

Page 1
USER MANUAL
ENGLISH
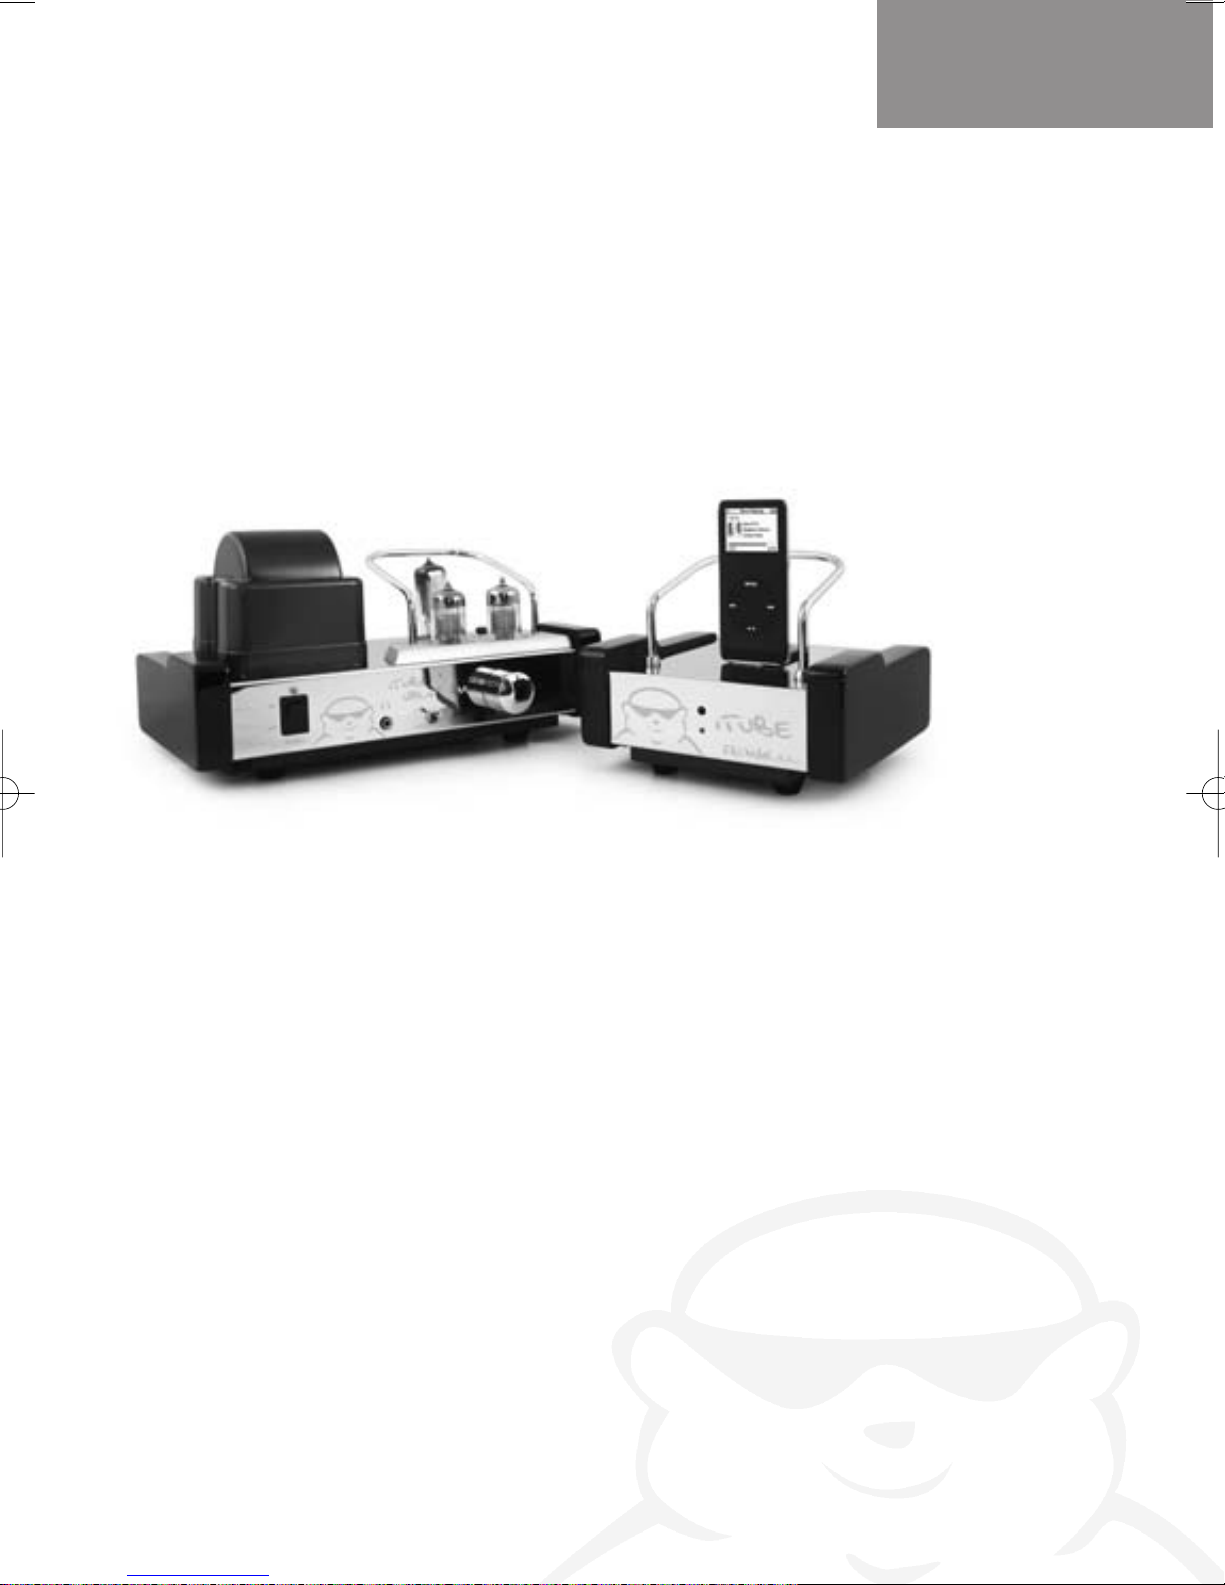
ITube
Vacuum Tube Amplifier
with Docking Station
FATMAN
BY
TL A
®
udio
Page 2

Contents
Kit contents . . . . . . . . . . . . . . . . . . . . . .3
Safety instructions . . . . . . . . . . . . . . . . .4
Connecting itube . . . . . . . . . . . . . . . . . .5
Remote control . . . . . . . . . . . . . . . . . . .6
Amplifier controls . . . . . . . . . . . . . . . . . .7
Amplifier connections . . . . . . . . . . . . . .8
How to use . . . . . . . . . . . . . . . . . . . . . .9
Troubleshooting . . . . . . . . . . . . . . . . . .10
Maintainance . . . . . . . . . . . . . . . . . . . .12
Specification . . . . . . . . . . . . . . . . . . . . .12
Service . . . . . . . . . . . . . . . . . . . . . . . . .12
Page
ITube
2
Congratulations on your choice of the Fatman iTube by TL Audio.
We have used years of audio engineering experience to bring you
a product that will truly enhance your listening experience.
In order to obtain the best performance from this system please
read this owners manual thoroughly and use your iTube only in
accordance with its instructions.
Page 3

Kit Contents
• ITube Vacuum Tube Amplifier
• ITube Docking Station
• Brush / Glove for cleaning
• Power cable
• Audio cable to connect Docking Station and Amplifier
• Banana Plug speaker cables
• Aux source audio cable for connecting CD player etc
• Video cable to connect from docking station to TV
USER MANUAL
ENGLISH
3
Page 4

Safety Instructions
Please read the following precautions before
attempting to operate the iTube.
• Read instructions - All safety and operating
instructions should be read thoroughly before
attempting to operate the Fatman iTube.
• Retain Instructions in a safe place for future
reference
• Follow all instructions detailed in this manual
• Observe all safety warnings given in this manual
• This unit should NOT be situated in close
proximity to water. Avoid placement near bathtubs,
sinks, washing machines, swimming pool, etc.
• Avoid exposure to direct sunlight or to extremes of
temperature or humidity,
• Do not place near direct heat sources such as
radiators, stoves, gas fires, naked flames or
candles.
• Ensure that the unit is placed on a clean, dry and
flat surface before operation.
• Do not drop unit, apply excessive force to the
controls or place heavy objects on top of the unit.
• Do not allow excessive levels of dust to gather on
the iTube.
• To clean, use a soft dry cloth. If necessary, use a
damp cloth without any solvents.
• Ensure that the area in which the unit is situated
has adequate ventilation. Do not place the iTube
in a position where its ventilation may become
obstructed. Avoid placement on beds, sofas, rugs,
enclosed bookcases / cabinets and any other area
which may cause interference to the ventilation of
the product thus causing it to overheat.
• Ensure that the unit is connected to the correct
power supply as indicated on the unit. Unplug the
iTube when not in use for a long period. Always
make sure power cables are placed safely and are
not obstructing a walkway
• This product can get hot. Do not touch the tubes
and keep away from babies and children
• To avoid risk of electric shock, do not attempt to
remover the cover or the back of unit - there are
no user serviceable parts.
• When this product is moved from a cool to a warm
place, condensation may occur on the surface of
the vacuum tube. In this instance, please allow 1
hour before attempting to operate the unit. This
will avoid leakage or blowout of the vacuum tube
due to sudden heat.
• The iTube should be serviced by an authorised
service engineer in the event of any of the
following circumstances
1. The power supply or cord sustains damage
2. The unit is struck by a falling object
3. The unit is exposed to rain or moisture.
4. Liquid is inadvertently spilt on the unit
5. The unit does not seem to operate normally or
exhibits a sudden change in performance
6.The unit has been dropped
• Any unauthorised changes or modifications to this
equipment would render the manufacturer's
warranty null and void.
1
2
3
4
ITube
4
Page 5

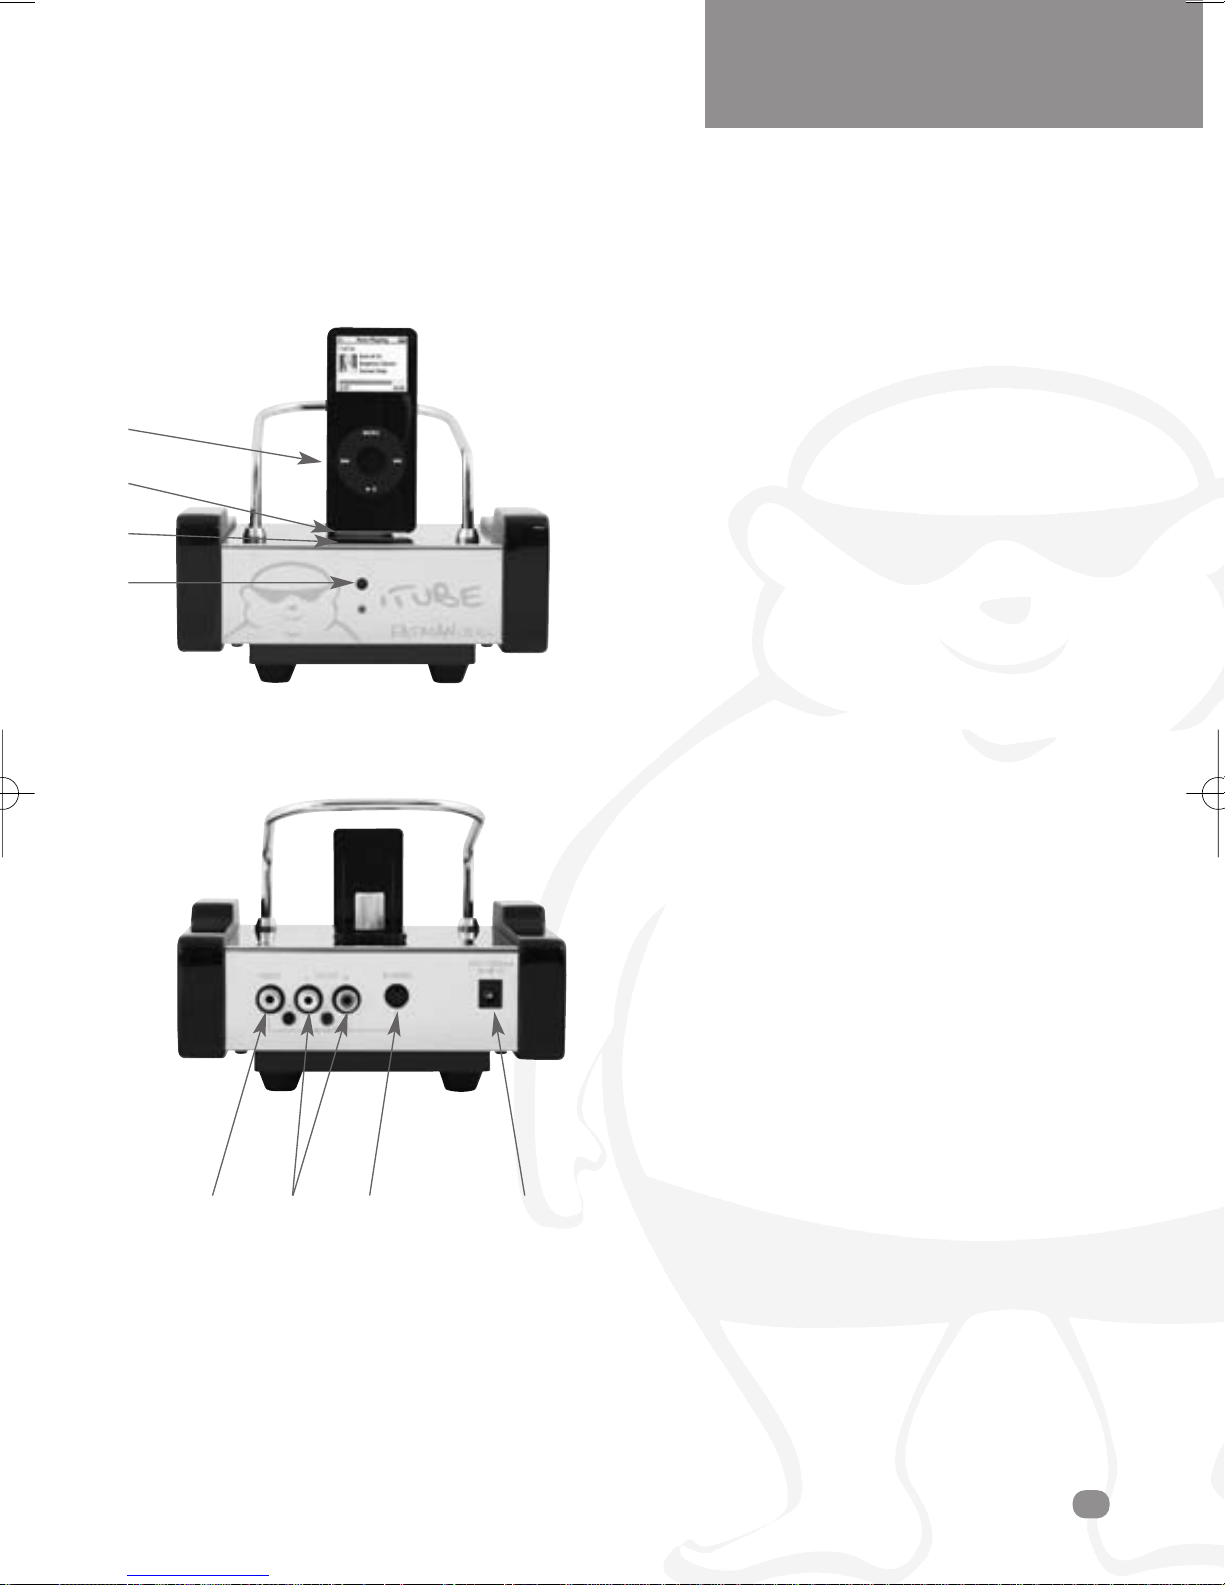
Connecting the iTube
1
2
USER MANUAL
ENGLISH
3
4
123 4
1.
Backrest
2.
iPod dock connector
3.
iPod dock input connected indicator LED
4.
Power indicator
1. Video Output:
Connect the video cable (yellow) in between
the video output connector (yellow) of the
iTube and the video input of your TV.
2. Audio Output:
Connect the audio cable from the audio output
of the ITube docking station to the audio input
of the the iTube Valve amplifier.
3. S-Video Output:
Use an S-Video cable (not included) to
connect S-Video output of your iTube to the SVideo input of your TV.
4. Power adaptor in:
Connect power cable between iTube and
mains supply.
5
Page 6

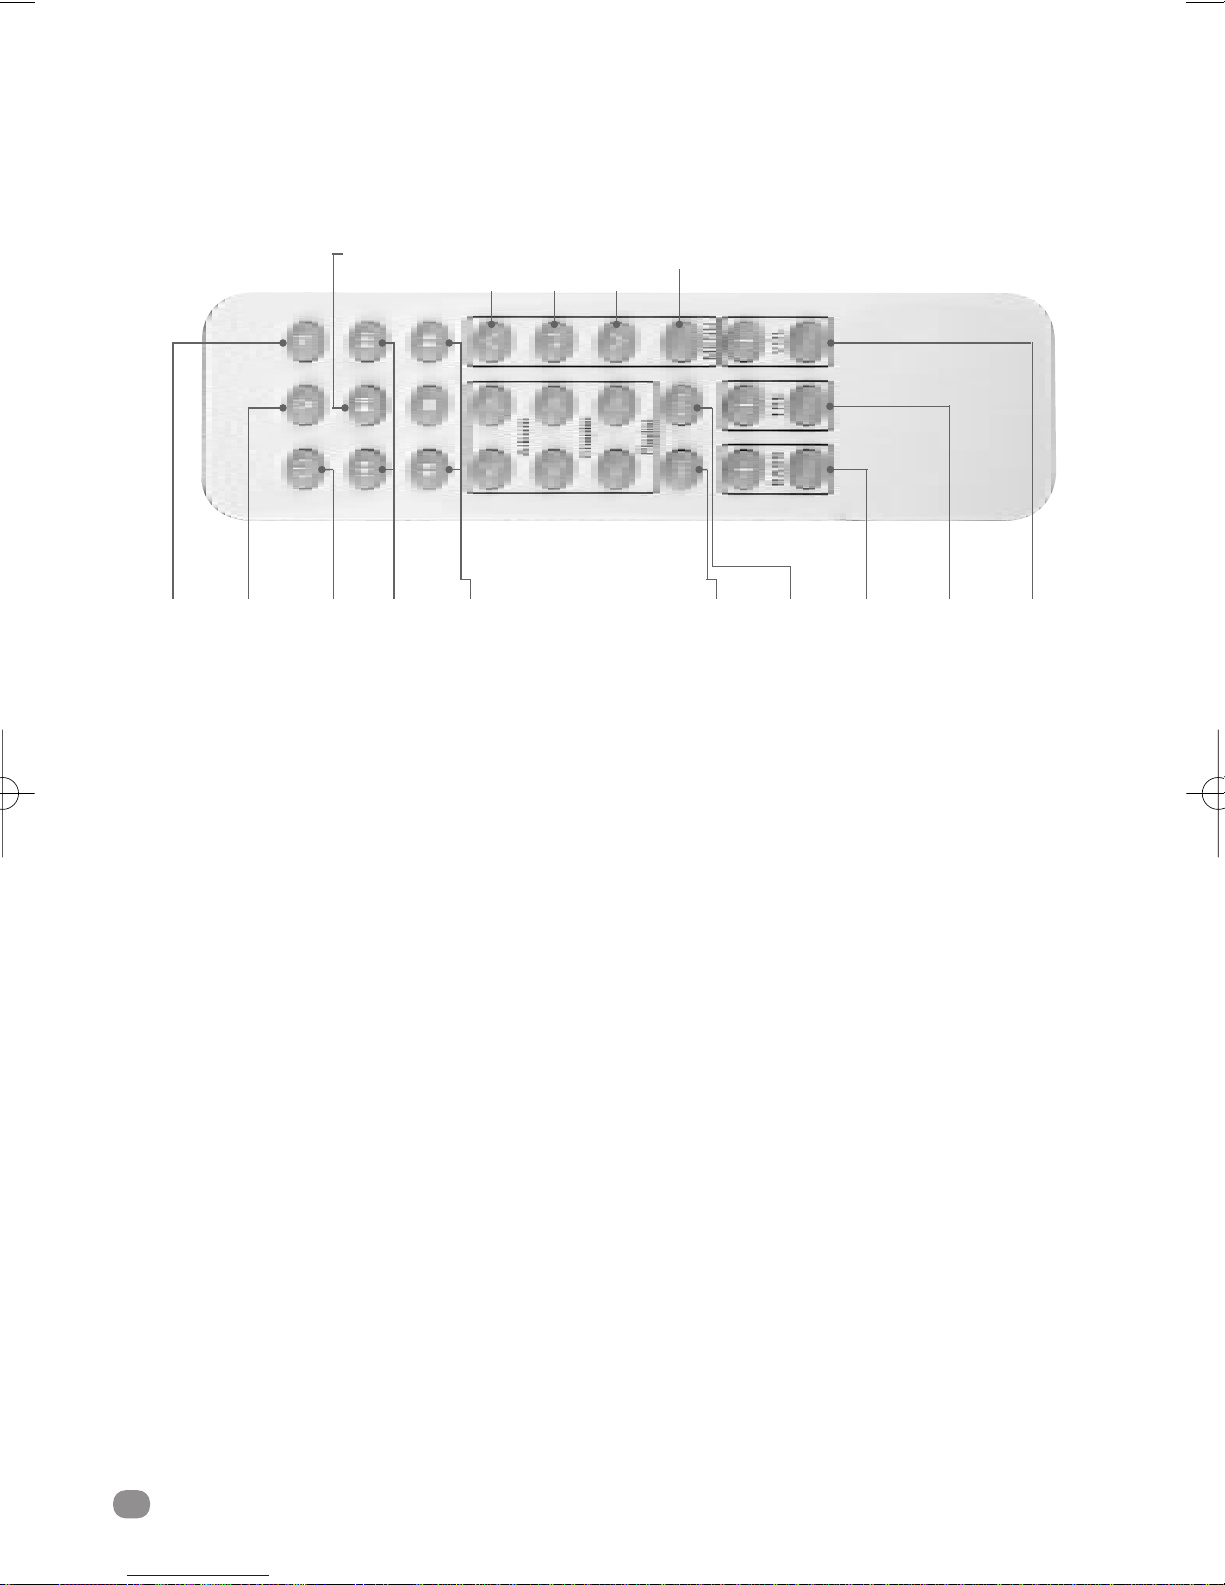
Remote Control
Power
Button
Mute
Button
Control speaker functions
Power Button Press to turn on the iTube,
Back
Light
Button
Skip
Track
power indicator will illuminate.
Up
Menu
Sub
Menu
Down
menu
Menu
Shufffle RepeatFF / RWPower
Control iPod functions
When an iPod is connected to the iTube and both units
are ON,
Bass
Volume
Treble
Volume
Master
Volume
Master Volume Press the “_” button to
increase master volume
Press the “_” button to
decrease master volume
Treble Volume Press the “_” button to
increase treble volume
Press the “_” button to
decrease treble volume
Bass Volume Press the “_” button to
increase bass volume
Press the “_” button to
decrease bass volume
Input Select Select Ipod dock input or AUX
input (when iPod dock input
selected, indicator LED is ON)
Some iPod functions can be controlled using the remote
Play/Pause song Press play/pause button
Turn off iPod Press and hold play button
Skip to next song Press next/fast forward
Start a song again Press previous/rewind
Play previous song Press previous/rewind twice
Fast forward song Press and hold next/fast
forward
Rewind a song Press and hold
previous/rewind
ITube
6
Page 7
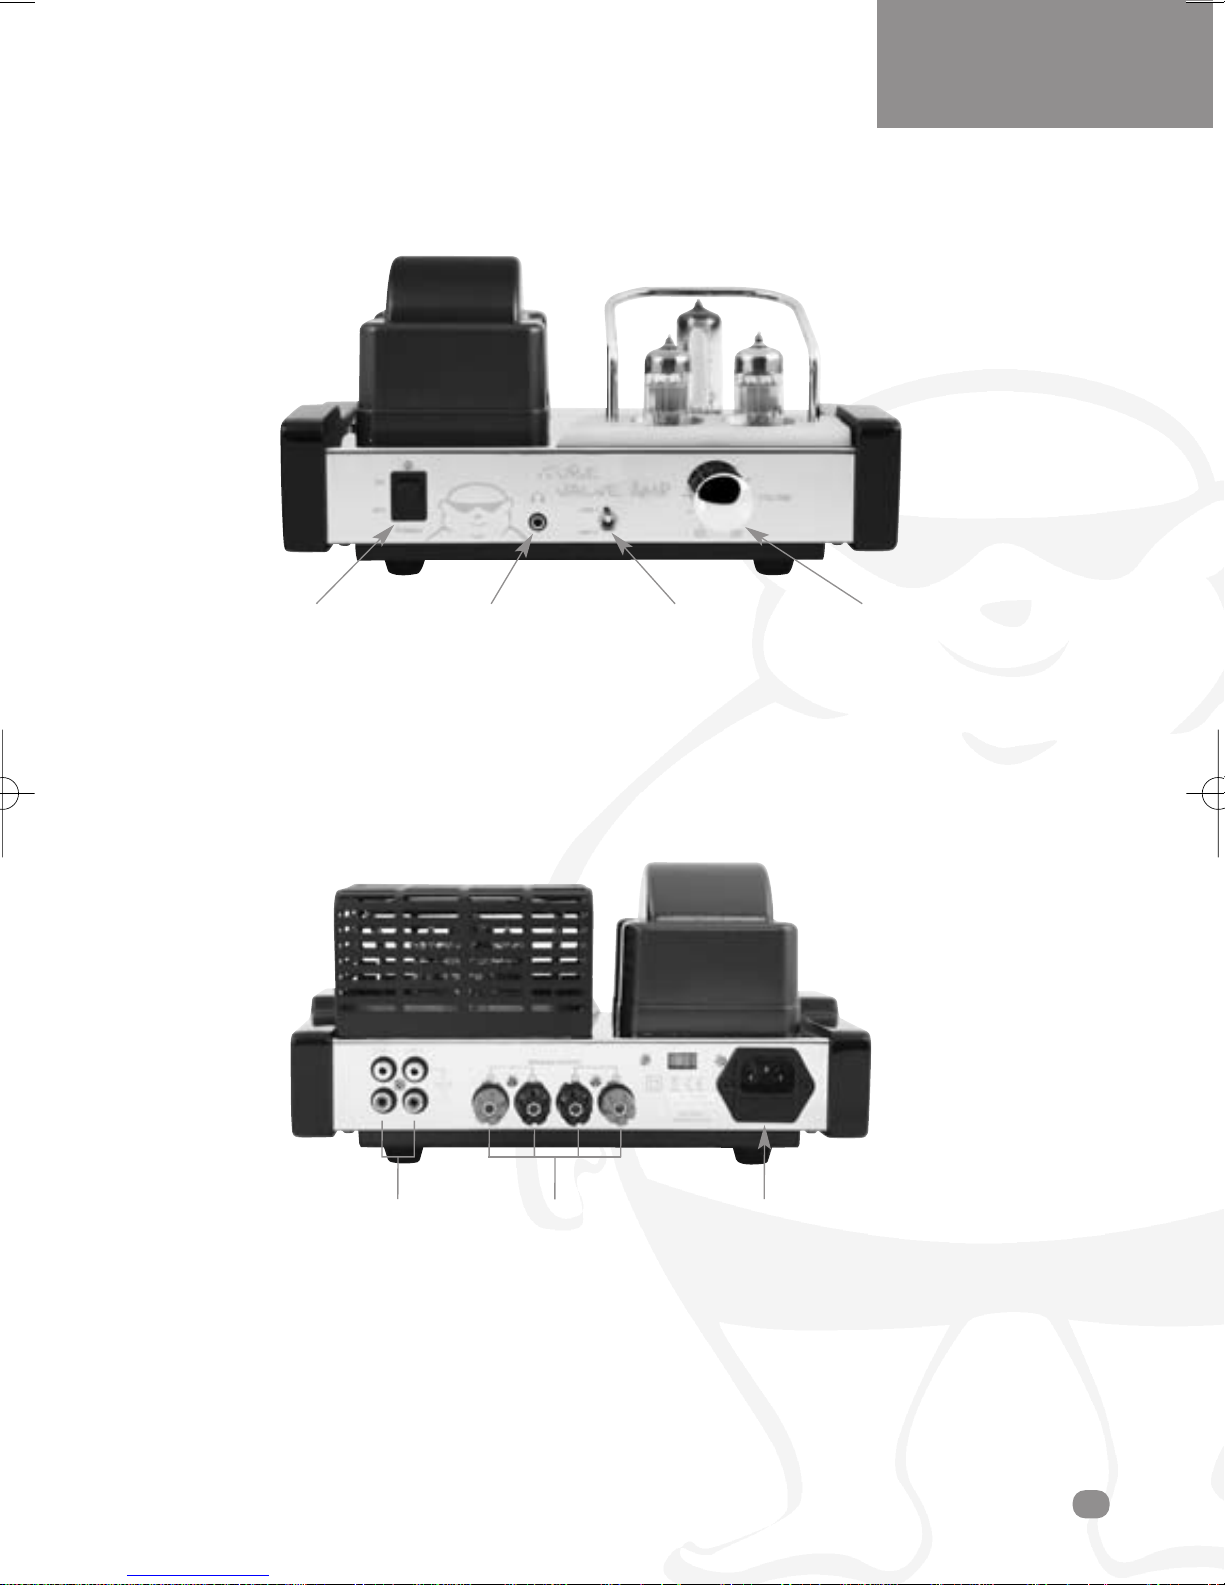
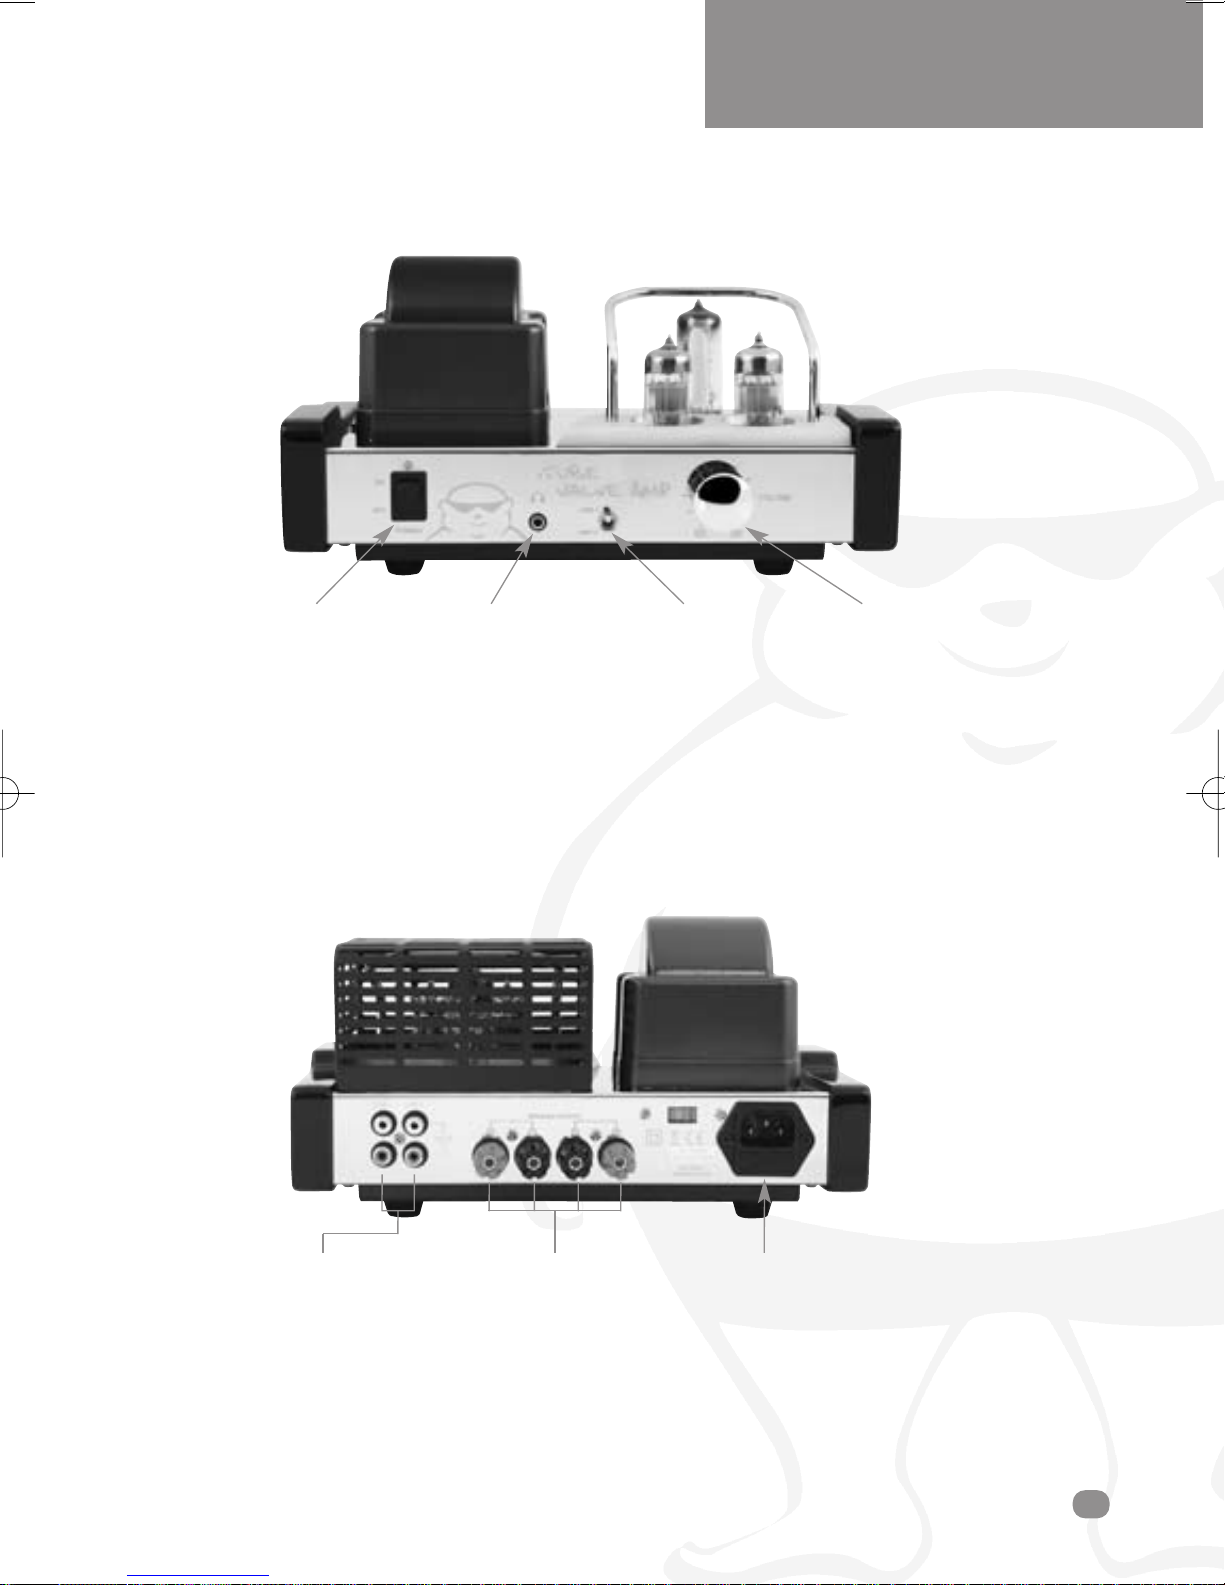
Amplifier controls
Power Switch Headphone Output Select Switch Volume
USER MANUAL
ENGLISH
NOTE:
Although product is
pictured without the
cage cover, the cage
covering the tubes
must be in place
during operation.
This product can get
hot. Keep away from
babies and children
FRONT PANEL
The indicator light above the power switch will illuminate when the power is ON. To switch power OFF, simply turn
switch in the alternate direction. Before switching on the power, please set the volume control to a low setting to avoid
damage to your speakers. Please note that a speaker protection circuit will mute speaker sound for a few seconds
after power is switched ON.
Line Inputs Speaker Outputs AC Power Input
REAR PANEL
The dock unit connects to the amp via the line outs of the dock connected to the line inputs on the amp.
7
Page 8
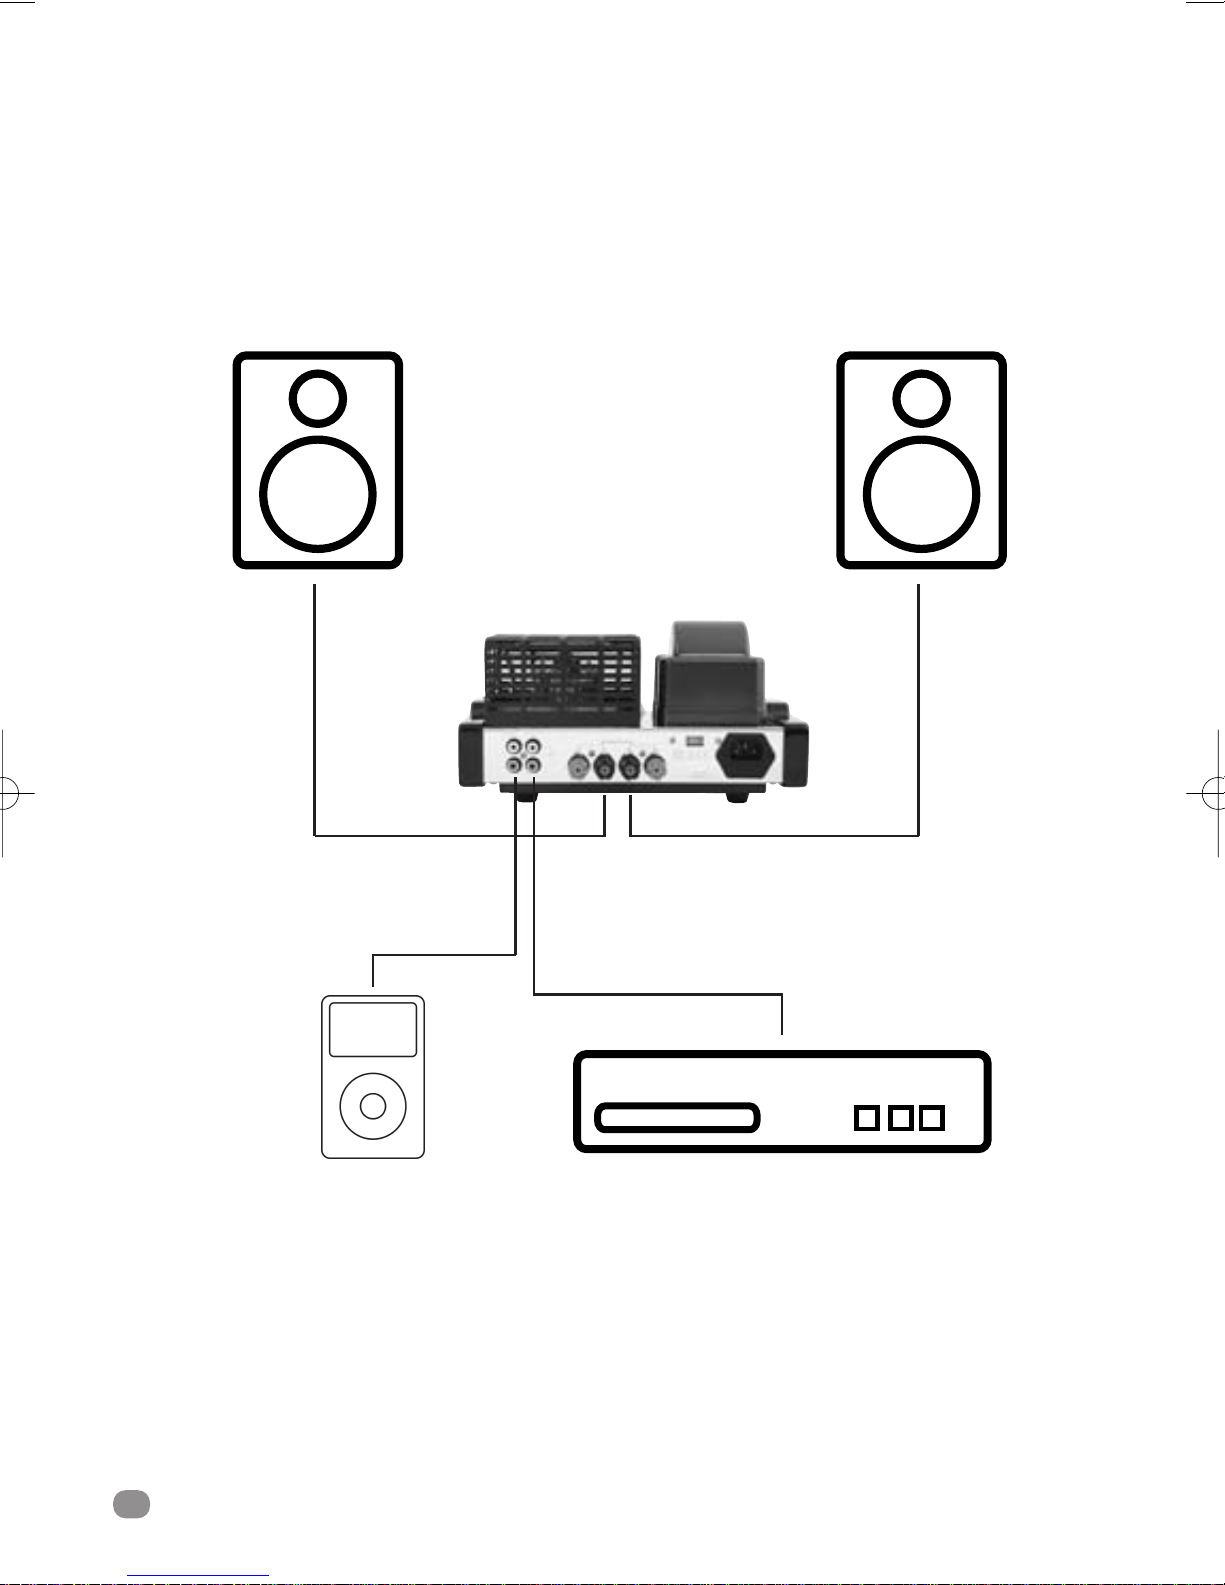
Amplifier Connections
ITUBE
SpeakerSpeaker
Hardware Music
Player or MP3 /
MP4 Player
ITube
8
CD Player
Page 9

How to Use
USER MANUAL
ENGLISH
CONNECTIONS
•
Before attempting to make any connections
to or from the iTube, including the iTube amp
and dock, firstly ensure that the iTube and all
connecting devices are switched OFF.
•
When making connections to other devices
from the iTube, take the time to ensure that
they are correct. For instance, (L) Left to (L)
left, and (R) right to (R) right.
•
Make sure connecting pins on wires are
clean and dust free and that all connectors
are inserted into the iTube fully and correctly.
•
Always turn both the power switches to the
OFF position on the units when connecting or
disconnecting the iTube tube amp or the
power supply.
POWER
SPEAKERS
•
When connecting speakers, ensure they have
an impedance of between 4 & 8 ohms.
•
Connect the speakers to the terminals using
either the supplied speaker cable (banana
plug) or high quality, bare(stripped) speaker
wire. (Please note that if your speaker wires
are not connected properly you may hear no
sound, or if polarities are reversed, you will
hear oddities in the signal path with an
unnatural loss of bass frequencies.
•
When using bare speaker wires, fit at least
1.6mm of insulation inside the speaker
terminals so that no bare wire is visible.
•
Make sure the wire holders are firmly
screwed in to prevent wires from becoming
loose. If wires touch each other, the
speakers and/or iTube could be damaged.
•
Do not switch on the iTube or mains supply
until after you have connected the AC power
adaptor between them. It is recommended
that you disconnect the power supply from
the mains when the unit is in a protracted
period of non-use (when on holiday /
travelling for instance).
9
Page 10

Troubleshooting
If your iTube fails to operate normally, please check the following points to determine if the fault can be
corrected with one of the simple suggestions below. If you feel your unit is still faulty after reading this,
please contact your authorised dealer or service centre.
SYMPTOM
No Power
- Blue LED is off
No Sound
Acoustic image is
unstable, characterised
by unnatural sound
and insufficient lowrange tonal quality
POSSIBLE CAUSE
- Power adaptor is not
connected properly
- Mains supply is off
- If from remote, battery needs
replacing
-
Volume control is turned down
- Speakers are not connected
properly
- 'Input Select' incorrect
- The positive (+) and
negative (-) polarities of the
iTube and speaker system
are not matched
REMEDY
- Make sure power is firmly plugged in.
- Test with another appliance/different
socket.
- Replace battery
-
Turn volume up slowly until desired level
- Check wires are firmly and correctly
inserted
- Ensure that you have control selected
to either iPod dock or Aux, depending
on which you are using.
- Reconnect the speakers ensuring the
polarities are aligned to the iTube
iPod volume does not
increase audio volume
Crackling sound from
speakers
-
- Bad connection
- A problem with your audio
ITube
10
iPod volume control only controls
volume to the headphone jack
source
- Use the iTube's amplifier volume
control when the iPod is docked
-
Check connection if iPod is in docking
station, check connection of the 3.5mm
stereo cable. Make sure it is connected
'line out' 'audio out' or 'headphone out'
of your source and NOT 'speaker out'
- Unplug the 3.5mm stereo cable from
the audio source, then plug it into the
headphone jack of an alternative
source (e.g. CD player, Mp3 player)
Page 11

USER MANUAL
ENGLISH
SYMPTOM
Sound is distorted
Radio Interference
Remote control doesn't
work
TV can not display
POSSIBLE CAUSE
- Volume level on iTube is
too high
- Sound source is distorted
- Too close to a radio tower
- Low battery
-
Remote is not pointing in
correct direction or within range
- Bad connection
- iPod video set up is incorrect
REMEDY
- Decrease the volume to a
more appropriate level
- WAV and MIDI files are often of poor
quality; therefore distortion and noise
are easily noticed through a high
quality system. Try a different audio
source such as music CD
- Move speakers to different positions
to see if interference
- Replace battery
- Point the remote control towards the
docking station within 20ft of the unit
- Check connection if iPod is in
docking station, check connection
of output cable
- Please check iPod video set up
11
Page 12

Maintainance
•
Switch off units when out of use
•
Allow units to cool completely before cleaning
•
Clean using a soft cloth or supplied brush periodically
•
When cleaning the Vacuum tube, take great care, please only gently shake
the tube to take it down and then install tubes in the same way after clean
•
Do not attempt to clean the products with chemical solvents - this may
damage the finish of the iTube
Specification
• Power Output: 13Wx2
• Frequency Response: 20Hz - 20KHz (±1.5Db)
• Harmonic Distortion: ≤0.5%
• Signal-To-Noise Ratio: ≥86Db
• Input Impedance: 100KΩ
• Output Impedance: 4Ω, 8Ω
• Valve Type: 2x6N1(ECC85), 1x6E2(EM87)
Service
Please contact your local authorised dealer or reseller.
info@fat-man.co.uk
www.fat-man.co.uk
• Power Supply: AC100~120V/50~60Hz
AC220~240V/50~60Hz
• Dimensions:
Amp (LxWxH) 260x145x130mm
Dock (WxDxH) 155x130x123mm
• Weight 4.3KGs
Specifications subject to change without notice.
FATMAN
BY
TL A
®
udio
ITube
12
Apple, the Apple logo and iPod are trademarks of Apple
Computer Inc., registered in the U.S. and other countries.
Page 13

BEDIENUNGSANLEITUNG
DEUTSCH
ITube
Vacuum Tube Amplifier
with Docking Station
FATMAN
BY
TL A
®
udio
Page 14

Contents
Seite
Sicherheitsanweisungen . . . . . . . . . . . . . . . .1
Ausstattungsmerkmale . . . . . . . . . . . . . . . . .2
Frontseite und Funktionen . . . . . . . . . . . . . .3
Rückseite und Anschlussmöglichkeiten . . . .4
Anschlussmöglichkeiten, Handhabung . . . . .5
Problembehebung . . . . . . . . . . . . . . . . . . . .6
Instandhaltung, Säuberung . . . . . . . . . . . . .7
Lieferumfang . . . . . . . . . . . . . . . . . . . . . . . .8
Technische Daten . . . . . . . . . . . . . . . . . . . .9
ITube
2
Sehr geehrte Damen und Herren, Vielen Dank, dass Sie sich
für den Röhrenvollverstärker mit iPOD Docking Station von
TL Audio entschieden haben.
Um das Optimum an Leistung und Sicherheit zu erreichen,
lesen Sie diese Bedienungsanleitung bitte gründlich durch
und halten Sie diese zukünftig griffbereit.
Page 15

BEDIENUNGSANLEITUNG
Lieferumfang
• Röhrenvollverstärker
• iPOD Docking Station
• Pinsel zur Säuberung
• Netzkabel
• Verbindungskabel zwischen iPOD Docking Station und Röhrenvollverstärker
• Lautsprecherkabel mit Banana Steckern
• Verbindungskabel, um Quellengerät anzustecken
• Verbindungskabel, um TV an iPOD Docking Station anzustecken
DEUTSCH
3
Page 16

Sicherheitsanweisungen
Bitte lesen Sie diese Gebrauchsanweisung gründlich bevor
Sie das Gerät in Betrieb nehmen. Beachten Sie die im
Folgenden aufgelisteten Sicherheitsanweisungen stetig
und halten Sie diese Bedienungsanleitung griffbereit.
• Lesen Sie bitte das gesamte Manual bevor Sie das
Gerät in Betrieb nehmen!
• Bitte beachten Sie diese Anweisungen auch in der
Zukunft.
• Bitte beachten Sie alle Warnungen.
• Folgen Sie allen Anweisungen in diesem Manual.
• Dieses Gerät darf nicht neben Badewannen,
Abwaschbecken, Waschwannen, Swimmingpool, oder
in nassen Räumen betrieben werden. Dieses Gerät
gehört zu den Hochtemperatur- und zerbrechlichen
Produkten. Die Arbeitstemperatur kann sich über 80°C
bewegen. Berühren Sie nicht die Röhren und
bespritzen Sie diese nicht mit Wasser. Und halten Sie
dieses Produkt von Kindern fern.
• Stromkabel und Verbindungskabel müssen so verlegt
• Bei Gewittern sollten Sie den Netzstecker ziehen.
• Nutzen Sie das Gerät ausschließlich auf festem
• Wenn Sie das Gerät zwischen einem heißen und
• Sie sollten Vorsichtsmaßnahmen treffen, um die
• Schließen Sie die Lautsprecher nur nach Schema von
sein, dass niemand darüber stolpert oder sich
einklemmt. Achten Sie vor allem auf zugfreie
Verlegung der Kabel, so das eine gute Verbindung am
Gerät gegeben ist.
Untergrund, da die Röhren bei losem bzw. bewegtem
Untergrund Schaden nehmen.
einem kalten Ort hin und hertragen, so lassen Sie das
Gerät mindestens eine Stunde abkühlen. Tun Sie
dieses nicht, wird die Lebenszeit der Röhre stark
verkürzt.
Erdung und richtige Polarisation zu gewährleisten.
Seite 6 an.
1
2
3
4
• Stellen Sie dieses Gerät auf festem, ebenem Boden
auf. Wenn Sie die Aufstellebene des Gerätes
verschieben, tun Sie dieses mit Vorsicht. Greifen Sie
niemals schreckhaft oder mit großer Gewalt zu, da das
Gerät sonst umstürzen kann und Schaden nimmt.
• Gewährleisten Sie eine ausreichende Luftzufuhr.
Decken Sie das Gerät niemals ab oder stellen es auf
ein Bett oder Coach. Stellen Sie das Gerät auch nicht
in ein Regal oder dergleichen, das den Luftfluss
behindert bzw. ausschließt. Decken Sie niemals die
Ventilationsöffnungen zu.
• Stellen Sie das Gerät nicht neben oder gegenüber von
Wärmequellen wie Heizlüfter, Öfen, Kaminen, oder
Ähnlichem auf. Stellen Sie keine offenen Flammen,
wie Kerzen, auf das Gerät.
• Betreiben Sie das Gerät nur mit dem beiliegendem
Netzkabel.
• Stecken Sie den Netzstecker fest ein.
• Falls das Gerät einen Sachmangel aufweist, senden
• Jegliche Änderungen und Modifikationen am Gerät
Sie es bitte zu Ihrem Verkäufer. Sachmängel können
sein:
1. Die Stromkabel oder der Anschluss sind beschädigt
2. Es sind Gegenstände auf das Gerät gefallen oder es
sind Flüssigkeiten eingetreten.
3. Das Gerät scheint nicht einwandfrei zu
funktionieren oder weißt schwankende Leistungsdaten
auf.
4. Das Gerät ist herunter gefallen.
und den Zubehörartikeln lassen die 24monatige
Sachmängelgewährleistung erlischen.
ITube
4
Page 17
Anschluss des iTUBE
1
2
BEDIENUNGSANLEITUNG
DEUTSCH
3
4
123 4
1.
Gegenständer
2.
iPOD Anschluss
3.
LED leuchtet, wenn iPOD angesteckt
4.
LED leuchtet, wenn Gerät unter
Spannung steht
1. Videoausgang:
Verwenden Sie das Verbindungskabel mit den
gelben Anschlüssen, um die iPOD Docking
Station mit Ihrem TV Gerät zu verbinden.
2. Audioausgang:
Verwenden Sie das Verbindungskabel mit den
roten und weißen Chinchanschlüssen, um die
iPOD Docking Station mit dem
Röhrenvollverstärker zu verbinden.
3. S Viedeo Ausgang:
Verwenden Sie ein optionales S Video
Verbindungskabel, u m die iPOD Docking
Station mit Ihrem TV Gerät zu verbinden.
4. Netzanschluss:
Stecken Sie hier ausschließlich das
mitgelieferte Netzteil an.
5
Page 18
Fernbedienung
Power
Button
Mute
Button
• Power Button: Ein & Aus Schalter für iPOD
• Up Menu: Drücken Sie diese Taste, um im
• Sub Menu: Drücken Sie diese Taste, um in
• Down Menu: Drücken Sie diese Taste, um im
• Menu: Drücken Sie diese Taste, um wieder
• Mute Button: Drücken Sie diese Taste, um die
• Back Light: Drücken Sie diese Taste, um die
• Power Button: Ein & Aus Schalter für iPOD
Back
Light
Docking Station
Menu herauf zu gehen.
ein Untermenu zu gelangen.
Menu harab zu steigen.
auf das Hauptmenu zu gelangen.
Lautstärke zu minimieren. Drücken Sie diese
Taste erneut, so wird die Lautstärke wieder
erhöht.
Beleuchtung am iPOD zu aktivieren.
Docking Station
Button
Skip
Track
Up
Menu
Sub
Menu
Down
menu
Menu
Shufffle RepeatFF / RWPower
• FF/RW: Drücken Sie diese Taste, um
innerhalb eines Titels vor- oder zurück zu
springen.
• Shuffle: Drücken Sie diese Taste, um den
Zufallsmodus am iPOD zu aktivieren.
• Repeat: Drücken Sie diese Taste, um den Titel
zu wiederholen.
• Mater Volume: Drücken Sie diese Tasten, um
die Lautstärke zu erhöhen oder zu verringern.
• Treble Volume: Drücken Sie diese Tasten, um
die Höhen zu maximieren bzw. minimieren.
• Bass Volume: Drücken Sie diese Tasten, um
die Bässe zu maximieren bzw. minimieren
• Input Select: Drücken Sie diese Taste, um
zwischen den Eingängen zu wechseln. Ist der
Eingang der iPOD Docking Station aktiviert, so
leuchtet die Status LED auf.
Bass
Volume
Treble
Volume
Master
Volume
• Skip Track: Dücken Sie diese Taste, um zum
nächsten oder vorherigen Titel zu springen.
ITube
6
Page 19
BEDIENUNGSANLEITUNG
DEUTSCH
Funktionen und Anschlüsse am Röhrenvollverstärker
NOTE:
Beachten Sie, dass dieses
Produkt ohne
Gitterröhrenabdeckung
fotografiert ist. In Betrieb
müssen die sich stark
erwärmenden Röhren
jedoch durch diese
Abdeckung geschützt sein.
Halten Sie Babys und
Kinder fern!
Ein- & Ausschalter Kophörerausgang Eingangswahlschalter Lautstärkeregler
FRONTSEITE
Wenn Sie LED auf der Frontseite leuchtet ist das Gerät in Betrieb. Um das Gerät auszuschalten, bewegen Sie den
Kippschalter einfach auf die andere Position. Wenn Sie das Gerät einschalten oder den Eingangswahlschalter
umlegen, sollten Sie die Lautstärke minimieren, da Sie nicht einschätzen können, wie laut die eingehenden Signale
sind. Bitte achten Sie auch zukünftig auf diesen Punkt, um Ihre Lautsprecher nicht zu beschädigen und Ihr
Hörvermögen nicht zu beeinträchtigen. Kurz nach dem Einschalten spielen die Lautsprecher nur in einer sehr
geringen Lautstärke, damit diese nicht beschädigt werden.
Hochpegeleingänge Lautsprecheranschlüsse Netzanschluss
RÜCKSEITE
Sie verbinden die iPOD Docking Station und den Röhrenvollverstärker durch das Verbindungskabel mit
den roten & weißen Steckern. Achten Sie beim Anschluss auf die Farbgebung der Anschlussbuchsen.
7
Page 20

Anschlüsse am Röhrenvollverstärker
ITUBE
LautsprecherLautsprecher
diverese
Quellengeräte oder
MP3 u. MP4
Player
ITube
8
CD Player
Page 21

Handhabung
BEDIENUNGSANLEITUNG
DEUTSCH
Bevor Sie die Anschlüsse nutzen, schalten Sie
das Gerät ab!
Wenn Sie die Verbindungskabel anstecken,
überprüfen Sie dir richtige Polarität (+ / -) bzw.
kontrollieren ob Sie den rechten und linken
Kanal nicht vertauscht haben. Bitte sehen Sie
auch die Bedienungsanleitungen aller
anzuschließenden Geräte ein
ANSCHLUSS VERSCHIEDENER AUDIOQUELLEN
•
Verbinden Sie die sauberen Chinch Anschlusskabel der Audioquelle mit den
LINE 1 bzw. LINE 2 Eingängen des Gerätes.
Beachten Sie den rechten und linken Kanal.
Bitte stellen Sie eine sicheren und festen
Kontakt zwischen Stecker und
Eingangsbuchse her. Wenn Sie die Kabel
wieder lösen oder durch andere tauschen, so
schalten Sie das Gerät ab.
und achten auf den Anschluss der rechten
Box am rechten Kanal und der linken Box
am linken Kanal. Falls dies nicht gegeben ist,
vernehmen Sie ein unnatürliches Klangbild
ohne Bass Sie können auch das mitgelieferte
Lautsprecherkabel mit Banana-Steckern
verwenden. Stecken Sie diese Stecker in die
Mitte des jeweiligen Terminals.
•
Achtung: Wenn Sie ein Kabel ohne feste
Steckerenden verwenden, so stecken sie
mindestens 1,6mm abisoliertes Kabel in die
Terminals ein. Dieses muss fest im Terminal
einstecken. Wenn die Kabelenden zu weit
aus den Terminals hinaus stehen und
Metalloberflächen am Gerät oder sich gar
selbst berühren, kommt es zum Schaden an
den Lautsprechern. Sie sollten die
eingesteckten Kabel auf Festigkeit im
Terminal von Zeit zu Zeit überprüfen.
ANSCHLUSS DER LAUTSPRECHER
•
Schließen Sie nur Lautsprecher an, die einen
Widerstand zwischen 4 und 8 Ohm haben.
Bitte schließen die Lautsprecher mit einem
Kabel an, dass über einen ausreichenden
Querschnitt verfügt. Um die Klanggüte weiter
zu steigern, sollte das Kabel so kurz wie
möglich gehalten werden. Ist der Anschluss
fehlerhaft, so vernehmen Sie keine Musik.
Stellen Sie die richtige Polarität (+ / -) sicher
ANSCHLUSS DES NETZSTECKERS
•
Wenn Sie sich vergewissert haben, dass das
Gerät ausgeschaltet ist, können Sie den
Netzstecker in eine Steckdose mit der
richtigen Spannung einstecken. Wenn Sie
das Gerät über einen längeren Zeitraum
nicht nutzen, wird empfohlen, den
Netzstecker zu ziehen.
9
Page 22

Problembehebung
Falls Ihr Gerät nicht einwandfrei funktioniert, kontrollieren Sie bitte ob die hier aufgeführten Fehler
zutreffen. Wen Ja, so können Sie diese einfach selbst beheben. Falls Sie ein Problem feststellen, dass
im Folgenden nicht aufgeführt ist, so ziehen Sie den Netzstecker und informieren Ihren Händler.
FEHLER
Das Gerät geht nicht
an, wenn der Ein- &
Ausschalter auf ON
steht.
Kein Sound
Die Wiedergabequalität
ist unnatürlich und hat
eine schlechte Qualität.
URSACHE
- Das Netzkabel ist nicht oder
nicht richtig angeschlossen.
- Der Lautstärkeknopf steht auf
Minimum.
- Die Verbindungskabel sind
nicht in den Eingängen des
Gerätes eingesteckt
- Die Verbindungskabel sind
nicht richtig in den Eingängen
des Gerätes eingesteckt
- Die Polarität der
Lautsprecherklemmen ist
vertauscht.
BEHEBUNG
- Stecken Sie das Netzkabel erneut ein.
- Drehen Sie den Lautstärkeknopf im
Urzeigersinn.
- Stecken Sie die Verbindungskabel
richtig ein.
- Stecken Sie die Verbindungskabel
richtig ein.
- Nehmen Sie die Lautsprecherkabel am
Gerät ab und stecken Sie diese erneut,
richtig ein..
ITube
10
Page 23

BEDIENUNGSANLEITUNG
DEUTSCH
11
Page 24

Instandhaltung, Säuberung
•
Schalten Sie das Gerät zur Säuberung aus und warten mit der Reinigung bis
sich die Röhren abgekühlt haben. Säubern Sie das Gerät mit dem
mitgelieferten Pinsel.
•
Wenn Sie die Röhren an sich reinigen möchten, so fassen Sie diese nur mit
einem weichen Baumwolltuch an. Berühren Sie diese niemals mit der Haut.
•
Reinigen Sie das Gerät niemals mit chemischen Mitteln, da dies das
Holzfurnier, die Lackschicht, und die Chromfront angreifen kann.
Technische Daten
• Verstärkerleistung: 2x13Watt
• Frequenz: 20Hz - 20 KHz + / - 1,5 dB
• Klirrfaktor: <0,5%
• Wirkungsgrad: >86dB
• Eingangswiderstand: 100kOhm
• Ausgangswiderstand: 4Ohm, 8Ohm
• Spannung: 220V/50Hz
Service
Bitte kontaktieren Sie Ihren autorisierten Händler.
info@fat-man.co.uk
www.fat-man.co.uk
• Größe: LxBxH - 260x145x130mm
• Masse: 4,3kg
• Röhren: 6N1 (ECC85) x2, 6E2 (EM87) x1
Technische Änderungen behält sich der Hersteller ohne
Bekanntgabe vor.
FATMAN
BY
TL A
®
udio
12
Apple, the Apple logo and iPod are trademarks of Apple
Computer Inc., registered in the U.S. and other countries.
Page 25

MANUAL DEL USUARIO
ESPAÑOL
ITube
Amplificador de válvulas con
estación de conexión
FATMAN
POR
TL A
®
udio
Page 26

ÍNDICE
Componentes incluidos . . . . . . . . . . . . .3
Instrucciones de seguridad . . . . . . . . . .4
Conectar el iTube . . . . . . . . . . . . . . . . . .5
El mando a distancia . . . . . . . . . . . . . . .6
Controles del amplificador . . . . . . . . . . .7
Conexiones del amplificador . . . . . . . . .8
Instrucciones de uso . . . . . . . . . . . . . . .9
Soluciones a problemas frecuentes . . . .10
Mantenimiento . . . . . . . . . . . . . . . . . . .12
Especificaciones . . . . . . . . . . . . . . . . . .12
Servicio . . . . . . . . . . . . . . . . . . . . . . . .12
Página
ITube
2
Felicidades por haber escogido el Fatman iTube de TL Audio.Hemos usado
años de experiencia en ingeniería acústica para poder brindarle un
producto que va a realzar verdaderamente sus experiencias auditivas.
Para poder obtener los mejores resultados de este equipo lea el
manual del usuario al completo y use el iTube solamente de acuerdo
con estas instrucciones.
Page 27

MANUAL DEL USUARIO
Componentes incluidos
• Amplificador de válvulas iTube
• Estación de conexión iTube
• Cepillo/guante para la limpieza
• Cable de alimentación
• Cable de audio para conectar el amplificador y la estación de conexión
• Cables de altavoz con conector de banana
• Cable de audio para conectar una fuente auxiliar, reproductores de CD, etc.
• Cable de vídeo para conectar la estación de conexión a la TV
ESPAÑOL
3
Page 28

Instrucciones de seguridad
Por favor leer las siguientes instrucciones antes de
poner en funcionamiento su iTube.
• Leer las instrucciones - Todas las instrucciones de
seguridad y de uso deben leerse al completo antes
de intentar poner en marcha el Fatman iTube.
• Guardar las instrucciones en un lugar seguro para
futuras referencias.
• Seguir las instrucciones que se detallan en este
manual.
• Cumplir todas las advertencias de seguridad que
se dan en este manual.
• NO se le debe situar cerca del agua. Evitar
colocarlo cerca de bañeras, fregaderos, lavadoras,
piscinas, etc.
• Evitar la exposición directa a la luz del sol o a
extremos de temperatura o humedad.
• No colocar cerca de fuentes directas de calor
como radiadores, hornos, estufas, fuegos de gas,
llamas o velas.
• No dejar que una cantidad excesiva de polvo se
acumule en su iTube.
• Para limpiar, usar un trapo suave y seco. Si fuera
necesario, usar un trapo ligeramente húmedo pero
sin disolventes químicos.
• Asegurarse de que la unidad está conectada a la
fuente de corriente tal como se indica.
Desconectar el iTube cuando no vaya a usar
durante un periodo largo de tiempo. Asegurarse
siempre de que los cables están colocados de
forma segura y de que no obstruyen el paso.
• Este producto se puede calentar. No tocar las
válvulas y alejarlo del alcance de los niños.
• Para evitar el riesgo de descarga eléctrica, no
intentar quitar la tapa de la parte posterior de la
unidad - no hay partes útiles para el usuario.
• Cuando movemos este producto de un lugar frío a
un lugar cálido, se puede formar condensación en
la superficie de las válvulas. En este momento, por
favor esperar 1 hora antes de intentar poner en
marcha la unidad. Esto va a evitar el goteo o la
explosión de las válvulas debido a un
calentamiento súbito.
• El iTube deberá ser revisado por el servicio técnico
autorizado cuando concurran las siguientes
circunstancias.
1. La fuente de alimentación o el cable de
alimentación presentan daños.
2. La unidad ha sido golpeada por un objeto.
3. La unidad ha estado expuesta a la lluvia o
humedad.
4. Se ha vertido líquido accidentalmente en la
unidad.
5. La unidad no parece funcionar normalmente o
muestra un cambio repentino en su rendimiento.
6. La unidad se ha caído.
• Cualquier cambio o modificación no autorizada en
este equipo daría como resultado la extinción o
nulidad de la garantía del fabricante.
1
2
3
4
ITube
4
Page 29

Conectar el iTube
1
2
MANUAL DEL USUARIO
ESPAÑOL
3
4
123 4
1. Respaldo
2. Puerto conector del iPod
Indicador LED de conexión correcta del puerto iPod
3.
4. Indicador de corriente
1. Salida de vídeo:
Conecte el cable de vídeo (amarillo) desde la
salida de vídeo del iTube (amarillo) a la
entrada de vídeo de su TV.
2. Salida de audio:
Conecte el cable desde la salida de audio de
la estación de conexión del iTube hasta la
entrada de audio del amplificador de válvulas
del iTube
3. Salida S-Vídeo:
Use un cable de S-Vídeo (no incluido) para
conectar la salida de S-Vídeo de su iTube a la
entrada de S-Vídeo de su TV.
4. Adaptador de potencia interno:
Conecte el cable de alimentación entre el
iTube y la red.
5
Page 30

Mando a distancia
Mute
Button
Back
Light
Power
Button
Button
Skip
Track
Up
Menu
Sub
Menu
Funciones de control de altavoces
Botón de encendido Pulsar para encender el iTube, el
indicador de encendido se
iluminará.
Volumen Pulsar el botón "_" para subir el
volumen
Pulsar el botón "_" para bajar el
volumen
Down
Menu
menu
Shufffle RepeatFF / RWPower
Bass
Volume
Treble
Volume
Control de las funciones del iPod
Cuando un iPod se conecta al iTube y ambas
unidades están ENCENDIDAS, algunas funciones del
iPod se pueden controlar desde el mando a distancia
Reproducir / Pulsar y mantener el botón
Pausar una canción play/pause
Apagar el iPod Pulsar y mantener el botón play
Saltar a la siguiente canción Pulsar next/fast forward
Master
Volume
Volumen de agudos Pulsar el botón "_" para subir el
volumen de agudos
Pulsar el botón "_" para bajar el
volumen de agudos
Volumen de graves Pulsar el botón "_" para subir el
volumen de graves
Pulsar el botón "_" para bajar el
volumen de graves
Selector de entradas Seleccione la entrada del puerto
iPod o la entrada del AUX (cuando
la entrada del puerto iPod esté
selccionada, el indicador LED
estará ENCENDIDO)
ITube
6
Empezar de nuevo Pulsar previous rewind
una canción
Reproducir la Pulsar previous rewind dos veces
canción anterior
Pasar rápido una canción Pulsar y mantener next/fast forward
Rebobinar una canción Pulsar y mantener previous/rewind
Page 31

Controles del amplificador
Botón de encendido Salida de auriculares Botón de selección Volumen
MANUAL DEL USUARIO
ESPAÑOL
NOTE:
Although product is
pictured without the
cage cover, the cage
covering the tubes
must be in place
during operation.
This product can get
hot. Keep away from
babies and children
PANEL FRONTAL
Cuando se accione el botón de encendido, la luz situada encima se iluminará, indicando que hay corriente. Para
apagar volver a accionar dicho botón en la dirección opuesta. Antes de accionar el botón, poner el volumen bajo
para evitar dañar los altavoces. Nótese que el circuito de protección de los altavoces los deja en silencio unos
segundos después de haber encendido la unidad.
Entradas de línea Salidas de altavoz Entrada de corriente
PANEL TRASERO
La estación de conexión se conecta con el amplificador a través de las líneas de salida de la estación
conectadas a las líneas de entrada al amplificador.
7
Page 32

Conexiones del amplificador
ITUBE
AltavocesAltavoces
Reproductor hardware
de música, reproductor
mp3/mp4
ITube
8
Reproductor CD
Page 33

Instrucciones de uso
MANUAL DEL USUARIO
ESPAÑOL
CONEXIONES
•
Antes de intentar conectar nada al iTube,
incluyendo el amplificador y la estación de
conexión, asegurarse primero de que el
iTube y todos los dispositivos a conectar
estén APAGADOS.
•
Cuando se conecta el iTube a otros
dispositivos, hay que asegurarse de que las
conexiones son correctas. Por ejemplo, (L)
izquierdo con (L) izquierdo, y (R) derecho
con (R) derecho.
•
Asegurarse de que las clavijas o cables de
conexión estén limpios y sin polvo y de que
todos los conectores estén insertados
correcta y completamente.
•
Apagar siempre los botones de encendido de
ambas unidades cuando se conecten o
desconecten el amplificador de válvulas
iTube, o la fuente de alimentación.
ALTAVOCES
•
Cuando se conectan los altavoces asegurarse
de que tienen una impedancia de entre 4 y 8
ohmios.
•
Conectar los altavoces a los terminales
usando el cable de altavoz suministrado (con
conectores banana), o cable de altavoz
pelado de alta calidad. Si los cables de
altavoz no están conectados correctamente
puede que no se oiga sonido, o si las
polaridades se invierten, se van a oír ruidos
en la señal con una pérdida desmesurada de
frecuencias graves.
•
Asegurarse de que los cables queden bien
enroscados para impedir que se suelten. Si
los cables entran en contacto, los altavoces
y/o el iTube podrían quedar dañados.
ALIMENTACIÓN
•
No encienda el iTube o hasta haber colocado
el adaptador de corriente. Se recomienda
que desconecte la fuente de alimentación de
la red eléctrica cuando la unidad esté en un
periodo prolongado de desuso (salidas de
vacaciones o viajes por ejemplo).
9
Page 34

Problemas más frecuentes
Si su iTube deja de funcionar con normalidad, compruebe los siguientes puntos para determinar si el fallo puede
ser corregido con una de las sugerencias descritas a continuación. Si después de leerlas aun estima que su
unidad no funciona con normalidad, contacte por favor con su distribuidor o servicio técnico autorizado.
SÍNTOMA
No hay corriente
- El LED azul está apagado
No hay sonido
La imagen acústica es
inestable. Se caracteriza
por un sonido anormal y
una calidad de tonos
graves insuficiente
POSIBLES CAUSAS
- El adaptador de corriente está mal
conectado
- No llega corriente
- Si se acciona desde el mando a
distancia, puede que éste
necesite pilas nuevas
- El volumen está bajado
- Los altavoces no están bien
conectados
- El dispositivo seleccionado (Select
input) no es el correcto
- Las polaridades positiva (+) y
negativa (-) del iTube y el sistema
de altavoces no están alineadas
SOLUCIÓN
- - Asegurarse de que los cables están bien
enchufados
- Probar con otro electrodoméstico o un
enchufe diferente
- Cambiarle las pilas
- Subir lentamente el volumen hasta el nivel deseado
- Comprobar que los cables están insertados correcta y
firmemente
- Asegurarse de que se ha seleccionado el dispositivo
que se está usando, ya sea el puerto iPod o el Aux
- Reconectar los altavoces asegurándose de
que las polaridades se alinean con las del
iTube
El volumen del iPod no
aumenta el volumen de
audio
Se oyen sonidos de
crepitación en los
altavoces
- El control de volumen del iPod
- Malas conexiones
ITube
10
sólo controla el volumen de audio
por la salida de los auriculares
- Usar el control de volumen del amplificador
iTube cuando el iPod esté en la estación
- Comprobar la conexión del iPod si está en la
estación de conexión.
- Comprobar la conexión del cable estéreo de
3,5 mm., asegurarse de que está conectado
en "line out", "audio out" o "headphone out"
de su reproductor y NO en "speaker out"
Page 35

MANUAL DEL USUARIO
ESPAÑOL
SÍNTOMA
El sonido está
distorsionado
Interferencias de radio
El mando a distancia no
funciona
POSIBLES CAUSAS
- Un problema con su dispositivo
de audio
- El volumen en el iTube está
demasiado alto
- El sonido de origen está
distorsionado
- Proximidad excesiva a una
estación de radio
- Se queda sin pilas
- El mando a distancia no apunta
en la dirección correcta o está
fuera de alcance
SOLUCIÓN
- Desenchufar el cable estéreo de 3,5 mm.
del reproductor de audio, enchufarlo en la
salida de auriculares de otro reproductor (p.
ej. CD, mp3)
- Disminuir el volumen a un nivel más
apropiado
- Los ficheros WAV y MIDI son con frecuencia
de baja calidad: esto hace que la distorsión y
el ruido se noten fácilmente en un sistema
de alta calidad.
- Probar una fuente de audio diferente como
música de calidad CD
- Mover los altavoces a posiciones diferentes
para ver si la interferencia desaparece
- Cambiar las pilas
- Apuntar con el mando a distancia hacia la
estación de conexión a menos de 6 m. de la
unidad
La TV no muestra nada
- Mala conexión
- La configuración (set up) de vídeo
del iPot es incorrecta
- Comprobar las conexiones si el iPod está en
la estación de conexión, comprobar la
conexión de la salida de cable.
- Comprobar la configuración (set up) de
vídeo del iPod
11
Page 36

Mantenimiento
•
Apagar las unidades cuando no estén en uso
•
Permitir que las unidades se enfríen completamente antes de limpiar
•
Limpiar periódicamente usando un trapo suave o el cepillo suministrado
•
Cuando se limpie la válvula, ir con mucho cuidado, moverla sólo ligeramente
para sacarla y luego instalar cada válvula del mismo modo después de
limpiarlas
•
No intentar limpiar los productos con disolventes químicos - estos pueden
dañar los acabados del iTube.
Especificaciones
• Salida de potencia: 13Wx2
• Respuesta de frecuencia:
• Distorsión harmónica: >0.5%
• Índice de señal e interferencia: >86Db
• Impedancia de entrada: 100Kohms
• Impedancia de salida: 4ohms, 8ohms
• Tipo de válvula: 2x6N1(ECC85), 1x6E2(EM87)
20Hz - 20KHz (+1.5Db)
Servicio técnico
Contacte con su distribuidor local autorizado.
info@fat-man.co.uk
www.fat-man.co.uk
• Fuente de alimentación: AC100-120V/50-60Hz
AC220-240V/50-60Hz
• Medidas:
Amplificador (largo x ancho x alto) 260x145x130 mm.
Estación (ancho x hondo x alto) 155x130x123 mm.
• Peso: 4.3KGs
Especificaciones sujetas a cambios sin notificar.
FATMAN
POR
TL A
®
udio
ITube
12
Apple, los logos de Apple y iPod son marcas de Apple
computer Inc., registradas en los U.S. t otros países.
Page 37

MANUEL D'UTILISATION
EN FRANÇAIS
ITube
Amplificateur à Lampes avec
Station d'accueil et télécommande
FATMAN
BY
TL A
®
udio
Page 38

Contenu
Page
Contenu de la boite . . . . . . . . . . . . . . . . . . .3
Instructions de Sécurité . . . . . . . . . . . . . . . .4
Connexions de l'iTube . . . . . . . . . . . . . . . . .5
Télécommande . . . . . . . . . . . . . . . . . . . . . .6
Contrôle de l'amplificateur . . . . . . . . . . . . . .7
Connexions de l'amplificateur . . . . . . . . . . . .8
Utilisation . . . . . . . . . . . . . . . . . . . . . . . . . . .9
Problèmes rencontrés . . . . . . . . . . . . . . . . .10
Maintenance . . . . . . . . . . . . . . . . . . . . . . . .12
Spécifications . . . . . . . . . . . . . . . . . . . . . . .12
Support Technique . . . . . . . . . . . . . . . . . . .12
ITube
2
Félicitations de votre choix de l'iTube. Afin d'obtenir la meilleure
utilisation de ce système, veuillez lire ce manuel avec
attention et utilisez votre iTube seulement selon les instructions
mentionnées.
Page 39

Contenu de la boîte
• Amplificateur à lampes iTube.
• Station d’accueil iTube.
• Brosse pour le nettoyage.
• Câble électrique.
• Câble audio pour relier la station et l'amplificateur.
• Câbles de type banane pour les enceintes.
• Câble audio pour le lecteur de CD ou autre.
• Câble video pour relier la station d’accueil à la TV.
MANUEL D'UTILISATION
EN FRANÇAIS
3
Page 40

Instructions de Sécurité
Veuillez lire les précautions suivantes avant d'essayer
d’utiliser l'iTube.
• Lisez les instructions - toutes les consignes d'utilisation
devraient être lues entièrement avant l’utilisation du
Fatman iTube.
• Conservez le manuel d’instructions dans un endroit
sûr pour référence future si besoin.
• Suivez toutes les instructions détaillées dans ce
manuel.
• Observez tous les avertissements de sécurité donnés
dans ce manuel.
• L’appareil ne devrait pas être située près de l’eau.
Évitez le placement près des baignoires, des éviers,
des machines à laver, d’une piscine, etc.
• Évitez l'exposition à la lumière directe du soleil ou à
des conditions extrêmes de température ou
d’humidité.
• Ne le placez pas près des sources de chaleur telles
que des radiateurs, des fours, de flammes ou des
bougies.
• Assurez-vous que l'unité est placée sur une surface
propre, sèche et plate avant l’utilisation.
• Ne laissez pas tomber l’appareil, ne pas appliquer une
pression excessive aux commandes, ne placer pas
d’objets lourds sur l’appareil.
• Ne laisser pas la poussière s’accumuler sur l'iTube.
• Pour nettoyer, employez un tissu sec doux. Au besoin,
employez un tissu humide sans aucun dissolvant.
• Assurez-vous que l’appareil est situé dans un endroit
correctement ventilé. Ne placez pas l'iTube dans une
position où sa ventilation peut être obstruée. Évitez le
placement sur des lits, des sofas, des couvertures, des
bibliothèques fermées/boîtiers ou n'importe quel autre
• Assurez-vous que l'unité est reliée à l'alimentation
• Débranchez l'iTube lors d’une longue période
• Ce produit peut devenir chaud. Ne touchent pas les
• Pour éviter le risque de décharge électrique, n'essayez
• Quand ce produit est déplacé d'un endroit frais à un
• L’intervention d’un technicien qualifié dans les cas
Tous les changements ou modifications non autorisés à cet
équipement rendraient la garantie du fabricant nulle.
endroit pouvant causer des problèmes de ventilation,
provoquant une surchauffe de l’appareil.
électrique comme indiqué sur l’appareil.
d’inactivité. Assurez-vous toujours que les câbles
électriques sont placés sans risque pour la circulation
des gens.
tubes et gardez le éloigné des bébés et des enfants
pas d’ouvrir l’appareil – il ne contient pas d’éléments
pouvant être changé par l’utilisateur.
endroit chaud, de la condensation peut se produire
sur la surface du tube. Dans ce cas, attendez 1 heure
avant d’allumer l’appareil. Ceci évitera la rupture du
tube due à une chaleur soudaine.
suivants :
1. l'alimentation ou le câble subit des dommages.
2. l’appareil est heurté par la chute d’un objet.
3. l’appareil est exposé à la pluie ou à l'humidité.
4. du liquide est renversé sur l’appareil.
5. si l’appareil ne semble pas fonctionner
normalement ou qu’un changement soudain des
performances est détecté.
6. L’appareil est tombé.
1
2
3
4
ITube
4
Page 41

Connexions de l’iTube
1
2
MANUEL D'UTILISATION
EN FRANÇAIS
3
4
1.
Support Arrière
2.
Connecteur station d’accueil iPod
3.
LED témoin de connexion de la station
d’accueil iPod
4.
Témoin d’alimentation
1. Sortie Vidéo : Reliez le câble vidéo (jaune)
entre le connecteur de sortie vidéo (jaune)
de l'iTube et l'entrée vidéo de votre TV.
2. Sortie Audio : Reliez le câble audio de la
sortie audio de la station d’accueil iTube à
l'entrée audio de l'amplificateur à lampe
iTube.
3. Sortie S-Video : Utilisez un câble S-Video
(non inclus) pour relier la sortie S-Video de
votre iTube à l'entrée S-Video de votre TV.
4. Alimentation Secteur : Reliez le câble
électrique d’alimentation entre l'iTube et
votre prise de courant.
123 4
5
Page 42

Télécommande
Mute
Button
Back
Light
Power
Button
Button
Skip
Track
Up
Menu
Sub
Menu
Fonctions de controles des enceintes
Power Button Pour allumer l’ITube. Le
témoin d’alimentation
s’allumera.
Down
Menu
menu
Shufffle RepeatFF / RWPower
Bass
Volume
Treble
Volume
Fonctions de contrôle de l’iPod
Lorsque un iPod est connecté à l’iTube et que les 2
appareils sont allumés, certaines fonctions de l’iPod
sont accessibles via la télécommande.
Master
Volume
Master Volume Utilisez les touches ‘+’ et ‘-‘
pour augmenter ou diminuer
le volume général.
Treble Volume Utilisez les touches ‘+’ et ‘-‘
pour augmenter ou diminuer
le réglage des aigus.
Bass Volume Utilisez les touches ‘+’ et ‘-‘
pour augmenter ou diminuer
le réglage des basses.
Input Select Sélectionnes l’entrée Ipod ou
l’entrée AUX (lorsque l’Ipod est
sélectionné, le témoin
s’allume.
Lecture / Pause Pressez le bouton play/pause
Eteindre l’iPod Pressez et maintenez le
bouton play
Aller au morceau suivant
Recommencer la
lecture d’un morceau
Jouer le morceau précédent
Avance rapide d’un morceau
Rembobiner un morceau
Pressez next/fast forward
Pressez previous/rewind
Pressez previous/rewind deux
fois
Pressez et maintenez
next/fastforward
Pressez et maintenez
previous/rewind
ITube
6
Page 43

Controles de l’amplicateur
Power Switch Headphone Output Select Switch Volume
MANUEL D'UTILISATION
EN FRANÇAIS
NOTE:
Although product is
pictured without the cage
cover, the cage covering the
tubes must be in place
during operation. This
product can get hot. Keep
away from babies and
children
PANNEAU AVANT
La LED au dessus de l’interrupteur général (Power Switch) s’allumera pour indiquer la mise sous tension. Pour
éteindre l’appareil, basculer simplement l’interrupteur dans la position suivante. Avant la mise sous tension, vérifiez
que le volume est faible afin d’éviter d'endommager vos haut-parleurs. Notez qu’un circuit de protection coupe le son
quelques secondes après la mise sous tension.
Line Inputs Speaker Outputs AC Power Input
PANNEAU ARRIÈRE
La station d’accueil se connecte à l’amplificateur via les sorties Line Out de la station sur les Entrées Line
In de l’amplificateur.
7
Page 44

Connexions de l’amplificateur
ITUBE
SpeakerSpeaker
Hardware Music
Player or MP3 /
MP4 Player
ITube
8
CD Player
Page 45

Utilisation
MANUEL D'UTILISATION
EN FRANÇAIS
CONNEXIONS
•
Avant d'établir les connexions à l'iTube, y
compris l’ampli et la station d’accueil,
assurez vous que tous les appareils sont
éteints.
•
Vérifiez bien que les connexions sont
correctement effectuées. Par exemple, (L)
vers (L) à gauche, et (R) vers (R) à droite.
•
Assurez-vous que les connecteurs et fils
soient bien propres et sans poussière et que
tous les connecteurs soient insérés
entièrement et correctement dans l'iTube.
•
Eteignez toujours les deux appareils avant
d’effectuer les connexions.
ALIMENTATION
•
N’allumez pas l'iTube avant d’avoir connecter
le câble d’alimentation. Il est recommandé
de débrancher l’appareil du secteur lors des
périodes d’inactivité de longue durée. (lors
de vacances ou voyages par exemple).
HAUT PARLEURS
•
En reliant les haut-parleurs, assurez-vous
qu’ils ont bien une impédance entre 4 et 8
ohms.
•
Reliez les haut-parleurs aux bornes en
utilisant le câble haut-parleur fourni (prise
type banane) ou des câbles haut-parleur
dénudés de haute qualité,. (notez que si les
câbles des haut-parleurs ne sont pas reliés
correctement, vous ne pourrez entendre
aucun bruit, et si les polarités sont inversées,
vous pourrez entendre un son « étrange »
avec une perte artificielle de fréquences
basses.
•
Quand en utilisant les fils dénudés pour les
haut-parleurs, insérez au moins 1.6mm à
l'intérieur des bornes de haut-parleur de
sorte qu'aucun câble nu ne soit apparent.
•
Assurez-vous que les supports de câbles sont
fermement vissés pour empêcher les
connecteurs de se toucher. Si les fils se
touchent, les haut-parleurs et/ou l'iTube
pourraient être endommagés.
9
Page 46

Problèmes rencontrés
Si votre iTube ne fonctionne pas normalement, veuillez vérifier les points suivants pour déterminer si le
défaut peut être corrigé avec une des suggestions simples ci-dessous. Ensuite, si l’appareil est toujours
défectueux après cela, contactez votre revendeur ou technicien autorisé.
SYMPTOMES
Pas d’alimentation
- la LED bleu témoin
est éteinte
Pas de Son
L’image acoustique est
instable, caractérisée par
un son non naturel et des
fréquences basses en retrait
Le contrôle de Volume
de l’iPod ne modifie
pas le volume général
CAUSES POSSIBLE
- Le câble d’alimentation n’est pas
connecté correctement.
- L’appareil est éteint.
- Si le contrôle se fait depuis la
télécommande, les piles sont usées.
-
le Volume est au minimum.
-
Les enceintes ne sont pas
connectées correctement.
-
Le réglage « Input Select » de
sélection de l’entrée est incorrect.
- les polarités ‘+’ et ‘-‘ sont
incorrectes entre l’iTube et les
enceintes.
-
Le réglage de Volume de l’iPod
ne contrôle que le volume du
Casque.
REMEDES
- Vérifiez que l’alimentation est bien
connectée.
- Testez avec une autre prise électrique.
- Remplacez les piles.
-
Montez le volume progressivement
jusqu’au volume désiré.
-
Vérifiez les connexions des hautparleurs. - Vérifiez votre sélection
d’entrée (iPod ou Aux)
- Reconnectez les enceintes en vérifiant
les polarités des câbles.
- Utilisez le réglage de volume de l’iTube
lorsque l’iPod est placé sur la station
d’accueil.
Des craquements sont
entendus dans les
haut-parleurs
- Mauvaises connexions.
- Il y a un problème avec la
ITube
10
source Audio.
-
Vérifiez la connexion si l’iPod est sur la
station d’accueil, vérifiez le câble jack
stéréo. Assurez vous qu’il est connecté sur
« Line Out » ou « Headphone Out » et non
pas sur une sortie Enceintes (speakers)
-
Débranchez le câble jack stéréo 3.5mm
de la source audio et branchez le sur
une sortie casque d’une autre source
audio (CD, lecteur MP3…)
Page 47

MANUEL D'UTILISATION
EN FRANÇAIS
SYMPTOMES
Le son est saturé
Il y a des Interférences
radio
La télécommande ne
fonctionne pas
La TV n’affiche rien
CAUSES POSSIBLE
- Le réglage de Volume sur
l’iTube est trop élevé.
- La source est saturée.
- Vous êtes trop près d’une
Tour Radio.
- Batterie faible.
- La télécommande ne pointe
pas vers la bonne direction ou
est trop éloignée.
- Mauvaise connexion.
- Le réglage Video de l’iPod est
incorrect.
REMEDES
- Réduire le volume.
- certains fichiers audio (WAV, MIDI…)
peuvent être de mauvaise qualité...
Essayez une autre source audio.
- Déplacez les enceintes dans
différentes positions.
- Remplacez les piles.
- Pointez la télécommande vers la
station d’accueil à moins de 6m de
l’appareil.
- Vérifiez les connexions si l’iPod est sur
la station d’accueil, vérifiez le câble de
sortie.
- Vérifiez le réglage Video sur l’iPod.
11
Page 48

Maintenance
•
Eteignez les appareils lors de périodes d’inactivité.
•
Laissez les appareils se refroidir complètement avant le nettoyage.
•
Nettoyez en utilisant un tissu doux ou la brosse fournie périodiquement
•
Faites attention lors du nettoyage de la lampe, secouez doucement la lampe
pour la sortir de l’appareil et re-installez la de la même manière.
•
N'essayez pas de nettoyer les appareils avec des dissolvants chimiques - ceci
peut endommager la finition de l'iTube.
Spécifications
• Puissance de Sortie: 2x13W
•
Réponse en fréquences:
• Distorsion Harmonique: ≤0.5%
• Rapport Signal/Bruit: ≥86Db
• Impédance d’Entrée: 100K ohms
• Impédance de Sortie: 4 ohm , 8 ohm
• Type de Lampe: 2x6N1(ECC85)
20Hz - 20KHz (±1.5Db)
1x6E2(EM87)
Support Technique
Veuillez contacter votre revendeur officiel.
info@fat-man.co.uk
www.fat-man.co.uk
• Alimentation: AC100~120V/50~60Hz
AC220~240V/50~60Hz
• Dimensions:
Amp (L x l x H) 260x145x130mm
Dock (l x P x H) 155x130x123mm
• Poids: 4.3KGs
FATMAN
BY
TL A
®
udio
12
Apple, le logo de Apple et iPod sont des marques déposées de Apple
Computer Inc., enregistrées aux ETATS-UNIS et dans d'autres pays.
Page 49

MANUALE D'UTENTE
ITALIANO
ITUBE
Amplificatore valvolare
con Docking Station
FATMAN
BY
TL A
®
udio
Page 50

Contenuti
Lista delle periferiche . . . . . . . . . . . . . . .3
Istruzioni per la sicurezza . . . . . . . . . . . .4
Collegamento dell itube . . . . . . . . . . . . .5
Telecomando . . . . . . . . . . . . . . . . . . . . .6
Comandi dell'amplificatore . . . . . . . . . . .7
Collegamenti dell'amplificatore . . . . . . . .8
Come si usa . . . . . . . . . . . . . . . . . . . . . .9
Problemi conflitti . . . . . . . . . . . . . . . . . .10
Manutenzione . . . . . . . . . . . . . . . . . . . .12
Specifiche . . . . . . . . . . . . . . . . . . . . . .12
Assistenza . . . . . . . . . . . . . . . . . . . . . .12
Pagina
ITUBE
2
Siamo felici della vostra scelta dell' iTube Fatman della TL Audio.
Abbiamo messo a vostra disposizione la nostra esperienza e conoscenza
sull'audio e ingegneria, studiando un prodotto che senza dubbio
migliorerà la qualità del vostro ascolto audio.
Avvertenza
La mancata osservanza di queste istruzioni può causare un utilizzo errato
dell'attrezzatura. Attenersi alle istruzioni indicate per un utilizzo sicuro.
Page 51

Materiali forniti
• Itube amplificatore valvolare
• Itube Docking Station
• Set di Pulizia guanto/spazzola
• Cavo elettrico
• Cavo audio da collegare alla dockig station e all'amplificatore
• Cavi di potenza per speakers 'altoparlanti'
• Cavo audio 'aux in' per collegamento con il CD player ecc
• Cavo video da collegare dalla docking station alla TV
MANUALE D'UTENTE
ITALIANO
3
Page 52

Istruzioni per la sicurezza dell' Itube
Precauzioni prima dell'accensione dell' iTube.
• Leggere le istruzioni - tutte le istruzioni di funzionamento
e di sicurezza dovrebbero essere lette completamente
prima di far funzionare il Fatman iTube .
• Mantenere le istruzioni in un posto sicuro per riferimento
futuro
• Seguire tutte le istruzioni dettagliate in questo manuale
• Osservare tutti gli avvertimenti di sicurezza dati in questo
manuale
• Questa unità non dovrebbe essere situata vicina
prossimità d'acqua. Evitare la disposizione vicino vasche
da bagno, lavandino, lavatrici, piscina, ecc.
• Evitare l'esposizione a luce solare diretta o agli estremi
della temperatura o dell'umidità,
• Non mettere vicino alle fonti di calore dirette, i radiatori,
le stufe, i fuochi del gas, le fiamme esposte o candele.
• Accertare questo apparecchiatura sia messa è disposto
su una superficie pulita, asciutta e piana prima del
funzionamento.
• Non fa cadere l'apparecchiatura, applicare la forza
eccessiva ai comandi o disporre gli oggetti pesanti in
cima all'unità.
• Non lasciare i livelli eccessivi di polvere ad depositarsi
sul iTube.
• Per pulire, usare un panno morbido e asciutto. Se
necessario, usare un panno umido senza alcuni solventi.
• Accertarsi che la zona in cui l'apparecchiatura è situata
abbia sufficiente ventilazione. Non mettere L' iTube in
una posizione dove la ventilazione può essere ostruita.
Evitare di mettere sulle basi, sui sofà, sulle coperte, sugli
scaffali /armadietti inclusi e su qualunque altra zona che
può causare l'interferenza alla ventilazione del prodotto
così indurlo a surriscaldarsi.
• Accerta che l'apparecchiatura sia collegata al gruppo di
• Questo prodotto è soggetto a riscaldarsi. Non toccare i
• Per evitare il rischio di scossa elettrica, non tentare di
• Se questo prodotto viene spostato da un posto freddo
• L' iTube dovrebbe essere portato in assistenza nel caso
• Tutti i cambiamenti o modifiche non autorizzati a questa
alimentazione corretto come indicato
sull'apparecchiatura. Disconnettere L' iTube quando non
in uso per un periodo lungo. Assicurarsi sempre che i
cavi elettrici siano messi al sicuro da non ostruire
passaggi.
tubi e non mantenere vicino ai bambini
rimuovere il coperchio o la parte posteriore
dell'apparecchiatura.
verso un posto caldo, può verificarsi condensa sulla
superficie delle Valvole elettroniche. In questo caso,
aspettare un'ora prima di accenderlo. Questo eviterà la
perdita o lo scoppio della valvola elettronica o
riscaldamenti eccessivi.
delle seguenti circostanze
1. L'alimentazione o il cavo sono danneggiati
2. Urto accidentale
3. L'apparecchiatura stata esposta a pioggia o ad
umidità
4. Riversamento liquidi sull' itube
5. L'apparecchiatura non sembra funzionare
normalmente o un cambiamento improvviso nelle
prestazioni
6. L'apparecchiatura è caduta
apparecchiatura. Faranno decadere la garanzia di
questo prodotto.
1
2
3
4
ITUBE
4
Page 53

Collegamento 'iTube'
1
2
MANUALE D'UTENTE
ITALIANO
3
4
123 4
1.
Sezione posteriore
2.
Connettore d' aggancio
3.
Indicatore di collegamento “input LED” per
avvenuta connessione dell' iPod
4.
Indicatore di alimentazione
1. Video Output:
Collegare il cavo del video (giallo) fra il
connettore output del video (colore giallo) del
iTube ed il video input della vostra TV.
2. Audio output:
Collegare il cavo audio dall'output della
Docking Station di ITube all'input dell' iTube
amplificatore valvolare.
3. S-Video Output
Usare un cavo del S-Video (non incluso) a
collegare il output del S-Video al vostro iTube
all'input del S-Video della vostra TV.
4. Connessione dell'alimentazione:
Collegare il cavo elettrico nel suo apposito
inserto
5
Page 54

Telecomando
Mute
Button
Back
Light
Power
Button
Button
Skip
Track
Up
Menu
Sub
Menu
Funzioni dell'altoparlante
Power Button Premere per accendere
L' iTube, l'indicatore di
alimentazione si illuminerà
Down
Menu
menu
Shufffle RepeatFF / RWPower
Bass
Volume
Treble
Volume
Funzioni del iPod
Quando un iPod è collegato a l'iTube ed entrambe le
apparecchiature sono accesi, alcune funzioni del iPod
possono essere controllate usando il telecomando.
Master
Volume
Master Volume Premere il bottone “_„ per
aumentare il volume master
Premere il bottone “_„ per fare
diminuire il volume master
Treble Volume Premere il bottone “_„ per
aumentare i treble
Premere il bottone “_„ per
diminuire i treble
Bass Volume Premere il bottone “_„ per
aumentare il volume bass
premere il bottone “_„ per
diminuire il volume bass
Input select Sceglie L' iPod Dock input
AUX. (quando l'iPod Dock
input è selezionato, l'indicatore
LED sarà acceso)
Play / Pause Premere il bottone Play/pause
Spegnere l'iPod Premere tenendo il bottone
Play per qualche secondo
Salto alla canzone seguente
Iniziare ancora una canzone
Suonare una canzone precedente
Avanti veloce Premere e tenere next/fast
Indietro veloce Premere e tenere
Premere next/fast forward
Premere previous/rewind
Premere previous/
rewind due volte
forward
previous/rewind
ITUBE
6
Page 55

MANUALE D'UTENTE
Controlli dell'amplificatore
Interruttore di alimentazione Output della cuffia Selezione Interruttore Volume
ITALIANO
NOTA:
Anche se il prodotto è
descritto senza la
copertura , i tubi
devevano essere
coperto durante il
funzionamento.
Questo prodotto é
soggetto a riscaldarsi.
Tenere via dai
bambini
PANNELLO ANTERIORE
Il led sopra l'interruttore di alimentazione si illuminerà quando l'alimentazione è ACCESA. Per spegnere l'apparato
girare semplicemente l'interruttore nel senso contrario. ATTENZIONE! Prima di accendere l'apparato, regolare il
volume ad una regolazione bassa per evitare il danneggiamento dei vostri speakers o altoparlanti. L'apparecchiatura
dispone di un dispositivo di sicurezza elettronico che all'accensione dell'apparato sarà in modalità “Mute” per
qualche secondo.
Line Inputs Speaker Outputs AC Power Input
PANNELLO POSTERIORE
La Dock unit sarà connessa all' amplificatore via line outs verso le line input dell' amplificatore
7
Page 56

Collegamenti dell'amplificatore
ITUBE
SpeakerSpeaker
Hardware Music
Player or MP3 /
MP4 Player
ITUBE
8
CD Player
Page 57

Come Usare
MANUALE D'UTENTE
ITALIANO
COLLEGAMENTI
•
Prima di fare tutti i collegamenti dell'iTube,
accertarsi che i dispositivi siano spenti.
•
Quando si collega L'itube ad altre periferiche
accertarsi che i collegamenti siano corretti
•
Per esempio, (L) left nel (L) left e (R) right
nel (R) right.
•
Assicurarsi che i connettori di collegamento
siano puliti e senza polvere e inseriti
completamente e correttamente nel' iTube
•
Spegnere sempre entrambe gli interruttori di
alimentazione nella posizione di OFF sulle
apparecchiature quando si deve collegare o
scollegare il sistema.
ALIMENTAZIONE
•
Non accendere l'iTube fino a quando non
avete collegato la presa di corrente fra loro.
È consigliabile staccare le prese di
alimentazione dalla rete elettrica quando
l'apparato non è utilizzato per un periodo
prolungato
ALTOPARLANTI
•
Nel collegare gli altoparlanti, accertarsi che
hanno un'impedenza compreso tra 4 & 8
Ohm
•
Collegare gli altoparlanti ai terminali usando il
cavo fornito dell'altoparlante (banana plug) o
di qualità, a legare l'altoparlante. (Notate che
se l'legare dell'altoparlante non sono collegati
correttamente non sentirete il suono, o se le
polarità sono invertite, sentirete perdita
artificiale delle frequenze bass
•
Nel usando i legare nudi dell'altoparlante,
misura almeno 1.6mm di isolamento
all'interno dei terminali dell'altoparlante in
modo che non c'sia visibile nessun legare
nudo
•
Accertarsi che i supporti del legare sono
avvitati saldamente per impedire i legare da
diventare sciolto. Se i legare si toccano, gli
altoparlanti e/o il iTube potrebbero essere
danneggiati
9
Page 58

Analisi Guasti
Se il vostro iTube non riesce a funzionare normalmente, pregasi controllare i seguenti punti per determinare se il difetto
può essere corretto con i suggerimenti riportati nel riquadro sottostante. Se ritenete che la vostra apparecchiature è
difettosa dopo aver letto i seguenti punti contattare il vostro centro di assistenza o il rivenditore autorizzato.
SINTOMO
Nessun'alimentazione
- il LED blu è spento
Nessun suono
L'immagine acustica è
instabile, caratterizzato
dal suono artificiale e
qualità insufficiente tono
della gamma-basso
CAUSA POSSIBILE
- L'adattatore di alimentazione
non è collegato correttamente
-
L'alimentatore esterno e spento
- se la batteria deve essere
cambiata dal telecomando
- Il controllo di volume è basso
- Gli altoparlanti non sono
collegati correttamente
- 'Input scelto' non è corretto
- la polarità positivo (+) e
negative (-) del sistema
dell'altoparlante e del iTube
non sono abbinati
RIMEDIO
- Assicurarsi che l'alimentazione è
tappata per bene.
- Esaminare con un altro apparecchio /
zoccolo differente.
- Cambiare la batteria
- Girare lentamente il volume in su fino
al livello voluto
- I legare del controllo sono inseriti
saldamente e correttamente
- Accertarsi che abbiate controllo
selezionato al bacino del iPod o Aux.,
secondo cui state usando
- Ricollegare gli altoparlanti accertandosi
che le polarità siano state allineate al
iTube
il volume del iPod non
aumenta il volume
audio
Suono distorto dagli
altoparlanti
- il controllo di volume del iPod
- Collegamento difettoso
ITUBE
10
controlla soltanto il volume
alla jack della cuffia
- Usare il controllo di volume
dell'amplificatore del iTube quando il
iPod è aggancio
- Controllare il collegamento tra iPod e
docking station, collegamento del
controllo del cavo di stereo di 3.5mm.
Assicurarsi che è “linea collegata out„
“audio out„ o “cuffia out„ della vostra
sorgente sonora e NON
“altoparlante out„
Page 59

MANUALE D'UTENTE
ITALIANO
SINTOMO
Suono distorto
Interferenza radiofonica
Il telecomando non
funziona
CAUSA POSSIBILE
- Un problema con la vostra
fonte audio
- Il livello del volume del iTube
è troppo alto
- il suono di fonte è distorto
- Troppovicino ad una torretta
radiofonica
- Batteria bassa
- Il telecomando non sta
indicando nel senso corretto o
non è dentro gamma
RIMEDIO
- Disconnettere il cavo di stereo di
3.5mm dalla fonte audio, quindi
inserirlo la presa della cuffia di
un'alternativa fonte (per esempio
lettore CD, lettore Mp3)
-
Fare diminuire il volume a un livello più
adatto - Le lime del MIDI e di WAV sono
spesso di meno qualità; quindi la distorsione
ed il rumore sono notati facilmente con un
alto sistema di qualità. Provare un audio
fonte differente come un CD di musica
- Spostare gli altoparlanti verso le
posizioni differenti per vedere se
l'interferenza si ferma
- sostituire la batteria
- indicare il telecomando verso la
stazione di aggancio dentro 600cm
dell'unità
La TV non può
visualizzare
- collegamento difettoso
-
Controllare il collegamento se il iPod è
nella stazione di aggancio, collegamento
del controllo del cavo output
- Controllare il video del iPod installato
11
Page 60

Maintenance
•
Spengnere l'apparecchiatura quando non in uso
•
lasciare raffreddare l'apparecchiatura completamente prima di pulire
•
Pulite periodicamente con un panno morbido o la spazzola fornita
•
Quando volete pulire la sezione della valvola, si prega di pulire evitando
movimenti bruschi
•
Non tentare di pulire i prodotti con i solventi chimici - questo può
danneggiare il rivestimento del iTube
Specifiche
• Alimentazione dell'output: 13Wx2
• Risposta di frequenza: 20Hz - 20KHz (±1.5Db)
• Distorsione armonica: ≤0.5%
• Segnale a rapporto-rumore: ≥86Db
• Impedenza dell'input: 100KΩ
• Impedenza dell'output: 4Ω, 8Ω
• Tipo di valvole: 2x6N1(ECC85), 1x6E2(EM87)
• Alimentazione: AC100~120V/50~60Hz
• Dimensioni:
• Peso 4.3KGs
Specifiche conforme a cambiamento senza avviso
Assistenza
Contattare il vostro commerciante o il venditore autorizzato.
info@fat-man.co.uk
www.fat-man.co.uk
AC220~240V/50~60Hz
Amp (LxWxH) 260x145x130mm
Dock (WxDxH) 155x130x123mm
FATMAN
BY
TL A
®
udio
12
Apple, Il marchini della Apple e l'iPod sonno marchi del Apple
Inc., registrati negli Stati Uniti ed altri paesi.
Page 61

ITUBE
Buizenversterker met
Docking Station
GEBRUIKSAANWIJZING
NL
Page 62

Pagina
Inhoud van de verpakking . . . . . . . . . . .
3
Veiligheidsinstructies
. . . . . . . . . . . . . . . 4
De iTube aansluiten
. . . . . . . . . . . . . . . . 5
Afstandsbediening
. . . . . . . . . . . . . . . . . 6
Bediening Versterker
. . . . . . . . . . . . . . . 7
Aansluitingen Versterker . . . . . . . . . . . .
8
Hoe te gebruiken
. . . . . . . . . . . . . . . . . . 9
Probleemoplossingen
. . . . . . . . . . . . . . .10
Onderhoud . . . . . . . . . . . . . . . . . . . . . .
12
Specificaties . . . . . . . . . . . . . . . . . . . . .
12
Service . . . . . . . . . . . . . . . . . . . . . . . . .
12
Gefeliciteerd met de keuze van de Fatman iTube van TL Audio.
We hebben vele jaren ervaring op het gebied van de audio
gebruikt om u een product te bieden dat uw luisterervaring zeker
een nieuwe dimensie zal geven.
Om de best mogelijke prestaties uit dit systeem te krijgen kunt
u het best deze gebruiksaanwijzing aandachtig doorlezen en uw
iTube alleen gebruiken zoals hierin beschreven wordt.
Inhoudsopgave
2
ITUBE
02
Page 63

• iTube Buizenversterker
• iTube Docking Station
• Borstel / Handschoen om het product reinigen
• Stroomsnoer
• Audiokabel om het Docking Station en de Versterker aan te sluiten
• Luidsprekerkabels met banaanconnector
• Audiokabel om een externe bron zoals CD speler aan te sluiten
• Videokabel om het Docking Station op de TV aan te sluiten
Inhoud van de Verpakking
03
GEBRUIKSAANWIJZING
NL
Page 64

Gelieve de volgende punten door te nemen alvorens
de iTube aan te sluiten en te gebruiken.
• Lees de instructies - Alle veiligheids- en
bedieningsinstructies moeten aandachtig
doorgelezen worden voordat de Fatman iTube in
gebruik genomen wordt.
• Bewaar deze instructies voor toekomstige
raadplegingen.
• Volg alle instructies uit deze gebruiksaanwijzing
op.
• Neem alle veiligheidsinstructies uit deze
gebruiksaanwijzing in acht.
• Dit apparaat mag niet in de nabijheid van water
in gebruik genomen worden. Vermijd plaatsing
bij badkuipen, aanrechten, wasmachines,
zwembaden, etc, etc.
• Vermijd contact met direct zonlicht of met extreme
temperaturen of vochtigheidsgraden.
• Plaats niet in de directe nabijheid van
hittebronnen zoals radiatoren, ovens, open vuur of
kaarsen.
• Let erop dat het apparaat op een schoon,
droog en effen oppervlak geplaatst wordt voor
ingebruikname.
• Laat het apparaat niet vallen, oefen niet teveel
kracht uit op de bedieningsknoppen en plaats
geen objecten op het apparaat.
• Laat de iTube niet teveel stof verzamelen.
• Gebruik een schone, droge doek om de iTube
schoon te maken. Gebruik zonodig een vochtige
doek zonder oplosmiddelen.
• Let erop dat er voldoende ventilatie is rondom
de iTube. Plaats niet waar ventilatie verhinderd
kan worden. Plaats niet op bedden, sofa's, tapijt,
kleden, afgesloten boekenplanken of kasten
en overige plekken waar oververhitting van het
apparaat kan ontstaan.
• Let erop dat alleen een voeding wordt gebruikt
zoals aangegeven op het apparaat. Ontkoppel
de iTube als deze langere tijd niet gebruikt
wordt. Vergewis u er altijd van dat stroomkabels
veilig gebruikt worden en men er niet over kan
struikelen.
• Dit product kan heet worden. Raak de buizen niet
aan en houd uit de buurt van babies en kinderen.
• Om het risico op een elektrische schok te
vermijden, dient men de achterzijde van het
apparaat niet te openen - er bevinden zich geen
door de gebruiker te servicen onderdelen.
• Wanneer de iTube van een koude naar een warme
ruimte verplaatst wordt kan condensvorming op de
buisoppervlakten plaatsvinden. Indien dit gebeurt
wacht dan minimaal 1 uur voor het apparaat te
gebruiken. Dit zal lekkage of opblazen van de
buizen ten gevolge van plotseling opwarmen
voorkomen.
• De iTube moet geserviced worden door een
geautoriseerde reparateur in de volgende gevallen:
1. De voeding of voedingskabel is beschadigd
2. Er is een object op de iTube gevallen
3. De iTube heeft blootgestaan aan vocht of regen
4. Er is vloeistof in de iTube terechtgekomen
5. De iTube functioneert niet normaal of vertoont
een plotselinge verandering in werking
6. De iTube is gevallen
• Alle ongeautoriseerde veranderingen of
modificaties aan dit apparaat zullen de
fabrieksgarantie doen vervallen
Veiligheidsinstructies
4
1
2
3
4
ITUBE
04
Page 65

1.
Achtersteun
2.
iPod dockconnector
3.
iPod LED "aangesloten" indicator
4.
Aan/Uit indicator
De iTube aansluiten
1. Video uitgang:
Verbind de videokabel (geel) met de video
uitgang (geel) van de iTube en de video ingang
van uw TV.
2. Audio uitgang:
Verbind de audiokabel met de audio uitgang
van de iTube Docking Station met de audio
ingang van de iTube buizenversterker.
3. S-Video uitgang:
Gebruik een S-Videokabel (niet bijgeleverd)
om de S-Video uitgang van de iTube met de SVideo ingang van uw TV te verbinden.
4. Ingang Voedingsadapter:
Verbind de voedingsadapter met de iTube en
met een stroompunt.
1
2
3
4
1 2 3 4
05
GEBRUIKSAANWIJZING
NL
Page 66

Bediening Versterkerfuncties
Aan/Uit knop Druk om iTube aan te zetten,
powerindicator zal oplichten.
Volume Druk op de “+” knop om het
volume harder te zetten
Druk op de “-” knop om het
volume zachter te zetten
Hoge Tonen Druk op de “+” knop voor
meer hoge tonen
Druk op de “-” knop voor
minder hoge tonen
Lage Tonen
Druk op de “+” knop voor
meer lage tonen
Druk op de “-” knop voor
minder lage tonen
Ingangsselectie Selecteert iPod dock ingang
of AUX ingang (wanneer iPod
is geselecteerd is de indicatie
LED aan)
Bediening iPod functies
Als een iPod is aangesloten op de iTube en beide
apparaten aan staan, kunnen sommige iPod functies via
de afstandsbediening worden bediend
Play/Pause nummer Druk op play/pause knop
Zet iPod uit Houd de play knop ingedrukt
Skip nummer Druk op next/fast forward knop
Start nummer opnieuw Druk op previous/rewind knop
Speel vorig nummer Druk 2x op previous/rewind
knop
Heenspoelen nummer Houd de next/fast forward
knop ingedrukt
Terugspoelen nummer
Houd de previous/rewind knop
ingedrukt
Afstandsbediening
6
Hoge
Tonen
Lage
Tonen
Volume
Shuffle
RepeatFF / RWAan/Uit
knop
Skip
nummer
Mute
knop
Verlichting
Play/Pause
knop
Menu opMenu
sub
Menu
neer
Menu
ITUBE
06
Page 67

VOORZIJDE
Het indicatielampje boven de Aan/Uit knop licht op als de iTube AAN staat. Om Uit te zetten zet u de schakelaar
in de andere richting. Voordat het apparaat aangezet wordt, dient u het volume laag te zetten om schade aan uw
luidsprekers te voorkomen door luide ploppen. Let erop dat het luidsprekerbeveiligingscircuit het geluid een aantal
seconden uitzet (mute) nadat de iTube is aangezet.
Bediening Versterker
ACHTERZIJDE
Het Docking Station wordt met de versterker verbonden via de lijn uitgangen van het Docking Station en
de Lijn ingangen van de versterker.
Aan/Uit knop Hoofdtelefoon uitgang Selectieknop Volume
Lijn Ingangen Speaker Uitgangen AC Stroom Ingang
07
GEBRUIKSAANWIJZING
NL
NOOT:
Hoewel afgebeeld
zonder bescherming
over de buizen, moet
deze tijdens bedrijf
wel gebruikt worden.
Het apparaat kan
heet worden. Houd
babies en kinderen
uit de buurt.
Page 68

Aansluitingen Versterker
8
LuidsprekerLuidspreker
Muziek Speler of
MP3 / MP4 Speler
CD Speler
ITUBE
08
Page 69

AANSLUITINGEN
• Voordat apparaten op de iTube versterker of
het Docking Station worden aangesloten, moet
de iTube en alle reeds aangesloten apparatuur
uitstaan.
• Let bij alle verbindingen op de juiste manier van
aansluiten. (L) Links op Links en (R) Rechts op
Rechts.
• Let erop dat contacten altijd schoon en stofvrij
zijn en dat pluggen helemaal en correct in de
ingangen zijn gestoken.
• Zet altijd de Aan/Uit knoppen van beide apparaten
uit als de iTube versterker of de voedingsadapter
aangesloten wordt.
STROOM
• Zet de iTube of voeding niet aan voordat de AC
voedingsadapter ook aangesloten is.
Wij bevelen
aan om de voeding te ontkoppelen als het
apparaat gedurende enige tijd niet gebruikt
gaat worden (bijv. in geval van vakantie of
reizen).
LUIDSPREKERS
• Sluit alleen luidsprekers aan met een impedantie
tussen de 4 en 8 Ohm.
• Sluit de luidsprekers op de iTube aan door
ofwel de bijgeleverde luidsprekerkabel met
banaanpluggen te gebruiken ofwel een andere
hoogwaardige luidsprekerkabel met de juiste
connectoren.
Let op de juiste fase bij het
aansluiten van de luidsprekerkabels ("+" op
de "+" en "-" op de "-"). Als de kabels niet
goed verbonden zijn kan het zijn dat u geen
geluid hoort en bij een omgekeerde fase
hoort u vreemde verschijnselen in het geluid,
zoals een onnatuurlijk verlies van lage tonen.
• Let erop dat bij het aansluiten van
onafgemonteerde luidsprekerkabels geen
open verbindingen zichtbaar dienen te zijn.
Gebruik dan tenminste 1,6mm isolatie bij de
luidsprekerklemmen.
• Let erop dat de luidsprekerklemmen goed zijn
vastgedraaid, zodat de kabels niet los kunnen
raken. Als de kabels losraken en in aanraking
komen met elkaar (kortsluiten) kunnen de
luidsprekers of de iTube ernstig beschadigen.
Hoe te gebruiken
GEBRUIKSAANWIJZING
NL
09
Page 70

Als de iTube niet normaal werkt, kunt u de onderstaande punten nakijken en nagaan of daarmee de
fout opgelost is. Mochten deze punten geen oplossing bieden, dient u contact op te nemen met uw
geautoriseerde dealer of servicepunt.
SYMPTOOM
Geen Power
- Blauwe LED is uit
Geen Geluid
Het geluidsbeeld is
niet stabiel, weinig lage
tonen en een wijds
karakter
iPod volume werkt niet
op iTube
Er komen ploppende
geluiden uit de
luidsprekers
MOGELIJKE OORZAAK
- Voedingsadapter niet juist
aangesloten
- Voeding staat uit
- Vanaf de afstandsbediening:
batterij leeg
-
Volume staat uit
- Luidsprekers niet juist
aangesloten
- 'Ingangsselectie' incorrect
- De fase (+ en -) tussen de
iTube en de luidsprekers komt
niet overeen
-
iPod volume werkt alleen op de
hoofdtelefoonuitgang
- Slechte verbinding
- Een probleem met uw audio
bron
OPLOSSING
- Kijk of de pluggen goed verbonden zijn
- Test met een ander apparaat/
stroompunt
- Vervang batterij
-
Zet het volume op het gewenste niveau
- Kijk of de kabels juist zijn aangesloten
- Kijk of de juiste ingang geselecteerd is
- Sluit de luidsprekers opnieuw aan
- Gebruik het volume van de iTube
versterker
- Controleer de verbinding met de
iPod
in het Docking Station en de 3.5mm
stereokabel. De verbinding moet zijn
'line out' 'audio out' of 'headphone out'
van de bron en NIET 'speaker out'
- Haal de 3.5mm stereokabel uit
de audiobronen plug deze in de
hoofdtelefoonaansluiting van een
andere bron (CD speler, Mp3 speler)
Probleemoplossingen
ITUBE
10
Page 71

SYMPTOOM
Geluid is vervormd
Radio Interferentie
Afstandsbediening
werkt niet
TV kan geen beeld
weergeven
MOGELIJKE OORZAAK
- Volumeniveau op de iTube is
te hoog
- De geluidsbron vervormt
- Te dicht bij een tuner
- Batterij leeg
-
Afstandsbediening is buiten
bereik, richting niet goed
- Slechte verbinding
- iPod videoverbinding incorrect
OPLOSSING
- Verminder het volume naar het gewenste
niveau
- WAV en MIDI bestanden zijn vaak van
mindere kwaliteit waardoor vervorming
makkelijker hoorbaar wordt als een
hoogwaardig systeem gebruikt wordt.
Gebruik ongecomprimeerde bestanden
- Verplaats de apparatuur
- Vervang batterij
- Richt de afstandsbediening op het
Docking Station binnen een straal van 7m.
- Controleer verbinding iPod in Docking
Station en de bekabeling
- Controleer de iPod video setup
11
GEBRUIKSAANWIJZING
NL
Page 72

• Schakel de apparaten uit indien deze niet gebruikt worden
• Laat de apparaten afkoelen alvorens deze te reinigen
• Gebruik een zachte doek of meegeleverde borstel
• Haal de buizen zeer voorzichtig uit de buishouder alvorens te reinigen en plaats ze net
zo voorzichtig weer terug na het reinigen.
• Gebruik bij het reinigen geen chemische middelen, deze kunnen de afwerking van de
iTube beschadigen
Onderhoud
• Uitgangsvermogen: 13Wx2
• Frequentiebereik: 20Hz - 20KHz (±1.5dB)
• Harmonische Vervorming:
≤0.5%
• Signaal-Ruis Verhouding:
≥86dB
• Ingangsimpedantie: 100K
Ω
• Uitgangsimpedantie:
4Ω, 8Ω
• Type Buis: 2x6N1(ECC85), 1x6E2(EM87
)
• Voedingsspanning: AC100~120V/50~60Hz
AC220~240V/50~60Hz
• Afmetingen
:
Versterker (BxDxH) 260x145x130mm
Docking Station (BxDxH) 155x130x123mm
•
Gewicht 4.3KG
Specificaties kunnen zonder voorafgaande
mededelingen gewijzigd worden
.
Specificaties
Neem contact op met uw dealer.
Apple, het Apple logo en iPod zijn handelsmerken van Apple
Computer Inc., geregistreerd in de V.S. en andere landen.
Service
12
 Loading...