

OWNER’S MANUAL
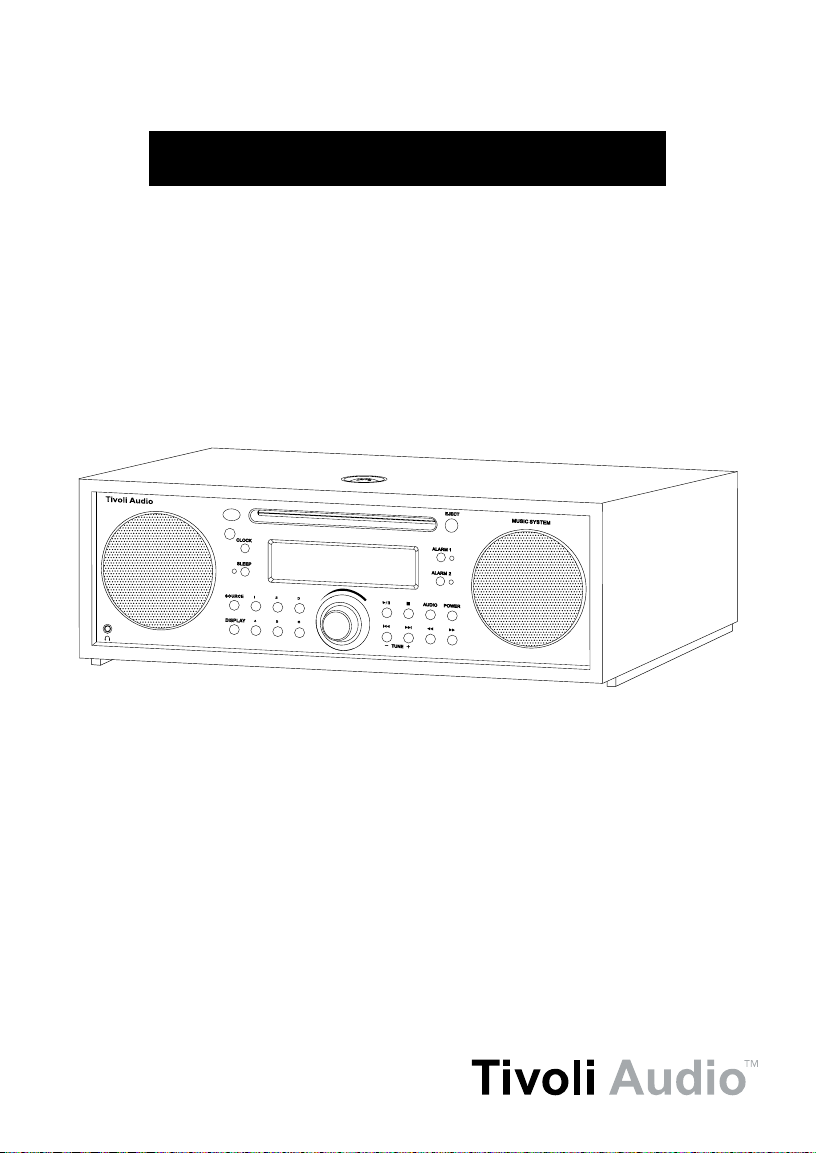
Music System
1
Important Safety Instructions
1) Read these instructions.
2) Keep these instructions.
3) Heed all warnings.
4) Follow all instructions.
5) Do not use this apparatus near water. For example, do not use near a bathtub, in a wet
basement, near a swimming pool, and the like. WARNING! Do not expose this product
to rain or moisture.
6) Clean only with a dry cloth.
7) Do not block any ventilation openings. Install in accordance with the manufacturer’s instructions.
8) Do not install near any heat sources such as radiators, heat registers, stoves, or other
apparatus (including amplifiers) that produce heat.
9) Do not defeat the safety purpose of the polarized or grounding-type plug. A polarized plug has
two blades with one wider than the other. A grounding type plug has two blades and a third
grounding prong. The wide blade or the third prong are provided for your safety. If the provided
plug does not fit into your outlet, consult an electrician for replacement of the obsolete outlet.
10) Protect the power cord from being walked on or pinched particularly at plugs, convenience
receptacles, and the point where they exit from the apparatus.
11) Only use attachments/accessories specified by the manufacturer.
12) Use only with the cart, stand, tripod, bracket, or table specified by the
manufacturer, or sold with the apparatus. When a cart is used, use caution
when moving the cart/apparatus combination to avoid injury from tip-over.
13) Unplug this apparatus during lightning storms or when unused for long periods of time.
2

14) Refer all servicing to qualified service personnel. Servicing is required when the apparatus
has been damaged in any way, such as power-supply cord or plug is damaged, liquid has
been spilled or objects have fallen into the apparatus, the apparatus has been exposed to rain
or moisture, does not operate normally, or has been dropped.
15) Operate this product only from the type of power source indicated on the rear panel.
For products using an external power supply, use an exact replacement if lost or damaged.
For products operating from battery power, refer to the user manual.
19) For added protection for this product during a lightning storm, or when it is left unattended
and unused for long periods of time, unplug it from the wall outlet and disconnect the antenna
or cable system. This will prevent damage to the product to lightning and power-line surges.
20) An outside antenna system should not be located in the vicinity of overhead power lines or
other electric light or power circuits, or where it can fall into such power lines or circuits.
When installing an outside antenna system, extreme care should be taken to keep from
touching such power lines or circuits as contact with them might be fatal.
21) This product utilizes a laser. Use of controls or adjustments or performance of procedures
other than those specified herein may result in hazardous radiation exposure. Do not remove
the panels and do not repair yourself. Refer service to qualified personnel only.
22) Unplug this product from the wall outlet and refer servicing to qualified service personnel
under the following conditions:
a. When the power supply cord or plug is damaged.
b. If liquid has been spilled or objects have fallen into the product.
c. If the product has been exposed to water or rain.
d. If the product does not operate normally by following the operating instructions.
e. If the product has been dropped or damaged in any way.
f. When the product exhibits a distinctive change in performance.
23) If the LCD becomes cracked and damaged, do not touch the liquid.
24) Keep this product a safe distance away from naked flame, such as a lit candle.
25) Do not expose this product to splashing or dripping. Objects containing liquid, such as vases
or drinking glasses, should not be placed on top of this product.
26) The recommended operating temperature range is 5˚ C to 40˚ C (41˚ F to 104˚ F).
This product can be recycled. Products bearing this symbol must NOT be
thrown away with normal household waste. At the end of the product’s life,
take it to a collection point designated for recycling of electrical and electronic
devices. Find out more about return and collection points through your local
authority.
The European Waste Electrical and Electronic Equipment (WEEE) Directive was
implemented to dramatically reduce the amount of waste going to landfills,
there by reducing the environmental impact on the planet and on human health.
Please act responsibly by recycling used products. If this product is still usable,
consider giving it away or selling it.
3

English
About Tivoli Audio
Tivoli Audio was started by Tom DeVesto with the goal of bringing simple to use, high quality
audio products to the consumer at reasonable prices. His long professional association with
Henry Kloss includes co-founding Cambridge SoundWorks*. As CEO and head of research and
development at his former company, Tom was responsible for the development of many of the
best selling home entertainment and multi-media products on the market. He also held senior
management positions in product development at both Advent and Kloss Video.
*Cambridge SoundWorks is a registered trademark of Creative Labs, Singapore.
Music System Instructions
Congratulations on your purchase of the Tivoli Audio Music System. We believe this to be one of
the finest-sounding stereo CD table radios on the market today.
In order to take full advantage of what your new radio is capable of, please take a moment to read
this Owner’s Manual and Safety Instructions. If you have any questions, please do not hesitate to
contact your dealer or Tivoli Audio.
Please save the carton and original packing should you ever need to ship your radio, as
shipping damage is not covered by the factory warranty.
On behalf of all of us, thank you for choosing Tivoli Audio and enjoy your new Music System!
Packed with your Music System you should find:
• 1 Power Cord
• 1 Remote Control (Battery installed)
• 1 FM Antenna
• 1 AM Antenna
• 1 Cleaning Cloth
• 2 “AA” Batteries
Please contact your dealer/distributor or Tivoli Audio if any of these items are missing.
Getting Started
Before operating the Music System, wait until it has reached room temperature. Otherwise,
condensation may form inside the CD player and it may not operate correctly. The display can
also be affected by hot or cold temperatures.
1. Insert the two “AA” back-up batteries before inserting the power cord.
2. Connect the power cord to the input in the rear of the Music System and then plug the
cord into an outlet.
3. Press the red Power button on the front panel to turn the Music System On.
4. Press the front panel Source button to select the desired source or insert a CD into the
CD slot and the CD will begin playing. If AM is selected, attach the included external
AM antenna and adjust to receive AM stations.
5. Adjust the volume to the desired level using the front rotary knob.
4
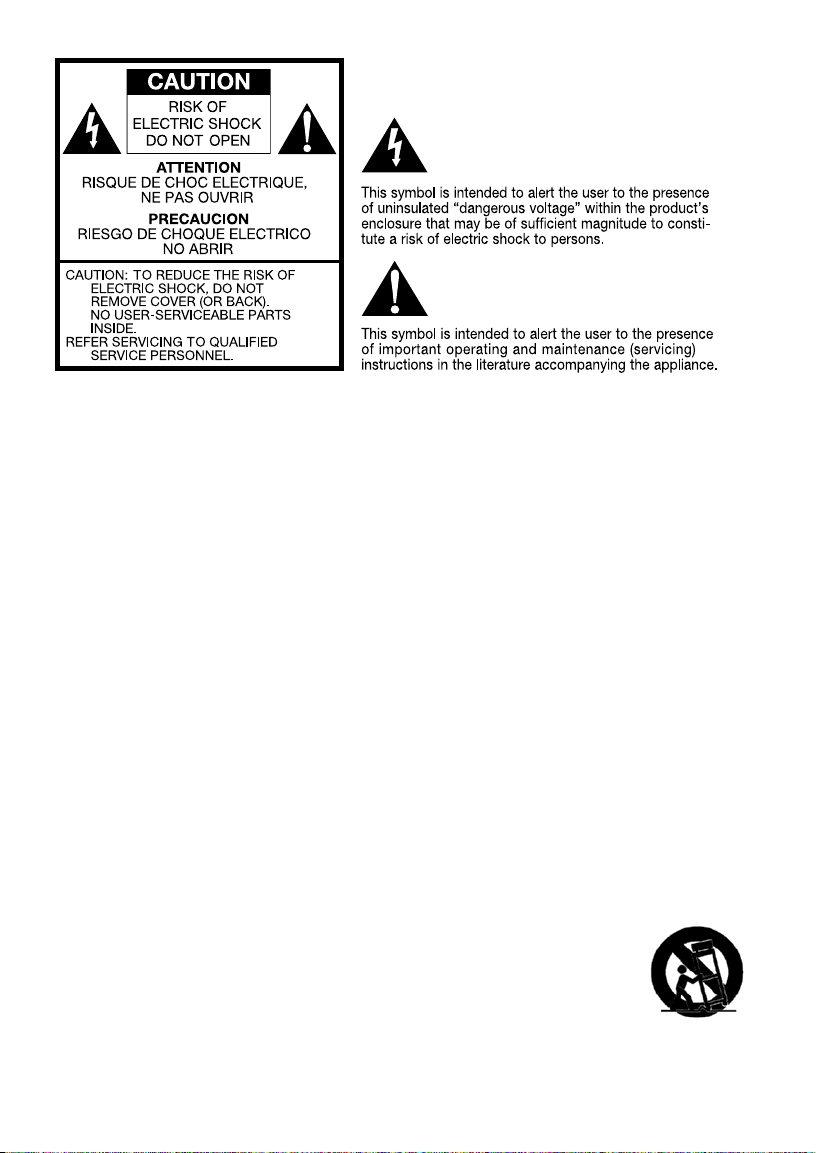
Guide To Features (Front Panel):
1. POWER: Push to power the Music System On or Off (Standby).
Figure 1 Figure 2
Figure 3 Figure 4
English
Figure 5
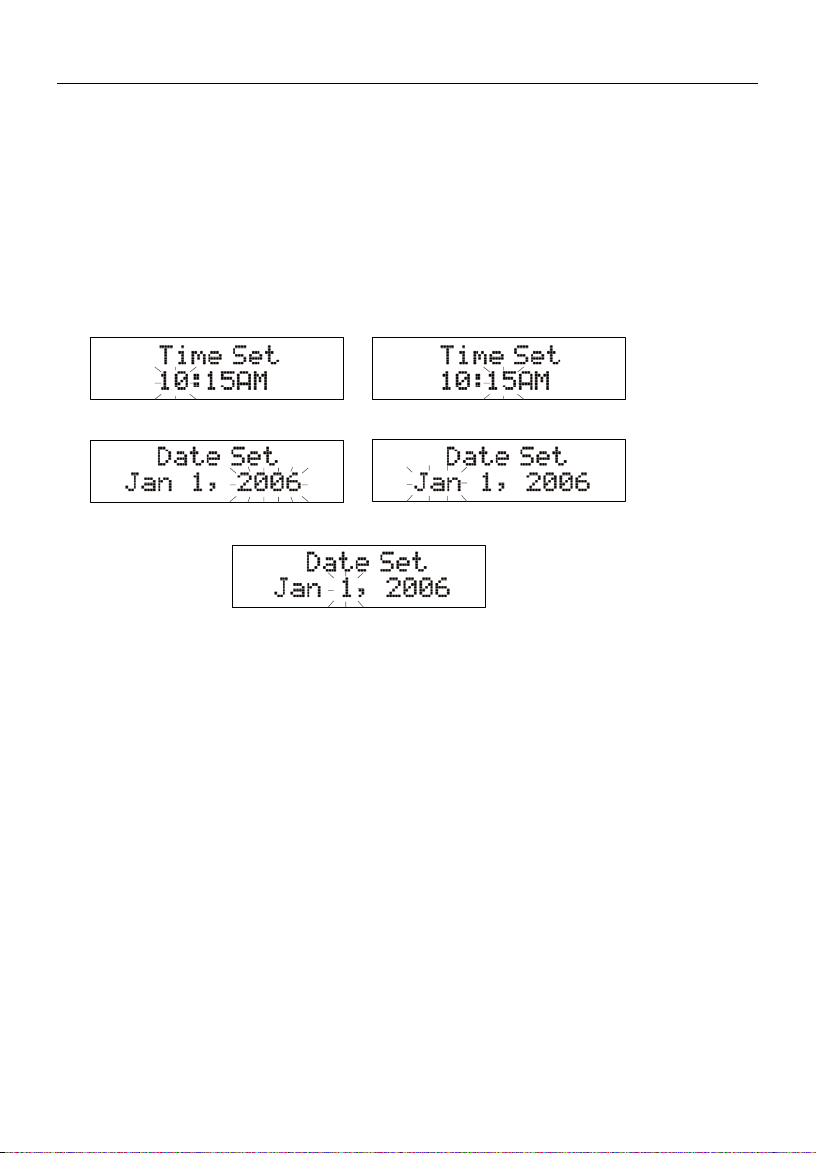
2. ALARM 1/ALARM 2: Briefly press and hold Alarm 1 or 2. A beep will confirm you are in the
alarm set-up mode and the corresponding green LED will illuminate. Rotate and press the
Volume knob in to adjust and set the hour (which also determines AM and PM (Figure 1) and
minutes (Figure 2) and press in to set and move to the next setting. Note, adjusting the hour
does not affect the minutes and vise-versa. Set the alarm source (Figure 3 and 4) and alarm
volume (Figure 5) in the same manner. Setting the alarm source to “AUX” will cause the alarm
to wake to a tone. You will not be able to set the alarm source to CD if a CD isn’t loaded inside.
When the alarm LED is off, press the Alarm button once to set the alarm. The display will
show the time the alarm is set to wake. When the alarm LED is on, press the Alarm button
briefly to turn it off. If the alarm is set and power is lost, the alarm will still sound (the tone will
sound in place of radio or CD) at the designated time provided fresh batteries are correctly
installed in the rear battery compartment. When the alarm activates (Alarm LED flashes) you
may either turn the unit off and keep the alarm set for the next day, press the Snooze button
to temporarily mute the alarm for 7 minutes, or briefly press the Alarm button to cancel
activation,turning the unit off, and keeping the alarm set to wake the next day.
Note: The non-US model uses a 24-hour clock format.
5

English
3. PRESETS 1– 6: Press and hold to memorize the tuned station to that particular preset.
A beep will sound confirming the station has been successfully stored. Press briefly to recall
the station associated with that preset. There are 6 FM presets and 6 AM presets. If a Preset
button is pressed but no station has been set, the display will show “Preset Empty” for
2 seconds. These buttons will also act as limited direct track access during CD playback.
The same station cannot be saved to more than 1 preset. Note the remote control’s 1
through 6 buttons cannot be used to save favorite stations to the presets, only recall them
after they have been saved using the Music System’s front panel buttons.
4. SOURCE: Briefly press to cycle through the four sources: FM, AM, CD, and Auxiliary. The
source can’t be changed while the alarm is sounding. If the source is changed during CD
playback and the source is changed back to CD again, the CD will start playback from the
first track.
5. SLEEP: With the Music System playing FM, AM, CD, or an auxiliary device, briefly press to
begin the 20 minute Sleep timer. The corresponding green LED will illuminate while the Sleep
timer is active and the display will countdown the remaining Sleep time. The Music System
will power off automatically at the end of the Sleep cycle. Sleep cannot be activated in CD
mode unless a CD is loaded. Note RDS and CD Text will not be displayed in Sleep mode.
6. / TUNE +/–: Briefly press to advance to the next track on a disc or back to a previous
track if the track has been playing for under 10 seconds. If the track has been playing for
more than 10 seconds, pressing the button will re-start the currently playing track. Using
these buttons during shuffle play may cause tracks to repeat. When listening to FM or AM,
press briefly to change the frequency up or down. Press, hold, and release to seek for the
next strongly received station. Press and hold to quickly advance through the frequencies.
7. STOP:
8. PLAY/PAUSE: With a CD loaded, briefly press to initiate disc playback. Press during playback
9. : Briefly press to fast forward or fast reverse in approximately 10 second intervals.
10. EJECT: Press to Eject a CD. The display will show “Ejecting”. This button is to eject only
and should NOT be used to load a CD. Always remove the disc in a straight position with out bending the disc. In the unlikely event you experience an error or a disc remains stuck
inside, disconnect the power cord for 60 seconds and reconnect firmly.
Figure 6 Figure 7
6
Press to stop CD playback and return to the first track.
to Pause playback and press again to resume playback. If the CD is paused for more than 5
consecutive minutes it will revert to Stop.
Press againto resume normal playback or press Play. These functions are not on the remote
control. Due to the nature of MP3 CDs, using the fast reverse will cause the CD to stop playback once it reaches the start of the track. Also note fast forward and fast reverse will not
operate during CD Intro mode. Pressing the fast scan buttons ( ) during shuffle play
may cause tracks to repeat.

English
Figure 8 Figure 9
Figure 10
11. CLOCK: Press and hold to set the hour first. A beep will confirm you are in the clock set
mode. Use the volume knob to select the hour (Figure 6) and then press the volume knob
in to set and cycle to the minutes (Figure 7). The hour determines AM or PM. Adjusting the
hour does not affect the minutes and vise-versa. Repeat this process to set the year, month
and the day (Figure 8, 9 and 10). Once set, press the Clock button briefly to recall the date
and time whenever RDS or CD text is displayed. When the date is shown, only the month
and day will show (not the year).
Note: The non-US model uses a 24-hour clock format.
12. VOLUME/TREBLE: Rotate clockwise to increase the volume or counter-clockwise to
decrease the volume. The volume level is represented in numbers from 0 (no output) to 30
(maximum output). If the volume ever sounds distorted, reduce the level immediately. Push
in and rotate counter-clockwise to reduce the treble or clockwise to increase the treble.
Press the volume knob in to set or the setting will store automatically and the display will
return to its previous state. This knob is also used to adjust and enter selections (by pushing
the knob in) when setting the Clock and Alarms. Adjusting the volume during Snooze will
cancel the Snooze mode.
13. AUDIO: Push briefly to cycle through Stereo, SpacePhase™ Wide mode, or Mono audio settings.
The SpacePhase™ Wide mode setting is designed to create a more expansive soundstage,
while the Mono setting reduces multiplex noise on weak FM stations, making otherwise unlistenable stations listenable. Regardless of the previous audio setting, the SpacePhase
™
Wide mode will automatically engage each time the Music System is turned on.
EQ: To temporarily turn the EQ off, press and hold the Audio button. The display will show
“EQ Off” and a confirmation beep will sound. The EQ will engage again automatically the next
time the Music System is turned on. To keep the EQ off, press and hold the Audio button and
the display will show “EQ Always Off” anda confirmation beep will sound. The EQ will remain
off until “EQ On” is selected. The EQ differs from Audio in that it enhances lower frequencies
primarily at lower volume levels. We suggest the rear Bass level be set to the center detent
position. Should the bass ever sound distorted, immediately lower the bass level and/or volume.
For more, see the section marked “Getting the most from your Music System.”
Figure 11 Figure 12
7

English
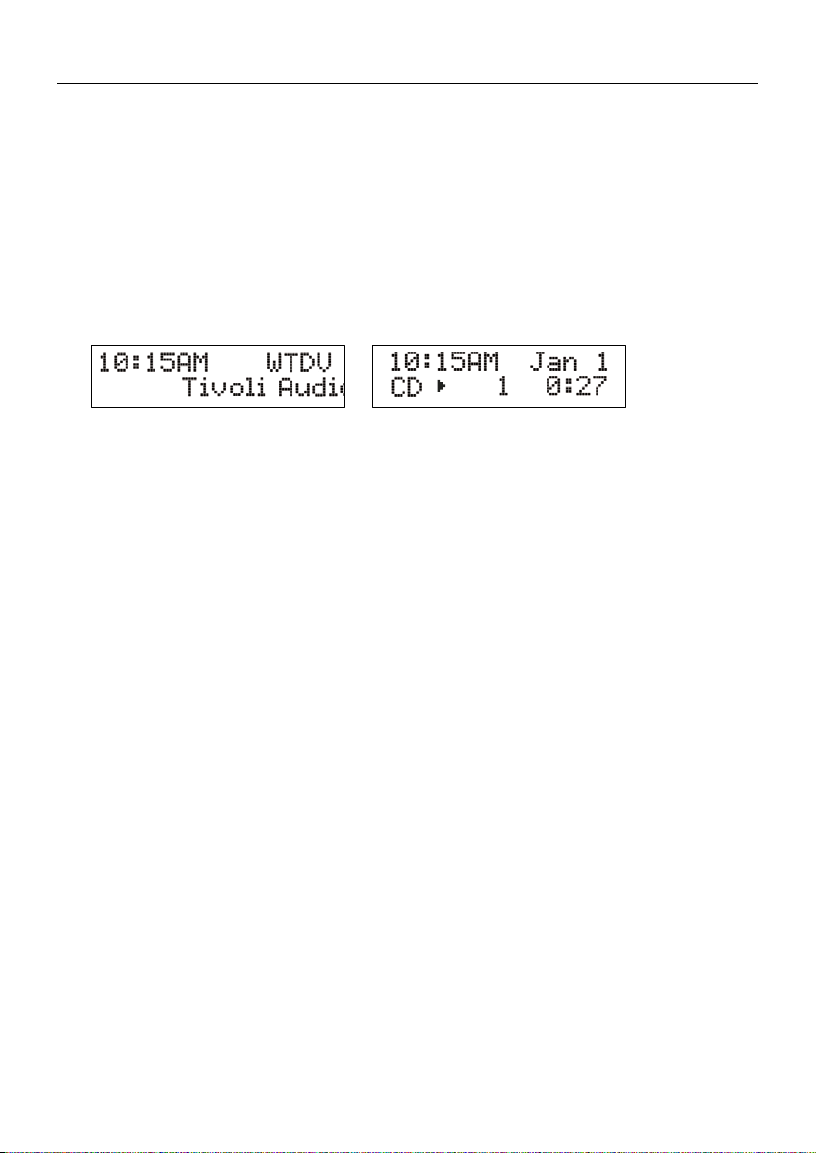
14. DISPLAY: When in FM mode, briefly press repeatedly to select between RDS Scrolling Text,
(Figure 11), Static Text, or RDS Off. If a station is not broadcasting in RDS or the RDS signal
is too weak, no RDS text will be shown. In cases where the signal is weakly received the text
may be scrambled. Note the AM band does not utilize RDS text. For more, see “Reception/
RDS”. RDS text will not be shown in Sleep mode. When playing a CD, press repeatedly to
select between CD Scrolling Text, Static Text, or CD Text Off. If the inserted CD does not
contain CD text (Figure 12), then this feature cannot be enabled. Not all commercial music
CDs contain CD Text. CD text will not be shown in Sleep mode.
15. SNOOZE/MUTE (Top of Cabinet): When the Alarm activates, press this button to silence
the alarm for 7 minutes. The display will count down the remaining Snooze time. Adjusting
the volume level will cancel the Snooze mode. During normal operation, press this button
to mute the audio. The display will show “Mute”. Press again to restore the audio output
or adjust the volume level.
16. HEADPHONE OUT: Connect a set of headphones (not included) to this variable stereo
output for private listening. Plugging in the headphones will mute the primary speakers.
The headphone’s volume is adjusted using the front panel volume knob. This stereo output
accepts a 1/8" stereo male mini connector. Avoid using headphones at high volume levels
to prevent possible hearing damage.
17. OPTICAL SENSOR: Automatically adjusts the display brightness based on ambient lighting
conditions. The display will dim in darker environments and brighten in brighter conditions.
Do not obstruct this sensor.
18. IR SENSOR: Receives signals from the included remote control. Do not obstruct this sensor.
19. SLOT-LOAD: Insert a disc (with printing side facing up) until it is drawn inside. The display
will say “Loading”. Disc functions will not work while the disc is loading. Playback will begin
automatically once the table of contents is read. The display will show “No Disc” when the
unit is set to CD mode and there is no CD inside. When ejecting a CD the display will show
“Ejecting”. For more, see “Important Notes About the CD Player.”
Getting the most from your Music System:
1. Treat the Music System as you would a home stereo system. Although the audio from a
computer or laptop can be connected to the Music System, it’s not intended for near-field
(close-up) listening like “computer speakers”. As with a home stereo system, listening at a
distance will yield the best results.
2. The SpacePhase™ Wide mode and EQ settings allow you to tailor the Music System’s
sound to your liking depending on the program material, room size and volume level. We’ve
spent countless hours of critical listening using a variety of material with different settings
and at different volume levels. In general we recommend the treble control be kept in
the “0” position. At high volume levels, for the most accurate reproduction, we recommend
keeping the EQ off and the Audio setting in Stereo or Mono (not SpacePhase™ Wide) mode.
3. Should you ever experience a problem, simply unplug the power cord for 60 seconds and
plug back in again firmly. This should restore normal operation.
8
English
1 2347 89 5 6
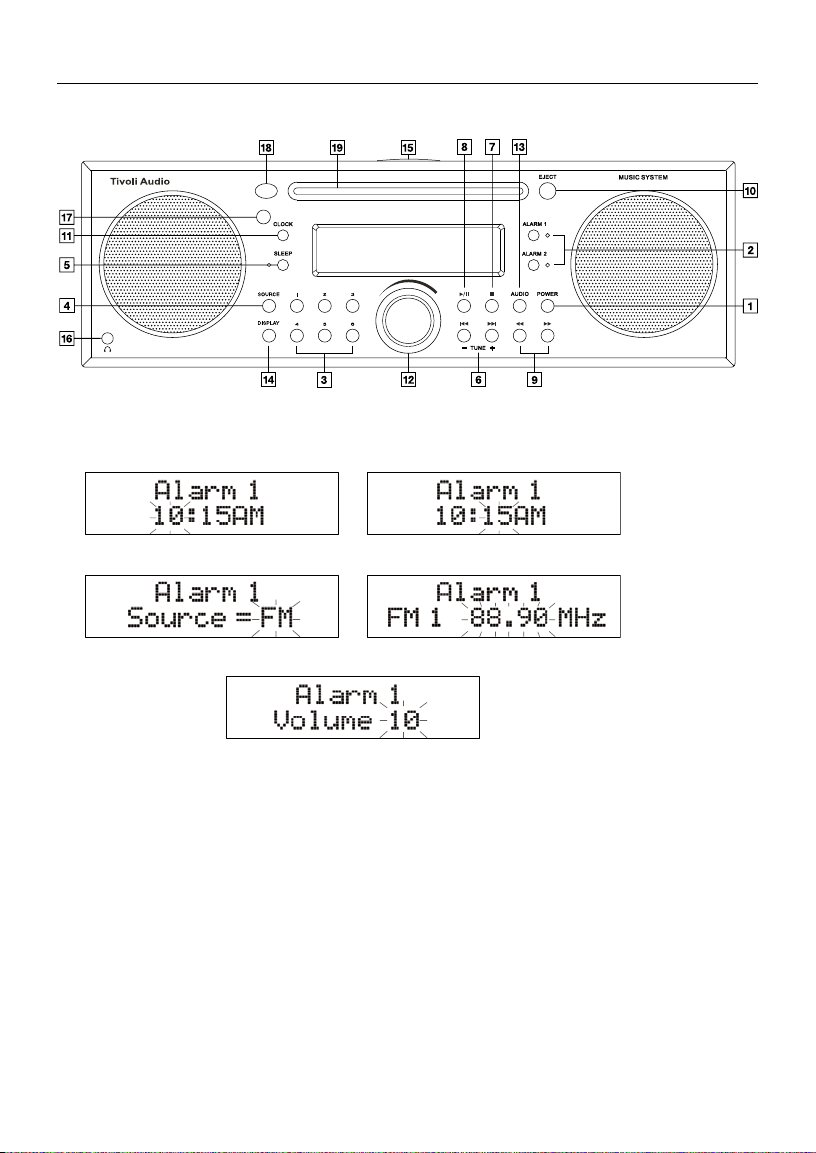
Guide To Features (Rear Panel):
1. FM ANTENNA SWITCH: Switch between internal and external FM antennas. If an external
antenna is used, the switch should be in the External position. This switch has no affect on
AM reception.
2. EXTERNAL FM ANTENNA INPUT: In most cases FM reception will be improved by sliding
the included external FM antenna over this “F” connector and setting the antenna switch to
External. To avoid damage, when removing the FM antenna, never pull it by the white cord.
Always grasp the antenna’s black connector firmly and pull it straight out. For more, see the
section marked “Reception”.
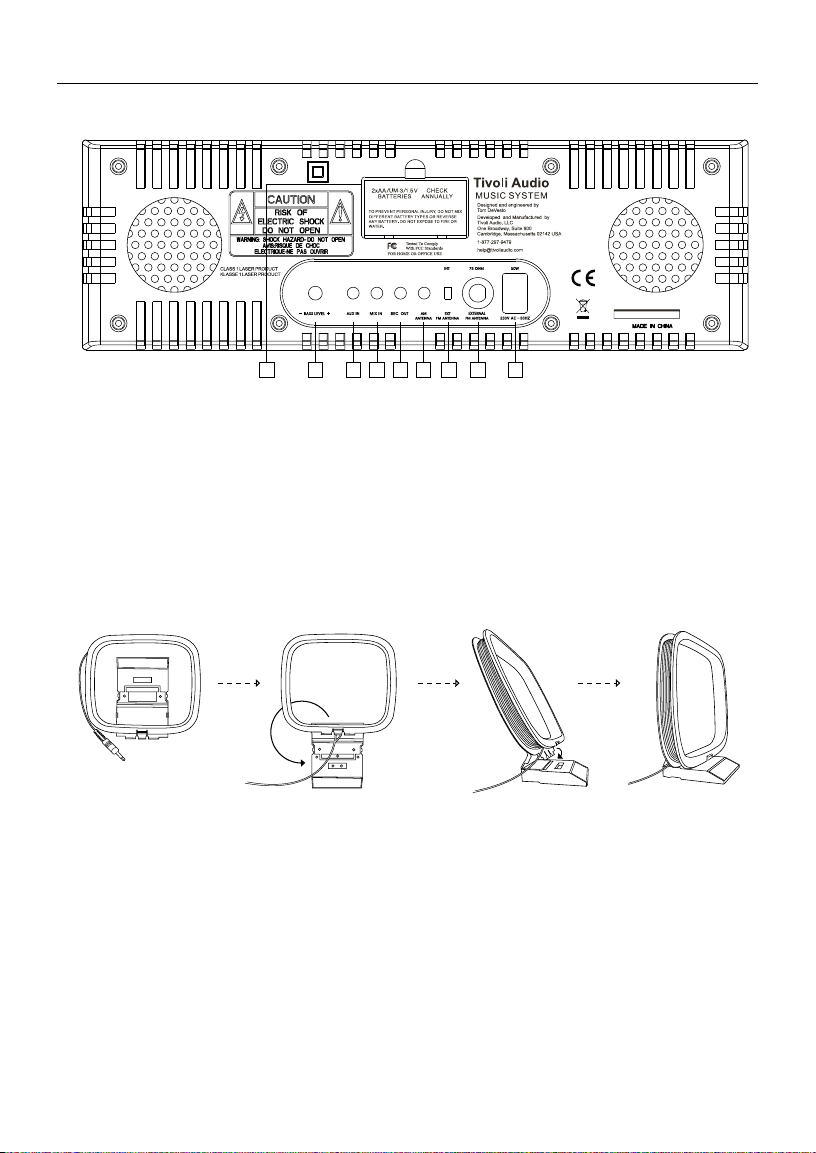
Figure 13
3. EXTERNAL AM ANTENNA INPUT: Connect the supplied external AM antenna’s 1/8" stereo
male mini connector. Assemble the integrated base, (Figure 13) and adjust for best reception
for each station. There will be no AM reception unless the AM antenna is connected.
For more, see the section marked “Reception”.
4. AUX IN: To hear audio from another device such as a TV or MP3 player, connect said device’s
audio output to this stereo input and set the Source button to AUX. Switching to the Auxiliary
position does not turn on the connected device. This stereo input accepts a 1/8" stereo male
mini connector. Note you may need to adjust the volume level differently for an auxiliary device
than the level used for radio or CD listening.
5. MIX IN: Connect your computer’s (or other device’s) audio output to this input to hear its audio
mixed in with the tuner, CD, or auxiliary device if one is connected. The volume level of this
input must be adjusted at the source. This input accepts a 1/8" male stereo mini connector.
9
English
1
5
6
2
3
4
6. REC OUT: You can record from the Music System by connecting a cassette deck’s audio
input (or other recording device) to this fixed level stereo output. The primary speakers will
not be muted when using this output. This jack accepts a 1/8" stereo male mini connector.
7. BASS LEVEL: Turn this control knob to the right to increase the bass volume level or to the
left to decrease the bass volume level. The subwoofer is designed to subtly augment the
lower bass frequencies, not overpower the sound. Tivoli Audio recommends setting this
knob to the center detent position. If the bass should ever sound distorted, immediately
lower the bass level control and/or the front volume control.
8. POWER INPUT: Connect the supplied power cord to this input and plug the cord into a wall
outlet not controlled by a switch. If the power cord is removed from the unit or unplugged
from the wall outlet, please wait 60 seconds before plugging the cord back into the Music
System. When power is restored the unit will auto eject a CD if one is inside.
9. BATTERY COMPARTMENT: Properly install the included “AA” batteries to maintain the clock
and alarm settings during a power outage. Check the batteries annually. The display will show
“No Batteries” if there are no batteries installed or the batteries have no or low power. Dispose
of spent batteries according to your state/country’s regulations. When operating on the battery
back-up power, the Music System’s display and LEDs will not illuminate in order to conserve
power, but if set, the alarm will still sound at the designated time. In such a case, the tone will
sound instead of the radio or CD to further conserve battery power.
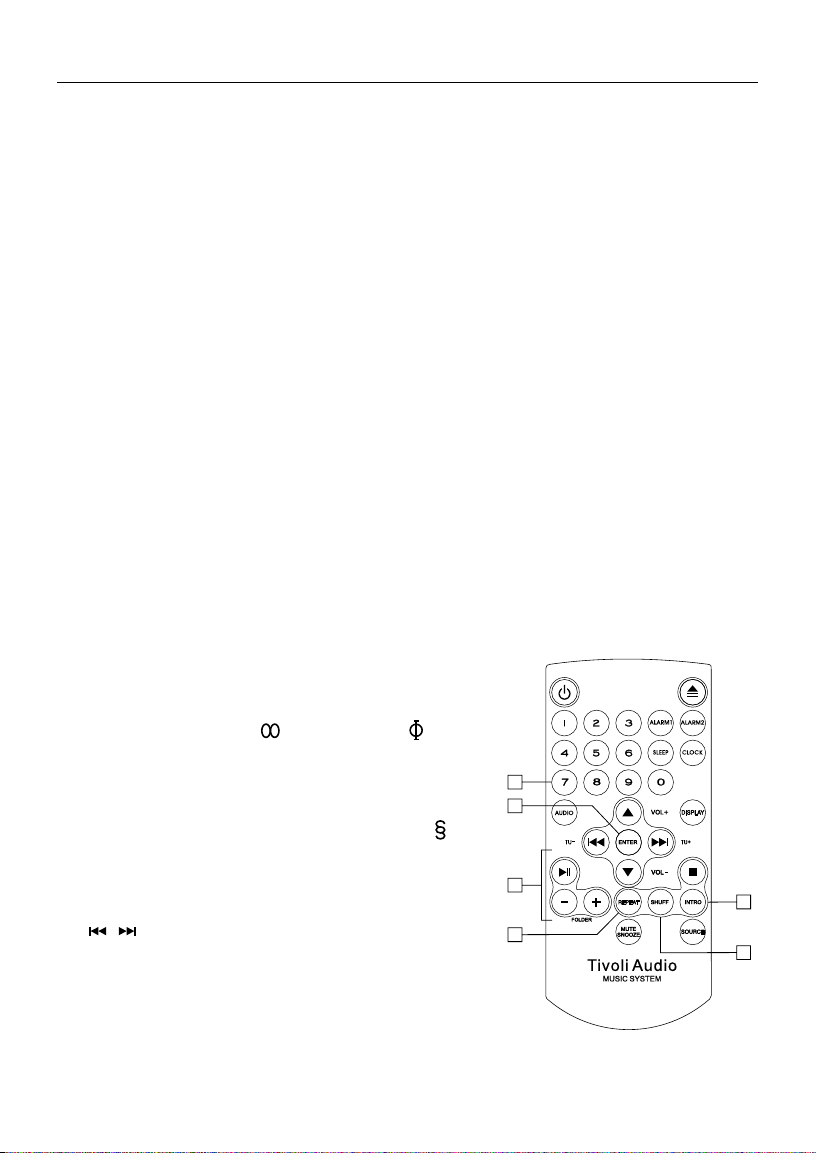
Remote Control (Remove clear tab over battery before use):
In addition to duplicating most of the front panel controls, the remote control adds the
following functions:
1. REP (REPEAT): With a CD playing, press once to repeat
the track being played; Press twice to repeat the entire
disc; Press again to cancel the Repeat mode or press
stop. The Repeat Once ( ) and Repeat All ( ) icons
will show on the Music System’s display when active.
Repeat 1 cannot be used in conjunction with Shuffle.
2. SHUFF (SHUFFLE): With a CD playing, briefly press to
play the tracks in random order. The Shuffle icon ( ) will
show on the Music System’s display when active. Press
the Shuffle button a second time to cancel shuffle play
or press Stop. Otherwise, CD playback will stop once all
tracks have been played. Pressing the track up or down
( ) on the remote and on the Music System during
shuffle play may cause tracks to repeat. Note that MP3
CDs with many tracks may repeat some songs in Shuffle
mode. Shuffle cannot be used in conjunction with Repeat
1, Repeat All or Intro.
10

English
3. INTRO: With a CD playing, briefly press to audition 10 seconds of each track. The Intro icon
( ) will show on the Music System’s display when active. Press a second time to cancel Intro
play or press Stop. Otherwise, CD playback will stop once all tracks have played.
Note: The above functions cannot be activated while the disc is loading. If two of the above
functions are used at the same time, both icons will alternate on the display until finished.
4. FOLDER +/–: Advance or go back to a previous MP3 folder.
5. ENTER: Same function as pressing the Volume Control in on the Music System to set
selections or adjust the treble.
6. 7,8,9,0: Use these buttons in addition to the 1-6 buttons to access a CD track directly. A
two second window is provided to enter another digit after the first digit is entered.
Saved favorite station presets can be recalled using the 1 through 6 buttons on the remote
control. However, favorite stations can only be saved using the 1 through 6 buttons on the
Music System’s front panel.
Controlling volume via the remote is performed using the up/down arrow buttons, while FM/AM
tuning is controlled using the Left and Right arrow (CD track) buttons.
When operating the remote control at close distances the display might pulse. This is normal
and is a direct result of the remote’s ability to operate at greater distances.
When it comes time to replace the remote control’s battery, use a 3V Lithium Cell #CR2025,
installed with the positive side facing the bottom side of the remote.
Important Notes About the CD Player:
• The display does not show the total disc time for MP3/WMA CDs due to their often very
lengthy table of contents. Total time will be shown for commercial music CDs but if either
track +/- buttons are pressed, the total time will disappear since the initial mode was changed.
• Playback will be delayed slightly while the table of contents is read.
• Disc functions will not work while the disc is loading.
• Do not use the Eject button to load a CD.
• Changing sources while a CD is playing causes the CD to stop playback. Playback will
resume when the source is set to CD again.
• The sound quality of MP3, CD-R/CD-RW, and even commercially recorded discs can vary
greatly. The same holds true for the sound quality of portable MP3 players.
• Do NOT use any CD lens cleaning discs since these are not designed for slot-load machines.
• Avoid bending the disc when loading or ejecting.
• Do not move the unit while a disc is playing and do not ship the unit with a CD inside.
• Do not try to insert a disc in the slot if one is already inside the unit.
• Do not insert specially shaped discs or 3" CD “single” discs.
• You may experience a delay in playback when inserting MP3 or WMA discs while the player
reads the directory.
11

English
• Paper labels stuck to CDR/CDRWs may become loose and possibly damage the player.
• CDs with severe scratches may not play properly.
• Do not insert anything except a CD inside the loading slot.
• In the rare event you experience an error, unplug the power cord for 60 seconds and then
plug it back in firmly.
Reception/RDS:
The internal FM antenna (built into the power cord) will provide good FM reception. The supplied
external FM antenna will usually provide improved reception. Fully extend the antenna and do
not bundle it with the power cord or other cords. Locating the antenna near a window or outside
wall will provide better reception than more interior locations. An outdoor antenna will provide the
best possible reception. Another alternative is to use an optional FM dipole antenna (adapter
required). Connecting your cable television 75ohm coaxial cable to the external FM connection
may also provide clear local reception, although you must usually request activation of this service
through your cable company. Be sure to set the rear panel switch to “External” when using an
external FM antenna. Otherwise, it should remain in the “Internal” position. This switch has no
affect on AM reception. If a noisy FM station is received, setting the Audio button to “Mono” may
help to clear up some of the multiplex noise. Route the power cord away from the antennas for
best reception.
The Radio Data System (RDS) in the USA and Europe transmits text information along with audio
broadcasts. Program Service data will be shown in the upper right corner when available. Not all
FM stations utilize RDS, thus text data may not be present with some stations. For stations using
RDS, text may not appear or may appear scrambled if the signal is too weak. Experimenting
with the FM antenna location may improve RDS reception. RDS content is determined by each
individual FM station, therefore if any data is shown incorrectly, this is not a fault of the unit. There
are also limitations in terms of the kinds of characters that can be displayed. Therefore it is not
unusual to see a different character or blank space in cases where the precise character can’t be
reproduced. Note RDS text will not be displayed in Sleep mode. RDS is not used on the AM band.
For AM, fold the included AM antenna’s integrated stand under the loop, (See Figure 13, page 9)
snap it in position, and connect the male stereo mini jack to the female mini connector on the
rear panel marked “AM Antenna”. Adjust for best reception for each AM station.
Buildings made with concrete, steel, or aluminum siding will hinder reception. Household
appliances, electric blankets, computers, and other electronic devices can also adversely affect
reception or inject noise. If you experience this, move the Music System further from the offending
device or plug it into an electrical outlet not shared by another device. Metal surfaces may hinder
AM reception.
Placement:
Place the Music System on a solid, flat, stable surface strong enough to support its weight.
Placement in a bookcase, cabinet, or close to walls or corners may inflate the bass, creating an
unnatural sound. Do not obstruct the vents on the rear panel, as these are for sound as well as
internal heat ventilation.
The CD player built-into the Music System has excellent shock protection, but it is not shock
12

English
proof. We therefore recommend the Music System be placed on a flat, level surface that is not
subject to vibration.
The Music System is shielded and may be placed near or below a TV or computer monitor.
Cleaning:
For your own safety, be sure the Music System is disconnected from the power outlet during
cleaning. Never use any harsh cleansers or solvents on your radio. Fingerprints may be removed
from the cabinet using the included cloth. The face may be cleaned with a slightly damp cloth
only if necessary.
Since the wood cabinet is natural wood, the color/grain pattern may not match your other
Tivoli Audio products.
Also note some finishes particularly walnut may darken over time to light exposure. This is
normal for a natural wood product.
Limited Warranty:
Tivoli Audio manufactures its products to very high standards and we are confident our products
will perform well. Accordingly, we provide a limited warranty on this product against manufacturing
defects in material and workmanship to the original owner. This warranty is non-transferable.
Products purchased in the European Union, Switzerland, and Norway have a minimum warranty
term of two years. For countries where minimum warranty terms are determined by statute, the
warranty term is the statutory period required. In all other locations, the warranty term is one year.
This Limited Warranty covers the functionality of the product for its normal, intended use as
specified in this Owner’s Manual. It does not cover a malfunction or damage that has resulted
from improper or unreasonable use or installation, using the charger to charge alkaline batteries,
faulty ancillary equipment, modifications, unauthorized repair, shipping damage or loss, abuse,
accidents, use on improper voltage/current, power surges, lightning or other acts of God, excess
moisture, normal wear and tear, commercial use, or purchase from unauthorized dealers. Proof
of purchase as evidence the unit was purchased from an authorized dealer may be required for
warranty service. Please contact the dealer of purchase or local distributor for warranty
service or repair.
Please refrain from opening this product or taking it apart as doing so will void this Limited
Warranty. There are no user serviceable parts inside. Tivoli Audio will not pay for costs incurred
due to correction of reception problems, elimination of externally generated static/noise, loss of
time, inconvenience, loss of use of product, or damage caused by improper use of this product.
In the event the product is returned during the warranty term and is eligible for service under this
Limited Warranty, we will repair or replace any defective parts within a reasonable period of time
and free of charge.
THIS LIMITED WARRANTY GIVES YOU SPECIFIC LEGAL RIGHTS SUBJECT TO SPECIFIED
CONDITIONS. YOU MAY ALSO HAVE OTHER LEGAL RIGHTS WHICH APPLY TO THE PRODUCT
13

English
YOU HAVE ACQUIRED. THESE LEGAL RIGHTS VARY FROM COUNTRY TO COUNTRY. SOME
PLACES DO NOT ALLOW THE EXCLUSION, RESTRICTION, OR MODIFICATION OF CERTAIN
IMPLIED RIGHTS OR THEIR EFFECT. IN THOSE SITUATIONS THIS LIMITED WARRANTY WILL
ONLY APPLY TO THE EXTENT THAT THE APPLICABLE LAW ALLOWS.
The laws of your country may provide you with legal claims against the seller or manufacturer of
this product. This Limited Warranty does not affect those rights.
The provisions of the Limited Warranty are in lieu of any other warranties or conditions, except
those provided by law. This Limited Warranty does not affect any legal rights provided to you by
law and does not preclude any remedy you may have under law.
In countries where liability limits are not precluded by statute, the maximum liability of Tivoli Audio
shall not exceed the purchase price paid by you for the product. In countries where limitations of
liability are precluded by law, Tivoli Audio shall be liable for no more than the direct damages for
bodily injury, and/or real or personal property arising from the negligence of Tivoli Audio.
Where not prohibited by law, Tivoli Audio shall not be liable for special, incidental, consequential,
or indirect damages. Some places do not allow limitations on the exclusion or limitation of relief,
special, incidental, consequential or indirect damages, or the limitation of liability to specified
amounts, so the above limitations or exclusions may not apply to you.
This Limited Warranty is void if the label bearing the serial number has been removed or defaced.
If you purchased an extended service contract from your dealer and service is required after the
term of this Limited Warranty has expired, please contact your extended service contract provider
to obtain service.
For your convenience, you may register your product for warranty service online at our website,
www.tivoliaudio.com. There is no legal obligation for you to provide personal information. However,
such information allows us to maintain a record of the Tivoli Audio products acquired by you and
better understand the purchasers of our products. The information collected will be used for
marketing purposes by Tivoli Audio and, where permitted, to contact you in relation to the products
you have acquired or other products which might be of interest to you from Tivoli Audio or other
companies. The information that you provide may be processed in another country.
Please visit the Tivoli Audio FAQ section at www.tivoliaudio.com prior to any request for
warranty service as information available there may answer your questions or concerns.
You may email questions to us at mail@tivoliaudio.com
14

English
Specifications:
Model: Tivoli Audio® Music System
Type: Digital FM/AM/CD HiFi System
Drivers: 2 x 3" (2 x 7.62 cm) full-range, video shielded
1 x 5.25" (1 x 13.34 cm) cm) down-firing woofer, video shielded
Dimensions: 14.125" W x 5.25" H x 9.5" D
35.88 cm W x 13.34 cm H x 24.13 cm D
Weight: 13.0 lbs. (5.90 kg)
Specifications subject to change without notice.
Tivoli Audio reserves the right to make product changes without notice.
Tivoli Audio, the Tivoli Audio logo, Tivoli Audio Music System and SpacePhase are trademarks of Tivoli Audio, LLC.
Other product and company names mentioned herein may be trademarks of their respective companies.
15

Dutch
Over Tivoli Audio
Tivoli Audio werd door Tom DeVesto opgericht met als doel om u uiterst gebruikersvriendelijke,
hoogwaardige en betaalbare audioproducten te kunnen bieden. Tijdens zijn langdurige
samenwerking met Henry Kloss, ontwerper van de legendarische Model One Table Radio, was
hij onder meer medeoprichter van Cambridge SoundWorks*. Als CEO en hoofd van de
ontwerpafdeling van zijn vorige bedrijf was Tom verantwoordelijk voor de ontwikkeling van een
groot aantal succesvolle audio- en multimediaproducten. Tom werkte ook als seniormanager
op de ontwerpafdelingen van Advent en Kloss Video.
*Cambridge SoundWorks is een geregistreerde handelsnaam van Creative Labs, Singapore.
Music System – Instructies
Hartelijk gefeliciteerd met de aanschaf van Tivoli Audio’s Music System. Wij zijn ervan overtuigd
dat u hiermee een van de best klinkende tafelradio’s/cd-spelers in huis gehaald heeft.
Om optimaal gebruik te maken van uw aanschaf raden we u aan om deze handleiding in z’n
geheel door te lezen. Heeft u daarna nog vragen, neemt u dan beslist even contact op met
uw dealer.
Wij adviseren u om de originele verpakking te bewaren voor het geval u het apparaat ooit
zou moeten versturen; transportschade valt niet onder de garantie.
Namens alle medewerkers van Tivoli Audio bedanken we u voor uw keuze voor dit product, en
we wensen u er bijzonder veel plezier mee!
Uw Music System wordt geleverd met:
• 1 netsnoer
• 1 afstandsbediening (met geïnstalleerde batterij)
• 1 FM-antenne
• AM-antenne
• 1 reinigingsdoek
• 2 AA-batterijen
We verzoeken u vriendelijk contact op te nemen met uw leverancier als een of meer van
bovengenoemde zaken zou ontbreken.
Om te beginnen
Voor u uw Music System voor het eerst activeert, is het goed om even te wachten tot het systeem
op kamertemperatuur is. Dat voorkomt condensvorming in de cd-speler, die daardoor niet goed
zou werken. Ook het display kan door extreem hoge of lagere temperaturen minder goed
functioneren.
1. Plaats de beide AA-batterijen alvorens de stekker in het stopcontact te steken.
2. Sluit het netsnoer eerst op het toestel aan en steek daarna de stekker in het stopcontact.
3. Zet het Music System aan met de rode Power-knop op het voorpaneel.
4. Kies de gewenste klankbron met de knop SOURCE op het voorpaneel, of plaats een CD in
de cd-opening. Deze cd wordt dan automatisch afgespeeld. Kiest u voor AM (middengolf),
sluit dan eerst de meegeleverde externe AM-antenne aan en plaats deze zo dat u een goede
ontvangst heeft.
5. Stel het gewenste volume af met de draaiknop op het voorpaneel.
16

Voorzijde:
1. POWER: Druk deze knop in om het Music System aan of uit (standby) te zetten.
Afbeelding 1 Afbeelding 2
Afbeelding 3 Afbeelding 4
Dutch
Afbeelding 5
2. ALARM 1/ALARM 2: (NB: Zet de klok van uw Music System alvorens de wektijd in te stellen.
Zie punt 11. voor het zetten van de klok). Om de wektijd in te stellen. Hou ALARM 1 of
ALARM 2 kort ingedrukt. Een piepje laat u horen dat u de gekozen wekker nu kunt instellen.
De corresponderende groene LED licht hierbij op. Druk de volumeknop even in en verdraai
hem om het correcte uur in te stellen. Leg deze instelling vast door de volumeknop in te
drukken (zie afbeelding 1). Draai de knop nu om de minuten in te stellen (zie afbeelding 2);
leg deze instelling vast door nogmaals de volumeknop in te drukken. Het instellen van de
minuten staat geheel los van het instellen van de uren en vice versa. Op dezelfde manier
kiest u de klankbron waarbij u wakker wilt worden (zie afbeeldingen 3 en 4) en stelt u het
wekvolume in (afbeelding 5). Als u voor AUX kiest, wordt u met een wektoon gewekt. U kunt
alleen voor de klankbron CD kiezen als er een cd in het toestel aanwezig is. Als de Alarm-LED
uit is, activeert u de wekker door op de knop ALARM te drukken. Het display toont dan de
ingestelde wektijd. Brandt de Alarm-LED, druk dan kort op de knop ALARM om de wekker
af te zetten. Als u de wekker gezet heeft en er doet zich een stroomstoring voor, dan wordt
u gewekt met de wektoon van het toestel, en niet met een eventueel gekozen cd of
radiostation. Voorwaarde is wel dat er twee AA-batterijen in het toestel geplaatst zijn, en dat
17

Dutch
deze batterijen voldoende (rest)capaciteit hebben. Als de wekker afgaat (de Alarm-LED
knippert hierbij), drukt u op de knop Alarm. De volgende dag wordt u dan opnieuw op
dezelfde tijd gewekt. Als u op SNOOZE drukt, gaat de wekker zeven minuten later opnieuw
af.
3. PRESETS 1–6: Hou een van deze voorkeuzetoetsen even ingedrukt om het actieve station
onder de betreffende toets vast te leggen. U hoort een piepje als het station daadwerkelijk
vastgelegd is. Om één van de zo vastgelegde voorkeuzestations op te roepen, volstaat een
korte druk op de betreffende toets. U kunt 6 FM- en 6 AM-voorkeuzestations vastleggen.
Is er geen station onder een bepaalde toets vastgelegd, dan toont het display bij een druk
op deze toets gedurende twee seconden de tekst ‘Preset empty’ (Lege preset). U kunt de
voorkeuzetoetsen ook gebruiken om direct naar één van de eerste zes tracks van een
spelende cd te gaan. Eenzelfde radiostation kan nooit onder twee of meer voorkeuzetoetsen
vastgelegd worden. De toetsen 1 tot en met 6 op de afstandsbediening kunnen uitsluitend
gebruikt worden om de met de toetsen op het Music System vastgelegde voorkeuzestations
op te roepen. U kunt met de afstandsbediening dus geen stations vastleggen.
4. SOURCE: Door deze knop in te drukken wisselt u van klankbron: FM, AM (middengolf), CD
of AUX (Auxiliary). De klankbron kan niet gewijzigd worden als de wekker afgaat. Als een
andere klankbron gekozen wordt tijdens het draaien van een cd, zal de betreffende cd weer
bij het eerste nummer starten als opnieuw voor CD gekozen wordt.
5. SLEEP: Om de slaaptimer te activeren, drukt u tijdens het beluisteren van een FM- of AM-
uitzending, een cd of een Auxiliary-klankbron kort op de knop SLEEP. De groene LED van
de slaaptimer zal oplichten en het display geeft weer hoeveel minuten het Music System
nog zal spelen. Aan het eind van deze cyclus gaat het Music System automatisch uit. Om de
slaaptimer met een cd te gebruiken, moet er vanzelfsprekend een cd in het toestel aanwezig
zijn. Als de slaaptimer geactiveerd is, kunnen RDS (zie ‘Ontvangst/RDS’, verderop in deze
handleiding) en CD Text niet weergegeven worden.
6. / TUNE +/–: Gebruik deze knoppen tijdens cd-weergave om naar het volgende
nummer te gaan, of naar het vorige nummer indien het huidige nummer korter dan 10
seconden bezig is. Indien het huidige nummer korter dan 10 seconden speelt, gaat u met
de knop terug naar het begin van dat nummer. In shuffle-weergave kan het gebruik van
deze knoppen ertoe leiden dat sommige nummers herhaald worden. Bij FM- of AM-weergave gebruikt u deze knoppen om een hogere of lagere frequentie in te stellen. Houdt u een
van deze knoppen heel even ingedrukt, dan zal het Music System automatisch het volgende
goed te ontvangen radiostation weergeven.
7. STOP: Met deze knop stopt u de cd-weergave. De cd gaat terug naar het begin van het
eerste nummer.
8. PLAY/PAUSE: Met deze toets start u de cd-weergave, indien zich een cd in het toestel bevindt.
Bij nogmaals drukken wordt de weergave tijdelijk stopgezet (pauze) of weer geactiveerd. Als
de cd-weergave langer dan 5 minuten gepauzeerd wordt, slaat de cd-speler af.
9. : Door een van deze knoppen kort in te drukken kunt u in stapjes van ongeveer 10
seconden achter- of vooruit spoelen. Bij nogmaals indrukken wordt de normale weergave
hervat. Deze knoppen bevinden zich alleen op het toestel zelf en niet op de afstandsbediening.
18
Dutch
Bij mp3-cd’s zal de weergave bij terugspoelen stopgezet worden zodra het begin van het
huidige nummer bereikt wordt. Vooruit- en achteruitspoelen is niet mogelijk als de cd in de
CD Intro-modus wordt afgespeeld. In shuffle-weergave kan het gebruik van deze knoppen
ertoe leiden dat sommige nummers herhaald worden.
10. EJECT: Gebruik deze knop op een geplaatste cd uit te werpen. Het display toont de tekst
‘Ejecting’. Deze knop mag NIET gebruikt worden om een cd te plaatsen. Neem de cd uit
het toestel zonder er kracht op uit te oefenen of de cd te buigen. In het onwaarschijnlijke
geval dat er een leesfout optreedt en/of de cd niet uitgeworpen wordt, neemt u het netsnoer
los en sluit u dit na een minuut weer aan.
Afbeelding 6 Afbeelding 7
Afbeelding 8 Afbeelding 9
Afbeelding 10
11. CLOCK: Om de juiste tijd in te stellen, houdt u deze knop ingedrukt tot u een piepje hoort.
Draai nu de volumeknop om het correcte uur in te stellen en leg deze instelling vast door
de volumeknop in te drukken (zie afbeelding 6). Nu kunt u de minuten instellen (zie afbeelding 7);
leg deze instelling vast door nogmaals de volumeknop in te drukken. Het instellen van de
minuten staat geheel los van het instellen van de uren en vice versa. Na het instellen van de
minuten kunt u op dezelfde wijze jaar, maand en datum invoeren. Zijn deze gegevens eenmaal
ingevoerd, dan kunt u ze tijdens RDS of CD Text-weergave altijd oproepen door de CLOCK knop kort in te drukken. De datumweergave toont alleen de maand en de dag; niet het jaartal.
NB: Amerikaanse modellen hebben een 12-uurs aanduiding met AM/PM-weergave.
12. VOLUME/TREBLE: Met deze knop verhoogt (met de klok mee) of verlaagt (tegen de klok
in) u het volume van de weergave. Het ingestelde volumeniveau wordt in het display
weergegeven met cijfers 0 (geen weergave) tot en met 30 (maximaal volumeniveau). Is de
weergave vervormd, verlaag het volumeniveau dan onmiddellijk. Door de volumeknop in
te drukken en te verdraaien kunt u het Music System helderder (met de klok mee) of juist wat
warmer (tegen de klok in) laten klinken. Ook dit wordt op het display weergegeven. Deze
instelling wordt automatisch bewaard tot u hem opnieuw wijzigt. De volumeknop wordt ook
gebruikt om de (wek)tijd in te stellen: zie aldaar. Door het wijzigen van het volume in de
sluimermodus (Snooze) wordt deze modus uitgeschakeld
13. AUDIO: Met deze knop maakt u een keuze uit de instellingen Stereo, SpacePhase™ Wide en
Mono. SpacePhase™ Wide zorgt voor een extra brede stereoweergave. Kies voor Mono als u
de weergave van een FM-radiostation met zwakke ontvangst wilt verbeteren. Elke keer dat u
het Music System aanzet, wordt automatisch voor SpacePhase™ Wide gekozen.
19
Dutch
EQ: Om de ingebouwde equalizer (toonregeling; EQ) tijdelijk uit te schakelen, houdt u de-
AUDIO-knop korte tijd ingedrukt. Het display toont dan de tekst ‘EQ Off’ en u hoort een
piepje ter bevestiging. De equalizer wordt automatisch weer geactiveerd als u het Music
System opnieuw aanzet. Om dat te voorkomen, houdt u de AUDIO-knop ingedrukt tot
de tekst ‘EQ Always Off’ verschijnt en u een piepje hoort. De equalizer is dan alleen te
activeren door voor ‘EQ On’ te kiezen. De equalizer versterkt de lagere frequenties (bass)
vooral bij lagere volumeniveaus. Wij adviseren u om de laagweergave (bass) altijd op de
middenpositie in te stellen. Als er in de lage frequenties vervorming optreedt, dient u deze
instelling of het volumeniveau direct te verlagen. Voor meer informatie verwijzen we u naar
de tekst onder ‘Maak optimaal gebruik van uw Music System’.
Afbeelding 11 Afbeelding 12
14. DISPLAY: Bij FM-weergave drukt u steeds kort op deze knop om te kiezen tussen RDS
Scrolling Text (afbeelding 11), Static Text of RDS Off. RDS-weergave ontbreekt indien het
gekozen radiostation geen RDS uitzendt of als het RDS-signaal te zwak is. Bij een zwak
signaal kan de tekstweergave niet optimaal zijn. Op de middengolf (AM) wordt geen gebruik
gemaakt van RDS. Zie ‘Ontvangst/RDS’ voor meer informatie. RDS Text wordt niet weegeven
als de slaaptimer geactiveerd is. Bij cd-weergave kunt u met de DISPLAY-knop kiezen uit
CD Scrolling Text, CD Static Text of CD Text Off. Als de geplaatste cd geen CD Text bevat,
is deze functie vanzelfsprekend niet actief. CD Text wordt niet weergeven als de slaaptimer
geactiveerd is.
15. SNOOZE/MUTE (bovenzijde): Als de wekker afgaat, drukt u deze knop in voor zeven
minuten extra rust. Het display geeft weer na hoeveel minuten de wekker opnieuw zal
klinken. Deze sluimermodus wordt afgebroken zodra u het volumeniveau wijzigt! Bij normale
weergave gebruik u de SNOOZE/MUTE-knop om het volume tijdelijk te dempen, bijvoorbeeld
als de telefoon gaat. Het display toont de tekst ‘Mute’. De weergave wordt hervat zodra u
de knop nogmaals indrukt of het volumeniveau aanpast.
16. HEADPHONE OUT: Om naar muziek of de radio zonder anderen daarmee lastig te vallen,
sluit u een hoofdtelefoon met een standaard stereomini-jackplug (1/8") op deze uitgang aan.
De ingebouwde luidsprekers worden automatisch uitgeschakeld. Het volumeniveau kan
met de volumeknop van uw Music System ingesteld worden. Voorkom gehoorbeschadiging
door uw hoofdtelefoon nooit op hoge volumeniveaus te gebruiken.
17. OPTICAL SENSOR: Deze optische sensor zorgt ervoor dat het display helderder oplicht
naarmate het donkerdere wordt, en omgekeerd. Zorg ervoor dat deze sensor niet afgedekt
wordt.
18. IR SENSOR: Deze infraroodsensor ontvangt de signalen van de meegeleverde
afstandsbediening. Ook deze sensor kan alleen goed functioneren als hij niet afgedekt wordt.
19. SLOT-LOAD: Als u een cd (met de bedrukte zijde boven) in deze sleuf steekt, wordt hij
vanzelf naarbinnen getrokken. Het display toont de tekst ‘Loading’. De knoppen waarmee de
cd-weergave gestuurd wordt (volgende nummer, vooruit- of terugspoelen, etc.) functioneren
20

Dutch
1 2347 89 5 6
tijdens dit proces niet. De weergave van de cd start automatisch zodra de inhoudsopgave van de
cd is gelezen. Als er voor cd-weergave gekozen wordt terwijl er geen cd in het toestel aanwezig
is, toont het display de tekst ‘No Disc’. Bij het uitwerpen van een cd toont het display de tekst
‘Ejecting’. Voor meer informatie verwijzen u naar de tekst onder ‘Belangrijke opmerkingen over de
cd-speler’.
Maak optimaal gebruik van uw Music System:
1. Gebruik uw Music System op dezelfde manier als een gewone stereoinstallatie. Het is mogelijk
om uw (laptop) computer op het Music System aan te sluiten, maar het systeem is – in
tegenstelling tot computerluidsprekers – niet ontworpen om op korte afstand beluisterd
te worden. Net als bij een gewone stereoinstallatie is enige afstand tussen luidsprekers en
luisteraar vereist om optimaal van de kwaliteiten van uw systeem te kunnen genieten.
2. Met de SpacePhase™ Wide-modus en de ingebouwde equalizer kunt u uw Music System
precies afstellen op het radiostation of de cd die u weergeeft, de akoestiek van de luisterruimte
of het ingestelde volumeniveau. We hebben eindeloos naar allerlei radiostations en cd’s
geluisterd om het Music System optimaal te configureren. We adviseren u daarom om in
principe de treble-instelling op ‘0’ te houden (standaardinstelling). Bij hogere volumeniveaus
krijgt u de meest natuurgetrouwe weergave als u de equalizer uitschakelt en bij audio-instelling
voor Stereo of Mono kiest (en dus niet voor SpacePhase™ Wide).
3. Mocht zich een probleem voordoen, dan is dit meestal te verhelpen door het netsnoer lost e
nemen en het na een minuut weer aan te sluiten.
Achterzijde:
1. FM-ANTENNESCHAKELAAR: Met deze knop kiest u voor de ingebouwde (INT) of externe
(EXT) FM-antenne. Bij gebruik van de externe antenne moet deze schakelaar naar beneden
staan. Deze schakelaar heeft geen invloed op de AM-ontvangst.
2. EXTERNAL FM ANTENNA INPUT: De FM-ontvangst zal in het algemeen beter zijn als u de
meegeleverde FM-antenne op deze ingang aansluit en de FM-antenneschakelaar (1) op EXT
zet. Trek nooit aan het snoer om de antenne te ontkoppelen, maar pak de plug van het snoer
vast. Zie ‘Ontvangst/RDS’ voor meer informatie.
21

Dutch
Afbeelding 13
3. INGANG EXTERNE AM-ANTENNE: Sluit hier de meegeleverde AM-antenne op aan. Vouw de
antenne uit (zie afbeelding 13) en experimenteer met de plaatsing tot de ontvangst optimaal is.
Zonder deze antenne is AM-ontvangst niet mogelijk. Zie ‘Ontvangst/RDS’ voor meer informatie.
4. AUX IN: Gebruik deze stereoingang (1/8" mini-jack) om externe klankbronnen zoals een
televisie of een mp3-speler aan te sluiten. Zet de SOURCE-schakelaar op AUX. Hiermee wordt
het aangesloten apparaat niet automatisch ingeschakeld. Mogelijk moet het volumeniveau
anders ingesteld worden dan bij weergave van een cd of een radiostation.
5. MIX IN: Audiosignalen van een apparaat dat op deze stereoingang (1/8" mini-jack) wordt
aangesloten, worden weergegeven terwijl u naar een radiostation, een cd of een op de AUX ingang aangesloten toestel luistert. Het volumeniveau van een op de MIX-ingang aangesloten
toestel moet op dat toestel worden ingesteld.
6. REC OUT: Via deze stereouitgang (1/8" mini-jack) kunnen radiouitzendingen, cd’s of andere op
het Music System aangesloten klankbronnen worden opgenomen. De ingebouwde luidsprekers
worden daarbij niet uitgeschakeld.
7. BASS LEVEL: Met deze knop is de laagweergave te versterken (met de klok mee) of te
verzwakken (tegen de klok in). De ingebouwde subwoofer is bedoeld om deze lage frequenties
subtiel te versterken, en niet om de overige frequenties te overheersen. Wij adviseren u om
deze knop in de met een klikje aangegeven neutrale middenstand te laten staan. Zodra de
basweergave lijkt te vervormen, dient u het BASS LEVEL of het ingestelde volumeniveau te
verlagen.
8. POWER INPUT: Sluit het het meegeleverde netsnoer aan, en steek de stekker in een
wandcontactdoos. Als het netsnoer aan een van beide zijden wordt losgehaald, sluit het dan
pas na een minuut weer aan. Dit geldt ook als de netvoeding op een andere manier tijdelijk
onderbroken wordt. Een in het toestel geplaatste cd zal uitgeworpen worden zodra het
netsnoer weer aangesloten is.
9. BATTERIJVAK: Zorg dat de meegeleverde AA-batterijen correct geplaatst worden om klok- en
wekkerinstellingen ook bij stroomstoring te bewaren. Controleer de batterijen eens per jaar.
Het display toont de tekst ‘No Batteries’ als er geen batterijen geplaatst zijn of als de geplaatste
batterijen leegraken. Lever lege batterijen in bij een inzamelpunt. Als het Music System van
deze batterijback-up gebruik maakt, wordt het stroomverbruik tot een miminum gereduceerd
door het display uit te schakelen en LEDs niet op te laten lichten. Om diezelfde reden zal de
wekker een wektoon geven en niet het eventueel ingestelde radiostation of een cd weergeven.
22

1
5
6
2
3
4
Dutch
Afstandsbediening: NB: Verwijder voor gebruikt de kunststof folie waarmee de
batterijcontacten afgedekt zijn. De meeste functies van het Music System zijn ook op de
afstandsbediening te vinden. Daarnaast biedt de afstandsbediening de volgende extra functies:
1. REP (REPEAT): Deze knop werkt alleen bij weergave van
een cd. Druk eenmaal om het huidige nummer te herhalen.
Druk tweemaal op de hele cd te herhalen. Bij driemaal
drukken (of door op Stop te drukken) wordt de herhaal
functie afgebroken. Het display van uw Music System
toont icoontjes voor Repeat Once ( ) of Repeat All ( )
bij het activeren van de herhaalfunctie. Repeat is niet te
combineren met de Shuffle-functie (zie punt 2).
2. SHUFF (SHUFFLE): Druk tijdens het weergeven van een CD
op deze knop om de nummers van de CD in willekeurige
volgorde af te laten spelen. Het display toont het Shuffleicoon ( ). De shuffle-weergave wordt afgebroken als
u nogmaals op de SHUFFLE drukt, of door op STOP
te drukken. Zodra alle nummers afgespeeld zijn, stopt
de CD. Het gebruik van de knoppen voor het vorige of
volgende nummer ( ) kan ertoe leiden dat sommige
nummers herhaald worden. Ook bij MP3-CD’s met veel
nummers kunnen sommige nummers bij shuffle-weergave
spontaan herhaald worden. De shufle- weergave is niet te
combineren met de repeat-functie of de intro-weergave
(zie punt 3).
3. INTRO: U kunt een cd scannen door alleen de eerste 10 seconden van elk nummer weer
te geven. Druk daartoe tijdens de cd-weergave op INTRO. De cd-weergave stopt zodrade
eerste 10 seconden van elk nummer weergegeven zijn. Door nogmaals drukken of door
STOP te drukken schakelt u de INTRO-functie voortijdig uit. De functie intro is niet te
op
combineren met shuffle-weergave.
NB: Bovenstaande functies werken niet tijdens het laden van een cd. Als twee van deze
functies tegelijkertijd actief zijn, zullen de bijbehorende iconen afwisselend getoond worden.
4. FOLDER +/–: Met deze knop gaat u naar de volgende of de vorige mp3-map bij weergave
van een mp3-cd.
5. ENTER: Deze toets heeft dezelfde functie als het indrukken van de volumeknop op het
Music System: u bevestigt keuzes (bij het instellen van tijd, wekker of datum) of stelt de
hoogweergave in.
6. 7,8,9,0: Samen met de knoppen 1-6 die ook op het Music System te vinden zijn, kunt u
hiermee nummers van een cd direct kiezen. Om nummers 10 of hoger te kiezen, moet u de
twee vereiste cijfers binnen twee seconden na elkaar indrukken.
Voorkeuzestations kunnen zowel met de afstandsbediening als met de knoppen 1-6 op het
Music System gekozen worden. Deze voorkeuzes zijn alleen met de knoppen op het Music
System vast te leggen.
23

Dutch
Om het volume met de afstandsbediening in te stellen, gebruikt u de pijltjes omhoog en omlaag.
Met de pijltjes naar links en rechts (vorige/volgende nummer) kiest u een andere radiofrequentie
of een volgend radiostation.
Als u de afstandbediening dichtbij het Music System bedient, kan de helderheid van het display
daar op reageren.
Vervang de batterij in de afstandbediening als deze leeg raakt. De nieuwe batterij moet een 3volt lithiumknoopbatterij zijn (CR2025). U plaatst hem met de positieve zijde (+) naar onderen.
Belangrijke opmerkingen over de CD-speler:
• De totale speelduur van mp3-/wma-cd’s wordt niet weergegeven. Bij reguliere cd’s gebeurt
dit wel, behalve als er voor een volgend of vorig nummer gekozen wordt: dan verdwijnt deze
aanduiding.
• Bij het lezen van de inhoudsopgave van een cd wordt de weergave iets uitgesteld.
• Weergavefuncties werken niet tijdens het laden van een cd.
• Gebruik de uitwerptoets (EJECT) niet om een cd te laden.
• Cd-weergave stopt als tijdens het afspelen van een cd voor een andere klankbron wordt
gekozen. Als de SOURCE-knop op CD wordt gezet, wordt de weergave hervat.
• De geluidskwaliteit van mp3-cd’s, cd-r’s en cd-rw’s en zelfs van die reguliere cd’s kan sterk
variëren. Dit geldt ook voor de weergavekwaliteit van mp3-spelers.
• Gebruik geen reinigings-cd’s; deze cd’s zijn niet bedoeld voor gebruik in cd-spelers met een
sleuf in plaats van een lade.
• Voorkom dat cd’s bij het laden of uitwerpen verbogen worden.
• Beweeg het toestel niet tijdens cd-weergave en verplaats het toestel niet als er een cd
geplaatst is.
• Probeer geen tweede cd te plaatsen als zich al een cd in het toestel bevindt.
• Gebruik geen afwijkende (rechthoekige) of 3" (cd single) cd’s.
• De weergave van mp3- of wma-cd’s start vaak pas na enige tijd, als het Music System de
complete inhoudsopgave gelezen heeft.
• Papieren cd-labels op cd-r’s of cd-rw’s kunnen loslaten en de cd-speler beschadigen.
• Gekraste cd’s worden mogelijk niet correct afgespeeld.
• Gebruik de cd-sleuf uitsluitend om cd’s te laden.
• Mocht zich een storing voordoen, haal dan het netsnoer los en sluit dit na een minuut weer
aan.
Ontvangst/RDS:
De interne FM-antenne (ingebouwd in het netsnoer) zorgt op zich voor een goede FM-ontvangst.
De ontvangst is nog te verbeteren door de externe FM-antenne aan te sluiten. Schuif de antenne
volledig uit en hou hem uit de buurt van het netsnoer en andere kabels. Plaatsing bij een raam
of een buitenmuur geeft de beste kans op een optimale ontvangst. De beste ontvangst wordt
bereikt met een buitenantenne. Natuurlijk kunt u het Music System ook op de kabel van uw radio/televisieprovider aansluiten. Zorg er bij gebruik van een externe antenne altijd voor dat de FMantenneschakelaar op EXT staat. Zet deze schakelaar anders op INT. Deze schakelaar heeft geen
invloed op de ontvangst van middengolfstations (AM). Ruis bij ontvangst van een FM-station is
te onderdrukkendoor het systeem met de AUDIO-knop op Mono te zetten. Voor een optimale
ontvangst houdt u het netsnoer altijd uit de buurt van antennes.
24

Dutch
Het Amerikaanse en Europese Radio Data System (RDS) stuurt tekstinformatie mee met
radiouitzendingen. In de rechterbovenhoek van het display wordt programmainformatie getoond,
als deze informatie beschikbaar is. Niet alle FM-stations zenden RDS-teksten mee. Bij station
die RDS gebruiken, kan het bij een zwakker signaal voorkomen dat de tekst niet of vervormd
getoond wordt. Het variëren van de plaatsing van de FM-antenne kan de RDS-ontvangst
verbeteren. De inhoud van de RDS-teksten wordt door het radiostation bepaald; foutieve
informatie kan niet door het Music System veroorzaakt worden. Het aantal tekens dat het display
kan weergeven is niet onbeperkt. Bij tekens die niet exact kunnen worden weergegeven,
verschijnt mogelijk een spatie of een ander teken. Als de slaaptimer actief is, worden er geen
RDS-teksten getoond. Op de middengolf (AM) wordt RDS niet gebruikt.
Voor AM-ontvangst klapt u de meegeleverde AM-antenne uit. Klik de standaard in positie onder
de antennelus, rol het snoer af (zie afbeelding 13) en sluit de 1/8" mini-jackplug aan op de ingang
voor de AM-Antenna aan de achterzijde van uw Music Station. Experimenteer met de plaatsing
van de antenne tot de ontvangst optimaal is.
Gebouwen met beton-, staal- of aluminiumconstructies kunnen een goede ontvangst verhinderen.
De ontvangst kan ook negatief beïnvloed worden door elektrische dekens, computers, cd-spelers,
magnetrons en andere elektrische apparaten, die tevens ruis en brom kunnen genereren. Deze
verschijnselen zijn vaak met succes tegen te gaan door uw Music System verder uit de buurt
van het betreffende apparaat te plaatsen of door het netsnoer op een wandcontactdoos van een
andere elektrische groep aan te sluiten. Een goede ontvangst van middengolfstations (AM) kan
belemmerd worden door stalen oppervlakken.
Plaatsing:
De ingebouwde cd-speler heeft een uitstekende bescherming tegen schokken, maar hij is niet
100% schokbestendig. Plaats het toestel daarom op een stabiele, trillingsvrije en vlakke
ondergrond. Plaatsing in een boekenkast of dichtbij een muur kan de basweergave ongewenst
sterk maken. Zorg dat de openingen aan de achterzijde van het toestel niet afgedekt worden:
ze zorgen zowel voor een goede ventilatie als voor een optimale geluidsweergave van uw
Music System.
Het Music System heeft een goede interne afscherming en kan dus zonder kans op storingen
dichtbij een computermonitor of televisie geplaatst worden.
Reinigen:
Haal het netsnoer los voordat u uw Music System reinigt. Gebruik geen agressieve reinigers
of oplosmiddelen. Vingerafdrukken kunnen met de meegeleverde reinigingsdoek verwijderd
worden. De voorzijde kan indien nodig met een licht bevochtigde doek gereinigd worden.
Het Music System heeft een houten behuizing; tintverschillen met andere Tivoli Audio
producten kunnen optreden.
Sommige houtsoorten, en walnoot in het bijzonder, kunnen onder invloed van daglicht
in de loop van de tijd donkerder worden. Dit is normaal.
25

Dutch
Garantie:
Tivoli Audio hanteert bijzonder hoge productiestandaards en we vertrouwen erop dat al onze
producten naar behoren functioneren. Daarom bieden we de eerste koper van dit toestel een
eenjarige garantie, gerekend vanaf het moment van aankoop, op fabrieks-, productie- enmateriaalfouten. Deze garantie is niet overdraagbaar.
Producten die gekocht werden in de Europese Unie, Zwitserland en Noorwegen hebben een
minimale garantietermijn van twee jaar.
Deze garantie dekt de functionaliteit van het toestel onder normale gebruiksomstandigheden met
inachtneming van de inhoud van de bijgevoegde gebruiksaanwijzing. Niet gedekt wordt schade
die veroorzaakt wordt door oneigenlijk of onjuist gebruik, een incorrecte installatie, het aansluiten
van niet passende accessoires, modificaties, reparaties door anderen dan gekwalificeerde
technici, transport, verlies, misbruik, ongelukken, onjuiste netspanning, stroomstoringen, bliksem
en andere natuurverschijnselen, normale slijtage, commercieel gebruik of aanschaf van het
toestel bij anderen dan geautoriseerde dealers. Om van deze garantie gebruik te kunnen maken,
dient u mogelijk een nota te kunnen overleggen als bewijs dat dit toestel bij een geautoriseerde
dealer werd aangeschaft. Als onderhouds- of servicewerkzaamheden noodzakelijk zijn, stuur
het toestel dan niet op zonder eerst contact met uw plaatselijke dealer op te nemen.
Weersta de verleiding om het toestel te openen. Er bevinden zich geen zelf te repareren of in
te stellen onderdelen in het apparaat. Bij zelf ondernomen pogingen om het toestel repareren
of te modificeren, vervalt de garantie. Tivoli Audio vergoedt geen kosten die gemaakt worden
ten gevolge van ontvangstproblemen, het elimineren van door externe bronnen veroorzaakte
storing, tijdsverlies, ongemak en het niet kunnen gebruiken van het toestel. Ook kosten ten
gevolge van schade door oneigenlijk of onjuist gebruik van het toestel worden niet vergoed.
Als dit toestel gedurende de garantietermijn wordt teruggestuurd en gezien de in deze bepalingen
opgenomen regels in aanmerking komt voor reparatie of servicewerkzaamheden, zullen defecte
onderdelen kosteloos en binnen een redelijke termijn gerepareerd of vervangen worden.
AAN DEZE GARANTIEBEPALINGEN KUNT U BEPAALDE RECHTEN ONTLENEN. DEZE EN
ANDERE RECHTEN KUNNEN VAN LAND TOT LAND EN VAN STAAT TOT STAAT VERSCHILLEN.
IN SOMMIGE LANDEN ZIJN BEPAALDE BEPERKINGEN OF UITSLUITINGEN IN GARANTIEBEPALINGEN NIET TOEGESTAAN. GENOEMDE BEPERKINGEN EN UITSLUITINGEN ZIJN DAAROM
MOGELIJK NIET OP UW SITUATIE VAN TOEPASSING.
Deze garantie vervalt indien het label met het serienummer verwijderd of beschadigd is.
Heeft u bij uw dealer voor een verlengde garantieperiode betaald en doen zich na het verstrijken
van de eenjarige fabrieksgarantie problemen voor, neem dan contact op met uw dealer.
26

Dutch
Wij adviseren u mede in verband met de garantiebepalingen om uw product te registreren op
www.tivoliaudio.nl, of de bijgesloten garantiekaart binnen 30 dagen na aanschaf in te vullen en
te versturen.
U bent niet verplicht om ons daarbij ook van uw persoonlijke informatie te voorzien. Wel kunnen
wij op grond van deze informatie vastleggen welke Tivoli Audio-producten u kocht, om zo een
beter beeld te krijgen van de kopers van onze apparatuur. Deze informatie wordt gebruikt voor
marketingdoeleinden en – voorzover toegestaan – om contact met u op te nemen over het product
dat u kocht, of over andere producten die mogelijk interessant voor u zouden kunnen zijn, zowel
van Tivoli Audio als van andere bedrijven. De persoonlijke informatie die u verschaft, wordt
mogelijk in het buitenland verwerkt.
Raadpleeg de lijst met vaak gestelde vragen (FAQ) op www.tivoliaudio.com voordat u aanspraak
op deze garantieregeling doet; mogelijk vindt u daar al het antwoord op uw vraag of de oplossing
van uw probleem. U kunt uw vragen ook aan ons mailen op info@audiac.nl.
27

Dutch
Specificaties:
Model: Tivoli Audio® Music System
Type: Digitaal FM/AM/CD-hifisysteem
Luidsprekers: 2 stuks 3" (7,62 cm) breedband met videoafscherming
1 x 5,25" (13,34 cm) naar beneden gerichte woofer met videoafscherming
Afmetingen: 359 x 133 x 241 mm (bhd)
Gewicht: 5,9 kg
Specificaties kunnen zonder nadere aankondiging gewijzigd worden.
Tivoli Audio behoudt zich het recht voor om producten te wijzigen zonder aankondiging vooraf.
Tivoli Audio, het Tivoli Audio-logo, Model DAB en Stereo Speaker zijn handelsmerken van Tivoli Audio, LLC.
Andere product- en bedrijfsnamen die in deze handleiding genoemd worden, zijn mogelijk geregistreerde
handelsnamen van de respectievelijke ondernemingen.
Wilt u meer weten over de fascinerende producten van Tivoli Audio, ga dan langs bij uw dealer, bezoek onze
website of neem contact met ons op:
Audiac
w www.audiac.nl
e info@audiac.nl
t +31 (0)30 6049000
28

Français
A Propos de Tivoli Audio
La marque Tivoli Audio a été créée par Tom DeVesto. Son but était de créer des produits de
qualité audio remarquable, d’une utilisation simple et à des prix raisonnables. Sa longue
collaboration avec Henry Kloss a aussi été à l’origine de la marque Cambridge SoundWorks*.
En qualité de Directeur Exécutif (CEO) et Directeur du département Recherche et Développement,
Tom DeVesto a mis au point de nombreux produits très performants aussi bien sur les marché
de la Haute Fidélité que du Multimédia. Tom a également fait partie du comité de direction
d’entreprises telles que Advent et Kloss Video.
*Cambridge SoundWorks est une marque déposée de Creative Labs, Singapour.
Music System : Instructions d’utilisation
Toutes nos félicitations pour avoir choisi le Music System de Tivoli Audio. Vous avez entre les
mains le meilleur ensemble tout-en-un du marché. Prenez quelques minutes pour lire le mode
d’emploi et vous familiariser avec votre appareil. Si vous avez la moindre question, n’hésitez
pas à contacter votre revendeur agréé Tivoli Audio ou à nous contacter directement.
Conserver votre emballage, il pourrait vous être utile si vous deviez retourner votre Music
System au service technique.
Encore une fois « Merci d’avoir choisi Tivoli Audio », consommez sans modération votre Music
System.
Dans l’emballage de votre Music System, vous trouverez:
• Un câble d’alimentation
• Une télécommande (avec pile installée)
• Une antenne FM filaire
• Une antenne AM en plastiq
• Un tissu de nettoyage
• 2 piles LR6
Démarrage Rapide
Placez votre Music System sur une surface plane et stable. Avant de mettre votre Music System
en route, assurez vous qu’il ait atteint la température ambiante. A défaut, de la condensation
pourrait empêcher le bon fonctionnement du lecteur CD. L’afficheur peut également être affecté
par la température externe.
1. Raccordez le câble d’alimentation sur le connecteur arrière du Music System marqué 230
VAC et raccordez l’autre extrémité à une prise de courant.
2. Appuyez sur le bouton rouge de la face avant pour mettre votre Music System sous tension.
3. Si les piles ne sont pas mises en place dans le Music System, toutes les fois que vous mettrez
en marche le Music System, l’afficheur indiquera pendant 5 sec « No Batteries ».
4. Appuyez sur la touche marquée « Source », pour sélectionner la source que vous souhaitez
écouter ou insérez un CD dans la fente prévue à cet effet, le lecteur CD se mettra directement
en route. Si vous souhaitez écouter la radio en AM, veillez à raccorder l’antenne fournie avec
votre Music System.
5. En utilisant le bouton rond central, ajustez le volume.
29

Français
Description de la façade:
1. POWER: Appuyez sur ce bouton pour mettre en marche votre Music System ou pour
l’éteindre (mise en veille).
Figure 1 Figure 2
Figure 3 Figure 4
Figure 5
2. ALARM 1/ALARM 2: Appuyez sur Alarm 1 ou Alarm 2. Un bip se fera entendre pour confirmer
que vous êtes dans le mode réglage du réveil sélectionné. Une diode verte confirmera le
réveil en utilisation. Tournez le bouton de volume pour ajuster l’heure de réveil souhaitée,
appuyez de nouveau sur ce bouton pour régler les minutes, (fig. 1 & fig. 2), le réglage des
minutes n’affecte pas le réglage des heures et réciproquement. Choisissez la source (fig. 3
& 4) et le volume (fig. 5) que vous souhaitez pour l’alarme de la même manière. Si vous
choisissez comme source « Aux », le Music System émettra des bips pour le réveil. Il ne
vous sera pas possible de choisir comme source « CD » si aucun disque n’est inséré dans
l’appareil. Lorsque la diode Alarm est éteinte, presser le bouton « Alarm » une fois pour
mettre le réveil en fonction. L’afficheur indiquera brièvement l’heure de réveil programmée.
Quand la diode Alarm est allumée, presser le bouton « Alarm » une fois pour mettre le réveil
hors fonction. Si l’alimentation secteur venait à être absente, la fonction réveil sera conservée
et active sur des bips en lieu et place de la radio ou du CD, à l’heure prévue, à condition que
des piles aient été installées dans l’appareil et soient chargées. Quand le réveil se met en
fonction (la diode Alarm clignote), vous pouvez éteindre le Music System et conserver la programmation de réveil pour le lendemain, appuyer sur « Snooze » et interrompre le réveil
30

Français
qui se réactivera 7 minutes plus tard, ou bien appuyer sur le bouton « Alarm » pour annuler le
réveil, en éteignant le Music System vous conserverez la programmation pour le lendemain.
3. PRÉSÉLECTIONS #1-5: En FM ou AM appuyez et maintenez appuyé le bouton pour
enregistrer dans la mémoire souhaitée la station écoutée. Un bip se fera entendre pour
indiquer que la présélection a été enregistrée. Une fois enregistrée, vous pouvez rappeler
cette station en appuyant sur le bouton correspondant. Vous pouvez enregistrer 6 pré sélections en FM et 6 en AM. Si vous sélectionnez une mémoire dans laquelle aucune
fréquence n’a été enregistrée, l’afficheur indiquera « Preset Empty ». Ces boutons servent
également à l’accès direct aux plages du CD.
4. SOURCE: Pressez légèrement ce bouton pour choisir votre source. La séquence est FM,
AM, CD ou Aux. La source ne peut être changée pendant que le réveil est en fonction.
5. SLEEP: Quand le Music System est sur CD, FM, AM ou Aux, appuyez pendant une seconde
et demi sur ce bouton pour écouter votre programme pendant environ 20 minutes. La diode
sleep s’illuminera et un compte à rebours de 20 mn apparaîtra dans l’afficheur. Au bout de
20 mn, le Music System se coupera. La fonction Sleep ne peut pas être activée en CD si
aucun disque n’est présent dans le Music System. Les information RDS et Text CD ne
seront pas affichées pendant la fonction Sleep.
6. / TUNE +/–: Appuyez sur ce bouton pour passer à la plage suivante ou précédente
du CD. Si la plage a été jouée pendant plus de 10 secs, une pression sur ramène au
début du morceau. En FM ou en AM une pression brève sur ces boutons permet de régler
la fréquence de réception. En maintenant appuyée une de ces touches, et en la relâchent,
la recherche automatique (seek) s’active et la réception s’arrête sur la première station au
signal suffisant. En les maintenant appuyées, vous faites défiler les fréquences.
7. STOP: Appuyez sur cette touche pour arrêter le CD et retourner à la 1ère plage.
8. PLAY/PAUSE: Quand un CD est inséré dans le Music System, appuyez sur cette pour faire
démarrer la lecture. Utiliser ce bouton pour interrompre la lecture (Pause) ou pour la reprendre.
Si vous laissez en Pause le CD pendant plus de 5 mn consécutives, il passera automatiquement en Stop.
9. : Appuyez sur ce bouton pour reculer ou avancer rapidement par pas approximatif
de 10 sec. Pour repasser en lecture normale, appuyez à nouveau sur ce bouton ou utiliser
la fonction Play. Ces fonctions ne sont pas accessibles sur la télécommande. Etant donné
la structure des CD MP3, le retour rapide stoppera la lecture une fois atteint le début du
morceau. Si vous utilisez le mode CD intro (lecture du début de plages du CD), ces fonctions
seront inopérantes. L’utilisation des fonctions rapide ( ) pendant la fonction « lecture
aléatoire », pourra causer la répétition de certaines plages.
10. EJECT: Une pression éjecte le CD. L’afficheur indiquera « Ejecting ». Ce bouton ne sert qu’à
éjecter le CD et ne permet pas de le charger dans le lecteur. Veillez à ne pas plier le disque
lors du retrait de la fente. Si par hasard vous êtes confrontés à une erreur de fonctionnement
ou au blocage à l’intérieur de l’appareil de votre CD, appuyez et maintenez appuyé le bouton
Eject pour réinitialiser le mécanisme et retirer le CD.
31

Français
Figure 6 Figure 7
Figure 8 Figure 9
Figure 10
11. CLOCK: Pressez et maintenez enfoncé ce bouton pour régler d’abord l’heure. Un beep vous
confirmera l’entrée en mode « réglage de la montre ». Utilisez le bouton de volume pour
régler l’heure (fig. 6). Une pression sur le bouton de volume vous permettra de régler les
minutes (fig. 7). Le réglage des minutes n’affecte pas le réglage des heures et réciproquement.
Procédez de la même manière pour régler l’année, le mois et le jour (fig. 8,9 & 10). Une fois
ce réglage effectué, le bouton « Clock » vous permet de visualiser la date et l’heure quand
sont affichées les informations RDS ou CD Text. L’indication de la date ne concerne que le
jour et le mois (pas l’année).
12. VOLUME/AIGUES: Tournez ce bouton dans le sens des aiguilles de la montre pour augmenter
le volume et dans le sens contraire pour le diminuer. Le niveau de sortie est matérialisé dans
l’afficheur par un nombre compris entre 0 (pas de son) et 30 (niveau maxi). Si le son vous
semble distordu, réduisez immédiatement le niveau. Appuyez sur le bouton central et ajuster
les aigues de -4dB à +4dB. Appuyer une deuxième fois sur ce bouton pour rester en mode
réglage, autrement l’afficheur retournera immédiatement dans l’état précédent. Ce bouton
sert également à sélectionner l’heure, la source ou le niveau pendant le réglage de l’horloge
ou des réveils. La modification du volume pendant le déclenchement du réveil, annulera la
fonction répétition (Snooze).
13. AUDIO: Appuyez sur ce bouton pour faire défiler les modes audio Stéréo, Stéréo élargie
(SpacePhase™ Wide), ou Mono. Le mode Stéréo élargie vous permet une écoute
impressionnante avec image sonore plus large. Le mode Mono vous permettra de réduire
sensiblement le bruit de multiplexage perceptible à l’écoute de stations FM au signal de
réception limité, et les rendant ainsi « audibles ». Sans tenir compte du réglage précédemment
utilisé, le mode Stéréo élargie sera automatiquement remis en fonction chaque fois que le
Music System aura été éteint et rallumé.
EQ: La fonction EQ permet de modifier le niveau des graves pendant l’écoute à faible niveau.
Nous vous suggérons de placer le bouton de réglage situé à l’arrière sur la position médiane
crantée. Si le son vous semble distordu dans les graves, réduisez immédiatement le niveau
des graves et/ou le volume. Au départ d’usine, le Music System est livré avec la fonction EQ
opérationnelle. Pour désactiver cette fonction appuyez et maintenez appuyée la touche
« Audio ». L’afficheur indiquera « EQ Off » et un beep confirmera l’enregistrement du
32

Français
changement. L’égaliseur se remettra automatiquement en fonction lors de la remise sous
tension du Music System. Pour désactiver de manière permanente la fonction égaliseur,
appuyez et maintenez appuyé le bouton « Audio », l’afficheur indiquera « EQ Always Off » et
un beep de confirmation se fera entendre. L’égaliseur restera inopérant tant que la fonction
« EQ On » n’aura pas été activée. Pour plus de détails reportez vous à la section « Utilisez
au mieux votre Music System ».
Figure 11 Figure 12
14. DI
SPLAY: Pendant l’écoute de la FM, pressez brièvement ce bouton pour activer la fonction
d’affichage d’informations RDS (Radio Data Service) en mode statique ou défilement (RDS
Scrolling Text, (Fig. 11), Static Text ou RDS off). Si le signal RDS reçu est trop faible, vous
risquez de voir s’afficher des caractères étranges. Seule la bande FM peut supporter le RDS.
Les informations RDS ne seront pas disponibles en mode « Extinction automatique » (Sleep).
Pendant l’écoute d’un CD appuyez de manière répétée pour choisir CD Scrolling Text, Static
Text, ou CD Text Off. Si le CD inséré dans le Music System ne contient pas d’information
sur les plages (Fig. 12), cette fonction ne peut être activée. L’info CD n’est pas disponible
quand la fonction « Extinction automatique » (Sleep) est activée.
15. SNOOZE/MUTE (Sur le dessus): Quand le réveil se met en fonction appuyez sur ce bouton
pour le réduire au silence pendant 7 mn. L’afficheur décomptera le temps jusqu’à la
réactivation du réveil. Le fait de changer le réglage de volume annulera la fonction de
répétition du réveil. En fonction d’écoute normale, ce bouton permet de couper la sortie
audio du Music System. L’afficheur indiquera « Mute ». Appuyez de nouveau sur ce bouton
ou modifier le réglage volume pour réactiver la sortie audio.
16. CASQUE: Raccordez un casque (non livré avec le Music System) sur cette sortie stéréo
contrôlée. Le raccordement du casque coupe automatiquement les hauts parleurs du
Music System. Le niveau d’écoute se règle par le bouton Volume. La connexion se fait par
l’intermédiaire d’un mini jack stéréo 3,5 mm. Ecoutez à un niveau raisonnable.
17. RÉCEPTEUR DE LUMINOSITÉ : Ce récepteur détecte les changements de lumière ambiante
et adapte automatiquement l’éclairage de l’afficheur. Veillez à ne pas le masquer.
18. Récepteur IR: Ce récepteur reçoit les commandes de la télécommande infrarouge. Veillez
à ne pas le masquer.
19. Fente CD : Insérez un CD (avec les inscriptions sur le dessus) jusqu’à ce qu’il soit avalé.
L’afficheur indiquera «Loading ». Pendant la mise en place du disc, les commandes seront
inopérantes. La lecture commencera automatiquement dès que le registre du disque aura
été lu. L’afficheur indiquera « No Disc » si aucun CD n’est présent et que la source CD a été
sélectionnée. A l’éjection du CD, l’afficheur indiquera « Ejecting ». Lire la section « Notes im
portantes concernant le lecteur CD » Lors de la mise sous tension du Music System ou
pendant l’activation du réveil sur CD, la lecture du CD commence toujours au début du
disque.
33

1 2347 89 5 6
Français
Utilisez au mieux votre Music System:
1. Considérez votre Music System comme une chaîne haute-fidélité. Bien que vous soyez
susceptible de raccordez à votre Music System la sortie audio de votre ordinateur, ce n’est
pas un système d’écoute rapprochée comme les enceintes multi média pour ordinateur. Tout
comme votre chaîne hi fi, l’écoute à une certaine distance vous offrira le meilleur résultat.
2. SpacePhase™ et EQ vous permettront d’ajuster les réglages de votre Music System selon
votre goût, le type de musique que vous écoutez, la taille de votre pièce et le niveau auquel
vous écoutez. Lorsque vous écoutez fort, nous vous recommandons de positionner le
réglages des aigues sur « O », EQ sur Off et de sélectionnez Stereo ou Mono (et non
SpacePhase™ Wide)
3. Si vous rencontrez le moindre problème au démarrage, débranchez votre appareil et après
2 minutes rebranchez le fermement, cela devrait réinitialiser le microprocesseur et résoudre
la plupart des problèmes.
Description de la face arrière:
1. COMMUTATEUR ANTENNE FM: Commuter sur « Internal » ou sur « External » si vous utilisez
une antenne FM externe; Ce commutateur n’a aucun effet sur la réception AM.
2. ENTRÉE EXTERNAL FM ANTENNA: Dans de nombreux cas la réception FM sera amélioré
par l’utilisation d’une antenne externe raccordée à la prise « F », vous pourrez utiliser l’antenne
FM filaire fournie avec votre Music System, ou raccorder une autre antenne FM externe. Ne
débranchez jamais l’antenne en tirant par le câble.
Figure 13.
34

Français
3. ENTRÉE EXTERNAL FM ANTENNA: Raccordez sur ce connecteur la fiche mini jack 3,5 mm
de l’antenne AM fournie avec votre Music System. Assemblez l’antenne (Fig. 13) et réglez son
orientation en fonction de la station écoutée. Vous ne pourrez avoir aucune réception AM si
cette antenne n’est pas raccordée.
4. AUX IN: Pour écouter une autre source telle qu’un iPod, un lecteur MP3, un ordinateur ou la
télévision, raccordez la sortie audio de cette source à cette entrée stéréo par l’intermédiaire
d’un cordon équipé d’un mini jack stéréo 3,5 mm et commutez la «Source» sur Aux. Ceci ne
met pas en fonction l’appareil connecté sur Aux. Vous devrez régler le niveau de sortie de
votre source afin de la rendre compatible avec le niveau d’écoute de la radio ou de votre CD.
5. MIX IN: Le signal raccordé sur cette entrée Mix in, se superpose à la source écoutée, que l’on
écoute la Radio, le CD ou la source Aux. Le niveau de sortie de la source raccordée devra
être ajustée.
6. REC OUT: Vous pouvez raccorder votre iYiYi sur un enregistreur ou sur un système de
sonorisation par l’intermédiaire de cette sortie à niveau fixe via un mini jack 3,5mm.
7. BASS LEVEL: Tournez ce bouton vers la droite pour augmenter le niveau des basses, ou vers
la gauche pour le diminuer. Le caisson de basses a été conçu pour subtilement augmenter
le niveau d’infra graves en écoute à faible niveau, mais en aucun cas pour générer une sur
puissance. Nous vous recommandons de positionner ce contrôle sur la position médiane. Si
le son vous semble distordu dans les graves, réduisez immédiatement le niveau des graves
et/ou le volume.
8. POWER INPUT: Enfoncez fermement le câble d’alimentation fourni avec votre Music System.
Ne jamais débrancher ce câble en tirant le fil. Si vous débranchez votre Music System du
secteur, attendez au moins une à deux minutes avant de le rebrancher. Au moment où
l’alimentation électrique est rétablie, si un CD est présent dans le Music System, celui-ci
sera éjecté.
9. PILES: Installer les 2 piles alcalines LR 6 fournies, pour maintenir la fonction horloge et réveil
en cas de coupure de l’alimentation. Vérifiez l’état de vos piles au moins une fois par mois.
L’afficheur indiquera « No Batteries » si aucune pile n’est installée ou si les piles sont déchargées. Lorsque vous changez les piles de votre Music System, veillez à utiliser des
piles alcalines et respectez la réglementation en vigueur concernant le recyclage des piles.
En cas de coupure de courant et de fonctionnement de sauvegarde sur piles, l’afficheuret
toutes les diodes seront éteintes afin de préserver l’énergie des piles. Si elle a été programmée, la fonction réveil sera exécutée par une série de bips en lieu et place de la radio ou du
lecteur CD.
35

1
5
6
2
3
4
Français
Télécommande (pour la mettre en fonction, retirer la protection
plastique du compartiment pile):
Cette télécommande vous permet d’avoir les fonctions suivantes :
1. REP (RÉPÉTITION): Pendant l’écoute du CD, appuyez une
fois pour la répétition de la plage en cours, deux fois pour
la répétition totale du CD. Une nouvelle pression annule la
répétition. Les icônes et apparaitront dans
l’afficheur. La fonction Répétition ne peut être activée en
même temps que la fonction « Lecture aléatoire » (Shuffle).
2. SHUFF (LECTURE ALÉATOIRE): Pendant l’écoute d’un
CD, appuyez sur cette touche pour activer la lecture
aléatoire. L’icône apparaîtra dans l’afficheur. Une
seconde pression annule la fonction. La lecture du CD
s’arrêtera après la lecture de l’ensemble du CD.
3. INTRO: Pendant l’écoute d’un CD, appuyez sur cette
touche pour activer la lecture des 10 premières secondes
de chaque plage. L’icône apparaîtra dans l’afficheur.
Une seconde pression ou la fonction Stop annule la fonction intro. La lecture du CD s’arrêtera après la lecture de
l’ensemble des intros.
Note: Aucune de ces 2 fonctions ne peut être activée pendant le chargement du CD. Si les
2 fonctions sont simultanément activées, les 2 icônes alterneront dans l’affichage.
4. FOLDER +/–: Permet de monter ou de descendre dans l’arborescence des fichiers MP3
gravés sur votre CD.
5. ENTER: Fonction identique que la pression sur le bouton de volume en façade, permettant
les sélections ou le réglages des aigues.
6. 7,8,9,0: Touches complémentaires pour l’accès direct aux plages du CD. Vous disposez de
2 sec pour presser une 2ème touche numérique pour le choix d’une plage.
Les stations en mémoire peuvent être rappelées à partir de la télécommande. Toutefois, il n’est
pas possible d’effectuer la mémorisation à partir de celle-ci.
Le réglage de volume à partir de la télécommande se fait avec les touches flèches haut /bas, le
réglage de la fréquence de réception se fait avec les touches flèches gauche/droite.
Pour remplacer la pile de votre télécommande, utiliser une CR 2025 ou équivalente.
36

Français
Notes importantes concernant le lecteur CD :
• Pendant la lecture d’un CD MP3 ou WMA, la durée totale du disque ne s’affiche pas. La
durée total d’un CD audio du commerce s’affiche à condition de laisser le CD se charger
sans appuyer sur les touches +/-.
• La lecture prend un certain temps à démarrer, pendant la lecture des tables des matières.
• Aucune des commandes CD n’est active pendant le chargement du CD.
• Ne pas utiliser la touche Eject pour charger le CD.
• Le changement de source arrête automatiquement la lecture du CD. La lecture redémarrera
au début du CD lorsque la source CD sera de nouveau sélectionnée.
• La qualité de reproduction est liée également à la qualité de la source en particulier des CD
gravés MP3, WMA, CDR ou des lecteurs MP3 connectés en Aux.
• Ne pas utiliser les CD nettoyeur de lentille laser, car la plupart ne sont pas prévus pour ce
type de chargement.
• Evitez de plier ou tordre le CD lors du chargement ou du retrait.
• Ne pas déplacer votre appareil pendant l’écoute d’un CD.
• Ne pas essayer de charger un CD si un premier est déjà à l’intérieur.
• Ne pas insérer les CD de format spécial et en particulier les 3pcs.
• Un délai au démarrage de la lecture d’un CD MP3 ou WMA est normal et dû à la lecture
du répertoire.
Réception/RDS:
L’antenne FM interne est constituée par le câble d’alimentation. En général cette antenne est
suffisante. L’utilisation de l’antenne externe fournie avec votre appareil ou de toute autre antenne
externe éventuellement amplifiée peut dans certains cas améliorer la réception. Vous risquez
d’avoir besoin d’un adaptateur spécial (fiche F) pour brancher ces antennes ou pour vous
raccorder au « Câble ». Vous devez dans ce cas commuter l’interrupteur arrière sur « Ext ». Ceci
est sans effet sur la réception AM. Si la réception FM est bruyante, vous pouvez réduire le bruit
de « multiplexage » en commutant la fonction Audio sur Mono. Veillez à ne pas enrouler les
câbles secteur et antenne, et à les séparer pour éviter les interférences.
Les RDS (Radio Data System) permet sur le Music System d’afficher des informations transmises
par la Station FM écoutée. Ce système varie d’un pays à l’autre et d’une station à l’autre. Les
informations reçues seront affichées selon le cas dans le coin supérieur droit ou sur la 2ème
ligne. Un non affichage ne signifie pas nécessairement un défaut de votre Music System. En
aucun cas le Music System ne peut se recaler automatiquement sur une nouvelle fréquence
d’une station enregistrée. Le RDS est inexistant en AM.
Pour la réception AM, utiliser l’antenne fournie avec l’appareil en la raccordant sur l’entrée
marquée « AM Antenna ». (Voir fig. 13). Positionner l’antenne pour obtenir la meilleure réception
possible.
Les bâtiments en béton armé, ou à structure métallique peuvent générer des problèmes de
réception FM. Les autres appareils électriques ou électroniques raccordés sur le secteur peuvent
générer des bruits parasites. N’hésitez pas à changer de prise secteur ou d’emplacement pour
améliorer la qualité de réception ou de reproduction.
37

Français
Placement:
Placer le Music System sur une surface plane et stable pouvant supporter le poids de votre
Music System. Ne bloquez pas les évents arrière. Le placement dans une niche, dans un meuble
ou à proximité d’un mur ou d’un coin peut accroître la reproduction des basses fréquences et
altérer la reproduction naturelle du son. Ne pas couvrir les ouvertures sur la partie arrière, elles
sont indispensables à la bonne ventilation interne de votre Music System.
Le lecteur CD du MusicSystem a une excellente protection contre les chocs, mais n’y est pas
insensible. Ne soumettez pas votre MusicSystem aux secousses et vibrations.
Le MusicSystem est magnétiquement blindé et peut être utilisé à proximité d’un écran ou d’un
téléviseur.
Entretien:
Pour votre propre sécurité, assurez vous d’avoir débranché votre MusicSystem avant de lenettoyer.
N’utiliser aucun chiffon ni produit abrasif. Les marques de doigt peuvent être effacées avec le
chiffon livré avec l’appareil. Si nécessaire, la façade peut être nettoyée avec un chiffon légèrement
humide.
Le boîtier de votre MusicSystem étant en bois naturel, la teinte et la veinure peuvent varier
d’un appareil à l’autre et ne pas correspondre à d’autres produits Tivoli Audio que vous
pourriez déjà posséder.
Certains finis en bois naturel sont susceptibles de changer d’aspect suite à l’exposition à
la lumière ou au soleil.
38

Français
Garantie:
Tivoli Audio fabrique ses produits selon un standard de qualité élevé et nous avons pleine
confiance dans les performances de nos produits. En conséquence, nous garantissons ces
produits (pièces et main d’oeuvre) contre tout vice caché, pendant un an à compter de la date
d’achat au profit de l’acheteur originel. Cette garantie n’est pas transférable.
Cette garantie ne couvre pas les dommages qui pourraient résulté d’une utilisation ou installation
inappropriée, de la tentative de charge de piles alcaline, utilisation de d’accessoires non adaptés,
de modifications, de tentative de réparation, de dégâts subis pendant le transport, de la perte,
de la malveillance, d’accidents, de l’utilisation sur une mauvaise tension, de surtension, de la
foudre ou de tout cas de force majeure, de l’usure normale, ou de l’utilisation commerciale.
Merci de vous adresser à votre revendeur pour toute réparation. La preuve d’achat peut s’avérer
indispensable.
Ne tentez pas d’ouvrir le produit. Aucune pièce ne se trouve à l’intérieur et toute tentative de
modification ou de réparation annulerait la garantie.
Tivoli Audio ne prendra pas en charge l’élimination de problèmes de réception, de bruits parasites
externes, la perte de temps, la gêne, la non disponibilité du produit ainsi que tout problème
résultant d’une mauvaise utilisation.
Si l’Etat ou le Pays où vous avez acheté cet appareil impose des droits complémentaires à la
garantie, ceux-ci s’appliquent. Si l’Etat ou le Pays interdisent certaines limitations, ces limitations
ne sauraient s’appliquer.
Si vous acquérez une extension de service ou de garantie, celle-ci incombe exclusivement au
revendeur auprès de qui vous l’avez souscrite.
Seule votre facture d’achat atteste vos droits à la garantie contractuelle réservée exclusivement
à l’acheteur initial, et à la condition que votre appareil ait été acheté auprès d’un revendeur Tivoli
Audio agréé par le distributeur officiel du pays d’achat et à la condition que le produit ait été
importé régulièrement et ait été soumis à tous les tests, homologations, droits de douane, ou
taxes en vigueur.
Vous pouvez validez votre garantie dans les jours qui suivent votre achat sur le site
www.tivoliaudio.com., mais cette validation n’est en aucun cas une obligation.
39

Français
Caractéristiques:
Modèle: Tivoli Audio® Music System
Type: Système Hifi équipé d’un lecteur CD et d’un récepteur AM/FM
Haut-parleurs: 2 Haut-parleurs large bande de 7,62 cm
1 Haut-parleur de graves 13,3 cm
Gamme de réception: FM 87,5 – 108 MHz
AM 520 – 1629 kHz
Désaccentuation: 50 µsec.
Dimensions: 36 x 13,4 x 24,2 cm
Poids: 5,9 kg
Ces spécifications peuvent être modifiées sans pré avis.
Tivoli Audio se réserve le droit de modifier ses produits sans notice préalable.
Tivoli Audio, le logo Tivoli Audio, Tivoli Audio Music System et SpacePhase sont déposés et propriété de
Tivoli Audio LLC.
Produits et design protégés par des brevets.
40

German
Tivoli Audio
Tom DeVesto gründete Tivoli Audio mit dem Ziel hochqualitative, einfach bedienbare,
aber zugleich erschwingliche Unterhaltungselektronik anzubieten. Während seiner langen
Zusammenarbeit mit Herny Kloss gründete er unter anderem die Firma Cambridge SoundWorks.
Als Geschäftsführer und Leiter der Entwicklungsabteilung seiner früheren Firma war DeVesto
vor allem für die Fertigung der vielfach bestverkauften HiFi Anlagen und Multimedia Produkten
verantwortlich. Zudem arbeitete er im Bereich Produktmanagement bei den Firmen Advent
und Kloss Video.
*Cambridge ist ein eingetragenes Warenzeichen von Creative Labs, Singapore.
Music System Bedienungsanleitung
Vielen Dank, dass Sie sich für das Tivoli Audio Model Music System entschieden haben. Wir
glauben, dass dies eines der besten auf dem Markt erhältlichen CD Weckreceivern ist. Um die
gesamten Funktionen Ihres Radios kennen zu lernen, bitten wir Sie, sich einen Moment Zeit zu
nehmen und diese Bedienungsanleitung genauestens zu lesen. Falls Sie weitere Fragen haben,
wenden Sie sich an Ihren Händler oder Tivoli Audio.
Wir wünschen Ihnen viel Freude mit Ihrem Music System.
Lieferumfang neben dem Music System an sich:
• 1x Netzkabel
• 1x Fernbedienung
• 1x UKW Antenne mit F Stecker zum Anschluss an die Hausantenne
• 1x Mittelwelle / AM Antenne
• 1x Putztuch
• 2x AA Batterien
Bitte informieren Sie Ihren Händler oder Tivoli Audio direkt, wenn Sie Bestandteile des
Lieferumfangs vermissen.
Erste Schritte
Bevor Sie das Gerät in Betrieb nehmen, warten Sie bis es Zimmertemperatur erreicht hat.
Anderseits können der CD-Player, sowie das Display nicht richtig funktionieren.
1. Stecken Sie zunächst die AA Batterien in das rückseitige Batteriefach.
2. Stecken Sie nun den Netzstecker am Gerät und dann am Stromnetz an..
3. Drücken Sie den roten ON Knopf und nehmen damit das Gerät in Betrieb.
4. Drücken Sie den Knopf „Source“, um die gewünschte Quelle zu aktivieren.Um eine
CD abzuspielen, schieben Sie diese einfach ins Laufwerk ein. Die Wiedergabe startet
automatisch. Für AM Empfang stecken sie zunächst die Antenne an.
5. Stellen Sie die gewünschte Lautstärke mit dem frontseitig angebrachten Drehknopf ein.
Tipp zur Fehlerbehebung: Wenn Sie einmal ein technisches Problem mit Ihrem Music System
feststellen, so bitten wir Sie die Batterien aus dem Gerät zu entfernen sowie den Netzstecker für
60sekunden heraus zu ziehen. Dies setzt den Mikroprozessor zurück und sollte bei Wiedereinschalten zum normalen Betrieb führen. Setzen Sie dann auch die Batterien wieder ein.
Falls Sie weitere Fragen und / oder Anmerkungen haben, kontaktieren Sie bitte Tivoli Audio
direkt oder Ihren Fachhändler.
41

German
Funktionen auf der Frontseite:
1. POWER: Drücken Sie diesen Knopf um das Gerät ein- bzw. auszuschalten. (Standby)
Abbildung 1 Abbildung 2
Abbildung 3 Abbildung 4
Abbildung 5
2. ALARM 1/ALARM 2: Halten Sie die jeweilige Taste kurz gedrückt, um den Weckmodus zu
aktivieren. Die LED leuchtet grün auf. Nun beginnt die Stundenanzeige zu blinken (Abbildung
1). Diese können Sie mit dem Lautstärkeknopf einstellen. Drücken Sie den Lautstärkeknopf,
um auf gleiche Art & Weise die Minuten einzustellen (Abbildung 2).Drücken Sie den
Lautstärkeknopf erneut, um die Quelle (Abbildung 3), bei Wecken mit Radio die Frequenz
(Abbildung 4) und die Lautstärke (Abbildung 5) festzulegen. Stellen Sie die Quelle auf „AUX“,
so werden Sie mit einem Piepton geweckt. Sie können sich nicht durch eine CD wecken
lassen, wenn Sie sich nicht im Laufwerk befindet. Um die Weckzeit generell zu de- bzw.
aktivieren, drücken Sie kurz die entsprechende Alarmtaste. Die Weckzeit erscheint kurz auf
dem Display und die Diode leuchtet auf. Bei eingelegten, geladenen Batterien weckt Sie das
Gerät im Fall eines Stromausfalls mit Piepton. Wenn der Weckruf beginnt¬ haben Sie die
Möglichkeit den Alarm für weitere 24h zu programmieren, indem Sie den Power Knopf kurz
drücken oder den entsprechenden Alarm Knopf gedrückt halten, um den Alarm gänzlich
auszuschalten. Durch das Drücken des SNOOZE Knopfes auf der Oberseite des Gerätes
können Sie den Weckruf für7min unterbrechen.
42

German
3. PRESETS 1–6: Halten Sie die gewünschte Vorwahltaste 1-6 gedrückt, um den derzeit
wiedergegeben Radiosender abzuspeichern. Ihre Eingabe wird durch einen Ton bestätigt.
Sie können jeweils 6 Sender im FM und AM Frequenzband speichern. Sollte eine Taste nicht
belegt sein, so erscheint für 2sek auf dem Display „ Preset empty“. Sie können diese
Vorwahltasten auch nutzen, um zwischen den ersten 6 Titeln einer CD direkt anzuwählen.
4. SOURCE: Drücken Sie diese Tasten, um zwischen den verschiedenen Quellen zu wählen.
Es gibt AM, FM, AUX, und CD. Während des Weckrufes können Sie die Quelle nicht ändern.
5. SLEEP: Während das Gerät in Betrieb genommen ist, gleich welche Quelle wiedergegeben
wird, können Sie programmieren, dass sich das Gerät automatisch nach 20min Spielzeit
ausschaltet. Halten Sie die Taste gedrückt, deaktivieren Sie diese Funktion.
6. / TUNE +/–: Drücken Sie diese Taste bei CD Wiedergabe, um einen Titelsprung zum
vorherigen oder nächstfolgenden Titel zu ermöglichen. Bei Radiowiedergabe können Sie
manuell Sender auf dem Frequenzband suchen. Wenn Sie die Taste gedrückt halten, sucht
das Gerät automatisch den nächstgelegenen, empfangsstärksten Sender heraus.
7. STOP: Beendet die CD Wiedergabe und lässt die CD Wiedergabe bei Drücken der Play Taste
wieder bei Titel 1 beginnen.
8. PLAY/PAUSE: Drücken Sie diese Taste, um die CD Wiedergabe zu starten. Drücken Sie diese
Taste erneut, um die Wiedergabe kurzzeitig zu unterbrechen. Wird die Wiedergabe für mehr
als 5min unterbrochen, so beginnt Sie bei erneutem Drücken dieser Taste bei Beginn der CD.
9. : Halten Sie die Taste gedrückt, um innerhalb von 10Sekundensprüngen zu wandern.
Beachten Sie, dass diese Funktion nicht auf der Fernbedienung vorhanden ist. Bei Wiedergabe
von MP3 Dateien auf einer CD wird zwischen den Titeln immer eine kurze Pause geschaltet.
Ferner beachten Sie, dass im INTRO Mode diese Gerätefunktion deaktiviert ist.
10. EJEKT: Drücken Sie diese Taste, um die CD aus dem Laufwerk auszugeben. Diese Taste ist
nur zum Ausgeben der Disc. Das Laufwerk zieht die CD automatisch ein. Bitte achten Sie
darauf, dass Sie die CD immer mit der Beschriftung nach oben einschieben und verbiegen
Sie die Disc nicht. Sollten Sie die CD einmal schief eingeschoben haben, halten Sie die
EJECT Taste gedrückt bis die CD ausgegeben wird.
Abbildung 6 Abbildung 7
Abbildung 8 Abbildung 9
43

German
Abbildung 10
11. CLOCK: Drücken Sie diese Taste als erstes nach der Inbetriebnahme, so dass Sie die Uhrzeit
am Gerät einstellen können. Ein Ton signalisiert Ihnen, dass Sie die Uhr jetzt stellen können.
Durch Drehen des Lautstärkeknopfes können Sie die zunächst die Stunden (Abbildung 6)
einstellen. Um auf gleiche Art & Weise die Minuten (Abbildung 7), das Jahr (Abbildung 8),
den Monat (Abbildung 9) und den Tag (Abbildung 10) einzustellen, drücken Sie jeweils den
Lautstärkeknopf. Sie werden nun automatisch, wie beschrieben durch das Menu geführt.
Wenn Sie während der CD Wiedergabe oder FM-RDS Wiedergabe die CLOCK Taste drücken,
erscheint kurz Datum und Uhrzeit.
12. VOLUME/TUNE: Drehen Sie diesen Knopf in Uhrzeigersinn, um die Lautstärke zu erhöhen.
Das Display bestätigt Ihre Eingabe mit der Lautstärkeanzeige zwischen null(Ton aus) und
30 (Maximallautstärke). Sollte der Klang verzerrt klingen, so verringern Sie unverzüglich die
Lautstärke. Drücken und drehen Sie den Knopf, im Uhrzeigersinn, um Sender nach oben hin
auf dem AM oder FM Frequenzband und gegen den Uhrzeigersinn, um Sender nach unten
hin auf dem AM oder FM Frequenzband zu suchen. Nach 10Sekunden springt das Gerät
automatisch wieder in den Lautstärkemodus oder Sie rufen diesen durch manuelles Drücken
des Knopfes auf. Beim Einstellen der Uhrzeit/Datum sowie der Weckzeit drücken Sie diesen
Knopf, um sich innerhalb des Menüs zu bewegen. Ferner können Sie mit dieser Taste den
SNOOZE Modus beenden.
13. AUDIO (SpacePhase™ EQ): Drücken Sie diese Taste, um zwischen den Klangeinstellungen
MONO, STEREO und dem WIDE Modus zu wählen. Der WIDE Modus ist entwickelt wurden,
um in größeren Räumen mehr Klangvolumen zu erzielen. Hingegen ist der MONO Modus
empfehlenswert, um empfangsschwache FM Sender, ohne Störgeräusche wieder zu geben.
EQ: Um den Equalizer zeitweise auszuschalten, halten Sie die Audio Taste gedrückt. Das Display
zeigt Ihnen „EQ OFF“ und Sie vernehmen einen Signalton. Der EQ wird bei der nächsten
Inbetriebnahme automatisch wieder eingeschaltet. Um den EQ dauerhaft auszuschalten, so
halten die die Audio Taste länger gedrückt bis Ihnen das Display „EQ ALWAYS OFF“ zeigt.
Sie können den EQ durch kurzes Drücken der Audio Taste wieder aktivieren. Der Equalizer
hebt bei geringen Lautstärken das Bassniveau an. Wir empfehlen die rückseitig angebrachte
Klangregler des Subwoofers auf linearer Stellung zu belassen. Falls der Bass bei einer lauten
Wiedergabe unsauber wieder gegeben wird, so reduzieren Sie sofort die Lautstärke.
Abbildung 11 Abbildung 12
14. DISPLAY: Im FM Modus zeigt Ihnen das Display den RDS Text an. Diesen können Sie statisch
oder rollend auf dem Display anzeigen lassen. Wenn Sie diese Taste drücken, wechseln Sie
zwischen den unterschiedlichen Modi. Falls ein Sender kein RDS Signal ausstrahlt, oder dieses
zu schwach ist, so erscheint kein RDS Text auf dem Display. Bitte bedenken Sie, dass im AM
44

German
Empfang kein RDS Signal vorhanden ist. Lesen Sie hierzu weiteres im Kapitel „Empfang/RDS“.
Auch während eine CD wiedergegeben wird, können Sie einen (wenn vorhandenen) CD Text
statisch oder rollend anzeigen lassen. Im Sleep-Modus wird kein RDS bzw. CD Text angezeigt.
15. SNOOZE/MUTE (auf Oberseite des Gehäuses): Wenn der Alarm beginnt bzw. während
dessen, haben Sie bei Drücken dieser Taste die Möglichkeit, den Weckruf für7min zu unterbrechen. Auf dem Display werden nun die 7min herunter gezählt. Bei normaler Wiedergabe
können Sie den Ton abschalten bzw. wieder einschalten. Das Display zeigt MUTE.
16. HEADPHONE OUT: Hier können Sie Ihre Kopfhörer (nicht im Lieferumfang enthalten) mit
einem 3,5mm Klinkenstecker anschließen. Die integrierten Lautsprecher schalten sich
automatisch ab und Sie können die Lautstärke des Stereosignals über den großen
Drehknopf einstellen. Bedenken Sie, dass sehr hohe Lautstärken Gehörschäden fördern.
17. OPTICAL SENSOR: Dies ist ein Lichtsensor. Die Displayhelligkeit wird jeweils an die
umgebene Raumhelligkeit angepasst.
18. IR SENSOR: Dieser Sensor empfängt die Eingaben der Fernbedienung. Bitte decken
Sie diesen nicht zu.
19. SLOT-LOAD: Stecken Sie hier Ihre CD mit der Beschriftung nach oben in das Laufwerk ein. Bis
die CD wiedergegeben werden kann, zeigt das Display „LOADING“. Wenn die Disc eingelesen
ist, beginnt die Wiedergabe automatisch. Ist im CD Modus keine CD eingelegt, so bestätigt
Ihnen dies das Display mit der Anzeige „No Disc“. Wenn Sie die CD ausgeben lassen, erscheint
auf dem Display „Ejecting“. Lesen Sie hierzu Ausführlicheres im Kapitel „Wichtige Informationen
über den CD Player“.
Holen Sie das Maximum aus Ihrem Music System heraus!
1. Betrachten Sie das Gerät als komplette HiFi Anlage. Zudem können Sie die Signale eines PC
oder MP3 Players wieder geben lassen. Das Gerät ist jedoch nicht wie Computerlautsprecher
konzipiert und erfordert daher einen weiteren Abstand zum Hörplatz.
2. Durch den AUDIO WIDE Modus und Equalizer können Sie das Music System nach Ihren
Wünschen zum Musikmaterial, Lautstärke und den Raumverhältnissen maßgeschneidert
anpassen. Das TIVOLI AUDIO Entwicklerteam hat unzählige Stunden mit der Klangabstimmung
des Systems verbracht. Wir empfehlen Ihnen die Höheneinstellung linear auf „0“ zu belassen.
Um bei hohen Lautstärken ein sauberes Klangbild wieder zu geben, empfehlen wir den
Equalizer und den AUDIO WIDE Modus auszuschalten.
3. Wenn Sie einmal ein technisches Problem mit Ihrem Music System feststellen, so bitten wir
Sie die Batterien aus dem Gerät zu entfernen sowie den Netzstecker für 60sekunden heraus
zu ziehen. Dies setzt den Mikroprozessor zurück und sollte bei Wiedereinschalten zum
normalen Betrieb führen. Setzen Sie dann auch die Batterien wieder ein.
45

German
1 2347 89 5 6
Funktionen auf der Rückseite:
1. FM ANTENNA SWITCH: Stellen Sie den Schalter auf intern, wenn Sie keine externe FM Antenne
angeschlossen haben. Diese Schaltung hat keinen Einfluss auf den Mittelwellenempfang.
2. EXTERNAL FM ANTENNA INPUT: Hier können Sie die beiliegende Wurfantenne anstecken,
um den FM Empfang zu verbessern. In den meisten Fällen ist dies jedoch nicht notwendig.
Bitte lesen Sie hierzu näheres im Kapitel „Empfang“.
Abbildung 13
3. EXTERNAL AM ANTENNA INPUT: Stecken Sie hier die mitgelieferte AM Antenne über den
3,5mm Klinkenstecker ein. Sie können die Antenne, wie in Abbildung 13 dargestellt, installieren.
Sie können die Antenne dort im Raum installieren, wo Sie den besten Empfang haben. Ohne
Antenne ist der Empfang nur schlecht möglich.
4. AUX IN: Über den Hilfseingang können Sie ein weiteres, externes Quellengerät, wie Ihren
MP3 Player, über einen 3,5mm Klinkenstecker anstecken. Um die Wiedergabe dieses
Gerätes zu ermöglichen, müssen Sie die Quelle „AUX“ am Gerät wählen. Die Lautstärke
muss unabhängig zu CD- und Radiowiedergabe einstellen.
5. MIX IN: Über den Hilfseingang können Sie ein weiteres, externes Quellengerät, wie Ihren
MP3 Player, über einen 3,5mm Klinkenstecker anstecken. Wenn ein Signal in das Gerät
eingespeist wird, so wird die Wiedergabe am Music System für die Dauer des externen
Signals ausgeblendet und anschließend wieder eingeblendet. Die Lautstärke dieses
Signals muss von der externen Quelle aus eingestellt werden.
46

1
5
6
2
3
4
German
6. REC OUT: Hier können Sie ein Aufnahmegerät ebenfalls über den 3,5mm Klinkenstecker
anschließen. Falls Sie einen Voll- o. Vorverstärker anschließen, arbeitet das Gerät als
Stereotuner. Die integrierten Lautsprecher spielen je nach eingestellter Lautstärke weiter.
7. BASS LEVEL: Drehen Sie den Knopf in Uhrzeigersinn, um das Basslevel zu erhöhen; bzw.
gegen den Uhrzeigersinn um dieses zu verringern. Der Subwoofer ist geeignet um dem
Klangbild mehr Volumen zu geben, nicht aber über den Klang zu dominieren. Wir empfehlen
die lineare Stellung beizubehalten. Falls der Klang aufgrund hoher Lautstärke verzerrt klingt,
so verringern Sie sofort die Lautstärke. Näheres hierzu finden Sie im Kapitel „EQ“.
8. POWER INPUT: Stecken Sie hier das mitgelieferte Netzkabel ein. Wenn Sie das Netzkabel
vom Gerät abgezogen haben, so stecken Sie es frühestens erst wieder nach 1min ein. Ist
eine CD im Laufwerk, so wird diese beim Neustart ausgegeben.
9. BATTERY COMPARTMENT: Legen Sie hier, wie im Gerät angezeigt, die mitgelieferten
Batterien ein, um im Falle eines Stromausfalls die Weckfunktion zu puffern. Bitte kontrollieren
Sie die Ladung der Batterien. Bei Entladung wird Ihnen dies am Display mit „no batteries“
angezeigt. Ersetzen Sie diese dann mit Batterien des gleichen Typs. Bei Entladung werden
Sie ausschließlich mit Piepton geweckt.
Fernbedienung (Bitte ziehen Sie vor Nutzung die transparente
Batterieabdeckung heraus):
Die Fernbedienung verfügt zusätzlich über folgende Funktionen:
1. REP (REPEAT): Drücken Sie diese Taste, um den derzeit abgespielten Titel bei CD
Wiedergabe zu wiederholen. Drücken Sie erneut, um die gesamte CD wiederholen zu lassen.
Die entsprechenden Symbole werden Ihnen auf dem Display angezeigt. Um die Funktion zu
deaktivieren, drücken Sie die Taste zum dritten Mal oder die Stopp Taste.
2. SHUFF (SHUFFLE): Drücken Sie diese Taste, um die
Titel auf einer CD in beliebiger Reihenfolge abspielen
zu lassen. Dieses wird Ihnen ebenfalls auf dem Display
angezeigt. Die Funktion kann durch erneutes Drücken
dieser oder der Stopp Taste beendet werden.
Automatisch endet die Funktion, wenn alle Titel der CD
einmal abgespielt sind. Durch Drücken der Pfeiltasten
können Sie zwischen den Titeln hin und her springen.
Diese Funktion ist nicht im Repeat Modus aktivierbar
3. INTRO: Nutzen Sie diese Taste, um sich alle auf der
CD befindlichen Titel jeweils für 10sek. anspielen zu
lassen. Die Funktion deaktiviert sich bei Ende der CD
oder erneutes Drücken dieser Intro Taste. Die Funktion
wird am Display angezeigt.
Beachten Sie, dass keine dieser Funktionen aktiviert
werden kann, während die CD eingelesen wird. Die
entsprechenden Symbole werden Ihnen am Display
angezeigt.
47

German
4. FOLDER +/–: Drücken Sie diese Taste, um sich im MP3 Menu zu bewegen.
5. ENTER: Mit dieser Taste bestätigen Sie Ihre Eingaben. Diese ist vergleichbar mit dem Drücken
des Lautstärkereglers am Gerät.
6. 7,8,9,0: Sie können diese Tasten nutzen, um Titel der CD direkt anzuwählen. Wenn Sie eine
zweistellige Titelnummer anwählen möchten, so drücken Sie zunächst die erste Ziffer und
innerhalb der kommenden 2sek. die zweite Ziffer. Ihre Eingabe müssen Sie nicht durch die
Enter Taste bestätigen.
Mit den Ziffertasten 1-6 können Sie die gespeicherten Radiostationen direkt über die
Fernbedienung aufrufen, jedoch ist es nicht möglich die 6 Speichertasten über die
Fernbedienung zu belegen.
Um die Lautstärke zu maximieren bzw. minimieren, nutzen Sie die obere bzw. untere
Pfeiltaste. Die rechte und linke Pfeiltaste sind geeignet, um zwischen den Frequenzen
im AM oder FM Bereich bzw. zwischen den Titel einer CD zu wandern.
Wenn Sie die Fernbedienung in kurzem Abstand zum Gerät nutzen, kann es sein, dass das
Gerätedisplay flackert. Dies ist kein Anlass zur Sorge, da dies nur die Leistungsfähigkeit der
Fernbedienung zeigt.
Wenn es nötig ist, die Batterie der Fernbedienung zu tauschen, nutzen Sie bitte Folgende:
3V Lithiumzelle CR2025. Legen Sie diese mit der positiven Seite nach unten in die
Fernbedienung ein.
Wichtige Informationen zum CD Player:
• Bei MP3 Wiedergabe zeigt Ihnen das Display aufgrund der langen Spielzeit nicht die volle
Spielzeit an. Bei Original CDs jedoch schon. Wenn Sie durch das Titelverzeichnis springen,
wird Ihnen jeweils die Spiellänge des Titels angezeigt.
• Es kommt zu einer verzögerten Wiedergabe nach dem Einlegen der CD, da diese erst
eingelesen werden muss.
• Während die CD eingelesen wird, können die Funktionen noch nicht genutzt werden.
• Nutzen Sie nicht di Eject Taste, um eine CD einzulesen.
• Wenn Sie die Quelle des Gerätes während der CD Wiedergabe wechseln, so stoppt die
Wiedergabe bis Sie wieder in den CD Modus zurück wechseln.
• Die Wiedergabequalität zwischen den CD und MP3 kann unterschiedlich sein.
• Nutzen Sie keine Linsenreinigungs-CD oder Ähnliches, wenn diese nicht ausdrücklich für
diese Art von Laufwerk konzipiert sind.
• Verbiegen Sie die CD nicht, wenn Sie diese ins Laufwerk schieben.
• Tragen Sie das Gerät nicht von der Stelle, wenn eine CD eingelegt ist.
• Während der Wiedergabe schieben Sie das Gerät nicht hin & her.
• Bevor Sie eine CD in das Laufwerk schieben, vergewissern Sie sich, dass sich im Laufwerk
keine CD mehr befindet.
• Legen Sie keine kleinen oder CD mit speziellem Format ein.
48

German
• Während das Gerät eine MP3 oder WMA CD einliest, kann es zu längeren Einlesezeiten kommen.
• Legen Sie keine CDR und CDRW mit selbstklebenden Labels ein, da sich diese im Laufwerk
ablösen könnten.
• CDs mit Kratzern werden womöglich fehlerhaft oder gar nicht abgespielt.
• Legen Sie nichts Anderes außer einer CD in das Laufwerk ein.
• Falls eine CD einmal schief eingezogen ist, oder Sie einen Lesefehler bemerken, halten Sie die
Eject Taste gedrückt und entnehmen die CD aus dem Laufwerk.
Empfang/RDS:
Die interne FM Antenne sorgt für guten Empfang. Sie können diesen oftmals durch die beigelegte
Antenne verbessern. Ziehen Sie diese komplett aus und wickeln Sie diese nicht um andere Kabel!
Bringen Sie die Antenne in die Nähe eines Fensters oder einer Außenwand, da dort besserer
Empfang zu erwarten ist.
Eine Außenantenne verspricht die besten Empfangsleistungen. Oder der Anschluss an eine
Hausantenne oder Kabelantenne über einen beiliegenden 75Ohm Stecker ist empfehlenswert.
Wenn Sie eine externe Antenne nutzen, vergewissern Sie sich, dass Sie diese Einstellung auf der
Rückseite des Gerätes gewählt haben. Diese Schaltung hat keinen Einfluss auf den AM Empfang.
Bei schlechter Sendeleistung wechseln Sie bitte in den Mono Modus an der Gerätefront. Halten
Sie das Netzkabel von den Antennen fern.
Das RADIO DATA SYSTEM (RDS) überträgt neben dem FM Signal Zusatzinformationen. Wenn
dieses Signal ausgestrahlt wird, so können Sie dies in der unteren Hälfte des Displays lesen.
Teilweise ist das Signal so schwach, dass entweder kein RDS Signal empfangen werden kann
oder nur sehr kleinteilig / fehlerhaft dargestellt werden kann. Dies ist somit kein Sachmangel des
Gerätes. Wir empfehlen Ihnen die Installation an verschiedenen Orten durchzuführen, um höhere
Sendestärken zu erkennen. RDS ist nicht im Sleep Mode darstellbar und wird zudem nur bei FM
Signalen ausgestrahlt.
Um einen AM Empfang zu erhalten, installieren Sie die mitgelieferte Antenne und stecken Sie den
Klinkenstecker auf der Rückseite des Gerätes bei „AM Antenna“ ein. Um für jeden Sender das
stärkste Signal zu suchen, müssen Sie die Antenne gegebenenfalls umstellen.
Bitte bedenken Sie, dass Stahlbetonbauten einen guten Empfang nahezu verhindern.
Eingeschaltete Haushaltsgeräte, Heizdecken und Computer haben ebenfalls Einfluss auf die
Empfangsqualität bzw. rufen sogar Störgeräusche hervor. Falls Sie dies feststellen, so stellen
Sie das Gerät an einen anderen Platz und stecken Sie das Netzkabel in eine andere Steckdose.
Metallische Oberflächen können den AM Empfang negativ beeinflussen.
Aufstellung:
Stellen Sie das Gerät auf eine ebene, saubere Fläche, die das Gewicht des Gerätes aushalten
kann. Verdecken Sie nicht die rückseitig angebrachten Lüftungseinlässe und Bassreflexöffnungen.
Wenn Sie das Gerät in einer Ecke oder Holzkasten aufstellen, so kann der Bass möglicherweise
zu voluminös tönen. Minimieren Sie in diesem Fall die Lautstärke des Subwoofers auf der Rückseite.
49

German
Das integrierte CD Playerlaufwerk verfügt über einen exzellenten Schlagschutz, jedoch empfehlen
wir das Gerät auf einem vibrationsfreien Untergrund zu positionieren. Das Music System ist geschirmt
und kann somit auch nah bei einem Fernseher oder PC Monitor platziert werden.
Reinigung:
Bevor Sie das Gerät reinigen, ziehen Sie bitte zu Ihrer eigenen Sicherheit den Netzstecker.
Säubern Sie das Gehäuse mit dem beiliegenden Tuch. Für die Front können Sie wenn nötig ein
leicht angefeuchtetes Baumwolltuch nutzen. Verwenden Sie niemals chemische Reiniger oder
harte Bürsten!
Da das Gerät aus Naturprodukten gefertigt ist, können weitere Tivoli Audio Geräte
gleichen Holztyps teilweise von dem Holz dieses Gerätes abweichen.
Garantie:
Tivoli Audio Produkte erfüllen einen hohen qualitativen Standard. Wir sind sicher, dass wir auch
Sie mit dem Produkt überzeugen können. Sollten Sie trotzdem einen Sachmangel feststellen, ist
dieser durch die 24monatige Gewährleistungsfrist ab Kaufdatum abgedeckt. Bitte heben Sie daher
Ihren Kaufbeleg auf. Die Garantie ist bei Weiterverkauf nicht übertragbar.
Diese Gewährleistung deckt nicht die Schäden von unsachgemäßer Aufstellung und/oder
Behandlung. Schlechte Empfangsleistungen, Diebstahl und auch Schäden durch
Naturkatastrophen sind vom Garantieanspruch ausgenommen. Zudem sind alle Geräte von
einer Gewährleistungsfrist ausgeschlossen, an denen nicht professionelle Reparaturen und
Modifikationen vorgenommen wurden. Das Gerät wurde ausschließlich für den Privatgebrauch
entwickelt.
Um Gewährleistungsansprüche geltend zu machen, wenden Sie sich bitte mit dem
Kaufbeleg zuerst an Ihren Händler oder Tivoli Audio direkt.
Bitte schrauben Sie das Gerät niemals auf. Es befinden sich keine Serviceteile im Inneren,
die durch Sie ausgetauscht werden müssten. Wenn Sie das Gerät aufschrauben, gehen die
umfassenden Garantieansprüche verloren.
Falls Sie einen weiterführenden Service oder eine Garantieverlängerung mit Ihrem Händler
abgestimmt haben, so ist dies eine Vereinbarung zwischen Ihnen und Ihrem Händler. Der
Hersteller bzw. der Importeur sind davon ausgeschlossen.
Falls Sie Fragen zu den Garantieleistungen haben, wenden Sie sich bitte an:
www.tivoliaudio.com
50

German
Technische Daten:
Model: Tivoli Audio® Music System
Typ: FM/AM/CD Stereo Tischradio mit Weckfunktion
Lautsprecher: Breitbandlautsprecher 2x7,62cm
Maße: LxBxH - 35,88x13,34x24,13cm
Gewicht: 5,9kg
Der Hersteller behält sich technische Änderungen ohne Ankündigung vor.
Tivoli Audio, das Tivoli Audio Logo und SpacePhase sind eingetragene Warenzeichen der Firma Tivoli Audio, LLC.
Andere hier genannte Firmennamen sind eingetragene Warenzeichen der entsprechenden Firmen.
51

Italiano
Manuale di istruzioni
Grazie per aver scelto il Tivoli Audio Music System. Crediamo sia uno dei migliori sistemi radio/cd
da tavolo che sia oggi possibile acquistare.
Per poter sfruttare appieno le notevoli capacità di questo apparecchio, la preghiamo di prendere
visione delle istruzioni d’uso presenti in questo manuale. Per qualsiasi ulteriore informazione al
riguardo, la invitiamo a rivolgersi al suo rivenditore Tivoli Audio di fiducia.
Abbia la precauzione di custodire l’imballaggio originale, esso è necessario per qualsiasi,
eventuale spedizione dell’apparecchio. I danni occorrenti durante il trasporto con un
imballo diverso dall’originale non sono coperti da garanzia.
Contenuto dell’imballo:
• 1 cordone di alimentazione
• 1 telecomando, con batteria installata
• 1 antenna FM
• 1 antenna AM
• 1 panno di pulizia
• 2 batterie di tipo AA
Nel caso manchi qualcosa di ciò che è nell’elenco, non esiti a contattare il suo rivenditore
Tivoli Audio.
Per cominciare
Importante: prima di mettere in funzione il Tivoli Audio Music System, aspettare che
l’apparecchio si adegui alla temperatura ambiente. Questa precauzione serve ad evitare che
il lettore CD, per l’accidentale formarsi di condensa sull’ottica del laser, possa non leggere
correttamente i dati. Questo fenomeno potrebbe temporaneamente interessare anche il display.
Come procedere:
1. Inserire le 2 batterie tampone di tipo AA PRIMA di collegare il cavo di alimentazione.
2. Connettere il cavo di alimentazione PRIMA all’apposita vaschetta posta sul retro
dell’apparecchio, POI alla presa di corrente domestica.
3. Per accendere l’apparecchio, premere il pulsante rosso (POWER) sul pannello frontale.
4. Premere il tasto SOURCE per scegliere la sorgente da cui ascoltare o inserire un CD
nell’apposita “fessura” sopra il display (SLOT-LOAD). In questo caso, il lettore CD si avvierà
automaticamente. Nel caso si decida di ascoltare la radio, quindi di selezionare una delle
due bande di frequenza (AM o FM), si dovrà provvedere in precedenza ad installare uno dei
due tipi di antenna in dotazione. Fatto questo si potrà regolare la sintonia per ricevere e
memorizzare le emittenti radio desiderate.
5. Regolate il volume al livello desiderato utilizzando la manopola sul pannello frontale.
52

Italiano
Guida Alle Funzioni:
(pannello frontale – significato e uso dei comandi)
1. POWER (ACCENSIONE/SPEGNIMENTO): Premendo il relativo pulsante si attiva/disattiva
l’apparecchio. Agendo con il telecomando l’apparecchio rimane in stato di stand-by.
Figura 1 Figura 2
Figura 3 Figura 4
Figura 5
2. ALARM-1/ALARM-2 (SVEGLIA): con questi pulsanti è possibile regolare 2 timer con funzioni
di temporizzazione e sveglia. Tenere premuto il tasto ALARM-1 o ALARM-2. Un bip ed il led
verde illuminato accanto al tasto segnaleranno la possibilità di procedere alla regolazione.
Per selezionare e fissare l’ora desiderata, ruotare e premere la manopola del Volume (Figura
1). Ripetendo l’operazione si interviene su i minuti (Figura 2). Nota bene: la regolazione
delle ore non influisce su quella dei minuti e viceversa. Impostato l’orario, si può passare
alla regolazione seguente, quella della sorgente da attivare all’orario desiderato. Le sorgenti
disponibili (“SOURCE”), sono “AM”, “FM”, “CD”, o “AUX” (è un ingresso ausiliario al quale
è possibile connettere una sorgente esterna come l’iPod o l’audio di un computer). La
selezione della sorgente e l’impostazione del livello del volume avvengono nello stesso modo
(Figure 3, 4, 5). Quando il led di “ALARM” è spento, è possibile premere nuovamente il tasto
per impostare la funzione di sveglia. Il display mostrerà il timer pronto per essere impostato
sull’orario di sveglia desiderato. Per spegnere il led a fine regolazioni sarà sufficiente premere
nuovamente il tasto “ALARM”. Se la corrente di rete dovesse mancare, la sveglia si attiverà
lo stesso all’ora prestabilita emettendo un tono di avviso, in luogo della predeterminata
53

Italiano
accensione del CD o della radio. Per questa ragione è bene assicurarsi che siano sempre
correttamente installate batterie in perfetto stato di efficienza. Quando si attiva il segnale
acustico della sveglia (led illuminato ad intermittenza), si può interrompere il segnale senza
eliminare l’impostazione “sveglia” per il giorno dopo. Premendo il tasto “SNOOZE” (sul
pannello superiore dell’apparecchio) si ritarda il segnale acustico di 7 minuti. Premendo il
tasto “ALARM” si annulla il segnale, si spegne l’apparecchio e si conserva l’impostazione
“sveglia” per il giorno dopo. Selezionando “CD” è importante ricordarsi di inserire un disco
nel lettore. In assenza di questo non sarà possibile determinare l’orario di accensione auto matica. Diversamente, selezionando “AUX”, all’orario prestabilito si attiverà un segnale
acustico.
3. PRESETS 1–6 (MEMORIZZARE LE STAZIONI RADIOFONICHE): per effettuare la
memorizzazione delle emittenti radio desiderate, procedere come di seguito. Sono disponibili
6 preselezioni (memorie) per emittenti AM ed altrettante per quelle FM. Dopo aver installato
l’antenna specifica per ogni banda di frequenza, selezionare “AM” o “FM” come sorgente.
Ricercare le emittenti desiderate come da paragrafo 4 (TUNE), quindi tenere premuto uno
dei tasti numerati da 1 a 6. Un bip confermerà l’avvenuta memorizzazione. Premendo
di nuovo il tasto di preselezione utilizzato, sarà possibile richiamare la stazione radio
memorizzata. Se premendo uno dei tasti di preselezione compare l’avviso “PRESET EMPTY”
per 2 secondi, vorrà dire che nessuna emittente è stata memorizzata in quella posizione.
Una stazione non può essere memorizzata contemporaneamente in più di una preselezione.
Nota: i tasti da 1 a 6 presenti sul telecomando servono a richiamare la stazione emittente in
memoria, ma non hanno la possibilità di effettuare nuove preselezioni. Questa operazione
è possibile solo dal pannello frontale. Questi stessi tasti possono essere utilizzati, durante
la riproduzione del CD, per accedere direttamente alle tracce del disco fino alla 6a traccia.
Sulle restanti è possibile intervenire a mezzo telecomando.
4. SOURCE (SORGENTE):
ripetutamente fino a trovare quella desiderata tra “FM”, “AM”, “CD”, AUX. La sorgente non
può essere cambiata quando il segnale acustico è in funzione. Se la sorgente viene cambiata
durante la riproduzione di un CD, essa si riposizionerà nuovamente su CD, riprendendo la
riproduzione dalla prima traccia.
5. SLEEP: con questo pulsante si attiva la funzione “SLEEP” (attivazione dell’apparecchio
per un tempo prestabilito e autospegnimento) e può essere associata ad una qualsiasi
delle sorgenti disponibili. Selezionata la sorgente, si preme il tasto “SLEEP”. Un led verde
illuminato comunica l’attivazione della funzione, mentre sul display appare il tempo disponibile
(20 minuti) prima dell’autospegnimento. Se si desidera usare il CD come sorgente preferenziale,
ricordarsi di inserire il disco nel lettore. Nota: le segnalazioni su display come RDS e CD-text
non saranno visualizzate nella funzione “SLEEP” attiva.
6. / TUNE +/– (TRACCE CD/SINTONIA RADIO): con questi pulsanti è possibile cambiare
traccia all’interno della funzione “CD”, o cambiare frequenza nella funzione “AM” o “FM”.
Procedere come segue. Premere il tasto per passare alla traccia seguente o per la
precedente entro 10 secondi dall’avvio della lettura. Se la riproduzione è in atto da più di
10 secondi, premere il tasto per farla ripartire. Nella funzione “AM” o “FM”, premendo
brevemente questi pulsanti, si può scorrere la gamma di frequenza e ricercare le emittenti
radiofoniche. Quando si trova una stazione che si desidera ascoltare, tenere premuto il tasto
per fissare la frequenza, quindi rilasciare e procedere oltre nello stesso modo.
54
per selezionare la sorgente, premere il tasto “SOURCE”

Italiano
7. STOP: premendo questo tasto si arresta la lettura del CD, tornando alla prima traccia del disco.
8. PLAY/PAUSE (LETTURA CD/PAUSA): premendo questo pulsante, con il disco inserito, si
procede alla sua riproduzione. Per attivare la funzione “PAUSE”, ripremere il tasto. Premendolo
ancora si riattiverà la riproduzione. Se la funzione “PAUSE” supera i 5 minuti consecutivi, il
lettore si posizionerà nella funzione “STOP” automaticamente.
9. FAST FORWARD/FAST REVERSE (AVANTI VELOCE/INDIETRO VELOCE): con
questi comandi si attivano le funzioni “FAST FORWARD” (“avanzamento veloce”) o “FAST
REVERSE” (“indietro veloce”) per muoversi all’interno delle tracce del CD ad intervalli di
circa 10 secondi. Per tornare all’ascolto, premere nuovamente il tasto, oppure direttamente
“PLAY”. Queste funzioni non sono presenti sul telecomando. Nei dischi con tracce MP3 può
accadere che, usando “indietro veloce”, si interrompa la riproduzione avendo raggiunto
l’inizio della traccia. Nella modalità “CD INTRO”, sia “avanzamento veloce”, sia “indietro
veloce” non sono attivi. Durante la funzione “SHUFFLE” può accadere che premendo
contemporaneamente si attivi la ripetizione del brano.
10. EJECT (ESPULSIONE DEL CD): con questo comando si ottiene l’espulsione del disco.
Attivandolo, il display comunicherà “EJECTING”. Questo pulsante serve solo per recuperare
il disco e NON per inserirlo. Il disco va inserito, o rimosso, tenendolo allineato al vano di lettura,
senza inclinarlo eccessivamente. In caso contrario, si può danneggiare il disco e/o indurre in
errore il lettore. In questo caso, disconnettere il cordone di alimentazione per 60 secondi,
quindi riconnetterlo correttamente.
Figura 6 Figura 7
Figure 8 Figure 9
Figure 10
11. CLOCK (OROLOGIO): con questa funzione si attiva e regola la funzione “CLOCK”. Tenere
premuto il tasto “CLOCK” per regolare l’ora. Un bip conferma di poter procedere alla
regolazione. Per compiere questa operazione usare la manopola del volume. Per selezionare e
fissare ora (Figura 6), e minuti (Figura 7) bisogna ruotare e premere in sequenza. Ricordiamo
che l’impostazione dell’ora non influisce su quella dei minuti e viceversa. Nello stesso modo
si può procedere alla determinazione della data (anno, mese, giorno Figura 8, 9, 10). Una
volta effettuate queste regolazioni, sarà possibile, premendo “CLOCK”, richiamare sul display
data e ora. Nell’indicare la data, solo mese e giorno saranno riportati.
55

Italiano
12. VOLUME/TREBLE (VOLUME/ALTE FREQUENZE): agendo su questo comando è possibile
variare il livello di ascolto (VOLUME) e l’emissione delle alte frequenze (TREBLE). Ruotando
la manopola in senso orario si incrementare il livello del volume di ascolto, in senso opposto
si attenua. Il livello del volume è suddiviso su una scala da 0 (nessun suono) a 30 (massimo
del volume erogabile). Se il suono dovesse giungere distorto, ridurre il livello del volume
immediatamente. Premendo e ruotando la manopola del volume in senso anti-orario si può
ridurre l’emissione di alte frequenze. Facendo la stessa operazione, ma ruotando nel verso
opposto, si aumenta. Nel compiere queste regolazioni, i livelli vengono automaticamente
memorizzati. La manopola del volume opera nello stesso modo in cui si impiega per
selezionare/regolare le funzioni “CLOCK” e “ALARM”. Regolare il volume mentre è attiva la
funzione “SNOOZE” annullerà tutte le relative impostazioni.
13. AUDIO: con questo tasto si può selezionare il tipo di emissione acustica. Premendo il
tasto “AUDIO” si può scegliere tra le seguenti modalità: “STEREO”, “SPACEPHASE™ WIDE”
e “MONO”. L’ascolto in “STEREO” consiste nella tradizionale emissione su due canali destro/
sinistro senza altre elaborazioni del segnale. Nel modo “SPACEPHASE™ WIDE”, si può
percepire una “scena” acustica più ampia, in grado di simulare quella ottenibile da sistemi
audio più sofisticati. Selezionando “MONO” (lo stesso segnale per entrambi i canali), si può
ridurre sensibilmente il fruscio proveniente dalle stazioni radio FM con segnale debole e/o
renderlo più piacevole. L’emissione “SPACEPHASE™ WIDE”, una volta selezionata, si attiva
automaticamente al momento dell’accensione dell’apparecchio e non interferisce con le
altre regolazioni.
“EQ”: questa funzione asserve l’equalizzazione delle basse frequenze. L’equalizzazione si
attiva automaticamente con l’accensione dell’apparecchio. Per disattivarla temporaneamente,
tenere premuto il tasto “AUDIO” fino a che sul display non compaia la scritta “EQ OFF”,
seguita da segnale acustico. Se si desidera escludere la funzione permanentemente,
premere “AUDIO” fino alla comparsa della scritta “EQ ALWAYS OFF”, seguita dal bip di
conferma. Quando l’equalizzazione è disattiva, sul display appare la scritta “EQ ON”.
L’effetto dell’equalizzazione, quando inserita, si manifesta attraverso un’enfatizzazione delle
frequenze più basse, utile soprattutto quando si ascolta a basso volume per restituire corpo
alla musica. Il livello di emissione della gamma bassa (-BASS LEVEL +) può essere regolato
tramite un apposito comando posto sul retro dell’apparecchio. E’ consigliato tenere il livello
impostato a metà dell’intera escursione. Se la gamma bassa dovesse suonare “sporca” o
distorta, abbassare immediatamente il volume o diminuire il livello dell’equalizzazione. Per
saperne di più, vedere la sezione “Come ottenere il meglio dal tuo Music System”.
Figura 11 Figura 12
14. DISPLAY (VISORE):
regolazioni, avere informazioni dalle emittenti radio FM. Impostando “FM” come sorgente, è
possibile visualizzare lo “RDS SCROLLING TEXT” (testi provenienti dalle stazioni radio che
adottano il sistema Radio Data System), “STATIC TEXT”, o deselezionare lo RDS (Figura
11). Se l’emittente radio non trasmette in RDS, o il segnale è troppo debole, nessun testo
sarà mostrato. Nei casi di segnale debole, il testo può apparire confuso o irregolare. Nota
bene: le emittenti AM non trasmettono segnali RDS. Per saperne di più, vedi “RICEZIONE/
56
tramite il display è possibile impostare le funzioni, leggere i valori delle

Italiano
RDS”. I testi RDS non sono mostrati quando la funzione “SLEEP” è attiva. Commutando la
sorgente su “CD”, e premendo nuovamente la manopola, è possibile selezionare tra “CD
SCROLLING TEST”, “STATIC TEXT”, o “CD TEXT OFF”. Inserendo un CD privo di CD TEXT
(Figura 12), questa funzione rimane inattiva. Non tutti i CD in commercio contengono CD
TEXT. Il CD TEXT non è visualizzato in modalità “SLEEP”.
15. SNOOZE/MUTE (SVEGLIA, sul pannello superiore): sul pannello superiore dell’apparecchio
è posto un pulsante che comanda lo spegnimento del segnale di avviso (SNOOZE) in
modalità “ALARM”. Il segnale rimane escluso per 7 minuti, conteggiati sul display come
“SNOOZE TIME”. Regolando il livello del volume si annulla la funzione sveglia (SNOOZE
MODE). Fuori da questa specifica funzione, questo pulsante serve a silenziare l’apparecchio,
operazione segnalata sul display con la scritta “MUTE”. Per ristabilire l’ascolto è sufficiente
premere di nuovo il pulsante o agire sulla manopola del volume.
16. USCITA CUFFIA: Su questo apparecchio è presente un’uscita per cuffia (non inclusa) con
volume regolabile. Il connettore deve essere del tipo mini-jack stereo da 1/8”. Inserendo
la cuffia, gli altoparlanti vengono automaticamente disinseriti. Il volume per la cuffia è
direttamente regolabile dalla relativa manopola. E’ sconsigliato ascoltare ad alto volume per
prevenire possibili danni all’udito.
17. SENSORE OTTICO: Il sensore ottico presente su questo apparecchio regola
automaticamente la luminosità del display in funzione della luce ambiente. Non ostruire
il sensore.
18. SENSORE INFRAROSSI: E’ il sensore per la ricezione dei segnali trasmessi dal telecomando
ad infrarossi dato a corredo. Non ostruire il sensore.
19. CARICATORE CD: E’ il dispositivo per caricare i CD. Il disco va inserito con la faccia
stampata in alto ed assicurarsi che il caricamento avvenga regolarmente. In questo caso il
display mostra la dicitura “LOADING”. Le funzioni relative all’uso del CD sono inattive durante
il caricamento del disco. La riproduzione si avvia automaticamente una volta terminata la
lettura della “tavola dei contenuti”, informazione presente in ogni CD. Sul display appare la
scritta “NO DISC” quando, selezionato “CD”, non sia caricato nessun disco. Quando si
decide di espellere il disco, il display segnala l’operazione con la dicitura “EJECTING”. Per
saperne di più, vedi “NOTE IMPORTANTI SULL’USO DEL LETTORE CD”.
Come ottenere il meglio dal Tivoli Audio Music System
1. Considerate il Tivoli Audio Music System alla stregua di un sistema audio hifi a tutti gli effetti.
Sebbene possa essere collegato all’uscita audio di un computer o laptop, il Music System
non va inteso per un ascolto ravvicinato. Il Music System è nato come alternativa ai sistemi
hi-fi stereo tradizionali e come questi va ascoltato a distanza per ottenere i migliori risultati
acustici.
2. Le regolazioni SpacePhase™ Wide e l’equalizzazione delle basse frequenze consentono di
ottimizzare il suono del Music System in funzione del tipo di musica, delle dimensioni della
stanza, del livello di ascolto. La Tivoli Audio ha speso molto tempo e risorse nel ricerca di un
suono di alta qualità. Come norma, è consigliato tenere su “0” il controllo delle alte, mentre
per un ascolto a livelli di volume sostenuti è preferibile escludere l’equalizzazione delle basse
57

Italiano
1 2347 89 5 6
(EQ OFF) e scegliere la modalita’ “STEREO” o “MONO”.
3. Se si dovessero presentare delle incertezze nel funzionamento, si consiglia di disconnettere
il cordone di alimentazione per circa 60 secondi, quindi connetterlo di nuovo. Questa
operazione dovrebbe ristabilire il normale stato di funzionamento.
Guida alle funzioni (pannello posteriore):
1. FM ANTENNA (SELETTORE ANTENNA FM): questa funzione commuta tra antenna FM
interna e quella esterna. Qualora si opti per l’uso di quella esterna, a corredo, selezionare
su “EXTERNAL”. Questa operazione non influisce sull’antenna AM.
2. EXTERNAL FM ANTENNA (INGRESSO ANTENNA FM ESTERNA): E’ la connessione per
l’antenna FM esterna. Nella maggioranza dei casi la ricezione è migliore usando l’antenna
esterna. Per evitare che si danneggi, non rimuovere mai il connettore dell’antenna tirandola
per il cavo. E’ consigliato afferrare saldamente il corpo del connettore (nero) ed estrarlo con
attenzione. Per saperne di più vedi “RICEZIONE”.
Figura 13
3. EXTERNAL AM ANTENNA (INGRESSO PER ANTENNA AM ESTERNA): E’ la connessione
per l’antenna AM esterna a corredo. Essa è dotata di connettore mini-jack maschio stereo
da 1/8". Per ricevere le stazioni radio AM, una volta collegata all’apposito ingresso, l’antenna
va poggiata sulla propria base ed orientata per ottimizzare la ricezione (Figura 13). Se
l’antenna non viene collegata non sarà possibile ricevere alcuna emittente. Per saperne di
più, vedi “RICEZIONE”.
58

Italiano
4. AUX IN (INGRESSO AUSILIARIO): con questo ingresso è possibile connettersi – tramite mini-
jack maschio stereo da 1/8"- ad una sorgente esterna come un TV, un lettore MP3 o iPod o
computer. Per ascoltarlo va selezionata la voce “AUX” dopo aver premuto il tasto “SOURCE”.
Nota: prestare attenzione al livello del volume per la sorgente collegata ad “AUX”; può
essere anche sensibilmente differente rispetto a quelle interne (CD, FM, AM). Prima di
procedere all’ascolto si consiglia di azzerare il volume, quindi portarlo al livello desiderato.
5. MIX IN (INGRESSO MISCELATO): questa funzione commuta tra antenna FM interna
e quella esterna. Qualora si opti per l’uso di quella esterna, a corredo, selezionare su
“EXTERNAL”. Questa operazione non influisce sull’antenna AM.
6. REC OUT (USCITA PER REGISTRARE): E’ possibile effettuare una registrazione dal Music
System collegando questa uscita stereo (con livello non regolabile) all’ingresso (input) di
un registratore audio a cassette o di altro tipo. La connessione è predisposta per accettare
mini-jack maschio da 1/8". Utilizzando questa uscita i diffusori rimarranno in funzione.
7. BASS LEVEL (LIVELLO BASSI): con questa manopola si può regolare il livello dell’emissione
della gamma bassa (ruotando a destra aumenta; a sinistra diminuisce). Questa facoltà è
destinata a migliorare la qualità del suono, NON ad aumentarne la potenza. Tivoli Audio
raccomanda di tenere la manopola posizionata al centro. Se i bassi dovessero suonaredistorti,
abbassare immediatamente il volume dal pannello frontale o diminuire il livello d’emissione
da quello posteriore.
8. PRESA PER IL CAVO DI ALIMENTAZIONE: Collegare il cordone PRIMA all’apparecchio,
POI alla presa di rete a muro. Se il cordone viene scollegato accidentalmente, aspettare 60
secondi prima di reinserirlo. Al riavviamento, se è presente un CD nella macchina, questo
viene espulso.
9. VANO BATTERIE: le batteria allegate, di tipo AA, vanno correttamente installate al fine di
mantenere attive le funzioni di “ALARM” e “CLOCK” quando l’apparecchio non è alimentato
dalla rete. Controlla le batterie annualmente. Sul display può apparire l’avviso “No Batteries”
ad indicare che non siano presenti o siano scariche. Si prega di smaltire le batterie esauste
secondo le leggi vigenti nel proprio paese. Quando l’apparecchio si trova ad operare con
alimentazione a batterie (in caso di black-out, p.e.), per risparmiare energia non saranno attivi
display e led, mentre le impostazioni temporizzate (timer o sveglia) saranno in perfetta efficienza.
In questo caso, allo scadere del tempo memorizzato, sarà attivato solo il tono di avviso anche
se diversamente impostato all’inizio, su CD, FM, AM.
59

1
5
6
2
3
4
Italiano
Telecomando (per usarlo, rimuovere la linguetta di protezione):
Oltre alla duplicazione della maggior parte delle funzioni accessibili dal pannello frontale, l’uso
del telecomando aggiunge le seguenti:
1. REP (RIPETIZIONE): Usando il lettore CD, premendo una
volta il tasto “REPEAT” si otterrà una ripetizione del brano
che si sta ascoltando. Premendo 2 volte, si riascolterà
l’intero disco. Per cancellare questa funzione, premere
ancora il tasto o selezionare “STOP”. Quando questa
funzione è attiva, sul display vengono mostrate le seguenti
icone: “REPEAT ONCE ” (ripetere una volta), e “REPEAT
ALL ” (ripetere tutto).
2. SHUFF (LETTURA A CAMPIONE): premendo questo
pulsante con il CD in funzione si otterrà una riproduzione
a campione dei brani contenuti nel disco. Quando questa
funzione è attiva, sul display apparirà la seguente icona:
“ ”. Per annullarla basta premere nuovamente lo stesso
tasto o premere “STOP”. Diversamente, la riproduzione
terminerà dopo aver esaurito tutte le tracce presenti.
Premendo i tasti di ricerca tracce ( ) durante la
funzione “SHUFFLE”, può accadere la ripetizione del
brano. Nota: nei CD masterizzati con files MP3 ricchi di
tracce, può capitare che un brano venga riprodotto più
volte. La funzione “SHUFFLE” non può essere utilizzata contemporaneamente a “REPEAT 1”,
“REPEAT ALL” e “INTRO”.
3. INTRO (RICERCA DEI BRANI): Attivando questa funzione con un CD inserito, è possibile
ascoltare i primi 10 secondi di ogni traccia. L’attivazione di “INTRO” appare sul display con
la seguente icona: “ ”. Premere una seconda volta per disattivare “INTRO”, oppure premere
“STOP”. Differentemente, la riproduzione ha fine dopo aver letto l’intera sequenza di tracce
registrate.
Nota: le funzioni su illustrate non possono essere attivate durante il caricamento del disco.
Se due di queste funzioni sono usate contemporaneamente, le icone di queste saranno
mostrate alternativamente sul display
4. FOLDER +/–: comando per muoversi all’interno delle tracce MP3.
5. ENTER (ATTIVAZIONE): Attiva la stessa funzione che si ottiene premendo la manopola del
volume sul pannello frontale, ovvero selezionare o regolare le frequenze alte.
6. 7,8,9,0: sono le tracce CD aggiuntive accessibili direttamente da telecomando. Integrano
quelle da 1-6 presenti sul pannello frontale. Le tracce possono essere digitate in sequenza
con un intervallo di 2 secondi tra una selezione e la seguente.
Le emittenti radio memorizzate possono essere richiamate usando i tasti da 1 a 6 del telecomando, mentre per la preselezione si possono usare esclusivamente i tasti con gli stessi numeri
60

Italiano
presenti sul pannello frontale dell’apparecchio.
Per controllare il volume a mezzo telecomando si devono usare i tasti contrassegnati con le frecce,
orientati su/giù ( ), mentre per la regolazione della sintonia in FM o AM, si devono premere
quelli disposti destra/sinistra ( ), gli stessi che si utilizzano per la selezione delle tracce CD.
Utilizzando il telecomando a distanza ravvicinata il display può lampeggiare. Ciò è normale ed è
l’effetto diretto della capacità del telecomando di agire anche a distanze maggiori.
Al momento di sostituire le batterie esaurite dal telecomando, usare quelle da 3V al litio #CR2025,
inserendole con il polo positivo (+) verso la parte inferiore del telecomando.
Note riguardanti il lettore CD:
• Usando CD con files MP3/WMA, può accadere che il display non mostri il “tempo totale” della
registrazione e ciò a causa della tavola dei contenuti spesso troppo lunga da leggere. Il
“tempo totale” è illustrato nei CD commerciali, ma se entrambi i tasti +/- sono premuti, questo
scomparirà fino a che lo stato di funzionamento iniziale non sia ristabilito.
• La riproduzione può essere leggermente ritardata durante la lettura della tavola dei contenuti.
• Le funzioni CD non sono attive durante il caricamento del disco.
• Non usare il tasto “EJECT” per caricare il CD.
• Cambiare sorgente durante la riproduzione del CD causa l’interruzione della lettura.
Selezionando nuovamente CD la riproduzione riprenderà.
• La qualità sonora dei CD masterizzati, MP3 compresi, come quella dei CD commerciali, può
variare fortemente tra una registrazione ed un’altra. Lo stesso dicasi per i lettori MP3.
• NON usare alcun tipo di liquido per la pulizia delle lenti del pick-up laser del CD che non sia
espressamente progettato per le macchine con cassettino slot-load.
• Evitare di incurvare eccessivamente il disco al momento del caricamento o dell’espulsione.
• Non trasportare l’apparecchio durante la riproduzione di un disco e non spedire l’unità con
un CD nel vano di lettura.
• Non provare ad inserire un CD nel caricatore, se ce n’è già uno presente all’interno.
• Non inserire nel caricatore CD di forma non consueta o “single CD” da 3".
• Si può verificare un ritardo nell’avvio della riproduzione di un disco MP3 o WMA a causa della
lettura della directory.
• Le etichette di carta applicate su i CDR/CDRW possono disturbare la lettura o anche
danneggiare la macchina.
• I dischi che presentano forti graffiature possono creare problemi di lettura.
• Non inserire nulla che non sia un disco nella fessura del caricatore CD.
• Se il lettore dovesse accidentalmente manifestare problemi, scollegare il cavo di alimentazione
per 60 secondi, quindi reinserirlo nuovamente.
61

Italiano
Ricezione/RDS:
L’antenna per FM interna - incorporata nel cavo di alimentazione – è in grado di fornire una buona
ricezione del segnale. L’antenna esterna a corredo è utile ad ottenere una ricezione ancora migliore.
Per utilizzarla correttamente, estendere completamente il cavo d’antenna evitando di formare
grovigli e/o intrecciandolo con il cordone di alimentazione. Collocando l’antenna vicino ad una
finestra, o su un muro esterno, si avrà una ricezione migliore rispetto ad una posizione più interna.
Un’antenna per esterni (da non confondere con “antenna esterna”), da collocare all’aperto, sarà la
soluzione ideale per la migliore ricezione possibile. Un’ulteriore alternativa è l’impiego di un’antenna
FM a dipolo (non fornita), la quale ha però bisogno di uno specifico adattatore. Si può anche
provare a collegare l’apparecchio ad una presa per antenna TV coassiale a 75 ohm. In qualsiasi
caso, usando l’antenna FM esterna, si deve selezionare “EXTERNAL” sul pannello posteriore del
Music System. Altrimenti, va lasciato su “INTERNAL”. Questa impostazione non ha effetto sulla
banda AM. Se si dovesse captare un’emittente particolarmente rumorosa, impostare nella funzione
“AUDIO”, la modalità “MONO”. Ciò dovrebbe fortemente ridurre il fruscio. Tenendo lontano dalle
antenne il cordone di alimentazione si migliora la ricezione.
Il Radio Data System (RDS) trasmette in Europa e USA testi informativi assieme all’emissione
audio. Quando questo servizio è attivo, ciò viene segnalato nell’angolo superiore destro del
display. Non tutte le stazioni radio operano con l’RDS, pertanto questa segnalazione può essere
assente. Laddove il segnale trasmesso fosse troppo debole, il testo RDS può non apparire, o
essere confuso e parziale. In tal caso è consigliato ricercare una posizione migliore per l’antenna
FM. Il contenuto RDS è determinato dal segnale emesso da ogni singola stazione FM, pertanto
se i dati saranno mostrati in modo non corretto, ciò non si deve ad un malfunzionamento
dell’apparecchio. Ci sono anche delle limitazioni per il tipo di caratteri che possono essere
illustrati. Quindi può normalmente accadere che ci siano degli spazi vuoti tra i caratteri, o che
questi siano di tipo differente laddove non è possibile riprodurre uno specifico tipo di carattere di
testo. Nota: il testo RDS non è mostrato quando si seleziona “SLEEP”. Operando in banda AM,
l’RDS non è attivo.
Per la banda AM, utilizzare l’antenna apposita, dotata di supporto integrato (Figura 13), quindi
collegarla, con il suo mini-jack stereo maschio, al connettore posto sul retro dell’apparecchio e
siglato “AM ANTENNA”. Orientare l’antenna per ricercare la migliore ricezione.
Edifici costruiti in cemento armato, acciaio, con pannelli in alluminio, sono ostili ad una buona
ricezione. Elettrodomestici, termocoperte, computers ed altri apparati elettronici possono
affliggere in modalità diverse la ricezione, inducendo rumore o interferenze. Se si dovessero
manifestare queste difficoltà, si consiglia di allontanare il Music System dalle fonti di disturbo
e/o provare a collegarlo ad una presa di rete dove non sono presenti altri dispositivi elettronici.
Le superfici metalliche possono disturbare la ricezione di segnali AM.
Collocazione:
Collocare il Music System su una superficie piana e solida abbastanza da sopportarne il peso.
L’inserimento in una libreria, in mobile chiuso o accostato al muro, può produrre un basso gonfiato,
creando un suono innaturale. Non ostacolare le fessure sul pannello posteriore della macchina.
Esse sono funzionali alla produzione del suono e provvedere al raffreddamento interno.
62

Italiano
Il lettore CD incorporato nel Music System ha un’eccellente protezione contro gli urti, ma non è
di tipo “anti-shock”. Pertanto suggeriamo di posizionare il Music System su una superficie piana
e livellata, non soggetta a vibrazioni.
Il Music System è magneticamente schermato e può essere posto accanto vicino ad uno schermo
TV o computer.
Pulizia:
Per motivi di sicurezza, assicurarsi di aver scollegato dalla rete elettrica il Music System prima di
procedere alla pulizia. Mai usare abrasivi o solventi. Le impronte digitali possono essere rimosse
dal cabinet semplicemente usando un panno morbido. Il frontale può essere pulito, se proprio
necessario, con un panno appena umido.
Essendo il cabinet del Music System in vero legno, può accadere che non abbia la stessa,
esatta finitura e/o colore degli altri componenti Tivoli Audio.
Nota anche che talune finiture, in particolar modo il noce, possono scurirsi con una
prolungata esposizione alla luce solare. Questo è normale per il legno naturale.
Specifiche tecniche:
Modello: Tivoli Audio® Music System
Tipo: sistema hi-fi con lettore CD e radio digitale FM e AM.
Altoparlanti: 2 gamma intera da 7.62 cm, schermati magneticamente; 1 subwoofer
da 13.34 cm, schermato magneticamente
Dimensioni: 35.88 x 13.34 x 24.13 cm (lxhxp)
Peso: 5.9 kg
63

This manual was written by Peter Skiera and cannot be
reproduced in whole or in part without the permission
of Tivoli Audio. Tivoli Audio shall not be held liable for
operational, technical, or editorial errors/omissions.
For more information about other exciting
products from Tivoli Audio, please visit our
website or contact us directly:
Tivoli Audio
One Broadway, Suite 600
Cambridge, Massachusetts 02142
Tel: 877-297-9479
www.tivoliaudio.com
MSYCE0307
64
 Loading...