

Tivoli Audio Model Three User Manual

Model Three
™
OWNER’S MANUAL
MO DE L
TH RE E
Tivoli Audio
12
6
9 3
1
2
4
5
7
8
10
11
88
1
08
170
0
1400
1200
1000
800
70
0
600
550
90
1
06
92
1
04
94
1
02
96
98
1
00
FM
OFF
AUX
AM


Congratulations on your purchase of The Model Three.
We believe the Model Three to be one of the finest AM/FM clock radios available. Henry Kloss
dedicated over half his life introducing people to the joy of music through his finely crafted, hi-fidelity
products. From his classic AR speakers of the 1950’s, to the Model 8 table radio of the 60’s, to the
Tivoli Audio radios of today, he consistently impressed consumers and critics alike with the quality
and value of his offerings.
In order to take full advantage of what your new Model Three is capable of, please take a moment to
fully read this owner’s manual. If you have any questions, do not hesitate to contact your dealer or
Tivoli Audio directly. It is a good idea to save the carton and original packing should you ever need
to ship your radio, as shipping damage is not covered by the factory warranty.
On behalf of all of us, thank you for choosing Tivoli Audio, and enjoy your new clock radio!
About Tivoli Audio:
Tivoli Audio was started by Model Three designerTom DeVesto with the goal of bringing simple to use,
high-quality audio products to the consumer at reasonable prices. His long professional association
with Henry Kloss includes co-founding Cambridge SoundWorks*. As the CEO and head of research
and development at his former company, Tom was responsible for the development of many of the
best-selling home entertainment and multi-media products on the market today. He also held senior
management positions in product development for both Advent and Kloss Video.
Henry Kloss (1929-2002) began his long love affair with audio back in the early 1950’s when, as a
student at M.I.T., he began building speaker enclosures for fellow students who wanted to exploit the
sound of live FM broadcasts of the Boston Symphony Orchestra. With encouragement from Major
Edwin Armstrong, the inventor of FM, and M.I.T. lab staff, he co-founded Acoustic Research in 1952.
Here, Henry helped develop the revolutionary AR1 acoustic suspension loudspeaker, which forever
changed the way audio was reproduced. In 1957 he went on to co-found KLH where he introduced
audio enthusiasts to the Model Six loudspeaker, Model Eight FM table radio, and the Model 11 portable phonograph. Ten years later he founded Advent where, along with great sounding speakers,
he produced one of the first projection televisions (which later earned him an Emmy) and one of the
first consumer cassette decks with Dolby* B noise reduction. Kloss Video entered the picture in 1977.
After Kloss Video, Henry co-founded Cambridge SoundWorks in 1988 along with long-time associate
Tom DeVesto, offering factory direct savings in hi-fi and manufacturing the number-one selling multimedia speakers. In 2000, at the age of 70, Henry emerged from retirement to once again team-up
with DeVesto to produce the critically acclaimed Model One mono table radio.
*Dolby is a registered trademark of Dolby Labs, Inc.
*Cambridge SoundWorks is a registered trademark of Creative Labs, Singapore.
English
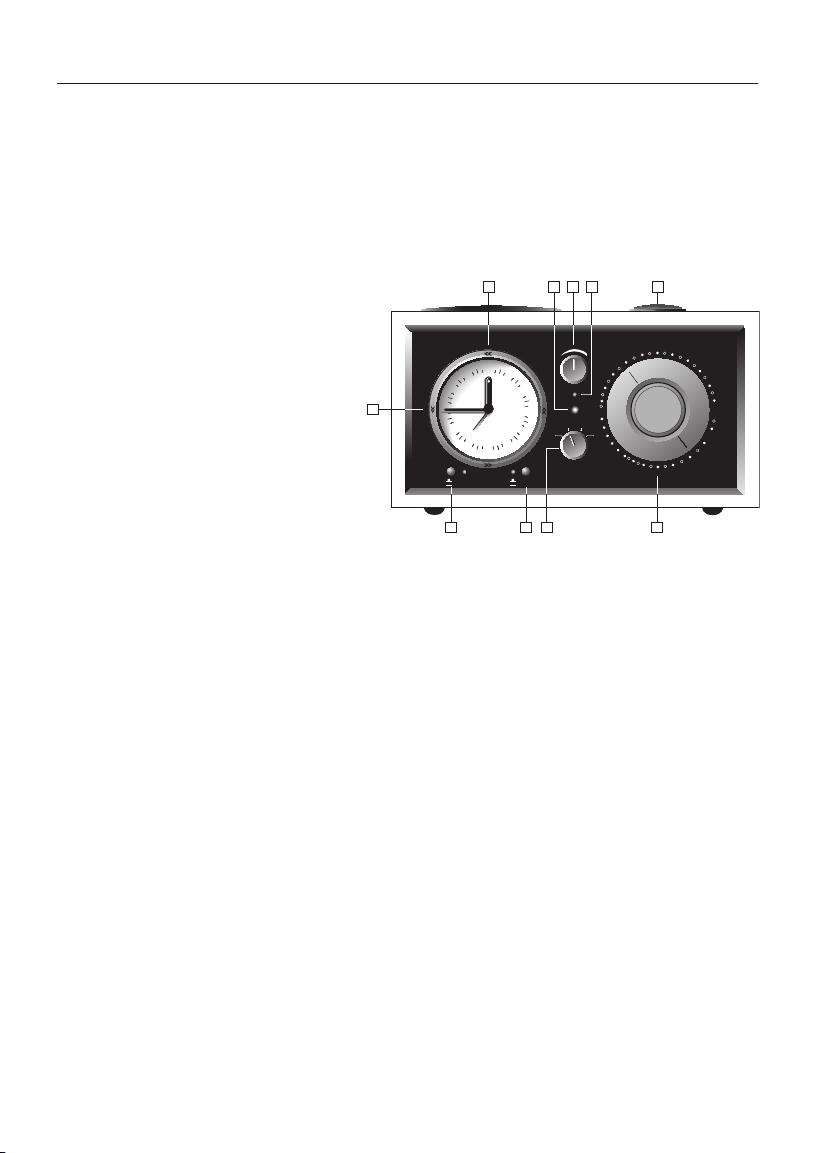
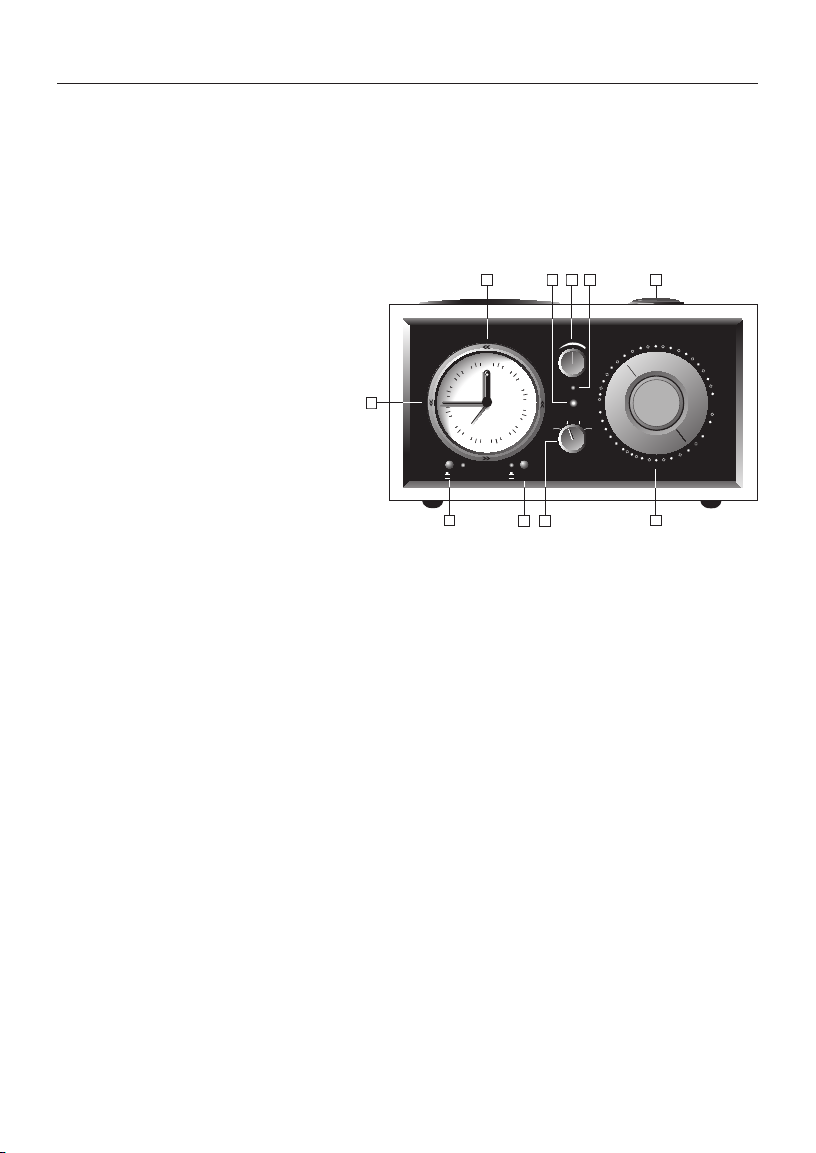
Guide to features (front panel):
1. VOLUME: Turn the volume knob to the right to increase the volume or to the left to decrease the
volume. This knob will also control the volume of headphones (not included) when connected.
2. SOURCE KNOB: Turn the knob 1 click to the right to select the FM band, 2 clicks to the right to
select the AM band, or 3 clicks to the right to select the auxiliary input.
3. TUNING DIAL: Turn the analog tuning dial to the right or to the left to change the AM and FM
frequency range.
4. POWER LIGHT: Glows green when
the Source knob is in any position other
than Off, except when the Alarm button
is activated.
5. TUNING INDICATOR: Glows bright amber when best tuning has been achieved.
Some listenable AM stations will not light
the tuning indicator and should be tuned
by ear for the clearest signal.
6. ALARM: Once you have set the wakeup time using the Alarm Thumbwheel, push
this button in to activate the alarm and the
corresponding green LED will light. The
LED will remain lit until the Alarm button is turned off. Push the Alarm button out to deactivate the
alarm and the LED will extinguish. See “How to set the alarm” for more information.
7. SLEEP: Turn the source knob to AM or FM, set the radio to a station you wish to fall asleep to and
adjust the volume to the desired level. Press the Sleep button and the corresponding green LED will
light. The radio will turn off automatically after approximately 20 minutes. The LED will remain lit until
the Sleep button is turned off or when Sleep has ended but the Sleep button is still pressed in.
8. ALARM THUMBWHEEL: Rotate the aluminum Thumbwheel counterclockwise until the Alarm hand
points to the designated time you wish to wake to. Do NOT turn the Thumbwheel clockwise or you
may damage the mechanism. See “How to set the Alarm” for more information.
9. SNOOZE (top of cabinet): When the Alarm sounds, press, hold, and then release the Snooze
button to silence the Alarm for approximately 5 minutes. After 5 minutes, the alarm sound will automatically resume.
10. CLOCK: This quartz analog clock features a fine mechanical quartz movement for superb accuracy. The clock operates off of a single “AA” battery so power failures will not affect the clock’s
accuracy. Check the battery annually so the clock remains accurate. The clock’s illumination cannot
be turned off or adjusted. It is normal for the light to take several seconds to extinguish if the power
supply is disconnected.
FM
OFF
ALARM OFF
ALARM ON
AUX
AM
MO DEL T HRE E
Tivoli Audio
2
4
3
1
5
88
10
8
1400
1700
1200
1000
800
700
600
550
90
10
6
92
10
4
94
10
2
96
98
10
0
12
6
3
1
2
4
5
7
8
10
11
7
6
8
9
10
9
SLEEP OFF
SLEEP ON

English
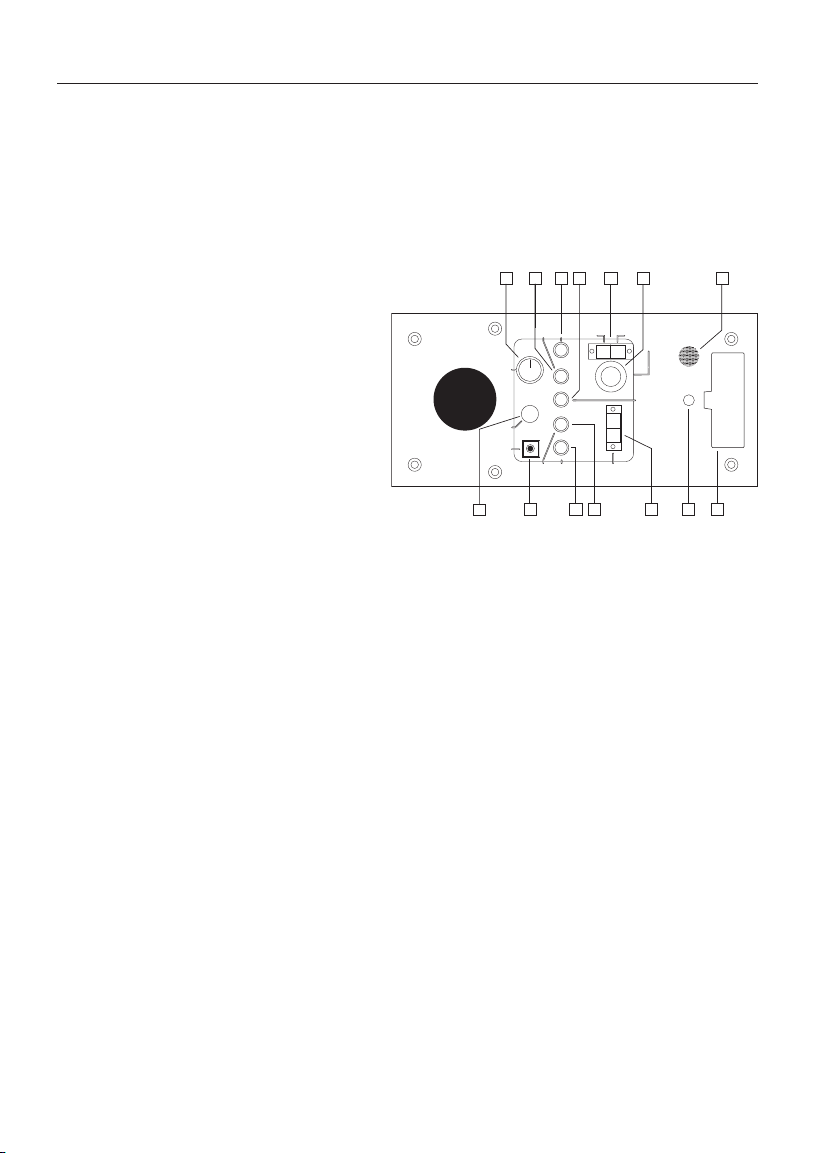
Guide to features (rear panel):
1. BALANCE: With the companion speaker (sold separately) connected, set the Mono/Stereo switch
to Stereo. Turn the balance knob upward to hear the left (main unit) speaker, or downward to hear the
right (companion) speaker. The center detent provides equal balance between the two speakers.
2 R SPR: Connect the male RCAcable from the right companion speaker (sold separately) to this
input and switch the Stereo/Mono switch to Stereo. Connecting a speaker other than the Tivoli Audio
Model Three companion speaker will void your
warranty and possibly damage your unit.
3. 12-16VDC: Connect the included AC power
supply to this input or use an optional DC
power supply. Do not plug the Model Three
into an outlet controlled by a wall switch.
Should the Model Three power supply ever
be misplaced or damaged, use only a like
replacement.The connector is 5.5mm/2.1mm
center positive.
4. ANTENNASWITCH: Switch between internal and external FM antennae. If the included
FM antenna is used, set this switch to external.
This switch has no affect on AM reception.
5. EXTERNAL FM CONNECTION: The Model Three has built-in AM and FM antennae. To improve
FM reception, insert the end of the supplied FM antenna into the center of this “F” connector and
set the switch to External. Adjust the wire for best reception. See the section marked “Reception” for
more information. This connection has no affect on AM reception.
6. HEADPHONE: Connect a headset (not included) to this stereo output for private listening. The
headphone volume is controlled by the Model Three’s volume knob. Connecting a pair of headphones
will mute the Model Three’s speaker. This jack accepts a 1/8" stereo male mini plug.
7. SUB OUT: Connect Tivoli Audio’s Model Subwoofer (sold separately) to this output to enhance the
bass. This jack accepts a 1/8" stereo male mini plug.
8. AUX IN: To hear audio from another device , such as Tivoli Audio’s Model CD, connect the device’s
audio output to this stereo input and switch the source knob to Aux. Note that you may need to adjust
the volume level differently for an auxiliary device than the level normally used for radio listening. This
jack accepts a 1/8" stereo male mini plug.
9. REC OUT: You may record from the Model Three by connecting a cassette deck or other recording
device to this fixed level, stereo output. You may also use the Model Three as a high-performance
AM/FM analog tuner by connecting a preamplifier or integrated amplifier to this output. The Model
Three’s speaker will not be muted when using this output. This jack accepts a 1/8" stereo male mini
plug.
10. MIX IN: Connect your computer’s (or other device) audio output to this stereo input to hear audio
mixed-in with either the tuner or auxiliary device if one is connected. The volume level of this input
must be adjusted at the source. This jack accepts a 1/8" stereo male mini plug.
11. MONO/STEREO: This switch should remain in the Mono position unless the right companion
speaker (sold separately) is connected, in which case the Stereo position should be selected. If you are
using the companion speaker and have the switch set to Stereo, you may wish to experiment with
Tivoli Audio
3
2
6
7
10
1
9
4
5
11
8
13
12
14

English
this switch during radio listening, as the Mono position may help to clean up FM static noise. The
Headphone and Record outputs are Stereo and are not affected by this switch, unless the
Source knob is set to AM (which is always Mono) or FM and this switch is set to Mono.
12. TIME SET: Briefly press and release this button to advance the hands in small increments. Press
and hold this button to continuously advance the clock’s hands. Release the button when the clock
is set properly. Be sure the alarm button is in the Off position when setting the time. See “How to set
the clock”.
13. ALARM GRILLE: The alarm beep emits from this grille. Do not block this grille
14. BATTERY BACK UP: Remove the battery cover and install a fresh major brand 1.5V “AA” alkaline
battery, observing correct +/ – polarity. The clock operates off of the battery continuously and the
battery also acts as a back up. In the event of a power failure, the battery back up will maintain the
clock’s operation and sound the wake-up tone if the alarm button is in the On position, provided a fresh
battery is correctly installed. The clock face will not illuminate and the radio will not operate during a
power failure in order to conserve battery life. Check the battery’s strength annually and replace only
with a major brand, 1.5V “AA” alkaline battery. If the clock stops operating, replace the battery. Discard
spent batteries according to your state/country’s regulations. See also “How to set the clock”.
WARNING
1.
For your safety, keep the Model Three a safe distance away from a naked flame, such as a
lit candle.
2. The recommended operating temperature range for the Model Three is 5 degrees C
- 40 degrees C.
3.
The 12-16VDC input is suited for operating the Model Three in a boat or camper using an optional
12VDC, 2A fused adaptor.
4.
The apparatus shall not be exposed to dripping and splashing and that no objects filled with
liquids, such as vases, shall be placed on the apparatus.
5. Attention: when the switch is in position OFF, the apparatus is still in tension
PLEASE NOTE THAT THE NATURAL WOOD CABINET COLOR MAY VARY AND THEREFORE
MAY NOT MATCH.
Français
Caractéristiques (panneau avant):
1. VOLUME: tournez le bouton du volume à droite pour augmenter le volume, à gauche pour le
diminuer. Ce même bouton contrôle également le volume du casque (non compris dans la fourniture)
au cas où un casque serait branché.
2. BOUTON DE SÉLECTION: tournez le bouton d’un cran à droite pour sélectionner la bande FM,
de 2 crans à droite pour sélectionner la bande AM, de 3 crans à droite pour l’entrée auxiliaire.
3. LA SYNTONISATION: Tournez le
bouton de la syntonie à droite ou à gauche
pour changer les fréquences des bandes
AM et FM .
4. TÉMOIN DE L’ALLUMAGE: le témoin
vert indique que le bouton de recherche se
trouve sur une position quelconque autre
que la position « éteint » exception faite du
cas où le réveil serait inclus.
5. INDICATEURS DE SYNTONIE: la
meilleure réception possible atteinte, les
deux indicateurs lumineux s’allument. Pour
un certain nombre de stations de la bande
AM, les indicateurs ne s’allument pas.
Dans ce cas, vous chercherez la meilleure réception en vous fiant de votre écoute.
6. RÉVEIL: pour régler le réveil, programmez l’heure et poussez le bouton pour l’activer. Un témoin
vert s’allume confirmant l’opération. Le témoin reste allumé tant que le bouton du réveil n’est
pas désactivé. Pour de plus amples informations, lisez “Comment régler le réveil” dans le livret
d’instructions en anglais.
7. DORMIR: Tournez le bouton de la syntonie sur AM ou FM, réglez la station radio sur laquelle
vous voulez vous endormir et mettez le volume au niveau désiré. Agissez sur le poussoir “sleep”.
Un témoin vert s’allume. La radio s’éteindra automatiquement au bout de vingt minutes environ.
Le led restera allumé tant que le poussoir “sleep” n’aura pas été désactivé. Il s’éteindra lorsque la
fonction a eu lieu.
8. HEURE DE RÉVEIL: tournez la bague en aluminium autour de la montre à gauche et positionnez
l’aiguille rouge du réveil sur l’heure de votre réveil. Ne tournez pas la bague dans le sens des aiguilles
d’une montre. Cette opération pourrait casser ou endommager le mécanisme de l’appareil. Pour de
plus amples informations, lisez “Comment régler le réveil” dans le livret d’instructions en anglais.
9. SNOOZE (dessus de la radio): lorsque le réveil sonne, poussez pendant quelques secondes la
touche placée sur le dessus de la radio. Le réveil s’arrêtera de sonner pendant 5 minutes passées
lesquelles il se remettra à sonner.
10. RÉGLAGE DE LA MONTRE: la montre analogique est dotée d’un mécanisme au quartz qui
garantit une précision exceptionnelle. La montre fonctionne avec une batterie “AA” de sorte que
même une panne de courant ne pourra pas compromettre son fonctionnement. Un contrôle annuel
des batteries assurera le maintien constant et rigoureux de la qualité du produit. L’éclairage de la
montre ne peut pas être réglé ou supprimé. Il est normal que la lumière mette un certain temps à
disparaître lorsque vous ôtez la batterie.
FM
OFF
ALARM OFF
ALARM ON
AUX
AM
MO DEL T HRE E
Tivoli Audio
2
4
3
1
5
88
10
8
1400
1700
1200
1000
800
700
600
550
90
10
6
92
10
4
94
10
2
96
98
10
0
12
6
3
1
2
4
5
7
8
10
11
7
6
8
9
10
9
SLEEP OFF
SLEEP ON
Français
Caractéristiques (panneau arrière):
1. BALANCE: le “companion speaker” (vendu séparément) branché, mettez la manette Mono/Stéréo
sur “Stéréo”. Poussez la manette de Balance vers le haut pour écouter l’unité de gauche (l’unité
principale) ou vers le bas pour écouter l’unité de droite (le companion speaker). Positionnez la
manette au centre pour balancer le son des deux haut-parleurs.
2. R SPR: branchez le fil mâle RCA du “companion speaker” (vendu séparément) à l’unité principale et
mettez la manette “stéréo/mono” sur Stéréo.
Brancher une unité autre que le companion
speaker Tivoli Audio à l’unité principale de
Model Three implique la déchéance de la
garantie et le risque d’endommager la radio.
3. 12-16VDC: Branchez l’alimentateur AC,
fourni avec la radio, à cette entrée. Faites
bien attention à ne pas connecter Model Three
à une prise commandée. Au cas où vous
perdriez ou abîmeriez l’alimentateur fourni,
vous devrez utiliser un alimentateur équivalent
ou identique. Le connecteur est de 5.5 mm /
2.1 mm avec un centre positif.
4. ANTENNE: commutateur de l’antenne FM
interne à l’antenne externe. Si vous utilisez l’antenne FM externe (fournie avec la radio) n’oubliez
pas de mettre la manette de l’antenne sur “external”. Ceci n’implique aucune interférence avec la
réception de la bande AM.
5. CONNEXION FM EXTERNE: Model Three contient, intégrées à l’intérieur, les antennes AM et FM.
Pour améliorer la réception en FM, vous pouvez introduire le terminal de l’antenne externe fournie
avec la radio dans le centre du connecteur “F” et mettre la manette sur “external”. Déplacez le fil
jusqu’à obtenir la meilleure réception du son. Pour de plus amples informations, consultez la section
“Réception”. Cette opération n’implique aucune interférence avec la réception de la bande AM.
6. CASQUE: Connectez le casque (non compris dans la fourniture) au stéréo pour une écoute
personnelle. Le volume du casque se règle à l’aide du bouton du volume de Model Three. La
connexion du casque inhibe le son des hauts-parleurs principaux de la radio. La prise n’accepte
que les jacks de 1/8”.
7. SUB OUT: Connectez le subwoofer de Tivoli Audio (vendu séparément) à cette entrée pour
améliorer les basses fréquences. La prise n’accepte que les jacks de 1/8”.
8. AUX IN: Pour écouter la radio avec une autre source telle que par exemple Tivoli Audio Model
CD, connectez la source externe à ce stéréo et mettez la touche d’allumage sur Aux. Attention, il
pourrait s’avérer nécessaire de régler différemment le niveau du volume par rapport à ce que l’on
fait en écoutant normalement la radio. La prise n’accepte que les jacks de 1/8”.
9. REC OUT: vous pouvez enregistrer depuis Model Three. Connectez un dispositif d’enregistrement
au “rec out” placé à l’arrière de l’unité radio. Vous pouvez utiliser Model Three comme syntonisateur
AM/FM analogique en le connectant à un préamplificateur ou à un amplificateur intégré. Le hautparleur de Model Three ne sera pas inhibé par l’utilisation de cette unité externe. La prise n’accepte
que les jacks de 1/8”.
10. MIX IN: Vous pouvez connecter votre ordinateur ou tout autre dispositif doté de sortie audio à
cette entrée stéréo pour un audio mixé de radio avec le dispositif auxiliaire. Le volume sera étalonné
Tivoli Audio
3
2
6
7
10
1
9
4
5
11
8
13
12
14

Français
11. MONO/STÉRÉO: Cette manette doit rester sur “Mono” si le “companion speaker” (vendu
séparément) n’est pas connecté. Au cas où il le serait, la manette devrait être remise sur la position
“Stéréo”. Si vous utilisez le “companion speaker” et si vous êtes positionnés sur “Stéréo”, vous
pourrez expérimenter la différence de son en déplaçant la manette sur “Mono” au cours de l’écoute
de la radio. Ceci pourrait rendre plus pur le son en “FM” éliminant tout bruissement de fond. Le casque
et une source extérieure d’enregistrement sont “Stéréo” et ne sont pas assujettis au déplacement
de la manette, à moins que la touche d’allumage ne soit positionnée sur “AM” (bande toujours sur
Mono) ou sur FM et la manette sur “Mono”.
12. RÉGLAGE DE L’HEURE: Poussez et relâchez rapidement le bouton “Time set” pour avancer
manuellement d’une minute à la fois. Poussez et tenez poussé le bouton pour déplacer l’aiguille de
la montre manuellement et rapidement. Relâcher le bouton lorsque vous avez obtenu l’heure désirée.
Assurez-vous que le bouton du réveil est sur “Off” lorsque vous réglez l’heure. Pour de plus amples
informations, lisez le chapitre “Réglage de la montre ”
13. GRILLE DU RÉVEIL: le son du réveil est émis à travers cette grille. Ne la bloquez jamais de
quelque manière que ce soit.
14. BATTERY BACK UP: ôtez les vieilles batteries et remplacez les avec des neuves du genre
1.5V “AA” alcalines en respectant le positionnement correct des polarités +/ – . La montre fonctionne
également sans batterie. En cas de coupure de courant, la batterie, si elle est chargée et correctement
positionnée maintiendra le réglage de la montre et le son du réveil actifs à la condition que le bouton
du réveil soit positionné sur “On”. L’éclairage de la montre et la radio ne fonctionneront pas au cours
de la coupure de courant. Ceci pour conserver la vie de la batterie. Contrôlez une fois par an l’état
de charge de la batterie. Remplacez les vieilles par des batteries neuves 1.5V “AA” alcalines, des
meilleures marques. Si la montre cessait de fonctionner, remplacez la batterie. Débarrassez-vous
des vieilles batteries conformément à la législation de votre pays. Pour de plus amples informations,
lisez également le paragraphe “Comment régler la montre”.
ATTENTION, LE BOÎTIER ÉTANT FABRIQUÉ EN BOIS NATUREL, LA COULEUR PEUT
VARIER D’UN PRODUIT À L’AUTRE, ET NE PAS CORRESPONDRE À CELLE D’AUTRES
ÉLÉMENTS.
 Loading...