

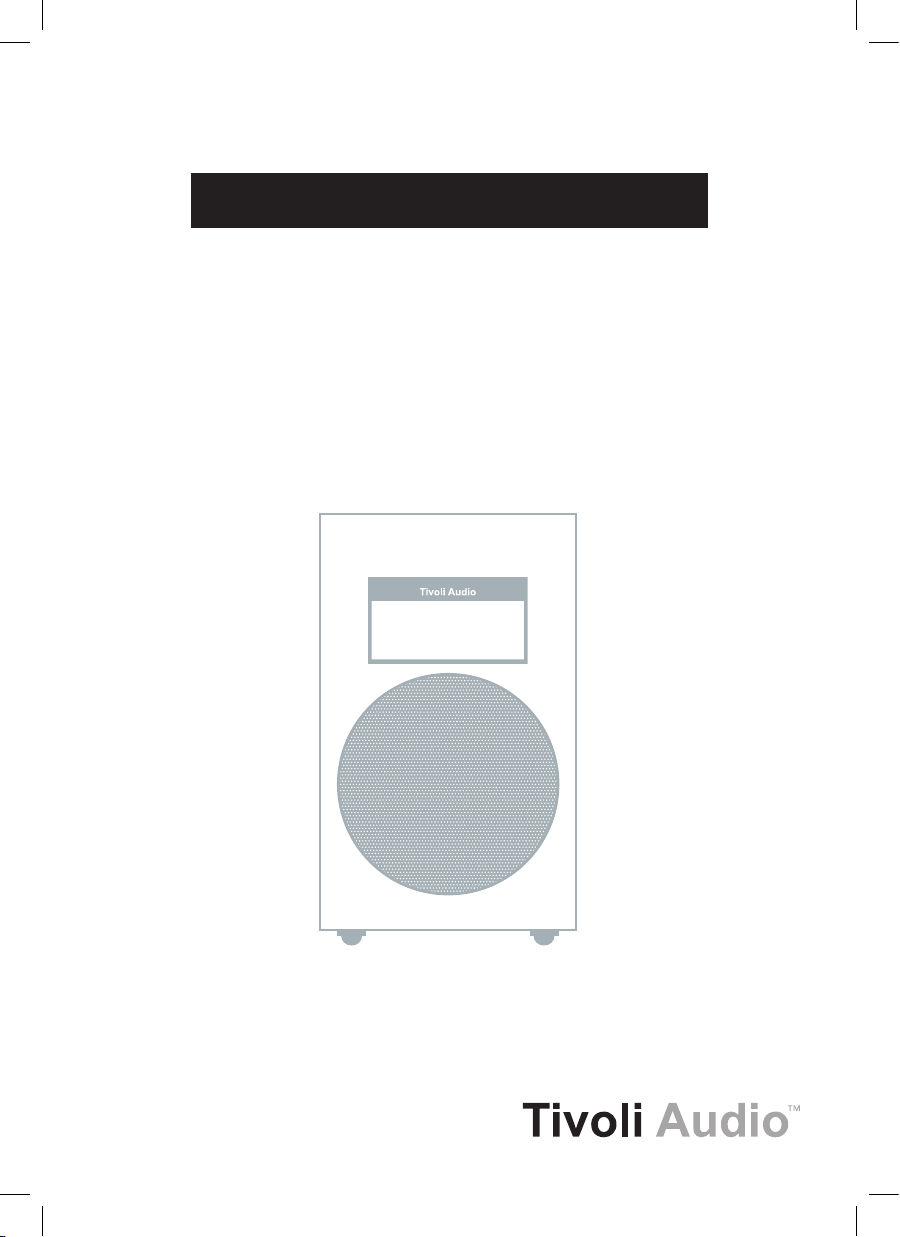
OWNER’S MANUAL
Model 10
DAB/DAB+/DMB/FM Clock Radio
™
+
1

Model 10+ Multi-language Manual:
English ............................................................................................................... 3
Dansk .............................................................................................................. 18
Deutsch ........................................................................................................... 33
Français ........................................................................................................... 50
Norsk ............................................................................................................... 65
Declaration of Conformity ............................................................................... 79

English
™
Model 10
DAB/DAB+/DMB/FM Clock Radio
Table of Contents:
Safety Instructions .............................................................................................................................4
Introduction; About Tivoli Audio ........................................................................................................ 6
Front panel controls ..........................................................................................................................7
Rear panel controls ...........................................................................................................................8
Remote control .................................................................................................................................. 9
Menu and specific features ............................................................................................................. 10
How to set alarm ............................................................................................................................. 12
Alarm options ..................................................................................................................................13
Digital radio (DAB/DAB+/DMB) mode ............................................................................................. 14
Digital Radio/FM Reception; RDS; Placement; Cleaning ................................................................ 15
Warranty ..........................................................................................................................................16
Specifications .................................................................................................................................. 17
+
3
English
Important Safety Instructions
1. Read these instructions.
2. Keep these instructions.
3. Heed all warnings.
4. Follow all instructions.
5. Do not use this apparatus near water. For example, do not use near a bathtub, in a wet basement,
near a swimming pool, and the like. WARNING! Do not expose this product to rain or moisture.
6. Clean only with a dry cloth.
7. Do not block any ventilation openings. Install in accordance with the manufacturer’s instructions.
8. Do not install near any heat sources such as radiators, heat registers, stoves, or other apparatus
(including amplifiers) that produce heat.
9. Do not defeat the safety purpose of the polarized or grounding-type plug. A polarized plug has
two blades with one wider than the other. A grounding type plug has two blades and a third
grounding prong. The wide blade or the third prong are provided for your safety. If the provided
plug does not fit into your outlet, consult an electrician for replacement of the obsolete outlet.
10. Protect the power cord from being walked on or pinched particularly at plugs, convenience
receptacles, and the point where they exit from the apparatus.
11. Only use attachments/accessories specified by the manufacturer.
12. Unplug this apparatus during lightning storms or when unused for long periods of time.
13. Refer all servicing to qualified service personnel. Servicing is required when the apparatus
has been damaged in any way, such as power-supply cord or plug is damaged, liquid has
been spilled or objects have fallen into the apparatus, the apparatus has been exposed to
rain or moisture, does not operate normally, or has been dropped.
4
English
14. The radio must be located such that the rear AC socket and connected power cord are readily
accessible.
15. This Class B digital device complies with the Canadian ICES-003.
16. For added protection for this product during a lightning storm, or when it is left unattended
and unused for long periods of time, unplug it from the wall outlet. This will prevent damage to
the product from lightning and power-line surges.
17. Operate this product only from the type of power source indicated on the rear panel.
For products using an external power supply, use an exact replacement if lost or damaged.
For products operating from battery power, refer to the user manual.
18. Unplug this product from the wall outlet and refer servicing to qualified service personnel under
the following conditions:
a. When the power supply cord or plug is damaged.
b. If liquid has been spilled or objects have fallen into the product.
c. If the product has been exposed to water or rain.
d. If the product does not operate normally by following the operating instructions.
e. If the product has been dropped or damaged in any way.
f. When the product exhibits a distinctive change in performance.
19. If the LCD becomes cracked and damaged, do not touch the liquid.
20. Keep this product a safe distance away from naked flame, such as a lit candle.
21. Do not expose this product to splashing or dripping. Objects containing liquid, such as vases
or drinking glasses, should not be placed on top of this product.
22. The recommended operating temperature range is 41˚ F to 104˚ F (5˚ C to 40˚ C).
23. As the main plug is used to disconnect the system from the mains, connect the system to an
easily accessible AC outlet.
24. The system is not disconnected from the mains as long as it is connected to the AC outlet,
even if the system itself has been turned off.
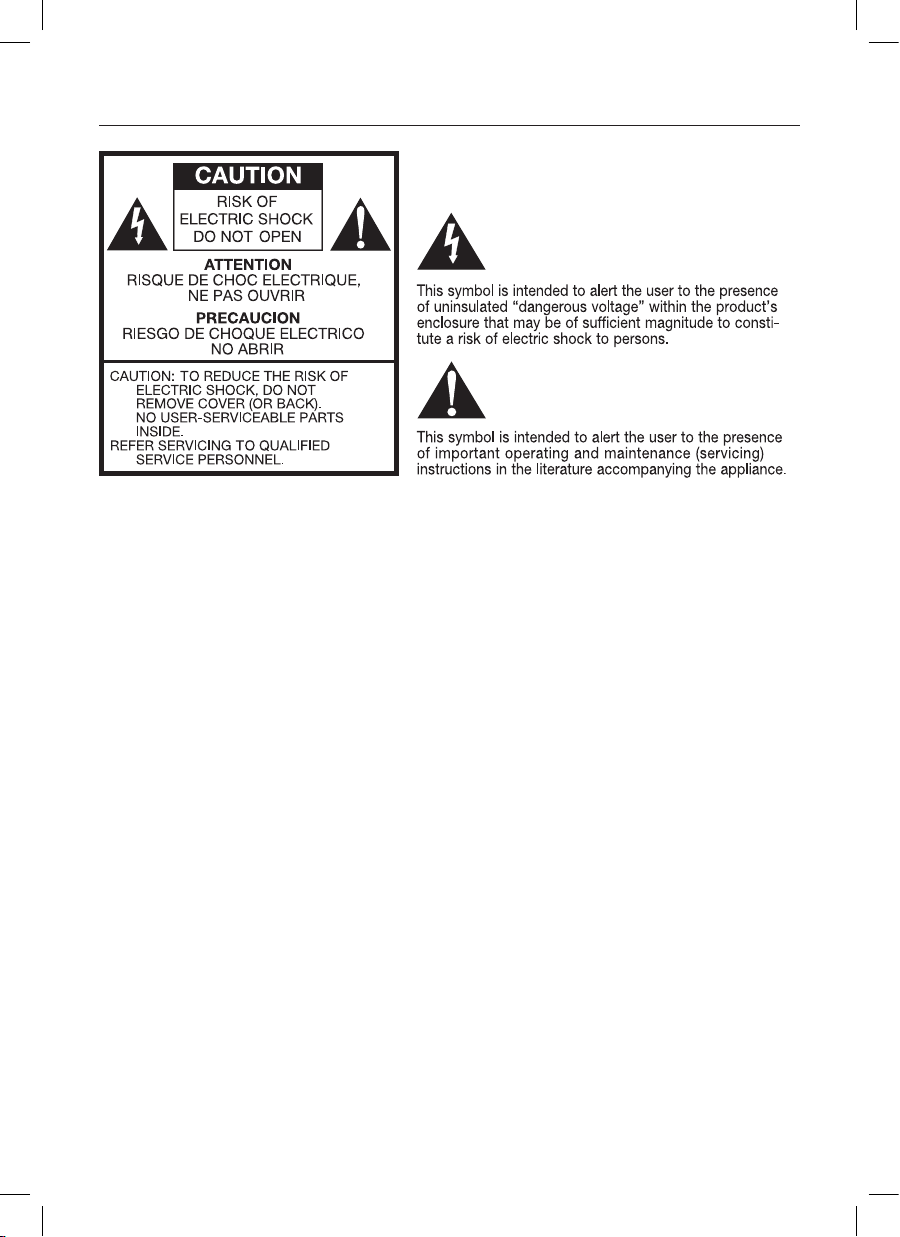
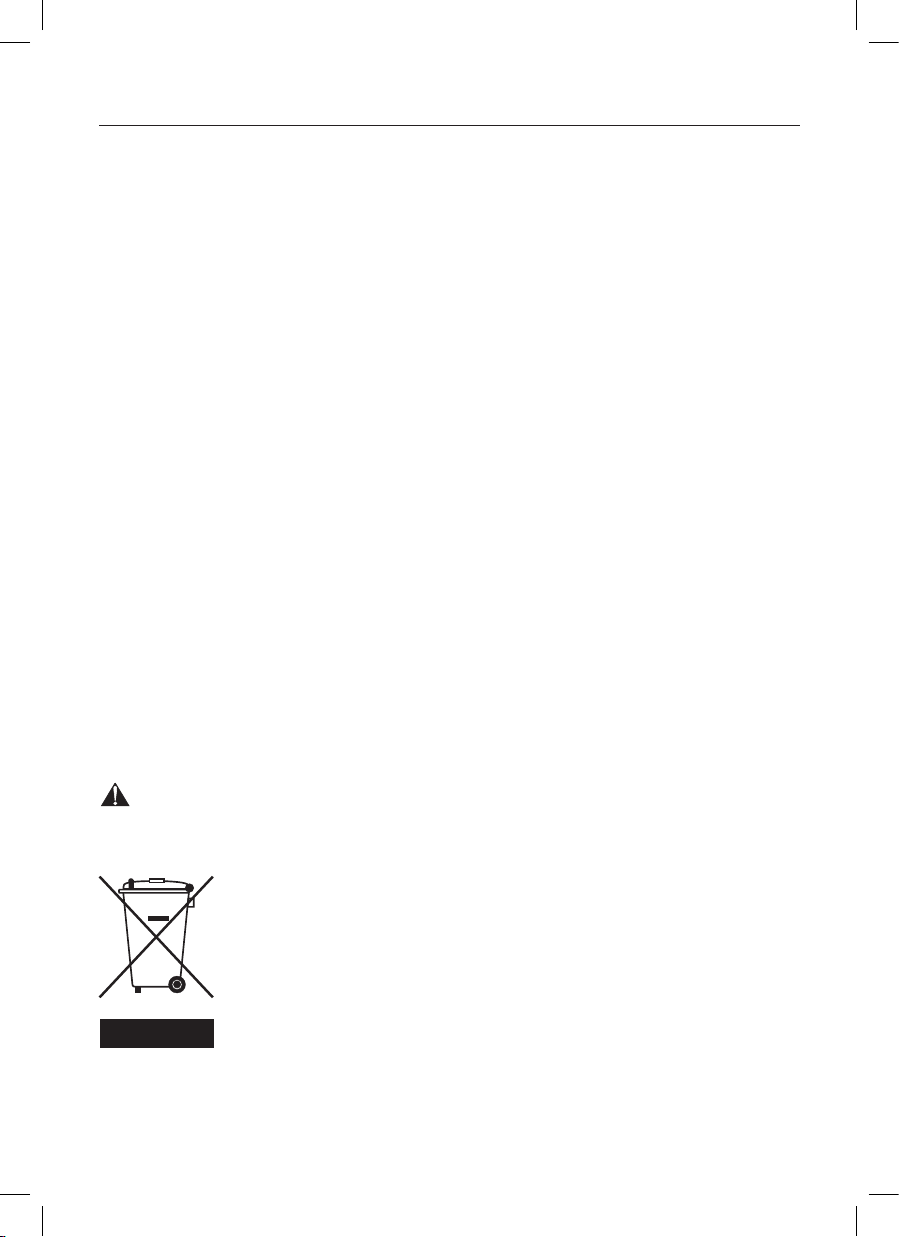
WARNING: THE MODEL 10+ EXTERNAL ANTENNA IS NOT INTENDED TO BE DETACHED.
This product can be recycled. Products bearing this symbol must NOT be thrown
away with normal household waste. At the end of the product’s life, take it to
a collection point designated for recycling of electrical and electronic devices.
Find out more about return and collection points through your local authority.
The European Waste Electrical and Electronic Equipment (WEEE) Directive was
implemented to dramatically reduce the amount of waste going to landfills,
thereby reducing the environmental impact on the planet and on human health.
Please act responsibly by recycling used products. If this product is still useable,
consider giving it away or selling it.
5

English
Model 10+ Instructions
Congratulations on your purchase. We believe the Model 10+ to be one of the finest DAB/DAB+/
DMB/FM table radios on the market today.
We know you are eager to begin listening to your new radio, but in order to take full advantage of
what your radio is capable of, please take a moment to read this owner’s manual and the safety
instructions. If you have any questions, please do not hesitate to contact your dealer or Tivoli Audio.
Please save the carton and original packing should you ever need to ship your radio, as shipping
damage is not covered by the factory warranty.
On behalf of all of us, thank you for choosing Tivoli Audio, and enjoy your Model 10+!
About Tivoli Audio
Tivoli Audio was founded by Tom DeVesto with the mission of bringing simple to use, elegantly
designed, high quality audio products to consumers. As CEO and head of research and development
at his former company, Cambridge SoundWorks, Tom was responsible for the development of many
of the best selling home entertainment and multi-media products on the market. He also held senior
management positions in product development at both Advent and Kloss Video.
*Cambridge SoundWorks is a registered trademark of Creative Labs, Singapore.
Packed with your Model 10+ you should find one each:
• 1 2.74 m (9') power cord
• 1 Remote control (battery installed)
Please contact your dealer or Tivoli Audio if any of these items are missing.
6
English
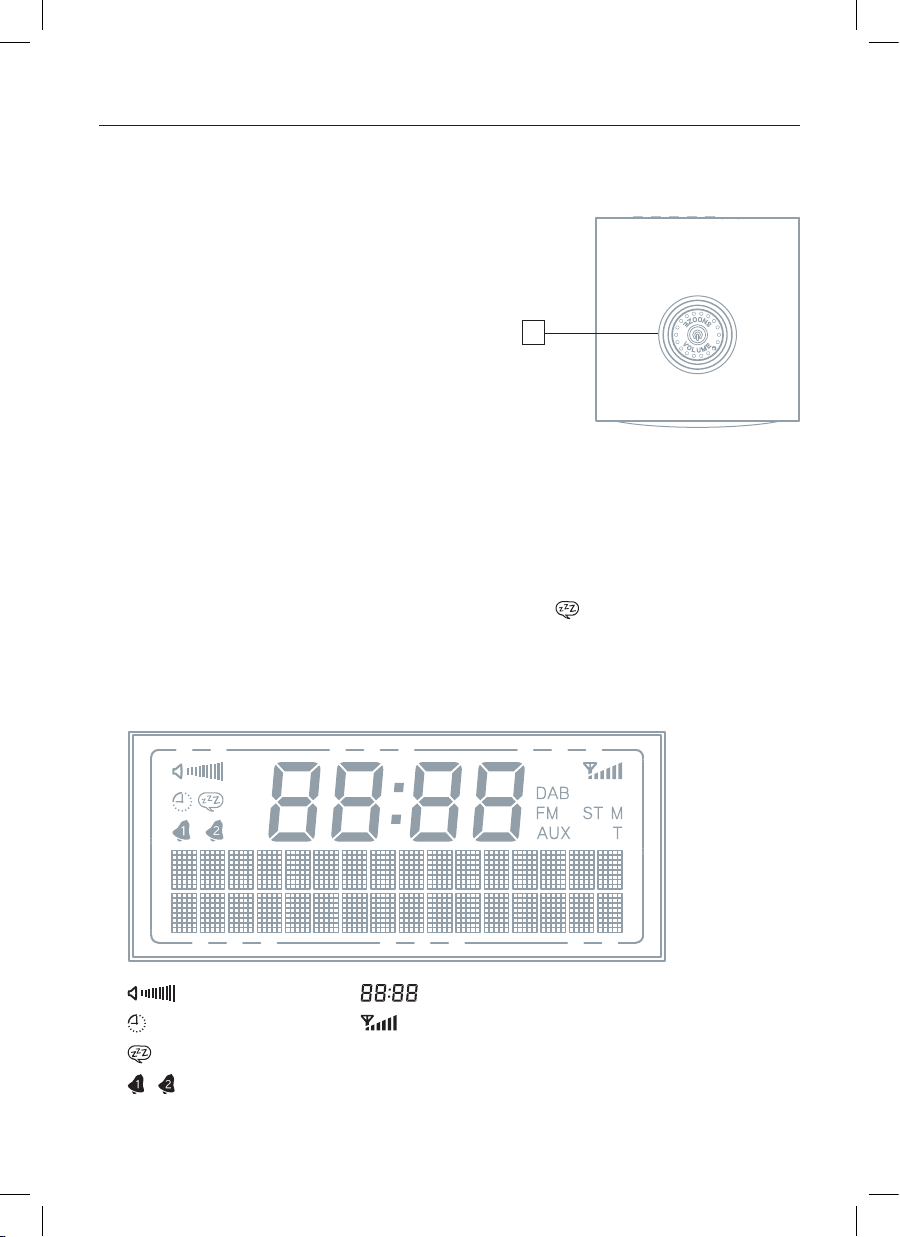
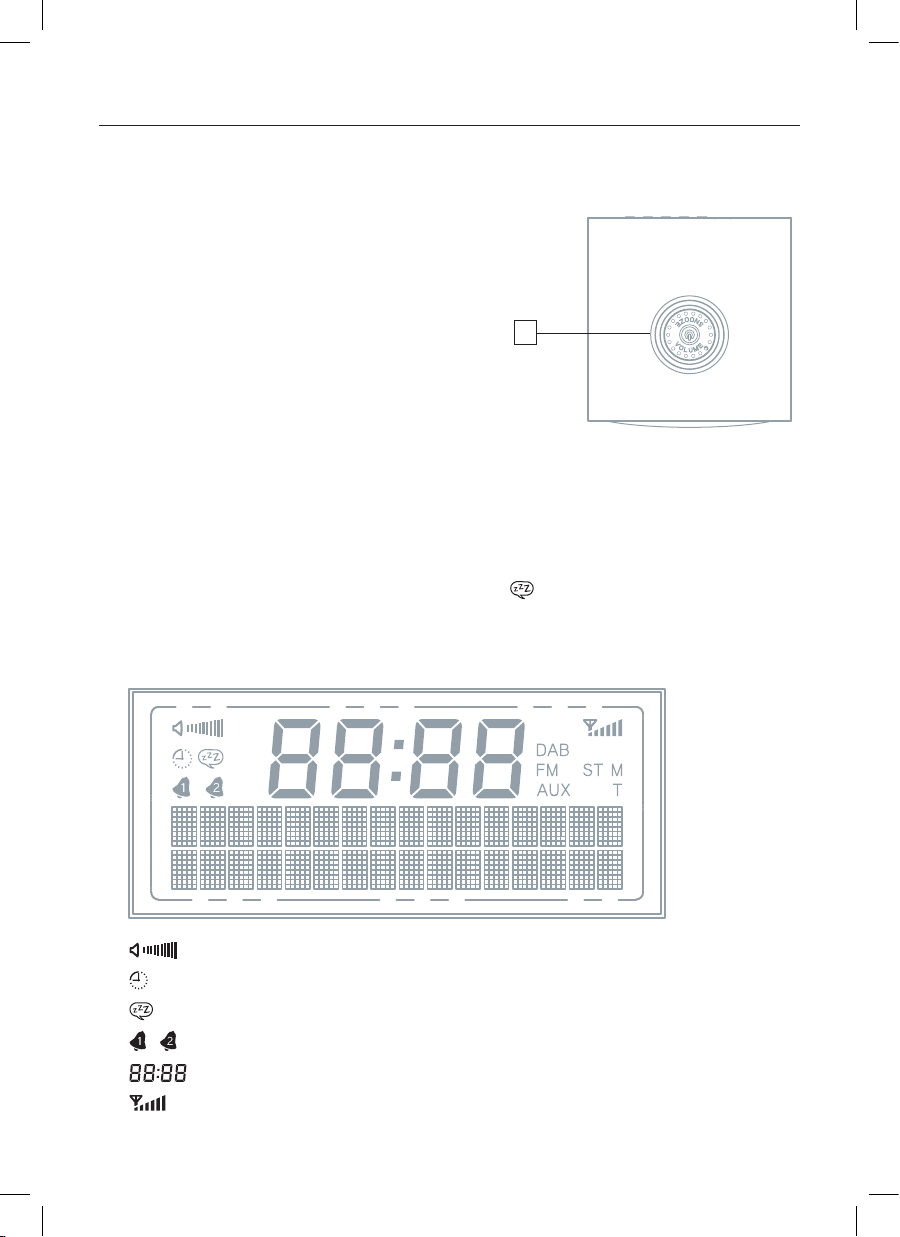
Guide to Features (Front Panel):
1. MULTI-FUNCTION CONTROL WHEEL (TOP):
The control wheel conveniently serves many functions:
Power: When the Model 10+ is off, press to power
the unit on. When the Model 10+ is on in any source,
press and hold to power the unit off.
Volume: When the Model 10+ is on in any source,
rotate clockwise to increase the volume level and
counter-clockwise to decrease the volume level.
Tuning: In Digital radio (DAB/DAB+/DMB) or FM
mode, press once and rotate clockwise to manually
tune up and counter-clockwise to manually tune
down. Press again to select a station and return to
volume control. The letter “T” will show on the display to indicate manual tuning mode. There
is no tuning function in Auxiliary. After about 7 seconds of no activity, the control wheel will
default back to the volume control function.
Source: Press twice to access the source menu and change sources by rotating the wheel in
either direction. Press again to select the source and return to volume control. After about 7
seconds of no activity, the control wheel will default back to the volume control function.
Snooze: Press to engage Snooze when the alarm sounds. A icon will show on the display
when Snooze is active. The Snooze time is fixed at 7 minutes. Press again during Snooze to
cancel the snooze.
1
2. LCD:
: Volume level (center digits): Time AUX: Auxiliary
: Sleep timer : Reception level ST: Stereo
: Snooze timer DAB: DAB/DAB+/DMB band M: Mono
: Alarms 1 and 2 FM: FM band T: Manual tuning mode
7
English
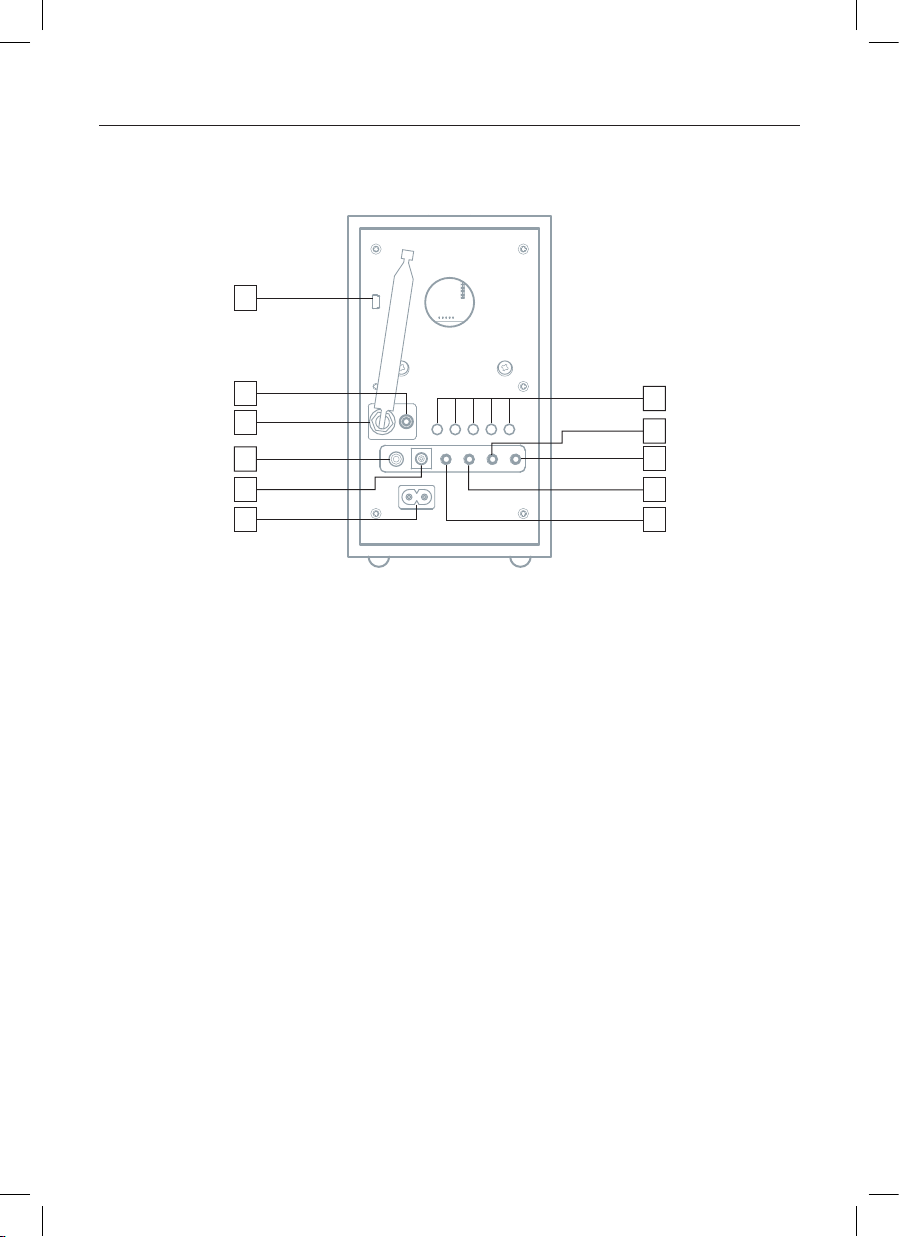
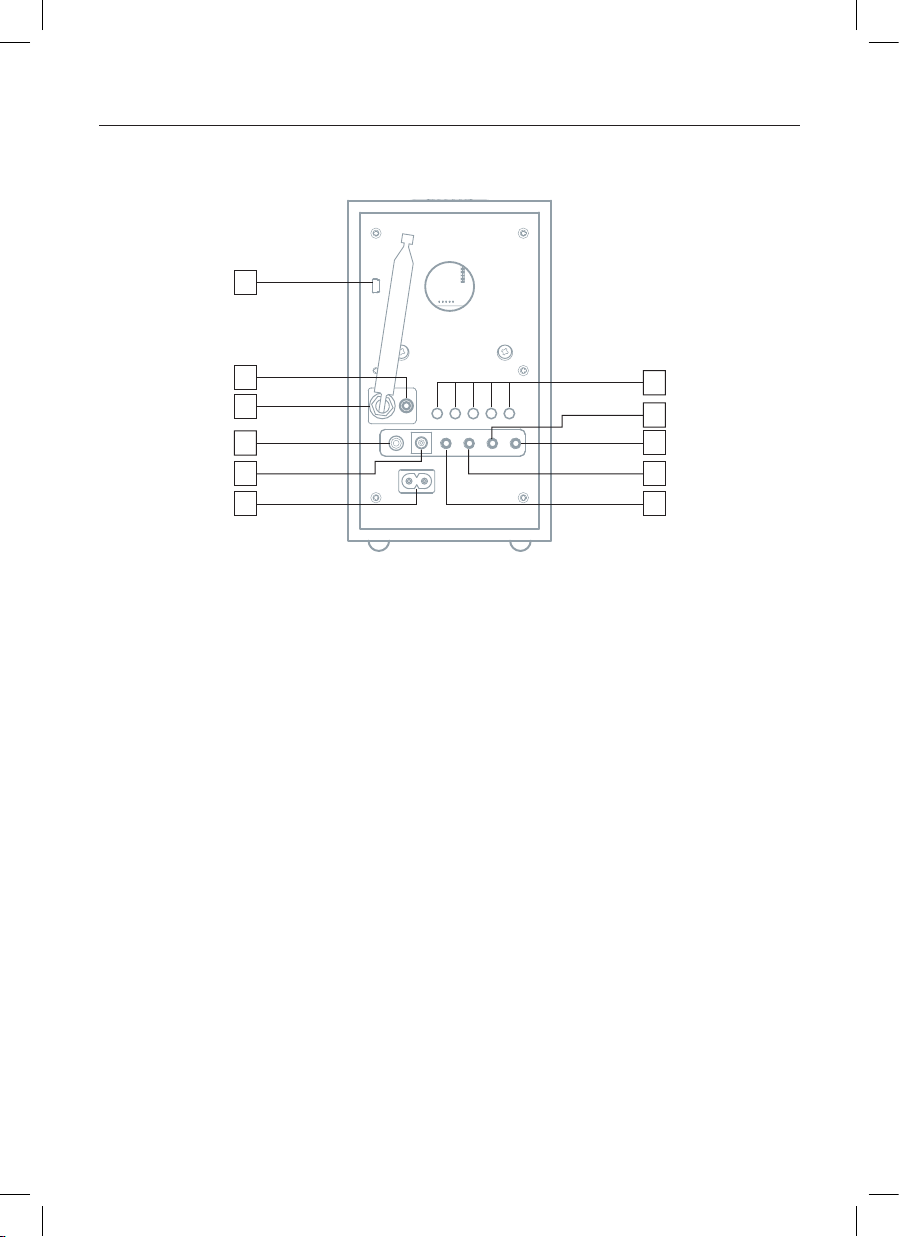
Guide to Features (Rear Panel):
10
3
2
5
1
11
1. 12VDC/1000mA: This input is for use with an optional 1A fused, 12VDC adapter. The adapter
must be 5.5mm/2.1mm center positive.
2. EXTERNAL ANTENNA: An external telescoping antenna is affixed to this input and is not
intended to be detached. Adjust for best reception. For more, see the section marked “Digital
Radio/FM Reception”.
3. HEADPHONE OUT: Connect a headset (not included) to this variable stereo output for private
listening. The headset will mute the primary speaker. The headset’s volume is adjusted using
the control wheel or the remote control. The remote’s “Mono” button also affects this output.
This stereo out-put accepts a 3.5mm stereo male mini connector. Avoid using headphones
at high volume levels to prevent possible hearing damage.
4. PRESETS 1-5: Press and hold to store the currently tuned station. Press briefly to recall the
station associated with that specific preset. In FM mode, the preset number will be indicated
on the display. There are 5 presets for each band.
5. R-SPR: Connect the male RCA cable from the optional Tivoli Audio Model 10 Speaker to
this female RCA output. Make sure the Stereo/Mono setting is set to Stereo by pressing the
Mono button on the remote control and be sure the display shows “ST” for stereo and not
“M” for mono.
6. SUB OUT: Connect the audio cable from the optional Tivoli Audio Model Subwoofer (or other
compatible subwoofer) to this output. This jack accepts a 3.5mm stereo male mini connector.
7. REC OUT: Connect a cassette deck’s audio input (or other recording device) to this fixed level
stereo output to record the audio. The primary speaker will not be muted when using this
output. This jack accepts a 3.5mm stereo male mini connector.
4
8
9
7
6
8
English
8. MIX IN: Connect the audio output of another device, such as a computer, to this input to hear
the audio mixed in with the tuner. With the Model 10+ in Auxiliary mode, this input acts as a
second Auxiliary input. This stereo input accepts a 3.5mm stereo male mini connector. The volume level is controlled by the source device.
9. AUX IN: To hear audio from another device, such as Tivoli Audio’s Model CD, a MP3 player, or
TV, connect said device’s audio output to this stereo input and change the source to Auxiliary.
This stereo input accepts a 3.5mm stereo male mini connector. Note you may need to adjust
the volume level differently for an auxiliary device than the level used for radio listening.
10. SERVICE: The port underneath this label is for use during service only. Do not remove the
“Service” label. Do not connect anything to this port or you could damage the Model 10+ and
void your warranty.
11. POWER CORD INPUT: Firmly insert the included power cord. When unplugging the power
cord from the wall outlet, always grasp it by the plug and not the cord. We recommend the
use of a power strip with surge protection. Be sure your region’s voltage is consistant with the
voltage indicated on the rear panel under the power cord input. Tivoli Audio is not responsible
for damages caused by incorrect voltage.
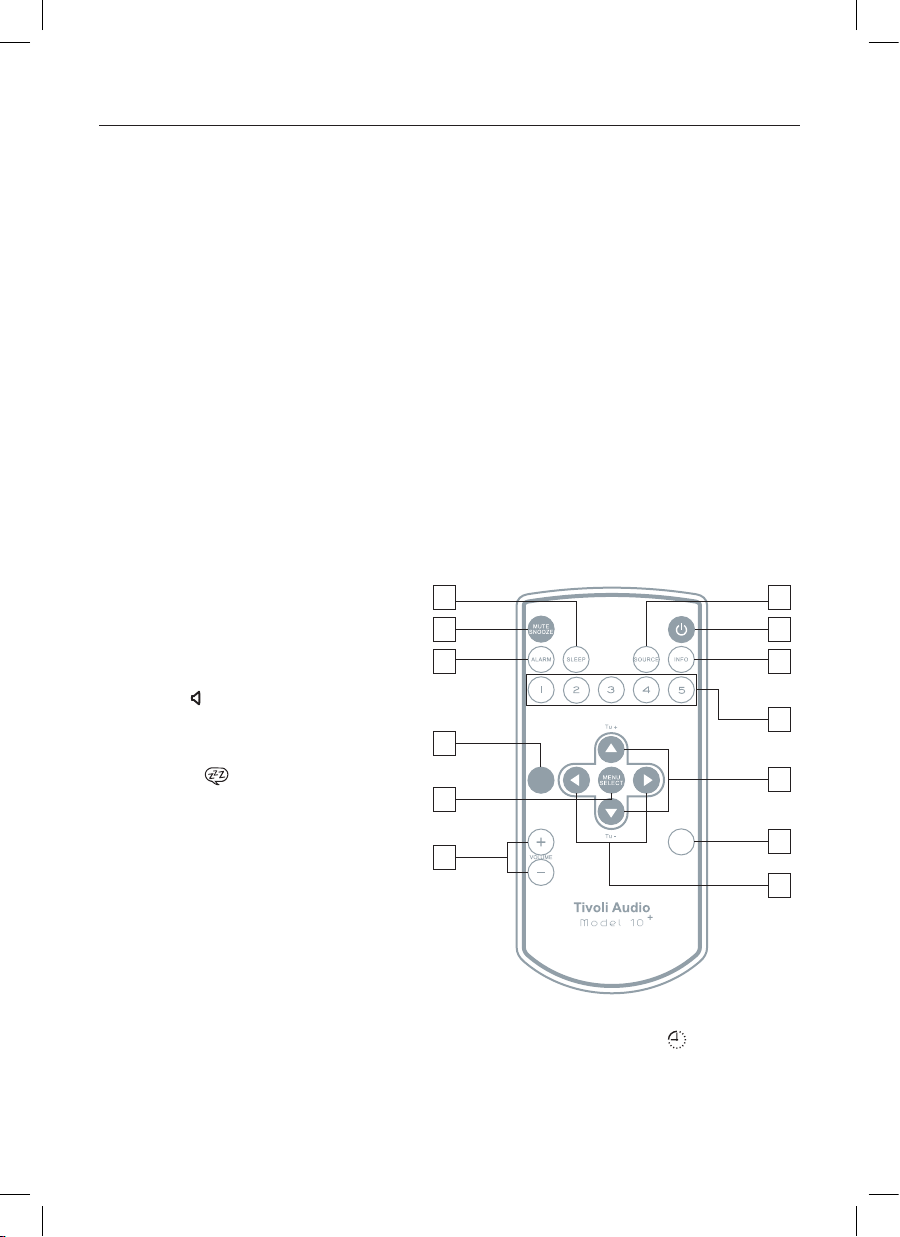
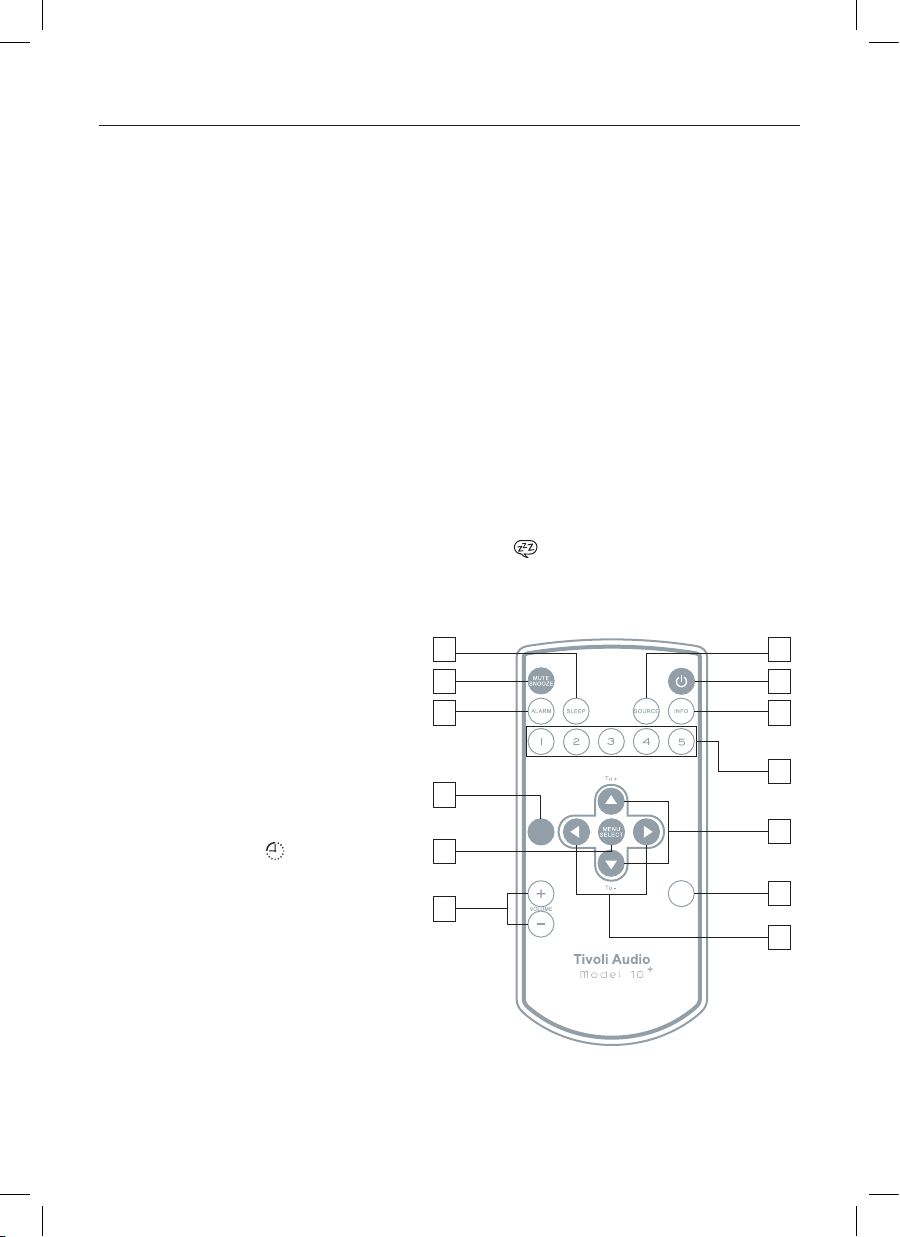
Guide to Features (Remote Control):
1. POWER: Press briefly to power the
Model 10+ off or on. The radio will
power on to the last source used.
2. MUTE/SNOOZE: Press to mute the
4
2
3
audio (the volume bars will disappear
from the icon) while the unit is playing; press again or adjust the volume
to restore sound. Press to mute the
alarm for 7 minutes after the alarm
sounds. A icon will show on the
display when Snooze is active. The
12
BACK
11
Snooze time is not adjustable.
3. ALARM: With the Model 10+ powered
on, use the pq and Select buttons to
8
MONO
adjust and set the alarms. For a complete step-by-step guide, refer to the
section titled “How to set the Alarm.”
4. SLEEP: Press repeatedly to view the
amount of time the radio will play before it turns off automatically, and
press the Select button to select that time. When the sleep timer is active you can check the
remaining time by means of pressing Sleep on remote. A small clock face [ ] will show on
the display when the Sleep timer is active. To cancel Sleep, press the Sleep button until the
display shows “Off”.
5. SOURCE: Press repeatedly to change sources.
5
1
6
7
9
13
10
9

English
6. INFO: Press repeatedly to cycle through the information available depending on the source
mode you are in. This function will not work in Auxiliary mode.
7. PRESETS 1-5: Press and hold to store the currently tuned station. Press briefly to recall the
station associated with that specific preset. In FM mode, the preset number will be indicated
on the display. There are 5 presets for each band.
8. VOLUME +/–: Press the Volume + button to raise the volume level or the Volume – button to
lower the volume level. If the audio ever sounds distorted, lower the volume level to avoid damaging the speaker. Adjusting the volume while the Model 10+ is muted will cancel the muting.
9. pq/TUNE +/-: Press to adjust menu items. Use these same buttons to manually tune up or
down when in FM mode. A “T” will show on the display to indicate manual tuning mode. Press
and hold to move quickly through the frequencies. It will take a second until the frequencies
begin to change. Press for 1.5 seconds and release to auto scan to the next station detected.
The display will show “Scanning…” Also refer to “Scan Setting” under the section “Menu
and Specific Features”. In DAB mode, use the pq buttons on the remote, or press the MultiFunction Control Wheel on top of the unit, to show all available DAB/DAB+/DMB stations. Use
the pq buttons or the top control wheel to highlight specific stations. The Station list will
disappear between 7 and 15 seconds depending on whether it was accessed via the Control
Wheel or the remote control.
10. tu: The right arrow button duplicates the Select button. The left arrow button moves you to
the previous page in certain menu items.
11. MENU/SELECT: Press and hold to enter the main menu and press briefly to select items
within the menu. For more, see the section marked “Menu”.
12. BACK: Press to go back to the previous menu page.
13. MONO: Press to change the Stereo/Mono setting. The display will show “M” for mono or
“ST” for stereo. “Mono” or “Stereo” will also be one of the fields shown when pressing the
Info button on the remote in FM mode. This setting also affects the headphone output. For
more, see the section marked “Digital Radio/FM Reception”.
10

English
Menu and specific features:
Press and hold the Menu/Select button on the remote to enter the main menu. Use the pq
buttons and the Select button to change the items within the menu. Use the Back button to
navigate back, or wait for 15 seconds until the timeout expires.
An asterics (*) indicates the shown menu item is currently set.
1. SCAN SETTING (FM MODE ONLY): Press the Select button and use pq and Select button
to choose between “Strong stations only” or “All stations” when performing an auto scan (see
#9 (pq/Tune +/-) under “Remote Control”. Selecting “All stations” increases the sensitivity of
the scan, possibly resulting in the auto seek stopping on noise. This feature is not accessible
in Auxiliary mode.
2. TIVOLI EQ: Press the Select button and use pq and Select buttons to adjust the Bass and
Treble. The adjusted values will be shown in “User EQ”. Press the Select button to turn
Loudness On or Off. Turning Loudness on when listening at low volume levels is recommended
since it boosts high and low frequencies resulting in a more natural sound. Use pq and Select
buttons to activate any one of the pre-set EQ settings. Selecting a preset EQ will over-ride
any adjustment made to the Bass and Treble settings, but Loudness will be unaffected. The
“Flat” EQ restores the audio settings to the factory defaults, meaning Bass and Treble will be
re-set to zero. The “Flat” EQ also restores Loudness Off. However, if the Bass and Treble had
been adjusted, those settings will still be shown in “User EQ”. Simply selecting “User EQ” will
reactivate the Bass and Treble settings. In the EQ menu page, the numbers to the right hand
side indicate the bass and treble settings.
3. BALANCE (FOUND UNDER TIVOLI EQ): As the Balance control has no affect when the
Model 10+ is set to Mono, this setting should remain in the center position, except when the
optional Model 10 Speaker is connected and Stereo mode is selected via the remote control’s
“Mono” button. Though we still recommend the center balance setting in Stereo mode, you
may use the pq buttons to adjust the balance to your liking, then press the Select button to
store any change.
4. TIME (FOUND UNDER SETTINGS):
Set 12/24 hour:
Press the Select button and use pq and Select buttons to choose 12 or 24 hour clock format.
Set time/date:
Press the Select button and use pq and Select buttons to adjust the hour and then minutes,
immediately followed by the date. You must also set the Auto update to “No update”. For more,
refer to “Auto update” below.
Auto Update:
Press the Select button and use pq and Select buttons to choose between “Update from any”,
“Update from DAB” (also DMB), or “Update from FM” (RDS). For any of the auto updates to
work, you must have consistent reception of DAB or FM RDS with a time/date signal provided.
It could take up to a minute or more for the clock to update. Tivoli Audio is not responsible for
inaccurate time/date information provided by the auto update signal.
To set the clock manually, select “No Update”, and then select “Set Time/Date” under the
“Time” menu using the pq or tu buttons and the Select button to set the hour. Repeat to
set the minutes and press Select to save. Within this same “Time” menu are additional options
to set the date format, and 12/24 hour clock mode.
11

English
NOTE: During a power outage, the alarm time(s) and clock will be maintained by an integrated
back-up memory. When “Auto update” is set to “Update from any”, the radio may find the
clock signal from the last listened station, even when the Model 10+ is in standby.
Set date format:
Press the Select button and use the pq and Select buttons to choose the date format
you prefer.
5. BACKLIGHT (FOUND UNDER SETTINGS):
Timeout:
The backlight level can be constant regardless of whether you are using any controls on the
Model 10+ or not (this is the way the Model 10+ is configured from the factory), or you can
customize the backlight to automatically change to a “Dim level” setting after a fixed period
of time for as long as no controls are being used. Once a control on the unit or the remote is
pressed, the normal backlight level is restored.
Press Select and use the pq and the Select buttons to set the amount of time it will take for
the backlight to change to the dim level from 10, 20 ,30, 45, 60, 90, 120, or 180 seconds, or
to keep the timeout feature Off.
On Level:
Press Select and use the pq and Select buttons to choose the intensity of the backlight.
Dim Level:
If you selected a time for the backlight to change to a dim setting under “Timeout”, then press
Select and use the pq and Select buttons to choose the intensity of the backlight when
it changes to this dim setting. Setting the Dim level to “Off” may be desirable if the display
backlight is bothersome while sleeping.
6. LANGUAGE (FOUND UNDER SETTINGS): Press Select and use pq and Select buttons to
set your language.
7. FACTORY RESET (FOUND UNDER SETTINGS): Press Select and use the pq or tu and
Select buttons to confirm (Yes) or reject (No) the factory reset. A factory reset will restore factory
defaults and cancel all your personal settings, such as presets and language. Also see the
section marked “Digital Radio/FM Reception”.
8. ID (FOUND UNDER SETTINGS): Press Select to view the ID. If you contact your dealer or
Tivoli Audio with a question, you may be asked to provide the number shown in this field.
9. SLEEP (FOUND UNDER SETTINGS): Press Select and use pq and the Select buttons to
set the sleep timer to one of the available times. There is also a dedicated Sleep button on the
remote control. A small clock face will show on the display when the Sleep timer is active.
How to set the alarm:
1. With the Model 10+ powered on, Access the alarm setting either through the main menu or by
pressing the alarm button on the remote.
2. Alarm 1 is shown first. Press the Alarm button repeatedly or use the pq and Select buttons
to choose between Alarm 1 and Alarm 2. Note: At any point you can navigate through the alarm
menu by using the Back or left arrow buttons, and the Select or right arrow buttons.
12

English
3. Use the pq and Select buttons to set the alarm on or off. If the time and date are not set
the Model 10+ will prompt you to set Time/Date. Otherwise, set the alarm as described in the
next step.
4. Use the pq buttons to set/change the hour, then press Select. Repeat this process to set/
change the minutes, followed by AM/PM (if time is set to 12 hour format), then press Select.
5. Use the pq buttons to select how long you want the alarm to sound, then press Select.
6. Use the pq buttons to select the source you wish to wake to, then press Select. If you set
the source to DAB (includes DAB+/DMB) or FM, use the pq buttons to select the station preset (if presets have been stored) or last listened, then press Select.
7. Use the pq buttons to set how often the alarm should be set to wake, then press Select.
If “Once” is selected, you must set the date you wish the one time alarm to sound.
8. Lastly, use the pq buttons to set the volume level of the alarm, then press Select.
9. Repeat this process for Alarm 2 if desired.
If you make a mistake at any point in the process, press the Back button on the remote and
begin again.
Note: Your settings will not be saved unless you complete the entire process and the display
shows “Alarm Saved”.
Note: If you set the alarm source to DAB and the last listened or preset station is unavailable at
the time the alarm sounds, the alarm will default to the tone.
Power Loss: Should power be lost, or the Model 10+ becomes disconnected, the alarm time
will be saved but the Model 10+ alarm cannot sound if there is no power.
Alarm Quick Set: With the Model 10+ in standby, repeatedly press the alarm button briefly to
toggle each alarm on or off.
ALARM OPTIONS:
The alarm sounds with a gradual volume increase. When the alarm sounds you can activate the
Snooze feature or shut the alarm off.
Alarm off: To stop the alarm while it is sounding, press the Alarm or Power button on remote, or
press and hold the Multi-Function Control Wheel on top of the unit.
Snooze: To activate Snooze while the alarm is sounding, press the Snooze button on the remote, or
briefly press the Multi-Function Control Wheel on top of the unit. The Snooze time is not adjustable.
Note: When in snooze mode, you can see the remaining snooze time by pressing the Snooze
button on the remote. If you press the Alarm or Power button on the remote, or if you press the
Multi-Function Control Wheel on top of the unit, then the snooze countdown will be cancelled.
13

English
Digital radio (DAB/DAB+/DMB) mode:
Press and hold the Menu button on the remote to enter the main menu. Use the pq buttons
and the Select button to change the items within the menu. Use the Back button to navigate
back, or wait for 15 seconds until the timeout expires.
An asterisk (*) indicates the shown menu item is currently set.
Note: Upon entering Digital radio mode, if the Station list is empty, an auto scan will initiate.
1. AUTO SCAN: Searches the entire frequency range. If you move the Model 10+ to another
location, you must perform a new scan so the radio will find stations in the new location. To
cancel the auto scan, press the Back button on remote.
2. TIVOLI EQ: Please refer to section marked “Menu and specific features”.
3. MANUAL TUNE: Press the pq buttons to manually tune specific DAB/DAB+/DMB
frequencies, then press Select to tune the displayed frequency.
4. DRC: Dynamic Range Control allows you change the sound level of stations to make
quiet passages louder to compensate for a noisy environment, or when listening at a low
volume level.
5. ADVANCED MODE: If the Model 10+ is relocated to a different area, you may find stations
with the same name. If you enable “Advanced View”, “Long labels”, and “Show Ensemble”
under Advanced Mode, you will be able to differentiate between extended station names.
For DAB/DAB+, we suggest disabling all the Advanced Mode settings. For DMB, we suggest
enabling them.
6. UPDATE LIST: If the Model 10+ is relocated to a different area, some stations may become
unavailable. Select “Update List” to remove unavailable stations from the Station list. Use the pq
or tu buttons and the Select button to confirm (Yes) or deny (No) removing unavailable stations.
DAB DISPLAY MESSAGES:
Secondary Services: Secondary stations will be indicated by a >> symbol next to the station
name. Secondary services may not be available in your area.
“?”: If this symbol appears next to the station name, it means the station is invalid or inactive.
“Not Available”: Shown when tuning a DAB station with an insufficient signal.
14

English
Digital Radio/FM Reception:
The included external antenna will provide good reception. In strong FM signal locations, reducing
the antenna’s length may provide better reception.
If you are using the Model 10+ together with the optional Model 10 Speaker for stereo sound and
you are listening to a noisy FM station, press the Mono button on the remote control, as this might
make the FM station more listenable. The display will show an “M” when in mono and an “ST” when
in stereo. This information will also be shown in FM mode when using the Info button on the remote.
Buildings made with concrete, steel, or aluminum siding will hinder reception. Household appliances,
electric blankets, computers, CD players, and other electronic devices can also adversely affect
reception or inject noise. If you experience this, move the Model 10+ further from the offending
device or plug it into an electrical outlet not shared by another device.
Note: When moving the Model 10+ to another location where there may be different DAB stations
from the previous location, it is recommended to perform a factory reset to initiate a new scan to
refresh the DAB station list.
RDS (FM band only):
The Radio Data System (RDS) transmits text data along with the audio broadcast. Not all FM stations
utilize this service, thus text may not be present with some stations. For stations broadcasting RDS,
the text still might not appear, or might appear scrambled if the signal is too weak. In such cases,
experiment with the position of the FM antenna. If RDS is being received, repeatedly press the
Info button to see the information available. Note RDS content is determined by each individual
FM station.
Placement:
Place the Model 10+ on a flat, stable surface. For proper bass and ventilation, do not obstruct the
rear bass port. The Model 10+ is not video shielded and should be kept at minimum of 127mm
away from a computer monitor or television set. Placement in a bookcase, cabinet, or close to
walls or corners may inflate the bass, creating an unnatural sound.
Cleaning:
Never use any harsh cleansers or solvents on your radio. Avoid spray-on waxes. A liquid wood
polish usually yields best results.
Painting or staining the wood cabinet will void your warranty.
An important note about the wood cabinet: The variation in color and grain are characteristics
of real wood and contribute to the cabinet’s natural beauty. The veneer for each cabinet is
unique. As a result, the cabinet’s finish may not match other Tivoli Audio products.
Depending on the veneer, you might also notice the wood darken over time with exposure to
light. This is normal.
15

English
Limited Warranty:
Tivoli Audio manufactures its products to very high standards and we are confident our products
will perform well. Accordingly, we provide a limited warranty on this product against manufacturing
defects in material and workmanship to the original owner. This warranty is non-transferable.
Products purchased in the European Union and Norway have a minimum warranty term of two years.
For countries where minimum warranty terms are determined by statute, the warranty term is the
statutory period required. In all other locations, the warranty term is one year.
This Limited Warranty covers the functionality of the product for its normal, intended use as
specified in this Owner’s Manual. It does not cover a malfunction or damage that has resulted
from improper or unreasonable use or installation, using the charger to charge alkaline batteries,
faulty ancillary equipment, modifications, unauthorized repair, shipping damage or loss, abuse,
accidents, use on improper voltage/current, power surges, lightning or other acts of God, excess
moisture, normal wear and tear, commercial use, or purchase from unauthorized dealers. Proof
of purchase as evidence the unit was purchased from an authorized dealer may be required for
warranty service. Please contact the dealer of purchase or local distributor for warranty
service or repair.
Please refrain from opening this product or taking it apart as doing so will void this Limited
Warranty. There are no user serviceable parts inside. Tivoli Audio will not pay for costs incurred
due to correction of reception problems, elimination of externally generated static/noise, loss of
time, inconvenience, loss of use of product, or damage caused by improper use of this product.
In the event the product is returned during the warranty term and is eligible for service under this
Limited Warranty, we will repair or replace any defective parts within a reasonable period of time
and free of charge.
THIS LIMITED WARRANTY GIVES YOU SPECIFIC LEGAL RIGHTS SUBJECT TO SPECIFIED
CONDITIONS. YOU MAY ALSO HAVE OTHER LEGAL RIGHTS WHICH APPLY TO THE PRODUCT
YOU HAVE ACQUIRED. THESE LEGAL RIGHTS VARY FROM COUNTRY TO COUNTRY. SOME
PLACES DO NOT ALLOW THE EXCLUSION, RESTRICTION, OR MODIFICATION OF CERTAIN
IMPLIED RIGHTS OR THEIR EFFECT. IN THOSE SITUATIONS THIS LIMITED WARRANTY WILL
ONLY APPLY TO THE EXTENT THAT THE APPLICABLE LAW ALLOWS.
The laws of your country may provide you with legal claims against the seller or manufacturer of
this product. This Limited Warranty does not affect those rights.
The provisions of the Limited Warranty are in lieu of any other warranties or conditions, except
those provided by law. This Limited Warranty does not affect any legal rights provided to you by
law and does not preclude any remedy you may have under law.
In countries where liability limits are not precluded by statute, the maximum liability of Tivoli Audio
shall not exceed the purchase price paid by you for the product. In countries where limitations of
liability are precluded by law, Tivoli Audio shall be liable for no more than the direct damages for
bodily injury, and/or real or personal property arising from the negligence of Tivoli Audio.
Where not prohibited by law, Tivoli Audio shall not be liable for special, incidental, consequential,
16

English
or indirect damages. Some places do not allow limitations on the exclusion or limitation of relief,
special, incidental, consequential or indirect damages, or the limitation of liability to specified
amounts, so the above limitations or exclusions may not apply to you.
This Limited Warranty is void if the label bearing the serial number has been removed or defaced.
If you purchased an extended service contract from your dealer and service is required after the
term of this Limited Warranty has expired, please contact your extended service contract provider
to obtain service.
For your convenience, you may register your product for warranty service online at our website,
www.tivoliaudio.com. There is no legal obligation for you to provide personal information. However,
such information allows us to maintain a record of the Tivoli Audio products acquired by you and
better understand the purchasers of our products. The information collected will be used for marketing
purposes by Tivoli Audio and, where permitted, to contact you in relation to the products you have
acquired or other products which might be of interest to you from Tivoli Audio or other companies.
The information that you provide may be processed in another country.
Please visit the Tivoli Audio FAQ section at http://www.tivoliaudio.com prior to any request
for warranty service as information available there may answer your questions or concerns.
For service, please contact your dealer or local distributor.
Specifications:
Model: Tivoli Audio Model 10+
Type: DAB/DAB+/DMB/FM clock radio
Drivers: 3" full range
Receiving bands: FM: 87.5-108MHz
DAB (Band III)/DAB+/DMB: 174-240MHz
(Receiving ranges vary by region)
FM De-Emphasis: 50uSec or 75uSec (depending upon region)
Dimensions: 202mm H x 117mm W x 117mm D (7.95"H x 4.61"W x 4.61"D)
Weight: 1.58 kg (3.5 lbs.)
All specifications subject to change without notice.
Tivoli Audio reserves the right to make product changes without notice.
Tivoli Audio, the Tivoli Audio logo, the Model 10+, and the Model 10 Speaker are trademarks of Tivoli Audio, LLC.
17

Dansk
™
Model 10
DAB/DAB+/DMB/FM Clock Radio
Indholdsfortegnelse:
Sikkerhedsinstruktioner ................................................................................................................... 19
Introduktion; Om Tivoli Audio .......................................................................................................... 21
Guide til funktioner på frontpanel .................................................................................................... 22
Guide til funktioner på bagpanel ..................................................................................................... 23
Fjernbetjening .................................................................................................................................. 24
Menu og særlige funktioner .............................................................................................................25
Sådan indstilles alarm .....................................................................................................................27
Alarm muligheder ............................................................................................................................28
Digital radio (DAB/DAB+/DMB) ....................................................................................................... 29
Digital Radio / FM Modtagelse; RDS; Placering; Rengøring ........................................................... 30
Garanti ............................................................................................................................................. 31
Specifikationer ................................................................................................................................. 32
+
18

Dansk
Important Safety Instructions
1. Læs disse instruktioner.
2. Gem disse instruktioner.
3. Tag alle advarsler alvorligt.
4. Følg alle instruktioner.
5. ADVARSEL – For at reducere risikoen for brand eller elektrisk stød må dette apparat ikke
udsættes for regn eller fugt, og det bør derfor ikke benyttes i nærheden af et badekar, i en
våd kælder, i nærheden af en swimming pool og lignende.
6. Må kun rengøres med en tør klud.
7. Ventilationsåbningerne på apparatet må ikke blokeres. Tilsluttes i overensstemmelse med
producentens instruktioner.
8. Må ikke installeres i nærheden af varmekilder såsom radiatorer, ovne/komfurer eller andre
varmeproducerende apparater (incl. forstærkere).
9. Træd ikke på strømledningen og pas på, at den ikke bliver klemt - især ved stik, stikdåser og
hvor ledningen tilsluttes apparatet.
10. Benyt kun tilbehør, der er angivet af producenten.
11. Træk strømledningen ud i tordenvejr og hvis apparatet i en længere periode ikke benyttes.
12. Apparatet må kun serviceres hos et autoriseret serviceværksted. Service er nødvendigt, hvis
apparatet har været beskadiget på nogen som helst måde - eksempelvis hvis ledning eller stik
er blevet beskadiget, hvis der er spildt væske eller tabt ting på apparatet, hvis apparatet har
været udsat for regn eller fugt, hvis det ikke fungerer normalt, eller hvis det har været tabt.
13. Radioen bør være placeret således, at AC indgangen på bagsiden samt strømkablet er
let tilgængelige.
19
Dansk
14. For yderligere at beskytte dette produkt i tordenvejr, eller når det efterlades ubrugt i længere
tid, tages det ud af stikkontakten og evt. antenne afkobles. Dette vil forhindre beskadigelse af
produktet ifm. lynnedslag samt evt. overspænding fra stærkstrømsledninger.
15. Dette apparat må kun benyttes med den strømkilde, der er angivet på bagpanelet. Hvis der
anvendes ekstern strømforsyning og denne bliver væk eller beskadiget, skal der benyttes en
lignende erstatning. Hvis apparatet anvender batterier, henvises der til brugervejledningen.
16. Træk stikket ud og tag kontakt til autoriseret forhandler under følgende omstændigheder:
a. Hvis ledning eller stik er beskadiget.
b. Hvis der er spildt væske eller tabt ting på apparatet.
c. Hvis apparatet har været udsat for vand eller regn.
d. Hvis apparatet ikke fungerer normalt i henhold til brugervejledningen.
e. Hvis apparatet er blevet tabt eller beskadiget på nogen måde.
f. Hvis apparatet udviser karakteristisk ændring i ydeevne.
17. Hvis LCD displayet revner eller bliver beskadiget, må væsken ikke berøres.
18. Hold apparatet i sikker afstand fra åben ild som fx et tændt stearinlys.
19. Apparatet må ikke udsættes for dryp eller stænk, og vaser og lignende genstande med væske
må ikke placeres på produktet.
20. 21. Den anbefalede driftstemperatur er 5˚ C to 40˚ C.
ADVARSEL: Den eksterne antenne på Model 10+ bør ikke afmonteres.
Dette apparat kan genbruges. Produkter med dette symbol må IKKE smides væk
med normalt husholdningsaffald. Ved udgangen af produktets levetid, bør det
medbringes til en genbrugsplads, der er udpeget til genbrug af elektrisk og elektronisk udstyr. Find ud af mere om bortskaffelse gennem din lokale kommune.
Direktivet for The European Waste Electrical and Electronic Equipment (WEEE)
var implementeret for drastisk at reducere mængden af affald til deponering, og
derved reducere de miljømæssige konsekvenser for kloden og for menneskers
sundhed. Udvis venligst ansvarlighed ved at genanvende brugte produkter. Hvis
dette produkt stadigvæk kan bruges, kan det overvejes at sælge eller forære
det væk
.
20

Dansk
Model 10+ - Instruktioner
Tillykke med din nye Tivoli Audio Model 10+. Vi tror på, at Model 10+ er en af de fineste
DAB / DAB + / DMB / FM bordradioer på markedet i dag.
Vi ved, at du sikkert er ivrig efter at begynde at lytte til din nye radio, men tag dig tid til at læse
denne sikkerheds- og brugervejledning for at få det fulde udbytte af dit nye produkt. Hvis du har
spørgsmål, kan du kontakte din lokale forhandler eller distributør.
Vi anbefaler, at den originale emballage gemmes, således at produktet kan pakkes korrekt ned
ved forsendelse til og fra service-værksted, da garantien ikke dækker skader påført produktet
under forsendelse, hvor årsagen skylden dårlig eller forkert indpakning.
Tak fordi du valgte Tivoli Audio og god fornøjelse med Model 10+!
Om Tivoli Audio
Tivoli Audio blev grundlagt af Tom DeVesto med det formål at designe elegante audio produkter,
hvor kvalitet og brugervenlighed er kendetegnet. Som grundlægger og teknologi udvikler har Tom
DeVesto gennem en årrække haft succes med virksomheder som Cambridge Soundworks, og
senest med Advent og Kloss Video.
I æsken med Model 10+ skal følgende være inkluderet:
• 1 2.74 m (9') Netledning
• 1 Fjernbetjening (batteri inkl.)
Kontakt venligst din forhandler, hvis nogen af disse genstande mangler.
21
Dansk
Guide til funktioner (front):
1. MULTI-FUNKTION KONTROLHJUL (TOP):
Kontrolhjulet gør det muligt for dig at benytte dig af
mange funktioner:
Power: Enheden tændes og slukkes her.
Volume: Når Model 10 + er tændt, roteres med uret
for at øge lydstyrken og mod uret for at
sænke lydstyrken.
Tuning: Med digital radio (DAB / DAB + / DMB) eller
FM skal du trykke en gang og rotere med uret for
manuelt at tune op og mod uret for manuelt at tune
ned. Tryk igen for at vælge en station og vende tilbage
til lydstyrkeregulering. Bogstavet “T” vil blive vist på
displayet for at angive manuel indstilling. Der er ingen tuning funktion med AUX. Efter ca 7
sekunder uden aktivitet, vil kontrolhjulet som standard skifte tilbage til regulering af volumen.
Kilde: Tryk to gange for at få adgang til kilde-menuen, hvor du kan ændre kilder ved at dreje
hjulet i begge retninger. Efter ca 7 sekunder uden aktivitet, vil kontrolhjulet som standard skifte
tilbage til regulering af volumen.
Snooze: Tryk for at snooze, når alarmen er sat til. Et ikon vises på displayet, når snooze
er aktiveret. Snooze time er sat til 7 minutter. Tryk igen for at annullere snooze.
2. LCD:
1
: Volume styrke DAB: DAB/DAB+/DMB band
: Sleep timer FM: FM band
: Snooze timer AUX: Aux
: Alarm 1 og 2 ST: Stereo
(center digits): Klokkeslæt M: Mono
: Niveau for modtagelse T: Manuel tuning mode
22
Guide til funktioner (bagpanel):
10
Dansk
3
2
5
1
11
1. 12VDC/1000mA: Denne indgang er beregnet til brug med en valgfri 1A/12VDC adapter, til
anvendelse i en båd eller autocamper. Adapter skal være 5.5mm/2.1mm center positiv.
2. EKSTERN ANTENNE: En ekstern teleskop-antenne er fastgjort til denne indgang og er ikke
beregnet til at blive afmonteret. Justeres for bedste modtagelse. For mere se afsnittet mærket
“Digital Radio / FM modtagelse”.
3. HØRETELEFONER UDGANG: Tilslut høretelefoner (medfølger ikke) til denne stereo-udgang
til mere diskret lytning. Høretelefonerne vil mute den primære højttaler. Volumen på høretelefonerne justeres via kontrolhjulet eller fjernbetjeningen. Fjernbetjeningen’s “Mono” knap påvirker
også denne udgang. Denne stereo udgang passer til et 3.5mm mini stereo jack stik. Undgå
brug af hovedtelefoner ved høj lydstyrke for at undgå eventuelle høreskader.
4. PRESET 1-5: Tryk og hold for at gemme den indstillede station. Tryk kort for at indstille til den
ønskede station. I FM-tilstand vil det forudindstillede nummer være angivet på displayet. Der
er mulighed for at gemme 5 stationer på hvert bånd.
5. R-SPR: Tilslut RCA-kabelet fra Tivoli Audio Model 10 Speaker til denne RCA udgang. Sørg for
at Stereo/Mono er sat til stereo ved at trykke på Mono-knappen på fjernbetjeningen og vær
sikker på, at displayet viser “ST” for stereo og ikke “M” for mono.
6. SUB OUT: Tilslut lydkablet fra Tivoli Audio Model Subwoofer (eller andre kompatible subwoo-
fere) til denne udgang. Denne udgang passer til et 3.5mm mini stereo jack stik.
7. REC OUT: Tilslut en kassettebåndoptager (eller andre optageenheder) til denne fixed-level
stereo udgang for at optage lyden. Den primære højttaler vil ikke blive dæmpet, når du bruger
denne udgang. Denne udgang passer til et 3.5mm mini stereo jack stik.
8. MIX IN: Tilslut en audio-enhed såsom en computer til denne indgang. Indstil Model 10+ til
AUX, og den fungerer som en almindelig AUX indgang. Denne indgang passer til et 3.5mm
mini stereo jack stik. Lydstyrken reguleres af audio-enheden.
4
8
9
7
6
23
Dansk
9. AUX IN: Hvis du vil høre lyd fra en anden audio-enhed, såsom Tivoli Audio’s Model CD, en
MP3-afspiller eller dit TV, skal du tilslutte enhedens lydudgang til denne stereo indgang og
ændre til AUX. Denne stereo indgang passer til et 3.5mm mini stereo jack stik. Bemærk at
det kan være nødvendigt at justere lydstyrken på audio-enheden, da den kan afvige i forhold til lydstyrken på Model 10+ ved normal radio lytning.
10. SERVICE: Indgangen under dette mærke er beregnet til brug ved service. “Service” etiketten
må ikke fjernes. Tilslut ikke noget til denne port, da du kan beskadige Model 10+ og garantien bortfalder.
11. POWER CORD INPUT: Indsæt den medfølgende netledning med et fast greb. Når du tager
netledningen ud af stikkontakten, bør du altid tage fat i selve stikket og ikke i ledningen. Vi
anbefaler brug af en strømskinne med overspændingsbeskyttelse. Vær sikker på at dit lands
strømspænding er i overensstemmelse med den angivne spænding på bagsiden under ledningens indgang. Tivoli Audio er ikke ansvarlig for skader forårsaget af forkert spænding.
Guide til funktioner (fjernbetjening):
1. POWER: Tryk kort for at tænde eller slukke din Model 10+.
2. MUTE/SNOOZE: Tryk for at slå lyden fra og tryk igen for at genoptage foregående lydstyrke.
Tryk for at snooze i 7 minutter efter alarmen lyder. Et ikon vil blive vist på skærmen, når
snooze er aktiv. Snooze-tiden er ikke justerbar.
3. ALARM: Brug pq og Select knapperne for at justere og indstille alarm. Hvis der ønskes en
komplet trin-for-trin guide henvises til
afsnittet “Sådan
indstilles alarmen”.
4. SLEEP: Tryk gentagne gange for at få
vist mængden af tid radioen vil spille,
før den slukker automatisk, og tryk på
Select knappen for at vælge det pågældende tidspunkt. Når Sleep timer er
aktiv, kan du kontrollere den resterende
tid ved at trykke på Sleep på fjernbetjeningen. En lille urskive vil blive
vist på skærmen [ ], når Sleep timeren er aktiv. For at annullere sleep,
skal du trykke på Sleep-knappen, indtil
displayet viser “Off”.
5. SOURCE: Tryk gentagne gange for at
ændre lydkilde.
6. INFO: Tryk gentagne gange for at gen-
nemgå de tilgængelige oplysninger.
Denne funktion fungerer ikke i AUX.
7. PRESETS 1-5: Tryk og hold for at
gemme den indstillede station. Tryk kort for at indstille til den ønskede station. I FM-tilstand
vil det forudindstillede nummer være angivet på displayet. Der er mulighed for at gemme 5
stationer på hvert bånd.
24
12
11
4
2
3
BACK
8
MONO
13
10
5
1
6
7
9

Dansk
8. VOLUME +/–: Tryk på Volume+ knappen for at hæve lydstyrken eller Volume- knappen for at
sænke lydstyrken. Hvis lyden forvrænges bør lydstyrken sænkes for at undgå at beskadige
højttaleren. Hvis lydstyrken justeres, mens Model 10+ er på Mute, vil dette annullere Mute.
9. pq/TUNE +/-: Tryk her for at navigere i menupunkterne. Brug de samme knapper til manuel
indstilling op eller ned, når radioen er i FM-tilstand. Et “T” vil blive vist på displayet for at angive
manuel indstilling. Tryk og hold for at scanne hurtigt igennem frekvenserne. Det vil tage et
sekund, før frekvenserne begynder at ændre sig. Tryk i 1,5 sekunder og slip, hvis radioen skal
scanne og automatisk finde næste kanal. Displayet vil vise “Scanning ...” Se også “Scan-indstilling” under afsnittet “Menu og Særlige funktioner Tryk her for at navigere i menupunkterne.
Brug de samme knapper til manuel indstilling op eller ned, når radioen er i FM-tilstand. Et “T”
vil blive vist på displayet for at angive manuel indstilling. Tryk og hold for at scanne hurtigt
igennem frekvenserne. Det vil tage et sekund, før frekvenserne begynder at ændre sig. Tryk i
1,5 sekunder og slip, hvis radioen skal scanne og automatisk finde næste kanal. Displayet vil
vise “Scanning ...” Se også “Scan-indstilling” under afsnittet “Menu og Særlige funktioner”.
DIGITAL RADIO (DAB/DAB+/DMB): Tryk på pq på fjernbetjeningen eller tryk på kontrolhjulet
på toppen af enheden for at se alle de tilgængelige DAB/DAB+/DMB stationer. Tryk på pq eller
kontrolhjulet på toppen af enheden for at se hver enkelt specifikke station. Stationssisten vil
forsvinde efter enten 7 eller 15 sekunder, alt efter om den var fremkommet via kontrolhjulet
på toppen af enheden eller via fjernbetjeningen.
10. tu: På højre pileknap dublikeres Select knappen. Den venstre pileknap flytter dig til den
forrige side i visse menupunkter.
11. MENU/SELECT: Tryk og hold for at åbne hovedmenuen, og tryk kort for at vælge punkter i
menuen. For mere, se afsnittet mærket “Menu”.
12. BACK: Tryk for at gå tilbage til den forrige menu side.
13. MONO: Tryk for at ændre Stereo / Mono indstilling. Displayet viser “M” for Mono og “ST”
for Stereo. “Mono” eller “Stereo” vil også være et af de områder, der vises når du trykker på
knappen Info på fjernbetjeningen i FM-tilstand. Denne indstilling påvirker også hovedtelefonudgangen. For mere, se afsnittet “Digital Radio / FM Modtagelse”.
Menu og særlige funktioner:
Tryk og hold Menu/Select-knappen på fjernbetjeningen for at åbne hovedmenuen. Brug pq
knapperne og knappen Select for at ændre punkterne i menuen. Brug knappen Tilbage for at
navigere tilbage, eller vent i 15 sekunder, indtil timeout udløber.
En stjerne (*) indikerer, at det viste menupunkt er indstillet.
1. SCAN SETTING (KUN I FM MODE): Tryk på Select knappen og brug pq og Select til at
vælge imellem “Kun stærke stationer” eller “Alle stationer” når der laves en autoscanning. (se
#9 (pq/Tune +/-) i afsnittet “Remote Control”. Vælges “Alle stationer” øges følsomheden af
scanningen, og dette kan resultere i, at autoscan stopper på en kanal med støj. Denne funktion
fungerer ikke i AUX.
2. TIVOLI EQ: Tryk på Select knappen og brug pq og Select til at regulere bas og diskant. De
justerede værdier vil blive vist i “Bruger EQ”. Tryk på Select knappen for at slå Loudness til eller
fra. Loudness anbefales når du lytter ved lav lydstyrke, da den optimerer de høje og lave frekvenser, hvilket resulterer i en mere naturlig lyd. Brug pq og Select til at aktivere en hvilken
som helst af de foruddefinerede EQ indstillinger. Valg af en foruddefineret EQ vil tilsidesætte
25

Dansk
enhver justering af bas og diskant-indstillinger, men Loudness vil ike blive påvirket. Ved at vælge
“Flat” EQ gendannes fabriksindstillingerne, hvilket betyder, at bas og diskant vil blive sat til nul.
“Flat” EQ slår også automatisk Loudness fra. Hvis bas og diskant var blevet justeret, vil disse
indstillinger stadigvæk vises i “Bruger EQ”. Ved blot at vælge “Bruger EQ” genaktiveres bas og
diskant-indstillingerne. I EQ menuen, viser tallene i højre side bas og diskant.
3. BALANCE (FINDES I MENUEN TIVOLI EQ): Da denne Balance-indstilling ikke har nogen
effekt, når Model 10+ er sat til at spille i Mono, bør Balance altid være centreret i midten, undtagen når Model 10 Stereo Speaker er tilsluttet, og Stereo mode er valgt via fjernbetjeningens
“Mono” knap. Selvom det anbefales at centrere Balance indstillingen i Stereo mode, kan du
bruge pq knapperne til at justere balancen efter dit behov. Tryk derefter på knappen Select
for at gemme eventuelle ændringer.
4. TIME (FINDES I MENUEN INDSTILLINGER):
Indstil 12/24 timer:
Tryk på knappen Select og brug pq og Select for at vælge 12 eller 24 timers ur.
Indstil tid/dato:
Tryk på knappen Select og brug pq og Select for at indstille timer og minutter, umiddelbart
efterfulgt af indstilling af dato. Du bør også indstille Auto Opdatering til “Ingen opdatering”.
For mere information om dette se “Auto Opdatering” nedenfor.
Auto Opdatering:
Tryk på knappen Select og brug pq og Select til at vælge imellem “Opdatering fra alle”, “Opdatering fra DAB” (også DMB), eller “Opdatering fra FM” (RDS). For at disse opdateringer skal
virke er det nødvendigt med en ensartet modtagelse af DAB eller FM, og derudover forudsættes
det, at der er tid/dato til rådighed. Det kan tage op til et minut eller mere for uret at opdatere.
Tivoli Audio er ikke ansvarlig for ukorrekt tid / dato i forbindelse med automatisk opdatering.
For manuelt at indstille uret vælges “Ingen opdatering”, og derefter vælges “Indstil Tid/Dato” i
menuen “Tid” ved hjælp af pq eller tu knapperne. Select bruges til indstilling af time, og dette
gentages til indstilling af minutter, hvorefter der trykkes på Select for at gemme indstillingen. I
denne menu er der yderligere mulighed for at indstille dato-format og 12/24 timer ur mode.
BEMÆRK VENLIGST: Under et strømsvigt vil indstilling af både alarm og ur opretholdes af en
integreret backup-hukommelse. Når “Auto Opdatering” er indstillet til “Opdatering fra alle”, kan
radioen finde klokkeslæt fra den station, der sidst blev lyttet til, og det sker selvom Model 10
+ er i standby.
Indstilling af dato format:
Tryk på knappen Select og brug pq og Select til at vælge det ønskede dato format.
5. BACKLIGHT (FINDES I MENUEN INDSTILLINGER):
Timeout:
Baggrundsbelysningen kan være konstant, uanset om du trykker på knapperne på din Model
10+ eller ej (det er den måde, hvorpå Model 10+ er konfigureret fra fabrikken), eller du kan tilpasse baggrundslyset, så det automatisk skifter til et dæmpet niveau efter en bestemt periode,
hvor der ikke er blevet trykket på nogen af knapperne. Når der trykkes på en knap på apparatet
eller fjernbetjeningen, bliver det normale niveau på baggrundslyset genoprettet.
Tryk på knappen Select og brug pq og Select for at indstille hvor lang tid, der skal gå, før
baggrundslyset dæmpes. Der kan vælges imellem 10, 20, 30, 45, 60, 90, 120 eller 180
sekunder, eller timeout funktionen kan slåes fra.
26

Dansk
On Level:
Tryk på knappen Select og brug pq og Select til at vælge intensiteten af baggrundslyset.
Dæmpning:
Hvis du har valgt et tidspunkt for dæmpning af baggrundslyset under “Timeout” trykkes herefter
på Vælg og brug pq og Select til at vælge intensiteten af baggrundsbelysningen, når det ændres til dæmpet styrke. Man kan også indstille baggrundsbelysningen til Off, hvis lyset generer,
når man sover.
6. SPROG (FINDES I MENUEN INDSTILLINGER): Tryk på knappen Select og brug pq og Select
til at vælge indstilling af sprog.
7. RESET TIL FABRIKSINDSTILLINGER (FINDES I MENUEN INDSTILLINGE): Tryk på knappen
Select og brug pq og Select for at bekræfte (Yes) eller afvise (No) reset til fabriksindstillinger.
Et reset vil genoprette fabriksindstillingerne og annullere alle dine personlige indstillinger, som
f.eks valgte kanaler og sprog.
8. ID (FINDES I MENUEN INDSTILLINGER): Tryk på Select for at se produktets ID. Hvis du kon-
takter din forhandler eller serviceværksted med et spørgsmål, kan du blive bedt om at opgive
dette nummer.
9. SLEEP (FINDES I MENUEN INDSTILLINGER): Tryk på knappen Select og brug pq og Select
for at indstille Sleep timeren til en af de mulige tider. Der er også en Sleep-knap på fjernbetjeningen. En lille ur vil blive vist på skærmen, når Sleep timeren er aktiv.
Sådan indstilles alarmen:
1. Du kan få adgang til alarm enten gennem hovedmenuen eller ved at trykke på alarm-knappen
på fjernbetjeningen.
2. Alarm 1 er vist først. Tryk gentagne gange på alarm-knappen eller brug pq og Select til at
vælge imellem Alarm 1 and Alarm 2. Bemærk: På ethvert tidspunkt kan du navigere gennem
alarm menuen ved hjælp af Tilbage eller venstre piletast, og Select eller højre piletast.
3. Tryk på pq og Select for at slå alarmen til eller fra. Hvis dato og klokkeslæt ikke allerede er
indstillet, vil Model 10+ bede dig om at indstille Tidspunkt / Dato. Ellers indstilles alarmen som
beskrevet i næste trin.
4. Tryk på pq for at justere timetallet og tryk på Select for at gemme og gentage processen for
minuttallet, efterfulgt af AM/PM (hvis tiden er sat til 12 timers format), tryk derefter på Select.
5. Tryk på pq for at vælge, hvor længe alarmen skal lyde, og tryk derefter på Select.
6. Tryk på pq for at vælge den lydkilde, du vil vågne op til, og tryk herefter på Select. Hvis du
indstiller DAB (omfatter også DAB+/DMB) eller FM, skal du bruge pq for at vælge den ønskede faste station (hvis presets er lagret) eller den station du sidst lyttede til, og tryk derefter
på Select.
7. Tryk på pq for at indstille hvor ofte alarmen skal vække dig, og tryk derefter på Select. Hvis
“Once” (én gang) er valgt, skal du angive den dato, hvor du ønsker alarmen.
8. Sidst men ikke mindst tryk på pq for at indstille lydstyrken for alarmen, og tryk derefter
på Select.
9. Gentag denne proces for Alarm 2, hvis det ønskes.
27

Dansk
Hvis du laver en fejl på noget tidspunkt i processen, kan du altid trykke på Tilbage-knappen på
fjernbetjeningen og begynde igen.
Bemærk: Dine indstillinger gemmes ikke med mindre du har fuldført hele processen, og displayet
viser “Alarm Saved” (Alarm gemt).
Bemærk: Hvis du vil indstille alarmen til DAB, og den sidst lyttede eller forudindstillede station er
ikke tilgængelig på det tidspunkt alarmen lyder, vil alarmen i stedet lyde i form af en standard tone.
Strøm svigt: Skulle strømmen forsvinde, eller skulle din Model 10+ blive afbrudt, vil den
indstillede alarm forblive gemt, men alarm kan ikke aktiveres, hvis der ikke er strøm.
Alarm Quick Indstilling: Når Model 10+ er i standby, trykkes gentagne gange kort på alarm
knappen for at slå alarmen til eller fra.
ALARM MULIGHEDER:
Alarmen lyder med en gradvis øget volumen. Når alarmen lyder, kan du aktivere Snooze funktionen eller slå alarmen fra.
Alarm fra: Du kan stoppe alarmenved at trykke på Alarm eller Power-knappen på fjernbetjeningen, eller tryk og hold kontrolhjulet på toppen af enheden.
Snooze: For at aktivere Snooze, skal du trykke på Snooze-knappen på fjernbetjeningen eller trykke kortvarigt på kontrolhjulet på toppen af enheden. Det er ikke muligt at indstille Snooze tiden.
Bemærk: Når du er i Snooze tilstand, kan du se den resterende Snooze tid ved at trykke på
Snooze-knappen på fjernbetjeningen. Hvis du trykker på Alarm eller Power-knappen på fjernbetjeningen, eller hvis du trykker på kontrolhjulet på toppen af enheden, vil Snooze nedtællingen blive annulleret.
28

Dansk
Digital radio (DAB/DAB+/DMB):
Tryk på og hold Menu-knappen på fjernbetjeningen for at åbne hovedmenuen. Tryk på pq og
Select for at skifte imellem punkterne i menuen. Brug knappen Tilbage for at navigere tilbage,
eller vent i 15 sekunder indtil menuens timeout.
En stjerne (*) indikerer, at det viste menupunkt er indstillet.
Bemærk: Hvis Stationsoversigten er tom, når du slår over på DAB, vil Model 10+
starte en auto scanning.
1. AUTO SCAN: Søger hele frekvensområdet. Hvis du flytter din Mode 10+ til en anden lokation,
bør du udføre en ny scanning, så radioen kan finde stationer på den nye placering. Hvis du vil
annullere den automatiske scanning, skal du trykke på knappen Tilbage på fjernbetjeningen.
2. TIVOLI EQ: Se “Menu og særlige funktioner”.
3. MANUEL TUNING: Tryk på pq for manuelt at søge efter DAB/DAB+/DMB frekvenser, og
tryk herefter på Select for at tune ind på den viste frekvens.
4. DRC: Dynamic Range Control giver dig mulighed for at ændre lydniveauet, så stille passa-
ger gøres kraftigere for at kompensere for evt. støjende omgivelser, eller hvis du lytter ved
lav lydstyrke.
5. ADVANCED MODE: Hvis Model 10 + er flyttet til et andet område, kan du risikere at finde
stationer med samme navn. Hvis du aktiverer “Avanceret visning”, “Long labels”, og “Show Ensemble” under Avanceret tilstand, vil du være i stand til at skelne mellem udvidet station navne.
Ved DAB / DAB + foreslår vi at deaktivere alle Avanceret indstillinger. For DMB foreslår vi at
slå dem til.
6. UPDATE LIST (NEDSKÆR): Hvis Model 10 + er flyttet til et andet område, kan nogle stationer
blive indisponible. Vælg “Update List” (Nedskær) for at fjerne utilgængelige stationer fra Stationsoversigten. Tryk på pq eller tu og Select for at bekræfte (Yes) eller afvise (No) fjernelsen
af de utilgængelige stationer.
DAB BESKEDER PÅ DISPLAY:
Sekundære tjenester: Sekundære stationer vil fremgå i form af et >> symbol ved siden af statio-
nens navn. Sekundære tjenester er muligvis ikke tilgængelig i dit område.
“?”: Hvis dette symbol vises ved siden af navnet på stationen, betyder det, at stationen er ugyldig
eller inaktiv.
“Not Available”: Vises når der stilles ind på en DAB-station med et utilstrækkeligt signal.
29

Dansk
Digital Radio / FM Modtagelse:
Den medfølgende eksterne antenne vil give en god modtagelse. I områder med stærkt FM signal,
kan reducering af antennens længde give bedre modtagelse.
Hvis du bruger Model 10+ sammen med Model 10 Stereo Speaker, og du lytter til en støjende FM
station, kan du med fordel trykke på Mono-knappen på fjernbetjeningen, da dette kan gøre FM
stationen mere støjfri og lyttevenlig. Displayet vil vise et “M”, når Model 10+ er i mono og et “ST”,
når den er i stereo. Denne information vil også blive vist i FM-tilstand, når du bruger knappen Info
på fjernbetjeningen.
Bygninger der indeholder beton, stål eller aluminium vil hindre modtagelse. Husholdningsapparater,
elektriske tæpper, computere, cd-afspillere og andre elektroniske enheder kan også have en negativ
indflydelse på modtagelsen eller give anledning til støj. If you experience this, move the Model 10+
further from the offending device or plug it into an electrical outlet not shared by another device.
RDS (kun ved FM):
Radio Data System (RDS) sender tekst data sammen med lyden. Ikke alle FM-stationer bruge denne
service, og teksten er således ikke tilgængelig ved alle stationer. Hvis det opleves, at RDS teksten
ikke vises, eller teksten ser rystet ud, kan det skyldes, at signalet er for svagt. I sådanne tilfælde kan
man eksperimentere med placeringen af FM-antennen. Hvis det er muligt at modtage RDS, trykkes
gentagne gange på Info-knappen for at se de tilgængelige oplysninger. Bemærk RDS indholdet
bestemmes af den enkelte FM-station.
Placering:
Placer Model 10 Stereo Speaker på en flad, stabil overflade. For fuld udnyttelse af bas og ventilation, må den bageste basport ikke dækkes til. Model 10+ er ikke video afskærmet og bør holdes
mindst 127 mm (5 ") væk fra en computer skærm eller et fjernsyn. Placering i en reol, et skab eller
tæt på vægge eller hjørner kan indvirke på bassen og dermed skabe en unaturlig lyd.
Rengøring:
Benyt aldrig skrappe rensemidler eller opløsningsmidler på Model 10+’s træfiner eller andre dele,
da dette kan beskadige finishen. Hvis der er behov for ekstra pleje, giver en flydende træ polish
normalt det bedste resultat.
Maling eller på anden måde farvning af trækabinettet vil annullere din garanti.
En vigtig bemærkning om trækabinettet: Variation i træets farve er kendetegnende for ægte træ,
og det bidrager til kabinettets naturlige skønhed. Hvert kabinet er unikt, og det er derfor ikke altid
muligt at opnå et nøjagtigt match i træfarven sammenlignet med andre Tivoli Audio produkter
Du vil formentlig også opleve, at træet bliver mørkere over tid - dette sker bla. på grund af
udsættelse for sollys, og det er helt normalt for ægte træ.
30

Dansk
Garanti:
Tivoli Audio producerer produkter af meget høj kvalitet og standard, og vi er sikre på at det produkt
du netop købt, nok skal fungere tilfredsstillende i mange år frem. Derfor tilbyder vi også 2 års garanti
mod enhver fabrikationsfejl.
Garantien dækker ikke fejl som følge af misbrug af produktet, eller efter hændeligt uheld som f.eks.
tab af produktet på gulvet. Endvidere gælder garantien heller ikke hvis det har været åbnet eller
på anden måde modificeret fra sin originale tilstand. Kun autoriserede serviceværksteder må lave
indgreb i produktet for at garantien bevares.
Såfremt produktet mod forventning er behæftet med en fabrikationsfejl, skal det indleveres til det
sted, hvor det er købt. Vi anbefaler, at emballagen gemmes, således at produktet kan pakkes korrekt
ned ved forsendelse til og fra service-værksted.
Garantien dækker ikke skader påført produktet under forsendelse, hvor årsagen skylden dårlig eller
forkert indpakning.
Tivoli Audio, eller dennes distributører dækker ikke forsendelsesomkostninger ved indsendelse
af et produkt til reparation under garanti. Omvendt opkræves heller ikke fragtomkostninger ved
returnering af produktet efter endt garanti reparation.
For yderligere informationer om garanti service, henvises til forhandleren hvor produktet er købt.
DENNE GARANTI STILLER DIG ALDRIG RINGERE END DEN TIL ENHVER TID GÆLDENDE
KØBELOV I DET LAND, HVOR PRODUKTET ER KØBT.
Denne garanti er ugyldig, hvis den etiket, der bærer serienummeret, er fjernet eller ødelagt.
Hvis du har købt en udvidet service aftale hos din forhandler, og service er påkrævet efter denne
garanti er udløbet, skal du kontakte din forhandler for at få hjælp og vejledning.
31

Dansk
Specifikationer:
Model: Tivoli Audio Model 10+
Type: DAB/DAB+/DMB/FM clock radio
Højttalere: 3" fuldtone
Frekvensbånd: FM: 87.5-108MHz
DAB (Band III)/DAB+/DMB: 174-240MHz
(Kan variere fra land til land)
FM De-Emphasis: 50uSec eller 75uSec. Kan variere fra land til land
Dimensioner: 202mm H x 117mm B x 117mm D (7.95"H x 4.61"B x 4.61"D)
Vægt: 1.58 kg (3.5 lbs.)
Der forbeholdes ret til at ændre specifikationer uden forudgående informationer herom.
Tivoli Audio forbeholder sig retten til at udføre produktændringer uden forudgående informationer herom.
Tivoli Audio, Tivoli Audio’s logo, Model 10+, og Model 10 Stereo Speaker er registerede varemærker som
tilhører Tivoli Audio, LLC
Denne brugervejledning er skrevet af Peter Skiera og kan ikke gengives helt eller delvist uden tilladelse fra
Tivoli Audio. Oplysningerne i denne brugervejledning var korrekte, da vejledningen blev trykt.
Tivoli Audio kan ikke holdes ansvarlig for driftstab, tekniske eller redaktionelle fejl / udeladelser. Besøg
vores hjemmeside, www.tivoliaudio.com download den seneste version af brugervejledningen.
For flere oplysninger om andre spændende produkter fra Tivoli Audio, besøg venligst vores
hjemmeside eller kontakt os direkte (på engelsk):
Tivoli Audio, LLC
Seaport Center
70 Fargo Street, Suite 900
Boston, MA 02210 USA
1.877.297.9479
www.tivoliaudio.com
help@tivoliaudio.com
32

Deutsch
™
Model 10
DAB/DAB+/DMB/FM - Uhrenradio
Inhalt:
Sicherheitshinweise ......................................................................................................................... 34
Einführung; Über Tivoli Audio .......................................................................................................... 36
Bedienelemente an der Vorderseite ................................................................................................36
Bedienelemente an der Rückseite...................................................................................................38
Fernbedienung ................................................................................................................................40
Menü und Funktionen .....................................................................................................................41
Alarmeinstellung .............................................................................................................................. 43
Alarmoptionen ................................................................................................................................. 44
Digital Radio (DAB/DAB+/DMB) Modus .......................................................................................... 45
Empfang; RDS; Aufstellung; Reinigung ........................................................................................... 46
Garantie ........................................................................................................................................... 47
Spezifikationen ................................................................................................................................ 49
+
33

Deutsch
Wichtige Sicherheitsanweisungen
1. Lesen Sie diese Anweisungen sorgfältig durch.
2. Bewahren Sie diese Anweisungen auf.
3. Beachten Sie alle Warnhinweise.
4. Befolgen Sie alle Anweisungen.
5. Halten Sie dieses Gerät von Wasser fern. Verwenden Sie dieses Gerät beispielsweise nicht in
der Nähe einer Badewanne, in einem feuchten Keller, in der Nähe eines Swimmingpools und
dergleichen. ACHTUNG! Setzen Sie das Gerät nicht Regen oder Feuchtigkeit aus.
6. Reinigen Sie das Gerät nur mit einem trockenen Tuch.
7. Stellen Sie sicher, dass die Belüftungsöffnungen nicht versperrt sind. Schließen Sie das Gerät
gemäß den Anweisungen des Herstellers an.
8. Schließen Sie das Gerät nicht in der Nähe von Wärmequellen wie z. B. Heizkörpern, Heizauslässen, Öfen oder anderen wärmeerzeugenden Geräten (inklusive Verstärkern) an.
9. Setzen Sie nicht die Sicherheitsfunktion des verpolungssicheren oder geerdeten Steckers
außer Kraft. Ein verpolungssicherer Stecker ist mit zwei unterschiedlich breiten Kontakten
ausgestattet. Ein geerdeter Stecker ist neben den zwei Kontakten außerdem mit einem Massekontakt ausgestattet. Der breite Kontakt bzw. der Massekontakt dienen zu Ihrer Sicherheit.
Falls der gelieferte Stecker nicht in Ihre Steckdose passt, wenden Sie sich zum Austausch der
entsprechenden Steckdose bitte an einen Elektriker.
10. Stellen Sie sicher, dass nicht auf das Stromkabel getreten oder das Kabel geknickt wird,
nsbesondere an Steckern, Steckdosen und der Stelle, wo das Kabel am Gerät austritt.
11. Benutzen Sie ausschließlich die vom Hersteller angegebenen Anbau- und Zubehörgeräte.
12. Ziehen Sie den Stecker dieses Gerätes bei Gewittern oder bei längerer Nichtverwendung heraus.
13. Lassen Sie jegliche Wartungsarbeiten nur von qualifiziertem Wartungspersonal durchführen.
Eine Wartung oder Reparatur ist erforderlich, wenn das Gerät auf irgendeine Weise beschädigt wurde, wie z. B. durch Beschädigung des Stromversorgungskabels oder Steckers, wenn
34

Deutsch
Flüssigkeit auf das Gerät verschüttet wurde oder Gegenstände in das Gerät gefallen sind, das
Gerät Regen oder Feuchtigkeit ausgesetzt wurde, nicht ordnungsgemäß funktioniert oder fallen
gelassen wurde.
14. Das Radio muss so positioniert sein, dass die hintere Steckdose und das angeschlossene
Stromkabel leicht zugänglich sind.
15. Dieses Produkt ist ein digitales Gerät der Klasse B, das mit dem kanadischen Standard
ICES-003 konform ist.
16. Schützen Sie das Gerät zusätzlich dadurch, dass Sie bei einem Gewitter, oder wenn Sie das
Gerät für längere Zeit unbeaufsichtigt lassen oder nicht benutzen wollen, den Stecker aus der
Steckdose ziehen und die Antenne abnehmen oder das Kabelsystem trennen. Dies verhindert
eine Beschädigung des Produktes durch Blitzschlag oder Spannungsspitzen.
17. Betreiben Sie das Gerät nur mit den auf der Rückseite angegebenen Stromquellen. Verwenden
Sie bei Geräten mit einer externen Stromversorgung im Fall von Verlust oder Beschädigung
nur ein identisches Ersatzteil. Entnehmen Sie bei Geräten mit einer Batteriestromversorgung
dem Benutzerhandbuch die notwendigen Informationen.
18. Ziehen Sie das Gerät von der Steckdose ab und lassen Sie die Wartungsarbeiten von
qualifiziertem Fachpersonal durchführen, wenn Folgendes passiert ist:
a. Das Stromversorgungskabel oder der Stecker ist beschädigt.
b. Flüssigkeit wurde auf das Gerät verschüttet oder Gegenstände sind hineingefallen.
c. Das Gerät wurde Wasser oder Regen ausgesetzt.
d. Das Gerät funktioniert nicht ordnungsgemäß, obwohl die Bedienungsanleitung
befolgt wird.
e. Das Gerät wurde fallen gelassen oder auf andere Weise beschädigt.
f. Das Gerät weist eine deutliche Veränderung der Leistung auf.
19. Berühren Sie nicht die Flüssigkeit, wenn die LCD einen Riss bekommt oder beschädigt wird.
20. Halten Sie das Gerät in sicherer Entfernung zu offenen Flammen wie z. B. brennenden Kerzen.
21. Halten Sie das Gerät von spritzender oder tropfender Flüssigkeit fern. Stellen Sie keine Gegen-
stände auf das Gerät, die Flüssigkeit enthalten, wie beispielsweise Vasen oder Trinkgläser.
22. Der empfohlene Betriebstemperaturbereich liegt zwischen 5 °C und 40 °C (41 °F und 104 °F).
WARNUNG: DIE EXTERNE ANTENNE DES MODEL 10+ IST NICHT ABNEHMBAR.
Dieses Produkt ist recyclingfähig. Produkte mit diesem Symbol dürfen NICHT im
normalen Hausmüll entsorgt werden. Entsorgen Sie das Produkt am Ende der
Nutzungsdauer bei einer ausgewiesenen Recycling-Sammelstelle für elektrische
und elektronische Geräte. Weiterführende Informationen über Rücknahme- und
Sammelstellen erhalten Sie bei Ihren örtlichen Behörden.
Die europäische WEEE-Richtlinie (Elektro- und Elektronikgerätegesetz) wurde
eingeführt, um die Abfallmenge auf Mülldeponien erheblich zu verringern und
so die Umweltauswirkungen auf unseren Planeten und auf die menschliche Gesundheit zu reduzieren. Handeln Sie bitte verantwortungsbewusst, indem Sie
Altgeräte dem Recycling zuführen. Falls das Produkt noch verwendbar sein
sollte, sollten Sie Verschenken oder Weiterverkauf in Betracht ziehen.
35

Deutsch
Anleitung und Hinweise zu Model 10+
Herzlichen Glückwunsch zum Erwerb des Geräts. Wir glauben, dass Model 10+ eines der besten
FM/AM-Tisch-Uhrenradios ist, die derzeit im Handel erhältlich sind.
Wir wissen, dass Sie mit Ihrem neuen Radio Musik hören möchten. Nehmen Sie sich jedoch bitte
einen Augenblick Zeit, um diese Bedienungsanleitung sowie die Sicherheitsanweisungen durchzulesen, damit Sie sämtliche Funktionen des Radios nutzen können. Zögern Sie nicht, sich bei Fragen
an Ihren Händler oder direkt an Tivoli Audio zu wenden.
Heben Sie bitte den Versandkarton und die Originalverpackung für den Fall auf, Ihren Lautsprecher
möglicherweise einmal verschicken zu müssen, da Versandschäden nicht von der Werksgarantie
gedeckt sind.
Im Namen aller Beschäftigten möchten wir uns dafür bedanken, dass Sie sich für Tivoli Audio entschieden haben, und wünschen Ihnen viel Vergnügen mit Ihrem Model 10+!
Über Tivoli Audio
Tivoli Audio wurde von Tom DeVesto mit der Vision gegründet, den Kunden Audioprodukte anzubieten, die über eine einfache Bedienung, ein elegantes Design und eine hohe Qualität verfügen.
Als Geschäftsführer und Leiter der Forschungs- und Entwicklungsabteilung bei seiner vorherigen
Firma, Cambridge SoundWorks*, war Tom verantwortlich für die Entwicklung einer Vielzahl der am
meisten verkauften Homeentertainment- und Multimediaprodukte auf dem Markt. Des Weiteren
bekleidete er Positionen im gehobenen Management der Produktentwicklung bei Advent und Kloss
Video.
*Cambridge SoundWorks ist ein eingetragenes Warenzeichen von Creative Labs, Singapur.
Im Lieferumfang Ihres Model 10+ sollte Folgendes enthalten sein:
• 1 Stromkabel (2,74 m)
• 1 Fernbedienung (inklusive Batterie)
Wenden Sie sich bitte an Ihren Händler oder Tivoli Audio, wenn einer dieser Artikel fehlen sollte.
Erläuterung der Bedienelemente (Vorderseite):
1. MEHRZWECK-DREHREGLER (OBEN):
Der Drehregler dient zur bequemen Ausführung
mehrerer Funktionen:
Ein-/Ausschalten: Wenn Model 10+ ausgeschaltet
ist, den Drehregler drücken, um das Gerät einzuschalten. Wenn Model 10+ über eine der Quellen
eingeschaltet ist, den Drehregler gedrückt halten,
um das Gerät auszuschalten.
Lautstärke: Wenn Model 10+ über eine der Quellen
eingeschaltet ist, den Drehregler im Uhrzeigersinn
drehen, um die Lautstärke zu erhöhen, und gegen
den Uhrzeigersinn, um die Lautstärke zu verringern.
36
1

Deutsch
Einstellung: Drücken Sie im Digital Radio- (DAB/DAB+/DMB) oder FM-Modus einmal und
drehen im Uhrzeigersinn, um manuell aufsteigend einzustellen und drehen Sie gegen den
Uhrzeigersinn, um manuell absteigend einzustellen. Drücken Sie erneut, um einen Sender zu
wählen und kehren Sie zur Lautstärkeregelung zurück. Der Buchstabe “T” erscheint auf dem
Display und zeigt den manuellen Einstellungsmodus an. Unter “Auxiliary” ist keine Einstellungsfunktion vorhanden. Nach circa 7 Sekunden ohne Aktivität schaltet das Steuerungsrädchen
wieder auf die Lautstärkeregelung um.
Quelle: Den Drehregler zweimal drücken, um das Quellen-Menü aufzurufen, und die Quellen
ändern, indem der Drehregler gedreht wird. Den Drehregler erneut drücken, um auf die neue
Quelle umzuschalten. Nach etwa 7 Sekunden Inaktivität schaltet Model 10+ auf die angezeigte
Quelle um.
Schlummerfunktion: Den Drehregler drücken, um die Schlummerfunktion zu aktivieren, wenn
der Alarm ertönt. An der Anzeige wird das Symbol angezeigt, wenn die Schlummerfunktion aktiviert ist. Die Zeit der Schlummerfunktion ist auf 7 Minuten eingestellt. Den Drehregler
bei aktivierter Schlummerfunktion erneut drücken, um die Schlummerfunktion zu deaktivieren.
2. LCD:
: Lautstärke DAB: DAB/DAB+/DMB Band
: Abschaltfunktion FM: FM Band
: Schlummerfunktion AUX: Auxiliary
: Alarme 1 und 2 ST: Stereo
(mittlere Ziffern): Zeit M: Mono
: Empfangsniveau T: Manueller Einstellungsmodus
37

Deutsch
Erläuterung der Bedienelemente (Rückseite):
10
3
2
5
1
11
1. 12 VDC/1000 mA: Dieser Eingang ist für den Betrieb mit einem 12-VDC-Adapter (Sicherung
1 A) in einem Boot oder Wohnmobil vorgesehen. Nur 5,5-mm/2,1-mm-Adapter, Mitte positiv,
verwenden.
2. EXTERNE ANTENNE: An diesem Eingang ist eine externe, ausziehbare Antenne installiert, die
nicht abnehmbar ist. Für besten Empfang ausrichten. Für weitere Informationen lesen Sie den
Abschnitt “Digitalradio/FM-Empfang”.
3. KOPFHÖRERAUSGANG: An diesen Stereoanschluss können Sie einen Kopfhörer (nicht im
Lieferumfang enthalten) anschließen. Bei angeschlossenem Kopfhörer wird der Gerätelautsprecher deaktiviert. Die Kopfhörerlautstärke wird über den Drehregler oder die Fernbedienung geregelt. Der Ausgang kann auch über die Taste “Mono” der Fernbedienung gesteuert werden.
Der Stereoausgang ist für 3,5-mm-Klinkenstecker ausgelegt. Vermeiden Sie beim Tragen von
Kopfhörern zu hohe Lautstärke, um Gehörschaden zu verhindern.
4. VOREINSTELLUNGEN 1-5: Halten Sie die Taste gedrückt, um den gerade eingestellten Sender
zu speichern. Drücken Sie die Taste kurz, um den Sender aufzurufen, der über die Voreinstellung
gespeichert ist. Die Nummer des voreingestellten Senders wird an der Anzeige angezeigt. Es
gibt 5 Voreinstellungen pro Band.
5. R-SPR: Schließen Sie den RCA-Kabelstecker des optionalen Tivoli Audio Model 10+ Speaker
an diese RCA-Ausgangsbuchse an. Stellen Sie sicher, dass die Stereo/Mono-Einstellung auf
Stereo gestellt ist, indem Sie an der Fernbedienung die Taste “Mono” verwenden.
6. SUB OUT: Schließen Sie das Audio-Kabel des optionalen Tivoli Audio Model Subwoofer (oder
eines anderen kompatiblen Subwoofers) an diesen Ausgang an. Der Ausgang ist für 3,5-mmKlinkenstecker ausgelegt.
4
8
9
7
6
38

Deutsch
7. REC OUT: Schließen Sie den Audio-Eingang eines Kassettendecks (oder eines anderen Auf-
nahmegeräts) an diesen Festpegel-Stereoausgang an, um Musik- oder Tonaufnahmen zu machen. Wenn dieser Ausgang verwendet wird, wird der Gerätelautsprecher nicht deaktiviert. Der
Ausgang ist für 3,5-mm-Klinkenstecker ausgelegt.
8. MIX IN: Schließen Sie den Audioausgang eines anderen Geräts, beispielsweise eines Compu-
ters, an diesen Ausgang an, um Klänge zu hören, die mit dem Tuner eingemischt werden. Wenn
sich Model 10+ im Modus “Auxiliary” befindet, ist dieser Eingang als zweiter “Aux”-Eingang
aktiviert. Der Stereoeingang ist für 3,5-mm-Klinkenstecker ausgelegt. Die Lautstärke wird durch
das Quellgerät gesteuert.
9. AUX IN: Um ein externes Gerät wie beispielsweise Model CD von Tivoli Audio, einen MP3-
Spieler oder ein Fernsehgerät anzuschließen, verbinden Sie den Audioausgang des externen
Geräts mit diesem Stereoeingang und stellen die Quelle auf “Auxiliary”. Der Stereoeingang ist
für 3,5-mm-Klinkenstecker ausgelegt. Beachten Sie, dass Sie die Lautstärke für die Wiedergabe
eines externen Geräts anders einstellen müssen als im Radiobetrieb.
10. SERVICE: Der Eingang unter dieser Markierung wird nur für Servicearbeiten verwendet. Bitte
das “Service”-Etikett nicht entfernen. Verwenden Sie diesen Eingang nicht, um etwas daran
anzuschließen, da hierdurch das Model 10+ beschädigt werden könnte und Ihre Garantie
ungültig wird.
11. STROMKABELEINGANG: Stecken Sie fest das mitgelieferte Stromkabel ein. Fassen Sie beim
Herausziehen des Stromkabels aus der Steckdose immer den Stecker des Stromkabels an,
nicht aber das Kabel selbst. Wie empfehlen die Verwendung einer Steckerleiste mit Überspannungsschutz. Stellen Sie sicher, dass die Spannung Ihres regionalen Stromnetzes mit
der Spannung übereinstimmt, die an der Rückseite des Geräts unter dem Stromkabeleingang
angegeben ist. Tivoli Audio ist nicht haftbar für Schäden, die durch falsche Spannung verursacht werden.
39

Deutsch
Funktionsbeschreibung (Fernbedienung):
1. POWER (EIN-/AUSSCHALTER): Drü-
cken Sie kurz diese Taste, um Model
10+ einzuschalten. Das Radio wird eingeschaltet, und die zuletzt verwendete
Quelle wird aktiviert. Drücken Sie diese
4
2
3
5
1
6
Taste, um Model 10+ auszuschalten.
2. MUTE/SNOOZE: Drücken Sie diese
Taste während der Tonwiedergabe des
Geräts, um den Audioausgang zu deaktivieren (die Balken zur Anzeige der
Lautstärke verschwinden vom Symbol) Drücken Sie die Taste erneut oder
stellen Sie die Lautstärke ein, um die
Wiedergabe wiederherzustellen. Drücken Sie diese Taste, um den Alarm 7
Minuten lang zu deaktivieren, nachdem
12
BACK
11
MONO
8
7
9
13
10
dieser ertönt. Der Alarm ertönt nach 7
Minuten erneut. An der Anzeige wird das
Symbol angezeigt, wenn die Schlummerfunktion aktiviert ist. Die Zeit der
Schlummerfunktion ist nicht einstellbar.
3. ALARM: Verwenden Sie die Pfeiltasten pq und die Taste “Select” (Auswählen), um Einstellun-
gen vorzunehmen und die Alarme einzustellen. Eine komplette schrittweise Anleitung finden Sie
im Abschnitt “So stellen Sie den Alarm ein”.
4. SLEEP (SCHLAF): ): Mehrmals drücken, um die Restspielzeit des Radios anzusehen, bevor es
automatisch ausgeschaltet wird. Durch drücken der “Select” (Wahl) Taste wird diese Zeit ausgewählt. Wenn die Abschaltfunktion aktiv ist, können Sie die verbleibende Zeit durch drücken
von “Sleep” auf der Fernbedienung prüfen. Eine kleine Uhrenansicht [ ] wird auf dem Display
angezeigt, wenn die Abschaltfunktion (Sleep) aktiv ist. Zum Löschen der Abschaltfunktion drücken Sie die “Sleep”-Taste, bis das Display “Off” anzeigt.
5. SOURCE (QUELLE): Mehrmals hintereinander drücken, um die Quellen zu ändern.
6. INFO: Press Drücken Sie mehrmals, um durch die Informationen, die je nach gewähltem Modus
vorhanden sind, zu schalten. Diese Funktion ist nicht im Auxiliary-Modus verfügbar.
7. VOREINSTELLUNGEN 1–5: Halten Sie die Taste gedrückt, um den gerade eingestellten Sender
zu speichern. Drücken Sie die Taste kurz, um den Sender aufzurufen, der über die Voreinstellung
gespeichert ist. Die Nummer des voreingestellten Senders wird an der Anzeige angezeigt. Es gibt
5 Voreinstellungen pro Band.
8. VOLUME +/–: Drücken Sie die Plustaste (+), um die Lautstärke zu erhöhen, oder die Minustaste
(–), um die Lautstärke zu verringern. Sollte der Klang verzerrt sein, verringern Sie die Lautstärke,
um eine Beschädigung des Lautsprechers zu vermeiden. Wenn die Lautstärke verstellt wird,
während Model 10+ deaktiviert ist, wird die Deaktivierung aufgehoben.
9. pq/TUNE +/-: Zur Einstellung der Menüobjekte drücken. Verwenden Sie diese Tasten auch
zum manuellen Hoch- oder Herunterschalten im FM-Modus. Ein “T” erscheint auf dem Display
40

Deutsch
und zeigt den manuellen Einstellungsmodus an. Drücken und halten Sie die Taste, um einen
Sender-Schnelldurchlauf zu starten. Es wird eine Sekunde dauern, bis ein Senderwechsel stattfindet. Drücken Sie 1,5 Sekunden lang und lassen Sie los, um den nächsten erkannten Sender
automatisch zu suchen. Das Display zeigt “Scanning…” an. Siehe auch “Sucheinstellung” unter
dem Abschnitt “Menü und Funktionen”.
DIGITALRADIO (DAB/DAB+/DMB) MODUS: Benutzen Sie die pq Tasten auf der Fernbedienung
oder drücken Sie das Multifunktions-Steuerungsrad oben am Gerät, um alle verfügbaren DAB/
DAB+/DMB-Sender anzuzeigen. Benutzen Sie die pq Tasten oder das Reglerrad oben, um die
einzelnen Sender zu markieren. Die Senderliste wird nach 7 bis 15 Sekunden verschwinden, je
nachdem, ob sie durch das Steuerungsrad oder die Fernbedienung aufgerufen wurde.
10. tu: Die rechte Pfeiltaste dupliziert die Wahltaste. Die linke Pfeiltaste führt Sie unter bestimmten
Menü-Objekten auf die vorherige Seite zurück.
11. MENU/SELECT (MENÜ/AUSWAHL): Drücken und halten Sie die Taste, um das Hauptmenü
auszuwählen. Drücken Sie kurz, um einzelne Punkte innerhalb des Menüs auszuwählen. Weitere Informationen finden Sie im Abschnitt “Menü”.
12. BACK (ZURÜCK): Drücken Sie die Taste, um zur vorhergehenden Menüseite zurückzugelangen.
13. MONO: Drücken Sie diese Taste, um die Stereo/Mono-Einstellung zu ändern. An der Anzeige
wird “M” für Mono oder “ST” für Stereo angezeigt. Das Feld “Mono” oder das Feld “Stereo”
wird angezeigt, wenn an der Fernbedienung die Info-Taste gedrückt wird. Diese Einstellung
beeinflusst auch den Kopfhörerausgang. Weitere Informationen finden Sie im Abschnitt “Digital
Radio/FM- Empfang”.
Menü und Funktionen:
Drücken und halten Sie die Taste, um einen Sender-Schnelldurchlauf zu starten. Benutzen Sie
die pq Tasten und die Select-Taste für Einstellungsänderungen im Menü. Verwenden Sie die
Back-Taste, um zurück zu navigieren oder warten Sie 15 Sekunden, bis die Zeitabschaltung
abgelaufen ist.
Ein Sternchen (*) zeigt an, dass das angezeigte Menü aktuell eingestellt ist.
1. SUCHEINSTELLUNG (NUR FM MODU): Drücken Sie die Select-Taste und verwenden Sie
pq und die Select-Taste, um zwischen “Strong Stations Only” (nur Sender mit gutem Empfang) oder “All Stations” (alle Sender) zu wählen, wenn Sie eine automatische Sendersuche
ausführen (siehe Punkt 9 (pq/Tune +/-) unter “Fernbedienung”. Die Wahl von “All Stations” erhöht die Suchempfindlichkeit, so dass die automatische Suche eventuell auf einem Rauschen
stehenbleibt. Diese Funktion ist nicht im Auxiliary-Modus verfügbar.
2. TIVOLI EQ: Drücken Sie die Select-Taste und verwenden Sie pq und die Select-Taste, um
Bass und Treble (Bass und Höhen) einzustellen. Die eingestellten Werte werden unter “User
EQ” angezeigt. Drücken Sie die Select-Taste zum Ein- oder Ausschalten der Lautstärke. Es
wird empfohlen, die Lautstärke beim Hören auf niedriger Lautstärke einzuschalten, da dies die
hohen und niedrigen Frequenzen erhöht und zu einem natürlicheren Klang führt. Verwenden
Sie die pq Tasten und die Select-Taste zur Aktivierung einer der drei voreingestellten EQEinstellungen. Die Wahl eines voreingestellten EQ hebt alle Einstellungen auf, die zuvor für Bass
und Treble vorgenommen wurden; die Lautstärke wird hiervon jedoch nicht betroffen. Der “Flat”
EQ setzt die Klangeinstellungen auf die Werkseinstellungen zurück. Das bedeutet, dass Bass
41

Deutsch
und Treble auf null zurückgesetzt werden. Der “Flat” EQ setzt auch die Einstellung “Loudness
Off” (Lautstärke aus) zurück. Wenn Bass und Treble jedoch eingestellt wurden, werden diese
Anzeigen weiterhin unter “User EQ” angezeigt. Das einfache Anwählen von “User EQ” reaktiviert die Bass- und Treble-Einstellungen wieder. Auf der EQ-Menüseite zeigen die Zahlen rechts
die Bass- und Höheneinstellungen an.
3. BALANCE (UNTER TIVOLI EQ): Da die Balance-Einstellung keine Auswirkungen hat, wenn
das Model 10+ auf Mono gestellt wurde, sollte diese Einstellung in der Mittelposition bleiben, es
sei denn, der optionale Model 10+ Lautsprecher wurde angeschlossen und der Stereo-Modus
wurde mittels “Mono”-Taste der Fernbedienung gewählt. Dennoch empfehlen wir im StereoModus die Mittelstellung. Sie können mithilfe der pq Tasten die Balance auf Ihre Bedürfnisse
anpassen und danach die Select-Taste drücken, um die Änderungen zu speichern.
4. TIME (ZEIT) (UNTER SETTINGS):
12/24 Std.-Anzeige:
Drücken Sie die Select-Taste und verwenden Sie die Aufwärts-/Abwärtspfeile und die SelectTaste, um das 12- oder 24-Std.-Format einzustellen.
Zeit/Datum einstellen:
Drücken Sie die Select-Taste und verwenden Sie die pq Tasten und die Select-Taste, um
die Stunden und Minuten und direkt danach das Datum einzustellen. Weiters müssen Sie das
Auto Update auf “No Update” (kein Update) einstellen. Für weitere Informationen siehe “Auto
Update” unten.
Auto Update:
Drücken Sie die Select-Taste und verwenden Sie die pq Tasten und die Select-Taste, um
unter “Update from any” (Update von beliebig), “Update from DAB” (Update von DAB oder
DMB) oder “Update from FM” (Update von FM RDS) zu wählen. Damit die automatischen Aktualisierungen funktionieren, benötigen Sie einen durchgängigen DAB- oder FM RDS-Empfang
mit Zeit-/Datumsignal. Die Uhr kann eine Minute oder länger für die Aktualisierung benötigen.
Tivoli Audio ist nicht für falsche Zeit-/Datumsangaben durch das automatische Update-Signal
verantwortlich.
Zum manuellen Einstellen der Uhr wählen Sie “No Update” und danach “Set Time/Date” unter dem “Time”-Menü mittels der pq oder tu Tasten und der Select-Taste zum Einstellen
der Stunden. Wiederholen Sie den Vorgang zum Einstellen der Minuten und drücken Sie auf
“Select” zum Speichern. Unter diesem “Time”-Menü sind weitere Optionen zur Einstellung des
Datumformats und des 12/24-Std.-Modus verfügbar.
HINWEIS: Bei einem Stromausfall werden Alarmzeit(en) und Uhr durch einen integrierten Backup-Speicher bewahrt. Wenn “Auto Update” auf “Update from any” eingestellt wurde, kann das
Radio das Uhrensignal unter dem zuletzt angehörten Sender finden, selbst wenn das Model
10+ im Standby ist.
Datumsformat einstellen:
Drücken Sie die Select-Taste und verwenden Sie die pq Tasten und die Select-Taste, um das
von Ihnen bevorzugte Datumsformat zu wählen.
5. HINTERGRUNDBELEUCHTUNG (UNTER SETTINGS):
Timeout (Zeitbeschränkung):
Die Hintergrundbeleuchtung kann konstant sein, unabhängig davon, ob Sie Schalter am Model
10+ bedienen oder nicht (das ist die Werkseinstellung des Model 10+ ) oder Sie können die Hintergrundbeleuchtung so einstellen, dass sie automatisch nach einer festgelegten Zeitdauer, in der
42

Deutsch
keine Schalter bedient werden, abdunkelt. Sobald ein Schalter am Gerät oder an der Fernbedienung gedrückt wurde, wird die normale Helligkeit der Hintergrundbeleuchtung wieder hergestellt.
Drücken Sie Select und verwenden Sie die pq Tasten und die Select Taste, um die Zeitspanne
von 10, 20, 30, 45, 60, 90, 120 oder 180 Sekunden einzustellen, nach der die Hintergrundbeleuchtung abdunkelt oder um die Zeitbeschränkungsfunktion auszuschalten.
Einschalten:
Drücken Sie Select und verwenden Sie die pq Tasten und die Select-Taste, um die Helligkeit
der Hintergrundbeleuchtung zu wählen.
Abdunkeln:
Wenn Sie unter “Timeout” eine Zeitspanne gewählt haben, nach der die Hintergrundbeleuchtung abdunkelt, drücken Sie Select und verwenden Sie die pq Tasten und die Select-Taste,
um die Helligkeit der Hintergrundbeleuchtung beim Wechsel in den abgedunkelten Modus zu
wählen. Wenn die Hintergrundbeleuchtung während des Schlafs als störend empfunden wird,
empfiehlt es sich, die Abdunkelung auf “Off” (Aus) zu stellen.
6. SPRACHE (UNTER SETTINGS): Drücken Sie Select und verwenden Sie die Aufwärts-/Ab-
wärts-Tasten, um Ihre Sprache einzustellen.
7. ZURÜCKSTELLEN AUF WERKSEINSTELLUNG (UNTER SETTINGS): Drücken Sie Se-
lect und verwenden Sie pq oder tu und die Select-Taste, um die Zurücksetzung auf die
Werkseinstellung zu bestätigen (Ja) oder abzulehnen (Nein). Ein Zurücksetzen auf die Werkseinstellungen stellt die Grundeinstellungen wieder her und löscht Ihre persönlichen Einstellungen,
wie z.B. alle Voreinstellungen und die Sprachauswahl.
8. ID (UNTER SETTINGS): Drücken Sie Select zum Ansehen der ID. Wenn Sie Ihren Händler oder
Tivoli Audio mit einer Frage kontaktieren, wird man Sie nach der Nummer fragen, die in diesem
Feld angezeigt wird.
9. SLEEP (ABSCHALTEN) (UNTER SETTINGS): Drücken Sie Select und verwenden Sie pq und
die Select-Taste, um die Abschaltfunktion auf eine der verfügbaren Uhrzeiten einzustellen. Es
gibt auch eine spezielle Sleep-Taste auf der Fernbedienung. Eine kleine Uhrenansicht wird auf
dem Display angezeigt, wenn die Abschaltfunktion (Sleep) aktiv ist.
So stellen Sie den Alarm ein:
1. Die Alarmeinstellungen können Sie entweder über das Hauptmenü anwählen oder indem Sie
den Alarmknopf an der Fernbedienung betätigen.
2. Alarm 1 wird zuerst angezeigt. Drücken Sie die Taste “Alarm” oder verwenden Sie die Tasten
pq und die Taste “Select”, um Alarm 1 oder Alarm 2 zu wählen. Hinweis: Sie können jederzeit
durch das Alarmmenü navigieren, indem Sie die Tasten “Back” oder Pfeil links betätigen und
die Tasten “Select” oder right Pfeil rechts.
3. Verwenden Sie die Tasten pq und die Taste “Select”, um den Alarm ein- oder auszuschalten.
Wenn Zeit und Datum nicht eingestellt sind, wird Sie das Model 10+ zur Einstellung von Zeit/
Datum auffordern. Ansonsten stellen Sie den Alarm wie im nächsten Schritt beschrieben ein.
4. Verwenden Sie die Tasten pq, um die Stunde(n) einzustellen oder zu ändern, und drücken Sie
dann “Select”. Wiederholen Sie diesen Ablauf zum Einstellen/Ändern der Minuten, gefolgt von
AM/PM (wenn die Zeit auf das 12-Std. Format eingestellt wurde) und drücken Sie dann Select.
43

Deutsch
5. Benutzen Sie die pq Tasten, um die Länge des Alarms einzustellen und drücken Sie dann Select.
6. Benutzen Sie die pq Tasten, um die Quelle für das Aufwecken zu wählen und drücken Sie
dann Select. Wenn Sie als Quelle DAB (umfasst DAB+/DMB) oder FM wählen, verwenden Sie
die Aufwärts-/Abwärts-Tasten zur Auswahl des Senders, der voreingestellt war (falls Voreinstellungen gespeichert wurden) oder zuletzt gehört wurde und drücken Sie dann auf Select.
7. Benutzen Sie die pq Tasten, um festzulegen, wie oft der Alarm auf Wecken eingestellt werden
soll und drücken Sie dann Select. Wenn “Once” (Einmal) gewählt wird, müssen Sie das Datum
wählen, zu dem der Alarm einmalig ertönen soll.
8. Verwenden Sie als Letztes die Tasten pq, um die Lautstärke des Alarms einzustellen, dann
drücken Sie “Select”.
9. Wiederholen Sie diesen Vorgang wenn nötig für Alarm 2.
Wenn Sie in diesem Ablauf einen Fehler machen, drücken Sie die “Back” (Zurück) Taste auf der
Fernbedienung und beginnen Sie erneut.
HINWEIS: Ihre Einstellungen werden erst gespeichert, wenn Sie den gesamten Ablauf abgeschlossen haben und das Display “Alarm Saved” (Alarm gespeichert) anzeigt.
HINWEIS: Wenn Sie die Alarmquelle auf DAB einstellen und der zuletzt gehörte oder voreingestellte
Sender zum Zeitpunkt des Alarms nicht verfügbar ist, wird der Alarm auf den Standardton zurückgesetzt.
Stromverlust: Sollte ein Stromverlust auftreten oder Model 10+ vom Netz getrennt werden,
wird die Alarmzeit gespeichert – allerdings kann Model 10+ keinen Alarm geben, wenn die
Stromversorgung unterbrochen ist.
Alarm-Schnelleinstellung: Drücken Sie mehrmals kurz auf die Alarmtaste, während das Model
10+ im Standby-Modus ist, um den jeweiligen Alarm ein- oder auszuschalten.
ALARMOPTIONEN:
Der Alarm erklingt mit einer stufenweise ansteigenden Lautstärke. Wenn der Alarm erklingt, können
Sie die Schlummerfunktion aktivieren oder den Alarm abschalten.
Alarm aus: Um den Alarm zu stoppen, drücken Sie an der Fernbedienung die Taste “Alarm” oder
die Taste “Power”, oder halten Sie den Mehrzweck-Drehregler gedrückt, der sich an der Oberseite
des Geräts befindet.
Snooze (Schlummerfunktion): Um die Schlummerfunktion zu aktivieren, während der Alarm ertönt, drücken Sie an der Fernbedienung die Taste “Snooze”, oder drücken Sie kurz den Mehrzweck-Drehregler, der sich an der Oberseite des Geräts befindet. Wenn Sie die Taste “Snooze”
erneut drücken, wird die Schlummerfunktion deaktiviert. Hinweis: Die Zeit der Schlummerfunktion
ist nicht einstellbar.
HINWEIS: Im Schlummermodus können Sie die verbleibende Schlummerzeit ansehen, indem
Sie die “Snooze”-Taste auf der Fernbedienung drücken. Wenn Sie die Alarm- oder Power-Taste
auf der Fernbedienung drücken oder wenn Sie das Multifunktions-Steuerungsrad oben am Gerät drücken, wird der Schlummer-Countdown gelöscht.
44

Deutsch
Digitalradio (DAB/DAB+/DMB) Modus:
Drücken und halten Sie die Menü-Taste auf der Fernbedienung, um in das Hauptmenü zu gelangen. Benutzen Sie die pq Tasten und die Select-Taste für Einstellungsänderungen im Menü.
Verwenden Sie die Back-Taste, um zurück zu navigieren oder warten Sie 15 Sekunden, bis die
Zeitabschaltung abgelaufen ist.
Ein Sternchen (*) zeigt an, dass das angezeigte Menü aktuell eingestellt ist.
HINWEIS: Beim Umschalten auf Digitalradio wird ein automatischer Suchlauf beginnen, wenn
die Senderliste leer ist.
1. AUTO SCAN: Durchsucht den gesamten Frequenzbereich. Wenn Sie das Model 10+ an einem
anderen Standort aufstellen, müssen Sie eine neue Sendersuche durchführen, damit das Radio
am neuen Standort Sender finden kann. Zum Löschen der automatischen Sendersuche drücken
Sie die “Back”-Taste auf der Fernbedienung.
2. TIVOLI EQ: Siehe Abschnitt “Menü und Funktionen”.
3. MANUELLE EINSTELLUNG: Drücken Sie die pq Tasten zur manuellen Einstellung spezifi-
scher DAB/DAB+/DMB-Frequenzen und drücken Sie dann Select, um die angezeigte Frequenz
einzustellen.
4. DRC: Die Dynamic Range Control ermöglicht die Änderung der Klangebenen der Sender, so
dass leise Passagen lauter werden, um damit laute Umgebungen auszugleichen, oder wenn die
Lautstärke niedrig eingestellt ist.
5. ADVANCED (ERWEITERTER) MODUS: Wenn das Model 10+ an einem anderen Ort aufgestellt
wird, finden Sie eventuell Sender mit gleichem Namen. Wenn Sie die Funktionen “Advanced
View” (erweiterte Ansicht), “Long Labels” (lange Kennzeichnungen) unter dem erweiterten Modus
aktivieren, können Sie unter erweiterten Sendernamen unterscheiden.
Für DAB/DAB+ empfehlen wir, alle Einstellungen unter dem erweiterten Modus zu deaktivieren.
Für DMB empfehlen wir die Aktivierung dieser Einstellungen.
6. UPDATE LIST (STATION ENTFERNEN): Wenn das Model 10+ an einem anderen Ort aufgestellt
wird, sind einige Sender eventuell nicht mehr verfügbar. Wählen Sie “Update List” (Station
Entfernen), um nicht mehr verfügbare Sender aus der Senderliste zu entfernen. Benutzen Sie
die pq oder tu Tasten und die Select-Taste zum Bestätigen (Ja) oder Abweisen (Nein) des
Entfernens nicht verfügbarer Stationen.
DAB DISPLAY-NACHRICHTEN:
Untergeordnete Dienste: Untergeordnete Sender werden durch ein >> Symbol neben dem Sender-
namen gekennzeichnet. Untergeordnete Dienste sind in Ihrer Gegend möglicherweise nicht verfügbar.
“?”: Wenn dieses Symbol neben dem Sendernamen erscheint, bedeutet dies, dass der Sender
ungültig oder nicht aktiv ist.
“Not Available”: Wird angezeigt, wenn ein DAB-Sender mit zu schwachem Signal eingestellt wird.
45

Deutsch
Digital Radio/FM- Empfang:
Die mitgelieferte externe FM-Antenne sorgt für einen guten Empfang. An Orten mit einem starken
FM-Signal kann die Länge der Antenne verringert werden, um den Empfang zu verbessern. Wenn
Sie Model 10+ zusammen mit dem optionalen Model 10+ Speaker für Stereoklang verwenden und
einen FM-Sender hören, der durch Geräusche gestört wird, drücken Sie an der Fernbedienung die
Taste “Mono”, um die Hörqualität zu verbessern. Das Display zeigt ein “M” für Mono und ein “ST” für
Stereo an. Diese Informationen werden auch im FM-Modus angezeigt, wenn die Info-Taste auf der
Fernbedienung benutzt wird.
Gebäude aus Beton-, Stahl- oder Aluminiumfassaden behindert den Empfang. Haushaltsgeräte,
Heizdecken, Computer, CD-Player und andere elektronische Geräte können den Empfang beeinträchtigen oder zu einem Rauschen führen. Wenn dies der Fall sein sollte, stellen Sie das Model 10+
weiter von der Störquelle entfernt auf oder stecken es in eine andere Steckdose ein, die nicht von
einem anderen Gerät belegt wird.
RDS/RBDS (nur FM-Frequenzbereich):
Das Funkdatensystem überträgt Textdaten zusammen mit der Tonübertragung. Da dieser Dienst nicht
von allen FM-Sendern genutzt wird, wird bei manchen Sendern kein Text angezeigt. Auch bei Sendern,
die RDS senden, ist es möglich, dass kein Text oder unleserlicher Text angezeigt wird, wenn das Signal
zu schwach ist. In solch einem Fall sollten Sie versuchen, die Position der FM-Antenne zu verändern.
Beachten Sie, dass der RDS-Inhalt der einzelnen FM-Sender unterschiedlich ist.
Aufstellung:
Stellen Sie Model 10+ auf einer ebenen, stabilen Fläche auf. Um den Bassbereich nicht zu beeinträchtigen und ausreichende Belüftung zu gewährleisten, nicht den hinteren Bassport verstellen.
Model 10+ ist nicht gegen Bildsignale abgeschirmt und sollte daher in einem Abstand von mindestens 127 mm von Computern und Fernsehgeräten entfernt aufgestellt werden. Durch Aufstellen der
Lautsprecher in Bücherregalen, Schränken oder nahe an Wänden oder Raumecken kann es zur
Verstärkung des Basses kommen und hierdurch ein unnatürlicher Klang entstehen.
Reinigung:
Verwenden Sie an Ihrem Radio nie aggressive Reinigungs- oder Lösungsmittel. Vermeiden Sie
aufsprühbare Wachse. Flüssige Holzpolituren führen normalerweise zu den besten Ergebnissen.
Durch Anstreichen oder Färben des Holzgehäuses wird Ihre Garantie ungültig.
Ein wichtiger Hinweis zum Holzgehäuse: Die Farb- und Maserungsveränderungen sind typische
Eigenschaften echten Holzes und tragen zur natürlichen Schönheit des Gehäuses bei. Das Furnier eines jeden Gehäuses ist einzigartig. Folglich kann es sein, dass die Ausführung des Gehäuses mit keiner der Ausführungen anderer Produkte von Tivoli Audio übereinstimmt.
In Abhängigkeit vom Furnier werden Sie möglicherweise zudem feststellen, dass das Holz, wenn
es Licht ausgesetzt ist, mit der Zeit nachdunkelt. Dies ist normal.
46

Deutsch
Beschränkte Gewährleistung:
Tivoli Audio Produkte erfüllen einen hohen qualitativen Standard, und wir sind zuversichtlich, dass wir
auch Sie mit unserem Produkt überzeugen können. Aus diesem Grund bieten wir dem Erstbesitzer
für dieses Produkt eine beschränkte Gewährleistung, die Herstellungsmängel in Form von Materialund Verarbeitungsfehlern abdeckt. Diese Gewährleistung ist nicht übertragbar.
Für Produkte, die in der Europäischen Union und Norwegen erworben werden, gilt ab Kaufdatum
eine Gewährleistung mit einer Mindestlaufzeit von 2 Jahren. In Staaten mit gesetzlich festgelegten
Mindestlaufzeiten für Gewährleistungen gilt die gesetzlich festgelegte Gewährleistungsfrist. In allen
anderen Staaten gelten Gewährleistungsfristen von einem Jahr.
Diese beschränkte Gewährleistung bezieht sich auf die Funktionsfähigkeit des Produkts bei normaler,
bestimmungsgemäßer Verwendung entsprechend den Angaben in der Bedienungsanleitung. Sie gilt
nicht für Fehlfunktionen oder Schäden, die durch Folgendes verursacht werden: unsachgemäße
oder unangemessene Verwendung oder Installation, Verwendung des Ladegeräts zum Aufladen
von Alkalibatterien, fehlerhafte Zusatzgeräte, Modifikationen, eigenmächtige Reparatur, Transportschäden oder Verlust, Missbrauch, Unfälle, Verwendung bei ungeeigneter Spannung/Stromstärke,
Überspannung, Blitzeinschlag oder andere Ereignisse höherer Gewalt, übermäßige Feuchtigkeit,
normale Abnutzung, kommerzielle Verwendung oder Kauf bei nicht autorisierten Händlern. Heben
Sie den Kaufbeleg gut auf, um im Falle einer Garantiewartung belegen zu können, dass Sie das
Gerät bei einem zugelassenen Händler erworben haben. Sind Service- oder Reparaturarbeiten
erforderlich, die unter die Gewährleistung fallen, wenden Sie sich bitte an den Verkäufer oder
einen Händler in Ihrer Nähe.
Bitte öffnen Sie das Gerät nicht selbst und schrauben Sie es nicht auseinander, da die beschränkte
Gewährleistung sonst erlischt. Im Inneren des Produkts befinden sich keine Teile, die durch den Benutzer selbst gewartet werden könnten. Tivoli Audio kommt nicht für Kosten auf, die durch Korrektur
von Empfangsstörungen, Beseitigung von extern verursachter Statik/Geräuschen, Zeitverlust, Unannehmlichkeiten, Nutzungsschaden des Produktes oder Schaden durch unsachgemäßen Gebrauch
dieses Produktes entstanden sind.
Wird Ihr Produkt innerhalb der Gewährleistungsfrist eingereicht und besteht ein Reparaturanspruch
gemäß der beschränkten Gewährleistung, werden wir alle defekten Teile innerhalb eines angemessenen Zeitraums und für Sie kostenfrei reparieren oder ersetzen.
DIESE BESCHRÄNKTE GEWÄHRLEISTUNG GEWÄHRT IHNEN BESTIMMTE RECHTSANSPRÜCHE
ZU FESTGELEGTEN BEDINGUNGEN. IN ABHÄNGIGKEIT VON DEM VON IHNEN ERWORBENEN
PRODUKT KÖNNEN WEITERE RECHTSANSPRÜCHE HINZUKOMMEN. DIESE RECHTE SIND
LANDESABHÄNGIG. IN BESTIMMTEN LÄNDERN IST AUSSCHLUSS, BESCHRÄNKUNG ODER
MODIFIZIERUNG VON BESTIMMTEN IMPLIZIERTEN RECHTEN ODER IHREN AUSWIRKUNGEN
NICHT ZULÄSSIG. IN SOLCHEN FÄLLEN IST DIESE BESCHRÄNKTE GEWÄHRLEISTUNG NUR
INNERHALB DES GESETZLICH VORGEGEBENEN RAHMENS GÜLTIG.
Durch die Gesetzgebung Ihres Landes stehen Ihnen unter Umständen bestimmte rechtliche Ansprüche gegenüber dem Händler oder dem Hersteller dieses Produktes zu. Diese Rechte werden durch
diese beschränkte Gewährleistung nicht beeinträchtigt.
Die Bestimmungen dieser beschränkten Gewährleistung ersetzen alle anderen Gewährleistungen
47

Deutsch
oder Bedingungen, ausgenommen gesetzliche Bestimmungen. Diese beschränkte Gewährleistung
hat keinen Einfluss auf Rechtsansprüche, die Ihnen von Rechts wegen zustehen, und schließt den
Rechtsweg nicht aus.
In Ländern, in denen Haftungsbeschränkungen nicht gesetzlich ausgeschlossen sind, geht die
Haftbarkeit von Tivoli Audio nicht über den von Ihnen für das Produkt bezahlten Kaufpreis hinaus.
In Ländern, in denen Haftungsbeschränkungen gesetzlich ausgeschlossen sind, erstreckt sich die
Haftbarkeit von Tivoli Audio lediglich auf direkte Schäden bei Verletzungen und/oder an beweglichem
oder unbeweglichem Privateigentum infolge von Fahrlässigkeit seitens Tivoli Audio.
Falls dies nicht gesetzlich ausgeschlossen ist, ist Tivoli Audio nicht für atypische, zufällige, indirekte
oder Folgeschäden haftbar. Manche Rechtssysteme erlauben keine Beschränkung oder den Ausschluss der Haftung oder die Begrenzung von Entschädigungsansprüchen bei atypischen, zufälligen,
indirekten oder Folgeschaden, oder die Begrenzung der Haftbarkeit auf bestimmte Beträge. Die oben
genannten Beschränkungen treffen also möglicherweise nicht auf Sie zu.
Die beschränkte Gewährleistung verliert ihre Gültigkeit, wenn der Aufkleber mit der Seriennummer
entfernt oder beschädigt wird.
Falls Sie mit Ihrem Händler oder über ihn einen erweiterten Kundenservice-Vertrag abgeschlossen
haben und nach Ende der Laufzeit dieser beschränkten Gewährleistung die Erbringung von Serviceleistungen erforderlich ist, wenden Sie sich zu diesem Zweck bitte an den Anbieter des erweiterten
Kundenservice-Vertrags.
Für mehr Komfort können Sie Ihr Produkt auf unserer Website www.tivoliaudio.com für den OnlineGarantieservice registrieren. Sie sind nicht verpflichtet, persönliche Angaben zu machen. Allerdings
helfen uns diese Angaben dabei, nachzuvollziehen, welche Produkte Sie erworben haben und Sie
als unseren Kunden besser zu verstehen. Ihre Angaben werden von Tivoli Audio lediglich zu Marketingzwecken benutzt und, falls erlaubt, um Sie in Bezug auf die von Ihnen gekauften und weitere
Produkte von Tivoli-Audio oder anderer Firmen zu kontaktieren. Die von Ihnen angegebenen Informationen können in anderen Ländern verarbeitet werden.
Durchsuchen Sie unsere häufig gestellten Fragen (FAQs) unter http://www.tivoliaudio.com, bevor Sie den Garantieservice nutzen – dort könnten Sie bereits die Lösung für Ihr Anliegen finden.
Bei Kundendienstfragen wenden Sie sich bitte an Ihren örtlichen Händler.
48

Deutsch
Spezifikationen:
Modell: Tivoli Audio Model 10+
Typ: DAB/DAB+/DMB/FM Radiowecker
Treiber: 3" Full Range
Empfangsbänder: FM: 87.5-108MHz
DAB (Band III)/DAB+/DMB: 174-240MHz
(Empfangsbänder variieren je nach Region)
FM De-Emphasis: 50 uSek oder 75 uSek (regionsabhängig)
Abmessungen: 202mm H x 117mm B x 117mm T (7.95"H x 4.61"B x 4.61"T)
Gewicht: 1,58 kg (3,5 lbs.)
Änderungen an technischen Daten vorbehalten.
Tivoli Audio behält sich das Recht vor, ohne vorherige Ankündigung Änderungen am Produkt vorzunehmen.
Tivoli Audio, das Tivoli Audio-Logo, Model 10+ und Model 10+ Speaker sind Warenzeichen von Tivoli Audio, LLC.
Diese Bedienungsanleitung wurde von Peter Skiera geschrieben und darf ohne die Genehmigung von Tivoli
Audio weder im Ganzen noch teilweise vervielfältigt werden. Die in dieser Anleitung enthaltenen Informationen
waren zum Zeitpunkt des Druckes korrekt. Tivoli Audio kann für betriebsbedingte, technische oder redaktionelle
Fehler/Auslassungen nicht haftbar gemacht werden. Besuchen Sie unsere Website, um die jeweils aktuellste
Bedienungsanleitungsversion einzusehen.
Weitere Informationen zu anderen interessanten Produkten von Tivoli Audio erhalten Sie auf unserer
Website oder direkt bei:
Tivoli Audio, LLC
Seaport Center
70 Fargo Street, Suite 900
Boston, MA 02210 USA
1.877.297.9479
www.tivoliaudio.com
help@tivoliaudio.com
49

Français
™
Model 10
Radio réveil DAB/DAB+/DMB/FM
Table des matières:
Précautions d’emploi ......................................................................................................................51
Introduction. A propos de Tivoli Audio ...........................................................................................53
Réglages sur le dessus. Afficheur ................................................................................................... 53
Réglages à l’arrière .......................................................................................................................... 55
Télécommande ................................................................................................................................ 56
Menu et spécificités ........................................................................................................................58
Comment régler le réveil. Options de réveil .................................................................................... 60
RNT (Radio Numérique Terrestre) DAB/DAB+/DMB .......................................................................61
Réception FM RDS Placement. Entretien .......................................................................................62
Garantie ........................................................................................................................................... 63
Caractéristiques ..............................................................................................................................64
+
50

Français
Précautions d’emploi
1. Lisez ce mode d’emploi.
2. Conservez ce mode d’emploi.
3. Respectez toutes les mises en garde.
4. Suivez toutes les instructions.
5. N’utilisez pas cet appareil près d’une source d’eau, telle qu’une baignoire, un sous-sol humide,
ou une piscine. Attention : ne pas exposer cet appareil à la pluie ou au risque de moisissure.
6. Nettoyez votre appareil avec un chiffon doux, n’utilisez ni savon, ni produit aérosol.
7. Ne bloquez pas les ouvertures de ventilation. Suivez les recommandations d’installation.
8. N’exposez pas votre appareil à des sources de chaleur telles que la cheminée, le radiateur ou
un amplificateur.
9. Raccordez votre appareil au secteur en respectant les normes de sécurité courantes.
10. Placez le câble d’alimentation de manière telle qu’il ne soit pas dans le passage.
11. N’utilisez que les accessoires fournis avec votre appareil.
12. Déplacez votre appareil avec soin.
13. Débranchez votre appareil en cas de risque de foudre ou pendant une absence prolongée de
votre domicile.
14. Ne tentez aucune réparation vous-même, toute intervention doit être effectuée par Tivoli Audio
ou son représentant dans votre pays. Prenez contact avec le service technique agréé en particulier si votre appareil, le câble d’alimentation ou la prise ont été endommagés, si du liquide ou
un objet est tombé sur l’appareil, s’il a été exposé à la pluie ou à la moisissure, s’il est tombé
ou bien si son fonctionnement est anormal.
51

Français
15. Lors de l’installation de la radio, veillez à ce que le cordon secteur et la prise soient facilement
accessibles.
16. Cet appareil numérique de Classe B est conforme à la règlementation canadienne ICES-003.
17. Pour une sécurité accrue en cas d’orage ou lorsque l’appareil n’est pas utilisé pendant une longue
période, débranchez aussi bien le câble secteur que l’antenne FM éventuellement connectée.
Ceci évitera des dommages possibles dus à la foudre ou à une surtension électrique.
18. Une antenne externe ne doit pas être installée au dessus de lignes électriques ou risquer de
tomber sur une ligne ou des circuits électriques. Ceci pourrait représenter un danger mortel.
19. Contrôlez la correspondance entre la tension électrique de votre installation et le voltage requis
pour votre appareil.
20. En cas de problème technique, débranchez votre appareil et faites le parvenir au service technique qualifié en particulier:
a. Si le cordon d’alimentation est endommagé.
b. Si du liquide s’est introduit dans l’appareil.
c. Si votre appareil a séjourné sous la pluie ou de l’eau.
d. Si votre appareil ne fonctionne pas normalement.
e. Si votre appareil est tombé ou a été endommagé.
f. Si les performances de votre appareil sont affectées d’une quelconque manière.
21. Si l’afficheur se brise et si du liquide en sort, évitez tout contact avec ce liquide.
22. Evitez la proximité d’une flamme nue telle qu’une bougie par exemple.
23. N’exposez pas cet appareil à des projections d’eau. Les objets contenant du liquide ne doivent
pas être placés à proximité de votre appareil ou au dessus.
24. La température de fonctionnement de votre appareil est de 5 à 40° C.
« ATTENTION: L’ANTENNE DU MODEL 10+ NE DOIT PAS ÊTRE DÉTACHÉE »
Cet appareil peut être recyclé. Les produits portant ce symbole ne doivent pas
être jetés avec les ordures ménagères. En fin de vie, vous devez déposer votre
appareil dans un point de collecte de produits électriques et électroniques. Pour
plus d’informations, vous pouvez contacter votre revendeur ou l’agence locale
de l’environnement.
La Directive européenne pour l’élimination des déchets d’équipements électriques
et électroniques (DEEE) a été mise en application pour réduire de manière importante la quantité de déchets, et en diminuer l’impact écologique sur la planète et
la santé. Agissez de manière responsable en recyclant les produits usagers. Si ce
produit est toujours en état de fonctionnement, pensez à le vendre ou à le donner.
52

Français
Model 10+
Toutes nos félicitations pour avoir choisi le radio réveil Model 10+ de Tivoli Audio. Vous avez entre
les mains le meilleur réveil radio numérique/ FM du marché, d’une qualité exceptionnelle de réception et de restitution sonore, et d’une simplicité d’utilisation remarquable.
Nous comprenons votre impatience à utiliser votre nouvelle radio, mais afin de tirer le meilleur parti
de votre nouvelle radio, prenez quelques minutes pour lire le mode d’emploi et les précautions
d’emploi. Familiarisez-vous avec votre appareil. Si vous avez la moindre question, n’hésitez pas à
contacter votre revendeur agréé Tivoli Audio ou à nous contacter directement.
Conserver votre emballage, il pourrait vous être utile si vous deviez retourner votre réveil radio
au service technique.
Encore une fois « Merci d’avoir choisi Tivoli Audio », consommez sans modération votre radio
Model 10+.
A propos de Tivoli Audio
La marque Tivoli Audio a été créée par Tom DeVesto, avec la mission de mettre à la disposition
des consommateurs des appareils de grande qualité audio, d’une utilisation simple et d’un design
élégant. En qualité de Directeur Exécutif (CEO) et Directeur du département Recherche et Développement de sa précédente entreprise Cambridge SoundWorks*, Tom DeVesto a mis au point de très
performants produits destinés aux marchés de la Haute Fidélité ou du Multimédia. Tom a également
fait partie du comité de direction d’entreprises telles qu’Advent et Kloss Video.
*Cambridge SoundWorks est une marque déposée de Creative Labs, Singapour.
Dans votre emballage de Model 10+ vous trouverez:
• Un câble secteur de 2,74 m
• Une télécommande (pile installée)
Si l’un quelconque de ces accessoires venait à manquer, contactez votre revendeur ou le
distributeur Tivoli Audio.
REGLAGES DU DESSUS - AFFICHEUR:
1. MOLETTE MULTI-FONCTION (Dessus):
De manière pratique, cette molette
plusieurs fonctions:
Mise en route: Appuyez au centre de la molette située au dessus de votre Model 10+, pour l’allumer.
Maintenez une pression une seconde pour l’éteindre.
Volume: Tournez le bouton dans le sens des aiguilles
de la montre pour augmenter le volume et dans le
sens inverse pour le diminuer.
Tuning (Réglage stations): En FM ou RNT (DAB/
DAB+/DMB), appuyez une fois au centre et tournez
la molette dans un sens ou dans l’autre pour régler
1
53

Français
manuellement la fréquence. Appuyez à nouveau pour que l’affichage se mette à jour. Une lettre
“T” apparait dans l’afficheur pour signaler le mode de réglage manuel. Il n’y a aucune fonction
réglage sur la source Aux. Sans manipulation pendant sept secondes, la molette redevient
contrôle de volume.
Source: Appuyez deux fois au centre de la molette pour passer en mode sélection et utilisez
la rotation de la molette pour choisir votre source. Une nouvelle pression au centre permettra
de confirmer votre choix. Sans manipulation pendant sept secondes, la source affichée sera
sélectionnée.
Snooze (rappel): Lors du déclenchement du réveil, une pression enclenchera le rappel. L’icône
apparait dans l’afficheur lorsque la fonction rappel est enclenchée. Le délai de rappel est
de 7 minutes. Une nouvelle pression annulera le rappel.
2. AFFICHEUR:
: Volume (niveau) DAB: DAB/DAB+/DMB
: Durée avant extinction (Sleep) FM: FM (Modulation fréquences)
: Temps avant rappel (Snooze) AUX: Entrée auxiliaire
: Réveils 1 & 2 ST: Stéréo
(Chiffres): Heure M: Mono
: Niveau du signal T: Réglage manuel fréquences
54

Description des contrôles (situés à l’arrière):
10
Français
3
2
5
1
11
1. 12VDC/1A: Pour utiliser une alimentation externe par exemple sur un bateau ou dans un véhi-
cule, il vous faudra utiliser une alimentation externe 12 Vcc 1000 mA. Le contact doit être positif
au centre 5,5 mm / 2,1 mm.
2. CONNECTEUR ANTENNE 75 OHM “F”: Une antenne télescopique FM est raccordée à cette
entrée. Pour plus d’information reportez vous à la rubrique “Réception FM/AM”.
3. CASQUE: Raccordez un casque (non fourni) sur cette sortie stéréo contrôlée. Le raccordement
du casque coupe automatiquement le haut parleur principal. Le niveau d’écoute se règle par
le bouton Volume du poste ou de la télécommande. La commande “Mono” de la télécomande
affecte également cette sortie. La connexion se fait par l’intermédiaire d’un mini jack stéréo 3,5
mm. Ecoutez à un niveau raisonnable.
4. MEMOIRES 1-5: Appuyez sur un bouton et maintenez pour enregistrer la station en écoute. Un
appui bref sur une de ces touches rappelle la mémoire correspondante. En FM, la fréquence et le
numéro de la mémoire s’affichent sur l’écran. Vous disposez de 5 mémoires en FM et 5 en RNT.
5. R-SPR: Raccordez la prise RCA mâle du câble de l’enceinte complémentaire Model 10 S.
grâce au contrôle sur la télécommande, assurez vous d’avoir sélectionné la fonction “stéréo”.
Contrôlez sur l’afficheur la présence du sigle “ST” indiquant stéréo et non “M” pour mono.
6. SUB OUT: Raccordez sur cette sortie par l’intermédiaire d’un câble équipé d’un mini jack stéréo
3,5 mm un caisson de basses Tivoli Audio.
7. REC OUT: Pour enregistrer à partir du Model 10+ ou pour distribuer le signal à travers une
sonorisation, utilisez cette connexion mini jack stéréo 3,5mm à niveau fixe. Le signal du hautparleur principal n’est pas affecté.
8. MIX IN: Pour entendre les messages d’alerte de votre ordinateur, raccordez le sur cette entrée
par l’intermédiaire d’un câble équipé d’un mini jack stéréo 3,5 mm. Le son de votre ordinateur
4
8
9
7
6
55

Français
sera audible en même temps que la source que vous avez sélectionnée sur votre Model 10+,
le volume des messages est commandé par l’ordinateur.
9. AUX IN: Pour écouter une source audio externe, telle qu’un lecteur CD ou MP3, un ordinateur,
un iPod ou un iPhone, raccordez la sortie casque de la source sur cette entrée par l’intermédiaire d’un câble équipé d’un mini jack stéréo 3,5 mm. Remarque: Les niveaux de cette entrée
auxiliaire et de la radio peuvent être tout à fait différents.
10. SERVICE: Le connecteur situé en dessous de cette étiquette est réservée à l’utilisation par le
service technique. Ne retirez pas cette étiquette, ceci annulerait le garantie.
11. RACCORDEMENT SECTEUR: Enfoncez fermement le câble d’alimentation fourni avec votre
radio, ne débranchez jamais ce câble en tirant le fil. Assurez-vous de la correspondance de la
tension de votre alimentation et celui de votre appareil.
Description des fonctions de la télécommande:
1. MISE SOUS TENSION: Appuyez sur
cette touche pour allumer votre Model
10+. La radio s’allumera sur la dernière
source écoutée. Appuyez à nouveau pour
éteindre.
4
2
3
5
1
6
2. MUTE/SNOOZE: Appuyez pour passer
en mode silence (Mute) pendant l’écoute,
les barres après l’icône disparaitront.
En appuyant sur cette touche ou en ajustant le volume, vous sortirez du mode
silence. Lorsque le réveil se déclenche,
appuyez sur cette touche pour déclencher une pause de 7 minutes. Le réveil se
re-déclenchera après. Un icône icône
apparait dans l’afficheur lorsque la fonction rappel est enclenchée. La durée de
12
BACK
11
MONO
8
7
9
13
10
rappel n’est pas réglable.
3. ALARM (RÉVEIL): Utilisez les touches
pq et Select pour régler les réveils. Reportez vous à la section “Comment régler
le réveil”.
4. SLEEP: (Tempo) Appuyez plusieurs fois sur cette touche pour visualiser le temps d’écoute
avant extinction de votre radio et utilisez la touche “Select” pour valider. Une pression sur le
touche “Sleep” de la télécommande affichera le temps restant. Lorsque la fonction Tempo est
active, une icône de montre [ ] s’affiche. Pour annuler cette fonction appuyez plusieurs fois
sur la touche “Sleep” jusqu’à afficher <Sleep off> et validez avez “Select”.
5. SOURCE: Pressez pour choisir la source.
6. INFO: Appuyez plusieurs fois pour afficher les différentes informations disponibles. Aucune
information n’est disponible en Aux.
56

Français
7. MEMOIRES 1-5: Appuyez sur un bouton et maintenez pour enregistrer la station en écoute. Un
appui bref sur une de ces touches rappelle la mémoire correspondante. En FM, la fréquence
et le numéro de la mémoire s’affichent sur l’écran. Vous disposez de 5 mémoires en FM et 5
en RNT.
8. VOLUME +/–: Appuyez sur + pour augmenter le volume et sur – pour le baisser. Si le son est
entaché de distorsion, diminuez le volume pour éviter d’endommager le haut-parleur. En réglant
le volume pendant que le Model 10+ est en mode silence, celui-ci sera annulé.
9. pq/TUNE +/-: Utilisez pour naviguer dans le menu. Utilisez ces mêmes touches pour régler
manuellement les fréquences. Appuyez et maintenez appuyé pour faire défiler rapidement les
fréquences. Un “T” dans l’afficheur indique le réglage manuel. Il faut 1 seconde avant que les
fréquences ne changent. Appuyez 1,5 sec et relâchez pour lancer la fonction scan automatique jusqu’à la détection de la prochaine station. En recherche automatique, l’afficheur indique
<Scanning…>.
RADIO NUMÉRIQUE TERRESTRE ( DAB/DAB+/DMB): Utilisez les touches haut/bas de la
télécommande ou appuyez sur la molette multi-fonctions pour afficher toutes les stations
numériques disponibles. Utiliser pq ou la molette pour afficher une station en particulier. La
liste de stations disparaitra de l’affichage après 7 ou 15 sec selon qu’elle ait été appelée par
la molette ou la télécommande.
10. tu: Utilisez pour naviguer dans le menu. La flèche droite duplique la touche “Menu/Select”.
Dans certains menus la flèche gauche permet de revenir à la rubrique précédente.
11. MENU/SELECT: Appuyez pour renter dans le menu et faire les sélections. Reportez vous à la
rubrique “Menu”.
12. BACK: : Cette touche vous permet de revenir en arrière.
13. MONO: Appuyez sur cette touche pour sélectionner Mono ou Stéréo. L’indication “M” ou “ST”
apparait. Cette information est également fournie lors de l’utilisation de la touche Info de la
télécommande. Pour plus d’information, reportez vous à la rubrique “Réception”.
57

Français
Menu et particularités:
Appuyez et maintenez enfoncée la touche Menu/Select. Utilisez les touches pq et Select pour
changer de rubrique. Utilisez la touche Back pour revenir ou attendez 15 sec la sortie automatique du menu.
1. RÉGLAGE SCAN (EN FM SEULEMENT): Appuyez sur “Menu” et utilisez pq et Select pour
choisir entre <Tout signal> et <Signal fort> lors de la recherche automatique. Le choix <Tout
signal> accroit la sensibilité et peut générer l’arrêt en recherche sur un bruit inter-station. Ceci
n’est pas disponible sur la source Auxiliaire.
2. EQ TIVOLI: Ceci vous permet de régler la tonalité de votre appareil. Avec les flèches pq et
la touches Select, vous pouvez régler comme vous le souhaitez les basses et les aiguës. Ces
réglages se trouvent sous <User EQ>. Sur le menu approprié, avec la touche “Select” vous
pourrez mettre en fonction <On> ou supprimer <Off> l’accentuation <Contour> (Loudness).
L’accentuation <Contour> est recommandée afin d’avoir un équilibre tonal plus naturel en
écoute à faible niveau. Utilisez pq et Select pour utilisez les courbes d’égalisation pré-enregistrées, ces réglages se substituent aux réglages Graves et Aiguës personnalisés, par contre
le réglage <Contour> n’est pas affecté. Le choix <Plat> rétablit les réglages d’usine, c’està-dire les Graves et Aiguës à 0 et Contour désactivé (Off). En sélectionnant <User EQ> vous
retrouverez vos réglages personnels. Dans le menu EQ Tivoli, le chiffre de gauche indique le
réglage des Graves et le chiffre de droite celui des Aiguës.
3. BALANCE (DANS LE MENU EQ TIVOLI): Dans la mesure où ce réglage n’a aucun effet si le
Model 10+ est en Mono, ce réglage devrait rester en position médiane sauf si l’enceinte droite
optionnelle est connectée et que le réglage “Stéréo” a été choisi via la touche Mono de la télécommande. Bien que nous recommandions la position médiane en mode stéréo, vous pouvez
utilisez les touches pq pour effectuer votre réglage préféré.
4. HEURE (DANS LE MENU RÉGLAGE):
12H/24H:
Appuyez sur Select et utilisez les flèches pq pour choisir le format 12h ou 24h.
Heure/Date:
Appuyez sur Select et utilisez les flèches pq pour régler l’heure, les minutes puis la date.
Passer immédiatement au réglage de Mise à Jour.
MAJ Auto:
Mise à jour automatique. Appuyez sur Select et utilisez les flèches pq pour choisir le mode
de mise à jour <MAJ de tout>, <MAJ DAB> (aussi DMB) ou <MAJ FM> (de RDS). Pour que
cette mise à jour ait lieu, il faut disposer de la réception d’un signal FM RDS ou RNT porteur
de l’information d’heure et de date. Cette mise à jour peut prendre plusieurs minutes avant
d’être effective. Tivoli Audio ne saurait être tenu responsable d’une mise à jour non exacte due
à l’information reçue d’une station.
Pour régler l’heure manuellement, choisissez <Pas de MAJ>, puis sélectionnez <Heure/Date>
dans le menu <Heure> et en utilisant les touches pq ou tu pour régler l’heure et la date. Dans
le même menu <Heure>, vous pourrez choisir le format d’affichage de l’heure et de la date.
Remarque: En cas de coupure de courant, le réglage du réveil et de l’horloge sont conservés
dans la mémoire interne. Lorsqu’il a été choisi une mise à jour automatique, celle-ci s’effectue
à partir de la dernière station écoutée, même si la radio est en veille.
58

Français
Format Date:
Appuyez sur Select et utilisez les flèches pq et la touche Select pour choisir le format souhaité.
5. ECLAIRAGE (DANS LE MENU RÉGLAGE):
Timeout:
L’éclairage de l’afficheur peut être constant que vous effectuiez ou non des commandes (tel est
le réglage d’usine). Vous pouvez programmer une atténuation de l’éclairage après une temporisation choisie. Toute commande sur l’appareil ou la télécommande réactive l’éclairage.
Appuyez sur Select et utilisez les flèches pq et la touche Select pour régler la temporisation
10, 20, 30, 45, 60, 90, 120 ou 180 secondes, ou Off pour désactiver l’atténuation de l’éclairage.
Eclairage fort:
Appuyez sur Select et utilisez les flèches pq et la touche Select pour régler l’éclairage fort.
Eclairage faible:
Si vous avez choisi une temporisation pour l’atténuation de l’éclairage, appuyez sur Select et
utilisez les flèches pq pour régler l’éclairage atténué. Vous pouvez choisir <Off> pour que
l’afficheur s’éteigne et ne soit pas gênant la nuit.
6. LANGUE (DANS LE MENU RÉGLAGE): Appuyez sur Select et utilisez les flèches pq et la
touche Select pour choisir la langue.
7. RÉGLAGE USINE (DANS LE MENU RÉGLAGE): Appuyez sur Select et utilisez les flèches pq
ou tu et la touche Select pour confirmer par <Oui> ou <Non> le retour aux réglages d’origine.
Un retour au réglage usine efface tous les réglages personnels tels que le choix de langue ou
les mémoires.
8. ID (DANS LE MENU RÉGLAGE): Appuyez sur Select pour afficher les informations concernant
la version logiciel de votre radio. Cette information peut vous être demandée en cas d’appel au
service technique.
9. SLEEP (DANS LE MENU RÉGLAGE): Appuyez sur Select et utilisez les flèches pq et la
touche Select pour régler le temps de temporisation choisi. Un accès direct à ce réglage est
possible par la touche Sleep da la télécommande.
59

Français
Comment régler le réveil:
1. Accédez au réveil par le menu ou appuyez sur le bouton Alarm de la télécommande.
2. <Alarm 1> est le 1er réglage qui apparait. Appuyez à nouveau sur Alarm ou utilisez les touches
pq et Select pour choisir Réveil 1 ou Réveil 2. Remarque: vous naviguez dans le menu Réveil
avec les touches Back ou t et Select ou u.
3. Utilisez les touches pq pour mettre en fonction le réveil. Si l’heure et la date n’ont pas encore
été réglées, le Model 10+ vous y invitera. Sinon réglez le réveil en suivant les étapes suivantes.
4. Utilisez les touches pq pour régler l’heure, puis pressez Select. Répétez la même opération
pour les minutes, ainsi que la mention AM/PM si vous utilisez le format 12h.
5. Utilisez les touches pq pour régler la durée du réveil, puis pressez Select.
6. Utilisez les touches pq pour choisir la source que vous souhaitez utiliser, puis pressez Select.
Si vous choisissez la RNT ou la FM, utilisez Tune+/- pour choisir une station en mémoire ou la
dernière station écoutée, puis pressez Select. Assurez-vous que la station choisie émet effectivement au moment programmé.
7. Utilisez les touches pq pour régler le type de réveil que vous souhaitez. Si votre choix se porte
sur <Une fois>, vous devez choisir la date.
8. Enfin utilisez les touches pq pour régler le volume et pressez Select.
9. Répétez cette procédure pour le Réveil 2, si vous le désirez.
Remarque: vos réglages ne seront sauvegardés que si vous avez été au bout du processus de
réglage du réveil et qu’est apparue sur l’afficheur l’inscription <Réveil réglé>.
Coupure de courant: Si le courant est coupé les réglages de réveil seront sauvegardés mais le
réveil ne fonctionnera pas.
Activation rapide: La radio étant en veille, un appui bref répété sur Alarm vous permettra d’activer
ou de désactiver l’un ou l’autre des réveils ou les deux.
OPTIONS REVEIL:
Au moment d’un réveil, le volume augmentera progressivement. Quand un réveil s’active, vous
pouvez soit enclencher la répétition, soit arrêter le réveil.
Couper le réveil: Pour couper le réveil lorsqu’il se met en fonction: appuyez sur Alarm ou Power
de la télécommande ou de manière prolongée au centre de la molette au dessus du Model 10+.
Snooze (Répétition): Pour activer la répétition du réveil, appuyez sur le bouton Snooze de la télécommande lorsque le réveil se déclenche ou brièvement au centre de la molette multi-fonctions. Le
délai de la fonction Répétition n’est pas ajustable.
Remarque: En cours de répétition, vous pouvez voir le délai avant activation en appuyant sur
la touche Snooze de la télécommande. Si vous appuyez sur les touches Alarm ou Power de la
télécommande ou sur la molette multi-fonctions du M 10+, la fonction répétition sera annulée.
60

Français
Radio Numérique Terrestre ( DAB/DAB+/DMB):
Appuyez et maintenez enfoncée la touche Menu/Select. Utilisez les touches pq et Select pour
changer de rubrique. Utilisez la touche Back pour revenir ou attendez 15 sec la sortie automatique du menu.
Un astérisque (*) indique que l’option affichée a été sélectionnée.
Remarque: Lorsque vous activez la RNT si la liste de station est vide, une recherche automatique se mettra en route.
1. RECHERCHE AUTOMATIQUE: Recherche toutes les stations disponibles. Si vous déplacez
le Model 10+, vous devrez relancer une recherche automatique pour mettre à jour la liste des
stations disponibles. Pour annuler la recherche automatique, appuyez sur Back.
2. EQ TIVOLI: Reportez vous plus haut à la rubrique Menu et particularités.
3. RECHERCHE MANUELLE: Utilisez les touches pq pour afficher la fréquence station spécifique
et utilisez la touche Select pour l’écouter. Ceci ne fonctionne pas dans toutes les bandes RNT.
4. DRC: Contrôle de la dynamique vous permet de compresser le signal de certaines stations afin
de pouvoir les écouter à faible niveau ou pour limiter le bruit de fond dans les passages faibles.
5. MODE AVANCÉ: : Si déplacez le Model 10+ dans une nouvelle région, vous risquez de retrouver
des stations avec le même nom. Si vous choisissez < Vue avancée>, <Long label>, et <Ensemble
vu> vous serez en mesure de distinguer les différentes stations.
En DAB/DAB+, nous vous conseillons de les désactiver, en DMB au contraire, il est conseillé
de les mettre en fonction.
6. UPDATE LIST: Si le Model 10+ est déplacé dans une nouvelle région, grâce à la fonction
<Update List>, les stations non disponibles seront supprimées de la liste. Utilisez les flèches
pq ou tu et la touche Select pour confirmer <Oui> ou pas <Non> la suppression de stations
non disponibles.
MESSAGES EN RNT:
Service associés: La disponibilité de services associés est signalée par le symbole >> affiché
après le nom de la station. Les services associés ne sont pas forcément disponibles dans toutes
les régions.
<?>: Ce symbole indique que la station n’émet pas.
“Not Available”: Indique que le signal de la station DAB est trop faible.
61

Français
Réception FM:
L’antenne FM télescopique livrée avec le Model 10+ offre une très bonne réception. Le positionnement près d’une fenêtre ou d’un mur extérieur peut améliorer la réception. Dans le cas où le signal
FM serait très fort, le fait de replier l’antenne peut améliorer la qualité de réception. Il peut être utile
selon le cas d’utiliser une antenne FM dipolaire éventuellement avec un adaptateur. Il se peut que
le raccordement à l’antenne de télévision ou du câble vous donne une meilleure réception. Il faudra
peut-être souscrire certains services du “câble”.
Si vous utilisez le Model 10+ en stéréo avec l’enceinte optionnelle M 10 S, et que l’écoute de la
station est entachée de bruit de fond, le passage en Mono peut rendre l’écoute plus silencieuse
et audible. Lorsque vous êtes en Mono, un M s’inscrit dans l’afficheur et un ST en stéréo. Cette
information est également donnée lorsque l’on active la fonction Info à partir de la télécommande.
Les bâtiments en béton, en acier ou en aluminium perturbent la propagation des ondes. Les appareils
électroménagers, les ordinateurs, les lecteurs CD, les routeurs Wifi et de nombreux autres appareils
électroniques peuvent affecter la réception et/ou générer des parasites. Si vous rencontrez ce type
de problèmes, essayez de déplacer votre radio et de changer de prise électrique pour l’alimentation.
RDS(en FM uniquement):
Le RDS (Radio Data System) transmet en même temps que le signal audio, du texte et des informations. Toutes les stations de radio FM ne transmettent pas nécessairement des informations RDS.
Si le signal RDS est trop faible, le texte affiché peut être entaché d’erreurs. Vous pouvez essayer
d’améliorer ceci en déplaçant l’antenne. La nature des informations RDS est déterminée par la
station de radio.
Positionnement:
Placez vote Model 10+ sur une surface plate et stable. Pour une ventilation correcte et une bonne
reproduction des basses, évitez d’obstruer l’évent arrière. Le model 10+ n’est pas magnétiquement
blindé et doit en conséquence être positionner au minimum à 15 cm d’un ordinateur ou d’un téléviseur. Le positionnement dans une bibliothèque, un meuble ou près d’un mur peut augmenter les
basses et rendre le son désagréable.
Entretien:
N’utilisez jamais de produit ou de chiffon corrosif. Le revêtement est très sensible aux produits de
nettoyage.
Note: Tivoli Audio utilise des placages en véritable bois naturel. Les essences d’un même bois
présentent de grandes différences. Il se peut que les 2 boîtiers d’un système Model 10 présentent un aspect très différent de couleur ou de veinure. D’autre part, il est normal que le bois
fonce avec le temps et/ou l’exposition au soleil.
62

Français
Garantie contractuelle:
Chez Tivoli Audio nous fabriquons des produits selon des standards de qualité élevés et nous avons
pleine confiance dans les performances de nos produits. En conséquence, nous garantissons ces
produits (pièces et main d’œuvre) contre tout vice caché, pendant un an à compter de la date
d’achat au profit de l’acheteur originel. Cette garantie n’est pas transférable.
Dans la Communauté européenne, en Suisse et en Norvège, cette garantie est de deux ans.
Cette garantie ne couvre pas les dommages qui pourraient résulter d’une utilisation ou installation
inappropriée, de la tentative de charge de piles alcaline, de l’utilisation d’accessoires non adaptés,
de modifications, de tentative de réparation, de dégâts subis pendant le transport, de la perte, de
la malveillance, d’accidents, de l’utilisation sur une mauvaise tension, de surtension, de la foudre,
de tout cas de force majeure, de l’usure normale, ou d’une utilisation commerciale. Merci de vous
adresser à votre revendeur pour toute réparation. La preuve d’achat peut s’avérer indispensable.
Ne tentez pas d’ouvrir le produit. Aucune pièce ne se trouve à l’intérieur et toute tentative de modification ou de réparation annulerait la garantie. Tivoli Audio ne peut prendre en charge l’élimination de
problèmes de réception, de bruits parasites externes, la perte de temps, la gêne, la non-disponibilité
du produit ainsi que tout problème résultant d’une mauvaise utilisation.
Si l’Etat ou le Pays où vous avez acheté cet appareil impose des droits complémentaires à la garantie, ceux-ci s’appliquent. Si l’Etat ou le Pays interdisent certaines limitations, ces limitations ne
sauraient s’appliquer.
Si vous avez acquis une extension de service ou de garantie, celle-ci incombe exclusivement au
revendeur auprès de qui vous l’avez souscrite.
Vous pouvez valider votre garantie dans les 30 jours qui suivent votre achat sur
le site www.tivoliaudio.com.
Pour tout problème technique, contactez votre revendeur ou le distributeur officiel Tivoli Audio de
votre pays.
63

Français
Caractéristiques:
Modèle: Tivoli Audio Model 10+
Type: Radio réveil RNT (DAB/DAB+/DMB) et FM
Haut-parleur: Haut-parleur large bande de 6,5 cm
Gamme de réception: FM: 87,5 – 108 MHz
DAB (Bande III)
DAB+/DMB: 174 – 240 MHz
Désaccentuation: 50 µsec.
Dimensions (l x h x p): 117mm x 202mm x 117mm
Poids: 1,58 kg
Tivoli Audio se réserve le droit de modifier ses produits sans préavis.
Ce mode d’emploi a été rédigé par Peter Skiera et ne peut être reproduit intégralement ou en partie sans
l’accord de Tivoli Audio. Les informations de ce manuel étaient parfaitement correctes au moment de leur
rédaction. Tivoli Audio ne peut être recherché pour toute erreur ou omission. Vous pourrez trouver un mode
d’emploi à jour des dernières modifications en visitant le site Internet www.tivoliaudio.com.
Pour plus d’information et découvrir toute la gamme Tivoli Audio, contactez nous ou contactez votre
distributeur local:
Tivoli Audio, LLC
Seaport Center
70 Fargo Street, Suite 900
Boston, MA 02210 USA
1.877.297.9479
www.tivoliaudio.com
help@tivoliaudio.com
64

Norsk
™
Model 10
DAB/DAB+/DMB/FM Klokke Radio
Innholdsfortegnelse:
Sikkerhetsinstruksjoner ................................................................................................................... 66
Introduksjon; Om Tivoli Audio .........................................................................................................68
Funksjoner front ..............................................................................................................................69
Funksjoner bak ................................................................................................................................ 70
Fjernkontroll ..................................................................................................................................... 71
Meny og spesielle egenskaper ........................................................................................................ 72
Hvordan stille alarmen; alarm innstillinger ....................................................................................... 74
Digital radio (DAB/DAB+/DMB) modus ........................................................................................... 75
Mottak; RDS; Plassering; Rengjøring .............................................................................................. 76
Garanti ............................................................................................................................................. 77
Spesifikasjoner ................................................................................................................................ 78
+
65

Norsk
Viktige sikkerhetsinstruksjoner
1. Les, oppbevar og følg disse instruksjonene.
2. ADVARSEL: Pass på å holde produktet unna regn og fuktighet for å forebygge faren for brann
eller elektrisk støt.
3. Rengjøring: Bruk en myk, tørr klut.
4. Ikke blokker noen ventilasjonsåpninger. Installer i overensstemmelse med
produsentens instruksjoner.
5. Ikke installer i nærheten av varmekilder slik som radiatorer, varmeapparater, ovner eller andre
apparater (inkludert forsterkere) som produserer varme
6. Ikke forsøk å endre kontakten på noen måte. En jordet kontakt har spesifikke egenskaper for
å passe inn i et støpsel. Dette er av hensyn til din sikkerhet. Dersom kontakten ikke passer i
støpselet, kontakt elektriker for bytte av støpsel.
7. Beskytt strømkabelen fra å bli tråkket på eller klemt, særlig ved koblingene, mottak og punktet
der kablene kommer ut fra apparatet.
8. Bruk kun koblinger/tilbehør som er spesifisert av produsenten.
9. Bruk også kun stativ etc. som medfølger produktet. Dette sikrer stabilitet og forebygger fall og
andre skader på produktet.
10. Kobl apparatet fra strømnettet under tordenvær eller dersom det ikke er i bruk over lengre tid.
11. Overlat all service til kvalifisert servicepersonale. Service er nødvendig når apparatet har blitt
skadet på noen som helst måte, slik som hvis strømkabelen eller støpselet er skadet, hvis det
er sølt væske på eller det har kommet gjenstander inn i apparatet. Også hvis apparatet har blitt
utsatt for regn eller fuktighet, apparatet ikke virker korrekt eller det har falt i gulvet.
66

Norsk
12. Benytt kun tilkoblinger indikert på baksiden av produktet. For produktet som bruker strømtilførsel, må originalen erstattes med eksakt samme type dersom denne blir borte eller skadet. For
produkter med batteritilførsel, se egen bruksanvisning
13. Kobl apparatet fra strømnettet dersom:
a. Strømtilførsel eller strømkabel blir skadet.
b. Væske har blitt sølt over produktet eller en gjenstand har falt inn i det.
c. Produktet er blitt utsatt for regn eller fuktighet.
d. Produktet ikke fungerer normalt i henhold til bruksanvisningen.
e. Produktet har falt i gulvet eller blitt skadet på annen måte.
f. Produktet har betydelige avvik i henhold til normal ytelse.
14. Åpen flamme: Hold dette produktet på sikker avstand fra alle åpne flammer, slik som
tent stearinlys.
15. Produktet må ikke utsettes for: drypp, sprut el. Gjenstander fylt med væske, slik som vaser, må
ikke plasseres oppå produktet.
16. Brukstemperaturer: Anbefalt brukstemperatur for dette produktet er fra 5 til 40 grader Celsius.
ADVARSEL: MODEL 10+ KOMMER MED EN EKSTERN ANTENNE SOM IKKE MÅ TAS AV.
Dette produktet kan resirkuleres. Produkter med dette symbolet må IKKE kastes
sammen med vanlig husholdningsavfall. Når produktets levetid er over, må det
leveres inn til en innsamlingskanal for resirkulering av elektrisk og elektronisk
utstyr. Finn mer ut om innsamlingskanaler fra lokale myndigheter.
Det europeiske WEEE-direktivet (Elektrisk og elektronisk avfall) ble realisert for
drastisk å redusere den avfallsmengden som havner på søppelfyllinger, og dermed redusere skadelige virkninger på miljøet og menneskers helse. Vær vennlig
å opptre ansvarsfullt og resirkuler brukte produkter. Hvis produktet fremdeles
kan brukes bør du vurdere å gi det bort eller selge det.
67

Norsk
Model 10+ veiledning
Gratulerer med din nye Model 10+. Vi mener at nettopp dette produktet er en av de aller beste
DAB/DAB+/DMB/FM bord-radioene som tilbys på markedet i dag. Vi vet du er ivrig etter å komme
i gang med lytteropplevelsen, men ta deg tid til å lese denne sikkerhets- og bruksanvisningen for å
få fullt utbytte av Model 10+´s mange muligheter. Hvis du har spørsmål, kan du kontakte din lokale
forhandler eller distributør.
Vi anbefaler å ta vare på emballasjen, slik at produktet kan pakkes korrekt ved eventuell forsendelse til og fra service-verksted, da garantien ikke dekker skader ved slike forsendelser.
Takk for at du valgte dette produktet fra Tivoli Audio. Vi håper at du vil få glede av Model 10+!
Om Tivoli Audio
Tivoli Audio ble grunnlagt av Tom Devesto med det formål å designe elegante produkter som
kjennetegnes av kvalitet og brukervennlighet. Som administrerende direktør og leder for forskning
og utvikling i sitt tidligere selskap Cambrigde SoundWorks, har Tom Devesto vært ansvarlig for
mangfoldige produktsuksesser på hjemmeunderholdning og -multimediamarkedet. DeVesto har
også vært ansvarlig for produktutvikling i firmaene Advent og Kloss Video.
*Cambridge SoundWorks er et registrert varemerke hos Creative Labs, Singapore.
Sammen med din Model 10+ finner du:
• 1 2,74m (9' )strømledning
• 1 Fjernkontroll (batteri installert)
Vennligst ta kontakt med forhandler eller Tivoli Audio dersom noen av delene mangler.
68

Norsk
Funksjoner front:
1. MULTI-FUNKSJON KONTROLL HJUL (TOPP):
Dette hjulet har flere funksjoner;
Power/Av-på: Trykk for å skru av eller på.
Volume/Lydstyrke: Vri til høyre for økt lydstyrke.
Til venstre for mindre lydstyrke.
Tuning/Søke: Når Model 10+ er innstilt på Digital ra-
dio (DAB/DAB+/DMB) eller FM, trykk en gang og vri
mot høyre eller venstre for manuelt søk. Trykk igjen
for å velge kanal og kontroll av lydstyrken. Bokstaven ”T” vises på displayet for å indikere manuelt søk.
Auiliary har ingen søkefunksjon. Etter ca. 7 sekunder
uten aktivitet, vil kontrollhjulet veksle tilbake til lydstyrkekontroll.
Source/Kilde: Trykk to ganger for tilgang til kildemenyen og velg kilde ved å vri hjulet til
høyre eller venstre. Etter ca. 7 sekunder uten aktivitet, vil kontrollhjulet veksle tilbake til
lydstyrkekontroll.
Snooze: Trykk to ganger når alarmen er på for å aktivere Snooze funksjonen. Et symbol vil
vises på displayet når Snooze er aktivert. Snooze tiden er forhåndsprogrammert til 7 minutter.
Trykk en gang til i løpet av denne tiden for å deaktivere Snooze funksjonen.
2. LCD:
1
: Volume level/Lydnivå DAB: DAB/DAB+/DMB bånd
: Sleep timer/Innsovningsur FM: FM bånd
: Snooze timer/Snoozeur AUX: Auxiliary
: Alarm1 og 2 ST: Stereo
(tegn i midten): Time/Klokkeslett M: Mono
: Reception level/Mottakerstyrke T: Manuell søkefunksjon
69

Norsk
Funksjoner bak:
10
3
2
5
1
11
1. 12VDC/1000mA: Inngang for 1A sikring, 12VDC adapter til bruk i båt eller campingbil. Adapteren
må være 5.5mm/2.1mm center positive.
2. EKSTERN ANTENNE: Den eksterne teleskop antennen er fastmontert, og skal ikke tas av.
Juster for bedre mottak. Se for øvrig ”Digital radio/FM mottak”.
3. HEADPHONE OUT/UTGANG HODETELEFONER: Kobl til hodetelefoner til denne stereo
utgangen. Hodetelefonene vil dempe hovedhøyttaleren.Volumet justeres med kontrollhjulet
eller fjernkontrollen. Mono knappen på fjernkontrollen kan også brukes hvis ønskelig. Denne
utgangen tar vanlig jack-plugg. Høyt volum i hodetelefonene kan skade hørselen.
4. PRESETS 1-5/FORHÅNDSINSTILLING 1-5: Trykk og hold nede for å lagre nåværende kanal.
Trykk lett for å komme tilbake til forhåndsinnstilt kanal. På FM-båndet, vil det forhåndsinnstilte
nummeret vises på displayet. Det er 5 forhåndsinnstillingsmuligheter for hvert bånd.
5. R-SPR: Kobl hann-plugg på R-SPR kabel fra Tivoli Audio Model 10 Speaker (ekstrautstyr) til
inngang (hunn-plugg). Pass på at stereo-innstillingen er på ved å trykke på Mono-knappen på
fjernkontrollen til displayet viser ”ST” og ikke ”M” for mono.
6. SUB OUT/SUB UT: Kobl lydkabel fra Tivoli Audio Model Subwoofer (kjøpes separat – eller
annen kompatibel subwoofer) til denne utgangen på 3,5 mm (hann-plugg).
7. REC OUT/OPPTAK: Du kan gjøre opptak ved å koble til en opptaksenhet til denne stereout-
gangen på 3,5 (hann-plugg). Hovedhøyttaleren vil ikke være lydløs under opptak.
8. MIX IN: Kobl til lydutgang fra f.eks. en PC til denne stereoutgangen på 3,5 mm for å høre lyd
mikset gjennom radioen. Når Model 10+ er stilt inn på Auxilary, virker denne sekundært. Volumet
må derfor justeres fra lydkilen. Denne inngangen tar 3,5mm hann-plugg.
9. AUX IN: Til bruk av annen lydkilde, som f.eks.Tivoli Audio’s Model CD, a MP3 spiller eller TV,
kobl mini hann-plugg til denne stereo inngangen og bytt lydkildeknappen til Auxiliary. Merk at
lydnivået kan variere.
70
4
8
9
7
6

Norsk
10. SERVICE: Inngangen som skjules under denne merkelappen skal kun brukes av kvalifisert
service personale. Merkelappen skal ikke fjernes. Dersom det tukles med denne inngangen,
kan Model 10+ bli ødelagt og garantien frafalle.
11. INNGANG STRØMKABEL: Settes godt fast i stikkontakten. Hold alltid i kontakten, og ikke
ledningen, når denne trekkes ut eller settes inn. Forsikre deg om at du bruker korrekt spenning
i henhold til hvor du befinner deg. Tivoli Audio er ikke ansvarlig for skader oppstått ved bruk
av feil spenning.
Funksjoner fjernkontroll:
1. POWER(AV/PÅ): Trykk lett for å skru av
eller på.
2. MUTE/SNOOZE(STILLE/SLUMRE):
Trykk for å dempe lyden helt (lydstrekene på displayet forsvinner). Trykk
igjen for å gjenopprette lyd eller justere
lydstyrke. Trykk for å stilne alarmen
ytterligere 7 minutter etter at den har
slått seg på. Et Snooze tegn vil vise
seg når denne funksjonen er aktiv. Det
er ikke mulig å justere Snooze tiden.
3. ALARM: Bruk pq og velg knappene
for å justere og stille alarmen. Se forøvrig ”Hvordan stille alarmen”.
4. SLEEP(INNSOVNING): Trykk gjentatte
ganger for å se hvor lenge radioen vil
spille før den slår seg automatisk av.
Trykk Select knappen for å velge tid.
Når denne funksjonen er aktiv, kan du
trykke på Sleep knappen for å sjekke
gjenværende tid. En liten klokke [ ]
vil vises på displayet når denne funksjonen er aktiv. For å kansellere, trykk
Sleep knappen til displayet viser ”Off”.
5. SOURCE (KILDE): Trykk gjentatte ganger for å bytte lydkilder.
6. INFO: Trykk gjentatte ganer for å bla igjennom informasjonen som er tilgjengelig avhengig av
hvilken kilde du har valgt. Denne funksjonen virker ikke når Auxiliary er i bruk.
7. PRESETS 1-5(FORHÅNDSINNSTILLING 1-5): Trykk og hold for å lagre kanalen som spilles.
Trykk lett for å hente opp kanalen lagret under dette nummeret. Når FM-båndet er i bruk, vil
forhåndsinnstillingene vises på displayet. Det finnes muligheter for fem forhåndsinnstillinger
på hvert bånd.
8. VOLUME +/–: Trykk for å justere lyd. Dersom Mute-funksjonen er på, vil bruk av volumknap-
pene oppheve denne.
12
11
4
2
3
5
1
6
7
BACK
MONO
8
9
13
10
71

Norsk
9. pq/TUNE +/-: Trykk for å justere menyvalgene. Bruk de samme knappene for manuelt FM-søk
(en T vises i displayet for å indikere dette). Trykk og hold for rask gjennomgang av frekvensene.
Trykk i 1,5 sekunder og slipp for automatisk søk. Displayet viser da ”Scanning”. Se for øvrig
”Menu and Specific Features”.
DIGITAL RADIO (DAB/DAB+/DMB) INNSTILLING: Bruk pq knappene på fjernkontrollen, eller
trykk på multifunksjonshjulet på toppen av enheten for å vise alle tilgjengelige DAB/DAB+/DMB
kanaler. Bruk pq knappene eller multifunksjonshjulet for å belyse utvalgte kanaler. Kanallisten
vil forsvinne etter 7 – 15 sekunder avhengig av hvilken fremgangsmetode som ble benyttet.
10. tu: Høyre pil dupliserer Select knappen. Venstre pil tar deg til forrige side i visse menyer.
11. MENU/SELECT(MENY/VALG): Trykk og hold for å komme inn på hovedmenyen. Trykk lett
igjen for å valg på menyen.
12. BACK(TILBAKE): Trykk for å gå tilbake til forrige menyside.
13. MONO: Trykk for å endre Stereo/Mono innstilling. Displayet vil vise ”M” for mono eller ”ST” for
stereo. ”Mono” eller ”Stereo” vises også i feltet dersom Info knappen benyttes på fjernkontrollen i FM modus. Se for øvrig ”Digital radio/FM mottak”.
Meny og spesielle egenskaper:
Trykk og hold Menu/Select knappen på fjernkontrollen for å komme inn på hovedmenyen. Bruk
pq knappene og Select knappen for å bytte emnene på menyen. Bruk Back knappen for å bla
tilbake, eller vent i 15 sekunder for automatisk tidsavbrudd.
En stjerne (*) indikerer at det viste menyvalget er i bruk.
1. SCAN SETTING (FM MODE ONLY)(BLA IGJENNOM, BARE FOR FM): Trykk og hold Select
knappen og bruk pq and Select knappen for å velge mellom ”Strong stations only”(bare sterke
signaler) eller ”All stations”(alle kanaler) ved autosøk. (se #9 (pq/Tune +/-) under ”Fjernkontroll”. Dette er ikke mulig når Auxiliary innstillingen er i bruk.
2. TIVOLI EQ: Trykk og velg Select knappen og bruk pq og Select knappen for å justere bass
og diskant. De justerte verdiene vil vises i ”User EQ”. Trykk på Select knappen for å skru på
eller av Loudness . Det anbefales å bruke denne funksjonen når lydvolumet er lavt da det kan
forekomme forvrengninger ved høyt volum. Bruk pq og Select knappen for å aktivere EQ
forhåndsinnstillinger. En forhåndsinnstilt EQ vil overstyre alle bass og diskant innstillinger, mens
Loudness ikke berøres. ”Flat” EQ gjenoppretter fabrikkinnstillingene som innebærer at bass og
diskant vil tilbakestilles til null. ”Flat” EQ slår også av Loudness . Dersom bass og diskant nivået har blitt justert, vil disse innstillingene fremdeles vises i ”User EQ”. Ved bare å velge ”User
EQ” , vil bass og diskant innstillingene bli aktivert. På EQ menysiden, indikerer tallene på høyre
side bass og diskant nivået.
3. BALANCE (BALANSE, FINNES UNDER TIVOLI EQ): Siden Balance kontrollen ikke har noen
funksjon når Model 10+ is står på Mono, bør denne innstillingen stå i senterposisjon unntatt
når Model 10 høyttaler (kjøpes ekstra) er koblet til og Stereo innstilling er valg med fjernkontrollens Mono knapp. Du kan selvsagt bruke pq knappene før å justere balansen, selv om vi ikke
anbefaler dette.
4. TIME (FINNES UNDER SETTINGS):
IInnstilling 12/24 klokkeslett:
Trykk Select knappen og bruk pq for å vise klokkeslett i 12 eller 24 timers format.
72

Norsk
Innstilling tid/dato:
Trykk Select knappen og bruk pq og Select knappene for å stille inn time, minutter og dato.
Du må også sette Auto update på ”No update”. Se for øvrig ”Auto update”.
Auto Update (Automatisk oppdatering):
Trykk Select knappen og bruk pq og Select knappene for å velge mellom ”Update from any”, ”Update from DAB” (også DMB), eller ”Update from FM” (RDS). For at noen av de automatiske oppdateringene skal virke, må du ha et vedvarende godt mottak av DAB eller FM RDS med klokke/dato
signal. Det kan ta opptil ett minutt eller mer for at klokken oppdateres. Tivoli Audio er ikke ansvarlig
dersom det forekommer unøyaktig tids/dato-informasjon under den automatiske oppdateringen.
For å stille klokken manuelt, velg ”No Update”, og deretter ”Set Time/Date” under ”Time” menyen ved å bruke pq eller tu knappene og Select knappen for å stille inn timer. Repeter for
minutter og trykk Select for å lagre. På den samme ”Time” menyen finnes tilleggsvalg for dato
format og 12/24 klokkeinnstilling.
MERK: Ved strømbrudd vil alarmtidspunktet og klokken opprettholdes av et integrert back-up
minne. Når ”Auto update” er stilt inn på ”Update from any”, kan radioen finne klokkesignalet fra
den sist brukte kanalen når Model 10+ står i hvilemodus.
Dato format:
Trykk Select knappen og bruk pq og Select knappen for å velge foretrukket dato format.
5. BACKGROUNDLIGHT/BAKGRUNNSLYS (FINNES UNDER SETTINGS):
Timeout:
Du kan velge om bakgrunnslyset skal være konstant (i henhold til fabrikkinnstilling) uansett bruk
av fjernkontroll og knapper, eller om du vil dempe det etter ditt eget behov. Bakgrunnslyset kan
dempes automatisk etter en tidsinnstilling så lenge ingen kontrollenheter benyttes.
Trykk Select og bruk pq og Select knappen for å velge tid for skifte mellom vanlig bakgrunnsbelysning og dempet belysning. Du kan velge10, 20 ,30, 45, 60, 90, 120, eller 180 sekunder,
eller velge å slå av Timeout knappen.
On Level(Lysintensitet i på-modus):
Trykk Select og bruk pq og Select knappene for å velge lysintensitet.
Dim Level(Lysintensitet i dempet modus):
Dersom du har valgt egen innstilling for demping av bakgrunnsbelysningen, kan du også velge
lysintensiteten på denne. Trykk Select og bruk pq og Select knappene for å velge intensitet.
Det kan være ønskelig å deaktivere denne funksjonen under søvn.
6. LANGUAGE/SPRÅK (FINNES UNDER SETTINGS): Trykk Select og bruk pq og Select knap-
pen for å velge språk.
7. FACTORY RESET /FABRIKKINNSTILLING (FINNES UNDER SETTINGS): Trykk Select og
bruk pq eller tu og Select knappene for å bekrefte (Yes) eller avvise (No) fabrikkinnstillingen. En gjenoppretting av fabrikkinnstillingene vil slette alle personlige data som eksempelvis
forhåndsinnstillinger og språk.
8. ID (FINNES UNDER SETTINGS): Trykk Select for å se ID. Dette nummeret kan være nyttig der-
som du for eksempel kontakter en forhandler eller Tivoli Audio med forespørsel om produktet.
9. SLEEP (FINNES UNDER SETTINGS): Trykk Select og bruk pq og Select knappene for å stille
innsovningsfunksjonen. Denne funksjonen kan også styres fra fjernkontrollen. Det vises en liten
klokke i displayet når funksjonen er aktiv.
73

Norsk
Hvordan stille alarmen:
1. Få tilgang til alarminnstillingene ved enten å benytte hovedmenyen eller fjernkontrollen.
2. Alarm 1 vises først. Trykk Alarm knappen gjentatte ganger eller bruk pq og Select knappen for
å velge mellom Alarm 1 og Alarm 2. Merk: Du kan når som helst navigere deg gjennom alarmmenyen ved å bruke Back eller venstre pilene og Select og høyre pilene.
3. Bruk pq og Select knappene for å sette alarmen på eller av. Dersom du ikke allerede har stilt
inn tid og dato, vil Model 10+ be deg om å gjør dette.
4. Bruk pq knappene til å velge/endre time. Trykk deretter Select. Gjenta dette for å velge/endre
minutter, fulgt av AM/PM dersom du bruker 12 timers format. Trykk Select.
5. Bruk pq knappene for å velge hvor lenge du vil at alarmen skal vare, trykk deretter Select.
6. Bruk pq knappene for å velge kilde, trykk Select. Dersom du velger DAB (inkludert DAB+/
DMB) eller FM, bruk pq knappene for å velge kanal. Trykk Select.
7. Bruk pq knappene for å velge hvor mange ganger du vil at alarmen skal virke. Trykk Select.
Dersom du velger ”Once”, må du også oppgi dato for alarmtidspunktet.
8. Til slutt, bruk pq knappene for å stille inn lydnivå på alarmen. Trykk Select.
9. Gjenta denne prosessen for Alarm 2 hvis du ønsker det.
If you make a mistake at any point in the process, press the Back button on the remote and
begin again.
Dersom du gjør feil på ett eller annet tidspunkt, kan du når som helst trykke på Back knappen
på fjernkontrollen for å begynne på nytt igjen.
Merk: Dine innstillinger vil ikke bli lagret dersom du ikke fullfører hele prosessen og displayet viser
”Alarm Saved”.
Merk: Dersom du velger DAB som kilde og den kanalen du sist lyttet til ikke gir signal, vil du
bli vekket av vanlig alarmlyd.
Alarm Quick Set: Med Model 10+ i dvale, trykk alarmknappen gjentatte ganger for å skru av eller
på hver enkelt alarminnstilling.
ALARM VALG:
Alarmen slår seg på med en gradvis høyere lyd. Når alarmen går av, kan du aktivere Snooze knappen
eller slå den av.
Alarm av: For å deaktivere alarmen mens den går, trykk Alarm eller Power knappen på fjernkontrollen.
Eller trykk og hold multifunksjonshjulet på toppen av radioen.
Snooze: For å aktivere Snooze mens alarmen går, trykk Snooze knappen på fjernkontrollen eller
trykk lett på multifunksjonshjulet på toppen av radioen. Du kan ikke endre Snooze tiden.
Merk: Når Snooze funksjonen er på, kan du sjekke gjenværende tid ved å trykke på Snooze
knappen på fjernkontrollen. Dersom du trykker på Alarm eller Power knappen på fjernkontrollen,
eller hvis du trykker på multifunksjonshjulet, kanselleres nedtellingen av Snooze funksjonen.
74

Norsk
Digital radio (DAB/DAB+/DMB) innstilling:
Trykk og hold nede Meny knappen på fjernkontrollen for å komme inn på hovedmenyen. Bruk
pq knappene og Select knappen for å bla gjennom menyen. Bruk Back knappen for å bla
tilbake eller vent i 15 sekunder før funksjonen opphører.
En stjerne (*) indikerer at det viste menyvalget er i bruk.
Merk: Dersom Kanalslisten er tom når du velger Digital radio innstilling, vil et automatisk søk
settes i gang.
1. AUTO SCAN/AUTOMATISK SØK: Søker på hele frekvensen. Dersom du flytter på Model 10+,
må du utføre et nytt søk for at radioen skal finne kanaler tilpasses plasseringen. For å kansellere
autosøket, trykk Back knappen på fjernkontrollen.
2. TIVOLI EQ: Vennligst se under ”Meny og spesielle egenskaper”.
3. MANUELT SØK: Trykk pq knappene for manuelt søk. Trykk deretter Select knappen for å
stille inn frekvensen.
4. DRC: Dynamic Range Control gir deg muligheten til å justere lyden slik at lav lyd kan avspilles
høyere for å kompensere for bakgrunnsstøy eller ved lytting på lavt volum.
5. ADVANSERT INNSTILLING: Dersom Model 10+ blir flyttet til et annet sted, kan det finnes andre
kanaler med samme navn. Dersom du aktiverer ”Advanced View”, ”Long labels” og ”Show
Ensemble” under Advanced Mode menyen, vil du kunne se forskjell mellom disse kanalene.
For DAB/DAB+, anbefaler vi ikke bruk av Advanced Mode innstillingene. Det gjør vi derimot for
DMB.
6. UPDATE LIST/FJERNE UGYLDIGE STASJ: Dersom Model 10+ flyttes til et annet sted, vil
noen kanaler ikke være tilgjengelige. Velg ”Update List” for å luke ut disse fra Kanallisten. Bruk
pq eller tu knappene og Select knappen for å bekrefte (Yes) eller avkrefte (No) dette valget.
DAB DISPLAY BESKJEDER:
Secondary Services: Sekundære kanaler vil vises med et >> symbol ved siden av kanalen. Sekun-
dær tjenesten er ikke tilgjengelig i alle områder.
”?”: Spørsmålstegnet indikerer at kanalen ikke er tilgjengelig eller ikke i bruk.
”Not Available”: Vises når en DAB-kanal ikke har kraftig nok signal.
75

Norsk
Digital Radio/FM mottak:
Den medfølgende eksterne antennen sørger for godt mottak. I områder hvor FM signalet er sterkt,
kan det lønne seg å redusere antennelengden for bedre mottak.
Dersom du bruker Model 10+ sammen med Model 10 Høyttaler for stereolyd og FM mottaket er
støyende, trykk Mono knappen på fjernkontrollen for å forbedre mottaket. Displayet viser en ”M”
i mono og ”ST” i stereo. Denne informasjonen vises også i FM innstilling når man trykker på Info
knappen på fjernkontrollen. T.
Bygninger av betong, stål eller aluminium, forringer mottak. Elektriske husholdingsapparater likeså.
Flytt Model 10+ vekk fra den forstyrrende kilden eller bytt stikkontakt som eventuelt deles med den.
RDS (bare for FM):
Radio Data System (RDS) sender tekstinformasjon sammen med sendingen. Ikke alle FM kanaler har
denne funksjonen. For kanaler som benytter seg av RDS, er det mulig at teksten ikke vises eller vises
bare delvis. Forsøk å flytte på FM antennen. Dersom RDS mottas, trykk på Info knappen gjentatte
ganger for å den tilgjengelige informasjonen. RDS innholdet blir fastsatt av hver enkelt FM kanal.
Plassering:
Sett Model 10+ på et flatt og stødig underlag. Pass på at bassporten bak ikke blir sperret. Model
10+ er ikke magnetisk skjermet og bør holdes på minst 13 centimeters avstand fra slike kilder.
Rengjøring:
Bruk aldri sterke rengjøringsmidler på din radio. Heller ikke spray voks. Du oppnår best resultat ved
å bruke flytende tre polish.
Maling eller flekker blir ikke dekket av garantien.
Det er viktig å merke seg at alle treflater har naturlige variasjoner, noe som ofte gir forskjeller
i utseende på enhetene. Husk også at treverk blir mørkere jo lenger det eksponeres til lys. Dette
er normalt.
76

Norsk
Garanti:
Tivoli Audio produktene er av høy kvalitet og standard, og vi tilstreber at det produktet du nettopp
har kjøpt vil vare i mange år fremover. Derfor tilbyr vi også to års garanti på enhver fabrikasjonsfeil.
Garantien dekker ikke skader som følge av feil bruk og håndtering av produktet samt hendelige
uhell som f.eks fall –og slagskader. Videre gjelder heller ikke garantien dersom produktet er blitt
åpnet eller på annen måte modifisert fra sin originale tilstand. Kun autoriserte service-verksteder må
ha håndtert produktet for at garantien skal gjelde. Dersom det skulle ha oppstått en fabrikasjonsfeil,
må produktet leveres der det er kjøpt. Vi anbefaler å ta vare på emballasjen, slik at produktet kan
pakkes korrekt ved forsendelse til og fra service-verksted. Garantien dekker nemlig ikke skader
som skyldes uforsvarlig pakking av produktet under forsendelse. Verken Tivoli Audio eller distributør
dekker forsendelsesomkostninger ved innsending av et produkt til reparasjon som er under garanti.
Likeledes kreves det ikke fraktomkostinger ved retur av reparert produkt under garanti.
For ytterligere informasjon om garanti service, henviser vi til forhandleren hvor produktet er kjøpt.
FOR ØVRIG GJELDER GARANTI –OG REKLAMASJONSREGLENE I HENHOLD KJØPSLOVENE
I DE ENKELTE LAND DER HVOR PRODUKTET ER KJØPT.
77

Norsk
Spesifikasjoner:
Modell: Tivoli Audio Model 10+
Type: DAB/DAB+/DMB/FM klokke radio
Drivere: 3" full range
Båndbredde: FM: 87.5-108MHz
DAB (Band III)/DAB+/DMB: 174-240MHz
(stedsavhengig)
FM De-Emphasis: 50uSec or 75uSec (stedsavhengig)
Dimensjoner: 202mm H x 117mm B x 117mm D (7.95"H x 4.61"W x 4.61"D)
Vekt: 1.58 kg (3.5 lbs.)
Tivoli Audio forbeholder seg retten til å endre alle spesifikasjoner uten forhåndsinformasjon.
Tivoli Audio forbeholder seg likeledes retten til produktendringer på samme premisser.
Tivoli Audio, Tivoli Audio logoen og Model 10+ og Model 10 Høyttaler er registrerte varemerker
som tilhører Tivoli Audio, LLC.Patent Pending.
Den opprinnelige engelske bruksanvisningen er skrevet av Peter Skiera. Norsk oversettelse og bearbeidelse ved
Elisabeth Ulven. Bruksanvisningen kan ikke gjengis i fullstendig eller delvis utgave uten tillatelse fra Tivoli Audio.
Innholdet er bekreftet korrekt ved tidspunket for trykking. Tivoli Audi er ikke ansvarlig for eventuelle feil som
skulle oppstå under prosessen. Se for øvrig vår webside for de siste oppdateringer av bruksanvisninger.
For mer informasjon om våre spennende produkter, vennligst besøk vår hjemmeside eller
kontakt oss direkte:
Tivoli Audio, LLC
Seaport Center
70 Fargo Street, Suite 900
Boston, MA 02210 USA
1.877.297.9479
www.tivoliaudio.com
help@tivoliaudio.com
78

79

This manual was written by Peter Skiera and cannot be
reproduced in whole or in part without the permission
of Tivoli Audio. The information included in this owner’s
manual was accurate at the time of printing. Tivoli Audio
shall not be held liable for operational, technical, or
editorial errors/omissions. Visit our web site for the latest
version of user manuals.
For more information about other exciting products
from Tivoli Audio, please visit our website or contact
us directly:
Tivoli Audio, LLC
Seaport Center
70 Fargo Street, Suite 900
Boston, MA 02210 USA
1.877.297.9479
www.tivoliaudio.com
help@tivoliaudio.com
M10+CE080211
 Loading...