

Tivoli Audio IYIYI User Manual
OWNER’S MANUAL
iYiYi
TM
1

Important Safety Instructions
Read these instructions.
1.
Keep these instructions.
2.
Heed all warnings.
3.
Follow all instructions.
4.
Do not use this apparatus near water. For example, do not use near a bathtub, in a wet basement,
5.
near a swimming pool, and the like. WARNING! Do not expose this product to rain or moisture.
Clean only with a dry cloth.
6.
Do not block any ventilation openings. Install in accordance with the manufacturer’s instructions.
7.
Do not install near any heat sources such as radiators, heat registers, stoves, or other apparatus
8.
(including amplifiers) that produce heat.
Do not defeat the safety purpose of the polarized or grounding-type plug. A polarized plug has
9.
two blades with one wider than the other. A grounding type plug has two blades and a third
grounding prong. The wide blade or the third prong are provided for your safety. If the provided
plug does not fit into your outlet, consult an electrician for replacement of the obsolete outlet.
Protect the power cord from being walked on or pinched particularly at plugs, convenience
10.
receptacles, and the point where they exit from the apparatus.
Only use attachments/accessories specified by the manufacturer.
11.
Use only with the cart, stand, tripod, bracket, or table specified by the
12.
manufacturer, or sold with the apparatus. When a cart is used, use caution
when moving the cart/apparatus combination to avoid injury from tip-over.
Unplug this apparatus during lightning storms or when unused for long
13.
periods of time.
2
Refer all servicing to qualified service personnel. Servicing is required when the apparatus has
1.
been damaged in any way, such as power-supply cord or plug is damaged, liquid has been
spilled or objects have fallen into the apparatus, the apparatus has been exposed to rain or
moisture, does not operate normally, or has been dropped.
This product has been tested and found to comply with the limits for Part 15 of the FCC rules.
2.
These limits are designed to provide reasonable protection against harmful interference in a
residential installation. This product generates, uses, and can radiate radio frequency energy
and, if not installed and used in accordance with the instructions, may cause harmful interference
with radio communications. However, there is no guarantee that interference will not occur in
a particular installation. If this equipment does cause harmful interference to radio or television
reception, which can be determined by turning the product on and off, the user is encouraged
to try to correct the interference by one or more of the following measures:
• Reorient or relocate the receiving antennas.
• Increase the separation between the equipment and the receiver.
• Connect the equipment to an outlet on a circuit different from that to which
the receiver is connected.
This Class B digital device complies with Canadian ICES-300.
3.
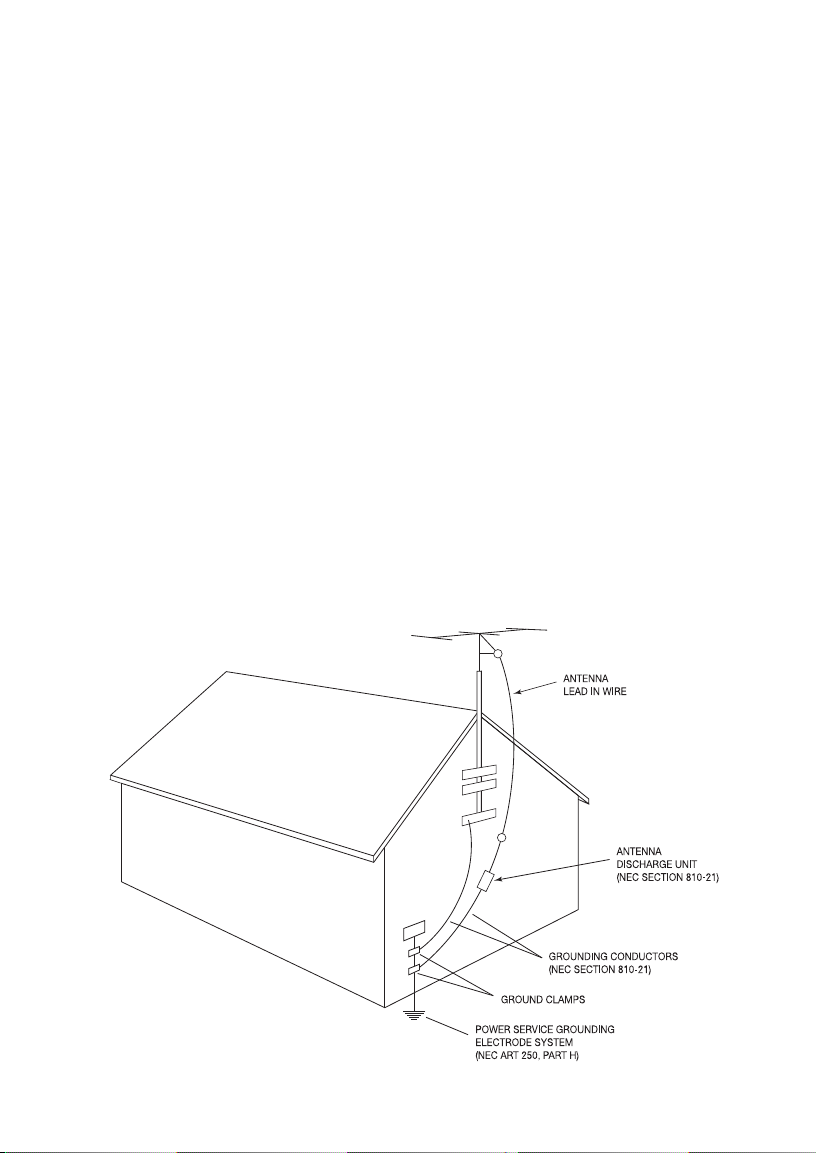
If an outside antenna or cable system is connected to the product, be sure the antenna or
4.
cable system is grounded so as to provide some protection against voltage surges and built-up
static changes. Article 810 of the National Electrical Code, ANSI/NFPA 70, provides information
with regard to proper grounding of the mast and supporting structure, grounding of the lead-in
wire to an antenna discharge unit, size of grounding conductors, location of antenna-discharge
unit, connection to grounding electrodes, and requirements for the grounding electrode.
See figure A.
Figure A
3

For added protection for this product during a lightning storm, or when it is left unattended
1.
and unused for long periods of time, unplug it from the wall outlet and disconnect the antenna
or cable system. This will prevent damage to the product to lightning and power-line surges.
An outside antenna system should not be located in the vicinity of overhead power lines or
2.
other electric light or power circuits, or where it can fall into such power lines or circuits.
When installing an outside antenna system, extreme care should be taken to keep from
touching such power lines or circuits as contact with them might be fatal.
Operate this product only from the type of power source indicated on the rear panel.
3.
For products using an external power supply, use an exact replacement if lost or damaged.
For products operating from battery power, refer to the user manual.
Unplug this product from the wall outlet and refer servicing to qualified service personnel
4.
under the following conditions:
a. When the power supply cord or plug is damaged.
b. If liquid has been spilled or objects have fallen into the product.
c. If the product has been exposed to water or rain.
d. If the product does not operate normally by following the operating instructions.
e. If the product has been dropped or damaged in any way.
f. When the product exhibits a distinctive change in performance.
If the LCD becomes cracked and damaged, do not touch the liquid.
5.
Keep this product a safe distance away from naked flame, such as a lit candle.
6.
Do not expose this product to splashing or dripping. Objects containing liquid, such as vases
7.
or drinking glasses, should not be placed on top of this product.
The recommended operating temperature range is 5˚ C to 40˚ C (41˚ F to 104˚ F).
8.
This product can be recycled. Products bearing this symbol must NOT be thrown
away with normal household waste. At the end of the product’s life, take it to
a collection point designated for recycling of electrical and electronic devices.
Find out more about return and collection points through your local authority.
The European Waste Electrical and Electronic Equipment (WEEE) Directive was
implemented to dramatically reduce the amount of waste going to landfills, there
by reducing the environmental impact on the planet and on human health. Please
act responsibly by recycling used products. If this product is still usable, consider
giving it away or selling it.
4

English
About Tivoli Audio
Tivoli Audio was started by Tom DeVesto with the goal of bringing simple to use, high quality audio
products to consumers at reasonable prices. As CEO and head of research and development at his
former company, Cambridge SoundWorks, Tom was responsible for the development of many of
the best selling home entertainment and multi-media products on the market. He also held senior
management positions in product development at both Advent and Kloss Video.
*Cambridge SoundWorks is a registered trademark of Creative Labs, Singapore.
iYiYi Instructions
Congratulations on your purchase of Tivoli Audio’s iYiYi sound system; a sound system with an
FM/AM radio and built-in universal dock for iPod. We believe the iYiYi sound system to be one of
the finest sounding “Made for iPod” stereo systems on the market today.
In order to take full advantage of what your new iYiYi sound system is capable of, please take a
moment to read this owner’s manual and the Safety Instructions. If you have any questions, please
do not hesitate to contact your dealer or Tivoli Audio.
Please save the carton and original packing should you ever need to ship your system, as
shipping damage is not covered by the factory warranty.
On behalf of all of us, thank you for choosing Tivoli Audio and enjoy your new iYiYi sound system!
Packed with your iYiYi you should find:
• 1 Remote Control (battery installed)
• 1 External FM Wire Antenna
• 7 Universal Dock Adapters
• 1 Power Cord
Please contact your dealer or Tivoli Audio if any of these items are missing.
Getting Started:
Correctly insert the power cord into the rear power input and plug the cord into a wall outlet.
1.
Press the Power button briefly to turn the system on, insert the appropriate dock adapter
2.
followed by your iPod and play a song, or tune to an FM radio station by rotating the tuning
knob, and adjust the volume level to your liking.
Note 1: Low (bass) frequencies place a heavy strain on speakers and amplifiers. The iYiYi
is engineered to reproduce the maximum amount of low frequencies for its size and power.
Therefore, we recommend setting your iPod’s EQ to “OFF” for best overall performance.
Note 2: The volume control for the iPod only controls a headset connected to the iPod.
It does not affect the volume of the iPod playing through the iYiYi.
5
English
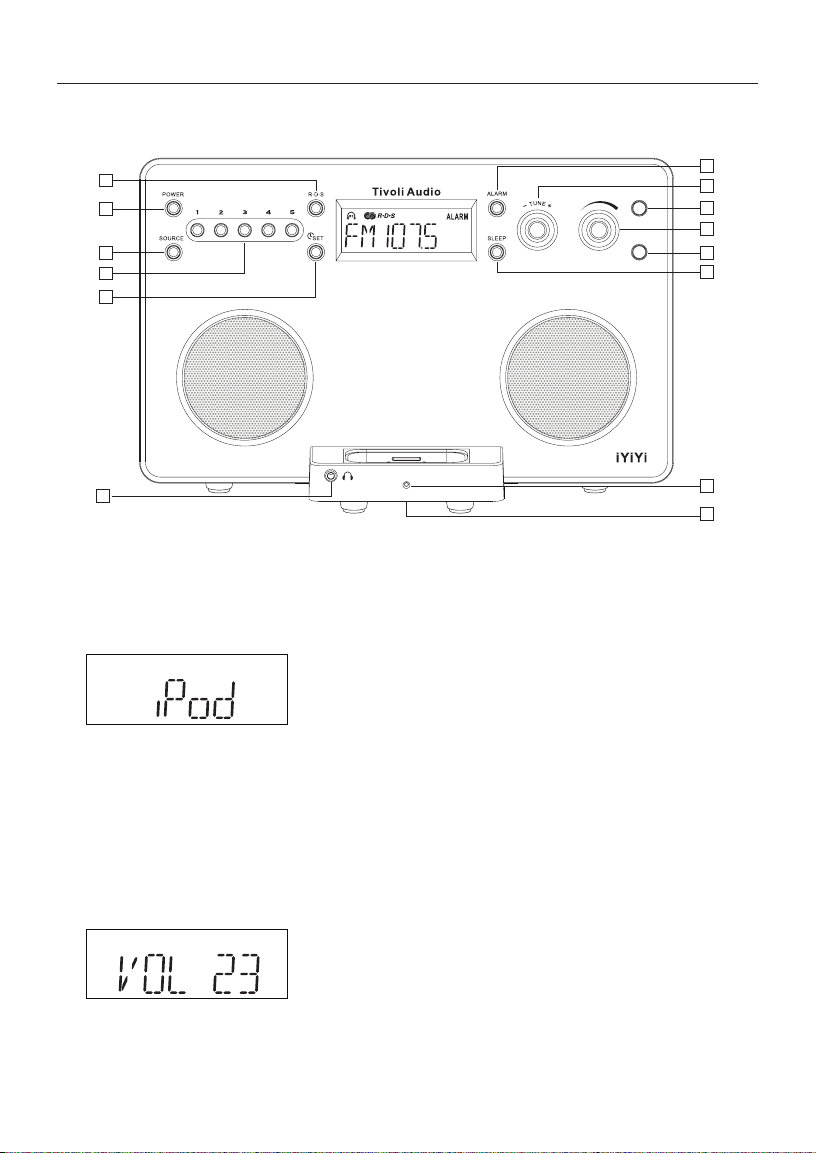
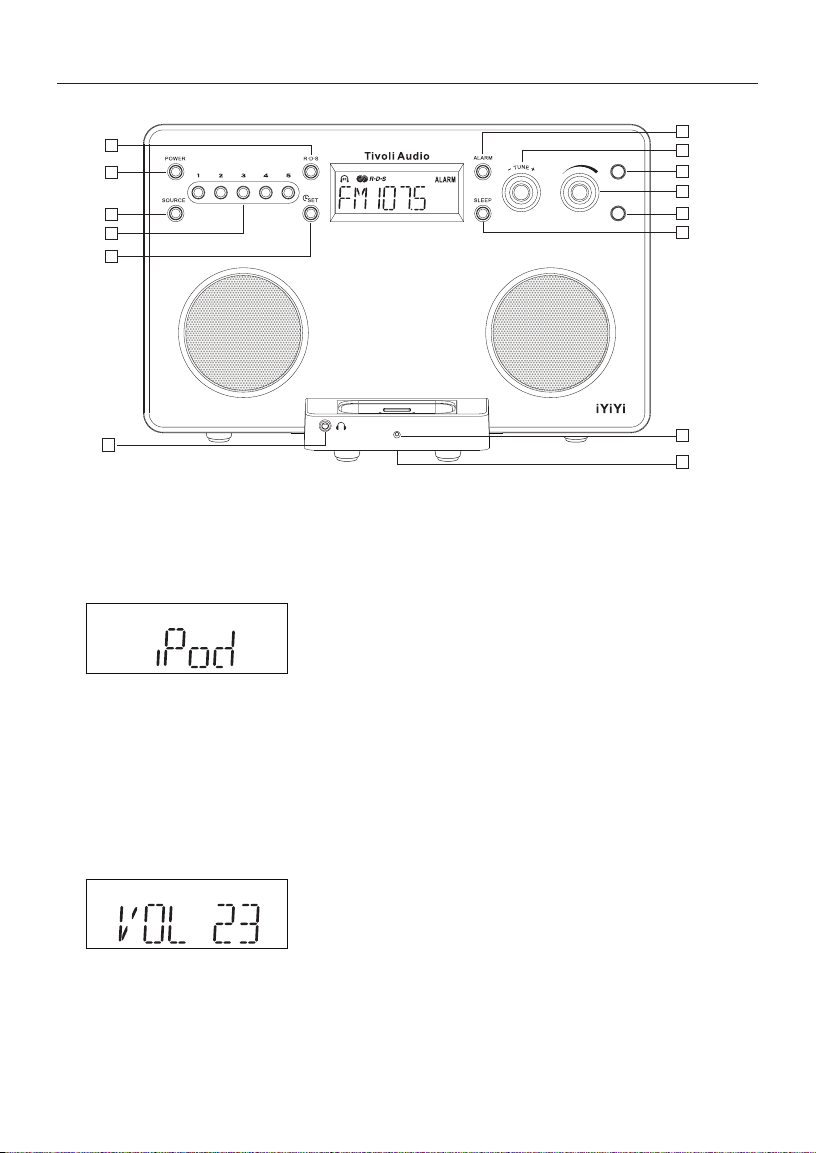
Guide to Features (Front Panel):
12
1
3
6
9
14
POWER: Press briefly to power the unit On or Off.
1.
POWER LED: Glows green whenever the system is powered On. Briefly glows bright green
2.
when receiving a signal from the remote control.
Figure 1
SOURCE BUTTON: Push briefly to change sources. The sequence is FM, AM, iPod (Fig. 1),
3.
and Aux.
– TUNE +: Rotate to the right (clockwise) to increase the FM/AM frequency; left (counter-
4.
clockwise) to lower the frequency. When the tuner locks on to an FM stereo signal the display
will show a pair of headphones with the letters “ST”. Push-in, hold and release the tune knob
to seek up to the next strongest station. Also used to set the time and alarm in conjunction
with the Time Set and Alarm buttons.
For more, see “Time Set” and “Using the Alarm”.
Figure 2
10
4
11
5
13
8
2
7
VOLUME KNOB: Rotate the volume knob to the right (clockwise) to increase the volume
5.
or to the left to decrease the volume. The volume level display ranges from 0 (no audio) to
30 (maximum output) and will appear momentarily each time the volume is adjusted (Fig. 2).
6

English
If the volume ever sounds distorted, immediately reduce the level to prevent damage to the
speakers. Since recording levels vary, you may need to adjust the volume level when switching
from the radio to the iPod and vise-versa.
Note: This knob also controls the volume of the headphone output.
Figure 3
PRESETS #1-5: With the unit set to FM or AM, press and hold one of these buttons to store
6.
the currently tuned radio station to a preset. The Preset number will flash and a beep will be
heard confirming the station has been successfully stored. Once stored, press the Preset
button briefly to recall the station associated with that Preset. The display will show “m”
(“memorized”) followed by the Preset number. The tuned preset number will show on the right
side of the display (Fig. 3). There are 5 presets for the FM band and 5 for the AM band. If a
Preset button is pressed and a station has not been saved to that Preset number, the display
will show “Empty”. Presets can only be stored using the controls on the iYiYi sound system
and not via the remote control.
DOCK: This universal dock accepts all iPods with dock connectors. Seven different dock
7.
adapters are included, each individually numbered. Use the dock adapter chart to determine
which dock fits your model iPod. Insert the appropriate dock adapter into the well of the
universal dock. Newer models of the iPod with dock connectors include a dock adapter that
will fit this dock. Never place an iPod in the dock without the adapter dock, as this may damage
the dock connector. A docked iPod will receive a charge whenever the iYiYi sound system is
powered On in any mode except AM so as not to compromise AM reception. A docked iPod
that is powered on may remain on if the source is changed too quickly.
An iPod Shuffle, older model iPod, or other MP3 player not having a dock connector can still
be used with the system by connecting an audio cable (not included) from its headphone
output to the unit’s auxiliary input. Each end of the audio cable should be terminated with a
1/8" stereo male mini connector.
If you have any questions about how to use your iPod, please contact Apple Computer
directly, or the establishment where you purchased your iPod.
Match your iPod model to the chart to determine which Dock Adapter is right for your iPod.
Each Dock Adapter is numbered on the back according to the chart.
Dock Adapter No. iPod Model
1 10, 15, 20 (Thin Version) GB
2 20 (Thick Version), 30, 40 GB
3 iPod mini, 4, 6 GB
4 iPod (Click Wheel) 20, 30 GB
5 iPod (Click Wheel) 40 GB
6 iPod with color display 20, 30 GB
7 iPod with color display 40, 60 GB60 GB
7
English
Figure 4
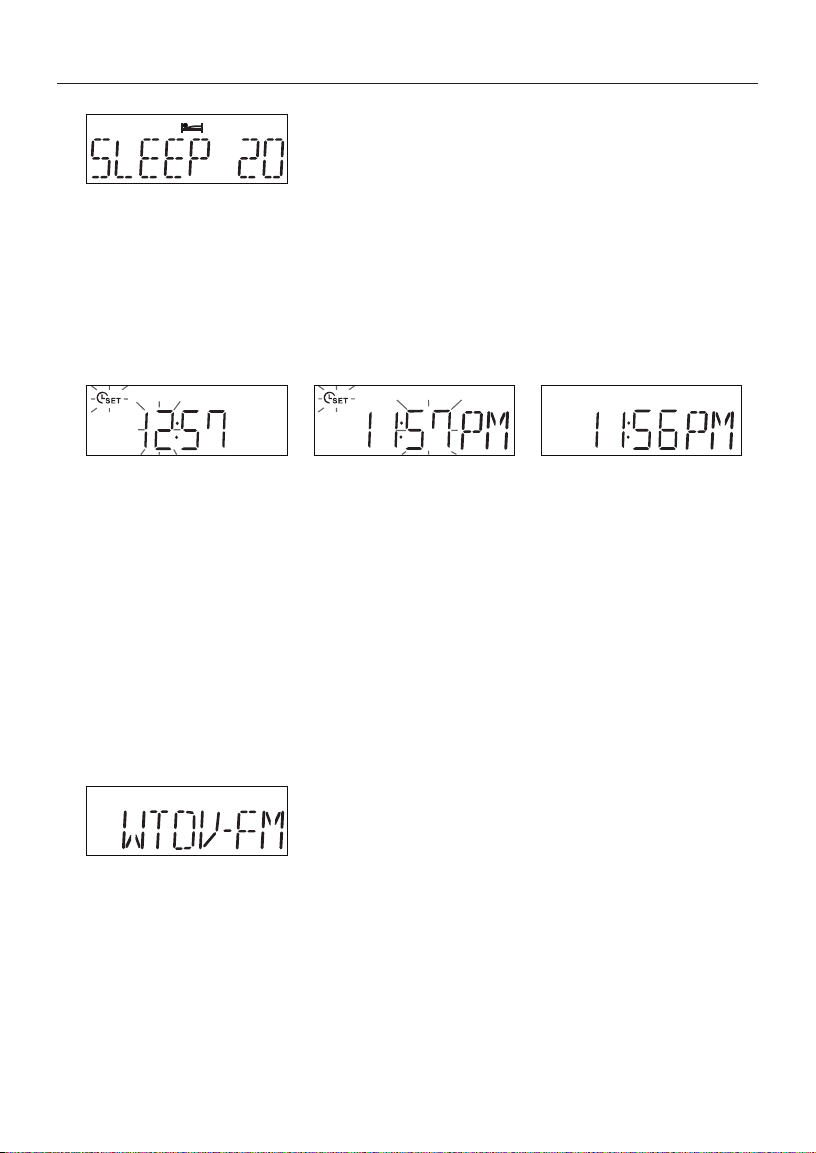
SLEEP: With the iYiYi sound system tuned to an FM or AM station, or with a docked iPod
8.
playing, press and hold for over 1.5 seconds to get 20 minutes of playback. An icon showing a
figure in bed will appear on the display and the number “20” will appear momentarily (Fig. 4).
A confirmation beep will also be heard. After approximately 20 minutes the iYiYi sound system
will turn off, the Sleep icon will disappear, and the clock will be displayed. You may press the
Sleep button for another 20 minutes of playback if you wish. To prematurely deactivate the
Sleep function during playback, press and hold the Sleep button. The Sleep icon will disappear
from the display and a confirmation beep will sound.
Figure 5 Figure 6 Figure 7
TIME SET (The time cannot be set when RDS is On): Press and hold to set the clock. A
9.
beep will be heard to confirm you have entered the Time Set mode. The hour will flash first
(Fig. 5, 6 & 7). Rotate the Tune knob to change the hour. The “PM” designation will appear for
afternoon/evening hours but there is no “AM” designation for morning hours. Press the Tune
knob in to set the hour, then adjust the minutes. The minutes will not affect the hour setting.
Press the Tune knob in again to store the minutes. Once the clock is set, press this button
briefly to temporarily display the clock while the unit is on. When an FM station is broadcasting
RDS, press briefly to set the clock automatically. The clock set icon will flash and then remain
on the display if the clock has been successfully set. This feature only works if the station
includes a clock signal in the RDS data. Note: Non-US models use a 24-hour clock format.
ALARM: Used in conjunction with the Time Set and Tune knob to set and activate the alarm.
10.
For more, see the section marked “Using the Alarm”.
IR SENSOR: Receives commands from the remote control. Do not block this sensor.
11.
Figure 8
RDS: Briefly press to display scrolling text information broadcast by FM radio stations (Fig. 8).
12.
Note: Not all radio stations transmit an RDS signal. The RDS logo will show in the display
regardless of whether an RDS signal is present or not. Press again to cancel RDS and the logo
will disappear. RDS is not used on the AM band. For more, see “RDS”.
LIGHT SENSOR: Detects changes in the ambient light and automatically adjusts the display’s
13.
backlight. Do not block this sensor.
HEADPHONE OUTPUT (Front of dock): Connect headphones (not included) to this variable
14.
stereo output for private listening. The main speakers will be muted. The headphone volume
is adjusted by rotating the volume knob. This jack accepts a 1/8" male stereo mini connector.
8

English
Guide to Features (Rear panel):
7
2
1
FM ANTENNA JACK: The iYiYi has a built-in FM antenna. To improve FM reception, slide the
1.
connector end of the supplied wire antenna over this jack. When disconnecting the included
external FM antenna, always firmly grasp the black connector. Never pull on the wire itself or
you may damage the antenna. For more, see “Reception”.
FM ANTENNA SWITCH: Switch between the internal FM antenna and one that you have
2.
connected to the external FM antenna jack. This switch has no effect on AM reception.
RECORD OUT: Connect a recorder’s input to record whatever is playing through the iYiYi
3.
sound system. This fixed level, stereo output accepts a 1/8" stereo male mini connector.
An adapter cable may be required to connect to your recording device.
Note: When the iYiYi sound system's volume is set to zero the record out will be muted.
Figure 9
3 4 65
AUX IN: To hear audio from another device, such as a CD player, TV, or computer, connect
4.
said device’s audio output to this stereo input and press the Source button until “AUX” appears
on the display. Switching your system to the Aux position does not turn on the connected
device (Fig. 9). The volume level may need to be adjusted differently when listening to an
auxiliary device than when listening to the radio or iPod.
MIX IN: The sound from this input will be mixed with whatever source you’ve selected. This
5.
stereo input accepts a 1/8" stereo male mini connector. The volume of mixed sound must be
adjusted at the source.
9
English
AC INPUT: Correctly and firmly insert the supplied power cord into this jack. When removing
6.
the cord, always grasp it at the connector. Never pull the cord itself. Do not bundle the power
cord together with the external FM antenna or any audio cables, as this can inject noise in the
audio path.
BASS PORTS: These ports produce low frequency output thereby enhancing the bass
7.
response. Do not obstruct the ports, as this will not only diminish the sound quality but also
reduce internal heat ventilation.
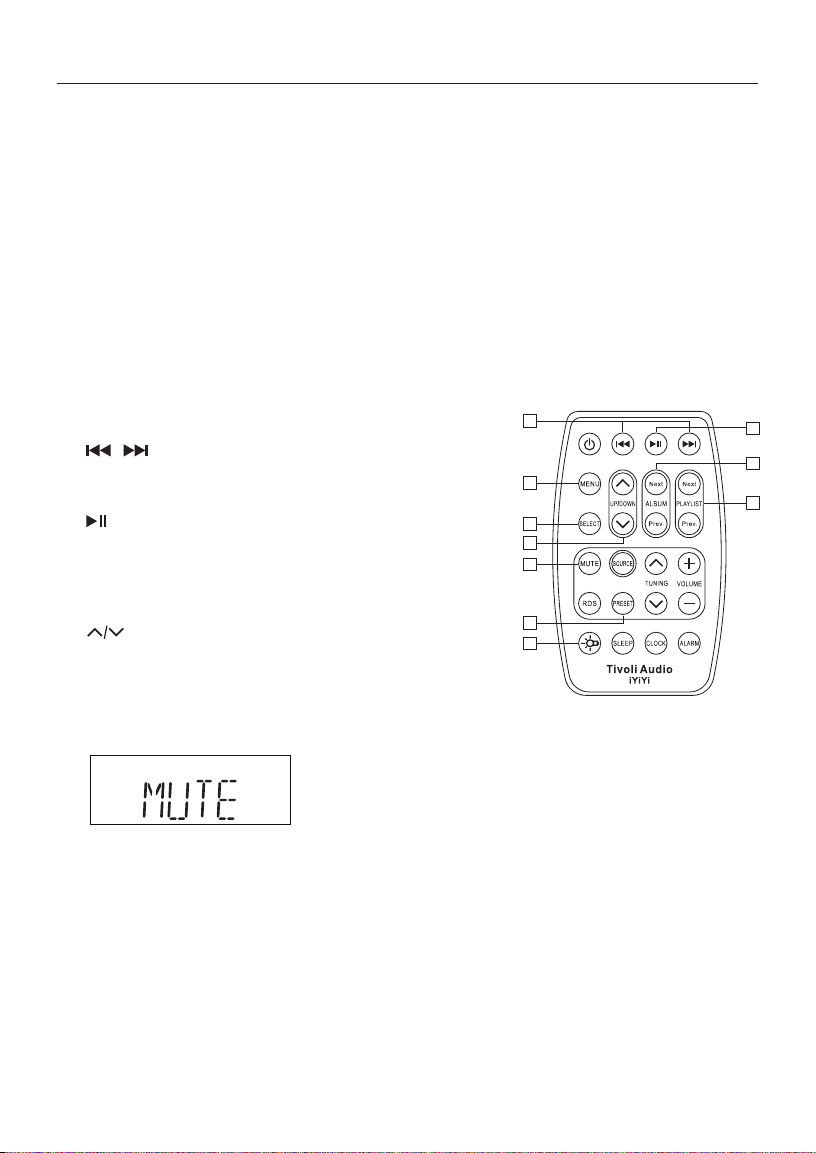
Remote Control (remove rear protective plastic from battery compartment):
Certain functions may not be compatible with older iPod software. To update your
software, log on to www.apple.com/ipod/download/
The front panel functions are repeated on the remote in addition to a Mute button.
The additional buttons pertain only to a docked iPod:
: Press briefly to advance or go back
1.
a track. Press and hold to fast forward or fast
reverse through a track.
: Press briefly to play; press again to pause playback.
2.
MENU: Press to enter the menu.
3.
SELECT: Press to select the option highlighted
4.
in the menu.
UP/DOWN: Navigate up and down within the menu.
5.
ALBUM NEXT/PREVIOUS: Advance to the next
6.
Album or go back.
PLAYLIST NEXT/PREVIOUS: Advance to the next Playlist or go back.
7.
Figure 10
1
3
4
5
8
9
10
2
6
7
MUTE: Press to mute output. “MUTE” will flash on the LCD until audio is restored by
8.
pressing Mute again or adjusting the volume (Fig. 10).
PRESET: Scrolls sequentially through the five FM and five AM preset radio stations.
9.
(Cannot be used to store preset frequencies.)
BACKLIGHT: Press to temporarily activate the iPod’s backlight.
10.
Note: the Clock and Alarm buttons on the remote only permit a brief display of the time and to
set the alarm to wake. These buttons do not allow setting the hour and minutes.
When it comes time to replace the remote’s battery, use only a major brand name 3V Lithium
battery compatible with model CR2025. Slide the battery cover off and install the new battery
with the positive “+” side facing up.
10

English
Using the Alarm:
Figure 11 Figure 12 Figure 13
TO SET THE ALARM TIME: (the clock must be set before the alarm can be set.) Briefly press
1.
the Alarm Button. The ALARM icon will flash on the display. Then press and hold the clock
set button until a beep indicates that you’re in the set mode and the hour will flash (Fig. 11).
Rotate the Tune knob (which also determines AM or PM) clockwise to increase hour, counter
clockwise to decrease the hour. There is no “AM” designation for morning hours. Now press
the Tune knob in to set the hour, and then adjust the minutes in the same manner (Fig. 12).
The minutes will not affect the hour setting. Press the Tune knob again to save the settings
(Fig. 13). Press the Alarm button briefly to see the current Alarm time. The “ALARM” icon will
blink when displaying alarm time.
Note: Non-US models use a 24-hour clock format.
SETTING THE ALARM TO WAKE: After setting the alarm time, press and hold the Alarm
2.
button until a beep is heard and the word “Alarm” shows on the display. When the alarm is
set to wake it will activate to the last source and volume level used prior to the iYiYi being
turned off. If the iYiYi was last used in auxiliary mode, a beep will sound when the alarm
activates. The volume level of the beep cannot be changed.
TO RE-SET THE ALARM FOR THE NEXT DAY: After the alarm activates, press the Alarm
3.
button to re-set the alarm for the following day. “OFF” and “ALARM” will flash on the display,
the system will shut off, and the current time will be displayed.
11

English
Reception:
The internal FM antenna will provide good reception. Using the supplied external FM antenna may
improve reception. Be sure to set the rear panel switch to "External" when using an external FM
antenna. Do not bundle the FM antenna with the power cord or other cords.
Locating the FM antenna near a window or outside wall will yield the best results. An optional
outdoor FM antenna will provide the best possible reception. Connecting your cable television’s
75ohm coaxial cable to the external FM antenna input may also provide clear, local reception.
However, you must usually request activation of this service by your cable provider.
Buildings made with concrete, steel, or aluminum siding will hinder reception. Household appliances,
electric blankets, computers, CD players, microwave ovens, and other electronic devices can also
adversely affect reception or inject noise. If you experience this, move the iYiYi sound system
further from the offending device or plug it into an electrical outlet not shared by another device.
For AM reception, since the AM antenna is internal, position the unit for best AM reception.
Note: metal surfaces may hinder AM reception.
RDS:
The Radio Data System (RDS) transmits text data along with the audio broadcast. Not all stations
use RDS, thus text may not be present on some stations. For stations using RDS, the text still
might not appear or may appear scrambled if the signal is too weak. In such cases, experiment
with the FM antenna’s location and position.
Note: RDS content is determined by each individual station. If the content shown is inaccurate,
that is not the fault of the iYiYi sound system. There are also limits to the kinds of characters that
can be displayed. Therefore, it is not unusual to see a different character or blank space in cases
where the precise character can't be reproduced.
Placement:
Place the unit on a solid, flat, stable surface. The system is shielded and may be used in close
proximity to a computer monitor or television set. Placing the iYiYi sound system in a bookcase,
corner, or flush against a wall or other flat surface will restrict the output of the bass ports, yielding
an unnatural bass sound. The bass ports also double as internal heat ventilation.
Note: the LCD can be affected by cold and hot temperatures.
Cleaning:
Never use any harsh cleansers or solvents on your unit. The high gloss finish is subject to
scratching, particularly the black color, so care should be exercised during dusting/cleaning.
For your own safety, always disconnect the power when cleaning the iYiYi sound system.
12

English
Limited Warranty:
Tivoli Audio manufactures its products to very high standards and we are confident our products
will perform well. Accordingly, we provide a limited warranty on this product against manufacturing
defects in material and workmanship to the original owner. This warranty is non-transferable.
Products purchased in the European Union, Switzerland, and Norway have a minimum warranty
term of two years. For countries where minimum warranty terms are determined by statute, the
warranty term is the statutory period required. In all other locations, the warranty term is one year.
This Limited Warranty covers the functionality of the product for its normal, intended use as
specified in this Owner’s Manual. It does not cover a malfunction or damage that has resulted
from improper or unreasonable use or installation, using the charger to charge alkaline batteries,
faulty ancillary equipment, modifications, unauthorized repair, shipping damage or loss, abuse,
accidents, use on improper voltage/current, power surges, lightning or other acts of God, excess
moisture, normal wear and tear, commercial use, or purchase from unauthorized dealers. Proof
of purchase as evidence the unit was purchased from an authorized dealer may be required for
warranty service. Please contact the dealer of purchase or local distributor for warranty
service or repair.
Please refrain from opening this product or taking it apart as doing so will void this Limited
Warranty. There are no user serviceable parts inside. Tivoli Audio will not pay for costs incurred
due to correction of reception problems, elimination of externally generated static/noise, loss of
time, inconvenience, loss of use of product, or damage caused by improper use of this product.
In the event the product is returned during the warranty term and is eligible for service under this
Limited Warranty, we will repair or replace any defective parts within a reasonable period of time
and free of charge.
THIS LIMITED WARRANTY GIVES YOU SPECIFIC LEGAL RIGHTS SUBJECT TO SPECIFIED
CONDITIONS. YOU MAY ALSO HAVE OTHER LEGAL RIGHTS WHICH APPLY TO THE PRODUCT
YOU HAVE ACQUIRED. THESE LEGAL RIGHTS VARY FROM COUNTRY TO COUNTRY. SOME
PLACES DO NOT ALLOW THE EXCLUSION, RESTRICTION, OR MODIFICATION OF CERTAIN
IMPLIED RIGHTS OR THEIR EFFECT. IN THOSE SITUATIONS THIS LIMITED WARRANTY WILL
ONLY APPLY TO THE EXTENT THAT THE APPLICABLE LAW ALLOWS.
The laws of your country may provide you with legal claims against the seller or manufacturer of
this product. This Limited Warranty does not affect those rights.
The provisions of the Limited Warranty are in lieu of any other warranties or conditions, except
those provided by law. This Limited Warranty does not affect any legal rights provided to you by
law and does not preclude any remedy you may have under law.
In countries where liability limits are not precluded by statute, the maximum liability of Tivoli Audio
shall not exceed the purchase price paid by you for the product. In countries where limitations of
liability are precluded by law, Tivoli Audio shall be liable for no more than the direct damages for
bodily injury, and/or real or personal property arising from the negligence of Tivoli Audio.
13

English
Where not prohibited by law, Tivoli Audio shall not be liable for special, incidental, consequential,
or indirect damages. Some places do not allow limitations on the exclusion or limitation of relief,
special, incidental, consequential or indirect damages, or the limitation of liability to specified
amounts, so the above limitations or exclusions may not apply to you.
This Limited Warranty is void if the label bearing the serial number has been removed or defaced.
If you purchased an extended service contract from your dealer and service is required after the
term of this Limited Warranty has expired, please contact your extended service contract provider
to obtain service.
For your convenience, you may register your product for warranty service online at our website,
www.tivoliaudio.com. There is no legal obligation for you to provide personal information.However,
such information allows us to maintain a record of the Tivoli Audio products acquired by you and
better understand the purchasers of our products. The information collected will be used for marketing
purposes by Tivoli Audio and, where permitted, to contact you in relation to the products you have
acquired or other products which might be of interest to you from Tivoli Audio or other companies.
The information that you provide may be processed in another country.
Please visit the Tivoli Audio FAQ section at www.tivoliaudio.com prior to any request for
warranty service as information available there may answer your questions or concerns.
You may email questions to us at mail@tivoliaudio.com
14

Specifications:
English
Model: Tivoli Audio iYiYi
TM
Type: High-Fidelity Stereo System for iPod
Drivers: 2 x 3.00" (7.62cm), video shielded, full range
Receiving bands: FM: 87.5-108MHz
AM: 520-1710kHz (522-1629kHz outside North America)
De-Emphasis: 75uSec UL/50uSec CE
Dimensions: 12.92"W x 7.5"H x 8.14"D (303mm W x 190mm H x 207mm D)
Weight: 6.5 lbs (3kg)
All specifications subject to change without notice.
Tivoli Audio reserves the right to make product changes without notice.
Tivoli Audio, the Tivoli Audio logo, and the iYiYi are trademarks of Tivoli Audio, LLC.
Other product and company names mentioned herein may be trademarks of their respective companies.
15

Dutch
Over Tivoli Audio
Tivoli Audio werd door Tom DeVesto opgericht met als doel om u uiterst gebruikersvriendelijke,
hoogwaardige en betaalbare audioproducten te kunnen bieden. Tijdens zijn langdurige samenwerking met Henry Kloss, ontwerper van de legendarische Model One Table Radio, was hij onder
meer medeoprichter van Cambridge SoundWorks*. Als CEO en hoofd van de ontwerpafdeling van
zijn vorige bedrijf was Tom verantwoordelijk voor de ontwikkeling van een groot aantal succesvolle
audio- en multimediaproducten. Tom werkte ook als seniormanager op de ontwerpafdelingen van
Advent en Kloss Video.
*Cambridge SoundWorks is een geregistreerde handelsnaam van Creative Labs, Singapore.
iYiYi – Instructies
Hartelijk gefeliciteerd met de aanschaf van de Tivoli Audio’s iYiYi. Wij zijn ervan overtuigd dat u
hiermee een van de beste voor de iPod ontworpen stereosystemen in huis gehaald heeft.
Om optimaal gebruik te maken van uw aanschaf raden we u aan om deze handleiding in z’n geheel
door te lezen. Heeft u daarna nog vragen, neemt u dan beslist even contact op met uw dealer.
Wij adviseren u om de originele verpakking te bewaren voor het geval u het apparaat ooit zou
moeten versturen; transportschade valt niet onder de garantie.
Namens alle medewerkers van Tivoli Audio bedanken we u voor uw keuze voor dit product, en we
wensen u er bijzonder veel plezier mee!
Uw iYiYi wordt geleverd met:
• 1 afstandsbediening (met geïnstalleerde batterij)
• 1 externe FM-draadantenne
• 7 adapters voor het iPod-dockingstation
• 1 netsnoer
Neem contact op met uw leverancier als een of meer van bovengenoemde zaken zou ontbreken.
Om Te Beginnen:
Sluit het netsnoer aan op de netaansluiting aan de achterzijde van de iYiYi en steek de stekker
1.
in een wandcontactdoos.
Druk de knop POWER in om de iYiYi aan te zetten. Plaats de met uw iPod corresponderende
2.
adapter in het iPod-station, plaats de iPod in de adapter en speel een nummer af of stem met
de zenderknop af op een radiostation naar keuze, en stel het gewenste volumeniveau in.
Opmerking 1: Lage frequenties (bassen) zijn extra belastend voor luidsprekers en versterkers.
De iYiYi is zo ontworpen dat er een maximale, op de afmetingen en het vermogen van het
systeem afgestemde basweergave gerealiseerd wordt. Voor optimale prestaties van de iYiYi
met uw iPod adviseren we u de equalizer van uw iPod niet te activeren (EQ Off).
Opmerking 2: De volumeregeling van de iPod beïnvloedt alleen het volumeniveau van een
op de iPod aangesloten hoofdtelefoon. Als de iPod via de iYiYi wordt weergegeven, is deze
volumeregelaar niet actief.
16
Dutch
VOORZIJDE:
12
1
3
6
9
14
POWER: Druk deze knop in om het toestel aan (ON) of uit (OFF) te zetten.
1.
POWER LED: Deze LED licht groen op als de iYiYi aanstaat. Bij het ontvangen van een
2.
signaal van de afstandsbediening licht hij even helder groen op.
Afbeelding 1
SOURCE: Met deze knop maakt u een keuze uit de verschillende klankbronnen, in de volgorde
3.
FM, AM (middengolf), iPod, Aux. Zie afbeelding 1.
– TUNE +: Draai deze knop met de klok mee om op radiostations met een hogere frequentie
4.
af te stemmen, en tegen de klok in voor radiostations die op een lagere frequentie uitzenden.
Zodra de tuner op een station met een FM-stereosignaal afgestemd wordt, toont het display
een hoofdtelefoontje met de lettere ‘ST’. Om op het volgende goed te ontvangen station af te
stemmen, houdt u deze knop kort ingedrukt en laat u hem weer los. De knop – TUNE + wordt
samen met de knoppen SET en ALARM ook gebruikt om de (wek)tijd in te stellen (zie aldaar).
Afbeelding 2
10
4
11
5
13
8
2
7
VOLUME: Met deze knop verhoogt (met de klok mee) of verlaagt (tegen de klok in) u het
5.
volumeniveau. Het ingestelde volumeniveau wordt in het display weergegeven met cijfers 0
(geen weergave) tot en met 30 (maximaal volumeniveau). Deze cijfers worden kort weergegeven
als u het volumeniveau wijzigt. Is de weergave vervormd, verlaag het volumeniveau dan
onmiddellijk om schade aan de speakers te voorkomen. Als u van radioweergave naar uw
iPod schakelt, is het mogelijk nodig om het volumeniveau aan te passen.
17
 Loading...