

Tivoli Audio ISONGBOOK User Manual
OWNER’S MANUAL
iSongBook
™

CAUTION
RISK OF
ELECTRIC SHOCK
DO NOT OPEN
RISQUE DE CHOC ELECTRIQUE,
RIESGO DE CHOQUE ELECTRICO
CAUTION: TO REDUCE THE RISK OF
ELECTRIC SHOCK, DO NOT
REMOVE COVER (OR BACK).
NO USER-SERVICEABLE PARTS
INSIDE.
REFER SERVICING TO QUALIFIED
SERVICE PERSONNEL.
ATTENTION
NE PAS OUVRIR
PRECAUCION
NO ABRIR
This symbol is intended to alert the user to the presence
of uninsulated “dangerous voltage” within the product’s
enclosure that may be of sufficient magnitude to constitute a risk of electric shock to persons.
This symbol is intended to alert the user to the presence
of important operating and maintenance (servicing)
instructions in the literature accompanying the appliance.
IMPORTANT SAFETY INSTRUCTIONS
1) Read and keep these instructions.
2) Heed all warnings.
3) Follow all instructions.
4) Warning: To reduce the risk of fi re or electric shock, do not expose this product to rain or
moisture. For example, do not use near a bathtub, in a wet basement, near a swimming
pool, and the like.
5) Clean only with a dry cloth. Do not use aerosol or liquid cleansers. Unplug the product before
cleaning.
6) Do not block any ventilation openings. Install in accordance with the manufacturer’s instructions.
Do not block openings by placing on a bed, sofa, rug, or similar surface. Do not place in a
built-in installation such as a rack or bookshelf unless proper ventilation is provided. Do not
push objects of any kind through openings.
7) Do not install near any heat sources such as radiators, heat registers, stoves, or other apparatus
(including amplifi ers) that produce heat.
8) Do not defeat the safety purpose of the polarized or grounding-type plug. A polarized plug
has two blades with one wider than the other. A grounding type plug has two blades and a
third grounding prong. The wide blade or the third prong is provided for your safety. If the
provided plug does not fi t into your outlet, consult an electrician for replacement of the obsolete
outlet. Do not overload wall outlets or extension cords.
9) Protect the power cord from being walked on or pinched particularly at plugs, convenience
receptacles, and the point where they exit from the apparatus. When removing the power
cord from the wall outlet, grasp it by the plug, not the cord.
10) Only use attachments/accessories specifi ed by the manufacturer.
2

11) Use only with the cart, stand, tripod, bracket, or table specifi ed by the manufacturer,
or sold with the apparatus. When a cart is used, use caution when moving the cart/
apparatus combination to avoid injury from tip-over.
12) Unplug this apparatus during lightning storms or when unused for long periods of time.
13) Refer all servicing to qualifi ed service personnel. Servicing is required when the apparatus
has been damaged in any way, such as if the power-supply cord or plug is damaged, liquid
has been spilled or objects have fallen into the apparatus, the apparatus has been exposed
to rain or moisture, does not operate normally, or has been dropped.
14) Operate this product only from the type of power source indicated on the rear panel.
For products using an external power supply, use an exact replacement if lost or damaged.
For products operating from battery power, refer to the user manual.
15) Unplug this product from the wall outlet and refer servicing to qualifi ed service personnel
under the following conditions:
a. When the power supply cord or plug is damaged.
b. If liquid has been spilled or objects have fallen into the product.
c. If the product has been exposed to water or rain.
d. If the product does not operate normally by following the operating instructions.
e. If the product has been dropped or damaged in any way.
f. When the product exhibits a distinctive change in performance.
16) When replacement parts are required, be sure the service technician has used replacement
parts specifi ed by the manufacturer.
17) Upon completion of any service, ask the service technician to perform safety checks to
confi rm the product is in proper operating condition.
18) This product has been tested and found to comply with the limits for Part 15 of the FCC
rules. These limits are designed to provide reasonable protection against harmful interference
in a residential installation. This product generates, uses, and can radiate radio frequency
energy and, if not installed and used in accordance with the instructions, may cause harmful
interference with radio communications. However, there is no guarantee that interference will
not occur in a particular installation. If this equipment does cause harmful interference to radio
or television reception, which can be determined by turning the product on and off, the user
is encouraged to try to correct the interference by one or more of the following measures:
- Reorient or relocate the receiving antennas
- Increase the separation between the equipment and the receiver.
- Connect the equipment to an outlet on a circuit different from that to which the
receiver is connected.
19) If the LCD becomes cracked and damaged, do not touch the liquid.
20) Keep this product a safe distance away from naked fl ame, such as a lit candle.
21) Do not expose this product to splashing or dripping. Objects containing liquid, such as vases
or drinking glasses, should not be placed on top of this product.
22 The recommended operating temperature range is 5 degrees C to 40 degrees C.
23) The 12VDC input is suited for operating this product in a boat or camper using an optional
12VDC, 2A fused adaptor.
3

About Tivoli Audio
Tivoli Audio was started by Tom DeVesto with the goal of bringing simple to use, high quality
audio products to the consumer at reasonable prices. His long professional association with
Henry Kloss includes co-founding Cambridge SoundWorks*. As CEO and head of research and
development at his former company, Tom was responsible for the development of many of the
best selling home entertainment and multi-media products on the market. He also held senior
management positions in product development at both Advent and Kloss Video.
*Cambridge SoundWorks is a registered trademark of Creative Labs, Singapore.
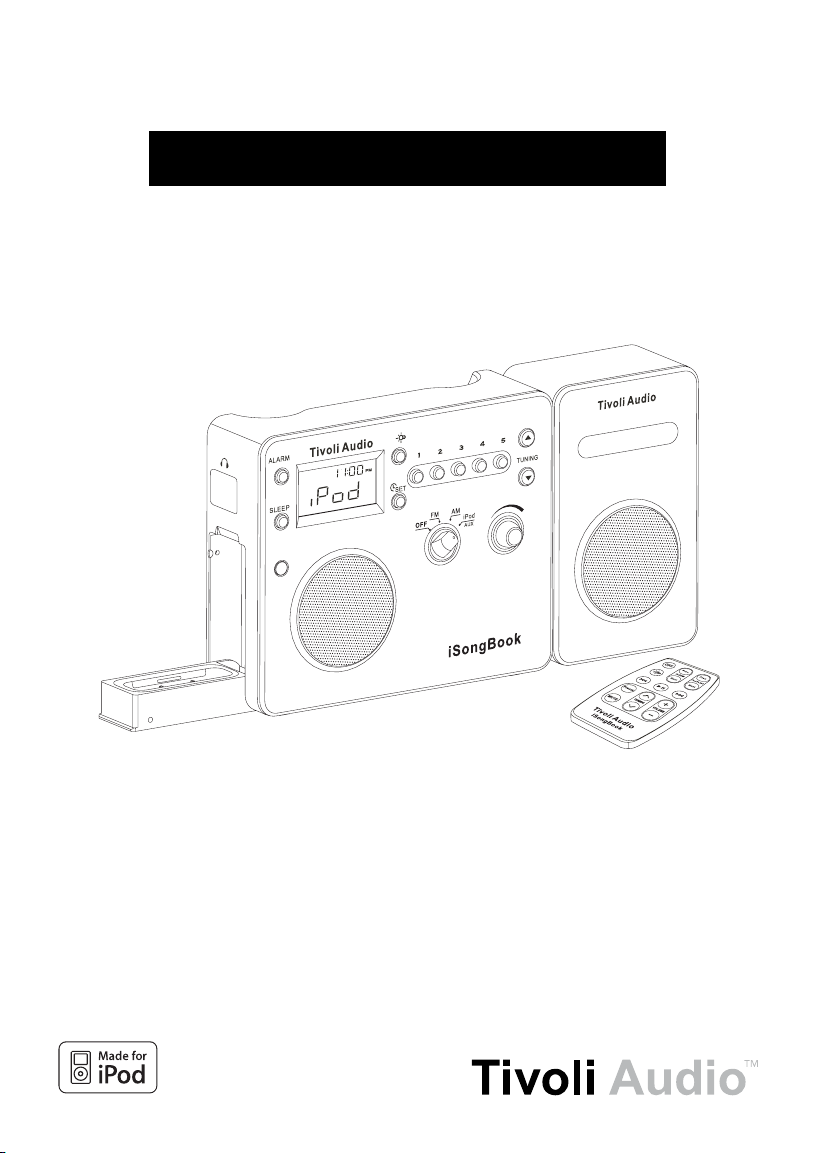
iSongBook Instructions
Congratulations on your purchase of Tivoli Audio’s iSongBook portable FM/AM radio with built-in
iPod dock. We believe the iSongBook to be one of the fi nest sounding “Made for iPod” stereo
audio systems on the market today.
In order to take full advantage of what your new radio is capable of, please take a moment to read
this owner’s manual and the Safety Instructions. If you have any questions, please do not hesitate
to contact your dealer or Tivoli Audio.
Please save the carton and original packing should you ever need to ship your radio, as
shipping damage is not covered by the factory warranty.
On behalf of all of us, thank you for choosing Tivoli Audio and enjoy your new iSongBook!
Packed with your iSongBook you should fi nd:
• 1 External Power Supply
• 1 Remote Control (battery installed)
• 7 iPod Dock Adapters (see “iPod Dock” on page 8)
• 1 Warranty Registration Card
Please contact your dealer/distributor or Tivoli Audio if any of these items are missing.
Getting Started
1. Set the iSongBook on a fl at, stable surface. Attach the male mini plug from the secondary
speaker cable into the jack marked “R CH” on the side of the iSongBook and position the
speaker and main unit as desired.
2. With the iSongBook Off, connect the external power supply to the rear jack on the iSongBook
labeled 12VDC/1A and then plug it into a wall outlet.
3. Flip down the iPod docking station and insert the appropriate iPod adapter cup based on the
iPod model you own. Install your iPod in the dock by fi tting the dock’s connector into the jack
on the bottom of the iPod.
4. Turn the iSongBook’s front source knob to the iPod/Aux position and set the volume control
to the desired level. The iPod will power On to its last state.
Note: Low (bass) frequencies place a heavy strain on speakers and amplifi ers. The iSongBook
was engineered to reproduce the maximum amount of low frequencies for its size and power.
Therefore, we recommend setting your iPod’s EQ to “Off” for best overall performance.
4
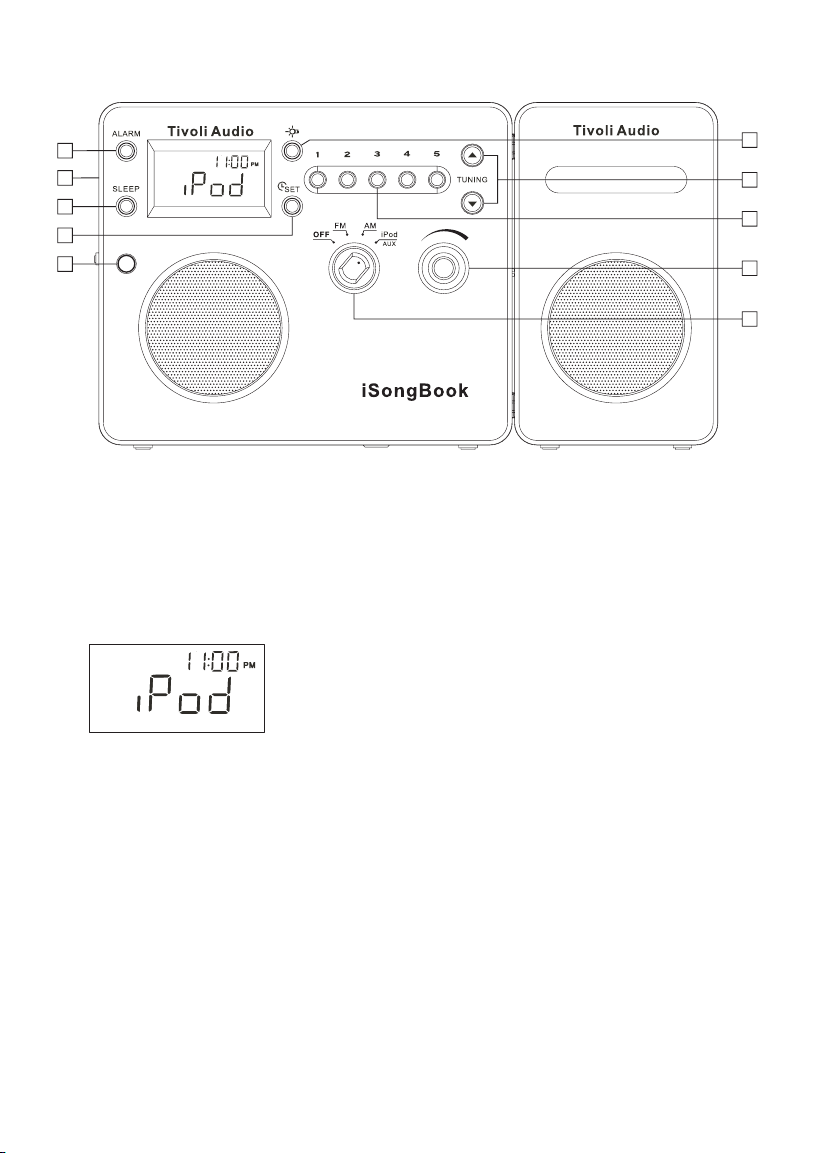
Guide To Features (Front Panel)
8
10
6
7
9
1. VOLUME KNOB: Rotate the volume knob to the right to increase the volume or to the left
to decrease the volume. This knob also controls the volume of the headphone output. The
volume level display ranges from 0 (no audio) to 30 (maximum output) and will appear
momentarily each time the volume is adjusted. If the volume ever sounds distorted, reduce
the level to prevent damage to the speakers. Since recording levels vary, you may need to
adjust the volume level when switching from the radio to the iPod and vise versa.
Figure 1
5
3
4
1
2
2. OFF/FM/AM/iPod/AUX KNOB: Turn the source knob one click to the right to hear the FM
band, two clicks to the right to hear the AM band, or three clicks to the right for the iPod/
Auxiliary input. When the iSongBook is switched to FM or AM the display will show the station
which was last tuned. When switched to the iPod/Auxiliary input, the display will show iPod
when an iPod is docked. (Figure 1) Otherwise, the display will show “AU”. In Off mode the
clock will be shown in a larger format.
3. TUNE ˆ/ˇ BUTTONS: Press the Tune Up button briefl y to increase the frequency steps or
the Tune Down button briefl y to decrease the frequency steps. Press and hold the Tune Up/
Down buttons to rapidly scan through the stations. To Auto Search, press, hold for more
about .5 seconds, and release the Tune Up or Down button and the tuner will automatically
stop on the next strongly received station. When the tuner locks on to an FM stereo signal
the display will show a pair of headphones with the letters “ST”. These buttons are also used
to set the clock and alarm times.
4. #1-5: With the iSongBook set to FM or AM, press and hold to set the currently tuned radio
station. The Preset number will fl ash and a beep will be heard confi rming the station has
5
been successfully stored. Once stored, press the Preset button briefl y to recall the station
associated with that Preset. The tuned preset number will shown on the bottom of the
display. There are 5 presets for the FM band and 5 for the AM band.
5. LIGHT: Press briefl y to engage the iSongBook's backlight. The backlight will turn off auto matically after 30 seconds to conserve power, or press again to cancel the backlight. Press
and hold to keep the backlight on for as long as the button is held in. If an iPod is docked
and the iSongBook is in iPod mode, when this button is pressed, the iPod backlight will also
activate for 30 seconds. However it cannot be turned off with the backlight button.
6. SLEEP: With the iSongBook tuned to an FM or AM station, or with a docked iPod playing,
press and hold for over 1.5 seconds to get 20 minutes of playback. An icon showing a fi gure
in bed will appear on the display and the number “20” will appear momentarily. A confi rmation
beep will also be heard. After approximately 20 minutes the iSongBook will go into Standby
mode and the display will show “Standby”. You may now press the Sleep button for another
20 minutes of playback, turn the iSongBook Off, or switch to a different input. To prematurely
deactivate the Sleep function during playback, press and hold the Sleep button. The bed
icon will disappear from the display and a confi rmation beep will be heard. The Sleep function
will not work when the source knob is set to the Off position.
To use the Sleep function in conjunction with the alarm, once the alarm has been set (see
"Using the Alarm") and the iSongBook goes into Standby, press the Sleep button. After 20
minutes, the iSongBook will return to Standby with the alarm set.
Figure 2 Figure 3 Figure 4
7. TIME SET: Press and hold to set the clock. A beep will be heard to confi rm you have entered
the Time Set mode. (Figure 2) The hour will fl ash fi rst. Press the Tune Up/Down buttons briefl y
to change the hour or press and hold to rapidly change the hours. The “PM” designation will
appear for afternoon/evening hours but there is no “AM” designation for morning hours. Now
press the Time Set button to adjust the minutes using the Tune Up/Down buttons. (Figure 3)
The minutes will not affect the hour setting. Press the Time Set button a third time to store the
settings. (Figure 4) If the clock is set and there are no batteries (or the batteries are dead) inside
the iSongBook, disconnecting the external power supply will cause the time to fl ash to indicate
power was lost. The clock remains this way until power is restored and the time is set again.
Note: Non-US models use a 24-hour clock format.
8. ALARM: This button is used in conjunction with the Time Set and Tuning buttons. For more,
see the section marked “Using the Alarm”.
9. IR SENSOR: Receives commands from the remote control. Do not block this sensor.
10. HEADPHONE OUT (Upper Left Side): Connect a headset (not included) to this variable stereo
output for private listening. The headset will mute the primary speaker(s). The headset’s
volume is adjusted using the volume knob. This stereo output accepts a 1/8" stereo male mini
connector. Avoid using headphones at high volume levels to prevent possible hearing damage.
Do not wear headphones while driving.
6
 Loading...