

Titan Tool 2000XD User Manual

Owner’s Manual

2
TABLE!OF! CONTENTS
Assembly . . . . . . . . . . . . . . . . . . . . . . . . . . . . . . . . .3-4
Batteries . . . . . . . . . . . . . . . . . . . . . . . . . . . . . . . . . . .5
Quick-Start Demo . . . . . . . . . . . . . . . . . . . . . . . . . .6-7
Basic Operation . . . . . . . . . . . . . . . . . . . . . . . . . . .8-11
All Metal . . . . . . . . . . . . . . . . . . . . . . . . . . . . . . .9
Discrimination . . . . . . . . . . . . . . . . . . . . . . . . . .10
Notch . . . . . . . . . . . . . . . . . . . . . . . . . . . . . . . .10
ITD . . . . . . . . . . . . . . . . . . . . . . . . . . . . . . . . . .11
Audio Target Identification . . . . . . . . . . . . . . . . . . . .12
Target and Depth Display . . . . . . . . . . . . . . . . . . . . .13
Sensitivity Adjustment . . . . . . . . . . . . . . . . . . . . . . .14
In The Field Techniques . . . . . . . . . . . . . . . . . . . .15-17
Trouble Shooting . . . . . . . . . . . . . . . . . . . . . . . . . . .18
Terminology . . . . . . . . . . . . . . . . . . . . . . . . . . . . . . .19
Treasure Hunter’s Code of Ethics . . . . . . . .Back Cover
Warranty . . . . . . . . . . . . . . . . . . . . . . . . . . .Back Cover

ASSEMBLY
Assembly is easy and requires no tools.
●
1 Position the lower stem (the straight tube)
with the silver button toward the back.
Using the bolt and knurled knob, attach the
search coil to the plastic extension
protruding from the lower stem.
●
2 P ress the button on the
upper end of the lower
stem, and slide the
lower stem into the
upper stem.
Adjust the stem to a
length that lets you
maintain a comfortable upright
posture, with your arm relaxed
at your side, and the search
coil parallel to the ground in
front of you.
●
3
Wind the cable secure l y
around the stem.
●
4
I n s e rt the plug into the
matching connector on the
right underside of the
detector body. Be sure that
the key-way and pins line
up correctly.
Caution:
Do not f o rce the
plug in. Excess force
will cause damage.
To disconnect the
cable, pull on the
plug. Do not pull
on the cable.
3

4
ASSEMBLY
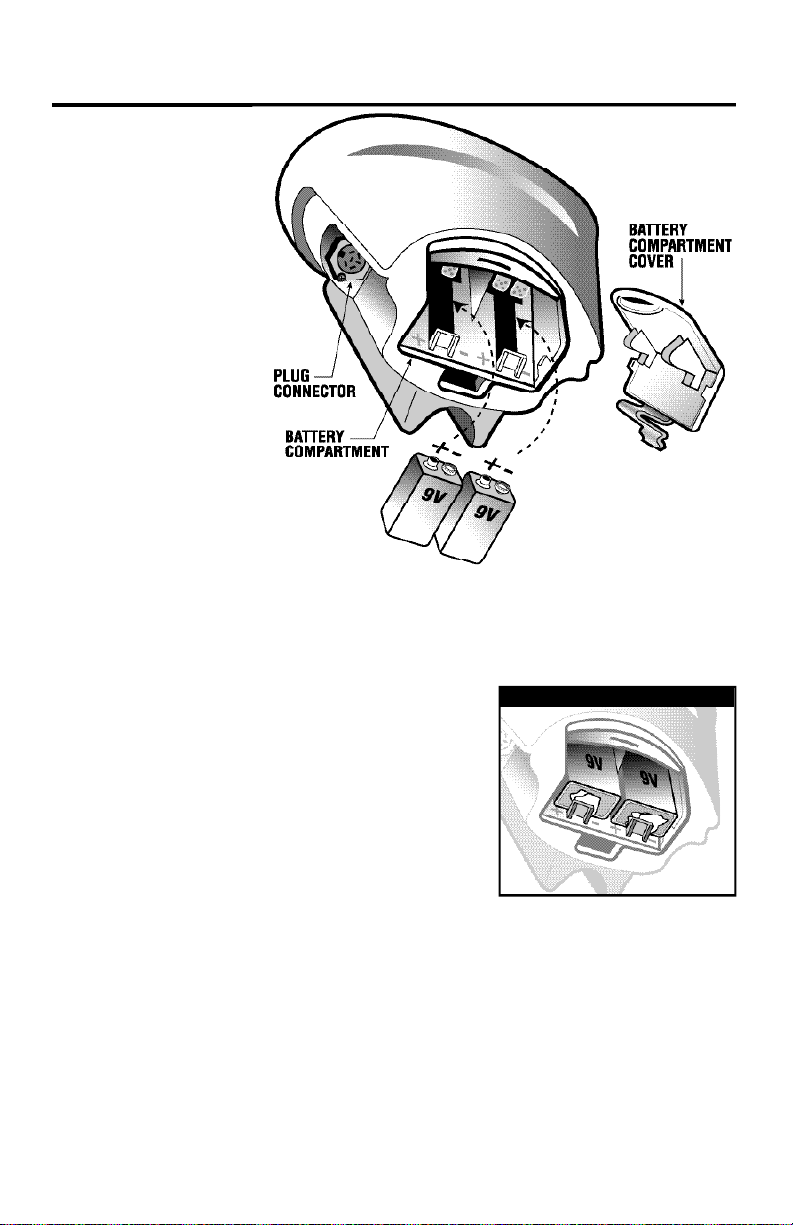
5
Use ALKALINE batteries
only.
To install the
batteries:
●
1 Remove the
b a t t e ry cover by
disengaging the
clip at the back.
●
2 Align the polarity
of the batteries
correctly, with the
positive "+" toward
the coil plug
connection, as
indicated by the +
and – indicators on
the housing.
●
3 I n s e rt (2) 9-Volt ALKALINE
b a t t e r i e s , with the contacts pointed inward, and press down on the back of
the batteries to snap them into place.
Some brands of batteries will re q u i re moderate force to clear the re t a i n i n g
t a b s .
If the batteries fit loosely, and you want to
guarantee a very secure electrical contact,
insert a piece of paper or thin cardboard
between the back of the battery and the
supporting post.
●
4
Replace the battery door.
The Low Battery Indicator will come on and stay on if the batteries need to be
replaced.
Most metal detector problems are due to improperly installed batteries, or the
use of non-alkaline or discharged batteries. If the detector does not turn on,
please check the batteries.
If the detector does not turn on, check to see that the batteries fit tightly. If the
batteries are loose, press them forward while pressing the ON touchpad. To
tighten up a loose battery, wedge a piece of paper or thin cardboard between
the back of the battery and the supporting post, as illustrated above.
BATTERIES
IN CASE OF LOOSE BATTERIES
6
QUICK-START!DEMONSTRATION
I. Supplies Needed
• A Nail • A Quarter
• A Pull-Tab from a beverage can • A Zinc Penny (dated after 1982)
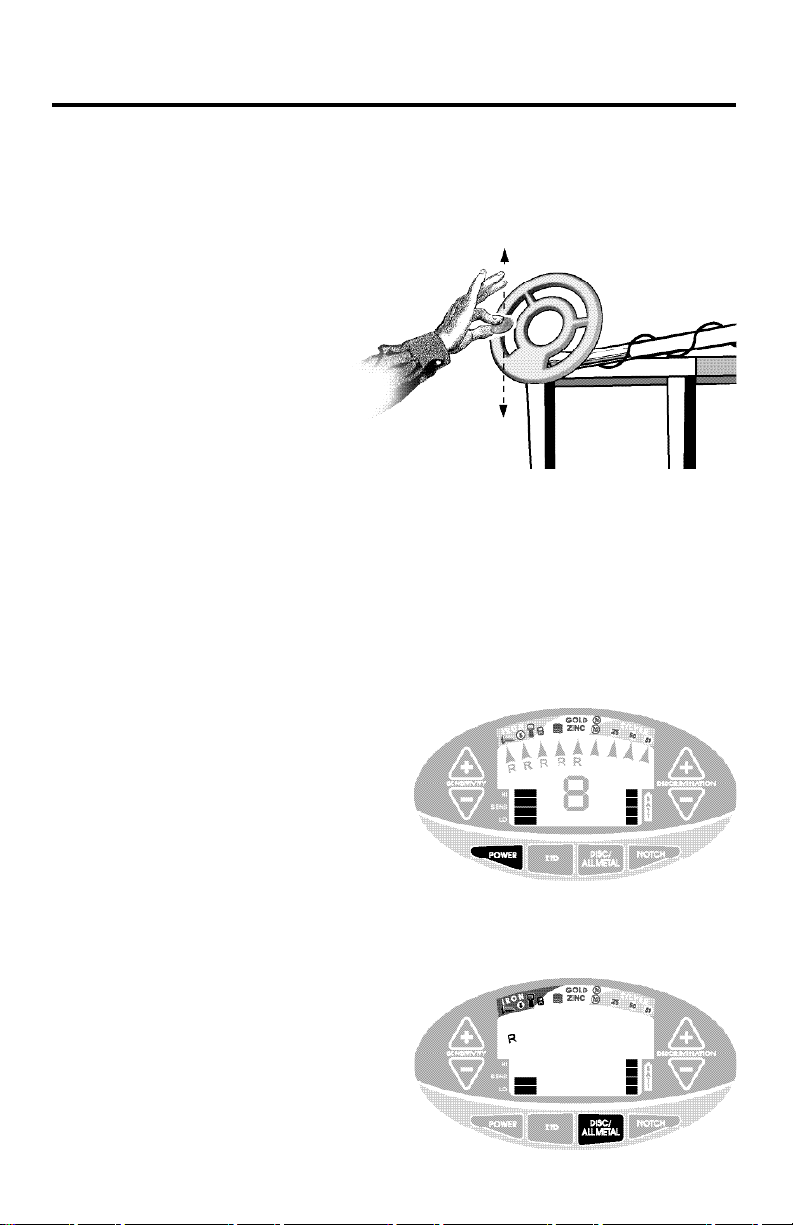
II. Position the Detector
a. Place the detector on a
table, with the search coil
hanging over the edge. (or
better, have a friend hold
the detector, with the coil
off the ground)
b. Keep the search coil away
f rom walls, floors, and
metal objects.
c. Remove watches, rings and other jewelry or metal objects from hands
and wrists.
d. Turn off appliances or lights that cause electromagnetic interference.
e. Pivot search coil back toward the detector body.
III. Power Up
Press the POWER touchpad.
IV. Wave each Object over the Search Coil
a. Notice a different tone for each
object.
Base Tone: Nail
Low Tone: Pull-tab
Medium Tone: Zinc Penny
High Tone: Quarter
b. Motion is required. Objects must
be in motion over the search coil to be detected.
V. Press the DISC/ALL METAL touchpad(*)
The detector will beep twice and
“R” will appear under the iro n
indicator.
Quick-Start Demo continued on next page
 Loading...