

Page 1
©2006 Timex Corporation. TIMEX is a registered trademark of Timex Corporation.
BODYLINK is a registered trademark of Timex Group B.V.
W-184 187-095002 EU
English page 1
Français page 23
Español página 43
Deutsch Seite 63
Italiano pagina 83
Português página 103
Nederlands pagina 123
Page 2

1
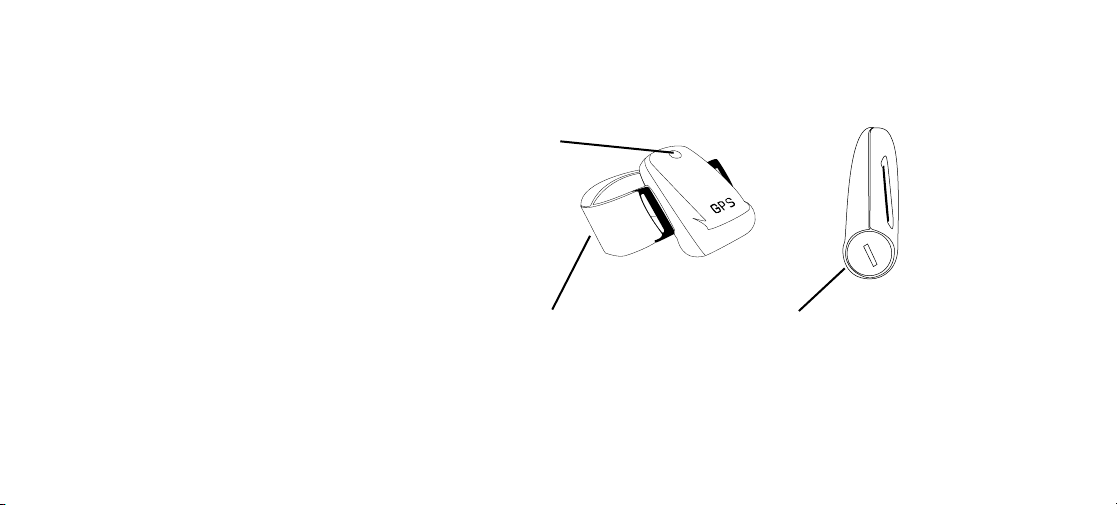
Heart Rate Sensor
Speed + Distance Sensor
Watches are for more than keeping time. Digital technology gives
your watch the ability to display your heart rate or measure your
speed and distance traveled. These functions require the use of
external sensors that transmit information wirelessly to your
watch. This booklet provides instructions for properly setting up,
operating and maintaining these devices. Look for the section that
is appropriate for the type of device you have.
For information on using your watch, consult
the watch instruction booklet.
Timex
®
Fitness Sensors
Table of Contents
Heart Rate Monitor . . . . . . . . . . . . . . . . . . . . . . . . . . . . . . . . . . . . .2
How the Digital Heart Rate Monitor Works . . . . . . . . . . . . . . . . .2
How to Use the Digital Heart Rate Monitor . . . . . . . . . . . . . . . .2
Warning . . . . . . . . . . . . . . . . . . . . . . . . . . . . . . . . . . . . . . . . . . . .3
Maintenance . . . . . . . . . . . . . . . . . . . . . . . . . . . . . . . . . . . . . . . .3
Transmitter Battery Life and Replacement . . . . . . . . . . . . . . . . .3
Battery Replacement . . . . . . . . . . . . . . . . . . . . . . . . . . . . . . . . . .4
Water Resistance . . . . . . . . . . . . . . . . . . . . . . . . . . . . . . . . . . . . .5
Speed + Distance Sensor . . . . . . . . . . . . . . . . . . . . . . . . . . . . . . . .5
How the Speed and Distance System Works . . . . . . . . . . . . . . .5
About GPS Lock Times . . . . . . . . . . . . . . . . . . . . . . . . . . . . . . . .5
Operating the S+D Sensor . . . . . . . . . . . . . . . . . . . . . . . . . . . . . .6
Wearing the Speed and Distance S+D Sensor . . . . . . . . . . . . . .7
Wearing the S+D Sensor on your upper arm . . . . . . . . . . . . . . .8
Wearing the S+D Sensor on your belt . . . . . . . . . . . . . . . . . . . . .9
Resolving S+D Sensor Errors and Error Messages . . . . . . . . . .10
S+D Sensor Battery Life and Replacement . . . . . . . . . . . . . . . .10
Replace battery . . . . . . . . . . . . . . . . . . . . . . . . . . . . . . . . . . . . .11
Maintenance . . . . . . . . . . . . . . . . . . . . . . . . . . . . . . . . . . . . . . .11
All Sensors . . . . . . . . . . . . . . . . . . . . . . . . . . . . . . . . . . . . . . . . . .12
Water-Resistance . . . . . . . . . . . . . . . . . . . . . . . . . . . . . . . . . . . .12
International Warranty . . . . . . . . . . . . . . . . . . . . . . . . . . . . . . . .13
Service . . . . . . . . . . . . . . . . . . . . . . . . . . . . . . . . . . . . . . . . . . . .16
Page 3

Heart Rate Monitor
Sensor Pads
How the Digital Heart Rate Monitor Works
The Heart Rate Monitor is a combination of a Heart Rate Sensor
and a sport watch. The Heart Rate Sensor attaches to your chest
and measures the electrical signals generated by the heart as it is
beating. Using this information, it then calculates your heart rate
and transmits it to your watch. You simply glance at the watch
during exercise/training to make sure you are in the appropriate
heart rate range to maintain or improve your fitness level.
How to Use the Digital Heart Rate Monitor
1. Wet the Heart Rate Sensor pads with tap water. If necessary,
use a heart rate monitor electrode gel for better contact. Good
contact between the skin and the sensor
pads is ESSENTIAL for proper operation
of the Heart Rate Monitor.
2. Put on the chest strap. Fasten the strap
snugly around your chest, just below
the breasts. Be sure the transmitter is
centered on the chest and is right side
up so the logo can be read by someone
facing you.
3. Start the Heart Rate Monitor: refer to the user manual for your
watch for detailed instructions on viewing heart rate data.
Warning
This is not a medical device and is not recommended for use
by persons with serious heart conditions. You should always
consult your physician before beginning or modifying an
exercise program.
Interference with the radio signal, poor contact between your skin
and the chest strap, and other factors may prevent accurate
transmission of heart rate data.
Maintenance
Rinse Heart Rate Sensor and strap in fresh water to avoid build up of
materials that can interfere with the measurement of your heart rate.
Transmitter Battery Life and Replacement
Battery life of the transmitter should exceed two years, based
upon using it an hour a day. Greater usage will shorten the battery
life. Replace transmitter battery when any of the following occur:
• The watch no longer receives heart rate information from the
chest transmitter when properly worn on the chest.
• Error messages (COMM ERR, SIGNAL LOST) appear with
increased frequency on the display.
2
3
Page 4

Battery Replacement
NOTE: You’ll need to have a device (such as a watch) capable
of displaying heart rate information to verify that the new
battery has been inserted correctly. Use a coin to open the
battery compartment cover (back of sensor).
• Insert new battery (CR2032 or equivalent) with “
• Push the reset button next to the battery. Use a toothpick or
straightened paper clip.
• Reinstall battery cover.
• Perform quick test of the unit:
1. Move away from sources of electrical or radio interference.
2. Liberally moisten the Heart Rate Sensor pads and put the
chest strap around your chest, securely against your skin.
3. Activate the heart rate monitor function on the watch.
4. Within a few seconds, the heart symbol on the watch display
should begin flashing, indicating that the sensor is active. This
confirms that the battery was installed correctly.
NOTE: A heart rate value does not need to appear on the
display during this test.
IF FLASHING HEART DOES NOT APPEAR ON WATCH:
• Press the reset switch in the battery compartment again and
replace the battery cover.
• Reinstall the battery, and repeat test procedure above.
4
+” facing you.
Water Resistance
The Heart Rate Sensor withstands water pressure to 60 p.s.i. See
chart at end of booklet for equivalents. WARNING: The Heart Rate
Sensor will not display heart rate when operated under water.
Speed + Distance Sensor
How the Speed and Distance System Works
The Speed + Distance (S+D) Sensor acquires signals from orbiting
GPS (Global Positioning System) satellites to determine your position
and changes in position anywhere on the globe. This information
is transmitted wirelessly to your watch so that it can compute
your speed, pace and distance traveled. For additional information
on determining your speed and distance, see the instructions for
your watch.
About GPS Lock Times
• On first use, the S+D Sensor can take 5 minutes or even longer
to establish a link with the satellites. After that, the unit typically
needs only one minute.
• If you move hundreds of miles from the location where you last
used the S+D Sensor or if you leave the S+D Sensor powered up
indoors for long periods of time before going outdoors, the search
may take longer than expected.
5
Page 5

S+D Sensor ON/OFF
Removable Arm Band Battery Hatch
• For shortest GPS lock times, try to minimize movement while
the indicator light is flashing red.
Operating the S+D Sensor
For best results, the Sensor needs a clear view of the sky.
• Press and hold the S+D SENSOR ON/OFF button to turn on the
receiver. You should be outdoors in an open area. If the button
light glows red immediately (continuously, not flashing), the battery is exhausted to the point where GPS operation is not possible and the battery must be replaced. The ON/OFF button on
the S+D Sensor will initially flash red while the S+D Sensor calculates its position relative to the GPS satellites. The text
“SEARCHING” may appear on the watch display if using a compatible Timex® watch.
• The ON/OFF button will flash green when the S+D Sensor has
successfully acquired signals from the satellites. Speed and
distance information is now being transmitted to the watch (or
other device).
• To turn off the S+D Sensor, press and hold the S+D SENSOR
ON/OFF button for one second. The button will glow red while
you are holding the button and then go out, indicating that the
S+D Sensor has shut down.
6
• The S+D Sensor will shut itself off automatically if any of the
following events occur:
— The battery becomes exhausted.
— No motion is detected for 15 consecutive minutes.
— No GPS signals are detected for 15 consecutive minutes.
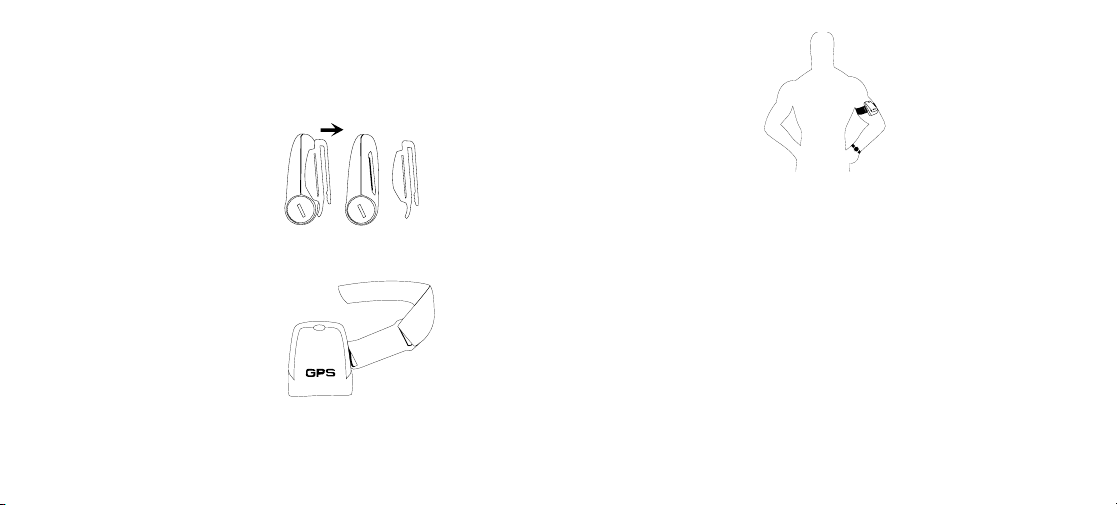
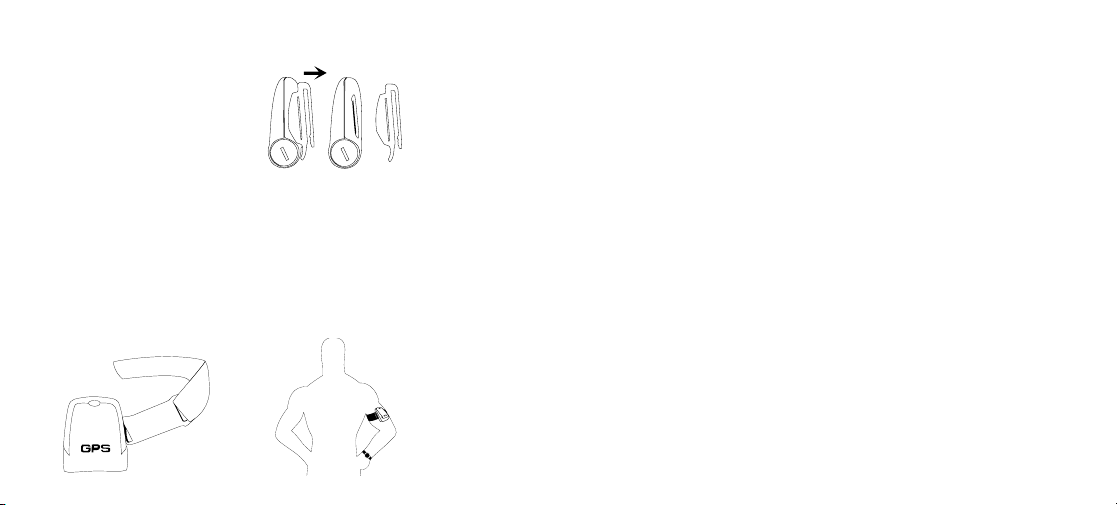
Wearing the Speed and Distance S+D Sensor
For best results, strap the S+D Sensor to your upper arm. You may
also clip it to your waist. Wear your watch so it is always within
1 meter (about 3 feet) of the S+D Sensor. Be sure the sensor is
right side up so the GPS logo can be read by someone facing you.
7
Page 6
Any clothing worn over the S+D Sensor must be dry and free of
8
Fig. 1
Fig. 2
Fig. 3
metal.
Wearing the S+D Sensor on your upper arm
• Make sure that the belt clip is
removed. To remove the belt clip,
grasp clip and gently pop off. (Fig.
1) To replace clip line up tab on
clip with slot on sensor and gently
pop clip on to unit.
• If the armband is not attached,
slide plastic attachment with
elastic strap into the slot of the
S+D Sensor as shown. (Fig. 2)
• Slide the elastic strap through
the open end of the attachment,
and fix it in place with the hook
and loop closure.
• Slip the sensor and strap over your
hand and onto your upper arm.
Watch must be worn on same
arm. (Fig. 3)
• Pull armband through the
adjustable end so that it fits snugly
around your arm.
Wearing the S+D Sensor on your belt
• If attached, remove armband by sliding out plastic attachment.
• Insert belt clip by lining up tab on belt clip with slot on Sensor
and pop into place.
• Wear sensor on same side of body as watch.
9
Page 7

Resolving S+D Sensor Errors and Error Messages
PROBLEM
• The S+D Sensor cannot lock onto GPS satellites (ON/OFF button
never changes to flashing green).
• The GPS S+D Sensor loses signals from the satellites during use.
The watch may display a message that the GPS signal is weak.
SOLUTION
• Move to a more open outdoor area.
• Move away from metal objects.
• Replace the battery in the S+D Sensor.
NOTE: The system can maintain accuracy for short periods when
GPS signals are lost.
PROBLEM
• Watch displays FATAL GPS ERROR message.
SOLUTION
• The S+D Sensor is damaged; contact Timex Customer Service.
S+D Sensor Battery Life and Replacement
The battery in the S+D Sensor will last approximately 12 hours.
The S+D Sensor itself does not indicate the condition of its
battery, except if the battery is completely exhausted (as noted in
the section “Operating the S+D Sensor”). Instead, this information
10
is broadcast to your watch along with your performance data.
Refer to the user manual for your watch for the procedure to
check the S+D Sensor’s battery level.
Replace battery
• Flip out the half-circle handle on the battery hatch (located on
the side of the S&D Sensor case) and turn it counter-clockwise
to unscrew.
• Remove the battery hatch.
• Remove old battery and insert one (1) new AA battery. Observe
the +/- markings inside the battery compartment to ensure the
new battery is properly aligned.
• Replace the battery hatch and tighten the cap by turning clockwise. Do not over-tighten.
Maintenance
Rinse the S+D Sensor and its strap in fresh water periodically to
avoid buildup of materials that can interfere with the measurement
of your speed and distance.
11
Page 8

All Sensors
Water-Resistance
The level of water-resistance (if any) is marked on the case. See
the chart below for equivalents.
The S+D Sensor is splash-resistant. If it becomes submerged,
remove the back of the case and the battery to let compartment
dry.
Water-Resistance p.s.i.a.* Water Pressure
Depth Below Surface
30m/98ft 60
50m/164ft 86
100m/328ft 160
200m/656ft 284
*pounds per square inch absolute
WARNING: TO MAINTAIN WATER-RESISTANCE, DO NOT PRESS
ANY BUTTONS UNDER WATER.
WARNING: SENSORS WILL NOT DISPLAY DATA WHEN
OPERATED UNDER WATER.
International Warranty
(U.S. LIMITED WARRANTY)
Your product is warranted against manufacturing defects by Timex
Corporation for a period of ONE YEAR from the original purchase
date. Timex and its worldwide affiliates will honor this
International Warranty.
Please note that Timex may, at its option, repair your product by
installing new or thoroughly reconditioned and inspected components or replace it with an identical or similar model. IMPORTANT:
PLEASE NOTE THAT THIS WARRANTY DOES NOT COVER DEFECTS
OR DAMAGES TO YOUR PRODUCT:
1) after the warranty period expires;
2) if the product was not originally purchased from an authorized
retailer;
3) from repair services not performed by the manufacturer;
4) from accidents, tampering or abuse; and
5) Case, attachments or battery. You may be charged for replacing
any of these parts.
12
13
Page 9

THIS WARRANTY AND THE REMEDIES CONTAINED HEREIN ARE
EXCLUSIVE AND IN LIEU OF ALL OTHER WARRANTIES, EXPRESS OR
IMPLIED, INCLUDING ANY IMPLIED WARRANTY OF MERCHANTABILITY OR FITNESS FOR PARTICULAR PURPOSE. TIMEX IS NOT LIABLE
FOR ANY SPECIAL, INCIDENTAL OR CONSEQUENTIAL DAMAGES.
Some countries and states do not allow limitations on implied
warranties and do not allow exclusions or limitations on damages,
so these limitations may not apply to you. This warranty gives you
specific legal rights and you may also have other rights which vary
from country to country and state to state.
To obtain warranty service, please return your watch and sensor
to the manufacturer, one of its affiliates or the retailer where the
product was purchased, together with a completed original
Product Repair Coupon or, in the U.S. and Canada only, the completed original Product Repair Coupon or a written statement
identifying your name, address, telephone number and date and
place of purchase. Please include the following with your watch
and sensor to cover postage and handling (this is not a repair
charge): a US$ 7.50 check or money order in the U.S.; a CAN$6.00
cheque or money order in Canada; and a UK£ 2.50 cheque or
money order in the U.K. In other countries, you will be charged for
postage and handling. NEVER INCLUDE ANY ARTICLE OF PERSONAL
VALUE IN YOUR SHIPMENT.
14
For the U.S., please call 1-800-328-2677 for additional warranty
information. For Canada, call 1-800-263-0981. For Brazil, call
+55 (11) 5572 9733. For Mexico, call 01-800-01-060-00. For Central
America, the Caribbean, Bermuda and the Bahamas, call (501)
370-5775 (U.S.). For Asia, call 852-2815-0091. For the U.K., call 44
208 687 9620. For Portugal, call 351 212 946 017. For France, call
33 3 81 63 42 00. For Germany, call +43 662 88 92130. For the
Middle East and Africa, call 971-4-310850. For other areas, please
contact your local Timex retailer or Timex distributor for warranty
information.
TIMEX INTERNATIONAL WARRANTY — WATCH REPAIR COUPON
Original Purchase Date:
(Attach copy of sales receipt, if available)
Purchased by:
(Name, address and telephone number)
Place of Purchase:
(Name and address)
Reason for Return:
THIS IS YOUR WATCH REPAIR COUPON. PLEASE KEEP IT IN A SECURE PLACE.
15
Page 10

Service
If your Sensor should ever need servicing, send it to Timex as set
forth in the Timex International Warranty or addressed to:
HotLine Watch Service
P.O. Box 2740
Little Rock, AR 72203.
Street address:
HotLine Watch Service
1302 Pike Ave.
North Little Rock, AR 72114
For your convenience in obtaining factory service, participating
Timex retailers can provide you with a pre-addressed Watch
Repair Mailer. See the Timex International Warranty for specific
instructions on the care and service of your watch module.
For service questions, call 1-800-328-2677.
Should you need a replacement strap or band,
call 1-800-328-2677.
16
.) / IC Notice (Canada)
FCC Notice (U
.S
Timex Corporation declares that the following products, which
include all components of the Timex® Bodylink® System, are
compliant to the relevant FCC Part 15 and Industry Canada rules
for Class B devices as follows:
Product Name:
Speed + Distance System - GPS Transceiver Series M8xx/M1xx
Heart Rate Monitor System – HRM Transmitter Series
M8xx/M5xx/M6xx
Product Type: Intentional Radiator
Model FCC ID No. IC Certification No.
M640 Heart Rate Monitor EP9TMXM640 3348A-TMXM640
M515 Heart Rate Monitor EP9TMXM515 3348A-M515
M185 Speed + Distance Monitor EP9TMXM185 3348A-TMXM185
M850 Speed + Distance Monitor EP9TMXM850 3348A-12181
These devices comply with Part 15 of the FCC rules. Operation
is subject to the following two conditions: (1) The device may
not cause harmful interference, and (2) the device must accept
any interference received, including interference that may cause
undesired operation.
17
Page 11

18
Product Name:
Watch Receivers – HRM/Speed+Distance Series
M8xx/M5xx/M6xx/M1xx
Data Recorders – HRM/Speed+Distance Series M5xx/M1xx
Product Type: Unintentional Radiator
This equipment has been tested and found to comply with the
limits for a Class B digital device, pursuant to Part 15 of the FCC
rules. These limits are designed to provide reasonable protection
against harmful interference in a residential environment. This
equipment generates, uses, and can radiate radio frequency
energy and, if not used in accordance with the instruction manual, may cause harmful interference to radio communications. If this
equipment does cause harmful interference to radio or television
reception, which can be determined by turning the equipment off
and on, the user is encouraged to try to correct the interference
by reorienting or relocating the receiving antenna; or by increasing the separation between the equipment and receiver.
Caution: Any changes or modifications to the equipment listed
above, not expressly approved by Timex Corporation, could void
the user’s authority to operate this equipment.
Industry Canada Notice: This Class B digital apparatus complies
with Canadian ICES-003. Cet appariel numérique de la classe B
est conforme à la norme NMB-003 du Canada.
Manufacturers Name: Timex Corporation
DECLARATION OF CONFORMITY
Manufacturers Address: 555 Christian Road
declares that the following products, which include all components of the Timex Bodylink System, are
compliant to the relevant EU Directives as follows:
Product Name:
Speed + Distance System — GPS Transceiver Series M8xx/M1xx
Heart Rate Monitor System
conforms to the following product specifications:
LVD: 72/23/EEC
Safety: IEC 60950
EMC: 89/336/EEC and amendments 92/31/EEC, 93/68/EEC, and 98/13/EEC
Emissions: EN300-330-1, -2
Immunity: EN300-683
Supplemental Information: The above products comply with the requirements of the Low-Voltage
Directive 72/23/EEC and the EMC Directive 89/336/EEC (including amendments 92/31/EEC, 93/68/EEC,
and 98/13/EEC) and carry the (!) marking accordingly.
Timex Corporation declares that these low power radio equipment devices are in compliance with the
essential requirements and other relevant provisions of R&TTE Directive 1999/5/EC.
Middlebury, CT 06762
United States of America
— HRM Transmitter Series M8xx/M6xx/M5xx
Radiated Emission 9kHz to 30MHz H-Field (magnetic
Radiated Emission 30MHz to 1000MHz E-Field (electric),
Ref. EN55022
Radiated Immunity 80MHz to 1000MHz, Ref. EN61000-4-3
ESD Electrostatic discharge, Ref. EN61000-4-2
19
Page 12

Product Name:
Watch Receivers – HRM/Speed+Distance Series M8xx/M5xx/M6xx/M1xx
Data Recorders – HRM/Speed+Distance Series M5xx/M1xx
conforms to the following product specifications:
Generic Emissions Standard EN 55022: 1998
Generic Immunity Standard EN 55024: 1998
Supplemental Information: The above products comply with the requirements of Electromagnetic
Compatibility (EMC) Directive 89/336/EEC (including amendments 92/31/EEC, 93/68/EEC, and
98/13/EEC) and carry the marking accordingly.
Timex Corporation declares that these low power electronic devices are in compliance with the essential requirements and other relevant provisions of the EMC Directive.
Agent: ___________________________
Brian J. Hudson
Director,Test Engineering and Module Development
Date: 17 October 2006, Middlebury, Connecticut, U.S.A.
2120
Page 13

TABLE DES MATIÈRES
Moniteur de fréquence cardiaque . . . . . . . . . . . . . . . . . . . . . . . .24
Comment fonctionne le moniteur de fréquence cardiaque . .24
Comment utiliser le moniteur de fréquence cardiaque . . . . . .24
Avertissement . . . . . . . . . . . . . . . . . . . . . . . . . . . . . . . . . . . . . .25
Entretien . . . . . . . . . . . . . . . . . . . . . . . . . . . . . . . . . . . . . . . . . .25
Durée de service et changement de la pile de l’émetteur . . .25
Changement de la pile . . . . . . . . . . . . . . . . . . . . . . . . . . . . . . .25
Étanchéité . . . . . . . . . . . . . . . . . . . . . . . . . . . . . . . . . . . . . . . . .26
Capteur de vitesse + distance . . . . . . . . . . . . . . . . . . . . . . . . . .27
Comment fonctionne le système de vitesse et distance . . . . .27
À propos des durées d’accrochage GPS . . . . . . . . . . . . . . . . .27
Fonctionnement du capteur V+D . . . . . . . . . . . . . . . . . . . . . . .28
Porter le capteur de vitesse + distance . . . . . . . . . . . . . . . . . .29
Port du capteur V+D sur le haut du bras . . . . . . . . . . . . . . . . .30
Port du capteur V+D à la ceinture . . . . . . . . . . . . . . . . . . . . . .31
Résolutions des erreurs de capteur V+D et messages d’erreur . .32
Durée de service et changement de la pile du capteur V+D . .32
Changer la pile . . . . . . . . . . . . . . . . . . . . . . . . . . . . . . . . . . . . . .33
Entretien . . . . . . . . . . . . . . . . . . . . . . . . . . . . . . . . . . . . . . . . . .33
Tous capteurs . . . . . . . . . . . . . . . . . . . . . . . . . . . . . . . . . . . . . . . .34
Étanchéité . . . . . . . . . . . . . . . . . . . . . . . . . . . . . . . . . . . . . . . . .34
Garantie Internationale . . . . . . . . . . . . . . . . . . . . . . . . . . . . . . .35
Réparation . . . . . . . . . . . . . . . . . . . . . . . . . . . . . . . . . . . . . . . . .38
23
Cardiofréquencemètre
Capteur de vitesse + distance
Les montres font plus que mesurer le temps. La technologie numérique
confère à votre montre la capacité d’afficher votre fréquence cardiaque ou
de mesurer votre vitesse et la distance parcourue. Ces fonctions supposent
l’emploi de modules externes qui transmettent les données à votre montre
sans fil. Ce livret contient les instructions de configuration, d’utilisation et
d’entretien de ces appareils. Reportez-vous à la section correspondant à
votre type d’appareil.
Pour tout renseignement sur l’utilisation de la
montre, consultez le mode d’emploi de la montre.
Timex
®
Capteurs de forme
Page 14

Moniteur de fréquence cardiaque
Coussinets
du capteur
f f
Comment fonctionne le moniteur de fréquence cardiaque
Le moniteur de fréquence cardiaque combine un cardiofréquencemètre et une
montre de sport. Le cardiofréquencemètre s’attache à votre thorax et mesure
les signaux électriques produits par le cœur lorsqu’il bat. À partir de cette information, il calcule votre fréquence cardiaque et la transmet à la montre. Durant
votre séance d’exercice/entraînement, un simple coup d’œil sur votre montre
vous permet de vérifier que vous êtes dans la plage de fréquence cardiaque
correcte pour maintenir ou améliorer votre forme physique.
Comment utiliser le moniteur de fréquence cardiaque
1. Humectez les coussinets du moniteur de fréquence cardiaque. Le cas
échéant, vous pouvez utilisez un gel pour l'électrode du moniteur de
fréquence cardiaque afin d'obtenir un meilleur contact. Un bon contact entre
la peau et les coussinets de l'émetteur est ESSENTIEL pour un bon fonctionnement du moniteur de fréquence cardiaque.
2. Posez la sangle de poitrine. Serrez bien la sangle
autour de la poitrine, juste sous les seins.
Vérifiez que l’émetteur est centré sur la poitrine
et qu’il est à l’endroit, à savoir que le logo peut
être lu par quelqu’un face à vous.
3. Démarrez le moniteur de fréquence cardiaque :
se reporter au mode d'emploi de votre montre
pour des instructions détaillées sur l'affichage
des données de fréquence cardiaque.
24
Avertissement
Ceci n’est pas un appareil médical et son emploi est déconseillé aux
personnes souffrant de troubles cardiaques graves. V
consulter votre médecin avant d’entamer ou de modifier un
programme d’exercice physique.
Le brouillage du signal radio, un mauvais contact entre la peau et la sangle
de poitrine et d’autres facteurs peuvent entraver la transmission des
données de fréquence cardiaque.
eillez à toujours
Entretien
Rincez le cardiofréquencemètre et la sangle dans de l’eau propre pour éviter
l’accumulation de matières susceptibles d’entraver la mesure de fréquence
cardiaque.
Durée de service et changement de la pile
de l’émetteur
La pile de l’émetteur devrait durer plus de deux ans, à raison d’une utilisation
d’une heure par jour. Un usage plus intense raccourcira la durée de service de
la pile. Changez la pile de l’émetteur dans l’un des quelconques cas suivants :
• La montre ne reçoit plus de données de fréquence cardiaque alors que
l’émetteur est porté correctement sur la poitrine.
• Des messages d’erreur (COMM ERR, SIGNAL LOST) s’affichent de plus en
plus fréquemment.
Changement de la pile
REMARQUE : Vous devez disposer d’un appareil (une montre, par ex.)
capable d’afficher les données de fréquence cardiaque pour vérifier
25
Page 15

que la batterie neuve est posée correctement. Ouvrez le couvercle du
logement de la pile (au dos de l’émetteur) avec une pièce de monnaie.
• Introduisez une pile neuve (CR2032 ou équivalent) avec le “
• Appuyez sur le bouton de réinitialisation à côté de la pile. Utilisez un curedent ou un trombone déplié.
• Remettez le couvercle en place.
• Effectuez un essai rapide de l’appareil :
1. Éloignez-vous des sources de brouillage électrique ou radio.
2. Humectez généreusement les coussinets du cardiofréquencemètre et
posez la sangle sur la poitrine, bien appuyée contre la peau.
3. Activez la fonction de contrôle de fréquence cardiaque sur la montre.
4. Au bout de quelques secondes, le symbole du cœur doit commencer à
clignoter sur l’écran pour indiquer que l’émetteur est activé. Ceci
confirme que la pile est correctement installée.
REMARQUE : Il n’est pas nécessaire qu’une valeur de fréquence
cardiaque s’affiche durant cet essai.
SI LE CŒUR CLIGNOTANT NE S’AFFICHE PAS SUR LA MONTRE :
• Appuyez de nouveau sur le bouton de réinitialisation dans le logement de
la pile et remettez le couvercle en place.
• Remettez la pile en place et répétez l’essai ci-dessus.
+ ” vers vous.
Étanchéité
Le cardiofréquencemètre résiste à une pression d’eau jusqu’à 60 p.s.i.
Reportez vous à la table d’équivalences à la fin du livret. MISE EN GARDE :
Le cardiofréquencemètre n’affiche pas de fréquence cardiaque lorsqu’il est
utilisé sous l’eau.
26
Capteur de vitesse + distance
Comment fonctionne le système de vitesse et distance
Le capteur de vitesse + distance (V+D) capte des signaux de satellites GPS
(Global Positioning System) en orbite pour déterminer votre position et vos
déplacements partout dans le monde. Ces données sont transmises sans fil à
votre montre, qui calcule votre vitesse, votre allure et la distance parcourue.
Pour plus de renseignements sur la détermination de la vitesse et de la
distance, consultez le mode d’emploi de votre montre.
À propos des durées d’accrochage GPS
• Lors de la première utilisation, le capteur V+D peut nécessiter jusqu’à 5
minutes voire plus pour établir une liaison avec les satellites. Par la suite,
l’appareil nécessite généralement une minute seulement.
• Si vous vous déplacez à des centaines de kilomètres de l’endroit de votre
dernière utilisation du capteur V+D ou si vous laissez le capteur en marche
à l’intérieur pendant des durées prolongées avant de sortir en plein air, la
recherche peut être plus longue que prévue.
• Pour raccourcir les durées d’accrochage GPS, essayez de minimiser vos
déplacements pendant que le témoin lumineux clignote en rouge.
27
Page 16
Fonctionnement du capteur V+D
MARCHE/ARRÊT du capteur V+D
Brassard amovible Couvercle du logement de la pile
Pour bien fonctionner, le capteur doit avoir une vue dégagée du ciel.
• Tenez le bouton
le récepteur. F
en rouge immédiatement (en continu, pas clignotant), c’est que la pile est
déchargée au point que la fonction GPS n’est pas possible et qu’elle doit
être changée. Le bouton marche/arrêt du capteur V+D clignote d’abord en
rouge pendant que le capteur V+D calcule sa position par rapport aux satellites GPS. Le texte “ SEARCHING ” peut s’afficher sur la montre s’il s’agit
d’une montre Timex® compatible.
• Le bouton MARCHE/ARRÊT clignote en vert lorsque le capteur V+D a réussi
à capter les signaux des satellites. Les données de vitesse et de distance
sont alors transmises à la montre (ou autre appareil).
• Pour éteindre le capteur de vitesse + distance, tenez le bouton
MARCHE/ARRÊT DU CAPTEUR V+D enfoncé pendant une seconde. Le
bouton brille en rouge pendant que le bouton est enfoncé puis s’éteint,
indiquant que le capteur V+D a été éteint.
• Le capteur V+D s’éteint automatiquement si l’un des quelconques
événements suivants se produit :
MARCHE/ARRÊT DU CAPTEUR V+D
aites-le dehors dans un endroit dégagé. Si le bouton s’allume
enfoncé pour allumer
— La pile est déchargée.
— Aucun déplacement n’est détecté pendant 15 minutes consécutives.
— Aucun signal GPS n’est détecté pendant 15 minutes consécutives.
Porter le capteur de vitesse + distance
Pour obtenir les meilleurs résultats, attachez le capteur V+D sur le haut du
bras. Vous pouvez aussi le fixer à la ceinture avec la pince. Portez votre
montre afin qu’elle soit toujours à moins de 1 mètre du capteur V+D.
Assurez-vous que le capteur est orienté vers le haut de telle façon que la
personne en face de vous puisse lire le logo GPS. Tout vêtement porté sur le
capteur V+D doit être sec et ne doit pas comporter de métal.
28
29
Page 17
Port du capteur V+D sur le haut du bras
Fig. 1
Fig. 2 Fig. 3
• Veuillez vous assurer d’enlever la
pince pour ceinture. Pour enlever la
pince, saisissez-la et libérez-la délicatement. (Fig. 1) . Pour remettre la
pince, alignez l’onglet de la pince sur
la rainure du capteur et rattachez délicatement la pince sur l’appareil.
• Si le brassard n’est pas attaché,
faites glisser l’attache plastique avec le bracelet élastique dans la fente du
capteur V+D, comme sur l’illustration (Fig. 2)
• Faites glisser le bracelet élastique dans la fente de l’attache et maintenezle en position avec la fermeture velcro.
• Glissez votre main dans le bracelet pour placer le capteur et le bracelet sur
votre bras. La montre doit être portée sur le même bras. (Fig. 3)
• Tirez le brassard par la partie réglable de façon à ce qu’il soit bien ajusté
sur votre bras.
Port du capteur V+D à la ceinture
• S’il est attaché, enlevez le brassard en enlevant l’attache plastique.
• Introduisez la pince pour ceinture en alignant l’onglet de la pince sur la
fente du capteur et fixez.
• Portez le capteur du même côté du corps que la montre.
30
31
Page 18

Résolutions des erreurs de capteur V+D et
messages d’erreur
PROBLÈME
• Le capteur V+D ne parvient pas à accrocher de satellites GPS (le bouton
MARCHE/ARRÊT ne devient jamais vert clignotant).
• Le capteur V+D GPS perd les signaux des satellites durant la marche. La
montre peut afficher un message indiquant que le signal GPS est faible.
SOLUTION
• Placez-vous dans un lieu extérieur plus dégagé.
• Éloignez-vous des objets métalliques.
• Changez la pile du capteur V+D.
REMARQUE : Le système peut rester précis pendant de courtes périodes de
perte des signaux GPS.
PROBLÈME
• La montre affiche FATAL GPS ERROR (erreur GPS fatale).
SOLUTION
• Le capteur V+D est endommagé ; contactez le Service clientèle de Timex.
Durée de service et changement de la pile du capteur
V+D
La pile du capteur V+D a une autonomie de 12 heures environ. Le
capteur V+D par lui-même n’indique pas l’état de sa pile, sauf si elle est
totalement déchargée (comme indiqué dans la section « Fonctionnement du
32
capteur V+D »). Par contre, cette information est transmise à la montre en
même temps que vos données de performances. Reportez-vous aux
instructions de contrôle de la charge de la pile du capteur V+D dans le mode
d’emploi de la montre.
Changer la pile
• Soulever l’anneau semi-circulaire sur le couvercle du logement de la pile
(situé sur le côté du capteur V+D) et tourner dans le sens contraire des
aiguilles d’une montre pour dévisser.
• Enlevez le couvercle du logement de la pile.
• Sortez la pile usagée et introduisez une (1) pile AA neuve. Respectez le
marquage +/- à l’intérieur du logement de piles pour vous assurer du bon
alignement de la pile neuve.
• Remettez le couvercle du logement de la pile en place et serrez-le en tournant dans le sens des aiguilles d’une montre. Ne forcez pas le serrage.
Entretien
Rincez périodiquement le capteur V+D et sa sangle dans de l’eau propre pour
éviter l’accumulation de matières susceptibles d’entraver la mesure de
vitesse et de distance.
33
Page 19

Tous capteurs
Étanchéité
Le degré d’étanchéité à l’eau (le cas échéant) est indiqué sur le boîtier.
Consultez la table d’équivalences ci-dessous.
Le capteur V+D résiste aux éclaboussures. S’il a été immergé, enlevez le dos
du boîtier et les piles pour laisser sécher le logement de piles.
Profondeur d’étanchéité Pression de l’eau sous la sur
30m/98ft 60
50m/164ft 86
100m/328ft 160
200m/656ft 284
*livres par pouce carré (abs.)
MISE EN GARDE : POUR PRÉSERVER L’ÉTANCHÉITÉ, NE PAS ENFONCER
LES BOUTONS SOUS L’EAU.
MISE EN GARDE : LES CAPTEURS N’AFFICHENT PAS DE DONNÉES
LORSQU’ILS SONT UTILISÉS SOUS L’EAU.
face en p.s.i.a.*
GARANTIE INTERNATIONALE
(GARANTIE LIMITÉE ÉTATS-UNIS)
Votre produit est garanti contre les défauts de fabrication par Timex
Corporation pendant une durée de UN AN à compter de la date d’achat.
Cette garantie internationale est honorée par Timex et ses filiales à travers le
monde. Timex se réserve le droit de réparer votre produit en y installant des
pièces neuves ou remises à neuf et contrôlées avec soin ou de le remplacer
par un modèle identique ou comparable. IMPORTANT : VEUILLEZ NOTER QUE
CETTE GARANTIE NE COUVRE PAS LES DÉFAUTS OU DOMMAGES DE VOTRE
PRODUIT :
1) après l’expiration de la période de garantie ;
2) si le produit n’a pas été acheté initialement chez un revendeur agréé ;
3) résultant de travaux de réparation non effectués par le fabricant ;
4) résultant d’accidents, d’altérations ou d’emplois abusifs ;
5) s’il s’agit du boîtier, des accessoires ou de la pile. Le remplacement de ces
pièces peut être payant.
34
35
Page 20

CETTE GARANTIE ET LES RECOURS AUX PRÉSENTES SONT EXCLUSIFS ET
REMPLACENT TOUTE AUTRE GARANTIE, EXPRESSE OU IMPLICITE, Y COMPRIS
TOUTE GARANTIE IMPLICITE DE QUALITÉ MARCHANDE OU D’ADAPTATION À
UN USAGE PARTICULIER. TIMEX DÉCLINE TOUTE RESPONSABILITÉ POUR LES
DOMMAGES SPÉCIAUX, INDIRECTS OU CONSÉCUTIFS.
Certains pays et états interdisent les limites sur les garanties implicites et les
exclusions ou limites sur les dommages, c’est pourquoi ces limitent peuvent
ne pas s’appliquer à votre cas. Cette garantie vous confère des droits
juridiques particuliers et il est possible que vous ayez d’autres droits
susceptibles de varier d’un pays ou d’un état à l’autre.
Pour recourir à la garantie, veuillez renvoyer votre montre et l'émetteur au
fabricant, à l’une de ses filiales ou au détaillant chez lequel le produit a été
acheté, accompagnée de l’original du Coupon de réparation de produit
dûment rempli ou, aux États-Unis et au Canada seulement, de l’original du
Coupon de réparation de produit dûment rempli ou d’une déclaration écrite
indiquant votre nom, adresse et numéro de téléphone ainsi que la date et le
lieu d’achat. Veuillez inclure la somme suivante avec votre moniteur de
fréquence cardiaque et l'émetteur pour couvrir les frais de poste et de
manutention (ce ne sont pas des frais de réparation) : un chèque ou mandat
de 7,50 $ É.U. aux États-Unis ; un chèque ou mandat de 6,00 $ CAN au
Canada ; un chèque ou mandat de 2,50 £ au Royaume-Uni. Dans les autres
pays, vous serez facturé pour l'affranchissement et la manutention. N'INCLUEZ JAMAIS D'ARTICLES DE VALEUR PERSONNELLE DANS VOTRE ENVOI.
36
Aux États-Unis, appelez le 1-800-328-2677 pour obtenir plus de renseignements sur la garantie. Au Canada, appelez le 1-800-263-0981. Au Brésil,
appelez le +55 (11) 5572 9733. Au Mexique, appelez le 01-800-01-060-00.
En Amérique Centrale, dans les Caraïbes, aux Bermudes et aux Bahamas,
appelez le (501) 370-5775 (États-Unis). En Asie, appelez le 852-2815-0091.
Au Royaume-Uni, appelez le 44 208 687 9620. Au Portugal, appelez le
351 212 946 017. En France, appelez le 33 3 81 63 42 00. En Allemagne,
appelez le +43 662 88 92130. Au Moyen-Orient et en Afrique, appelez le
971-4-310850. Dans les autres régions, veuillez contacter votre détaillant ou
distributeur Timex local.
GARANTIE INTERNATIONALE TIMEX —
COUPON DE RÉPARATION DE LA MONTRE
Date d’achat initiale :
(joindre si possible une copie du reçu)
Acheté par :
(Nom, adresse et numéro de téléphone)
Lieu d’achat :
(Nom et adresse)
Raison du renvoi :
CECI EST VOTRE COUPON DE RÉPARATION. CONSERVEZ-LE DANS UN ENDROIT SÛR.
37
Page 21

Réparation
Si votre capteur doit être réparé, envoyez-le à Timex conformément aux
dispositions de la Garantie internationale Timex ou adressez-le à :
HotLine Watch Service
P.O. Box 2740
Little Rock, AR 72203 USA.
Adresse physique :
HotLine Watch Service
1302 Pike Ave.
North Little Rock, AR 72114 USA
Pour l’envoi à l’usine pour réparation, les revendeurs Timex participants
peuvent vous fournir une enveloppe de renvoi pour réparation avec adresse.
Reportez-vous aux instructions particulières d’entretien et de réparation de
votre module pour montre dans la Garantie internationale Timex.
Pour toute question concernant les réparations, appelez le
1-800-328-2677.
Pour obtenir un bracelet ou brassard de rechange, appelez le
1-800-328-2677.
38
Avis FCC (États-Unis) / Avis IC (Canada)
Timex Corporation déclare que les produits suivants, qui comprennent tous
les composants du système Timex® Bodylink®, sont conformes au
règlement applicable de FCC Partie 15 et d’Industrie Canada pour les
appareils de Classe B comme suit :
Nom du produit :
Système de vitesse + distance — Émetteur-récepteur GPS Série M8xx/M1xx
Système de cardiofréquencemètre – Émetteur CFM Série M8xx/M5xx/M6xx
Type de produit : Source de rayonnement intentionnelle
Modèle N° matricule FCC N° d’homologation IC
Moniteur de fréquence cardiaque EP9TMXM640 3348A-TMXM640
M640
Moniteur de fréquence cardiaque EP9TMXM515 3348A-M515
M515
Contrôleur de vitesse + distance EP9TMXM185 3348A-TMXM185
M185
Contrôleur de vitesse + distance EP9TMXM850 3348A-12181
M850
Ces appareils sont conformes à la Partie 15 du règlement de la FCC.
L’utilisation est sujette aux deux conditions suivantes : (1) L’appareil ne doit
pas causer de brouillage nuisible et (2) l’appareil doit accepter tout brouillage
reçu, y compris tout brouillage susceptible de causer un fonctionnement
indésirable.
39
Page 22

Nom du produit :
Récepteurs de montre – CFM/Vitesse + distance Série
M8xx/M5xx/M6xx/M1xx
Enregistreurs de données – CFM/Vitesse + distance Série M5xx/M1xx
Type de produit : Source de rayonnement involontaire
Cet équipement a été contrôlé et déclaré conforme aux limites fixées pour
un appareil numérique de classe B, en vertu de la Partie 15 du règlement de
la FCC. Ces limites servent à assurer une protection raisonnable contre le
brouillage préjudiciable dans un environnement résidentiel. Cet équipement
produit, utilise et peut rayonner de l’énergie radiofréquence et, s’il n’est pas
utilisé conformément au mode d’emploi, peut causer un brouillage
préjudiciable aux communications radio. Si cet équipement cause un
brouillage préjudiciable à la réception radio ou télévisuelle, ce qui peut être
déterminé en éteignant l’équipement et en le rallumant, l’utilisateur est
invité à tenter d’éliminer le brouillage en réorientant ou en déplaçant
l’antenne de réception ou en augmentant la distance séparant l’équipement
du récepteur.
Attention : Tout changement ou modification de l’équipement indiqué cidessus non expressément autorisé par Timex Corporation peut invalider le
droit de l’utilisateur d’exploiter ce matériel.
Avis Industrie Canada : Cet appareil numérique de la classe B est
conforme à la norme NMB-003 du Canada.
4140
Page 23

Índice
Medidor de pulso . . . . . . . . . . . . . . . . . . . . . . . . . . . . . . . . . . . . .44
Funcionamiento del Medidor digital de pulso . . . . . . . . . . . . .44
Cómo usar el Medidor digital de pulso . . . . . . . . . . . . . . . . . . .44
Advertencia . . . . . . . . . . . . . . . . . . . . . . . . . . . . . . . . . . . . . . . .45
Mantenimiento . . . . . . . . . . . . . . . . . . . . . . . . . . . . . . . . . . . . .45
Vida útil de la pila del transmisor y reemplazo . . . . . . . . . . . .45
Reemplazo de la pila . . . . . . . . . . . . . . . . . . . . . . . . . . . . . . . . .45
Resistencia al agua . . . . . . . . . . . . . . . . . . . . . . . . . . . . . . . . . .46
Medidor de velocidad + distancia . . . . . . . . . . . . . . . . . . . . . . . .47
Cómo funciona el sistema de Velocidad y Distancia . . . . . . . .47
Tiempo que demora en localizar el GPS . . . . . . . . . . . . . . . . . .47
Funcionamiento del Medidor de S+D . . . . . . . . . . . . . . . . . . . .48
Uso del El Medidor de Velocidad y Distancia . . . . . . . . . . . . . .49
Uso del Medidor de S+D en la parte superior del brazo . . . . .50
Uso del Medidor de S+D en el cinturón . . . . . . . . . . . . . . . . . .51
Mensajes de error en el Medidor de S+D . . . . . . . . . . . . . . . . .52
Vida útil de la pila y su reemplazo . . . . . . . . . . . . . . . . . . . . . .52
Reemplazo de la pila . . . . . . . . . . . . . . . . . . . . . . . . . . . . . . . . .53
Mantenimiento . . . . . . . . . . . . . . . . . . . . . . . . . . . . . . . . . . . . .53
Todos los medidores . . . . . . . . . . . . . . . . . . . . . . . . . . . . . . . . . .54
Resistencia al agua . . . . . . . . . . . . . . . . . . . . . . . . . . . . . . . . . .54
Garantía Internacional . . . . . . . . . . . . . . . . . . . . . . . . . . . . . . . .55
Servicio . . . . . . . . . . . . . . . . . . . . . . . . . . . . . . . . . . . . . . . . . . .58
Timex
®
Medidores de estado físico
Medidor de pulso
Medidor de velocidad + distancia
Los relojes sirven para algo más que para medir el tiempo. La tecnología digital hace que su reloj pueda mostrarle su pulso o medir
su velocidad y la distancia que recorrió. Estas funciones requieren el
uso de módulos externos que transmiten información inalámbrica al
reloj. En este folleto encontrará instrucciones sobre cómo preparar,
operar y mantener estos módulos. Refiérase a la sección que
corresponda a su tipo de reloj.
En el folleto también encontrará información
sobre el uso del reloj.
43
Page 24

Medidor de pulso
Almohadillas
medidor
f f
Funcionamiento del Medidor digital de pulso
El Medidor de pulso es una combinación de Medidor de pulso y reloj
deportivo. El Medidor de pulso se coloca en el pecho y mide las
señales eléctricas generadas por el corazón cuando late. Con esta
información se calcula su pulso y se transmite al reloj. Una simple
mirada durante el ejercicio/entrenamiento le informará si está dentro
del rango de pulso deseado para mantener o mejorar su estado físico.
Cómo usar el Medidor digital de pulso
1. Moje las almohadillas del medidor de pulso con agua de la llave.
Use un gel para electrodos de monitor de pulso si se necesita. Es
IMPORTANTE que haya buen contacto entre la piel y las almohadillas para el correcto funcionamiento del medidor de pulso.
2. Póngase la tira en el pecho. Cíñasela al
pecho inmediatamente debajo de los pectorales. Verifique que el transmisor esté
centrado en el pecho y esté con el lado
correcto hacia arriba; el logotipo debe
poder ser leído por cualquiera que lo mire
de frente.
3. Inicie el medidor de pulso: refiérase al manual
del usuario del reloj, donde encontrará
instrucciones detalladas sobre cómo ver
los datos del pulso.
44
Advertencia
Este no es un aparato médico y no se recomienda que lo usen
personas con afecciones cardíacas graves. Consulte siempre a su
médico antes de comenzar o modificar un programa de ejercicios.
La transmisión de los datos del pulso puede verse entorpecida por
interferencias de señales de radio, contacto insuficiente entre su
cuerpo y la tira del pecho, u otros factores que podrían impedir la
transmisión adecuada de los datos de pulso.
Mantenimiento
Enjuague el Medidor de pulso y la tira con agua dulce, para evitar que
se acumulen materiales que pueden interferir con la medición del
pulso.
Vida útil de la pila del transmisor y reemplazo
La vida útil de la pila del transmisor debería superar los dos años, en
base a un uso de una hora diaria. Un uso mayor acortará la vida útil
de la pila. Reemplace la pila del transmisor cuando se produzca
cualquiera de los siguientes casos:
• El reloj ya no recibe información de pulso del transmisor del pecho
a pesar de que éste esté bien colocado en el pecho.
• Empiezan a verse mensajes de error (COMM ERR, SIGNAL LOST) con
mayor frecuencia.
Reemplazo de la pila
NOTA: usted tiene que tener un aparato (un reloj, por ejemplo)
capaz de mostar la información del pulso para verificar que
45
Page 25

instaló la nueva pila correctamente. Use una moneda para abrir
el compartimiento para las pilas (en la parte de atrás del transmisor).
• Coloque la nueva pila (CR2032 o equivalente) con el símbolo "+"
hacia usted.
• Oprima el botón de reponer que está próximo a la pila. Use un
mondadientes o un sujetador de papel desplegado.
• Vuelva a colocar la cubierta.
• Haga una prueba rápida de la unidad:
1. Aléjese de las fuentes de interferencia eléctrica o radial.
2. Humedezca las almohadillas del Medidor de pulso y póngase la
tira en el pecho; cíñasela contra la piel.
3. Active la función "Medidor de pulso" del reloj.
4. En unos pocos segundos empezará a destellar el símbolo de un
corazón en el reloj, indicando que el transmisor está activado.
Esto confirma que la pila se instaló correctamente.
NOTA: durante esta prueba no aparecerá necesariamente un
valor de pulso.
SI NO APARECIERA UN CORAZÓN DESTELLANDO:
• Vuelva a oprimir el interruptor "reponer" del compartimiento de la
pila y coloque la tapa.
• Con la pila colocada, repita el procedimiento anterior.
Resistencia al agua
El Medidor de pulso soporta una presión de hasta 60 p.s.i. Al final del
46
folleto encontrará una tabla de equivalentes.
Medidor de pulso no muestra el pulso cuando está sumergido.
ADVERTENCIA: El
Medidor de velocidad + distancia
Cómo funciona el sistema de Velocidad y
Distancia
El Medidor de Velocidad + Distancia (S+D) recibe señales de satélites
en órbita GPS (Sistema de Posicionamiento Global) gracias a los
cuales determina su posición y sus cambios de posición en cualquier
parte del mundo. Esta información se transmite inalámbricamente al
reloj para que pueda calcular su velocidad, paso y distancia recorrida. En las instrucciones del reloj encontrará más información sobre
cómo determinar su velocidad y la distancia recorrida.
Tiempo que demora en localizar el GPS
• La primera vez que se usa, el Medidor S+D puede tomar hasta
5 minutos (a veces más) en establecer el enlace con los satélites.
Después de eso, normalmente necesitará sólo un minuto.
• Si se traslada cientos de millas desde el lugar donde usó por última
vez el Medidor de S+D o si lo deja encendido durante largos períodos adentro de cualquier edificio antes de volver al aire libre, la
localización podrá demorar mucho más tiempo de lo esperado.
• Para acortar el tiempo de localización, trate de reducir al mínimo
sus movimientos mientras la luz del indicador esté destellando con
color rojo.
47
Page 26
Funcionamiento del Medidor de S+D
Botón S+D Sensor ON/OFF
Tira desmontable para el Brazo Cubierta de la Pila
El mejor resultado se obtiene cuando el Medidor está bajo un cielo
despejado.
• Mantenga oprimido el botón S+D SENSOR (ON/OFF) para encen-
der el receptor mientras se encuentra al aire libre. Si el botón se
pone rojo de inmediato (fijo, sin destellos), la pila está agotada
hasta el punto en que el funcionamiento del GPS no es posible y
hay que reemplazar la pila. Al principio el botón (ON/OFF) del
Medidor de S+D estará destellando con color rojo mientras el
Medidor calcula su posición con respecto a los satélites GPS. Si usa
un reloj Timex® compatible, verá la palabra "SEARCHING" en el
reloj.
• El botón (ON/OFF) comenzará a destellar con color verde cuando
el Medidor haya adquirido finalmente las señales de los satélites.
La información de velocidad y distancia comenzará entonces a
transmitirse al reloj (o a otro aparato).
• Para apagar el Medidor de S+D, mantenga oprimido el botón S+D
SENSOR ON/OFF por un segundo. El botón se pondrá rojo mientras mantiene oprimido el botón y luego se apagará, para indicar
que el Medidor está desactivado.
• El Medidor de S+D se apagará automáticamente cuando se produzca cualquiera de los siguientes hechos:
48
— La pila se agote.
— No se detecte ningún movimiento por 15 minutos en forma
consecutiva.
— No se detecten señales de GPS por 15 minutos en forma
consecutiva.
Uso del El Medidor de Velocidad y Distancia
Para un óptimo resultado, colóquese el Medidor de S+D en la parte
superior del brazo. También puede ponérselo en la cintura. Use el
reloj de modo que esté siempre a menos de 1 metro (unos 3 pies)
del Medidor. Observe que el medidor esté hacia arriba para que el
logo GPS pueda ser leído por cualquiera al frente de usted. Si usa
ropa que cubra el Medidor de S+D, ésta debe estar seca y no debe
tener ningún tejido metálico.
49
Page 27

Uso del Medidor de S+D
Fig. 1
Fig. 2 Fig. 3
en la parte superior del brazo
• Asegúrese de quitar el sujetador para
cinturón. Para ello, tome el sujetador y
sáquelo con cuidado (Fig. 1). Para volver
a colocarlo alinee la lengüeta del sujetador con la ranura del medidor y encájelo
con cuidado en la unidad.
• Si no tuviera puesta la tira para el
brazo, pase la hebilla plástica con la tira elástica por la ranura del
Medidor de S+D, tal como se muestra. (Fig.2)
• Pase la tira elástica por el ojal de la hebilla y asegúrela con el gancho y cierre de lazo.
• Pase su mano por la banda con el medidor y colóqueselo en la
parte superior del brazo. El reloj debe usarse en el mismo brazo.
(Fig.3)
50
• Hale la tira para el brazo por la punta ajustable de modo que se
ciña cómodamente alrededor de su brazo.
Uso del Medidor de S+D en el cinturón
• Quite la tira para el brazo sacando la hebilla plástica.
• Inserte el sujetador para cinturón, alineando la lengüeta con la
ranura en el medidor y encájela en el puesto.
• Use el medidor al mismo lado del cuerpo donde lleva el reloj.
51
Page 28

Mensajes de error en el Medidor de S+D
PROBLEMA
• El Medidor de S+D no puede localizar los satélites GPS (el botón
ON/OFF nunca se ve de color verde y destellando).
• El Medidor S+D pierde la señal de los satélites durante el uso. El
reloj podría mostrar un mensaje que indica que la señal de GPS es
débil.
SOLUCIÓN
• Vaya a un sitio más abierto al aire libre.
• Aléjese de objetos metálicos.
• Reemplace la pila del Medidor de S+D.
NOTA: el sistema mantendrá su precisión durante cortos períodos
cuando las señales de GPS se pierdan.
PROBLEMA
• Se ve el mensaje de error "FATAL GPS".
SOLUCIÓN
• El Medidor de S+D está dañado; comuníquese con el Servicio al
Cliente de Timex.
Vida útil de la pila y su reemplazo
La pila del Medidor de S+D dura aproximadamente 12 horas. El
Medidor de S+D mismo no indica el estado de la pila, excepto si está
completamente agotada (como se dijo en la sección
"Funcionamiento del Medidor de S+D"). En cambio, esta información
se envía al reloj junto con los datos del desempeño. Refiérase al
manual del usuario del reloj respecto al procedimiento para conocer
la carga de la pila del Medidor de S+D.
Reemplazo de la pila
• Levante la manija semicircular de la cubierta de la pila (al lado de la
caja del Medidor de S+D) y gírela en sentido contrahorario para
desenroscar.
• Quite la cubierta de la pila.
• Quite la pila agotada y coloque una (1) pila nueva "AA". Observe la
indicación +/- del compartimiento para colocar la pila nueva en
forma correcta.
• Vuelva a colocar la cubierta y ajústela sin apretarla demasiado, dando
vuelta en sentido horario.
Mantenimiento
Enjuague siempre el Medidor de S+D y la tira con agua para evitar
que se acumulen sustancias que pudieran interferir con la medición
de la velocidad y la distancia.
52
53
Page 29

Todos los medidores
Resistencia al agua
Si el aparato fuera resistente al agua, se indicará en el exterior. En la
tabla siguiente encontrará los equivalentes.
El Medidor de S+D soporta bien las salpicaduras con agua. Si se
mojara por inmersión, quítele la tapa y las pilas para que el compartimiento se seque por completo.
Profundidad de resistencia Presión del agua debajo de la
*libras por pulgada cuadrada absoluta
ADVERTENCIA: PARA NO PERDER LA RESISTENCIA AL AGUA, NO
OPRIMA NINGÚN BOTÓN MIENTRAS ESTÉ SUMERGIDO.
ADVERTENCIA: LOS MEDIDORES NO ENVIARÁN DATOS CUANDO
ESTÉN SUMERGIDOS.
al agua superficie en p.s.i.a.*
30m/98pies 60
50m/164pies 86
100m/328pies 160
200m/656pies 284
GARANTÍA INTERNACIONAL
(GARANTÍA LIMITADA PARA EE.UU.)
Timex Corporation garantiza su producto TIMEX® contra defectos de
fabricación por un período de UN AÑO a partir de la fecha de compra
original. Timex y sus afiliados de todo el mundo cumplirán con esta
Garantía Internacional.
Recuerde que Timex, a su entera discreción, podrá reparar su reloj
mediante la instalación de componentes nuevos o totalmente reacondicionados e inspeccionados, o bien reemplazarlo con un modelo
idéntico o similar. IMPORTANTE - ESTA GARANTÍA NO CUBRE DEFECTOS O DAÑOS A SU PRODUCTO:
1) después de que vence el plazo de la garantía;
2) si el producto inicialmente no se compró a un distribuidor
autorizado;
3) si las reparaciones efectuadas no las hizo el fabricante;
4) si son consecuencia de accidentes, manipulación no autorizada
o abuso
5) si son en la caja, los accesorios o la pila. Timex podría cobrarle
por el reemplazo de cualquiera de estas piezas.
54
55
Page 30

ESTA GARANTÍA Y LOS REMEDIOS QUE ELLA CONTIENE SON EXCLUSIVOS Y REEMPLAZAN A CUALQUIER OTRA GARANTÍA, EXPRESA O
IMPLÍCITA, INCLUSO LA GARANTÍA IMPLÍCITA DE COMERCIABILIDAD O
ADECUACIÓN PARA UN FIN PARTICULAR. TIMEX NO SE RESPONSABILIZA DE NINGÚN DAÑO ESPECIAL, INCIDENTAL O INDIRECTO.
Algunos países y estados no permiten limitaciones en las garantías
implícitas y no permiten exclusiones o limitaciones a los daños, por
lo cual dichas limitaciones podrían no aplicarse al caso suyo. Esta
garantía le concede derechos legales específicos; usted también
podría estar amparado por otros derechos, que varían según el país
y el estado donde viva.
Para solicitar servicio de reparación, envíe su reloj y el transmisor al
fabricante, a uno de sus afiliados o al distribuidor donde lo compró,
junto con el cupón original para reparación del producto lleno con
los datos o, sólo en EUA y Canadá, el cupón original para reparación
del producto lleno con los datos o una declaración por escrito con su
nombre, dirección, teléfono, fecha y lugar de compra. Para cubrir
gastos de manejo y envío (no es el costo de la reparación), incluya
por favor junto con el reloj y transmisor lo siguiente: en EUA, un
cheque o giro postal ("money order") por US$7,50; en Canadá, un
cheque o giro postal por CAN$6,00; en el Reino Unido, un cheque o
giro postal por UK£ 2,50. En otros países se le cobrará por gastos de
manipulación y envío. JAMÁS INCLUYA NINGÚN ARTÍCULO DE VALOR
PERSONAL EN SU ENVÍO.
56
Si desea más información sobre la garantía, en EE.UU. llame al
1-800-328-2677. En Canadá, al 1-800-263-0981. En Brasil, al
+55 (11) 5572 9733. En México, al 01-800-01-060-00. En América
Central, el Caribe, Bermudas y Bahamas, al (501) 370-5775 (EE.UU.).
En Asia, al 852-2815-0091. En el Reino Unido, al 44 208 687 9620.
En Portugal, al 351 212 946 017. En Francia, al 33 3 81 63 42 00. En
Alemania, al +43 662 88 92130. En Medio Oriente y África, al
971-4-310850. En otras áreas, consulte al vendedor local de Timex
o al distribuidor de Timex.
GARANTÍA INTERNACIONAL DE TIMEX — CUPÓN DE
Fecha de compra:
(Si la tiene, adjunte la factura de compra)
Comprado por:
(Nombre, dirección y teléfono)
Sitio de compra:
(Nombre y dirección)
Razón de devolución:
PARA REPARAR EL RELOJ NECESITARÁ ESTE CUPÓN. GUÁRDELO EN UN SITIO
SEGURO.
REPARACIÓN
57
Page 31

Servicio
Si el Medidor tuviera que ser reparado, envíelo a Timex según lo indicado en la Garantía Internacional de Timex o bien envíelo a:
HotLine Watch Service
P.O. Box 2740
Little Rock, AR 72203.
Dirección:
HotLine Watch Service
1302 Pike Ave.
North Little Rock, AR 72114
Para facilitarle los trámites del servicio de reparación, los distribuidores de Timex pueden enviarle un sobre con la dirección
impresa que usted necesita. En la Garantía Internacional de Timex
encontrará instrucciones específicas respecto a los cuidados y servicios que necesita el reloj.
Si tiene consultas sobre el servicio, llame al 1-800-328-2677.
Si necesita una malla o una tira de reemplazo, llame al
1-800-328-2677.
58
viso de FCC (EE.UU
A
.) / Aviso de IC (Canadá)
Timex Corporation declara que los siguientes productos, con todos
®
los componentes del sistema Bodylink
las reglas correspondientes de FCC Sección 15 y las reglas canadienses para la industria para dispositivos Clase B de acuerdo con
el siguiente detalle:
Nombre del producto:
Medidor de velocidad + distancia - GPS Transceiver Series
M8xx/M1xx
de Timex®, cumplen con
Medidor de Pulso – HRM Transmitter Series M8xx/M5xx/M6xx
Tipo de producto: Radiador intencional
Modelo No. ID FCC Certificación IC No.
Monitor de Pulso M640 EP9TMXM640 3348A-TMXM640
Monitor de Pulso M515 EP9TMXM515 3348A-M515
Monitor Velocidad+Distancia M185 EP9TMXM185 3348A-TMXM185
Monitor Velocidad+Distancia M850 EP9TMXM850 3348A-12181
Estos dispositivos cumplen con la Sección 15 de las Reglas de FCC.
Su funcionamiento está sujeto a las siguientes dos condiciones:
(1) no provocarán interferencias nocivas y (2) aceptarán todas las
interferencias que reciban, incluso interferencias que podrían provocar un funcionamiento no deseado.
59
Page 32

Nombre del producto:
Receptores para relojes – HRM/Speed+Distance Series
M8xx/M5xx/M6xx/M1xx
Grabador de datos – HRM/Speed+Distance Series M5xx/M1xx
Tipo de producto: Radiador no intencional
Luego de probar este equipo se ha determinado que cumple con los
límites establecidos para los dispositivos digitales Clase B, de acuerdo con la Sección 15 del reglamento de FCC. Estos límites se han
fijado para proporcionar un grado de protección razonable contra
interferencias nocivas en áreas residenciales. Este equipo genera,
usa y emite energía de radiofrecuencia y, si no se usa según lo indicado en el manual de instrucciones, podrá causar interferencias en
las comunicaciones de radio. Si este equipo causa interferencias en
la recepción de señales de radio o televisión (determinado al encender y apagar el equipo), se recomienda al usuario que para evitar la
interferencia oriente la antena receptora en otra dirección o la cambie de lugar. También puede aumentar la distancia entre el equipo y
el receptor.
Precaución: cualquier cambio o modificación que no esté expresamente aprobada por Timex Corporation podría anular la autoridad que tiene el usuario de operar este reloj
Aviso canadiense para la industria: este aparato digital Clase B
cumple con la norma canadiense ICES-003
numérique de la classe B est conforme à la norme NMB-003 du
Canada.
.
. Cet appariel
6160
Page 33

Inhaltsverzeichnis
Herzfrequenzmonitor . . . . . . . . . . . . . . . . . . . . . . . . . . . . . . . . . .64
Funktionsweise des digitalen Herzfrequenzmonitors . . . . . . .64
So benutzen Sie den digitalen Herzfrequenzmonitor . . . . . . . .64
Warnhinweis . . . . . . . . . . . . . . . . . . . . . . . . . . . . . . . . . . . . . . .65
Wartung . . . . . . . . . . . . . . . . . . . . . . . . . . . . . . . . . . . . . . . . . . .65
Nutzungsdauer und Auswechseln der Transmitter-Batterie . . .65
Auswechseln der Batterie . . . . . . . . . . . . . . . . . . . . . . . . . . . . .65
Wasserbeständigkeit . . . . . . . . . . . . . . . . . . . . . . . . . . . . . . . . .66
Geschwindigkeits- und Entfernungssensor . . . . . . . . . . . . . . . . .67
Funktion des Geschwindigkeits- / Entfernungssensors . . . . . .67
Zu den GPS Verbindungszeiten . . . . . . . . . . . . . . . . . . . . . . . . .67
Bedienung des G+E Sensors . . . . . . . . . . . . . . . . . . . . . . . . . . .68
agen des Geschwindigkeits- und Entfernungssensors . . . . .69
Tr
Tragen des G+E Sensors am Oberarm . . . . . . . . . . . . . . . . . . .70
Tragen des G+E Sensors am Gürtel . . . . . . . . . . . . . . . . . . . . .71
Fehler und Fehlermeldungen des G+E Sensors . . . . . . . . . . . .72
Nutzungsdauer und Auswechseln der G+E Sensor Batterie . .72
Auswechseln der Batterie . . . . . . . . . . . . . . . . . . . . . . . . . . . . .73
Wartung . . . . . . . . . . . . . . . . . . . . . . . . . . . . . . . . . . . . . . . . . . .73
Alle Sensoren . . . . . . . . . . . . . . . . . . . . . . . . . . . . . . . . . . . . . . . .74
Wasserbeständigkeit . . . . . . . . . . . . . . . . . . . . . . . . . . . . . . . . .74
Internationale Garantie . . . . . . . . . . . . . . . . . . . . . . . . . . . . . . .75
Service . . . . . . . . . . . . . . . . . . . . . . . . . . . . . . . . . . . . . . . . . . . .78
Timex
®
Fitness Sensoren
Herzfrequenzsensor
Geschwindigkeits- und Entfernungssensor
Eine Armbanduhr verfügt über mehr Funktionen als die Angabe der Uhrzeit.
Mit Digitaltechnologie kann Ihre Armbanduhr Herzfrequenz, zurückgelegte
Entfernung und entsprechende Geschwindigkeit anzeigen. Für diese
Funktionen müssen externe Module eingesetzt werden, die Informationen
drahtlos an Ihre Armbanduhr senden. Dieses Handbuch enthält die
entsprechenden Gebrauchsanweisungen für die richtige Einrichtung,
Bedienung und Wartung dieser Geräte. Lesen Sie den Abschnitt durch, der
sich auf Ihren Gerätetyp bezieht.
Für Informationen zum Gebrauch Ihrer Armbanduhr
möchten wir Sie auf das Handbuch mit den
Gebrauchsanweisungen verweisen.
63
Page 34

Herzfrequenzmonitor
SensorPolster
f f
Funktionsweise des digitalen Herzfrequenzmonitors
Der Herzfrequenzmonitor ist eine Kombination aus Herzfrequenzsensor und
Sportarmbanduhr. Der Herzfrequenzsensor wird an Ihrem Brustkorb angebracht
und misst die elektrischen Signale, die durch Ihren Herzschlag erzeugt werden.
Anhand dieser Information errechnet er dann Ihre Herzfrequenz und überträgt
diese an Ihre Armbanduhr. Beim Sport/Training schauen Sie dann einfach auf
Ihre Uhr, um sich zu vergewissern, dass Sie im richtigen Herzfrequenzbereich
liegen, um Ihr Fitness-Niveau zu halten bzw. zu verbessern.
So benutzen Sie den digitalen Herzfrequenzmonitor
1. Die Herzfrequenzraten-Sensorkissen gut mit Wasser befeuchten. Falls
nötig, für besseren Kontakt ein spezielles Elektrodengel benutzen. Für
korrekte Funktion des Herzfrequenzratenmonitors ist guter Hautkontakt
mit den Sensorkissen SEHR WICHTIG.
2. Legen Sie den Brustgurt an und ziehen Sie ihn
eng unterhalb der Brust fest. Vergewissern Sie
sich, dass der Transmitter genau mittig auf Ihrer
Brust sitzt und dass die rechte Seite nach oben
zeigt, sodass eine Ihnen gegenüber stehende
Person das Logo lesen kann.
3. Inbetriebnahme des Herzfrequenzmonitors: Zum
Ablesen der Herzfrequenzdaten sehen Sie bitte
die detaillierten Anleitungen im Handbuch für
Ihre Uhr.
64
Warnhinweis
Dies ist kein medizinisches Gerät. Bei schweren Herzkrankheiten wird
von dem Gebrauch abgeraten. Vor Beginn oder Änderung eines FitnessProgramms sollten Sie stets Ihren Arzt konsultieren.
Durch die Interferenz mit Radiosignalen, unzulänglichen Kontakt zwischen
Haut und Brustgurt sowie andere Faktoren kann die genaue Übertragung
Ihrer Herzfrequenzdaten beeinträchtigt werden.
Wartung
Der Herzfrequenzsensor und Gurt müssen mit frischem Wasser abgespült
werden, um die Ablagerung von Fremdkörpern zu vermeiden, die das Messen
Ihrer Herzfrequenz beeinträchtigen könnten.
Nutzungsdauer und Auswechseln der
Transmitter-Batterie
Die Transmitter-Batterie sollte eine Nutzungsdauer von über zwei Jahren
haben, wenn sie eine Stunde pro Tag beansprucht wird. Geht der Gebrauch
darüber hinaus, verkürzt dies die Nutzungsdauer der Batterie. Die TransmitterBatterie muss in den folgenden Fällen ausgewechselt werden:
• Die Armbanduhr empfängt die Herzfrequenzinformation nicht mehr richtig
vom Brust-Transmitter, trotz vorschriftsmäßiger Anbringung auf der Brust.
• Auf dem Display erscheinen gehäuft Fehlermeldungen (COMM ERR, SIGNAL
LOST).
Auswechseln der Batterie
HINWEIS: Sie müssen ein Gerät (z.B. eine Armbanduhr) haben, auf dem
Herzfrequenzinformationen angezeigt werden können, um sich zu
65
Page 35

vergewissern, dass die neue Batterie richtig eingesetzt worden ist. Öffnen Sie die Abdeckung der Batteriekammer mit einer Münze (Rückseite
des Transmitters).
• legen Sie die neue Batterie (CR2032 oder entsprechend) mit dem „+"-
Zeichen zu Ihnen ein.
• Drücken Sie die Rückstelltaste neben der Batterie. Verwenden Sie dazu
einen Zahnstocher oder eine geradegebogene Büroklammer.
• Setzen Sie die Batterie-Abdeckung wieder ein.
• Führen Sie einen Schnell-Test des Geräts durch:
1. Entfernen Sie sich von Quellen elektrischer oder Rundfunkinterferenzen.
2. Machen Sie die Polster des Herzfrequenzsensors richtig nass und legen
Sie den Brustgurt an, der fest auf der Haut aufliegen muss.
3. Aktivieren Sie die Herzfrequenzmonitor-Funktion an Ihrer Armbanduhr.
4. Nach ein paar Sekunden sollte das Herzsymbol auf dem Display Ihrer
Armbanduhr zu blinken beginnen und damit anzeigen, dass der
Transmitter aktiviert ist. Dadurch wird das vorschriftsmäßige Einlegen
der Batterie bestätigt.
HINWEIS: Während dieses Tests muss kein Herzfrequenzwert auf dem
Display erscheinen.
FALLS KEIN BLINKENDES HERZ AUF DER UHR ANGEZEIGT WIRD:
• Drücken Sie erneut die Rückstelltaste in der Batteriekammer und setzen Sie
die Batterieabdeckung wieder ein.
• Legen Sie die Batterie erneut ein und wiederholen Sie den obigen Test.
Wasserbeständigkeit
Der Herzfrequenzsensor ist bis zu einem Wasserdruck von 60 psi
66
wasserbeständig. Am Ende des Handbuchs finden Sie eine Tabelle mit den
entsprechenden Werten. WARNHINWEIS: Der Herzfrequenzsensor zeigt bei
der Bedienung unter Wasser keine Herzfrequenz an.
Geschwindigkeits- und Entfernungssensor
Funktion des Geschwindigkeits- / Entfernungssensors
Der Geschwindigkeits- und Entfernungssensor (G+E) erfasst Signale von GPS
(globales Positionierungssystem) Satelliten in der Umlaufbahn, um Ihre
Position und die Veränderungen Ihrer Position an jedem beliebigen Standort
der Welt zu bestimmen. Diese Informationen werden drahtlos an Ihre
Armbanduhr übertragen, sodass sie Ihre Geschwindigkeit, Ihr Tempo und die
zurückgelegte Entfernung berechnen kann. Weitere Informationen zur
Bestimmung Ihrer Geschwindigkeit und Entfernung entnehmen Sie bitte der
Gebrauchsanweisung für Ihre Armbanduhr.
Zu den GPS Verbindungszeiten
• Bei der ersten Benutzung braucht der G+E Sensor evtl. bis zu 5 Minuten
und länger, um eine Verbindung mit den Satelliten herzustellen. Danach
braucht das Gerät normalerweise nur eine Minute.
• Wenn Sie sich mehrere hundert Kilometer von dem Standort entfernen, wo
der G+E Sensor zuletzt benutzt wurde, oder wenn Sie den G+E Sensor für
längere Zeit in geschlossenen Räumen eingeschaltet lassen, bevor Sie ins
Freie gehen, kann die Suche länger dauern als erwartet.
• Um die kürzesten GPS Verbindungszeiten zu erreichen, sollten Sie Ihre
Bewegungen auf ein Minimum beschränken, während der Indikator rot
blinkt.
67
Page 36

Bedienung des G+E Sensors
G+E Sensor ON/OFF
Entfernbarer Armgurt Batterieverschluss
Um die besten Ergebnisse zu erzielen, braucht der G+E Sensor freie Sicht auf
den Himmel.
• Die ON/OFF (AN/AUS) Taste des G+E Sensors gedrückt halten, um den
Empfänger einzuschalten. Sie sollten sich auf offenem Gelände im Freien
aufhalten. Wenn die Taste sofort rot aufleuchtet (permanent) und nicht
blinkt, ist die Batterie so abgenutzt, dass eine GPS Bedienung nicht möglich
ist und die Batterie ausgewechselt werden muss. Die ON/OFF Taste auf
dem G+E Sensor blinkt zu Anfang rot, während der G+E Sensor die Position
im Verhältnis zum GPS Satelliten berechnet.Auf dem Display der Armbanduhr erscheint möglicherweise der Text „SEARCHING", wenn eine kompatible
Timex® Armbanduhr benutzt wird.
• Die ON/OFF Taste blinkt grün, wenn der G+E Sensor erfolgreich Signale von
den Satelliten erfasst hat. Die Geschwindigkeits- und Entfernungsinformationen werden nun an die Armbanduhr (bzw. ein entsprechendes anderes
Gerät) gesendet.
• Zum Abschalten des G+E Sensors die ON/OFF Taste des G+E Sensors eine
Sekunde lang gedrückt halten. Die Taste leuchtet rot, während Sie die Taste
gedrückt halten und geht dann aus; dadurch wird das Abschalten des G+E
Sensors angezeigt.
• In folgenden Fällen schaltet sich der G+E Sensor automatisch ab:
— Die Batterie ist leer.
— Es wird 15 Minuten lang keine Bewegung festgestellt.
— Es werden 15 Minuten lang keine GPS Signale festgestellt.
Tragen des Geschwindigkeits- und Entfernungssensors
Für die besten Ergebnisse sollten Sie den G+E Sensor an Ihren Oberarm anlegen. Sie können ihn auch um die Taille tragen. Tragen Sie Ihre Armbanduhr
stets innerhalb von 1 Meter (ungefähr 3 Fuß) Reichweite des G+E Sensors.
Achten Sie darauf, dass die richtige Seite nach oben zeigt, so dass das GPS
Logo von einer gegenüber stehenden Person gesehen werden kann. Über
dem G+E Sensor getragene Kleidung muss stets trocken und metallfrei sein.
68
69
Page 37

Tragen des G+E Sensors am Oberarm
Abb. 1
Abb. 2 Abb. 3
• Stellen Sie sicher, dass der Gurtclip entfernt
ist. Zum Entfernen des Clips ziehen Sie ihn
vorsichtig heraus (s. Abb. 1). Um den Clip
wieder anzubringen, die Lasche über den
Schlitz am Sensor legen und vorsichtig
hineinschieben.
• Ist der Armgurt nicht befestigt, die Plastikseite des Elastikbands in den Schlitz am G+E
Sensor schieben (s. Abb. 2).
• Das Elastikband in die vorgesehene Öffnung schieben
und mit Haken und Öse schließen.
• Den Sensor und das Band über die Hand bis zum Oberarm streifen.
Die Uhr muss am gleichen Arm getragen werden. (Abb. 3)
• Ziehen Sie den Armgurt durch das justierbare Ende, so dass
es perfekt um Ihren Arm passt.
Tragen des G+E Sensors am Gürtel
• Falls der Armgurt befestigt ist, entfernen Sie ihn, indem Sie die Plastikseite herausgleiten lassen.
• Zum Anbringen des Gurtclips, die Lasche des Clips über den Schlitz am
Sensor legen und hineinschieben.
• Den Sensor auf der gleichen Körperseite tragen wie die Uhr.
70
71
Page 38

Fehler und Fehlermeldungen des G+E Sensors
PROBLEM
• Der G+E Sensor kann keine Verbindung mit den GPS Satelliten herstellen
(Die ON/OFF Taste geht zu keinem Zeitpunkt zu blinkendem Grün über).
• Der GPS G+E Sensor verliert während der Verwendung Signale von den
Satelliten. Die Armbanduhr zeigt eine Meldung an, dass das GPS Signal
schwach ist.
LÖSUNG
• Verlagern Sie Ihren Standort in offenes Gelände im Freien.
• Entfernen Sie sich von Metallgegenständen.
• Tauschen Sie die Batterie im G+E Sensor aus.
HINWEIS: Wenn die GPS Signale verloren gehen, kann das System kurzfristig
genaue Angaben aufrecht erhalten.
PROBLEM
• Armbanduhr zeigt Meldung FATAL GPS ERROR an.
LÖSUNG
• Der G+E Sensor ist beschädigt; setzen Sie sich mit dem Timex
Kundendienst in Verbindung.
Nutzungsdauer und Auswechseln der G+E Sensor
Batterie
Die Batterie im G+E Sensor hält ungefähr 12 Stunden. Der G+E Sensor selbst
gibt keinen Hinweis auf den Zustand seiner Batterie, außer wenn die Batterie
vollständig leer ist, (siehe Hinweis im Abschnitt „Bedienung des G+E
72
Sensors"). Stattdessen wird diese Information zusammen mit Ihren
Leistungsdaten an Ihre Armbanduhr gesendet. Bitte schlagen Sie im
Benutzerhandbuch für Ihre Armbanduhr nach, wie der Stand der Batterien
des G+E Sensors überprüft wird.
Auswechseln der Batterie
• Halbrunden Griff am Batterieverschluss (an der Seite des G+D Sensor
Gehäuses) herausklappen und zum Öffnen gegen den Uhrzeigersinn
drehen.
• Entfernen Sie den Batterieverschluss.
• Die alte Batterie herausnehmen und eine (1) neue AA-Batterie einlegen.
Achten Sie auf die +/- Markierung in der Batteriekammer, um zu
gewährleisten, dass die neue Batterie richtig eingelegt ist.
• Den Batterieverschluss wieder einsetzen und durch Drehen im
Uhrzeigersinn festziehen. Nicht zu fest anziehen.
Wartung
Den G+E Sensor und den Gurt in regelmäßigen Abständen mit frischem
Wasser abspülen, um Ablagerung von Fremdkörpern zu verhindern, die das
Messen Ihrer Geschwindigkeit und Entfernung beeinträchtigen könnten.
73
Page 39

Alle Sensoren
Wasserbeständigkeit
Der Grad der Wasserbeständigkeit (falls zutreffend) ist auf dem Gehäuse
angegeben. Entsprechende Werte entnehmen Sie bitte der nachstehenden
Tabelle.
Der G+E Sensor ist spritzfest. Falls er in Wasser eingetaucht wurde, die
Rückseite des Gehäuses und die Batterien entfernen, und die Kammer
trocknen lassen.
Water-Resistance p.s.i.a.* Water Pressure
Depth Below Surface
30m/98ft 60
50m/164ft 86
100m/328ft 160
200m/656ft 284
*pounds per square inch absolute
WARNHINWEIS: UM DIE WASSERBESTÄNDIGKEIT ZU WAHREN, DÜRFEN
UNTER WASSER KEINE TASTEN BETÄTIGT WERDEN.
WARNHINWEIS: DIE SENSOREN ZEIGEN BEI DER BEDIENUNG UNTER
WASSER KEINE DATEN AN.
INTERNATIONALE GARANTIE
(USA BESCHRÄNKTE GARANTIE)
Ihr Produkt hat ab dem Zeitpunkt des ursprünglichen Kaufs eine EINJÄHRIGE
Garantie für Herstellungsfehler der Timex Corporation. Diese internationale
Garantie wird von Timex und seinen Partnern weltweit anerkannt.
Bitte nehmen Sie zur Kenntnis, dass Timex nach eigenem Ermessen Ihr
Produkt durch Installieren neuer oder gründlich überholter und überprüfter
Komponenten reparieren, bzw. es mit einem identischen oder ähnlichen
Modell ersetzen kann. WICHTIG: BITTE BEACHTEN SIE, DASS FEHLER ODER
BESCHÄDIGUNGEN IHRES PRODUKTS NICHT UNTER DIESE GARANTIE FALLEN:
1) wenn die Garantiezeit abgelaufen ist;
2) wenn das Produkt ursprünglich nicht von einem autorisierten Händler
gekauft wurde;
3) wenn diese durch Reparaturen entstanden sind, die nicht vom Hersteller
durchgeführt wurden;
4) wenn diese durch Unfälle oder unsachgemäßen Gebrauch entstanden sind;
5) wenn sie das Gehäuse, Zubehör oder die Batterie betreffen. Ein Ersatz
dieser Zubehörteile kann Ihnen in Rechnung gestellt werden.
74
75
Page 40

DIESE GARANTIE UND DIE HIERIN ENTHALTENEN RECHTSMITTEL SCHLIESSEN ALLE
ANDERWEITIGEN GARANTIEN AUS UND ERSETZEN DIESE, UNABHÄNGIG DAVON,
OB ES SICH BEI DIESEN UM AUSDRÜCKLICHE ODER STILLSCHWEIGENDE
GARANTIEN BZGL. FEHLERFREIHEIT, MARKTÜBLICHER QUALITÄT UND FUNKTIONSTÜCHTIGKEIT HANDELT. TIMEX ÜBERNIMMT KEINERLEI HAFTUNG BEI SPEZIFISCHEN, ZUFÄLLIG ENTSTANDENEN ODER FOLGESCHÄDEN.
In manchen Ländern oder Staaten sind keine Einschränkungen stillschweigender
Garantien bzgl. Fehlerfreiheit, sowie Ausnahmen oder Einschränkungen des
Schadenersatzes erlaubt. Daher gelten die Einschränkungen u.U. nicht für Sie.
Diese Garantie verleiht Ihnen spezifische Rechte; darüber hinaus haben Sie u.U.
andere Rechte, die je nach Land oder Staat unterschiedlich sind.
Für Garantieservice senden Sie bitte Ihre Uhr und den Sensor an den Hersteller,
einen der Partner oder den Händler, der Ihnen das Produkt verkauft hat. Bitte
fügen Sie den ausgefüllten Original-Reparaturschein bei, oder, ausschließlich in
den USA oder Kanada, eine schriftliche Erklärung mit Ihrem Namen, Adresse,
Telefonnummer, Kaufdatum und Namen des Händlers. Für Porto und Versand
entstehen folgende, zusätzliche Kosten (dies sind keine Reparaturkosten): in
den USA $7.50 als Scheck oder Money Order; in Kanada CAN$ 6.00 als Scheck
oder Money Order, in Großbritannien UK£ 2.50 als Scheck oder Money Order. In
allen anderen Ländern wird Ihnen Porto und Versand in Rechnung gestellt.
BITTE LEGEN SIE IHRER SENDUNG NIEMALS OBJEKTE MIT PERSÖNLICHEM WERT
BEI.
Bitte rufen Sie für USA die Telefonnummer 1-800-328-2677 für weitere
Informationen zur Garantie an. Bitte rufen Sie für Kanada die Telefonnummer
1-800-263-0981, für Brasilien +55 (11) 5572 9733, für Mexiko 01-800-01-060-00,
für Mittelamerika, die Karibik, Bermuda und die Bahamas (501) 370-5775 (USA),
für Asien 852-2815-0091, für Großbritannien 44 208 687 9620, für Portugal
351 212 946 017, für Frankreich 33 3 81 63 42 00, für Deutschland
+43 662 88 92130, für den Nahen Osten und Afrika 971-4-310850 an.
Garantie-Informationen für alle weiteren Regionen erhalten Sie von Ihrem
Timex-Einzelhändler oder -Vertragshändler vor Ort.
TIMEX INTERNATIONALE GARANTIE
ARMBANDUHR-REPARATURGUTSCHEIN
Ursprüngliches Kaufdatum:
(Kopie der Quittung beilegen, falls vorhanden)
Gekauft von:
(Name, Anschrift und Telefonnummer
Ort des Kaufs:
(Name und Anschrift)
Grund für die Rücksendung:
BITTE BEWAHREN SIE DIESEN UHREN-REPARATURGUTSCHEIN SICHER AUF.
76
77
Page 41

Service
Sollte Ihr Sensor jemals Wartung benötigen, schicken Sie ihn bitte gemäß den
in der Internationalen Garantie von Timex enthaltenen Informationen an
Timex oder an die folgende Anschrift:
HotLine Watch Service
P.O. Box 2740
Little Rock, AR 72203.
Anschrift:
HotLine Watch Service
1302 Pike Ave.
North Little Rock, AR 72114
Um Ihnen die Inanspruchnahme der Werkswartung zu erleichtern, kann Ihr
Timex-Einzelhändler Ihnen einen bereits adressierten Uhren-ReparaturUmschlag zur Verfügung stellen. Bitte schlagen Sie in der Internationalen
Garantie von Timex die speziellen Anleitungen zur Pflege und Wartung Ihres
Armbanduhr-Moduls nach.
Für Service rufen Sie bitte die Telefonnummer 1-800-328-2677 an.
Für Ersatzgurt oder Ersatzband rufen Sie bitte 1-800-328-2677 an.
FCC Hinweis (US-Fernmeldeverwaltung) (USA) / IC Hinweis ( integrierter
Schaltkreis) (Kanada)
Die Timex Corporation erklärt, dass die nachstehenden Produkte, die alle
Komponenten des Timex® Bodylink® Systems umfassen, die einschlägigen
FCC-Bestimmungen, Teil 15, sowie die kanadischen Branchenbestimmungen
für Geräte der Klasse B wie folgt erfüllen:
Produktname:
Speed + Distance System – GPS Transceiver Series M8xx/M1xx
Heart Rate Monitor System – HRM Transmitter Series M8xx/M5xx/M6xx
Produktyp: Intentional Radiator
Modell FCC ID Nr. IC Norm No.
M640 Heart Rate Monitor EP9TMXM640 3348A-TMXM640
M515 Heart Rate Monitor EP9TMXM515 3348A-M515
M185 Speed + Distance Monitor EP9TMXM185 3348A-TMXM185
M850 Speed + Distance Monitor EP9TMXM850 3348A-12181
Diese Geräte entsprechen Teil 15 der FCC-Bestimmungen. Die Bedienung unterliegt
den folgenden zwei Bedingungen: (1) Das Gerät darf keine schädlichen Interferenzen
verursachen, und (2) das Gerät muss alle empfangenen Interferenzen akzeptieren,
einschließlich Interferenzen, die zu unerwünschten Resultaten führen können.
78
79
Page 42

Produktname:
Watch Receivers – HRM/Speed+Distance Series M8xx/M5xx/M6xx/M1xx
Data Recorders – HRM/Speed+Distance Series M5xx/M1xx
Produkttyp: Unintentional Radiator
Tests haben ergeben, dass diese Geräte den Beschränkungen für digitale
Geräte der Klasse B gemäß Teil 15 der FCC-Bestimmungen entsprechen.
Diese Beschränkungen sollen für angemessenen Schutz vor schädlichen
Interferenzen in Wohngebieten sorgen. Die Geräte erzeugen, verwenden und
verströmen u.U. Radiofrequenzenergie und können zu schädlichen Interferenzen des Funkverkehrs führen, wenn sie nicht gem. Anleitungen im
Benutzerhandbuch verwendet werden. Falls diese Geräte zu schädlichen
Interferenzen beim Rundfunk- oder Fernsehempfang führen, was durch Ausund Einschalten der Geräte festgestellt werden kann, sollte der Benutzer versuchen, die Interferenz durch veränderte Ausrichtung, einen veränderten
Standort der Empfangsantenne, oder durch eine vergrößerte Distanz
zwischen den Geräten und dem Empfänger zu korrigieren.
Vorsicht: Jegliche an den oben aufgeführten Geräten vorgenommenen
Veränderungen, die nicht ausdrücklich von der Timex Corporation genehmigt
wurden, können die Genehmigung des Benutzers zur Bedienung dieser
Geräte null und nichtig machen.
Hinweis für Kanada: Dieses digitale Gerät der Klasse B entspricht der
kanadischen ICES-003 Norm. Cet appareil numérique de la classe B est
conforme a la norme NMB-003 du Canada.
8180
Page 43

indice
Monitor della frequenza cardiaca . . . . . . . . . . . . . . . . . . . . . . . .84
Come funziona il Monitor digitale dellafrequenza cardiaca . . .84
Come usare il Monitor digitale della frequenza cardiaca . . . . .84
Avvertenza . . . . . . . . . . . . . . . . . . . . . . . . . . . . . . . . . . . . . . . . .85
Manutenzione . . . . . . . . . . . . . . . . . . . . . . . . . . . . . . . . . . . . . .85
Durata e sostituzione della batteria del trasmettitore . . . . . . .85
Sostituzione della batteria . . . . . . . . . . . . . . . . . . . . . . . . . . . . .86
Resistenza all’acqua . . . . . . . . . . . . . . . . . . . . . . . . . . . . . . . . .87
Sensore di Velocità + Distanza . . . . . . . . . . . . . . . . . . . . . . . . . . .87
Come funziona il Sistema di Velocità e Distanza . . . . . . . . . . .87
Tempi di connessione GPS . . . . . . . . . . . . . . . . . . . . . . . . . . . .87
Funzionamento del Sensore S+D . . . . . . . . . . . . . . . . . . . . . . .88
Come indossare il Sensore di Velocità e Distanza (V+D) . . . . .89
Se si indossa il Sensore V+D sulla parte superiore del braccio . .90
Se si indossa il Sensore V+D alla cintura . . . . . . . . . . . . . . . . .91
Come risolvere gli errori ed i messaggi di errore del Sensore V+D 92
Durata e sostituzione della batteria del Sensore V+D . . . . . . .92
Sostituire le batterie . . . . . . . . . . . . . . . . . . . . . . . . . . . . . . . . .93
Manutenzione . . . . . . . . . . . . . . . . . . . . . . . . . . . . . . . . . . . . . .93
Tutti i sensori . . . . . . . . . . . . . . . . . . . . . . . . . . . . . . . . . . . . . . . .94
Resistenza all’acqua . . . . . . . . . . . . . . . . . . . . . . . . . . . . . . . . .94
Garanzia Internazionale . . . . . . . . . . . . . . . . . . . . . . . . . . . . . . .95
Riparazioni . . . . . . . . . . . . . . . . . . . . . . . . . . . . . . . . . . . . . . . . .98
Timex
®
Sensori per fitness
Sensore della frequenza cardiaca
Sensore di Velocità + Distanza
Gli orologi fanno molto più che segnare l’ora. La tecnologia digitale dà a
questo orologio la capacità di visualizzare la frequenza cardiaca o misurare la velocità raggiunta e la distanza percorsa. Queste funzioni
richiedono l’uso di moduli esterni che trasmettono senza fili queste informazioni all’orologio. Questo libretto offre le istruzioni per impostare,
usare e conservare in modo corretto questi dispositivi. Consultare la
sezione appropriata per il tipo di dispositivo in dotazione.
Per informazioni sull’uso dell’orologio, consultare il
libretto di istruzioni relativo.
83
Page 44

Monitor della frequenza cardiaca
Piastre del
sensore
f f
Come funziona il Monitor digitale della
frequenza cardiaca
Il Monitor della frequenza cardiaca è un dispositivo che combina un
Sensore della frequenza cardiaca ed un orologio sportivo. Il Sensore
della frequenza cardiaca viene collegato al petto dell’utente e misura i
segnali elettrici generati dal cuore mentre batte. Usando queste informazioni, calcola quindi la frequenza cardiaca e la trasmette all’orologio.
Basta gettare uno sguardo all’orologio durante l’esercizio/l’allenamento
per assicurarsi di trovarsi all’interno dell’intervallo appropriato di frequenza cardiaca per mantenere o migliorare il proprio livello di fitness.
Come usare il Monitor digitale della frequenza cardiaca
1. Inumidire con acqua del rubinetto le piastre
del Sensore della frequenza cardiaca. Se necessario, per ottenere un contatto migliore,
usare un gel per elettrodi da monitor della
frequenza cardiaca. Affinché il Monitor della
frequenza cardiaca funzioni in modo ottimale
è ESSENZIALE stabilire un buon contatto fra
la pelle e le piastre del sensore.
2. Indossare la fascia toracica. Allacciarla bene
aderente attorno al petto, subito sopra i muscoli pettorali. Assicurarsi che il trasmettitore sia centrato sul petto e
che presenti il logotipo rivolto verso l’esterno in modo da poter essere
84
letto chiaramente da una persona che si trova di fronte all’utente.
3. Avviare il Monitor della frequenza cardiaca: consultare il manuale
dell'utente dell'orologio per istruzioni dettagliate sulla visualizzazione
dei dati sulla frequenza cardiaca.
Avvertenza
Questo non è un dispositivo medico e non se ne raccomanda l’uso
da parte di persone con gravi malattie cardiache. Consultare sempre il proprio medico prima di iniziare o modificare un programma
di esercizio fisico.
Interferenza con il segnale radio, scarso contatto fra la pelle e la fascia
toracica e altri fattori possono impedire una trasmissione accurata dei
dati sulla frequenza cardiaca.
Manutenzione
Risciacquare il Sensore della frequenza cardiaca e la fascia in acqua per
evitare l’accumulo di materiale che può interferire con la misurazione della
frequenza cardiaca.
Durata e sostituzione della batteria del trasmettitore
La durata della batteria del trasmettitore dovrebbe superare i due anni,
in base all’uso di un’ora al giorno. Un uso più frequente accorcia la sua
durata. Sostituire la batteria del trasmettitore quando si verifica una
qualsiasi delle seguenti circostanze:
• l’orologio non riceve più informazioni sulla frequenza cardiaca dal trasmet-
titore sul petto, anche quando quest’ultimo viene indossato correttamente;
• Appaiono messaggi di errore (ERR COMU, SEGNAL PERS) con
crescente frequenza sul display.
85
Page 45

Sostituzione della batteria
NOTA: Per verificare che la nuova batteria sia stata inserita correttamente, si avrà bisogno di un dispositivo (come un orologio) che
possa visualizzare le informazioni sulla frequenza cardiaca. Usare
una moneta per aprire il coperchio del vano batteria (il retro del
trasmettitore).
• Inserire la nuova batteria (CR2032 o equivalente) con il polo “
verso di sé.
• Spingere il pulsante di ripristino accanto alla batteria. Usare la punta di
uno stuzzicadenti o di una graffetta raddrizzata.
• Rimettere il coperchio.
• Eseguire una rapida prova del dispositivo seguendo questi procedimenti.
1. Allontanarsi da fonti di interferenza radio o elettrica.
2. Inumidire abbondantemente le piastre del Sensore della frequenza
cardiaca e indossare attorno al petto, bene a contatto con la pelle, la
fascia toracica.
3. Attivare la funzione monitoraggio della frequenza cardiaca
sull’orologio.
4. Entro pochi secondi, il simbolo del cuore sul display dell’orologio
dovrebbe iniziare a lampeggiare, indicando che il trasmettitore è attivo. Questo conferma che la batteria è stata installata correttamente.
NOTA: durante questo test non è necessario che appaia sul display un
valore di frequenza cardiaca.
86
+” rivolto
SE SULL’OROLOGIO NON APPARE IL CUORE LAMPEGGIANTE:
• Premere di nuovo l’interrutore di ripristino nel vano della batteria e
rimettere a posto il coperchio;
• Installare di nuovo la batteria e ripetere la procedura di prova indicata
sopra.
Resistenza all’acqua
Il Sensore della frequenza cardiaca sopporta pressioni dell’acqua fino a
60 p.s.i. Vedere la tabella in fondo al libretto per informazioni sulle equivalenze. AVVERTENZA: il Sensore della frequenza cardiaca non visualizza
la frequenza quando viene usato sott’acqua.
Sensore di Velocità + Distanza
Come funziona il Sistema di Velocità e Distanza
Il Sensore di Velocità + Distanza (V+D) acquisisce segnali dai satelliti GPS
(Global Positioning System) orbitanti per determinare la posizione ed i
cambiamenti di posizione dell’utente ovunque si trovi nel mondo. Queste
informazioni vengono trasmesse via etere all’orologio in modo che possa
calcolare la velocità, il passo e la distanza percorsa dall’utente. Per ultriori informazioni sulla determinazione di velocità e distanza, vedere le
istruzioni dell’orologio.
Tempi di connessione GPS
• Al primo uso, il Sensore V+D può richiedere anche 5 minuti o più per
stabilire un collegamento con i satelliti. Dopo il primo uso, di solito
richiede solo un minuto.
87
Page 46

• Se ci si sposta di centinaia di chilometri dall’ubicazione in cui si è usato
Sensore V+D ON/OFF
Fascia rimovibile per il braccio Sportello della batteria
per la prima volta il Sensore V+D, o se si lascia il sensore acceso per
lunghi periodi di tempo in luoghi chiusi prima di uscire, la ricerca del
collegamento potrebbe richiedere più del previsto.
• Per ottenere tempi di collegamento GPS più brevi, cercare di ridurre al
minimo il movimento quando la spia indicatrice lampeggia in rosso.
Funzionamento del Sensore S+D
Per ottenere i migliori risultati, il Sensore deve avere una chiara visione
del cielo.
Premere e tenere premuto il pulsante V+D ON/OFF per accen-
•
dere il ricevitore. Occorre essere all’aperto. Se il pulsante si
accende in rosso (fisso, non lampeggiante) la batteria è scarica
al punto da impedire l’acquisizione dei segnali GPS, e deve
essere sostituita. Il pulsante ON/OFF sul sensore V+D inizialmente lampeggia in rosso mentre il sensore calcola la propria
posizione in relazione ai satelliti GPS. Potrebbe apparire la scritta
“RICERCA” sul display dell’orologio se si usa un orologio compatibile Timex®.
•
Il pulsante ON/OFF lampeggia in verde quando il Sensore V+D
acquisisce segnali dai satelliti. Le informazioni su velocità e distanza sono ora trasmesse all’orologio (o a un altro dispositivo
collegato).
•
Premere e tenere premuto il pulsante V+D ON/OFF per un secondo per spegnere il sensore. Il pulsante si illumina in rosso
quando si preme il pulsante, e poi si spegne, ad indicare che il
88
sensore è stato spento.
•
Il Sensore V+D si spegne automaticamente se si verifica una
qualsiasi delle seguenti circostanze:
—
La batteria si è scaricata.
—
Non viene rilevato movimento per 15 minuti consecutivi.
—
Non vengono rilevati segnali GPS per 15 minuti consecutivi.
Come indossare il Sensore di Velocità e Distanza (V+D)
Fissare il Sensore V+D alla parte superiore del braccio. Si può
anche fissare alla vita. Indossare l’orologio in modo che si trovi
sempre ad una distanza massima di 1 metro dal Sensore V+D.
Assicurarsi che il sensore sia con la parte giusta rivolta verso l'alto, in modo che una persona posta di fronte all'utente possa leggere il logotipo GPS. Qualsiasi indumento che copra il Sensore V+D
deve essere asciutto e non avere parti metalliche.
89
Page 47

Se si indossa il Sensore V+D sulla parte superiore
Fig. 1
Fig. 2 Fig. 3
del braccio
•
Assicurarsi di aver rimosso il fermaglio
per cintura. Per rimuovere il fermaglio
della cintura, afferrare il fermaglio e
farlo scattare via delicatamente
(Fig. 1). Per rimettere a posto il
fermaglio, allineare la linguetta sul
fermaglio con la fessura sul sensore e
delicatamente far scattare il fermaglio sul dispositivo.
•
Se la fascia da braccio non è attaccata, far scivolare l’attacco in
plastica con la fascia elastica nella fessura del Sensore V+D,
come mostrato (Fig. 2).
•
Far scivolare la fascia elastica attraverso l’estremità aperta dell’attacco, e fissarla in posizione con l’elemento di fissaggio a
gancio e anello (Velcro).
•
Far scivolare il sensore e la fascia sopra il braccio fino a raggiungere la sua parte superiore. L’orologio va indossato sullo stesso
braccio (Fig. 3).
•
Tirare la fascia attraverso l’estremità regolabile in modo che
resti aderente al braccio.
Se si indossa il Sensore V+D alla cintura
•
Se è collegata, rimuovere la fascia facendo scivolare fuori da
essa l’attacco in plastica.
•
Inserire il fermaglio della cintura allineando la linguetta sul fermaglio con la fessura sul sensore, e farlo scattare in posizione.
•
Indossare il sensore sullo stesso lato del corpo su cui si indossa
l’orologio.
90
91
Page 48

Come risolvere gli errori ed i messaggi di errore del
Sensore V+D
PROBLEMA
•
Il Sensore V+D non riesce a collegarsi ai satelliti GPS (il pulsante
ON/OFF non passa mai al verde lampeggiante).
• Il Sensore V+D del GPS perde il segnale proveniente dai satelliti durante
l’uso. L’orologio potrebbe visualizzare un messaggio indicante che il
segnale GPS è debole.
SOLUZIONE
• Spostarsi, fuori, in una zona più aperta.
• Allontanarsi da oggetti metallici.
Sostituire la batteria del Sensore V+D.
•
NOTA: il sistema può mantenere l’accuratezza per brevi periodi quando
si perdono i segnali GPS.
PROBLEMA
• L’orologio visualizza il messaggio ERRORE GPS FATALE.
SOLUZIONE
• Il Sensore V+D è danneggiato; contattare il Servizio di assistenza clienti
Timex.
Durata e sostituzione della batteria del
Sensore V+D
Le batterie del Sensore V+D durano circa 12 ore. Il Sensore V+D
non indica di per sé le condizioni della sua batteria, eccetto nel
92
caso in cui la batteria sia completamente scarica (come indicato
nella sezione “Funzionamento del Sensore V+D”). Invece, questa
informazione viene inviata all’orologio insieme ai dati sulle
prestazioni. Consultare il manuale dell’orologio per la procedura di
controllo della carica della batteria del Sensore V+D.
Sostituire le batterie
•
Tirare in fuori il manico a semicerchio sul vano batteria (situato
sul lato della cassa del sensore Velocità e Distanza) e girarlo in
senso antiorario per svitare.
•
Rimuovere lo sportello della batteria.
•
Rimuovere la vecchia batteria e inserire una (1) batteria AA
nuova. Fare attenzione ai contrassegni +/- all’interno del vano
della batteria per assicurarsi di allineare correttamente la nuova
batteria.
•
Rimettere a posto lo sportello della batteria e serrare il coperchio girandolo in senso orario. Non serrarlo troppo.
Manutenzione
Risciacquare periodicamente il Sensore V+D ed il cinturino in acqua per
evitare l’accumulo di materiale che può interferire con la misurazione
della velocità e della distanza.
93
Page 49

Tutti i sensori
Resistenza all’acqua
L’eventuale livello di resistenza all’acqua è contrassegnato sulla cassa.
Vedere la tabella sotto per le equivalenze.
Il Sensore V+D è a prova di schizzi. Se viene sommerso, rimuovere il
retro della cassa e le batterie, e fare asciugare il vano batterie.
Profoditá di Pressione equivalente
Immersione expressa in p.s.i.a.*
30m/98ft 60
50m/164ft 86
100m/328ft 160
200m/656ft 284
*libbre per pollice quadrato assolute
AVVERTENZA - PER MANTENERE LA RESISTENZA ALL’ACQUA, NON PREMERE ALCUN PULSANTE MENTRE CI SI TROVA SOTT’ACQUA.
AVVERTENZA - I SENSORI NON VISUALIZZANO DATI QUANDO VENGONO
OPERATI SOTT’ACQUA.
GARANZIA INTERNAZIONALE
(USA - GARANZIA LIMITAT
Il prodotto è garantito contro difetti di produzione dalla Timex
Corporation per un periodo di UN ANNO dalla data di acquisto originaria.
Timex e le sue affiliate di tutto il mondo onoreranno questa Garanzia
Internazionale.
Si prega di notare che la Timex potrà, a sua discrezione, riparare il
prodotto installando componenti nuovi o accuratamente ricondizionati e
ispezionati, oppure sostituirlo con un modello identico o simile. IMPORTANTE: SI PREGA DI NOTARE CHE QUESTA GARANZIA NON COPRE I
DIFETTI O I DANNI AL PRODOTTO:
1) dopo la scadenza del periodo di garanzia;
2) se il prodotto non è stato acquistato originariamente da un dettagliante autorizzato;
3) derivanti da interventi di riparazione non eseguiti dal fabbricante;
4) derivanti da incidenti, manomissione o abuso;
5) La cassa, periferiche o batteria. La Timex potrebbe addebitare al
cliente la sostituzione di una qualsiasi di queste parti.
A)
94
95
Page 50

QUESTA GARANZIA ED I RIMEDI IN ESSA CONTENUTI SONO ESCLUSIVI E
SOSTITUISCONO TUTTE LE ALTRE GARANZIE, ESPRESSE O IMPLICITE,
INCLUSA QUALSIASI GARANZIA IMPLICITA DI COMMERCIABILITÀ O
IDONEITÀ AD UN USO PARTICOLARE. LA TIMEX NON È RESPONSABILE
DI NESSUN DANNO SPECIALE, INCIDENTALE O CONSEQUENZIALE.
Alcuni Paesi e Stati non permettono limitazioni su garanzie implicite e
non permettono esclusioni sui danni; pertanto queste limitazioni
potrebbero non pertenere al cliente. Questa garanzia dà al cliente diritti legali specifici, e il cliente potrebbe avere anche altri diritti, che variano da Paese a Paese e da Stato a Stato.
Per ottenere il servizio sotto garanzia, si prega di restituire l’orologio e
il sensore al fabbricante, ad una delle sue affiliate o al rivenditore dove
è stato acquistato il prodotto, insieme al Buono di riparazione originale
compilato o, solo negli USA e nel Canada, insieme al Buono di
riparazione originale o una dichiarazione scritta indicante nome e
cognome, indirizzo, numero di telefono e data e luogo dell’acquisto.
Si prega di includere quanto segue con l’orologio e sensore, al fine di
coprire le spese di spedizione e gestione (non si tratta di addebiti per
la riparazione): un assegno o un vaglia da US$ 7,50 negli U.S.A.; un
assegno o vaglia da CAN$ 6,00 in Canada; un assegno o vaglia da UK£
2,50 in Gran Bretagna. Negli altri Paesi, la Timex addebiterà il cliente
per le spese di spedizione e la gestione. NON ALLEGARE MAI ALLA
SPEDIZIONE NESSUN ARTICOLO DI VALORE PERSONALE.
Per gli U.S.A., si prega di chiamare il numero 1-800-328-2677 per ulte-
96
riori informazioni sulla garanzia. Per il Canada, chiamare l’1-800-263-
0981. Per il Brasile, chiamare lo +55 (11) 5572 9733. Per il Messico,
chiamare lo 01-800-01-060-00. Per l’America Centrale, i Caraibi, le isole
Bermuda e le isole Bahamas, chiamare il (501) 370-5775 (U.S.A.). Per
l’Asia, chiamare l’852-2815-0091. Per il Regno Unito, chiamare il 44 208
687 9620. Per il Portogallo, chiamare il 351 212 946 017. Per la Francia,
chiamare il 33 3 81 63 42 00. Per l’Italia, chiamare il +39 800 450 650.
Per la Germania, chiamare il +43.662 88 92130. Per il Medio Oriente e
l’Africa, chiamare il 971-4-310850. Per altre aree, si prega di contattare
il rivenditore o distributore Timex di zona per ottenere informazioni
sulla garanzia.
GARANZIA INTERNAZIONALE TIMEX — BUONO PER LA
Data dell’acquisto originario:
(Se disponibile, allegare una copia dello scontrino)
Acquistato da:
(Nome, indirizzo e numero di telefono)
Luogo dell’acquisto:
(Nome e indirizzo)
Motivo della restituzione:
BUONO PER LA RIPARAZIONE DELL’OROLOGIO. CONSERVARLO IN UN LUOGO
SICURO.
RIPARAZIONE DELL’OROLOGIO
97
Page 51

Riparazioni
Se il Sensore dovesse mai aver bisogno di riparazioni, inviarlo alla Timex
come indicato nella Garanzia Internazionale Timex o indirizzandolo a:
HotLine Watch Service
P.O. Box 2740
Little Rock, AR 72203, USA.
Recapito postale:
HotLine Watch Service
1302 Pike Ave.
North Little Rock, AR 72114, USA.
Per assistere il cliente ad ottenere riparazioni presso la fabbrica,
i dettaglianti Timex partecipanti possono fornirgli una busta di spedizione
apposita preindirizzata. Per informazioni specifiche sulla cura e sulle
riparazioni del modulo dell'orologio, consultare la Garanzia Internazionale
Timex.
Per informazioni sulle riparazioni, chiamare il numero
1-800-328-2677.
Se si necessitasse di un cinturino in pelle o a catena sostitutivo,
chiamare l’1-800-328-2677.
98
VVISO FCC (U
A
.S.A.) / Avviso IC (Canada)
La Timex Corporation dichiara che i seguenti prodotti, che includono tutti
®
i componenti del Sistema Timex® Bodylink
FCC rilevante e ai regolamenti IC del Canada per i dispositivi di Classe B
secondo quanto segue:
Nome del prodotto:
Sistema Velocità + Distanza - Ricetrasmettitore GPS Serie M8xx/M1xx
Sistema di monitoraggio della frequenza cardiaca - Ricetrasmettitore
MFC Serie M8xx/M5xx/M6xx
, sono conformi alla Parte 15
Tipo di prodotto: Trasmettitore intenzionale
Modello N. ID FCC N. certificazione IC
Monitor della frequenza
cardiaca M640 EP9TMXM640 3348A-TMXM640
Monitor di Velocità + Distanza M185 EP9TMXM185 3348A-TMXM185
Monitor della frequenza
cardiaca M515 EP9TMXM515 3348A-M515
Monitor di Velocità + DIstanza M850 EP9TMXM850 3348A-12181
Questi dispositivi rispettano la Parte 15 delle norme FCC. Il funzionamento è soggetto alle seguenti due condizioni: (1) questo dispositivo non
deve causare interferenza distruttiva, e (2) questo dispositivo deve
accettare qualsiasi interferenza ricevuta, comprese le interferenze che
potrebbero causare un funzionamento indesiderato.
99
Page 52

Nome del prodotto:
Ricevitori dell’orologio - MFC/Velocità+Distanza Serie
M8xx/M5xx/M6xx/M1xx
Registratori dati - MFC/Velocità+Distanza Serie M5xx/M1xx
Tipo di prodotto: Trasmettitore non intenzionale
Questa apparecchiatura è stata collaudata ed è risultata conforme ai
limiti previsti per i dispositivi digitali di Classe B, Parte 15 delle norme
FCC. Tali limiti hanno lo scopo di fornire adeguata protezione dalle
interferenze dannose che possono originarsi in ambienti residenziali.
Questa apparecchiatura genera, usa e può emettere energia in radiofrequenza e, se non viene installata e utilizzata secondo il manuale di
istruzioni, può causare interferenze dannose alle comunicazioni radio.
Qualora l’apparecchiatura dovesse provocare interferenze nella ricezione
radiotelevisiva, cosa che può essere verificata spegnendo e riaccendendo l’apparecchio, si consiglia di eliminare l’interferenza riorientando o
spostando l’antenna di ricezione, oppure aumentando la distanza fra
l’apparecchiatura ed il ricevitore.
Attenzione: qualsiasi cambiamento o modifica all’apparecchiatura
indicata sopra che non siano espressamente autorizzati dalla Timex
Corporation potrebbero annullare il diritto dell’utente ad usare il
dispositivo.
Avviso di settore per il Canada: questo apparato digitale di Classe B è
conforme alle Norme canadesi ICES-003. Cet appariel numérique de la
classe B est conforme à la norme NMB-003 du Canada.
101100
Page 53

Índice
Monitor de Ritmo Cardíaco . . . . . . . . . . . . . . . . . . . . . . . . . . . .104
Como funciona o Monitor Digital de Ritmo Cardíaco . . . . . . .104
Como Usar o Monitor Digital de Ritmo Cardíaco . . . . . . . . . .104
Aviso . . . . . . . . . . . . . . . . . . . . . . . . . . . . . . . . . . . . . . . . . . . .105
Manutenção . . . . . . . . . . . . . . . . . . . . . . . . . . . . . . . . . . . . . . .105
Vida Útil e Substituição da Bateria do Transmissor . . . . . . . .105
Substituição da Bateria . . . . . . . . . . . . . . . . . . . . . . . . . . . . . .105
Resistência à Água . . . . . . . . . . . . . . . . . . . . . . . . . . . . . . . . .107
Sensor de Velocidade + Distância . . . . . . . . . . . . . . . . . . . . . . .107
Como Funciona o Sistema de Velocidade e Distância . . . . . .107
Acerca do Tempo de Ligação Firme do GPS . . . . . . . . . . . . . .107
Fazer Funcionar o Sensor V+D . . . . . . . . . . . . . . . . . . . . . . . .108
Usar o Sensor V+D de Velocidade e Distância no Corpo . . . .109
Usar o Sensor V+D na parte superior do seu braço . . . . . . . .110
Usar o Sensor V+D no seu cinto . . . . . . . . . . . . . . . . . . . . . . .111
Resolver Problemas e Mensagens de Erro do Sensor V+D . .112
Vida Útil e Substituição da Bateria do Sensor V+D . . . . . . . .112
Substituir a Bateria . . . . . . . . . . . . . . . . . . . . . . . . . . . . . . . . .113
Manutenção . . . . . . . . . . . . . . . . . . . . . . . . . . . . . . . . . . . . . . .113
Para todos os Sensores . . . . . . . . . . . . . . . . . . . . . . . . . . . . . . .114
Resistência à água . . . . . . . . . . . . . . . . . . . . . . . . . . . . . . . . . .114
Garantia Internacional . . . . . . . . . . . . . . . . . . . . . . . . . . . . . . .115
Serviço de Assistência . . . . . . . . . . . . . . . . . . . . . . . . . . . . . . .118
Sensores de Boa Forma Física
Timex
Sensor de Ritmo Cardíaco
Sensor de Velocidade + Distância
Os relógios servem para outras coisas além de ver as horas.
A tecnologia digital dá ao seu relógio a capacidade para lhe mostrar
o seu ritmo cardíaco ou medir a velocidade e a distância percorrida.
Estas funções exigem o uso de módulos externos que transmitem
informações ao seu relógio via rádio. Este livro fornece as instruções
para configurar, fazer funcionar e manter em bom estado estes
aparelhos. Procure a secção que for apropriada para o tipo
de aparelho que tenha adquirido.
Para obter mais informações sobre a utilização do
seu relógio, consulte o livro de instruções do relógio.
®
103
Page 54

Monitor de Ritmo Cardíaco
Placas de Contacto
do Sensor
f f
105
Como funciona o Monitor Digital de Ritmo Cardíaco
O Monitor de Ritmo Cardíaco é uma combinação de um Sensor de
Ritmo Cardíaco com um relógio desportivo. O Sensor de Ritmo
Cardíaco prende-se ao seu peito e mede os sinais eléctricos criados
pelo coração à medida que está a bater. Usando esta informação, ele
calcula então o seu ritmo cardíaco e transmite-o ao seu relógio.
Basta olhar para o relógio durante os exercícios ou o treino, para se
permite manter e melhorar o seu nível de forma física.
Como Usar o Monitor Digital de Ritmo Cardíaco
1. Humedeça as placas de contacto do Sensor de Ritmo Cardíaco
com água da torneira. Se for necessário utilize o gel para eléctrodos do sensor do ritmo cardíaco para melhorar o contacto. Um
bom contacto entre a pele e a placa de contacto do sensor é
ESSENCIAL para o funcionamento correcto do Monitor de Ritmo
Cardíaco.
2. Coloque a cinta em volta do peito. Ajuste a
cinta de modo que abrace firmemente à
volta do peito, um pouco abaixo dos seios.
Assegure-se de que o transmissor esteja
centrado no peito e de que esteja de pé,
isto é, que o nome da marca possa ser lido
por uma pessoa que esteja na sua frente.
3. Ponha o Monitor de Ritmo Cardíaco a funcionar: Consulte o manual do utilizador do
seu relógio para obter instruções detal-
104
hadas sobre como observar os dados do ritmo cardíaco.
Aviso
Isto não é um aparelho médico e não é recomendado para uso
por pessoas que tenham problemas cardíacos graves. Deverá
sempre consultar o seu médico antes de iniciar ou de modificar
um programa de exercícios.
Interferências com o sinal de rádio, mau contacto entre a sua pele
e a cinta que abraça o peito e ainda outros factores poderão impedir
a transmissão exacta dos dados do ritmo cardíaco.
Manutenção
Use água doce para lavar o Sensor de Ritmo Cardíaco e a cinta, para
evitar a acumulação de materiais que possam interferir com a medição
do seu ritmo cardíaco.
Vida Útil e Substituição da Bateria do Transmissor
A vida útil da bateria do transmissor deverá ser superior a dois anos,
baseando-nos num uso de uma hora por dia. Um uso mais intenso
encurtará a duração da bateria. Substitua a bateria do transmissor
quando acontecer algum dos casos seguintes:
• O relógio já não recebe informações sobre o ritmo cardíaco do seu
transmissor, mesmo quando ele está correctamente colocado no peito.
• Mensagens de erro (COMM ERR, SIGNAL LOST) aparecem cada vez
com maior frequência no mostrador.
Substituição da Bateria
NOTA: Precisa de ter um aparelho (tal como um relógio) que
seja capaz de exibir as informações do ritmo cardíaco, para
Page 55

poder verificar se a nova bateria foi colocada correctamente.
Use uma moeda para abrir a tampa do compartimento
da bateria (na traseira do transmissor).
• Insira a nova bateria (CR2032 ou equivalente) com o “
para si.
• Empurre o botão de rearmar que está ao lado da bateria. Use um
palito ou um clipe para papel endireitado.
• Volte a colocar a tampa da bateria.
• Faça um teste rápido da unidade:
1. Afaste-se de quaisquer fontes de interferência eléctricas
ou de rádio.
2. Humedeça bem as placas de contacto do Sensor de Ritmo
Cardíaco e coloque a cinta em volta do peito, firmemente
contra a sua pele.
3. Ponha a funcionar a função de monitor do ritmo cardíaco
do seu relógio.
4. Passados poucos segundos, o símbolo do coração deverá
começar a piscar no mostrador do seu relógio, indicando que
o transmissor ficou activado. Isto confirma que a bateria foi
instalada correctamente.
NOTA: Não é necessário que apareça um valor de ritmo cardíaco
no mostrador durante este teste.
SE O CORAÇÃO A PISCAR NÃO APARECER NO MOSTRADOR:
• Carregue novamente no botão de re-armar, no compartimento
da bateria e volte a montar a tampa da bateria.
• Volte a instalar a bateria e repita o teste indicado acima.
+” voltado
106
Resistência à Água
O Sensor de Ritmo Cardíaco resiste a uma pressão da água até 60
p.s.i. Consulte o quadro no fim do livro para obter as equivalências.
VVIISSO
O
A
A
: O Sensor de Ritmo Cardíaco não exibirá o ritmo cardíaco
quando o fizer funcionar debaixo de água.
Sensor de Velocidade + Distância
Como Funciona o Sistema de Velocidade e Distância
O Sensor de Velocidade + Distância (S+D em inglês) captura sinais
dos satélites GPS (Sistema de Posicionamento Global) que estão em
órbita, para determinar a sua posição e as suas mudanças de posição
em qualquer lugar do mundo. Esta informação é transmitida por rádio
para o seu relógio para poder calcular a sua velocidade, cadência
e distância percorrida. Para obter mais informações sobre a sua
velocidade e distância, consulte as instruções do seu relógio.
Acerca do Tempo de Ligação Firme do GPS
• Na primeira vez em que for usado, o Sensor V+D pode demorar 5
minutos ou até mais a estabelecer a ligação com os satélites. Depois
disso, o aparelho normalmente apenas precisa de um minuto.
• Se se deslocar para centenas de quilómetros de distância do local
em que usou o Sensor V+D pela última vez ou se deixar o Sensor
V+D ligado dentro de casa por longos períodos de tempo, até sair
novamente para o exterior, a busca poderá demorar mais tempo
do que se esperava.
• Para ter tempos de ligação firme do GPS mais curtos, tente minimizar os movimentos enquanto a luz vermelha estiver a piscar.
107
Page 56

Fazer Funcionar o Sensor V+D
Sensor V+D Ligar/Desligar
Braçadeira amovível
Tampa do compartimento
da bateria
Para obter melhores resultados, o Sensor precisa de uma vista
desimpedida do céu.
• Carregue e segure no botão S+D SENSOR ON/OFF (SENSOR
V+D LIGAR/DESLIGAR) para ligar o receptor. Deverá estar ao ar
livre e numa área descampada. Se a luz do botão indicador do
estado brilhar em vermelho imediatamente (continuamente, isto
é, sem piscar), então a bateria está esgotada a ponto de não ser
possível fazer funcionar o GPS e portanto a bateria tem que ser
substituída. O botão ON/OFF (LIGAR/DESLIGAR) do Sensor V+D
piscará inicialmente em vermelho enquanto o Sensor V+D
calcula a sua posição em relação aos satélites GPS. O texto
“SEARCHING” (BUSCANDO) pode aparecer no mostrador do
relógio se estiver a usar um relógio Timex® que seja compatível.
• O botão ON/OFF (LIGAR/DESLIGAR) piscará em verde quando o
Sensor S+D tiver conseguido capturar os sinais dos satélites.
As informações de velocidade e de distância estão agora a ser
transmitidas para o relógio (ou para outro aparelho).
• Para desligar o Sensor V+D, Sensor, carregue e segure no botão
S+D SENSOR ON/OFF (SENSOR V+D LIGAR/DESLIGAR) durante
um segundo. O botão brilhará em vermelho enquanto estiver
a segurar o botão e depois apaga-se, indicando que o Sensor
V+D está desligado.
• O Sensor V+D apagar-se-á automaticamente se ocorrer algum dos
casos seguintes:
108
— A bateria esgotou-se.
— Não é detectado movimento durante 15 minutos
consecutivos.
— Não são detectados sinais de GPS durante 15 minutos
consecutivos.
Usar o Sensor V+D de Velocidade e Distância no Corpo
Para obter melhores resultados, ate o Sensor V+D com
a braçadeira à parte superior do seu braço. Também pode usá-lo
na cintura com o grampo. Use o seu relógio de modo que fique
sempre a menos de 1 metro (cerca de 3 pés) do sensor V+D.
Assegure-se que o sensor está virado para cima de forma que o
logotipo GPS possa ser lido por uma pessoa que esteja de frente
para si. Quaisquer roupas que se usem por cima do Sensor V+D
terão que estar secas e livres de metais.
109
Page 57

Usar o Sensor V+D na parte superior do seu braço
Fig. 1
Fig. 2 Fig. 3
• Assegure-se de que retirou o grampo
do cinto. P
para o cinto, agarre no grampo
e empurre-o gentilmente para fora
(Fig. 1). Para voltar a colocar o grampo
alinhe a patilha do grampo com
a ranhura do sensor e introduza
gentilmente o grampo na unidade.
• Se a braçadeira não estiver colocada, faça deslizar a ligação
de plástico com a tira elástica pela ranhura do Sensor V+D
como se mostra. (Fig. 2)
• Faça deslizar a tira elástica através da extremidade aberta
da ligação, e fixe-a no seu lugar com o gancho e o fecho.
• Passe o sensor e a fita sobre a mão e para a parte superior
do braço. O relógio deve ser usado no mesmo braço. (Fig. 3)
ara remover o grampo
• Puxe a braçadeira através da extremidade ajustável de maneira
a ajustar-se aconchegadamente à volta do braço.
Usar o Sensor V+D no seu cinto
• Se a braçadeira estiver colocada, retire-a fazendo deslizar
a ligação de plástico.
• Insira o grampo para o cinto alinhando a patilha do grampo
com a ranhura do Sensor e instalando-a no seu lugar.
• Use o sensor do mesmo lado do corpo em que usa o relógio.
110
111
Page 58

Resolver Problemas e Mensagens de Erro do
Sensor V+D
PROBLEMA
• O Sensor V+D não consegue estabelecer a ligação com
os satélites GPS (O botão ON/OFF (LIGAR/DESLIGAR) nunca
muda para verde a piscar).
• O Sensor GPS V+D perde os sinais dos satélites durante a utilização.
O relógio poderá exibir uma indicação de que o sinal GPS está fraco.
SOLUÇÃO
• Mude-se para uma área ao ar livre mais descampada.
• Afaste-se dos objectos metálicos.
• Substitua a bateria do Sensor V+D.
NOTA: O sistema pode manter a sua precisão durante períodos
de tempo curtos mesmo quando os sinais GPS se perdem.
PROBLEMA
• O relógio exibe a mensagem FATAL GPS ERROR (ERRO GPS FATAL).
SOLUÇÃO
• O Sensor V+D está danificado; contacte o Serviço de Apoio ao
Cliente da Timex.
Vida Útil e Substituição da Bateria do Sensor V+D
A bateria do Sensor V+D dura aproximadamente 12 horas.
O Sensor V+D por si mesmo não indica o estado em que se
encontra a sua bateria, excepto se a bateria estiver completamente esgotada (como foi explicado na secção “Fazer Funcionar
112
o Sensor V+D”). Em vez disso, esta informação é enviada por rádio
para o seu relógio, juntamente com os dados da sua performance.
Consulte o manual do utilizador do seu relógio para obter
o procedimento para verificar o nível da bateria do Sensor V+D.
Substituir a Bateria
• Levante o desandador de meio círculo que se encontra na tampa
do compartimento da bateria (localizada no lado da caixa
do Sensor V+D) e rode-o no sentido contrário ao dos ponteiros
do relógio, para desapertar.
• Retire a tampa do compartimento da bateria.
• Retire a bateria velha e insira uma (1) bateria tipo AA nova.
Observe as marcas +/- dentro do compartimento da bateria
para se assegurar de que a nova bateria fica alinhada da forma
correcta.
• Volte a colocar a tampa do compartimento da bateria e aperte-a
rodando-a no sentido dos ponteiros do relógio. Não a aperte
demasiado.
Manutenção
Use água doce para lavar periodicamente o Sensor V+D e a sua
braçadeira, a fim de evitar a acumulação de materiais que possam
interferir com as medições da sua velocidade e distância.
113
Page 59

Para todos os Sensores
Resistência à água
O nível de resistência à água (se houver algum) está marcado na
caixa. Consulte o quadro abaixo para encontrar as equivalências.
O Sensor V+D é resistente aos salpicos de água. Se ele alguma vez
ficar submerso, retire a traseira da caixa e a bateria e deixe que
o compartimento seque por completo.
Water-Resistance p.s.i.a.* Water Pressure
Depth Below Surface
30m/98ft 60
50m/164ft 86
100m/328ft 160
200m/656ft 284
*libras por polegada quadrada absolutas
AVISO: PARA MANTER A RESISTÊNCIA À ÁGUA, NÃO CARREGUE
EM NENHUM DOS BOTÕES DEBAIXO DE ÁGUA.
AVISO: OS SENSORES NÃO EXIBIRÃO DADOS QUANDO
FUNCIONAREM DEBAIXO DE ÁGUA.
GARANTIA INTERNACIONAL
(GARANTIA LIMITADA U.S.A.)
O seu produto é garantido contra defeitos de fabricação pela Timex
Corporation por um período de UM ANO contado desde a data da
compra original. A Timex e as suas representantes no mundo inteiro
aceitarão esta Garantia Internacional.
É favor notar que a Timex pode, à sua escolha, reparar o seu
produto instalando componentes novos ou completamente
recondicionados e inspeccionados ou substitui-lo por um modelo
idêntico ou semelhante. IMPORTANTE: NOTE QUE ESTA GARANTIA
NÃO COBRE DEFEITOS OU ESTRAGOS NO SEU PRODUTO:
1) depois de ter expirado o período da garantia;
2) se o produto não tiver sido originalmente comprado num
retalhista autorizado;
3) devidos a serviços de reparação que não tenham sido
executados pelo fabricante;
4) devidos a acidentes, modificações ou maus tratos; e
5) na caixa, acessórios ou bateria. Poderá ter que pagar pela
substituição de qualquer destas peças.
114
115
Page 60

ESTA GARANTIA E OS REMÉDIOS AQUI CONTIDOS SÃO EXCLUSIVOS
E SUBSTITUEM TODAS AS OUTRAS GARANTIAS, EXPRESSAS OU
IMPLÍCITAS, INCLUINDO QUALQUER GARANTIA IMPLÍCITA DE
COMERCIALIZAÇÃO OU DE ADEQUAÇÃO PARA UM PROPÓSITO EM
PARTICULAR. A TIMEX NÃO É RESPONSÁVEL POR QUAISQUER
COMPENSAÇÕES ESPECIAIS, INCIDENTAIS OU CONSEQUENTES.
Alguns países e estados não permitem limitações em garantias
implícitas e não permitem exclusões ou limitações em compensações e portanto estas limitações poderão não se aplicar a si. Esta
garantia dá-lhe direitos legais específicos e poderá ter também outros direitos que variam de país para país e de estado para estado.
Para obter serviço de garantia, faça o favor de devolver o seu relógio
e o sensor ao fabricante, a um dos seus agentes ou ao retalhista
onde o produto foi comprado, juntamente com o original preenchido
do Cupão de Reparação do Produto ou, nos EUA e Canadá apenas, o
original preenchido do Cupão de Reparação do Produto ou uma
declaração escrita identificando o seu nome, morada, número de
telefone e a data e local da compra. Junte ao seu relógio e ao sensor
o seguinte pagamento para despesas de envio e processamento
(não se trata de despesas de reparação): um cheque ou vale postal
de US$7,50 nos EUA; um cheque ou vale postal de CAN$6,00 no
Canadá; e um cheque ou vale postal de UK£2,50 no Reino Unido.
Noutros países, ser-lhe-á debitada a franquia e o manejo. NUNCA
INCLUA QUALQUER ARTIGO DE VALOR PESSOAL NA EMBALAGEM
QUE NOS ENVIA.
Para os E.U.A, chame pelo telefone 1-800-328-2677 para obter
116
informações adicionais sobre a garantia. No Canadá, chame para
1-800-263-0981. No Brasil, chame para +55 (11) 5572 9733. No
México, chame para 01-800-01-060-00. Na América Central, nas
Caraíbas, nas Bermudas e nas Bahamas, chame para (501) 370-5775
(E.U.A.). Na Ásia, chame para 852-2815-0091. No Reino Unido, chama
para 44 208 687 9620. Em Portugal, chame para 351 212 946 017.
Na França, chame para 33 3 81 63 42 00. Na Alemanha, chame para
+43 662 88 92130. No Médio Oriente e na África, chame para
971-4-310850. Noutras áreas, por favor contacte o seu retalhista
Timex local ou o distribuidor Timex para obter mais informações
sobre a garantia.
GARANTIA INTERNACIONAL TIMEX — CUPÃO DE REPARAÇÃO
Data da Compra Original:
(Junte cópia do recibo da venda, se o tiver)
Comprado por:
(Nome, endereço e número de telefone)
Local de Compra:
(Nome e endereço)
Razão da Devolução:
ESTE É O SEU CUPÃO PARA REPARAÇÃO DO RELÓGIO.
GUARDE-O EM LUGAR SEGURO.
DE RELÓGIO
117
Page 61

Serviço de Assistência
Se o seu Sensor alguma vez precisar de serviço de assistência,
envie-o para a Timex conforme explicado na Garantia Internacional
Timex ou para o seguinte endereço:
HotLine Watch Service
P.O. Box 2740
Little Rock, AR 72203, E.U.A.
Endereço:
HotLine Watch Service
1302 Pike Ave.
North Little Rock, AR 72114, E.U.A.
Para sua conveniência em obter serviço de assistência da fábrica,
os retalhistas Timex participantes poderão fornecer-lhe uma
embalagem apropriada para o envio do relógio para reparação, já
com o endereço impresso. Consulte a Garantia Internacional Timex
para ver instruções específicas sobre os cuidados e a manutenção
do seu aparelho de relojoaria.
Para questões de serviço de assistência, chame para
1-800-328-2677.
Se precisar de uma nova cinta ou bracelete sobressalente,
chame para 1-800-328-2677.
118
Participação FCC (E.U.A.) / Participação IC (Canada)
A Timex Corporation declara que os seguintes produtos, que
incorporam só componentes da Timex® Bodylink
®
System, estão
em conformidade com a relevante Parte 15 das regras da FCC
e com as regras para dispositivos da Classe B da Industry Canada,
conforme se segue:
Nome do Produto:
Sistema de Velocidade + Distância - GPS Transmissor da Série
M8xx/M1xx
Sistema Monitor de Ritmo Cardíaco – HRM Transmissor da Série
M8xx/M5xx/M6xx
Tipo de Produto: Irradiador Intencional
Modelo No. Ident. FCC Certificado IC No.
M640 Monitor de Ritmo Cardíaco EP9TMXM640 3348A-TMXM640
M515 Monitor de Ritmo Cardíaco EP9TMXM515 3348A-M515
M185 Monitor de
Velocidade + Distância EP9TMXM185 3348A-TMXM185
M850 Monitor de
Velocidade + Distância EP9TMXM850 3348A-12181
Estes dispositivos estão em conformidade com a Parte 15 das
regras da FCC. O funcionamento está sujeito às duas condições
seguintes: (1) O dispositivo não pode causar interferência nociva
e (2) o dispositivo tem que aceitar qualquer interferência recebida,
incluindo interferências que possam provocar um funcionamento
não desejado.
119
Page 62

Nome do Produto:
Receptores de Relógio – HRM/Velocidade+Distância da Série
M8xx/M5xx/M6xx/M1xx
Gravadores de Dados – HRM/Velocidade+Distância da Série
M5xx/M1xx
Tipo de Produto: Irradiador não intencional
Este equipamento foi ensaiado e determinou-se que estava em
conformidade com os limites de um dispositivo digital da Classe B,
conforme a Parte 15 das regras da FCC. Estes limites são projectados para fornecerem uma protecção razoável contra interferências
nocivas num ambiente residencial. Este equipamento cria, usa
e pode radiar energia sob a forma de frequências rádio e, se não
for usado conforme indicado no manual de instruções, pode causar
interferência nociva às comunicações por rádio. Se este equipamento
causar interferência nociva à recepção de rádio ou de televisão,
o que pode ser determinado ligando e desligando o equipamento,
o utilizador deverá tentar corrigir essa interferência re-orientando
ou movendo para outro lado a antena receptora; ou aumentando
o espaço que separa o equipamento e o receptor.
Cuidado: Quaisquer alterações ou modificações ao equipamento
indicado acima, não expressamente aprovadas pela Timex
Corporation, poderão anular a autoridade do utilizador para utilizar
este equipamento.
Declaração Industry Canada: Este aparelho digital da Classe B
está em conformidade com a norma canadiana ICES-003. Cet
appariel numérique de la classe B est conforme à la norme
NMB-003 du Canada.
120
121
Page 63

inhoudsopgave
Hartslagmonitor . . . . . . . . . . . . . . . . . . . . . . . . . . . . . . . . . . . . .124
De werking van de digitale hartslagmonitor . . . . . . . . . . . . . .124
De digitale hartslagmonitor gebruiken . . . . . . . . . . . . . . . . . .124
Waarschuwing . . . . . . . . . . . . . . . . . . . . . . . . . . . . . . . . . . . . .125
Onderhoud . . . . . . . . . . . . . . . . . . . . . . . . . . . . . . . . . . . . . . . .125
Levensduur en vervanging van zenderbatterij . . . . . . . . . . . .125
Batterij vervangen . . . . . . . . . . . . . . . . . . . . . . . . . . . . . . . . . .125
Waterbestendigheid . . . . . . . . . . . . . . . . . . . . . . . . . . . . . . . .126
Snelheids- + afstandssensor . . . . . . . . . . . . . . . . . . . . . . . . . . .127
De werking van het snelheids- en afstandssysteem . . . . . . .127
Informatie over GPS-zoektijden . . . . . . . . . . . . . . . . . . . . . . .127
Werking van de S+A-sensor . . . . . . . . . . . . . . . . . . . . . . . . . .128
De snelheids- en afstandssensor (S+A) dragen . . . . . . . . . . .129
De S+A-sensor op de bovenarm dragen . . . . . . . . . . . . . . . . .130
De S+A-sensor op de riem dragen . . . . . . . . . . . . . . . . . . . . .131
Oplossing voor S+A-sensorfouten en foutmeldingen . . . . . . .132
Levensduur en vervanging van batterijen van S+A-sensor . .132
Batterijen vervangen . . . . . . . . . . . . . . . . . . . . . . . . . . . . . . . .133
Onderhoud . . . . . . . . . . . . . . . . . . . . . . . . . . . . . . . . . . . . . . . .133
Alle sensors . . . . . . . . . . . . . . . . . . . . . . . . . . . . . . . . . . . . . . . .134
Waterbestendigheid . . . . . . . . . . . . . . . . . . . . . . . . . . . . . . . .134
Internationale Garantie . . . . . . . . . . . . . . . . . . . . . . . . . . . . . .135
Service . . . . . . . . . . . . . . . . . . . . . . . . . . . . . . . . . . . . . . . . . . .138
Timex
®
Conditiesensors
Hartslagsensor
Snelheids- + afstandssensor
Horloges zijn voor meer dan alleen maar de tijd. Dankzij digitale technologie kan uw horloge ook uw hartslag weergeven of snelheid en
afgelegde afstand meten. Voor deze functies moeten externe modules worden gebruikt die informatie draadloos naar het horloge
overzenden. In dit boekje vindt u instructies voor het instellen, bedienen en onderhouden van deze apparaten. Zoek het hoofdstuk op
dat van toepassing is op het type apparaat dat u hebt.
Voor informatie over het gebruik van het horloge
kunt u het horloge-instructieboekje raadplegen.
123
Page 64

Hartslagmonitor
Sensorkussentjes
f f
De werking van de digitale hartslagmonitor
De hartslagmonitor is een combinatie van een hartslagsensor en een
sporthorloge. De hartslagsensor wordt op de borstkas bevestigd en meet
de elektrische signalen die door het kloppende hart worden opgewekt.
Aan de hand van deze informatie berekent de monitor de hartslag en
zendt deze naar het horloge over. U kunt tijdens de training even naar
het horloge kijken om te controleren of u in het juiste hartslagbereik
bent om uw conditieniveau te handhaven of te verbeteren.
De digitale hartslagmonitor gebruiken
1. Maak de kussentjes van de hartslagsensor nat met leidingwater.
Gebruik zo nodig een elektrodegel voor hartslagmonitors voor
beter contact. Goed contact tussen de huid en de sensorkussentjes
is ZEER BELANGRIJK voor de juiste werking
van de hartslagmonitor.
2. Doe de borstband om. Maak de band strak
om de borstkas vast, vlak onder de borsten.
Zorg dat de zender in het midden op de
borstkas zit en de juiste kant naar boven
wijst zodat het logo gelezen kan worden
door iemand die tegenover u staat.
3. Start de hartslagmonitor: raadpleeg de
gebruikshandleiding van het horloge voor
gedetailleerde instructies voor het aflezen
van de hartslaggegevens.
124
Waarschuwing
Dit is geen medisch apparaat en wordt niet aanbevolen voor
gebruik door personen met ernstige hartkwalen. U dient altijd
uw arts te raadplegen voordat u een trainingsprogramma begint
of wijzigt.
Storing van het radiosignaal, slecht contact tussen de huid en borstband en andere factoren kunnen tot gevolg hebben dat hartslaggegevens niet nauwkeurig worden overgezonden.
Onderhoud
Spoel de hartslagsensor en band in schoon water af om te
voorkomen dat stoffen zich ophopen die de meting van de hartslag
kunnen verstoren.
Levensduur en vervanging van zenderbatterij
De batterij dient minstens twee jaar mee te gaan bij gebruik van een
uur per dag. Langer gebruik verkort de levensduur van de batterij.
Vervang de zenderbatterij wanneer zich een van de volgende
omstandigheden voordoet:
• Het horloge ontvangt de hartslaginformatie niet meer van de borstkaszender terwijl deze naar behoren op de borstkas wordt gedragen.
• Foutmeldingen [COMM ERR, SIGNAL LOST (COMM.FOUT, SIGNAAL
VERLOREN)] verschijnen vaker op het display.
Batterij vervangen
OPMERKING: U hebt een apparaat (zoals een horloge) nodig dat
hartslaginformatie kan weergeven om te controleren of de
nieuwe batterij correct aangebracht is. Maak het deksel van de
125
Page 65

batterijruimte (achterkant van zender) open met een munt.
• Breng de nieuwe batterij (CR2032 of gelijkwaardig) aan met de “
naar u gericht.
• Druk op de reset-knop naast de batterij. Gebruik daarvoor een
tandenstoker of een recht gebogen paperclip.
• Breng het batterijdeksel weer aan.
• Voer een sneltest van het apparaat uit:
1. Zorg dat u uit de buurt van bronnen van elektrische of radiostoring bent.
2. Maak de hartslagsensorkussentjes goed nat en breng de borstband om uw borstkas aan, stevig tegen de huid gedrukt.
3. Schakel de hartslagmonitorfunctie op het horloge in.
4. Binnen enkele seconden hoort het hartsymbool op het display
van het horloge te beginnen te knipperen, wat aangeeft dat de
zender werkt. Dit betekent dat de batterij goed geïnstalleerd is.
OPMERKING: Er hoeft tijdens deze test geen hartslagwaarde op
het display te verschijnen.
ALS HET KNIPPERENDE HART NIET OP HET HORLOGE VERSCHIJNT:
• Druk nogmaals op de reset-schakelaar in de batterijruimte en breng
het batterijdeksel weer aan.
• Breng de batterij weer aan en herhaal de bovenstaande testprocedure.
+”
Waterbestendigheid
De hartslagsensor is bestand tegen een waterdruk van 60 p.s.i. Zie de
tabel aan het einde van dit boekje voor overeenkomstige waarden.
126
WAARSCHUWING: De hartslagsensor geeft geen hartslag weer wanneer deze onder water wordt gebruikt.
Snelheids- + afstandssensor
De werking van het snelheids- en afstandssysteem
De snelheids- + afstandssensor (S+A) krijgt signalen van GPS-satellieten (globaal positioneringssysteem) die zich in een baan rond de aarde
bevinden, om uw positie en positieveranderingen op de wereldbol te
bepalen. Deze informatie wordt draadloos naar het horloge overgezonden zodat het de snelheid, het tempo en de afgelegde afstand kan
berekenen. Voor meer informatie over het bepalen van de snelheid en
afstand kunt u de instructies voor het horloge raadplegen.
Informatie over GPS-zoektijden
• Wanneer u de S+A-sensor voor het eerst gebruikt, kan het wel
5 minuten of zelfs langer duren voordat een verbinding met de
satellieten tot stand is gebracht. Daarna duurt het gewoonlijk
slechts één minuut.
• Als u honderden kilometers van de plaats vandaan gaat waar u de
S+A-sensor voor het laatst hebt gebruikt of als u de S+A-sensor
lange tijd binnenshuis aan laat staan voordat u naar buiten gaat, kan
het zoeken langer duren dan verwacht wordt.
• Probeer voor de kortste GPS-zoektijden verplaatsing tot een minimum te beperken terwijl de indicator rood is en knippert.
127
Page 66

Werking van de S+A-sensor
S+D-sensor AAN/UIT
Verwijderbare armband Batterijdeurtje
Voor de beste resultaten moet de sensor een duidelijk zicht op de
hemel hebben.
• Houd de knop S+A-SENSOR AAN/UIT ingedrukt om de ont-
vanger aan te zetten. U moet buiten op een open plek zijn. Als
de knop onmiddellijk rood wordt (continu, knippert niet), is de
batterij zo ver ontladen dat het GPS niet kan worden gebruikt,
en moet de batterij worden vervangen. De knop AAN/UIT op de
S+A-sensor wordt eerst rood en knippert terwijl de S+A-sensor
de positie ten opzichte van de GPS-satellieten berekent. De tekst
“SEARCHING” (ZOEKEN) kan op het display van het horloge verschijnen als een compatibel Timex® horloge wordt gebruikt.
• De knop AAN/UIT wordt groen en knippert wanneer de S+A-
sensor signalen van de satellieten heeft verkregen. Informatie
over snelheid en afstand wordt nu naar het horloge (of een
ander apparaat) overgezonden.
• Als u de S+A-sensor wilt uitzetten, houdt u de knop
SOR AAN/UIT één seconde ingedrukt. De knop is rood terwijl u
de knop ingedrukt houdt en gaat vervolgens uit, wat aangeeft
dat de S+A-sensor uitgeschakeld is.
• De S+A-sensor gaat automatisch uit als een van de volgende
omstandigheden zich voordoet:
S+A-SEN-
128
— De batterij raakt ontladen.
— Gedurende 15 minuten achter elkaar is geen beweging gede-
tecteerd.
— Gedurende 15 minuten achter elkaar zijn geen GPS-signalen
gedetecteerd.
De snelheids- en afstandssensor (S+A) dragen
Voor de beste resultaten bindt u de S+A-sensor om uw bovenarm
vast. U kunt hem ook aan uw middel vastklemmen. Draag het horloge zodanig dat het altijd binnen 1 meter van de S+A-sensor is.
Zorg dat de juiste kant van de sensor naar boven gericht is zodat
het GPS-logo door iemand tegenover u gelezen kan worden.
Kleding die over de S+A-sensor wordt gedragen, moet droog en
vrij van metaal zijn.
129
Page 67

De S+A-sensor op de bovenarm dragen
Fig. 1
Fig. 2 Fig. 3
• Zorg dat de riemklem verwijderd is.
Als u de riemklem wilt verwijderen,
pakt u de klem vast en maakt u hem
voorzichtig los. (Fig. 1) Als u de klem
weer wilt aanbrengen, brengt u het
lipje op de klem in lijn met de gleuf op
de sensor en klikt u de klem
voorzichtig op het apparaat.
• Als de armband niet aangebracht is, schuift u het kunststof hulpstuk met elastische band in de gleuf van de S+A-sensor zoals
afgebeeld. (Fig. 2)
• Schuif de elastische band door het open einde van het hulpstuk
en zet het met de haak-en-oog sluiting vast.
• Schuif de sensor en band over uw hand en op uw bovenarm.
Het horloge moet aan dezelfde arm worden gedragen.
• Trek de armband door het verstelbare einde zodat deze strak
om de arm zit.
De S+A-sensor op de riem dragen
• Als de armband aangebracht is, verwijdert u hem door hem uit
het kunststof hulpstuk te schuiven.
• Draag de sensor aan dezelfde kant van het lichaam als het horloge.
130
131
Page 68

Oplossing voor S+A-sensorfouten en foutmeldingen
PROBLEEM
De S+A-sensor kan de GPS-satellieten niet vinden (de knop
•
AAN/UIT wordt nooit groen en knippert).
• De S+A-sensor voor het GPS verliest tijdens gebruik signalen van de
satellieten. Het horloge geeft wellicht een bericht weer dat het GPSsignaal zwak is.
OPLOSSING
• Ga naar een meer open plek buiten.
• Zorg dat er geen metalen voorwerpen in de buurt zijn.
Vervang de batterij in de S+A-sensor
•
OPMERKING: Het systeem kan gedurende korte tijd nauwkeurig blijven wanneer GPS-signalen verloren zijn.
PROBLEEM
• Op het horloge staat het bericht FATAL GPS ERROR (FATALE GPS-
FOUT).
OPLOSSING
• De S+A-sensor is beschadigd; neem contact op met de klantenservice van Timex.
Levensduur en vervanging van batterijen van S+Asensor
De batterij in de S+A-sensor gaat ongeveer 12 uur mee. De S+Asensor zelf geeft de conditie van de batterij niet aan, behalve als
de batterij helemaal ontladen is (zoals vermeld in het hoofdstuk
132
“Werking van de S+A-sensor”). Maar deze informatie wordt naar
het horloge uitgezonden, samen met de prestatiegegevens.
Raadpleeg de gebruikshandleiding van het horloge voor de procedure om de conditie van de batterij van de S+A-sensor te controleren.
Batterijen vervangen
• Wip de halfcirkelvormige knop op het batterijdeurtje (aan de
zijkant van de S+D-sensorbehuizing) naar buiten en draai hem
tegen de klok in om het deurtje los te schroeven.
• Verwijder het batterijdeurtje.
• Verwijder de oude batterij en breng één (1) nieuwe AA batterij
aan. Zorg dat de +/- markeringen van de nieuwe batterij in lijn
liggen met dezelfde markeringen in de batterijruimte.
• Breng het batterijdeurtje weer aan en draai de dop met de klok
mee vast. Draai hem niet te strak vast. .
Onderhoud
Spoel de S+A-sensor en de bijbehorende band regelmatig in schoon
water af om te voorkomen dat stoffen zich ophopen die de meting
van de snelheid en afstand kunnen verstoren.
133
Page 69

Alle sensors
Waterbestendigheid
Het waterbestendigheidsniveau (indien van toepassing) wordt op de
behuizing aangegeven. Zie de tabel hieronder voor gelijkwaardige
overeenkomstige waarden.
De S+A-sensor is bestand tegen spatten. Als hij ondergedompeld
raakt, verwijdert u de achterkant van de behuizing en de batterijen
zodat de batterijruimte kan drogen.
Waterbestendige p.s.i.a.* Waterdruk
diepte onder oppervlak
30 m/98 ft 60
50 m/164 ft 86
100 m/328 ft 160
200 m/656 ft 284
*lb per vierkante inch absoluut
WAARSCHUWING: DRUK ONDER WATER OP GEEN ENKELE KNOP
OPDAT HET APPARAAT WATERBESTENDIG BLIJFT.
WAARSCHUWING: DE SENSORS GEVEN GEEN GEGEVENS WEER
WANNEER ZE ONDER WATER WORDEN GEBRUIKT.
INTERNATIONALE GARANTIE
(BEPERKTE AMERIKAANSE GARANTIE)
Het product heeft een garantie van Timex Corporation voor gebreken
in fabricage gedurende een periode van EEN JAAR vanaf de oorspronkelijke aankoopdatum. Timex en gelieerde ondernemingen over
de hele wereld erkennen deze internationale garantie.
Timex mag, naar eigen keuze, het product repareren door nieuwe of
grondig gereviseerde en geïnspecteerde componenten te installeren
of het vervangen door een identiek of gelijksoortig model. BELANGRIJK: DEZE GARANTIE DEKT GEEN GEBREKEN OF SCHADE AAN HET
PRODUCT:
1) nadat de garantietermijn is verlopen;
2) als het product oorspronkelijk niet bij een erkende winkelier is
gekocht;
3) als gevolg van reparaties die niet door de fabrikant zijn uitgevoerd;
4) als gevolg van ongelukken, knoeien of misbruik; en
5) Behuizing, accessoires of batterij. Het vervangen van deze
onderdelen kan aan u in rekening worden gebracht.
134
135
Page 70

DEZE GARANTIE EN HET HIERIN UITEENGEZETTE VERHAAL ZIJN
EXCLUSIEF EN KOMEN IN DE PLAATS VAN ALLE ANDERE GARANTIES,
UITDRUKKELIJK OF IMPLICIET, MET INBEGRIP VAN IMPLICIETE GARANTIE
VAN VERKOOPBAARHEID OF GESCHIKTHEID VOOR EEN BEPAALD DOEL.
TIMEX IS NIET AANSPRAKELIJK VOOR SPECIALE, INCIDENTELE OF
GEVOLGSCHADE.
Sommige landen en staten staan geen beperkingen toe met betrekking tot impliciete garanties en staan geen uitsluitingen of beperkingen met betrekking tot schade toe, zodat deze beperkingen wellicht
niet voor u van toepassing zijn. Deze garantie geeft u specifieke wettelijk rechten en u kunt ook andere rechten hebben die van land tot
land en van staat tot staat verschillen.
Voor het verkrijgen van service onder de garantie dient u het horloge
en de sensor naar de fabrikant, een van de gelieerde ondernemingen
of de winkelier waar het product gekocht is, te retourneren, samen
met een ingevulde, originele productreparatiebon of, alleen in de VS
en Canada, de ingevulde originele productreparatiebon of een
schriftelijke verklaring waarin uw naam, adres, telefoonnummer en
datum en plaats van aankoop worden vermeld. Wilt u het volgende
met het horloge en de sensor sturen voor port en behandeling (dit
zijn geen reparatiekosten): een cheque of postwissel voor US$ 7,50 in
de VS; een cheque of postwissel voor CAN$ 6,00 in Canada; en een
cheque of postwissel voor UK£ 2,50 in Groot-Brittannië. In andere landen worden port en behandeling in rekening gebracht. STUUR NOOIT
EEN ARTIKEL VAN PERSOONLIJKE WAARDE MEE.
136
Voor de V.S. kunt u 1-800-328-2677 bellen voor meer informatie over
de garantie. Voor Canada belt u 1-800-263-0981. Voor Brazilië
+55 (11) 5572 9733. Voor Mexico 01-800-01-060-00. Voor MiddenAmerika, het Caribisch gebied, Bermuda en de Bahama’s
(501) 370-5775 (V.S.). Voor Azië 852-2815-0091. Voor Groot-Brittannië
44 208 687 9620. Voor Portugal 351 212 946 017. Voor Frankrijk
33 3 81 63 42 00. Voor Duitsland +43 662 88 92130. Voor het MiddenOosten en Afrika 971-4-310850. Voor andere gebieden kunt u contact
opnemen met uw plaatselijke Timex-winkelier of -distributeur voor
informatie over de garantie.
INTERNATIONALE GARANTIE VAN TIMEX —
HORLOGEREPARATIEBON
Oorspronkelijke aankoopdatum:
(kopie van ontvangstbewijs aanhechten, indien beschikbaar)
Gekocht door:
(naam, adres en telefoonnummer)
Plaats van aankoop:
(naam en adres)
Reden voor terugzending:
DIT IS UW HORLOGEREPARATIEBON. BEWAAR HEM OP EEN VEILIGE PLAATS.
137
Page 71

Service
Mocht de sensor ooit gerepareerd moeten worden, stuur hem dan
naar Timex zoals uiteengezet in de internationale garantie van Timex
of geadresseerd aan:
HotLine Watch Service
P.O. Box 2740
Little Rock, AR 72203 USA
Straatadres:
HotLine Watch Service
1302 Pike Ave.
North Little Rock, AR 72114 USA
Om gemakkelijk service van de fabriek te verkrijgen kunnen deelnemende Timex-winkeliers u een geadresseerde horlogereparatieenveloppe verstrekken. Zie de internationale garantie van Timex voor
specifieke instructies over het onderhoud en de service van de horlogemodule.
Bel voor vragen over service: 1-800-328-2677.
Bel 1-800-328-2677 als u een nieuwe borst- of armband nodig
hebt.
.) / IC-kennisgeving (Canada)
FCC-kennisgeving (V
.S
Timex Corporation verklaart dat de volgende producten, waaronder
®
alle componenten van het Timex® Bodylink
de regels van het relevante deel 15 van de FCC en de regels van
Industry Canada voor apparaten van klasse B, en wel als volgt:
systeem, voldoen aan
Productnaam:
Snelheids- + afstandssysteem - GPS-zendontvanger serie M8xx/M1xx
Hartslagmonitorsysteem – HRM-zender serie M8xx/M5xx/M6xx
Producttype:
Model FCC ID-nr. IC-certificatienr.
M640 hartslagmonitor EP9TMXM640 3348A-TMXM640
M515 hartslagmonitor EP9TMXM515 3348A-M515
M185 snelheids- + afstandsmonitor EP9TMXM185 3348A-TMXM185
M850 snelheids- + afstandsmonitor EP9TMXM850 3348A-12181
Opzettelijke straler
Deze apparaten voldoen aan deel 15 van de FCC-voorschriften. Het
gebruik is afhankelijk van de volgende twee voorwaarden: (1) Het
apparaat mag geen schadelijke storing veroorzaken, en (2) het apparaat moet alle ontvangen storing accepteren, waaronder storing die
ongewenste werking kan veroorzaken.
138
139
Page 72

Productnaam:
Horlogeontvangers – HRM/snelheid+afstand serie
M8xx/M5xx/M6xx/M1xx
Gegevensrecorders – HRM/snelheid+afstand serie M5xx/M1xx
Producttype:
Deze apparatuur is getest en er is gebleken dat deze aan de grenzen
voor een digitaal apparaat van klasse B voldoet conform deel 15 van
de FCC-voorschriften. Deze grenzen zijn bedoeld om redelijke
bescherming tegen schadelijke storing in woonwijken te bieden.
Deze apparatuur produceert en gebruikt radiofrequente energie en
kan deze energie uitstralen, en kan, als deze niet volgens de handleiding wordt gebruikt, schadelijke storing voor radiocommunicatie
veroorzaken. Als deze apparatuur schadelijke storing voor radio- en
televisieontvangst veroorzaakt, wat vastgesteld kan worden door de
apparatuur uit en aan te zetten, wordt de gebruiker aangeraden te
proberen de storing te verhelpen door de ontvangstantenne te
heroriënteren of te verplaatsen; of door de afstand tussen de apparatuur en de ontvanger te vergroten.
Voorzichtig:
melde apparatuur die niet uitdrukkelijk door Timex Corporation zijn
goedgekeurd, kunnen ertoe leiden dat de toestemming voor de
gebruiker om deze apparatuur te gebruiken wordt ingetrokken.
Kennisgeving van Industry Canada:
klasse B voldoet aan Canadese ICES-003. Cet appariel numérique de
la classe B est conforme à la norme NMB-003 du Canada.
Onopzettelijke straler
Alle veranderingen of wijzigingen in de hierboven ver-
Dit digitale apparaat van
141140
Page 73

©2007 Timex Corporation. TIMEX is a registered trademark of Timex
Corporation. INDIGLO is a registered trademark of Indiglo Corporation in the
US and other countries. HEART ZONES is a trademark of Sally Edwards.
W235 EU 685-095002
English page 1
Français page 45
Español página 89
Português página 131
Italiano pagina 173
Deutsch Seite 217
Nederlands pagina 259
Page 74

T
T
AABBLLEEOOF
F
C
C
OONNTTEENNTTS
S
Overview . . . . . . . . . . . . . . . . . . . . . . . . . . . . . . . . . . . . . . . . . . . . . . . .1
Watch Buttons . . . . . . . . . . . . . . . . . . . . . . . . . . . . . . . . . . . . . . . . . . . . . .3
Display Icons . . . . . . . . . . . . . . . . . . . . . . . . . . . . . . . . . . . . . . . . . . . . . . . .3
Resources . . . . . . . . . . . . . . . . . . . . . . . . . . . . . . . . . . . . . . . . . . . . . . . . . .4
Print Resources . . . . . . . . . . . . . . . . . . . . . . . . . . . . . . . . . . . . . . . . . . . .4
Web Resources . . . . . . . . . . . . . . . . . . . . . . . . . . . . . . . . . . . . . . . . . . . .4
Determining Your Optimal Heart Rate Zone . . . . . . . . . . . . . . . . . . . . . . .5
Digital Heart Rate Monitor . . . . . . . . . . . . . . . . . . . . . . . . . . . . . . . . . .6
Before You Begin . . . . . . . . . . . . . . . . . . . . . . . . . . . . . . . . . . . . . . . . . . . .6
To Use Your Digital Heart Rate Monitor . . . . . . . . . . . . . . . . . . . . . . . . . . .6
Digital Heart Rate Monitor Notes & Tips . . . . . . . . . . . . . . . . . . . . . . . . . .8
Time of Day . . . . . . . . . . . . . . . . . . . . . . . . . . . . . . . . . . . . . . . . . . . . . .9
To Set or Adjust the Time, Date, and Audibles . . . . . . . . . . . . . . . . . . . . . .9
To Switch Time Zones . . . . . . . . . . . . . . . . . . . . . . . . . . . . . . . . . . . . . . . .12
Time of Day Notes & Tips . . . . . . . . . . . . . . . . . . . . . . . . . . . . . . . . . . . . .12
Time of Day Example . . . . . . . . . . . . . . . . . . . . . . . . . . . . . . . . . . . . . . . .13
Chrono . . . . . . . . . . . . . . . . . . . . . . . . . . . . . . . . . . . . . . . . . . . . . . . . .14
Chrono Terminology . . . . . . . . . . . . . . . . . . . . . . . . . . . . . . . . . . . . . . . . .14
To Operate the Chrono . . . . . . . . . . . . . . . . . . . . . . . . . . . . . . . . . . . . . . .15
Chrono Mode Tips & Tricks . . . . . . . . . . . . . . . . . . . . . . . . . . . . . . . . . . . .16
Chrono Mode Example . . . . . . . . . . . . . . . . . . . . . . . . . . . . . . . . . . . . . . .17
Timer . . . . . . . . . . . . . . . . . . . . . . . . . . . . . . . . . . . . . . . . . . . . . . . . . . .18
To Set the Timer . . . . . . . . . . . . . . . . . . . . . . . . . . . . . . . . . . . . . . . . . . . .18
To Operate the Timer . . . . . . . . . . . . . . . . . . . . . . . . . . . . . . . . . . . . . . . .19
Timer Mode Notes & Tips . . . . . . . . . . . . . . . . . . . . . . . . . . . . . . . . . . . . .19
Timer Mode Example . . . . . . . . . . . . . . . . . . . . . . . . . . . . . . . . . . . . . . . .20
Page 75

Recover . . . . . . . . . . . . . . . . . . . . . . . . . . . . . . . . . . . . . . . . . . . . . . . . .21
About Recovery Heart Rate . . . . . . . . . . . . . . . . . . . . . . . . . . . . . . . . . . .21
To Manually Determine a Recovery Heart Rate . . . . . . . . . . . . . . . . . . . .22
Review . . . . . . . . . . . . . . . . . . . . . . . . . . . . . . . . . . . . . . . . . . . . . . . . .23
To Review Activity Data . . . . . . . . . . . . . . . . . . . . . . . . . . . . . . . . . . . . . .24
Review Mode Notes & Tips . . . . . . . . . . . . . . . . . . . . . . . . . . . . . . . . . . .25
HRM Setup . . . . . . . . . . . . . . . . . . . . . . . . . . . . . . . . . . . . . . . . . . . . . .25
To Set a Target Heart Rate Zone . . . . . . . . . . . . . . . . . . . . . . . . . . . . . . . .26
Preset Target Heart Rate Zones . . . . . . . . . . . . . . . . . . . . . . . . . . . . . .26
Manual Target Heart Rate Zone . . . . . . . . . . . . . . . . . . . . . . . . . . . . . .27
To Set Other Heart Rate Statistical Data . . . . . . . . . . . . . . . . . . . . . . . . .28
Digital Heart Rate Monitor Notes & Tips . . . . . . . . . . . . . . . . . . . . . . . . .29
Alarm . . . . . . . . . . . . . . . . . . . . . . . . . . . . . . . . . . . . . . . . . . . . . . . . . .30
To Set the Alarm . . . . . . . . . . . . . . . . . . . . . . . . . . . . . . . . . . . . . . . . . . . .30
Alarm Mode Notes & Tips . . . . . . . . . . . . . . . . . . . . . . . . . . . . . . . . . . . .31
Care & Maintenance . . . . . . . . . . . . . . . . . . . . . . . . . . . . . . . . . . . . . .32
Digital Heart Rate Monitor . . . . . . . . . . . . . . . . . . . . . . . . . . . . . . . . . . . .32
Battery . . . . . . . . . . . . . . . . . . . . . . . . . . . . . . . . . . . . . . . . . . . . . . . . . . .32
Digital Heart Rate Sensor Battery . . . . . . . . . . . . . . . . . . . . . . . . . . . . .32
Watch Battery Replacement . . . . . . . . . . . . . . . . . . . . . . . . . . . . . . . . .34
INDIGLO®Night-Light . . . . . . . . . . . . . . . . . . . . . . . . . . . . . . . . . . . . . . . . .34
Water Resistance . . . . . . . . . . . . . . . . . . . . . . . . . . . . . . . . . . . . . . . . . . .34
Watch . . . . . . . . . . . . . . . . . . . . . . . . . . . . . . . . . . . . . . . . . . . . . . . . . . .34
Digital Heart Rate Monitor . . . . . . . . . . . . . . . . . . . . . . . . . . . . . . . . . .35
Warranty & Service . . . . . . . . . . . . . . . . . . . . . . . . . . . . . . . . . . . . . . .35
Service . . . . . . . . . . . . . . . . . . . . . . . . . . . . . . . . . . . . . . . . . . . . . . . . . . .37
Declaration of Conformity . . . . . . . . . . . . . . . . . . . . . . . . . . . . . . . . . .39
O
O
EERRVVIIEEW
W
V
V
CCoonnggrraattuullaattiioonnss!
With your purchase of the Timex®Digital Heart Rate Monitor you have
hired a new personal trainer.Your Digital Heart Rate Monitor offers you the
ability to track, store, and analyze key indicators of your personal fitness
level.
You will find your Digital Heart Rate Monitor to be a user-friendly fitness
tool. But, like any new device, you should take the time to familiarize
yourself with its components to optimize its usefulness.
So, check out the features and functions of your Digital Heart Rate Monitor
to develop a basic understanding of this fitness tool. But most of all, enjoy
your new partner on the road to increased fitness!
AA FFiitt HHeeaarrt
Recent fitness findings indicate that anyone can get fit and stay fit without
being overzealous. It can be as simple as:
!
t
v Exercising 3 to 4 times per week.
v Exercising for 30 to 45 minutes during each exercise session.
v Exercising at the appropriate heart rate.
Note: Always consult your physician before beginning any exercise
program.
1
Page 76

Heart rate represents the effects of exercise on all parts of the body.
START/SPLIT
STOP/SET/RESET
HEART RATE
MODE
INDIGLO®night-light
Selecting the appropriate heart rate zone conditions the heart, lungs, and
muscles to perform at optimal levels to get and keep your body in shape.
Once set, your Digital Heart Rate Monitor can automatically show you
when you are in the exercise zone you choose and signal you when you
are not. It can help keep your body exercising at an intensity level that can
help you achieve your desired fitness objectives without over- or underexercising.
WARNING:
This is not a medical device and is not recommended for use by
persons with serious heart conditions.
Interference with the radio signal, poor contact between your skin and the
Digital Heart Rate Sensor, or other factors may prevent accurate
transmission of heart rate data.
WWaattcchh BBuuttttoonns
NOTE: The specific use for these buttons varies by mode. Refer to each
mode for more information on how to use the Watch buttons.
DDiissppllaayy IIccoonns
You will see the hollow heart icon as the Watch searches for a signal
X
from the Digital Heart Rate Sensor.
You will see the heart icon fill once the Watch has located a signal
Y
from the Digital Heart Rate Sensor. This icon will continue to flash as
long as the Watch continually receives a signal from the Digital Heart
Rate Sensor.
You will see the stopwatch icon to indicate that the Watch is timing
w
your activity in Chrono Mode.
s
s
2
3
Page 77

You will see the hourglass icon to indicate that the Watch is timing
H
your activity in Timer Mode.
You will see the alarm clock icon to indicate you have set the
b
alarm to alert you at a designated time.
You will see the melody icon to indicate that you have set the
N
hourly chime to sound every hour on the hour.
RReessoouurrccees
s
Print Resources
In addition to this manual, your Digital Heart Rate Monitor includes these
valuable resources:
v Fitness Sensors User Guide: Complete information for set-up,
operation, and maintenance of your Digital Heart Rate Sensor.
v Heart Zones
Information to use your Digital Heart Rate Monitor in conjunction with
the Heart Zones®Training System fitness program, meant to help you to
increase the strength and endurance of your heart.
Web Resources
The Timex
Digital Heart Rate Monitor.
v Register your product at www.timex.com.
v Visit www.timex.com/hrm/ for more information on Timex
Rate Monitors, including product features.
4
®
Tools for Success (U.S. customers only):
®
Websites offer beneficial information to help you optimize your
®
Heart
v Visit www.timex.com/fitness/ for fitness and training tips using
Timex®Heart Rate Monitors.
DDeetteerrmmiinniinngg YYoouurr OOppttiimmaall HHeeaarrtt RRaattee ZZoonne
There are five basic heart rate target zones. Simply select a percent of
maximum (%MAX) heart rate that matches your zone and the fitness goal
you want to achieve during a particular exercise.
% MAX Goal Benefit
ZONE
50% to 60% Light exercise Maintain a healthy heart and get fit
1
60% to 70% Weight management Lose weight and burn fat
2
70% to 80% Aerobic base building
3
80% to 90% Optimal conditioning Sustain excellent fitness condition
4
90% to
5
100%
Before you can set your target zone, you first need to determine your
maximum heart rate. You can use many methods to estimate your
maximum heart rate. The booklet Heart Zones
in your Personal Heart Rate Monitor packaging (U.S. customers only)
provides excellent procedures and Timex recommends you use one of
these methodologies.
Elite athletic training Achieve superb athletic condition
Increase stamina and aerobic
endurance
e
®
Tools For Success included
5
Page 78

However, if you cannot use any of the procedures described in Heart
Zones®Tools for Success (U.S. customers only), you might consider using
an age-based method.
Begin with the number 220 and then subtract your age. For instance, a 35
year old would begin with 220 and subtract 35 (her age), which gives an
estimated maximum heart rate of 185. Once you know your maximum
heart rate, you can set the zones described in the table on the previous
page.
H
IIG
G
IITTAAL
n
H
L
D
D
BBeef
f
oorree YYoouu BBeeggiin
Once you have determined your fitness goal and maximum heart rate,
Timex recommends you input this information into the HRM SETUP Mode.
This will allow you to tailor your Digital Heart Rate Monitor to your
personal parameters. For information on HRM Setup Mode, refer to pages
25 to 30.
TToo UUssee YYoouurr DDiiggiittaall HHeeaarrtt RRaattee MMoonniittoor
For more detailed information on the use and care of your Digital Heart
Rate Monitor, refer to the Fitness Sensor User Guide that shipped with
your product.
1. Wet the Digital Heart Rate Sensor pads.
2. Center the Sensor on your chest with the Timex®logo facing up and
out and fasten it firmly, just below your sternum.
EEAARRT
R
R
M
AATTE
E
M
OONNIITTOOR
R
T
r
3. Press MODE until your desired mode appears. You can
view heart rate information in Time of Day, Chrono, or
Timer Modes.
4. While standing at least six feet (two meters) away from
other heart rate monitors or other sources of radio or
electrical interference, press the HEART RATE button on
your Watch. The hollow heart rate icon will appear on
the display indicating the Watch is searching for a signal from the
Sensor. When the Watch begins receiving a signal, the outlined heart
becomes solid and begins pulsing.
5. Begin your activity.
NOTE: The Watch automatically records your heart rate and other
statistical data about your activity (available in Review Mode) only if
you operate Chrono Mode during your activity.
6. If the Watch is set to alert you when you go above or below your
chosen target heart rate zone press and hold
turn the audible alert off. Otherwise it will continue beeping until you
return to your target zone. When you are turning the audible alert off,
you will see the message HOLD ALERT OFF. Continue pressing HEART
RATE button until you see the message ALERT OFF. Conversely, when
you are turning the audible alert on, you will see the message HOLD
ALERT ON. Continue pressing HEART RATE button until you see the
message A
7. When you have finished your activity in Chrono Mode, press
STOP/SET/RESET to stop recording data for the activity.
UDIBLE ALERT ON.
HEART RATE button to
6
7
Page 79

T
T
IIMMEEOOF
F
D
D
AAY
Y
Your Watch can act as an ordinary timepiece, displaying the time, date, and
day for two different time zones using a 12- or 24-hour format. Note that
you must independently set the time of day for each time zone.
TToo SSeett oorr AAddjjuusstt tthhee TTiimmee,, DDaattee,, aanndd AAuuddiibbllees
s
1. Press MODE until Time of Day Mode appears, showing the current time.
2. Press and hold STOP/SET/RESET until the words HOLD TO SET briefly
appear on the display followed by SET TIME with the number 1 flashing
in the lower right corner.
3. PRESS START/SPLIT (+) or HEART RATE (–) to toggle between the
primary (T1) and secondary (T2) time zones.
4. Press MODE (NEXT) to begin setting the time for the chosen time zone.
The time will appear on the display with the hour value flashing.
9
8. Press MODE until you see Review Mode. This Mode includes heart rate
and other statistical data about your workout. See pages 23 to 25 for
more information about Review Mode.
DDiiggiittaall HHeeaarrtt RRaattee MMoonniittoorr NNootteess && TTiipps
s
The Watch and the Digital Heart Rate Sensor need to be within three feet
(one meter) of each other to function properly. If the Watch is not receiving
heart rate information, you may receive the message NO HRM DATA on the
Watch display. Try the following:
v Shorten the distance between the Watch and the Digital Heart Rate
Sensor.
v Adjust the position of the Digital Heart Rate Sensor and elastic chest
strap.
v Make sure the Digital Heart Rate Sensor pads are wet.
v Check the battery in the Digital Heart Rate Sensor and replace it if
necessary.
v Move away from other heart rate monitors or other sources of radio or
electrical interference.
8
START/SPLIT
Press to peak at or switch
time zones or increase or
toggle the setting item.
STOP/SET/RESET
Press to start or complete
the setting process.
HEART RATE
Press to decrease or
toggle the setting item or
switch display views.
MODE
Press to move to the next
mode, digit, or setting
option or group.
INDIGLO®night-light
Press to light the Watch.
Page 80

5. Make the desired adjustment as indicated in the table on the next two
pages.
6. Press MODE (NEXT) to move to the next setting option.
7. Press and hold STOP/SET/RESET (DONE) to save your changes and exit
the setting process.
For this Watch, you can make the Time of Day adjustments described in
the tables that appear on this page and the next page.
Setting Group Adjustment
Hour
Minute
Second
Day of Week
Month
Press START/SPLIT (+) to increase the hour value or
HEART RATE (–) to decrease the hour value.
Press START/SPLIT (+) to increase the minute value or
HEART RATE (–) to decrease the minute value.
Press START/SPLIT (+) or HEART RATE (–) to reset the
seconds to zero.
Press START/SPLIT (+) to move forward through the days of
the week or HEART RATE (–) to move backward through
the days of the week.
Press START/SPLIT (+) to move forward through the months
or HEART RATE (–) to move backward through the months.
10
Setting Group Adjustment
Date
12- or 24-hour
Format
Appearance of
the Month and
Day
Hourly Chime
Button Beep
NOTE: To quickly change the value being set, press and hold START/SPLIT
(+) or HEART Rate (–).
Press START/SPLIT (+) to increase the date value or
HEART RATE (–) to decrease the date value.
Press START/SPLIT (+) or HEART RATE (–) to toggle between
the 12- and 24-hour formats. In the 12-hour format the AM
and PM time indicators will also appear above the seconds
on the time display.
Press START/SPLIT (+) or HEART RATE (–) to toggle between
the appearance options for the month and the day.The
options include Month Day (MM-DD) or Day Month
(DD.MM). For example, March 15 can appear as 3-15 (MMDD) or 15.03 (DD.MM).
Press START/SPLIT or HEART RATE to toggle between
turning the chime on and turning the chime off. When you
turn the chime on, you will see the chime icon and the
Watch will emit a beep every hour on the hour.
Press START/SPLIT or HEART RATE to toggle between
turning the button beep on and turning the button beep
off. When you turn the button beep on, your Watch will
emit a beep every time you press a button other than the
INDIGLO®button.
11
Page 81

TToo SSwwiittcchh TTiimmee ZZoonnees
The Watch can track two time zones (T1 and T2). To look at the second
zone in Time of Day Mode, press START/SPLIT. T1 or T2 will flash in the
lower right corner indicating the alternate time zone. You can switch from
T1 to T2 or T2 to T1 by using these steps:
1. Press and hold START/SPLIT until HOLD FOR T1 or HOLD FOR T2
appears.
2. Continue to hold until the time switches and the Watch beeps.
TTiimmee ooff DDaayy NNootteess && TTiipps
You can return to Time of Day Mode from any other mode on the
v
Watch by pressing MODE until the time of day appears.
v The Watch does not automatically adjust for Daylight Savings Time.
When switching between Standard Time and Daylight Savings Time,
you must manually adjust the hour value.
v The Watch automatically moves from February 28 to March 1. To
accommodate a leap year, you must manually set the date value to
February 29. The Watch will then automatically move from February 29
to March 1.
v At any time during the setting process, you can save your changes and
return to the main time display by pressing STOP/SET/RESET.
s
s
v While setting the Watch, if you do not press any buttons on the Watch
for a period of 2 to 3 minutes, the Watch will automatically save
whatever changes you have made and will exit the setting process.
v With the chronograph or timer running along with the Digital Heart
Rate Sensor, you can change the Time of Day Mode display by pressing
HEART RATE. Choose from:
1) Time of Day with Day/Month/Date;
2) Zone Trainer bar/Heart Rate;
3) Zone Trainer bar/Lap or Split Time;
4) Heart Rate/Lap or Split Time;
5) Lap or Split Time/Heart Rate; or
6) Heart Rate only.
TTiimmee ooff DDaayy EExxaammpplle
Assume that you live in San Francisco and work with a client in Singapore.
Like all busy people, it is imperative you keep track of time, so you set T1
to your local time. But it is also important to have a quick reminder of your
client’s time, so you set T2 to Singapore time. With both time zones
available, you can quickly check your client’s time or even switch your
Watch to display T2 when you travel to Singapore.
e
12
13
Page 82

C
START/SPLIT
Press to begin timing,
take a lap or split, or
continue timing after a
pause.
STOP/SET/RESET
Press to clear chrono
data, choose between lap
or split display format, or
pause or stop the chrono.
HEART RATE
Press to switch display
views.
MODE
Press to move to the next
mode, or immediately
display a new lap or split.
INDIGLO®night-light
Press to light the Watch.
C
HHRROONNO
O
Chrono Mode operates as the main workout data center for your Watch. It
can record elapsed time for up to 100 hours. It can also recall information
for up to 30 laps.
CChhrroonnoo TTeerrmmiinnoollooggy
v
Chronograph: The chronograph records timed segments for the
duration of your activity.
y
v Lap: Lap time records individual segments of your activity.
v Split: Split time records the total elapsed time since the beginning of
your current activity.
v Taking a lap or split: When you take a lap or split, the chrono-graph
records one time and automatically begins timing a new one.
14
TToo OOppeerraattee tthhee CChhrroonno
1. Press MODE until CHRONO appears.
2. Press and hold STOP/SET/RESET to clear any Chrono data.
3. Press STOP/SET/RESET to choose between Lap or Split time format
display. You cannot select a display format if the chronograph is
running or is not reset.
4. Press START/SPLIT to begin timing. The stopwatch icon (w)) will appear
on the display.
5. Press START/SPLIT again to take a lap or split. The Watch will display
the lap or split number, time average heart rate (for the lap or split) if
the data from Digital Heart Rate Sensor is being received.
6. Press MODE to immediately display new lap or split information OR
wait for a few seconds and the Watch will automatically begin to
display data for a new lap or split.
7. Press STOP/SET/RESET to stop timing when you want to take a break
or you reach the end of your activity.
NOTE: The recovery heart rate timer will begin automatically (for 1 or
2 minutes, as user set) after pressing STOP/SET/RESET if the Watch is
receiving data from the Digital Heart Rate Sensor. For more information
about recovery heart rate, see pages 21 and 22.
8. Press START/SPLIT to continue timing OR press and hold
STOP/SET/RESET to clear the chronograph display and set it back to
zero.
o
15
Page 83

CChhrroonnoo MMooddee TTiippss && TTrriicckks
Press MODE to switch to Time of Day Mode while running the
v
chronograph. The stopwatch icon (
chronograph is still operating.
s
W) will appear to indicate the
v When you operate the Watch in Chrono Mode with the Digital Heart
Rate Sensor, you will accumulate heart-related data in Review Mode,
including:
1) Amount of time your heart rate stays within your target heart rate
zone;
2) Average, peak, and minimum heart rates;
3) Total calories burned;
4) Latest recovery heart rate; and
5) Average heart rate for each recorded lap or split.
v With the chronograph running along with the Digital Heart Rate Sensor,
you can change the Chrono Mode display by pressing HEART RATE.
Choose from:
1) Lap or Split #/Lap or Split Time;
2) Zone Trainer bar/Heart Rate;
3) Zone Trainer bar/Lap or Split Time;
4) Heart Rate/Lap or Split Time;
5) Lap or Split Time/Heart Rate; or
6) Heart Rate only.
v The Zone Trainer bar allows you to graphically view where your heart is
in relation to the low and high ends of your selected target heart rate
zone. A left arrow (
zone and a right arrow (
rate zone.
See the Watch picture on page 14 for another view of the Zone Trainer
bar.
CChhrroonnoo MMooddee EExxaammpplle
Recently you heard that the run/walk method can help you increase your
overall endurance and burn more calories. This method calls for running
for a period of time followed by a short period of walking. You decide to
use Chrono Mode to help you try this method. You press START/SPLIT to
begin your run and then after 10 minutes of running you press
START/SPLIT again and walk for 2 minutes. You continue using these two
timing sequences until you have completed a 60 minute run/walk.
t) will blink if you go below the target heart rate
u) will blink if you go above the target heart
e
16
17
Page 84

T
START/SPLIT
Press to increase the
setting item or start or
resume timing.
STOP/SET/RESET
Press to start or complete
the setting process or
pause or reset the timer.
HEART RATE
Press to decrease the
setting item or switch
display views.
MODE
Press to move to the next
mode or digit.
INDIGLO®night-light
Press to light the Watch.
T
IIMMEER
R
Timer Mode allows you to set a fixed time from which the Watch counts
down to zero (i.e., 10, 9, 8, ...).
NOTE: You can press any button in Timer Mode to silence the alert that
sounds when the timer reaches zero.
TToo SSeett tthhee TTiimmeer
1. Press MODE until TIMER appears.
2. Press STOP/SET/RESET until SET briefly appears on the display followed
by the timer with the hours value flashing.
3. Press START/SPLIT (+) to increase the values or HEART RATE (–) to
decrease the value. This applies for hours, minutes, and seconds.
NOTE: To quickly change the value being set, press and hold
18
r
START/SPLIT (+) or HEART Rate (–).
4. Press MODE (NEXT) to move to the next value for hours, minutes, and
seconds
5. Press STOP/SET/RESET (DONE) to save your changes and exit the
setting process.
TToo OOppeerraattee tthhee TTiimmeer
1. Press START/SPLIT to start the timer countdown. The hourglass icon
( H) will appear on the display.
2. Pause the countdown by pressing STOP/SET/RESET.
3. Resume the countdown by pressing START/SPLIT again or reset the
timer by pressing and holding STOP/SET/RESET again until the words
HOLD TO RESET briefly appear on the display followed by the original
countdown time.
4. When the timer reaches zero, a brief alert will sound and the INDIGLO
-light will flash. Press any button to silence the alert.
night
TTiimmeerr MMooddee NNootteess && TTiipps
v
You can press MODE within Timer Mode to switch the display to
another mode without disrupting the operation of the timer. The
hourglass icon will continue to display to indicate the timer is
operating.
v You can repeat the countdown by immediately pressing START/SPLIT at
the end once the alert stops.
r
s
19
®
Page 85

v With the timer running along with the Digital Heart Rate Sensor, you
START/SPLIT
Press to start or restart
the recovery timer.
STOP/SET/RESET
Press to toggle between a
1- or a 2-minute recovery
time or to stop or reset
the recovery timer.
MODE
Press to move to the next
mode.
INDIGLO®night-light
Press to light the Watch.
can change the Timer Mode display by pressing HEART RATE. Choose
from:
1) Countdown Time;
2) Zone Trainer bar/Heart Rate;
3) Zone Trainer bar/Countdown Time;
4) Heart Rate/Countdown Time;
5) Countdown Time/Heart Rate; or
6) Heart Rate only.
TTiimmeerr MMooddee EExxaammpplle
As part of your overall health plan, you decide to take a 30-minute walk
during your lunch hour two times per week. To help keep track of time so
you do not return late from your lunch hour, you set the timer to 15
minutes. After 15 minutes the Watch beeps telling you to begin walking
back to your office. You immediately start another 15-minute countdown,
helping you track how much time you have to return to your office.
e
R
R
EECCOOVVEER
R
AAbboouutt RReeccoovveerryy HHeeaarrtt RRaatte
Heart rate recovery provides an indicator of fitness and training level. As
you become more fit, your heart rate should return more quickly to a
lower heart rate value at the end of your activity, indicating a higher level
of cardiovascular fitness.
A slower recovery rate might also indicate a need to take a
break from training due to fatigue, illness, or other factors.
Your recovery rate represents the change in your heart rate over a period
of time. Your Digital Heart Rate Monitor records the change in your heart
rate for either a 1- or 2-minute period.
e
20
21
Page 86

TToo MMaannuuaallllyy DDeetteerrmmiinnee aa RReeccoovveerryy HHeeaarrtt RRaatte
START/SPLIT
Press to scroll forward
through activity data.
HEART RATE
Press to scroll backward
through activity data.
MODE
Press to move to the next
mode.
INDIGLO®night-light
Press to light the Watch.
While running the chronograph, the recovery heart rate timer will begin
automatically after pressing STOP/SET/RESET if the Watch is receiving data
from the Digital Heart Rate Sensor. You can also manually initiate a
recovery heart rate after stopping the chronograph by following these
steps.
1. Press MODE until RECOVER appears.
NOTE: From this display, you set the duration of the automatic
recovery heart rate recorded at the end of a chronograph session.
2. Press STOP/SET/RESET to toggle between a 1- or a 2-minute recovery
time.
3. Press START/SPLIT. The top line of the Watch display will show the
heart rate at the beginning of the recovery period followed by your
current heart rate. The bottom line will show the time remaining in
your recovery countdown.
NOTE: The Watch cannot record a recovery unless it is receiving by
valid heart rate data from the Digital Heart Rate Sensor. Without a
current heart rate, the display will read NO HRM DATA at the end of the
recovery period. If the starting heart rate is lower than the ending heart
rate, the display will read NO REC.
4. After a 1- or 2-minute countdown, the Watch will beep indicating the
end of the recovery period. The Watch will capture your heart rate a
second time, subtract the second value from the first value and display
the difference as the recovery.
e
5. You can continue to initiate a 1- or 2-minute recovery period by
repeating step 3.
R
R
EEVVIIEEW
W
Review Mode allows you to recall overall information recorded by the
chronograph for your most recent activity.
Data groupings appear in the order listed.
v Total Time: The amount of time the chronograph was running during
your activity.
v Time in Zone: The amount of time during an activity when your heart
rate is between the lower and upper target zone limits you set.
v Average Heart Rate: The average heart rate achieved during an
activity.
22
23
Page 87

v Peak Heart Rate: The highest recorded heart rate during an
START/SPLIT
Press to select a target
heart rate zone or
increase or toggle a
setting item.
STOP/SET/RESET
Press to start or complete
the setting process.
HEART RATE
Press to turn the audible
ON or OFF or decrease or
toggle the setting item.
MODE
Press to enter or exit the
mode or move to the next
digit or setting group.
INDIGLO®night-light
Press to light the Watch.
activity.
v Minimum Heart Rate: The lowest recorded heart rate during an
activity.
v Total Calories: The number of calories burned during an activity. This
number is dependent on the weight you entered when you set your
Digital Heart Rate Monitor, your heart rate during the activity, and the
time you spent in the activity.
v Recovery Heart Rate: The result of the most recent recovery heart
rate calculation.
v Lap or Split Recall: The amount of time and average heart rate for
each segment of your workout.
TToo RReevviieeww AAccttiivviittyy DDaatta
1. Press MODE until REVIEW appears.
2. Press START/SPLIT (+) or HEART RATE (–) to scroll through activity data.
a
RReevviieeww MMooddee NNootteess && TTiipps
Once you restart the chronograph from zero (the reset position) for
v
your next activity, you erase summary data from your previous activity,
except recovery heart rate.
s
v Without the Digital Heart Rate Sensor, you will see total time and Lap
or Split Recall in Review Mode, along with your last recorded recovery
heart rate.
HHRRMM S
S
EETTUUP
P
HRM Setup Mode allows you to select and set key pieces of statistical data
that will be used by your Digital Heart Rate Monitor.
24
25
Page 88

TToo SSeett aa TTaarrggeett HHeeaarrtt RRaattee ZZoonne
You can choose one of the Preset Target Heart Zones or set the Manual
Target Heart Rate Zone for a customized target heart rate zone.
e
Preset Target Heart Rate Zones
The preset heart rate zones described in the table below correspond to
your maximum heart rate (MHR) value.
Zone Lower Limit Upper Limit
1 50% 60%
2 60% 70%
3 70% 80%
4 80% 90%
5 90% 100%
Determine the zone you want to use by reviewing the table on page 5.
To choose a Preset Target Heart Rate Zone:
1. Press MODE until HRM Setup Mode appears.
2. Press START/SPLIT to cycle through the target heart rate zones (labeled
ZONE 1 to ZONE 5).
3. Press HEART RATE to turn the audible alert ON or OFF. If you turn on
the audible alert, the Watch will beep to alert you if you go above or
below your chosen target heart rate zone and continue beeping until
you return to your target zone.
26
4. Press MODE to save your selected target heart rate zone and exit HRM
Setup Mode. When you leave HRM Setup Mode, the Watch will use the
target heart rate zone you have selected as the basis for all HRM-based
operations and tracking.
Manual Target Heart Rate Zone
The Manual Target Heart Rate Zone allows you to customize your lower
and upper target heart rate zone limits. You might use the Manual Target
Heart Rate Zone where the 10% range in the Preset Heart Rate Zones is
either too large or too small a range for your exercise goals.
To set the Manual Target Heart Rate Zone:
1. Press MODE until HRM Setup Mode appears.
2. Press START/SPLIT until MANUAL appears.
3. Press STOP/SET/RESET to enter the setting process. You will see the
word MANUAL flashing on the display.
4. Press MODE (NEXT) to begin setting the upper and lower target heart
rate zones.
5. Press START/SPLIT (+) to increase the flashing value, HEART RATE (–) to
decrease the flashing value, or MODE (NEXT) to move to the next value.
6. When you have finished setting the upper and lower target heart rate
zone limits, you can press STOP/SET/RESET (DONE) to save your
settings and exit the setting process or you can continue to set or
adjust other heart rate statistical data.
27
Page 89
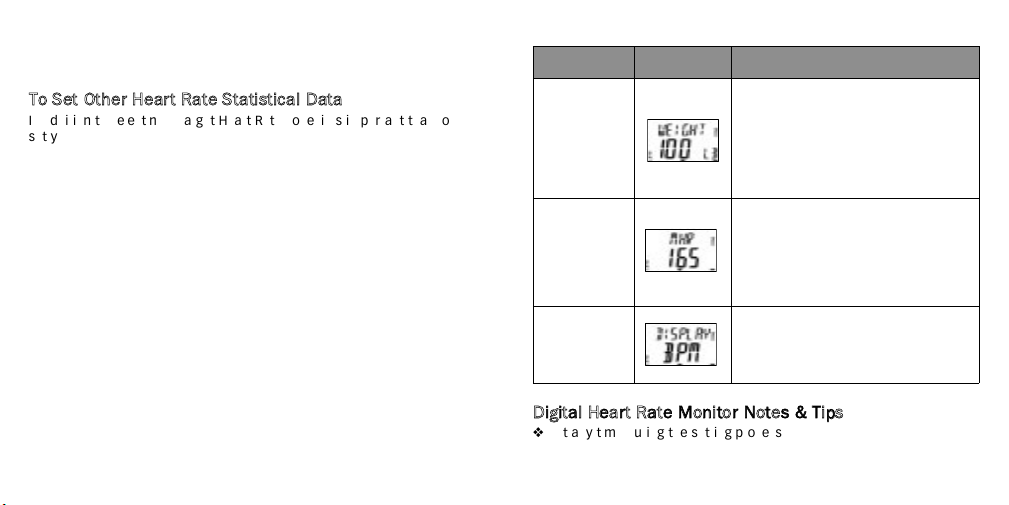
Note: If your upper and lower targets are set less than 5 BPM apart,
the Watch will adjust the lower limit to be 5 BPM less than the upper
limit.
TToo SSeett OOtthheerr HHeeaarrtt RRaattee SSttaattiissttiiccaall DDaatta
a
In addition to selecting a Target Heart Rate Zone, it is important that you
set your weight, maximum heart rate, and heart rate display. Accurate
information used by these options helps tailor your Digital Heart Rate
Monitor to your specific fitness needs.
To set other heart rate statistical data:
1. Press MODE until HRM Setup Mode appears.
2. Press STOP/SET/RESET to enter the setting process. You will see your
selected target heart rate zone flashing on the display.
3. Make the desired adjustment by pressing START/SPLIT (+) or HEART
RATE (–). In some setting groups pressing START/SPLIT (+) will increase
a value and pressing HEART RATE (–) will decrease a value.At other
times pressing START/SPLIT (+) or HEART RATE (–) will toggle between
two options or cycle through a setting group.
4. Press MODE (NEXT) to move to the next digit you want to set or the
You can make the adjustments described in the table.
Setting Group Display Description
You can enter your current weight and
whether your weight appears in pounds
Weight
Maximum
Heart Rate
Heart Rate
Display
(lbs) or kilograms (kg) This number is used
to help calculate how many calories you
burn during your activity. Your recorded
weight cannot go below 22 lbs (10 kg) or
above 550 lbs (250 kg).
Your maximum heart rate value is used to
determine your preset target heart rate
zones, and it is also used as a reference to
display your heart rate in terms of percent
of maximum (%MAX). Maximum heart rate
cannot be set below 80 or above 240
beats per minute (BPM).
You can choose whether your heart rate
will display as beats per minute (BPM) or
as a percent of maximum (%MAX).
next setting group.
5. Press STOP/SET/RESET to save your changes and exit the setting
process.
6. Press MODE to exit HRM Setup.
DDiiggiittaall HHeeaarrtt RRaattee MMoonniittoorr NNootteess && TTiipps
v
At any time during the setting process, you can save your changes and
s
return to the main heart rate display by pressing STOP/SET/RESET
(DONE).
28 29
Page 90

also flash if you have set the Watch to 12-hour format.
3. Press START/SPLIT (+) to increase the hour value or HEART RATE (–) to
decrease the hour value.
NOTE: To quickly change the value being set, press and hold
START/SPLIT (+) or HEART Rate (–).
4. Press MODE (NEXT) to move to the minute value.
5. Press START/SPLIT (+) to increase the minute value or HEART RATE (–)
to decrease the minute value.
6. Press STOP/SET/RESET (DONE) to save your changes and exit the
setting process.
AAllaarrmm MMooddee NNootteess && TTiipps
s
v
To turn an alarm ON or OFF without entering the setting state, press
START/SPLIT while in Alarm Mode.
v If you change any alarm settings, you automatically turn the alarm on.
v When you set the alarm, the alarm clock icon (b) appears on the
display in Time of Day Mode.
v While the alarm sounds, you can silence it by pressing any button on
the Watch.
v If you do not silence the alarm before the alert finishes, a backup alarm
will sound after 5 minutes.
31
v While setting the Watch, if you do not press any buttons on the Watch
for a period of 2 to 3 minutes, the Watch will automatically save
whatever changes you have made and exit the setting process.
A
A
LLAARRM
M
You can use your Watch as an alarm clock to alert you at a pre-set time.
When the Watch reaches the scheduled alarm, the alarm tone sounds and
the INDIGLO®night light flashes for a period of 20 seconds.
NOTE: When the alarm sounds, you can press any button on the Watch to
silence it.
TToo SSeett tthhee AAllaarrm
m
1. Press MODE until Alarm Mode appears.
2. Press and hold STOP/SET/RESET until SET briefly appears on the display
followed by time with the hour value flashing. The AM/PM value will
30
START/SPLIT
Press to increase the
setting value or turn an
the alarm ON or OFF.
STOP/SET/RESET
Press to start or complete
the setting process.
HEART RATE
Press to decrease the
setting value.
MODE
Press to move to the next
mode or digit.
INDIGLO®night-light
Press to light the Watch.
Page 91

C
BATTERIA
APRIRE
BATTERIA
C
&& M
E
M
AAIINNTTEENNAANNCCE
r
E
AARRE
DDiiggiittaall HHeeaarrtt RRaattee MMoonniittoor
To avoid build up of materials that can interfere with the Digital Heart
v
Rate Monitor’s ability to receive a valid pulse, rinse the Digital Heart
Rate Sensor with fresh water.
v Do not clean the Digital Heart Rate Monitor sensor or chest strap with
abrasive or corrosive materials. Abrasive cleaning agents may scratch
the plastic parts and corrode the electronic circuit.
v Do not subject the Digital Heart Rate Monitor to excessive force, shock,
dust, temperature, or humidity. Such treatment may result in
malfunction, a shorter electronic life span, damaged batteries, or
distorted parts.
v Do not tamper with the Digital Heart Rate Monitor’s internal
components. Doing so will terminate the Monitor’s warranty and may
cause damage.
v The Digital Heart Rate Monitor contains no user-serviceable parts,
except batteries.
BBaatttteerry
y
Digital Heart Rate Sensor Battery
If your heart rate readings become erratic or stop, you may need to
replace the battery on your Digital Heart Rate Sensor.You can change the
battery yourself without any special tools.
32
This product uses a CR2032 lithium battery for the Digital Heart Rate
Monitor. To change the battery:
1. Open the Sensor battery lid with a coin, turning the coin
counterclockwise.
2. Replace the battery with a new CR2032, 3V lithium battery with (+)
facing you, taking care not to touch the two contacts and discharge
the battery.
3. When you have finished inserting the battery, press the reset button
(located in the lower left corner) with a toothpick or straightened paper
clip and close the lid with a coin -- screwing in a clockwise direction.
To test the new battery after you have inserted it:
1. Move away from any possible sources of electrical or radio
interference.
2. Wet the Digital Heart Rate Sensor pads and securely fasten the chest
strap below your sternum.
3. While wearing the Watch, press the HEART RATE button. A set of three
dashes (- - -) and the flashing heart rate icon will appear on the display.
33
Page 92

WARNING: TO MAINTAIN WATER-RESISTANCE, DO NOT PRESS ANY
BUTTONS UNDER WATER.
Digital Heart Rate Monitor
v
Your 30 Meter Water Resistant Digital Heart Rate Monitor and chest
strap withstand water pressure to 60 p.s.i. (equals immersion to 98
feet or 30 meters below sea level).
WARNING: THIS UNIT WILL NOT DISPLAY YOUR HEART RATE WHEN
OPERATED UNDER WATER.
W
W
AARRRRAANNTTY
Y
&& S
S
EERRVVIICCE
E
TTiimmeexx IInntteerrnnaattiioonnaall WWaarrrraannttyy ((UU..SS.. LLiimmiitteedd WWaarrrraannttyy)
)
Your Timex®Digital Heart Rate Monitor is warranted against manufacturing
defects by Timex Corporation for a period of ONE YEAR from the original
purchase date. Timex and its worldwide affiliates will honor this
International Warranty.
Please note that Timex may, at its option, repair your Heart Rate Monitor
by installing new or thoroughly reconditioned and inspected components
or replace it with an identical or similar model.
IMPORTANT: PLEASE NOTE THAT THIS WARRANTY DOES NOT COVER
DEFECTS OR DAMAGES TO YOUR HEART RATE MONITOR:
1. after the warranty period expires;
2. if the Heart Rate Monitor was not originally purchased from an
authorized Timex retailer;
35
4. If you do not see a flashing heart icon on your Watch, reinstall the
sensor battery.
NOTE: It is not necessary for a heart rate value to appear on the display
during this test.
Watch Battery Replacement
When the battery of the Watch is running low, the display or INDIGLO
®
night-light will dim. This Watch uses a CR2032 lithium battery.
To avoid the possibility of permanently damaging the Watch, TIMEX
STRONGLY RECOMMENDS TAKING YOUR MONITOR TO A LOCAL RETAILER
OR JEWELER TO HAVE THE BATTERY REPLACED.
IINNDDIIGGLLO
O
®
®
NNiigghhtt--LLiigghht
t
Press the INDIGLO®button to activate the night
-
light. This patented (U.S.
Patent Numbers 4,527,096 and 4,775,964) electroluminescent technology
illuminates the Watch display at night and in low light conditions.
WWaatteerr RReessiissttaanncce
e
Watch
v
Your 30 Meter Water Resistant Watch withstands water pressure to 60
p.s.i. (equals immersion to 98 feet or 30 meters below sea level).
v The Watch is only water-resistant as long as the lens, pushbuttons, and
case remain intact.
v Timex recommends rinsing your wrist monitor with fresh water after
exposure to salt water.
34
Page 93

3. from repair services not performed by Timex;
4. from accidents, tampering or abuse; and
5. lens or crystal, strap or band, Heart Rate Monitor case, attachments or
battery. Timex may charge you for replacing any of these parts.
THIS WARRANTY AND THE REMEDIES CONTAINED HEREIN ARE EXCLUSIVE
AND IN LIEU OF ALL OTHER WARRANTIES, EXPRESS OR IMPLIED, INCLUDING
ANY IMPLIED WARRANTY OF MERCHANTABILITY OR FITNESS FOR
PARTICULAR PURPOSE.
TIMEX IS NOT LIABLE FOR ANY SPECIAL, INCIDENTAL OR CONSEQUENTIAL
DAMAGES. Some countries and states do not allow limitations on implied
warranties and do not allow exclusions or limitations on damages, so
these limitations may not apply to you. This warranty gives you specific
legal rights and you may also have other rights which vary from country to
country and state to state.
To obtain warranty service, please return your Heart Rate Monitor to
Timex, one of its affiliates or the Timex retailer where the Heart Rate
Monitor was purchased, together with a completed original Repair Coupon
or, in the U.S. and Canada only, the completed original Repair Coupon or a
written statement identifying your name, address, telephone number and
date and place of purchase. Please include the following with your Heart
Rate Monitor to cover postage and handling (this is not a repair charge): a
US$ 7.00 check or money order in the U.S.; a CAN$6.00 cheque or money
order in Canada; and a UK£2.50 cheque or money order in the U.K. In other
countries, Timex will charge you for postage and handling. NEVER INCLUDE
ANY ARTICLE OF PERSONAL VALUE IN YOUR SHIPMENT.
36
For the U.S., please call 1-800-328-2677 for additional warranty
information. For Canada, call 1-800-263-0981. For Brazil, call +55 (11) 5572
9733. For Mexico, call 01-800-01-060-00. For Central America, the
Caribbean, Bermuda and the Bahamas, call (501) 370-5775 (U.S.). For Asia,
call 852-2815-0091. For the U.K., call 44 020 8687 9620. For Portugal, call
351 212 946 017. For France, call 33 3 81 63 42 00. For Germany, call 49 7
231 494140. For the Middle East and Africa, call 971-4-310850. For other
areas, please contact your local Timex retailer or Timex distributor for
warranty information. In Canada, the U.S. and in certain other locations,
participating Timex retailers can provide you with a postage-paid, preaddressed Heart Rate Monitor Repair Mailer for your convenience in
obtaining factory service.
SSeerrvviicce
e
If your Timex®Digital Heart Rate Monitor should ever need servicing, send
it to Timex as set forth in the Timex International Warranty or addressed
to:
HOTLINE WATCH SERVICE, P.O. Box 2740, Little Rock, AR 72203
For service questions, call 1-800-328-2677.
For your convenience in obtaining factory service, participating Timex
retailers can provide you with a pre-addressed Heart Rate Monitor Repair
Mailer.
See the Timex International Warranty for specific instructions on the care
and service of your Timex®Digital Heart Rate Monitor.
37
Page 94

Should you need a replacement strap or band,
TIMEX®INTERNATIONAL WARRANTY REPAIR COUPON
Original Purchase Date:
(attach a copy of sales receipt, if available)
Purchased By:
(name, address, telephone number)
Place of Purchase:
(name and address)
Reason for Return:
THIS IS YOUR REPAIR COUPON. KEEP IT IN A SAFE PLACE.
call 1-800-328-2677.
D
D
EECCLLAARRAATTIIOONNOOF
(according to ISO Guide 22 and EN 45014)
Manufacturer: Timex Corporation
declares that the product:
Product Name: Timex®Digital Heart Rate Monitor
Model Number: M640
Product Options: All
conforms to the following Product Specifications:
LVD: 73/23/EEC
Safety: IEC 60950
EMC: 89/336/EEC
Emissions: EN300-683
Immunity: EN300-683
555 Christian Road
Middlebury, CT 06762
Radiated Emission 30 MHz to 1000 MHz EField (Electric). Ref.EN55022
Radiated Immunity 80 MHz to 1000 MHz. Ref.
EN61000-4-3
ESD Electrostatic discharge. Ref. EN61000-4-2
Radiated Immunity 900 MHz. Ref. ENV50204
C
C
F
OONNFFOORRMMIITTY
Y
38
39
Page 95

Supplemental Information: The product herewith complies with the
requirements of the Low-Voltage Directive 73/23/EEC and the EMC
Directive 89/336/EEC and carries the 7 marking accordingly.
Hereby, Timex Corporation declares that this low power radio equipment is
in compliance with the essential requirements and other relevant
provisions of Directive 1999/5/EC.
Agent:
Brian J. Hudson
Director, Test Engineering and Module Development
Date: 15 July 2004, Middlebury, Connecticut, U.S.A.
40
41
Page 96

S
S
OOMMMMAAIIRRE
E
Vue d’ensemble . . . . . . . . . . . . . . . . . . . . . . . . . . . . . . . . . . . . . . . . . .45
Boutons de la montre . . . . . . . . . . . . . . . . . . . . . . . . . . . . . . . . . . . . . . . .47
Icones d’affichage . . . . . . . . . . . . . . . . . . . . . . . . . . . . . . . . . . . . . . . . . . .47
Ressources . . . . . . . . . . . . . . . . . . . . . . . . . . . . . . . . . . . . . . . . . . . . . . . .48
Ressources imprimées . . . . . . . . . . . . . . . . . . . . . . . . . . . . . . . . . . . . .48
Ressources sur le Web . . . . . . . . . . . . . . . . . . . . . . . . . . . . . . . . . . . . .48
Déterminer votre zone optimale de fréquence cardiaque. . . . . . . . . . . .49
Cardiofréquencemètre Numérique . . . . . . . . . . . . . . . . . . . . . . . . . . .50
Avant de commencer . . . . . . . . . . . . . . . . . . . . . . . . . . . . . . . . . . . . . . . .50
Utilisation du cardiofréquencemètre numérique . . . . . . . . . . . . . . . . . .50
Cardiofréquencemètre numérique : remarques et conseils pratiques . .52
Heure de la Journée . . . . . . . . . . . . . . . . . . . . . . . . . . . . . . . . . . . . . . .53
Régler ou modifier l’heure, la date et les alarmes sonores : . . . . . . . . .53
Changer de fuseau horaire . . . . . . . . . . . . . . . . . . . . . . . . . . . . . . . . . . . .56
Heure de la journée : remarques et conseils pratiques . . . . . . . . . . . . .56
Exemple d’utilisation de l’Heure de la journée . . . . . . . . . . . . . . . . . . . .57
Chrono . . . . . . . . . . . . . . . . . . . . . . . . . . . . . . . . . . . . . . . . . . . . . . . . .58
Terminologie relative au chronographe . . . . . . . . . . . . . . . . . . . . . . . . . .58
Fonctionnement du Chrono . . . . . . . . . . . . . . . . . . . . . . . . . . . . . . . . . . .59
Mode Chrono : astuces et conseils pratiques . . . . . . . . . . . . . . . . . . . . .60
Exemple d’utilisation du mode Chrono . . . . . . . . . . . . . . . . . . . . . . . . . .62
Minuterie . . . . . . . . . . . . . . . . . . . . . . . . . . . . . . . . . . . . . . . . . . . . . . .62
Réglage de la minuterie . . . . . . . . . . . . . . . . . . . . . . . . . . . . . . . . . . . . . .63
Fonctionnement de la minuterie . . . . . . . . . . . . . . . . . . . . . . . . . . . . . . .63
Mode Minuterie : remarques et conseils pratiques . . . . . . . . . . . . . . . .64
Exemple d’utilisation du mode Minuterie . . . . . . . . . . . . . . . . . . . . . . . .65
Page 97

Récupération . . . . . . . . . . . . . . . . . . . . . . . . . . . . . . . . . . . . . . . . . . . .65
À propos de la fréquence cardiaque de récupération . . . . . . . . . . . . . .65
Déterminer manuellement la fréquence cardiaque de récupération . . .66
Examen . . . . . . . . . . . . . . . . . . . . . . . . . . . . . . . . . . . . . . . . . . . . . . . . .68
Vérification des données d’activités . . . . . . . . . . . . . . . . . . . . . . . . . . . .69
Mode Examen : remarques et conseils pratiques . . . . . . . . . . . . . . . . . .70
Configuration CFM . . . . . . . . . . . . . . . . . . . . . . . . . . . . . . . . . . . . . . . .70
Pour fixer une zone cible de fréquence cardiaque . . . . . . . . . . . . . . . . .71
Zones de fréquence cardiaque cibles préréglées . . . . . . . . . . . . . . . .71
Zone cible de fréquence cardiaque manuelle . . . . . . . . . . . . . . . . . . .72
Réglage des autres données statistiques de fréquence cardiaque . . . .73
Cardiofréquencemètre numérique : remarques et conseils pratiques . .75
Alarme . . . . . . . . . . . . . . . . . . . . . . . . . . . . . . . . . . . . . . . . . . . . . . . . .75
Réglage de l’alarme . . . . . . . . . . . . . . . . . . . . . . . . . . . . . . . . . . . . . . . . .76
Mode Alarme : remarques et conseils pratiques . . . . . . . . . . . . . . . . . .76
Soin et entretien . . . . . . . . . . . . . . . . . . . . . . . . . . . . . . . . . . . . . . . . .77
Cardiofréquencemètre numérique . . . . . . . . . . . . . . . . . . . . . . . . . . . . . .77
Pile . . . . . . . . . . . . . . . . . . . . . . . . . . . . . . . . . . . . . . . . . . . . . . . . . . . . . .78
Pile du cardiofréquencemètre numérique . . . . . . . . . . . . . . . . . . . . . .78
Changement de la pile de montre . . . . . . . . . . . . . . . . . . . . . . . . . . . .79
Veilleuse INDIGLO® . . . . . . . . . . . . . . . . . . . . . . . . . . . . . . . . . . . . . . . . . .79
Étanchéité . . . . . . . . . . . . . . . . . . . . . . . . . . . . . . . . . . . . . . . . . . . . . . . . .80
Montre . . . . . . . . . . . . . . . . . . . . . . . . . . . . . . . . . . . . . . . . . . . . . . . . . .80
Cardiofréquencemètre numérique . . . . . . . . . . . . . . . . . . . . . . . . . . . .80
Garantie et service . . . . . . . . . . . . . . . . . . . . . . . . . . . . . . . . . . . . . . . .81
Réparation . . . . . . . . . . . . . . . . . . . . . . . . . . . . . . . . . . . . . . . . . . . . . . . . .83
V
V
’
’
UUEED
D
EENNSSEEMMBBLLE
F
F
éélliicciittaattiioonnss !
En achetant le cardiofréquencemètre numérique Timex®, vous avez
embauché votre nouvel entraîneur personnel. Votre cardiofréquencemètre
numérique vous offre la capacité de suivre, d’enregistrer et d’analyser les
indicateurs de votre propre niveau de forme.
Vous trouverez que votre cardiofréquencemètre numérique est un outil de
mise en forme facile à utiliser. Mais, comme avec toute technologie
nouvelle, prenez le temps de vous familiariser avec ses composants afin
d’optimiser l’utilité de votre investissement.
Ainsi, consultez les caractéristiques et les fonctions de votre
cardiofréquencemètre numérique pour acquérir une connaissance de base
de cet outil de mise en forme. Mais avant tout, profitez pleinement de votre
nouveau partenaire pour une mise en forme toujours plus performante !
UUnn ccœœuurr eenn ffoorrmme
De récentes recherches sur la forme physique indiquent que tout le
monde peut se remettre et rester en forme sans exagérer. Cela peut
simplement se ramener à :
v Faire une séance d’exercice 3 à 4 fois par semaine
v Faire une séance d’exercice de 30 à 45 minutes
v Faire une séance d’exercice à un rythme cardiaque optimal
Remarque : Veillez à toujours consulter votre médecin avant d’entamer
un programme d’exercice physique.
!
e
E
45
Page 98

La fréquence cardiaque représente les effets de la séance sur tout
START / SPLIT
STOP/SET/RESET
FRÉQUENCE
CARDIAQUE
MODE
Veilleuse INDIGLO
®
l’organisme. La sélection d’une zone de fréquence cardiaque appropriée
entraîne le cœur, les poumons et les muscles à fonctionner à des niveaux
optimaux afin que l’organisme atteigne et se maintienne en forme.
Une fois réglé, le cardiofréquencemètre numérique peut automatiquement
vous signaler quand vous vous trouvez dans la zone d’effort choisie et
quand vous n’y êtes pas. Il peut vous aider à maintenir votre effort
physique au niveau d’intensité devant vous permettre de réaliser l’objectif
de forme fixé, sans sous-entraînement ni surentraînement.
MISE EN GARDE :
Ceci n’est pas un appareil médical et son emploi est déconseillé
aux personnes souffrant de troubles cardiaques graves.
Le brouillage du signal radio, un mauvais contact entre votre peau et le
capteur du cardiofréquencemètre numérique, ou d’autres facteurs
peuvent entraver la transmission des données de fréquences cardiaques.
46
BBoouuttoonnss ddee llaa mmoonnttrre
REMARQUE : L’utilisation particulière de ces boutons varie selon le mode.
Consultez les informations relatives à chaque mode pour l’utilisation des
boutons de la montre.
IIccoonneess dd’’aaffffiicchhaagge
L’icone d’un cœur vide s’affiche pendant que la montre attend le
X
signal du capteur du cardiofréquencemètre numérique.
Une fois que la montre a reçu le signal du capteur du
Y
cardiofréquencemètre numérique, l’icone d’un cœur plein s’affiche.
Cette icone continuera de clignoter aussi longtemps que la montre
recevra un signal du capteur du cardiofréquencemètre numérique.
L’icone du chronographe indique que la montre mesure la durée de
w
votre activité en mode Chrono.
e
e
47
Page 99

L’icone d’un sablier indique que la montre mesure la durée de votre
H
activité en mode Minuterie.
L’icone de réveil indique que vous avez réglé l’alarme pour être averti
b
à une certaine heure.
L’icone de mélodie indique que vous avez réglé le carillon horaire
N
pour qu’il sonne toutes les heures.
RReessssoouurrccees
s
Ressources imprimées
En plus du présent manuel, votre cardiofréquencemètre numérique
comprend la documentation suivante :
v Mode d’emploi des capteurs de forme : Des instructions
détaillées sur le réglage, l’utilisation et l’entretien du cardiofréquencemètre numérique.
v Heart Zones
uniquement) : Des informations sur l’emploi du cardiofréquencemètre numérique en association avec le programme de forme Heart
Zones®Tr
résistance de votre cœur.
Ressources sur le Web
Les sites Timex
d’optimiser votre cardiofréquencemètre numérique.
v Enregistrer le produit sur www.timex.com.
48
®
Tools for Success (pour les clients aux États-Unis
aining System, conçu pour aider à accroître la force et la
®
proposent de précieux renseignements permettant
v Visiter www.timex.com/hrm/ pour plus de renseignements sur les
cardiofréquencemètres Timex®, y compris la liste des fonctions du produit.
v Visiter www.timex.com/fitness/ pour des conseils pratiques sur la
forme physique et l’entraînement à l’aide des cardiofréquencemètres
Timex®.
DDéétteerrmmiinneerr vvoottrree zzoonnee ooppttiimmaallee ddee ffrrééqquueennccee ccaarrddiiaaqquuee.
Il y a essentiellement cinq zones cibles de fréquence cardiaque. Il vous suffit
de choisir un pourcentage de fréquence cardiaque maximale (%MAX)
correspondant à l’objectif de forme physique visé pour l’exercice considéré.
ZONE % MAX Objectif Bénéfices
50% à 60% Exercice léger
1
60% à 70% Contrôle du poids
2
70% à 80%
3
80 % à 90%
4
90% à
5
100%
Avant de régler votre zone cible, vous devez d’abord déterminer votre
fréquence cardiaque maximale. Il y a plusieurs méthodes d’estimation
de celle-ci. La brochure Heart Zones
Établissement de base
cardiorespiratoire
Conditionnement
optimal
Entraînement pour
athlète supérieur
Maintenir un cœur sain et remise
en forme
Perdre du poids et brûler des
graisses
Accroître l’endurance et la
capacité aérobique
Maintenir une excellente condition
physique
Atteindre un athlétisme de pointe
®
Tools For Success comprise dans
.
49
Page 100

l’emballage de votre cardiofréquencemètre personnel (pour les clients aux
États-Unis uniquement) en propose d’excellentes et Timex vous conseille
d’utiliser une de celles qui y sont décrites.
Toutefois, si vous ne pouvez utiliser aucune des méthodes suggérées dans
Heart Zones®Tools for Success (pour les clients aux États-Unis uniquement),
vous pourriez envisager de recourir à une méthode basée sur l’âge.
Partez du chiffre 220 puis soustrayez-en votre âge. Par exemple, une
personne âgée de 35 ans commencerait avec le chiffre 220 puis en
soustrairait 35 (son âge) ce qui donne une fréquence cardiaque maximale
estimée de 185. Une fois que vous connaissez votre fréquence cardiaque
maximale, vous pouvez régler les zones indiquées dans le tableau de la
page précédente.
N
C
C
AARRDDIIOOFFRRÉÉQQUUEENNCCEEMMÈÈTTRRE
AAvvaanntt ddee ccoommmmeenncceer
Une fois que vous connaissez votre fréquence cardiaque maximale,
Timex vous conseille d’enregistrer cette information sous le mode
CONFIGURATION CFM. Ceci vous permettra de régler le cardiofréquencemètre numérique en fonction de vos paramètres personnels. Pour plus de
renseignements sur le mode Configuration CFM, veuillez vous reporter aux
pages 70 à 75.
r
UUttiilliissaattiioonn dduu ccaarrddiiooffrrééqquueenncceemmèèttrree nnuumméérriiqquue
Pour de plus amples renseignements sur l’utilisation de votre
cardiofréquencemètre numérique, veuillez consulter le
capteurs de forme fourni avec l’appareil.
50
N
E
UUMMÉÉRRIIQQUUE
E
e
Mode d’emploi des
1. Humecter les coussinets du capteur du cardiofréquencemètre numérique.
2. Poser le capteur sur votre poitrine avec le logo Timex®orienté vers le
haut et l’extérieur et bien le serrer, juste en dessous du sternum.
3. Appuyer sur MODE jusqu’à afficher le mode souhaité. On
peut afficher les données de fréquence cardiaque sous les
modes Heure de la journée, Chrono ou Minuterie.
4. À partir d’un endroit situé à au moins deux mètres d’autres
cardiofréquencemètres ou d’autres sources de brouillage
électrique ou radio, appuyer sur le bouton HEART RATE
(fréquence cardiaque) de la montre. L’icone d’un cœur vide s’affiche à
l’écran pour indiquer que la montre cherche le signal du capteur. Une
fois que la montre reçoit un signal, le témoin devient un cœur plein et
commence à battre.
5. Commencer l’activité.
REMARQUE : La montre enregistre automatiquement votre fréquence
cardiaque et toute autre donnée statistique concernant votre activité
(en mode Examen) uniquement si vous activez le mode Chrono au
cours de cette activité.
6. Si la montre est réglée pour vous avertir lorsque vous passez au-dessus
ou en dessous de votre zone de fréquence cardiaque, appuyer sur le
bouton HEART RATE (fréquence cardiaque) et le tenir enfoncé pour
couper l’alarme sonore. Sinon elle continuera d’émettre un bip sonore
jusqu’à ce que vous retourniez dans votre zone cible. Après avoir coupé
l’alarme sonore, le message HOLD ALERT OFF s’affiche. Continuer à
appuyer sur le bouton HEART RATE jusqu’à afficher le message ALERT
OFF. Inversement, après avoir activé l’alarme sonore, le message HOLD
51
 Loading...