

Page 1

ENGLISH / ESPAÑOL / FRANÇAIS
Page 2
USER MANUAL
Model no: MO2Q
Page 3

Getting Started 6
Setting up watch and app 6
Connecting the GUESS CONNECT DIGITAL+ watch to your phone. 8
Entering personal data 18
GUESS CONNECT DIGITAL+ Features 26
Operating Your New Watch 27
Basic Button Functions 27
SOS Function 27
Viewing different watchfaces 28
Main Menu 28
Long Press Quick Menu 29
NOTIFICATIONS 30
ACTIVITY 32
WORKOUT 36
Workout features 37
Configurable Center row (Distance, HR or toggle) 37
Training pages (pace, speed, cadence, calories, time of day) 38
Auto Scroll 39
Auto Pause 39
Using other features during a workout 39
Workout Settings (refer to the settings workout section) 39
Pausing/Leaving Workout Mode 39
MUSIC 41
TIMING 43
STOP WATCH 43
TIMER 45
ALARMS 47
SETTINGS 52
TIME & DATE Functions 53
UNITS 54
WORKOUT SETTINGS 55
POWER & MODES (Quick Menu) 56
ABOUT 58
FACTORY RESET 59
Page !3
Page 4

SOS 60
Common Help Topics 62
General 62
Connectivity & Bluetooth 63
Activity & Workout Data 63
User Account & Profile 64
Getting familiar with the app 65
Dashboard Navigation Bar 65
DASHBOARD 66
Steps 67
Distance 68
Calories 69
Watchfaces 70
Sleep 73
Last Workout 75
Workout Details 75
Heart Rate BPM 77
Smart Camera 79
The Workout Feed 80
The Calendar 81
Phone Settings 82
Profile 83
Watch Control 85
Heart Rate 86
Workout and Activity 87
Device Settings 88
Daily Goals 90
Notifications 91
SOS Contacts 92
Sharing 94
About 96
Logout 96
Compliance & Regulatory 97
Water Resistance 97
Page !4
Page 5

Technical Data 98
FCC Notice (U.S.) / IC Notice (Canada): 99
DECLARATION OF CONFORMITY 100
Page !5
Page 6

Getting Started
Setting up watch and app
1. What’s in the box:
! The Watch
! Magnetic Charging Cable
! Quick Start Guide
2. The first step to using your new GUESS CONNECT DIGITAL+ watch is to fully charge
the battery. This will take up to 2.5 hours.
3. Position the magnetic charging cable to the charging port (2 silver pins) on the back of
the watch. With the strap buckle facing away from you, set the cable so that it comes
from the left side. The magnetic connection will hold the cable in position while charging.
4. The charging status will be displayed as the watch is being charged and will read “FULLY
CHARGED” when it’s done.
!
Page !6
Page 7

5. Disconnect the charging cable. The screen will display the list of language options. Use
the buttons on the right side of the watch to scroll through and select from the list of
language options.
!
6. Press the SELECT button (center right side) to select the appropriate language. The
screen prompts you to OPEN DIGITAL+ APP ON PHONE in selected language.
!
7. Download the GUESS CONNECT DIGITAL+ app for your type of phone.
! For Android phones, download the app from the Google Play Store
! For iPhones, download the app from the Apple Store.
Page !7
Page 8

Connecting the GUESS CONNECT DIGITAL+ watch to your phone.
1. Once you have downloaded and installed the GUESS CONNECT DIGITAL+ app on
your phone, open the app.
!
2. You will be prompted to Sign Up. You have four options for creating an account. The sign
up options include:
! Facebook
! Google
! Email
! Mobile Phone
!
Page !8
Page 9

3. To sign in using Facebook:
a. Tap on the CONTINUE WITH FACEBOOK OPTION. The following screen is
displayed.
!
b. Tap on the “Continue as ….” button to continue. The “Select your watch” screen is
displayed.
Page !9
Page 10

4. To sign in using your Google account:
a. Tap on the CONTINUE WITH GOOGLE button. The following screen is displayed.
!
b. Tap on the Allow button. The Select your watch screen is displayed.
Page !10
Page 11

5. To sign up using an email address:
a. Tap the Sign up with email option. You are prompted to enter a valid email address
and password.
!
b. Enter you email address and create a password. Press the Done button on the
keypad.
c. You will be prompted to enter the 4-digit code that was sent to your email address.
!
d. Check your email for the code and enter it in the Verification Code field. Press the
Done button and the Select your watch screen will be displayed.
Page !11
Page 12

!
Page !12
Page 13

6. To sign in using a mobile phone:
a. Tap the Sign up with mobile phone option and the next screen prompts you to enter a
valid phone number and password.
!
b. Enter your phone number and a password to be used when signing in. Press the
Done button. A text message is sent to that phone number with a verification code.
The next screen displayed prompts you to enter the Verification Code.
!
c. Enter the Verification Code and press the Finish button.
Page !13
Page 14

7. After signing in with any of the four options, you are prompted to select your watch from
the illustrated list.
!
a. Swipe the screen to view all of the watches. When you find your new watch, tap it.
Your selection will be displayed on the next screen.
!
If the correct watch is displayed, press the SET UP button on the screen.
!
If the watch displayed is not the correct one, simply press the back button (lower left)
to display the list and re-select.
!
Page !14
Page 15

b. With your selected watch displayed, tap Ready To Pair?.
!
c. The app will search for and display a list of compatible watches. You are prompted to
Select a Watch to Pair. Your watch will likely be the first (and only) watch on the
selection screen.
!
Page !15
Page 16

d. Tap the watch with the strongest signal to pair to your cell phone. You will be
prompted to Confirm Your Watch.
!
e. On your new device, accept the pairing request by hitting the select button when
highlighting the check icon. You will need to accept the pairing request from the
watch on your phone (both iOS and Android). Tap PAIR when this prompt appears.
! !
Page !16
Page 17

f. You will now begin creating your profile. Tap LET’S GET STARTED at the bottom of
the screen.
!
Page !17
Page 18

Entering personal data
1. Enter a nickname for your watch and tap SAVE.
!
2. The next screen gives you the option to take a profile picture or select one already stored
on your phone. Tap the camera icon to display the options for your profile picture.
!
Page !18
Page 19

3. After tapping the camera icon you can choose to either take a picture or choose from
your device’s photo album.
!
4. Edit the photo as required. When you have finished editing, tap Done.
5. Tap the First Name field to open the keypad and type in your First Name and tap Done.
!
6. Tap the icon for your gender and tap the NEXT STEP button.
Page !19
Page 20

7. The next screen asks for your date of birth.
!
8. Swipe the columns for Month, Day, and Year so that your birthdate is displayed in the
center row of the display. Tap NEXT STEP.
9. Tap either Imperial or Metric and tap NEXT STEP.
!
Page !20
Page 21

10. Swipe through the columns for feet and inches (if you selected Imperial) or centimeters (if
you selected Metric) until your height is displayed in the middle row of the screen. Tap
NEXT STEP.
!
11. Swipe through the three columns to select the time you go to sleep and select whether
the time is AM or PM. Tap NEXT STEP.
!
Page !21
Page 22

12. Swipe through the three columns to select the time you wake up and whether the time is
AM or PM. Tap NEXT STEP.
!
13. Highlight the circle representing the activity level you prefer.
!
Page !22
Page 23

14. You can customize your goals by tapping a specific activity goal (Steps, Distance,
Calories, or Sleep) that you want to change. To change the goal, tap the “>” symbol to the
right of the activity to enter a new figure for each goal, and tap SAVE to save your
changes.
! ! ! !
15. Tap NEXT STEP. The next screen allows you to select which Notifications and Alerts from
your phone are to be displayed on your watch. When all of your selections are made, tap
NEXT STEP.
! !
Page !23
Page 24
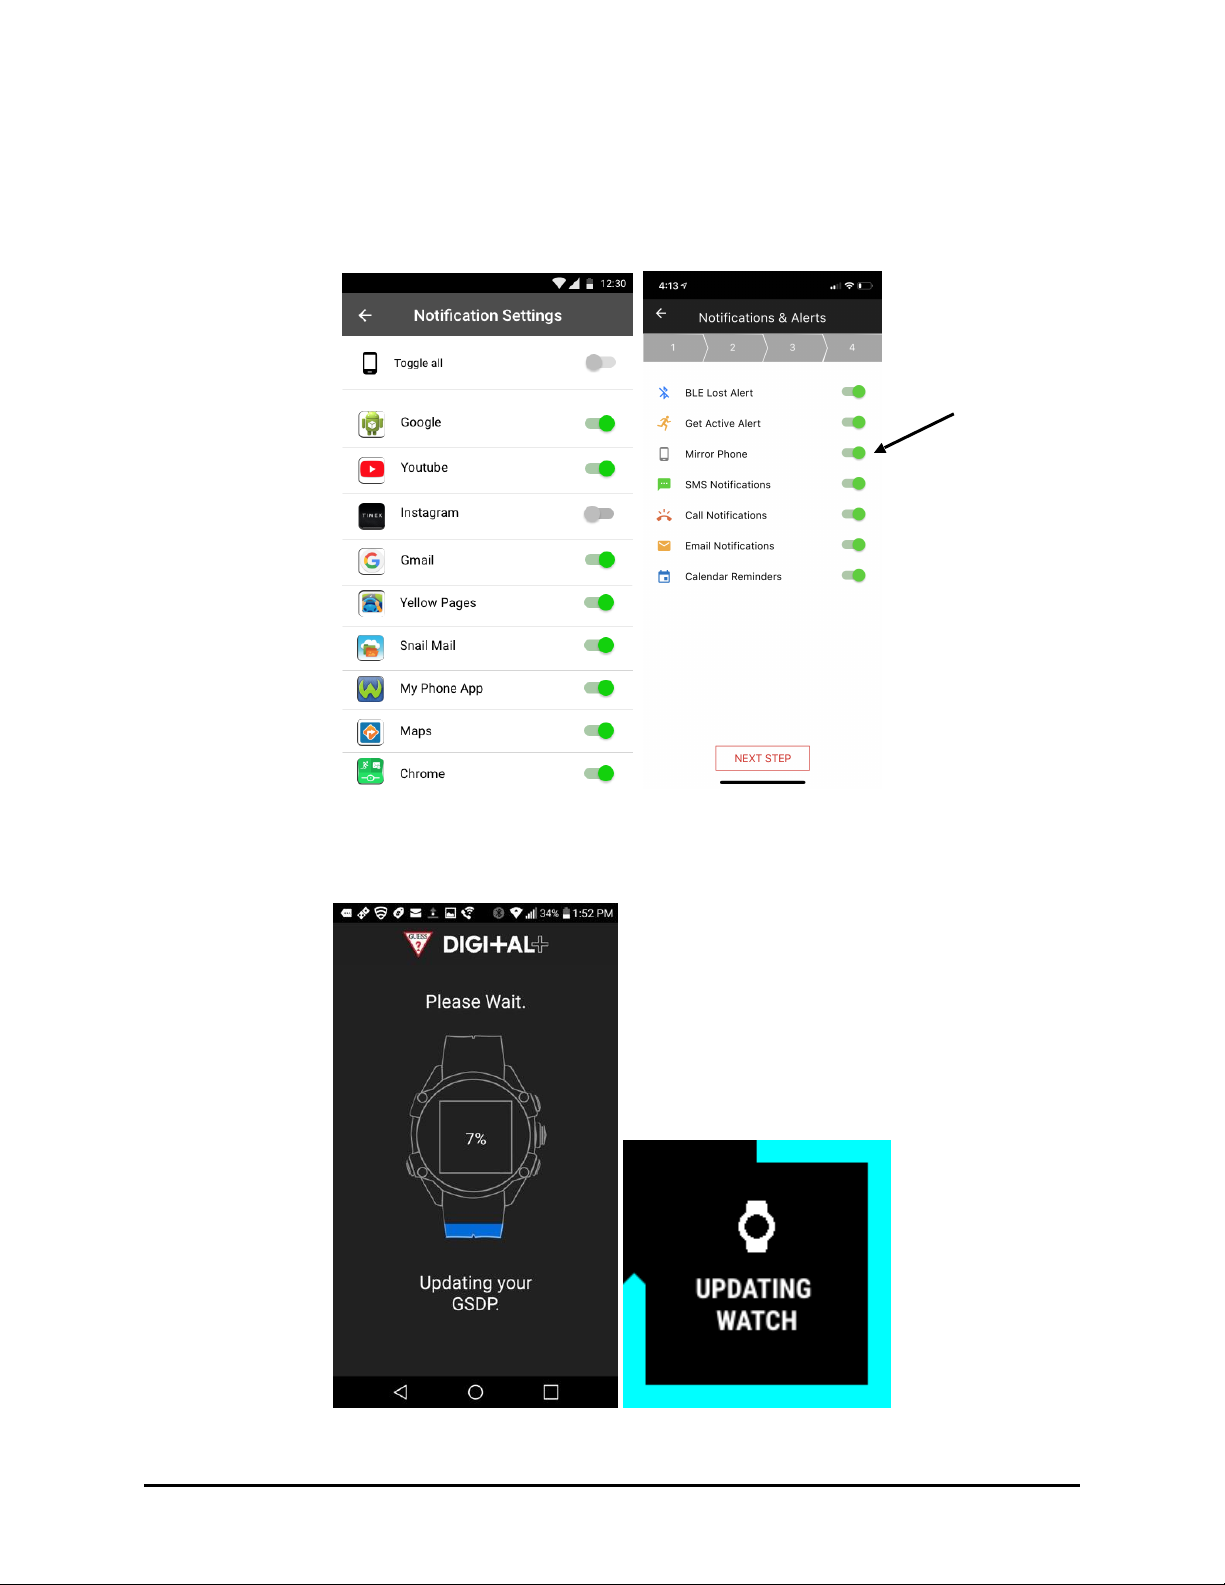
16. Notifications are handled slightly differently, depending on the phone operating system.
!
iOS users can adjust app notification settings individually (Settings, Notifications), and
“Mirror Phone” will simply mirror the notifications from the phone.
!
Android users can toggle apps on and off individually.
! !
Android Screen iPhone Screen
!
The app will check to ensure your watch is running the latest software. If the app detects
that the software is outdated, it will update your watch automatically.
! !
Page !24
Page 25

!
Once the update has completed, a setup complete screen is displayed.
!
! The information you entered on the app setup screens are downloaded to the watch.
!
When the setup is complete, this will be indicated on the watch.
! An interactive walkthrough of the app is available when users first setup the watch and
app, describing the major features of the app. Users can view the walkthrough or skip.
!
Your mobile app dashboard will display the statistics for your various activities. When the
setup is brand new, there will be no history to display.
!
17. End of Setup Procedure.
Page !25
Page 26

GUESS CONNECT DIGITAL+ Features
!
Long Battery Life
!
Water-resistant to 30m (C3001) IPX7 (C3002). Do not activate the buttons while the
watch is submerged.
!
Compatible with iOS and Android smartphones.
!
Daily activity tracking of steps, distance, calories & sleep
!
Supports multiple types of notifications (calls, text messages, inactivity)
!
Workout mode provides time, distance, Heart Rate, as well as pace, speed, cadence,
calories and time of day.
!
Timing features: Alarms, Stopwatch & Timer
!
Music control of connected phone
!
SOS Emergency Alerts
Page !26
Page 27

Operating Your New Watch
Basic Button Functions
!
SOS Function
!
Page !27
ON/OFF, Back button and
backlight display
SCROLL UP
Button
SCROLL DOWN
Button
SELECT Button
Press and Hold 10
seconds at the same
time
Press and Hold 10
seconds at the same
time
Page 28

Viewing different watchfaces
1. When you first turn on the watch after it’s been connected to your phone (by pressing the
ON/OFF button), the screen displays the watchface you last selected.
!
2. Press the UP or DOWN scroll buttons to toggle through the installed watchfaces if you
want to change the one current displayed.
Main Menu
From TOD, press the Select button to display a scrollable Main Menu list of features:
! NOTIFICATIONS
! ACTIVITY
! WORKOUT
! MUSIC
! TIMING
! SETTINGS
By default, NOTIFICATIONS icon is displayed first. To access all options in the main menu, use
the Up and Down scroll buttons to move through the list. Press the Select button to open a
feature displayed on the screen. For example to view Notifications, press the Select button to
view the list of notifications.
!
Use the ON/OFF and BACK button to move to the previous screen or back out of the current
function to return to the main menu.
Page !28
Page 29

Long Press Quick Menu
Long press Back button to access the Quick Menu:
! Power Options
! Airplane Mode
! Do Not Disturb
Page !29
Page 30
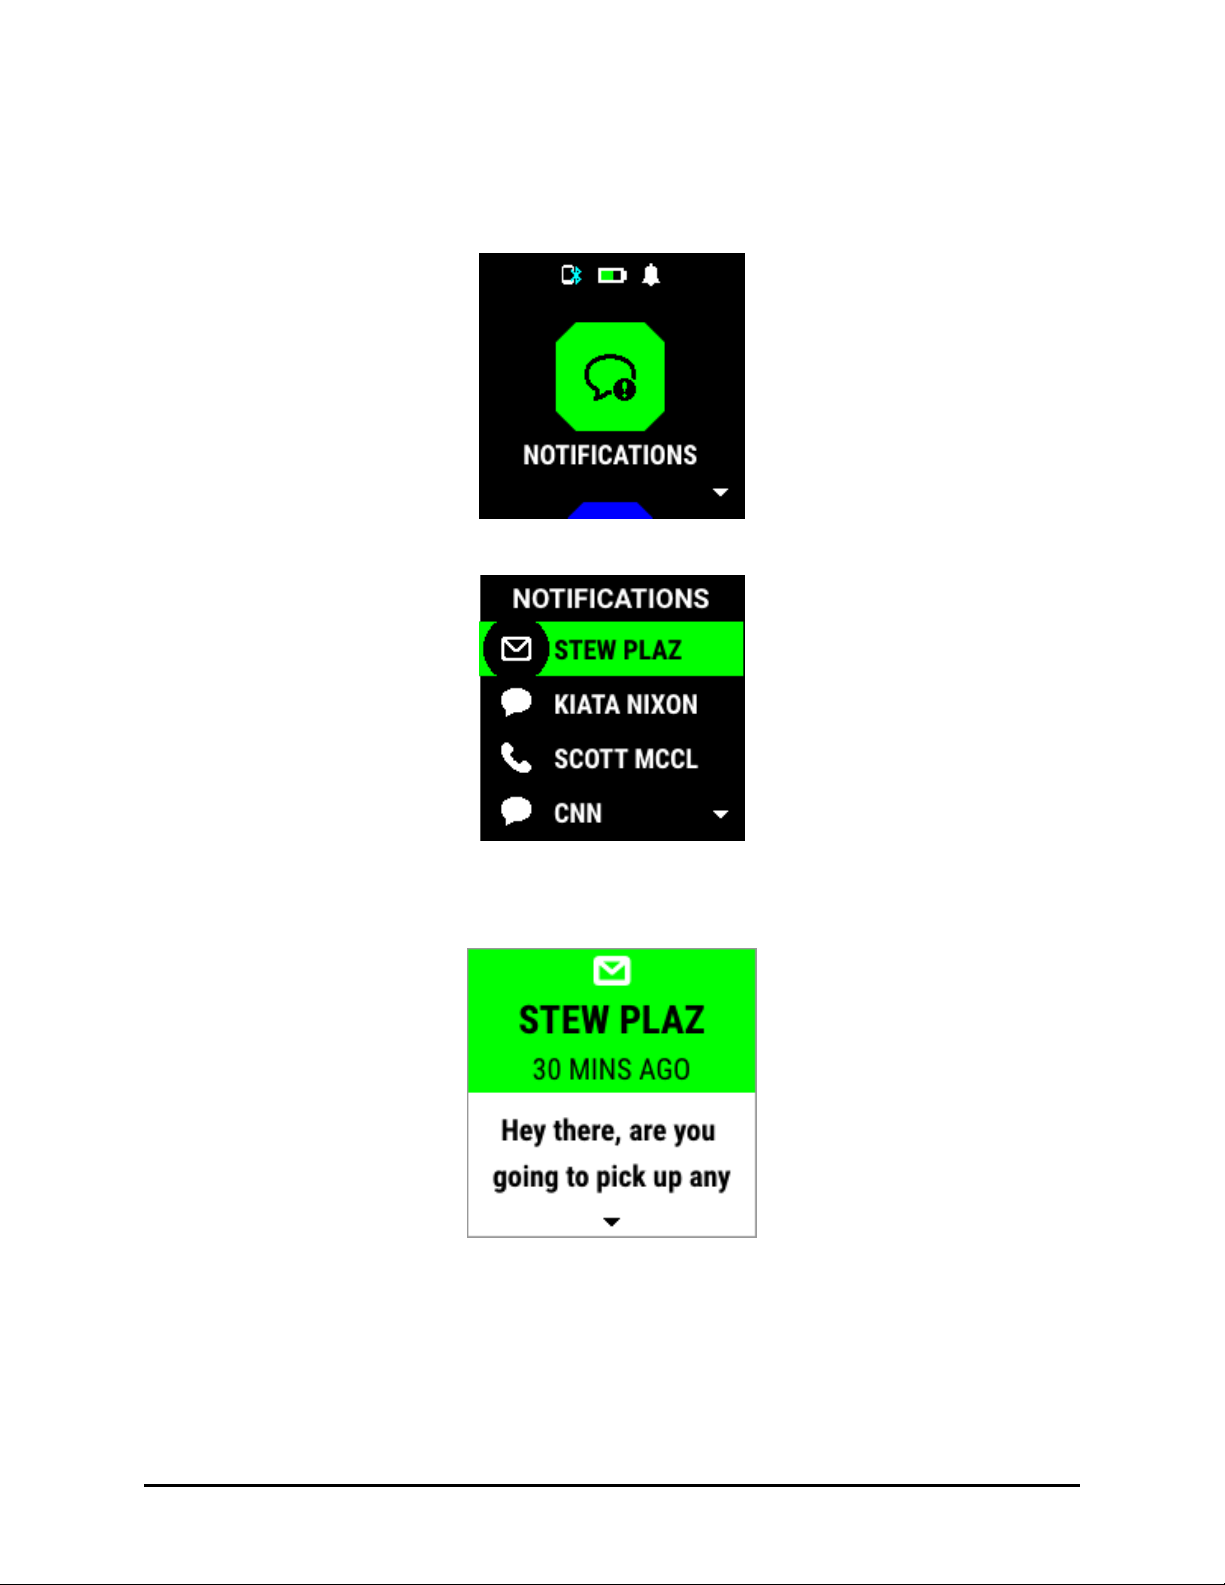
NOTIFICATIONS
1. The NOTIFICATIONS feature is always the first screen in the main menu. This feature
stores all notifications and allows you to quickly view them.
!
2. Press the SELECT button to view your list of notifications.
!
3. Use the UP and DOWN scroll buttons to scroll through the list of notifications. When
highlighting the notification you would like to view, press the SELECT button to display
the message.
!
Page !30
Page 31

4. With the message opened, you have the following options:
a. View the full message by pressing the scroll down button.
!
b. Press the select button to display a side menu, displaying options to view next
notification or delete the current notification.
!
c. Press the select button to save this notification and view the next notification or
d. Press the scroll down button to delete the displayed notification.
e. At the end of the list of notifications there is a CLEAR ALL entry. Use the scroll button
to highlight this option and press the select button to clear all notifications from the
current list. Note that the actual emails and text messages will not be deleted, just the
notification of the email or text will be removed from the watch.
f. When you have finished viewing your notifications, press the ON/OFF and BACK
button to return to the list of applications.
Page !31
Page 32

ACTIVITY
1. The ACTIVITY feature allows you to view multiple aspects of your daily activity level
including:
!
Steps taken
!
Distance traveled
!
Calories burned
!
Sleep time
!
HR TODAY (Heart Rate at rest, average, and maximum for the day).
!
2. To view the details for each of the activity aspects, use the UP and DOWN SCROLL
buttons and each activity detail screen will be displayed in the sequence the activity is
listed on the watchface.
3. As you reach the half way point for your Steps, Calories, and Miles (or kilometers) you
will be notified with one of the following displays:
! ! ! !
4. The screens show your activity goals along with your current progress. The border along
the inside of each panel is a progress bar showing how close you are to reaching your
daily goals.
a. In the STEPS display, the progress bar is complete as you completed 12,500 steps
against a goal of 10,000.
b. In the MILES display, the progress bar is 75% complete as you have covered 7.5
miles against a goal of 10 miles.
Page !32
Page 33

NOTE: Steps and distance are calculated based on the (Thalchemy) algorithm, taking into
consideration the user’s height and age. Calories are based on BMR (Basal
Metabolic Rate, an estimate of how many calories your body burns at rest) and
active calories.
5. To view your continuous heart rate, press the select button with the HR TODAY screen
displayed.
Steps Detail Screen
Distance Detail Screen
Calories Burned Detail
Screen
Hours Slept Detail Screen
Heart Rate Today Detail !
Screen
!
!!!
!
Page !33
Page 34

6. As your activity level increases, the heart rate zone will be displayed to match your
current heart rate. The heart icon next to the heart rate display is color coded to the
heart rate zone. In this case, the screen shows a blue heart icon to match the low heart
rate zone.
!
7. The zone and heart icon colors will change as your heart rate continues to increase.
! !
8. To pause the heart rate reading, press the select button. Press the select button once
more to resume continuous reading.
!
9. Heart Rate Zones are based on this formula (220 - Age = 100% Maximum HR) !
So for a 28 year old, 192 is their maximum HR value (@ 100% (200 – 28 = 192)
! Maximum zone range is from 90-100% (173 - 192 bpm)
! Hard is 80-90% (154 - 172)
! Moderate is 70-80% (134 - 153)
! Normal is 60-70% (115 - 133)
! Low is 50-60% (96 - 114)
Page !34
Page 35

10. Press the ON/OFF and BACK button to return to the activity screens.
11. When you have finished viewing your activity details, press the ON/OFF and BACK
button to return to the list of applications.
Page !35
Page 36

WORKOUT
1. The WORKOUT feature allows you to start a workout or access the workout settings.
!
2. To start a workout, while in the workout menu press the SELECT button.
!
3. With the START button highlighted, press the SELECT button. A three second timer will
count down and tell you to “GO”. option.
! ! !
Page !36
Page 37

4. The workout details screen will display during your workout.
!
Workout features
Configurable Center row (Distance, HR or toggle)
1. The Workout display center row is configurable. By default the center row display will
toggle between Heart Rate and Distance. The center row can be changed to display
either Heart Rate or Distance.
! ! !
Toggle (HR/Distance) Set to Distance Set to Heart Rate
Page !37
Workout Time
Training Pages
Center Row!
HR, Distance or
Both (Toggle)
Page 38

Training pages (pace, speed, cadence, calories, time of day)
1. While in a workout, pushing the bottom button scrolls through a list of Training Page
views.
Example Training Pages with Center Row set to HR
! ! !
!
If the Center Row setting is set to Toggle (Default) the Variable Data Field would cycle in
this order:
1. PACE
2. SPEED
3. CADENCE
4. CALORIES
5. TIME OF DAY
Note that if the Center Row setting is set to something other than Toggle, the stat
that is not shown in the center row is added to the variable data field rotation.
!
If the Center Row setting is set to Distance, the Variable Data Field would cycle in this
order:
1. HEART RATE
2. PA CE
3. SPEED
4. CADENCE
5. CALORIES
6. TIME OF DAY
!
If the Center Row setting is set to Heart Rate, the Variable Data Field would cycle in this
order:
1. DISTANCE
2. PA CE
3. SPEED
4. CADENCE
5. CALORIES
6. TIME OF DAY
Page !38
Page 39

Auto Scroll
This feature activates the transitioning of Training pages during a workout, and can be
turned ON or OFF. Default setting is OFF. When Auto Scroll is set to ON, Training Pages will
cycle every 3 seconds.
Auto Pause
This feature utilizes the built-in accelerometer to determine if the user is running, and
will ask the user if they want to pause the workout if reduced activity is detected. This
feature can be turned ON or OFF. Default setting is OFF.
Using other features during a workout
During a workout, other watch features are available (the workout does not pause while you
use other watch features). Hit the BACK button to view the main menu. A PLAY icon
indicates the workout is still running.
NOTE: If the workout is paused, it will display a PAUSE icon.
! !
Workout Settings (refer to the settings workout section)
Pausing/Leaving Workout Mode
User can pause a workout by pressing the Middle Button during an active workout. This
brings the user to a pause menu, where the user can resume, end the workout, or discard
the workout.
1. To pause a workout, press the SELECT button while on the workout details page.
!
! To resume your workout, highlight RESUME and press the SELECT button and your
workout timer will resume where you left off.
! To end the workout, highlight the END WORKOUT option and press the SELECT button.
Page !39
Page 40

The WORKOUT COMPLETE screen is displayed.
! !
2. Press the SELECT button to display the first workout detail screen. Use the UP and
DOWN SCROLL buttons to scroll through all three workout detail screens.
! ! !
3. When you have finished viewing your workout details, press the ON/OFF and BACK
button to return to the list of applications.
Note: If the message “Workout memory full” is displayed, the watch will not allow you to do
another workout until you have synced your workouts to clear the cache.
Page !40
Page 41

MUSIC
1. This feature requires Bluetooth connection.
2. The MUSIC feature allows you to control your music playing from your smart phone on
your watch. You can control the volume and scroll through the list using next and
previous buttons.
!
3. From the main menu, highlight MUSIC and press the SELECT button to launch the
watch’s music player.!
!
!
iOS: Last music app used is reinitialized.
!
Android: Launching music player is displayed until user starts music on their phone.
4. The first set of controls you have in the music player is next song or previous song.
Use the UP button to play the next song and the DOWN button to play the previous
song.
5. Use the SELECT button to launch the timed music player control menu. You can now
increase or decrease the volume of your music player and pause/play the song. Use the
UP button to increase the volume and the DOWN button to decrease the volume. Use
the SELECT button to play/pause your song.
Page !41
Page 42

! ! !
6. To go back to the previous music control, press the SELECT button. If you just played/
paused a song, wait 5 seconds for timed music player control menu to switch back to the
original option.
7. When you have finished making music selections, press the ON/OFF and BACK button
to return to the list of applications.
Page !42
Page 43

TIMING
1. The TIMING feature provides several functions including:
!
Stop Watch
!
Timer
!
Alarms
!
STOP WATCH
1. Stopwatch and timer can be run at the same time.
2. Press the SELECT button. The STOPWATCH screen is displayed.
!
3. Press the SELECT button. The stop watch screen is displayed with the timer set at
00:00. Press the SELECT button to begin the stop watch. The reading will increment to
indicate the recorded time.
! ! !
Page !43
Page 44

4. Press the SELECT button to pause the stop watch. The display will indicate the time
recording has paused.
!
5. Press the SELECT button to restart the stop watch time recording.
6. When you have finished with the stop watch function, press the ON/OFF and BACK
button to exit.
7. The millisecond is only displayed on-pause.
8. Recording laps, hitting the lap icon (button right) will increment a new lap
9. Pausing, middle button, will pause the stop watch, allowing you to scroll through your
laps using the bottom button.
10. Resetting, top button, will reset the stopwatch.
Page !44
Page 45

TIMER
1. The TIMER function allows you to set a timer which counts down from a predefined
duration. To access the TIMER function, start the Timing feature and use the UP or
DOWN SCROLL buttons to highlight the TIMER function. Then press the SELECT
button to start.
!
! Default timer is set to 5 minutes.
!
! Press Select to begin the Timer countdown.
!
!
You can pause the timer by pressing the SELECT button and then resume the timer by
pressing the SELECT button once more.
Page !45
Page 46

!
!
The TIMER function will operate in the background even when you are viewing another
application.
!
Edit the timer by hitting the bottom button
!
Edit wizard for hour, minute, seconds. (up arrow to add to the number, down arrow to
subtract, middle button to advance to next option).
! ! !
! Reset timer. Press top right reset icon to reset the timer.
!
Page !46
Page 47

ALARMS
1. The ALARMS function allows you to define and enable or disable multiple alarms and
customize which days of the week they are active. To access the ALARMS function, start
the Timing feature and use the UP or DOWN SCROLL buttons to highlight the ALARMS
function.
!
2. Press the SELECT button to start the ALARMS function. Previously defined alarms are
displayed.
!
3. Use the UP and DOWN SCROLL buttons to select an alarm to edit and press the
SELECT button.
! !
4. The default option on each detail alarm screen allows you to toggle the alarm either ON
or OFF. Press the SELECT button to change the ON/OFF status for this alarm. The icon
will change based on the alarm state.
Page !47
Page 48

5. Use the SCROLL button to highlight the EDIT option and press the SELECT button to
display the edit options.
! !
6. To change the time of the alarm, use the scroll keys to highlight the Time: entry and
press the SELECT button.
!
7. The Hours field is first displayed.
!
Page !48
Page 49

8. To change the time of the alarm, use the UP and DOWN SCROLL buttons to set the
hours and press the SELECT button. The Minutes field will be displayed.
!
9. Use the UP and DOWN SCROLL buttons to set the minutes for the alarm and press the
SELECT button. The AM/PM field will be displayed.
!
10. Use the SCROLL keys to toggle the entry to AM or PM.
11. Press the ON/OFF and BACK button to save your changes and return to the previous
screen.
12. The Repeat: field allows you to determine which days the alarm will sound. The options
are:
!
Once (one time only)
!
Daily (7 days a week)
!
Weekdays (Monday through Friday)
!
Weekends (Saturday and Sunday)
!
Custom (allows you to define specific days for the alarm to be sound)
Page !49
Page 50

!
13. With the Repeat: field highlighted, press the SELECT button to display the Repeat
options.
!
14. Use the scroll keys to highlight either one of the predefined repeat options (once, daily,
weekends, weekdays) or the CUSTOM option.
!
15. Use the CUSTOM option to scroll through the days of the week and set each day
individually for the alarm to sound. Highlight each day with the scroll buttons and use the
SELECT button to toggle the day to either ON (to sound the alarm) or OFF (to not sound
the alarm).
Page !50
Page 51

!
16. When you have finished setting the alarm options, press the ON/OFF and BACK button
to save your changes and return to the list of features.
17. You can also customize the alarms vibrations and sounds through the app.
Page !51
Page 52

SETTINGS
1. The SETTINGS function allows you to enable or disable certain watch functions and how
some functions are displayed (such as your choice of a 12 or 24 hour clock).
!
2. Press the SELECT button to display the SETTINGS options.
!
Page !52
Page 53

TIME & DATE Functions
1. Press the SELECT button with the TIME & DATE option highlighted. The time and date
setting options are displayed.
!
2. The TIME & DATE function shows:
! SOURCE: Where your device is obtaining the time and date information. You can choose
either your phone or a custom time.
! TIME: The current time. This field cannot be edited.
! DATE: The current date. This field cannot be edited.
! Format: This field allows you to toggle between 12 hour (AM and PM) and 24 hour
(military style) formats for displaying the time and determine if the date is to be displayed
in Month-Day-Year (M-D-Y) format or Day-Month-Year (D-M-Y) format.
! Custom time and date, user can override current time and date. (ex: if it is currently 4:30,
the user can choose to have his/her watch to display the time as 10:30). !
3. To change the hour or date format from its current setting, highlight the Format option
and press the SELECT button. The Time format screen is displayed.
!
Page !53
Page 54

4. Press either scroll button to toggle between 12 and 24 hour time formats. When your
choice is displayed, press the SELECT button to display the options for the date format.
!
5. Press either scroll button to toggle between M-D-Y and D-M-Y formats. When your
choice is displayed, press the SELECT button to return to the TIME & DATE screen.
UNITS
!
1. The UNITS function allows you to determine if Imperial (miles, pounds, etc.) or Metric
(kilometer, kilograms, etc.) will be used. Highlight the UNITS option and press the
SELECT button to display the UNITS options.
!
2. Use the scroll buttons to toggle between Metric and Imperial and press the SELECT
button when your choice is highlighted. The previous menu will be displayed."
Page !54
Page 55

WORKOUT SETTINGS
1. The WORKOUT feature allows you to set the default settings for three characteristics of
the workout display:
!
!
AUTO SCROLL: You can toggle this option either ON or OFF. When ON, this will slowly
scroll the details of your workout into view. When OFF, you will need to manually scroll
through the list to see all of the workout details.
!
CENTER ROW: This allows you to select which detail is displayed in the center row of the
workout screen. The options are Heart Rate, Distance, or Toggle which allows you to view
either heart rate or distance.
!
AUTO PAUSE: You can toggle this option either ON or OFF. When ON, this will
automatically pause your workout timer when you stop exercising and resume your
workout when you start again. When OFF, you will need to manually pause and resume
your workout when you take a break to keep an accurate time duration.
2. To change either the AUTO SCROLL or AUTO PAUSE settings, highlight the option and
press the SELECT button. The ON or OFF setting will toggle with each press of the
SELECT button.
3. To change the CENTER ROW setting, highlight the option and press the SELECT button.
The three options for the center row display are shown.
!
4. Highlight the option you want displayed at the center of the workout screen, use the scroll
buttons to highlight the desired option and press the SELECT button to save your change
and return to the previous menu.
Page !55
Page 56

POWER & MODES (Quick Menu)
1. The POWER & MODES function allows you to view the watch’s remaining battery life
and to enable or disable the Airplane Mode and Do Not Disturb options.
!
2. Highlight the option and press the SELECT button to display the POWER & MODES
options. The battery icon is selected and displays the remaining watch battery life.
!
3. With the POWER OPTIONS (center) icon highlighted, press on the SELECT button to
display its options.
!
4. Highlight the desired option and press the SELECT button either turn off or restart the
watch.
Page !56
Page 57

5. Airplane mode, when enabled, turns off Bluetooth; you will not receive any notifications
or phone calls connected from your phone. To change the setting of Airplane mode:
a. Use the scroll buttons to highlight the Airplane icon and press the SELECT button.
AIRPLANE MODE will be displayed on the screen along with the current setting (ON
or OFF). A strike through line is drawn on the airplane icon when Airplane Mode is
disabled (OFF).
b. When the setting is correct, press the ON/OFF and BACK button to return to the
previous screen.
! !
6. DO NOT DISTURB has three options:
! Sound and vibration off
! Sound only
! Vibration only
7. To change the setting of the DO NOT DISTURB mode:
a. Highlight the icon on the right side of the screen and press the SELECT button. The
DO NOT DISTURB option status is shown as either ON or OFF.
b. Press the SELECT button to change the setting. A strike through line is drawn
through the icon when the option is disabled.
c. When the setting is correct, press the ON/OFF and BACK button to return to the
previous screen.
! !
Page !57
Page 58

ABOUT
1. The ABOUT feature list technical data about your watch including:
!
BATTERY – remaining battery percentage.
!
LAST SYNC – the time the watch and phone were last synced.
!
FREE SPACE – the remaining device storage space.
!
VERSION – the version of the firmware currently running on the watch.
!
DEVICE ID – the unique number ID for this watch.
!
SENSOR – the version number of the sensor currently installed.
!
FCC ID – the Federal Communications Commission ID number.
!
IC REGULATORY – the Interstate Communications Regulatory number.
2. To view the detail for any of these options, simply use the scroll buttons to highlight the
option. Its detail will automatically be displayed.
! !
3. To exit the ABOUT screen, press the ON/OFF and BACK button to display the previous
menu.
Page !58
Page 59

FACTORY RESET
The FACTORY RESET feature will return the watch to all of its factory default settings. All of you
customized settings will be lost. Be certain you are willing to lose your changes before
performing a factory reset.
1. To perform a factory reset, highlight the FACTORY RESET option and press the
SELECT button.
!
2. Use the scroll keys to highlight either the “X” to cancel the factory reset or the checkmark
to proceed with the reset. This will disconnect your watch from your smart phone.
!
3. Press the SELECT button when the correct icon is highlighted.
4. Make sure to “Forget” your watch from your phones Bluetooth settings to ensure you can
connect your watch back to your phone or to another phone.
Page !59
Page 60

SOS
1. The SOS feature sends an alert to all of those on the list you created from the SOS
Contacts dashboard feature. To send the alert:
2. Press and hold the lower left (ON/OFF) button and the lower right (SCROLL DOWN)
button at the same time. The watch will display “CONTINUE TO HOLD BUTTONS FOR
SOS”.
!
3. Keep pressing and holding the two buttons. You will be prompted to as to whom to send
the alert. Your options are all contacts or just for one contact.
!
4. Use the scroll buttons to highlight your choice and press the select button to send the
alert. The screen will change to verify the SOS was sent.
!
Page !60
Page 61

5. The contact will receive the following text message. It displays your location coordinates
as follows:
!
Page !61
Page 62

Common Help Topics
General
1. How to Turn off your watch.
To get to the power options, either hold the back button for 5s, or go to the settings in the main
menu then go to the power & modes section.
2. I am not able to sync.
If your app is having trouble syncing, try to close and reopen your app and sync again.
3. Time of Day out of sync.
When changing time zones, restart the app in order for the watch time to be in sync with your
updated phone time.
4. How do I change watch faces?
On your dashboard, tap the watch face tile. Then select your desired watch face. Tap SETUP,
then select which of the 3 current watch face you would like to replace.
5. How do I change backlight timer?
On the settings tab (top right of app) go to the device settings and change the backlight time.
6. How do I use the music controller?
Launching the music controller from your watch’s main menu will start your default music
playing application from your phone. You have the option to skip ahead with the top
button, behind with the bottom button, and access new options with the middle button. If
you hit the middle button you have the option to raise or lower your volume. To go back to
the original options, hit the back button.
7. What is the SOS function?
When you assign a contact as your SOS contact you can hold the back button and the down
button simultaneously for 5 seconds and it will text them that you need help and to contact
you as soon as possible.
8. Best placement for HR measurement accuracy.
To get optimal HR measurements, place your watch one finger length high from your wrist bone.
Page !62
Page 63

Connectivity & Bluetooth
1. What is the bluetooth range?
The range of the bluetooth connector is around 10-20 meters, or 30 feet. This could be a
challenge when going through walls.
2. How do I update firmware?
To update your watches firmware, go to the settings in the app. Then go to Watch Controls. Tap
“Firmware Update” to see if there is an update available for your watch.
3. I cannot re-pair my watch.
If for some reason you need to pair your watch to your device for a second time, you will need to
“forget” your watch from your phones bluetooth settings.
Activity & Workout Data
1. How do I record a workout?
You can record a workout with your watch from the “Workout” section in the main menu. Once
you select “Workout”, then select “Start”.
2. What is auto-pause?
Auto-pause detects when you stopped exercising during a workout and will pause for you. It will
also detect when you start up again. To turn this on go to your watch, go to settings >
workout > auto pause.
3. How do I share my workout details?
From the dashboard, tap the workout tile. Select which workout you would like to share then tap
it. Once you are in the workout details page, tap the share icon.
4. How do I change my workout goals?
In the settings tabs (top right of app), tap Daily Goals to change your daily goal preset or make a
custom goal.
5. What is Distance Adjustment?
Distance adjustment compensates for the difference between people’s actual leg length relative
to the user’s height. Users can adjust distance using the app if they are finding the watch
records distances too short or too long.
Page !63
Page 64

User Account & Profile
1. Can I delete my account info?
When you remove your watch, you have the option to permanently delete your account and all
activity data associated with your account (including workouts).
2. How do I change my profile info?
In the settings tab (top right of app), tap Profile to change your profile info.
3. Why does the app ask when I go to bed?
To easily determine your sleep data, the app will use your usual enter sleep and wake time data
to assist with automatically stitching together sleep events.
Page !64
Page 65

Getting familiar with the app
Dashboard Navigation Bar
1. The Dashboard Screen shortcut brings you back to the dashboard screen.
2. The Summary Workout Statistics Screen shortcut shows a partial listing of details from
the previous several workouts.
3. The Detail Workout Statistics Screen shortcut displays statistics of your saved
workouts including duration, distance, heartrate info, calories burned, etc.
Page !65
Page 66

DASHBOARD
1. The dashboard screen is the first screen displayed when you open the app on your
phone. Select the day for which you want to view activity data by pressing the left and
right arrow keys at the top of the screen.
! !
Page !66
Page 67

Steps
1. The Steps feature indicates the number of steps taken during the day and indicates if the
daily goal has been reached, based on the preferred activity goal you selected during
setup.
2. Tap the icon to display the detail screen for the Steps feature which allows you to view
saved Steps data for periods of time including previous hours, days, weeks, months, and
years.
!
Note: To edit the step goal, go to Daily Goals in the Settings Menu."
Page !67
Page 68

Distance
1. The distance run or walked is displayed on the icon and whether the goal for the day has
been reached, based on your preferred activity goal selection during setup.
2. Tap the icon to display the detail distance information for any time period including hours,
days, weeks, months, and years. Tap one of the duration options to display distance
information for different time periods.
!
Note: To edit the Distance goal, go to Daily Goals in the Settings Menu."
Page !68
Page 69

Calories
1. The Calories icon displays the calories (KCAL) burned so far today. Tap the Calories icon
to display the Days detail screen.
!
2. You can view the statistics for durations of time ranging from hours to years by tapping on
the buttons for the various time periods.
3. Note: To edit the Calories goal, go to Daily Goals in the Settings Menu."
Page !69
Page 70

Watchfaces
1. There are 3 preloaded watchfaces on your watch for viewing the time of day (TOD). A
different watchface can be chosen using the up and down buttons.
The watchface app feature allows you to download different watchfaces to the watch.
2. Tap this icon to display the watchface options. The “Featured” group is displayed. The
“Other” group and “Feature” group both show all watchface options.
! "
Page !70
Page 71

3. Tap the watchface you want. A popup message is displayed showing your watchface
selection and a prompt to CANCEL or SET UP.
4. Tap SET UP and the next popup message will display your three currently installed
watchfaces. You will need to select one watchface to be replaced with your newly
selected watchface.
!
Page !71
Page 72

5. Highlight the currently selected watchface and tap the SYNC button. The new watchface
will be installed and a progress bar is displayed during the installation.
Page !72
Page 73

Sleep
1. This feature shows your sleep events and details from the previous night.
2. Tap the Sleep icon to display the Events durations screen for this feature.
!
To see further details on any specific sleep event, tap that event.
!
To see statistics for any range of time from days to years, tap one of the duration
options.
! ! "
Page !73
Page 74

3. The Sleep Event screen displays the following details:
Deep
The duration of deep (restful) sleep.
Light
The duration of light (non-restful) sleep.
Awake
The duration of awake time.
Efficiency
This is the percentage of the sleep event
actually spent sleeping.
Hours
Total number of sleeping and waking hours
for this sleep event.
Average
The average number of hours for a sleep
event.
Page !74
Page 75

Last Workout
1. The Last Workout icon shows the distance of your last workout and the duration in hours
and minutes. Tap the icon to display the detail screen. There are four views to this screen.
Workout Details
1. The upper half of the screen shows Stats and HR Zones.
! The Stats side that shows speed distance and cadence statistics. Other stats? Avg pace,
avg hr, calories, avg speed, max HR
! The HR Zones side that shows how many minutes were spend in each heartrate zone
! !
Page !75
Page 76

2. Swipe down on the screen to display the graphing options for the Last Workout. You can
view graphs of your workout based over time or distance and for of those options, you
can elect to view Heart Rate and/or Pace, and/or Cadence by using the buttons to the
right of each option to turn on or off that part of the graph.
! !
Page !76
Page 77

Heart Rate BPM
1. The Heart Rate BPM icon shows your current heart rate in beats per minute. Tap the icon
to display the detail screen for this feature. The Hours duration screen is displayed.
!
Page !77
Page 78

2. Swipe the screen side-to-side to show graphic representation of your heart rate over time.
! !
Page !78
Page 79

Smart Camera
1. The Smart Camera Feature allows you to use your watch to operate the camera on your
smart phone. Tap the Smart Camera icon. Your phone’s camera is activated and the
prompt to PRESS FOR SHUTTER is displayed on your watch.
!
2. Position the camera phone as required and press the SELECT button (right side, center
position) to take the picture.
!
Page !79
Page 80

The Workout Feed
1. This screen is accessed by selecting the Detail Workout Statistics shortcut icon from the
Navigation Bar, or selecting Workouts from the menu.
!
Workouts are listed by date, with most recent workout first.
!
Multiple workouts in the same day are separated with a thick line.
!
Tap any of the entries to view the Workout Detail / Statistics for that workout.
! ! !
!
Swipe any of the entries to the left to mark the entry for deletion. Tap the “X” in the red
box to complete the deletion. NOTE: There is a limit to the number of workouts that can
saved. An error message will be displayed when that limit is reached. It is therefore
beneficial to delete unwanted workouts before the limit is reached to ensure future
workouts can be saved.
The Summary Workout
Statistics
The Detail Workout
Statistics
Tap the “X” to delete
entries.
Page !80
Page 81

The Calendar
!
The Calendar icon displays a screen listing recent workouts and previously completed
goals.
!
Days with completed goals and/or workouts are indicated with a colored dot:
a. Orange Dot represents a workout
b. Tapping a day circle activates the goals and workout summary for that day.
!
Page !81
Page 82

Phone Settings
1. The Settings options for the phone provide an easy way to update personal information
and activity goals and to allow for control over how communications are handled.
2. Tap the Settings icon at the top right corner of the screen.
2. The list of settings categories is displayed.
!
Page !82
Page 83

Profile
1. Tap the Profile option under the Settings icon to display all of the profile information you
entered when you created your account. You can tap any of the entries to update the
information.
!
2. To change an entry, tap the greater than (>) sign next to the existing value to display a
field allowing a change to that entry. Either type in the new entry or scroll through the list
to select the new entry, depending on the type of field.
Page !83
Page 84

3. Scroll through the list to view and access all aspects of the profile including your photo.
You can add or change the profile photo using the same steps used during original setup.!
First Name
Country
Unit
Birthdate
Sex
Height
Weight
Bedtime
Wake Time
!!!!!!!
!
!
Page !84
Page 85

Watch Control
1. Tap the Watch Control option under the Settings icon to access control over many
aspects of your watch’s performance.
!
2. The options under the Watch Control heading are described below.
Page !85
Page 86

Heart Rate
1. The Heart Rate Settings options include:
!
Background Monitoring. When enabled, this option records your heart rate even when
you are not participating in a workout. Use the button to the right of the option to enable
or disable background monitoring.
!
Broadcast During Workout. When enabled, this option displays your heart rate on the
watchface. Use the toggle button to the right of this option to enable or disable broadcast
during workout.
!
HR Zone Setting. This option allows you to select from Automatic HR zone setting (the
system determines when you should be alerted about your heart rate) or Custom HR
zone setting which allows you to determine at which heart rate you should be alerted.
2. To change the HR Zone setting, tap the > next to the option. A screen is displayed
allowing to select either Automatically or Custom.
3. Tap the Custom option. A screen is displayed allowing you to enter the heart rate at which
you will be alerted.
4. Scroll up or down the field to select the maximum heart rate (in beats per minute) that you
want for your HR zone. Click the SAVE button to save your changes and return to the
Watch Control screen."
Page !86
Page 87

Workout and Activity
The Workout and Activity settings include:
1. Distance Adjustment. Your distance traveled is estimated based on your height and the
number of steps taken. If your stride is longer or shorter than the estimate, you will need
to adjust the estimated stride to be more accurate. Tap the Distance Adjustment option to
access this screen.
2. Enter the percentage adjustment which can be either a positive or negative amount. To
determine how much adjustment is needed and in which direction (+ or -), run a known
distance (like a few laps around a quarter mile track) and compare the watch’s reading to
the known distance.
3. Track Sleep. The Track Sleep feature allows you to track your sleep time either
throughout the day or only at night. Select an option and the display returns to the Watch
Control screen.
!
Page !87
Page 88

Device Settings
1. Nickname. Tap this option to enter or change the nickname of your watch. Type in the
new name and tap the Save button to save your change and return to the Watch Control
screen.
2. Backlight Time. Tap this option to select the duration of time (in seconds) the backlight will
remain lit. A lower backlight time will significantly increase your battery life. Select an
option and the display will return to the Watch Control screen.
!
3. Sounds. This option turns watch sounds either on or off.
4. Alarm Vibration. Use this option to set the number of times the watch will vibrate when
providing notifications. Select an option and the display will return to the Watch Control
screen.
! "
Page !88
Page 89

5. Alarm Sound. Use this option to set the number of times the watch alarm will sound on
notification. Select an option and the display will return to the Watch Control screen.
!
6. Language. Use this option to select what language your watch will display. Select an
option and the display will return to the Watch Control screen.
!
7. Firmware Update. Use this option to check for software updates to your watch and load
them if they are available. If you have the latest software, this will be indicated. If a newer
software version is available, you will be prompted to load it into your watch. Tap the OK
button to return to the Watch Control screen.
Page !89
Page 90

8. Remove Watch. This option decouples your phone from your watch. You would only need
to do this if you want to couple your phone to a different watch or couple your watch to a
different phone. If you are using an iOS device, please “forget” your watch from your
Bluetooth settings.
Daily Goals
1. The Daily Goals screen allows you to define daily activity goals. The goals are expressed
in Steps taken, Distance run or walked, Calories burned, and the number and duration of
Sleep events.
!
2. You can select a specific goal profile among Less Active, Active, or More Active. Once
you select the activity level you have the option to customize the individual settings just
as you did during the initial setup.
Page !90
Page 91

Notifications
1. The Notifications screen allow you to select which phone apps which send notifications to
your watch.
!
2. Select the Notifications and customize the individual settings just as you did during the
initial setup.
Page !91
Page 92

SOS Contacts
1. Use this option to list those people who are to receive a notification in case you have an
emergency and use the SOS feature. Tap the option to view or edit existing contacts and
to create new contacts. You can save up to 10 contacts.
!
2. To create a new entry, tap the + sign.
!
3. The Name and Mobile Phone number entries are required. You can optionally add the
contact’s email address. Press the SAVE button to save you adds or edits and return to
the previous screen.
Page !92
Page 93

4. To view and/or edit an existing contact, tap that contact to display its existing information
and make any changes as necessary. Tap the Save button to save your changes and
return to the previous screen.
!
Page !93
Page 94

Sharing
1. The Sharing option allows you to post workout activities to various social media or fitness
sites.
!
2. To post your data to one of the three major social networks or Google Fit, tap the option
and log into the site as you normally would.
3. To post to another fitness site, tap the Add Site option. A display of supported fitness sites
is displayed.
!
Page !94
Page 95

4. Select a site. In this case it is Strava. The login screen for the selected site will be
displayed.
!
5. Log into the selected site as you normally would to allow communication with your phone.
Page !95
Page 96

About
1. The About screen displays technical information about your phone, including software
version, firmware version, model name, connection and battery status, and Mac Address.
!
2. Tap the End User License Agreement to view the agreement.
Logout
1. The Logout function logs you out of your GUESS CONNECT DIGITAL+ account.
2. Tap the LOGOUT button to continue with the disconnection.
Page !96
Page 97

Compliance & Regulatory
Water Resistance
WARNING: TO MAINTAIN WATER RESISTANCE, DO NOT PRESS ANY BUTTONS UNDER
WATER.
NOTE: To confirm that your watch is water resistant, check for the “O” symbol before immersing
in water.
!
Your GUESS CONNECT DIGITAL+ watch is water resistant to a depth of 30 meters
(C3001) IPX7 (C3002). The watch is water resistant only as long as lens, push buttons
and case remain intact.
!
The watch is not a diver watch and should not be used for diving.
!
Rinse the watch with fresh water after exposure to salt water.
Page !97
Page 98

Technical Data
Frequency Range
Operation within the band 2400 - 2483.5 MHz
Versions of software or firmware affecting
compliance with essential requirements
Software Version: V1.2.8
Maximum RF output power of the product
Max measured value: -3.33 !
Limit: ≤ 100mW (20dBm
Accessories/components marketed together
N/A
Page !98
Page 99

FCC Notice (U.S.) / IC Notice (Canada):
Warning: Changes or modifications to this unit not expressly approved by the party responsible for
compliance could void the user’s authority to operate the equipment.
NOTE: This equipment has been tested and found to comply with the limits for a Class B digital
device,"pursuant to Part 15 of the FCC Rules." These limits are designed to provide reasonable
protection against harmful interference in a residential installation. This equipment generates, uses
and can radiate radio frequency energy and,"if not installed and used in accordance with the
instructions,"may cause harmful interference to radio communications.
However,"there is no guarantee that interference will not occur in a particular installation." If this
equipment does cause harmful interference to radio or television reception, which can be determined
by turning the equipment off and on,"the user is encouraged to try to correct the interference by one
or more of the following measures:
-Reorient or relocate the receiving antenna.
-Increase the separation between the equipment and receiver.
-Connect the equipment into an outlet on a circuit different from that to which the receiver is
connected.
-Consult the dealer or an experienced radio/TV technician for help.
This device complies with Part 15 of the FCC Rules. Operation is subject to the following two
conditions: (1) this device may not cause harmful interference, and (2) this device must accept any
interference received,"including interference that may cause undesired operation.
This device complies with Industry Canada licence-exempt RSS standard(s).
! Operation is subject to the following two conditions: (1) this device may not cause interference, and
(2) this device must accept any interference, including interference that may cause undesired
operation of the device.
! Le présent appareil est conforme aux CNR d'Industrie Canada applicables aux appareils radio
exempts de licence. L'exploitation est autorisée aux deux conditions suivantes : (1) l'appareil ne
doit pas produire de brouillage, et (2) l'utilisateur de l'appareil doit accepter tout brouillage
radioélectrique subi, même si le brouillage est susceptible d'en compromettre le fonctionnement.
! This equipment complies with Industry Canada radiation exposure limits set forth for an
uncontrolled environment.
! Cet équipement est conforme à l'exposition aux rayonnements Industry Canada limites établies
pour un environnement non contrôlé.
(Translation of content: This radiocommunication equipment is exempted
to possess license, user license, or radiocommunication station license as !
per NBTC notification regarding radiocommunication equipment and
radiocommunication station has been exempted for license according to
radio communication act B.E.2498)"
Page !99
Page 100

DECLARATION OF CONFORMITY
Manufacturers Name: Timex Group USA, Inc.
Manufacturers Address: 555 Christian Road
Middlebury, CT 06762
United States of America
declares that the product:
Product Name: Timex® Simply Smart Fit / Guess Digital+
Product Description: Smartwatch
Model Numbers: M02Q
is in conformity with the relevant EU harmonized legislations. This declaration is issued under
the sole responsibility of the manufacturer and conforms to the following:
RED Directive 2014/53/EU
Standards:
ETSI EN 301 489-1: V2.2.0
ETSI EN 301 489-17: V3.2.0
EN 300 328: V2.1.1
EN 62479: 2010
LVD: 2014/35/EU
Standards:
EN 60950-1: 2006+A11:A1:A12:A2
Electromagnetic Compatibility (EMC) – Radio Frequency (RF)
Standards
FCC 47CFR 15, Subpart B and C
IC RSS GEN Issue 5 April 2018
IC RSS 247; Issue 2 February 2017
ICES-003; Issue 6 January 2016
Agent: !
Sam Everett
Director Quality Assurance & Regulatory
Date: 7 May 2019, Middlebury, Connecticut, U.S.A.
"
Page !100
 Loading...