

Page 1

INSTALLATION & OPERATING
INSTRUCTIONS
PROGRAMMABLE
MOTION DETECTOR
WITH SECURITY ALARM
Cat No. TG135A
Page 2

123
456
7
8
9
ARM
DISARM
O
1
TG135A Programmable Motion
Detector with Security Alarm
Please read the instructions before using the
product and retain for future use.
Chime
switch
Battery low
LED
Programme
button
Red panic
button
105dB alarm
PIR lens
Keypad
Page 3

2
Introduction
The TG135A is a programmable security alarm
with a high security PIR sensor incorporating
pulse-count technology. It has an optional
capability of sounding a chime when it detects
and is not in security mode.
Battery Installation and
Replacement
In armed mode the battery low LED will flash
every three seconds if the battery needs
replacing.
Remove the screw from the battery cover and,
pushing down in the area of the arrow heads
on the cover, release the catches and slide the
cover outwards in the direction of the arrow
heads. Remove the connector from the battery
if necessary and connect to a new alkaline PP3
battery taking care to get the polarity correct.
Locate the new battery in the battery
compartment and slide the cover into place.
Page 4
3
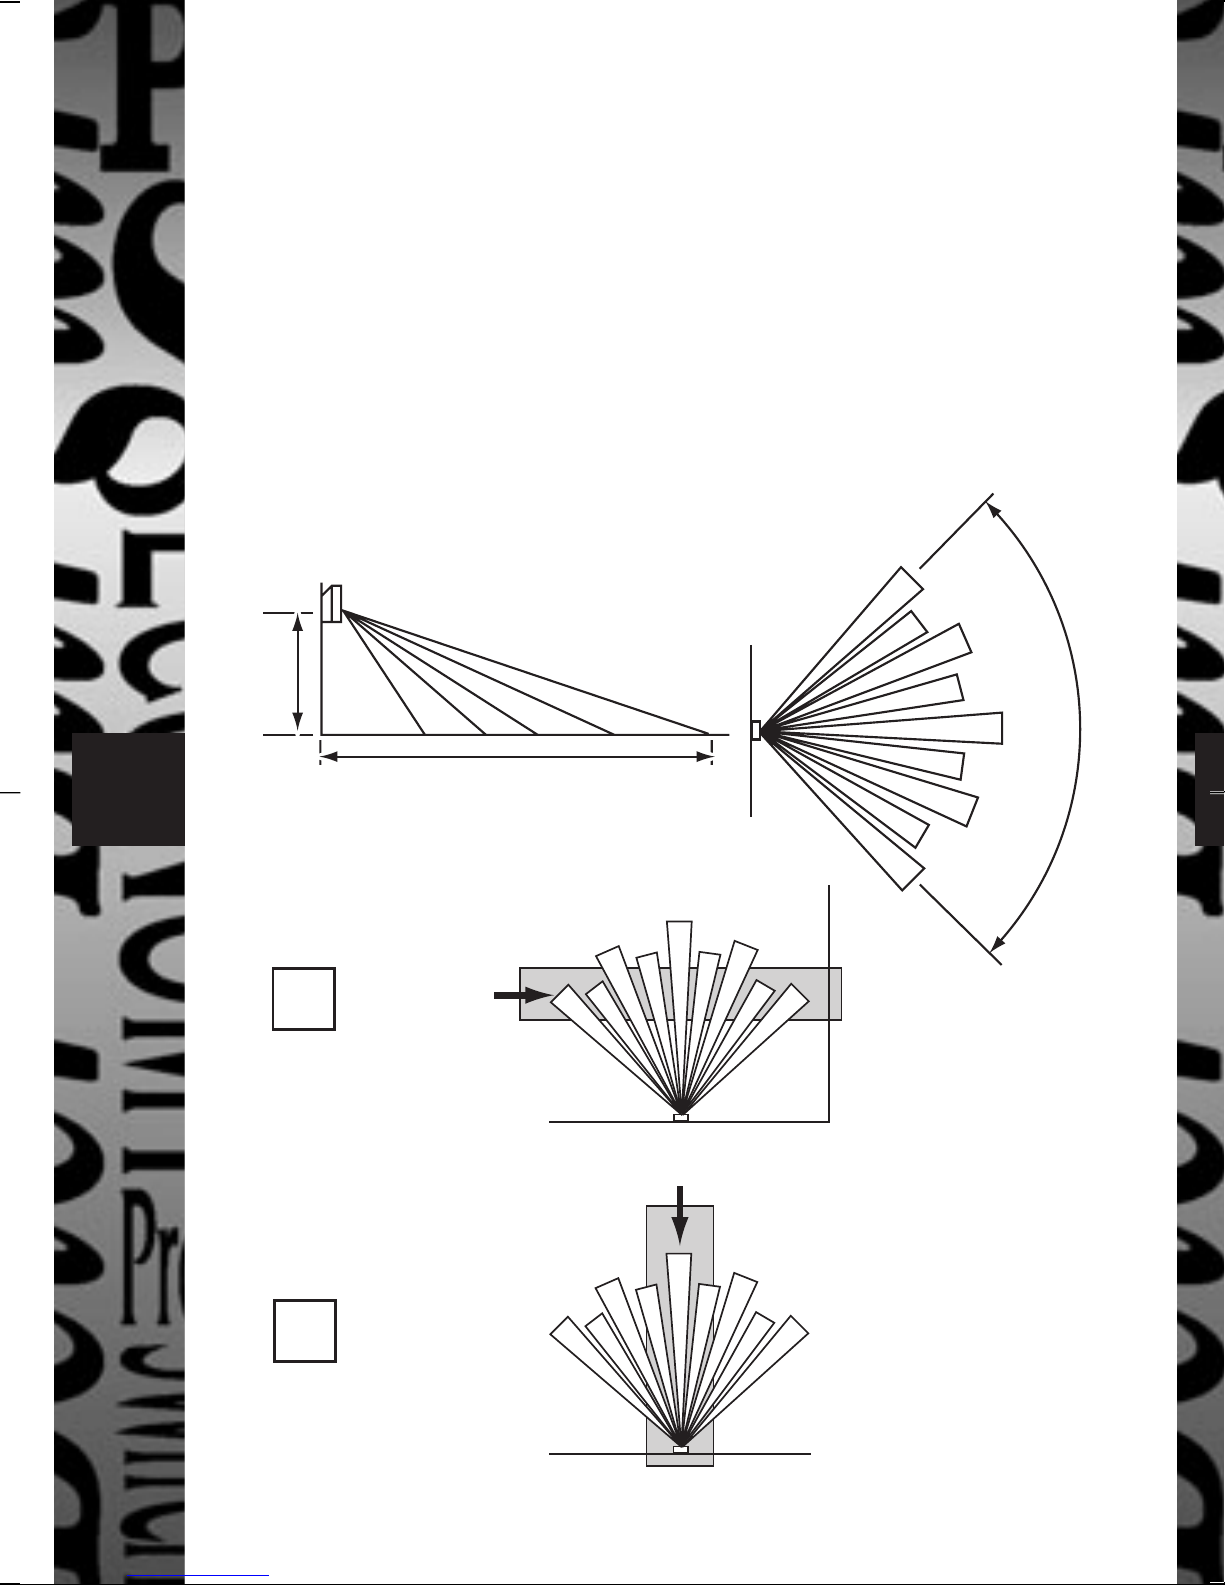
Detection Range
The TG135A has a PIR detection range of
between 5 and 7m across a 90° angle (see fig
3). It should be mounted between 1.5m and
2.0m high and in a position where potential
intruders will move across the face of the unit.
5-7m 90¡
1.5 -
2.0m
5-7m
Best sensitivity
Worst sensitivity
✗
✓
Page 5

4
Keyhole
fixings
Cover
catches
Battery
compartment
cover
Battery
compartment
Battery
connector
Cover
fixing screw
hole
Installation
Having decided on a
position, mark and
drill two holes 36mm
horizontally apart and
fit the plugs (if
necessary) and screws
supplied.
The screws (with heads
left 2.5mm proud of
the fixing surface)
engage with the two
keyhole fixings on
the back of the case
(see fig 2).
Do not remove
shorting bar or unit
will be permanantly
in alarm state
Page 6

5
Programming
You can only arm and disarm the unit if you
can key in the security code which can be
between one and six digits. The factory set
code is 000.
1. To programme your own security code
after battery installation:
a. Press 000 (or previous code if the user
wants to make a change).
b. Press PROG.
c. Enter new code (up to six digits).
d. Press PROG.
The PIR coverage of the unit should now be
checked, by switching chime on and waiting
60 seconds before moving around the expected
coverage area. At every detection a two-tone
chime is heard. It should be noted that the unit
is more sensitive when the installer moves
across the face of the unit and not directly
towards or away from it.
Page 7

6
2. To programme the alarm pattern:
a. Press PROG.
b. Press 1 (factory set); 30 seconds on,
30 seconds off, 30 seconds on.
or 2; 60 seconds on, 30 seconds off,
60 seconds on.
or 3; 90 seconds on, 60 seconds off,
90 seconds on.
3. To programme the entry delay (the time
between PIR detection and alarm
sounding):
a. Press PROG.
b. Press 7 (factory set); 20 seconds delay.
or 8; 10 seconds delay.
or 9; instant alarm (zero delay).
Page 8

Operation
1. To arm the unit on leaving the building:
a. Ensure chime switch is off.
b. Enter your security code (see
programming).
c. Press ARM.
Approximately 60 seconds after completing
this sequence a single bleep will be heard
confirming the system is active. This allows
the PIR system to become operational and
gives time for occupants to leave the
building.
2. To disarm the unit on entering the
building:
a. Enter your security code.
b. Press DISARM and you will hear a
single bleep confirming disarming.
Note: If zero delay has been chosen it may
be difficult to disarm the unit without it
going into alarm for a short period.
7
Page 9

3. Chime mode (only available when unit is
disarmed):
a. Slide chime switch to on.
b. Wait for 60 seconds until a bleep is heard.
The unit will now respond to moving heat
sources with a two-tone chime.
4 Panic mode
If the user feels endangered by a potential
or actual intruder then the panic alarm (30
seconds duration) may be used to discourage
them. The panic button can be pressed at any
time to start this and it can be stopped by
entering your security code and pressing
DISARM.
8
Page 10

Trouble Shooting
Unit fails to ARM or DISARM
Try entering security code and ARM or
DISARM again. If this does not work then
disconnect the battery for at least three
minutes which returns the unit to 000 security
code. Reconnect the battery and try again.
Security code forgotten
Disconnect battery for three minutes which
returns the unit to 000 security code and it
may be reprogrammed with a code of your
choice (up to six digits).
Points to note
• For indoor use only.
• Keep away from direct sunlight.
• Loud alarm – keep away from ears.
• Do not locate near radiators or heaters.
• Do not locate near fans.
9 1
Page 11

3 Year Guarantee
In the unlikely event of this product
becoming faulty due to defective material
or manufacture within 3 years of the date
of purchase, please return it to your local
Homebase store in the first year with
proof of purchase and it will be replaced
free of charge.
For the second and third years or any
difficulty in the first year telephone the
helpline on 020 8450 0515.
THREE YEAR
GUARANTEE
3
Specifications
PIR detection: 5 – 7m over 90°.
Alarm: 105dB.
Battery: PP3 Alkaline.
10
Page 12

HELPLINE
020-8450-0515
For a product brochure please contact:
Timeguard Ltd.
Victory Park, 400 Edgware Road,
London NW2 6ND
020-8452-1112
or email csc@timeguard.com
 Loading...