

Page 1
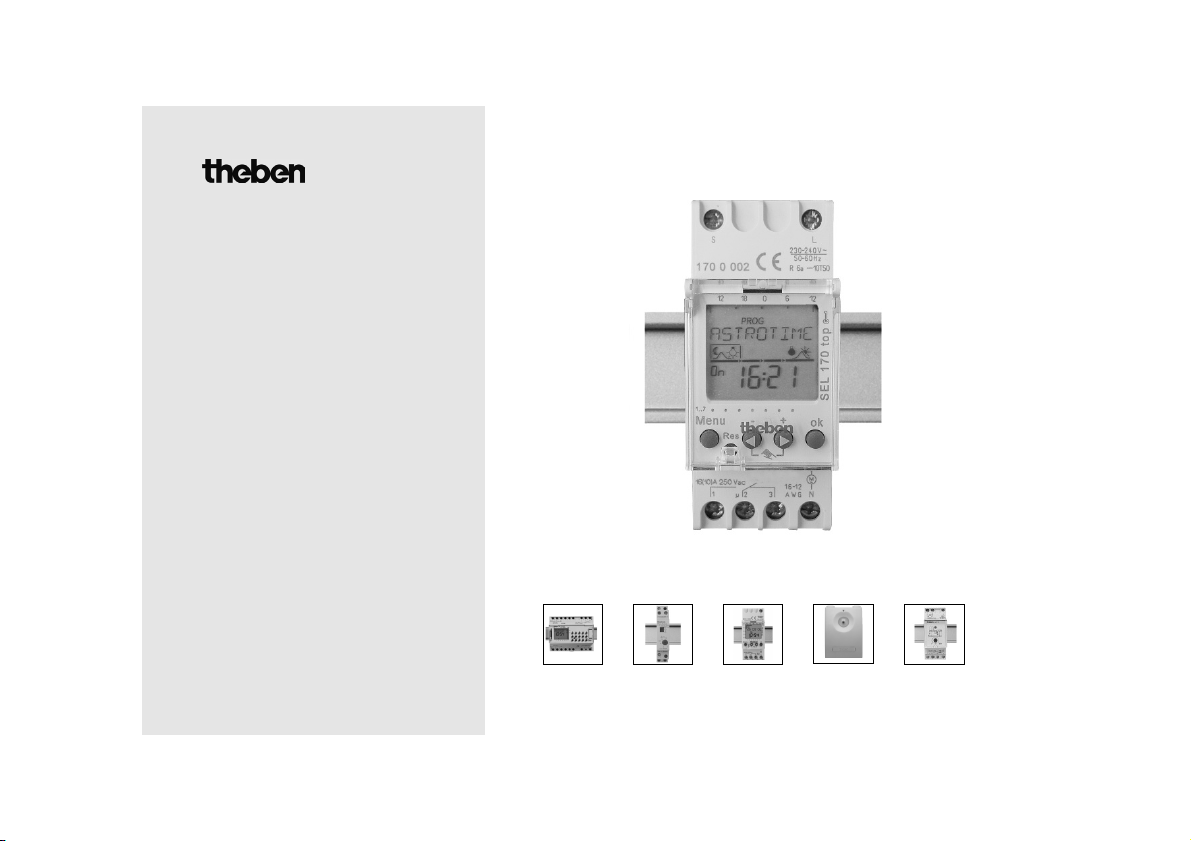
SEL 173 DCF ELPA 5 TR 610 top LUNA 126 star LU 110
Bedienungsanleitung 3
Schaltuhr mit Astroprogramm
Operating instructions 25
Timer with astronomical program
Mode d’emploi 47
Horloge programmable avec
astroprogramme
Gebruiksaanwijzing 69
Schakelklok med astronomisch
programma
Istruzioni per l’uso 91
Timer con programma astronomico
Instrucciones de servicio 113
Timer con programa astronómico
SELEKTA 170 top
Ref. Nr. 170 0 002
310 716 01
Page 2
1. Designated use 25
2. Safety note 25
3. Equipment description 26
4. Use/Installation 27
5. Operating information 27
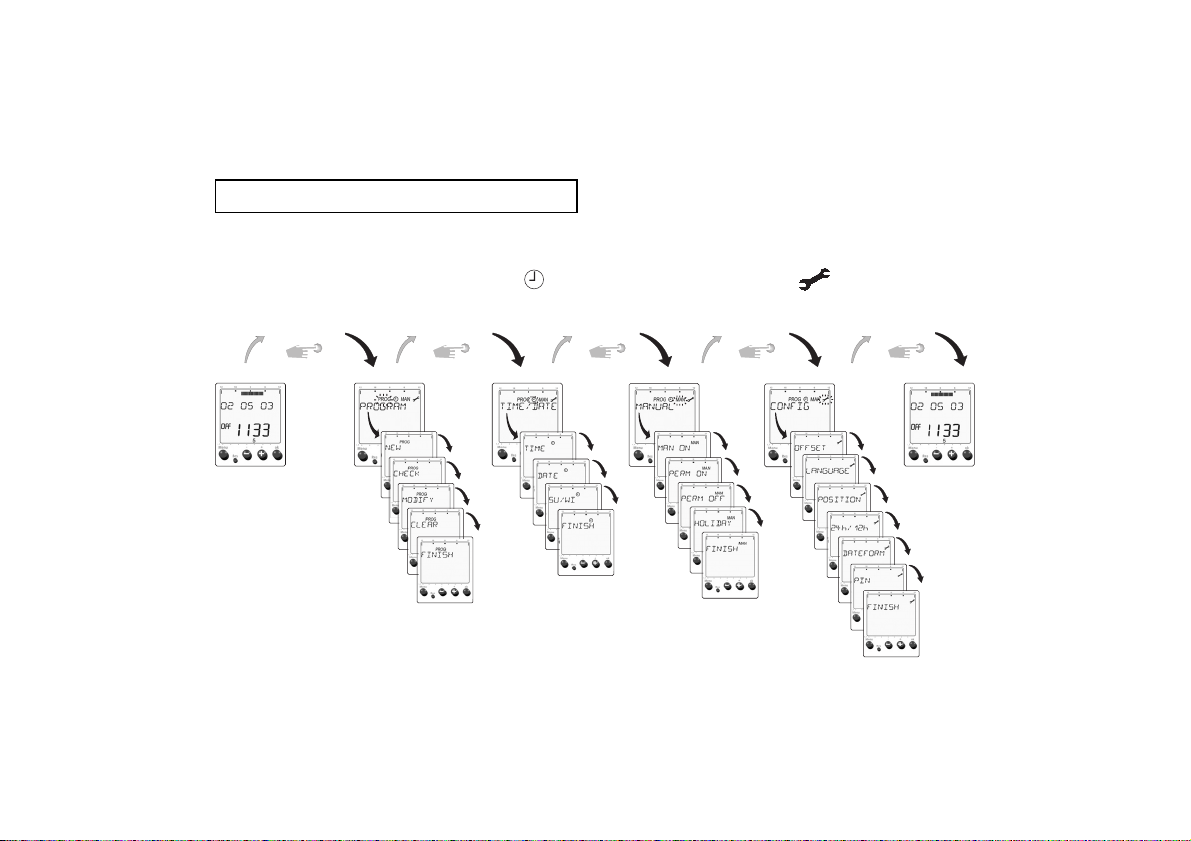
6. Overview of input menu 28
7. Initial start-up 28
8. Menu PROG 31
9. Menu 36
10. Menu MAN 38
11. Menu 42
12. Reset response 45
13. Technical data 46
Contents
Installation of electrical devices should only be
carried out by a professional electrician. National
regulations and safety requirements must be adhered to! Tampering with or making modifications to the
device will invalidate the guarantee.
The timer with astronomical program is suitable for light
control (e.g. lighting of streets, shop windows).
By inputting the location coordinates, it calculates the sunrise and sunset times for every day of the year for the geographic location entered.
Upon start-up, the clock is fully functional (with integrated
astronomical program). It can be individually programmed
for nighttime interruption to save energy.
The keyboard can be locked with a PIN code.
Designated use also includes adherence to the instructions
for installation and operation. Any other use is considered
contrary to the designated use. The manufacturer accepts
no liability for damage resulting from such use.
2.
Safety note
1. Designated use
25
GB
Page 3
3. Equipment description
Overview of programmed switch times
with segments every 30 minutes
Pictogram line with PROG,
MAN,
Astronomical and switch time symbols
Sunset ON
Start nighttime interruption OFF
End of nighttime interruption ON
Sunrise OFF
Channel status
Ein = ON, AUS = OFF
Selection Menu (when inputting information in
the device always press the Menu key first)
PROG, , MAN, or
Aborting input
Service voltage OK: two dots flash
Power failure: three dots flash
Key + or – = answer NO,
or continue (and setting of values,
e.g. change clock time)
Menu
+
–
ok
1
2
3
N
PROG
MAN
COPY
1 2
3
4
5
6 7
1
min
klx
s
Text lines (always represents a question in
the operating menu, which must be answe-
red with YES (Key OK) or NO (Keys + or -)
Time display
a.m./p.m. change segment (not visible
with 24-hour design)
s = seconds
min = minutes
Days of the week from 1 to 7 with an
arrow for changeover of day (1 = Monday,
2 = Tuesday ..)
Key OK = answer YES
Confirmation of selection or
programming
Direct manual switching (only in
Automatic mode)
• press both keys at the same time
=> manual switching (switching pre-selection)
• press both keys at the same time for about
2 seconds
=> permanent switching
26
Page 4
27
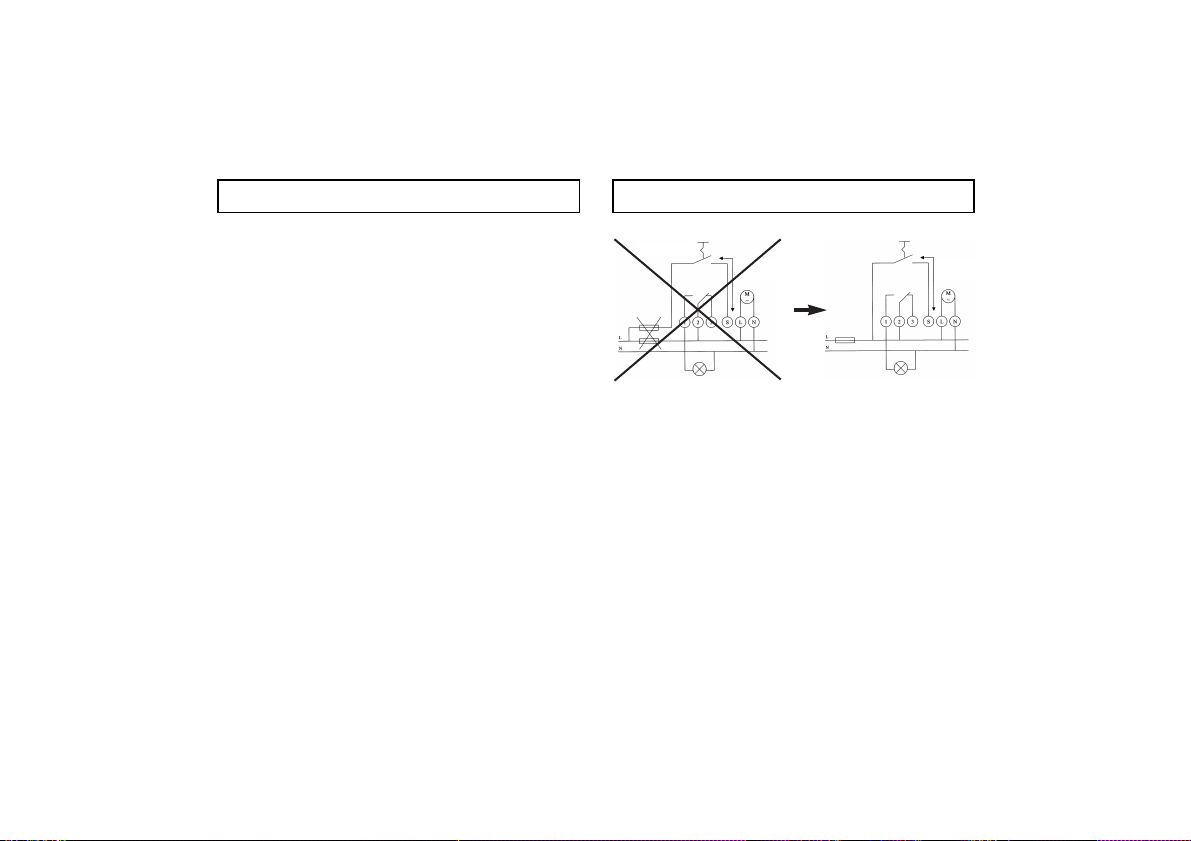
4.
Use/Installation
- Use the timer only in dry areas.
-The timer is only intended for use where environmental conditions are of normal pollution.
-Timer for distributor installation in the 35 mm-rail
fixing (DIN 50022); wall installation with additional
terminal box cover plate also available.
- Regardless of expensive protective measures, strong
electro-magnetic fields can interfere with the microprocessor-controlled timer.
Please note therefore, before installation:
- Use a separate line for the service voltage supply.
- Shield inductive consumer with appropriate RC filter.
- Do not install device close to sources of interference, e.g.
transformers, contactors, PC, television and remote control
devices.
-Perform a RESET after any type of interruption.
Note:The programmed switch times remain stored in the
EEPROM.
- Devices producing a great deal of heat located near the
device will shorten the service life of the battery.
5.
Operating information
The main overall principle of operation
1. Read the text lines:
Flashing text or flashing symbol always
indicates a question.
2. Make a decision:
Answer the question by pressing a key.
Decision YES:
Confirmation
with key OK
Decision NO:
Change/revise
with + or – key
Page 5
28
6.
Overview of input menu
PROG
MAN
MENU MENU MENUMENUMENU
Page 6
29
Control input
This input allows the device to be activated independent
of the sunrise and sunset times and the programmed
nighttime interruptions.
This switch per the control signal corresponds to the function permanent ON.
The input is operated with a line voltage of 230 V, with
available N-clamp as a point of reference.
The timer is delivered in so-called sleep mode (Display is
shut off).
Activate without service voltage
Briefly press any desired key.The timer has a power
reserve. Therefore, it can be programmed even before
installation.
Initial start-up
7.
Initial start-up
Note
If a voltage is impressed on the “S” external input, the
keys will be blocked.
Therefore, the external input must be idle when starting
the machine.
max. 50 m
230-240 V / 0,5 mA
max. 50 m
230-240 V / 0,5 mA
Control input
Page 7
30
Initial start-up
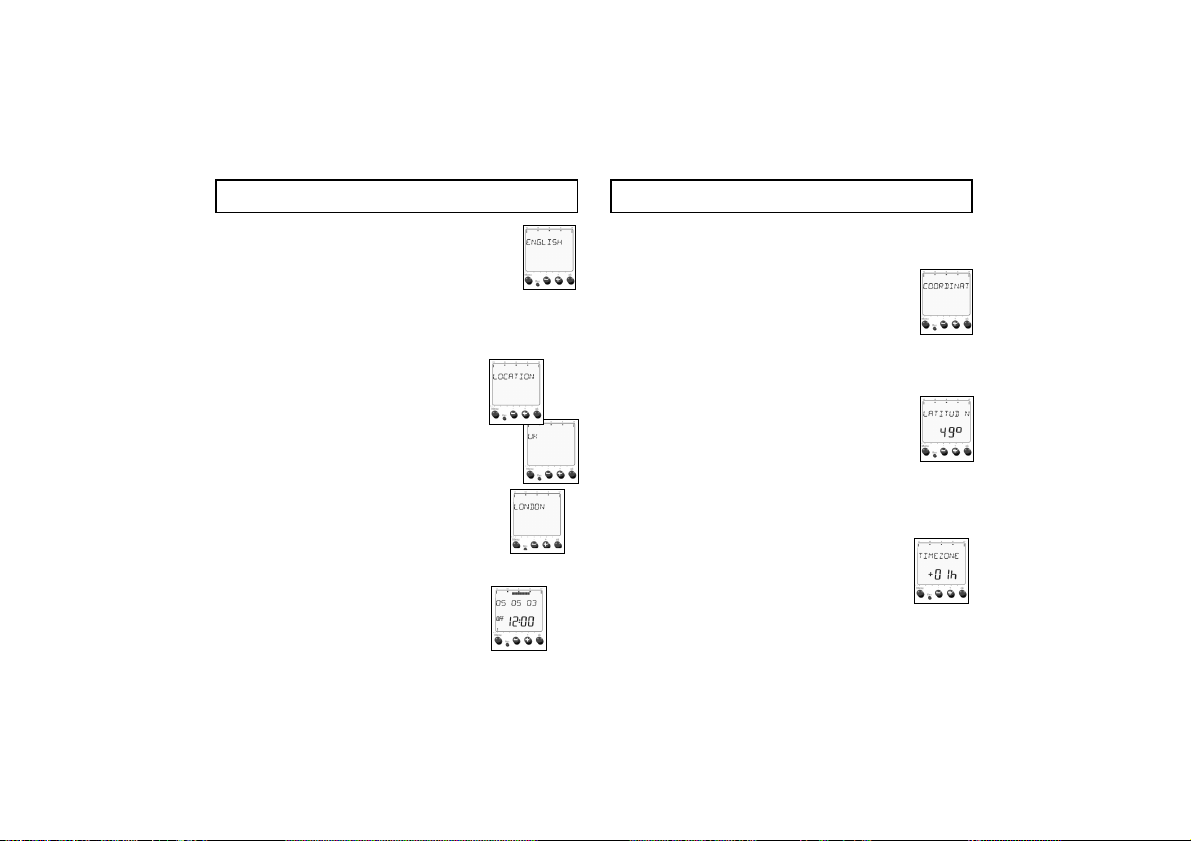
Initial start-up by coordinates
1. Instead of LOCATION, use the + or – key to
select COORDINAT. Confirm with the OK key.
2.Select your geographic location from the
accompanying time zone by longitude,
latitude and time zone.
3.Use the + or – key to set your location coordinates
of southern/northern latitude. Inputting the
latitude ranges from 0° north to 90° south.
4.Confirm with the OK key.
5.Use the + or – key to set your longitude
west or east. Inputting the latitude ranges
from 180° east to 180° west.
6.Use the + or – key to set your longitude or
your time zone (e.g. Germany +01 hours).
7.Store by pressing the OK key.
The timer is now ready to use and is in
Automatic mode.
Initial start-up
1.Using the + or – key, select your
language (e.g. English).
2.Store by using the OK key.
You can now start the clock by inputting
default locations or coordinates.
Initial start-up by location
1.Confirm LOCATION with the OK key.
Display UK (on moving screen).
2.Select your country with the + or – key.
Confirm with the OK key.
3.Use the + or – key to select the city
in your area (e.g. LONDON).
Confirm with the OK key.
Since the date and the time are already
pre-programmed ex factory, the timer is
now ready to use and is in
Automatic mode.
Page 8
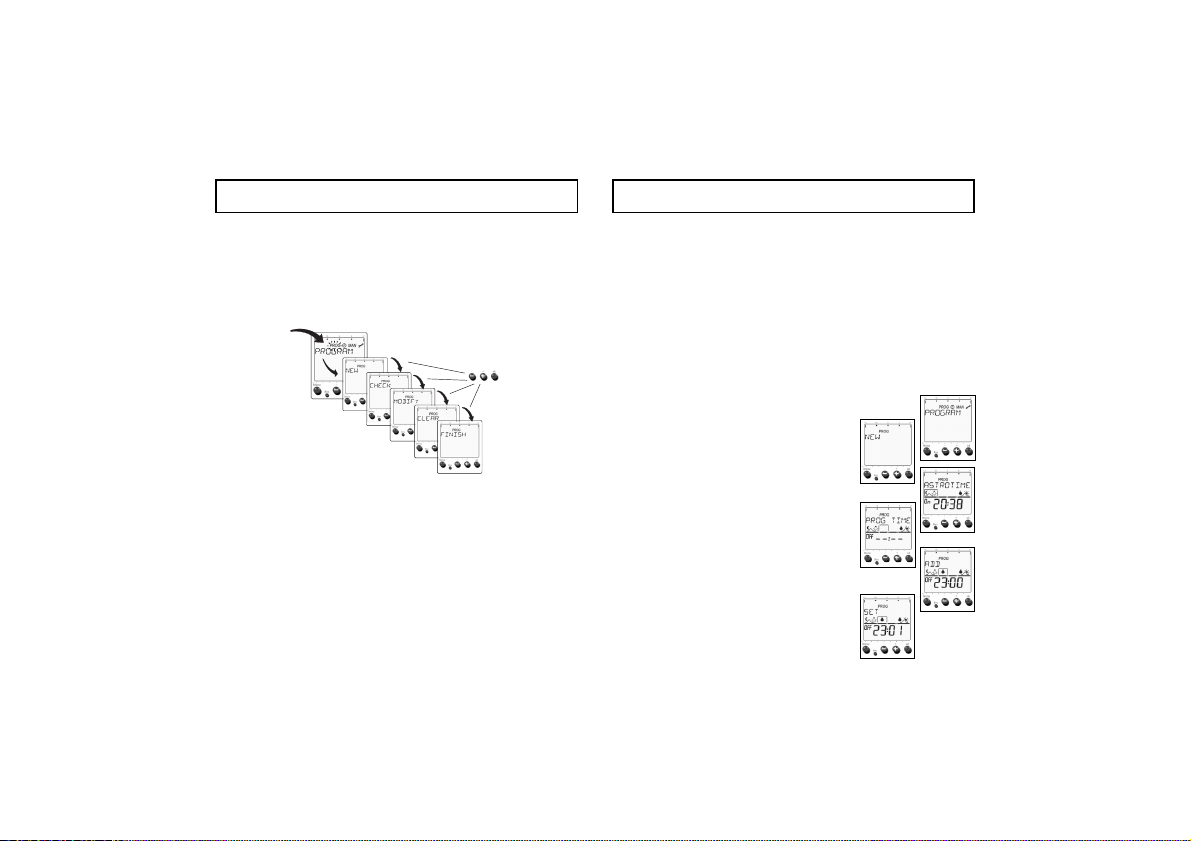
Menu PROG
Sub-menu NEW
Example Programming of nighttime interruption
Four phases of the night are always passed through when
programming. The clock switches on in the evenings at sunset (astronomical) (Step 1) and at a pre-determined time
(e.g. 11:00 p.m.) shuts off again (Step 2). In the morning it
again switches on at a fixed time (e.g. 4:00 a.m.) (Step 3)
and at sunset (astronomical) shuts off again (Step 4).
1.Select menu item PROGRAM.
2.Confirm with the OK key.
3.Use the + or – key to select the
sub-menu NEW.
4.Confirm with the OK key .
The display shows ASTROTIME.
5.Confirm with the OK key.
The display shows PROG TIME.
6.Press the + key.
The display shows ADD.
7. Confirm with the OK key.
The display shows SET.
8.
Menu PROG
Switching program
Using the Menu key, you go from Automatic mode to the
main menu of the input mode. Select menu item PROG
(PROGRAM) and confirm with the OK key. Using the +
or
– key, you can switch between the sub-menus New,
Check, Modify, Clear and Finish. Using the OK key,
confirm the respective Menu. By confirming Finish, you
return back to Automatic mode.
MENU
The astronomical switching times are automatically stored
after start-up of the clock and after inputting the position
information and will be performed daily. In the menu
PROG additional fixed nighttime interruptions can be programmed in or astronomical switchings can be deactivated.
31
Page 9

32
Menu PROG
16. Select the desired night with the + or – key
17. Confirm with the OK key.
The night from Monday to Tuesday is shown in the weekday display with 1 2.
Info
You have now entered the nighttime interruption for
Monday night. You can store this program for an individual night. You can also copy it to other nights or all
other nights of the week.
18. The display shows COPY.
19. Confirm with the OK key, if you
wish to copy to other nights.
20. Use the + key to select the night to which
the program is also applicable (e.g. the
night from Tuesday to Wednesday).
21. Confirm with the OK key.
22. Use the + key to select, for example,
another night (e.g. the night from Thursday
to Friday) .
Menu PROG
8. Using the + or – key to set the desired time.
9. Confirm with OK. The display PROGTIME flashes and your set time is
shown.
Switching to a fixed point in time (end of a
nighttime interruption) is not yet stored.
10. Confirm your entry with the OK key.
Again the display shows PROG TIME.
11. Press the key +.
Then the display shows ADD.
12. Confirm with the OK key.
The display shows SET.
13. Use the + or – keytoset the
desired time.
14. Confirm with the OK key.
The display shows ASTROTIME.
Automatic switch-off at the calculated time of sunset is
stored as activated.
15. Confirm with the OK key.
The display shows MO-NIGHT.
Page 10

keys + or – you could change to the display of another
night).
7.The symbol line for the astronomical/switching times
now appears, which shows the 4 switching steps of the
night (the first switching step is shown in detail).
NEXT flashes in the text line.To view other
switching steps, press the OK key again and
again. The switching times for all of the week
days (Tues-Night, Wed-Night ...) are
displayed one after the other.
8.When the view is finished, FINISH appears. By pres
sing the OK key, you arrive back at the Sub-menu
selection. Using the Menu key, you can discontinue at
any time and revert to Automatic mode.
Example Deactivate/remove individual switching
steps
1.Use the Menu key to select the Menu
item PROG.
2.Confirm with the OK key.
3. Use the + key to select the Sub-menu
MODIFY.
Menu PROGMenu PROG
23. Confirm with the OK key.
24.For all nights of the week, press the
OK key, until SAVE appears at the end of
the week.
25. Confirm with the OK key, until NEW appears.
Check and Modify Sub-menu
Example: Check individual switching steps
1.Use the Menu key to select the Menu
item PROG.
2.Confirm with the OK key.
3. Use the + key to select the Sub-menu
CHECK.
4.Confirm with the OK key.
5.The display shows MO-NIGHT.
The switching times for Monday night are
displayed.
6.Confirm with the OK key, to see the 4 switching steps
for the night from Monday to Tuesday (with the
33
Page 11

34
4.Confirm with the OK key.
The display shows MO-NIGHT.
The switching times for Monday night are displayed in segment bars. Using the + or – key,
you can now select the night in which the astronomical
time is to be deleted.
5.Confirm with the OK key.
NEXT flashes. (see 7. previous page)
6.Press the + key.
The display shows REMOVE (This means that
you can deactivate this first step (automatic
activation by calculated time of sunset).
7.Confirm with the OK key.
8.If you want to clear (deactivate) additional switching
steps, proceed as described above.
Menu PROG Menu PROG
Example: Change switch times for switching steps
Note: Only the fixed switch times of the nighttime inter-
ruption (Steps 2 and 3 of a night)can be changed. The
astronomically calculated sunrise and sunset times (steps
1 and 4) can only be deactivated or adjusted via OFFSET
in the Menu .
1.Use the Menu key to select Menu item PROG.
2.Confirm with the OK key.
3.Use the + key to select the Sub-menu MODIFY.
4.Confirm with the OK key.
The display shows MO-NIGHT.The switching times for
Monday night are displayed in segment bars. Using the +
or – key, you can now select the night in which the switching time is to be changed.
5.Confirm with the OK key.
6.The symbol line for the astronomical/switching times
appears, which shows 4 switching steps of the night
(the first switching step is displayed in detail).
NEXT flashes in the text line.
Page 12

Menu PROGMenu PROG
Sub-menu Clear
1. Use the Menu key to select the Menu item PROG.
2. Confirm with the OK key.
3. Use the + key to select the Sub-menu CLEAR.
4. Confirm with the OK key. There is a choice of 3
different Delete sub-menus:
• NIGHT: delete an individual night (astrono
mical times and switching times)
• PROG OFF: delete all switching times, the
astronomical times are activated for all days
(Status at delivery)
• ALL OFF: all astronomical times and all switching
times are deleted (memory empty)
5. Confirm, for example NIGHT with the OK key.
The display shows MO-NIGHT.
6. Confirm with the OK key.
The display shows CLEARED and the astronomical and switching times for Monday
night are deleted, you return back to
Automatic mode.
7. If you want to delete additional nights, follow steps 1.
through 6.
7. Confirm NEXT with the OK key.
8. The second switching step of the night now appears in
the display (start of nighttime interruption).
Use the + key to select the Sub-menu ADD.
9. Confirm with the OK key.
10. With the + or
– keys, set the desired
time for the nighttime switch-off.
11. Confirm with the OK key.
12. Switching step 3 (end of nighttime interruption) can be
done as described 8. below.After going through
the 4 switching steps of the night, you arrive at the
night selection (point 4) for the following night.
If required, additional nights can be selected and switching
times changed.
By pressing the OK key, you arrive back at the Sub-menu
selection. Using the Menu key, you can abort at any time
and return to Automatic mode.
35
Page 13

36
Menu
Setting/changing the clock time
1.Choose menu item with the Menu key.
2.Confirm with the OK key.
The Sub-menu TIME appears.
3.Confirm with the OK key.
4.Use the + or – key to set the current
clock time.
5.Confirm with the OK key.
Set date, month and day
1.Choose menu item with the Menu key
2.Confirm with the OK key.
3.Use the + key to select the Sub-menu DATE.
4.Confirm with the OK key.
The display shows YEAR.
5.Use the + or – key to set the year.
6.Confirm with the OK key.
The display shows MONTH.
9. Menu
Using the Menu key, you go from the Automatic mode
to the main menu of the input mode. Select menu item
(TIME/DATE) and confirm with the OK key.
With the + or – keys, you can switch between the submenus TIME, Date, SU/WI and Finish.
Using the OK key, confirm the respective Menu.
By confirming Finish, you return back to Automatic
mode.
MENU
Page 14

Menu
37
The selection "free" allows the individual programming
of a changeover rule by inputting the month, week and
switching hour (month 3 = March, week 4 = 4th week of
the month, week 5 = last week in the month). The changeover takes place in the respective week during the
night from Saturday to Sunday.
1. Choose the menu item with the Menu key
2.Confirm with the OK key.
3.Use the + key to select the Sub-menu SU/WI.
4.Confirm with the OK key.
5.Use the + or – key to select WITH S/W
(automatic changeover activated).
6.Confirm with the OK key.
7.Use the + or – key to select a changeover rule
from the table (e.g. EUROPE).
8.Confirm with the OK key (this rule is now activated).
The display shows FINISH.
9.With the OK key, you return back to Automatic mode.
Summer/winter time changeover (SU/WI)
Depending on the particular version, an automatic summer/winter time changeover is already pre-programmed.
If you want to set a different summer/winter time, choose
this from the table.
Menu
7.Use the + or – key to set the current month.
8.Confirm with the OK key.
The display shows DAY.
9.Use the + or – key to set the current day.
10. Confirm with the OK key.
Setting / Start of the Start of the changeoverscope for summer time winter time hours
Europe last week in March last week in October 2:00 a.m.
Great Britain/ last week in March last week in October 1:00 a.m.
Portugal
SF/Greece/TR last week in March last week in October 3:00 a.m.
USA/Canada first week in April last week in October 2:00 a.m.
freely -- -- selectable selectable selectable
Page 15

Automatic summer/winter time
deactivate changeover
1. Choose the menu item with the Menu key
2.Confirm with the OK key.
3.Use the + key to select the Sub-menu SU/WI.
4.Confirm with the OK key.
5.Use the + key to select WOUT S/W
(automatic changeover not activated).
6.Confirm with the OK key (now
there is no automatic conversion).
The display shows FINISH.
7. With the OK key you return back to Automatic mode.
Menu
10. Menu MAN
Using the Menu key you go from the automatic mode to
the main menu of the input mode. Select menu item
MAN (MANUAL) and confirm with the OK key. Using
the + or – key, you can switch between the sub-menus
Man, Perm, Holiday and Finish.
Using the OK key, confirm the respective Menu. By con-
firming Finish, you return back to Automatic mode.
38
MENU
Page 16

39
Menu MAN Menu MAN
Manual switching
Manual switchings ON or OFF always return to the cur-
rent switching status of the program. They are automatically corrected by the stored program at the next sequential switch time.
Set manual switching
1.Use the Menu key to select the Menu
item MAN (MANUAL).
2. Confirm with the OK key.
3.Use the + or – key to select MANUAL.
The display shows MAN ON or MAN OFF
(depending on previous switching status).
4. Confirm with the OK key.
The timer reverts back to Automatic mode, the switching
status is changed and instead of the date showing in the
display, MAN ON or MAN OFF appears.
Delete manual switching
When you want to delete Manual switching,
1.Use the Menu key to select the menu item MAN
(MANUAL).
2.Confirm with OK key.
3.Use the + key to select CLEAR.
4.Confirm with the OK key.
The clock reverts back to Automatic mode and the switching status is changed.
The date appears again in the display.
Note
Manual switching (manual and permanent switching) can
be activated and deleted in Automatic mode by simultaneously pressing the + and – keys.
Page 17

Holiday program
The holiday program renders the astronomical program
and the programmed nighttime interruption times ineffective.
The switch outlet remains in the holiday time which is set
on OFF. It is defined by inputting the date and time of
the start and end of the holiday period.
Set Holiday program
1. Use the Menu key to select the Menu item MAN.
2.Confirm with the OK key.
3. Use the + key to select HOLIDAY.
4. Confirm with the OK key.
The display shows NEW.
5. Confirm with the OK key.
The display briefly shows BEGIN and then
YEAR.
Menu MAN
Permanent switching (permanent switching)
Set PERM ON / PERM OFF
1.Use the Menu key to select the Menu item MAN.
2.Confirm with the OK key.
3.Use the + or – key to select PERM ON or
PERM OFF.
4.Confirm with the OK key.
The timer reverts back to Automatic mode and the selected switching status is accepted. The display shows
PERM ON or PERM OFF.This switch status remains
until permanent switching is again reset.
Cancel/delete Permanent switching
1. Use the Menu key to select the Menu item
MAN.
2.Confirm with the OK key.
3. Use the + or – key to select CLEAR.
4. Confirm with the OK key.
Menu MAN
The timer reverts back to Automatic mode and the applicable switch status according to the switch program is
accepted. The date appears again in the display.
40
Page 18

Check Holiday program
1.Follow the above steps from 1. through 4.
2.Use the + key to select CHECK.
3.Confirm with the OK key.
Each time a key is pressed, the Holiday program information is displayed.
Clear Holiday program
1.Follow the above steps from 1. through 4.
2. Use the + key to select CLEAR.
3. Confirm with the OK key.
The Holiday program is deleted. If the Holiday program
was already active, the clock performs a program review
and re-establishes the correct switch status.
Menu MANMenu MAN
41
6.Use the + or – key to set the year for the beginning
of the holiday program.
7.Confirm with the OK key.
8.Use the + or – key to set the MONTH.
9.Confirm with the OK key.
10. Use the + or – key to set the DAY for the
beginning of the holiday program.
11. Confirm with the OK key. The time appears.
12. Use the + or – key to set the time for the
beginning of the holiday program (only complete
hours an be entered.
13. Confirm with the OK key.
For inputting the end date (YEAR, MONTH, DAY, TIME)
(End of Holiday program), follow the steps as described
above.
The clock reverts back to Automatic mode. The Holiday
program is started on the date that has been input, i.e.
the clock remains in the OFF status from that time on
until the end date.
Page 19

42
Menu
Offset
The device can be optimally adapted to the environment
(mountains, valley ...). The calculated sunrise and sunset
times can be adapted to the location of use with a
manually set correction factor, referred to in the information that follows as OFFSET.
1.Use the Menu key to select the Menu item CONFIG.
2.Confirm with the OK key.
3.Use the + or – key to select the Submenu
OFFSET.
4.Confirm with the OK key.
The display shows SUNSET in a minutes
display.
No correction: Again press the OK key.
11.
Menu
Using the Menu key, you go from the automatic mode
to the main menu of the input mode. Select menu
(CONFIG) and confirm with OK. Using the + or – key,
you can switch between the sub-menus Offset,
Language, Position, 24h/ 12h, Dateform, PIN and
Finish.
Using the OK key, select the respective Menu. By confirming FINISH, you return back to Automatic mode.
MENU
Page 20

6.Confirm with the OK key.
The display shows FINISH in the newly-selected
language.
7.With the OK key, you return back to Automatic mode.
Position
1.Use the Menu key to select the Menu item CONFIG.
2.Confirm with the OK key.
3.Use the + or – key to select the Sub-menu POSITION.
4.Confirm with OK key. The display shows
LOCATION.
5.Use the + or – key to select the Sub-menu
LOCATION or COORDINAT.
6.for example, you confirm LOCATION with
the OK key, press the + or – key for the
desired country (e.g. UK on moving
screen).
7.Confirm with the OK key.
8.Next select the desired city.The display shows FINISH.
9.With the OK key you return back to Automatic mode.
43
MenuMenu
Correction
5.Use the + or – key to select the respective
correction factor. It consists of -120 to +120 minutes.
6.Confirm with the OK key.
The display shows SUNRISE in a minutes
display.
7.such as 5.
8.Confirm with the OK key. The display shows FINISH.
9.With the OK key, you return back to Automatic mode.
Language
1.Use the Menu key to select the Menu item CONFIG.
2.Confirm with the OK key.
3.Use the + or – key to select the Sub-menu
LANGUAGE.
4.Confirm with the OK key.
The currently set language appears.
5.Use the + or – key to select your desired language.
Page 21

Menu
5.Use the + or – key to select the desired display format,
e.g. 31 12 00 either 12 31 00 12 31 00 or
00 12 31.
6.Confirm with the OK key.
The display shows FINISH.
7.With the OK key, you return back to Automatic mode.
PIN
The device can be locked against unauthorized use with
a 4-digit code number.
1.Use the Menu key to select the Menu item CONFIG.
2.Confirm with the OK key.
3.Use the + or – key to select the Sub-
menu PIN.
4.Confirm with the OK key. The display shows
NO PIN.
Menu
24h/ 12h (a.m. - p.m.)
1.Use the Menu key to select the Menu item CONFIG.
2.Confirm with the OK key.
3.Use the + or – key to select the Sub-menu 24h/ 12h.
4.Confirm with the OK key.
The display shows 24h or 12h.
5.Use the + or – key to select the desired
format.
6.Confirm with the OK key. The display shows FINISH.
7.With the OK key, you return back to Automatic mode.
Datformat (time and date display)
1.Use the Menu key to select the Menu item CONFIG.
2.Confirm with the OK key.
3.Use the + or – key to select the Sub-menu
DATEFORM.
4.Confirm with OK key.
44
Page 22

45
Selection WITH PIN (enter new PIN)
5.Use the + or – key to select WITH PIN.
6.Confirm with the OK key.
7.Create and make note of any desired 4-digit
number.
8.Use the + or – key to select the first digit
of the 4-digit code.
9.Confirm the input digit with the OK key.
10. Select the other digits as described with the + or – key.
11. Confirm in each instance with the OK key. The display
shows FINISH.
12. With the OK key you return back to Automatic mode.
90 seconds after the last key activation, the keyboard lock
engages, i.e. PIN appears. Operation can now only continue after inputting the correct PIN code.
Selection NO PIN (Remove PIN code)
1.Steps 1. through 4. as before.
2.Use the + or – key to select NO PIN.
3.Confirm with the OK key. The display shows FINISH.
4.You return back to Automatic mode by pressing OK key.
RESET (only in case of emergency)
If you perform a RESET of the timer, the individual
settings will be deleted. The programmed switching times remain intact.
Note
• If a PIN code has been entered to lock the keyboard,
then it must be input again after a RESET for setting
the clock again.
• Therefore, before performing any RESET operation,
make sure your PIN code is handy.
• If a PIN code has been activated, the timer can no longer be activated without a valid PIN code after a RESET.
The device must be sent in!
Menu
12.
Reset response
Page 23

Technical data
Protection class:
II in accordance with EN 60 730-1 for designated
installation
Degree of protection:
IP 20 in accordance with EN 60529
13.
Technical data
Nominal voltage: 230 V - 240 V/ +10 % -15 %
Frequency: 50-60 Hz
Contact: floating
Gap: less than 3 mm (µ)
Time based on: Quartz
Contact material: AgSnO
2
Switching capacity: 16 A/250 V~, cos = 1
10 A/250 V~, cos = 0.6
Incandescent lamp load: 2300 W
Halogen lamp load: 2300 W
Fluorescent lamps:
- Uncorrected: 1000 VA
- Series-corrected: 1000 VA
- Parallel-corrected: 400 VA (42 µF)
Compact fluorescent lamps:
- 9 x 7 W, 7 x 11 W, 7 x 15 W, 7 x 20 W, 7 x 23 W
46
Page 24

Theben AG,
Postfach 56, D-72394 Haigerloch
Telefon (0 74 74) 692-0
Telefax (0 74 74) 692-150
Kundendienst: Telefon (0 74 74) 692-240
Telefax (0 74 74) 692-207
www.theben.de
SIBLIK ELEKTRIK GES.M.B.H & CO.KG,
Murbangasse 6, 1100 Wien,
Tel. 01/680060, Fax 01/68006543
TEMPOLEC SA.
49, Route de Biesme, 6530 Thuin,
Tél. 071/590039, Fax 071/590161
Theben (Schweiz) AG
Schwettistraße 152, 5704 Egliswil
Telefon 062/7753811,Telefax 062/7753812
THEBEN SARL.
Zone Industrielle des Vignes,
32 – 38, Rue Bernard,
93012 Bobigny cédex,
Tel. 01/49159700, Fax 01/48445761
TIMEGUARD LTD.
Victory Park, 400 Edgware Road
London NW2 6ND
Tel. 0208/4508944, Fax 0208/4525143
THEBEN SRL., Via Ciro Menotti 11,
20129 Milano
Tel. 02/7386141/2/3/4, Fax 02/7386144
GUIJARRO HERMANOS SL,
Polígono Industrial
„Virgen de Butarque“, Isaac Peral 6,
28914 Leganés (Madrid)
Tel.: 91-6870022, Fax 91-6876616
ITHO BV
Adm. de Ruyterstraat 2, 3115 HB Schiedam
Tel. 0031/10427-8520, Fax 0031/10427-8873
E-mail: itho@itho.nl
Service
 Loading...