

Page 1
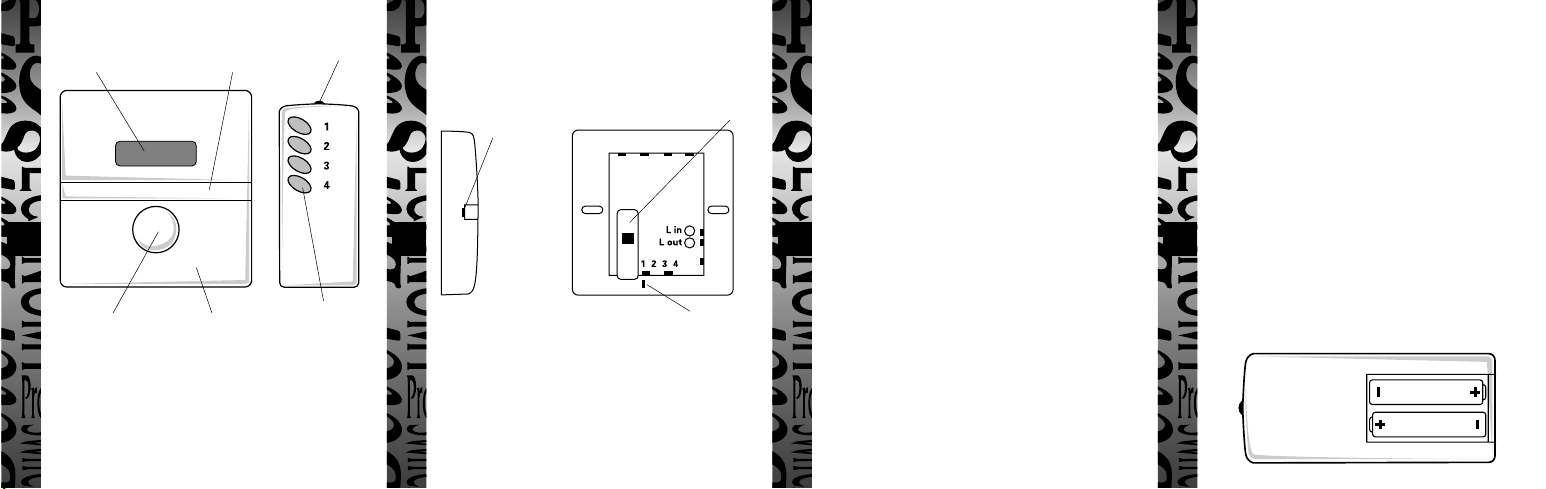
RLS010 Infra Red Remote Dimmer Switch
IR receiving window with
power on LED indication
Wall Switch
Push button for ON/OFF
and dimming control
Central screw
cover strip
Tough, flame
retardant case
IR transmitter
Remote
Controller
Push buttons for ON/OFF
and dimming control (only
one chosen and used)
1. General
The RLS010 is a standard size replacement wall switch for
dimming filament lamps only up to 300W. The light under control
can either be switched ON or OFF by a brief press of the push
button on the switch itself or on the remote controller.
If either push button is held down after the lamp has turned ON
the RLS010 will begin dimming progressively until the correct level
is reached and the button is released.
The RLS010 is only suitable for single-way switching applications
and cannot be used for two-way switching.
Fuse holder
Insert
screwdriver
here to
lever central
cover off
i. Remove the central screw cover strip by levering at each end
ii At the rear of the unit (see fig 2) select the channel (1-4) you
iii TURN OFF THE MAINS SUPPLY TO THE SWITCH
iv Unscrew the fixing screws holding the existing switch to its
v Insert these two wires into the screw terminals on the back of
Fig 1 Fig 2
2. Installation
IF IN DOUBT CONSULT AN ELECTRICIAN.
The RLS010 can be directly mounted on a standard 16mm plaster
depth flush box or a standard 16mm surface mount box.
Channel switch
(shown in channel 1)
vi By pushing the cable back up the conduit and bending the
vii Screw home fixing screws - do not overtighten.
with a screwdriver before pulling the strip away - see fig 1.
wish the RLS010 to work on. This determines which of the 4
buttons on the remote controller the wall switch will respond
to.
TO BE REPLACED.
back box. Pull the switch clear of its back box and remove the
two wires from the terminals after loosening the terminal
screws.
the RLS010 marked L in (live supply) and L out (normally red
into L in and black to L out). The screws should then be
securely tightened. If a metal back box is in use ensure that the
cable earth wire is sleeved and connected to the box. If a plastic
box is in use ensure that, if the earth wire is loose, it cannot
come in contact with the L in or L out terminals.
4321
wires as necessary position the RLS010 over the 2 fixing holes.
3. Commissioning
Ensure that the lamp(s) to be controlled are of a suitable type and
wattage. Turn on the mains supply to the lamp(s) and RLS010.
Press the push button on the wall switch briefly and the lamp(s)
will turn ON, press the button briefly again and the lamp(s) will
turn OFF.
If the push button on the wall switch is now pressed and held
down the lamp(s) will turn ON and then begin to dim
progressively. If the user continues to hold the button down the
lamp(s) will dim to a minimum, turn OFF, and then progressively
increase in brightness to a maximum. If the button continues to be
pressed the brightness will continue to cycle up and down.
To check the remote capability remove battery cover and insert
2 x AAA alkaline batteries in the remote controller being careful to
ensure correct polarity (see fig 3). Then using the same number
push button as the switch setting in the wall switch repeat the
above procedure remembering that there must be a line of sight
between the IR transmitter in the remote controller and the
receiving window on the wall switch.
Fig 3
Page 2
HELPLINE
020-8450-0515
For a product brochure please contact:
Timeguard Ltd.
Victory Park, 400 Edgware Road,
London NW2 6ND
020-8452-1112
or email csc@timeguard.com
4. Operation by remote control
Press the correct button on the remote controller briefly to turn the
lamp(s) ON or OFF. Press and hold down this button until the
correct brightness is achieved and then release.
5. Operation at the wall switch
Use the push button at the wall switch in the same way as above.
6. Troubleshooting
Symptom Cause
Power ON LED on wall switch Supply tripped or fuse blown
not illuminated (check lighting ring including
Push button on wall switch Lamp failed
not operative
Push button on remote Incorrect channel selected
controller not operative at wall switch
RLS010 circuit)
RLS010 fuse blown
(check RLS010 lamp circuit)
Faulty RLS010
Faulty RLS010
Specifications
i Conforms to EC Directives: 73/23/EEC and 89/336/EEC
ii Permissible Loads: Min 40W Max 300W filament lighting
iii Operating Ambient
iv Operating Voltage: 230V AC 50Hz
v IR Range: At least 8m up to ±50°, line of sight
vi Remote Controller Batteries: 2 x AAA Alkaline
vii Fuse: BS 1362 3A HRC ceramic
Not suitable for fluorescent low energy and discharge lighting.
65
Also unsuitable for flickering (neon) candle lamps.
3 Year Guarantee
In the unlikely event of this product becoming faulty, due to
defective material or manufacture, within 3 years of the date of
purchase, please return it to your supplier with proof of
purchase and it will be replaced free of charge.
Should you encounter any difficulty please contact
our helpline on 020 8450 0515.
(including halogen)
Temperature Range: -10°C to 40°C
INFRA RED REMOTE
DIMMER SWITCH
Cat No. RLS010
INSTALLATION & OPERATING
INSTRUCTIONS
 Loading...