

Timberk TEC.E15 M 1000, TEC.E15 DG 1500, TEC.E15 M 1500, TEC.E15 M 2000, TEC.E15 DG 2000 Instruction Manual
...Page 1

Instruction manual
Руководство по эксплуатации
Электрический
конвектор
Модели/Models:
TEC.E15 M 1000
TEC.E15 M 1500
TEC.E15 M 2000
TEC.E15 DG 1000
TEC.E15 DG 1500
TEC.E15 DG 2000
TEC.E15 GL 1000
TEC.E15 GL 1500
TEC.E15 GL 2000
Electric
convector
heater
Outlook of devices, aslo colour scores can be revised without any special advance
notices.
Производитель вправе менять внешний вид прибора и цветовую гамму прибора без специального уведомления.
Руководство по эксплуатации включает в себя гаратийный талон
Page 2
www.timberk.com • electric convector heater
2
1. Important information
2. Safeguards
3. Technical characteristics
4. Convector description
5. Delivery set
6. Installation
7. Cooecting to the mains
8. Oparation
9. Service
10. Troubleshooting
11. Circuit schematics
12. Transportation and storage
13. Utilization
СОДЕРЖАНИЕ
2
3
4
5
5
5
6
6
8
8
9
9
9
Dear customer!
We thank you for your happy choice and purchasing of home
electric convector heater TIMBERK. It will serve you for a long
time.
Home electric convector heater TIMBERK is intended for heating
and creating of comfortable climate conditions in your room
during cold seasons. The convector heater may be installed only
upright in places, where it is possible to connect to wiring with
single-phase electric supply of 220-240~/50 V/Hz. This heating
appliance is convenient and easy to install, efficient and economic
in use in connection with minimum power losses, increased heat
emission and comfortable distribution of heat flow.
Please, read this manual carefully before use of the convector heater.
This manual contains important information regarding your safety, as well
as recommendations concerning the correct use and maintenance of this
appliance.
Keep this manual with a guarantee slip, cash register receipt and, if
possible, carton and packaging material.
The convector heater you have bought may slightly differ from that
described in the manual, but it does not affect its use and operation
procedures.
IMPORTANT!
Important safeguards and instructions contained in
this manual do not include all possible modes and
situations. It is necessary to understand that common
sense, caution and accuracy are factors, which cannot
be ‘built-in’ any product.
1. IMPORTANT INFORMATION
Page 3

www.timberk.com • electric convector heater
3
IMPORTANT!
These factors should be considered by a person, who
is interested in the proper operation of the appliance.
The manufacturer is nor responsible for damage of the
appliance or its parts during transportation, as a result
of incorrect installation or voltage fluctuations, as well
as when any part of the appliance has been changed
or modified.
When using the convector heater several safety precautions should be
followed. Incorrect operation due to disregard to precautions may cause
harm to health of the user and other persons, as well as damage to their
property.
1. Read all the instructions before using the convector heater.
2. The convector is very hot when in use. To avoid burns, do not let bare
skin touch hot surfaces.
3. The appliance should not be located near highly flammable and
deformable objects.
4. Make sure that the appliance case and heating element are cool before
it will be dismantled and laid into the package for extended storage.
5. When the appliance is not used for a long time, keep it in cool dry
place in the original carton.
6. DO NOT COVER THE APPLIANCE, when it is operating. Do not dry
your clothes and any other fabrics and materials on it. It may result
in its overheating, breakdown or cause considerable damage to you
and/or your property.
2. SAFEGUARDS
IMPORTANT!
The manufacturer considers this type of failure a nonguaranteed event.
7. The appliance should always be closely supervised, especially when
it is used near children. Take care that children do not touch the
appliance.
8. Always unplug the convector heater when not in use.
9. The appliance is equipped with a Euro-plug with earthing contact. The
plug should fit the standard Euro-outlet. If it cannot be plugged into
the outlet or plugged with difficulty, turn it through 180° vertically and
try again. If it is impossible to plug it easily after that, call an electrician
to replace the outlet. Never use the appliance when incompletely
plugged.
10. Never plug the appliance with wet surface.
11. Never use the appliance, when it may have a contact with water.
12. When the appliance is turned on and operating, do not touch its
surface and the surface of control unit with wet hands and other parts
of your body.
13. Do not operate convector heater with a damaged power cord or
plug. To avoid the damage of electric shock, damaged cord should
be replaced only in authorized service centers of the manufacturer by
qualified specialists.
14. Never try to repair the convector heater by yourself. It may cause harm
to your health and affect the warranty service of the appliance.
15. Do not use the convector heater in open spaces outdoors.
16. It is forbidden to install or use the appliance in bathrooms, shower
rooms or swimming pools in places where water sheets or drops may
fall on its surface when the appliance is switched on.
17. Do not run cord of the radiator under carpeting and do not press it with
furniture. Arrange cord where it will not be tripped over.
18. To shut-off the appliance set the side switch on control panel to ‘off’
position (0) and unplug it. Never pull the power cord or unplug it
suddenly.
19. Do not insert your fingers and do not allow foreign objects to enter any
ventilation or exhaust opening as it may cause an electric shock or
damage the convector heater.
20. To prevent a possible fire, do not block air intakes or exhaust in any
manner. Do not dry your clothes on the convector heater! 13. Do
not switch on the convector if its power cord or plug is damaged. To
prevent electric shock, the damaged power cord must be repaired
only in authorized service centers of the manufacturer and by skilled
specialists.
Page 4
www.timberk.com • electric convector heater
4
Use the convector only on flat dry surface.
21. The convector heater has hot sparking parts inside. Do not use it in
areas where gasoline, paint or other flammable liquids are used or
stored.
22. Use this convector heater only as described in this manual. Any other
use not recommended by the manufacturer may cause fire, electric
shock or injury to persons.
23. Always unplug the convector before cleaning. Do not submerge the
convector. Never pull the cord.
24. Avoid the change of a cord and the use of an extension cord because
it may cause overheat and a risk of fire, as well as damage of internal
electrical network. However, if you have to use an extension cordits
parameters should correspond to the appliance power and not be
used by other power consumers.
25. For normal work of the appliance the voltage level of power network
should be sufficient and its technical parameters should be in strict
correspondence to technical parameters indicated on the appliance
case. If needed, find out specifications of your network from power
supplier.
26. Install and operate the appliance only when upright. Do not operate
the appliance in the horizontal or on the slant.
The appliance should be installed in the way that the control panel
could not be accessed by a person being in a bathtub (in contact with
water) or showering.
27. It is forbidden to install the appliance under a convenience outlet or an
electric cable, when output heat flows affect them. It may result in their
overheating and develop an emergency situation.
28. The appliance is not intended for use by handicapped persons
(including children) with insufficient experience and knowledge, if they
are not under observation or have not been instructed in the use of
appliance from a person responsible for their safety. Make sure that
children do not play with the radiator.
3. TECHNICAL CHARACTERISTICS
Model
Rated power
consumption,
W
Power supply,
V/Hz
Rated
curren,
A
Protection
class
Electric
protection
class
Net
weight,
kg
Device
dimensions,
mm
TEC.E15 M 1000 1000 220~/50 4,5 IP24 Class I 5,4 613x88x450
TEC.E15 M 1500 1500 220~/50 6,8 IP24 Class I 6,4 770x88x450
TEC.E15 M 2000 2000 220~/50 9,1 IP24 Class I 7,6 890x88x450
TEC.E15 DG 1000 1000 220~/50 4,5 IP24 Class I 5,4 613x88x450
TEC.E15 DG 1500 1500 220~/50 6,8 IP24 Class I 6,4 770x88x450
TEC.E15 DG 2000 2000 220~/50 9,1 IP24 Class I 7,6 890x88x450
TEC.E15 GL 1000 1000 220~/50 4,5 IP24 Class I 7,2 613x88x450
TEC.E15 GL 1500 1500 220~/50 6,8 IP24 Class I 8,6 770x88x450
TEC.E15 GL 2000 2000 220~/50 9,1 IP24 Class I 9,8 890x88x450
Table 1
For a detailed description of technical parameters and characteristics go to
www.timberk.com or contact TIMBERK official dealers.
IMPORTANT!
The manufacturer reserves the right to change the set-list
of the device (including liquid and powder components)
for different supplies without prior notice. The changes
either in no way influence the basic technical parameters
of the device or may improve them, and also not violate
the legislation or quality standards of the countries of
manufacture, transit and selling.
The changes in the set-list may result in changing of the
weight and dimensions of the device, but not more than
by +\- 5-20% (depending on the product category)
Page 5
www.timberk.com • electric convector heater
5
4. CONVECTOR DESCRIPTION
5. DELIVERY SET
1. Front panel
2. Air outlet
3. Rear panel
4. Control Panel
5. Handle
6. Water box
7. Wheels assembly
1. Convector - 1 pc.
2. Supporting feet - 2 pc.
3. Wall mounting set - 1 pc.
4. Operating manual and warranty card - 1 pc.
Wall installation
1. Uncover the original packaging and carefully remove device from it.
2. Remove any foam seals on the edges of the device and release it from
polyethylene.
3. Determine the location for the convector in compliance with the minimum
distance from the object and the floor.
4. Mark the height at which you must install the convector and put labels
in visible fixing holes.
5. Drill holes in the wall of the required diameter, insert the dowels*, tighten
the set screws*.
6. Attach the mounting brackets to the cover of the unit with the mounting
screws.
7. Perform installation on the wall convector, setting the screws installed in
the wall brackets with the holes that are installed on the device.
8. Check the installation. Convector should fit snugly against the wall.
* May not be included in delivery set
NOTE:
Design and technical characteristics of the convector
heater, as well as its complete set may be changed by
the manufacturer without prior notification, when it is
needed to improve its quality.
Fig. 1
6. INSTALLATION
Fig. 2
Page 6
www.timberk.com • electric convector heater
6
Fig. 3
Fig. 6
Fig. 4 Fig. 5
Floor installation
1. Carefully remove the heater from the package.
2. Make sure that the parts of the appliance have no remaining crumbles of
packing foam plastic or other debris.
3. Remove the two support legs from the packaging of the convector.
4. Turn the unit so that its bottom was in easy access.
5. Attach the support legs to the bottom of the device to the left and right
sides so that the fastening holes align with the holes on the fixture.
6. Tighten the screws in the existing holes.
1. Convector is designed for connection to the plug with single-phase 220-
240~V, 50Hz.
2. Before connecting, make sure that the voltage is correct as specified on
the nameplate with the technical data of the device.
3. Convector when connected to the plug must comply with applicable
1000 W
300 494 600
118110119
1500 W 2000 W
7. CONNECTING TO THE MAINS
8. OPERATION
electrical codes.
4. Electric outlet must be properly grounded. The receptacle must be
rated for at least 10A. Electrical plug and socket must always be kept
dry to prevent electrical leakage. Regularly check that the electrical plug
is firmly connected to the outlet. Verification is performed in the following
order: Insert the mains plug into the socket. After half an hour, turn off the
convector and unplug the power cord, check with the hand, whether the
plug is not heated.
If the plug is heated to a temperature above 50 °C, in order to avoid
damage, accidents, fire, due to poor electrical contact replace the socket
with help of a specialist.
For models:
TEC.E15 M 1000
TEC.E15 M 1500
TEC.E15 M 2000
1. Inclusion
1.1 Connect the convector to the mains by inserting the plug into the outlet.
2. Selecting the heating power
2.1 Turn the knob in the heating mode position «I» to select low power
heating.
2.2 Turn the selector knob to position the heating mode «II» to select the
average heating power.
2.3 Turn the selector knob to position the heating mode «III» to select a
high heating power.
3. Setting the temperature
3.1 Turn the thermostat knob clockwise until it stops. When the room
temperature reaches the desired level, turn the thermostat knob counter-
IMPORTANT!
The power outlet should be rated at least 10A for models
with a maximum capacity of up to 2000 W and at least
12 A for models with a maximum capacity of 2500 watt.
Page 7
www.timberk.com • electric convector heater
7
Fig. 7
For models:
TEC.E15 DG 1000
TEC.E15 DG 1500
TEC.E15 DG 2000
TEC.E15 GL 1000
TEC.E15 GL 1500
TEC.E15 GL 2000
IMPORTANT!
In order to increase the operational life of the convector
is recommended to note the order unit is switched off.
Shutting down the output without pre-cooling of the
heating elements can cause overheating and premature
failure.
clockwise to turn off the meter. Now the thermostat will maintain the set
temperature, periodically enabling and disabling convector.
4. Shutdown
4.1 Set the mode switch «OFF» and disconnect the appliance from the
mains.
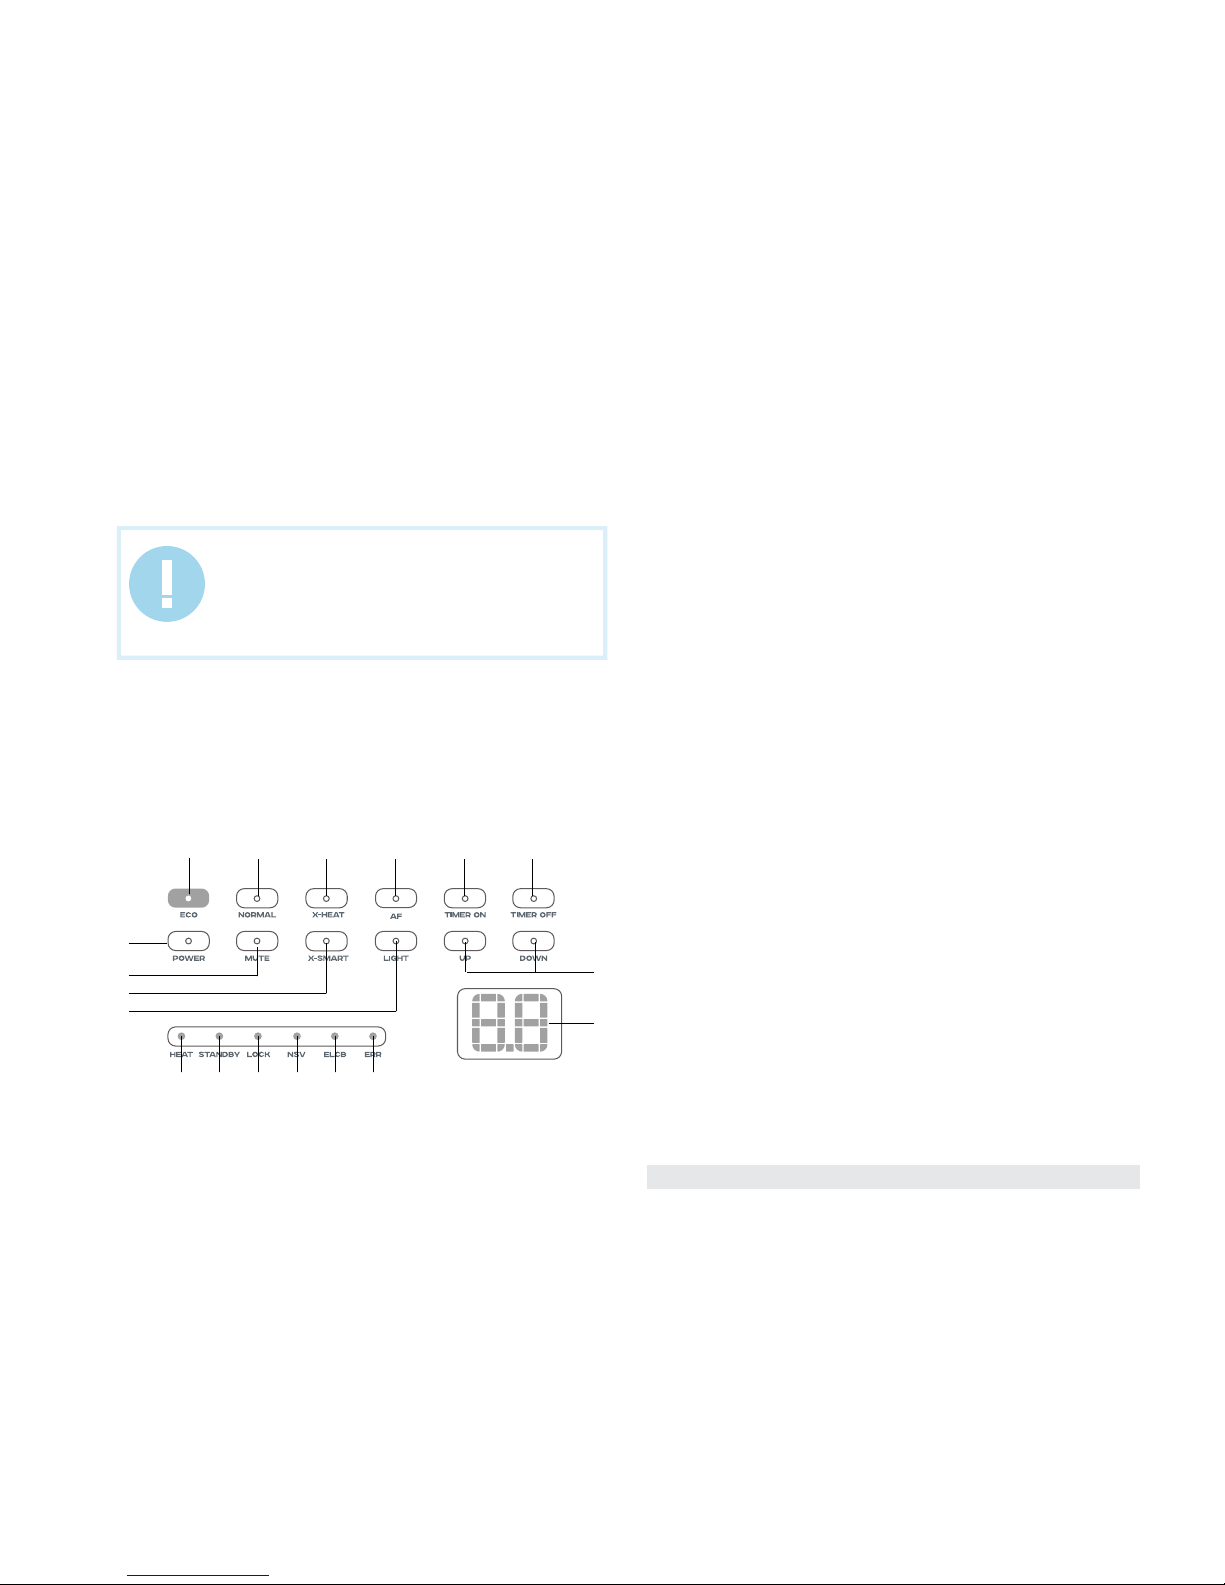
1. Button «POWER»
Press the button «POWER», when the appliance is not working, it starts
working by default in Low power.
2. Button «NORMAL»
Press the button «NORMAL», when the appliance is working, it starts
working in middle power.
3. Button «X-HEAT»
Press the button «X-HEAT», when the appliance is working, it starts
working in high power.
4. Button «ECO»
Press the button «ECO», when the appliance is working, it starts working
in low power.
5. Button «AF»
Press the «AF» button, the light is working, the appliance would be in antifreeze mode. Press the button «AF» again, the appliance would be out of
Anti-freeze mode.
6. Button «MUTE»
Press the «mute», the warning tone is off. Press the button «mute» again,
the warning tone is on.
7. Button «X-SMART»
Press the button «X-SMART», the appliance would be on smart mode:
• When the setting temperature is higher than current temperature of 5
degrees, it starts working in high power.
• When the setting temperature is higher than current temperature 3
degrees or the setting temperature is lower than current temperature 5
degrees, it starts working in middle power.
• When the setting temperature is lower than current temperature 3
degrees, it starts working in low power.
8. Button «LIGHT»
Press the button «LIGHT», the appliance would be on night mode. The light
display, display screen will turn off.
Press the button «LIGHT» again, the appliance would be out of night mode.
9. Button «UP» and «DOWN»
• Press the button «UP» or «DOWN», it would increase or decrease the
temperature settings (default settings are 25 degrees).
• When set a temperature or timer, if no any setting action in 3 seconds,
the timer would be confirmed.
24
14 15 16 17 18 19
1
9
13
6
7
8
3 5 10 11
Page 8
www.timberk.com • electric convector heater
8
• When the current temperature is higher than setting temperature of 1
degree, the appliance will be power off.
• When the current temperature is lower than setting temperature of 1
degree, the appliance will be power on.
10. Button «TIMER ON»
When in standby, press the button of «TIMER ON», the display screen
show number 1 for power on, press the button «UP» again, the display
screen would show number 2, the max timer is 24 hours, press the button
of «DOWN», the number would be decrease 1.
11. Button «TIMER OFF»
When in power on, press the button of «TIMER OFF», the display screen
show number 1 for power off by alarm, the light would be off in the same
time, press the button «UP» again, the display screen would show number
2, the max timer is 24 hours, and press the button of «DOWN», the number
would decrease 1.
12. Function «CHILD LOCK»
• Press the button «UP»/«DOWN» for 3 second, the keyboard lock will be
on, the light of «LOCK» would be on, the screen would be flashing, it will
become to be the previous setting after 5 seconds; when the keyboard is
on, any key is no working.
• For unlock press «UP»/«DOWN» for 3 seconds again, the appliance
would be unlocked.
13. LED-display
Displays the current temperature value or time settings.
14. «POWER» indicator
Lights up when starts heating mode
15. «Standby» indicator
Lights up when convector connecting to electric main
16. «LOCK» indicator
Lights up when control panel is locked
17. «NSV» indicator
Lights up when it tests the voltage when the product starts working, if the
voltage below ~180V or over ~240V, the lamp are light.
18. «ELCB» indicator
Lights up when it tests the grounding function when the product starts
working, if it isn’t connect the ground, the lamp are light.
19. «ERR» indicator
Lights up when if there is something wrong in the product, the lamp are light.
9. SERVICE
10. TROUBLESHOOTING
IMPORTANT!
See «Rules for safe operation and installation of electric
convector»
In the process of using an electric convector on the intake, outlet grill or
on the device may appear dust or other contamination. To preserve the
health and appearance of the device must be regularly cleaned from dust
and dirt. Before cleaning the external surfaces of the electric convector,
disconnect the appliance from the mains and allow it to cool completely.
Clean the outside of the appliance with a damp, soft cloth and then wipe
dry and allow the device to dry completely. Do not use abrasive cleaning
agents. Do not damage the appliance with a sharp object, as scratches on
painted surfaces can cause rust.
If you are not able to remedy a malfunction according to the
recommendations or other malfunctions occur, contact the authorized
service center of Timberk.
Troubleshooting Possible causes Removal
Electric convector is
connected to the mains,
switch handle Mode is set to
heating but convector does
not work.
1. No power.
2. Violated contacts in the wiring diagram
of the circuit.
3. Defective switch modes
1. Check whether the power supply is
disconnected from the device and, if
necessary, post power to the appliance.
2. Restore reliable connection contacts.
3. Refer to a specialist repair service center
Timberk.
Electric convector is
connected to the mains,
switch handle modes of
operation is set to the
heating, but the heating is not
going on.
1. The thermostat is set to temperature
lower than in the room.
2. Temperature limiter parted electrical
circuit and shut off the heating elements.
3. Defective switch modes.
4. Defective power relay.
5. Faulty thermostat.
6. Defective heating element.
7. Faulty temperature limiter.
1. Set the thermostat to a higher
temperature heat the room, turning the
thermostat knob clockwise.
2. Ensure that the air inlet or outlet grill is
not blocked by foreign objects and wait for
the inclusion of the temperature limiter,
after the body of the device to cool.
3-7. Refer to a specialist repair service
center Timberk.
Page 9
www.timberk.com • electric convector heater
9
TEC.E15 M 1000
TEC.E15 M 1500
TEC.E15 M 2000
TEC.E15 DG 1000
TEC.E15 DG 1500
TEC.E15 DG 2000
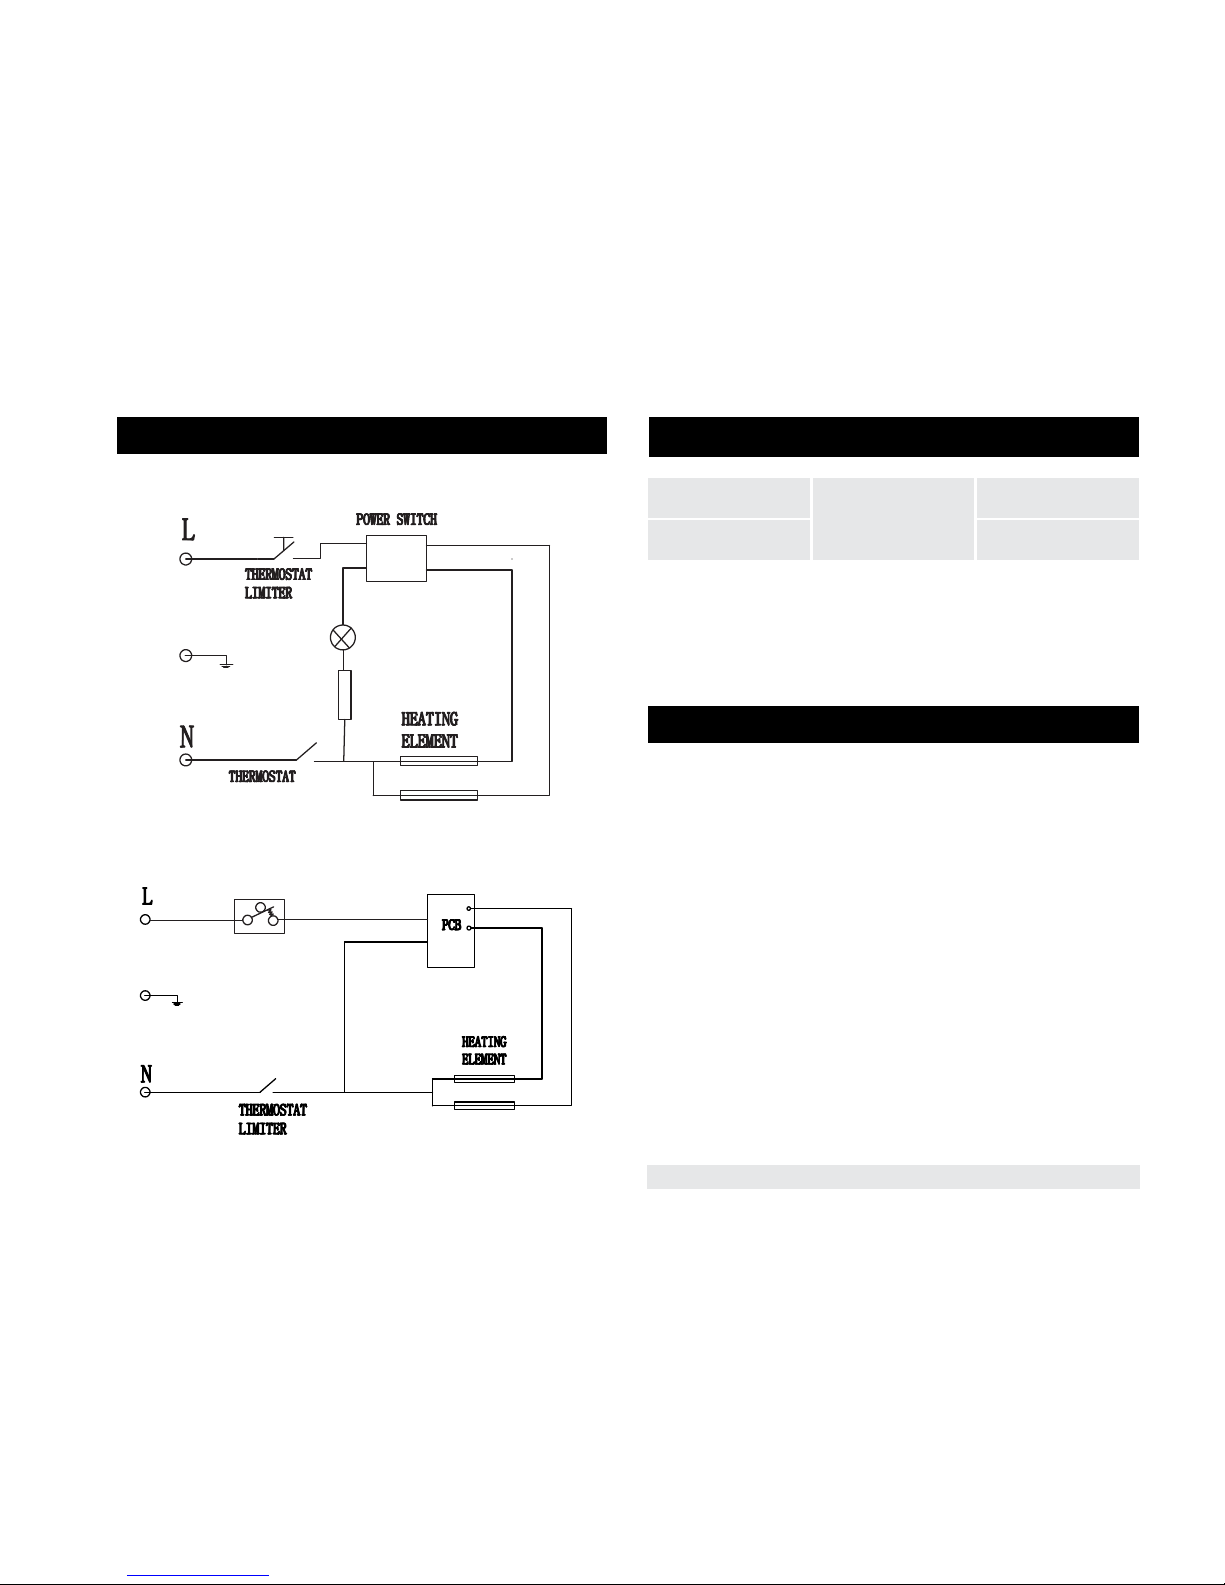
11. CIRCUIT SCHEMATICS
Fig. 8
Fig. 9
TEC.E15 GL 1000
TEC.E15 GL 1500
TEC.E15 GL 2000
13. UTILIZATION
Upon end of its life convector heater should be utilized in accordance with
rules and regulations and in ways effective in the place of utilization. For
details concerning utilization of your convector heater, please, contact local
authorities.
12. TRANSPORTATION AND STORAGE
Temperature
requirements*
Humidity
requirements*
We are exploring new technologies and we constantly improving the quality
of our products. That’s why specifications, design and accessories are
subject to change without any specific notice.
* This product must have storage in dry, well-ventilated space of warehouse
at the temperature not lower than -30°
Transportation and
storage
From -30° to +50°
From 15% to 85%
(without a condensate)
Page 10

www.timberk.com • электрический конвектор
10
1. Важная информация
2. Меры предосторожности
3. Технические характеристики
4. Описание конвектора
5. Комплект поставки
6. Установка
7. Подключение к электрической сети
8. Эксплуатация
9. Обслуживание
10. Устранение неисправностей
11. Принципиальная электрическая схема
12. Гарантийный талон
СОДЕРЖАНИЕ
Уважаемый покупатель!
Благодарим Вас за удачный выбор и приобретение бытового электрического конвектора ТIMBERK. Он прослужит Вам
долго.
Бытовой электрический конвектор TIMBERK предназначен
для обогрева и создания комфортной атмосферы в помещении в холодное время года. Конвектор может быть установлен только в вертикальном положении в местах, где есть
возможность подключения к электропроводке с однофазным электропитанием 220~/50 V/Hz. Данный нагревательный
прибор удобен и прост в установке, эффективен и экономичен в использовании в связи с минимальными потерями
электроэнергии, повышенной теплоотдачей и максимально
комфортным распределением теплового потока.
Просим внимательно ознакомиться с руководством по эксплуатации
перед использованием конвектора.
В данном руководстве по эксплуатации содержится важная информация, касающаяся Вашей безопасности, а также рекомендации по
правильному использованию прибора и уходу за ним.
Сохраните руководство по эксплуатации, вместе с гарантийным талоном, кассовым чеком, и, по возможности, картонной упаковкой и
упаковочным материалом.
Приобретенный Вами конвектор может несколько отличаться от
описанного в руководстве, что не влияет на способы использования
и эксплуатации.
ВНИМАНИЕ!
Важные меры предосторожности и инструкции, содержащиеся в данном руководстве, не включают
всех возможных режимов и ситуаций, которые мо
гут встречаться. Необходимо понимать, что здравый смысл, осторожность и тщательность являются
факторами, которые невозможно «встроить» ни в
один продукт.
1. ВАЖНАЯ ИНФОРМАЦИЯ
10
11
12
13
13
14
14
15
17
18
18
20
Page 11

www.timberk.com • электрический конвектор
11
При использовании конвектора, необходимо соблюдать ряд мер предосторожности. Неправильная эксплуатация в силу игнорирования
мер предосторожности может привести к причинению вреда здоровью
пользователя и других людей, а также нанесения ущерба их имуществу.
1. Прочитайте все инструкции перед использованием конвектора.
2. Конвектор при работе нагревается до очень высокой температуры.
Чтобы избежать ожогов, не прикасайтесь руками и другими частями
тела к горячим поверхностям прибора.
3. Прибор должен располагаться вдали от легковоспламеняющихся и
легкодеформируемых объектов.
4. Удостоверьтесь, что корпус прибора и его нагревательный элемент
остыл, прежде чем прибор будет демонтирован и уложен в упаковку
для длительного хранения.
5. Когда прибор не используется долгое время, храните его в сухом
прохладном месте в заводской картонной упаковке.
6. НЕ НАКРЫВАЙТЕ ПРИБОР, когда он работает. Не сушите на нём
одежду и любые другие ткани и материалы. Это может привести к его
перегреву, выходу из строя или причинить значительный ущерб Вам
и/или Вашему имуществу.
ВНИМАНИЕ!
Эти факторы должен учитывать человек, который
заинтересован в надлежащей эксплуатации устрой
ства. Изготовитель не несет ответственности в случае повреждения прибора или его отдельных частей
во время транспортировки, в результате неправиль
ной установки, в результате колебаний напряжения,
а также в случае, если какая-либо часть прибора
была изменена или модифицирована.
2. МЕРЫ ПРЕДОСТОРОЖНОСТИ
ВНИМАНИЕ!
Производитель рассматривает данный вид поломки, как негарантийный случай.
7. Прибор всегда должен находиться под наблюдением, особенно
если неподалеку от прибора находятся дети. Внимательно следите за
тем, чтобы дети не прикасались к прибору руками.
8. Всегда отключайте конвектор от электрической сети, когда он не
используется.
9. Прибор оснащен евровилкой с контактом заземления. Вилка
должна подходить к стандартной евророзетке и входить в нее без
особых усилий. Если вилка не входит в розетку или входит туго, переверните ее по вертикали на 180 градусов и повторите попытку. Если
и после этого Вы не можете легко вставить вилку в розетку, вызовите электрика, для замены розетки. Никогда не используйте прибор,
если вилка вставлена в розетку не до конца.
10. Никогда не подключайте прибор к электросети, если его поверхность влажная (мокрая).
11. Никогда не используйте прибор в ситуации, когда он может соприкасаться с водой.
12. Когда прибор включен и работает, не касайтесь его поверхности
и поверхности блока управления мокрыми руками и любыми частями
тела.
13. Не включайте конвектор, если его сетевой шнур или вилка имеют
повреждения. Во избежание опасности поражения электрическим
током, поврежденный сетевой шнур должен меняться только в авторизованных сервисных центрах изготовителя, квалифицированными
специалистами.
14. Никогда не пытайтесь производить ремонт конвектора самостоятельно. Это может причинить вред Вашему здоровью и повлиять на
гарантийное обслуживание прибора. В случае необходимости сервисного обслуживания, обратитесь авторизованный сервисный центр
изготовителя.
15. Не используйте конвектор на открытых пространствах вне помещения.
16. Запрещено устанавливать и использовать прибор в ванных комнатах, душевых или бассейнах, именно в тех местах, где есть вероятность прямого попадания струй и капель воды на его поверхность во
время, когда прибор включен.
17. Не прокладывайте сетевой шнур конвектора под ковровыми покрытиями и не прижимайте его предметами мебели. Прокладывайте
сетевой шнур так, чтобы об него невозможно было споткнуться.
18. Для выключения прибора установите выключатель питания сбоку
Page 12

www.timberk.com • электрический конвектор
12
на панели управления в положение «O» («выключено») и отсоедините
вилку сетевого шнура от розетки. Никогда не тяните за сетевой шнур
и не отсоединяйте вилку резко.
19. Не просовывайте пальцы и исключите попадание посторонних
предметов в какие-либо вентиляционные, воздухозаборные или выходные отверстия, так как это может привести к поражению электрическим током или повреждению конвектора.
20. Для предотвращения возможного пожара не загораживайте ничем воздухозаборные и выходные отверстия. Не вешайте и не сушите
вещи на конвекторе! Используйте конвектор только на ровной сухой
поверхности.
21. Конвектор содержит внутри горячие и искрящие компоненты. Не
используйте конвектор в местах использования или хранения бензина, краски или других легковоспламеняющихся жидкостей.
22. Используйте данный конвектор только так, как описано в данном
руководстве. Любое другое использование, не рекомендуемое изготовителем, может привести к пожару, поражению электрическим током или травмированию людей.
23. Ни в коем случае не выполняйте очистку конвектора, когда он
включен в розетку. Не погружайте конвектор в воду. Никогда не тяните за сетевой шнур.
24. Во избежание перегрева и риска возникновения пожара, а также
повреждения внутренней электрической сети, не изменяйте длину
сетевого шнура и не подключайте прибор через электрические удлинители. Однако при необходимости можно использовать удлинитель,
если его параметры соответствуют мощности прибора и если он не
используется другими потребителями электроэнергии.
25. Для нормальной работы прибора уровень напряжения электросети должен быть достаточен, а ее технические параметры должны
быть в строгом соответствии с техническими параметрами, указанными на корпусе прибора. При необходимости выясните характеристики своей сети у поставщика электроэнергии.
26. Устанавливайте и эксплуатируйте прибор в строго вертикальном
положении. Запрещено эксплуатировать прибор в горизонтальном
или наклонном положениях.
27. Прибор должен быть установлен так, чтобы панель управления
не могла быть доступна человеку, находящемуся непосредственно в
ванной (в контакте с водой) или принимающему душ.
28. Запрещено устанавливать прибор непосредственно под электрической розеткой или под проведенным электрическим кабелем, когда
выходящие тепловые потоки попадают на них. Это может привести к
их перегреву, что создаст аварийную ситуацию.
29. Прибор не предназначен для использования лицами (включая
детей) с ограниченными физическими, сенсорными или умственными
возможностями, обладающими недостаточным опытом и знаниями,
если они не находятся под наблюдением и не получили инструкций
по использованию устройства от лица, ответственного за их безопасность. Необходимо следить, чтобы дети не играли с конвектором.
Таблица 1
3. ТЕХНИЧЕСКИЕ ХАРАКТЕРИСТИКИ
Модель
Номинальная
потребляемая
мощность
Параметры
электропи-
тания
Номи-
нальная
сила
тока
Степень
защиты
Класс
электро-
защиты
Вес
нетто
Размеры
прибора
TEC.E15 M 1000 1000 220~/50 4,5 IP24 Class I 5,4 613x88x450
TEC.E15 M 1500 1500 220~/50 6,8 IP24 Class I 6,4 770x88x450
TEC.E15 M 2000 2000 220~/50 9,1 IP24 Class I 7,6 890x88x450
TEC.E15 DG 1000 1000 220~/50 4,5 IP24 Class I 5,4 613x88x450
TEC.E15 DG 1500 1500 220~/50 6,8 IP24 Class I 6,4 770x88x450
TEC.E15 DG 2000 2000 220~/50 9,1 IP24 Class I 7,6 890x88x450
TEC.E15 GL 1000 1000 220~/50 4,5 IP24 Class I 7,2 613x88x450
TEC.E15 GL 1500 1500 220~/50 6,8 IP24 Class I 8,6 770x88x450
TEC.E15 GL 2000 2000 220~/50 9,1 IP24 Class I 9,8 890x88x450
Более подробное описание технических параметров и характеристик
смотрите на сайте www.timberk.com или спрашивайте у официальных
дилеров TIMBERK
Page 13

www.timberk.com • электрический конвектор
13
ВНИМАНИЕ!
Производитель оставляет за собой право для разных партий поставок без предварительного уведомления изменять комплектующие части изделия
(включая заливаемые \ засыпаемые составляю
-
щие), не влияя при этом на основные технические
параметры изделия или улучшая их, а также не на
-
рушая изменениями принятые на территории страны производства \ транзита \ реализации стандарты качества и нормы законодательства. Это может
повлечь за собой изменение веса и габаритов из
-
делия, но не более чем на +\- 5-20% (могут отличаться для разного вида изделий).
4. ОПИСАНИЕ КОНВЕКТОРА
1. Лицевая панель
2. Решетка выхода горячего воздуха
3. Задняя панель
4. Панель управления
5. Ручка для переноски
6. Увлажнитель
7. Опорные ножки с колесиками
1. Конвектор - 1 шт.
2. Опорные ножки - 2 шт.
3. Комплект настенной установки – 1 шт.
4. Руководство по эксплуатации и гарантийный талон - 1 шт.
Рис. 1
Рис. 2
5. КОМПЛЕКТ ПОСТАВКИ
ПРИМЕЧАНИЕ:
Для улучшения качества продукции, конструкция
и технические характеристики конвектора, а так
же его комплектация могут быть изменены производителем без предварительного уведомления.
6. УСТАНОВКА
Настенная установка (рис. 2, 3, 4, 5, 6)
1. Раскройте заводскую упаковку и аккуратно извлеките из нее прибор.
2. Удалите любые уплотнители из пенопласта с краев прибора и освободите его от полиэтилена.
3. Определите место установки конвектора с соблюдением минимальных расстояний от предметов и пола (см. рис. 2).
Размеры указаны в милиметрах
Page 14

www.timberk.com • электрический конвектор
14
1. Конвектор рассчитан на подключение к электрической сети с однофазным напряжением 220В, 50Гц.
2. Перед подключением убедитесь, что параметры электросети в месте подключения соответствуют параметрам, указанным на маркировочной табличке с техническими данными прибора.
3. При подключении конвектора к электрической сети следует соблюдать действующие правила электробезопасности.
4. Электрическая розетка должна быть правильно заземлена. Розетка должна быть рассчитана на номинальный ток прибора. Электрические розетка и вилка должны всегда оставаться сухими во избежание
утечки электрического тока. Регулярно проверяйте, что электрическая вилка плотно подключена к розетке. Проверку производите в
следующем порядке: вставьте электрическую вилку в розетку. Через
полчаса работы выключите конвектор и выньте вилку из розетки,
проверьте рукой, не нагрелась ли вилка.
Если вилка нагрелась до температуры выше 50°С, во избежание
повреждений, происшествий, возникновения пожара в результате
плохого электрического контакта замените розетку на другую. Это
должен делать специалист.
Напольная установка
1. Аккуратно извлеките обогреватель из упаковки.
2. Убедитесь, что на его частях не осталось крошки упаковочного пенопласта или другого мусора.
3. Достаньте 2 опорные ножки из упаковки конвектора
4. Переверните прибор так, чтобы его нижняя часть находилась вверху.
Рис. 3 Рис. 4
Рис. 5
Рис. 6
1000 W
300 мм 494 мм 600 мм
118 мм
110 мм
119 мм
1500 W 2000 W
7. ПОДКЛЮЧЕНИЕ К ЭЛЕКТРИЧЕСКОЙ СЕТИ
4. Отметьте высоту, на которой необходимо установить конвектор и
поставьте видимые метки в крепежных отверстиях.
5. Просверлите в стене отверстия необходимого диаметра по меткам крепления (см. рис. 6), вставьте дюбели*, закрутите установочные
винты*.
6. Присоедините крепежные кронштейны к корпусу конвектора с помощью крепежных винтов.
7. Осуществите монтаж конвектора на стену, сопоставляя установленные крепежные винты в стене с отверстиями кронштейнов, установленных на приборе.
8. Проверьте надежность монтажа. Конвектор должен плотно прилегать к стене.
*Могут не входить в комплект поставки
5. Приложите опорные ножки к нижней части прибора с левой и правой стороны таким образом, чтобы крепежные отверстия совпадали
с отверстиями на корпусе прибора.
6. Закрутите крепежные винты* в имеющиеся отверстия, прилагая
при этом усилия. Проверьте надежность крепления.
7. Переверните прибор в правильное положение и установите его на
горизонтальной и ровной поверхности строго в вертикальном положении. Помните, что установка конвектора на ножки должна происходить только тогда, когда вы отключили прибор от электрической
сети!
*Могут не входить в комплект поставки
Page 15

www.timberk.com • электрический конвектор
15
Для моделей:
TEC.E15 DG 1000 / TEC.E15 DG 1500 / TEC.E15 DG 2000
TEC.E15 GL 1000 / TEC.E15 GL 1500 / TEC.E15 GL 2000
Панель управления и эксплуатация конвектора
Панель управления
1. Ручка переключателя режимов
мощности нагрева.
Используется для выбора следующих режимов мощности нагрева:
низкая, средняя, высокая.
2. Индикатор.
Загорается при работе прибора
3. Ручка термостата.
Используется для установки желаемой температуры в помещении.
Для моделей: TEC.E15 M 1000 / TEC.E15 M 1500 / TEC.E15 M 2000
Эксплуатация конвектора
1. Включение
1.1. Подключите конвектор к электрической сети, вставив вилку
сетевого шнура в сетевую розетку.
2. Выбор режима мощности нагрева
2.1. Поверните ручку переключателя режимов обогрева в положение «1» чтобы выбрать низкую мощность нагрева.
2.2. Поверните ручку переключателя режимов обогрева в положение «2» чтобы выбрать среднюю мощность нагрева.
2.3. Поверните ручку переключателя режимов обогрева в положение «3» чтобы выбрать высокую мощность нагрева.
3. Установка температуры
3.1. Поверните ручку термостата по часовой стрелке до упора.
Когда температура в помещении достигнет желаемого уровня, поверните ручку термостата против часовой стрелки до отключения
прибора (будет слышен щелчок). Теперь термостат будет поддерживать заданную температуру, периодически включая и отключая
конвектор.
4. Выключение
4.1. Установите ручку переключателя режимов в положение «O» и
отключите прибор от электрической сети.
Рис. 7
8. ЭКСПЛУАТАЦИЯ
24
14 15 16 17 18 19
1
9
13
6
7
8
3 5 10 11
1
2
3
Рис. 8
1. Кнопка «POWER»
Для включения прибора нажмите на кнопку «POWER». По умолча-
нию прибор начнет работу в режиме низкой мощности нагрева.
2. Кнопка «NORMAL»
Нажмите на кнопку «NORMAL» во время работы приборы для выбо-
ра средней мощности нагрева.
3. Кнопка «X-HEAT»
Нажмите на кнопку «X-HEAT» во время работы прибора для выбора
высокой мощности нагрева.
4. Кнопка «ECO»
Нажмите на кнопку «eco» во время работы прибора для выбора низ-
кой мощности нагрева.
5. Кнопка «AF»
Нажмите на кнопку «AF» для выбора режима анти-замерзания. Для
отмены режима анти-замерзания нажмите на кнопку «AF» еще раз.
Режим анти-замерзания автоматически поддерживает установлен-
ную температуру в пределах 5 °С.
Page 16

www.timberk.com • электрический конвектор
16
6. Кнопка «MUTE»
Нажмите на кнопку «MUTE» во время работы прибора для отклю-
чения предупреждающих звуковых сигналов. Для отмены данного
режима нажмите на кнопку «MUTE» еще раз. Предупреждающие
звуковые сигналы будут доступны снова.
7. Кнопка «x-smart»
Нажмите на кнопку «X-SMART», во время работы прибора для вы-
бора данного режима:
• Когда установленная температура выше, чем температура в помещении на 3-5 °С прибор автоматически начнет работу в режиме
средней мощности нагрева.
• Когда установленная температура выше, чем температура в помещении на 1-3°С, прибор автоматически начнет работу в режиме
низкой мощности нагрева.
8. Кнопка «LIGHT»
Нажмите на кнопку «LIGHT» во время работы прибора для отклю-
чения световой индикации дисплея и индикаторов. Повторное нажатие на кнопку «LIGHT» отменяет данную функцию.
9. Кнопки «UP» и «DOWN»
• Нажимайте на кнопки «UP» и/или «DOWN» для выбора необходимого Вам значения температуры обогрева (установленное значение температуры по умолчанию 25 °С) или значения времени
таймера.
• После выбора необходимого значения температуры обогрева или
времени таймера через 3 секунды установленное значение будет
запомнено.
• Когда температура в помещении больше, чем установленная температура на 1°С, прибор выключит обогрев.
• Когда температура в помещении ниже, чем установленная температура на 1 °С, прибор включит обогрев.
10. Кнопка «TIMER ON»
Когда прибор находится в режиме ожидания, нажмите на кнопку
«TIMER ON», для включения режима «Таймер на включение». На
дисплее будет отображаться значение времени таймера с возможностью установки до 24 часов с шагом в 1 час. Для установки необходимого значения используйте кнопки «UP» и/или «DOWN».
11. Кнопка «TIMER OFF»
Когда прибор находится в режиме работы, нажмите на кнопку
«timer off», для включения режима «Таймер на отключение». На
дисплее будет отображаться значение времени таймера с возможностью установки до 24 часов с шагом в 1 час. Для установки необходимого значения используйте кнопки «UP» и/или «DOWN».
12. Функция блокировки панели управления «CHILD LOCK»
• Одновременно зажмите кнопки «UP» и «DOWN» в течение 3 секунд, загорится индикатор «LOCK» и панель управления будет заблокирована
• Для разблокировки панели управления зажмите одновременно
кнопки «UP» и «DOWN» в течение 3 секунд. Индикатор «LOCK» погаснет. Панель управления будет разблокирована.
13. LED-дисплей
Отображает текущее значение установок температуры нагрева или
времени таймера.
14. «HEAT» индикатор
Индикатор загорается, когда прибор работает в режиме обогрева
15. «STANDBY» индикатор
Индикатор загорается, когда прибор подключен к электрической сети
и не работает в режиме обогрева или каком либо другом режиме.
16. «LOCK» индикатор
Индикатор загорается, когда включена функция блокировки пане-
ли управления. После снятия блокировки индикатор гаснет.
17. «NSV» индикатор
Система автоматически осуществляет проверку напряжения в
электрической сети для нормальной работы прибора. Если напряжение в электрической сети ниже ~180В или выше ~240В, то индикатор загорится. Использовать прибор строго не рекомендуется.
18. «ELCB» индикатор
Система осуществляет автоматическую проверку заземления
электросети. Если заземление отсутствует, то индикатор загорится. Использовать прибор без заземляющего контура электрической розетки запрещено.
19. «ERR» индикатор
Индикатор загорится тогда, когда обнаружена, какая либо неис-
правность в электронной системе конвектора. В этом случае дальнейшее использование прибора запрещено.
Page 17

www.timberk.com • электрический конвектор
17
ПРИМЕЧАНИЕ:
При первом включении конвектора возможно появление характерного запаха и дыма, т. к.
происходит сгорание консервируюшей смазки с
поверхности нагревательного элемента. Поэтому
рекомендуется первое включение конвектора в
хорошо проветриваемом помещении.
9. ОБСЛУЖИВАНИЕ
Прибор необходимо регулярно мыть для удаления пыли и загрязнений
с внешних поверхностей, т.к. это влияет на эффективность его работы
и температурные параметры обогрева помещения.
Перед проведением профилактических работ выключите прибор
и отсоедините его от электрической сети, дайте ему остыть, затем
протрите его поверхность мягкой слегка влажной тряпкой. Для мытья
не рекомендуется использовать моющие средства, в т.ч. средства с
абразивными составами. Не допускайте повреждения прибора остры
ми предметами, т.к. царапины на окрашенной поверхности могут привести к появлению ржавчины.
Заднюю поверхность конвектора также необходимо периодически
очищать от пыли и грязи. Для этого нужно отсоединить прибор от сте
ны, а после чистки вернуть его в исходное положение.
Процедуру профилактической очистки следует производить периоди
чески для поддержания технического состояния конвектора и сохранения его внешнего вида на долгие годы.
ПРИМЕЧАНИЕ:
Изменение цвета эмали на лицевой поверхности
не является дефектом, т. к. данный факт обуслов
лен содержанием в воздухе повышенного содержания частиц пыли и других загрязнений.
Неисправность Возможные причины Устранение
Электрический конвектор под
ключён к электрической сети,
но конвектор не работает.
1. Отсутствует электропитание.
2. Нарушены контакты в схеме подключения к электрической цепи.
3. Неисправен переключатель.
1. Проверьте, не отключено ли электропитание от прибора и при необходимости
подайте электропитание на прибор.
2. Восстановите надёжное соединение
контактов.
3. Обратитесь к специалисту по ремонту
в сервисный центр Timberk.
Электрический конвектор под
ключён к электрической сети,
но нагрев не происходит.
1. Термостат установлен в положение
низкой температуры нагрева
помещения.
2. Ограничитель температуры разомкнул электрическую цепь и отключил
нагревательные элементы.
3. Неисправен переключатель.
4. Неисправно силовое реле.
5. Неисправен термостат.
6. Неисправен нагревательный
элемент.
7. Неисправен ограничитель
температуры.
1. Установите термостат в положение
более высокой температуры нагрева помещения, повернув ручку термостата по
часовой стрелке (для серии TEC.E15 M).
2. Убедитесь, что воздухозаборная или
воздуховыпускная решётка не перекрыты
посторонними предметами и дождитесь
включения ограничителя температуры,
после того как корпус прибора остынет.
3-7. Обратитесь к специалисту по ремонту в сервисный центр Timberk.
10. УСТРАНЕНИЕ НЕИСПРАВНОСТЕЙ
Возможные неисправности и методы их устранения:
Таблица 2
Если неисправность не удается устранить в соответствии с рекомендациями или при возникновении других неисправностей обратитесь в
авторизованный сервисный центр Timberk.
Page 18

www.timberk.com • электрический конвектор
18
TEC.E15 M 1000
TEC.E15 M 1500
TEC.E15 M 2000
TEC.E15 DG 1000
TEC.E15 DG 1500
TEC.E15 DG 2000
TEC.E15 GL 1000
TEC.E15 GL 1500
TEC.E15 GL 2000
11.
ПРИНЦИПИАЛЬНАЯ ЭЛЕКТРИЧЕСКАЯ СХЕМА
Рис. 9 Рис. 10
ПЕРЕКЛЮЧАТЕЛЬ
ТЕРМООГРАНИЧИТЕЛЬ
ИНДИКАТОР
ТЕРМОСТАТ
НАГРЕВАТЕЛЬНЫЙ
ЭЛЕМЕНТ
ТЕРМООГРАНИЧИТЕЛЬ
СИЛОВАЯ ПЛАТА
ДАТЧИК ПАДЕНИЯ
НАГРЕВАТЕЛЬНЫЙ
ЭЛЕМЕНТ
Page 19

www.timberk.com • электрический конвектор
19
Уважаемый покупатель!
Timberk предоставляет вам специальный сервис в рамках
программы клиентской поддержки. Теперь вы всегда сможете
заказать и оформить доставку на запасные части и расходные
материалы, необходимые для оптимальной, качественной работы
техники Timberk в течение всего срока службы на едином портале
www.btpart.ru.
Всю информацию о работе портала вы также всегда сможете
увидеть на сайте www.timberk.com. Мы искренне надеемся, что
этот уникальный дополнительный сервис поможет вам сделать
жизнь с Timberk еще удобнее!
www.btpart.ru
Все расходные материалы для
продукции Timberk вы можете
приобрести на сайте www.btpart.ru
Page 20

www.timberk.com • электрический конвектор
20
ГАРАНТИЙНЫЙ ТАЛОН
www.timberk.com
Уважаемый покупатель!
Обратите внимание на необходимость вашей подписи
на стр. 24
Page 21

www.timberk.com • гарантийный талон
21
Гарантийные обязательства
Гарантийное обслуживание и ремонт бытового электрического конвектора TIMBERK с соблюдением требований и
норм Изготовителя (TIMBERK) производятся на территории
РФ только в авторизованных сервисных центрах Изготовителя или мастерских, уполномоченных производителем и
работающих с ним на основании договора.
Срок проведения экспертизы и гарантийного ремонта - не
более 45 дней с момента приемки дефектного изделия авторизованным сервисным центром TIMBERK.
Если при эксплуатации изделия Вы столкнулись с неполадками в его
работе, которые Вы не можете устранить самостоятельно в строгом соответствии с Руководством по эксплуатации изделия, обратитесь к региональному представителю Изготовителя в России или в региональный
авторизованный сервисный центр TIMBERK, уточнив адрес у продавца.
Полный перечень сервисных центров указан на сайте: www.timberk. com
или приложен отдельным списком в комплекте с изделием.
Также Вы можете обратиться в уполномоченную сервисную службу Изготовителя по телефону: +7 (495) 627-5285, либо по телефонам, указанным на сайте: www.timberk.com, или отправить сообщение по электронному адресу: ru.service@timberk.com
Если отсутствие надлежащим образом заполненного гарантийного талона на изделие или отсутствие чека с указанием изделия не позволяет
идентифицировать изделие и факт его продажи на территории РФ, то
Изготовитель вправе отказать в гарантийном обслуживании изделия.
При невозможности определить дату продажи изделия, гарантийный
срок исчисляется с даты его производства.
Дата производства изделия определяется по реестру Изготовителя в соответствии с серийным номером изделия.
Официальный срок службы бытового электрического конвектора
TIMBERK, установленный изготовителем, составляет 20 лет, со дня передачи изделия потребителю.
Указанный срок службы действителен только при условии соблюдения
правил эксплуатации и правильного ухода за изделием.
Во избежание недоразумений убедительно просим Вас внимательно
изучить Руководство по эксплуатации изделия и условия гарантийных
обязательств, проверить правильность заполнения бланка гарантийного
талона. Согласно требованиям Изготовителя, гарантийный талон действителен только при наличии четко и правильно указанных дан-ных:
модели, серийного номера изделия, даты покупки, данных фирмы-продавца, подписи покупателя. Соответствующие данные также должны
быть указаны продавцом на отрывных талонах.
Модель и серийный номер изделия (на маркировочной (идентифи-кационной) наклейке Изготовителя на изделии (Timberk ID) должны соответствовать указанным в гарантийном талоне продавцом. При нарушении
этих условий, а также в случае, когда данные, указанные в гарантийном
талоне, изменены или стерты, талон может быть признан недействительным.
Данным гарантийным талоном Изготовитель подтверждает принятие на
себя обязательств по удовлетворению законных требований потреби-телей в случае обнаружения недостатков изделия, возникших по вине Изготовителя в течение установленного гарантийного срока.
Гарантийный срок для бытового электрического конвектора TIMBERK,
установленный изготовителем, составляет 1 год, со дня передачи изде-
лия потребителю.
Гарантийный срок для нагревательного элемента бытового электриче-
ского конвектора составляет 1 год.
Гарантийные обязательства дополняют и уточняют оговоренные зако-
ном обязательства, предполагающие соглашение сторон либо договор;
выдаются Изготовителем в дополнение к законным правам потребителей и ни в коей мере их не ограничивают.
Гарантия Изготовителя действительна только на территории РФ на изделия, купленные на территории РФ и изготовленные для РФ.
Page 22

www.timberk.com • гарантийный талон
22
нарушением правил Руководства по эксплуатации данного изделия;
наличием следов несанкционированного вскрытия и/или ремонта из-
делия (за исключением случаев, предусмотренных Руководством по
эксплуатации), повлекших за собой отказ в работе изделия;
дефектом или отказом системы или ее части, где изделие использовалось как часть системы и это могло привести к дефекту или отказу
изделия.
Гарантийные обязательства не распространяются на перечисленные ниже части и принадлежности изделия:
монтажные приспособления, инструмент и документацию, прилагаемую к изделию;
материалы, наклеенные на изделие, имеющие рекламное или информационное назначение, за исключением маркировочной (идентификационной) наклейки Изготовителя (Timberk ID).
Изготовитель оставляет за собой право:
отказать в гарантийном сервисном обслуживании изделия в случае
несоблюдения изложенных ниже условий (cм. «Досрочное прекращение гарантийного обслуживания»);
самостоятельно инициировать независимую экспертизу для выяснения обстоятельств, приведших к выходу прибора из строя;
сравнивать предоставленную маркировочную (идентификационную)
наклейку изделия (Timberk ID) с данными реестров производства для
проверки соответствия серийного номера изделия уникальным производственным номерам реестров.
предоставлять дополнительную гарантию; информация об условиях
дополнительной гарантии содержится на сайте www.timberk.com.
Просим Вас хранить Гарантийный талон в течение всего гарантийного
срока, установленного Изготовителем на приобретенное Вами изделие.
При покупке изделия требуйте от продавца проверку его комплектности и отсутствия механических повреждений в Вашем присутствии, а
также правильного и четкого заполнения данного гарантийного талона.
Пре-тензии по некомплектности и выявленным механическим повреждени-ям после продажи изделия не принимаются.
Для гарантийного ремонта предъявляйте данный Гарантийный талон
вместе с товарным (кассовым) чеком или другим документом, подтверждающим дату и факт продажи изделия на территории РФ.
Досрочное прекращение гарантийного обслуживания.
Все условия гарантийного обслуживания регулируются Законодательством РФ и Законом РФ «О защите прав потребителей». В частности,
отказ в бесплатном гарантийном обслуживании изделия может быть
вызван:
нарушением при оформлении гарантийного талона при продаже изделия;
отсутствием товарного или кассового чека о продаже изделия или невозможностью определить продавца изделия;
наличием следов механических повреждений, возникших после передачи изделия потребителю и явившихся возможной причиной возникновения дефекта;
наличием повреждений, вызванных несоответствием стандартам параметров питающих сетей и других подобных внешних факторов, а
также вызванных использованием нестандартных, неоригинальных
(или некачественных) аксессуаров, принадлежностей, запасных частей, элементов и т.д.;
ВНИМАНИЕ!
Если в результате экспертизы/диагностики изделия
установлено, что его недостатки возникли вслед
ствие обстоятельств, за которые не отвечает продавец (изготовитель), либо недостатки в товаре отсусттвуют, Потребитель обязан возместить продавцу
(изготовителю или уполномоченной изготовителем
организации) расходы на проведение экспертизы
(диагностики, а также связанные с ее проведением
расходы на хранение и транспортировку товара) в
соответсствии с Законом РФ «О защите прав потре
бителей» № 171-ФЗ в ред. от 21.12.2004 ст. 18 п.5.
Page 23

www.timberk.com • гарантийный талон
23
Изготовитель не несет гарантийных обязательств за изделие в
следующих случаях:
если изделие использовалось в иных целях, не соответствующих его
прямому назначению в соответствии с Руководством по эксплуатации;
если на изделии отсутствует маркировочная (идентификационная) табличка Изготовителя (Timberk ID);
если изделие имеет следы несанкционированного вскрытия, не предусмотренного Руководством по эксплуатации, и попыток неквалифицированного ремонта;
если дефект вызван изменением/нарушением конструкции или схемы
изделия, не предусмотренным Изготовителем;
если обнаружены повреждения, вызванные попаданием внутрь изделия посторонних предметов, веществ, жидкостей, насекомых, скоплением большого количества пыли;
если обнаружены повреждения, вызванные подключением к сетям с
недопустимыми параметрами;
если дефект вызван действием непреодолимых сил, несчастными
случаями, умышленными или неосторожными действиями потребителя или третьих лиц;
неправильного хранения (консервации / разборки-сборки на период
хранения) изделия;
если использование изделия производится без разрешительной документации исполнительных органов власти субъектов РФ там, где
подобная документация требуется в соответствии с требованиями
законодательства РФ (в т.ч. Жилищного Кодекса РФ).
Изготовитель снимает с себя любую ответственность за возможный
вред, прямо и или косвенно нанесенный продукцией Timberk людям,
домашним животным, и имуществу, в случаях, если это произошло в результате несоблюдения правил и условий эксплуатации или вследствие
неквалифицированного, обслуживания и ремонта изделия, умышленных
или неосторожных действий потребителя или третьих лиц.
Изготовитель/импортер/продавец не несут ответственности в
случае возникновения недостатков изделия из-за неправильных
сервисных работ выполненных неавторизованными организациями и специалистами.
Гарантийные обязательства Изготовителя не распространяются
на случаи:
если изделие эксплуатировалось в положении, отличном от указанного в Руководстве по эксплуатации на данный прибор;
если неисправность изделия возникла в результате попадания внутрь
изделия посторонних предметов, веществ, жидкостей, насекомых,
скоплением большого количества пыли;
если в процессе эксплуатации был затруднен проход воздуха через
вентиляционные отверстия и решетки (например, прибор накрывался
какими-либо предметами, шторами, производилась сушка одежды
без использования специальных, предусмотренных Изготовителем в
Руководстве по эксплуатации устройств, большое скопление пыли
снаружи и внутри прибора и т.д.)
ВНИМАНИЕ!
Если маркировочная (идентификационная) наклейка
на изделие Timberk (Timberk ID) закреплена на изде
лии не плотно и существует риск ее утери, то вклейте ее в гарантийный талон на последней странице.
ПРИМЕЧАНИЕ:
Пожалуйста, потребуйте от продавца полностью,
четко и правильно заполнить бланк Гарантийного
талона.
Page 24

www.timberk.com • гарантийный талон
24
Бланк гарантийного талона.
Заполняется фирмой-продавцом
Заполняется сервисным центром
«А»
«Б»
«В»
«Г»
Печать
фирмы-продавца
Печать
сервисного центра
Печать
сервисного центра
Печать
сервисного центра
Печать
сервисного центра
Без подписи покупателя Гарантийный талон является недействительным.
Изделие
Модель
Серийный номер
Дата продажи
Фирма-продавец
Адрес фирмы продавца
Телефон фирмы продавца
Дата приема
Дата выдачи
Особые отметки
Дата приема
Дата выдачи
Особые отметки
Дата приема
Дата выдачи
Особые отметки
Дата приема
Дата выдачи
Особые отметки
Подписывая данных гарантийный талон, Покупатель признает, что он:
1. Проверил заполнение информации.
2. Получил Руководство по эксплуатации на изделие на русском языке.
3. Владеет всей необходимой информацией о приобретенном изделии и
его потребительских свойствах, характеристиках в соответствии со статьей 10 Закона РФ «О защите прав потребителей».
4. Ознакомлен и полностью согласен с условиями и ограничениями гарантийного обслуживания, а также с условиями установки / подключения
/ сервисного обслуживания / эксплуатации приобретенного изделия.
5. Не имеет претензий к внешнему виду / комплектности / работоспособности (если прибор проверялся в его присутствии при продаже) приобретенного изделия.
Подпись покупателя (с расшифровкой)
__________________________________ / _____________________/
Дата______________________________
Page 25

www.timberk.com • гарантийный талон
25
Отрывной талон«А»
Отрывной талон«Б»
Отрывной талон«В»
Отрывной талон«Г»
Заполняется фирмой-продавцом
Заполняется фирмой-продавцом
Заполняется фирмой-продавцом
Заполняется фирмой-продавцом
Печать
фирмы-продавца
Печать
фирмы-продавца
Печать
фирмы-продавца
Печать
фирмы-продавца
Изделие
Модель
Серийный номер
Дата продажи
Фирма-продавец
Изделие
Модель
Серийный номер
Дата продажи
Фирма-продавец
Изделие
Модель
Серийный номер
Дата продажи
Фирма-продавец
Изделие
Модель
Серийный номер
Дата продажи
Фирма-продавец
Page 26

www.timberk.com • гарантийный талон
26
Заполняется сервисным центром
Заполняется сервисным центром
Заполняется сервисным центром
Заполняется сервисным центром
Печать
сервисного центра
Печать
сервисного центра
Печать
сервисного центра
Печать
сервисного центра
Дата приема
Дата выдачи
Номер заказа-наряда
Проявление дефекта
Мастер
Код неисправности
Дата приема
Дата выдачи
Номер заказа-наряда
Проявление дефекта
Мастер
Код неисправности
Дата приема
Дата выдачи
Номер заказа-наряда
Проявление дефекта
Мастер
Код неисправности
Дата приема
Дата выдачи
Номер заказа-наряда
Проявление дефекта
Мастер
Код неисправности
Page 27

www.timberk.com • электрический конвектор
27
В целях информирования покупателей техники TIMBERK, мы дополнительно сообщаем, что русский
является государственным языком в
следующих государствах:
• в Российской Федерации
• в Республике Беларусь
наряду с белорусским языком
• в частично признанной
Южной Осетии наряду с
осетинским языком
Русский язык является официальным
языком (во всех случаях другой язык
или другие языки выступают как государственный или второй официальный) в следующих государствах и
на территориях:
• в Республике Казахстан
• в Киргизской Республике
• в административных
единицах Украины, где доля
носителей русского языка
cоставляет более 10%, при
соответствующем решении
местных советов
• в Автономной Республике
Крым
В Республике Таджикистан русский
язык признан по Конституции языком межнационального общения.
Официальным языком
международной организации
Содружество Независимых
Государств (СНГ) является русский
язык.
Если вы заметили ошибку в руководстве по эксплуатации, пожалуйста, сообщите нам об этом, связавшись с нами по электронной почте,
указанной на сайте www.timberk.com
If you found any mistake in this manual please let us know by email listed on www.timberk.com
Page 28

www.timberk.com
 Loading...