

Page 1
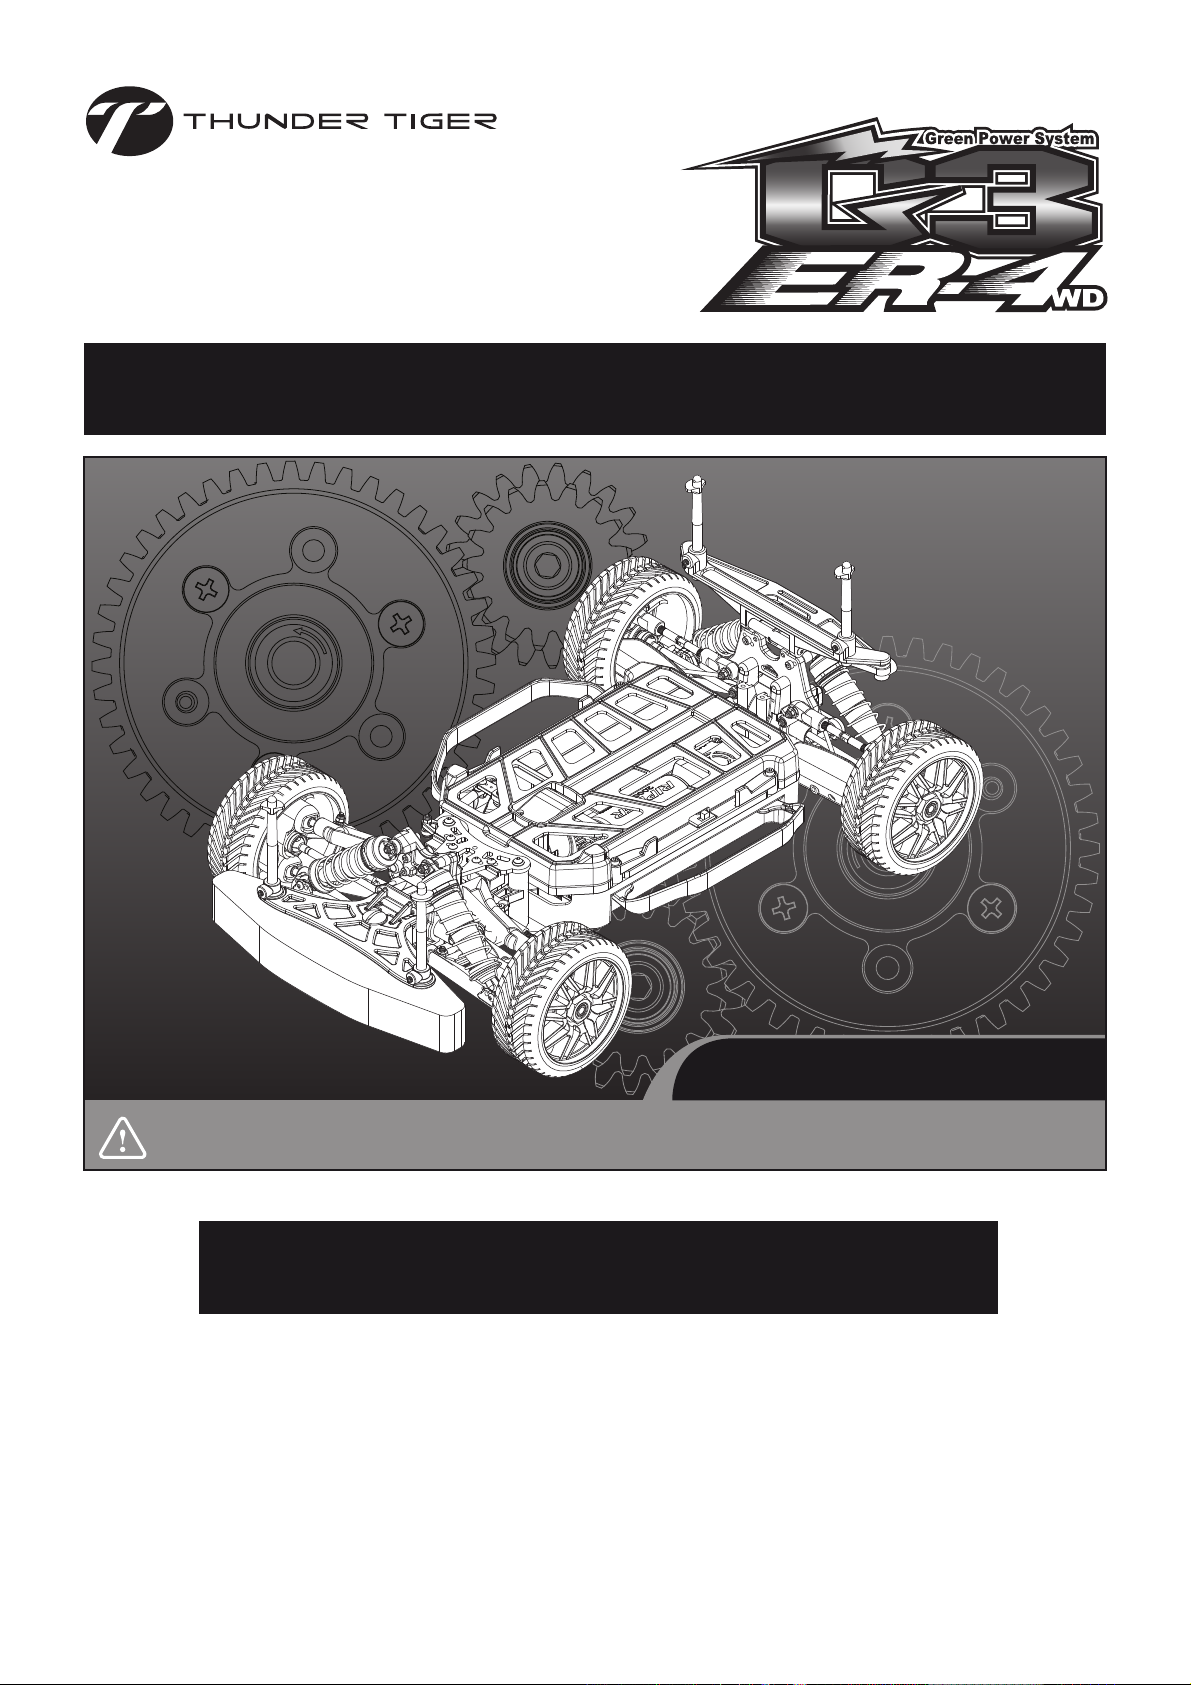
1:8 TH SCALE BRUSHLESS 4WD RALLY CAR
無刷電動四驅拉力越野車
1:8
No.6402-F / No.6402-A
This radio control model car is not a toy! Before beginning assembly, please read this manual thoroughly.
本產品為高性能模型非一般玩具,組裝與操作前,請詳閱本產品說明書。
The contents are subject to change without prior notice due to product improvements and specificatrion changes.
本套件所附之零件可能跟圖示有所差異。因產品後續之設計研發或功能不斷改善之因,我們將保留產品規格變更權力,不再另行通知使用者。
Instruction Manual & Parts Catalogue
操作說明書及零件包型錄
WARRANTY
Thunder Tiger Corporation guarantees this model kit to be free from defects in both material and workmanship. The total monetary value under
warranty will in no case exceed the cost of the original kit purchased. This warranty does not cover any components damaged by use or modification.
Part or parts missing from this kit must be reported within 60 days of purchase. No part or parts will be sent under warranty without proof of purchase.
To receive part or parts under warranty, the service center must receive a proof of purchase and/or the defective part or parts. Should you find a
defective or missing part, contact the authorized Thunder Tiger Service/Distributor nearest you. Under no circumstances can a dealer or distributor
accept return of a kit if assembly has started.
本公司對於製造過程中產生之瑕疵,負完全品質保證責任。
保證事項僅限於產品本身與隨產品所附之零配件。
品質保證不包含下列事項
因使用、組裝或調整本產品所發生之損壞。
其他所有非產品本身品質所造成之損壞。
品質保證事項
Page 2
INTRODUCTION
Thank you for purchasing this Thunder Tiger product. This manual contains the steps and instructions required to assemble your car.
Please read this manual completely before attempting to start maintenance. Follow the directions in this manual closely to reduce
problems during operation. We offer online help on our www.acehobby.com or www.thundertiger.com and forums and our product
specialists are ready to take your call if you have any technical questions. Have fun and enjoy the exciting world of R/C.
感謝您購買雷虎科技 ER-4 G3 無刷電動四驅越野車。雷虎科技一向以提供最高品質的產品及服務作為持續努力的目標,並藉由參與競賽
及重覆測試產品,不斷累積經驗,進而提昇設計及製造品質,期望能呈現給您最頂級之工藝產品。本使用說明書包含了組裝及維修本產
品前所需注意的重要事項,建議您在開始組裝及維修本產品之前,能詳閱此說明書,並熟悉本產品之組裝步驟及維修程序。若是您在產
品的使用上有任何的疑問,歡迎多加利用我們所提供的24小時諮詢留言版或洽詢雷虎科技授權經銷商。
雷虎科技的全球英文網址為 www.thundertiger.com,我們將竭誠為您服務!
前言
CAUTION
1. This product is not a toy. It is important to familiarize yourself with the model, its manual, and its construction before assembly or
operation.
2. Always keep this instruction manual for your assembling and operating reference.
3. Do not operate model products in rain, on public roads, near airport, or near areas with restricted radio operation.
4. This product, its parts, and its construction tools can be harmful to your health. Always exercise extreme caution when assembling
and/or operating this product. Do not touch any part of the model that is rotating.
5. Use an adequate charger for the batteries and follow the instruction correctly.
6. Right after use, do not touch the motor or ESC because they may generate high temperatures!
7. Do not stall the motor. The ESC may fail if power is applied to the motor when car cannot move freely.
8. By the act of assembling or operating this product, the user accepts all resulting liability. If the buyer is not prepared to accept this
liability, then he/she return this product in new, unassembled, and unused condition to the place of purchase.
WARNING ! To avoid a possible fire hazard, ALWAYS unplug the battery after use. Do NOT leave your
vehicle unattended with the battery plugged in.
感謝您購買雷虎科技產品,在您開始操作本產品前,請詳閱本產品說明書。
1. 本產品為高性能模型產品非一般玩具,組裝與操作過程皆須由成人陪同。請詳讀此使用說明書避免因組裝錯誤與操作不當造成損壞。
2. 請妥善保管此說明書,對於後續維修、操控說明將可提供您協助。
3. 請勿於雨天、公眾空間、道路、機場附近與其他限遙控模型活動區,操控本項產品。
4. 此項產品具有相當之危險性,於組裝、調整、操控上的不熟悉都可能造成自身或他人的傷害,發生這些傷害事件時製造商是可以免除
責任的,建議您於次使用本產品前,先行請教具有相當程度經驗同好或是專業雷虎經銷商與模型專賣店。
5. 請使用合格之電池充電器並循說明書之使用規範,以免發生危險。
6. 車輛操作後,請小心誤觸碰會產生高溫之零件部分,以避免燙傷。
7. 車輛作動時,請勿以異物強停馬達(輪胎)以避免電子速控器超出承載負荷而失效。
8. 如使用者對於產品品質或操作組裝上所須負擔之風險有任何疑慮,請勿開封組裝或進行操作本產品並將產品退回購買地點。
注意事項
警告!為避免因電線短路等因素而引起之可能災害,請務必於操作本產品後,將電池接頭拔除以避免可能發生之危險!請勿在電
池接頭未經拔除前就將產品儲藏於無法留意之處。
INDEX
INTRODUCTION 前言 1
CAUTION 注意事項 1
ITEMS REQUIRED FOR OPERATION 周邊配件 2
CHARGING THE BATTERY PACK 電池包充電 2
PREPARING THE CHASSIS 操作前,車體準備 3
INSTALLATION BATTERY 電池安裝 3
THE ACE RC COUGAR P3 RADIO AND BLC-80C
熟悉2.4GHz電控系統及無刷馬達速控器 3
BINDING PROCESS 安全校頻配對(鎖碼) 5
FAIL SAFE(F/S) FUNCTION SETTING 安全回復功能設定 6
RADIO OPERATION 遙控器操作 7
OPERATING RADIO STEERING FUNCTION 遙控器設定-轉向 8
ADJUSTING THE ELECTRONIC SPEED CONTROL 速控器調整 8
索引
DRIVING BASIC 操控基本動作 8
SHOCK ADJUSTMENT 避震器懸吊調整 8
WHEEL AND TIRE PREPARATION 輪胎及輪轂 8
GEAR RATIO CHART 驅動齒比對照 9
MAINTENANCE AFTER RUNNING 車體保養 9
BEFORE OPERATING 操控前準備 9
DRIVING TIPS 操控的小技巧 10
TROUBLESHOOTING 常見問題與解決方法 11
SET UP 競技角度設定 12
ASSEMBLY EXPLODED VIEW 組裝爆炸圖檢索 17
ER-4WD BUGGY SPARE PARTS LIST 零件表 22
ER-4WD BUGGY OPTIONAL PARTS LIST 選購零件表 26
1
Page 3
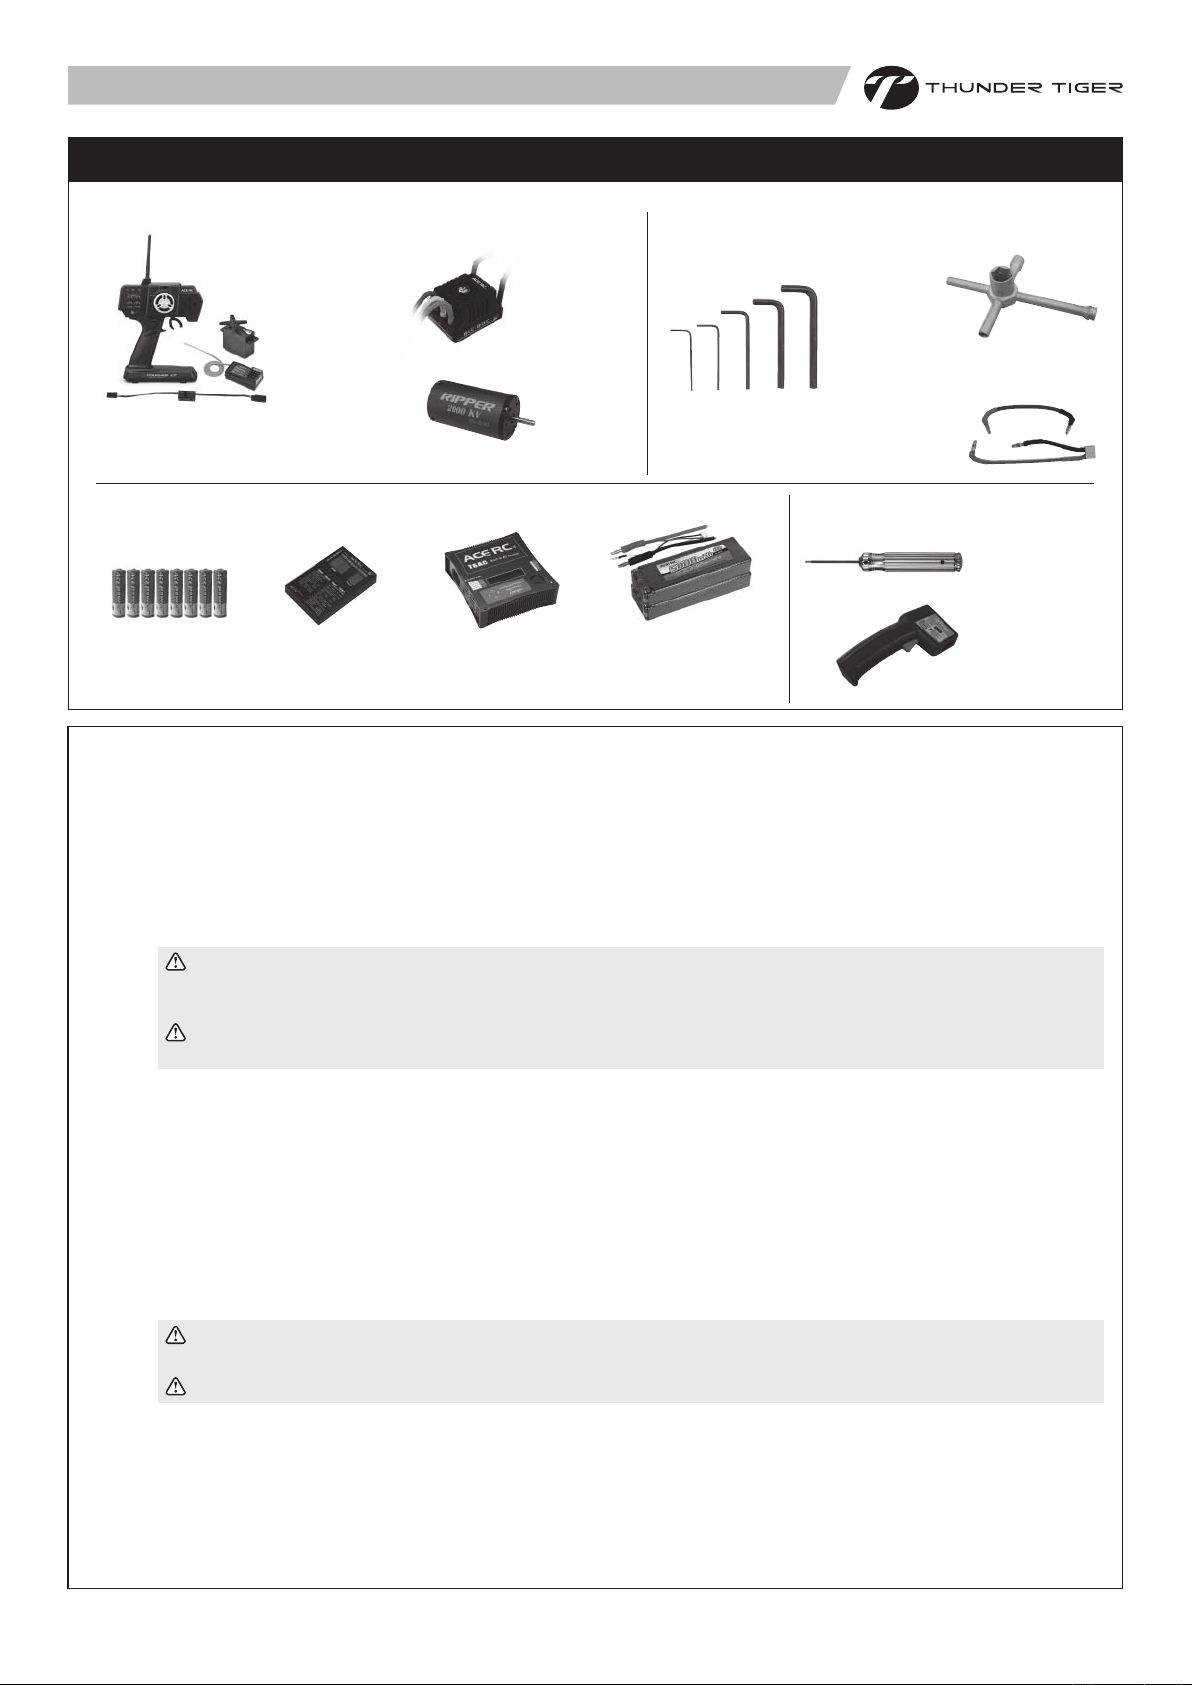
ITEMS REQUIRED FOR OPERATION
周邊配件
RTR CONTENTS 完成車輛配備 TOOLS INCLUDED 包含工具配備
ACE RC BLC-80C Brushless Motor ESC
車用無刷馬達速控器80A
ACE RC Cougar P3
3-Channel digital 2.4GHz pistol radio
system with Standard Servo.
3動作發射機、接收機及伺服機
RIPPER IBL40/20 Brushless Motor
車用無刷馬達 2000 KV
EQUIPMENT NEEDED 需求配件 TOOLS NEEDED 需求工具
AA Alkaline dry batteries
8 pieces for transmitter
發射機用電池
No. AQ6327
BLC ESC Program Card
速控器設定卡
(No.6402-F RTR Only )
(Not included in the kit 不包含在此套件內)
No. 2537
T6AC Battery Balance Charger
(for Ni-MH/Li-Po)
鋰電池充電器(氫用/鋰電用)
No. 2843 Li-Po Batter Pack x 2
7.4V/5000mAh/35C(Hard Case)
鋰電7.4V/5A/35C硬殼 x 2
Hex Wrench Set, 1.5mm / 2.0mm /
2.5mm / 3.0mm / 5.0mm
六角扳手
5-Way Wrench
5向六角螺帽套筒板手
Battery Cord
電池接線
Hex Head Screwdriver
六角起子
No.1149 2.0mm
No.1150 2.5mm
No.1151 3.0mm
Temp.Gun
測溫槍
CHARGING THE BATTERY PACK 電池包充電
(Battery and Charger are not included in the kit. 本產品不含電池及充電器)
1
Before charging the battery, read the instructions for the battery and battery charger.
準備充電前,請先詳閱電池及充電器的操作說明。
LiPo BATTERIES 鋰電池充電注意事項
Lithium Polymer (LiPo) batteries are becoming popular for use in R/C models due to their compact size, high energy density, and
high-current output. However, these types of batteries require special care and handling procedures for long life and safe operation.
Warning ! Lithium Polymer (LiPo) batteries are intended only for advanced users that are educated on the risks associated
with LiPo battery use. THUNDER TIGER/ACE RC does not recommend that anyone under the age of 16 use or handle
LiPo battery packs without the supervision of a knowledgeable and responsible adult.
Important ! Do not use NiCd/NiMH battery chargers for LiPO batteries. If you do not use a special charger for LiPO
batteries, they will be damaged.
The ACE RC BLC electronic speed control is able to use LiPo batteries with nominal voltage not to exceed 14.8 volts (2S packs x2
recommended). Exceeding these voltages may result in damage to your brushless system. LiPo batteries have a minimum safe
discharge voltage threshold that should either not be exceeded. The ACE RC BLC electronic speed control is equipped with built-in
Low-voltage detection that cuts the power automatically when batteries have reached their minimum voltage (discharge) threshold.
Refer to the low power auto-cut table in the ESC instruction manual. It is the driver’s responsibility to stop immediately to prevent the
battery pack from being discharged below its safe minimum threshold. It is critical for you, the user, to follow all other instructions
supplied by the battery manufacturer and the charger manufacturer for proper charging, use, and storage of LiPo batteries. Make sure
you understand how to use your LiPo batteries. Be aware that THUNDER TIGER/ACE RC shall not be liable for any special, indirect,
incidental, or consequential damages arising out of the installation and/or use of LiPo batteries in THUNDER TIGER models.
鋰電池(鋰聚合)因為其形狀的多變性,高電容量及高放電的特性,所以現今已是非常受歡迎的一種遙控模型電池種類。然而由於此
種電池具有相程度的使用風險性,故在使用時「正確的使用」以延長電池壽命與嚴守「操作安全」這兩點是需特別注意的。
警告!鋰電池(鋰聚合)的使用者需具備進階鋰電池使用知識,並瞭解其中可能因為使用錯誤,所引發的潛在危險。
THUNDER TIGER/ACE RC 強烈建議使用者需年滿 16 歲或是經由具有鋰電池進階使用知識的成人陪同操作。
注意!請勿使用氫/鎘充電器對鋰電池進行充電!此舉很可能引起電池的損壞。請使用專業之鋰電池充電器進行鋰電池之充放電。
ACE RC BLC系列之無刷馬達速控器在設計上是可以允許使用鋰電池,但須注意請勿使用超過14.8 volts (建議使用2S packs x2)的鋰電
池,否則你的無刷馬達速控器及無刷馬達很可能因過高的電壓而燒毀。使用鋰電本身應該也需具有過度放電之保護,以避免電電池本
身的壽命及效能產生不可回復性的傷害。ACE RC BLC系列之無刷馬達速控器本身內建有低電壓偵測裝置,電池電壓低於一定電壓時
速控器會進行自動斷電程序以保護電池之壽命。請參考速控器說明書上低電壓斷電。發生上述斷電情況請操作者即刻暫停操作以防電
池之損壞。操控者在使用鋰電池時應先詳讀電池及充電器廠商所提供之使用操作說明書以瞭解正確的鋰電池充放電方法,儲存及使用
方式。請注意!THUNDER TIGER / ACE RC對於消費者因為使用或安裝鋰電池於所屬之遙控模型上,而造成任何的直接或間接的損
害,無須擔負任何法律責任。
2
Page 4
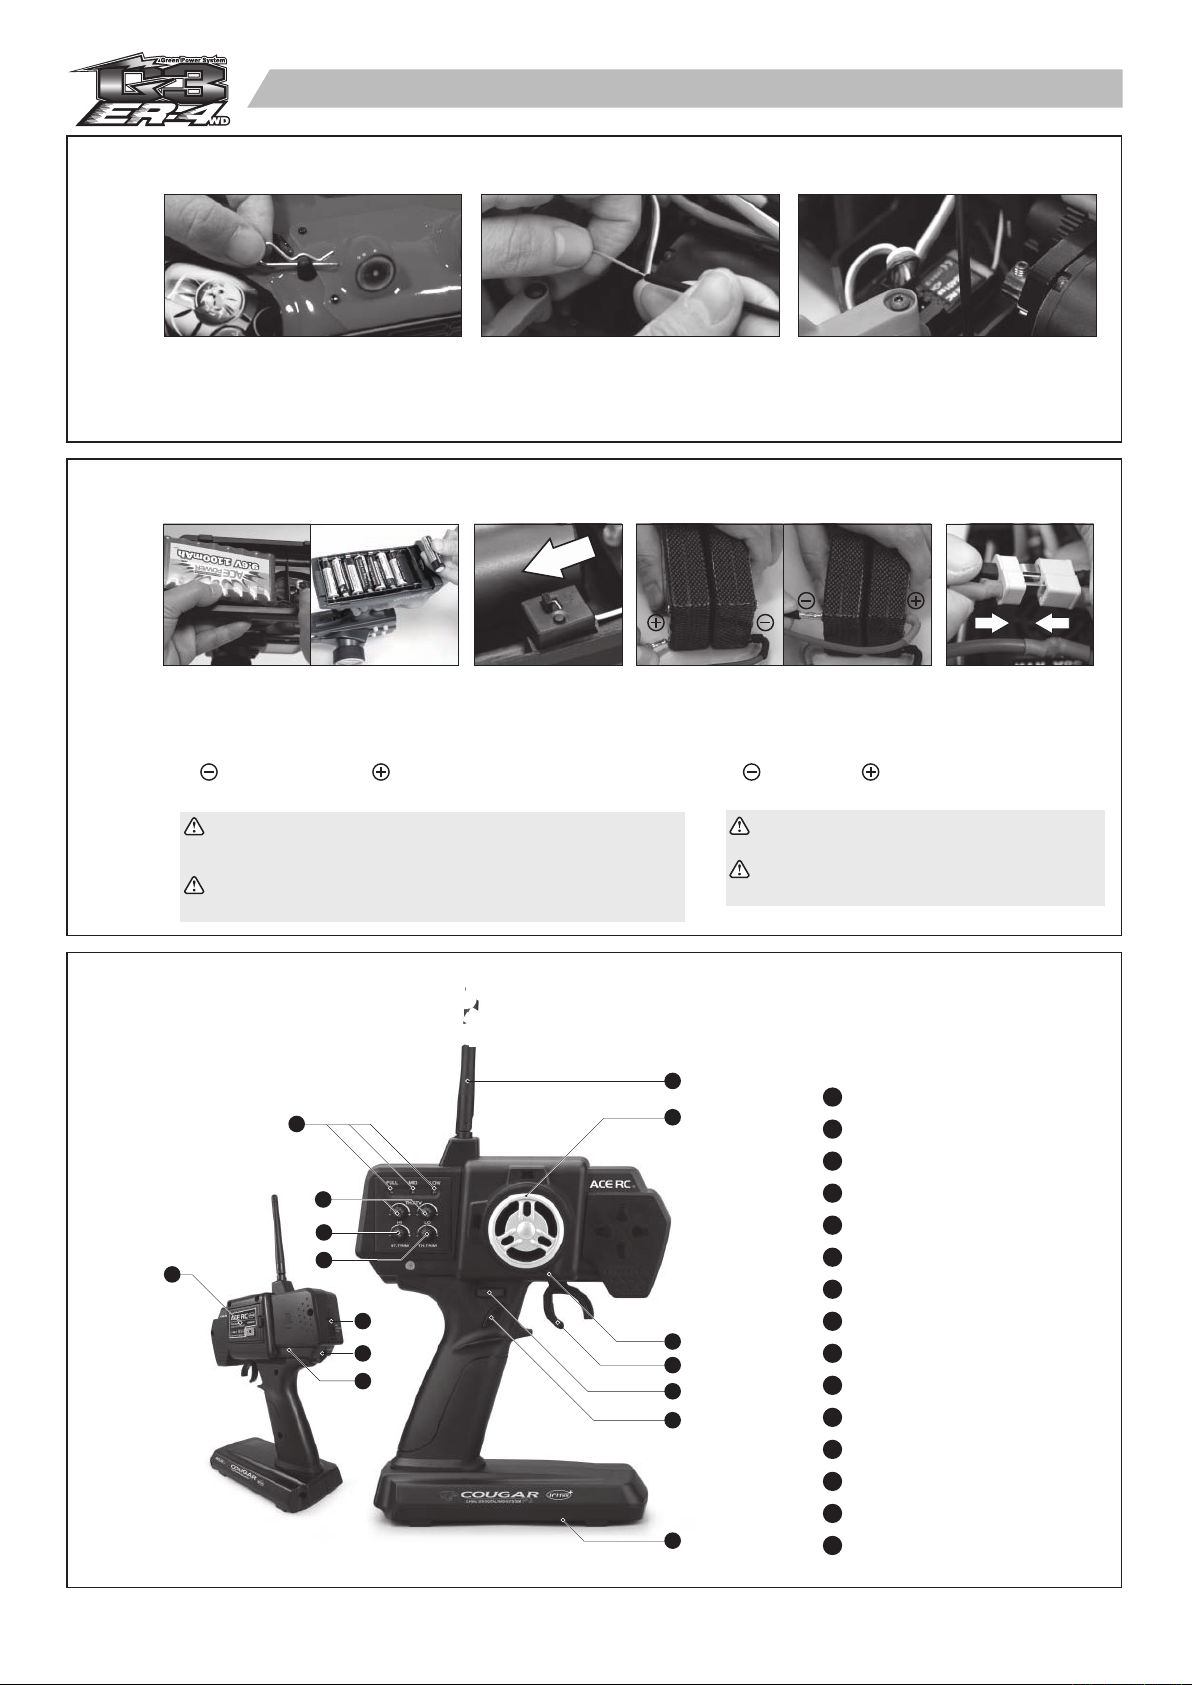
PREPARING THE CHASSIS 操作前,車體準備
2
3
a b
a. Remove the body pins (4 pcs.) and detach the body.
b. Straighten antenna and insert into antenna tube.
c. Put the antenna wire through the antenna pipe. (Do not cut or shorten
antenna wire.!) Push the antenna pipe into the chassis mount hole.
INSTALLING BATTERY 電池安裝
OFF
a
a. Install 8pcs alkaline or rechargeable AA-size batteries into transmitter.
b. Make sure switch is OFF.
c1. Combine two LiPo battery pack with included battery cord.
c2. Use included battery cord (with dean plag) to connect two battery.
( Connect black cord, Connect red cord.)
d. Install the power pack and connect to the ESC.
Caution ! Confirm wiring and connections before connecting
thespeed control to the battery. Incorrect polarity will damage
your speed control.
Caution ! Do not combine Ni-MH battery with Lipo battery. Use
fully charged batteries of the same type.
b
關
c
1
c
a. 將車殼固定插銷(共4個)拆除以取下車殼。
將天線穿套進天線管內。
b.
將天線套管安裝於底板固定孔上
c.
(請勿裁短天線以免影響接收距離)。
(Batteries are not included in the kit. 本產品不含電池)
c
2
a. 安裝八顆三號鹼性電池或充電電池於發射機內。
b.
先確認電源是關閉的。
以內附連接線連接兩個(7.4Vx2)鋰電池組。
c1.
c2.
使用內附電池連接兩組電池
( 負極接黑線, 正極接紅線)
將鋰電充電池電池組合裝入底板連接電池條與速控器。
d.
注意!請注意電池與速控器接線之正負極置
(反裝電極將造成電池短路或速控器之損壞)。
注意!鎳氫電池請勿與鋰電池混搭使用。
使用兩組以上電池,請使用同性質電池組做搭配。
d
4
The ACE RC Cougar P3 and BLC-80C
The ACE RC Cougar P3 and BLC-80C
熟悉2.4GHz電控系統及無刷馬達速控器
熟悉2.4GHz電控系統及無刷馬達速控器
1
2
3
5
10
6
12
9
4
11
14
13
7
8
15
4.1 ACE RC Cougar P3 2.4GHz 發射機
Transmitter Antenna
1
發射機天線
Battery Level Indicator
2
發射機電源顯示燈
HI/LO Throttle ATV (Adjustable Travel Volume)
3
高、低速油門行程調整鈕
Servo reversing switches
4
正逆轉設定裝置
Steering Trim
5
轉向微調鈕
Throttle Trim
6
油門微調鈕
Steering D/R (Dual Rates)
7
轉向大小動調整鈕
AUX Ch Button
8
第三動開關
External Charging Jack
9
充電孔
2.4GHz binding SW
10
2.4GHz校頻配對設定鈕
Steering Wheel
11
轉向舵輪
Power Switch
12
電源開關
Throttle Trigger
13
油門控制板機
Steering Tension Adjustment
14
轉向舵輪調整螺絲
Battery Cover
15
電池蓋
3
Page 5

TRANSMITTER CONTROLS
1. Transmitter Antenna: Straighten up the antenna before operating the model.
2. Battery Level Indicator: Three LEDs indicate the battery voltage level. If the Red LED flashes, please replace the batteries.
3. HI/LO Throttle ATV (Adjustable Travel Volume): Allows you to independently preset the maximum travel of the throttle servo either side
(high / low) of neutral.
4. Servo reversing switches: To reverse the servo's rotation direction at the flip of the switch. The reversing switches are recessed into the
transmitter to prevent accidental operation.
5. Steering Trim: To adjust the steering in small increments or decrements to run the model straight.
6. Throttle Trim: To adjust the throttle in small increments or decrements and shift neutral position.
7. Steering D/R (Dual Rates): Push this lever left or right to adjust the amount of the steering dual rate. Right to increase dual rate amount,
and left to decrease amount.
8. AUX Ch Button: Additional function for controlling of the model.
9. External Charging Jack: For rechargeable NiCd/NiMH battery pack (transmitter pack only).
10. 2.4GHz binding SW: The Binding SW button is located on the back of the 2.4GHz transmitter. For additional details, please refer to the
“Binding” setting procedure (Page 5).
11. Steering Wheel: To control the steering of the model.
12. Power Switch: Slide to turn the transmitter on & off.
13. Throttle Trigger: Pull or push to control forward, reverse & speed of the model.
14. Steering Tension Adjustment: Use a Phillip type screwdriver to tighten or loosen the tension of the steering wheel.
15. Battery Cover: Slide cover to install or remove batteries.
發射機各部功能簡介
1. 發射機天線:使用發射機時,請先將發射機天線打直,以增加訊號接收距離。
2. 發射機電源顯示燈:三顆LED設計顯示發射機電池殘量,若紅色LED燈閃爍時,請更換發射機電池。
3. 高、低速油門行程調整鈕:獨立調整高、低速油門行程量功能。
4. 正逆轉設定裝置:位於發射機背面(如圖示),控制伺服機作動方向。
5. 轉向微調鈕:利用此旋鈕,調整設定轉向正確中立點位置。
6. 油門微調鈕:利用此旋鈕,調整設定油門正確中立點位置。
7. 轉向大小動調整鈕:調整轉向伺服機的行程量。
8. 第三動開關:第三動功能開關鈕。
9. 充電孔:使用充電式電池時,可利用此充電孔,進行充電工作。
10. 2.4GHz 校頻配對設定鈕:BINDING SW校頻配對設定鈕為配對發射/接收頻率之用。更多設定請參考說明書第5頁“安全校頻配對步驟”。
11. 轉向舵輪:控制車輛轉向裝置。
12. 電源開關:發射機電源開關。
13. 油門控制板機:控制車輛前進或後退的裝置。
14. 轉向舵輪調整螺絲:使用小型十字起子調整此調整螺絲來改變轉向舵輪旋轉鬆緊度。
15. 電池蓋。
MOTOR
馬達
ANTENNA
天線
SERVO
伺服機
RECEIVER
接收機
CH1
Battery Connector
電池接頭
ON/OFF Switch
ESC
速控器
CH2
7.4V POWER BATTER PACK
7.4V POWER BATTER PACK
電池
電池
速控器開關
To Motor
(Orange/Yellow/Blue)
馬達接頭(橘黃藍)
4.2 MODEL WIRING DIAGRAM 電控系統連結圖
4
To Receiver (CH2)
接收機 (CH2)
Heat Sink
散熱鰭片
Page 6
5
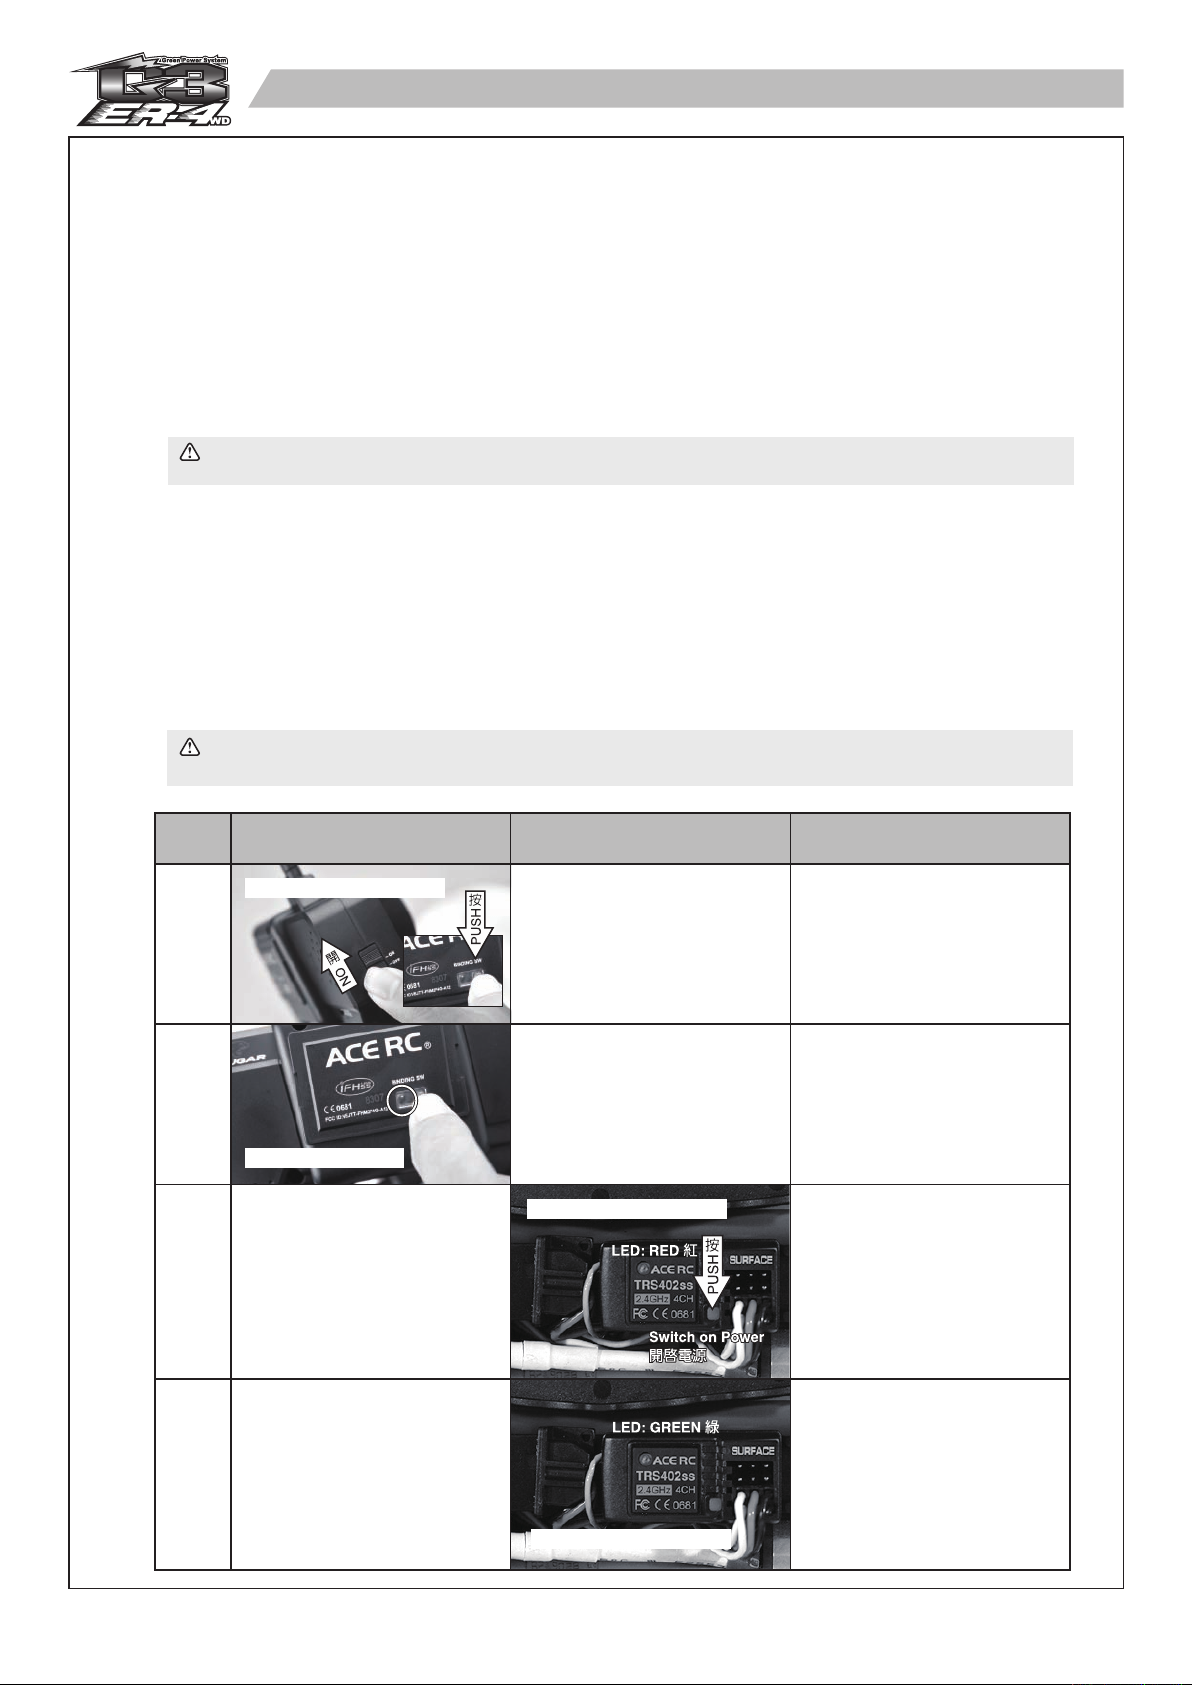
BINDING PROCESS
A binding feature is included in the ACE RC Cougar 2.4GHz spread spectrum system to ensure the transmitter and receiver
bind properly and prevent interference from other controllers.
To manually bind Tx/Rx, please proceed as per the following steps:
a. Press and hold the “Binding SW” button on the back side of the transmitter while turning on the transmitter.
b. Release the “Binding SW” button after the green LED flashes indicating the transmitter is binding.
c. Press and hold the bind button on the receiver while turning on the receiver. Binding process will then start automatically.The
LED will turn green/reed flash on the receiver.
d. Release the “Binding SW” button. Successful binding is confirmed by the binding LED changing from a quick blinking and
then remain solid on the transmitter. The LED will turn green on the receiver. Once binding is complete, the system will
automatically connect.
Note ! Binding process may take 3~10 seconds to execute. If binding fails, the LED on the receiver will turn red.
Please turn off the power and repeat the steps from a) ~d).
安全校頻配對(鎖碼)
ACE RC Cougar P3 採用最先進的專用3動2.4GHz無限展頻遙控系統。這個系統結合發射與接收可以互動溝通模式,跳動頻道搜
尋,使得整體無線遙控系統的傳輸展現準穩定的特性同時也無須擔心頻率干擾的問題。如發現無法操控情形發生,需要重新校頻
配對,請依照下列步驟重新進行校頻配對程序:
a. 打開發射機電源時,同時持續按壓發射機背面之 "Binding SW" 按鈕。
b. 直按鈕旁之LED綠燈快速閃爍,再放開 "Binding SW" 按鈕,示發射機正在進行自動搜尋校頻,此時請不要關閉發射機電源。
c. 然後按壓接收機上之 "Binding SW" 按鈕並同時開啟接收機電源,此時接收機將自動進行校頻配對程序。接收機LED燈號為紅
綠快速閃爍。
d. 放開 "Binding SW" ,一旦完成配對程序,發射機LED燈號會從綠色快速閃爍轉換成持續綠色燈號,接收機LED燈號將從紅色
轉換為綠色。此時示接收機與發射機已完成配對溝通,可以進行操控。
注意!遙控系統校頻配對可能需要 3~10 執行程序。如果程序執行錯誤,發射及接收模組的 LED 燈號將持續呈現紅色。請
關閉電源再依 a)~d) 的順序重新操作配對程序。
Step
步驟
a
b
TX Action
發射機動作
Swithch On 開 / Push
按
RX Action
接收機動作
No Action
無須動作
No Action
無須動作
LED
燈號
_
TX LED:GREEN FLASH
TX 燈號:綠燈快速閃爍
Release
c
d
放開
No Action
無須動作
No Action
無須動作
Swithch On 開 / Push
Release
放開
按
RX LED:GREEN/RED FLASH
RX 燈號:綠/紅燈快速閃爍
TX LED
GREEN FLASH-->GREEN SOLID
RX LED
RED SOLID-->GREEN SOLID
TX
綠燈快速閃爍
RX
紅燈亮
燈號:
燈號:
:
:
-->
-->
綠燈亮
綠燈亮
5
Page 7
6
FAIL SAFE(F/S) FUNCTION SETTING
ACE RC COUGAR 2.4GHz R/C system features a built-in Failsafe function to automatically set a servo command if the receiver
loses the signal from transmitter due to interference. For safety, we strongly recommend to active the FAILSAFE function on
your Cougar R/C system.
Setting up the Failsafe (F/S) Function:
a. After binding the transmitter and receiver, you can continually set up the F/S function. Turn on the transmitter power and then
receiver power.
b. Press and hold the “Binding SW” button on the receiver for 10 seconds. The LED will start flashing GREEN on the receiver.
CAUTION ! Do not release the “Binding SW” button on the receiver until STEP C is completed.
c. Move and hold the throttle trigger to the position you want the control to be in if a failsafe condition should occur. First, keep
steering wheel at neutral position(steering servo at neutral position). To set up F/S function with the throttle servo position
at "Brake", first push the trigger to the brake position and hold. To set up F/S function with servo position at "Neutral", keep
the trigger at neutral position.
NOTE ! Always set the throttle trigger to neutral or full brake position and steering servo to neutral position in
case of any unexpected control error !
Factory pre-settings for RC car F/S function are :
Electric Car - Steering servo at neutral, throttle at neutral.
Nitro Car - Steering servo at neutral, throttle at iddle and car brakes.
d. After the Step C, release the “Binding SW” button on the receiver first and then the throttle trigger. The LED turns to solid
e. Test by turning off your transmitter and watching the servo failsafe position activate.
F/S at "Neutral" : To check the fail safe is working properly, by moving the throttle trigger to the full forward (full brake), hold
F/S at "Brake" : To check the fail safe is working properly, by keeping the throttle trigger at neutral and then turn off the
f. If the F/S function fails or need to change the F/S hold position, repeat the steps a) ~e). After the F/S is completed, you can
“RED” and then back to solid “GREEN” indicating the F/S function has now been activated.
this position and then turn off the transmitter. The F/S function should move the throttle servo to “Neutral” position and the
steering servo to “Neutral” position.
transmitter. The F/S function should move the throttle servo to “Brake” position and the steering servo to “Neutral” position.
start normal operation.
CAUTION ! ALWAYS reset FAILSAFE function after binding your transmitter & receiver.
安全回復功能設定
ACE RC COUGAR 2.4GHz 遙控系統內建安全回復功能,可設定接收機因干擾或斷電而失去發射機訊號時,伺服機自動回復製預
設置。安全起見,強烈建議您務必啟用安全回復功能。
安全回復功能設定
a. 設定此功能前請先完成系統發射與接收之對頻。確定後,先打開發射機再開接收機電源。
b. 壓著接收機對頻開關,約10鐘後LED會變為綠色快速閃爍。示進入F/S設定模式。
注意!C步驟完成前不要放開接收機對頻鍵。
c. 同時移動油門扳機至您想要設定F/S伺服機置。轉向輪請保持中立點置。
【如想要設定F/S油門伺服機置為煞車,需先移動油門扳機至煞車置不要鬆開。】
【如想要設定F/S油門伺服機置為中立,請保持油門扳機在中立點置。】
注意!油門伺服機安全回復置建議設定為煞車或中立點,請勿設定為油門開啟置,以免發生危險。本系統出廠預設 F/S 功
能如下:
電車﹣轉向伺服機置在中立點,速控器油門在靜中立點。
油車﹣轉向伺服機置在中立點,油門伺服機在怠速置。
d. 此時你可以放開接收機對頻鍵,然後再放開發射機油門板機。LED會變為亮紅燈,約2後又回亮綠燈,此時示F/S功能已經設定
完成。
e. 檢查動作:
F/S油門伺服機置設定為中立點: 將油門扳機全煞車,關掉發射機電源,檢視F/S伺服機置動作是否轉回中立點置。
F/S油門伺服機置設定為煞車: 油門扳機保持中立點,關掉發射機電源,檢視F/S伺服機置動作是否轉回煞車置。
f. 檢查無誤後,開發射機開關,然後接收機關開始操作。
注意!重新對頻後,請務必重新設定安全回復功能。
6
Page 8
Step
步驟
a
b
Binding Complete
完成對頻
No Action
無須動作
TX Action
發射機動作
RX Action
接收機動作
Binding Complete
完成對頻
Push for 10 sceonds
先持續按10
LED
燈號
TX LED:GREEN SOLID
RX LED:GREEN SOLID
TX
燈號:綠燈亮
RX
燈號:綠燈亮
RX LED:GREEN FLASH
RX
燈號:綠燈快速閃爍
1. Steering: Neutral
2. Keep brake or trigger at neutral
1. 2.
c
d
e
f
Release later
後放開
1. Keep brake
2. Swithch Off
1.
保持煞車
2.
關
發射機
OK!
1.
1.
轉向中立
2.
保持煞車或是油門在中立點
or
2.
OFF
No Action
無須動作
Release first
No Action
無須動作
先放開
Pre-settings for F/S function:
EP Car : Steering at Neutral
GP Car : Steering at Neutral
出廠預設F/S功能:
電車:轉向朝前,速控器煞車
油車:轉向朝前,油門關閉
RX LED:RED
SOLID-2s->GREEN SOLID
RX燈號:
紅燈亮-2->綠燈亮
F/S function activates
F/S 安全回復功能啟用
/ ESC at Neutral
/ Carb. at Iddle and
car barkes
(怠速)
7
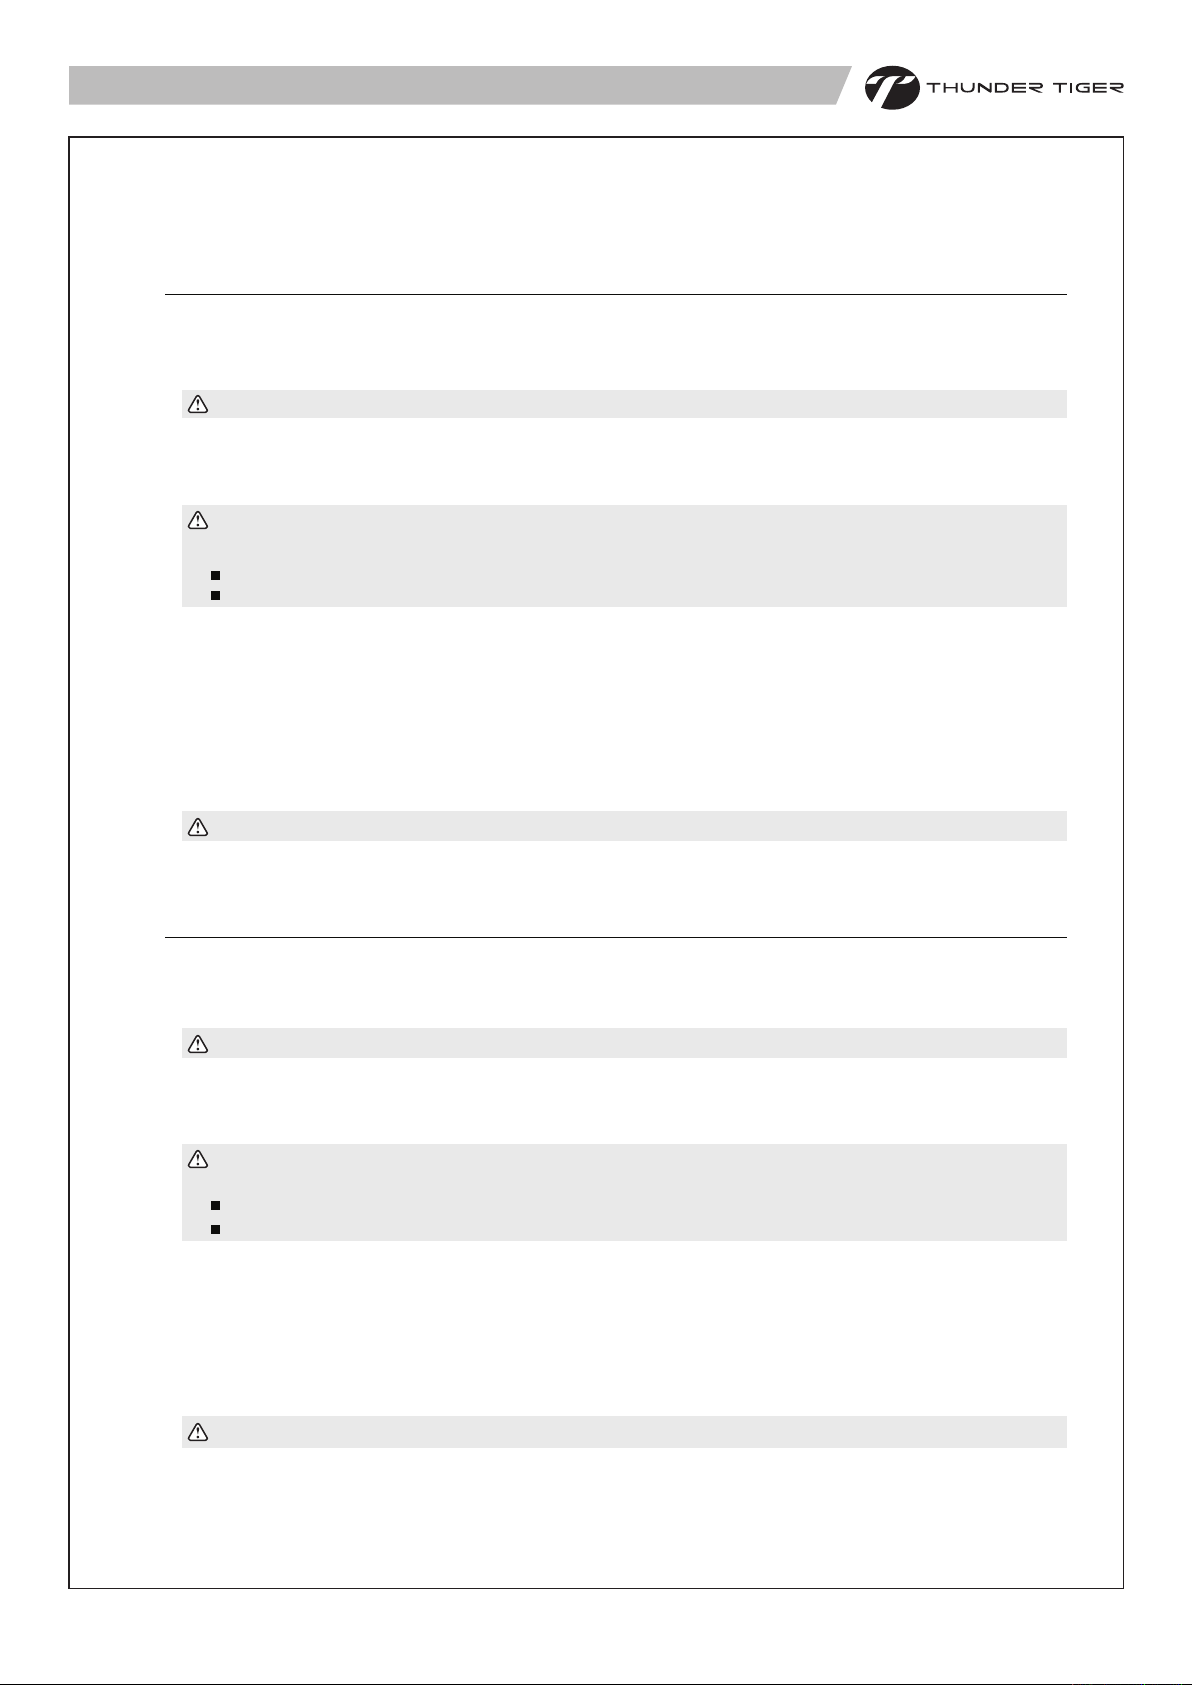
RADIO OPERATION 遙控器操作
WARNING: The brushless system is very powerful. For safety, please always keep the wheels away from the track
when you are preparing to switch on the car.
注意:本系統功率十分強勁!基於安全因素,建議請在車輪懸空的裝態下開啟系統電源,避免非預期性的暴衝。
開
ON
When turning radio system on. Turn the transmitter on first, then turn on the ESC.
a.
b. When turning the radio system off. Turn the ESC off first, then turn off the transmitter.
Caution ! Do not run the transmitter's battery flat or you will lose control of the car. For additional details, please refer
to the transmitter instruction manual.
a.
為避免車子失控暴衝,先開啟發射機電源。
b. 接著開啟速控器電源。電源的關閉則是相反的順序,先關速控器電源,再關發射機電源。
其他注意事項請參考發射機說明書。
7
ba
關
OFF
ON
開
Page 9
OPERATING RADIO STEERING FUNCTION 遙控器設定-轉向
8
9
a b
a. Check the radio steering functions. With the radio transmitter and receiver on, turn the steering wheel to the left. The front tires/wheels
should turn left accordingly. If not, flip the steering servo reverse switch.
Return the steering wheel to neutral. The front tires/wheels should point straight forward. If not, use the steering trim lever to
b.
correct it.
c. Turn the steering wheel to the right. The front tires/wheels should turn right accordingly.
a.
確認轉向功能。打開發射機及接收機電源,方向轉左邊時,輪胎將朝向左邊,若方向不一致,請調整方向的正逆轉開關。
b.
方向回中立點時,前輪應筆直向前,若有偏差,請調整方向微調旋鈕。
方向轉向右邊時,前輪應轉向右邊。
c.
ADJUSTING THE ESC
Before adjusting the ESC, read the instructions for the ESC first.
調整電子速控器前,請先詳閱電子速控器的操作說明。
速控器調整
c
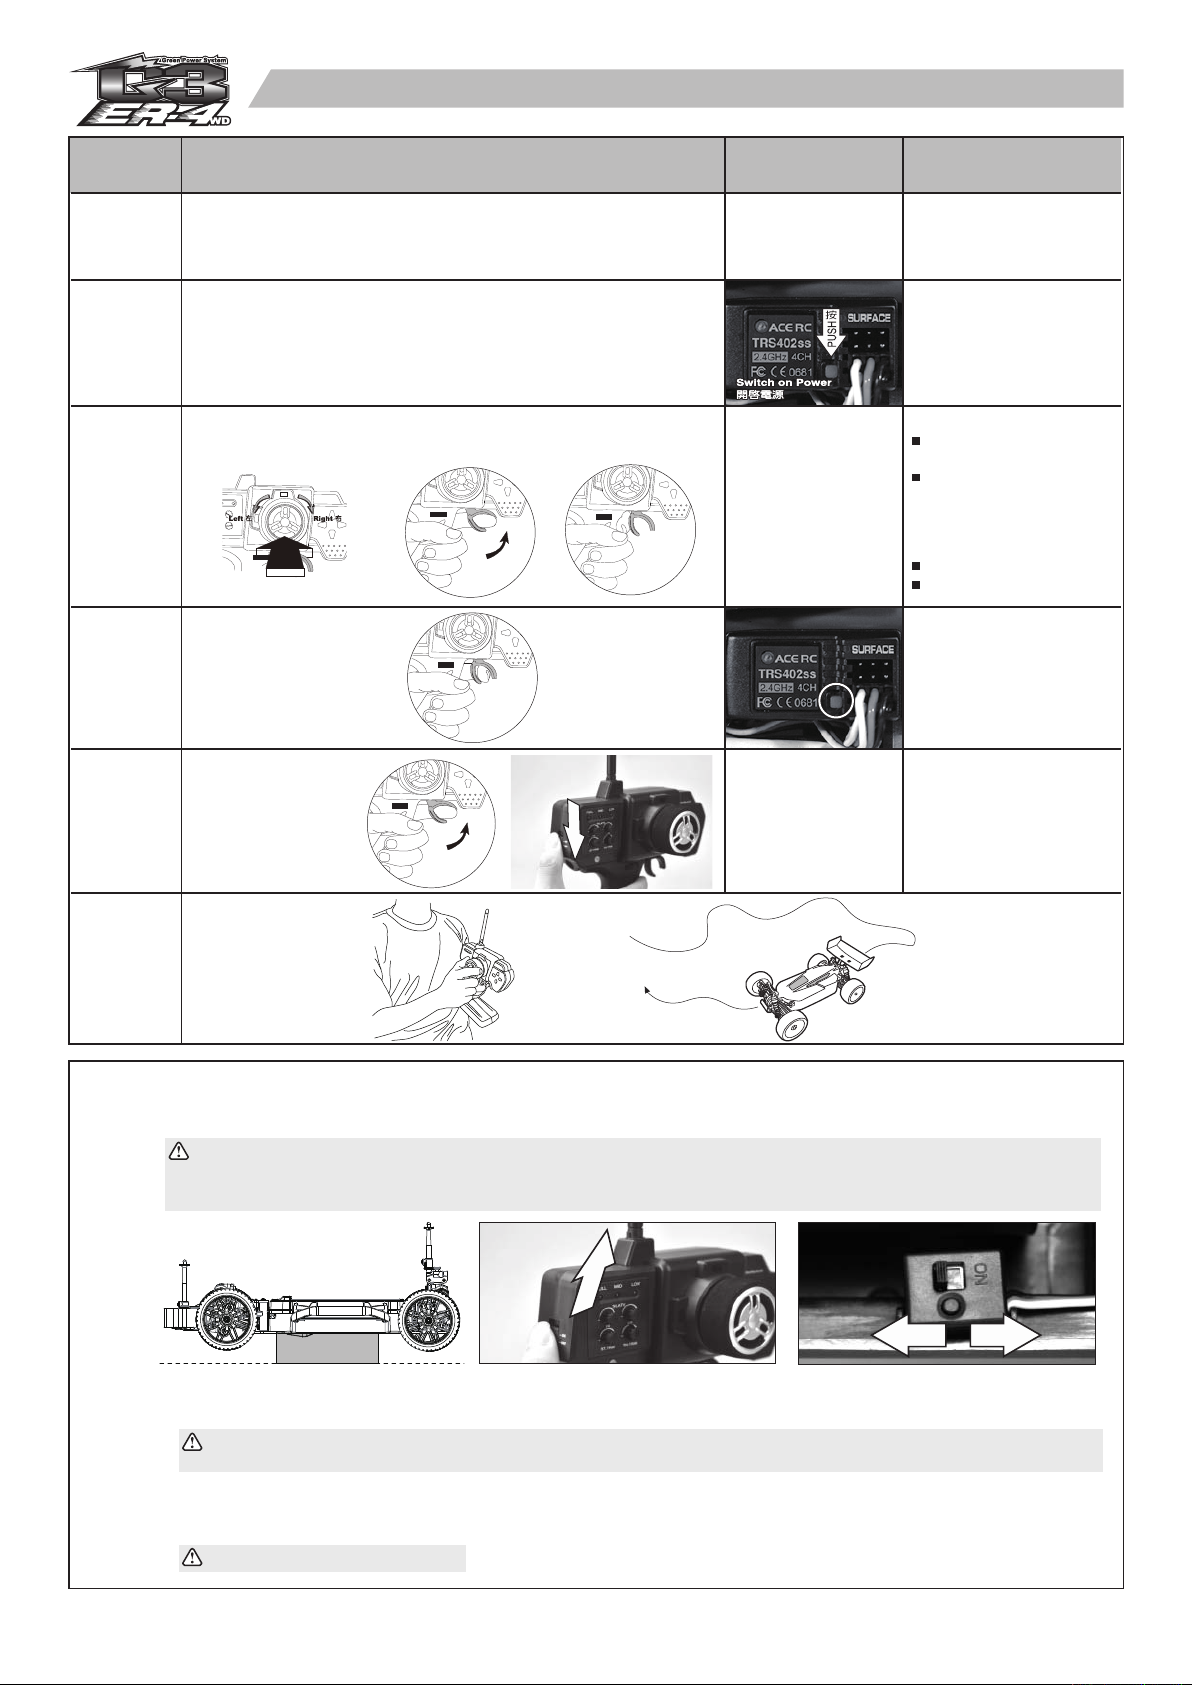
DRIVING BASIC
10
操控基本動作
SHOCK ADJUSTMENT 避震器懸吊調整
11
WHEEL AND TIRE PREPARATION 輪胎及輪轂
12
a
Stop (Neutral)
停(中立點)
10mm
Hard Suspension
懸吊較硬
Use the included shock clips to adjust for spring pre-load.
使用內附的避震器調整環,調整車身高度。更詳細的調整方式請參考設定。
Brake
煞車
5mm
b
Reverse
後退
2mm3mm
Soft Suspension
懸吊較軟
c
Acceleration
加速
1mm
a. Remove wheel lock nut using the 4-way wrench and detach wheels.
b. Replace fresh tires and wheels if the original tires are worn out.
c. Tighten the wheel lock nut.
8
a. 使用內附之六角螺帽套筒板手將輪轂上六角固定螺帽取下。
b. 將已磨損嚴重之輪胎組取下後,換上新的輪胎組。
c. 將六角固定螺帽重新鎖緊。
Page 10

GEAR RATIO CHART 驅動齒比對照
This gear ratio chart shows the recommended combinations of spurs and pinions. Increasing the gear ratio will result in higher Max.
13
Speed, but will also increase the temperature of the motor. Be note that the motor temperature does not exceed 190℉/88℃. If the
motor temperature is too high, reduce the gear ratio by changing a smaller pinion gear and/or a bigger spur gear.
此顯示最終驅動比與驅動大齒盤和馬達齒輪之間的關係。我們強烈建議操作者在更換齒輪/齒盤時應以這張為更換基準。驅動齒比增
大,將提升車子操控的極速,但馬達溫度也將相對升溫。為避免因為驅動齒比更換不導致馬達過熱燒毀,請注意馬達操作溫度勿超過
華氏溫度190度/攝氏溫度88度。調降更改齒比(更換較小馬達齒輪和/或較大驅動齒盤)將有助於馬達的降溫。
Pinion Gear
馬達齒輪
Spur Gear
驅動大齒盤
Max. Speed
最高速
Acceleration
加速
MAINTENANCE AFTER RUNNING 車體保養
a. Always turn off the radio system and disconnect the battery pack when the car is not in use.
14
b. Remove sand, mud, dirt, and any other elements before storing the car.
c. Never use chemicals or any solvents to clean the chassis as it may cause damage to the electronics components and plastic parts.
Use compressed air, soft paintbrush, or toothbrush to clean dust and dirt.
a.
結束操控儲存車體前,請謹記要關閉電源,並將電池接頭拔除,以免電池短路造成不必要之危險。
b. 清潔車體上所沾附之沙塵、泥屑。
c. 請勿使用化學清潔劑來清洗底板,以免遙控之電子設備受潮、電線、焊點及膠件被侵蝕而導致不必要之損壞。清潔車體時,請儘量
使用強力之壓縮空氣,搭配軟毛刷來請清理車體上所沾附之沙塵、泥屑。
48T
Std 標準
50T
Std 標準
12T 13T 14T 15T
13.23
13.78
Slower
低速
Quicker
快
12.21
12.72
Cautions
警告
11.34
11.81
ESC might be HOT.
Check temperature often.
速控器可能會過熱,
請隨時檢測溫度。
10.58
11.02
Faster
高速
Slower
慢
Max temp
最大溫度
190°F
88°C
BEFORE OPERATING
For best operating range, always ensure the largest section of your transmitter antenna faces the model.
15
以天線最大面積對正模型,可獲得最佳的遙控距離。
CORRECT
操控前準備
Warning ! Operating range may be significantly reduced with the transmitter antenna pointing directly at the model !
警告!天線頂端直指模型會嚴重縮短遙控距離!
WRONG
9
Page 11

DRIVING TIPS 操控的小技巧
a. Hold your elbows in and keep the
16
transmitter antenna pointing straight up.
a. 手持發射機時請將雙肘靠緊身體並保持
發射機天線朝上。
d.
If you are of unsure of the steering
direction, practice with the
transmitter facing towards you.
d.
假設你不確定發射機的轉向,將發射
機轉輪面向自己,先熟悉左右轉向。
Squeeze the throttle trigger or pull
b.
the throttle stick gently and steer the
car to left and right.
b. 開始操控前按扣油門板機(油門拉)時
請緩慢增加油門並試著熟悉前輪轉向
操作。
e. At first, set the steering D/R function
for less steering response.
e. 學者可參考發射機說明書調整D/R功
能,以避免轉向太過靈活不易操控。
c. Squeeze the throttle trigger and
release. Repeat this action to control
car speed.
c. 學者請先熟悉油門操控再慢慢加快車
子行進速度。
Be careful not to squeeze the throttle
f.
trigger abruptly while steering.
f. 轉向時請勿將油門全開以避免速度過
快導致失控翻覆。
g.
After you become used to the controls, experiment with high
performance possible at full throttle and full steering.
g. 熟悉前述基本操控後再試著將油門全開進行高速操控。
10
h.
Practice doing figure 8S.
h. 建議可以使用繞8字來熟悉發射機操控動作。
Page 12

TROUBLESHOOTING 常見問題與解決方 法
If you have trouble starting or keeping your ER-4 G3 running, here's a quick checklist of what to look for first.
如果您的 ER-4 G3 有行駛上的問題,您可以參考下的說明。
如果問題無法解決,請與購買經銷商聯絡。
Description 問題
Car dies or slows
車不動或速度變慢
Car is glitching
車故障
Motor overheats
馬達過熱
No power
失去電力
No throttle
失去動力
Problem 可能原因
Speed control over heats
速控器過熱
Car has a problem on power
車子的動力有問題
Gear mesh is too tight
馬達驅動齒輪太緊
Battery is discharged
電池沒充電
Battery not plugged in
電池沒接好
Motor not plugged in
馬達連接線沒接好
Motor failure
馬達損壞
Motor keeps running
未扣引發射機油門,馬達卻持續轉動
Solution 解決方法
Let it cool and try later
先冷卻,稍後再試
Check for loose wires, dead radio batteries.
檢查電線是否脫落或遺失
Let motor cool and check recommended gearing for motor
type. Reset gear mesh
先讓馬達冷卻,再重新調整合適的齒隙
Charge battery
將電池充電
Plug battery in
將電池接頭確實連接遙控車
Plug motor in
確實接上紅、黃、黑端之馬達電源傳輸線(紅對紅、黃對
黃、黑對黑)
Replace motor
置換新馬達
Check if the throttle trim is in neutral position.
檢查是否油門微調不在中立點的位置
No steering
失去控制
Reversing
後退功能
Servo not plugged in
轉向伺服機未安裝好
Locked up steering linkage
轉向裝置卡死
Servo failure
伺服機失靈
Goes backwards when you pull the
trigger or goes right when turning the
wheel left
當扣引/放開發射機油門板機,車子卻
後退/前進或是發射機方向轉輪之轉向
跟車子轉向左右相反
Plug servo into ESC unit
將連接電線接上速控器
Free up steering linkage
排除可能的干涉(卡)的零件部
Replace servo
置換新伺服機
Check throttle / steering reversing switches on transmitter
檢查發射機上之油門/轉向的反轉開關是否反轉?
11
Page 13

SET UP 競技角度設定
Toe Adjustment
(Front)
前束角(前投影)設定
Toe Adjustment
(Rear)
後束角(後投影)設定
1. Toe Adjustment (Front) Adjust the front toe angle by tuning the length of the left and right steering rod.
前束角(前投影)設定: 調整前轉向拉長度,藉以改變前輪束角角度。
Rod length 拉桿長度 Steering Characteristics 轉向特性
Tuning longer
More front toe-in
拉桿越長,前束角越大
Tuning shorter
More front toe-out
拉桿越短,前束角越小
Note: Ensure you adjust either the length of right and left tie rod the same.
註:調整時請注意左右轉向拉需調整一樣的長度。
2. Toe Adjustment (Rear) Adjust the rear toe angle by changing the
various toe blocks behind the rear bulkhead. Take out the embedded
plastic balls inside of the block length and re-insert to the new toe
block. Replace the toe block. There are 4 different blocks that can
be chosen for adjustments. Please refer to the table below.
後束角(後投影)設定: 更換後影版改變後輪束角角度,備有4種後
影角度可供替換。
Block No. 影版標號
RR1
RR 1.5
• Increases straight-line stability
• Makes the steering response milder
• Decreases straight-line stability
• Makes the steering response quicker
Rear toe-in angle 後束角角度 Steering Characteristics 轉向特性
Less rear toe-in (Less grip)
後束角小(捉地力較差)
• 增加直線穩定度
• 轉向反應較緩
• 直線穩定度較差
• 轉向反應較快
OUT IN
FRONT TOE
IN
REAR TOE
Increases steering but decreases the
stability on power when exiting corners.
入彎轉向角度大,出彎補油穩定度弱
Front Anti-Dive
Adjustment
前懸吊防潛角度
RR 2
Decreases steering but increases
RR 3
4. Front Anti-Dive: The Front Dive-Squat angle can be adjusted using the different plastic eccentric bushings in
the front suspension plate. Please refer to the table below.
前懸吊防潛角度:前防潛角度的調整可經由更換前下擺臂前固定版之橢圓內襯而改變。
Eccentric Bushing
橢圓內襯
FF-1
FF0
FF1
Total
前翹角
6˚
7˚
8˚
More rear toe-in (More grip)
後束角大(捉地力較好)
Characteristics
Decreases steering response.
Good handling on bumpy tracks.
轉向反應慢,適顛簸路面
Increases steering response.
Good handling on smooth tracks
轉向反應快,適平緩路面
調整特性
stability on power when exiting corners.
入彎轉向角度小,出彎補油穩定度佳
6˚~ 8˚
Note: Ensure you make equal adjustments
on both left and right sides of the car.
註: 調整時請注意左右內襯角度選擇需一致
12
Page 14

SET UP 競技角度設定
Rear Anti-Squat
Adjustment
後懸吊防蹲角度
5. Rear Anti-Squat Adjustment: Adjust the rear anti-squat of the rear lower
arms by replacing the different plastic arms suspension holders at the
front of the rear bulkhead.
後懸吊防蹲角度:底板後防蹲角度的調整可經由更換後下擺臂前固定版
而改變。
0˚~ 4˚
Rear susp. arm holders
後擺臂固定版
RF 0
RF 2
RF 3
RF 4
Characteristics
調整特性
Less anti-squat, flat arm
Increases rear traction when cornering
Decrease rear traction when accelerating.
Easy handling on bumpy tracks
More anti-squat, leaning backwards
Decreases rear traction when cornering
Increases rear traction when accelerating
Easy handling on smooth or slippery tracks
防蹲角小,擺臂與底板角度水平
轉彎時,後輪循跡性增加
加速時,後輪循跡性緩
適顛簸路面
防蹲角大,擺臂與底板角度後傾
轉彎時,後輪循跡性弱
加速時,後輪循跡性增加
適平緩路面
Camber
Adjustment(Front)
外傾角(前輪)
6. Camber Adjustment(Front): Adjust the front camber by adjusting the lengths
of threaded parts of the front pivot balls in the upper arms longer or shorter.
外傾角(前輪):調整前輪座球頭螺長度,藉以改變前輪外傾角。
Length(L) 螺長度
Making longer. 螺越長
Positive camber. 正值
Making shorter. 螺越短
Negative camber. 負值
Note1: To expanding the adjusting range of the front camber, you can also change
the eccentric bushing in the upper plate at the very front of the front bulkhead
and the mounting holes of hinge holders on the servo saver top plate.
註1:另一個搭配調整外頃角的方式是利用更換前上擺臂固定版之橢圓內襯來增
加外傾角的調整範圍。
Eccentric
bushings
橢圓內襯
Outer hole
外孔
Inner hole
內孔
Steering Characteristics 轉向特性
Less steering
趨於轉向不足
More steering
趨於轉向過度
Servo saver
top plate
Camber adjusting range
of the front camber
外傾角調整範圍
More camber adjustment
範圍大
Less camber adjustment
範圍小
FRONT CAMBER
+ -
Note2: Ensure you make equal adjustments on both left and right sides of the car.
註2:調整時請注意左右內襯孔選擇需一致。
13
Page 15

SET UP 競技角度設定
REAR CAMBER
Camber
Adjustment
(Rear)
外傾角(後輪)
PD0399 ALUM TURNBUCKLE
WRENCH, 5mm
Ride Height (or
Droop) Adjustment
車離地高
7. Camber Adjustment (Rear): Adjust the rear camber by adjusting
the lengths of the upper tie rods.
外傾角(後輪):調整後輪座上拉長度,藉以改變後輪外傾角。
Length(L)
上拉長度
Making longer. 越長
Positive camber. 正值
Making shorter. 越短
Negative camber. 負值
Note1: You can also adjust the rear camber by positioning the rear upper tie
rods in the different holes in the shock towers and outer rear hubs. For more
information, please refer to the "Set-Up Sheet" in a separate sheet.
Note2: Ensure you make equal adjustments on both left and right sides of the
car.
註1: 另一個搭配調整後輪外傾角的方式是利用更換後上擺臂固定拉之固定置(
避震器支架及後輪座)來增加外傾角的調整範圍。
註2: 調整時請注意左右邊固定孔選擇需一致
8. Ride Height (or Droop) Adjustment: The front/rear ride height can be
adjusted by screwing in or unscrewing the setscrews in the lower arms.
車體離地高:車體離地高的調整可經由調整前後下擺臂的無頭內六角螺絲來
改變。
Setscrews
調整螺絲
Screwing in
往下旋
Unscrewing
往上旋
Ride height
離地高
Becomes lower
變低
Becomes higher
變高
Steering Characteristics
轉向特性
Decreases traction when entering corners.
轉彎時,後輪循跡性弱
Increases traction when entering corners
轉彎時,後輪循跡性增加
Characteristics
調整特性
Less steering, good handling on smooth tracks
轉向較不足,適和平緩場地操控
More steering, good handling on rough tracks
轉向較過度,適和顛簸場地操控
L
+-
L
Ackerman
Adjustment
阿克曼轉向角
FRONT REAR
1.5mm
FR0RR3
Initial Setting
9. Ackerman Adjustment: Adjust the Ackerman angle by linking the front
steering rods into the different holes on the steering slider.
阿克曼轉向角:阿克曼角角度的調整可經由更換轉向曲柄的固定孔而改變。
Steering tie-rod mounting holes Characteristics
曲柄固定孔
Forward holes
外孔
Rearward holes
內孔
Note: Ensure you make equal adjustments on both left and right sides of the car.
註:調整時請注意左右邊固定孔選擇需一致
調整特性
Makes the steering response milder
Suitable for high speed race way.
轉向反應較緩,適合高速場地
Makes the steering response sharper.
Suitable for narrow, tight tracks
轉向反應較快,適合彎曲狹窄場地
2.5mm
14
Ackerman Position
F
R
Page 16

SET UP SHEET
Name of Driver Date Track Radio Servo Motor
Spur / Pinion Gear
T/ T
Wheels
Tires
Inner
SHOCKS
(Shock Oil Brand: )
Shaft Type
Piston
Piston Ball
Oil
Spring
Spacer
□ Std □ Other: □ Std □ Other:
□
#
□ Blue: Softer(3.2lb) □ Blue: Softer(2.7lb)
□ Red: Average(4.3lb) □ Red: Average(3.2lb)
□ Black: Harder(5.2 lb) □ Black: Harder(4.5lb)
mm mm
Front
0 □ 1 □ 2
CAMBER ANGLE
˚Upper mm,
˚Lower mm
Front
˚ mm
Rear
□
0 □ 1 □ 2
#
Rear
SHOCK MOUNT POSITION
Arm Mounting
Front □IN □OUT Rear □IN □OUT
Tower Mounting
Front Rear
DIFF. OIL
Oil
Front
#
Center
#
Rear
#
+ -
Upper
Lower
+-
TOE ANGLE
˚ mm
OUT IN IN
Front
□ 1 , □ 1.5 , □ 2 , □ 3
RR(1 , 1.5 , 2 , 3)
15
Rear
Page 17

FRONT/ REAR SUSPENSION HOLDER
Front Rear
□ FF-1
□ RF0
□ RF2
□ FF0
□ RF3
□ FF1
FR
□ RF4
□ RR1
□ RR1.5
□ RR2
□ RR3
REAR UPPER ARM POSITION
1. Rear Hub Position
2. Upper Arm Position
3. Upright Pin Position
STEERING PLATE
A: Front
B: Rear
□ A
□B
SWAY BAR
Front
Rear
Gold ø3
Gold ø3
Black ø2.7
Black ø2.7
TRACK WIDTH
1
Track Width mm
2
RACE NOTE
Main: Place □ TQ
Notes:
WHEELBASE ADJUSTMENT
Spacer:
3
Front: □ 1mm □ 2mm □ 3mm
Rear: □ 1mm □ 2mm □ 3mm
1mm 2mm
RearFront
TRACK CONDITIONS
Surface:
Bumps:
Traction:
Composition:
□ Smooth □ Bumpy
□ Low □ Med □ High
□ Sandy □ Soft Dirt □ Grass □ Clay □ Other
□ Wet □ Dry □ Dusty □ Other
16
Page 18

ARTR
PD01-0004
PD1899
PD2001
PD0662
PD1895
PD0680
PD6308
PD02-0010
ARTR
PD01-0003
PD7475
PD02-0009
PD02-0011
PD1895
PD1897
PD0662
SHOCK ASSEMBLY CTR DIFF. ASSEMBLY
PD07-0018
PD07-0013
PD07-0025
Motor Not Inoluded in ARTR
PD07-0014
PD1890
PD07-0020
PD07-0024
PD2001
PD1895
PD1899
PD1912
PD07-0016
PD07-0017
17
Page 19

PD6577
PD0675
PD7710
PD7199
PD1898
PD0680
PD2001
PD7786
PD0662
PD0662
PD7710
PD7199
PD0662
PD1871
PD0662
PD1781
PD0662
PD7710
PD1895
PD0662
PD7786
PD2448
PD2001
PD1898
SERVO SAVER ASSEMBLY FR / RR DIFF. ASSEMBLY
PD0669
PD2385
PD2385
PD2331-T
PD1926
PD1925
PD1928
PD7752
PD2340
PD0681
PD1968
PD1927-T
PD1968
PD1244
PD1918
PD1244
PD2385
PD1926
18
Page 20

PD0882
PD0668
PD0882
PD1211
PD1949
J
J
J
PD0668
J
J
J
J
PD07-0019
PD1244
PD0662
PD1924
PD1970
PD1923
PD09-0047
K
K
PD8934
PD1543
PD10-0041
K
K
PD09-0040
PD1244
PD2385
PD1194
PD1567
PD10-0040
PD7771
PD1907
PD7769
PD1906
PD1921
PD7769
PD1244
BD103-0023
PD1978
PD2385
PD1244
PD1913
PD7771
PD1963
PD1567
PD05-0014
PD1922
PD1567
PD0670
PD03-0012
PD03-0015
PD1907
PD1969
PD1906
PD0674
PD6305
PD03-0015
PD09-0046
PD0668
REAR ASSEMBLY
PD05-0014
39±0.2
PD03-0012
19
PD09-0046
PD1924
PD08-0017
PD1981-W
Page 21

PD1924
PD08-0017
PD1981-W
PD9123
PD1924
PD05-0013
PD0669
PD09-0040
PD1567
PD1906
PD1871
PD03-0015
PD1907
PD1244
PD1920
PD03-0010
PD1919
PD2385
PD1871
PD1969
PD8934
PD1915
PD1918
PD7770
PD07-0019
PD1244
PD1969
PD1567
PD1970
PD1963
PD1917
PD05-0013
PD1916
PD0672
17.3
PD0670
PD03-0011
PD03-0010
PD1338
PD1543
PD1211
PD2264
PD1913
PD0675
PD1905-T
PD1972
PD10-0038
PD1973
FRONT ASSEMBLY
PD1949
20
PD2264
PD2262
PD2432
PD2262
Page 22

PD0677
PD1971
B
B
ARTR
Motor Not Inoluded in ARTR
Batteries Not Inoluded in RTR / ARTR
ESC Not Inoluded in ARTR
PD09-0030
ARTR
PD09-0032
PD09-0029
ARTR
PD1871
RTR
ARTR
PD1973
PD09-0045
PD06-0008
PD1244
PD1973
PD6310
PD0669
PD1912
PD1973
PD1244
PD09-0027
PD05-0015
PD1918
PD05-0015
B
B
PD0671
11.6
CHASSIS ASSEMBLY
ARTR
PD0674
PD09-0028
PD09-0029
PD09-0045
B
B
PD9016
B
B
PD09-0031
PD1244
PD6310
PD0678
PD1871
PD9011
PD1973
PD0679
PD02-0010
PD0679
PD1973
21
Page 23

ER-4 G3 RALLY CAR SPARE PARTS LIST 零件表
1319
TT LOGO DECAL
TT LOGO貼紙 4"
PD02-0011
SPUR GEAR (50T)
主齒輪
PD05-0013
FR UNINI SHAFT
前中央傳動軸組
PD01-0003
MOTOR MOUNT
馬達固定座
PD03-0015
SUSP, HING PIN SET
擺臂固定銷組
PD05-0014
RR UNINI SHAFT
後中央傳動軸組
PD01-0004
PINION GEAR (13T)
馬達驅動齒輪
PD03-0016
UP SUSP.ARM SET
前上擺臂
PD05-0015
SERVO ARM SET
伺服拉桿組
PD02-0009
CTR DIFF MNT.
中差支架組
PD03-0017
LWR SUSP.ARM SET
前下擺臂组
PD06-0008
SERVO HORN SET
伺服轉向組
PD02-0010
CTR DIFF PLT.
差速護蓋組
PD03-0018
REAR SUSP.ARM SET
後擺臂组
PD07-0013
SHOCK DIAPHRAGM
避震器空氣活門
PD07-0014
SHOCK SHAFT
避震器軸
PD07-0024
O-RING & SPACERS
避震器O型環&內環柱組
PD09-0030
UPPR CTR UNIT
本體上蓋
PD07-0016
SHOCK SPRING
避震器彈簧
PD07-0025
SHOCK PSITON
避震器活塞組
PD09-0031
LWR CTR UNIT
本體下蓋
PD07-0017
SHOCK PLASTIC PARTS
避震器塑膠配件
PD08-0017
TIRE SET, HB35°
輪胎組(HB35度)
PD09-0032
BRACE SET
補強塊組
22
PD07-0019
SHOCK SET
避震器組
PD09-0027
CHASSIS
車底板
PD09-0040
SHOCK TOWER
避震器支架
PD07-0020
SHOCK BODY
避震器套筒
PD09-0028
LEAD TRAY
導線護板組
PD09-0042
BODY SET
完成車殼
Page 24

ER-4 G3 RALLY CAR SPARE PARTS LIST 零件表
PD09-0043
CLEAR BODY SET + BODY DECAL
透明車殼+貼紙組
PD09-0050
RR BODY EXT.MNT
後車殼層架组
PD1897
DIFF. CASE
差速器本體
PD09-0044
BODY DECAL
車殼貼紙組
PD09-0052
BODY SUPPORT SET 1/8 R-G
車殼支柱零件包
PD1898
DIFF. OUTDRIVE (2) FR / RR
差速傳動軸套
PD09-0045
SIDE BUMPER
ER4側護板
FOR TRANS CASE, OUTSIDE
PD0662
BEARING (10), d8xd16x5
滾珠軸承, 8x16x5
PD1905-T
FF SUSP. PLATE SET
前投影板FF0
PD09-0046
MUDGUARD
檔泥板组零件包
PD1871
TRANS CASE / BULKHEAD SET
差速箱本體
PD1906
SUSP. PLATE SET
投影板組
PD09-0049
CTR UNIT LOCK
本體固定旋鈕組
PD1895
DIFF. INNER GEAR & PARTS
差速內傘齒維修包10T/18T
PD1907
SUSP. PLATE JOINT
球座
PD1908-T
UP SUSP. ARM PLATE
上擺臂固定板
PD1917
ADJ. SCREW (4)
轉向球頭固定螺絲
PD1922
RR PIVOT BALL
後上擺臂拉桿球座
PD1912
PIVOT BALL
球頭
PD1918
ST. PIVOT BALL
轉向球座
PD1923
REAR HUB SET
後輪組
PD1914
RR LOWER HINGE PIN
後輪座固定銷
PD1919
STEERING TURNBUCKLE
轉向拉桿
PD1924
HEX WHEEL ADAPTER SET
六角輪轂轉換器
23
PD1915
KNUCKLE
轉向輪座組
PD1920
ST. TIE END
轉向拉桿頭
PD1925
SERVO SAVER PL. PARTS
轉向搖臂塑件
PD1916
ADJ. BALL (4)
擺臂球頭
PD1921
RR TIE END
後上擺臂拉桿頭
PD1926
SERVO SAVER ML. PARTS
轉向金屬配件
Page 25

ER-4 G3 RALLY CAR SPARE PARTS LIST 零件表
FOR SERVO SAVER
PD1927-T
STEERING SLIDER
轉向曲板
PD1975
HEX WRENCH SET
六角板手組, S3
PD2264
FRONT BODY SUPPORT SET
前車殼支柱固定座
PD1928
SERVO SAVER BUSHING
轉向曲板襯套
PD1976
SHOCK PLASTIC BUSHING
避震器襯套
PD2281
CASTER SHIM
傾角調整夾片
PD1968
BEARING, d5xD10xW4
滾珠軸承
PD1978
RR TURNBUCKLE
後上擺臂拉桿
PD2331-T
SERVO SAVER TOP PLATE ST
前補強板
PD1969
BEARING, d10xD19xW5
滾珠軸承
PD1981-W
MULTI-SPOKE WHL, 1 / 8 (WHITE)
輪轂, 1/8(白)
PD2340
UP SUSP. ARM HOLDER
前上擺臂支撐座
PD1970
DOWEL PIN SET
軸承滾針
PD2262
RALLY BUMPER MOUNT
前防撞板固定座
PD2432
RALLY SPONGE BUMPER (S)
前防撞泡棉零件包(S)
PD2448
DIFF. SET, FR & RR
前後差速組
PD7782
ANTENNA BAG
天線零件包
PD2385
PD9004
WASHER SET
墊片組
PD1949 (10)
R CLIPS
R型插銷
PD7710
DIFF. GEAR SET
傳動大/小斜齒輪
PD7786
DIFF. SHIME (10), 0.2mm
差速器墊片(0.2mm)
PD0667 M3x8 (20)
PD0668 M3x10 (20)
PD0669 M3x12 (20)
PD0670 M3x14 (20)
PD0671 M3x16 (20)
PD0672 M3x18 (20)
PD0674 M3x22 (20)
PD0675 M3x25 (20)
PD1972 M3x30 (20)
BHCS SCREW
半圓內六角螺絲
PD7769
SWING SHAFT BAG
後傳動軸
PD8934
SHOCK PLASTIC BUSHING
避震器襯套
PD0677 M3x8 (20)
PD0678 M3x10 (20)
PD0679 M3x12 (20)
PD0680 M3x14 (20)
PD0681 M3x16 (20)
PD1973 M4x12 (20)
PD6310 M4x10 (20)
PD7752 M3x22 (20)
PD9016 M3x5 (20)
FHCS SCREW
平頭內六角螺絲
24
PD7770
FR CVA (2)
前萬向傳動軸組
PD1244 M3 (10)
PD7467 M2.5 (20)
LOCK NUT
止鬆螺帽
PD1199 d3 mm (20)
PD1966 φ3.2x8x0.5 (20)
WASHER
墊圈
PD0961 M3x3 (20)
PD1567 M5x4 (20)
PD1598 M4x4 (20)
PD1963 M4x12 (20)
PD6305 M3x5 (20)
SET SCREW
無頭內六角螺絲
PD7771
REAR AXLE / NUT
後傳動軸套
PD2001 φ4.4 (10)
O-RING
O型環
PD1971 M3x14 (20)
FHS SCREW
扁圓盤內六角螺絲
PD1338 M3x12 (20)
PD1339 M3x20 (20)
PD1543 M3x18 (20)
PD6308 M3x8 (20)
PD7774 M3x26 (20)
PD7780 M3x23 (20)
PD9123 M3x28 (20)
PD10-0040 M3x32 (20)
SHCS SCREW
內六角螺絲
Page 26

ER-4 G3 RALLY CAR SPARE PARTS LIST 零件表
1319 TT LOGO DECAL TT LOGO貼紙 4"
PD01-0003 MOTOR MOUNT 馬達固定座
PD01-0004 PINION GEAR (13T) 馬達驅動齒輪
PD02-0009 CTR DIFF MNT. 中差支架組
PD02-0010 CTR DIFF PLT. 差速護蓋組
PD02-0011 SPUR GEAR (50T), 1/8 主齒輪
PD03-0015 SUSP, HING PIN SET 擺臂固定銷組
PD03-0016 UP SUSP.ARM SET 前上擺臂
PD03-0017 LWR SUSP.ARM SET 前下擺臂组
PD03-0018 REAR SUSP.ARM SET 後擺臂组
PD05-0013 FR UNINI SHAFT 前中央傳動軸組
PD05-0014 RR UNINI SHAFT 後中央傳動軸組
PD05-0015 SERVO ARM SET 伺服拉桿組
PD06-0008 SERVO HORN SET 伺服轉向組
PD07-0013 SHOCK DIAPHRAGM 避震器空氣活門
PD07-0014 SHOCK SHAFT 避震器軸
PD07-0015 SHOCK BOOTS 避震器腹套
PD07-0016 SHOCK SPRING 避震器彈簧
PD07-0017 SHOCK PLASTIC PARTS 避震器塑膠配件
PD07-0019 SHOCK SET 避震器組
PD07-0020 SHOCK BODY 避震器套筒
PD07-0024 O-RING & SPACERS 避震器O型環&內環柱組
PD07-0025 SHOCK PSITON 避震器活塞組
PD08-0017 TIRE SET, HB35° 輪胎組(HB35度)
PD09-0027 CHASSIS 車底板
PD09-0028 LEAD TRAY 導線護板組
PD09-0030 UPPR CTR UNIT 本體上蓋
PD09-0031 LWR CTR UNIT 本體下蓋
PD09-0032 BRACE SET 補強塊組
PD09-0040 SHOCK TOWER 避震器支架
PD09-0042 BODY SET 完成車殼
PD09-0043
PD09-0044 BODY DECAL 車殼貼紙組
PD09-0045 SIDE BUMPER ER4側護板
PD09-0046 MUDGUARD 檔泥板组零件包
PD09-0049 CTR UNIT LOCK 本體固定旋鈕組
PD09-0050 RR BODY EXT.MNT 後車殼層架组
PD10-0040 SHCS SCREW (20), M3x32 內六角螺絲 (20), M3x32
PD0662 BEARING (10), d8xd16x5 滾珠軸承 (10), d8xd16x5
PD0667 BHCS SCREW (20), M3x8 半圓內六角螺絲(20), M3x8
PD0668 BHCS SCREW (20), M3x10 半圓內六角螺絲(20), M3x10
PD0669 BHCS SCREW (20), M3x12 半圓內六角螺絲(20), M3x12
PD0670 BHCS SCREW (20), M3x14 半圓內六角螺絲(20), M3x14
PD0671 BHCS SCREW (20), M3x16 半圓內六角螺絲(20), M3x16
PD0672 BHCS SCREW (20), M3x18 半圓內六角螺絲(20), M3x18
PD0674 BHCS SCREW (20), M3x22 半圓內六角螺絲(20), M3x22
PD0675 BHCS SCREW (20), M3x25 半圓內六角螺絲(20), M3x25
PD0677 FHCS SCREW (20), M3x8 平頭內六角螺絲(20), M3x8
PD0678 FHCS SCREW (20), M3x10 平頭內六角螺絲(20), M3x10
PD0679 FHCS SCREW (20), M3x12 平頭內六角螺絲(20), M3x12
PD0680 FHCS SCREW (20), M3x14 平頭內六角螺絲(20), M3x14
PD0681 FHCS SCREW (20), M3x16 平頭內六角螺絲(20), M3x16
PD0961 SET SCREW (20), M3x3 無頭內六角螺絲(20), M3x3
PD1199 WASHER (20) 平墊圈(20)
PD1211 BODY SUPPORT SET 1/8 R-G 車殼支柱零件包
PD1244 LOCK NUT (10) 止鬆螺帽(10)
PD1338 SHCS SCREW (20), M3x12 內六角螺絲(20), M3x12
PD1339 SHCS SCREW (20), M3x20 內六角螺絲(20), M3x20
PD1543 SHCS SCREW (20), M3x18 內六角螺絲(20), M3x18
PD1567 SET SCREW (20), M5x4 無頭內六角螺絲(20), M5x4
PD1598 SET SCREW (20), M4x4 無頭內六角螺絲(20), M4x4
PD1871
CLEAR BODY SET + BODY DECAL
TRANS CASE / BULKHEAD SET
透明車殼+貼紙組
差速箱本體
PD1895 DIFF. INNER GEAR & PARTS 差速內傘齒維修包10T/18T
PD1897 DIFF. CASE 差速器本體
PD1898 DIFF. OUTDRIVE (2) FR / RR 差速傳動軸套
PD1905-T FF SUSP. PLATE SET 前投影板FF0
PD1906 SUSP. PLATE SET 投影板組
PD1907 SUSP. PLATE JOINT 球座
PD1908-T UP SUSP. ARM PLATE 上擺臂固定板
PD1912 PIVOT BALL 球頭
PD1914 RR LOWER HINGE PIN 後輪座固定銷
PD1915 KNUCKLE 轉向輪座組
PD1916 ADJ. BALL (4) 擺臂球頭
PD1917 ADJ. SCREW (4) 轉向球頭固定螺絲
PD1918 ST. PIVOT BALL 轉向球座
PD1919 STEERING TURNBUCKLE 轉向拉桿
PD1920 ST. TIE END 轉向拉桿頭
PD1921 RR TIE END 後上擺臂拉桿頭
PD1922 RR PIVOT BALL 後上擺臂拉桿球座
PD1923 REAR HUB SET 後輪組
PD1924 HEX WHEEL ADAPTER SET 六角輪轂轉換器
PD1925 SERVO SAVER PL. PARTS 轉向搖臂塑件
PD1926 SERVO SAVER ML. PARTS 轉向金屬配件
PD1927-T STEERING SLIDER 轉向曲板
PD1928 SERVO SAVER BUSHING 轉向曲板襯套
PD1949 R CLIPS (10), SHORT R型插銷
PD1963 SET SCREW (20), M4x12 無頭內六角螺絲(20), M4x12
PD1966 WASHER (20), φ3.2x8x0.5 平板墊圈(20), φ3.2x8x0.5
PD1968 BEARING (4), d5xD10xW4 滾珠軸承(4), d5xD10xW4
PD1969 BEARING (4), d10xD19xW5 滾珠軸承(4), d10xD19xW5
PD1970 DOWEL PIN SET 軸承滾針
PD1971
PD1972 BHCS SCREW (20), M3x30
PD1973 FHCS SCREW (20), M4x12 平頭內六角螺絲(20), M4x12
PD1975 HEX WRENCH SET 六角板手組
PD1976 SHOCK PLASTIC BUSHING 避震器襯套
PD1978 RR TURNBUCKLE 後上擺臂拉桿
PD1981-W
PD2001 O-RING,φ4.4 O型環
PD2262
PD2264
PD2281 CASTER SHIM 傾角調整夾片
PD2331-T
PD2340 UP SUSP. ARM HOLDER
PD2385 WASHER SET 墊片組
PD2432 RALLY SPONGE BUMPER (S) 前防撞泡棉零件包(S)
PD2448 DIFF. SET, FR & RR 前後差速組
PD6305 SET SCREW (20), M3x5 無頭內六角螺絲(20), M3x5
PD6308 SHCS SCREW (20), M3x8 內六角螺絲(20), M3x8
PD6310 FHCS SCREW (20), M4x10 平頭內六角螺絲(20), M4x10
PD7467 LOCK NUT, M2.5 止鬆螺帽, M2.5
PD7710 DIFF. GEAR SET 傳動大/小斜齒輪
PD7752 FHCS SCREW (20), M3x22
PD7769 SWING SHAFT BAG 後傳動軸
PD7770 FR CVA (2) 前萬向傳動軸組
PD7771 REAR AXLE / NUT 後傳動軸套
PD7774 SHCS SCREW (20), M3x26 內六角螺絲(20), M3x26
PD7780 SHCS SCREW (20), M3x23 內六角螺絲(20), M3x23
PD7782 ANTENNA BAG, 1/8 天線零件包, 1/8
PD7786 DIFF. SHIME (10), 0.2mm 差速器墊片(0.2mm)
PD8934 SHOCK PLASTIC BUSHING 避震器襯套
PD9004 WASHER SET 墊片組
PD9016 FHCS SCREW (20), M3x5 平頭內六角螺絲(20), M3x5
PD9123 SHCS SCREW (20), M3x28 內六角螺絲(20), M3x28
FLAT HEAD SOCKET SCREW, M3x14
MULTI-SPOKE WHL, 1 / 8 (WHITE)
RALLY BUMPER MOUNT, S3 RG
FRONT BODY SUPPORT SET
SERVO SAVER TOP PLATE ST
扁圓盤內六角螺絲, M3x14
半圓頭內六角螺絲(20), M3x30
輪轂, 1/8(白)
前防撞板固定座
前車殼支柱固定座
前補強板
前上擺臂支撐座
平頭內六角螺絲螺絲(20), M3x22
25
Page 27

ER-4 G3 RALLY CAR OPTIONAL PARTS LIST 選購零件表
PD02-0012
AL CTR DIFF MNT
中差支撐架
PD07-0027
16mm SHOCK COLLARS
避震器調整環零件包
PD0399
TURNBUCKLE WRENCH, 5mm
拉桿板手,5mm
PD02-0013
AL CTR DIFF PLT
中差連板
PD09-0047
AL. SHOCK TOWER, FR
前避震器支架組
PD0590
TIRE SET, CUBIC
1/8輪胎組
PD03-0014
FR SWAY BAR 2.7mm, 3mm
前防傾桿
PD09-0048
AL. SHOCK TOWER, RR
後避震器支架組
PD1843-B
SERVO SAVER TOP PLT(B)
轉向擺臂固定板零件包(黑)
PD07-0021
AL. SHOCK BODY
避震器套筒
PD10-0037
RR SWAY BAR 2.7mm, 3mm
後防傾桿零件包
PD1843-R
SERVO SAVER TOP PLT(R)
轉向擺臂固定板零件包(紅)
PD07-0023
AL. SHOCK CAP
避震器上蓋
PD10-0039
SWAY BAR SETY
防傾桿配件包
PD1847
FR PLT FR TRANS, FF-1
前投影板(FF-1)零件包
PD1848
FR PLT FR TRANS, FF0
前投影板(FF0)零件包
PD1857
ALUM S. SAVER SET
緩衝/轉向擺臂零件包
PD1849
FR PLATR FR TRANS, FF+1
前投影板(FF+1)零件包
PD1858
A75 ST. SLIDER W / BB
轉向曲板零件包
PD1850
A75RR PLT FR TRN, FR0
前投影板(FR0)零件包
PD1851
A75FR PLT RR TRN, RF0
後投影板(RF0)零件包
PD1863
LITE PILLOW BALL
懸吊球頭零件包
PD1852
A75FR PLT RR TRN, RF+4
後投影板(RF+4)零件包
PD1853
A75RR PLT RR TRN, RR+2
後投影板(RR+2)零件包
PD1864
LITE HEX WHEEL ADAPTER
六角輪轂固定座螺絲
PD1865
LITE WHEEL NUT
六角輪轂止鬆螺帽
PD1854
A75RR PLT RR TRN, RR+3
後投影板(RR+3)零件包
PD1855
A75UP ARM PLATE
上擺臂前固定板零件包
PD1873
RR CVA (2)
後萬向傳動軸
PD1894
DIFF. BEVEL GEAR SET
傳動大/小斜齒輪
PD1896
DIFF. SHIME (10), 0.3mm
差速器墊片(0.3mm)
5-SPOKE WHL, 17mm輪轂
PD1946-B BLACK 黑
PD1946-G GREEN 綠
PD1946-P PINK 粉紅
PD1946-Y YELLOW 黃
26
MULTI-SPOKE WHL 輪轂
PD1981-B BLACK 黑
PD1981-G GREEN 綠
PD1981-P PINK 粉紅
PD1981-Y YELLOW 黃
VELOCITY WHL 輪轂
PD6602-B BLACK 黑
PD6602-G GREEN 綠
PD6602-O ORANGE 橘
PD6602-P PINK 粉紅
PD6602-Y YELLOW 黃
Page 28

ER-4 G3 RALLY CAR OPTIONAL PARTS LIST 選購零件表
PD02-0012 AL CTR DIFF MNT 中差支撐架
PD02-0013 AL CTR DIFF PLT 中差連板
PD03-0014 FR SWAY BAR 2.7mm, 3mm 前防傾桿
PD07-0021 AL. SHOCK BODY 避震器套筒
PD07-0023 AL. SHOCK CAP 避震器上蓋
PD07-0027 16mm SHOCK COLLARS 避震器調整環零件包
PD09-0047 AL. SHOCK TOWER, FR 前避震器支架組
PD09-0048 AL. SHOCK TOWER, RR 後避震器支架組
PD10-0037 RR SWAY BAR 2.7mm, 3mm 後防傾桿零件包
PD10-0039 SWAY BAR SETY 防傾桿配件包
PD0399 TURNBUCKLE WRENCH, 5mm 拉桿板手, 5mm
PD0590 TIRE SET, CUBIC 1/8輪胎組
PD1843-B SERVO SAVER TOP PLT (B) 轉向擺臂固定板零件包(黑)
PD1843-R SERVO SAVER TOP PLT (R) 轉向擺臂固定板零件包(紅)
PD1847 FR PLT FR TRANS, FF-1 前投影板(FF-1)零件包
PD1848 FR PLT FR TRANS, FF0 前投影板(FF0)零件包
PD1849 FR PLATR FR TRANS, FF+1 前投影板(FF+1)零件包
PD1850 A75RR PLT FR TRN, FR0 前投影板(FR0)零件包
PD1851 A75FR PLT RR TRN, RF0 後投影板(RF0)零件包
PD1852 A75FR PLT RR TRN, RF+4 後投影板(RF+4)零件包
PD1853 A75RR PLT RR TRN, RR+2 後投影板(RR+2)零件包
PD1854 A75RR PLT RR TRN, RR+3 後投影板(RR+3)零件包
PD1855 A75UP ARM PLATE 上擺臂前固定板零件包
PD1857 ALUM S. SAVER SET 緩衝/轉向擺臂零件包
PD1858 A75 ST. SLIDER W / BB 轉向曲板零件包
PD1863 LITE PILLOW BALL 懸吊球頭零件包
PD1864 LITE HEX WHEEL ADAPTER 六角輪轂固定座螺絲
PD1865 LITE WHEEL NUT 六角輪轂止鬆螺帽
PD1873 RR CVA (2) 後萬向傳動軸
PD1894 DIFF. BEVEL GEAR SET 傳動大/小斜齒輪
PD1896 DIFF. SHIME (10), 0.3mm 差速器墊片(0.3mm)
PD1946-B 5-SPOKE WHL, 17mm 1/8 (B) 輪轂, 1/8 (黑)
PD1946-G 5-SPOKE WHL, 17mm 1/8 (G) 輪轂, 1/8 (綠)
PD1946-P 5-SPOKE WHL, 17mm 1/8 (P) 輪轂, 1/8 (粉紅)
PD1946-Y 5-SPOKE WHL, 17mm 1/8 (Y) 輪轂, 1/8 (黃)
PD1981-B MULTI-SPOKE WHL, 1/8 (B) 輪轂, 1/8 (黑)
PD1981-G MULTI-SPOKE WHL, 1/8 (G) 輪轂, 1/8 (綠)
PD1981-P MULTI-SPOKE WHL, 1/8 (P) 輪轂, 1/8 (粉紅)
PD1981-Y MULTI-SPOKE WHL, 1/8 (Y) 輪轂, 1/8 (黃)
PD6602-B VELOCITY WHL, 1/8 (B) 輪轂, 1/8 (黑)
PD6602-G VELOCITY WHL, 1/8 (G) 輪轂, 1/8 (綠)
PD6602-O VELOCITY WHL, 1/8 (O) 輪轂, 1/8 (橘)
PD6602-P VELOCITY WHL, 1/8 (P) 輪轂, 1/8 (粉紅)
PD6602-W VELOCITY WHL, 1/8 (W) 輪轂, 1/8 (白)
PD6602-Y VELOCITY WHL, 1/8 (Y) 輪轂, 1/8 (黃)
JD7480
 Loading...