

Page 1
Manufactured under license from Dolby Laboratories. ”Dolby”, ”ProLogic II” and the double-D symbol are trademarks of Dolby Laboratories.
Confidential unpublished works. © 1992-1997 Dolby Laboratories Inc. All rights reserved.
Manufactured under license from Digital Theater Systems, Inc. US Pat. No. 5,451,942, 5,956,674, 5,974,380, 5,978,762, 6,487,535 and other
U.S. and world-wide patents issued and pending. "DTS", "DTS-ES Extended Surround" and "Neo:6" are trademarks of Digital Theater
Systems, Inc. Copyright 1996, 2003 Digital Theater Systems, Inc. All Rights Reserved.
Thule Audio ApS has the right to make changes without prior notice
Owner’s Manual
SPHERE AV100, AV120, AV100S and AV120S
Page 2

Page 3

___________________________________________________________________________
page 3
INDEX
OVERVIEW OF REMOTE CONTROL......................................................................................................... 4
OVERVIEW OF REAR AND FRONT PANELS ........................................................................................... 5
OVERVIEW OF CONTROL PANEL AND DISPLAY................................................................................. 9
CONGRATULATIONS WITH YOUR NEW SPHERE AV100/120! ......................................................... 10
0. INSTALLATION......................................................................................................................................... 12
1. INPUT SELECTION ................................................................................................................................... 12
2. VOLUME CONTROLS .............................................................................................................................. 13
3. ZONE 2 ......................................................................................................................................................... 14
4. DELAY ......................................................................................................................................................... 14
5. SURROUND MODES ................................................................................................................................. 16
5.1 D
OLBY DIGITAL
....................................................................................................................................... 16
5.2 DTS ......................................................................................................................................................... 17
5.3 D
OLBY PROLOGIC
II ................................................................................................................................ 18
5.4 PCM
AND ANALOGUE INPUTS
.................................................................................................................. 18
5.5 S
IDE CHANNELS
....................................................................................................................................... 19
6. CONFIG MENU .......................................................................................................................................... 19
6.1 S
PEAKERS
................................................................................................................................................ 20
6.2 I
NPUTS
..................................................................................................................................................... 21
6.3 N
OISE
....................................................................................................................................................... 21
6.4 C
ROSSOVER FREQUENCY
.......................................................................................................................... 21
6.5 E
XTENDED SURROUND
............................................................................................................................. 21
6.6 D
YNAMIC RANGE COMPRESSION
............................................................................................................... 21
6.7 V
OLUME SCALE
........................................................................................................................................ 22
6.8 S
AVING SET-UP PARAMETERS IN THE MEMORY BANK
................................................................................ 22
6.9 R
ETURN TO FACTORY DEFAULT SETTING
.................................................................................................. 23
6.10 OSD (O
NLY APPLICABLE FOR
AV100S
AND
AV120S.) ......................................................................... 23
6.11 SPDIF OUT........................................................................................................................................... 23
6.12 P
OWER AMP CONTROL
........................................................................................................................... 23
6.13 PROL
OGIC
II .......................................................................................................................................... 24
6.14 V
IDEO INPUT OUTPUT (ONLY ACTIVE IN
AV100S/AV120S)................................................................... 24
6.15 V
IDEO MISCELLANEOUS (ONLY ACTIVE IN
AV100S/AV120S)................................................................ 24
TECHNICAL SPECIFICATIONS................................................................................................................. 25
7.0 YOUR NOTES ........................................................................................................................................... 26
APPENDIX A: SPECIAL FUNCTIONS ....................................................................................................... 27
A.1 A/D
LEVEL
.............................................................................................................................................. 27
A.2 E
LECTRICAL (COAXIAL) VERSUS OPTICAL DIGITAL INPUT
......................................................................... 27
A.3 A
UTOMATIC FAILURE CORRECTION SYSTEM
............................................................................................ 27
Page 4
STBY
MUTE
[MODE]
TAPE 1
DIM
L
SL SUB SR
C
R
LD TAPE 2
[STATUS]
TV
SAT
DVD
[CONFIG]
ENTER
VOL
PURE A.
VOL
VOL
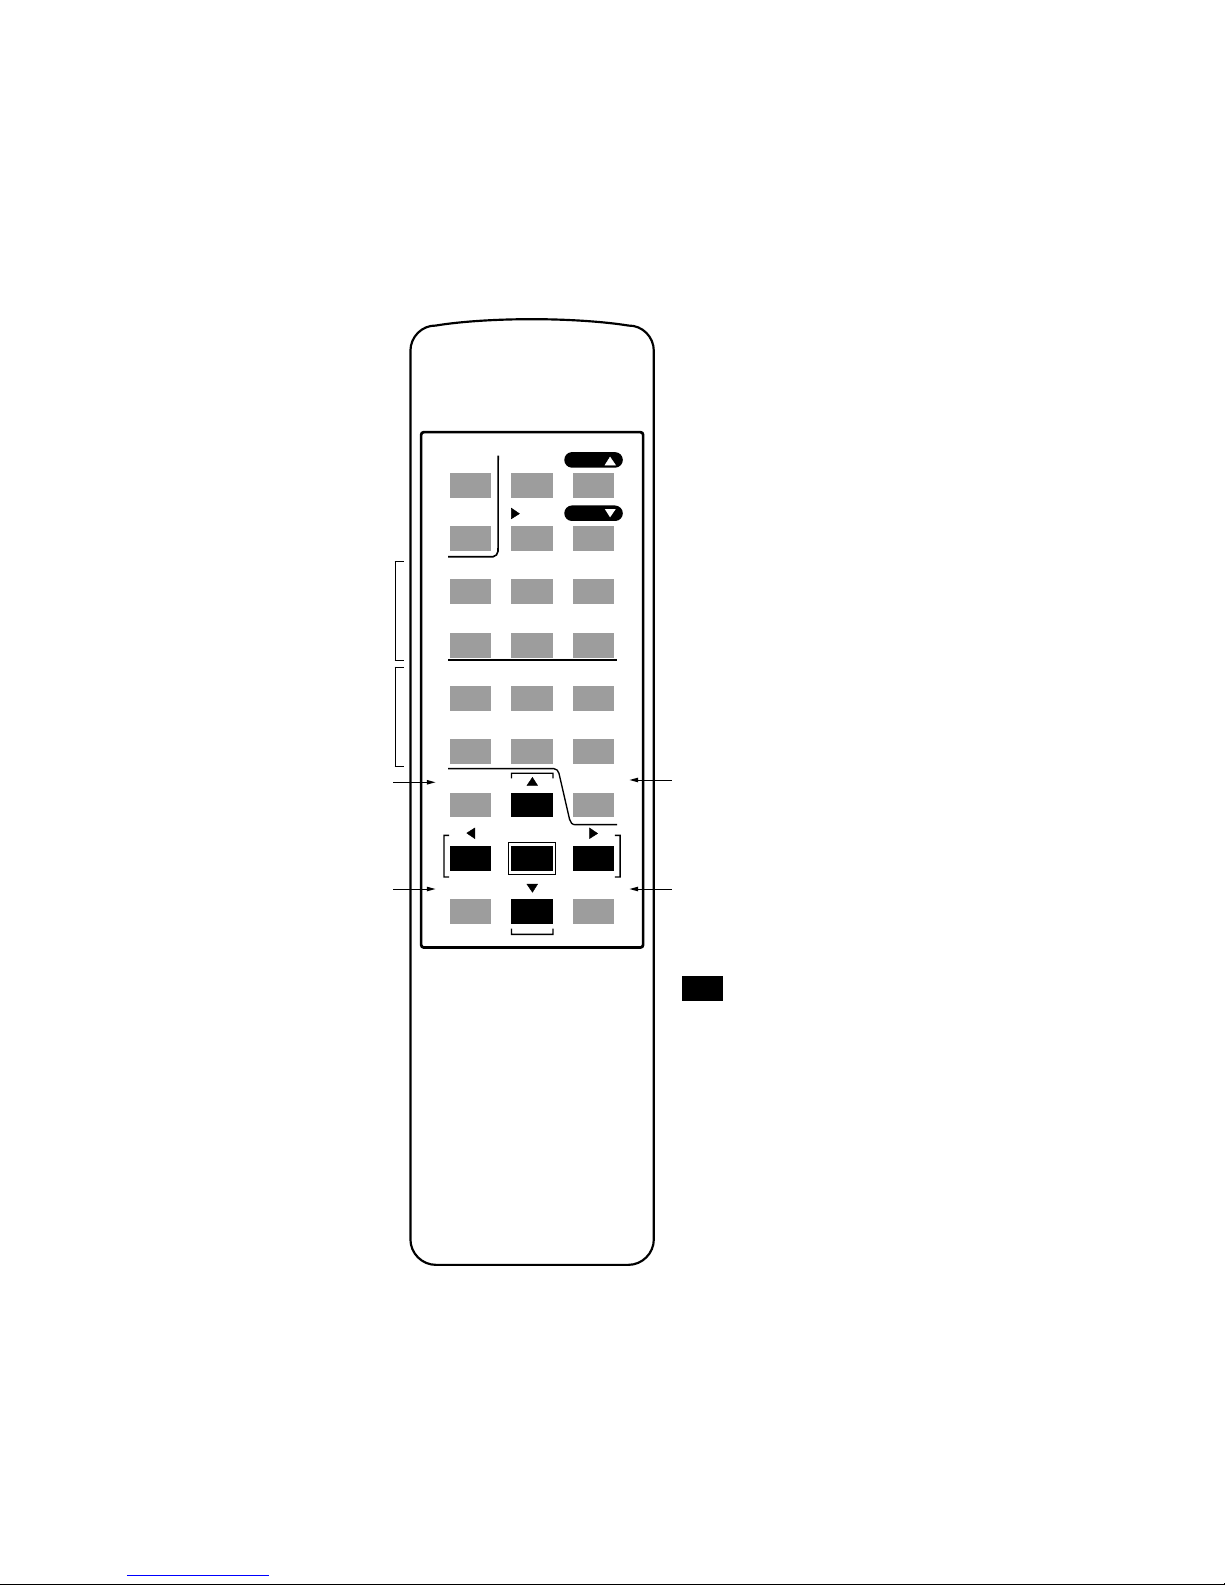
standby | mute -20dB | increase volume
REMOTE CONTROL
change light | return to master volume | decrease volume
left | center | right
surround left | subwoofer | surround right
DVD player | sattelite receiver | TV-set
laser disc | audio/video tape1 | audio/video tape2
pure audio input
enter config mode
navigate in config menu
change surround mode
received input status
channel balance
double push: delay
input selection
Page 5
SURROUND OUTPUTS
ZONE 2ZONE 2
MADE IN DENMARK BY THULE AUDIO
SURROUND AMPLIFIER
SC
SL
C
L
DIGITAL I/O
DATA I/O SURROUND OUTPUTS
ZONE 2
PURE AUDIO INPUT
CAUTION - RISK OF ELECTRIC SHOCK - DO NOT OPEN!
L
SL
CSC
SSL
C
SL
L
R
SR
SR
R
SUB SUB
SSR
SUB
SR
R
SAT
TV
LD/CD
TAPE1 TAPE2IN DVD
OUT
SAT
DVD
LD/CD
TV OUT
RS232
L
R
220-230 V
50-60 Hz
Manufacturedunder licence from Dolby LaboratoriesLicensing Corporation.
“Dolby”,“AC-3” and the double-D symbolare trademarks of Dolby Laboratories
LicensingCorporation. Copyright 1992 Dolby Laboratories,Inc. All rights reserved.
MODEL: SPHERE AV100
Manufacturedunder license from Digital Theater Systems,
Inc.US Pat. No. 5,451,942, 5,956,674, 5,974,380, 5,978,762
andother world-wide patents issued and pending. “DTS”,
“DTS-ESExtended Surround” and “Neo:6” are trademarks
ofDigital Theater Systems, Inc. Copyright 1996, 2000
DigitalT heater Systems, Inc. AllRights Reserved.
HIGH EFFICIENCY - VIRTUAL CLASS A
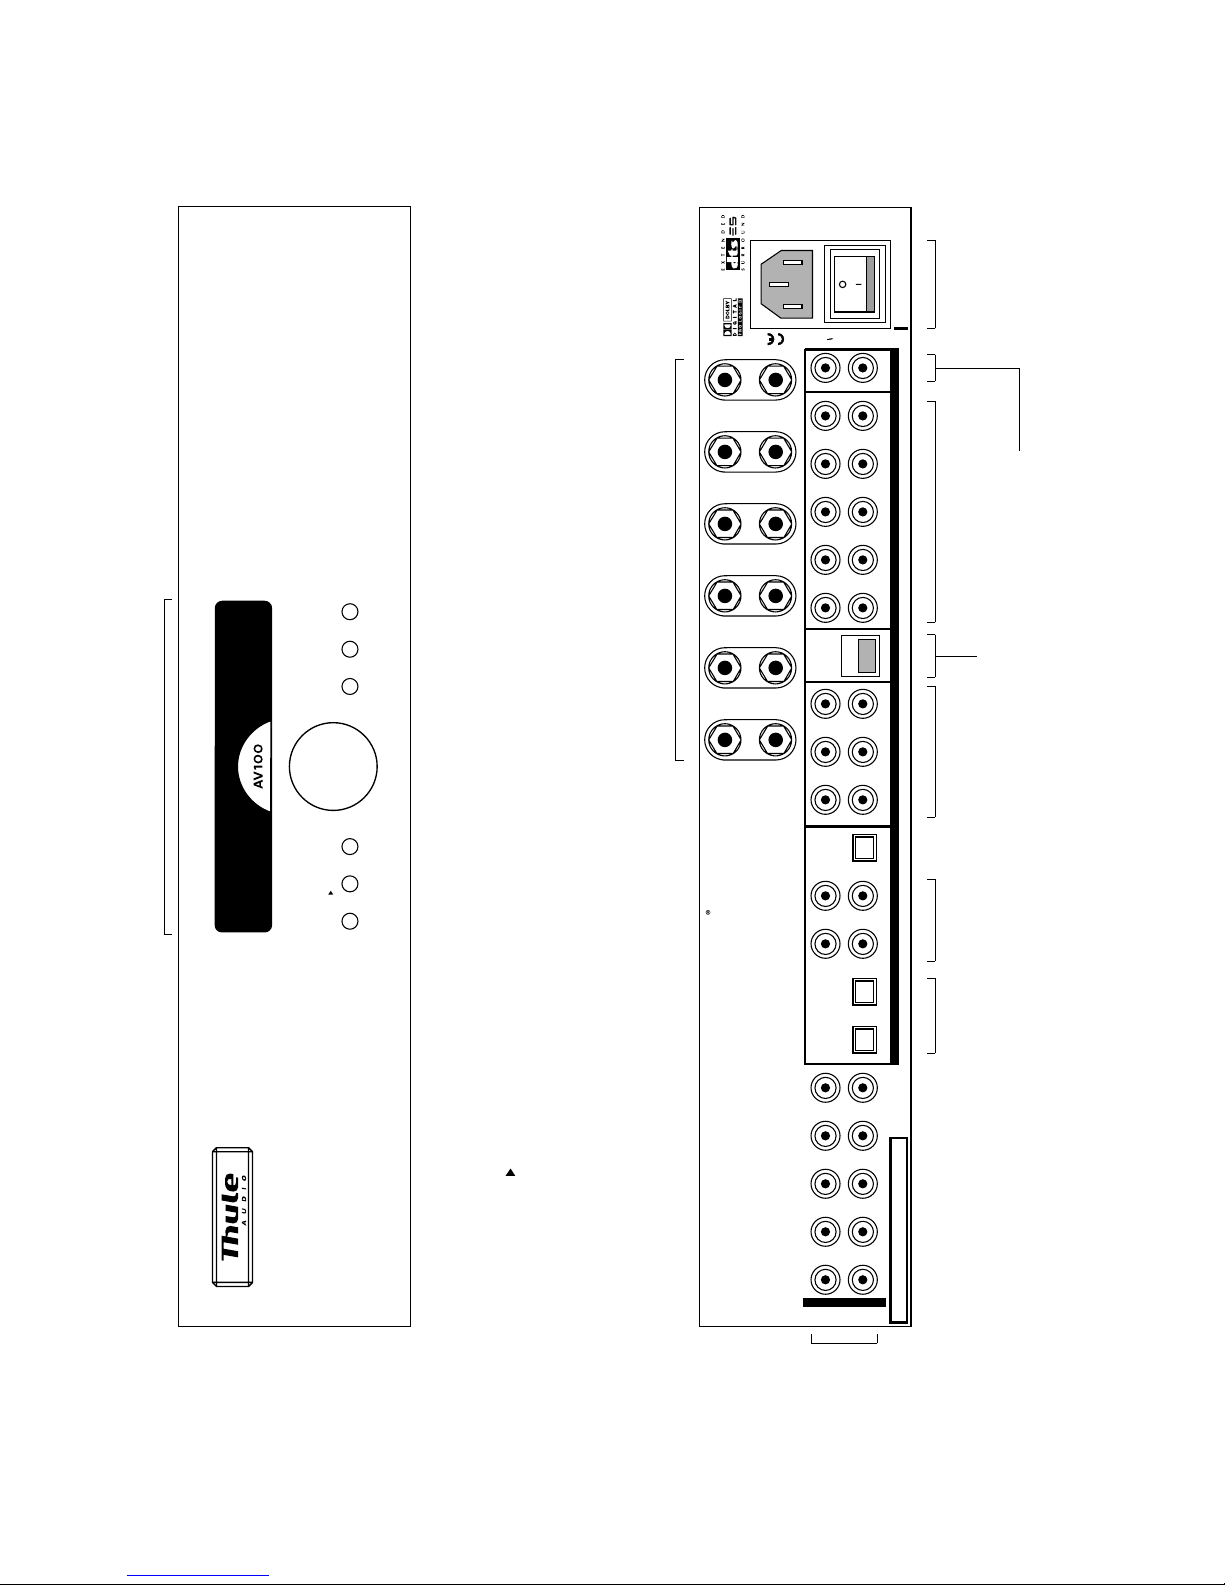
FRONT PANEL AND REAR PANEL - AV100
analog audio inputs
to DSP
power
connector
connector to control other
Thule Audio equipment or
RS232 communication
pre-out surroundelectrical digital
connectors
optical digital inputs
zone 2 out
6 x speaker outputs
inputs bypassing
DSP circuits
SURROUND
MODE
PURE
AUDIO
MUTE/
STBYCHANNEL INPUTVOL
PURE
AUDIO
MUTE/
STBY
pure audio input
INPUT
input selector
SURROUND
MODE
VOL
CHANNEL
channel balance
short push: change surround mode
2 sec. push: input format information
back to master volume
short push: mute to “40”
2 sec. push: standby
CONTROL PANEL
display: see page 9
Page 6
SURROUND OUTPUTS
ZONE 2
ZONE 2
MADE IN DENMARK BY THULE AUDIO
SURROUND AMPLIFIER
SC
SL
C
L
DIGITAL I/O
DATA I/O SURROUND OUTPUTS
ZONE 2
PURE AUDIO INPUT
CAUTION - RISK OF ELECTRIC SHOCK - DO NOT OPEN!
L
SL
CSC
SSL
C
SL
L
R
SR
SR
R
SUB SUB
SSR
SUB
SR
R
SAT
TV
LD/CD
TAPE1 TAPE2IN DVD
OUT
SAT
DVD
LD/CD
TV OUT
RS232
L
R
220-230 V
50-60 Hz
Manufacturedunder licence from Dolby LaboratoriesLicensing Corporation.
“Dolby”,“AC-3” and the double-D symbolare trademarks of Dolby Laboratories
LicensingCorporation. Copyright 1992 Dolby Laboratories,Inc. All rights reserved.
MODEL: SPHERE AV120
Manufacturedunder license from Digital Theater Systems,
Inc.US Pat. No. 5,451,942, 5,956,674, 5,974,380, 5,978,762
andother world-wide patents issued and pending. “DTS”,
“DTS-ESExtended Surround” and “Neo:6” are trademarks
ofDigital Theater Systems, Inc. Copyright 1996, 2000
DigitalT heater Systems, Inc. AllRights Reserved.
HIGH EFFICIENCY - VIRTUAL CLASS A
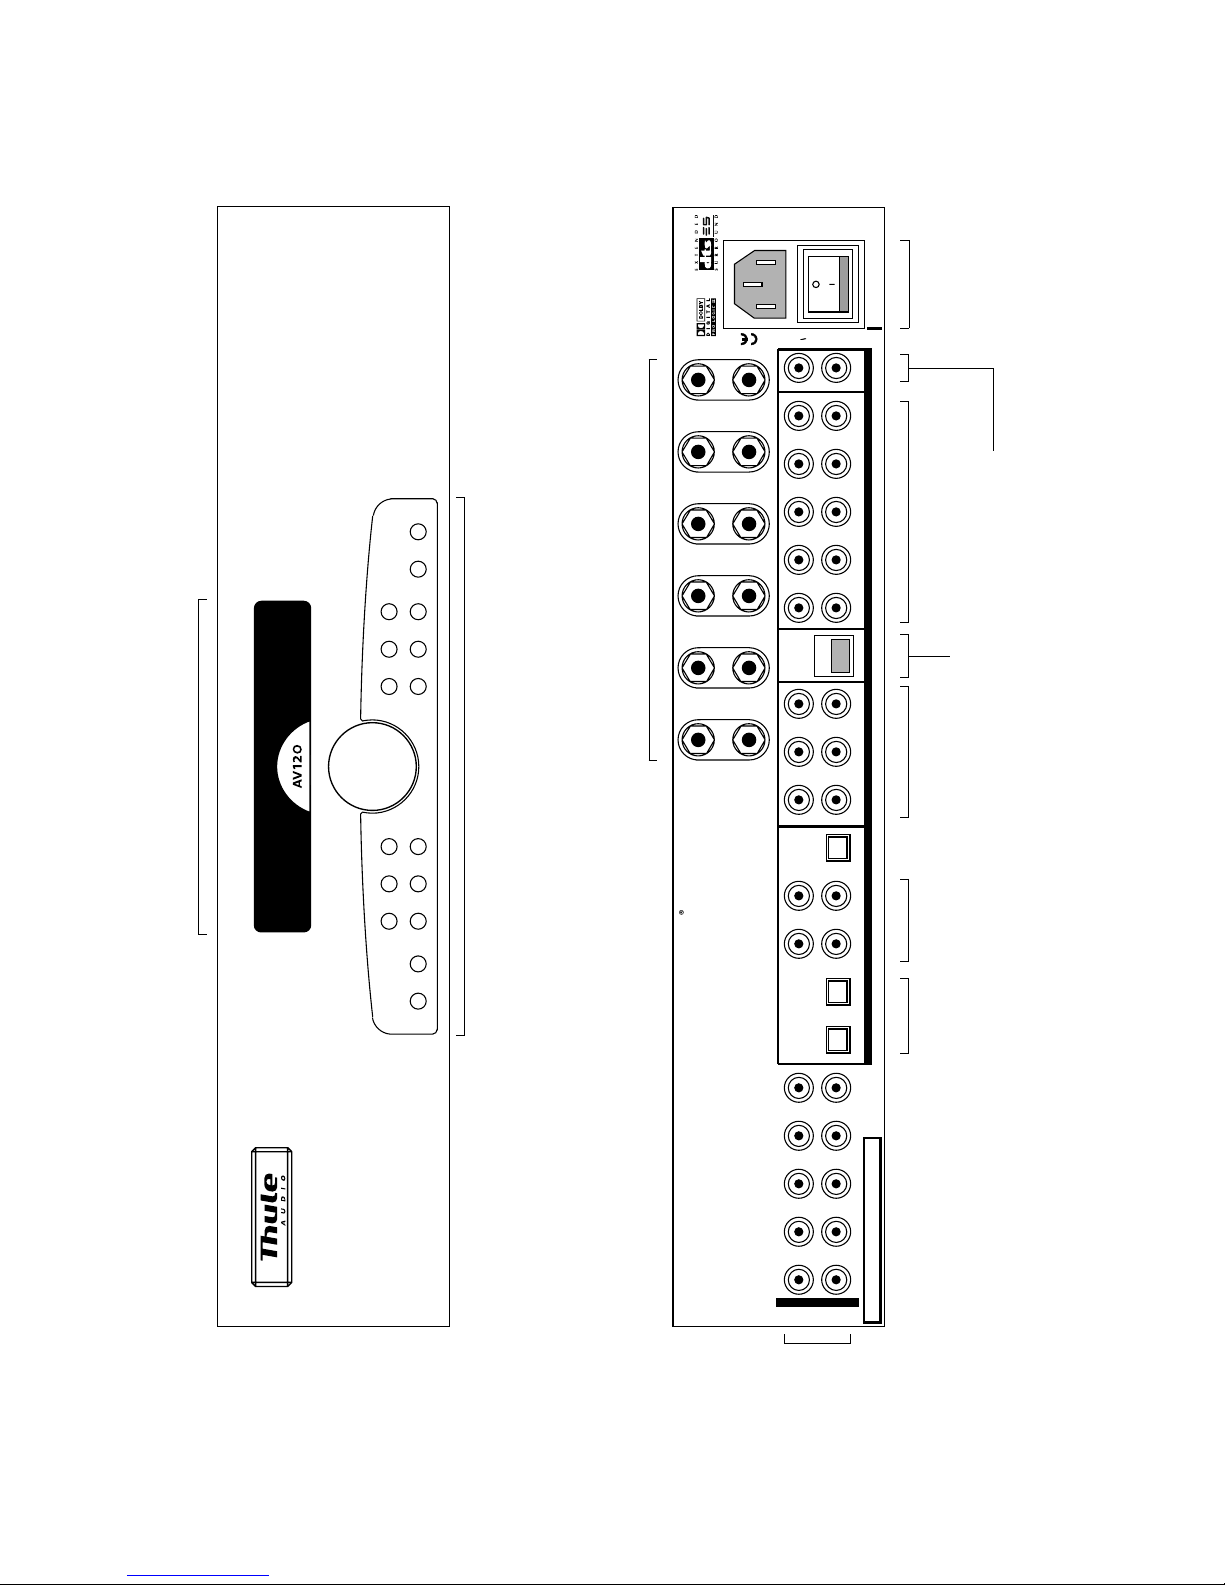
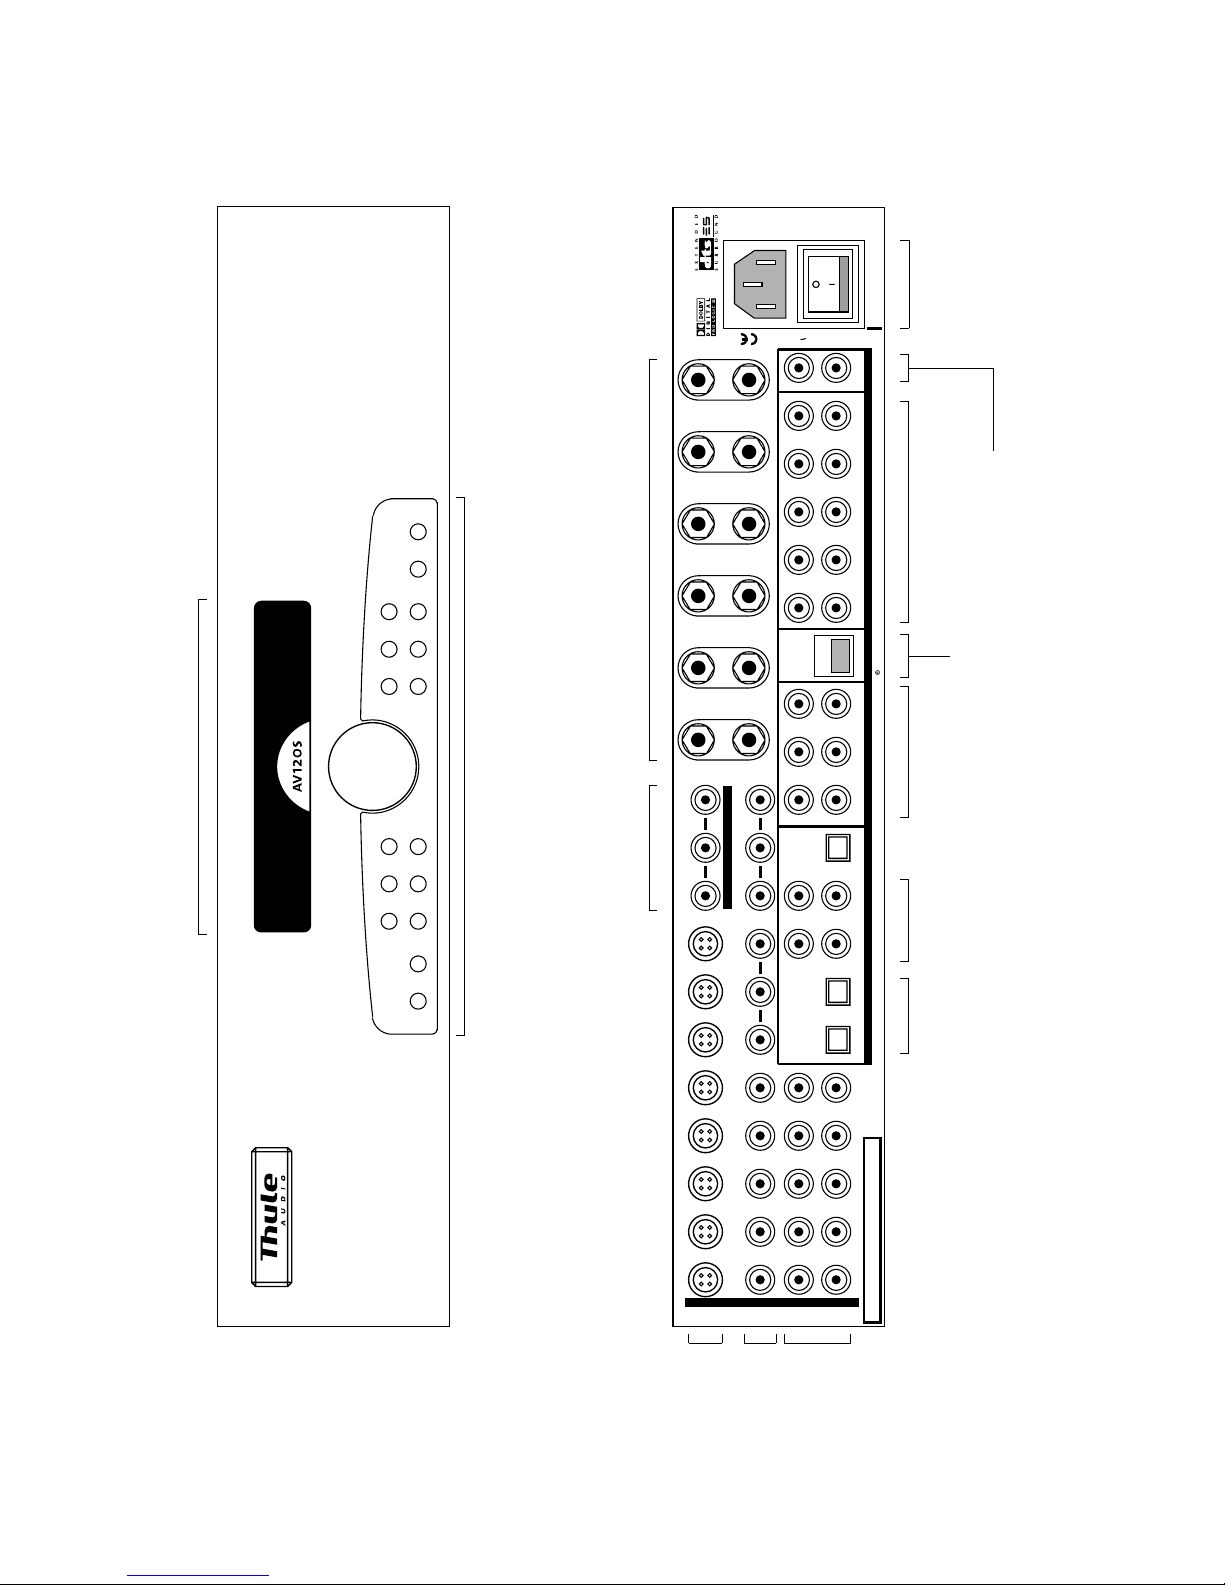
FRONT PANEL AND REAR PANEL - AV120
analog audio inputs
to DSP
power
connector
connector to control other
Thule Audio equipment or
RS232 communication
pre-out surroundelectrical digital
connectors
optical digital inputs
zone 2 out
6 x speaker outputs
inputs bypassing
DSP circuits
volume control | control panel: see page 9
display: see page 9
Page 7

SURROUND
MODE
PURE
AUDIO
MUTE/
STBYCHANNEL INPUTVOL
PURE
AUDIO
MUTE/
STBY
pure audio input
INPUT
input selector
SURROUND
MODE
VOL
CHANNEL
channel balance
short push: change surround mode
2 sec. push: input format information
back to master volume
CONTROL PANEL
SURROUND OUTPUTS
ZONE 2
MADE IN DENMARK BY THULE AUDIO
SURROUND AMPLIFIER
SC
SL
C
L
DIGITAL I/O
DATA I/O SURROUND OUTPUTS
ZONE 2
PURE AUDIO INPUT
CAUTION - RISK OF ELECTRIC SHOCK - DO NOT OPEN!
L
SL
CSC
SSL
C
SL
L
C/B
b C/Rr Y/G
R
SR
SR
R
SUB SUB
SSR
SUB
SR
R
SAT
SAT
TV
TV
LD/CD
LD/CD
TAPE1
TAPE1 TAPE2
TAPE2IN
IN DVD
DVD
DVD
OUT
OUT
SAT
DVD
OUT OUT
SAT
LD/CD
TV OUT
RS232
L
S-VIDEO
COMPOSITE
R
220-230 V
50-60 Hz
Manufacturedunder licence from Dolby LaboratoriesLicensing Corporation.
“Dolby”,“AC-3” and the double-D symbolare trademarks of Dolby Laboratories
LicensingCorporation. Copyright 1992 Dolby Laboratories,Inc. All rights reserved.
MODEL: SPHERE
A
V100 S
Manufacturedunder license from Digital Theater Systems,
Inc.US Pat. No. 5,451,942, 5,956,674, 5,974,380, 5,978,762
andother world-wide patents issued and pending. “DTS”,
“DTS-ESExtended Surround” and “Neo:6” are trademarks
ofDigital Theater Systems, Inc. Copyright 1996, 2000
DigitalTheater Systems, Inc. All Rights Reserved.
HIGH EFFICIENCY - VIRTUAL CLASS A
FRONT PANEL AND REAR PANEL - AV100S
S-video inputs
composite/component
video inputs
analog audio inputs
to DSP
power
connector
connector to control other
Thule Audio equipment or
RS232 communication
pre-out surroundelectrical digital
connectors
optical digital inputs
zone 2 out
6 x speaker outputs
inputs bypassing
DSP circuits
RGB/component
video output
display: see page 9
short push: mute to “40”
2 sec. push: standby
Page 8
SURROUND OUTPUTS
ZONE 2
MADE IN DENMARK BY THULE AUDIO
SURROUND AMPLIFIER
SC
SL
C
L
DIGITAL I/O
DATA I/O SURROUND OUTPUTS
ZONE 2
PURE AUDIO INPUT
CAUTION - RISK OF ELECTRIC SHOCK - DO NOT OPEN!
L
SL
CSC
SSL
C
SL
L
C/B
b C/Rr Y/G
R
SR
SR
R
SUB SUB
SSR
SUB
SR
R
SAT
SAT
TV
TV
LD/CD
LD/CD
TAPE1
TAPE1 TAPE2
TAPE2IN
IN DVD
DVD
DVD
OUT
OUT
SAT
DVD
OUT OUT
SAT
LD/CD
TV OUT
RS232
L
S-VIDEO
COMPOSITE
R
220-230 V
50-60 Hz
Manufacturedunder licence from Dolby LaboratoriesLicensing Corporation.
“Dolby”,“AC-3” and the double-D symbolare trademarks of Dolby Laboratories
LicensingCorporation. Copyright 1992 Dolby Laboratories,Inc. All rights reserved.
MODEL: SPHERE
A
V120 S
Manufacturedunder license from Digital Theater Systems,
Inc.US Pat. No. 5,451,942, 5,956,674, 5,974,380, 5,978,762
andother world-wide patents issued and pending. “DTS”,
“DTS-ESExtended Surround” and “Neo:6” are trademarks
ofDigital Theater Systems, Inc. Copyright 1996, 2000
DigitalTheater Systems, Inc. All Rights Reserved.
HIGH EFFICIENCY - VIRTUAL CLASS A
FRONT PANEL AND REAR PANEL - AV120S
S-video inputs
composite/component
video inputs
analog audio inputs
to DSP
power
connector
connector to control other
Thule Audio equipment or
RS232 communication
pre-out surroundelectrical digital
connectors
optical digital inputs
zone 2 out
6 x speaker outputs
inputs bypassing
DSP circuits
RGB/component
video output
volume control | control panel: see page 9
display: see page 9
Page 9

SL
SL
SURROUND PURE MUTE/
MODE
SURROUND
MODE
AUDIO STBY
SR
SR
SAT
SAT
LD
LD
TAPE 2
TAPE 2
SUB
SUB
L
L
C
C
R
R
DVD
DVD
TV
TV
TAPE 1
TAPE 1
VOL
VOL
short push: surround left channel balance
2 sec. push: surround left channel delay
/ enter
left channel balance
/ left
Dolby Digital surround
Dolby ProLogic II surround
2 channel stereo
Adjustments Zone 2
DTS digital surround
short push: change surround mode
2 sec. push: input format information
short push: back to master volume
2 sec. push: enter config mode
/ exit config menu
short push: center channel balance
2 sec. push: center channel delay
/up
right channel balance
/ right
short push: surround right channel balance
2 sec. push: surround right channel delay
DVD player
remote sensor
multi functional display
standby indicator
surround mode
TV-set
audio/video tape1
audio/video tape2
laser disc player or
CD player
sattelite receiver
pure audio input
short push: mute -20dB
2 sec push: standby
short push: subwoofer balance
2 sec push: LFE balance
/ down
main function
/ function in config mode
CONTROL PANEL - AV120, AV120S
DISPLAY
MUTE/
STBY
PURE
AUDIO
volume level
100: max
0: min
ZONE 2
ZONE 2
STEREO
STEREO
Page 10

___________________________________________________________________________
page 10
Congratulations with your new SPHERE AV100/120 integrated surround amplifier!
The SPHERE AV100/120 offers you an outstanding range of features and sound
performance due to its use of highly advanced technology.
We feel confident that the AV100/120 will give you many enjoyable moments while
watching films and listening to music.
To ensure you the full benefit of this advanced product, please read this manual
carefully before you proceed.
The SPHERE AV100/120 includes the following features:
- Pure analogue input with 6 channels
- 32 – 96 kHz PCM stereo
- 96kHz Dolby ProLogic II decoding
- Dolby Digital decoding with auto detection
- DTS 5.1, DTS 6.1 discrete, DTS 6.1 matrix and DTS 24bit/96kHz decoding with
auto detection
- Extended precision decoder improves dynamic range for 24-bit DTS up to
115dBA
- New Motorola DSP 56367 with 150 MIPS (Million Instructions Per Second)
- Upgradeable design for coming sound formats
- 10x Burr Brown 24-bit/192kHz D/A converters
-
True differential D/A conversion in all channels
- Direct-key access (AV120 only) to channel trim adjustments with 0.5dB
adjustment step
Precision volume control for all 10 channels with 0.5dB adjustment steps and
100dB range
- Delay adjustment for centre, surround left, surround right and surround centre
channels
- Common delay (Lip sync) for all channels up to 5ms to compensate for possible
video delays
- Direct-key access to input selection (AV120 only)
- Most inputs can be assigned as analogue, electrical digital or optical digital
- Sensitivity for analogue inputs to DSP is adjusted automatically for improved
dynamic range
- Test Noise signal for the individual channels’ volume trim
- Flexible speaker settings with extensive bass management
- Adjustable crossover frequency (60 – 120Hz) for bass management
- Dynamic range compression for both DTS and Dolby Digital, e.g. for improved
performance in noisy environments
AV100S and AV120S only:
- Component, S-video and composite video switching with 4-line adaptive comb
filter, so that only one RGB or Component video connection to TV / Projector is
necessary.
- Progressive video pass-through with 100MHz bandwidth
- Video encoder with On Screen Display (OSD), which is automatically bypassed
when not used
Each feature is described further in the following pages.
Page 11

___________________________________________________________________________
page 11
Following formats are used in this manual:
Cursive text indicates display readout, e.g.: CONFIG
Key type is indicated with “”, e.g.: “ENTER” key.
Stereo speakers:
“L” : left speaker
“R” : right speaker
Surround speakers:
“C” : centre speaker placed in front of the listening position
“SL” : surround left speaker placed rear left of the listening position
“SR” : surround right speaker placed rear right of the listening position
Extended surround speakers:
“SC” : surround centre speaker placed back of the listening position.
“SSL” : Left side speaker, placed between L and SL speaker.
“SSR” : Right side speaker, placed between R and SR speaker.
All video specifications apply only for AV100S and AV120S.
Page 12

___________________________________________________________________________
page 12
0. Installation
Please ensure carefully that all following rules are complied to; otherwise you may void
your warranty and Thule Audio will accept no responsibility for any damages incurred:
- Place the amplifier on a hard and flat surface.
- The ventilation holes should not be covered. There must be at least 10 cm (4
inches) of free air on top of the amplifier. Do not place any other equipment on top
of the amplifier.
-
Do not expose the amplifier to direct sunlight.
-
Do not place the amplifier in warm or dusty environments.
Caution: Because of risk of fire or electric shock, do not expose the amplifier to rain or
moisture.
Caution: Because of risk of electric shock, do not open the amplifier.
1. Input selection
The input selection is very flexible, so it can suit many different home theatre and
stereo installations. It is possible to switch between seven different inputs, which are
directly accessed by keys on the front panel (only AV120) or on the remote control.
Each input can be configured in different ways, shown below with an “X”.
The factory settings are marked with [ ] brackets. Changes to this setting can be
made in the config menu.
INPUTS
DVD
SAT
LD
TV
Tape 1 Tape 2 Pure A.
Analogue
X
X
[X]
[X]
[X]
Coax digital [X]
[X]
[X]
X
Dig. Direct X
Optical
X
[X]
Composite
[X]
X
[X]
X
S-video
X
X
[X]
X
[X]
Component [X]
X
For audio signals, one of four options in the upper three rows must be selected
under the config.input menu.
Similarly, the video inputs configuration must be selected for AV100S/AV120S in the
config.video-input-output menu. After video switching, the built-in adaptive comb
filter converts the selected video source into component or RGB video format.
Therefore, your projector or TV must be set correctly to either RGB or component,
and the “intelligent” video switching in AV100S/120S will take of the rest.
The Pure Audio input will bypass the DSP circuits and is recommended for high
quality music listening in stereo e.g. to a CD player or another analogue source.
Alternatively, for high quality music listening in stereo, connect the digital output from
a CD player or DVD player to one of the available digital inputs in the AV100/120
Page 13

___________________________________________________________________________
page 13
and use the built-in balanced 24-bit D/A converters. This will bypass the CD-player’s
own normal 16-bit D/A converters and improve playback quality significantly.
The Sphere AV100/120 is also optimised for D/A conversion of the 24bit/96kHz
stereo DVD music discs.
2. Volume controls
The master volume level is set by rotating the volume knob on the front panel or by
using the “VOL ⇑” or VOL ⇓” key on the remote control.
The volume adjustments are scaled, so that at normal listening levels, the setting is
extremely accurate with 0.5dB steps, while at lower levels the step size increases to
allow a more rapid setting. The scaled volume setting is the most convenient for
normal users, and is therefore set as default.
However, it is possible to change the volume to 0.5dB steps for the entire volume
range by changing it in the config.volume menu.
The volume trims between each channel are set under the config.noise menu by
comparing the perceived sound volume from each channel via the built-in noise
generator, so that you can compensate for speaker sensitivity differences and
distances from listening position.
We recommend that the settings for each channel after using the config.noise option
are stored as initial settings for each of the individual Stereo, ProLogic II, Dolby
Digital and DTS memory banks. See further description of the memory banks in
section 5.
However, each surround mode may lead to a different setting of volume trims based
on individual requirements. In Thule Audio’s experience, Dolby Digital and ProLogic
II mode gain can be increased 3 – 6 dB more in the surround speakers than
“measured” under the noise test to obtain a more realistic surround image. Also in
DTS mode, the gain can be increased 2 – 4 dB in the surround speakers. These
more practical settings based on individual requirements can then be stored under
each memory bank for automatic reload depending on chosen surround mode.
Each movie or music source may also lead to a different setting of volume trims.
Therefore it is possible to adjust the volume trim “on the fly” directly by pushing the
channel “L”, “C”, “R”, “SL”, “SUB” or “SR” key on the front panel or remote control.
However, for setting the volume trim from the front panel on AV100/100S, it is
necessary to toggle the “channel” knob.
Subsequently, the extended surround channels “SC”,”SSL” and “SSR” can be
selected for adjusting by using the arrow keys. The channel level can then be
adjusted by rotating the volume knob on the front panel or by pressing the “VOL ⇑”
or VOL ⇓” key on the remote control.
The volume trim settings changed “on the fly” will return to the default settings stored
in the memory banks when the AV100/120 is set into standby or power is turned off.
By pushing the “SUB” key on the front panel or remote in for 2 seconds, the LFE
(low frequency effect) channel is activated for adjusting. The LFE channel is the
bass information, which is sent to the subwoofer or alternatively sent to the “L” and
“R” channels if the subwoofer is deactivated. In this way, it is possible to adjust the
Page 14

___________________________________________________________________________
page 14
low frequency content even when no subwoofer is present.
The normal display returns 15 sec. after the last action on any of the channel select
keys, or immediately after the ”>VOL” key is pushed.
3. Zone 2
With zone 2, it is possible to redirect the sound to other audio systems, e.g. in the
kitchen or bedroom. The zone 2 has a separate volume control and input selector.
Adjustments for zone 2 are achieved by holding down the same input knob as
currently selected. When e.g. DVD input is selected, hold down the “DVD” knob on
remote or front panel for approximately 1 sec.
Then the ZONE2 indicator becomes active.
Possible inputs are:
SAT ANLG
TV ANLG
LD ANLG
TAPE1 ANLG
Z1 -> Z2 (Input selected in the main zone is played in zone 2)
Even if an input is defined as digital in the main zone, the analogue option is chosen
in zone 2.
The operation returns to the main zone 15 sec. after the last adjustment made to
zone 2, or by pressing the ”>VOL” key.
4. Delay
To experience the best surround sound quality, it is important that the sound signal
from all the speakers arrives at the same time at the listening position. If the
listening position is placed closer to the rear surround speakers, the sound from
these speakers will arrive earlier at the listening position. In this case, it is necessary
to delay the sound slightly from the rear speakers.
The important issue here is the difference in distance from the listening position to
the front and rear speakers.
The same problem arises if the centre speaker is placed closer to the listening
position than the front speakers.
On some video sources, the video is delayed compared to the audio, due to video
processing. To compensate for video delay, it is possible to delay all audio channels
up to 5ms. This common delay is called “Lip sync”.
The delays can be set directly from the front panel keys by pushing the “SL”, “SR” or
“C” keys for more than two seconds (only AV120/120S) or double-push on the same
knobs on the remote control.
The display responds briefly with the message DELAY, and afterwards the delay
setting for the selected channel is displayed, e.g. SL 5.0ms. Subsequently, the
delay of the extended surround channel SC and “Lip Sync” can be selected by using
the arrow keys.
The delay can then be changed in steps of 1.0ms by turning the volume knob or
Page 15

___________________________________________________________________________
page 15
pressing the “VOL ⇑” or “VOL ⇓” key on the remote control.
The normal display will return after 15 seconds from last change or by pushing the
“>VOL” key.
The setting is expressed in milliseconds, but the delay can be calculated from the
physical distance.
A sound wave travels at approx. 340 metres per second, which is equivalent to:
1 foot per 1 millisecond or
1 metre per 3 milliseconds
The following example demonstrates how to calculate the delay setting for SL, SR,
SC and C. The distances mentioned from the listening position to each speaker are
used as an example only and are not meant to be an ideal guideline:
Example Your measurements
Listening position <-> Left speaker: 3.8 m (= 11.4 ft)
Listening position <-> Right speaker: 3.8 m (= 11.4 ft)
Listening position <-> Centre speaker: 2.9 m (= 8.7 ft)
Listening position <-> Left surround speaker: 2.1 m (= 6.3 ft)
Listening position <-> Right surr. speaker: 2.1 m (= 6.3 ft)
Listening position <-> Centre surr. speaker: 1.8 m (= 6.3 ft)
The delays when measuring the distance in metres are then calculated as:
SL delay : (L - SL distance) x 3 = (3.8 - 2.1) x 3 = 5.1ms
SR delay : (R - SR distance) x 3 = (3.8 - 2.1) x 3 = 5.1ms
C delay : (L - C distance) x 3 = (3.8 - 2.9) x 3 = 2.7ms
SC delay : (L - C distance) x 3 = (3.8 - 1.8) x 3 = 6ms
or when the distance is measured in feet:
SL delay : L - SL distance = 11.4 - 6.3 = 5.1ms
SR delay : R - SR distance = 11.4 - 6.3 = 5.1ms
C delay : L - C distance = 11.4 - 8.7 = 2.7ms
SC delay : L - SC distance = 11.4 - 5.4 = 6ms
In this example, we would set the delay at:
SL 5.0ms C 3.0ms SR 5.0ms SC 6.0ms
The above calculations for delay are based on the physical installation and should
be stored as the initial settings in the memory banks (see section 5).
For each surround mode, the preferred settings should be stored in the memory
banks for automatic reload.
The user may still prefer to change delays during playback of a movie, based on
subjective preference in a specific movie.
Page 16

___________________________________________________________________________
page 16
Hence the delay can also be set “on the fly”.
The intermediate delay settings will return to the default settings stored in the
memory banks when the AV100/120 is set into standby or turned off.
5. Surround Modes
The actual surround mode of the AV100/120 is constantly indicated in the display:
Possible input types:
- Stereo analogue input, PCM or Dolby Digital 2.0 bitstream
- Dolby ProLogic II analogue input, PCM or Dolby Digital 2.0 bitstream
- Dolby Digital Dolby Digital 5.1 bitstream.
- DTS DTS bitstream: 5.1, ES 6.1 discrete or 96kHz 5.1
5.1 Dolby Digital
If a Dolby Digital 5.1 surround bitstream is detected, the AV100/120 will automatically switch to Dolby Digital surround, and the Dolby Digital indicator will light up.
By pushing the “SURROUND MODE” key on the front panel or “mode” on the
remote control, information about which outputs can be expected to be active are
indicated, thus:
L: left speaker
R: right speaker
C: centre speaker
SC: surround centre speaker
SL: surround left speaker
SR: surround right speaker
SW: subwoofer
The number of active outputs will depend on which speakers are activated in the
config.speaker and config.extended surround menu, the received input type
(analogue, PCM, Dolby Digital bitstream or DTS bitstream), and if applicable, also
the selected surround mode.
By pushing the “SURROUND MODE” key for more than one second, information
about the received bitstream will be displayed:
Active audio channels in the received bitstream:
2/0 : L, R are present
2/1 : L, R, Sub are present*
2/2 : L, R, SL, SR are present*
3/0 : L, R, C are present*
3/1 : L, R, C, Sub are present*
3/2 : L, R, SL, SR, C are present*
*If not all speakers are selected under the config.speaker menu, down-mixing will occur automatically.
Page 17

___________________________________________________________________________
page 17
And the transmission bit rate of the received bitstream:
32k : 32 kbit/sec.
.
.
448k : 448 kbit/sec.
648k : 648 kbit/sec.
768k : 768 kbit/sec. (DTS only)
1411k : 1411 kbit/sec. (DTS only)
1532k : 1532 kbit/sec. (DTS only)
If only two audio channels are active in the received Dolby Digital bitstream (2/0),
the input is assumed to be Dolby ProLogic II when indicated in the bitstream. All
other signals will be interpreted by default as two-channel stereo.
In case of only two active audio channels, the user can toggle between STEREO
and Dolby ProLogic II by an additional short push on the “SURROUND MODE” key.
In this case, both the Dolby Digital and Stereo or the Dolby Digital and Dolby
ProLogic II indicators are turned on. See further information about ProLogic II below.
The normal display will return after 15 sec. from last push on “SURROUND MODE”
or by pushing the ”>VOL” key.
5.2 DTS
Generally, DTS offer the same information and possibilities as Dolby Digital. But
DTS also contains additional possibilities as described in the following.
Several new DTS formats are supported by the AV100/120:
DTS 24-bit:
The DTS encoding resolution is indicated during the DTS lock-on, second line. E.g.
768k/24 means a 768kHz transmission bit rate with 24-bit encoding resolution.
AV100/120 offers extended precision decoding of DTS 24-bitstream to take full
advantage of this increased resolution. For DTS 24-bit, this improves the dynamic
range up to 117dBA, which is fully comparable with DVD-Audio. But DTS 24bitstream can be played on normal DVD-Video players. Several mainstream DVDVideo discs are already encoded with DTS 24-bit, e.g.: “Pearl Harbor”, “Jurassic
Park III”, “Moulin Rouge”, ”Gladiator”, “Lord of the Rings, SE” and “The Haunting”.
DTS ES 6.1 Discrete and DTS ES 6.1 Matrix:
Some DTS discs are encoded with a discrete centre surround channel, called “6.1
Discrete”. If such DVD discs are played, AV100/120 will indicate ES 3/3.1 at lock-on.
This means three front channels (L, C, R) and three surround channels (SL, SC,
SR) are present in the DTS stream. If “6.1 Discrete” is enabled under the
config.extended surround menu, the AV100/120 will automatically activate the
extended surround channel, SC.
Examples of DTS ES 6.1 Discrete DVD discs are “Gladiator” and “The Haunting”.
A few other DVD discs are encoded with DTS ES 6.1 Matrix, where the extended
surround channel, SC, is generated by a matrix process on the surround channels
SL and SR.
One example of a DTS ES 6.1 Matrix disc is “Terminator II, special edition”.
Page 18

___________________________________________________________________________
page 18
6.1 Matrix:
This DTS mode is actually identical to DTS ES 6.1 Matrix as described above, but
by enabling this mode, the user thereby chooses always to activate the matrix
process on the SL and SR to generate the SC channel.
6.1 Matrix mode will work on Dolby Digital 5.1 streams, too. Try out this feature on
e.g. “Black Hawk Down”.
If the installation contains three rear surround channels, the 6.1 Matrix mode will
improve the surround experience on nearly all 5.1 encoded music and movie
CD/DVD discs. Also, the 6.1 Matrix mode will generate the same sound information
in the SC channel as the THX Surround EX process.
In this case, the user should enable both “DTS 6.1 Discrete” and “6.1 Matrix” under
the config.extended surround menu.
DTS 96kHz:
DTS now offers a new format, where D/A conversion takes place at 96kHz. This is
also supported by AV100/120. The encoding resolution is also 24-bit, thus the
format is normally referred to as “DTS 24/96”. AV100/120 will automatically detect
this type of bitstream and display 96k 5.1. No interaction from the user is necessary.
The 6.1 Matrix mode is automatically disabled and no sound comes from the SC
channel in 96kHz mode.
The “Queen: A night at the opera” DVD in DTS 24/96 demonstrates the potential of
this format.
The DTS 24/96 format is compatible in performance with DVD-Audio, but can be
played on normal DVD-video or CD players.
5.3 Dolby ProLogic II
The AV100/120 supports the new ProLogic II format, which generates surround and
centre channels from a normal stereo signal. Compared to the conventional
ProLogic, the new ProLogic II among other things offers separate SL and SR
channels with full bandwidth information.
Especially on TV-films in stereo, Prologic II can generate a near-Dolby Digital 5.1
experience.
AV100/120 supports separate music and movie modes for ProLogic II. The normal
movie mode will concentrate too much information in the centre channel when
listening to music, therefore the special music mode spreads out the music away
from the centre channel into the L & R speakers.
Thule Audio finds the music mode especially useful for some live recordings, but it is
of course a matter of personal taste, which mode is preferable.
For each input, the user can decide by default whether to use Music or Movie mode,
or to activate ProLogic II under the config.ProLogic II menu.
The surround mode can be toggled between STEREO and Dolby ProLogic II by an
additional short push on the “SURROUND MODE” key.
5.4 PCM and analogue inputs
An analogue input is activated if the letters “ANLG” are indicated after the source
name, e.g. LD ANLG. A PCM input is present if a Dolby Digital or DTS stream is not
auto-detected for a digital input (COAX or OPTO).
An analogue or PCM input stream contains no information about the surround
Page 19

___________________________________________________________________________
page 19
mode, therefore STEREO is selected as default, unless ProLogic II is selected
under the config.ProLogic II menu.
By pushing the “SURROUND MODE” key or “STATUS” on the remote control for
more than one second, information about received bitstream will be displayed, e.g.
PCM. The AV100/120 can receive PCM inputs with sampling rates from 32kHz up to
96kHz.
For analogue inputs going through the DSP, PCM will also be displayed, because
the digital data from the analogue to digital converter (A/D) is converted into PCM
format with a 96 kHz sampling rate.
For the “PURE AUDIO” input, only ANALOG is displayed. This input completely
bypasses the DSP circuits for the purest analogue reproduction by using the
shortest possible signal path while not adding unnecessary sound processing.
The normal display will return after 15 sec. from last push on “SURROUND MODE”,
or by pushing the ”>VOL” key.
5.5 Side Channels
Thule Audio offers a unique 8.1 channel extension setup for large rooms: Side
channels. By blending the sound from the front speakers and the rear speakers into
to new channels called SSL and SSR, it is possible to create a more continuous
sound sweep for sound effects moving from one end of the room to the other.
The side speakers are simply activated in the config.extended surround menu.
The AV100/120 amplifier contains only six power amplifiers, so it is necessary to
add a two-channel external power amplifier for creating a 8.1 system. It is possible
to redirect the sound from the SSL, SSR processor section into the L and R power
section of AV100/120, and then use a large external power amplifier, e.g. Thule
Audio Space PA350B for powering the L, R channels.
6. Config menu
The config menu is activated by pushing “CONFIG” on the remote control or
pressing the “>VOL” key for 2 seconds on the front panel.
Navigate through the config menu via the remote control by using the arrow keys:
⇑ ⇓ ⇒ ⇐
Enter any sub-menu by pushing “⇒”. Select your desired options by pushing “enter”.
Selected options are underlined on the front panel display and highlighted on the
OSD screen. Exit from a sub-menu with “⇐ ”. On AV120, it is also possible to
navigate in the config menu with the front panel keys, as the following keys are
reassigned in the config mode:
“L”: ⇐ “C”: ⇑ “R”: ⇒
“SL”: enter “SUB”: ⇓
It is possible to exit the config menu by several pushes on the “⇐” key, or one push
on the “>VOL” key.
The config menu has two pages. Page 2 is displayed by an additional push on the ⇑
Page 20

___________________________________________________________________________
page 20
or ⇓ key.
In the config sub-menus, even more settings can be activated as described in the
following paragraphs:
6.1 Speakers
The SPHERE AV100/120 contains extensive bass management adjustments, so
that the bass signal can be re-routed to those loudspeakers specifically capable of
handling low-frequency information.
The following selections can be made in the config.speaker menu by using the
navigation keys described above:
Left speaker (L): SMALL or LARGE
Right speaker (R): SMALL or LARGE
Centre speaker (C): SMALL or LARGE or OFF
Surround left speaker (SL): SMALL or LARGE or OFF
Surround right speaker (SR): SMALL or LARGE or OFF
Subwoofer (SUB): ON or OFF
When a speaker is selected as SMALL, the bass signal will be re-routed to the subwoofer or the L&R speakers (bass management).
If a speaker is turned off, the sound signal will be sent to the remaining speakers,
which are selected as active (down-mixing).
Special attention should be given to the subwoofer management:
For Dolby Digital 3/2 and DTS input signals, a special low frequency channel (LFE)
is normally included in the bitstream, which is indicated with a “.1” after the input
stream indication, e.g. 3/2 .1 . The LFE channel produces an output signal for the
subwoofer. This means even if all speakers are selected as LARGE, where no
signal normally should be sent to the subwoofer by the bass management, the LFE
input channel overrides this setting and sends out its own subwoofer signal.
For Stereo and ProLogic II,
no LFE channel is present. If all speakers are chosen as
LARGE, the bass management will not send any signal to the subwoofer. To obtain
a subwoofer signal in this case, the user can select the subwoofer – max bass ON
option under the config.cross freq menu. Now, the AV100/120 takes the
accumulated full range signal from the L and R channels and sends it to the
subwoofer.
When activating the subwoofer for Stereo and Pro Logic modes, you can decide
between the two following options:
a ) Select L & R (or L,R,C,SL,SR in Pro Logic II) as SMALL. The bass management
will now send the L & R low frequencies to the subwoofer. You can choose
between six different crossover frequencies in the config.cross freq menu.
or
Page 21

___________________________________________________________________________
page 21
b) Select L and R (or L,R,C,SL,SR in Pro Logic) to be LARGE and then select
Subwoofer – max bass ON in the config.cross freq menu. Here, a full-range
accumulated mono signal of all the other channels will be sent to the subwoofer.
The implication of b) is that “double bass” is present in the system. That means the
user should consider choosing a lower gain setting for the subwoofer, e.g. –4 to –8
dB depending on the sensitivity of the subwoofer relative to the other speakers.
The b) situation is useful in situations where the L & R speakers can handle deep
bass information but extra bass is required.
If the L & R speakers are not well suited for the lowest frequencies, then choose a),
probably with not less than a 60Hz crossover frequency.
Furthermore, the Subwoofer – max bass ON can be selected in the Dolby Digital
and DTS mode if extra bass is required.
The Subwoofer – max bass setting will be stored in the memory bank and can
therefore be set individually for each surround mode.
6.2 Inputs
Assignment of socket for each input can be selected in this menu as previously
described in section 1.
6.3 Noise
If different speakers are used or the distance from the listening position to each
speaker is different, the perceived sound level at the listening position from each
speaker will change. By selecting the NOISE option, a noise signal is sent to each
activated speaker. The noise signal will cycle around, and the user can now set the
level for each speaker to obtain equal sound level at the listening position.
A sound pressure level meter can be used if required - use the "C" weighted setting,
and hold the meter away from your body.
Exit from noise test: push “⇐” or “>VOL” keys.
6.4 Crossover frequency
A very useful feature is the crossover frequency setting. If a speaker is selected as
SMALL, the low frequency content is sent to the Subwoofer and/or L/R speakers.
The corresponding crossover frequency is selected under the config.cross freq
menu. Small surround speakers could be selected as high as 120Hz, but larger
speakers should be set at 60Hz.
6.5 Extended Surround
In this menu, you can enable DTS ES 6.1 Discrete, 6.1 Matrix and activate the side
channels. Please refer to the “Surround mode” section for explanations.
6.6 Dynamic range compression
When playing in a noisy environment, it may be desirable to boost the low level
Page 22

___________________________________________________________________________
page 22
signals to be able to hear the low level signals at realistic average sound levels (e.g.
the sound of leaves rustling in the wind). In addition, the low level boost can
increase understanding of speech, especially in noisy environments.
It may also be desirable to limit the peak sound level, so as not to disturb your
neighbours at night.
The following settings are possible:
DYNAMIC HI (DTS + Dolby Digital)
High-level limit: 0.0 (disable high-level limit function)
0.1
0.2
0.4
0.6
1.0 (maximize high-level limit function)
DYNAMIC LO (Dolby Digital)
Low-level boost: 0.0 (disable low-level boost)
0.1
0.2
0.4
0.6
1.0 (maximize low-level boost)
6.7 Volume scale
It is possible to select two different volume scale settings: a progressive step size,
where step size is larger at low levels for rapid setting and small at normal listening
levels, or alternatively a fixed more precise but slower to use 0.5dB step size.
The default selected progressive step size is more convenient for most users and is
therefore called “normal”, while the fixed step size scale is called “full”:
“normal”: 0.0, 5.0 , 10.0, 15.0, 20.0, 22.0, 24.0,......38.0, 40.0, 41.0,
42.0,..... , 68.0, 69.0, 70.0, 70.5, 71.0, 71.5,..... , 99.5, 100
“full”: fixed 0.5dB step size from 0.0 to 100 ( 200 steps).
6.8 Saving set-up parameters in the memory bank
In the menu MEM BANK, you can store the set-up parameters in four memory
banks, one for each surround mode: Stereo, ProLogic II, Dolby Digital and DTS.
The following parameters are saved:
- Channel volume trims (L, C, R, SL, SR, SUB and LFE)
- Channel delay (SL, SR, C, SC)
- Speaker configuration (speaker size and crossover frequencies)
- Subwoofer max bass (accumulated mono signal sent to the subwoofer)
When you have completed your settings for one of the four above-mentioned
modes, you can save your settings by choosing the correct memory bank (Stereo,
ProLogic II, Dolby Digital or DTS) by pressing “⇒ “ followed by “ENTER”.
The saved parameters will be reloaded each time a surround mode is changed.
Page 23

___________________________________________________________________________
page 23
However, intermediate settings made “on the fly” will be maintained for each
surround mode until the AV100/120 is turned off or set into standby.
6.9 Return to factory default setting
Each setting in the configuration menu will be stored even if the mains power is cut
off.
However, if your entire set-up does not work satisfactorily, it may be desirable simply
to reload the original factory default settings, like rebooting a computer.
If this option is selected by the ”⇒” key, the user will be asked SURE ? in the
display. If accepted, the user must then press the “ENTER” key. Otherwise, cancel
the changes by pushing “⇐” or “>VOL”.
Please note that delay and volume trim settings will be returned to their original
settings with this command and your personal settings cannot be restored.
6.10 OSD (Only applicable for AV100S and AV120S.)
The information on the front panel display can also be displayed on the TV-set or
projector (On Screen Display) by the built-in video encoder.
When entering the config menu, a full-screen OSD is enabled, which overrides other
video sources.
In normal mode, the OSD is mixed with the selected video signal.
The following settings are possible:
- OSD is disabled
- OSD is enabled only by commands from the remote control (factory setting)
- OSD is enabled both by command from the remote control and front panel keys
When no OSD is displayed, the OSD circuit is automatically switched out of the
video signal path to obtain maximum video quality from the sources.
6.11 SPDIF OUT
In this menu you can select which channels should be sent to the optical digital
output.
The sample rate will change according to the different sources used, e.g. analogue
input and DTS 96kHz has an output of 96kHz, while normal DVD output is 48kHz.
6.12 Power Amp control
The AV100/AV120 can control an external Thule Audio amplifier via the rear RJ45
connector. When using IA350, PA350 or PA250 MKII for L & R power amplification
in an 8.1 system (see “Side Channels” in “Surround mode” section), the AV100/120
should be set in “FIXED 2 CH CONTROL” and signal from SSL, SSR processor
should be redirected to the built-in L & R power amplifiers by setting “L,R processor”
-> SSL, SSR power.
In this case, it is also necessary to connect a special RCA/phono-to-XLR cable
between the AV100/120 and the IA/PA350B amplifiers, because the IA/PA350B
amplifiers will always use the balanced input in two-channel mode when controlled
externally by the RJ45 connection.
Page 24

___________________________________________________________________________
page 24
6.13 ProLogic II
In this menu, you may select the default setting of ProLogic II for each input. You
can choose between movie and music mode, depending on what type of material is
most commonly used. Please refer to the “Surround mode” section for explanations.
6.14 Video input output (only active in AV100S/AV120S)
For every input source, the user must select the correct video input format.
Furthermore, the output format to the TV/Projector must be chosen as either RGB or
Component.
The DVD component input can be selected as pass-through with over 100MHz
bandwidth. This is suitable for e.g. progressive DVD signals. See below table for
bandwidth consumption:
NTSC interlaced: 6 MHz
NTSC progressive: 12 MHz
PAL interlaced: 7 MHz
PAL progressive: 14MHz
In progressive pass-through mode, no mixed mode video (e.g. volume setting) will
be displayed on the screen. Also Composite video and S-Video outputs are muted.
6.15 Video miscellaneous (only active in AV100S/AV120S)
To activate the RGB input in Scart connectors, some TV-sets require a separate
“activate” signal. Tape 1 composite input can be reassigned to perform this Scart
RGB activation.
For Scart connection, use these five signals:
- RGB out
-
Tape1 Composite out
-
Scart RGB activator signal (tape 1 composite in)
Now choose RGB out in the video-input-output menu. Thule Audio can supply a
high-quality 5-pole RCA Phono-to-Scart cable.
Normally, the RGB output signal is without sync included, and the Composite sync
can therefore be taken from the Tape1 out. Some projectors accept sync included in
the RGB signal – in these cases, no extra sync signal is required.
Extended sharpness will shape the contours even further by accelerating the
luminance transitions.
In Noise Reduction mode, very low-level video signals will be interpreted as noise
and will be subtracted from the original signal. Consequently, some sharpness and
details can be lost, so please use Noise reduction with consideration, e.g. on noisy
antenna signals. Do not use noise reduction on high-quality signal sources like DVD
or cable TV video, since the signals thereby may become degraded.
Page 25

___________________________________________________________________________
page 25
TECHNICAL SPECIFICATIONS
Processor section:
Max analogue output voltage: 8V phono Analogue inputs to DSP: 4 Phono
THD, Pure Audio input, 2V out: 0.002% Digital inputs to DSP: 4 Electrical
THD, A/D inputs, 0 dB: 0.005% 2 Opto
THD, digital inputs, 0 dB, 44kHz PCM: 0.003% Pure Audio inputs: 1x 5.1 Pho.
S-Video inputs: 5 S-VHS
Dynamic range, DTS 20bit: 115dBA Video composite inputs: 4 Phono
Frequency response, 20 – 20k Hz: < - 0.6dB S-Video outputs: 2 S-VHS
Video composite outputs: 1 Phono
RGB/Component out: 1x 3Phono
Power section:
AV100 (S):
Max power output 20- 20kHz, 8 ohms: 6x 100W
Max power output 20- 20kHz, 4 ohms: 6x 150W
AV120 (S):
Max power output 20- 20kHz, 8 ohms: 6x 120W
Max power output 20- 20kHz, 4 ohms: 6x 170W
THD, -10dB, 8 ohms < 0.007%
Size (W x D x H), weight 420 x 370 x 90mm+12mm feets, 16kg AV100(S), 19kg AV120(S)
Configuration DATA I/O + RS232, pin: 1) Data (for communication with other Thule Audio Equipment)
2) Clock (for communication with other Thule Audio Equipment)
3) No connection
4) No connection
5) RX-RS232
6) No connection
7) TX-RS232
8) Analogue Ground (must be connected to analogue ground to prevent
analogue-digital ground loops)
Thule Audio reserves the right to alter specifications and design without notice.
Page 26

___________________________________________________________________________
page 26
7.0 Your notes
In this section you can fill in your own settings for the Sphere AV100/120, so you
always have them if you erase them or perform a factory reset by mistake.
Stereo
Speaker size
Delay / ms
Volume Trim / dB
L (left main)
R (Right main)
ProLogic II
Speaker size
Delay / ms
Volume Trim / dB
L (left main)
R (Right main)
C (Centre)
SL (Surround left)
SR (Surround right)
Dolby Digital
Speaker size
Delay / ms
Volume Trim / dB
L (left main)
R (Right main)
C (Centre)
SL (Surround left)
SR (Surround right)
SC (Surround Centre)
DTS
Speaker size
Delay / ms
Volume Trim / dB
L (left main)
R (Right main)
C (Centre)
SL (Surround left)
SR (Surround right)
SC (Surround Centre)
Page 27

___________________________________________________________________________
page 27
APPENDIX A: Special Functions
A.1 A/D level
Except for the Pure Audio inputs, all other analogue inputs will be converted to
digital samples (A/D conversion) by the built-in 24 bit 96kHz high quality A/D
converter. The digital audio samples are then used in the DSP circuit e.g. for further
processing, e.g. Dolby ProLogic II.
However, a fundamental problem by A/D conversion is that the peak analogue input
level should be as close as possible to the maximum input range of the A/D
converter, otherwise the important dynamic range will be degraded.
On the other hand, the peak analogue level must under no circumstances exceed
the maximum analogue limit for the A/D converter, or severe clipping will occur.
In the AV100/120 is included an auto-gain feature, which operates as follows:
When an input is selected, the high sensitivity position is initially selected for
obtaining best dynamic range. If clipping occurs, the sensitivity is automatically
reduced. During changes in sensitivity, a small click can be heard, which is not a
malfunction.
A.2 Electrical (coaxial) versus optical digital input.
Normally, a coaxial connection between e.g. DVD and processor has been preferred
to an optical by HiFi-enthusiasts due to larger bandwidth and consequently less jitter
on the receiver side.
However, with the increasing complexity of a surround system that integrates
analogue, digital and video signals, it is easy to create disturbances and ground
problems in any system.
To create a worthy alternative, the optical transmitters and receivers in the
AV100/120 are a new type featuring a substantially increased bandwidth of 13MHz
compared to the normal 7MHz type. This eliminates most traditional problems with
the optical connection, and the advantage with full galvanic isolation is clear due to
far less sensitivity to hum.
If any problems in the system with ground loops or disturbances appear, it is
advisable to change the digital connection from coaxial to optical.
A.3 Automatic failure correction system
A special “watch dog” in the AV100/120 will monitor all DSP (Digital Signal
Processor) operation as well as the control ICs. If any external disturbances like
lightning, transient bursts on the mains net, or static discharge causes the DSP to
crash, the DSP will automatically be reset for correct operation. This is performed in
a fraction of a second, and only a short dropout in the sound will be audible.
During standby, the entire system in AV100/120 is reset. If any problem occurs with
the operation of AV100/120, please set the unit into standby for a few seconds.
If standby does not cure the problem, please turn off the mains switch on the rear
panel before turning back on.
With the many different settings in AV100/120, it is possible to select a setting,
which does not match the installed system and cause the unit to malfunction. If
malfunction is observed, and a standby/operate command does not help, then run
the factory default resetting described in the config menu followed by a
standby/operate command.
Page 28

Manufactured under license from Dolby Laboratories. ”Dolby”, ”ProLogic II” and the double-D symbol are trademarks of Dolby Laboratories.
Confidential unpublished works. © 1992-1997 Dolby Laboratories Inc. All rights reserved.
Manufactured under license from Digital Theater Systems, Inc. US Pat. No. 5,451,942, 5,956,674, 5,974,380, 5,978, 762, 6, 487, 535 and other
U.S. and world-wide patents issued and pending. "DTS", "DTS-ES Extended Surround" and "Neo:6" are trademarks of Digital Theater
Systems, Inc. Copyright 1996, 2003 Digital Theater Systems, Inc. All Rights Reserved.
Thule Audio ApS has the right to make changes without prior notice
Brugervejledning
SPHERE AV100, AV120, AV100S and AV120S
Page 29

INDEX
REMOTE KONTROL - FIGUR.......................................................................................................................30
BAG- OG FRONTPANEL - FIGURER...........................................................................................................31
KONTROL PANEL OG DISPLAY - FIGUR..................................................................................................35
TILLYKKE MED DIN NYE SPHERE AV100/120!.......................................................................................36
0. INSTALLATION............................................................................................................................................38
1. VALG AF INDGANG....................................................................................................................................38
2. VOLUMENKONTROL................................................................................................................................. 39
3. ZONE 2............................................................................................................................................................ 40
4. FORSINKELSE ..............................................................................................................................................40
5. TYPER AF SURROUND SOUND................................................................................................................41
5.1 D
OLBY DIGITAL
..........................................................................................................................................42
5.2 DTS............................................................................................................................................................43
5.3 D
OLBY PROLOGIC
II ...................................................................................................................................44
5.4 PCM OG A
NALOGE INPUT
.........................................................................................................................44
5.5 S
IDEKANALER
.............................................................................................................................................45
6. CONFIG MENUEN........................................................................................................................................45
6.1 H
ØJTALERE
.................................................................................................................................................46
6.2 I
NPUT
..........................................................................................................................................................47
6.3 K
ALIBRERING AF HØJTALERE
......................................................................................................................47
6.4 C
ROSSOVER FREKVENS
...............................................................................................................................47
6.5 E
XTENDED SURROUND
...............................................................................................................................47
6.6 K
OMPRESSION AF DYNAMISK BREDDE
........................................................................................................47
6.7 V
OLUMESKALAEN
......................................................................................................................................48
6.8 A
T GEMME NYE INDSTILLINGER I HUKOMMELSESBANKERNE
......................................................................48
6.9 G
ENDAN FABRIKSINDSTILLINGER
...............................................................................................................48
6.10 OSD (K
UN RELEVANT FOR
AV100S
OG
AV120S.)..................................................................................49
6.11 SPDIF OUT .............................................................................................................................................49
6.12 K
ONTROLLER FOR INTERNE EFFEKTFORSTÆRKERE
...................................................................................49
6.13 PROL
OGIC
II.............................................................................................................................................49
6.14 V
IDEO INPUT OUTPU T (KUN RELEVANT FOR
AV100S
OG
AV120S)..........................................................49
6.15 D
IVERSE VIDEOINDSTILLINGER (KUN RELEVANT FOR
AV100S
OG
AV120S)...........................................50
TEKNISKE SPECIFIKATIONER...................................................................................................................51
7.0 DINE NOTER...............................................................................................................................................52
APPENDIX A: SPECIELLE FEATURES.......................................................................................................53
A.1 A/D
NIVEAU
..............................................................................................................................................53
A.2 E
LEKTRONISK (COAX) OVERFOR OPTISK DIGITALT INPUT
..........................................................................53
A.3 S
YSTEM TIL AUTOMATISK FEJLRETNING
....................................................................................................53
Page 30

STBY
MUTE
[MODE]
TAPE 1
DIM
L
SL SUB SR
C
R
LD TAPE 2
[STATUS]
TV
SAT
DVD
[CONFIG]
ENTER
VOL
PURE A.
VOL
VOL
standby | mute -20dB | increase volume
REMOTE CONTROL
change light | return to master volume | decrease volume
left | center | right
surround left | subwoofer | surround right
DVD player | sattelite receiver | TV-set
laser disc | audio/video tape1 | audio/video tape2
pure audio input
enter config mode
navigate in config menu
change surround mode
received input status
channel balance
double push: delay
input selection
Page 31

SURROUND OUTPUTS
ZONE 2ZONE 2
MADE IN DENMARK BY THULE AUDIO
SURROUND AMPLIFIER
SC
SL
C
L
DIGITAL I/O
DATA I/O SURROUND OUTPUTS
ZONE 2
PURE AUDIO INPUT
CAUTION - RISK OF ELECTRIC SHOCK - DO NOT OPEN!
L
SL
CSC
SSL
C
SL
L
R
SR
SR
R
SUB SUB
SSR
SUB
SR
R
SAT
TV
LD/CD
TAPE1 TAPE2IN DVD
OUT
SAT
DVD
LD/CD
TV OUT
RS232
L
R
220-230 V
50-60 Hz
Manufacturedunder licence from Dolby LaboratoriesLicensing Corporation.
“Dolby”,“AC-3” and the double-D symbolare trademarks of Dolby Laboratories
LicensingCorporation. Copyright 1992 Dolby Laboratories,Inc. All rights reserved.
MODEL: SPHERE AV100
Manufacturedunder license from Digital Theater Systems,
Inc.US Pat. No. 5,451,942, 5,956,674, 5,974,380, 5,978,762
andother world-wide patents issued and pending. “DTS”,
“DTS-ESExtended Surround” and “Neo:6” are trademarks
ofDigital Theater Systems, Inc. Copyright 1996, 2000
DigitalT heater Systems, Inc. AllRights Reserved.
HIGH EFFICIENCY - VIRTUAL CLASS A
FRONT PANEL AND REAR PANEL - AV100
analog audio inputs
to DSP
power
connector
connector to control other
Thule Audio equipment or
RS232 communication
pre-out surroundelectrical digital
connectors
optical digital inputs
zone 2 out
6 x speaker outputs
inputs bypassing
DSP circuits
SURROUND
MODE
PURE
AUDIO
MUTE/
STBYCHANNEL INPUTVOL
PURE
AUDIO
MUTE/
STBY
pure audio input
INPUT
input selector
SURROUND
MODE
VOL
CHANNEL
channel balance
short push: change surround mode
2 sec. push: input format information
back to master volume
short push: mute to “40”
2 sec. push: standby
CONTROL PANEL
display: see page 9
Page 32

SURROUND OUTPUTS
ZONE 2
ZONE 2
MADE IN DENMARK BY THULE AUDIO
SURROUND AMPLIFIER
SC
SL
C
L
DIGITAL I/O
DATA I/O SURROUND OUTPUTS
ZONE 2
PURE AUDIO INPUT
CAUTION - RISK OF ELECTRIC SHOCK - DO NOT OPEN!
L
SL
CSC
SSL
C
SL
L
R
SR
SR
R
SUB SUB
SSR
SUB
SR
R
SAT
TV
LD/CD
TAPE1 TAPE2IN DVD
OUT
SAT
DVD
LD/CD
TV OUT
RS232
L
R
220-230 V
50-60 Hz
Manufacturedunder licence from Dolby LaboratoriesLicensing Corporation.
“Dolby”,“AC-3” and the double-D symbolare trademarks of Dolby Laboratories
LicensingCorporation. Copyright 1992 Dolby Laboratories,Inc. All rights reserved.
MODEL: SPHERE AV120
Manufacturedunder license from Digital Theater Systems,
Inc.US Pat. No. 5,451,942, 5,956,674, 5,974,380, 5,978,762
andother world-wide patents issued and pending. “DTS”,
“DTS-ESExtended Surround” and “Neo:6” are trademarks
ofDigital Theater Systems, Inc. Copyright 1996, 2000
DigitalT heater Systems, Inc. AllRights Reserved.
HIGH EFFICIENCY - VIRTUAL CLASS A
FRONT PANEL AND REAR PANEL - AV120
analog audio inputs
to DSP
power
connector
connector to control other
Thule Audio equipment or
RS232 communication
pre-out surroundelectrical digital
connectors
optical digital inputs
zone 2 out
6 x speaker outputs
inputs bypassing
DSP circuits
volume control | control panel: see page 9
display: see page 9
Page 33

SURROUND
MODE
PURE
AUDIO
MUTE/
STBYCHANNEL INPUTVOL
PURE
AUDIO
MUTE/
STBY
pure audio input
INPUT
input selector
SURROUND
MODE
VOL
CHANNEL
channel balance
short push: change surround mode
2 sec. push: input format information
back to master volume
CONTROL PANEL
SURROUND OUTPUTS
ZONE 2
MADE IN DENMARK BY THULE AUDIO
SURROUND AMPLIFIER
SC
SL
C
L
DIGITAL I/O
DATA I/O SURROUND OUTPUTS
ZONE 2
PURE AUDIO INPUT
CAUTION - RISK OF ELECTRIC SHOCK - DO NOT OPEN!
L
SL
CSC
SSL
C
SL
L
C/B
b C/Rr Y/G
R
SR
SR
R
SUB SUB
SSR
SUB
SR
R
SAT
SAT
TV
TV
LD/CD
LD/CD
TAPE1
TAPE1 TAPE2
TAPE2IN
IN DVD
DVD
DVD
OUT
OUT
SAT
DVD
OUT OUT
SAT
LD/CD
TV OUT
RS232
L
S-VIDEO
COMPOSITE
R
220-230 V
50-60 Hz
Manufacturedunder licence from Dolby LaboratoriesLicensing Corporation.
“Dolby”,“AC-3” and the double-D symbolare trademarks of Dolby Laboratories
LicensingCorporation. Copyright 1992 Dolby Laboratories,Inc. All rights reserved.
MODEL: SPHERE
A
V100 S
Manufacturedunder license from Digital Theater Systems,
Inc.US Pat. No. 5,451,942, 5,956,674, 5,974,380, 5,978,762
andother world-wide patents issued and pending. “DTS”,
“DTS-ESExtended Surround” and “Neo:6” are trademarks
ofDigital Theater Systems, Inc. Copyright 1996, 2000
DigitalTheater Systems, Inc. All Rights Reserved.
HIGH EFFICIENCY - VIRTUAL CLASS A
FRONT PANEL AND REAR PANEL - AV100S
S-video inputs
composite/component
video inputs
analog audio inputs
to DSP
power
connector
connector to control other
Thule Audio equipment or
RS232 communication
pre-out surroundelectrical digital
connectors
optical digital inputs
zone 2 out
6 x speaker outputs
inputs bypassing
DSP circuits
RGB/component
video output
display: see page 9
short push: mute to “40”
2 sec. push: standby
Page 34

SURROUND OUTPUTS
ZONE 2
MADE IN DENMARK BY THULE AUDIO
SURROUND AMPLIFIER
SC
SL
C
L
DIGITAL I/O
DATA I/O SURROUND OUTPUTS
ZONE 2
PURE AUDIO INPUT
CAUTION - RISK OF ELECTRIC SHOCK - DO NOT OPEN!
L
SL
CSC
SSL
C
SL
L
C/B
b C/Rr Y/G
R
SR
SR
R
SUB SUB
SSR
SUB
SR
R
SAT
SAT
TV
TV
LD/CD
LD/CD
TAPE1
TAPE1 TAPE2
TAPE2IN
IN DVD
DVD
DVD
OUT
OUT
SAT
DVD
OUT OUT
SAT
LD/CD
TV OUT
RS232
L
S-VIDEO
COMPOSITE
R
220-230 V
50-60 Hz
Manufacturedunder licence from Dolby LaboratoriesLicensing Corporation.
“Dolby”,“AC-3” and the double-D symbolare trademarks of Dolby Laboratories
LicensingCorporation. Copyright 1992 Dolby Laboratories,Inc. All rights reserved.
MODEL: SPHERE
A
V120 S
Manufacturedunder license from Digital Theater Systems,
Inc.US Pat. No. 5,451,942, 5,956,674, 5,974,380, 5,978,762
andother world-wide patents issued and pending. “DTS”,
“DTS-ESExtended Surround” and “Neo:6” are trademarks
ofDigital Theater Systems, Inc. Copyright 1996, 2000
DigitalTheater Systems, Inc. All Rights Reserved.
HIGH EFFICIENCY - VIRTUAL CLASS A
FRONT PANEL AND REAR PANEL - AV120S
S-video inputs
composite/component
video inputs
analog audio inputs
to DSP
power
connector
connector to control other
Thule Audio equipment or
RS232 communication
pre-out surroundelectrical digital
connectors
optical digital inputs
zone 2 out
6 x speaker outputs
inputs bypassing
DSP circuits
RGB/component
video output
volume control | control panel: see page 9
display: see page 9
Page 35

SL
SL
SURROUND PURE MUTE/
MODE
SURROUND
MODE
AUDIO STBY
SR
SR
SAT
SAT
LD
LD
TAPE 2
TAPE 2
SUB
SUB
L
L
C
C
R
R
DVD
DVD
TV
TV
TAPE 1
TAPE 1
VOL
VOL
short push: surround left channel balance
2 sec. push: surround left channel delay
/ enter
left channel balance
/ left
Dolby Digital surround
Dolby ProLogic II surround
2 channel stereo
Adjustments Zone 2
DTS digital surround
short push: change surround mode
2 sec. push: input format information
short push: back to master volume
2 sec. push: enter config mode
/ exit config menu
short push: center channel balance
2 sec. push: center channel delay
/up
right channel balance
/ right
short push: surround right channel balance
2 sec. push: surround right channel delay
DVD player
remote sensor
multi functional display
standby indicator
surround mode
TV-set
audio/video tape1
audio/video tape2
laser disc player or
CD player
sattelite receiver
pure audio input
short push: mute -20dB
2 sec push: standby
short push: subwoofer balance
2 sec push: LFE balance
/ down
main function
/ function in config mode
CONTROL PANEL - AV120, AV120S
DISPLAY
MUTE/
STBY
PURE
AUDIO
volume level
100: max
0: min
ZONE 2
ZONE 2
STEREO
STEREO
Page 36

36
Tillykke med din nye SPHERE AV100/120 integrerede surroundforstærker
Denne forstærker giver dig med sin meget avancerede teknologi et væld af muligheder og en
fantastisk lyd.
Vi er overbeviste om, at AV100/120 vil give dig mange gode stunder, hvad enten du vil lytte til
musik eller se film.
For at få det fulde udbytte af din nye forstærker, bør du læse denne manual grundigt igennem, før
du tager den i brug.
Sphere AV100/120 har følgende specifikationer:
- Mulighed for ren analog signalvej med 6 kanaler på Pure Audio indgangen
- 32 – 96 kHz PCM stereo
- 96 kHz Dolby ProLogic II afkodning med 5.1 eller 6.1 output
- Dolby Digital afkodning med auto detection
- DTS 5.1, DTS 6.1 matrix og DTS 24 bit / 96 kHz afkodning med auto detection
- Udvidet præcisionsafkoder - med 48 bit øger det dynamik området for 24 bit DTS op til 115dBA
- Motorola DSP med 150 MIPS (Million Instruktioner Per Sekund)
- Opgraderbart design, der tager hensyn til kommende lydformater
- 10stk Burr Brown 24 bit /192 kHz D/A konvertere med kombineret delta-sigma og multibit
teknologi
- Mulighed for at trimme kanalerne med 0.5db intervaller direkte fra frontpanelet (kun AV120)
- Præcisions-volumenkontrol for samtlige 10 kanaler - op til 100db med 0.5db intervaller
- Mulighed for at indstille forsinkelse for center- og surround kanalerne
- Fælles forsinkelse (lip sync) på alle kanaler, så der er mulighed for at kompensere for eventuelle
forsinkelser i videosignalet
- Mulighed for direkte valg af input-enhed direkte fra frontpanelet (kun AV120)
- De fleste indgange kan sættes til enten analog, elektrisk digital eller optisk digital input
- De analoge indganges følsomhed justeres automatisk i forhold til signal niveauet, hvilket giver et
bedre dynamik område
- Der er et test-støjsignal for de enkelte kanalers volumenkontrol
- Fleksible højtalerindstillinger med udvidet kontrol over bassen
- Indstillelig crossover-frekvens (60 – 120Hz) for baskontrollen
- Mulig kompression af dynamik området for både DTS og Dolby Digital, hvilket kan være rart i
eksempelvis støjende omgivelser
Kun for AV100S og AV120S:
- Mulighed for omskiftning imellem komponent, S-video og Composite Video ved hjælp af et 4 kanals adaptivt kamfilter, således at der kun er behov for et RGB eller Komponent kabel til Tv’et
eller projektoren
- 100MHz Component video pass-through
- Video encoder med OSD, der automatisk forbigås, når den ikke er i brug
Hver enkel af ovenstående specifikationer gennemgås nedenfor.
Følgende konventioner er brugt i denne manual:
Kursiveret tekst indikerer, at der er tale om en displaytekst, som eksempelvis: CONFIG.
Citationstegn indikerer, at der er tale om et tryk på en tast, som eksempelvis: ”ENTER” knappen.
Page 37

37
Stereohøjtalere:
”L” = venstre højtaler.
”R” = højre højtaler.
Surroundhøjtalere:
”C” = centerhøjtaleren, som er placeret foran lyttepositionen.
”SL” = den venstre surroundhøjtaler, som er placeret til venstre bagved lyttepositionen.
”SR” = den højre surroundhøjtaler, som er placeret til højre bagved lyttepositionen
Udvidede surroundhøjtalere:
”SC” = surround-centerhøjtaler, som er placeret bagved lyttepositionen
”SSL” = sidehøjtaler, som er placeret til venstre for lyttepositionen
”SSR” = sidehøjttaler, som er placeret til højre for lyttepositionen.
Alle videospecifikationer gælder kun for AV100S og AV 120S.
Page 38

38
0. Installation
Vær omhyggelig med at følge nedenstående forskrifter, da du ellers risikerer at din garanti
bortfalder, i hvilket tilfælde Thule Audio ikke kan tage ansvaret for eventuelle skader på personer
eller ting.
- Placér forstærkeren på en hård, plan flade
- Undgå at tildække ventilationshullerne og sørg for, at der er mindst 10 cm fri luft over
forstærkeren. Undgå at stille andre apparater oven på forstærkeren
- Undlad at udsætte forstærkeren for direkte sollys
- Stil ikke forstærkeren i varme eller støvede omgivelser
Advarsel: udsæt ikke forstærkeren for regn eller fugt - der er risiko for brandfare eller elektrisk stød
Advarsel: Åbn ikke forstærkeren - der er fare for elektrisk stød
1. Valg af indgang
Opsætning af indgangene er meget fleksible og kan tilpasses mange forskellige hjemmebiografer og
stereoopsætninger. Der er mulighed for at skifte imellem 7 forskellige inputkanaler, ved hjælp af
knapper på frontpanelet (kun AV120) eller fjernbetjeningen. Hver af inputkanalerne kan indstilles
på forskellige måder, som vist nedenfor. De mulige indstillinger er markeret med ”x”, mens
fabriksindstillingerne er markeret med klammer ”[]”. Indstillingerne kan ændres i config-menuen.
Input DVD SAT LD TV Tape1 Tape2 Pure Audio
Analog x x [x] [x] [x]
Coax digital [x] [x] [x] x
Optisk x [x]
Komposite [x] x [x] X
S-video x x [x] x [x]
Komponent [x] x
For audiosignaler skal man vælge en ud af de tre muligheder inden for de øverste tre rækker i
menuen config.input.
På samme måde skal man konfigurere videoinputtet for AV100S/120S i menuen config.video-input-
output. Når man skifter til video, så konverterer det indbyggede kamfilter signalet til enten
Komponent- eller RGB-format. Tv’et/projektoren skal derfor indstilles til enten RGB eller
Komponent, hvorefter den ”intelligente” videoomskifter i AV100S/120S klarer resten.
Pure Audio inputtet vil gå uden om DSP-kredsløbene og anbefales til stereo musiksignaler af
virkelig høj kvalitet, eksempelvis fra en Cd-afspiller eller andet analogt input. Alternativt kan man
sende det digitale signal fra Cd’en eller DVD’en til et af de digitale input i AV100/120 og derved
gøre brug af de indbyggede balancerede 24-bit konvertere. På denne måde sendes signalet udenom
Cd-afspillerens egen 16-bit konvertere, hvilket kan forbedre lydkvaliteten betragteligt.
Sphere AV100/120 er optimeret til at D/A konvertere 24-bit/96kHz stereolyd fra DVD musikdiske.
Page 39

39
2. Volumenkontrol
Det overordnede lydniveau indstilles ved at dreje på volumenkontrollen forrest på apparatet eller
ved at trykke på ”VOL ↓” eller ”VOL ↑” knapperne på fjernbetjeningen.
Volumenkontrollen er skaleret, således at den på det normale lytteniveau er meget akkurat (ned til
0.5db), mens den på lavere niveauer har større intervaller, hvilket gør at man hurtigere kan indstille
lyden. Den skalerede volumenkontrol er det letteste for almindelige brugere, og er derfor sat som
standard. Det er dog muligt at gå ind i config.volume menuen og ændre det, så lyden indstilles med
0.5db intervaller i hele skalaen.
Volumenforskellen imellem de enkelte kanaler indstilles fra config.noise menuen. Den indbyggede
støjgenerator bruges i den forbindelse til at sammenligne lydniveauerne fra de forskellige kanaler,
så man kan finjustere i forhold til de enkelte højtaleres følsomhed og afstand fra lyttepositionen.
Vi anbefaler, at indstillingerne for henholdsvis Stereo, ProLogic II, Dolby Digital og DTS gemmes
som startindstillinger i de relevante hukommelsesbanker, efter man har brugt config.noise
funktionen.
Individuelle ønsker og behov kan gøre det nødvendigt at indstille yderligere på de enkelte højtaleres
lydstyrke. Når man afspiller Dolby Digital og PrologicII er det Thule Audios erfaring, at man opnår
en mere realistisk surroundlyd, hvis man indstiller surroundhøjtalerne 3-6 dB højere end støjtesten
indikerer. Når man afspiller DTS kilder, kan man sagtens øge lydstyrken i surroundhøjtalerne med
2-4 dB. Disse mere specielle indstillinger kan gemmes i de forskellige lydtypers hukommelsesbanker og der vil blive skiftet til dem automatisk, når lydformatet afspilles.
Specielle film eller musikstykker kan også kræve, at man indstiller surroundhøjtalerne forskelligt.
Derfor er det muligt hurtigt at indstille lydstyrken for de enkelte kanaler ved at trykke på ”L”, ”C”,
”R”, ”SL”, ”SUB” og ”SR” på frontpanelet eller fjernbetjeningen. Hvis man ønsker at indstille
lyden fra frontpanelet, skal man dog først trykke på knappen ”channel”. De udvidede
surroundkanaler ”SC”, ”SSL” og ”SSR” kan vælges ved at trykke på piltasterne. Herefter indstilles
lyden, ved at dreje på volumenkontrollen forrest på apparatet eller trykke på ”VOL ↓” eller
”VOL ↑” på fjernbetjeningen.
Indstillinger man har valgt manuelt som beskrevet ovenfor nulstilles, hvis man sætter AV100/120 i
standby eller slukker for strømmen. Når apparatet starter igen loader det de indstillinger, der er
gemt i hukommelsesbanken.
LFE-kanalen (Low Frequency Effect) kan indstilles ved at holde SUB-knappen på frontpanelet eller
fjernbetjeningen nede i mere end to sekunder. LFE-kanalen er basinformationer, der sendes til
subwooferen, eller til ”L” og ”R”, hvis subwooferen er deaktiveret. På den måde kan man ændre på
lavfrekvenslyden, også selv om der ikke er nogen subwoofer.
Displayet går tilbage til at vise de almindelige informationer ca. 15 sekunder efter man har trykket
på kanalvalgsknapperne eller i det øjeblik man har trykket på ”VOL” knappen.
Page 40

40
3. Zone 2
Funktionen ”zone 2” gør det muligt at sende lyden hen i et helt andet lokale, eksempelvis køkkenet
eller soveværelset. Zone 2 har separat volumenkontrol og valg af input. Indstillingerne for zone 2
aktiveres ved at holde inputknappen for det allerede valgte input nede i mere end et sekund – har
man for eksempel valgt DVD’en som input, så skal man holde ”DVD” knappen nede i ca. et
sekund, for at aktivere zone 2. Når zone 2 er aktiveret aktiveres indikatoren ZONE2.
Mulige input er:
SAT ANLG
TV ANLG
LD ANLG
TAPE1 ANLG
Z1 -> Z2 (det valgte input for zone 1 spilles også i zone 2)
Alle input behandles som analoge i zone 2, også selvom de behandles som digitale i zone 1.
Displayet går tilbage til at vise informationerne for zone 1 ca. 15 sekunder efter man har trykket på
kanalvalgsknapperne eller i det øjeblik man har trykket på ”VOL” knappen.
4. Forsinkelse
For at opnå den bedste surroundlyd er det vigtigt, at de forskellige signaler ankommer samtidig til
lyttepositionen. Hvis denne er placeret tættere på baghøjtalerne end på fronthøjtalerne,
for eksempel, så vil lyden fra baghøjtalerne ankomme først til lyttepositionen. Hvis det er tilfældet
er det nødvendigt at forsinke signalet fra baghøjtalerne en lille smule. Det vigtige her er forskellen i
afstand fra lyttepositionen til front- og baghøjtalerne. Det samme problem opstår, hvis
centerhøjtaleren er placeret tættere på lyttepositionen end fronthøjtalerne.
På nogle videokilder er lyden let forsinket i forhold til billedet, idet der er taget højde for videoens
arbejdshastighed. Hvis man ønsker at kompensere for denne forsinkelse, så er det muligt at forsinke
lyden fra samtlige kanaler på en gang. Denne fælles forsinkelsesfunktion hedder ”lip sync”.
Forsinkelsen kan indstilles direkte fra frontpanelet ved at trykke på knapperne ”SL”, ”SR” og ”C” i
mere end 2 sekunder (Kun AV120/120S) eller ved at trykke to gange på de samme knapper på
fjernbetjeningen. Displayet viser ganske kort teksten DELAY, og derefter vises forsinkelses-
indstillingen for den valgte kanal, eksempelvis SL 5.0ms. Herefter kan man indstille forsinkelsen for
den udvidede surroundkanal SC og ”lip-sync” ved at trykke på piltasterne.
Herefter indstilles lyden i 0.1ms intervaller ved at dreje på volumenkontrollen eller ved at trykke på
”VOL ↓” eller ”VOL ↑” på fjernbetjeningen.
Displayet går tilbage til at vise de almindelige informationer ca. 15 sekunder efter man sidst har
trykket på knapperne eller i det øjeblik man har trykket på ”VOL” knappen.
Indstillingen ”forsinkelse” udtrykkes i millisekunder, men kan udregnes ved hjælp af den fysiske
afstand. En lydbølge bevæger sig med ca. 340 meter i sekundet, hvilket betyder, at:
Page 41

41
1 fod = 1 millisekunds forsinkelse, eller
1 meter = 3 millisekunders forsinkelse
Følgende eksempel viser, hvordan man kan udregne forsinkelsen for SL, SR, SC og C. De afstande
fra lyttepositionen til de enkelte højtalere der nævnes er blot eksempler og er ikke nødvendigvis de
ideelle afstande:
Eksempel: Dine egne afstande:
Lytteposition <-> venstre højtaler 3,8 m
Lytteposition <-> højre højtaler 3,8 m
Lytteposition <-> centerhøjtaler 2,9 m
Lytteposition <-> venstre surroundhøjtaler 2,1 m
Lytteposition <-> højre surroundhøjtaler 2,1 m
Lytteposition <-> center surroundhøjtaler 1,8 m
Forsinkelsen udregnes derfor som følger:
SL forsinkelse: (L – SL afstand) x 3 = (3,8 – 2,1) x 3 = 5,1ms
SR forsinkelse: (R – SR afstand) x 3 = (3,8 – 2,1) x 3 = 5,1ms
C forsinkelse: (L – C afstand) x 3 = (3,8 – 2,9) x 3 = 2,7ms
SC forsinkelse: (L – SC afstand) x 3 = (3,8 – 1,8) x 3 = 6ms
I dette eksempel skal forsinkelsen altså sættes til:
SL: 5,0ms C: 3,0ms SR: 5,0ms SC: 6,0ms
Ovenstående udregning for forsinkelse er baseret på anlæggets fysiske opsætning og bør gemmes i
de grundlæggende indstillinger i hukommelsesbankerne (se afsnit 5).
Man bør gemme de foretrukne indstillinger for hver surroundtype i disses individuelle
hukommelsesbanker, så de kan loades automatisk. Dette forhindrer ikke, at man kan ændre på
indstillingerne ved afspilning af specifikke film.
De indstillinger, man har valgt til specifikke film, eller lignende, nulstilles hvis man sætter
AV100/120 i standby eller slukker for strømmen. Når apparatet starter igen, loader det de
indstillinger, der er gemt i hukommelsesbanken.
5. Typer af Surround Sound
Den aktive surroundtype er altid indikeret i displayet på AV100/120:
Mulige typer af input
- Stereo analogt input, PCM eller Dolby 2.0 bitstream
- Dolby ProLogic II analogt input, PCM eller Dolby 2.0 bitstream
- Dolby Digital Dolby Digital 5.1 bitstream
- DTS DTS bitstream: 5.1, ES 6.1 discrete eller 96kHz 5.1
Page 42

42
5.1 Dolby Digital
Hvis AV100/120 detekterer en Dolby Digital 5.1 bitstream, vil apparatet automatisk skifte til denne
type af surround sound, og Dolby Digital indikatoren vises i displayet. Du kan få information om
hvilke kanaler, der vil blive aktiveret, ved at trykke på ”SURROUND MODE” knappen på
frontpanelet eller ”mode” knappen på fjernbetjeningen:
L: Venstre højtaler
R: Højre højtaler
C: Centerhøjtaleren
SC: Surround centerhøjtaleren
SL: Surround venstre højtaler
SR: Surround højre højtaler
SW: Subwoofer
Antallet af aktive kanaler vil afhænge af hvilke højtalere der er aktiveret i config.speaker og
config.extended surround menuerne, af inputsignalets type (analog, PCM, Dolby Digital bitstream
eller DTS bitstream), og – hvis relevant – af den valgte surroundtype.
Hvis man trykker på ”SURROUND MODE” i mere end 1 sekund, så vises information om
inputsignalets beskaffenhed:
Aktive audiokanaler i inputsignalet:
2/0: L og R er tilstede
2/1: L, R og Sub er tilstede*
2/2: L, R, SL og SR er tilstede*
3/0: L, R, og C er tilstede*
3/1: L, R, C og Sub er tilstede*
3/2: L, R, SL, SR og C er tilstede*
* Hvis man ikke har valgt at aktivere alle højtalerne i config.speaker menuen, så vil lyden
automatisk blive tilpasset det valgte antal højtalere (downmixing).
Og transmissions-bitraten i inputsignagnalet:
32k : 32kbit/sek
448k : 448kbit/sek
648k : 648kbit/sek
768k : 768kbit/sek (kun DTS)
1411k : 1411kbit/sek (kun DTS)
1532k : 1532kbit/sek (kun DTS)
Hvis der kun er to aktive kanaler i inputsignalet (2.0) og signalet ellers indikerer det, så antages det,
at der er tale om et Dolby ProLogic II signal. Hvis der ikke er en sådan indikation, så vil signalet
blive fortolket som et 2 kanals stereosignal.
Hvis der kun er to aktive kanaler, så kan brugeren vælge imellem STEREO og Dolby ProLogic II
ved et endnu
et kort tryk på ”SURROUND MODE” knappen. Her vil både Dolby Digital og
Page 43

43
STEREO eller Dolby Digital og ProLogic II indikatorerne være tændt. Se mere om Dolby ProLogic
II nedenfor. Displayet går tilbage til at vise de almindelige informationer ca. 15 sekunder efter man
sidst har trykket på ”SURROUND MODE” eller i det øjeblik man har trykket på ”VOL” knappen.
5.2 DTS
Overordnet set har man med DTS de samme oplysninger og muligheder som ved Dolby Digital.
Dog medfører DTS formatet, at man får nogle ekstra muligheder. Dem kigger vi på i det følgende.
AV100/120 understøtter adskillige nye DTS formater.
DTS 24-bit:
Når forstærkeren opfanger DTS signalet, indikerer den oplysningerne for DTS signalet i den anden
linje på displayet. For eksempel betyder 768/24 at der er tale om en bit-rate på 768kHz og en
opløsning på 24 bit. AV100/120 har udvidede funktioner til afkodning af 24-bit signaler, så den
udnytter den højere opløsning fuldt ud. For DTS 24-bit forbedres ydeevnen helt op til 115dBa,
hvilket er fuldt sammenligneligt med DVD audio eller SACD. Men DTS-24 signalet kan afspilles af
normale DVD-afspillere. Flere nyere ”mainstream” film findes allerede i 24-bit formatet. Det
gælder eksempelvis ”Pearl Harbour”, ”Jurassic Park III”, ”Moulin Rouge”, ”Gladiator”, ”Lord of
the Rings, SE”, ”The Haunting” og "Minority report".
DTS ES 6.1 Descrete:
Nogle DTS diske er født med en diskret center surround kanal, kaldet ”6.1 discrete”. Hvis man
spiller sådan en disk, vil displayet vise ES 3/3.1 når AV100/120 fanger signalet. Det betyder, at de
tre frontkanaler (L, C og R) og de tre surroundkanaler (SL, SC og SR) alle findes i DTS signalet.
Hvis ”6.1 discrete” er aktiveret. Hvis ”6.1 discrete” er slået til i config.extended surround menuen,
så aktiveres den ekstra surroundkanal SC automatisk, når det er nødvendigt.
Eksempler på DVD diske der er født med DTS ES 6.1 er ”Gladiator” og ”The Haunting”.
6.1 Matrix:
Denne type DTS er i realiteten identisk med DTS ES 6.1 Matrix, som er beskrevet ovenfor. Men
ved at aktivere denne funktion kan brugeren vælge altid at have slået Matrix funktionaliteten til og
kombinere SL og SR, for at danne SC.
6.1 Matrix virker også på Dolby 5.1 signaler. Prøv eksempelvis dette på ”Black Hawk Down”.
Hvis anlægget inkluderer tre baghøjtalere vil 6.1 Matrix funktionen stort set altid give en bedre
surround oplevelse på 5.1 kodet musik- og videodiske. Endvidere vil 6.1 Matrix funktionen
generere den samme lydinformation til SC kanalen som THX Surround EX processen.
I dette tilfælde skal man sørge for, at have slået både ”DTS 6.1 discrete” og ”6.1 Matrix” til i
config.extended surround menuen.
DTS 96kHz:
DTS Har bragt et nyt format på banen, hvor D/A konversionen sker med 96kHz. Det er kodet med
24 bit og kaldes derfor ”DTS 24/96”. Dette format understøttes også af AV100/120: apparatet vil
selv identificere det og der vil stå 96k 5.1 i displayet. Brugeren behøver ikke at foretage nogen
indstillinger. 6.1 Matrix funktionen slås automatisk fra og der vil ikke komme nogen lyd fra SC
kanalen, når der afspilles lyd i 96kHz formatet.
Page 44

44
DVD’en ” ”Queen: A night at the opera”, der er indspillet i DTS 24/96, er et udmærket eksempel på
formatets potentiale.
DTS 24/96 er fuldt på linje med DVD audio, men kan afspilles i almindelige DVD-video eller Cdafspillere.
5.3 Dolby ProLogic II
AV 100/120 understøtter ProLogic II formatet, der genererer surround- og centerkanaler fra et
almindeligt stereoformat. En af de helt store forskelle på det gamle ProLogic format og ProLogic II
formatet er, at sidstnævnte kan genere signaler til SL og SR i fuld båndbredde.
Specielt ved tv og film i stereo vil ProLogic II formatet kunne skabe en oplevelse, der minder om
Dolby Digital 5.1.
Den gængse ProLogic funktion, der benyttes til film, koncentrerer en stor del af lyden i
centerhøjtaleren og er altså ikke særligt velegnet til at afspille musik. AV 100/120 har derfor to
forskellige ProLogic funktioner: En til film og en til musik. Sidstnævnte sender en større del af
lyden ud til L og R højtalerne. Mange ville nok mene, at musikfunktionen er særligt velegnet til
livemusik, men det er selvfølgelig et smagsspørgsmål.
Brugeren kan for hver enkel type input bestemme, om der skal vælges den ene eller den anden type
ProLogic – det gøres i config.ProLogic II menuen.
I config.extended surround menuen kan man også vælge om Prologic II skal genere et 5.1 signal
eller et 6.1 signal (Prologic IIs)
Man kan skifte imellem almindelig STEREO og ProLogic II afspilning ved kort at trykke en ekstra
gang på ”SURROUND MODE” knappen.
5.4 PCM og analoge input
Hvis der står ”ANLG” efter et input, som i eksempelvis LD ANLG, så er der tale om et analogt
input. Hvis der ikke kan findes nogen Dolby Digital eller DTS informationer i et digitalt input (dvs.
COAX eller OPTO), så behandles det som et PCM input.
Hverken analog eller PCM indeholder nogen informationer om surround sound, og derfor vælges
STEREO som udgangspunkt for sådanne input, med mindre brugeren vælger ProLogic II i
config.ProLogic II menuen.
Man kan få oplysninger om det nuværende signals beskaffenhed (eksempelvis PCM) ved at trykke
mere end et sekund på ”SURROUND MODE” knappen på frontpanelet eller ”STATUS” knappen
på fjernbetjeningen. AV 100/120 kan håndtere PCM signaler fra 32kHz til 96kHz.
Efter analoge input der går igennem DSP’en vil der også stå PCM , hvilket skyldes at det analoge
signal konverteres til PCM (A/D) med en bit-rate på 96kHz.
Page 45

45
Ved ”PURE AUDIO” vil der kun stå ANALOG i displayet. Denne input-type går helt udenom DSP
kredsløbene og skaber den reneste analoge lyd med en kort signalvej og uden unødig
lydbehandling.
Displayet går tilbage til at vise de almindelige informationer ca. 15 sekunder efter man sidst har
trykket på ”SURROUND MODE” eller i det øjeblik man har trykket på ”VOL” knappen.
5.5 Sidekanaler
Med Sidekanaler giver Thule Audio dig mulighed for en unik 8.1 kanals udvidet installation, hvis
du har dit anlæg i et stort lokale. Ved at blande lyden fra for- og baghøjtalerne i to nye kanaler,
kaldet SSL og SSR, er det muligt at opnå et bedre kontinuum i lyden, når den bevæger sig frem og
tilbage i rummet. De to ekstra kanaler er enkle at slå til og fra i config.extended surround menuen.
AV 100/120 indeholder kun 6 forstærkerelementer, så det er nødvendigt at koble en to-kanals
ekstern forstærker på, for at lave et 8.1. system. Det er også muligt at omdirigere lyden fra SSL og
SSR kanalerne til L og R effektkanalerne, og så bruge en stor ekstern forstærker, som eksempelvis
Thules PA350B, til at give R og L kanalerne et boost.
6. Config menuen
Man aktiverer configmenuen ved at trykke på ”CONFIG” knappen på fjernbetjeningen eller ved at
trykke på ”VOL" knappen på frontpanelet i mere end 2 sekunder.
Man navigerer rundt i menuerne ved hjælp af piltasterne:
← ↑ → ↓
Tryk på ”→” for at gå ned i en undermenu. Foretag dine valg ved at trykke på ”enter”. De valg du
har foretaget er understregede i displayet på frontpanelet og fremhævede i OSD menuen. Gå ud af
en undermenu ved at trykke på ”←”. På AV 120 kan man også navigere i config menuen ved hjælp
af knapperne på frontpanelet, idet følgende knapper får nye værdier:
”L”: ← ”C”: ↑ ”R” →
”SL”: enter ”SUB”: ↓
Man kan gå ud af config menuen ved at trykke flere gange på ”←” eller en enkelt gang på ”VOL”
knappen.
Config menuen har to sider. Man går til side 2 ved at trykke en ekstra gang på ”↑” eller ”↓”
knapperne, når curseren står på sidste linje.
I de forskellige config undermenuer kan man aktivere en masse forskellige funktioner, som kort vil
blive beskrevet i det følgende:
Page 46

46
6.1 Højtalere
SPHERE AV 100/120 har udvidede muligheder for at styre basindstillingerne, således at signalerne
kan sendes ud til de højtalere, der er bedst egnet til at håndtere de dybe toner. Følgende indstillinger
kan foretages i menuen config.speaker, ved at benytte navigationstasterne som beskrevet ovenfor:
Venstre højtaler (L): LARGE (stor) eller SMALL (lille)
Højre højtaler (R): LARGE eller SMALL
Centerhøjtaler (C): LARGE eller SMALL eller OFF (slukket)
Venstre surroundhøjtaler (SL): LARGE eller SMALL eller OFF
Højre surroundhøjtaler (SR): LARGE eller SMALL eller OFF
Subwoofer (sub): ON eller OFF
Når en højtaler er indstillet til at være SMALL vil de dybe toner blive omdirigeret til subwooferen
eller L og R højtalerne.
Hvis der slukkes for en højtaler, sendes signalet til de resterende – tændte – højtalere (downmixing).
Det er specielt vigtigt at styre indstillingerne for subwooferen:
I Dolby Digital 3/2 og DTS signaler er der som regel en lavfrekvent kanal (LFE), der indikeres
med ”.1” efter inputbeskrivelsen, eksempelvis 3/2.1. LFE kanalen danner et direkte output til
subwooferen.
I Stereo og ProLogic II signaler er der ikke en LFE kanal. Hvis alle højtalere er sat som LARGE, så
vil der ikke være et signal til subwooferen. Hvis man alligevel ønsker et signal til subwooferen, så
kan man sætte indstillingen til subwoofer – max bas ON i menuen config.cross freq. Så vil
AV100/120 tage de samlede signaler fra L og R kanalerne og sende dem til subwooferen.
Når man aktiverer subwooferen for Stereo og ProLogic signaler, så kan man vælge imellem
følgende indstillinger:
A: Indstil L og R (eller L, R, C, SL, SR, for ProLogic's vedkommende) som SMALL.
Bashåndteringsenheden sender nu de lave L og R toner til subwooferen. Det er muligt
at vælge imellem 6 forskellige crossover-frekvenser i config.cross freq menuen.
Eller
B: Indstil L og R (eller L, R, C, SL, SR, for ProLogics vedkommende) som LARGE og
aktiver subwoofer – max bas ON i menuen config.cross freq. I dette tilfælde vil et
summeret mono-signal fra samtlige kanaler blive sendt til subwooferen.
Hvis man vælger løsning B, så er der ”dobbeltbas” i systemet. Det betyder, at man bør overveje at
skrue lidt ned for subwooferen i forhold til de andre kanaler, for eksempel med –4 til –8 db,
afhængig af subwooferens sensitivitet i forhold til de andre højtalere. Løsning B er ideel når L og R
højtalerne godt kan håndtere dybe toner, men der er behov for ekstra bas. Hvis højtalerne derimod
ikke kan håndtere de dybe toner, så løsning A bedst, sandsynligvis med en crossover-frekvens på
mindst 60Hz.
Page 47

47
Subwoofer – max bas ON indstillingen er også brugbar i forbindelse med Dolby Digital og DTS,
hvis der er behov for ekstra bas.
Subwoofer – max bas ON indstillingen gemmes i hukommelsesbanken og kan altså indstilles
individuelt for hver enkel type surround sound.
6.2 Input
Indgangsstik for hver enkelt tilsluttet enhed kan vælges under dette punkt, som beskrevet ovenfor, i
sektion 1.
6.3 Kalibrering af højttalerne
Hvis man bruger forskellige højtalere eller afstanden fra de enkelte højtalere til lyttepositionen er
forskellig, så opfattes lydniveauet fra hver enkelt højtaler forskelligt. Når man aktiverer
menupunktet NOISE, så sendes et støjsignal ud til hver enkelt af de aktive højtalere. Støjsignalet vil
springe fra højtaler til højtaler, således at man kan indstille højtalerne til at lyde ens i forhold til
lyttepositionen. En lydtryksmåler kan eventuelt benyttes i denne forbindelse – brug C vejet indstillingen og hold apparatet væk fra kroppen.
Man går ud af støjtesten ved at trykke på ”←” eller ”VOL” knappen.
6.4 Crossover frekvens
Denne indstilling er meget praktisk. Hvis man sætter en højtaler som SMALL, så sendes de lave
toner i signalet til subwooferen eller L/R højtalerne. Den tilsvarende cross-over frekvens vælges i
menuen config.cross freq. Mindre højtalere kan sættes til 120Hz, mens større højtalere kan sættes til
60Hz.
6.5 Extended Surround
I denne menu kan du slå DTS ES 6.1 Discrete, 6.1 Matrix og sidehøjtalerne til og fra. Se venligst i
sektionen ”Typer af Surround Sound”, hvis du vil have uddybet ovenstående begreber.
6.6 Kompression af den dynamiske bredde
I støjende omgivelser kan det være rart at give de svage lyde et boost (eksempelvis lyden af blade,
der rasler i vinden), så de kommer op på et realistisk niveau og ikke drukner i baggrundsstøjen.
Endvidere kan kompression gøre tale mere tydelig, specielt i støjende omgivelser. Endelig kan det
være praktisk at begrænse de høje lyde (tage toppen af lyden), så man eksempelvis ikke forstyrrer
sine naboer midt om natten.
Følgende indstillinger er mulige for den dynamiske kompression:
DYNAMIC HI (DTS + Dolby Digital)
Begrænsning af de høje lyde: 0.0 (Funktionen er slået fra)
0.1
0.2
0.4
0.6
1.0 (Maksimal begrænsning af de høje lyde)
Page 48

48
DYNAMIC LO (Dolby Digital)
Boost til de lave lyde: 0.0 (Funktionen er slået fra)
0.1
0.2
0.4
0.6
1.0 (Maksimalt boost til de lave lyde)
6.7 Volumenskalaen
Det er muligt at vælge imellem to forskellige volumenskalaer: En med progressive intervaller, hvor
intervallerne bliver større lavt nede i skalaen, så man hurtigere kan indstille lydniveau'et. Den anden
skala har faste 0.5dB intervaller er langsommere i brug. Indstillingen med progressive intervaller er
valgt som standard og er at foretrække for de fleste brugere. Den kaldes derfor ”normal”, mens
skalaen med faste intervaller kaldes ”full”:
”normal”: 0.0, 5.0 , 10.0, 15.0, 20.0, 22.0, 24.0,......38.0, 40.0, 41.0,
42.0,..... , 68.0, 69.0, 70.0, 70.5, 71.0, 71.5,..... , 99.5, 100.
”full”: Faste 0.5dB intervaller fra 0 til 100 (200 i alt).
6.8 At gemme nye indstillinger i hukommelsesbankerne
I menuen MEM BANK kan man gemme sine nye indstillinger i 4 hukommelsesbanker, en for hver
af surroundtyperne: Stereo, ProLogic II, Dolby Digital og DTS. Følgende parametre gemmes:
- Kanal volumen (for L, C, R, SL, SR, SUB og LFE)
- Kanalforsinkelse (for SL, SR, C, SC)
- Højtalerkonfiguration (højtalerstørrelse og crossover frekvens)
- Subwoofer max bas (samlet monosignal sendes til subwoofer)
Når du er færdig med at indstille en af ovenstående parametre, så kan du gemme det ved først at
benytte ”→” til at vælge den korrekte hukommelsesbank (Stereo, ProLogic II, Dolby Digital og
DTS) og derefter trykke ”ENTER”
De gemte parametre vil blive indlæst hver gang der skiftes til en anden type surround sound. Der er
naturligvis stadig mulighed for at lave midlertidige ændringer, og disse vil gælde indtil AV100/120
slukkes eller stilles i standby.
6.9 Gendan fabriksindstillinger
Alle indstillinger i konfigurationsmenuen gemmes selvom der slukkes helt for strømmen. Men hvis
dine indstillinger ikke fungerer ordentligt eller lyder forkert, så kan det være en løsning simpelthen
at gendanne fabriksindstillingerne, hvilket fungerer lidt som når man genstarter en computer.
Hvis man vælger denne indstilling (ved at trykke på ”→”), vil teksten SURE? komme frem i
displayet, for at kontrollere om man er helt sikker på man ønsker at gøre det. Det kan man bekræfte
ved at trykke på ”ENTER” eller sige nej til ved at trykke på ”←” eller ”VOL” knappen.
Bemærk venligst, at indstillingerne for forsinkelse og kompression slettes hvis du gendanner
fabriksindstillingerne, og at det ikke er muligt at finde dine egne indstillinger frem igen.
Page 49

49
6.10 OSD (kun relevant for AV100S og AV120S)
Man kan vælge også at få informationen på frontpanelet vist på skærmen (On Screen Display).
Når man går ind i config-menuen, så vises et OSD på hele skærmen, som overskygger alle andre
videosignaler.
Det normale er, at OSD signalet blandes med det aktuelle videosignal, men følgende indstillinger er
mulige:
- OSD er slået fra.
- OSD slås kun til ved tast på fjernbetjeningen (dette er fabriksindstillingen).
- OSD slås til både ved tast på fjernbetjeningen og på frontpanelet.
Når OSD ikke benyttes, så fjernes OSD signalet fra signalstrømmen, så man kan få det maksimale
udbytte af de videokilder, man afspiller.
6.11 SPDIF OUT
I denne menu kan man vælge hvilke kanaler der skal sendes til optiske output. Her vil signalet
ændres i forhold til hvilken kilde det kommer fra – for eksempel vil analog input og DTS 96kHz
have et output på 96kHz, mens normal DVD output kun er på 48kHz.
6.12 Kontroller for interne effektforstærkere
AV 100/120 kan kontrollere en ekstern Thule Audio forstærker fra RJ45 stikket bag på apparatet.
Hvis man benytter en IA350, IA252B IA255B, PA350 eller PA250 MKII til R/L effektforstærkning
i et 8.1 system (se sektionen ”Sidekanaler” i afsnittet ”Typer af Surround Sound”), så bør
AV100/120 indstilles til ”FIXED 2 CH CONTROL”. Endvidere skal man omdirigere signalet fra
SSL og SSR processorerne til de indbyggede L og R effektforstærkere, ved at ændre indstillingerne
fra ”L,R processor” til ”SSL, SSR power”.
6.13 ProLogic II
I denne menu kan man vælge standardindstillingerne for ProLogic II, for hver enkel type input.
Man kan vælge imellem movie og music afhængig af hvilke medier man afspiller hyppigst. Der
henvises til ”Typer af Surround Sound” for en uddybende forklaring.
6.14 Video input output (kun relevant for AV100S og AV120S)
Brugeren skal for hver input kilde vælge det korrekte inputformat. Endvidere skal der vælges enten
RGB eller Komponent som output til TV/projektor.
DVD Komponent input kan vælges, hvis signalet har en båndbredde på over 100MHz., hvilket for
eksempel er passende for et progressivt DVD signal. Neden for er et skema over forbruget af
båndbredde:
NTSC Interlaced: 6 MHz
NTSC Progressive: 12 MHz
PAL Interlaced: 7 MHz
PAL Progressive: 14 MHz
Page 50

50
Hvis progressive pass-through indstillingen er slået til, så vil der ikke vises informationer på
skærmen (så som volumenindstillinger), og lyden for composite video og S-video udgangene er
slået fra.
6.15 Diverse Videoindstillinger (kun relevant for AV100S og AV120S)
Nogle Tv-apparater kræver et selvstændigt ”aktiveringssignal” for at aktivere RGB input i deres
Scartstik. Tape1 Composite input kan sættes til at foretage denne Scart RGB aktivering. Benyt disse
fem signaler til Scartforbindelser:
- RGB ud
- Tape1 Composite ud
- Scart RGB aktiveringssignal (tape1 Composite ind)
Vælg nu RGB out i video input output menuen. Thule Audio kan levere et 5 benet RCA Phono-tilScart kabel af høj kvalitet.
Normalt vil RGB signalet være uden sync, så det kan man tage fra Tape1 out. Nogle projektorer kan
godt håndtere at sync inkluderes i RGB signalet, og disse vil ikke kræve et ekstra sync signal.
Udvidet skarphed trækker konturerne skarpere op ved at accelerere lysskiftene.
Hvis man slår støjdæmpningsfunktionen til, så opfattes meget svage videofrekvenser som støj, og de
sorteres fra signalet. Det betyder, at en del af skarpheden og detaljerne kan gå tabt. Brug derfor
denne funktion med omtanke, for eksempel hvis der er meget støj på et antennesignal. Brug ikke
støjdæmpningsfunktionen på signaler af høj kvalitet, så som DVD eller kabel Tv, da disse signaler
kan blive forringet af processen.
Page 51

Manufactured under license from Dolby Laboratories. ”Dolby”, ”ProLogic II” and the double-D symbol are trademarks of Dolby Laboratories.
Confidential unpublished works. © 1992-1997 Dolby Laboratories Inc. All rights reserved.
Manufactured under license from Digital Theater Systems, Inc. US Pat. No. 5,451,942, 5,956,674, 5,974,380, 5,978, 762, 6, 487, 535 and other
U.S. and world-wide patents issued and pending. "DTS", "DTS-ES Extended Surround" and "Neo:6" are trademarks of Digital Theater
Systems, Inc. Copyright 1996, 2003 Digital Theater Systems, Inc. All Rights Reserved.
Thule Audio ApS has the right to make changes without prior notice
TEKNISKE SPECIFIKATIONER
Processor section:
Max analogue output voltage: 8V phono Analogue inputs to DSP: 4 Phono
THD, Pure Audio input, 2V out: 0.002% Digital inputs to DSP: 4 Electrical
THD, A/D inputs, 0 dB: 0.005% 2 Opto
THD, digital inputs, 0 dB, 44kHz PCM: 0.003% Pure Audio inputs: 1x 5.1 Pho.
S-Video inputs: 5 S-VHS
Dynamic range, DTS 20bit: 115dBA Video composite inputs: 4 Phono
Frequency response, 20 – 20k Hz: < - 0.6dB S-Video outputs: 2 S-VHS
Video composite outputs: 1 Phono
RGB/Component out: 1x 3Phono
Power section:
AV100 (S):
Max power output 20- 20kHz, 8 ohms: 6x 100W
Max power output 20- 20kHz, 4 ohms: 6x 150W
AV120 (S):
Max power output 20- 20kHz, 8 ohms: 6x 120W
Max power output 20- 20kHz, 4 ohms: 6x 170W
THD, -10dB, 8 ohms < 0.007%
Size (W x D x H), weight 420 x 370 x 90mm+12mm feets, 16kg AV100(S) , 19kg AV120 (S)
Configuration DATA I/O + RS232, pin: 1) Data (for communication with other Thule Audio Equipment)
2) Clock (for communication with other Thule Audio Equipment)
3) No connection
4) No connection
5) RX-RS232
6) No connection
7) TX-RS232
8) Analogue Ground (must be connected to analogue ground to prevent
analogue-digital ground loops)
Thule Audio forbeholder sig ret til at ændre specifikationer og design uden varsel
Page 52

52
7.0 Dine noter
I denne sektion kan du selv udfylde specifikationerne for dit Sphere AV100/120 anlæg, så du har
dem, hvis du skulle komme til at slette noget i hukommelsesbankerne ved et uheld.
Stereo
Højtaler størrelse
Forsinkelse / ms Volumen just. / dB
L (Venstre hovedhøjtaler)
R (Højre hovedhøjtaler)
ProLogic II
Højtaler størrelse
Forsinkelse / ms Volumen just. / dB
L (Venstre hovedhøjtaler)
R (Højre hovedhøjtaler)
C (Centerhøjtaler)
SL (Surround venstre)
SR (Surround højre)
Dolby Digital
Højtaler størrelse
Forsinkelse / ms Volumen just. / dB
L (Venstre hovedhøjtaler)
R (Højre hovedhøjtaler)
C (Centerhøjtaler)
SL (Surround venstre)
SR (Surround højre)
SC (Surround Centerhøjt.)
DTS
Højtaler størrelse
Forsinkelse / ms Volumen just. / dB
L (Venstre hovedhøjtaler)
R (Højre hovedhøjtaler)
C (Centerhøjtaler)
SL (Surround venstre)
SR (Surround højre)
SC (Surround Centerhøjt.)
Page 53

53
Appendix A: Specielle Features
A.1 A/D niveau
Alle analoge input med undtagelse af Pure Audio bliver omdannet til digitale signaler (D/A
konvertering) af de indbyggede 24 bit 96kHz højkvalitets A/D konvertere. De digitale signaler
bliver herefter forarbejdet af DSP kredsløbene til eksempelvis Dolby ProLogic.
Et fundamentalt problem ved D/A konvertering er dog, at de højeste lyde i det analoge signal skal
ligge så tæt som muligt på A/D konverterens maksimale ydeevne, da dynamik området for signalet
ellers kan blive forringet. Samtidig er det dog uhyre vigtigt, at de højeste lyde i det analoge signal
ikke overstiger D/A konverterens analoge kapacitet, da signalet ellers bliver "klippet".
I AV100/120 er der indbygget en auto-gain funktion, der virker som følger: når man vælger input,
så vælges den mest følsomme indstilling automatisk, for at få det fulde udbytte af dynamik området.
Hvis signalet klippes, så formindskes følsomheden automatisk. Ved en sådan ændring giver
apparatet et svagt klik: dette er altså ikke en fejl i apparatet.
A. 2 Elektronisk (Coax) overfor optisk digitalt input
Normalt foretrækker HiFi-entusiaster en coaxial forbindelse imellem eksempelvis en DVD og
forstærkeren, da denne har større båndbredde og dermed medfører mindre støj på forstærkersiden.
Med de mere og mere komplekse surroundanlæg, der integrerer analoge, digitale og videosignaler,
så er det dog kun alt for let at skabe forstyrrelser og jordingsproblemer i et anlæg.
For at skabe et værdigt alternativ til coaxforbindelsen, så har AV100/120 en helt ny type optiske
sendere og receivere, der har en noget større båndbredde på 13MHz i stedet for de normale 7MHz.
Dette eliminerer de fleste af de traditionelle problemer ved optiske forbindelser, og så er det en
fordel at forbindelsen er fuldt galvanisk adskilt og dermed mindre følsom overfor brumsløjfer.
Hvis der opstår problemer med jordsløjfer eller andre forstyrrelser, så kan man med fordel benytte
den optiske forbindelse frem for coax.
A.3 System til automatisk fejlretning
En særlig ”vagthund” i AV100/120 vil monitorere alle DSP (Digital Signal Processing) operationer
og kontrollere IC’erne. Hvis en ekstern forstyrrelse så som lynnedslag, pludselige strømudsving
eller statiske udladninger får DSP’en til at gå ned, genstartes den automatisk, så den kan fungere
korrekt igen. Dette sker på en brøkdel af et sekund og der vil kun være et ganske kort lydudfald.
Når AV100/120 sættes i standby, bliver alle indstillinger nulstillet. Det betyder, at man blot kan
sætte apparatet i standby nogle få sekunder, hvis der skulle opstå problemer med det. Hvis dette
ikke løser problemet, så kan man derudover slukke for strømmen bag apparatet, og så genstarte det.
Med de mange forskellige indstillinger man kan foretage for AV100/120, kan man nemt komme til
at foretage indstillinger der ikke matcher resten af anlægget og får apparatet til at virke ustabilt.
Hvis dette sker og det ikke hjælper at sætte apparatet i standby eller slukke for strømmen, så kan
man gendanne fabriksindstillingerne, som beskrevet ovenfor. Når man herefter genstarter apparatet
med standby/operate, så skulle problemet være løst.
 Loading...