

Page 1

Owners manual
SPIRIT DVA100, SPHERE DVA120, SPIRIT DVA150B, SPACE DVA250B
OVERVIEW OF FRONT AND REAR PANEL DVA100 ............................................. 3
OVERVIEW OF FRONT AND REAR PANEL DVA120 ............................................. 4
OVERVIEW OF FRONT AND REAR PANEL DVA150B........................................... 5
OVERVIEW OF FRONT AND REAR PANEL DVA250B........................................... 6
OVERVIEW OF REMOTE CONTROL....................................................................... 7
OVERVIEW OF DISPLAY.......................................................................................... 8
CONGRATULATIONS WITH YOUR NEW THULE AUDIO DISC PLAYER.............. 9
1. INSTALLATION................................................................................................... 10
2. GETTING STARTED............................................................................................ 10
3. PLAYING A DVD-VIDEO DISC............................................................................ 10
3.1 Playing a title ................................................................................................................................. 10
3.2 Moving to another chapter ...........................................................................................................11
3.3 Parental control ............................................................................................................................. 11
3.4 Still picture/ Pause ........................................................................................................................ 11
3.5 Search ............................................................................................................................................. 11
3.6 Repeat chapter/title/disc............................................................................................................... 12
3.7 A-B repeat ...................................................................................................................................... 12
3.8 Changing the audio language and channel configuration (Audio system)............................. 12
3.9 Subtitles.......................................................................................................................................... 12
3.10 Audio format................................................................................................................................ 12
3.11 Checking the contents of DVD-Video discs: menus................................................................ 13
1
Page 2

4. PLAYING AN AUDIO CD OR VIDEO CD............................................................ 13
4.1 Playing a disc................................................................................................................................. 13
5. SETTINGS............................................................................................................ 14
5.1 General setup................................................................................................................................. 14
5.1.1 TV display................................................................................................................................14
5.1.2 Pic Mode..................................................................................................................................14
5.1.3 Angle Mark .............................................................................................................................. 15
5.1.4 OSD Language........................................................................................................................ 15
5.1.5 Captions .................................................................................................................................. 15
5.1.6 Screen Saver........................................................................................................................... 15
5.1.7 YUV video................................................................................................................................15
5.2 Speaker setup................................................................................................................................15
5.2.1 Downmix..................................................................................................................................15
5.2.2 Speaker enable .......................................................................................................................15
5.2.3 Speaker delay ......................................................................................................................... 15
5.2.4 Test tone.................................................................................................................................. 15
5.3 Audio setup .................................................................................................................................... 16
5.3.1 AUDIO OUT ............................................................................................................................. 16
5.3.2 OP MODE................................................................................................................................. 16
5.3.3 DUAL MONO ........................................................................................................................... 16
5.3.4 DYNAMIC................................................................................................................................. 16
5.3.5 PRO LOGIC ............................................................................................................................. 16
5.3.6 LPCM OUTPUT........................................................................................................................ 16
5.4 Preferences....................................................................................................................................16
5.4.1 TV Type.................................................................................................................................... 16
5.4.2 Audio........................................................................................................................................ 17
5.4.3 Subtitle..................................................................................................................................... 17
5.4.4 Disc menu ............................................................................................................................... 17
5.4.5 Locale ...................................................................................................................................... 17
5.4.6 Parental.................................................................................................................................... 17
5.4.7 Password................................................................................................................................. 17
5.4.8 Default...................................................................................................................................... 17
APPENDIX A: OPTICAL VERSUS ELECTRICAL DIGITAL AUDIO OUTPUT....... 18
APPENDIX B: HUM LOOPS IN HOME THEATRE INSTALLATIONS.................... 19
TECHNICAL SPECIFICATIONS.............................................................................. 20
2
Page 3
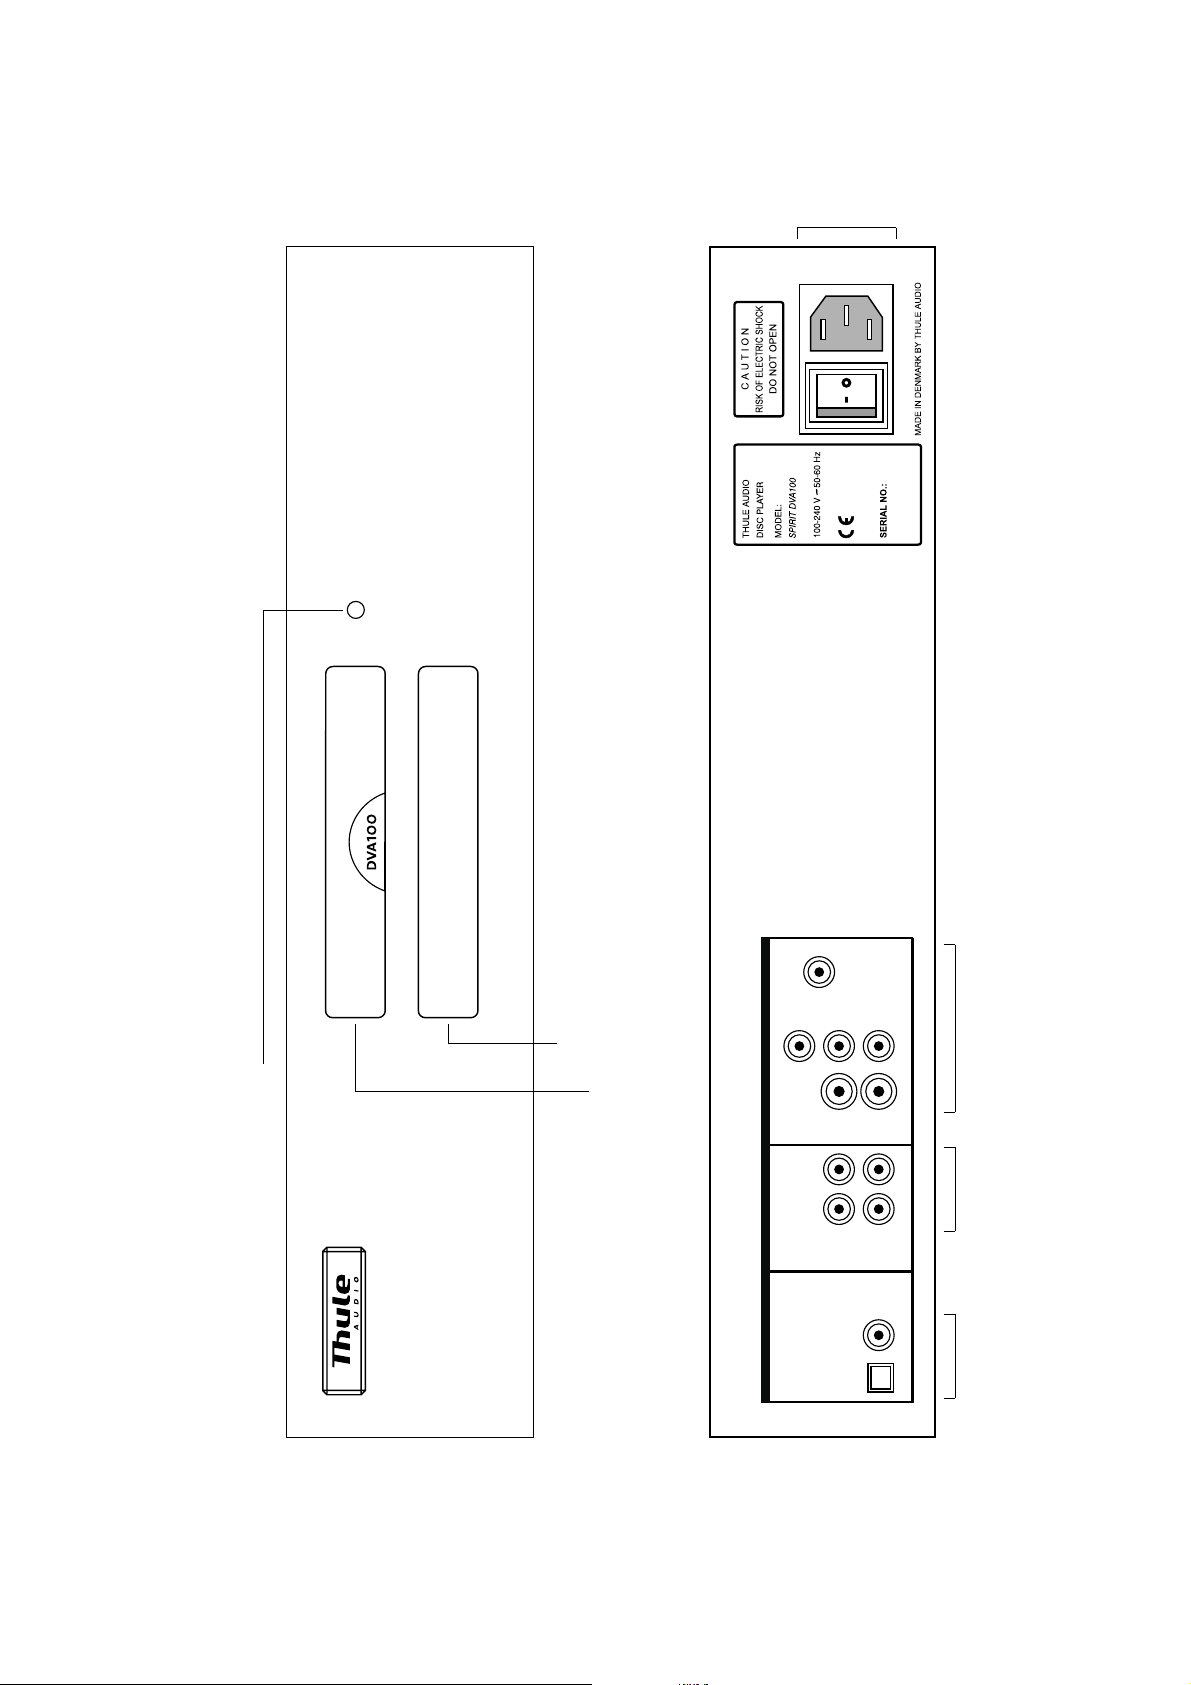
Mains input
Front panel
Rear panel
"One knob operation"
-by first push the CD-tray moves in and first track is played
-by additional short push the player jumps to next track's
-by holding in the knob for 2 seconds the CD-tray moves out
Display
CD-tray
VIDEO OUT
ANALOG OUT
DIGITAL OUT
/RGB
SCART
Y/G
/B
B
C
CVBS
L
L
COAX
75 ohm
OPTICAL
/R
R
C
Video connectors to
Video-S
R
R
amplifier or TV/projector
Stereo
analog audio
connectors to
Digital audio
connectors to
amplifier
amplifier
3
Page 4
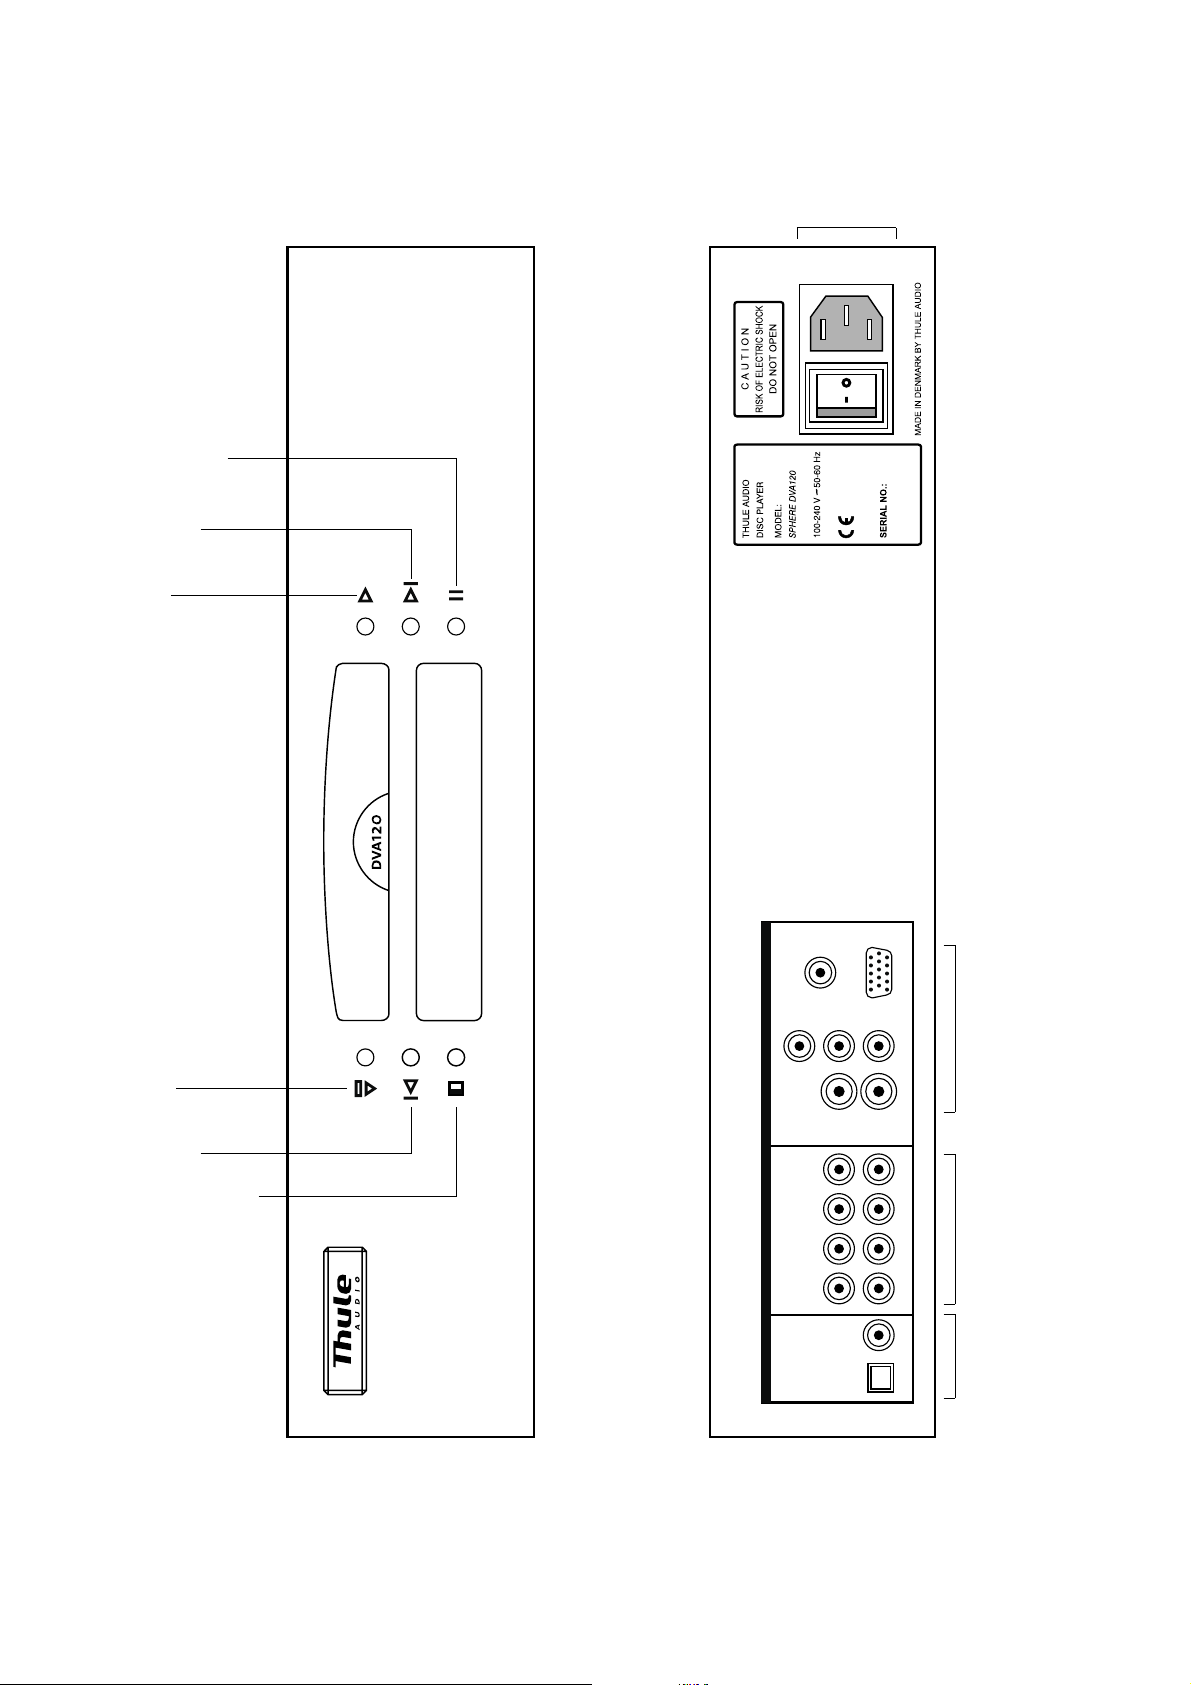
Mains input
play
next track
pause
Front panel
Rear panel
open/close
stop
previous track
short press:
standby
long press:
VIDEO OUT
ANALOG OUT
DIGITAL OUT
/RGB
SCART
Y/G
/B
B
C
CVBS
L
L
SL
C
COAX
75 ohm
OPTICAL
VGA
/R
R
C
Video connectors to
Video-S
R
R
SR
SUB
amplifier or TV/projector
5.1 analog audio
connectors to
amplifier
Digital
audio
connectors
to amplifier
4
Page 5
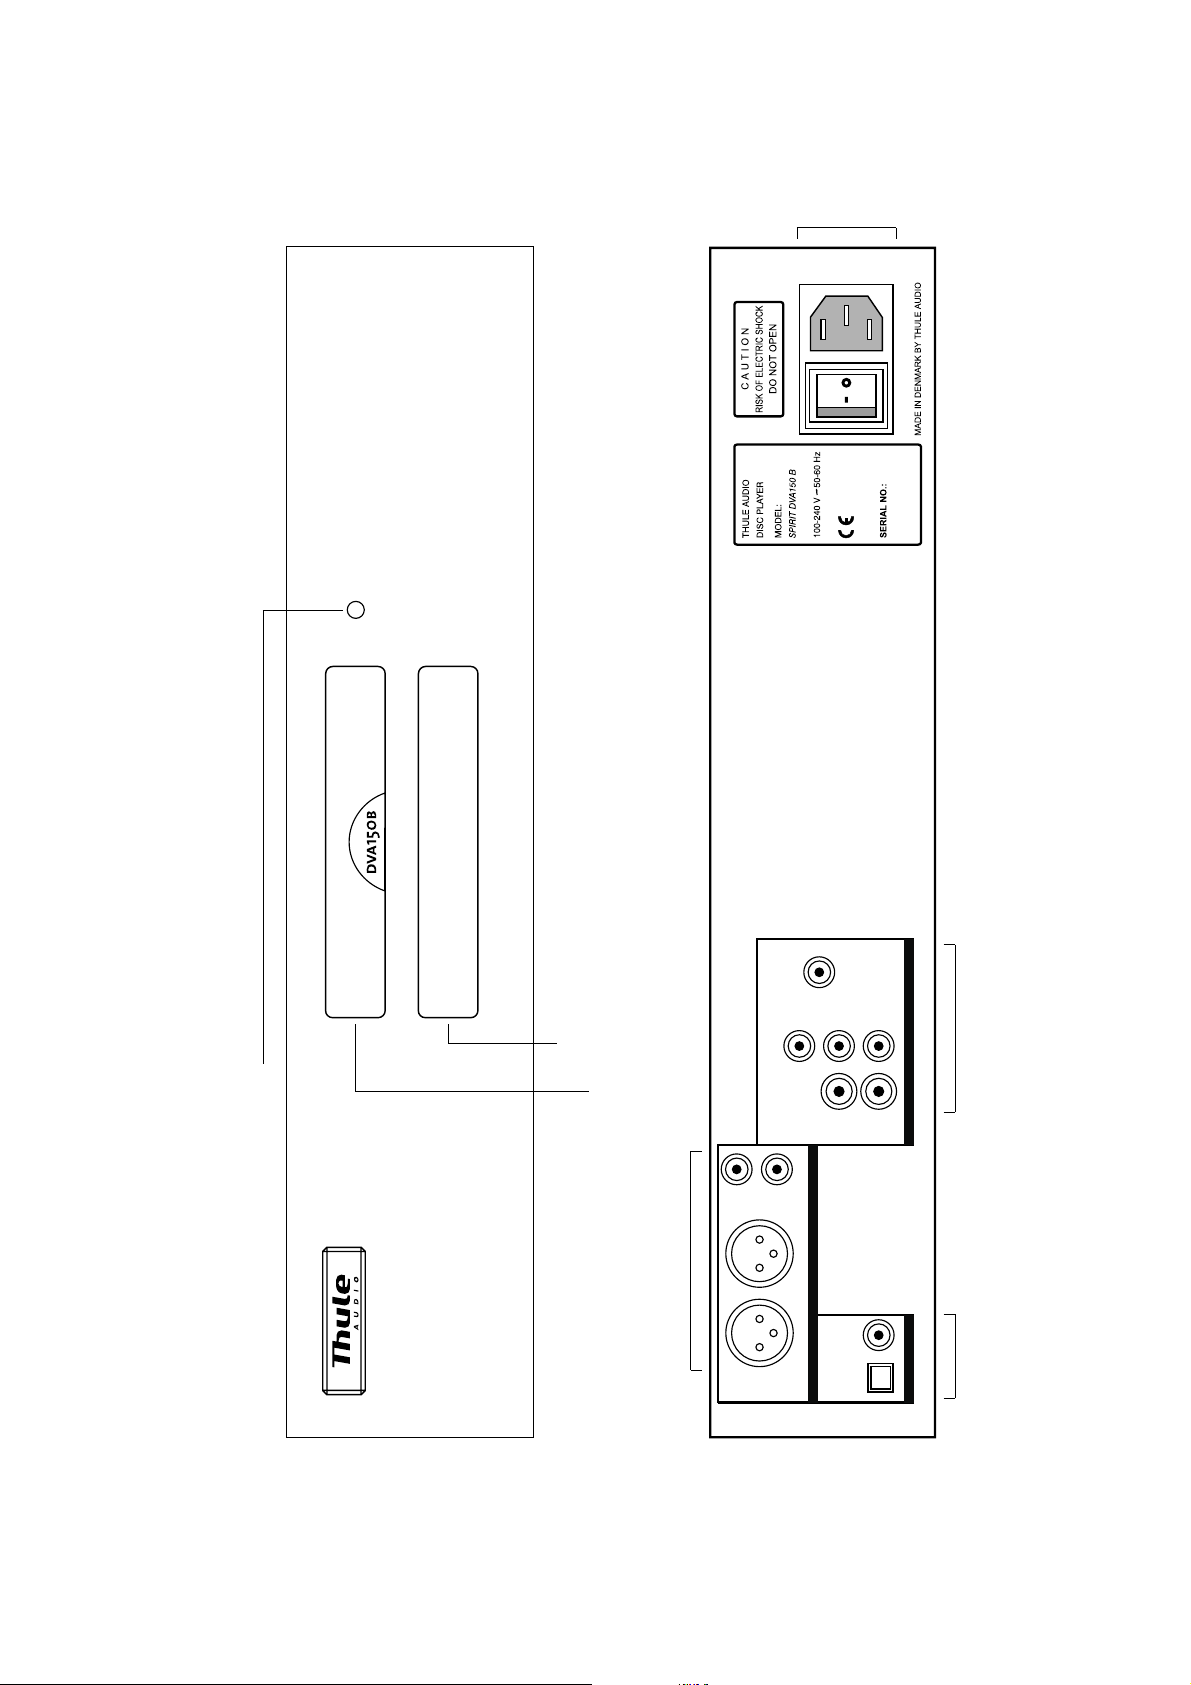
Mains input
Front panel
Rear panel
-by first push the CD-tray moves in and first track is played
-by additional short push the player jumps to next track's
"One knob operation"
-by holding in the knob for 2 seconds the CD-tray moves out
Display
CD-tray
XLR stereo connector
to amplifier
/RGB
SCART
/B
/R
B
Y/G
C
CVBS
L
R
L
R
ANALOG OUT
COAX
75 ohm
OPTICAL
VIDEO OUT
R
C
Video connectors to
Video-S
DIGITAL OUT
amplifier or TV/projector
Digital
audio
connectors
to amplifier
5
Page 6
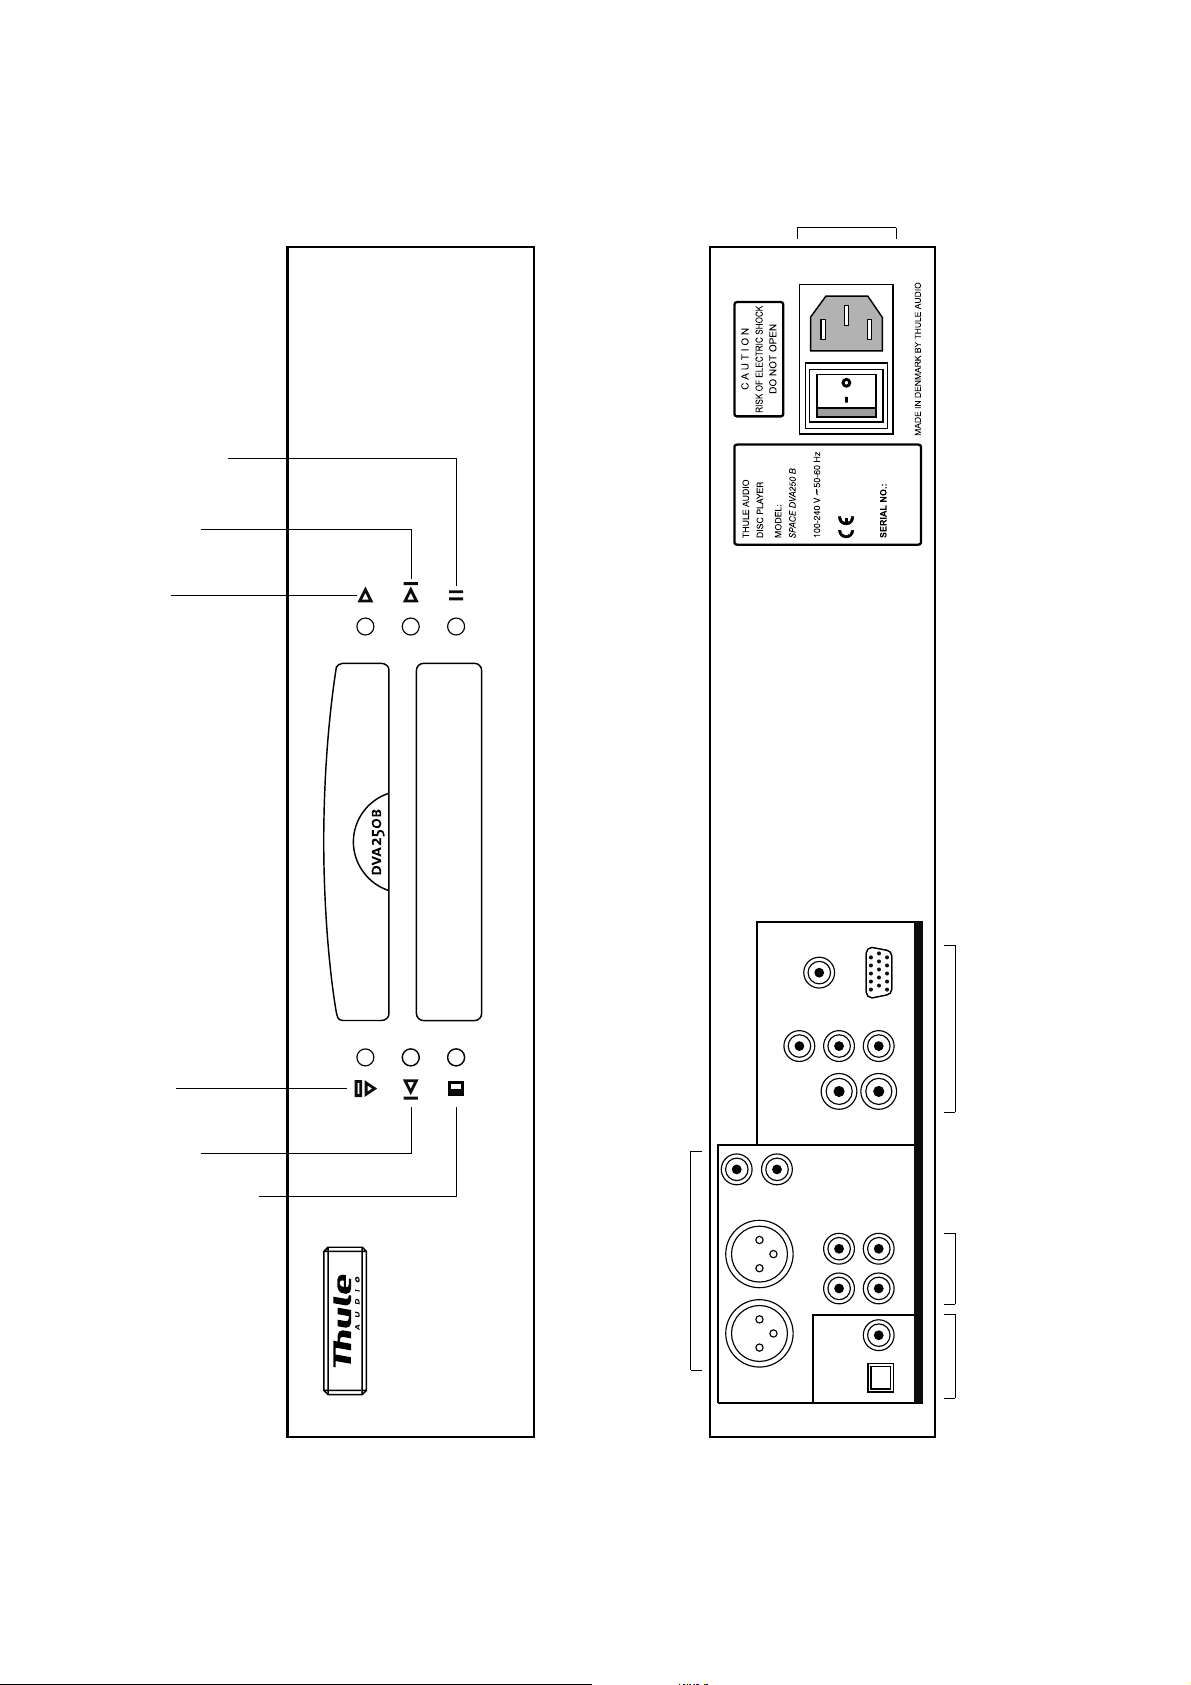
Mains input
play
next track
pause
Front panel
Rear panel
open/close
stop
previous track
short press:
standby
long press:
XLR stereo connector
to amplifier
/RGB
SCART
Y/G
L
R
L
R
VGA
/B
B
C
CVBS
SL
C
COAX
75 ohm
OPTICAL
VIDEO OUT
/R
R
C
Video connectors to
Video-S
OUT
SR
ANALOG
SUB
DIGITAL OUT
amplifier or TV/projector
5.1 analog audio
connectors to
amplifier
Digital
audio
connectors
to amplifier
6
Page 7

Remote control
Turns off the unit.
Stops video and audio playback.
Opens or closes the disc tray.
Goes to the previous chapter, track or scene in continuous play mode.
Goes to the next chapter, track or scene in continuous play mode.
Using this function, you can play a specific portion of a title, chapter, or track repeatedly.
[REPEAT]
Press button for one second.
A/B
You can play all of the titles or tracks on a disc or a single title, chapter, or track repeatedly.
Press this button to pause or un-pause a disc.
Use these buttons to input numbers.
To jump to a specific track number on a CD disc: Press one or two numbers and
player will jump after one second.
To jump to a specific track number on a DVD disc: Press one or two numbers and
player will jump when is pressed.
dvdPress this button to enter play mode, resume play after pause or resume play after stop ( ).
ENTER
5
[MENU]
[SUBT]
[AUDIO]
[FB] or [FF]
[DISP]
[P-SCAN]
[CONFIG]
[VIDEO]
DVD: Calls the Root Menu of the DVD disc.
DVD: Displays the subtitles. Press this button repeatedly to cycle through
the subtitle options.
Press button for one second.
[SUBT]
If the DVD is recorded with multiple language tracks, you can select the language
you want while playing the DVD.
If the DVD is recorded in multiple audio formats (PCM, Dolby Digital or DTS),
you can select the audio format you want while playing the DVD. Not all DVD discs
offer these possibilities.
This button activates the selected button on the screen.
When selecting menu items or the zoom function shown in the monitor screen,
use the cursor buttons to move the cursor up, down, left and right.
Press or button for one second.
Locate a specific sequence quickly by playing a disc in fast forward or fast reverse (scan).
There are four scan speeds: press the button repeatedly to cycle through
the different speeds - 2x, 4x, 6x and 8x. To resume normal playback speed,
press the button.
PLAY
Shows either the elapsed time of the title, the remaining time of the title, the elapsed time
of the chapter or the remaining time of the chapter. Press the button repeatedly to cycle
through the different indications.
Press button for one second.
[DISP]
Switches between progressive scan and interlace scan video.
Displays the initial setup screen of your DVA unit.
Press button for one second.
[CONFIG]
Short-cut button: pressing this button causes the video to enter S-VIDEO and
interlace scan modes
.
7
Page 8

Audio formats
Play indication
Seconds
Minutes
Hours
Chapter
number
Title
number
Seconds
Minutes
Track
number
Repeat indicator
Display
Disc formats
Display example - playing a DVD disc
Display example - playing a CD disc
8
Page 9

Congratulations with your new Thule
Audio
disc player DVA100,
DVA120, DVA150B or DVA250B.
The DVA disc player contains advanced technology for an outstanding range of
features and sound performance..
We are sure that the DVA disc player will give you many hours of pleasure with
music and movies.
To receive the full benefit from this advanced product, please read this manual
carefully before you proceed.
The DVA100, DVA120, DVA150B, DVA250B series contains the following features:
- Reads MP3, HDCD, CD, CD-R, CD-RW (+ & -), CD-DA, VCD, SVCD, DVD video
and DVD audio, and navigates on non-finalized CD-R and CD-RW (+ & -) discs.
- Video output: Composite (coax), S-VHS, RGB (coax) or Component and VGA
(only DVA120 and DVA250B)
- Excellent video performance, giving superb picture quality from high rated multibit
10 bit video D/A converter with external linear phase video buffer.
- Progressive video output with advanced filters, including film mode for both PAL
and NTSC.
- Digital audio output: 96kHz optical and Coax 75 Ohm. DVD Audio L/R output
format is 24bit 96kHz.
- Analog audio outputs with high performance D/A converter and OPA2134 analog
buffer:
DVA100 audio output: stereo unbalanced RCA phono
DVA150B audio output: stereo unbalanced RCA phono +
DVA120 audio output: 5.1 unbalanced RCA phono
DVA250B audio output: 5.1 unbalanced RCA phono +
- Possible upgrade for DVA150B and DVA250B: DIGIT II 24 bit / 192kHz
asynchronous upsampling board.
- True low-noise audio laser drive.
- Full, easy-to-use on-screen display (OSD) with many options for video and audio
settings. Settings can be adjusted without TV or projector access.
- 8 mm thick extruded and anodized aluminum front.
- 1½ mm plated steel cabinet, specifically designed for low noise. Aluminium
shielding of power supply.
stereo balanced XLR
stereo balanced XLR
Each feature is described further in the nex t pages.
9
Page 10

1. Installation
Place the disc player on a hard and flat surface. To ensure long and trouble free
operation we recommend:
- Do not expose the player to direct sunlight.
- Do not place the player in warm or dusty environments.
Caution: Because of risk of fire or electric shock, do not expose the player to rain or
moisture.
Caution: Because of risk of electric shock, do not open the player.
2. Getting started
a: Press
OPEN
on the front of the player.
b: Lay a disc of your choice in the tray, label side up. Make sure it is resting properly
in the correct recess.
c: Gently push the tray, or press
OPEN
or
PLAY
on the front or remote to close the tray.
Note: If you want to use RGB or component video out it is necessary to select RGB
or YUV (Component) under “YUV VIDEO” in the GENERAL menu.
3. Playing a DVD-video disc
You will recognize a DVD video disc by the logo shown in the display of the player.
Depending on the material on the disc (a movie, video clips, a drama series, etc.) it
may have several titles, and each title may have several chapters. Play stops at the
end of each title. To make access easy and convenient your player lets you move
between titles, as well as between chapters.
Note: During play various icons will appear on the TV screen for about one second to
confirm that a function has been selected. If an open hand icon appears the
command you have entered is not valid.
3.1 Playing a title
- Play starts when you close the tray.
- Depending on the disc, you may be invited to select an item from a menu. If the
selections are numbered, press the appropriate numerical key and if not, use
ARROW UP, ARROW DOWN
press
ENTER
.
,
ARROW RIGHT
and
ARROW LEFT
to highlight your selection and
- As the disc plays, the DVA player display shows the current title and chapter, and
the elapsed playing time.
10
Page 11

- Play will stop at the end of any title and usually returns to the menu afterwards.
To move on to the next title, press
- To stop at any other time, press
- You can resume play from the point at which you stopped by pressing
PLAY
STOP.
.
PLAY
again,
as long as you do not put the player in standby or turn it off.
3.2 Moving to another chapter
When a title on a disc has more than one chapter (this is shown on the DVA display),
you can move to another chapter as follows:
- Press
- Press
- To skip rapidly between tracks, hold down
NEXT
briefly during play to step forward to the next chapter.
PREVIOUS
briefly to step back to the beginning of the previous chapter.
NEXT
or
PREVIOUS
until the desired track is
reached.
- To go directly to any chapter, use the numerical keys to enter the track number
and then press
ENTER
.
Note: If the number has more than one digit, press the keys in rapid succession and
then press
ENTER
.
3.3 Parental control
- If you activate Parental Control, only discs that you have already authorised as
suitable for all ages can be played following the above procedures.
- To play any other DVD-Video disc, you will have to enter your Parental Control
PIN code. When this has been done, play starts automatically.
Note: If you forget your PIN code, you can always use the Factory Pin code 3308.
3.4 Still picture/ Pause
- To get a still picture, press
-
To return to play, press
PLAY
PAUSE
during play.
.
3.5 Search
- To search forwards or backwards on the disc, press
ARROW RIGHT
or
ARROW LEFT
for
more than 1 second during play.
- Search begins and sound is muted.
- To step up to 2x, 4x, 6x and 8x normal speed, press
ARROW RIGHT
or
ARROW LEFT
multiple times for more than 1 second.
To end the search press
PLAY, PAUSE
or
STOP
as desired.
11
Page 12

3.6 Repeat chapter/title/disc
- To repeat the currently playing chapter, press
A/B
for 1 second:
- Repeat chapter appears on the DVA player display.
- To repeat the currently playing title, press
A/B
again
for about 1 second:
- Repeat title appears on the player display.
- To exit repeat mode, press
A/B
a third time for about 1 second.
3.7 A-B repeat
To repeat or loop a sequence in a title:
- Press
A/B
briefly at your chosen starting point;
- A appears on the player display.
- Press
A/B
briefly at your chosen end point;
- A-B appears on the player display, and the repeat sequence begins.
- To exit the sequence, press
A/B
briefly again.
3.8 Changing the audio language and channel configuration (Audio system)
To change the language and the audio channel configuration, when alternatives are
available on the disc, enter the DVD disc menu, by pressing
[MENU]
. The menu where
the audio system can be changed is usually called languages, audio, subtitles or
something similar. When you have made the appropriate language and audio
system adjustments, you can return to playing the disc. In some cases you can also
adjust the subtitle settings in the same menu.
3.9 Subtitles
- When subtitles are available on a disc, you ca n turn them on by pressing
[SUBT]
during play.
- To step through language options or turn the subtitles off entirely, press
[SUBT]
repeatedly until the desired setting is reached.
3.10 Audio format
- With some DVD discs it is possible to change audio format during play mode. In
this case press
To step through audio format options, press
[SUBT]
during play for more than 1 second.
[SUBT]
for more than 1 second repeatedly
until the desired audio format is reached.
12
Page 13

3.11 Checking the contents of DVD-Video discs: menus
Special selection menus may be included on the disc for titles and chapters. The
DVD player’s menu feature allows you to make selections from these menus. Press
the appropriate numerical key; or use the
your selection, and press
ENTER
.
ARROW UP, DOWN, RIGHT, LEFT
keys to highlight
- Press
[MENU]
.
- If the disc has a title menu, this now appears on the OSD.
- To remove the title menu, press
[MENU]
again.
4. Playing an audio CD or video CD
Audio and video CD’s contain music tracks only.
You can play audio CD’s using the OSD or using the keys on the remote and/or front
panel.
4.1 Playing a disc
- Play starts when you close the disc drawer.
- Play will stop at the end of the disc.
- To stop play at any other time, press
Pause
- Press
-
To return to continuous play mode, press
PAUSE
during play to pause the disc.
STOP
.
PLAY
.
Search
- To search forwards or backwards through the disc at up to 4x normal speed,
press
ARROW RIGHT
or
ARROW LEFT
during play for more than 1 second.
- Search begins and sound is partially muted.
- To step up to higher speed press
ARROW RIGHT
or
ARROW LEFT
again for more than 1
second
- To end search, press
PLAY, PAUSE
or
STOP
as desired.
Moving to another track
- Press
- Press
- To skip rapidly through tracks, hold down
NEXT
once during play to step forward to the next track.
PREVIOUS
to step back to the beginning of the previous track.
NEXT
or
PREVIOUS
until the desired track is
reached.
- To go to any track, enter the track number using the numerical keys.
Note: if the number has more than one digit press the keys in rapid succession.
13
Page 14

Repeat track/disc
- To repeat the currently playing chapter, press
- REP ONE appears on the DVA or TV display.
- To repeat the entire disc, press
A/B
for about 1 second:
- REP ALL appears on the DVA or TV display.
- To exit repeat mode, press
A/B
a third time for about 1 second.
A/B repeat
To repeat or loop a sequence:
A/B
for a about 1 second:
- Press
- SET A
- Press
A/B
briefly at your chosen starting point;
appears on the DVA or TV display.
A/B
briefly at your chosen end point;
- SET B appears on the DVA or TV display, and the repeat sequence begins.
To exit the sequence, press
A/B
briefly.
5. Settings
In the configuration menu you can customize your DVA player in a number of areas
to suit your own particular requirements.
- Press
- Move to the function you want to change, using
ARROW LEFT
- To exit the settings menu, select
5.1 General setup
5.1.1 TV display
(Factory setting Pan Scan). If you have a regular 4:3 TV you can choose Letterbox
“LB” for a ‘wide-screen’ picture with black bars top and bottom or Pan Scan “PS” for a
full-height picture with the sides trimmed. If a disc has Pan Scan the picture moves
(scans) horizontally to keep the main picture on the screen. If you have a 16:9 TV
select “WIDE”.
[CONFIG]
or
to reach the settings menu.
ARROW RIGHT
to scroll to your preferred option.
EXIT SETUP
ARROW DOWN, ARROW UP
or press
[CONFIG]
, then use
again.
5.1.2 Pic Mode
Select Pixel mode when in progressive mode: AUTO, FILM, VIDEO, SMART,
SSMART.
Auto: auto choice of best mode below in comparison with the disc inserted.
Film, Smart, S(uper)smart: Frame by frame + line by line. These three modes each
uses a slightly different algorithm strategy, and nothing else. We find SSmart to give
the best picture.
Video: Line by line de interlacing (preferable for recordings played over from VCR, or
a VCD home video). It is not recommendable to choose when watching a DVD.
14
Page 15

5.1.3 Angle Mark
Select ON or OFF.
5.1.4 OSD Language
Choose the language used in the on-screen menu.
5.1.5 Captions
Select ON or OFF.
5.1.6 Screen Saver
Always select ON if you have a plasma screen.
5.1.7 YUV video
Select video format. If you want to use the VGA output, then select RGB. Progressive
video only works on RGB or YUV (component).
5.2 Speaker setup
5.2.1 Downmix
If only two channels are connected, e.g. for DVA100 and DVA150B, the sound from
the rear channels and center channels can be blended into the R and L channels. In
this case select “STEREO”. If you only want to downmix the center channel, then
select “LT/RT”.
5.2.2 Speaker enable
Alternatively, the center, rear or subwoofer speaker can be disabled individually.
5.2.3 Speaker delay
In most cases the rear speakers and sometimes the center speakers are placed
closer to the listening position than the left and right speakers. In this case the sound
wave from e.g. the rear speakers will arrive earlier at the listening position and cause
the sound stage to become diffused. To compensate for this, the sound from the rear
and center speakers can be delayed.
Calculate the difference in distance from the rear speakers and left/right speakers
and set the delay of rear speakers accordingly:
- difference in distance in ft. equals delay in milliseconds (one ft. equals one
millisec.)
- difference in distance in meters equals delay in milliseconds times 3 (one meter
equals three milliseconds)
Do the same for the center speaker.
5.2.4 Test tone
To check if each speaker is connected or adjusted correctly, activate to send out a
test tone .
Note: 5.2.2, 5.2.3 and 5.2.4 can only be selected, when “DOWNMIX” is OFF.
15
Page 16

5.3 Audio setup
5.3.1 AUDIO OUT
Selects the format of digital output from your player. If you have an external decoder,
which can accept coded formats like DTS or Dolby Digital, e.g. PR350B, AV100 or
AV120 from Thule Audio, then select SPDIF/RAW. Otherwise select SPDIF/PCM
(use this setting for digital speakers, for instance).
Note: If you only use your DVA as CD player, you can disable the digital out.
5.3.2 OP MODE
For future upgrades. Select “LINE OUT”.
5.3.3 DUAL MONO
It is possible to create several different forms of mono output in your DVA player. If
you would like the output of a mix of the L & R channel to be played in both channels,
then select “MIX-MONO”. You can also choose either the L or R channel to be
played in both channels, then select “L-MONO” or “R-MONO”.
5.3.4 DYNAMIC
To limit explosions in an action-movie and similar phenomena, you can activate
dynamic range compression. The more you would like to limit the dynamics, the
higher setting you choose.
5.3.5 PRO LOGIC
PRO LOGIC will generate center and rear channels from a stereo signal. If a movie is
recorded only in stereo you can get a surround-like sound field by activating PRO
LOGIC. Thule Audio does not recommend using PRO LOGIC for two channel music.
5.3.6 LPCM OUTPUT
Select whether SPDIF output can go all the way to up to 96kHz (e.g. DVD Audio), or
should be limited to 48 kHz.
Select 96kHz if you use the AV100, AV120 or PR350B from Thul e Audi o. The out put
should only be selected as limited if your surround amplifier cannot decode 96KHz,
please refer to the users manual of the amplifier.
5.4 Preferences
The preferences menu can only be accessed if the tray is open or no disc is loaded.
5.4.1 TV Type
Set video out format to disc format ”Multi”, or force it into PAL or NTSC.
Normally it would be advisable to use Multi, except if your TV cannot accept PAL or
NTSC format. The video quality will be degraded by PAL to NTSC or NTSC to PAL
conversion.
Note: Please be advised that the background picture and menu always are displayed in PAL,
when TV type setting is “Multi”. If your TV screen does not accept PAL, you will not be able
to see the background and menu. By using the menu shown in the display window of the
player, you can set the player into NTSC.
16
Page 17

5.4.2 Audio
Set the preferred audio language.
5.4.3 Subtitle
Set the preferred subtitle language.
5.4.4 Disc menu
Set the preferred disc menu language.
5.4.5 Locale
Set the preferred regional area you live in. If your country isn’t mentioned, then
choose the closest one mentioned. It is recommendable that you leave the player set
in the default region chosen from the factory.
5.4.6 Parental
Set parental level for disc access without password. The factory password is “3308”.
5.4.7 Password
Change password for parental disc access.
5.4.8 Default
Load factory settings. All user settings will be erased.
17
Page 18

Appendix A: Optical versus electrical digital audio output
The electrical connection has more bandwidth, typically more than 50MHz, and this
will maintain the pulse quality at the receiver end, which reduces jitter.
However there is noise emission from the digital pulses, which can potentially disturb
the video signal or TV/FM receiver. A short cable, e.g. less than 75cm and not
crossing the video cables or antenna cables, is necessary. Also, disturbances
through the receiver’s ground plane can occur, which can add new jitter.
The optical transmitter in DVA100, DVA120, DVA150B and DVA250B has a high
bandwidth of 14MHz, and ensures that the signal quality is maintained, even at a
transmission rate of 96 kHz.
The optical connection is completely free from ground return current and noise
emission. This will in many cases more than justify the use of an optical connection in
a complicated audio/video system.
If you face any noise problems, e.g. humming noises or noise caused by an electrical
connection, then change to an optical connection.
18
Page 19

Appendix B: Hum loops in home theatre installations
As the same ground reference is used for video and audio inside nearly all
audio/video equipment it is essential to avoid ground loops – otherwise audio
hum/noise will likely appear.
Please take into consideration the following rules:
a) Keep all wires from one unit to another together, to prevent fields from mains cable
and CRT monitor (TV set) from inducing noise in the ground path. For instance, this
means you should keep all cables leading from your DVA player to your amplifier
together: video, analog audio and digital audio. Use cable strapping or something
similar to ensure this.
b) Use a digital audio connection instead of an analog audio connection if any noise
problems occur.
c) Keep any antenna cables away from all other cables to prevent stripes on the
screen.
d) Keep mains cable away from all other cables (avoid parallel wirering).
19
Page 20

TECHNICAL SPECIFICATIONS
Analog outputs
Analog output voltage, 0 dB 2.2 V phono/ 4.4 V XLR
THD, digital inputs, 0 dB, 24bit/48 kHz: 0.002%
Dynamic range, 24 bit : 107 dBA (117dBA with DIGIT II installed)
Frequency response, 20 -20k Hz: <+/- 0.5 dB
Digital audio output
Electrical 0.5V, 75 ohms Coax, 32-96kHz
Optical Toslink type. 32-96kHz
Video output
Composite: 75 ohms; 0.7V / -0.3V sync
S-video: 75 ohms; 1V,0.7V / -0.3V sync on Y
YCrCb: 75 ohms; 1V,0.7V,0.7V / -0.3V sync on Y
RGB: 75 ohms; 0.7V / use Composite as sync
Size (W x D x H), weight: 420mm x 300mm x 90mm, 6.5 kg
Thule Audio ApS reserves the right to alter any specifications and designs without further notice.
20
 Loading...