

Page 1

- USER MANUAL
- MANUEL DE L’UTILISATEUR
- BENUTZERHANDBUCH
- HANDLEIDING
- MANUALE D’USO
- MANUAL DEL USUARIO
- MANUAL DO UTILIZADOR
РУКОВОДСТВО ПОЛЬЗОВАТЕЛЯ
ΕΓΧΕΙΡΙΙΟ ΧΡΗΣΗΣ
KULLANIM KILAVUZU
INSTRUKCJA OBSŁUGI
Compatible / Kompatibel PC
Page 2

2
1
9
LEFT
HANDED
5
10
8
6
12
LEFT
HANDED
3
6
7
9
255 0
8
7
RIGHT
HANDED
3
4
10
11
5
RIGHT
HANDED
1
4
2
Y Axis
0
X Axis
163830
16383
11
12
13
16
15
14
11
12
16
15
LEFT
HANDED
3
13
255 0
14
RIGHT
HANDED
1
4
2
Y Axis
0
X Axis
163830
16383
5
6
7
10
9
8
0+
255-
Slider0 Axis
RZ Axis
0+
RZ Axis
255-
Slider0 Axis
Page 3

A
E
A
D
B
C
C
B
F
Page 4
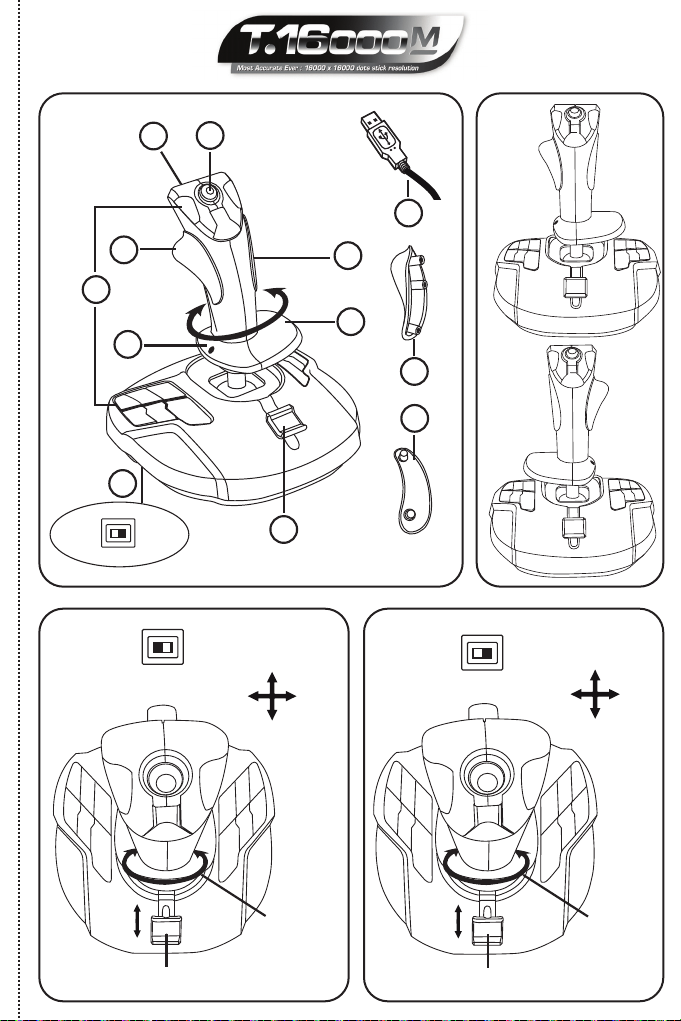
1/6
1. Digital trigger
7. Hand rest rotation screw, with right-
TECHNICAL FEATURES
Compatible: PC
User Manual
2. Multidirectional "Point of View" hat
switch
3. Right-handed screw cover
4. Rudder control via rotating handle with
hand rest
5. Throttle
6. 15 action buttons
handed or left-handed positions
8. Right-handed thumb rest
9. PC USB connector
10. Left-handed thumb rest
11. Left-handed screw cover
12. Right-handed or left-handed buttons
selector switch
GETTING TO KNOW YOUR JOYSTICK
EXCLUSIVE PRECISION TECHNOLOGY:
"H.E.A.R.T™: HallEffect AccuRate Technology"
Your T-16000M joystick features technology providing it with a level of precision currently unequaled in the world of gaming joysticks, including:
- A 3D (Hall Effect) magnetic sensor on the stick, with a resolution of more than 268 million
values over the X and Y axes (16384 x 16384 values), whereas current competing systems
(even high-end systems) provide resolutions in the neighborhood of only one million values
(1024 x 1024 values).
- A magnet: no friction, for unlimited precision and incredible responsiveness.
- Coil spring on stick (2.8mm): for firm, linear and ultra-fluid tension.
BACKLIGHTING
For even greater precision, there is no dead zone in the central position of the T-16000M's
stick. To symbolize this, the center is backlit in green as soon as you move the stick (even
very slightly); the backlighting switches off after 3 seconds of inactivity, once you have
brought the stick back to dead center.
THROTTLE
Your joystick features a throttle (5), which you can use to easily control your acceleration in games.
Page 5

2/6
RUDDER FUNCTION
Your joystick features a rudder function (4), which in an airplane corresponds to the pedals used by the pilot to move the rudder, thereby allowing the plane to pivot around its vertical axis (making the plane turn to the left or to the right).
This rudder function is available on your joystick by rotating the stick to the left or right.
MULTIDIRECTIONAL "POINT OF VIEW" HAT SWITCH
Your joystick features a "Point of View" hat switch (2) which, as its name indicates, allows
you to instantly view everything that is going on around your aircraft (in games where this
feature is enabled). To use this feature, simply go into your game's setup menu, and
program the different views (rear view, view to the left, view to the right, and also external
views) onto the directions of the "Point of View" hat switch.
If you wish, you can also reserve the "Point of View" hat switch for other uses instead (firing, etc.).
AMBIDEXTROUS SYSTEM
Your T-16000M joystick has the advantage of being fully ambidextrous, allowing it to
perfectly adapt to all players, whether they are right-handed or left-handed.
To do so, 3 elements can be adjusted: the configuration of the buttons on the base, the hand
rest, and the thumb rest.
CONFIGURATION OF BUTTONS IN RIGHT-HANDED MODE
To set the positions of the 12 buttons located on the base to right-handed mode, set the selector switch (12) located under the joystick's base to "RIGHT HANDED":
CONFIGURATION OF BUTTONS IN LEFT-HANDED MODE
To set the positions of the 12 buttons located on the base to left-handed mode, set the selector switch (12) located under the joystick's base to "LEFT HANDED":
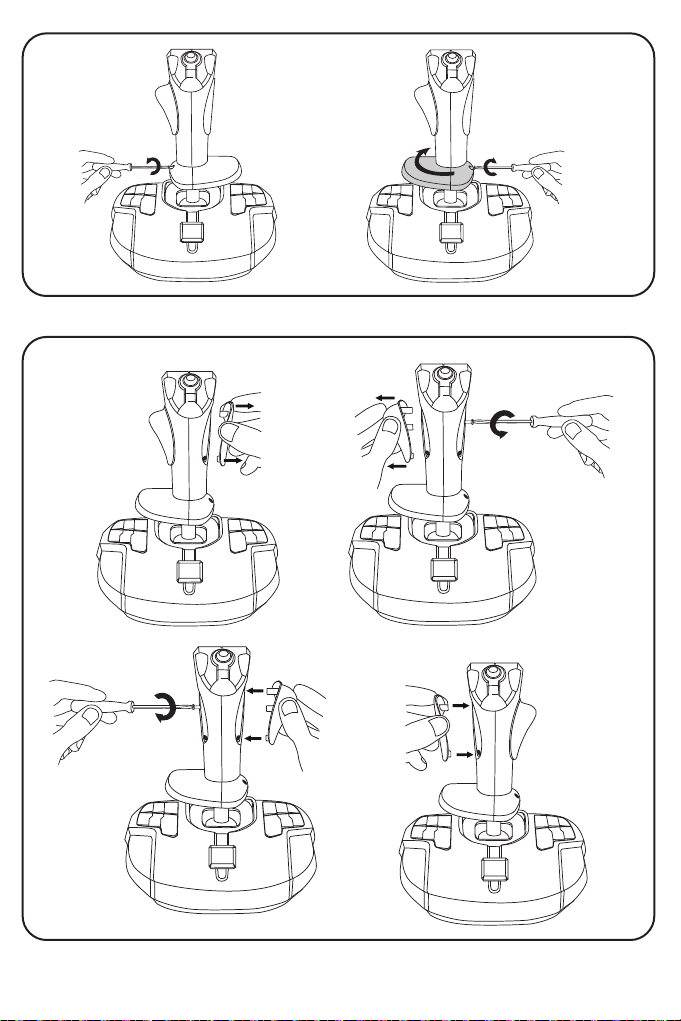
ADJUSTING THE HAND REST FOR RIGHT- OR LEFT-HANDED MODE
By default, the hand rest is configured in RIGHT-HANDED MODE.
To adjust it to LEFT-HANDED MODE:
A) Using a small screwdriver, carefully loosen (without actually removing) the small hand
rest rotation screw (7), located on the left of the hand rest.
B) Turn the hand rest 180°.
C) Completely tighten the screw on the hand rest again (now located on the right).
Note: Carry out this procedure in reverse to return to right-handed mode.
Page 6

3/6
ADJUSTING THE THUMB REST FOR RIGHT- OR LEFT-HANDED
MODE
By default, the stick's thumb rest is configured in RIGHT-HANDED MODE.
To adjust it to LEFT-HANDED MODE:
A) Remove the right-handed screw cover (3) located on the right of the stick.
B) Using a small screwdriver, unscrew and completely remove the long screw now
accessible (on the right of the stick).
C) Remove the right-handed thumb rest (8) located on the left of the stick.
D) Position the left-handed thumb rest (10) (included separately in the joystick's box) on the
right of the stick.
E) Position the long screw in the opening on the left of the stick and completely tighten the
screw in order to fasten the left-handed thumb rest in place.
F) Position the left-handed screw cover (11) (included separately in the joystick's box) on the
left of the stick.
Note: Carry out this procedure in reverse to return to right-handed mode.
PC
INSTALLATION ON PC
1. Connect the PC USB connector (9) to one of your computer’s USB ports.
Windows XP, Vista, 7 or 8 will automatically detect the new device.
2. The drivers are installed automatically.
Follow the on-screen instructions to complete the installation.
3. Click Start/Settings/Control Panel and double-click Game Controllers.
The Game Controllers dialog box displays the joystick's name with OK status.
4. In the Control Panel, click Properties to test and view all of your joystick's functions.
You are now ready to play!
IMPORTANT NOTE
When connecting your joystick: always set the stick and the rudder to their central positions, and avoid moving them (to avoid any calibration problems).
Page 7

4/6
TROUBLESHOOTING AND WARNING
• My joystick isn't functioning properly or seems to be improperly calibrated:
- Power off your computer and disconnect your joystick; then, turn your computer back on, reconnect your joystick and restart your game.
- When connecting your joystick: always set the stick and the rudder to their central positions, and avoid moving them (to avoid any calibration problems).
• I can't configure my joystick:
- In your game's "Options/Controller/Gamepad or Joystick" menu: select the appropriate configuration, or completely reconfigure the controller options.
- Please refer to your game's user manual or online help utility for more information.
• My joystick is too sensitive or not sensitive enough:
- Your joystick self-calibrates independently once you have made some movements along the different axes.
- In your game's "Options/Controller/Gamepad or Joystick" menu: adjust the sensitivity and dead zones for your joystick (if these options are available).
• The joystick's central backlighting doesn't turn off automatically:
- Move the stick very slightly so that it is set to the absolute central value; the backlighting will then switch off after 3 seconds of inactivity.
Page 8
5/6
Consumer warranty information
Worldwide, Guillemot Corporation S.A. (hereinafter “Guillemot”) warrants to the consumer that this
Thrustmaster product shall be free from defects in materials and workmanship, for a warranty period which
corresponds to the time limit to bring an action for conformity with respect to this product. In the countries
of the European Union, this corresponds to a period of two (2) years from delivery of the Thrustmaster
product. In other countries, the warranty period corresponds to the time limit to bring an action for
conformity with respect to the Thrustmaster product according to applicable laws of the country in which
the consumer was domiciled on the date of purchase of the Thrustmaster product (if no such action exists
in the corresponding country, then the warranty period shall be one (1) year from the original date of
purchase of the Thrustmaster product).
Notwithstanding the above, rechargeable batteries are covered by a warranty period of six (6) months from
the date of original purchase.
Should the product appear to be defective during the warranty period, immediately contact Technical
Support, who will indicate the procedure to follow. If the defect is confirmed, the product must be returned
to its place of purchase (or any other location indicated by Technical Support).
Within the context of this warranty, the consumer’s defective product shall, at Technical Support’s option,
be either repaired or replaced. If permitted under applicable law, the full liability of Guillemot and its
subsidiaries (including for consequential damages) is limited to the repair or replacement of the
Thrustmaster product. If permitted under applicable law, Guillemot disclaims all warranties of
merchantability or fitness for a particular purpose. The consumer’s legal rights with respect to laws
applicable to the sale of consumer goods are not affected by this warranty.
This warranty shall not apply: (1) if the product has been modified, opened, altered, or has suffered
damage as a result of inappropriate or abusive use, negligence, an accident, normal wear, or any other
cause unrelated to a material or manufacturing defect (including, but not limited to, combining the
Thrustmaster product with any unsuitable element, including in particular power supplies, rechargeable
batteries, chargers, or any other elements not supplied by Guillemot for this product); (2) in the event of
failure to comply with the instructions provided by Technical Support; (3) to software, said software being
subject to a specific warranty; (4) to consumables (elements to be replaced over the product’s lifespan:
disposable batteries, audio headset or headphone ear pads, for example); (5) to accessories (cables,
cases, pouches, bags, wrist-straps, for example); (6) if the product was sold at public auction.
This warranty is nontransferable.
Additional warranty provisions
In the United States of America and in Canada, this warranty is limited to the product’s internal mechanism
and external housing. In no event shall Guillemot or its affiliates be held liable to any third party for any
consequential or incidental damages resulting from the breach of any express or implied warranties. Some
States/Provinces do not allow limitation on how long an implied warranty lasts or exclusion or limitation of
liability for consequential or incidental damages, so the above limitations or exclusions may not apply to
you. This warranty gives you specific legal rights, and you may also have other rights which vary from
State to State or Province to Province.
Liability
If permitted under applicable law, Guillemot Corporation S.A. (hereinafter “Guillemot”) and its subsidiaries
disclaim all liability for any damages caused by one or more of the following: (1) the product has been
modified, opened or altered; (2) failure to comply with assembly instructions; (3) inappropriate or abusive
use, negligence, an accident (an impact, for example); (4) normal wear. If permitted under applicable law,
Guillemot and its subsidiaries disclaim all liability for any damages unrelated to a material or
manufacturing defect with respect to the product (including, but not limited to, any damages caused
directly or indirectly by any software, or by combining the Thrustmaster product with any unsuitable
element, including in particular power supplies, rechargeable batteries, chargers, or any other elements
not supplied by Guillemot for this product).
Page 9
6/6
FCC STATEMENT
TECHNICAL SUPPORT
1. This device complies with Part 15 of the FCC Rules. Operation is subject to the following two conditions: (1) This device may not cause harmful interference, and (2) This device must accept any interference received, including interference that may cause
undesired operation.
2. Changes or modifications not expressly approved by the party responsible for compliance could void the
user's authority to operate the equipment.
COPYRIGHT
© 2015 Guillemot Corporation S.A. All rights reserved. Thrustmaster® is a registered trademark of
Guillemot Corporation S.A. Windows® is a registered trademark of Microsoft Corporation in the United
States and/or other countries. All other trademarks are the property of their respective owners. Illustrations
not binding. Contents, designs and specifications are subject to change without notice and may vary from
one country to another. Made in China.
ENVIRONMENTAL PROTECTION RECOMMENDATION
Please contact your local authorities for information on the collection point nearest you.
Retain this information. Colours and decorations may vary.
This product conforms to all standards regarding children 14 years of age and older. This product is not
suitable for use by children less than 14 years of age.
www.thrustmaster.com
At the end of its working life, this product should not be disposed of with standard
household waste, but rather dropped off at a collection point for the disposal of Waste
Electrical and Electronic Equipment (WEEE) for recycling.
This is confirmed by the symbol found on the product, user manual or packaging.
Depending on their characteristics, the materials may be recycled. Through recycling
and other forms of processing Waste Electrical and Electronic Equipment, you can make
a significant contribution towards helping to protect the environment.
http://ts.thrustmaster.com
Page 10

2
1
9
LEFT
HANDED
5
10
8
6
12
LEFT
HANDED
3
6
7
9
255 0
8
7
RIGHT
HANDED
3
4
10
11
5
RIGHT
HANDED
1
4
2
Y Axis
0
X Axis
163830
16383
11
12
13
16
15
14
11
12
16
15
LEFT
HANDED
3
13
255 0
14
RIGHT
HANDED
1
4
2
Y Axis
0
X Axis
163830
16383
5
6
7
10
9
8
0+
255-
Slider0 Axis
RZ Axis
0+
RZ Axis
255-
Slider0 Axis
Page 11
A
E
A
D
B
C
C
B
F
Page 12
1/6
1. Gâchette numérique
7. Vis pour rotation du Repose-main avec
CARACTERISTIQUES TECHNIQUES
Compatible : PC
Manuel de l'utilisateur
2. Croix multidirectionnelle Point de Vue
3. Cache-vis Droitier
4. Palonnier par rotation du manche avec
Repose-main
5. Manette des gaz
6. 15 boutons d’action
position Droitier ou Gaucher
8. Repose-pouce Droitier
9. Connecteur USB PC
10. Repose-pouce Gaucher
11. Cache-vis Gaucher
12. Sélecteur Boutons Droitier ou Gaucher
A LA DECOUVERTE DE VOTRE JOYSTICK
TECHNOLOGIE DE PRECISION EXCLUSIVE :
« H.E.A.R.T™ : HallEffect AccuRate Technology »
Votre Joystick T-16000M a la particularité de disposer d’une technologie qui lui permet une précision inégalée à ce jour dans l’univers des joysticks de jeu avec :
- un capteur magnétique 3D (Hall Effect) sur le manche d’une résolution de plus de 268
millions de valeurs sur l’ensemble des axes X et Y (soit 16384 x 16384) alors que les
systèmes actuels concurrents (même haut de gamme) varient aux alentours de seulement 1
million de valeurs (soit 1024 x 1024)
- Un aimant : pour éviter toute friction et garantir une précision illimitée dans le temps
- Un ressort de manche hélicoïdal 2.8mm : pour une tension ferme, linéaire et ultra fluide.
RETRO-ECLAIRAGE
Pour encore plus de précision le centre du manche du T-16000M ne possède aucune zone
morte. Pour le symboliser, son centre se rétro-éclaire en vert dès que vous bougez le
manche (et ce même très légèrement) et s’éteint après 3 secondes d’inactivité lorsque vous
le ramenez au centre parfait.
MANETTE DES GAZ
Votre joystick dispose d’une manette des gaz (5) grâce à laquelle vous pourrez aisément contrôler l’accélération de votre appareil.
Page 13

2/6
FONCTION PALONNIER
Votre joystick dispose d’une fonction palonnier (4) qui correspond dans un avion aux pédales
actionnées par le pilote pour faire braquer la gouverne de direction, permettant de faire pivoter
l’avion autour de son axe vertical (entraînant ainsi un virage de l’avion vers la gauche ou la
droite).
Cette fonction palonnier est accessible sur votre joystick par rotation du manche vers la gauche ou la droite
CROIX MULTIDIRECTIONNELLE « POINT DE VUE »
Votre joystick est doté d’une croix point de vue (2) qui, comme son nom l’indique, vous
permettra (dans les jeux le permettant) de surveiller instantanément tout ce qui se passe
autour de votre avion. Il vous suffit pour cela, depuis le menu de configuration de votre jeu,
de programmer les différentes vues (vue arrière, vue sur la gauche, vue sur la droite, mais
aussi vues externes) sur les directions de la croix point de vue.
Vous pouvez bien entendu réserver la croix point de vue à d’autres utilisations (tir, etc.).
SYSTEME AMBIDEXTRE
Votre joystick T-16000M à l’avantage d’être entièrement ambidextre afin de s’adapter
parfaitement à tous les joueurs qu’ils soient droitiers ou gauchers.
Pour ce faire, 3 éléments sont ajustables : la disposition des boutons sur la base, le reposemain ainsi que le repose-pouce.
CONFIGURATION DES BOUTONS EN MODE DROITIER
Pour ajuster la position des 12 boutons situés sur la base en mode « DROITIER », positionnez le sélecteur (12) situé sous la base du joystick sur « RIGHT HANDED » :
CONFIGURATION DES BOUTONS EN MODE GAUCHER
Pour ajuster la position des boutons en mode « GAUCHER », positionnez le sélecteur (12) situé sous la base du joystick sur « LEFT HANDED » :
AJUSTER LE REPOSE-MAIN EN MODE DROITIER OU GAUCHER
Par défaut, le repose-main du manche est positionné en mode DROITIER.
Pour l’ajuster en mode GAUCHER :
A) A l’aide d’un petit tournevis, dévissez légèrement (sans la retirer) la petite vis (7)
du repose-main situé à gauche de celui-ci.
B) Tournez le « repose-main » de 180°.
C) Revissez complètement la vis du repose-main (désormais situé à droite).
Remarque : Effectuez l’opération inverse pour revenir en mode Droitier.
Page 14

3/6
AJUSTER LE REPOSE POUCE EN MODE DROITIER OU GAUCHER
Par défaut, le repose-pouce du manche est positionné en mode DROITIER.
Pour l’ajuster en mode GAUCHER :
A) Retirez le « cache-vis Droitier » (3) situé à droite du manche.
B) A l’aide d’un petit tournevis, dévissez et retirez complètement la longue vis désormais
accessible (à droite du manche).
C) Retirez le repose-pouce Droitier (8) situé à gauche du manche.
D) Positionnez le repose-Pouce Gaucher (10) (inclus séparément dans la boite du joystick) à
droite du manche.
E) Positionnez et vissez au maximum la longue vis à gauche du manche afin de fixer le
repose-pouce Gaucher.
F) Positionnez le cache-vis Gaucher (11) (inclus séparément dans la boite du joystick) à
gauche du manche.
Remarque : Effectuez l’opération inverse pour revenir en mode Droitier.
PC
INSTALLATION SUR PC
1. Reliez le connecteur USB (9) à l'un des ports USB de votre unité centrale.
Windows XP, Vista, 7 ou 8 détectera automatiquement le nouveau périphérique.
3. L'installation des pilotes est automatique.
Suivez les instructions affichées à l'écran pour terminer l'installation.
4. Sélectionnez Démarrer/Paramètres/Panneau de configuration puis double-cliquez sur
Contrôleurs de jeu
La boîte de dialogue Contrôleurs de jeu affichera le nom du joystick avec l'état OK.
5. Dans le Control Panel, cliquez sur Propriétés pour tester et visualiser l’ensemble des
fonctions.
Vous êtes maintenant prêt à jouer !
REMARQUES IMPORTANTES SUR « PC »
Lorsque vous branchez votre joystick : laissez toujours le manche et le palonnier centrés et évitez de les déplacer (pour éviter tout problème de calibration).
Page 15

4/6
DEPANNAGE ET AVERTISSEMENT
• Mon joystick ne fonctionne pas correctement ou semble mal calibré :
- Eteignez votre ordinateur, déconnectez votre joystick, rebranchez et relancez votre jeu.
- Lorsque vous branchez votre joystick : laissez le manche et le palonnier centrés et évitez
de les déplacer (pour éviter tout problème de calibration).
• Je n’arrive pas à configurer mon joystick :
- Dans le menu « Options / Contrôleur / Manettes ou Joystick » de votre jeu : choisissez la
configuration appropriée ou reconfigurez complètement les options du contrôleur.
- Reportez-vous au manuel de l’utilisateur ou à l’aide en ligne de votre jeu pour plus
d’informations.
• Mon joystick est trop ou pas assez sensible :
- Votre joystick s’auto-calibre de manière autonome après quelques mouvements effectués
sur les différents axes.
- Dans le menu « Options / Contrôleur / Manettes ou Joystick » de votre jeu : ajustez la
sensibilité et les zones mortes de votre contrôleur (si l’option est disponible).
• Le rétro-éclairage central du joystick ne s’éteint pas automatiquement
- Bougez très légèrement le manche afin qu’il atteigne la valeur centrale absolue et s’éteigne
après 3 secondes d’inactivité.
Page 16

5/6
INFORMATIONS RELATIVES A LA GARANTIE AUX CONSOMMATEURS
Dans le monde entier, Guillemot Corporation S.A. (ci-après « Guillemot ») garantit au consommateur que le
présent produit Thrustmaster est exempt de défaut matériel et de vice de fabrication, et ce, pour une période
de garantie qui correspond au délai pour intenter une action en conformité de ce produit. Dans les pays de
l’Union Européenne, ce délai est de deux (2) ans à compter de la délivrance du produit Thrustmaster. Dans
les autres pays, la durée de la période de garantie correspond au délai pour intenter une action en conformité
du produit Thrustmaster selon la législation en vigueur dans le pays où le consommateur avait son domicile
lors de l’achat du produit Thrustmaster (si une telle action en conformité n’existe pas dans ce pays alors la
période de garantie est de un (1) an à compter de la date d’achat d’origine du produit Thrustmaster).
Nonobstant ce qui précède, les batteries sont garanties six (6) mois à compter de la date d’achat d’origine.
Si, au cours de la période de garantie, le produit semble défectueux, contactez immédiatement le Support
Technique qui vous indiquera la procédure à suivre. Si le défaut est confirmé, le produit devra être
retourné à son lieu d’achat (ou tout autre lieu indiqué par le Support Technique).
Dans le cadre de la garantie, le consommateur bénéficiera, au choix du Support Technique, du
remplacement ou de la réparation du produit défectueux. Lorsque la loi applicable l’autorise, toute
responsabilité de Guillemot et ses filiales (y compris pour les dommages indirects) se limite à la
réparation ou au remplacement du produit Thrustmaster. Lorsque la loi applicable l’autorise, Guillemot
exclut toutes garanties de qualité marchande ou d’adaptation à un usage particulier. Les droits légaux du
consommateur au titre de la législation applicable à la vente de biens de consommation ne sont pas
affectés par la présente garantie.
Cette garantie ne s’appliquera pas : (1) si le produit a été modifié, ouvert, altéré, ou a subi des dommages
résultant d’une utilisation inappropriée ou abusive, d’une négligence, d’un accident, de l’usure normale,
ou de toute autre cause non liée à un défaut matériel ou à un vice de fabrication (y compris, mais non
limitativement, une combinaison du produit Thrustmaster avec tout élément inadapté, notamment
alimentations électriques, batteries, chargeurs, ou tous autres éléments non-fournis par Guillemot pour ce
produit) ; (2) en cas de non respect des instructions du Support Technique ; (3) aux logiciels, lesdits
logiciels faisant l’objet d’une garantie spécifique ; (4) aux consommables (éléments à remplacer pendant
la durée de vie du produit : piles, coussinets de casque audio, par exemple) ; (5) aux accessoires (câbles,
étuis, housses, sacs, dragonnes, par exemple) ; (6) si le produit a été vendu aux enchères publiques.
Cette garantie n’est pas transférable.
Stipulations additionnelles à la garantie
Aux États-Unis d’Amérique et au Canada, cette garantie est limitée au mécanisme interne et au boîtier
externe du produit. En aucun cas, Guillemot ou ses sociétés affiliées ne sauraient être tenues
responsables envers qui que ce soit de tous dommages indirects ou dommages accessoires résultant du
non respect des garanties expresses ou implicites. Certains États/Provinces n’autorisent pas la limitation
sur la durée d’une garantie implicite, ou l’exclusion ou la limitation de responsabilité pour les dommages
indirects ou accessoires, de sorte que les limitations ou exclusions ci-dessus peuvent ne pas vous être
applicables. Cette garantie vous confère des droits spécifiques ; vous pouvez également bénéficier
d’autres droits qui peuvent différer d’un État/Province à l’autre.
Responsabilité
Lorsque la loi applicable l’autorise, Guillemot Corporation S.A. (ci-après « Guillemot ») et ses filiales
excluent toute responsabilité pour tous dommages causés par un ou plusieurs des faits suivants: (1) le
produit a été modifié, ouvert, altéré, (2) l’irrespect des instructions de montage, (3) l’utilisation
inappropriée ou abusive, la négligence, l’accident (un choc, par exemple), (4) l’usure normale du produit.
Lorsque la loi applicable l’autorise, Guillemot et ses filiales excluent toute responsabilité pour tout
dommage dont la cause n’est pas liée à un défaut matériel ou à un vice de fabrication du produit (y
compris, mais non limitativement, tout dommage causé directement ou indirectement par tout logiciel, ou
par une combinaison du produit Thrustmaster avec tout élément inadapté, notamment alimentations
électriques, batteries, chargeurs, ou tous autres éléments non-fournis par Guillemot pour ce produit).
Page 17
6/6
COPYRIGHT
© 2015 Guillemot Corporation S.A. Tous droits réservés. Thrustmaster® est une marque déposée de
Guillemot Corporation S.A. Windows® est une marque déposée de Microsoft Corporation aux Etats-Unis
et/ou dans d’autres pays. Toutes les autres marques sont la propriété de leurs propriétaires respectifs.
Illustrations non contractuelles. Le contenu, la conception et les spécifications sont susceptibles de
changer sans préavis et de varier selon les pays. Fabriqué en Chine.
RECOMMANDATION RELATIVE A LA PROTECTION DE L’ENVIRONNEMENT
Veuillez consulter les autorités locales qui vous indiqueront le point de collecte concerné.
Informations à conserver. Les couleurs et décorations peuvent varier.
Ce produit est en conformité avec l’ensemble des normes relatives aux enfants de plus de 14 ans. Il ne
convient pas aux enfants de moins de 14 ans.
www.thrustmaster.com
En fin de vie, ce produit ne doit pas être éliminé avec les déchets ménagers
normaux mais déposé à un point de collecte des déchets d'équipements
électriques et électroniques en vue de son recyclage.
Ceci est confirmé par le symbole figurant sur le produit, le manuel utilisateur ou
l’emballage.
En fonction de leurs caractéristiques, les matériaux peuvent être recyclés. Par le
recyclage et par les autres formes de valorisation des déchets d'équipements
électriques et électroniques, vous contribuez de manière significative à la
protection de l’environnement.
SUPPORT TECHNIQUE
http://ts.thrustmaster.com
Page 18
2
1
9
LEFT
HANDED
5
10
8
6
12
LEFT
HANDED
3
6
7
9
255 0
8
7
RIGHT
HANDED
3
4
10
11
5
RIGHT
HANDED
1
4
2
Y Axis
0
X Axis
163830
16383
11
12
13
16
15
14
11
12
16
15
LEFT
HANDED
3
13
255 0
14
RIGHT
HANDED
1
4
2
Y Axis
0
X Axis
163830
16383
5
6
7
10
9
8
0+
255-
Slider0 Axis
RZ Axis
0+
RZ Axis
255-
Slider0 Axis
Page 19

A
E
A
D
B
C
C
B
F
Page 20

1/6
1. Digitaler Trigger
7. Handstützen-Rotationsschraube mit
TECHNISCHE FEATURES
Kompatibel: PC
Benutzerhandbuch
2. Multidirektionaler "Point of View
(Panoramasicht)" Kopfschalter
3. Rechtshändige Schraubenabdeckung
4. Ruderkontrolle via Drehgriff mit
Handstütze
5. Gashebel
6. 15 Actionbuttons
rechts- oder linkshändigen Positionen
8. Rechtshändige Daumenstütze
9. PC USB Stecker
10. Linkshändige Daumenstütze
11. Linkshändige Schraubenabdeckung
12. Rechts- oder linkshändiger Button-
Wahlschalter
LERNEN SIE IHREN JOYSTICK KENNEN
EXKLUSIVE PRÄZISIONSTECHNOLOGIE:
"H.E.A.R.T™: HallEffect AccuRate Technology"
Ihr T-16000M Joystick beinhaltet Technologie, die diesen mit einer Präzisionsstufe ausstattet, die derzeit beispiellos in der Welt der Spiel-Joysticks ist, inklusive:
- Einen 3D (Hall Effect) Magnetsensor am Stick, mit einer Auflösung von mehr als 268 Mio.
Werten über den X und Y Achsen (16384 x 16384 Werte), wohingegen aktuelle
Mitbewerbersysteme (selbst High-End-Systeme) Auflösungen in der Nähe von nur 1 Mio.
Werten (1024 x 1024 Werte) bieten.
- Ein Magnet: Keine Reibung, für unbegrenzte Präzision und unglaubliche
Ansprechempfindlichkeit.
- Spiraldruckfeder am Stick (2.8mm): Für beständige, lineare und ultrageschmeidige
Federkraft.
HINTERGRUNDBELEUCHTUNG
Für noch größere Präzision gibt es keine Blindzone in der mittigen Position des T-16000M
Sticks. Um das Zentrum anzuzeigen und sobald Sie den Stick bewegen (auch sehr leicht) ist
dieses grün beleuchtet. Die Hintergrundbeleuchtung schaltet sich nach 3-sekündiger
Inaktivität aus, sobald Sie den Stick mittig gesetzt haben.
GASHEBEL
Ihr Joystick verfügt über einen Gashebel (5), den Sie für die leichte Kontrolle von Beschleunigung in Ihren Spielen nutzen können.
Page 21

2/6
RUDERFUNKTION
Ihr Joystick verfügt über eine Ruderfunktion (4), die IN EINEM Flugzeug den Pedalen
entspricht, die durch den Piloten zum Bewegen des Ruders benutzt werden und das
Flugzeug zu einer Drehbewegung um die vertikale Achse veranlaßt (Links- oder
Rechtsdrehung des Flugzeugs).
Diese Ruderfunktion ist bei Ihrem Joystick durch drehen des Sticks nach links oder rechts verfügbar.
MULTIDIREKTIONALER "POINT OF VIEW " KOPFSCHALTER
Ihr Joystick verfügt über einen "Point of View" Kopfschalter (2), der – wie der Name besagt –
Ihnen ermöglicht, alles was um Ihr Flugzeug herum geschieht, zu sehen (in Spielen, in
denen dieses Feature aktiviert ist). Um dieses Feature zu nutzen, gehen Sie einfach in das
Setup-Menü Ihres Spiels und programmieren die verschiedenen Blickwinkel (Blick nach
hinten, links rechts und ebenso externe Blickwinkel) auf den "Point of View" Kopfschalter.
Wenn gewünscht, können Sie den "Point of View" Kopfschalter stattdessen auch mit anderen Nutzungen belegen (Feuern, etc.).
BEIDHÄNDIGES SYSTEM
Ihr T-16000M Joystick hat den Vorzug vollständig Beidhändig zu sein und somit zu allen Spielern
zu passen, egal ob diese Rechts- oder Linkshänder sind. Dafür können 3 Elemente eingestellt
werden: Die Konfiguration der Buttons an der Basis, die Handstütze und die Daumenstütze.
KONFIGURATION DER BUTTONS IM RECHTSHÄNDIGEN MODUS
Um die Positionen der 12 Buttons an der Basis in den rechtshändigen Modus zu stellen, stellen Sie den Wahlschalter (12) unter der Joystickbasis auf "RECHTSHÄNDIG":
KONFIGURATION DER BUTTONS IM LINKSHÄNDIGEN MODUS
Um die Positionen der 12 Buttons an der Basis in den linkshändigen Modus zu stellen, stellen Sie den Wahlschalter (12) unter der Joystickbasis auf "LINKSHÄNDIG":
EINSTELLEN DER HANDSTÜTZE FÜR RECHTS- ODER LINKSHÄNDER
Werksseitig ist die Handstütze für RECHTSHÄNDER montiert.
Um diese für den LINKSHÄNDIGEN Gebrauch einzustellen:
A) Benutzen Sie einen kleinen Schraubendreher zum lösen der kleinen HandstützenRotationsschraube(7) (ohne diese vollständig zu entfernen), die sich links der Handstütze
befindet.
B) Drehen Sie die Handstütze um 180°.
C) Ziehen Sie die Schraube, die sich nun rechts befindet wieder fest an.
Bitte beachten: Führen Sie diese Prozedur in umgekehrter Reihenfolge durch, um zum rechtshändigen Betrieb zurückzukehren.
Page 22
3/6
EINSTELLEN DER DAUMENSTÜTZE FÜR RECHTS- ODER
LINKSHÄNDIGEN BETRIEB
Werksseitig ist die Daumenstütze für RECHTSHÄNDER montiert.
Um diese für den LINKSHÄNDIGEN Gebrauch einzustellen:
A) Entfernen Sie rechterhand am Stick die Schraubenabdeckung (3).
B) Benutzen Sie einen kleinen Schraubendreher und schrauben die nun zugängliche, lange
Schraube, rechts am Stick, los und entfernen diese.
C) Entfernen Sie die rechtshändige Daumenstütze (8), zu finden links am Stick.
D) Positionieren Sie die linkshändige Daumenstütze (
enthalten) rechts am Stick.
E) Stecken Sie die lange Schraube durch die Öffnung links am Stick und ziehen diese fest
an, um die linkshändige Daumenstütze fest zu montieren.
F) Setzen Sie die linkshändige Schraubenabdeckung (11) (separat in der Joystickbox
enthalten x) links am Stick ein.
Bitte beachten: Führen Sie diese Prozedur in umgekehrter Reihenfolge durch, um zum rechtshändigen Betrieb zurückzukehren.
10) (separat in der Joystickbox
PC
INSTALLATION AUF DEM PC
1. Schließen Sie den PC USB Stecker (9) an einen der USB Ports Ihres Computers an.
Windows XP, Vista, 7 oder 8 erkennt automatisch das neue Gerät.
2. Die Treiber werden automatisch installiert.
Folgen Sie den Bildschirmanweisungen, um die Installation abschließen zu können.
3. Klicken Sie auf Start/Einstellungen/Systemsteuerung und (doppel)klicken dann auf
Gamecontroller.
In der Gamecontroller-Dialogbox wird der Joystickname mit dem OK Status angezeigt.
4. Im Bedienpanel, auf Eigenschaften klicken, um alle Funktionen des Joysticks
anzusehen und zu testen.
Sie sind nun spielbereit!
WICHTIGE ANMERKUNG
Wenn Sie Ihren Joystick anschließen: Stellen Sie den Stick und das Ruder auf deren zentrale Positionen und vermeiden es diese zu bewegen (um jedwede Kalibrierungsprobleme zu vermeiden).
Page 23

4/6
FEHLERBESEITIGUNG UND WARNUNG
• Mein Joystick funktioniert nicht richtig oder schein falsch kalibriert zu sein:
- Schalten Sie Ihren Computer aus und stöpseln Ihren Joystick aus, schalten Sie Ihren
Computer wieder ein, stöpseln den Joystick wieder ein und starten Ihr Spiel erneut.
- Wenn Sie Ihren Joystick anschließen: Stellen Sie den Stick und das Ruder auf deren
mittige Positionen und vermeiden es diese zu bewegen (um jedwede Kalibrierungsprobleme
zu vermeiden).
• Ich kann meinen Joystick nicht konfigurieren:
- Im Menü Ihres Spieles "Optionen/Controller/Gamepad oder Joystick": Wählen Sie
adäquate Konfiguration oder konfigurieren die Controlleroptionen vollständig neu.
- Bitte lesen Sie für mehr Informationen im Benutzerhandbuch oder der Online-Hilfe Ihres
Spiels nach.
• Mein Joystick ist zu empfindlich oder nicht empfindlich genug:
- Ihr Joystick kalibriert sich unabhängig sobald Sie ein paar Bewegungen auf den
verschiedenen Achsen getätigt haben.
- Im Menü Ihres Spieles "Optionen/Controller/Gamepad oder Joystick": Stellen Sie die
Empfindlichkeit und Todzonen für Ihren Joystick ein, falls diese Optionen verfügbar sind.
• Die mittige Hintergrundbeleuchtung schaltet sich nicht automatisch aus:
- Bewegen Sie den Stick sehr leicht, so daß dieser absolut mittig steht – die
Hintergrundbeleuchtung schaltet sich nach 3-sekündiger Inaktivität aus.
Page 24

5/6
Kunden-Garantie-Information
Guillemot Corporation S.A. (fortfolgend “Guillemot”) garantiert Kunden weltweit, daß dieses Thrustmaster
Produkt frei von Mängeln in Material und Verarbeitung für eine Gewährleistungsfrist ist, die mit der Frist
für eine Mängelrüge bezüglich des Produktes übereinstimmt. In den Ländern der Europäischen Union
entspricht diese einem Zeitraum von zwei (2) Jahren ab Kaufdatum des Thrustmaster Produktes. In
anderen Ländern entspricht die Gewährleistungsfrist der zeitlichen Begrenzung für eine Mängelrüge
bezüglich des Thrustmaster Produktes in Übereinstimmung mit anwendbarem Recht des Landes, in dem
der Kunde zum Zeitpunkt des Erwerbs eines Thrustmaster Produktes wohnhaft ist. Sollte eine
entsprechende Regelung in dem entsprechenden Land nicht existieren, umfasst die
Gewährleistungspflicht einen Zeitraum von einem (1) Jahr ab dem originären Kaufdatum des
Thrustmaster Produktes.
Ungeachtet dessen werden wiederaufladbare Batterien (fortfolgend „Akkus“) durch eine
Gewährleistungsfrist von sechs (6) Monaten ab dem Kaufdatum abgedeckt.
Sollten bei dem Produkt innerhalb der Gewährleistungsfrist Defekte auftreten, kontaktieren Sie
unverzüglich den Technischen Kundendienst, der die weitere Vorgehensweise anzeigt. Wurde der Defekt
bestätigt, muß das Produkt an die Verkaufsstelle (oder an eine andere Stelle, je nach Maßgabe des
Technischen Kundendienstes) retourniert werden.
Im Rahmen dieser Garantie sollte das defekte Produkt des Kunden, je nach Entscheidung des
Technischen Kundendienstes, repariert oder ausgetauscht werden. Wenn nach geltendem Recht
zulässig, beschränkt sich die volle Haftung von Guillemot und ihrer Tochtergesellschaften auf die
Reparatur oder den Austausch des Thrustmaster Produktes (inklusive Folgeschäden). Wenn nach
geltendem Recht zulässig, lehnt Guillemot alle Gewährleistungen der Marktgängigkeit oder Eignung für
einen bestimmten Zweck ab. Die Rechte des Kunden in Übereinstimmung mit anwendbarem Recht
bezüglich des Verkaufs auf Konsumgüter wird durch diese Garantie nicht beeinträchtigt.
Der Gewährleistungsanspruch verfällt: (1) Falls das Produkt modifiziert, geöffnet, verändert oder ein Schaden
durch unsachgemäßen oder missbräuchlichen Gebrauch hervorgerufen wurde, sowie durch Fahrlässigkeit,
einen Unfall, Verschleiß oder irgendeinem anderen Grund – aber nicht durch Material- oder Herstellungsfehler
(einschließlich, aber nicht beschränkt auf, die Kombination der Thrustmaster Produkte mit ungeeigneten
Elementen, insbesondere Netzteile, Akkus, Ladegeräte, oder andere Elemente, die von Guillemot für dieses
Produkt nicht mitgeliefert wurden); (2) Im Falle der Nichteinhaltung der durch den Technischen Support
erteilten Anweisungen; (3) Durch Software. Die besagte Software ist Gegenstand einer speziellen Garantie;
(4) Bei Verbrauchsmaterialien (Elemente, die während der Produktlebensdauer ausgetauscht werden, wie z.
B. Einwegbatterien, Ohrpolster für ein Audioheadset oder für Kopfhörer); (5) Bei Accessoires (z. B. Kabel,
Etuis, Taschen, Beutel, Handgelenk-Riemen); (6) Falls das Produkt in einer öffentlichen Versteigerung
verkauft wurde.
Diese Garantie ist nicht übertragbar.
Haftung
Wenn nach dem anwendbaren Recht zulässig, lehnen Guillemot Corporation S.A. (fortfolgend "Guillemot")
und ihre Tochtergesellschaften jegliche Haftung für Schäden, die auf eine oder mehrere der folgenden
Ursachen zurückzuführen sind, ab: (1) das Produkt wurde modifiziert, geöffnet oder geändert; (2)
Nichtbefolgung der Montageanleitung; (3) unangebrachte Nutzung, Fahrlässigkeit, Unfall (z. B. ein
Aufprall); (4) normalem Verschleiß. Wenn nach dem anwendbaren Recht zulässig, lehnen Guillemot und
seine Niederlassungen jegliche Haftung für Schäden, die nicht auf einen Material- oder Herstellungsfehler
in Bezug auf das Produkt beruhen (einschließlich, aber nicht beschränkt auf, etwaige Schäden, die direkt
oder indirekt durch Software oder durch die Kombination der Thrustmaster Produkte mit ungeeigneten
Elementen, insbesondere Netzteile, Akkus, Ladegeräte, oder andere Elemente, die von Guillemot für
dieses Produkt nicht geliefert wurden), ab.
Page 25

6/6
COPYRIGHT
TECHNISCHER SUPPORT
© Guillemot Corporation S.A. 2015. Alle Rechte vorbehalten. Thrustmaster® ist ein eingetragenes
Warenzeichen der Guillemot Corporation S.A. Windows® ist eine eingetragene Warenzeichen der
Microsoft Corporation in den Vereinigten Staaten von Amerika und/oder anderen Ländern. Alle anderen
Handelsmarken sind im Besitz Ihrer jeweiligen Eigentümer. Illustrationen nicht verbindlich. Inhalte, Design
und Spezifikationen können ohne vorherige Ankündigung geändert werden und können von Land zu Land
unterschiedlich sein. Hergestellt in China.
HINWEISE ZUM UMWELTSCHUTZ
Bitte erfragen Sie bei der Gemeindeverwaltung die zuständige Entsorgungsstelle.
Wichtige Informationen. Die Farben und Verzierungen können abweichen.
Dieses Produkt stimmt mit allen Standards, die Kinder ab 14 und älter betreffen, überein. Dieses Produkt
ist nicht geeignet für den Gebrauch von Kindern, die jünger als 14 Jahre sind.
www.thrustmaster.com
Dieses Produkt darf nach Ende seiner Lebensdauer nicht über den Hausmüll entsorgt
werden, sondern muss an einem Sammelpunkt für das Recycling von elektrischen
und elektronischen Geräten abgegeben werden.
Das Symbol auf dem Produkt, der Gebrauchsanleitung oder der Verpackung weist
darauf hin.
Die Werkstoffe sind gemäß ihrer Kennzeichnung wiederverwertbar. Mit der
Wiederverwertung, der stofflichen Verwertung oder anderen Formen von Altgeräten
leisten Sie einen wichtigen Beitrag zum Schutz unserer Umwelt.
http://ts.thrustmaster.com
Page 26

2
1
9
LEFT
HANDED
5
10
8
6
12
LEFT
HANDED
3
6
7
9
255 0
8
7
RIGHT
HANDED
3
4
10
11
5
RIGHT
HANDED
1
4
2
Y Axis
0
X Axis
163830
16383
11
12
13
16
15
14
11
12
16
15
LEFT
HANDED
3
13
255 0
14
RIGHT
HANDED
1
4
2
Y Axis
0
X Axis
163830
16383
5
6
7
10
9
8
0+
255-
Slider0 Axis
RZ Axis
0+
RZ Axis
255-
Slider0 Axis
Page 27

A
E
A
D
B
C
C
B
F
Page 28

1/6
1. Digitale trigger
7. Draaischroef voor handsteun, instelbaar
TECHNISCHE KENMERKEN
Compatibel met: pc
Handleiding
2. Multidirectionele "Point of View"-hat-
switch
3. Afdekplaatje bij rechtshandig gebruik
4. Roerbediening via draaihendel met
handsteun
5. Throttle
6. 15 actieknoppen
voor rechts- of linkshandig gebruik
8. Duimsteun bij rechtshandig gebruik
9. USB-connector (voor pc)
10. Duimsteun bij linkshandig gebruik
11. Afdekplaatje bij linkshandig gebruik
12. Schakelaar voor rechtshandig of
linkshandig gebruik van de knoppen
DE DIVERSE FUNCTIES VAN DE JOYSTICK
EXCLUSIEVE PRECISIETECHNOLOGIE:
"H.E.A.R.T™: HallEffect AccuRate Technology"
De T-16000M is uitgerust met technologie die garant staat voor ongeëvenaarde nauwkeurigheid:
- Een magnetische 3D-sensor (Hall Effect) op de stick, met een resolutie van meer dan 268
miljoen waarden voor de X- en Y-as (16384 x 16384 waarden), terwijl de huidige
concurrerende systemen (zelfs de meest geavanceerde) slechts een resolutie bieden van
circa 1 miljoen waarden (1024 x 1024 waarden).
- Een magneet: geen wrijving, grenzeloos nauwkeurig en ongelooflijk snel reagerend.
- Spiraalveer op stick (2,8 mm): voor stevige, lineaire en vloeiende weerstand.
ACHTERGRONDVERLICHTING
Voor extra nauwkeurigheid hebben we er voor gezorgd dat er geen dode zone is als de stick
van de T-16000M in de middenstand staat. Om dit te benadrukken, krijgt het
middengedeelte een groene achtergrondverlichting zodra de stick wordt bewogen (hoe
minimaal die beweging ook is). De achtergrondverlichting wordt uitgeschakeld na 3
seconden inactiviteit, wanneer de stick is teruggebracht naar de middenstand.
THROTTLE
De joystick heeft een throttle (5) die uitermate geschikt is om gas te geven in games.
Page 29

2/6
ROERFUNCTIE
De joystick heeft een roerfunctie (4) die correspondeert met de pedalen in een vliegtuig waarmee het roer wordt bediend om het vliegtuig om de verticale as te kantelen (een bocht naar links of rechts maken).
Deze roerfunctie is beschikbaar op de joystick door de stick naar links of rechts te draaien.
MULTIDIRECTIONELE POINT-OF-VIEW-HAT-SWITCH
De joystick heeft een "Point Of View"-hat-switch (2) waarmee u in één keer een overzicht
krijgt van alles wat zich rondom het vliegtuig afspeelt (als deze functie is ingeschakeld in de
game). Als u deze functie wilt gebruiken, hoeft u alleen maar in het setup-menu van de
game de verschillende views (links, rechts, naar voren, naar achteren) op de richtingen van
de Point-of-View-hat-switch te programmeren.
De "Point Of View"-hat-switch kan desgewenst ook voor andere functies worden gebruikt, bijvoorbeeld om te schieten.
SYSTEEM VOOR LINKS- EN RECHTSHANDIG GEBRUIK
De T-16000M is instelbaar voor links- of rechtshandig gebruik.
Er kunnen 3 elementen worden ingesteld: de configuratie van de knoppen op de voet, de
handsteun en de duimsteun.
CONFIGURATIE VAN DE KNOPPEN VOOR RECHTSHANDIG GEBRUIK
Als u de positie van de 12 knoppen op de voet wilt omzetten voor rechtshandig gebruik, stelt u de schakelaar (12) onder de voet van de joystick in op "RIGHT HANDED":
CONFIGURATIE VAN DE KNOPPEN VOOR LINKSHANDIG GEBRUIK
Als u de positie van de 12 knoppen op de voet wilt omzetten voor linkshandig gebruik, stelt u de schakelaar (12) onder de voet van de joystick in op "LEFT HANDED":
DE HANDSTEUN INSTELLEN VOOR RECHTS- OF LINKSHANDIG
GEBRUIK
Standaard is de handsteun geconfigureerd voor RECHTSHANDIG GEBRUIK.
Ga als volgt te werk om de steun te configureren voor LINKSHANDIG GEBRUIK:
A) Draai met een kleine schroevendraaier voorzichtig de kleine draaischroef voor de
handsteun (7) los (zonder de schroef te verwijderen), die zich aan de linkerzijde van de
handsteun bevindt.
B) Draai de handsteun 180°.
C) Draai de schroef op de handsteun (die zich nu aan de rechterzijde bevindt) weer
helemaal vast.
Opmerking: voer deze procedure in omgekeerde volgorde uit om de steun weer in te stellen
op rechtshandig gebruik.
Page 30

3/6
DE DUIMSTEUN INSTELLEN VOOR RECHTS- OF LINKSHANDIG
GEBRUIK
Standaard is de duimsteun van de stick geconfigureerd voor RECHTSHANDIG GEBRUIK.
Ga als volgt te werk om de steun te configureren voor LINKSHANDIG GEBRUIK:
A) Verwijder het afdekplaatje voor rechtshandig gebruik (3) aan de rechterzijde van de stick.
B) Schroef met een kleine schroevendraaier de lange schroef die nu zichtbaar is (aan de
rechterzijde van de stick) helemaal los en verwijder deze schroef.
C) Verwijder de duimsteun voor rechtshandig gebruik (8) aan de linkerzijde van de stick.
D) Plaats de duimsteun voor linkshandig gebruik (10) (los meegeleverd bij de joystick) aan
de rechterzijde van de stick.
E) Plaats de lange schroef in de opening aan de linkerzijde van de joystick en draai de
schroef helemaal vast om de duimsteun voor linkshandig gebruik te bevestigen.
F) Plaats het afdekplaatje voor linkshandig gebruik (11) (los meegeleverd bij de joystick) aan de linkerzijde van de stick.
Opmerking: voer deze procedure in omgekeerde volgorde uit om de steun weer in te stellen op rechtshandig gebruik.
PC
INSTALLATIE OP DE PC
1. Sluit de USB-connector (9) aan op een van de USB-poorten van de computer.
Windows XP, Vista, 7 of 8 herkent het nieuwe apparaat automatisch.
2. De drivers worden automatisch geïnstalleerd.
Volg de aanwijzingen op het scherm om de installatie te voltooien.
3. Klik op Start/Configuratiescherm en dubbelklik op Spelbesturingen.
In het dialoogvenster Spelbesturingen dat nu wordt geopend, ziet u de naam van de joystick met als status OK.
4. Klik op Eigenschappen in het Configuratiescherm om de joystick te testen en te
configureren.
Nu kan er gespeeld worden!
BELANGRIJKE OPMERKING
Bij het aansluiten van de joystick: plaats de stick en het roer altijd in de middenstand en beweeg de stick en het roer niet (om kalibratieproblemen te voorkomen).
Page 31

4/6
PROBLEMEN OPLOSSEN EN WAARSCHUWINGEN
• Mijn joystick werkt niet goed of lijkt niet goed gekalibreerd te zijn:
- Zet de computer uit en koppel de joystick los, zet vervolgens de computer weer aan en
sluit de joystick opnieuw aan en start de game opnieuw.
- Bij het aansluiten van de joystick: plaats de stick en het roer altijd in de middenstand en
beweeg de stick en het roer niet (om kalibratieproblemen te voorkomen).
• Ik kan mijn joystick niet configureren:
- Ga in de game naar het menu met opties voor de controller, gamepad of joystick. Selecteer
de gewenste configuratie of stel alle controller-opties volledig opnieuw in.
Raadpleeg de handleiding of de online help van de game voor meer informatie.
• Mijn joystick reageert te gevoelig of reageert niet gevoelig genoeg:
- De joystick wordt automatisch gekalibreerd wanneer u deze een paar maal in de richting
van de verschillende assen hebt bewogen.
- Ga in de game naar het menu met opties voor de controller, gamepad of joystick. Pas de
gevoeligheid en dode zones van de joystick aan (indien deze opties beschikbaar zijn).
• De achtergrondverlichting in het midden van de joystick gaat niet automatisch uit:
- Beweeg de stick een heel klein beetje zodat deze precies in het midden staat. De
achtergrondverlichting wordt dan uitgeschakeld na 3 seconden inactiviteit.
Page 32

5/6
Informatie met betrekking tot kopersgarantie
Wereldwijd garandeert Guillemot Corporation S.A. (“Guillemot”) de koper dat dit Thrustmaster-product vrij
zal zijn van materiaal- en fabricagefouten gedurende een garantieperiode gelijk aan de tijd maximaal
vereist om een restitutie/vervanging voor dit product te claimen. In landen van de Europese Unie komt dit
overeen met een periode van twee (2) jaar vanaf het moment van levering van het Thrustmaster-product.
In andere landen komt de garantieperiode overeen met de tijd maximaal vereist om een
restitutie/vervanging voor dit Thrustmaster-product te claimen zoals wettelijk is vastgelegd in het land
waarin de koper woonachtig was op de datum van aankoop van het Thrustmaster-product. Indien een
dergelijk claimrecht niet wettelijk is vastgelegd in het betreffende land, geldt een garantieperiode van één
(1) jaar vanaf datum aankoop van het Thrustmaster-product.
Ongacht het hierboven gestelde, geldt voor oplaadbare batterijen een garantieperiode van zes (6)
maanden vanaf datum aankoop.
Indien u in de garantieperiode een defect meent te constateren aan dit product, neem dan onmiddellijk
contact op met Technical Support die u zal informeren over de te volgen procedure. Als het defect wordt
bevestigd, dient het product te worden geretourneerd naar de plaats van aankoop (of een andere locatie
die wordt opgegeven door Technical Support).
Binnen het gestelde van deze garantie wordt het defecte product van de koper gerepareerd of vervangen,
zulks ter beoordeling van Technical Support. Indien toegestaan door van toepassing zijnde wetgeving,
beperkt de volledige aansprakelijkheid van Guillemot en haar dochterondernemingen (inclusief de
aansprakelijkheid voor vervolgschade) zich tot het repareren of vervangen van het Thrustmaster-product.
Indien toegestaan door van toepassing zijnde wetgeving, wijst Guillemot elke garantie af met betrekking
tot verhandelbaarheid of geschiktheid voor enig doel. De wettelijke rechten van de koper die van
toepassing zijn op de verkoop van consumentproducten worden op generlei wijze door deze garantie
beperkt.
Deze garantie is niet van kracht: (1) indien het product aangepast, geopend of gewijzigd is, of beschadigd
is ten gevolge van oneigenlijk of onvoorzichtig gebruik, verwaarlozing, een ongeluk, normale slijtage, of
enige andere oorzaak die niet gerelateerd is aan een materiaal- of fabricagefout (inclusief maar niet
beperkt tot het combineren van het Thrustmaster-product met enig ongeschikt element waaronder in het
bijzonder voedingsadapters, oplaadbare batterijen, opladers of enig ander element niet geleverd door
Guillemot voor dit product); (2) indien u zich niet houdt aan de instructies zoals verstrekt door Technical
Support; (3) op software die onder een specifieke garantie valt; (4) op verbruiksartikelen (elementen die
tijdens de levensduur van het product worden vervangen zoals bijvoorbeeld batterijen of pads van een
headset of koptelefoon); (5) op accessoires (zoals bijvoorbeeld kabels, behuizingen, hoesjes, etui's,
draagtassen of polsbandjes); (6) indien het product werd verkocht op een openbare veiling.
Deze garantie is niet overdraagbaar.
Aansprakelijkheid
Indien toegestaan door van toepassing zijnde wetgeving, wijzen Guillemot Corporation S.A. (hierna te
noemen “Guillemot”) en haar dochterondernemingen alle aansprakelijkheid af voor enige schade
veroorzaakt door één van de volgende oorzaken: (1) indien het product aangepast, geopend of gewijzigd
is; (2) de montage-instructies niet zijn opgevolgd; (3) oneigenlijk of onvoorzichtig gebruik, verwaarlozing,
een ongeluk (bijvoorbeeld stoten); (4) normale slijtage. Indien toegestaan onder van toepassing zijnde
wetgeving, wijzen Guillemot en haar dochterondernemingen alle aansprakelijkheid af voor enige schade
aan dit product niet gerelateerd aan een materiaal- of fabricagefout (inclusief maar niet beperkt tot enige
schade direct of indirect veroorzaakt door enige software, of door het combineren van het Thrustmasterproduct met enig ongeschikt element waaronder in het bijzonder voedingsadapters, oplaadbare batterijen,
opladers of enig ander element niet geleverd door Guillemot voor dit product).
Page 33

6/6
COPYRIGHT
© 2015 Guillemot Corporation S.A. Alle rechten voorbehouden. Thrustmaster® is een geregistreerd
handelsmerk van Guillemot Corporation S.A. Windows® is een geregistreerd handelsmerk van Microsoft
Corporation in de Verenigde Staten en/of andere landen. Alle andere handelsmerken zijn eigendom van
de respectieve eigenaren. Afbeeldingen zijn niet bindend. Inhoud, ontwerp en specificaties kunnen zonder
kennisgeving vooraf worden gewijzigd en kunnen per land verschillen. Geproduceerd in China.
AANBEVELINGEN VOOR DE BESCHERMING VAN HET MILIEU
Neem contact op met uw gemeente voor informatie over een inzamelpunt bij u in de buurt.
Bewaar deze informatie. De kleuren en decoraties kunnen variëren.
Dit product voldoet aan alle normen voor kinderen van 14 jaar en ouder. Dit product is niet geschikt voor
gebruik door kinderen jonger dan 14 jaar.
www.thrustmaster.com
Gooi dit product na het einde van de levensduur niet weg met het normale afval,
maar breng het naar het door uw gemeente aangewezen inzamelpunt voor
elektrische en/of computerapparatuur.
Ter herinnering is hiertoe op het product, de gebruikshandleiding of de verpakking
een symbool aangebracht.
De meeste materialen kunnen worden gerecycled. Door recycling en andere
methoden voor verantwoorde verwerking van afgedankte elektrische en
elektronische apparaten kunt u een belangrijke bijdrage leveren aan de bescherming
van het milieu.
TECHNISCHE ONDERSTEUNING
http://ts.thrustmaster.com
Page 34

2
1
9
LEFT
HANDED
5
10
8
6
12
LEFT
HANDED
3
6
7
9
255 0
8
7
RIGHT
HANDED
3
4
10
11
5
RIGHT
HANDED
1
4
2
Y Axis
0
X Axis
163830
16383
11
12
13
16
15
14
11
12
16
15
LEFT
HANDED
3
13
255 0
14
RIGHT
HANDED
1
4
2
Y Axis
0
X Axis
163830
16383
5
6
7
10
9
8
0+
255-
Slider0 Axis
RZ Axis
0+
RZ Axis
255-
Slider0 Axis
Page 35

A
E
A
D
B
C
C
B
F
Page 36

1/6
1. Grilletto digitale
7. Vite per la rotazione della zona di riposo
CARATTERISTICHE TECNICHE
PC compatibile
Manuale d’uso
2. Hat switch "Angolo di visuale"
multidirezionale
3. Copri-vite per destrimani
4. Controllo del timone tramite
impugnatura rotante con zona di
riposo per la mano
5. Manetta
6. 15 pulsanti azione
per la mano, con posizioni per destrimani
o mancini
8. Appoggia-pollice per destrimani
9. Connettore PC USB
10. Appoggia-pollice per mancini
11. Copri-vite per mancini
12. Selettore per pulsanti in configurazione
utente destrimane o mancino
CONOSCERE IL TUO JOYSTICK
ESCLUSIVA TECNOLOGIA DI PRECISIONE:
"H.E.A.R.T™: HallEffect AccuRate Technology"
Il tuo joystick T-16000M è dotato di una tecnologia in grado di garantire un livello di precisione ineguagliabile nel mondo dei joystick per giocare; in particolare:
- Un sensore 3D magnetico (Hall Effect) garantisce una risoluzione da oltre 268 milioni da
valori per gli assi X e Y (16384 x 16384 valori), mentre gli attuali sistemi concorrenti (perfino
i sistemi high-end) offrono risoluzioni prossime ad un solo milione di valori (1024 x 1024
valori).
- Un magnete: niente attrito, per una precisione senza limiti e una risposta incredibile.
- Molla elicoidale (2,8mm) nella leva: per una tensione decisa, lineare e ultra-fluida.
RETROILLUMINAZIONE
Per una precisione ancor più grande, nella posizione centrale della leva del T-16000M non
sono presenti zone morte. Per rappresentare questa caratteristica, mentre muovi la leva
(anche leggermente), il centro viene retroilluminato in verde; la retroilluminazione si spegne
dopo 3 secondi di inattività, una volta che la leva è tornata nella posizione centrale.
MANETTA
Il tuo joystick è dotato di manetta (5), tramite la quale potrai facilmente controllare la tua accelerazione nei giochi.
Page 37

2/6
FUNZIONE TIMONE
Il tuo joystick è dotato di una funzione timone (4), che in un aeroplano corrisponde ai pedali
utilizzati dal pilota per muovere il timone, in modo tale che il velivolo ruoti attorno al proprio
asse verticale (l’aereo gira verso destra o verso sinistra).
Con il tuo joystick, questa funzione timone è attivabile ruotando la leva verso destra o sinistra.
HAT SWITCH "ANGOLO DI VISUALE" MULTIDIREZIONALE
Il tuo joystick è dotato di un hat switch "Angolo di visuale" (2), che, come il nome stesso
indica, ti consente di vedere istantaneamente ciò che sta accadendo attorno al tuo
aeroplano (nei giochi in cui è attiva tale funzione). Per utilizzare questa funzione, non devi
far altro che accedere al menu di configurazione del tuo gioco ed associare le varie visuali
(visuale posteriore, visuale destra, visuale sinistra e perfino le visuali esterne) alle direzioni
dell’hat switch "Angolo di visuale".
Se lo desideri, puoi destinare l’hat switch "Angolo di visuale" ad altri usi (sparo, ecc.).
SISTEMA AMBIDESTRO
Il tuo joystick T-16000M ha il vantaggio di essere totalmente ambidestro: si adatta
perfettamente a tutti i giocatori, sia destrimani che mancini.
Per permettere questa possibilità, vi sono 3 elementi configurabili: i pulsanti presenti nella
base, la zona di riposo per la mano e l’appoggia-pollice.
CONFIGURAZIONE DEI PULSANTI IN MODALITÀ DESTRIMANE
Per impostare la configurazione destrimane delle posizioni dei 12 pulsanti della base, sposta l’apposito switch (12), posto sotto la base del joystick, su "RIGHT HANDED":
CONFIGURAZIONE DEI PULSANTI IN MODALITÀ MANCINO
Per impostare la configurazione destrimane delle posizioni dei 12 pulsanti della base, sposta l’apposito switch (12), posto sotto la base del joystick, su "LEFT HANDED":
IMPOSTAZIONE DELLA ZONA DI RIPOSO PER LA MANO NELLA
MODALITÀ DESTRIMANE O MANCINO
Per default, la zona di riposo per la mano è configurata in MODALITÀ DESTRIMANE.
Per spostarla in MODALITÀ MANCINO:
A) Tramite un piccolo cacciavite, allenta accuratamente (senza rimuoverla) la piccola vite di rotazione della zona di riposo per la mano the (7), presente sulla parte sinistra di tale zona.
B) Ruota di 180°la zona di riposo per la mano.
C) Stringi nuovamente la vite della zona di riposo per la mano (ora presente sulla destra).
Nota: Per ritornare alla modalità destrimane, esegui al contrario la presente procedura.
Page 38

3/6
REGOLAZIONE DELL’APPOGGIA-POLLICE PER LA MODALITÀ
DESTRIMANE O MANCINO
Per default, l’appoggia-pollice presente sulla leva è posizionato in MODALITÀ
DESTRIMANE.
Per regolarlo in MODALITÀ MANCINO:
A) Rimuovi il copri-vite per destrimani (3) posto sulla parte destra della leva.
B) Utilizzando un piccolo cacciavite, svita completamente e rimuovi la lunga vite divenuta
ora accessibile (presente sulla parte destra della leva).
C) Rimuovi l’appoggia-pollice destro (8) posto sulla parte sinistra della leva.
D) Colloca l’appoggia-pollice mancino (10) (presente separatamente nella confezione del
joystick) sulla parte sinistra della leva.
E) Inserisci ed avvita completamente la lunga vite nell’apposita apertura presente nella parte
sinistra della leva, in modo tale da fissare in saldamente l’appoggia-pollice mancino.
F) Inserisci il copri-vite mancino (11) (presente separatamente nella confezione del joystick)
nella parte sinistra della leva.
Nota: Carry Per ritornare alla modalità destrimane, esegui al contrario la presente procedura.
PC
INSTALLAZIONE SU PC
1. Collega il connettore PC USB (9) ad una porta USB del tuo computer.
Windows XP, Vista, 7 o 8, individuerà automaticamente la nuova periferica.
2. I driver vengono installati automaticamente.
Completa l’installazione seguendo le istruzioni che compaiono sullo schermo.
3. Clicca su Start/Impostazioni/Panello di controllo e fai doppio clic su Periferiche di
gioco.
Nella finestra di dialogo Periferiche di gioco, comparirà il nome del joystick con associato lo stato di OK.
4. Nel Panello di controllo, clicca su Proprietà per testare e visualizzare tutte le funzioni
del tuo joystick.
Ora sei pronto per giocare!
NOTA IMPORTANTE
Quando colleghi il tuo joystick, per evitare eventuali problemi di calibrazione, colloca la leva e il timone nelle rispettive posizioni centrali.
Page 39

4/6
RISOLUZIONE DEI PROBLEMI E AVVISI
• Il mio joystick non funziona correttamente o sembra non essere ben calibrato:
- Spegni il tuo computer and scollega il tuo joystick; quindi, riaccendi il computer, ricollega il
tuo joystick e riavvia il gioco.
- Per non imbatterti in problemi di calibrazione, quando colleghi il tuo joystick, lascia sempre
la leva e il timone nelle rispettive posizioni centrali, evitando di muoverli.
• Non riesco a configurare il mio joystick:
- Nel menu "Opzioni/Controller/Gamepad o Joystick" del tuo gioco: seleziona la
configurazione appropriata, oppure riconfigura completamente le opzioni del controller.
- Per ulteriori informazioni, consulta il manuale d’uso o l’utility di aiuto online del tuo gioco.
• Il mio joystick è troppo sensibile o non sensibile abbastanza:
- Il tuo joystick si calibra automaticamente non appena avrai effettuato alcuni movimenti
lungo i vari assi.
- Nel menu "Opzioni/Controller/Gamepad o Joystick" del tuo gioco: imposta la sensibilità e le
zone morte del tuo joystick (qualora queste opzioni siano disponibili).
• La retroilluminazione del centro del joystick non si spegne automaticamente:
- Muovi di pochissimo la leva fino a che questa non si trovi nella posizione centrale assoluta:
la retroilluminazione si spegnerà dopo 3 secondi di inattività.
Page 40

5/6
Informazioni sulla garanzia al consumatore
A livello mondiale, Guillemot Corporation S.A. (d’ora in avanti “Guillemot”) garantisce al consumatore che
il presente prodotto Thrustmaster sarà privo di difetti relativi ai materiali e alla fabbricazione, per un
periodo di garanzia corrispondente al limite temporale stabilito per la presentazione di un reclamo
riguardante la conformità del prodotto in questione. Nei paesi della Comunità Europea, tale periodo
equivale a due (2) anni a partire dalla consegna del prodotto Thrustmaster. In altri paesi, la durata della
garanzia corrisponde al limite temporale stabilito per la presentazione di un reclamo riguardante la
conformità del prodotto Thrustmaster in base alle leggi applicabili nel paese in cui il consumatore
risiedeva alla data di acquisto del prodotto Thrustmaster (qualora nel paese in questione non esistesse
alcuna norma a riguardo, il periodo di garanzia corrisponderà a un (1) anno a partire dalla data originale di
acquisto del prodotto Thrustmaster).
Diversamente da quanto affermato in precedenza, le batterie ricaricabili sono coperte da una garanzia di
sei (6) mesi dalla data di acquisto originale.
Qualora, durante il periodo di garanzia, il prodotto dovesse apparire difettoso, contatti immediatamente
l’Assistenza Tecnica, che le indicherà la procedura da seguire. Qualora il difetto dovesse essere
confermato, il prodotto dovrà essere riportato al luogo di acquisto (o qualsiasi altro luogo indicato
dall’Assistenza Tecnica).
Nel contesto della presente garanzia, il prodotto difettoso di proprietà del consumatore potrà essere
riparato oppure sostituito, a discrezione dell’Assistenza Tecnica. Qualora le leggi applicabili in materia lo
consentano, la totale responsabilità di Guillemot e delle sue controllate (compresi i danni conseguenti) si
limita alla riparazione o alla sostituzione del prodotto Thrustmaster. Qualora le leggi applicabili in materia
lo consentano, Guillemot declina ogni garanzia sulla commerciabilità o la conformità a finalità particolari. I
diritti legali del consumatore, stabiliti dalle leggi vigenti in materia di vendita di beni di consumo, non
vengono intaccati dalla presente garanzia.
La presente garanzia non potrà essere applicata: (1) se il prodotto è stato modificato, aperto, alterato o ha
subito danni derivanti da un uso inappropriato o non autorizzato, da negligenza, da un incidente, dalla
semplice usura, o da qualsiasi altra causa non riconducibile a difetti nei materiali o nell'assemblaggio
(compresi, ma non i soli, prodotti Thrustmaster combinati con elementi inadatti, tra cui, in particolare,
batterie ricaricabili, caricatori o qualsiasi altro elemento non fornito da Guillemot per questo prodotto); (2)
in caso di mancato rispetto delle istruzioni fornite dall'Assistenza Tecnica; (3) in caso di software, ovvero
software soggetto a una specifica garanzia; (4) ai materiali di consumo (elementi che richiedono la loro
sostituzione al termine della loro durata di esercizio come, ad esempio, batterie di tipo convenzionale o
cuscinetti protettivi per auricolari o cuffie); (5) agli accessori (ad esempio, cavi, custodie, borsette, borse,
cinturini); (6) se il prodotto è stato venduto ad un'asta pubblica.
La presente garanzia non è trasferibile.
Responsabilità
Qualora le leggi applicabili in materia lo consentano, Guillemot Corporation S.A. (d'ora in avanti
“Guillemot”) e le sue controllate declinano ogni responsabilità per qualsiasi danno derivante da almeno
una delle seguenti condizioni: (1) il prodotto è stato modificato, aperto o alterato; (2) mancato rispetto
delle istruzioni di installazione; (3) uso inappropriato o non permesso, negligenza, incidente (come, ad
esempio, un impatto); (4) semplice usura. Qualora le leggi applicabili in materia lo consentano, Guillemot
e le sue controllate declinano ogni responsabilità per qualsiasi danno non riconducibile a difetti nei
materiali o nella fabbricazione del prodotto (compresi, ma non i soli, potenziali danni causati direttamente
o indirettamente da un qualunque software, oppure dall’uso del prodotto Thrustmaster in combinazione
con elementi inadatti, tra cui, in particolare, batterie ricaricabili, caricatori o qualsiasi altro elemento non
fornito da Guillemot per questo prodotto).
Page 41

6/6
COPYRIGHT
© 2015 Guillemot Corporation S.A. Tutti i diritti riservati. Thrustmaster® è un marchio registrato di
proprietà di Guillemot Corporation S.A. Windows® è un marchio registrato di proprietà di Microsoft
Corporation per gli Stati Uniti e/o altri Paesi. Tutti gli altri marchi appartengono ai legittimi proprietari.
Illustrazioni escluse. I contenuti, i design e le caratteristiche possono essere oggetto di modifiche senza
preavviso e possono variare da un Paese all’altro. Fabbricato in Cina.
RACCOMANDAZIONI SULLA TUTELA DELL’AMBIENTE
Per conoscere i punti di raccolta più vicini a te, contatta le autorità locali competenti.
Informazioni da conservare. I colori e le decorazioni possono variare.
Questo prodotto è conforme con le norme relative ai bambini di età superiore ai 14 anni. Non è adatto
all’uso da parte di bambini di età inferiore ai 14 anni.
www.thrustmaster.com
Al termine della sua vita operativa, questo prodotto non dovrebbe essere gettato
assieme ai comuni rifiuti, ma dovrebbe essere portato ad un apposito punto di
raccolta destinato al riciclaggio del Materiale Elettrico ed Elettronico.
Ciò è confermato dal simbolo riportato sul prodotto, nel manuale d’uso o sulla
confezione.
A seconda delle proprie caratteristiche, i materiali potrebbero essere riciclati. Tramite
il riciclaggio ed altre forme di trattamento del Materiale Elettrico ed Elettronico, è
possibile fornire un importante contributo per la salvaguardia dell’ambiente.
ASSISTENZA TECNICA
http://ts.thrustmaster.com
Page 42

2
1
9
LEFT
HANDED
5
10
8
6
12
LEFT
HANDED
3
6
7
9
255 0
8
7
RIGHT
HANDED
3
4
10
11
5
RIGHT
HANDED
1
4
2
Y Axis
0
X Axis
163830
16383
11
12
13
16
15
14
11
12
16
15
LEFT
HANDED
3
13
255 0
14
RIGHT
HANDED
1
4
2
Y Axis
0
X Axis
163830
16383
5
6
7
10
9
8
0+
255-
Slider0 Axis
RZ Axis
0+
RZ Axis
255-
Slider0 Axis
Page 43

A
E
A
D
B
C
C
B
F
Page 44

1/6
1. Gatillo digital
7. Tornillo de rotación del reposamanos,
CARACTERÍSTICAS TÉCNICAS
Compatible: PC
Manual del usuario
2. Hat switch multidireccional "Punto de
vista"
3. Tapa del tornillo en posición diestra
4. Control de timón mediante mango
giratorio con reposamanos
5. Mando de potencia
6. 15 botones de acción
con posiciones para diestros y zurdos
8. Reposapulgares para diestros
9. Conector USB para PC
10. Reposapulgares para zurdos
11. Tapa del tornillo en posición zurda
12. Interruptor selector de botones para
diestros o zurdos
INTRODUCCIÓN A TU JOYSTICK
TECNOLOGÍA DE PRECISIÓN EXCLUSIVA:
"H.E.A.R.T™: HallEffect AccuRate Technology"
Tu joystick T-16000M incorpora tecnología que le ofrece un nivel de precisión actualmente inigualada en el mundo de los joysticks de juego, que incluye:
- Un sensor magnético 3D (Hall Effect) en la palanca, con una resolución de más de 268
millones de valores en los ejes X e Y (16384 x 16384 valores), mientras que los sistemas
actuales de la competencia (incluso sistemas de alto nivel) ofrecen resoluciones próximas a
sólo un millón de valores (1024 x 1024 valores).
- Un imán: sin fricción, para lograr una precisión ilimitada y una receptividad increíble.
- Muelle de bobina en la palanca (2,8 mm): para lograr una tensión firme, lineal y muy
homogénea.
RETROILUMINACIÓN
Para lograr una precisión aún mayor, no hay zonas muertas en la posición central de la
palanca del T-16000M. Para simbolizarlo, el centro se retroilumina en verde en cuanto se
mueve la palanca (incluso de manera muy ligera); la retroiluminación se apaga después de
3 segundos de inactividad, una vez que has devuelto la palanca al punto muerto del centro.
MANDO DE POTENCIA
Tu joystick incorpora un mando de potencia (5), que puedes utilizar para controlar fácilmente la aceleración en los juegos.
Page 45

2/6
FUNCIÓN DE TIMÓN
Tu joystick incorpora una función de timón (4), que en un avión corresponde con los pedales
que el piloto utiliza para mover el timón, que permiten que el avión pivote sobre su eje
vertical (haciendo que el avión gire hacia la izquierda o hacia la derecha).
Esta función de timón está disponible en tu joystick rotando la palanca a la izquierda o a la derecha.
HAT SWITCH MULTIDIRECCIONAL "PUNTO DE VISTA"
Tu joystick incorpora un hat switch "Punto de vista" (2) que, como su nombre indica, te
permite ver instantáneamente todo lo que pasa alrededor de tu avión (en los juegos que
dispongan de esta función). Para utilizar esta función, dirígete al menú de configuración del
juego y programa las diferentes vistas (vista trasera, vista a la izquierda, vista a la derecha y
también las vistas externas) en las direcciones del hat switch "Punto de vista".
Si lo deseas, también puedes reservar el hat switch "Punto de vista" para otros usos (disparar, etc.).
SISTEMA AMBIDEXTRO
Tu joystick T-16000M tiene la ventaja de ser totalmente ambidextro, lo que le permite
adaptarse a todos los jugadores, tanto si son diestros como zurdos.
Para ello, se pueden ajustar 3 elementos: la configuración de los botones de la base, el
reposamanos y el reposapulgares.
CONFIGURACIÓN DE BOTONES EN MODO DIESTRO
Para fijar las posiciones de los 12 botones situados en la base en el modo diestro, pon el interruptor selector (12) situado debajo de la base del joystick en "RIGHT HANDED":
CONFIGURACIÓN DE BOTONES EN MODO ZURDO
Para fijar las posiciones de los 12 botones situados en la base en el modo zurdo, pon el interruptor selector (12) situado debajo de la base del joystick en "LEFT HANDED":
AJUSTE DEL REPOSAMANOS EN MODO DIESTRO O ZURDO
De forma predeterminada, el reposamanos está configurado en MODO DIESTRO.
Para ajustarlo a MODO ZURDO:
A) Utilizando un destornillador pequeño, afloja con cuidado (sin llegar a quitarlo) el pequeño tornillo de rotación del reposamanos (7), situado en la parte izquierda del reposamanos.
B) Gira el reposamanos 180°.
C) Vuelve a apretar totalmente el tornillo del reposamanos (ahora situado a la derecha).
Nota: Realiza este procedimiento a la inversa para volver al modo diestro.
Page 46

3/6
AJUSTE DEL REPOSAPULGARES EN MODO DIESTRO O ZURDO
De forma predeterminada, el reposapulgares de la palanca está configurado en MODO
DIESTRO.
Para ajustarlo a MODO ZURDO:
A) Quita la tapa del tornillo en posición diestra (3) situada en la parte derecha de la palanca.
B) Utilizando un destornillador pequeño, desatornilla y quita por completo el tornillo largo
ahora accesible (en la parte derecha de la palanca).
C) Quita la tapa del tornillo en posición diestra (8) situada en la parte izquierda de la
palanca.
D) Coloca el reposapulgares para zurdos (10) (incluido por separado en la caja del joystick)
en la parte derecha de la palanca.
E) Coloca el tornillo largo en la abertura de la parte izquierda de la palanca y aprieta
totalmente el tornillo para asegurar el reposapulgares para zurdos en su sitio.
F) Coloca la tapa del tornillo en posición zurda (11) (incluida por separado en la caja del
joystick) en la parte izquierda de la palanca.
Nota: Realiza este procedimiento a la inversa para volver al modo diestro.
PC
INSTALACIÓN EN PC
1. Enchufa el conector USB para PC (9) en uno de los puertos USB de tu ordenador.
Windows XP, Vista, 7 o 8 detectarán automáticamente el nuevo dispositivo.
2. Los controladores se instalan automáticamente.
Sigue las instrucciones en pantalla para terminar la instalación.
3. Haz clic en Inicio/Configuración/Panel de control y haz doble clic en Dispositivos de
juego.
El cuadro de diálogo Dispositivos de juego muestra el nombre del joystick con el estado OK.
4. En el Panel de control, haz clic en Propiedades para probar y ver todas las funciones
del joystick.
¡Ya estás preparado para jugar!
NOTA IMPORTANTE
Al conectar el joystick: coloca siempre la palanca y el timón en sus posiciones centrales, y no los muevas (para evitar problemas de calibración).
Page 47

4/6
RESOLUCIÓN DE PROBLEMAS Y ADVERTENCIAS
• Mi joystick no funciona correctamente o parece no estar bien calibrado:
- Apaga el ordenador y desconecta el joystick; luego, vuelve a encender el ordenador,
vuelve a conectar el joystick y reinicia el juego.
- Al conectar el joystick: coloca siempre la palanca y el timón en sus posiciones centrales, y
no los muevas (para evitar problemas de calibración).
• No puedo configurar mi joystick:
- En el menú "Opciones/Mando/Gamepad o Joystick" del juego: selecciona la configuración
apropiada, o reconfigura completamente las opciones del mando.
- Consulta el manual del usuario o la ayuda en línea del juego para obtener más
información.
• Mi joystick es demasiado sensible o no lo bastante sensible:
- Tu joystick se autocalibra de forma independiente una vez que has realizado algunos
movimientos en los distintos ejes.
- En el menú "Opciones/Mando/Gamepad o Joystick" del juego: ajusta la sensibilidad y las
zonas muertas del joystick (si esas opciones están disponibles).
• La retroiluminación central del joystick no se apaga automáticamente:
- Mueve la palanca muy ligeramente para que quede en su valor central absoluto; la
retroiluminación se apagará después de 3 segundos de inactividad.
Page 48

5/6
INFORMACIÓN DE GARANTÍA AL CONSUMIDOR
En todo el mundo, Guillemot Corporation S.A. (en lo sucesivo “Guillemot”) garantiza al consumidor
que este producto de Thrustmaster estará libre de defectos de materiales y mano de obra, durante
un período de garantía que corresponde al límite de tiempo para interponer una acción legal
referida a la conformidad en relación con este producto. En los países de la Unión Europea, esto
corresponde a un período de dos (2) años a partir de la entrega del producto de Thrustmaster. En
otros países, el período de garantía corresponde al límite de tiempo para interponer una acción
legal referida a la conformidad en relación con este producto de Thrustmaster según las leyes
aplicables del país en el que el consumidor estuviese domiciliado en la fecha de compra del
producto de Thrustmaster (si no existiese una acción similar en el país correspondiente, entonces
el período de garantía será de un (1) año a partir de la fecha de compra original del producto de
Thrustmaster).
A pesar de lo anterior, las baterías recargables están cubiertas por un período de garantía de seis
(6) meses a partir de la fecha de compra original.
Si el producto resultase defectuoso durante el período de garantía, hay que ponerse en contacto
inmediatamente con el Soporte Técnico, que indicará el procedimiento a seguir. Si se confirma el
defecto, el producto debe devolverse a su lugar de compra (o a cualquier otra ubicación indicada
por el Soporte Técnico).
Dentro del contexto de esta garantía, el producto defectuoso del consumidor será reparado o
sustituido, a elección del Soporte Técnico. Si la ley aplicable lo permite, toda la responsabilidad de
Guillemot y sus filiales (incluso por daños resultantes) se limita a la reparación o sustitución del
producto de Thrustmaster. Si la ley aplicable lo permite, Guillemot renuncia a todas las garantías
de comerciabilidad o adecuación para un propósito determinado. Los derechos legales del
consumidor en relación con las leyes aplicables a la venta de productos de consumo no se ven
afectados por esta garantía.
Esta garantía no se aplicará: (1) si el producto ha sido modificado, abierto, alterado o ha sufrido
daños como resultado de un uso inapropiado o abuso, negligencia, accidente, desgaste normal, o
cualquier otra causa no relacionada con un defecto de materiales o fabricación (incluyendo, pero
no de forma exclusiva, la combinación del producto de Thrustmaster con cualquier elemento no
adecuado, incluyendo en particular fuentes de alimentación, baterías recargables, cargadores o
cualquier otro elemento no suministrado por Guillemot para este producto); (2) en caso de
incumplimiento de las instrucciones proporcionadas por el Soporte Técnico; (3) a software, es
decir software sujeto a una garantía específica; (2) en caso de incumplimiento de las
instrucciones proporcionadas por el Soporte Técnico; (3) a software, es decir software sujeto a
una garantía específica; (4) a consumibles (elementos que se tienen que reemplazar a lo largo de
la vida del producto: por ejemplo, baterías desechables o almohadillas para auriculares de audio);
(5) a accesorios (por ejemplo, cables, cajas, bolsas, bolsos o muñequeras); (6) si el producto se
ha vendido en una subasta pública. (6) si el producto se ha vendido en una subasta pública.
Esta garantía no es transferible.
Responsabilidad
Si la ley aplicable lo permite, Guillemot Corporation S.A. (en lo sucesivo “Guillemot”) y sus filiales
renuncian a toda responsabilidad por los daños causados por uno o más de los siguientes
motivos: (1) el producto ha sido modificado, abierto o alterado; (2) incumplimiento de las
instrucciones de montaje; (3) uso inapropiado o abuso, negligencia, accidente (un impacto, por
ejemplo); (4) desgaste normal. Si la ley aplicable lo permite, Guillemot y sus filiales renuncian a
toda responsabilidad por los daños no relacionados con defectos de materiales o fabricación en
relación con el producto (incluyendo, pero no de forma exclusiva, los daños causados de forma
directa o indirecta por cualquier software, o por combinar el producto de Thrustmaster con
cualquier elemento no adecuado, incluyendo en particular fuentes de alimentación, baterías
recargables, cargadores o cualquier otro elemento no suministrado por Guillemot para este
producto).
Page 49

6/6
SOPORTE TÉCNICO
COPYRIGHT
© 2015 Guillemot Corporation S.A. Todos los derechos reservados. Thrustmaster® es una marca
registrada de Guillemot Corporation S.A. Windows® es una marca registrada de Microsoft Corporation en
Estados Unidos y/o en otros países. Todas las demás marcas son propiedad de sus respectivos dueños.
Ilustraciones no definitivas. El contenido, la concepción y las especificaciones son susceptibles de
cambiar sin previo aviso y varían según el país. Fabricado en China.
RECOMENDACIÓN DE PROTECCIÓN AMBIENTAL
Contacta con las autoridades locales para más información sobre el punto de recogida más cercano.
Esta información debe conservarse. Los colores y motivos decorativos pueden variar.
Este producto cumple con todas las normas relativas a los niños de más de 14 años. No es
recomendable para niños de menos de 14 años.
www.thrustmaster.com
Al terminar su vida útil, este producto no debe tirarse en un contenedor de basuras
estándar, sino que debe dejarse en un punto de recogida de desechos eléctricos y
equipamiento electrónico para ser reciclado.
Esto viene confirmado por el símbolo que se encuentra en el producto, manual del
usuario o embalaje.
Dependiendo de sus características, los materiales pueden reciclarse. Mediante el
reciclaje y otras formas de procesamiento de los desechos eléctricos y el
equipamiento electrónico puedes contribuir de forma significativa a ayudar a
proteger el medio ambiente.
http://ts.thrustmaster.com
Page 50

2
1
9
LEFT
HANDED
5
10
8
6
12
LEFT
HANDED
3
6
7
9
255 0
8
7
RIGHT
HANDED
3
4
10
11
5
RIGHT
HANDED
1
4
2
Y Axis
0
X Axis
163830
16383
11
12
13
16
15
14
11
12
16
15
LEFT
HANDED
3
13
255 0
14
RIGHT
HANDED
1
4
2
Y Axis
0
X Axis
163830
16383
5
6
7
10
9
8
0+
255-
Slider0 Axis
RZ Axis
0+
RZ Axis
255-
Slider0 Axis
Page 51

A
E
A
D
B
C
C
B
F
Page 52

1/6
1. Gatilho digital
7. Parafuso de rotação do descanso, com
CARACTERÍSTICAS TÉCNICAS
Compatível: PC
Manual do Utilizador
2. Hat switch multidireccional de “ponto
de vista”
3. Tampa direita do parafuso
4. Leme de direcção controlado via
rotação da coluna com descanso
5. Manete
6. 15 botões de acção
posições à esquerda ou à direita
8. Descanso para o polegar direito
9. Conector PC USB
10. Descanso para o polegar esquerdo
11. Tampa esquerda do parafuso
12. Selector dos botões para a posição
direita ou esquerda
CONHEÇA O SEU JOYSTICK
TECNOLOGIA DE PRECISÃO EXCLUSIVA:
“H.E.A.R.T™: Hall Effect AccuRate Technology”
A tecnologia integrada no seu joystick T-16000M confere-lhe um nível de precisão presentemente sem igual no mundo dos joysticks para jogos, incluindo:
- Sensor magnético 3D (Hall Effect) na coluna, com uma resolução superior a 268 milhões
nos eixos X e Y (valores de 16.384 x 16.384), ao passo que os sistemas rivais existentes
(inclusive os de topo de gama) oferecem resoluções que rondam apenas valores de um
milhão (1024 x 1024).
- Íman: sem fricção, para uma precisão ilimitada e uma capacidade de resposta incrível.
- Mola helicoidal na coluna (2,8 mm de diâmetro): tensão firme, linear e ultrafluida.
RETROILUMINAÇÃO
A fim de aumentar ainda mais a precisão, não há uma zona morta na posição central da
coluna do T-16000M. Simbolicamente, o centro fica retroiluminado a verde assim que move
a coluna (ainda que ligeiramente); a retroiluminação apaga-se ao fim de 3 segundos de
inactividade, depois de a coluna regressar ao centro.
MANETE
O seu joystick possui uma manete (5), que pode usar para controlar facilmente a aceleração nos jogos.
Page 53

2/6
FUNÇÃO DE LEME DE DIRECÇÃO
O joystick dispõe de uma função de leme de direcção (4), que numa aeronave corresponde
aos pedais utilizados pelo piloto para mover o leme de direcção, permitindo assim que
aquela rode no seu eixo vertical (e, por conseguinte, vire à esquerda ou à direita).
Esta função está disponível no joystick via rotação da coluna para a esquerda ou direita.
HAT SWITCH MULTIDIRECCIONAL DE “PONTO DE VISTA”
O seu joystick possui um hat switch de “ponto de vista” (2), que, tal como o nome indica,
permite-lhe ver imediatamente o que se passa à volta da aeronave (nos jogos que suportam
esta funcionalidade). Para tal, basta aceder ao menu de configuração do jogo e programar
as diferentes vistas (retaguarda, esquerda, direita e também as vistas externas) nas
direcções do hat switch de “ponto de vista”.
Se desejar, também pode usar o hat switch de “ponto de vista” para em vez disso realizar outras funções (disparar, etc.).
SISTEMA AMBIDESTRO
O seu joystick T-16000M tem a vantagem de ser totalmente ambidestro, o que lhe permite
adaptar-se na perfeição a todos os jogadores, tanto destros como esquerdinos.
Para tal, é possível ajustar três elementos: a configuração dos botões na base, o descanso
para as mãos e o descanso do polegar.
CONFIGURAÇÃO DOS BOTÕES NO MODO DESTRO
A fim de definir as posições dos 12 botões da base no modo destro, ajuste o selector (12) sob a base do joystick para “RIGHT HANDED”:
CONFIGURAÇÃO DOS BOTÕES NO MODO ESQUERDINO
A fim de definir as posições dos 12 botões da base no modo esquerdino , ajuste o selector
(12) sob a base do joystick para “LEFT HANDED”:
DESCANSO DAS MÃOS NO MODO DESTRO OU ESQUERDINO
Por predefinição, o descanso para as mãos está configurado no MODO DESTRO.
Para ajustá-lo para o MODO ESQUERDINO:
A) Com uma chave de fendas pequena, desaperte (sem chegar a remover) o pequeno parafuso de rotação do descanso das mãos (7), no lado esquerdo ou direito do descanso.
B) Rode o descanso para as mãos 180°.
C) Volte a apertar completamente o parafuso do descanso para as mãos (agora à direita).
Nota: Execute este procedimento no sentido inverso para regressar ao modo destro.
Page 54

3/6
DESCANSO DO POLEGAR NO MODO DESTRO OU ESQUERDINO
Por predefinição, o descanso do polegar está configurado no MODO DESTRO.
Para ajustá-lo para o MODO ESQUERDINO:
A) Remova a tampa direita do parafuso (3) situada no lado direito da coluna.
B) Com uma chave de fendas pequena, desaperte e remova por completo o parafuso
comprido que está agora acessível (no lado direito da coluna).
C) Remova o descanso para o polegar direito (8), situado no lado esquerdo da coluna.
D) Posicione o descanso para o polegar esquerdo (10) (incluído à parte na caixa do joystick)
no lado direito da coluna.
E) Posicione o parafuso comprido no orifício existente no lado esquerdo da coluna e aperteo completamente a fim de fixar o descanso para o polegar esquerdo no sítio.
F) Posicione a tampa esquerda do parafuso (11) (incluída à parte na caixa do joystick) no
lado esquerdo da coluna.
Nota: Execute este procedimento no sentido inverso para regressar ao modo destro.
PC
INSTALAÇÃO NO PC
1. Ligue o conector PC USB (9) numa das portas USB do computador.
O Windows XP, Vista, 7 ou 8 detecta automaticamente o novo dispositivo.
2. Os controladores são instalados automaticamente.
Siga as instruções que surgirem no ecrã para concluir a instalação.
3. Clique em Iniciar/Definições/Painel de controlo e depois duas vezes em
Controladores de jogos.
A caixa de diálogo Controladores de jogos mostra o nome do joystick com o estado OK.
4. No Painel de controlo, clique em Propriedades para testar e ver todas as funções do
joystick.
Está pronto para começar a jogar!
NOTA IMPORTANTE
Quando ligar o joystick: coloque sempre a coluna e o leme de direcção nas respectivas posições centrais, e evite movê-los (para evitar problemas de calibração).
Page 55

4/6
RESOLUÇÃO DE PROBLEMAS E AVISO
• O meu joystick não funciona correctamente ou parece estar mal calibrado:
- Encerre o computador e desconecte o joystick; em seguida, volte a ligar o computador,
conecte novamente o joystick e reinicie o jogo.
- Quando ligar o joystick: coloque sempre a coluna e o leme de direcção nas respectivas
posições centrais, e evite movê-los (para evitar problemas de calibração).
• Não consigo configurar o meu joystick:
- No menu “Options/Controller/Gamepad or Joystick” do jogo: seleccione a configuração
mais adequada ou reconfigure por completo as opções do controlador.
- Consulte o manual de utilizador do jogo ou a ajuda online para obter mais informações.
• O meu joystick é demasiado sensível ou não é suficientemente sensível:
- O seu joystick autocalibra-se independentemente assim que executar alguns movimentos
nos diferentes eixos.
- No menu “Options/Controller/Gamepad or Joystick” do jogo: ajuste a sensibilidade e as
zonas mortas do joystick (caso estas opções estejam disponíveis).
• A retroiluminação central do joystick não se apaga automaticamente:
- Mova a coluna muito ligeiramente de modo que fique ajustada no valor central absoluto; a
retroiluminação irá então apagar-se ao fim de 3 segundos de inactividade.
Page 56

5/6
INFORMAÇÕES SOBRE A GARANTIA PARA O CONSUMIDOR
A Guillemot Corporation S.A. (a seguir designada como “Guillemot”) garante a nível mundial ao
consumidor que este produto Thrustmaster está livre de defeitos em termos de materiais e fabrico
durante um período de garantia que corresponde ao limite de tempo para intentar uma ação de
conformidade relativamente a este produto. Nos países da União Europeia, isto corresponde a um
período de dois (2) desde a entrega do produto Thrustmaster. Noutros países, o período de
garantia corresponde ao limite de tempo para intentar uma ação de conformidade relativamente
ao produto Thrustmaster de acordo com a legislação em vigor do país no qual o consumidor
residia à data de compra do produto Thrustmaster (se a dita ação não existir no país
correspondente, então o período de garantia será de um (1) ano a partir da data de compra
original do produto Thrustmaster.
Não obstante o supracitado, as baterias recarregáveis estão cobertas por um período de garantia
de seis (6) meses a partir da data de compra original.
No caso de o produto apresentar algum defeito durante o período da garantia, contacte
imediatamente o Suporte Técnico, que lhe indicará o procedimento a tomar. Se esse defeito se
confirmar, o produto terá de ser devolvido ao respetivo local de compra (ou qualquer outro local
indicado pelo Suporte Técnico).
No âmbito da presente garantia, e por opção do Suporte Técnico, o produto defeituoso do
consumidor será reparado ou substituído. Se for permitido pela legislação em vigor, a
responsabilidade total da Guillemot e das respetivas filiais (incluindo para danos indiretos) está
limitada à reparação ou substituição do produto Thrustmaster. Se for permitido pela legislação em
vigor, a Guillemot rejeita todas as garantias de comercialização ou adequação a um fim
específico. Os direitos legais do consumidor no que concerne à legislação aplicável à venda de
bens de consumo não são afetados pela presente garantia.
A presente garantia não se aplicará: (1) se o produto tiver sido modificado, aberto, alterado ou
danificado em resultado de utilização inadequada ou abusiva, negligência, acidente, desgaste
normal ou qualquer outra casa relacionada com um defeito de material ou fabrico (incluindo, mas
sem limitação, combinar o produto Thrustmaster com qualquer elemento inadequado, incluindo,
em particular, fontes de alimentação, baterias recarregáveis, carregadores ou quaisquer outros
elementos não fornecidos pela Guillemot para este produto); (2) na eventualidade de
incumprimento das instruções fornecidas pelo Suporte Técnico; (3) a software, estando o mesmo
sujeito a uma garantia específica; (4) a consumíveis (elementos para substituir ao longo da vida
útil do produto, como baterias descartáveis e auriculares de auscultadores, por exemplo); (5) a
acessórios (cabos, estojos, bolsas, sacos e correias de pulso, por exemplo); (6) se o produto foi
vendido num leilão público.
A presente garantia não é transmissível.
Responsabilidade
Se for permitido ao abrigo da legislação aplicável, a Guillemot Corporation S.A. (a seguir
designada “Guillemot”) e as respetivas filiais rejeitam qualquer responsabilidade por danos
resultantes de uma ou mais das seguintes causas: (1) o produto foi modificado, aberto ou
alterado; (2) incumprimento das instruções de montagem; (3) utilização inadequada ou abusiva,
negligência ou acidente (um impacto, por exemplo); (4) desgaste normal. Se for permitido ao
abrigo da legislação aplicável, a Guillemot e as respetivas filiais rejeitam qualquer
responsabilidade por danos relacionados com um defeito de material ou fabrico relativamente ao
produto (incluindo, mas sem limitação, quaisquer danos causados direta ou indiretamente por
qualquer software ou por combinar o produto Thrustmaster com qualquer elemento inadequado,
incluindo, em particular, fontes de alimentação, baterias recarregáveis, carregadores ou quaisquer
outros elementos não fornecidos pela Guillemot para este produto).
Page 57

6/6
DIREITOS DE AUTOR
SUPORTE TÉCNICO
© 2015 Guillemot Corporation S.A. Todos os direitos reservados. Thrustmaster® é uma marca registada
da Guillemot Corporation S.A. Windows® é uma marca registada da Microsoft Corporation nos Estados
Unidos e/ou noutros países. Todas as outras marcas comerciais são pertencem aos respectivos
proprietários. As ilustrações não são vinculativas. Os conteúdos, desenhos e especificações estão
sujeitos a alteração sem aviso prévio e podem variar de país para país. Fabricado na China.
RECOMENDAÇÕES DE PROTECÇÃO AMBIENTAL
Contacte as autoridades locais para saber onde fica o ponto de recolha mais perto da sua área de residência.
Informações a reter. As cores e as decorações podem variar.
Este produto está em conformidade com as normas relativas às crianças com mais de 14 anos de idade.
Não é recomendado às crianças com menos de 14 anos de idade.
www.thrustmaster.com
Quando este produto chegar ao fim da sua vida útil, não o elimine juntamente com
os resíduos domésticos normais; em vez disso, deixe-o num ponto de recolha de
resíduos de equipamento eléctrico e electrónico (REEE) para posterior reciclagem.
O símbolo presente no produto, no manual de utilizador ou na caixa confirma-o.
Os materiais podem ser reciclados, dependendo das suas características. Através
da reciclagem e de outras formas de processamento de resíduos de equipamento
eléctrico e electrónico, pode dar um importante contributo no sentido de ajudar a
proteger o ambiente.
http://ts.thrustmaster.com
Page 58

2
1
9
LEFT
HANDED
5
10
8
6
12
LEFT
HANDED
3
6
7
9
255 0
8
7
RIGHT
HANDED
3
4
10
11
5
RIGHT
HANDED
1
4
2
Y Axis
0
X Axis
163830
16383
11
12
13
16
15
14
11
12
16
15
LEFT
HANDED
3
13
255 0
14
RIGHT
HANDED
1
4
2
Y Axis
0
X Axis
163830
16383
5
6
7
10
9
8
0+
255-
Slider0 Axis
RZ Axis
0+
RZ Axis
255-
Slider0 Axis
Page 59

A
E
A
D
B
C
C
B
F
Page 60

1/6
1. Цифровое пусковое устройство
7. Вращающийся болт опоры с
Руководство пользователя
ТЕХНИЧЕСКИЕ ХАРАКТЕРИСТИКИ
Совместим с ПК
2. Многонаправленный
миниджойстик «Вид обзора»
3. Крепление накладки для правой
руки
4. Руль направления с поворотной
рукояткой и опорой руки
5. Ручка управления скоростью
6. 15 командных кнопок
положениями для правой и левой руки
8. Опора для большого пальца правой
руки
9. Разъем USB для ПК
10. Опора для большого пальца левой
руки
11. Крепление накладки для левой руки
12. Многопозиционный переключатель
кнопок правой и левой руки
ДОПОЛНИТЕЛЬНО О ДЖОЙСТИКЕ
УНИКАЛЬНАЯ ТОЧНАЯ ТЕХНОЛОГИЯ: «H.E.A.R.T™
Джойстик T-16000M разработан на основе уникальной технологии (не имеющей аналогов в мире игровых джойстиков), которая обеспечивает высокий уровень точности, благодаря таким элементам:
- трехмерный (с гальваномагнитным эффектом) магнитный сенсор на рукоятке, с
предельным значением более 268 млн. единиц на осях X и Y (16384 x 16384), в то
время как конкурирующие системы (даже самого высокого класса) предлагают
максимальное значение приблизительно в 1 млн. единиц (1024 x 1024).
- магнит: неограниченная точность и поразительная маневренность возможна
благодаря отсутствию трения.
- спиральная пружина на рукоятке (диаметром 2,8 мм) обеспечивает устойчивость и
равномерно распределяет напряжение.
ФОНОВАЯ ПОДСВЕТКА
Для повышения уровня точности в центральном положении джойстика T-16000M
устранены нечувствительные зоны. Об этом свидетельствует тот факт, что центр
рукоятки подсвечивается зеленым светом даже при незначительном ее движении.
Если рукоятка находится в режиме ожидания на протяжении 3 секунд, фоновая
подсветка выключается.
РУЧКА УПРАВЛЕНИЯ СКОРОСТЬЮ
Джойстик оснащен небольшой ручкой управления скоростью (5), благодаря которой можно легко управлять процессами ускорения в любой игре.
– точная технология гальваномагнитного эффекта»
Page 61

2/6
ФУНКЦИИ РУЛЯ НАПРАВЛЕНИЯ
Джойстик имеет функцию руля направления (4), которая является симулятором
педалей настоящего самолета. Педали используются пилотом для управления рулем
и позволяют изменять положение самолета относительно вертикальной оси,
поворачивая его влево или вправо.
Достаточно повернуть рукоятку джойстика влево или вправо и функция активируется автоматически.
МНОГОНАПРАВЛЕННЫЙ МИНИДЖОЙСТИК «ВИД ОБЗОРА»
Устройство оснащено миниджойстиком «Вид обзора» (2), который позволяет
немедленно отображать все, что происходит вокруг самолета (особенно в играх,
которые поддерживают эту функцию). Для использования данной функции достаточно
зайти в настройки вашего игрового меню и задать различные виды обзоров (вид
сзади, слева, справа, а также внешние обзоры) в соответствии с направлениями
миниджойстика «Вид обзора».
По необходимости миниджойстик «Вид обзора» можно настроить для других функций (например, стрельбы и др.).
Система для правой и левой руки
Джойстик T-16000M оснащен специальной системой для правой и левой руки, которая
позволяет идеально приспособить устройство как для правшей, так и для левшей.
Для этого необходимо выполнить настройку 3 элементов: кнопок на панели, опоры для
руки и опоры для большого пальца.
Настройки кнопок В режимЕ правой руки
Для настройки 12 кнопок, расположенных на панели, в режиме правой руки, выставьте многопозиционный переключатель (12), расположенный под основой джойстика, в режим «ПРАВАЯ РУКА»:
НАСТРОЙКА КНОПОК В РЕЖИМЕ ЛЕВОЙ РУКИ
Для настройки 12 кнопок, расположенных на панели, в режиме левой руки, выставьте многопозиционный переключатель (12), расположенный под основой джойстика, в режим «ЛЕВАЯ РУКА»:
ОТЛАДКА ОПОРЫ ДЛЯ ПРАВОЙ И ЛЕВОЙ РУКИ
Опора руки по умолчанию задана в РЕЖИМЕ ПРАВОЙ РУКИ.
Для отладки опоры в РЕЖИМЕ ЛЕВОЙ РУКИ выполняйте указанные ниже действия.
A) С помощью небольшой отвертки осторожно раскрутите вращающийся болт,
который фиксирует опору руки (7) и расположен с левой стороны от опоры.
B) Поверните опору на 180°.
C) Плотно закрутите болт на опоре руки (теперь расположенной с правой стороны).
Примечание: выполняйте данную процедуру в обратном порядке при настройке режима правой руки.
Page 62

3/6
ОТЛАДКА ОПОРЫ БОЛЬШОГО ПАЛЬЦА ДЛЯ РЕЖИМА ПРАВОЙ И
ЛЕВОЙ РУКИ
Опора для большого пальца по умолчанию задана в РЕЖИМЕ ПРАВОЙ РУКИ.
Для отладки опоры в РЕЖИМЕ ЛЕВОЙ РУКИ выполняйте указанные ниже действия.
A) Снимите крепление накладки для правой руки (3), расположенное с правой стороны
от рукоятки.
B) С помощью небольшой отвертки раскрутите удлиненный болт и полностью
извлеките его из отверстия (болт расположен с правой стороны от рукоятки).
C) Уберите опору для большого пальца правой руки (8), которая расположена с левой
стороны от рукоятки.
D) Расположите опору для большого пальца левой руки (10) (прилагается к комплекту
для джойстика отдельно) с правой стороны от рукоятки.
E) Поместите удлиненный болт в отверстие с левой стороны от рукоятки и плотно
закрутите его, чтобы зафиксировать опору для большого пальца левой руки.
F) Расположите крепление накаладки для левой руки (11) (прилагается к комплекту
для джойстика отдельно) с левой стороны от рукоятки.
Примечание: выполняйте данную процедуру в обратном порядке при настройке режима правой руки.
ПК
УСТАНОВКА НА ПК
1. Подключите разъем USB (9) к одному из USB-портов компьютера.
Операционные системы Windows XP, Vista, 7 или 8 автоматически обнаружат новое устройство.
2. Драйверы устанавливаются автоматически.
Для завершения процесса установки следуйте инструкциям на экране.
3. Выберите Start (Пуск)/Settings (Настройка)/Control Panel (Панель управления) и
двойным нажатием кнопки мыши откройте вкладку Game Controllers (Игровые
устройства).
Диалоговое окно Game Controllers (Игровые устройства) выводит название джойстика и его статус (OK).
4. Сontrol Panel (Панели управления) выберите вкладку Properties (Свойства) для
испытания и просмотра функций джойстика.
Теперь можно начинать игру!
ВАЖНОЕ ПРИМЕЧАНИЕ
При подключении джойстика всегда располагайте рукоятку и руль в центральном положении во избежание непредусмотренного смещения или проблем с калибровкой.
Page 63

4/6
УСТРАНЕНИЕ НЕИСПРАВНОСТЕЙ И ПРЕДУПРЕЖДЕНИЕ
• Джойстик работает неправильно или не калибровка не выполнена должным
образом:
- выключите компьютер и отсоедините джойстик, затем снова включите компьютер,
подключите джойстик и запустите игру.
- при подключении джойстика всегда располагайте рукоятку и руль в центральном
положении во избежание непредусмотренного движения или проблем с калибровкой.
• Не удается настроить джойстик:
- в меню игры Options (Параметры)/Controller (Контроллер)/ Gamepad (Игровой
контроллер) или Joystick (джойстик) выберите соответствующие настройки или
задайте совершенно новые настройки функции контроллера.
- дополнительные сведения см. в руководстве пользователя игры или в Интернете.
• Джойстик слишком или недостаточно чувствительный:
- калибровка джойстика осуществляется автоматически даже при незначительном
движении вокруг осей.
- в меню игры Options (Параметры)/Controller (Контроллер)/ Gamepad (Игровой
контроллер) или Joystick (джойстик) настройте режим чувствительности или
нечувствительности для контроллера (при наличии данных функций).
• Центральная подсветка джойстика не включается автоматически:
- слегка подвигайте рукояткой для отладки абсолютного центрального значения;
подсветка автоматически выключится по истечению 3 секунд ожидания.
Page 64

5/6
Сведения о потребительской гарантии
Корпорация Guillemot Corporation S.A. (далее — «Guillemot») гарантирует своим клиентам во всем мире,
что в данном изделии Thrustmaster не будет выявлено никаких дефектов материалов и производства в
течение гарантийного периода, который равен сроку предъявления претензии по соответствию для
данного изделия. В странах Европейского Союза этот срок соответствует двум (2) годам с момента
поставки изделия Thrustmaster. В других странах гарантийный период равен сроку предъявления
претензии по соответствию для изделия Thrustmaster, определяемому соответствующим
законодательством страны, в которой проживал потребитель на момент приобретения изделия
Thrustmaster (если подобные претензии не действуют в соответствующей стране, гарантийный период
равняется одному (1) году с первоначальной даты приобретения изделия Thrustmaster).
Невзирая на вышеизложенное, гарантия на аккумуляторы равняется шести (6) месяцам с
первоначальной даты приобретения.
В случае обнаружения дефектов изделия во время гарантийного периода незамедлительно
обратитесь в службу технической поддержки, сотрудники которой определят дальнейшую
процедуру. Если дефект будет подтвержден, изделие следует вернуть по месту приобретения (или
в любое другое место, указанное службой технической поддержки).
В рамках действия гарантии дефектное изделие будет, по усмотрению службы технической
поддержки, отремонтировано или заменено. В мере, разрешенной применимым законодательством,
полная ответственность компании Guillemot и ее дочерних компаний (в том числе косвенный ущерб)
ограничивается ремонтом или заменой изделия Thrustmaster. В мере, разрешенной применимым
законодательством, компания Guillemot отказывается от любых гарантий коммерческой пригодности
или пригодности для определенной цели. Настоящая гарантия не ущемляет прав потребителя,
предоставляемых ему применимыми законами в отношении продажи потребительских товаров.
Настоящая гарантия не распространяется: (1) на ситуации, когда изделие было видоизменено, открыто,
модифицировано или получило повреждения в результате недопустимого или неправильного
использования, небрежности или несчастного случая, естественного износа или любой другой причины,
не связанной с дефектом материалов или производства (включая, помимо прочего, использование
изделия Thrustmaster совместно с любыми неподходящими элементами, в частности — с блоками
питания, аккумуляторами, зарядными устройствами и любыми другими элементами, не входящими в
комплектацию Guillemot для данного изделия); (2) на ситуации, когда указания службы технической
поддержки не были выполнены; (3) на ПО, так как на такое ПО распространяется отдельная гарантия; (4)
на расходные материалы (элементы, предназначенные для замены в течение срока службы изделия:
например, батарейки и ушные подушки для гарнитур или наушников); (5) на аксессуары (например,
кабели, чехлы, сумки, футляры, наручные ремешки); (6) на случаи продажи изделия с открытого аукциона.
Данная гарантия не подлежит передаче.
Ответственность
В мере, разрешенной применимым законодательством, компания Guillemot Corporation S.A. (далее
— «Guillemot») и ее дочерние предприятия отказываются от любой ответственности за любой
ущерб, вызванный одним или несколькими из следующих факторов: (1) видоизменение, вскрытие
или модификация изделия; (2) несоблюдение инструкций по сборке; (3) недопустимое или
неправильное использование, небрежность, несчастный случай (например, физическое
воздействие); (4) естественный износ. В мере, разрешенной применимым законодательством,
компания Guillemot и ее дочерние предприятия отказываются от любой ответственности за любой
ущерб, не связанный с дефектами материалов или изготовления, в отношении данного изделия
(включая, помимо прочего, любой ущерб, вызванный прямо или опосредованно любым
программным обеспечением или использованием изделия Thrustmaster с любыми неподходящими
элементами, в частности — блоками питания, аккумуляторами, зарядными устройствами и
любыми другими элементами, не входящими в комплектацию Guillemot для данного изделия).
Page 65

6/6
АВТОРСКОЕ ПРАВО
© 2015 Guillemot Corporation S.A. Все права защищены. Thrustmaster® является
зарегистрированной торговой маркой Guillemot Corporation. Windows® является
зарегистрированной торговой маркой Microsoft Corporation в Соединенных Штатах Америки и/или
других странах. Все прочие торговые марки являются собственностью соответствующих
владельцев. Иллюстрации могут не соответствовать внешнему виду/функциям конкретного
изделия. Содержание руководства, конструкция и технические характеристики изделия
изменяются без предварительного уведомления и зависят от страны приобретения.
РЕКОМЕНДАЦИИ ПО ЗАЩИТЕ ОКРУЖАЮЩЕЙ СРЕДЫ
Обратитесь в местные органы власти за информацией о ближайшем пункте приема таких отходов.
При пользовании изделием учитывайте следующее. Цвета и украшения могут различаться.
Настоящий продукт соответствует всем стандартам в отношении детей в возрасте 14 лет и
старше. Использование данного продукта детьми младше 14 лет недопустимо.
www.thrustmaster.com
После окончания срока службы данное изделие не следует утилизировать
вместе с бытовым мусором, но в пункте сбора отходов электрического и
электронного оборудования.
Данное указание подтверждается соответствующим символом, нанесенным на
изделие, руководство пользователя или упаковку.
В зависимости от свойств, материалы могут передаваться в повторную переработку.
Повторная переработка отходов электрического и электронного оборудования может
внести значительный вклад в сохранение окружающей среды.
ТЕХНИЧЕСКОЙ ПОДДЕРЖКИ
http://ts.thrustmaster.com
Page 66

2
1
9
LEFT
HANDED
5
10
8
6
12
LEFT
HANDED
3
6
7
9
255 0
8
7
RIGHT
HANDED
3
4
10
11
5
RIGHT
HANDED
1
4
2
Y Axis
0
X Axis
163830
16383
11
12
13
16
15
14
11
12
16
15
LEFT
HANDED
3
13
255 0
14
RIGHT
HANDED
1
4
2
Y Axis
0
X Axis
163830
16383
5
6
7
10
9
8
0+
255-
Slider0 Axis
RZ Axis
0+
RZ Axis
255-
Slider0 Axis
Page 67

A
E
A
D
B
C
C
B
F
Page 68

1/6
1.
Ψηφιακή σκανδάλη
7.
Βίδα περιστροφής του στηρίγματος
Συμβατό με: PC
Εγχειρίδιο χρήσης
ΤΕΧΝΙΚΑ ΧΑΡΑΚΤΗΡΙΣΤΙΚΑ
2. Διακόπτης τύπου hat «Point of View»
πολλών κατευθύνσεων
3. Κάλυμμα βίδας για διαμόρφωση για
δεξιόχειρες
4. Χειρισμός πηδαλίου μέσω
περιστρεφόμενης λαβής με στήριγμα
χειρός
5. Γκάζι
6. 15 κουμπιά δράσης
ΣΥΝΤΟΜΗ ΠΑΡΟΥΣΙΑΣΗ ΤΟΥ JOYSTICK
ΑΠΟΚΛΕΙΣΤΙΚΗ ΤΕΧΝΟΛΟΓΙΑ ΑΚΡΙΒΕΙΑΣ:
«H.E.A.R.T™: HallEffect AccuRate Technology»
Το joystick T-16000M διαθέτει τεχνολογία που του παρέχει μοναδική ακρίβεια που δεν υπάρχει όμοιά της σε κανένα joystick στον κόσμο των παιχνιδιών, και περιλαμβάνει:
- Έναν τρισδιάστατο (Hall Effect) μαγνητικό αισθητήρα στη λαβή, με ανάλυση μεγαλύτερη
από 268 εκατομμύρια τιμές στους άξονες X και Y (τιμές 16384 x 16384), ενώ τα τρέχοντα
συστήματα των ανταγωνιστών (ακόμη και σε συστήματα κορυφαίας τεχνολογίας) παρέχουν
αναλύσεις παρόμοιας θέσης μόνο με ένα εκατομμύριο τιμές (τιμές 1024 x 1024).
- Έναν μαγνήτη: χωρίς τριβή, για απεριόριστη ακρίβεια και ανεπανάληπτη ανταπόκριση.
- Ένα ελατήριο με σπείρες στη λαβή (2,8 mm): για σταθερή, γραμμική και εκπληκτικά
ρευστή αντίσταση.
ΟΠΙΣΘΙΟΣ ΦΩΤΙΣΜΟΣ
Για ακόμη μεγαλύτερη ακρίβεια, δεν υπάρχει νεκρή ζώνη στην κεντρική θέση του joystick T16000M. Για αυτόν τον συμβολισμό, το κέντρο φωτίζεται με οπίσθιο φωτισμό πράσινου
χρώματος αμέσως μόλις μετακινήσετε το joystick (έστω και πολύ ελαφριά), ο οπίσθιος
φωτισμός σβήνει μετά από 3 δευτερόλεπτα αδράνειας, αφού επαναφέρετε το joystick στη
θέση νεκράς στο κέντρο.
ΓΚΑΖΙ
Το joystick διαθέτει γκάζι (5), που μπορείτε να το χρησιμοποιήσετε για να χειριστείτε εύκολα την ταχύτητά σας στα παιχνίδια.
χειρός με θέσεις για διαμόρφωση για
δεξιόχειρες ή αριστερόχειρες
8. Στήριγμα αντίχειρα για διαμόρφωση για
δεξιόχειρες
9. Υποδοχή USB για PC
10. Στήριγμα αντίχειρα για διαμόρφωση για
αριστερόχειρες
11. Κάλυμμα βίδας για διαμόρφωση για
αριστερόχειρες
12. Διακόπτης επιλογής με διαμόρφωση
κουμπιών για δεξιόχειρες ή
αριστερόχειρες
Page 69

2/6
ΛΕΙΤΟΥΡΓΙΑ ΠΗΔΑΛΙΟΥ
Το joystick διαθέτει λειτουργία πηδαλίου (4), που σε αεροπλάνο αντιστοιχεί με τα πεντάλ που
χρησιμοποιεί ο πιλότος για να κινήσει το πηδάλιο, και έτσι επιτρέπει στο αεροπλάνο να
περιστραφεί γύρω από τον κάθετο άξονά του (κάνοντας το να στρίψει προς αριστερά ή δεξιά).
Αυτή η λειτουργία πηδαλίου είναι διαθέσιμη στο joystick περιστρέφοντας τη λαβή προς αριστερά ή δεξιά.
ΔΙΑΚΟΠΤΗΣ ΤΥΠΟΥ HAT «POINT OF VIEW» ΠΟΛΛΩΝ ΚΑΤΕΥΘΥΝΣΕΩΝ
Το joystick διαθέτει διακόπτη τύπου hat «Point of View» (2) που, όπως λέει και το όνομά του,
σας επιτρέπει να βλέπετε άμεσα όλα όσα συμβαίνουν γύρω από το αεροσκάφος σας (σε
παιχνίδια όπου αυτή η δυνατότητα είναι ενεργοποιημένη). Για να χρησιμοποιήσετε αυτήν τη
δυνατότητα, απλώς μεταβείτε στο μενού ρυθμίσεων του παιχνιδιού και προγραμματίστε τις
διαφορετικές προβολές (πίσω προβολή, προβολή προς αριστερά, προβολή προς δεξιά και
επίσης εξωτερικές προβολές) στις κατευθύνσεις του διακόπτη τύπου hat «Point of View».
Αν το θέλετε, αντ' αυτού, μπορείτε επίσης να φυλάξετε τον διακόπτη τύπου hat «Point of View» για άλλες χρήσεις (πυροβολισμός, κ.λπ.).
ΑΜΦΙΔΕΞΙΟ ΣΥΣΤΗΜΑ
Το joystick T-16000M έχει το πλεονέκτημα ότι διαθέτει αμφιδέξιο σύστημα, και επομένως, μπορεί να
χρησιμοποιηθεί απόλυτα από όλους τους παίκτες, είτε είναι δεξιόχειρες είτε είναι αριστερόχειρες.
Για να το κάνετε αυτό, πρέπει να ρυθμίσετε 3 στοιχεία: τη διαμόρφωση των κουμπιών στη
βάση, το στήριγμα χειρός και το στήριγμα αντίχειρα.
ΔΙΑΜΟΡΦΩΣΗ ΤΩΝ ΚΟΥΜΠΙΩΝ ΓΙΑ ΛΕΙΤΟΥΡΓΙΑ ΑΠΟ ΔΕΞΙΟΧΕΙΡΕΣ
Για να ρυθμίσετε τις θέσεις των 12 κουμπιών που βρίσκονται στη βάση για λειτουργία από
δεξιόχειρες, ρυθμίστε τον διακόπτη επιλογής (12) που βρίσκεται κάτω από τη βάση του
joystick σε «ΔΕΞΙΟΧΕΙΡΕΣ»:
ΔΙΑΜΟΡΦΩΣΗ ΤΩΝ ΚΟΥΜΠΙΩΝ ΓΙΑ ΛΕΙΤΟΥΡΓΙΑ ΑΠΟ
ΑΡΙΣΤΕΡΟΧΕΙΡΕΣ
Για να ρυθμίσετε τις θέσεις των 12 κουμπιών που βρίσκονται στη βάση για λειτουργία από
αριστερόχειρες, ρυθμίστε τον διακόπτη επιλογής (12) που βρίσκεται κάτω από τη βάση
του joystick σε «ΑΡΙΣΤΕΡΟΧΕΙΡΕΣ»:
ΡΥΘΜΙΣΗ ΤΟΥ ΣΤΗΡΙΓΜΑΤΟΣ ΧΕΙΡΟΣ ΓΙΑ ΛΕΙΤΟΥΡΓΙΑ ΑΠΟ
ΔΕΞΙΟΧΕΙΡΕΣ Ή ΑΡΙΣΤΕΡΟΧΕΙΡΕΣ
Από προεπιλογή, το στήριγμα χειρός είναι διαμορφωμένο για ΛΕΙΤΟΥΡΓΙΑ ΑΠΟ ΔΕΞΙΟΧΕΙΡΕΣ.
Για να το ρυθμίσετε σε ΛΕΙΤΟΥΡΓΙΑ ΑΠΟ ΑΡΙΣΤΕΡΟΧΕΙΡΕΣ:
Α) Με ένα μικρό κατσαβίδι, χαλαρώστε προσεκτικά (χωρίς να την αφαιρέσετε) τη μικρή βίδα
περιστροφής του στηρίγματος χειρός (7), που βρίσκεται στα αριστερά του στηρίγματος χειρός.
Β) Γυρίστε το στήριγμα χειρός 180°.
C) Σφίξτε ξανά εντελώς τη βίδα επάνω στο στήριγμα χειρός (τώρα βρίσκεται στη δεξιά μεριά
του στηρίγματος).
Σημείωση: Διεξαγάγετε αυτήν τη διαδικασία αντίστροφα για να επαναφέρετε τη διαμόρφωση για αριστερόχειρες.
Page 70

3/6
ΡΥΘΜΙΣΗ ΤΟΥ ΣΤΗΡΙΓΜΑΤΟΣ ΑΝΤΙΧΕΙΡΑ ΓΙΑ ΛΕΙΤΟΥΡΓΙΑ ΑΠΟ
ΔΕΞΙΟΧΕΙΡΕΣ Ή ΑΡΙΣΤΕΡΟΧΕΙΡΕΣ
Από προεπιλογή, το στήριγμα αντίχειρα είναι διαμορφωμένο για ΛΕΙΤΟΥΡΓΙΑ ΑΠΟ
ΔΕΞΙΟΧΕΙΡΕΣ.
Για να το ρυθμίσετε σε ΛΕΙΤΟΥΡΓΙΑ ΑΠΟ ΑΡΙΣΤΕΡΟΧΕΙΡΕΣ:
A) Αφαιρέστε το κάλυμμα της βίδας στη διαμόρφωση για δεξιόχειρες (3) που βρίσκεται στη
δεξιά μεριά της λαβής.
B) Με ένα μικρό κατσαβίδι, ξεβιδώστε και αφαιρέστε εντελώς τη μακριά βίδα που τώρα
είναι προσβάσιμη (στη δεξιά μεριά της λαβής).
C) Αφαιρέστε το στήριγμα αντίχειρα στη διαμόρφωση για δεξιόχειρες (8) που βρίσκεται
στην αριστερή μεριά της λαβής.
D) Τοποθετήστε το στήριγμα αντίχειρα για λειτουργία από αριστερόχειρες (10) (περιλαμβάνεται ξεχωριστά στη συσκευασία του joystick) στη δεξιά μεριά της λαβής.
E) Τοποθετήστε τη μακριά βίδα στο άνοιγμα στην αριστερή μεριά της λαβής και σφίξτε εντελώς τη βίδα για να στερεώσετε με ασφάλεια το στήριγμα αντίχειρα για λειτουργία από αριστερόχειρες στη σωστή θέση.
F) Τοποθετήστε το κάλυμμα της βίδας για λειτουργία από αριστερόχειρες (11) (περιλαμβάνεται ξεχωριστά στη συσκευασία του joystick) στην αριστερή μεριά της λαβής.
Σημείωση: Διεξαγάγετε αυτήν τη διαδικασία αντίστροφα για να επαναφέρετε τη διαμόρφωση για δεξιόχειρες.
PC
ΕΓΚΑΤΑΣΤΑΣΗ ΣΕ PC
1. Συνδέστε την υποδοχή USB του PC (9) σε μία από τις θύρες USB του υπολογιστή σας.
Τα Windows XP, Vista, 7 ή 8 θα εντοπίσουν αυτόματα τη νέα συσκευή.
2. Η εγκατάσταση των οδηγών γίνεται αυτόματα.
Ακολουθήστε τις οδηγίες εγκατάστασης που εμφανίζονται στην οθόνη για να ολοκληρώσετε την εγκατάσταση.
3. Κάντε κλικ στις επιλογές Έναρξη/Ρυθμίσεις/Πίνακας ελέγχου και κάντε διπλό κλικ
στην επιλογή Ελεγκτές παιχνιδιού.
Το πλαίσιο διαλόγου Ελεγκτές παιχνιδιού εμφανίζει το όνομα του joystick με την κατάσταση OK.
4. Στον Πίνακα ελέγχου, κάντε κλικ στις Ιδιότητες για να δοκιμάσετε και να προβάλετε
όλες τις λειτουργίες του joystick.
Τώρα είστε έτοιμοι για παιχνίδι!
ΣΗΜΑΝΤΙΚΗ ΣΗΜΕΙΩΣΗ
Κατά τη σύνδεση του joystick: να ρυθμίζετε πάντα τη λαβή και το πηδάλιο στις κεντρικές τους θέσεις και να αποφεύγετε να τα μετακινείτε (για να αποτρέψετε τυχόν προβλήματα βαθμονόμησης).
Page 71

4/6
ΑΝΤΙΜΕΤΩΠΙΣΗ ΠΡΟΒΛΗΜΑΤΩΝ ΚΑΙ ΠΡΟΕΙΔΟΠΟΙΗΣΕΙΣ
• Το joystick δεν λειτουργεί σωστά ή φαίνεται να έχει βαθμονομηθεί λανθασμένα:
- Απενεργοποιήστε τον υπολογιστή σας και αποσυνδέστε το joystick. Έπειτα,
ενεργοποιήστε ξανά τον υπολογιστή σας, επανασυνδέστε το joystick και αρχίστε ξανά το
παιχνίδι.
- Κατά τη σύνδεση του joystick: να ρυθμίζετε πάντα τη λαβή και το πηδάλιο στις κεντρικές
τους θέσεις και να αποφεύγετε να τα μετακινείτε (για να αποτρέψετε τυχόν προβλήματα
βαθμονόμησης).
• Δεν μπορώ να διαμορφώσω το joystick:
- Στο μενού του παιχνιδιού «Επιλογές/Ελεγκτής/Χειριστήριο για παιχνίδια ή Joystick»:
επιλέξτε την κατάλληλη διαμόρφωση ή διαμορφώστε ξανά από την αρχή τις επιλογές του
ελεγκτή.
- Για περισσότερες πληροφορίες, ανατρέξτε στο εγχειρίδιο χρήσης του παιχνιδιού ή στην
online βοήθεια.
• Το joystick είναι εξαιρετικά ευαίσθητο ή δεν είναι αρκετά ευαίσθητο:
- Το joystick πραγματοποιεί αυτόματη βαθμονόμηση από μόνο του αφού έχετε κάνει μερικές
κινήσεις κατά μήκος διαφόρων αξόνων.
- Στο μενού του παιχνιδιού «Επιλογές/Ελεγκτής/Χειριστήριο για παιχνίδια ή Joystick»:
ρυθμίστε την ευαισθησία και τις νεκρές ζώνες του joystick (αν αυτές οι επιλογές είναι
διαθέσιμες).
• Ο κεντρικός οπίσθιος φωτισμός του joystick δεν απενεργοποιείται αυτόματα:
- Μετακινήστε τη λαβή πολύ ελαφριά ώστε να ρυθμιστεί στην απόλυτη κεντρική τιμή. Τότε ο
οπίσθιος φωτισμός θα απενεργοποιείται μετά από 3 δευτερόλεπτα αδράνειας
.
Page 72

5/6
Πληροφορίες εγγύησης καταναλωτή
Παγκοσμίως, η Guillemot Corporation S.A. (εφεξής “Guillemot”) εγγυάται στον καταναλωτή ότι το
προϊόν της Thrustmaster δεν παρουσιάζει ελάττωμα στο υλικό ούτε κατασκευαστικές ατέλειες για
το χρονικό διάστημα της εγγύησης, το οποίο αντιστοιχεί στο χρονικό όριο για άσκηση αγωγής για
συμμόρφωση αναφορικά με αυτό το προϊόν. Στις χώρες της Ε.Ε., αυτό αντιστοιχεί σε διάστημα
δύο (2) ετών από την παράδοση του προϊόντος της Thrustmaster. Σε άλλες χώρες, η περίοδος
εγγύησης αντιστοιχεί στο χρονικό όριο για άσκηση αγωγής για συμμόρφωση αναφορικά το
προϊόν της Thrustmaster σύμφωνα με την ισχύουσα νομοθεσία της χώρας στην οποία ο
καταναλωτής διέμενε κατά την ημερομηνία αγοράς του προϊόντος της Thrustmaster (σε
περίπτωση που δεν υπάρχει τέτοια ενέργεια στην αντίστοιχη χώρα, τότε η εγγύηση θα ισχύει για
ένα (1) έτος από την αρχική ημερομηνία αγοράς του προϊόντος της Thrustmaster).
Κατά παρέκκλιση των παραπάνω, οι επαναφορτιζόμενες μπαταρίες καλύπτονται από περίοδο
εγγύησης έξι (6) μηνών από ημερομηνία της αρχικής αγοράς.
Σε περίπτωση που το προϊόν σας φαίνεται να είναι ελαττωματικό κατά την περίοδο της εγγύησης,
επικοινωνήστε αμέσως με την Τεχνική υποστήριξη, η οποία θα υποδείξει την διαδικασία που θα
ακολουθήσετε. Αν το ελάττωμα επιβεβαιωθεί, το προϊόν πρέπει να επιστραφεί στο σημείο αγοράς
του (ή σε οποιοδήποτε άλλο σημείο υποδεικνύει η Τεχνική υποστήριξη).
Στα πλαίσια της εγγύησης, το ελαττωματικό προϊόν του καταναλωτή, με επιλογή της Τεχνικής
υποστήριξης, είτε θα επισκευαστεί είτε θα αντικατασταθεί. Αν επιτρέπεται από την ισχύουσα
νομοθεσία, η πλήρης ευθύνη της Guillemot και των θυγατρικών της (περιλαμβάνονται οι
επακόλουθες ζημιές) περιορίζεται στην επισκευή ή αντικατάσταση του προϊόντος της
Thrustmaster. Αν επιτρέπεται από την ισχύουσα νομοθεσία, η Guillemot αποποιείται κάθε
εγγύηση εμπορευσιμότητας ή καταλληλότητας για τον συγκεκριμένο σκοπό. Τα νομικά
δικαιώματα του καταναλωτή σε σχέση με την ισχύουσα νομοθεσία όσον αφορά την πώληση των
καταναλωτικών ειδών δεν επηρεάζονται από την παρούσα εγγύηση.
Η παρούσα εγγύηση δεν ισχύει: (1) αν το προϊόν έχει τροποποιηθεί, ανοιχτεί, μεταποιηθεί ή
υποστεί βλάβη ως αποτέλεσμα ακατάλληλης ή κακής χρήσης, αμέλειας, ατυχήματος,
φυσιολογικής φθοράς ή οποιασδήποτε άλλης αιτίας που δεν σχετίζεται με ελάττωμα στο υλικό ή
κατασκευαστικό ελάττωμα (συμπεριλαμβανομένων, ενδεικτικά, συνδυάζοντας το προϊόν της
Thrustmaster με οποιοδήποτε ακατάλληλο στοιχείο, συμπεριλαμβανομένων συγκεκριμένων
παροχών ρεύματος, επαναφορτιζόμενων μπαταριών, φορτιστών ή άλλων στοιχείων που δεν
παρέχονται από τη Guillemot για αυτό το προϊόν), (2) σε περίπτωση μη συμμόρφωσης με τις
οδηγίες που παρέχονται από την Τεχνική υποστήριξη, (3) για λογισμικό, το εν λόγω λογισμικό
υπόκειται σε συγκεκριμένη εγγύηση, (4) για αναλώσιμα (στοιχεία που πρόκειται να
αντικατασταθούν από τη διάρκεια ζωής του προϊόντος: για παράδειγμα, μπαταρίες μίας χρήσης,
καλύμματα αυτιών για σετ ακουστικών ή ακουστικά), (5) για αξεσουάρ (για παράδειγμα, καλώδια,
περιβλήματα, θήκες, τσάντες, λουράκια καρπού), (6) αν το προϊόν πωληθεί σε δημοπρασία.
Η παρούσα εγγύηση δεν μεταβιβάζεται.
Ευθύνη
Αν επιτρέπεται από την ισχύουσα νομοθεσία, η Guillemot Corporation S.A. (εφεξής “Guillemot”)
και οι θυγατρικές της αποποιούνται κάθε ευθύνης για οποιαδήποτε ζημιά προκαλείται από ένα ή
περισσότερα από τα ακόλουθα: (1) το προϊόν έχει τροποποιηθεί, ανοιχτεί ή μεταποιηθεί, (2)
αποτυχία ως προς τη συμμόρφωση με τις οδηγίες συναρμολόγησης, (3) ακατάλληλη ή κακή
χρήση, αμέλεια, ατύχημα (για παράδειγμα, πρόσκρουση), (4) φυσιολογική φθορά. Αν επιτρέπεται
από την ισχύουσα νομοθεσία, η Guillemot και οι θυγατρικές της αποποιούνται κάθε ευθύνης για
οποιαδήποτε ζημιά δεν σχετίζεται με λάθος στο υλικό ή την κατασκευή αναφορά με το προϊόν
(συμπεριλαμβάνεται, ενδεικτικά, οποιαδήποτε ζημιά προκαλείται άμεσα ή έμμεσα από
οποιοδήποτε λογισμικό ή από συνδυασμό του προϊόντος της Thrustmaster με κάθε ακατάλληλο
στοιχείο, συμπεριλαμβανομένων συγκεκριμένων παροχών ρεύματος, επαναφορτιζόμενων
μπαταριών, φορτιστών ή άλλων στοιχείων που δεν παρέχονται από την Guillemot για αυτό το
προϊόν).
Page 73

6/6
ΤΕΧΝΙΚΉΣ ΥΠΟΣΤΉΡΙΞΗΣ
ΠΝΕΥΜΑΤΙΚΑ ΔΙΚΑΙΩΜΑΤΑ
© 2015 Guillemot Corporation S.A. Με την επιφύλαξη παντός δικαιώματος. Η ονομασία Thrustmaster®
είναι εμπορικό σήμα της Guillemot Corporation S.A. Η ονομασία Windows® είναι εμπορικό σήμα
κατατεθέν της Microsoft Corporation στις Ηνωμένες Πολιτείες Αμερικής και/ή σε άλλες χώρες. Όλα τα
υπόλοιπα εμπορικά σήματα αποτελούν ιδιοκτησία των αντίστοιχων κατόχων τους. Οι εικόνες δεν είναι
δεσμευτικές. Τα περιεχόμενα, οι σχεδιασμοί και οι προσδιορισμοί προδιαγραφών υπόκεινται σε αλλαγή
χωρίς ειδοποίηση και ενδέχεται να ποικίλουν από χώρα σε χώρα. Κατασκευάζεται στην Κίνα.
ΣΥΣΤΑΣΗ ΠΡΟΣΤΑΣΙΑΣ ΠΕΡΙΒΑΛΛΟΝΤΟΣ
Επικοινωνήστε με τις τοπικές αρχές για το πλησιέστερο σε εσάς σημείο συλλογής.
Κρατήστε αυτές τις πληροφορίες. Τα χρώματα και τα διακοσμητικά ενδέχεται να ποικίλουν.
Αυτό το προϊόν συμμορφώνεται με όλα τα πρότυπα όσον αφορά τα παιδιά ηλικίας 14 ετών και πάνω.
Αυτό το προϊόν δεν είναι κατάλληλο για παιδιά ηλικίας κάτω των 14 ετών.
www.thrustmaster.com
Στο τέλος της ωφέλιμης διάρκειας ζωής, το παρόν προϊόν δεν πρέπει να
απορρίπτεται με τα τυπικά οικιακά απορρίμματα, αλλά να απορρίπτεται σε σημείο
συλλογής απόρριψης ηλεκτρικού και ηλεκτρονικού εξοπλισμού για ανακύκλωση.
Το παρόν επιβεβαιώνεται με το σύμβολο που υπάρχει στο προϊόν, στο εγχειρίδιο
χρήσης ή στη συσκευασία.
Ανάλογα με τα χαρακτηριστικά τους, τα υλικά μπορούν να ανακυκλωθούν. Μέσω της
ανακύκλωσης και άλλων μορφών επεξεργασίας απόρριψης ηλεκτρικού και ηλεκτρονικού
εξοπλισμού, μπορείτε να συμβάλετε σημαντικά στην προστασία του περιβάλλοντος.
http://ts.thrustmaster.com
Page 74

2
1
9
LEFT
HANDED
5
10
8
6
12
LEFT
HANDED
3
6
7
9
255 0
8
7
RIGHT
HANDED
3
4
10
11
5
RIGHT
HANDED
1
4
2
Y Axis
0
X Axis
163830
16383
11
12
13
16
15
14
11
12
16
15
LEFT
HANDED
3
13
255 0
14
RIGHT
HANDED
1
4
2
Y Axis
0
X Axis
163830
16383
5
6
7
10
9
8
0+
255-
Slider0 Axis
RZ Axis
0+
RZ Axis
255-
Slider0 Axis
Page 75

A
E
A
D
B
C
C
B
F
Page 76

1/6
1. Dijital tetik
7. Sağ veya sol elini kullanan pozisyonlu el
TEKNİK ÖZELLİKLER
Uyumlu olduğu platform: PC
Kullanma Kılavuzu
2. Çok yönlü “Görüş Açısı” başlık
düğmesi
3. Sağ elini kullanan vida kapağı
4. El dayama yeri olan döndürme kollu
dümen kontrolü
5. Gaz kolu
6. 15 eylem tuşu
dayama yeri dönüş vidası
8. Sağ elini kullanan başparmak dayama
yeri
9. PC USB konektörü
10. Sol elini kullanan başparmak dayama yeri
11. Sol elini kullanan vida kapağı
12. Sağ veya sol elini kullanan düğme
seçme anahtarı
JOYSTICK’İ TANIYALIM
ÖZEL HASSASİYET TEKNOLOJİSİ:
"H.E.A.R.T™: HallEffect AccuRate Technology"
T-16000M joystick’iniz şu özellikler de dahil olmak üzere, halihazırda oyun joystick’leri dünyasında eşsiz hassasiyet seviyesi sağlayan bir teknolojiye sahiptir:
- Kol üzerinde 3D (Hall Effect) manyetik sensörü, X ve Y eksenlerinde 268 milyonu aşkın
değere sahip çözünürlük (16384 x 16384 değer), mevcut rakip sistemler (son teknolojili
sistemler bile) sadece bir milyon değer (1024 x 1024 değer) civarında çözünürlük sağlarlar.
- Mıknatıs: Sınırsız hassasiyet ve olağanüstü tepkisellik için sürtünmesiz.
- Kol üzerinde yay (2,8mm): Sıkı, doğrusal ve ultra akıcı gerilim için.
ARKA IŞIK
Daha da fazla hassasiyet için T-16000M’in kolunun merkez pozisyonunda ölü bölge mevcut
değildir. Bunu sembolize etmek için kolu hareket ettirdiğinizde (çok hafif olsa bile) merkez
yeşil renkle arkadan aydınlatılır; arka ışık, kolu yeniden ölü merkeze getirdiğinizde 3 saniye
hareketsizlik sonunda kapanır.
GAZ KOLU
Joystick’iniz oyunlarda hızı kolayca kontrol etmeniz için bir gaz kolu (5) içerir.
Page 77

2/6
DÜMEN FONKSİYONU
Joystick’iniz uçakta uçağın dikey ekseni etrafında dönmesini sağlayan (uçağı sağa veya sağa döndüren) dümeni hareket ettirmek için pilot tarafından kullanılan pedallara karşılık gelen bir dümen fonksiyonu (4) içerir.
Bu dümen fonksiyonu joystick’inizde kolu sağa veya sola döndürerek kullanılabilir.
ÇOK YÖNLÜ “GÖRÜŞ AÇISI” BAŞLIK DÜĞMESİ
Joystick’iniz adından da anlaşılacağı üzere (bu özelliğinin etkin olduğu oyunlarda) uçağınızın
çevresinde olan herşeyi anında görmenizi sağlayan bir "Görüş Açısı" başlık düğmesi (2)
içerir. Bu özelliği kullanmak için oyunun kurulum menüsüne giderek farklı görünümleri
(arkadan görünüm, soldan görünüm, sağdan görünüm ve dıştan görünümler) “Görüş Açısı”
başlık düğmesinin yönlerine programlayın.
İsterseniz “Bakış Açısı” başlık düğmesini başka amaçlarla (ateşleme, vb.) kullanmak için ayırabilirsiniz.
İKİ YÖNLÜ SİSTEM
T-16000M joystick’iniz sağ veya sol elini kullanan tüm kullanıcılara mükemmel uyum
sağlamak için komple iki yönlü kullanılma avantajına sahiptir.
Bunun için 3 eleman ayarlanabilir: Tabandaki düğmelerin konfigürasyonu, el dayama yeri ve
baş parmak dayama yeri.
SAĞ ELE UYGUN MODDA DÜĞME KONFİGÜRASYONU
Tabanda bulunan 12 düğmenin pozisyonlarını sağ ele uygun moda ayarlamak için joystick tabanının altında bulunan seçme düğmesini (12) "RIGHT HANDED" konumuna alın:
SOL ELE UYGUN MODDA DÜĞME KONFİGÜRASYONU
Tabanda bulunan 12 düğmenin pozisyonlarını sol ele uygun moda ayarlamak için joystick tabanının altında bulunan seçme düğmesini (12) "LEFT HANDED" konumuna alın:
EL DAYAMA YERİNİN SAĞ VEYA SOL ELE UYGUN MODA
AYARLANMASI
Varsayılan olarak el dayama yeri SAĞ ELE UYGUN MODA ayarlanmıştır.
SOL ELE UYGUN MODA ayarlamak için:
A) Küçük bir tornavida kullanarak el dayama yerinin solunda bulunan küçük el dayama yeri
döndürme vidasını (7), dikkatlice gevşetin (sökmeyin).
B) El dayama yerini 180° döndürün.
C) El dayama yeri üzerindeki (şimdi sağ tarafta yer alan) vidayı tekrar iyice sıkın.
Not: Sağ ele uygun moda dönmek için bu prosedürü tersten uygulayın.
Page 78

3/6
BAŞ PARMAK DAYAMA YERİNİN SAĞ VEYA SOL ELE UYGUN
MODA AYARLANMASI
Varsayılan olarak kolun baş parmak dayama yeri SAĞ ELE UYGUN MODA ayarlanmıştır.
SOL ELE UYGUN MODA ayarlamak için:
A) Kolun sağ tarafında bulunan sağ ele uygun vida kapağını (3) çıkarın.
B) Küçük bir tornavida kullanarak artık ulaşılabilir durumda olan (kolun sağ tarafındaki) uzun
vidayı sökerek tamamen çıkarın.
C) Kolun sol tarafında bulunan sağ ele uygun baş parmak dayama yerini (8) çıkarın.
D) Joystick kutusunda ayrıca yer alan sol ele uygun baş parmak dayama yerini (10) kolun
sağ tarafına yerleştirin.
E) Uzun vidayı kolun sol tarafındaki deliğe yerleştirin ve sol ele uygun baş parmak dayama
yerini sabitlemek için iyice sıkın.
F) Joystick kutusunda ayrıca yer alan sol ele uygun vida kapağını (11) kolun sol tarafına
yerleştirin.
Not: Sağ ele uygun moda dönmek için bu prosedürü tersten uygulayın.
PC
PC'DE KURULUM
1. PC USB konektörünü (9) bilgisayarın USB bağlantı noktalarından birine bağlayın.
Windows XP, Vista, 7 veya 8 yeni aygıtı otomatik olarak algılayacaktır.
2. Sürücüler otomatik olarak yüklenir.
Ekrandaki talimatları izleyerek kurulumu tamamlayın.
3. Başlat/Ayarlar/Denetim Masasına tıklayarak Oyun Kumandalarına çift tıklayın.
Oyun Kumandaları iletişim kutusu, joystick'in adını ve Tamam durumunda gösterir.
4. Denetim Masasında, joystick fonksiyonlarının tamamını test etmek ve görmek için
Özelliklere tıklayın.
Artık oynamaya hazırsınız!
ÖNEMLİ NOT
Joystick’inizi bağlarken: Her türlü kalibrasyon sorununu engellemek için daima kol ve dümeni merkez pozisyonlarına getirin ve hareket ettirmekten kaçının.
Page 79

4/6
SORUN GİDERME VE UYARI
• Joystick düzgün çalışmıyor ya da uygun kalibre edilmemiş gözüküyor:
- Bilgisayarınızı kapatın ve joystick’inizi ayırın; ardından bilgisayarınızı yeniden açın,
joystick’inizi tekrar bağlayın ve oyununuzu yeniden başlatın.
- Joystick’inizi bağlarken: Her türlü kalibrasyon sorununu engellemek için daima kol ve
dümeni merkez pozisyonlarına getirin ve hareket ettirmekten kaçının.
• Joystick’imi ayarlayamıyorum:
- Oyununuzun “Seçenekler/Kumanda/Gamepad veya Joystick” menüsünden: Uygun
konfigürasyonu seçin veya kumanda birimi seçeneklerinin tümünü yeniden ayarlayın.
- Daha fazla bilgi için lütfen oyununuzun kullanma kılavuzuna veya online yardıma başvurun.
• Joystick’im çok hassas veya yeterince hassas değil:
- Joystick’iniz farklı eksenlerde birkaç hareket yaptığınızda kendini bağımsız olarak kalibre
eder.
- Oyununuzun “Seçenekler/Kumanda/Gamepad veya Joystick” menüsünden: Joystick’iniz
için hassasiyeti ve ölü bölgeleri (bu seçenekler mevcutsa) ayarlayın.
• Joystick'in merkezi arka ışığı otomatik olarak kapanıyor:
- Kolu çok hafif hareket ettirerek mutlak merkezi değere getirin; arka ışık 3 saniyelik
hareketsizlik sonunda kapanacaktır.
Page 80

5/6
TÜKETİCİ GARANTİ BİLGİSİ
İşbu Thrustmaster ürünü, malzeme ve işçilik hatalarına karşı, müşterinin kusurlu ürünün ücretinin
iade edilmesi veya değiştirilmesi talebinde bulunabileceği süreye karşılık gelen garanti süresince
dünya çapında Guillemot Corporation S.A. (bundan sonra “Guillemot” olarak ifade edilecektir)
garantisi altındadır. Avrupa Birliği ülkelerinde bu süre, Thrustmaster ürününün tesliminden itibaren
iki (2) seneye karşılık gelir. Diğer ülkelerde garanti süresi, Thrustmaster ürünü ile ilgili olarak,
Thrustmaster ürününün satın alındığı tarihte müşterinin ikamet ettiği ülkede geçerli yasalara uygun
şekilde, müşterinin kusurlu ürünün ücretinin iade edilmesi veya değiştirilmesi talebinde
bulunabileceği süreye karşılık gelir (İlgili ülkede bu tür bir düzenleme mevcut değilse garanti süresi
Thrustmaster ürününün satın alındığı asıl tarihten itibaren bir (1) yıl olacaktır).
Yukarıdakilere bağlı kalmaksızın, yeniden doldurulabilir piller ilk satın alındıkları tarihten itibaren
altı (6) ay boyunca garanti kapsamındadır.
Garanti süresi içinde üründe hata veya kusur tespit edilmesi durumunda derhal izlenecek yöntem
ile ilgili size bilgi verecek olan Teknik Destek servisimize başvurun. Hata veya kusur onaylanırsa
ürünün satın alındığı yere (ya da Teknik Destek servisi tarafından belirtilen yere) iade edilmesi
gerekmektedir.
İşbu garanti kapsamında müşterinin kusurlu ürünü, Teknik Destek servisinin insiyatifine bağlı
olarak, onarılacak veya değiştirilecektir. Yürürlükte olan yasaların izin verdiği durumlarda,
Guillemot ve bağlılarının tüm sorumluluğu (dolaylı hasarlar da dahil olmak üzere) Thrustmaster
ürününün onarılması veya değiştirilmesi ile sınırlıdır. Yürürlükte olan yasaların izin vermesi halinde
Guillemot, ticarete elverişlilik veya belirli bir amaca uygunluk ile ilgili tüm garantileri reddeder.
Tüketim mallarının satışına ilişkin tüketicinin yasal hakları işbu garantiden etkilenmemektedir.
İşbu garanti aşağıdaki durumlar için geçerli değildir: (1) Ürün modifiye edilmişse, açılmışsa,
üzerinde değişiklik yapılmışsa, uygunsuz veya kötü kullanım, ihmal, kaza, normal aşınma ya da
malzeme veya üretim hatası ile ilgili olmayan nedenlerden dolayı hasar görmüşse (ancak bununla
sınırlı kalmamak üzere, Thrustmaster ürününü herhangi uygun bir elemanla birleştirmek, buna
dahil olarak özellikle güç kaynakları, yeniden doldurulabilir piller, şarj cihazları veya bu ürün için
Guillemot tarafından tedarik edilmemiş tüm diğer elemanlar); (2) Teknik Destek servisi tarafından
sağlanan talimatlara uyulmamışsa; (3) yazılım için, işbu garanti geçerli değildir, söz konusu yazılım
için sağlanan özel garanti hükümlerine tabidir; (4) sarf malzemeleri için (ürünün kullanım süresi
içinde değiştirilecek elemanlar: örneğin; tek kullanımlık piller, kulaklık yastıkları); (5) aksesuarlar
için (örneğin; kablolar, kılıflar, cepler, çantalar, bileklikler); (6) ürün açık artırma ile satılmışsa.
Bu garanti devrolunamaz.
Sorumluluk
Yürürlükte olan yasaların izin vermesi halinde, Guillemot Corporation S.A. (bundan sonra
“Guillemot” olarak ifade edilecektir) ve bağlıları aşağıdakilerin biri veya daha fazlasından
kaynaklanan her türlü hasara karşı tüm sorumluluğu reddeder: (1) Ürün modifiye edilmişse,
açılmışsa, üzerinde değişiklik yapılmışsa; (2) montaj talimatlarına uyulmamışsa; (3) uygunsuz veya
kötü kullanım, ihmal, kaza (örneğin bir darbe); (4) normal aşınma. Yürürlükte olan yasaların izin
vermesi halinde, Guillemot ve bağlıları ürünle ilgili malzeme veya üretim hatası ile ilgili olmayan her
türlü hasara karşı tüm sorumluluğu reddeder (ancak bununla sınırlı kalmamak üzere, herhangi bir
yazılımdan veya Thrustmaster ürününün herhangi bir uygun olmayan elemanla birleştirilmesinden
doğrudan veya dolaylı olarak kaynaklanan tüm hasarlar, buna dahil olarak özellikle güç kaynakları,
yeniden doldurulabilir piller, şarj cihazları veya bu ürün için Guillemot tarafından tedarik edilmemiş
tüm diğer elemanlar).
Page 81

6/6
TELİF HAKKI
TEKNIK DESTEK
© 2015 Guillemot Corporation S.A. Tüm hakları saklıdır. Thrustmaster® Guillemot Corporation S.A’nın
tescilli markasıdır. Windows® ABD ve/veya diğer ülkelerde, Microsoft Corporation’ın tescilli ticari
markasıdır. Diğer tüm ticari markalar kendi sahiplerinin. Resimler bağlayıcı değildir. İçerik, tasarım ve
özellikler önceden haber verilmeksizin değiştirilebilir ve bir ülkeden başka bir ülkeye değişiklik gösterebilir.
Çin’de yapılmıştır.
ÇEVRE KORUMA ÖNERİLERİ
Size en yakın toplama merkezleri hakkında bilgi almak için lütfen yerel yetkililerle iletişime geçin.
Bu belgeyi saklayın. Renkler ve süslemeler değişiklik gösterebilir.
Bu ürün 16 yaş veya üstü çocuklar ile ilgili tüm standartlara uygundur. Bu ürün, 16 yaşından küçük
çocukların kullanımına uygun değildir.
www.thrustmaster.com
Cihazın kullanım ömrü sona erdiğinde, standart ev atıkları ile atılmamalı, geri dönüşüm
için Atık Elektrikli ve Elektronik Cihazların toplandığı bir yere bırakılmalıdır.
Bu, ürünün, kullanım kılavuzunun veya paketin üzerinde bulunan sembol ile
onaylanmıştır.
Özelliklerine bağlı olarak malzemeler geri dönüştürülebilir. Atık Elektrik ve Elektronik
Cihazların geri dönüşümü veya diğer işleme yöntemleri sayesinde çevrenin
korunmasına yönelik önemli bir katkıda bulunabilirsiniz.
http://ts.thrustmaster.com
Page 82

2
1
9
LEFT
HANDED
5
10
8
6
12
LEFT
HANDED
3
6
7
9
255 0
8
7
RIGHT
HANDED
3
4
10
11
5
RIGHT
HANDED
1
4
2
Y Axis
0
X Axis
163830
16383
11
12
13
16
15
14
11
12
16
15
LEFT
HANDED
3
13
255 0
14
RIGHT
HANDED
1
4
2
Y Axis
0
X Axis
163830
16383
5
6
7
10
9
8
0+
255-
Slider0 Axis
RZ Axis
0+
RZ Axis
255-
Slider0 Axis
Page 83

A
E
A
D
B
C
C
B
F
Page 84

1/6
1. Spust cyfrowy
7. Śruba umożliwiająca obrót podpórki na
ELEMENTY
Zgodna platforma: PC
Instrukcja obsługi
2. Wielokierunkowy przełącznik
widoku (hat switch)
3. Pokrywa śruby dla graczy
praworęcznych
4. Sterowanie sterem kierunku
przy użyciu drążka obrotowego
z podpórką na dłoń
5. Przepustnica
6. 15 przycisków czynności
dłoń z położeniami dla graczy prawo- i
leworęcznych
8. Podpórka na kciuk dla graczy
praworęcznych
9. Złącze USB PC
10. Podpórka na kciuk dla graczy leworęcznych
11. Pokrywa śruby dla graczy leworęcznych
12. Wybierak przycisków dla graczy prawo-
lub leworęcznych
INFORMACJE NA TEMAT JOYSTICKA
WYJĄTKOWA TECHNOLOGIA ZAPEWNIAJĄCA PRECYZJĘ:
„H.E.A.R.T™: HallEffect AccuRate Technology”
Dzięki wyjątkowym rozwiązaniom technicznym joystick T-16000M charakteryzuje się
precyzją niespotykaną obecnie w innych joystickach do gier:
— Drążek zawiera trójwymiarowy (hallotronowy) czujnik magnetyczny o rozdzielczości
umożliwiającej odczyt ponad 268 milionów wartości w osiach X i Y (16 384 x 16 384
wartości), podczas gdy konkurencyjne rozwiązania (nawet klasy high-end) udostępniają
rozdzielczość w okolicach zaledwie miliona wartości (1024 x 1024).
— Magnes: wyeliminowanie tarcia zapewniające nieograniczoną precyzję i niewiarygodną
szybkość reakcji.
— Sprężyna śrubowa w drążku (2,8 mm): pewna, liniowa i superpłynna zmiana naprężenia.
PODŚWIETLENIE
Ponieważ naszym celem była maksymalna precyzja sterowania, w położeniu centralnym
joysticka T-16000M nie występuje strefa martwa. Dla podkreślenia tego faktu środek jest
podświetlany na zielono z chwilą poruszenia drążkiem (nawet bardzo delikatnego).
Podświetlenie gaśnie po 3 sekundach bezczynności, gdy drążek ponownie znajdzie się
dokładnie w położeniu środkowym.
PRZEPUSTNICA
Joystick zawiera dźwignię przepustnicy (5), która ułatwia sterowanie przyspieszeniem w grach.
Page 85

2/6
FUNKCJA STERU KIERUNKU
Joystick jest wyposażony w funkcję steru kierunku (4), która w samolocie odpowiada pedałom, przy użyciu których pilot porusza sterem kierunku, umożliwiając samolotowi obracanie się wokół osi pionowej (i powodując skręt samolotu w lewo lub w prawo).
Aby w joysticku użyć funkcji steru kierunku, należy obrócić drążek w lewo lub w prawo.
WIELOKIERUNKOWY PRZEŁĄCZNIK WIDOKU
Joystick zawiera przełącznik widoku (2), tzw. grzybek lub hat switch. Jak sugeruje nazwa,
umożliwia on szybkie wzrokowe sprawdzenie, co dzieje się wokół samolotu (w grach
posiadających taką funkcję). Aby użyć tej funkcji, należy wejść do menu konfiguracji gry i
przypisać poszczególne widoki (tylny, lewy, prawy, a także widoki zewnętrzne) odpowiednim
kierunkom przełącznika widoku.
W razie potrzeby przełącznik widoku można zarezerwować do innych celów (np. do strzelania).
UKŁAD OBURĘCZNY
Ważną zaletą joysticka T-16000M jest to, że stanowi on urządzenie w pełni oburęczne.
Dzięki temu wszyscy gracze, zarówno prawo-, jak i leworęczni, mogą łatwo przystosować go
do swoich potrzeb.
W tym celu można dostosować 3 elementy: konfigurację przycisków na podstawie, podpórkę
na dłoń i podpórkę na kciuk.
KONFIGURACJA PRZYCISKÓW W TRYBIE DLA PRAWORĘCZNYCH
Aby pozycje 12 przycisków znajdujących się na podstawie przestawić w tryb dla praworęcznych, ustaw wybierak (12) pod podstawą joysticka w położeniu „RIGHT HANDED”:
KONFIGURACJA PRZYCISKÓW W TRYBIE DLA
LEWORĘCZNYCH
Aby pozycje 12 przycisków znajdujących się na podstawie przestawić w tryb dla leworęcznych, ustaw wybierak (12) pod podstawą joysticka w położeniu „LEFT HANDED”:
REGULOWANIE PODPÓRKI NA DŁOŃ ODPOWIEDNIO DO TRYBU
DLA PRAWO- LUB LEWORĘCZNYCH
Domyślnie podpórka na dłoń jest ustawiona zgodnie z TRYBEM DLA PRAWORĘCZNYCH.
Aby przestawić ją w TRYB DLA LEWORĘCZNYCH:
A) Niewielkim śrubokrętem ostrożnie odkręć (ale nie do końca) śrubę umożliwiającą obrót
podpórki na dłoń (7), która znajduje się z lewej strony podpórki.
B) Obróć podpórkę na dłoń o 180°.
C) Dobrze dokręć śrubę znajdującą się w podpórce na dłoń (teraz znajdującą się po prawej stronie).
Uwaga: Aby przywrócić tryb dla praworęcznych, wykonaj tę procedurę w odwrotnej kolejności.
Page 86

3/6
REGULOWANIE PODPÓRKI NA KCIUK ODPOWIEDNIO DO TRYBU
DLA PRAWO- LUB LEWORĘCZNYCH
Domyślnie podpórka na kciuk jest ustawiona zgodnie z TRYBEM DLA PRAWORĘCZNYCH.
Aby przestawić ją w TRYB DLA LEWORĘCZNYCH:
A) Zdejmij pokrywę śruby dla graczy praworęcznych (3), znajdującą się z prawej strony
drążka.
B) Niewielkim śrubokrętem całkowicie wykręć długą śrubę, którą zobaczysz po zdjęciu
pokrywy (po prawej stronie drążka).
C) Zdejmij podpórkę na kciuk dla graczy praworęcznych (8), znajdującą się z lewej strony
drążka.
D) Przyłóż podpórkę na kciuk dla graczy leworęcznych (10) (osobny element znajdujący się
w pudełku joysticka) z prawej strony drążka.
E) Włóż długą śrubę do otworu z lewej strony drążka i wkręć ją do końca, aby zamocować
podpórkę na kciuk dla graczy leworęcznych.
F) Załóż pokrywę śruby dla graczy leworęcznych (11) (osobny element znajdujący się w
pudełku joysticka) z lewej strony drążka.
Uwaga: Aby przywrócić tryb dla praworęcznych, wykonaj tę procedurę w odwrotnej kolejności.
PC
INSTALACJA NA KOMPUTERZE PC
1. Podłącz złącze USB PC (9) do jednego z portów USB w komputerze.
System Windows (XP, Vista, 7, 8) automatycznie wykryje nowe urządzenie.
2. Sterowniki zostaną zainstalowane automatycznie.
Wykonaj instrukcje wyświetlane na ekranie, aby dokończyć instalację.
3. Kliknij Start/Settings/Control Panel (Start/Ustawienia/Panel sterowania), a następnie
kliknij dwukrotnie Game Controllers (Kontrolery gier).
W oknie dialogowym Game Controllers (Kontrolery gier) pojawi się nazwa joysticka ze stanem OK.
4. W oknie Control Panel (Panel sterowania) kliknij Properties (Właściwości), aby
przetestować i wyświetlić wszystkie funkcje joysticka.
Teraz możesz zacząć grać!
WAŻNA UWAGA
Podłączając joystick, zawsze ustawiaj drążek i ster kierunku w położeniu środkowym i nie poruszaj nimi (aby uniknąć problemów z kalibracją).
Page 87

4/6
ROZWIĄZYWANIE PROBLEMÓW I OSTRZEŻENIA
• Joystick nie działa prawidłowo lub wydaje się niewłaściwie skalibrowany:
- Wyłącz komputer i odłącz joystick, a następnie uruchom ponownie komputer, podłącz
joystick i uruchom ponownie grę.
— Podłączając joystick, zawsze ustawiaj drążek i ster kierunku w położeniu środkowym i nie poruszaj nimi (aby uniknąć problemów z kalibracją).
• Nie mogę skonfigurować joysticka:
— W menu opcji/kontrolera/gamepada/joysticka dostępnym w grze wybierz odpowiednią konfigurację lub całkowicie przekonfiguruj opcje kontrolera.
— Więcej informacji znajdziesz w instrukcji obsługi gry lub jej pomocy online.
• Joystick jest zbyt czuły lub niewystarczająco czuły:
— Joystick kalibruje się automatycznie w sposób niezależny, gdy poruszasz nim trochę wzdłuż poszczególnych osi.
— W menu opcji/kontrolera/gamepada/joysticka dostępnym w grze ustaw odpowiednią czułość i strefy martwe joysticka (jeśli tego rodzaju opcje są dostępne).
• Środkowe podświetlenie joysticka nie wyłącza się automatycznie:
— Porusz drążkiem bardzo delikatnie, aby ustawić go w bezwzględnym położeniu środkowym. Podświetlenie wyłączy się wówczas po 3 sekundach bezczynności.
Page 88

5/6
Informacje dotyczące gwarancji dla klienta
Firma Guillemot Corporation S.A. („Guillemot”) udziela klientowi obowiązującej na całym świecie
gwarancji, że niniejszy produkt Thrustmaster będzie wolny od wad materiałowych i produkcyjnych
przez okres gwarancji równy limitowi czasu, w którym klient może występować z roszczeniami z
tytułu wad niniejszego produktu. W krajach Unii Europejskiej jest to okres dwóch (2) lat od
dostarczenia produktu Thrustmaster. W innych krajach okres gwarancji jest równy limitowi czasu,
w którym klient może występować z roszczeniami z tytułu wad produktu Thrustmaster zgodnie z
przepisami obowiązującymi w kraju, w którym klient mieszkał w dniu zakupu produktu
Thrustmaster. (Jeśli przepisy danego kraju nie przewidują występowania z takimi roszczeniami,
okres gwarancji będzie wynosić jeden (1) rok od pierwotnej daty zakupu produktu Thrustmaster).
Niezależnie od powyższego akumulatory są objęte sześciomiesięcznym (6-miesięcznym) okresem
gwarancji liczonym od daty pierwotnego zakupu.
Jeśli w okresie gwarancji wystąpią objawy mogące świadczyć o wadzie produktu, należy
niezwłocznie skontaktować się z działem pomocy technicznej, który wskaże dalszy sposób
postępowania. W razie potwierdzenia wady produkt należy zwrócić w punkcie zakupu (lub innym
miejscu wskazanym przez dział pomocy technicznej).
W ramach niniejszej gwarancji wadliwy produkt zostanie naprawiony lub wymieniony, zgodnie z
decyzją działu pomocy technicznej. Jeśli zezwala na to obowiązujące prawo, całkowita
odpowiedzialność firmy Guillemot i jej podmiotów zależnych (łącznie z odpowiedzialnością za
szkody wtórne) ogranicza się do naprawy lub wymiany produktu Thrustmaster. Jeśli zezwala na to
obowiązujące prawo, firma Guillemot wyłącza wszelkie gwarancje pokupności i przydatności do
określonego celu. Niniejsza gwarancja nie wpływa na prawa klienta wynikające z przepisów
dotyczących sprzedaży dóbr konsumenckich.
Niniejsza gwarancja nie obowiązuje: (1) w przypadku, gdy produkt został zmodyfikowany, otwarty,
zmieniony albo uszkodzony na skutek nieodpowiedniego lub nadmiernego użytkowania,
niedbałości, wypadku, normalnego zużycia lub z innego powodu niezwiązanego z wadą
materiałową ani produkcyjną (w tym między innymi z powodu połączenia produktu Thrustmaster z
nieodpowiednim elementem, w tym w szczególności z zasilaczem, akumulatorem, ładowarką lub
jakimkolwiek innym elementem niedostarczonym przez firmę Guillemot dla tego produktu); (2) w
razie nieprzestrzegania instrukcji podanych przez dział pomocy technicznej; (3) w odniesieniu do
oprogramowania, jako że oprogramowanie to jest objęte odrębną szczegółową gwarancją; (4)
materiałów eksploatacyjnych (elementów wymienianych w czasie eksploatacji produktu, na
przykład baterii jednorazowych, muszli/nakładek na uszy do zestawów słuchawkowych lub
słuchawek); (5) akcesoriów (na przykład kabli, pokrowców, etui, torebek, pasków na rękę); (6) w
przypadku sprzedania produktu na aukcji publicznej.
Niniejsza gwarancja nie podlega przeniesieniu.
Odpowiedzialność
Jeśli zezwala na to obowiązujące prawo, firma Guillemot Corporation S.A. („Guillemot”) i jej
podmioty zależne nie ponoszą żadnej odpowiedzialności za szkody spowodowane przez co
najmniej jeden z następujących czynników: (1) modyfikację lub otwarcie produktu bądź
wprowadzenie w nim zmian; (2) nieprzestrzeganie instrukcji montażu; (3) nieodpowiednie lub
nadmierne użytkowanie, niedbałość, wypadek (na przykład uderzenie); (4) normalne zużycie. Jeśli
zezwala na to obowiązujące prawo, firma Guillemot i jej podmioty zależne nie ponoszą żadnej
odpowiedzialności za szkody niezwiązane z wadą materiałową lub produkcyjną produktu (w tym
między innymi za szkody spowodowane bezpośrednio lub pośrednio przez jakiekolwiek
oprogramowanie lub na skutek połączenia produktu Thrustmaster z nieodpowiednim elementem,
w tym w szczególności z zasilaczem, akumulatorem, ładowarką lub jakimkolwiek innym
elementem niedostarczonym przez firmę Guillemot dla tego produktu).
Page 89

6/6
PRAWA AUTORSKIE
WSPARCIE TECHNICZNE
© 2015 Guillemot Corporation S.A. Wszelkie prawa zastrzeżone. Thrustmaster® jest zastrzeżonym
znakiem towarowym firmy Guillemot Corporation S.A. Windows® jest zastrzeżonym znakiem towarowym
firmy Microsoft Corporation w USA i/lub innych krajach. Wszystkie inne znaki towarowe stanowią
własność odpowiednich podmiotów. Ilustracje nie są wiążące prawnie. Treść, wzory i dane techniczne
przedstawione w instrukcji mogą ulec zmianie bez powiadomienia i mogą różnić się w zależności od kraju.
Wyprodukowano w Chinach.
ZALECENIE DOTYCZĄCE OCHRONY ŚRODOWISKA
Aby uzyskać informacje o najbliższych punktach zbiórki odpadów, należy skontaktować z miejscowymi władzami.
Niniejsze informacje należy zachować. Kolorystyka i elementy ozdobne mogą różnić się od
przedstawionych.
Produkt spełnia wszystkie standardy dotyczące dzieci w wieku minimum 14 lat. Produkt nie jest
przeznaczony dla dzieci poniżej 14 roku życia.
www.thrustmaster.com
Gdy okres przydatności produktu do eksploatacji dobiegnie końca, produktu nie
należy pozbywać się wraz ze zwykłymi odpadami z gospodarstwa domowego,
ale oddać do recyklingu w punkcie zbiórki zużytego sprzętu elektrycznego i
elektronicznego.
Potwierdza to symbol znajdujący się na produkcie, w instrukcji obsługi lub na
opakowaniu.
Zależnie od swoich właściwości materiały zawarte w produkcie mogą nadawać
się do recyklingu. Dzięki recyklingowi i innym formom utylizacji zużytych
urządzeń elektrycznych i elektronicznych klient może w znacznym stopniu
przyczynić się do ochrony środowiska.
http://ts.thrustmaster.com
Page 90

2
1
9
LEFT
HANDED
5
10
8
6
12
LEFT
HANDED
3
6
7
9
255 0
8
7
RIGHT
HANDED
3
4
10
11
5
RIGHT
HANDED
1
4
2
Y Axis
0
X Axis
163830
16383
11
12
13
16
15
14
11
12
16
15
LEFT
HANDED
3
13
255 0
14
RIGHT
HANDED
1
4
2
Y Axis
0
X Axis
163830
16383
5
6
7
10
9
8
0+
255-
Slider0 Axis
RZ Axis
0+
RZ Axis
255-
Slider0 Axis
Page 91

A
E
A
D
B
C
C
B
F
Page 92

6\1
29
30
91
92
93
94
95
)5(
1.
ﻲﻣﻗﺭ ﻝﻐﺷﻣ
7.
ﺩﻳﻟﺍ ﻡﺍﺩﺧﺗﺳﺍ ﻲﻌﺿﻭﻟ ،ﺩﻳ ﺓﺩﺎﺳﻭ ﻥﺍﺭﻭﺩ ﻲﻏﺭﺑ
ﺩﻳﻟﺍ ﻡﺍﺩﺧﺗﺳﺍ ﻭﺃ ﻰﻧﻣﻳﻟﺍﻯﺭﺳﻳﻟﺍ
ﻯﺭﺳﻳﻟﺍ ﺩﻳﻟﺍ ﻡﺍﺩﺧﺗﺳﺍ ﻲﻏﺭﺑ ءﺎﻁﻏ
ﻭﺃ ﻰﻧﻣﻳﻟﺍ ﺩﻳﻟﺍ ﻡﺍﺩﺧﺗﺳﺍ ﻱﺭﺯﻟ ﺭﺎﻳﺗﺧﺍ ﺡﺎﺗﻔﻣ
ﻯﺭﺳﻳﻟﺍ ﺩﻳﻟﺍ ﻡﺍﺩﺧﺗﺳﺍ
ﺩﻌﺑ ءﻭﺿﻟﺍ ﺊﻔﻁﻧﻳ ؛(ﺔﻔﻳﻔﻁﻟﺍ ﺔﻛﺭﺣﻟﺍ ﻊﻣ ﻰﺗﺣ) ﻉﺍﺭﺫﻟﺍ ﻙﻳﺭﺣﺗ ﺩﺭﺟﻣﺑ ﺭﺿﺧﻷﺍ ﻥﻭﻠﻟﺎﺑ ﺯﻛﺭﻣﻟﺍ ءﻲﺿﻳ3 ٍﻥﺍﻭﺛ
B:ﻊﻣ ﺔﻘﻓﺍﻭﺗﻣ ﺭﺗﻭﻳﺑﻣﻛﻟﺍ
Bﻡﺩﺧﺗﺳﻣﻟﺍ ﻝﻳﻟﺩ
37B
8. 38Bﻰﻧﻣﻳﻟﺍ ﺩﻳﻟﺍ ﻡﺍﺩﺧﺗﺳﺍ ﻡﺎﻬﺑﺇ ﺓﺩﺎﺳﻭ
9. 18B ﻝﺻﻭﻣUSB ﺭﺗﻭﻳﺑﻣﻛﻠﻟ
10.
ﻭﻰﻧﻣﻳﻟﺍ ﺩﻳﻟﺍ ﻡﺍﺩﺧﺗﺳﺍ ﻡﺎﻬﺑﺇ ﺓﺩﺎﺳ
11.
12.
ً
ﻯﻭﺗﺳﻣ ﺭﻓﻭﺗ ﺔﻳﻧﻘﺗﺑ
) (ﺹ)ﻭ (ﺱ)16384 ×16384 ﻣﻟﺍ ﺔﻣﻅﻧﻷﺍ ﻥﺃ ﻥﻳﺣ ﻲﻓ ،(ﺔﻣﻳﻗ ﺭﻓﻭﺗ (ﺔﻣﺩﻘﺗﻣﻟﺍ ﺔﻣﻅﻧﻷﺍ ﻰﺗﺣ) ﺎًﻳﻟﺎﺣ ﺔﺳﻓﺎﻧ
) ﻁﻘﻓ ﺔﻣﻳﻗ ﻥﻭﻳﻠﻣﻟﺍ ﺏﺭﺎﻘﺗ ﺔﻗﺩ1024 ×1024 .(ﺔﻣﻳﻗ
.ﻯﺭﺧﺃ ﺓﺭﻣ ﺔﺗﻳﻣﻟﺍ ﺔﻘﻁﻧﻣﻟﺍ ﻰﻟﺇ ﻉﺍﺭﺫﻟﺍ ﺓﺩﺎﻋﺇ ﺩﺭﺟﻣﺑ ،ﻪﻁﺎﺷﻧ ﻡﺩﻋ ﻥﻣ
ﻧﻛﻣﻳ ،.ﻙﺑﺎﻌﻟﺃ ﻲﻓ ﻉﺭﺎﺳﺗﻟﺍ ﻲﻓ ﺔﻟﻭﻬﺳﺑ ﻡﻛﺣﺗﻠﻟ ﻪﻣﺍﺩﺧﺗﺳﺍ ﻙ
Bﺔﻳﻧﻘﺗﻟﺍ ﺕﺍﺯﻳﻣﻟﺍ
31B
2. 32B"ﻩﺎﺟﺗﻻﺍ ﻲﻋﺎﺑﺭ" ﺕﺎﻫﺎﺟﺗﻻﺍ ﺩﺩﻌﺗﻣ ﺡﺎﺗﻔﻣ
3. 33Bﻰﻧﻣﻳﻟﺍ ﺩﻳﻟﺍ ﻡﺍﺩﺧﺗﺳﺍ ﻲﻏﺭﺑ ءﺎﻁﻏ
4. 34Bﺩﻳ ﺓﺩﺎﺳﻭﺑ ﺭﺍﻭﺩ ﺽﺑﻘﻣ ﻝﻼﺧ ﻥﻣ ﻪﻳﺟﻭﺗ ﺓﺍﺩﺃ
5. 35Bﻕﻧﺎﺧ
6. 36B15 ءﺍﺭﺟﺇ ﺭﺯ
Bﻙﺑ ﺔﺻﺎﺧﻟﺍ ﺏﻌﻠﻟﺍ ﻉﺍﺭﺫ ﻰﻠﻋ ﻑﺭﻌﺗﻟﺍ
B:ﺔﻗﺩﻟﺍ ﻲﻓ ﺔﻳﺎﻏ ﺔﻳﻧﻘﺗ
39B":H.E.A.R.T™ ﺔﻳﻧﻘﺗ HallEffect AccuRate"
40B ﺏﻌﻠﻟﺍ ﻉﺍﺭﺫ ﺯﻳﻣﺗﻳT-16000M :ﻥﻣﺿﺗﻳ ،ﺏﻌﻠﻟﺍ ﻉﺭﺫﺃ ﻡﻟﺎﻋ ﻲﻓ ﺔﻗﺩﻟﺍ ﻥﻣ ﻪﻟ ﻝﻳﺛﻣ ﻻ
41B- ) ﺩﺎﻌﺑﻷﺍ ﻲﺛﻼﺛ ﻲﺳﻳﻁﺎﻧﻐﻣ ﺭﻌﺷﺗﺳﻣHall Effect ﻥﻋ ﺩﻳﺯﺗ ﺔﻗﺩﺑ ،ﻉﺍﺭﺫﻟﺍ ﻰﻠﻋ (268 ﻱﺭﻭﺣﻣ ﻥﻋ ﺔﻣﻳﻗ
42B- :ﺱﻳﻁﺎﻧﻐﻣ .ﺔﻠﻫﺫﻣ ﺕﺎﺑﺎﺟﺗﺳﺍﻭ ﺔﻳﻫﺎﻧﺗﻣ ﺔﻗﺩﻟ ،ﻙﺎﻛﺗﺣﺍ ﻥﻭﺩﺑ
43B- ) ﻉﺍﺭﺫﻟﺍ ﻰﻠﻋ ﻙﺭﺑﻧﺯ ﻑﻠﻣ2.8 :(ﻡﻣ .ﺔﺳﻼﺳ ﺭﺛﻛﺃ ﺩﺷﻭ ﺔﻣﺎﻘﺗﺳﻻﺍﻭ ﺕﺎﺑﺛﻠﻟ
Bﺔﻳﻔﻠﺧﻟﺍ ﺓءﺎﺿﻹﺍ
44Bﺟﻭﺗ ﻻ ،ﻰﻠﻋﺃ ﺔﻗﺩ ﻰﻠﻋ ﻝﻭﺻﺣﻠﻟ ﻉﺍﺭﺫﻟ ﻱﺯﻛﺭﻣﻟﺍ ﻊﺿﻭﻟﺍ ﻲﻓ ﺔﺗﻳﻣ ﺔﻘﻁﻧﻣ ﺩT-16000M. ،ﻙﻟﺫ ﻁﻳﺳﺑﺗﻟ
Bﻕﻧﺎﺧﻟﺍ
45B ﻕﻧﺎﺧ ﺏﻌﻠﻟﺍ ﻉﺍﺭﺫ ﺭﻓﻭﺗ
Page 93

6\2
)4(
)2(
96
97
98
99
ﺭﺎﻳﻁﻟﺍ ﺎﻬﻣﺩﺧﺗﺳﻳﻭ ﺓﺭﺋﺎﻁﻟﺍ ﻲﻓ ﺓﺩﻭﺟﻭﻣﻟﺍ ﺕﺎﺳﺍﻭﺩﻟﺍ ﻝﺑﺎﻘﺗ ﻲﺗﻟﺍﻭ ،
.(ﺍًﺭﺎﺳﻳ ﻭﺃ ﺎًﻧﻳﻣﻳ ﺭﻭﺩﺗ ﺓﺭﺋﺎﻁﻟﺍ ﻝﻌﺟﻟ) ﻲﺳﺃﺭﻟﺍ ﺎﻫﺭﻭﺣﻣ ﻝﻭﺣ ﻥﺍﺭﻭﺩﻟﺎﺑ ﺓﺭﺋﺎﻁﻠﻟ ﺢﻣﺳﻳ ﺎﻣ ،ﺔﻓﺩﻟﺍ ﻙﻳﺭﺣﺗﻟ
ﻲﻓ) ﻙﺗﺭﺋﺎﻁ ﻝﻭﺣ ءﻲﺷ ﻝﻛ ﺽﺭﻌﺑ ﻙﻟ ﺢﻣﺳﻳ ،ﻪﻣﺳﺍ ﺭﻳﺷﻳ ﺎﻣﻛ ،
.(ﺎﻬﺑ ﺓﺯﻳﻣﻟﺍ ﻩﺫﻫ ﻥﻳﻛﻣﺗ ﻡﺗﻳ ﻲﺗﻟﺍ ﺏﺎﻌﻟﻷﺍ ﺔﺻﺎﺧﻟﺍ ﺏﺎﻌﻟﻷﺍ ﺩﺍﺩﻋﺇ ﺔﻣﺋﺎﻗ ﻰﻟﺇ ﻝﻘﺗﻧﺍ ﻁﻘﻓ ،ﺓﺯﻳﻣﻟﺍ ﻩﺫﻫ ﻡﺍﺩﺧﺗﺳﻻ
ﻰﻠﻋ (ﺎًﺿﻳﺃ ﺔﻳﻓﺎﺿﺇ ﺭﻅﺎﻧﻣﻭ ﻥﻣﻳﺃ ﺭﻅﻧﻣﻭ ﺭﺳﻳﺃ ﺭﻅﻧﻣﻭ ﻲﻔﻠﺧ ﺭﻅﻧﻣ) ﺔﻔﻠﺗﺧﻣﻟﺍ ﺭﻅﺎﻧﻣﻟﺍ ﺔﺟﻣﺭﺑﺑ ﻡﻗﻭ ،ﻙﺑ
."ﺕﺎﻫﺎﺟﺗﻻﺍ ﻲﻋﺎﺑﺭ" ﺭﺯﻟﺍ ﺕﺎﻫﺎﺟﺗﺍ
ً
ﻣﺎﻣﺗ ﺎﻬﻔﻳﻛﺗﺑ ﺢﻣﺳﻳ ﺎﻣ ،ﻝﻣﺎﻛﻟﺎﺑ ﻁﺑﺿﻟﺍ ﺔﻳﻠﺑﺎﻘﺑ ﺏﻌﻠﻟﺍ ﻉﺍﺭﺫ ﺯﻳﻣﺗﺗ
.ﻯﺭﺳﻳﻟﺍ ﻭﺃ ﻰﻧﻣﻳﻟﺍ ﺩﻳﻟﺍ
ﻰﻠﻋ ﺏﻌﻠﻟﺍ ﻉﺍﺭﺫ ﺓﺩﻋﺎﻗ ﻝﻔﺳﺃ ﺩﻭﺟﻭﻣﻟﺍ "RIGHT HANDED" :(ﻰﻧﻣﻳﻟﺍ ﺩﻳﻟﺍ ﻡﺍﺩﺧﺗﺳﺍ)
ﻰﻠﻋ ﺏﻌﻠﻟﺍ ﻉﺍﺭﺫ ﺓﺩﻋﺎﻗ ﻝﻔﺳﺃ ﺩﻭﺟﻭﻣﻟﺍ"LEFT HANDED" (ﻯﺭﺳﻳﻟﺍ ﺩﻳﻟﺍ ﻡﺍﺩﺧﺗﺳﺍ):
46Bﻪﻳﺟﻭﺗﻟﺍ ﺔﻔﻳﻅﻭ
47B ﻪﻳﺟﻭﺗﻟﺍ ﺔﻔﻳﻅﻭ ﺏﻌﻠﻟﺍ ﻉﺍﺭﺫ ﺭﻓﻭﺗ
48Bﺗ.ﺭﺎﺳﻳﻟﺍ ﻭﺃ ﻥﻳﻣﻳﻟﺍ ﻰﻟﺇ ﻉﺍﺭﺫﻟﺍ ﺭﻳﻭﺩﺗ ﻕﻳﺭﻁ ﻥﻋ ﻙﺑ ﺹﺎﺧﻟﺍ ﺏﻌﻠﻟﺍ ﻉﺍﺭﺫ ﻲﻓ ﻪﻳﺟﻭﺗﻟﺍ ﺓﺯﻳﻣ ﺭﻓﻭﺗ
49B"ﻩﺎﺟﺗﻻﺍ ﻲﻋﺎﺑﺭ" ﺕﺎﻫﺎﺟﺗﻻﺍ ﺩﺩﻌﺗﻣ ﺡﺎﺗﻔﻣ
50B "ﻩﺎﺟﺗﻻﺍ ﻲﻋﺎﺑﺭ" ﺭﺯ ﺏﻌﻠﻟﺍ ﻉﺍﺭﺫ ﺭﻓﻭﺗ
51B ﻥﻣ ﻻﺩﺑ ﻯﺭﺧﺃ ﺕﺎﻣﺍﺩﺧﺗﺳﺍ ﻰﻟﺇ ﻪﻠﻳﺩﺑﺗﻟ "ﻩﺎﺟﺗﻻﺍ ﻲﻋﺎﺑﺭ" ﺭﺯﻟﺍ ﺱﻛﻋ ﻙﻧﻛﻣﻳ ﺎﻣﻛ.(ﻙﻟﺫ ﺭﻳﻏﻭ ﻕﻼﻁﻹﺎﻛ) ﻙﻟﺫ
Bﻁﺑﺿﻟﺍ ﻡﺎﻅﻧ
52B ﻥﻭﻣﺩﺧﺗﺳﻳ ﺍﻭﻧﺎﻛ ءﺍﻭﺳ ،ﻥﻳﺑﻋﻼﻟﺍ ﺔﻓﺎﻛ ﻊﻣ ﺎ
53B ﻁﺑﺿ ﻥﻛﻣﻳ ،ﻙﻟﺫﺑ ﻡﺎﻳﻘﻠﻟ3 :ﺭﺻﺎﻧﻋ .ﻡﺎﻬﺑﻹﺍ ﺓﺩﺎﺳﻭﻭ ﺩﻳﻟﺍ ﺓﺩﺎﺳﻭﻭ ﺓﺩﻋﺎﻘﻟﺍ ﻰﻠﻋ ﺓﺩﻭﺟﻭﻣﻟﺍ ﺭﺍﺭﺯﻷﺍ ﻥﻳﻭﻛﺗ
Bﻰﻧﻣﻳﻟﺍ ﺩﻳﻟﺍ ﻡﺍﺩﺧﺗﺳﺍ ﻊﺿﻭ ﻲﻓ ﺭﺍﺭﺯﻷﺍ ﻥﻳﻭﻛﺗ
54B ﻊﺿﺍﻭﻣ ﻥﻳﻳﻌﺗﻟ12 ) ﺭﺎﻳﺗﺧﻻﺍ ﺡﺎﺗﻔﻣ ﻥﻳﻳﻌﺗﺑ ﻡﻗ ،ﻰﻧﻣﻳﻟﺍ ﺩﻳﻟﺍ ﻡﺍﺩﺧﺗﺳﺍ ﻊﺿﻭﻟ ﺓﺩﻋﺎﻘﻟﺍ ﻰﻠﻋ ﺓﺩﻭﺟﻭﻣﻟﺍ ﺭﺯ12 (
Bﻯﺭﺳﻳﻟﺍ ﺩﻳﻟﺍ ﻡﺍﺩﺧﺗﺳﺍ ﻊﺿﻭ ﻲﻓ ﺭﺍﺭﺯﻷﺍ ﻥﻳﻭﻛﺗ
55B ﻊﺿﺍﻭﻣ ﻥﻳﻳﻌﺗﻟ12 ) ﺭﺎﻳﺗﺧﻻﺍ ﺡﺎﺗﻔﻣ ﻥﻳﻳﻌﺗﺑ ﻡﻗ ،ﻯﺭﺳﻳﻟﺍ ﺩﻳﻟﺍ ﻡﺍﺩﺧﺗﺳﺍ ﻊﺿﻭﻟ ﺓﺩﻋﺎﻘﻟﺍ ﻰﻠﻋ ﺓﺩﻭﺟﻭﻣﻟﺍ ﺭﺯ12 (
Bﻯﺭﺳﻳﻟﺍ ﺩﻳﻟﺍ ﻭﺃ ﻰﻧﻣﻳﻟﺍ ﺩﻳﻟﺍ ﻡﺍﺩﺧﺗﺳﺍ ﻊﺿﻭﻟ ﺩﻳﻟﺍ ﺓﺩﺎﺳﻭ ﻁﺑﺿ
56Bﻟﺍ ﺓﺩﺎﺳﻭ ﻥﻳﻭﻛﺗ ﻡﺗﻳ ،ﻲﺿﺍﺭﺗﻓﺍ ﻝﻛﺷﺑ.ﻰﻧﻣﻳﻟﺍ ﺩﻳﻟﺍ ﻡﺍﺩﺧﺗﺳﺍ ﻊﺿﻭ ﻲﻓ ﺩﻳ
57B:ﻯﺭﺳﻳﻟﺍ ﺩﻳﻟﺍ ﻡﺍﺩﺧﺗﺳﺍ ﻊﺿﻭ ﻰﻠﻋ ﺎﻬﻁﺑﺿﻟ
.ﺩﻳﻟﺍ ﺓﺩﺎﺳﻭ ﺭﺎﺳﻳ
58B) ﺩﻳﻟﺍ ﺓﺩﺎﺳﻭ ﺭﻳﻭﺩﺗﻟ (ﻝﻣﺎﻛﻟﺎﺑ ﻪﺗﻟﺍﺯﺇ ﻥﻭﺩ) ﺭﻳﻐﺻﻟﺍ ﻲﻏﺭﺑﻟﺍ ﻙﻔﺑ ﻡﻗ ،ﺭﻳﻐﺻ ﻙﻔﻣ ﻡﺍﺩﺧﺗﺳﺎﺑ (ﺃ7 ﻰﻠﻋ ﺩﻭﺟﻭﻣﻟﺍ ،(
ً
ﻣﺎﻣﺗ ﻲﻏﺭﺑﻟﺍ ﻁﺑﺭﺑ ﻡﻗ (ﺝ.(ﻥﻳﻣﻳﻟﺍ ﻰﻠﻋ ﻥﻵﺍ ﺩﺟﻭﻳ) ﻯﺭﺧﺃ ﺓﺭﻣ ﺩ
59B ﺩﻳﻟﺍ ﺓﺩﺎﺳﻭ ﺭﻳﻭﺩﺗﺑ ﻡﻗ (ﺏ180 .ﺔﺟﺭﺩ
60Bﻳﻟﺍ ﺓﺩﺎﺳﻭ ﻰﻠﻋ ﺎ
61Bﺔﻅﺣﻼﻣ: .ﻰﻧﻣﻳﻟﺍ ﺩﻳﻟﺍ ﻡﺍﺩﺧﺗﺳﺍ ﻊﺿﻭ ﻰﻟﺇ ﺓﺩﻭﻌﻠﻟ ءﺍﺭﺟﻹﺍ ﺍﺫﻫ ﺱﻛﻌﺑ ﻡﻗ
Page 94

6\3
100
)3(
67
)10(
69
)11(
101
102
)9(
0
103
ً
ﺟﻭﺩﺯﻣ ﺍًﺭﻘﻧ ﺭﻘﻧﺍﻭ (ﻡﻛﺣﺗﻟﺍ ﺔﺣﻭﻟ/ﺕﺍﺩﺍﺩﻋﻹﺍ/ﺃﺩﺑﺍ)
OK
Windows XP Vista
ﻭﺃ7 ﻭﺃ8 .ﺎًﻳﺋﺎﻘﻠﺗ ﺩﻳﺩﺟﻟﺍ ﺯﺎﻬﺟﻟﺍ
.
.ﻉﺍﺭﺫﻟﺍ ﻥﻳﻣﻳ ﻰﻠﻋ (ﻝﺻﻔﻧﻣ ﻝﻛﺷﺑ ﺏﻌﻠﻟﺍ ﻉﺍﺭﺫ ﺔﺑﻠﻋ ﻲﻓ ﺔﻧﻣﺿﻣ)
ﻟﺍ ﻉﺍﺭﺫ ﺔﺑﻠﻋ ﻲﻓ ﻥﻣﺿﻣ) ﺭﺎﺳﻳ ﻰﻠﻋ (ﻝﺻﻔﻧﻣ ﻝﻛﺷﺑ ﺏﻌﻠ
ﺫﻓﺎﻧﻣ ﺩﺣﺄﺑUSB .ﻙﺑ ﺹﺎﺧﻟﺍ ﺭﺗﻭﻳﺑﻣﻛﻟﺍ ﻰﻠﻋ
ً
ﻳﺋﺎﻘﻠﺗ ﻝﻳﻐﺷﺗﻟﺍ ﺞﻣﺍﺭﺑ ﺕﻳﺑﺛﺗ ﻡﺗﻳ
Game Controllers
ﺔﻟﺎﺣﻟﺎﺑ ﺏﻌﻠﻟﺍ ﻉﺍﺭﺫ ﻡﺳﺍ (ﺏﺎﻌﻟﻷﺎﺑ ﻡﻛﺣﺗﻟﺍ ﺕﺍﺩﺣﻭ)
.(ﻉﺍﺭﺫﻟﺍ
.ﺎﻬﻧﺎﻛﻣ ﻲﻓ ﻯﺭﺳﻳﻟﺍ ﺩﻳﻟﺍ ﻡﺎﻬﺑﺇ
.ﻉﺍﺭﺫﻟﺍ
ﻝﻳﻐﺷﺗﻟﺍ ﺔﻣﻅﻧﺃ ﻑﺷﺗﻛﺗﺳ
ﻕﻭﻓGame Controllers .(ﺏﺎﻌﻟﻷﺎﺑ ﻡﻛﺣﺗﻟﺍ ﺕﺍﺩﺣﻭ)
ﺍﻭﺣ ﻊﺑﺭﻣ ﺽﺭﻌﻳ ﺭ
.(ﻡﺗ)
.ﺎﻬﺿﺭﻋﻭ ﺏﻌﻠﻟﺍ ﻉﺍﺭﺫ
ً
ﻣﺋﺍﺩ ﻡﻗ ﺏﻧﺟﺗﻟ) ﺎﻬﻛﻳﺭﺣﺗ ﺏﻧﺟﺗﻭ ،ﺔﻳﺯﻛﺭﻣﻟﺍ ﺎﻬﻌﺿﺍﻭﻣ ﻰﻠﻋ ﻪﻳﺟﻭﺗﻟﺍ ﺓﺍﺩﺃﻭ
.(ﺓﺭﻳﺎﻌﻣﻟﺍ ﻲﻓ ﺕﻼﻛﺷﻣ ﻱﺃ
Bﻯﺭﺳﻳﻟﺍ ﺩﻳﻟﺍ ﻭﺃ ﻰﻧﻣﻳﻟﺍ ﺩﻳﻟﺍ ﻡﺍﺩﺧﺗﺳﺍ ﻊﺿﻭﻟ ﻡﺎﻬﺑﻹﺍ ﺓﺩﺎﺳﻭ ﻁﺑﺿ
62B.ﻰﻧﻣﻳﻟﺍ ﺩﻳﻟﺍ ﻡﺍﺩﺧﺗﺳﺍ ﻊﺿﻭ ﻲﻓ ﻉﺍﺭﺫﻟﺍ ﻡﺎﻬﺑﺇ ﺓﺩﺎﺳﻭ ﻥﻳﻭﻛﺗ ﻡﺗﻳ ،ﻲﺿﺍﺭﺗﻓﺍ ﻝﻛﺷﺑ
63Bﺍ ﻡﺍﺩﺧﺗﺳﺍ ﻊﺿﻭ ﻰﻠﻋ ﺎﻬﻁﺑﺿﻟ:ﻯﺭﺳﻳﻟﺍ ﺩﻳﻟ
64B ﻰﻧﻣﻳﻟﺍ ﺩﻳﻟﺍ ﻡﺍﺩﺧﺗﺳﺍ ﻲﻏﺭﺑ ءﺎﻁﻏ ﺔﻟﺍﺯﺈﺑ ﻡﻗ (ﺃ
65B ﻥﻳﻣﻳ ﻰﻠﻋ) ﻝﻣﺎﻛﻟﺎﺑ ﻪﺗﻟﺍﺯﺇﻭ ﻥﻵﺍ ﻪﻳﻟﺇ ﻝﻭﺻﻭﻟﺍ ﻥﻛﻣﻳ ﻱﺫﻟﺍ ﻝﻳﻭﻁﻟﺍ ﻲﻏﺭﺑﻟﺍ ﻙﻔﺑ ﻡﻗ ،ﺭﻳﻐﺻ ﻙﻔﻣ ﻡﺍﺩﺧﺗﺳﺎﺑ (ﺏ
66B) ﻰﻧﻣﻳﻟﺍ ﺩﻳﻟﺍ ﻡﺎﻬﺑﺇ ﺓﺩﺎﺳﻭ ﺔﻟﺍﺯﺈﺑ ﻡﻗ (ﺝ8.ﻉﺍﺭﺫﻟﺍ ﺭﺎﺳﻳ ﻰﻠﻋ ﺓﺩﻭﺟﻭﻣﻟﺍ (
B(ﺩ ﻟﺍ ﻡﺎﻬﺑﺇ ﺓﺩﺎﺳﻭ ﻊﺿ ﻰﻧﻣﻳﻟﺍ ﺩﻳ
68B ﺓﺩﺎﺳﻭ ﻡﺎﻛﺣﻹ ﻝﻣﺎﻛﻟﺎﺑ ﻲﻏﺭﺑﻟﺍ ﻁﺑﺭﺑ ﻡﻗﻭ ﻉﺍﺭﺫﻟﺍ ﺭﺎﺳﻳ ﻰﻠﻋ ﺓﺩﻭﺟﻭﻣﻟﺍ ﺔﺣﺗﻔﻟﺍ ﻲﻓ ﻝﻳﻭﻁﻟﺍ ﻲﻏﺭﺑﻟﺍ ﻊﺿ (ـﻫ
B(ﻭ ﻯﺭﺳﻳﻟﺍ ﺩﻳﻟﺍ ﻡﺍﺩﺧﺗﺳﺍ ﻲﻏﺭﺑ ءﺎﻁﻏ ﻊﺿ
70Bﺔﻅﺣﻼﻣ: .ﻰﻧﻣﻳﻟﺍ ﺩﻳﻟﺍ ﻡﺍﺩﺧﺗﺳﺍ ﻊﺿﻭ ﻰﻟﺇ ﺓﺩﻭﻌﻠﻟ ءﺍﺭﺟﻹﺍ ﺍﺫﻫ ﺱﻛﻌﺑ ﻡﻗ
Bﺭﺗﻭﻳﺑﻣﻛﻟﺍ
Bﺭﺗﻭﻳﺑﻣﻛﻟﺍ ﻰﻠﻋ ﺕﻳﺑﺛﺗﻟﺍ
22B1. ﻝﺻﻭﻣ ﻝﻳﺻﻭﺗﺑ ﻡﻗUSB ﺭﺗﻭﻳﺑﻣﻛﻠﻟ
23
B
24B2. .ﺎ
25B.ﺕﻳﺑﺛﺗﻟﺍ ﻝﺎﻣﻛﻹ ﺕﻧﺭﺗﻧﻹﺍ ﻰﻠﻋ ﺕﺎﻣﻳﻠﻌﺗﻟﺍ ﻊﺑﺗﺍ
26B3. ﻕﻭﻓ ﺭﻘﻧﺍStart/Settings/Control Panel ﺎ
27
B
28B4. ﻲﻓControl Panel ﻕﻭﻓ ﺭﻘﻧﺍ ،(ﻡﻛﺣﺗﻟﺍ ﺔﺣﻭﻟ)Properties ﻑﺋﺎﻅﻭ ﺔﻓﺎﻛ ﺭﺎﺑﺗﺧﻻ (ﺹﺋﺎﺻﺧﻟﺍ)
B!ﺏﻌﻠﻟ ﺩﻌﺗﺳﻣ ﻥﻵﺍ ﺕﻧﺃ
Bﺔﻣﺎﻫ ﺔﻅﺣﻼﻣ
6B:ﻉﺍﺭﺫﻟﺍ ﻝﻳﺻﻭﺗ ﺩﻧﻋ ﻉﺍﺭﺫﻟﺍ ﻥﻳﻳﻌﺗﺑ ﺎ
Page 95

6\4
104
7
10
13
16
Bﺕﺍﺭﻳﺫﺣﺗﻭ ﺎﻬﺣﻼﺻﺇﻭ ﺕﻼﻛﺷﻣﻟﺍ ﻑﺎﺷﻛﺗﺳﺍ
•
B:ﺢﻳﺣﺻ ﺭﻳﻏ ﻝﻛﺷﺑ ﺓﺭﻳﺎﻌﻣ ﻭﺩﺑﺗ ﻭﺃ ﺢﻳﺣﺻ ﻝﻛﺷﺑ ﻝﻣﻌﺗ ﻻ ﺏﻌﻠﻟﺍ ﻉﺍﺭﺫ
.ﺔﺑﻌﻠﻟﺍ ﻝﻳﻐﺷﺗ ﺓﺩﺎﻋﺇﻭ ﺏﻌﻠﻟﺍ
ً
ﻣﺋﺍﺩ ﻡﻗ
8B- ﺭﺧﺃ ﺓﺭﻣ ﺭﺗﻭﻳﺑﻣﻛﻟﺍ ﻝﻳﻐﺷﺗﺑ ﻡﻗ ،ﻡﺛ ؛ﺏﻌﻠﻟﺍ ﻉﺍﺭﺫ ﻝﺻﻓﻭ ﺭﺗﻭﻳﺑﻣﻛﻟﺍ ﻝﻳﻐﺷﺗ ﻑﺎﻘﻳﺈﺑ ﻡﻗ ﻉﺍﺭﺫ ﻝﻳﺻﻭﺗ ﺓﺩﺎﻋﺇﻭ ،ﻯ
9B- :ﺏﻌﻠﻟﺍ ﻉﺍﺭﺫ ﻝﻳﺻﻭﺗ ﺩﻧﻋ ﺎﻬﻛﻳﺭﺣﺗ ﺏﻧﺟﺗﻭ ،ﺔﻳﺯﻛﺭﻣﻟﺍ ﺎﻬﻌﺿﺍﻭﻣ ﻰﻠﻋ ﻪﻳﺟﻭﺗﻟﺍ ﺓﺍﺩﺃﻭ ﻉﺍﺭﺫﻟﺍ ﻥﻳﻳﻌﺗﺑ ﺎ
.(ﺓﺭﻳﺎﻌﻣﻟﺍ ﻲﻓ ﺕﻼﻛﺷﻣ ﻱﺃ ﺏﻧﺟﺗﻟ)
•
B:ﻲﺑ ﺹﺎﺧﻟﺍ ﺏﻌﻠﻟﺍ ﻉﺍﺭﺫ ﻥﻳﻭﻛﺗ ﻲﻧﻧﻛﻣﻳ ﻻ
:ﺔﺑﻌﻠﻟﺎﺑ ﺔﺻﺎﺧﻟﺍ (ﺏﻌﻠﻟﺍ ﻉﺍﺭﺫ .ﻝﻣﺎﻛﻟﺎﺑ ﻡﻛﺣﺗﻟﺍ ﺓﺩﺣﻭ ﺕﺍﺭﺎﻳﺧ ﻥﻳﻭﻛﺗﺑ ﻡﻗ ﻭﺃ ،ﺏﺳﺎﻧﻣﻟﺍ ﻥﻳﻭﻛﺗﻟﺍ ﺩﺩﺣ
11B" ﺔﻣﺋﺎﻗ ﻲﻓOptions/Controller/Gamepad or Joystick ﻭﺃ ﺔﺑﻌﻠﻟﺍ ﺔﺣﻭﻟ/ﻡﻛﺣﺗﻟﺍ ﺓﺩﺣﻭ/ﺕﺍﺭﺎﻳﺧﻟﺍ) "
12B- ﻥﻣ ﺩﻳﺯﻣ ﻰﻠﻋ ﻝﻭﺻﺣﻠﻟ ﺕﻧﺭﺗﻧﻹﺍ ﺭﺑﻋ ﺕﺎﻣﻳﻠﻌﺗﻠﻟ ﺓﺩﻋﺎﺳﻣﻟﺍ ﺓﺍﺩﻷﺍ ﻭﺃ ﺔﺑﻌﻠﻟﺍ ﻡﺩﺧﺗﺳﻣ ﻝﻳﻟﺩ ﻰﻟﺇ ﻉﻭﺟﺭﻟﺍ ﻰﺟﺭﻳ
.ﺕﺎﻣﻭﻠﻌﻣﻟﺍ
•
Bﻟﺍ ﻉﺍﺭﺫ:ﺔﻳﺎﻔﻛﻟﺍ ﻪﻳﻓ ﺎﻣﺑ ﺔﺳﺎﺳﺣ ﺕﺳﻳﻟ ﻭﺃ ﺔﻳﺎﻐﻠﻟ ﺔﺳﺎﺳﺣ ﺏﻌﻠ
14B- .ﺔﻔﻠﺗﺧﻣﻟﺍ ﺭﻭﺎﺣﻣﻟﺍ ﻰﻠﻋ ﺕﺎﻛﺭﺣﻟﺍ ﺽﻌﺑ ءﺍﺭﺟﺇ ﺩﺭﺟﻣﺑ ﻝﻘﺗﺳﻣ ﻝﻛﺷﺑ ﺏﻌﻠﻟﺍ ﻉﺍﺭﺫﻟ ﺔﻳﺗﺍﺫ ﺓﺭﻳﺎﻌﻣ ءﺍﺭﺟﺇ ﻡﺗﻳ
ﺑﻌﻠﻟﺎﺑ ﺔﺻﺎﺧﻟﺍ (ﺏﻌﻠﻟﺍ ﻉﺍﺭﺫ:ﺔ ﻩﺫﻫ ﺕﻧﺎﻛ ﺍﺫﺇ) ﻙﺑ ﺹﺎﺧﻟﺍ ﺏﻌﻠﻟﺍ ﻉﺍﺭﺫﻟ ﺔﺗﻳﻣﻟﺍ ﻕﻁﺎﻧﻣﻟﺍﻭ ﺔﻳﺳﺎﺳﺣﻟﺍ ﻁﺑﺿﺑ ﻡﻗ
15B" ﺔﻣﺋﺎﻗ ﻲﻓOptions/Controller/Gamepad or Joystick ﻭﺃ ﺔﺑﻌﻠﻟﺍ ﺔﺣﻭﻟ/ﻡﻛﺣﺗﻟﺍ ﺓﺩﺣﻭ/ﺕﺍﺭﺎﻳﺧﻟﺍ) "
.(ﺓﺭﻓﻭﺗﻣ ﺕﺍﺭﺎﻳﺧﻟﺍ
•
ﻳﺋﺎﻘﻠﺗ ﺏﻌﻠﻟﺍ ﻉﺍﺭﺫﻟ ﻱﺯﻛﺭﻣﻟﺍ ءﻭﺿﻟﺍ ﺊﻔﻁﻧﻳ ﻻ
ً
B:ﺎ
ﻥﺍﻭﺛ
ٍ
17B- ﺩﻌﺑ ءﻭﺿﻟﺍ ﺊﻔﻁﻧﻳﺳ ؛ﺔﻘﻠﻁﻣ ﺔﻳﺯﻛﺭﻣ ﺔﻣﻳﻗ ﻰﻠﻋ ﻪﻧﻳﻳﻌﺗ ﻡﺗﻳ ﺙﻳﺣﺑ ءﻁﺑﺑ ﻉﺍﺭﺫﻟﺍ ﻙﺭﺣ3 ﻡﺩﻋ ﻥﻣ
.ﻁﺎﺷﻧﻟﺍ
Page 96

6\5
ﻝﻳﻐﺷﺗﻟﺍ ﺞﻣﺍﺭﺑ ﺕﺍﺭﺍﺩﺻﺇ ﺙﺩﺣﺃ ،ﺔﻌﺋﺎﺷﻟﺍ ﺔﻠﺋﺳﻷﺍ) ﺔﻋﻭﻧﺗﻣﻟﺍ ﺓﺩﻋﺎﺳﻣﻟﺍ ﺕﺍﻭﺩﻷﺍ ﻰﻟﺇ ﻝﻭﺻﻭﻟﺍ ﻥﻣ ﻥﻛﻣﺗﺗﺳ ﻙﺎﻧﻫ ﻥﻣﻓ
76
78
ﻳﺮﻁ ﻦﻋ ﻭﺃ ﺞﻣﺎﻧﺮﺑ ﻱﺃ ﺐﺒﺴﺑ ﺮﺷﺎﺒﻣ ﺮﻴﻏ ﻭﺃ ﺮﺷﺎﺒﻣ ﻞﻜﺸﺑ ﺙﺪﺤﺗ ﺭﺍﺮﺿﺃ ﻱﺃ ،ﺮﺼﺤﻟﺍ ﻻ ﻝﺎﺜﻤﻟﺍ
.ﻙﺗﻠﻛﺷﻣ ﻝﺣ ﻲﻓ ﻙﺩﻋﺎﺳﺗ ﺩﻗ ﻲﺗﻟﺍ (ﺞﻣﺍﺭﺑﻟﺍﻭ ﺔﻠﻛﺷﻣﻟﺍ ﺕﺭﻣﺗﺳﺍ ﺍﺫﺇ ﺕﺎﺟﺗﻧﻣﻟ ﻲﻧﻔﻟﺍ ﻡﻋﺩﻟﺍ ﺔﻣﺩﺧﺑ ﻝﺎﺻﺗﻻﺍ ﻙﻧﻛﻣﻳﻓ ،
Thrustmaster :("ﻲﻧﻔﻟﺍ ﻡﻋﺩﻟﺍ")
ﺏﻳﻭhttp://ts.thrustmaster.com/. ﺎﻣﻭﻠﻌﻣﻟﺍ ﺩﻋﺎﺳﺗﺳ ﺙﻳﺣ ﻲﻓ ﻙﺗﻠﻛﺷﻣ ﻝﺣ ﻲﻓ ﻥﻳﻳﻧﻔﻟﺍ ﺎﻬﻣﺩﻘﺗﺳ ﻲﺗﻟﺍ ﺕ
.ﻥﻛﻣﻣ ﺕﻗﻭ ﻉﺭﺳﺃ
ﻝﻭﻘﺣﻟﺍ ﻲﻓ ﻡﺩﺧﺗﺳﻣﻟﺍ ﺕﺎﻣﻭﻠﻌﻣ ﻝﺎﺧﺩﺇ ﻰﺟﺭﻳﻓ ،ﻝﻌﻔﻟﺎﺑ ﺞﺗﻧﻣﻟﺍ ﻝﻳﺟﺳﺗﺑUsername )ﻡﺩﺧﺗﺳﻣﻟﺍ ﻡﺳﺍ (
ﺞﺘﻨﻣThrustmaster ﻟﺍ ﻊﻣ ﻖﻓﺍﻮﺘﺗ ﻲﺘﻟﺍ ﻥﺎﻤﻀﻟﺍ ﺓﺮﺘﻓ ﺓﺪﻣ ﻝﺍﻮﻁ ،ﻊﻴﻨﺼﺘﻟﺍ ﺏﻮﻴﻋﻭ ﺩﺍﻮﻤﻟﺍ ﺏﻮﻴﻋ ﻦﻣ ﺎًﻴﻟﺎﺧ ﺍﺬﻫ ﺓﺮﺘﻔ
.ﻪﻟﺍﺪﺒﺘﺳﺍ ﻭﺃ ﺞﺘﻨﻤﻟﺍ ﺍﺬﻫ ﺔﻤﻴﻗ ﺩﺍﺩﺮﺘﺳﻻ ﺔﻘﺑﺎﻄﻤﻟﺎﺑ ﺔﺒﻟﺎﻄﻤﻟﺍ ﺎﻬﻟﻼﺧ ﻦﻜﻤﻳ ﻲﺘﻟﺍ ﺓﺩﺪﺤﻤﻟﺍ ﺍﺬﻫ ﻱﺮﺴﻳ ،ﻲﺑﻭﺭﻭﻷﺍ ﺩﺎﺤﺗﻻﺍ ﻝﻭﺩ ﻲﻓ
) ﺓﺪﻤﻟ2 ﺞﺘﻨﻤﻟﺍ ﻡﻼﺘﺳﺍ ﺦﻳﺭﺎﺗ ﻦﻣ ﻦﻴﻣﺎﻋ (Thrustmaster . ﺓﺩﺪﺤﻤﻟﺍ ﺓﺮﺘﻔﻟﺍ ﻊﻣ ﻥﺎﻤﻀﻟﺍ ﺓﺮﺘﻓ ﻖﻓﺍﻮﺘﺗ ،ﻯﺮﺧﺃ ﻝﻭﺩ ﻲﻓﻭ
ﺞﺘﻨﻤﻟﺍ ﺔﻘﺑﺎﻄﻤﺑ ﺔﺒﻟﺎﻄﻤﻠﻟThrustmaster ﺦﻳﺭﺎﺗ ﺪﻨﻋ ﻚﻠﻬﺘﺴﻤﻟﺍ ﺎﻬﺑ ﻦﻄﻘﻳ ﻥﺎﻛ ﻲﺘﻟﺍ ﺔﻟﻭﺪﻟﺍ ﻲﻓ ﺎﻬﺑ ﻝﻮﻤﻌﻤﻟﺍ ﻦﻴﻧﺍﻮﻘﻠﻟ ﺎًﻘﻓﻭ
ﺞﺘﻨﻤﻟﺍ ءﺍﺮﺷThrustmaster ) ﻡﺎﻋ ﻥﺎﻤﻀﻟﺍ ﺓﺮﺘﻓ ﻥﻮﻜﺘﺳ ،ﺔّﻴﻨﻌﻤﻟﺍ ﺔﻟﻭﺪﻟﺍ ﻲﻓ ﺔﺒﻟﺎﻄﻤﻟﺍ ﻡﺪﻋ ﺔﻟﺎﺣ ﻲﻓ)1 ﺦﻳﺭﺎﺗ ﻦﻣ ﺪﺣﺍﻭ (
ﺞﺘﻨﻤﻠﻟ ﻲﻠﺻﻷﺍ ءﺍﺮﺸﻟﺍThrustmaster .(
ﺒﻴﻌﻣ ﺞﺘﻨﻤﻟﺍ ﻥﺃ ﺮﻬﻅ ﺍﺫﺇﻭ
ً
.ﺎﻬﻌﺒﺘﺗ ﺮﺷ ﻥﺎﻜﻣ ﻰﻟﺇ ﺞﺘﻨﻤﻟﺍ ﺓﺩﺎﻋﺇ ﺐﺠﻴﻓ ،ﺐﻴﻌﻟﺍ ﺩﻮﺟﻭ ﻦﻣ ﺪﻛﺄﺘﻟﺍ ﻢﺗ ﺍﺫﺇﻭ.(ﻲﻨﻔﻟﺍ ﻢﻋﺪﻟﺍ ﻪﻴﻟﺇ ﺮﻴﺸﻳ ﺮﺧﺁ ﻊﻗﻮﻣ ﻱﺃ ﻭﺃ) ﻪﺋﺍ
ﺔﻛﺮﺸﻟ ﺔﻠﻣﺎﻜﻟﺍ ﺔﻴﻟﻭﺆﺴﻤﻟﺍ ﺮﺼﺘﻘﺗGuillemot ﺞﺘﻨﻤﻟﺍ ﺡﻼﺻﺇ ﻰﻠﻋ (ﺔﻴﻌﺒﺘﻟﺍ ﺭﺍﺮﺿﻷﺍ ﻚﻟﺫ ﻲﻓ ﺎﻤﺑ) ﺎﻬﻋﻭﺮﻓﻭ
Thrustmaster ﻭﺃ .ﻱﺭﺎﺴﻟﺍ ﻥﻮﻧﺎﻘﻟﺍ ﺐﺟﻮﻤﺑ ﺍًﺰﺋﺎﺟ ﺍﺬﻫ ﻥﻮﻜﻳ ﺎﻣﺪﻨﻋ ﻚﻟﺫﻭ ،ﻪﻟﺍﺪﺒﺘﺳﺍ ﺔﻛﺮﺷ ﻲﻠﺨﺗGuillemot ﺎﻬﺘﻴﻟﻭﺆﺴﻣ
.ﻱﺭﺎﺴﻟﺍ ﻥﻮﻧﺎﻘﻟﺍ ﺐﺟﻮﻤﺑ ﺍًﺰﺋﺎﺟ ﺍﺬﻫ ﻥﻮﻜﻳ ﺎﻣﺪﻨﻋ ﻚﻟﺫﻭ ،ﻦّﻴﻌﻣ ﺽﺮﻐﻟ ﺔﻣءﻼﻤﻟﺍ ﻭﺃ ﺓﺭﺎﺠﺘﻟﺎﺑ ﺔﺻﺎﺧ ﺕﺎﻧﺎﻤﺿ ﻱﺃ ﻦﻋ ﺮﺛﺆﻳ ﻻ
ً
ﺔﺠﻴﺘﻧ ﻒﻠﺘﻠﻟ ﺽّﺮﻌﺗ ﺍﺫﺇ ﻭﺃ ﻩﺮﻴﻴﻐﺗ ﻭﺃ ﻪﺤﺘﻓ ﻭﺃ ﺞﺘﻨﻤﻟﺍ ﻞﻳﺪﻌﺗ ﻢﺗ ﺍﺫﺇ (
ﺍ ﻦﻴﻧﺍﻮﻘﻟﺍ ﻰﻀﺘﻘﻤﺑ ﻚﻠﻬﺘﺴﻤﻠﻟ ﺔﻴﻧﻮﻧﺎﻘﻟﺍ ﻕﻮﻘﺤﻟﺍ ﻰﻠﻋ ﻥﺎﻤﻀﻟﺍ ﺍﺬﻫ.ﺔﻴﻛﻼﻬﺘﺳﻻﺍ ﻊﻠﺴﻟﺍ ﻊﻴﺑ ﻰﻠﻋ ﺔﻘّﺒﻄﻤﻟ
ﻟﺍ ﻭﺃ ﺩﺍﻮﻤﻟﺍ ﻲﻓ ﺐﻴﻋ ﺩﻮﺟﻮﺑ ﻂﺒﺗﺮﻳ ﻻ ﺮﺧﺁ ﺐﺒﺳ ﻱﺃ ﻭﺃ ،ﻱﺩﺎﻌﻟﺍ ﻝﺎﻤﻌﺘﺳﻻﺍ ﺔﺠﻴﺘﻧ ﻙﻼﻫﻹﺍ ﻭﺃ ﺙﺩﺎﺣ ﻭﺃ ﻝﺎﻤﻫﻹﺍ ﻭﺃ ﺎﻤﺑ) ﻊﻴﻨﺼﺘ
ﺞﺘﻨﻣ ﻊﻴﻤﺠﺗ ،ﺮﺼﺤﻟﺍ ﻻ ﻝﺎﺜﻤﻟﺍ ﻞﻴﺒﺳ ﻰﻠﻋ ،ﻚﻟﺫ ﻲﻓThrustmaster ﻪﺟﻭ ﻰﻠﻋ ﻚﻟﺫ ﻲﻓ ﺎﻤﺑ ،ﺐﺳﺎﻨﻣ ﺮﻴﻏ ﺮﺼﻨﻋ ﻱﺃ ﺔﻄﺳﺍﻮﺑ
ﻦﻣ ﺎﻫﺪﻳﺭﻮﺗ ﻢﺘﻳ ﻻ ﻯﺮﺧﺃ ﺮﺻﺎﻨﻋ ﻱﺃ ﻭﺃ ﻦﺣﺍﻮﺸﻟﺍ ﻭﺃ ﻦﺤﺸﻟﺍ ﺓﺩﺎﻋﻹ ﺔﻠﺑﺎﻘﻟﺍ ﺕﺎﻳﺭﺎﻄﺒﻟﺍ ﻭﺃ ﺔﻗﺎﻄﻟﺎﺑ ﺩﺍﺪﻣﻹﺍ ﺕﺍﺪﺣﻭ ﺹﻮﺼﺨﻟﺍ
ﻝﻼﺧGuillemot ) ؛(ﺞﺘﻨﻤﻟﺍ ﺍﺬﻬﻟ2 () ؛ﻲﻨﻔﻟﺍ ﻢﻋﺪﻟﺍ ﻞَﺒِﻗ ﻦﻣ ﺔﻣﺪﻘﻤﻟﺍ ﺕﺎﻤﻴﻠﻌﺘﻟﺎﺑ ﻡﺍﺰﺘﻟﻻﺍ ﻡﺪﻋ ﺔﻟﺎﺣ ﻲﻓ3 ﺚﻴﺣ ،ﺞﻣﺍﺮﺒﻟﺍ ﻰﻠﻋ (
) ؛ﺩﺪﺤﻣ ﻥﺎﻤﻀﻟ ﺞﻣﺍﺮﺒﻟﺍ ﻩﺬﻫ ﻊﻀﺨﺗ4 :ﺞﺘﻨﻤﻟﺍ ﺮﻤﻋ ﺓﺮﺘﻓ ﻝﻼﺧ ﺎﻬﻛﻼﻬﺘﺳﺍ ﻢﺘﻳ ﻲﺘﻟﺍ ﺮﺻﺎﻨﻌﻟﺍ) ﺔﻴﻛﻼﻬﺘﺳﻻﺍ ﺮﺻﺎﻨﻌﻟﺍ ﻰﻠﻋ (
ﺕﺍﺩﺎﺳﻭ ﻭﺃ ﺱﺃﺮﻟﺍ ﺕﺎﻋﺎﻤﺳ ﻭﺃ ﻡﺍﺪﺨﺘﺳﻻﺍ ﺓﺩﺎﻋﻹ ﺔﻠﺑﺎﻘﻟﺍ ﺮﻴﻏ ﺕﺎﻳﺭﺎﻄﺒﻟﺎﻛ) ؛(ﺱﺃﺮﻟﺍ ﺔﻋﺎﻤﺴﺑ ﺔﺻﺎﺨﻟﺍ ﻥﺫﻷﺍ5 ﺕﺎﻘﺤﻠﻤﻟﺍ (
) ؛(ﻢﺼﻌﻤﻟﺍ ﺔﻄﺑﺭﺃﻭ ﺐﺋﺎﻘﺤﻟﺍﻭ ﺕﺎﻈﻓﺎﺤﻟﺍﻭ ﺐﻠﻌﻟﺍﻭ ﺕﻼﺑﺎﻜﻟﺎﻛ)6.ﻲﻨﻠﻋ ﺩﺍﺰﻣ ﻲﻓ ﺞﺘﻨﻤﻟﺍ ﻊﻴﺑ ﻢﺗ ﺍﺫﺇ (
71Bﻲﻧﻔﻟﺍ ﻡﻋﺩﻟﺍ
72B ﻰﻟﺇ ﻝﺎﻘﺗﻧﻻﺍ ﻰﺟﺭﻳﻓ ،ﻙﺑ ﺹﺎﺧﻟﺍ ﺞﺗﻧﻣﻟﺍ ﻊﻣ ﺔﻠﻛﺷﻣ ﺕﻬﺟﺍﻭ ﺍﺫﺇhttp://ts.thrustmaster.com .ﺔﻐﻠﻟﺍ ﺩﻳﺩﺣﺗﻭ
73B:ﻲﻧﻭﺭﺗﻛﻟﻹﺍ ﺩﻳﺭﺑﻟﺍ ﻕﻳﺭﻁ ﻥﻋ
74B ﺭﺑﻋ ﺎﻧﺑ ﺹﺎﺧﻟﺍ ﻲﻧﻔﻟﺍ ﻡﻋﺩﻟﺍ ﻰﻟﺇ ﻝﻭﺻﻭﻠﻟﻲﻧﻭﺭﺗﻛﻟﻹﺍ ﺩﻳﺭﺑﻟﺍ ﻊﻗﻭﻣ ﻰﻠﻋ ﺕﻧﺭﺗﻧﻹﺍ ﺭﺑﻋ ﻝﻳﺟﺳﺗﻟﺎﺑ ﻻﻭﺃ ﻡﻭﻘﺗ ﻥﺃ ﺏﺟﻳ ،
75B ﻕﻭﻓ ﺭﻘﻧﺍProduct Registration )ﺞﺗﻧﻣﻟﺍ ﻝﻳﺟﺳﺗ.ﺔﺷﺎﺷﻟﺍ ﻰﻠﻋ ﺔﺿﻭﺭﻌﻣﻟﺍ ﺕﺎﻣﻳﻠﻌﺗﻟﺍ ﻊﺑﺗﺍﻭ ( ﺕﻣﻗ ﺍﺫﺇ
ﻭPassword )ﺭﻭﺭﻣﻟﺍ ﺔﻣﻠﻛ ﻡﺛ ( ﻕﻭﻓ ﺭﻘﻧﻟﺍLogin )ﻝﻭﺧﺩﻟﺍ ﻝﻳﺟﺳﺗ.(
Bﻚﻠﻬﺘﺴﻤﻟﺍ ﻥﺎﻤﺿ ﺕﺎﻣﻮﻠﻌﻣ
1B ﺔﻛﺮﺷ ﻦﻤﻀﺗGuillemot Corporation S.A" ﻢﺳﺎﺑ ﺪﻌﺑ ﺎﻤﻴﻓ ﺎﻬﻴﻟﺇ ﺭﺎﺸﻤﻟﺍ) ﺔﻴﻤﻟﺎﻌﻟﺍ .Guillemot ﻥﻮﻜﻳ ﻥﺃ ﻚﻠﻬﺘﺴﻤﻠﻟ ("
2Bﻟﺍ ﻞﻤﺸﻳ ،ﻡﺪﻘﺗ ﺎﻤﺑ ﻝﻼﺧﻹﺍ ﻡﺪﻋ ﻊﻣ) ﺔﺘﺳ ﺓﺪﻤﻟ ﻦﺤﺸﻟﺍ ﺓﺩﺎﻋﻹ ﺔﻠﺑﺎﻘﻟﺍ ﺕﺎﻳﺭﺎﻄﺒﻟﺍ ﻥﺎﻤﻀ6 .ﻲﻠﺻﻷﺍ ﻊﻴﺒﻟﺍ ﺦﻳﺭﺎﺗ ﻦﻣ ﺮﻬﺷﺃ (
3B ﻥﺃ ﺐﺠﻳ ﻲﺘﻟﺍ ﺕﺍءﺍﺮﺟﻹﺍ ﻰﻟﺇ ﻙﺪﺷﺮﻴﺳ ﻱﺬﻟﺍ ﻲﻨﻔﻟﺍ ﻢﻋﺪﻟﺎﺑ ﺭﻮﻔﻟﺍ ﻰﻠﻋ ﻞﺼﺗﺎﻓ ،ﻥﺎﻤﻀﻟﺍ ﺓﺮﺘﻓ ﻝﻼﺧ ﺎ
4B.ﻲﻨﻔﻟﺍ ﻢﻋﺪﻟﺍ ﺭﺎﻴﺘﺧﺍ ﺐﺴﺣ ﻚﻟﺫﻭ ،ﻪﻟﺍﺪﺒﺘﺳﺍ ﻭﺃ ﻚﻠﻬﺘﺴﻤﻟﺎﺑ ﺹﺎﺨﻟﺍ ﺐﻴﻌﻤﻟﺍ ﺞﺘﻨﻤﻟﺍ ﺡﻼﺻﺇ ﺐﺠﻳ ،ﻥﺎﻤﻀﻟﺍ ﺍﺬﻫ ﻕﺎﻴﺳ ﻲﻓﻭ
5B:ﻥﺎﻤﻀﻟﺍ ﺍﺬﻫ ﻱﺮﺴﻳ ﻻ )1 ﻢﺋﻼﻤﻟﺍ ﺮﻴﻏ ﻭﺃ ﺊﻴﺴﻟﺍ ﻡﺍﺪﺨﺘﺳﻼﻟ
77B.ﻞﻳﻮﺤﺘﻠﻟ ﻞﺑﺎﻗ ﺮﻴﻏ ﻥﺎﻤﻀﻟﺍ ﺍﺬﻫ
:ﻱﺭﺎﺴﻟﺍ ﻥﻮﻧﺎﻘﻟﺍ ﺐﺟﻮﻤﺑ ﺍًﺰﺋﺎﺟ ﺍﺬﻫ ﻥﺎﻛ ﺍﺫﺇ ،ﺔﻴﻟﺎﺘﻟﺍ ﺕﻻﺎﺤﻟﺍ ﻦﻣ ﺮﺜﻛﺃ ﻭﺃ ﺔﻟﺎﺣ ﻦﻋ ﺞﺘﻨﺗ ﺭﺍﺮﺿﺃ ﻱﺃ ﻦﻋ )1 ﻞﻳﺪﻌﺗ (
) ؛ﻩﺮﻴﻴﻐﺗ ﻭﺃ ﻪﺤﺘﻓ ﻭﺃ ﺞﺘﻨﻤﻟﺍ2) ؛ﺔﻋﻮﻤﺠﻤﻟﺍ ﺕﺎﻤﻴﻠﻌﺘﺑ ﻡﺍﺰﺘﻟﻻﺍ ﻡﺪﻋ (3 ﻭﺃ ﻝﺎﻤﻫﻹﺍ ﻭﺃ ﻢﺋﻼﻤﻟﺍ ﺮﻴﻏ ﻭﺃ ﺊﻴﺴﻟﺍ ﻡﺍﺪﺨﺘﺳﻻﺍ (
ﻰﻠﻋ ،ﻡﺩﺎﺼﺗ) ﺙﺩﺎﺤﻟ ﺽّﺮﻌﺘﻟﺍ) ؛(ﻝﺎﺜﻤﻟﺍ ﻞﻴﺒﺳ4.ﻱﺩﺎﻌﻟﺍ ﻝﺎﻤﻌﺘﺳﻻﺍ ﻦﻋ ﺞﺗﺎﻨﻟﺍ ﻙﻼﻫﻹﺍ ( ﺔﻛﺮﺷ ﻲﻠﺨﺗGuillemot
ﻞﻴﺒﺳ ﻰﻠﻋ ،ﺎًﻨﻤﻀﺘﻣ) ﺞﺘﻨﻤﻟﺎﺑ ﻖﻠﻌﺘﻳ ﻊﻴﻨﺼﺘﻟﺍ ﻭﺃ ﺩﺍﻮﻤﻟﺍ ﻲﻓ ﺐﻴﻌﺑ ﻂﺒﺗﺮﺗ ﻻ ﺭﺍﺮﺿﺃ ﻱﺃ ﻦﻋ ﺎﻬﺘﻴﻟﻭﺆﺴﻣ ﺔﻓﺎﻛ ﺎﻬﻋﻭﺮﻓﻭ
ﺞﺘﻨﻣ ﺞﻣﺩ ﻖ
Thrustmaster ﺕﺎﻳﺭﺎﻄﺒﻟﺍ ﻭﺃ ﺔﻗﺎﻄﻟﺎﺑ ﺩﺍﺪﻣﻹﺍ ﺕﺍﺪﺣﻭ ﺹﻮﺼﺨﻟﺍ ﻪﺟﻭ ﻰﻠﻋ ﻚﻟﺫ ﻲﻓ ﺎﻤﺑ ،ﺐﺳﺎﻨﻣ ﺮﻴﻏ ﺮﺼﻨﻋ ﻱﺃ ﻊﻣ
ﻝﻼﺧ ﻦﻣ ﺎﻫﺪﻳﺭﻮﺗ ﻢﺘﻳ ﻻ ﻯﺮﺧﺃ ﺮﺻﺎﻨﻋ ﻱﺃ ﻭﺃ ﻦﺣﺍﻮﺸﻟﺍ ﻭﺃ ﻦﺤﺸﻟﺍ ﺓﺩﺎﻋﻹ ﺔﻠﺑﺎﻘﻟﺍGuillemot ﺍﺬﻫ ﻥﺎﻛ ﺍﺫﺇ ،(ﺞﺘﻨﻤﻟﺍ ﺍﺬﻬﻟ
.ﻱﺭﺎﺴﻟﺍ ﻥﻮﻧﺎﻘﻟﺍ ﺐﺟﻮﻤﺑ ﺍًﺰﺋﺎﺟ
Bﺔﻴﻟﻭﺆﺴﻤﻟﺍ
79B ﺔﻛﺮﺷ ﻲﻠﺨﺗGuillemot Corporation S.A. " ﻢﺳﺎﺑ ﺪﻌﺑ ﺎﻤﻴﻓ ﺎﻬﻴﻟﺇ ﺭﺎﺸﻤﻟﺍ)Guillemot"( ﻣ ﺎﻬﻋﻭﺮﻓﻭ ﺔﻠﻣﺎﻛ ﺎﻬﺘﻴﻟﻭﺆﺴ
Page 97

6\6
80
81B- © 2015 Guillemot Corporation S.A. .ﺔﻅﻭﻔﺣﻣ ﻕﻭﻘﺣﻟﺍ ﺔﻓﺎﻛ ﺔﻣﻼﻌﻟﺍThrustmaster® ﺔﻣﻼﻋ ﻲﻫ
83
.ﺭﺧﺁ ﻰﻟﺇ ﺩﻠﺑ ﻥﻣ ﻑﻠﺗﺧﺗ ﺩﻗﻭ ﺭﺎﻌﺷﺇ ﻥﻭﺩ ﺭﻳﻳﻐﺗﻠﻟ ﺕﺎﻔﺻﺍﻭﻣﻟﺍﻭ ﺕﺎﻣﻳﻣﺻﺗﻟﺍﻭ .ﻥﻳﺻﻟﺍ ﻲﻓ ﻊﻧﺻ
ﺓﺩﺎﻋﻹ ﺔﻳﻧﻭﺭﺗﻛﻟﻹﺍﻭ ﺔﻳﺑﺭﻬﻛﻟﺍ ﺕﺍﺩﻌﻣﻟﺍ ﺕﺎﻳﺎﻔﻧ ﻥﻣ ﺹﻠﺧﺗﻟﺎﺑ ﺔﺻﺎﺧ ﻊﻳﻣﺟﺗ ﺔﻁﻘﻧ ﻲﻓ ﻩﺅﺎﻘﻟﺇ ﺏﺟﻳ
ً
ءﺎﻧﺑ ﺩﺍﻭﻣﻟﺍ ﺭﻳﻭﺩﺗ ﺓﺩﺎﻋﺇ ﻥﻛﻣﻳ ﻼﺧ ﻥﻣﻭ ﻯﺭﺧﻷﺍ ﻝﺎﻛﺷﻷﺍﻭ ﺭﻳﻭﺩﺗﻟﺍ ﺓﺩﺎﻋﺇ ﻝ
ﺔﻳﺎﻣﺣ ﻲﻓ ﺓﺩﻋﺎﺳﻣﻟﺍ ﻲﻓ ﺭﻳﺑﻛ ﻝﻛﺷﺑ ﺔﻣﻫﺎﺳﻣﻟﺍ ﻙﻧﻛﻣﻳ ﺔﻳﻧﻭﺭﺗﻛﻟﻹﺍﻭ ﺔﻳﺑﺭﻬﻛﻟﺍ ﺕﺍﺩﻌﻣﻟﺍ ﺕﺎﻳﺎﻔﻧ ﺔﺟﻟﺎﻌﻣﻟ
ً
ﻣﺎﻋ ﺔﻁﺳﺍﻭﺑ ﻡﺍﺩﺧﺗﺳﻼﻟ ﺏﺳﺎﻧﻣ ﺭﻳﻏ ﺞﺗﻧﻣﻟﺍ ﺍﺫﻫ
Bﺭﺷﻧﻟﺍ ﻕﻭﻘﺣ
ﺔﻛﺭﺷﻟ ﺔﻠﺟﺳﻣ ﺔﻳﺭﺎﺟﺗGuillemot Corporation S.A.. ﺔﻣﻼﻌﻟﺍﻭWindows® ﺔﻛﺭﺷﻟ ﺔﻠﺟﺳﻣ ﺔﻳﺭﺎﺟﺗ ﺔﻣﻼﻋ ﻲﻫ
Microsoft Corporation .ﻯﺭﺧﺃ ﻥﺍﺩﻠﺑ ﻲﻓ ﻭﺃ/ﻭ ﺓﺩﺣﺗﻣﻟﺍ ﺕﺎﻳﻻﻭﻟﺍ ﻲﻓ
82Bﺎﻣﻼﻌﻟﺍ ﺔﻓﺎﻛ.ﻥﻳﻳﻧﻌﻣﻟﺍ ﺎﻬﺑﺎﺣﺻﻷ ﺔﻛﻭﻠﻣﻣ ﻯﺭﺧﻷﺍ ﺔﻳﺭﺎﺟﺗﻟﺍ ﺕ .ﺔﻣﺯﻠﻣ ﺭﻳﻏ ﺔﻳﺣﻳﺿﻭﺗﻟﺍ ﻡﻭﺳﺭﻟﺍ ﺕﺎﻳﻭﺗﺣﻣﻟﺍ ﻊﺿﺧﺗﻭ
84Bﻟﺍ ﻊﻣ ﻪﻧﻣ ﺹﻠﺧﺗﻟﺍ ﻡﺩﻋ ﺏﺟﻳ ،ﺞﺗﻧﻣﻟﺍ ﺍﺫﻬﻟ ﻲﻠﻳﻐﺷﺗﻟﺍ ﺭﻣﻌﻟﺍ ءﺎﻬﺗﻧﺍ ﺩﻧﻋ ﻥﻛﻟ ﺔﻳﺩﺎﻌﻟﺍ ﺔﻳﻟﺯﻧﻣﻟﺍ ﺕﺎﻳﺎﻔﻧ
Bﺔﺋﻳﺑﻟﺍ ﺔﻳﺎﻣﺣ ﺕﺎﻳﺻﻭﺗ
.ﺭﻳﻭﺩﺗﻟﺍ
85B.ﻑﻼﻐﻟﺍ ﻭﺃ ﻡﺩﺧﺗﺳﻣﻟﺍ ﻝﻳﻟﺩ ﻭﺃ ﺞﺗﻧﻣﻟﺍ ﻰﻠﻋ ﺩﻭﺟﻭﻣﻟﺍ ﺯﻣﺭﻟﺍ ﻝﻼﺧ ﻥﻣ ﺍﺫﻫ ﻰﻠﻋ ﺩﻳﻛﺄﺗﻟﺍ ﻡﺗﻳﻭ
86B.ﺎﻬﺻﺋﺎﺻﺧ ﻰﻠﻋ
.ﺔﺋﻳﺑﻟﺍ
87B.ﻙﻳﻟﺇ ﻊﻳﻣﺟﺗ ﺔﻁﻘﻧ ﺏﺭﻗﺃ ﻥﻋ ﺕﺎﻣﻭﻠﻌﻣ ﻰﻠﻋ ﻝﻭﺻﺣﻠﻟ ﺔﻳﻠﺣﻣﻟﺍ ﺕﺎﻁﻠﺳﻟﺎﺑ ﻝﺎﺻﺗﻻﺍ ﻰﺟﺭﻳ
88B.ﺕﺎﻣﻭﻠﻌﻣﻟﺍ ﻩﺫﻬﺑ ﻅﻔﺗﺣﺍ .ﻑﺭﺎﺧﺯﻟﺍﻭ ﻥﺍﻭﻟﻷﺍ ﻑﻠﺗﺧﺗ ﺩﻗ
89Bﻫ ﻥﺳ ﻥﻣ ﻝﺎﻔﻁﻷﺎﺑ ﺔﻘﻠﻌﺗﻣﻟﺍ ﺭﻳﻳﺎﻌﻣﻟﺍ ﺔﻓﺎﻛ ﻊﻣ ﻕﻓﺍﻭﺗﻣ ﺞﺗﻧﻣﻟﺍ ﺍﺫ14 .ﺭﺛﻛﺃﻭ ﺎ
ﻥﻣ ﻝﻗﺃ ﻝﺎﻔﻁﻷﺍ14 .ﺔﻧﺳ
90Bwww.thrustmaster.com
 Loading...