

Page 1
TEP 302
User Manual
Bedienungsanleitung
Page 2

© 2006 Thorens Export Company Ltd, all rights reserved.
Under the copyright laws, this manual may not be copied, in whole or in part, without
the consent of Thorens.
The Thorens logo is a trademark of Thorens Holding Ltd. Use for commercial
purposes without the prior consent of Thorens may constitude trademark
infringement.
Thorens is not responsible for printing or clerical errors.
© 2006 Thorens Export Company AG, alle Rechte vorbehalten.
Bedienungsanleitungen und Handbücher sind urhebrrechtlich geschützt. Das
Kopieren, Vervielfältigen, Übersetzen oder Umsetzen in irgendein elektronisches
Medium oder maschinell lesbare Form im Ganzen oder in Teilen ohne vorherige
Genehmigung von Thorens ist nicht gestattet.
Das Thorens Logo ist eine Marke der Thorens Holding AG. Die Verwendung des
Logos für kommerzielle Zwecke ohne vorherige Genehmigung von Thorens kann
einen Markenmissbrauch darstellen.
Thorens übernimmt keine Gewähr für die Richtigkeit des Inhalts dieser
Bedienungsanleitung.
Thorens Export Company AG, Im Huebel 1, CH-4304 Giebenach, Switzerland
Tel: +41 (0) 61 813 03 36, Fax: +41 (0) 61 813 03 39, E-Mail: info@thorens.com
www.thorens.com
Page 3
User Manual
Bedienungsanleitung
English........................................................................4
Deutsch.....................................................................17
3
Page 4

English
Congratulations on purchasing your Thorens TEP 302!
The TEP 302 amplifies signals from a turntable to meet the require
ments of the “line level” input of any power amplifier. At the same time
it performs a RIAA equalization to provide you with the highest music
quality available.
The whole product is “Made in Germany”, which guarantees highest
sonic quality combined with a long lifespan.
We understand that you would like to start listening at once, yet you
should take a few minutes and carefully read this manual first. It contains important information that will help you to avoid damages and
to ensure proper wiring with the rest of your system. However, if you
still have questions of any kind, please feel free to contact us.
Contents
Safety instructions.......................................................................... 5
Unpacking and installation.............................................................. 6
Connecting the TEP 302................................................................ 7
Configuring the TEP 302................................................................. 9
Operation.....................................................................................12
Maintenance................................................................................. 13
Specifications...............................................................................14
-
Customer support........................................................................15
4
Page 5

Safety instructions
PLEASE READ THIS PAGE BEFORE OPERATING YOUR UNIT!
CAUTION
RISK OF ELECTRIC SHOCK
DO NOT OPEN
ATTENTION: DANGER D’ELECTROCUTION. NE PAS OUVRIR.
CAUTION
To reduce risk of electric shock, do not
remove the cover (or back). No userserviceable parts inside.
EXPLANATION OF GRAPHICAL SYMBOLS
The lightning flash with arrowhead symbol, within an equilateral
triangle, is intended to alert you to the presence of uninsulated
‘dangerous voltage’ within the product’s enclosure that may be of
sufficient magnitude to constitute an electric shock to persons.
The exclamation point within an equilateral triangle is intended to
alert you to the presence of important operating and maintanance
(servicing) instructions in the literature accompanying the appliance.
FOR YOUR SAFETY:
Units shipped to the U.S.A. and Canada are designed to operate on 115-120 V AC
only. Safety precaution with use of a polarized AC plug. However, some products may be
supplied with a non-polarized plug.
CAUTION: TO PREVENT ELECTRIC SHOCK, DO NOT USE THIS (POLARIZED) PLUG
WITH AN EXTENSION CORD RECEPTABLE OR OTHER OUTLET UNLESS THE BLADES
CAN BE FULLY INSERTED TO PREVENT BLADE EXPOSURE.
WARNING
TO PREVENT FIRE OR SHOCK HAZARD,
DO NOT EXPOSE THIS APPLIANCE TO
RAIN OR MOISTURE.
This product was tested and
complies with all the require
ments for the CE Mark.
-
IMPORTANT: DISPOSAL OF WASTE EQUIPMENT BY USERS IN
PRIVATE HOUSEHOLDS IN THE EUROPEAN UNION
This symbol on the product or on its packaging indicates that this
product must not be disposed off with your other household waste.
Instead, it is your responsibility to dispose of your waste equipment
by handing it over to a designated collection point for the recycling of
waste electrical and electronic equipment. The separate collection and
recycling of your waste equipment at the time of disposal will help to
conserve natural resources and ensure that it is recycled in a manner
that protects human health and the environment. For more information
about where you can drop off your waste equipment for recycling,
please contact your local city office, your household waste disposal
service or the shop where you purchased the product.
5
Page 6

Unpacking and installation
Unpack the TEP 302 and place it on a level surface in proximity of
the turntables. We suggest that you save the cardboard and packing
materials for later use.
Please make sure that the following items were delivered with
your TEP 302 before you proceed:
Scope of supply:
Never expose the unit to either of the following conditions:
Locations near air ducts, radiators or other sources of
heat or direct exposure to sunlight
Extremely cold locations
Locations subject to extensive dust, moisture,
mechanical vibration, shock or poor ventilation
1 x Thorens TEP 302
1 x Power supply unit
1 x Power cord
1 x RCA interconnect
6
Page 7
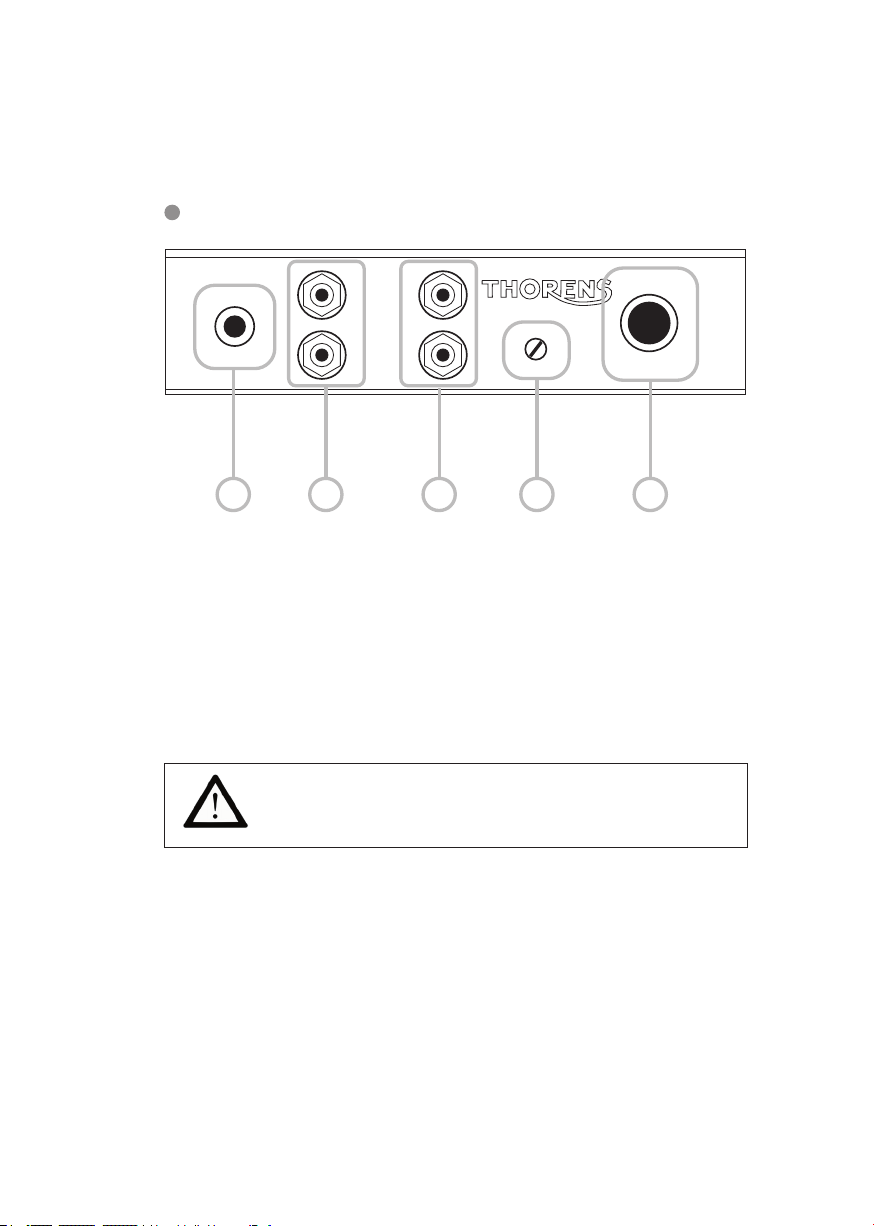
Connecting the TEP 302
1 2 4 5
3
Rear panel connectors
Power Supply
Connect the included power cord with the 3-pin AC socket of the
power supply unit with an AC outlet that meets the power supply
conditions (see Specifications for more information). Connect the
power supply unit with the power connector of the TEP 302.
Please make sure that the unit is switched off before you
proceed! (To turn it off press the Power button on the front panel).
Do not pull out the power cord when the amplifier
is switched on. The unit might be damaged.
Required line voltage for the power supply unit
U.S.A. and Canada...........................................................115-120 V
Europe, Australia and Asia................................................220-240 V
Japan...................................................................................100 V
Power consumption
See Specifications or type plate at the rear of the unit.
7
Page 8

Connecting the TEP 302
Audio input
Connect the TEP 302 input with the output sockets of your
turntable (use the turntable’s RCA cable).
Audio output
Use the included RCA cable to connect the TEP 302 output with
a “line level” input (e.g. CD, Aux, DVD, Tuner...) of your amplifier or
preamplifier.
Never connect the TEP 302 with the phono
input of your amplifier! High distortion and an
extremely high input level may cause damage to
your amplifier.
When connecting the RCA cables, always make sure you
don’t mix up the channels!
Grounding
Please check if the TEP 302 needs to be grounded: Turn the volume knob of your amplifier to zero (silent) and switch it off. Now turn
on the TEP 302 and afterwards your amplifier. If you hear a humming noise from the speakers, turn off the amplifier and connect the
ground socket of the TEP 302 with the ground cable of your turn-
table (This step is not necessary for Thorens turntables).
If you still hear the humming noises, they are probably caused by
power cords or DVD/CD cables. Try to place the TEP 302 as far
away as possible from possible sources of interference and remember: Distance is the best protection against disturbance.
If your sound system stays silent, put on a record and slowly increase
the volume on your amplifier.
Note: When the needle touches the record you may hear
some cracking noises.
8
Page 9
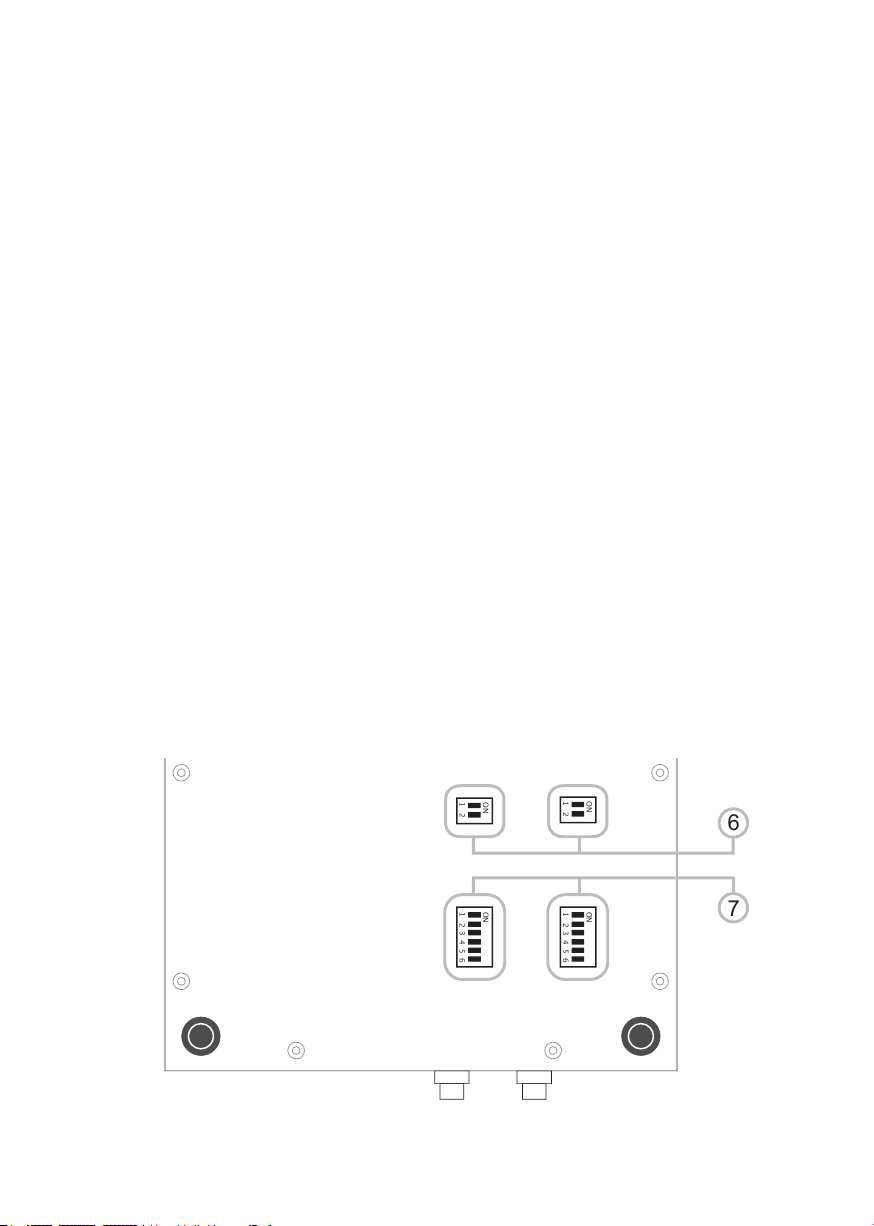
Configuring the TEP 302
ON
1 2
ON
1 2
1 2 3 4 5 6
ON
1 2 3 4 5 6
ON
6
7
Configuration for use with MM- and MC-pickup-systems
There are two different kinds of pickup systems on the market, the so
called MM (Moving Magnet) and MC (Moving Coil) systems. Having a
MM system, a magnet attached to the pickup system moves inside a
coil and a voltage proportional to the vibration amplitude is induced.
On the other hand, when you have a MC system the coil is wrapped
around the needle and the magnets are arranged around the coil. As
the coils used in MM systems have to be rather small to save weight,
a higher output voltage is needed. While MM systems usually deploy
a voltage of several mVolts, most MC systems only use 100 µV. Now
adays you often find mixed types as well, they are called high-output
MC systems and have a voltage of up to 2.5 mV.
Due to the better sampling resolution today most high quality turntables make use of the MC system. However, there are still some very
sophisticated MM systems available.
The TEP 302 was designed to handle both systems without any loss
in quality. To handle the differences between them (MC: higher amplification, adjusted by resistors MM: adjusted by capacitors) there are
four adjustment units on the bottom of the appliance (two for each
channel – on the left: left channel, on the right: right channel):
-
9
Page 10

Configuring the TEP 302
The following steps don’t have to be repeated until you change
your pickup system.
Keep in mind to set both channels to the same value!
Begin with setting the adjustment units
to either MC or MM, depending on the pickup system you use (MM is recommended for
high-output MC systems).
Both switches On: MC
Both switches Off: MM
Now you can conduct your fine tuning. Most manufacturers of pick
up systems don’t give any recommendations regarding the ideal settings, they suggest that you adjust the system to your personal taste
(e.g. while listening to your favorite record).
Adjustments for MM systems
Input impedance: 47 kohms
Input capcitance: 15 pF
By using switches 1 and 2 (adjustment units ) you can connect
additional matching capacitances. For an overview over possible settings and values, please refer to the following chart.
Table of values (capacitance)
Switch “ON” Capacitance
none 15 pF
1 115 pF
2 235 pF
1+2 350 pF
-
10
Page 11

Configuring the TEP 302
Adjustments for MC systems
Input impedance: 1000 ohms
Input capcitance: 15 pF
The permanent input resistor cannot be deactivated. The input impedance can be adjusted by using switches 3 to 6 (adjustment units
). All matching resistors are connected in parallel, therefore allowing impedance values between 99 ohms (all resistors used) and 1000
ohms (no additional resistors used).
This is how you can find the best settings:
First listen to your favorite record using the highest impedance, then
the lowest, and finally select a resistor with a value of about 600 ohms.
Now try different adjustments until you get the results you want. All
values can be found in the table below.
Keep in mind to set both channels to the same value!
Table of values (impedance)
Switch “ON” Impedance Switch “ON” Impedance
none 1000 ohms
6 783 ohms 3 130 ohms
5 600 ohms 3+6 126 ohms
5+6 514 ohms 3+5 120 ohms
4 405 ohms 3+5+6 116 ohms
4+6 364 ohms 3+4 109 ohms
4+5 319 ohms 3+4+5 102 ohms
4+5+6 293 ohms 3+4+5+6 99 ohms
11
Page 12

Operation
Once the TEP 302 is properly set up, the unit is fully functional
after switching it on.
Please consider that it takes around 50 hours of operation until the
TEP 302 reaches its full sonic quality.
Switching on/off
Push the power button on the front panel to switch the unit on and
off. While the appliance is turned on, the blue Thorens writing is il
luminated.
Always turn on the TEP 302 first and the amplifier(s) afterwards. For
shutting down the system, repeat the steps in reverse order.
Ultimately put on a record and slowly increase the volume at the
amplifier.
When the needle touches the record you may
hear some cracking noises.
-
Ambience
Adjust the brightness of the blue illuminated Thorens logo at the front
panel by jiggering the rotary switch (see drawing at p. 7).
12
Page 13

Maintenance
Cleaning
Remove dust by wiping the unit with a soft dry cloth. The chromium
front-plate can be polished with a soft purpose-designed cloth. If
necessary use a soft glass-cleaning detergent on a soft cloth. The
wooden side-cheeks can be cleaned in the same way.
Never use benzine, thinner, alcohol or other volatile agents
and avoid spraying cleaning detergents into the ventilation
slots on the cover!
No user-serviceable parts inside. Unauthorized
opening, repair or modifications of the unit will
result in loss of warranty.
TO PREVENT RISK OF ELECTRICAL SHOCK, DO
NOT OPEN THE POWER SUPPLY UNIT.
13
Page 14

Specifications
System
RIAA equalisation
Gain
Input
Output
Power supply
Power consumption
Dimensions (WxHxD)
Weight (net)
Specifications are subject to change without prior notice.
Phono Pre-Amplifier
for MM- or MC-pickup systems
± 0.5 dB (20 Hz - 20 kHz)
40 dB (MM), 60 dB (MC)
asymmetric RCA connector
asymmetric RCA connector
depending on your country
see p. 7
6 W max.
6 W idle
no stand-by
9.1 x 2.0 x 6.9 ”
232 x 50 x 174 mm
6.6 lbs (3.0 kg)
Made in Germany
14
Page 15

Customer support
Your local Thorens dealer or distributor is the person to contact in all
cases related to your Thorens product.
You also may contact Thorens directly:
Thorens Export Company Ltd.
Im Huebel 1, CH-4304 Giebenach, Switzerland
www.thorens.com, info@thorens.com
In case of warranty, please contact your Thorens dealer or
distributor at first.
Further service information
www.thorens.com
15
Page 16

Notes
16
Page 17

Deutsch
Herzlichen Glückwunsch zum Kauf Ihres Thorens TEP 302!
Der TEP 302 dient zur Verstärkung und RIAA-Entzerrung von Plat
tenspielersignalen. Der Ausgang des Geräts kann an einen Hochpegeleingang eines beliebigen Vor- oder Vollverstärkers angeschlossen
werden.
Fertigung und Montage des TEM 3200 erfolgen ausschließlich in
Deutschland - dies garantiert höchste Qualität, auch noch nach Jahren.
Verständlicherweise wollen Sie möglichst sofort mit dem Musikhören
loslegen. Bitte nehmen Sie sich jedoch einige Minuten Zeit, um diese
Anleitung zu lesen. Sie enthält wichtige Hinweise, die Ihnen dabei
helfen werden, das Gerät richtig anzuschließen und Beschädigungen
zu vermeiden. Sollten Sie noch Fragen haben, die hier nicht beantwortet werden, können Sie sich gerne an uns wenden.
Inhalt
Sicherheitshinweise......................................................................19
Aufstellung................................................................................20
Anschluß....................................................................................21
Konfiguration................................................................................23
Betrieb.........................................................................................26
Wartung und Pflege......................................................................27
-
Technische Daten.........................................................................28
Kundenservice..............................................................................29
17
Page 18

Sicherheitshinweise
BITTE VOR DER ERSTMALIGEN INBETRIEBNAHME LESEN!
Niemals das
Netzteil öffnen!
Wir bestätigen, dass dieses Produkt den gültigen EG-Richtlinien zur Erlangung des CE-Zei
chens entspricht. Die notwendigen Prüfungen
wurden mit positivem Ergebnis vorgenommen.
-
VORSICHT
Um einen elektrischen Schlag zu vermeiden, darf das Gehäuse nicht geöffnet werden.
Im Geräteinneren befinden sich keine vom Benutzer zu wartenden Teile.
WARNUNG
UM DER GEFAHR VON FEUER UND EINES ELEKTRISCHEN SCHLAGES VORZUBEUGEN, DARF DAS GERÄT WEDER REGEN NOCH FEUCHTIGKEIT AUSGESETZT
WERDEN.
ERLÄUTERUNG DER GRAFISCHEN SYMBOLE
Das Blitz-Symbol mit dem nach unten weisenden Pfeil im gleichseitigen
Dreieck warnt vor “gefährlicher Spannung” im Gehäuseinneren, deren
Höhe für eine Gefährung von Personen durch einen Stromschlag
ausreichend ist.
Das Ausrufungszeichen innerhalb des gleichseitigen Dreiecks macht
auf wichtige Bedienungs- und Wartungsvhinweise in der beiliegenden
Bedienungsanleitung aufmerksam.
WICHTIG: ENTSORGUNG VON ELEKTROGERÄTEN DURCH
VERBRAUCHER IN PRIVATEN HAUSHALTEN IN DER EU
Dieses Symbol auf dem Produkt oder dessen Verpackung gibt an,
dass das Produkt nicht zusammen mit dem Restmüll entsorgt
werden darf. Es obliegt daher Ihrer Verantwortung, das Gerät an einer
entsprechenden Stelle für die Emtsorgung oder Wiederverwertung
von Elektrogeräten aller Art abzugeben (z.B. ein Werkstoffhof). Die
separate Sammlung und das Recyceln Ihrer alten Elektrogeräte
zum Zeitpunkt ihrer Entsorgung trägt zum Schutz der Umwelt bei
und gewährleistet, dass sie auf eine Art und Weise recycelt werden,
die keine Gefährdung für die Gesundheit von Mensch und Umwelt
darstellt. Weitere Informationen darüber, wo Sie alte Elektrogeräte zum
Recyceln abgeben können, erhalten Sie bei den örtlichen Behörden,
Werkstoffhöfen oder dort, wo Sie das Gerät erworben haben.
18
Page 19

Aufstellung
Entnehmen Sie den TEP 302 der Verpackung und stellen Sie ihn auf
einem ebenen Untergrund in der Nähe des Plattenspielers auf. Die
Innenverpackung besteht aus Schaumformteilen, die einen sicheren
Transport gewährleisten. Wir empfehlen Ihnen daher die gesamte
Verpackung aufzubewahren.
Bitte prüfen Sie zunächst den Inhalt Ihrer Verpackung:
Lieferumfang:
Betreiben Sie den TEP 302 niemals...
in der Nähe von Heizungen, Heizkörpern oder anderen
Wärmequellen
an sehr kalten Orten
an Orten, die starkem Schmutzbefall, Staub,
mechanischen Vibrationen oder schlechter Belüftung
ausgesetzt sind
1 x Thorens TEP 302
1 x Netzeil
1 x Netzkabel
1 x Cinchkabel
19
Page 20

Anschluß
1 2 4 5
3
Anschlüsse auf der Rückseite
Netzanschluß
Verbinden Sie das externen Netzteil des TEP 302 mittels des beiliegenden Netzkabels mit dem Stromnetz. Verbinden Sie das Netzteil
mit dem Netzanschluß des TEP 302
Achten Sie darauf, dass der TEP 302 ausgeschaltet ist, bevor
Sie weitere Anschlussarbeiten vornehmen!
Ziehen Sie den Netzstecker nur, wenn das Gerät
zuvor ausgeschaltet wurde.
Benötigte Netzspannung
U.S.A. und Kanada...........................................................115-120 V
Europa, Australien und Asien............................................220-240 V
Japan...................................................................................100 V
Leistungsaufnahme
Siehe Technische Daten oder Typenschild auf dem Gerät.
20
Page 21

Anschluß
Audio Eingang
Verbinden Sie den Eingang des TEP 302 mit dem Ausgang Ihres
Plattenspielers (Verwenden Sie das Cinchkabel des Plattenspielers).
Audio Ausgang
Verbinden Sie mithilfe des beiliegenden Cinchkabels den Ausgang
des TEP 302 mit einem Hochpegeleingang (CD, Tuner, Tape, Aux,
etc.) Ihres Vor- oder Vollverstärkers.
Verbinden Sie den TEP 302 keinesfalls mit dem
Phonoeingang eines Verstärkers. Starke Verzer
rungen und ein extrem hoher Pegel könnten Ihre
Lautsprecher beschädigen!
Achten Sie beim Anschluß von Cinchkabeln stets darauf, nicht
die Kanäle zu vertauschen!
-
Erdung
Bitte überprüfen Sie nun, ob der TEP 302 geerdet werden muss:
Drehen Sie den Lautstärkeregler an Ihrem Verstärker auf 0 und
schalten Sie ihn ab. Schalten Sie nun zunächst den TEP 302 und
danach Ihren Verstärker ein. Wenn Sie ein Brummen über Ihre Lautsprecher hören, schalten Sie den Verstärker wieder aus und verbinden Sie die Erdungsbuchse des TEP 302 mit dem Erdungskabel
Ihres Plattenspielers (dies ist bei Thorens Plattenspielern nicht notwendig).
Sollte danach noch ein Brummen über die Lautsprecher zu vernehmen sein, so rührt dies wahrscheinlich von Einstreuungen durch
Netz-, CD- oder DVD-Spielerkabel her. Versuchen Sie den TEP 302
und das Plattenspielerkabel möglichst weit weg von diesen Kabeln
aufzustellen oder die Kabel anders zu verlegen. Die beste Abschirmung gegenüber Einstreuungen ist Abstand.
Hinweis: Beim Aufsetzen der Nadel kann es trotz korrekter
Erdung kurzzeitig zu einem Aufsetzknacks kommen!
21
Page 22

Konfiguration
ON
1 2
ON
1 2
1 2 3 4 5 6
ON
1 2 3 4 5 6
ON
6
7
Anpassung an das Tonabnehmersystem
Es gibt zwei unterschiedliche Arten von Tonabnehmersystemen, die
sogenannten MM- (Moving Magnet) und die MC- (Moving Coil) Sys
teme. Beim MM-System bewegt sich der auf der Tonabnehmernadel befestigte Magnet in einer Spule und induziert dadurch eine der
Auslenkung proportionale Spannung. Beim MC-System sind kleine
Spulen auf die Nadel gewickelt und der Magnet ist um sie herum angeordnet. Dementsprechend haben reine MM-Systeme immer eine
höhere Ausgangsspannung als MC-Systeme, da hier die Spulen klein
sein müssen, um nicht die Nadelmasse unnötig zu erhöhen. MMSysteme haben typischerweise Ausgangsspannungen von mehreren
mVolt während MC-Systeme oft nur 100 µVolt haben. Natürlich gibt
es auch Mischtypen, die als High-Output MC-Systeme bezeichnet
werden und bis zu 2,5 mVolt Ausgangsspannung erzeugen.
Aufgrund der feineren Abtastung haben sich heutzutage im hochwertigen Bereich MC-Systeme auf breiter Front durchgesetzt. Es gibt
aber auch immer noch hervorragende MM-Systeme.
Der TEP 302 arbeitet mit beiden Systemtypen. Diese erfordern jedoch unterschiedliche Verstärkung und Feinanpassung (über eine
Kapazität, bzw. einen Widerstand). Hierzu befinden sich vier Einstelleinheiten auf der Unterseite des TEP 302 (jeweils zwei pro Kanal –
links: linker Kanal, rechts: rechter Kanal):
-
22
Page 23

Konfiguration
Sie müssen die nachfolgenden Einstellungen nur einmal vor
nehmen. Nur bei einem Wechsel des Tonabnehmersystems
muss der TEP 302 neu eingestellt werden.
Achten Sie darauf, beide Kanäle identisch zu konfigurieren!
Stellen Sie zunächst die Einstelleinheiten
auf MC oder MM, je
nachdem, ob Sie ein MC- oder ein MM-System verwenden (bei HighOutput MC-Systemen empfiehlt sich zumeist die Einstellung MM).
Beide Schalter auf On: MC
Beide Schalter auf Off: MM
Abhängig von der gewählten Einstellung, können Sie nun noch eine
Feinanpassung vornehmen. Viele Hersteller von Tonabnehmersyste
men geben hierzu oftmals keine Empfehlung ab, so dass Sie die Einstellungen nach Ihrem subjektiven Empfinden selbst bewerten müssen (Diese Einstellungen können während des Hörens vorgenommen
werden).
Anpassung für MM-Systeme
Eingangsimpedanz: 47 kOhm
Eingangskapazität: 15 pF
Sie können nun mittels der Schalter
1 und 2 (Einstelleinheiten ) eine
Anpassungskapazität zuschalten. Die möglichen Werte und Einstellungen zeigt die untenstehende Tabelle.
-
-
Wertetabelle Kapazität
Schalterstellung „ON“ Kapazität
keiner 15 pF
1 115 pF
2 235 pF
1+2 350 pF
23
Page 24

Konfiguration
Anpassung für MC-Systeme
Eingangsimpedanz: 1000 Ohm
Eingangskapazität: 15 pF
Die Eingangskapazität bleibt unverändert. Die Eingangsimpedanz
kann mittels der Schalter 3 - 6 (Einstelleinheiten ) angepasst werden. Die Anpassungswiderstände werden parallel geschaltet, der
höchste Wert ist somit 1000 Ohm (keine Widerstände zugeschaltet),
der niedrigste 99 Ohm (alle Widerstände zugeschaltet).
So finden Sie die optimalen Einstellungen:
Hören Sie Ihre Lieblingsplatte mit dem höchsten Widerstand, dann
mit dem niedrigsten und schließlich mit ca. 600 Ohm. Die klanglich
beste Stellung können Sie nun noch durch Feinjustage genauer einstellen. Die Einstellung der Werte entnehmen können Sie der untenstehenden Tabelle entnehmen.
Achten Sie darauf, beide Kanäle identisch zu konfigurieren!
Wertetabelle Impedanz
Position „ON“ Impedanz Position „ON“ Impedanz
keiner 1000 Ohm
6 783 Ohm 3 130 Ohm
5 600 Ohm 3+6 126 Ohm
5+6 514 Ohm 3+5 120 Ohm
4 405 Ohm 3+5+6 116 Ohm
4+6 364 Ohm 3+4 109 Ohm
4+5 319 Ohm 3+4+5 102 Ohm
4+5+6 293 Ohm 3+4+5+6 99 Ohm
24
Page 25

Betrieb
Nach erfolgreicher Konfiguration ist der TEP 302 nach dem
Einschalten sofort betriebsbereit.
Bitte beachten Sie, dass das Gerät eine Einlaufphase von ca. 50 Be
triebsstunden benötigt, bevor es seine volle Klangqualität entfaltet.
Ein-/Ausschalten
Durch Drücken des Ein-/Ausschalters auf der Front (Power) können
Sie das Gerät ein- oder ausschalten. Das Thorens Logo auf der Front
leuchtet blau, wenn das Gerät eingeschaltet ist.
Schalten Sie zuerst den TEP 302, danach den (die) Verstärker ein.
Gehen Sie beim Ausschalten in umgekehrter Reienfolge vor.
Legen Sie anschließend eine Platte auf und drehen Sie den Laut
stärkeregler am Verstärker langsam hoch.
Beim Aufsetzen der Nadel kann es kurzzeitig zu
einem Aufsetzknacks kommen.
Helligkeitsregelung
Sie können die Helligkeit des beleuchtete Thorens Logos auf der Vor-
derseite mittels dieses Drehreglers stufenlos einstellen (siehe Abbildung auf Seite 20).
-
-
25
Page 26

Wartung und Pflege
Reinigung
Der TEP 302 benötigt keine spezielle Pflege. Die Chromblende kann
mithilfe eines Glasreinigers von Fingerabdrücken befreit und mit ei
nem weichen, glatten Tuch nachpoliert werden. Die Seitenwangen
können ebenfalls mit Glasreiniger und einem weichen Tuch abgerieben werden.
Verwenden Sie kein Benzin, Alkohol oder andere leichtflüchtige Substanzen zur Reinigung und achten Sie darauf, dass niemals Reinigungsflüssigkeit in das Innere des Geräts gelangt!
Unauthorisiertes Öffnen des Gehäuses sowie
Reparaturen und Modifikationen durch nicht
authorisertes Personal, führen zum Verlust der
Garantieansprüche.
ÖFFNEN SIE NIEMALS DAS GEHÄUSE DES
NETZTEILS. ES BESTEHT DIE GEFAHR EINES
ELEKTRISCHEN SCHLAGES.
-
26
Page 27

Technische Daten
System
RIAA-Entzerrung
Verstärkung
Eingang
Ausgang
Netzanschluß
Leistungsaufnahme
Abmssungen (BxHxT)
Gewicht (netto)
Phono Vorverstärker
für MM- or MC-Tonabnemersysteme
± 0,5 dB (20 Hz - 20 kHz)
40 dB (MM), 60 dB (MC)
Cincheingang, asymmetrisch
Cinchausgang, asymmetrisch
landesspezifisch
siehe Seite 20
6 Watt im Betrieb
6 Watt im Leerlauf
Kein Stand-by
232 x 50 x 174 mm
3.0 kg
Hergestellt in Deutschland
Technische Änderungen vorbehalten.
27
Page 28

Kundenservice
Ihr Fachhändler oder Ihr Vertrieb sind jederzeit kompetente An
sprechpartner, die Ihnen bei sämtlichen Fragen rund um Ihr Thorens
Produkt gerne zur Verfügung stehen.
Sie können Thorens auch direkt kontaktieren:
Thorens Export Company AG
Im Huebel 1, CH-4304 Giebenach, Schweiz
www.thorens.com, info@thorens.com
Bitte kontaktieren Sie im Garantiefall immer zuerst Ihren Fach
händler oder Vertrieb!
Weitergehende Service Informationen
www.thorens.com/de
-
-
28
Page 29

Notizen
29
Page 30

Notizen
30
Page 31

Page 32

thorens.com
UM0302-0306-B
Printed in Germany
 Loading...