

Page 1

THOMSON TG185n
Ethernet-to-WiFi Convertor/Wireless-n Repeater
Setup and User Guide
Page 2

Page 3

THOMSON TG185n
Setup and User Guide
Page 4

Copyright
Copyright ©1999-2008 THOMSON. All rights reserved.
Distribution and copying of this document, use and communication of its contents is not permitted without written authorization
from THOMSON. The content of this document is furnished for informational use only, may be subject to change without notice,
and should not be construed as a commitment by THOMSON. THOMSON assumes no responsibility or liability for any errors or
inaccuracies that may appear in this document.
Thomson Telecom Belgium
Prins Boudewijnlaan, 47
B-2650 Edegem
Belgium
http://www.thomson-broadband.com
Trademarks
The following trademarks may be used in this document:
DECT is a trademark of ETSI.
Bluetooth® word mark and logos are owned by the Bluetooth SIG, Inc.
Ethernet™ is a trademark of Xerox Corporation.
Wi-Fi®, WMM® and the Wi-Fi logo are registered trademarks of the Wi-Fi Alliance®. "Wi-Fi CERTIFIED", "Wi-Fi ZONE",
"Wi-Fi Protected Access", "Wi-Fi Multimedia", "Wi-Fi Protected Setup", WPA", WPA2" and their respective logos are trademarks of the Wi-Fi Alliance®.
UPnP™ is a certification mark of the UPnP™ Implementers Corporation.
Microsoft®, MS-DOS®, Windows®, Windows NT® and Windows Vista® are either registered trademarks or trademarks
of Microsoft Corporation in the United States and/or other countries.
Apple® and Mac OS® are registered trademarks of Apple Computer, Incorporated, registered in the United States and
other countries.
UNIX® is a registered trademark of UNIX System Laboratories, Incorporated.
Adobe®, the Adobe logo, Acrobat and Acrobat Reader are trademarks or registered trademarks of Adobe Systems, Incor-
porated, registered in the United States and/or other countries.
Other brands and product names may be trademarks or registered trademarks of their respective holders.
Document Information
Status: v2.0 (October 2008)
Reference: E-DOC-CTC-20080624-0009
Short Title: Setup and User Guide TG185n R8.2 (en)
Page 5

Contents
About this Setup and User Guide ............................................. 1
1 Introduction..................................................................................3
2 Installation....................................................................................5
3 The THOMSON TG185n as Wireless Access Point................... 7
3.1 Configuring The THOMSON TG185n As Access Point.................................... 8
3.2 Connecting a Wireless Client via WPS .......................................................... 11
3.2.1 Push Button Configuration ..................................................................................................................12
3.2.2 PIN Code Entry On The Wireless Client.............................................................................................. 13
3.2.3 PIN Code Entry On the THOMSON TG185n .......................................................................................14
3.3 Manually Configuring a Wireless Client ........................................................ 15
3.4 Securing Your Wireless Network .................................................................. 16
3.4.1 Configuring WPA(2)-PSK Encryption..................................................................................................17
3.4.2 Configuring WPA Encryption .............................................................................................................. 18
3.4.3 Configuring WEP Encryption...............................................................................................................19
4 The THOMSON TG185n as Wireless Repeater .......................21
4.1 Automatic Configuration (Via WPS).............................................................. 22
4.1.1 Push Button Configuration ..................................................................................................................23
4.1.2 PIN Code Entry On The Access Point..................................................................................................24
4.1.3 PIN Code Entry On the THOMSON TG185n .......................................................................................25
4.2 Manual Configuration (Without WPS) ........................................................... 26
5 Your THOMSON TG185n as Wireless Client ........................... 29
5.1 Automatic Configuration (Via WPS).............................................................. 30
5.1.1 Push Button Configuration ..................................................................................................................31
5.1.2 PIN Code From Your Access Point...................................................................................................... 32
5.2 Manual Configuration (Without WPS) ........................................................... 33
6 THOMSON TG185n Basics........................................................ 35
6.1 THOMSON TG185n LED Behaviour ............................................................... 36
6.1.1 Status LEDs ........................................................................................................................................... 37
6.1.2 WPS Button LED ................................................................................................................................... 38
6.1.3 Ethernet LEDs ....................................................................................................................................... 39
E-DOC-CTC-20080624-0009 v2.0
i
Page 6

Contents
6.2 THOMSON TG185n Web Interface ................................................................ 40
6.3 Saving/Restoring Your Configuration ........................................................... 41
7.1 Assigning a Static IP to Your Computer ....................................................... 44
7.1.1 Assigning a Static IP Address On Windows Vista .............................................................................45
7.1.2 Assigning a Static IP Address On Windows XP.................................................................................46
7.1.3 Assigning a Static IP Address On Mac OS X......................................................................................47
7.2 Restoring the IP Settings of Your Computer ................................................ 48
7.3 General THOMSON TG185n Troubleshooting ............................................... 49
7.3.1 Wired Connection Troubleshooting.................................................................................................... 50
7.3.2 Wireless Connection Troubleshooting ............................................................................................... 51
7.4 Reset to Factory Defaults ............................................................................. 52
7 Support....................................................................................... 43
ii
E-DOC-CTC-20080624-0009 v2.0
Page 7

About this Setup and User Guide
About this Setup and User Guide
Used Symbols
A note provides additional information about a topic.
A caution warns you about potential problems or specific precautions that need to be taken.
Typographical Conventions
Following typographical convention is used throughout this manual:
Sample text indicates a hyperlink to a Web site.
Example: For more information, visit us at www.thomson-broadband.com
Sample text indicates an internal cross-reference.
Example: If you want to know more about guide, see “1 Introduction” on page 7”.
Sample text indicates an important content-related word.
Example: To enter the network, you must authenticate yourself.
Sample text indicates a GUI element (commands on menus and buttons, dialog box elements, file
names, paths and folders).
Example: On the File menu, click Open to open a file.
.
Documentation and software updates
THOMSON continuously develops new solutions, but is also committed to improving its existing products.
For more information on THOMSON's latest technological innovations, documents and software releases,
visit us at http://www.thomson-broadband.com
.
E-DOC-CTC-20080624-0009 v2.0
1
Page 8

About this Setup and
User Guide
2
E-DOC-CTC-20080624-0009 v2.0
Page 9
1 Introduction
Introduction
This Setup and User Guide will show you how to set up your THOMSON TG185n.
Supported wireless standards
The THOMSON TG185n supports the following wireless standards:
Standard Maximum Data Rate
IEEE 802.11n 300 Mbps
IEEE 802.11g 54 Mbps
IEEE 802.11b 11 Mbps
IEEE 802.11a 54 Mbps
1 Introduction
THOMSON TG185n Modes
You can use the THOMSON TG185n as:
Wireless Access Point
Wireless Repeater
Wireless Client
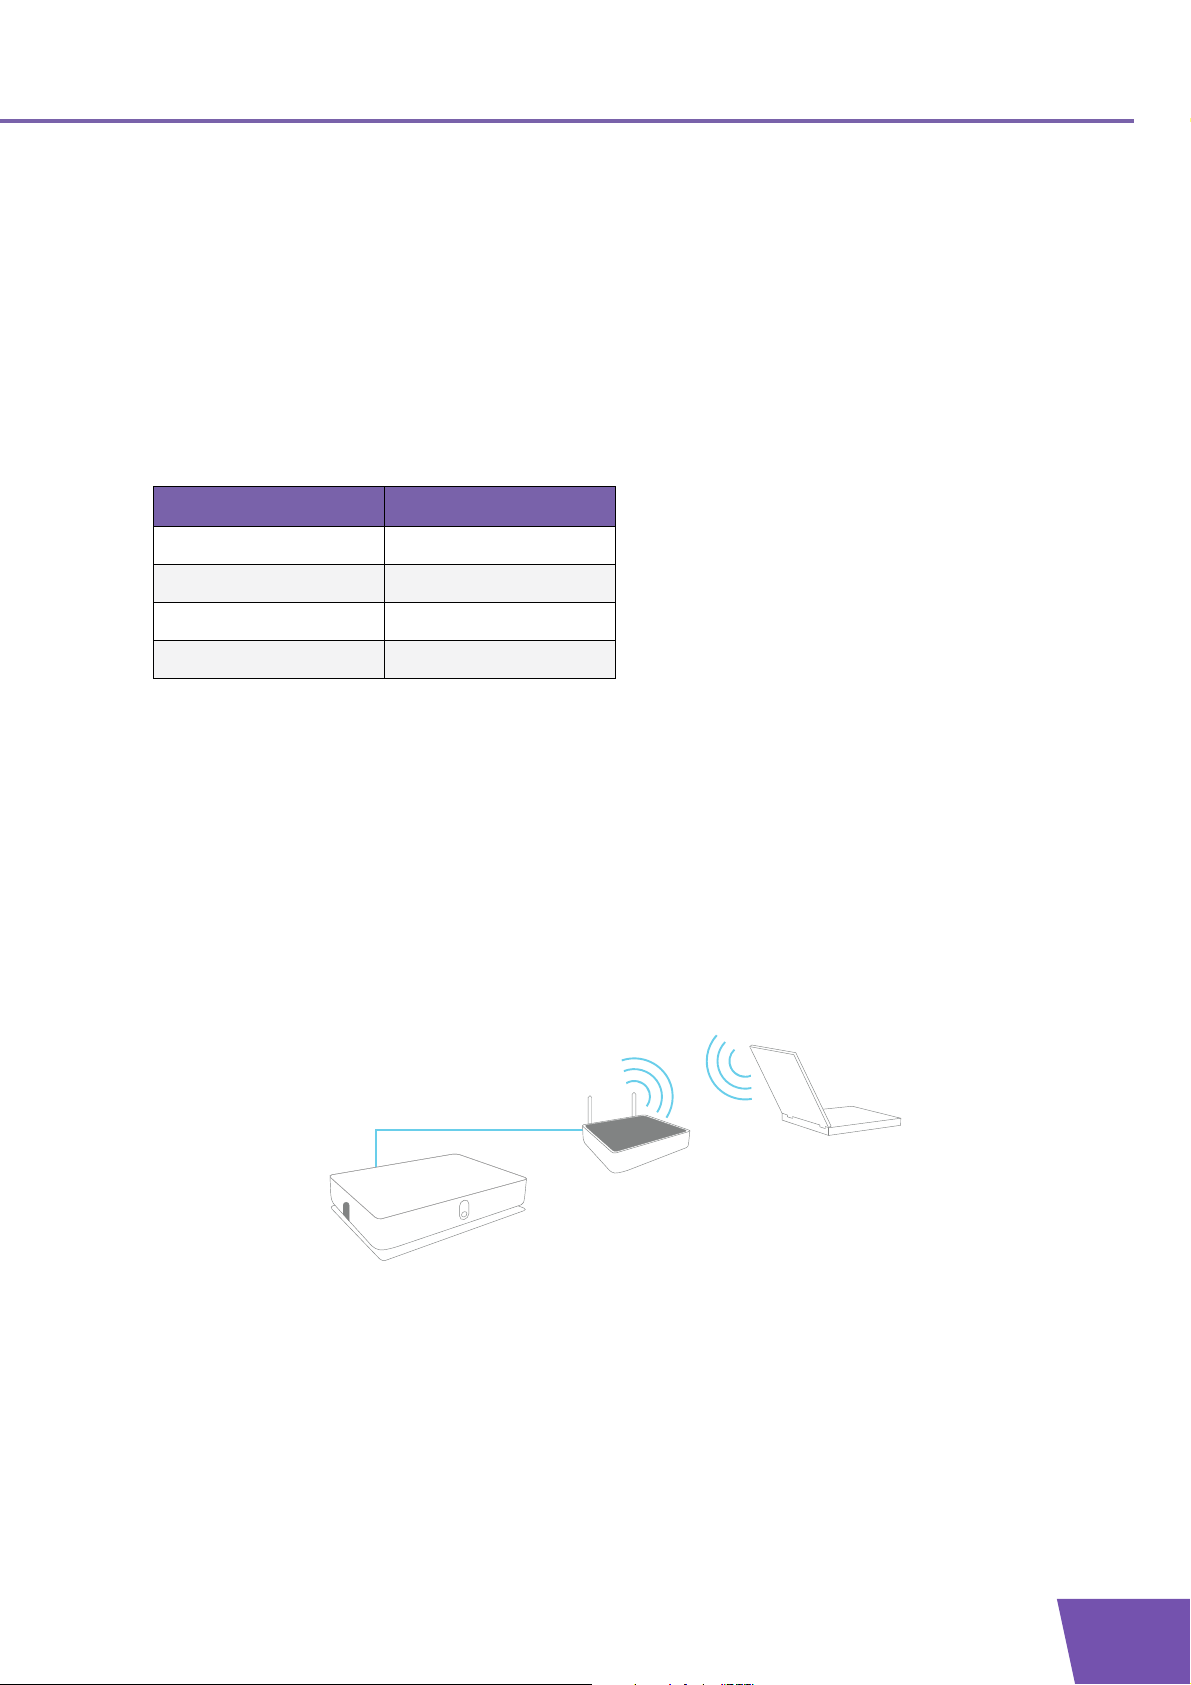
Wireless Access Point
Use this mode if you are using a wired network and you now want to be able to access your network
wirelessly.
E-DOC-CTC-20080624-0009 v2.0
3
Page 10
1 Introduction
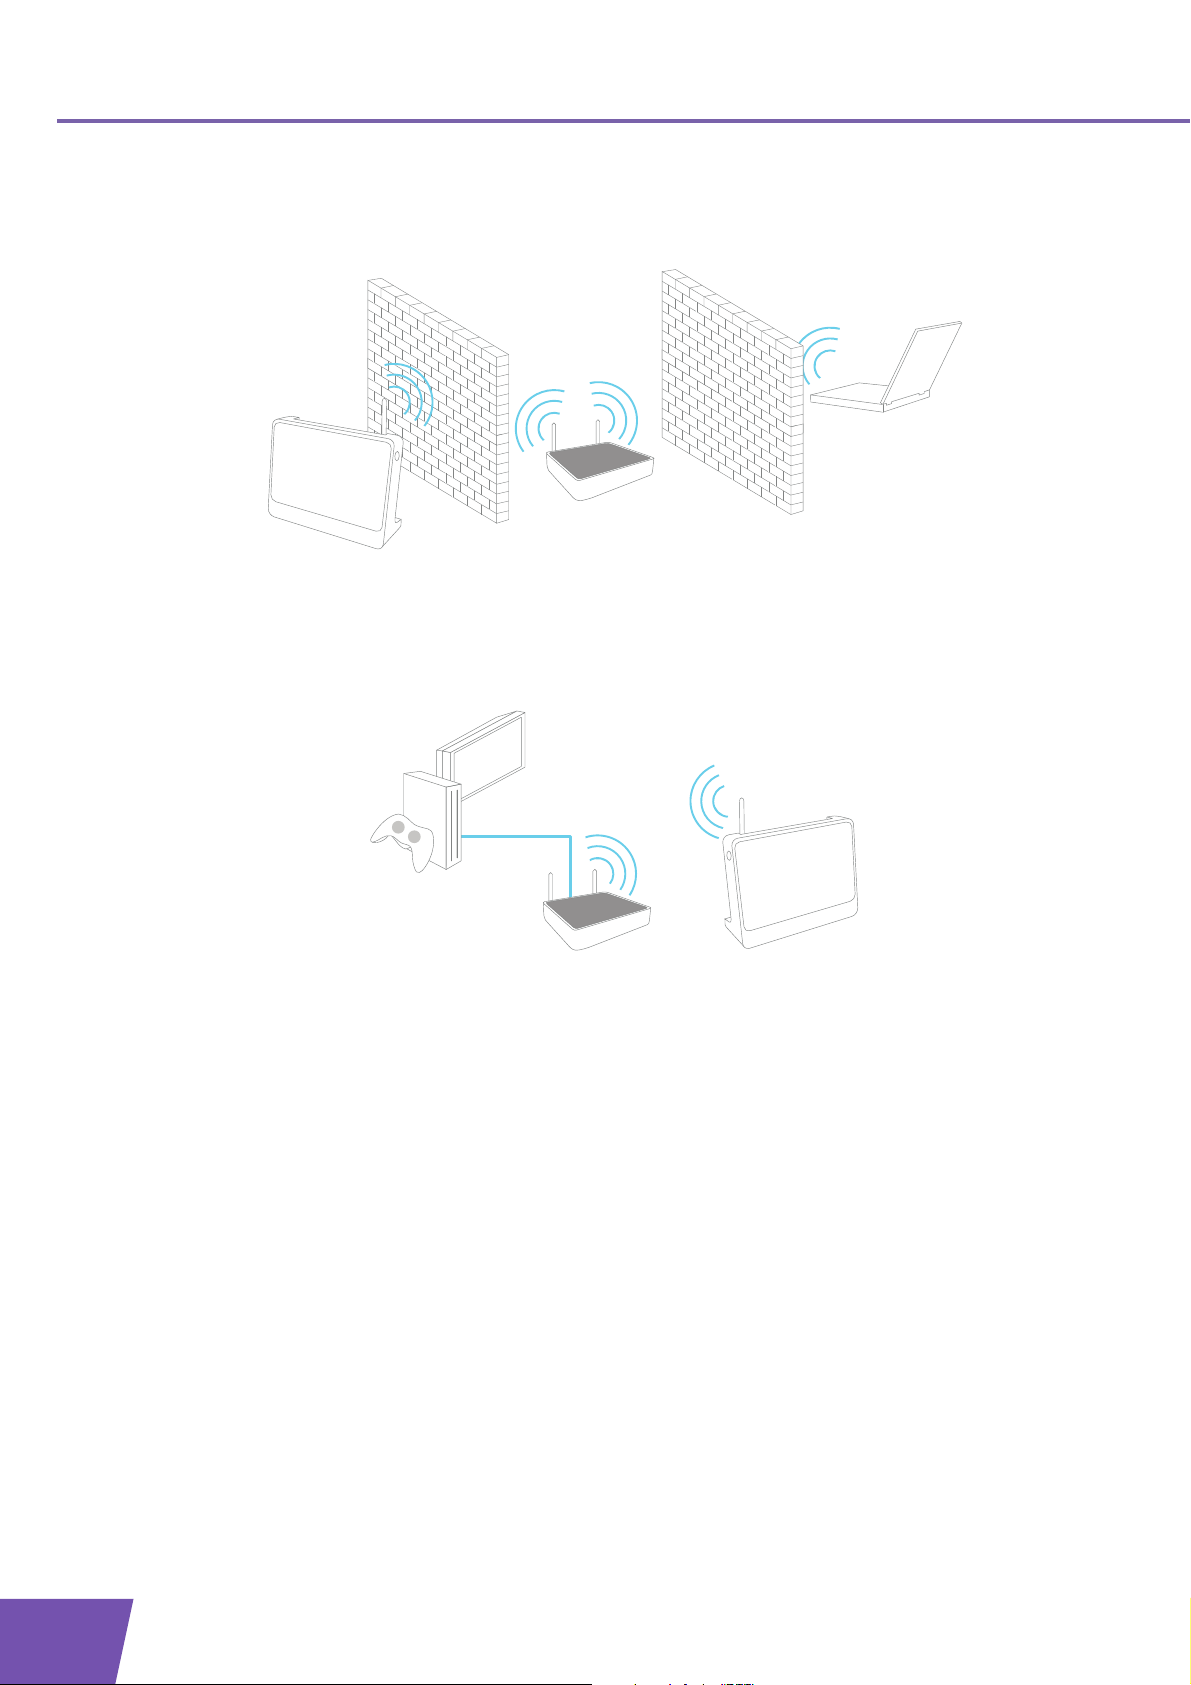
Wireless Repeater
Use this mode to extend the coverage of an existing wireless network:
Wireless Client
Use this mode to connect a wired Ethernet device (for example: a laptop, a gaming console with Ethernet
connectivity,...):
4
E-DOC-CTC-20080624-0009 v2.0
Page 11

2 Installation
2 Installation
Introduction
In this chapter we will help you to:
1 Connect the cables.
2 Configure the THOMSON TG185n.
Connect the cables
Proceed as follows:
1 Plug the connector of the electric power supply adapter into the power inlet port on the back panel of
your THOMSON TG185n.
2 Plug the adapter into a nearby mains socket.
3 Plug one end of the Ethernet cable into the Ethernet port of your THOMSON TG185n.
4 Plug the other end of the Ethernet cable in the Ethernet port on your computer.
Ethernet ports are often marked with the following label:
Configure the THOMSON TG185n
If you want to configure your THOMSON TG185n as:
Wireless Access Point, proceed with “3.1 Configuring The THOMSON TG185n As Access Point” on
page 8.
Wireless Repeater, proceed with “4 The THOMSON TG185n as Wireless Repeater” on page 21.
Wireless Client, proceed with “5 Your THOMSON TG185n as Wireless Client” on page 29.
E-DOC-CTC-20080624-0009 v2.0
5
Page 12

2 Installation
6
E-DOC-CTC-20080624-0009 v2.0
Page 13
3 The THOMSON TG185n as Wireless Access Point
3 The THOMSON TG185n as Wireless Access Point
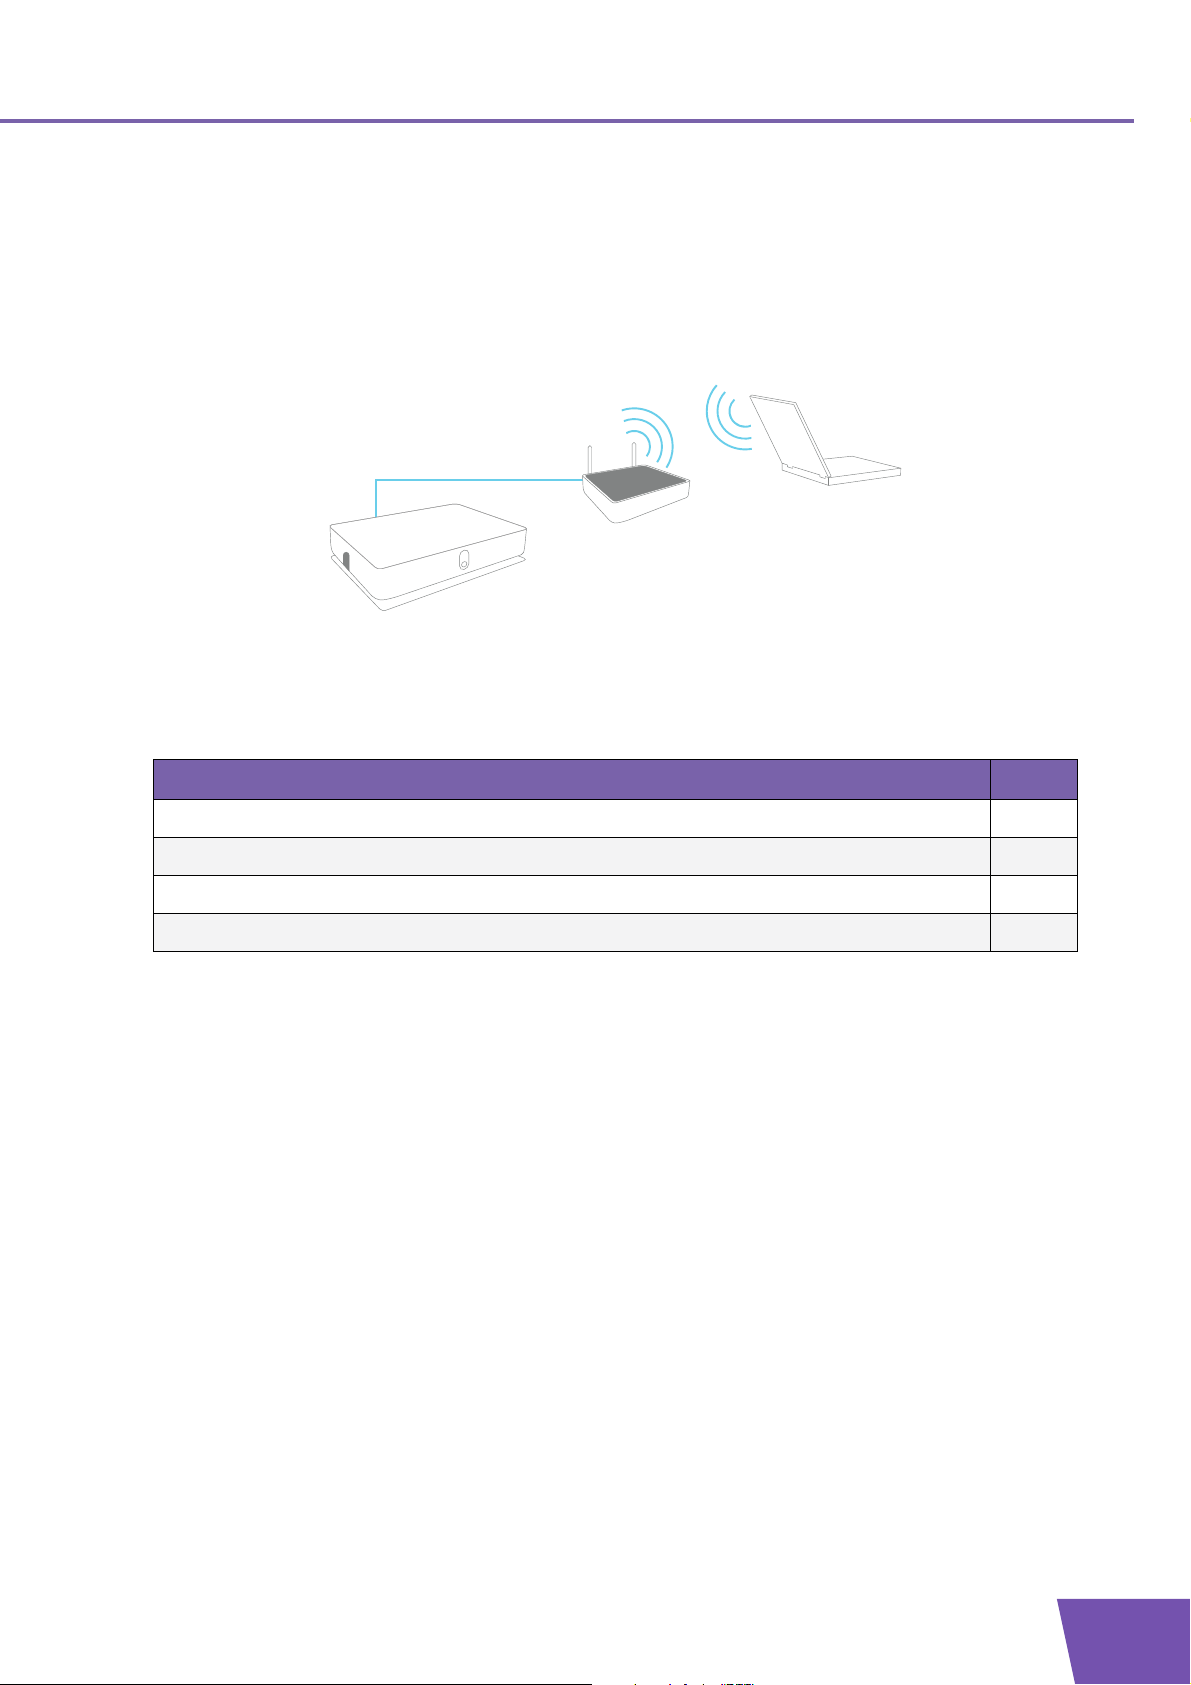
Usage
Use this mode if you are using a wired network and you now want to be able to access your network
wirelessly.
In this chapter
Configuring The THOMSON TG185n As Access Point 8
Connecting a Wireless Client via WPS 11
Manually Configuring a Wireless Client 15
Securing Your Wireless Network 16
Topi c Page
E-DOC-CTC-20080624-0009 v2.0
7
Page 14
3 The THOMSON TG
185n as Wireless Acces
3.1 Configuring The THOMSON TG185n As Access Point
Procedure
Before you can use your THOMSON TG185n as wireless access point you have to complete following steps:
1 Switch the THOMSON TG185n to access point mode.
2 Assign a static IP address to your computer.
3 Configure the wireless settings of your THOMSON TG185n.
4 Configure the IP settings of your THOMSON TG185n (optional).
5 Connect your THOMSON TG185n to your Internet gateway.
6 Configure your wireless clients.
7 Configure your computer to obtain an IP address automatically.
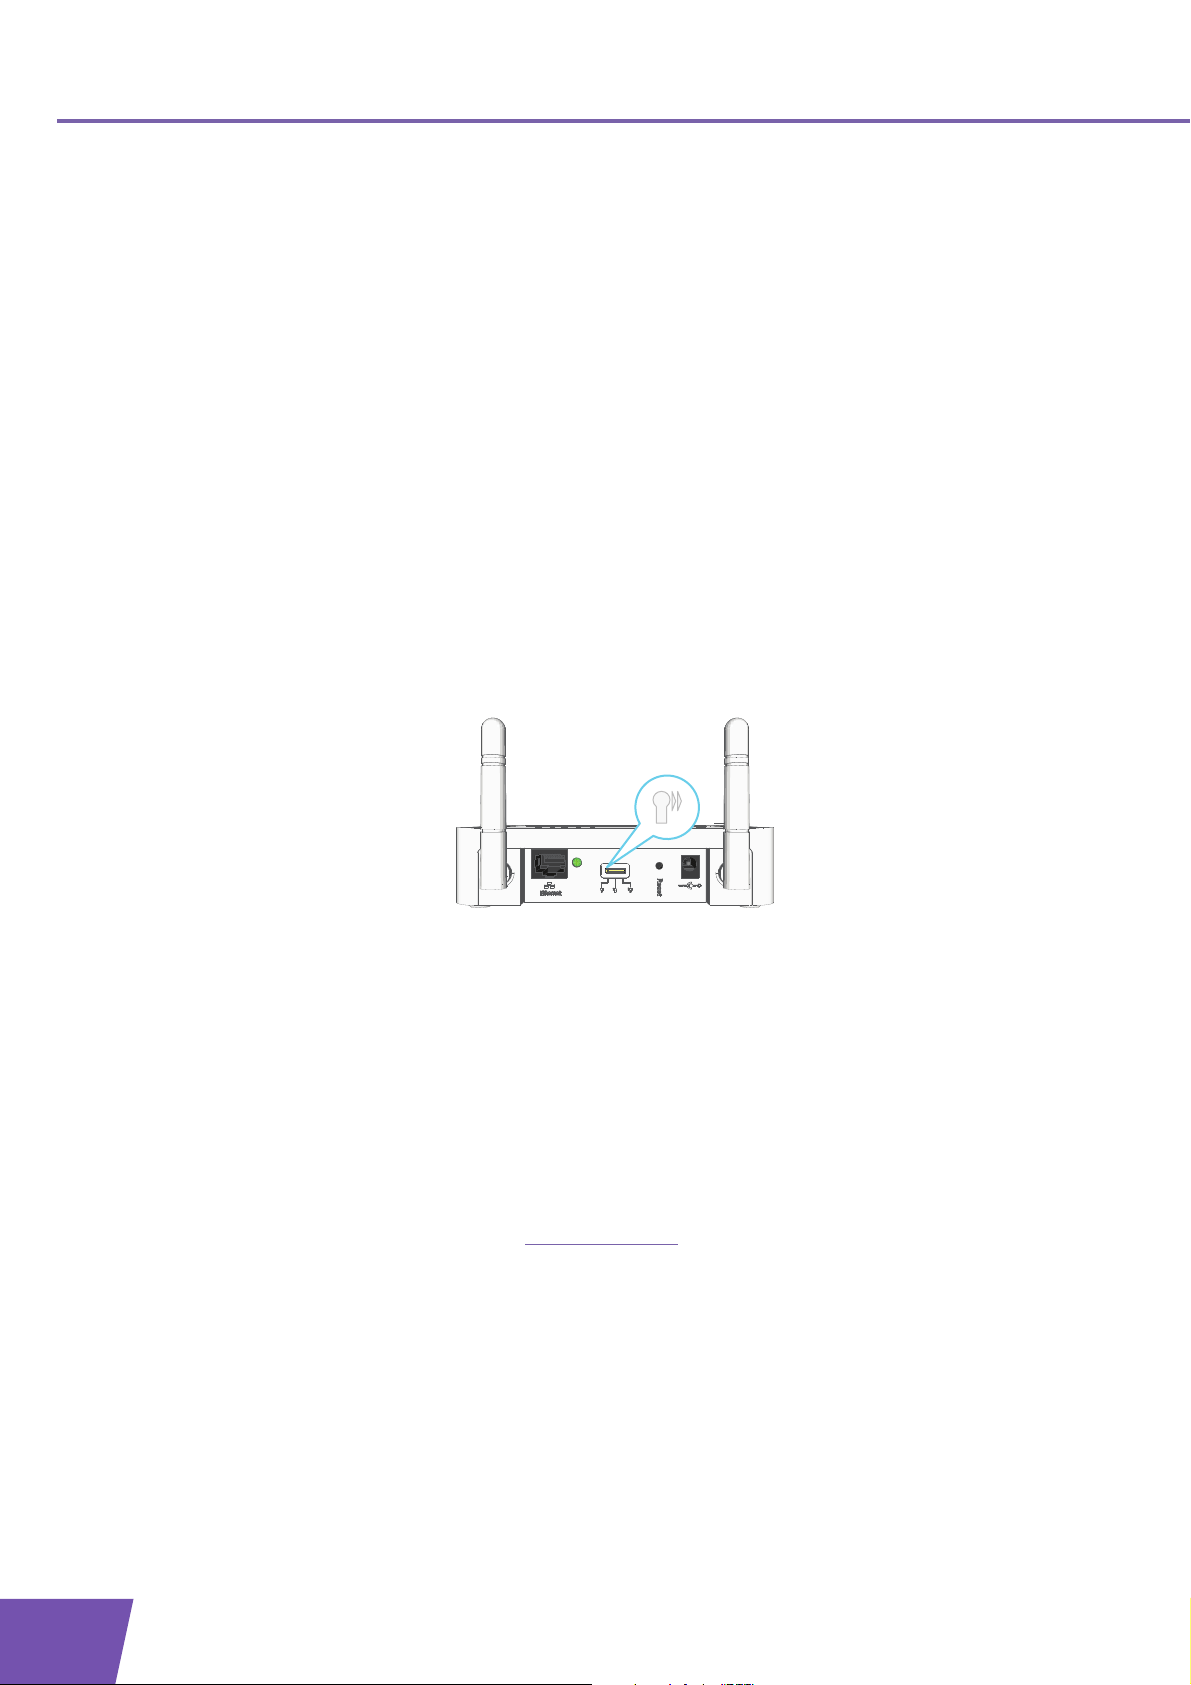
Switch the THOMSON TG185n to access point mode
Proceed as follows:
1 On the back panel of your THOMSON TG185n, move the switch to the access point position.
s Point
2 After a few seconds the Access Point LED will turn green.
Assign a static IP address to your computer
The IP address must be between 192.168.1.14 and 192.168.1.63 (for example 192.168.1.20). The subnet mask
must be 255.255.255.0.
For more information, see “7.1 Assigning a Static IP to Your Computer” on page 44.
Configure the wireless settings of your THOMSON TG185n
Proceed as follows:
1 Open your web browser and browse to http://192.168.1.11
2 The THOMSON TG185n Web Interface appears. On the Basic Setting menu, click Wireless Setting.
3 The Wireless Settings page appears.
4 In the Network ID (SSID) box, you can change the name of your wireless network.
This name will be displayed in the list of available networks when you try to connect a device to your
THOMSON TG185n access point.
.
8
E-DOC-CTC-20080624-0009 v2.0
Page 15

3 The THOMSON TG185n as Wireless Access Point
5 In the Select Security Policy list, select the security policy of your choice and enter a passphrase/
encryption key. For more information, see “3.4 Securing Your Wireless Network” on page 16.
If the Enable WPS (Wi-Fi Protected Setup) check box is enabled you can only select the
following policies:
None
WPA-PSK
WPA2-PSK
WPA-PSK-AUTO
If you want to select another policy (not recommended), clear the Enable WPS (Wi-Fi Protected
Setup) check box.
For more information on WPS, see “3.2 Connecting a Wireless Client via WPS”.
6 Select the WPS Configured check box, this way you are sure that your settings will not be changes during
WPS.
7 Click Apply.
8 The THOMSON TG185n prompts you that the configuration was successful.
Configure the IP settings of your THOMSON TG185n (optional)
If you still want to be able to access your THOMSON TG185n after connecting it to your Internet gateway, you
have to make sure that they are both using the same IP range.
If your Internet gateway is also a THOMSON product, this will automatically be the case and no
extra configuration is needed. Continue with the next topic.
If you choose not to do this configuration or you don’t know the IP settings of your Internet gateway, yo u will
only be able to access the THOMSON TG185n by assigning a static IP address to your computer that is the
same range as your THOMSON TG185n.
To change the IP settings of your THOMSON TG185n:
1 On the Basic Setting menu, click Device IP Setting.
2 The Device IP Setting page appears. On this page you can configure the IP address of your THOMSON
TG185n. Select:
Assign static IP address to this device if you want to choose the IP address for your THOMSON
TG185n yourself.
1 In the IP address box, type an IP address that is in the same range as your Internet gateway.
2 In the IP Subnet Mask, type the same subnet mask as your Internet gateway.
3 In the Gateway IP Address, type the type the IP address of your Internet gateway.
4 Write down this IP address and subnet mask. From now on, you can only access the THOMSON
TG185n at this address
Use the DHCP client protocol to automatically get the IP address for this device if you want your
Internet gateway to assign an IP address to your THOMSON TG185n. In this case you do not have to
provide an IP address, IP Subnet Mask and Gateway IP Address.
3 Click Apply.
Connect your THOMSON TG185n to your Internet gateway
Proceed as follows:
1 Disconnect the Ethernet cable from your computer.
2 Plug the Ethernet in an Ethernet port on your Internet gateway.
3 Your THOMSON TG185n is now connected your Internet gateway via the Ethernet cable.
E-DOC-CTC-20080624-0009 v2.0
9
Page 16

3 The THOMSON TG
185n as Wireless Acces
Configure your wireless clients
In order to connect your wireless clients to the THOMSON TG185n you must configure them with the same
Network ID (SSID) and security as your wireless access point. You can do this:
Automatically via WPS.
For more information, see “3.2 Connecting a Wireless Client via WPS” on page 11
Manually entering these settings on the configuration utility of your wireless clients.either using Wi-Fi
Protected Setup (WPS) or manually. For more information, see “3.3 Manually Configuring a Wireless
Client” on page 15.
Configure your computer to obtain an IP address automatically
For more information, see “7.2 Restoring the IP Settings of Your Computer” on page 48.
s Point
10
E-DOC-CTC-20080624-0009 v2.0
Page 17

3 The THOMSON TG185n as Wireless Access Point
3.2 Connecting a Wireless Client via WPS
WPS
Wi-Fi Protected Setup (WPS) allows you to add new wireless clients to your network in a swift and easy way,
without the need to enter all of your wireless settings (SSID, encryption,...).
Requirements
Your wireless clients must supports WPS. Check the documentation of your wireless client for this.
WPS must be enabled on your THOMSON TG185n (factory default).
You can only use WPS with the following security levels:
WPA-PSK
WPA2-PSK
No encryption
Supported WPS options
The THOMSON TG185n supports the following options:
Push Button Configuration (PBC):
This is the easiest way to connect your wireless client. You have to push a button both on the THOMSON
TG185n and the wireless client. For more information, see “3.2.1 Push Button Configuration” on page 12.
PIN code entry on the wireless client:
The THOMSON TG185n generates a PIN code that you have to enter in the configuration utility of your
wireless client. For more information, see “3.2.2 PIN Code Entry On The Wireless Client” on page 13.
PIN code entry on the THOMSON TG185n:
The wireless client generates a PIN code that you have to enter on the web interface of your THOMSON
TG185n. For more information, see “3.2.3 PIN Code Entry On the THOMSON TG185n” on page 14.
Your wireless client may not support all of these options. For more information, consult the
documentation of your wireless client.
Troubleshooting
If you are having trouble connecting your wireless client via WPS, try to configure it manually. For more
information, see “3.3 Manually Configuring a Wireless Client” on page 15.
E-DOC-CTC-20080624-0009 v2.0
11
Page 18

3 The THOMSON TG
185n as Wireless Acces
3.2.1 Push Button Configuration
Procedure
Proceed as follows:
1 Shortly press the WPS button on the THOMSON TG185n:
s Point
2 The WPS button LED starts blinking green. This indicates that the THOMSON TG185n is now searching
for wireless clients that are in registration mode. You now have two minutes to start WPS on your
wireless client.
If the LED does not start to blink, WPS is not enabled on your THOMSON TG185n. For more
information on how to enable WPS, see “ WPS does not work” on page 51.
3 Start WPS on your wireless client and choose Push Button Configuration (PBC) as method.
For more information, consult the documentation of your wireless client.
12
E-DOC-CTC-20080624-0009 v2.0
Page 19

3 The THOMSON TG185n as Wireless Access Point
3.2.2 PIN Code Entry On The Wireless Client
Get the THOMSON TG185n’s PIN code
You can find the WIRELESS PIN:
On the label on the bottom of your THOMSON TG185n.
On the THOMSON TG185n Web Interface:
1 Open your web browser and browse to http://192.168.1.11
2 On the Basic Setting menu, click Wireless Setting.
3 You can find the PIN code in the WPS Pin box.
Enter the THOMSON TG185n’s PIN code in the client utility
Proceed as follows:
1 Open the configuration utility of your wireless client.
2 Start WPS on your wireless client and choose to enter a PIN from your access point. For example, on the
TG121n Wireless Client Utility you will see the following screen:
.
3 Enter the PIN code of your THOMSON TG185n and follow the instructions. For example, on the TG121n
Wireless Client Utility you will see the following screen:
4 At the end of the installation your utility will inform you that WPS was successful.
E-DOC-CTC-20080624-0009 v2.0
13
Page 20

3 The THOMSON TG
185n as Wireless Acces
3.2.3 PIN Code Entry On the THOMSON TG185n
Get your wireless client’s PIN code
Proceed as follows:
1 Open the configuration utility of your wireless client.
2 Start WPS and choose to generate a PIN code or enter a PIN code into your access point. For example on
the TG121n Wireless Client Utility you will see the following screen:
s Point
3 Write down the PIN code generated by the configuration utility.
Enter your wireless client’s PIN code in the THOMSON TG185n web interface
Proceed as follows:
1 Open your web browser and browse to http://192.168.1.11
2 On the Advanced Setting menu, click WPS Setting.
3 Under Select the WPS Method, select PIN and enter the PIN code in the Pin Number box.
4 Click Submit.
5 Continue with the configuration on the configuration utility of your wireless client.
6 At the end of the installation your utility will inform you that WPS was successful.
.
14
E-DOC-CTC-20080624-0009 v2.0
Page 21

3 The THOMSON TG185n as Wireless Access Point
3.3 Manually Configuring a Wireless Client
Before you start
Before you can connect a computer to your wireless network you need to know which Network ID (SSID) and
encryption your THOMSON TG185n is using.
Default values
If you did not yet change the wireless settings, you must use the default settings that are printed on the label
on the bottom of your THOMSON TG185n.
Forgot your wireless settings?
If you have changed the wireless settings manually and you can’t remember your settings, try one of the
following:
If one of your computers is already connected to your network:
1 Open your web browser and browse to http://192.168.1.11
2 The THOMSON TG185n Web Interface appears. On the Basic Setting menu, click Wireless Setting.
3 On the Wireless Setting menu, you can find:
The network name (SSID).
The encryption.
If none of your computers is connected to your network, connect a computer using a wired connection and
follow the procedure above to find out what your wireless settings are.
Another option is to reset your THOMSON TG185n and reconfigure it all over again. For more information,
see “7.4 Reset to Factory Defaults” on page 52.
.
Procedure
Configure your computer with the same wireless settings as your THOMSON TG185n. For more information,
consult the help of your wireless client.
E-DOC-CTC-20080624-0009 v2.0
15
Page 22

3 The THOMSON TG
185n as Wireless Acces
3.4 Securing Your Wireless Network
Introduction
By using encryption, communication between the wireless clients and your THOMSON TG185n is protected
by a passphrase. Only clients which use the correct network name (SSID) and passphrase can connect to your
network.
Encryption methods
During the years a number of encryption types have been developed. The list below gives you an overview of
the supported encryption types ordered by security level, you will find the highest level of security at the top
of the list:
For Enterprise environment:
WPA(2) Encryption:
To use this encryption, a RADIUS authentication server must be available in your network. In this scenario
wireless clients first have to authenticate to the RADIUS server. The RADIUS server will tell the wireless
client which key it should use to encrypt its data. The RADIUS server will change this key after a specified
time.
If you do not have a RADIUS server in your network, use on the of the encryption types for home and
small office environment.
For home or small office environment:
WPA(2)-PSK Encryption:
The wireless data is being encrypted with a user-defined key. Wireless clients must be configured with
this key before they can connect to the THOMSON TG185n.
WEP Encryption:
The first encryption type used for wireless connections. Like WPA-PSK it uses a user-defined key, but WEP
has been proven to have some security issues. We strongly recommend you to use WPA-PSK instead.
s Point
Which encryption method should I use?
We strongly recommend you to use the highest level of encryption that is supported by all your wireless
clients.
Configuring the wireless encryption
Proceed as follows:
1 Open your web browser and browse to http://192.168.1.11
2 The THOMSON TG185n Web Interface appears. On the Basic Setting menu, click Wireless Setting.
3 The Wireless Setting page appears.
4 In the Security Policy list, you can select the policy of your choice. If you want to use:
WPA(2)-PSK Encryption, continue with “3.4.1 Configuring WPA(2)-PSK Encryption” on page 17.
WEP Encryption, continue with “3.4.3 Configuring WEP Encryption” on page 19.
WPA(2) Encryption, continue with “3.4.2 Configuring WPA Encryption” on page 18.
.
16
E-DOC-CTC-20080624-0009 v2.0
Page 23

3 The THOMSON TG185n as Wireless Access Point
3.4.1 Configuring WPA(2)-PSK Encryption
Procedure
Continuing from “ Configuring the wireless encryption” on page 16:
1 In the Select Security list, select:
WPA2-PSK:
WPA2-PSK is the most secure version, but not all wireless clients already support it. Before you select
this version, make sure that all of your wireless clients support it.
WPA-PSK-AUTO:
If not all of your wireless clients support WPA2-PSK or you are not sure if they support WPA2-PSK, we
recommend you to choose WPA-PSK-AUTO. Wireless clients that support WPA2-PSK will use WPA2-
PSK, the others will use WPA-PSK.
WPA-PSK:
If none of your wireless clients support WPA2-PSK choose this option.
To use WPA2-PSK on Windows XP Service Pack 2 (SP2) you first have to install Wi-Fi Protected
Access 2 (WPA2)/Wireless Provisioning Services Information Element (WPS IE) update or install
SP3 on your Windows XP.
You can find the WPS IE update on http://support.microsoft.com/kb/917021
2 In the Pre-Shared Key box, type a pass phrase (also known as Pre-shared key) of your choice. The key
must consist of 8 to 63 alphanumeric characters or 64 hexadecimal characters (characters from 0 to 9 and
from A to F).
3 Click Apply.
4 The THOMSON TG185n prompts you that the configuration was successful.
5 Configure your wireless client(s) with the same settings.
.
E-DOC-CTC-20080624-0009 v2.0
17
Page 24

3 The THOMSON TG
185n as Wireless Acces
3.4.2 Configuring WPA Encryption
Configure the RADIUS server
Continuing from “ Configuring the wireless encryption” on page 16:
Proceed as follows:
1 On the Advanced Setting menu, click RADIUS setting.
2 Under Primary Server, select Enable Primary Server.
3 In the Server IP address box, type the IP address of your RADIUS server.
4 In the Port Number box, type the RADIUS Port.
5 In the Shared Secret box, type the RADIUS Key.
Enable WPA
Proceed as follows:
1 On the Basic Setting menu, click Wireless Setting.
2 Clear the Enable WPS (Wi-Fi Protected Setup) check box.
3 In the Select Security Policy list, click the desired WPA version.
WPA2:
WPA2 is the most secure version, but not all wireless clients already support it. Before you select this
version, make sure that all of your wireless clients support it.
WPA-AUTO:
If not all of your wireless clients support WPA2 or if you are not sure if they support WPA2, we
recommend you to choose WPA-AUTO. Wireless clients that support WPA2 will use WPA2, the others
will use WPA.
WPA:
If none of your wireless clients support WPA2 choose this option.
To use WPA2-PSK on Windows XP Service Pack 2 (SP2) you first have to install Wi-Fi Protected
Access 2 (WPA2)/Wireless Provisioning Services Information Element (WPS IE) update or install
SP3 on your Windows XP.
You can find the WPS IE update on http://support.microsoft.com/kb/917021
4 Click Apply to immediately apply your changes.
5 The THOMSON TG185n prompts you that the configuration was successful.
6 Configure your wireless client(s) with the same settings.
s Point
.
18
E-DOC-CTC-20080624-0009 v2.0
Page 25

3 The THOMSON TG185n as Wireless Access Point
3.4.3 Configuring WEP Encryption
Warning
WEP has been proven to have some security issues. We strongly recommend you to use WPA-PSK instead.
Procedure
Continuing from “ Configuring the wireless encryption” on page 16:
1 Clear the Enable WPS (Wi-Fi Protected Setup) check box.
2 In the Select Security Policy list, select WEP.
3 In the WEP Key Length list, click the desired key length (a higher key length offers higher security).
4 Select:
WEP64-ASCII if you want to use a key consisting of 5 alphanumeric characters.
WEP64-Hex if you want to use a key consisting of 10 hexadecimal characters (characters from 0 to 9
and from A to F).
WEP128-ASCII if you want to use a key consisting of 13 alphanumeric characters.
WEP128-Hex if you want to use a key consisting of 26 hexadecimal characters (characters from 0 to 9
and from A to F).
WEP152-ASCII if you want to use a key consisting of 16 alphanumeric characters.
WEP152-Hex if you want to use a key consisting of 32 hexadecimal characters (characters from 0 to 9
and from A to F).
5 In the text box next to this selection, type the network key of your choice.
6 Click Apply.
7 The THOMSON TG185n prompts you that the configuration was successful.
8 Configure your wireless client(s) with the same settings.
E-DOC-CTC-20080624-0009 v2.0
19
Page 26

3 The THOMSON TG
185n as Wireless Acces
s Point
20
E-DOC-CTC-20080624-0009 v2.0
Page 27

4 The THOMSON TG185n as Wireless Repeater
4 The THOMSON TG185n as Wireless Repeater
Usage
Use this mode if you want to extend the coverage of an existing wireless network:
Terminology
The wireless access point to which we will try to connect can both be a stand-alone wireless access point or a
built-in wireless access point (for example, your Internet Gateway may be equipped with a wireless access
point). In the following pages we will just refer to it as your access point.
Configuring your THOMSON TG185n
If your Internet Gateway:
Supports WPS, see “4.1 Automatic Configuration (Via WPS)” on page 22.
Does not support WPS or you know if it does or not, see “4.2 Manual Configuration (Without WPS)” on
page 26.
In this chapter
This chapter will help your to configure your THOMSON TG185n as wireless repeater.
E-DOC-CTC-20080624-0009 v2.0
21
Page 28

4 The THOMSON TG
185n as Wireless Repea
4.1 Automatic Configuration (Via WPS)
WPS
Wi-Fi Protected Setup (WPS) allows you to connect new wireless devices to your network in a swift and easy
way, without the need to enter all of your wireless settings (SSID, encryption,...).
Requirements
Your access point must supports WPS. Check the documentation of your access point for this.
WPS must be enabled on your THOMSON TG185n (factory default).
You can only use WPS with the following security levels:
WPA-PSK
WPA2-PSK
No encryption
ter
Procedure
Proceed as follows:
1 On the back panel of your THOMSON TG185n, move the switch to the repeater position.
2 After a few seconds the Repeater LED will turn green.
3 Connect your THOMSON TG185n to you access point. The THOMSON TG185n supports the following
options to do this:
Push Button Configuration (PBC):
This is the easiest way to connect your access point. You have to push a button both on the
THOMSON TG185n and the access point. For more information, see “4.1.1 Push Button
Configuration” on page 23.
PIN code entry on the access point:
The THOMSON TG185n generates a PIN code that you have to enter in the configuration utility of
your access point. For more information, see “4.1.2 PIN Code Entry On The Access Point” on page 24.
PIN code entry on the THOMSON TG185n:
The access point generates a PIN code that you have to enter on the web interface of your THOMSON
TG185n. For more information, see “4.1.3 PIN Code Entry On the THOMSON TG185n” on page 25.
22
Your access point may not support all of these options. For more information, consult the
documentation of your access point.
E-DOC-CTC-20080624-0009 v2.0
Page 29

4 The THOMSON TG185n as Wireless Repeater
4.1.1 Push Button Configuration
Procedure
Proceed as follows:
1 Start Push Button Configuration on your access point. For more information, consult the documentation
of your access point.
2 Shortly press the WPS button on your THOMSON TG185n:
3 The WPS button LED starts blinking green.
If the LED does not start to blink, WPS is not enabled on your THOMSON TG185n. For more
information on how to enable WPS, see “ WPS does not work” on page 51.
4 The WPS button LED will turn solid green when the configuration has been completed. After a few
seconds the LED will turn off again.
E-DOC-CTC-20080624-0009 v2.0
23
Page 30

4 The THOMSON TG
185n as Wireless Repea
4.1.2 PIN Code Entry On The Access Point
Get the THOMSON TG185n’s PIN code
You can find the WIRELESS PIN:
On the label on the bottom of your THOMSON TG185n.
On the THOMSON TG185n Web Interface:
1 Open your web browser and browse to http://192.168.1.13
2 On the Basic Setting menu, click Wireless Setting.
3 You can find the PIN code in the WPS Pin box.
Enter the THOMSON TG185n’s on your access point
Proceed as follows:
1 Open the configuration utility or web interface of your access point.
2 Start WPS on your access point and choose to enter a PIN code.
3 Enter the PIN code of your THOMSON TG185n and follow the instructions.
ter
.
24
E-DOC-CTC-20080624-0009 v2.0
Page 31

4 The THOMSON TG185n as Wireless Repeater
4.1.3 PIN Code Entry On the THOMSON TG185n
Get your access point’s PIN code
Check the documentation of your THOMSON TG185n to know where to find the PIN code of your access
point. You may find this PIN code:
On a label on the housing
On the configuration utility or web interface
Enter your access point’s PIN code in the THOMSON TG185n web interface
Proceed as follows:
1 Open your web browser and browse to http://192.168.1.13
2 On the Advanced Setting menu, click WPS Setting.
3 Under Select the WPS Method, select PIN and enter the PIN code in the Pin Number box.
4 Click Submit.
5 Continue with the configuration on configuration utility or web interface of your access point.
.
E-DOC-CTC-20080624-0009 v2.0
25
Page 32

4 The THOMSON TG
185n as Wireless Repea
4.2 Manual Configuration (Without WPS)
What you need
Before you start make sure you have the following information at hand:
The Network ID (SSID) of your access point.
The encryption key/passphrase used by your access point (if security is enabled).
For more information on how to find these items, consult the documentation of your access point.
Procedure
Before you can use your THOMSON TG185n as a repeater you have to complete following steps:
1 Switch the THOMSON TG185n to repeater mode.
2 Assign a static IP address to your computer.
3 Configure the wireless settings of your THOMSON TG185n.
4 Configure the IP settings of your THOMSON TG185n (optional).
ter
Switch the THOMSON TG185n to repeater mode
Proceed as follows:
1 On the back panel of your THOMSON TG185n, move the switch to the repeater position.
2 After a few seconds the Repeater LED will turn green.
Assign a static IP address to your computer
The IP address must be between 192.168.1.14 and 192.168.1.63. The subnet mask must be 255.255.255.0.
For more information, see “7.1 Assigning a Static IP to Your Computer” on page 44.
Configure the wireless settings of your THOMSON TG185n
Proceed as follows:
1 Open your web browser and browse to http://192.168.1.13
2 The THOMSON TG185n Web Interface appears. On the Basic Setting menu, click Wireless Setting.
3 The Wireless Settings page appears.
4 Under Wireless configurations for repeater mode, select Universal Repeater.
5 In the Network ID (SSID) box, type the SSID of your access point.
6 In the Select Security Policy list, select the same encryption as your access point.
.
26
E-DOC-CTC-20080624-0009 v2.0
Page 33

4 The THOMSON TG185n as Wireless Repeater
7 Click Apply.
8 The THOMSON TG185n prompts you that the configuration was successful.
Configure the IP settings of your THOMSON TG185n (optional)
If you still want to be able to access your THOMSON TG185n after connecting it to your access point, you
have to make sure that they are both using the same IP range.
If your access point is also a THOMSON product, this will automatically be the case and no extra
configuration is needed.
If you choose not to do this configuration or you don’t know the IP settings of your Internet Gateway, you will
only be able to access the THOMSON TG185n by assigning a static IP address to your computer that is the
same range as your THOMSON TG185n.
To change the IP settings of your THOMSON TG185n:
1 On the Basic Setting menu, click Device IP Setting.
2 The Device IP Setting page appears. On this page you can configure the IP address of your THOMSON
TG185n. Select:
Assign static IP address to this device if you want to choose the IP address for your THOMSON
TG185n yourself.
1 In the IP address box, type an IP address that is in the same range as your Internet Gateway.
2 In the IP Subnet Mask, type the same subnet mask as your Internet Gateway.
3 In the Gateway IP Address, type the type the IP address of your Internet Gateway.
4 Write down this IP address and subnet mask. From now on, you can only access the THOMSON
TG185n at this address.
Use the DHCP client protocol to automatically get the IP address for this device if you want your
access point to assign an IP address to your THOMSON TG185n. In this case you do not have to
provide an IP address, IP Subnet Mask and Gateway IP Address.
3 Click Apply.
4 You can now remove the Ethernet cable form your THOMSON TG185n and computer.
E-DOC-CTC-20080624-0009 v2.0
27
Page 34

4 The THOMSON TG
185n as Wireless Repea
ter
28
E-DOC-CTC-20080624-0009 v2.0
Page 35

5 Your THOMSON TG185n as Wireless Client
5 Your THOMSON TG185n as Wireless Client
Usage
Use this mode if you want to add wireless connectivity to an Ethernet device (for example: a laptop, a gaming
console with Ethernet connectivity,...):
Terminology
The wireless access point to which we will try to connect can both be a stand-alone wireless access point or a
built-in wireless access point (for example, your Internet Gateway may be equipped with a wireless access
point). In the following pages we will just refer to it as your access point.
Default behaviour
If the THOMSON TG185n is still using its factory default settings, it will automatically repeat the strongest
unsecured network.
Configuring your THOMSON TG185n
If your access point:
Supports WPS, see “5.1 Automatic Configuration (Via WPS)” on page 30.
Does not support WPS or you don’t know if it does or not, see “5.2 Manual Configuration (Without WPS)”
on page 33.
E-DOC-CTC-20080624-0009 v2.0
29
Page 36

5 Your THOMSON TG
185n as Wireless Clien
5.1 Automatic Configuration (Via WPS)
WPS
Wi-Fi Protected Setup (WPS) allows you to connect the THOMSON TG185n to your access point in a swift and
easy way, without the need to enter all of your wireless settings (SSID, encryption,...).
Requirements
Your access point must support WPS. Check the documentation of your access point for this.
You can only use WPS with the following security levels:
WPA-PSK
WPA2-PSK
No encryption
t
Procedure
Proceed as follows:
1 On the back panel of your THOMSON TG185n, move the switch to the client position.
2 After a few seconds the Client LED will turn green.
3 Configure the THOMSON TG185n with the wireless settings of your access point. The THOMSON TG185n
supports the following options to do this:
Push Button Configuration (PBC):
This is the easiest way to connect your wireless client. You have to push a button both on your access
point and the THOMSON TG185n. For more information, see “5.1.1 Push Button Configuration” on
page 31.
PIN code entry on your THOMSON TG185n:
Your access point generates a PIN code that you have to enter on the web interface of your
THOMSON TG185n. For more information, see “5.1.2 PIN Code From Your Access Point” on page 32.
30
Your wireless client may not support all of these options. For more information, consult the
documentation of your wireless client.
E-DOC-CTC-20080624-0009 v2.0
Page 37

5 Your THOMSON TG185n as Wireless Client
5.1.1 Push Button Configuration
Procedure
1 Start Push Button Configuration on your access point. For more information, consult the documentation
of your access point.
2 Shortly press the WPS button on your THOMSON TG185n:
3 The WPS button LED starts blinking green.
4 The WPS button LED will turn solid green when the configuration has been completed. After a few
seconds the LED will turn off again.
E-DOC-CTC-20080624-0009 v2.0
31
Page 38

5 Your THOMSON TG
185n as Wireless Clien
5.1.2 PIN Code From Your Access Point
Get your access point’s PIN code
Check the documentation of your THOMSON TG185n to know where to find the PIN code of your access
point. You may find this PIN code:
On a label on the housing
On the configuration utility or web interface
Enter the PIN code in the THOMSON TG185n web interface
Proceed as follows:
1 Open your web browser and browse to http://192.168.1.12
2 On the Advanced Setting menu, click WPS Setting.
3 Under Select the WPS Method, select PIN and enter the PIN code in the Pin Number box.
4 Click Submit.
5 Continue with the configuration or web interface of your access point.
t
.
32
E-DOC-CTC-20080624-0009 v2.0
Page 39

5 Your THOMSON TG185n as Wireless Client
5.2 Manual Configuration (Without WPS)
Procedure
Before you can use your THOMSON TG185n as a repeater you have to complete following steps:
1 Switch the THOMSON TG185n to wireless client mode.
2 Assign a static IP address to your computer.
3 Connect the THOMSON TG185n to your access point.
4 Configure the IP settings of your THOMSON TG185n.
5 Configure your computer to obtain an IP address automatically.
Switch the THOMSON TG185n to wireless client mode
Proceed as follows:
1 On the back panel of your THOMSON TG185n, move the switch to the client position.
2 After a few seconds the Client LED will turn green.
Assign a static IP address to your computer
The IP address must be between 192.168.1.14 and 192.168.1.252. The subnet mask must be 255.255.255.0.
For more information, see “7.1 Assigning a Static IP to Your Computer” on page 44.
Connect the THOMSON TG185n to your access point
Proceed as follows:
1 Open your web browser and browse to http://192.168.1.12
2 The THOMSON TG185n Web Interface appears. On the Device Status menu, click Site Survey.
3 The THOMSON TG185n lists all the access points that are within range.
4 Select your access point and click Associate.
5 If your access point is secured, the THOMSON TG185n will take you to the Wireless Settings page. Enter
the passphrase/key used by your access point and click Apply.
6 The THOMSON TG185n prompts you that the configuration was successful.
.
E-DOC-CTC-20080624-0009 v2.0
33
Page 40

5 Your THOMSON TG
185n as Wireless Clien
Configure the IP settings of your THOMSON TG185n
To change the IP settings of your THOMSON TG185n:
1 On the Basic Setting menu, click Device IP Setting.
2 The Device IP Setting page appears. On this page you can configure the IP address of your THOMSON
TG185n. Select:
Assign static IP address to this device if you want to choose the IP address for your THOMSON
TG185n yourself.
1 In the IP address box, type an IP address that is in the same range as your access point.
2 In the IP Subnet Mask, type the same subnet mask as your access point.
3 In the Gateway IP Address, type the type the IP address of your access point.
4 Write down this IP address and subnet mask. From now on, you can only access the THOMSON
TG185n at this address.
Use the DHCP client protocol to automatically get the IP address for this device if you want your
access point to assign an IP address to your THOMSON TG185n. In this case you do not have to
provide an IP address, IP Subnet Mask and Gateway IP Address.
3 Click Apply.
4 Remove the Ethernet cable form your THOMSON TG185n and computer.
t
Configure your computer to obtain an IP address automatically
For more information, see “7.2 Restoring the IP Settings of Your Computer” on page 48.
34
E-DOC-CTC-20080624-0009 v2.0
Page 41

6 THOMSON TG185n Basics
In this chapter
THOMSON TG185n LED Behaviour 36
THOMSON TG185n Web Interface 40
Saving/Restoring Your Configuration 41
6 THOMSON TG185n Basics
Topi c Page
E-DOC-CTC-20080624-0009 v2.0
35
Page 42

6 THOMSON TG185
n Basics
6.1 THOMSON TG185n LED Behaviour
Content
This chapter describes the behaviour of:
Status LEDs
WPS Button LED
Ethernet LEDs
36
E-DOC-CTC-20080624-0009 v2.0
Page 43

6 THOMSON TG185n Basics
6.1.1 Status LEDs
Introduction
On the top panel of your THOMSON TG185n, you can find a number of status LEDs, indicating the state of the
device during normal operation.
Power LED
Colour State Description
Green Solid on Power on, normal operation
Off Power off
Wireless LED
Colour State Description
Green Blinking Wireless activity
Solid on Wireless service enabled, no activity
Off No Ethernet connection
Access Point LED
When the LED is solid green, the THOMSON TG185n is in Wireless Access Point mode. For more information
see “ THOMSON TG185n Modes” on page 3.
Client LED
When the LED is solid green, the THOMSON TG185n is in Wireless Client mode. For more information see
“ THOMSON TG185n Modes” on page 3.
Repeater LED
When the LED is solid green, the THOMSON TG185n is in Wireless Repeater mode. For more information see
“ THOMSON TG185n Modes” on page 3.
E-DOC-CTC-20080624-0009 v2.0
37
Page 44

6 THOMSON TG185
6.1.2 WPS Button LED
Introduction
The WPS button allows you to connect the THOMSON TG185n with other wireless devices.
n Basics
WPS LED
Colour State Description
green Solid On Client successfully registered via WPS
Blinking WPS registration ongoing
Off No WPS registration ongoing.
38
E-DOC-CTC-20080624-0009 v2.0
Page 45

6 THOMSON TG185n Basics
6.1.3 Ethernet LEDs
Ethernet LED
On the right of the Ethernet port, you can find a LED indicating the link integrity (or activity).
LED Status Description
Off No connection on this port
Solid on Ethernet link up
Blinking Data is flowing from/to this port
E-DOC-CTC-20080624-0009 v2.0
39
Page 46

6 THOMSON TG185
n Basics
6.2 THOMSON TG185n Web Interface
Introduction
The THOMSON TG185n Web Interface allows you to configure your THOMSON TG185n using your web
browser.
Requirements
Javascript must be enabled on your browser. For more information, consult the help of your Internet
browser.
The IP address of your computer must be between 192.168.1.14 and 192.168.1.63 (for example
192.168.1.20). The subnet mask must be 255.255.255.0. For more information, see “7.1 Assigning a Static
IP to Your Computer” on page 44.
Accessing the THOMSON TG185n Web Interface
Proceed as follows:
1 Open your web browser.
2 If your THOMSON TG185n is switched to:
Access Point mode, browse to http://192.168.1.11
Wireless Client mode, browse to http://192.168.1.12
Repeater mode, browse to http://192.168.1.13
If you have changed the IP address of your THOMSON TG185n during installation, use this IP
address to access the THOMSON TG185n Web Interface.
3 The THOMSON TG185n Web Interface appears.
4 You can now browse through all configurable items of the THOMSON TG185n using the menu on the left.
If you have protected your THOMSON TG185n with a password, the THOMSON TG185n will prompt you
to enter your password. Enter your password and click Log on.
.
.
.
40
E-DOC-CTC-20080624-0009 v2.0
Page 47

6 THOMSON TG185n Basics
6.3 Saving/Restoring Your Configuration
Introduction
Once you have configured your THOMSON TG185n to your needs, it may be a good idea to save your
configuration for later use. This way you can always return to your working configuration in case of
problems.
Backing up your configuration
Proceed as follows:
1 Browse to the THOMSON TG185n Web Interface.
2 On the System Tools menu, click Configuration Save and Restore.
3 Under Save Configuration, click Save to file.
4 The THOMSON TG185n prompts you to save your file.
5 Save your file to a location of your choice.
Restoring your configuration
Proceed as follows:
1 Browse to the THOMSON TG185n Web Interface.
2 On the System Tools menu, click Configuration Save and Restore.
3 Under Restore Configuration, click Browse.
4 Open your backup file.
5 Click Restore from file.
6 The THOMSON TG185n prompts you that the THOMSON TG185n will have to restart after restoring the
configuration. Click OK.
7 The THOMSON TG185n restores your configuration.
8 After restarting, the THOMSON TG185n returns to the home page.
E-DOC-CTC-20080624-0009 v2.0
41
Page 48

6 THOMSON TG185
n Basics
42
E-DOC-CTC-20080624-0009 v2.0
Page 49

7 Support
Introduction
This chapter suggests solutions for problems you may encounter while installing or configuring your
THOMSON TG185n.
If the suggestions do not resolve the problem, look at the support pages on http://www.thomson-
broadband.com or contact your service provider.
Topics
This chapter describes the following topics:
Topi c Page
Assigning a Static IP to Your Computer 44
Restoring the IP Settings of Your Computer 48
7 Support
General THOMSON TG185n Troubleshooting 49
Reset to Factory Defaults 52
E-DOC-CTC-20080624-0009 v2.0
43
Page 50

7 Support
7.1 Assigning a Static IP to Your Computer
IP addresses
In a network, each device carries a unique address, the IP address. If a network device wants to communicate
with another network he will send his message to this IP address.
Why a static IP address?
These IP addresses are normally assigned to your computer by a dedicated server, the Dynamic Host
Configuration Protocol (DHCP) server. This server can be integrated in your (Internet) gateway or located on
the Internet. But since your THOMSON TG185n is currently not connected to either of these, we will have to
manually assign an address to your computer.
How can I configure this on my computer?
If your computer runs:
Windows Vista, proceed with “7.1.1 Assigning a Static IP Address On Windows Vista” on page 45.
Windows XP, proceed with “7.1.2 Assigning a Static IP Address On Windows XP” on page 46.
Mac OS X, proceed with “7.1.3 Assigning a Static IP Address On Mac OS X” on page 47.
Another operating system, consult the help of your operating system.
44
E-DOC-CTC-20080624-0009 v2.0
Page 51

7 Support
7.1.1 Assigning a Static IP Address On Windows Vista
Procedure
Proceed as follows:
1 On the Windows Start menu, click Network.
2 In the top bar, click Networking and Sharing Center.
3 In the Tasks list, click Manage network connections.
4 Right-click Local Area Connection and click Properties. If Windows prompts you for your permission, click
Continue.
5 The Local Area Connection Properties window appears:
In the This connection uses the following items list, select Internet Protocol Version 4(TCP/IPv4) and click
Properties.
6 The Internet Protocol Version 4 (TCP/IPv4) window appears. Select Use the Following IP address.
7 In the IP address box, type an IP address between 192.168.1.14 and 192.168.1.63 (for example
192.168.1.20).
8 In the Subnet mask box, type 255.255.255.0.
9 Click OK.
10 Click OK.
E-DOC-CTC-20080624-0009 v2.0
45
Page 52

7 Support
7.1.2 Assigning a Static IP Address On Windows XP
Procedure
Proceed as follows:
1 On the Windows Start menu, click Control Panel.
2 Double-click Network Connections (if needed, switch to Classic View first).
3 Right-click Local Area Connection and click Properties.
4 The Local Area Connection Properties window appears:
In the This connection uses the following items list, select Internet Protocol (TCP/IP) and click Properties.
5 The Internet Protocol (TCP/IP) window appears:
Select Use the Following IP address.
6 In the IP address box, type an IP address between 192.168.1.14 and 192.168.1.63 (for example
192.168.1.20).
7 In the Subnet mask box, type 255.255.255.0.
8 Click OK.
9 Click OK.
46
E-DOC-CTC-20080624-0009 v2.0
Page 53

7.1.3 Assigning a Static IP Address On Mac OS X
Procedure
Proceed as follows:
1 In the apple menu, click System Preferences.
2 Under Internet & Network, click Network.
3 Select Built-in Ethernet and click Configure.
4 In the Configure IPv4 list, select Manually.
5 In the IP Address box, type an IP address between 192.168.1.14 and 192.168.1.63 (for example
192.168.1.20).
6 In the Subnet Mask box, type 255.255.255.0.
7 Click Apply Now.
7 Support
E-DOC-CTC-20080624-0009 v2.0
47
Page 54

7 Support
7.2 Restoring the IP Settings of Your Computer
MS Windows
Use the same procedure as described in “7.1 Assigning a Static IP to Your Computer” on page 44, but select
Obtain an IP address automatically instead of Use the following IP address.
Mac OS X
Use the same procedure as described in “7.1 Assigning a Static IP to Your Computer” on page 44, but select
Using DHCP instead of Manually in the Configure IPv4 list:
48
E-DOC-CTC-20080624-0009 v2.0
Page 55

7 Support
7.3 General THOMSON TG185n Troubleshooting
THOMSON TG185n does not work
If none of the LEDs light up, make sure that:
The THOMSON TG185n is plugged into a power socket outlet.
You are using the correct power supply for your THOMSON TG185n device.
The power requirements for your THOMSON TG185n are clearly indicated on the identification
label on the bottom of the THOMSON TG185n. Only use the power adaptor supplied with your
THOMSON TG185n.
THOMSON TG185n unreachable
If your THOMSON TG185n cannot be reached due to misconfiguration, you might consider a hardware reset
to factory defaults as described in “7.4 Reset to Factory Defaults” on page 52.
E-DOC-CTC-20080624-0009 v2.0
49
Page 56

7 Support
7.3.1 Wired Connection Troubleshooting
Ethernet LED does not light up
Make sure that:
The Ethernet cable is securely connected to the Ethernet port on your THOMSON TG185n and your
computer.
You are using the correct cable type for your Ethernet equipment that is at least UTP CAT5 with RJ-45
connectors.
50
E-DOC-CTC-20080624-0009 v2.0
Page 57

7 Support
7.3.2 Wireless Connection Troubleshooting
WPS does not work
Make sure that WPS is enabled on your THOMSON TG185n:
1 Browse to the THOMSON TG185n Web Interface.
2 On the Basic Setting menu, click Wireless Setting.
3 The Wireless Setting page appears.
4 Select the Enable WPS check box.
5 Click Apply.
6 The THOMSON TG185n prompts you that the configuration was successful.
No Wireless Connectivity
Make sure that:
The access point and wireless clients are allowed to connect through wireless channels as defined for
local regulatory domain.
The wireless client is configured for the correct wireless settings (SSID, security settings).
Check the signal strength, indicated by the wireless client manager. If the signal is low, try repositioning
the THOMSON TG185n or directing the THOMSON TG185n’s antenna(s) for optimal performance.
Make sure that the wireless client adapter is enabled (message like “radio on”).
Poor Wireless Connectivity or Range
Try the following:
Change the wireless channel of your access point. If you are also using a repeater, do not forget to
change it also.
Make sure both the access point and the wireless clients are allowed to connect through wireless
channels as defined for local regulatory domain.
Check the location of the access point in the building.
Use WPA(2)-PSK as encryption.
Changing the wireless channel on a THOMSON TG185n in Access Point mode
Proceed as follows:
1 Browse to the THOMSON TG185n Web Interface.
2 On the Basic Setting menu, click Wireless Setting.
3 The Wireless Setting page appears.
4 In the Channel list, select the channel of your choice.
5 Click Apply.
6 The THOMSON TG185n prompts you that the configuration was successful.
E-DOC-CTC-20080624-0009 v2.0
51
Page 58

7 Support
7.4 Reset to Factory Defaults
Resetting your THOMSON TG185n
If at some point you can no longer connect to the THOMSON TG185n or you want to make a fresh install, it
may be useful to perform a reset to factory defaults.
Warning
A reset to factory default settings deletes all configuration changes you made. Therefore, after the reset, a
reconfiguration of your THOMSON TG185n will be needed.
Procedure
Proceed as follows:
1 Use a pen or an unfolded paperclip to push the recessed Reset button for 7 seconds.
2 Release the Reset button.
3 The THOMSON TG185n restores the initial configuration and restarts.
52
E-DOC-CTC-20080624-0009 v2.0
Page 59

Page 60

THOMSON Telecom Belgium
Prins Boudewijnlaan 47
2650 Edegem
www.thomson-broadband.com
© THOMSON 2008. All rights reserved.
E-DOC-CTC-20080624-0009 v2.0.
 Loading...