

Page 1
SpeedTouch™546(v6)
Residential ADSL Gateway
Installation and Setup Guide
Release R5.4
Page 2

Page 3

SpeedTouch™
546
Installation and Setup Guide
R5.4
(v6)
Page 4

Copyright
Copyright ©1999-2005 THOMSON. All rights reserved.
Distribution and copying of this document, use and communication of its contents is not permitted without written authorization
from THOMSON. The content of this document is furnished for informational use only, may be subject to change without notice,
and should not be construed as a commitment by THOMSON. THOMSON assumes no responsibility or liability for any errors or
inaccuracies that may appear in this document.
Thomson Telecom Belgium
Prins Boudewijnlaan, 47
B-2650 Edegem
Belgium
www.speedtouch.com
Trademarks
The following trademarks are used in this document:
SpeedTouch™ is a trademark of THOMSON.
Bluetooth® word mark and logos are owned by the Bluetooth SIG, Inc.
Ethernet™ is a trademark of Xerox Corporation.
Wi-Fi® and the Wi-Fi logo are registered trademarks of the Wi-Fi Alliance. "Wi-Fi CERTIFIED", "Wi-Fi ZONE", "Wi-Fi Alli-
ance", their respective logos and "Wi-Fi Protected Access" are trademarks of the Wi-Fi Alliance.
UPnP™ is a certification mark of the UPnP™ Implementers Corporation.
Microsoft®, MS-DOS®, Windows® and Windows NT® are either registered trademarks or trademarks of Microsoft Corpo-
ration in the United States and/or other countries.
Apple® and Mac OS® are registered trademarks of Apple Computer, Incorporated, registered in the United States and
other countries.
UNIX® is a registered trademark of UNIX System Laboratories, Incorporated.
Adobe®, the Adobe logo, Acrobat and Acrobat Reader are trademarks or registered trademarks of Adobe Systems, Incor-
porated, registered in the United States and/or other countries.
Netscape® and Netscape Navigator® are registered trademarks of Netscape Communications Corporation.
Other brands and product names may be trademarks or registered trademarks of their respective holders.
Document Information
Status: v1.0 (November 2005)
Reference: E-DOC-CTC-20051017-0068
Short Title: Installation and Setup Guide ST546
(v6) R5.4 (en)
Page 5

Contents
Contents
About this Installation and Setup Guide ................... 1
1 Introducing the SpeedTouch™....................................3
2 Basic Installation ...........................................................5
2.1 Setting up your SpeedTouch™....................................................... 6
2.2 Installing your SpeedTouch™......................................................... 7
2.2.1 Guided Installation...........................................................................................................8
2.2.2 Manual Installation........................................................................................................16
2.3 The SpeedTouch™ Setup CD........................................................ 18
2.4 SpeedTouch™ Connection Essentials .......................................... 19
2.5 Connections Overview and Powering.......................................... 20
2.6 Basic Security .............................................................................. 21
3 Web-Based User Interface.......................................... 23
E-DOC-CTC-20051017-0068 v1.0
i
Page 6

Contents
4 Internet Connection Troubleshooting.......................25
4.1 Checking the Hardware................................................................ 26
4.2 LED Diagnostics........................................................................... 27
4.3 Web Diagnostics .......................................................................... 29
4.4 SpeedTouch™ Setup CD Troubleshooting ................................... 31
4.5 Easy Setup Troubleshooting ........................................................ 34
ii
E-DOC-CTC-20051017-0068 v1.0
Page 7

About this Installation and Setup Guide
About this Installation and Setup Guide
Used symbols The following symbols are used in this Installation and Setup Guide:
A note provides additional information about a topic.
A tip provides an alternative method or shortcut to perform an action.
A caution warns you about potential problems or specific precautions that
!
need to be taken.
Terminology Generally, the SpeedTouch™546(v6)(i) will be referred to as SpeedTouch™ in this
Installation and Setup Guide.
Documentation and
software updates
THOMSON continuously develops new solutions, but is also committed to improve
its existing products.
For suggestions regarding this document, please contact
documentation.speedtouch@thomson.net
For more information on THOMSON's latest technological innovations, documents
and software releases, visit us at: w
.
ww.speedtouch.com.
E-DOC-CTC-20051017-0068 v1.0
1
Page 8

About this Installation and Setup Guide
2
E-DOC-CTC-20051017-0068 v1.0
Page 9

1 Introducing the SpeedTouch™
Introduction In a minute you will be able to access the Internet using your
SpeedTouch™546
This Installation and Setup Guide will show you how to set up your SpeedTouch™
and how to connect a computer or a local area network (LAN) to the Internet.
(v6)(i) Residential ADSL Gateway.
Chapter 1
Introducing the SpeedTouch™
Identifying your
SpeedTouch™
The label on the bottom of your SpeedTouch™ informs you about the
SpeedTouch™’s:
Product name
Model number
Serial number
Power requirements
Do not remove or cover the label.
!
DSL variants The SpeedTouch™ comes in two ADSL variants:
POTS: The SpeedTouch™546(v6) connects to an analogue Plain Old Telephone
Service (POTS) line.
ISDN: The SpeedTouch™546(v6)iconnects to an Integrated Service Digital
Network (ISDN) line, enabling residences with an ISDN line to use the ADSL
service.
The ... variant supports ...
POTS ADSL
ADSL2
ADSL2+
RE-ADSL
E-DOC-CTC-20051017-0068 v1.0
ISDN
ADSL
ADSL2
ADSL2+
You can easily identify your variant by checking the product name printed on the
label on the bottom of your SpeedTouch™.
Only use the SpeedTouch™ variant which is appropriate for the DSL service
!
provided to your premises.
3
Page 10

Chapter 1
Introducing the SpeedTouch™
SpeedTouch™ Setup CD Your SpeedTouch™ comes with a Setup CD.
If you insert the CD into a Microsoft Windows PC or Mac OS X computer:
The first time, an intuitive SpeedTouch™ Quick-Install Wizard will guide you
through the hardware setup of your SpeedTouch™ and will help you to
connect to the Internet.
See “2.2 Installing your SpeedTouch™” on page 7 for more information.
For future reference, the SpeedTouch™ CD Menu provides links to all contents
See “2.3 The SpeedTouch™ Setup CD” on page 18 for more information.
If you use another operating system, a set of subdirectories allows you to easily
browse for user documentation, SpeedTouch™ system software, service templates,
etc.
SpeedTouch™ Home Install
Wizard
The SpeedTouch™ Home Install Wizard has been designed to help you on the
Internet very quickly.
First, the wizard tries to detect your SpeedTouch™. As soon as you have connected
your SpeedTouch™ to your computer, the wizard configures your SpeedTouch™
and - if necessary - your computer.
The Home Install Wizard was designed for Microsoft Windows operating systems
and Mac OS X - in the latter case provided you use a wired connection to your
SpeedTouch™.
You can start the SpeedTouch™ Home Install Wizard:
Automatically from the SpeedTouch™ Quick-Install Wizard when you insert
the SpeedTouch™ Setup CD into a computer for the first time.
See “2.2 Installing your SpeedTouch™” on page 7 for more information.
From the SpeedTouch™ CD Menu Home page, via Run Quick Installation. This
will in fact re-run the Quick-Install Wizard and subsequently start the Home
Install Wizard as if you started the Setup CD for the first time.
From the SpeedTouch™ CD Menu Maintenance page, via Reconfigure my
SpeedTouch™.
If you do not want to use the guided installation procedure, you can also
install and configure your SpeedTouch™ manually. See “2.2.2 Manual
Installation” on page 16 for more information.
4
E-DOC-CTC-20051017-0068 v1.0
Page 11

Chapter 2
Basic Installation
2 Basic Installation
Before you begin Make sure you read the safety instructions and regulatory notices first. You can find
the safety instructions on the Setup CD (see “2.2 Installing your SpeedTouch™” on
page 7). They may also be provided as a printed booklet.
ADSL service The ADSL service must be up and running on your telephone or ISDN line.
If both telephone and ADSL service are simultaneously available from the same
copper pair, you will need a central splitter or distributed filters for decoupling
ADSL and telephone signals.
Public telephone lines carry voltages that can cause electric shock. Only try
!
to set up splitter/filters that have been designed to be installed by unqualified
personnel. For further assistance, contact your Internet Service Provider.
Computer requirements To connect computer(s) via Ethernet, make sure the computer(s) are equipped
with an Ethernet network interface card (NIC).
Connection details from
your Internet Service
Provider (ISP)
You need the following connection details from your Internet Service Provider (ISP):
Your ISP’s method for connecting to the Internet (for example PPPoE)
The VPI/VCI (for example 8/35)
Your user name and password to connect to the Internet
You must have received this information when you took out an ADSL subscription
with your Internet Service Provider (ISP). You will be prompted for this information
at a given step in the installation procedure.
E-DOC-CTC-20051017-0068 v1.0
5
Page 12
Chapter 2
Basic Installation
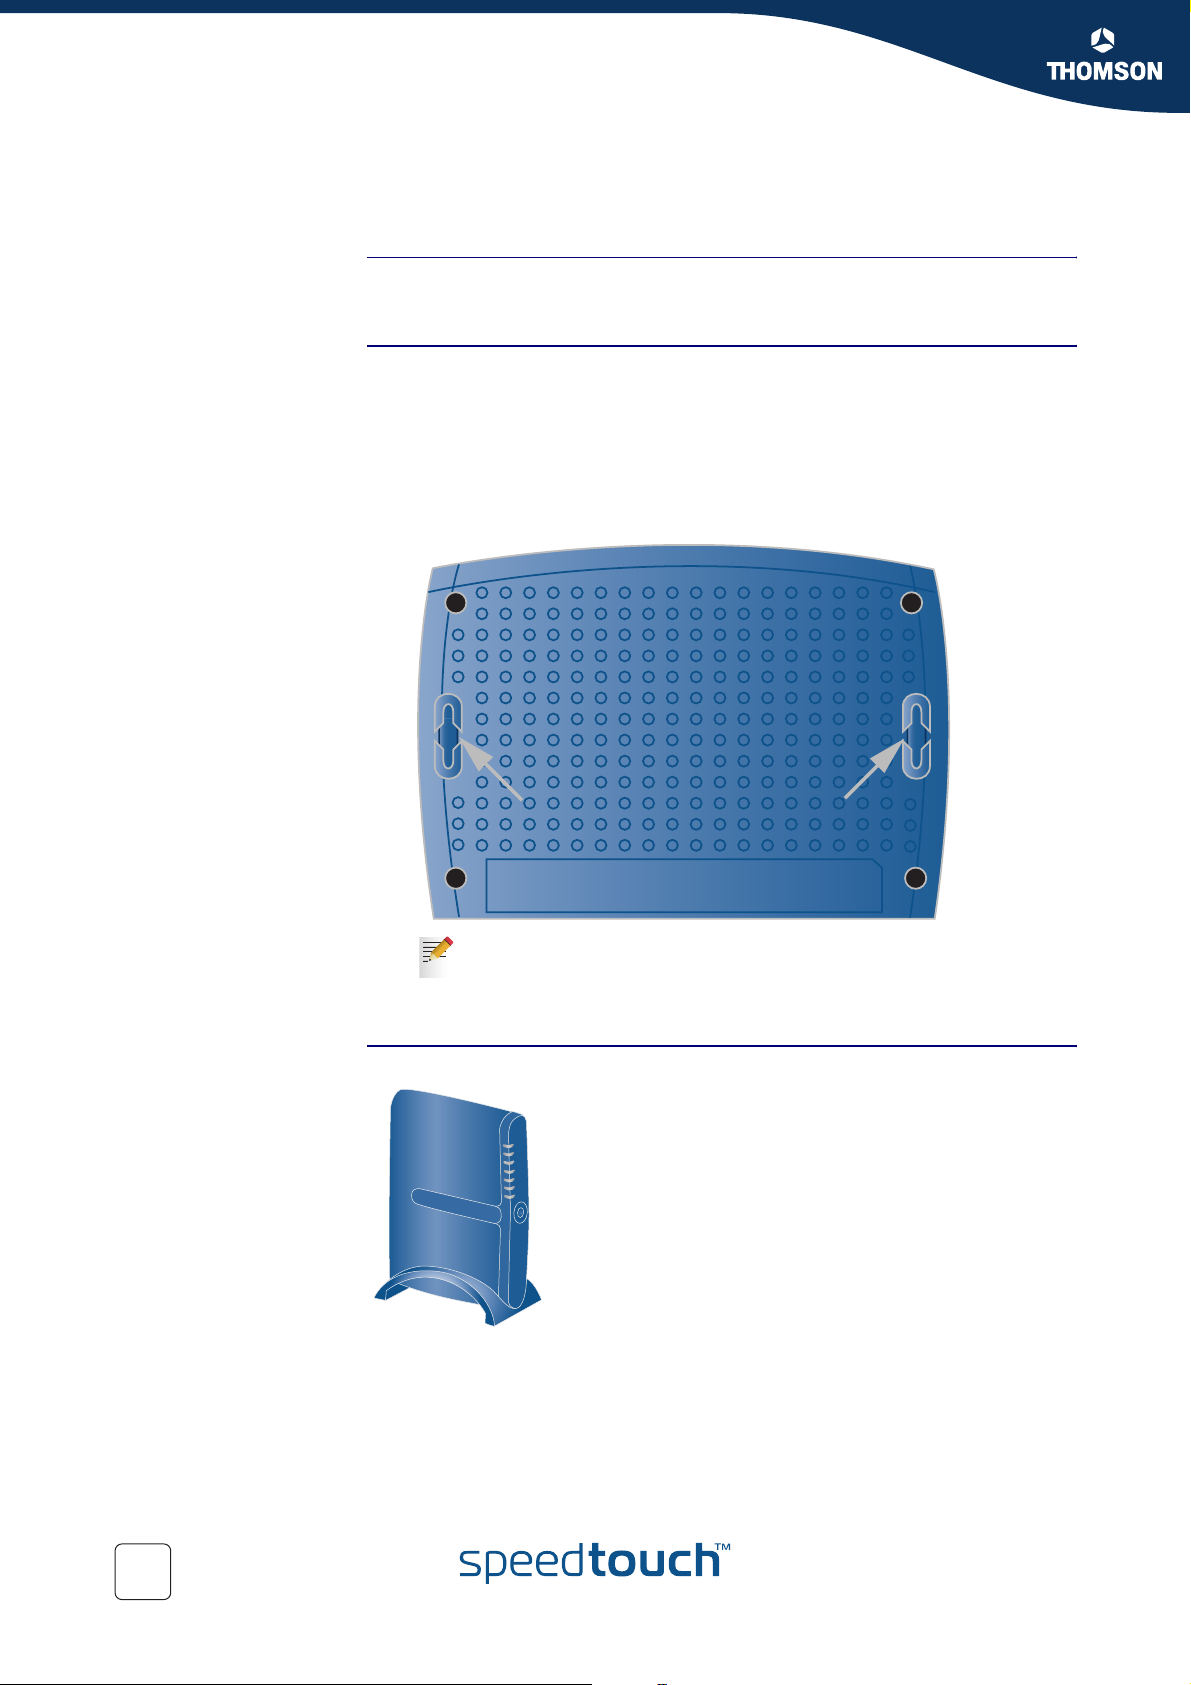
2.1 Setting up your SpeedTouch™
Setup possibilities You can mount the SpeedTouch™ on a wall, set it up upright or simply place it on a
desk.
Wall mount Proceed as follows to mount the SpeedTouch™ on a wall or other vertical surface:
1 Drill two holes in the wall or other vertical surface where you want to place the
SpeedTouch™.
2 Fasten two screws in the wall holes. The screws should protrude five
millimetres from the surface of the wall.
3 Attach your SpeedTouch™ on the wall using the two mounting slots on the
bottom.
If you install the SpeedTouch™ onto plasterboard, use dowels to
secure the screws. Otherwise the strain of the cables connected to the
SpeedTouch™ rear panel connectors could pull the SpeedTouch™
from the wall.
Stand-up To set up the SpeedTouch™ in an upright position, use the cradle (if available).
6
E-DOC-CTC-20051017-0068 v1.0
Page 13
Basic Installation
2.2 Installing your SpeedTouch™
Internet connectivity setup There are different ways to set up your SpeedTouch™. The best way depends on
your operating system.
Chapter 2
If you use the following
operating system
Microsoft Windows (98 SE,
Millennium, 2000 or XP)
Mac OS X
Any operating system
(provided you have IP
connectivity)
If you are using Microsoft Windows XP, you can also use the Microsoft
Windows XP Internet Gateway Device (IGD) Control Agent for UPnP, as
described in the SpeedTouch™ User’s Guide.
the recommended way to set up your
SpeedTouch™ is
the Home Install Wizard, as described in
“2.2.1 Guided Installation” on page 8.
the Easy Setup, as described in “2.2.2 Manual
Installation” on page 16: Open your Web
browser, the SpeedTouch™ HTTP intercept will
do the rest.
E-DOC-CTC-20051017-0068 v1.0
7
Page 14

Chapter 2
Basic Installation
2.2.1 Guided Installation
Introduction On the CD, a Quick-Install Wizard is provided that will guide you through the first
installation and setup of your SpeedTouch™.
The Quick-Install Wizard will:
Provide important safety and regulatory information.
Show you how to make the necessary connections to your SpeedTouch™.
Show you how to turn on your device.
Prepare you to smoothly run the SpeedTouch™ Home Install Wizard.
The subsequent SpeedTouch™ Home Install Wizard will then prepare your
SpeedTouch™ and your local computer(s) to connect to the Internet.
The Home Install Wizard will:
Guide you through connecting your computer(s) to your SpeedTouch™.
Prepare the SpeedTouch™ to connect to the Internet.
You need administrative rights to run the applications on the Setup CD on a
!
Microsoft Windows 2000 or XP operating system, or Mac OS X computer.
Connecting the cables:
wait!
Starting the CD for the first
time
Do not make any connections to your SpeedTouch™ until you are prompted to do
so by the SpeedTouch™ Quick-Install Wizard and/or the SpeedTouch™ Home Install
Wizard.
To start the SpeedTouch™ Setup CD Menu:
1 Insert the Setup CD into your computer's CD-ROM or DVD-ROM drive.
Microsoft Windows: The CD should autostart.
If not, see ”The SpeedTouch™ CD does not start automatically”
on page 31.
Mac OS X: Double-click Menu in the window with the content of the CD.
2 Select the language of your choice and click OK.
3 The procedure continues with the SpeedTouch™ Quick-Install Wizard.
Proceed with “ Quick-Install Wizard” on page 9.
8
E-DOC-CTC-20051017-0068 v1.0
Page 15

Chapter 2
Basic Installation
Quick-Install Wizard The SpeedTouch™ Quick-Install Wizard guides you through the first setup of your
SpeedTouch™.
Proceed as follows:
1 On the Welcome page, click Next to continue.
If you ran the CD on this computer before, the Quick-Install Wizard is
not shown; the CD menu appears instead.
2 Select your SpeedTouch™ from the list of supported devices and click Next.
A product picture helps you to easily identify your SpeedTouch™. If
you are not sure what device you have, check the label on the bottom
of your SpeedTouch™.
The SpeedTouch™ Safety Instructions and Regulatory Notices are displayed.
E-DOC-CTC-20051017-0068 v1.0
9
Page 16

Chapter 2
Basic Installation
3 Scroll down and read all the instructions carefully, select I have read and I fully
understand the Safety Instructions and Regulatory Information to confirm
your reading, and then click Next.
Your SpeedTouch™ is designed and tested to meet the latest safety
!
standards. However, to ensure safe use of this product, it is important
that you carefully read and comply with the Safety Instructions and
Regulatory Notices shown and/or available in the Safety and
Regulatory booklet before you install the SpeedTouch™.
Subsequent screens guide you through the preliminary hardware setup of
your SpeedTouch™.
4 Follow all the instructions carefully and click Next each time your are ready to
proceed.
As soon as all the required preliminary connections to your SpeedTouch™
have been made, and your SpeedTouch™ is turned on and initialized, the final
steps in the Quick-Install Wizard will:
Make all information readily available to let the Home Install Wizard
configure your SpeedTouch™ to connect to the Internet.
See “ Connection details from your Internet Service Provider (ISP)” on
page 5 for an overview of information you must have readily available.
Start the SpeedTouch™ Home Install Wizard.
5 Click Set up my SpeedTouch to continue.
6 The procedure continues with the SpeedTouch™ Home Install Wizard.
Proceed with “ Home Install Wizard” on page 11.
10
E-DOC-CTC-20051017-0068 v1.0
Page 17

Basic Installation
Home Install Wizard The SpeedTouch™ Home Install Wizard guides you through your local network
connections and prepares the SpeedTouch™ to connect to the Internet. Proceed as
follows:
1 On the Welcome page, click Next to continue.
Chapter 2
The Software License Agreement window appears.
2 You must accept before continuing. Click Yes to accept.
If you accepted the Software License Agreement in a previous
configuration setup, this window will not be shown.
The SpeedTouch™ Home Install Wizard checks your system and invites you to
connect the SpeedTouch™ to your computer.
E-DOC-CTC-20051017-0068 v1.0
See “ SpeedTouch™ wiring” on page 19 for a comprehensive
overview of all SpeedTouch™ connections.
11
Page 18

Chapter 2
Basic Installation
3 Make the following connection:
Connect the yellow RJ-45 Ethernet cable to the yellow Ethernet port on
your SpeedTouch™ and the other end to the computer’s Ethernet port.
4 Once the hardware is installed and connected to the SpeedTouch™, the
procedure continues with configuring your Internet connection.
If the wizard does not detect a connection, an error message will be
displayed. Refer to “ The wizard does not detect a connection” on
page 31.
Proceed with “ Configuring the Internet connection” on page 13.
12
E-DOC-CTC-20051017-0068 v1.0
Page 19

Chapter 2
Basic Installation
Configuring the Internet
connection
Proceed as follows:
1 If prompted, enter the User name and Password for your SpeedTouch™
security settings and click OK.
The factory default user is ‘Administrator’ and its password is blank. It
is advisable to specify another user name and password to protect
your SpeedTouch™ from security violation during the configuration
procedure. See “2.6 Basic Security” on page 21 for more information.
2 Select the appropriate Region, Provider and Service for your Internet
connection as specified by your Internet Service Provider and click Next.
If the Internet Service Provider has included a separate disk with a
dedicated service profile, click Have Disk to browse to the location of
the appropriate service profile template file.
From here on, the procedure might differ from the description below.
!
The requested information will depend on the selected service profile
and should be provided by your Internet Service Provider. Subsequent
screens will guide you through the configuration of both the
SpeedTouch™ and your computer. Enter the requested information
and click Next whenever requested.
3 Your connection to the Internet connectivity is set up:
Select the VPI/VCI - and, if required, the Connection Type - as specified
by your Internet Service Provider and click Next.
Enter the User Name and Password for your Internet account settings as
specified by your Internet Service Provider and click Next.
4 The procedure continues with some additional configurations.
Proceed with “ Configuring the SpeedTouch™ (and your computer)” on
page 14.
E-DOC-CTC-20051017-0068 v1.0
13
Page 20

Chapter 2
Basic Installation
Configuring the
SpeedTouch™ (and your
computer)
Proceed as follows:
1 Depending on the selected service profile and your ISP’s requirements, you
may have to fill in some additional settings during the Home Install Wizard,
like Dynamic DNS Service, Time Configuration or other.
Enter the information provided by your ISP and click Next whenever
requested.
2 Provide a user name and password to protect your SpeedTouch™ from
unauthorised access. Each time a user wants to access a SpeedTouch™
management interface, the user will be prompted to provide this user name
and password before access is granted.
Click Next to continue.
3 The procedure continues with the final steps of configuring your
SpeedTouch™ and your computer.
Proceed with “ Finishing the Home Install Wizard” on page 15.
14
E-DOC-CTC-20051017-0068 v1.0
Page 21

Chapter 2
Basic Installation
Finishing the Home Install
Wizard
The SpeedTouch™ Home Install Wizard will configure the SpeedTouch™ and your
computer according to the service profile. Proceed as follows:
1 You can follow the configuration progress in following window:
2 Click Finish to close the wizard.
The following steps will happen automatically:
After some seconds, the Internet LED on your SpeedTouch™ will be lit
green to indicate Internet connectivity. If not, refer to “4.2 LED
Diagnostics” on page 27. If needed, you can test your Internet
connection as described in “ Testing your Internet Connection” on
page 29.
The SpeedTouch™ CD Menu is displayed. See “2.3 The SpeedTouch™
Setup CD” on page 18 for more information.
You are redirected to the embedded SpeedTouch™ pages automatically
(unless you cleared the http://speedtouch.lan check box in the last
window of the Home Install Wizard). These pages allow you to configure
your firewall, device settings, and so on. See the SpeedTouch™ User’s
Guide for more information.
More on IP settings The computer’s networking interface used during the Home Install Wizard
E-DOC-CTC-20051017-0068 v1.0
procedure will be configured for obtaining its IP configuration dynamically in the
most cases. This is the most convenient configuration and should not be changed.
For fixed or advanced IP configurations, please follow the instructions of
your ISP.
15
Page 22

Chapter 2
Basic Installation
Web-based Easy Setup With the help of the Easy Setup, your Internet connection is set up in a few clicks.
2.2.2 Manual Installation
The Easy Setup is Operating System independent.
Preconditions Make sure that:
Your SpeedTouch™ is correctly set up and turned on.
Your computer is connected to the SpeedTouch™.
See “ SpeedTouch™ wiring” on page 19 for a comprehensive
overview of all SpeedTouch™ connections.
Your host computer is configured as DHCP client or with a valid fixed IP
address. For more information, refer to the Help of your browser.
In case of problems, you can give the host computer a fixed IP address
in the same subnet as your SpeedTouch™ (If the SpeedTouch™ is in
its default settings, that is an address between 192.168.1.1 and
192.168.1.253). In case you use fixed IP addresses, the SpeedTouch™
has to be configured as DNS server (default).
Your Web browser is not using a proxy server. For more information, see
“ Disable proxy server” on page 34.
HTTP intercept Proceed as follows:
1 Open a Web browser. Browse to an arbitrary Web site, for instance http://
www.speedtouch.com. As long as no Internet connection has been set up, you
will be automatically redirected to the SpeedTouch™ Welcome page.
If you are not redirected automatically, go to “ Starting the Easy Setup
wizard” on page 17.
2 Click Set up my SpeedTouch to start the Easy Setup wizard.
3 Proceed with “ Using Easy Setup” on page 17.
16
E-DOC-CTC-20051017-0068 v1.0
Page 23

Chapter 2
Basic Installation
Starting the Easy Setup
wizard
You can also start the Easy Setup wizard from within the embedded Web pages.
Proceed as follows:
1 Browse to the SpeedTouch™ pages on http://speedtouch.lan or on its IP
address, 1
92.168.1.254 by default).
2 In the menu, click SpeedTouch.
3 In the Pick a task list, click Set Up.
Using Easy Setup In the Easy Setup wizard:
1 Click Next to proceed. If for some reason you want to abort the wizard, click
Cancel.
2 Choose the Service provided by your ISP (Router or Bridge) and click Next.
3 Select the appropriate VPI/VCI - and, if required, the Connection Type (PPPoE
or PPPoA) - provided by your ISP, and then click Next.
4 For a Routed service, fill in the Internet Account settings (PPP user name and
password) provided by your ISP, and then click Next.
5 Fill in the SpeedTouch™ Security user name and Password.
The factory default user is ‘Administrator’ and its password is blank. It
is advisable to specify another Administrator user name and
password to protect your SpeedTouch™ from security violation, as
described in “2.6 Basic Security” on page 21.
6 In the next window you can review your settings, before starting the
configuration of your SpeedTouch™. If something is missing or incorrect, click
Back. To confirm your settings, click Start.
7 Wait until the configuration is finished, and then click Finish. After a while you
will be redirected automatically to the Welcome page. Click the bottom link to
go to the SpeedTouch™ pages or select Don’t show this page to access the
Internet via your default home page.
E-DOC-CTC-20051017-0068 v1.0
17
Page 24

Chapter 2
Basic Installation
SpeedTouch™ Setup CD Your SpeedTouch™ comes with a Setup CD. If you insert the Setup CD into a
SpeedTouch™ CD menu The SpeedTouch™ CD menu appears automatically each time you insert the CD, or
2.3 The SpeedTouch™ Setup CD
Microsoft Windows PC or Mac OS X computer, an intuitive CD Menu guides you
through the features and contents of the Setup CD and allows you to easily browse
for user documentation, SpeedTouch™ system software, service templates, etc.
after running the Quick-Install Wizard and subsequent Home Install Wizard:
18
Select:
Run Quick Installation to start the SpeedTouch™ Quick-Install Wizard and
SpeedTouch™ Home Install Wizard.
SpeedTouch Maintenance to:
Reconfigure your SpeedTouch™ via the Home Install Wizard.
Check for SpeedTouch™ upgrades on the Internet.
Documentation and Help to:
Consult user documentation for your SpeedTouch™ DSL Gateway.
Consult user documentation for SpeedTouch™ networking products.
See more information on SpeedTouch™ products and solutions.
Visit the online support sections on www.speedtouch.com.
If you have problems viewing the SpeedTouch™ documentation, see
“ I cannot view the SpeedTouch™ documentation” on page 32.
Open a new window to view the Setup CD contents.
E-DOC-CTC-20051017-0068 v1.0
Page 25

Basic Installation
2.4 SpeedTouch™ Connection Essentials
SpeedTouch™ wiring The image below shows all possible types of connection to the SpeedTouch™.
ON/OFF
Chapter 2
The colour coded printing on the backpanel of your SpeedTouch™ will
facilitate matching the colour coded cables.
Making connections In most cases, the SpeedTouch™ Quick-Install Wizard and Home Install Wizard will
guide you through the process of making all the required connections to your
SpeedTouch™.
It is recommended to wait to make any of these connections until the wizard
prompts you to do so. See “2.2 Installing your SpeedTouch™” on page 7 for
more information.
If you want to make the required connections yourself, see “2.5 Connections
Overview and Powering” on page 20 for more information.
E-DOC-CTC-20051017-0068 v1.0
19
Page 26

Chapter 2
Basic Installation
2.5 Connections Overview and Powering
Introduction If you want to make the required connections yourself without using the guided
installation procedure as recommended, you must:
Read the safety instructions and regulatory notices first.
You can find the safety instructions on the Setup CD (see
“2.2 Installing your SpeedTouch™” on page 7). They may also be
provided as a printed booklet.
Follow the order as indicated below.
DSL Connection Use the grey DSL cable to connect the SpeedTouch™ DSL port to your telephone
wall outlet or distributed filter.
Powering the
SpeedTouch™
Plug the coaxial jack of the electric power supply adapter into the SpeedTouch™
power inlet port and the other end into the wall outlet.
The SpeedTouch™ electrical power requirements are indicated on the label
!
on the bottom side of your SpeedTouch™. In case you need to use another
power supply than the one provided, make sure that the spare supply
complies with the SpeedTouch™ power requirements.
To turn on the SpeedTouch™, press the power button on the SpeedTouch™ rear
panel.
During the start-up procedure, the power LED on the front panel is lit red for some
seconds. As soon as the power LED is solidly lit green, your SpeedTouch™ is ready
for service. After another couple of seconds, also the DSL LED will light green.
If these LEDs do not light, please refer to ”Checking the LEDs” on page 27. A
comprehensive LED overview can be found in the SpeedTouch™ User’s Guide.
Use the same button to turn off your SpeedTouch™.
Network connections Your SpeedTouch™ allows you to connect your computer(s) via Ethernet.
It is recommended to use the Guided Installation procedure.
See “2.2.1 Guided Installation” on page 8 for more information.
20
E-DOC-CTC-20051017-0068 v1.0
Page 27

2.6 Basic Security
Chapter 2
Basic Installation
Default user name and
password
Changing your password For security reasons, it is recommended to set a password to access the
The SpeedTouch™ comes with a default user. Its user name is ‘Administrator’ and
the default password is blank.
SpeedTouch™. Proceed as follows:
1 Go to the SpeedTouch™ home page (http://speedtouch.lan or 192.168.1.254).
2 In the left pane, choose Toolbox > User Management.
3 In the Pick a task list, click Change my password.
4 Enter a new password and confirm.
Do not forget this logon information or you will be forced to reset the
SpeedTouch™ back to its default configuration.
E-DOC-CTC-20051017-0068 v1.0
21
Page 28

Chapter 2
Basic Installation
22
E-DOC-CTC-20051017-0068 v1.0
Page 29

Chapter 3
Web-Based User Interface
3 Web-Based User Interface
Embedded pages The SpeedTouch™ comes with embedded web pages, providing an interface to the
software installed on the device. It allows easy setup and management of the
SpeedTouch™ via your Web browser from any PC connected to the SpeedTouch™.
Access Proceed as follows to access the pages:
1 Open your Web browser.
The recommended screen resolution is 1024 by 768 pixels.
2 In the address bar, type http://speedtouch.lan or your SpeedTouch™’s IP
address (1
3 Enter your SpeedTouch™ security user name and password.
92.168.1.254 by default) and press ENTER.
The default user name is Administrator and the default password is
blank.
4 The SpeedTouch™’s home page will be displayed in your browser. From here -
depending on the rights of your user account - you have access to the other
pages.
Tasks Among others, you can:
View the SpeedTouch™’s current settings and status.
Configure the SpeedTouch™ to connect to your Service Provider with the
settings provided.
Set the SpeedTouch™’s firewall to work with specific applications.
Set up security features.
Enable remote management access.
Back up your configuration settings.
Reset the SpeedTouch™’s default settings.
Update the SpeedTouch™’s software.
Using the Web pages When making changes to the SpeedTouch™ configuration via the Web pages, the
configuration is stored automatically whenever you click Apply.
For more information on the embedded pages, refer to the Help in the upper right
corner of the notification and navigation area or refer to the SpeedTouch™ User’s
Guide.
E-DOC-CTC-20051017-0068 v1.0
23
Page 30

Chapter 3
Web-Based User Interface
Site Map The following Site Map gives you an overview of the main pages:
SpeedTouch
Information
Configuration
Event Logs
Broadband Connection
DSL Connection
Internet Services
Toolbox
Game & Application Sharing
Remote Assistance
Parental Control
Intrusion Detection
User Management
Firewall
Dynamic DNS
Home Network
Devices
Interfaces
24
E-DOC-CTC-20051017-0068 v1.0
Page 31

Internet Connection Troubleshooting
4 Internet Connection Troubleshooting
What to check The first things to check if you cannot access the Internet, are:
Power
Hardware connections
LEDs
If the suggestions in this chapter do not resolve the Internet connection problem,
please contact your Internet Service Provider.
For other problems (Security, Management, ...), refer to the SpeedTouch™ User’s
Guide.
Chapter 4
E-DOC-CTC-20051017-0068 v1.0
25
Page 32

Chapter 4
Internet Connection Troubleshooting
4.1 Checking the Hardware
Check the wiring Plug in properly all the cables you need. Make sure that the cables between your
Test the telephone line To eliminate the possibility of a fault with the telephone line itself, check for a
SpeedTouch™, computers and telephone socket are plugged in firmly. Loose
connections can affect your Internet connection.
Damaged cables can interfere with your Internet connection. Check for damage along
the cables and loose connections at the end of the cable. Replace any damaged
cables.
dialling tone by using a telephone connected to the telephone master socket.
If you are using ADSL, check whether a splitter has been installed or that micro-
filters have been correctly fitted.
Contact your telephone company if there is no dialling tone.
Restart your computer Loss of Internet or network connectivity may be caused by the computer. Restarting
your computer may solve the problem.
Power-cycle the
SpeedTouch™
To restart your SpeedTouch™, simply turn it off. Wait five seconds and turn it back
on.
26
E-DOC-CTC-20051017-0068 v1.0
Page 33

Chapter 4
Internet Connection Troubleshooting
4.2 LED Diagnostics
Checking the LEDs After establishing a connection with the Internet, at least the following LEDs should
solidly light green: Power, DSL, Internet.
LED status Possible solutions
No LEDs are lit The SpeedTouch™ is not turned on, or turned off.
Make sure the SpeedTouch™ is plugged into an
electrical outlet.
Make sure you are using the correct power supply for
your SpeedTouch™. The SpeedTouch™ electrical
power requirements are indicated on the label on the
bottom of your SpeedTouch™.
Make sure the SpeedTouch™ is turned on.
Unplug the SpeedTouch™, restart your computer and
then plug the SpeedTouch™ back in.
Power LED is lit
red or flashing
amber
The SpeedTouch™ is malfunctioning or not able to start
up.
Fully unplug the SpeedTouch™ from your computer
and disconnect it from its power supply. Wait five
seconds, connect the SpeedTouch™ again and turn it
back on.
Run the SpeedTouch™ Upgrade Wizard on the CD
Menu to restore the system software.
DSL LED is
flashing green or
no DSL LED
Your DSL service is unable to synchronise.
Make sure the SpeedTouch™ is plugged into the DSL-
enabled phone line.
Make sure micro-filters are correctly fitted (if not, it is
very likely that your regular telephone service is not
working properly).
Make sure you have the correct SpeedTouch™
variant (ISDN or POTS) according the DSL/phone
service provided to your premises.
If you have previously had a working connection, call
your ISP to check for service outages.
No Ethernet LED No Ethernet connectivity:
Make sure the Ethernet cable(s) are firmly connected
to the 10/100Base-T port.
Make sure you are using the correct cable type for
your Ethernet equipment.
Make sure the Ethernet NIC driver is correctly installed
and enabled on your computer. Power safe options for
the Ethernet NIC should preferably be disabled.
E-DOC-CTC-20051017-0068 v1.0
27
Page 34

Chapter 4
Internet Connection Troubleshooting
LED status Possible solutions
Red Internet LED
or No Internet LED
There was an authentication failure. This will usually
present itself as an error message regarding an
incorrect password.
Check whether your user name is correct. For
ADSL connections, the user name is normally in
the form of username@ISP.
Check whether your password is correctly
entered. The password is case sensitive.
If you continue to get password failures, contact your
ISP.
The wrong service profile was selected. Restart the
setup of your SpeedTouch™, and make sure to select
the correct service profile.
You can find a comprehensive LED overview in the SpeedTouch™ User’s Guide.
28
E-DOC-CTC-20051017-0068 v1.0
Page 35

4.3 Web Diagnostics
Chapter 4
Internet Connection Troubleshooting
Testing your Internet
Connection
After setting up the Internet connection, there is an easy way to check whether your
configuration is fine. Proceed as follows:
1 Go to the SpeedTouch™ home page (http://speedtouch.lan or 192.168.1.254).
2 In the Menu, click SpeedTouch.
3 In the Pick a task list, click Check connectivity to the Internet.
4 In the Internet Service to Check box, select the Internet service you want to
check.
5 Click Check Connectivity.
If the test is successful, you will see a list of green check marks as shown in the
example below:
E-DOC-CTC-20051017-0068 v1.0
Otherwise a red cross will help you to diagnose the problem:
Test result Explanation
Your DSL line is not synchronised.
Check whether your telephone line is
correctly connected to your SpeedTouch™.
Check the DSL LED, as described in
“ Checking the LEDs” on page 27.
No ATM activity detected on your DSL line.
29
Page 36

Chapter 4
Internet Connection Troubleshooting
Test result Explanation
No Ethernet activity.
If you are connected through a protocol other
than PPPoE, this check is not applicable as the
result will always be ‘No Ethernet activity’.
Authentication failed: check your user
name and password. The user name is in
most cases in the form of username@ISP.
Your connection is disconnected.
Could not bring up link.
No IP No IP address or no DNS server has been
configured. During IP address negotiation, there
was an IPCP error or a DHCP error.
No Internet This test sends 1 ping to each address of a
configured list of IP addresses. The test
succeeds if all addresses can be reached. If your
primary and secondary DNS server are part of
the list, reaching one of both is enough.
No DNS The DNS service provided by your ISP may have
a problem.
30
E-DOC-CTC-20051017-0068 v1.0
Page 37

Internet Connection Troubleshooting
4.4 SpeedTouch™ Setup CD Troubleshooting
Chapter 4
The SpeedTouch™ CD
does not start
automatically
The wizard does not detect
a connection
Proceed as follows:
In Microsoft Windows:
1 In the Windows task bar, click the Start button.
2 Select Run.
3 In the Open field, enter the following path: D:\Setup.exe, where D stands
for the drive letter of your CD-ROM drive.
In Mac OS X:
1 On your desktop, double-click the CD icon.
2 Double-click Menu.
If the Home Install Wizard does not detect a connection to your SpeedTouch™, an
error window appears.
E-DOC-CTC-20051017-0068 v1.0
If this is the case, check whether:
The SpeedTouch™ is turned on and fully initialised.
Your computer has a valid IP address, that is any address but 0.0.0.0.
In Microsoft Windows:
1 In the taskbar, click the Start button.
2 Select Run.
3 In the Open field, type cmd.
4 Click OK.
A black window will appear with a flashing cursor.
5 Type ipconfig /all and press ENTER.
In Microsoft Windows 98 or Microsoft Windows Millennium,
type winipcfg and then press ENTER.
Your IP address is displayed.
31
Page 38

Chapter 4
Internet Connection Troubleshooting
In Mac OS X:
1 Go to Dock > System Preferences.
2 Click Network.
3 Click the TCP/IP tab.
Your IP address is displayed.
No dedicated firewall device or router is placed between your computer and
the SpeedTouch™.
No personal firewall software is running on your computer.
Your computer is correctly connected to the SpeedTouch™.
To repeat the search for your SpeedTouch™, click Back or restart the wizard. As
soon as the wizard finds your SpeedTouch™, you can continue with “ Configuring
the SpeedTouch™ (and your computer)” on page 14.
The SpeedTouch™ is not
responding
I cannot view the
SpeedTouch™
documentation
If the completing window does not appear after running the SpeedTouch™ Home
Install Wizard, this means that the SpeedTouch™ is not responding or not
accessible anymore.
There are two possibilities:
This might be due to the reconfiguration of the SpeedTouch™’s IP settings. In
this case, the last window of the Home Install Wizard will not be shown. Your
SpeedTouch™ is correctly set up though and you will be able to surf the
Internet.
If you did not reconfigure the SpeedTouch™’s IP settings, restart the Home
Install Wizard.
If the setup fails over a wireless connection, try to set up your
SpeedTouch™ using a wired connection.
If the problem persists, refer to the Service Provider’s instructions for more
information.
To be able to view the SpeedTouch™ documentation pages on the Setup CD,
JavaScript must be enabled in your Web browser. For more information, refer to the
Help of your Web browser.
To allow active content on a Microsoft Windows XP system, see “ I get a warning
about active content in Internet Explorer” on page 33.
32
E-DOC-CTC-20051017-0068 v1.0
Page 39

Chapter 4
Internet Connection Troubleshooting
I get a warning about active content in Internet Explorer
When opening documentation pages from the Setup CD, a warning might be
displayed. This may be the case when the pages are opened in Internet Explorer
and you are using Microsoft Windows XP with Service Pack 2.
Proceed as follows to view the documentation:
1 In Internet Explorer, the following message will appear in the Information Bar:
2 Click the Information Bar (with the warning).
3 Select Allow Blocked Content.
A security warning is displayed:
4 Click Yes .
You can now view or print the SpeedTouch™ documentation pages.
This warning will be displayed every time you consult the documentation. If
you do not want this message to be shown in the future, you must allow
CDs to run active content on your computer:
1 In the Internet Explorer menu, select Tools > Internet Options.
2 Under Security, select Allow active content from CDs to run on My
Computer.
E-DOC-CTC-20051017-0068 v1.0
33
Page 40

Chapter 4
Internet Connection Troubleshooting
4.5 Easy Setup Troubleshooting
Prerequisites Before you run the Easy Setup on the embedded SpeedTouch™ pages, make sure
Supported Web browsers Your Web browser must be able to run JavaScript. The following browsers are
that:
The necessary connections are made.
The SpeedTouch™ is turned on.
Your host computer is configured as DHCP client or with a valid fixed IP
address.
If you have any problems, you can give the host computer a fixed IP
address in the same subnet as your SpeedTouch™ (If the
SpeedTouch™ is in its default settings, that is an address between
192.168.1.1 and 192.168.1.253).
If you use fixed IP addresses, the SpeedTouch™ has to be configured
as DNS server (default).
supported:
Internet Explorer (5.0 and later)
Netscape Navigator (4.7 and later)
Mozilla Firefox (1.2 and later)
Opera (5 and later)
Safari (1.0 and later)
Konqueror (2.2 and later)
Disable proxy server The Easy Setup only works if the proxy server is disabled or bypassed for local
addresses. For more information, refer to the Help of your Web browser.
Proceed as follows to disable a proxy server in Internet Explorer:
1 In the Internet Explorer menu, choose Tools > Internet Options.
2 Click the Connections tab.
3 Click the Lan settings button.
4 Clear the Use proxy server box and the Use automatic script box.
It is recommended to disable all other network connections on your
!
computer first, except the one connecting to your SpeedTouch™.
Proceed as follows to disable a network connection:
1 In the Windows XP taskbar, click the Start button.
2 Choose (All) Programs > Control Panel > (Network and Internet
Connections >) Network Connections.
3 Right-click the network interface icon you want to disable and choose
Disable.
34
E-DOC-CTC-20051017-0068 v1.0
Page 41

Page 42

© THOMSON 2005. All rights reserved. E-DOC-CTC-20051017-0068 v1.0
Need more help?
Additional help is available online at www.speedtouch.com
 Loading...