

Page 1
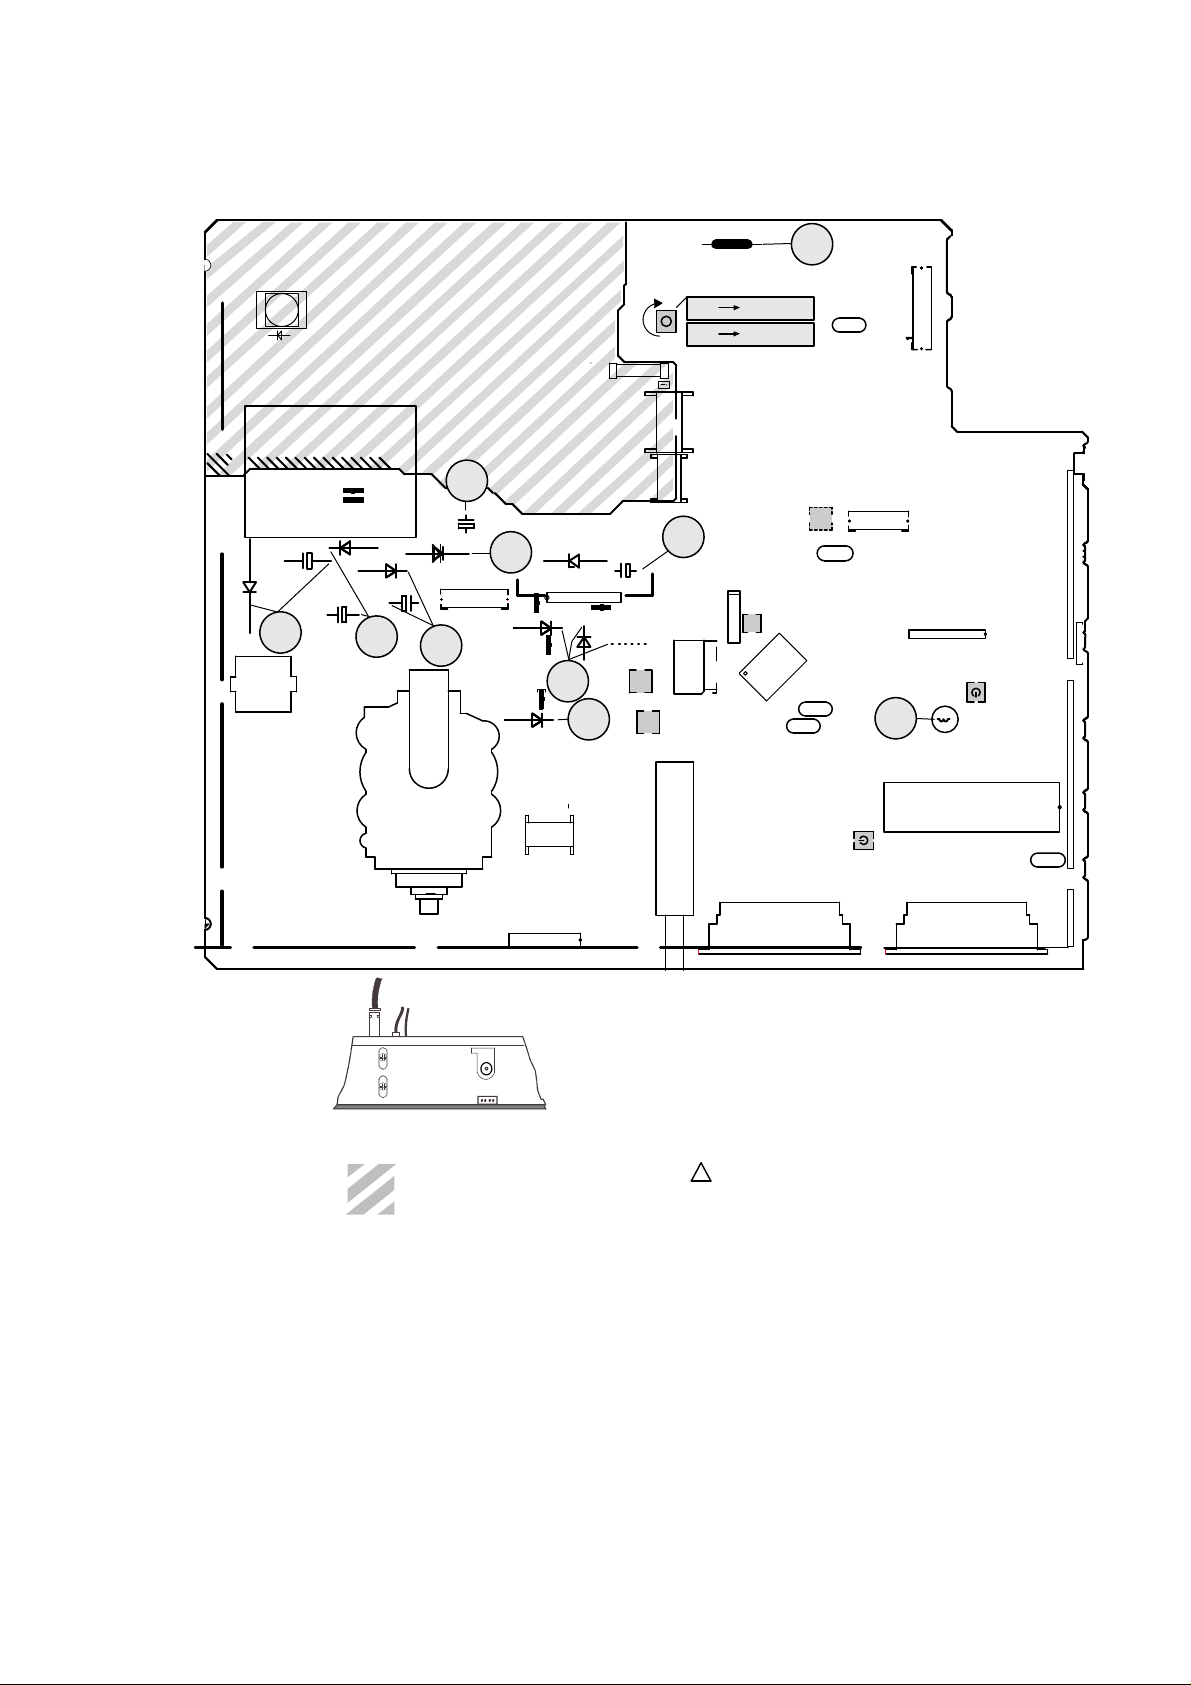
LOCATION OF CONTROLS - EMPLACEMENT DES REGLAGES SERVICE LAGEPLAN - POSIZIONE REGOLATORI DI SERVIZIO -
SITUACIÓN DE LOS AJUSTES
DP80
CP80
U-
SYS
LP44
CP92
RP92
CP82
DP82
DP93
U-
VIDEO
CP93
CP84
DP84
U
Timer
-UA
+UA
BL02
DP83
DP85
DL14
1
DP72
+5V
UP
IP95
DST
5V
5V
DL12
FP01
T 2.5A L
BP15
CP97
JF14
FI02
31,9Mhz
40,4Mhz
PP64
190 264V (EUR)
140 265V (ASIA)
1
BP01
1
8V
FI01
FI10
NH01
RP76
FI20
FI30°
77,8Mhz
U
STBY
QR01
LV02
5,74Mhz
3,579545Mhz
IV01
QC01
4,433619Mhz
4Mhz
QC02
FI50
BV01
+5V
+5V
ON
ON
BR01
1
1
IX01
LS25
LS25
LX18
1
BF01
IF01
focus
G2/cutoff
BX50
Part of board connected to mains supply.
Partie du châssis reliée au secteur.
Primärseite des Netzteils.
Parte dello châssis collegata alla rete.
Parte del chassis conectada a la red.
IS40
LS10
° it is not necessary , to adjust FI30 by after sales
Use isolating mains transformer -
!
Utiliser un transformateur isolateur du secteur -
Trenntrafo verwenden -
Utilizar un transformador aislador de red -
Utilizzare un trasformatore per isolarvi dalla rete
QS40
1
BX02BX01
ICC17
Page 2
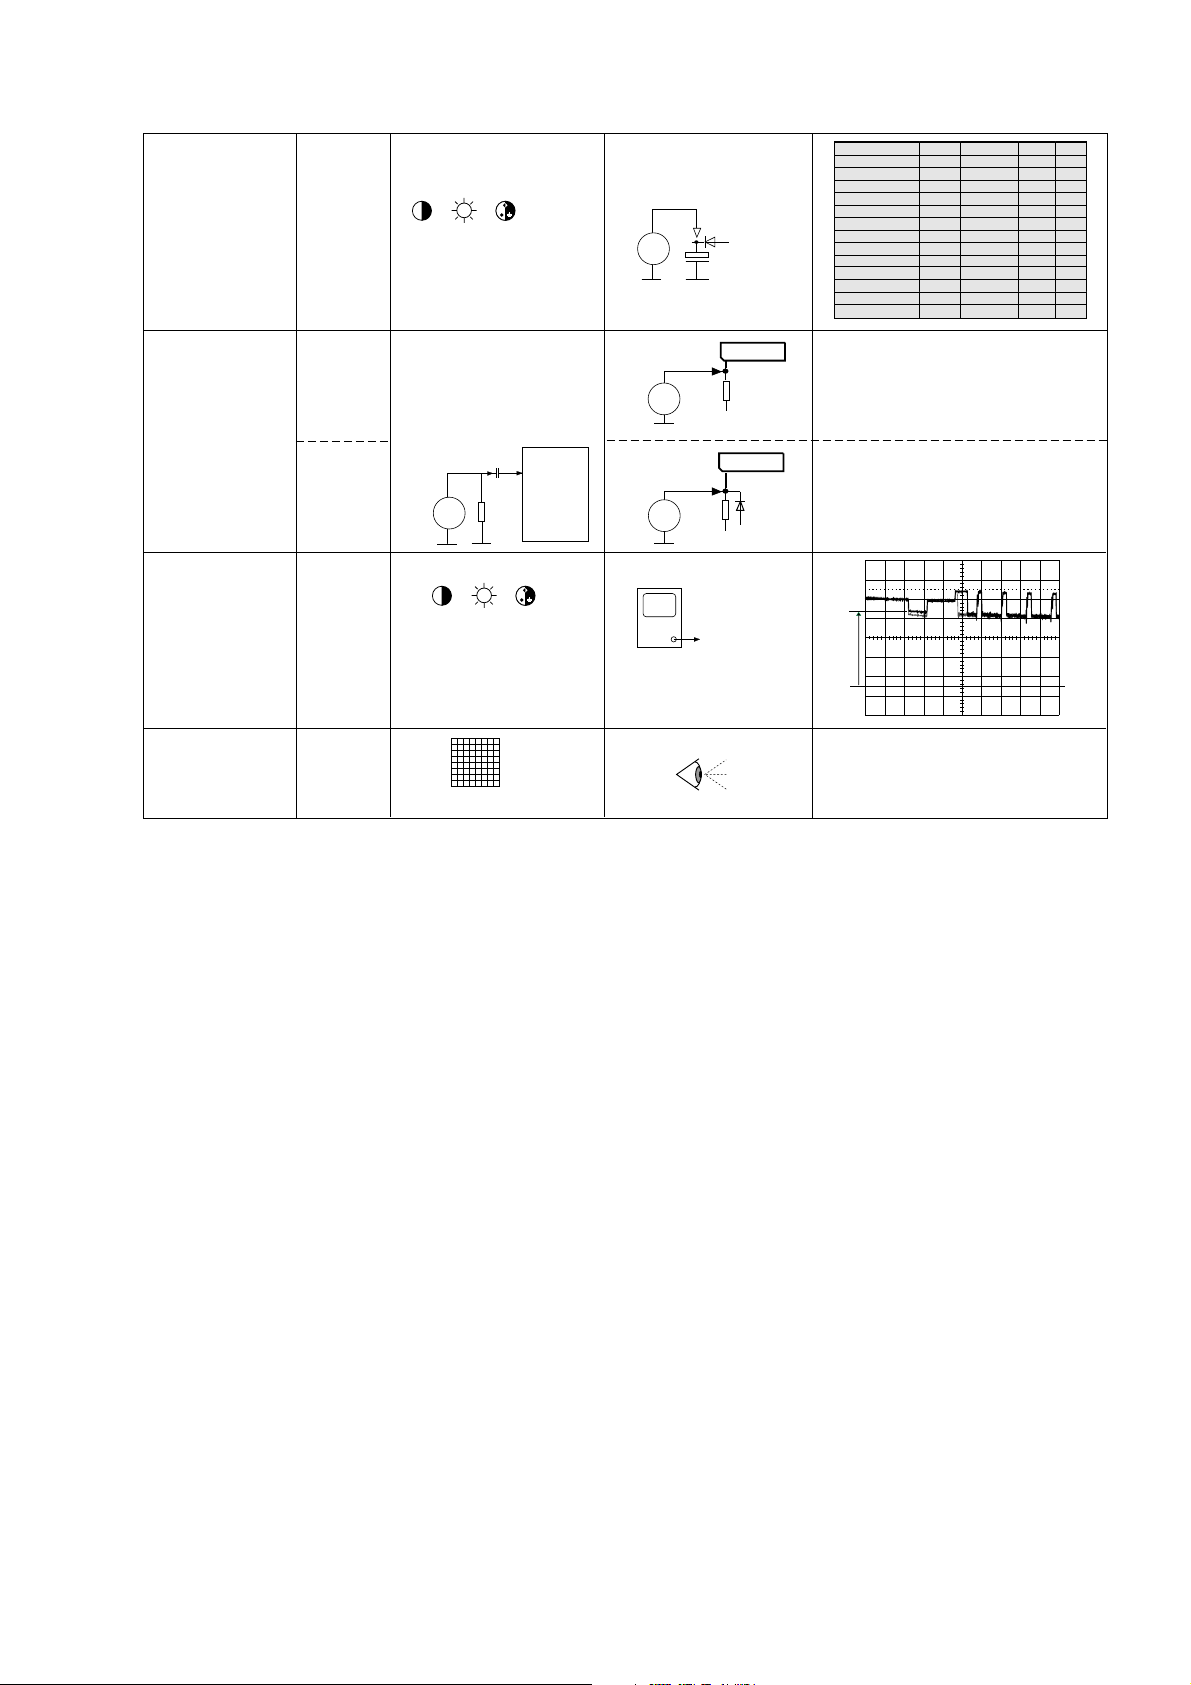
ADJUSTMENTS - REGLAGES - EINSTELLUNGEN - REGOLAZIONE - AJUSTES
Tube FormatUsys JumperRL65
A51EBV13X01 4:3 128V+/-0,5VJL80 4k7
A51EFS83X191 4:3 126V+/-0,5VJL80 4k7
A59EHJ43X15 4:3 132V+/-0,5VJL81 24k
A66EHJ43X15 4:3 132V+/-0,5VJL81 24k
U_Sys PP 64
++= 50%
TV to AV1 : Black test pattern
V=
DP 80
CP 80
A59EGD048X30 4:3 126V+/-0,5VJL80 4k7
A68EGD038X30A68EGD038X30 4:3 126V+/-0,5VJL80 4k7
A68EGD038X70 4:3 126V+/-0,5VJL80 4k7
A68AGA25X01 4:3 126V+/-0,5VJL80 4k7
A80AEJ15X01 4:3 126V+/-0,5VJL80 4k7
A80AEJ15X99 4:3 126V+/-0,5VJL80 4k7
W56EGV023X015 16:9 138V+/-0,5VJL82 47k
W66EGV023X015 16:9 138V+/-0,5VJL82 47k
W76EGV023X015 16:9 138V+/-0,5VJL82 47k
IF Alignment
Alignement FI
U G2 / cutoff
FOCUS
Trap 40.4Mhz
FI 01
Trap 31.9Mhz
FI 02
SCREEN
FOCUS
LL05
Switch TV to BG standard
Commuter le TV au standard
BG
IF Signal
40,4MHz (BG)
31,9MHz (BG)
50 mV
G
1nF
75Ω
TUNER
11
NH01
++= 50%
AV (no Signal, black screen)
Test pattern
(standard values)
RI33
mV
~
RI41 DI40
mV
~
CRT IB01:
pins 9 / 12 / 15
highest output
1
1
FI10
FI20
Adjust FI01 for minimum value at 40,4Mhz
Adjust FI02 for minimum value at 31,9Mhz
145V
0
Sharp picture
ICC17
Page 3
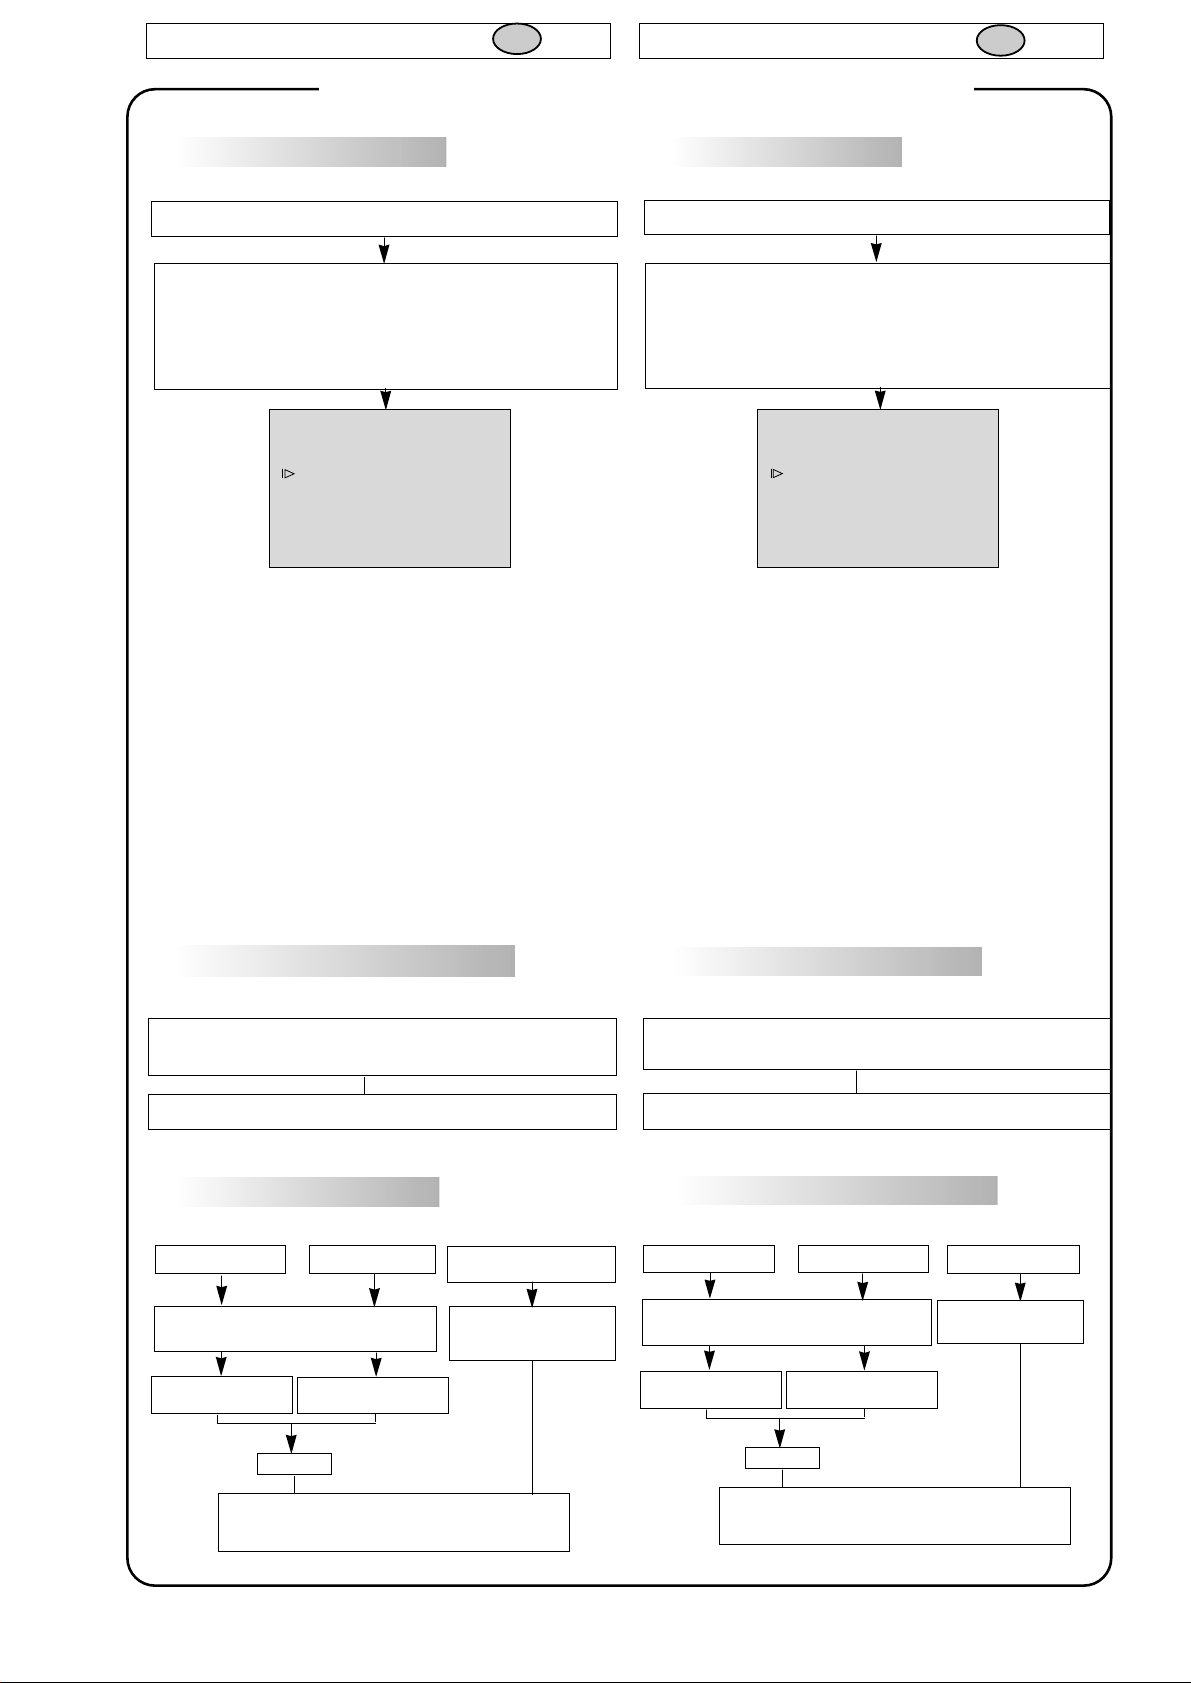
SERVICE MODE
I - ENTER/EXIT SERVICE MODE - ENTREE/SORTIE DU MODE SERVICE
GB
MODE SERVICE
F
ACCESSING THE SERVICE MODE
1
TV Control Panel Access
• Switch the TV into “Standby” mode by pressing the Standby button on
the RCU.
• Switch “OFF” the mains supply to the TV and wait for the
LED to extinguish.
• Whilst holding depressed the PR - and VOL- (8s),
switch “ON” the mains supply to the TV.
• Once initialised, the Main Service Menu will appear on the screen of
the TV.
Soft-Ver. V1.00-0 0080
Config. A5- - - -N
Serial-No. 103465071
QUIT
TUBE
SETUP
GEOMETRY
VIDEO
IF
Please Note:
In the service mode :
- The CHILD LOCK function is re-initialised.The LOCK function (PIN
number) is ignored.
- All Wake-up/Sleep timer settings are CLEARED.
- SCART socket pin 8 switching voltages are ignored.
- AV-Link, WSS Detection, EPG and TELETEXT functions are
disabled.
- Automatic standby mode switching functions (no signal conditions)
are disabled.
- Brightness, Colour and Contrast are set to factory defaults.
- Sharpness settings are set to MID position.
- Contrast Expand is set to LOW.
- Automatic INSTALL mode is disabled.
- FORMAT and ZOOM are reset to factory defaults.
ACCES AU MODE SERVICE
1
Accès avec le clavier du téléviseur
• Commuter le téléviseur en position de veille avec la télécommande.
Eteindre le téléviseur par l’interrupteur secteur (attendre l’extinction
complète du voyant).
• Tout en appuyant sur les touches PR - et VOL - , mettre le TV en
service à l'aide de la touche M/A.
• Maintenir enfoncées les touches PR - et VOL -
Le menu suivant apparaît.
Soft-Ver. V1.00-0 0080
Config. A5- - - -N
Serial-No. 103465071
QUIT
TUBE
SETUP
GEOMETRY
VIDEO
IF
Note :
En mode service:
- Le verrouillage parental est effacé ( réinitialisé ).
- La fonction de verrouillage ( Pin number ) est ignorée.
- La programmation des heures «reveille/matin» est annulée.
- Possibilité de passer en mode service avec commutation lente active.
- AV- Link , la détection WSS, l’EPG et le Vidéotexte ne sont pas
validés.
- La fonction de stand-by automatique en cas d’absence de signal
d’antenne n’est pas validée.
- Les valeurs de réglages usine sont affectées au contraste, à la
couleur et à la lumière.
- Le contour est appelé à sa valeur moyenne.
- L’expansion contraste est au niveau bas.
- Le mode ambiance «Light sensor» n’est pas valides.
- Zoom et format ignorées.
. (8s)
TEMPORARY EXIT FROM SERVICE MODE
2
- Press the “EXIT” button on the RCU.
- Pressing the “MENU” button on the RCU will activate the customer
menus.
- The Service Menu can be re-entered by pressing the “BLUE” button on
the RCU.
EXITING FROM SERVICE MODE
3
Remote Control
- Select the “QUIT” line of the “Main Service
Menu”.
- Press «<», «OK»
or «>» button
- TV mode.
Values or adjustment not “STORED” before exiting
the service mode will NOT be “SAVED” in the NVM.
TV Control Panel
- Press «VOL.+»button
ON/OFF key or “Stand-by”
buttons
- RCU “Standby” button
or switch “OFF”
mains supply.
SORTIE TEMPORAIRE DU MODE SERVICE
2
- Utiliser la touche Exit de la télécommande.
- Le menu utilisateur peut être accessible via la touche «Menu».
- Pour entrer à nouveau dans le mode service utliliser la touche bleue.
SORTIE DEFINITIVE DU MODE SERVICE
3
télécommande
- Aller au point «QUIT» dans le menu principal
du mode service.
- Appuyer sur «<»,
«OK» ou «>»
- Mode TV.
Les valeurs ou réglages non mémorisées avant la
sortie ne seront pas écrites en NVM.
clavier du téléviseur
-Appuyer sur «VOL+»
Inter M/A ou Stand-by
- Foncion Stand-by ou
«off» par M/A
ICC17
First issue 07 / 98
Page 4
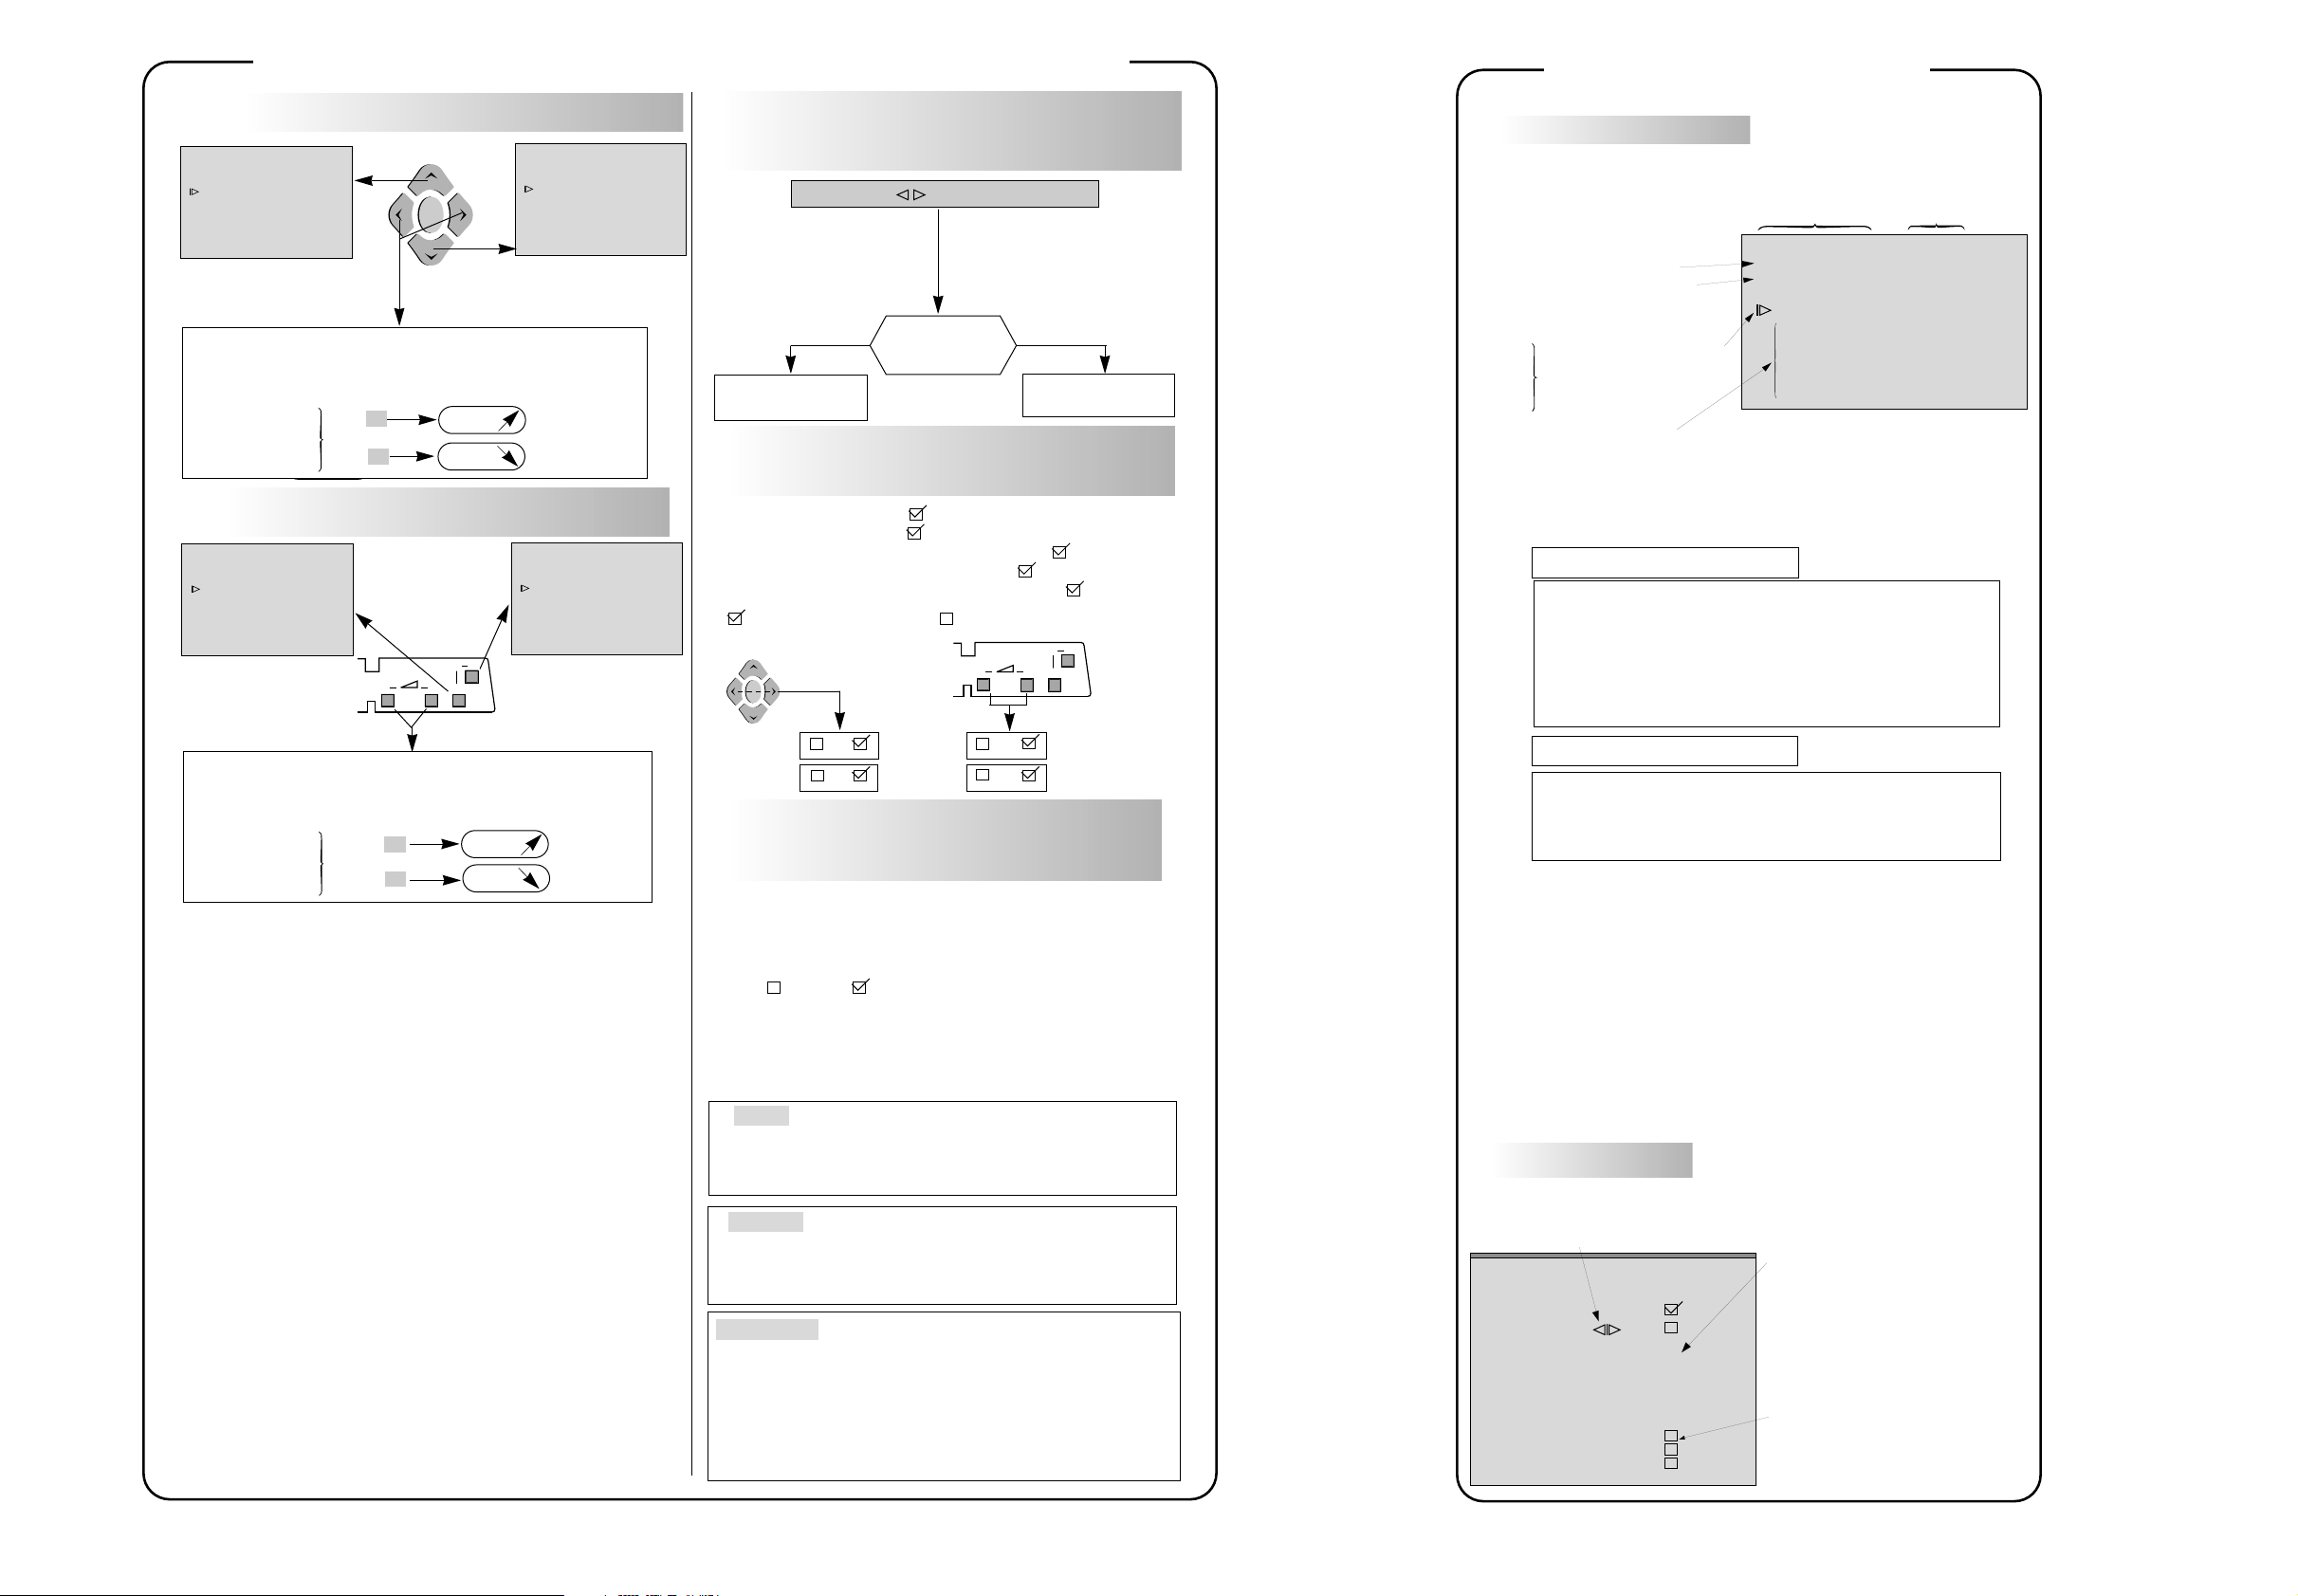
FUNCTIONS WALLIN SERVICE MODE - OPZIONI NEL SERVICE MODE - BUSQUEDA EN MODO SERVICIO
1
REMOTE CONTROL - TELECOMMANDE - FERNBEDIENUNG
Soft-Ver. V1.00-0 0080
Config. A5- - - -N
Serial-No. 103465071
QUIT
TUBE
SETUP
GEOMETRY
VIDEO
IF
Naviagation up
- Select option
- Option anwählen
- Selezionare l’opzione
- Seleccionar opción
- “Change“ value
- Wert “änden“
- “Cambiare“ valore
- “Cambiar“ valor
2
Soft-Ver. V1.00-0 0080
Config. A5- - - -N
Serial-No. 103465071
QUIT
TUBE
SETUP
GEOMETRY
VIDEO
IF
Naviagation down
➠
TV CONTROL PANEL - CLAVIER TV - TASTATUR DES
FERNSEHGERÄTS - COMANDI DEL TELEVISORE -
II - NAVIGATION INSIDE THE SERVICE MODE - DEPLACEMENT DANS LE MODE SERVICE
DISPLAYING THE VALUE OF THE SETTING - AFFICHAGE DES
TELECOMANDO - MANDO A DISTANCIA
Soft-Ver. V1.00-0 0080
Config. A5- - - -N
Serial-No. 103465071
QUIT
TUBE
SETUP
GEOMETRY
VIDEO
IF
Naviagation down
>
<
➠
-
+
VALUE
VALUE
+
PR
-
Soft-Ver. V1.00-0 0080
Config. A5- - - -N
Serial-No. 103465071
QUIT
TUBE
SETUP
GEOMETRY
VIDEO
IF
Naviagation up
➠
➠
3
VALEURS - ANZEIGE DES EINSTELL WERTS
VISUALIZZAZIONE DEL VALORE DELLA REGOLAZIONE -
Display
➠
4
To enable a function check (tick) the box.
Pour valider une fonction cocher la case correspondante
Zum Implementieren einer Funktion das Kontrollkästchen aktivieren
Per implementare una funzione di verifica, (vistare) la casella
Para poner en fucionamiento una función verifique (señale) la casilla
VISUALIZACION DEL VALOR DE AJUSTE
H-Position
><
0E
00 to FF
Hexadecimal value
valeur hexadécimale
Einstell wert hexadezimal
Valore esadecimale
Valor héxadecimal
Set value
: NVM value
NVM value
+ >
TOGGLE FUNCTIONS - VALIDATION DES FONCTIONS
EIN-UND AUSSCHALT FUNKTIONEN - FUNZIONI DI
COMMUTAZIONE - FUNCION CONMUTACION
: :Enable function : Disable function
-
Display
➠
+
PR
-
-
<
+
NVM value
(ankreuzen)
III - LITE-MENU FOR FIELD SERVICE MODE -
MENUS DU MODE SERVICE
MAIN MENU - MENU PRINCIPAL
1
Software Version
Version software
Software Version
Versione software
Versión software
Soft-Ver. V1.00-0 0080
Config. A5- - - -N
Serial-No. 103465071
QUIT
TUBE
SETUP
GEOMETRY
VIDEO
IF
SELECT
UP
DOWN
Chassis Configuration codes.
Configuration du récépteur
Gerätekonfiguration
Composizione del ricevitore
Composición del Receptor
Navigation inside the Service Mode
Navigation dans le Service Mode
Funktionen im Service Mode
Opzioni del Service Mode
Búsqueda en el Modo Servicio
Serial Number
N° de série
Serien-Nr.
Numero seriale
N
Alignment
Alignement
Abgleich
Regolazione
Alineacion
°
Serie
TV CONFIGURATION - CONFIGURATION DU TV - GERÄTEKONFIGURATION CONFIGURAZIONE DEL TV - CONFIGURACI
ÕN DEL TV
Config. A1Z-DKC
Character 1 : Tube type : «A»= 4/3 , «W» =16/9
Character 2 : Chassis type : «5» = 50Hz,
Character 3 : Zoom available : «Z»=yes, «-»=not
Character 4 : Ambiant Sensor : «S»= detected, «-»= not
Character 5 : Dolby : «D»=detected, «-»= not
Character 6 : AV Link detected : «K»=IR link detected, «-»= not
Character 7 : Chassis Variant: «N»= Nicam, «S»=Stereo
Counter
Compteur
Betriebsstundenzähler
Contador
Contatore
- Select option
- Option anwählen
- Selezionare l’opzione
- Seleccionar opción
- “Change“ value
- Wert “änden“
- “Cambiare“ valore
- “Cambiar“ valor
GEOMETRY FULL SCREEN
Return
System Voltage -3B
H-VCO
H-Delay
V-Blanking
V-Amplitude
V-Position
UP
+1B
-23
1E
+0A
1B
DOWN CHANGE
Vol.
Vol.
➠
➠
➠
➠
Serial-N0. AI6------
Character 1 : Factory : «A»= Angers , «C» =Celle, «T» =Tarancon
5
STORING VALUES IN MEMORY - MEMORISATION DES
+
-
VALUE
VALUE
VALEURS - SPEICHERN DER WERTE - MEMORIZZAEZ I
VALORI - VALORES ALMACENADOS EN LA MEMORIA
After setting, the values are stored in NVM.
Après réglages les valeurs sont mémorisées en NVM.
Nach dem Einstellen werden die Werte im NVM gespeichert.
Dopo la regolazione i valori vengono memorizzati in NVM.
Después del ajuste, los valores son almacenados en NVM
The box becomes
During alignment, values are temporarily stored in RAM.
En cours d’alignement les valeurs sont mémorisées temporairement en RAM
Während des Abgleichs werden die Werte vorübergehend im RAM gespeichert
Durante l’allineamento i valori vengono memorizzati provvisoriamente sulla RAM
Durante el ajuste, los valores son almacenados temporalmente en RAM
TIME COUNTER - COMPTEUR DE TEMPS - BETRIEBSSTUNDENZÄHLER CONTATORE - CONTADOR
The counter indicates the TV’s number of service hours.It counts from to 0 to 65535 hours.
The display is hexadecimal.
Le compteur de temps indique le nombre d’heures de service du TV. Il compte de 0 à 65535
heures. L’affichage est en hexadécimal.
Der Zähler zeigt an, wieviele Stunden der Fernseher in Betrieb ist. Die Anzeige ist
hexadezimal.
Il contatore indica il numero di ore di servizio del TV. Puo’ contatore da 0 a 65535. La
visualizzazione è esadecimale.
El contador indica el número de horas de servicio de la TV. Cuenta de 0 a 65535 horas. El
visualizador es hexadecimal.
2
VIDEO PAL BG
Return
Norm.
Drive Adjust.
R-Drive
G-Drive
B-Drive
Peak-White
Scale Bright
Scale Colour
Scale Contr.
Default
Store
Restore
GEOMETRY ZOOM0
H-Blanking
H-Blanking Symmetry
Default
Store
Restore
UP
+3B
-19
DOWNCHANGE
Store
Copîes RAM values into NVM
➠
Copie la valeur RAM en NVM
Kopieren des Werts von RAM nach NVM
Copiare i valori RAM in NVM
Copiar valores RAM en NVM
Restore
Copies all values from NVM into RAM.
➠
Copie toutes les valeurs des données NVM en RAM
Kopiert alle NVM-Datenwerte in den RAM
ROM Default
Copiare tutti i valori da NVM sulla RAM
Copia todos los valores de NVM a RAM
All the default values of a page in use are stored in RAM.
➠
L’ensemble des valeurs par défaut d’une page courante
est chargé en RAM.
Sämtliche Standardwerte der aktuellen Seite werden im
RAM geladen
Tutti i valori di default di una pagina in uso vengono
memorizzati sulla RAM
Todos los valores por defecto de la página en curso
están almacenados en RAM.
Character 2 : Year : «G» = 1996, «H»= 1997 etc..
Character 3 : Month, from : «1»=January to «C»=December
Character 4-9 : Serial N0.
SUBMENU - SOUS-MENU
Navigation inside the Service Mode
Navigation dans le Service Mode
Funktionswahl im Service Mode
Opzioni del Service Mode
Busquena en el Modo Servicio
Factory
9C
9C
9C
70
5C
CC
Hexadecimal value
Valeur hexadecimale de reglage
Abgleichwerte hexadezimal
Valore di regolazione esadecimale
Valor del ajuste en hexadecimal
Enable a function
Case de validation - Fonction validée si "cochée"
Zum Implementieren einer Funktion
Per inserire la Funzione
Activar una functión
Page 5
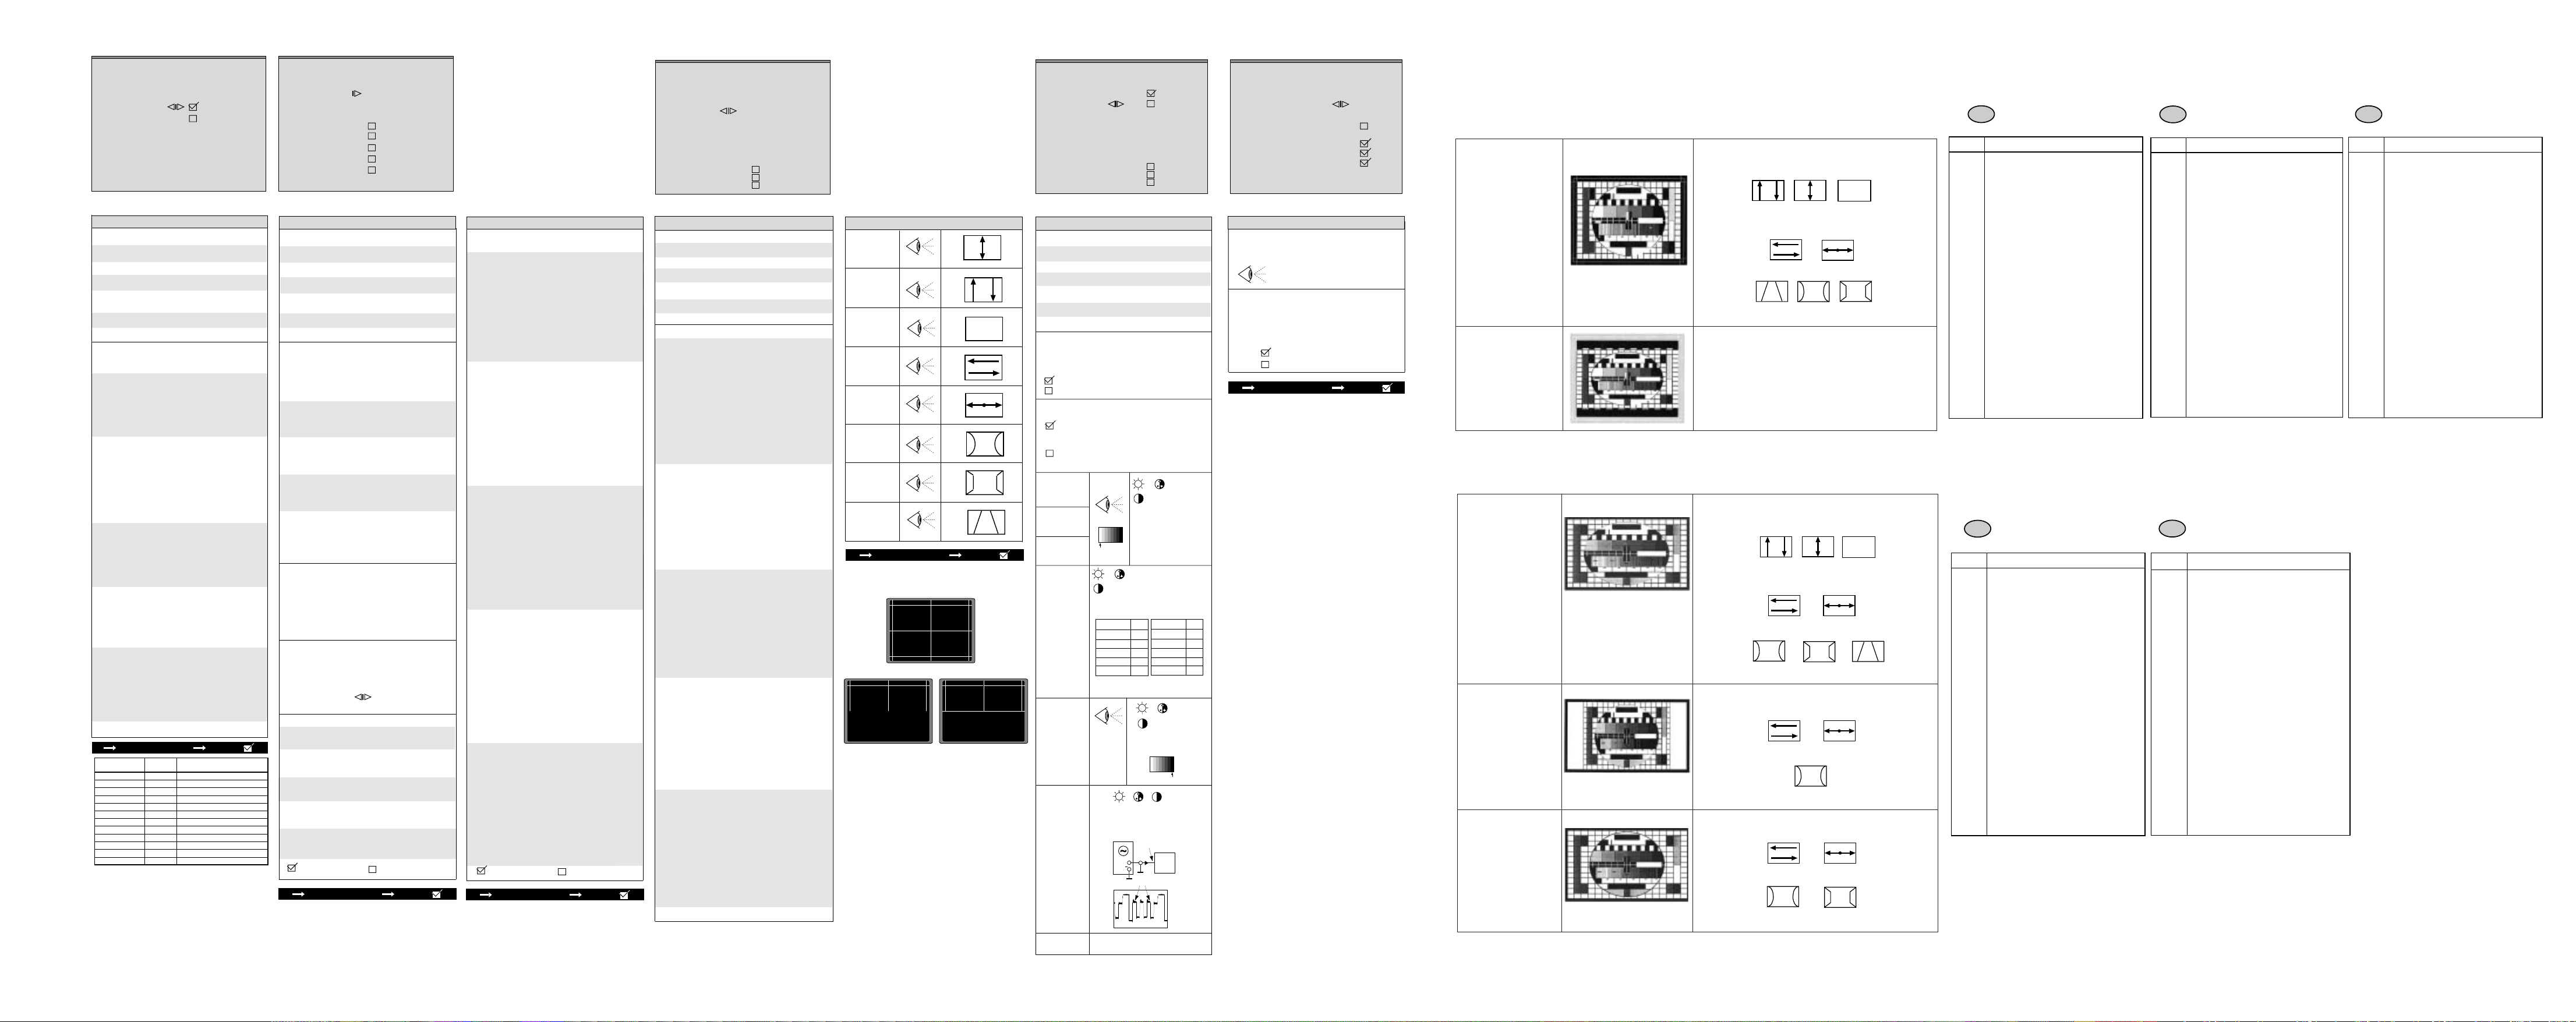
ALIGNMENT PROCEDURE - PROCESSUS DE REGLAGES - ABGLEICH - VISUALIZZAZIONE DEL VALORE DI REGOLAZIONE - PROCEDIMIENTO DE ALINEACION
TUBE
Return
Tube type A66ECY...
Store
Restore
SETUP
Return
Clear Progs.
Brand
* Other
Kbd. Config.
Bus Quiet
Default
WSS
Default
Store
Restore
*
according to model - selon modèle - gemäß modell -
Secondo il modello - segun modelo .
TUBE
Return
Closes the sub-menu and returns to the “Main
Service Menu”.
Retourne au menu principal. Retourne au menu principal.
Schließt das Untermenü, und das
Servicemodus-Menü erscheint.
Chiude il sottomenu e fa apparire il menu
principale Field Service Mode.
Cierra el submenú. El menú Field Service
Mode aparece.
Press </>: remote control; Vol. +/- : TV keyb. Press </>: remote control; Vol. +/- : TV keyb.
Tube type
After replacing the NVM, the correct tube type
number must be entered (6 characters).
Once entered, the tubes geometry and video
default vales are immediately activated.
Variable geometry and video parameters
are written to the NVM when the “STORE” line
is selected.
See table below for tube type numbers.
Définit le tube exact après changement de
NVM.
Les nouvelles valeurs de tubes (avec video
et géometrie) sont actives de suite.
Les paramètres de vidéo et de géométrie sont
chargés en NVM lorsque STORE est
sélectionné. Voir liste ci-dessous.
Nach Tausch des NVM den Bildröhrentyp
(6 Ziffern) auswählen. Die neuen Geometrie-und
Video-Defaultwerte werden sofort aktiv. Variable
Geometrie- und Videowerte werden durch
Speichern mit "STORE" ins NVM geschrieben.
Bildrohrauflistung : siehe unten.
Scegliere il tubo appropriato dopo aver sostituito
la NVM; i 6 caratteri che indicano il nuovo tipo di
tubo, richiamano i valori video e geometria di
default. I parametri per video e geometria
vengono caricati nella NVM
Definir el tubo correcto después de haber
cambiado el NVM.6 caracteres.Los nuevos
valores de tipo de tubo (con la vídeo y la
geometría por defecto) se activan
inmediatamente. Los parámetros variables de
geometría y vídeo se graban en el NVM al
seleccionar la función Store. Vea más abajo
la lista de tubos.
After setting Store (+)
Tube Name LIST name Description
A51EFS83X191 A51EFS 4:3; 21” OT; AK-Mask; Coty-M
A59EHJ43X15 A59EHJ 4:3; 25” MP; AK-Mask; Vector
A66EHJ43X15 A66EHJ 4:3; 28” MP; AK-Mask; Vector
A68EGD038X30
A68EGD038X70
A80AEJ13X01 A80AEJ
A80AEJ15X99 A80AEJ
A59EGD048X30 A59EGD 4:3; 25” SF; Invar-Mask; Vector
A68AGA25X01 A68AGA 4:3; 29” VHP; AK-Mask; Coty-M
W56EGV023X015 W56EGV 16:9; 24” SF; Invar-Mask; Vector
W66EGV023X015 W66EGV 16:9; 28” SF; Invar-Mask; Vector
W76EGV023X015 W76EGV 16:9; 32” SF; Invar-Mask; Vector
A68EGD
4:3; 29” SF; Invar; Vector
A68EGD
4:3; 29” SF; Invar; Vector
4:3; 33” MP AK-Mask; Coty-M
4:3; 33” MP AK-Mask; Coty-M
SETUP
Return
Closes the sub-menu and returns to the “Main
Service Menu”.
Schließt das Untermenü, und das
Servicemodus-Menü erscheint.
Chiude il sottomenu e fa apparire il menu
principale Field Service Mode.
Cierra el submenú. El menú Field Service
Mode aparece.
Clear Prog.
Clears all programmes STORED in memory and
resets all PICTURE and SOUND settings to the
factory default values . The AUTO INSTALL
(out of factory) mode can be initialised by a
long press (> 2.5sec.) of the selection button.
Efface tous les programmes mémorisés, initialise
les valeurs SON et IMAGES aux valeurs usines et
met le TV en mode de sortie usine "AUTO INSTALL"
Fonction valide par une longue pression (>2.5s) sur
la touche de séléction </>.
Löscht alle Programmplätze und setzt alle Bildund Toneinstellungen auf Fabrikwerte zurück.
Der AUTO-INSTALL-Modus kann durch einen
langen Knopfdruck (>2,5s) initialisiert werden.
Clear Prog.
Cancella tutti i programmi in memoria e regola i
Valori analogici SUONO IMMAGINE: ai livelli di
fabbrica.Riportare la TV al modo Selezione:
pressione prolungata: 2,5 sec.
Programa de borrado.
Borra todos los programas almacenados en la
memoria.Valores analógicos de
IMAGEN y SONIDO: valores de fábrica.Regreso
a la TV para "salir del modo fábrica".Selección:
Presión larga igual a 2,5 s.
Brand*
Set the "Brand": Thomson, Telefunken, Other
Factory adjusted
Reserve au reglage usine
Reserviert für Fabrikeinstellungen
Riservato alla regolazione di fabbrica
Ajuste reservado fábricas
Press </>: remote control; Vol. +/- : TV keyb.
Kbd. Config
Factory adjusted
Reserve au reglage usine
Reserviert für Fabrikeinstellungen
Riservato alla regolazione di fabbrica
Ajuste reservado fábricas
Kbd. Config
Other / Default
Press </>: remote control; Vol. +/- : TV keyb.
WSS
Automatic detection of DOLBY surround sound
and 16/9 format pictures via Teletext line
number 23 is valid on all programmes.
Détection automatique du son surround
et du format 16/9 via la ligne 23 du Teletxte.
Valide pour tous programmes.
WSS (nur bei 16:9 oder Dolby)
Auswertung der Zeile 23 zur automatischen
Format-und Dolbyumschaltung.
Identificazione "auto-surround" e "format" via
televideo alla riga 23.La selezione di WSS
Processing vale per tutti i programmi.
Detección "auto-surround" y "format" a través
de la línea 23 de Teletext.La selección del
procesamiento WSS es válida para todos los
programas.
Detection enable
Detection disable
DOLBY
After setting Store (+)
SETUP
Bus Quiet
In bus quiet, the NVM can be read, modified and
reprogrammed by means of a NVM Programmer.
To access " Bus Quiet" : Long press ">".
The TV should remain in "Bus quiet" mode until
either Exit, Left, Right, Up, Down or Standby
keys on the RCU or local keyboard are pressed;
at which point the TV should carry out a
warmstart in order to prevent differences between
the NVM and RAM contents.
After returning from warmstart checks
the NVM content.
If it is not valid, the software performs a new
default writing of the NVM content.
En mode bus quiet la NVM peut être lue,
modifiée et reprogrammée.
Accès au mode Bus quiet : Longue pression ">".
Utiliser l'une des touches Exit, Gauche, Droite
Haut, Bas, standby ou une des touches du
clavier pour sortir le téléviseur du mode bus
quiet.
A partir de ce point de sortie le démarrage
du téléviseur s'effectue à chaud pour éviter toute
différence des contenus RAM et NVM.
En sortie de mode bus quiet, le logiciel contrôle
le contenu de la NVM.
S'il n'est pas correct le logiciel exécute une
nouvelle écriture par défaut de celle-ci.
Im "Bus Quiet"-Modus kann der Inhalt des NVM
mittels eines externen NVM-Programmiergerätes
ausgelesen, geändert oder neu programmiert
werden. "Bus Quiet" wird einem längeren
Druck auf ">" aktiviert.
Das Gerät bleibt solange im "Bus Quiet" -Mode,
bis durch Druck auf die EXIT-, LINKS-,
RECHTS-, HOCH-, RUNTER- oder STANDBYTaste (am Gerät oder auf der Fernbedienung) ein Warmstart des Gerätes veranlaßt wird,
um unterschiedliche Daten in RAM und NVM zu
vermeiden.
Es folgt ein Software-Check des NVM-Inhaltes.
Sollte dieser nicht gültig sein, wird der Inhalt mit
Default-Werten überschrieben.
In Modo Bus Quiet, la memoria NVM può essere
letta, modificata o riprogrammata.
Per accedere al modo Bus Quiet premere a
lungo il tasto ">".
Il TV dovrebbe rimanere in modo Bus Quiet fino
a che vengono premuti i tasti Exit, o Destro
Sinistro, Su o Giù o Standby dal telecomando o
dalla tastiera locale; a questo punto il TV
dovrebbe ripartire per evitare interferenze tra i
contenuti della memoria NVM e della RAM.
All'uscita dal modo Bus Quiet, il software
controlla il contenuto della memoria NVM. Se
tale contenuto non è valido, il software provvede
a una nuova programmazione della NVM con
l'inserimento dei dati di default.
En bus quieto, la NVM puede ser leída,
modificada y reprogramada.
Acceso a bus quieto : Larga presión en ">"
El TV permanecerá en bus quieto hasta que se
pulse cualquiera de las teclas siguientes:
Exit, "<", "Ÿ", "⁄", ">"o Standby del telemando o
del teclado.
En este momento el TV arrancará para evitar
cualquier diferencia entre los contenidos de la
RAM y NVM.
Al salir del modo bus quieto, el software
comprueba el contenido de la NVM.
Si no coincide, el software ejecuta la escritura de
los datos en la NVM.
Bus quiet enable Bus quiet disable
After setting Store (+)
ICC17
First issue 07 / 98 Updated 06 / 99
GEOMETRY
Return
V- Slope
V-Amplitude
V-Position
S - Correction
H-Position
H-Amplitude
EW-Amplitude
EW-Shape
EW-Trapezium
Default
Store
Restore
7C
6C
7C
54
94
70
78
50
98
GEOMETRY
Return
Closes the sub-menu and returns to the
“Main Service Menu”.
Retourne au menu principal.
Schließt das Untermenü, und das
Servicemodus-Menü erscheint.
Chiude il sottomenu e fa apparire il menu
principale Field Service Mode.
Cierra el submenú. El menú Field Service
Mode aparece.
Press </>: remote control; Vol. +/- : TV keyb.
V-Slope
- ATTENTION: Select the standard 4:3
format for
tube.
- Apply a test pattern signal to the TV
with a single horizontal and vertical line
on the screen.
- Select the "V_Slope" line of the menu.
The bottom half of the screen will go black.
-Adjust V_Slope until the centre line of the
pattern is just invisible.
- Leave the line "V_Slope".
- Switch the test pattern signal to the
crosshatch geometry pattern.
- Perform the geometry adjustments
described below.
- Store
-ATTENTION: Sélectionner le format 4/3 pour
tube 4/3 et le format 16/9 pour les TV 16/9.
- Appliquer une mire de barres avec seulement
une ligne blanche horizontale en milieu
de l'écran.
- Sélectionner la ligne "V-Slope".
La moitié basse de l'écran devient noire.
- Aligner "V_Slope" pour que la ligne médiane
soit à peine non visible.
- Commuter la mire en mode de réglage de
géométrie (quadrillage).
- Effectuer les reglages de geometrie ci- après.
- Memoriser
-ACHTUNG: Wählen Sie das 4:3 Format
bei 4:3 Bildröhren oder 16:9 bei 16:9
Bildröhren.
-Speisen Sie ein Testbild mit einem
horizontalen Strich in der Bildmitte ein.
- Wählen Sie im Menü die Funktion
"V-Slope" an.
Die untere Bildhälfte wird dunkel.
- Stellen Sie "V-Slope" so ein, daß die
Mittellinie fast verschwindet.
- Verlassen Sie die Funktion "V-Slope".
- Speisen Sie ein Gittertestbild ein.
- Nehmen Sie die Geometrieeinstellungen
wie nebenstehend beschrieben vor.
-ATTENZIONE: Selezionare il formato
standard 4/3 per il cinescopio 4/3 e il
formato 16/9 per il cinescopio 16/9.
-Applicare un monoscopio con un'unica linea
bianca orizzontale al centro dello schermo
-Selezionare la riga "V slope" del menu. La
parte bassa dello schermo viene oscurata.
-Allineare la "Vertical Slope" in modo che
la linea centrale sia appena visibile
-Abbandonare la riga "V slope".
-Posizionare il monoscopio
-Effettuare le regolazioni di geometria
descritte in precedenza
- Memorizzare.
-ATENCIÓN: Seleccionar 4/3 para tubos de
formato 4/3 y el formato 16/9 para tubos
16/9.
-Aplique una carta de ajuste con sólo una
línea blanca horizontal y una vertical en
el centro de la pantalla.
- Seleccionar en el menú, la línea
"V-Slope". La mitad inferior de la pantalla
se pondrá oscura.
-Ajuste "V-Slope" justo hasta que la línea
horizontal sea invisible.
-Cambiar la carta de ajuste a "cuadrícula"
y efectuar los ajustes de geometria
descritos a continuación
-Antes de salir, memorizar con "Store"
4/3 tube
or 16/9 format for 16/9
Press </>: remote control; Vol. +/- : TV keyb.
Test Pattern Signal used: 4/3 with geometric circle.
Adjust separate for 4/3 and 16/9 format. See annexed
GEOMETRY
V-Amplitude
V-Position
S -Correction
S
H-Position
H-Amplitude
EW -
Amplitude
EW -
Shape
EW -
Trapezium
After setting Store (+)
V-Slope :
Correct incorrect
VIDEO PAL BG
Return
Norm. Factory
Drive Adjust.
R-Drive
G-Drive
B-Drive
Peak-White
Scale Bright
Scale Colour
Scale Contr.
Default
Store
Restore
The signals colour standard is auto detected and displayed opposite the main menu line.
Select 4:3 mode for 4:3 TV sets and 16:9 mode for 16:9 TV sets.
9C
9C
9C
70
5C
CC
VIDEO PAL
Return
Closes the sub-menu and returns to the
“Main Service Menu”.
Retourne au menu principal.
Schließt das Untermenü, und das
Servicemodus-Menü erscheint.
Chiude il sottomenu e fa apparire il menu
principale Field Service Mode.
Cierra el submenú. El menú Field Service
Mode aparece.
Press </>: remote control; Vol. +/- : TV keyb.
Norm. Factory
Recalls the factory settings for colour,
brightness, contrast and sharpness and sets
Black Expand off.
Factory settings recalled
User settings kept.
Drive Adjust.*
Enable before R/B/G-Drive and Peak White
alignments.
After the alignment is completed "Drive
Adjustment" should be disabled.
=50%
R - Drive
G - Drive
B - Drive
Peak-White**
Scal.
Brightness
Scal.
Colour
white
+
=50%
=70% : invar mask.
Peak white test pattern, white =100%
Colourimeter
Tube Type
A51EFS
A59EHJ
A59EGD
A66EHJ
A68AGA -
Adjustments : RF-BG, RF-L, RF-I,
AV for CVBS, RGB
RF : BG-PAL, L-SECAM, I-PAL
75% Colour bar test pattern via
RF.
+
=50%
: AK mask tube
=70% : invar mask.
Grey scale test pattern
white =100%
RF-BG, RF-L, AV1-RGB
Drives cannot be aligned
in I (PAL)
=50%
: AK mask tube
[Nits]
420
380
400
300
[Nits]
Tube Type
A68EGD
A80AEJ
W56EGV
W66EGV
W76EGV 370
+= 50%
= 100%
Grey scale test pattern
white =100%
black
+
Blue
Cathode
=nom.
+
350
240
520
480
CRT
=
F-H
Scal.
Contrast
factory settings.
IF
Return
AGC Take Over
FFI - Bit
Default
Store
Restore
IF
AGC
- Minimum noise- Minimum de bruit
- Minimum Rauschen- Rumore minimo
- Minimo ruido
FFi - Bit
Fast filter (IF /PLL)
Filtre rapide (FI /PLL)
Schnelles Filter (ZF/PLL)
Filtro rapido (IF /PLL)
Asie
Europ
After setting Store (+)
Note :
* Before R/B/G Drive and Peak White alignment the;
1- Blue Stretch must be switched ON
2- Black Stretch must be switched OFF
3- Tone must be set to Neutral
All of the above are enabled when the Drive Adjust.
checkbox is checked
After alignment, the checkbox should be unchecked.
This action will restore the Blue Stretch, Black
and Tone settings .
Avant l'alignement des Drives R/G/B:
1- L'extension "Bleu" doit être en fonction.
2- L'extension "Noir" doit être inhibée.
3- La tonalité doit être neutre.
1-2-3 sont effectués en validant la fonction Drive Adjust.
Après l'alignement il est nécessaire de désactiver
"drive adjust." pour rétablir les valeurs des extensions
Bleu, Noire et Tonalité.
Vor dem R/G/B/-Drive und dem Peak White
Abgleich müssen Black Stretch und Blue Stretch
abgeschaltet werden und der Farbton auf "neutral"
gestellt werden. Dieses geschieht automatisch bei
der Aktivierung des Abgleiches "Drive Adjust."
Nach dem Abgleich müssen die Funktionen durch ein
erneutes Anklicken der Checkbox ("unchecken")
"Drive Adjust. " wieder aktiviert werden.
Prima di allineare R/B/G Drive e Peak White:
1. Deve essere inserita la funzione Blue Stretch
2. Deve essere disattivata la funzione Black Stretch
3. Tone deve essere regolato su Neutral
Le funzioni 1,2,3 sono abilitate dal Drive Adjustment.
Dopo avere effettuato l'allineamento, disabilitare la linea
Adjustment.
Questa funzione richiama le regolazioni Blue, Black,
Stretch e Tone.
Antes de los ajustes R/G/B Drive y Peak White :
1 - La expansión del "azul" debe ser activada
2 - La expansión del "negro" debe ser desactivada
3 - La tonalidad debe ser neutra
Los pasos 1, 2 y 3 son efectuados validando los ajustes
DRIVE.
Después de los ajustes, la casilla "Drive Adjust" debe ser
desactivada.
Esta acción restaurará los valores "Blue", "Black", "Stretch"
y "Tone".
**When the Peak White is activated R-Drive, G-Drive and
B-Drive register values are changed in parallel (+/-1)
Lorsque l'on agit sur le réglage de Peak White
les valeurs de registre R-Drive, G-Drive et B-Drive
varient simultanément (+/-1).
Bei der Peak White-Einstellung werden die Register für
R-Drive, G-Drive und B-Drive parallel (+/-1) geändert.
Quando "Peak White " è attivo, i valori di registro di R-Drive,
G-Drive e B-Drive vengono cambiati in parallelo (+/-1).
Cuando se activa el ajuste "Peak White", los valores de
R-Drive, G-Drive y B-Drive varian simultáneamente (+/- 1)
GEOMETRY MODE ALIGNMENT
88
4/3 picture tube
Signal : 4/3 test pattern
overscan V=107% , H=107%
1- Adjust Vertical position and Vertical amplitude
4 / 3
standard mode
zoom 0
16 / 9
standard mode
zoom 0
2- Adjust S-correction
S
3- Store vertical geometry data.
4- Adjust Horizontal position and Horizontal ampltude
5- Adjust EW Amplitude ,EW Shape and Trapezium
6- Store geometry data.
- Control the vertical height : V = 80%
ERROR CODES
GB
CODES DEFAULTS
AUDIO-DPL DOES NOT ANSWER12
TDA8855H DOES NOT ANSWER 14
AUDIO-MSP PROCESSOR NO LONGER RESPONDING15
TUNER DOES NOT ANSWER
19
SDA LINE BEING HELD LOW
21
CLOCK JAMMED AT LOW LEVEL,SCL LINE JAMMED AT
23
AT LOW LEVEL
SWITCHED 5V NOT AVAILABLE25
TUBE DOES NOT GET WARM IN TIME
26
THE DEFLECTION HAS DETECTED PROTECTION ON
27
MORE THAN THREE OCCASIONS
TDA VERTICAL GUARD VOLTAGE EXCEEDED28
INTERNAL SOFTWARE ERROR
31
32
A SOFTWRE-TIMER HAS BEEN REQUESTED, BUT IS
NOT AVAILABLE YET
THE NVM CHIP DOES NOT ANSWER
34
+13V IS NOT AVAILABLE
35
WRONG NVRAM ADDRESS PASSED TO THE
36
BUS - HANDLER
UNEXPECTED LEVEL ON NMI (INTERRUPT) LINE FOUND
37
(POSSIBLE CAUSE : TUBE FLASHOVER)
HEAP FULL
38
BUS (DATA LINE) NOT RECOVERABLE41
F
CODES DEFAUTS
PROCESSEUR AUDIO-DPL NE REPOND PLUS12
TDA8855H NE REPOND PLUS14
PROCESSEUR AUDIO-MSP NE REPOND PLUS15
TUNER NE REPOND PLUS
19
LIGNE SDA AU NIVEAU BAS
21
CLOCK A NIVEAU BAS
23
5V COMMUTE N’EST PAS DISPONIBLE25
PAS D'INFO TUBE CHAUD (APRES 25S)
26
PROTECTION BASE DE TEMPS ACTIVE PLUS DE TROIS
27
FOIS
VERTICAL GUARD EXCESSIF28
ERREUR LOGICIEL INTERNE
31
32
REQUETE LOGICIEL-TIMER DEMANDEE MAIS PAS
ENCORE DISPONIBLE
PROBLEME NVM, MEMOIRE NE REPOND PLUS
34
+13V N'EST PAS DISPONIBLE
35
MAUVAISE ADRESSE NVM TRANSFEREE AU
36
GESTIONNAIRE DE BUS
PROBLEME DETECTE SUR LA LIGNE NMI (HALT)
37
PENDANT LE DEMARAGE OU LE FONCTIONNEMENT
DU TV (POSSIBILITE : ARKING)
PILE LOGICIEL PLEINE
38
LIGNE DATA DU BUS I2C RESTE BLOQUEE41
D
CODES FEHLER
AUDIO-DPL ANTWORTET NICHT12
TDA8855H ANTWORTET NICHT14
1. AUDIO-MSP ANTWORTET NICHT15
19
I2C-BUS DATA IST IMMER L
21
I2C-BUS CLOCK IST IMMER L
23
GESCHALTETE +5V NICHT VORHANDEN25
BILDROHR WIRD NICHT INNERHALB VON 25S
26
AUFGEHEIZT
SCHUTZSCHALTUNG HAT DREIMAL AUSGELÖST
27
TDA VERTIKAL-SCHUTZ VGUARD IST AKTIVIERT WORDEN
28
INTERNER SOFTWAREFEHLER
31
EIN SOFTWARE-TIMER WURDE ANGEFORDERT, IST
32
ABER NOCH NICHT BEREIT.
DAS EEPROM (NVM) ANTWORTET NICHT
34
35
+13V NICHT VORHANDEN
NVM ADRESSE NICHT GEFUNDEN36
UNERWARTETER PEGEL AUF NMI (POWER_FAIL),
37
MÖGLICHE URSACHE: SPANNUNGSÜBERSCHLAG
HEAP FULL
38
I2C-BUS (DATA) BLOCKIERT41
-
16/9 picture tube
Signal : 4/3 test pattern
overscan V=107%, H =107%
1- Adjust Vertical position and Vertical amplitude
16 / 9
standard mode
zoom 0
4 / 3
standard mode
zoom 0
4 / 3
cinerama zoom
2- Adjust S-correction.
S
3- Store vertical geometry data.
4- Adjust Horizontal position and Horizontal ampltude
5- Adjust EW Amplitude ,EW Shape and Trapezium
6- Store geometry data.
overscan V=107%, H =77%
1- Adjust Horizontal position and Horizontal ampltude
2- Adjust EW Amplitude
3- Store geometry data
overscan V=114%, H =104%
1- Adjust Horizontal position and Horizontal ampltude
2- Adjust EW Amplitude and the EW Shape
3- Store geometry data
I
CODICE PROBLEMA
AUDIO - DPL NON RISPONDE12
TDA8855H NON RISPONDE 14
PROCESSORE AUDIO NON RISPONDE PIU.15
IL TUNER NON RISPONDE
19
LINEA SDA FORZATA BASSA
21
CLOCK BLOCCATO AL LIVELLO BASSO, LINEA TERRA
23
BLOCCATA AL LIVELLO BASSO
LA TENSIONE 5V COMMUTATI NON DISPONIBILE25
IL TUBO NON RAGGIUNGE LA CORRETTA
26
TEMPERATURA NEL TEMPO STABILITO.
PIU DI 3 VOLTE LA RILEVAZIONE HA SCOPERTO UNA
27
PROTEZIONE
ECCESSIVA TENSIONE ALLA LINEA VERTICAL GUARD DEL TDA
28
ERRORE INTERNO DEL SOFTWARE
31
32
E' STATO RICHIESTO UN SOFTWARE-TIMER, MA NON È
ANCORA DISPONIBILE
IL CHIP NVM NON RISPONDE
34
+13V NON È DISPONIBILE
35
E' STATO TRASMESSO AL BUS UN INDIRIZZO
36
ERRATO DELLA NVRAM
LIVELLO IMPREVISTO SULLA LINEA NMI
37
MEMORIA PIENA
38
BUS I2C (LINEA DATI) NON RIPRISTINABILE41
E
CÓDIGO DEFECTO
AUDIO-DPL NO RESPONDE12
TDA8855H NO RESPONDE 14
PROCESADOR AUDIO-MSP NO RESPONDE 15
SINTONIZADOR NO RESPONDE
19
LÍNEA SDA PUESTA A NIVEL BAJO
21
CLOCK FORZADO A NIVEL BAJO,
23
LÍNEA SCL FORZADA A NIVEL BAJO
LOS 5V CONMUTADOS, FALTAN25
EL TRC NO SE CALIENTA EN EL TIEMPO PREVISTO
26
EL BARRIDO HA DETECTADO PROTECCIÓN EN MÁS
27
DE 3 OCASIONES
TDA DEL VERTICAL, EXCESIVA TENSIÓN DE GUARD28
ERROR INTERNO DE SOFTWARE
31
UN TIMER-SOFTWARE HA SIDO SOLICITADO, PERO
32
NO ESTÁ DISPONIBLE
LA "NVM" NO RESPONDE
34
LOS +13V, FALTAN
35
DIRECCIÓN DE LA NVRAM INCORRECTA36
NIVEL INESPERADO EN LA LÍNEA NMI (INTERRUPT)
37
POSIBLE CAUSA: DESCARGAS DEL TRC
PILA LLENA
38
BUS (LÍNEA DE DATOS) NO RECUPERABLE41
 Loading...