


Base Setup
1. Make sure your phone is OFF (not in talk mode).
. Press the
. Use the
4. Press the
Code, and Dial mode.
Area Code
The telephone uses the pre-programmed area code to determine the number format
to display when a valid Caller ID record is received. The pre-programmed area code is
also used for the Dialback feature.
From the Setup BS Menu:
1. Use the
. Press menu button to enter the menu. The screen displays
. Use the touch-tone pad to enter your -digit area code.
4. Press the
NOTE: If you want to overwrite the area code, you must delete the
existing one rst.
Dial Mode
From the Setup BS Menu:
1. Use the
. Press the
select Tone or Pulse.
. Press the
menu button to go to the main menu.
cid/vol (3or4) button to scroll to Setup BS.
menu button to conrm and you may program the following items: Area
cid/vol (3or4) button to scroll to the Area code sub-menu.
Enter area code.
menu button to save the setting.
cid/vol (3or4) button to scroll to the Dial mode sub-menu.
menu button to enter the menu and use the cid/vol (3or4) button to
menu button to save your selection.
Date/Time
NOTE: Time set on handset will be transferred to the base unit
automatically.
1. Make sure your phone is OFF (not in talk mode).
. Press the
button to scroll to Date/Time.
. Press the
4. Use the touch-tone pad to enter the last two digits of the current year (range: 00
to 99).
6
menu button to go to the main menu and use the cid/vol (3or4)
menu button to enter the menu. The screen displays Year 2008.

De-Registration
Deregistration cancels registration. During the deregistration process, keep the
handset near the base.
WARNING: It is not recommended that a handset be deregistered
unless absolutely necessary because once a handset is
deregistered, that handset’s telephone features cannot be used
until the handset is re-registered.
1. Make sure your phone is OFF (not in talk mode).
. Press the
button to scroll to Registration.
4. Press the
1. Use the
. Press the
. Press the
NOTE: If a handset is de-registered, the screen displays Not
Register in Standby and Unavailable if the TALK button is pressed.
menu button to go to the main menu and use the cid/vol (3or4)
menu button to conrm.
cid/vol (3or4) button to scroll to the Remove handset.
menu button to enter the menu. The screen displays Remove handset? .
menu button again to conrm de-registration.
Telephone Operation
Charge Indicator on Base
The charge indicator on the base illuminates when a handset is in the base charging.
Making a Call
1. Press the talk/call back button. Dial the desired number.
- OR -
Dial the number rst, then press the talk/call back
. When nished, press the talk/call back
cradle to hang up.
NOTE: If you want to delete the pre-dial number you entered, press
the mute/clear button until all of the digits are erased.
button or put the handset back into the
button.
8

Answering Calls
1. When the phone rings, press the talk/call back button.
. When nished, press the talk/call back
cradle to hang up.
NOTE: If you have turned the Auto Talk function on, you can pick
up the handset from the base to answer the incoming call directly,
without pressing any buttons.
NOTE: Adjust the handset volume by pressing the
button during a call.
button or put the handset back into the
cid/vol (3or4)
Inserting a Pause in the Dialing Sequence
Press the #pause button twice to insert a delay in dialing sequence when a pause is
needed to wait for a dial tone (for example, after you dial 9 for an outside line, or to
wait for a computer access tone.) The screen displays a pause as a P, and each pause
counts as one digit in the dialing sequence.
Redial
To quickly redial a number you dialed:
1. Make sure the phone is
. Press the talk/call back
. Press the redial button rst, then use the cid/vol (3or4) button to select the
desired redial number.
NOTE: You may choose from 10 last dialed numbers.
4. Press the menu button. The number dials automatically.
-OR-
1. Make sure the phone is
. Press the
redial number.
NOTE: You may choose from 10 last dialed numbers.
. Press the talk/call back button. The number dials automatically.
redial button. Then use the cid/vol (3or4) button to select the desired
OFF (not in talk mode).
button.
OFF (not in talk mode).
9

Editing a Redial Record Before Dialing
1. Make sure the phone is OFF (not in talk mode).
. Press the
desired redial number.
. Press the
4. Use the
5. Press the
6. Use the
touch-tone pad to add digits or press the mute/clear button to backspace and
delete one digit at a time.
7. After editing, press the talk/call back
redial button rst, then use the cid/vol (3or4) button to select the
menu button.
cid/vol (3or4) button to scroll to Select.
menu button to enter edit mode.
cid/vol (3or4) button to move the cursor forward or backward. Use the
button to dial the modied redial number.
Storing a Redial Record in Phone Book
1. Make sure the phone is OFF (not in talk mode).
. Press the
desired redial number.
. Press the
4. Use the
5. Press the
6. The screen displays
Name” for name editing method.
NOTE: A name must be input otherwise the record cannot be stored.
7. Press the menu button to save. The screen displays Saved. Repeat steps
through 7 to save other records.
redial button rst, then use the cid/vol (3or4) button to scroll to the
menu button.
cid/vol (3or4) button to scroll to Save number.
menu button to enter edit mode.
Enter name. Input a name. Please refer to section “Handset
Deleting a Redial Record
1. Make sure the phone is OFF (not in talk mode).
. Press the
desired redial number.
. Press the
4. Use the
5. Press the
6. Press the
NOTE: Press the ash/exit button to return to the standby mode
without deleting any redial records.
redial button rst, then use the cid/vol (3or4) button to select the
menu button.
cid/vol (3or4) button to scroll to Delete?.
menu button to delete the record. The screen displays Conrm?.
menu button again to conrm the deletion. The screen displays Deleted.
0

Deleting All Redial Records
1. Make sure the phone is OFF (not in talk mode).
. Use the
. Press the
4. Use the cid/vol (3or4) button to scroll to Delete all?.
5. Press the
6. Press the
deleted.
NOTE: Press the ash/exit button to return to the standby mode
without deleting any redial records.
cid/vol (3or4) button to display any redial record.
menu button.
menu button. The screen displays Conrm? .
menu button again to conrm the deletion. The screen displays All
Call Timer
After you press the talk/call back button on the handset, the built-in call timer shows on the
display and counts the length of time of the call in hours, minutes and seconds.
Auto Standby
If you place the handset in the cradle while the handset is off the hook (during a call),
the call is automatically disconnected.
Ringer On/Off
1. Make sure the phone is OFF (not in talk mode).
. Press the
NOTE: If you turn the ringer OFF, the screen displays RINGER OFF.
mute/clear/ringer on/off button to switch the ringer on or off.
Flash
If you subscribe to the combined Call Waiting Caller ID service from your local
telephone company, you will receive Caller ID information (if available) on Call Waiting
calls. During a phone call, you will hear a beep to indicate another call is waiting on
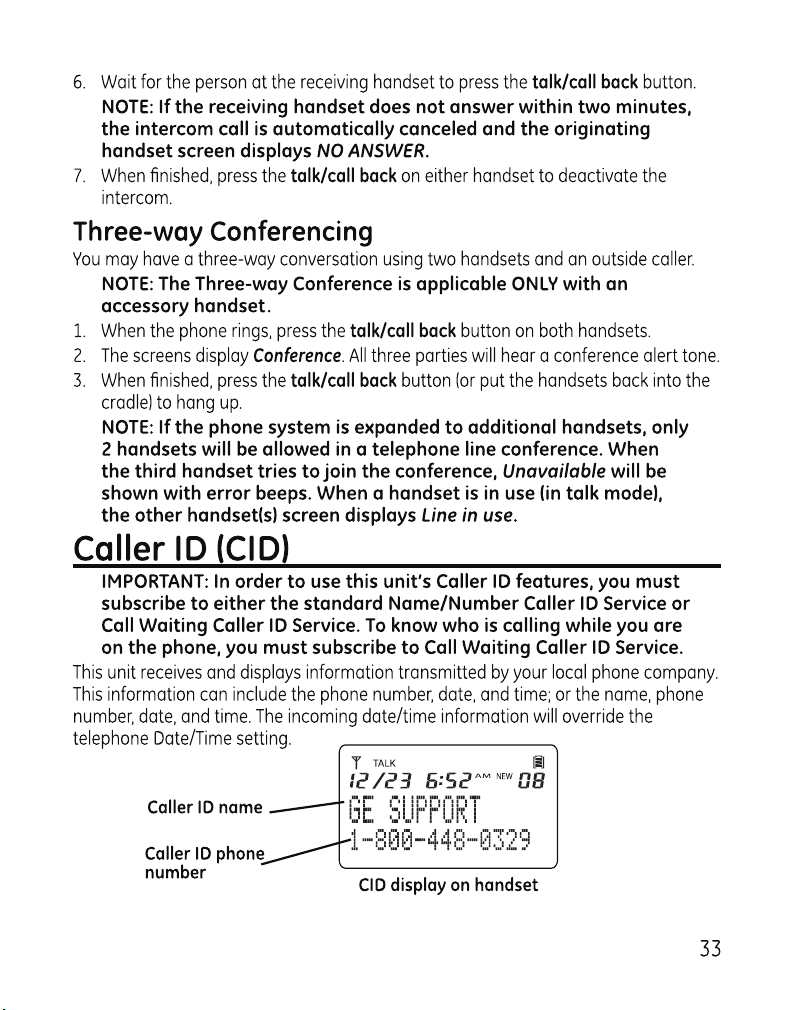
the line and the handset screen displays the Caller ID information for the waiting call.
• To connect to the waiting call, press the
your original call is put on hold.
• To switch between the two calls, press the
TIP: Do not press the talk/call back button on the handset to
activate a custom calling service, such as call waiting, or the call
will disconnect.
ash/exit button on the handset, and
ash/exit button.
1

Mute
To have a private, off-line conversation, use the mute feature. The party on the
telephone line cannot hear you, but you can hear them.
1. Press the
. Press the
mute/clear button. The handset screen displays MUTE.
mute/clear button to cancel and return to your phone conversation.
Page
The page feature helps you locate a misplaced handset.
1. Press the
handset beeps, then the handset screen displays Page from base.
. To cancel the page, press the
handset. Otherwise the paging will last for minutes.
page button on the base. The base screen displays Paging and the
page button on the base, or press any key on the
Receiver Volume Control
When the handset is ON (in talk mode) you may adjust the receiver volume by
pressing the cid/vol (3or4) button. There are ve volume levels to choose from. VOL
1 is minimum and VOL 5 is maximum.
Intercom Operation
The intercom feature allows you to have a conversation with another registered
handset without tying up the telephone line, allowing you to still receive incoming
calls.
NOTE: The Intercom Operation is applicable ONLY with an
accessory handset.
Handset to Handset Intercom Call
1. Make sure the originating phone is OFF (not in talk mode).
. Press the
. Press the
4. Use the touch-tone pad to input the number of the handset you want to page.
(For example: press 1 to page handset 1.)
5. The receiving handset is paged and emits a tone.
NOTE: To cancel the page, press the talk/call back button on the
originating handset.
menu button and use the cid/vol (3or4) button to scroll to Intercom.
menu button to enter the menu. The screen displays INT - Number?.
 Loading...