

Page 1

2 Combo(GB-D-IT-ES) 17/05/1999 19:58 Page 1
GUARANTEE
The type and production number of your appliance are printed on the guarantee certificate delivered with your video recorder. Keep this certificate as well as the invoice.These documents are indispensable for claiming your guarantee rights.
• All repairs during the guarantee period must be carried out by an authorised technician representing our brand.
• If this condition is not met, your rights will no longer be valid.
• Never open the appliance yourself, since this may be dangerous for you or damage the equipment.
PRECAUTIONS
SETTING UP - Ensure that the mains supply in your house complies with that indicated on the identification sticker located on
the back of your appliance. Install the video recorder horizontally,away from any source of heat (fireplace) or appliances creating strong magnetic or electric fields.
If you install your video recorder in a purpose-built unit,check that the air vents are not obstructed.Allow a clearance of 10
cm on either side and at the rear of the appliance and at least 7 cm above.
Even when the on/off switch is off, the Combi TV-video recorder is not completely cut off from the mains.To disconnect it
completely, it is necessary to remove the mains plug from the mains socket
For MAINS powered apparatus and for apparatus producing internal voltages greater than 35V (peak) a.c. or d.c., having no
protection against splashing water, the instructions for use shall state that the apparatus shall not be exposed to dripping or
splashing and that no objects filled with liquids, such as vases, shall be placed on the apparatus.
The ventilation should no be impedes by covening the ventilation openings with item, such as newspapers, table-cloths, curtains, etc…
No naked flame sources, such as lighted candies, should be placed on the apparatus.
USE
Maximum ambient temperature: 35°
Maximum humidity ratio: 85%
SE - If your appliance, or a cassette, has been stored in a very cold atmosphere for a certain amount of time (transported
U
during winter for example), wait approximately 2 hours before using your video recorder.The openings located on the top
and the bottom are for ventilation purposes.They should not be obstructed. In the event of lightning, the appliance should be
disconnected from the external aerial.
Under no circumstances should this appliance be put to industrial use. It is designed solely for domestic operation.
M
AINTENANCE - Use a dry,clean, soft cloth. Do not use any scouring agents, solvents or abrasive products, etc. If an object or
liquid enters inside the appliance, unplug it immediately and have it checked by an authorised technician.
It is illegal to make total or partial copies of recordings protected by copyright laws without explicit permission of the
copyright holder.
Thomson Multimédia is not liable if the television is used other than in
accordance with this manual.
1
ENGLISH
Page 2

2 Combo(GB-D-IT-ES) 17/05/1999 19:58 Page 2
CONTENTS
BASIC CONNECTIONS
NAVIGATION PRINCIPLES
NSTALLING TV CHANNELS ON THE COMBI TV-VIDEO RECORDER FOR
I
THE FIRST TIME
. . . . . . . . . . . . . . . . . . . . . . . . . . . . . . . . . . . . . . . . . 3
. . . . . . . . . . . . . . . . . . . . . . . . . . . . . . . . . . . . . . 3
. . . . . . . . . . . . . . . . . . . . . . . . . . . . . . . . . . . . . . . . . . . .13
Sorting your channels . . . . . . . . . . . . . . . . . . . . . . . . . . . . . . . . . . .14
ETTING THE CLOCK . . . . . . . . . . . . . . . . . . . . . . . . . . . . . . . . . . . . .14
S
EW CHANNELS . . . . . . . . . . . . . . . . . . . . . . . . . . . . . . . . . . . . . . . .15
N
PERATING BASIC COMBI TV-VIDEO RECORDER FUNCTIONS . . . . . . . .17
O
UDIO VIDEO 1/2 . . . . . . . . . . . . . . . . . . . . . . . . . . . . . . . . . . . . . . . . . .20
A
ECORDING . . . . . . . . . . . . . . . . . . . . . . . . . . . . . . . . . . . . . . . . . . . . . . .21
R
Instant recording of a TV programme . . . . . . . . . . . . . . . . . . . . . .21
Recording with automatic stop . . . . . . . . . . . . . . . . . . . . . . . . . . . .21
ROGRAMMING A RECORDING WITH SHOW VIEW CODES . . . . . . . . . . .22
P
ETTING TIMER RECORDING . . . . . . . . . . . . . . . . . . . . . . . . . . . . . . . . . .23
S
RASING A TIMER RECORDING . . . . . . . . . . . . . . . . . . . . . . . . . . . . . . . .25
E
REFERENCES . . . . . . . . . . . . . . . . . . . . . . . . . . . . . . . . . . . . . . . . . . . . .26
P
OW TO USE VIDEOTEXT ? . . . . . . . . . . . . . . . . . . . . . . . . . . . . . . . . . . .27
H
DDITIONAL INFORMATION . . . . . . . . . . . . . . . . . . . . . . . . . . . . . . . . . .28
A
DENTIFYING AND SOLVING PROBLEMS . . . . . . . . . . . . . . . . . . . . . . . . . .32
I
In our efforts to improve the quality of our products, we reserve the right to change their features.The information
contained in these instructions are therefore liable to change and are not contractual.
BEFORE YOU START
ENGLISH
Dipole antenna
or
Loop antenna *
Getting started
guide and operating
instructions
These documents have been printing on environnementally-friendly recycled,non-bleached paper.
* If included
Antenna adaptator *
TRK
SHOWVIEW
PREF.
INFO
EXIT
TV
VPS
TEXT
MENU
GO TO 0000
1
2
4
PR
3
5
MONITOR
7
6
8
AV
0000
9
0
/--
SP/LP
REW.
PLAY
F.FWD
REC.
STOP
PAUSE
+
SIZE AAA 1,5 V 0%MERCURY
-
EXTRA HEAVY DUTY
GREENELL
-
GREENELL
EXTRA HEAVY DUTY
SIZE AAA 1,5 V 0%MERCURY
+
Remote control unit and batteries
2
Page 3

B
MENU
EXIT
GO TO 0000
VPS
2 Combo(GB-D-IT-ES) 17/05/1999 19:58 Page 3
ABOUT THIS INSTRUCTION BOOKLET : this document applies to several Combi TV-Video recorder models.Certain functions or
settings may, therefore, not be included in the model which you have bought.
A
BOUT THE SWITCH: the position of the On / Off
or on the right side.
switch varies from model to model. It may be located on the front panel
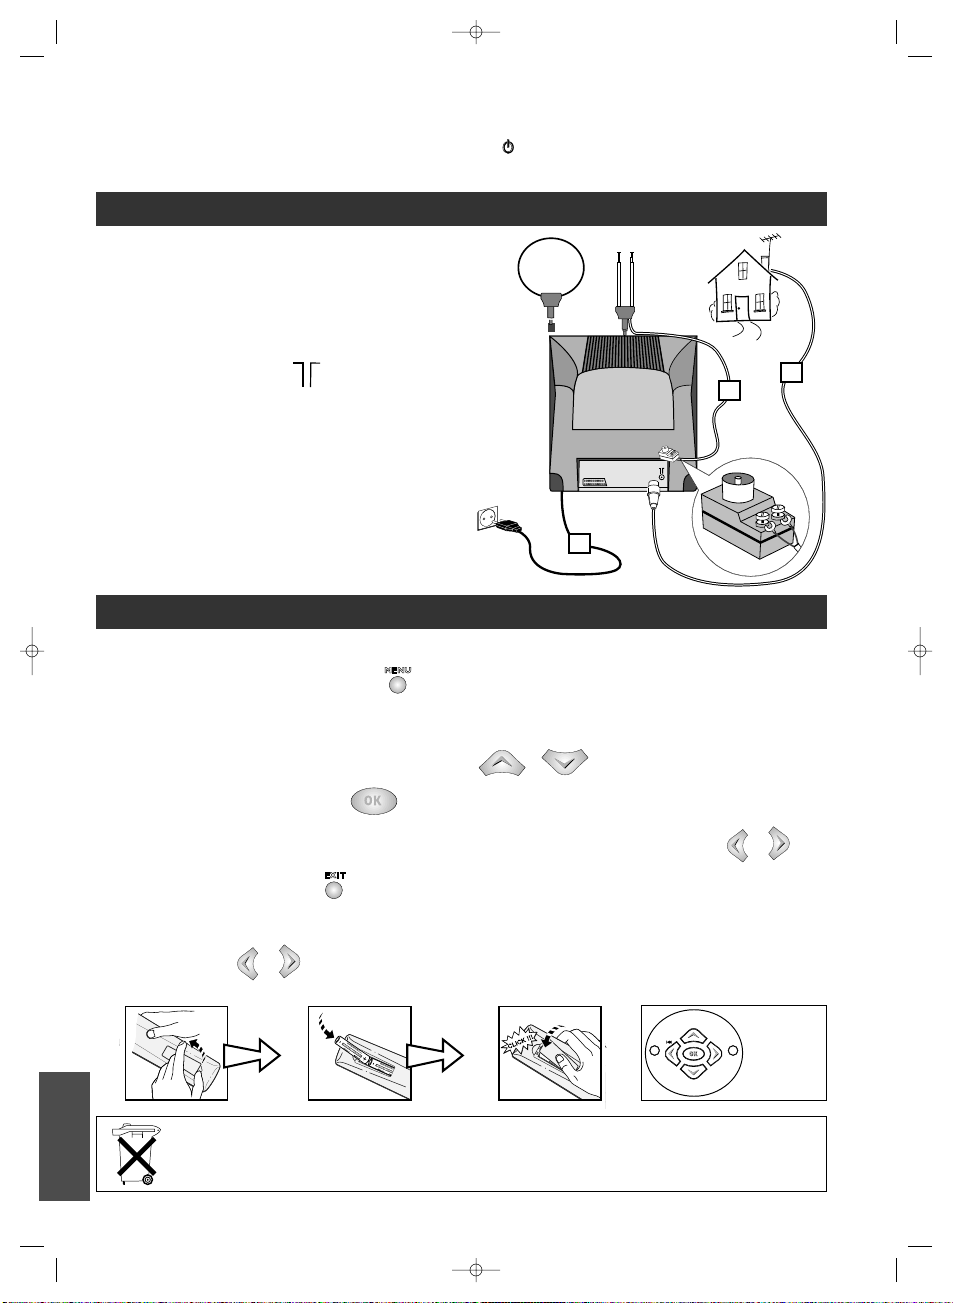
BASIC CONNECTIONS
1
Plug existing aerial cable or use the dipole antenna
into the Combi TV-Video (
2
Connect the Combi TV-Video to the mains using the
power cord.
IN ).
*
1
1
220 - 240 V
2
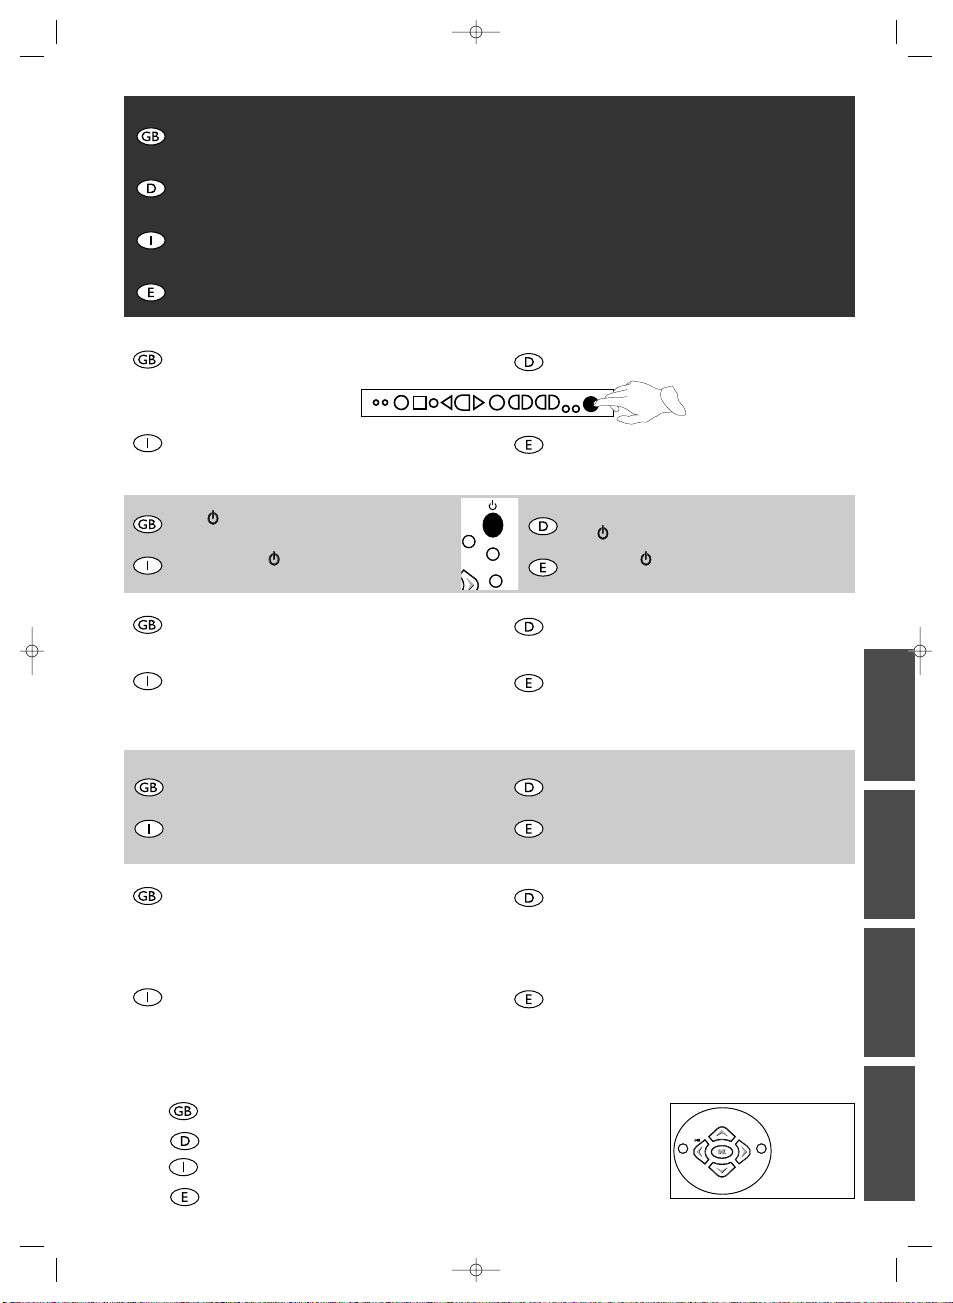
NAVIGATION PRINCIPLES
Always point the remote control at the Combi TV-Video recorder.
1
ALLING UP A MENU - The key on the remote control calls up the menu which enables you to use the features of
C
your Combi TV-Video recorder and to adjust it.
AVIGATION WITHIN THE MENUS :
N
2
- To choose a function,select a line with or .
1
2 -
To validate your choice, press
3
- To make an adjustment (i.e. to select an option, increase or decrease a given value), you must use key or .
4
- To exit a menu,press key .
E
XAMPLE : The symbols C/B displayed on the screen indicate that an option is available. To select an option, press key
or .
12 3
!
MENU
EXIT
ENGLISH
.
▲
OK
C
B
▼
EXIT MENU
Please respect the environment! Before throwing any batteries away,consult your distributor
who may be able to take them back for specific recycling.
* If included
3
Page 4

2 Combo(GB-D-IT-ES) 17/05/1999 19:58 Page 4
GARANTIE
Auf dem Garantieschein sind der Typ und die Seriennummer Ihres Gerätes angegeben. Bitte den Garantieschein zusammen
mit der Rechnung sorgfältig aufbewahren, da diese bei einem eventuellen Garantiefall unbedingt erforderlich sind.
• Jede Reparatur während der Garantiezeit muß von einem Techniker vorgenommen werden, der als
Vertreter unserer Marke zugelassen ist.
• Bei jedem Verstoß gegen diese Regel verfällt Ihr Garantieanspruch.
• Öffnen Sie Ihr Gerät nie selbst. Sie könnten sich selbst gefährden oder das Gerät beschädigen.
VORSICHTSMAßNAHMEN
INSTALLATION - Stellen Sie sicher, daß die Netzspannung in Ihrer Wohnung mit der übereinstimmt,die auf dem Typenschild auf
der Gerätrückseite angegeben ist. Stellen Sie den Kombi TV-Videorecorder waagerecht und in großer Entfernung von bedeutenden Wärmequellen (Kamin usw.) oder Geräten auf, die starke Magnet- bzw.Kraftfelder erzeugen.
Falls Sie den Kombi TV-videorecorder in einem eigens dafür vorgesehenen Möbelstück installieren, sollten Sie auf eine einwandfreie Belüftung achten.Lassen Sie an den Seiten sowie auf der Rückseite des Geräts mindestens 10 cm und oberhalb mindestens 7 cm Zwischenraum.
Selbst wenn der Schalter Ein/Aus auf Aus steht,ist der Kombi TV-Videorecorder nicht vollständig vom Netzt getrennt.Um ihn
vollständig vom Netzt zu trennen, ist es notwendig, den Netztstecker aus der Steckdose zu ziehen.
Für Geräte, die an das Stromnetz angeschlossen werden und interne Spannungen über 35 V (Peak) über Mittelfeld- oder
Wechselstrom erzeugen und die keinen Schutz gegen Wasserspritzer aufweisen, wird in den Bedienungsanleitungen angegeben, daß das Gerät nicht einer Berieselung oder Wasserspritzern ausgesetzt werden und daß kein mit Flüssigkeit gefülltes
Gefäß, wie z.B. eine Vase, auf dem Gerät abgestellt werden darf.
Die Ventilation darf nicht durch Verschließen der Ventilationsöffnungen mit Gegenständen wie z.B.Zeitschriften,Tischservietten,
Vorhängen etc. behindert werden.
Auf dem Gerät darf keine offene Flamme, etwa eine brennende Kerze abgestellt werden.
INBETRIEBNAHME
Maximale Raumtemperatur: 35°
Maximaler Feuchtigkeitsgehalt: 85%
DEUTSCH
INBETRIEBNAHME - Wenn Ihr Gerät oder eine Cassette längere Zeit in einer kalten Umgebung war, etwa während eines
Transports im Winter, sollten Sie vor dem Gebrauch des Videorecorders ungefähr 2 Stunden warten. Die Öffnungen über und
unter dem Gerät dienen der Entlüftung und sind stets freizuhalten. Bei Gewittern empfiehlt es sich, den Stecker des Geräts
aus der Buchse zu ziehen, die an die Außenantenne angeschlossen ist.
Dieses Gerät darf auf keinen Fall zu gewerblichen Zwecken verwendet werden, sondern dient ausschließlich dem
Heimgebrauch.
ARTUNG - Verwenden Sie einen weichen,trockenen, sauberen Lappen ohne Beiz- und Lösungsmittel, scheuernde Substanzen
W
usw.Ziehen Sie den Stecker des Geräts sofort aus der Buchse, falls ein Gegenstand oder eine Flüssigkeit in das Geräteinnere
eindringen, und lassen Sie den Videorecorder von einem zugelassenen Techniker überprüfen.
Das vollständige oder teilweise Kopieren von Aufnahmen, die den gesetzlichen Bestimmungen bezüglich der Urheberrechte unterliegen,
verstößt ohne die ausdrückliche Genehmigung des Rechtsinhabers gegen die geltenden Vorschriften.
Sollte das Fersehgerät nicht in Übereinstimmung mit den Anweisungen der vorliegenden
Anleitung benutzt werden, sind alle Rechtsansprüche gegen Thomson Multimédia
ausgeschlossen.
4
Page 5

2 Combo(GB-D-IT-ES) 17/05/1999 19:59 Page 5
INHALTSVERZEICHNIS
GRUNDANSCHLÜSSE
NAVIGATIONSPRINZIPIEN
E
RSTMALIGE EINSTELLUNG DER FERNSEHSENDER IN IHREM
. . . . . . . . . . . . . . . . . . . . . . . . . . . . . . . . . . . . . . . . . . 6
. . . . . . . . . . . . . . . . . . . . . . . . . . . . . . . . . . . . . . . 6
KOMBI TV-VIDEORECORDER . . . . . . . . . . . . . . . . . . . . . . . . . . . . . . . . . .13
Sortieren der Sender . . . . . . . . . . . . . . . . . . . . . . . . . . . . . . . . . . . .14
E
INSTELLEN VON DATUM UND UHRZEIT . . . . . . . . . . . . . . . . . . . . . . . .14
N
EUE SENDER . . . . . . . . . . . . . . . . . . . . . . . . . . . . . . . . . . . . . . . . . .15
B
ENUTZEN DER GRUNDLEGENDEN FUNKTIONEN DES
KOMBI TV-VIDEORECORDERS . . . . . . . . . . . . . . . . . . . . . . . . . . . . . . . . .17
A
UDIO VIDEO 1/2 . . . . . . . . . . . . . . . . . . . . . . . . . . . . . . . . . . . . . . . . . .20
A
UFNEHMEN . . . . . . . . . . . . . . . . . . . . . . . . . . . . . . . . . . . . . . . . . . . . . .21
Sofortaufnahme einer Fernsehsendung . . . . . . . . . . . . . . . . . . . . . .21
Aufnahme mit automatischem Ausschalten . . . . . . . . . . . . . . . . . . .21
PROGRAMMIEREN EINER AUFNAHME MIT HILFE DER SHOWVIEW CODES
T
IMER-PROGRAMMIERUNG . . . . . . . . . . . . . . . . . . . . . . . . . . . . . . . . . . . .23
L
ÖSCHEN EINER PROGRAMMIERTEN AUFNAHME . . . . . . . . . . . . . . . . . .25
V
ORZUGSEINSTELLUNGEN . . . . . . . . . . . . . . . . . . . . . . . . . . . . . . . . . . . .26
W
IE KANN MAN VIDEOTEXT BENUTZEN? . . . . . . . . . . . . . . . . . . . . . . . .27
Z
USÄTZLICHE INFORMATIONEN . . . . . . . . . . . . . . . . . . . . . . . . . . . . . . .28
F
EHLERERKENNUNG UND ABHILFEMAßNAHMEN . . . . . . . . . . . . . . . . . . .32
Im Bermühen um eine ständige Verbesserung unserer Produkte behalten wit uns vor, die technischen Daten ohne
Vorankündigung zu verändern. Die in der vorliegenden Anleitung enthaltenen Angaben sind daher Änderungen
unterworfen und keinesfalls rechtsverbindlich.
.22
VOR DER INBETRIEBNAHME
Dipolantenne
oder
Spulenantenne *
Installationsanleitung
und
benutzerhandbuck
Um weiteren Belastungen der Umwelt vorzubeugen, sind diese Handbücher auf ungebleichtem
Recyclingpapier gedruckt worden.
* bei entsprechend ausgestatteten Modellen
Antennenadapter *
TRK
SHOWVIEW
PREF.
INFO
EXIT
TV
VPS
TEXT
MENU
GO TO 0000
1
2
4
PR
3
5
MONITOR
7
6
8
AV
0000
9
0
/--
SP/LP
REW.
PLAY
F.FWD
REC.
STOP
PAUSE
+
SIZE AAA 1,5 V 0%MERCURY
-
EXTRA HEAVY DUTY
GREENELL
-
GREENELL
EXTRA HEAVY DUTY
SIZE AAA 1,5 V 0%MERCURY
+
Fernbedienung und batterien
5
DEUTSCH
Page 6

B
MENU
EXIT
GO TO 0000
VPS
2 Combo(GB-D-IT-ES) 17/05/1999 19:59 Page 6
ZU DIESER ANLEITUNG: die vorliegende Bedienungsanleitung bezieht sich auf mehrere Kombi TV-Videorecordermodelle,so daß
gewisse Funktionen oder Einstellungen von Ihrem Modell abweichen bzw. fehlen können.
Z
UR TASTE EIN/AUS : Je nach Modell kann sich die Taste Ein/Aus
vorne oder an der Seite des Videorecorders befinden.
GRUNDANSCHLÜSSE
*
1
Schließen Sie das Kabel der Außenantenne oder der
Dipolantenne an die Buchse (
TV-Videorecorders an.
2
Schließen Sie den Kombi TV-Videorecorder über das
Netzkabel an eine Steckdose an.
IN ). Ihres Kombi
1
1
220 - 240 V
2
NAVIGATIONSPRINZIPIEN
Richten Sie die Fernbedienung stets auf den Kombi TV-Videorecorder.
AUFRUF EINES MENÜS - Die Taste der Fernbedienung ruft das Menü auf, daß Ihnen das Benutzen der Funktionen
1
Ihres Kombi TV-Videorecorders bzw. dessen Einstellung ermöglicht.
AVIGATION IN DEN MENÜS
N
2
1 - Um eine Funktion zu wählen, eine Zeile mit oder wählen.
2 - Zum Bestätigen Ihrer Wahl auf drücken.
3 - Zum Vornehmen einer Einstellung (eine Option wählen, einen Wert erhöhen oder verrungen) sind die Tasten
oder zu benutzen.
DEUTSCH
4 - Zum Verlassen eines Menüs die Taste drücken.
B
EISPIEL
:
Die auf dem Bildschirm angezeigten Symbole C /B geben an,daß eine Option vorhanden ist. Zur Wahl einer Option
die Taste oder drücken.
12 3
!
MENU
EXIT
▲
OK
C
B
▼
EXIT MENU
Batterie-Entsorgung : batterien gehören nicht in den Hausmüll. Als Verbraucher sind Sie
gesetzlich verpflichtet, gebauchte Batterien zurückzugeben. Sie können Ihren alten Batterien
bei den öffentlichen Sammelstellen in Ihrer Gemeinde oder überall dort abgeben, wo
Batterien der betreffenden Art verkauft werden.
* bei entsprechend ausgestatteten Modellen
6
Page 7

2 Combo(GB-D-IT-ES) 17/05/1999 19:59 Page 7
GARANZIA
Nel certificato di garanzia rilasciato con il videovision è indicato il tipo ed il numero di fabbricazione dell'apparecchio.
Conservatelo con la ricevuta fiscale. Questo certificato e la ricevuta fiscale sono infatti i documenti indispensabili per fare valere i vostri diritti di garanzia.
• Qualunque riparazione durante il periodo di garanzia deve essere effettuata da
un tecnico di un nostro Centro Assistenza autorizzato.
• Qualunque violazione o questa regola comporta l'annullamento dei diritti di garanzia.
• Non aprite mai il vostro apparecchio da soli. Ciò potrebbe essere pericoloso per voi, o potrebbe
danneggiare l'apparecchio stesso.
PRECAUZIONI
INSTALLAZIONE - Accertatevi che la tensione in rete della vostra abitazione sia conforme a quella indicata sull'etichetta di iden-
tificazione situata sulla parte posteriore dell'apparecchio. Installate il videovision orizzontalmente, lontano da fonti di calore
(camini...) o da apparecchi produttori di campi magnetici o elettrici elevati.
Se installate il videovision in un mobile apposito, controllate che l'aerazione non sia ostruita. Lasciate 10 cm minimo da ogni
lato e nella parte posteriore dell'apparecchio, e 7 cm minimo nella parte superiore.
Anche se l’interruttore di accendimento/spegnimento è in posizione spegnimento,il videovision non è completamente scollegato dalla rete di alimentazione. Per scollegarlo completamente, estrarre la presa del videovision dalla presa di alimentazione.
Per gli apparecchi funzionanti su rete e gli apparecchi che producono tensioni interne superiori s 35 V (picco), a corrente continua o alternata, che non sono provvisti di protezioni contro spruzzi d’acqua, le istruzioni di funzionamento precisano che l’apparecchio non deve essere esposto ad acqua corrente o a spruzzi e che non dovranno essere posti sull’apparecchio oggetti
pieni di liquido, come vasi ecc.
L’aerazione non deve essere impedita otturando le bocche di aerazione con oggetti come giornali, tovaglioli da tavola, tende
ecc.
Non dovranno essere poste sull’apparecchio fiamme libere come candele accese.
UTILIZZO
Temperatura ambientale massima : 35°
Tasso d’umiditá massimo : 85%
USO - Se l’apparecchio o una cassetta sono rimasti per un certo tempo in un ambiente freddo, per esempio in occasione di
un trasporto, in inverno,aspettare circa 2 ore prima di utilizare l’apparecchio. Le aperture situate sopra e sotto sono previste
per la ventilazione e non devono essere coperte. In caso di temporale, si consiglia di scollegare il videovision dalla presa collegata all ‘ antenna esterna. Questo apparechio è stato concepito per l’uso domestico. Non deve venir utilizzato a fini industriali.
MANUTENZIONE - Utilizzare uno strofinaccio morbido,asciutto e pulito, non utilizzare mai prodotti abrasivi, solventi, ecc. Se un
oggetto o un liquido penetra nell'apparecchio, scollegatelo immediatamente e fatelo controllare da un tecnico autorizzato.
La copia totale o parziale di registrazioni protette dalla legislazione sui diritti d'autore, senza autorizzazione esplicita
del titolare dei diritti, è vietata dalla legislazione in vigore.
Thomson Multimédia declina ogni responsabilità in caso di utilizzo non
conforme a quanto indicato nel presente libretto d'istruzioni.
7
ITALIANO
Page 8

2 Combo(GB-D-IT-ES) 17/05/1999 19:59 Page 8
SOMMARIO
COLLEGAMENTI DI BASE
CRITERI DI NAVIGAZIONE
OME INSTALLARE PER LA PRIMA VOLTA I CANALI TV
C
SUL VIDEOVISION . . . . . . . . . . . . . . . . . . . . . . . . . . . . . . . . . . . . . . . . . . .13
. . . . . . . . . . . . . . . . . . . . . . . . . . . . . . . . . . . . . . . 9
. . . . . . . . . . . . . . . . . . . . . . . . . . . . . . . . . . . . . . . 9
Riordinare i vostri canali . . . . . . . . . . . . . . . . . . . . . . . . . . . . . . . . .14
EGOLAZIONE DELL’OROLOGIO . . . . . . . . . . . . . . . . . . . . . . . . . . . . . .14
R
UOVO CANALE . . . . . . . . . . . . . . . . . . . . . . . . . . . . . . . . . . . . . . . .15
N
TILIZZARE LE FUNZIONI DI BASE DEL VIDEOVISION . . . . . . . . . . . . . . .17
U
UDIO VIDEO 1/2 . . . . . . . . . . . . . . . . . . . . . . . . . . . . . . . . . . . . . . . . . .20
A
EGISTRARE . . . . . . . . . . . . . . . . . . . . . . . . . . . . . . . . . . . . . . . . . . . . . .21
R
Registrare immediatamente una trasmissione TV . . . . . . . . . . . . . .21
Registrazione con interruzione automatica . . . . . . . . . . . . . . . . . . .21
ROGRAMMARE UNA REGISTRAZIONE CON I CODICI SHOW VIEW . . . .22
P
ROGRAMMARE UNA REGISTRAZIONE . . . . . . . . . . . . . . . . . . . . . . . . . . .23
P
ANCELLARE UNA PROGRAMMAZIONE . . . . . . . . . . . . . . . . . . . . . . . . .25
C
REFERENZE . . . . . . . . . . . . . . . . . . . . . . . . . . . . . . . . . . . . . . . . . . . . . .26
P
OME UTILIZZARE IL TELEVIDEO ? . . . . . . . . . . . . . . . . . . . . . . . . . . . . .27
C
NFORMAZIONI COMPLEMENTARI . . . . . . . . . . . . . . . . . . . . . . . . . . . . . .28
I
DENTIFICARE E RISOLVERE I PROBLEMI . . . . . . . . . . . . . . . . . . . . . . . . . .32
I
Al fine di migliorare la qualit
mazioni contenute in questo manualetto d’istruzioni possono quindi venir modificate e non rivestono
carattere contrattuale.
á dei nostri prodotti, ci riserviamo il diritto di modificarne le caratteristiche. Le infor-
PRIMA DI COMINCIARE
Antenna bipolare
o
Antenna ad anello *
Manuali di
installazione
e di utilizzazione
ITALIANO
Rispettosi dell’ambiente, abbiamo stampato questi documenti su carta riciclata non sbiancata.
* solo su certi modelli
Adattatore antenna *
TRK
SHOWVIEW
PREF.
INFO
EXIT
TV
VPS
TEXT
MENU
GO TO 0000
1
2
4
PR
3
5
MONITOR
7
6
8
AV
0000
9
0
/--
SP/LP
REW.
PLAY
F.FWD
REC.
STOP
PAUSE
+
-
GREENELL
EXTRA HEAVY DUTY
SIZE AAA 1,5 V 0%MERCURY
Telecomando e batterie
8
SIZE AAA 1,5 V 0%MERCURY
-
EXTRA HEAVY DUTY
GREENELL
+
Page 9

B
MENU
EXIT
GO TO 0000
VPS
2 Combo(GB-D-IT-ES) 17/05/1999 19:59 Page 9
A PROPOSITO DI QUESTO MANUALETTO: il presente documento è comune a più modelli di Videovision, pertanto alcune funzioni
o determinate regolazioni possono mancare sul modello da voi acquistato.
A PROPOSITO DELL’INTERRUTTORE: la posizione dell’interruttore On/Off
anteriore o sul lato destro.
COLLEGAMENTI DI BASE
è diversa a seconda dei modelli. Può trovarsi sul lato
*
1
Collegare al Videovision ( IN ) il cavo d'antenna
esistente o utilizzare l’antenna bipolare.
2
Collegare il Videovision alla presa di corrente con il
cavo elettrico.
220 - 240 V
2
1
CRITERI DI NAVIGAZIONE
Per l'uso rivolgere sempre il telecomando verso il Videovision
1
ER SELEZIONARE UN MENU - Il tasto sul telecomando permette di visualizzare il menu che vi consentirà di utiliz-
P
zare le funzioni del vostro Videovision o di regolarlo.
AVIGAZIONE NEI MENU :
N
2
1 -
Per selezionare una funzione, scegliete una linea con o .
2 -
Premete su per confermare la vostra scelta.
3 -
Per effettuare una regolazione,(selezionare un'opzione, aumentare o diminuire un valore) utilizzate i tasti o .
4 -
Per uscire da un menu, premete su
SEMPIO : I simboli C/B sullo schermo indicano che un'opzione è accessibile.
E
MENU
EXIT
.
1
Per selezionare un'opzione, premete i tasti o .
12 3
!
Rispettate l'ambiente! Non buttate via le pile, rivolgetevi ai punti di raccolta, che sono incaricarti di recuperarle se possono subire un riciclaggio speciale.
* solo su certi modelli
9
▲
OK
C
▼
EXIT MENU
ITALIANO
B
Page 10

2 Combo(GB-D-IT-ES) 17/05/1999 19:59 Page 10
GARANTÍA
El certificado de garantía entregado con el Combi TV-vídeo indica el tipo y el número de fabricación de su aparato.Guárdelo
con la factura. Se trata de los documentos imprescindibles para utilizar el derecho a la garantía.
• Toda reparación efectuada durante el periodo de garantía deberá ser realizada por un técnico de
un Centro de Asistencia autorizado.
• Toda infracción de esta regla implicará la anulación del derecho de garantía.
• No abra nunca el aparato usted mismo.Puede ser peligroso para usted y causar daños al equipo.
PRECAUCIÓN
INSTALACIÓN - Asegúrese de que la tensión de la red eléctrica de su domicilio es la misma que la que indica la etiqueta de iden-
tificación, situada en la parte trasera de su aparato. Instale horizontalmente el Combi TV-vídeo, lejos de cualquier fuente de
calor importante (chimenea...) y de aparatos que produzcan campos magnéticos o eléctricos importantes.
Si usted instala el Combi TV-vídeo en un mueble previsto para ello, controle que la ventilación no esté obstaculizada. Deje 10
cm como mínimo por cada lado y por detrás del aparato y al menos 7 cm por la parte de arriba.
Incluso cuando el interruptor marcha/parada está en posición parada,el Combi TV-vídeo no está completamente separado del
sector. Para desconectarlo completamente, es necesario retirar el enchufe de la toma de alimentación.
Para los aparatos que funcionan con la red eléctrica y aquellos que producen voltajes internos superiores a 35 V (pico), en corriente directa o alterna, que no presenten ninguna protección contra las salpicaduras de agua, las instrucciones de funcionamiento precisarán que el aparato no debe ser expuesto al chorreo o las salpicaduras, y que no se le debe colocar encima
ningún objeto lleno de líquido, como un florero.
No deben haber obstáculos a la ventilación por obturación de las mangas de ventilación con objetos tales como periódicos,
servilletas, cortinas, etc.
No se debe colocar sobre el aparato una llama descubierta, tal como una vela encendida.
UTILIZACIÓN
Temperatura ambiente máxima: 35°C
Grado medio de humedad: 85%
TILIZACIÓN - Si su aparato,o si una cinta, ha permanecido durante algún tiempo en un ambiente frío, por ejemplo debido a un
U
transporte en invierno, espere aproximadamente 2 horas antes de utilizar su aparato de video. Las aberturas situadas por
encima y por debajo han sido previstas para la ventilación. No deben ser recubiertas. Durante las tormentas, se aconseja
desenchufar el video de la toma conectada a la antena exterior. Este aparato ha sido previsto para un uso doméstico. No debe
ser nunca utilizado para fines industriales.
ANTENIMIENTO - Utilice un paño suave, límpio y seco, no utilice productos decapantes,disolventes, abrasivos, etc...Si un objeto
M
o un líquido se introduce en el aparato,desenchúfelo inmediatamente y póngase en contacto con un técnico autorizado.
Es ilegal hacer copias completas o parciales de las grabaciones protegidas por la ley de copyright, sin tener autorización
explícita del titular de los derechos.
Thomson Multimedia no se responsabiliza por la utilización no conforme a las
ESPAÑOL
indicaciones de estas instrucciones.
10
Page 11

2 Combo(GB-D-IT-ES) 17/05/1999 19:59 Page 11
INDICE
CONEXIONES BÁSICAS
INSTRUCCIONES DE NAVEGACIÓN
ÓMO SINTONIZAR POR PRIMERA VEZ LOS CANALES DE TV EN EL
C
. . . . . . . . . . . . . . . . . . . . . . . . . . . . . . . . . . . . . . . . 12
. . . . . . . . . . . . . . . . . . . . . . . . . . . . . . . . 12
COMBI TV-VÍDEO . . . . . . . . . . . . . . . . . . . . . . . . . . . . . . . . . . . . . . . . . .13
Clasificación de canales . . . . . . . . . . . . . . . . . . . . . . . . . . . . . . . . . .14
AJUSTE DEL RELOJ . . . . . . . . . . . . . . . . . . . . . . . . . . . . . . . . . . . . . .14
Y
UEVOS CANALES . . . . . . . . . . . . . . . . . . . . . . . . . . . . . . . . . . . . . . .15
N
UNCIONES BÁSICAS DEL COMBI TV-VÍDEO . . . . . . . . . . . . . . . . . . . . .17
F
UDIO VÍDEO 1/2 . . . . . . . . . . . . . . . . . . . . . . . . . . . . . . . . . . . . . . . . . .20
A
RABAR . . . . . . . . . . . . . . . . . . . . . . . . . . . . . . . . . . . . . . . . . . . . . . . . .21
G
Grabación inmediata de un programa . . . . . . . . . . . . . . . . . . . . . .21
Grabación con parada automática . . . . . . . . . . . . . . . . . . . . . . . . . .21
ÓMO PROGRAMAR UNA GRABACIÓN CON LOS CÓDIGOS
C
SHOW VIEW . . . . . . . . . . . . . . . . . . . . . . . . . . . . . . . . . . . . . . . . . . . . . .22
RABACIÓN PROGRAMADA . . . . . . . . . . . . . . . . . . . . . . . . . . . . . . . . . . .23
G
ÓMO SUPRIMIR UNA GRABACIÓN PROGRAMADA . . . . . . . . . . . . . . . . .25
C
REFERENCIAS . . . . . . . . . . . . . . . . . . . . . . . . . . . . . . . . . . . . . . . . . . . .26
P
ÓMO UTILIZAR EL TELETEXTO? . . . . . . . . . . . . . . . . . . . . . . . . . . . . .27
¿C
NFORMACIONES SUPLEMENTARIAS . . . . . . . . . . . . . . . . . . . . . . . . . . . . .28
I
DENTIFICACIÓN Y SOLUCIÓN DE PROBLEMAS . . . . . . . . . . . . . . . . . . . .32
I
Preocupados por mejorar la calidad de nuestros productos, nos reservamos el derecho de modificar sus caracteristicas. Por lo tanto las informaciones contenidas en esta nota pueden cambiar y no son contractuales.
ANTES DE COMENZAR
Antena de dipolo
u
Antena de bucle *
Manuales de instalación y
de utilización
Respetuosos con el medio ambiente, hemos impreso estos documentos en papel reciclado no blanqueado.
* en los modelos equipados
Adaptador de antena *
TRK
SHOWVIEW
PREF.
INFO
EXIT
TV
VPS
TEXT
MENU
GO TO 0000
1
2
4
PR
3
5
MONITOR
7
6
8
AV
0000
9
0
/--
SP/LP
REW.
PLAY
F.FWD
REC.
STOP
PAUSE
+
SIZE AAA 1,5 V 0%MERCURY
EXTRA HEAVY DUTY
GREENELL
-
GREENELL
EXTRA HEAVY DUTY
SIZE AAA 1,5 V 0%MERCURY
+
Mando a distancia y pilas
11
-
ESPAÑOL
Page 12
B
MENU
EXIT
GO TO 0000
VPS
2 Combo(GB-D-IT-ES) 17/05/1999 19:59 Page 12
ACERCA DE LAS INSTRUCCIONES: este documento es común a varios modelos de Combi TV-Vídeo.Por ello, ciertas funciones o
ajustes pueden no estar disponibles en el modelo adquirido por usted.
ACERCA DEL INTERRUPTOR: la posición del interruptor Marcha/Parada
difiere de unos modelos a otros.
CONEXIONES BÁSICAS
*
1
Conecte el cable de la antena exterior o de la
antena de dipolo a la toma (
vídeo.
2
Conecte el Combi TV-vídeo a un enchufe de la red
mediante el cable de alimentación.
IN ) del Combi TV-
1
1
220 - 240 V
2
INSTRUCCIONES DE NAVEGACIÓN
Dirija el mando a distancia hacia el Combi TV-vídeo cuando pulse una tecla.
EXIT
MENU
.
o
.
▲
OK
C
B
▼
EXIT MENU
1
SELECCIÓN DE UN MENÚ - Mediante la tecla del mando a distancia se accede al menú que permite utilizar las fun-
ciones del Combi TV-vídeo o sintonizarlo.
2
ÓMO MOVERSE POR LOS MENÚS :
C
1 - Para seleccionar una función, elija la línea por medio de o .
2 - Para confirmar su selección, pulse
3 -
Para realizar algún ajuste (seleccionar una opción, aumentar o disminuir un valor), utilice las teclas
4 - Para salir de un menú, pulse .
EJEMPLO : Los símbolos C/B que aparecen en la pantalla indican que una opción se encuentra accesible. Para seleccionar una
opción, pulse las teclas o .
12 3
!
¡Respete el medio ambiente! Antes de tirar las pilas, infórmese en su distribuidor, quien podrá
ESPAÑOL
* en los modelos equipados
encargarse de recuperarlas si las mismas son objeto de un reciclaje especial.
12
Page 13
B
B
B
MENU
EXIT
GO TO 0000
VPS
2 Combo(GB-D-IT-ES) 17/05/1999 20:00 Page 13
For easy identification of the channels, we suggest you look up the programmes in a TV-magazine.
INSTALLING THE CURRENT TV CHANNELS IN THE COMBI TV-VIDEO RECORDER FOR THE 1ST TIME
Um Ihnen das Erkennen der Programme zu erleichtern, sollten Sie eine Programmzeitschrift zur Hand haben.
ERSTMALIGE EINSTELLUNG DER FERNSEHSENDER IN IHREM KOMBI TV-VIDEORECORDER
Per aiutarvi ad identificare i canali, vi consigliamo di consultare un programma TV.
COME INSTALLARE PER LA PRIMA VOLTA I CANALI TV SUL VIDEOVISION
Para poder identificar los distintos canales, le sugerimos que consulte la programación de TV.
CÓMO SINTONIZAR POR PRIMERA VEZ LOS CANALES DE TV EN EL COMBI TV-VÍDEO
1
2
3
4
5
Switch on your Combi TV-Video recorder using the on
button which is located on the front of your Combi TVVideo recorder.
Accendete il Videovision con il tasto di accensione situato
sulla parte anteriore del Videovision.
Press Bbutton to turn on your Combi TV-Video
recorder The Power LED will turn green.
Premete il tasto
diodo verde si accende.
By means of key V/W,select the language you prefer for
display of the menus. Confirm with OK.
Con il tasto V/W del telecomando scegliete la lingua che
preferite per visualizzare i menu che appariranno via via
sullo schermo. Convalidate con OK.
Press C/B buttons until the country you are currently
residing in is selected. Confirm with OK.
Premete il tasto C/B per selezionare il vostro paese di
residenza abituale. Convalidate con OK.
You are informed by a message that your
Combi TV-Video recorder is now scanning the channels
which can be received in your region and is storing them.
You'll have to wait a fairly long time until a message
informs you that channel storage is completed.
Press OK to sort the channels.
Un messaggio indicher
memorizzando i canali che potete ricevere nella vostra
regione. Alla fine dell’operazione, un messaggio segnalerà
la fine della memorizzazione dei canali.
Premete OK per procedere al riordino dei canali.
per accendere il Videovision. Il
à che il
Videovision sta cercando e
TV
TEXT
MENU
Schalten Sie den Kombi TV-Videorecorder mit Hilfe der
Taste Ein/Aus auf der Vorderseite des Videorecorders ein.
Encienda su Combi TV-Vídeo con la tecla de encendido
que hay en la cara delantera de su aparato.
Zum Einschalten Ihres Kombi TV-Videorecorders die
Taste
drücken.Die grüne Anzeigelampe leuchtet auf.
Pulse la tecla
piloto se encenderá de color verde.
Mit der Taste V/W die von Ihnen für die Anzeige der
Bildschirmmenüs bevorzugte Sprache wählen. Mit OK.
bestätigen.
Utilice la tecla V/W del mando a distancia para elegir el
idioma en el que desea que aparezcan los menús en la pantalla. Para confirmar su selección, pulse OK.
Zur Wahl des Landes, in dem Sie wohnen, die Taste C/B
benutzen. Mit OK. bestätigen.
Pulse las teclas C/B para seleccionar su país de
residencia. Para confirmar su selección, pulse OK.
Eine Meldung informiert Sie, daß Ihr Kombi TVVideorecorder die in Ihrer Region empfangenen Sender
sucht und anschließend speichert.Warten Sie solange, bis
Sie die Meldung erhalten, daß die Senderspeicherung
abgeschlossen ist.
Zum Sortieren der Sender OK drücken.
Un mensaje le indicará que su Combi TV-vídeo está buscando los canales que se pueden recibir en su región y los
guardará en la memoria. Espere un rato (hasta 10 minutos); aparecerá un mensaje indicando que ha finalizado la
memorización de los canales.
Pulse OK para clasificar los canales.
para encender el Combi TV-vídeo. El
ENGLISH
DEUTSCHITALIANOESPAÑOL
Continue on the following page.
Weiter auf der nächsten Seite.
Continua nella pagina seguente
!
Continúa en la página siguiente.
13
▲
COKB
▼
EXIT MENU
Page 14
2 Combo(GB-D-IT-ES) 17/05/1999 20:00 Page 14
To add, modify or install new channels (decoder), refer to page 15.
Informationen über das Hinzufügen, Ändern oder Installieren neuer Programme (Decoder) entnehmen Sie der Seite 15.
Per completare, modificare o installare nuovi canali (decodificatore) vedi pagina 15.
!
Para completar, modificar o sintonizar nuevos canales (descodificador) remítase a la página 15.
ENGLISHDEUTSCHITALIANOESPAÑOL
... Sorting your channels
Menu Organizer
... Riordinare i vostri canali
Menu Ordine dei canali
Press "OK" key to continue. If the programme number
matches the pictures you are viewing,press key Bto go
on to the next programme .
Se il numero di canale proposto corrisponde all'immagine trovata,premete su Bper passare ad un altro canale.
If the channel number does not match the picture: select
the command "Swap with Pr", enter the correct channel
number and confirm by pressing OK (O and 1 for PRI).
Se il numero di canale non corrisponde alle immagini: selezionate la linea “Cambiare con Pr”, digitate il numero giusto e confermate con OK (0 e 1 per PRI).
When you find a channel you want to delete, set
the cursor on the line D
press
OK.
Quando trovate un canale da cancellare, posizionatevi
sulla linea C
If you wish to sort the TV channels, repeat steps 1 to
3; otherwise move on to step 5.
Se volete continuare a riordinare i canali TV,ripetete le
tappe da 1 a 3; in caso contrario passate alla tappa 5.
Press E
Premete il tasto E
ANCELLARE
XIT
button to remove menu.
XIT
ELETE
PR, poi premete su
per uscire dal menu.
PR and then
OK.
... Sortieren der sender
Menu Programm-Organisation
... Clasificación de los canales
Menu Organizador
Wenn die Nummer des vorgeschlagenen Senders dem
gefundenen Bild entspricht, drücken Sie die Taste B,um
auf den nächsten Sender weiterzuschalten.
Si el número del canal propuesto corresponde a la imagen encontrada, pulse Bpara pasar a otro canal.
Sollte die Programmnummer nicht mit der Anzeige übereinstimmen:
wählen Sie “Wechseln mit Pr.”,geben Sie die richtige Programmnummer
ein und bestätigen Sie mit OK (0 und 1 für PRI).
Si el número del canal no corresponde a las imágenes:seleccione la línea “Permutar con Pr”, introduzca el número de
canal correcto y valide con OK (0 y 1 para PRI).
Wenn Sie auf einen Sender löschen möchten, den
Cursor auf die Zeile P
OK
drücken.
Si encuentra un canal que desea suprimir, sitúese en la
ORRE CANAL
línea B
Wenn Sie weitere TV-Sender sortieren möchten,wiederholen
Sie die Schritte 1 bis 3; andernfalls gehen Sie zu Schritt 5 über.
Si desea continuar ordenando los canales de TV,repita
las etapas 1 a 3; de lo contrario, pase a la etapa 5.
Zum Verlassen des Menüs die Taste E
Pulse la tecla E
ROGR.LÖSCHEN
y pulse
XIT
para que desaparezca el menú.
setzen und dann
OK.
XIT
drücken.
1
2
3
4
5
…Et réglage de l’horloge
...And clock setting
…Et réglage de l’horloge
... E regolazione dell’orologio
Call up the S
V/W
the line
Visualizzate il menu S
Posizionatevi sulla linea Installazione con
mete su
logio con
Use the digit buttons (0-9) to enter the time & date in
the following order: hour, minute, day, month, year.
Servendovi dei tasti numerici (da 0 a 9) digitate l’ora
e la data nel seguente ordine: ora, minuti,giorno, mese,
anno.
Press OKbutton to confirm.
Premete il tasto OKper convalidare.
UMMARY
, select the line Installation and press
Clock set
OK.
V/W
menu with key
with key
OMMARIO
Posizionatevi sulla linea Regolazione oro-
e premete su
V/W
OK.
MENU
and press
con il tasto
.With key
OK.
OK.
MENU
V/W
Select
e pre-
…Et réglage de l’horloge
…Und einstellenvon datum und uhrzeit
...Y ajuste del reloj
…Et réglage de l’horloge
Rufen Sie das
Tasten V/W die Zeile Installation wählen und OK. drücken.
Mit den Tasten V/W die Zeile Uhr wählen und OK drücken.
.
14
Para ver el menú I
en la línea I
Sitúese en la línea Puesta en hora reloj con
pulse
Mit Hilfe der Zifferntasten (0-9) die Uhrzeit und das Datum in
folgender Reihenfolge eingeben:Stunde, Minuten,Tag, Monat,Jahr.
Utilice las teclas numéricas (0-9) para introducir la
hora y la fecha en el siguiente orden:hora, minutos,día,
mes, año.
Zum Bestätigen die Taste
Pulse la tecla OKpara confirmar.
OK.
Ü
BERSICHT
NDICE
NSTALACIÓN
mit der Taste MENU auf. Mit den
pulse la tecla
con
OK
V/W
drücken.
MENU
y pulse
. Sitúese
OK.
V/W
1
y
2
3
Page 15

2 Combo(GB-D-IT-ES) 17/05/1999 20:00 Page 15
1
2
3
4
5
…Et réglage de l’horloge
New channel
…Et réglage de l’horloge
Nuovo canale
Call up the S
W
Press Wor Vto select the line MANUAL INSTALLA-
TION. Press OK.
Visualizzate il menu S
MENU.Premete su Wo Vper selezionare la linea
Installazione. Premete su OK. Premete su Wo
per selezionare la linea INSTALLAZIONE MANUALE.
Premete su OK.
The option STANDARD is pre-selected.Press
select the TV standard. With
RECEPTION and choose aerial or cable with
(CABLE for cable TV channels, AERIAL for the channels received via your roof aerial).
La linea S
C/B
Selezionate la linea RICEZIONE con
te Antenna o Cavo con
trasmessi via cavo,Antenna per i canali captati dalla
vostra Antenna televisiva sul tetto).
Press W/V to select the line AUTO SEARCH.
Premete su W/V per selezionare la linea R
AUTOM AT
B
EGINNING INSTALLATION
Press C/B to begin installation. When a channel is
found, the picture is displayed. IF THE PICTURE QUALITY
IS POOR
COMINCIARE L'INSTALLAZIONE
Premete su C/B per cominciare l'installazione . Quando
un canale viene trovato,appaiono le immagini.
E LA QUALITÀ DELL’IMMAGINE È SCADENTE : provate la
S
Sintonia fine (W,C/B poi W).
VIDEOPLUS+ code (If included)
OPTION: These codes are stored automatically when programming the first time
VIDEOPLUS+ CODE (channel ID)
Check these codes to make sure that your Videoplus+-programmed recording is successful. Most TV magazines
contain a list of Videoplus+ numbers attributed to the satellite and terrestrial channels.If a Videoplus+ programming on
a channel has not worked properly (wrong channel, wrong
times), check and correct the Videoplus+ number.
N° SHOWVIEW (solo su certi modelli)
FACOLTATIVO : questi codici si iscrivono automaticamente
al momento della prima programmazione.NR. SHOWVIEW
N° SHOWVIEW (N° GUIDA)
Per effettuare con successo le vostre registrazioni programmate con i codici
ri. La maggior parte delle riviste di programmi TV pubblicano una lista dei numeri guida
canali via satellite e terrestri.
UMMARY menu with key MENU.Press
or Vto select the line installation. Press OK.
OMMARIO con il tasto
W/V
TANDARD è già selezionata, premete su
per scegliere la norma di ricezione.
C/B
.(CAVO per i canali
.
,use the Fine tuning buttons (W,C/B then W).
SHOWVIEW
,verificate questi nume-
SHOWVIEW
C/B
, select the line
W/V
C/B
e sceglie-
ICERCA
attribuiti ai
V
to
15
…Et réglage de l’horloge
Neuer sender
…Et réglage de l’horloge
Nuevos canales
Rufen Sie das Ü
Drücken Sie Wbzw.V, um die Zeile INSTALLATION
zu wählen.OKdrücken.Drücken Sie Wbzw.V,um
die Zeile MANUELLE INSTAL. zu wählen.OKdrücken.
Para ver el menú I
Pulse Wo Vpara seleccionar la línea INSTALACIÓN.
Pulse OK. Pulse Wo Vpara seleccionar la línea
INSTALACIÓN MANUAL. Pulse OK.
Die Zeile EMPFANGSSTANDARD ist bereits vor gewählt,
drücken Sie nun zur Wahl der Empfangsnorm C/B Mit
W/V die Zeile KANALTYP wählen und Normal oder
Sonder mit C/B wählen (SONDER für die
Kabelfernsehprogramme, NORMAL für die über Ihre
Hausantenne empfangenen Sender).
La línea NORMA DE VÍDEO ya se encuentra seleccionada. Pulse
Seleccione la línea RECEPCIÓN con
Antena o Cable por medio de
canales por cable,Antena para los canales captados
a través de la antena del tejado).
Drücken Sie W/V, um die Zeile S
wählen.
Pulse W/V para seleccionar la línea
AUTO
SENDERSUCHE STARTEN
Die Sendersuche mit C/B starten. Wird ein Sender
gefunden, erscheinen seine Bilder. W
BILDQUALITÄT SCHLECHT IST, die Feineinstellung benutzen (W,C/B dann W).(Feinabstimmung)
COMENZAR LA SINTONIZACIÓN
Pulse C/B para comenzar la instalación . Cuando se
encuentra un canal, aparecen las im
dientes. Si la imagen es de mala calidad: pruebe el
Sintonía fina (W,C/B y W).
SHOWVIEW-Nr (bei entsprechend ausgestatteten Modellen)
OPTION: diese Codes werden bei der ersten
Programmierung automatisch eingetragen.
SHOWVIEW-SENDERKENNZAHL
Prüfen Sie diese Kennzahlen,damit Ihnen Ihre mit den
SHOWVIEW
gen. Die meisten Fernsehprogrammzeitschriften
enthalten eine Liste der den Funkfernseh- und
Satellitensendern zugeordneten
Nº SHOWVIEW (en los modelos equipados)
OPCIONAL: estos códigos quedan registrados de forma
automática al realizar la primera programación.
Nº SHOWVIEW (Nº GUÍA)
Para la buena ejecución de sus grabaciones programadas
con los códigos SHOWVIEW, compruebe estos números. La
programación de TV en la mayoría de las publicaciones aparece acompañada de una lista de los números guía
SHOWVIEW asignados a los canales por satélite y terrestres.
BERSICHT mit der Taste MENU auf.
NDICE pulse la tecla MENU.
C/B
para elegir la norma de recepción.
.
-Codes programmierten Aufnahmen gelin-
W/V
C/B
.(CABLE para los
UCHLAUF zu
á
genes correspon-
SHOWVIEW
BUSQUEDA
ENN DIE
-
y elija
ENGLISH
DEUTSCHITALIANOESPAÑOL
Page 16

MENU
EXIT
GO TO 0000
VPS
2 Combo(GB-D-IT-ES) 17/05/1999 20:00 Page 16
I
f the channel is scrambled, set the cursor on
DECODER
(W)
OK key, otherwise continue with the next step.
Se il canale è in codice, posizionatevi su
ECODIFICATORE
D
tasto OK, altrimenti passate al punto seguente.
and tick off the box by pressing the
(W)
e selezionate la casella col
Wenn der Sender verschlüsselt ist, den Cursor auf
DECODER (W) setzen und das Kästchen durch
Drücken der OK-Taste ankreuzen, sonst mit dem
nächsten Schritt fortfahren.
Si el canal está codificado, sitúese sobre
DESCODIFICADOR (W) y marque la casilla por medio de
la tecla OK. En caso contrario, pase a la etapa siguiente.
6
ENGLISHDEUTSCHITALIANOESPAÑOL
Set the cursor to STORE ON PR and assign a number to the channel with key
(0 and 1 for PR1)
Posizionatevi su M
un numero di canale servendovi dei tasti
(0 e 1 per PR1)
Press OKbutton to store.
Premete il tasto
If you want to continue searching for other TV channels,
repeat step 4-9.
Se desiderate proseguire la ricerca dei canali TV, ripetete le tappe da 4 a 9.
Press
Premete il tasto
SHOWVIEW is a registered trademark of Gemstar Development Corporation.
The SHOWVIEW system is manufactured under licence from Gemstar Development Corporation.
SHOWVIEW ist ein eingetragenes Warenzeichen der Gemstar Development Corporation.
Das SHOWVIEW-System wurde hergestellt unter der Lizenz der Gemstar Development Corporation.
SHOWVIEW è un marchio registrato di Gemstar Development Corporation.
Il sistema SHOWVIEW è prodotto su licenza di Gemstar Development Corporation.
SHOWVIEW es una marca registrada por Gemstar Development Corporation.
El sistema SHOWVIEW está fabricado bajo licencia de Gemstar Development Corporation.
.
OK
EXIT
button to remove menu.
EXIT
C/B
.
EMORIZ. SU N. PR ed attribuite
per memorizzare questo numero.
per uscire dal menu.
C/B
.
Den Cursor auf S
Programm mit den Tasten C/B eine Sendernummer
zuteilen. (0 und 1 für PR1)
Sitúese en MEMORIZAR EN PR y asigne un número
al canal mediante las teclas
(0 y 1 para PR1)
Zum Speichern der Sendernummer OK drücken.
Pulse la tecla OK para guardar.
Wenn Sie die Sendersuche fortsetzen möchten,
nun die Schritte 4-9 wiederholen.
Si desea seguir buscando otros canales de TV,
repita los pasos 4-9.
Zum Verlassen des Menüs die Taste
Pulse la tecla
PEICHERN AUF PR. setzen und dem
C/B
EXIT
para salir del menú.
.
EXIT
drücken.
COKB
EXIT MENU
7
8
9
10
▲
▼
Tape ejection :
To eject a tape, press on button
STOP/EJECT on the front of
your combined TV-VCR unit.
Cassettenauswurf :
Um eine Videocassette auszuwerfen, drücken Sie auf die Auswerftaste STOP/EJECT an der
Frontseite Ihres TV-VideoKombigerätes.
16
Espulsione di una cassetta :
Per l’espulsione di una cassetta
premere il tasto STOP/EJECT
sul frontale del vostro videovision.
Extracción de un casete :
Para extraer un casete, pulsar la
tecla STOP/EJECT en la fachada
del TV-Vídeo
Page 17

B
B
B
TEXT
PREF.
2 Combo(GB-D-IT-ES) 17/05/1999 20:00 Page 17
THE MAIN FUNCTIONS OF YOUR REMOTE CONTROL CAN BE FOUND ON THE VCR FRONT.
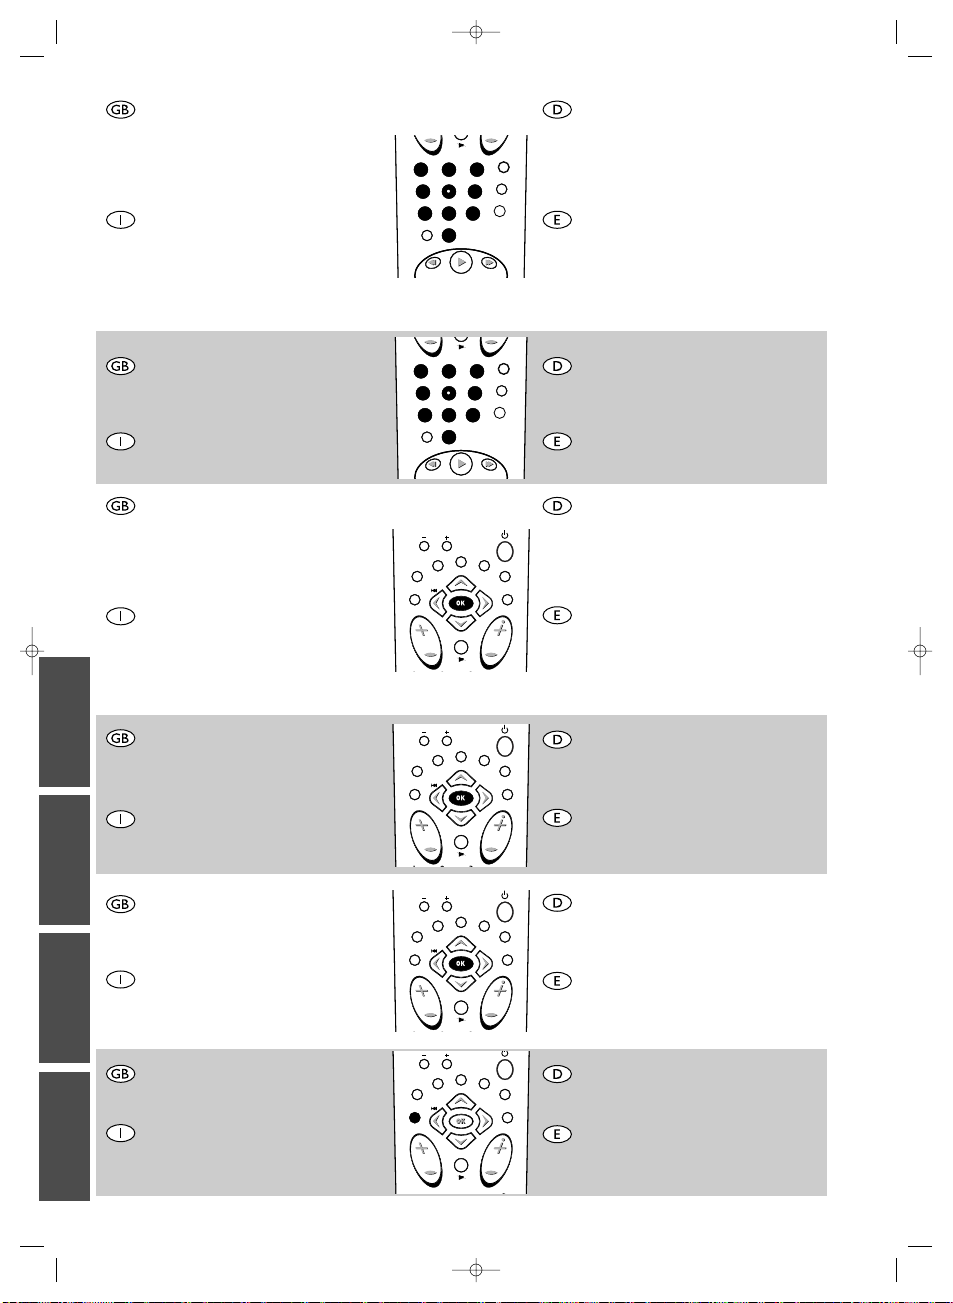
O
PERATING BASICCOMBI
DIE HAUPTFUNKTIONEN IHRER FERNBEDIENUNG SIND AUF DER VORDERSEITE IHRES VIDEOREKORDERS ZU FINDEN.
B
ENUTZEN DER GRUNDLEGENDENFUNKTION DESKOMBI
TROVERETE LE PRINCIPALI FUNZIONI DEL VOSTRO TELECOMANDO SULLA FACCIA ANTERIORE DEL VIDEOREGISTRATORE.
U
TILIZZARE LE FUNZIONI DI BASE DELVIDEOVISION
ENCONTRARÁ LAS PRINCIPALES FUNCIONES DE SU MANDO A DISTANCIA EN LA PARTE FRONTAL DEL VÍDEO.
F
UNCIONES BÁSICAS DELCOMBI
TV-V
IDEO RECORDER FUNCTIONS
TV-
VÍDEO
TV-V
IDEORECORDERS
Powering up the Combi TV-Video
recorder from standby mode.
Press the Bbutton.
Per accendere il Videovision messo
in standby :
Premete il tasto B.
Putting the Combi TV-Video
recorder into standby mode.
Press the Bbutton.
Per mettere il Videovision in
standby:
Premete il tasto
To select a programme above 9 :
.
E.g.: press 0/-- then 1 and 7 for Pr. 17.
Per selezionare un programma
superiore a 9 :
Esempio : premete il tasto 0/-- poi 1 e 7
per il programma 17.
Watching the TV channels installed in your VCR :
Press the digit (0-9) or PR. + /-.
Per guardare i canali TV installati
sul vostro videoregistratore :
premete sui tasti numerici (da 0 a 9) o
su PR. + /-.
Volume. Use the volume a +/- buttons
to increase or decrease the sound volume.
Regolazione dell'audio. Tramite i tasti
audio a +/-, è possible aumentare o
ridurre il livello audio dell'apparecchio.
TRK
SHOWVIEW
PREF.
EXIT
TRK
SHOWVIEW
PREF.
EXIT
2
1
5
4
8
7
AV
0/--
2
1
5
4
8
7
AV
0/--
EXIT
2
1
5
4 6
INFO
VPS
GO TO 0000
INFO
VPS
GO TO 0000
GO TO 0000
GO TO 0000
PLAY
VPS
GO TO 0000
TV
TEXT
MENU
Einschalten des auf Bereitschaft stehenden Kombi TV-Videorecorders :
Taste Bdrücken.
Encender el Combi TV-vídeo cuando se
encuentra en modo de espera :
Pulse la tecla B.
PR
TV
TEXT
MENU
PR
PR
MONITOR
3
0000
6
SP/LP
9
Um den Kombi TV-Videorecorder
auf Bereitschaft zu schalten :
Taste
drücken.
Poner el Combi TV-vídeo en modo
de espera :
Pulse la tecla
Wahl eines zweistelligen Programmes
.
(über 9) :
Beispiel:drücken Sie die Taste 0/ - gefolgt von
I und 7, um das Programm 17 zu wählen.
Para seleccionar un programa superior a 9 :
Ejemplo: pulse la tecla 0/-- y luego 1 y 7
para Pr 17.
Sie möchten die auf Ihrem Videorecorder
PR
MONITOR
3
0000
6
SP/LP
9
gespeicherten TV-Programme sehen :
drücken Sie die Zifferntasten (0-9) oder die
Tasten PR. + /-.
Ver los canales de TV sintonizados
en el vídeo :
pulse las teclas numéricas (0-9) o las
ENGLISH
teclas PR. + /-.
DEUTSCHITALIANOESPAÑOL
MENU
PR
MONITOR
3
0000
Läutstärke :erhöhen bzw.senken Sie die
Lautstärke mit den Tasten a +/-.
Ajuste del volumen : con las teclas
a +/-, aumente o disminuya el volumen
de sonido..
Sound mute. Press to mute the
sound, press again to restore.
VPS
EXIT
MENU
Ton abstellen. Durch Drücken der
Taste können sie den Ton abstellen;
durch erneutes Drücken der Taste wird
Esclusione dell'audio. Una pressione
GO TO 0000
sul tasto elimina l'audio che può
essere in seguito ripristinato esercitando
una seconda pressione sullo stesso tasto.
2
1
5
4 6
PR
MONITOR
3
0000
der Ton wieder eingestellt.
Interrupción del sonido.Al presionar
la tecla el sonido se interrumpe, al
volverla a presionar se restablece.
17
Page 18

2 Combo(GB-D-IT-ES) 17/05/1999 20:00 Page 18
ENGLISHDEUTSCHITALIANOESPAÑOL
To watch a TV channel or a programme as it is being recorded :
press the
MONITOR key.
(On models equipped with 1 tuner.)
Guardare un canale o una registrazione in corso:premete il tasto
MONITOR.
(Con modello munito di 1 tuner)
Playing back a video tape.
Press the PLAY button.
Per leggere una videocassetta :
premete il tasto PLAY.
Stopping a video tape playback.
Press the
STOP
button.
Per interrompere la lettura di una
videocassetta :
Premete il tasto
STOP
.
Performing a forward search on a
video tape. Press the
F.FWD
button
while in playback mode.
Per cercare una registrazione video
andando verso la fine della video-
: premete il tasto
cassetta
registratore in lettura).
F.FWD
(video-
Performing a backward search
on a video tape. Press the
REW
but-
ton while in playback mode.
Per cercare una registrazione
video andando verso l’inizio della
videocassetta : premete il tasto
REW
(videoregistratore in lettura).
Performing a pause on a video
tape. Press the PAUSE button while
in playback mode.
Per interrompere momentaneamente la lettura di una registrazione video : premete il tasto PAUSE.
Releasing the pause mode on a
video tape. Press the
PLAY
button.
Per riprendere la lettura di una
registrazione video : premete il
PLAY
tasto
.
0000
5
4
6
SP/LP
8
9
7
AV
0/--
PLAY
REW.
F.FWD
Betrachten von Bildern eines Programmes
bzw. Bildern, die gerade aufgezeichnet
werden :
Drücken Sie die Taste Monitor MONITOR.
(Bei Modellen, die mit 1 Tuner ausgerüstet
sind)
Ver las imágenes de una cadena o las
REC.
PAUSE
STOP
imágenes que se están grabando:
Pulse la tecla MONITOR.
(En el modelo equipado con 1 tuner)
0000
5
4
6
SP/LP
8
9
7
AV
0/--
PLAY
REW.
F.FWD
Wiedergabe einer Videokassette :
Taste PLAY drücken.
Ver una cinta de vídeo.
REC.
4
7
AV
REW.
REC.
4
7
AV
REW.
REC.
4
7
AV
REW.
REC.
4
7
AV
REW.
PAUSE
STOP
0000
5
6
SP/LP
8
9
0/--
PLAY
F.FWD
PAUSE
STOP
0000
5
6
SP/LP
8
9
0/--
PLAY
F.FWD
PAUSE
STOP
0000
5
6
SP/LP
8
9
0/--
PLAY
F.FWD
PAUSE
STOP
0000
5
6
SP/LP
8
9
0/--
PLAY
F.FWD
Pulse la tecla PLAY.
Stoppen der Wiedergabe einer
Videokassette :
Taste
STOP
drücken.
Para una cinta de vídeo.
Pulse la tecla
STOP
.
Bildsuchlauf vorwärts : drücken Sie
während der wiedergade einer
Kassette die Taste
Búsqueda hacia delante en una
cinta de vídeo. Pulse la tecla
con el vídeo en modo “PLAY”.
F.FWD
.
F.FWD
Bildsuchlauf rückwärts : drücken
Sie während der wiedergade einer
Kassette die Taste
Búsqueda hacia atrás en una
cinta de vídeo. Pulse la tecla
con el vídeo en modo “PLAY”.
REW
.
REW
Vorübergehendes Stoppen der
Wiedergabe einer Kassette : drüc-
ken Sie die Taste PAUSE.
Pausa en la lectura de una cinta
REC.
4
7
AV
REW.
REC.
PAUSE
STOP
0000
5
6
SP/LP
8
9
0/--
PLAY
F.FWD
PAUSE
STOP
de vídeo. Pulse la tecla PAUSE.
Fortsetzen der Wiedergabe einer
Kassette : drücken Sie die Taste
PLAY
.
Finalizar la pausa en una cinta de
vídeo. Pulse la tecla
PLAY
.
18
Page 19

2 Combo(GB-D-IT-ES) 17/05/1999 20:00 Page 19
5
4
Playing a video tape fast forward.
Press the
F.FWD
button while in STOP
mode.
Per far avanzare il nastro : preme-
F.FWD
te il tasto
STOP).
(videoregistratore su
Rewinding a video tape. Press the
REW button while in STOP mode.
Per riavvolgere il nastro : premete
il tasto REW (videoregistratore su
TOP).
S
Variable speed* :Press the REW or
F.FWD button several times.(Combi TV-
Video recorder in pause mode).
6
8
9
7
AV
0/--
PLAY
REW.
REC.
STOP
5
4
6
8
9
7
AV
0/--
PLAY
REW.
REC.
STOP
5
4
6
8
9
7
AV
0/--
PLAY
REW.
Rallentatore variabile* : Premere più
volte il tasto REW o F.FWD
(Videovision su PAUSE)
REC.
STOP
SP/LP
F.FWD
PAUSE
SP/LP
F.FWD
PAUSE
SP/LP
F.FWD
PAUSE
0000
Schneller Vorlauf : drücken Sie die
Taste
F.FWD
(Videorecorder auf STOP).
Avance rápido de una cinta de
vídeo. Pulse la tecla
vídeo en modo “STOP”.
0000
Schneller Rücklauf : drücken Sie
F.FWD
con el
die Taste REW (Videorecorder auf
S
TOP).
Rebobinar una cinta de vídeo.
Pulse la tecla REW con el vídeo en
TOP”.
modo “S
0000
Einstellbares Replay* :Drücken Sie
mehrere Male auf REW bzw. F.FWD
(Videorecorder in Pause-Stellung).
Cámara lenta variable* : Pulse varias
veces la tecla REW o F.FWD
(Combi TV-Vídeo en pausa).
Manually tracking a video tape for
improved viewing. Press the
TRK +/-
buttons to manually track the tape.
Per comandare la regolazione
manuale della testina di lettura
rispetto alla pista registrata (fase)
allo scopo di migliorare l’immagine : premete il tasto
gistratore in lettura).
TRK +/-
(videore-
Viewing the status of the Combi
TV-videorecorder. Press the INFO
button.
Per sapere in che modo si trova il
videovision : premete il tasto INFO.
Selecting standard play (SP) or
long play (LP)*.
Press the SP/LP button
(2 seconds).
Per selezionare durata normale
(SP) o lunga durata (LP)* :
premete il tasto SP/LP
(2 secondi).
TRK
INFO
TV
SHOWVIEW
PREF.
EXIT
TRK
SHOWVIEW
PREF.
EXIT
2
1
5
4
8
7
AV
0/--
REW.
VPS
GO TO 0000
INFO
VPS
GO TO 0000
PLAY
TEXT
MENU
PR
TV
TEXT
MENU
PR
PR
MONITOR
3
0000
6
SP/LP
9
F.FWD
Manuelles Spureinstellung zur
Verbesserung der Wiedergabe :
drücken Sie während der wiedergabe
die Taste TRK +/-.
Ajuste manual del cabezal de lectura a la cinta grabada (fase) para
mejorar la calidad de la imagen.
Pulse las teclas TRK +/- con el vídeo en
modo “PLAY”.
Anzeige des momentanen
Betriebszustandes des Kombi TVVideorecorder :
drücken Sie die Taste
INFO.
Ver el modo en que se encuentra
el Combi TV-vídeo. Pulse la tecla
INFO.
Zur Wahl von Standardspielzeit
(SP) oder Langzeit (LP)* :
drücken Sie die Taste SP/LP
(2 Sekunden).
Selección de duración normal
(SP) o larga duración (LP)* :
pulse la tecla SP/LP
(2 segundos)
* If included / bei entsprechend ausgestatteten Modellen / solo su certi modelli / en los modelos equipados
19
ENGLISH
DEUTSCHITALIANOESPAÑOL
Page 20

2 Combo(GB-D-IT-ES) 17/05/1999 20:00 Page 20
TO VIEW AND/OR COPY PICTURES FROM A CONNECTED SET
AUDIO VIDEO 1/2.
ZUR WIEDERGABE UND/ODER DER AUFNAHME VON EINEM ANGESCHLOSSENEN GERÄT
AUDIO VIDEO 1/2.
PER VEDERE E/O COPIARE LE IMMAGINI DI UN APPARECCHIO COLLEGATO
AUDIO VIDEO 1/2.
PARA VER Y/O DUPLICAR LAS IMAGENES DE UN APARATO ADICION
Á
L CONECTADO
AUDIO VIDÉO 1/2.
Á
AV 2 AV 1
ENGLISHDEUTSCHITALIANOESPAÑOL
Press the AV key on the remote control to select
the unit connected to socket AV1 or AV2.
Premete il tasto AV del telecomando per selezionare un apparecchio collegato alla presa AV1 o
AV2.
Drücken Sie die Taste AV der Fernbedienung,um
ein an den Anschluß AV1 bzw. AV2 angeschlossenes Gerät zu wählen.
Pulse la tecla AV del mando a distancia para selec-
cionar un aparato conectado a la toma AV1 y AV2.
20
Page 21

0
AV
0
INFO
INFO
0
2 Combo(GB-D-IT-ES) 17/05/1999 20:01 Page 21
1
2
3
4
RECORDING ...
REGISTRARE ...
Insert a tape.
Inserire una cassetta
Performing instant recording of TV programme
Registrare immediatamente una trasmissione TV
Press REC. button, the status screen appears.
Check the information on the screen.
You can only change the programme
number or select a set connected on the
AV1
or
AV2
socket.
Premete il tasto REC. per visualizzare lo
stato dello schermo.Verificate le informazione allo schermo. Potete cambiare il numero
di programma o selezionare un apparecchio
collegato alla presa scart AV1 o AV2.
*
SP for normal play LP for long play.
Scegliete la durata
durata normale,LP.
SP/LP*.SP
per una
per una lunga durata.
Start recording with PLAY button
Avviare la registrazione premendo il tasto PLAY.
Press EXIT to leave.
Premere EXIT per uscire.
AV
/--
REW.
REC.
1
4
7
AV
0/--
/--
REW.
REC.
SHOWVIEW
PREF.
EXIT
2
5
8
PLAY
STOP
PLAY
STOP
VPS
GO TO 0000
AUFNEHMEN ...
GRABAR ...
Legen Sie eine Kassette ein.
Introduzca una cinta.
Sofortaufnahme einer Fernsehsendung
Grabación inmediata de un programa de TV
Drücken Sie die Taste
nen Informationen zur Überprüfung. Sie
können den Programmplatz ändern, oder
F.FWD
PAUSE
MONITOR
3
0000
6
SP/LP
9
F.FWD
PAUSE
TV
TEXT
MENU
ein Gerät wählen,das an die Buchsen
oder.
AV2
angeschlossen ist.
Pulse la tecla
de información. Compruebe los datos.
REC.
Ahora puede cambiar el número de
cadena o seleccionar un aparato conectado a la toma
AV1ó AV2..
Die Laufzeit wählen :
Normallaufzeit,LPfür Longplay (doppelte Laufzeit).
Escoja la duración
SP/LP*.SP
ción normal,LPpara una larga duración.
Starten Sie die Aufnahme mit der Taste PLAY.
Arranque la grabación con la tecla PLAY.
Verlassen Sie das Menü mit EXIT.
Pulse EXIT para salir.
REC.
Nun erschei-
AV1
, Aparece la pantalla
SP/LP*.SP
für die
para una dura-
ENGLISH
Recording with automatic stop
Registrazione con interruzione automatica
AV
/--
PLAY
Press the REC button twice.
1
Premere 2 volte il tasto REC.
Enter the time that the current programme ends using the numerical buttons.
2
Premere l'ora della fine della trasmissione
in corso mediante i tasti numerici.
3
Press EXIT to leave.
Premere EXIT per uscire.
* If included / bei entsprechend ausgestatteten Modellen / solo su certi modelli / en los modelos equipados
REW.
REC.
STOP
2
1
5
4
8
7
AV
0/--
PLAY
SHOWVIEW
PREF.
VPS
EXIT
GO TO 0000
21
Aufnahme mit automatischem Ausschalten
Grabación con parada automática
F.FWD
PAUSE
MONITOR
3
0000
6
SP/LP
9
TV
TEXT
MENU
Drücken Sie folgende Taste REC zweimal.
Pulse 2 veces la tecla REC.
Geben Sie über die Zifferntasten die
Ausschaltzeit ein.
Teclee la hora de fin de la emisión en
curso mediante las teclas numéricas.
Verlassen Sie das Menü mit EXIT.
Pulse EXIT para salir.
DEUTSCHITALIANOESPAÑOL
Page 22

2 Combo(GB-D-IT-ES) 17/05/1999 20:01 Page 22
You can programme a recording using the ShowView codes in your TV listings magazine or using the manual programming procedure, if you do not know the codes.
PROGRAMMING A RECORDING WITH SHOW VIEW CODES
Sie können eine Aufnahme mit den ShowView Codes Ihres TV-Magazins oder, falls Sie diese nicht kennen, manuell programmieren.
PROGRAMMIEREN EINER AUFNAHME MIT HILFE DER SHOW VIEW CODES
Potete programmare una registrazione con i codici ShowView indicati sulla vostra rivista di programmi TV o utilizzando la programmazione manuale se non conoscete i codici.
PROGRAMARE UNA REGISTRAZIONE CON I CODICI SHOW VIEW
Usted puede programar una grabación mediante los códigos ShowView de su revista de TV o bien utilizando la programación
manual si no conoce los códigos.
PROGRAMAR UNA GRABACIÓN CON LOS CÓDIGOS SHOW VIEW
TRK
INFO
TV
Press button SHOWVIEW.
Premere il tasto SHOWVIEW.
Enter the programme’s code.
Digitate il codice della trasmissione.
SHOWVIEW
PREF.
EXIT
1
4
7
AV
0/--
REW.
2
5
8
VPS
GO TO 0000
PLAY
TEXT
MENU
PR
MONITOR
3
0000
6
SP/LP
9
F.FWD
Drücken Sie die Taste SHOWVIEW.
Pulse la tecla SHOWVIEW.
Den Code für die Sendung eingeben.
Teclee el código de la emisión.
1
2
ENGLISHDEUTSCHITALIANOESPAÑOL
!
TRK
INFO
TV
Confirm.
(On models equipped with 2 tuners)
Confermate.
(Con modello munito di 2 tuner)
Switch off theCombi TV-Video recorder
to switch to pause-record.
(On models equipped with 1 tuner)
Spegnete il Videovision per metterlo in
Stand-by-registrazione.
(Con modello munito di 1 tuner)
INFO
VPS
EXIT
PREF.
SHOWVIEW
TV
GO TO 0000
TEXT
VPS
MENU
PR
TEXT
Bestätigen.
(Bei Modellen, die mit 2 Tuner ausgerüstet
sind)
Confirme.
(En el modelo equipado con 2 tuners)
Jetzt Ihren Kombi TV-Videorecorder auf
Aufnahme-Bereitschaft schalten.
(Bei Modellen,die mit 1 Tuner ausgerüstet sind)
Apague el Combi TV-vídeo para ponerlo
en espera-grabación.
(En el modelo equipado con 1 tuner)
First programming ?The first time you programme a channel, the Combi TV-Video asks you to enter the channel number (pr -). Press EXIT to validate and to leave.
(O and 1 for PRI).
Erste Programmierung ? Falls Sie zum ersten Mal einen bestimmten Sender programmieren, bittet der Kombi
TV-Videorecorder Sie um die Eingabe des Programmplatzes (Pr-).Verlassen Sie das Menü mit EXIT.
(0 und 1 für PRI)
Prima programmazione ? Durante una prima programmazione su un canale, il Videovision chiederà di inserire il numero del canale (Pr-). Premere EXIT per uscire.
(0 e 1 per PRI).
¿Primera programacIón ?En la primera programación de una cadena el Combi TV-vídeo le pide el número de
la cadena (pr-).Pulse EXIT para salir.
(0 y 1 para PRI)
22
3
4
Page 23

PR
2 Combo(GB-D-IT-ES) 17/05/1999 20:01 Page 23
Whilst recording, you can only display other channels if your model is equipped with 2 tuners.
SETTING TIMER RECORDING
Soweit Ihr Modell über 2 Tuner verfügt,kênnen Sie sich wöhrend einer Aufnahme ein anderes Fernsehprogramm ansehen
TIMER-PROGRAMMIERUNG
Durante la registrazione, potete guardare le trasmissioni di un altro canale solo se il vostro modello é dotato di 2 tuner
PROGRAMMARE UNA REGISTRAZIONE
Durante una grabación, usted sólo podre· ver las imagenes de otra cadena si su modelo está provisto de 2 tuners
GRABACIÓN PROGRAMADA
1
2
3
With the MENU key, call up the
SUMMARY menu and with
▲/▼
, select the
line Record timer Validate with OK.
Fate apparire il menu S
tasto MENU, poi selezionate la linea
TIMER con
Press
▲/▼
▲/▼
button to select an empty
OMMARIO con il
. Convalidate con OK.
timer recording menu line. Otherwise go
to page 25 to erase an existing timer
recording.
▲/▼
Premete il tasto
riga libera nel menu delle registrazioni
per selezionare una
programmate. Se non ne trovate, andate
alla pagina 25 per sapere come liberare
una riga cancellando una programmazione.
Press digit buttons (0-9) to timer record
TV programmes, or press AV button to
timer record AV programme.
(O and 1 for PRI).
Premete sui tasti numerici (da 0 a 9) per
programmare la registrazione di una trasmissione televisiva o sul tasto AV per programmare la registrazione a partire da un
altro apparecchio Audio Video.
(0 e 1 per PRI).
TRK
INFO
TV
SHOWVIEW
PREF.
EXIT
TEXT
VPS
MENU
Mit der MENU-Taste das
anzeigen, dann mit
▲/▼
Ü
BERSICHT
die Zeile TIMER
AUFNAHME wählen. Mit OK bestätigen.
Haga aparecer el menú INDICE median-
GO TO 0000
TRK
SHOWVIEW
PREF.
EXIT
GO TO 0000
PR
INFO
TV
TEXT
VPS
MENU
PR
MONITOR
te la tecla menu y seleccione la línea
RABACIÓN PROGRAM. por medio de
G
Para confirmar, pulse OK.
Drücken Sie die Taste
▲/▼
▲/▼
, um eine leere
.
Zeile im Timer-Menü zu finden. Sollte
keine Zeile mehr frei sein, schlagen Sie
bitte auf Seite 25 nach, um herauszufinden, wie man eine programmierte
Aufnahme löscht.
▲/▼
Pulse las teclas
línea de menú de grabación programada
para seleccionar una
que se encuentre libre.Si no la encuentra,
consulte en la página 25 el modo de borrar una grabación programada existente.
Zum Programmieren einer Fernsehsendung
die Zifferntasten (0-9) benutzen. Möchten
1
4
7
AV
0/--
REW.
0000
5
6
SP/LP
8
9
PLAY
F.FWD
MONITOR
2
3
Sie das Überspielen einer Aufzeichnung von
einer anderen Audio-/Videoquelle programmieren, die Taste AV betätigen.
(0 und 1 für PRI)
Pulse las teclas numéricas (0-9) para programar la grabación de un programa de
TV o bien la tecla AVpara programar la
grabación a partir de otro aparato de
Audio Vídeo.
ENGLISH
DEUTSCHITALIANOESPAÑOL
(0 y 1 para PRI)
4
Press digit buttons (0-9) to enter the
Start time of the timer recording.
Note : Make sure the Start time entered
does not overlap on the time zone of
other timer recordings.
Premete i tasti numerici (da 0 a 9) per
memorizzare l’ora alla quale la registrazione dovrà cominciare.
Nota : verificate che l’ora dell’inizio non
si sovrapponga all’orario di un altra registrazione programmata.
Mit den Tasten (0-9) die Uhrzeit einge-
1
4
7
AV
0/--
REW.
0000
5
6
SP/LP
8
9
PLAY
F.FWD
MONITOR
2
3
ben, zu der die Aufnahme beginnen soll.
Pulse las teclas numéricas (0-9) para
introducir la hora de inicio de la grabación programada.
Nota : asegúrese de que la hora de
inicio introducida no coincida con la franja horaria de otras grabaciones programadas.
23
Page 24
PR
PR
2 Combo(GB-D-IT-ES) 17/05/1999 20:01 Page 24
Press digit buttons (0-9) to enter the
Stop time of the timer recording.
NOTE : Make sure the Stop time entered
does not overlap on the time zone of the
other timer recordings.
Premete i tasti numerici (da 0 a 9) per
memorizzare l’ora alla quale la registrazione dovrà terminare.
OTA : verificate che l’ora della fine non si
N
sovrapponga all’orario di un’altra registrazione programmata.
Press digit buttons (0-9) to enter the
Date of the timer recording in day and
month format.
Premete i tasti numerici (da 0 a 9) per
memorizzare la data alla quale la registrazione dovrà cominciare (formato gg mm).
*Press OK button to select between SP
or LP recording.
NOTE : Long Play recording may enable
you to record up to twice the length of
the tape.
*Premete il tasto OK per scegliere tra
una registrazione in durata normale (SP)
o in lunga durata (LP).
OTA : la registrazione in lunga durata vi
N
permette di raddoppiare la capacità della
videocassetta.
Mit den Zifferntasten (0-9) die Endzeit
der Aufnahme eingeben.
Anmerkung : Sie sollten überprüfen, ob
1
4
7
AV
0/--
REW.
0000
5
6
SP/LP
8
9
PLAY
F.FWD
MONITOR
2
3
die Anfangs und Endzeit sich nicht mit
einer anderen bereits programmierten
Aufnahmezeit überschneidet.
Pulse las teclas numéricas (0-9) para
introducir la hora a la que debe detenerse la grabación programada.
NOTA : asegúrese de que la hora de ter-
5
mino introducida no coincida con la franja horaria de otras grabaciones programadas.
1
4
7
AV
0/--
REW.
TRK
SHOWVIEW
PREF.
EXIT
5
8
PLAY
INFO
VPS
GO TO 0000
0000
6
SP/LP
9
F.FWD
TV
TEXT
MENU
PR
MONITOR
2
3
Zur Eingabe des Datums, an eine
Aufnahme erstellt werden soll, die
Zifferntasten (0-9) benutzen (Format des
Datums:TTMM).
Pulse las teclas numéricas (0-9) para
introducir la fecha de la grabación programada (formato: día - mes).
*
Die Taste OK drücken, um entweder die
normale Aufnahmezeit (SP) oder die
Langzeit (LP) zu wählen.
ANMERKUNG : Mit der Langzeit können Sie
die Aufnahmekapazität der Kassette verdoppeln.
*Pulse la tecla OK para elegir entre gra-
bación de duración normal (SP) o de
larga duración (LP).
OTA : la grabación de larga duración le
N
permite duplicar lacapacidad de graba-
6
7
ción de la cinta.
TRK
INFO
TV
SHOWVIEW
PREF.
EXIT
VPS
GO TO 0000
TEXT
MENU
PR
*Bruges til at optage i det øjeblik, hvor
udsendelsen reelt begynder, hvad enten
den er forsinket eller ikke (senderen skal
udsende VPS/PDC-signaler).
*Para grabar en el momento en que
comienza realmente el programa, cualquiera sea el retraso (el programa emisor
debe transmitir señales VPS).
TRK
INFO
TV
SHOWVIEW
PREF.
EXIT
VPS
GO TO 0000
TEXT
MENU
PR
*Nun mit der Taste OK die Häufigkeit der
zeitgesteuerten Aufnahme wählen: einmalig, täglich von Montag bis Freitag (5/7)
oder wöchentlich (1/7).
*Pulse la tecla OK para seleccionar la frecuencia de la grabación: una sola vez, de
lunes a viernes (5/7) o de forma semanal
(1/7).
TRK
INFO
TV
SHOWVIEW
PREF.
EXIT
TEXT
VPS
MENU
Zum Programmieren weiterer Aufnahme die
Schritte 2-10 wiederholen, sonst zum
Verlassen des Menüs die Taste EXIT drücken.
Para programar otra grabación, repita los
GO TO 0000
2
1
PR
MONITOR
3
pasos 2-10. En caso contrario, pulse la
tecla EXIT para salir del menú.
ENGLISHDEUTSCHITALIANOESPAÑOL
* “VPS” : in order to record when the
programme really starts, however late
(the programme provider needs to transmit VPS signals). Press “OK” to select.
*Per registrare al momento in cui la trasmissione comincia realmente, qualunque
sia il ritardo (l’emittente deve trasmettere segnali VPS/PDC).
*Press OK button to select between
Once, Monday to Friday (5/7) or Weekly
(1/7) timer recording.
*Premete il tasto OK per selezionare la
frequenza della registrazione programmata: una sola volta, dal lunedì al venerdì
(5/7) o ogni settimana (1/7).
To set another timer recording, repeat
step 2-10. Otherwise press EXIT button
to memorise and to remove menu.
Per programmare altre registrazioni,ripetete le tappe da 2 a 10; altrimenti premete il tasto EXIT per uscire dal menu.
* If included / bei entsprechend ausgestatteten Modellen / solo su certi modelli / en los modelos equipados
24
8
9
10
Page 25

GO TO 0000
MENU
EXIT
GO TO 0000
VPS
2 Combo(GB-D-IT-ES) 17/05/1999 20:01 Page 25
ERASING A TIMER RECORDING
LÖSCHEN EINER PROGRAMMIERTEN AUFNAHME
CANCELLARE UNA PROGRAMMAZIONE
CÓMO SUPRIMIR UNA GRABACIÓN PROGRAMADA
TRK
INFO
TV
SHOWVIEW
PREF.
VPS
EXIT
GO TO 0000
TRK
INFO
TV
SHOWVIEW
PREF.
VPS
EXIT
GO TO 0000
1
2
With the
MENU
menu and with
RECORD TIMER Validate with
key, call up the SUMMARY
▲/▼
, select the line
OK.
Fate apparire il MENU SOMMARIO con il
tasto menu, poi selezionate la linea TIMER
con
▲/▼
. Convalidate con OK.
Press
▲/▼
button until the menu line you
wish to erase is selected.
▲/▼
Premete i tasti
menu che desiderate cancellare non
finché la linea del
viene selezionata.
TEXT
MENU
TEXT
MENU
Mit der MENU-Taste das
anzeigen, dann mit
▲/▼
Ü
BERSICHT
die Zeile TIMER
Aufnahme wählen. Mit OKbestätigen.
Haga aparecer el menú INDICE median-
PR
te la tecla menu y seleccione la línea
RABACIÓN PROGRAM. por medio de
G
Para confirmar, pulse OK.
Die Taste
▲/▼
drücken, bis die Menüzeile,
▲/▼
.
die Sie löschen wollen, gewählt ist.
▲/▼
Pulse las teclas
línea del menú que desea borrar.
PR
hasta seleccionar la
3
4
Press OOOO button to permanently
erase the timer recording menu line
selected.
Premete il tasto OOOO per cancellare la
riga selezionata nel menu di programmazione delle registrazioni.
Press EXIT button to remove menu.
Premete il tasto EXIT per uscire dal
menu.
PR
MONITOR
2
3
1
4
7
AV
0/--
REW.
TRK
SHOWVIEW
PREF.
EXIT
0000
5
6
SP/LP
8
9
PLAY
F.FWD
INFO
TV
TEXT
VPS
MENU
GO TO 0000
PR
Zum Löschen der im Menü
Aufnahmeprogrammierung gewählten
Zeile die Taste OOOO drücken.
Pulse la tecla OOOO para borrar definitivamente la línea del menú de grabación
seleccionada programada.
Zum Verlassen des Menüs die Taste EXIT
drücken.
Pulse la tecla EXIT para salir del menú.
ENGLISH
DEUTSCHITALIANOESPAÑOL
▲
COKB
EXIT MENU
25
▼
Page 26

2 Combo(GB-D-IT-ES) 17/05/1999 20:01 Page 26
ENGLISHDEUTSCHITALIANOESPAÑOL
PREFERENCES
PREFERENZE
To customise your control of the Combi TV-Video recorder,automate certain functions, complete your programming
or modifying the settings.
Zum Einstellen des Kombi TV-Videorecorders auf Ihre Präferenzwerte, zum Automatisieren gewisser Funktionen,zum
Vervollständigen Ihrer Programmierung oder zum Ändern der Einstellungen.
Per personalizzare il vostro Videovision, automatizzare alcune funzioni,completare le vostre programmazioni o modificare delle regolazioni.
Para personalizar su Combi TV-vídeo, automatizar ciertas funciones, completar su programación o modificar los
ajustes.
MENU LANGUAGE. To change the language of the
OSD menus , use keys
M
ENU LINGUA. Per cambiare la lingua dei menu che
appaiono allo schermo, premete i tasti
AUTO CLOCK:(If included).When the automatic daily
clock set feature in your region does not match the
time of the place where you reside, deactivate this
(o)
function
der clock manually.
RA AUTOMATICA: (solo su certi modelli).Se la rego-
O
lazione dell'ora automatica e quotidiana della vostra
regione non corrisponde all'ora del luogo dove
risiedete, disattivate questa funzione
l'orologio del vostro Videovision manualmente.
SHOWVIEW + 10. Select this option to add 10
minutes to the end time of your Videoplus+ recordings. So you will avoid defective recordings due to
programme time shifting or programmes exceeding
the scheduled time (within the 10-minutes limit).
SHOWVIEW + 10. Scegliete questa opzione per aggiungere
10 minuti all'ora di fine delle vostre registrazioni
ShowView.Così eviterete registrazioni non riuscite a causa
di cambiamenti d'orario delle trasmissioni o di prolungamento delle trasmissioni stesse (nei limiti di 10 minuti).
C/B.
C/B.
and set your Combi TV-Video recor-
(o)
e regolate
VORZUGSEINSTELLUNGEN
PREFERENCIAS
ENÜSPRACHE. Zum Ändern der Menüsprache der
M
Bildschirmmenüs die Tasten
I
DIOMA MENÚS. Para cambiar el idioma de los menús
que aparecerán en pantalla, utilice las teclas
AUTOM.UHRZEIT: (bei entsprechend ausgestatteten Modellen).
Sollte die täglich ausgeführte automatische Zeiteinstellung
nicht mit der an Ihrem Wohnort gültigen Zeit übereinstimmen,
müssen Sie die Funktion deaktivieren
Kombi TV-Videorecorders per Hand einstellen.
RELOJ AUTO.: (en los modelos equipados).Si la pues-
ta en hora automática y habitual de su región no
corresponde a la hora del lugar donde reside,
desactive esta función
Combi TV-vídeo de forma manual.
SHOWVIEW + 10. Machen Sie von dieser Option Gebrauch, um die
Abschaltzeit Ihrer mit ShowView-Leitzahlen programmierten Aufnahmen
um 10 Minuten aufzuschieben. So können Sie das Mißlingen Ihrer
Aufnahmen aufgrund von Programmänderungen oder.
Programmverspätungen verhindern (innerhalb der 10-Minutengrenze).
SHOWVIEW + 10. Elija esta opción para añadir 10 minutos a la
hora de fin de sus grabaciones Showview. De esta forma evitará que se estropee su grabación debido a los posibles desajustes horarios de las emisiones (con un límite de 10 minutos).
C/B benutzen.
(o)
und die Uhr Ihres
(o)
y ajuste el reloj del
C/B.
MESECAM. If you wish to record or to play a programme in
key.
M
trasmissione in M
(þ)Mesecam (tasto OK).
P
to be adjusted (brightness, colour, contrast, sharpness).
Adjust using the C/B buttons.
NB : You can call up the settings made in the P
P
on the remote control.
I
MMAGINE
Colore, Contrasto, Contorno) con i tasti
Regolate con i tasti C/B.
N
P
mando.
M
ESECAM
, tick off box (þ) with the OK
ESECAM. Se desiderate registrare o leggere una
ICTURE
: Using the
REFERENCES
OTA
: Per richiamare le regolazioni eseguite nel menu
REFERENZEIMMAGINE
ESECAM selezionate la casella
OK,
V/W buttons, select the function
OK,
ICTURE
V/W
menu at any time: press the PREF. button
: Selezionate la funzione da regolare (Luce,
, premete il tasto PREF. del teleco-
M
ESECAM. Wenn Sie eine M
erstellen oder wiedergeben möchten, müssen Sie
das Kästchen
ESECAM. Si desea grabar o reproducir una emi-
M
sión en Mesecam, marque la casilla
(tecla OK).
ILD
B
lende Funktion aus (Helligkeit, Farbe, Kontrast,
Bildschärfe) und nehmen Sie die Einstellung mit den
Tasten C/B vor.
H
INWEIS
B
ILDEINSTELLUNGEN
indem Sie auf die Taste PREF der Fernbedienung drücken.
I
MAGEN
que desea ajustar (Luz, Color,Contraste, Nitidez).Realice
los ajustes con las teclas C/B.
N
OTA
la los ajustes realizados en el menú P
pulse la tecla PREF. del mando a distancia.
(þ) mit der OK-Taste ankreuzen.
: wählen Sie mit den Tasten
: Sie können jederzeit aus dem Menü
: die gewählten Einstellungen abrufen,
:: Con las teclas
: En cualquier momento puede visualizar en pantal-
ESECAM
-Aufnahme
(þ) MESECAM
OK,
V/W die einzustel-
OK,
V/W seleccione la función
REFERENCIASIMAGEN
:
26
Page 27

2 Combo(GB-D-IT-ES) 17/05/1999 20:01 Page 27
H
OW TO USEVIDEOTEXT
W
IE KANN MANVIDEOTEXT BENUTZEN
C
OME UTILIZZARE IL TELEVIDEO
¿
C
ÓMO AJUSTAR LA IMAGEN
?
(If included)
.
? (bei entsprechend ausgestatteten Modellen).
? (nei modelli che ne sono muniti).
? (en los modelos equipados).
Press the key
CALLING UP A PAGE.
displayed.To visualise the next or previous page, press the directional keys
A
UTO-SCROLLING PAGES
PRIZE COMPETITIONS.
ZOOM.
page display.
VIDEOTEXT DISPLAY.
picture and to switch back to the videotext picture.
FASTEXT.
corresponding colour keys to select one out of the 4 headings displayed in the footer. Selection of a given heading may have the effect to
display further headings. Certain programmes use videotext to broadcast subtitles, as well as constantly updated news.These pages can be
found in the videotext summary.Once you have found the page, the subtitle and/or news will be superposed on the TV picture.
Use TEXT key to return to page 100 or I
To leave videotext, press
Zum Anzeigen des Inhaltsverzeichnisses (Seite 100) die Taste TEXT drücken.
A
UFRUF EINER SEITE. Die 3 Ziffern der Seitennummer (z.B.150, 170),die Sie lesen möchten, eintippen. Einen Augenblick später wird die
Seite angezeigt. Zum Konsultieren der nächsten oder vorherigen Seite die Pfeiltasten
D
URCHLAUFENDE SEITEN. Sie können den Seitendurchlauf mit der roten Taste stoppen. OK.Wenn Sie dann erneut die OK Taste drüc-
ken, wird der Seitendurchlauf wieder gestartet.
S
PIELE,RÄTSEL… Mit der MENU Taste können sie die Auflösungen anzeigen oder verdecken.
Z
OOM. Mit der
zur Anzeige der ganzen Seite zurückschalten.
V
IDEOTEXT-ANZEIGE. Mit der
Normalbild zurückschalten.
F
ASTEXT. Wenn die Videotext-Seiten nach der Fastext-Norm übertragen werden, können Sie eine der 4 im Seitenfuß angezeigten
Rubriken mit den
entsprechenden Farbtasten selektieren. Nach Auswahl einer Rubrik können weitere Titel
angezeigt werden.Einige Programme benutzen Videotext zur
Übertragung von Untertiteln sowie von ständig aktualisierten Nachrichten. Die entsprechenden Seitenzahlen können Sie dem
Videotext-Inhaltsverzeichnis entnehmen. Sowie Sie die Seite gefunden haben, wird der Untertitel bzw. die Blitzmeldung in das
Fernsehbild eingeblendet.
Aufruf der Seite 100 bzw.des I
Zum Verlassen der Videotext-Funktion EXIT drücken.
Premete il tasto TEXT per visualizzare il sommario (pagina 100).
C
HIAMARE UNA PAGINA. Digitate le 3 cifre del numero della pagina che desiderate leggere (150, 170 ad esempio).
Un momento dopo la pagina appare. Utilizzate i tasti
P
AGINE GIREVOLI. Interrompere lo scorrimento delle pagine girevoli con il tasto OK Una nuova
pressione sul tasto OK avvia nuovamente lo scorrimento.
G
IOCHI. Rivelate o nascondete una risposta con il tasto MENU.
Z
OOM. Ingrandite la parte alta dello schermo, poi la parte bassa e tornate alla visualizzazione normale con il tasto
V
ISUALIZZAZIONE. Sovrapponete una pagina televideo all'immagine, e ritornate alla visualizzazione normale con il tasto
F
ASTEXT. Se il televideo trasmesso è fastext, potrete selezionare una delle 4 rubriche visualizzate nella parte bassa della pagina con i tasti
colorati corrispondenti. Quando una rubrica viene selezionata, possono apparire altri titoli.Alcuni canali forniscono via televideo i sottotitoli di alcune delle loro trasmissioni o dei flash d'informazioni riaggiornati. Il numero delle pagine corrispondenti viene indicato nel
sommario del televideo. Una volta trovata la pagina, i sottotitoli o il flash d'informazione verranno inseriti sull'immagine TV.
Richiamate la pagina 100 o I
Uscite dal televideo con EXIT.
Pulse la tecla TEXT para que aparezca el sumario (página 100).
BUSCAR UNA PÁGINA. Teclee las 3 cifras del número de la página que desee leer (por ejemplo, 150,170).Tras unos instantes aparecerá
la página. Utilice las teclas
PÁGINAS MÚLTIPLES. Puede detener el paso de las páginas múltiples por medio de la tecla OK. Para seguir pasando las páginas, pulse
de nuevo esta tecla.
JUEGOS. Pulse la tecla MENU para que aparezcan o desaparezcan las respuestas.
ZOOM. Aumente de tamaño la parte superior y a continuación la inferior de la pantalla por medio de la tecla
también para volver al tamaño normal.
SUPERPOSICIÓN. La tecla
FASTEXT. Si el teletexto transmitido es de Fastext,puede seleccionar una de las 4 opciones que aparecen en la parte inferior de la pan-
talla mediante las teclas de color correspondientes. Una vez seleccionada una opción, podrán aparecer otros títulos. Algunos canales
de TV ofrecen por teletexto el subtitulado de ciertas emisiones,así como flashes informativos actualizados. El número de la página correspondiente aparece indicado en el sumario del teletexto.Una vez que se ha encontrado la página, el subtitulado o el flash informativo aparecerá integrado en la imagen de TV.
Retorno a la página 100 o I
Para salir del teletexto, pulse la tecla EXIT.
TEXT
to display the Summary (page 100).
Enter the 3 digits of the number (e.g. 150,170) of the page you want to read.After a few moments, the page will be
.
You may stop the page scrolling with the OKkey.When pressing the OKkey again, page scrolling will start again.
With the ▲key, you can subsequently enlarge the upper and the lower half of the screen page and then switch back to full screen
When videotext pages are broadcast as per the Fastext standard,you can use the
By means of the Menu key, you can either display or hide the solutions.
The ▼key enables you to superpose a videotext page on the standard TV
NDEX
EXIT
.
▲
Taste können Sie nacheinander den oberen und dann den unteren Teil des Bilds vergrößern und schließlich wieder
▼
Taste können Sie das normale Fernsehbild mit einer Videotext-Seite überlagern und wieder auf
NDEX
NDICE
con il tasto TEXT.
C/B
para consultar la página siguiente o la anterior.
▼
permite superponer una página de teletexto a la imagen y volver luego a la opción normal.
NDICE
con la tecla TEXT.
.
mit der Taste TEXT.
C/B
per consultare la pagina seguente o la precedente.
C/B
.
C/B
benutzen.
▲
.
▼
.
▲
, que sirve
27
ENGLISH
DEUTSCHITALIANOESPAÑOL
Page 28

2 Combo(GB-D-IT-ES) 17/05/1999 20:01 Page 28
ENGLISHDEUTSCHITALIANOESPAÑOL
ADDITIONAL INFORMATION
INFORMAZIONI COMPLEMENTARI
HOW TO ADJUST THE PICTURE?
Press S
UMMARY. Press the key MENU once to call up
the PICTURE window.With the directional keys ▲/▼,
select the feature you want to adjust (brightness,
colour, contrast, sharpness/ tint). Now perform the
adjustment by means of the directional keys C/B.
(see page 26).
COME REGOLARE L’IMMAGINE?
Premete SOMMARIO.Premete una volta su IMMAGINE
per visualizzare la finestra. Con i tasti ▲/▼ selezionate la funzione da regolare (Luce, Colore,
Contrasto, Definizione / Tinta). Regolate con i
tasti C/B.(vedi pagina 26).
ALARM MENU/AUTOMATIC STOP
TV-TIMER :
This menu means you can set your Combi TV-Video
recorder to wake you up,in the same way as a radio
alarm clock. Display the TV-TIMER MENU by
pressing .
Using the W/C/B buttons.
1 - Select W
2 - Choose the time of the alarm and the channel
3 - Press E
S
LEEP TIMER :
To programme an automatic stop, adjust the time
remaining before the Combi TV-Video recorder is
stopped, using the C/Bbuttons.
MENU SVEGLIA / INTERRUZIONE AUTOMATICA
TV SVEGLIA :
Questo menu vi consente di essere svegliati dal vostro Videovision come con una sveglia normale.
Visualizzate il MENU SVEGLIA premendo il tasto .
Per mezzo dei tasti W/C/B.
1 - selezionate S
2 - Scegliete l’ora della sveglia e il numero di canale
3 - Premete E
I
NTERRUZIONE AUTOMATICA :
per programmare l’interruzione automatica, servitevi dei tasti C/B per regolare il tempo rimanente
prima dell’interruzione del Videovision.
AKE-UP :
• OFF : alarm de-activated,
• D
AILY : for a wake up alarm every day,,
• O
NCE : for a single wake-up alarm.
number (W,C,B, 0 to 9).
XIT.
VEGLIA :
• DISATTIVA : sveglia disattivata,
• Q
UOTIDIANO : per essere svegliato ogni giorno,
• U
NA VOLTA : per una volta sola.
(W,C,B, 0-9).
XIT.
ZUSÄTZLICHE INFORMATIONEN
INFORMACIONES SUPLEMENTARIAS
WIE KANN MAN DAS BILD EINSTELLEN?
Drücken Sie auf Ü
Menüfensters einmal die Taste BILDMENÜ betätigen.
Dann mit den Pfeiltasten ▲/▼ die einzustellende
Funktion wählen (Helligkeit, Farbe, Kontrast,
Bildschärfe/Schattierung). Die Einstellungen mit Hilfe
der Tasten C/B vornehmen.(siehe Seite 26)
CÓMO AJUSTAR LA IMAGEN?
Pulsar en I
NDICE. Pulse una vez la tecla IMAGEN para
que aparezca la ventana. Mediante las teclas ▲/▼,
seleccione la función que desea ajustar (Luz, Color,
Contraste, Contorno / Tono). Ajústela mediante las
teclas C/B. (ver página 26)
WECKER/AUTOMATISCHES AUSSCHALTEN
TV-TIMER :
Mit Hilfe dieses Menüs können Sie durch Ihren
Kombi TV-Videorecorder wie durch einen
Radiowecker geweckt werden. Zum Aufrufen des
MENU TV-TIMER drücken Sie auf die Taste .
Mit Hilfe der Tasten W/C/B.
1 - Wählen Sie die Funktion TV-T
• AUS : Wecker ausstellen,
• T
ÄGLICH : um täglich geweckt zu werden,
• E
INMAL : zum einmaligen Wecken.
2 - Stellen Sie die Weckzeit und die
Programmnummer ein (W,C,B, 0 bis 9).
3 - Drücken Sie E
A
UTOMATISCHES AUSSCHALTEN :
Stellen Sie mit den Tasten C/B die verbleibende
Dauer bis zum automatischen Ausschalten Ihres
Kombi TV-Videorecorders ein.
MENÚ DESPERTADOR / PARADA AUTOMÁTICA
DESPERTADOR :
Este menú le permite ser despertado por su combi
tv-vídeo del mismo modo que podría hacerlo con
una radio-despertador. Haga aparecer el MENÚ
DESPERTADOR pulsando la tecla .
Con ayuda de las teclas W/C/B.
1 - Seleccione D
• NO : despertador desactivado,
• D
IARIO : para que le despierte todos los días,
• U
NA VEZ : para que le despierte una sola vez.
2 - Elija la hora de despertar y el número de canal
(W,C,B, 0 a 9).
3 - Pulse E
P
XIT.
ARADA AUTOMÁTICA :
para programar una parada automática, ajuste con
C/B el tiempo que debe transcurrir antes de que se
pare el combi tv-vídeo.
BERSICHT Zum Aufrufen des
IMER :
XIT (BEENDEN).
ESPERTADOR :
28
Page 29

B
B
2 Combo(GB-D-IT-ES) 17/05/1999 20:01 Page 29
ELECTRONIC KEY (CHILD LOCK)
To prevent use of the video recorder, the keys on
the front can be locked. Press theBkey on the
remote control for 4 seconds and keep it in a safe
place.
Unlock the video recorder with theBkey on the
remote control.
CHIAVE ELETTRONICA (SICUREZZA BAMBINI)
Per vietare l'uso del videoregistratore, i tasti disposti sul frontale possono essere bloccati. Premete il
tastoBdel telecomando per 4 secondi e conservate il telecomando stesso in un luogo sicuro.
Sbloccate il videoregistratore con il tastoBdel telecomando.
TAPE CONTROL/THE COUNTERS
*
(Press the INFO button)
The index system mark sequences on the tape (beginning
of a film, exerpts...) to help you find them easily.At the
beginning of a recording,the video recorder automatically
marks an index on the tape.
Use
C/B
to go to the next or previous index mark.
The counter indicates the time elapsed in hours, minutes
and seconds (status menu, copy mode). Counting starts
upon loading of the cassette or the position 00h00m00s
of the counter.
To reset the counter to zero (0000), press key 0000.
CONTROLLO NASTRO/I CONTATORI
*
((Premete il tasto INFO)
Gli indici permettono di individuare i passaggi del nastro
(inizio di film, sequenze...) per poterli ritrovare con rapidità.
All’inizio di ogni registrazione,il videoregistratore scrive automaticamente un indice sul nastro. Potete accedere all'indice
precedente o seguente per mezzo degli indici
Il contatore indica il tempo trascorso in ore, minuti e
secondi (menu status, modo copia). Il conto viene effettuato a partire dal caricamento della cassetta o dalla posizione 00h00m00s del contatore.
Per rimettere il contatore a zero (0000), premete il tasto
0000.
AUTO REPEAT
Display the S
the A
sing OK.Enter the 6 figures which correspond to the required position (if this is before zero, press the - button).
UMMARY
UTOREPEAT
menu by pressing M
command using V/W. Confirm by pres-
C/B
ENU
then select
.
ELEKTRONISCHE SPERRE (Kindersicherung)
Um die Benutzung des Videorecorders zu verhindern,
können die auf der Vorderseite angebrachten Tasten verriegelt werden. Drücken Sie 4 Sekunden lang auf die
TasteBder Fernbedienung und bewahren Sie diese
anschließend an einem sicheren Ort auf. Zum Entriegeln
des Videorecorders die TasteBder Fernbedienung betätigen.
LLAVE ELECTRÓNICA
Para prohibir la utilización del vídeo, las teclas dispuestas en el frente pueden bloquearse. Pulse la tecla
del telemando durante 4 segundos y guárdelo en
un lugar seguro. Desbloquee el vídeo con la tecla
del telemando.
*
B
ANDKONTROLLE /
(Drücken Sie die Taste INFO)
Die Indexe ermöglichen Ihnen, bestimmte Bandabschnitte
(Filmanfang, Bildabschnitte...) zu markieren, um sie später
ohne langes Suchen leicht wiederzufinden. Der Anfang jeder
Aufnahme wird automatisch vom Videorecorder durch das
Setzen eines Indexes auf dem Band markiert.Mit
nen Sie den nächsten oder vorherigen Index anwählen.
Der Zähler zeigt die abgelaufene Zeit in Stunden, Minuten
und Sekunden an (Status-Menü,Kopiermodus).Das Zählen
beginnt mit dem Laden der Cassette oder mit dem Setzen
des Zählers auf 00h00m00s.
Zum Zurücksetzen des Zählers auf Null (0000), die Taste
0000 drücken.
CONTROL DE CINTA/CONTADORES
*
(Pulse la tecla INFO)
Los índices permiten identificar los pasajes de cinta
(comienzos de pelicules, secuencias...) para poder encontrarlos rápidamente.Al comienzo mismo de la grabación el
vídeo marca inmediatamente un índice de la cinta. Para
acceder al índice siguiente o anterior por medio de
El contador indica el tiempo transcurrido en horas,minutos y segundos (menú estatus, modo copia). El conteo se
efectúa a partir del momento en que se carga la cinta o
de la posición 00h00m00s del contador.
Para volver a poner el contador a cero (0000), pulse la
tecla 0000.
AUTOMATISCHES WIEDERHOLEN
Rufen Sie mit der Taste M
wählen Sie mit den Tasten V/W die Zeile A
Bestätigen Sie mit OK. Geben Sie die 6 der gewünschten
Position entsprechenden Ziffern ein (bei Zahlen kleiner Null
die Taste - drücken).
DIE ZÄHLER
ENÜ
das Menü Ü
BERSICHT
UTO-REPEAT
C/B
auf und
kön-
C/B
.
ENGLISH
.
DEUTSCHITALIANOESPAÑOL
AUTO REPEAT
Visualizzate il menu S
zionate la linea R
OK. Digitate le 6 cifre corrispondenti alla posizione desiderata (se si trova prima dello zero, premete il tasto -)
NTSC
STANDARD CASSETTE
standard used in the USA, Japan and other countries.
Your Combi TV-Video recorder can read VHS-NTSC
cassettes.The sound will be monophonic.
C
ASSETTA
zato negli Stati Uniti, in Giappone e in altri paesi. Il vostro Videovision può leggere le cassette VHS-NTSC. Il
suono restituito sarà monofonico.
OMMARIO
IPETIZ CONTINUA
NTSC: :
con il tasto M
con V/W.Confermate con
:
NTSC is the television
NTSC è lo standard televisivo utiliz-
ENU
, poi sele-
REPETICIÓN AUTOMÁTICA
Haga aparecer el menú I
línea A
UTOREPETICIÓN
cifras correspondientes a la posición deseada (si es antes de
cero,pulse la tecla -)
NTSC-
KASSETTE
Japan und anderen Ländern üblichen TV-Standard. Ihr
Kombi TV-Videorecorder kann VHS-NTSC-Kassetten
lesen, wobei eine monophone Tonwiedergabe erfolgt.
C
INTAS
NTSC :
en estados unidos, japón y algunos otros países. su combi
tv-vídeo puede leer las cintas vhs-ntsc. el sonido reproducido tendrá calidad mono.
NDICE
con la tecla M
con V/W.Valide con OK. teclee las 6
:
NTSC entspricht dem in den USA, in
ntsc es la norma de televisión utilizada
* If included / bei entsprechend ausgestatteten Modellen / solo su certi modelli / en los modelos equipados
29
ENU
y elija la
Page 30

2 Combo(GB-D-IT-ES) 17/05/1999 20:01 Page 30
ENGLISHDEUTSCHITALIANOESPAÑOL
VPS/PDC SYSTEM
Some programmes broadcast on certain channels are
transmitted using VPS (Video Programme System) or
PDC (Programme Delivery Control).These signals precisely start or stop the recording even when there is a
delay in the programme schedule.Your video recorder
can recognise these signals.
ECORDING STOPPED BY
R
VPS programme, press key VPS -4 seconds.The recording will stop when the programme is really over.
ECORDING STARTED BY
R
pause-record mode, then press key VPS As soon as the VPS programme starts, the video recorder starts to record.
SISTEMA VPS/PDC
Alcuni programmi diffusi da certi canali sono trasmessi
con segnali
(Programme Delivery Control).Questi segnali consentono di avviare o interrompere una registrazione indipendentemente dal ritardo di fine o di inizo dei programmi.
Il vostro videoregistratore riconosce questi segnali.
ARRESTO REGISTRAZIONE CON VPS.
zione di una trasmissione
secondi.
ne è effettivamente terminata.
REGISTRAZIONE AVVIATA CON VPS.
tratore su pause, poi premete il tasto
Non appena la trasmissione
tratore avvia la registrazione.
VPS
La registrazione si arresta quando la trasmissio-
VPS. During the recording of a
VPS. Put the video recorder in
4 seconds.
(Video Programme System) o PDC
Durante la registra-
VPS
premete sul tasto
Mettete il videoregis-
VPS
comincia, il videoregis-
VPS -4
VPS - -4 secondi
.
CONTINUOUS PLAY/RECORD
You can permanently play or record a tape.At the
end, the tape is rewound to the beginning and
continues playing or recording.
P
LAY
: Press the PLAY button (on the front of your
Combi TV-Video recorder) for 6 seconds.
ECORD
: Press the REC. button once, then press PLAY
R
(on the front of your Combi TV-Video recorder) for 6
seconds.
RIPRODUZIONE E REGISTRAZIONE
CONTINUE
Il videoregistratore riproduce la cassetta o registra
fino a fine nastro, riavvolge il nastro e continua a
riprodurre o a registrare.
L
ETTURA
: Premete il tasto PLAY per 6 secondi (il tasto si
trova sul lato anteriore del Videovision).
EGISTRAZIONE
R
tasto PLAY per 6 secondi (il tasto si trova sul lato ante-
riore del Videovision).
: Premete una volta il tasto REC e poi il
VPS/PDC SYSTEM
Einige Programme werden mit VPS- (Video
Programme System) oder PDC-Signalen (Programme
Delivery Control) übertragen. Diese Signale erlauben
die exakte Steuerung des Aufnahmestarts und stopps, ganz gleich, mit wieviel Verspätung die
Programme gesendet werden. Ihr Videorecorder
erkennt diese Steuersignale.
GESTEUERTERAUFNAHMESTOP
VPS-
einer VPS-Sendung auf die Taste VPS drücken Der Aufnahmestop erfolgt dann genau zum Ende der
Sendung.
GESTEUERTERAUFNAHMEBEGINN
VPS-
auf Aufnahme-Pause schalten und dann auf die Taste
VPS drücken beginnt, startet der Videorecorder die Aufnahme.
SISTEMA VPS/PDC
Algunos programas difundidos por algunas emisoras
se transmiten con señales VPS (Vídeo Programme
System) o PDC (Programme Delivery Control). Estas
señales permiten un inicio o una parada precisa de una
grabación cualquiera que sea el retraso del programa.
Su vídeo reconoce estas señales.
G
RABACIÓN PARADA POR
una emisión VPS, pulse la tecla VPS -4 segundos .
La grabación se para cuando la emisión se termina
realmente.
RABACIÓN INICIADA POR
G
pausa/grabación y luego pulse la tecla VPS -4 segun-
dos .
Tan pronto comience la emisión VPS, el vídeo inicia la
grabación.
PERMANENTE WIEDERGABE/AUFNAHME
4 Sekunden
:Im Laufe der Aufnahme
4 Sekunden
.
: Den Videorecorder
. Sowie die VPS-Sendung
VPS. Durante la grabación de
VPS. Ponga el vídeo en
Bei dieser Einstellung wird am Ende der
Aufnahme/Wiedergabe die Kassette zurückgespult,
um die Wiedergabe/Aufnahme erneut zu beginnen.
A
BSPIELEN
: Drücken Sie 6 Sekunden auf die Taste PLAY
(auf der Vorderseite des Kombi TV-Videorecorders)
UFZEICHNEN
A
dann ca. 6 Sekunden auf PLAY (auf der Vorderseite des
Kombi TV-Videorecorders).
: Drücken Sie einmal auf die Taste REC.,
LECTURA / GRABACIÓN EN CIRCUITO
Ud puede leer o grabar permanentemente una cassette. Al final de ésta la cinta se rebobina hasta el
comienzo y se reanuda la lectura o la grabación
R
EPRODUCCIÓN
(en la cara delantera de su combi tv-vídeo
GRABACIÓN
6 segundos, la tecla PLAY (en la cara delantera de su
combi TV-Video).
: pulse durante 6 segundos la tecla PLAY
: pulse una vez la tecla REC. y luego, durante
MENU HOTEL
To display the menu, press simultaneously on the PR-,
STOP and on / off buttons (on the front of your Combi
TV-Video recorder).Adjust using the C, B, V, W, OK.
Press EXIT to quit the menu.
MENU HOTEL
Per visualizzare il menu,premete simultaneamente i tasti
PR-, Stop e Interruttore On/Off (situati sul lato anteriore del Videovision). Regolate a piacere per mezzo dei tasti
C, B, V,W, OK. Per uscire, premete EXIT.
30
MENÜ HOTEL
Um das Menü anzuzeigen, drücken Sie gleichzeitig auf die
Tasten PR, STOP und EIN/AUS (auf der Vorderseite des
Recorders). Durch Drücken der Tasten C, B, V, W, OK
erhalten Sie die gewünschten Einstellungen.
Drücken Sie EXIT um das Menü zu beenden.
MENÚ HOTEL
Para visualizar el menú, pulse simultáneamente las teclas
pr., stop y el interruptor de encendido/apagado que hay
en la carta delantera de su combi tv-vídeo. ajuste, según
su preferencia con ayuda de las teclas C, B, V, W, OK.
Teclee EXIT para salir.
Page 31

2 Combo(GB-D-IT-ES) 17/05/1999 20:01 Page 31
IDENTIFYING AND SOLVING PROBLEMS
FEHLERERKENNUNG UND ABHILFEMAßNAHMEN
SYMPTOMS
VCR set cannot be turned on. 1. Make sure the power cord plug is inserted in an AC power outlet.
Intermittent or no remote operation. 1.Aim the remote control directly at the Combi TV-video.Nothing should be blocking the remote
Snowy picture. Noisy sound. 1. Check your aerial or cable Combi TV-video connection.
Dotted lines or stripes Spotted picture 1.This may be caused by local interference (e.g. cars, neon signs, hair dryers, personal computer, audio
(crosstalk.) Lines or streaks in picture devices, handphone,radio stations, etc.).Try moving the interfering equipment or adjust the aerial antenna.
(interference).
Double images or“ghosts”. 1.A highly directional antenna may improve the Picture.This may be caused by reflections from nearby
Good picture. Noisy sound. 1. Check the transmission standard selected for the current Combi TV-video programme.
No picture. No. sound. 1. Ensure the power On/Off switch is on.
MESECAM If the PAL source is poor quality or if the PAL cassettes are old de-activate MESECAM.
Recording is impossible: 1.See if the safety tab of the cassette isn’t broken.
FEHLERERKENNUNG ABHILFEMAßNAHMEN
Der Videorecorder läßt sich nicht einschalten. 1. Prüfen, ob der Stecker des Netzkabels an die Steckdose angeschlossen ist.
Die Fernbedienung funktioniert mit
Unterbrechungen oder überhaupt nicht. zwischen der Fernbedienung und dem Kombi TV-videorecorder unterbrochen werden.
Bild mit “Schnee” Schlechte Tonqualität. 1. Überprüfen Sie den Anschluß der Antenne oder des Kabelnetzes am Kombi TV-videorecorder.
Gestrichelte Linien oder Streifen geflecktes Bild 1. Die Ursache hierfür können in der Nachbarschaft vorhandene Störquellen sein (z.B.Kraftfahrzeuge,
(Übersprechen) Striche oder Balken auf Neonschilder, Föhne, Computer, Audiogeräte, Handies, Rundfunksender usw.).Versuchen Sie, das die
dem Bild (Störungen). Störungen hervorrufende Gerät in größerer Entfernung vom Videorecorder aufzustellen oder ändern
Doppel- bzw.“Geisterbild”. 1. Eine Antenne mit besonderer Richtcharakteristik kann das Bild verbessern. Derartige Erscheinungen
Gutes Bild bei schlechter Tonqualität. 1. Prüfen Sie die für das laufende Fernsehprogramm am Kombi TV-videorecorder gewählte Empfangsnorm.
Kein Bild. Kein Ton 1.Vergewissern Sie sich, daß der Netzschalter auf Ein steht.
MESECAM Handelt es sich um eine qualitativ schlechte PAL-Aufzeichnung bzw.um alte PAL-Kasseten,MESECAM bitte
Das Aufzeichnen ist unmöglich: 1. Prüfen Sie, ob der Aufnahmeschutz der Cassette nicht herausgebrochen ist.
2. Ensure the Power On/Off switch is on.
control and the Combi TV-video.
2. Use new batteries.The batteries in the remote control may be weak or dead.
2. Check the antenna connection on the Combi TV-video and on the wall.
mountains or building.
2.Vergewissein Sie sich, daß der Netzschalter auf Ein steht.
1. Richten Sie die Fernbedienung auf den Kombi TV-videorecorder. Der Infrarotstrahl darf durch kein Hindernis
2.Wechseln Sie die Batterien der Fernbedienung, da diese vielleicht verbraucht sind.
2. Prüfen Sie, ob das Antennenkabel am Kombi TV-videorecorder und an der Hausantennenbuchse richtig angeschlossen ist.
Sie die Ausrichtung der Antenne.
können durch die Reflexion der in der Umgebung vorhandenen Berge oder Wohngebäude hervorgerufen werden.
2. Prüfen Sie den Antennenanschluß.
deaktivieren.
➞
SOLUTONS
unprotected
➞
protected
ENGLISH
DEUTSCH
nicht geschützt
➞
31
➞
geschützt
Page 32

2 Combo(GB-D-IT-ES) 17/05/1999 20:01 Page 32
IDENTIFICARE E RISOLVERE I PROBLEMI
IDENTIFICACIÓN Y SOLUCIÓN DE PROBLEMAS
SINTOMI INTERVENTI CORRETTIVI
Il videoregistratore non si accende. 1.Verificate che la presa del cavo sia inserita in una presa elettrica a corrente alternata.
2.Verificate che l’interruttore ON/OFF sia in posizione ON.
Il telecomando funziona in modo intermittente 1.Orientate il telecomando verso il videovision. Niente deve interrompere il fascio d’infrarossi tra
o non funziona affatto. il telecomando ed il videovision. 2. Cambiate le pile. Quelle del telecomando sono forse esaurite.
Immagine con effetto “neve” 1.Verificate i collegamenti del videovision all’antenna o al cavo.2.Verificate i collegamenti del cavo
Suono di qualità scadente. dell’antenna al videovision ed alla presa a muro.
Linee punteggiate o strisce Immagine a macchie 1. Ciò può essere dovuto ad interferenze nelle vicinanze (ad esempio,automobili, insegne al neon,
(diafonia) Linee o righe sull’immagine . asciuga-capelli, computer, apparecchi radio, telefonini, radiotrasmittenti ecc.). Provate ad allontanare
(interferenze) l’apparecchio che provoca le interferenze o regolate l’antenna.
Immagine doppia o immagine “fantasma”
L’immagine è buona ma il suono è di cattiva qualità.
Mancanza d’immagine. Mancanza di suono. 1.Verificate che l’interruttore ON/OFF sia in posizione ON.
MESECAM Se la fonte PAL è di qualità scadente o se le cassette PAL sono vecchie, disattivate MESECAM.
Non è possibile registrare. 1.Verificate che la linguetta di protezione della cassettanon sia rotta.
1. Un’antenna direzionale potrebbe migliorare l’immagine. Questi fenomeni possono essere dovuti all’effetto
di riflessione provocato dalle montagne o dai palazzi nei dintorni.
1.Verificate la norma di trasmissione selezionata per il programma in corso sul videovision.
2.Verificate il collegamento dell’antenna
non protetta
➞
SÍNTOMA CORRECIÓN
El vídeo no se enciende. 1. Compruebe que el enchufe de la toma de red está conectado a la toma de corriente.
El mando a distancia no funciona o funciona
--de forma intermitente.
Imagen con nieve. Mala calidad del sonido. 1. Compruebe la conexión del combi TV-vídeo a la antena o al cable.
Líneas de puntos o bandas. Manchas en la imagen
(diafonía). Líneas o rayas sobre la imagen de pelo, ordenadores, aparatos de audio, teléfonos móviles, emisoras de radio, etc.) Intente retirar el
(interferencias). aparato que origine las interferencias o ajustar la antena.
Imagen doble o “fantasma”. 1. Una antena direccional puede mejorar la imagen. Estos fenómenos pueden estar provocados por
La imagen es buena pero el sonido es
de mala calidad. estas anomalías.
ITALIANOESPAÑOL
No hay imagen ni sonido. 1. Compruebe que el interruptor de Encendido/Apagado está en posición de Encendido.
MESECAM Si la fuente PAL es de mala calidad o si las cintas PAL son viejas, debe desactivar MESECAM.
No se puede grabar. 1. Compruebe que la lengüeta de protección de la cinta no está rota.
2. Compruebe que el interruptor Encendido/Apagado se encuentra en posición de Encendido.
1. Dirija el mando a distancia directamente hacia el combi TV-vídeo. No debe haber nada que pueda bloquear los
rayos infrarrojos entre el mando a distancia y el combi TV-vídeo. 2. Cambie las pilas; las de su mando a distancia
pueden estar gastadas.
2. Compruebe la conexión del cable de la antena al combi TV-vídeo y a la toma de la pared.
1. Esto puede deberse a interferencias locales (por ejemplo,coches, rótulos de neón,secadores
reflejos de montañas o edificios cercanos.
1. Compruebe la norma de transmisión seleccionada en el combi TV-vídeo para el canal de TV en que se producen
2. Compruebe la conexión de la antena.
no protegida
➞
32
EUROCOMBO 99/COMIDOC/SC/GB-D-IT-ES/0399
protetta
➞
protegida
➞
Page 33

2 Combo(GB-D-IT-ES) 17/05/1999 20:01 Page Couv3
CARATTERISTICHE tecniche
Alimentazione elettrica da 220 a 240 V -50Hz
Potenza consumata
Autonomia orologio 30 minuti circa
Temperatura di funzionamento + 10°C a + 45°C - unmidita' ambiente dell'75% al massimo
Testine rotanti : video 2
Tuner Tipo PLL, FST
Bande di ricezione I-III-IV Hertziane (antenna)
Gamme di frequenza Banda I : 48.25 a 116.75 MHz
Sistema colore e norma PAL-SECAM-B/G-LL'-MESECAM
Numero di canali memorizzabili 99
Dimensioni dello schermo 14"(36 cm) 14CB10 C, 14"(36 cm) 14CB15 CT, 14"(36 cm) 14CB15 FT,
Audio 3.0 WRMS
Telecomando Infrarossi-Batterie 2x1.5 V(AA)
Si dichiara che il televisore a colori con videoregistratore incorporato,
marca THOMSON, SABA, modellos 14"(36 cm) 14CB10 C, 14"(36 cm) 14CB15 CT,
14"(36 cm) 14CB15 FT, 14"(36 cm) 14CB25 CT, 14"(36 cm) 14CB25 FT, 14"(36 cm),
14CD25FT, 14"(36 cm) C3610C, 14"(36 cm) C3610F, 20"(51 cm) 20CB20C,
20"(51 cm) C5110F, 20"(51 cm) 20CB25FT, 21"(55 cm) 21CB25FT,
risponde alle precrizioni dell' Art.2 comma 1 del D.M. 28Agosto 1995, no 548.
THOMSON multimedia-Italia S.p.A. - Via L.Da Vinci, 43 - 20090 Trezzano sul Naviglio (MI)
20" (51cm) : 65 watt in funzione (circa)
14" (36cm) : 45 watt in funzione (circa)
Inter-banda (via cavo)
Iper-banda (via cavo)
Banda III: 119.25 a 399.25 MHz
Banda IV: 407.25 a 863.25 MHz
14"(36 cm) 14CB25 CT, 14"(36 cm) 14CB25 FT, 14"(36 cm) 14CD25FT,
14"(36 cm) C3610C, 14"(36 cm) C3610F, 20"(51 cm) 20CB20C,
20"(51 cm) C5110F, 20"(51 cm) 20CB25FT
DICHIARAZIONE DI CONFORMITA
Fatto a MILANO, il 1/7/99.
, 21"(55 cm) 21CB25FT
El que suscribe, en nombre y representación TTT declara bajo
DECLARATION DE CONFORMIDAD CON NORMAS
su propia responsabilidad que el:
objeto de esta declaración, cumple con la normativa siguiente:
- Artículo 9.2 del Reglamento Técnico del Servicio de Difusión
de Televisión aprobado en el Real Decreto 1160/89.
- Anexo V del Reglamento sobre perturbaciones radioeléctricas
aprobado en el Real Decreto 138/89
Equipo: Combi TV-vídeo
Fabricado por:
THOMSON TELEVISION
THAILAND CO LTD
En: THAILAND
Marca: THOMSON, SABA
Modelos: 14"(36 cm) 14CB10 C, 14"(36 cm) 14CB15 CT, 14"(36
cm) 14CB15 FT, 14"(36 cm) 14CB25 CT, 14"(36 cm)
14CB25 FT, 14"(36 cm) 14CD25FT, 14"(36 cm) C3610C,
14"(36 cm) C3610F, 20"(51 cm) 20CB20C, 20"(51 cm)
C5110F,
20"(51 cm) 20CB25FT, 21"(55 cm) 21CB25FT
Quality Assurance Manager
 Loading...