

THOMAS SABO KE1890-415-40-L42v, KE1890-415-40-L50v, KE1890-415-40-L60, KE1890-415-40-L70, KE1890-415-40-L80 operation manual
...Page 1

WWW.THOM ASSABO.C OM
TS_instruction_manual_watches-8.indd 1-2 16.07.13 10:15
Page 2
CONTENTS
2 Deutsch
16 English
30 Français
44 Español
58 Italiano
72 Traditional Chinese(繁體中文)
86 Simplified Chinese(简体中文)
100 Русский язык
115 International Guarantee
1
TS_instruction_manual_watches-8.indd 1-1TS_instruction_manual_watches-8.indd 1-1 16.07.13 10:1516.07.13 10:15
Page 3
Deutsch Deutsch
INTERNATIONALE GARANTIE
Auf Ihre THOMAS SABO Uhr haben Sie eine Garantie von 24 Monaten ab
dem Kauftag hinsichtlich Materialdefekten und Verarbeitungsfehlern.
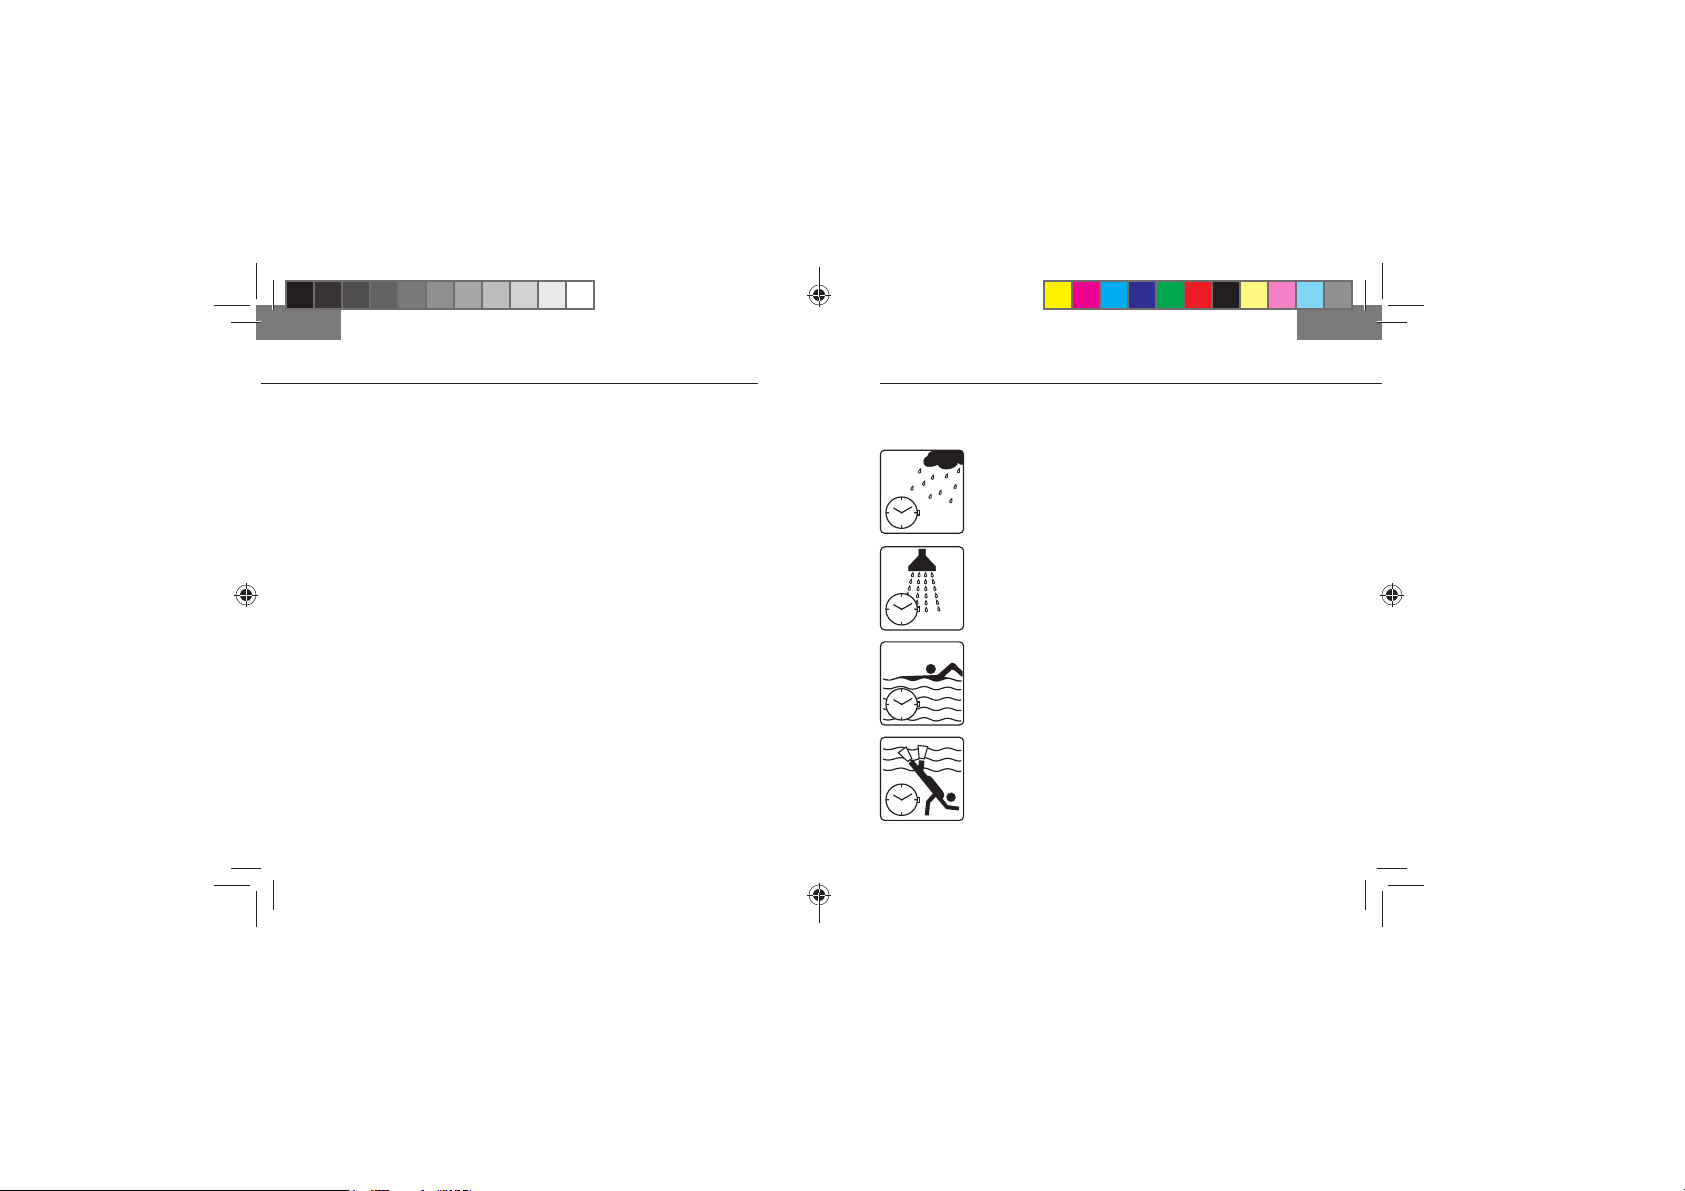
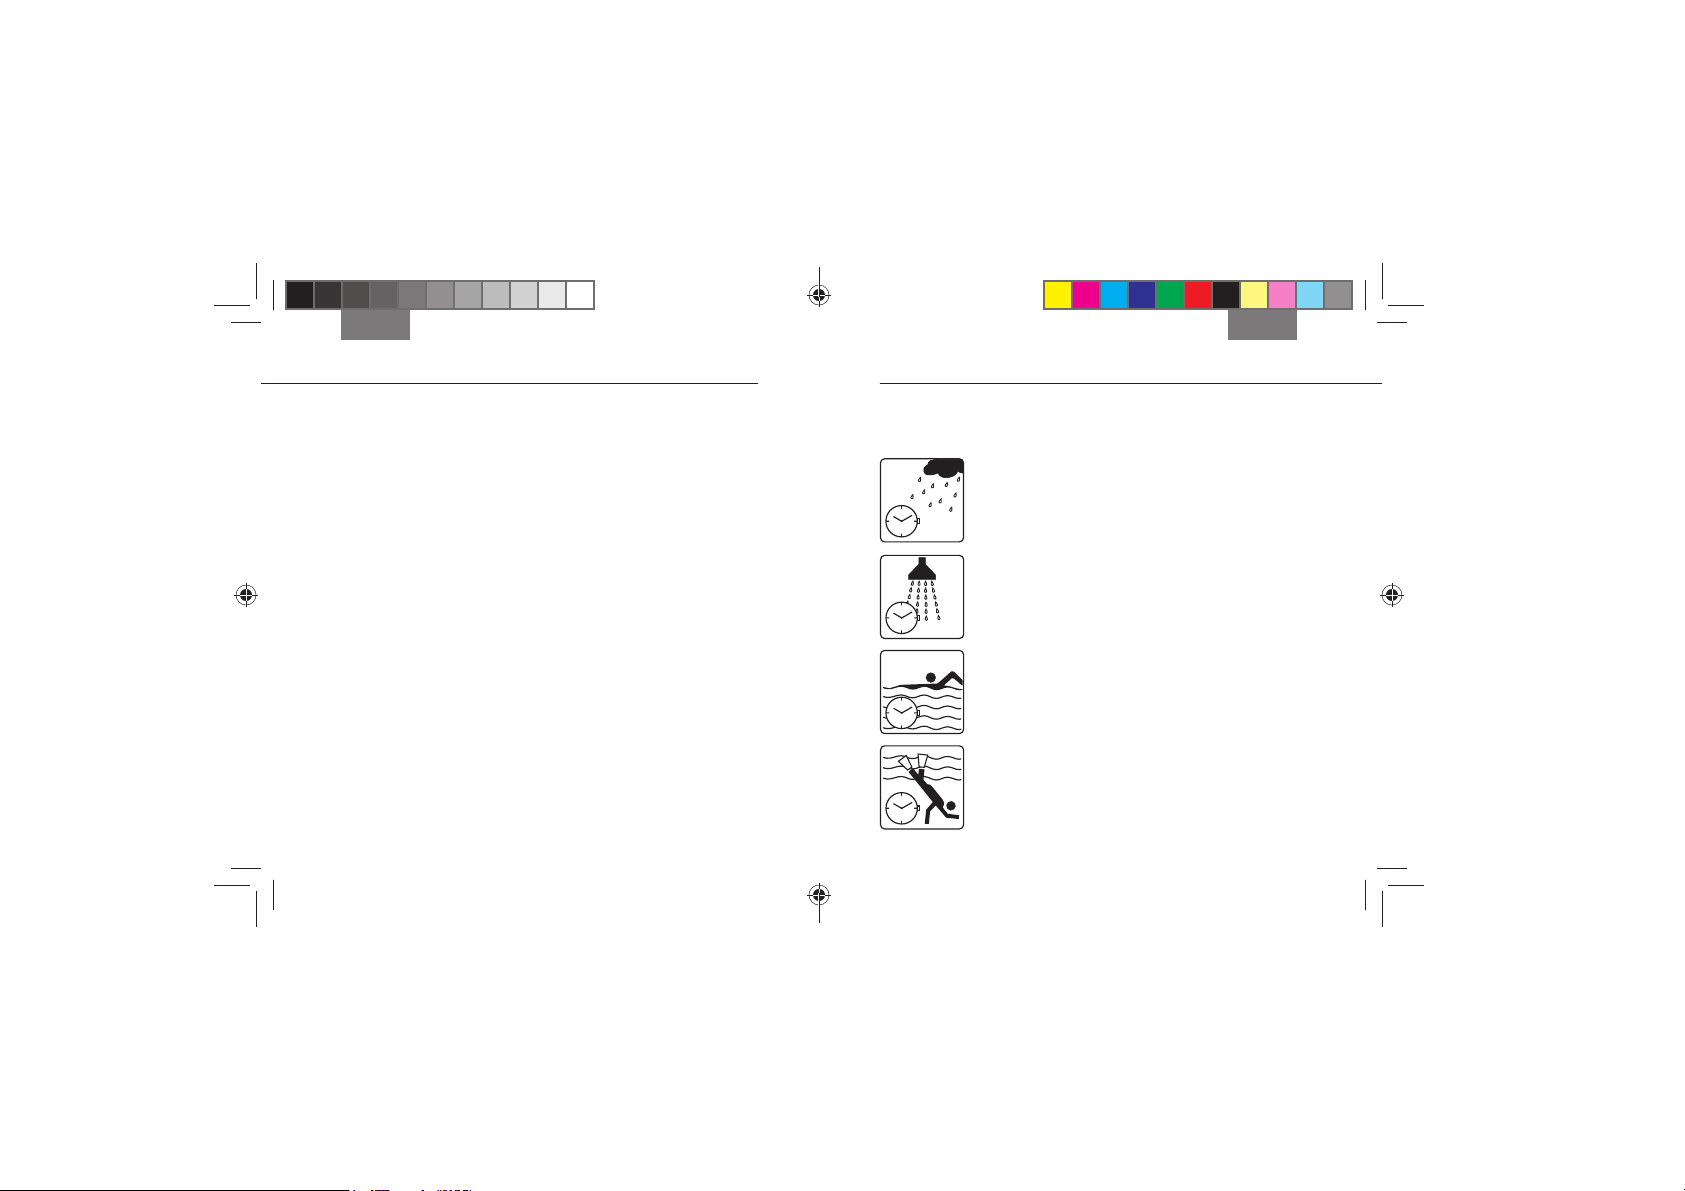
BENUTZUNGSBEISPIELE
Ihre THOMAS SABO Uhr hat eine modellabhängige Wasserdichte. Diese
Angabe finden Sie auf dem Gehäuseboden und hat folgende Bedeutung:
Voraussetzung ist, dass Sie als Verbraucher die Uhr in einer THOMAS SABO
eigenen Verkaufsstelle oder im THOMAS SABO Online-Shop gekauft
haben. Garantiegeber ist die THOMAS SABO GmbH & Co. KG, MartinLuther-Str. 20, 91207 Lauf, Deutschland.
Wasserdicht 1 ATM
Wasserspritzer, Regen
Bitte beachten Sie, dass THOMAS SABO Uhren, die bei einem autorisierten
Fachgeschäft gekauft wurden, auch dort unter Abgabe des ausgefüllten
Garantiescheins eingereicht werden müssen und nicht bei THOMAS SABO
direkt eingeschickt werden können. Um diese Garantie in Anspruch zu
Wasserdicht 5 ATM
Baden, Waschen, Duschen
nehmen, legen Sie bitte das internationale Garantiezertifikat vor – ausgefüllt
von einem THOMAS SABO Shop oder einem autorisierten THOMAS SABO
Händler, datiert, unterschrieben und gestempelt. Bitte bewahren Sie dieses
Zertifikat sicher auf. Diese Garantie gilt nur unter der Voraussetzung, dass
von THOMAS SABO anerkannte Batterien verwendet werden. Ihre Uhr ist
mit einem Quarzwerk ausgestattet. Die Garantie besteht nicht bei unsach-
Wasserdicht 10 ATM
Schwimmen, Schnorcheln
gemäßem Gebrauch, Fremdreparatur, nachlässiger Behandlung,
Verschleiß, Beschädigungen durch den üblichen Gebrauch, Missbrauch
oder bei Schäden z. B. durch einen Unfall. Ausgenommen von dieser
Garantie sind Verschleißteile wie Armbänder und Batterien.
Wasserdicht 20 ATM
Freitauchen
Die Rechte im Rahmen der gesetzlichen Gewährleistung gemäß den
nationalen Gesetzen werden durch die Garantie nicht ersetzt oder eingeschränkt.
2 3
TS_instruction_manual_watches-8.indd 2-3TS_instruction_manual_watches-8.indd 2-3 16.07.13 10:1516.07.13 10:15
Page 4
Deutsch Deutsch
KUNDENINFORMATION
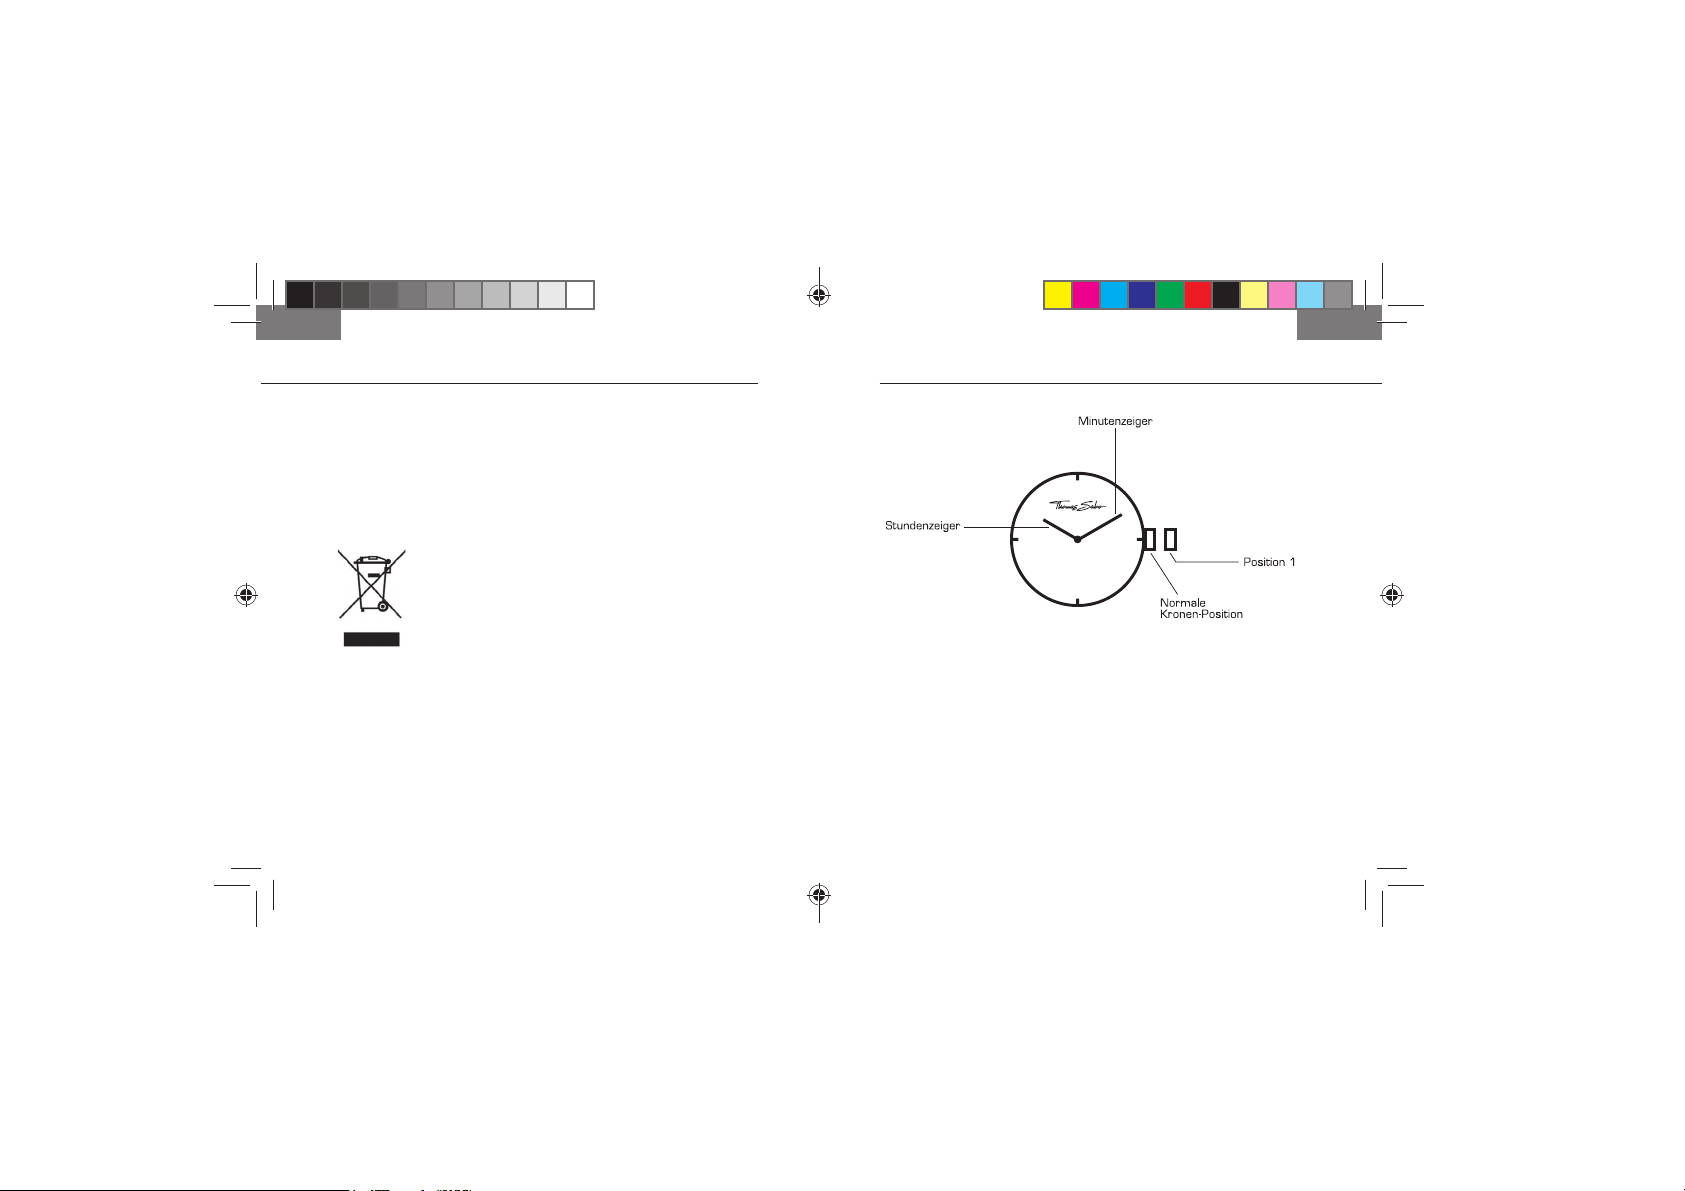
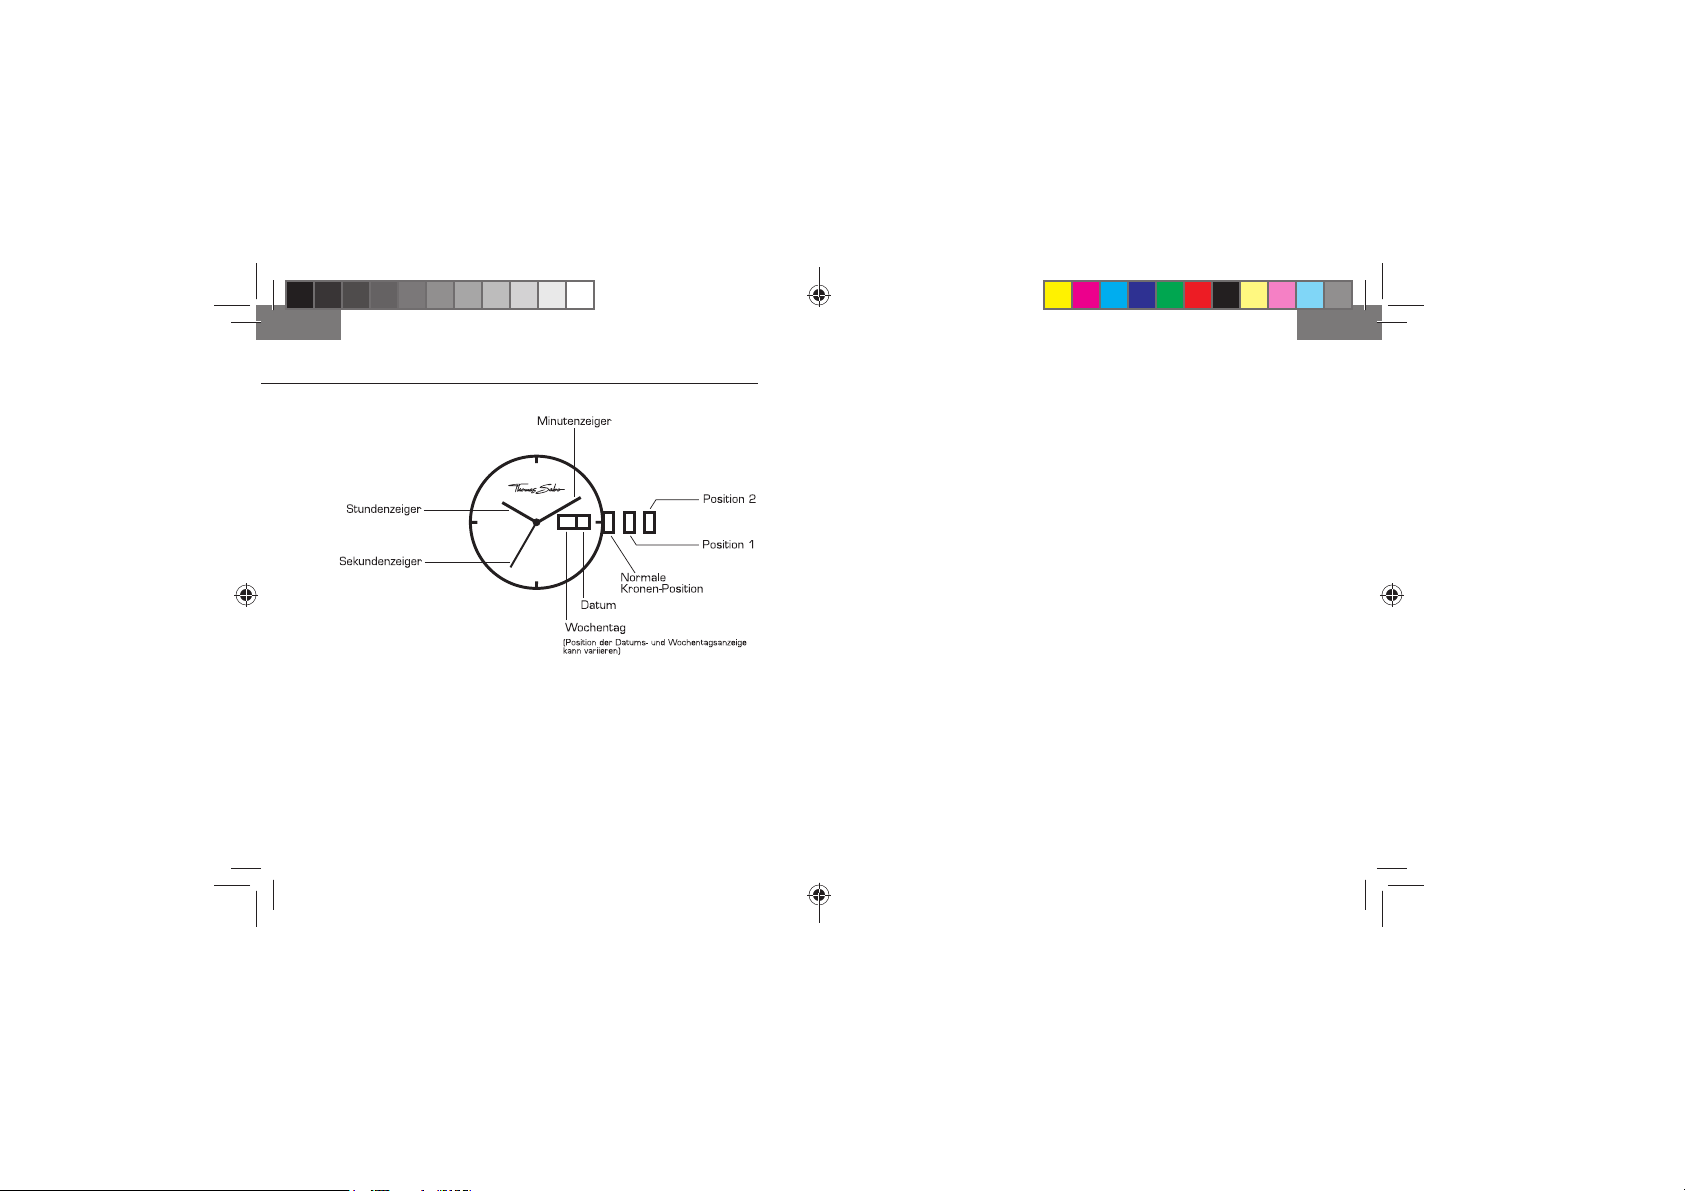
1. ZWEIZEIGER-UHR
Dieses Produkt von THOMAS SABO unterliegt der Richtlinie 2002/96/EG
des Europäischen Parlaments und des Rates über Elektro- und ElektronikAltgeräte bzw. dem deutschen Elektro- und Elektronikgerätegesetz
(ElektroG). Dieses Gerät ist nach dem 13.08.2005 in den Handel
gekommen und darf nicht im Rahmen des normalen Hausmülls entsorgt
werden. Nutzen Sie zur Entsorgung dieses Geräts bitte die entsprechenden
Rücknahmesysteme Ihrer Gemeinde und beachten Sie auch alle weiteren
Vorschriften in diesem Zusammenhang.
ZEIT EINSTELLEN
1. Krone herausziehen auf Position 1.
2. Durch Drehen der Krone beide Zeiger einstellen.
3. Nach Zurückdrücken der Krone in die Normalposition beginnen die
Zeiger ihre Funktion.
4 5
TS_instruction_manual_watches-8.indd 4-5TS_instruction_manual_watches-8.indd 4-5 16.07.13 10:1516.07.13 10:15
Page 5
Deutsch Deutsch
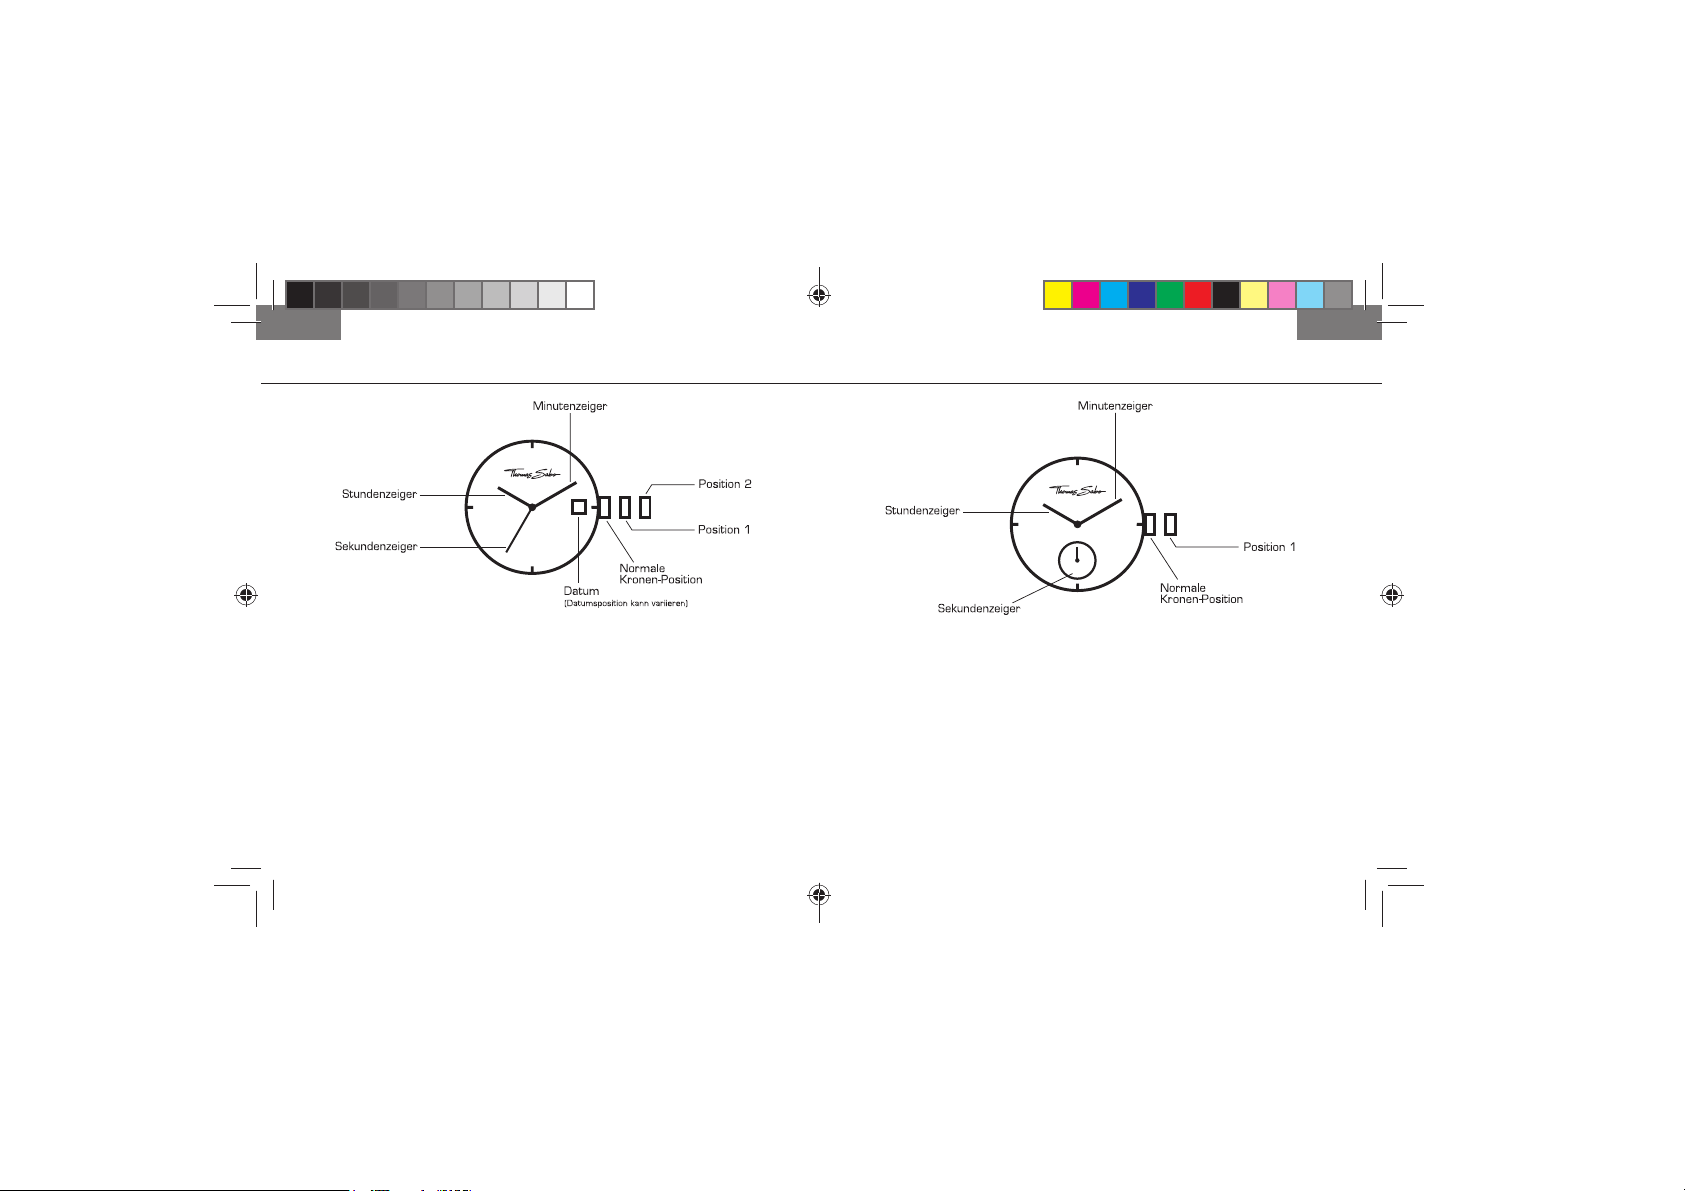
2. ZWEI- UND DREIZEIGER-UHR MIT DATUMSANZEIGE*
ZEIT EINSTELLEN
1. Krone herausziehen auf Position 2.
2. Durch Drehen der Krone Stunden- und Minutenzeiger einstellen.
3. Nach Zurückdrücken der Krone in die Normalposition beginnt der
Sekundenzeiger seine Funktion.
*Anleitung gilt auch für Modelle ohne Sekundenzeiger und Taschenuhren.
Achtung: Bei Taschenuhren befindet sich die Krone auf 12 Uhr.
3. DREIZEIGER-UHR MIT DEZENTRALER SEKUNDENANZEIGE
ZEIT EINSTELLEN
1. Krone herausziehen auf Position 1.
2. Durch Drehen der Krone Stunden- und Minutenzeiger einstellen.
3. Nach Zurückdrücken der Krone in die Normalposition beginnt der
Sekundenzeiger seine Funktion.
DATUM EINSTELLEN
1. Krone herausziehen auf Position 1.
2. Krone gegen den Uhrzeigersinn drehen, um das Datum
einzustellen. Wird das Datum zwischen 21:00 und 01:00 Uhr
eingestellt, wechselt das Datum am nächsten Tag evtl. nicht.
3. Krone in die Normalposition zurückdrücken.
6 7
TS_instruction_manual_watches-8.indd 6-7TS_instruction_manual_watches-8.indd 6-7 16.07.13 10:1516.07.13 10:15
Page 6
Deutsch Deutsch
4. DREIZEIGER-UHR MIT DATUMS- UND WOCHENTAGSANZEIGE
DATUM EINSTELLEN
1. Krone herausziehen auf Position 1.
2. Krone gegen den Uhrzeigersinn drehen, um das Datum
einzustellen. Wird das Datum zwischen 21:00 und 01:00 Uhr
eingestellt, wechselt das Datum am nächsten Tag evtl. nicht.
3. Krone in die Normalposition zurückdrücken.
WOCHENTAG EINSTELLEN
1. Krone herausziehen auf Position 1.
2. Krone im Uhrzeigersinn drehen, um den Wochentag einzustellen.
Wird die Einstellung zwischen 21:00 und 01:00 Uhr vorgenommen,
wechselt die Anzeige am nächsten Tag evtl. nicht.
3. Krone in die Normalposition zurückdrücken.
ZEIT EINSTELLEN
1. Krone herausziehen auf Position 2.
2. Durch Drehen der Krone Stunden- und Minutenzeiger einstellen.
3. Nach Zurückdrücken der Krone in die Normalposition beginnt der
Sekundenzeiger seine Funktion.
98
TS_instruction_manual_watches-8.indd 8-9TS_instruction_manual_watches-8.indd 8-9 16.07.13 10:1516.07.13 10:15
Page 7
Deutsch Deutsch
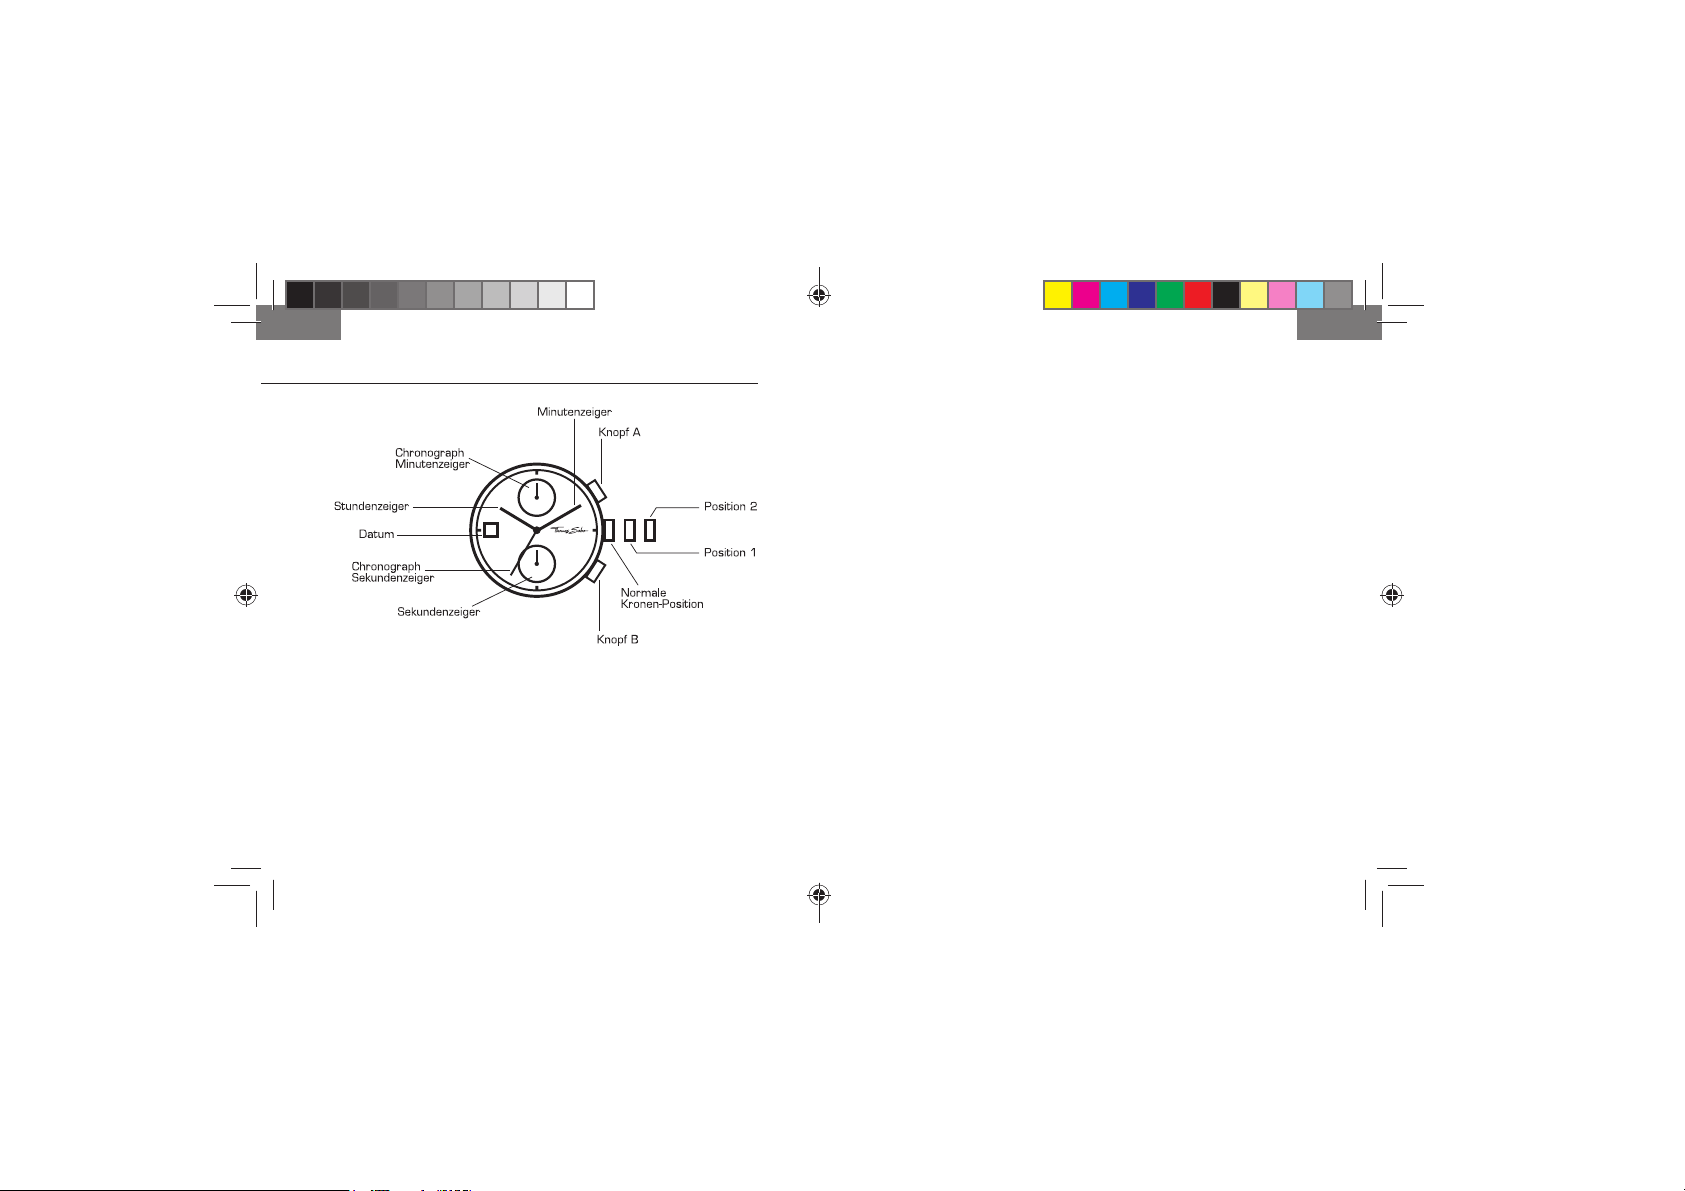
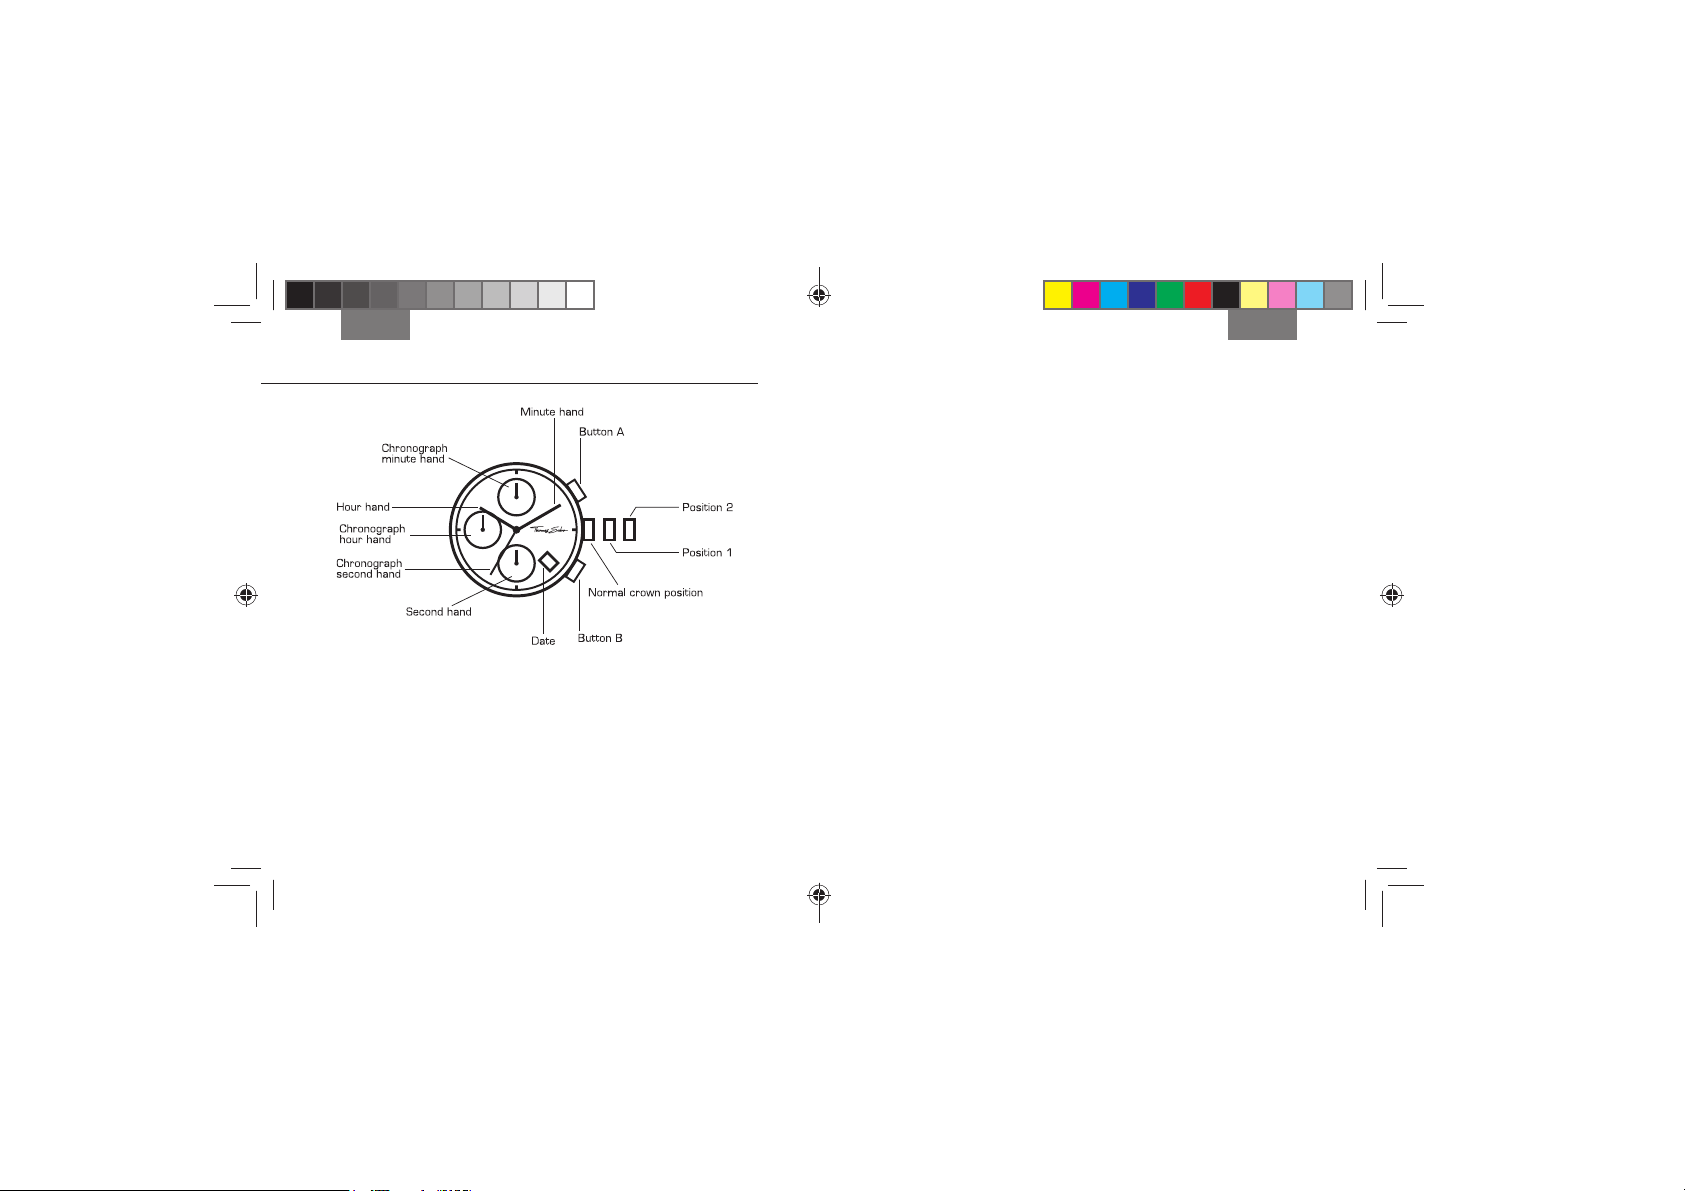
5. CHRONOGRAPH MIT ZWEI ANZEIGERN
DATUM EINSTELLEN
1. Krone herausziehen auf Position 1.
2. Krone gegen den Uhrzeigersinn drehen, um das Datum
einzustellen. Wird das Datum zwischen 21:00 und 01:00 Uhr
eingestellt, wechselt das Datum am nächsten Tag evtl. nicht.
3. Krone in die Normalposition zurückdrücken.
STOPPFUNKTION NUTZEN
Der Chronograph kann in 1/1-Sekunden-Einheiten Zeiten bis zu
59 Minuten und 59 Sekunden messen. Während dieser Zeit kreist der
Chronographen-Sekundenzeiger kontinuierlich.
1. Zum Starten und Stoppen des Chronographen Knopf A drücken.
2. Zum Zurückstellen Knopf B drücken. Die Chronographen-Zeiger
kehren in die Ausgangsposition zurück.
CHRONOGRAPH ZURÜCKSTELLEN (auch nach Batteriewechsel)
Dieser Vorgang sollte ausgeführt werden, wenn die Batterie
gewechselt wurde und/oder der Sekundenzeiger des Chronographen
ZEIT EINSTELLEN
1. Krone herausziehen auf Position 2.
2. Durch Drehen der Krone Stunden- und Minutenzeiger einstellen.
3. Nach Zurückdrücken der Krone in die Normalposition beginnt
der kleine Sekundenzeiger seine Funktion.
nach dem Zurückstellen nicht in die Ausgangsposition zurückkehrt.
1. Krone herausziehen auf Position 2.
2. Knopf A so lange drücken, bis der Sekundenzeiger des Chronogra-
phen in die Ausgangsposition zurückgekehrt ist.
3. Krone in die Normalposition zurückdrücken.
Achtung: Krone nicht zurückdrücken, solange der Zeiger in
Bewegung ist, da sonst die Ausgangsposition verstellt wird.
1110
TS_instruction_manual_watches-8.indd 10-11TS_instruction_manual_watches-8.indd 10-11 16.07.13 10:1516.07.13 10:15
Page 8

Deutsch Deutsch
6. CHRONOGRAPH MIT DREI ANZEIGERN
DATUM EINSTELLEN
1. Krone herausziehen auf Position 1.
2. Krone gegen den Uhrzeigersinn drehen, um das Datum
einzustellen. Wird das Datum zwischen 21:00 und 01:00 Uhr
eingestellt, wechselt das Datum am nächsten Tag evtl. nicht.
3. Krone in die Normalposition zurückdrücken.
STOPPFUNKTION NUTZEN
Der Chronograph kann in 1/1-Sekunden-Einheiten Zeiten bis zu
11 Stunden, 59 Minuten und 59 Sekunden messen. Während dieser
Zeit kreist der Chronographen-Sekundenzeiger kontinuierlich.
1. Zum Starten und Stoppen des Chronographen Knopf A drücken.
2. Zum Zurückstellen Knopf B drücken. Die Chronographen-Zeiger
kehren in die Ausgangsposition zurück.
CHRONOGRAPH ZURÜCKSTELLEN (auch nach Batteriewechsel)
Dieser Vorgang sollte ausgeführt werden, wenn die Batterie
gewechselt wurde und/oder der Sekundenzeiger des Chronographen
ZEIT EINSTELLEN
1. Krone herausziehen auf Position 2.
2. Durch Drehen der Krone Stunden- und Minutenzeiger einstellen.
3. Nach Zurückdrücken der Krone in die Normalposition beginnt
der kleine Sekundenzeiger seine Funktion.
nach dem Zurückstellen nicht in die Ausgangsposition zurückkehrt.
1. Krone herausziehen auf Position 2.
2. Knopf A so lange drücken, bis der Sekundenzeiger des Chronogra-
phen in die Ausgangsposition zurückgekehrt ist.
3. Krone in die Normalposition zurückdrücken.
Achtung: Krone nicht zurückdrücken, solange der Zeiger in Bewegung
ist, da sonst die Ausgangsposition verstellt wird.
12 13
TS_instruction_manual_watches-8.indd 12-13TS_instruction_manual_watches-8.indd 12-13 16.07.13 10:1516.07.13 10:15
Page 9
Deutsch Deutsch
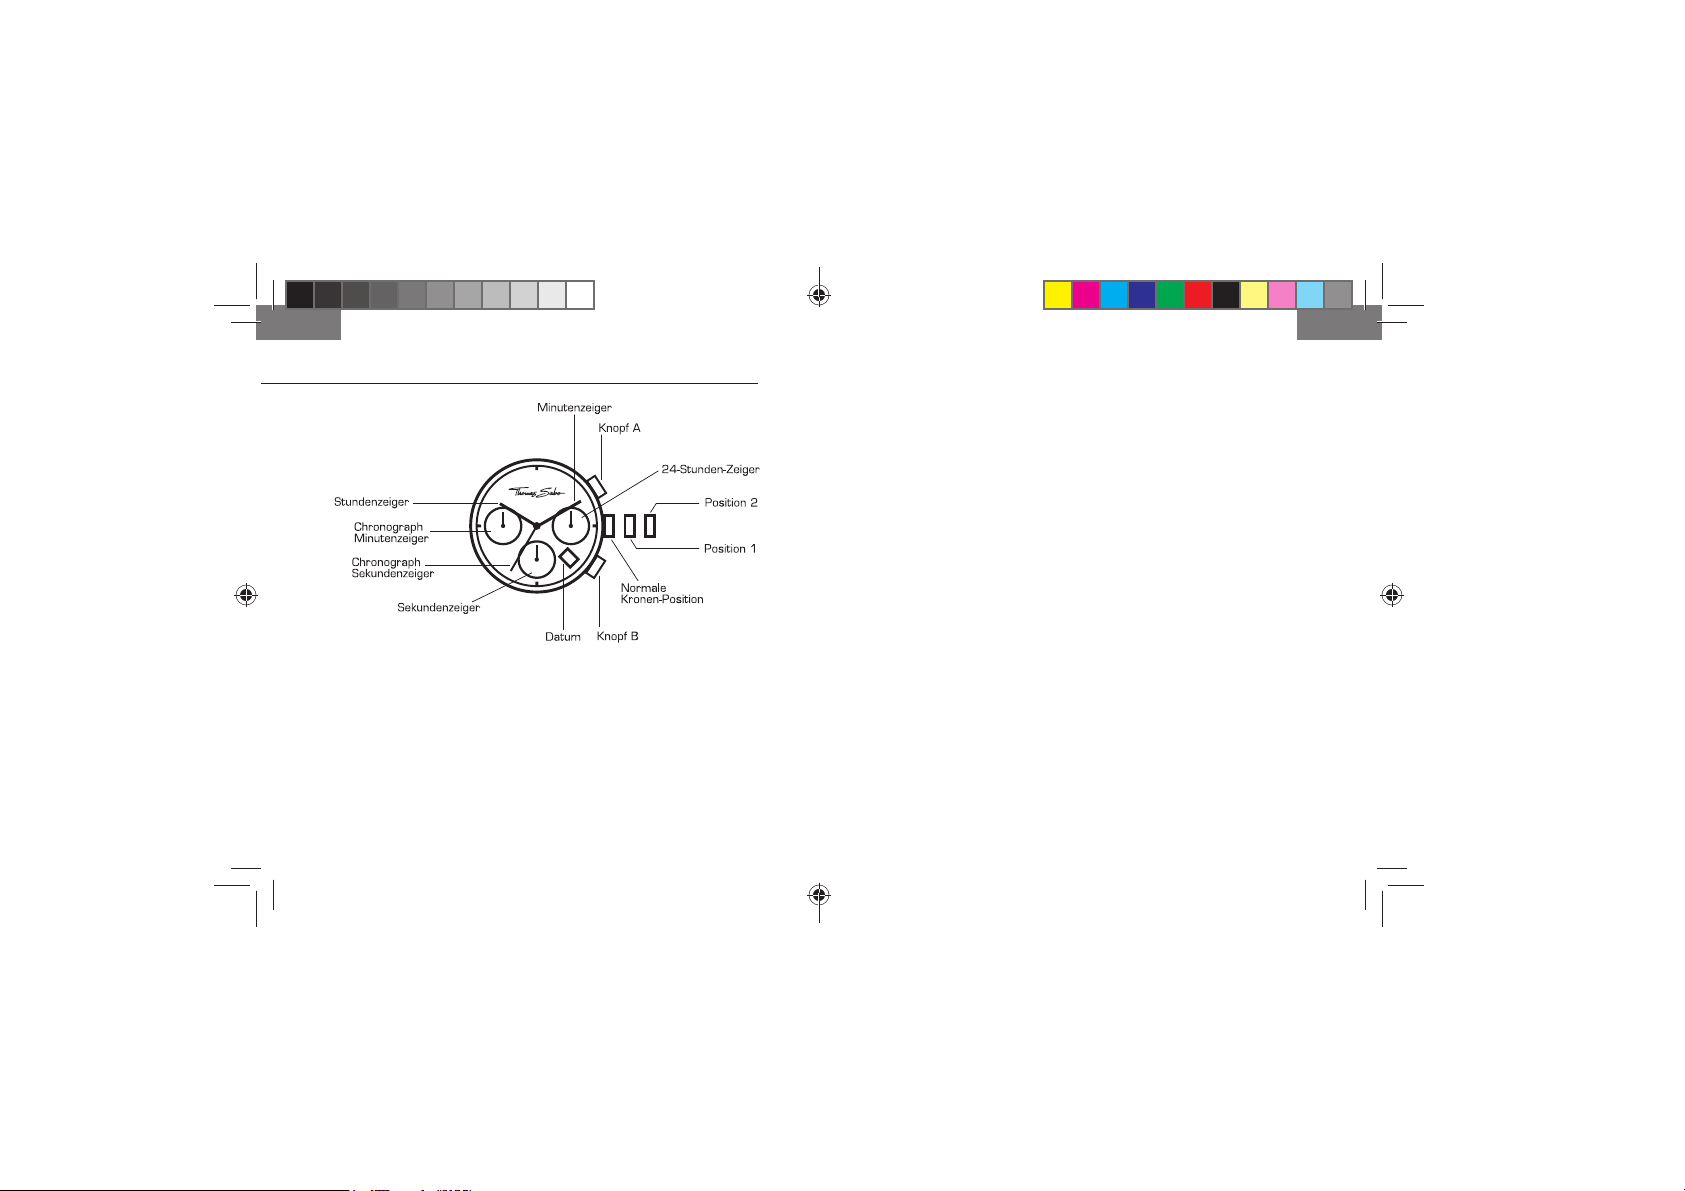
7. CHRONOGRAPH MIT DREI ANZEIGERN
DATUM EINSTELLEN
1. Krone herausziehen auf Position 1.
2. Krone gegen den Uhrzeigersinn drehen, um das Datum
einzustellen. Wird das Datum zwischen 21:00 und 01:00 Uhr
eingestellt, wechselt das Datum am nächsten Tag evtl. nicht.
3. Krone in die Normalposition zurückdrücken.
STOPPFUNKTION NUTZEN
Der Chronograph kann in 1/1-Sekunden-Einheiten Zeiten bis zu
59 Minuten und 59 Sekunden messen. Während dieser Zeit kreist der
Chronographen-Sekundenzeiger kontinuierlich.
1. Zum Starten und Stoppen des Chronographen Knopf A drücken.
2. Zum Zurückstellen Knopf B drücken. Die Chronographen-Zeiger
kehren in die Ausgangsposition zurück.
CHRONOGRAPH ZURÜCKSTELLEN (auch nach Batteriewechsel)
ZEIT EINSTELLEN
1. Krone herausziehen auf Position 2.
2. Durch Drehen der Krone Stunden- und Minutenzeiger einstellen.
3. Nach Zurückdrücken der Krone in die Normalposition beginnt der
kleine Sekundenzeiger seine Funktion.
24-STUNDEN-ZEIGER
Der separate 24-Stunden-Zeiger gibt die aktuelle Uhrzeit im Tag/NachtModus an. Diese Anzeige wird automatisch beim Einstellen der aktuellen Uhrzeit mit eingestellt.
Dieser Vorgang sollte ausgeführt werden, wenn die Batterie
gewechselt wurde und/oder der Sekundenzeiger des Chronographen
nach dem Zurückstellen nicht in die Ausgangsposition zurückkehrt.
1. Krone herausziehen auf Position 2.
2. Knopf A so lange drücken, bis der Sekundenzeiger
des Chronographen in die Ausgangsposition zurückgekehrt ist.
3. Krone in die Normalposition zurückdrücken.
Achtung: Krone nicht zurückdrücken, solange der Zeiger in
Bewegung ist, da sonst die Ausgangsposition verstellt wird.
14 15
TS_instruction_manual_watches-8.indd 14-15TS_instruction_manual_watches-8.indd 14-15 16.07.13 10:1516.07.13 10:15
Page 10
English English
INTERNATIONAL GUARANTEE
Your THOMAS SABO watch has a 24-month guarantee from the day of
purchase covering material defects and manufacturing faults.
The prerequisite for this is that you, as the consumer, purchased the
watch at a THOMAS SABO-owned outlet or at the THOMAS SABO Online
Shop. This guarantee is issued by THOMAS SABO GmbH & Co. KG, MartinLuther-Str. 20, D-91207 Lauf, Germany.
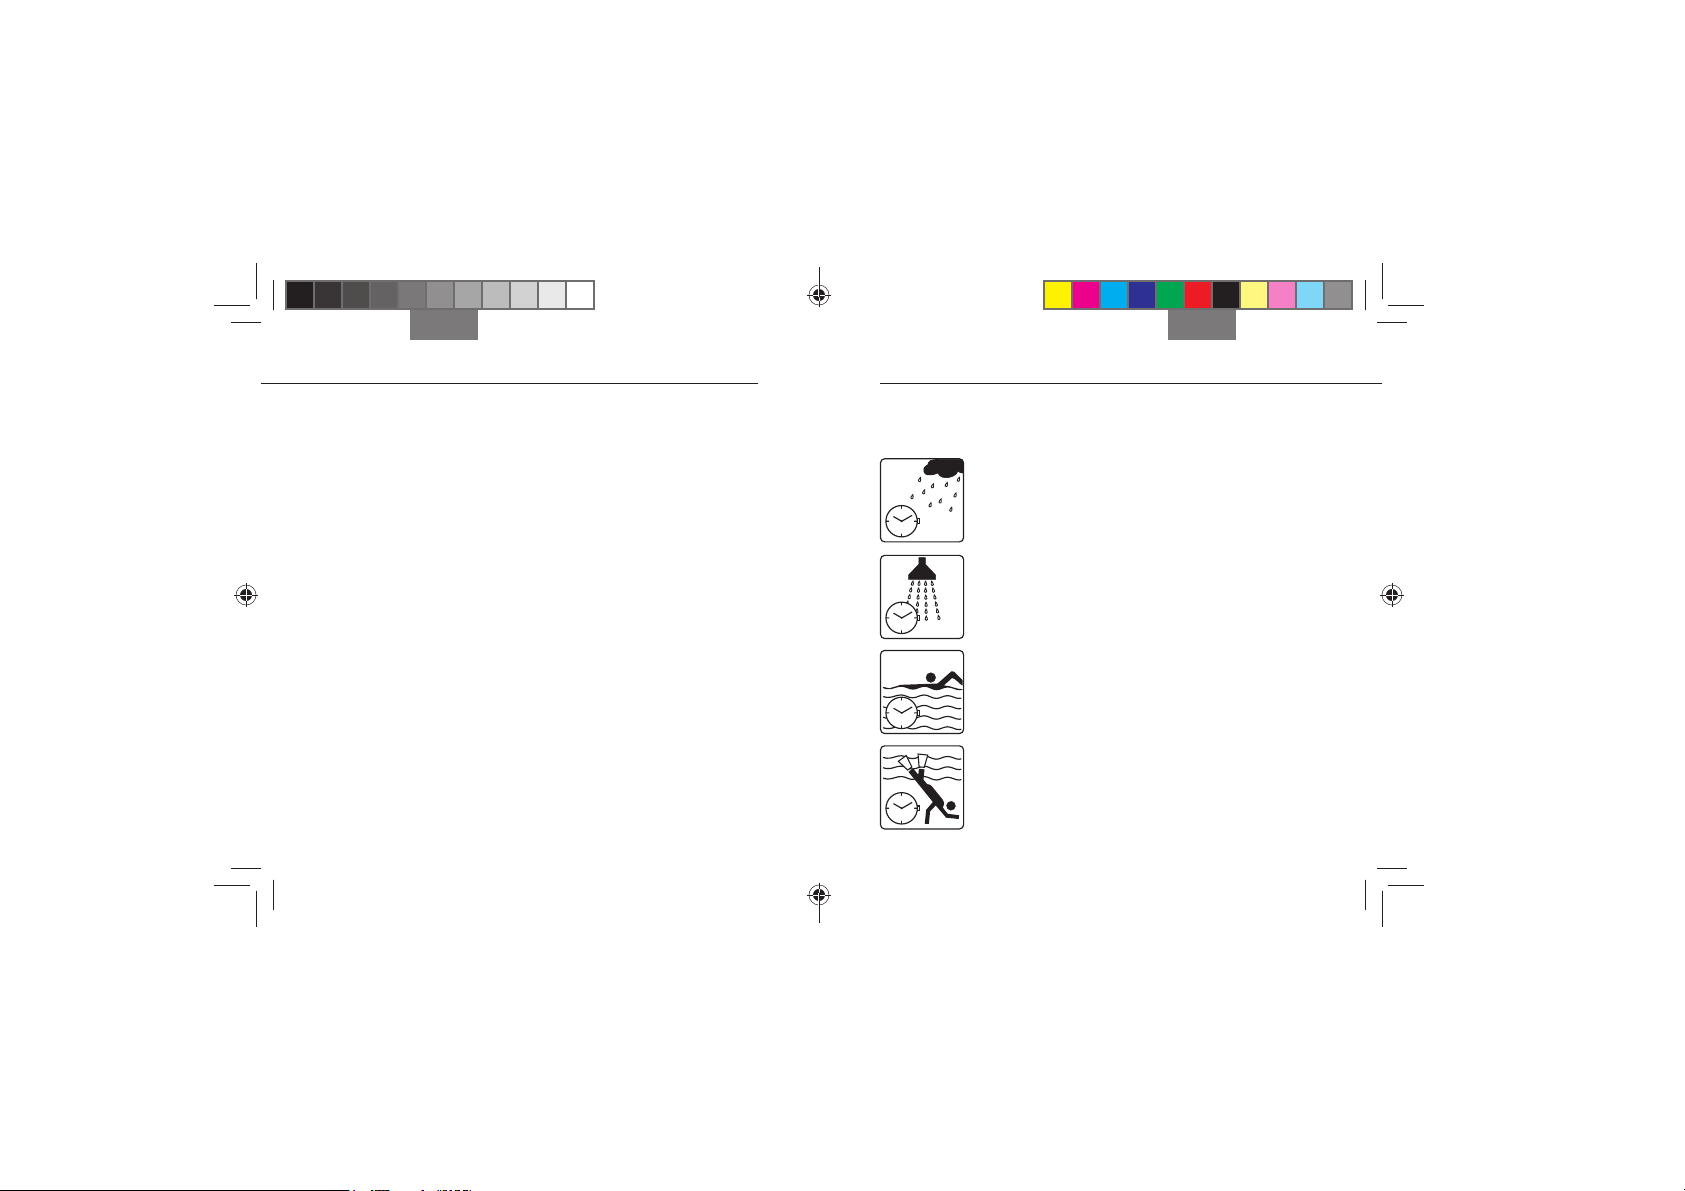
USAGE EXAMPLES
Depending on the model, your THOMAS SABO watch has a specific
water-proof rating. This information is on the back of the watch housing
and has the following meanings:
Water-proof to 1 ATM
Splashes, rain
Please note that THOMAS SABO watches purchased from an authorised
dealer must be returned to this same authorised dealer along with the
completed Guarantee Certificate and must not be sent to THOMAS SABO
directly. To take advantage of this, please present the International
Guarantee Certificate – dated, signed and stamped by a THOMAS SABO
Water-proof to 5 ATM
Bathing, washing, showering
Shop or an authorised THOMAS SABO dealer. Please keep this Certificate
in a safe place. This guarantee is only valid if batteries approved by
THOMAS SABO have been used. Your watch is equipped with a quartz
movement.
This guarantee is invalidated in the case of inappropriate usage, non-
Water-proof to 10 ATM
Swimming, snorkelling
THOMAS SABO repairs, careless handling, wear, damage caused by
normal usage, abuse or damage resulting, for example, from an accident.
Excluded from this guarantee are wear parts such as straps, bracelets and
batteries.
This guarantee does not replace or limit legal warranties in accordance with
Water-proof to 20 ATM
Diving
the valid laws of the respective country.
16 17
TS_instruction_manual_watches-8.indd 16-17TS_instruction_manual_watches-8.indd 16-17 16.07.13 10:1516.07.13 10:15
Page 11
English English
CONSUMER NOTICE
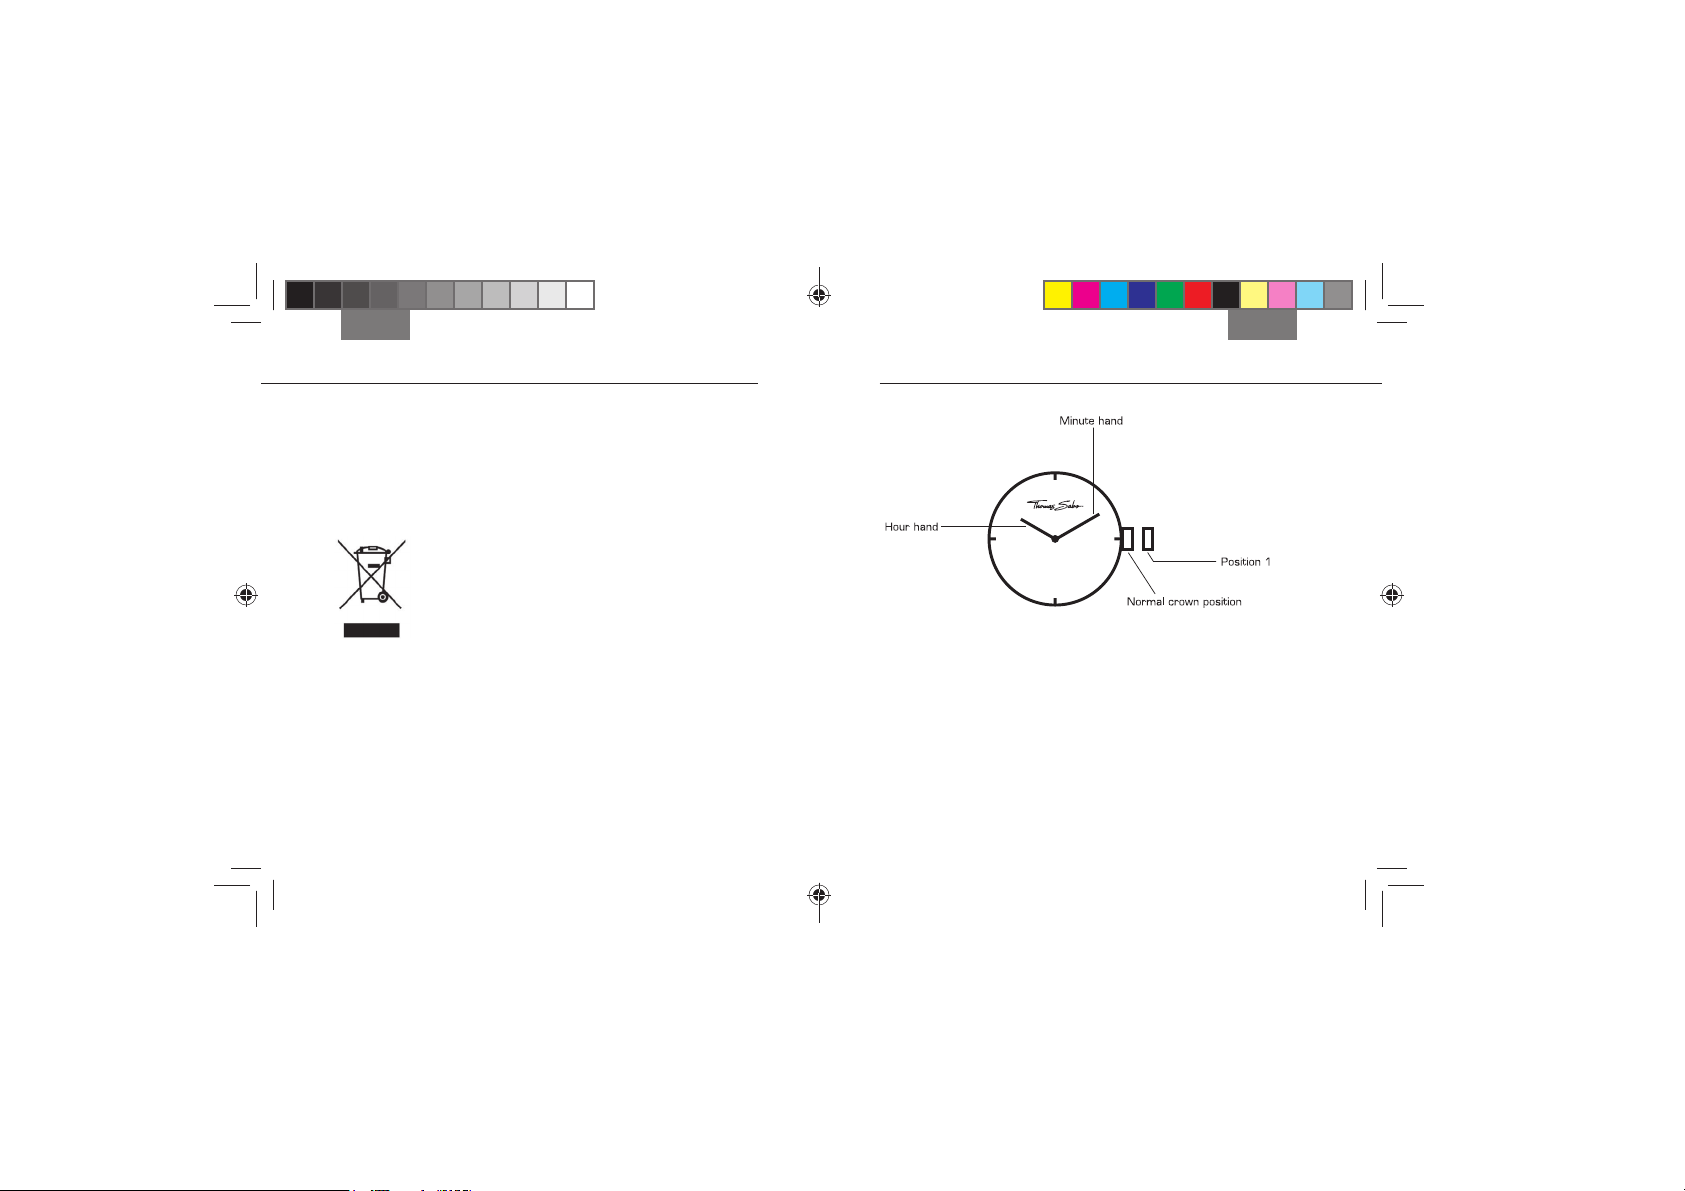
1. TWO-HAND WATCH
This THOMAS SABO product is subject to Directive 2002/96/EC of the
European Parliament and the Council of Europe on waste electrical and
electronic equipment, respectively the German Electrical and Electronic
Equipment Act (ElektroG). This product came on the market after August
13, 2005 and is not allowed to be disposed of with normal household
waste. Please use your local authority‘s return system for disposing of this
product and also comply with all other regulations in connection with this.
SETTING THE TIME
1. Pull the crown out to position 1.
2. Set both hands by turning the crown.
3. The hands will start operating once the crown has been
returned to the normal position.
18 19
TS_instruction_manual_watches-8.indd 18-19TS_instruction_manual_watches-8.indd 18-19 16.07.13 10:1516.07.13 10:15
Page 12
English English
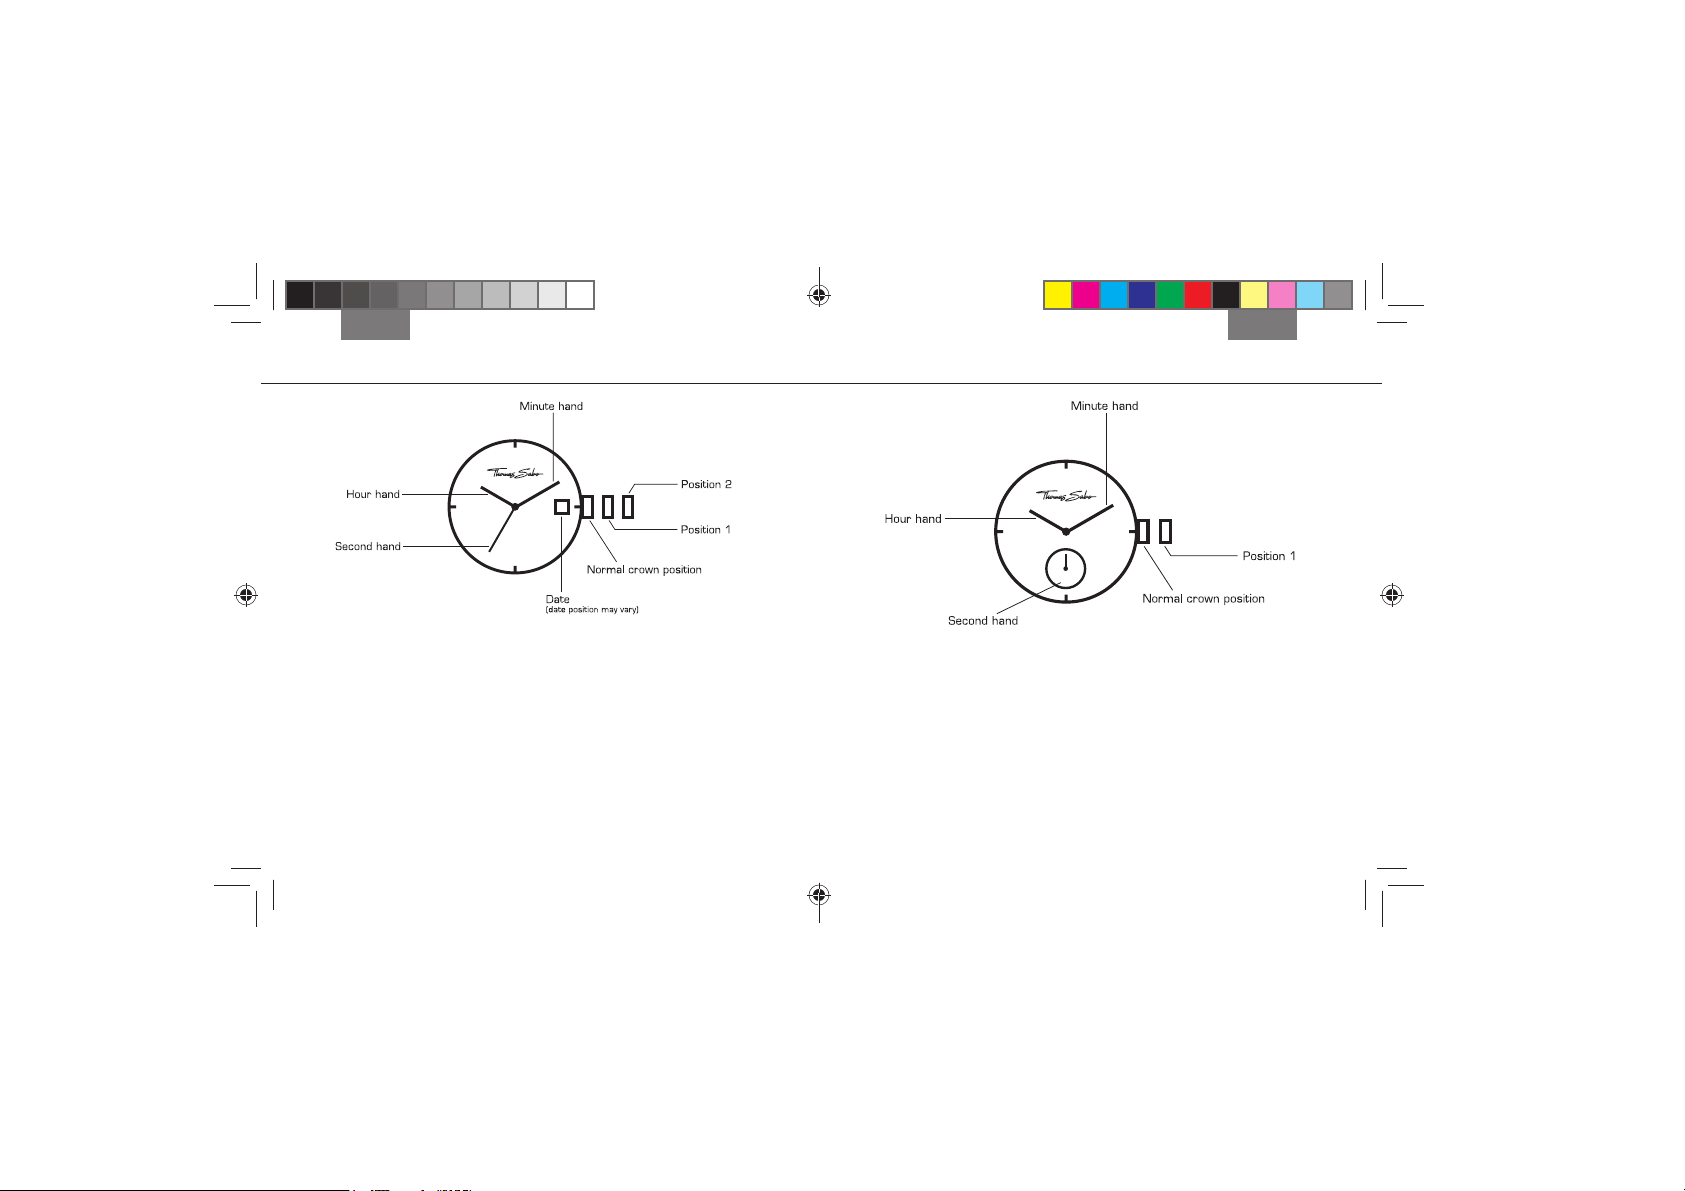
2. TWO- AND THREE-HAND WATCH WITH DATE DISPLAY*
SETTING THE TIME
1. Pull the crown out to position 2.
2. Set the hour and minute hands by turning the crown.
3. The second hand will start operating once the crown has been
returned to the normal position.
SETTING THE DATE
*Instructions also apply to models without a second hand and pocket watches.
Note: the crown is at the 12 o’clock position in the case of pocket watches.
3. THREE-HAND WATCH WITH DECENTRALISED SECOND
SETTING THE TIME
1. Pull the crown out to position 1.
2. Set the hour and minute hands by turning the crown.
3. The second hand will start operating once the crown has been
returned to the normal position.
1. Pull the crown out to position 1.
2. To set the date, turn the crown anticlockwise. Do not set the date
between 9 p.m. and 1 a.m. because the date may not correctly
switch over the following day.
3. Return the crown to the normal position.
2120
TS_instruction_manual_watches-8.indd 20-21TS_instruction_manual_watches-8.indd 20-21 16.07.13 10:1516.07.13 10:15
Page 13
English English
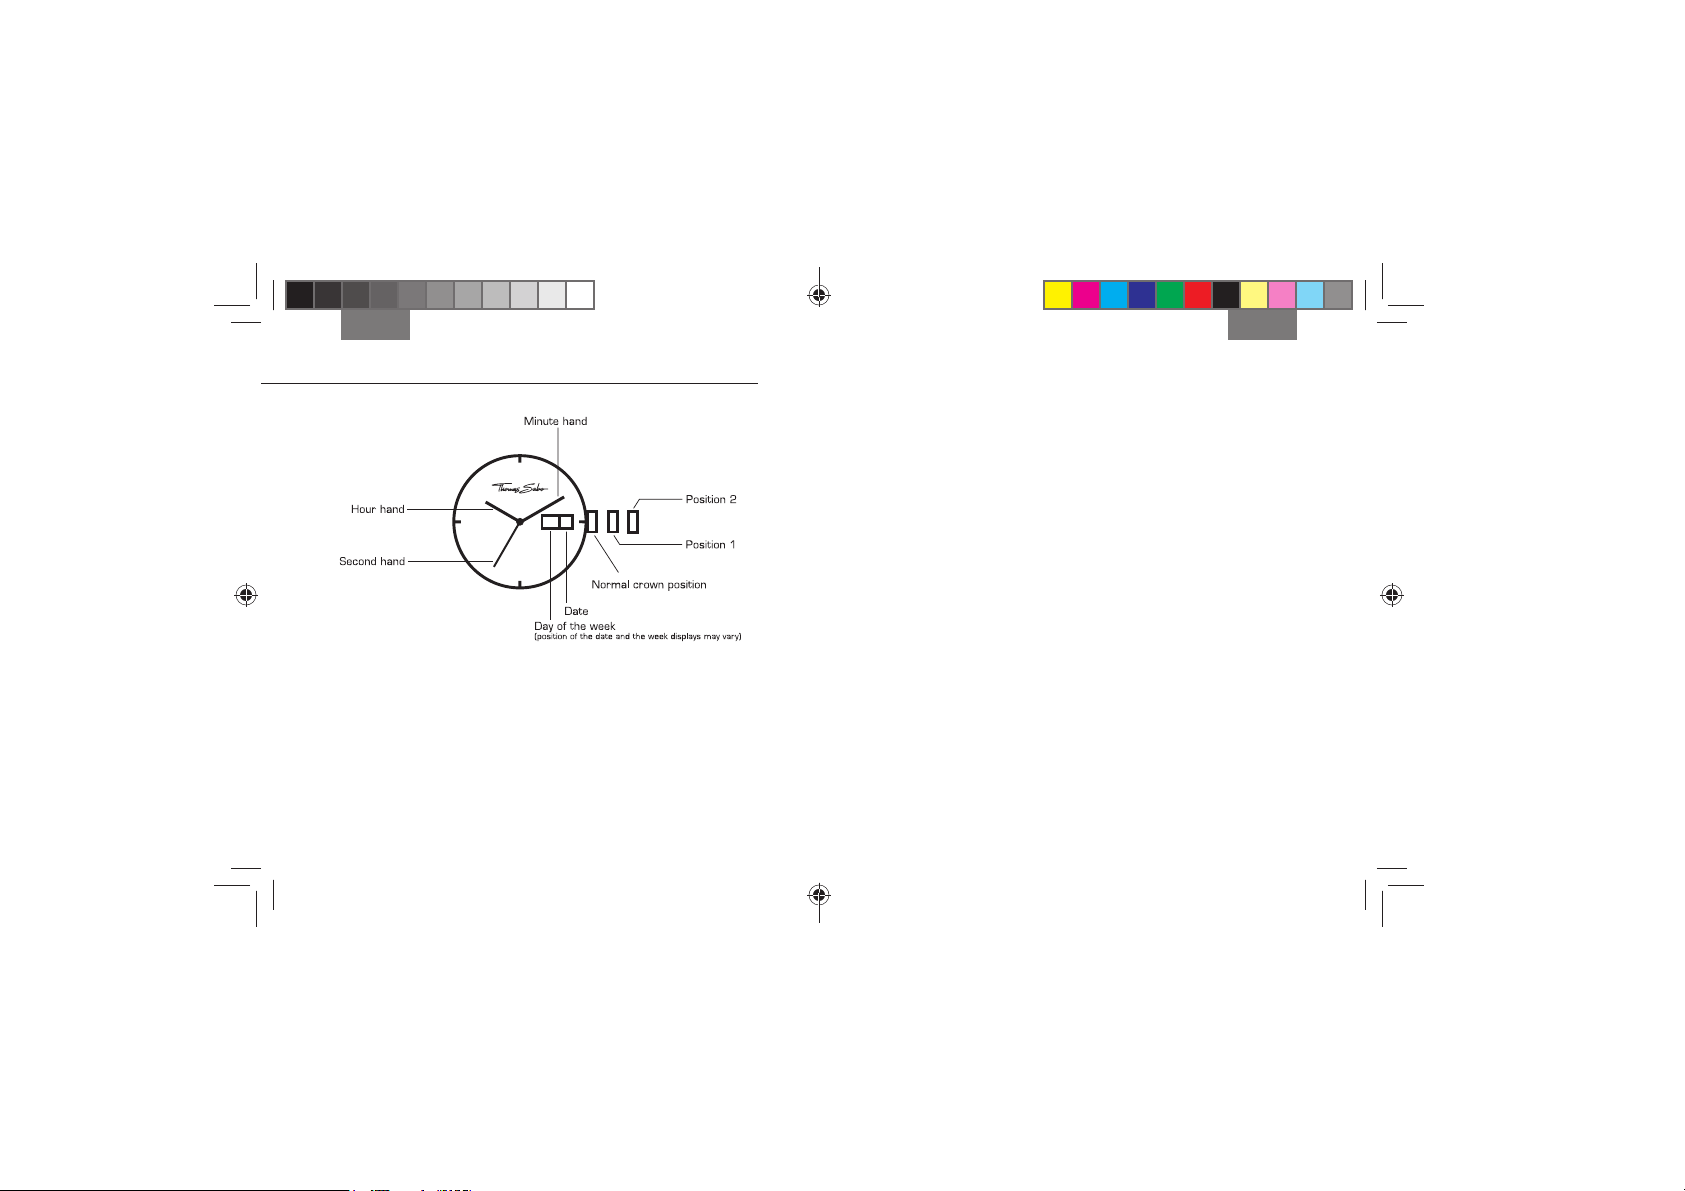
4. THREE-HAND WATCH WITH DATE AND DAY OF THE WEEK
DISPLAYS
SETTING THE DATE
1. Pull the crown out to position 1.
2. To set the date, turn the crown anticlockwise. Do not set the date
between 9 p.m. and 1 a.m. because the date may not correctly
switch over the following day.
3. Return the crown to the normal position.
SETTING THE DAY OF THE WEEK
1. Pull the crown out to position 1.
2. To set the day of the week, turn the crown clockwise. Do not set the
day between 9 p.m. and 1 a.m. because the date may not correctly
switch over the following day.
3. Return the crown to the normal position.
SETTING THE TIME
1. Pull the crown out to position 2.
2. Set the hour and minute hands by turning the crown.
3. The second hand will start operating once the crown has been
returned to the normal position.
2322
TS_instruction_manual_watches-8.indd 22-23TS_instruction_manual_watches-8.indd 22-23 16.07.13 10:1516.07.13 10:15
Page 14
English English
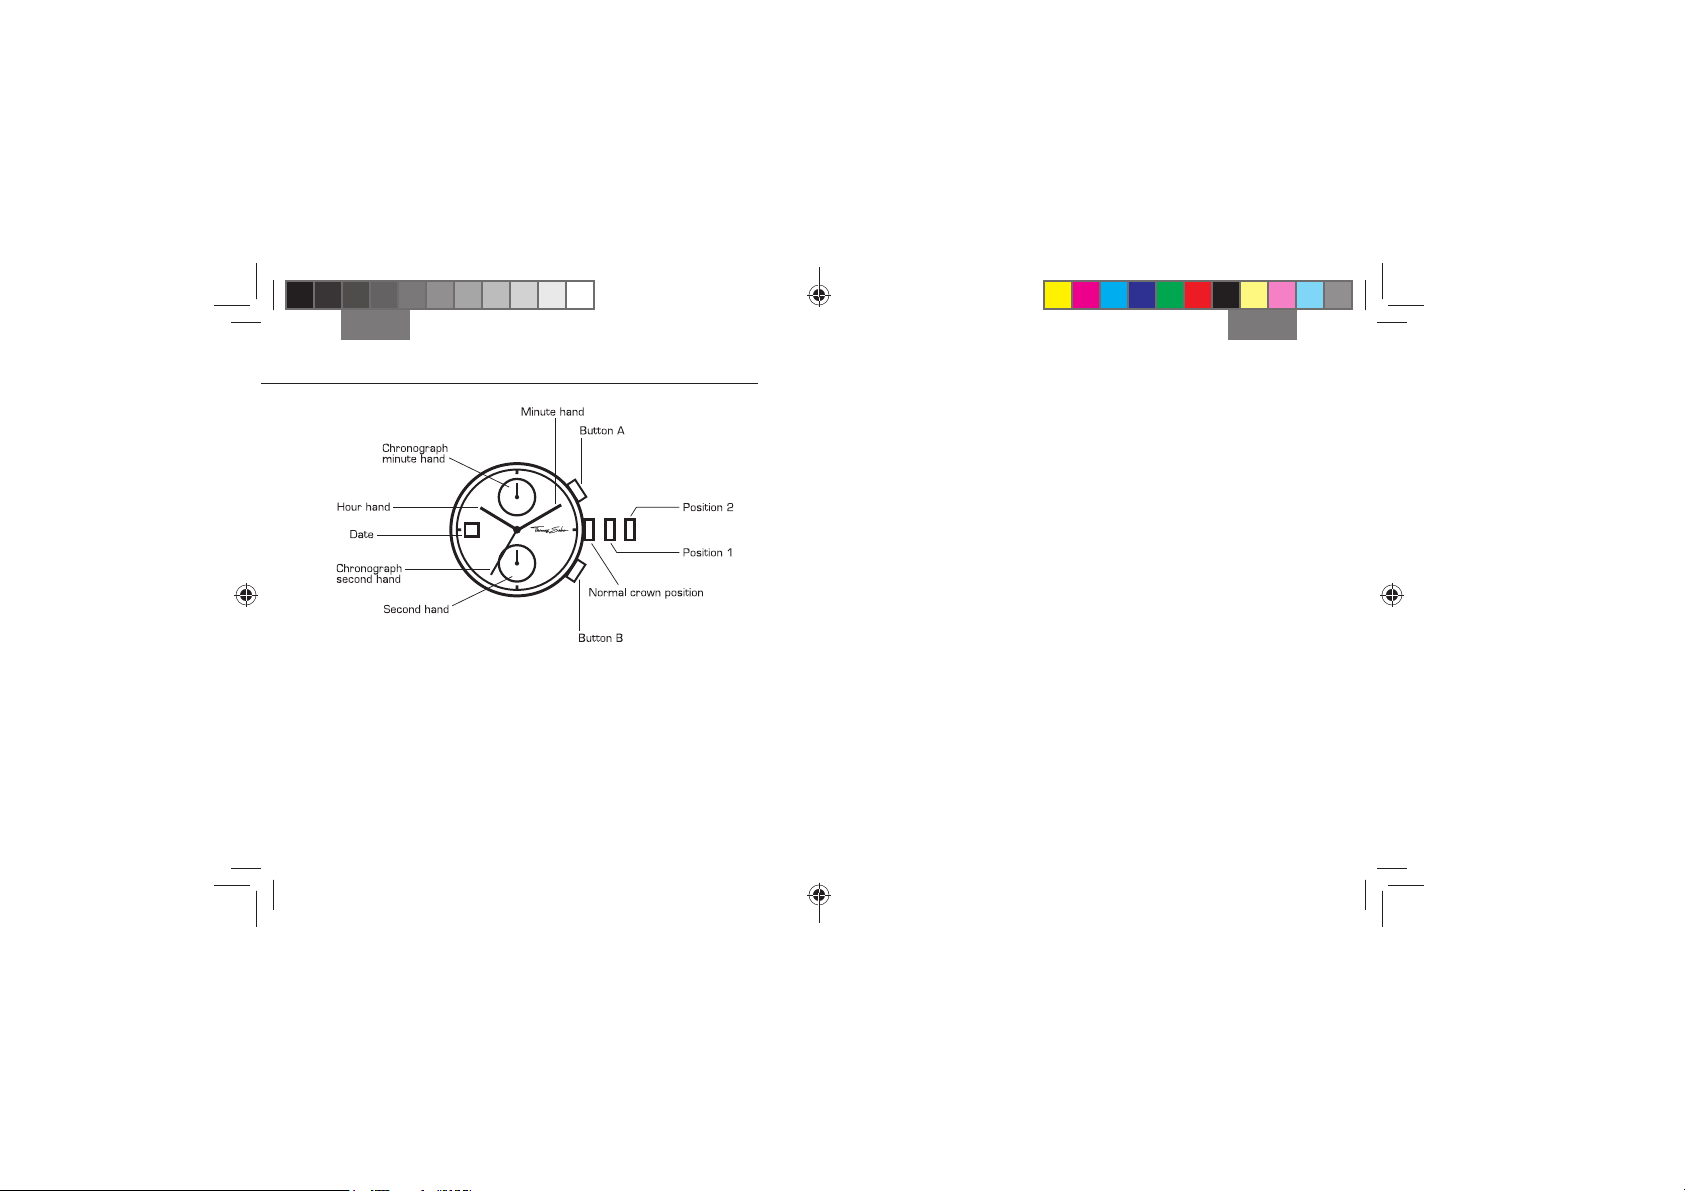
5. CHRONOGRAPH WITH TWO DISPLAYS
SETTING THE DATE
1. Pull the crown out to position 1.
2. To set the date, turn the crown anticlockwise. Do not set the date
between 9 p.m. and 1 a.m. because the date may not correctly
switch over the following day.
3. Return the crown to the normal position.
USING THE CHRONOGRAPH FUNCTION
The chronograph can measure times in 1/1-second units of up to 59
minutes and 59 seconds. During this time, the chronograph’s second
hand rotates continuously.
1. Press button A to start and stop the chronograph.
2. Press button B to reset the chronograph. The chronograph hands
will return to their starting positions.
RESETTING THE CHRONOGRAPH (also following a battery replacement)
This should be carried out when the battery has been changed and/or
the chronograph’s second hand does not return to the starting position
SETTING THE TIME
1. Pull the crown out to position 2.
2. Set the hour and minute hands by turning the crown.
3. The small second hand will start operating once the crown
has been returned to the normal position.
following a reset.
1. Pull the crown out to position 2.
2. Press button A until the chronograph’s second hand has returned to
the starting position.
3. Return the crown to the normal position.
Note: Do not press the crown in while the hand is moving. This may
misalign the starting position.
2524
TS_instruction_manual_watches-8.indd 24-25TS_instruction_manual_watches-8.indd 24-25 16.07.13 10:1516.07.13 10:15
Page 15
English English
6. CHRONOGRAPH WITH THREE DISPLAYS
SETTING THE DATE
1. Pull the crown out to position 1.
2. To set the date, turn the crown anticlockwise. Do not set the date
between 9 p.m. and 1 a.m. because the date may not correctly
switch over the following day.
3. Return the crown to the normal position.
USING THE CHRONOGRAPH FUNCTION
The chronograph can measure times in 1/1-second units of up to
11 hours, 59 minutes and 59 seconds. During this time, the
chronograph’s second hand rotates continuously.
1. Press button A to start and stop the chronograph.
2. Press button B to reset the chronograph. The chronograph hands
will return to their starting positions.
RESETTING THE CHRONOGRAPH (also following a battery replacement)
This should be carried out when the battery has been changed and/or
the chronograph’s second hand does not return to the starting position
SETTING THE TIME
1. Pull the crown out to position 2.
2. Set the hour and minute hands by turning the crown.
3. The small second hand will start operating once the crown
has been returned to the normal position.
following a reset.
1. Pull the crown out to position 2.
2. Press button A until the chronograph’s second hand has returned to
the starting position.
3. Return the crown to the normal position.
Note: Do not press the crown in while the hand is moving. This may
misalign the starting position.
2726
TS_instruction_manual_watches-8.indd 26-27TS_instruction_manual_watches-8.indd 26-27 16.07.13 10:1516.07.13 10:15
Page 16
English English
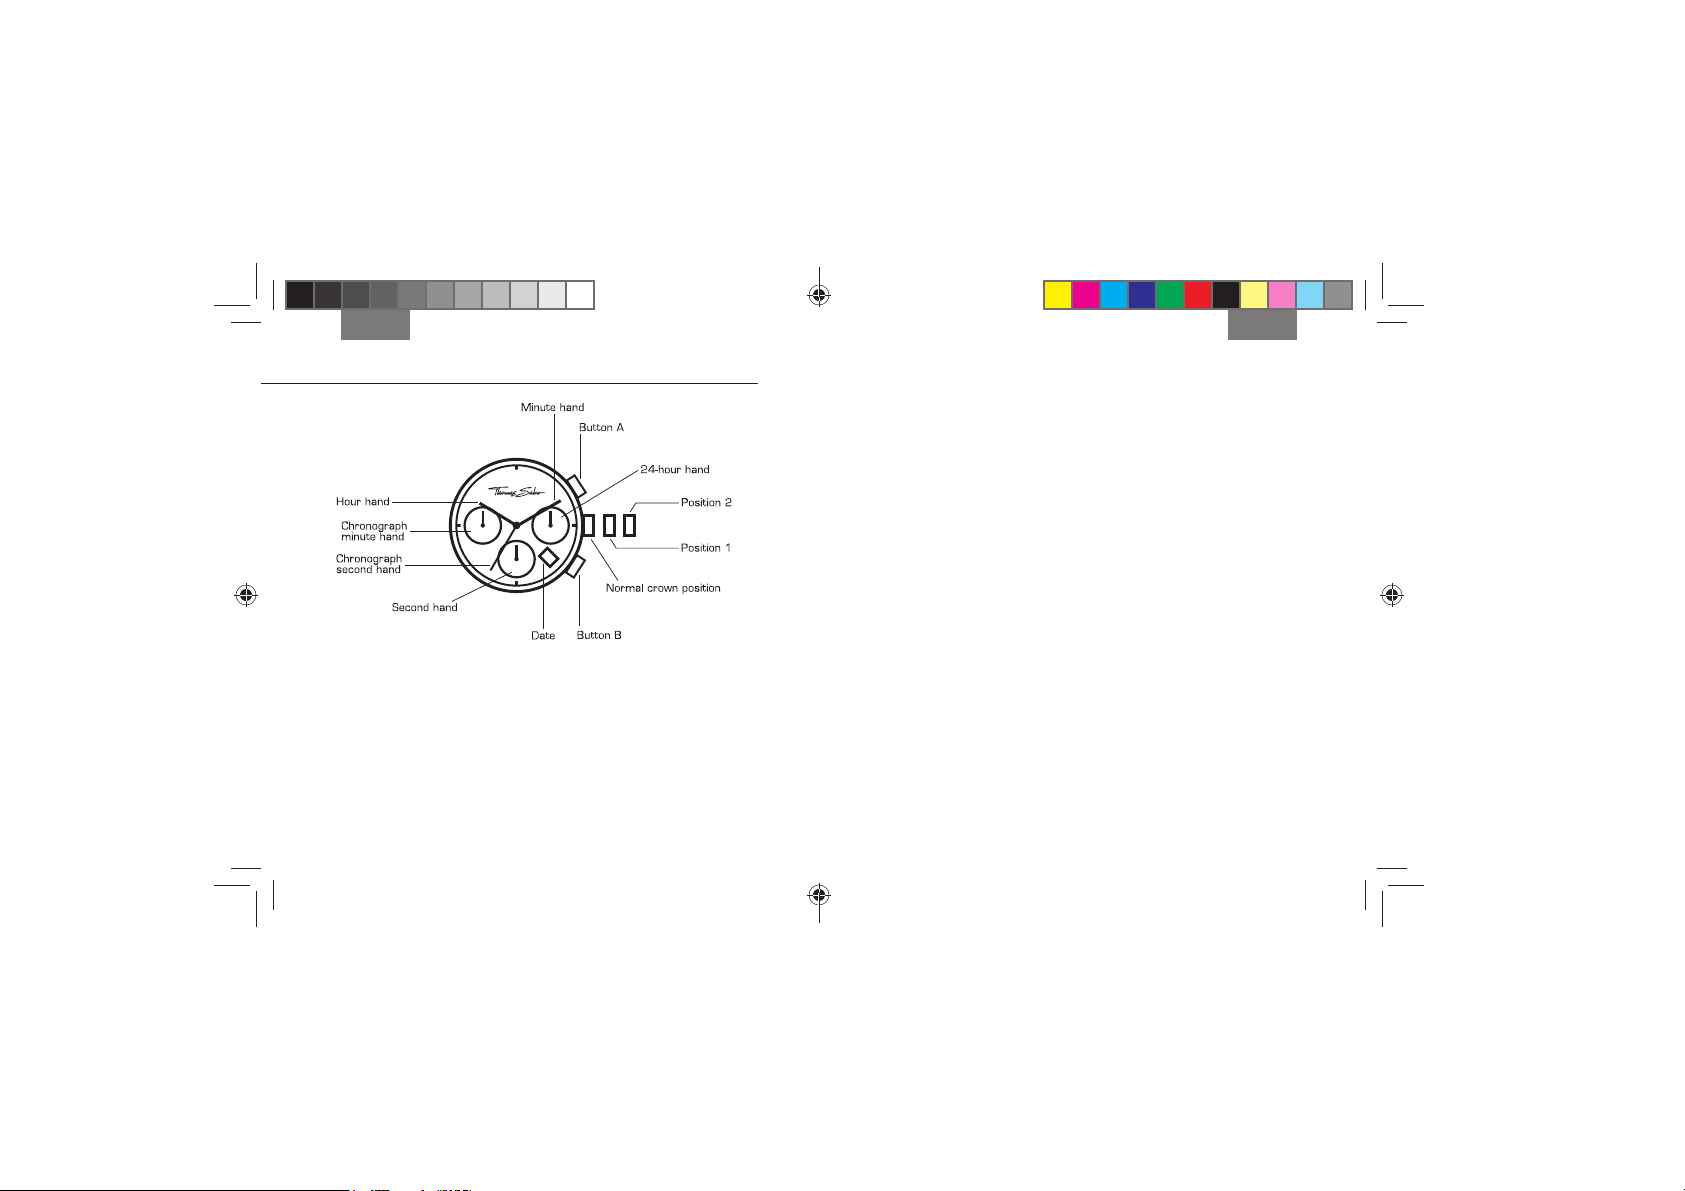
7. CHRONOGRAPH WITH THREE DISPLAYS
SETTING THE DATE
1. Pull the crown out to position 1.
2. To set the date, turn the crown anticlockwise. Do not set the date
between 9 p.m. and 1 a.m. because the date may not correctly
switch over the following day.
3. Return the crown to the normal position.
USING THE CHRONOGRAPH FUNCTION
The chronograph can measure times in 1/1-second units of up to 59
minutes and 59 seconds. During this time, the chronograph’s second
hand rotates continuously.
1. Press button A to start and stop the chronograph.
2. Press button B to reset the chronograph. The chronograph hands
return to their starting positions.
RESETTING THE CHRONOGRAPH (also following a battery replacement)
SETTING THE TIME
1. Pull the crown out to position 2.
2. Set the hour and minute hands by turning the crown.
3. The small second hand will start operating once the crown
has been returned to the normal position.
24-HOUR HAND
The separate 24-hour hand displays the current time in day/night
mode. This display is automatically set when adjusting the current time.
This should be carried out when the battery has been changed and/or
the chronograph’s second hand does not return to the starting position
following a reset.
1. Pull the crown out to position 2.
2. Press button A until the chronograph’s second hand has returned to
the starting position.
3. Return the crown to the normal position.
Note: Do not press the crown in while the hand is moving. This may
misalign the starting position.
2928
TS_instruction_manual_watches-8.indd 28-29TS_instruction_manual_watches-8.indd 28-29 16.07.13 10:1516.07.13 10:15
Page 17
Français Français
GARANTIE INTERNATIONALE
Votre montre THOMAS SABO est garantie contre tout défaut de matériau
et tout vice de fabrication pour une durée de 24 mois à compter de la date
d’achat. Pour recourir à cette garantie, il est impératif en votre qualité de
consommateur que vous ayez acheté la montre dans un point de vente
THOMAS SABO ou dans la boutique en ligne THOMAS SABO. Le donneur
de garantie est la société THOMAS SABO GmbH & Co. KG, Martin-LutherStr. 20, 91207 Lauf, Allemagne.
Veuillez tenir compte du fait que vous devez retourner les montres
THOMAS SABO au détaillant agréé qui vous les a vendues sans oublier
d’inclure le coupon de garantie dûment rempli. Il n’est pas possible de les
envoyer directement à THOMAS SABO. Afin de bénéficier de cette garantie,
vous devez présenter le certificat de garantie internationale – dûment
rempli, daté, revêtu du cachet et signé par une boutique THOMAS SABO
ou un concessionnaire agréé THOMAS SABO. Veuillez conserver précieusement ce certificat. Cette garantie est seulement valable à condition que les
piles utilisées soient celles prescrites par THOMAS SABO. Votre montre est
équipée d’un mouvement à quartz.
La garantie exclut les défauts résultant d’une utilisation impropre, d’une
réparation qui n’a pas été effectuée par THOMAS SABO, d’un mauvais
traitement, de l’usure, des vieillissements issus d’une utilisation normale ou
abusive ainsi que tout autre dommage dû par exemple à un accident. Sont
exclues de la garantie toutes les pièces d’usure telles que les bracelets et
les piles.
Cette garantie ne peut ni remplacer ni restreindre les droits que vous
accorde la loi nationale dans le cadre de la garantie légale.
EXEMPLES D’UTILISATION
L’étanchéité de votre montre THOMAS SABO varie en fonction du
modèle. Cette indication précisée au fond du boîtier a la signification
suivante :
Étanche jusqu’à 1 ATM
Éclaboussures, pluie
Étanche jusqu’à 5 ATM
Bain, lessive, douche
Étanche jusqu’à 10 ATM
Natation, plongée avec tuba
Étanche jusqu’à 20 ATM
Plongée libre
30 31
TS_instruction_manual_watches-8.indd 30-31TS_instruction_manual_watches-8.indd 30-31 16.07.13 10:1516.07.13 10:15
Page 18
Français Français
À L‘ATTENTION DU CLIENT
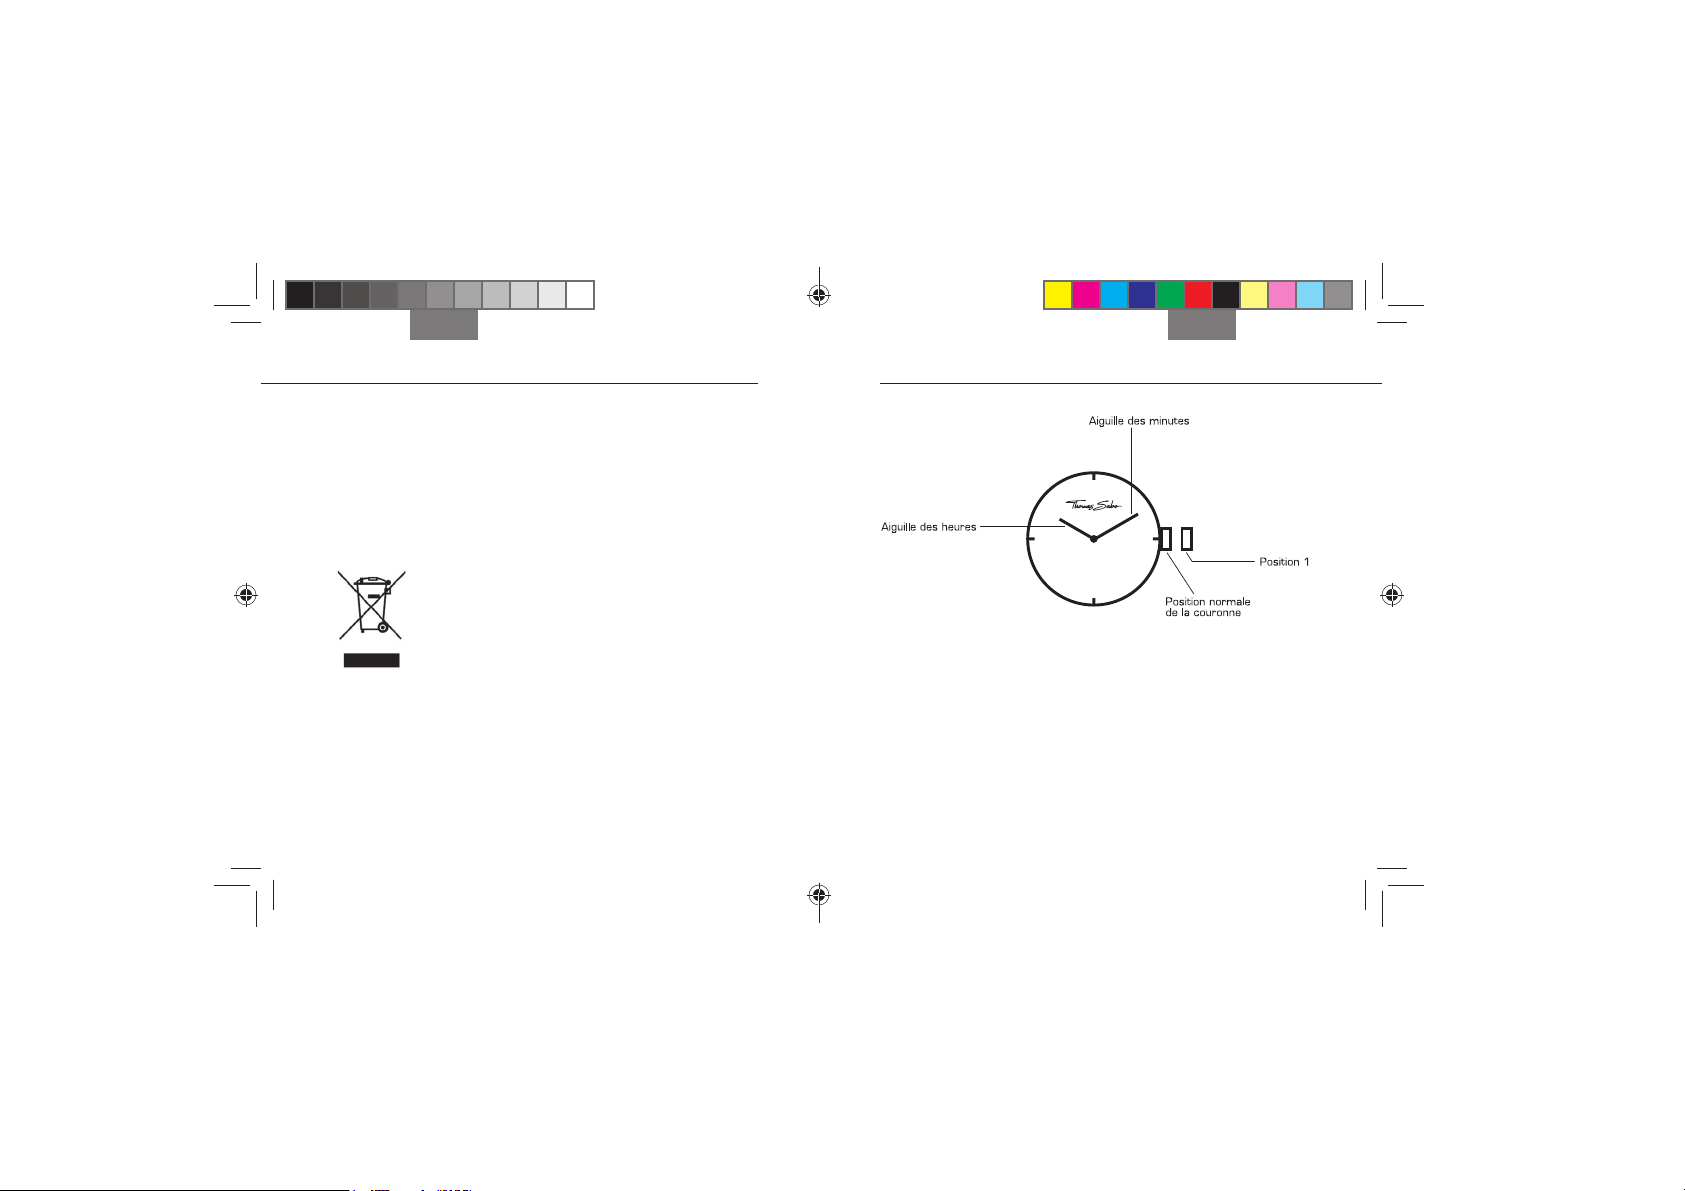
1. MONTRE À DEUX AIGUILLES
Ce produit de THOMAS SABO est assujetti à la directive 2002/96/CE
du Parlement européen et du Conseil concernant la gestion des déchets
d’équipements électriques et électroniques ou à la loi allemande sur les
appareils électriques et électroniques (ElektroG). Cette montre a été mise
sur le marché après le 13 août 2005 et ne doit jamais être jetée dans la
poubelle domestique normale.
Veuillez utiliser les systèmes de collecte sélective mis en place par votre
commune pour éliminer cette montre et respecter par ailleurs toutes les
dispositions de la réglementation en vigueur.
RÉGLAGE DE L’HEURE
1. Tirer sur la couronne jusqu’à la position 1.
2. Faire tourner la couronne pour régler les deux aiguilles.
3. Une fois la couronne repoussée jusqu’à sa position normale, les
aiguilles se mettent à tourner.
32 33
TS_instruction_manual_watches-8.indd 32-33TS_instruction_manual_watches-8.indd 32-33 16.07.13 10:1516.07.13 10:15
Page 19

Français Français
2. MONTRE À DEUX ET TROIS AIGUILLES AVEC AFFICHAGE
DE LA DATE*
3. MONTRE À TROIS AIGUILLES AVEC AFFICHAGE DÉCENTRALISÉ
DES SECONDES
RÉGLAGE DE L’HEURE
1. Tirer sur la couronne jusqu’à la position 2.
2. Faire tourner la couronne pour régler les aiguilles des heures et
des minutes.
3. Une fois la couronne repoussée jusqu’à sa position normale,
la trotteuse se met à tourner.
RÉGLAGE DE LA DATE
1. Tirer sur la couronne jusqu’à la position 1.
2. Faire tourner la couronne dans le sens anti-horaire pour régler la
date. Si la date est réglée entre 9h00 du soir et 1h00 du matin,
elle ne changera peut-être pas correctement le jour suivant.
3. Repousser la couronne jusqu’à sa position normale.
*Les instructions sont également valables pour les modèles sans trotteuse et les montres de poche.
Attention : dans le cas des montres de poche, la couronne est positionnée à 12h00.
RÉGLAGE DE L’HEURE
1. Tirer sur la couronne jusqu’à la position 1.
2. Faire tourner la couronne pour régler les aiguilles des heures et
des minutes.
3. Une fois la couronne repoussée jusqu’à sa position normale,
la trotteuse se met à tourner.
3534
TS_instruction_manual_watches-8.indd 34-35TS_instruction_manual_watches-8.indd 34-35 16.07.13 10:1516.07.13 10:15
Page 20

Français Français
4. MONTRE À TROIS AIGUILLES AVEC AFFICHAGE DE LA DATE
ET DU JOUR DE LA SEMAINE
RÉGLAGE DE L’HEURE
1. Tirer sur la couronne jusqu’à la position 2.
2. Faire tourner la couronne pour régler les aiguilles des heures
et des minutes.
3. Une fois la couronne repoussée jusqu’à sa position normale,
la trotteuse se met à tourner.
RÉGLAGE DE LA DATE
1. Tirer sur la couronne jusqu’à la position 1.
2. Faire tourner la couronne dans le sens anti-horaire pour régler la
date. Si la date est réglée entre 9h00 du soir et 1h00 du matin,
elle ne changera peut-être pas correctement le jour suivant.
3. Repousser la couronne jusqu’à sa position normale.
RÉGLAGE DU JOUR DE LA SEMAINE
1. Tirer sur la couronne jusqu’à la position 1.
2. Faire tourner la couronne dans le sens horaire pour régler le jour
de la semaine. Si le jour de la semaine est réglé entre 9h00 du soir
et 1h00 du matin, il ne changera peut-être pas correctement le jour
suivant.
3. Repousser la couronne jusqu’à sa position normale.
3736
TS_instruction_manual_watches-8.indd 36-37TS_instruction_manual_watches-8.indd 36-37 16.07.13 10:1516.07.13 10:15
Page 21

Français Français
5. CHRONOGRAPHE AVEC DEUX COMPTEURS
RÉGLAGE DE L’HEURE
1. Tirer la couronne jusqu’à la position 2.
2. Faire tourner la couronne pour régler les aiguilles des heures
et des minutes.
3. Une fois la couronne repoussée jusqu’à sa position normale,
la petite trotteuse se met à tourner.
RÉGLAGE DE LA DATE
1. Tirer la couronne jusqu’à la position 1.
2. Faire tourner la couronne dans le sens anti-horaire pour régler la
date. Si la date est réglée entre 9h00 du soir et 1h00 du matin,
elle ne changera peut-être pas correctement le jour suivant.
3. Repousser la couronne jusqu’à sa position normale.
UTILISATION DE LA FONCTION CHRONOMÉTRAGE
Le chronographe peut mesurer et afficher le temps par 1/1
seconde jusqu’à la durée maximale cumulée de 59 minutes et 59
secondes. Ce faisant, la trotteuse du chronographe tourne en
permanence et indique les secondes sans s’arrêter.
1. Pour mettre en marche et arrêter le chronographe, appuyer sur le
poussoir A.
2. Pour le remettre à zéro, appuyer sur le poussoir B. Les aiguilles du
chronographe reviennent à la position initiale.
RÉINITIALISATION DU CHRONOGRAPHE
(également après le changement de la pile)
Cette opération doit être effectuée lorsque la pile a été changée et/ou
lorsque la trotteuse du chronographe ne revient pas à la position initiale
après la remise à zéro du chronographe.
1. Tirer sur la couronne jusqu’à la position 2.
2. Appuyer sur le poussoir A jusqu’à ce que la trotteuse du
chronographe soit revenue à la position initiale.
3. Repousser la couronne jusqu’à sa position normale.
Attention : ne pas repousser la couronne tant que la trotteuse est en
mouvement étant donné qu’elle s’arrête sinon à une position
intermédiaire qui est reconnue à tort comme étant la position initiale.
ème
de
3938
TS_instruction_manual_watches-8.indd 38-39TS_instruction_manual_watches-8.indd 38-39 16.07.13 10:1516.07.13 10:15
Page 22

Français Français
6. CHRONOGRAPHE AVEC TROIS COMPTEURS
RÉGLAGE DE L’HEURE
1. Tirer la couronne jusqu’à la position 2.
2. Faire tourner la couronne pour régler les aiguilles des heures
et des minutes.
3. Une fois la couronne repoussée jusqu’à sa position normale,
la petite trotteuse se met à tourner.
RÉGLAGE DE LA DATE
1. Tirer la couronne jusqu’à la position 1.
2. Faire tourner la couronne dans le sens anti-horaire pour régler la
date. Si la date est réglée entre 9h00 du soir et 1h00 du matin,
elle ne changera peut-être pas correctement le jour suivant.
3. Repousser la couronne jusqu’à sa position normale.
UTILISATION DE LA FONCTION CHRONOMÉTRAGE
Le chronographe peut mesurer et afficher le temps par 1/1
seconde jusqu’à la durée maximale cumulée de 11 heures, 59 minutes
et 59 secondes. Ce faisant, la trotteuse du chronographe tourne en
permanence et indique les secondes sans s’arrêter.
1. Pour mettre en marche et arrêter le chronographe, appuyer sur le
poussoir A.
2. Pour le remettre à zéro, appuyer sur le poussoir B. Les aiguilles du
chronographe reviennent à la position initiale.
RÉINITIALISATION DU CHRONOGRAPHE
(également après le changement de la pile)
Cette opération doit être effectuée lorsque la pile a été changée et/ou
lorsque la trotteuse du chronographe ne revient pas à la position initiale
après la remise à zéro du chronographe.
1. Tirer sur la couronne jusqu’à la position 2.
2. Appuyer sur le poussoir A jusqu’à ce que la trotteuse du
chronographe soit revenue à la position initiale.
3. Repousser la couronne jusqu’à sa position normale.
Attention : ne pas repousser la couronne tant que la trotteuse est en
mouvement étant donné qu’elle s’arrête sinon à une position
intermédiaire qui est reconnue à tort comme étant la position initiale.
ème
de
4140
TS_instruction_manual_watches-8.indd 40-41TS_instruction_manual_watches-8.indd 40-41 16.07.13 10:1516.07.13 10:15
Page 23

Français Français
7. CHRONOGRAPHE AVEC TROIS COMPTEURS
RÉGLAGE DE L’HEURE
1. Tirer la couronne jusqu’à la position 2.
2. Faire tourner la couronne pour régler les aiguilles des heures
et des minutes.
3. Une fois la couronne repoussée jusqu’à sa position normale,
la petite trotteuse se met à tourner.
AIGUILLE 24 HEURES
L’aiguille 24 heures indépendante indique l’heure en mode jour ou nuit.
Cet affichage se règle automatiquement avec le réglage de l’heure
actuelle.
RÉGLAGE DE LA DATE
1. Tirer la couronne jusqu’à la position 1.
2. Faire tourner la couronne dans le sens anti-horaire pour régler la
date. Si la date est réglée entre 9h00 du soir et 1h00 du matin,
elle ne changera peut-être pas correctement le jour suivant.
3. Repousser la couronne jusqu’à sa position normale.
UTILISATION DE LA FONCTION CHRONOMÉTRAGE
Le chronographe peut mesurer et afficher le temps par 1/1
seconde jusqu’à la durée maximale cumulée de 59 minutes et 59
secondes. Ce faisant, la trotteuse du chronographe tourne en
permanence et indique les secondes sans s’arrêter.
1. Pour mettre en marche et arrêter le chronographe, appuyer sur le
poussoir A.
2. Pour le remettre à zéro, appuyer sur le poussoir B. Les aiguilles du
chronographe reviennent à la position initiale.
RÉINITIALISATION DU CHRONOGRAPHE
(également après le changement de la pile)
Cette opération doit être effectuée lorsque la pile a été changée et/ou
lorsque la trotteuse du chronographe ne revient pas à la position initiale
après la remise à zéro du chronographe.
1. Tirer sur la couronne jusqu’à la position 2.
2. Appuyer sur le poussoir A jusqu’à ce que la trotteuse du
chronographe soit revenue à la position initiale.
3. Repousser la couronne jusqu’à sa position normale.
Attention : ne pas repousser la couronne tant que la trotteuse est en
mouvement étant donné qu’elle s’arrête sinon à une position
intermédiaire qui est reconnue à tort comme étant la position initiale.
ème
de
4342
TS_instruction_manual_watches-8.indd 42-43TS_instruction_manual_watches-8.indd 42-43 16.07.13 10:1516.07.13 10:15
Page 24

Español Español
GARANTÍA INTERNACIONAL
Su reloj THOMAS SABO tiene una garantía de 24 meses a partir del día de
la compra, en lo que concierne a material defectuoso o defectos de
fabricación. Es un requisito que el usuario del reloj lo haya adquirido en un
puesto de venta THOMAS SABO o en la tienda online THOMAS SABO.
El proveedor de la garantía es THOMAS SABO GmbH & Co. KG, MartinLuther-Str. 20, 91207 Lauf, Alemania.
EJEMPLOS DE USO
Su reloj THOMAS SABO tiene una resistencia al agua que depende de
cada modelo. Estos datos los encontrará en la base de la caja y
significan lo siguiente:
Resistencia al agua: 1 ATM
Salpicaduras de agua, lluvia
Por favor, tenga en cuenta que los relojes THOMAS SABO que han sido
adquiridos en una tienda especializada autorizada, también deben
presentarse, junto con la garantía, en dicha tienda y, en ningún caso,
enviarse directamente a THOMAS SABO GmbH & Co. KG. Para acogerse
a este beneficio, debe presentar la garantía internacional, la cual tiene que
Resistencia al agua: 5 ATM
Baño, lavado, ducha
estar debidamente rellenada por una tienda THOMAS SABO o por un
distribuidor autorizado por THOMAS SABO, con fecha, firma y sello. Por
favor, conserve este certificado en lugar seguro. Esta garantía es válida
solamente en caso de que se hayan utilizado las pilas reconocidas por
parte de THOMAS SABO. Su reloj está dotado de un mecanismo de
Resistencia al agua: 10 ATM
Natación, buceo con esnórquel
cuarzo.
La garantía pierde su validez en caso de uso indebido, reparaciones por
parte de terceros, deterioro por mal trato o negligencia, desgaste o
desperfectos por uso habitual, empleo incorrecto o en caso de daños
debidos, por ejemplo, a un accidente. Quedan exentas de esta garantía las
piezas que sufren desgaste, como las correas y pilas.
Resistencia al agua: 20 ATM
Buceo libre
Esta garantía no reemplaza o limita las garantías legales establecidas por
las leyes nacionales.
TS_instruction_manual_watches-8.indd 44-45TS_instruction_manual_watches-8.indd 44-45 16.07.13 10:1516.07.13 10:15
4544
Page 25

Español Español
AVISO AL CONSUMIDOR
1. RELOJ DE DOS MANECILLAS
Este producto de THOMAS SABO guarda conformidad con la Directiva
2002/96/EG del Parlamento Europeo y el Consejo sobre residuos de
aparatos eléctricos y electrónicos al igual que con la ley alemana de
productos eléctricos y electrónicos (ElektroG, por sus siglas en alemán).
Este artículo fue introducido en el comercio después del 13 de agosto de
2005 y no se debe eliminar como si se tratara de un desecho doméstico
normal. Por favor, para la eliminación, recurra al sistema correspondiente
de devolución de su comunidad y observe todas las demás prescripciones
relacionadas con el caso.
AJUSTE DE LA HORA
1. Extraer la corona hasta la posición 1.
2. Ajustar las dos manecillas girando la corona.
3. Tras volver a poner la corona en la posición normal, las manecillas
inician su funcionamiento.
4746
TS_instruction_manual_watches-8.indd 46-47TS_instruction_manual_watches-8.indd 46-47 16.07.13 10:1516.07.13 10:15
Page 26

Español Español
2. RELOJ DE DOS Y TRES MANECILLAS CON INDICADOR DE FECHA*
3. RELOJ DE TRES AGUJAS CON INDICACIÓN DESCENTRALIZADA
DE LOS SEGUNDOS
AJUSTE DE LA HORA
1. Extraer la corona hasta la posición 2.
2. Ajustar el horario y el minutero girando la corona.
3. Tras volver a poner la corona en la posición normal, el segundero
inicia su funcionamiento.
AJUSTE DE LA HORA
1. Extraer la corona hasta la posición 1.
2. Ajustar el horario y el minutero girando la corona.
3. Tras volver a poner la corona en la posición normal, el segundero
inicia su funcionamiento.
AJUSTE DE LA FECHA
1. Extraer la corona hasta la posición 1.
2. Girar la corona en dirección contraria a las manecillas del reloj para
ajustar la fecha. Al ajustar la fecha entre las 21:00 y las 01:00
horas, posiblemente ésta no cambie al día siguiente.
3. Volver a poner la corona en la posición normal.
TS_instruction_manual_watches-8.indd 48-49TS_instruction_manual_watches-8.indd 48-49 16.07.13 10:1516.07.13 10:15
*Estas instrucciones también son válidas para relojes sin segundero y para relojes de bolsillo.
Atención: en los relojes de bolsillo la corona se encuentra sobre las 12 h.
4948
Page 27

Español Español
4. RELOJ DE TRES MANECILLAS CON INDICADOR DE FECHA Y
DÍA DE LA SEMANA
AJUSTE DE LA FECHA
1. Extraer la corona hasta la posición 1.
2. Girar la corona en dirección contraria a las manecillas del reloj para
ajustar la fecha. Al ajustar la fecha entre las 21:00 y las 01:00
horas, posiblemente ésta no cambie al día siguiente.
3. Volver a poner la corona en la posición normal.
AJUSTE DEL DÍA DE LA SEMANA
1. Extraer la corona hasta la posición 1.
2. Girar la corona en la misma dirección de las manecillas de reloj para
ajustar el día de la semana. Al ajustar el día de la semana entre las
21:00 y las 01:00 horas, posiblemente éste no cambie al día
siguiente.
3. Volver a poner la corona en posición normal.
AJUSTE DE LA HORA
1. Extraer la corona hasta la posición 2.
2. Ajustar el horario y el minutero girando la corona.
3. Tras volver a poner la corona en la posición normal el segundero
inicia su funcionamiento.
5150
TS_instruction_manual_watches-8.indd 50-51TS_instruction_manual_watches-8.indd 50-51 16.07.13 10:1516.07.13 10:15
Page 28

Español Español
5. CRONÓGRAFO CON DOS INDICADORES
AJUSTE DE LA FECHA
1. Extraer la corona hasta la posición 1.
2. Girar la corona en dirección contraria a las manecillas del reloj para
ajustar la fecha. Al ajustar la fecha entre las 21:00 y las 01:00
horas, posiblemente ésta no cambie al día siguiente.
3. Volver a poner la corona en la posición normal.
UTILIZAR LA FUNCIÓN DE PARADA
El cronógrafo puede medir tiempos indicando intervalos de segundos
hasta un máximo de 59 minutos y 59 segundos. Durante este tiempo
el segundero del cronógrafo gira continuamente.
1. Para iniciar y parar el cronógrafo, pulsar el botón A.
2. Para que vuelva a la posición inicial, pulsar el botón B. Las manecillas
del cronógrafo retornan a la posición inicial.
REINICIAR EL CRONÓGRAFO (también después de cambiar las pilas)
Este procedimiento debe efectuarse cuando se hayan cambiado las
AJUSTE DE LA HORA
1. Extraer la corona hasta la posición 2.
2. Ajustar el horario y el minutero girando la corona.
3. Tras volver a poner la corona en la posición normal el segundero
pequeño inicia su funcionamiento.
pilas y/o si el segundero del cronógrafo no vuelve a la posición inicial
una vez que se reinicie.
1. Extraer la corona hasta la posición 2.
2. Pulsar el botón A hasta que el segundero del cronógrafo
vuelva a la posición inicial.
3. Volver a poner la corona en la posición normal.
Atención: no poner la corona en posición normal mientras la manecilla
esté en movimiento, puesto que se desconfigurará la posición inicial.
TS_instruction_manual_watches-8.indd 52-53TS_instruction_manual_watches-8.indd 52-53 16.07.13 10:1516.07.13 10:15
5352
Page 29

Español Español
6. CRONÓGRAFO CON TRES INDICADORES
AJUSTE DE LA FECHA
1. Extraer la corona hasta la posición 1.
2. Girar la corona en dirección contraria a las manecillas del reloj para
ajustar la fecha. Al ajustar la fecha entre las 21:00 y las 01:00
horas, posiblemente ésta no cambie al día siguiente.
3. Volver a poner la corona en la posición normal.
UTILIZAR LA FUNCIÓN DE PARADA
El cronógrafo puede medir tiempos indicando intervalos de segundos
hasta un máximo de 11 horas, 59 minutos y 59 segundos. Durante
este tiempo el segundero del cronógrafo gira continuamente.
1. Para iniciar y parar el cronógrafo, pulsar el botón A.
2. Para que vuelva a la posición inicial, pulsar el botón B. Las manecillas
del cronógrafo retornan a la posición inicial.
REINICIAR EL CRONÓGRAFO (también después de cambiar las pilas)
Este procedimiento debe efectuarse cuando se hayan cambiado las
AJUSTE DE LA HORA
1. Extraer la corona hasta la posición 2.
2. Ajustar el horario y el minutero girando la corona.
3. Tras volver a poner la corona en la posición normal el segundero
pequeño inicia su funcionamiento.
pilas y/o si el segundero del cronógrafo no vuelve a la posición inicial
una vez que se reinicie.
1. Extraer la corona hasta la posición 2.
2. Pulsar el botón A hasta que el segundero del cronógrafo vuelva a la
posición inicial.
3. Volver a poner la corona en la posición normal.
Atención: no poner la corona en la posición normal mientras la manecilla
esté en movimiento, puesto que se desconfigurará la posición inicial.
TS_instruction_manual_watches-8.indd 54-55TS_instruction_manual_watches-8.indd 54-55 16.07.13 10:1516.07.13 10:15
5554
Page 30

Español Español
7. CRONÓGRAFO CON TRES INDICADORES
AJUSTE DE LA FECHA
1. Extraer la corona hasta la posición 1.
2. Girar la corona en dirección contraria a las manecillas del reloj para
ajustar la fecha. Al ajustar la fecha entre las 21:00 y las 01:00
horas, posiblemente ésta no cambie al día siguiente.
3. Volver a poner la corona en la posición normal.
UTILIZAR LA FUNCIÓN DE PARADA
El cronógrafo puede medir tiempos indicando intervalos de segundos
hasta un máximo de 59 minutos y 59 segundos. Durante este tiempo
el segundero del cronógrafo gira continuamente.
1. Para iniciar y parar el cronógrafo, pulsar el botón A.
2. Para que vuelva a la posición inicial, pulsar el botón B. Las manecillas
del cronógrafo retornan a la posición inicial.
AJUSTE DE LA HORA
1. Extraer la corona hasta la posición 2.
2. Ajustar el horario y el minutero girando la corona.
3. Tras volver a poner la corona en la posición normal el segundero
pequeño inicia su funcionamiento.
MANECILLA DE 24 HORAS
La manecilla separada de 24 horas indica la hora actual en el modo
día/noche. Este indicador se ajustará automáticamente si se
selecciona la hora actual.
TS_instruction_manual_watches-8.indd 56-57TS_instruction_manual_watches-8.indd 56-57 16.07.13 10:1516.07.13 10:15
REINICIAR EL CRONÓGRAFO (también después de cambiar las pilas)
Este procedimiento debe efectuarse cuando se hayan cambiado las
pilas y/o si el segundero del cronógrafo no vuelve a la posición inicial
una vez que se reinicie.
1. Extraer la corona hasta la posición 2.
2. Pulsar el botón A hasta que el segundero del cronógrafo vuelva a la
posición inicial.
3. Volver a poner la corona en la posición normal.
Atención: no poner la corona en la posición normal mientras la manecilla
esté en movimiento, puesto que se desconfigurará la posición inicial.
5756
Page 31

Italiano Italiano
GARANZIA INTERNAZIONALE
Il vostro orologio THOMAS SABO è garantito contro difetti di materiale e
fabbricazione per un periodo di 24 mesi dalla data di acquisto. La garanzia
è valida soltanto se avete acquistato l’orologio in veste di utilizzatore finale
presso un punto vendita THOMAS SABO oppure nel negozio on line
THOMAS SABO. La garanzia è rilasciata da THOMAS SABO GmbH & Co.
KG, Martin-Luther-Str. 20, 91207 Lauf, Germania.
Si prega di osservare che gli orologi THOMAS SABO acquistati presso un
rivenditore autorizzato devono essere ivi consegnati accompagnati dal
certificato di garanzia compilato in tutte le sue parti e non possono essere
spediti direttamente a THOMAS SABO. Per poter usufruire della garanzia,
dovete presentare il certificato di garanzia internazionale correttamente
compilato, datato e recante la firma e il timbro del punto vendita THOMAS
SABO o del rivenditore autorizzato THOMAS SABO in cui è stato acquistato
l’orologio. Si prega di conservare attentamente tale certificato. Questa
garanzia è applicabile soltanto se sono state utilizzate batterie raccomandate da THOMAS SABO. Il vostro orologio è dotato di un movimento al
quarzo.
Questa garanzia non è valida se l’orologio risulta danneggiato a causa di
utilizzo inadeguato o inappropriato, negligenza, incidenti, deterioramento
dovuto alla normale usura del prodotto o al trascorrere del tempo nonché
riparazione non autorizzata o non effettuata da un orologiaio autorizzato.
Sono escluse da questa garanzia le parti soggette a usura quali cinturino
e batterie.
Questa garanzia non pregiudica né limita i diritti di garanzia spettanti
all’acquirente in materia di garanzie legali in forza della normativa vigente nel
paese di acquisto.
ESEMPI D’USO
Il grado di impermeabilità del vostro orologio THOMAS SABO dipende
dal modello. La corrispondente indicazione è riportata sul retro della
cassa e significa:
impermeabile fino a 1 ATM
schizzi, pioggia
impermeabile fino a 5 ATM
bagno, doccia, lavaggi
impermeabile fino a 10 ATM
nuoto,
immersioni in apnea a bassa profondità
impermeabile fino a 20 ATM
immersioni in apnea
5958
TS_instruction_manual_watches-8.indd 58-59TS_instruction_manual_watches-8.indd 58-59 16.07.13 10:1516.07.13 10:15
Page 32

Italiano Italiano
AVVISO AL CONSUMATORE
1. OROLOGIO A DUE LANCETTE
Questo prodotto THOMAS SABO è soggetto alla direttiva 2002/96/CE del
Parlamento Europeo e del Consiglio dell’Unione Europea sui rifiuti di
apparecchiature elettriche ed elettroniche nonché alla legge tedesca sulle
apparecchiature elettriche ed elettroniche (ElektroG). Quest’orologio è stato
immesso sul mercato dopo il 13.08.2005 e non può essere smaltito
come rifiuto urbano. Alla fine del suo ciclo di vita, depositate quindi l’orologio
presso uno dei centri di raccolta differenziata del vostro comune di
appartenenza e rispettate ogni ulteriore normativa nazionale vigente in
proposito.
PREDISPOSIZIONE DELL’ORA
1. Estrarre la corona fino alla posizione 1.
2. Ruotare la corona per regolare entrambe le lancette.
3. Riportando la corona in posizione normale, le lancette iniziano a
funzionare.
6160
TS_instruction_manual_watches-8.indd 60-61TS_instruction_manual_watches-8.indd 60-61 16.07.13 10:1516.07.13 10:15
Page 33

Italiano Italiano
2. OROLOGIO A DUE O TRE LANCETTE CON DATARIO*
3. OROLOGIO A TRE LANCETTE CON SFERINO DEI SECONDI
DECENTRATO
PREDISPOSIZIONE DELL’ORA
1. Estrarre la corona fino alla posizione 2.
2. Ruotare la corona per regolare le lancette delle ore e dei minuti.
3. Riportando la corona in posizione normale, la lancetta dei secondi
inizia a funzionare.
PREDISPOSIZIONE DELL’ORA
1. Estrarre la corona fino alla posizione 1.
2. Ruotare la corona per regolare le lancette delle ore e dei minuti.
3. Riportando la corona in posizione normale, la lancetta dei secondi
inizia a funzionare.
PREDISPOSIZIONE DELLA DATA
1. Estrarre la corona fino alla posizione 1.
2. Girare la corona in senso orario per predisporre la data desiderata.
Se la data viene impostata tra le ore 21.00 e 01.00, il prossimo
cambiamento della data potrebbe non aver luogo in modo corretto.
*Le presenti istruzioni valgono anche per i modelli senza lancetta dei secondi e gli orologi da taschino.
3. Riportare la corona in posizione normale.
Attenzione: negli orologi da taschino la corona è posizionata alle ore 12.00.
6362
TS_instruction_manual_watches-8.indd 62-63TS_instruction_manual_watches-8.indd 62-63 16.07.13 10:1516.07.13 10:15
Page 34

Italiano Italiano
4. OROLOGIO A TRE LANCETTE CON DATARIO
E GIORNO DELLA SETTIMANA
PREDISPOSIZIONE DELLA DATA
1. Estrarre la corona fino alla posizione 1.
2. Girare la corona in senso orario per predisporre la data desiderata.
Se la data viene impostata tra le ore 21.00 e 01.00, il prossimo
cambiamento della data potrebbe non aver luogo in modo corretto.
3. Riportare la corona in posizione normale.
PREDISPOSIZIONE DEL GIORNO DELLA SETTIMANA
1. Estrarre la corona fino alla posizione 1.
2. Girare la corona in senso orario per predisporre il giorno della
settimana desiderato. Se l’impostazione viene effettuata tra le ore
21.00 e 01.00, il prossimo passaggio potrebbe non aver luogo in
modo corretto.
3. Riportare la corona in posizione normale.
PREDISPOSIZIONE DELL’ORA
1. Estrarre la corona fino alla posizione 2.
2. Ruotare la corona per regolare le lancette delle ore e dei minuti.
3. Riportando la corona in posizione normale, la lancetta dei secondi
inizia a funzionare.
6564
TS_instruction_manual_watches-8.indd 64-65TS_instruction_manual_watches-8.indd 64-65 16.07.13 10:1516.07.13 10:15
Page 35

Italiano Italiano
5. CRONOGRAFO CON DUE CONTATORI
PREDISPOSIZIONE DELLA DATA
1. Estrarre la corona fino alla posizione 1.
2. Girare la corona in senso orario per predisporre la data desiderata.
Se la data viene impostata tra le ore 21.00 e 01.00, il prossimo
cambiamento della data potrebbe non aver luogo in modo corretto.
3. Riportare la corona in posizione normale.
USO DELLA FUNZIONE CRONOMETRO
Il cronografo è in grado di misurare intervalli in secondi fino a un
massimo di 59 minuti e 59 secondi. Durante tale misurazione, la
lancetta dei secondi del cronografo ruota costantemente.
1. Per avviare e arrestare il cronografo premere il pulsante A.
2. Per azzerare il cronografo premere il pulsante B. Le lancette del
cronografo ritornano alla posizione iniziale (posizione ‘zero’).
AZZERAMENTO DELLE LANCETTE DEL CRONOGRAFO
(anche dopo la sostituzione della batteria)
Questa operazione va eseguita dopo la sostituzione della batteria e/o
PREDISPOSIZIONE DELL’ORA
1. Estrarre la corona fino alla posizione 2.
2. Ruotare la corona per regolare le lancette delle ore e dei minuti.
3. Riportando la corona in posizione normale, la lancetta dei secondi
continui (lancetta piccola) inizia a funzionare.
quando una o più lancette del cronografo non ritornano più alla
posizione iniziale dopo l’azzeramento del cronografo.
1. Estrarre la corona fino alla posizione 2.
2. Premere il pulsante A finché la lancetta dei secondi del cronografo
ritorna alla posizione iniziale.
3. Riportare la corona in posizione normale.
Attenzione: onde evitare lo spostamento accidentale della posizione
‘zero’, non esercitare alcuna pressione sulla corona finché le lancette
sono in movimento.
TS_instruction_manual_watches-8.indd 66-67TS_instruction_manual_watches-8.indd 66-67 16.07.13 10:1516.07.13 10:15
6766
Page 36

Italiano Italiano
6. CRONOGRAFO CON TRE CONTATORI
PREDISPOSIZIONE DELLA DATA
1. Estrarre la corona fino alla posizione 1.
2. Girare la corona in senso orario per predisporre la data desiderata.
Se la data viene impostata tra le ore 21.00 e 01.00, il prossimo
cambiamento della data potrebbe non aver luogo in modo corretto.
3. Riportare la corona in posizione normale.
USO DELLA FUNZIONE CRONOMETRO
Il cronografo è in grado di misurare intervalli in secondi fino a un
massimo di 11 ore, 59 minuti e 59 secondi. Durante tale misurazione,
la lancetta dei secondi del cronografo ruota costantemente.
1. Per avviare e arrestare il cronografo premere il pulsante A.
2. Per azzerare il cronografo premere il pulsante B. Le lancette del
cronografo ritornano alla posizione iniziale (posizione ‘zero’).
AZZERAMENTO DELLE LANCETTE DEL CRONOGRAFO
(anche dopo la sostituzione della batteria)
Questa operazione va eseguita dopo la sostituzione della batteria e/o
PREDISPOSIZIONE DELL’ORA
1. Estrarre la corona fino alla posizione 2.
2. Ruotare la corona per regolare le lancette delle ore e dei minuti.
3. Riportando la corona in posizione normale, la lancetta dei secondi
continui (lancetta piccola) inizia a funzionare.
quando una o più lancette del cronografo non ritornano più alla
posizione iniziale dopo l’azzeramento del cronografo.
1. Estrarre la corona fino alla posizione 2.
2. Premere il pulsante A finché la lancetta dei secondi del cronografo
ritorna alla posizione iniziale.
3. Riportare la corona in posizione normale.
Attenzione: onde evitare lo spostamento accidentale della posizione
‘zero’, non esercitare alcuna pressione sulla corona finché le lancette
sono in movimento
TS_instruction_manual_watches-8.indd 68-69TS_instruction_manual_watches-8.indd 68-69 16.07.13 10:1516.07.13 10:15
6968
Page 37

Italiano Italiano
7. CRONOGRAFO CON TRE CONTATORI
PREDISPOSIZIONE DELLA DATA
1. Estrarre la corona fino alla posizione 1.
2. Girare la corona in senso orario per predisporre la data desiderata.
Se la data viene impostata tra le ore 21.00 e 01.00, il prossimo
cambiamento della data potrebbe non aver luogo in modo corretto.
3. Riportare la corona in posizione normale.
USO DELLA FUNZIONE CRONOMETRO
Il cronografo è in grado di misurare intervalli in secondi fino a un
massimo di 59 minuti e 59 secondi. Durante tale misurazione la
lancetta dei secondi del cronografo ruota costantemente.
1. Per avviare e arrestare il cronografo premere il pulsante A.
2. Per azzerare il cronografo premere il pulsante B. Le lancette del
cronografo ritornano alla posizione iniziale (posizione ‘zero’).
AZZERAMENTO DELLE LANCETTE DEL CRONOGRAFO
(anche dopo la sostituzione della batteria)
PREDISPOSIZIONE DELL’ORA
1. Estrarre la corona fino alla posizione 2.
2. Ruotare la corona per regolare le lancette delle ore e dei minuti.
3. Riportando la corona in posizione normale, la lancetta dei secondi
continui (lancetta piccola) inizia a funzionare.
LANCETTA DELLE 24 ORE
La lancetta delle 24 ore (quadrante separato) indica l’ora attuale in
modalità giorno / notte. Sincronizzata con la normale lancetta delle
ore, viene impostata in automatico quando si esegue la predisposizione
dell’ora attuale.
TS_instruction_manual_watches-8.indd 70-71TS_instruction_manual_watches-8.indd 70-71 16.07.13 10:1516.07.13 10:15
Questa operazione va eseguita dopo la sostituzione della batteria e/o
quando una o più lancette del cronografo non ritornano più alla
posizione iniziale dopo l’azzeramento del cronografo.
1. Estrarre la corona fino alla posizione 2.
2. Premere il pulsante A finché la lancetta dei secondi del cronografo
ritorna alla posizione iniziale.
3. Riportare la corona in posizione normale.
Attenzione: onde evitare uno spostamento accidentale della posizione
‘zero’, non esercitare alcuna pressione sulla corona finché le lancette
sono in movimento.
7170
Page 38

繁體中文 繁體中文
國際保用證明書
您的THOMAS SABO腕錶,由購買當日起,
可享有24個月的保修服務,
使用說明
因應不同型號,您的THOMAS SABO腕錶亦有特定的防水級別。
您可以於錶殼後面找到相關資訊,以下則為符號的解釋:
保修範圍包括原廠組件的損壞與製作過程的錯誤。
防水性能(1個標準大氣壓)
作為消費者,顧客必須於THOMAS SABO專門店或是 THOMAS
SABO網上商店購入此腕錶,並獲取由「THOMAS SABO GmbH
適用於濺水、雨水的意外接觸
& Co. KG, Martin-Luther-Str. 20, D-91207 Lauf, Germany」
發出的保用證, 保修服務方能生效。
請注意,顧客若從THOMAS SABO授權之經銷商購買此腕錶,
欲享用保修服務,則須連同已填妥的保用證明書,送回購入腕錶
防水性能(5個標準大氣壓)
適用於浸浴、淋浴與洗滌
之經銷商,切勿直接將腕錶交回THOMAS SABO。
行使保修服務時,請提供「國際保用證明書」 -- 需由THOMAS
SABO或其授權經銷商填上購買日期、簽字與蓋印。請好好將此
保用證明書保存在安全地方。顧客必須使用THOMAS SABO
認可的電池,保用方才有效。你的腕錶採用的是石英機芯。
防水性能(10個標準大氣壓)
適用於游泳、浮潛
本保用不包括在以下情況所引起之損壞:不正確的使用、曾由非
THOMAS SABO原廠進行的修理、處理或配戴不善、
正常損耗或意外而造成的任何損壞。配件如錶帶、錶鐲與電池等
亦不在保修之列。
防水性能(20個標準大氣壓)
適用於潛水活動
此保用證明不會取代或規限購買國家之法律。
7372
TS_instruction_manual_watches-8.indd 72-73TS_instruction_manual_watches-8.indd 72-73 16.07.13 10:1516.07.13 10:15
Page 39

繁體中文 繁體中文
1. 兩針腕錶
設定時間:
1. 將錶冠拉出到位置一
2. 旋轉錶冠將可同時設定時針與分針
3. 將錶冠回復至原來位置後,錶針將立即運作。
2. 附有日期顯示之兩針或三針腕錶*
*以上使用方法同樣適用於鉈錶與沒有秒針之型號
設定時間:
1. 將錶冠拉出到位置二
2. 旋轉錶冠,以設定時針與分針
3. 將錶冠回復至原來位置後,錶針將立即運作。
設定日期:
1. 將錶冠拉出到位置一
2. 逆時針方向旋轉錶冠以設定日期。請勿在晚上9 時到凌晨1
時的時間內設定日期。否則,日期將不能正確地轉換到下一天。
3. 將錶冠回復至原來位置
7574
TS_instruction_manual_watches-8.indd 74-75TS_instruction_manual_watches-8.indd 74-75 16.07.13 10:1516.07.13 10:15
留意:鉈錶型號之錶冠位於正12時位置
Page 40

繁體中文 繁體中文
3. 帶有獨立秒針的三針腕表
設定時間:
1. 將錶冠拉出到位置一
2. 旋轉錶冠,以設定時針與分針
3. 將錶冠回復至原來位置後,錶針將立即運作。
7776
TS_instruction_manual_watches-8.indd 76-77TS_instruction_manual_watches-8.indd 76-77 16.07.13 10:1516.07.13 10:15
Page 41

繁體中文 繁體中文
4. 附有日期與星期顯示之三針腕錶
設定星期:
1. 將錶冠拉出到位置一
2. 順時針方向旋轉錶冠以設定星期。勿在晚上9 時到凌晨1
時的時間內設定日期。否則,日期將不能正確地轉換到下一天。
3. 將錶冠回復至原來位置
設定時間:
1. 將錶冠拉出到位置二
2. 旋轉錶冠,以設定時針與分針
3. 將錶冠回復至原來位置後,錶針將立即運作。
設定日期:
1. 將錶冠拉出到位置一
2. 逆時針方向旋轉錶冠以設定日期。請勿在晚上9 時到凌晨1
時的時間內設定日期。否則,日期將不能正確地轉換到下一天。
3. 將錶冠回復至原來位置
7978
TS_instruction_manual_watches-8.indd 78-79TS_instruction_manual_watches-8.indd 78-79 16.07.13 10:1516.07.13 10:15
Page 42

繁體中文 繁體中文
5. 備有兩個計時器之型號
設定日期:
1. 將錶冠拉出到位置一
2. 逆時針方向旋轉錶冠以設定日期。請勿在晚上9 點到凌晨1
點的時間內設定日期。否則,日期將不能正確地轉換到下一天。
3. 將錶冠回復至原來位置
使用計時器功能:
計時器之準確度至1秒,可以進行1秒至59分鐘59秒之計時。計
時期間,計時器之秒針將不停轉動。
1. 按動A按鈕以啟動或停止計時器
2. 按下B按鈕去重設計時器。計時器之錶針將回至開始位置
重設計時器(更換電池後)
每次更換電池後,或是計時器之秒針沒法回至開始位置時,均可
使用以下操作。
1. 將錶冠拉出到位置二
2. 按動A按鈕,直至計時器之秒針回至開始位置
3. 將錶冠回復至原來位置
設定時間:
1. 將錶冠拉出到位置二
2. 旋轉錶冠,以設定時針與分針
注意:計時器之秒針轉動時請勿將錶冠回復至原來位置,否則秒
針之起始位置將出現錯誤。
3. 將錶冠回復至原來位置後,秒針將立即運作。
8180
TS_instruction_manual_watches-8.indd 80-81TS_instruction_manual_watches-8.indd 80-81 16.07.13 10:1516.07.13 10:15
Page 43

繁體中文 繁體中文
6. 備有三個計時器之型號
設定日期:
1. 將錶冠拉出到位置一
2. 逆時針方向旋轉錶冠以設定日期。請勿在晚上9 時到凌晨1
時的時間內設定日期。否則,日期將不能正確地轉換到下一天。
3. 將錶冠回復至原來位置
使用計時器功能:
計時器之準確度至1秒,可以進行1秒至11小時59分鐘59秒之
計時。計時期間,計時器之秒針將不停轉動。
1. 按動A按鈕以啟動或停止計時器
2. 按下B按鈕去重設計時器。計時器之錶針將回至開始位置
重設計時器(更換電池後)
每次更換電池後,或是計時器之秒針沒法回至開始位置時,均可
使用以下操作。
1. 將錶冠拉出到位置二
2. 按動A按鈕,直至計時器之秒針回至開始位置
3. 將錶冠回復至原來位置
設定時間:
1. 將錶冠拉出到位置二
2. 旋轉錶冠,以設定時針與分針
注意:計時器之秒針轉動時請勿將錶冠回復至原來位置,否則秒
針之起始位置將出現錯誤。
3. 將錶冠回復至原來位置後,秒針將立即運作。
8382
TS_instruction_manual_watches-8.indd 82-83TS_instruction_manual_watches-8.indd 82-83 16.07.13 10:1516.07.13 10:15
Page 44

繁體中文 繁體中文
7. 備有24小時顯示,共三個計時器之型號
設定日期:
1. 將錶冠拉出到位置一
2. 逆時針方向旋轉錶冠以設定日期。請勿在晚上9 時到凌晨1
時的時間內設定日期。否則,日期將不能正確地轉換到下一天。
3. 將錶冠回復至原來位置
使用計時器功能:
計時器之準確度至1秒,可以進行1秒至59分鐘59秒之計時。計
時期間,計時器之秒針將不停轉動。
1. 按動A按鈕以啟動或停止計時器
2. 按下B按鈕去重設計時器。計時器之錶針將回至開始位置
重設計時器(更換電池後)
每次更換電池後,或是計時器之秒針沒法回復至開始位置時,均
可使用以下操作。
1. 將錶冠拉出到位置二
設定時間:
1. 將錶冠拉出到位置二
2. 旋轉錶冠,以設定時針與分針
3. 將錶冠回復至原來位置後,秒針將立即運作。
2. 按動A按鈕,直至計時器之秒針回復至開始位置
3. 將錶冠回復至原來位置
注意:計時器之秒針轉動時請勿將錶冠回復至原來位置,否則秒
針之起始位置將出現錯誤。
24-小時時針
獨立的24-小時時針顯示日間/晚間時間。
這個顯示模式將會在您設定小時與分鐘的同時自動調校。
8584
TS_instruction_manual_watches-8.indd 84-85TS_instruction_manual_watches-8.indd 84-85 16.07.13 10:1516.07.13 10:15
Page 45

简体中文 简体中文
环球保修
您的THOMAS SABO腕表,由购买当日起,
可享有24个月的保修服务,保修范围包括原厂组件的损坏与制作
使用说明
因应不同型号,您的THOMAS SABO腕表亦有特定的防水级别。
您可以于表壳后面找到相关信息,以下则为符号的解释:
过程的错误。
防水性能(1个标准大气压)
作为消费者,顾客必须于THOMAS SABO专门店或是THOMAS SABO
网上商店购入此腕表,并获取由「THOMAS SABO GmbH & Co. KG,
适用于溅水、雨水的意外接触
Martin-Luther-Str. 20, D-91207 Lauf, Germany」发出的保用证,保
修服务方能生效。
请注意,顾客若从THOMAS SABO授权之经销商购买此腕表,
欲享用保修服务,则须连同已填妥的保用证明书,送回购入腕表之
防水性能(5个标准大气压)
适用于浸浴、淋浴与洗涤
经销商,切勿直接将腕表交回THOMAS SABO。
行使保修服务时,请提供「国际保用证明书」 -- 需由THOMAS
SABO或其授权经销商填上购买日期、签字与盖印。请好好将此保
用证明书保存在安全地方。顾客必须使用THOMAS SABO
认可的电池,保用方才有效。你的腕表采用的是石英机芯。
防水性能(10个标准大气压)
适用于游泳、浮潜
本保用不包括在以下情况所引起之损坏:不正确的使用、曾由非
THOMAS SABO原厂进行的修理、处理或配戴不善、
正常损耗或意外而造成的任何损坏。配件如表带、表镯与电池等亦
不在保修之列。
防水性能(20个标准大气压)
适用于潜水活动
此保用证明不会取代或规限购买国家之法律。
8786
TS_instruction_manual_watches-8.indd 86-87TS_instruction_manual_watches-8.indd 86-87 16.07.13 10:1516.07.13 10:15
Page 46

简体中文 简体中文
1. 两针腕表
设定时间:
1. 将表冠拉出到位置一
2. 旋转表冠将可同时设定时针与分针
3. 将表冠回复至原来位置后,表针将立即运作。
2. 附有日期显示之两针或三针腕表*
*以上使用方法同样适用于铊表与没有秒针之型号
设定时间:
1. 将表冠拉出到位置二
2. 旋转表冠,以设定时针与分针
3. 将表冠回复至原来位置后,表针将立即运作。
设定日期:
1. 将表冠拉出到位置一
2. 逆时针方向旋转表冠以设定日期。请勿在晚上9 时到凌晨1
时的时间内设定日期。否则,日期将不能正确地转换到下一天。
3. 将表冠回复至原来位置
8988
TS_instruction_manual_watches-8.indd 88-89TS_instruction_manual_watches-8.indd 88-89 16.07.13 10:1516.07.13 10:15
留意:铊表型号之表冠位于正12时位置
Page 47

简体中文 简体中文
3. 带有独立秒针的三针腕表
设定时间:
1. 将表冠拉出到位置一
2. 旋转表冠,以设定时针与分针
3. 将表冠回复至原来位置后,表针将立即运作。
9190
TS_instruction_manual_watches-8.indd 90-91TS_instruction_manual_watches-8.indd 90-91 16.07.13 10:1516.07.13 10:15
Page 48

简体中文 简体中文
4. 附有日期与星期显示之三针腕表
设定星期:
1. 将表冠拉出到位置一
2. 顺时针方向旋转表冠以设定星期。勿在晚上9 时到凌晨1
时的时间内设定日期。否则,日期将不能正确地转换到下一天。
3. 将表冠回复至原来位置
设定时间:
1. 将表冠拉出到位置二
2. 旋转表冠,以设定时针与分针
3. 将表冠回复至原来位置后,表针将立即运作。
设定日期:
1. 将表冠拉出到位置一
2. 逆时针方向旋转表冠以设定日期。请勿在晚上9 时到凌晨1
时的时间内设定日期。否则,日期将不能正确地转换到下一天。
3. 将表冠回复至原来位置
9392
TS_instruction_manual_watches-8.indd 92-93TS_instruction_manual_watches-8.indd 92-93 16.07.13 10:1516.07.13 10:15
Page 49

简体中文 简体中文
5. 备有两个定时器之型号
设定日期:
1. 将表冠拉出到位置一
2. 逆时针方向旋转表冠以设定日期。请勿在晚上9 点到凌晨1
点的时间内设定日期。否则,日期将不能正确地转换到下一天。
3. 将表冠回复至原来位置
使用定时器功能:
定时器之准确度至1秒,可以进行1秒至59分钟59秒之计时。计
时期间,定时器之秒针将不停转动。
1. 按动A按钮以激活或停止定时器
2. 按下B按钮去重设定时器。定时器之表针将回至开始位置
重设定时器(更换电池后)
每次更换电池后,或是定时器之秒针没法回至开始位置时,均可
使用以下操作。
1. 将表冠拉出到位置二
2. 按动A按钮,直至定时器之秒针回至开始位置
3. 将表冠回复至原来位置
设定时间:
1. 将表冠拉出到位置二
2. 旋转表冠,以设定时针与分针
注意:定时器之秒针转动时请勿将表冠回复至原来位置,否则秒
针之起始位置将出现错误。
3. 将表冠回复至原来位置后,秒针将立即运作。
9594
TS_instruction_manual_watches-8.indd 94-95TS_instruction_manual_watches-8.indd 94-95 16.07.13 10:1516.07.13 10:15
Page 50

简体中文 简体中文
6. 备有三个定时器之型号
设定日期:
1. 将表冠拉出到位置一
2. 逆时针方向旋转表冠以设定日期。请勿在晚上9 时到凌晨1
时的时间内设定日期。否则,日期将不能正确地转换到下一天。
3. 将表冠回复至原来位置
使用定时器功能:
定时器之准确度至1秒,可以进行1秒至11小时59分钟59秒之计
时。计时期间,定时器之秒针将不停转动。
1. 按动A按钮以激活或停止定时器
2. 按下B按钮去重设定时器。定时器之表针将回至开始位置
重设定时器(更换电池后)
每次更换电池后,或是定时器之秒针没法回至开始位置时,均可
使用以下操作。
1. 将表冠拉出到位置二
2. 按动A按钮,直至定时器之秒针回至开始位置
3. 将表冠回复至原来位置
设定时间:
1. 将表冠拉出到位置二
2. 旋转表冠,以设定时针与分针
注意:定时器之秒针转动时请勿将表冠回复至原来位置,否则秒
针之起始位置将出现错误。
3. 将表冠回复至原来位置后,秒针将立即运作。
9796
TS_instruction_manual_watches-8.indd 96-97TS_instruction_manual_watches-8.indd 96-97 16.07.13 10:1516.07.13 10:15
Page 51

简体中文 简体中文
7. 备有24小时显示,共三个定时器之型号
设定日期:
1. 将表冠拉出到位置一
2. 逆时针方向旋转表冠以设定日期。请勿在晚上9 时到凌晨1
时的时间内设定日期。否则,日期将不能正确地转换到下一天。
3. 将表冠回复至原来位置
使用定时器功能:
定时器之准确度至1秒,可以进行1秒至59分钟59秒之计时。计
时期间,定时器之秒针将不停转动。
1. 按动A按钮以激活或停止定时器
2. 按下B按钮去重设定时器。定时器之表针将回至开始位置
重设定时器(更换电池后)
每次更换电池后,或是定时器之秒针没法回复至开始位置时,均
可使用以下操作。
1. 将表冠拉出到位置二
设定时间:
1. 将表冠拉出到位置二
2. 旋转表冠,以设定时针与分针
3. 将表冠回复至原来位置后,秒针将立即运作。
2. 按动A按钮,直至定时器之秒针回复至开始位置
3. 将表冠回复至原来位置
注意:定时器之秒针转动时请勿将表冠回复至原来位置,否则秒
针之起始位置将出现错误。
24-小时时针
独立的24-小时时针显示日间/晚间时间。 这个显示模式将会在
您设定小时与分钟的同时自动调校
9998
TS_instruction_manual_watches-8.indd 98-99TS_instruction_manual_watches-8.indd 98-99 16.07.13 10:1516.07.13 10:15
Page 52

Русский язык Русский язык
МЕЖДУНАРОДНАЯ ГАРАНТИЯ
В отношении дефектов материала и обработки на Ваши часы
THOMAS SABO предоставляется гарантия 24 месяца со дня покупки.
При условии, что Вы как потребитель приобрели Ваши часы в
собственном магазине фирмы THOMAS SABO или в онлайн-магазине
THOMAS SABO. Гарантия предоставляется фирмой THOMAS SABO
GmbH & Co. KG, Martin-Luther-Str. 20, D-91207 Lauf, Deutschland.
Пожалуйста, обратите внимание на то, что часы THOMAS SABO,
купленные в
необходимо принести именно туда с заполненным гарантийным
талоном, их не нужно непосредственно направлять фирме THOMAS
SABO. Чтобы воспользоваться гарантией, предъявите, пожалуйста,
сертификат международной гарантии, заполненный магазином
THOMAS SABO или аккредитованным дилером THOMAS SABO, с
соответствующими подписью и печатью. Пожалуйста, сохраняйте
этот сертификат. Гарантия действительна только при условии
использования признанных батарей THOMAS SABO.
снабжены кварцевым механизмом.
Гарантия не предоставляется при ненадлежащем применении,
ремонте посторонними организациями, небрежном обращении,
износе, повреждениях в результате обычного использования,
неправильного использования или повреждениях, возникших,
например, в результате несчастного случая. Настоящая гарантия не
распространяется на быстроизнашивающиеся детали, например,
ремешки и батареи.
Настоящая гарантия не заменяет и не ограничивает права
предоставляемые в рамках гарантий, установленных национальным
законодательством.
аккредитованном специализированном магазине,
Ваши часы
,
ПРИМЕРЫ ИСПОЛЬЗОВАНИЯ
В зависимости от модели Ваши часы THOMAS SABO могут быть
водонепроницаемыми. Эти данные находятся на обратной стороне
корпуса и имеют следующее значение:
Водонепроницаемые 1 АТМ
Брызги воды, дождь
Водонепроницаемые 5 АТМ
Купание, мытье, принятие душа
Водонепроницаемые 10 АТМ
Плавание, подводное плавание
Водонепроницаемые 20 АТМ
Автономное погружение
101100
TS_instruction_manual_watches-8.indd 100-101TS_instruction_manual_watches-8.indd 100-101 16.07.13 10:1516.07.13 10:15
Page 53

Русский язык Русский язык
1. ДВУХСТРЕЛОЧНЫЕ ЧАСЫ 2. ДВУХ- И ТРЕХСТРЕЛОЧНЫЕ ЧАСЫ С ИНДИКАТОРОМ ДАТЫ*
УСТАНОВКА ВРЕМЕНИ
1. Вытянуть заводную головку в положение 1.
2. Поворачивая заводную головку, установить обе стрелки.
3. После возвращения заводной головки в стандартное
положение, стрелки начинают двигаться.
УСТАНОВКА ВРЕМЕНИ
1. Вытянуть заводную головку в положение 2.
2. Поворачивая заводную головку, установить часовую и
минутную стрелки.
3. После возвращения заводной головки в стандартное
положение, секундная стрелка начинает работать.
УСТАНОВКА ДАТЫ
1. Вытянуть заводную головку в положение 1.
2. Для установки даты поворачивать заводную головку против
часовой стрелки. Если дата устанавливается
01:00, то возможно, что дата на следующий день не
изменится.
3. Вернуть заводную головку в стандартное положение.
между 21:00 и
* Инструкция действительная также для моделей без секундной стрелки и карманных часов.
103102
TS_instruction_manual_watches-8.indd 102-103TS_instruction_manual_watches-8.indd 102-103 16.07.13 10:1516.07.13 10:15
Внимание: в карманных часах заводная головка располагается над цифрой 12.
Page 54

Русский язык Русский язык
3. ТРЕХСТРЕЛОЧНЫЕ ЧАСЫ С РАСПОЛОЖЕННОЙ
СБОКУ СЕКУНДНОЙ СТРЕЛКОЙ
УСТАНОВКА ВРЕМЕНИ
1. Вытянуть заводную головку в положение 1.
2. Поворачивая заводную головку, установить часовую и
минутную стрелки.
3. После возвращения заводной головки в стандартное
положение, секундная стрелка начинает работать.
105104
TS_instruction_manual_watches-8.indd 104-105TS_instruction_manual_watches-8.indd 104-105 16.07.13 10:1516.07.13 10:15
Page 55

Русский язык Русский язык
4. ТРЕХСТРЕЛОЧНЫЕ ЧАСЫ С ИНДИКАТОРОМ ДАТЫ И ДНЯ НЕДЕЛИ
УСТАНОВКА ВРЕМЕНИ
1. Вытянуть заводную головку в положение 2.
2. Поворачивая заводную головку, установить часовую и
минутную стрелки.
возвращения заводной головки в стандартное
3. После
положение, секундная стрелка начинает работать.
УСТАНОВКА ДАТЫ
1. Вытянуть заводную головку в положение 1.
2. Для установки даты поворачивать заводную головку против
часовой стрелки. Если дата устанавливается между 21:00 и
01:00, то возможно, что дата на следующий день не
изменится.
3. Вернуть заводную головку в стандартное положение.
УСТАНОВКА ДНЯ НЕДЕЛИ
1. Вытянуть заводную головку в положение 1.
установки дня недели поворачивать заводную головку по
2. Для
часовой стрелке. Если дата устанавливается между 21:00 и
01:00, то возможно, что индикация на следующий день не из
менится.
3. Вернуть заводную головку в стандартное положение.
107106
TS_instruction_manual_watches-8.indd 106-107TS_instruction_manual_watches-8.indd 106-107 16.07.13 10:1516.07.13 10:15
Page 56

Русский язык Русский язык
5. ХРОНОГОГРАФ С ДВУМЯ УКАЗАТЕЛЯМИ
УСТАНОВКА ВРЕМЕНИ
1. Вытянуть заводную головку в положение 2.
2. Поворачивая заводную головку, установить часовую и
минутную стрелки.
3. После возвращения заводной головки в стандартное
положение маленькая секундная стрелка начинает работать.
УСТАНОВКА ДАТЫ
1. Вытянуть заводную головку в положение 1.
2. Для установки даты поворачивать заводную головку против
часовой стрелки. Если дата устанавливается между 21:00 и
01:00, то возможно, что дата на следующий день не изменится.
3. Вернуть заводную головку в стандартное положение.
ИСПОЛЬЗОВАНИЕ ФУНКЦИИ ОСТАНОВА
Хронограф может измерять время с шагом 1/1 секунды в
59 минут и 59 секунд. В течение этого времени секундная стрелка
хронографа непрерывно вращается.
1. Для запуска и останова хронографа нажать кнопку A.
2. Для сброса настроек нажать кнопку B. Стрелки хронографа
возвращаются в свое исходное положение.
СБРОС НАСТРОЕК ХРОНОГРАФА (также после замены батареи)
Эту операцию необходимо выполнить, если была заменена батарея
/или секундная стрелка хронографа после сброса настроек не
и
вернулась в исходное положение.
1. Вытянуть заводную головку в положение 2.
2. Удерживать нажатой кнопку A до тех пор, пока секундная
стрелка хронографа не вернется в исходное положение.
3. Вернуть заводную головку в стандартное положение.
Внимание: не нажимать на заводную головку, пока стрелка
, так как в противном случае изменится исходное
движется
положение.
течение
109108
TS_instruction_manual_watches-8.indd 108-109TS_instruction_manual_watches-8.indd 108-109 16.07.13 10:1516.07.13 10:15
Page 57

Русский язык Русский язык
6. ХРОНОГОГРАФ С ТРЕМЯ УКАЗАТЕЛЯМИ
УСТАНОВКА ВРЕМЕНИ
1. Вытянуть заводную головку в положение 2.
2. Поворачивая заводную головку, установить часовую и
минутную стрелки.
3. После возвращения заводной головки в стандартное
положение, маленькая секундная стрелка начинает работать.
УСТАНОВКА ДАТЫ
1. Вытянуть заводную головку в положение 1.
2. Для установки даты поворачивать заводную головку против
часовой стрелки. Если дата
01:00, то возможно, что дата на следующий день не изменится.
3. Вернуть заводную головку в стандартное положение.
ИСПОЛЬЗОВАНИЕ ФУНКЦИИ ОСТАНОВА
Хронограф может измерять время с шагом 1/1 секунды в
течение 11 часов, 59 минут и 59 секунд. В течение этого времени
секундная стрелка хронографа непрерывно вращается.
1. Для запуска и останова хронографа нажать
2. Для сброса настроек нажать кнопку B.
Стрелки хронографа возвращаются в свое исходное положение.
СБРОС НАСТРОЕК ХРОНОГРАФА (также после замены батареи)
Эту операцию необходимо выполнить, если была заменена батарея
и/или секундная стрелка хронографа после сброса настроек не
вернулась в исходное положение.
1. Вытянуть заводную головку в положение 2.
2. Удерживать нажатой
стрелка хронографа не вернется в исходное положение.
3. Вернуть заводную головку в стандартное положение.
Внимание: не нажимать на заводную головку, пока стрелка
движется, так как в противном случае изменится исходное
положение.
устанавливается между 21:00 и
кнопку A.
кнопку A до тех пор, пока секундная
111110
TS_instruction_manual_watches-8.indd 110-111TS_instruction_manual_watches-8.indd 110-111 16.07.13 10:1516.07.13 10:15
Page 58

Русский язык Русский язык
7. ХРОНОГОГРАФ С ТРЕМЯ УКАЗАТЕЛЯМИ
УСТАНОВКА ВРЕМЕНИ
1. Вытянуть заводную головку в положение 2.
2. Поворачивая заводную головку, установить часовую и
минутную стрелки.
3. После возвращения заводной головки в стандартное
положение, маленькая секундная стрелка начинает работать.
24-ЧАСОВАЯ СТРЕЛКА
Отдельная 24-часовая стрелка показывает текущее время в
суточном режиме. Эта индикация настраивается одновременно с
установкой текущего времени.
УСТАНОВКА ДАТЫ
1. Вытянуть заводную головку в положение 1.
2. Для установки даты поворачивать заводную головку против
часовой стрелки. Если дата устанавливается между 21:00 и
01:00, то возможно, что дата на следующий день не изменится.
3. Вернуть заводную головку в стандартное положение.
ИСПОЛЬЗОВАНИЕ ФУНКЦИИ ОСТАНОВА
Хронограф может измерять время с шагом 1/1 секунды в течение
59 минут и
хронографа непрерывно вращается.
1. Для запуска и останова хронографа нажать кнопку A.
2. Для сброса настроек нажать кнопку B. Стрелки хронографа
возвращаются в свое исходное положение.
СБРОС НАСТРОЕК ХРОНОГРАФА (также после замены батареи)
Эту операцию необходимо выполнить, если была заменена батарея
и/или секундная стрелка
вернулась в исходное положение.
1. Вытянуть заводную головку в положение 2.
2. Удерживать нажатой кнопку A до тех пор, пока секундная
стрелка хронографа не вернется в исходное положение.
3. Вернуть заводную головку в стандартное положение.
Внимание: не нажимать на заводную головку, пока стрелка
движется, так как в противном
положение.
59 секунд. В течение этого времени секундная стрелка
хронографа после сброса настроек не
случае изменится исходное
113112
TS_instruction_manual_watches-8.indd 112-113TS_instruction_manual_watches-8.indd 112-113 16.07.13 10:1516.07.13 10:15
Page 59

INTERNATIONAL GUARANTEE | INTERNATIONALE GARANTIE
Model Number | Modellnummer
Sold to | Käufer
Country, Date | Land, Datum
Sold by, Stamp | Händler, Stempel
115114
TS_instruction_manual_watches-8.indd 114-115TS_instruction_manual_watches-8.indd 114-115 16.07.13 10:1516.07.13 10:15
 Loading...