


KE1890-415-40-L42v
THOMAS SABO KE1890-415-40-L42v, KE1890-415-40-L50v, KE1890-415-40-L60, KE1890-415-40-L70, KE1890-415-40-L80 operation manual
...
WWW.THOM ASSABO.C OM
TS_instruction_manual_watches-8.indd 1-2 16.07.13 10:15
1
2 Deutsch
16 English
30 Français
44 Español
58 Italiano
72 Traditional Chinese(繁體中文)
86 Simplified Chinese(简体中文)
100 Русский язык
115 International Guarantee
CONTENTS
TS_instruction_manual_watches-8.indd 1-1TS_instruction_manual_watches-8.indd 1-1 16.07.13 10:1516.07.13 10:15
2 3
Auf Ihre THOMAS SABO Uhr haben Sie eine Garantie von 24 Monaten ab
dem Kauftag hinsichtlich Materialdefekten und Verarbeitungsfehlern.
Voraussetzung ist, dass Sie als Verbraucher die Uhr in einer THOMAS SABO
eigenen Verkaufsstelle oder im THOMAS SABO Online-Shop gekauft
haben. Garantiegeber ist die THOMAS SABO GmbH & Co. KG, Martin-
Luther-Str. 20, 91207 Lauf, Deutschland.
Bitte beachten Sie, dass THOMAS SABO Uhren, die bei einem autorisierten
Fachgeschäft gekauft wurden, auch dort unter Abgabe des ausgefüllten
Garantiescheins eingereicht werden müssen und nicht bei THOMAS SABO
direkt eingeschickt werden können. Um diese Garantie in Anspruch zu
nehmen, legen Sie bitte das internationale Garantiezertifikat vor – ausgefüllt
von einem THOMAS SABO Shop oder einem autorisierten THOMAS SABO
Händler, datiert, unterschrieben und gestempelt. Bitte bewahren Sie dieses
Zertifikat sicher auf. Diese Garantie gilt nur unter der Voraussetzung, dass
von THOMAS SABO anerkannte Batterien verwendet werden. Ihre Uhr ist
mit einem Quarzwerk ausgestattet. Die Garantie besteht nicht bei unsach-
gemäßem Gebrauch, Fremdreparatur, nachlässiger Behandlung,
Verschleiß, Beschädigungen durch den üblichen Gebrauch, Missbrauch
oder bei Schäden z. B. durch einen Unfall. Ausgenommen von dieser
Garantie sind Verschleißteile wie Armbänder und Batterien.
Die Rechte im Rahmen der gesetzlichen Gewährleistung gemäß den
nationalen Gesetzen werden durch die Garantie nicht ersetzt oder einge-
schränkt.
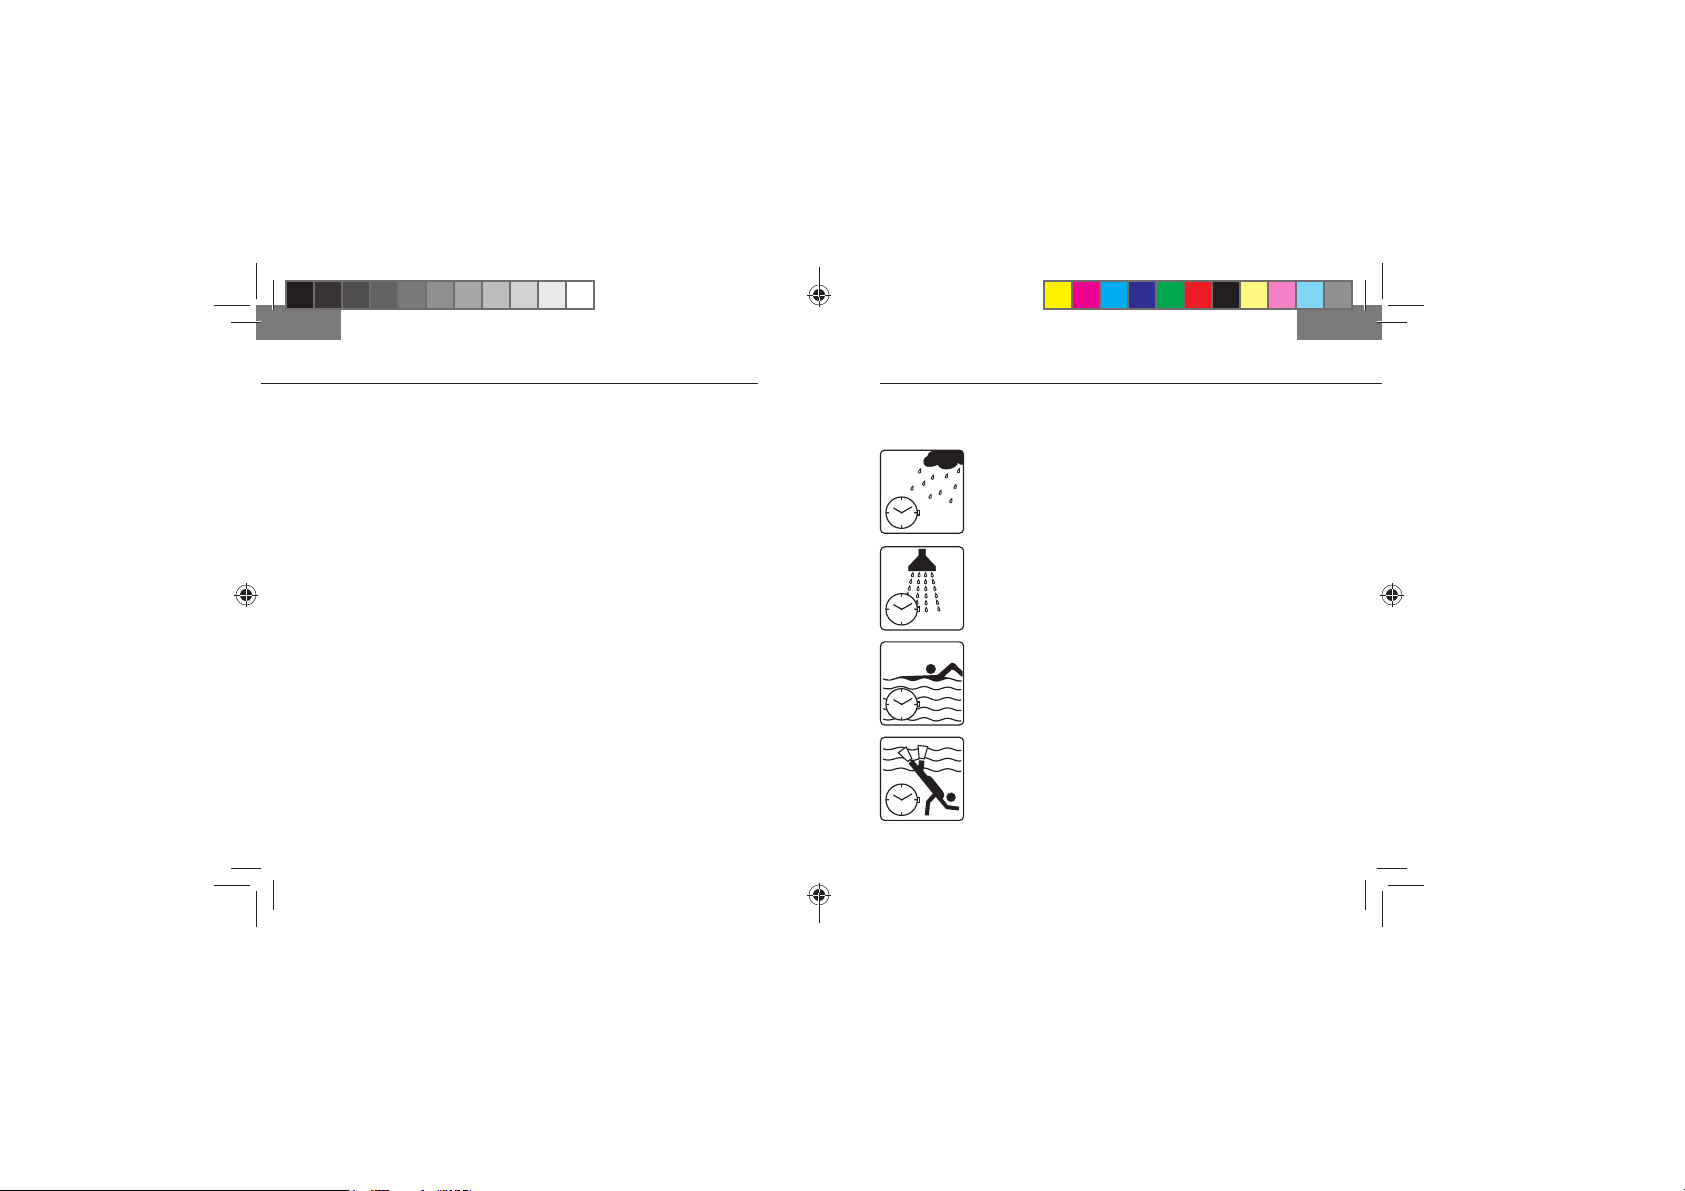
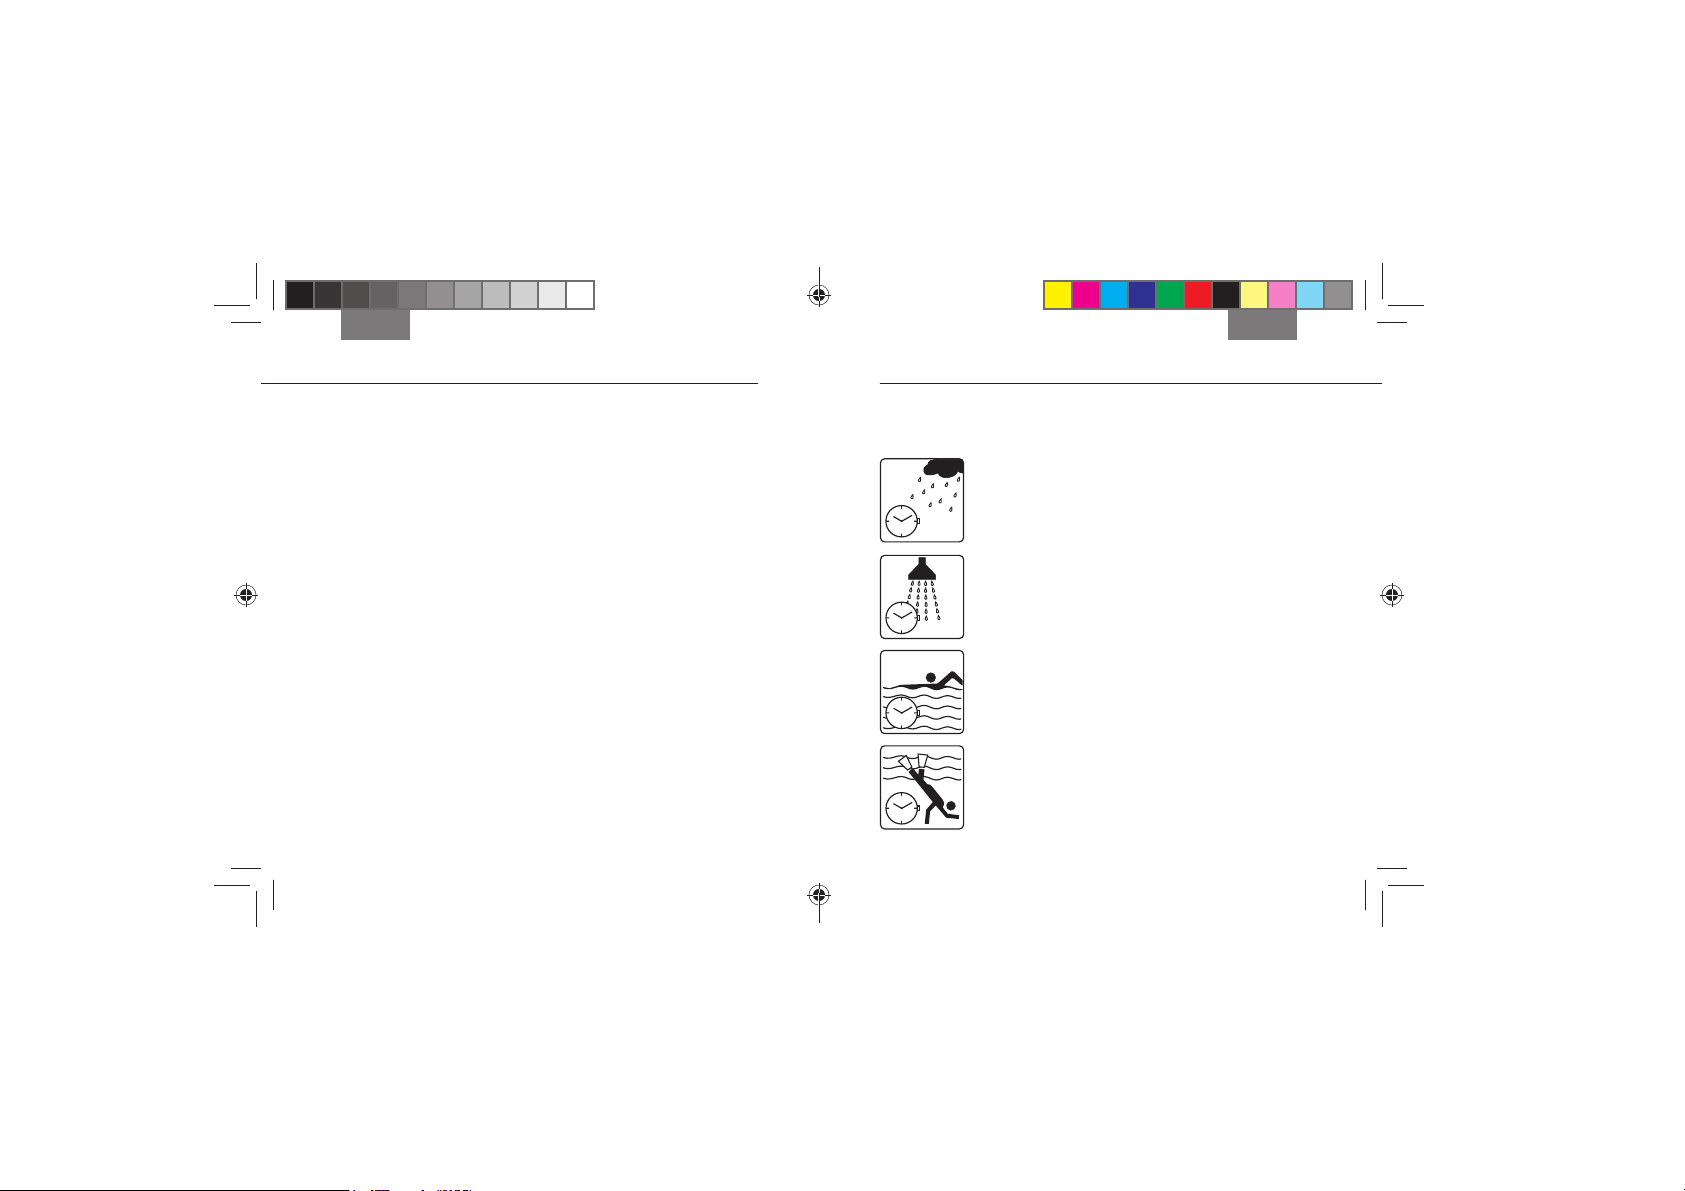
Wasserdicht 1 ATM
Wasserspritzer, Regen
Wasserdicht 5 ATM
Baden, Waschen, Duschen
Wasserdicht 10 ATM
Schwimmen, Schnorcheln
Wasserdicht 20 ATM
Freitauchen
Deutsch Deutsch
BENUTZUNGSBEISPIELE
INTERNATIONALE GARANTIE
Ihre THOMAS SABO Uhr hat eine modellabhängige Wasserdichte. Diese
Angabe finden Sie auf dem Gehäuseboden und hat folgende Bedeutung:
TS_instruction_manual_watches-8.indd 2-3TS_instruction_manual_watches-8.indd 2-3 16.07.13 10:1516.07.13 10:15
4 5
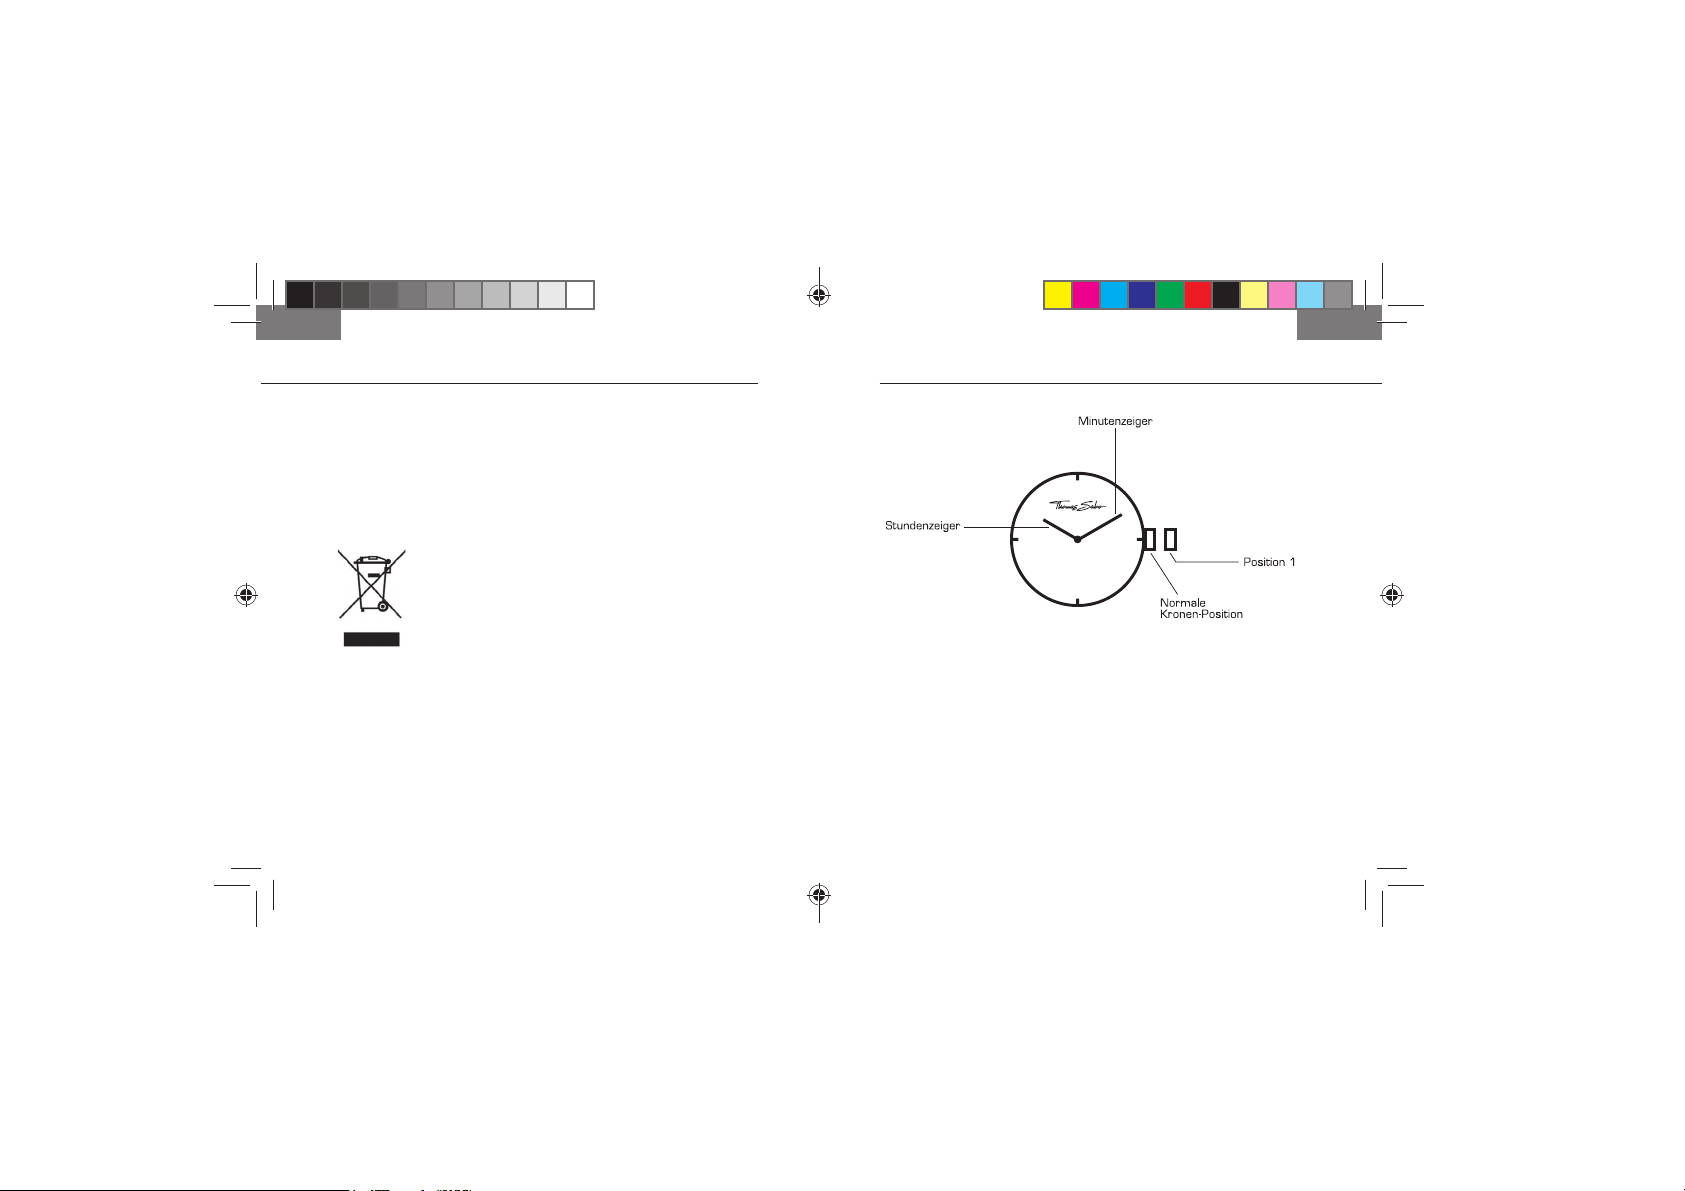
ZEIT EINSTELLEN
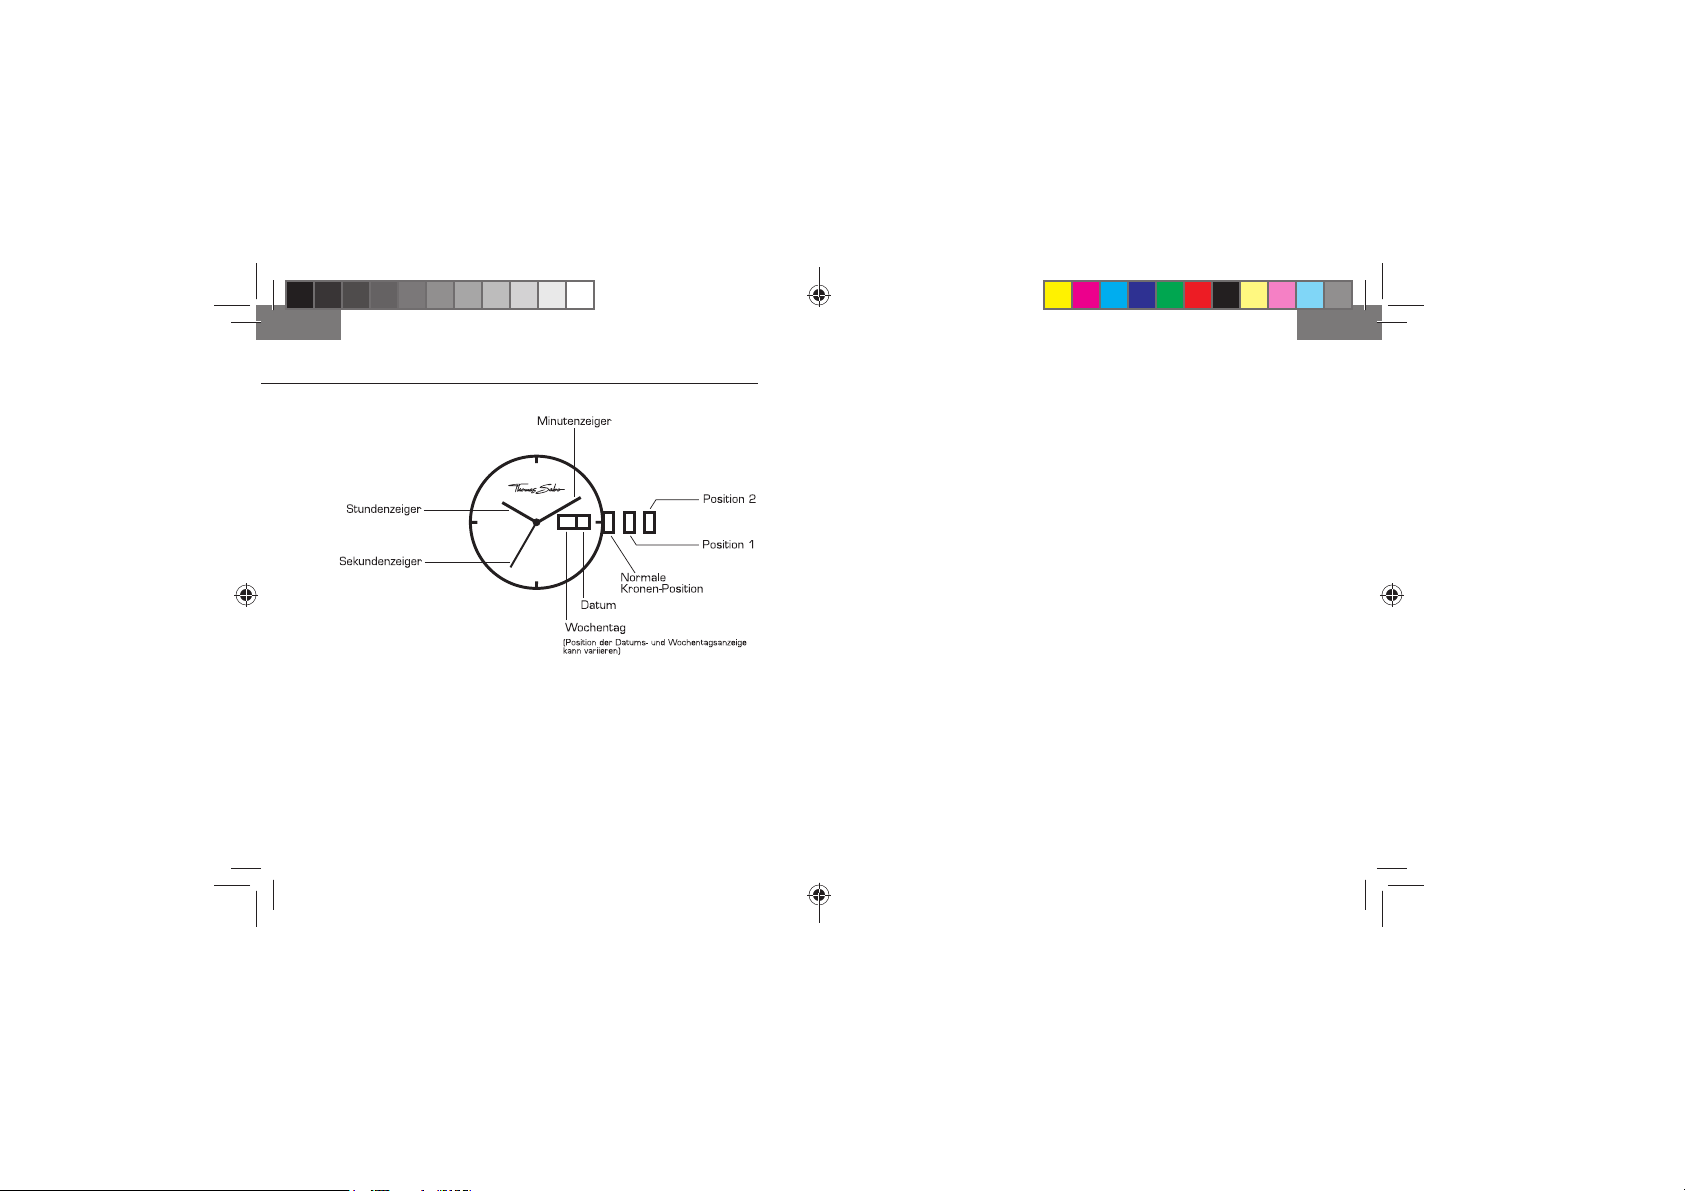
1. Krone herausziehen auf Position 1.
2. Durch Drehen der Krone beide Zeiger einstellen.
3. Nach Zurückdrücken der Krone in die Normalposition beginnen die
Zeiger ihre Funktion.
1. ZWEIZEIGER-UHR
Deutsch Deutsch
Dieses Produkt von THOMAS SABO unterliegt der Richtlinie 2002/96/EG
des Europäischen Parlaments und des Rates über Elektro- und Elektronik-
Altgeräte bzw. dem deutschen Elektro- und Elektronikgerätegesetz
(ElektroG). Dieses Gerät ist nach dem 13.08.2005 in den Handel
gekommen und darf nicht im Rahmen des normalen Hausmülls entsorgt
werden. Nutzen Sie zur Entsorgung dieses Geräts bitte die entsprechenden
Rücknahmesysteme Ihrer Gemeinde und beachten Sie auch alle weiteren
Vorschriften in diesem Zusammenhang.
KUNDENINFORMATION
TS_instruction_manual_watches-8.indd 4-5TS_instruction_manual_watches-8.indd 4-5 16.07.13 10:1516.07.13 10:15
6 7
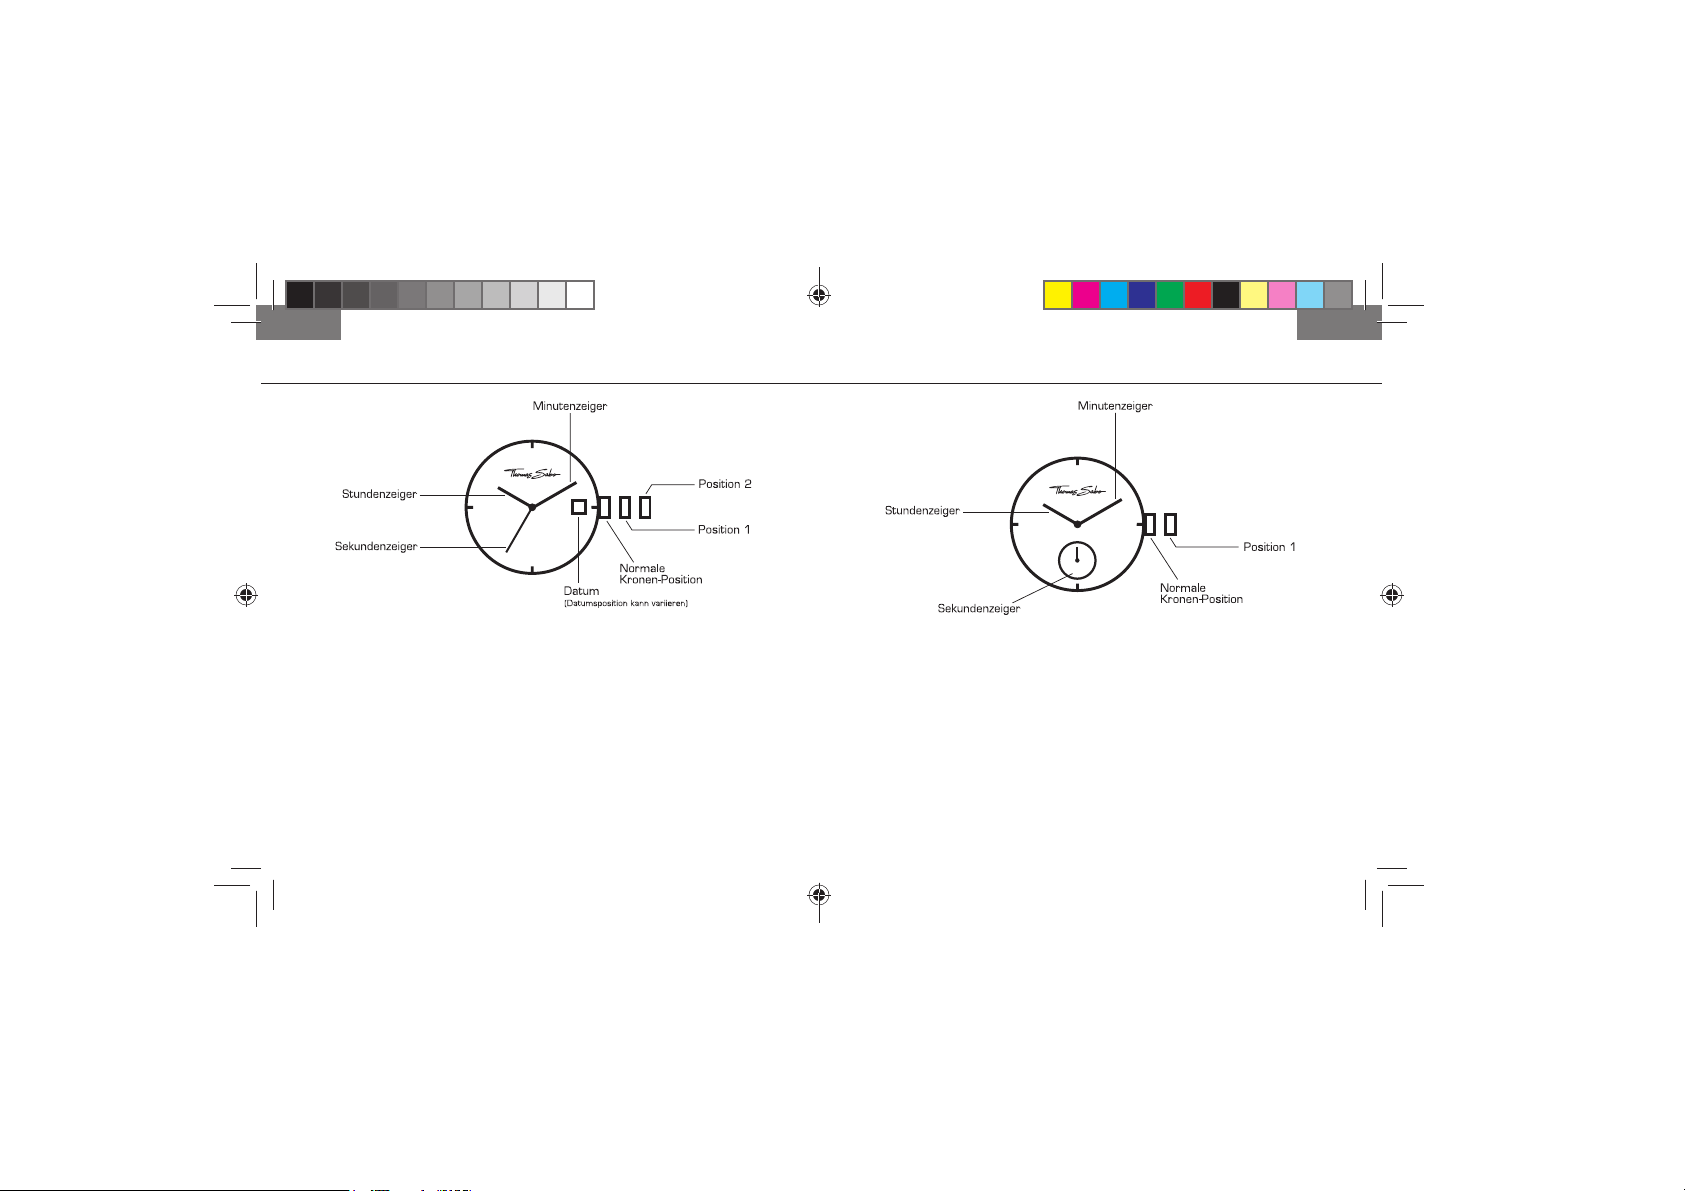
ZEIT EINSTELLEN
1. Krone herausziehen auf Position 1.
2. Durch Drehen der Krone Stunden- und Minutenzeiger einstellen.
3. Nach Zurückdrücken der Krone in die Normalposition beginnt der
Sekundenzeiger seine Funktion.
3. DREIZEIGER-UHR MIT DEZENTRALER SEKUNDENANZEIGE
Deutsch Deutsch
2. ZWEI- UND DREIZEIGER-UHR MIT DATUMSANZEIGE*
ZEIT EINSTELLEN
1. Krone herausziehen auf Position 2.
2. Durch Drehen der Krone Stunden- und Minutenzeiger einstellen.
3. Nach Zurückdrücken der Krone in die Normalposition beginnt der
Sekundenzeiger seine Funktion.
DATUM EINSTELLEN
1. Krone herausziehen auf Position 1.
2. Krone gegen den Uhrzeigersinn drehen, um das Datum
einzustellen. Wird das Datum zwischen 21:00 und 01:00 Uhr
eingestellt, wechselt das Datum am nächsten Tag evtl. nicht.
3. Krone in die Normalposition zurückdrücken.
*Anleitung gilt auch für Modelle ohne Sekundenzeiger und Taschenuhren.
Achtung: Bei Taschenuhren befindet sich die Krone auf 12 Uhr.
TS_instruction_manual_watches-8.indd 6-7TS_instruction_manual_watches-8.indd 6-7 16.07.13 10:1516.07.13 10:15
98
4. DREIZEIGER-UHR MIT DATUMS- UND WOCHENTAGSANZEIGE
DATUM EINSTELLEN
1. Krone herausziehen auf Position 1.
2. Krone gegen den Uhrzeigersinn drehen, um das Datum
einzustellen. Wird das Datum zwischen 21:00 und 01:00 Uhr
eingestellt, wechselt das Datum am nächsten Tag evtl. nicht.
3. Krone in die Normalposition zurückdrücken.
WOCHENTAG EINSTELLEN
1. Krone herausziehen auf Position 1.
2. Krone im Uhrzeigersinn drehen, um den Wochentag einzustellen.
Wird die Einstellung zwischen 21:00 und 01:00 Uhr vorgenommen,
wechselt die Anzeige am nächsten Tag evtl. nicht.
3. Krone in die Normalposition zurückdrücken.
ZEIT EINSTELLEN
1. Krone herausziehen auf Position 2.
2. Durch Drehen der Krone Stunden- und Minutenzeiger einstellen.
3. Nach Zurückdrücken der Krone in die Normalposition beginnt der
Sekundenzeiger seine Funktion.
Deutsch Deutsch
TS_instruction_manual_watches-8.indd 8-9TS_instruction_manual_watches-8.indd 8-9 16.07.13 10:1516.07.13 10:15
1110
DATUM EINSTELLEN
1. Krone herausziehen auf Position 1.
2. Krone gegen den Uhrzeigersinn drehen, um das Datum
einzustellen. Wird das Datum zwischen 21:00 und 01:00 Uhr
eingestellt, wechselt das Datum am nächsten Tag evtl. nicht.
3. Krone in die Normalposition zurückdrücken.
STOPPFUNKTION NUTZEN
Der Chronograph kann in 1/1-Sekunden-Einheiten Zeiten bis zu
59 Minuten und 59 Sekunden messen. Während dieser Zeit kreist der
Chronographen-Sekundenzeiger kontinuierlich.
1. Zum Starten und Stoppen des Chronographen Knopf A drücken.
2. Zum Zurückstellen Knopf B drücken. Die Chronographen-Zeiger
kehren in die Ausgangsposition zurück.
CHRONOGRAPH ZURÜCKSTELLEN (auch nach Batteriewechsel)
Dieser Vorgang sollte ausgeführt werden, wenn die Batterie
gewechselt wurde und/oder der Sekundenzeiger des Chronographen
nach dem Zurückstellen nicht in die Ausgangsposition zurückkehrt.
1. Krone herausziehen auf Position 2.
2. Knopf A so lange drücken, bis der Sekundenzeiger des Chronogra-
phen in die Ausgangsposition zurückgekehrt ist.
3. Krone in die Normalposition zurückdrücken.
Achtung: Krone nicht zurückdrücken, solange der Zeiger in
Bewegung ist, da sonst die Ausgangsposition verstellt wird.
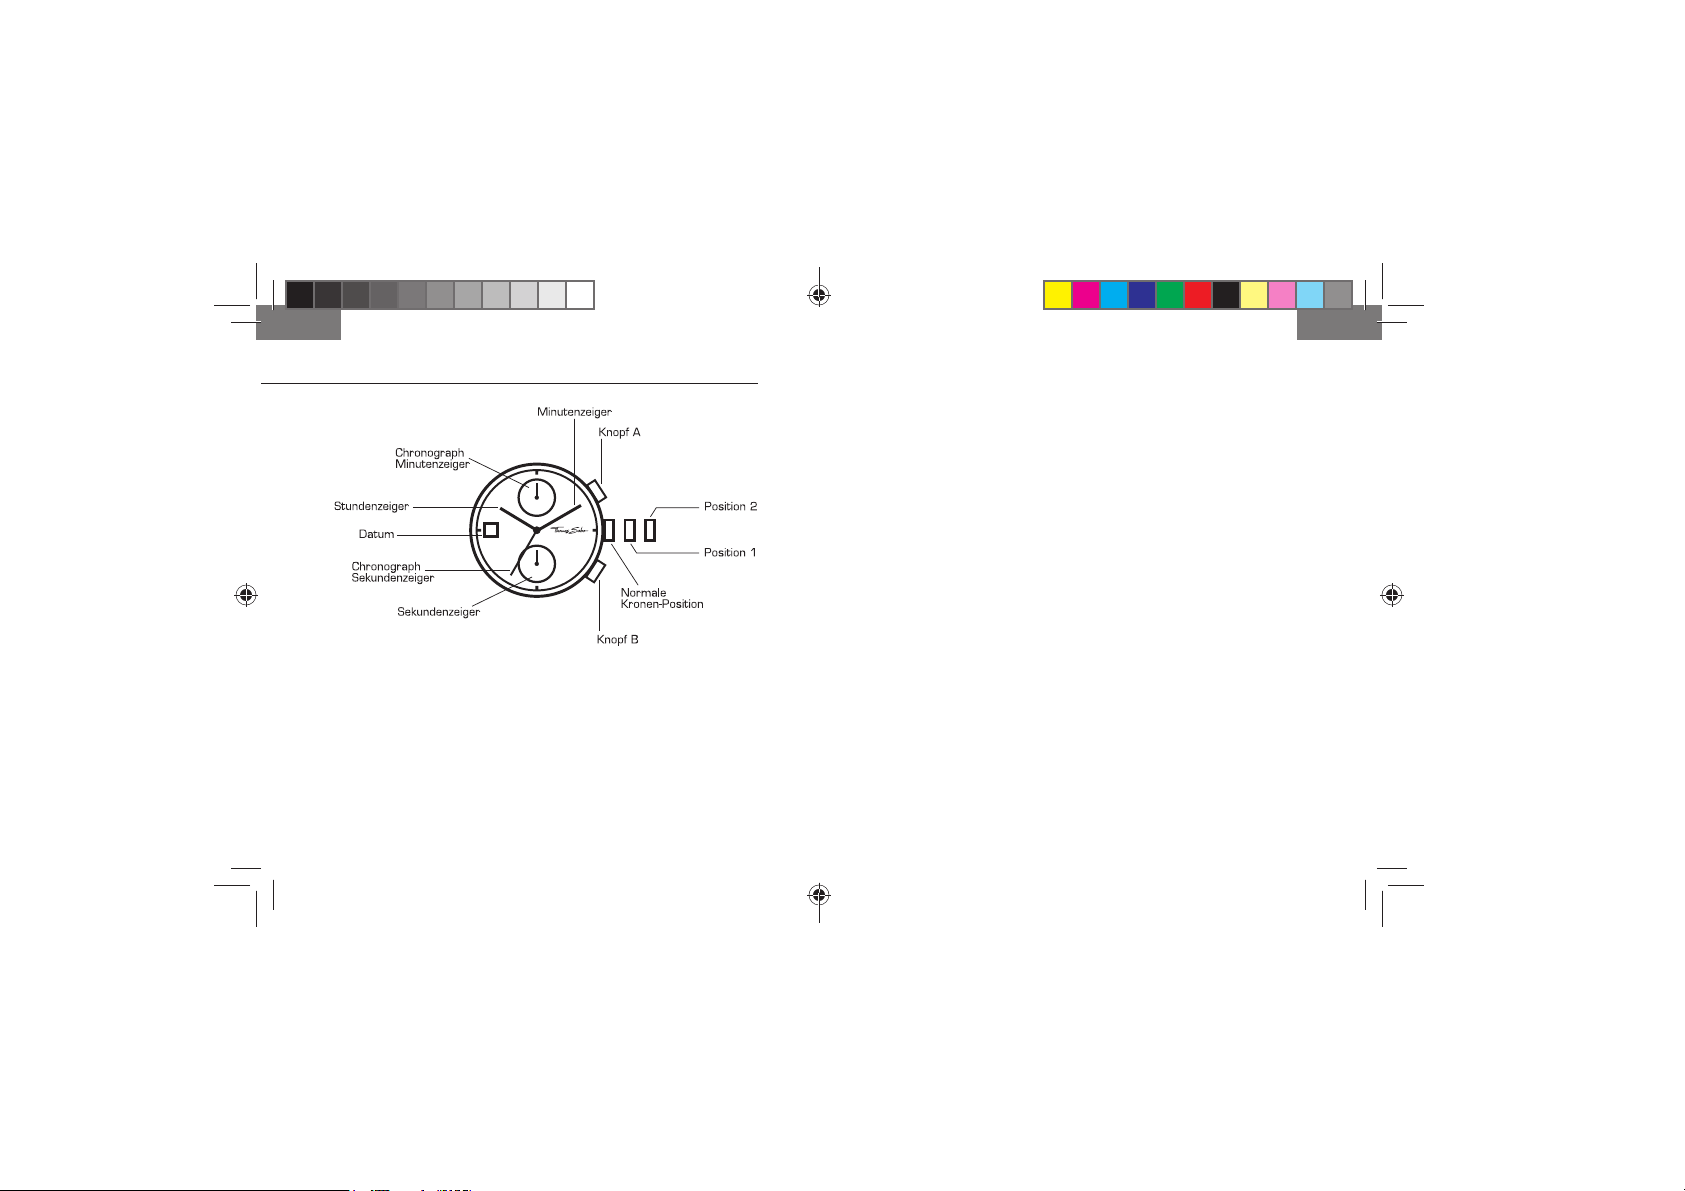
5. CHRONOGRAPH MIT ZWEI ANZEIGERN
ZEIT EINSTELLEN
1. Krone herausziehen auf Position 2.
2. Durch Drehen der Krone Stunden- und Minutenzeiger einstellen.
3. Nach Zurückdrücken der Krone in die Normalposition beginnt
der kleine Sekundenzeiger seine Funktion.
Deutsch Deutsch
TS_instruction_manual_watches-8.indd 10-11TS_instruction_manual_watches-8.indd 10-11 16.07.13 10:1516.07.13 10:15

12 13
6. CHRONOGRAPH MIT DREI ANZEIGERN
ZEIT EINSTELLEN
1. Krone herausziehen auf Position 2.
2. Durch Drehen der Krone Stunden- und Minutenzeiger einstellen.
3. Nach Zurückdrücken der Krone in die Normalposition beginnt
der kleine Sekundenzeiger seine Funktion.
DATUM EINSTELLEN
1. Krone herausziehen auf Position 1.
2. Krone gegen den Uhrzeigersinn drehen, um das Datum
einzustellen. Wird das Datum zwischen 21:00 und 01:00 Uhr
eingestellt, wechselt das Datum am nächsten Tag evtl. nicht.
3. Krone in die Normalposition zurückdrücken.
STOPPFUNKTION NUTZEN
Der Chronograph kann in 1/1-Sekunden-Einheiten Zeiten bis zu
11 Stunden, 59 Minuten und 59 Sekunden messen. Während dieser
Zeit kreist der Chronographen-Sekundenzeiger kontinuierlich.
1. Zum Starten und Stoppen des Chronographen Knopf A drücken.
2. Zum Zurückstellen Knopf B drücken. Die Chronographen-Zeiger
kehren in die Ausgangsposition zurück.
CHRONOGRAPH ZURÜCKSTELLEN (auch nach Batteriewechsel)
Dieser Vorgang sollte ausgeführt werden, wenn die Batterie
gewechselt wurde und/oder der Sekundenzeiger des Chronographen
nach dem Zurückstellen nicht in die Ausgangsposition zurückkehrt.
1. Krone herausziehen auf Position 2.
2. Knopf A so lange drücken, bis der Sekundenzeiger des Chronogra-
phen in die Ausgangsposition zurückgekehrt ist.
3. Krone in die Normalposition zurückdrücken.
Achtung: Krone nicht zurückdrücken, solange der Zeiger in Bewegung
ist, da sonst die Ausgangsposition verstellt wird.
Deutsch Deutsch
TS_instruction_manual_watches-8.indd 12-13TS_instruction_manual_watches-8.indd 12-13 16.07.13 10:1516.07.13 10:15
14 15
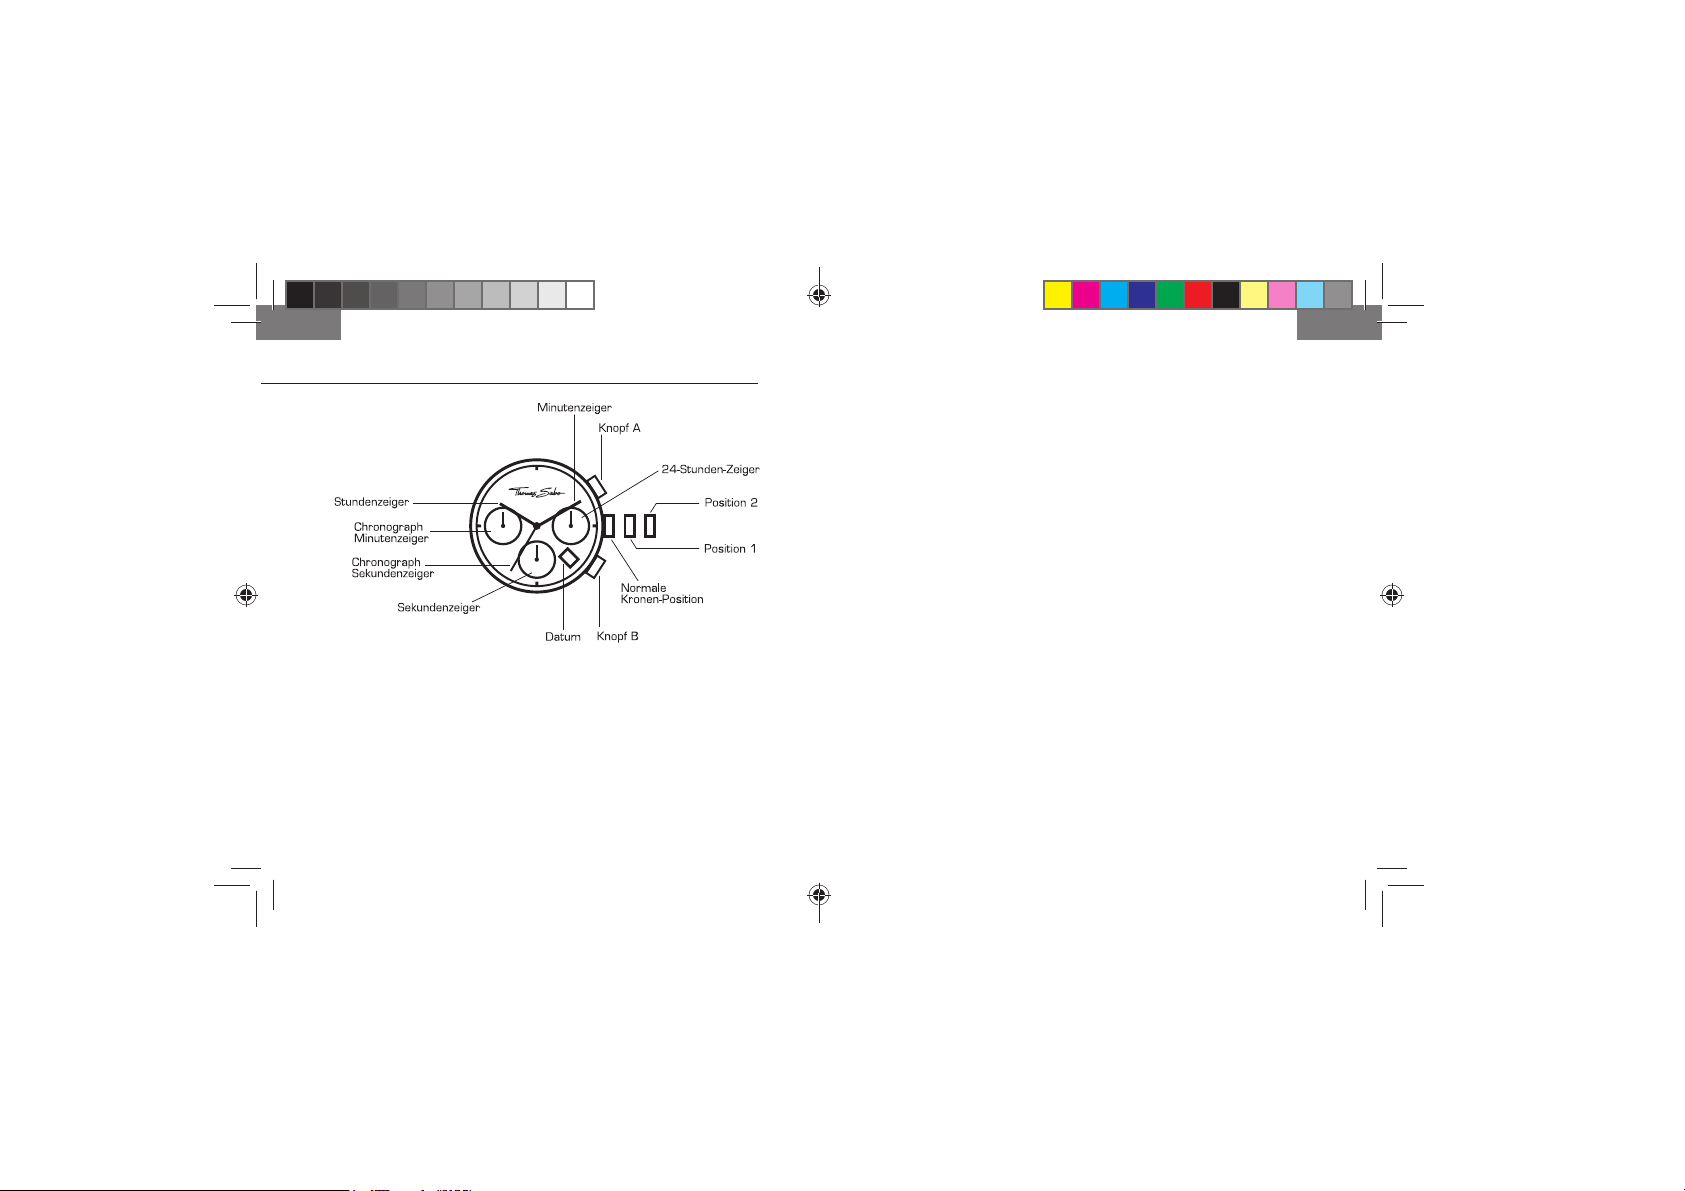
7. CHRONOGRAPH MIT DREI ANZEIGERN
ZEIT EINSTELLEN
1. Krone herausziehen auf Position 2.
2. Durch Drehen der Krone Stunden- und Minutenzeiger einstellen.
3. Nach Zurückdrücken der Krone in die Normalposition beginnt der
kleine Sekundenzeiger seine Funktion.
24-STUNDEN-ZEIGER
Der separate 24-Stunden-Zeiger gibt die aktuelle Uhrzeit im Tag/Nacht-
Modus an. Diese Anzeige wird automatisch beim Einstellen der aktuel-
len Uhrzeit mit eingestellt.
DATUM EINSTELLEN
1. Krone herausziehen auf Position 1.
2. Krone gegen den Uhrzeigersinn drehen, um das Datum
einzustellen. Wird das Datum zwischen 21:00 und 01:00 Uhr
eingestellt, wechselt das Datum am nächsten Tag evtl. nicht.
3. Krone in die Normalposition zurückdrücken.
STOPPFUNKTION NUTZEN
Der Chronograph kann in 1/1-Sekunden-Einheiten Zeiten bis zu
59 Minuten und 59 Sekunden messen. Während dieser Zeit kreist der
Chronographen-Sekundenzeiger kontinuierlich.
1. Zum Starten und Stoppen des Chronographen Knopf A drücken.
2. Zum Zurückstellen Knopf B drücken. Die Chronographen-Zeiger
kehren in die Ausgangsposition zurück.
CHRONOGRAPH ZURÜCKSTELLEN (auch nach Batteriewechsel)
Dieser Vorgang sollte ausgeführt werden, wenn die Batterie
gewechselt wurde und/oder der Sekundenzeiger des Chronographen
nach dem Zurückstellen nicht in die Ausgangsposition zurückkehrt.
1. Krone herausziehen auf Position 2.
2. Knopf A so lange drücken, bis der Sekundenzeiger
des Chronographen in die Ausgangsposition zurückgekehrt ist.
3. Krone in die Normalposition zurückdrücken.
Achtung: Krone nicht zurückdrücken, solange der Zeiger in
Bewegung ist, da sonst die Ausgangsposition verstellt wird.
Deutsch Deutsch
TS_instruction_manual_watches-8.indd 14-15TS_instruction_manual_watches-8.indd 14-15 16.07.13 10:1516.07.13 10:15
16 17
Your THOMAS SABO watch has a 24-month guarantee from the day of
purchase covering material defects and manufacturing faults.
The prerequisite for this is that you, as the consumer, purchased the
watch at a THOMAS SABO-owned outlet or at the THOMAS SABO Online
Shop. This guarantee is issued by THOMAS SABO GmbH & Co. KG, Martin-
Luther-Str. 20, D-91207 Lauf, Germany.
Please note that THOMAS SABO watches purchased from an authorised
dealer must be returned to this same authorised dealer along with the
completed Guarantee Certificate and must not be sent to THOMAS SABO
directly. To take advantage of this, please present the International
Guarantee Certificate – dated, signed and stamped by a THOMAS SABO
Shop or an authorised THOMAS SABO dealer. Please keep this Certificate
in a safe place. This guarantee is only valid if batteries approved by
THOMAS SABO have been used. Your watch is equipped with a quartz
movement.
This guarantee is invalidated in the case of inappropriate usage, non-
THOMAS SABO repairs, careless handling, wear, damage caused by
normal usage, abuse or damage resulting, for example, from an accident.
Excluded from this guarantee are wear parts such as straps, bracelets and
batteries.
This guarantee does not replace or limit legal warranties in accordance with
the valid laws of the respective country.
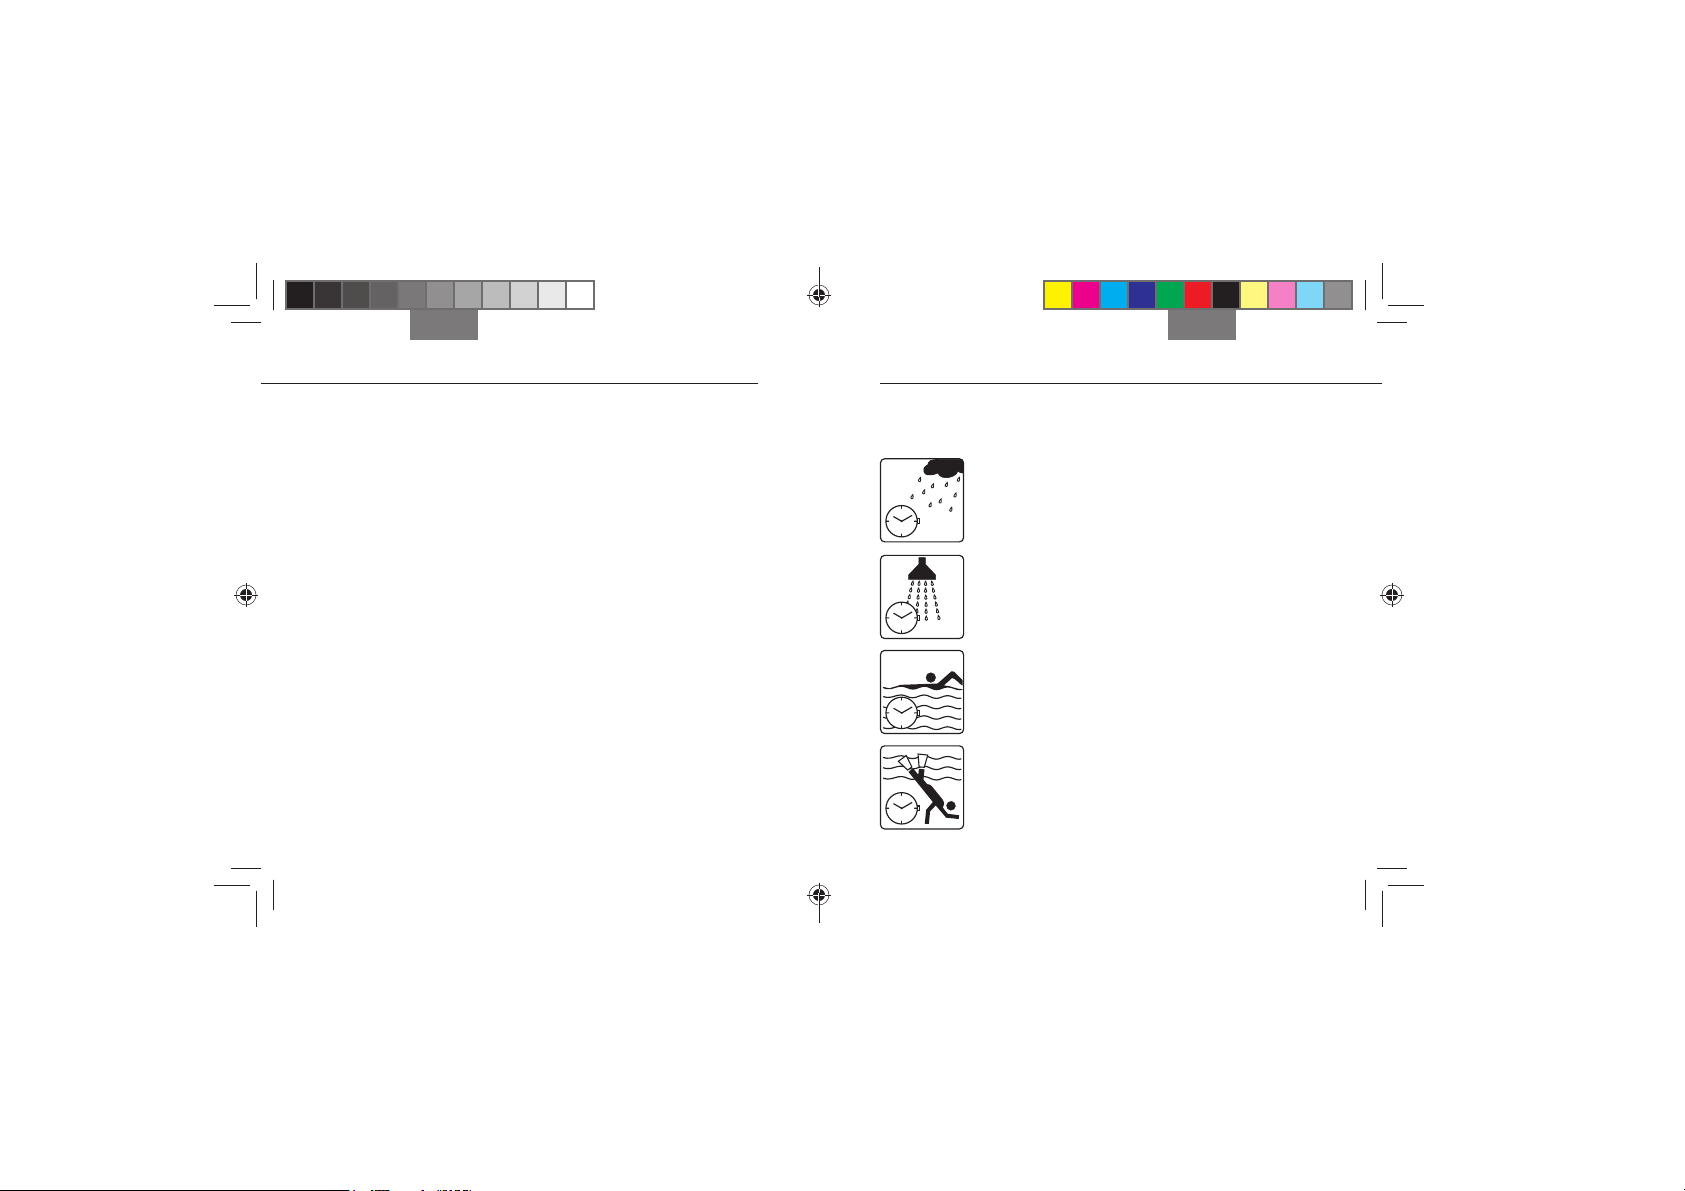
USAGE EXAMPLES
INTERNATIONAL GUARANTEE
English English
Water-proof to 1 ATM
Splashes, rain
Water-proof to 5 ATM
Bathing, washing, showering
Water-proof to 10 ATM
Swimming, snorkelling
Water-proof to 20 ATM
Diving
Depending on the model, your THOMAS SABO watch has a specific
water-proof rating. This information is on the back of the watch housing
and has the following meanings:
TS_instruction_manual_watches-8.indd 16-17TS_instruction_manual_watches-8.indd 16-17 16.07.13 10:1516.07.13 10:15
18 19
English English
This THOMAS SABO product is subject to Directive 2002/96/EC of the
European Parliament and the Council of Europe on waste electrical and
electronic equipment, respectively the German Electrical and Electronic
Equipment Act (ElektroG). This product came on the market after August
13, 2005 and is not allowed to be disposed of with normal household
waste. Please use your local authority‘s return system for disposing of this
product and also comply with all other regulations in connection with this.
CONSUMER NOTICE
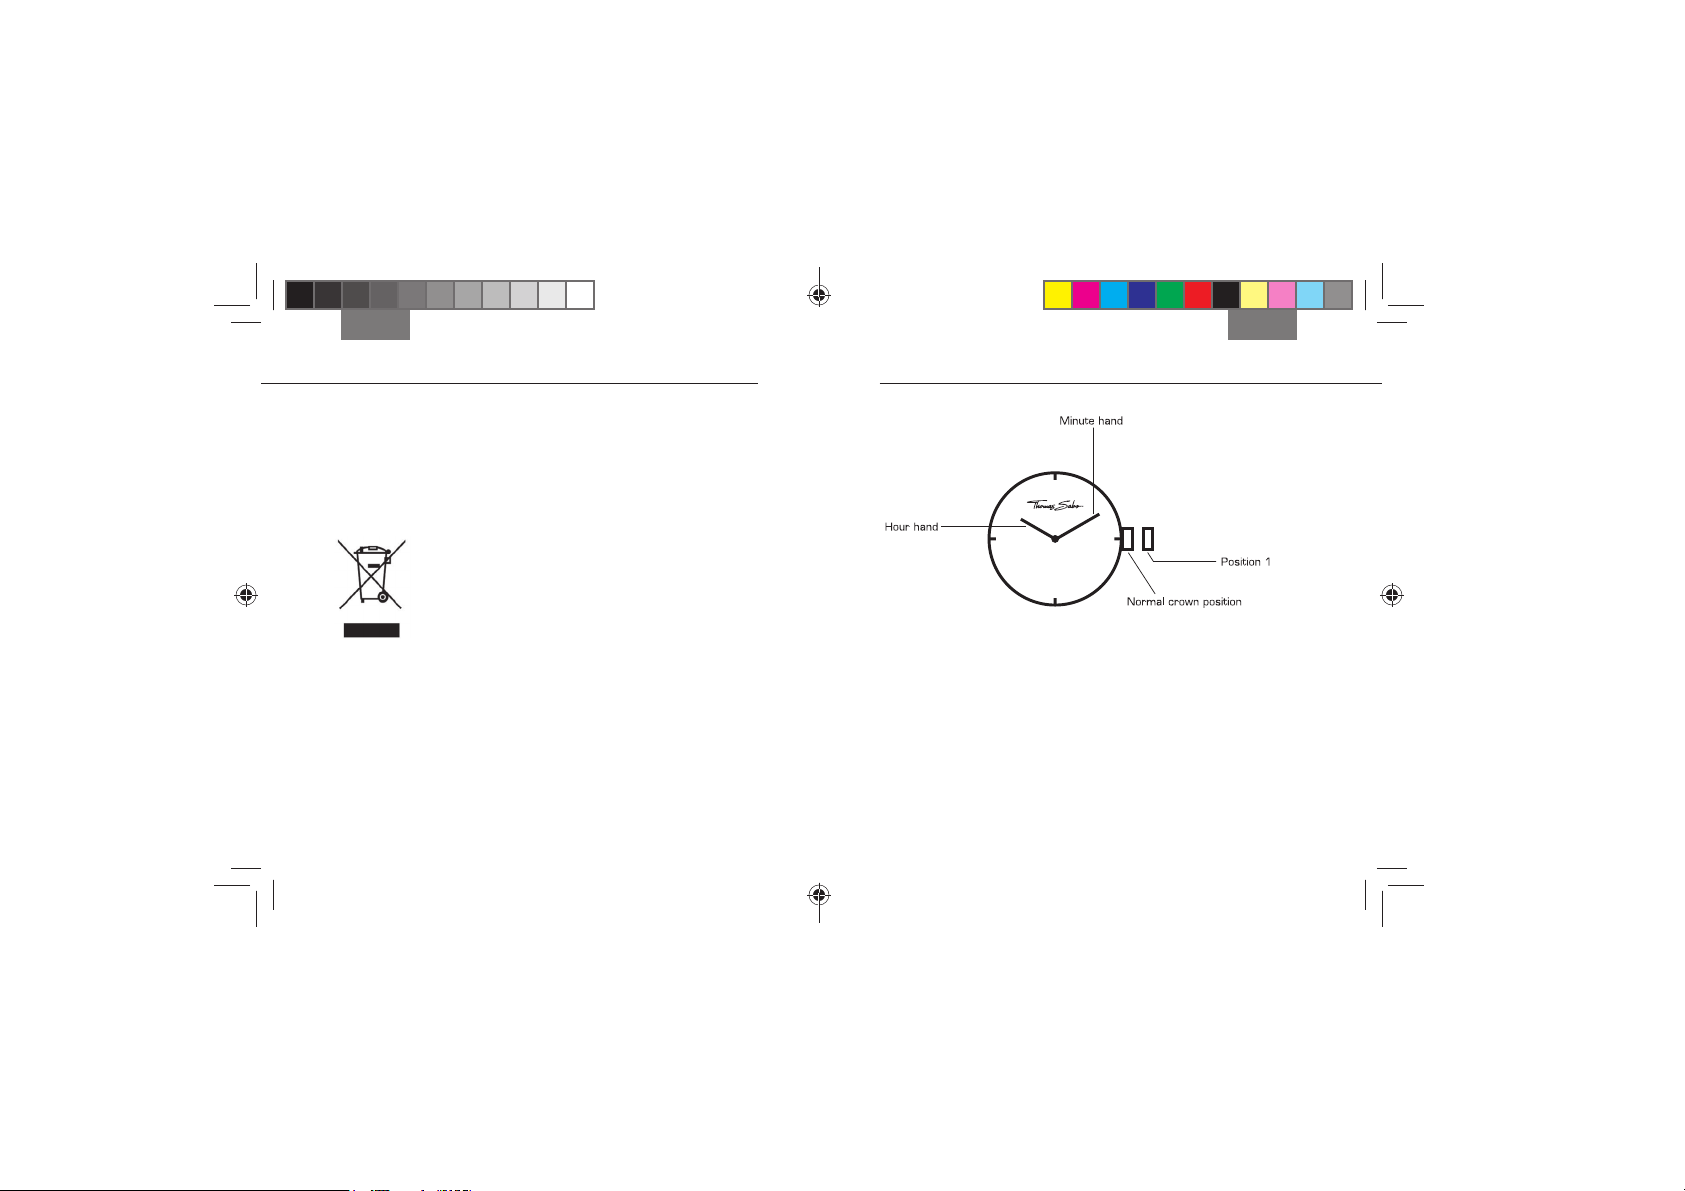
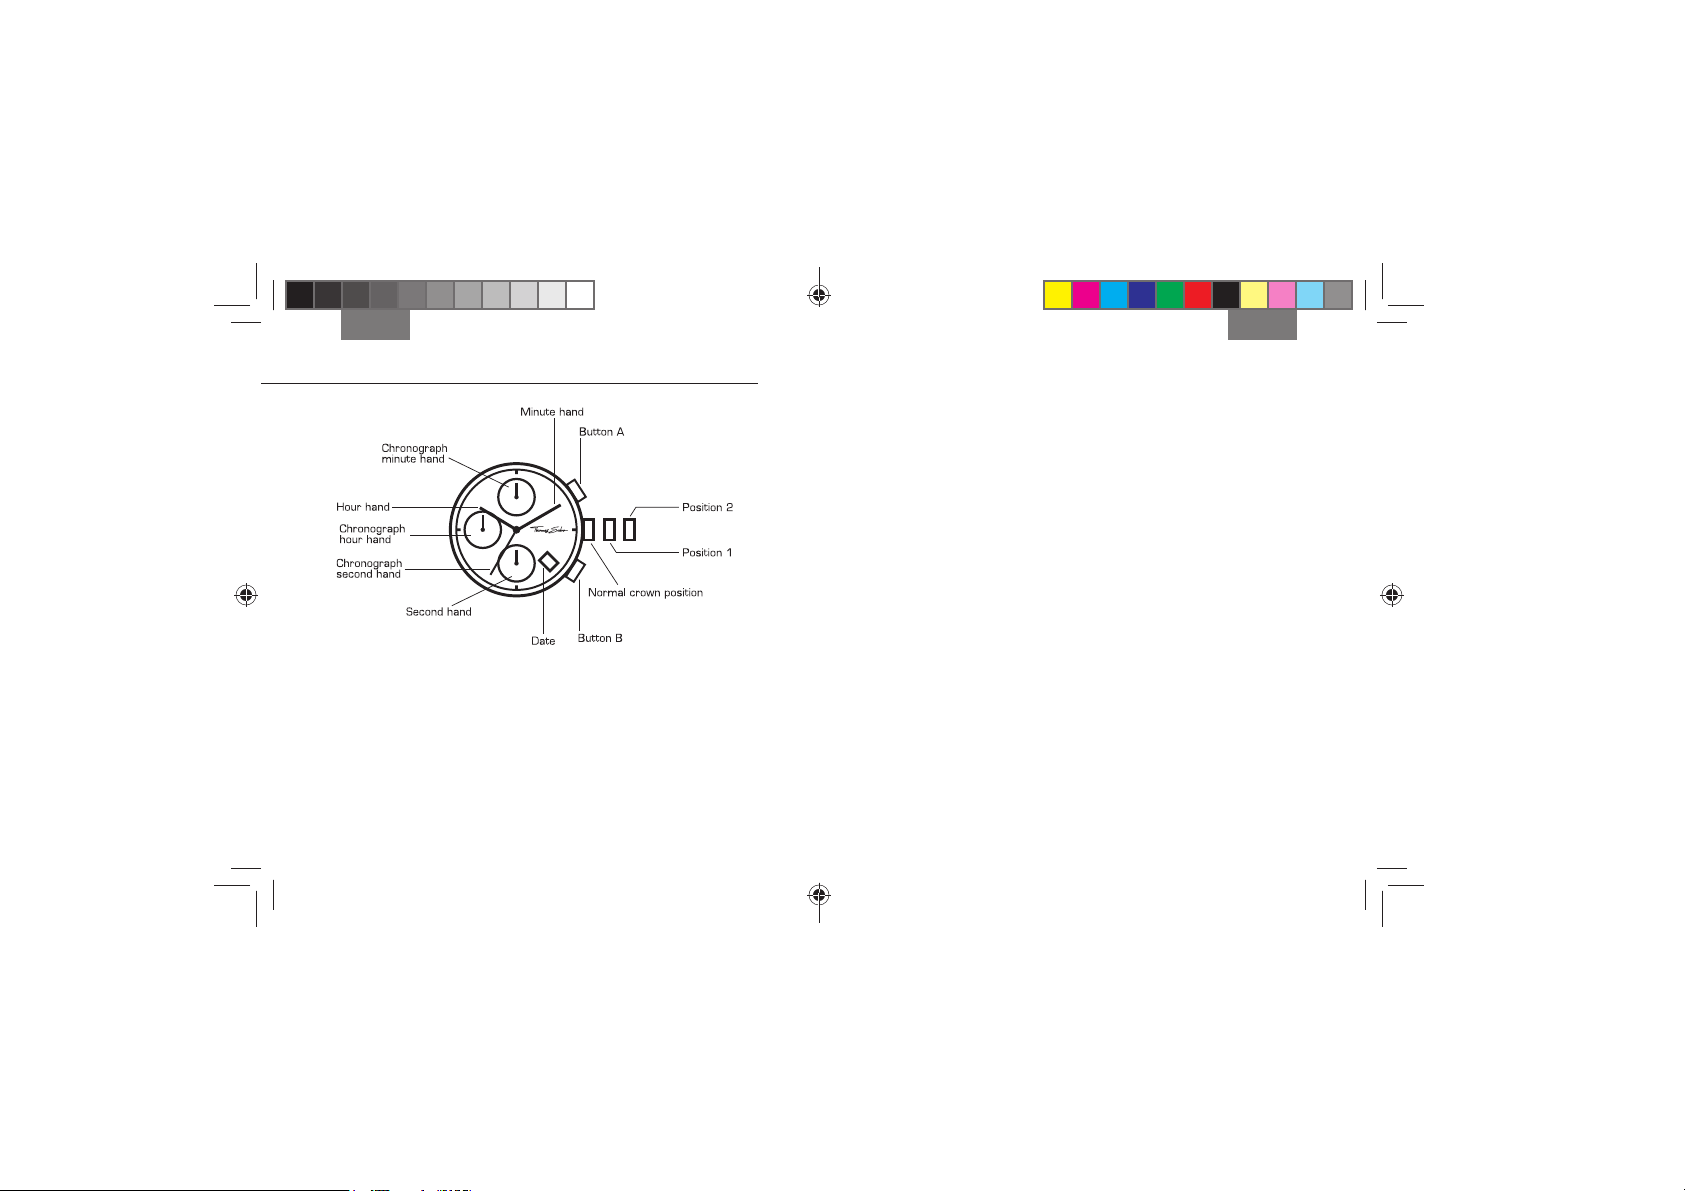
SETTING THE TIME
1. Pull the crown out to position 1.
2. Set both hands by turning the crown.
3. The hands will start operating once the crown has been
returned to the normal position.
1. TWO-HAND WATCH
TS_instruction_manual_watches-8.indd 18-19TS_instruction_manual_watches-8.indd 18-19 16.07.13 10:1516.07.13 10:15
2120
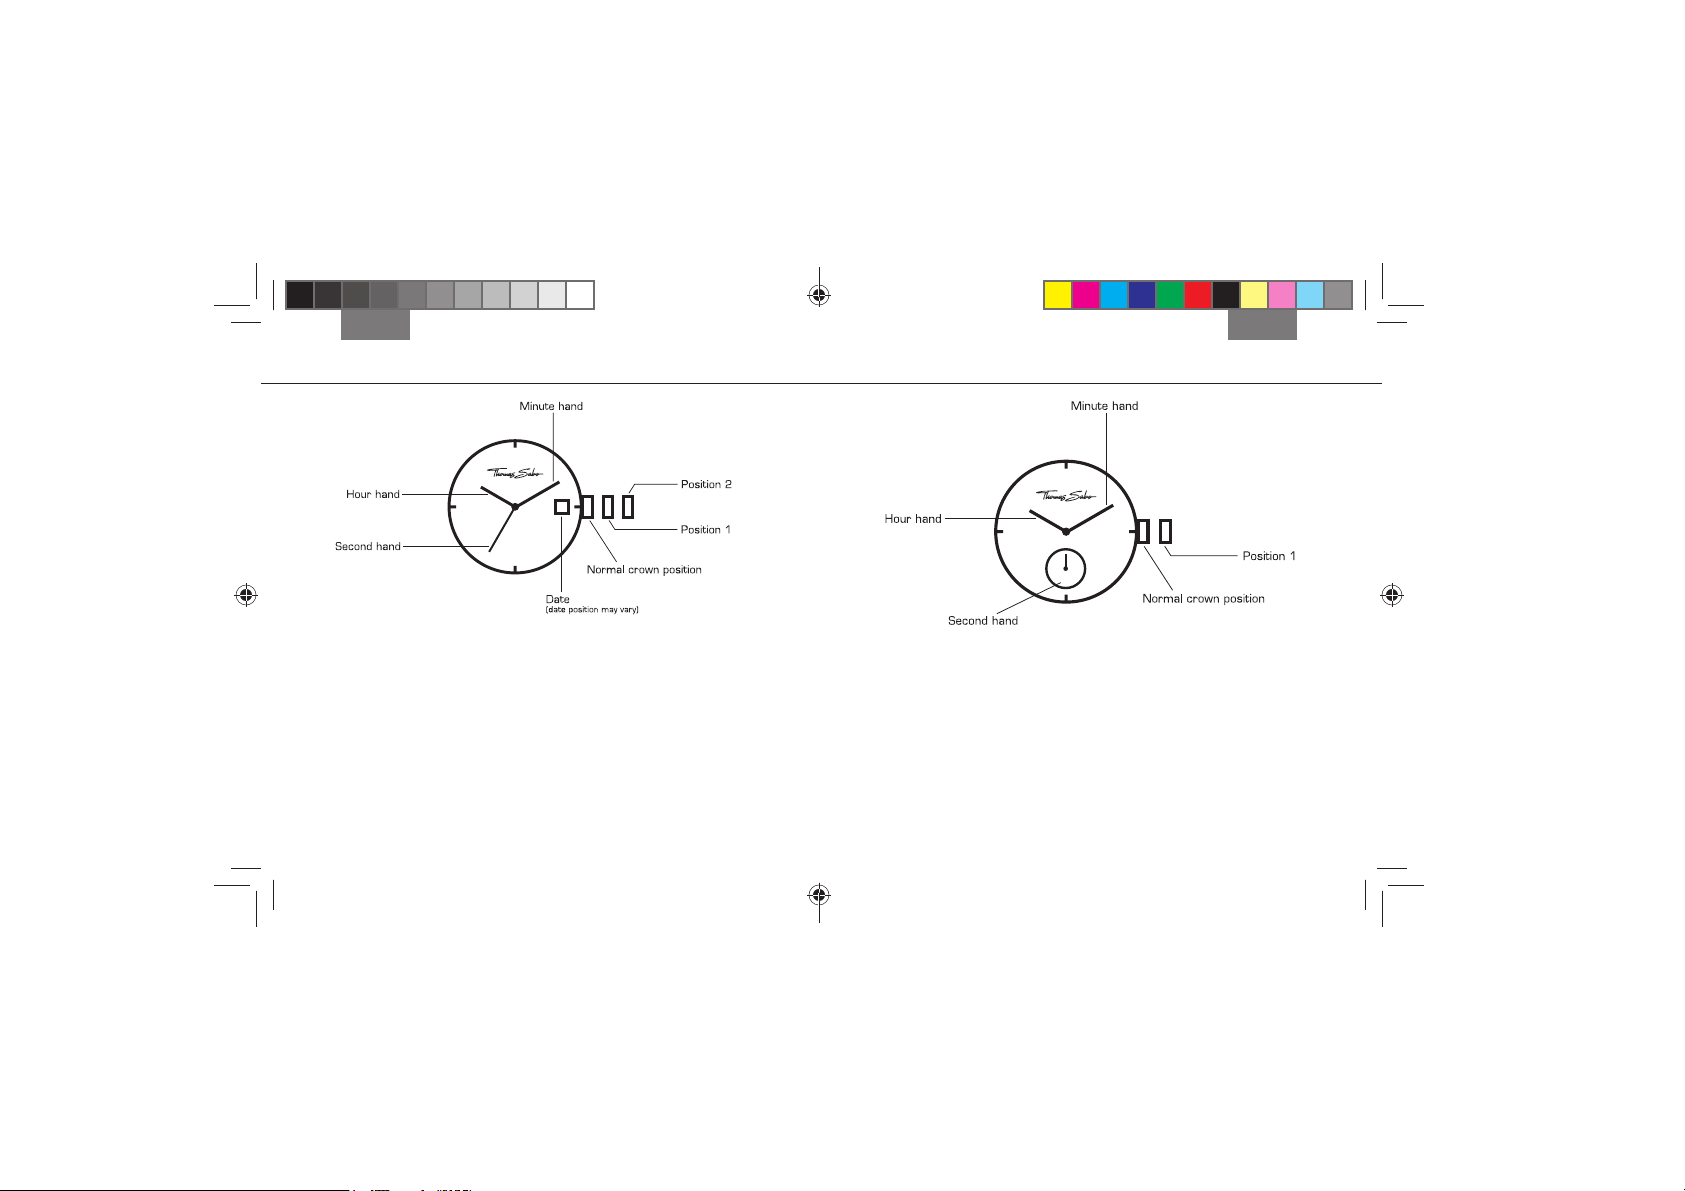
2. TWO- AND THREE-HAND WATCH WITH DATE DISPLAY*
SETTING THE TIME
1. Pull the crown out to position 2.
2. Set the hour and minute hands by turning the crown.
3. The second hand will start operating once the crown has been
returned to the normal position.
SETTING THE DATE
1. Pull the crown out to position 1.
2. To set the date, turn the crown anticlockwise. Do not set the date
between 9 p.m. and 1 a.m. because the date may not correctly
switch over the following day.
3. Return the crown to the normal position.
*Instructions also apply to models without a second hand and pocket watches.
Note: the crown is at the 12 o’clock position in the case of pocket watches.
English English
SETTING THE TIME
1. Pull the crown out to position 1.
2. Set the hour and minute hands by turning the crown.
3. The second hand will start operating once the crown has been
returned to the normal position.
3. THREE-HAND WATCH WITH DECENTRALISED SECOND
TS_instruction_manual_watches-8.indd 20-21TS_instruction_manual_watches-8.indd 20-21 16.07.13 10:1516.07.13 10:15
2322
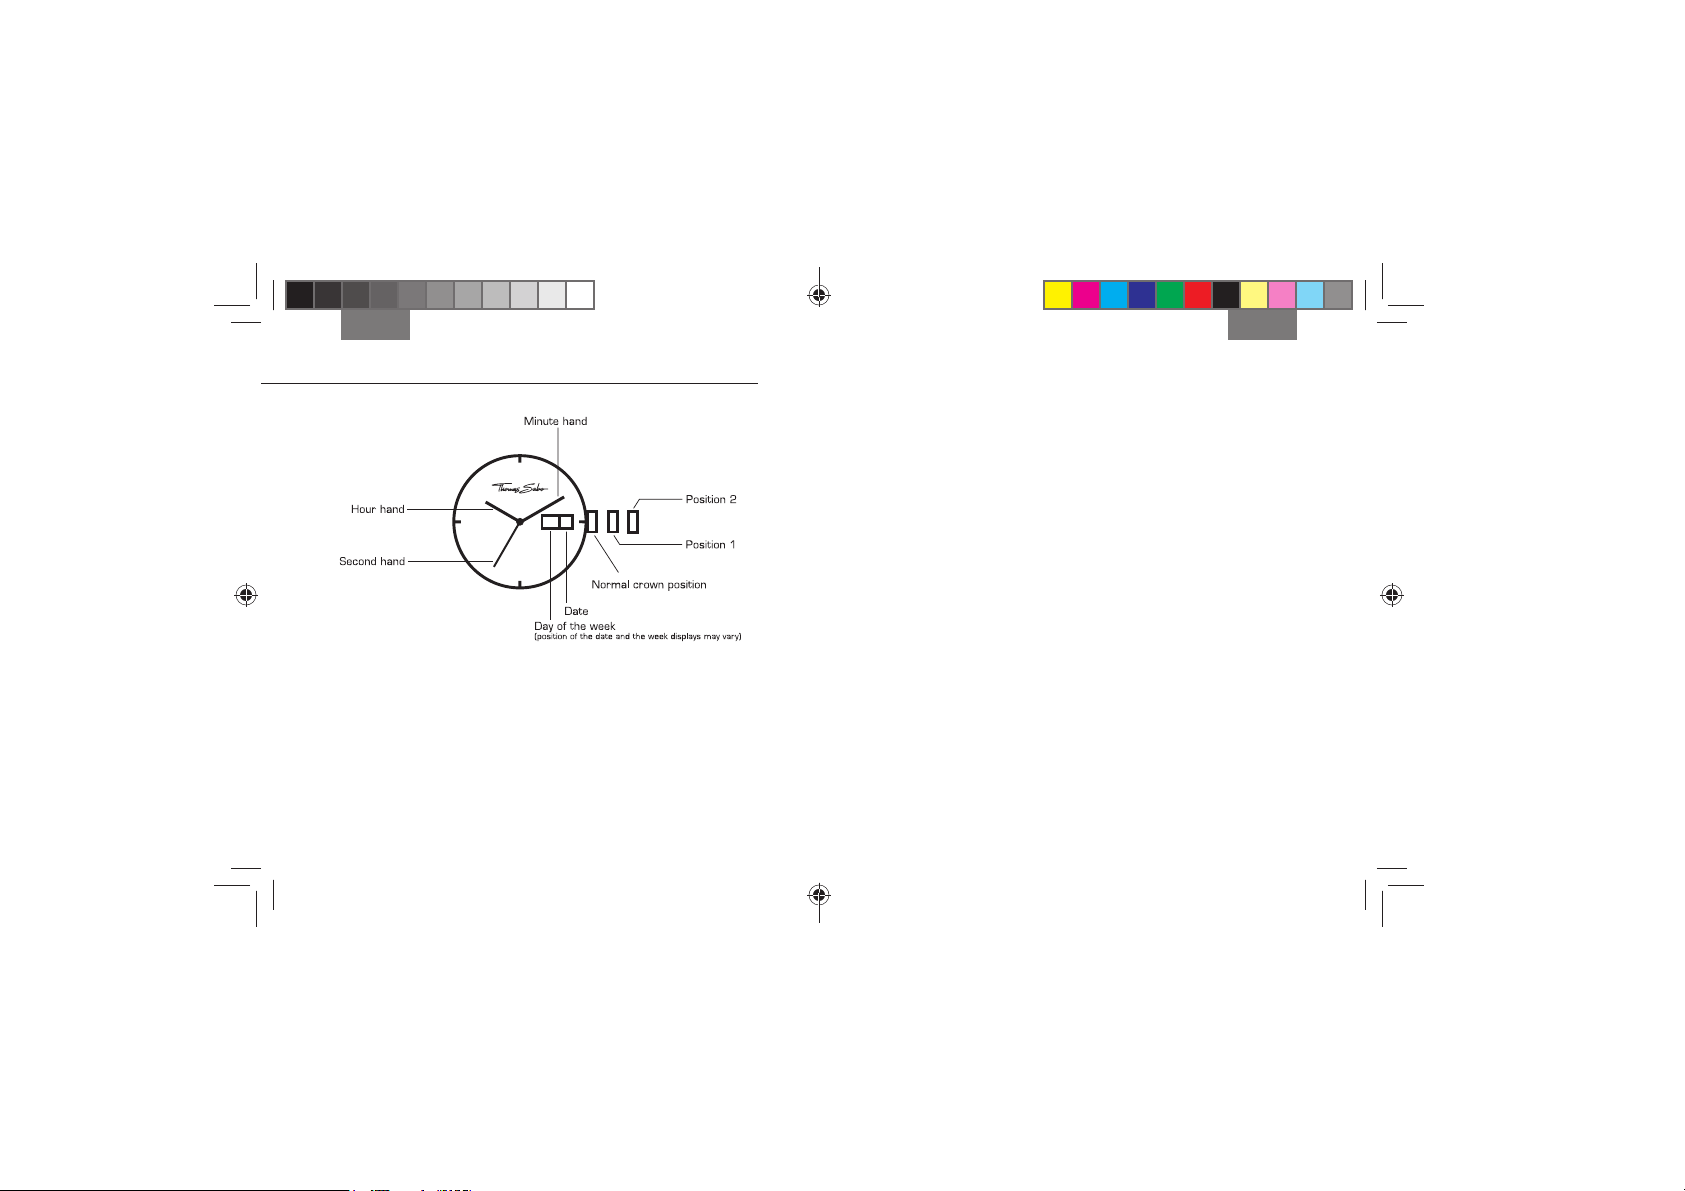
SETTING THE DATE
1. Pull the crown out to position 1.
2. To set the date, turn the crown anticlockwise. Do not set the date
between 9 p.m. and 1 a.m. because the date may not correctly
switch over the following day.
3. Return the crown to the normal position.
SETTING THE DAY OF THE WEEK
1. Pull the crown out to position 1.
2. To set the day of the week, turn the crown clockwise. Do not set the
day between 9 p.m. and 1 a.m. because the date may not correctly
switch over the following day.
3. Return the crown to the normal position.
SETTING THE TIME
1. Pull the crown out to position 2.
2. Set the hour and minute hands by turning the crown.
3. The second hand will start operating once the crown has been
returned to the normal position.
4. THREE-HAND WATCH WITH DATE AND DAY OF THE WEEK
DISPLAYS
English English
TS_instruction_manual_watches-8.indd 22-23TS_instruction_manual_watches-8.indd 22-23 16.07.13 10:1516.07.13 10:15
2524
SETTING THE DATE
1. Pull the crown out to position 1.
2. To set the date, turn the crown anticlockwise. Do not set the date
between 9 p.m. and 1 a.m. because the date may not correctly
switch over the following day.
3. Return the crown to the normal position.
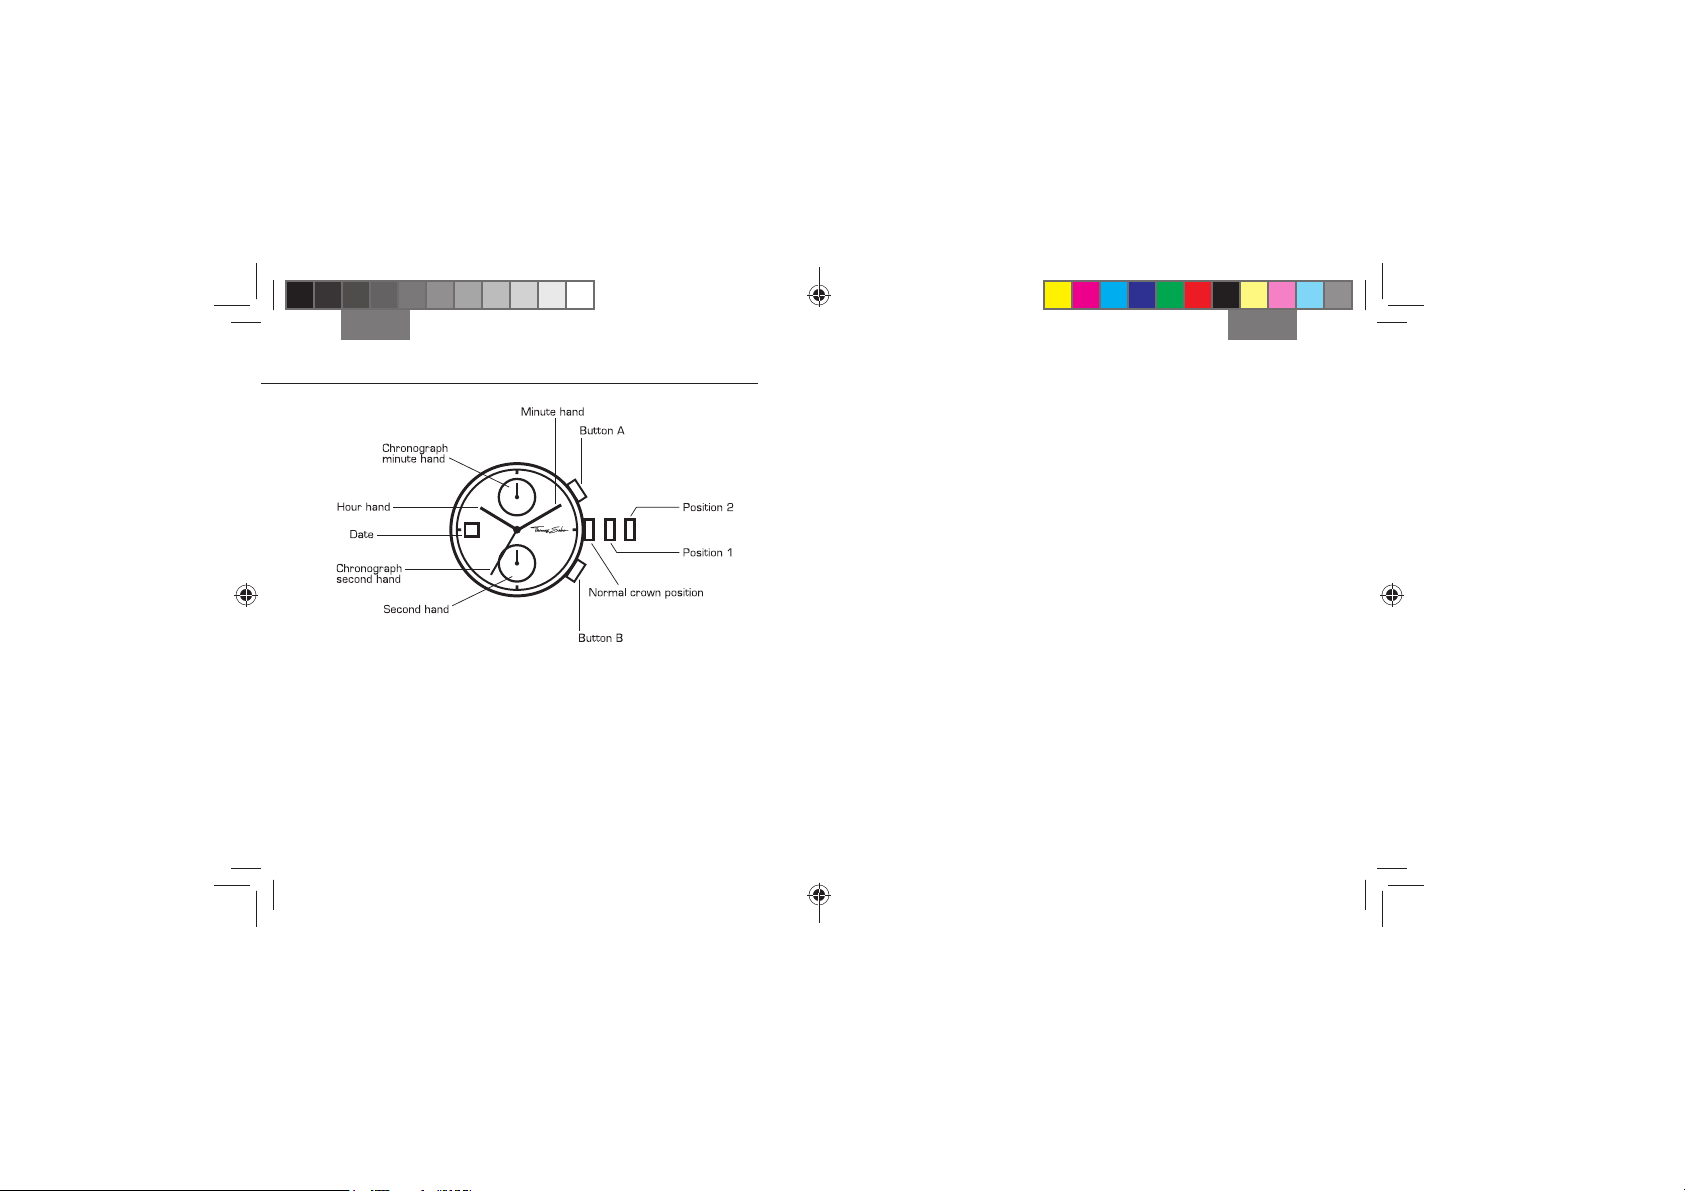
USING THE CHRONOGRAPH FUNCTION
The chronograph can measure times in 1/1-second units of up to 59
minutes and 59 seconds. During this time, the chronograph’s second
hand rotates continuously.
1. Press button A to start and stop the chronograph.
2. Press button B to reset the chronograph. The chronograph hands
will return to their starting positions.
RESETTING THE CHRONOGRAPH (also following a battery replacement)
This should be carried out when the battery has been changed and/or
the chronograph’s second hand does not return to the starting position
following a reset.
1. Pull the crown out to position 2.
2. Press button A until the chronograph’s second hand has returned to
the starting position.
3. Return the crown to the normal position.
Note: Do not press the crown in while the hand is moving. This may
misalign the starting position.
SETTING THE TIME
1. Pull the crown out to position 2.
2. Set the hour and minute hands by turning the crown.
3. The small second hand will start operating once the crown
has been returned to the normal position.
5. CHRONOGRAPH WITH TWO DISPLAYS
English English
TS_instruction_manual_watches-8.indd 24-25TS_instruction_manual_watches-8.indd 24-25 16.07.13 10:1516.07.13 10:15
2726
6. CHRONOGRAPH WITH THREE DISPLAYS
SETTING THE TIME
1. Pull the crown out to position 2.
2. Set the hour and minute hands by turning the crown.
3. The small second hand will start operating once the crown
has been returned to the normal position.
SETTING THE DATE
1. Pull the crown out to position 1.
2. To set the date, turn the crown anticlockwise. Do not set the date
between 9 p.m. and 1 a.m. because the date may not correctly
switch over the following day.
3. Return the crown to the normal position.
USING THE CHRONOGRAPH FUNCTION
The chronograph can measure times in 1/1-second units of up to
11 hours, 59 minutes and 59 seconds. During this time, the
chronograph’s second hand rotates continuously.
1. Press button A to start and stop the chronograph.
2. Press button B to reset the chronograph. The chronograph hands
will return to their starting positions.
RESETTING THE CHRONOGRAPH (also following a battery replacement)
This should be carried out when the battery has been changed and/or
the chronograph’s second hand does not return to the starting position
following a reset.
1. Pull the crown out to position 2.
2. Press button A until the chronograph’s second hand has returned to
the starting position.
3. Return the crown to the normal position.
Note: Do not press the crown in while the hand is moving. This may
misalign the starting position.
English English
TS_instruction_manual_watches-8.indd 26-27TS_instruction_manual_watches-8.indd 26-27 16.07.13 10:1516.07.13 10:15
2928
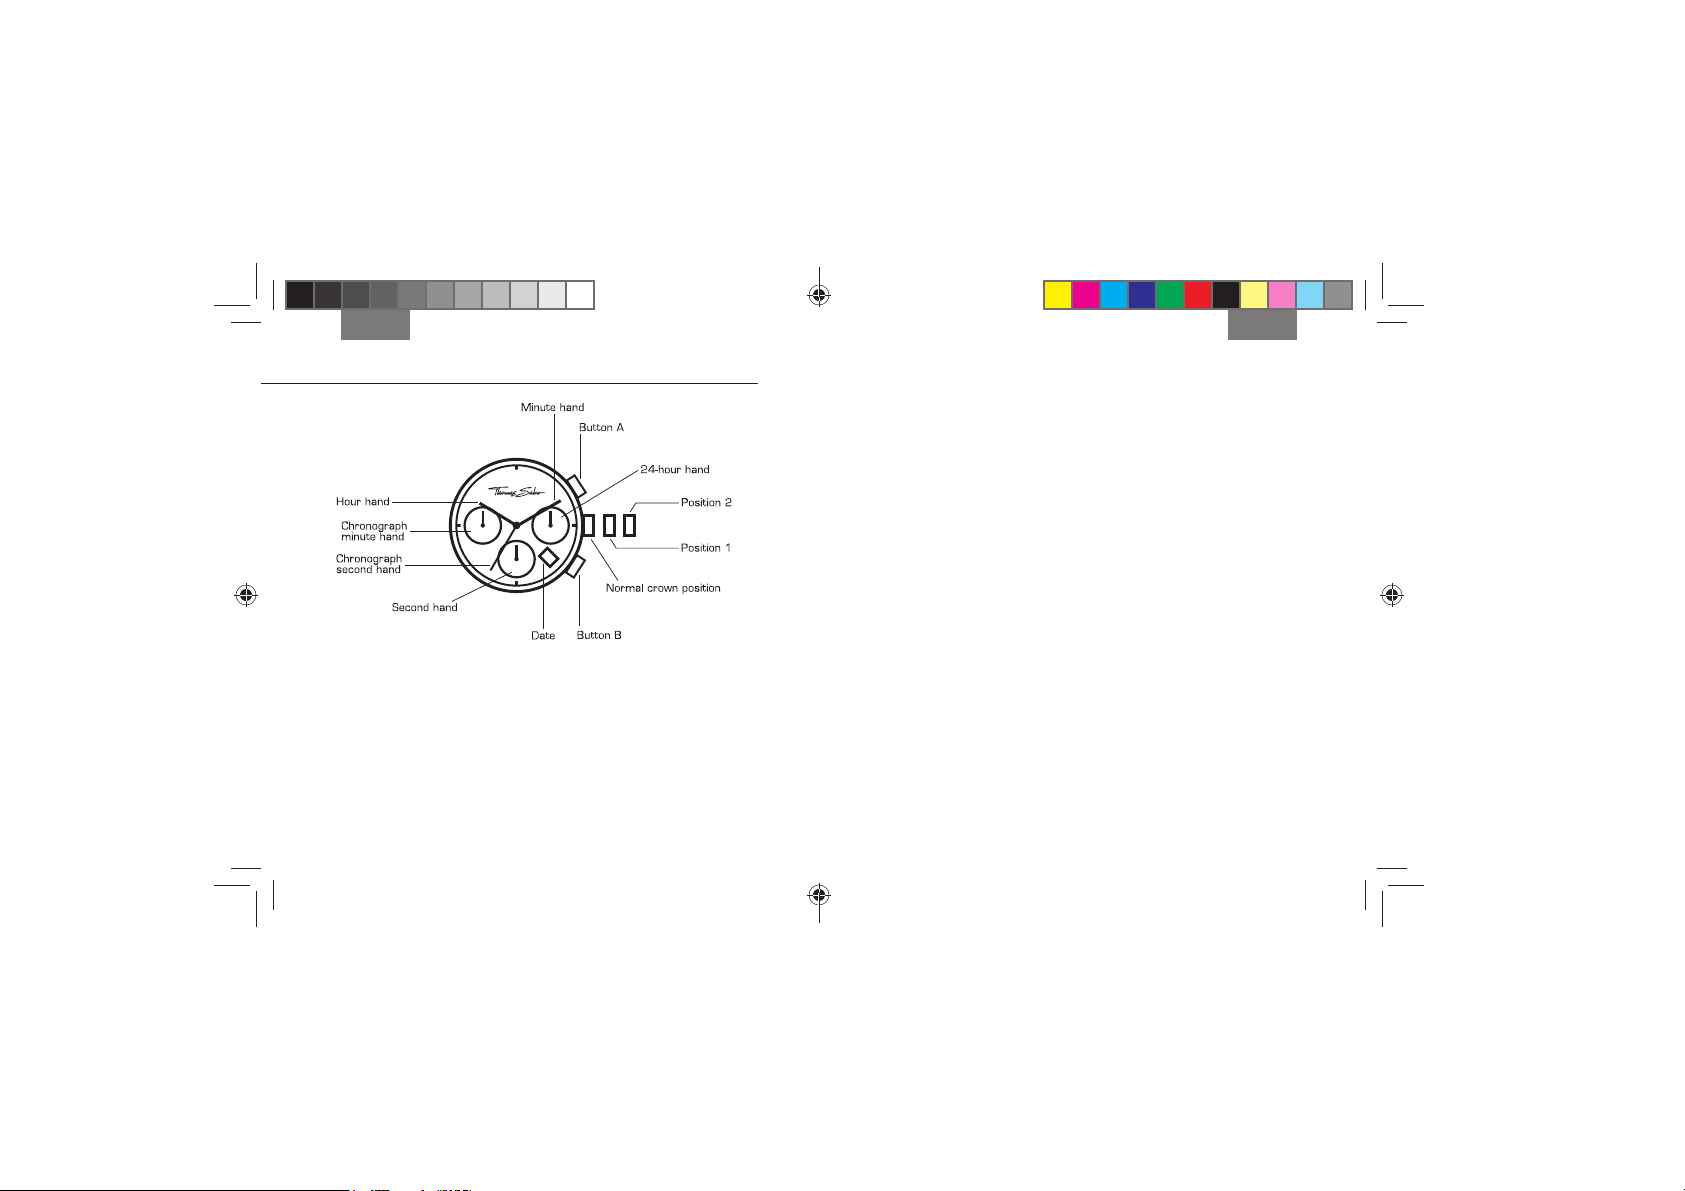
7. CHRONOGRAPH WITH THREE DISPLAYS
SETTING THE TIME
1. Pull the crown out to position 2.
2. Set the hour and minute hands by turning the crown.
3. The small second hand will start operating once the crown
has been returned to the normal position.
24-HOUR HAND
The separate 24-hour hand displays the current time in day/night
mode. This display is automatically set when adjusting the current time.
SETTING THE DATE
1. Pull the crown out to position 1.
2. To set the date, turn the crown anticlockwise. Do not set the date
between 9 p.m. and 1 a.m. because the date may not correctly
switch over the following day.
3. Return the crown to the normal position.
USING THE CHRONOGRAPH FUNCTION
The chronograph can measure times in 1/1-second units of up to 59
minutes and 59 seconds. During this time, the chronograph’s second
hand rotates continuously.
1. Press button A to start and stop the chronograph.
2. Press button B to reset the chronograph. The chronograph hands
return to their starting positions.
RESETTING THE CHRONOGRAPH (also following a battery replacement)
This should be carried out when the battery has been changed and/or
the chronograph’s second hand does not return to the starting position
following a reset.
1. Pull the crown out to position 2.
2. Press button A until the chronograph’s second hand has returned to
the starting position.
3. Return the crown to the normal position.
Note: Do not press the crown in while the hand is moving. This may
misalign the starting position.
English English
TS_instruction_manual_watches-8.indd 28-29TS_instruction_manual_watches-8.indd 28-29 16.07.13 10:1516.07.13 10:15
30 31
Français Français
Votre montre THOMAS SABO est garantie contre tout défaut de matériau
et tout vice de fabrication pour une durée de 24 mois à compter de la date
d’achat. Pour recourir à cette garantie, il est impératif en votre qualité de
consommateur que vous ayez acheté la montre dans un point de vente
THOMAS SABO ou dans la boutique en ligne THOMAS SABO. Le donneur
de garantie est la société THOMAS SABO GmbH & Co. KG, Martin-Luther-
Str. 20, 91207 Lauf, Allemagne.
Veuillez tenir compte du fait que vous devez retourner les montres
THOMAS SABO au détaillant agréé qui vous les a vendues sans oublier
d’inclure le coupon de garantie dûment rempli. Il n’est pas possible de les
envoyer directement à THOMAS SABO. Afin de bénéficier de cette garantie,
vous devez présenter le certificat de garantie internationale – dûment
rempli, daté, revêtu du cachet et signé par une boutique THOMAS SABO
ou un concessionnaire agréé THOMAS SABO. Veuillez conserver précieuse-
ment ce certificat. Cette garantie est seulement valable à condition que les
piles utilisées soient celles prescrites par THOMAS SABO. Votre montre est
équipée d’un mouvement à quartz.
La garantie exclut les défauts résultant d’une utilisation impropre, d’une
réparation qui n’a pas été effectuée par THOMAS SABO, d’un mauvais
traitement, de l’usure, des vieillissements issus d’une utilisation normale ou
abusive ainsi que tout autre dommage dû par exemple à un accident. Sont
exclues de la garantie toutes les pièces d’usure telles que les bracelets et
les piles.
Cette garantie ne peut ni remplacer ni restreindre les droits que vous
accorde la loi nationale dans le cadre de la garantie légale.
Étanche jusqu’à 1 ATM
Éclaboussures, pluie
Étanche jusqu’à 5 ATM
Bain, lessive, douche
Étanche jusqu’à 10 ATM
Natation, plongée avec tuba
Étanche jusqu’à 20 ATM
Plongée libre
EXEMPLES D’UTILISATION
GARANTIE INTERNATIONALE
L’étanchéité de votre montre THOMAS SABO varie en fonction du
modèle. Cette indication précisée au fond du boîtier a la signification
suivante :
TS_instruction_manual_watches-8.indd 30-31TS_instruction_manual_watches-8.indd 30-31 16.07.13 10:1516.07.13 10:15
32 33
Français Français
Ce produit de THOMAS SABO est assujetti à la directive 2002/96/CE
du Parlement européen et du Conseil concernant la gestion des déchets
d’équipements électriques et électroniques ou à la loi allemande sur les
appareils électriques et électroniques (ElektroG). Cette montre a été mise
sur le marché après le 13 août 2005 et ne doit jamais être jetée dans la
poubelle domestique normale.
Veuillez utiliser les systèmes de collecte sélective mis en place par votre
commune pour éliminer cette montre et respecter par ailleurs toutes les
dispositions de la réglementation en vigueur.
À L‘ATTENTION DU CLIENT
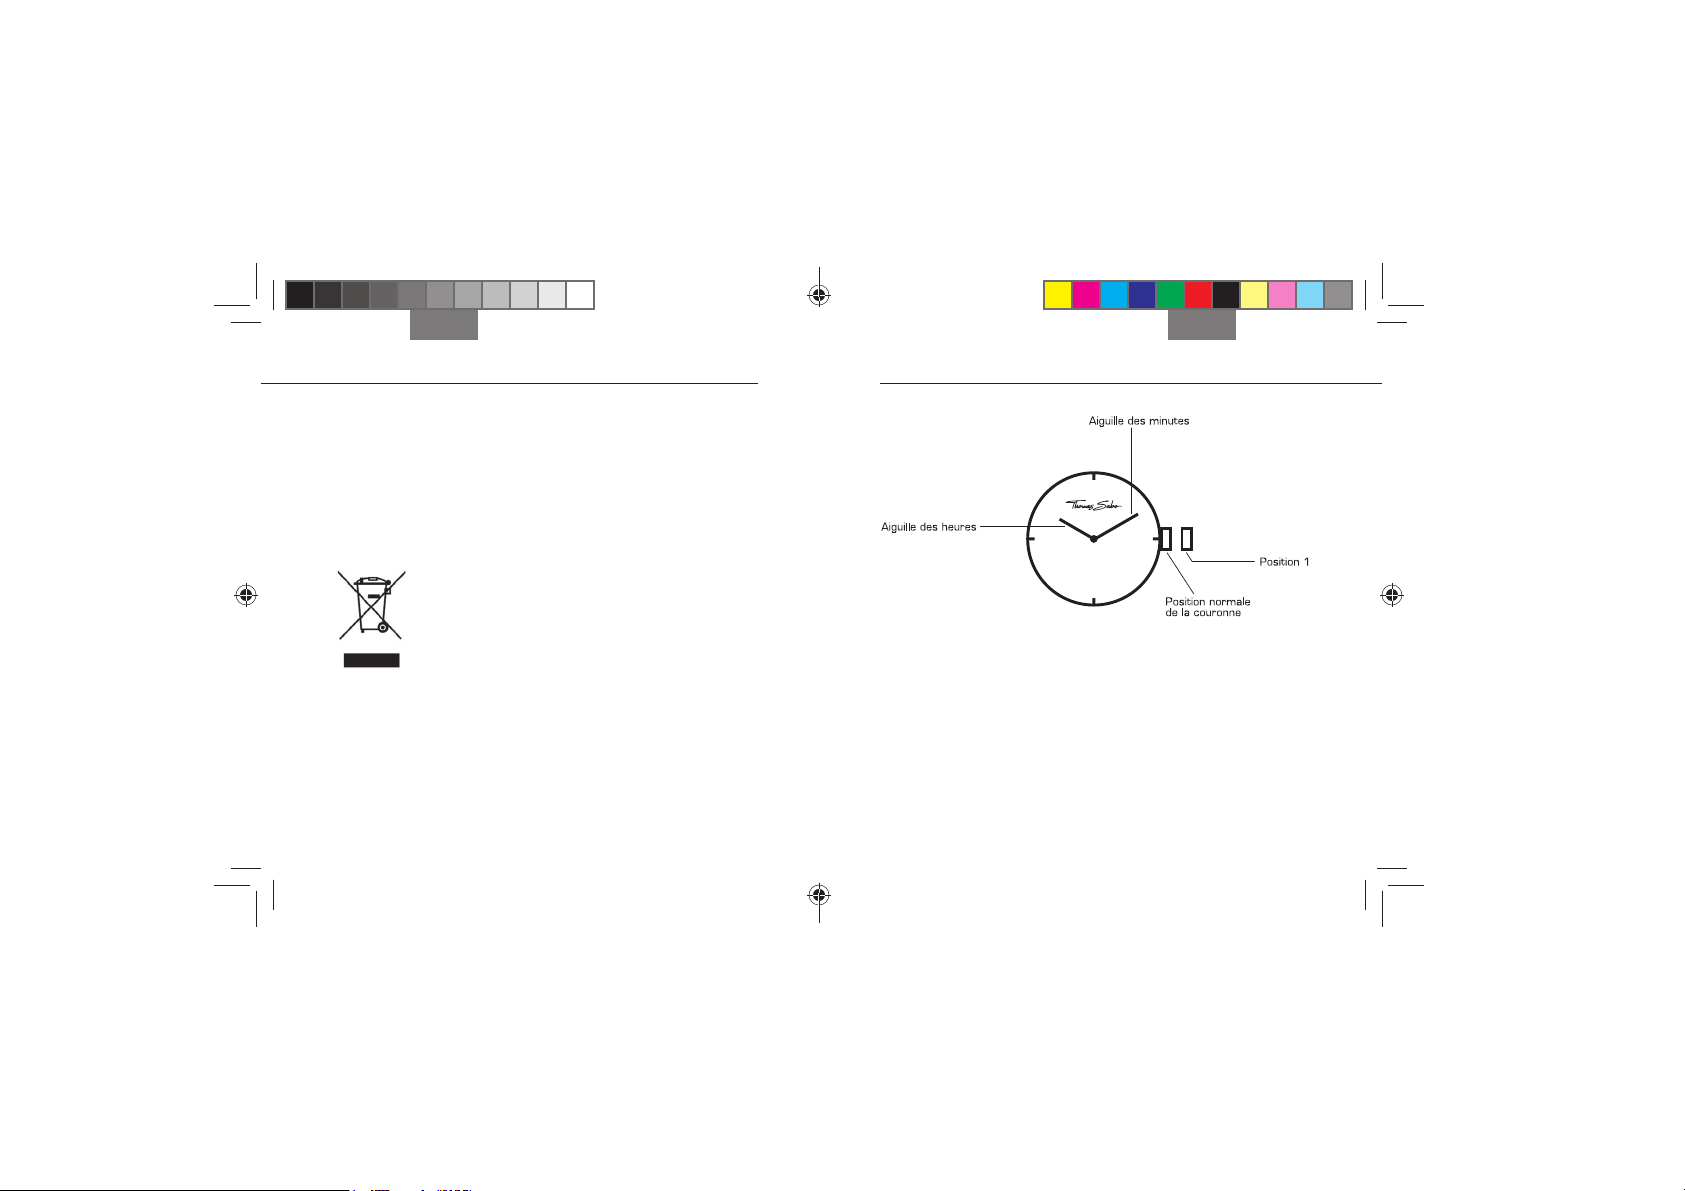
RÉGLAGE DE L’HEURE
1. Tirer sur la couronne jusqu’à la position 1.
2. Faire tourner la couronne pour régler les deux aiguilles.
3. Une fois la couronne repoussée jusqu’à sa position normale, les
aiguilles se mettent à tourner.
1. MONTRE À DEUX AIGUILLES
TS_instruction_manual_watches-8.indd 32-33TS_instruction_manual_watches-8.indd 32-33 16.07.13 10:1516.07.13 10:15
 Loading...