

Page 1

USB TYPE-C DOCK III
USER MANUAL
Page 2

2 -
© 2019. All Rights Reserved.
Acer USB Type-C Dock III
Cover: ADK930
This revision: December 2019
Changes may be periodically made to the information in this
publication without obligation to notify anyone of such revisions or
changes. Such changes will be incorporated into new editions of this
manual or supplementary documents and publications. This company
makes no representations or warranties, either expressed or implied,
with respect to the contents hereof, and specifically disclaims the
implied warranties of merchantability or fitness for a particular
purpose.
Record the model number, serial number, purchase date, and place of
purchase information in the space provided below. The serial number
and model number are recorded on the label affixed to your docking
station. All correspondence concerning your unit should include the
serial number, model number, and purchase information.
No part of this publication may be reproduced, stored in a retrieval
system, or be transmitted, in any form or by any means, electronic,
mechanical, photocopy, recording, or otherwise, without the prior
written permission of Acer Incorporated.
Model number: _________________________________
Serial number: _________________________________
Date of purchase: ______________________________
Place of purchase: ______________________________
Page 3
INTRODUCTION
Note
The new Acer USB Type-C Dock III is designed for extra connectivity
demands and supports DP 1.4 output. With this docking station, you
can extend the connection of a computer to more USB peripherals, an
ethernet network, speakers and a microphone via USB-C. The USB
Type-C plug is reversible and fits either way. By adopting PD charging
to allow upstream charging over USB-C, you can charge the host up
to 85W with a 100W or higher power adapter, or automatically adjust
to lower charging with a smaller power adapter. With the built-in USB
3.1 ports, the docking station allows you to enjoy super high-speed
data transmission between USB peripherals.
Features
USB-C Input
• USB-C 3.1 Gen 2 port
• Upstream PD supporting up to 85W
• Supports VESA USB Type-C DisplayPort Alt mode
Introduction - 3
Downstream Output
• 2 x USB-A 3.1 Gen 2 ports (5V/0.9A)
• 1 x USB-A 3.1 Gen 2 port with BC 1.2 CDP (5V/1.5A) and DCP and
Apple Charge 2.4A
Video output
NB support 1x Display 2x Display 3x Display
DP1.2 HBR2 1x 4K30 2x FHD60 3x FHD30
DP1.4 HBR3 1x 4K60 2x QHD60 3x FHD60
DP1.4 HBR3 DSC 1x 5K60* 2x 4K60 3x 4K30
* Dual DP cables to one monitor
Supports audio 2.1 channels
Supports gigabit ethernet
Page 4
4 - Introduction
Note
Package Contents
• Acer USB Type-C Dock III Device
• Power Adapter
•Power Cord
• USB Type-C Cable
• Quick Start Guide
• Warranty
Package contents vary depending on model and/or region.
System Requirements
•Windows 10
• Mac OS 10.14.2 above (Duplicate mode only)
Page 5
PRODUCT OVERVIEW
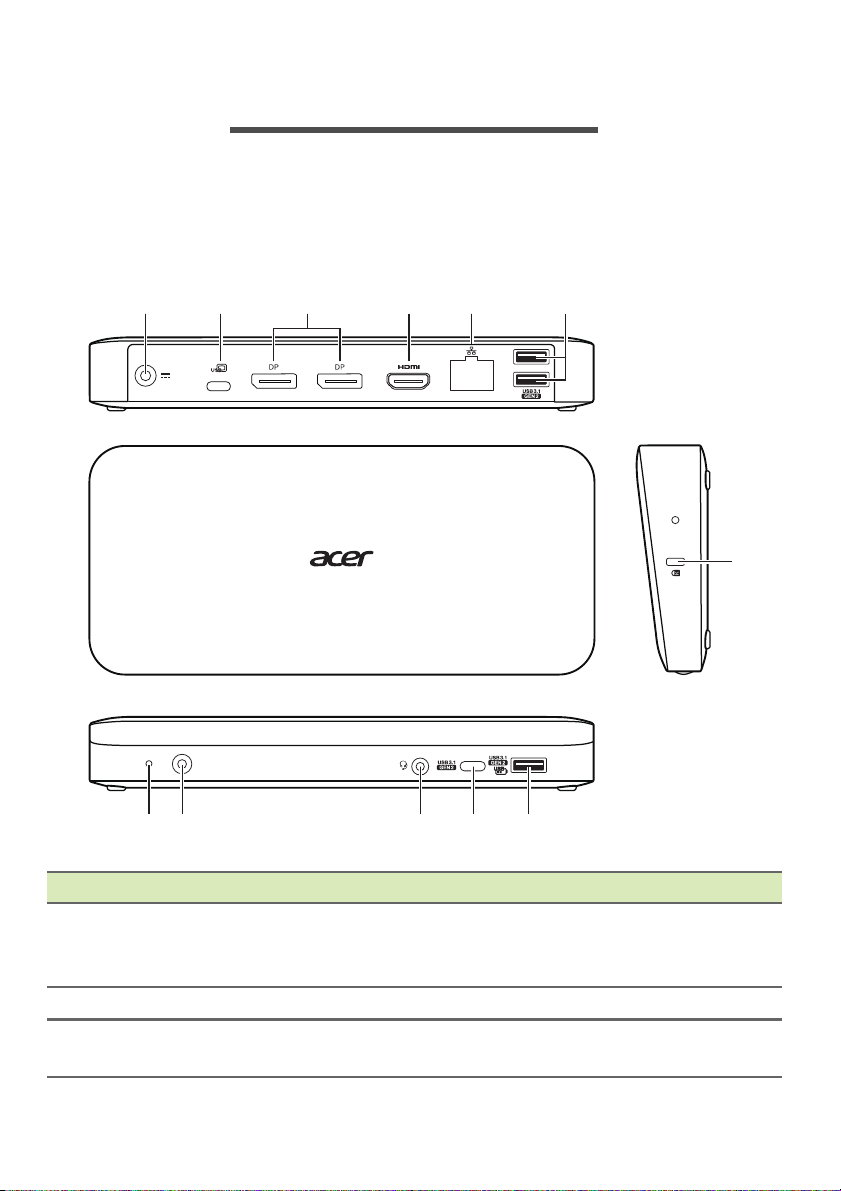
2 3 45 6
1
1112 10 9 8
7
This section describes the ports and connectors of the Acer USB
Type-C Dock III.
Views
Product Overview - 5
# Item Description
1 DC-in jack
2 USB Type-C port Powers and connects to your notebook.
3
Connects to the AC adapter to power the dock.
Note: Only use the 135W power adapter
included with the dock.
DisplayPort 1.4++
ports
Supports high-definition digital video
connections.
Page 6
6 - Product Overview
Note
# Item Description
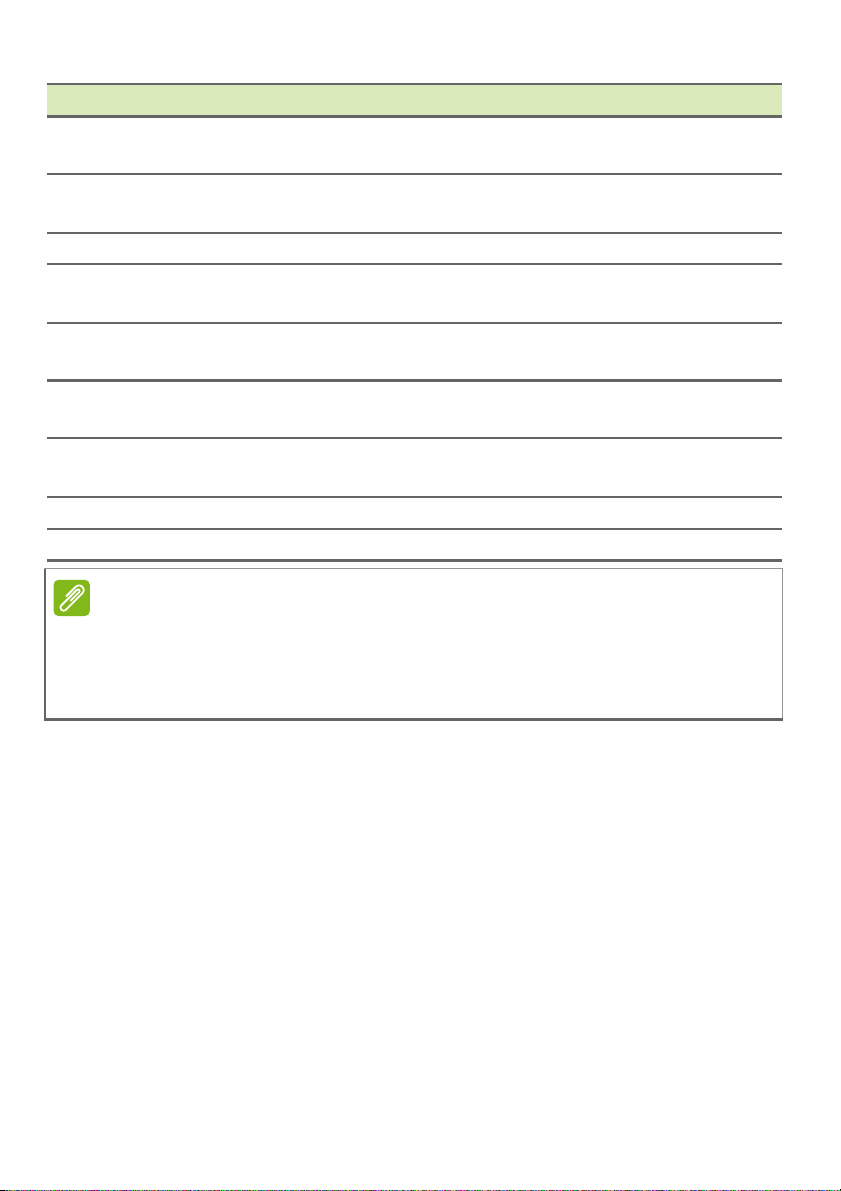
4 HDMI 2.0 port
5 Ethernet (RJ-45) port
Supports high-definition digital audio/video
connections.
Connects to an Ethernet 10/100/1000Base
network.
6 USB 3.1 ports Connect to USB devices.
7 Kensington lock
USB 3.1 port with BC
8
1.2 charging
9 USB Type-C port
Headset/speaker
10
jack
Connects to a Kensington-compatible security
lock.
Connects to USB devices with BC 1.2
charging.
Connects to USB Type-C devices for data
transfer only.
Connects to audio devices (e.g. speakers,
headphones) or a headset with microphone.
11 Power button Press to turn your dock on and off.
12 Power indicator Indicates the dock power status.
The dock power button is unable to mirror what the host power button does.
The power indicator is unable to reflect the power status of the host.
Your computer must feature a USB Type-C port that supports Power Delivery, Display
Port, and data transfer functions at the same time.
Page 7
Display Configuration - 7
Note
DISPLAY CONFIGURATION
Multi-monitor configuration
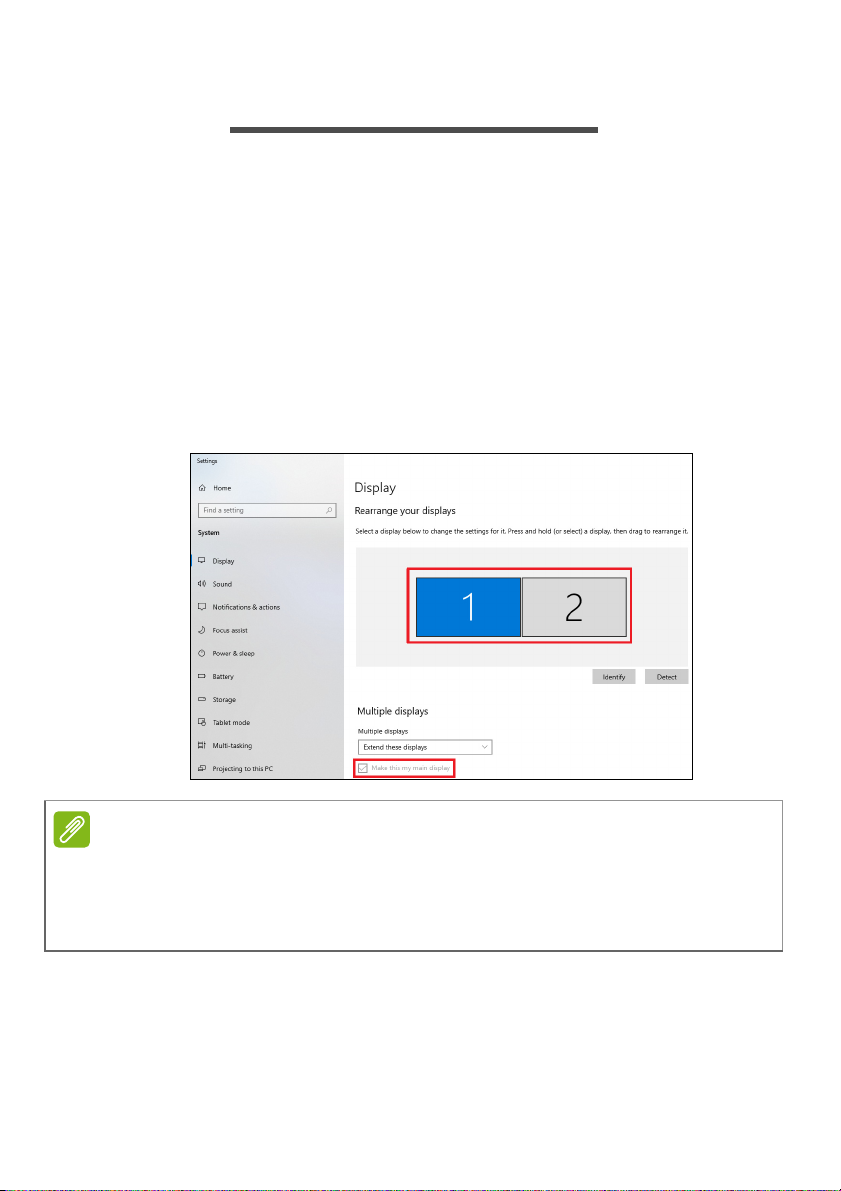
Once extra monitors are connected, they can be configured to either
Duplicate mode, Extend mode or set as the primary display.
Position the mouse anywhere on the Windows desktop, right-click and
select Display settings.
Set the primary monitor
Select the preferred monitor and check Make this my main display
to make it your main display.
For some computers, you may need to disable the main display by
unchecking “Extend the desktop onto this monitor” or “Extend my Windows
desktop onto this monitor.” (Screenshots may vary slightly with the operating
system.)
Duplicate mode
1. Select Multiple Displays > Duplicate these displays.
2. Click Keep changes to confirm.
Page 8
8 - Display Configuration
Note
Extend mode
1. Select Multiple Displays > Extend these displays.
2. Click Keep changes to confirm.
3. Once the setting is completed, simply drag and drop application
icons or open windows on the external monitor. However, some
applications may not support being displayed on the extended
desktop.
If the system only supports SST mode, connected external monitors will be
considered the same output.
4. Troubleshooting
• Video playback in Extend mode
If video or DVD playback quality is poor or suffers from low
performance in Extend mode, please play it on the primary monitor
instead of the external monitor.
SST mode
If the system only supports SST mode, connected external monitors
will be considered the same output.
MST mode
When using MST mode to connect external monitors, you can use
Duplicate mode, Extend mode or set the primary display.
Page 9
Audio Configuration - 9
AUDIO CONFIGURATION
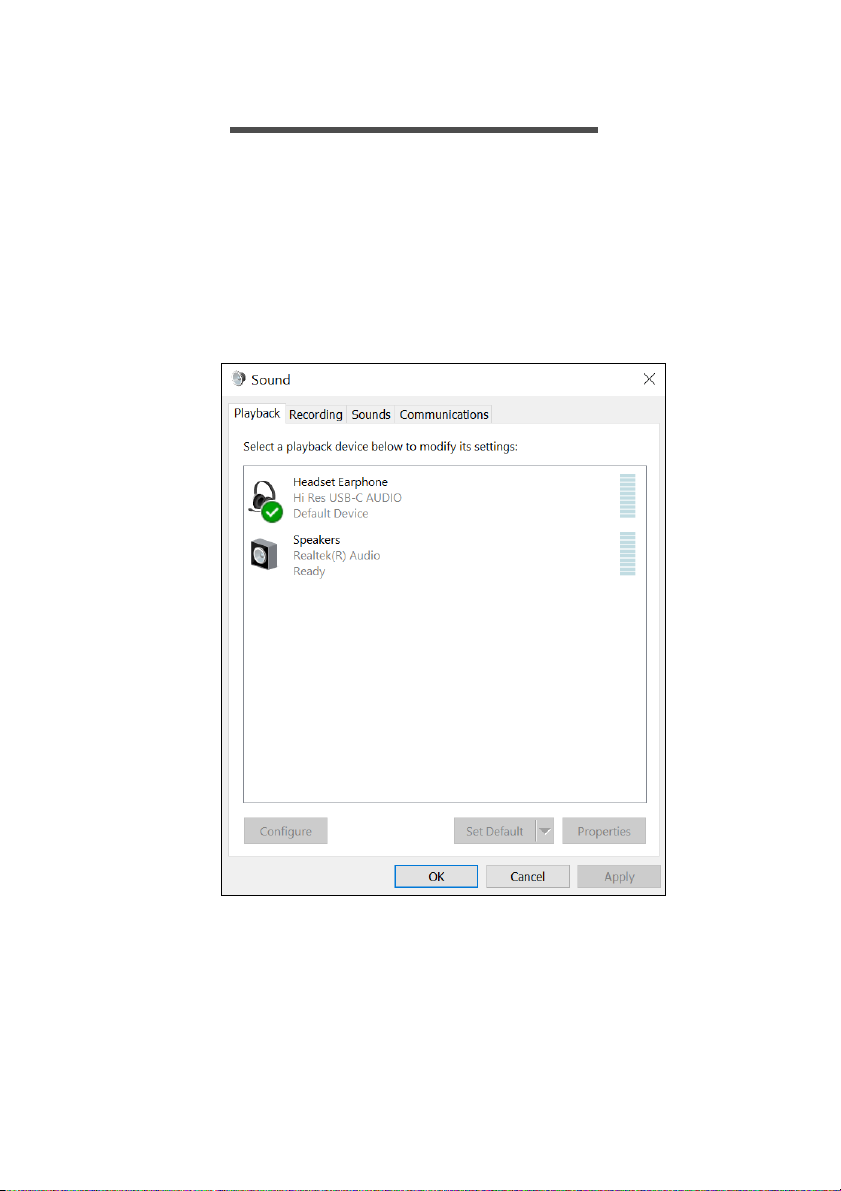
By default, when the docking station is connected to a computer, the
audio configuration will attempt to change to USB (Multimedia)
Audio Device automatically (this setting depends on the model). If
this does not work, follow the steps below to set it up.
1. Open Control Panel and then select the Hardware and Sound.
2. Click Sound > Manage audio devices and then select USB Audio
Device.
Page 10
10 - Setting up
SETTING UP
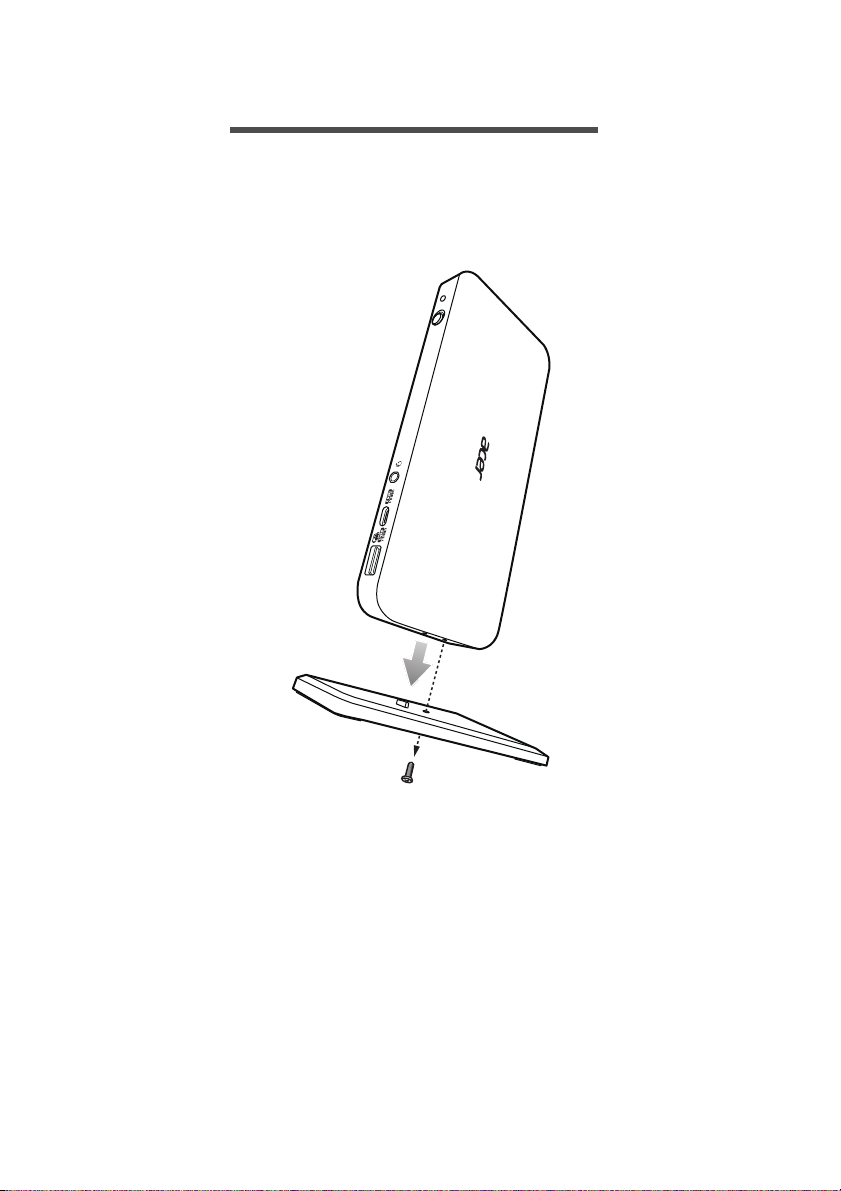
The dock comes with a vertical stand as illustrated. You may choose
to place the dock horizontally or vertically.
Page 11

Regulatory Information and Safety Guide - 11
REGULATORY INFORMATION AND
SAFETY GUIDE
Read these instructions carefully. Keep this document for future
reference. Follow all warnings and instructions marked on the product.
General
• Do not use this product near water.
• Do not place this product on an unstable surface, stand or table. If
the product falls, it could be seriously damaged.
• Slots and openings are provided for ventilation to ensure reliable
operation of the product and to protect it from overheating. These
openings must not be blocked or covered. The openings should
never be blocked by placing the product on a bed, sofa, rug or other
similar surfaces. This product should never be placed near or over a
radiator or heat source, or used in a built-in installation unless
proper ventilation is provided.
• Never push objects of any kind into this product through the cabinet
slots as they may touch dangerous voltage points or short out parts
that could result in a fire or electric shock. Never spill liquid of any
kind onto or into the product.
• To avoid damaging internal components and to prevent battery
leakage, do not place the product on a vibrating surface.
• The bottom surface, areas around ventilation openings and the AC
adapter may get hot. To avoid injury, ensure they do not come into
contact with your skin or body.
• Your device and its accessories may contain small parts. Keep them
out of the reach of small children.
Safety instructions
Product servicing
Do not attempt to service this product yourself, as opening or
removing the covers may expose you to dangerous voltage points or
other risks. Refer all servicing to qualified service personnel.
Page 12
12 - Regulatory Information and Safety Guide
Note
Unplug this product from the wall outlet and request the assistance of
qualified service personnel when:
• The power cord or plug is damaged, cut or frayed.
• Liquid was spilled into the product.
• The product was exposed to rain or water.
• The product was dropped or the case damaged.
• The product exhibits a distinct change in performance, indicating a
need for service.
• The product does not operate normally after following the operating
instructions.
Only adjust the controls which are covered by the operating instructions,
since improper adjustment of other controls may result in damage and could
require extensive work by a qualified technician to restore the product to its
normal condition.
Unplug the product before cleaning
Unplug the product from the wall outlet before cleaning. Do not use
liquid cleaners or aerosol cleaners. Use a damp cloth for cleaning.
Warnings
Accessing the power
Be sure that the power outlet you plug into is easily accessible and
located as close to the equipment as possible. When you need to
disconnect the power to the equipment, be sure to unplug it from the
electrical outlet.
Disconnecting the power source
Observe the following guidelines when connecting and disconnecting
power to the power supply unit:
Install the power supply unit before connecting the AC power outlet.
If the system has multiple sources of power, disconnect power from
the system by unplugging all power cords from the power supplies.
Page 13
Regulatory Information and Safety Guide - 13
Warning
Note
Using electrical power
• Do not connect the adapter to any other device.
• When unplugging the power cord, do not pull on the cord itself but
pull on the plug instead.
• This product should be operated using the type of power indicated
on the marking label. If you are not sure of the type of power
available, consult your dealer or local power company.
• Do not allow anything to rest on the power cord. Do not locate this
product where people could walk on the cord.
• If an extension cable is used with this product, make sure that the
total ampere rating of the equipment plugged into the extension
cable does not exceed its ampere rating. Also make sure that the
total rating of all products plugged into the wall outlet does not
exceed the fuse rating.
• Do not overload a power outlet, strip or receptacle by plugging in too
many devices. The overall system load must not exceed 80% of the
branch circuit rating. If power strips are used, the load should not
exceed 80% of the power strip's input rating.
• If this product's AC adapter is equipped with a three-wire grounded
plug, the plug will only fit in a grounded power outlet. Make sure the
power outlet is properly grounded before inserting the AC plug. Do
not insert the plug into a non-grounded power outlet. Contact your
electrician for details..
The grounding pin is a safety feature. Using a power outlet that is not
properly grounded may result in electric shock and/or injury.
The grounding pin also provides good protection from unexpected noise
produced by other nearby electrical devices that may interfere with the
performance of this product.
• The system can be powered using a wide range of voltages: 100120 or 220-240 V AC or 100-240 V AC. The power cord included
with the system meets the requirements for use in the country/
region where the system was purchased. Power cords for use in
Page 14
14 - Regulatory Information and Safety Guide
Warning
other countries/regions must meet the requirements for that country/
region. For more information on power cord requirements, contact
an authorized reseller or service provider.
Protecting your hearing
To protect your hearing, follow these instructions:
• Increase the volume gradually until you can hear clearly and
comfortably.
• Do not increase the volume level after your ears have adjusted.
• Do not listen to music at high volume for extended periods of time.
• Do not increase the volume to block out noisy surroundings.
• Decrease the volume if you cannot hear people speaking near you.
Permanent hearing loss may occur if earphones or headphones
are used at high volume for prolonged periods of time.
Disposal instructions
Do not throw this electronic device into the rubbish when
discarding. To minimize pollution and ensure utmost
protection of the global environment, please recycle. For
more information on the Waste from Electrical and
Electronics Equipment (WEEE) regulations, visit https://
www.acer-group.com/public/Sustainability
FCC statement
This device has been tested and found to comply with the limits for a
Class B digital device pursuant to Part 15 of the FCC rules. These
limits are designed to provide reasonable protection against harmful
interference in a residential installation. This device generates, uses,
and can radiate radio frequency energy and, if not installed and used
in accordance with the instructions, may cause harmful interference to
radio communications.
However, there is no guarantee that interference will not occur in a
particular installation. If this device does cause harmful interference to
Page 15

Regulatory Information and Safety Guide - 15
radio or television reception, which can be determined by turning the
device off and on, the user is encouraged to try to correct the
interference by one or more of the following measures:
• Reorient or relocate the receiving antenna.
• Increase the separation between the device and receiver.
• Connect the device into an outlet on a circuit different from that to
which the receiver is connected.
• Consult the dealer or an experienced radio/television technician for
help.
This device complies with Part 15 of the FCC Rules. Operation is
subject to the following two conditions: (1) this device may not cause
harmful interference, and (2) this device must accept any interference
received, including interference that may cause undesired operation.
Notice: Shielded cables
All connections to other computing devices must be made using
shielded cables to maintain compliance with FCC regulations.
Notice: Peripheral devices
Only peripherals (input/output devices, terminals, printers etc.)
certified to comply with the Class B limits may be attached to this
equipment. Operation with non-certified peripherals is likely to result in
interference to radio and TV reception.
Caution
Changes or modifications not expressly approved by the manufacturer
could void the user's authority, which is granted by the Federal
Communications Commission, to operate this computer.
Notice: Canadian users
This Class B digital apparatus complies with Canadian ICES-003.
Remarque à l'intention des utilisateurs canadiens
Cet appareil numérique de la classe B est conforme a la norme
NMB-003 du Canada.
Page 16

16 - Regulatory Information and Safety Guide
Compliant with Russian regulatory certification
Declaration of Conformity for EU countries
Acer Inc. hereby declares that this USB Type-C Dock III is in
compliance with the essential requirements and other relevant
provisions of EMC Directive 2014/30/EU and RoHS Directive
2011/65/EU.
List of National Codes
This equipment may be operated in the following countries:
Country
Austria
Belgium
Cyprus
Czech
Republic
Denmark
Estonia
Finland
France
Germany
Greece
Hungary
Ireland
Italy
Latvia
Lithuania
Luxembourg
ISO 3166
2 letter code
AT
BE
CY
CZ
DK
EE
FI
FR
DE
GR
HU
IE
IT
LV
LT
LU
Country
Malta
Netherlands
Poland
Portugal
Russia
Slovakia
Slovenia
Spain
Sweden
United Kingdom
Iceland
Liechtenstein
Norway
Switzerland
Bulgaria
Romania
Turkey
Operating environment
• Temperature: 0 °C to 40 °C
• Humidity (non-condensing): 20% to 80%
ISO 3166
2 letter code
MT
NT
PL
PT
RU
SK
SL
ES
SE
GB
IS
LI
NO
CH
BG
RO
TR
Page 17

Regulatory Information and Safety Guide - 17
Storage and Transporting environment
The product is recommended to be transported in the original
packaging and stored under the following conditions:
• Temperature: -20 °C to 70 °C
• Humidity (non-condensing): 20% to 60%
Page 18

18 - Specification
SPECIFICATION
Colour Options Black
Dimensions
Dimensions and
weight
Display
Audio Combo Audio (supports 2.1 audio channels)
Video Output
Networking Ethernet LAN 10/100/1000 Mbps
Power delivery
profiles
USB Type-C ports
USB Type-A ports
Power mode Self-Power
Power adapter
Security Kensington lock slot
Certificated CE/FCC/RCM
Manufacturer
190 (L) x 85 (W) x 27 (H) mm
(7.48 x 3.35 x 1.06 inches)
Weight
240 g (0.53 lbs)
Max. Resolution of Extended Display
<DP1.2 HBR2> 1x 4K30, 2x FHD60, 3x FHD30
<DP1.4 HBR3> 1x 4K60, 2x QHD60, 3x FHD60
<DP1.4 HBR3 DSC> 1x 5K60, 2x 4K60, 3x 4K30
2 x DP1.4++
1 x HDMI 2.0
Supports: 5V/9V/15V@3A, [email protected]
Upstream port: 1 x USB 3.1 Type-C PD 85W (rear)
Downstream Output: 1 x USB-C 3.1 Gen 2 port (5V/
1.5A)
Downstream Output:
2 x USB-A 3.1 Gen 2 ports (5V/0.9A)
1 x USB-A 3.1 Gen 2 port with BC1.2 (5V/1.5A) and
Apple Charge 2.4A
3-pin 135W AC adapter
Input: AC 100-240V
Output: DC 20V/6.75A
Acer Inc
8F, No. 88, Sec. 1, Xintai 5th Rd., Xizhi, New Taipei
City 221, Taiwan
 Loading...