

Page 1
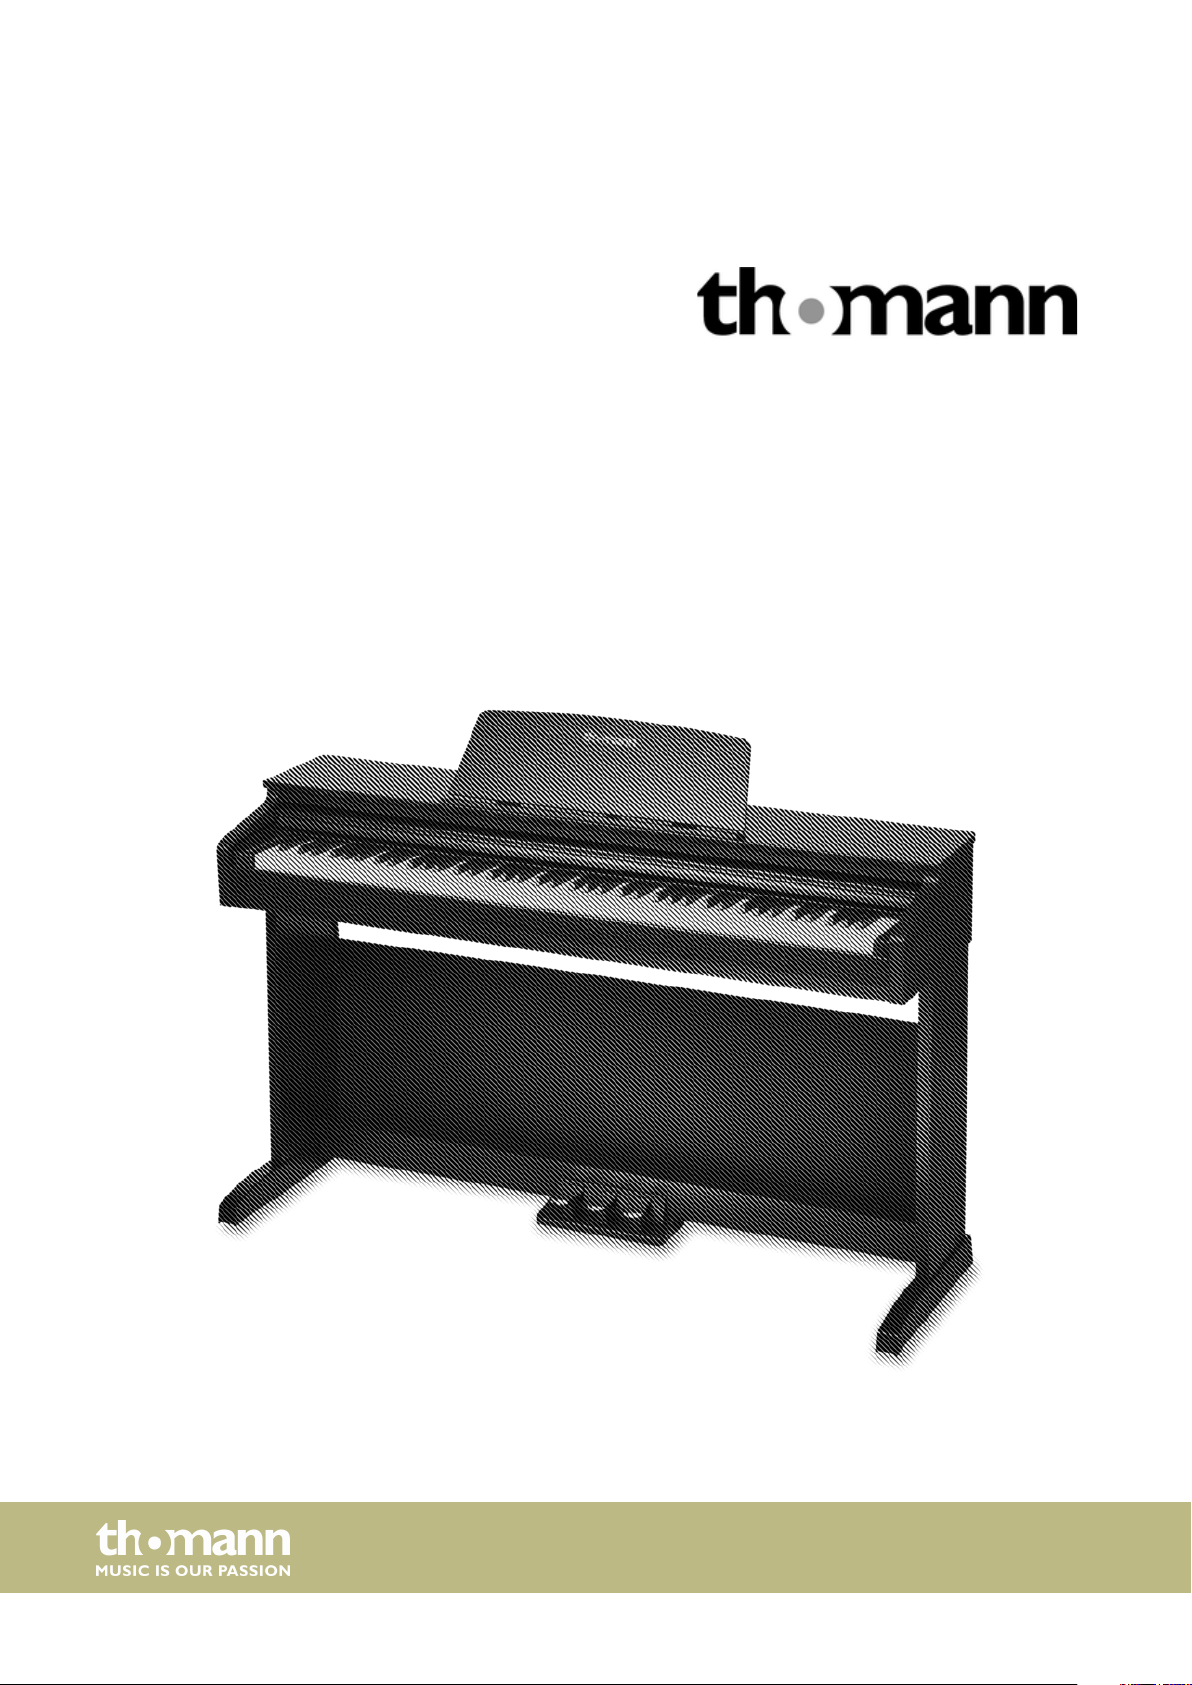
DP-32 B, DP-32 WH
digital piano
user manual
Page 2

Musikhaus Thomann
Thomann GmbH
Hans-Thomann-Straße 1
96138 Burgebrach
Germany
Telephone: +49 (0) 9546 9223-0
E-mail: [email protected]
Internet: www.thomann.de
10.07.2019, ID: 448686, 448687 (V2)
Page 3

Table of contents
Table of contents
1 General information.............................................................................................................. 5
1.1 Further information........................................................................................................ 5
1.2 Notational conventions................................................................................................. 5
1.3 Symbols and signal words........................................................................................... 6
2 Safety instructions................................................................................................................. 7
3 Features....................................................................................................................................... 9
4 Assembly instructions........................................................................................................ 10
5 Connections and operating elements........................................................................ 14
6 Connection options............................................................................................................. 17
7 Turning the digital piano on / o, setup................................................................... 19
7.1 Switching the digital piano on................................................................................. 19
7.2 Automatic shuto......................................................................................................... 19
7.3 Adjusting the volume.................................................................................................. 19
7.4 Touch sensitivity............................................................................................................ 20
7.5 Transposing..................................................................................................................... 21
7.6 Fine tuning...................................................................................................................... 21
7.7 Metronome..................................................................................................................... 22
7.8 Tempo............................................................................................................................... 23
7.9 Button sound.................................................................................................................. 24
7.10 Pedal resonance.......................................................................................................... 24
8 Operating................................................................................................................................. 25
8.1 Demo song...................................................................................................................... 25
8.2 Practising songs............................................................................................................. 25
8.2.1 Selecting practise songs......................................................................................... 25
8.2.2 Practising left and / or right hand........................................................................ 26
8.3 Voices................................................................................................................................ 27
8.3.1 Selecting voices.......................................................................................................... 27
8.3.2 Split mode.................................................................................................................... 27
8.3.3 Dual mode.................................................................................................................... 28
8.3.4 Demo mode................................................................................................................. 29
8.3.5 Duet mode................................................................................................................... 29
8.3.6 TWINOVA...................................................................................................................... 30
8.4 Digital eects.................................................................................................................. 31
8.4.1 Chorus eect............................................................................................................... 31
8.4.2 Reverb eect............................................................................................................... 32
8.4.3 Dynamic Acoustic System (DAS).......................................................................... 32
8.5 Recording function....................................................................................................... 33
8.5.1 Preparing and starting recording........................................................................ 33
8.5.2 Stopping recording.................................................................................................. 33
8.5.3 Playing a recording................................................................................................... 34
8.5.4 Deleting recordings.................................................................................................. 34
DP-32 B, DP-32 WH
3
Page 4

Table of contents
8.6 MIDI functions................................................................................................................ 35
8.6.1 USB connection to a computer............................................................................ 35
8.6.2 Setting the MIDI channel........................................................................................ 35
9 Practise and demo songs.................................................................................................. 36
10 Voice list.................................................................................................................................... 38
11 MIDI implementation chart............................................................................................. 39
12 Troubleshooting................................................................................................................... 41
13 Technical specications.................................................................................................... 42
14 Plug and connection assignment................................................................................. 43
15 Protecting the environment........................................................................................... 44
digital piano
4
Page 5
1 General information
1.1 Further information
General information
This user manual contains important information on the safe operation of the device.
Read and follow all safety notes and all instructions. Save this manual for future refer‐
ence. Make sure that it is available to all persons using this device. If you sell the
device to another user, be sure that they also receive this manual.
Our products and user manuals are subject to a process of continuous development.
We therefore reserve the right to make changes without notice. Please refer to the
latest version of the user manual which is ready for download under
www.thomann.de.
On our website (www.thomann.de) you will nd lots of further information and
details on the following points:
1.2 Notational conventions
Letterings
Displays
Download This manual is also available as PDF le for you to download.
Keyword search
Online guides
Personal
consultation
Service
This manual uses the following notational conventions:
The letterings for connectors and controls are marked by square brackets and italics.
Examples: [VOLUME] control, [Mono] button.
Texts and values displayed on the device are marked by quotation marks and italics.
Examples: ‘24ch’ , ‘OFF’.
Use the search function in the electronic version to nd the
topics of interest for you quickly.
Our online guides provide detailed information on technical
basics and terms.
For personal consultation please contact our
technical hotline.
If you have any problems with the device the
customer service will gladly assist you.
DP-32 B, DP-32 WH
5
Page 6
General information
Instructions
Cross-references
1.3 Symbols and signal words
The individual steps of an instruction are numbered consecutively. The result of a
step is indented and highlighted by an arrow.
Example:
1. Switch on the device.
2. Press [Auto].
Automatic operation is started.
ð
3. Switch o the device.
References to other locations in this manual are identied by an arrow and the speci‐
ed page number. In the electronic version of the manual, you can click the crossreference to jump to the specied location.
Example: See Ä ‘Cross-references’ on page 6.
In this section you will nd an overview of the meaning of symbols and signal words
that are used in this manual.
Signal word Meaning
DANGER! This combination of symbol and signal word indicates
an immediate dangerous situation that will result in
death or serious injury if it is not avoided.
CAUTION! This combination of symbol and signal word indicates
a possible dangerous situation that can result in minor
injury if it is not avoided.
NOTICE! This combination of symbol and signal word indicates
a possible dangerous situation that can result in mate‐
rial and environmental damage if it is not avoided.
Warning signs Type of danger
Warning – high-voltage.
Warning – danger zone.
digital piano
6
Page 7
2 Safety instructions
Safety instructions
Intended use
Safety
This device is intended to be used for electronic sound generation using a piano key‐
board. Use the device only as described in this user manual. Any other use or use
under other operating conditions is considered to be improper and may result in per‐
sonal injury or property damage. No liability will be assumed for damages resulting
from improper use.
This device may be used only by persons with sucient physical, sensorial, and intel‐
lectual abilities and having corresponding knowledge and experience. Other persons
may use this device only if they are supervised or instructed by a person who is
responsible for their safety.
DANGER!
Danger for children
Ensure that plastic bags, packaging, etc. are disposed of properly and
are not within reach of babies and young children. Choking hazard!
Ensure that children do not detach any small parts (e.g. knobs or the
like) from the unit. They could swallow the pieces and choke!
Never let children unattended use electrical devices.
DANGER!
Electric shock caused by short-circuit
Always use proper ready-made insulated two-wire mains cabling
(power cord). Do not modify the mains cable or the plug. Failure to do
so could result in electric shock/death or re. If in doubt, seek advice
from a registered electrician.
DANGER!
Electric shock caused by high voltages inside
Within the device there are areas where high voltages may be present.
Never remove any covers.
There are no user-serviceable parts inside.
Do not use the device if covers, protectors or optical components are
missing or damaged.
DP-32 B, DP-32 WH
7
Page 8
Safety instructions
CAUTION!
Possible hearing damage
With loudspeakers or headphones connected, the device can produce
volume levels that may cause temporary or permanent hearing impair‐
ment.
Do not operate the device permanently at a high volume level.
Decrease the volume level immediately if you experience ringing in
your ears or hearing impairment.
CAUTION!
Risk of injury due to heavy weight
Due to the heavy weight of the device, at least two persons are required
for transport and installation.
NOTICE!
Operating conditions
This device has been designed for indoor use only. To prevent damage,
never expose the device to any liquid or moisture. Avoid direct sunlight,
heavy dirt, and strong vibrations.
NOTICE!
Power supply
Before connecting the device, ensure that the input voltage (AC outlet)
matches the voltage rating of the device and that the AC outlet is pro‐
tected by a residual current circuit breaker. Failure to do so could result
in damage to the device and possibly injure the user.
Unplug the device before electrical storms occur and when it is unused
for long periods of time to reduce the risk of electric shock or re.
digital piano
8
Page 9

3 Features
Features
The digital piano is characterized by the following features:
n Keyboard: 88 weighted keys with hammer action and adjustable touch response.
n 16 sounds
n 128-voice polyphony
n Reverb
n Chorus
n Split mode
n Metronome
n Transpose function
n Music Library with 60 rehearsal songs
n Speaker: 2 × 10 W
n 3 pedals
n Connections: 2 × headphones out, stereo AUX IN/OUT, USB MIDI 2.0
n Finish: matt black (item # 448686) or matt white (item # 448687)
n Automatic shuto
DP-32 B, DP-32 WH
9
Page 10
Assembly instructions
4 Assembly instructions
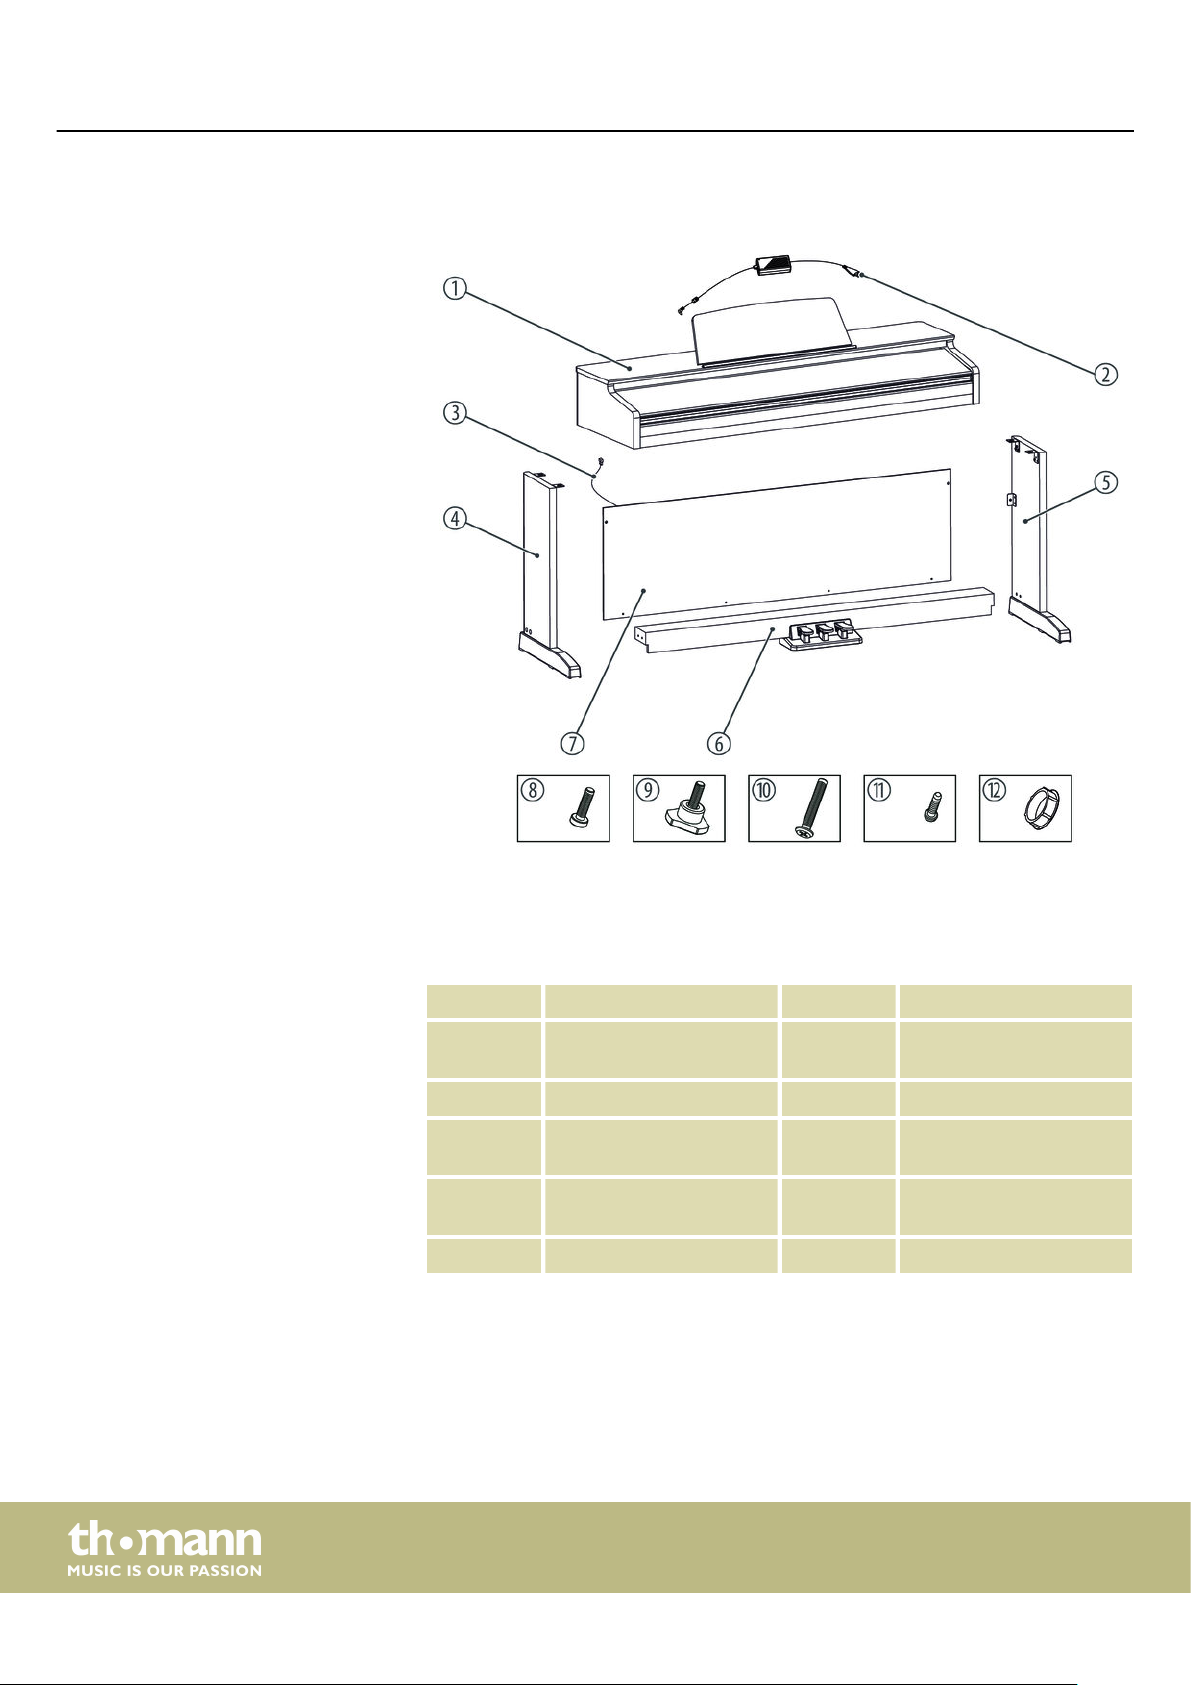
You need a Phillips screwdriver (not supplied) for the assembly of the digital piano.
Open the package and make sure before assembling that the entire scope of delivery
is present, as posted here.
1 Digital piano housing 7 Back panel
2 Power cord 8 Phillips-head
screws M6 ´ 18 (2 pcs.)
3 Pedal cable 9 Hand screws (4 pcs.)
4 Left side panel 10 Phillips-head
screws 6 ´ 50 (4 pcs.)
5 Right side panel 11 Phillips-head
screws 4 ´ 15 (4 pcs.)
6 Pedal box 12 Plastic caps (4 pcs.)
10
digital piano
Page 11
Assembly instructions
Mechanical assembly
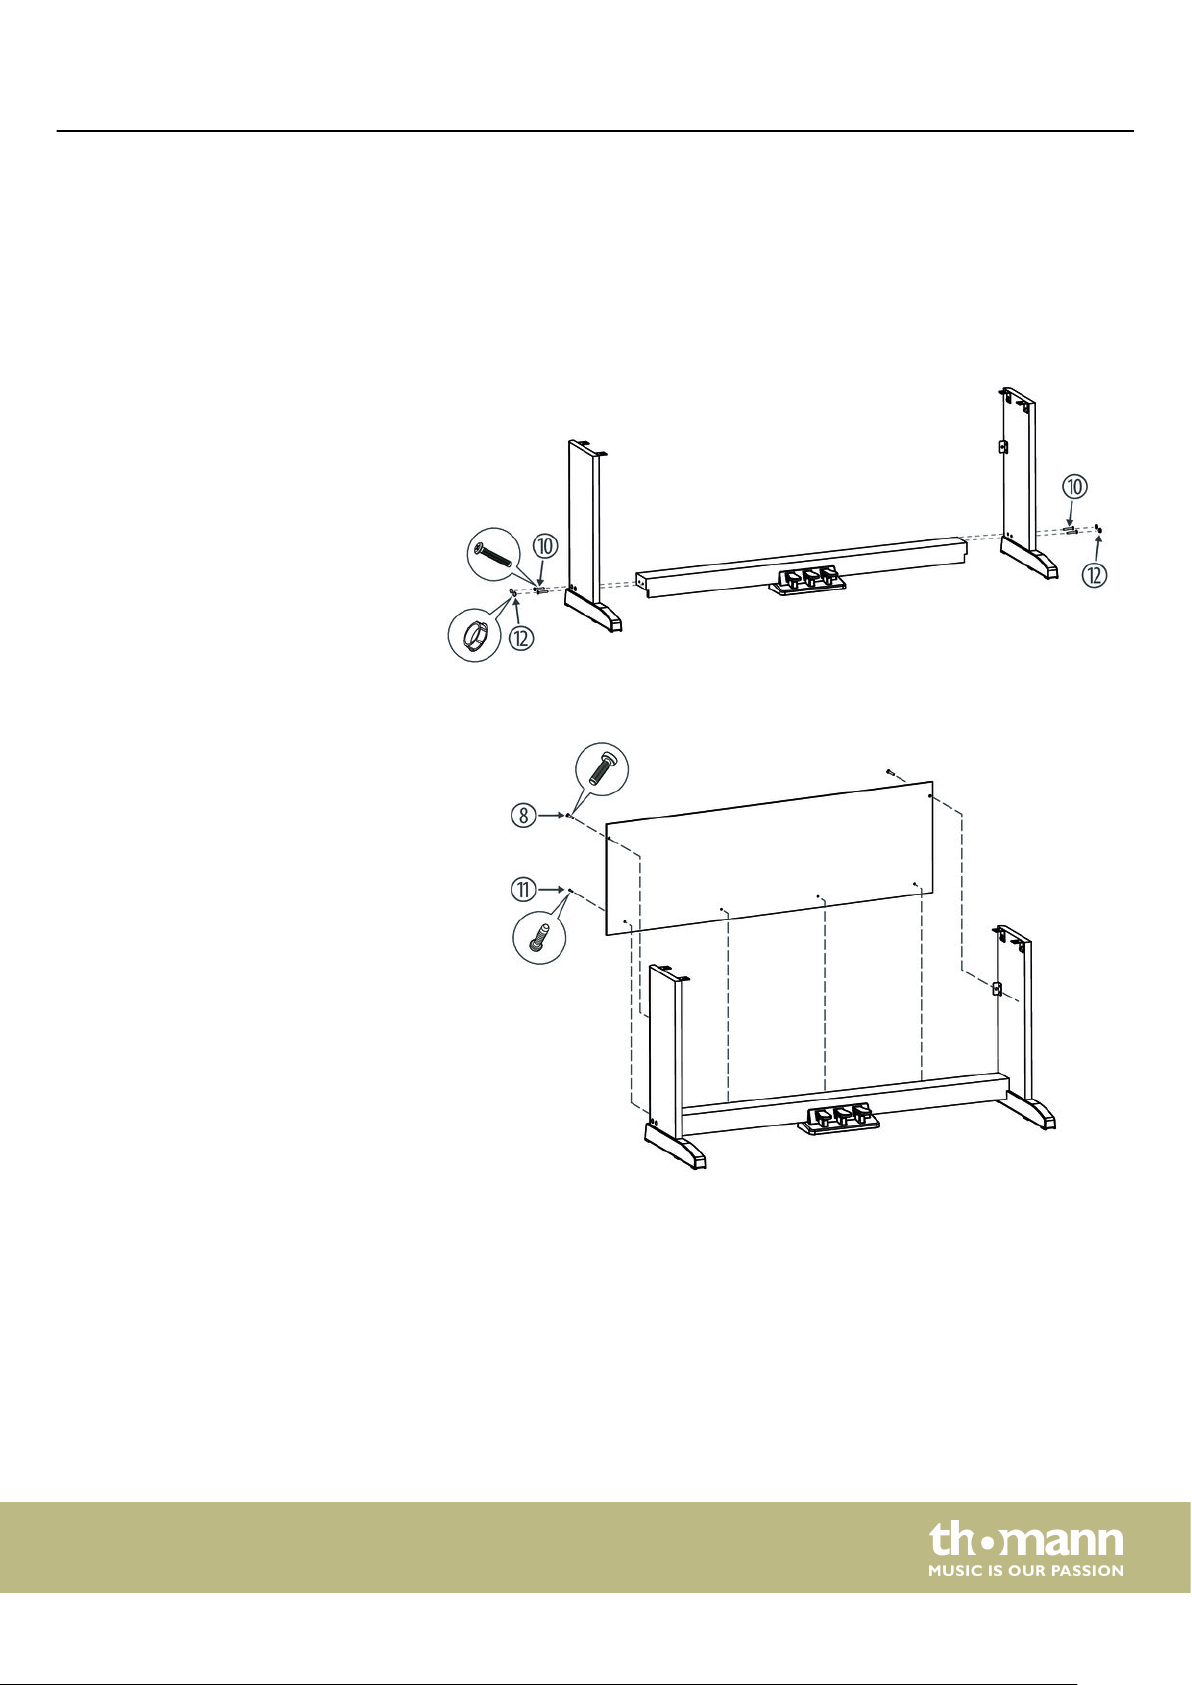
Proceed according to the illustrations and only use the supplied screws. Using other
screws could damage the piano housing or result in a reduced stability of the piano.
n Hand screws (4 pcs.)
n Phillips-head screws M6 ´ 18 (8 pcs.)
n Phillips-head screws 6 ´ 50 (4 pcs.)
n Phillips-head screws 4 ´ 15 (4 pcs.)
n Plastic caps (4 pcs.)
Put the pedal box between the left and right side panel and use two screws 6 ´ 50 on
each side to ax both side panels to the pedal box. Attach the four plastic caps.
Attach the rear panel to the pedal box with four screws 4 ´ 15 and with two screws
M6 ´ 18 to the mounting brackets of the side panels.
DP-32 B, DP-32 WH
11
Page 12
Assembly instructions
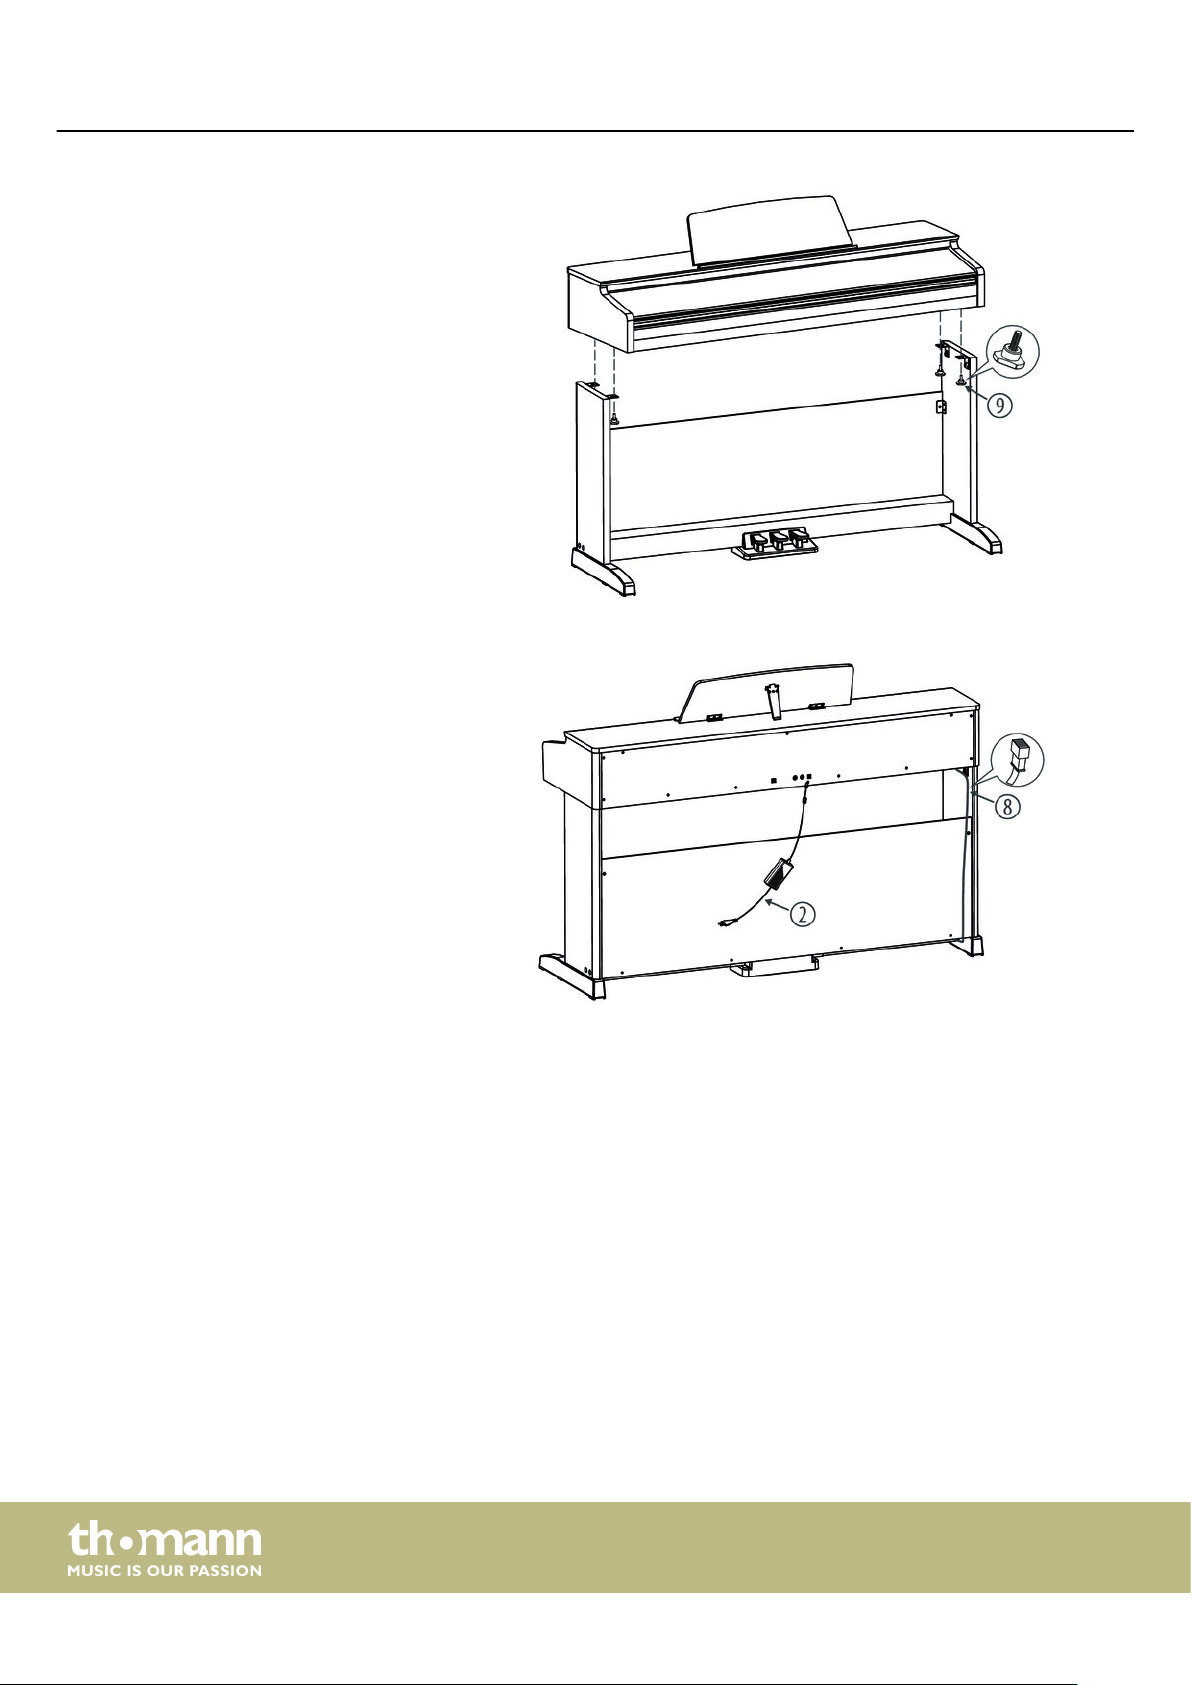
Put the digital piano housing on the stand and ax it using four hand screws.
Connect the DIN plug of the pedal cable to the provided socket on the bottom side
of the digital piano housing. Fix the cable to the base and move the digital piano to
the desired position.
digital piano
12
Page 13
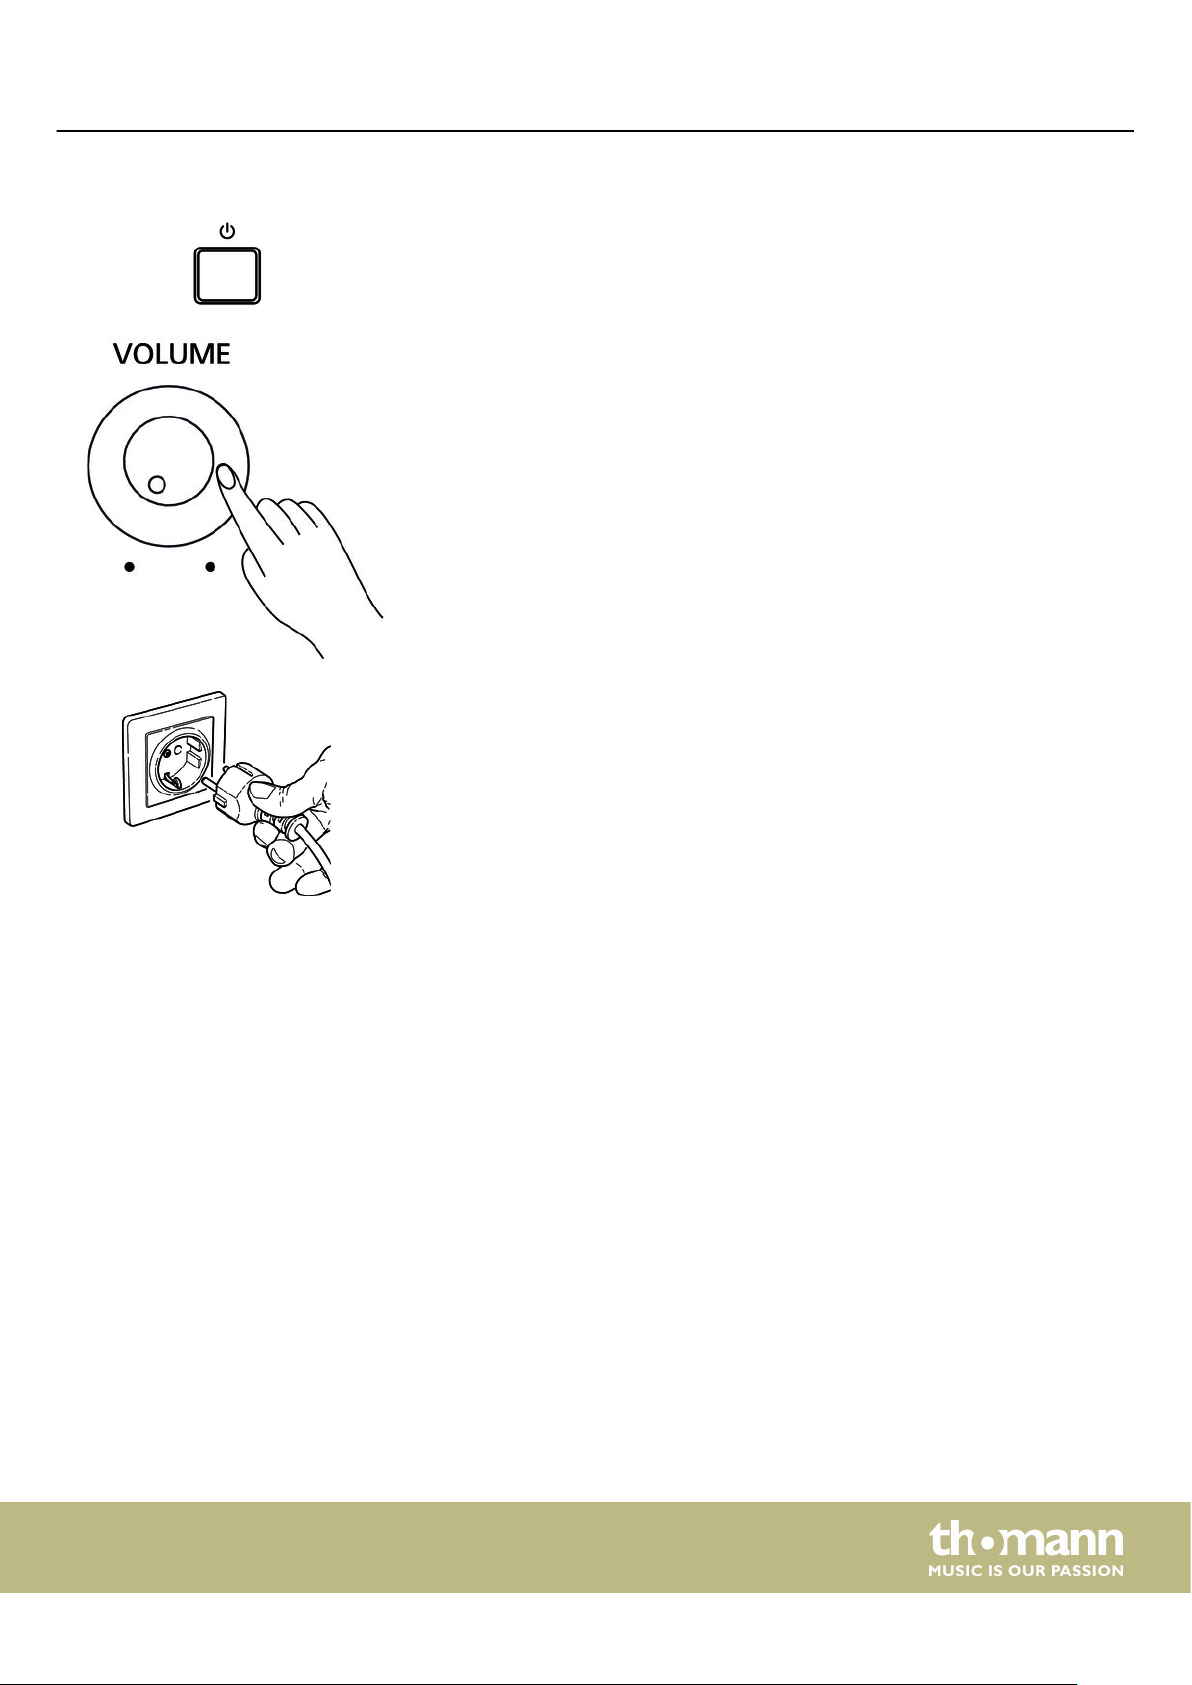
Connecting the power supply
Assembly instructions
Make sure that the device is turned o before you connect it to the power supply or
disconnect it.
Turn the volume knob counter-clockwise to minimum before connecting the digital
piano to the power supply or to other devices. This is to protect the speakers from
damage.
Connect the cable from the power adapter outlet to the input socket [DC IN] on the
rear panel of the digital piano.
Plug the AC power cord into a properly wired mains wall outlet.
DP-32 B, DP-32 WH
13
Page 14
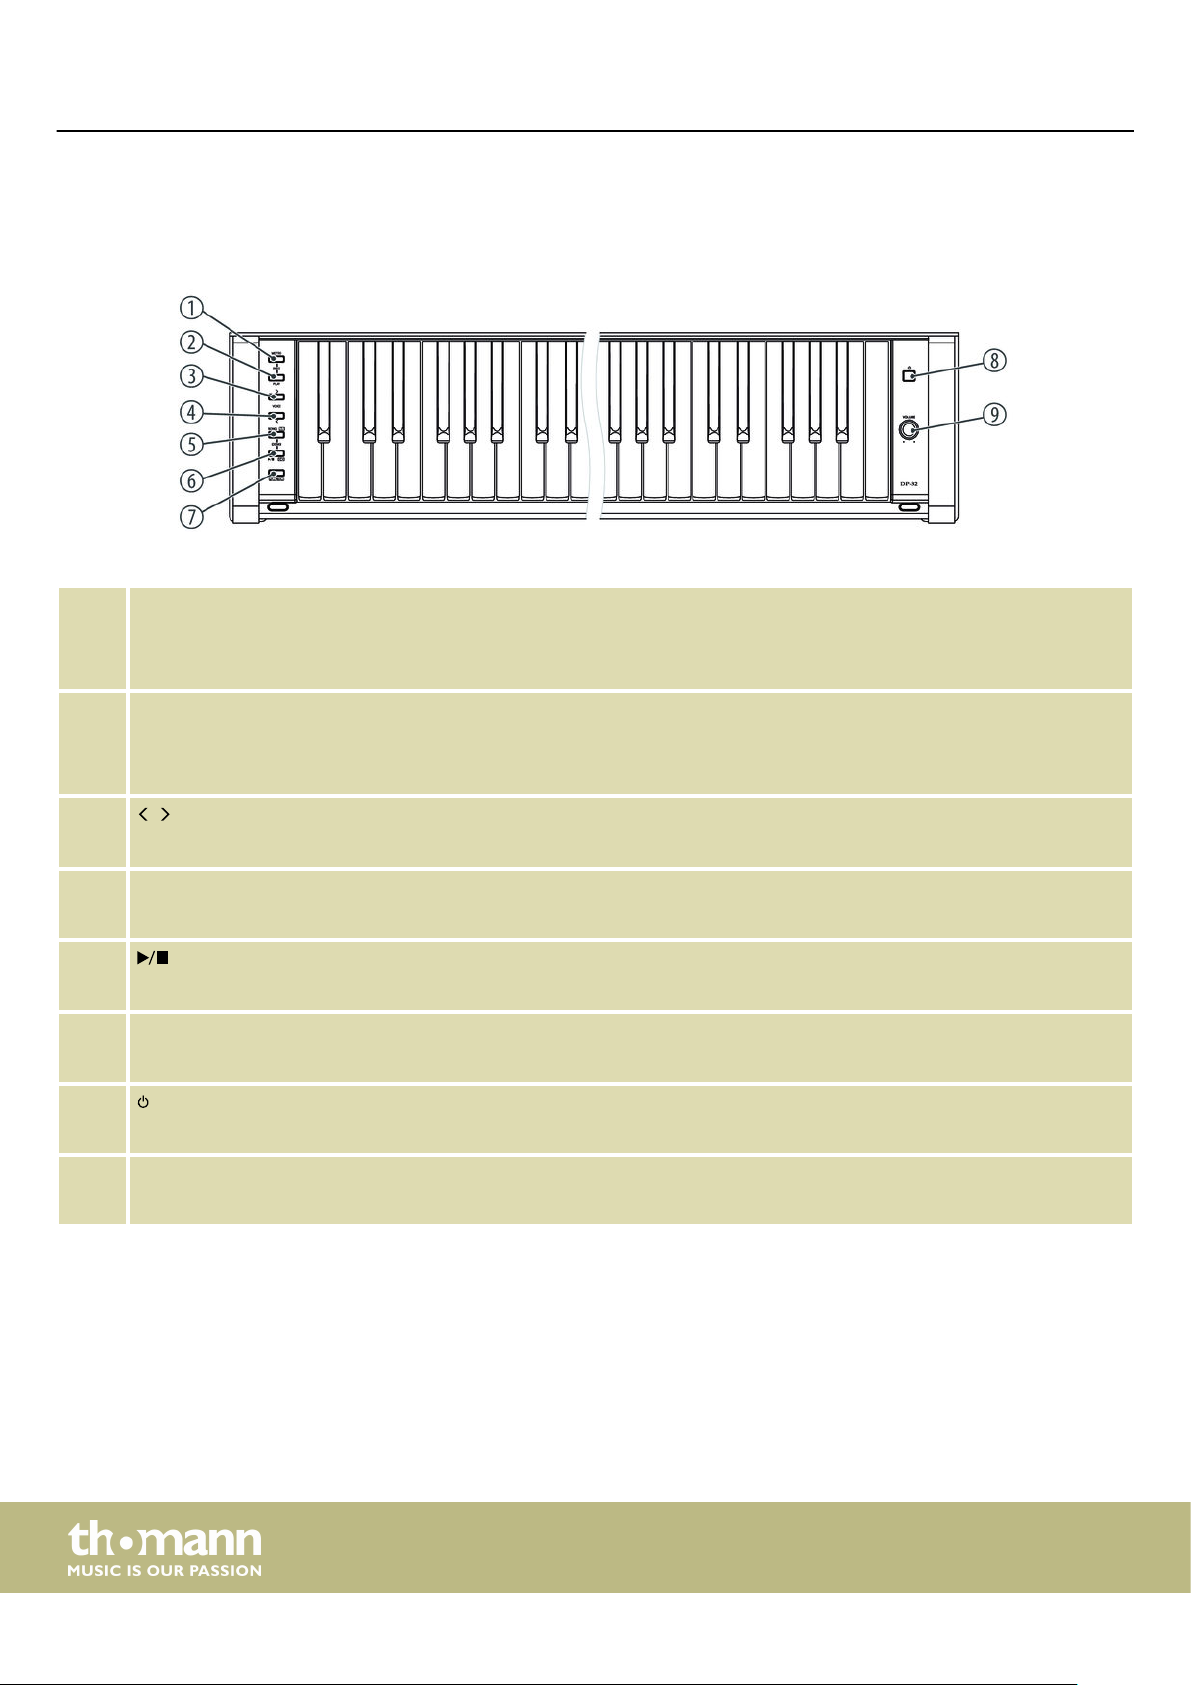
Connections and operating elements
5 Connections and operating elements
Control panel left and right
1 [METRO]
Button to turn the metronome on and o
Press [METRO] and [PLAY] simultaneously to enable the recording mode.
2 [PLAY]
Button to start and stop user song playback
Press [METRO] and [PLAY] simultaneously to enable the recording mode.
3, 4
/
Buttons to set the parameters
5 [SONG/RVB]
Button for selecting practise pieces
6
/[CHO]
Button to start and stop the practice pieces
7 [FUNCTION]
Press and hold this key while you call up a specic function with a piano key.
8
Turns the digital piano on and o
9 [VOLUME]
Rotary volume control
14
digital piano
Page 15
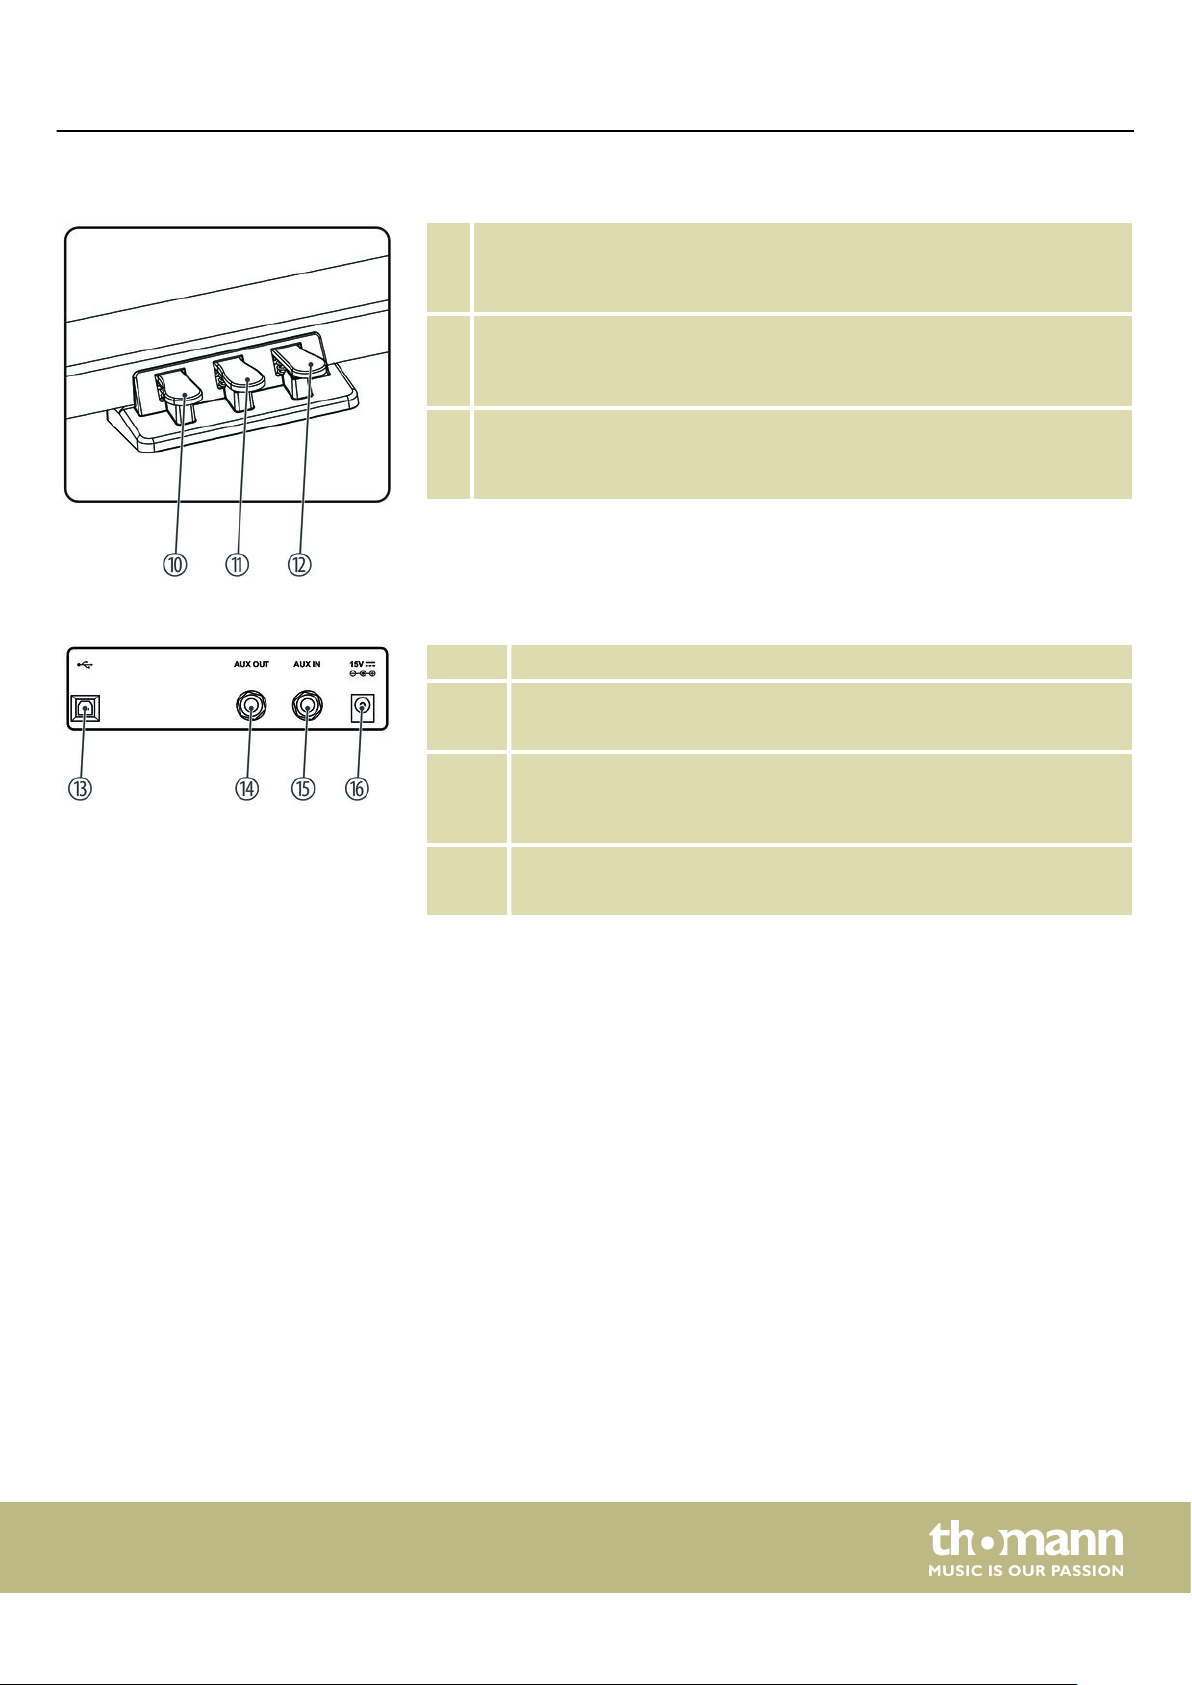
Pedals
Rear panel connections
Connections and operating elements
10 Soft pedal
Using the Soft pedal makes the piano sound smoother and the overall
volume is attenuated.
11 Sostenuto pedal
When stepping on the Sostenuto pedal, the currently played notes linger
until you release the pedal.
12 Sustain pedal
With the sustain pedal all played notes sound longer. This eect simulates the
lifting of the damper in an analogue keyboard instrument.
13 USB/MIDI interface to connect a computer
14 [AUX OUT]
Output for external audio devices like active speakers or ampliers
15 [AUX IN ]
Connection for external audio devices such as MP3 or CD players to use
the internal speakers
16 [DC IN]
Connection for the power adapter
DP-32 B, DP-32 WH
15
Page 16
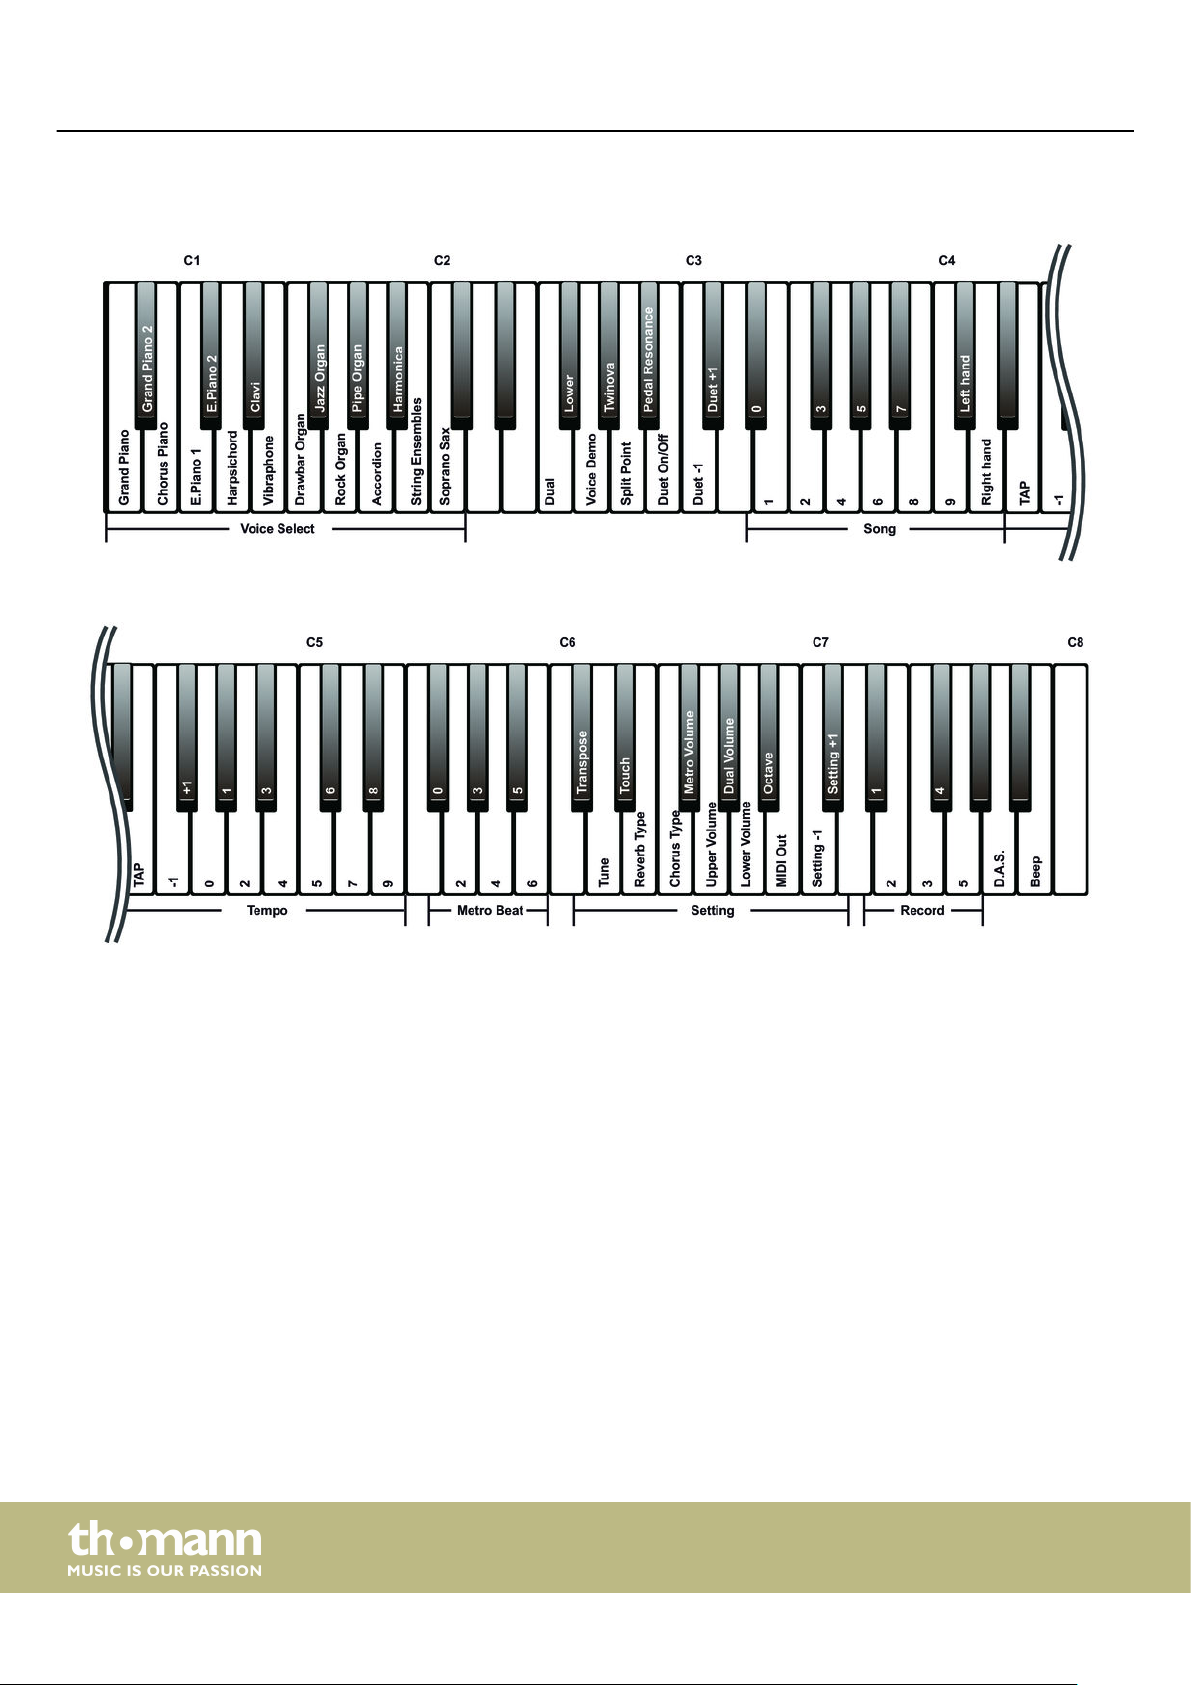
Connections and operating elements
The keyboard keys are referred to in this manual as shown below.Piano keys
16
digital piano
Page 17
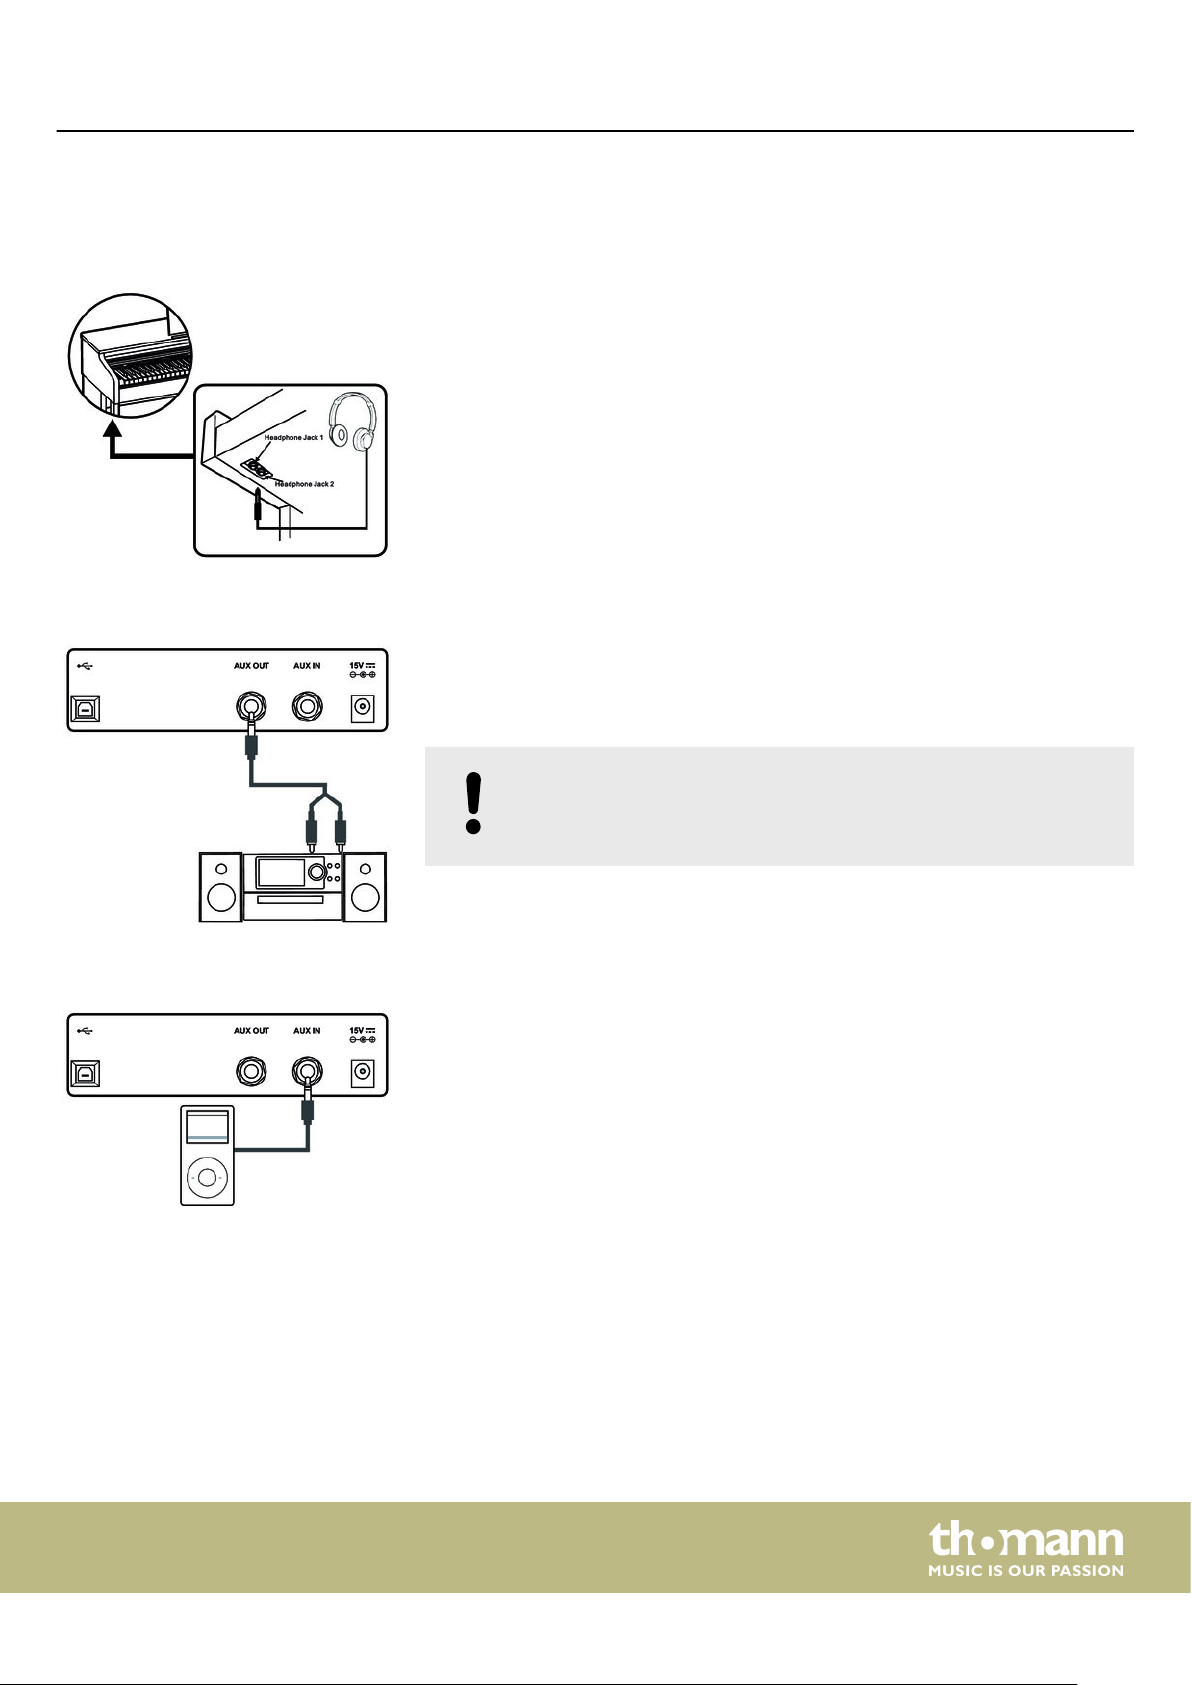
6 Connection options
Headphones
External audio devices via the AUX
OUT socket
Connection options
To the left beneath the keyboard you nd the headphones outlets 1 and 2 (designed
as 1/4" phone socket).
If you connect headphones (not supplied) to output 1, speaker playback will be
retained.
Using outlet 2 mutes the speakers.
Use the AUX OUT socket to connect the digital piano to an amplier, stereo device,
mixing console or recording device. Plug one end of the audio cable into the AUX
OUT socket on the rear panel of the digital piano and the other end into the input of
the respective audio device.
External audio devices via the AUX IN
socket
NOTICE!
To prevent damage to the speakers, turn the volume down to ‘Mini‐
mum’ before you connect other devices to the digital piano.
Use the AUX IN socket to connect a, for example, CD or MP3 player to the digital
piano. So you can playback music through the internal speakers of the digital piano
and simultaneously play along to it. Plug one end of the audio cable into the AUX IN
socket on the rear panel of the digital piano and the other end into the output of the
respective audio device.
DP-32 B, DP-32 WH
17
Page 18
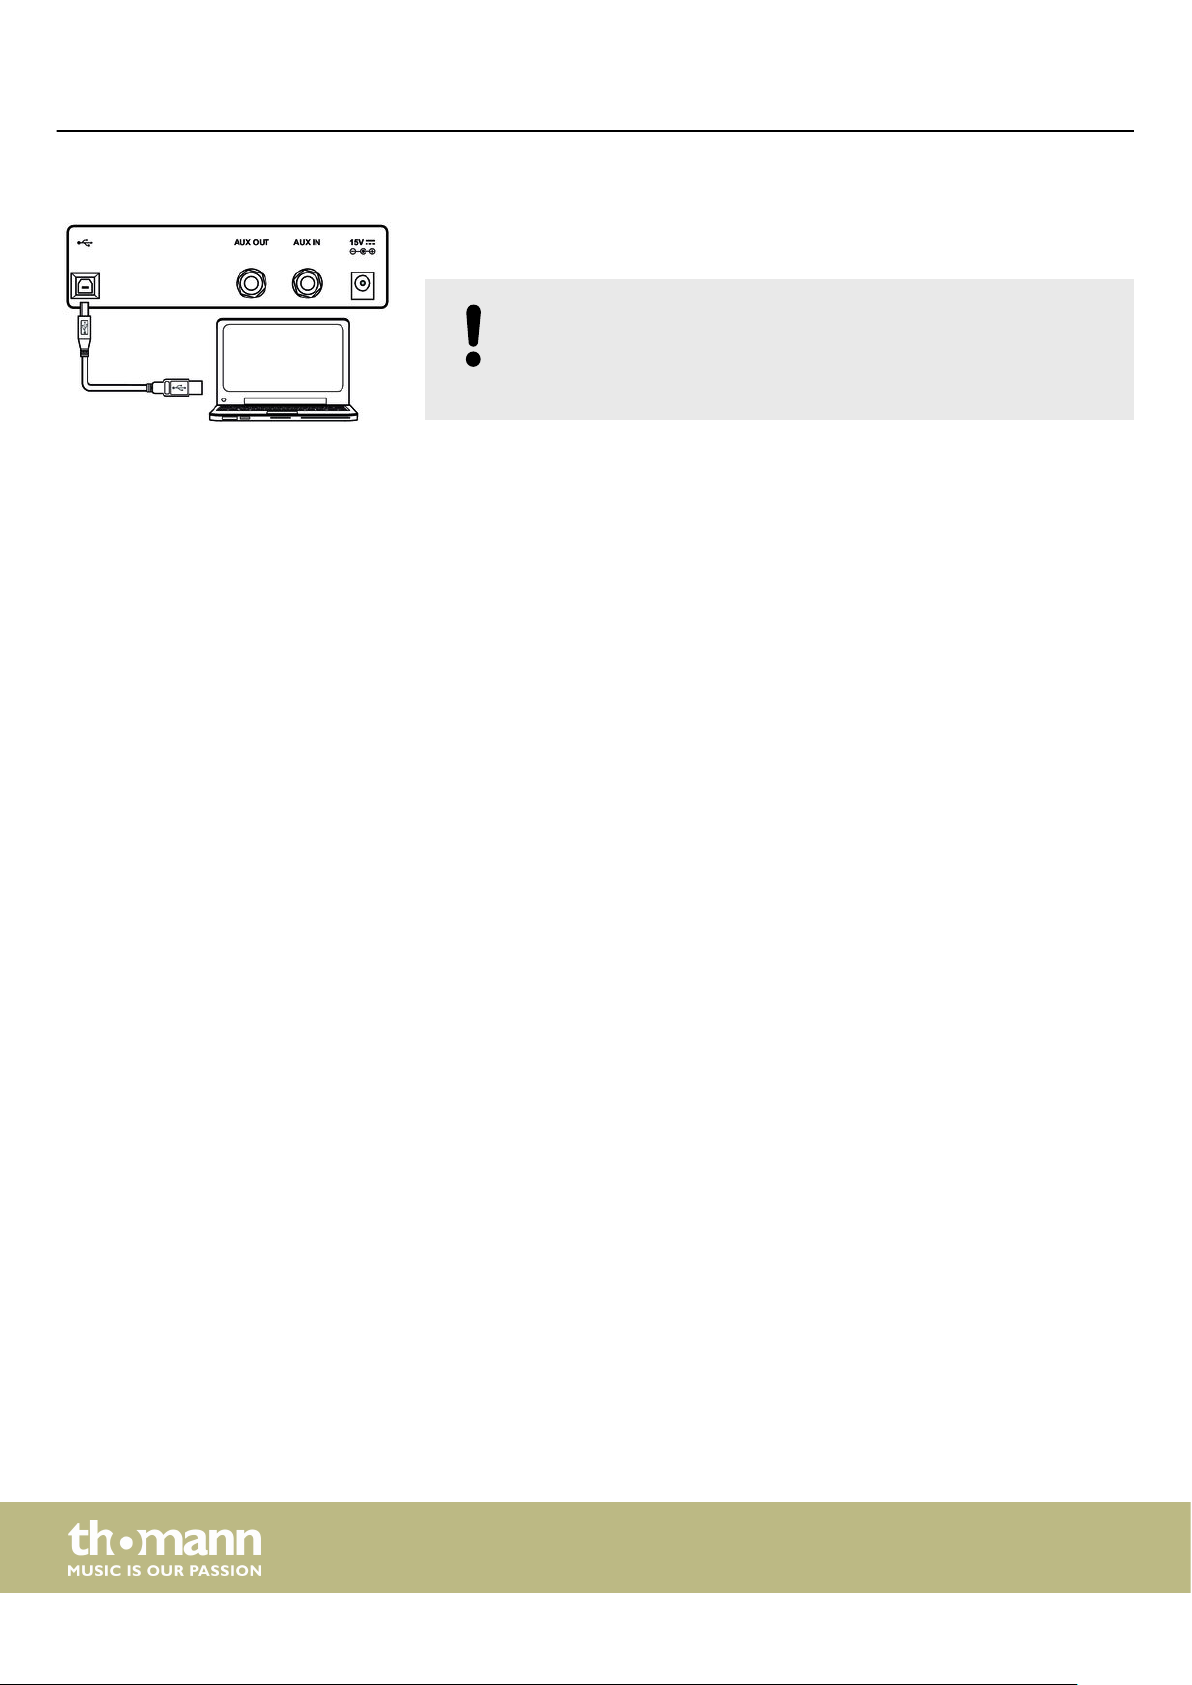
Connection options
Computer via USB
You can connect the digital piano to exchange data with a PC via the USB port. This
also allows the transfer of MIDI data.
NOTICE!
Do not set the USB interface as the in and output at the same time in the
computer software. Otherwise, there will be overlap when playing the
digital piano.
18
digital piano
Page 19
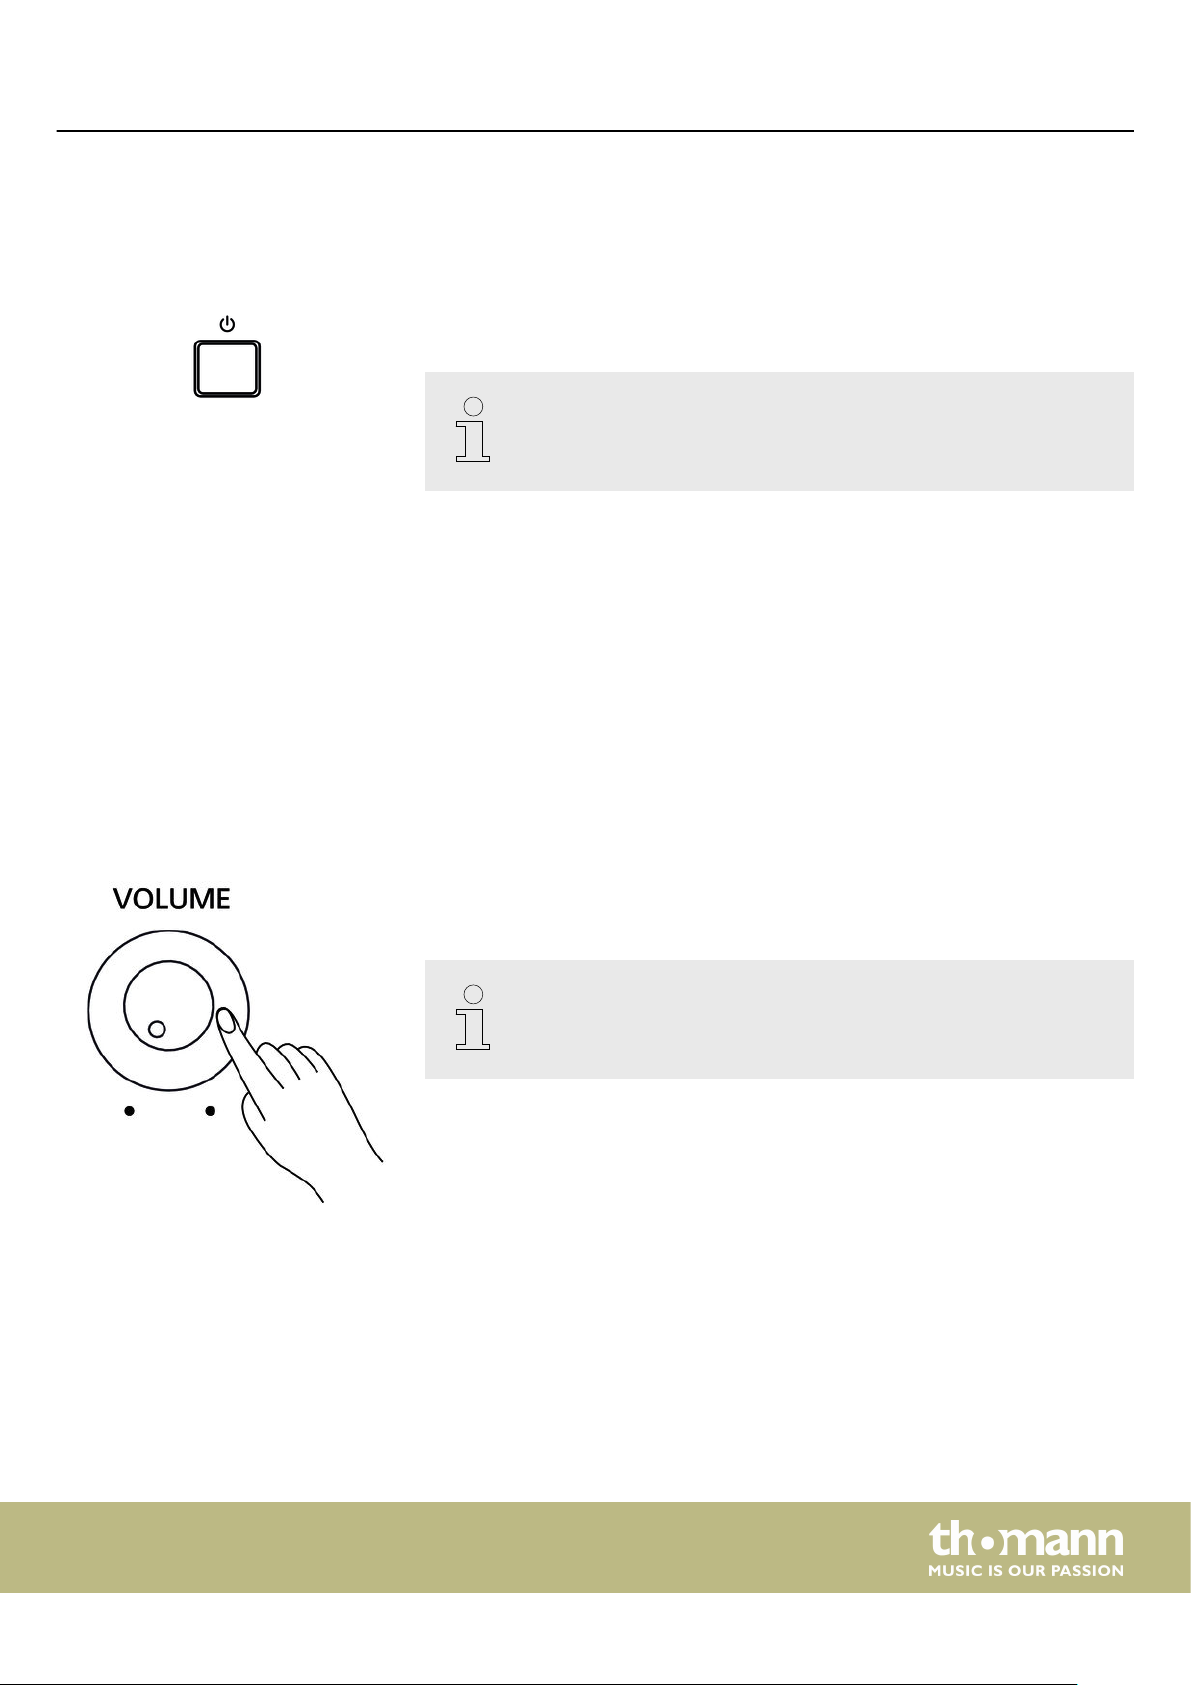
Turning the digital piano on / o, setup
7 Turning the digital piano on / o, setup
7.1 Switching the digital piano on
Press the power button on the right of the claviature to turn the digital piano on or
o.
If you hear nothing coming from the speakers, the volume may be set to
‘minimum’.
7.2 Automatic shuto
When the digital piano is not being used for 30 minutes, it switches o automatically.
To turn it on again, press the power button on the unit.
The automatic shuto is activated automatically when powering up the digital piano.
To deactivate the automatic shuto function, press the rst white key on the left
while the digital piano is being switched on.
7.3 Adjusting the volume
Adjust the rotary control [VOLUME] for a pleasant volume for playback and practising.
Turn this control clockwise to increase the volume. Turn it counter-clockwise to
reduce volume.
If you hear nothing coming from the speakers, the volume may be set to
‘minimum’ or headphones are connected to outlet 2.
DP-32 B, DP-32 WH
19
Page 20
Turning the digital piano on / o, setup
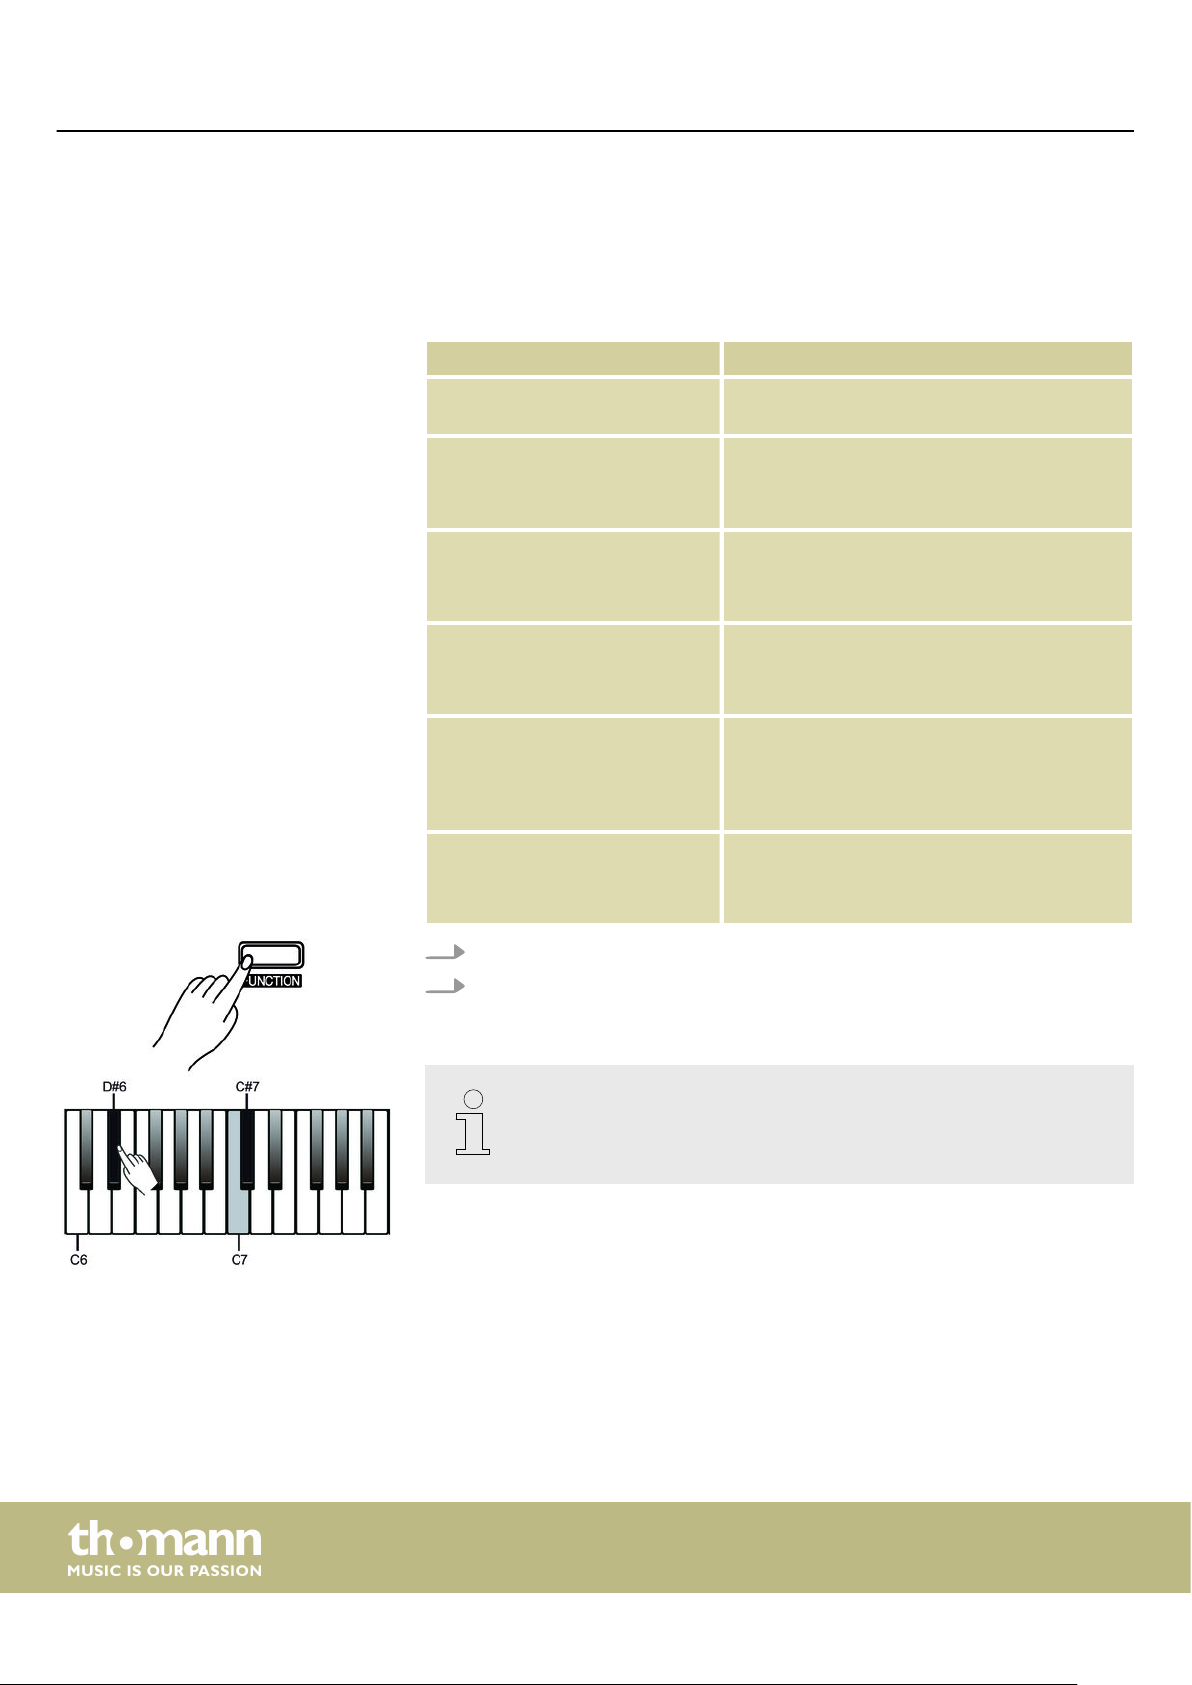
7.4 Touch sensitivity
With this function you can adjust the touch response of the keyboard at six dierent
levels.
Parameter Meaning
[OFF] Touch sensitivity is o. This can be very recom‐
[1] Hard 2
[2] Hard 1
[3] Normal
mendable when playing the organ voice.
In this setting, the volume is lower than usual
even when playing with a hard touch.
In this setting, the volume is slightly lower than
usual even when playing with a hard touch.
This setting corresponds to the usual touch
response of a keyboard.
[4] Soft 1
In this setting, the volume is slightly higher
than usual even when playing with a soft
touch.
[5] Soft 2
In this setting, the volume is higher than usual
even when playing with a soft touch.
1. Hold down the [FUNCTION] button and press piano key [D#6].
2. Hold down the [FUNCTION] button and press piano key [C7] or [C#7] to adjust
the touch sensitivity.
– Hold down the [FUNCTION] button and press piano key [C7] and [C#7]
simultaneously to restore the preset value ‘3’.
20
digital piano
Page 21
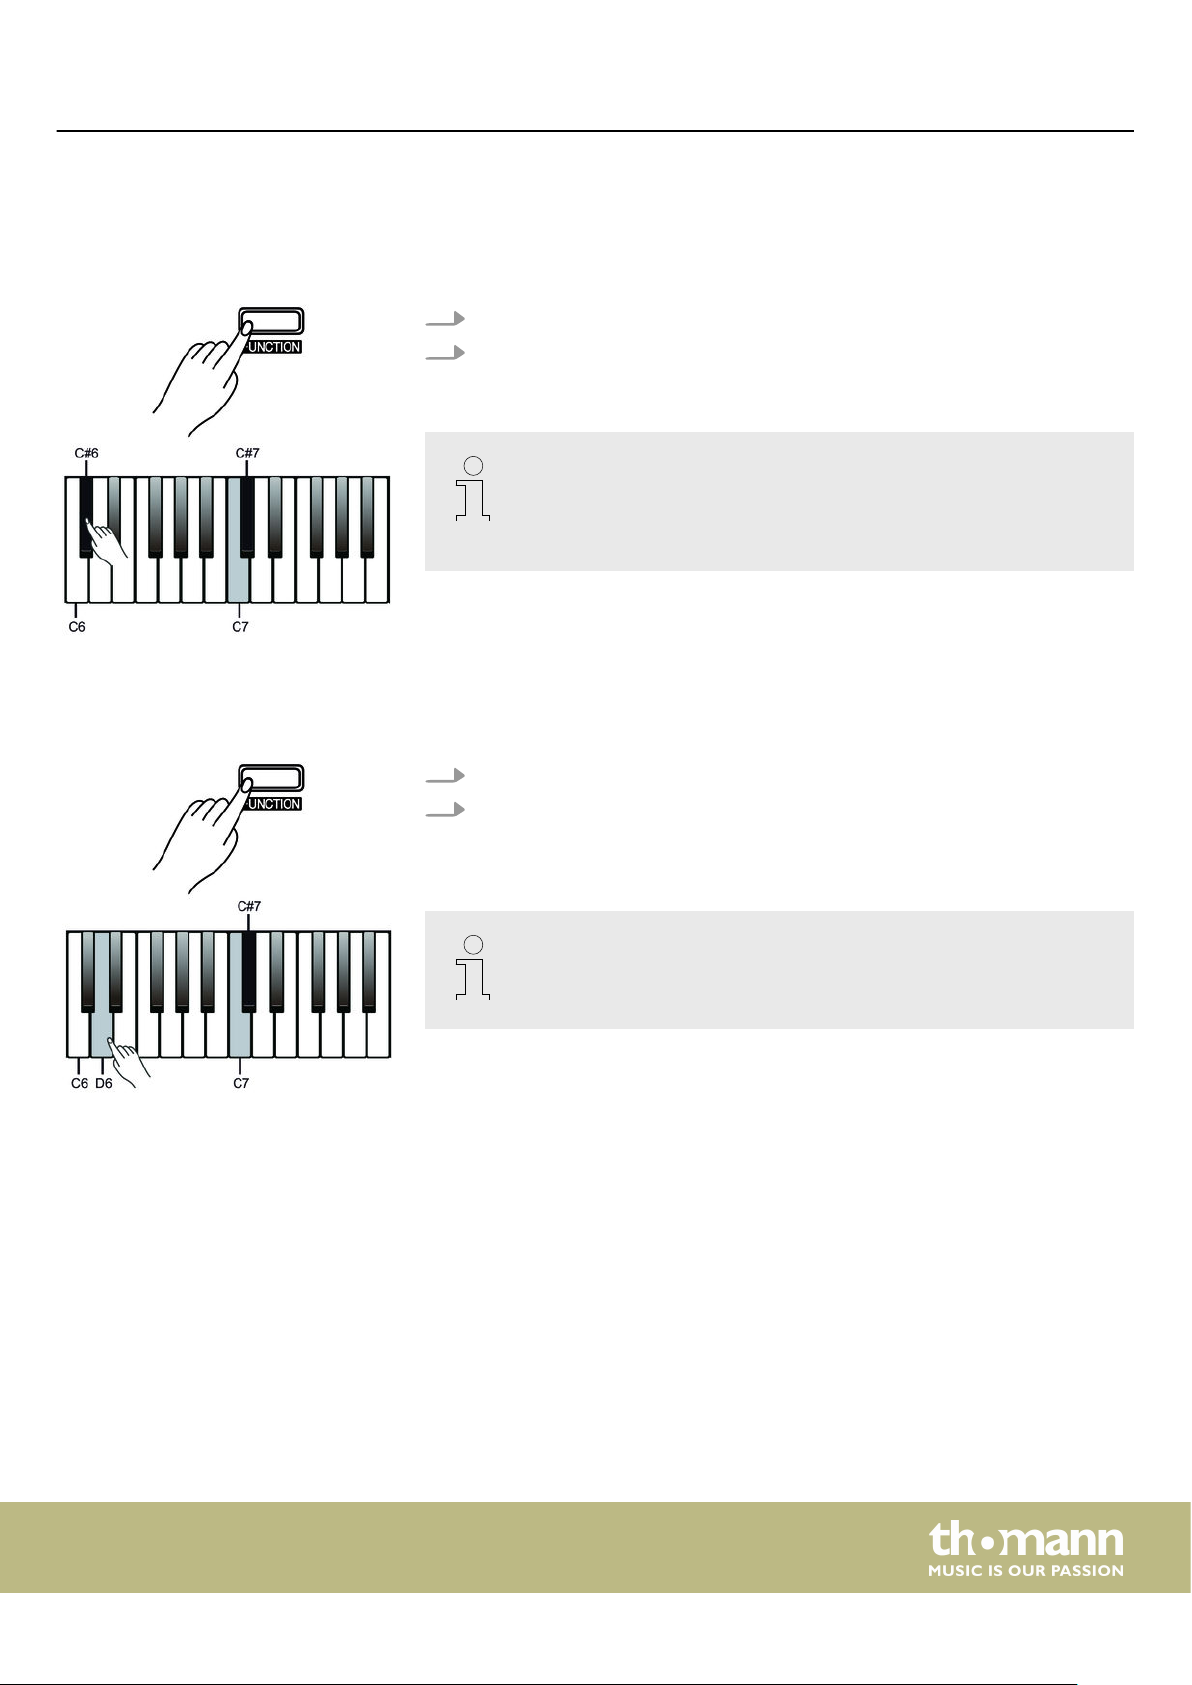
7.5 Transposing
Turning the digital piano on / o, setup
With this function you can adjust the pitch of the keyboard in 12 semitone steps up
or down.
1. Hold down the [FUNCTION] button and press piano key [C#6].
2. Hold down the [FUNCTION] button and press piano key [C7] or [C#7] to trans‐
pose the keyboard pitch in 12 semitone steps up or down.
– Hold down the [FUNCTION] button and press piano key [C7] and [C#7]
simultaneously to restore the preset value ‘00’.
– For example, if you set the transpose value to ‘–05’ or ‘+07’, you will
hear the pitch [G] while playing the [C] keys.
7.6 Fine tuning
With this function you can ne tune the entire keyboard in 2-cent steps.
1. Hold down the [FUNCTION] button and press piano key [D6].
2. Hold down the [FUNCTION] button and press piano key [C7] or [C#7] to ne
tune the keyboard. The value changes by 2 Cents per keystroke in a range from
–50 bis +50 Cents.
– Hold down the [FUNCTION] button and press piano key [C7] and [C#7]
simultaneously to restore the preset value ‘0 Cent’.
DP-32 B, DP-32 WH
21
Page 22
Turning the digital piano on / o, setup
7.7 Metronome
The digital piano metronome has six preset time signatures.
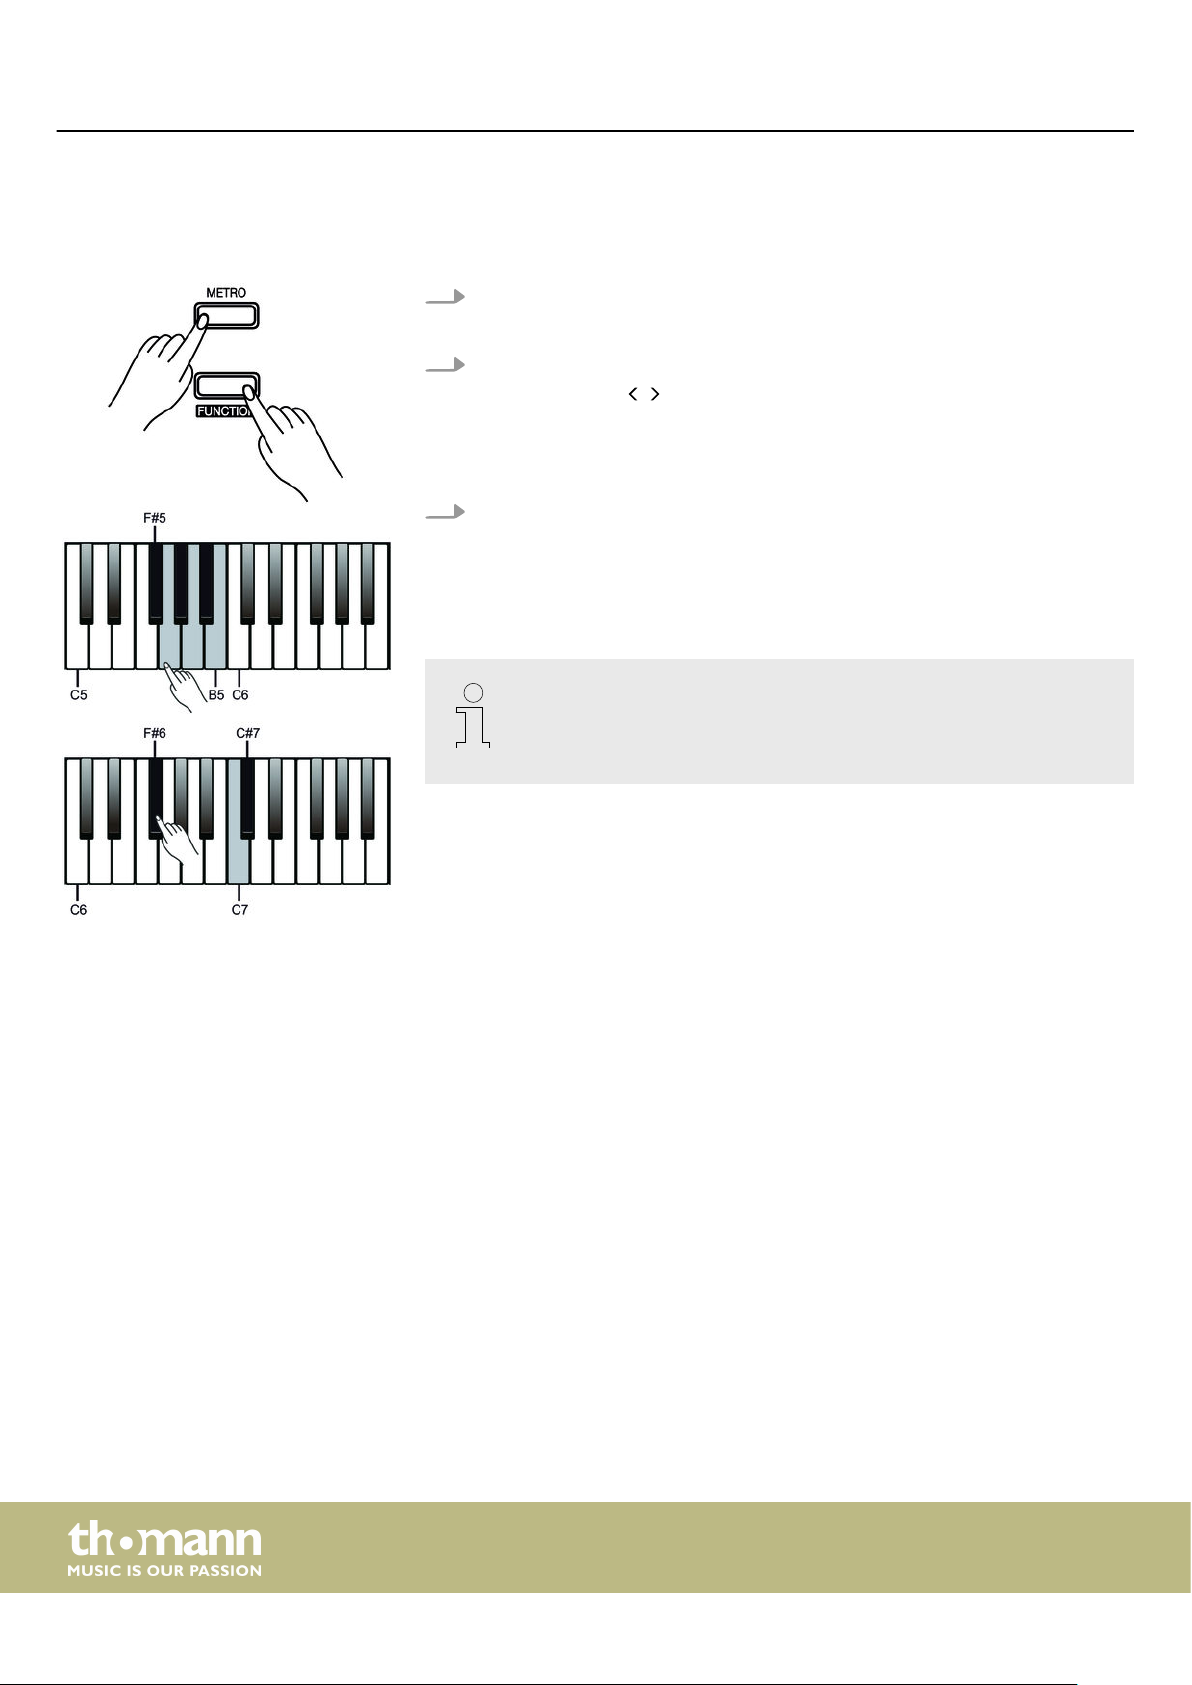
1. Turning the metronome on / o
Press the [METRO] button to turn the Metronome on or o.
2. Setting the time signature
Press the buttons / to set one of the preset time signatures ‘0’, ‘2’ , ‘3’ , ‘4’ ,
‘5’ or ‘6’ .
Hold down the [FUNCTION] button and press one of the piano keys [F#5] …
[B5] to set the time signature directly.
3. Setting the Click volume
Hold down the [FUNCTION] button and press piano key [F#6].
Hold down the [FUNCTION] button and press piano key [C7] or [C#7] to adjust
the Click volume between ‘0’ … ‘15’ .
Hold down the [FUNCTION] button and press piano keys [C7] and [C#7]
simultaneously to restore the default value.
– The metronome is not available while playing practice pieces.
22
digital piano
Page 23
7.8 Tempo
Turning the digital piano on / o, setup
All preprogrammed pieces and voices as well as the metronome function are stored
with certain tempo information. These presets can be adjusted at any time in various
ways.
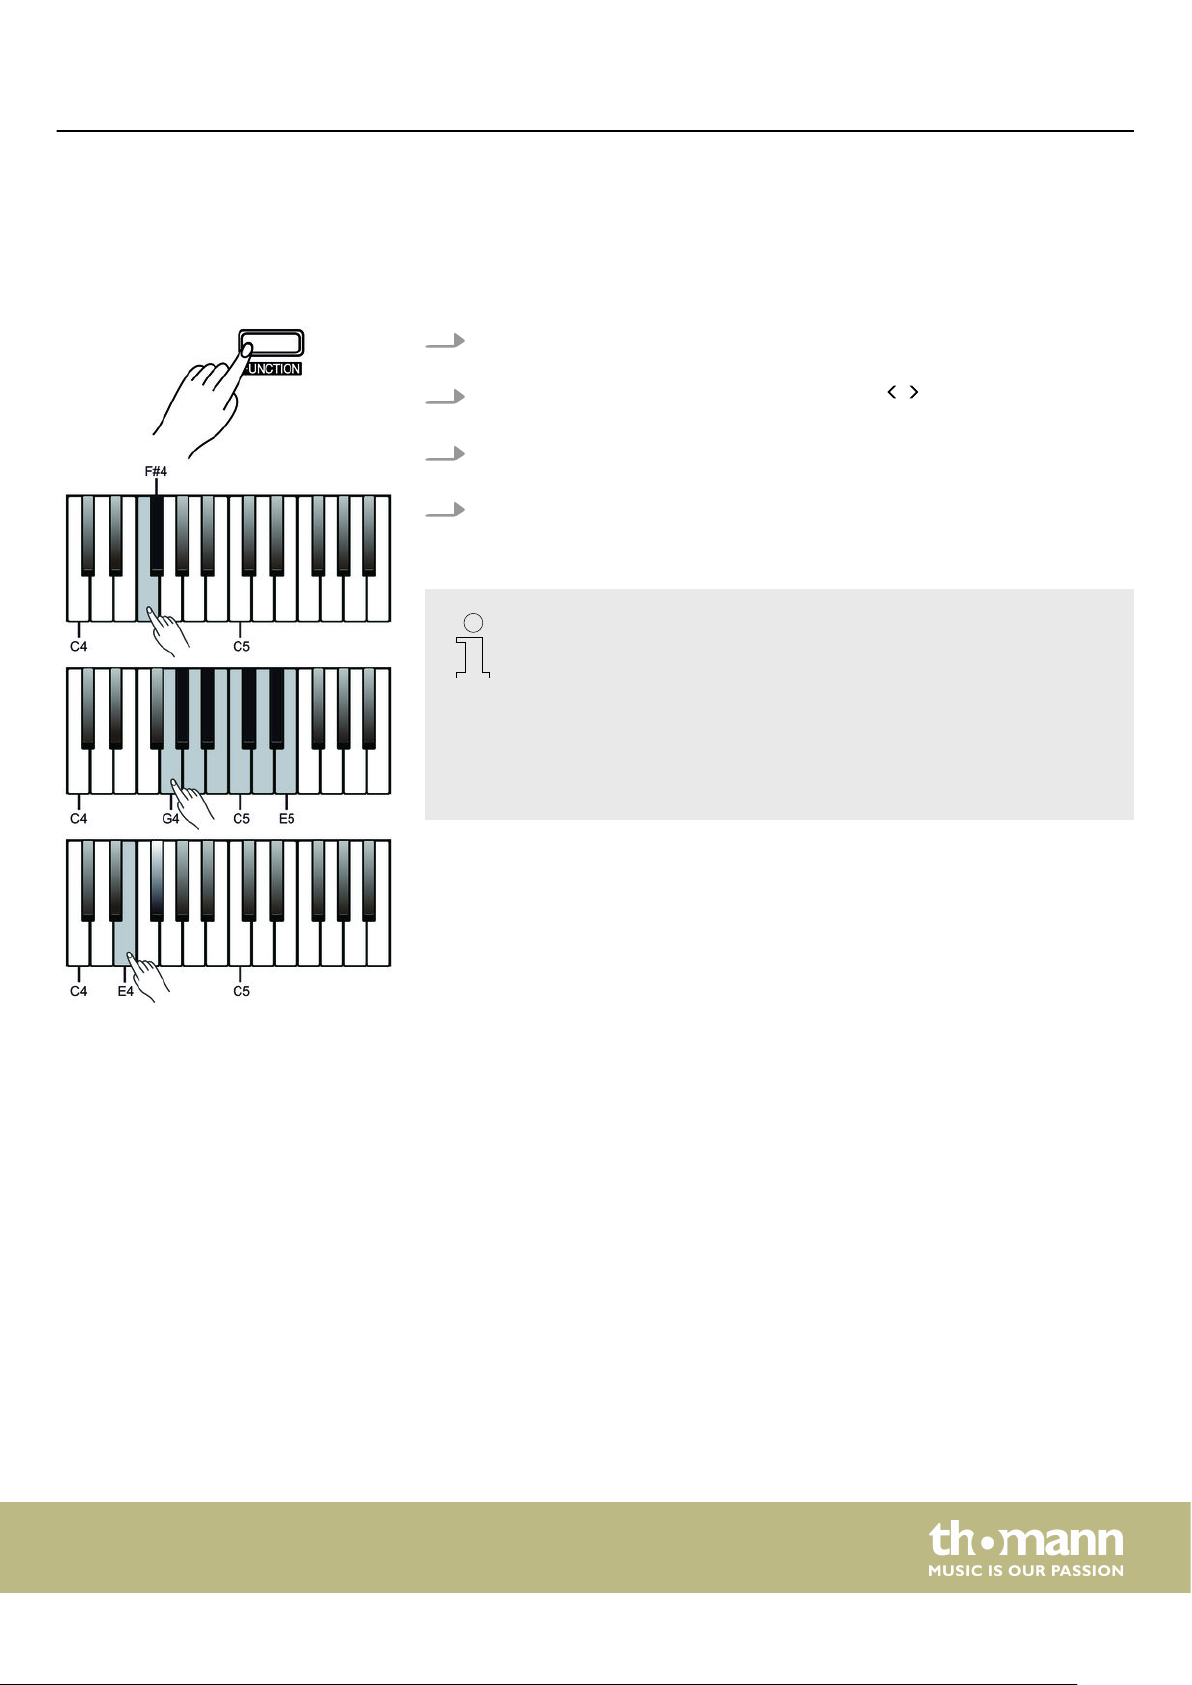
1. Hold down the [FUNCTION] button and press piano key [F4] or [F#4] to adjust
the tempo in steps of 1.
2.
Hold down the [FUNCTION] button and press the / buttons to adjust the
tempo in steps of 10.
3. Hold down the [FUNCTION] button and press one of the piano keys [G4] … [E5]
to adjust the tempo directly.
4. Hold down the [FUNCTION] button and press piano key [E4] repeatedly in the
desired tempo to set the tempo.
– Hold down the [FUNCTION] button and press piano keys [F4] and [F#4]
simultaneously, the tempo will be reset to the default standard value
(120 beats per minute).
– The tempo can be adjusted in a range from 30 to 280 bpm.
– If you want to change the tempo using one of the piano keys [G4] to
[E5], you always have to enter it in three-digit format. For example, to
set tempo 214, hold down the [FUNCTION] button and press the piano
keys [A4, ][G#4] and [B4] one after the other.
DP-32 B, DP-32 WH
23
Page 24
Turning the digital piano on / o, setup
7.9 Button sound
With this function, you can turn the Key Tone on or o. By default, the Key Tone is
turned on.
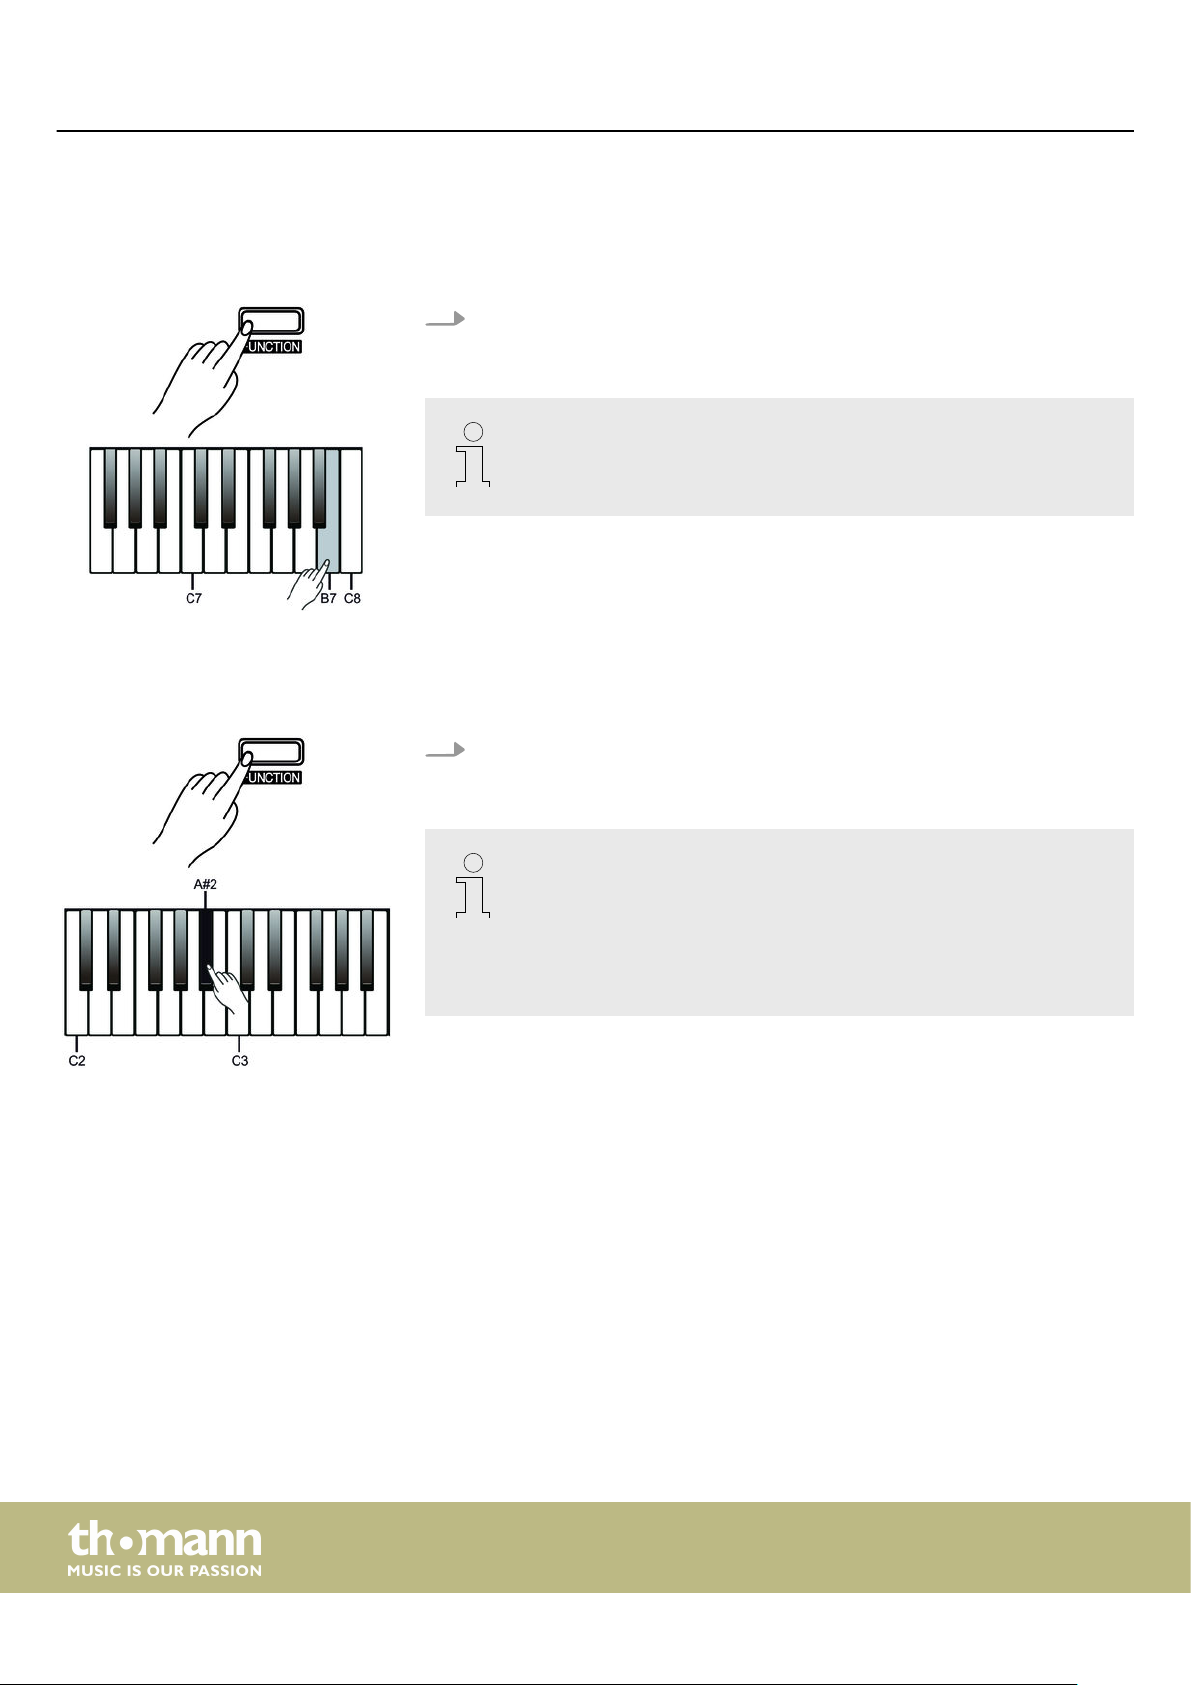
Hold down the [FUNCTION] button and press the piano key [B7] to turn the
button sound on or o.
7.10 Pedal resonance
– When you turn on the button sound, you will hear a sound each time
you press a function button.
This function mimics the sustain eect of a piano.
Press and hold the [FUNCTION] button. Press the piano key [A#2] to turn the
eect on or o.
– The resonance eect is activated as soon as the digital piano is
switched on.
– While the resonance eect is activated, the chorus eect of the digital
piano is suppressed.
– There may be a brief pause if you turn the Resonance eect on or o
during playing.
24
digital piano
Page 25
8 Operating
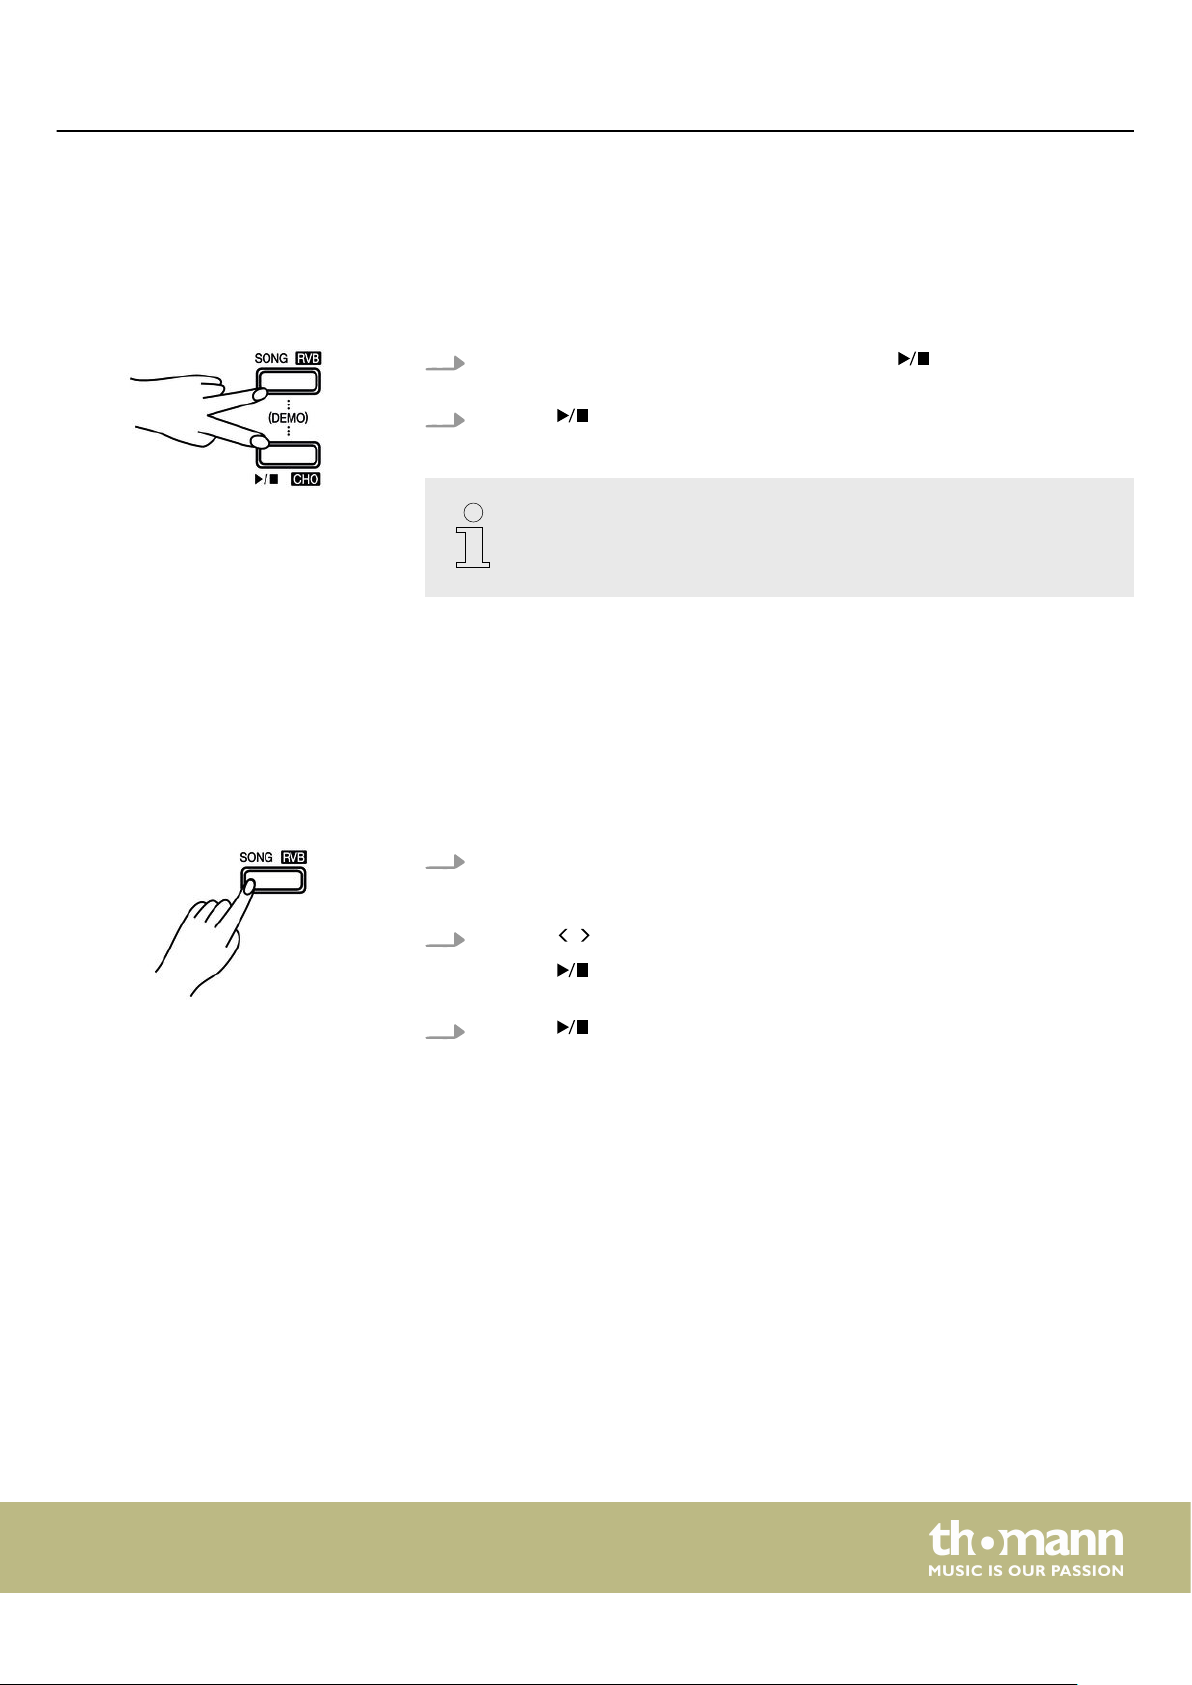
8.1 Demo song
Operating
The built-in demo song shows the sound and the pitch range of the instrument.
1.
Simultaneously press the buttons [SONG/RVB] and /[CHO] to start the play‐
back of the demo song. The demo song is playing in an endless loop.
2.
Press the /[CHO] button again to stop the playback.
During playback, the piano keys are muted.
8.2 Practising songs
8.2.1 Selecting practise songs
The digital piano oers 60 practise songs in total (see Ä Chapter 9 ‘Practise and demo
songs’ on page 36).
1. Press the [SONG/RVB] button to enter the playback mode for practise songs.
The [SONG/RVB] button LED lights up. All practise songs are played in an end‐
less loop.
2.
Press the / buttons during playback to select a desired practice song.
Press the /[CHO] button to play the selected practice song in an innite
loop.
3.
Press the /[CHO] button to stop playback and exit the current mode.
DP-32 B, DP-32 WH
25
Page 26
Operating
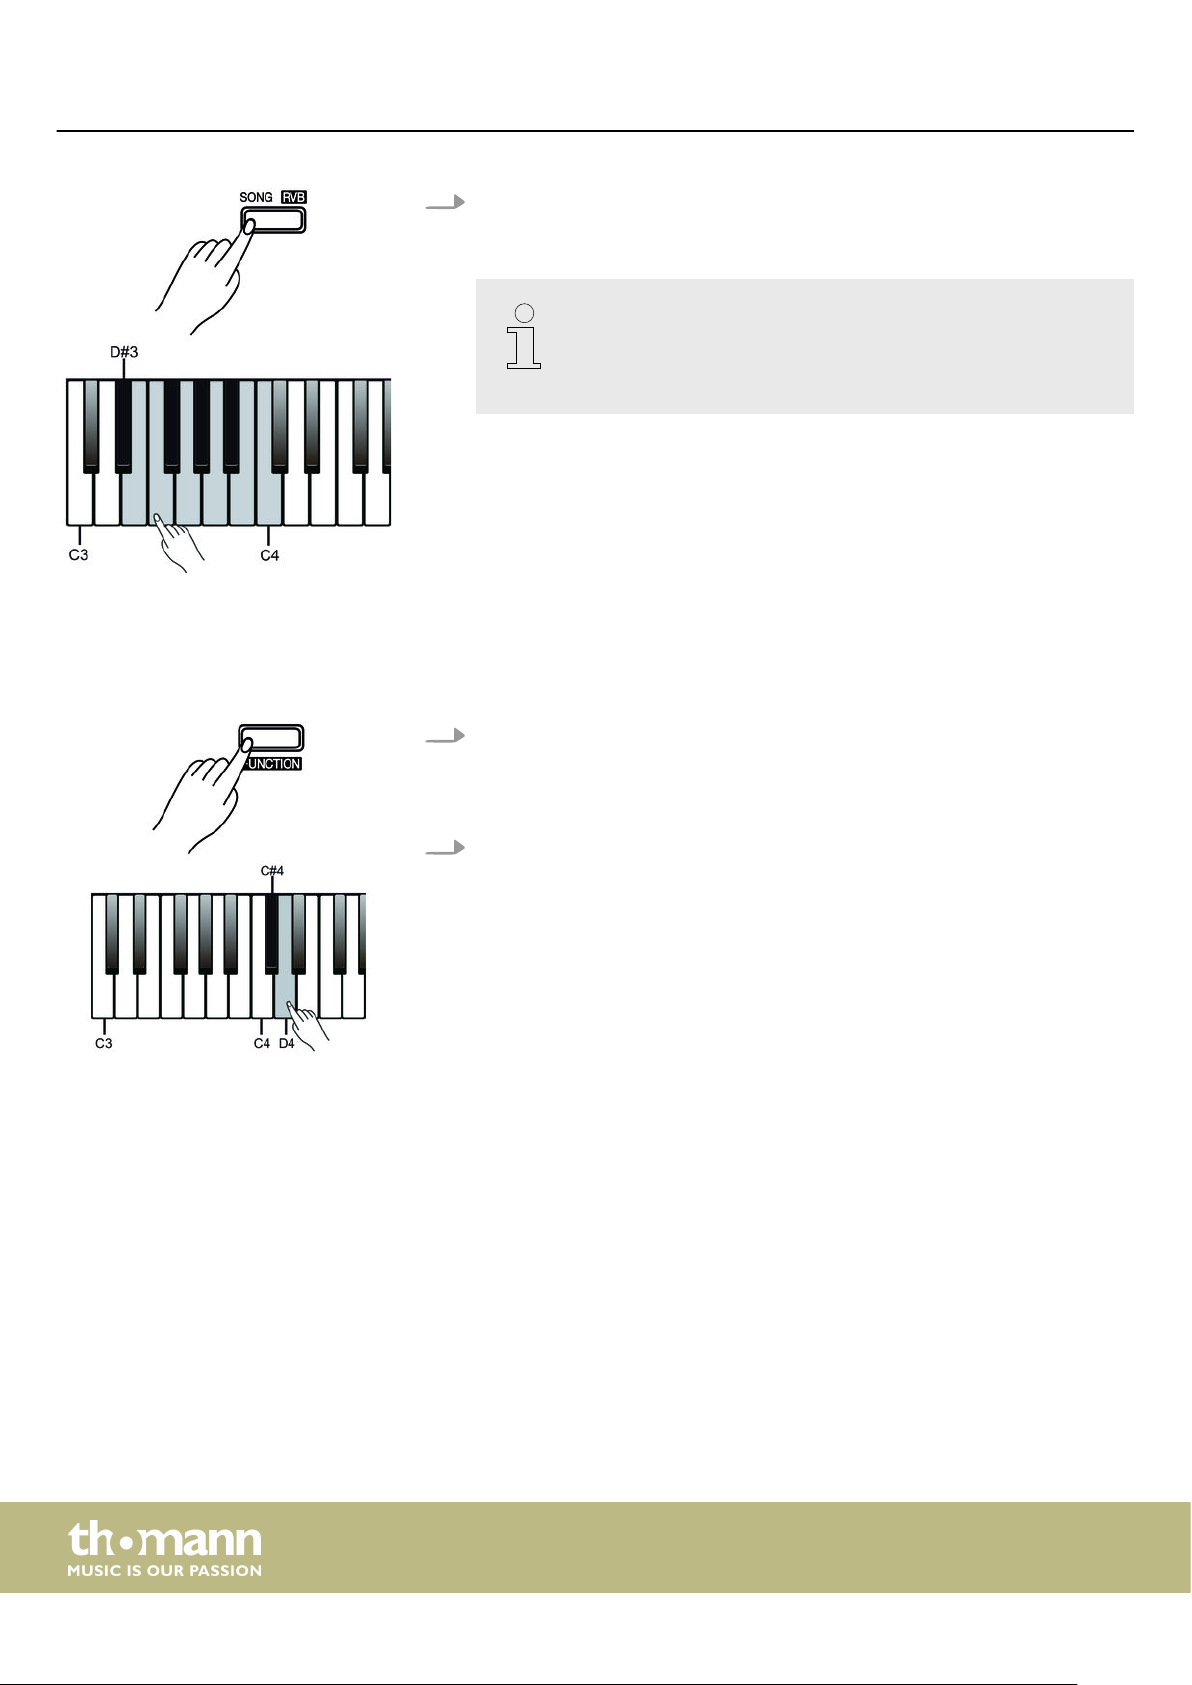
4. Selecting a practise song directly
8.2.2 Practising left and / or right hand
Hold down the [FUNCTION] button and press one of the piano keys
[D#3] … [C4] during playback to select the desired practise song.
To select the practise song with the piano keys [D#3] … [C4], always
enter the number in two-digit format. If you want to select the eighth
practise song, for example, press the piano keys [D#3] and [B3] one
after the other.
In [SONG] mode, you can set whether to play both tracks of the practise song or only
the left or right track so that hands can practice individually or together.
1. To mute the left track of the practice song, hold down the [FUNCTION] button
and press piano key [C#4].
To deactivate the setting, hold down the [FUNCTION] button and press piano
key [C#4] again.
2. To mute the right track of the practice song, hold down the [FUNCTION] button
and press piano key [D4].
To deactivate the setting, hold down the [FUNCTION] button and press piano
key [D4] again.
26
digital piano
Page 27
8.3 Voices
8.3.1 Selecting voices
Operating
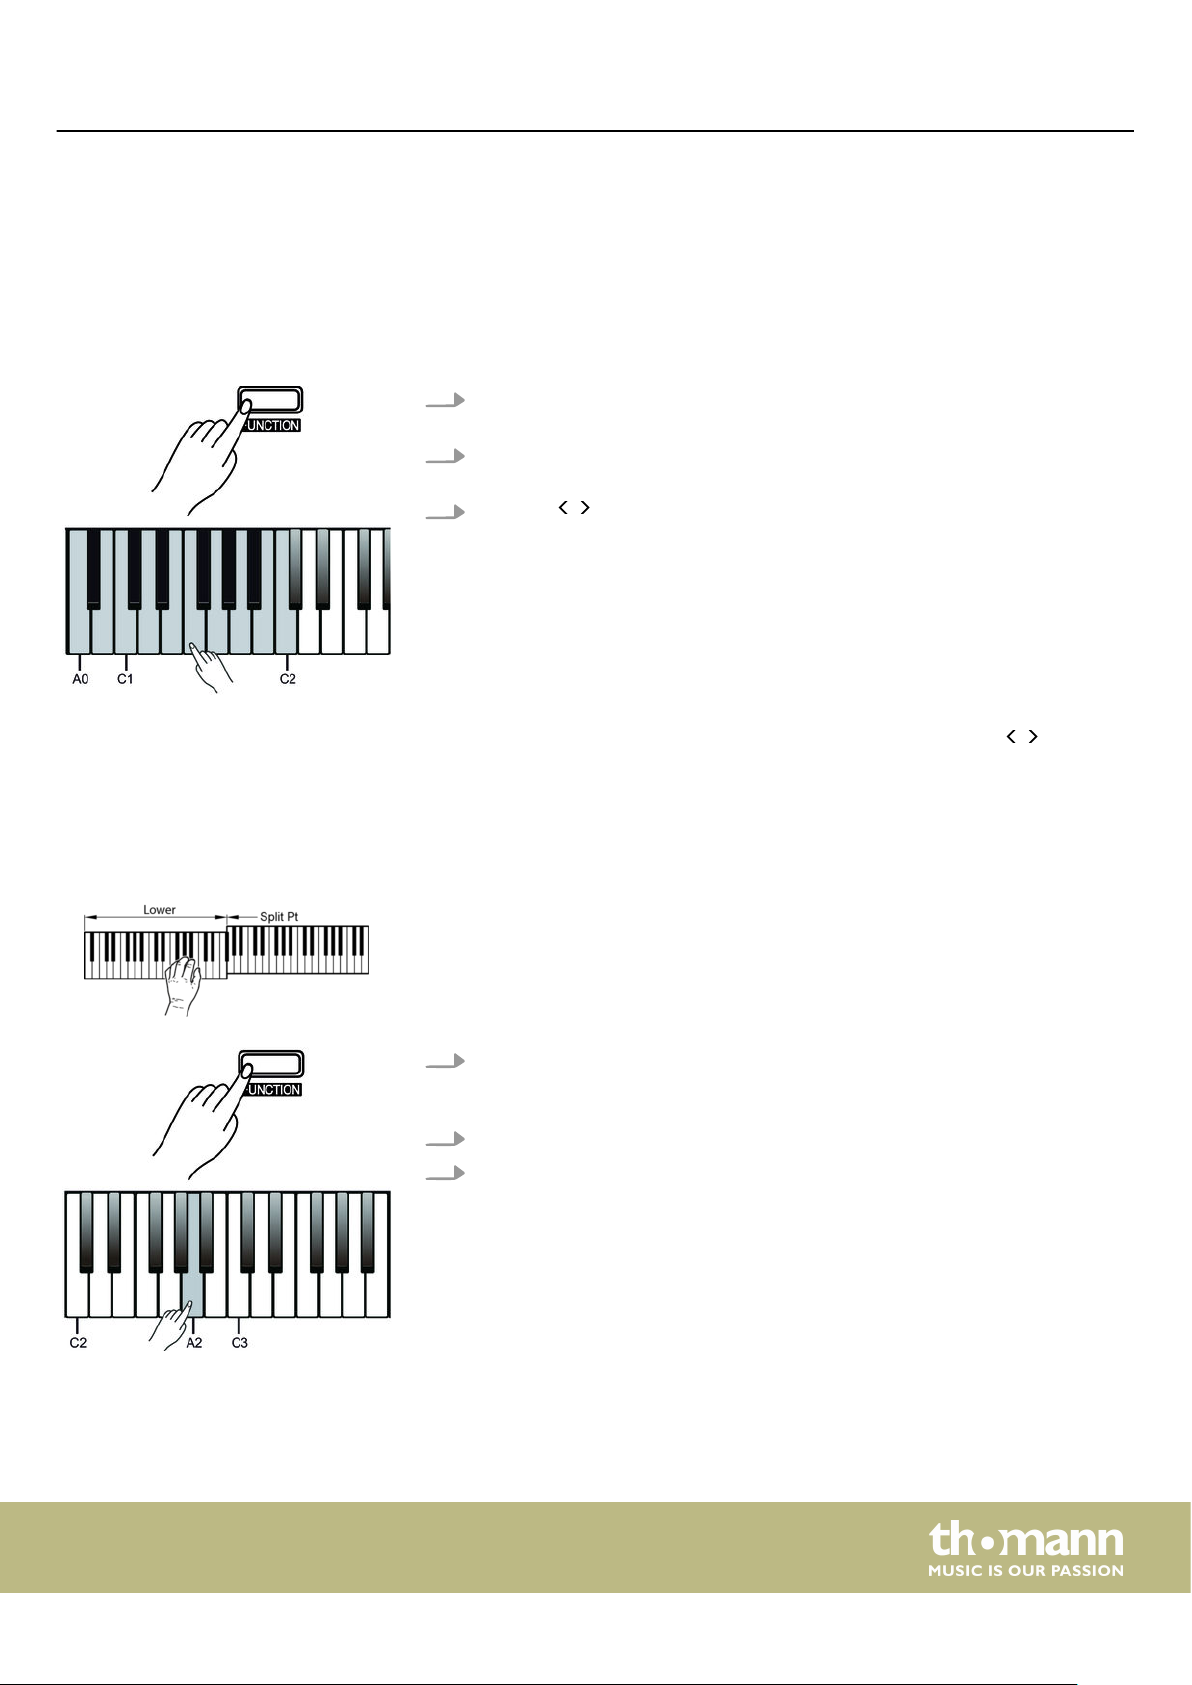
Overall, the digital piano has 16 voices, which can be accessed via piano keys
[A0] … [C2] (see Ä Chapter 10 ‘Voice list’ on page 38). A preset voice is assigned to
each piano key.
1. Hold down the [FUNCTION] button and press one of the piano keys [A0] … [C2]
to select the desired voice.
2. To select another voice, hold down the [FUNCTION] button again and press one
of the piano keys [A0] … [C2].
3.
Press the / buttons to select a desired voice.
8.3.2 Split mode
Alternatively, you can call up the 16 voices of the digital piano via the
Ä
Chapter 10 ‘Voice list’ on page 38).
(see
This feature allows you to select a point that splits the entire keyboard into two sec‐
tions and to assign dierent voices to those sections. The preset split point is on
piano key [F#3].
1. Hold down the [FUNCTION] button and press piano key [A2]. Select the desired
piano key that you want to be the split point. Usually, the split point lies within
the piano keys [C3] … [C6].
2. Release the [FUNCTION] button to apply the setting.
3. To assign voices to the two sections, rst select the rst voice as described in
chapter Ä Chapter 8.3.1 ‘Selecting voices’ on page 27.
/ buttons
DP-32 B, DP-32 WH
27
Page 28
Operating
8.3.3 Dual mode
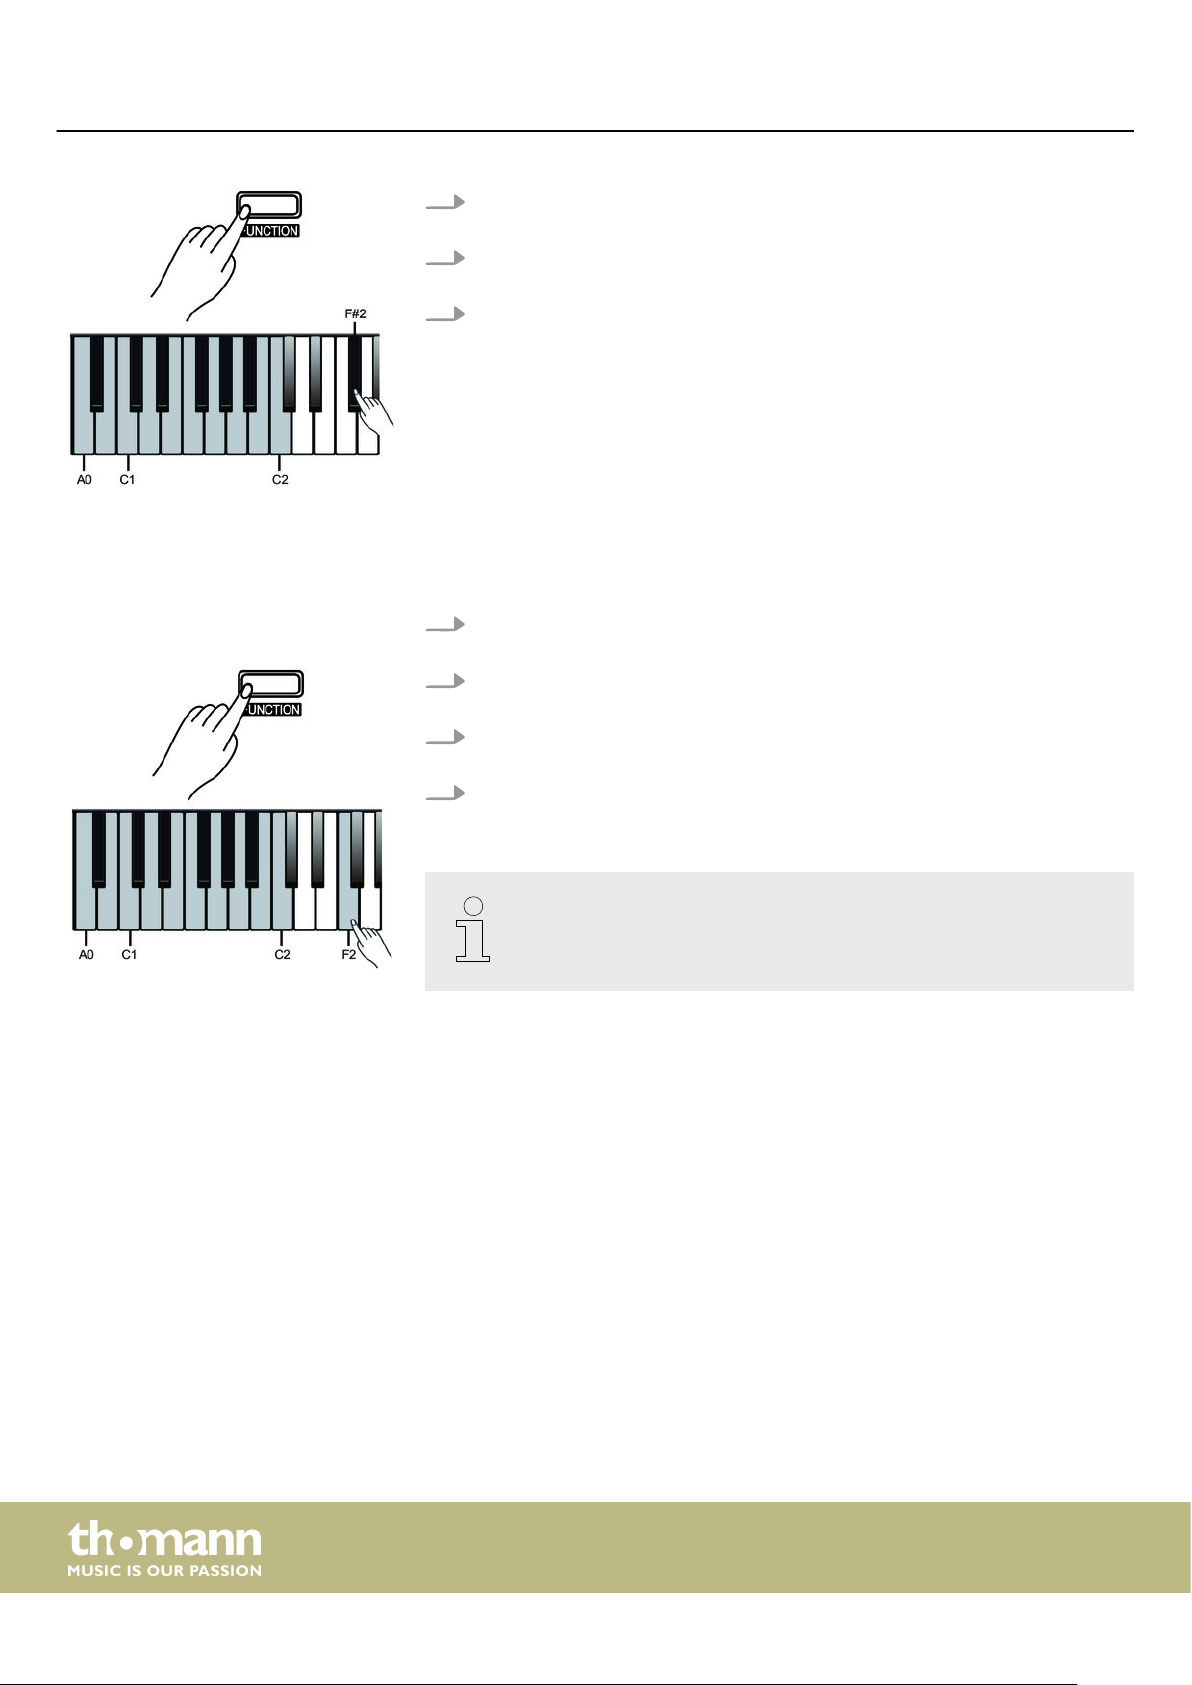
4. To assign the second voice, hold down the [FUNCTION] button and press piano
key [F#2] to start the split mode. The preset second voice is ‘String Ensembles’ .
5. Hold down the [FUNCTION] button and press piano key [F#2] again. Use one of
the piano keys [A0] … [C2] to select the second voice.
6. Hold down the [FUNCTION] button and press piano key [F#2] again to exit the
split mode.
In Dual mode, you can play two voices simultaneously.
1.
First, select the rst voice as described in section
voices’ on page 27.
2. Hold down the [FUNCTION] button and press piano key [F2] to start the dual
mode. The preset second voice is ‘String Ensembles’ .
3. Hold down the [FUNCTION] button and press piano key [F2] again. Use one of
the piano keys [A0] … [C2] to select the second voice.
4. Hold down the [FUNCTION] button and press piano key [F2] again to exit the
dual mode.
Ä
Chapter 8.3.1 ‘Selecting
When split mode and dual mode are selected, only the right track can play
the second voice.
28
digital piano
Page 29
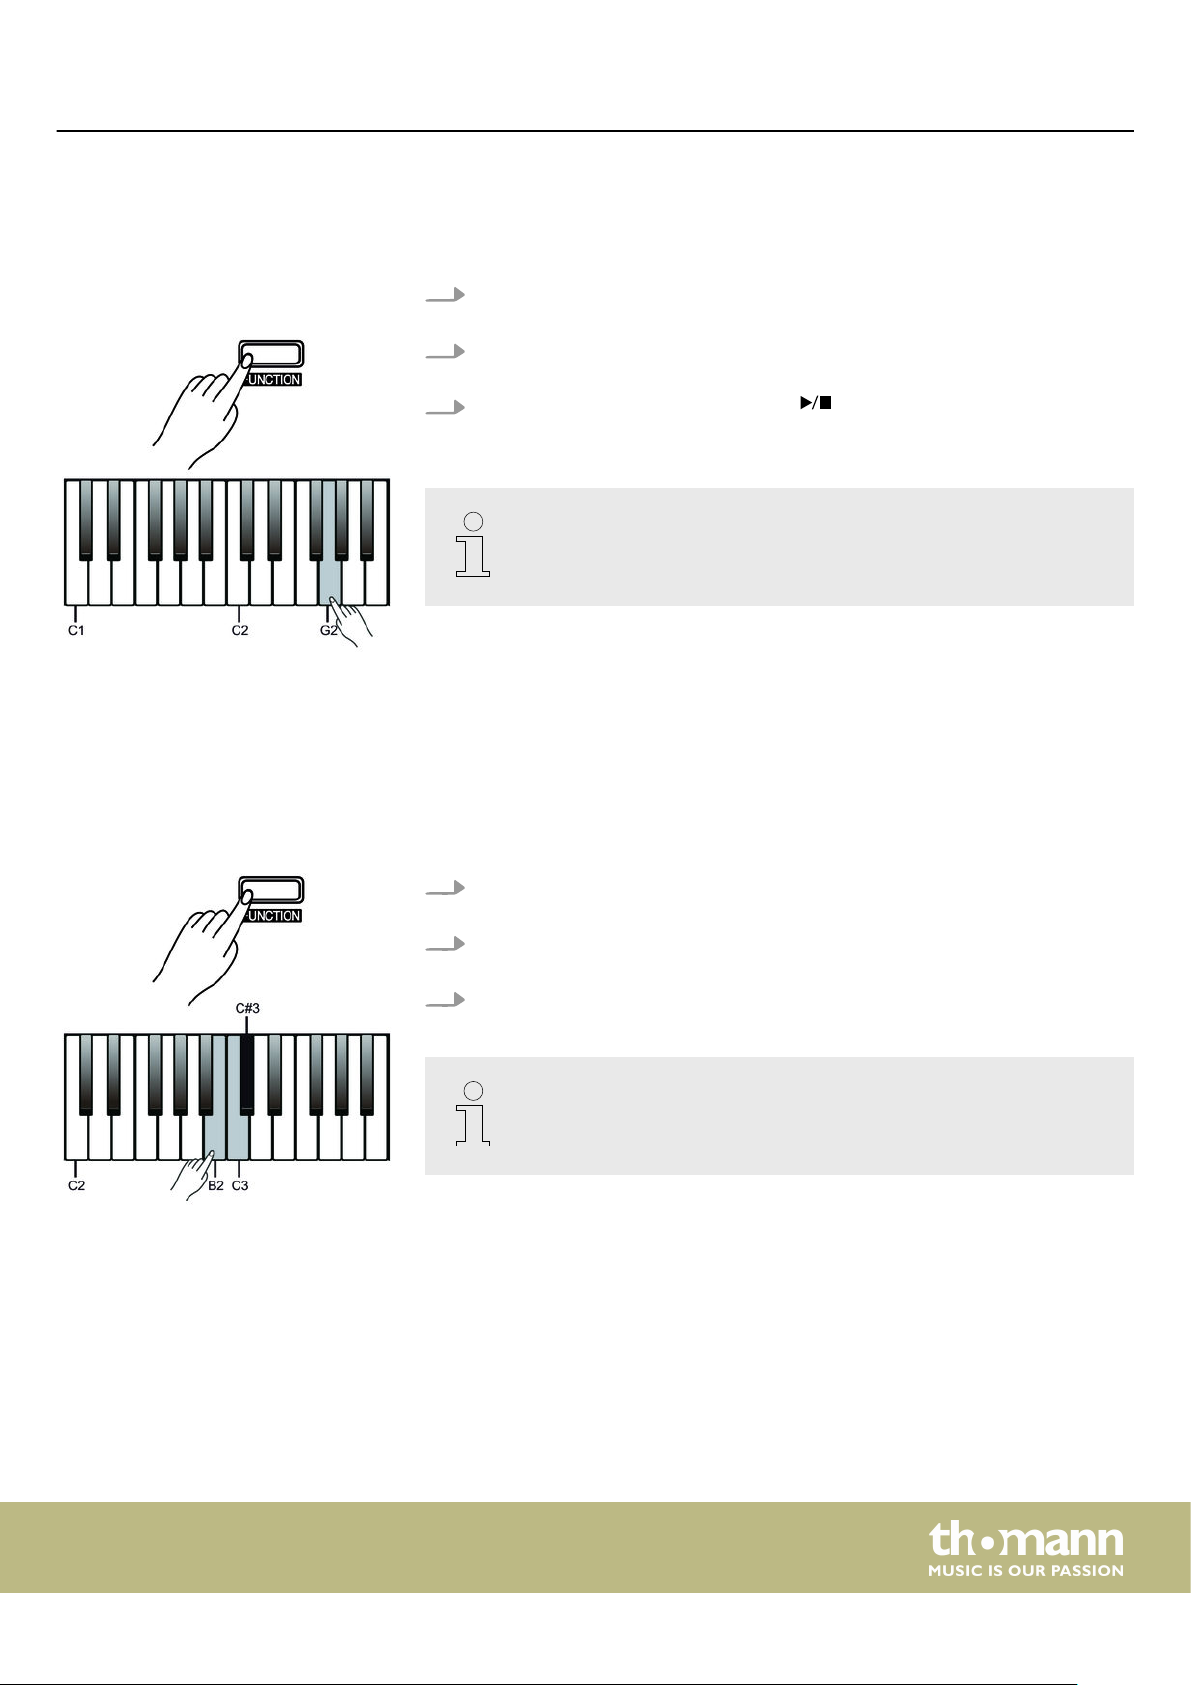
8.3.4 Demo mode
Operating
The digital piano oers 16 demos for the individual voices.
1.
First, select the rst voice as described in section Ä Chapter 8.3.1 ‘Selecting
voices’ on page 27.
2. Hold down the [FUNCTION] button and press piano key [G2] to start the demo
for the selected voice.
3.
Press piano key [G2] again or press the /[CHO] button to exit the demo
mode.
During playback, the piano keys are muted.
8.3.5 Duet mode
8.3.5.1 Turning the duet mode on and o
With this feature on, the digital piano automatically creates a matching accompa‐
nying voice when chords are played in the chord section of the keyboard. The digital
piano oers 32 duet patterns.
1. Hold down the [FUNCTION] button and press piano key [B2] to start the duet
2. Hold down the [FUNCTION] button and select the desired duet pattern with the
3. Press [B2] again to deactivate the function again.
mode.
piano keys [C3] or [C#3].
A preset duet pattern is assigned to each voice.
DP-32 B, DP-32 WH
29
Page 30
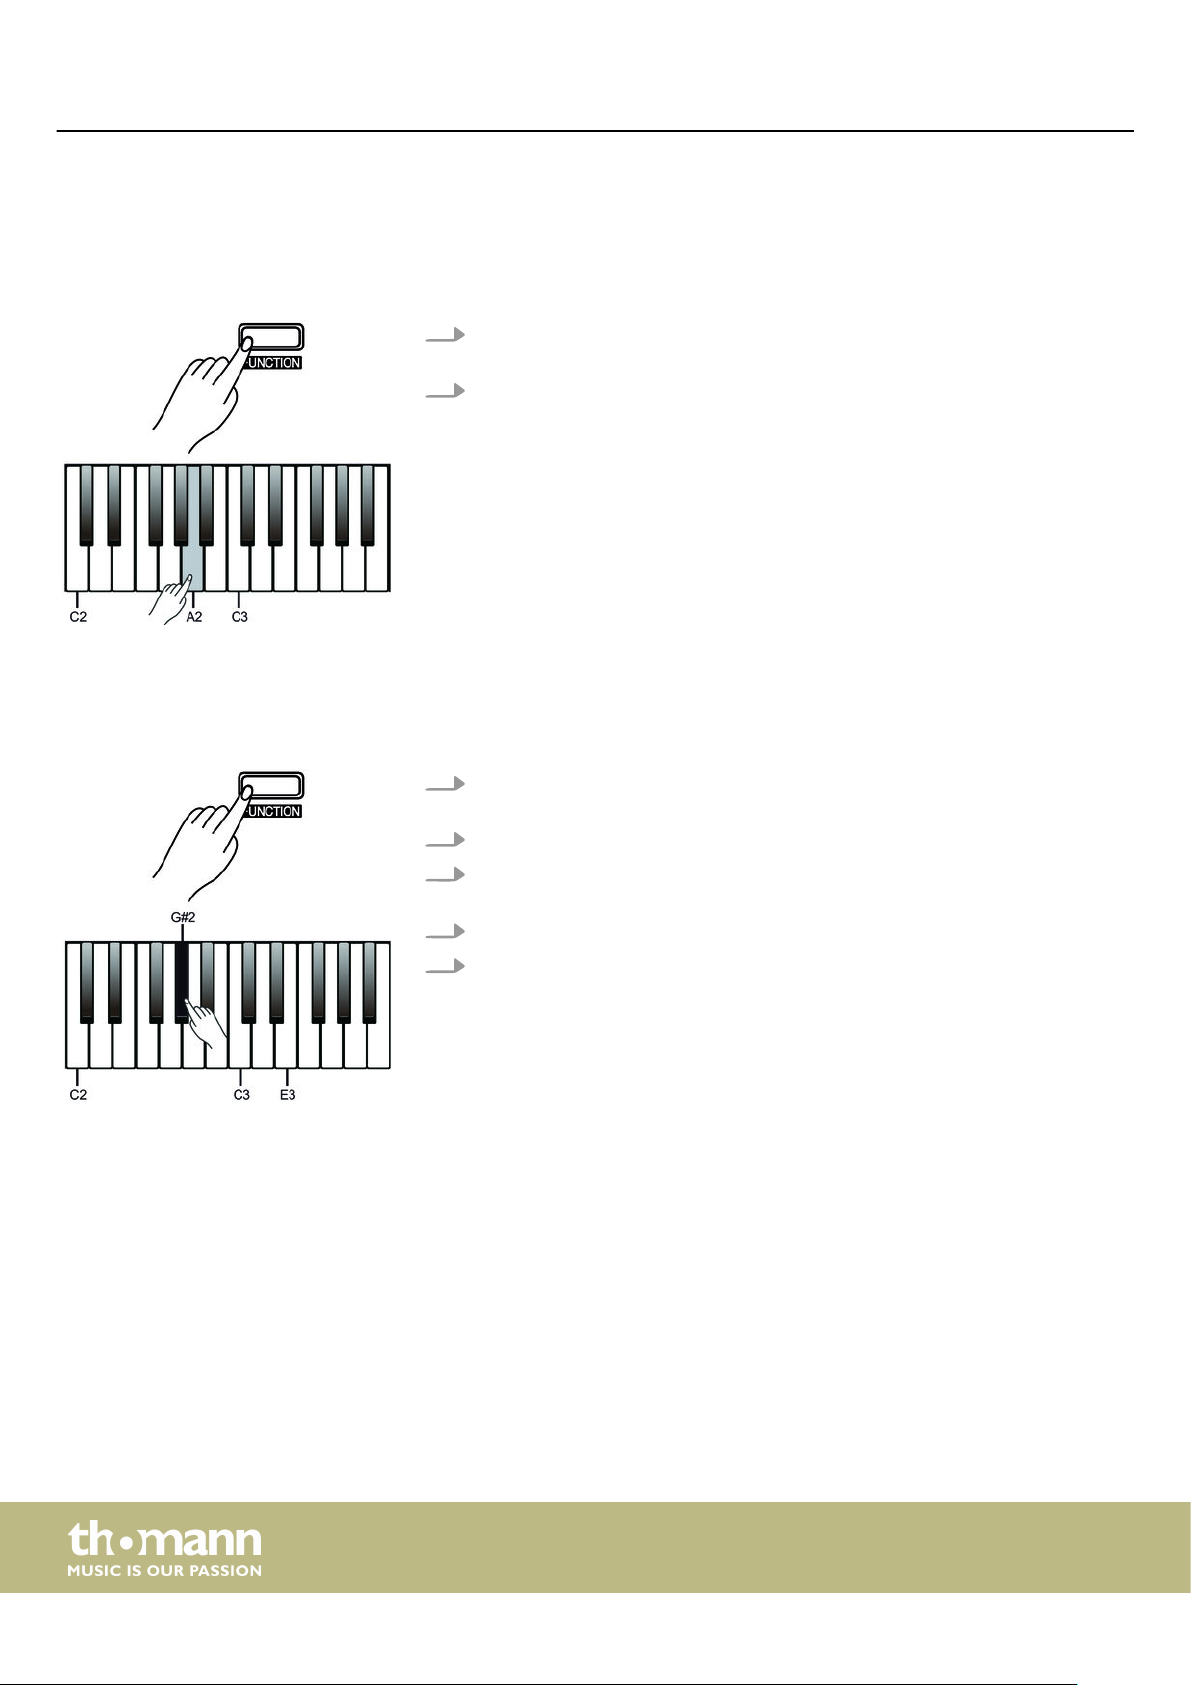
Operating
8.3.5.2 Setting duet split point
In duet mode, to play the chords in the chord section with your left hand and the
melody with your right hand, you can select a point that splits the entire keyboard
into two sections.
1. Hold down the [FUNCTION] button and press piano key [A2]. Select the desired
piano key that you want to be the split point.
2. Release the [FUNCTION] button to apply the setting.
8.3.6 TWINOVA
In TWINOVA mode, the keyboard is divided into two areas with the same voice and
the same pitch.
1. Hold down the [FUNCTION] button and press piano key [G#2] to start the TWI‐
NOVA mode.
2.
Select the desired voice, see
3.
If necessary, specify a split point, see Ä Chapter 8.3.2 ‘Split mode’ on page 27.
The preset split point is on piano key [E3].
4.
If necessary, adapt the Octave area, see
5. Hold down the [FUNCTION] button and press piano key [G#2] again to deacti‐
vate the TWINOVA mode.
Ä
Chapter 8.3.1 ‘Selecting voices’ on page 27.
Ä
Chapter 7.5 ‘Transposing’ on page 21.
30
digital piano
Page 31
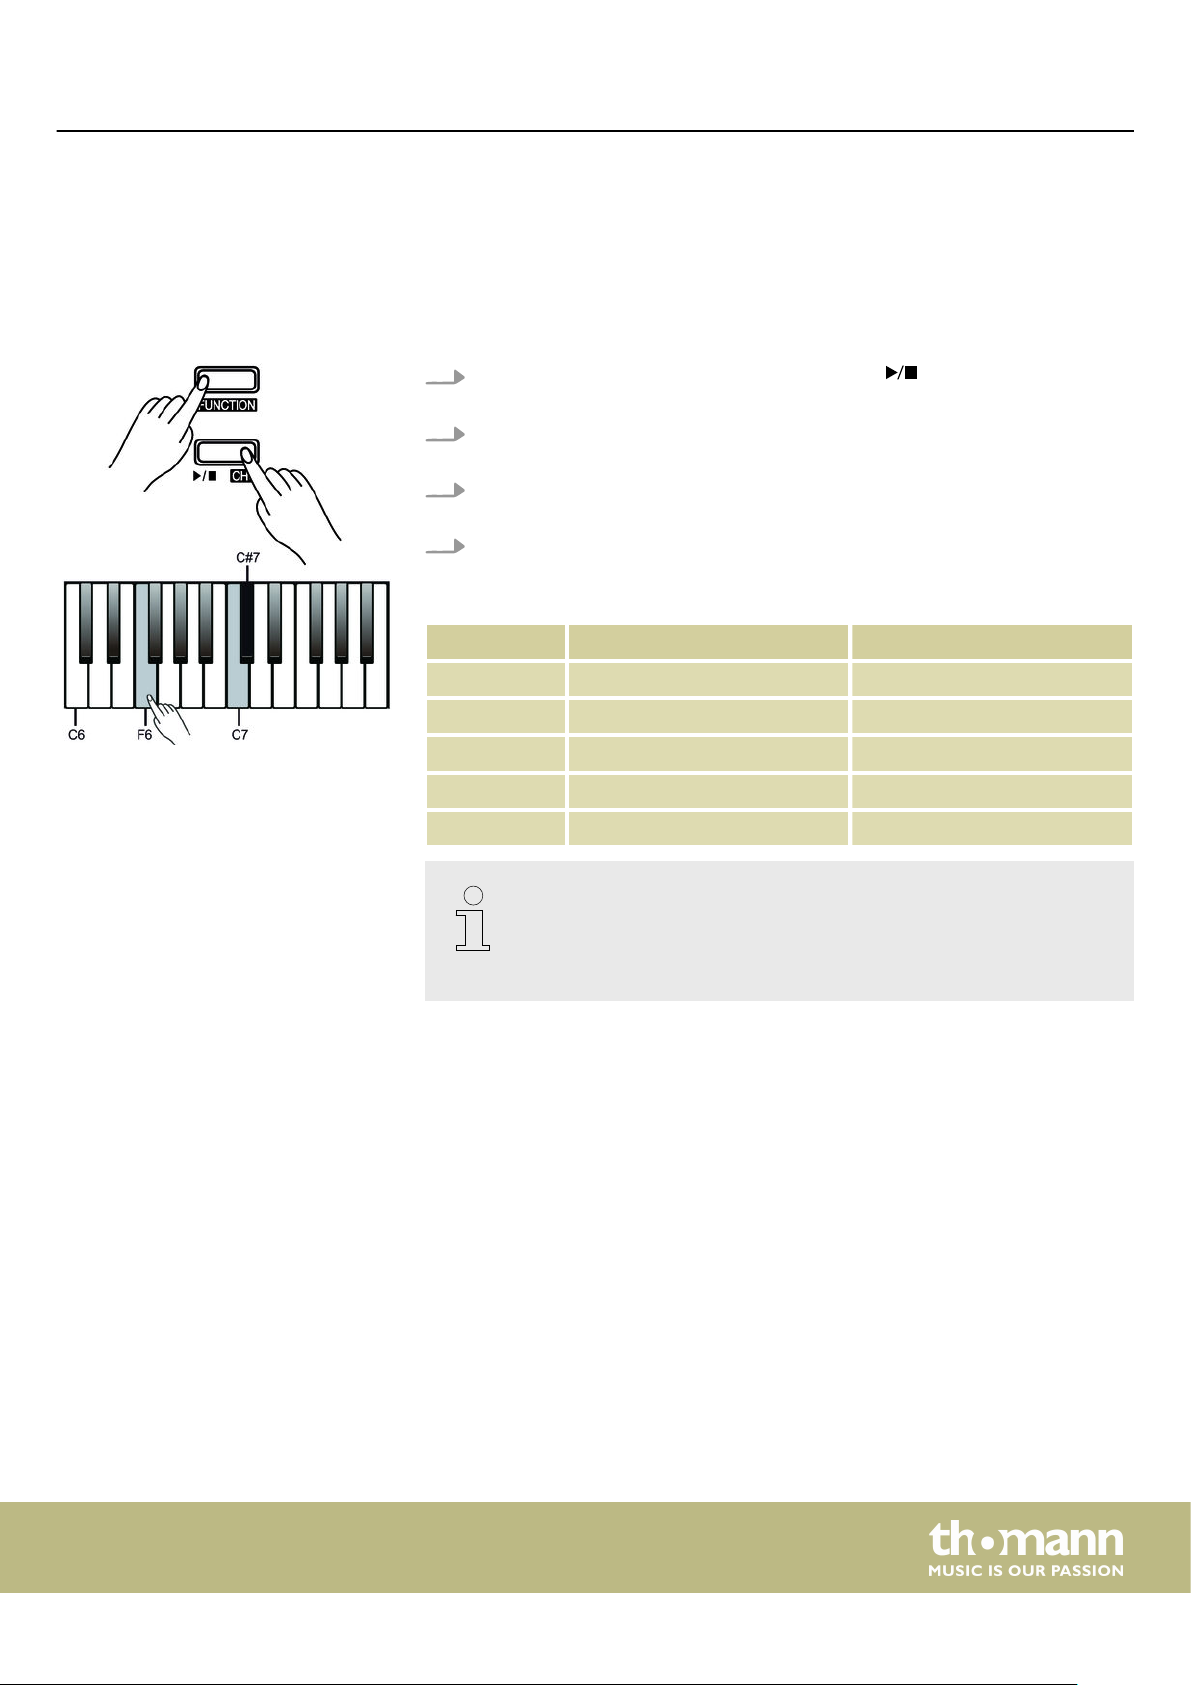
8.4 Digital eects
8.4.1 Chorus eect
Operating
The Chorus function lets you simulate the acoustic eects under dierent environ‐
mental conditions.
1.
Hold down the [FUNCTION] button and press the /[CHO] button to turn the
Chorus eect on or o.
2. Hold down the [FUNCTION] button and press piano key [F6] to call up the con‐
guration mode of the Chorus eect.
3. Hold down the [FUNCTION] button and press piano key [C7] or [C#7] to set the
desired eect between ‘1’ … ‘5’ .
4. To restore the default settings, hold down the [FUNCTION] button in congura‐
tion mode and simultaneously press [C7] and [C#7].
Parameter Eect Meaning
[1] Chorus 1 Slight Chorus eect
[2] Chorus 2 Medium Chorus eect
[3] Chorus 3 Strong Chorus eect
[4] Flanger Flanger eect
[5] Rotary Rotary eect
– By default, the Chorus eect is deactivated when the digital piano is
switched on.
– While the Chorus eect is activated, the Resonance eect of the digital
piano is suppressed.
DP-32 B, DP-32 WH
31
Page 32
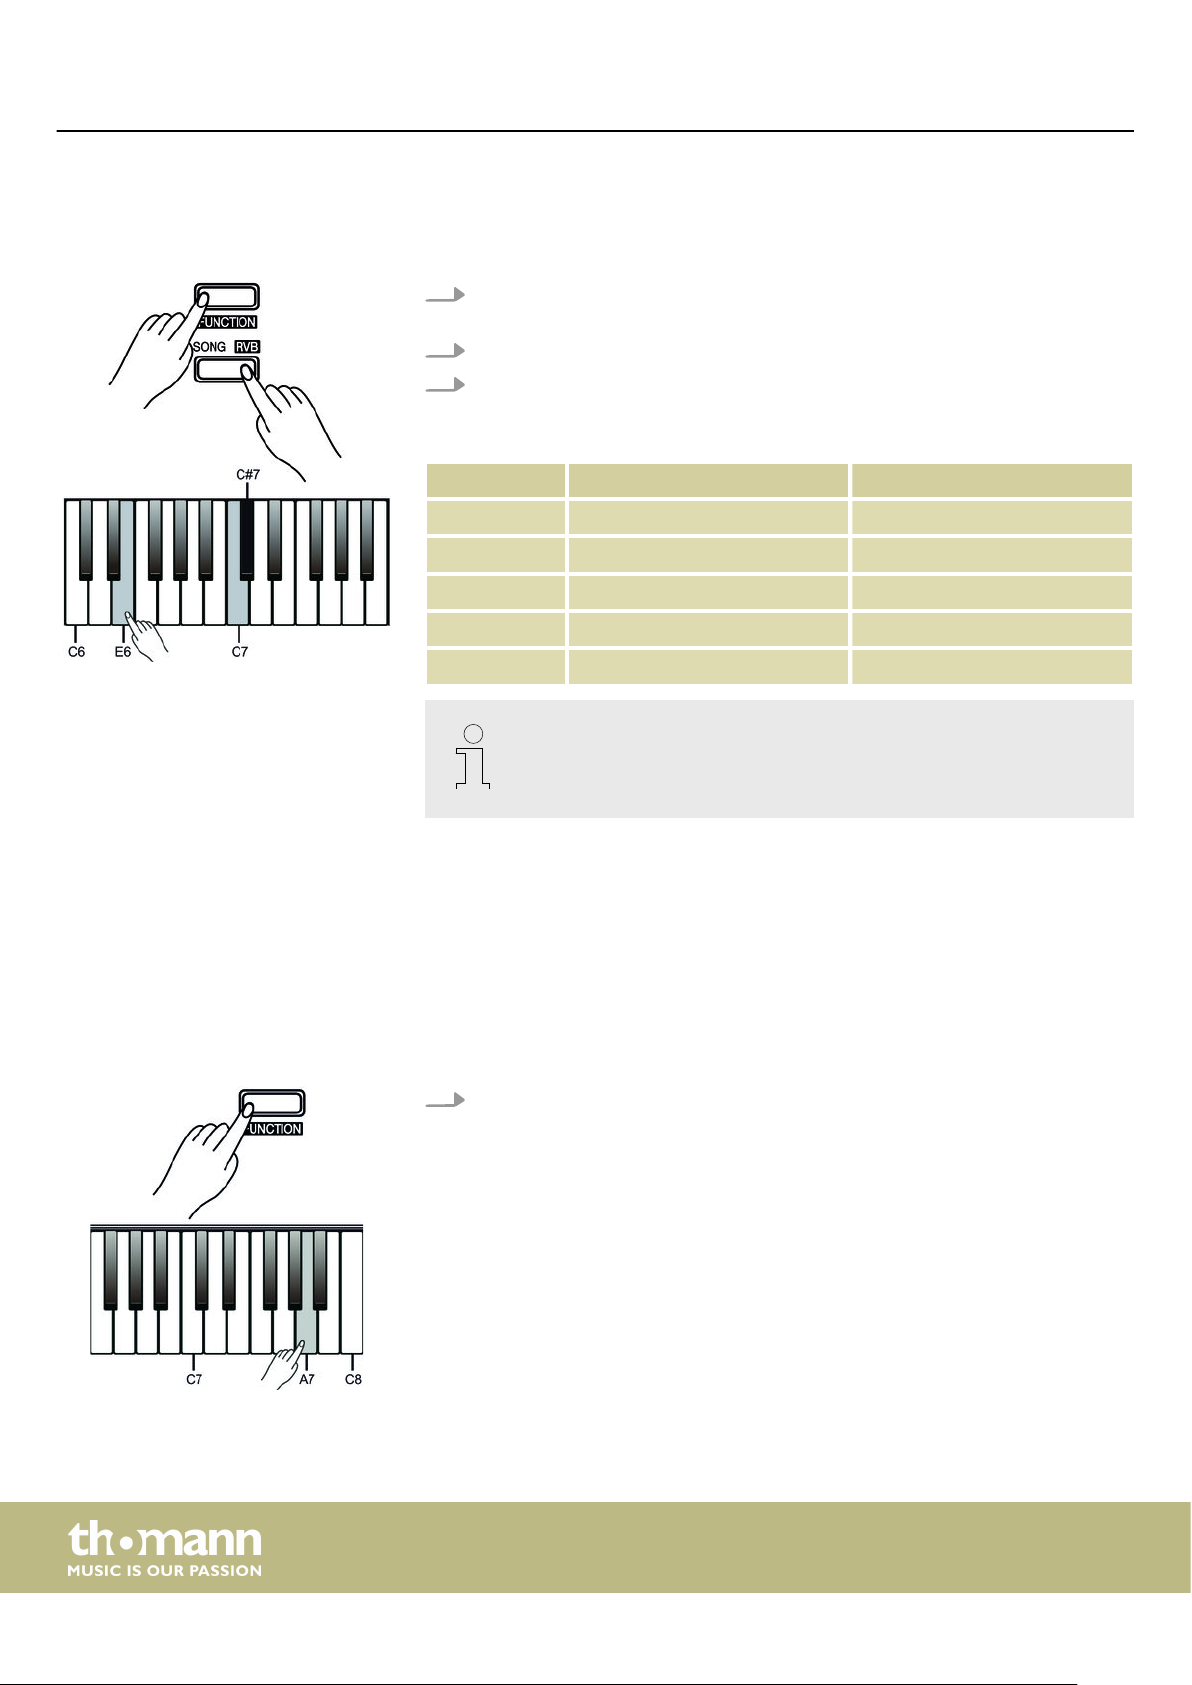
Operating
8.4.2 Reverb eect
With this function you can turn on the Reverb eect and select the eect type.
1. Hold down the [FUNCTION] button and press the [SONG/RVB] button to turn
the Reverb eect on or o.
2. Hold down the [FUNCTION] button and press piano key [E6].
3. Hold down the [FUNCTION] button and press piano key [C7] or [C#7] to set the
desired eect between ‘1’ … ‘5’ .
Parameter Eect Meaning
[1] Room Room
[2] Reverb Reverb
[3] Church Church
[4] Delay Delay
[5] Pan Delay Pan Delay
8.4.3 Dynamic Acoustic System (DAS)
With this function you can adjust the tone at low volumes to the characteristic of
human hearing. The level of extremely high and low frequencies is dynamically
increased when reducing the volume.
The Dynamic Acoustic System (DAS) is activated automatically when powering up
the digital piano.
Hold down the [FUNCTION] button and press piano keys [C7] and [C#7]
simultaneously to restore the preset value ‘3’.
Hold down the [FUNCTION] button and press the piano key [A7] to activate or
deactivate the DAS function.
32
digital piano
Page 33
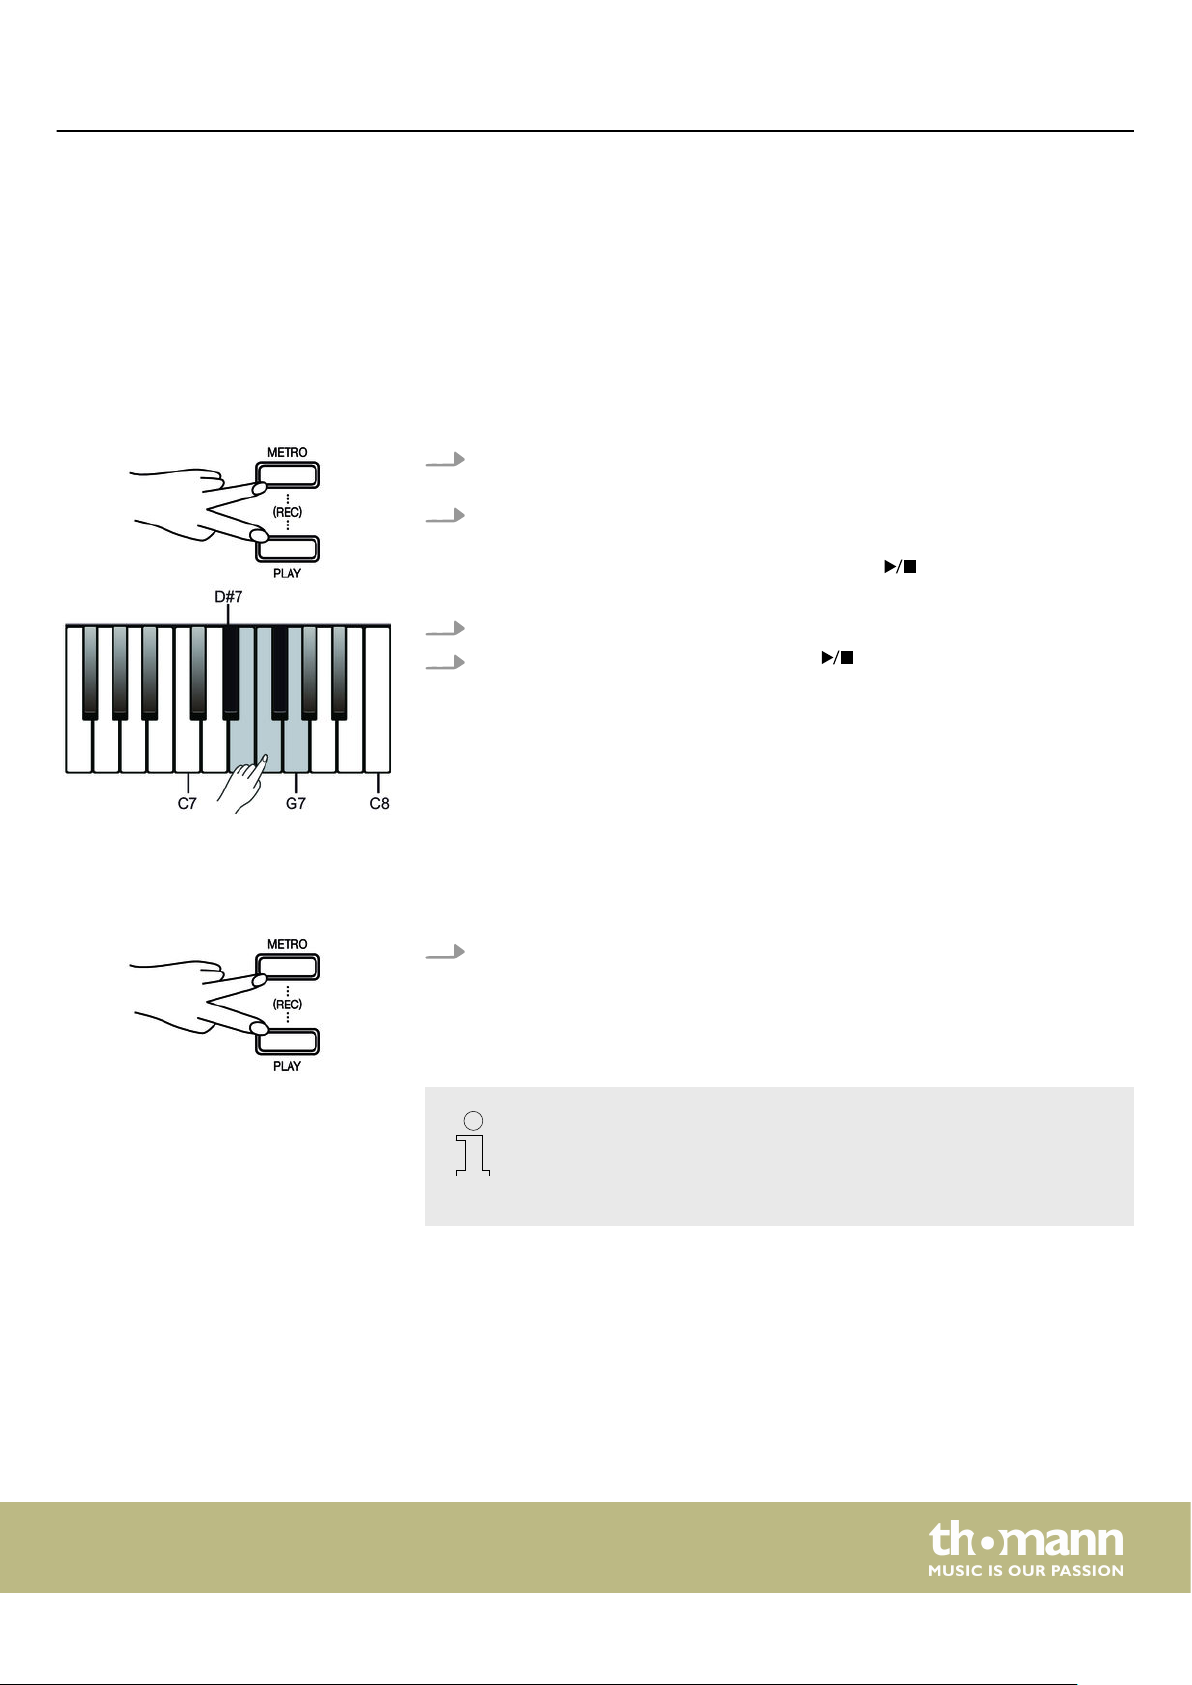
8.5 Recording function
You can record your own songs with the digital piano and save up to ve recordings
as user songs in the internal memory. Unsaved recordings are lost after switching the
digital piano o.
8.5.1 Preparing and starting recording
1. Press the [METRO] and [PLAY] buttons simultaneously to enable the recording
2. Press one of the piano keys [D#7] … [G7] to select a memory location for
3. Set the recording tempo.
4.
Operating
mode.
recording.
The digital piano is now record enabled. The /[CHO] button LED
ð
ashes.
Recording starts as soon as you press the /[CHO] button or play the rst
note or chord.
8.5.2 Stopping recording
The [METRO] and [PLAY] button LEDs light up.
ð
You can cancel or stop recording at any time.
During recording, press the [METRO] and [PLAY] buttons simultaneously to stop
recording.
The recording is stopped and saved to the selected memory location. The
ð
[METRO] and [PLAY] button LEDs turn o.
– The recording previously saved in the selected memory location is over‐
written.
– When the full memory capacity has been reached, the recording is ter‐
minated automatically and the recorded data is saved.
DP-32 B, DP-32 WH
33
Page 34
Operating
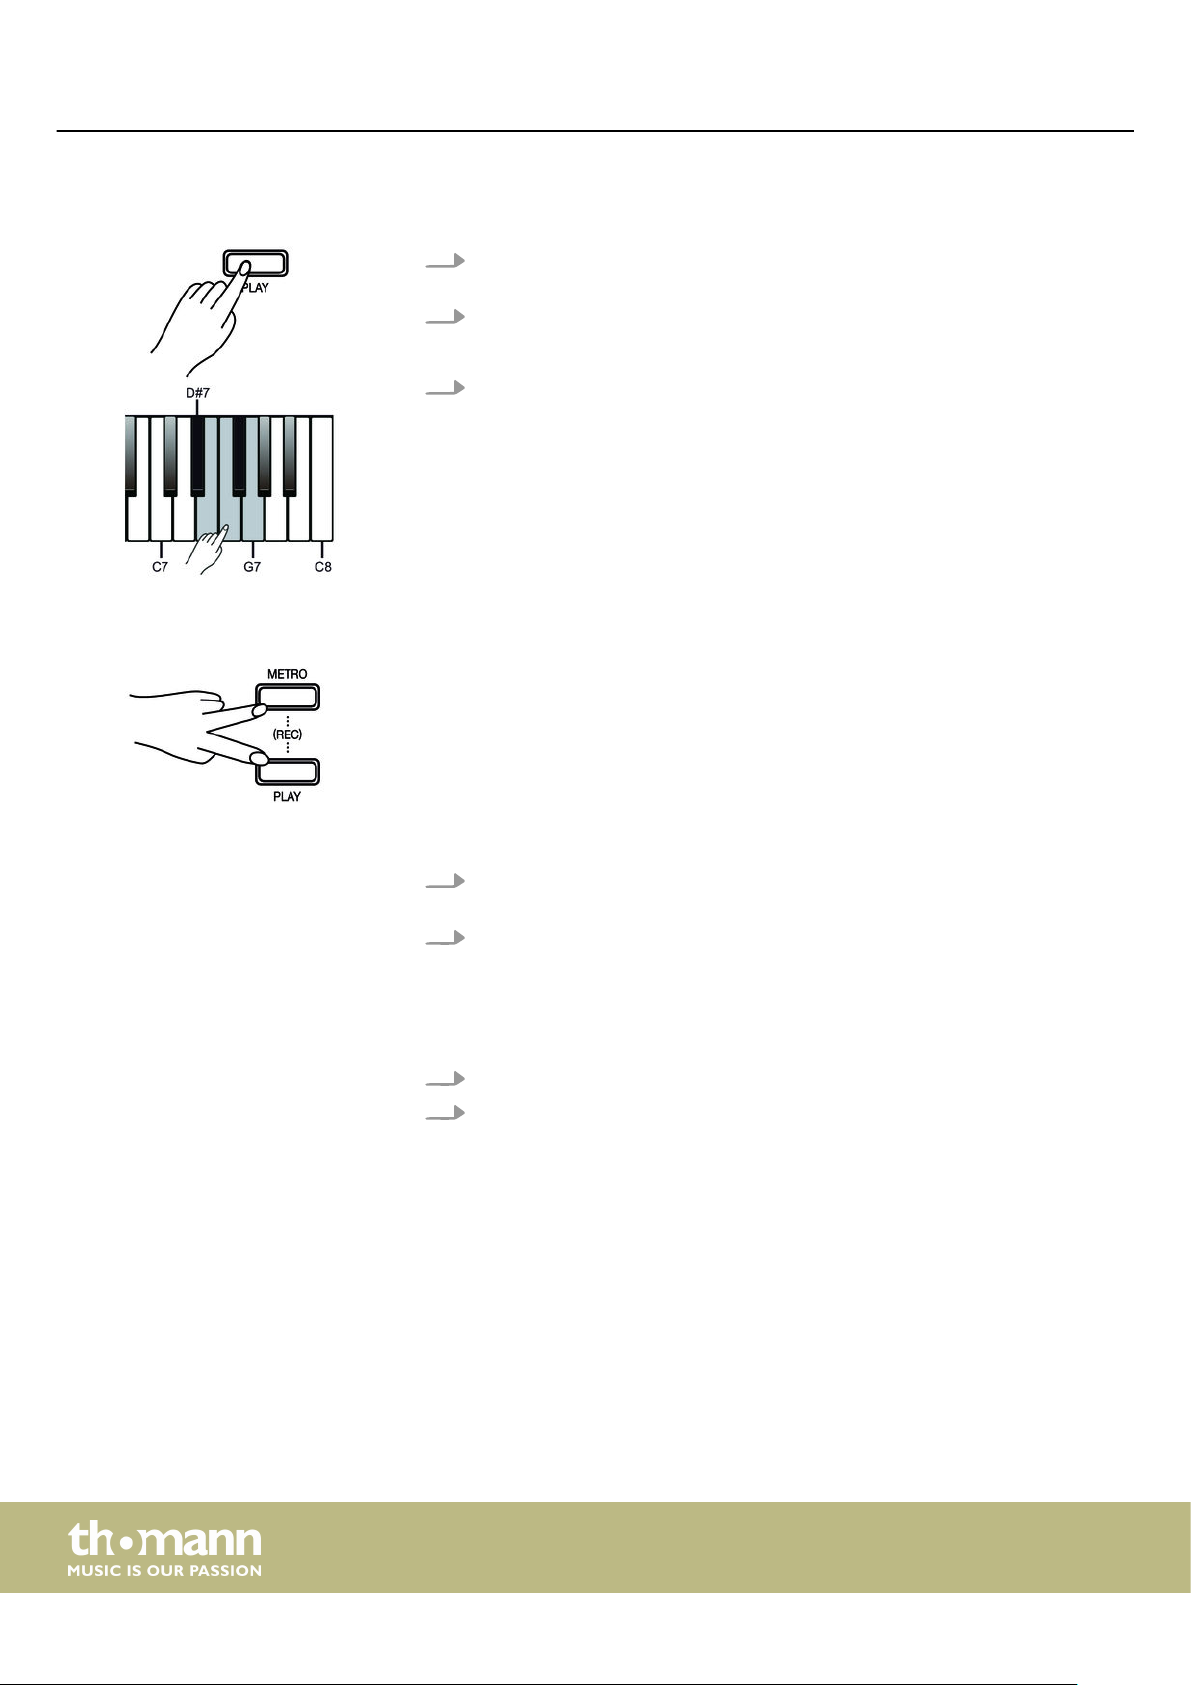
8.5.3 Playing a recording
8.5.4 Deleting recordings
1. Hold down the [PLAY] button and press one of the piano keys [D#7] … [G7] to
select the desired recording.
2. Press the [PLAY] button to play back the recording.
The [PLAY] button LED lights.
ð
3. Press the [PLAY] button again to stop the playback.
The [PLAY] button LED goes out.
ð
Deleting single recordings
1. Switch to playback mode and select the desired recording as described in
Ä
Chapter 8.5.3 ‘Playing a recording’ on page 34.
2. Hold down the [METRO] and [PLAY] buttons simultaneously.
The selected recording is deleted.
ð
Deleting all recordings
1. Turn o the digital piano.
2. Simultaneously press the [METRO] and [PLAY] buttons and turn the digital
piano back on.
All user recordings are deleted.
ð
34
digital piano
Page 35
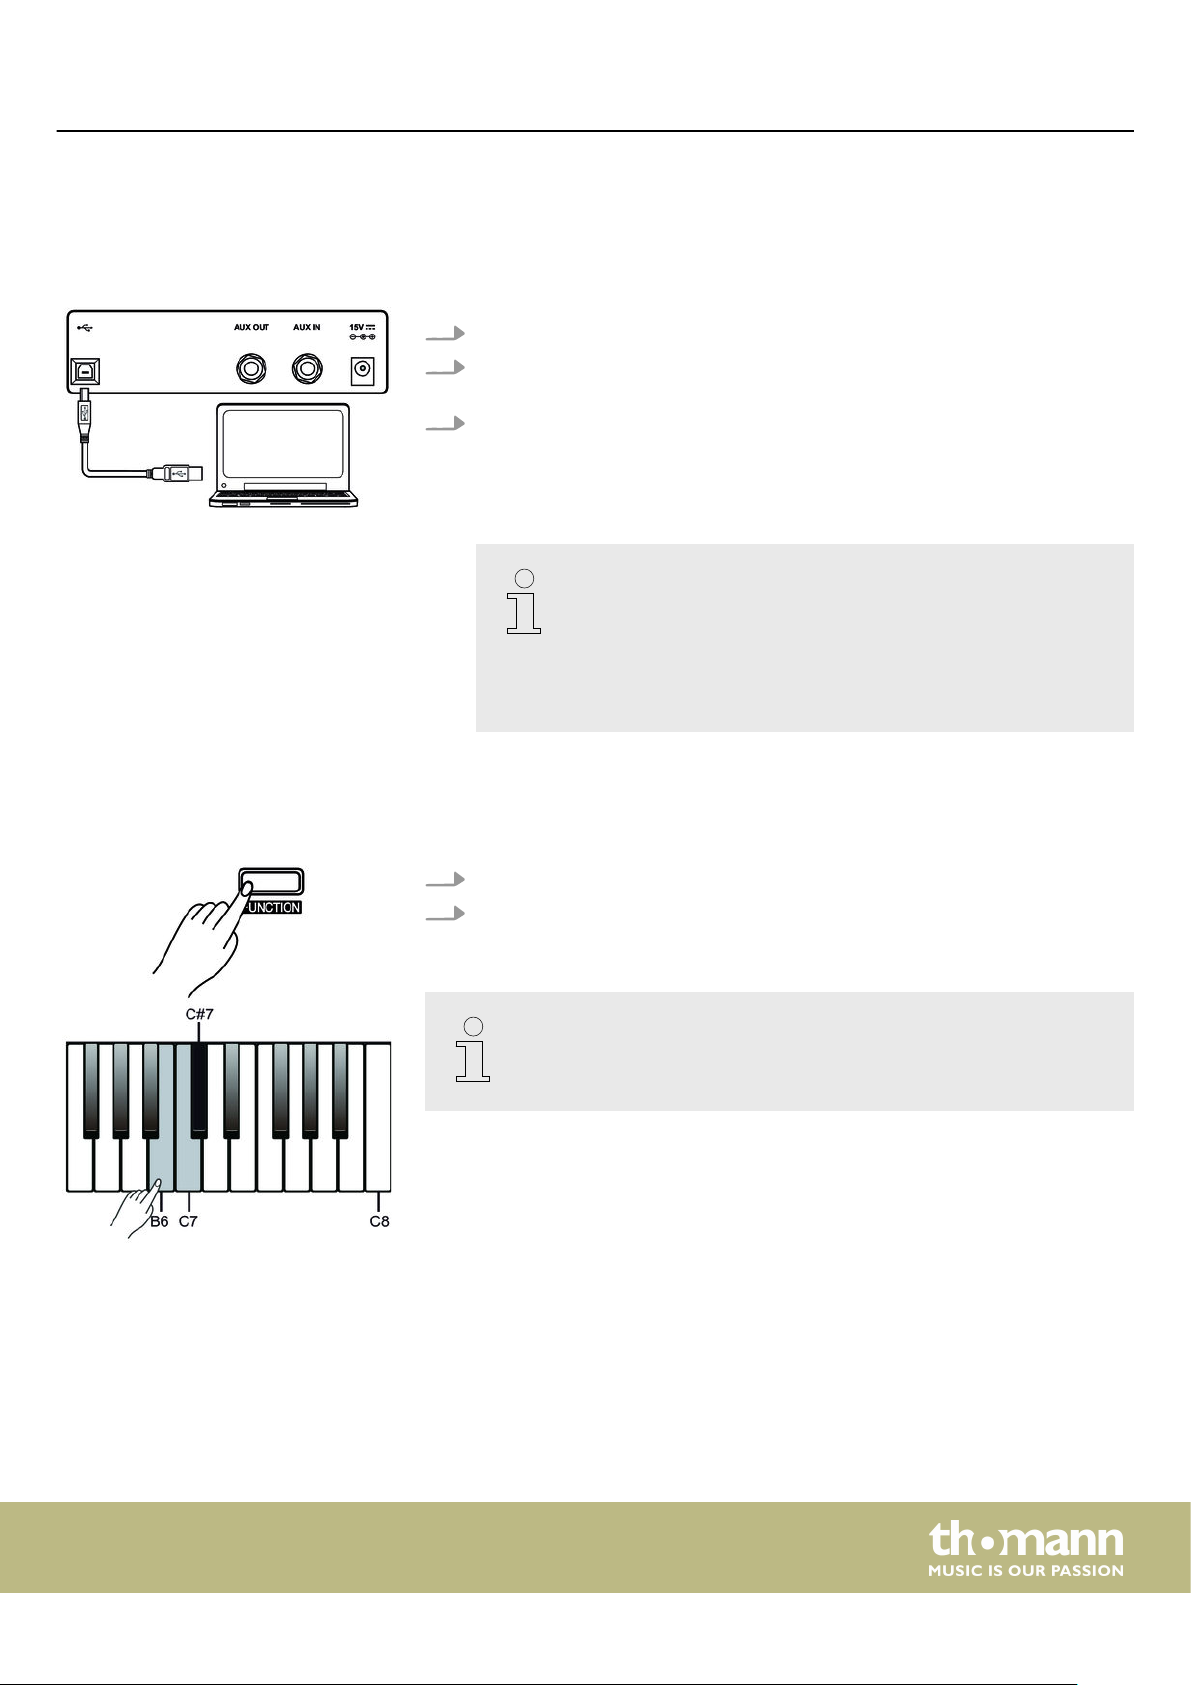
8.6 MIDI functions
8.6.1 USB connection to a computer
1. Turn on the computer.
2. Connect the USB port on the rear panel of the digital piano using a standard
3. Then turn the digital piano on.
Operating
USB cable (not included) to the USB port on your computer.
Please heed the following instructions when connecting USB instruments to
computers. Otherwise, the instrument or the computer may ‘crash’, which can
result in data loss. If a ‘crash’ should occur, turn o computer and instrument
and restart both after a few seconds.
– If the computer is in standby or hibernation, wake the computer
before connecting the USB cable.
– Establish the USB connection between computer and instrument
before turning on the instrument.
– For additional applications you may need a suitable software for
recording and editing music (not included).
8.6.2 Setting the MIDI channel
1. Hold down the [FUNCTION] button and press piano key [B6].
2. Hold down the [FUNCTION] button and press piano key [C7] or [C#7] to set the
desired MIDI OUT channel between ‘1’ … ‘16’ .
Hold down the [FUNCTION] button and press piano keys [C7] and [C#7]
simultaneously to restore the preset value ‘1’.
DP-32 B, DP-32 WH
35
Page 36
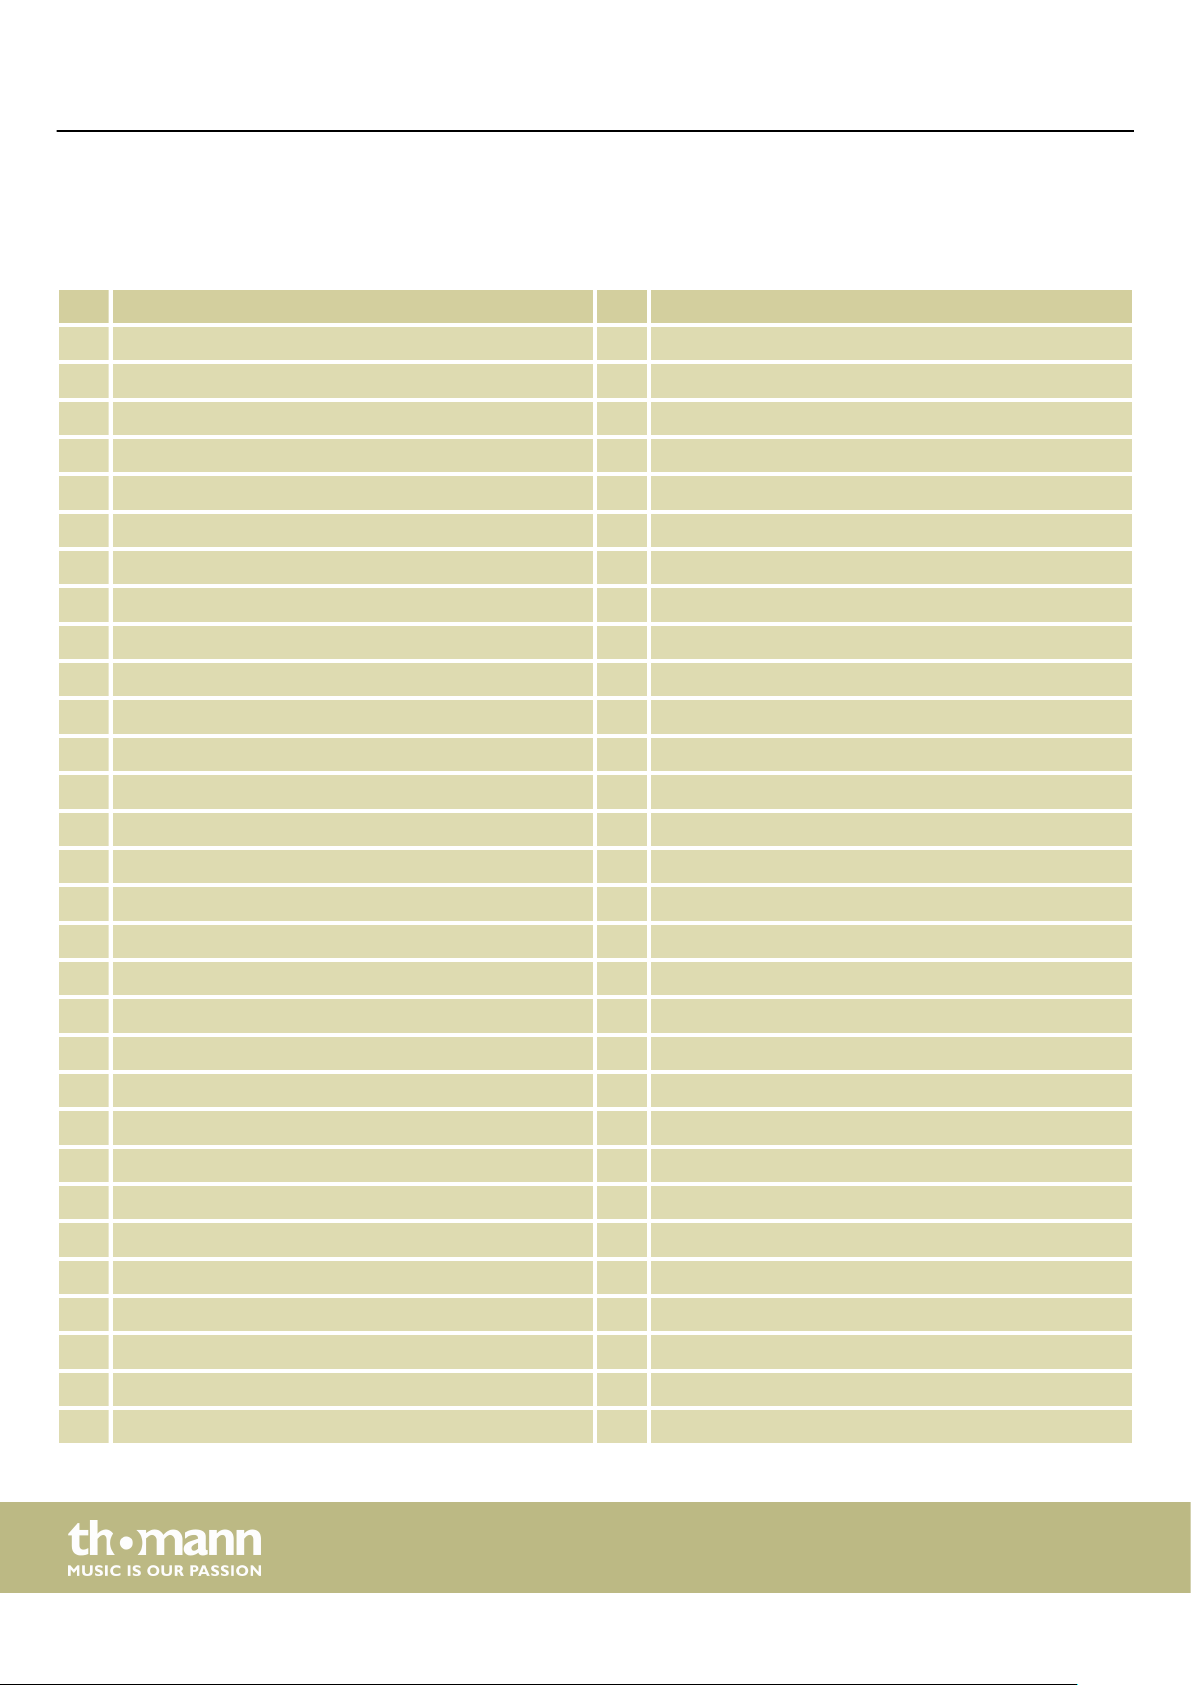
Practise and demo songs
9 Practise and demo songs
Practising songs
No. Name No. Name
1 The Entertainer 31 Robot Doll
2 Rialto Ripples (Rag) 32 Consolation
3 Neapolitan Song 33 2-Part Invention #13 In A Minor.B.W. III
4 Waltzes 34 Minuet In G Major (BWV Anh. 114)
5 Turkish March 35 Barcarolle
6 Schos Doll's Dance No. 2 36 Norwegian Dance No.2
7 Minuet In D Major 37 Moseta Dance
8 Inquietude 38 The Small Gathering
9 Italian Polka 39 The Return
10 Moment Musical 40 The Wagtail
11 Prelude In C-Sharp Major 41 Bulie Dance
12 The Happy Farmer 42 Tender Blossom
13 The Rag-Time Dance 43 Grace
14 Piano Sonata In C Major, K.330. III 44 Cherish The Memories
15 Mazurka 45 Chopsticks
16 Prelude In E Major 46 Four Little Swans
17 Piano Sonata In A Major, K.331. I 47 Progress
18 Waltz For Piano In G-Sharp Minor 48 Eclogue
19 Gavotte 49 The Limpid Stream
20 L'Arabesque 50 Brave Cavalier
21 Austria Variation 51 The Chatterbox
22 Schos Doll's Dance No. 7 52 Tarantella
23 To A Wild Rose 53 Frankness
24 Gavotte I 54 Tender Grieving
25 Waltz 55 The Farewell
26 Minuet In G Major (BWV Anh. 116) 56 The Chase
27 Innocence 57 Habanera
28 Tchaikovsky Waltz 58 Prelude In C Major
29 Salut d' Amour 59 Fountain
30 Barcarolle 60 Für Elise
digital piano
36
Page 37
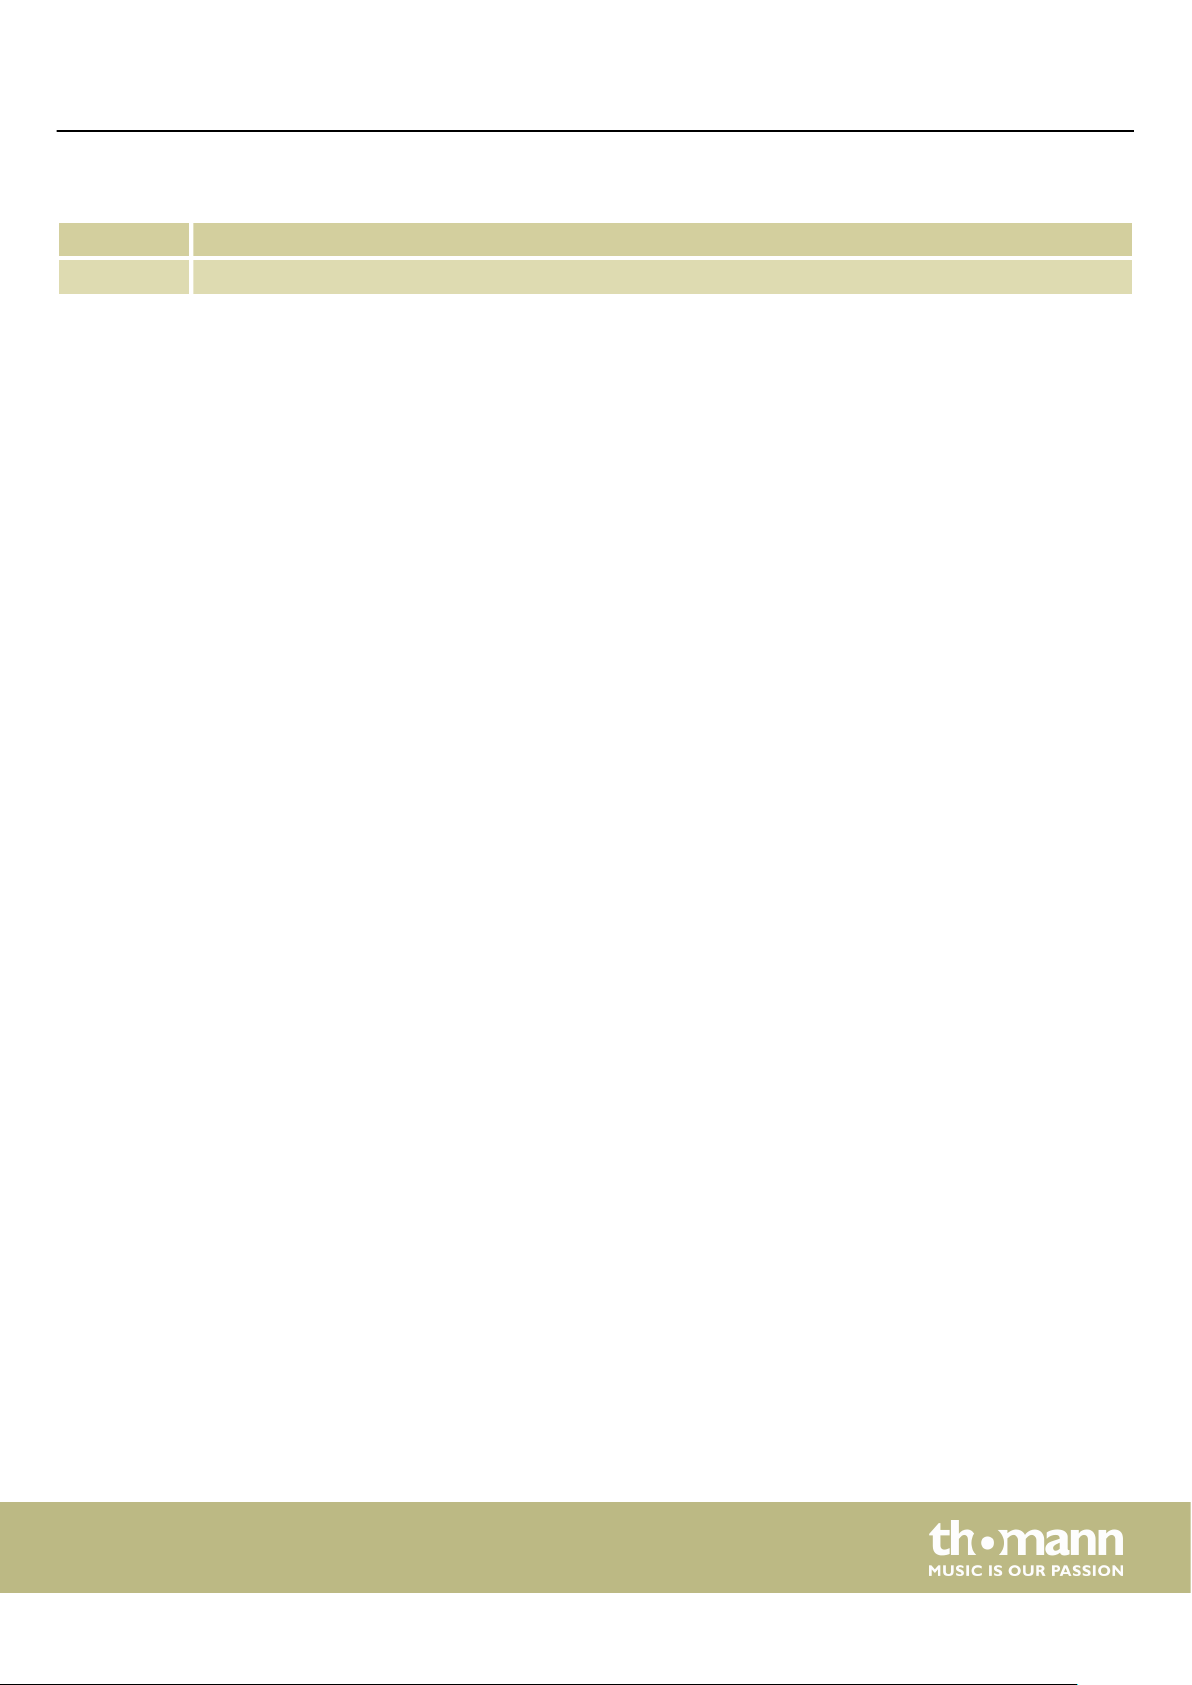
Demo song
No. Name
1 Fantasia
Practise and demo songs
DP-32 B, DP-32 WH
37
Page 38
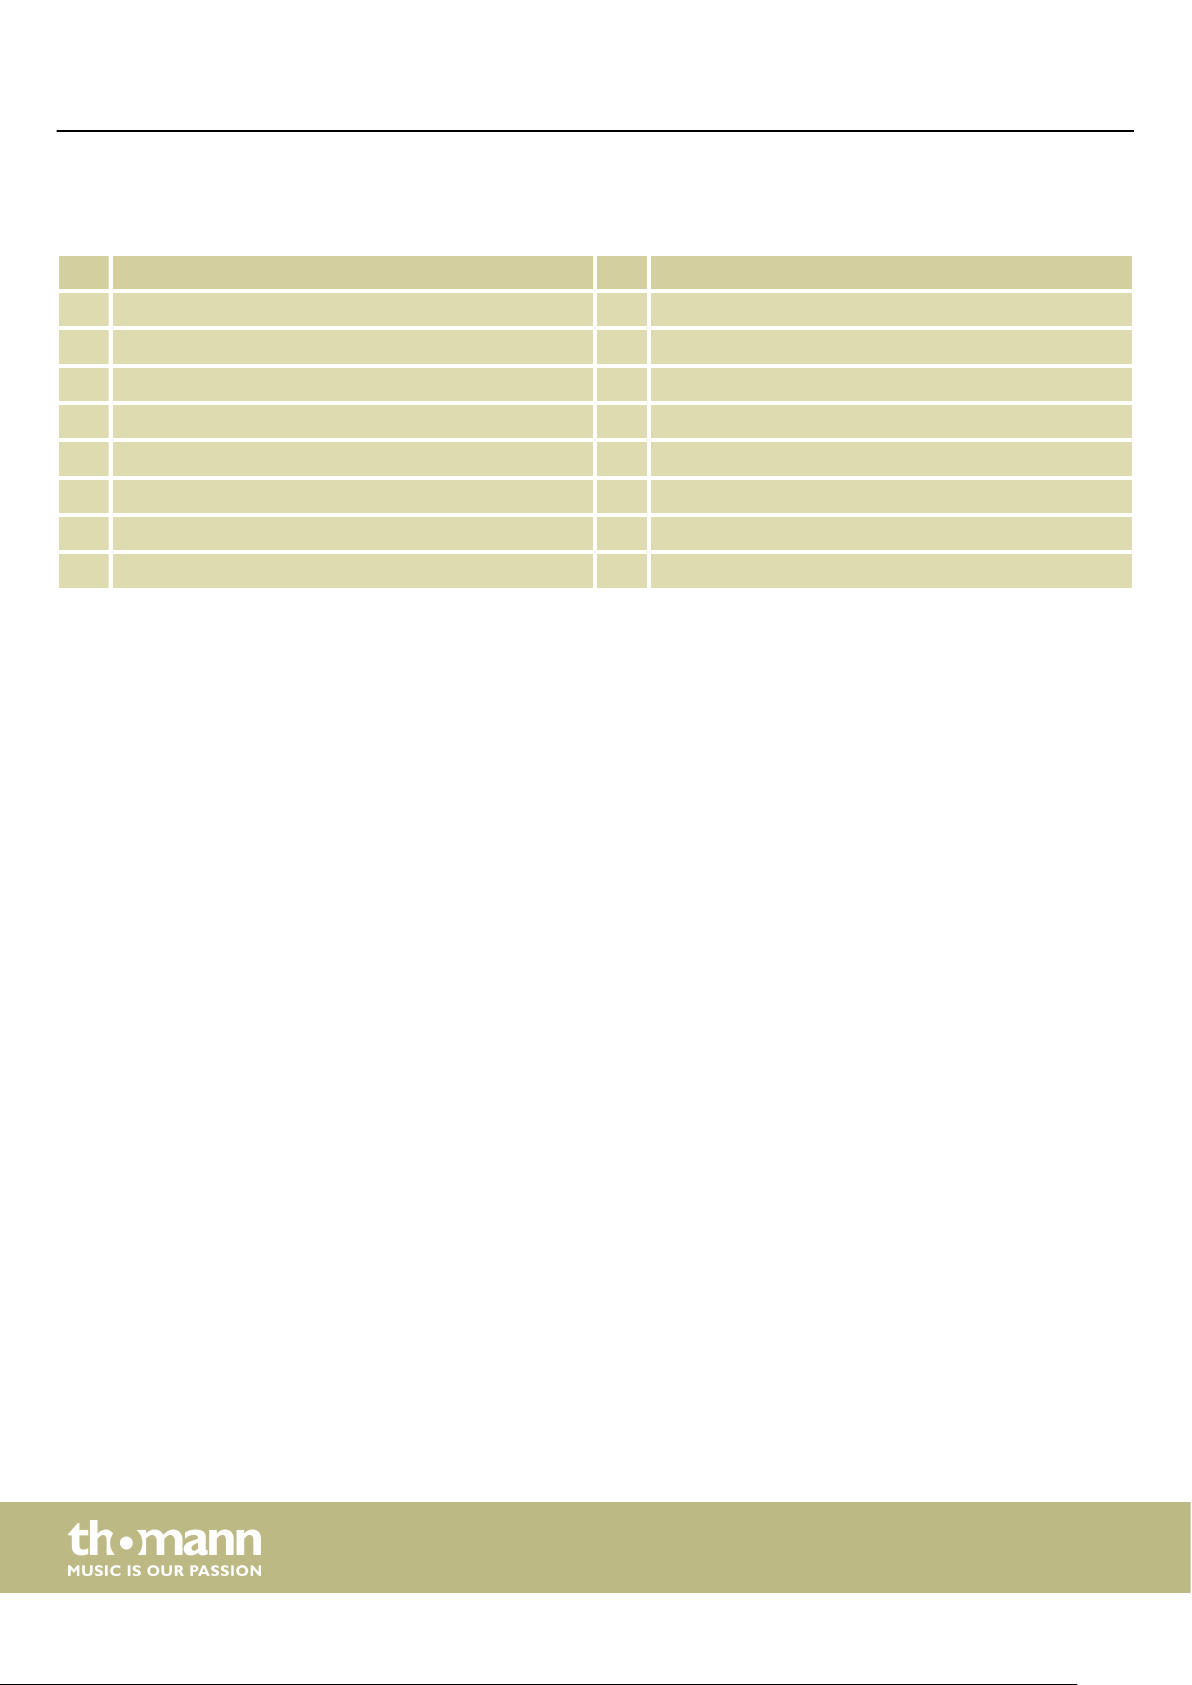
Voice list
10 Voice list
No. Name No. Name
1 Grand Piano 9 Drawbar Organ
2 Grand Piano 2 10 Jazz Organ
3 Chorus Piano 11 Rock Organ
4 E.Piano 1 12 Pipe Organ
5 E.Piano 2 13 Accordion
6 Harpsichord 14 Harmonica
7 Clavi 15 String Ensembles
8 Vibraphone 16 Soprano Sax
38
digital piano
Page 39
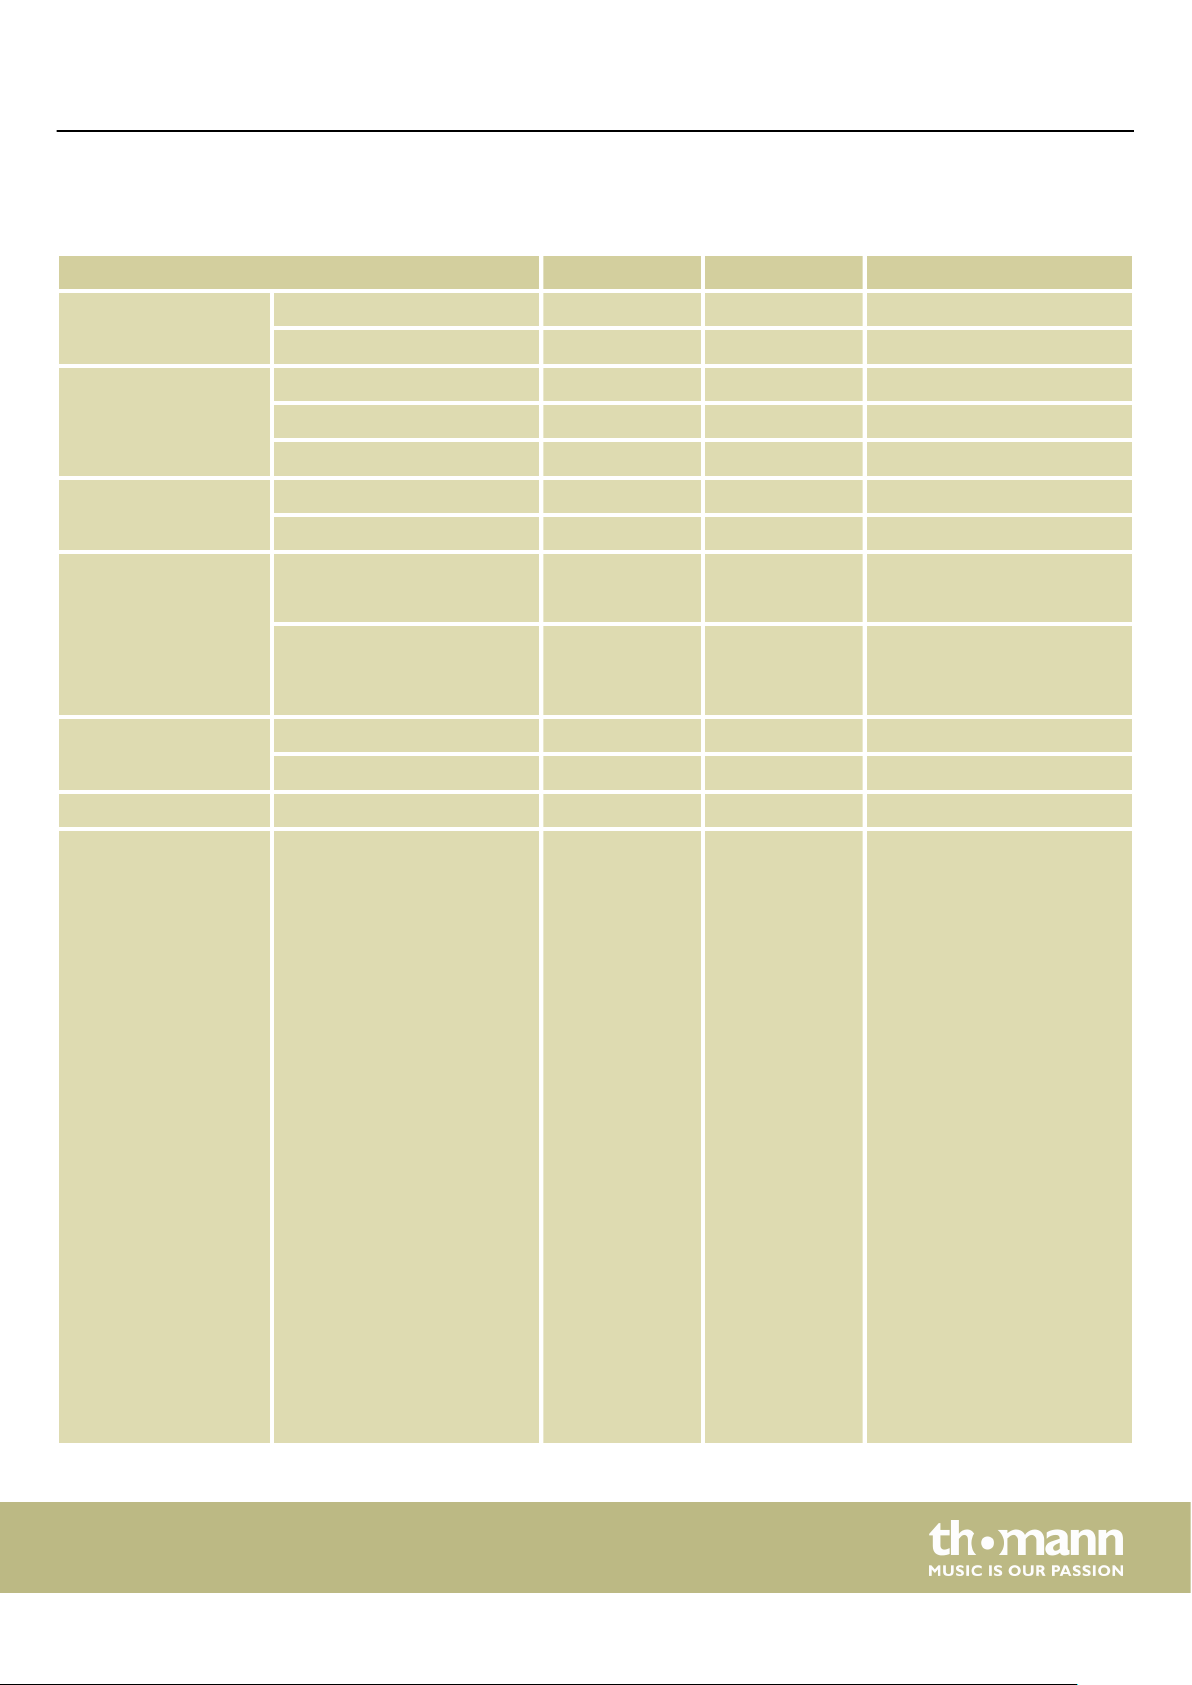
MIDI implementation chart
11 MIDI implementation chart
Function Sent Received Notes
Basic Channel Default 1 ALL
Changed 1-16 1-16
Mode Default No Mode 3
Messages No Mode 3
Altered *********** No
Note Number 0 – 127 0 – 127
True voice *********** 0 – 127
Velocity Note Note ON Yes, 9nH,
v = 1 – 127
Note OFF No, 9nH,
v = 0
After Touch Keys No No
Channels No No
Pitch Bend No Yes
Control Change 0
1
5
6
7
10
11
64
65
66
67
80
81
91
93
Yes
No
No
Yes
Yes
No
No
Yes
No
Yes
Yes
Yes
Yes
Yes
Yes
Yes, 9nH,
v = 1 – 127
Yes, 9nH,
v = 0 or 8nH,
v = 0 – 127
Yes
Yes
Yes
Yes
Yes
Yes
Yes
Yes
Yes
Yes
Yes
Yes
Yes
Yes
Yes
Bank Select
Modulation
Portamento Time
Data Entry
Volume
Pan
Expression
Sustain Pedal
Portamento ON/OFF
Sostenuto Pedal
Soft Pedal
Reverb Program
Chorus Program
Reverb Level
Chorus Level
120
121
123
Yes
No
Yes
DP-32 B, DP-32 WH
Yes
Yes
Yes
All Sound O
Reset All Controllers
All Notes O
39
Page 40
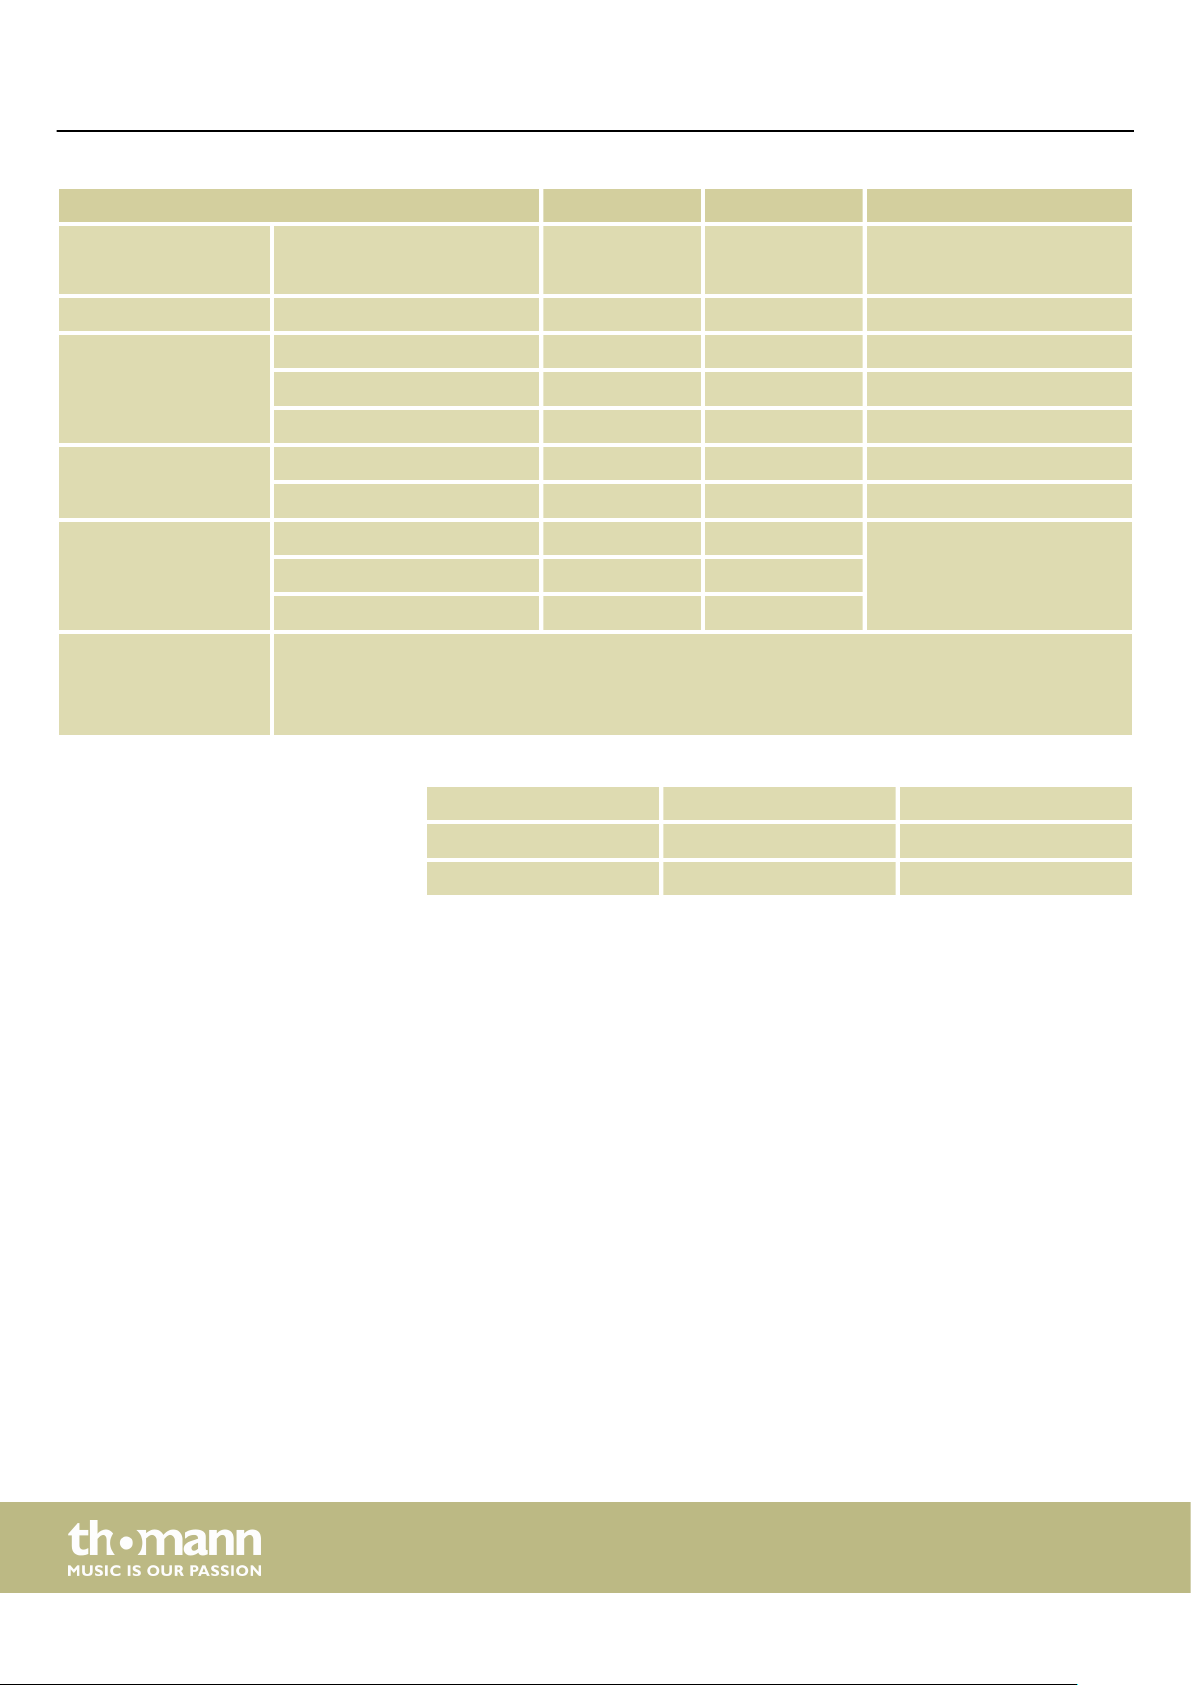
MIDI implementation chart
Function Sent Received Notes
Program Change True # Yes
***********
System Exclusive No Yes
System Common Song Position Pointer No No
Song Select No No
Tune Request No No
System Real Time Clock Yes No
Commands No *1 No *1
Aux Messages Local ON/OFF No No
Active Sensing No Yes
System Reset No Yes
Notes: *1
When the accompaniment starts, an FAH message is transmitted.
When the accompaniment stops, an FCH message is transmitted.
MIDI channel modes
POLY MONO
Yes
0 – 127
OMNI ON Mode 1 Mode 2
OMNI OFF Mode 3 Mode 4
40
digital piano
Page 41
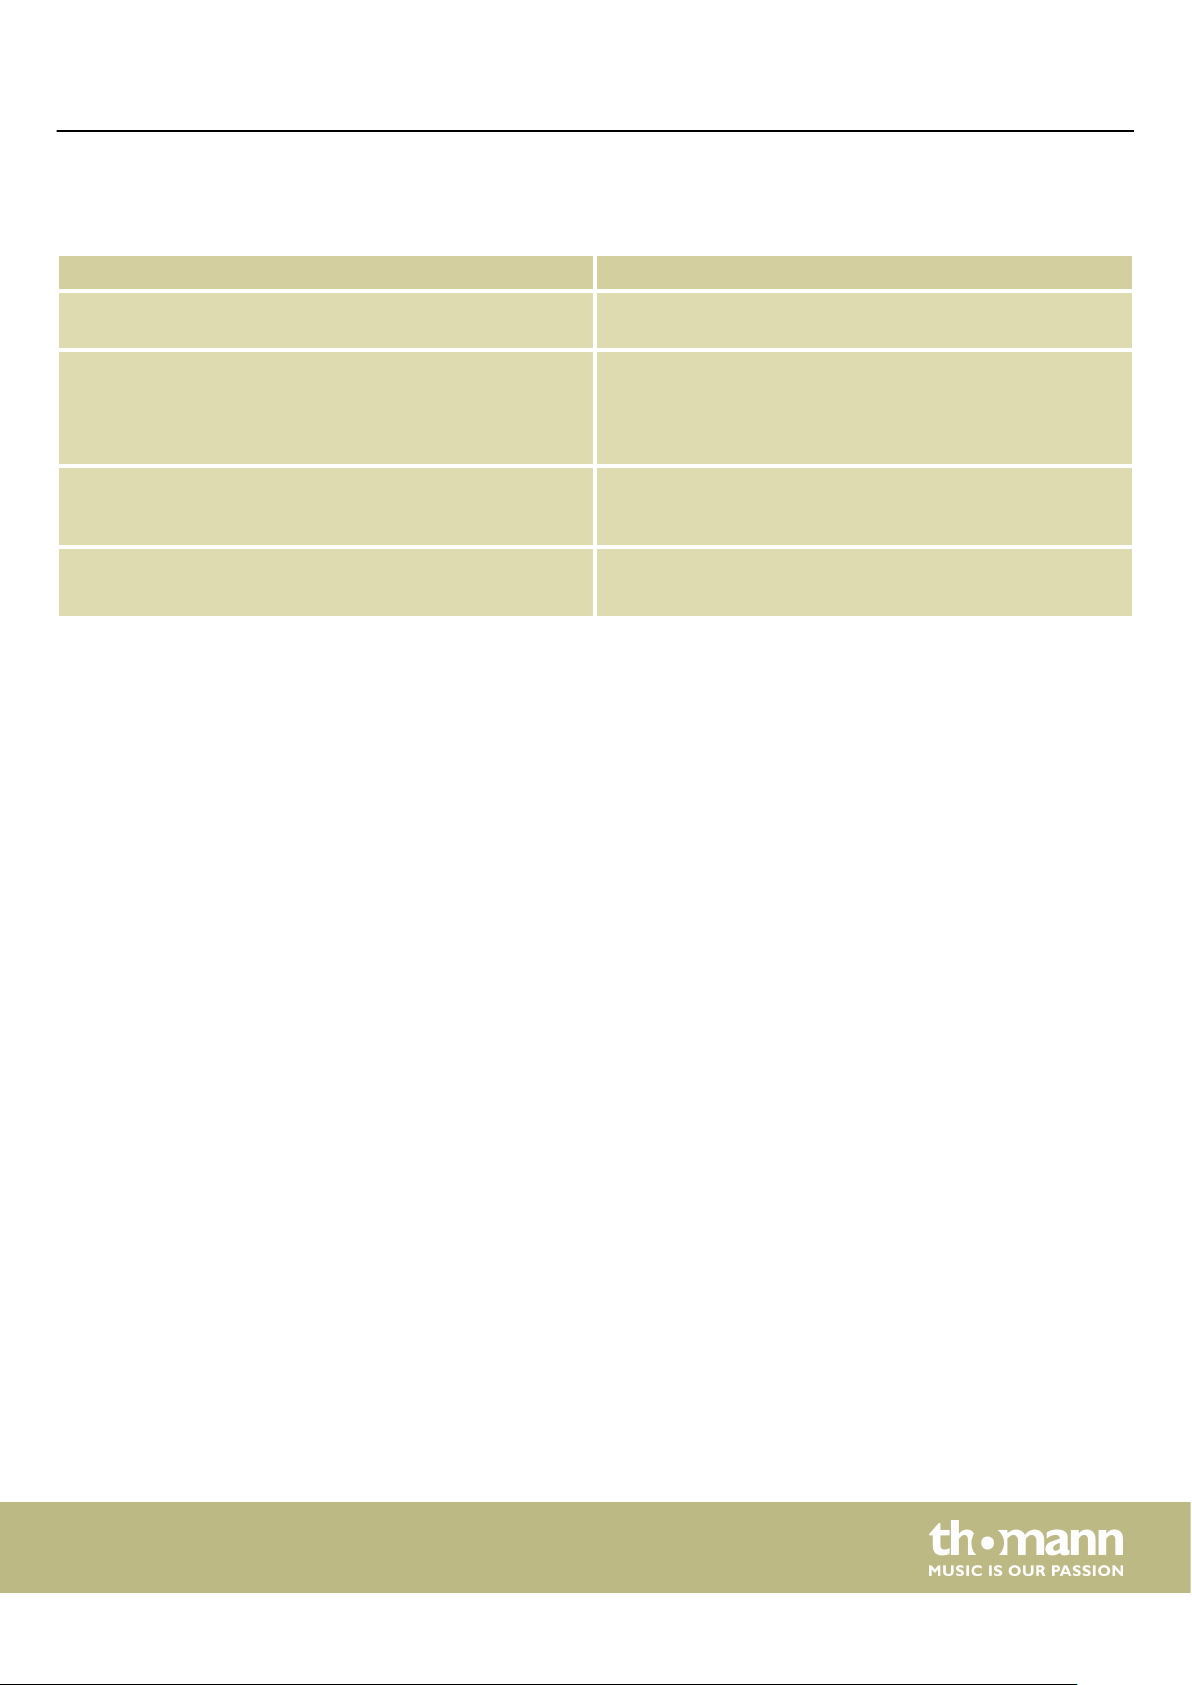
12 Troubleshooting
Problem Possible causes and solutions
Troubleshooting
You hear a 'pop' sound from the speakers when switching the
digital piano on and o.
No sound can be heard when playing the piano. Make sure that the volume control is set appropriately.
Malfunction occurs when using a mobile phone. Using a mobile phone near the digital piano can cause inter‐
A connected computer does not detect the digital piano. Check if the USB cable is connected properly.
This is normal. No need to worry.
Check if headphones are plugged into the headphone output
2. Connecting headphones will mute the speakers of the dig‐
ital piano.
ference. To prevent this, turn o the mobile phone or use it
only at a safe distance.
Connect the USB cable to another USB port on the computer.
DP-32 B, DP-32 WH
41
Page 42
Technical specications
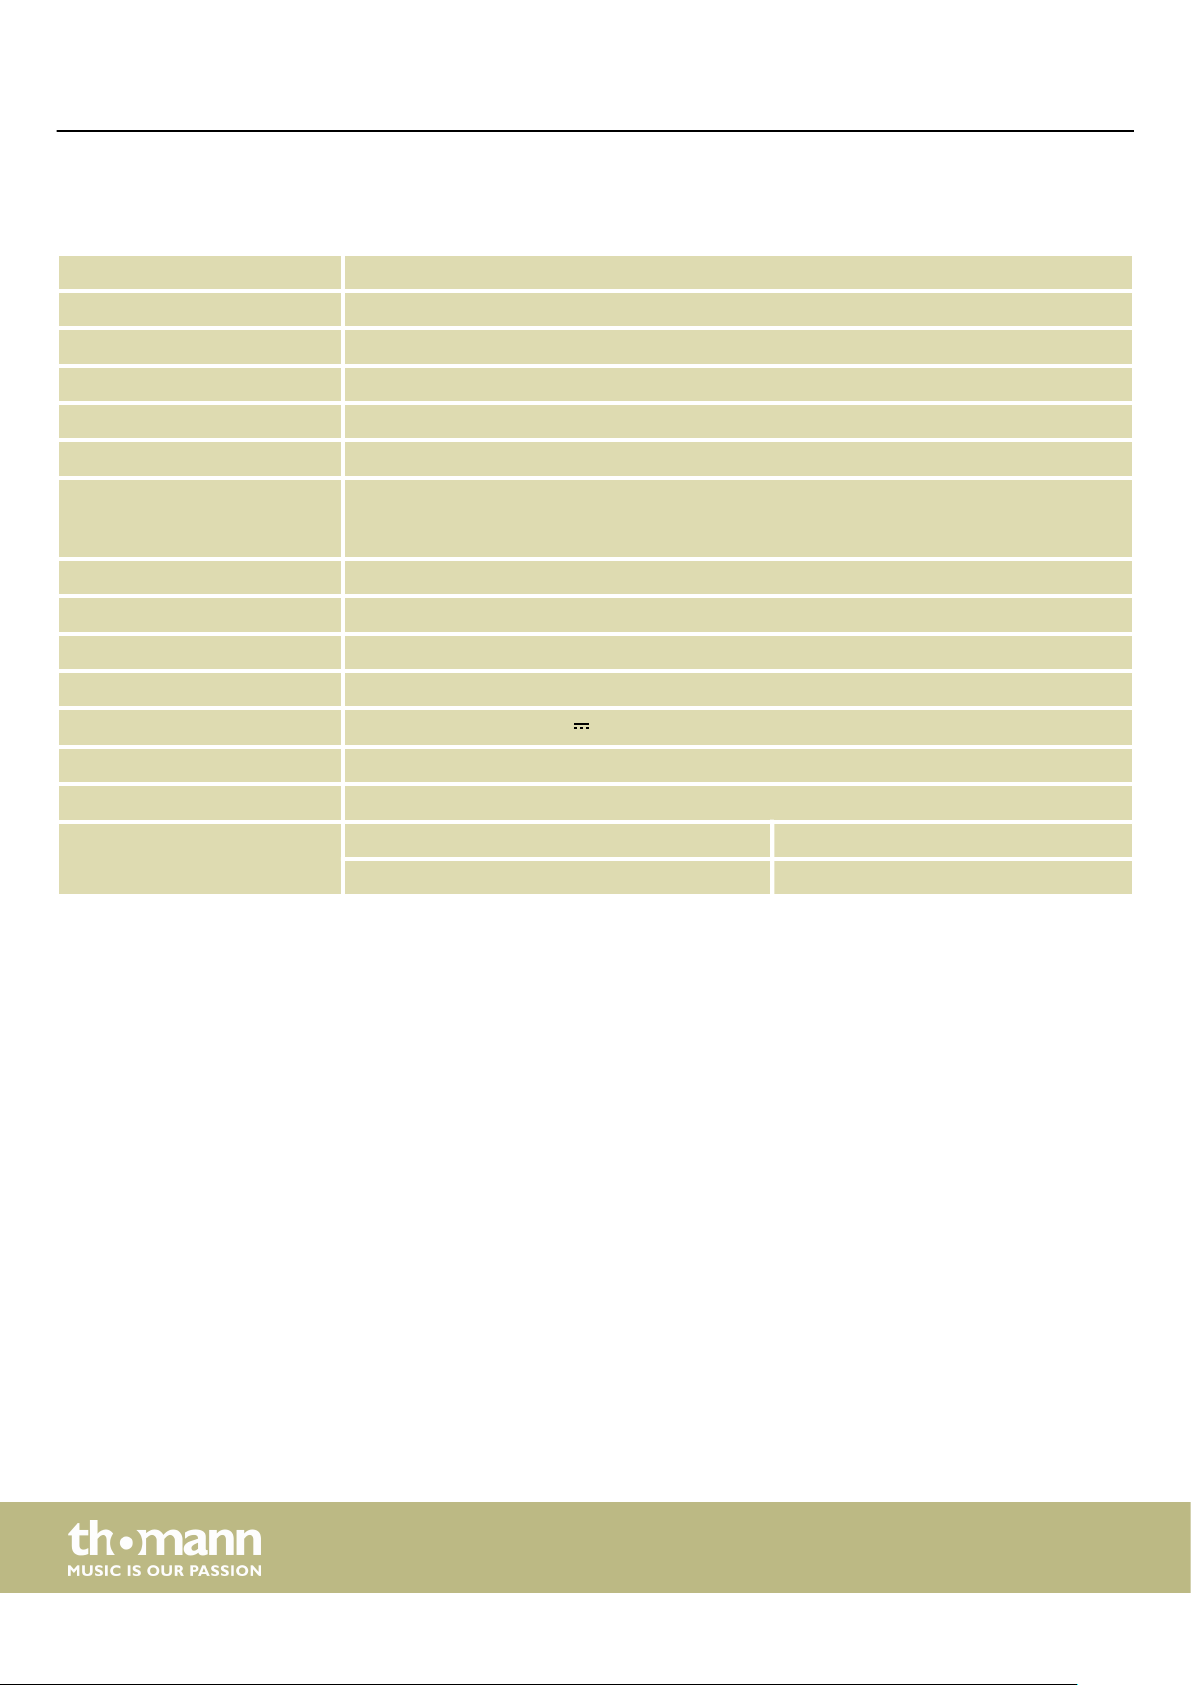
13 Technical specications
Keyboard 88 weighted keys with hammer action and adjustable touch response
Polyphony 128-voice
Voices 16
Practising songs 60
Demo pieces 1
Memory 5 × memory locations for user recordings
Operating elements On / O switch, Volume control, Start / Stop button, Piano function keys to select Voices,
Demo and Rehearsal songs, Dual mode, Duet mode, Split mode, Tempo, Metronome, Reverb
and Chorus eect, Velocity sensitivity, Transposition, Fine tuning, Button sound, TWINOVA.
Pedals Soft, Sostenuto, Sustain
Connections DC IN, 2 × head phones (1/4" phone jack), AUX IN, AUX OUT, USB
Speaker 2 × 10 W
Amp 2 × 20 W
Voltage supply
Dimensions (W × H × D) 1320 mm × 815 mm × 440 mm
Weight 38.5 kg
Housing colour Matt black Item number 448686
Plug-in power supply (15 V / 2500 mA, centre positive)
Matt white Item number 448687
42
digital piano
Page 43
14 Plug and connection assignment
Plug and connection assignment
Introduction
Balanced and unbalanced transmis‐
sion
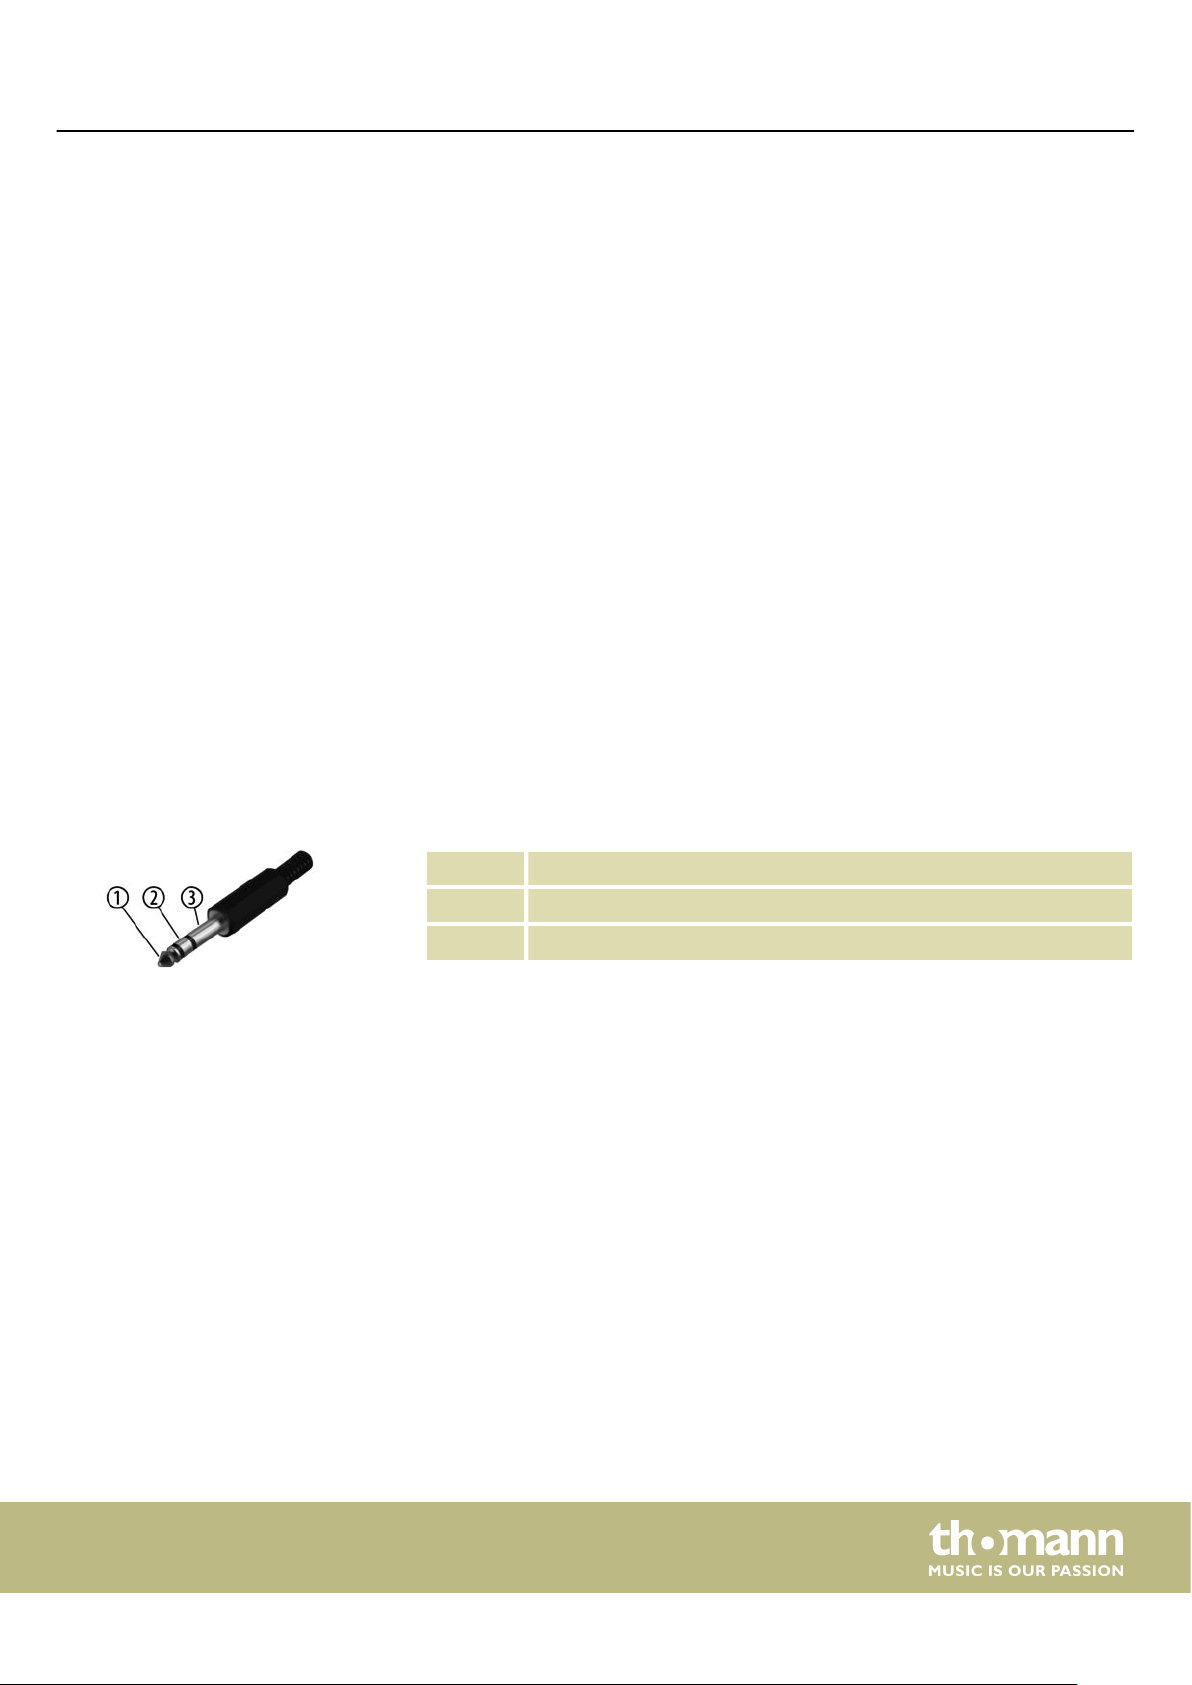
1/4" TRS phone plug (stereo, unbal‐
anced)
This chapter will help you select the right cables and plugs to connect your valuable
equipment in such a way that a perfect sound experience is ensured.
Please note these advices, because especially in ‘Sound & Light’ caution is indicated:
Even if a plug ts into the socket, an incorrect connection may result in a destroyed
power amp, a short circuit or ‘just’ in poor transmission quality!
Unbalanced transmission is mainly used in semi-professional environment and in hi
use. Instrument cables with two conductors (one core plus shielding) are typical rep‐
resentatives of the unbalanced transmission. One conductor is ground and shielding
while the signal is transmitted through the core.
Unbalanced transmission is susceptible to electromagnetic interference, especially at
low levels, such as microphone signals and when using long cables.
In a professional environment, therefore, the balanced transmission is preferred,
because this enables an undisturbed transmission of signals over long distances. In
addition to the conductors ‘Ground’ and ‘Signal’, in a balanced transmission a second
core is added. This also transfers the signal, but phase-shifted by 180°.
Since the interference aects both cores equally, by subtracting the phase-shifted
signals, the interfering signal is completely neutralized. The result is a pure signal
without any noise interference.
1 Signal (left)
2 Signal (right)
3 Ground
DP-32 B, DP-32 WH
43
Page 44
Protecting the environment
15 Protecting the environment
Disposal of the packaging material
For the transport and protective packaging, environmentally friendly materials have
been chosen that can be supplied to normal recycling.
Ensure that plastic bags, packaging, etc. are properly disposed of.
Do not just dispose of these materials with your normal household waste, but make
sure that they are collected for recycling. Please follow the notes and markings on
the packaging.
Disposal of your old device
This product is subject to the European Waste Electrical and Electronic Equipment
Directive (WEEE) in its currently valid version. Do not dispose with your normal
household waste.
Dispose of this device through an approved waste disposal rm or through your local
waste facility. When discarding the device, comply with the rules and regulations
that apply in your country. If in doubt, consult your local waste disposal facility.
44
digital piano
Page 45

Notes
DP-32 B, DP-32 WH
45
Page 46

Notes
46
digital piano
Page 47

Page 48

Musikhaus Thomann · Hans-Thomann-Straße 1 · 96138 Burgebrach · Germany · www.thomann.de
 Loading...