

Page 1
© 2016 THINKWARE. All rights reserved.
Confidential Restricted
Confidential Information
Page 2
© 2016 THINKWARE. All rights reserved.
Confidential Restricted
Page 3
© 2016 THINKWARE. All rights reserved.
Confidential Restricted
Mounting related terms
Dash cam components
Hardwiring cable for each model
Items to check when mounting a dash cam
…………………………1
……………………………4
………………5
…6
1
2
3
4
Table of
Contents
Page 4

© 2016 THINKWARE. All rights reserved.
Confidential Restricted
Fuse box
- Locating the fuse box
- How to connect fuse
Recovery
- Recovering the weather strip
- Recovering the A pillar
Front camera
Overview of the sequence of mounting
Order of mounting front camera
1
Basic operation test for continuous power
supply
Removal
- Removing the weather strip
- Removing the A pillar
Attaching a dash cam
- Attaching a mounting (Non LCD Type)
- Attaching a mounting (LCD Type)
……… 7
…………………… 12
…………………… 13
……………………………… 14
……………… 15
……………… 16
………………17
………………18
…………… 8
Table of
Contents
Basic functional tests for a dash cam
- Adjusting the visual angle
……………………21
Overview of the sequence for mounting
Rear camera _ Car
3
Location of rear camera attachment
Order of mounting rear camera
…………23
……………………24
…………19
……………22
…………20
Rear camera
2
Page 5

© 2016 THINKWARE. All rights reserved.
Confidential Restricted
Rear camera _ SUV
4
Overview of the sequence for mounting
Order of mounting rear camera
………………………40
……27
……………28
Table of
Contents
Testing operation of rear camera
5
Testing operation of rear camera (Non
LCD type)
………………………40
………………………………………30
Testing operation of rear camera (LCD type)
…31
Page 6
© 2016 THINKWARE. All rights reserved.
Confidential Restricted
Items to check after mounting
…………………32
1
Table of
Contents
2
Window PC VIEWER SETTING
Memory Card Settings
Camera Settings
Road safety Settings
Record Settings
System Settings
Initializing and saving the settings
………………………33
………………………………34
…………………………35
………………………………37
………………………………39
…………42
3
MAC PC VIEWER SETTING
Common
Continuous Mode
Parking Mode
Additional Functions
Initializing and saving the settings
………………………………………43
……………………………45
…………………………………48
…………………………50
…………52
Page 7

© 2016 THINKWARE. All rights reserved.
Confidential Restricted
RF interference problem
…………………59
1
2
Table of
Contents
FAQ
How to check the power/
booting failure/rebooting
Cannot enter the parking mode, impact
recording/sensitivity, SD card insertion
announcement
How to check SD card detection failure
Cannot connect Wi-Fi _ F750
Cannot use road safety warning function
_X500
Supported Micro SD memory card
……………… 53
… 55
………………………… 54
………… 56
…………………………………… 57
…… 58
Remove the mounting of dash cam
or rear camera
………………………………60
3
Installation location of dash cams
in the UK
…………………………………61
4
Page 8
© 2016 THINKWARE. All rights reserved.
Confidential Restricted
Before
Installation
Page 9

© 2016 THINKWARE. All rights reserved.
Confidential Restricted
Names Descriptions
B+
- Continuous power : The point where the current flows even when the engine is off.
→ Continuous power is used by the following: stop lamps, emergency lamps, indoor lamps, motor seats and trunks.
ACC
- Accessory power : The point where the current flows when the car key is in ACC or On.
(But when starting the motor, the ACC power will be off.)
→ Cigar jacks, ACC, audio and power outlets use ACC.
GND
- Ground : the (-) side of electrical connection.
→ The metallic part connected to the fuse box frame is the ground.
Wirings
Device
- Equipment used to test B+, ACC and GND.
→ When the part that a wiring tester is connected to is powered up, you will normally see the light or hear the buzzer
sound.
Remover
- Often called a duck's foot. It is used to tear off indoor materials or remove the fuse cover.
Hera
- It is used to tear off indoor materials, remove the fuse cover or neatly arrange the wires.
Mounting related terms
1
Page 10

© 2016 THINKWARE. All rights reserved.
Confidential Restricted
Mounting related terms
Name Description
Pillar
- There are pillar types A, B and C. When you work on the hardwiring cable and the rear cable for your dash cam, be sure to
remove the pillar and neatly arrange the wire.
[A pillar]
Attached in the driver/front passenger seat.
[B pillar]
Attached to the middle of the driver seat and
the rear passenger seat by forming a shape of T.
[C pillar]
It is attached to the glass of the rear seats.
2
Page 11

© 2016 THINKWARE. All rights reserved.
Confidential Restricted
Mounting related terms
Names Descriptions
Weather strip
- Rubber material used to prevent entry of rain water or wind through gaps in the car.
→ When wiring the dash cam, be sure to remove the weather strip and insert the wires into the ceiling inside the weather
strip.
RF
- Refers to the wireless frequency.
→ Refers to the DMB, GPS, radio or remote controller's wireless frequencies.
Ferrite core
- It is called a noise filter. It reduces the level of RF interference (noise).
Power supply
- Power supply
→ A user can set an arbitrary voltage level on this. It is useful when you test the parking or continuous mode.
3
Page 12
© 2016 THINKWARE. All rights reserved.
Confidential Restricted
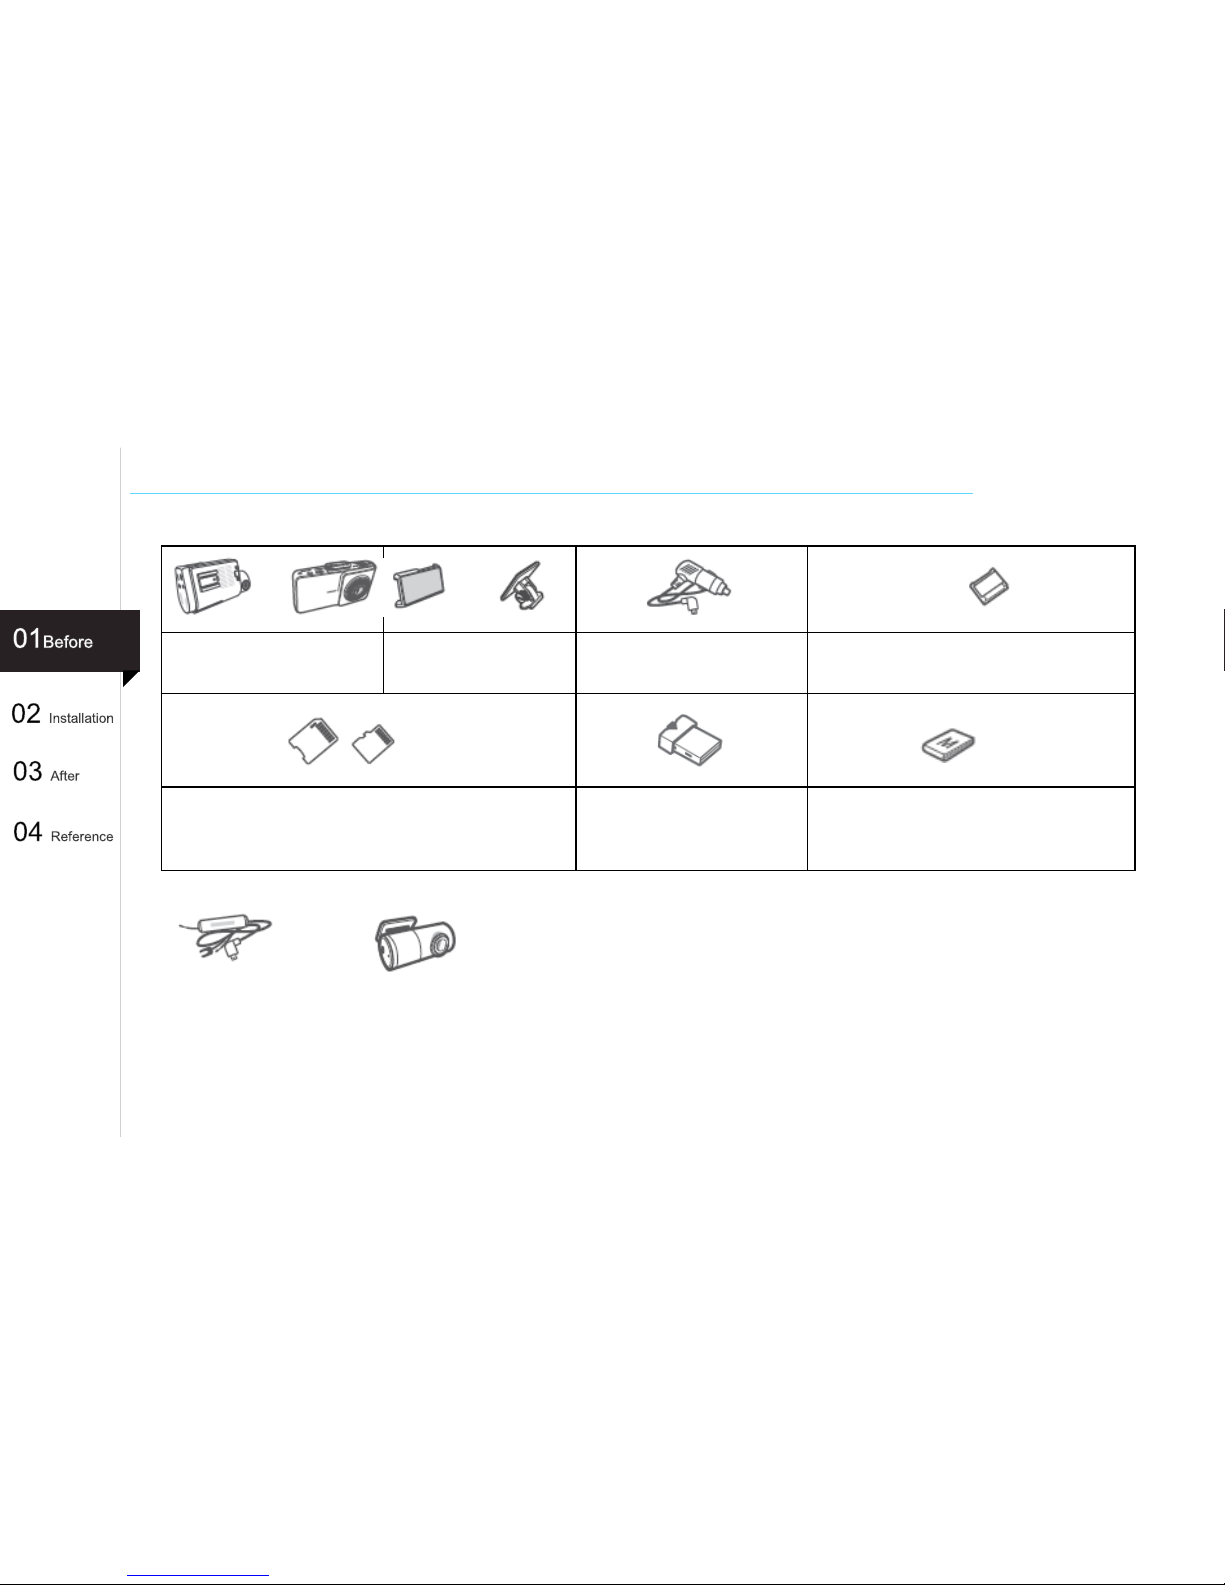
Main Dash Cam Unit
Mount with 3M tape
(1EA)
Car Charger
Adhesive Cable Holder
(5EA)
MicroSD memory card with adapter
(consumable)
USB MicroSD card reader
Quick Start Guide/Warranty/User
Manual
(stored in the MicroSD card)
Dash cam components
※ Components are subject to change depending on the model.
In the Package (Ex : F750 OR X500)
Optional Accessories
Hardwiring Cable Rear View Camera
OR OR
LCD Type
4
Page 13

© 2016 THINKWARE. All rights reserved.
Confidential Restricted
F750, X500, X300, X150, H100, H50
F550
Hardwiring cable for each model
B+
ACC
GND
ACC
B+
GND
B+
ACC
GND
5
[Type A]
[TIP]
Current hardwiring cable’s type is A. (After2016.03)
But it will be changed to type B.
So when you install the hardwiring cable,
please double check which line is B+ or ACC by
checking tale of the each line.
[Type B]
Page 14
© 2016 THINKWARE. All rights reserved.
Confidential Restricted
Items to check before mounting a dash cam
When mounting the dash cam holder, do not use instant glue or
silicone.
If you use tinted glass made of metal, it can make the video darker or
degrade the GPS sensitivity.
Consequently, the customer needs to be informed properly.
Do not cut or extend the rear cable when using it.
When connecting the ACC, do not use a continuous cigar power jack.
(EX power outlet 2)
- You cannot enter the parking mode. This can cause a problem in
battery discharging.
1. Before installing your dash cam, check the
existing locations of devices/terminals and
their wires.
- Check the locations of each terminal's power supply,
connection cables and RF cables and how they are
connected. Check wires.
-Check the locations of various antennas for an RF device
and the direction of wires. (Shark antenna, GPS/DMB external
antenna)
- Check the locations of the door lock remote controller's
receiving units, and the privately made remote controller's
antenna and the TPMS(Tire Pressure Monitoring System) in
advance.
2. In the following cases, do not install or
finish in advance. Instead, check for
interference while gradually making temporary
wirings.
- If you don't know the locations of wires for internal devices,
or antennas, then make sure the rear cable is hanging long
or while making pre wirings, operate the dash cam to check
for interference. If everything is ok, perform a final checkup
and finish wirings.
3. In advance, check the effects of interference in
each situation. After that, move the devices far
away from the source of interferences.
- If you need to install a dash cam when your car has a standard
navigation or other type of navigation installed, check the effects of
interference in advance and separate wires away from the source of
interference or make wirings on the floor and maintain a good
distance to the antenna or the device.
- If devices use continuous power supplies, you cannot combine
wirings because this can cause interference and noise. Make sure to
separate wires in this case and use a ferrite core or other filters to
separate or attenuate the level of noise in advance.
- The RF cable should be separated and not overlapped by each power
cable or rear cable. The remaining cables should not be tied up at the
back end of the car. Instead, it should be tied up in the middle.
- In case of narrow space inside the fuse box, or excessive interference,
cut off the extra length of the continuous power cable at the side of
the car.
4. Cautionary items used when mounting a dash
cam
6
Page 15
© 2016 THINKWARE. All rights reserved.
Confidential Restricted
Installation
Page 16
© 2016 THINKWARE. All rights reserved.
Confidential Restricted
Overview of the sequence for mounting a front camera
01. Locate the fuse box and remove the cover.
02. After checking the fuse configuration diagram, make wirings. (B+, ACC, GND)
03. After connecting the hardwiring cable and the terminal, perform a basic operation test. (Test items:
power supplies)
04. Remove the weather strip from the front passenger seat.
05. Remove the A pillar.
06. Temporarily wire the hardwiring cable. (Proceed with pre wirings at the fuse box)
07. Nicely arrange the hardwiring cable. (Tie it with the existing cables.)
08. Recover A pillar and the weather strip.
09. Neatly insert the remaining cable into the ceiling of the front glass.
10. Attach a holder.
11. Perform a basic function test on the dash cam. (Test items: power supplies, parking recording,
continuous recording and event recording and so on.)
12. Wait one day(24 hours) until the 3M tape in the holder is firmly attached. Then ship out without a
terminal installed in it.
7
Page 17
© 2016 THINKWARE. All rights reserved.
Confidential Restricted
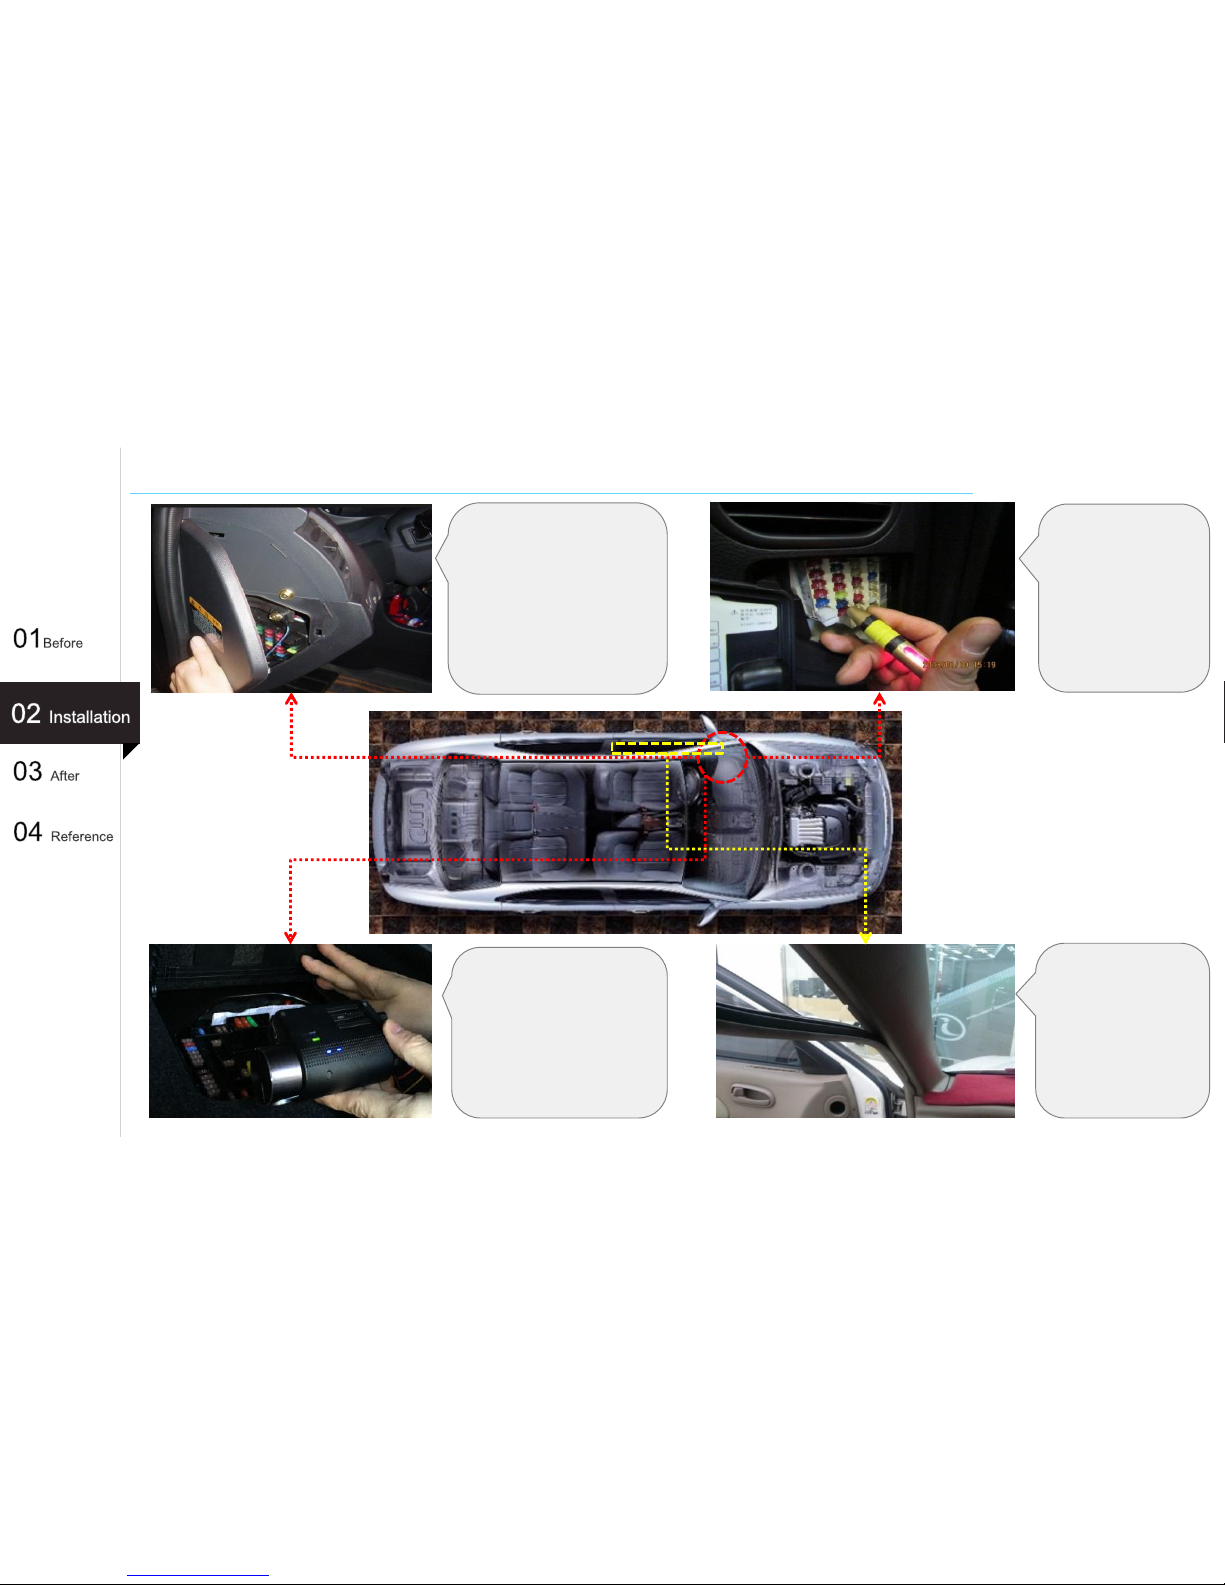
Order of mounting a front camera
Check the location of the
fuse box and remove the
cover.
(Use the hera or remover.)
①
Using a wiring
tester, check for
ACC /B+/GND and
connect wires.
(refer to page 12 to
14)
While the continuous
power cable is connected
to the fuse, turn on the
terminal and ensure it is
powered up properly.
(Ensure the booting is
finished successfully.)
With your hand, pull
down the weather
strip on the driver
seat and remove it
properly.
④
③
②
8
③
Page 18
© 2016 THINKWARE. All rights reserved.
Confidential Restricted
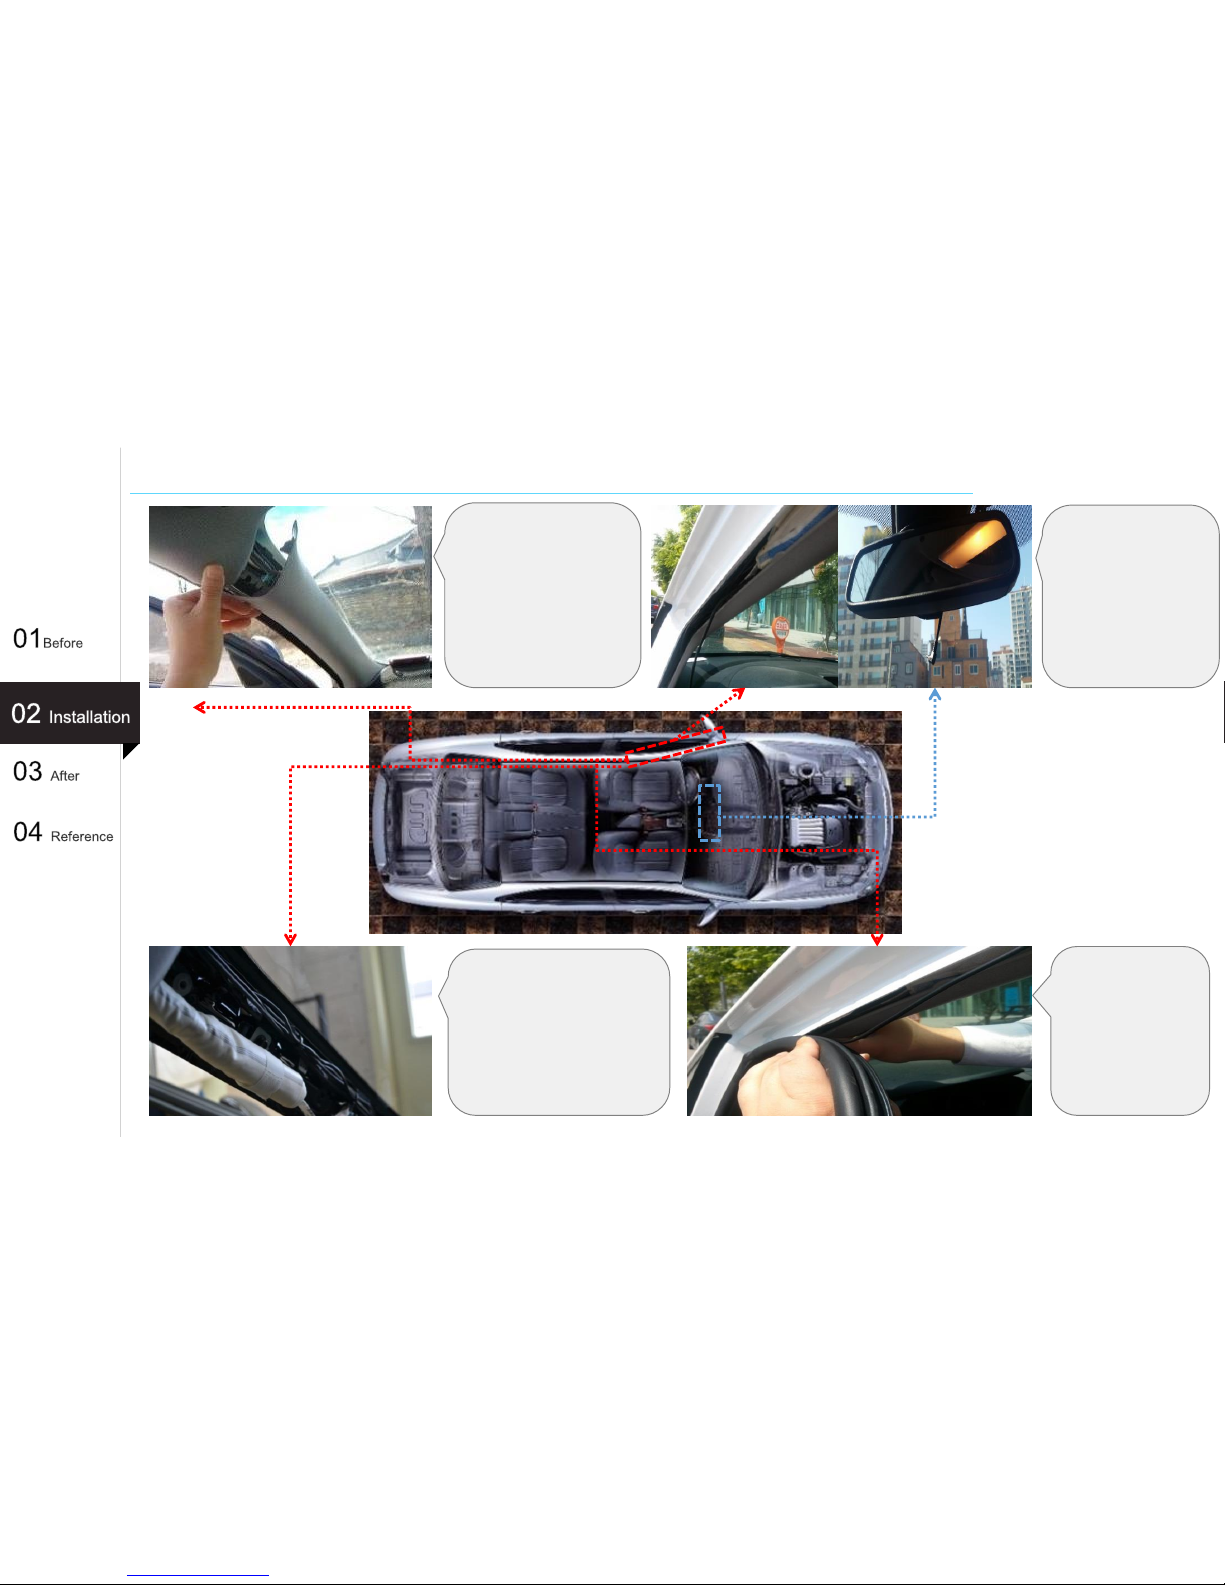
Order of mounting a front camera
⑤
⑥
Remove the A pillar by
pulling it toward the
driver’s seat. If it is
fixed by a hook, then
use the remover and
twist it 90 degrees to
remove it.
Make sure that the
cable penetrates
from the fuse box to
the A pillar when you
wire it.
⑦
⑧
While the hardwiring cable
is connected to the fuse,
turn on the terminal and
ensure it is powered up
properly.
(Ensure the booting is
completed successfully.)
Insert the cable
between the main
body and the
weather strip
when you try to
recover the A
pillar and the
weather strip.
9
Page 19

© 2016 THINKWARE. All rights reserved.
Confidential Restricted
Order of mounting a front camera (Non LCD type)
While the hardwiring cable is
connected to the fuse, turn on
the terminal and ensure it is
powered up properly.
(Ensure the booting is finished
successfully.)
⑨ ⑩
Insert the remaining cable
between the front glass and the
indoor material(ceiling) and
nicely arrange the cable.
Select a location to attach
the holder. Install the lens
of the dash cam to the
center behind the rearview
mirror. Use a clean cloth
to wipe it.
Using both hands, apply
force to a holder so that
the 3M double sided tape
is firmly attached.
(Pay special attention so
that there will be no
bubbles formed in the 3M
double sided tape.)
⑪
⑫
10
⑪
Tell the customer to
wait for one day(24
hours) before mounting
a dash cam so that the
3M tape is completely
fixed to the holder.
Page 20

© 2016 THINKWARE. All rights reserved.
Confidential Restricted
Order of mounting a front camera (LCD type)
While the hardwiring cable is
connected to the fuse, turn on
the terminal and ensure it is
powered up properly.
(Ensure the booting is finished
successfully.)
⑨ ⑩
Insert the remaining cable
between the front glass and the
indoor material(ceiling) and
nicely arrange the cable.
Select a location to attach
the holder. Install the lens
of the dash cam to the
center behind the rearview
mirror. Use a clean cloth
to wipe it.
Using both hands, apply
force to a holder so that
the 3M double sided tape
is firmly attached.
(Pay special attention so
that there will be no
bubbles formed in the 3M
double sided tape.)
⑫
11
⑪
Tell the customer to
wait for one day(24
hours) before mounting
a dash cam so that the
3M tape is completely
fixed to the holder.
Page 21

© 2016 THINKWARE. All rights reserved.
Confidential Restricted
Locating the fuse box
1. Checking the location of the fuse box
1) Each model of car has a different fuse box location. So, check where it is located within your car.
2) Some of luxurious or imported cars have a different left/right side to a fuse box, so it can be more reliable to connect it
to the right side(front passenger seat).
2. Checking the location of the hardwiring cable(B+, ACC) fuse
1) Before connecting the ACC / B+(continuous), using a wiring tester, check the ACC, B+ and then check the fuse to be
finally connected.
- ACC : If the car key is in ACC or On, then the current will flow. If it is Off, then no current will flow.
- B+ : Regardless of whether the car key is ON/OFF, the current will always flow.
- GND : Connect(ground) it to the metallic parts connected to the frame near the fuse box.
Location of the fuse tester
Fuse test Cautions
When using a multi meter, test it by
inserting it into the fuse. Be careful as
this can widen the gap between pins
inside the fuse box.
12
Page 22

© 2016 THINKWARE. All rights reserved.
Confidential Restricted
How to connect the fuse box
1. Peel off the hardwiring cable shell about 2cm and
twist the core wire in a one direction only.
2. Wrap the core wire around the left pin.
- After inserting the fuse into the fuse box, ensure that the core
wire is not exposed to the outside.
4. Using a long nose, insert it firmly into the fuse
box until reaching the end.
- After inserting the fuse into the fuse box, make sure that the
core wire is not exposed to the outside.
13
About 2cm
[Old fuse type]
[New fuse type]
[Cutting and separating
new types of fuse]
3. When fuse tester contact the points, put the core
wire on the place where there are no buzzer
sound.
Page 23
© 2016 THINKWARE. All rights reserved.
Confidential Restricted
Basic operation test for the continuous power supply
1. Power on and continuous recording test
- After connecting the continuous power supply to the fuse box, ensure the power is on properly.
(While the terminal is connected, turn on the engine to ensure the dash cam is powered up properly.)
※ If the power is not on properly, then check that the GND, B+ wirings are connected properly.
2. Parking recording test
- After a continuous recording test, turn off the engine, and try to enter the parking recording mode.
※ If you cannot enter the parking recording mode, and the dash cam is turned off, then check the ACC wirings.
3. Wiring tester fuse test operation
B+ ACC GND
Engine Start ON → Buzzer sound
heard
Engine Start ACC →
Buzzer sound
heard
Engine Start OFF → Buzzer sound
heard
Engine Start ON → Buzzer sound
heard
Engine Start ACC →
Buzzer sound
heard
Engine Start Off →
Buzzer sound
not heard
Metallic parts connected to the
frame.
[TIP}
You will hear no buzzer sound
during a B+/ACC test unless the
GND is connected.
14
Page 24

© 2016 THINKWARE. All rights reserved.
Confidential Restricted
Removing the weather strip
※ Pull down the weather strip rubber from the top to the bottom until
reaching the location of the fuse box and then remove it.
[Driver seat] [Rear seat]
[Weather strip removed]
[Removing the weather strip]
15
Page 25

© 2016 THINKWARE. All rights reserved.
Confidential Restricted
Removing the A pillar
[Removing A pillar]
[A pillar removed]
※ While the weather strip is removed, pull A pillar to remove it.
- If there is a pin inside A pillar, remove it first with the remover before removing the weather strip.
[When A pillar has screws inside it]
16
Page 26

© 2016 THINKWARE. All rights reserved.
Confidential Restricted
Recovering the weather strip
※ Assemble the weather strip rubber from the bottom to the top while
fitting it to the groove.
- If you cannot assemble the weather strip rubber, the iron core
inside the rubber is bent. Ensure it is straight before assembling it.
- If some remaining rubber parts when you think you are finished
assembling the weather strip rubber, disassemble it and assemble
it again.
17
Page 27

© 2016 THINKWARE. All rights reserved.
Confidential Restricted
Recovering the A pillar
※ A pillar can be assembled in the reverse order of removal.
- Start assembling A pillar from the bottom (glass side).
- If A pillar has a pin in it, then recover it to fit the pin location.
18
Page 28

© 2016 THINKWARE. All rights reserved.
Confidential Restricted
Attaching a mounting (Non LCD Type)
[TIP]
The lens of the camera is located on the left side of the main unit, install the dash
cam to the right side of the rearview mirror so that lens should be located on the
center of the car.
[TIP]
To ensure that the mount is safely secured, separate the device from the mount after
installation and press the mount against windshield for 5 minutes while maintaining
pressure. Allow 24 hours for the adhesive on the mount to set before connecting the
dash cam.
1. Place the mount so it is aligned with the connector (A), and push it toward (B) until it
clicks into place.
2. Remove the protective film from the camera lens.
3. Clean the area on the windshield where the dash cam will be installed.
With dash cam main unit still attached to the mount, remove the protective tape from
the back of the mount.
4. Attach the adhesive side of the mount on the windshield where it has an
unobstructed view of the road but does not interfere with the driver’s view.
19
(Ex : F750)
Page 29

© 2016 THINKWARE. All rights reserved.
Confidential Restricted
Attaching a mounting (LCD Type)
1. Place the mount so it is aligned with the connector (A), and push it toward (B) until it
clicks into place.
2. Remove the protective film from the camera lens.
3. Clean the area on the windshield where the dash cam will be installed.
With dash cam main unit still attached to the mount, remove the protective tape from
the back of the mount.
4. Attach the adhesive side of the mount on the windshield where it has an
unobstructed view of the road but does not interfere with the driver’s view.
20
(Ex : X500)
[TIP]
The lens of the camera is located on the left side of the main unit, install the dash
cam to the right side of the rearview mirror so that lens should be located on the
center of the car.
[TIP]
To ensure that the mount is safely secured, separate the device from the mount after
installation and press the mount against windshield for 5 minutes while maintaining
pressure. Allow 24 hours for the adhesive on the mount to set before connecting the
dash cam.
Page 30

© 2016 THINKWARE. All rights reserved.
Confidential Restricted
Basic function tests for a dash cam (visual angle adjustment)
○ Adjusting the dash cam camera's visual angle
▶ Adjust the visual angle so that 1/8~1/4 of the hood is visible.
- For an LCD model, adjust the visual angle while viewing the LCD screen.
- For a non LCD dash cam, adjust the visual angle while referring to the AV connection and
monitor(Ex. Navigation).
- If there is no monitor(Ex. Navigation) installed in the car, adjust the visual angle while
referring to the saved video.
Adjust the visual angle so
that 1/8~1/4 of the hood is
visible.
21
Page 31

© 2016 THINKWARE. All rights reserved.
Confidential Restricted
Location of rear camera attachment
The recommended location of the rear camera is at the top center.
[Caution]
- In the case of rear camera, please check rear view is alright to prevent view upside down
before installing. (There are no option to reverse the screen.)
- When you remove the rear camera, please disconnect cable from rear camera first.
Otherwise it can be disabled. Also be careful of tinting and heat ray of the rear window.
Recommended location for rear
camera installation
22
Page 32

© 2016 THINKWARE. All rights reserved.
Confidential Restricted
Overview of the sequence for mounting a rear camera _ Car
01. Ensure the rear camera operates properly by connecting it to the terminal.
02. Select a good location of rear camera attachment and attach the rear camera.
03. Make temporary wirings of the rear camera cables to the terminal.
04. Arrange the wires. (A pillar)
05. After removing the weather strip on the front passenger seat and insert the cable.
(Insert the cable while recovering the weather strip.)
06. Arrange the wires. (B pillar)
07. After removing the weather strip on the rear right passenger seat , insert the cable.
(Insert the cable while recovering the weather strip.)
08. Arrange the wires. (C pillar)
09. Connect the rear camera to the cable.
10. Arrange the wires. (Rear glass)
11. Perform operation test for rear camera (Test items: rear video recording check)
23
Page 33

© 2016 THINKWARE. All rights reserved.
Confidential Restricted
Order of mounting rear camera _ Car
①
②
③
Before wiring,
to ensure the
rear camera is
ok, connect it
to the dash
cam and check .
Select a good
location for the
rear camera
attachment and
attach the rear
camera. (refer to
page 22)
24
Connect the
rear cable to
dash cam.
Insert the
remaining cable
between the front
glass and the
indoor
material(ceiling)
and nicely
arrange the cable.
④
Page 34

© 2016 THINKWARE. All rights reserved.
Confidential Restricted
Order of mounting rear camera _ Car
⑤
⑥
⑦
⑧
While pushing the
rear cable to the
inside, recover the
weather strip.
Using a hera,
firmly insert the
rear cable into
the gap of
between B pillar
and the ceiling.
As in ⑤, remove the
weather strip from
the rear left
passenger seat and
recover it while
pushing the rear
cable to the inside.
Using a hera,
firmly insert the
rear cable into
the gap between
C pillar and the
ceiling.
25
Page 35

© 2016 THINKWARE. All rights reserved.
Confidential Restricted
Order of mounting rear camera _ Car
⑨
⑩
Connect the rear
camera to the
cable and attach it
on rear window.
Insert the
remaining cable
between the rear
glass and the
indoor
material(ceiling)
and neatly
arrange the cable.
On the opposite
side, ensure the
rear camera's LED
is properly lit.
⑪
26
Page 36

© 2016 THINKWARE. All rights reserved.
Confidential Restricted
Overview of the sequence for mounting rear camera _ SUV
01. Check whether the rear camera is operating properly by connecting it to the terminal.
02. Select a good location for the rear camera attachment and attach it.
03. Make temporary wirings of the rear camera cables to the terminal.
04. Arrange the wires. (A pillar)
05. After removing the weather strip on the front passenger seat and insert the cable. (Insert the cable while
recovering the weather strip.)
06. Arrange the wires. (B pillar)
07. After removing the weather strip on the rear right passenger seat and insert the cable. (Insert the cable
while recovering the weather strip.)
08. Arrange the wires. (C pillar)
09. Remove the top of the trunk weather strip.
10. Remove the trunk door trim.
11. Remove the fixing hook from the indoor ceiling.
12. Neatly arrange the cables that pass through the C pillar. (While recovering the weather strip, insert the
rear camera cable.)
13. Disconnect the tube from the trunk.
14. Ensure the rear camera cable penetrates the trunk connection tube.
15. Recover the trunk connection cable.
16. Attach the rear camera/arrange the wires (Indoor ceiling and door trim)
17. Perform an operation test for a rear camera (Test items: rear video recording check)
27
Page 37

© 2016 THINKWARE. All rights reserved.
Confidential Restricted
Order of mounting a rear camera _ SUV
②
③
Remove the top of
the trunk weather
strip.
※ The tasks up to C
pillar are same as
for a car.
Remove the trunk
door trim.
Remove the fixing
hook from the
indoor ceiling.
Ensure the cable
penetrating C
pillar passes
through the indoor
material(Ceiling)
and reaches the
tube in the top.
28
①
④
Page 38

© 2016 THINKWARE. All rights reserved.
Confidential Restricted
Order of mounting a rear camera _ SUV
⑥
Recover the
trunk
connection tube.
After mounting the
rear camera,
connect the cable in
the direction of arrow
as illustrated.
Disassemble the trunk
connection tube to be
sure the cable
penetrates.
Arrange the wires
at the
ceiling(indoor
material) and
assemble the
trunk door trim
and the weather
strip.
29
⑤
⑦
⑧
Page 39

© 2016 THINKWARE. All rights reserved.
Confidential Restricted
Testing operation of rear camera (Non LCD Type)
1. When connecting the rear camera, main unit will sound the voice guidance and reboot.
(“Rear view camera connected, system restarting.”)
2. From outside the vehicle, ensure the rear camera's LED is lit. Also when you see the rear
camera in the vehicle, lens of rear camera should be located on your left side.
3. Using the recorded video on the PC viewer, check that everything is ok.
30
(Ex : F750)
Page 40

© 2016 THINKWARE. All rights reserved.
Confidential Restricted
Testing operation of rear camera (LCD Type)
1. When connecting the rear camera, main unit will sound the voice guidance and reboot.
Ensure the rear view on the screen. (“Rear view camera connected, system restarting.”)
2. From outside the vehicle, ensure the rear camera's LED is lit. Also when you see the rear
camera in the vehicle, lens of rear camera should be located on your left side.
3. Using the recorded video on the PC viewer, check that everything is ok.
31
(Ex : X500)
Page 41

© 2016 THINKWARE. All rights reserved.
Confidential Restricted
After
Installation
Page 42

© 2016 THINKWARE. All rights reserved.
Confidential Restricted
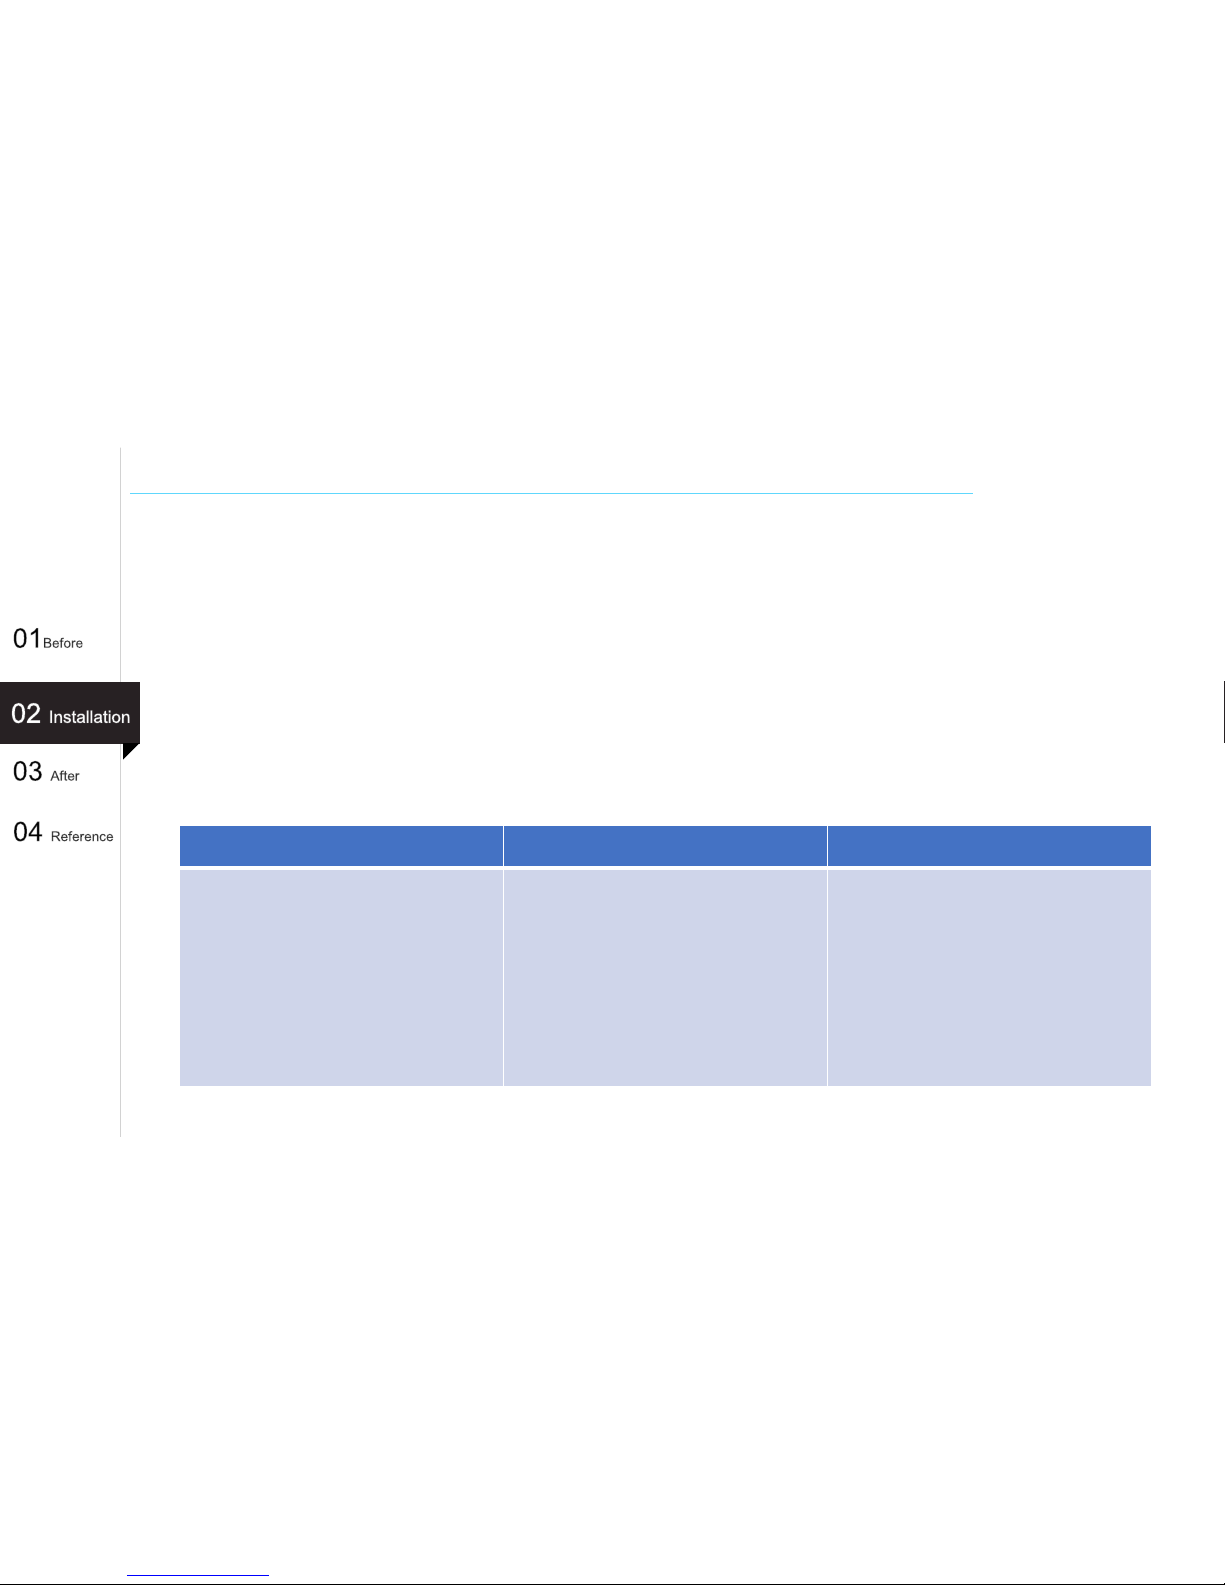
Items to check after mounting
NO Items to check Details
1 Lens protection vinyl
Check if the front/rear lens protection vinyl is removed.
2 Check a holder
From the front of the car, ensure there are no bubbles in the tape wrapping around
the holder.
3 Front/rear power supply
After powering up the dash cam, ensure the front/rear camera LEDs are lit.
4 Front/rear video Record for about two to three minutes and use the PC viewer to check the recording.
5 Check the camera angle
Check the front/rear video and see if you can see 1/8 to 1/4 of the bonnet.
6
Parking/event/motion
recording
Try to power off the car, and ensure you can enter the parking recording mode.
Check if impact/motion recording is activated in parking recording mode.
7 FM radio
Check if FM radio has noise. If there is too much noise in the radio, apply a ferrite
core to the hardwiring cable.
(You made a detour around the rear cable, but the problem persists.)
8 GPS/DMB
Scan the GPS/DMB channels and ensure they are received properly.
Check the separation to the navigation system and mount a ferrite core at the input
to the rear camera.
9 Door lock
Check how far away the door lock can receive the signals.
Separate the door lock receiver and mount a ferrite core at the input to the rear
camera.
32
Page 43

© 2016 THINKWARE. All rights reserved.
Confidential Restricted
Window PC VIEWER SETTING (Memory Card Settings)
Memory Partition
: Sets how storage space on the memory card
will be allotted for each recording mode
(preconfigured type A, B, and C).
Formatting memory card
: Formats the microSD card. Note that dash cam
settings are restored after formatting the
memory card.
[Caution]
- It is recommended that you back up data
before formatting the memory card.
- Once you format the memory card, all data will
be deleted and cannot be restored.
- The method for formatting a microSD card
might vary depending on the computer
operating system.
33
Overwriting video
: The oldest file is deleted if the total size of the
recorded videos in the checked folder exceeds
the storage capacity of the memory card.
Page 44

© 2016 THINKWARE. All rights reserved.
Confidential Restricted
Window PC VIEWER SETTING (Camera Settings)
Brightness : Sets the brightness of the front and
rear view camera.
Wide Dynamic Range
: Sets the WDR mode to record clear videos
under large variation of backlighting
illumination.
34
Page 45

© 2016 THINKWARE. All rights reserved.
Confidential Restricted
Window PC VIEWER SETTING (Road safety Settings)
Road safety Warning
: Sets the audible notifications for road
safety warnings
LDWS (Lane Departure Warning)
: Sets the LDWS driver assistance notification
Vehicle type
: Sets the vehicle type to be used to optimize
Advanced Driver Assistance Systems (ADAS)
features
LDWS sensitivity
: Sets the lane departure detection sensitivity
(It is recommended that the sensitivity is
set at high level for wider vehicles)
35
Page 46

© 2016 THINKWARE. All rights reserved.
Confidential Restricted
Window PC VIEWER SETTING (Road safety Settings)
LDWS speed
: Sets the speed at which the LDWS
notification is enabled. LDWS warning will
only be notified to the driver when the
vehicle veers off the lane travelling at the
configured speed.
FCWS (Forward Collision Warning)
: Sets the FCWS driver assistance notification
FCWS sensitivity
: Sets the forward collision detection
sensitivity
36
[X500 function]
- FVDW(Front Vehicle Departure Warning)
: Front vehicle departure warning alerts the driver when the vehicle ahead starts to move
forward from a complete stop.
- The vehicle must be at a complete stop for more than 4 seconds in order for the FVDW
notification to be activated.
Page 47

© 2016 THINKWARE. All rights reserved.
Confidential Restricted
Window PC VIEWER SETTING (Record Settings)
Impact Sensitivity
: Set impact sensitivity from Level 1 to 5
(1 is least sensitive/ 5 is most sensitive).
Parking Mode
: Monitors vehicle ignition status to
automatically convert to parking mode
when the vehicle engine is turned off.
37
Page 48

© 2016 THINKWARE. All rights reserved.
Confidential Restricted
Window PC VIEWER SETTING (Record Settings)
Motion detection
: Sets motion detection sensitivity from
Levels 1 to 5.
Timer Setting to Stop Recording
: Dash cam can be configured to stop
recording after a preset time period
during parking surveillance mode in order
to prevent the vehicle battery from being
discharged.
- Time Range : 1-48 hours
38
Battery Voltage Setting for Stop Recording
: Dash cam can be configured to automatically shut down when battery voltage drops below preset
value during parking surveillance mode in order to prevent the vehicle battery from being discharged.
Vehicle voltage 12V - 11.7V-12.4V (changeable by 0.1V)
Vehicle voltage 24V - 23.4V-24.8V (changeable by 0.2V)
Page 49

© 2016 THINKWARE. All rights reserved.
Confidential Restricted
Window PC VIEWER SETTING (System Settings)
Language : Sets the language for the device
Voice Guidance
: Set the volume of voice guidance from off
to Level 3.
Time Zone : Sets date and time of the
location (time zone).
39
[F750 function]
- Security LED
: Sets the pattern of the Security LED which is used to visually alert other drivers that the vehicle is
equipped with functional dash cam.
Mode 1 (moving side to side) : LED moves between left and right.
Mode 2 (blinking) : The entire LED blinks every 0.5 seconds.
Mode 3 (expanding) : LED expands and fades out to both sides originating in the center.
Disabled : Security LED is turned off (default).
Page 50

© 2016 THINKWARE. All rights reserved.
Confidential Restricted
Window PC VIEWER SETTING (System Settings)
Daylight Saving Time
: Sets the daylight saving time (DST) on/off
Speed Unit
: Sets unit for the vehicle speed
(Km/h or mph)
40
Page 51

© 2016 THINKWARE. All rights reserved.
Confidential Restricted
[X500 function]
- LCD Brightness
: Sets the brightness of the LCD screen (0~2)
- LCD Auto-Off : Sets the time for LCD auto shut
off.
When LCD is off, pressing any
button will turn the LCD screen
back on
41
Window PC VIEWER SETTING (System Settings)
- Security LED : Sets the pattern of the Security LED which is used to visually alert other drivers
that the vehicle is equipped with functional dash cam.
Mode 1 (circular) : LED moves circular
Mode 2 (blinking) : The entire LED blinks.
Mode 3 (depends on recording mode) : LED depends on recording mode.
Disabled : Security LED is turned off (default).
Page 52

© 2016 THINKWARE. All rights reserved.
Confidential Restricted
Window PC VIEWER SETTING (Initializing and saving the settings)
Apply and Save Settings
① Click Save after changing settings to
store the configuration information on
the microSD card.
② The setting file is stored on the microSD
card as setup.cfg under Setting folder.
③ Insert the microSD card into the dash
cam and turn on the device to apply
the settings.
[Caution]
Thinkware Dash Cam Viewer requires
setup.cfg file on the microSD card in order
to recognize the external drive as a dash
cam memory device. If setup.cfg is deleted
or corrupted, PC Viewer will not be able to
read videos or device settings on the
microSD card. In such case, insert the
microSD card back into the dash cam and
power on the device to reinitialize thus
creating a setup.cfg file with default
settings.
42
Initialize
: resets the device settings to default factory settings.
Page 53

© 2016 THINKWARE. All rights reserved.
Confidential Restricted
MAC PC VIEWER SETTING (Common)
Language : Sets the language for the device
Brightness : Sets the brightness of the front and
rear view camera.
Voice Guidance
: Set the volume of voice guidance from off
to Level 3.
43
Page 54

© 2016 THINKWARE. All rights reserved.
Confidential Restricted
MAC PC VIEWER SETTING (Common)
Time Zone : Sets date and time of the
location (time zone).
Daylight Saving Time
: Sets the daylight saving time (DST) on/off
Speed Unit
: Sets unit for the vehicle speed
(Km/h or mph)
[X500 function]
- LCD Brightness
: Sets the brightness of the LCD screen (0~2)
- LCD Auto-Off : Sets the time for LCD auto shut
off.
When LCD is off, pressing any
button will turn the LCD screen
back on
44
Page 55

© 2016 THINKWARE. All rights reserved.
Confidential Restricted
MAC PC VIEWER SETTING (Continuous Mode)
Impact Sensitivity
: Set impact sensitivity from Level 1 to 5
(1 is least sensitive/ 5 is most sensitive).
Road safety Warning
: Sets the audible notifications for road
safety warnings
Wide Dynamic Range
: Sets the WDR mode to record clear videos
under large variation of backlighting
illumination.
Vehicle type
: Sets the vehicle type to be used to optimize
Advanced Driver Assistance Systems (ADAS)
features
LDWS (Lane Departure Warning)
: Sets the LDWS driver assistance notification
45
Page 56

© 2016 THINKWARE. All rights reserved.
Confidential Restricted
MAC PC VIEWER SETTING (Continuous Mode)
LDWS sensitivity
: Sets the lane departure detection sensitivity
(It is recommended that the sensitivity is
set at high level for wider vehicles)
LDWS speed
: Sets the speed at which the LDWS
notification is enabled. LDWS warning will
only be notified to the driver when the
vehicle veers off the lane travelling at the
configured speed.
46
Page 57

© 2016 THINKWARE. All rights reserved.
Confidential Restricted
FCWS (Forward Collision Warning)
: Sets the FCWS driver assistance notification
FCWS sensitivity
: Sets the forward collision detection
sensitivity
[X500 function]
- FVDW(Front Vehicle Departure Warning)
: Front vehicle departure warning alerts the
driver when the vehicle ahead starts to move
forward from a complete stop.
The vehicle must be at a complete stop for
more than 4 seconds in order for the FVDW
notification to be activated.
47
MAC PC VIEWER SETTING (Continuous Mode)
Page 58

© 2016 THINKWARE. All rights reserved.
Confidential Restricted
MAC PC VIEWER SETTING (Parking Mode)
Parking Mode
: Monitors vehicle ignition status to
automatically convert to parking mode
when the vehicle engine is turned off.
Impact Sensitivity
: Set impact sensitivity from Level 1 to 5
(1 is least sensitive/ 5 is most sensitive).
Motion detection
: Sets motion detection sensitivity from
Levels 1 to 5.
Timer Setting to Stop Recording
: Dash cam can be configured to stop
recording after a preset time period
during parking surveillance mode in order
to prevent the vehicle battery from being
discharged.
- Time Range : 6-48 hours
48
Page 59

© 2016 THINKWARE. All rights reserved.
Confidential Restricted
Battery Voltage Setting for Stop Recording
: Dash cam can be configured to automatically
shut down when battery voltage drops below
preset value during parking surveillance mode
in order to prevent the vehicle battery from
being discharged.
- Vehicle voltage 12V - 11.6V-12.4V
(changeable by 0.1V)
- Vehicle voltage 24V - 23.2V-24.8V
(changeable by 0.2V)
49
MAC PC VIEWER SETTING (Parking Mode)
Page 60

© 2016 THINKWARE. All rights reserved.
Confidential Restricted
MAC PC VIEWER SETTING (Additional Functions)
Overwriting video
: The oldest file is deleted if the total size of the
recorded videos in the checked folder exceeds
the storage capacity of the memory card.
Memory Partition
: Sets how storage space on the memory card
will be allotted for each recording mode
(preconfigured type A, B, and C).
[X500 function]
- Security LED : Sets the pattern of the Security LED which is used to visually alert other drivers
that the vehicle is equipped with functional dash cam.
Mode 1 (circular) : LED moves circular
Mode 2 (blinking) : The entire LED blinks.
Mode 3 (depends on recording mode) : LED depends on recording mode.
Disabled : Security LED is turned off (default).
50
Page 61

© 2016 THINKWARE. All rights reserved.
Confidential Restricted
51
MAC PC VIEWER SETTING (Additional Functions)
[F750 function]
- Security LED
: Sets the pattern of the Security LED which is used to visually alert other drivers that the vehicle is
equipped with functional dash cam.
Mode 1 (moving side to side) : LED moves between left and right.
Mode 2 (blinking) : The entire LED blinks every 0.5 seconds.
Mode 3 (expanding) : LED expands and fades out to both sides originating in the center.
Disabled : Security LED is turned off (default).
Page 62

© 2016 THINKWARE. All rights reserved.
Confidential Restricted
MAC PC VIEWER SETTING (Initializing and saving the settings)
52
Apply and Save Settings
① Click Save after changing settings to
store the configuration information on
the microSD card.
② The setting file is stored on the microSD
card as setup.cfg under Setting folder.
③ Insert the microSD card into the dash
cam and turn on the device to apply
the settings.
[Caution]
Thinkware Dash Cam Viewer requires
setup.cfg file on the microSD card in order
to recognize the external drive as a dash
cam memory device. If setup.cfg is deleted
or corrupted, PC Viewer will not be able to
read videos or device settings on the
microSD card. In such case, insert the
microSD card back into the dash cam and
power on the device to reinitialize thus
creating a setup.cfg file with default
settings.
Initialize
: resets the device settings to default factory settings.
Page 63

© 2016 THINKWARE. All rights reserved.
Confidential Restricted
Reference
Page 64

© 2016 THINKWARE. All rights reserved.
Confidential Restricted
FAQ (How to check the power/booting failure/rebooting)
Symptoms Diagnosis and troubleshooting plans
How to check
power/booting
failures/rebooting
○ Check if the hardwiring cable is wrongly wired or if the terminal is defective.
▶ Replace the main body of dash cam. If the power is on properly, then you can see that the product was defective.
▶ If there is no power after replacing the dash cam, then suspect there is something wrong with the wiring.
- Check if the GND connection is ok.
○ Check if the SD card is defective.
▶ Insert a normal SD card and ensure everything is ok.
- A defective SD card can cause booting failures or rebooting.
○ Check the B+ wirings.
▶Check the fuse connected to B+. After some time, check if the dash cam is terminated.
- Each car has its own characteristics. If the indoor lamp is B+, after some time, it can be accidentally turned off.
※ If you have a power supply, connect it to your product to perform tests. You can see if the product or the cable is
defective.
○ Check the power jack.
▶ If the power jack is not correctly connected and has poor contact, it can cause repeated rebooting and the problem can
be recognized as a power failure.
53
Page 65

© 2016 THINKWARE. All rights reserved.
Confidential Restricted
FAQ (Cannot enter the parking mode, impact recording/sensitivity, SD card insertion announcement)
Symptoms Diagnosis and troubleshooting plans
Cannot enter parking
mode
○ Product that enters the parking mode by supporting ACC (hardwiring cable- wire 3)
▶Check if the ACC side cable has poor contact.
- Check if the cable is disconnected from the fuse. Check for cut wires, etc..
▶ Check if it is an ACC fuse.
- After connecting a wiring tester to the fuse connected to ACC, test ACC/ACC OFF.
- If ACC is connected to B+, it will only operate in continuous mode but it cannot enter parking mode.
○ Product that enters the parking mode by checking the voltage (hardwiring cable- wire 2)
▶ On the PC viewer, check if the parking mode is used and check the voltage setting.
※ If you have a power supply, connect it to your product to perform tests. You can see if the product or the cable is
defective.
Impact
recording/sensitivity
○ How to check if recording is done when there is an impact
▶ Adjust the impact sensitivity and perform tests.
○ What to check if it enters the impact recording mode too frequently
▶ On the PC viewer, reduce the sensitivity level.
SD card insertion
announcement heard
○ Check if your SD card is inserted properly.
▶If your SD card is inserted properly, try to insert it again repeatedly.
○ Check if the SD card is defective.
▶ Insert a normal SD card to the defective dash cam and see if you hear the SD card insertion announcement.
▶ Insert a defective SD card to the PC and see if it is detected properly.
- When you see the format guidance text, format it and then reconnect to the dash cam and check again.
※ A dash cam's SD card is a consumable. The warranty period last for six months. If it is defective, purchase a new one.
54
Page 66

© 2016 THINKWARE. All rights reserved.
Confidential Restricted
FAQ (How to check if the SD card detection is ok)
Symptoms Diagnosis and troubleshooting plans
How to check if the SD
card detection is okay
1. Connect the SD card to the PC.
2. Check the drive of the SD card. (ex E:, F: etc)
3.
Select Start > Command Prompt and enter CMD.
4. Enter the chkdks drive name and press the Enter key.
(ex : chkdsk d: ) You can check if the SD card is ok.
5. If the file is corrupted, proceed with recovery.
6. If the following problem persists, format the SD card. If
impossible to format it, replace it with a new one.
55
Page 67

© 2016 THINKWARE. All rights reserved.
Confidential Restricted
FAQ (Cannot connect Wi-Fi _ F750)
Symptoms Diagnosis and troubleshooting plans
Cannot connect
Wi-Fi
When you cannot connect Wi-Fi on mobile app, check the
following steps.
1. Press briefly the Wi-Fi button on the dash cam to enter
Wi-Fi connection mode.
2. Device will sound “Wi-Fi enabled”
3. Make sure to turn on the Wi-Fi in the device setting. In
the Thinkware Dash Cam Mobile Viewer application, turn
on the Wi-Fi option, select “Thinkware_000000” from
SSID list, and enter password as “123456789” Password
is only required during first time you try to connect. The
device will auto-connect in subsequent connections.
4. If password is not correct or cannot connect Wi-Fi, press
and hold REC and FORMAT buttons simultaneously to
reset the device settings to default factory.
5. After initialize, Wi-Fi password will be changed
to ”123456789”. Enter password to connect Wi-Fi again.
6. If there is no SSID list such as “Thinkware_000000” on
smartphone, turn off the dash cam and then boot on to
connect again.
※ Dash cam will automatically turn off the Wi-Fi connection
mode if not connected within 1 minute.
56
Page 68

© 2016 THINKWARE. All rights reserved.
Confidential Restricted
FAQ (Cannot use road safety warning function _ X500)
Symptoms Diagnosis and troubleshooting plans
Cannot use road safety
warning function
When you cannot use road safety waring function such as
Safety Camera Alert and ADAS(Advanced Driver Assistance
Systems), check the following steps.
1. Check the Road safety settings. “Main Menu >
Settings > Road Safety Settings > Safety Camera Alert”
2. Adjust the location of dash cam with the following
image.
3. Check the GPS is connected on the screen. If GPS status
icon is blue, it means that dash cam cannot find GPS
signal. Reset GPS by selecting
“Main Menu > About Device > GPS info > Reset GPS”
57
Page 69

© 2016 THINKWARE. All rights reserved.
Confidential Restricted
FAQ (Supported Micro SD memory card)
※ If you use any other Micro SD memory card(not product of THINKWARE DASH CAM), we
do not assure to act dash cam properly.
58
Models
Supported Micro SD memory card
8GB 16GB 32GB 64GB
F750
X
X500
X
Page 70

© 2016 THINKWARE. All rights reserved.
Confidential Restricted
RF Interference Problem
Symptoms Diagnosis and troubleshooting plans
RF interference problems
○ How to check RF interference and degradation
1) Check if the main body of the dash cam is the cause of the problem.
- Turn on/off the dash cam to see if RF interference exists.
2) Check if the rear camera is the cause of the problem.
- Before and after checking the rear camera terminal, compare the two conditions.
3) Check if the wiring is the cause of the problem.
- Before wiring it, first assess the locations of various devices in the car.
- Make pre wirings to check in stages.
○ Degraded sensitivity for radios and DMB
1) Check the wiring and separate it from the continuous power supplies.
2) Apply four sets of ferrite cores to the hardwiring cable.
○ Improving the door lock / TPMS(Tire Pressure Monitoring System) / remote controller with shorter receiving
distance
1) Make sure that the remote controller's receiving unit (antenna) is at least
15 to 20cm away from the continuous power supply/rear power cable.
2) Make sure the instantaneous power supply for the dash cam is separated
far away from the privately made power supply(continuous).
- In case that the space is insufficient or there is interference among
continuous power supplies, mount a ferrite core.
59
Page 71

© 2016 THINKWARE. All rights reserved.
Confidential Restricted
Remove the mounting of dash cam or rear camera
Symptoms Diagnosis and troubleshooting plans
Remove the mounting of
dash cam or rear camera
When you want to remove the mounting of dash cam or rear camera, use a heat gun. In that way you can
remove 3M tape easily and clearly(no sticky).
1. Activate heat gun heading towards 3M tape, outside of the windshield.
2. And then detach the mountings or rear camera.
3. But it can be difficult and danger to use for beginner, please read the instructions before use or receive
support from specialist.
4. After remove the mounting of dash cam or rear camera, 3M tape lost their adhesive strength. So you need to
get new 3M tape for reusing.
60
Page 72

© 2016 THINKWARE. All rights reserved.
Confidential Restricted
It is common sense to avoid obstructing the field of view of the driver, so the recommended
location for a dash cam is behind the rear view mirror; however there are also legal
considerations. If you use a suction mounted car camera in the UK, if the device (camera and /
or cradle and / or suction cup) intrudes more than 4cm into the secondary (pink) wiper clearance
zone, or intrudes more than 1cm into the primary (red) wiper clearance zone of the windscreen,
you are committing a serious traffic offence (dangerous driving) under the UK Road Traffic Act
1988, and your vehicle is not roadworthy (it would fail an MOT).
Installation Location of Dash cams in the UK
61
Page 73

© 2016 THINKWARE. All rights reserved.
Confidential Restricted
Also in addition, if you use a car camera with an LCD screen, if the screen is on for any of the
time while you are driving and you, the driver, can view that screen, you are also committing a
serious traffic offence.
The company selling a windscreen suction mounted car camera has a legal duty to ensure a)
that the camera can actually be attached to a section of the windscreen of the vehicle which
does not result in an unlawful intrusion of the primary (red) and / or secondary (pink) wiper
clearance zone, b) that the screen does not remain on or visible to the driver and c) that the
user is aware of the law. If the company sells a suction mounted car camera without doing this,
they have committed a crime.
Installation Location of Dash cams in the UK
62
Page 74

© 2016 THINKWARE. All rights reserved.
Confidential Restricted
 Loading...