


Motorsports Cam
M1
Quick Start Guide
& Warranty
www.thinkware.com
ACMA-024TAM102

Contents
English |
|
2 |
|
||
Français |
|
18 |
|
||
Deutsch |
|
36 |
|
||
Español |
|
54 |
|
||
Italiano |
|
72 |
|
||
Русский |
|
90 |
|
||
|
|
108 |
|
||
|
|
125 |
|
||
|
|
141 |
|
||
|
|
157 |
|
Quick Start Guide
& Warranty
English
Before using the product
This product records videos while the motorcycle is operating. Use this product only for reference when investigating incidents or road accidents. This product is not guaranteed to record ALL events. The device may not properly record accidents with small impacts that are too minor to activate the impact sensor or accidents with massive impacts that cause the motorcycle’s battery voltage to deviate.
Video recording does not begin until the product is completely turned on (booted up). To ensure that all motorcycle events are recorded, wait until the product is completely booted up after turning it on, and then begin operating the motorcycle.
THINKWARE is not responsible for any loss caused by an accident, nor is it responsible for providing any support regarding the outcome of an accident.

FCC Statement
This device complies with Part 15 of the FCC Rules. Operation is subject to the following two conditions: (1) this device may not cause harmful interference, and (2) this device must accept any interference received, including interference that may cause undesired operation.
This equipment has been tested and found to comply with the limits for a Class B digital device, pursuant to Part 15 of the FCC Rules. These limits are designed to provide reasonable protection against harmful interference in a residential installation. This equipment generates, uses and can radiate radio frequency energy and, if not installed and used in accordance with the instructions, may cause harmful interference to radio communications. However, there is no guarantee that interference will not occur in a particular installation. If this equipment does cause harmful interference to radio or television reception, which can be determined by turning the equipment off and on, the user is encouraged to try to correct the interference by one or more of the following measures:
•Reorient or relocate the receiving antenna.
•Increase the separation between the equipment and receiver.
•Connect the equipment to an outlet on a circuit different from that to which the receiver is connected.
•Consult the dealer or an experienced radio/TV technician for help.
•This appliance and its antenna must not be co-located or operation in conjunction with any other antenna or transmitter.
FCC CAUTION: Any changes or modifications to the equipment not expressly approved by the party responsible for compliance could void your authority to operate the equipment.
FCC ID: 2ADTG-M1
English
Information to user : RSS-247
This device complies with Industry Canada’s licence-exempt RSSs.
Please be cautioned the changes or modifications not expressly approved by the party responsible for compliance could void the user’s authority to operate the equipment.
Notice: Operation is subject to the following two conditions : (1) this device may not cause interference, and (2) this device must accept any interference, including interference that may cause undesired operation of the device.
This Class B digital apparatus complies with Canadian ICES-003. IC: 12594A-M1
United States Representative
Company Name: Thinkware Systems USA Inc.
Address: 18021, Sky Park Circle, STE J2, Irvine, CA, 92614, USA
Telephone Number: +1-949-553-0530
E-mail: support@thinkware.com
3

Safety information
Read the following safety information to properly use the product.
Safety symbols in this guide
 "Warning" - Indicates a potential hazard, which, if not avoided, may result in injury or death.
"Caution" - Indicates a potential hazard, which, if not avoided, may result in minor injury or property damage.
 "Note" - Provides useful information to help users better utilize the product's features.
During use of the product
• Do not operate the product while driving a motorcycle. Distraction while driving may cause accidents and result in injury or death.
•Firmly install the product to the motorcycle. The product may fall during motorcycle operation if it is not properly mounted. Improper mounting may lead to accidents that result in injury or death.
•Do not install the product in a place exposed to flammable gas. Doing so may result in fire or an explosion.
•Do not use the product in a place with high humidity or temperature. It may cause malfunction of the product, explosion, or fire.
•Ensure that the product is out of the reach of children and pets. If the product breaks, it may
result in fatal damage.
•Do not leave the product exposed to direct sunlight. Failure to do so may result in malfunction of the internal electronic circuit or a lens.
•Do not fully submerge the product in water. Doing so may damage the product.
•Do not disassemble the product or subject the product to impact. Doing so may damage the product. Unauthorized disassembly of the product voids the product warranty.
•Do not apply excessive force or use a sharp object when pressing the buttons. Doing so may damage the buttons.
•Do not clean the product with chemicals or detergent. Doing so may damage the product. Clean the product using a clean, soft, dry fabric.
•Ensure that the memory card is in the correct direction before inserting it into the product. The memory card slot or the memory card may be damaged if it is inserted incorrectly.
•Do not use the product outside for a prolonged period of time when it is raining. Doing so may cause water damage to the product.
•Use the product at a temperature between 14°F and 140°F (-10°C to 60°C) and store the product at a temperature between -4°F and 158°F (-20°C to 70°C). The product may not function as designed and some permanent physical damages may result if it is operated or stored out of the specified temperature ranges. Such damages are not covered by the warranty.
•Frequently check the product for the proper installation position. Impact caused by extreme road conditions may alter the installation position. Ensure that the product is positioned as instructed in this guide.
4

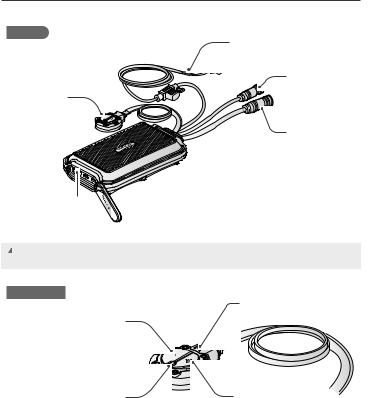
Product overview
Ensure that all the items are included in the product box when you open it. The standard items may change without prior notice.
Main unit/integrated remote control |
Front camera |
Rear camera |
|
(power cable included) |
|||
|
|
||
Mount |
Quick start guide & Warranty / |
microSD memory card |
|
CS information |
|||
|
|
Check the thickness of each cable to identify the front camera and the rear camera. The front camera cable is thicker than the rear camera cable.
English
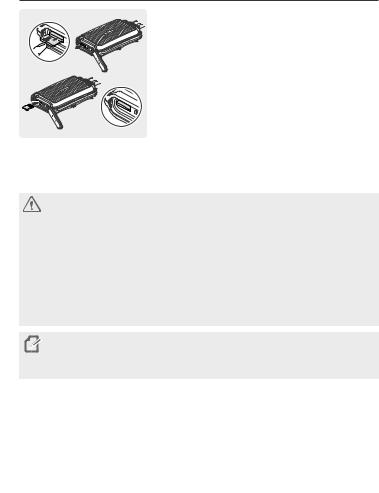
Removing and inserting the memory card
Removing the memory card
1 |
Ensure that the product is turned off, and then gently push |
|
the memory card into the slot with the tip of your finger. |
The memory card will be partially ejected from the product. 2 Remove it from the product.
Inserting the memory card
Insert the memory card into the memory card slot, paying attention to the direction of the memory card, and then push the memory card into the slot until you hear a click. Before inserting the memory card, ensure that the metal contacts on the memory card are facing toward the buttons of the product.
•Ensure that the product is turned off before removing the memory card. The recorded video files may be corrupted or lost if you remove the memory card while the product is on.
•Ensure that the memory card is in the correct direction before inserting it into the product. The memory card slot or the memory card may be damaged if it is inserted incorrectly.
•Use only authentic memory cards from THINKWARE. THINKWARE does not warrant the compatibility and normal operation of third-party memory cards.
•The memory card is covered by warranty against malfunctions for 6 (six) months from the purchase date. If the memory card fails to work after the warranty period, purchase a new one from THINKWARE or its authorized retailers.
•To prevent loss of recorded video files, periodically back up the video files on a separate storage device.
•For the best recording performance, format the memory card quarterly.
5
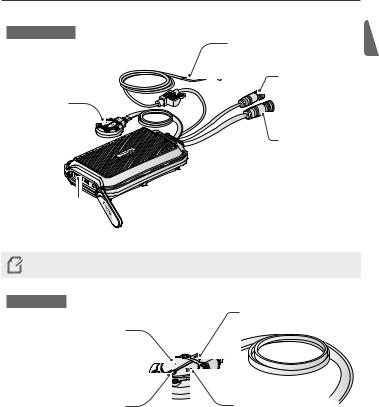
Part names
The product design may change without prior notice.
Main unit
Remote control
Used to control the product.
Memory card slot
Insert a memory card to save recordings.
Power cable
Connect each wire (ACC, GND) to your motorcycle’s battery.
Rear camera port
Used to connect the
product to the rear
camera. (thin cable)
Front camera port
Used to connect the product to the front camera.
(thick cable)
Check the thickness of each cable to identify the front camera and the rear camera. The front
 camera cable is thicker than the rear camera cable.
Remote control
Manual recording button
Press to start manual recording.
Status LED
Indicates the product status.
* The AP mode allows the product to operate as a router (HUB).
Microphone
Used for voice recording.
Wi-Fi button
Press to turn on the AP mode* that connects the product to a smartphone via Wi-Fi network.
6

Front/Rear camera
Horizontal reference point
Attach the product to the mount based on the marked point (  ).
).
Front/Rear camera lens 
Records the front view.
Camera cable 
Connect to the main unit’s camera port.
Check the thickness of each cable to identify the front camera and the rear camera. The front camera cable is thicker than the rear camera cable.
English
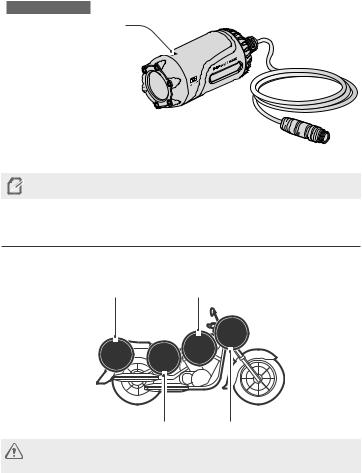
Installing the product
The following illustration shows the proper installation locations on a motorcycle for each part of the product. Select the appropriate installation locations and follow the instructions to properly install the each part of the product.
Rear camera |
Remote control |
Main unit |
Front camera |
The hardwiring cable must be professionally installed on the motorcycle by a trained mechanic. It may result in fire or electric shock if the product is installed incorrectly.
7

Attach the main unit to the inner part of the motorcycle, such as the inside of the seat.
Firmly attach the product to the motorcycle. The product may become detached while driving if it is not firmly attached.
Remove the protective film from the remote control, and attach it where it can be used easily without obstructing vehicle operation.
For safe driving, arrange the cables to prevent the driver's vision from being obstructed or from interfering with driving.
Before attaching the product, wipe the installation surface of the windshield with a dry cloth. If foreign objects remain on the surface and the product cannot be attached firmly, it may become detached from the installation location while driving.
1 Remove the protective film from the mount and attach it to a place where the cameras can record both front and rearview.
Before attaching the product, wipe the installation surface of the
windshield with a dry cloth. If foreign objects remain on the surface and the product cannot be attached firmly, it may become detached from the installation location while driving.
1
2
2 Attach the camera to the mount as indicated by the horizontal reference point, and firmly tighten the screws using a wrench.
Tighten the bolts firmly to fix the front/rear camera to the mount. The camera may become detached from the mount while driving if the screws are not firmly tightened.
To adjust the angle of the front/rear camera, appropriately tighten the screws attached to the mount.
Insert the camera cable into the camera port by lining up the guide marks ( ) on the camera cable and the port. Rotate the port clockwise until it is tight to secure the connection.
To disconnect the camera cable from the camera port, rotate the port
counterclockwise until it is loose, and then pull the connectors apart.
For safe driving, arrange the cables to prevent the driver's vision from being obstructed or from interfering with driving.
English
9

Connecting the power cable
Connect the power cable (ACC, GND) to the motorcycle key-on wiring.
• The hardwiring cable must be professionally installed on the motorcycle by a trained mechanic. It may result in fire or electric shock if the product is installed incorrectly.
•Ensure the wiring is completed correctly after connecting the power cable (ACC, GND) to the motorcycle key-on wiring. Failure to do so may damage the product or the motorcycle.
Turning the product on or off
The product turns on automatically and continuous recording starts when you turn on the ACC or start the engine. To turn off the product, turn off the ACC or stop the engine. The product will turn off automatically.
Using the continuous recording feature
The continuous recording starts when the product is turned on. During continuous recording, the product operates as follows.
Operation description |
Status LED |
|
|
|
|
During driving, videos are recorded in 1 minute segments and stored in |
Blue (light on) |
|
the "cont_rec" folder. |
||
|
||
|
|
• Wait until the product is fully ready to operate after turning it on, and then start driving. Video recording does not start until the product is completely turned on.
•Park your motorcycle in a safe location before using or configuring product settings.
•The product will stop recording while configuring settings on the THINKWARE CLOUD application.
•Check the recorded video on the application or PC only. If you insert the memory card directly into a smart device, such as a smartphone or a tablet PC, and play the recorded videos, the video files may be lost.
 Videos are stored in the following folders, according to their recording mode.
On the application |
Continuous recording |
Manual recording |
|
|
|
In the memory card |
cont_rec |
manual_rec |
10

Recording manually
You can record a scene you want to capture while driving and store it as a separate file.
Operation description |
Status LED |
When you press the manual recording ( REC ) button, a video will be
recorded for 1 minute, from 10 seconds before to 50 seconds after Blue (flickers) pressing the button, and stored in the "manual_rec" folder.
Checking the status LED
Refer to the following table to check the status LED.
Operation status |
Status LED |
|
|
|
|
Recording continuously |
Blue (light on) |
|
|
|
|
Recording manually |
Blue (flickers) |
|
|
|
|
Searching for the application to connect |
Green (light on) |
|
|
|
|
The product is connected to the application |
Green (flickers) |
|
|
|
|
Upgrading firmware through the application |
Red (light on) |
|
|
|
|
• An error occurred with the connection |
|
|
between the front/rear camera and the main unit |
Red (flickers) |
|
• An error occurred with the connection |
||
|
||
between the memory card and the main unit |
|
|
|
|
|
Turning on the product |
Blue + Green + Red |
|
(flickers) |
||
|
||
|
|
English
11

Using the THINKWARE CLOUD application
You can view and manage recorded videos and configure various product features with your smartphone. Download the “THINKWARE CLOUD” application via the Google Play Store or Apple App Store and install it on your smartphone.
 THINKWARE CLOUD application does not support cloud service for this model.
Connecting the application to the product
Connecting via Wi-Fi
1Turn on the motorcycle or start the engine to turn on the product, and launch the THINKWARE CLOUD application on your smartphone.
2Tap Dash cam connection is required. at the bottom of the screen.
3Press the Wi-Fi( ) button on the remote control and tap connect in the Wi-Fi connection area at the top of the screen.
4Tap Next on the Wi-Fi activating screen.
5Tap Wi-Fi Settings on the Wi-Fi Connecting screen. The Wi-Fi Settings screen will appear.
6From the network list, select the Wi-Fi network starting with "Thinkware" and enter "123456789" in the Password field. For security purposes, change the Wi-Fi password after the Wi-Fi network is connected.
7Return to the THINKWARE CLOUD application and check Dash cam is connected via Wi-Fi at the bottom of the main screen. The product is now connected to the application.
• To disconnect the product from the application, tap Dash cam is connected via Wi-Fi at the bottom of the main screen, and tap Confirm on the disconnection pop-up message. The product is now disconnected from the application.
•If you disconnect the product and the application after you connect them for the first time, you can reconnect them by tapping Connect Hotspot in the Quick Connect window and following the instructions on the application.
•To connect a new smartphone to the product, press the Wi-Fi( ) button on the remote
control.
12

Connecting via hotspot
1 |
Turn on the motorcycle or start the engine to turn on the product, and launch the THINKWARE |
English |
||
|
||||
|
CLOUD application on your smartphone. |
|
||
2 |
|
|
||
|
|
|
|
|
Tap Dash cam connection is required. at the bottom of the screen. |
|
|||
3 Press the Wi-Fi( ) button on the remote control and tap connect on the Hotspot connection area at the bottom of the screen and tap Configure New Connection.
4 Tap Next on the Wi-Fi activating screen.
5 Tap Wi-Fi Settings on the Wi-Fi Connecting screen. The Wi-Fi Settings screen will appear.
6 From the network list, select the Wi-Fi network starting with "Thinkware" and enter "123456789" in the Password field. For security purposes, change the Wi-Fi password after the Wi-Fi network is connected.
7 Return to the THINKWARE CLOUD application, enter your smartphone hotspot SSID and password, and tap Next.
8 Tap Turn on hotspot on the hotspot activation screen.
9 Allow the THINKWARE CLOUD application to access on your smartphone settings.
10Return to the THINKWARE CLOUD application and tap Turn on hotspot on the hotspot activation screen.
11 Wait until the product is connected with your smartphone. You can see Dashcam is connected via hotspot. on the screen when the product is connected with your smartphone.
• To disconnect the product from the application, tap Dash cam is connected via Wi-Fi at the bottom of the main screen, and tap Confirm in the disconnection pop-up message. The product is now disconnected from the application.
• If you disconnect the product and the application after you connect them for the first time, you can reconnect them by tapping Connect Hotspot in the Quick Connect window and following the instructions on the application.
• To connect a new smartphone to the product, press the Wi-Fi( ) button on the remote control.
13

THINKWARE CLOUD application screen
View and play recorded videos.
View the product information.
View main menu.
Move to the Live view screen.
View or configure the dash cam (product) settings.
View the connected Wi-Fi network or add a new network.
Displays the connection status of the product.
View menus for setting up your account, downloading the latest firmware,
or safety camera data.
14

Settings
1 |
Connect the product and the THINKWARE CLOUD application and tap Dash Cam Settings on the |
|
|
application. |
|
2 You can set the product features based on your needs and preferences. |
||
|
|
|
|
Options |
Description |
|
|
|
|
|
• Format the memory card |
|
Memory card Managing |
• Partition the memory card |
|
|
• Configure the video overwriting feature |
|
|
|
|
Camera settings |
• Set the brightness of the front/rear camera |
|
• Reverse the rear view upside down |
|
|
|
|
|
|
|
|
Recording features settings |
Turn the Super Night Vision feature* and the Daytime Video |
|
Stabilization* on/off. |
|
|
|
|
|
|
|
|
System settings |
Select a language to display on the application. |
|
|
|
English
* You can record bright, high-resolution videos at night if you activate the Super Night Vision feature.
** Stabilize the videos recorded during the day. Except for during the daytime, normal recording is performed.
Checking recorded images and videos
Follow the instructions to check recorded images and videos.
1
2
Connect the product and the application and tap File List on the application.
Choose the recording mode (Continuous/Manual recording) of the recorded video and play the video you want.
•Park your motorcycle in a safe location before checking the video.
•The product will stop recording while checking the file list or playing the video.
•Check the recorded video on the application or PC only. If you insert the memory card directly into a smart device, such as a smartphone or a tablet PC, and play the recorded video, the file may be lost.
•Vehicle identification numbers may be difficult to identify depending on the relative speed of the vehicle and the lighting conditions of the road.
15

Specifications
Items |
Specification |
|
|
|
|
Model name |
M1 |
|
|
|
|
Front camera Dimensions / Weight |
75.3 x 36.6 x 36.6 mm / 167.2 g |
|
|
|
|
Rear camera Dimensions / Weight |
75.3 x 36.6 x 36.6 mm / 102.6 g |
|
|
|
|
Main unit Dimensions / Weight |
118 x 73 x 26 mm / 254.3 g |
|
(Including remote control (50.1 x 40 x 16.1 mm)) |
||
|
||
|
|
|
Memory |
microSD memory card (Class10) |
|
|
|
|
Recording mode |
Continuous recording/Manual recording/ |
|
Video stabilization/Super night vision |
||
|
||
|
|
|
Camera sensor |
2.1M Pixels, 1/2.8" CMOS, 1080p (Front camera: 6-axis gyro sensor) |
|
|
|
|
Image sensor |
IMX291 |
|
|
|
|
Angle of view (Lens) |
Approximately 140° (diagonally) |
|
|
|
|
Video |
FHD (1920 x 1080) / H.264 / file extension: MP4 |
|
|
|
|
Frame rate |
Maximum 30 fps |
|
|
|
|
Audio |
High-Efficiency Advanced Audio Coding, HE-AAC |
|
|
|
|
GPS |
Embedded GPS |
|
|
|
|
Wi-Fi |
802.11b/g/n |
|
|
|
|
Power input |
DC 12 V |
|
|
|
|
Power consumption |
5.3 W (2CH, Fully charged supercapacitor) |
|
|
|
|
Auxiliary power unit |
Supercapacitor |
|
|
|
|
LED indicator |
Remote control: 3 colors LED (Status/Recording LED) |
|
|
|
|
Operating/Storage temperature |
14 – 140 /-10 – 60 |
|
|
|
16

Warranty
THINKWARE warrants to the original purchaser for the following period from your purchasing date against deficiencies in material and workmanship under normal use. Should this unit fail to operate in a satisfactory manner within the warranty period, THINKWARE will at its discretion, replace or repair the product. We may use functionally equivalent, similar (if model is discontinued or out of stock), reconditioned, refurbished, remanufactured, pre-owned or new products or parts.
MicroSD Card: |
6 months |
Main Dash Cam unit and all Accessories in Box: 1 Year
If service is required
Should this unit fail to operate in a satisfactory manner, it is best to first check with the store where it was originally purchased.
Should this fail to resolve the matter and if you believe your unit meets the criteria for warranty replacement or repair, please contact us at www.thinkware.com/Support.
What this warranty does not cover
This limited warranty does not cover:
1.If the device was not purchased from THINKWARE or its authorized retailers.
2.Device malfunction due to the normal wear and tear, misuse, lack of maintenance, accidents, modification, alteration or repairs by an unauthorized person or entity.
3.Products that are operated in combination with ancillary or peripheral equipment not furnished or otherwise certified by
THINKWARE for use with the product or any damage to the products or ancillary equipment as a result of such uses.
4.THINKWARE is not liable for any damages (properties, business, and/or indirect damages), loss or corruption of data for any reason, product damage or personal injuries that occur due to accidents or natural disasters.
5.THINKWARE Dash Cam records and saves video of vehicle accidents. It does not however guarantee to record all accidents. Accidents with light impact that is not enough to activate the impact detection sensor may not be recorded.
LIMITED WARRANTY AND DISCLAIMERS
THINKWARE warrants that the product will be free from defects in materials or workmanship under normal use for one (1) year starting from original date of purchase. You may be required to provide proof of purchase as a condition of receiving warranty service.
The obligations of THINKWARE and the right of the purchaser under this warranty is limited to repair or replacement at the option of THINKWARE authorized dealer. The purchaser must provide notice of any defect within (1) year from the date of purchase and the defective product must be returned to the store where it was originally purchased or THINKWARE authorized dealers, at your expense.
Where permitted by local law, THINKWARE Products and any replacement products or parts may be either new or refurbished to be functionally equivalent to new in performance and
reliability. Replacement products or parts will have functionality at least equal to that of the product or part being replaced. Replacement products and parts are warranted to be free from defects in materials or workmanship for 90 days, or for the remainder of the warranty period for the THINKWARE Product which they are replacing or in which they are installed, whichever is longer.
This Limited Warranty extends only to the original retail or wholesale Buyer.
This Limited Warranty does not cover cosmetic damage or damage resulting from (a) accident, abuse, misuse, natural disaster, insufficient or excessive electrical supply, abnormal environmental conditions or other external causes; (b) repair, replacement, modification, unauthorized disassembly or service by anyone other than THINKWARE or THINKWARE authorized service provider; or (c) modification or conversion conducted at user’s discretion, carelessness, or negligence.
EXCEPT AS EXPRESSLY SET FORTH IN THIS LIMITED WARRANTY, THERE ARE NO OTHER WARRANTIES, EXPRESS OR IMPLIED, FOR YOUR THINKWARE PRODUCT. ALL IMPLIED WARRANTIES OF MERCHANTABILITY OR FITNESS FOR A PARTICULAR PURPOSE IMPOSED BY LAW ARE LIMITED
IN DURATION TO THE APPLICABLE WARRANTY PERIOD. THINKWARE DISCLAIMS ALL OTHER WARRANTIES INCLUDING ANY IMPLIED WARRANTIES.
This Limited Warranty gives you specific legal rights, and it is governed by the laws of the jurisdiction in which your
THINKWARE Product was purchased. Some jurisdictions do not allow any limitation on how long a limited warranty will last
or the exclusion or limitation of incidental or consequential damages in which case, the exclusions or limitations stated in this Limited Warranty may not apply to you. You may also have other rights that vary by jurisdiction.
To the extent allowed by local law, the remedies provided in this Limited Warranty are your sole and exclusive remedies. These terms and conditions supersede any prior agreements or
representations, including statements made in sales literature or advice given in connection with your purchase.
TO THE EXTENT ALLOWED BY LOCAL LAW, AND EXCEPT AS SPECIFICALLY SET FORTH IN THIS LIMITED WARRANTY, IN NO EVENT SHALL THINKWARE OR ANY THINKWARE-AUTHORIZED SERVICE PROVIDER BE LIABLE FOR (1) ANY DAMAGES CAUSED BY THE PRODUCT OR THE FAILURE OF THE PRODUCT TO PERFORM,
(2) ANY DAMAGES RESULTING FROM LOSS DATA, OR (3) ANY INCIDENTAL, CONSEQUENTIAL, CONTINGENT OR SPECIAL DAMAGES WHATSOEVER, (4) ANY OBLIGATIONS ARISING FROM TORT OR ANY OTHER LEGAL THEORY, AND WHETHER OR NOT ADVISED OF THE POSSIBILITY OF SUCH DAMAGES. THINKWARE MAKES NO OTHER WARRANTIES.
Limited 6 Month Warranty:
Product carrying a 6 month warranty against defects in materials and workmanship include THINKWARE MicroSD card included in the product package.
In the event of a product defect that requires support during the warranty period, please contact THINKWARE Customer Support (www.thinkware.com) for assistance.
English
17
Guide de démarrage rapide et garantie
Français
Avant d’utiliser le produit
Ce produit enregistre des vidéos pendant le fonctionnement de la moto. Utilisez cet appareil seulement à des fins de documentation pour les enquêtes d’incidents ou d’accidents de la route. Il n’existe aucune garantie que cet appareil enregistrera TOUS les événements. L’appareil pourrait ne pas enregistrer correctement les accidents incluant un impact minime insuffisant pour activer le capteur d’impact, ou encore les accidents avec un très impact qui cause une déviation de la tension électrique de la batterie de la moto.
L’enregistrement vidéo commence seulement à partir du moment où le produit est entièrement en fonction (activé). Pour vous assurer que tous les événements concernant la moto sont enregistrés, attendez que le produit ait terminé de s’activer après l’avoir allumé, puis commencez à conduire.
THINKWARE n’est aucunement responsable de toute perte résultant d’un accident ni de fournir du soutien, quel qu’il soit, en lien avec les conséquences d’un accident.
Énoncé FCC
Cet appareil est conforme à la partie 15 des Règles de la FCC. Son utilisation est assujettie aux deux conditions suivantes : (1) Cet appareil ne doit causer aucune interférence nuisible et (2) cet appareil doit accepter toutes les interférences reçues, y compris celles qui pourraient provoquer un fonctionnement non souhaitable.
Cet équipement a été testé et déclaré conforme aux limites pour appareils numériques de classe B, selon la section 15 des Règles de la FCC. Ces limites sont destinées à assurer une protection raisonnable contre les interférences nuisibles dans une installation résidentielle. Cet équipement génère, utilise et émet de l’énergie de fréquences radio et peut, en cas d’installation ou d’utilisation non conforme aux instructions, engendrer des interférences nuisibles pour les communications radio. Toutefois, il n’existe aucune garantie qu’une installation particulière sera à l’abri des interférences. Si cet équipement cause des interférences nuisibles à la réception radiophonique ou télévisuelle, ce qui peut être vérifié en mettant l’équipement hors, puis sous tension, l’utilisateur peut tenter de résoudre le problème de l’une des façons suivantes :
•Réorienter ou déplacer l’antenne de réception.
•Augmenter la distance entre l’équipement et le récepteur.
•Brancher l’équipement sur un circuit électrique différent de celui où le récepteur est branché.
•Consulter le fournisseur ou un technicien expérimenté dans le domaine de la radio ou de la télévision.
•Cet appareil et son antenne ne doivent pas être placés à proximité de toute autre antenne ou de tout autre émetteur, ni être utilisés conjointement avec ceux-ci.
MISE EN GARDE DE LA FCC : Tout changement ou toute modification à l’équipement qui n’a pas fait l’objet d’une autorisation expresse par la partie responsable d’assurer sa conformité pourrait annuler votre droit à utiliser l’équipement.
Code FCC : 2ADTG-M1
Français
Information pour l’utilisateur : CNR-247
Cet appareil est conforme aux exigences des CNR d’Innovation, Sciences et Développement économique Canada pour les dispositifs exempts de licence.
Soyez avisés que tout changement ou toute modification à l’équipement qui n’a pas fait l’objet d’une autorisation expresse par la partie responsable d’assurer sa conformité pourrait annuler le droit de l’utilisateur à utiliser l’équipement.
Avis : L’utilisation est assujettie aux deux conditions suivantes : (1) Cet appareil ne doit causer aucune interférence et (2) cet appareil doit accepter toutes les interférences, y compris celles qui pourraient provoquer un fonctionnement non souhaité.
Cet appareil numérique de classe B est conforme à la norme canadienne NMB-003. ISDEC : 12594A-M1
19

Consignes de sécurité
Veuillez lire les consignes de sécurité ci-dessous pour utiliser le produit correctement.
Symboles de sécurité utilisés dans le guide
« Avertissement » : Indique un danger potentiel qui, s’il n’est pas évité, pourrait causer des blessures ou la mort.
« Mise en garde » : Indique un danger potentiel qui, s’il n’est pas évité, pourrait causer des blessures légères ou des dommages matériels.
« Remarque » : Indique la présence d’information utile pour une utilisation optimale des fonctions du produit.
Lors de l’utilisation de l’appareil
• N’utilisez pas l’appareil pendant que vous conduisez une moto. La distraction pendant la conduite peut causer des accidents occasionnant des blessures ou la mort.
•Fixez solidement l’appareil à la moto. S’il n’est pas installé correctement, le produit pourrait tomber pendant l’utilisation de la motocyclette. Une installation incorrecte peut occasionner des accidents et des blessures graves ou mortelles.
•N’installez pas l’appareil à un endroit exposé à du gaz inflammable. Ceci pourrait causer une explosion ou un incendie.
•N’utilisez pas le produit à un endroit avec une température ou une humidité élevées. Cela pourrait causer un mauvais fonctionnement du produit, une explosion ou un incendie.
•Tenir le produit à distance des enfants et des animaux. Si l’appareil venait à se briser, des
blessures ou la mort pourraient survenir.
•N’exposez pas l’appareil à la lumière directe du soleil. Ceci pourrait causer un mauvais fonctionnement du circuit électronique interne ou d’une lentille.
•Ne submergez pas le produit sous l’eau. Ceci pourrait endommager le produit.
•Ne pas démonter le produit ni le soumettre à des chocs. Ceci pourrait endommager le produit. Le démontage non autorisé du produit annule la garantie du produit.
•Ne pas appliquer de force excessive ni utiliser d’objet pointu en appuyant sur les boutons. Ceci pourrait endommager les boutons du produit.
•Ne nettoyez pas le produit avec des produits chimiques ou avec du détergent. Ceci pourrait endommager le produit. Nettoyez le produit avec un linge propre, sec et doux.
•Assurez-vous que la carte mémoire est dans le bon sens avant de l’insérer dans l’appareil. Le logement de la carte mémoire ou la carte mémoire elle-même pourrait subir des dommages si elle est mal insérée.
•En cas de pluie, n’utilisez pas le produit à l’extérieur pendant une période prolongée. L’eau pourrait endommager le produit.
20

•Utiliser le produit dans une plage de température de -10 °C à 60 °C (14 °F à 140 °F) et entreposez le produit dans une plage de température de -20 °C à 70 °C (-4 °F à 158 °F). Le produit pourrait ne pas fonctionner tel que prévu et subir des dommages permanents s’il est utilisé ou entreposé hors des plages de température spécifiées. De tels dommages ne sont pas couverts par la garantie.
•Vérifiez régulièrement le produit pour vous assurer que l’emplacement d’installation est approprié. Les impacts causés par des conditions routières difficiles pourraient modifier l’emplacement d’installation. Assurez-vous que le produit est positionné selon les instructions du présent guide.
Français
Aperçu du produit
Lorsque vous ouvrez la boîte du produit, assurez-vous que tous les éléments sont présents. Les articles standard sont sujets à changement sans préavis.
Appareil principal/ télécommande intégrée (câble d’alimentation inclus)
Support
Caméra avant |
Caméra arrière |
|
Guide de démarrage rapide et |
Carte mémoire microSD |
|
garantie / Information CS |
||
|
Vérifiez l’épaisseur des câbles pour identifier la caméra avant et la caméra arrière. Le câble de la caméra avant est plus épais que le câble de la caméra arrière.
21
Retrait et insertion de la carte mémoire
Retrait de la carte mémoire
1 Assurez-vous que le produit est éteint, puis poussez délicatement la carte mémoire vers l’intérieur du logement avec le bout du doigt. La carte mémoire sera partiellement éjectée de l’appareil.
2 Retirez-la de l’appareil.
Insertion de la carte mémoire
Insérez la carte mémoire dans le logement de carte mémoire, en prenant soin de la placer dans le bon sens, puis appuyez sur la carte mémoire pour la faire entrer dans le logement jusqu’à ce que vous entendiez un déclic. Avant d’insérer la carte mémoire, assurez-vous que les contacts métalliques de la carte mémoire sont placés en direction des boutons de l’appareil.
• Assurez-vous que l’appareil est éteint avant de retirer la carte mémoire. Les fichiers vidéo enregistrés pourraient être endommagés ou effacés si vous retirez la carte mémoire pendant que le produit est allumé.
•Assurez-vous que la carte mémoire est dans le bon sens avant de l’insérer dans l’appareil. Le logement de la carte mémoire ou la carte mémoire elle-même pourrait subir des dommages si elle est mal insérée.
•Utilisez seulement des cartes mémoire d’origine de THINKWARE. THINKWARE ne garantit pas la compatibilité ni le fonctionnement de cartes mémoire de tiers.
•La carte mémoire est garantie contre les problèmes de fonctionnement pour une durée de six
(6) mois à partir de la date d’achat de l’appareil. Si la carte mémoire ne fonctionne pas après la période de garantie, achetez une nouvelle carte mémoire chez THINKWARE ou chez un de ses détaillants autorisés.
• Pour éviter la perte des fichiers vidéo enregistrés, faites une sauvegarde périodique des fichiers vidéo sur un autre dispositif de stockage.
•Pour une meilleure performance d’enregistrement, formatez la carte mémoire tous les trois mois.
22
Légende des pièces
La conception du produit est sujette à changement sans préavis.
Appareil principal
Télécommande
Permet der commander l’appareil.
Logement de la carte mémoire
Permet d’insérer une carte mémoire pour enregistrer les vidéos filmées.
Câble d’alimentation
Connectez chaque câble
(ACC et GND) à la batterie de la moto.
Port de la caméra arrière
Permet de raccorder
le produit à la caméra
avant. (câble fin)
Port de la caméra avant
Permet de raccorder le produit à la caméra avant.
(câble épais)
Vérifiez l’épaisseur des câbles pour identifier la caméra avant et la caméra arrière. Le câble de la caméra avant est plus épais que le câble de la caméra arrière.
Télécommande
Bouton d’enregistrement manuel
Appuyez sur ce bouton pour démarrer l’enregistrement manuel.
Voyant d’état
Indique l’état de l’appareil.
Microphone
Permet d’enregistrer la voix.
Bouton Wi-Fi
Appuyez sur ce bouton pour activer le mode AP* qui permet de connecter le produit à un téléphone intelligent par un réseau Wi-Fi.
* Le mode AP permet d’utiliser le produit comme routeur (concentrateur).
Français
23
Caméra avant/arrière
Point de référence horizontal
Fixez le produit au support en vous basant sur le point indiqué (  ).
).
Objectif de la caméra avant/  arrière
Enregistre la vue avant.
Câble de la caméra 
Raccordez-le au port de la caméra de l’appareil principal.
Vérifiez l’épaisseur des câbles pour identifier la caméra avant et la caméra arrière. Le câble de la caméra avant est plus épais que le câble de la caméra arrière.
Installation du produit
L’illustration ci-dessous indique les bons emplacements pour l’installation de chaque partie du produit sur la moto. Sélectionnez les emplacements d’installation appropriés et suivez les instructions pour installer correctement chaque partie du produit.
Caméra arrière |
Télécommande |
Appareil principal Caméra avant
Le câble de raccordement doit être installé professionnellement sur la motocyclette par un mécanicien formé. Une installation inadéquate du produit peut entraîner un incendie ou un choc électrique.
24

Fixez l’appareil principal à l’intérieur de la moto, par exemple à l’intérieur du siège.
Fixez solidement l’appareil à la moto. Si le produit n’est pas fixé solidement, il peut se détacher pendant la conduite de la moto.
Retirez le film protecteur de la télécommande, puis fixez la télécommande à un endroit où elle peut être utilisée facilement sans obstruer la vue du conducteur.
Pour une conduite en toute sécurité, placez les câbles afin de ne pas obstruer le champ de vision du conducteur ou nuire à la conduite du véhicule.
Avant de fixer le produit, essuyez la surface d’installation sur le parebrise avec un linge sec. Si des corps étrangers restent sur la surface d’installation et que le produit ne peut être fixé solidement, le produit peut se détacher de l’emplacement
d’installation pendant la conduite de la moto.
Français
25

Installation de la caméra avant/arrière
1 Retirez le film protecteur du support et fixez le support à un endroit où les
caméras peuvent enregistrer la vue avant et la vue arrière.
Avant de fixer le produit, essuyez la surface d’installation sur le parebrise avec un linge sec. Si des corps étrangers restent sur la surface d’installation et que le produit ne peut être fixé solidement, le produit peut se détacher de l’emplacement d’installation pendant la conduite de la moto.
2 Fixez la caméra sur le support comme indiqué par le point de référence horizontal, puis serrez les vis fermement avec une clé.
Serrez fermement les boulons pour fixer la caméra avant/arrière au support. Si les vis ne sont pas serrées fermement, la caméra peut se détacher du support pendant la conduite de la moto.
Pour ajuster l’angle de la caméra avant/arrière, serrez adéquatement les vis attachées au support.
26

1
2
Insérez le câble de la caméra dans le port de la caméra en alignant les guides ( ) du câble de la caméra avec ceux du port. Faites tourner le port dans le sens horaire pour le serrer et sécuriser le branchement.
Pour débrancher le câble de la caméra du port de la caméra, faites tourner le port dans le sens antihoraire pour le desserrer, puis débranchez les connecteurs en tirant pour les séparer.
Pour une conduite en toute sécurité, placez les câbles afin de ne pas obstruer le champ de vision du conducteur ou nuire à la conduite du véhicule.
Français
Branchement du câble d’alimentation
Branchez le câble d’alimentation (ACC, GND) au câblage du contact de la moto.
•Le câble de raccordement doit être installé professionnellement sur la motocyclette par un mécanicien formé. Une installation inadéquate du produit peut entraîner un incendie ou un choc électrique.
•Après avoir branché le câble d’alimentation (ACC, GND) au câblage du contact de la moto, assurez-vous que le câblage est adéquat. Un câblage inadéquat pourrait endommager le produit ou la moto.
27

Allumer ou éteindre le produit
Le produit s’allume automatiquement et l’enregistrement en continu démarre quand le démarreur est en position ACC ou quand le moteur démarre. Pour éteindre le produit, désactivez l’ACC ou arrêtez le moteur. Le produit s’éteindra automatiquement.
Utilisation de la fonction d’enregistrement en continu
L’enregistrement en continu commence lorsque l’appareil est allumé. Pendant l’enregistrement en continu, le produit fonctionne comme suit.
Description du fonctionnement |
Voyant d’état |
|
|
|
|
Pendant la conduite, les vidéos sont enregistrées en segments de |
Bleu (voyant allumé) |
|
1 minute, puis enregistrées dans le dossier « cont_rec ». |
||
|
||
|
|
• Après avoir allumé l’appareil, attendez qu’il soit prêt à fonctionner, puis commencer à conduire. L’enregistrement vidéo commence seulement à partir du moment où le produit est entièrement en fonction.
•Stationnez la moto dans un endroit sécuritaire avant d’utiliser ou de configurer les paramètres du produit.
•L’appareil cesse d’enregistrer pendant la configuration des paramètres avec l’application THINKWARE CLOUD.
•Visionnez la vidéo enregistrée uniquement avec l’application ou sur un ordinateur. Si vous insérez la carte mémoire directement dans un appareil intelligent, comme un téléphone intelligent ou une tablette pour lire les vidéos enregistrées, les fichiers vidéo pourraient être perdus.
 Les fichiers vidéo sont enregistrés dans le dossier suivant, en fonction du mode d’enregistrement.
Sur l’application |
Enregistrement en continu |
Enregistrement manuel |
|
|
|
Sur la carte mémoire |
cont_rec |
manual_rec |
28
 Loading...