


User Guide
This product records videos while the vehicle is operating.
Read and follow the instructions in this guide to properly use and maintain the product.

Before using the product
About the product
This product records videos while the vehicle is operating. Use this product only for reference when
investigating incidents or road accidents. This product is not guaranteed to record and cloud service for
ALL events. The device may not properly record accidents with small impacts that are too minor to activate
the impact sensor or accidents with massive impacts that cause the vehicle’s battery voltage to deviate.
Video recording does not begin until the product is completely turned on (booted up). To ensure that all
vehicle events are recorded, wait until the product is completely booted up after turning it on, and then
begin operating the vehicle.
THINKWARE is not responsible for any loss caused by an accident, nor is it responsible for providing any
support regarding the outcome of an accident.
Depending on the vehicle's configuration or operating conditions, such as the installation of remote door
lock devices, ECU settings, or TPMS settings, some product features may not be supported, and different
firmware versions may influence the product's performance or features.
About the user guide
The information provided in the guide may change when the manufacturer updates its service policy.
This user guide is intended for THINKWARE F200 models only, and it may contain technical errors, editorial
errors, or missing information.
Copyrights
All rights for the content and maps in this guide are reserved by THINKWARE and are protected under
copyright laws. All unauthorized duplication, revision, publication, or distribution of this guide without
written consent from THINKWARE is prohibited and is eligible for criminal charges.
Registered trademarks
THINKWARE F200 is a registered trademark of THINKWARE.
Other product logos and service names in this guide are trademarks of the relevant companies.
Industry Canada Radiation Exposure Statement
This equipment complies with IC radiation exposure limits set forth for an uncontrolled environment. This
equipment should be installed and operated with minimum distance 20 cm between the radiator & your
body.

FCC Statement
This device complies with Part 15 of the FCC Rules. Operation is subject to the following two
conditions: (1) this device may not cause harmful interference, and (2) this device must accept any
interference received, including interference that may cause undesired operation.
This equipment has been tested and found to comply with the limits for a Class B digital device,
pursuant to Part 15 of the FCC Rules. These limits are designed to provide reasonable protection
against harmful interference in a residential installation. This equipment generates, uses and can
radiate radio frequency energy and, if not installed and used in accordance with the instructions, may
cause harmful interference to radio communications. However, there is no guarantee that interference
will not occur in a particular installation. If this equipment does cause harmful interference to radio
or television reception, which can be determined by turning the equipment off and on, the user is
encouraged to try to correct the interference by one or more of the following measures:
• Reorient or relocate the receiving antenna.
• Increase the separation between the equipment and receiver.
• Connect the equipment to an outlet on a circuit different from that to which the receiver is
connected.
• Consult the dealer or an experienced radio/TV technician for help.
• This appliance and its antenna must not be co-located or operation in conjunction with any other
antenna or transmitter.
• A minimum separation distance of 20cm must be maintained between the antenna and the person
for this appliance to satisfy the RF exposure requirements.
FCC CAUTION: Any changes or modifications to the equipment not expressly approved by the party
responsible for compliance could void your authority to operate the equipment.
FCC ID: 2ADTG-F200
Information to user : RSS-247
This device complies with Industry Canada’s licence-exempt RSSs.
Please be cautioned the changes or modifications not expressly approved by the party responsible for
compliance could void the user’s authority to operate the equipment.
Notice: Operation is subject to the following two conditions : (1) this device may not cause
interference, and (2) this device must accept any interference, including interference that may cause
undesired operation of the device.
This Class B digital apparatus complies with Canadian ICES-003.
IC: 12594A-F200

Contents
Safety information 6
1. Product overview 9
1.1 Included items 9
1.1.1 Standard items 9
1.1.2 Accessories (sold separately) 9
1.2 Part names 10
1.2.1 Front camera (main unit) - front view 10
1.2.2 Front camera (main unit) - rear view 11
1.2.3 Rear camera (optional) 11
1.3 Removing and inserting the memory card 12
2. Installing the product 13
2.1 Installing the front camera (main unit) 13
2.1.1 Selecting an installation location 13
2.1.2 Securing the product 13
2.1.3 Connecting the power cable 15
2.2 Installing the rear camera (optional) 16
2.2.1 Selecting an installation location 16
2.2.2 Securing the rear camera 17
2.2.3 Connecting the rear camera cable 18
3. Using recording features 19
3.1 Turning the product on or off 19
3.2 Learning about file storage locations 19
3.3 Using the continuous recording feature 20
3.4 Recording manually 20
3.5 Using parking mode 21
4. Using the mobile viewer 22
4.1 Connect the product to a smartphone 22
4.1.1 Connecting the product to an
Android device
4.1.2 Connecting the product to an iOS device 23
4.2 Mobile viewer screen layout 24
4.3
Playing recorded videos on the mobile viewer 25
4.4 Video control menu overview 25
22
5. Using the PC viewer 26
5.1 System requirements 26
5.2 PC viewer for Windows 26
5.2.1 Installing the PC viewer (for Windows) 26
5.2.2 PC viewer screen layout (for Windows) 27
5.2.3 Playing recorded videos on the
PC viewer (for Windows)
5.2.4 Video control menu overview
(for Windows)
29
28
5.3 PC viewer for Mac 30
5.3.1 Installing the PC viewer (for Mac) 30
5.3.2 PC viewer screen layout (for Mac) 31
5.3.3 Playing recorded videos on the
PC viewer (for Mac)
5.3.4 Video control menu overview (for Mac) 33
32
6. Settings 34
6.1 Managing the memory card 34
6.1.1 Partitioning the memory card 34
6.1.2 Formatting the memory card 34
6.1.3 Configuring the video overwriting
function
6.2 Setting the camera 35
6.2.1 Setting the brightness of the
front camera
6.2.2 Setting the brightness of the
rear camera
35
35
6.3 Setting recording features 36
6.3.1 Setting the continuous impact detection
sensitivity
6.3.2 Setting parking mode 36
6.3.3 Setting the impact sensitivity
in parking mode
6.3.4 Setting the motion detection sensitivity 37
6.3.5 Setting the record timer feature 37
6.3.6 Setting the battery protection feature 38
6.3.7 Setting the battery cutoff voltage feature 38
6.3.8
Setting the battery protection feature for
wintertime 38
36
34
36
4

6.4 Setting road safety features 39
6.4.1 Setting the safety cameras 39
6.4.2 Setting the mobile zone alert 39
6.5 Configuring the system settings 39
6.5.1 Setting the display language 39
6.5.2 Adjusting the system volume 40
6.5.3 Setting the time zone 40
6.5.4 Setting the daylight saving time 40
6.5.5 Setting the speed unit 41
6.5.6 Setting the speed stamp 41
7. Accessing the product information 42
7.1 Viewing the product information 42
7.2 Accessing and configuring the GPS 42
8. Upgrading the firmware 43
9. Troubleshooting 44
10. Specifications 45
5

Safety information
Read the following safety information to properly use the product.
Safety symbols in this guide
"Warning" - Indicates a potential hazard which, if not avoided, may result in injury or death.
"Caution" - Indicates a potential hazard which, if not avoided, may result in minor injury or property damage.
"Note" - Provides useful information to help users better utilize the product's features.
Safety information for proper use
Driving and product operation
•Do not operate the product while driving a vehicle. Distraction while driving may cause accidents and
result in injury or death.
•Install the product in places where the driver's view is not obstructed. Obstruction of the driver’s vision
may cause accidents and result in injury or death. Check with your state and municipal laws before
mounting the product to the windshield.
6

Power supply
•Do not operate or handle the power cable with wet hands. Doing so may result in electrocution.
•Do not use damaged power cables. Doing so may result in electrical fire or electrocution.
•Keep the power cable away from all heat sources. Failure to do so may cause the power cord insulation to
melt, resulting in electrical fire or electrocution.
•Use the power cable with the correct connector and make sure the power cable is connected securely
and is firmly in place. Failure to do so may result in electrical fire or electrocution.
•Do not modify or cut the power cable. Also, do not place heavy objects on the power cable or pull, insert,
or bend the power cable using excessive force. Doing so may result in electrical fire or electrocution.
•Use only genuine accessories from THINKWARE or an authorized THINKWARE dealer. THINKWARE does
not guarantee compatibility and normal operation of third-party accessories.
•When connecting the power cable to the product, ensure that the connection between the cable plug
and the power cable connector on the product is secure. If the connection is loose, the power cable may
become disconnected due to vehicle vibration. Video recording is not available if the power connector is
disconnected.
Children and pets
•Ensure that the product is out of the reach of children and pets. If the product breaks, it may result in fatal
damage.
7

Other information about the product
Product management and operation
•Do not expose the product to direct sunlight or intense light. The lens or internal circuitry may fail
otherwise.
•Use the product at a temperature between 14°F and 140°F (-10°C to 60°C) and store the product at a
temperature between -4°F and 158°F (-20°C to 70°C). The product may not function as designed and some
permanent physical damages may result if it is operated or stored out of the specified temperature ranges.
Such damages are not covered by the warranty.
•Frequently check the product for the proper installation position. Impact caused by extreme road
conditions may alter the installation position. Ensure that the product is positioned as instructed in this
guide.
•Do not apply excessive force when pressing the buttons. Doing so may damage the buttons.
•Do not use chemical cleaners or solvents to clean the product. Doing so may damage plastic components
of the product. Clean the product using a clean, soft, and dry fabric.
•Do not disassemble the product or subject the product to impact. Doing so may damage the product.
Unauthorized disassembly of the product voids the product warranty.
•Handle with care. If you drop, mishandle, or expose the product to external shocks, it may cause damage
and/or result in the malfunction of the product.
•Do not attempt to insert foreign objects into the device.
•Avoid excessive humidity and do not allow any water to enter the product. Electronic components inside
the product may fail if exposed to humidity or water.
•Depending on the make and model of your car, the power may be constantly supplied to the dash cam
even when the ignition is turned off. Installation of the device to a continuously powered 12V outlet could
result in vehicle battery drainage.
•This device is designed to record video while the vehicle is in operation. The quality of the video might be
affected by weather conditions and the road environment, such as whether it is day or night, presence of
street lighting, entering/exiting tunnels, and the surrounding temperature.
•THINKWARE is NOT responsible for the loss of any recorded video during operation.
•Although the device was designed to withstand high-impact car collisions, THINKWARE does not
guarantee the recording of accidents when the device is damaged as a result of the accident.
•Keep the windshield and camera lens clean for optimal video quality. Particles and substances on the
camera lens or windshield may reduce the quality of the recorded videos.
•This device is intended to be used inside the vehicle only.
8

1. Product overview
1.1 Included items
Ensure that all the items are included when you open the product box.
1.1.1 Standard items
Front camera (main unit) Mount
MicroSD memory card
Adhesive cable holder
The standard items may change without prior notice.
with adapter
(consumable)
1.1.2 Accessories (sold separately)
BATTERY
GND
ACC
Hardwiring cable External GPS receiver Rear camera
Car charger
Quick start guide & Warranty
/ CS information / User guide
(stored in the microSD card)
•GPS reception may be affected by interference from the vehicle's windshield, particularly those treated
with anti-UV protective coating, or built-in defroster. It is recommended that an external GPS receiver is
used when the GPS signal is weak or when you cannot get a GPS signal.
•To connect the external GPS receiver to the front camera, carefully remove the front camera's GPS port
cover with a pry tool or a small flat-head screwdriver to access the port.
9

Product overview
1.2 Part names
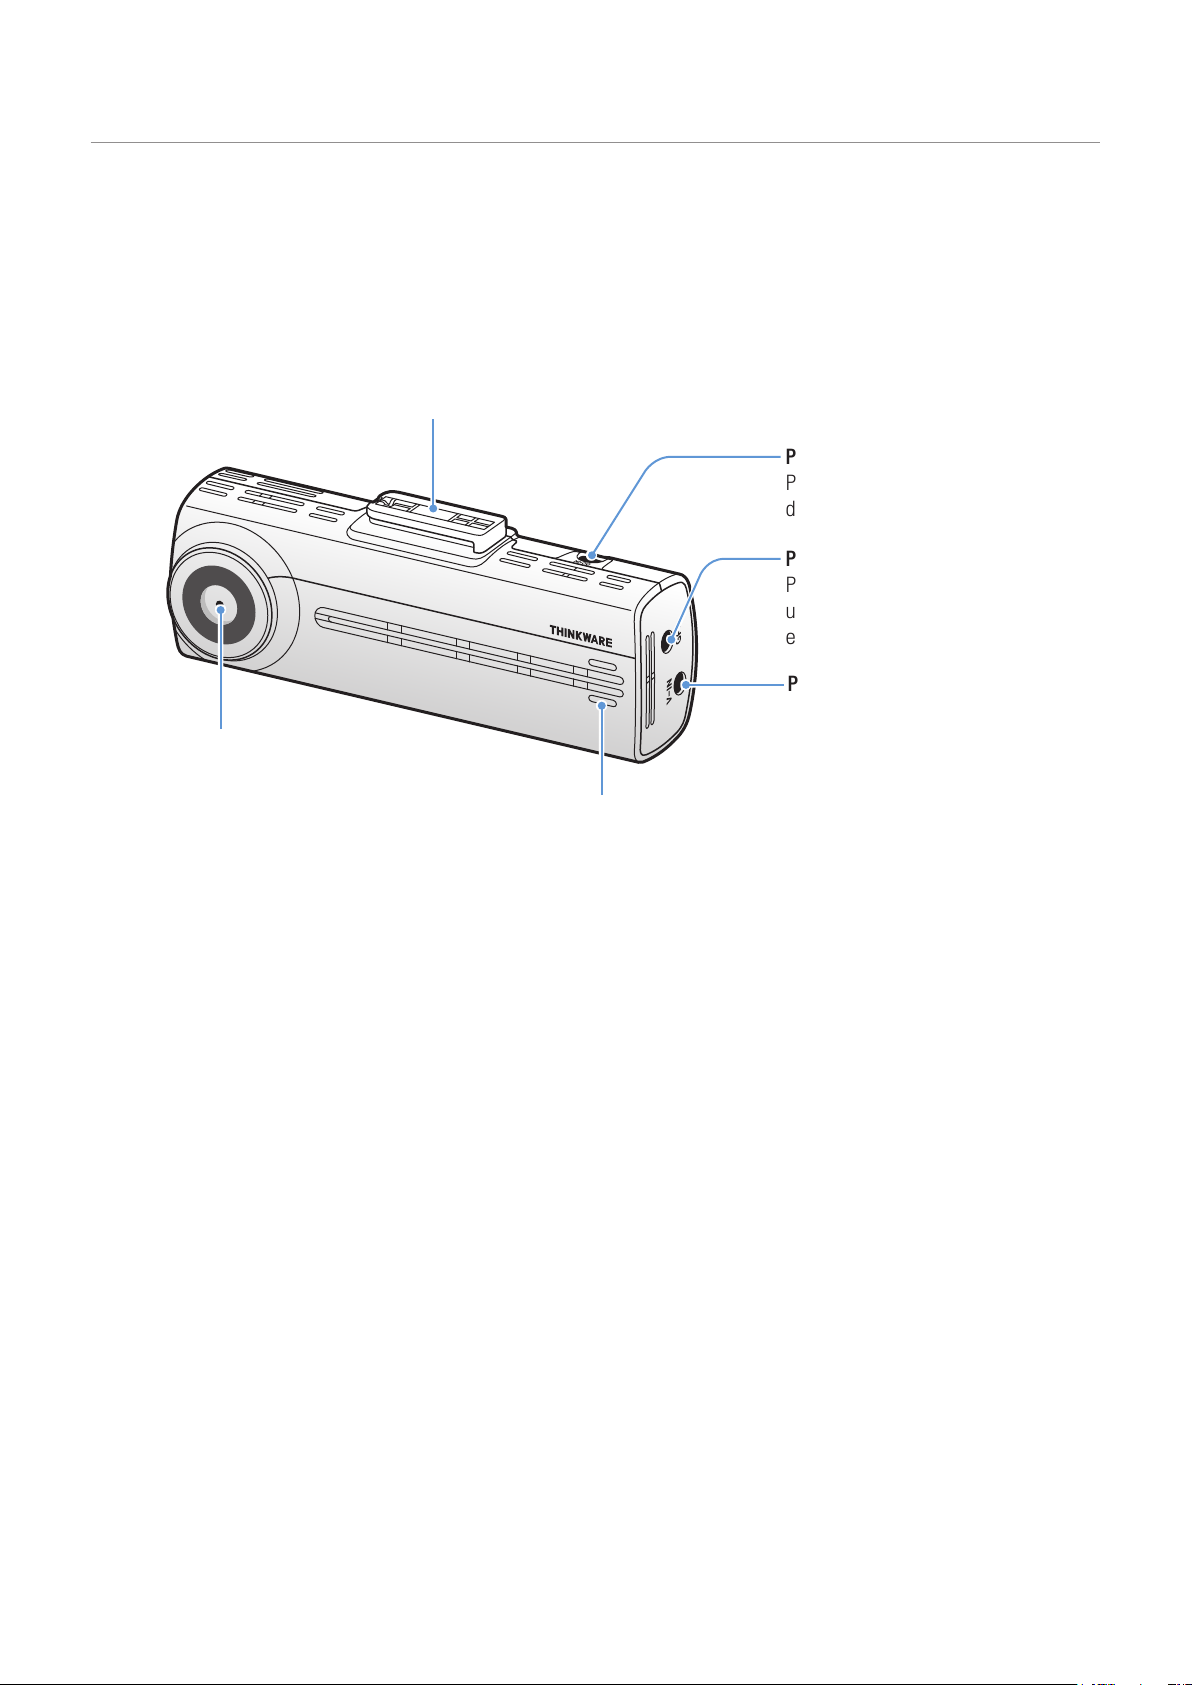
1.2.1 Front camera (main unit) - front view
Front camera lens
Records the front view.
Mount connector
Used to connect the mount.
Speaker
Outputs the voice guide and buzzer
sounds to indicate the product’s status.
DC-IN power port
Used to connect the
power cable.
GPS port
Used to connect the
external GPS receiver
(optional).
V-IN input port
Used to connect the
rear camera (optional).
10

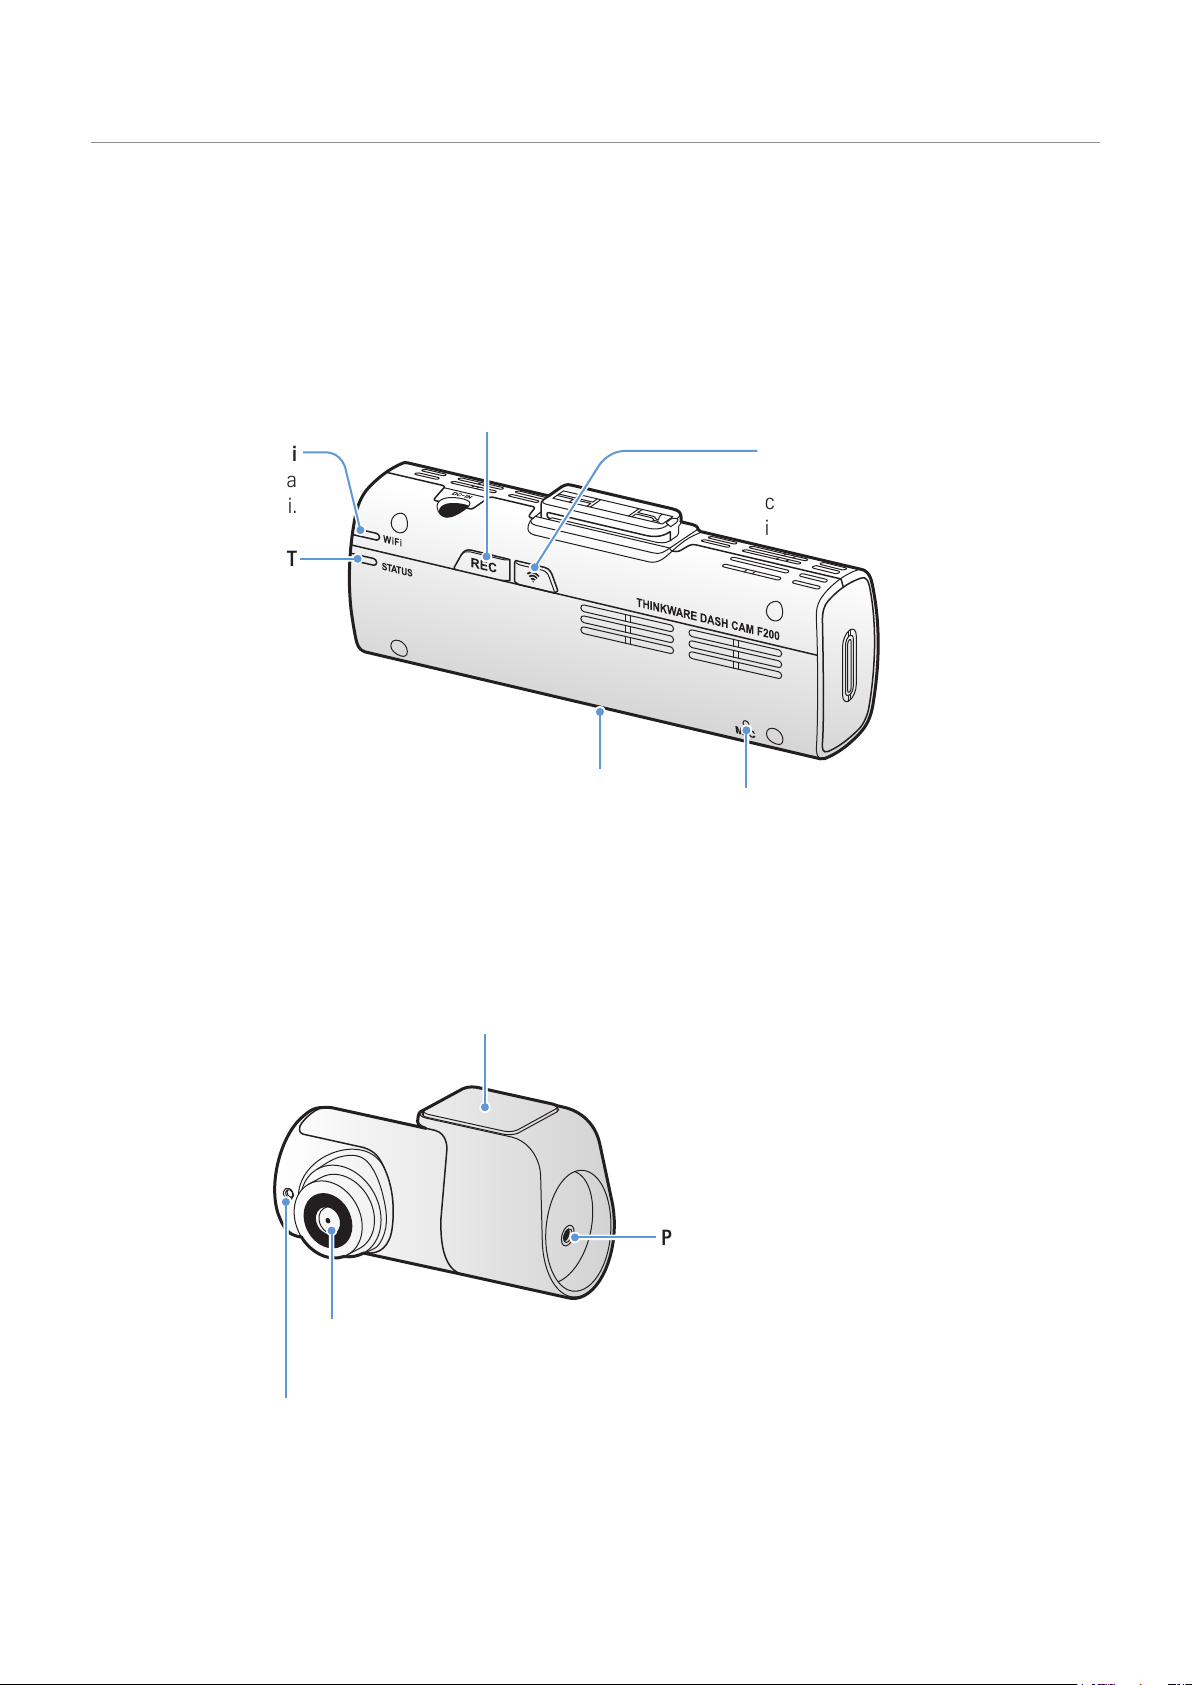
1.2.2 Front camera (main unit) - rear view
REC button
• Short Press: Starts manual recording
• Press and hold for 3 seconds: Audio
recording ON/OFF
• Press and hold for 5 seconds:
Memory card format
Product overview
Wi-Fi LED
Indicates the Wi-Fi
connection status.
STATUS LED
Indicates the
recording status.
Insert a memory card to save recordings.
1.2.3 Rear camera (optional)
Wi-Fi button
Press to connect the product to a
smartphone via Wi-Fi network.
Memory card slot
Adhesive mount
Used to fix the rear camera in the vehicle.
Microphone
Used for voice recording.
Rear camera lens
Records the rear view.
Security LED
Indicates that the video is being recorded.
Connection port
Used to connect the rear
camera to the front camera
using a rear camera cable.
11

Product overview
1.3 Removing and inserting the memory card
Follow the instructions to remove the memory card from the product or to insert the memory card into the
product.
Removing the memory card
Ensure that the product is turned off, and then gently push the
bottom of the memory card with your fingernail. The lower
part of the memory card will be exposed.
Remove it from the product.
Inserting the memory card
Insert the memory card into the memory card slot, paying
attention to the direction of the memory card, and then push
the memory card into the slot until you hear a click.
Before inserting the memory card, ensure that the metal
contacts on the memory card are facing toward the lens of
the product.
•Ensure that the product is turned off before removing the memory card. The recorded video files may be
corrupted or lost if you remove the memory card while the product is on.
•Ensure that the memory card is in the correct direction before inserting it into the product. The memory
card slot or the memory card may be damaged if it is inserted incorrectly.
•Use only authentic memory cards from THINKWARE. THINKWARE does not guarantee compatibility and
normal operation of third-party memory cards.
To prevent loss of recorded video files, periodically back up the video files on a separate storage device.
12

2. Installing the product
20 cm
2.1 Installing the front camera (main unit)
Follow the instructions to properly install the product.
2.1.1 Selecting an installation location
Select an installation location that can record the
entire view in front of the vehicle without obstructing
the driver’s vision. Ensure that the front camera lens
is located in the center of the windshield.
If a GPS navigating device is installed on the dashboard,
its GPS reception may be affected depending on the
dashboard camera's installation location.
Adjust the installation location of the GPS navigating
device to ensure that the two devices are separated by
at least 20 centimeters (approximately 8 inches).
2.1.2 Securing the product
Follow the instructions to secure the product at the installation location.
1
1
2
After determining the installation location, wipe the installation location on the windshield with a dry
2
cloth.
Align the mount to the mount rail on the product,
➊
➋
). Then,
).
and then slide it until you hear a click (
carefully remove the protective film (
13

Installing the product
1
2
3
4
5
Remove the protective film from the adhesive mount,
1
2
and then press the mount to the installation location.
Remove the product from the mount and push the
mount against the windshield to ensure that the
mount is firmly fixed.
Align the product to the mount, and then slide it into
the locking position until you hear a click.
•The product may fall and be damaged during vehicle operation if it is not firmly fixed to the mount.
•If you need to remove the mount from the windshield to alter the installation location, be careful not
to damage the windshield’s film coat.
6
Set the vertical angle of the camera appropriately
and tighten the screw of the mount firmly by using a
flat-head screwdriver or a coin.
To confirm the camera angle, record a video after installation and check the video using the mobile
viewer or the PC viewer. If necessary, adjust the camera angle again.
For more information about the mobile viewer or the PC viewer, refer to "4. Using the mobile viewer" on
page 22 or "5. Using the PC viewer" on page 26.
14

2.1.3 Connecting the power cable
When the engine and electrical accessories are turned off, connect the car charger.
The hardwiring cable (optional) must be professionally installed to the vehicle by a trained mechanic.
Connect the cigar socket power cable to the product’s
DC-IN power connector and insert the cigar jack into the
1
2
vehicle’s power socket.
Installing the product
The location and specifications of the power socket may differ by vehicle make and model.
•Use the authentic THINKWARE cigar socket power cable (optional). If you use another manufacturer's
cable, the product may be damaged or electrical fire or electrocution may result due to the voltage
difference.
•Do not cut or modify the power cable yourself. Doing so may damage the product or the vehicle.
•For safe driving, arrange the cables to prevent the driver's vision from being obstructed or interfering with
driving.
15

Installing the product
2.2 Installing the rear camera (optional)
Refer to the following instructions to properly install the rear camera.
2.2.1 Selecting an installation location
Select a location on the rear windshield where there
is no defrost grid wire and the camera can record
the entire rear view.
•For vehicles with a sunshade attached to the rear windshield, you must select a location where using the
sunshade will not interfere with camera operation.
•The adhesive part of the rear camera should not touch the defrost grid.
16

Installing the product
2
1
2.2.2 Securing the rear camera
Refer to the following instructions to secure the product to the installation location.
After determining the installation location, wipe the installation surface of the windshield with a dry
1
cloth.
Check the installation location before you secure the rear camera to the rear windshield. After
securing the rear camera to the windshield, it is hard to remove the camera or change the installation
location due to the strong adhesive.
2
3
Remove the protective film from the adhesive mount
and camera lens.
Attach the product with the THINKWARE logo facing
indoors and press the adhesive tape firmly to secure
the camera.
If the product is fixed in reverse, the rear view
will be recorded upside down.
4
Adjust the camera's vertical angle.
17

Installing the product
2.2.3 Connecting the rear camera cable
Power off the product and connect the rear camera cable to the front camera (main unit).
1
2
Connect one end of the rear camera cable to the
front camera’s V-IN port.
Connect the other end of the rear camera cable to
the rear camera's connection port.
For safe driving, arrange the cables to prevent the driver's vision from being obstructed or interfering
with driving.
Turn on the ACC or start the engine to check if the product is powered on. After the product is powered
3
on, the Status LED and the voice guidance will be turned on.
The product is powered on when the ACC mode is turned on or when the engine starts.
18

3. Using recording features
REC_2017_07_01_10_25_30_
REC_2017_07_01_10_25_30_R.MP4
3.1 Turning the product on or off
The product is turned on automatically and continuous recording starts when you turn on the ACC or start
the engine.
Wait until the product is completely booted up after turning it on, and then begin operating the vehicle. The
video recording does not begin until the product is completely turned on (booted up).
3.2 Learning about file storage locations
Videos are stored in the following folders according to their recording mode.
On the mobile viewer
In the memory card
Play videos on Window/Mac computer or using the Thinkware mobile app. If you play videos by inserting
the memory card in devices such as a smartphone or a tablet PC, the video files may be lost.
A file name is composed of the recording start date and time, and the recording option.
Continuous
F.MP4
Continuous
Incident
Recording conditions
•F: Front camera
•R: Rear camera (when optional
rear camera is equipped)
Manual
Recording
Motion
Detection
Parking Incident
19

Using recording features
3.3 Using the continuous recording feature
Connect the power cable to the product’s DC-IN power port and then turn on the vehicle’s electrical
accessories or start the engine. The status LED and the voice guide are turned on, and the continuous
recording starts.
During continuous recording, the product operates as follows.
Mode Operation description Recording LED (REC)
Continuous
recording
Incident
continuous
recording*
* When an impact to the vehicle is detected during continuous recording, incident continuous recording starts with a
buzzer sound.
•Wait until the product is completely booted up after turning it on, and then begin operating the vehicle. The
video recording does not begin until the product is completely turned on (booted up).
•When incident continuous recording starts, the buzzer sounds as a notification. This function saves you
time when checking the status LED to know the operating status of the product.
•To enable recording, you must insert a memory card into the product.
During driving, videos are recorded in 1 minute segments and stored
in the "cont_rec" folder.
When an impact to the vehicle is detected, a video is recorded for 20
seconds, from 10 seconds before the detection to 10 seconds after
the detection, and stored in the "evt_rec" folder.
(light on)
(flickers)
3.4 Recording manually
You can record a scene you want to capture while driving and store it as a separate file.
To start manual recording, press the REC button. Then, manual recording will start with the voice guide.
During manual recording, the product operates as follows.
Mode Operation description Recording LED (REC)
Manual
recording
20
When you press the REC button, a video will be recorded for 1 minute, from
10 seconds before to 50 seconds after pressing the button, and stored in
the "manual_rec" folder.
(flickers)

Using recording features
3.5 Using parking mode
When the product is connected to the vehicle via the hardwiring cable (optional), the operating mode is
switched to parking mode with the voice guide after the engine or electrical accessories are turned off.
•Parking mode operates only when the hardwiring cable is connected. The hardwiring cable (optional)
must be professionally installed to the vehicle by a trained mechanic.
•To use all recording modes, you must insert a memory card into the product.
•Depending on the battery charging status of the vehicle, the duration of parking mode may differ. If you
want to use parking mode for an extended period, check the battery level to prevent battery depletion.
If you do not want to use parking mode or you want to change the mode settings, from the mobile viewer,
>
tap Dash Cam Settings
Refer to the following table to set the Parking Mode options.
Option Operation description Recording LED (REC)
Record Settings.
Motion
Detection
Energy
Saving
motion
or impact
detected
Motion
detected
Impact
detected
impact
detected
Impact
detected
OFF
No
No
Monitors movement in the area or impacts to the vehicle. Video
will be recorded only when motion or an impact is detected.
When a moving objects is detected while parking, a video is
recorded for 20 seconds, from 10 seconds before detection to
10 seconds after detection, and stored in the "motion_rec" folder.
When an impact is detected while parking, a video is recorded for
20 seconds, from the moment 10 seconds before detection to 10
seconds after detection, and stored in the "parking_rec" folder.
Monitors impacts to the vehicle. Video will be recorded only when
an impact is detected.
When an impact is detected while parking, a video is recorded for
20 seconds from within 1 second after detection and stored in the
"parking_rec" folder.
The product is powered off when electric accessories and the
engine are turned off.
(light on)
(flickers)
(flickers)
(light on)
(flickers)
Off
If parking mode settings are changed, the videos recorded with the previous settings will be deleted. To
prevent data loss, back up all parking mode videos before changing parking mode settings.
21

4. Using the mobile viewer
You can view and manage recorded videos and configure various product features on your smartphone.
One of the following environments is required to use the THINKWARE CLOUD application:
•Android 4.4 (KitKat) or higher
• iOS 8.0 or higher
4.1 Connect the product to a smartphone
4.1.1 Connecting the product to an Android device
On your Android device, open the Play Store, and download and install THINKWARE CLOUD.
1
Run THINKWARE CLOUD.
2
Tap Dash cam connection is required. at the bottom of the screen and follow the on-screen
3
instructions to connect the product to an Android device.
The Wi-Fi password is required when you connect the product to a smartphone for the first time. Enter
“123456789” in the password input field.
22

4.1.2 Connecting the product to an iOS device
On your iOS device, open the App Store, and download and install THINKWARE CLOUD.
1
Run THINKWARE CLOUD.
2
Tap Dash cam connection is required. at the bottom of the screen.
3
Tap Wi-Fi Connection.
4
On the product, press the Wi-Fi ( ) button.
5
6
From the THINKWARE CLOUD, tap Next.
The Wi-Fi Settings screen will appear.
Using the mobile viewer
7
From the network list, select the Wi-Fi network starting with "Thinkware."
8
Enter "123456789" in the Password field, and tap Join.
The product is connected to your iOS device via Wi-Fi.
23

Using the mobile viewer
4.2 Mobile viewer screen layout
The following provides brief information about the mobile viewer’s screen layout.
View notifications for firmware
View the connected
product or configure a
new connection.
update.
Move to the live view
screen.
View and play the
recorded videos.
View the product
information.
View main menu.
F200 does not support this
menu.
View or configure the
dash cam settings.
View the connected WiFi network or add a new
network.
Displays the connection
status of the product.
View more menus for setting the
account, downloading the latest
firmware, or safety cameras data.
24

Using the mobile viewer
4.3 Playing recorded videos on the mobile viewer
Follow the instructions to play recorded videos.
The recording and the Advanced Driver Assistance System (ADAS) features of the product are disabled
while checking the video file list or playing a video on the mobile viewer.
On your smartphone, run the Thinkware Cloud application and connect the product to the smartphone.
1
From the home screen of the mobile viewer, tap File List. The categories will be displayed.
2
Tap the desired category. The video file list will appear.
3
If necessary, tap All, Front, or Rear to filter the video file list by camera.
4
Select the desired video.
5
4.4 Video control menu overview
The following provides brief information about the mobile viewer’s video control menu.
The recording and the Advanced Driver Assistance System (ADAS) features of the product are disabled
while checking the video file list or playing a video on the mobile viewer.
Move to the file list
screen.
Displays the
playback status.
Play the next file.Play the previous file.
Play or pause the video.
25

5. Using the PC viewer
You can view and manage the recorded videos and configure various product features on your PC.
5.1 System requirements
The following are the system requirements for running the PC viewer.
• Processor: Intel Core i5, or higher
• Memory: 4 GB or more
• Operating system: Windows 7 or later (64-bit is recommended), macOS X10.8 Mountain Lion or later
• Other: DirectX 9.0 or higher / Microsoft Explorer version 7.0 or higher
The PC viewer will not operate properly on PC systems running an operating system other than those listed
in the system requirements.
5.2 PC viewer for Windows
5.2.1 Installing the PC viewer (for Windows)
You can download the latest PC viewer software from the THINKWARE website (http://www.thinkware.com/
Support/Download).
The PC viewer installation file (setup.exe) is stored in the root folder of the memory card that is provided
with the product. Follow the instructions to install the PC viewer on your PC.
Insert the memory card into a memory card reader connected to your PC.
1
Run the installation file, and complete the installation according to the instructions given in the
2
installation wizard.
After the installation is complete, there will be a shortcut icon to THINKWARE Dashcam Viewer.
26

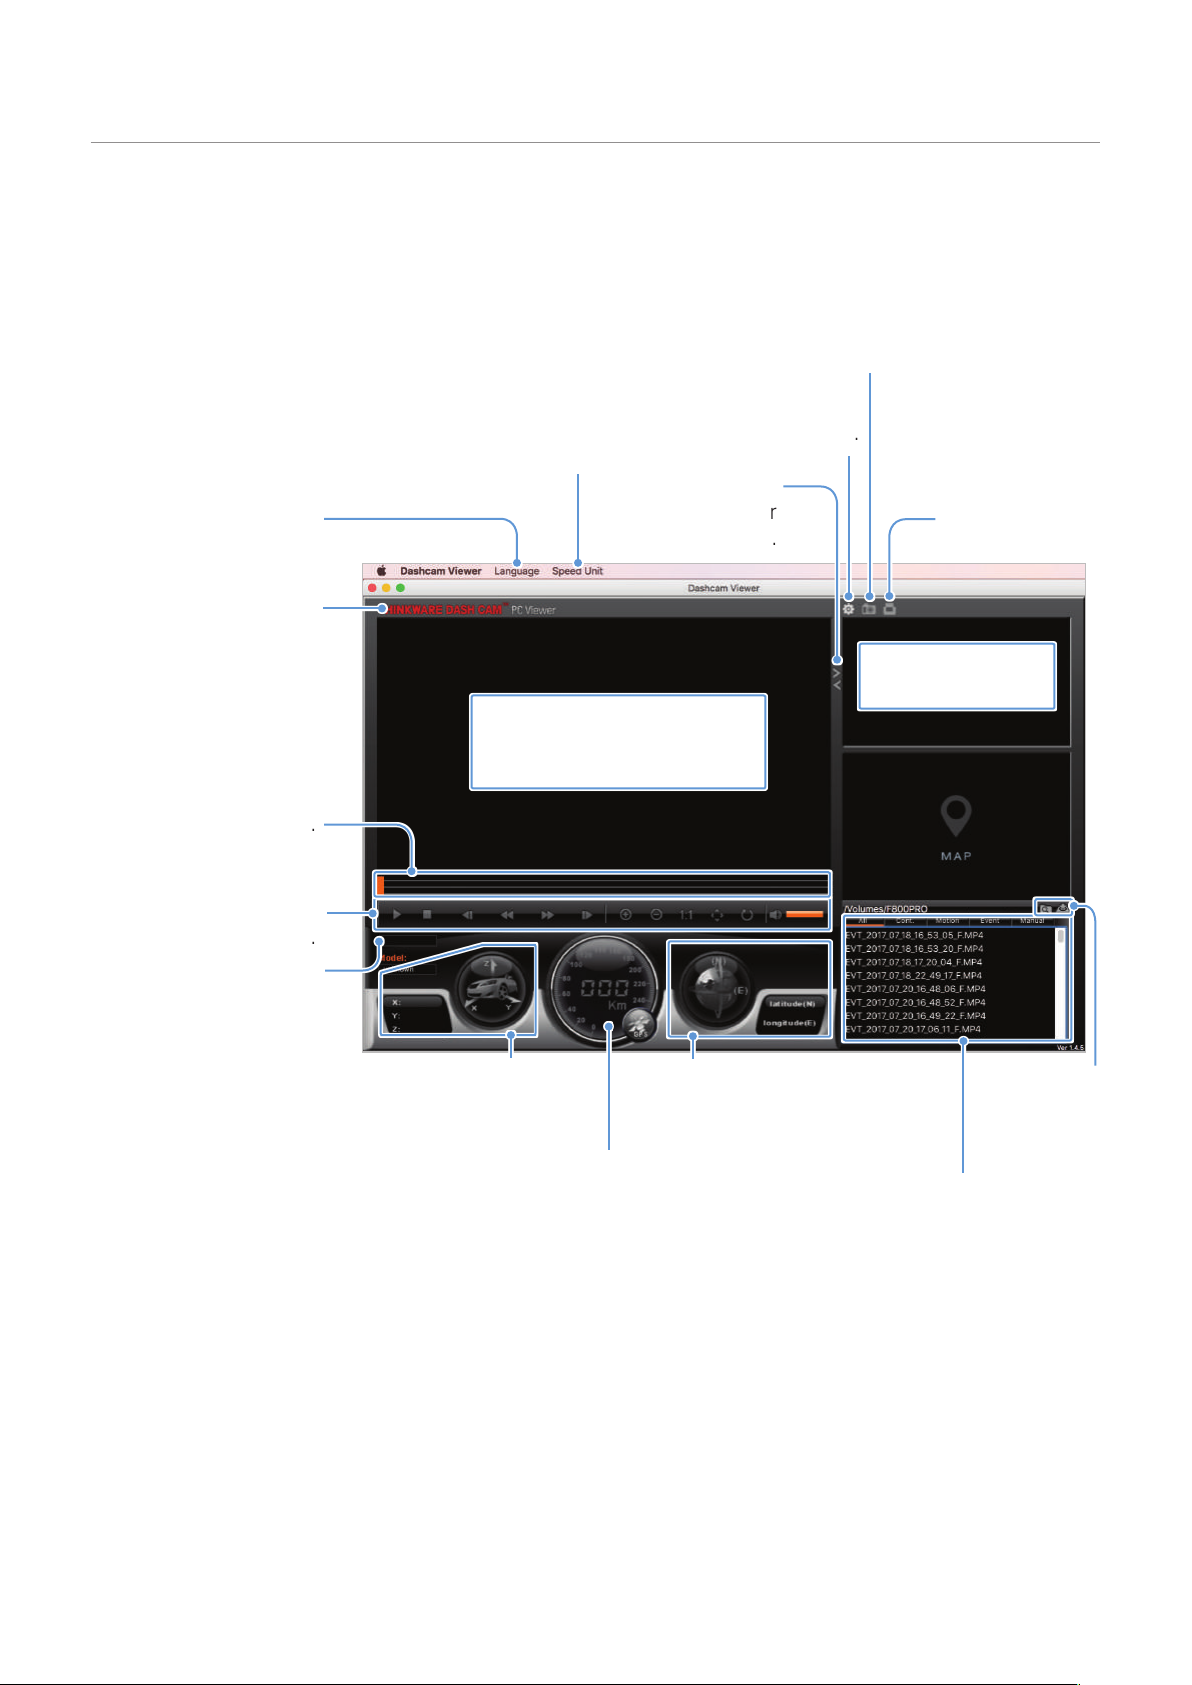
5.2.2 PC viewer screen layout (for Windows)
The following provides brief information about the PC viewer's screen layout.
Using the PC viewer
View or configure the dashcam
settings, and set the language
Visit the THINKWARE
website.
Open a file, or save a
video with a different
name.
Displays the video file
name.
Play or control a video.
Displays the progress of
video playback.
Displays the current and
total running time of the
current video.
for the PC viewer.
Display the current video in full
screen. Tap the Back button (
to return to the previous screen.
Displays the current video.
Switch between the front and
rear videos.
)
Minimize, expand, or close
the software.
Displays the GPS
information at the
time of recording.
Indicates the vehicle's
driving speed at the time
of recording.
Indicates the G sensor value
at the time of recording.
Displays the playlist.
27

Using the PC viewer
5.2.3 Playing recorded videos on the PC viewer (for Windows)
Follow the instructions to play recorded videos.
Turn off the product and remove the memory card.
1
Insert the memory card into a memory card reader connected to your PC.
2
Double-click the shortcut to the PC viewer ( ) to open the program. The video files in the memory
3
card will be automatically added to the playlist in the bottom-right corner of the PC viewer screen. The
playlist section layout is as follows.
Select a folder.
Displays a list of videos
in the selected folder.
Double-clickavideofileafterselectingavideofolder,orclickthePlaybutton(▶)afterselectinga
4
video file. The selected video file will be played.
If the video files on the memory card are not automatically added to the playlist when you run the PC viewer,
click File▼ > Open, select the removable storage device for the memory card, and click Confirm.
28

5.2.4 Video control menu overview (for Windows)
The following provides brief information about the PC viewer's video control menu.
➐ ➑ ➒ ➓
Using the PC viewer
➊ ➋ ➌ ➍ ➎ ➏
Number Item Description
➊
➋
➌
➍
➎
➏
➐
➑
➒
Play the previous file Play the previous file in the currently selected folder.
Rewind by 10 sec. Rewind the video by 10 sec.
Play/Pause Play or pause the selected video file.
Stop
Skip forward by 10 sec. Fast forward the video by 10 sec.
Play the next file Play the next file in the currently selected folder.
Enable/Disable playing
the next file in the
playlist
Enlarge/Reduce image Enlarge or reduce the size of the current video.
Save Save the current video on your PC.
Stop playing the current video. The progress bar will move to the beginning of
the video.
Enables or disables the feature for playing the next file in the playlist.
➓
Volume Adjust the volume of the current video.
29

Using the PC viewer
5.3 PC viewer for Mac
5.3.1 Installing the PC viewer (for Mac)
You can download the latest PC viewer software from the THINKWARE website (http://www.thinkware.com/
Support/Download).
The PC viewer installation file is stored in the root folder of the memory card that is provided
with the product. Follow the instructions to install the PC viewer on your PC.
Insert the memory card into your PC using a SD card reader or SD card adapter provided.
1
Move the file named "dashcam_viewer_X.X.X.dmg" to the desktop.
2
Double-click the dashcam_viewer_X.X.X.dmg and click Open Dashcam Viewer application.
3
The THINKWARE Dashcam Viewer opens.
30
5.3.2 PC viewer screen layout (for Mac)
The following provides brief information about the PC viewer's screen layout.
Save the current scene.
View or configure the
dashcam settings.
videos.
Set the language for the
PC viewer.
Visit the THINKWARE
website.
Set the speed unit.
Switch between
the front and rear
Displays the current front video.
Right-click this pane to display
the current video in full screen.
Using the PC viewer
Print the current
scene.
Displays the current
rear video.
Play or control a video.
Displays the progress of
video playback.
Displays the current and
total running time of the
current video.
Indicates the G sensor value
at the time of recording.
Indicates the vehicle's
driving speed at the time
of recording.
Displays the GPS
information at the time of
recording.
Displays the playlist.
Open a file, or
save a video
with a different
name.
31

Using the PC viewer
5.3.3 Playing recorded videos on the PC viewer (for Mac)
Follow the instructions to play recorded videos.
Turn off the product and remove the memory card.
1
Insert the memory card into your Mac using a SD card reader or SD card adapter provided.
2
Open the PC viewer.
3
Click and locate the memory card.
4
The video files in the memory card will be automatically added to the playlist in the bottom-right
corner of the PC viewer screen. The playlist section layout is as follows.
Select a folder.
Displays a list of videos
in the selected folder.
Double-clickavideofileafterselectingavideofolder,orclickthePlaybutton(▶)afterselectinga
5
video file. The selected video file will be played.
32

5.3.4 Video control menu overview (for Mac)
The following provides brief information about the PC viewer's video control menu.
➊ ➋ ➌ ➍ ➎ ➏ ➐ ➑ ➒ ➓
Number Item Description
Using the PC viewer
➊
➋
➌
➍
➎
➏
➐
➑
➒
➓
Play/Pause Play or pause the selected video file.
Stop
Play the previous file Play the previous file in the currently selected folder.
Rewind by 1 frame Rewind the video by 1 frame.
Skip forward by 1 frame Fast forward the video by 1 frame.
Play the next file Play the next file in the currently selected folder.
Zoom in Zoom into the current video.
Zoom out Zoom out of the current video.
Restore image size Restore the size of the current video to the original size.
Display scrollbar Display the scrollbar when the image is enlarged.
Reverse image Reverse the video upside down.
Volume Adjust the volume of the current video.
Stop playing the current video. The progress bar will move to the beginning of
the video.
33

6. Settings
You can set the product features according to your needs to your needs and preferences using the mobile
viewer or the PC viewer. The following procedures are based on the mobile viewer.
The product will stop recording while configuring settings on the mobile viewer.
6.1 Managing the memory card
6.1.1 Partitioning the memory card
You can partition the memory card to adjust the storage space for different types of video recordings. Refer
to the following instructions to partition the memory card.
From the mobile viewer, tap Dash Cam Settings > Memory Card Settings.
1
From Memory Partition, select the desired memory partition type. The new setting is applied
2
automatically.
6.1.2 Formatting the memory card
This menu allows you to format the memory card that is inserted in the product. Refer to the following
instructions to format the memory card.
From the mobile viewer, tap Dash Cam Settings > Memory Card Settings and tap the Format button
1
under Formatting Memory Card.
From Formatting Memory Card, tap OK to proceed with memory formatting. All the data stored on the
2
memory card will be erased after the formatting. Tap Cancel to cancel memory formatting.
6.1.3 Configuring the video overwriting function
This menu allows new video files to overwrite the oldest video files in the storage reserved for each mode.
From the mobile viewer, tap Dash Cam Settings > Memory Card Settings.
1
From Overwrite Videos, select the modes to allow video overwriting. The new setting is applied
2
automatically.
34

Settings
6.2 Setting the camera
You can adjust the brightness of the front and rear view or reverse left and right of the rear view.
6.2.1 Setting the brightness of the front camera
You can set the brightness of the front view recording. Refer to the following instructions to set the
brightness.
From the mobile viewer, tap Dash Cam Settings > Camera Settings.
1
From Brightness-front, select Dark, Mid, or Bright. The new setting is applied automatically.
2
6.2.2 Setting the brightness of the rear camera
You can set the brightness of the rear view recording. Refer to the following instructions to set the
brightness.
From the mobile viewer, tap Dash Cam Settings > Camera Settings.
1
From Brightness-rear, select Dark, Mid, or Bright. The new setting is applied automatically.
2
35

Settings
6.3 Setting recording features
You can set and adjust various features for recording, including the detection sensitivity for recording when
the product detects an impact during continuous recording.
6.3.1 Setting the continuous impact detection sensitivity
You can set the detection sensitivity for recording when an impact is detected while driving. When you set
the sensitivity, you must consider the road conditions, traffic situation, and your driving style.
From the mobile viewer, tap Dash Cam Settings > Record Settings.
1
From Continuous Mode Incident Recording Sensitivity, select the desired sensitivity. The new setting is
2
applied automatically.
6.3.2 Setting parking mode
You can set the operating mode of the product while the vehicle is parked. Follow the instructions to set
parking mode.
To use parking mode, you must install the hardwiring cable (optional). If continuous power is not supplied to
the product, the product will stop recording when the vehicle engine is turned off.
For more information about parking mode, refer to "3.5 Using parking mode"
From the mobile viewer, tap Dash Cam Settings > Record Settings.
1
From Parking Mode, select Motion Detection or Energy Saving. The new setting is applied
2
automatically.
6.3.3 Setting the impact sensitivity in parking mode
You can set the detection sensitivity for recording when impact is detected while parking. Refer to the
following instructions to set the parking impact sensitivity.
From the mobile viewer, tap Dash Cam Settings > Record Settings.
1
From Impact Sensitivity in Parking Mode, select the desired sensitivity. The new setting is applied
2
automatically.
36

Settings
6.3.4 Setting the motion detection sensitivity
The Motion detection feature records a video when a moving object is detected near your vehicle. Refer to
the following instructions to set the motion detection sensitivity.
From the mobile viewer, tap Dash Cam Settings > Record Settings.
1
From Motion Detection Sensitivity, select the desired sensitivity. The new setting is applied
2
automatically.
6.3.5 Setting the record timer feature
When you activate the record timer feature, the product will record a video in parking mode at a preset
time. Refer to the following instructions to set the time.
From the mobile viewer, tap Dash Cam Settings > Record Settings.
1
From Record Timer, select the desired time. The new setting is applied automatically.
2
The vehicle battery will not be charged while the vehicle is parked. If you record in parking mode for an
extended period, the vehicle’s battery may be depleted and you may not be able to start the vehicle.
37

Settings
6.3.6 Setting the battery protection feature
You can set to use the battery protection feature. Follow the instructions to activate the feature.
From the mobile viewer, tap Dash Cam Settings > Record Settings.
1
From Battery Protection, select Enabled or Disabled. The new setting is applied automatically.
2
6.3.7 Setting the battery cutoff voltage feature
You can set the voltage limit to stop recording at when using the Low Voltage Off feature. Refer to the
following instructions to set the voltage.
•The battery cutoff voltage can be set only when the Battery Protection setting is set to Enabled.
•If the Off voltage value is too low, the product may consume the battery completely depending on the
conditions like the vehicle type or temperature.
From the mobile viewer, tap Dash Cam Settings > Record Settings.
1
From 12V or 24V, select the desired voltage.
2
For vehicles using a 12 V battery (most passenger vehicles), configure the 12V setting. For vehicles
using the 24 V battery (trucks and commercial vehicles), adjust the 24V setting. The new setting is
applied automatically.
6.3.8 Setting the battery protection feature for wintertime
You can set the month(s) during the cold season to apply the low voltage protection level of the vehicle.
Refer to the following instructions to set the month(s).
From the mobile viewer, tap Dash Cam Settings > Record Settings.
1
From Wintertime Battery Protection, select the month(s) to apply the battery protection feature. The
2
new setting is applied automatically.
38

Settings
6.4 Setting road safety features
You can activate or deactivate a safety camera alert system.
6.4.1 Setting the safety cameras
When the vehicle approaches or passes the speed limit zone, the safety camera alert system will collect
GPS signals and safety camera data. Refer to the following instructions to enable or disable this feature.
From the mobile viewer, tap Dash Cam Settings > Road Safety Settings.
1
From Safety Cameras, select Enabled or Disabled. The new setting is applied automatically.
2
6.4.2 Setting the mobile zone alert
Follow the instructions to turn on or off the mobile zone alert.
From the mobile viewer, tap Dash Cam Settings > Road Safety Settings.
1
From Mobile Zone Alert, select Enabled or Disabled. The new setting is applied automatically.
2
6.5 Configuring the system settings
This menu allows you to configure the hardware settings that are globally applied to the system during
operation, such as the display language and screen brightness.
6.5.1 Setting the display language
Select a language to display on the screen. Follow the instructions to select a language.
From the mobile viewer, tap Dash Cam Settings > System Settings.
1
From Language, select the desired language. The new setting is applied automatically.
2
39

Settings
6.5.2 Adjusting the system volume
This menu allows you to adjust the voice guidance volume. Follow the instructions to adjust the volume.
From the mobile viewer, tap Dash Cam Settings > System Settings.
1
From Volume, select 0, 1, 2, or 3. The new setting is applied automatically.
2
If you select 0, the voice guidance will be disabled.
6.5.3 Setting the time zone
Follow the instructions to set the time zone.
From the mobile viewer, tap Dash Cam Settings > System Settings.
1
From Time Zone, select the desired time zone. The new setting is applied automatically.
2
6.5.4 Setting the daylight saving time
Follow the instructions to set the daylight saving time.
From the mobile viewer, tap Dash Cam Settings > System Settings.
1
From Daylight Saving, select Enabled or Disabled. The new setting is applied automatically.
2
40

6.5.5 Setting the speed unit
Follow the instructions to set the speed unit.
From the mobile viewer, tap Dash Cam Settings > System Settings.
1
From Speed Unit, select km/h or mph.
2
6.5.6 Setting the speed stamp
Follow the instructions to turn on or off the speed stamp feature.
From the mobile viewer, tap Dash Cam Settings > System Settings.
1
From Speed Stamp, select Enabled or Disabled. The new setting is applied automatically.
2
Settings
41

7. Accessing the product information
New users may benefit from the basic product information that can be accessed from the Menu screen.
7.1 Viewing the product information
From the mobile viewer, tap Dash Cam Info to view product information. The following product information
will be displayed on the screen.
• Model Name
• Memory Size
• Firmware Ver.
• LOCAL ID
• Safety Camera Ver.
• GPS Info
7.2 Accessing and configuring the GPS
A GPS module is used to include the location data in the recorded videos. From the mobile viewer, tap Dash
Cam Info > GPS Info to view the GPS features. The connection status, signal strength, time (UTC), vehicle
speed, current altitude, and Horizontal Dilution of Precision (HDOP) are displayed on the screen.
Tap the
to initialize the GPS, and allow it to locate the current position.
Horizontal Dilution of Precision (HDOP)
HDOP is a value that refers to GPS deviation due to satellite positioning.
42

8. Upgrading the firmware
A firmware upgrade is provided to enhance the product's features, operation or to increase stability. For
optimal operation of the product, ensure that you keep the firmware up to date.
Follow the instructions to upgrade the firmware.
On your PC, open a web browser and go to http://www.thinkware.com/Support/Download.
1
2
Select the product and download the latest firmware upgrade file.
3
Unzip the downloaded file.
Disconnect power to the product and remove the memory card.
4
Open the memory card on a PC and copy the firmware upgrade file to the root folder of the memory
5
card.
While the power is disconnected from the product, insert the memory card into the memory card slot
6
on the product.
Connect the power cable to the product, and then turn on the power (ACC ON) or start the engine to
7
turn on the product. The firmware upgrade starts automatically, and the system will restart once the
firmware update is completed.
Do not disconnect the power or remove the memory card from the product during the upgrade. Doing
so may cause serious damage to the product, or to the data stored in the memory card.
You can also update the firmware from the mobile viewer and the PC viewer.
43

9. Troubleshooting
The following table lists the problems users may encounter while using the product and measures to
resolve them. If the problem persists after taking the measures provided in the table, contact the customer
service center.
Problems Solution
•Make sure the power cable (the car charger or the hardwiring cable) is
Cannot power on the product
connected to the vehicle and the product properly.
•Check the vehicle’s battery level.
The voice guide and/or buzzer
do not sound.
The video is unclear or hardly
visible.
The memory card cannot be
recognized.
The recorded video cannot be
played on a PC.
GPS signal cannot be received
even though the external GPS
receiver is installed.
Check if the volume is set to the minimum. For more information about how to
adjust the volume, refer to "6.5.2 Adjusting the system volume".
•Ensure that the protective film on the camera lens has been removed. The
video may look unclear if the protective film is still on the camera lens.
•Check the installation location of the front or rear camera, turn on the product,
and then adjust the camera's viewing angle.
•Ensure that the memory card has been inserted in the correct direction. Before
inserting the memory card, ensure that the metal contacts on the memory card
are facing toward the lens of the product.
•Turn off the power, remove the memory card, and then check to ensure that the
contacts in the memory card slot are not damaged.
•Ensure that the memory card is an authentic product distributed by
THINKWARE. THINKWARE does not guarantee compatibility and normal
operation of third-party memory cards.
The recorded videos are stored as MP4 video files. Ensure that the video player
installed on your PC supports the playback of MP4 video files.
The GPS signal may not be received in out-of-service areas, or if the product is
located between tall buildings. Also, GPS signal reception may not be available
during storms or heavy rain. Try again on a clear day at a location that is known
to have a good GPS reception. It may take up to 5 minutes until GPS reception is
established.
44

10. Specifications
To see the product specifications, refer to the following table.
Item Specification Remarks
Model name F200
Dimensions / Weight 98.5 x 34 x 22 mm / 54 g
Memory microSD memory card
Continuous Rec
Incident Rec
Recording mode
Manual Rec
Parking Rec (parking mode) Requires the hardwiring cable installation
Audio Recording
Camera sensor
Angle of view (Lens) Approximately 140° (diagonally)
Video
2.1 Megapixel, ON Semiconductor
CMOS
FHD (1920 X 1080) /H.264/ file
extension: MP4
- UHS-1: 8 GB, 16 GB, 128 GB
- Class10: 32 GB,64 GB
Records videos in 1-minute segments (dual
channels are supported for recording the front
and rear view)
Records 10 seconds before and after the incident
(total 20 seconds)
Records from 10 seconds before and 50 seconds
after manually starting the recording (total 1
minute)
Frame rate Maximum 30 fps Applies equally to the front / rear recording
Audio PCM
Acceleration sensor 3-axis acceleration sensor (3D, ±3G) 5 levels for sensitivity adjustment available
Rear camera (optional) V-IN port
GPS External GPS Safety driving section alert supported
Power input DC 12 / 24 V supported
Power consumption 2ch: 3.1 W / 1ch: 2.3 W (Wi-Fi on) Except for the fully charged supercapacitor / GPS
Auxiliary power unit Super capacitor
LED indicator Rear: Status LED, Wi-Fi LED
Alarm Built-in speakers Voice guide (buzzer sounds)
Optional accessory that requires separate
purchase
45

Specifications
Item Specification Remarks
Operating temperature 14–140℉/-10–60℃
Storage temperature -4–158℉/-20–70℃
Connection Interface 1 x V-IN port
46

Specifications
Before contacting a service center
Please back up all important data stored in the memory card. The data in the memory card may be deleted
during repair. Every product requested for repair is regarded as a device that has had its data backed up.
The customer service center does not back up your data. THINKWARE is not responsible for any loss, such
as data loss.
47

http://www.thinkware.com
Ver. 1.0 (Mar. 2018)

Guide de l’utilisateur
Ce produit enregistre des vidéos pendant le fonctionnement du véhicule.
Veuillez lire et suivre les instructions du présent guide pour utiliser et entretenir le
produit correctement.

Avant d’utiliser le produit
À propos de ce produit
Ce produit enregistre des vidéos pendant le fonctionnement du véhicule. Utilisez cet appareil seulement
à des fins de documentation pour les enquêtes d’incidents ou d’accidents de la route. Il n’existe aucune
garantie que ce produit enregistrera et offrira le service en nuage pour TOUS les événements. L’appareil
pourrait ne pas enregistrer correctement les accidents incluant un impact minime insuffisant pour activer
le capteur d’impact, ou encore les accidents avec un très impact qui cause une déviation de la tension
électrique de la batterie du véhicule.
L’enregistrement vidéo commence seulement à partir du moment où le produit est entièrement en fonction
(activé). Pour vous assurer que tous les événements concernant le véhicule sont enregistrés, attendez que
le produit ait terminé de s’activer après l’avoir allumé, puis commencez à conduire.
THINKWARE n’est aucunement responsable de toute perte résultant d’un accident ni de fournir du soutien,
quel qu’il soit, en lien avec les conséquences d’un accident.
Selon la configuration ou les conditions de fonctionnement du véhicule, par exemple l’installation de
dispositifs de verrouillage à distance des portes ou les réglages de l’unité de contrôle électronique ou
du système de surveillance de la pression des pneus, certaines fonctions du produit pourraient ne pas
être prises en charge et différentes versions du logiciel peuvent avoir des effets sur le rendement ou les
fonctions du produit.
À propos du guide de l’utilisateur
L’information présentée dans ce guide est sujette à modification quand le fabricant met à jour sa politique
de service.
Ce guide de l’utilisateur est conçu pour les modèles THINKWARE F200 seulement et peut comporter des
erreurs techniques ou de rédaction ou des omissions.
Droits d’auteur
Tous les droits portant sur le contenu et les cartes du présent guide sont réservés par THINKWARE et
protégés selon les lois sur la propriété intellectuelle. Toute copie, modification, publication ou distribution
du présent guide sans une autorisation écrite de THINKWARE est interdite et sujette à des poursuites
criminelles.
Marques de commerce déposées
THINKWARE F200 est une marque déposée de THINKWARE.
Les autres logos de produits et noms de services apparaissant dans le présent guide sont des marques de
commerce de leurs entreprises respectives.
Déclaration d’exposition aux radiations
Cet équipement est conforme aux limites d’exposition aux rayonnements IC établies pour un environnement
non con trôlé. Cet équipement doit être installé et utilisé avec un minimum de 20 cm de distance entre la
source de rayonnement et votre corps.

Énoncé FCC
Cet appareil est conforme à la partie 15 des Règles de la FCC. Son utilisation est assujettie aux
deux conditions suivantes : (1) Cet appareil ne doit causer aucune interférence nuisible et (2) cet
appareil doit accepter toutes les interférences reçues, y compris celles qui pourraient provoquer un
fonctionnement non souhaitable.
Cet équipement a été testé et déclaré conforme aux limites pour appareils numériques de classe B,
selon la section 15 des Règles de la FCC. Ces limites sont destinées à assurer une protection
raisonnable contre les interférences nuisibles dans une installation résidentielle. Cet équipement
génère, utilise et émet de l’énergie de fréquences radio et peut, en cas d’installation ou d’utilisation
non conforme aux instructions, engendrer des interférences nuisibles pour les communications radio.
Toutefois, il n’existe aucune garantie qu’une installation particulière sera à l’abri des interférences. Si
cet équipement cause des interférences nuisibles à la réception radiophonique ou télévisuelle, ce qui
peut être vérifié en mettant l’équipement hors, puis sous tension, l’utilisateur peut tenter de résoudre
le problème de l’une des façons suivantes :
• Réorienter ou déplacer l’antenne de réception.
• Augmenter la distance entre l’équipement et le récepteur.
• Brancher l’équipement sur un circuit électrique différent de celui où le récepteur est branché.
• Consulter le fournisseur ou un technicien expérimenté dans le domaine de la radio ou de la
télévision.
• Cet appareil et son antenne ne doivent pas être placés à proximité de toute autre antenne ou de tout
autre émetteur, ni être utilisés conjointement avec ceux-ci.
• Une distance de séparation minimale de 20 cm doit être maintenue entre l’antenne de cet appareil et
l’utilisateur pour satisfaire aux exigences d’exposition aux RF.
MISE EN GARDE DE LA FCC : Tout changement ou toute modification à l’équipement qui n’a pas fait
l’objet d’une autorisation expresse par la partie responsable d’assurer sa conformité pourrait annuler
votre droit à utiliser l’équipement.
Code FCC : 2ADTG-F200
Information pour l’utilisateur : CNR-247
Cet appareil est conforme aux exigences des CNR d’Innovation, Sciences et Développement
économique Canada pour les dispositifs exempts de licence.
Soyez avisés que tout changement ou toute modification à l’équipement qui n’a pas fait l’objet d’une
autorisation expresse par la partie responsable d’assurer sa conformité pourrait annuler le droit de
l’utilisateur à utiliser l’équipement.
Avis : L’utilisation est assujettie aux deux conditions suivantes : (1) Cet appareil ne doit causer aucune
interférence et (2) cet appareil doit accepter toutes les interférences, y compris celles qui pourraient
provoquer un fonctionnement non souhaité.
Cet appareil numérique de classe B est conforme à la norme canadienne NMB-003.
ISDEC : 12594A-F200

Table des matières
Consignes de sécurité 6
1. Aperçu du produit 9
1.1 Articles inclus 9
1.1.1 Articles standard 9
1.1.2 Accessoires (vendus séparément) 9
1.2 Légende des pièces 10
1.2.1 Caméra avant (appareil principal) –
vue avant 10
1.2.2 Caméra avant (appareil principal) –
vue arrière 11
1.2.3 Caméra arrière (en option) 11
1.3 Retrait et insertion de la carte mémoire 12
2. Installation du produit 13
2.1 Installation de la caméra avant
(appareil principal) 13
2.1.1 Choix de l’emplacement d’installation 13
2.1.2 Fixation du produit 13
2.1.3 Branchement du câble d’alimentation 15
2.2 Installation de la caméra arrière (en option) 16
2.2.1 Choix de l’emplacement d’installation 16
2.2.2 Fixation de la caméra arrière 17
2.2.3 Raccordement du câble de la caméra
arrière 18
3. Utilisation des fonctions d’enregistrement 19
3.1 Allumer ou éteindre le produit 19
3.2 Emplacements de stockage des fichiers 19
3.3 Utilisation de la fonction d’enregistrement en
continu 20
3.4 Enregistrement manuel 20
3.5 Utilisation du mode de stationnement 21
4. Utilisation de la visionneuse mobile 23
4.1 Connecter le produit à un téléphone
intelligent 23
4.1.1 Connexion du produit à un appareil
Android 23
4.1.2 Connexion du produit à un appareil iOS 24
4
4.2 Disposition de l’écran de la visionneuse
mobile 25
4.3 Regarder des vidéos enregistrées avec la
visionneuse mobile 26
4.4 Aperçu du menu des commandes vidéo 26
5. Utilisation de la visionneuse pour
ordinateur 27
5.1 Exigences système 27
5.2 Visionneuse pour ordinateur Windows 27
5.2.1 Installation de la visionneuse pour
ordinateur (Windows) 27
5.2.2 Disposition de l’écran de la visionneuse
pour ordinateur (pour Windows) 28
5.2.3 Regarder des vidéos enregistrées avec
la visionneuse pour ordinateur.
(pour Windows) 29
5.2.4 Aperçu du menu des commandes vidéo
(pour Windows) 30
5.3 Visionneuse pour ordinateur Mac 31
5.3.1 Installation de la visionneuse pour
ordinateur (Mac) 31
5.3.2 Disposition de l’écran de la visionneuse
pour ordinateur (pour Mac) 32
5.3.3 Regarder des vidéos enregistrées avec
la visionneuse pour ordinateur (Mac) 33
5.3.4 Aperçu du menu des commandes vidéo
(Mac) 34
6. Paramétrage 35
6.1 Gestion de la carte mémoire 35
6.1.1 Partitionnement de la carte mémoire 35
6.1.2 Formatage de la carte mémoire 35
6.1.3 Configuration de la fonction
d’écrasement vidéo 36
6.2 Réglage de la caméra 36
6.2.1 Réglage de la luminosité de la caméra
avant 36
6.2.2 Réglage de la luminosité de la caméra
arrière 36

6.3 Réglage des fonctions d’enregistrement 37
6.3.1 Réglage de la sensibilité de détection
des impacts pour l’enregistrement en
continu 37
6.3.2 Réglage du mode de stationnement 37
6.3.3 Réglage de la sensibilité de l’impact
pour le mode de stationnement 38
6.3.4 Réglage de la sensibilité de la détection
du mouvement 38
6.3.5 Réglage de la fonction de minuterie
d’enregistrement 38
6.3.6 Réglage de la fonction de protection de
la batterie 39
6.3.7 Réglage de la limite de tension
électrique de la batterie 39
6.3.8 Réglage de la fonction de protection de
la batterie en hiver 39
6.4 Régler les fonctions de sécurité routière 40
6.4.1 Réglage des alertes de caméra de
sécurité 40
6.4.2 Réglage de l’alerte de zone de vitesse 40
6.5 Configuration des paramètres du système 40
6.5.1 Réglage de la langue d’affichage 40
6.5.2 Réglage du volume du système 41
6.5.3 Réglage du fuseau horaire 41
6.5.4 Réglage de l’heure d’été 41
6.5.5 Réglage des unités de vitesse de
l’appareil 42
6.5.6 Réglage de la fonction d’inscription de
la vitesse 42
7. Consulter l’information sur le produit 43
7.1 Afficher l’information sur le produit 43
7.2 Consultation et configuration de la fonction
GPS 43
8. Mise à jour du micrologiciel 44
9. Dépannage 45
10. Caractéristiques techniques 46
5

Consignes de sécurité
Veuillez lire les consignes de sécurité ci-dessous pour utiliser le produit correctement.
Symboles de sécurité utilisés dans le guide
« Avertissement » : Indique un danger potentiel qui, s’il n’est pas évité, pourrait causer des blessures ou la
mort.
« Mise en garde » : Indique un danger potentiel qui, s’il n’est pas évité, pourrait causer des blessures
légères ou des dommages matériels.
« Remarque » : Indique la présence d’information utile pour une utilisation optimale des fonctions du produit.
Consignes de sécurité pour l’utilisation
Conduite et utilisation du produit
•Ne pas actionner l’appareil pendant que vous conduisez un véhicule. La distraction pendant la conduite
peut causer des accidents occasionnant des blessures ou la mort.
•Installer le produit à un endroit où il n’obstrue pas la vision du conducteur. L’obstruction du champ de
vision du conducteur peut causer des accidents occasionnant des blessures ou la mort. Avant d’installer
l’appareil sur un pare-brise, vérifier les lois de votre municipalité et de votre province.
6

Alimentation électrique
•Ne pas actionner ou manipuler le produit avec des mains mouillées. Ceci pourrait causer une
électrocution.
•Ne pas utiliser des câbles ou fils électriques endommagés. Ceci pourrait causer un incendie ou une
électrocution.
•Tenir le câble d’alimentation à distance de toute source de chaleur. La chaleur pourrait faire fondre
l’isolant du câble d’alimentation et causer un incendie ou une électrocution.
•Utiliser un câble d’alimentation doté du connecteur approprié et s’assurer que le câble d’alimentation est
branché correctement et solidement. Le défaut de suivre cette consigne pourrait causer un incendie ou
une électrocution.
•Ne pas modifier ni couper le câble d’alimentation. Ne pas placer d’objet lourd sur le câble d’alimentation
ni tirer, insérer ou plier le câble d’alimentation avec force. Ceci pourrait causer un incendie ou une
électrocution.
•Utiliser uniquement des accessoires d’origine obtenus auprès de THINKWARE ou d’un revendeur
THINKWARE autorisé. THINKWARE ne garantit pas la compatibilité ni le fonctionnement d’accessoires de
tiers.
•Lors du raccordement du câble d’alimentation au produit, s’assurer que le branchement est solide entre la
fiche de câble et le connecteur du câble d’alimentation de l’appareil. Si le branchement n’est pas solide,
le câble d’alimentation pourrait se détacher en raison de la vibration du véhicule. L’enregistrement vidéo
n’est pas disponible si le câble d’alimentation est débranché.
Enfants et animaux domestiques
•Tenir le produit à distance des enfants et des animaux. Si l’appareil venait à se briser, des blessures ou la
mort pourraient survenir.
7

Autres renseignements à propos de ce produit
Gestion et utilisation du produit
•Ne pas exposer le produit à la lumière directe du soleil ou à une lumière forte. L’objectif et les circuits de
l’appareil pourraient cesser de fonctionner.
•Utiliser le produit dans une plage de température de -10 °C à 60 °C (14 °F à 140 °F) et entreposez le produit
dans une plage de température de -20 °C à 70 °C (-4 °F à 158 °F). Le produit pourrait ne pas fonctionner tel
que prévu et subir des dommages permanents s’il est utilisé ou entreposé hors des plages de température
spécifiées. De tels dommages ne sont pas couverts par la garantie.
•Vérifiez régulièrement le produit pour vous assurer que l’emplacement d’installation est approprié. Les
impacts causés par des conditions routières difficiles pourraient modifier l’emplacement d’installation.
Assurez-vous que le produit est positionné selon les instructions du présent guide.
•Ne pas appliquer de force excessive en appuyant sur les boutons. Ceci pourrait endommager les boutons
du produit.
•Ne pas utiliser de nettoyants chimiques ou de solvants pour nettoyer ce produit. Ceci pourrait
endommager les pièces de plastique du produit. Nettoyer le produit avec un linge propre, sec et doux.
•Ne pas démonter le produit ni le soumettre à des chocs. Ceci pourrait endommager le produit. Le
démontage non autorisé du produit annule la garantie du produit.
•Manipuler le produit avec précaution. La chute ou la manipulation incorrecte du produit ou son
exposition à des chocs externes pourrait causer des dommages au produit ou causer un problème de
fonctionnement.
•Ne pas tenter d’insérer de corps étranger dans l’appareil.
•Éviter l’excès d’humidité et empêcher l’eau d’entrer dans l’appareil. Les composantes électroniques du
produit pourraient cesser de fonctionner si elles sont exposées à l’humidité ou à l’eau.
•Selon la marque et le modèle de votre véhicule, l’alimentation électrique pourrait être fournie en continu à
la caméra de tableau de bord, même quand le système d’allumage est éteint. L’installation de l’appareil sur
une sorte de 12 V à alimentation continue pourrait épuiser la batterie du véhicule.
•Cet appareil est conçu pour enregistrer des vidéos pendant le fonctionnement du véhicule. La qualité de la
vidéo peut être affectée par les conditions météorologiques et routières, par exemple selon l’heure du jour
ou de la nuit, la présence d’un éclairage de rue, la position dans un tunnel et la température ambiante.
•THINKWARE n’est PAS responsable de la perte de toute vidéo pendant l’utilisation.
•Bien que l’appareil soit conçu pour résister à des collisions de véhicules à fort impact, THINKWARE ne
garantit pas l’enregistrement d’accidents où l’appareil est endommagé en raison de l’accident.
•Maintenir la propreté du pare-brise et de l’objectif de la caméra pour optimiser la qualité vidéo. La
présence de particules ou de substances sur le pare-brise ou l’objectif de la caméra pourraient réduire la
qualité des vidéos enregistrées.
•Cet appareil est conçu pour être utilisé à l’intérieur du véhicule seulement.
8

1. Aperçu du produit
1.1 Articles inclus
Assurez-vous que tous les articles indiqués sont inclus dans l’emballage.
1.1.1 Articles standard
Caméra avant (appareil principal) Support
Soutien adhésif pour câble
Les articles standard sont sujets à changement sans préavis.
Carte mémoire MicroSD avec
adaptateur (produit consommable)
1.1.2 Accessoires (vendus séparément)
BATTERY
GND
ACC
Câble de raccordement Récepteur GPS externe Caméra arrière
Chargeur pour véhicule
Guide de démarrage rapide et garantie
/ Information CS / Guide de l’utilisateur
(sur la carte MicroSD)
•La réception GPS peut être affectée par des interférences provenant du pare-brise du véhicule,
particulièrement s’il comporte un revêtement de protection contre les UV ou un dégivreur intégré. Il est
recommandé d’utiliser un récepteur GPS externe si le signal GPS est faible ou absent.
•Pour raccorder le récepteur GPS externe au port GPS de la caméra avant, retirez délicatement le capuchon
du port GPS de la caméra avant avec une pince ou un petit tournevis à tête plate.
9
Aperçu du produit
1.2 Légende des pièces
1.2.1 Caméra avant (appareil principal) – vue avant
Objectif de la caméra avant
Enregistre la vue avant.
Connecteur du support
Permet de raccorder le support.
Haut-parleur
Émet le son du guidage vocal et de la
sonnette pour indiquer l’état du produit.
Prise d’alimentation DC-IN
Permet de brancher le câble
d’alimentation.
Port GPS
Permet de brancher
un récepteur GPS
externe (en option).
Prise d’entrée V-IN
Permet de raccorder
la caméra arrière
(en option).
10
1.2.2 Caméra avant (appareil principal) – vue arrière
Bouton REC
• Pression courte : Démarre l’enregistrement manuel
• Pression pendant 3 secondes : Activation/
désactivation de l’enregistrement vidéo
• Pression pendant 5 secondes :
Formatage de la carte mémoire
Aperçu du produit
Voyant Wi-Fi
Indique l’état de la
connexion Wi-Fi.
VOYANT D’ÉTAT
Indique l’état de
l’enregistrement.
Logement de la carte mémoire
Permet d’insérer une carte mémoire pour
enregistrer les vidéos filmées.
1.2.3 Caméra arrière (en option)
Support adhésif
Permet de fixer la caméra arrière dans le véhicule.
Bouton Wi-Fi
Appuyez sur ce bouton pour
connecter le produit à un téléphone
intelligent par un réseau Wi-Fi.
Microphone
Permet d’enregistrer la voix.
Objectif de la caméra arrière
Enregistre la vue avant.
Voyant de sécurité
Indique que l’enregistrement est en cours.
Port de connexion
Permet de brancher la caméra
arrière à la caméra avant au
moyen du câble de caméra
arrière.
11

Aperçu du produit
1.3 Retrait et insertion de la carte mémoire
Suivez les instructions pour retirer la carte mémoire de l’appareil ou pour insérer la carte mémoire dans
l’appareil.
Retrait de la carte mémoire
Assurez-vous que le produit est éteint, puis appuyez
délicatement sur le dessous de la carte mémoire avec l’ongle.
La partie inférieure de la carte mémoire sera exposée.
Retirez-la de l’appareil.
Insertion de la carte mémoire
Insérez la carte mémoire dans le logement de carte mémoire,
en prenant soin de la placer dans le bon sens, puis appuyez
sur la carte mémoire pour la faire entrer dans le logement
jusqu’à ce que vous entendiez un déclic.
Avant d’insérer la carte mémoire, assurez-vous que les
contacts métalliques de la carte mémoire sont tournés vers
l’objectif de l’appareil.
•Assurez-vous que l’appareil est éteint avant de retirer la carte mémoire. Les fichiers vidéo enregistrés
pourraient être endommagés ou effacés si vous retirez la carte mémoire pendant que le produit est
allumé.
•Assurez-vous que la carte mémoire est dans le bon sens avant de l’insérer dans l’appareil. Le logement de
la carte mémoire ou la carte mémoire elle-même pourrait subir des dommages si elle est mal insérée.
•Utilisez seulement des cartes mémoire d’origine de THINKWARE. THINKWARE ne garantit pas la
compatibilité ni le fonctionnement de cartes mémoire de tiers.
Pour éviter la perte des fichiers vidéo enregistrés, faites une sauvegarde périodique des fichiers vidéo sur
un autre dispositif de stockage.
12

2. Installation du produit
20 cm
2.1 Installation de la caméra avant (appareil principal)
Suivez les instructions pour installer le produit correctement.
2.1.1 Choix de l’emplacement d’installation
Choisissez un emplacement d’installation qui permet
d’enregistrer toute la vue avant du véhicule, sans
obstruer le champ de vision du conducteur. Assurezvous que l’objectif de la caméra avant est placé au
centre du pare-brise.
Si un appareil de navigation GPS est installé sur le
tableau de bord, la réception du signal GPS pourrait
être affectée selon l’emplacement d’installation de la
caméra de tableau de bord.
Modifiez l’emplacement d’installation de l’appareil
de navigation GPS afin que les deux appareils soient
placés à une distance d’au moins 20 centimètres
(environ 8 pouces).
2.1.2 Fixation du produit
Suivez les instructions pour fixer l’appareil à l’emplacement d’installation.
1
1
2
Après avoir choisi l’emplacement d’installation, essuyez l’emplacement d’installation sur le pare-brise
2
avec un linge sec.
Alignez le support avec le rail du support sur
l’appareil, puis faites-le glisser jusqu’à ce que vous
➊
entendiez un déclic (
protecteur avec précaution (
). Ensuite, retirez le film
➋
).
13
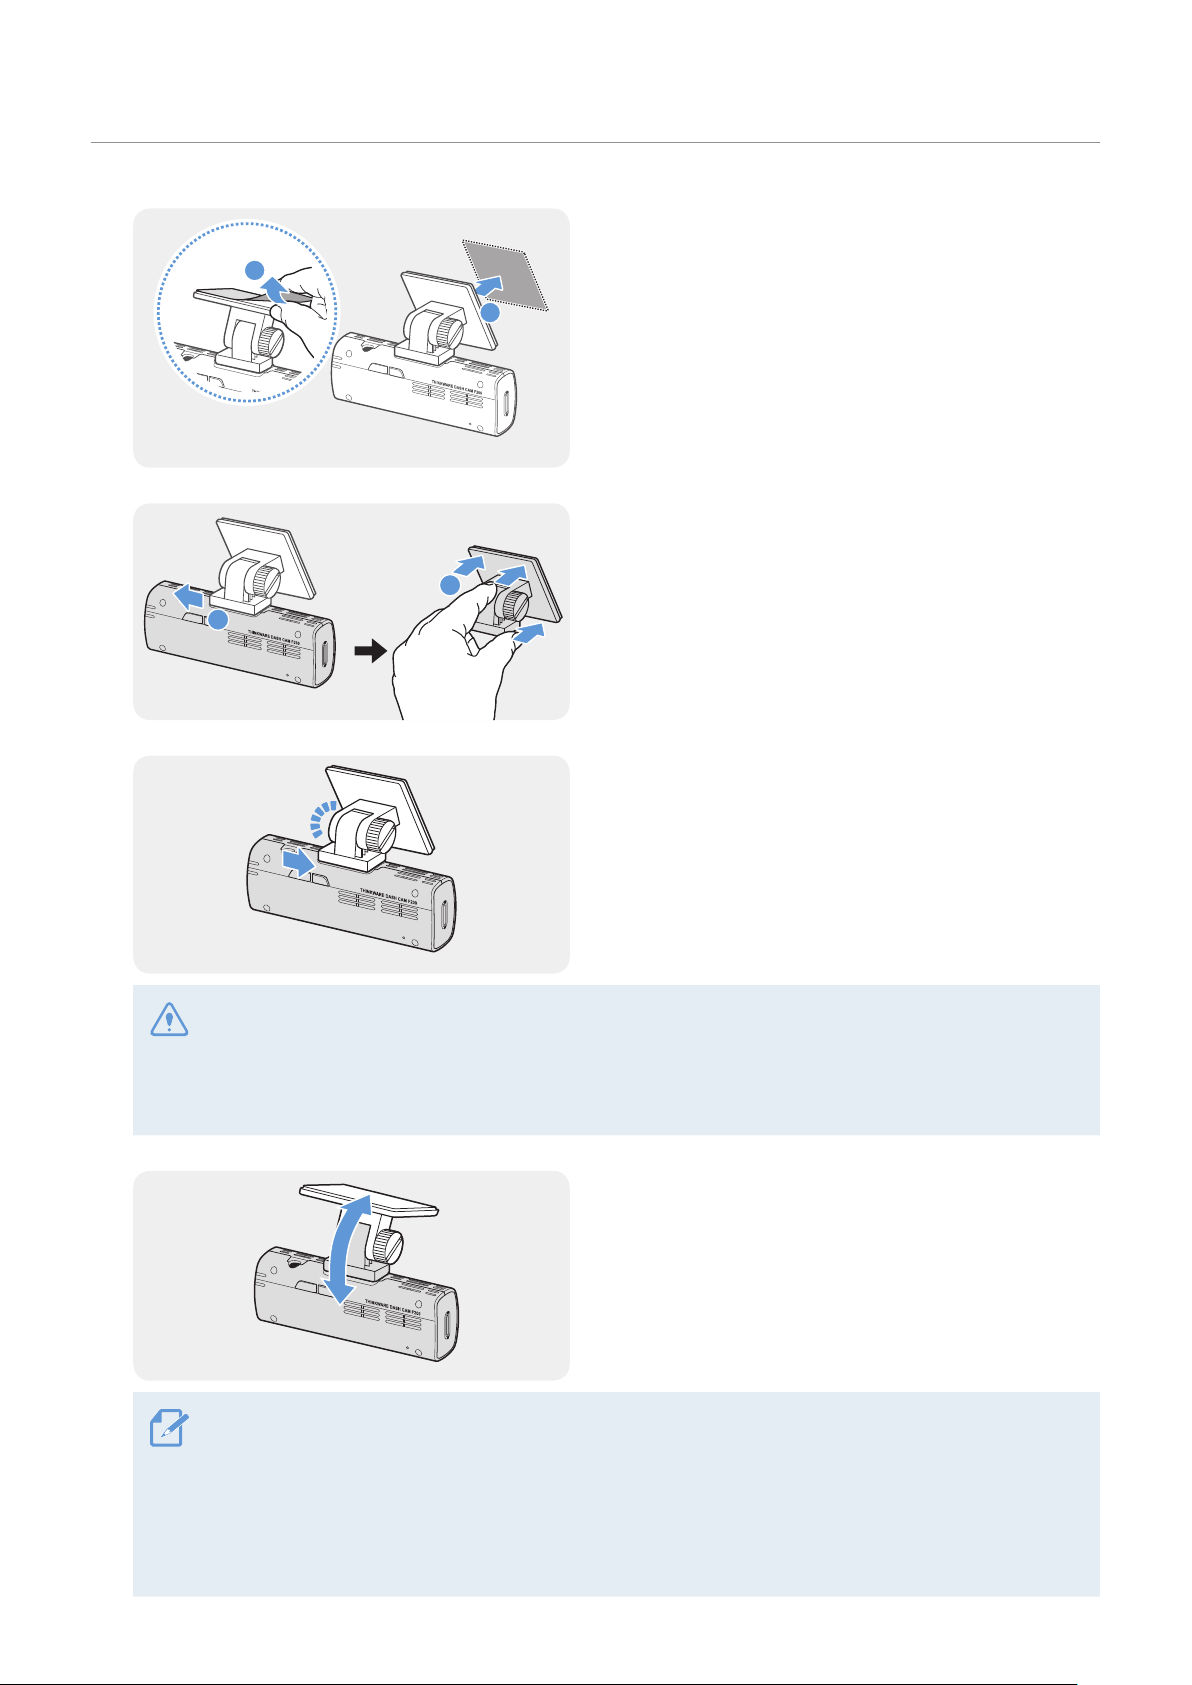
Installation du produit
1
2
3
4
5
Retirez le film protecteur du support adhésif, puis
1
appuyez le support sur la surface de l’emplacement
d’installation.
2
Retirez l’appareil du support et appuyez le support
sur le pare-brise pour vous assurer que le support
est fixé solidement.
Alignez l’appareil avec le support, puis faites-le
glisser en position de fixation jusqu’à ce que vous
entendiez un déclic.
•Si l’appareil n’est pas fixé solidement au support, il pourrait tomber et subir des dommages pendant
le fonctionnement du véhicule.
•Si vous devez retirer le support du pare-brise pour changer l’emplacement d’installation, veillez à ne
pas endommager le film protecteur du pare-brise.
6
Réglez l’angle vertical de la caméra, puis serrez
fermement la vis du support avec un tournevis à tête
plate ou une pièce de monnaie.
Pour confirmer que l’angle de la caméra est correctement réglé, enregistrez une vidéo après
l’installation, puis regardez la vidéo avec la visionneuse mobile ou la visionneuse pour ordinateur. Au
besoin réglez l’angle de la caméra de nouveau.
Pour plus de renseignements à propos de la visionneuse mobile ou de la visionneuse pour ordinateur,
consultez « 4. Utilisation de la visionneuse mobile » à la page 23 ou « 5. Utilisation de la visionneuse
14
pour ordinateur » à la page 27.
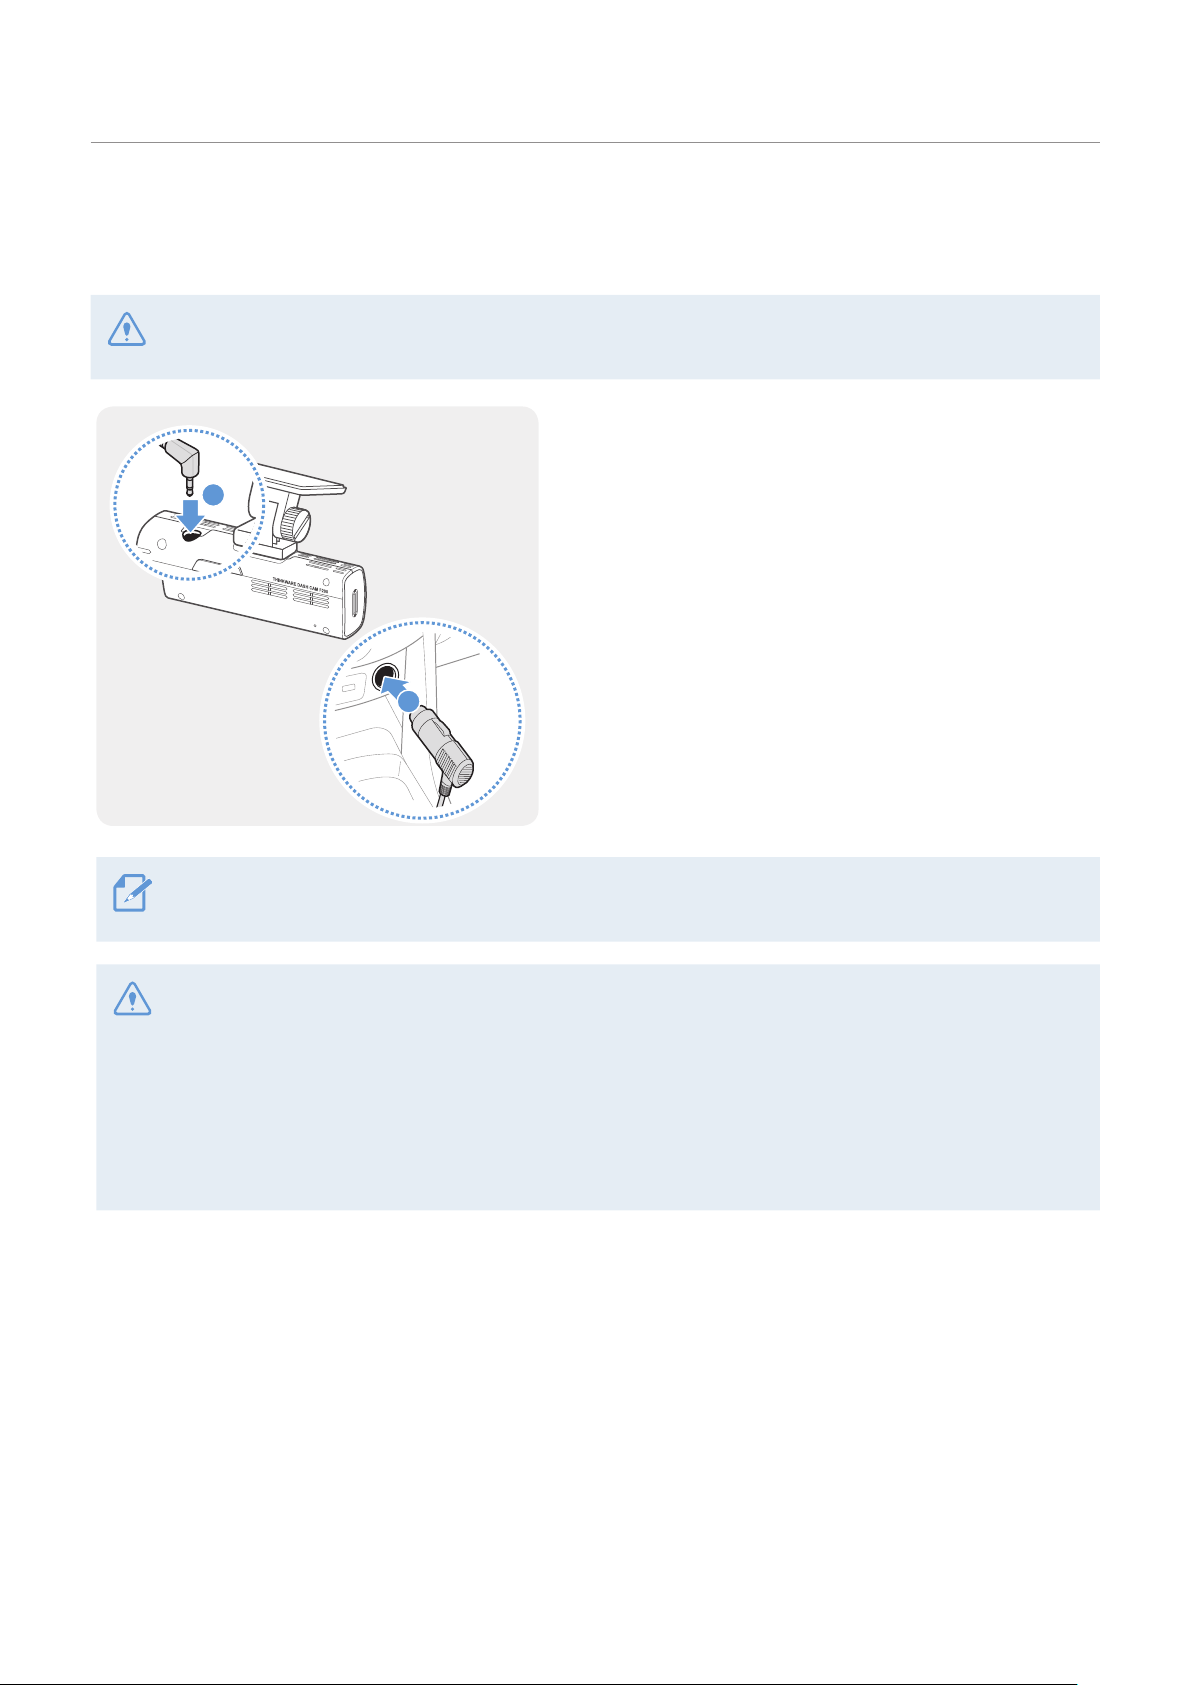
Installation du produit
2.1.3 Branchement du câble d’alimentation
Éteignez le moteur du véhicule et ses accessoires électriques, puis branchez le chargeur pour véhicule.
Le câble de raccordement (en option) doit être installé professionnellement dans le véhicule par un
mécanicien formé.
Branchez le câble d’alimentation pour allume-cigare
au connecteur d’alimentation DC-IN de l’appareil,
1
2
puis insérez la fiche pour allume-cigare dans la prise
d’alimentation du véhicule.
L’emplacement et les caractéristiques techniques de la prise d’alimentation peuvent varier selon la marque
et le modèle du véhicule.
•Utilisez le câble d’alimentation pour allume-cigare d’origine de THINKWARE (en option). L’utilisation d’un
câble d’un autre fabriquant pourrait entraîner des dommages à l’appareil ou la différence de tension
électrique pourrait causer un incendie ou une électrocution.
•Ne pas modifier ni couper le câble d’alimentation vous-même. Ceci pourrait endommager le produit ou le
véhicule.
•Pour une conduite en toute sécurité, placez les câbles afin de ne pas obstruer le champ de vision du
conducteur ou nuire à la conduite du véhicule.
15

Installation du produit
2.2 Installation de la caméra arrière (en option)
Reportez-vous aux instructions suivantes pour installer la caméra arrière correctement.
2.2.1 Choix de l’emplacement d’installation
Choisissez un emplacement d’installation sur
la lunette arrière qui n’est pas dans la grille du
dégivreur et qui permet à la caméra d’enregistrer
toute la vue arrière du véhicule.
•Sur les véhicules dont la lunette arrière est protégée par un pare-soleil, choisissez un emplacement où le
pare-soleil ne nuire pas à l’utilisation de la caméra.
•L’adhésif de la caméra arrière ne doit pas entrer en contact avec la grille du dégivreur.
16

Installation du produit
2
1
2.2.2 Fixation de la caméra arrière
Reportez-vous aux instructions suivantes pour fixer l’appareil à l’emplacement d’installation.
Après avoir choisi l’emplacement d’installation, essuyez la surface d’installation sur le pare-brise avec
1
un linge sec.
Inspectez l’emplacement d’installation avant de fixer la caméra arrière sur la lunette arrière. Après
avoir fixé la caméra arrière sur la lunette arrière, il est difficile de retirer la caméra ou de changer
l’emplacement d’installation en raison de la force de l’adhésif.
2
3
Retirez le film protecteur du support adhésif et de
l’objectif de la caméra.
Placez l’appareil en tournant le logo THINKWARE
vers l’intérieur de l’habitacle, puis appuyez
fermement l’adhésif sur la surface pour fixer la
caméra.
Si l’appareil est fixé à l’envers, la vue arrière
sera enregistrée à l’envers.
4
Réglez l’angle vertical de la caméra.
17

Installation du produit
2.2.3 Raccordement du câble de la caméra arrière
Éteignez le produit, puis branchez le câble de la caméra arrière à la caméra avant (appareil principal).
1
2
Branchez une extrémité du câble de la caméra
arrière au port V-IN de la caméra avant.
Branchez l’autre extrémité du câble de la caméra
arrière au connecteur de la caméra arrière.
Pour une conduite en toute sécurité, placez les câbles afin de ne pas obstruer le champ de vision du
conducteur ou nuire à la conduite du véhicule.
Placez le démarreur en position ACC ou démarrez le moteur pour vous assurer que le produit s’allume.
3
Une fois que le produit est allumé, le voyant d’état et le guide vocal s’allument.
Le produit s’allume quand le démarreur est en position ACC (accessoires) ou quand le moteur démarre.
18
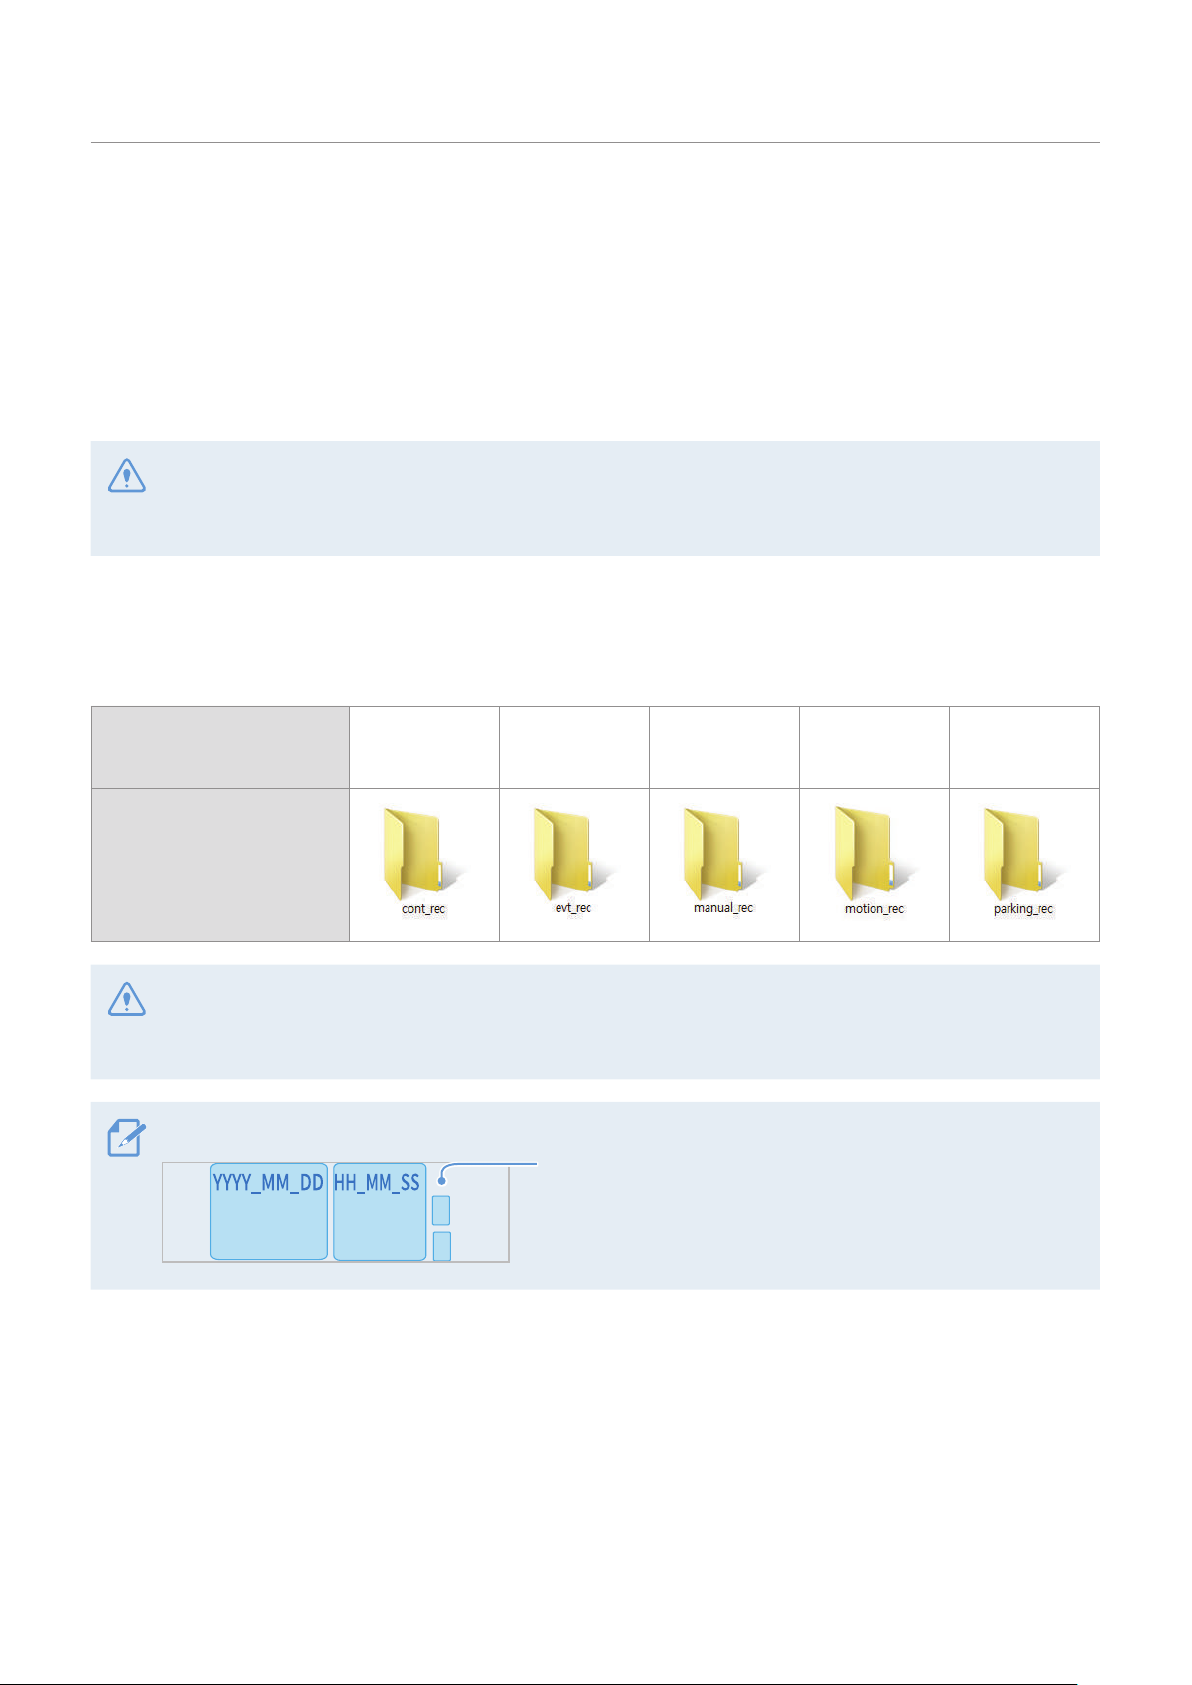
3. Utilisation des fonctions d’enregistrement
REC_2017_07_01_10_25_30_
REC_2017_07_01_10_25_30_R.MP4
3.1 Allumer ou éteindre le produit
Le produit s’allume automatiquement et l’enregistrement en continu démarre quand le démarreur est en
position ACC ou quand le moteur démarre.
Attendez que le produit ait terminé de s’activer après l’avoir allumé, puis commencez à conduire.
L’enregistrement vidéo commence seulement à partir du moment où le produit est entièrement en fonction
(activé).
3.2 Emplacements de stockage des fichiers
Les fichiers vidéo sont enregistrés dans le dossier suivant, en fonction du mode d’enregistrement.
Sur la visionneuse mobile
Sur la carte mémoire
Regarder des vidéos sur un ordinateur Windows ou Mac ou utiliser l’application mobile Thinkware. Si vous
tentez de visionner des vidéos en insérant la carte mémoire dans un autre dispositif, comme un téléphone
intelligent ou une tablette, les fichiers vidéo pourraient être effacés.
Le nom du fichier est composé de la date et de l’heure de début de la vidéo et de l’option d’enregistrement.
Continu
F.MP4
Incident en
continu
Conditions d’enregistrement
•F : Caméra avant
•R : Caméra arrière (quand une caméra arrière en
option est installée)
Enregistrement
manuel
Détection du
mouvement
Incident en
stationnement
19

Utilisation des fonctions d’enregistrement
3.3 Utilisation de la fonction d’enregistrement en continu
Branchez le câble d’alimentation à la prise d’alimentation DC-IN de l’appareil, puis placez le démarreur
du véhicule à la position ACC ou démarrez le moteur. Le voyant d’état et le guide vocal s’allument et
l’enregistrement en continu commence.
Pendant l’enregistrement en continu, le produit fonctionne comme suit.
Voyant
Mode Description du fonctionnement
d’enregistrement
(REC)
Enregistrement
en continu
Enregistrement
d’incident en
continu*
* Quand un impact au véhicule est détecté pendant l’enregistrement en continu, le début de l’enregistrement
d’incident est annoncé par un bruit de sonnette.
•Attendez que le produit ait terminé de s’activer après l’avoir allumé, puis commencez à conduire.
L’enregistrement vidéo commence seulement à partir du moment où le produit est entièrement en fonction
(activé).
•Quand l’enregistrement d’incident en continu commence, un bruit de sonnette se fait entendre en tant que
notification. Cette fonction vous permet de gagner du temps quand vous vérifiez le voyant d’état afin de
connaître l’état de fonctionnement du produit.
•Pour activer l’enregistrement, vous devez insérer une carte mémoire dans l’appareil.
Pendant la conduite, les vidéos sont enregistrées en segments de
1 minute, puis enregistrées dans le dossier « cont_rec ».
Quand un impact au véhicule est détecté, une vidéo de 20 secondes
est enregistrée, à partir de 10 secondes avant la détection et jusqu’à
10 secondes après la détection, puis la vidéo est enregistrée dans le
dossier « evt_rec ».
(voyant allumé)
(clignotement)
3.4 Enregistrement manuel
Vous pouvez enregistrer une scène que vous voulez filmer pendant la conduite et l’enregistrer en tant que
fichier séparé.
Pour démarrer l’enregistrement manuel, appuyez sur le bouton REC. Ensuite, l’enregistrement manuel
commence avec le guide vocal. Pendant l’enregistrement manuel, le produit fonctionne comme suit.
Voyant
Mode Description du fonctionnement
Quand vous appuyez sur le bouton REC, une vidéo de 1 minute est
Enregistrement
manuel
20
enregistrée, à partir de 10 secondes avant la pression sur le bouton et
jusqu’à 50 secondes après la pression sur le bouton, puis la vidéo est
enregistrée dans le dossier « manual_rec ».
d’enregistrement
(REC)
(clignotement)

Utilisation des fonctions d’enregistrement
3.5 Utilisation du mode de stationnement
Quand le produit est branché au véhicule avec le câble de raccordement (en option), le mode de
fonctionnement passe au mode de stationnement avec guide vocal quand le moteur et le démarreur sont
éteints.
•Le mode de stationnement fonctionne seulement quand le câble de raccordement est raccordé. Le câble
de raccordement (en option) doit être installé professionnellement dans le véhicule par un mécanicien
formé.
•Pour utiliser tous les modes d’enregistrement, vous devez insérer une carte mémoire dans l’appareil.
•Selon l’état de charge de la batterie du véhicule, la durée du mode de stationnement peut varier. Avant
d’utiliser le mode de stationnement pendant une longue période, vérifiez le niveau de charge de la batterie
pour éviter qu’elle ne se décharge.
Si vous ne souhaitez pas utiliser le mode de stationnement ou que vous voulez changer les paramètres de
>
mode, à partir de la visionneuse mobile, appuyez sur Param. de caméra de tableau de bord
d’enregistrement.
Paramètres
Reportez-vous au tableau suivant pour régler les options du Mode Stationnement.
Option Description du fonctionnement
Détection du
mouvement
Aucun
mouvement
ni impact
détecté
Mouvement
détecté
Impact
détecté
Surveille les mouvements à proximité et les impacts
au véhicule. Une vidéo est enregistrée seulement si un
mouvement ou un impact est détecté.
Quand un mouvement est détecté pendant que le véhicule est
stationné, une vidéo de 20 secondes est enregistrée, à partir
de 10 secondes avant la détection et jusqu’à 10 secondes
après la détection, puis la vidéo est enregistrée dans le
dossier « motion_rec ».
Quand un impact est détecté pendant que le véhicule est
stationné, une vidéo de 20 secondes est enregistrée, à partir
de 10 secondes avant la détection et jusqu’à 10 secondes
après la détection, puis la vidéo est enregistrée dans le
dossier « parking_rec ».
Voyant
d’enregistrement
(REC)
(voyant allumé)
(clignotement)
(clignotement)
21
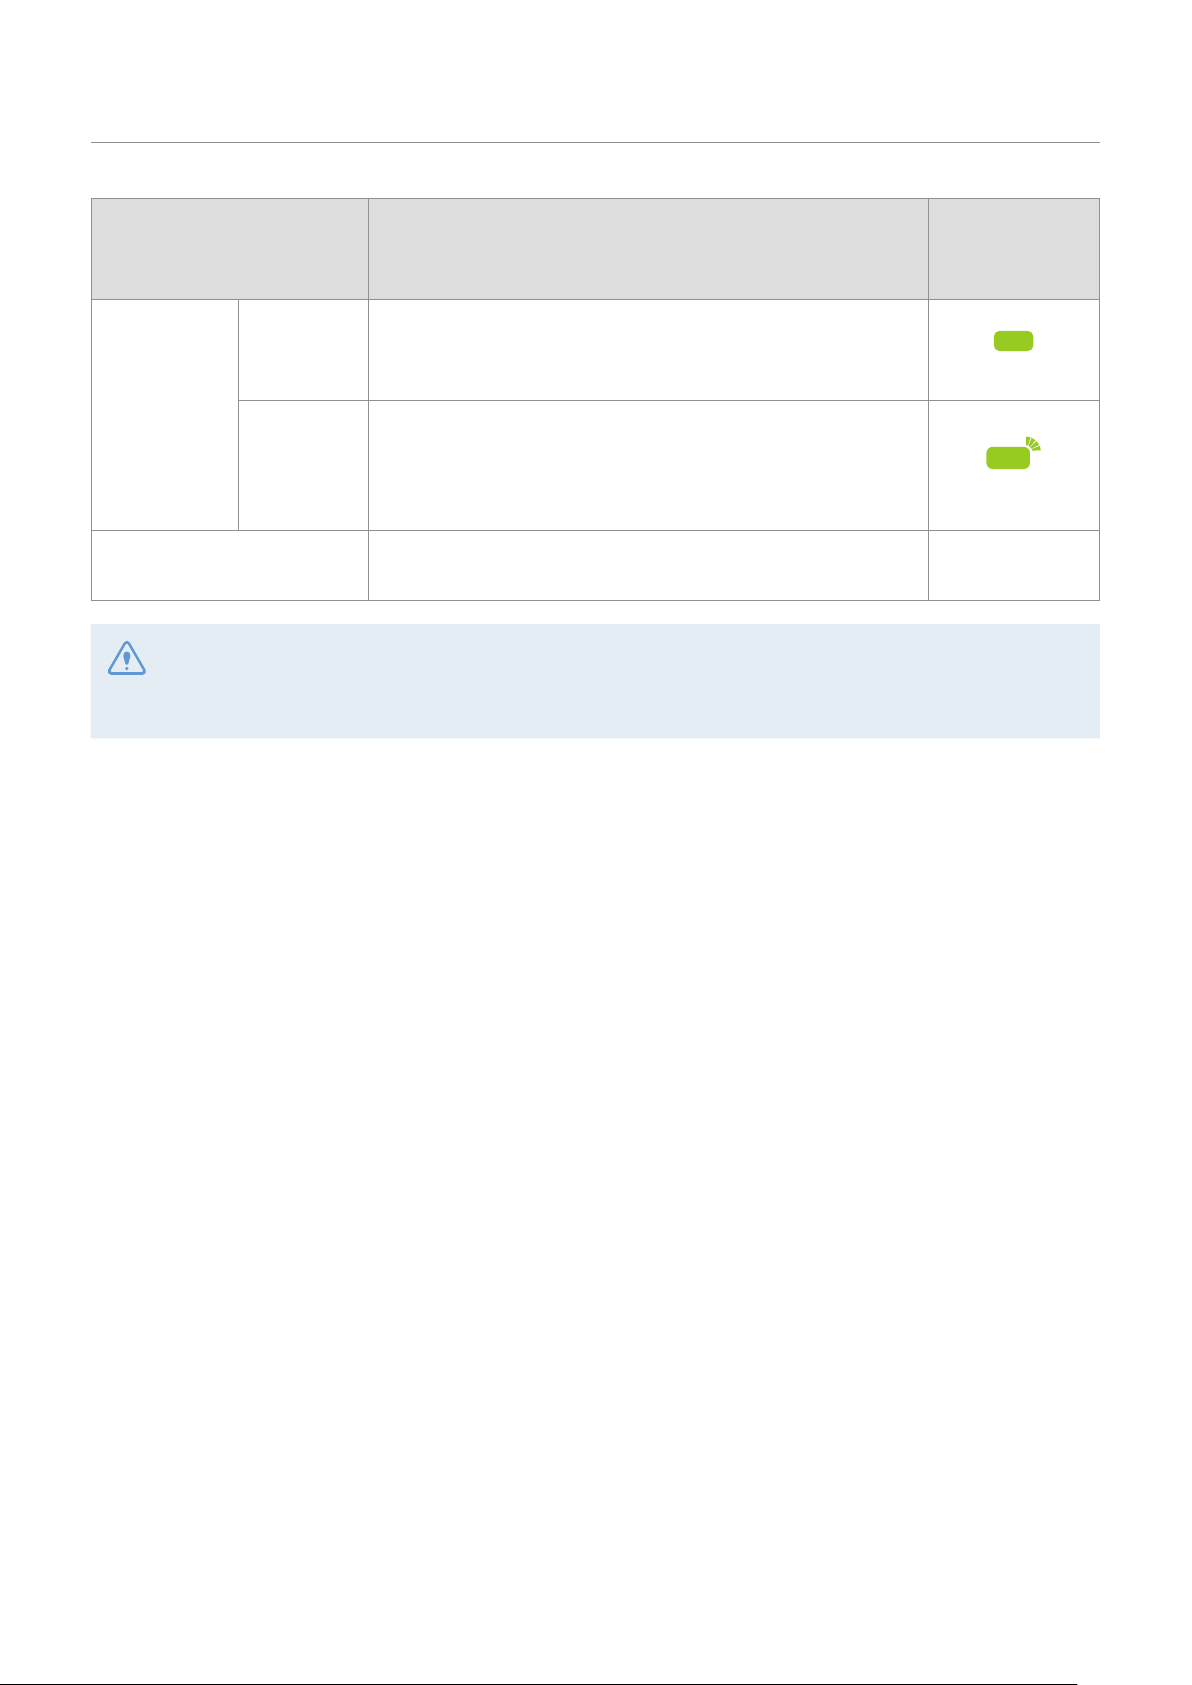
Utilisation des fonctions d’enregistrement
Option Description du fonctionnement
Voyant
d’enregistrement
(REC)
Aucun
impact
détecté
Économie
d'énergie
Impact
détecté
Désactivé
Si vous modifiez les paramètres du mode de stationnement, les vidéos enregistrées avec les paramètres
précédents seront effacées. Pour éviter la perte de données, effectuez une sauvegarde de toutes les vidéo
du mode de stationnement avant de modifier les paramètres du mode de stationnement.
Suvreille les impacts reçus par le véhicule. Une vidéo est
enregistrée seulement si un impact est détecté.
Quand un impact est détecté pendant que le véhicule est
stationné, une vidéo de 20 secondes est enregistrée à partir
de moins de 1 seconde après la détection, puis la vidéo est
enregistrée dans le dossier « parking_rec ».
Le produit est désactivé quand les accessoires électriques et
le moteur du véhicule sont éteints.
(voyant allumé)
(clignotement)
Désactivé
22

4. Utilisation de la visionneuse mobile
Avec la visionneuse mobile, vous pouvez regarder et gérer les vidéos enregistrées et configurer diverses
fonctions du produit à partir de votre téléphone intelligent.
Un des systèmes d’exploitation suivants est requis pour utiliser l’application THINKWARE CLOUD :
•Android 4.4 (KitKat) ou plus récent
• iOS 8.0 ou plus récent
4.1 Connecter le produit à un téléphone intelligent
4.1.1 Connexion du produit à un appareil Android
Sur votre appareil Android, ouvrez Play Store, puis téléchargez et installez THINKWARE CLOUD.
1
Ouvrez l’application THINKWARE CLOUD.
2
Appuyez sur La connexion à la caméra est requise. dans le bas de l’écran, puis suivez les instructions
3
affichées pour connecter le produit à un téléphone Android.
Le mot de passe Wi-Fi est requis la première fois que vous connectez le produit à un téléphone
intelligent. Saisissez « 123456789 » dans le champ de saisie du mot de passe.
23

Utilisation de la visionneuse mobile
4.1.2 Connexion du produit à un appareil iOS
Sur votre appareil iOS, ouvrez App Store, puis téléchargez et installez THINKWARE CLOUD.
1
Exécutez THINKWARE CLOUD.
2
Appuyez sur La connexion à la caméra est requise. dans le bas de l’écran.
3
Appuyez sur Connexion au Wi-Fi.
4
Sur le produit, appuyez sur le bouton Wi-Fi ( ).
5
6
Dans THINKWARE CLOUD, appuyez sur Suivant.
L’écran des paramètres Wi-Fi s’affiche.
7
Dans la liste des réseaux, sélectionnez le réseau Wi-Fi dont le nom commence par « Thinkware ».
8
Saisissez « 123456789 » dans le champ de saisie Mot de passe, puis appuyez sur Joindre.
Le produit est connecté à votre appareil iOS par Wi-Fi.
24

Utilisation de la visionneuse mobile
4.2 Disposition de l’écran de la visionneuse mobile
Cette section présente une courte description de la disposition de l’écran de la visionneuse mobile.
Afficher les notifications de
mise à jour du micrologiciel.
Afficher le produit
connecté ou configurer
une nouvelle connexion.
Aller à l’écran
d’affichage en direct.
Afficher et regarder les
vidéos enregistrées.
Afficher l’information sur le
produit.
Afficher le menu principal.
F200 ne prend pas ce menu
en charge.
Afficher ou configurer les
paramètres de la caméra
de tableau de bord.
Afficher le réseau Wi-Fi
connecté ou en ajouter
un nouveau.
Affiche l’état de
connexion du produit.
Afficher d’autres menus pour
le réglage des paramètres du
compte, le téléchargement du
micrologiciel le plus récent ou les
données des caméras de sécurité.
25
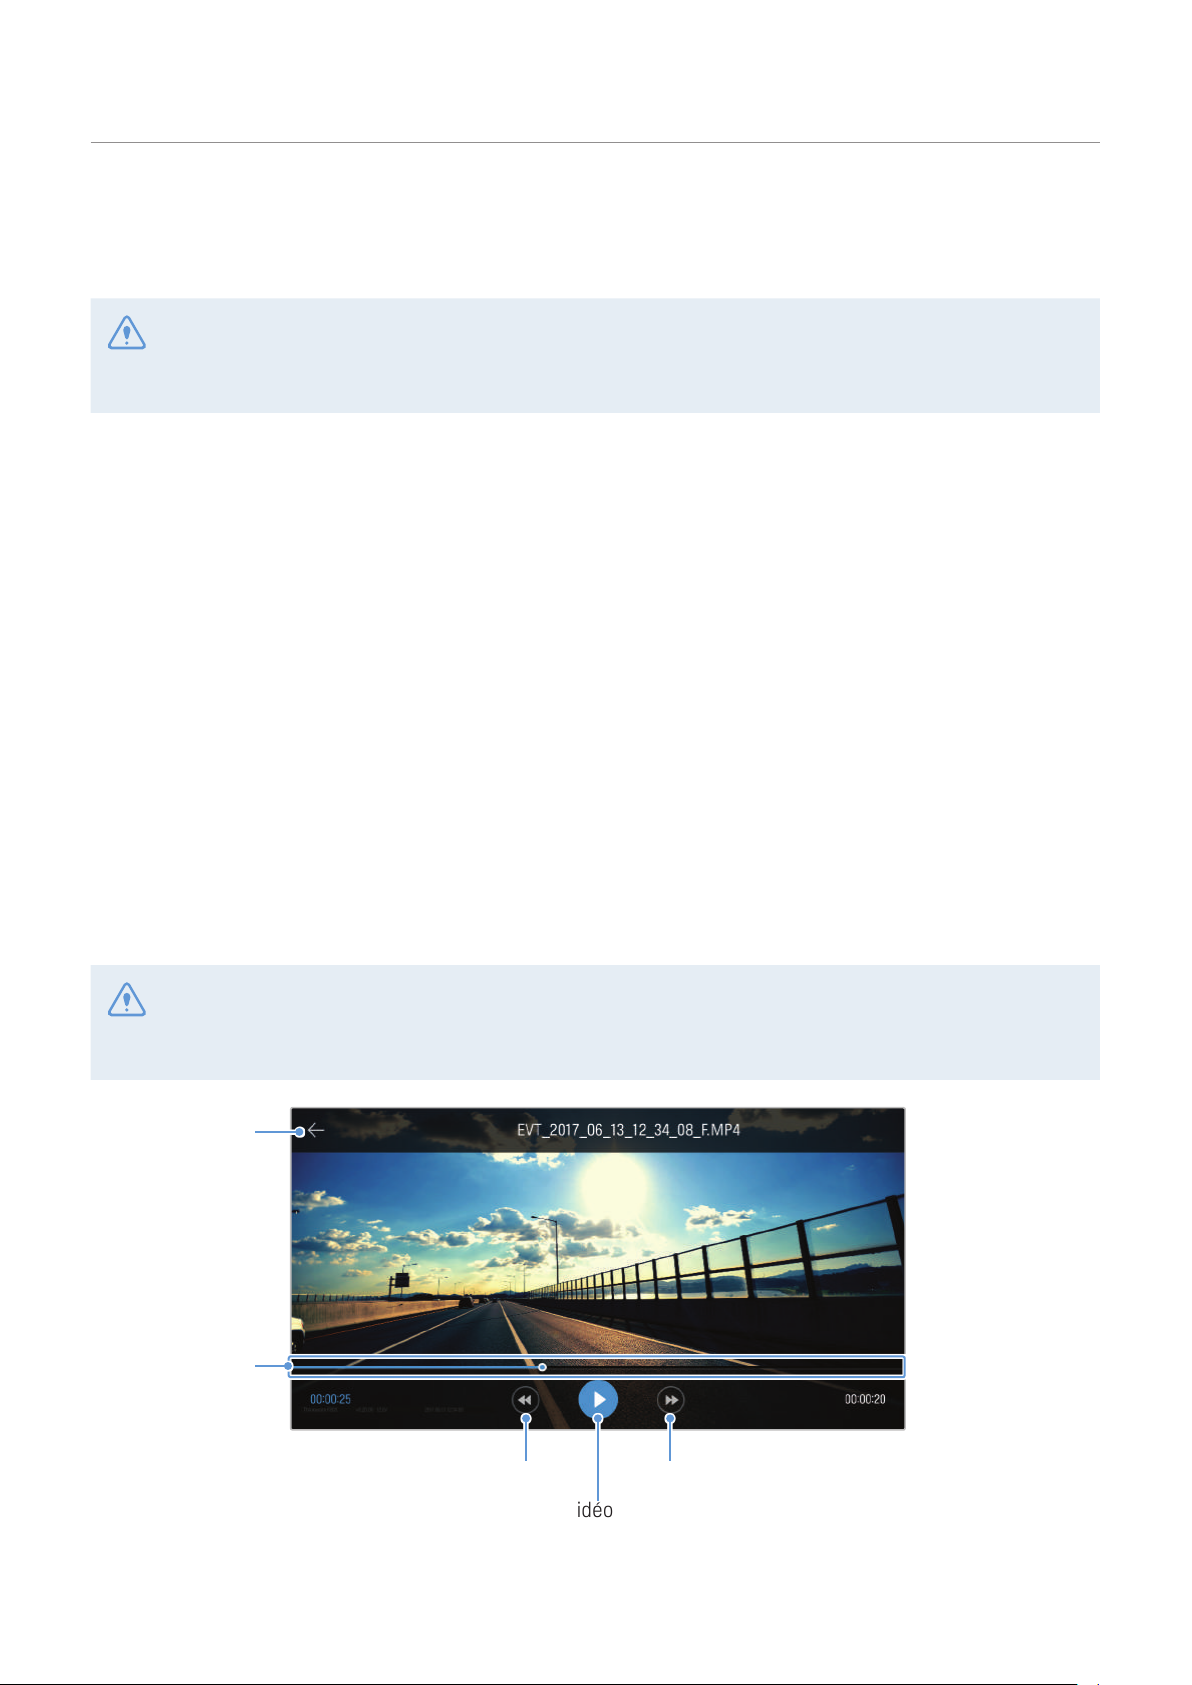
Utilisation de la visionneuse mobile
4.3 Regarder des vidéos enregistrées avec la visionneuse mobile
Suivez les instructions pour regarder des vidéos enregistrées.
Les fonctions d’enregistrement et de système avancé d’aide à la conduite (ADAS) de l’appareil sont
désactivées pendant que vous consultez la liste des fichiers vidéo ou que vous regardez une vidéo avec la
visionneuse mobile.
Sur votre téléphone intelligent, ouvrez l’application Thinkware Cloud et connectez l’appareil au
1
téléphone intelligent.
Sur l’écran d’accueil de la visionneuse mobile, touchez Liste des fichiers. Les catégories s’affichent.
2
Touchez la catégorie souhaitée. La liste des fichiers vidéo s’affiche.
3
Si nécessaire, touchez Tout, Avant ou Arrière pour filtrer la liste des fichiers vidéo en fonction de la
4
caméra.
Touchez la vidéo de votre choix.
5
4.4 Aperçu du menu des commandes vidéo
Cette section présente un bref aperçu du menu des commandes vidéo de la visionneuse mobile.
Les fonctions d’enregistrement et de système avancé d’aide à la conduite (ADAS) de l’appareil sont
désactivées pendant que vous consultez la liste des fichiers vidéo ou que vous regardez une vidéo avec la
visionneuse mobile.
Aller à l’écran de
la liste des fichiers.
Afficher l’état de la
lecture.
26
Lancer la lecture du fichier suivant.Lancer la lecture du fichier précédent.
Lancer la lecture vidéo ou faire une pause.

5. Utilisation de la visionneuse pour ordinateur
À partir de votre ordinateur, vous pouvez regarder et gérer les vidéos enregistrées et configurer diverses
fonctions du produit.
5.1 Exigences système
Les caractéristiques ci-dessous représentent les exigences liées au système pour l’exécution de la
visionneuse pour ordinateur.
• Processeur : Intel Core i5 ou supérieur
• Mémoire : 4 Go ou plus
• Système d’exploitation : Windows 7 ou plus récent (64 bits recommandé), macOS X10.8 Mountain Lion ou
plus récent
• Autres : DirectX 9.0 ou plus récent / Microsoft Explorer version 7.0 ou plus récent
La visionneuse pour ordinateur ne fonctionnera pas correctement sur un ordinateur doté d’un système
d’exploitation autre que ceux indiqués dans la liste d’exigences système.
5.2 Visionneuse pour ordinateur Windows
5.2.1 Installation de la visionneuse pour ordinateur (Windows)
Pour télécharger la plus récente version du logiciel de visionneuse pour ordinateur, accédez au site de
THINKWARE (http://www.thinkware.com/Support/Download).
Le fichier d’installation de la visionneuse pour ordinateur (setup.exe) se trouve dans le fichier racine de
la carte mémoire fournie avec le produit. Suivez les instructions pour installer la visionneuse sur votre
ordinateur.
Insérez la carte mémoire dans un lecteur de carte mémoire connecté à votre ordinateur.
1
Exécutez le fichier d’installation, puis suivez les instructions de l’assistant d’installation.
2
Au cours de l’installation, une icône de raccourci vers THINKWARE Dashcam Viewer sera créée.
27

Utilisation de la visionneuse pour ordinateur
5.2.2 Disposition de l’écran de la visionneuse pour ordinateur (pour Windows)
Cette section présente une courte description de la disposition de l’écran de la visionneuse pour
ordinateur.
Consulter ou configurer les paramètres de
la caméra de tableau de bord et régler la
langue de la visionneuse pour ordinateur.
Visitez le site Web de
THINKWARE.
Ouvrir un fichier ou
enregistrer ne vidéo sous
un nom différent.
Affiche le nom du fichier
vidéo.
Permet de lancer la
lecture ou commander les
fonctions pour un fichier
vidéo.
Affiche la progression de
la lecture vidéo.
Affiche le temps écoulé et
la durée totale de la vidéo
en cours.
Affiche la vidéo en cours en plein
écran. Appuyez sur le bouton
Retour (
Affiche la vidéo en cours.
) pour revenir à l’écran
précédent.
Alterner entre la vidéo avant
et arrière.
Réduire ou agrandir la fenêtre
ou fermer le logiciel.
Affiche l’information
GPS au moment de
l’enregistrement.
Indique la vitesse du
véhicule au moment de
l’enregistrement.
Indique la vitesse du
capteur G au moment de
l’enregistrement.
Affiche la liste de lecture.
28
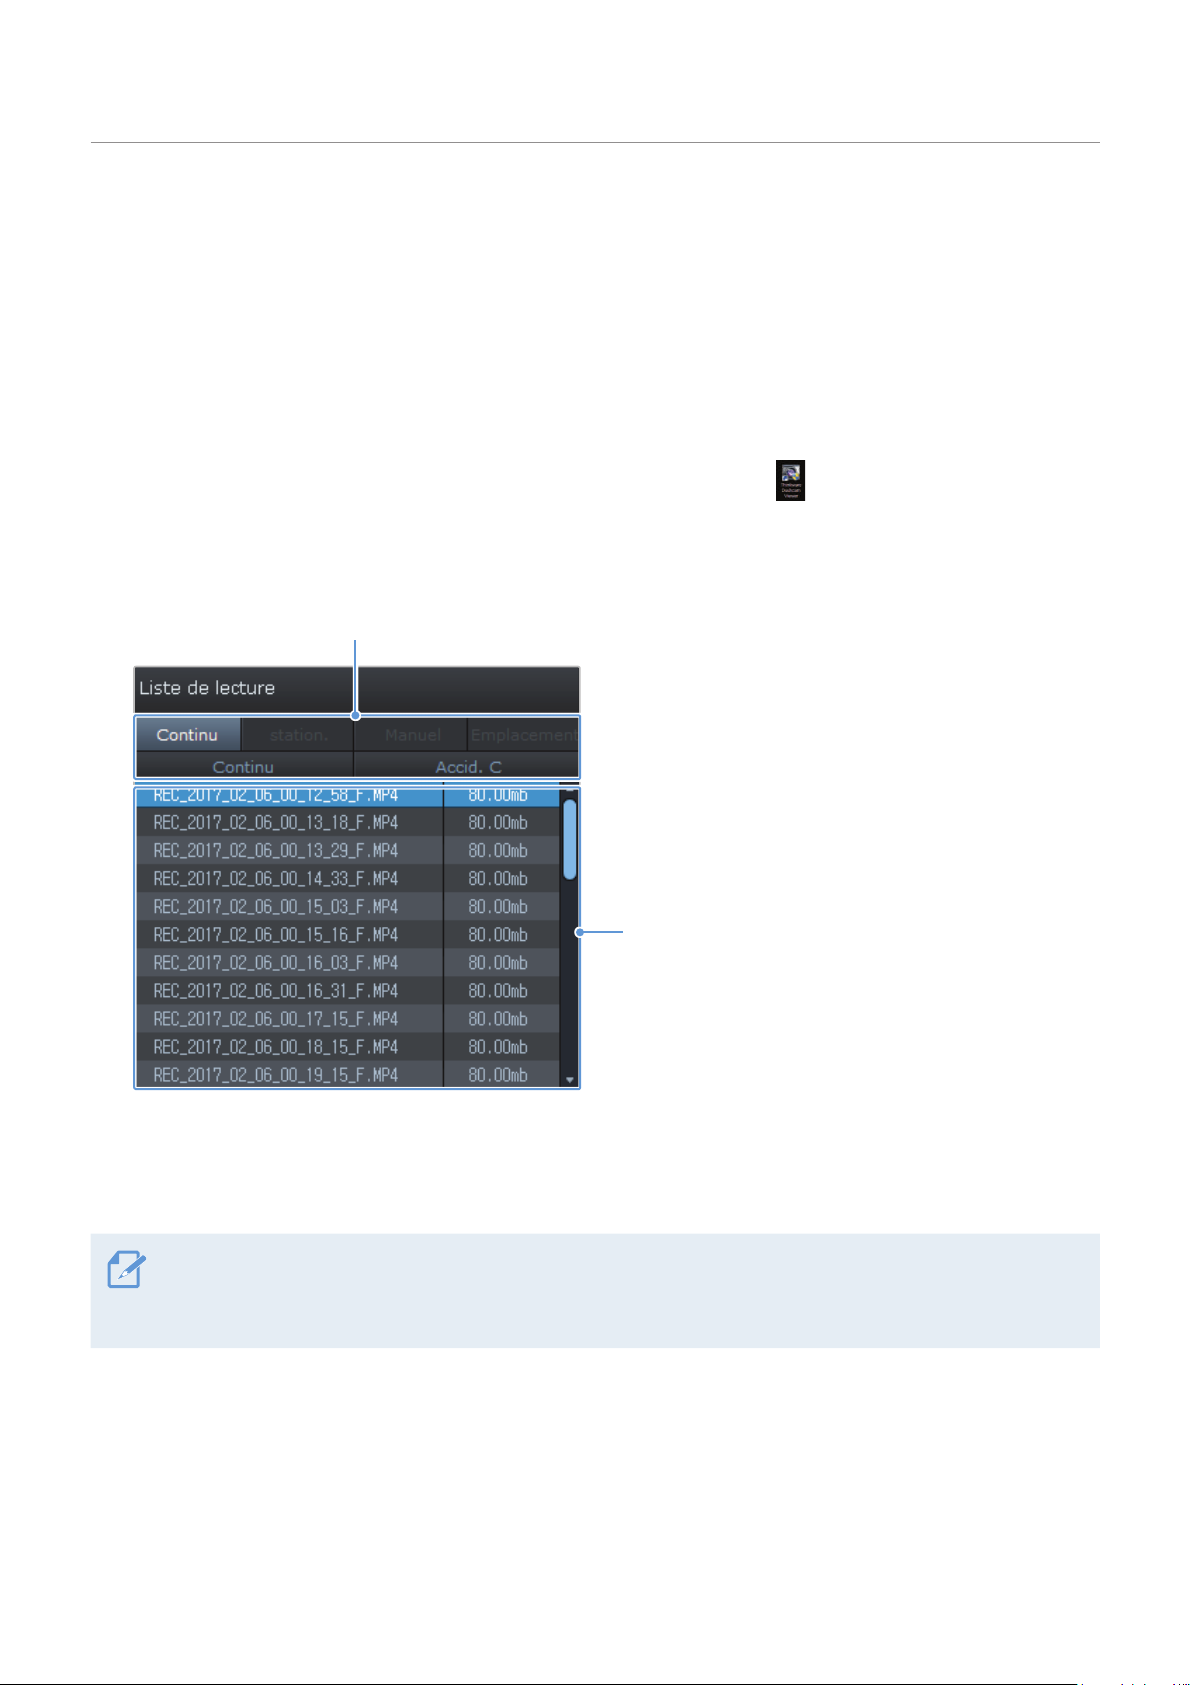
Utilisation de la visionneuse pour ordinateur
5.2.3 Regarder des vidéos enregistrées avec la visionneuse pour ordinateur. (pour
Windows)
Suivez les instructions pour regarder des vidéos enregistrées.
Éteignez le produit, puis retirez la carte mémoire.
1
Insérez la carte mémoire dans un lecteur de carte mémoire connecté à votre ordinateur.
2
Double-cliquez sur le raccourci vers la visionneuse pour ordinateur ( ) pour ouvrir le logiciel. Les
3
fichiers vidéo enregistrés sur la carte mémoire sont automatiquement ajoutés à la liste de lecture dans
le coin inférieur droit de la visionneuse pour ordinateur. La section de liste de lecture est disposée
comme suit.
Sélectionner un fichier.
Affiche la liste des
vidéos du dossier
sélectionné.
Sélectionnez un dossier, puis double-cliquez sur un fichier vidéo, ou encore sélectionnez un fichier
4
vidéo,puiscliquezsurleboutondelecture(▶).Lefichiervidéosélectionnéseralu.
Si les fichiers vidéo de la carte mémoire ne sont pas automatiquement ajoutés à la liste de lecture quand
vous activez la visionneuse pour ordinateur, cliquez sur File▼ > Open, sélectionnez le dispositif de stockage
amovible de la carte mémoire, puis cliquez sur Confirm.
29
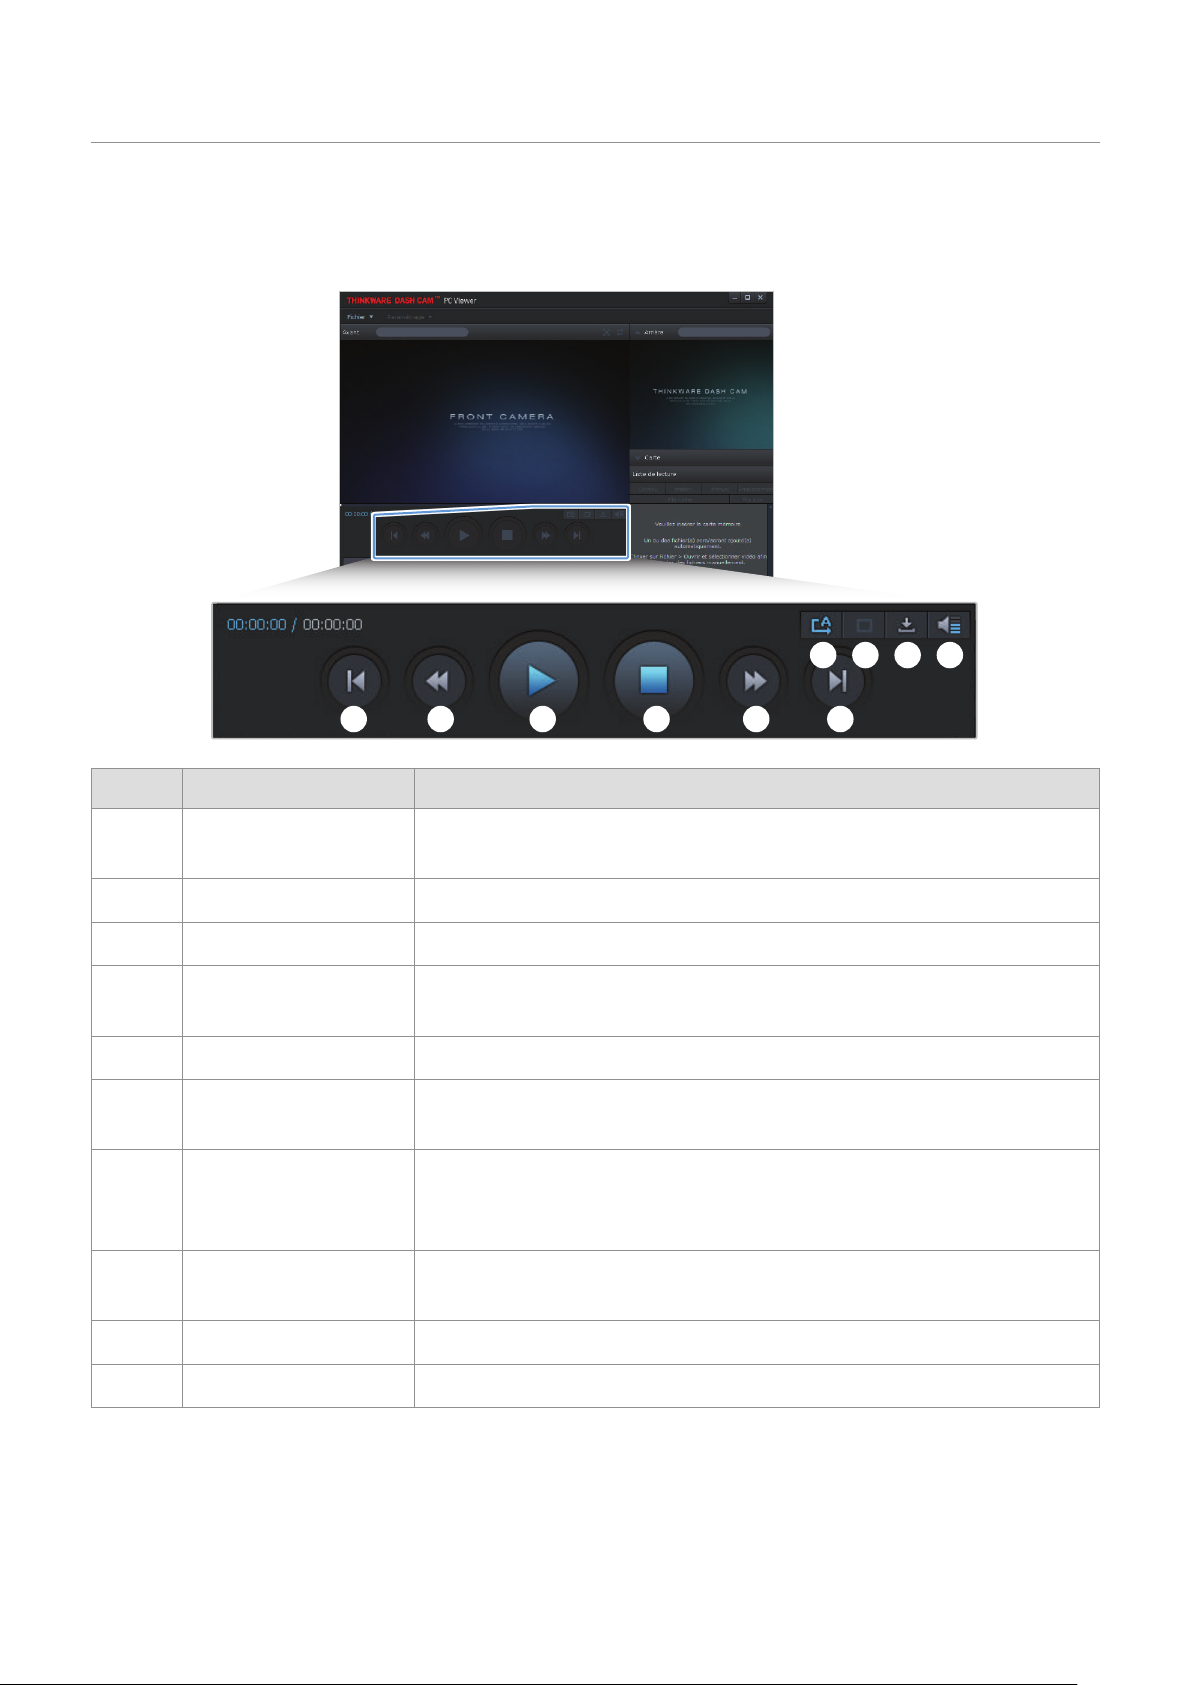
Utilisation de la visionneuse pour ordinateur
5.2.4 Aperçu du menu des commandes vidéo (pour Windows)
Cette section présente un bref aperçu du menu des commandes vidéo de la visionneuse pour ordinateur.
➐ ➑ ➒ ➓
➊ ➋ ➌ ➍ ➎ ➏
Numéro Élément Description
➊
➋
➌
➍
➎
➏
➐
➑
Lecture du fichier
précédent
Recul de 10 secondes Recule la lecture de 10 secondes dans la vidéo en cours.
Lecture/pause Lance la lecture du fichier vidéo sélectionné ou fait une pause de lecture.
Arrêt
Avance de 10 secondes Fait avancer la lecture de 10 secondes dans la vidéo en cours.
Lecture du fichier
suivant
Lecture du fichier
suivant (activer/
désactiver)
Agrandissement/
réduction de l’image
Lance la lecture du fichier précédent dans le dossier sélectionné en cours.
Arrête la lecture du fichier vidéo en cours. La barre de progression revient au
début de la vidéo.
Lance la lecture du fichier suivant dans le dossier sélectionné en cours.
Permet d’activer ou de désactiver la fonction de lecture du fichier suivant
dans la liste de lecture.
Permet d’agrandir ou de réduire la taille de la vidéo en cours.
30
➒
➓
Enregistrer Permet d’enregistrer la vidéo en cours sur votre ordinateur.
Volume Permet de régler le volume sonore de la vidéo en cours.

Utilisation de la visionneuse pour ordinateur
5.3 Visionneuse pour ordinateur Mac
5.3.1 Installation de la visionneuse pour ordinateur (Mac)
Pour télécharger la plus récente version du logiciel de visionneuse pour ordinateur, accédez au site de
THINKWARE (http://www.thinkware.com/Support/Download).
Le fichier d’installation de la visionneuse pour ordinateur se trouve dans le fichier racine de la carte
mémoire fournie
avec le produit. Suivez les instructions pour installer la visionneuse sur votre ordinateur.
Insérez la carte mémoire dans votre ordinateur avec un lecteur de carte SD ou l’adaptateur pour carte
1
SD fourni.
Déplacez le fichier nommé « dashcam_viewer_X.X.X.dmg » sur le bureau.
2
Double-cliquez sur le fichier dashcam_viewer_X.X.X.dmg et cliquez sur Ouvrir Dashcam Viewer.
3
Le logiciel THINKWARE Dashcam Viewer s’ouvre.
31

Utilisation de la visionneuse pour ordinateur
5.3.2 Disposition de l’écran de la visionneuse pour ordinateur (pour Mac)
Cette section présente une courte description de la disposition de l’écran de la visionneuse pour
ordinateur.
Enregistre la scène en cours.
Afficher ou configurer les
Régler les unités de vitesse de l’appareil.
paramètres de la caméra
de tableau de bord.
Régler la langue
d’affichage de la
visionneuse pour
ordinateur.
Visitez le site Web de
THINKWARE.
Permet de lancer la
lecture ou commander les
fonctions pour un fichier
vidéo.
Affiche la progression de
la lecture vidéo.
Affiche le temps écoulé et
la durée totale de la vidéo
en cours.
Alterner entre la
vidéo avant et
arrière.
Affiche la vidéo avant en cours.
Cliquez avec le bouton droit sur
cette fenêtre pour afficher la
vidéo en cours en mode plein
écran.
Imprime la scène en
cours.
Affiche la vidéo
arrière en cours.
32
Indique la vitesse du
capteur G au moment de
l’enregistrement.
Indique la vitesse du
véhicule au moment de
l’enregistrement.
Affiche l’information
GPS au moment de
l’enregistrement.
Ouvrir un
fichier ou
enregistrer une
vidéo sous un
nom différent.
Affiche la liste de lecture.

Utilisation de la visionneuse pour ordinateur
5.3.3 Regarder des vidéos enregistrées avec la visionneuse pour ordinateur (Mac)
Suivez les instructions pour regarder des vidéos enregistrées.
Éteignez le produit, puis retirez la carte mémoire.
1
Insérez la carte mémoire dans votre Mac avec un lecteur de carte SD ou l’adaptateur pour carte SD
2
fourni.
Ouvrez la visionneuse pour ordinateur.
3
Cliquez sur et repérez la carte mémoire.
4
Les fichiers vidéo enregistrés sur la carte mémoire sont automatiquement ajoutés à la liste de lecture
dans le coin inférieur droit de la visionneuse pour ordinateur. La section de liste de lecture est
disposée comme suit.
Sélectionner un fichier.
Affiche la liste des
vidéos du dossier
sélectionné.
Sélectionnez un dossier, puis double-cliquez sur un fichier vidéo, ou encore sélectionnez un fichier
5
vidéo,puiscliquezsurleboutondelecture(▶).Lefichiervidéosélectionnéseralu.
33

Utilisation de la visionneuse pour ordinateur
5.3.4 Aperçu du menu des commandes vidéo (Mac)
Cette section présente un bref aperçu du menu des commandes vidéo de la visionneuse pour ordinateur.
➊ ➋ ➌ ➍ ➎ ➏ ➐ ➑ ➒ ➓
Numéro Élément Description
➊
➋
➌
➍
➎
➏
➐
➑
➒
➓
Lecture/pause Lance la lecture du fichier vidéo sélectionné ou fait une pause de lecture.
Arrêt
Lecture du fichier
précédent
Recul de 1 image Fait reculer la lecture de 1 image dans la vidéo en cours.
Avance de 1 image Fait avancer la lecture de 1 image dans la vidéo en cours.
Lecture du fichier
suivant
Zoom avant Agrandit l’image de la vidéo en cours.
Zoom arrière Réduit l’image de la vidéo en cours.
Rétablir la taille de
l’image
Afficher la barre de
défilement
Inverser l’image Inverse l’image de la vidéo et l’affiche à l’envers.
Arrête la lecture du fichier vidéo en cours. La barre de progression revient au
début de la vidéo.
Lance la lecture du fichier précédent dans le dossier sélectionné en cours.
Lance la lecture du fichier suivant dans le dossier sélectionné en cours.
Rétablit l’image de la vidéo en cours à la taille d’origine.
Affiche la barre de défilement quand l’image est agrandie.
34
Volume Permet de régler le volume sonore de la vidéo en cours.

6. Paramétrage
Vous pouvez régler les fonctions du produit selon vos besoins et préférences avec la visionneuse mobile
ou la visionneuse pour ordinateur. Les instructions suivantes correspondent aux menus de la visionneuse
mobile.
L’appareil cesse d’enregistrer pendant la configuration des paramètres avec la visionneuse mobile.
6.1 Gestion de la carte mémoire
6.1.1 Partitionnement de la carte mémoire
Vous pouvez partitionner la carte mémoire pour régler l’espace de stockage pour différents types
d’enregistrements vidéo. Reportez-vous aux instructions suivantes pour partitionner la carte mémoire.
À partir de la visionneuse mobile, touchez Param. de caméra de tableau de bord > Paramètres de la
1
carte mémoire.
Dans le menu Paramètres de la mémoire, sélectionnez le type de partition désiré pour la mémoire. Les
2
nouveaux paramètres sont appliqués automatiquement.
6.1.2 Formatage de la carte mémoire
Ce menu vous permet de formater la carte mémoire insérée dans le produit. Reportez-vous aux instructions
suivantes pour formater la carte mémoire.
À partir de la visionneuse mobile, appuyez sur Param. de caméra de tableau de bord > Paramètres de
1
la carte mémoire puis appuyez sur le bouton Formater dans le menu Formatage de la carte mémoire.
Dans le menu Formatage de la carte mémoire, touchez Confirmer pour commencer le formatage de la
2
carte mémoire. Toutes les données de la carte mémoire seront effacées après le formatage. Touchez
Annuler pour annuler le formatage de la carte mémoire.
35

Paramétrage
6.1.3 Configuration de la fonction d’écrasement vidéo
Ce menu vous permet de faire en sorte que les nouveaux fichiers vidéo remplacent les plus anciens fichiers
vidéo dans le répertoire de stockage réservé à chacun des modes.
À partir de la visionneuse mobile, touchez Param. de caméra de tableau de bord > Paramètres de la
1
carte mémoire.
Dans le menu Remplacer les vidéos, sélectionnez les modes pour lesquels vous voulez permettre le
2
remplacement (écrasement) des fichiers. Les nouveaux paramètres sont appliqués automatiquement.
6.2 Réglage de la caméra
Vous pouvez régler la luminosité de la vue avant ou arrière, ou inverser les côtés gauche et droit de la vue
arrière.
6.2.1 Réglage de la luminosité de la caméra avant
Vous pouvez régler la luminosité de l’enregistrement avec la caméra avant. Reportez-vous aux instructions
suivantes pour régler la luminosité.
À partir de la visionneuse mobile, touchez Param. de caméra de tableau de bord > Paramètres de la
1
caméra.
Dans le menu Luminosité-avant, sélectionnez Foncé, Moyen ou Clair. Les nouveaux paramètres sont
2
appliqués automatiquement.
6.2.2 Réglage de la luminosité de la caméra arrière
Vous pouvez régler la luminosité de l’enregistrement avec la caméra arrière. Reportez-vous aux
instructions suivantes pour régler la luminosité.
À partir de la visionneuse mobile, touchez Param. de caméra de tableau de bord > Paramètres de la
1
caméra.
Dans le menu Luminosité-arrière, sélectionnez Foncé, Moyen ou Clair. Les nouveaux paramètres sont
2
appliqués automatiquement.
36

Paramétrage
6.3 Réglage des fonctions d’enregistrement
Vous pouvez régler et changer les réglages de diverses fonctions d’enregistrement, y compris la sensibilité
du produit pour la détection des impacts au cours de l’enregistrement en continu.
6.3.1 Réglage de la sensibilité de détection des impacts pour l’enregistrement en
continu
Vous pouvez régler la sensibilité de détection des impacts au cours de la conduite afin de déterminer
quand l’enregistrement se produira. Quand vous réglez la sensibilité, tenez compte des conditions
routières, de la circulation et de votre style de conduite.
À partir de la visionneuse mobile, touchez Param. de caméra de tableau de bord > Paramètres
1
d’enregistrement.
Dans le menu Sensibilité de l’enregistrement d’incidents en mode Continu, sélectionnez la sensibilité
2
voulue. Les nouveaux paramètres sont appliqués automatiquement.
6.3.2 Réglage du mode de stationnement
Vous pouvez régler le mode de fonctionnement du produit pendant que le véhicule est stationné. Suivez les
instructions pour régler le mode de stationnement.
Pour utiliser le mode de stationnement, un câble de raccordement (en option) doit être installé. Si
l’alimentation en continu n’est pas fournie au produit, le produit cesse d’enregistrer quand le moteur du
véhicule est éteint.
Pour plus de renseignements à propos du mode de stationnement, consultez « 3.5 Utilisation du mode de
stationnement ».
À partir de la visionneuse mobile, touchez Param. de caméra de tableau de bord > Paramètres
1
d’enregistrement.
À partir de Mode Stationnement, sélectionnez Détection du mouvement ou Économie d’énergie. Les
2
nouveaux paramètres sont appliqués automatiquement.
37

Paramétrage
6.3.3 Réglage de la sensibilité de l’impact pour le mode de stationnement
Vous pouvez régler la sensibilité de détection des impacts en mode de stationnement afin de déterminer
quand l’enregistrement se produira. Reportez-vous aux instructions suivantes pour régler la sensibilité de
détection des impacts en mode de stationnement.
À partir de la visionneuse mobile, touchez Param. de caméra de tableau de bord > Paramètres
1
d’enregistrement.
Dans le menu Sensibilité aux impacts en mode Stationnement, sélectionnez la sensibilité désirée. Les
2
nouveaux paramètres sont appliqués automatiquement.
6.3.4 Réglage de la sensibilité de la détection du mouvement
La fonction de détection du mouvement enregistre une vidéo quand un mouvement est détecté à proximité
de votre véhicule. Reportez-vous aux instructions suivantes pour régler la sensibilité de la détection du
mouvement.
À partir de la visionneuse mobile, touchez Param. de caméra de tableau de bord > Paramètres
1
d’enregistrement.
Dans le menu Sensibilité de la détection de mouvement, sélectionnez la sensibilité désirée. Les
2
nouveaux paramètres sont appliqués automatiquement.
6.3.5 Réglage de la fonction de minuterie d’enregistrement
Quand vous activez la fonction de minuterie d’enregistrement, le produit enregistre une vidéo en mode
de stationnement pendant une durée préréglée. Reportez-vous aux instructions suivantes pour régler la
minuterie.
À partir de la visionneuse mobile, touchez Param. de caméra de tableau de bord > Paramètres
1
d’enregistrement.
Dans le menu Minuterie d’enregistrement, sélectionnez la durée voulue. Les nouveaux paramètres
2
sont appliqués automatiquement.
38
La batterie du véhicule ne se recharge pas pendant que le véhicule est stationné. Si vous enregistrez une
vidéo en mode de stationnement pendant une longue période, la batterie du véhicule pourrait se décharger
et vous pourriez ne plus pouvoir démarrer le véhicule.

Paramétrage
6.3.6 Réglage de la fonction de protection de la batterie
Vous pouvez activer une fonction de protection de la batterie. Suivez les instructions pour activer cette fonction.
À partir de la visionneuse mobile, touchez Param. de caméra de tableau de bord > Paramètres
1
d’enregistrement.
Dans le menu Arrêt pour basse tension, sélectionnez Activé ou Désactivé. Les nouveaux paramètres
2
sont appliqués automatiquement.
6.3.7 Réglage de la limite de tension électrique de la batterie
Vous pouvez régler la limite de tension électrique de la batterie à laquelle le produit arrêtera
l’enregistrement lorsque vous utilisez la fonction Arrêt basse tension. Reportez-vous aux instructions
suivantes pour régler la limite de tension électrique.
•La limite de tension électrique de la batterie peut seulement être définie quand le paramètre Arrêt pour
basse tension
•Si la limite de tension de la batterie pour l’arrêt de l’enregistrement est trop faible, le produit pourrait
épuiser complètement la batterie en fonction de différentes conditions, comme le type de véhicule ou la
température.
À partir de la visionneuse mobile, touchez Param. de caméra de tableau de bord > Paramètres
1
d’enregistrement.
Sélectionnez la tension voulue, soit 12 V ou 24 V.
2
Pour les véhicules équipés d’une batterie de 12 V (la plupart des véhicules de passagers), réglez
ce paramètre à 12 V. Pour les véhicules équipés d’une batterie de 24 V (camions et véhicules
commerciaux), réglez ce paramètre à 24 V. Les nouveaux paramètres sont appliqués automatiquement.
est réglé à Activé.
6.3.8 Réglage de la fonction de protection de la batterie en hiver
Vous pouvez définir le ou les mois d’hiver pendant lesquels le niveau de protection de faible tension
s’appliquera pour le véhicule. Reportez-vous aux instructions suivantes pour régler le ou les mois
d’activation.
À partir de la visionneuse mobile, touchez Param. de caméra de tableau de bord > Paramètres
1
d’enregistrement.
Dans le menu Tension d’arrêt en hiver, sélectionnez le ou les mois pendant lesquels la fonction de
2
protection de la batterie s’appliquera. Les nouveaux paramètres sont appliqués automatiquement.
39

Paramétrage
6.4 Régler les fonctions de sécurité routière
Vous pouvez activez ou désactiver un système d’alerte de caméra de sécurité.
6.4.1 Réglage des alertes de caméra de sécurité
Quand le véhicule s’approche d’une zone de limite de vitesse ou la dépasse, le système d’alerte de
caméra de sécurité récolte des données sur les signaux GPS et la caméra de sécurité. Reportez-vous aux
instructions suivantes pour activer ou désactiver cette fonction.
À partir de la visionneuse mobile, touchez Param. de caméra de tableau de bord > Paramètres de
1
sécurité routière.
Dans le menu Caméras de sécurité, sélectionnez Activé ou Désactivé. Les nouveaux paramètres sont
2
appliqués automatiquement.
6.4.2 Réglage de l’alerte de zone de vitesse
Suivez les instructions pour activer ou désactiver la fonction d’alerte de zone de vitesse.
À partir de la visionneuse mobile, touchez Param. de caméra de tableau de bord > Paramètres de
1
sécurité routière.
Dans le menu Alerte de zone de vitesse, sélectionnez Activé ou Désactivé. Les nouveaux paramètres
2
sont appliqués automatiquement.
6.5 Configuration des paramètres du système
Ce menu vous permet de configurer les paramètres du matériel qui s’appliquent au système dans son
ensemble pendant le fonctionnement, par exemple la langue d’affichage et la luminosité de l’écran.
6.5.1 Réglage de la langue d’affichage
Sélectionnez une langue pour l’affichage à l’écran. Suivez les instructions pour sélectionner une langue.
À partir de la visionneuse mobile, touchez Param. de caméra de tableau de bord > Paramètres du
1
système.
Dans le menu Langue, sélectionnez la langue de votre choix. Les nouveaux paramètres sont appliqués
2
automatiquement.
40

Paramétrage
6.5.2 Réglage du volume du système
Ce menu vous permet de régler le volume du guidage vocal. Suivez les instructions pour régler le volume.
À partir de la visionneuse mobile, touchez Param. de caméra de tableau de bord > Paramètres du
1
système.
Dans le menu Volume, sélectionnez 0, 1, 2 ou 3. Les nouveaux paramètres sont appliqués
2
automatiquement.
Si vous sélectionnez 0, le guidage vocal sera désactivé.
6.5.3 Réglage du fuseau horaire
Suivez les instructions pour régler le fuseau horaire.
À partir de la visionneuse mobile, touchez Param. de caméra de tableau de bord > Paramètres du
1
système.
Dans le menu Fuseau horaire, sélectionnez votre fuseau horaire. Les nouveaux paramètres sont
2
appliqués automatiquement.
6.5.4 Réglage de l’heure d’été
Suivez les instructions pour régler l’heure d’été.
À partir de la visionneuse mobile, touchez Param. de caméra de tableau de bord > Paramètres du
1
système.
Dans le menu Heure avancée, sélectionnez Activé ou Désactivé. Les nouveaux paramètres sont
2
appliqués automatiquement.
41

Paramétrage
6.5.5 Réglage des unités de vitesse de l’appareil
Suivez les instructions pour régler les unités de vitesse utilisées par l’appareil.
À partir de la visionneuse mobile, touchez Param. de caméra de tableau de bord > Paramètres du
1
système.
Sous Unité de vitesse, sélectionnez km/h ou mph.
2
6.5.6 Réglage de la fonction d’inscription de la vitesse
Suivez les instructions pour activer ou désactiver la fonction d’inscription de la vitesse.
À partir de la visionneuse mobile, touchez Param. de caméra de tableau de bord > Paramètres du
1
système.
Dans le menu Estampille de vitesse, sélectionnez Activé ou Désactivé. Les nouveaux paramètres sont
2
appliqués automatiquement.
42

7. Consulter l’information sur le produit
Particulièrement utile pour les nouveaux utilisateurs, cette information de base est accessible à partir de
l’écran du menu.
7.1 Afficher l’information sur le produit
À partir de la visionneuse mobile, touchez Infos sur la caméra de tableau de bord pour afficher l’information
sur le produit. L’information suivante à propos du produit s’affiche à l’écran.
• Numéro de modèle
• Capacité de mémoire
• Numéro du micrologiciel
• LOCAL ID
• Version de la caméras de
sécurité
• Infos sure le GPS
7.2 Consultation et configuration de la fonction GPS
Un module GPS sert à inclure les données de positionnement dans les vidéos enregistrées. À partir de la
visionneuse mobile, touchez Infos sur la caméra de tableau de bord > Infos sur le GPS pour afficher les
fonctions GPS. L’état de connexion, la force du signal, l’heure (temps universel coordonné), la vitesse du
véhicule, l’altitude et l’affaiblissement de la précision horizontale (HDOP) s’affichent à l’écran.
Touchez
pour initialiser le GPS et lui permettre de définir la position en cours.
Affaiblissement de la précision horizontale (HDOP)
La valeur HDOP indique la déviation de la mesure GPS en raison du positionnement des satellites.
43

8. Mise à jour du micrologiciel
Les mises à jour du micrologiciel sont fournies pour faire des ajouts aux fonctions du produit ou améliorer
la stabilité du produit. Pour un fonctionnement optimal du produit, assurez-vous de garder le micrologiciel à
jour.
Suivez les instructions pour faire la mise à jour du micrologiciel.
Sur l’ordinateur, ouvrez votre navigateur et accédez au site http://www.thinkware.com/Support/
1
Download.
2
Sélectionnez votre produit et téléchargez le plus récent fichier de mise à jour du micrologiciel.
3
Décompressez le fichier Zip téléchargé.
Débranchez l’alimentation du produit et retirez la carte mémoire.
4
Ouvrez le répertoire de la carte mémoire à partir d’un ordinateur, puis copiez le fichier de mise à jour
5
du micrologiciel dans le fichier racine de la carte mémoire.
Pendant que l’alimentation est débranchée du produit, insérez la carte mémoire dans le logement de
6
carte mémoire du produit.
Branchez le câble d’alimentation au produit, puis placez le démarreur du véhicule à la position
7
ACC (accessoires) ou démarrez le moteur pour allumer le produit. La mise à jour du micrologiciel
commence automatiquement, puis le système redémarre quand la mise à jour du micrologiciel est
terminée.
Ne débranchez pas l’alimentation et ne retirez pas la carte mémoire du produit pendant la mise à jour.
Ceci pourrait endommager le produit ou les données stockées sur la carte mémoire.
Vous pouvez également mettre à jour le micrologiciel à partir de la visionneuse mobile ou de la visionneuse
pour ordinateur.
44

9. Dépannage
Le tableau suivant contient certains problèmes que l’utilisateur pourrait rencontrer pendant l’utilisation su
produit, ainsi que des mesures à prendre pour les résoudre. Si le problème persiste après avoir suivi les
mesures conseillées dans le tableau, communiquez avec le centre de service à la clientèle.
Problème Solution
•Assurez-vous que le câble d’alimentation (chargeur pour véhicule ou câble de
Impossible d’allumer le produit
raccordement) est branché correctement au véhicule et au produit.
•Vérifiez le niveau de charge de la batterie du véhicule.
Je n’entends pas le guidage
vocal ou la sonnette.
L’image vidéo n’est pas claire ou
presque invisible.
La carte mémoire n’est pas
reconnue.
Les vidéos enregistrées ne
peuvent pas être lues sur un
ordinateur.
Vérifiez le réglage du volume pour vous assurer qu’il n’est pas au minimum. Pour
plus d’information sur le réglage du volume, consultez « 6.5.2 Réglage du volume
du système ».
•Vérifiez que vous avez bien retiré le film protecteur de l’objectif. Il se peut que
l’image ne soit pas claire si le film de protection de l’objectif de la caméra est
en place.
•Vérifiez l’emplacement d’installation de la caméra avant ou arrière, allumez le
produit, puis réglez l’angle de la caméra.
•Assurez-vous que la carte mémoire est insérée dans le bon sens. Avant
d’insérer la carte mémoire, assurez-vous que les contacts métalliques de la
carte mémoire sont tournés vers l’objectif de l’appareil.
•Éteignez le produit, retirez la carte mémoire, puis vérifiez les contacts
du logement pour carte mémoire afin de vous assurer qu’ils ne sont pas
endommagés.
•Assurez-vous que la carte mémoire est un produit d’origine distribué par
THINKWARE. THINKWARE ne garantit pas la compatibilité ni le fonctionnement
de cartes mémoire de tiers.
Les vidéos sont enregistrées au format de fichier vidéo MP4. Vérifiez que le
lecteur vidéo installé sur votre ordinateur prend en charge la lecture de fichiers
vidéo MP4.
Le signal GPS n’est pas reçu,
même si le récepteur GPS
externe est installé.
Il se peut que le signal GPS ne soit pas reçu dans les zones hors de portée du
signal ou si le produit se trouve entre des immeubles de grande hauteur. Il se
peut aussi que le signal GPS ne soit pas reçu pendant une tempête ou de fortes
pluies. Essayez de nouveau par beau temps, dans un endroit où vous savez que
le réception du signal GPS est habituellement bonne. La réception du signal GPS
peut prendre jusqu’à 5 minutes.
45

10. Caractéristiques techniques
Pour connaître les caractéristiques techniques du produit, reportez-vous au tableau suivant.
Élément Caractéristique Remarques
Nom du modèle F200
Dimensions/poids 98,5 x 34 x 22 mm / 54 g
Mémoire Carte mémoire microSD
Continuous Rec (enregistrement en
continu)
Incident Rec (enregistrement
Mode
d’enregistrement
Capteur de la caméra
Angle de vue (objectif) Environ 140° (diagonale)
Vidéo
d’incidents)
Manual Rec (enregistrement manuel)
Parking Rec (mode de stationnement) Requiert le câblage lors de l’installation
Enregistrement audio
2,1 mégapixels, CMOS à
semiconducteur ON
FHD (1920 X 1080) / H.264 / format de
fichier : MP4
- UHS-1 : 16 Go, 32 Go, 64 Go, 128 Go
- Classe 10 : 8 Go
Enregistre des vidéos à intervalles de
1 minute (deux canaux pris en charge pour
l’enregistrement avec la caméra avant et
arrière)
Enregistre pendant 10 secondes avant et après
l’incident (20 secondes au total).
Enregistre pendant 10 secondes avant et
50 secondes après le démarrage manuel de
l’enregistrement (1 minute au total).
Cadence de prise de
vue
Audio PCM
Capteur d’accélération
Caméra arrière (en
option)
GPS GPS externe
Entrée électrique 12/24 V CC pris en charge
Consommation
électrique
46
30 images/seconde max.
Capteur d’accélération triaxial (3D,
±3G)
Port V-IN Accessoire en option vendu séparément
2 canaux : 3,1 W / 1 canal : 2,3 W (WiFi activé)
Applicable à l’enregistrement par les caméras
avant et arrière.
5 niveaux de réglage de la sensibilité
Alerte de zone de sécurité de conduite prise en
charge
Exception : supercondensateur pleinement
chargé / GPS

Caractéristiques techniques
Élément Caractéristique Remarques
Dispositif
d’alimentation
auxiliaire
Voyant indicateur Arrière : Voyant d’état, voyant Wi-Fi
Alarme Haut-parleurs intégrés Guidage vocal (sons de sonnette)
Supercondensateur
Température de
fonctionnement
Température
d’entreposage
Interface de connexion 1 port V-IN
-10à60℃/14à140℉
-20à70℃/-4à158℉
47

Caractéristiques techniques
Avant de communiquer avec un centre de service
Veuillez faire une sauvegarde de toutes les données importantes stockées sur la carte mémoire. Les
données de la carte mémoire pourraient être effacées au cours de la réparation. Pour chaque produit
envoyé pour réparation, l’entreprise considère que les données ont été sauvegardées. Le centre de service
à la clientèle n’effectue pas la sauvegarde de vos données. THINKWARE n’est responsable d’aucune perte,
telle que la perte de données.
48

http://www.thinkware.com
V. 1.0 (Avr. 2018)
 Loading...