

Page 1

P50 User Guide
Page 2

Note: Before using this information and the product it supports, be sure to read and understand the
following:
• Safety, Warranty, and Setup Guide
• “Important safety information” on page v
The latest Safety, Warranty, and Setup Guide and the Regulatory Notice are available on the Lenovo Support
Web site at:
http://www.lenovo.com/support
Sixth Edition (August 2017)
© Copyright Lenovo 2015, 2017.
LIMITED AND RESTRICTED RIGHTS NOTICE: If data or software is delivered pursuant to a General Services
Administration “GSA” contract, use, reproduction, or disclosure is subject to restrictions set forth in Contract No. GS35F-05925.
Page 3

Contents
Important safety information . . . . . . v
Read this first. . . . . . . . . . . . . . . . . v
Important information about using your computer . . v
Conditions that require immediate action . . . . . . vii
Service and upgrades . . . . . . . . . . . . viii
Power cords and power adapters . . . . . . . . . ix
Extension cords and related devices. . . . . . . . ix
Plugs and outlets . . . . . . . . . . . . . . . x
Power supply statement . . . . . . . . . . . . x
External devices . . . . . . . . . . . . . . . xi
General battery notice . . . . . . . . . . . . . xi
Notice for removable rechargeable battery . . . . . xi
Notice for non-rechargeable coin-cell battery . . . . xii
Heat and product ventilation . . . . . . . . . . xiii
Electrical current safety information . . . . . . . xiv
Liquid crystal display (LCD) notice . . . . . . . . xv
Using headphones or earphones . . . . . . . . . xv
Choking hazard notice . . . . . . . . . . . . . xv
Plastic bag notice . . . . . . . . . . . . . . . xv
Glass parts notice . . . . . . . . . . . . . . xvi
Chapter 1. Product overview . . . . . . 1
Computer controls, connectors, and indicators . . . 1
Front view . . . . . . . . . . . . . . . . 1
Left-side view. . . . . . . . . . . . . . . 3
Right-side view . . . . . . . . . . . . . . 4
Rear view . . . . . . . . . . . . . . . . 5
Bottom view . . . . . . . . . . . . . . . 7
Status indicators . . . . . . . . . . . . . 7
Important product information labels . . . . . . . 9
Machine type and model information. . . . . . 9
FCC ID and IC Certification information. . . . 10
Labels for the Windows operating systems . . 11
Features. . . . . . . . . . . . . . . . . . 12
Specifications . . . . . . . . . . . . . . . 13
Operating environment . . . . . . . . . . . . 14
Lenovo programs . . . . . . . . . . . . . . 14
Accessing Lenovo programs . . . . . . . . 14
An introduction to Lenovo programs . . . . . 15
Chapter 2. Using your computer . . . 19
Registering your computer . . . . . . . . . . 19
Frequently asked questions . . . . . . . . . . 19
Getting help about the Windows operating
system . . . . . . . . . . . . . . . . . . 20
Using the multi-touch screen . . . . . . . . . 20
Special keys . . . . . . . . . . . . . . . . 22
Using the ThinkPad pointing device . . . . . . . 24
Using the TrackPoint pointing device. . . . . 24
Using the TrackPoint pointing device. . . . . 25
Using the trackpad with buttons . . . . . . 26
Using the trackpad touch gestures . . . . . 27
Customizing the ThinkPad pointing device . . 27
Replacing the cap on the pointing stick . . . . 28
Power management . . . . . . . . . . . . . 28
Using the ac power adapter . . . . . . . . 28
Using the battery . . . . . . . . . . . . 29
Managing the battery power . . . . . . . . 30
Power-saving modes . . . . . . . . . . . 30
Connecting to the network . . . . . . . . . . 31
Ethernet connections . . . . . . . . . . . 31
Wireless connections . . . . . . . . . . . 31
Using an external display . . . . . . . . . . . 35
Connecting an external display . . . . . . . 35
Choosing a display mode . . . . . . . . . 36
Changing display settings . . . . . . . . . 36
Using the color sensor . . . . . . . . . . . . 36
Using the NVIDIA Optimus Graphics feature. . . . 37
Using audio features . . . . . . . . . . . . . 37
Using the camera . . . . . . . . . . . . . . 38
Using an ExpressCard, a media card, or a smart
card . . . . . . . . . . . . . . . . . . . 38
Traveling with your computer . . . . . . . . . 40
Chapter 3. Enhancing your
computer . . . . . . . . . . . . . . . . 43
Finding ThinkPad options . . . . . . . . . . . 43
ThinkPad Pen Pro . . . . . . . . . . . . . . 43
ThinkPad Workstation Dock . . . . . . . . . . 45
ThinkPad Workstation Dock overview . . . . 45
Attaching the docking station to your
computer . . . . . . . . . . . . . . . 46
Detaching the docking station from your
computer . . . . . . . . . . . . . . . 47
Guideline on connecting multiple external
displays to the docking station . . . . . . . 49
Chapter 4. Accessibility, ergonomic,
and maintenance information . . . . . 51
Accessibility information . . . . . . . . . . . 51
Ergonomic information . . . . . . . . . . . . 53
Cleaning and maintenance . . . . . . . . . . 54
Chapter 5. Security . . . . . . . . . . 57
Using passwords . . . . . . . . . . . . . . 57
© Copyright Lenovo 2015, 2017 i
Page 4

Passwords introduction . . . . . . . . . . 57
Setting, changing, or removing a password . . 58
Hard disk security . . . . . . . . . . . . . . 59
Setting the security chip . . . . . . . . . . . 59
Using the fingerprint reader . . . . . . . . . . 60
Deleting data from your storage drive . . . . . . 63
Using firewalls . . . . . . . . . . . . . . . 63
Protecting data against viruses . . . . . . . . . 63
Chapter 6. Advanced
configuration . . . . . . . . . . . . . . 65
Installing a new operating system . . . . . . . . 65
Installing the Windows 7 operating system . . 65
Installing the Windows 10 operating system . . 66
Installing device drivers. . . . . . . . . . . . 67
Using the ThinkPad Setup program . . . . . . . 68
Configuring ThinkPad Setup . . . . . . . . 68
Changing the startup sequence . . . . . . . 69
Updating the UEFI BIOS. . . . . . . . . . 69
BIOS menu. . . . . . . . . . . . . . . 69
Using system management . . . . . . . . . . 84
Setting management features . . . . . . . 85
Chapter 7. Troubleshooting
computer problems . . . . . . . . . . 87
General tips for preventing problems . . . . . . 87
Diagnosing problems . . . . . . . . . . . . 87
Troubleshooting . . . . . . . . . . . . . . 88
Computer stops responding . . . . . . . . 88
Spills on the keyboard . . . . . . . . . . 89
Error messages . . . . . . . . . . . . . 89
Beep errors. . . . . . . . . . . . . . . 91
Memory module problems . . . . . . . . . 91
Networking problems. . . . . . . . . . . 92
Problems with the keyboard and other
pointing devices . . . . . . . . . . . . . 94
Problems with the display and multimedia
devices . . . . . . . . . . . . . . . . 94
Fingerprint reader problems . . . . . . . . 100
Battery and power problems . . . . . . . . 100
Problems with drives and other storage
devices . . . . . . . . . . . . . . . . 103
A software problem . . . . . . . . . . . 103
Problems with ports and connectors . . . . . 104
Chapter 8. Recovery information . . . 105
Recovery information for the Windows 7 operating
system . . . . . . . . . . . . . . . . . . 105
Creating and using recovery media . . . . . 105
Performing backup and recovery
operations . . . . . . . . . . . . . . . 106
Using the Rescue and Recovery
workspace . . . . . . . . . . . . . . . 107
Creating and using a rescue medium. . . . . 108
Reinstalling preinstalled programs and device
drivers . . . . . . . . . . . . . . . . 109
Solving recovery problems. . . . . . . . . 109
Recovery information for the Windows 10
operating system . . . . . . . . . . . . . . 110
Resetting your computer . . . . . . . . . 110
Using advanced startup options . . . . . . 110
Recovering your operating system if Windows
10 fails to start . . . . . . . . . . . . . 110
Creating and using a recovery USB drive . . . 111
Chapter 9. Replacing devices . . . . . 113
Static electricity prevention . . . . . . . . . . 113
Replacing the removable battery . . . . . . . . 113
Installing or replacing the micro SIM card . . . . . 115
Replacing the bottom cover . . . . . . . . . . 116
Replacing the hard disk drive . . . . . . . . . 117
Replacing the M.2 solid-state drive . . . . . . . 120
Replacing the memory module under the bottom
cover . . . . . . . . . . . . . . . . . . . 123
Replacing the coin-cell battery . . . . . . . . . 124
Replacing the keyboard. . . . . . . . . . . . 126
Replacing an M.2 wireless-WAN card . . . . . . 129
Replacing the memory module under the
keyboard . . . . . . . . . . . . . . . . . 132
Chapter 10. Getting support. . . . . . 135
Before you contact Lenovo . . . . . . . . . . 135
Getting help and service . . . . . . . . . . . 135
Lenovo Support Web site . . . . . . . . . 136
Calling Lenovo . . . . . . . . . . . . . 136
Purchasing additional services . . . . . . . . . 137
Appendix A. Supplemental
information about the Ubuntu operating
system . . . . . . . . . . . . . . . . . 139
Appendix B. Regulatory
information . . . . . . . . . . . . . . . 141
Certification related information . . . . . . . . 141
Wireless-related information . . . . . . . . . . 141
Wireless interoperability. . . . . . . . . . 141
Usage environment and your health . . . . . 142
Locating the UltraConnect wireless
antennas. . . . . . . . . . . . . . . . 142
Wireless-radio compliance information . . . . 143
Locating wireless regulatory notices . . . . . 143
TCO certification . . . . . . . . . . . . . . 143
Export classification notice . . . . . . . . . . 144
Electronic emission notices . . . . . . . . . . 144
ii P50 User Guide
Page 5

Federal Communications Commission
Declaration of Conformity . . . . . . . . . 144
Industry Canada Class B emission
compliance statement . . . . . . . . . . 144
European Union conformity . . . . . . . . 144
German Class B compliance statement. . . . 145
Japan VCCI Class B compliance
statement . . . . . . . . . . . . . . . 146
Japan compliance statement for products
which connect to the power mains with rated
current less than or equal to 20 A per
phase . . . . . . . . . . . . . . . . . 146
Japan notice for ac power cord . . . . . . . 146
Lenovo product service information for
Taiwan . . . . . . . . . . . . . . . . 146
Eurasian compliance mark . . . . . . . . . . 146
Brazil audio notice. . . . . . . . . . . . . . 146
Important WEEE information. . . . . . . . . . 147
Japan recycling statements . . . . . . . . . . 148
Recycling information for Brazil. . . . . . . . . 148
Battery recycling information for the European
Union . . . . . . . . . . . . . . . . . . . 149
Battery recycling information for Taiwan . . . . . 150
Battery recycling information for the United States
and Canada . . . . . . . . . . . . . . . . 150
Recycling information for China . . . . . . . . 150
Appendix D. Restriction of
Hazardous Substances (RoHS)
Directive . . . . . . . . . . . . . . . . 151
Appendix E. ENERGY STAR model
information . . . . . . . . . . . . . . . 155
Appendix C. WEEE and recycling
statements . . . . . . . . . . . . . . . 147
General recycling information . . . . . . . . . 147
Appendix F. Notices . . . . . . . . . . 157
Appendix G. Trademarks . . . . . . . 159
© Copyright Lenovo 2015, 2017 iii
Page 6

iv P50 User Guide
Page 7
Important safety information
Note: Read the important safety information first.
Read this first
This information can help you safely use your notebook computer. Follow and retain all information included
with your computer. The information in this document does not alter the terms of your purchase agreement
or the Limited Warranty. For more information, see "Warranty Information" in the Safety, Warranty, and Setup
Guide that comes with your computer.
Customer safety is important. Our products are developed to be safe and effective. However, personal
computers are electronic devices. Power cords, power adapters, and other features can create potential
safety risks that can result in physical injury or property damage, especially if misused. To reduce these risks,
follow the instructions included with your product, observe all warnings on the product and in the operating
instructions, and review the information included in this document carefully. By carefully following the
information contained in this document and provided with your product, you can help protect yourself from
hazards and create a safer computer work environment.
Note: This information includes references to power adapters and batteries. In addition to notebook
computers, some products (such as speakers and monitors) ship with external power adapters. If you have
such a product, this information applies to your product. In addition, computer products contain a coin-sized
internal battery that provides power to the system clock even when the computer is unplugged, so the
battery safety information applies to all computer products.
Important information about using your computer
Ensure that you follow the important tips given here to get the most use and enjoyment out of your computer.
Failure to do so might lead to discomfort or injury, or cause the computer to fail.
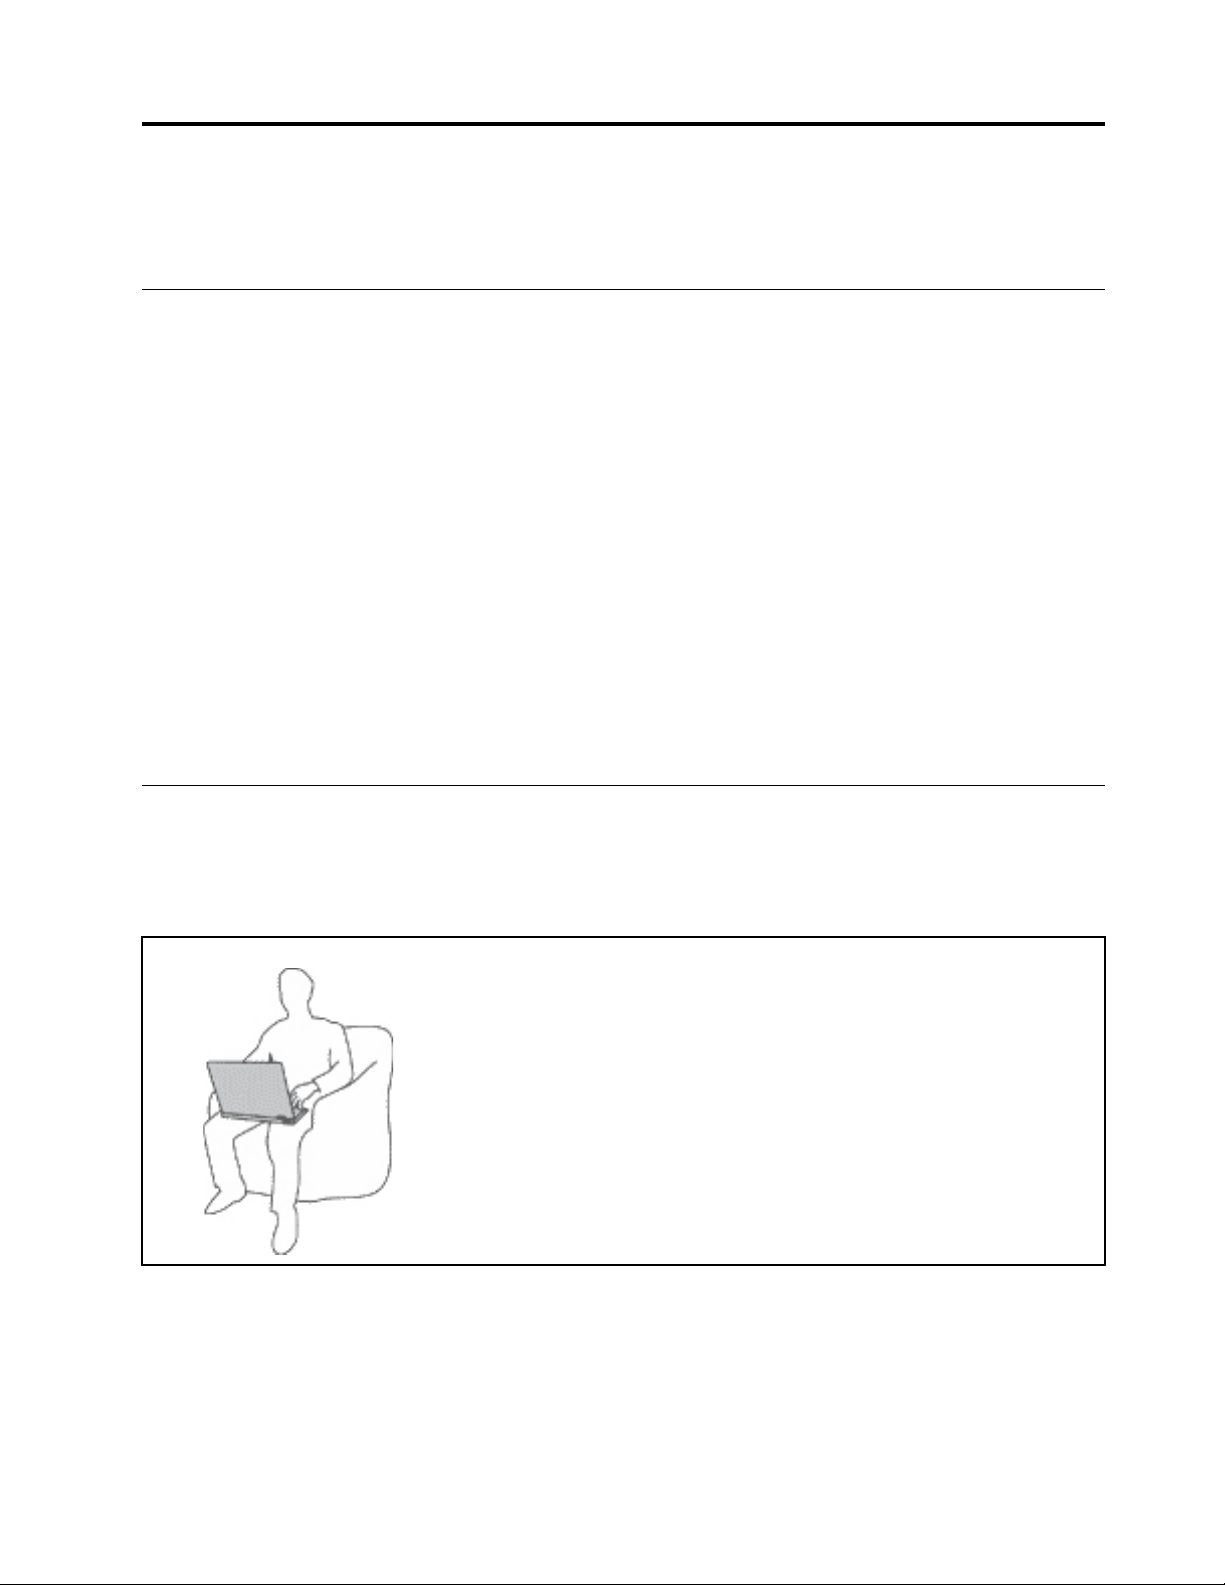
Protect yourself from the heat that your computer generates.
When your computer is turned on or the battery is charging, the base, the palm
rest, and some other parts may become hot. The temperature they reach
depends on the amount of system activity and the level of charge in the
battery.
Extended contact with your body, even through clothing, could cause
discomfort or even a skin burn.
• Avoid keeping your hands, your lap, or any other part of your body in
contact with a hot section of the computer for any extended time.
• Periodically take hands from using the keyboard by lifting your hands from
the palm rest.
© Copyright Lenovo 2015, 2017 v
Page 8
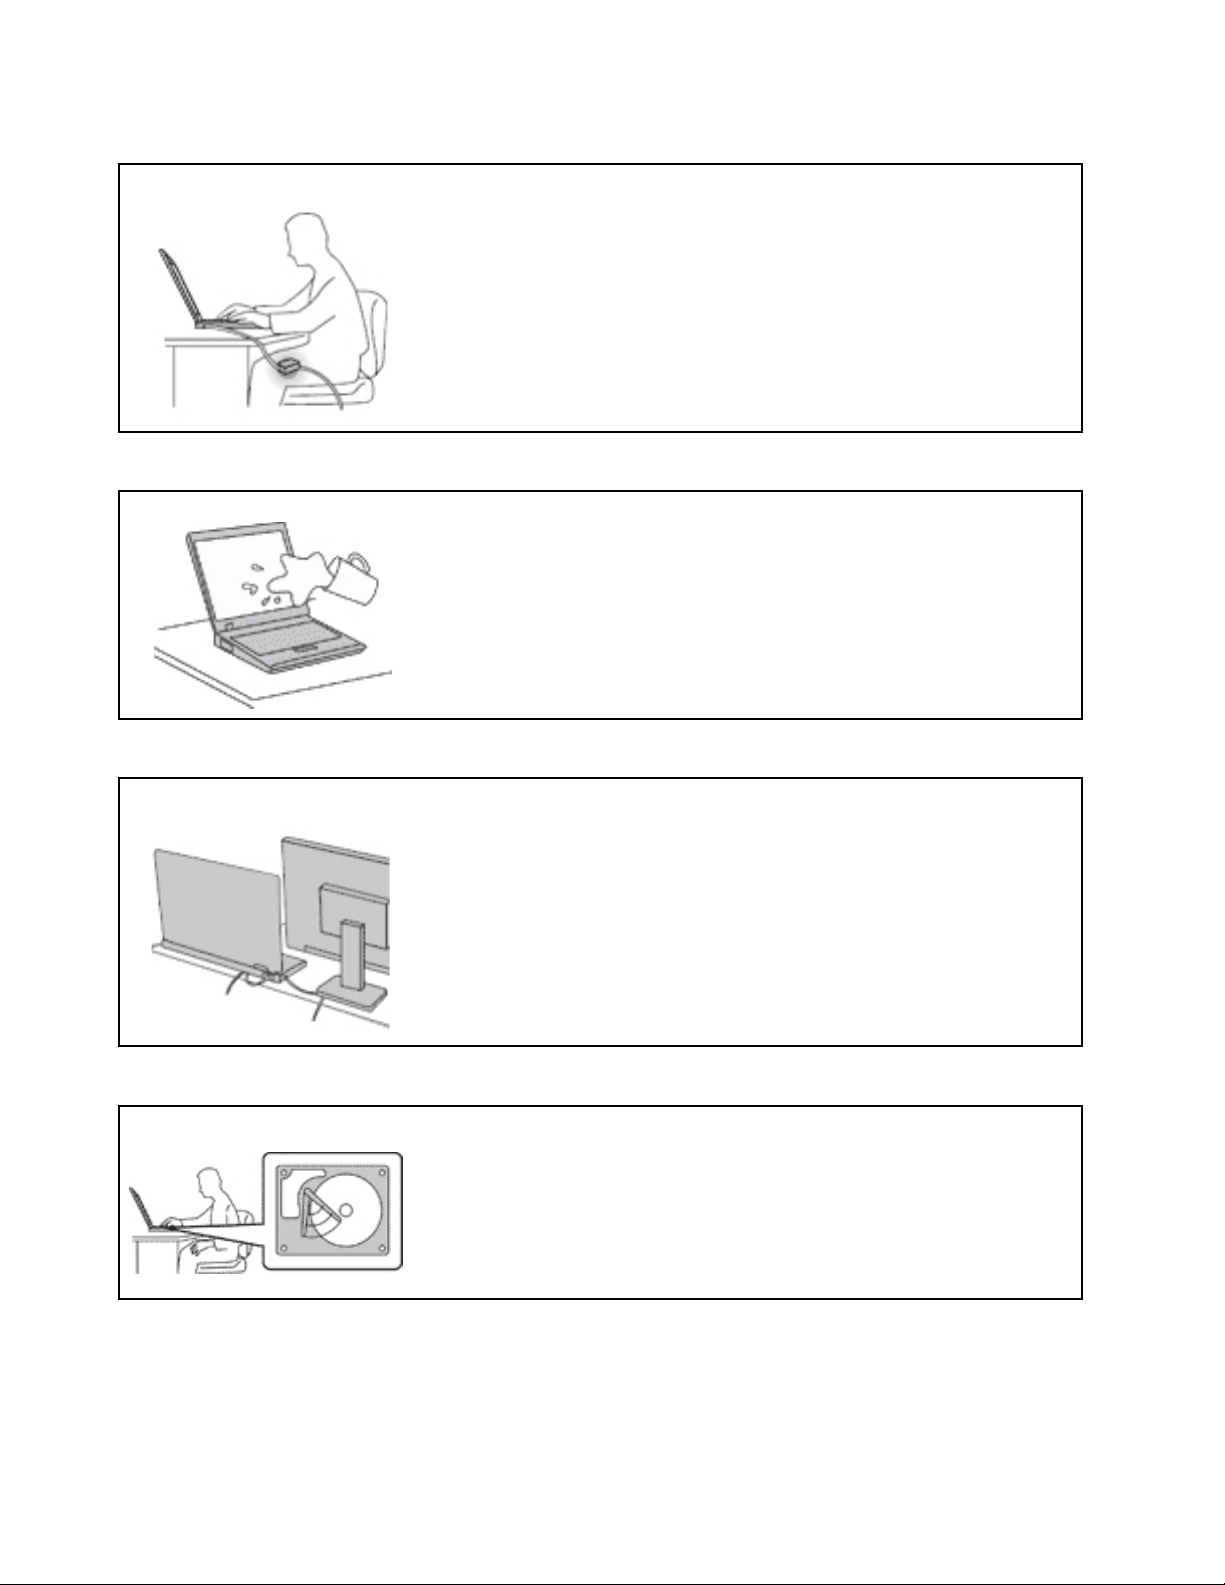
Protect yourself from the heat generated by the ac power adapter.
When the ac power adapter is connected to an electrical outlet and your
computer, it generates heat.
Extended contact with your body, even through clothing, may cause a skin
burn.
• Do not place the ac power adapter in contact with any part of your body
while it is in use.
• Never use it to warm your body.
Prevent your computer from getting wet.
To avoid spills and the danger of electrical shock, keep liquids away from your
computer.
Protect the cables from being damaged.
Applying strong force to cables may damage or break them.
Route communication lines, or the cables of an ac power adapter, a mouse, a
keyboard, a printer, or any other electronic device, so that they cannot be
walked on, tripped over, pinched by your computer or other objects, or in any
way subject to treatment that could interfere with the operation of your
computer.
Protect your computer and data when moving it.
Before moving a computer equipped with a hard disk drive, do one of the
following:
• Turn it off.
• Put it in sleep mode.
• Put it in hibernation mode.
This helps to prevent damage to the computer, and possible loss of data.
vi P50 User Guide
Page 9

Handle your computer gently.
Carry your computer carefully.
Do not drop, bump, scratch, twist, hit, vibrate, push, or place heavy objects on
your computer, display, or external devices.
• Use a quality carrying case that provides adequate cushioning and protection.
• Do not pack your computer in a tightly packed suitcase or bag.
• Before putting your computer in a carrying case, make sure that it is off, in sleep
mode, or in hibernation mode. Do not put a computer in a carrying case while it is
turned on.
Conditions that require immediate action
Products can become damaged due to misuse or neglect. Some product damage is serious enough
that the product should not be used again until it has been inspected and, if necessary, repaired by an
authorized servicer.
As with any electronic device, pay close attention to the product when it is turned on. On very rare
occasions, you might notice an odor or see a puff of smoke or sparks vent from your product. Or you
might hear sounds like popping, cracking, or hissing. These conditions might merely mean that an
internal electronic component has failed in a safe and controlled manner. Or, they might indicate a
potential safety issue. However, do not take risks or attempt to diagnose the situation yourself.
Contact the Customer Support Center for further guidance. For a list of Service and Support phone
numbers, see the following Web site:
http://www.lenovo.com/support/phone
Frequently inspect your computer and its components for damage or wear or signs of danger. If you
have any question about the condition of a component, do not use the product. Contact the Customer
Support Center or the product manufacturer for instructions on how to inspect the product and have it
repaired, if necessary.
In the unlikely event that you notice any of the following conditions, or if you have any safety concerns
with your product, stop using the product and unplug it from the power source and
telecommunication lines until you can speak to the Customer Support Center for further guidance.
© Copyright Lenovo 2015, 2017 vii
Page 10
• Power cords, plugs, power adapters, extension cords, surge protectors, or power supplies that are
cracked, broken, or damaged.
• Signs of overheating, smoke, sparks, or fire.
• Damage to a battery (such as cracks, dents, or creases), discharge from a battery, or a buildup of foreign
substances on the battery.
• A cracking, hissing, or popping sound, or strong odor that comes from the product.
• Signs that liquid has been spilled or an object has fallen onto the computer product, the power cord, or
power adapter.
• The computer product, power cord, or power adapter has been exposed to water.
• The product has been dropped or damaged in any way.
• The product does not operate normally when you follow the operating instructions.
Note: If you notice these conditions with a product (such as an extension cord) that is not manufactured for
or by Lenovo
®
, stop using that product until you can contact the product manufacturer for further
instructions, or until you get a suitable replacement.
Service and upgrades
Do not attempt to service a product yourself unless instructed to do so by the Customer Support Center or
your documentation. Only use a Service Provider who is approved to repair your particular product.
Note: Some computer parts can be upgraded or replaced by the customer. Upgrades typically are referred
to as options. Replacement parts approved for customer installation are referred to as Customer
Replaceable Units, or CRUs. Lenovo provides documentation with instructions when it is appropriate for
customers to install options or replace CRUs. You must closely follow all instructions when installing or
replacing parts. The Off state of a power indicator does not necessarily mean that voltage levels inside a
product are zero. Before you remove the covers from a product equipped with a power cord, always make
sure that the power is turned off and that the product is unplugged from any power source. If you have any
questions or concerns, contact the Customer Support Center.
Although there are no moving parts in your computer after the power cord has been disconnected, the
following warnings are required for your safety.
CAUTION:
Hazardous moving parts. Keep fingers and other body parts away.
CAUTION:
Before you open the computer cover, turn off the computer and wait several minutes until the
computer is cool.
viii
P50 User Guide
Page 11

Power cords and power adapters
DANGER
Use only the power cords and power adapters supplied by the product manufacturer.
The power cords shall be safety approved. For Germany, it shall be H03VV-F, 3G, 0.75 mm
better. For other countries, the suitable types shall be used accordingly.
Never wrap a power cord around a power adapter or other object. Doing so can stress the cord in
ways that can cause the cord to fray, crack, or crimp. This can present a safety hazard.
Always route power cords so that they will not be walked on, tripped over, or pinched by objects.
Protect power cords and power adapters from liquids. For instance, do not leave your power cord
or power adapter near sinks, tubs, toilets, or on floors that are cleaned with liquid cleansers. Liquids
can cause a short circuit, particularly if the power cord or power adapter has been stressed by
misuse. Liquids also can cause gradual corrosion of power cord terminals and/or the connector
terminals on a power adapter, which can eventually result in overheating.
Ensure that all power cord connectors are securely and completely plugged into receptacles.
Do not use any power adapter that shows corrosion at the ac input pins or shows signs of
overheating (such as deformed plastic) at the ac input pins or anywhere on the power adapter.
Do not use any power cords where the electrical contacts on either end show signs of corrosion or
overheating or where the power cord appears to have been damaged in any way.
To prevent possible overheating, do not cover the power adapter with clothing or other objects
when the power adapter is plugged into an electrical outlet.
2
, or
Extension cords and related devices
Ensure that extension cords, surge protectors, uninterruptible power supplies, and power strips that you use
are rated to handle the electrical requirements of the product. Never overload these devices. If power strips
are used, the load should not exceed the power strip input rating. Consult an electrician for more information
if you have questions about power loads, power requirements, and input ratings.
© Copyright Lenovo 2015, 2017 ix
Page 12
Plugs and outlets
DANGER
If a receptacle (power outlet) that you intend to use with your computer equipment appears to be
damaged or corroded, do not use the outlet until it is replaced by a qualified electrician.
Do not bend or modify the plug. If the plug is damaged, contact the manufacturer to obtain a
replacement.
Do not share an electrical outlet with other home or commercial appliances that draw large
amounts of electricity; otherwise, unstable voltage might damage your computer, data, or attached
devices.
Some products are equipped with a three-pronged plug. This plug fits only into a grounded
electrical outlet. This is a safety feature. Do not defeat this safety feature by trying to insert it into a
non-grounded outlet. If you cannot insert the plug into the outlet, contact an electrician for an
approved outlet adapter or to replace the outlet with one that enables this safety feature. Never
overload an electrical outlet. The overall system load should not exceed 80 percent of the branch
circuit rating. Consult an electrician for more information if you have questions about power loads
and branch circuit ratings.
Be sure that the power outlet you are using is properly wired, easily accessible, and located close to
the equipment. Do not fully extend power cords in a way that will stress the cords.
Be sure that the power outlet provides the correct voltage and current for the product you are
installing.
Carefully connect and disconnect the equipment from the electrical outlet.
Power supply statement
DANGER
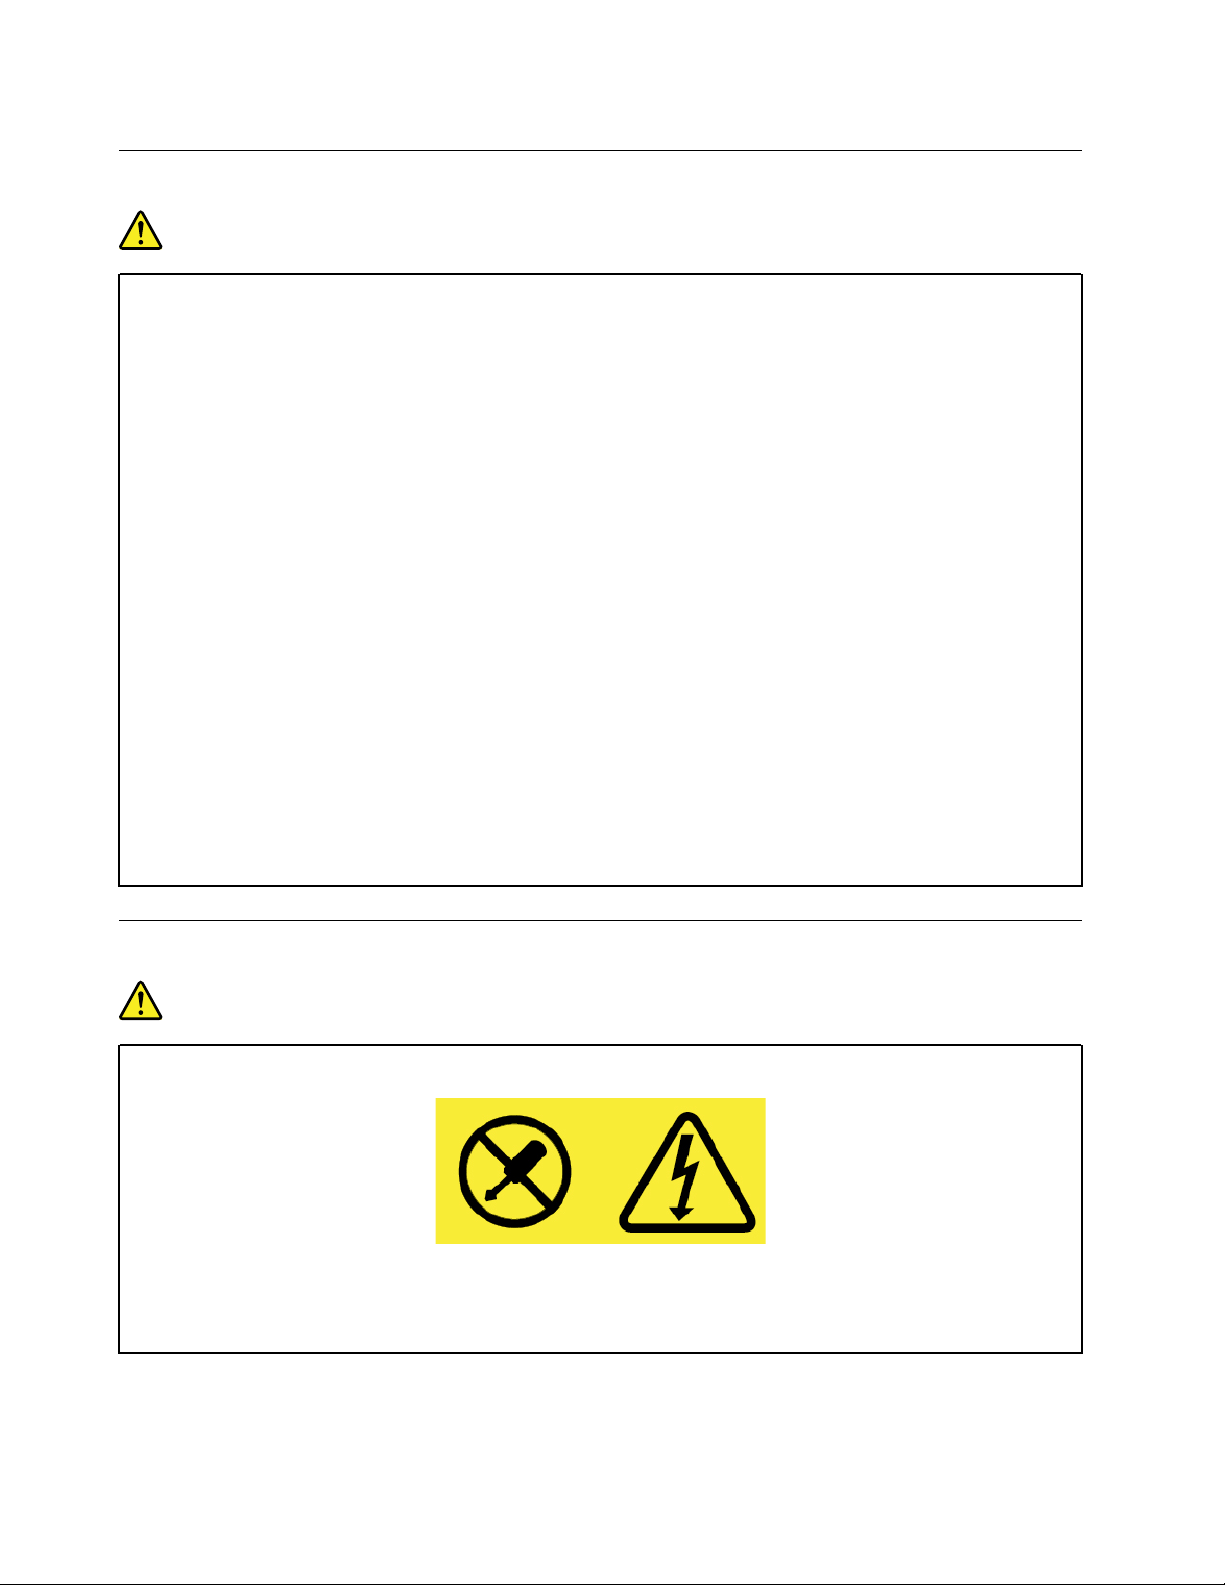
Never remove the cover on a power supply or any part that has the following label attached.
Hazardous voltage, current, and energy levels are present inside any component that has this label
attached. There are no serviceable parts inside these components. If you suspect a problem with
one of these parts, contact a service technician.
x
P50 User Guide
Page 13
External devices
CAUTION:
Do not connect or disconnect any external device cables other than Universal Serial Bus (USB) and
1394 cables while the computer power is on; otherwise, you might damage your computer. To avoid
possible damage to attached devices, wait at least five seconds after the computer is shut down to
disconnect external devices.
General battery notice
DANGER
Batteries supplied by Lenovo for use with your product have been tested for compatibility and
should only be replaced with approved parts. A battery other than the one specified by Lenovo, or a
disassembled or modified battery is not covered by the warranty.
Battery abuse or mishandling can cause overheat, liquid leakage, or an explosion. To avoid possible
injury, do the following:
• Do not open, dissemble, or service any battery.
• Do not crush or puncture the battery.
• Do not short-circuit the battery, or expose it to water or other liquids.
• Keep the battery away from children.
• Keep the battery away from fire.
Stop using the battery if it is damaged, or if you notice any discharge or the buildup of foreign
materials on the battery leads.
Store the rechargeable batteries or products containing the rechargeable batteries at room
temperature, charged to approximately 30 to 50% of capacity. We recommend that the batteries be
charged about once per year to prevent overdischarge.
Do not put the battery in trash that is disposed of in landfills. When disposing of the battery, comply
with local ordinances or regulations.
Notice for removable rechargeable battery
DANGER
Only recharge the battery strictly according to instructions included in the product documentation.
If the battery is incorrectly replaced, there is danger of an explosion. The battery contains a small
amount of harmful substances.
© Copyright Lenovo 2015, 2017 xi
Page 14

Notice for non-rechargeable coin-cell battery
DANGER
If the coin-cell battery is incorrectly replaced, there is danger of an explosion. The battery contains
a small amount of harmful substance.
Do not heat to more than 100°C (212°F).
The following statement applies to users in the state of California, U.S.A.
California Perchlorate Information:
Products containing manganese dioxide lithium coin-cell batteries may contain perchlorate.
Perchlorate Material - special handling may apply, See
perchlorate
http://www.dtsc.ca.gov/hazardouswaste/
xii P50 User Guide
Page 15

Heat and product ventilation
DANGER
Computers, ac power adapters, and many accessories can generate heat when turned on and when
batteries are charging. Notebook computers can generate a significant amount of heat due to their
compact size. Always follow these basic precautions:
• When your computer is turned on or the battery is charging, the base, the palm rest, and some
other parts may become hot. Avoid keeping your hands, your lap, or any other part of your body
in contact with a hot section of the computer for any extended length of time. When you use the
keyboard, avoid keeping your palms on the palm rest for a prolonged period of time. Your
computer generates some heat during normal operation. The amount of heat depends on the
amount of system activity and the battery charge level. Extended contact with your body, even
through clothing, could cause discomfort or even a skin burn. Periodically take breaks from using
the keyboard by lifting your hands from the palm rest; and be careful not to use the keyboard for
any extended length of time.
• Do not operate your computer or charge the battery near flammable materials or in explosive
environments.
• Ventilation slots, fans and/or heat sinks are provided with the product for safety, comfort, and
reliable operation. These features might inadvertently become blocked by placing the product on
a bed, sofa, carpet, or other flexible surface. Never block, cover, or disable these features.
• When the ac power adapter is connected to an electrical outlet and your computer, it generates
heat. Do not place the adapter in contact with any part of your body while using it. Never use the
ac power adapter to warm your body. Extended contact with your body, even through clothing,
may cause a skin burn.
For your safety, always follow these basic precautions with your computer:
• Keep the cover closed whenever the computer is plugged in.
• Regularly inspect the outside of the computer for dust accumulation.
• Remove dust from vents and any perforations in the bezel. More frequent cleanings might be
required for computers in dusty or high-traffic areas.
• Do not restrict or block any ventilation openings.
• Do not operate your computer inside furniture, as this might increase the risk of overheating.
• Airflow temperatures into the computer should not exceed 35°C (95°F).
© Copyright Lenovo 2015, 2017 xiii
Page 16
Electrical current safety information
DANGER
Electric current from power, telephone, and communication cables is hazardous.
To avoid a shock hazard:
• Do not use your computer during a lightning storm.
• Do not connect or disconnect any cables or perform installation, maintenance, or reconfiguration
of this product during an electrical storm.
• Connect all power cords to a properly wired and grounded electrical outlet.
• Connect to properly wired outlets any equipment that will be attached to this product.
• Whenever possible, use one hand only to connect or disconnect signal cables.
• Never turn on any equipment when there is evidence of fire, water, or structural damage.
• Disconnect the attached power cords, battery, and all the cables before you open the device
covers, unless instructed otherwise in the installation and configuration procedures.
• Do not use your computer until all internal parts enclosures are fastened into place. Never use
the computer when internal parts and circuits are exposed.
DANGER
Connect and disconnect cables as described in the following procedures when installing, moving,
or opening covers on this product or attached devices.
To connect:
1. Turn everything OFF.
2. First, attach all cables to devices.
3. Attach signal cables to connectors.
4. Attach power cords to outlets.
5. Turn devices ON.
The power cord must be disconnected from the wall outlet or receptacle before installing all other electrical
cables connected to the computer.
The power cord may be reconnected to the wall outlet or receptacle only after all other electrical cables have
been connected to the computer.
DANGER
During electrical storms, do not perform any replacement and do not connect the telephone cable
to or disconnect it from the telephone outlet on the wall.
To disconnect:
1. Turn everything OFF.
2. First, remove power cords from outlets.
3. Remove signal cables from connectors.
4. Remove all cables from devices.
xiv
P50 User Guide
Page 17
Liquid crystal display (LCD) notice
CAUTION:
The liquid crystal display (LCD) is made of glass, and rough handling or dropping the computer can
cause the LCD to break. If the LCD breaks and the internal fluid gets into your eyes or on your hands,
immediately wash the affected areas with water for at least 15 minutes; if any symptoms are present
after washing, get medical care.
Note: For products with mercury-containing fluorescent lamps (for example, non-LED), the fluorescent lamp
in the liquid crystal display (LCD) contains mercury; dispose of according to local, state, or federal laws.
Using headphones or earphones
CAUTION:
Excessive sound pressure from earphones and headphones can cause hearing loss. Adjustment of
the equalizer to maximum increases the earphone and headphone output voltage and the sound
pressure level. Therefore, to protect your hearing, adjust the equalizer to an appropriate level.
Excessive use of headphones or earphones for a long period of time at high volume can be dangerous if the
output of the headphone or earphone connectors do not comply with specifications of EN 50332-2. The
headphone output connector of your computer complies with EN 50332-2 Sub clause 7. This specification
limits the computer’s maximum wide band true RMS output voltage to 150 mV. To help protect against
hearing loss, ensure that the headphones or earphones you use also comply with EN 50332-2 (Clause 7
limits) for a wide band characteristic voltage of 75 mV. Using headphones that do not comply with EN 503322 can be dangerous due to excessive sound pressure levels.
If your Lenovo computer came with headphones or earphones in the package, as a set, the combination of
the headphones or earphones and the computer already complies with the specifications of EN 50332-1. If
different headphones or earphones are used, ensure that they comply with EN 50332-1 (Clause 6.5
Limitation Values). Using headphones that do not comply with EN 50332-1 can be dangerous due to
excessive sound pressure levels.
Choking hazard notice
CHOKING HAZARD – Product contains small parts.
Keep away from children under three years.
Plastic bag notice
DANGER
Plastic bags can be dangerous. Keep plastic bags away from babies and children to avoid danger of
suffocation.
© Copyright Lenovo 2015, 2017 xv
Page 18

Glass parts notice
CAUTION:
Some parts of your product may be made of glass. This glass could break if the product is dropped on
a hard surface or receives a substantial impact. If glass breaks, do not touch or attempt to remove it.
Stop using your product until the glass is replaced by trained service personnel.
xvi
P50 User Guide
Page 19
Chapter 1. Product overview
This chapter provides basic information to help you get familiar with your computer.
Computer controls, connectors, and indicators
This section introduces hardware features of the computer.
Front view
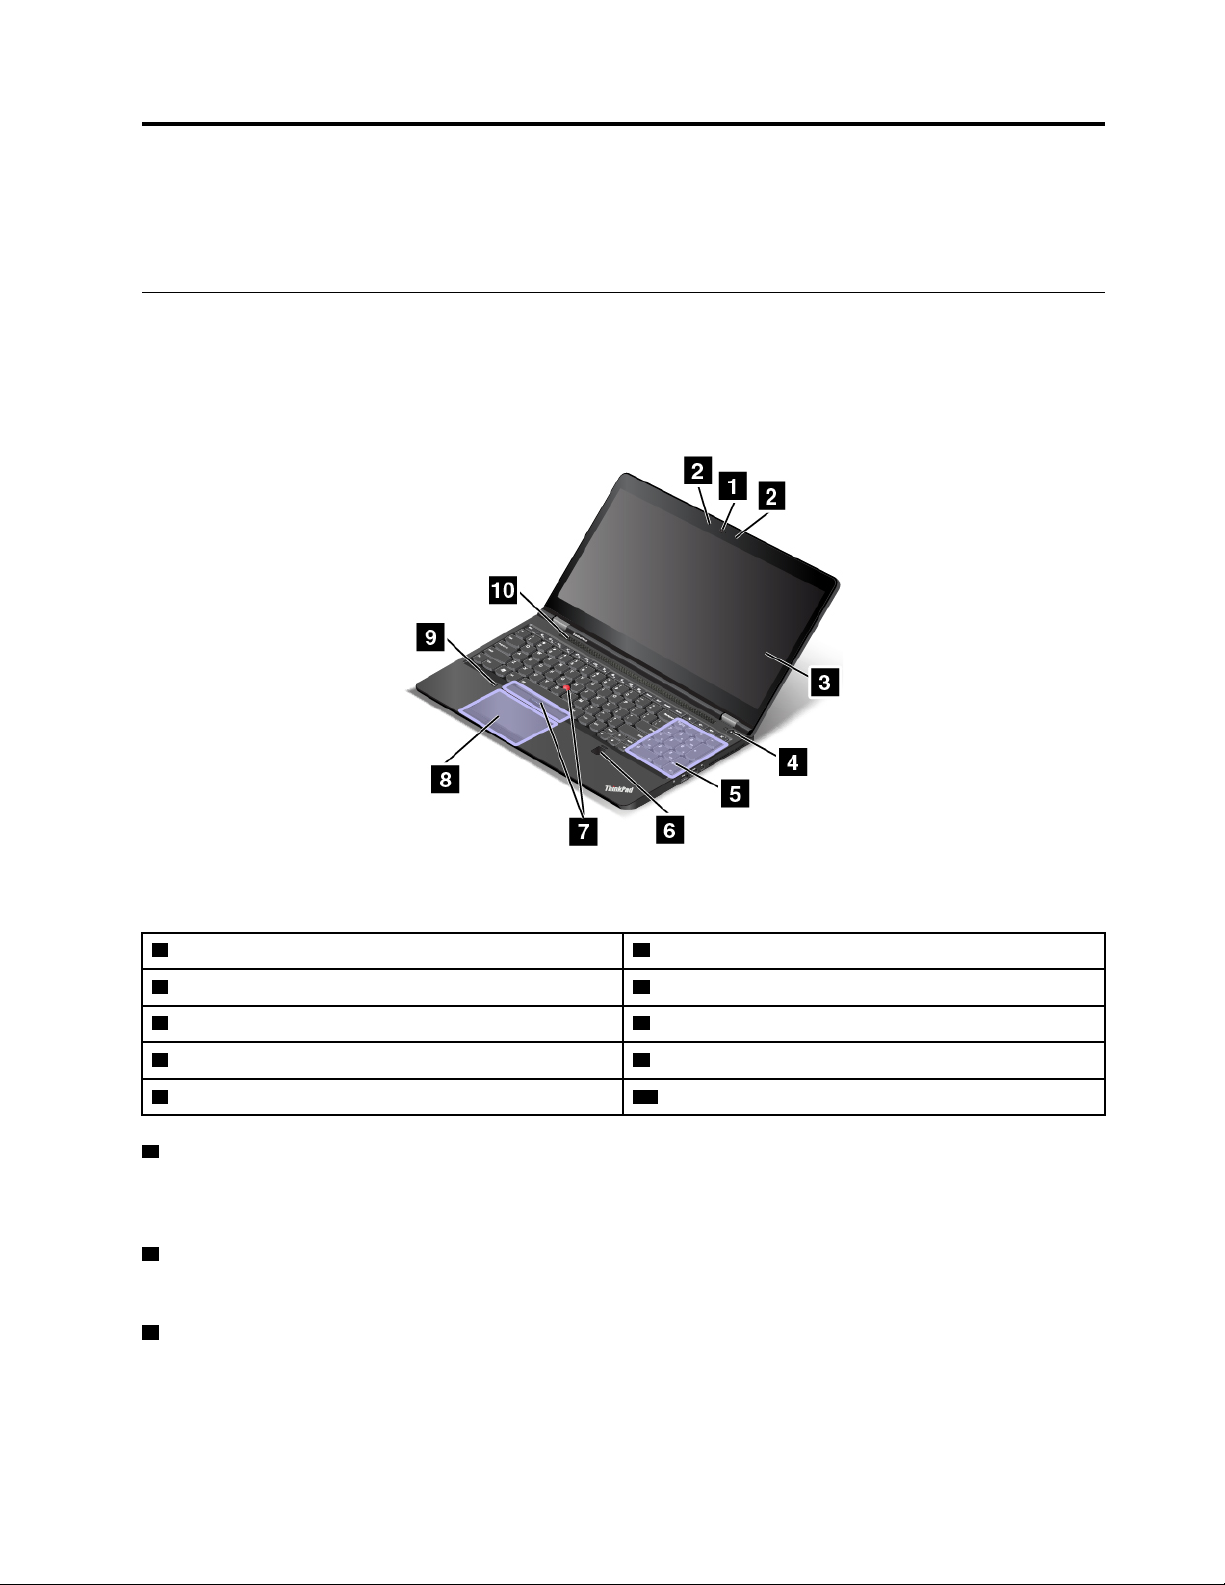
Figure 1. Front view
1 Camera (available on some models) 2 Microphones (available on some models)
3 Screen (multi-touch on some models)
5 Numeric keypad 6 Fingerprint reader
7 TrackPoint
9 Color sensor (available on some models) 10 Speakers
1 Camera (available on some models)
®
pointing device 8 Trackpad with buttons
4 Power button
Use the camera to take pictures or hold a video conference. For more information, see “Using the camera”
on page 38.
2 Microphones (available on some models)
The microphones capture sound and voice when used with a program capable of handling audio.
3 Screen (multi-touch screen on some models)
The multi-touch screen enables you to use your computer with simple touch gestures. For more information,
see “Using the multi-touch screen” on page 20.
© Copyright Lenovo 2015, 2017 1
Page 20

4 Power button
Press the power button to turn on the computer or put the computer into sleep mode. For information about
how to turn off the computer, see “Frequently asked questions” on page 19.
If your computer is completely unresponsive, you can turn off the computer by pressing and holding the
power button for four or more seconds. If the computer cannot be turned off, see “Computer stops
responding” on page 88 for more information.
You also can define what the power button does. For example, by pressing the power button, you can turn
off the computer or put the computer into sleep or hibernation mode. To change what the power button
does, do the following:
1. Go to Control Panel, and then change the view of Control Panel from Category to Large icons or Small
icons.
2. Click Power Options ➙ Choose what the power buttons do.
3. Follow the instructions on the screen.
5 Numeric keypad
Use the numeric keypad to quickly input numbers.
6 Fingerprint reader
Fingerprint authentication technology provides simple and secure user access by associating your fingerprint
with passwords. For more information, see “Using the fingerprint reader” on page 60.
ThinkPad
7 TrackPoint pointing device
8 Trackpad with buttons
®
pointing device
The keyboard contains the Lenovo-unique ThinkPad pointing device. For information about using the
ThinkPad pointing device, see “Using the ThinkPad pointing device” on page 24.
9 Color sensor (available on some models)
The color sensor enables you to measure and adjust the color accuracy of your displays. For more
information, see “Using the color sensor” on page 36.
10 Speakers
Your computer is equipped with a pair of stereo speakers.
2
P50 User Guide
Page 21
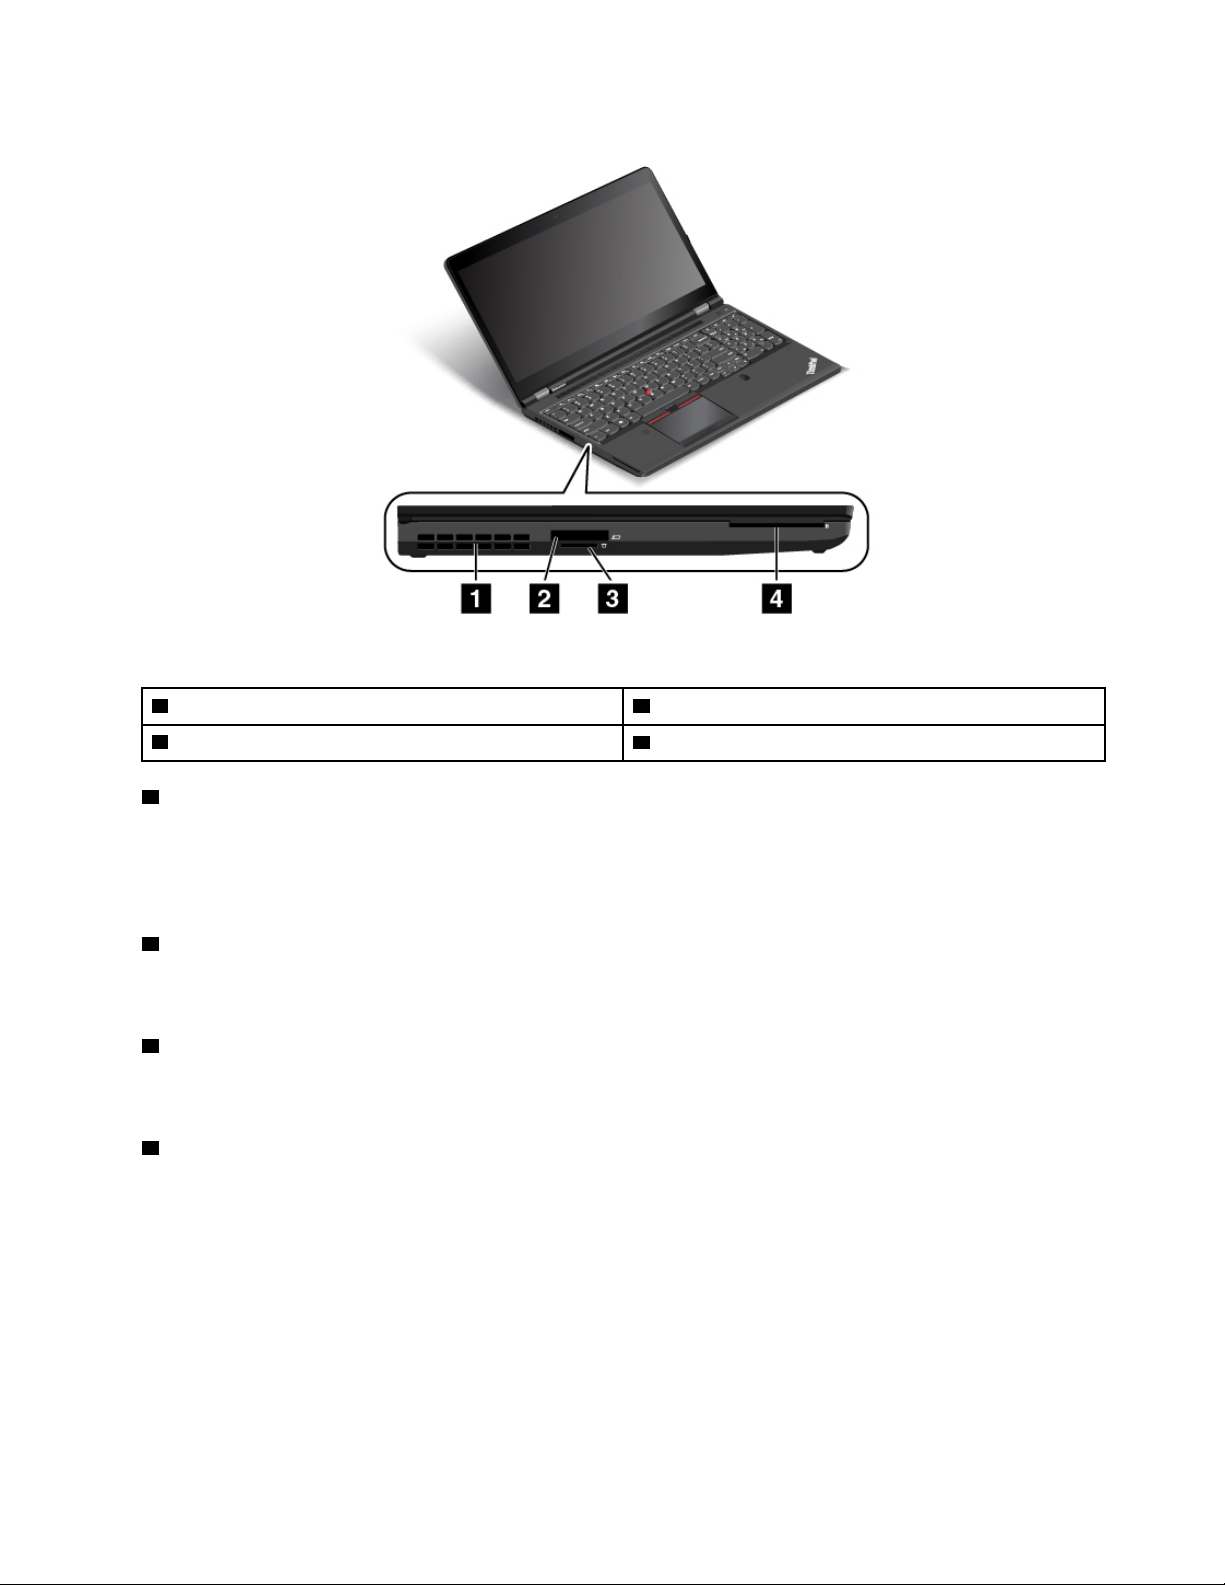
Left-side view
Figure 2. Left-side view
1 Fan louvers
3 Media-card slot
1 Fan louvers
2 ExpressCard slot
4 Smart-card slot (available on some models)
The fan louvers and internal fan enable air to circulate in the computer, which in turn ensure proper cooling,
especially the cooling of the microprocessor.
Note: To ensure proper airflow, do not place any obstacles in front of the fan louvers.
2 ExpressCard slot
Your computer has an ExpressCard slot. For more information, see “Using an ExpressCard, a media card, or
a smart card” on page 38.
3 Media-card slot
Your computer has a media-card slot. Insert your media card into this slot to read the data on the card. For
more information, see “Using an ExpressCard, a media card, or a smart card” on page 38.
4 Smart-card slot (available on some models)
Smart cards can be used for authentication, data storage, and application processing. Smart cards also
might provide strong security authentication for single sign-on (SSO) within large organizations. For more
information, see “Using an ExpressCard, a media card, or a smart card” on page 38.
Chapter 1. Product overview 3
Page 22
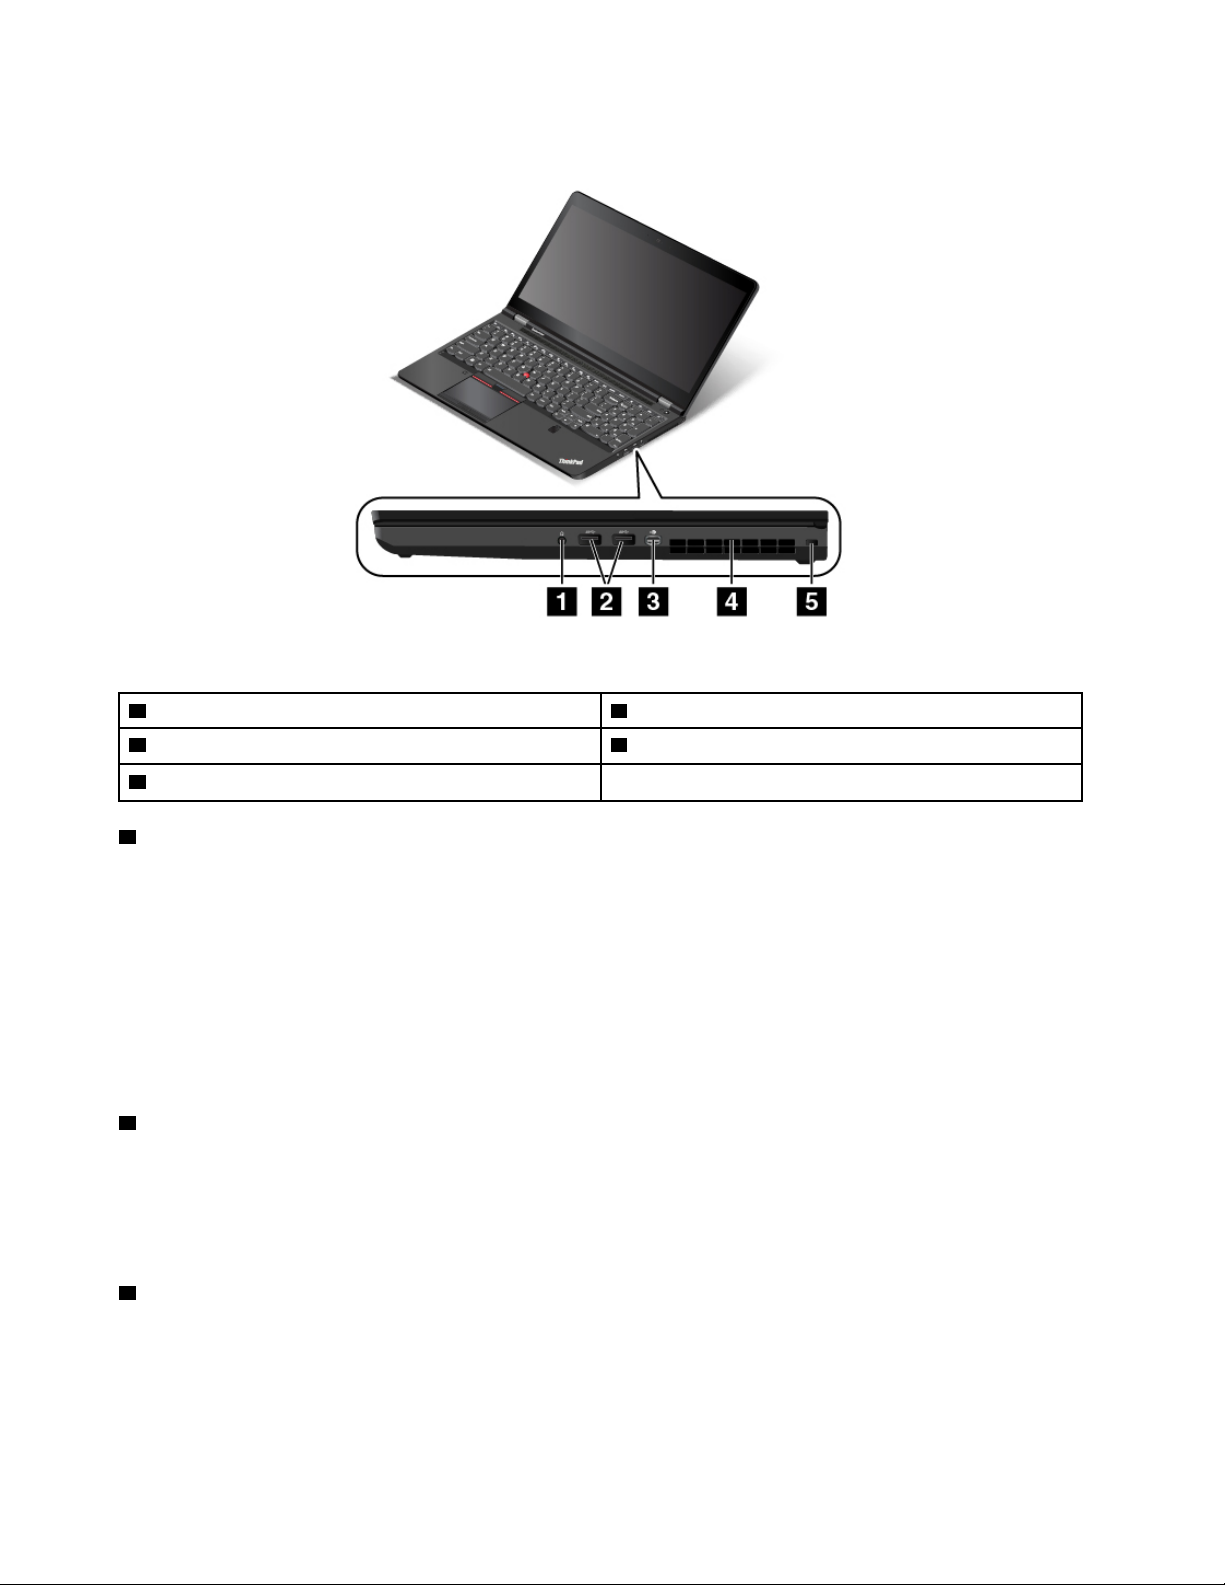
Right-side view
Figure 3. Right-side view
1 Audio connector
3 Mini DisplayPort
5 Security-lock slot
1 Audio connector
®
connector 4 Fan louvers
2 USB 3.0 connectors
Connect headphones or a headset that has a 3.5-mm (0.14-inch), 4-pole plug to the combo audio connector
to listen to the sound from the computer.
Notes:
• If you are using a headset with a function switch, for example, a headset for an iPhone mobile digital
device, do not press this switch while using the headset. If you press the switch, the headset microphone
will be disabled, and the integrated microphones on the computer will be enabled instead.
• The audio connector does not support a conventional microphone. For more information, see “Using
audio features” on page 37.
2 USB 3.0 connectors
The Universal Serial Bus (USB) 3.0 connectors are used for connecting USB-compatible devices, such as a
USB keyboard, a USB mouse, a USB storage device, or a USB printer.
Attention: When you attach a USB cable to the USB 3.0 connector, ensure that the USB mark is facing
upward. Otherwise the connector might get damaged.
3 Mini DisplayPort
®
connector
Use the mini DisplayPort connector to connect your computer to a compatible projector, external display, or
high-definition television. The mini DisplayPort connector of your computer supports audio as well as video
streaming. This compact connector enables a plug-and-play setup and supports adapters that can plug into
Digital Visual Interface (DVI), Video Graphics Array (VGA), or High-Definition Multimedia Interface (HDMI™)
connectors. For more information, see “Using an external display” on page 35.
4
P50 User Guide
Page 23
4 Fan louvers
The fan louvers and internal fan enable air to circulate in the computer, which in turn ensure proper cooling,
especially the cooling of the microprocessor.
Note: To ensure proper airflow, do not place any obstacles in front of the fan louvers.
5 Security-lock slot
To protect your computer from theft, you can purchase a security cable lock that fits the security-lock slot to
lock the computer to a stationary object.
Note: You are responsible for evaluating, selecting, and implementing the locking device and security
feature. Lenovo makes no comments, judgments, or warranties about the function, quality, or performance
of the locking device and security feature.
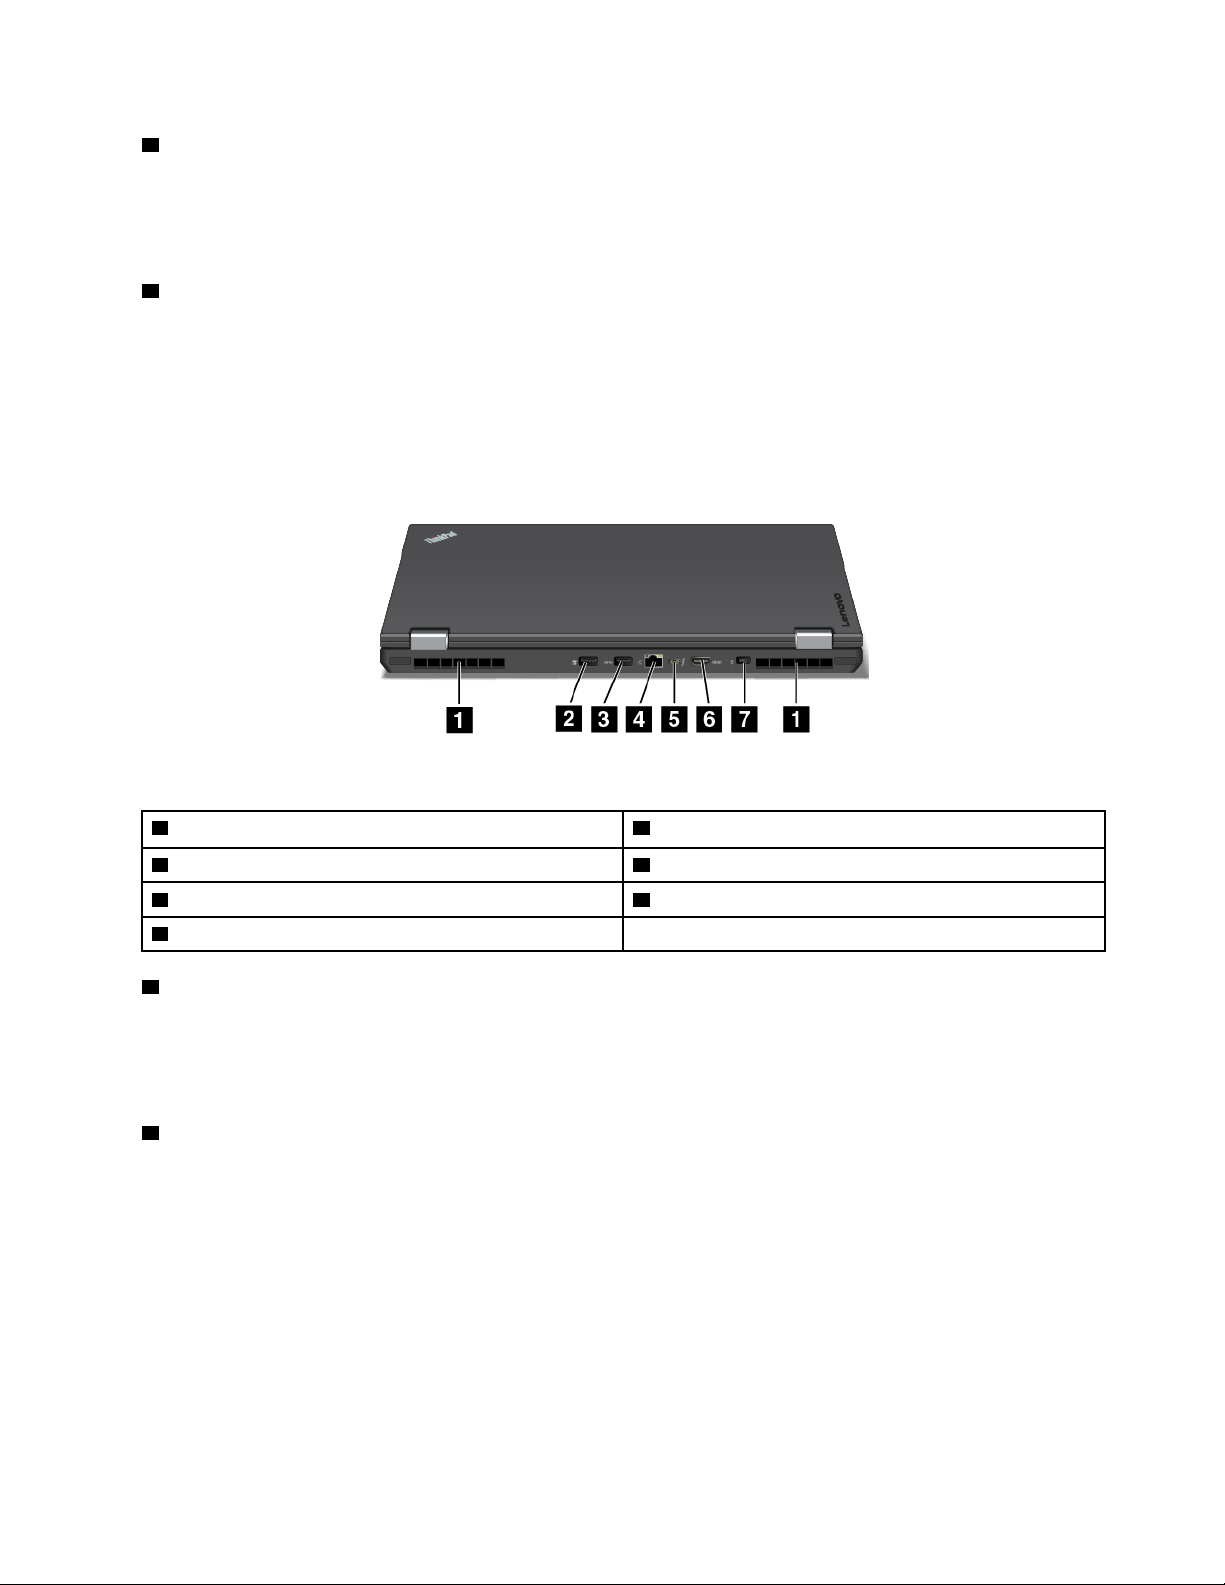
Rear view
Figure 4. Bottom view
1 Fan louvers
3 USB 3.0 connector
5 Thunderbolt™ 3 connector 6 HDMI connector
7 Power connector
1 Fan louvers
2 Always On USB 3.0 connector
4 Ethernet connector
The fan louvers and internal fan enable air to circulate in the computer, which in turn ensure proper cooling,
especially the cooling of the microprocessor.
Note: To ensure proper airflow, do not place any obstacles in front of the fan louvers.
2 Always On USB connector
By default, the Always On USB connector enables you to charge some mobile digital devices and
smartphones in the following situations:
• When your computer is on or in sleep mode
• When your computer is in hibernation mode or is turned off, but connected to ac power
If you want to charge these devices when the computer is in hibernation mode or is turned off, and the
computer is not connected to ac power, do the following:
• For Windows 7: Start the Power Manager program, click the Global Power Settings tab, and then follow
the instructions on the screen to make your preferred setting.
Chapter 1. Product overview 5
Page 24
• For Windows 10: Start the Lenovo Companion program, click Hardware Settings ➙ Always On USB,
and then follow the instructions on the screen to make your preferred setting.
For instructions on how to start the programs, see “Accessing Lenovo programs” on page 14.
Attention: When you attach a USB cable to this connector, ensure that the USB mark is facing upward.
Otherwise the connector might get damaged.
3 USB 3.0 connector
The USB 3.0 connector is used for connecting USB-compatible devices, such as a USB keyboard, a USB
mouse, a USB storage device, or a USB printer.
Attention: When you attach a USB cable to the USB 3.0 connector, ensure that the USB mark is facing
upward. Otherwise the connector might get damaged.
4 Ethernet connector
Connect the computer to a local area network (LAN) with the Ethernet connector.
DANGER
To avoid the risk of electrical shock, do not connect the telephone cable to the Ethernet connector.
You can only connect an Ethernet cable to this connector.
The Ethernet connector has two network status indicators. When the green indicator is on, the computer is
connected to a LAN. When the yellow indicator blinks, data is being transmitted.
Note: If the computer is connected to a docking station, use the Ethernet connector on the docking station
instead of the one on the computer.
5 HDMI connector
HDMI connector is a digital audio and video interface that can connect a compatible digital audio device or
video monitor, such as a DVD player or a high-definition digital television (HDTV).
6 Thunderbolt™ 3 connector
The Thunderbolt 3 connector is compatible with USB Type_C standard. It enables you to connect your
computer to a device that is compatible with the Thunderbolt 3 interface, such as a projector, an external
monitor, or an HDTV. With the Thunderbolt 3 connector, you can transfer data and run an external display
simultaneously.
7 Power connector
Connect the ac power adapter to the power connector to provide ac power to the computer and charge the
battery.
6
P50 User Guide
Page 25
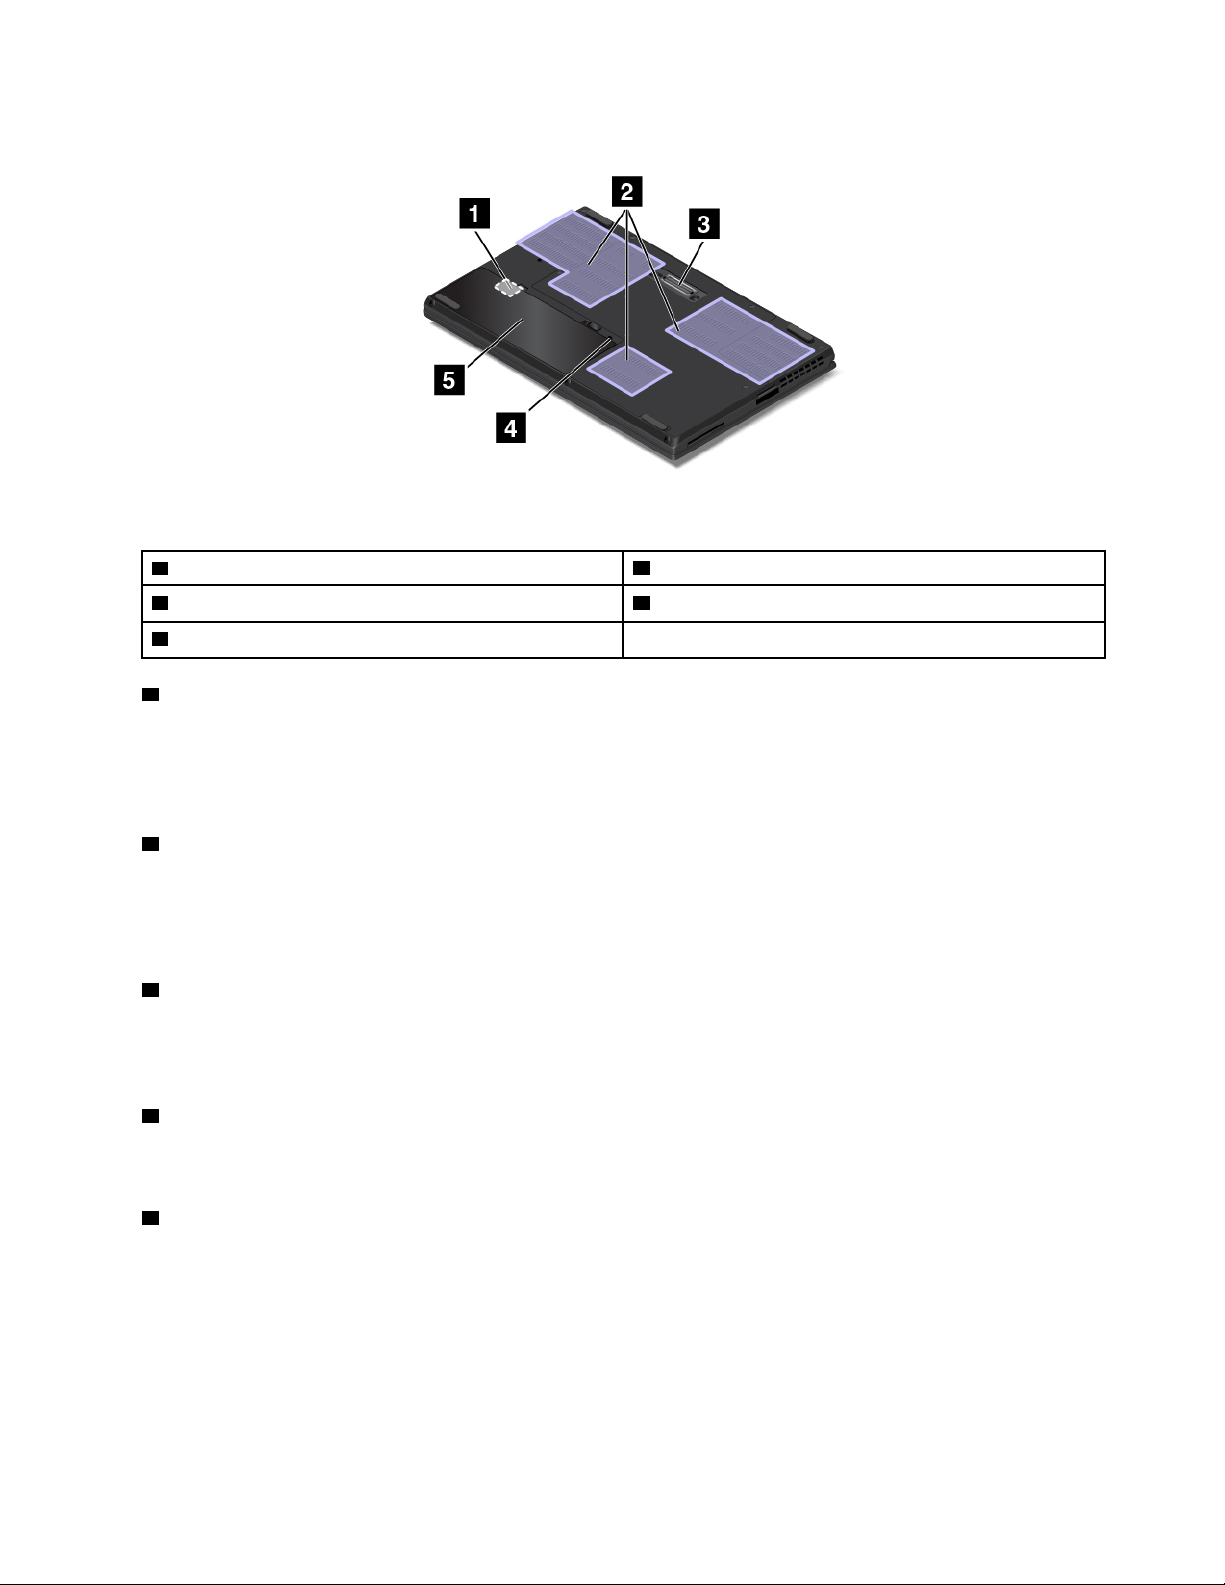
Bottom view
Figure 5. Bottom view
1 Micro-SIM-card slot
3 Docking station connector 4 Keyboard drainage hole
5 Removable battery
1 Micro-SIM-card slot
2 Fan louvers
The micro-SIM-card slot is inside the battery compartment. If the computer has a wireless Wide Area
Network (WAN) feature, a micro Subscriber Identification Module (SIM) card might be required to establish
wireless-WAN connections. For instructions about replacing or installing the micro SIM card, see “Installing
or replacing the micro SIM card” on page 115.
2 Fan louvers
The fan louvers and internal fan enable air to circulate in the computer, which in turn ensure proper cooling,
especially the cooling of the microprocessor.
Note: To ensure proper airflow, do not place any obstacles in front of the fan louvers.
3 Docking station connector
You can use the connector to connect the computer to a supported docking station to extend the computer
capabilities when you are at the office or at home. For more information about the supported docking
stations, see “ThinkPad Workstation Dock” on page 45.
4 Keyboard drainage hole
The keyboard drainage hole can help drain out liquid from your computer if you accidentally spill water or
drink over the keyboard.
5 Removable battery
Use the computer with the battery power whenever ac power is unavailable.
Status indicators
This topic helps you locate and identify the various status indicators on your computer.
Note: Your computer might have slight variations from the following illustrations.
Chapter 1. Product overview 7
Page 26
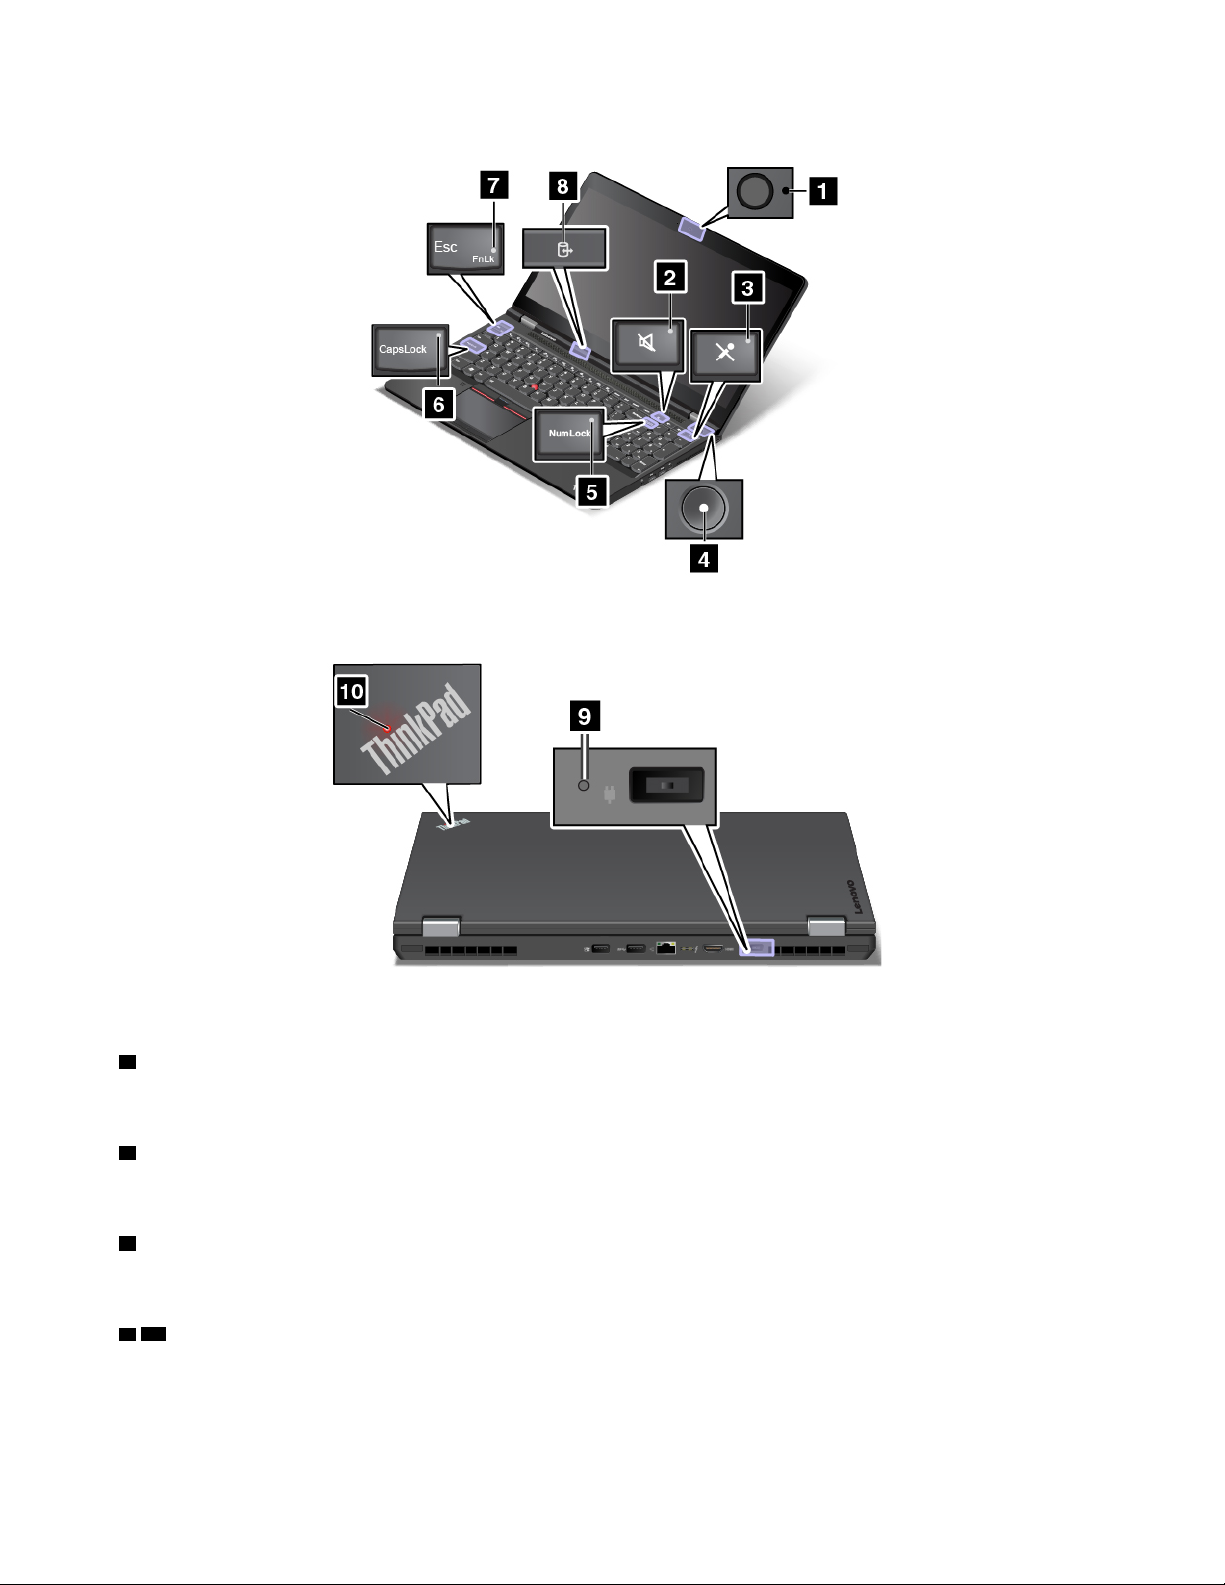
1 Camera-status indicator
When the camera-status indicator is on, the camera is in use.
2 Speaker-mute indicator
When the speaker-mute indicator is on, the speakers are muted.
3 Microphone-mute indicator
When the microphone-mute indicator is on, the microphones are muted.
4 10 System-status indicators
The indicator in the ThinkPad logo and the indicator in the center of the power button show the system status
of the computer.
• Blinks for three times: The computer is initially connected to power.
8
P50 User Guide
Page 27

• On: The computer is on (in normal mode).
• Blinks fast: The computer is entering sleep or hibernation mode.
• Blinks slowly: The computer is in sleep mode.
• Off: The computer is off or in hibernation mode.
Note: If your computer supports color sensor, the indicator in the ThinkPad logo
10 can also be used as a
color-sensor indicator. When the color sensor is in use, the indicator blinks twice at regular intervals.
5 Numeric Lock indicator
When the indicator is on, you can use the numeric keypad to input numbers.
6 Caps Lock indicator
When the indicator is on, it indicates that Caps Lock mode is enabled. You can type all alphabetic characters
(A-Z) in upper case directly.
7 Fn Lock indicator
The Fn Lock indicator shows the status of Fn Lock function. For more information, see “Special keys” on
page 22.
8 Device-access-status indicator
When the device-access-status indicator is blinking, the storage device of your computer is reading or
writing data. During this period, do not put the computer into sleep mode, remove the storage device, or turn
off the computer.
9 ac power-status indicator
The ac power-status indicator shows the ac power charging status of the computer.
• Green: Connected to ac power (charging 80%–100%)
• Amber: Connected to ac power (charging 1%–80%)
• Off: Not connected to ac power (no charging)
Important product information labels
This section provides information to help you locate the following labels:
• Machine type and model label
• FCC ID and IC Certification label
• Labels for the Windows operating systems
Machine type and model information
The machine type and model label identifies your computer. When you contact Lenovo for help, the machine
type and model information helps support technicians to identify your computer and provide faster service.
Depending on the computer model, the machine type and model label might be located on the computer
cover, under the battery, or on the power adapter. The following illustration on the left shows the location of
the machine type and model of your computer.
Chapter 1. Product overview 9
Page 28

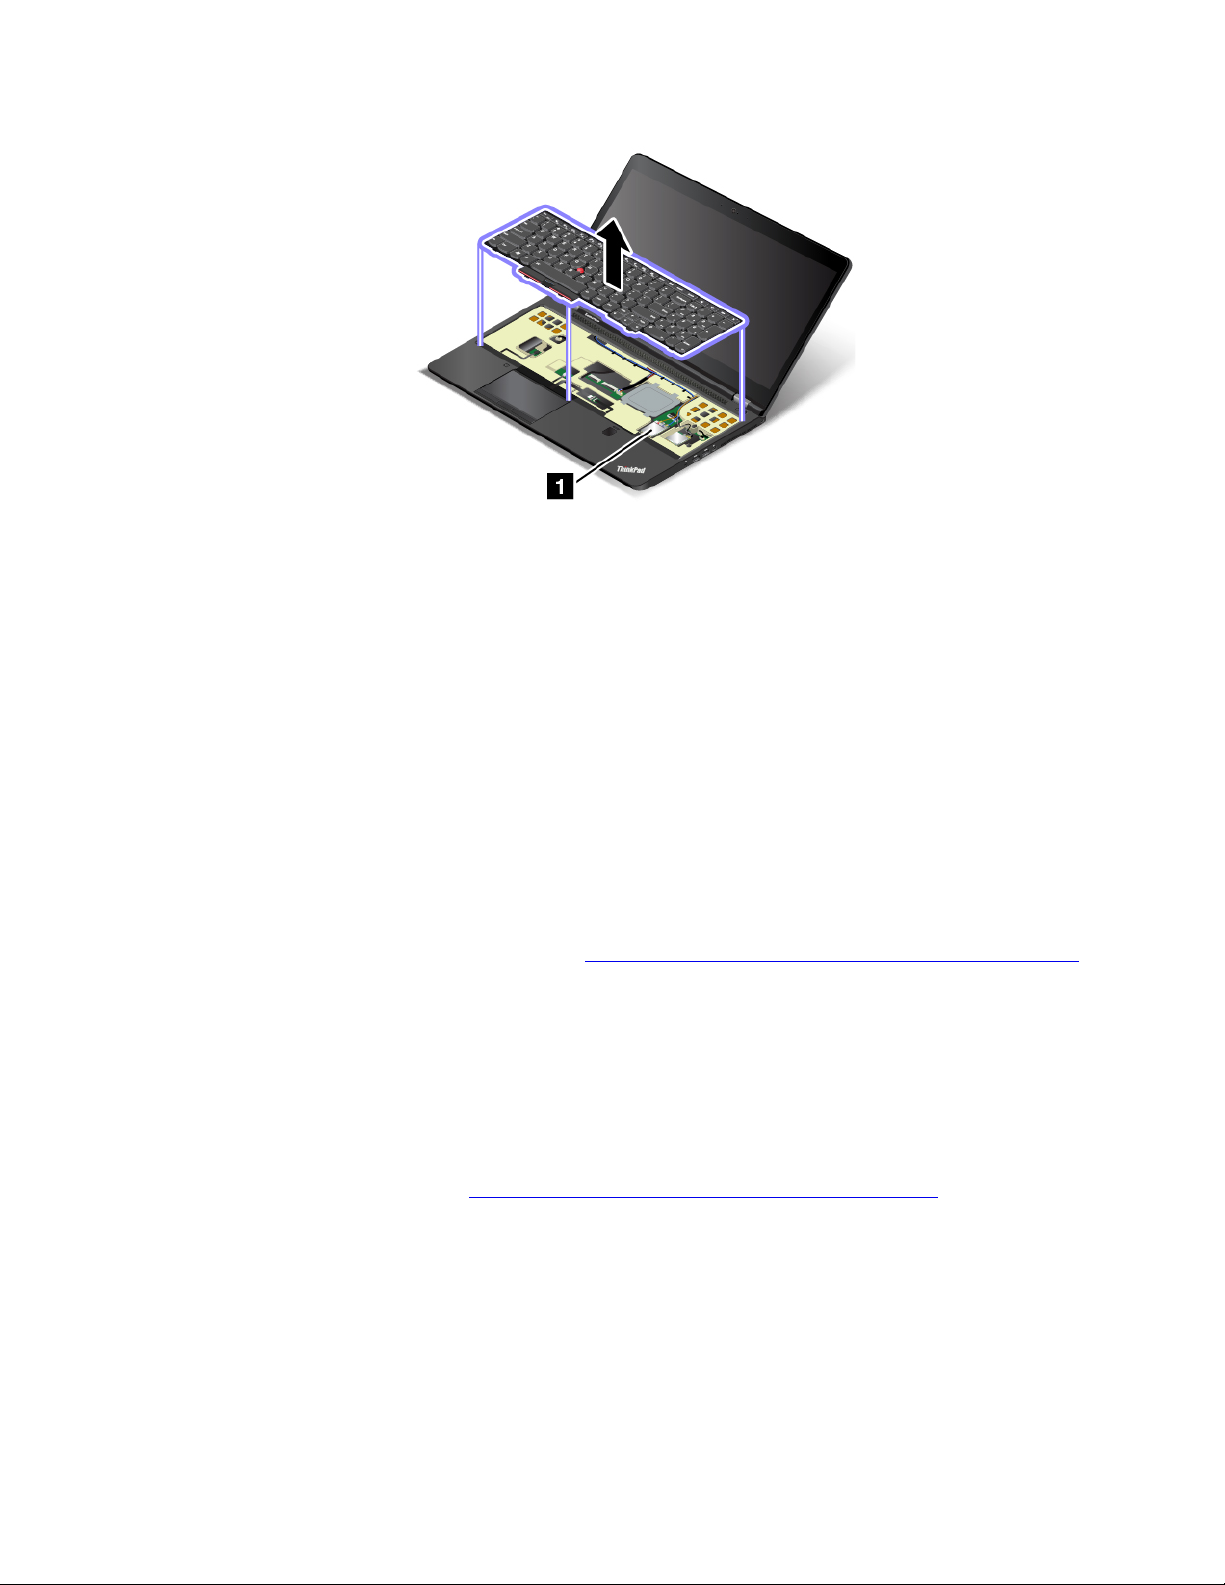
FCC ID and IC Certification information
The FCC and IC Certification information is identified by a label located on the computer as shown in the
following figure.
The content of this label differs depending on the wireless modules that come with your computer:
• For a preinstalled wireless module, this label identifies the actual FCC ID and IC certification number for
the wireless module installed by Lenovo.
Note: Do not remove or replace a preinstalled wireless module by yourself. For module replacement, you
must contact Lenovo service first. Lenovo is not responsible for any damage caused by unauthorized
replacement.
• For a user-replaceable wireless WAN module, this label directs you to consult this user guide for the
actual FCC ID and IC certification number.
The FCC ID and IC Certification number label for the user-replaceable wireless WAN module is affixed to
the wireless WAN module
10
P50 User Guide
1 (available on some models) installed in your computer.
Page 29
Note: For the user-replaceable wireless module, ensure that you use only Lenovo-authorized wireless
modules for the computer. Otherwise, an error message will be displayed and the computer will beep
when you turn on the computer.
Labels for the Windows operating systems
Windows 7 Certificate of Authenticity: Computer models preinstalled with the Windows 7 operating
system have a Certificate of Authenticity label affixed to the computer cover or inside the battery
compartment. The Certificate of Authenticity is your indication that the computer is licensed for a Windows 7
product and is preinstalled with a Windows 7 genuine version. In some cases, an earlier Windows version
might be preinstalled under the terms of the Windows 7 Professional license downgrade rights. Printed on
the Certificate of Authenticity is the Windows 7 version for which the computer is licensed and the Product
ID. The Product ID is important in case you need to reinstall the Windows 7 operating system from a source
other than a Lenovo product recovery disc set.
Windows 10 Genuine Microsoft label: Depending on your geographic location, the date when your
computer was manufactured, and the version of Windows 10 that is preinstalled, your computer might have
a Genuine Microsoft label affixed to its cover. See
for illustrations of the various types of Genuine Microsoft labels.
• In the People’s Republic of China, the Genuine Microsoft label is required on all computer models
preinstalled with any version of Windows 10.
• In other countries and regions, the Genuine Microsoft label is required only on computer models licensed
for Windows 10 Pro.
http://www.microsoft.com/en-us/howtotell/Hardware.aspx
The absence of a Genuine Microsoft label does not indicate that the preinstalled Windows version is not
genuine. For details on how to tell whether your preinstalled Windows product is genuine, refer to the
information provided by Microsoft at
Unlike Windows 7 products, there are no external, visual indicators of the Product ID or Windows version for
which the computer is licensed. Instead, the Product ID is recorded in the computer firmware. Whenever a
Windows 10 product is installed, the installation program checks the computer firmware for a valid, matching
Product ID to complete the activation.
In some cases, an earlier Windows version might be preinstalled under the terms of the Windows 10 Pro
license downgrade rights.
http://www.microsoft.com/en-us/howtotell/default.aspx.
Chapter 1. Product overview 11
Page 30

Features
The computer features introduced in this section cover various models. For your specific model, some
features might vary or not apply.
Microprocessor
• To view the microprocessor information of your computer, do the following:
– For Windows 7: Open the Start menu, right-click Computer, and then click Properties.
– For Windows 10: Do either of the following:
– Open the Start menu and click Settings. If Settings is not displayed, click All apps to display all
programs, and then click Settings ➙ System ➙ About.
– Right-click the Start button
Memory
• Double data rate 4 (DDR4) small outline dual in-line memory modules (SODIMM)
• Error check and correct (ECC) memory module (available on some models)
Storage device
Depending on the model:
• 2.5-inch form factor, 7-mm (0.28-inch) height Serial ATA (SATA) hard disk drive
• M.2 form factor, Peripheral Component Interconnection Express (PCIe) or SATA solid-state drive
Display
• Brightness control
• Color display with the thin-film transistor (TFT) technology
• Display size: 396.2 mm (15.6 inches)
• Display resolution: 1920 x 1080 pixels or 3840 x 2160 pixels, depending on the model
• Multi-touch technology (available on some models)
Keyboard
• Six-row keyboard (with backlight function available on some models)
• Function keys
• Numeric keypad
• ThinkPad pointing device
and then select System.
Connectors and slots
• ac power connector
• Always On USB 3.0 connector
• Audio connector
• Docking station connector (available on some models)
• ExpressCard slot
• HDMI connector
• Micro-SIM-card slot (inside the battery compartment)
12
P50 User Guide
Page 31

• Mini DisplayPort connector
• RJ45 Ethernet connector
• Smart-card slot(available on some models)
• Media-card slot
• Thunderbolt 3 connector
• Two USB 3.0 connectors
GPS and integrated wireless features
• Global Positioning System (GPS) satellite receiver (available on models with wireless WAN)
• Bluetooth
• Wireless LAN
• Wireless WAN (available on some models)
Security features
• Fingerprint reader
• Security-lock slot
• Trusted Platform Module (TPM) (available on some models)
Others
• Camera (available on some models)
• Color sensor (available on some models)
• Microphones (available on some models)
Specifications
Size
• Width: 377.4 mm (14.86 inches)
• Depth: 252.3 mm (9.93 inches)
• Height:
– Touch models: from 25.9 mm (1.02 inches) to 34.1 mm (1.34 inches)
– Non-touch models: from 24.5 mm (0.96 inch) to 32.7 mm (1.29 inches)
Heat output
• 135 W (460 Btu/hr) maximum
• 170 W (580 Btu/hr) maximum
Power source (ac power adapter)
• Sine-wave input at 50 to 60 Hz
• Input rating of the ac power adapter: 100 to 240 V ac, 50 to 60 Hz
Chapter 1. Product overview 13
Page 32

Operating environment
Maximum altitude (without pressurization)
• 3048 m (10 000 ft)
Temperature
• At altitudes up to 2438 m (8000 ft)
– Operating: 5°C to 35°C (41°F to 95°F)
– Storage: 5°C to 43°C (41°F to 109°F)
• At altitudes above 2438 m (8000 ft)
– Maximum temperature when operating under the unpressurized condition: 31.3°C (88°F)
Note: When you charge the battery, its temperature must be at least 10°C (50°F).
Relative humidity
• Operating: 8% to 95% at wet-bulb temperature 23°C (73°F)
• Storage: 5% to 95% at wet-bulb temperature 27°C (81°F)
If possible, place your computer in a well-ventilated and dry area without direct exposure to sunshine.
Attention:
• Keep electrical appliances such as electric fans, radio, air conditioners, and microwave ovens away from
the computer. The strong magnetic fields generated by these appliances can damage the monitor and
data on the internal storage drive.
• Do not place any beverages on top of or beside the computer or other attached devices. If liquid is spilled
on or in the computer or an attached device, a short circuit or other damage might occur.
• Do not eat or smoke over your keyboard. Particles that fall into your keyboard can cause damage.
Lenovo programs
Your computer comes with Lenovo programs to help you work easily and securely.
Accessing Lenovo programs
To access Lenovo programs on your computer, do the following:
1. Open the Start menu and locate a program by the program name.
2. If the program is not displayed on the Start menu on Windows 7, click All programs to display all
programs.
3. If you still do not find the program in the program list, search for the program in the search box.
Note: If you are using the Windows 7 operating system, some Lenovo programs are ready to be installed.
You cannot find these programs through the above methods unless you have installed them first. To install
these Lenovo programs, start the Lenovo PC Experience program, click Lenovo Tools, and then follow the
instructions on the screen.
14
P50 User Guide
Page 33

An introduction to Lenovo programs
This topic provides a brief introduction to Lenovo programs. Depending on your computer model, some of
the programs might not be available.
The available programs are subject to change without notice. To learn more about the programs and other
computing solutions offered by Lenovo, go to:
http://www.lenovo.com/support
Access Connections™
(Windows 7)
Active Protection System™
(Windows 7 and Windows 10)
Auto Scroll Utility
(Windows 7)
Communications Utility
(Windows 7)
The Access Connections program is a connectivity assistant program for
creating and managing location profiles. Each location profile stores all the
network and Internet configuration settings needed for connecting to a network
infrastructure from a specific location such as a home or an office.
By switching between location profiles as you move your computer from place
to place, you can quickly and easily connect to a network with no need to
manually reconfigure your settings and restart the computer each time.
The Active Protection System program protects your internal storage device
(such as hard disk drive) when the shock sensor inside your computer detects a
condition that could damage the drive, such as system tilt, excessive vibration,
or shock.
The internal storage device is less vulnerable to damage when it is not operating.
This is because when the internal storage device is not operating, the system
stops it from spinning, and might also move the read and write heads of the
drive to areas that do not contain data.
As soon as the shock sensor senses that the environment is stable again
(minimal change in system tilt, vibration, or shock), it turns on the internal
storage device.
This program enhances your experience with window operation. The window
position of a foreground application is automatically adjusted. The scroll bar on a
user interface is also automatically adjusted.
The Communications Utility program enables you to configure settings for the
integrated camera and audio devices.
Hotkey Features Integration
(Windows 7 and Windows 10)
Hotkey Features Integration is a utility package that enables you to select and
install utility programs specifically for the special keys and buttons on your
computer. The special keys and buttons are designed to meet accessibility and
usability requirements. Installing related utility programs enables full functionality
of the special keys and buttons.
Chapter 1. Product overview 15
Page 34

Lenovo Companion
(Windows 10)
Your computer’s best features and capabilities should be easy to access and
understand. With Lenovo Companion, they are.
Use Lenovo Companion to do the following:
• Optimize your computer performance, monitor your computer health, and
manage updates.
• Access your user guide, check warranty status, and view accessories
customized for your computer.
• Read how-to articles, explore Lenovo forums, and stay up-to-date on
technology news with articles and blogs from trusted sources.
• Configure hardware settings.
• Create and manage your Lenovo ID.
This app is filled with exclusive Lenovo content to help you learn more about
what you can do with your Lenovo computer.
Lenovo PC Experience
(Windows 7 and Windows 10)
Lenovo Touch Fingerprint
Software
(Windows 7)
Lenovo Solution Center
(Windows 7 and Windows 10)
Mobile Broadband Connect
(Windows 7 and Windows 10)
Message Center Plus
(Windows 7)
Password Manager
(Windows 7)
The Lenovo PC Experience program helps you work more easily and securely by
providing easy access to various programs, such as Active Protection System
and Lenovo Solution Center.
Note: On the Windows 10 operating system, this program cannot be found
from the all program list or search box. To access this program, go to Control
Panel. View Control Panel by Category, click Hardware and Sound ➙ Devices
and Printers, and then double-click the device with your computer name.
If your computer comes with a fingerprint reader, the fingerprint program
enables you to enroll your fingerprint and associate it with your passwords. As a
result, fingerprint authentication can replace your passwords and enable simple
and secure user access.
The Lenovo Solution Center program enables you to troubleshoot and resolve
computer problems. It combines diagnostic tests, system information collection,
security status, and support information, along with hints and tips for optimal
system performance.
The Mobile Broadband Connect program enables you to connect the computer
to the mobile broadband network through a supported wireless WAN card.
The Message Center Plus program automatically displays messages to inform
you about important notices from Lenovo, such as alerts on system updates and
alerts on conditions that require your attention.
The Password Manager program automatically captures and fills in
authentication information for Windows programs and Web sites.
Power Manager
(Windows 7)
Recovery Media
(Windows 7 and Windows 10)
16 P50 User Guide
The Power Manager program provides convenient, flexible, and complete power
management for the computer. It enables you to adjust your computer power
settings to achieve the best balance between performance and power saving.
The Recovery Media program enables you to restore the contents of the hard
disk drive to the factory default settings.
Page 35

Rescue and Recovery
(Windows 7)
®
The Rescue and Recovery program is a one-button recovery and restore
solution. It includes a set of self-recovery tools to help you diagnose computer
problems, get help, and recover from system crashes, even if you cannot start
the Windows operating system.
System Update
(Windows 7)
The System Update program enables you to keep the software on the computer
up-to-date by downloading and installing software packages, including device
drivers, Unified Extensible Firmware Interface (UEFI) basic input/output system
(BIOS) updates, and other third-party programs.
Chapter 1. Product overview 17
Page 36

18 P50 User Guide
Page 37

Chapter 2. Using your computer
This chapter provides information to help you use the various features provided by your computer.
Registering your computer
When you register your computer, information is entered into a database, which enables Lenovo to contact
you if there is a recall or other severe problem. In addition, some locations offer extended privileges and
services to registered users.
When you register your computer with Lenovo, you also will receive the following benefits:
• Quicker service when you call Lenovo for help
• Automatic notification of free software and special promotional offers
To register your computer with Lenovo, go to
the screen.
If you are using a Windows 7 operating system, you also can register your computer through the preinstalled
Lenovo Product Registration program. The program starts automatically after you have used your computer
for a period of time. Follow the instructions on the screen to register your computer.
http://www.lenovo.com/register and follow the instructions on
Frequently asked questions
This topic provides a few tips that will help you optimize the use of your ThinkPad notebook computer.
To ensure that you receive the best performance from your computer, browse the following Web page to find
information such as aids for troubleshooting and answers to frequently asked questions:
http://www.lenovo.com/support/faq
Can I get my user guide in another language?
To download the user guide in another language, go to
instructions on the screen.
How to turn off my computer?
• For Windows 7: Open the Start menu and click Shut down.
• For Windows 10: Open the Start menu, click
How do I access Control Panel?
• For Windows 7: Open the Start menu and click Control Panel.
• For Windows 10: Right-click the Start button and click Control Panel.
http://www.lenovo.com/support. Then follow the
Power, and then click Shut down.
How do I use battery power more effectively when I am on the go?
• To conserve power, or to suspend operation without exiting programs or saving files, see “Power-saving
modes” on page 30.
• To achieve the best balance between performance and power saving, change power plan settings. See
“Managing the battery power” on page 30.
• If your computer will be turned off for an extended period of time, remove the removable battery.
© Copyright Lenovo 2015, 2017 19
Page 38

How do I securely dispose of data stored on the storage device?
• Study Chapter 5 “Security” on page 57 to find out how you can protect your computer from theft and
unauthorized use.
• Before you dispose of the data on the storage device, be sure to read the topic “Deleting data from your
storage drive” on page 63.
How do I give presentations or attach an external display?
• Ensure that you follow the procedure in the topic “Connecting an external display” on page 35.
• With the Extend desktop function, you can display output on both the computer display and the external
display. See “Choosing a display mode” on page 36.
I have been using the computer for some time already, and it is getting slower. What should I do?
• Follow the “General tips for preventing problems” on page 87.
• Diagnose problems yourself by using the preinstalled diagnostic software. See “Diagnosing problems” on
page 87.
• Check for recovery solutions in Chapter 8 “Recovery information” on page 105.
Print the following sections and keep them with your computer in case you are unable to access this
online help when necessary.
• “Installing a new operating system” on page 65
• “Computer stops responding” on page 88
• “Power problems” on page 101
Getting help about the Windows operating system
The Windows help information system provides you with detailed information about using the Windows
operating system so that you can get the most of your computer. To access the Windows help information
system, do the following:
• For Windows 7: Click the Start button to open the Start menu and click Help and Support.
• For Windows 10: Click the Start button to open the Start menu, and then click Get Help. Additionally,
you can use the Cortana
®
personal assistant to search for help, apps, files, settings, and so on.
Using the multi-touch screen
This topic provides instructions on how to use the multi-touch screen that is available on some models.
Notes:
• Your computer screen might look different from the following illustrations.
• Depending on the program you use, some gestures might not be available.
The following table introduces some frequently used gestures.
20
P50 User Guide
Page 39
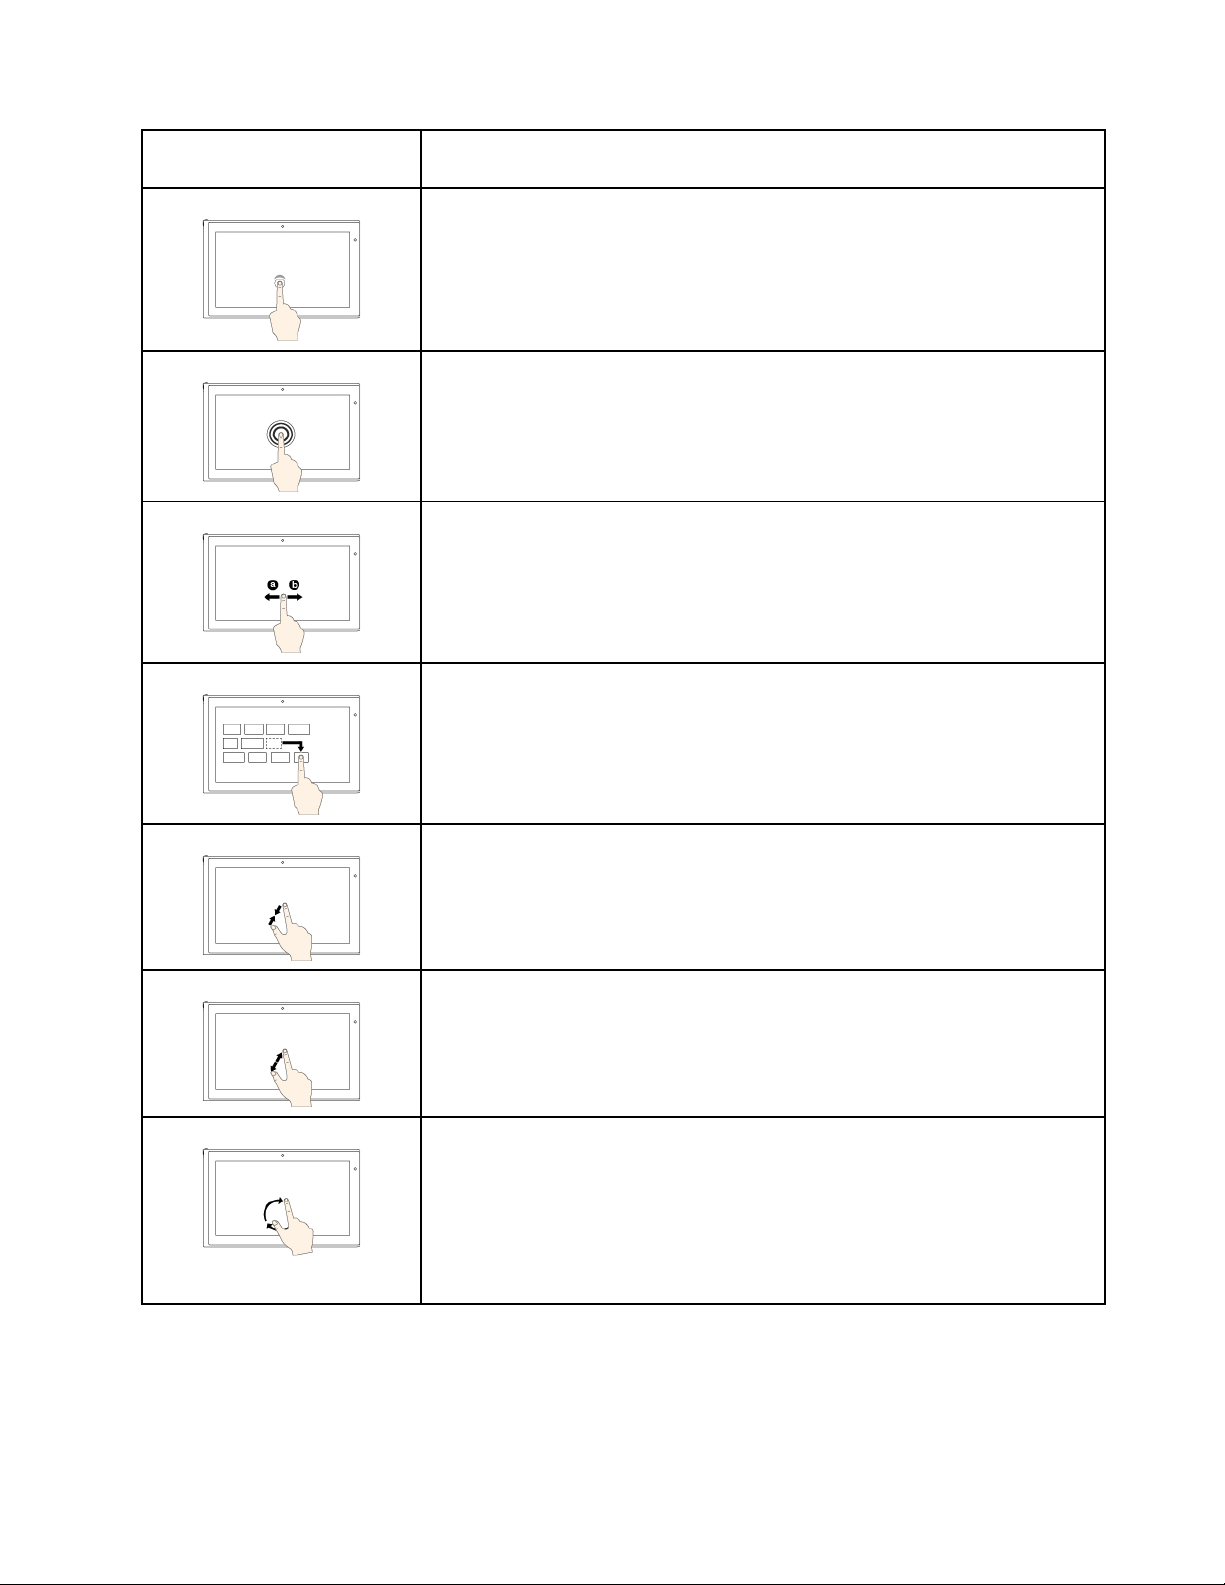
Touch gesture (touch models
only)
Description
Touch: Tap.
Mouse action: Click.
Function: Open an app or perform an action on an open app, such as Copy, Save,
and Delete, depending on the app.
Touch: Tap and hold.
Mouse action: Right-click.
Function: Open a menu with multiple options.
Touch: Slide.
Mouse action: Scroll the mouse wheel, move the scroll bar, or click the scroll
arrow.
Function: Scroll through items, such as lists, pages, and photos.
Touch: Drag an item to the location you want.
Mouse action: Click, hold, and drag an item.
Function: Move an object.
Touch: Move two fingers closer together.
Mouse action: Press the Ctrl key while scrolling the mouse wheel backward.
Function: Zoom out.
Touch: Move two fingers farther apart.
Mouse action: Press the Ctrl key while scrolling the mouse wheel forward.
Function: Zoom in.
Touch: Put two or more fingers on an item and then rotate your fingers clockwise
or counterclockwise.
Mouse action: If the app supports rotation, click the rotation icon.
Function: Rotate an item.
Note: The gesture is supported only on the Windows 7 operating system.
Chapter 2. Using your computer 21
Page 40
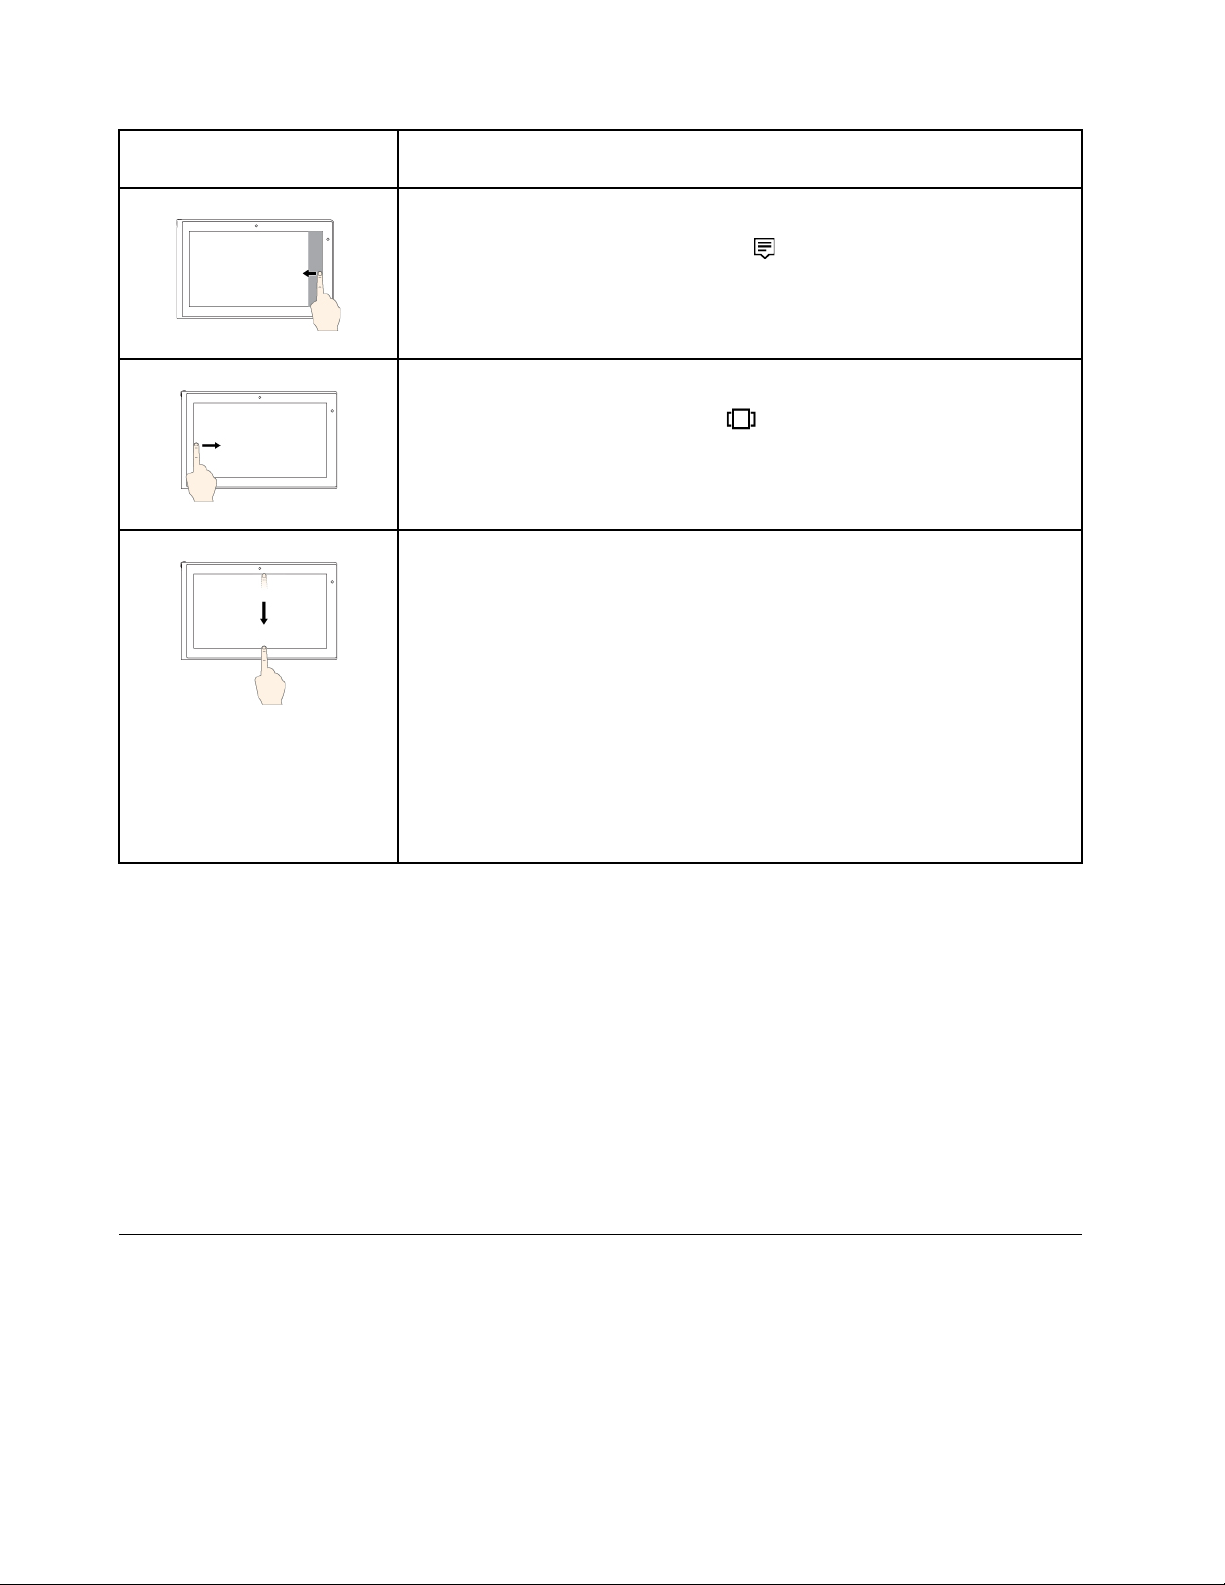
Touch gesture (touch models
only)
Description
Touch: Swipe in from the right edge.
Mouse action: Click the action center icon
Function: Open the action center to see your notifications and quick actions.
Note: The gesture is supported only on the Windows 10 operating system.
Touch: Swipe in from the left edge.
Mouse action: Click the task-view icon
Function: View all your open windows in task view.
Note: The gesture is supported only on the Windows 10 operating system.
• Short swipe for full-screened app or when your computer is in the tablet
mode
Touch: Swipe downwards shortly from the top edge.
Mouse action: Move your pointer to the top edge of the screen.
Function: Show a hidden title bar.
• Long swipe when your computer is in the tablet mode
Touch: Swipe in from the top edge to the bottom edge.
Mouse action: From the top edge of the screen, click and hold, move the
pointer to the bottom of the screen, and then release.
Function: Close the current app.
Note: The gesture is supported only on the Windows 10 operating system.
in the Windows notification area.
on the taskbar.
Tips on using the multi-touch screen
• The multi-touch screen is a glass panel covered with a plastic film. Do not apply pressure or place any
metallic object on the screen, which might damage the touch panel or cause it to malfunction.
• Do not use fingernails, gloved fingers, or inanimate objects for input on the screen.
• Regularly calibrate the accuracy of the finger input to avoid a discrepancy.
Tips on cleaning the multi-touch screen
• Turn off the computer before cleaning the multi-touch screen.
• Use a dry, soft, and lint-free cloth or a piece of absorbent cotton to remove fingerprints or dust from the
multi-touch screen. Do not apply solvents to the cloth.
• Gently wipe the screen using a top-down motion. Do not apply any pressure on the screen.
Special keys
Your computer has several special keys to help you work more easily and effectively.
Note: Your computer might look slightly different from the following illustration.
22
P50 User Guide
Page 41
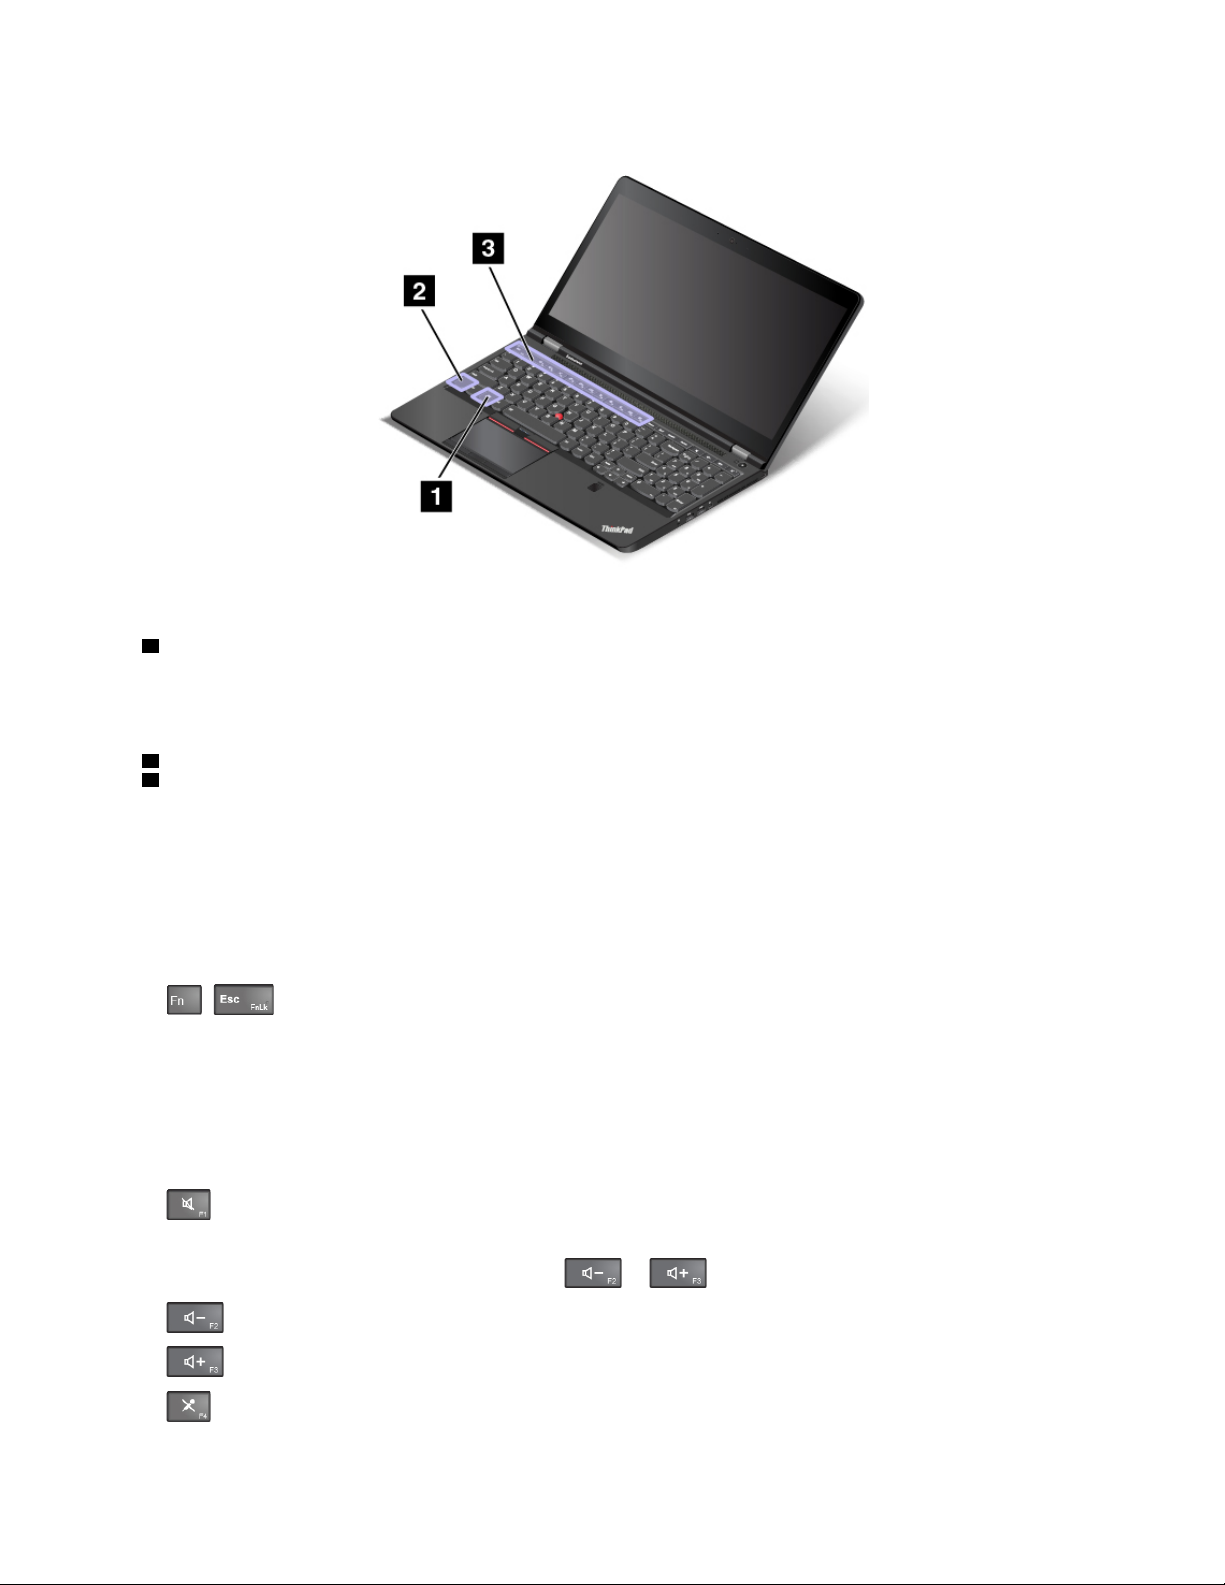
1 Windows key
Press the Windows key to open the Start menu. You also can use the Windows key together with another key
to achieve other functions. For details, refer to the help information system of the Windows operating system.
2 Fn key
3 Function keys
You can configure the Fn key and function keys in the Keyboard Properties window by doing the following:
1. Go to Control Panel, and then change the view of Control Panel from Category to Large icons or Small
icons.
2. Click Keyboard. In the displayed Keyboard Properties window, click the Fn and function keys tab.
3. Select the options of your preference.
•
+ Enables or disables the Fn Lock function.
When the Fn Lock function is enabled: The Fn Lock indicator is on. To input F1–F12, press the function
keys directly. To initiate the special function printed as an icon on each key, press the Fn key and the
corresponding function key.
When the Fn Lock function is disabled: The Fn Lock indicator is off. To initiate the special function
printed as an icon on each key, press the function key directly. To input F1–F12, press the Fn key and the
corresponding function key.
•
Mutes or unmutes the speakers. When the speakers are muted, the indicator on the key is on.
If you mute the sound and turn off your computer, the sound will remain muted when you turn on your
computer again. To turn on the sound, press
•
•
•
Decreases the speaker volume.
Increases the speaker volume.
Mutes or unmutes the microphones. When the microphones are muted, the indicator on the key is
or .
on.
Chapter 2. Using your computer 23
Page 42

• Darkens the computer display.
•
•
•
Brightens the computer display.
Manages the external displays.
Enables or disables the wireless features.
•
– Windows 7: Opens Control Panel.
– Windows 10: Opens the Settings window.
•
– Windows 7: Opens Windows Search.
– Windows 10: Opens the Cortana
•
Views all the programs that you have opened.
®
search box.
•
– Windows 7: Opens Computer.
– Windows 10: Views all the programs.
Key combinations
• Fn+Spacebar: Controls the keyboard backlight.
There are three modes for the keyboard backlight: Off, Low, and High. Press Fn+Spacebar to change the
mode of the keyboard backlight.
• Fn+4: Puts the computer into sleep mode. To return to normal operation, press the Fn key or power
button.
• Fn+End: Has the same function as the Insert key on a conventional keyboard.
• Fn+B: Has the same function as the Break key on a conventional keyboard.
• Fn+K: Has the same function as the ScrLK key on the conventional keyboard.
• Fn+P: Has the same function as the Pause key on the conventional keyboard.
• Fn+S: Has the same function as the SysRq key on the conventional keyboard.
Using the ThinkPad pointing device
This section provides information about using the ThinkPad pointing device.
Using the TrackPoint pointing device
The TrackPoint pointing device consists of the following components:
1 Pointing stick
2 Right-click button (secondary-click button)
3 Scroll bar
4 Left-click button (primary-click button)
Use the pointing stick
pointing-stick nonslip cap in any direction parallel to the keyboard. The pointer moves accordingly but the
pointing stick itself does not move. The speed at which the pointer moves depends on the amount of
pressure you apply to the pointing stick.
24
P50 User Guide
1 to move the pointer on the screen. To use the pointing stick, apply pressure to the
Page 43
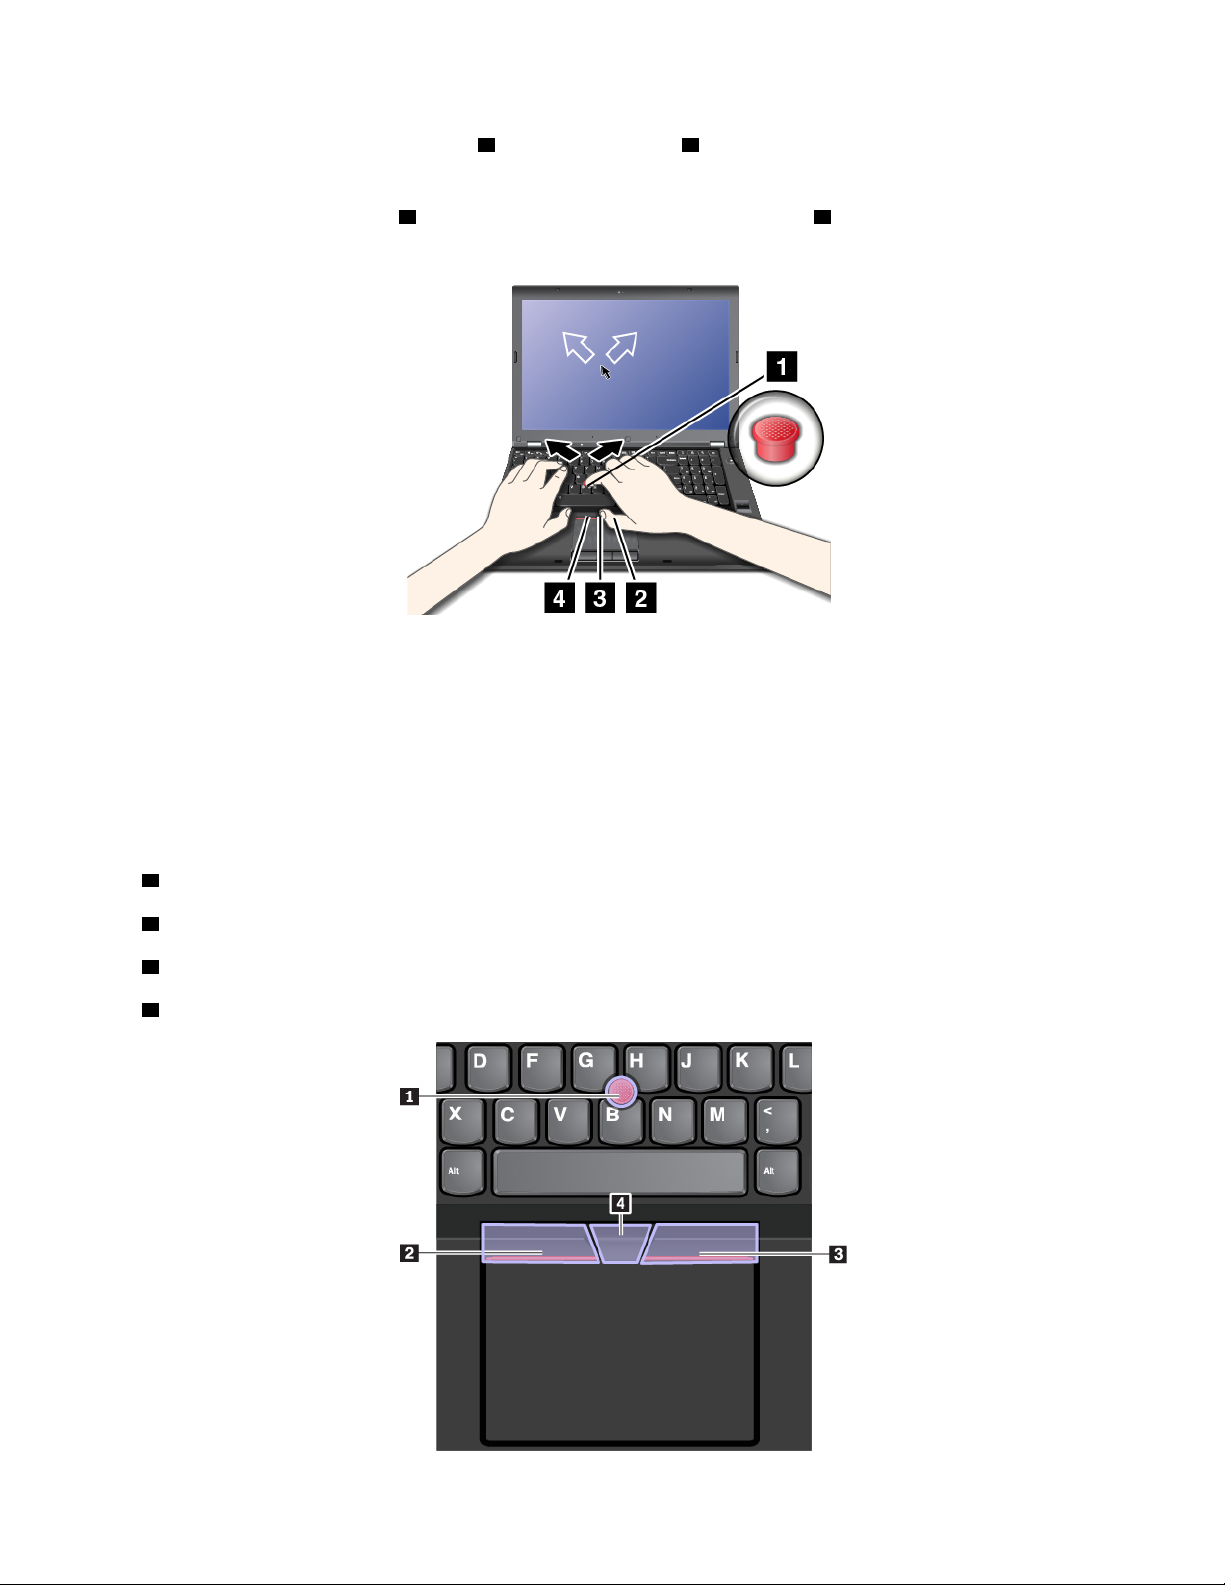
The functions of the right-click button 2 and left-click button 4 correspond to those of the right and left
mouse buttons on a conventional mouse.
Press and hold the scroll bar
3 while applying pressure to the pointing stick 1 in the vertical or horizontal
direction. Then you can scroll through the document, Web site, or programs.
Note: The pointer might drift. This is not a defect. Stop using the TrackPoint pointing stick for a few
seconds. Then the pointer stops drifting.
Using the TrackPoint pointing device
The TrackPoint pointing device enables you to perform all the functions of a traditional mouse, such as
pointing, clicking, and scrolling.
The TrackPoint pointing device consists of the following components:
1 Pointing stick
2 Left-click button (primary-click button)
3 Right-click button (secondary-click button)
4 Scroll bar
Chapter 2. Using your computer 25
Page 44
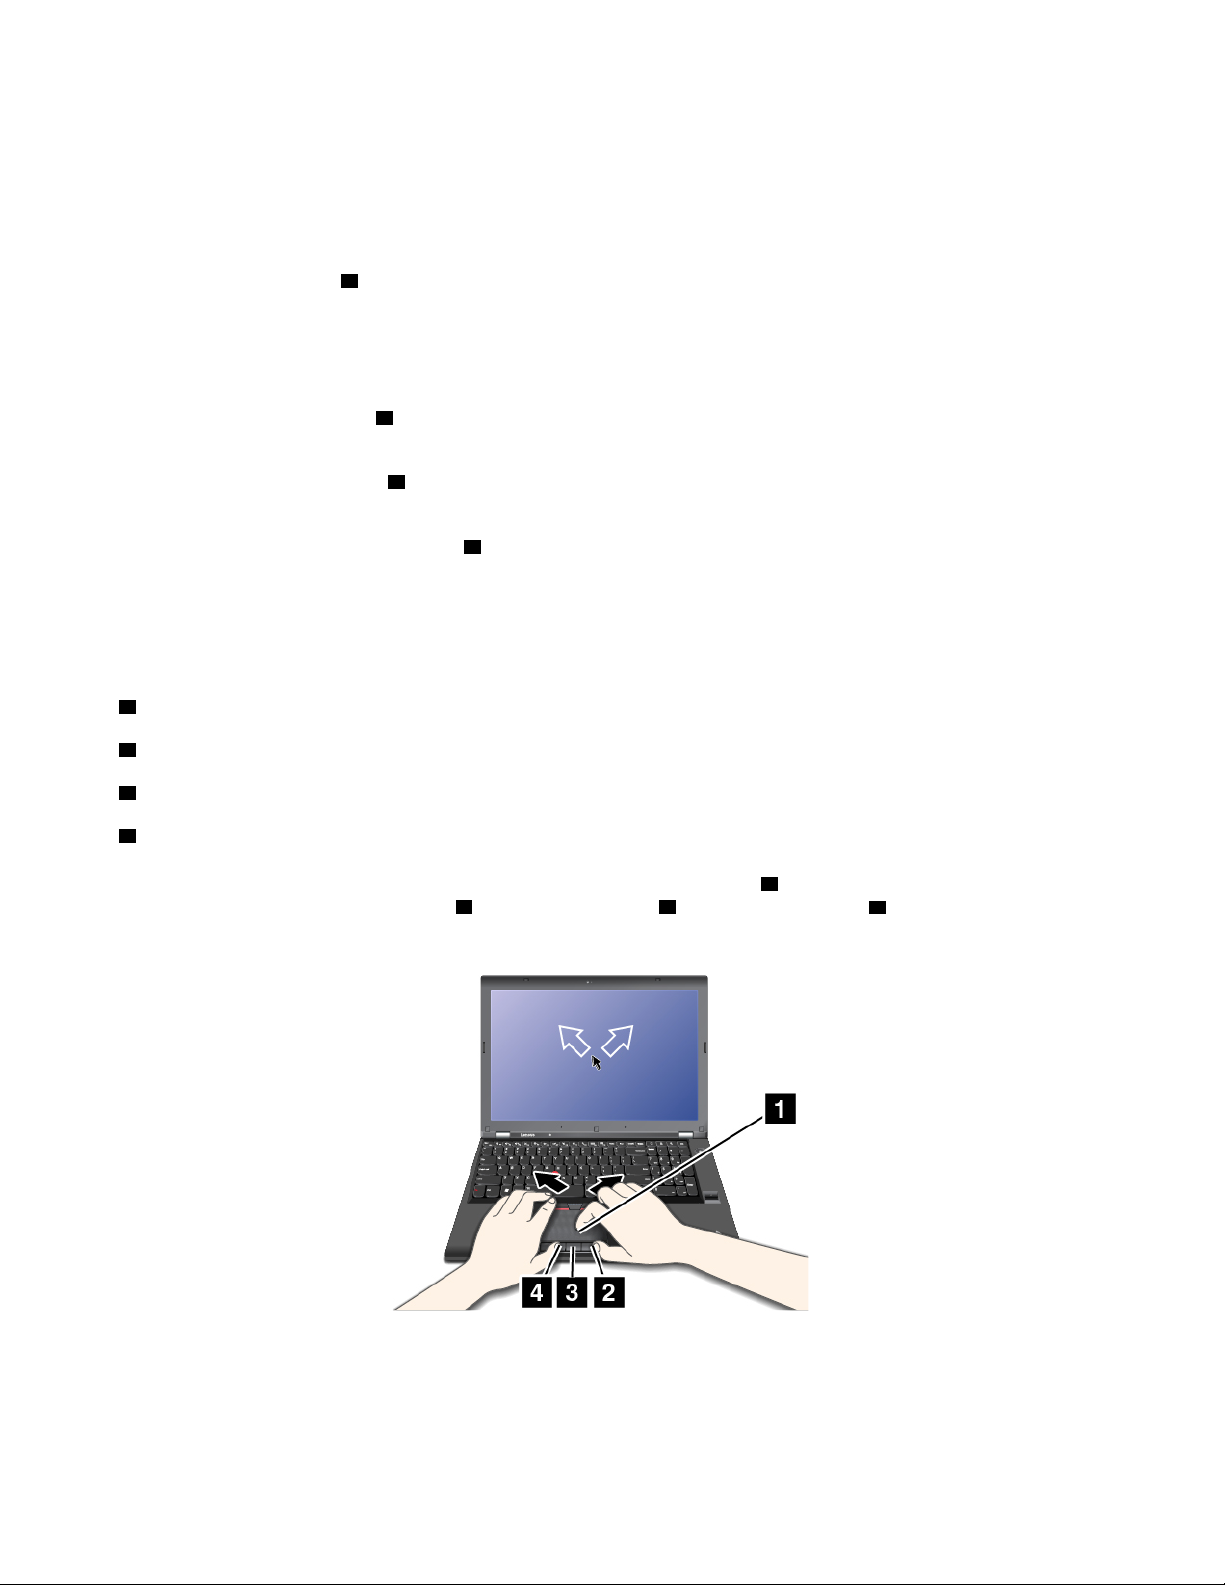
To use the TrackPoint pointing device, see the following instructions:
Note: Place your hands in the typing position and use your index finger or middle finger to apply pressure to
the pointing-stick nonslip cap. Use either thumb to press the left-click button or right-click button.
• Point
Use the pointing stick
1 to move the pointer on the screen. To use the pointing stick, apply pressure to
the pointing-stick nonslip cap in any direction parallel to the keyboard. The pointer moves accordingly but
the pointing stick itself does not move. The speed at which the pointer moves depends on the amount of
pressure you apply to the pointing stick.
• Left-click
Press the left-click button
2 to select or open an item.
• Right-click
Press the right-click button
3 to display a shortcut menu.
• Scroll
Press and hold the dotted scroll bar
4 while applying pressure to the pointing stick in the vertical or
horizontal direction. Then you can scroll through the document, Web site, or apps.
Using the trackpad with buttons
The trackpad with buttons consists of the following components:
1 Trackpad
2 Right-click button (secondary-click button)
3 Middle-click button
4 Left-click button (primary-click button)
To move the pointer on the screen, slide your fingertip over the trackpad
The functions of the right-click button
2 , middle-click button 3 , and left-click button 4 correspond to those
of the right, middle, and left mouse buttons on a conventional mouse.
1 in the corresponding direction.
If the trackpad surface is stained with oil, turn off the computer first. Then gently wipe the trackpad surface
with a soft and lint-free cloth moistened with lukewarm water or computer cleaner.
26
P50 User Guide
Page 45
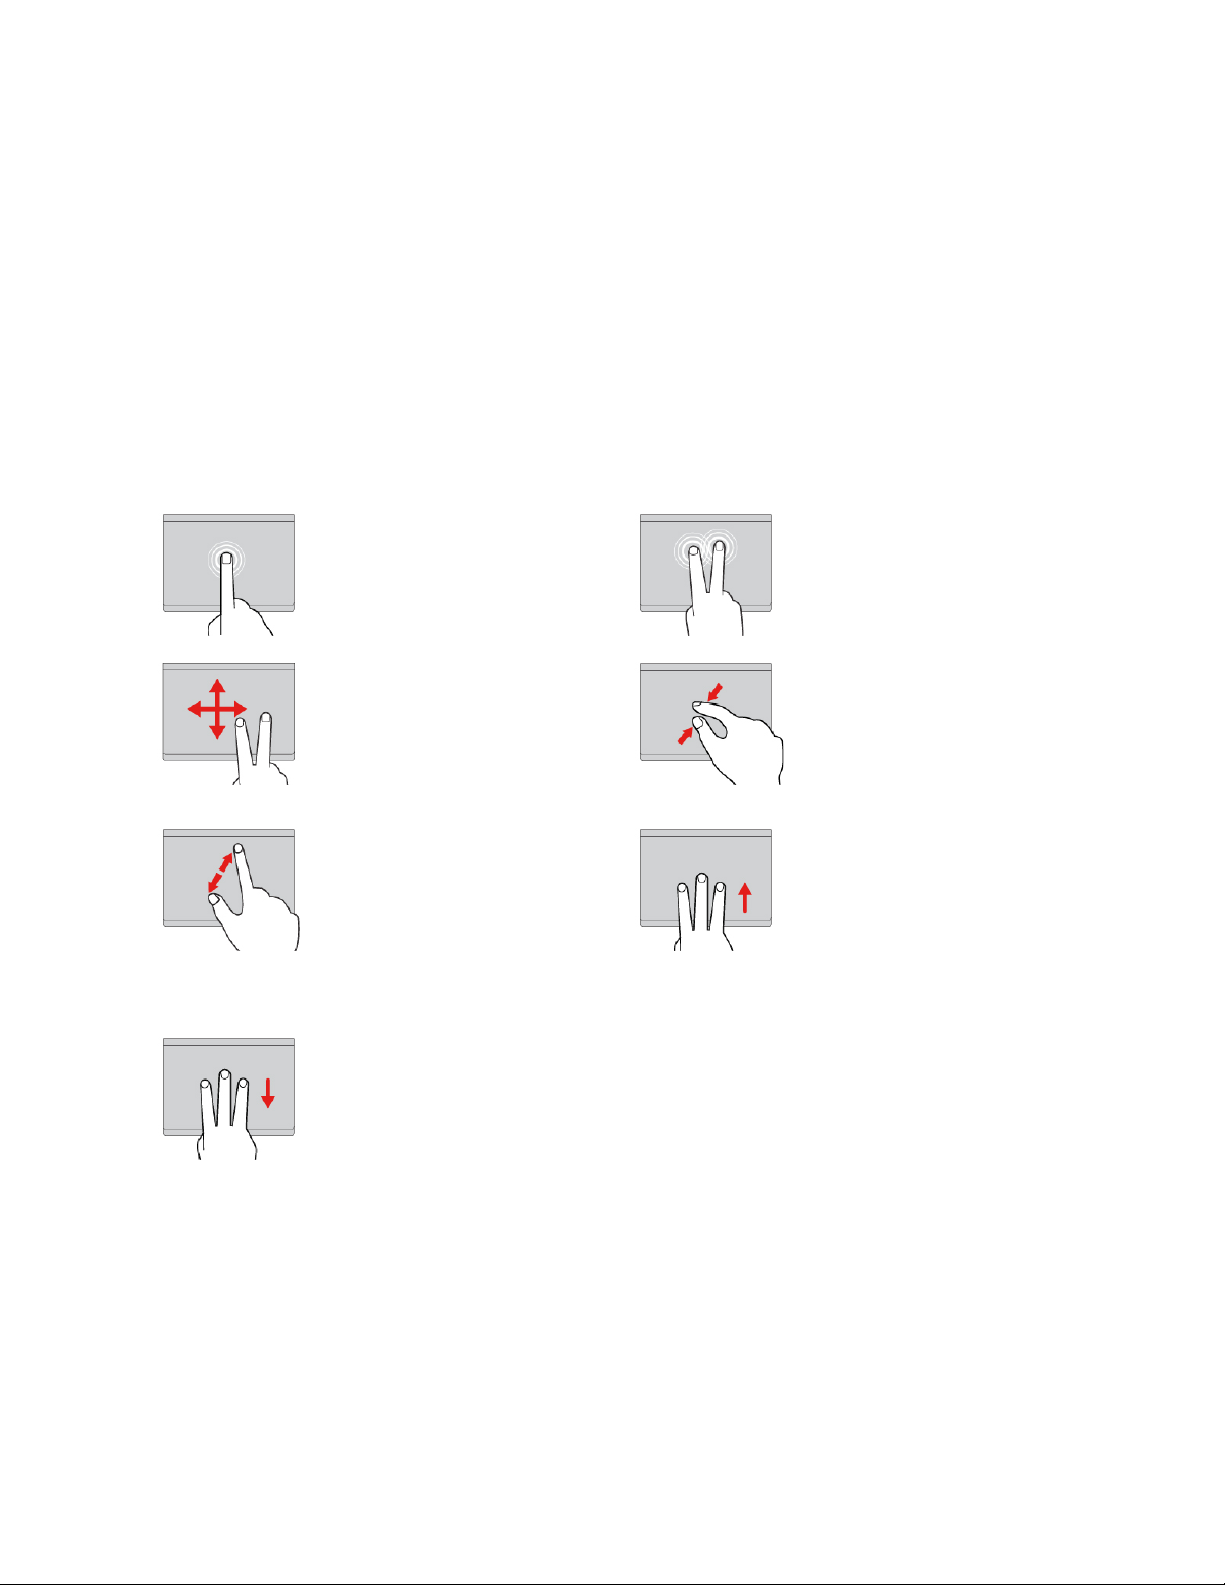
Using the trackpad touch gestures
The entire trackpad surface is sensitive to finger touch and movement. You can use the trackpad to perform
the same point and click actions as you would use a traditional mouse. You also can use the trackpad to
perform various touch gestures.
The following section introduces some frequently used touch gestures such as tapping, dragging, and
scrolling. For more gestures, see the help information system of the ThinkPad pointing device.
Notes:
• When using two or more fingers, ensure that you position your fingers slightly apart.
• Some gestures are not available if the last action was done from the TrackPoint pointing device.
• Some gestures are only available when you are using certain apps.
• Depending on the model, the trackpad on your computer might look different from the illustrations in this
topic.
Tap
Tap anywhere on the trackpad
with one finger to select or open
an item.
Two-finger scroll
Put two fingers on the trackpad
and move them in the vertical or
horizontal direction. This action
enables you to scroll through the
document, Web site, or apps.
Two-finger zoom in
Put two fingers on the trackpad
and move them farther apart to
zoom in.
Swipe three fingers down
Put three fingers on the trackpad
and move them down to show
the desktop.
Two-finger tap
Tap anywhere on the trackpad with
two fingers to display a shortcut
menu.
Two-finger zoom out
Put two fingers on the trackpad
and move them closer together to
zoom out.
Swipe three fingers up
Put three fingers on the trackpad
and move them up to open the task
view to see all your open windows.
Note: The gesture is supported
only on the Windows 10 operating
system.
Note: The gesture is supported
only on the Windows 10
operating system.
Customizing the ThinkPad pointing device
You can customize the ThinkPad pointing device so you can use it more comfortably and efficiently. For
example, you can choose to enable the TrackPoint pointing device, the trackpad, or both. You also can
disable or enable the touch gestures.
To customize the ThinkPad pointing device, do the following:
1. Go to Control Panel.
Chapter 2. Using your computer 27
Page 46
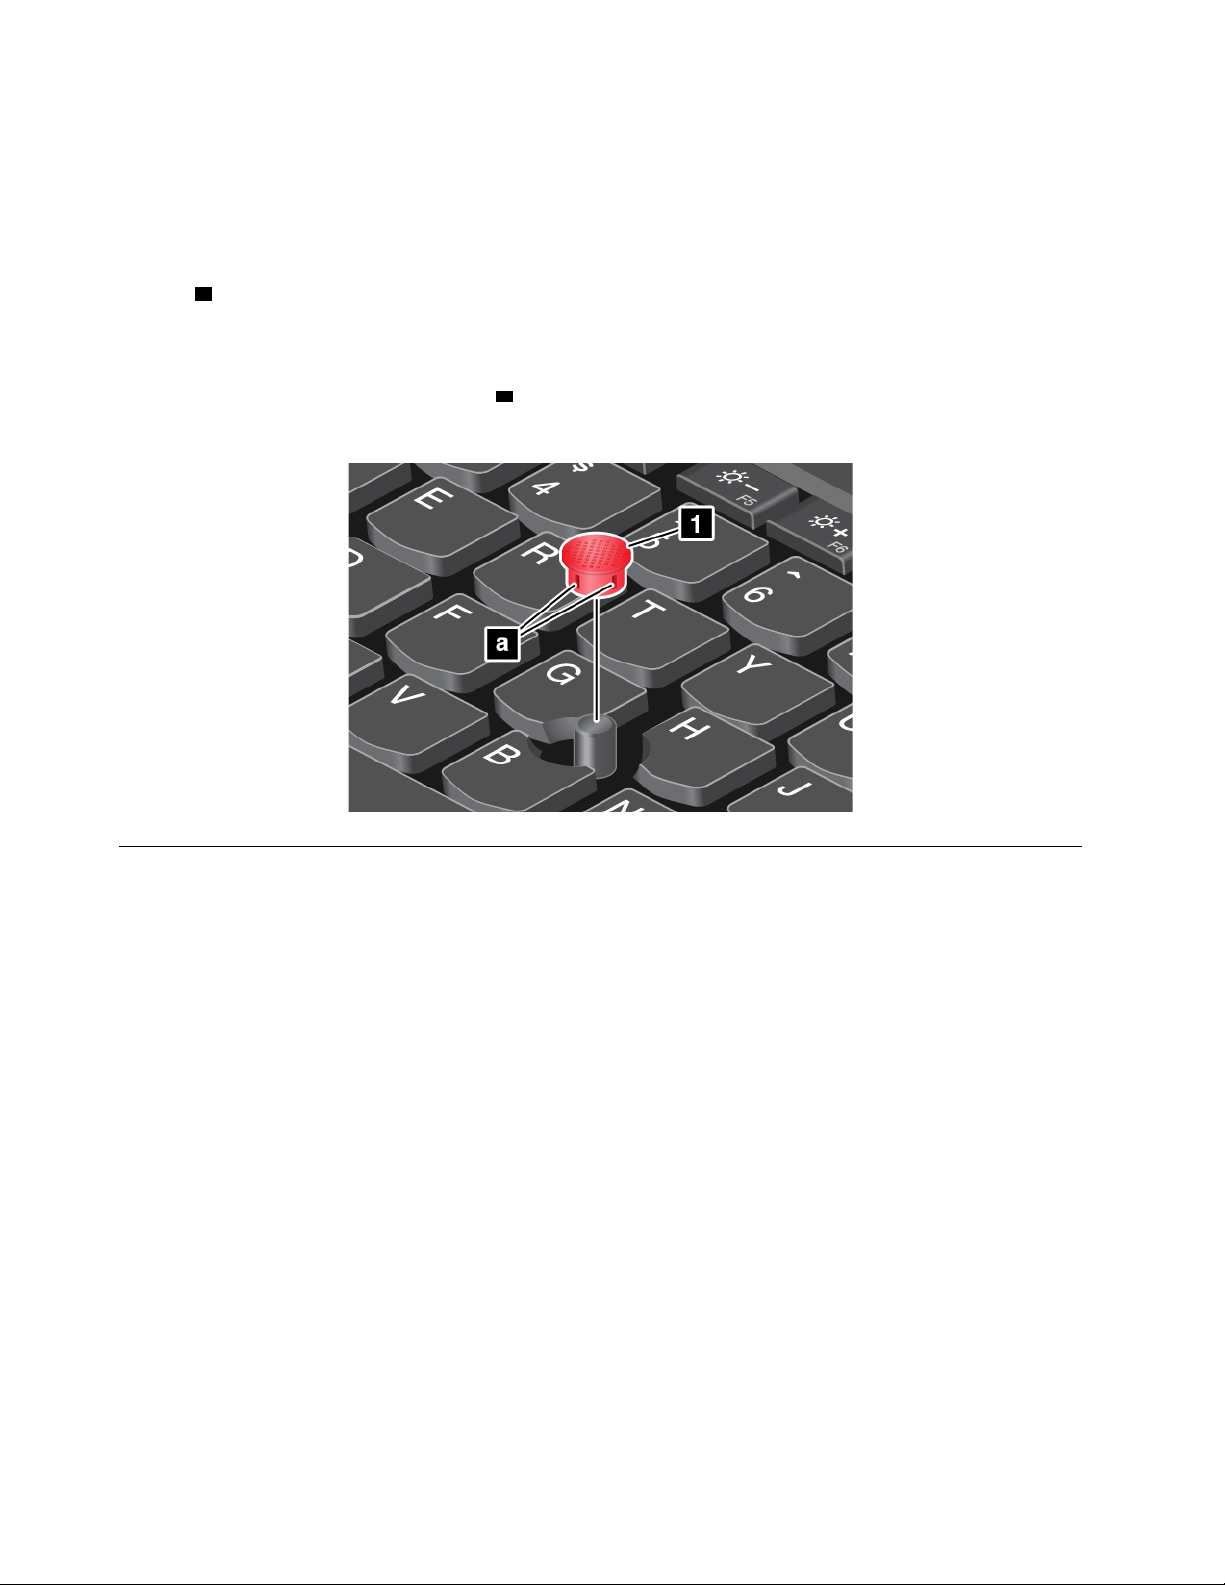
2. View Control Panel by Large icons or Small icons. Click Mouse. The Mouse Properties window is
displayed.
3. In the Mouse Properties window, follow the instructions on the screen to complete the customization.
Replacing the cap on the pointing stick
The cap 1 on the end of the pointing stick is removable. After you use the cap for a period of time, you might
consider replacing the cap with a new one.
Notes:
• Ensure that you use a cap with grooves
• Depending on the model, your keyboard might look different from the illustration in this topic.
a as shown in the following illustration.
Power management
This section provides information about how to use ac power and battery power to achieve the best balance
between performance and power management.
Using the ac power adapter
The power to run your computer can come either from the battery or from ac power. While you use ac power,
the battery charges automatically.
Your computer comes with an ac power adapter and a power cord.
• ac power adapter: Converts ac power for notebook computer use.
• Power cord: Connects the ac outlet and the ac power adapter.
Connecting the ac power adapter
To connect the computer to ac power, ensure that you follow the steps in order:
Attention: Using an improper power cord might severely damage your computer.
1. Connect the power cord to the ac power adapter.
2. Connect the ac power adapter to the power connector of the computer.
3. Connect the power cord to an electrical outlet.
28
P50 User Guide
Page 47

Tips on using the ac power adapter
• When the ac power adapter is not in use, disconnect it from the electrical outlet.
• Do not bind the power cord tightly around the ac power adapter transformer pack when it is connected to
the transformer.
Using the battery
When you use your computer away from electrical outlets, you depend on battery power to keep your
computer running. Different computer components consume power at different rates. The more you use the
power-intensive components, the faster you consume battery power.
Spend more time unplugged with ThinkPad batteries. Mobility has revolutionized business by enabling you to
take your work wherever you go. With ThinkPad batteries, you are able to work longer without being tied to
an electrical outlet.
Checking the battery status
Move your pointer to the battery-status icon in the Windows notification area to check the battery status. The
battery-status icon displays the percentage of battery power remaining and how long you can use your
computer before you must charge the battery.
The rate at which you use battery power determines how long you can use the battery of your computer
between charges. Because every computer user has individual habits and needs, it is difficult to predict how
long a battery charge lasts. There are two main factors:
• How much energy is stored in the battery when you begin to work
• The way you use your computer, for example:
– How often you access the storage drive
– How bright you make the computer display
– How often you use the wireless feature
Enabling the battery alarm on the Windows 7 operating system
For the Windows 7 operating system, you can configure your computer so that when the battery power falls
below a certain level, three events occur: the alarm goes off, a message is displayed, and the computer
display is turned off.
To enable the battery alarm, do the following:
1. Start the Power Manager program. See “Accessing Lenovo programs” on page 14.
2. Click the Global Power Settings tab.
3. For Low battery alarm or Critically low battery alarm, set the percentage of the power level and set
the action.
Note: If your computer enters sleep or hibernation mode when the battery power is low without the alarm
message, the message is displayed when the computer resumes. To resume normal operation, click OK
when the message is displayed.
Charging the battery
When you find that the remaining battery power is low, charge your battery or replace the battery with a
charged battery.
If an ac outlet is convenient, connect the computer to ac power. The battery is fully charged in about four to
eight hours. The actual charging time depends on the battery size, the physical environment, and whether
Chapter 2. Using your computer 29
Page 48

you are using the computer. You can check the battery charging status at any time through the batterystatus icon in the Windows notification area.
Note: To maximize the life of the battery, the computer does not start recharging the battery if the remaining
power is greater than 95%.
Tips on charging the battery
• Before you charge the battery, ensure that the battery temperature is lower than 10°C (50°F).
• Charge the battery in any of the following conditions:
– A new battery is installed.
– The percentage of power remaining is low.
– The battery has not been used for a long time.
Maximizing the battery life
To maximize the life of the battery, do the following:
• Use the battery until the charge is depleted.
• Recharge the battery completely before using it. You can see whether the battery is fully charged from the
battery-status icon in the Windows notification area.
• Always use power management features such as power-saving modes.
Managing the battery power
To achieve the best balance between performance and power saving, adjust your power plan settings. To
adjust power plan settings, do the following:
1. Go to Control Panel, and then change the view of Control Panel from Category to Large icons or Small
icons.
2. Click Power Options.
3. Follow the instructions on the screen.
For more information, see the Windows help information system.
Power-saving modes
There are several modes that you can use at any time to conserve power. This section introduces each mode
and gives tips on the effective use of battery power.
• Screen blank mode (for Windows 7 only)
The computer display requires considerable battery power. To enter screen blank mode, right-click the
battery-status icon in the Windows notification area and select Power off display.
• Sleep mode
In sleep mode, your work is saved to memory, and then the storage drive and the computer display are
turned off. When your computer wakes up, your work is restored within seconds.
To put your computer into sleep mode, do the following:
– For Windows 7: Open the Start menu and click the arrow next to the Shut down button. Click Sleep
from the menu displayed.
– For Windows 10: Open the Start menu, click
• Hibernation mode
30
P50 User Guide
Power, and then click Sleep.
Page 49
By using this mode, you can turn off your computer completely without saving files or exiting any
programs that are running. When the computer enters hibernation mode, all open programs, folders, and
files are saved to the storage drive, and then the computer turns off.
To put the computer into hibernation mode, do the following:
– For Windows 7: Open the Start menu and click the arrow next to the Shut down button. Click
Hibernate from the menu displayed.
– For Windows 10: Define what the power button does first, and then press the power button to put the
computer into hibernation mode.
If you put your computer into hibernation mode with the wake-up function disabled, the computer does
not consume any power. The wake-up function is disabled by default. If you put your computer into
hibernation mode with the wake-up function enabled, the computer consumes a small amount of power.
To enable the wake-up function, do the following:
1. Open Control Panel, view Control Panel by Category, and then click System and Security.
2. Click Administrative Tools.
3. Double-click Task Scheduler. If you are prompted for an administrator password or confirmation,
type the password or provide confirmation.
4. From the left pane, select the task folder for which you want to enable the wake-up function. The
scheduled tasks are displayed.
5. Click a scheduled task, and then click the Conditions tab.
6. Under Power, select Wake the computer to run this task.
• Wireless off
When you are not using the wireless features, such as Bluetooth or wireless LAN, turn them off to help
conserve power.
Connecting to the network
Your computer has one or more network cards that enable you to connect your computer to the Internet or
other network connections.
Ethernet connections
You can connect your computer to a local network or a broadband connection by using the built-in Ethernet
feature of the computer.
DANGER
Your computer has an Ethernet connector. To avoid the risk of electrical shock, do not connect the
telephone cable to the Ethernet connector.
Wireless connections
Wireless connection is the transfer of data without the use of cables but by means of radio waves only.
In the Airplane mode, all wireless features are disabled. To disable the Airplane mode, do the following:
Note: Airplane mode is only available on the Windows 10 operating system.
1. Open the Start menu and click Settings. If Settings is not displayed, click All apps to display all
programs.
Chapter 2. Using your computer 31
Page 50

2. Click Settings ➙ Network & Internet ➙ Airplane mode, and then turn off the Airplane mode.
Depending on the wireless devices installed on your computer, you might be able to use the following
wireless networks:
• Wireless-LAN connection
• Wireless-WAN connection
• Bluetooth connection
Using the wireless-LAN connection
A wireless LAN covers a relatively small geographic area, such as an office building or a house. Devices
based on the 802.11 standards can connect to this type of network.
Your computer comes with a built-in wireless network card and a configuration utility to help you establish
wireless connections and monitor the connection status. This enables you to stay connected to your network
while you are at the office, in a meeting room, or at home, with no need for a wired connection.
To establish a wireless-LAN connection, do the following:
1. Click the wireless-network-connection-status icon in the Windows notification area. A list of available
wireless networks is displayed.
2. Double-click a network to connect to it. Provide required information if needed.
The computer automatically connects to an available wireless network when the location changes. For more
information, refer to the Windows help information system.
Tips for using the wireless-LAN feature
To achieve the best connection, use the following guidelines:
• Place your computer so that there are as few obstacles as possible between the wireless-LAN access
point and the computer.
• Open your computer display to an angle of slightly more than 90 degrees.
• If you use the wireless feature (the 802.11 standards) of your computer simultaneously with a Bluetooth
option, the data transmission speed can be delayed and the performance of the wireless feature can be
degraded.
Checking the wireless-LAN connection status
You can check the wireless-LAN connection status through the wireless-network-connection-status icon in
the Windows notification area. The more bars encompassed, the better the signal is.
For the Windows 7 operating system, you also can check the Access Connections gauge, the Access
Connections status icon, or the Access Connections wireless status icon in the Windows notification area.
Access Connections gauge:
•
•
Power to the wireless radio is off or no signal.
Power to the wireless radio is on. The signal strength of the wireless connection is poor. To
improve signal strength, move your computer closer to the wireless access point.
•
marginal.
•
excellent.
32
P50 User Guide
Power to the wireless radio is on. The signal strength of the wireless connection is
Power to the wireless radio is on. The signal strength of the wireless connection is
Page 51

Access Connections status icon:
No location profile is active or none exists.
•
•
Current location profile is disconnected.
•
Current location profile is connected.
Access Connections wireless status icon:
•
Power to the wireless radio is off.
•
Power to the wireless radio is on. No association.
•
Power to the wireless radio is on. No signal.
•
Power to the wireless radio is on. The signal strength of the wireless connection is excellent.
•
Power to the wireless radio is on. The signal strength of the wireless connection is marginal.
Power to the wireless radio is on. The signal strength of the wireless connection is poor. To improve
•
signal strength, move your computer closer to the wireless access point.
Using the wireless WAN connection
Wireless WAN which uses cellular networks for data transmission, enables you to establish wireless
connections over remote public or private networks. These connections can be maintained over a large
geographical area, such as a city or an entire country, by use of multiple antenna sites or satellite systems
maintained by wireless service providers.
Some ThinkPad notebook computers come with a built-in wireless WAN card integrated with some wireless
WAN technologies, such as 1xEV-DO, HSPA, 3G, GPRS, or LTE. By using the built-in wireless WAN card and
the configuration utility that comes with your computer, you can establish wireless WAN connections and
monitor the connection status.
Note: The wireless WAN service is provided by authorized service providers in some countries.
Tips for using the wireless WAN feature
To achieve the best connection, use the following guidelines:
• Keep your computer away from your body.
• Place your computer on a flat surface and open your computer display to an angle of slightly more than 90
degrees.
• Place your computer away from concrete or brick walls that might dampen cellular signals.
• Best reception will be available near windows and other locations where cellular phone reception is the
strongest.
Checking the wireless WAN connection status
You can check the wireless WAN connection status through the wireless network connection status icon in
the Windows notification area. The more bars encompassed, the better the signal is.
For the Windows 7 operating system, you also can check the Access Connections gauge, the Access
Connections status icon, or the Access Connections wireless status icon in the Windows notification area.
Access Connections gauge status:
•
No signal
Chapter 2. Using your computer 33
Page 52

• Weak signal
•
•
Medium signal
Strong signal
Access Connections icon status:
•
No location profile is active or none exists.
•
Current location profile is disconnected.
•
Current location profile is connected.
Wireless status icon status:
Power to the WAN radio is off
•
•
No association
•
No signal
•
Weak signal
•
Medium signal
•
Strong signal
Using the Bluetooth connection
Bluetooth can connect devices that are a short distance from one another. It is commonly used for
connecting peripheral devices to a computer, transferring data between hand-held devices and a personal
computer, or remotely controlling and communicating with devices such as mobile phones.
Depending on the model, your computer might support the Bluetooth feature. To transfer data through the
Bluetooth feature, do the following:
Note: If you use the wireless feature (the 802.11 standards) of your computer simultaneously with a
Bluetooth option, the data transmission speed can be delayed and the performance of the wireless feature
can be degraded.
1. Ensure that the Bluetooth feature is enabled.
• For Windows 7: Press the wireless-radios control key
and turn on the Bluetooth feature.
• For Windows 10: Do one of the following:
– Open the Start menu and click Settings. If Settings is not displayed, click All apps to display all
programs, and then click Settings ➙ Devices ➙ Bluetooth. Turn on the Bluetooth feature.
– Open the Start menu and click Settings. If Settings is not displayed, click All apps to display all
programs, and then click Settings ➙ Network & Internet ➙ Airplane mode. Turn on the
Bluetooth feature.
2. Right-click the data that you want to send.
3. Select Send To ➙ Bluetooth Devices.
4. Select a Bluetooth device, and then follow the instructions on the screen.
For more information, refer to the Windows help information system and the Bluetooth help information
system.
34
P50 User Guide
Page 53

Using an external display
You can use an external display such as a projector or a monitor to give presentations or to expand your
workspace. This topic introduces how to connect an external display, choose display modes, and change
display settings.
When you connect an external display, a video interface cable with a ferrite core is required. Your computer
can support the following video resolution, if the external display also supports that resolution.
• Up to 3840 x 2160 @ 30Hz, with an external display connected to the HDMI connector of your computer.
• Up to 3840 x 2160 @ 60Hz, with an external display connected to the mini DisplayPort connector or
Thunderbolt connector of your computer.
For more information about the external display, refer to the manuals provided with it.
Connecting an external display
You can use either a wired display or a wireless display. The wired display can be connected to the HDMI or
mini DisplayPort connector by a cable. The wireless display can be added through the Wi-Di or Miracast
function.
• Connecting a wired display
Note: When you connect an external display, a video interface cable with a ferrite core is required.
1. Connect the external display to an appropriate video connector on your computer, such as the mini
DisplayPort connector or HDMI connector.
2. Connect the external display to an electrical outlet.
3. Turn on the external display.
If your computer cannot detect the external display, do the following:
– For Windows 7: Right-click on the desktop, and then click Screen resolution ➙ Detect.
– For Windows 10: Right-click on the desktop, and then click Display settings ➙ Detect.
• Connecting a wireless display
Note: To use a wireless display, ensure that both your computer and the external display support the WiDi or Miracast feature.
– For Windows 7
Start the Intel
on the screen.
– For Windows 10
Do one of the following:
– Open the Start menu and click Settings. If Settings is not displayed, click All apps to display all
programs, and then click Settings ➙ Devices ➙ Connected devices ➙ Add a device.
– Click the action center icon
wireless display and follow the instructions on the screen.
For more information, refer to the Windows help information system.
®
Wi-Di program. Select the desired wireless display in the list and follow the instructions
in the Windows notification area. Click Connect. Select the desired
Chapter 2. Using your computer 35
Page 54

Choosing a display mode
You can display your desktop and apps on the computer display, the external display, or both. To choose
how to display the video output, press the display-mode switching key
mode you prefer.
There are four display modes:
• Disconnect: Displays the video output only on your computer screen.
Note: Depending on the situation, you might see Disconnect, PC screen only, Computer only, or
Disconnect projector.
• Duplicate: Displays the same video output on both your computer screen and an external display.
• Extend: Extends the video output from your computer display to an external display. You can drag and
move items between the two displays.
• Projector only: Shows the video output only on an external display.
Note: Depending on the situation, you might see Projector only or Second screen only.
Note: If you show programs using DirectDraw or Direct3D
the video output.
®
in full-screen mode, only the main display shows
and then select a display
Changing display settings
You can change the settings for both the computer display and the external display. For example, you can
define which one is the main display and which one is the secondary display. You also can change the
resolution and orientation.
To change display settings, do the following:
1. Right-click on the desktop and select Screen resolution or Display settings.
2. Select the display that you want to configure.
3. Change display settings as you want.
Note: If you set a higher resolution for the computer display than the external display, only part of the screen
can be shown on the external display.
Using the color sensor
Some computer models are equipped with a color sensor. The color sensor enables you to measure and
adjust the color accuracy of your computer display. Therefore, a color image or graphic is rendered as close
as possible to its original intent. The color profile for ThinkPad computer displays is preinstalled on your
computer. If you want to install a different color profile, go to
To use the color sensor, do the following:
• For Windows 7: Open the Start menu, click All Programs ➙ X-Rite ➙ PANTONE Color Calibrator, and
then follow the instructions on the screen.
• For Windows 10: Open the Start menu, click All apps ➙ X-Rite ➙ PANTONE Color Calibrator, and then
follow the instructions on the screen.
When the color sensor is in use, the color-sensor indicator on the computer outer lid blinks twice at regular
intervals. When the color measuring and adjustment finishes, the color-sensor indicator stays on. To locate
the color-sensor indicator, see “Status indicators” on page 7.
http://www.lenovo.com/ThinkPadDrivers.
36
P50 User Guide
Page 55

After you use the color sensor for the first time, a calibration profile ECCM2SensorData.dat is generated. Back
up this calibration profile on an external storage device in case that both the color sensor and the internal
storage device are replaced.
To locate the DAT file, do the following:
• For Windows 7: Go to C:\ProgramData\X-Rite\ECCM-2.
• For Windows 10: Click This PC ➙ Documents ➙ X-Rite.
If your computer comes with a color sensor, the display provides a color profile that can work with the
Microsoft Image Color Management (ICM) function. If the graphics software you are using is compatible with
ICM, you can display a color image on your monitor and match it with the same quality one on another
device, such as a scanner or a printer.
For more information about the Microsoft ICM, refer to the Windows help information system.
Using the NVIDIA Optimus Graphics feature
Some ThinkPad notebook computers support NVIDIA Optimus Graphics.
The running program and power plan settings that you use on your computer have specific graphics quality
demand. To achieve the best balance between the computer performance and a long battery life, the NVIDIA
Optimus Graphics feature automatically switches between High Performance Graphics and Energy Saving
Graphics. You do not have to restart your computer, close programs, or intervene manually.
Using audio features
Your computer is equipped with the following items:
• Microphones
• Speakers
• Audio connector, 3.5 mm (0.14 inch) in diameter
Your computer also has an audio chip that enables you to enjoy various multimedia audio features, such as
the following:
• Playback of MIDI and MP3 files
• Recording and playback of PCM and WAV files
• Recording from various sound sources, such as a headset attached
The following table shows which functions of the audio devices attached to the connector on your computer
or docking station are supported.
Table 1. Audio feature list
Connector
Audio connector Headphone and
Headset with a 3.5 mm
(0.14–inch), 4-pole plug
microphone functions
supported
Conventional headphone Conventional microphone
Headphone function
supported
Not supported
To configure the microphone for optimal sound recording, use the Realtek HD Audio Manager program. To
start the program, go to Control Panel and click Hardware and Sound ➙ Realtek HD Audio Manager.
Chapter 2. Using your computer 37
Page 56

Using the camera
If your computer has a camera, you can use the camera to preview your video image and take a snapshot of
your current image.
To start the camera, do the following:
• For Windows 7: Start the Communications Utility program. See “Accessing Lenovo programs” on page
14.
• For Windows 10: Open the Start menu, and click Camera from the all apps list.
When the camera is started, the green camera-in-use indicator turns on.
You also can use the integrated camera with other programs that provide features such as photographing,
video capturing, and video conferencing. To use the integrated camera with other programs, open one of the
programs and start the photographing, video capturing, or video conferencing function. Then, the camera
will start automatically and the green camera-in-use indicator will turn on. For more information about using
the camera with a program, refer to the help information system of the program.
Configuring camera settings
You can configure the camera settings to meet your needs, such as adjusting the quality of the video output.
To configure the camera settings, do the following:
• For Windows 7: Start the Communications Utility program and configure the camera settings as desired.
• For Windows 10: Do one of the following:
– Open the Camera app, click the settings icon in the upper-right corner. Follow the instructions on the
screen to configure the camera settings as desired.
– Open the Start menu and click Lenovo Companion ➙ Hardware Settings ➙ Display, Camera &
Audio/ Media. Locate the Camera section and then follow the instructions on the screen to make your
preferred setting.
Using an ExpressCard, a media card, or a smart card
Your computer has an ExpressCard slot and a media-card slot. Depending on the model, your computer
might have a smart-card slot.
Supported media cards
• MultiMediaCard (MMC)
• Secure Digital eXtended-Capacity (SDXC) card
• Secure Digital (SD) card
Note: Your computer does not support the content protection for recordable media (CPRM) feature for
the SD card.
• Secure Digital High-Capacity (SDHC) card
Supported smart card
The smart card reader on your computer only supports the smart card of the following specifications:
38
P50 User Guide
Page 57
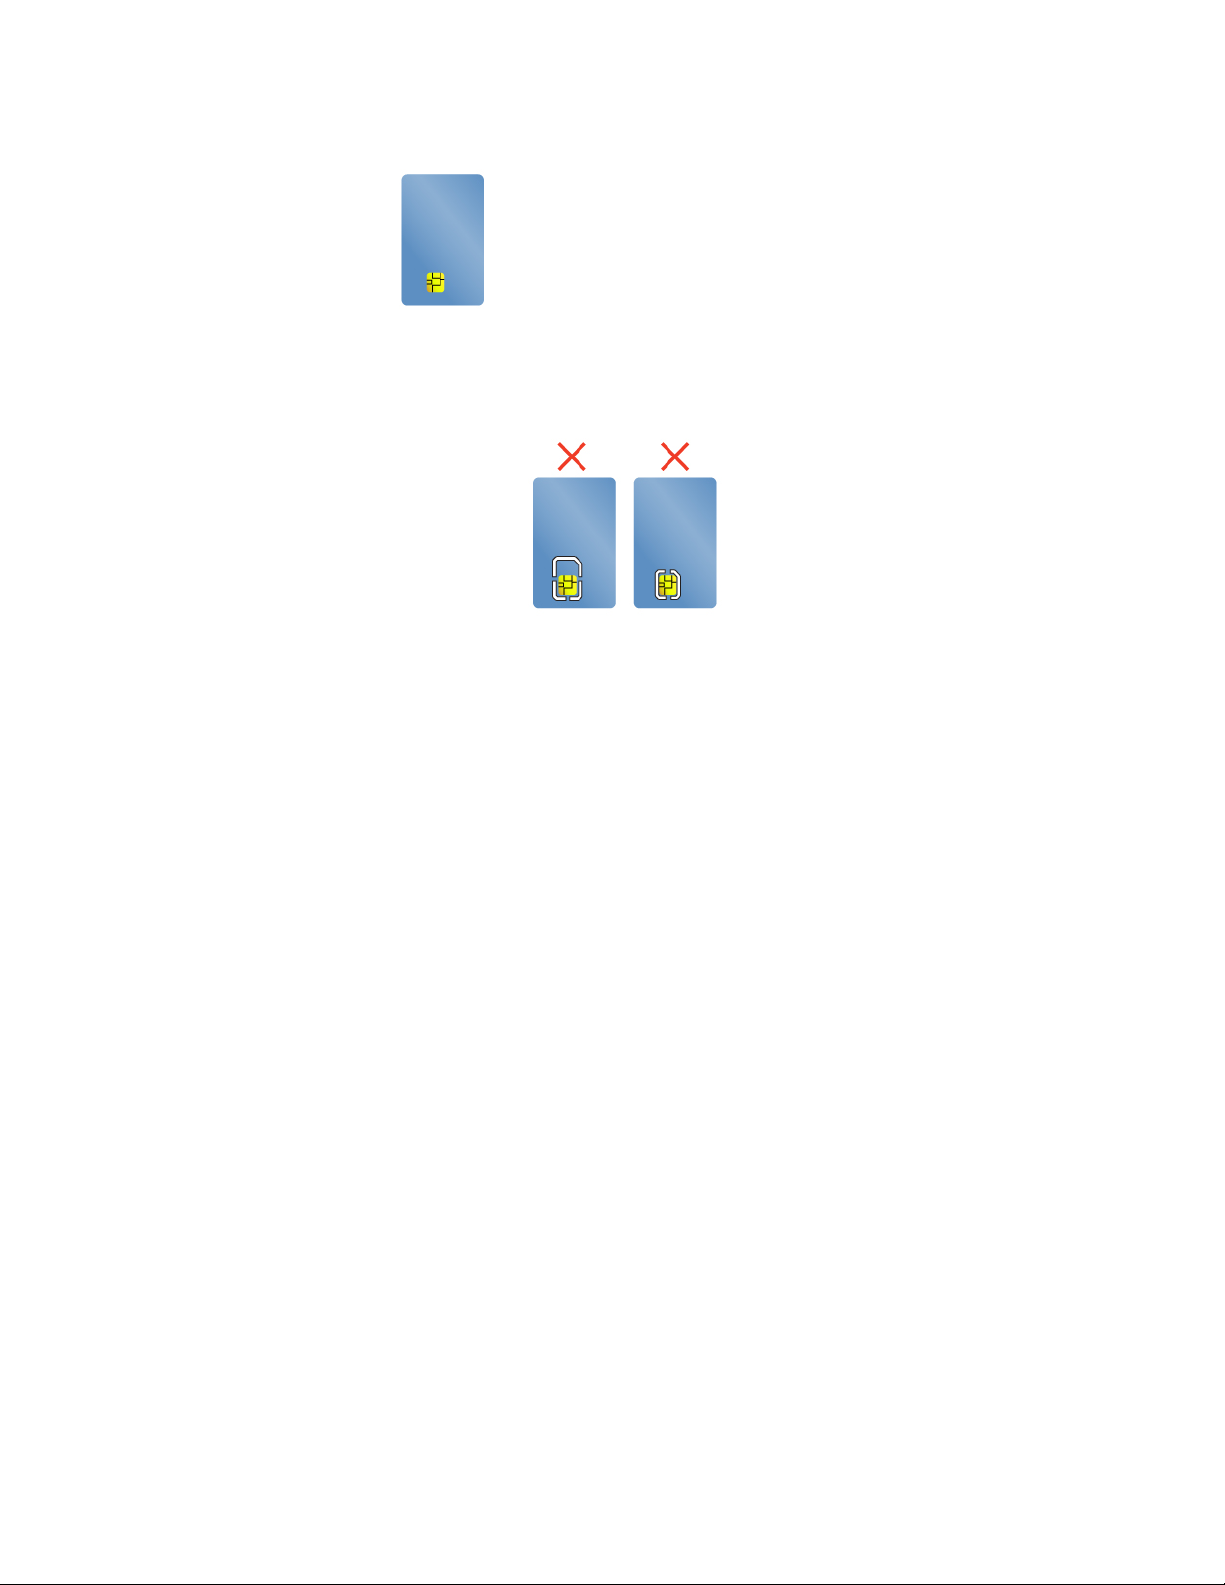
• Length: 85.60 mm (3.37 inches)
• Width: 53.98 mm (2.13 inches)
• Thickness: 0.76 mm (0.03 inch)
Do not insert smart cards with slits into your computer. Otherwise, the smart card reader might get
damaged.
Installing an ExpressCard, a media card, or a smart card
Attention:
• Before you start installing a card, touch a metal table or a grounded metal object. This action reduces any
static electricity from your body. The static electricity could damage the card.
• Do not insert an ExpressCard while the computer is in sleep mode or hibernation mode. Otherwise, the
computer might not respond when you try to resume using it.
To install a card, do the following:
1. Locate the appropriate type of slot for your card. See “Computer controls, connectors, and indicators”
on page 1.
2. Ensure that the card is correctly oriented.
• For ExpressCard: The notched edge of the card is facing upward and pointing toward to the card slot.
• For media card: The metal contacts are facing down and pointing toward the card slot.
• For smart card: The metal contacts are facing upward and pointing toward the card slot.
3. Insert the card firmly into the card slot.
If the plug-and-play feature is not enabled for the installed ExpressCard, media card, or smart card, do the
following to enable the feature:
1. Go to Control Panel.
2. Click Hardware and Sound.
3. Click Device Manager. If you are prompted for an administrator password or confirmation, type the
password or provide confirmation.
4. From the Action menu, select Add legacy hardware. The Add Hardware Wizard starts.
5. Follow the instructions on the screen.
Removing an ExpressCard, a media card, or a smart card
Attention:
Chapter 2. Using your computer 39
Page 58

• Before removing a card, stop the card first. Otherwise, data on the card might get damaged or lost.
• While transferring data to or from an ExpressCard, a media card, or a smart card, do not put your
computer into sleep or hibernation mode before the data transfer is completed; otherwise, your data could
get damaged.
• Do not remove a card while the computer is in sleep mode or hibernation mode. Otherwise, the system
might not respond when you try to resume operation.
To remove a card, do the following:
1. Click the triangular icon in the Windows notification area to show hidden icons. Then, right-click the
Safely Remove Hardware and Eject Media icon.
2. Select the item you want to remove to stop the card.
3. Press the card to eject it from your computer.
4. Remove the card and store it safely for future use.
Note: If you do not remove the card from your computer after you eject the card from the Windows
operating system, the card can no longer be accessed. To access the card, you must remove it first, then
insert it again.
Traveling with your computer
This topic provides information to help you work with your computer when you are traveling.
Use the following travel tips to travel more confidently and efficiently with your computer.
• When your computer goes through the x-ray machines at airport security stations, it is important to keep
your eyes on the computer at all times to prevent theft.
• Consider bringing an electrical adapter for use on an airplane or automobile.
• If you carry an ac power adapter, detach the ac cord from it to avoid damaging the cord.
Travel tips on airplanes
If you carry your computer onto an airplane, observe the following tips:
• Be careful about the seat in front of you on airplanes. Angle your computer display so that it does not get
caught when the person in front of you leans back.
• When taking off, remember to turn off your computer or put it into hibernation mode.
• If you intend to use your computer or wireless services (such as Internet and Bluetooth), check with the
airline for restrictions and availability of services before boarding the airplane. If there are restrictions on
the use of computers with wireless features on the airplane, you must abide by those restrictions.
The Airplane mode is supported on the Windows 10 operating system. In the Airplane mode, all wireless
features are disabled.
To enable the Airplane mode, do the following:
1. Open the Start menu, and then click Settings ➙ Network & Internet ➙ Airplane mode.
2. Slide the Airplane mode control to turn it on.
Travel accessories
If you are traveling to another country or region, you might want to consider an appropriate ac power adapter
for the country or region to which you are traveling.
To purchase travel accessories, go to:
40
P50 User Guide
Page 59

http://www3.lenovo.com/us/en/accessories-and-upgrades/c/ACCESSORY?menu-id=Accessories_Upgrades
Chapter 2. Using your computer 41
Page 60

42 P50 User Guide
Page 61

Chapter 3. Enhancing your computer
This chapter provides instructions on how to use hardware devices to expand your computer capabilities.
Finding ThinkPad options
If you want to expand the capabilities of your computer, Lenovo has a number of hardware accessories and
upgrades to meet your needs. Options include memory modules, storage devices, network cards, port
replicators or docking stations, batteries, power adapters, keyboards, mice, and more.
To shop at Lenovo, go to:
http://www3.lenovo.com/us/en/accessories-and-upgrades/c/ACCESSORY?menu-id=Accessories_Upgrades
ThinkPad Pen Pro
Depending on the model, your computer might come with a ThinkPad Pen Pro (referred to as the pen in this
section). The pen enables you to write and draw in a nature manner.
Use the pen instead of your finger in conditions such as the following:
• You need precise and detailed input, such as drawing a picture or using the handwriting mode.
• Too many elements are crowded on the screen, for example, when you are playing games.
• You want to keep your screen free from smudges.
• You have long fingernails and it is difficult for you to type.
Notes:
• The pen is not waterproof. Take care not to drop the pen in water.
• The pen contains pressure sensors. Do not push the tip of the pen for an extended period of time. Do not
subject the pen to shock or vibration.
© Copyright Lenovo 2015, 2017 43
Page 62
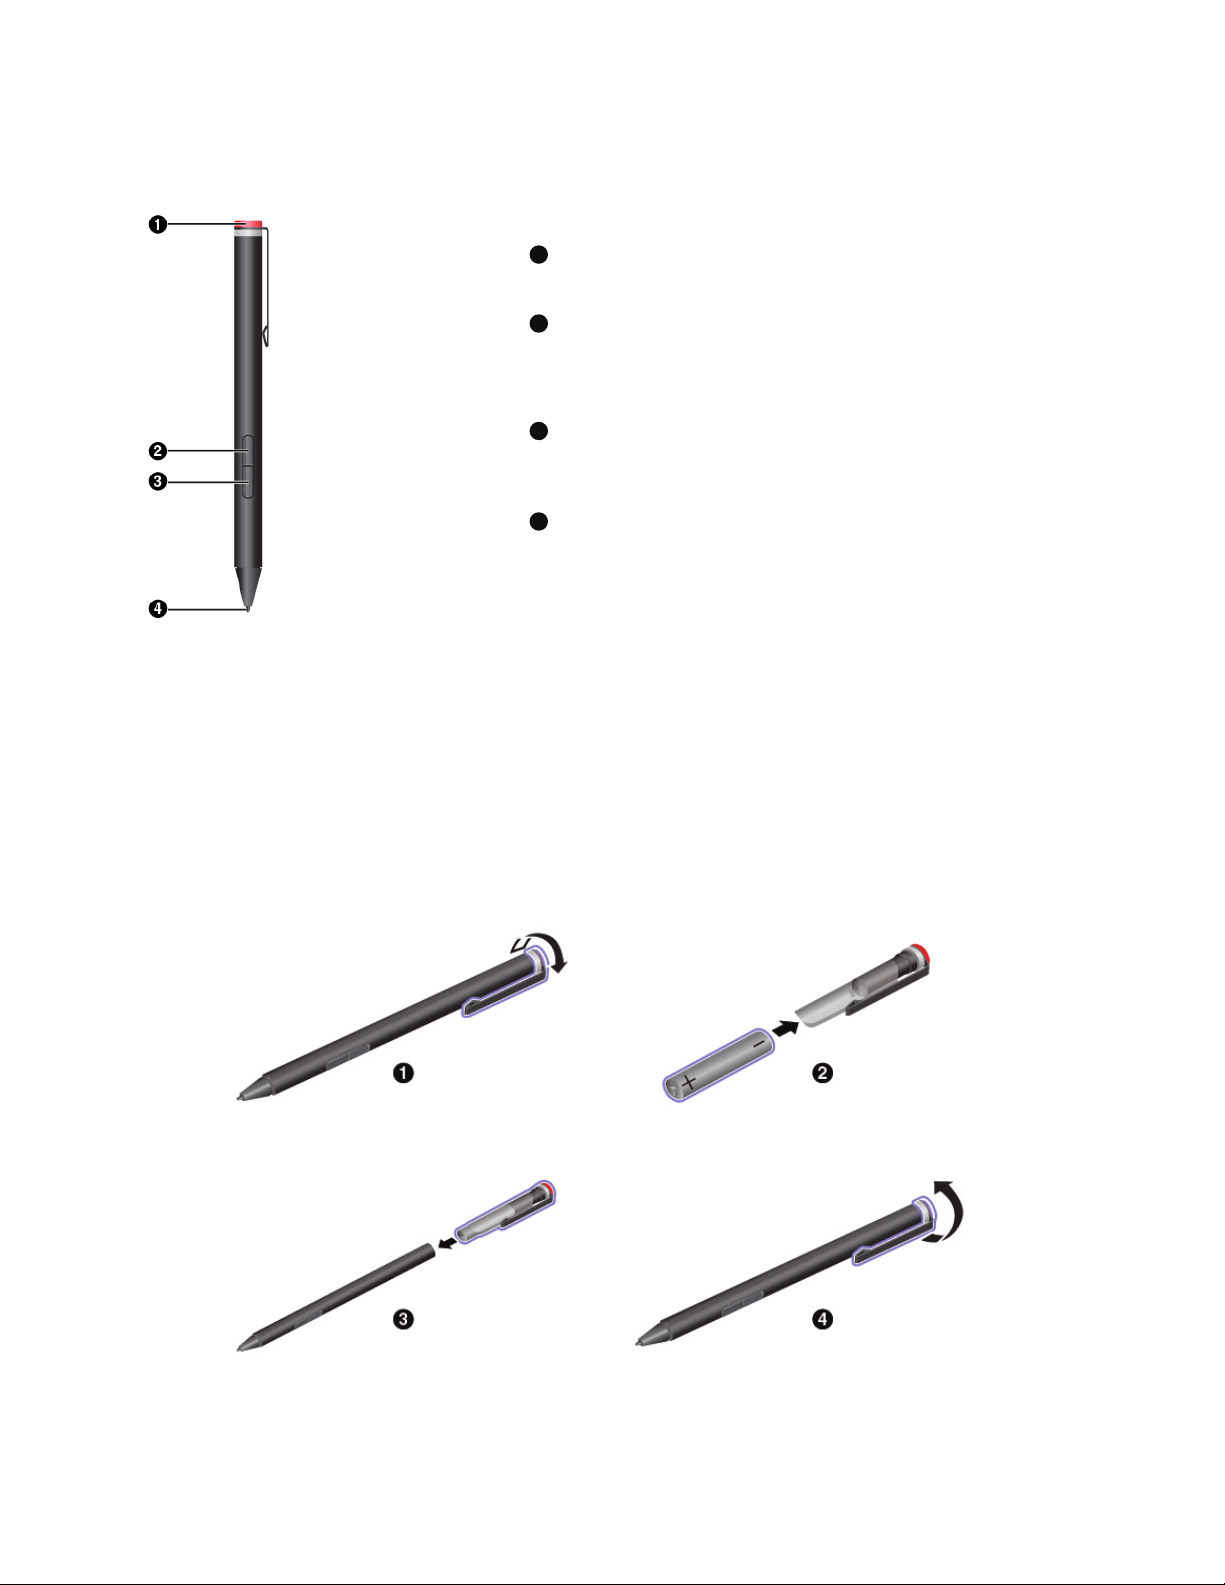
Overview of the pen
1
2
3
4
End cap
Unscrew the end cap to install or replace a battery.
Right-click button
To right-click, tap the tip on the screen and hold the pen there for
one second, or press and hold the click button while tapping the tip
on the screen.
Eraser button
To erase text or drawing, press and hold the eraser button and drag
the tip across the area you want to erase.
Pen tip
To click, tap on the screen with the tip. To double-click, tap twice.
Installing a battery to power the pen
Depending on the model, your pen might not be installed with a battery. To install an AAAA alkaline battery,
do the following:
1. Unscrew the end cap.
2. Insert an AAAA alkaline battery into the battery compartment.
3. Reinstall the end cap.
4. Tighten the end cap.
For more information, refer to the documentation of the pen.
44
P50 User Guide
Page 63
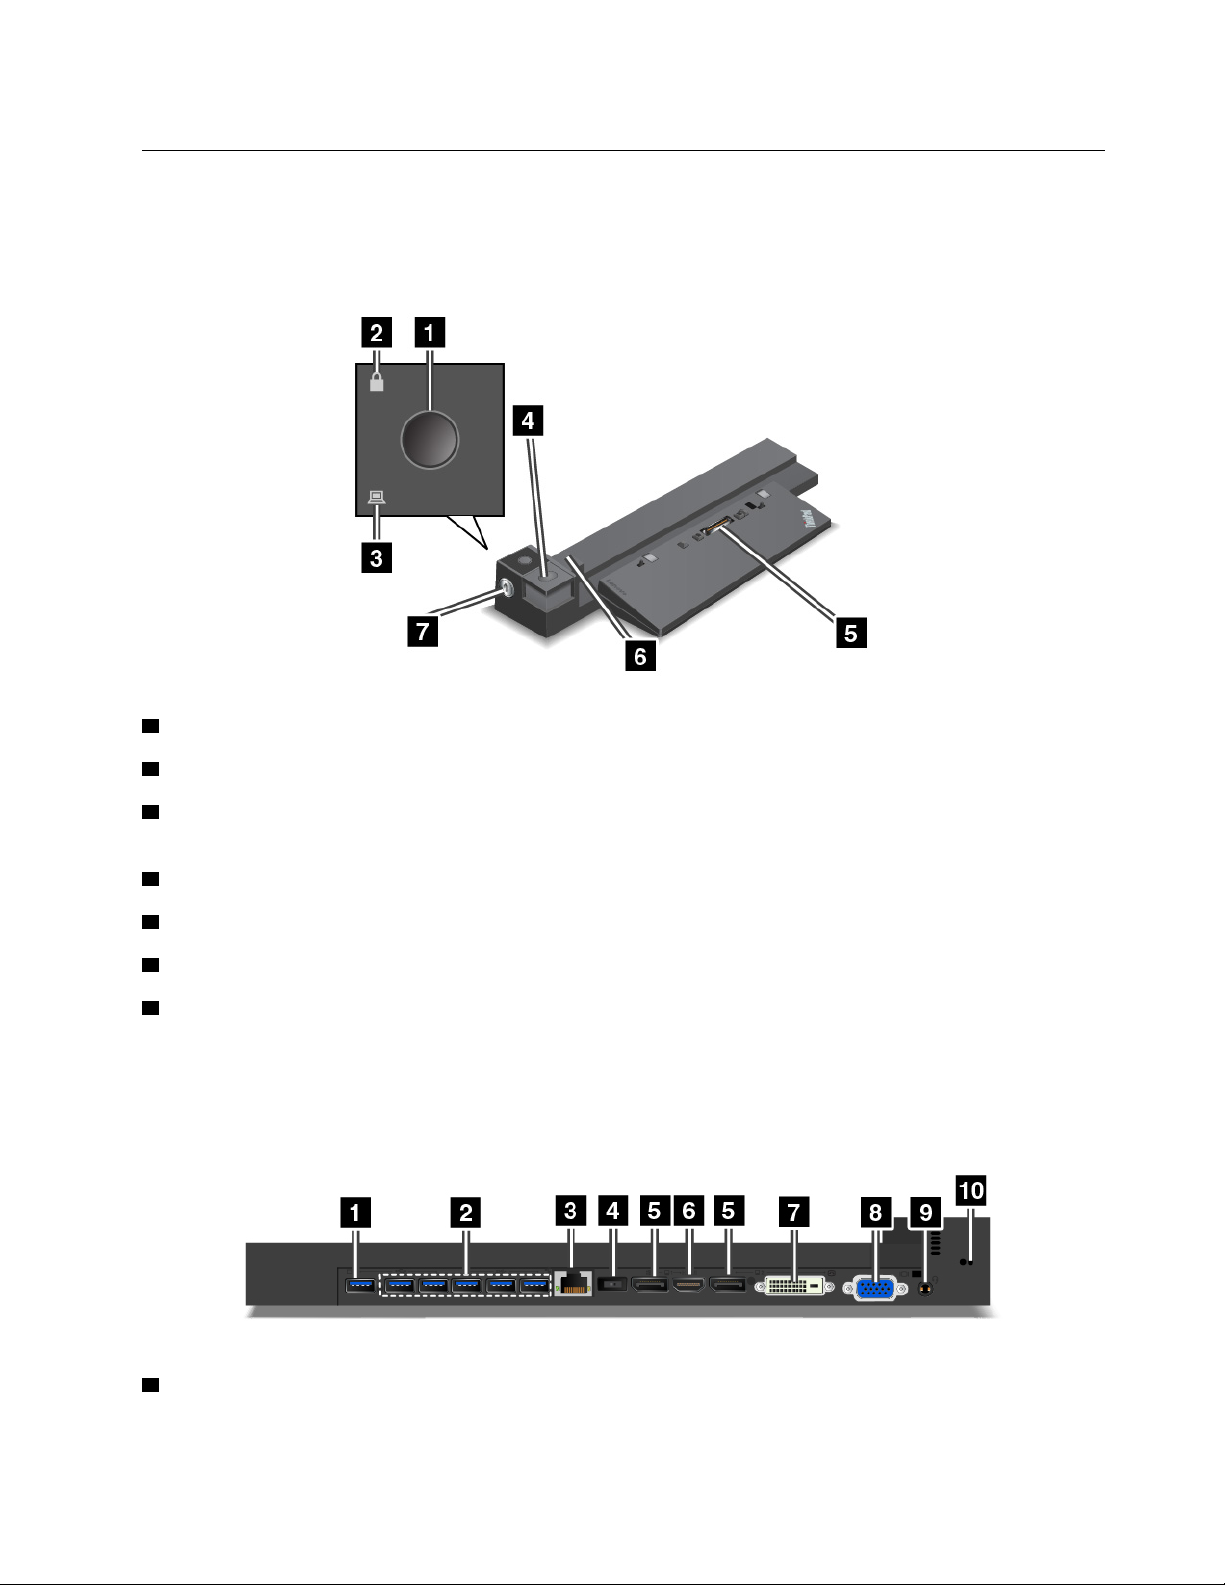
ThinkPad Workstation Dock
Depending on the model, your computer might come with the ThinkPad Workstation Dock (referred to as
docking station in this section). Attach your computer to the docking station to expand working capability.
ThinkPad Workstation Dock overview
1 Power button: Press the power button to turn on or turn off the computer.
2 Key lock indicator: This indicator turns on when the system lock is in the locked position.
3 Docking status indicator: This indicator turns on when your computer is attached to the docking station
properly.
4 Eject button: Press the eject button to eject the computer from the docking station.
5 Docking-station connector: Connect the docking station to the computer.
6 Adjuster: Use the adjuster as a guide to align your computer with the docking station.
7 System lock: Use the system lock to lock or unlock the eject button.
• When the system lock is in the locked position, the eject button is locked, and you cannot attach or
detach your computer.
• When the system lock is in the unlocked position, the eject button is unlocked, and you can attach or
detach your computer.
1 Always On USB connector: Connect USB-compatible devices or charge some mobile digital devices and
smartphones.
Chapter 3. Enhancing your computer 45
Page 64

2 USB 3.0 connectors: Connect USB-compatible devices, such as a USB keyboard, a USB mouse, a USB
storage device, or a USB printer.
3 Ethernet connector: Connect to an Ethernet LAN.
Note: When your computer is attached to the docking station, always use the Ethernet connector or the
external monitor connectors on the docking station. Do not use the ones on the computer.
4 Power connector: Connect the computer to ac power.
5 DisplayPort connectors
6 HDMI connector
7 DVI connector
8 VGA connector
Use the DisplayPort connectors, HDMI connector, DVI connector, or VGA connector to connect the
computer to the compatible projector, external monitor, or television.
To connect a DVI display, do the following:
1. Ensure that the computer is connected to the docking station and works properly.
2. Turn off the computer.
3. Connect the DVI display to the DVI connector on the docking station, and then connect the display to an
electrical outlet.
4. Turn on the DVI display.
5. Turn on the computer.
Note: Turn on the DVI display before you turn on the computer. Otherwise the system cannot recognize the
display.
9 Audio connector: Connect headphones or a headset with a 3.5-mm (0.14-inch), 4-pole plug.
10 Security-lock slot: To protect your docking station from theft, lock your docking station to a desk, table,
or other non-permanent fixture. Use a security cable lock that fits this security-lock slot.
Attaching the docking station to your computer
Attention: When the computer is attached to a docking station, do not pick up the assembly by taking hold
of the computer only. Always hold the whole assembly. Otherwise the docking station might drop down.
To attach the docking station to your computer, do the following:
1. Disconnect all cables and devices from the computer. Ensure that the system lock key is in the unlocked
position as shown (horizontal).
46
P50 User Guide
Page 65
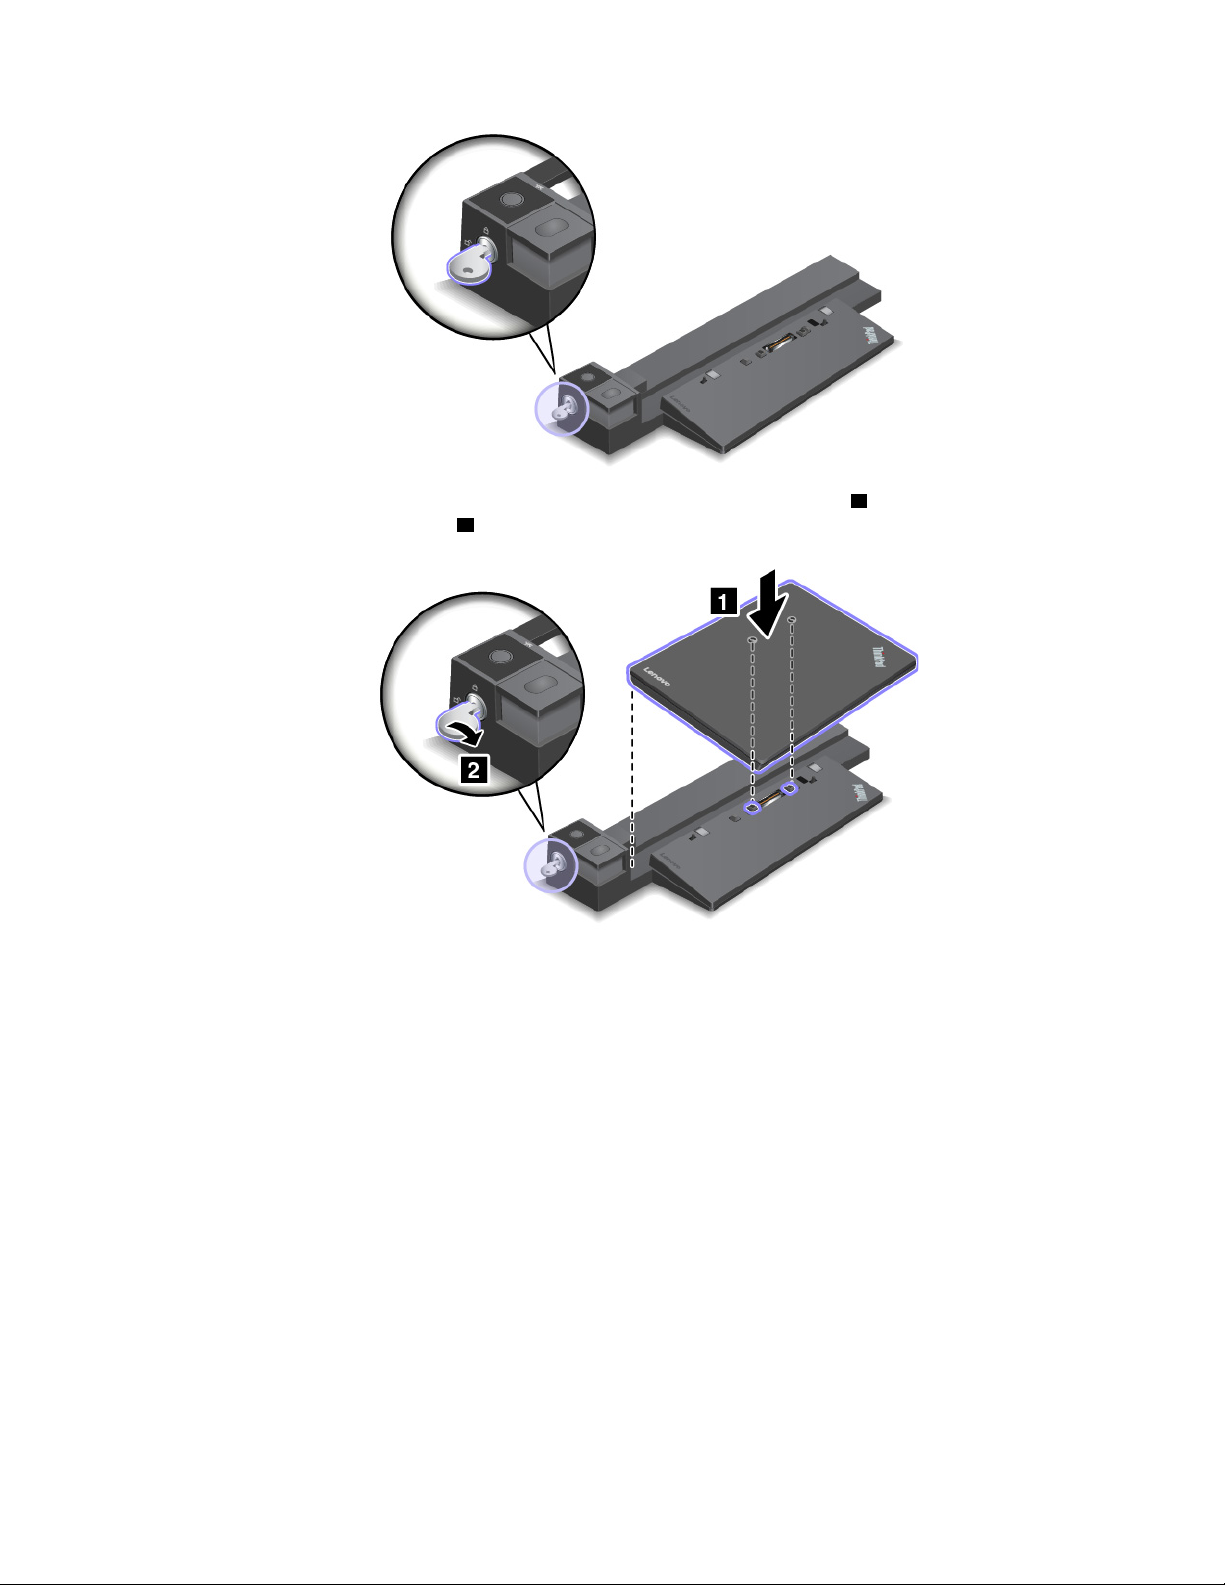
2. Attach your computer to the docking station as shown until you hear a click 1 . Turn the system lock key
to the locked position (vertical)
2 .
3. Check the docking status indicator. If the indicator is off, your computer is not attached to the docking
station successfully. To solve the problem, detach and reattach the computer. If the problem persists,
detach and reattach the ac power adapter of the docking station.
Note: If you attach the computer to the docking station, but do not connect the docking station to ac power,
your computer consumes battery power.
Detaching the docking station from your computer
Attention: When the computer is attached to a docking station, do not pick up the assembly by taking hold
of the computer only. Always hold the whole assembly. Otherwise the docking station might drop down.
To detach the docking station from your computer, do the following:
1. Disconnect all cables and devices from the computer and the docking station.
2. Turn the system lock key to the unlocked position (horizontal).
Chapter 3. Enhancing your computer 47
Page 66
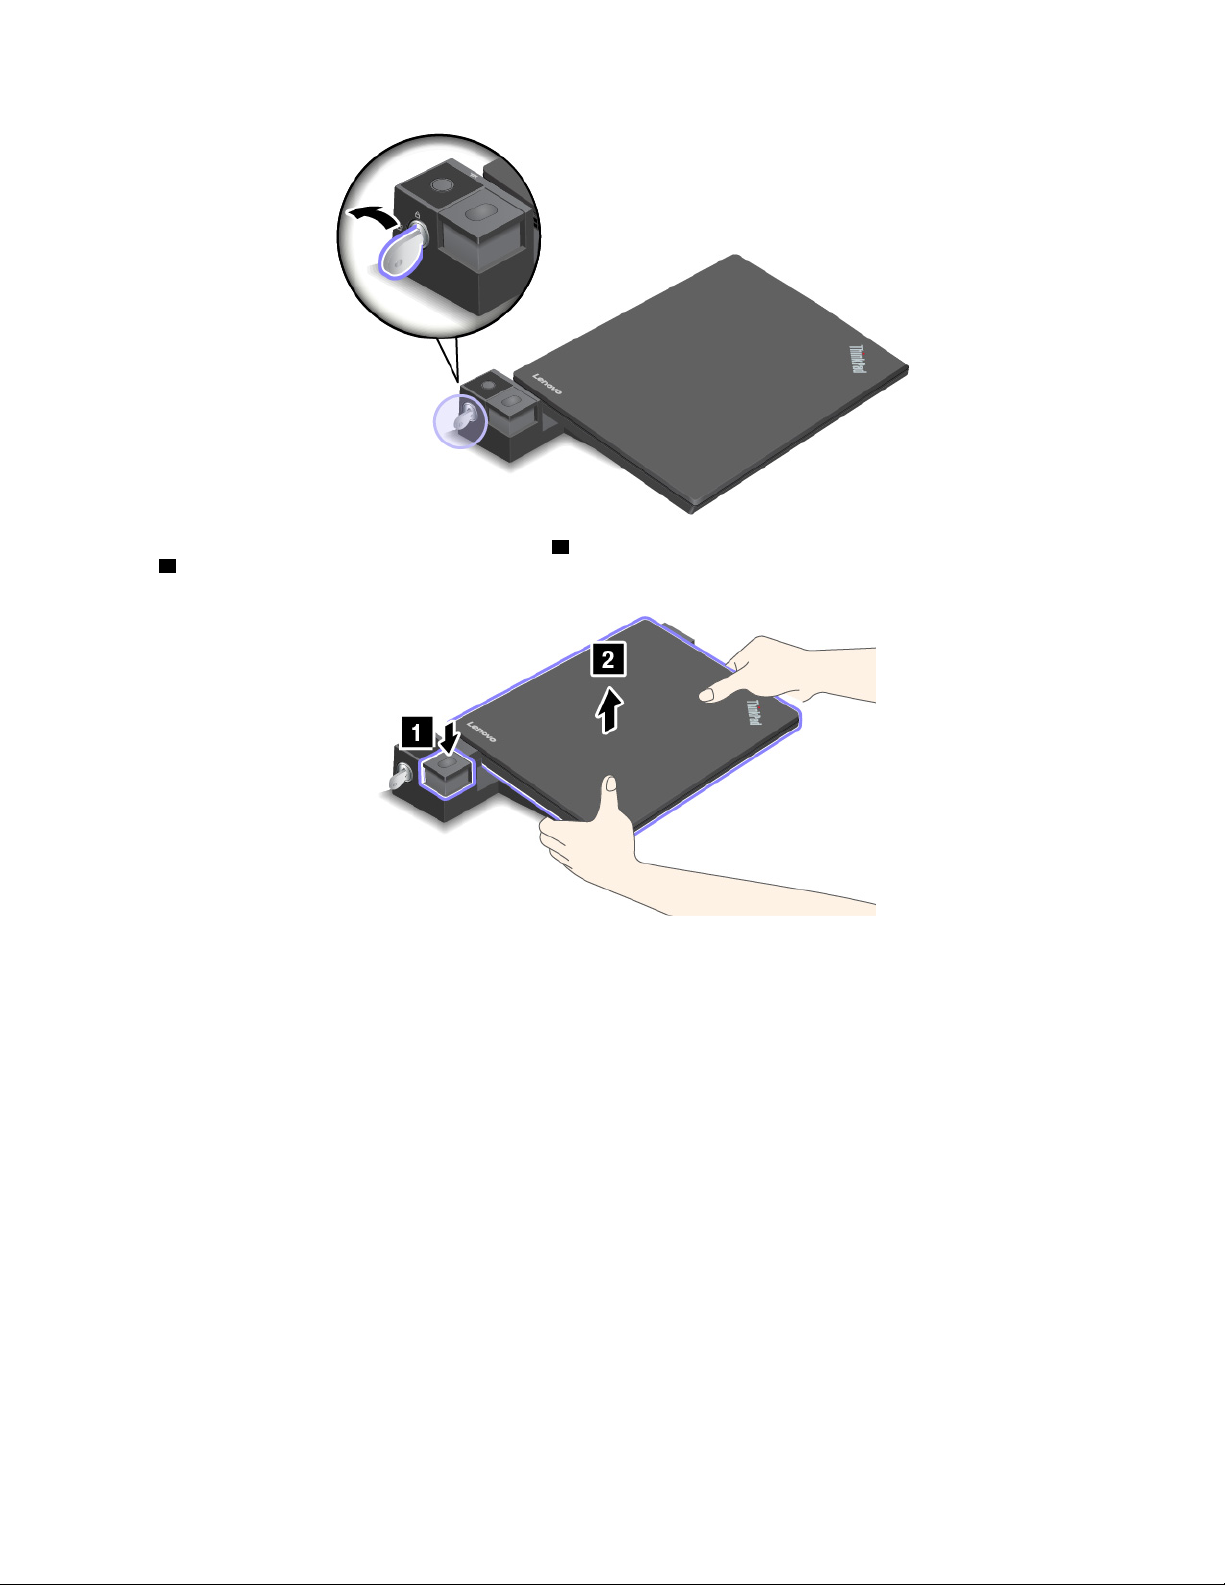
3. Press the eject button to eject the computer 1 , and then grasp both sides of the computer to remove it
2 .
48 P50 User Guide
Page 67
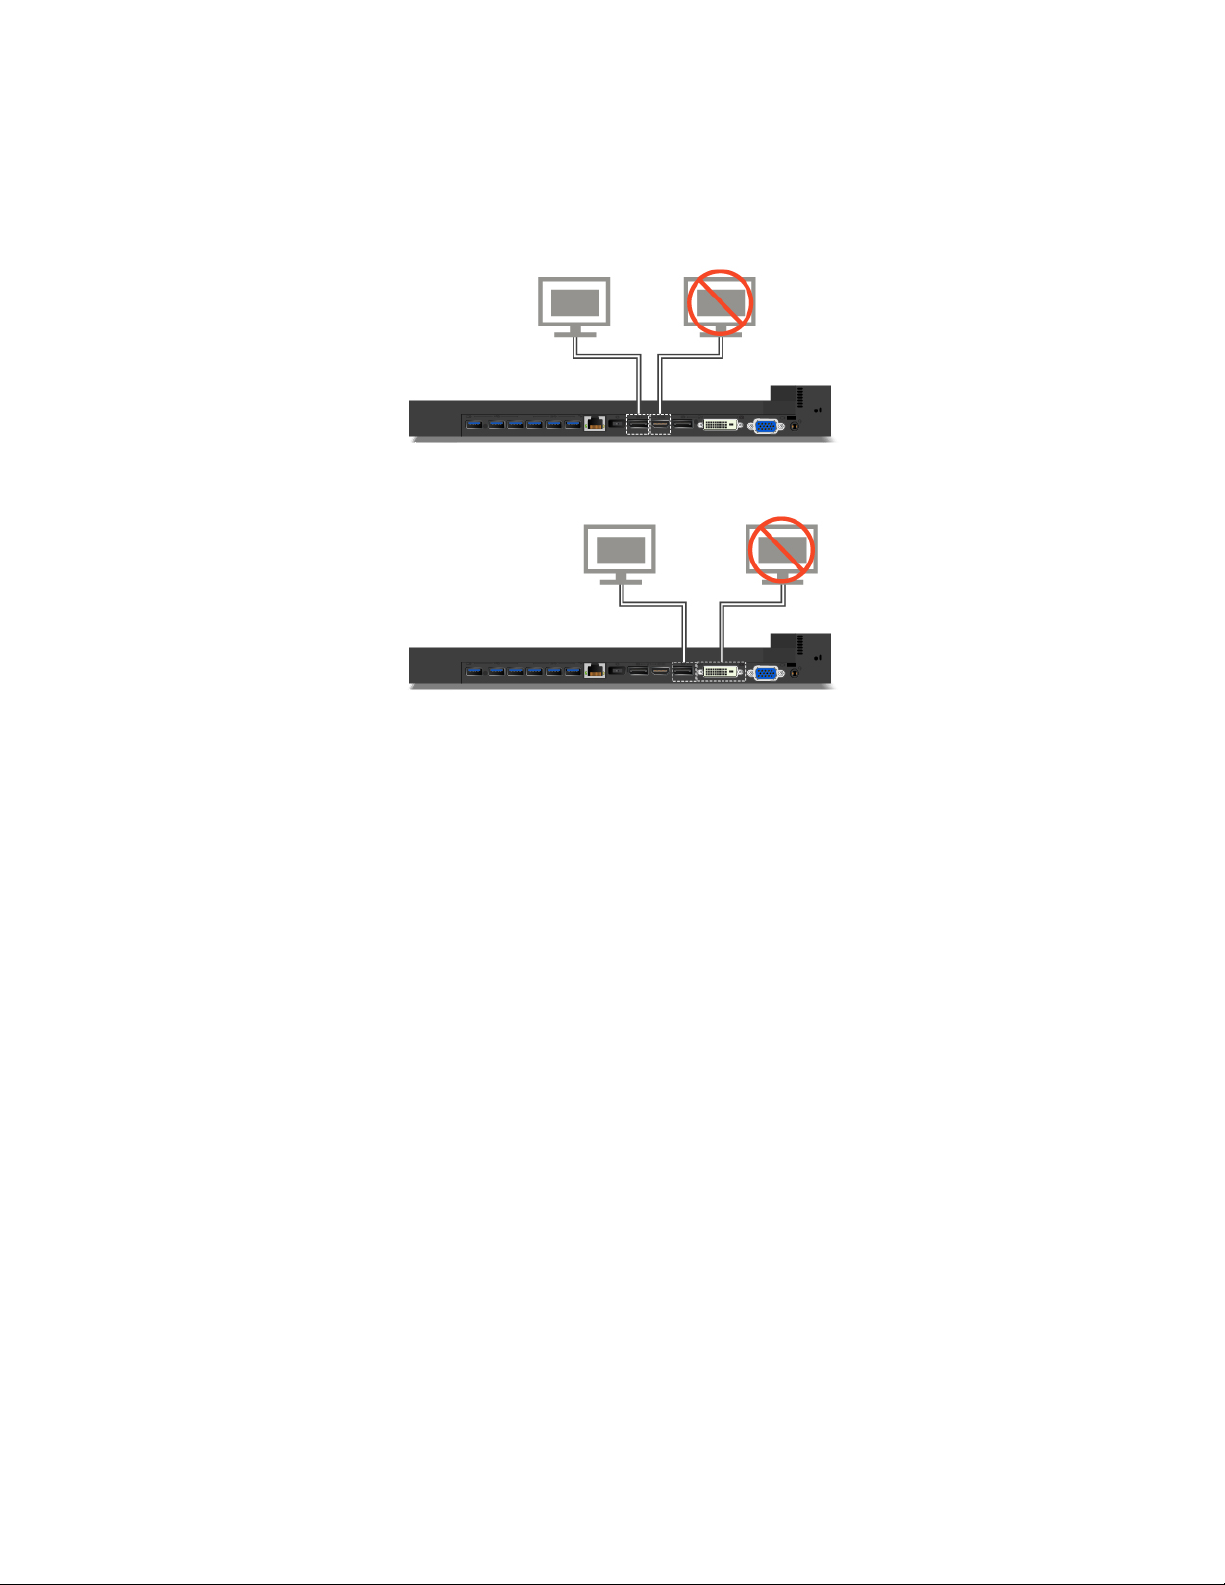
Guideline on connecting multiple external displays to the docking station
Do not use the connectors as shown in the following illustrations at the same time for connecting multiple
displays. Otherwise, one of the displays will not work.
Chapter 3. Enhancing your computer 49
Page 68

50 P50 User Guide
Page 69

Chapter 4. Accessibility, ergonomic, and maintenance information
This chapter provides information about accessibility, ergonomic, and cleaning and maintenance.
Accessibility information
Lenovo is committed to providing users who have hearing, vision, and mobility limitations with greater
access to information and technology. This section provides information about the ways these users can get
the most out of their computer experience. You also can get the most up-to-date accessibility information
from the following Web site:
http://www3.lenovo.com/us/en/lenovo/accessibility/
Keyboard shortcuts
The following list contains keyboard shortcuts that can help make your computer easier to use.
Note: Depending on your keyboard, some of the following keyboard shortcuts might not be available.
• Windows logo key + U: Open Ease of Access Center
• Right Shift for eight seconds: Turn on or turn off Filter Keys
• Shift five times: Turn on or turn off Sticky Keys
• Num Lock for five seconds: Turn on or turn off Toggle Keys
• Left Alt+Left Shift+Num Lock: Turn on or turn off Mouse Keys
• Left Alt+Left Shift+PrtScn (or PrtSc): Turn on or turn off High Contrast
For more information, go to
keywords: keyboard shortcuts, key combinations, shortcut keys.
Ease of Access Center
Ease of Access Center on the Windows operating system enables you to configure your computers to suit
their physical and cognitive needs.
To access Ease of Access Center, do the following:
1. Go to Control Panel, and ensure that you view Control Panel using Category.
2. Click Ease of Access ➙ Ease of Access Center.
3. Choose the appropriate tool by following the instructions on the screen.
Ease of Access Center mainly includes the following tools:
• Magnifier
Magnifier is a useful utility that enlarges the entire screen or part of the screen so that you can see the
items better.
• Narrator
Narrator is a screen reader that reads what is displayed on the screen aloud and describes events such as
error messages.
• On-Screen Keyboard
https://windows.microsoft.com/, and then search using any of the following
© Copyright Lenovo 2015, 2017 51
Page 70

If you prefer to type or enter data into your computer using a mouse, joystick, or other pointing device
instead of a physical keyboard, you can use On-Screen Keyboard. On-Screen Keyboard displays a visual
keyboard with all the standard keys. You can select keys using the mouse or another pointing device, or
you can tap to select the keys if your computer supports multi-touch screen.
• High Contrast
High Contrast is a feature that heightens the color contrast of some text and images on your screen. As a
result, those items are more distinct and easier to identify.
• Personalized keyboard
Adjust keyboard settings to make your keyboard easier to use. For example, you can use your keyboard
to control the pointer and make the keyboard easier to type certain key combinations.
• Personalized mouse
Adjust mouse settings to make your mouse easier to use. For example, you can change the pointer
appearance and make your mouse easier to manage windows.
Speech Recognition
Speech Recognition enables you to control your computer by voice.
Using only your voice, you can start programs, open menus, click objects on the screen, dictate text into
documents, and write and send e-mails. Everything you do with the keyboard and mouse can be done with
only your voice.
To use Speech Recognition, do the following:
1. Go to Control Panel, and ensure that you view Control Panel by Category.
2. Click Ease of Access ➙ Speech Recognition.
3. Follow the instructions on the screen.
Screen-reader technologies
Screen-reader technologies are primarily focused on software program interfaces, help systems, and various
online documents. For additional information about screen readers, see the following:
• Using PDFs with screen readers:
https://www.adobe.com/accessibility.html?promoid=DJGVE
• Using the JAWS screen reader:
https://www.freedomscientific.com/Products/Blindness/JAWS
• Using the NVDA screen reader:
https://www.nvaccess.org/
Screen resolution
You can make the text and images on your screen easier to read by adjusting the screen resolution of your
computer.
To adjust the screen resolution, do the following:
1. Right-click an empty area of the desktop and do the following:
• For Windows 7: Click Screen resolution.
• For Windows 10: Click Display settings ➙ Display.
2. Follow the instructions on the screen.
Note: Setting a resolution too low might prevent some items from fitting on the screen.
52
P50 User Guide
Page 71

Customizable item size
You can make the items on your screen easier to read by changing the item size.
• To change the item size temporarily, use the Magnifier tool in Ease of Access Center.
• To change the item size permanently, do the following:
– Change the size of all the items on your screen.
– For Windows 7:
1. Go to Control Panel, and ensure that you view Control Panel by Category.
2. Click Appearance and Personalization ➙ Display.
3. Change the item size by following the instructions on the screen.
4. Click Apply. This change will take effect the next time you log in to the operating system.
– For Windows 10:
1. Right-click an empty area of the desktop and then click Display settings ➙ Display.
2. Change the item size by following the instructions on the screen. For some applications, your
configuration might not take effect until you sign out and then sign in again.
– Change the size of the items on a Web page.
Press and hold Ctrl, and then press the plus-sign key (+) to enlarge or the minus-sign key (–) to reduce
the text size.
– Change the size of the items on the desktop or a window.
Note: This function might not work on some windows.
If your mouse has a wheel, press and hold Ctrl, and then scroll the wheel to change the item size.
Industry-standard connectors
Your computer provides industry-standard connectors that enable you to connect assistive devices.
Documentation in accessible formats
Lenovo provides electronic documentation in accessible formats, such as properly tagged PDF files or
HyperText Markup Language (HTML) files. Lenovo electronic documentation is developed to ensure that
visually impaired users can read the documentation through a screen reader. Each image in the
documentation also includes adequate alternative text so that visually impaired users can understand the
image when they use a screen reader.
Ergonomic information
Good ergonomic practice is important to get the most from your personal computer and to avoid discomfort.
Arrange your workplace and the equipment you use to suit your individual needs and the kind of work that
you perform. In addition, use healthy work habits to maximize your performance and comfort when using
your computer.
Working in the virtual office might mean adapting to frequent changes in your environment. Adapting to the
surrounding light sources, active seating, and the placement of your computer hardware, can help you
improve your performance and achieve greater comfort.
This example shows someone in a conventional setting. Even when not in such a setting, you can follow
many of these tips. Develop good habits, and they will serve you well.
Chapter 4. Accessibility, ergonomic, and maintenance information 53
Page 72
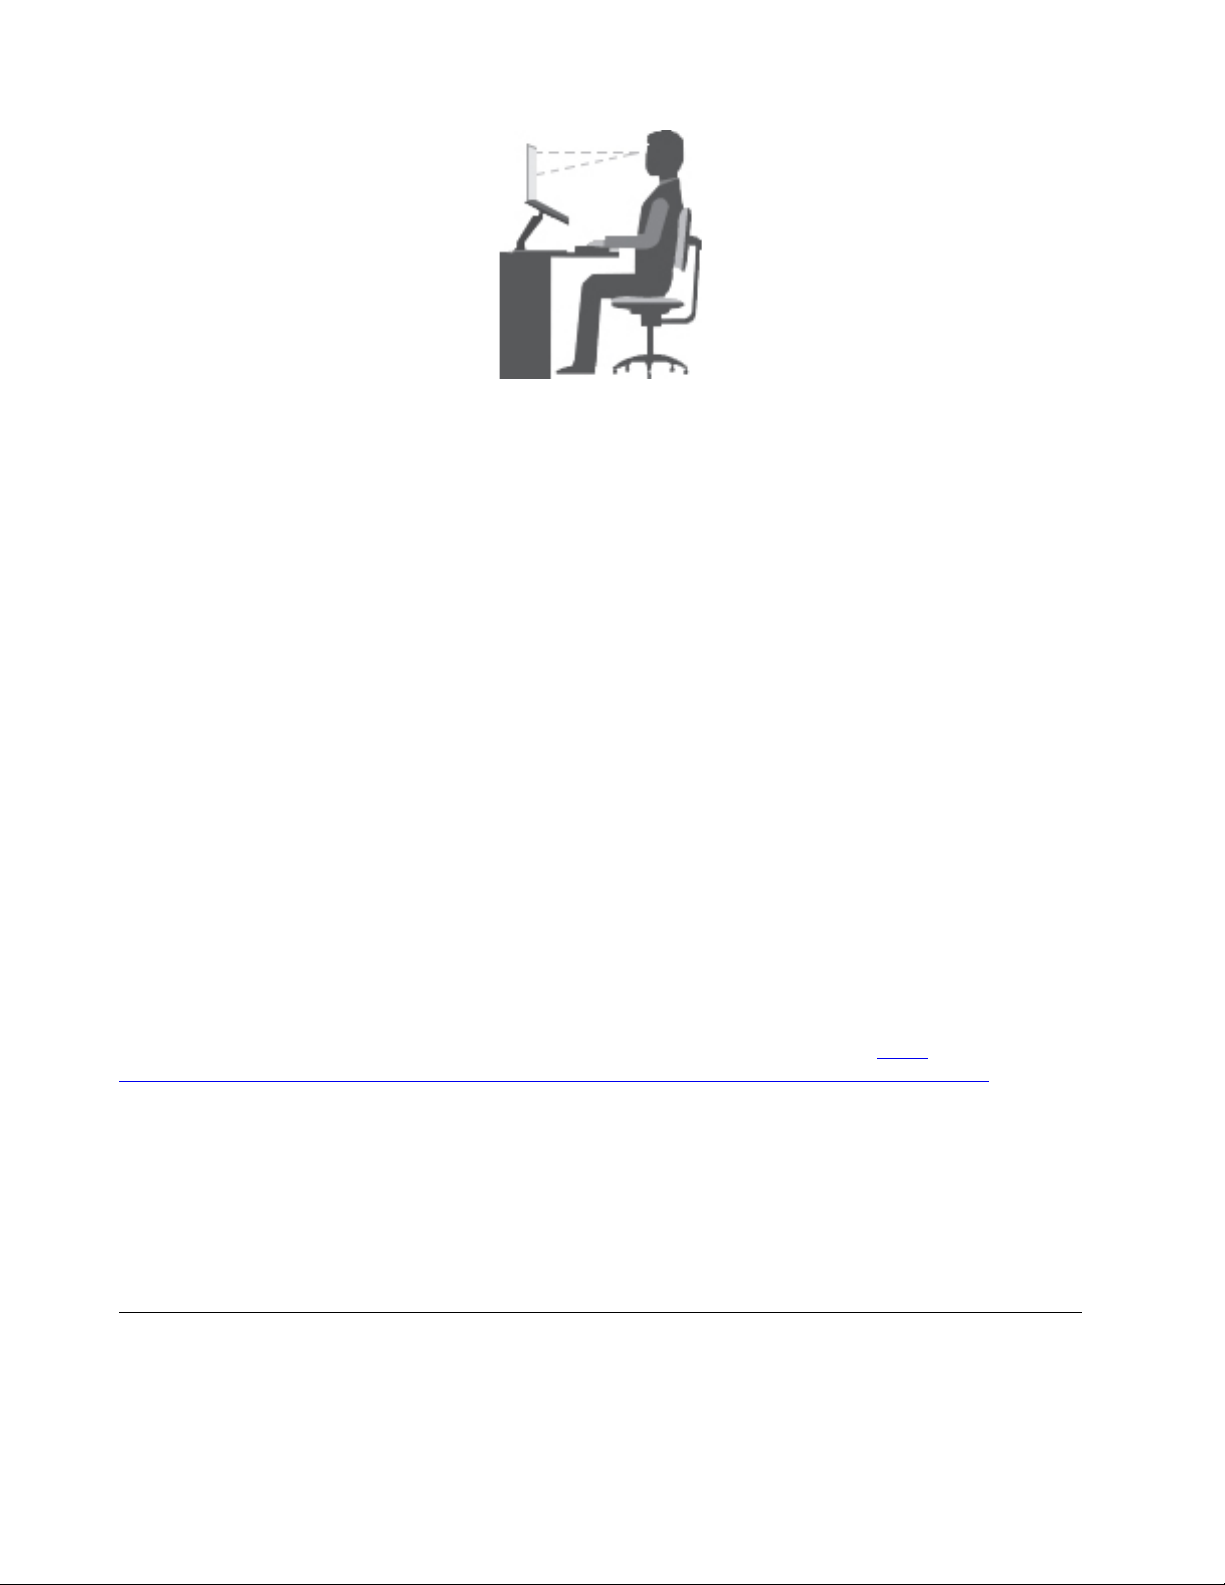
General posture: Make minor modifications in your working posture to deter the onset of discomfort caused
by long periods of working in the same position. Frequent short breaks from your work also help to prevent
minor discomfort associated with your working posture.
Display: Position the display to maintain a comfortable viewing distance of 510 mm to 760 mm (20 inches to
30 inches). Avoid glare or reflections on the display from overhead lighting or outside sources of light. Keep
the display screen clean and set the brightness to levels that enable you to see the screen clearly. Press the
brightness control keys to adjust display brightness.
Head position: Keep your head and neck in a comfortable and neutral (vertical, or upright) position.
Chair: Use a chair that gives you good back support and seat height adjustment. Use chair adjustments to
best suit your comfort posture.
Arm and hand position: If available, use chair arm rests or an area on your working surface to provide
weight support for your arms. Keep your forearms, wrists, and hands in a relaxed and neutral (horizontal)
position. Type with a soft touch without pounding the keys.
Leg position: Keep your thighs parallel to the floor and your feet flat on the floor or on a footrest.
What if you are traveling?
It might not be possible to observe the best ergonomic practices when you are using your computer while on
the move or in a casual setting. Regardless of the setting, try to observe as many of the tips as possible.
Sitting properly and using adequate lighting, for example, helps you maintain desirable levels of comfort and
performance. If your work area is not in an office setting, ensure to take special note of employing active
sitting and taking work breaks. Many ThinkPad product solutions are available to help you modify and
expand your computer to best suit your needs. You can find some of these options at
www3.lenovo.com/us/en/accessories-and-upgrades/c/ACCESSORY?menu-id=Accessories_Upgrades
your options for docking solutions and external products that provide the adjustability and features that you
want.
http://
. Explore
Questions about vision?
The visual display screens of ThinkPad notebook computers are designed to meet the highest standards.
These visual display screens provide you with clear, crisp images and large, bright displays that are easy to
see, yet easy on the eyes. Any concentrated and sustained visual activity can be tiring. If you have questions
on eye fatigue or visual discomfort, consult a vision-care specialist for advice.
Cleaning and maintenance
With appropriate care and maintenance your computer will serve you reliably. The following topics offer
information to help you keep your computer in top working order.
54
P50 User Guide
Page 73

Basic maintenance tips
Here are some basic points about keeping your computer functioning properly:
• Store packing materials safely out of the reach of children to prevent the risk of suffocation from plastic
bags.
• Keep your computer away from magnets, activated cellular phones, electrical appliances, or speakers
(more than 13 cm or 5 inches).
• Avoid subjecting your computer to extreme temperatures (below 5°C/41°F or above 35°C/95°F).
• Avoid placing any objects (including paper) between the display and the keyboard or the palm rest.
• Your computer display is designed to be opened and used at an angle slightly greater than 90 degrees. Do
not open the display beyond 180 degrees. Otherwise, the computer hinge might get damaged.
• Do not turn your computer over when the ac power adapter is plugged in, otherwise, it could break the
adapter plug.
• Before moving your computer, be sure to remove any media, turn off attached devices, and disconnect
cords and cables.
• When picking up your open computer, hold it by the bottom. Do not pick up or hold your computer by the
display.
• Only an authorized ThinkPad repair technician should disassemble and repair your computer.
• Do not modify or tape the latches to keep the display open or closed.
• Avoid directly exposing your computer and peripherals to the air from an appliance that can produce
negative ions. Wherever possible, ground your computer to facilitate safe electrostatic discharge.
Cleaning your computer
It is a good practice to clean your computer periodically to protect the surfaces and ensure trouble-free
operation.
Cleaning the computer cover: Wipe it with a lint-free cloth dampened in mild soap and water. Avoid
applying liquids directly to the cover.
Cleaning the keyboard: Wipe the keys one by one with a lint-free cloth dampened in mild soap and water. If
you wipe several keys at a time, the cloth might hook onto an adjacent key and possibly damage it. Avoid
spraying cleaner directly onto the keyboard. To remove any crumbs or dust from beneath the keys, you can
use a camera blower with a brush or use cool air from a hair dryer.
Cleaning the computer screen: Scratches, oil, dust, chemicals, and ultraviolet light can affect the
performance of your computer screen. Use a dry, soft lint-free cloth to wipe the screen gently. If you see a
scratchlike mark on your screen, it might be a stain. Wipe or dust the stain gently with a soft, dry cloth. If the
stain remains, moisten a soft, lint-free cloth with water or eyeglass cleaner, but do not apply liquids directly
to your computer screen. Ensure that the computer screen is dry before closing it.
Chapter 4. Accessibility, ergonomic, and maintenance information 55
Page 74

56 P50 User Guide
Page 75

Chapter 5. Security
This chapter provides information about how to protect your computer from unauthorized use.
Using passwords
This topic provides information about how to use the power-on password, supervisor password, and hard
disk password.
Passwords introduction
You can help prevent your computer from unauthorized use by using passwords. After you set a password, a
prompt is displayed on the screen each time you turn on the computer. Enter your password at the prompt.
You cannot use the computer unless you type the correct password.
If you have set a power-on password, a supervisor password, or a hard disk password, it unlocks
automatically when the computer resumes from sleep mode.
Note: If a Windows password has been set, you are prompted to enter it when the computer resumes from
sleep mode.
Power-on password
You can set a power-on password to help protect your computer against unauthorized access.
If you set a power-on password, the password prompt is displayed on the screen whenever you turn on the
computer. You must enter the correct password to start using the computer.
When this icon
Supervisor password
The supervisor password protects the system information stored in the ThinkPad Setup program. It provides
the following security features:
• If only a supervisor password is set, a password prompt is displayed when you try to start the ThinkPad
Setup program. Unauthorized users cannot change most of the system configuration options in the
ThinkPad Setup program without the password.
• The system administrator can use the supervisor password to access a computer even if the user of that
computer has set a power-on password. The supervisor password overrides the power-on password.
• The system administrator can set the same supervisor password on many ThinkPad notebook computers
to make administration easier.
Hard disk passwords
Setting a hard disk password prevents unauthorized access to the data on the hard disk drive. When a hard
disk password is set, you are prompted to type a valid password each time you try to access the hard disk
drive.
The following two types of hard disk passwords can help protect the information stored on the storage drive:
is displayed, type a power-on password or a supervisor password.
• User hard disk password
© Copyright Lenovo 2015, 2017 57
Page 76

If a user hard disk password has been set, but no master hard disk password has been, the user must
enter the user hard disk password to access files and applications on the storage drive.
• Master hard disk password
The master hard disk password also requires a user hard disk password. The master hard disk password
is set and used by a system administrator. It enables the administrator to access any storage drive in a
system like a master key. The administrator sets the master password; then assign a user password for
each computer in the network. The user can then change the user password as desired, but the
administrator still can get access by using the master password.
When a master hard disk password is set, only the administrator can remove the user hard disk password.
When this icon
press F1. When the icon changes to
, press F1 again.
Tips on using the hard disk passwords:
• You can set the minimum length of a hard disk password.
• If you set a hard disk password of over seven characters, the storage drive can be used only with a
computer that can recognize a hard disk password of over seven characters. If you then install the storage
drive in a computer that cannot recognize a hard disk password that contains more than seven
characters, you cannot access the drive.
• Record your password and store it in a safe place. If you forget the user hard disk password, or both user
and master hard disk passwords, Lenovo cannot reset your passwords or recover data from the storage
drive. You must take your computer to a Lenovo reseller or a marketing representative to have the storage
drive replaced. Proof of purchase is required, and a fee will be charged for parts and service.
Notes: The eDrive storage drives or Trusted Computing Group (TCG) Opal-compliant storage drives provide
self-encryption capabilities to secure your data.
• If a TCG Opal-compliant storage drive and a TCG Opal management software program are installed, and
the TCG Opal management software program is activated, the hard disk password is not available.
• If an eDrive storage drive is installed in your computer, and your computer is preinstalled with the
Windows 10 operating system, the hard disk password is not available.
is displayed, type a user hard disk password. To type a master hard disk password,
, type the master hard disk password. To return to the icon
Setting, changing, or removing a password
Before you start, print these instructions.
To set, change, or remove a password, do the following:
1. Restart the computer. When the logo screen is displayed, press F1 to start the ThinkPad Setup program.
2. Select Security ➙ Password by using the directional keys.
3. Depending on the password type, select Power-on Password, Supervisor Password, or Hard disk x
Password.
4. Follow the instructions on the screen to set, change, or remove a password.
You might want to record your password and store it in a safe place. Otherwise, if you forget the password,
you have to take your computer to a Lenovo reseller or a marketing representative to have the password
canceled.
58
P50 User Guide
Page 77

Hard disk security
To protect passwords from unauthorized security attacks, refer to the following tips to maximize security:
• Set a power-on password as well as a hard disk password for your internal storage device. Refer to the
procedures in “Setting, changing, or removing a password” on page 58. For security, a longer password is
recommended.
• To provide reliable security for the UEFI BIOS, use the security chip and a security application with a
Trusted Platform Module management feature. Refer to “Setting the security chip” on page 59.
• If a Disk Encryption storage device is installed in your computer, be sure to protect the contents of your
computer memory from unauthorized accesses by use of drive encryption software, such as Microsoft
Windows BitLocker
• Before you dispose of, sell, or hand over your computer, delete data stored on it. For more information,
refer to “Deleting data from your storage drive” on page 63.
The storage device built into your computer can be protected by the UEFI BIOS.
Using Windows BitLocker Drive Encryption
To help protect your computer against unauthorized access, use the drive encryption software, such as
Windows BitLocker Drive Encryption.
Windows BitLocker Drive Encryption is an integral security feature of some editions of the Windows
operating system. It can help you protect the operating system and data stored on your computer, even if
your computer is lost or stolen. BitLocker works by encrypting all user and system files, including the swap
and hibernation files.
®
Drive Encryption.
BitLocker uses a Trusted Platform Module to provide enhanced protection for your data and to ensure early
boot component integrity. A compatible TPM is defined as a V1.2 TPM.
To check the BitLocker status, go to Control Panel, and click System and Security ➙ BitLocker Drive
Encryption.
For more information about Windows BitLocker Drive Encryption, see the help information system of the
Windows operating system, or search for “Microsoft Windows BitLocker Drive Encryption Step-by-Step
Guide” on the Microsoft Web site.
Disk Encryption storage device
Some models contain the Disk Encryption storage device. This feature helps to protect your computer
against security attacks on media, NAND flash, or device controllers by use of a hardware encryption chip.
For the efficient use of the encryption feature, set a hard disk password for the internal storage device.
Setting the security chip
Strict security requirements are imposed on network client computers that transfer confidential information
electronically. Depending on the options you ordered, your computer might have an embedded security chip
(a cryptographic microprocessor). With the security chip, you can do the following:
• Protect your data and system
• Strengthen access controls
• Secure communications
Before you start, print these instructions.
Chapter 5. Security 59
Page 78

To set an item on the Security Chip submenu, do the following:
1. Restart the computer. When the logo screen is displayed, press F1 to start the ThinkPad Setup program.
2. Select Security ➙ Security Chip by using the directional keys.
3. Press Enter. The Security Chip submenu opens.
4. Move to an item you want to set by using the directional keys. When the item is highlighted, press Enter.
5. Set other items that you want to set.
6. Press F10. A Setup Confirmation window is displayed. Select Yes to save the configuration changes and
exit.
Notes:
• Ensure that the supervisor password has been set in ThinkPad Setup. Otherwise anyone can change the
settings for the security chip.
• When you clear the security chip, turn off your computer and then turn it on again after you set the security
chip to Active. Otherwise, the Clear Security Chip option is not displayed.
Using the fingerprint reader
Depending on the model, your computer might have a fingerprint reader. Fingerprint authentication can
replace your passwords, such as the Windows password, power-on password, and hard disk password. In
this way, you can log in to your computer simply and securely.
To enable fingerprint authentication, enroll your fingerprints first. During the enrollment, the fingerprints are
associated with the Windows password automatically. To associate your fingerprints with your power-on
password and hard disk password, manually create a connection.
Enrolling your fingerprints
It is recommended that you enroll more than one fingerprint in case of any injuries to your fingers. To enroll
your fingerprints, do the following:
• For Windows 7
1. Start the fingerprint program. For instructions on how to start the fingerprint program, see “Accessing
Lenovo programs” on page 14.
2. Enter the Windows password as required.
3. Follow the instructions on the screen to finish the enrollment.
For more information about how to use the fingerprint reader, refer to the help system of the fingerprint
program.
• For Windows 10
1. Open the Start menu and click Settings. If Settings is not displayed, click All apps to display all
programs, and then click Settings ➙ Accounts ➙ Sign-in options.
2. Follow the instructions on the screen to finish the enrollment.
Scanning your finger
To scan your finger, tap the fingerprint reader with the top joint of your finger and hold your finger there for
one or two seconds with a little pressure. Then lift the finger to complete one scan.
60
P50 User Guide
Page 79
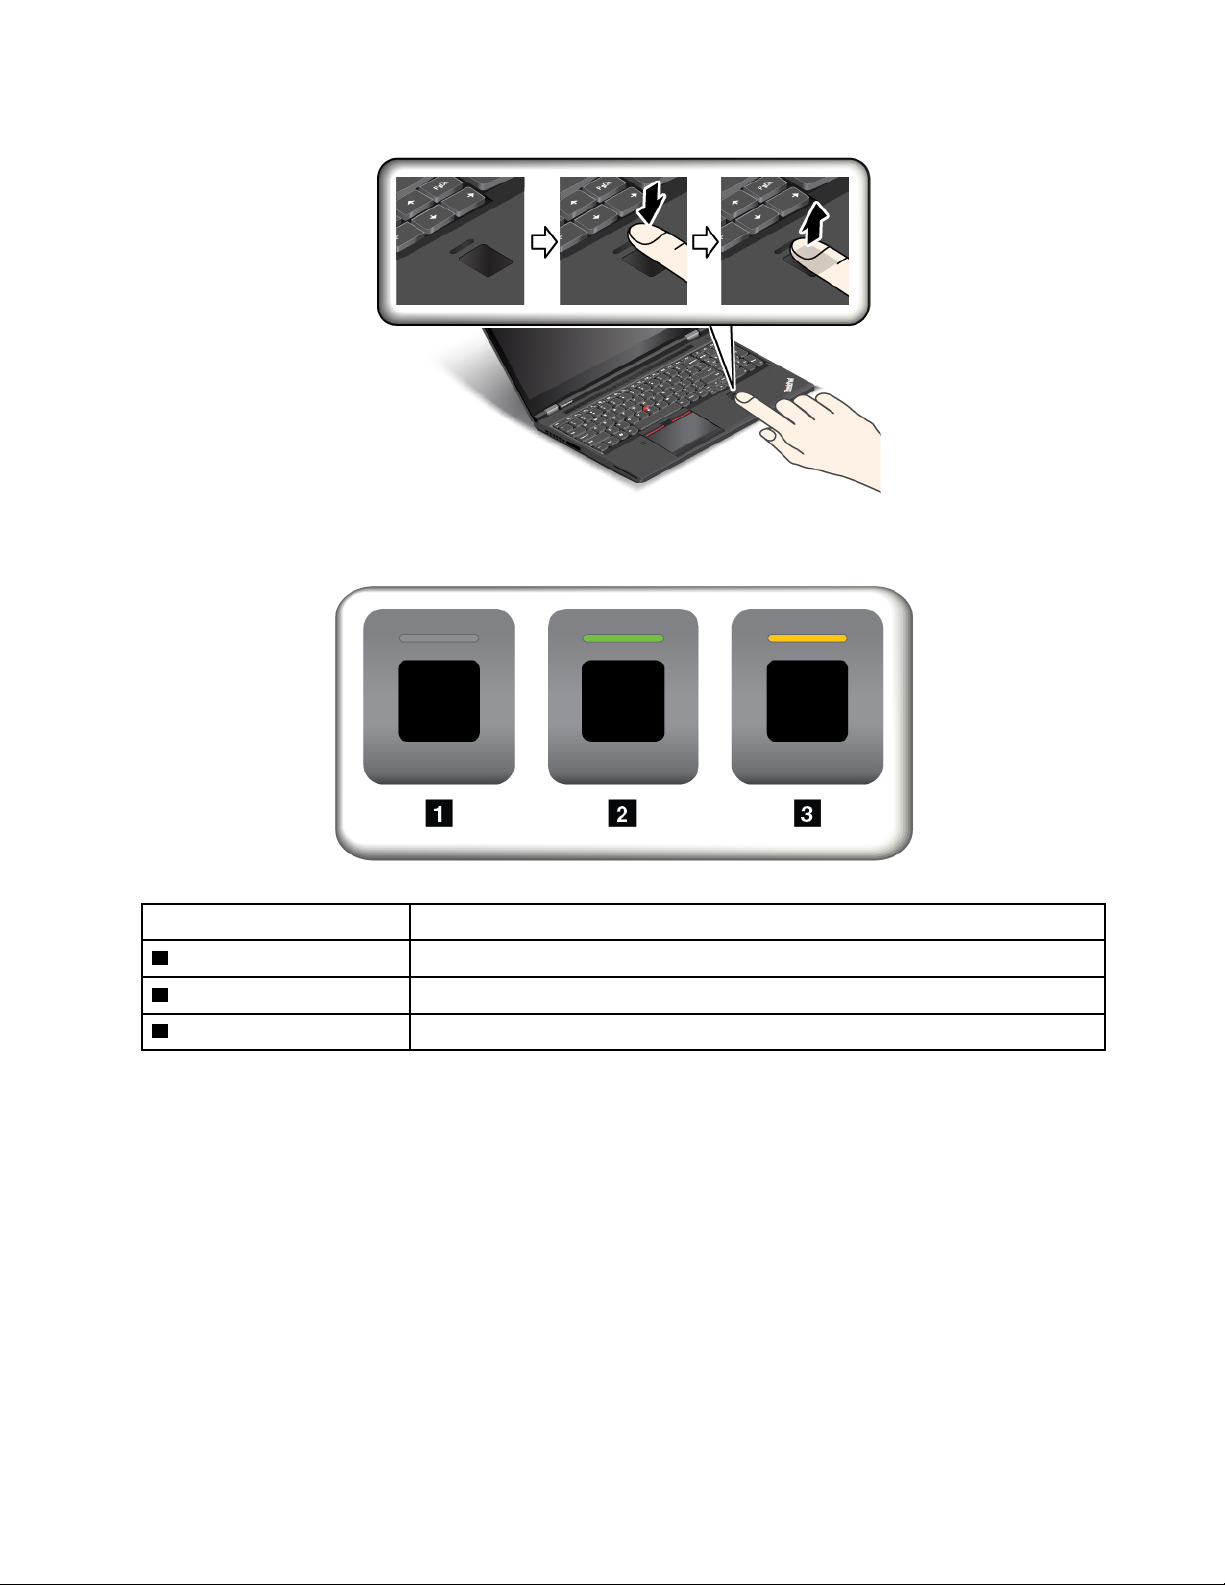
Behavior of the fingerprint reader indicator
Indicator behavior Description
1 Off The fingerprint reader is not ready for tapping.
2 Solid green The fingerprint reader is ready for tapping.
3 Amber, blinking The fingerprint cannot be authenticated.
Associating your fingerprints with your power-on password and hard disk password
To associate your fingerprints with your power-on password and hard disk password, do the following:
1. Turn off and then turn on the computer.
2. When prompted, scan your finger on the fingerprint reader.
3. Enter your power-on password, hard disk password, or both as required. The connection is created.
When you start the computer again, you can use your fingerprints to log in to the computer with no need to
enter your Windows password, power-on password, and hard disk password.
Attention: If you always use your fingerprint to log in to the computer, you might forget your passwords.
Write down your passwords, and keep them in a safe place. If you forget your power-on password, you must
take your computer to a Lenovo authorized servicer or a marketing representative to have the password
canceled. If you forget your hard disk password, Lenovo cannot reset your password or recover data from
the storage device. You must take your computer to a Lenovo authorized servicer or a marketing
Chapter 5. Security 61
Page 80

representative to have the storage device replaced. Proof of purchase is required, and a fee will be charged
for parts and service.
Setting the fingerprint reader
You can set the fingerprint reader in the fingerprint program if available. You also can change the following
settings in the ThinkPad Setup program:
• Predesktop Authentication: Enables or disables fingerprint authentication before the operating system is
loaded.
• Reader Priority: Defines the priority for the fingerprint readers if an external fingerprint reader is attached.
• Security Mode: Specifies the settings of the security mode.
• Password Authentication: Enables or disables the password authentication.
Note: This item is displayed only if High security mode is enabled.
• Reset Fingerprint Data: Select this item to erase all of the fingerprint data stored in either the internal or
external fingerprint reader.
To change the settings in the ThinkPad Setup program, see “Using the ThinkPad Setup program” on page
68.
Maintaining the fingerprint reader
The following actions could damage the fingerprint reader or cause it not to work properly:
• Scratching the surface of the reader with a hard, pointed object
• Scraping the surface of the reader with your fingernail or anything hard
• Using or touching the reader with a dirty finger
If you notice any of the following conditions, gently clean the surface of the reader with a dry, soft, lint-free
cloth:
• The surface of the reader is dirty or stained.
• The surface of the reader is wet.
• The reader often fails to enroll or authenticate your fingerprint.
If your finger has any of the following conditions, you might not be able to register or authenticate it:
• Your finger is wrinkled.
• Your finger is rough, dry, or injured.
• Your finger is stained with dirt, mud, or oil.
• The surface of your finger is different from the one when you enrolled your fingerprint.
• Your finger is wet.
• Your finger that you are currently using has not been enrolled before.
To improve the situation, try the following:
• Clean or wipe your hands to remove any excess dirt or moisture from the fingers.
• Enroll and use a different finger for authentication.
62
P50 User Guide
Page 81

Deleting data from your storage drive
Some of the data stored on the storage drive might be sensitive. Handing your computer over to someone
else without deleting the installed software, such as operating systems and programs, might even violate the
license agreements. Be sure to delete data stored on the storage drive before you dispose of, sell, or hand
over your computer.
You can use the following methods to delete data from the storage drive:
• Move the data to the Recycle Bin, and then empty the Recycle Bin.
• Format your storage drive, using the software to initialize it.
• Use the recovery program provided by Lenovo to bring the storage drive back to the factory default
settings.
These operations, however, only change the file location of the data; they do not delete the data itself. The
data is still there, even though it seems to be lost. Thus, it is sometimes possible to read the data by use of
special software for data recovery. There is a risk that people of bad faith might read and misuse the critical
data on storage drives for unexpected purposes.
To prevent leakage of data, it is important that you delete all the data from the hard disk drive when you
dispose of, sell, or hand over your computer. You can destroy the data physically by smashing the hard disk
drive with a hammer, or magnetically by means of strong magnetic power, thus making the data unreadable.
But it is recommended that you use the software (payware) or service (pay service) developed for that
purpose. The process might take several hours.
For disposing of data on the solid-state drive, Lenovo provides the Drive Erase Utility for Resetting the
Cryptographic Key and Erasing the Solid State Drive tool.
Some computers might support a Disk Encryption hard disk drive or Encryption solid-state drive and have
such a drive installed. You can logically dispose of all the data on the drive in a short time by erasing the
cryptographic key. The data encrypted with the old key is not physically erased but remains on the drive;
however, it cannot be decrypted without the old key. This feature is also available with the Drive Erase Utility
for Resetting the Cryptographic Key and Erasing the Solid State Drive tool.
Using firewalls
If your system is preinstalled with a firewall program, it protects against computer Internet security threats,
unauthorized access, intrusions, and Internet attacks. It also protects your privacy.
For more information about how to use the firewall program, see the help system that comes with the
program.
Protecting data against viruses
Lenovo provides a full version of antivirus software on your computer with a free 30-day subscription. After
30 days, you must renew the license to continue receiving the antivirus software updates.
For more information about your antivirus software, see the help system of your antivirus software.
Chapter 5. Security 63
Page 82

64 P50 User Guide
Page 83

Chapter 6. Advanced configuration
This chapter provides information to help you further configure the computer:
Installing a new operating system
In some situations, you might need to install a new operating system. This topic provides instructions on how
to install a new operating system.
Installing the Windows 7 operating system
Before you start, print these instructions.
Attention: The process of installing a new operating system deletes all the data on your internal storage
device, including the data that were stored in a hidden folder.
To install the Windows 7 operating system, do the following:
1. Ensure that you set the security chip to TPM 1.2. For more information, see “Setting the security chip”
on page 59.
2. Copy all the subdirectories and files in the C:\SWTOOLS directory to a removable storage device.
• The supplement files for the Windows 7 operating system are in the C:\SWTOOLS\OSFIXES directory.
• The device drivers are in the C:\SWTOOLS\DRIVERS directory.
• The preinstalled programs are in the C:\SWTOOLS\APPS directory.
3. Start the ThinkPad Setup program. See “Using the ThinkPad Setup program” on page 68.
4. Select Startup ➙ Boot to display the Boot Priority Order submenu.
5. Select the drive that contains the operating system installation program, for example, USB HDD. Then
press Esc.
6. Select Startup ➙ UEFI/Legacy Boot. Then do one of the following:
• To install the Windows 7 (32-bit) operating system, select Legacy Only or Both.
• To install the Windows 7 (64-bit) operating system in Legacy mode, select Legacy Only.
• To install the Windows 7 (64-bit) operating system in UEFI mode, select UEFI Only.
Note: For computers that support RAID, you can install the Windows 7 operating system onto the drive
only in UEFI mode. In this case, ensure that you always select UEFI Only.
7. Press F10 to exit the ThinkPad Setup program.
8. Insert the Windows 7 operating system installation DVD into the optical drive, and restart the computer.
Notes:
• If you are starting the installation DVD image from an external USB device or if your computer has an
NVM Express drive installed, do additional configurations before you start. For more information, go
to
http://www.lenovo.com/support/installwin7viausb3.
• If an NVM Express drive is installed, additional drivers also are required. For more information, go to
https://support.microsoft.com/en-us/kb/2990941.
9. Restore the C:\SWTOOLS directory that you backed up before installing the Windows 7 operating system.
10. Install the device drivers. See “Installing device drivers” on page 67.
© Copyright Lenovo 2015, 2017 65
Page 84

11. Install the Windows 7 fix modules. You can find the Windows 7 fix modules in the C:\SWTOOLS\OSFIXES\
directory. For more information, go to the Microsoft Knowledge Base home page at:
http://support.microsoft.com/
12. Install the registry patches, for example the Enabling Wake on LAN from Standby for ENERGY STAR
patch. To download and install the registry patches, go to the Lenovo Support Web site at:
http://www.lenovo.com/support
Note: After installing the operating system, do not change the initial UEFI/Legacy Boot setting in the
ThinkPad Setup program. Otherwise the operating system will not start correctly.
When you install the Windows 7 operating system, you might need one of the following country or region
codes:
Country or region Code Country or region Code
China SC
Denmark DK Norway
Finland FI Spain SP
France FR
Germany GR
Italy IT
Japan JP
Netherlands NL
NO
Sweden SV
Taiwan and Hong Kong
United States US
TC
Installing the Windows 10 operating system
Before you start, print these instructions.
Attention: The process of installing a new operating system deletes all the data on your internal storage
drive, including the data that were stored in a hidden folder.
To install the Windows 10 operating system, do the following:
1. Ensure that you set the security chip to TPM 2.0. For more information, see “Setting the security chip”
on page 59.
2. Connect the drive that contains the operating system installation program to the computer.
3. Start the ThinkPad Setup program. See “Using the ThinkPad Setup program” on page 68.
4. Select Startup ➙ Boot to display the Boot Priority Order submenu.
5. Select the drive that contains the operating system installation program, for example, USB HDD. Then
press Esc.
6. Select Restart and ensure that OS Optimized Defaults is enabled. Then press F10 to save the settings
and exit the ThinkPad Setup program.
7. Follow the on-screen instructions to install the device drivers and necessary programs. See “Installing
device drivers” on page 67.
8. After installing the device drivers, apply Windows Update to get the latest modules, for example the
security patches.
9. Depending on your preference, install Lenovo programs. For information about Lenovo programs, see
“Lenovo programs” on page 14.
Note: After installing the operating system, do not change the initial UEFI/Legacy Boot setting in the
ThinkPad Setup program. Otherwise, the operating system will not start correctly.
66
P50 User Guide
Page 85

When you install the Windows 10 operating system, you might need one of the following country or region
codes:
Country or region Code Country or region Code
China SC Netherlands NL
Denmark DK Norway NO
Finland FI
France FR Sweden SV
Germany GR Taiwan and Hong Kong TC
Italy IT
Japan JP
Spain SP
United States US
Installing device drivers
Device drivers are programs that contain instructions for the operating system about how to operate or
“drive” a certain piece of hardware. Each hardware component on your computer has its own specific driver.
If you add a component, the operating system must be instructed on how to operate that piece of hardware.
After you install the driver, the operating system can recognize the hardware component and understand
how to use it.
Note: Because drivers are programs, like any other file on your computer, they are susceptible to corruption
and might not perform properly if corruption occurs.
It is not always necessary to download the latest drivers. However, you should download the latest driver for
a component when you notice poor performance from that component or when you added a component.
This action might eliminate the driver as the potential cause of a problem.
Getting the latest drivers from the Web site
You can download and install updated device drivers from the Lenovo Support Web site by doing the
following:
1. Go to
2. Select the entry for your computer and then follow the instructions on the screen to download and install
http://www.lenovo.com/support.
necessary software.
Getting the latest drivers using preinstalled programs
ThinkPad notebook computers provide the following preinstalled programs that you can use to download
and install updated device drivers.
• For Windows 7: System Update
• For Windows 10: Lenovo Companion
The system update function of System Update or Lenovo Companion helps you keep the software on your
computer up-to-date. Update packages are stored on Lenovo servers and can be downloaded from the
Lenovo Support Web site. Update packages can contain applications, device drivers, UEFI BIOS flashes, or
software updates. When System Update or Lenovo Companion connects to the Lenovo Support Web site,
the program automatically recognizes the following information and determines what updates are available
for your computer:
• Machine type and model of your computer
• Installed operating system
Chapter 6. Advanced configuration 67
Page 86

• Language of the operating system
System Update or Lenovo Companion then displays a list of update packages and categorizes each update
as critical, recommended, or optional to help you understand the importance. You have complete control of
which updates to download and install. After you select the update packages you want, System Update or
Lenovo Companion automatically downloads and installs the updates.
System Update or Lenovo Companion is preinstalled on your computer and is ready to run. The only
prerequisite is an active Internet connection. You can start the program manually, or you can use the
schedule feature to enable the program to search for updates automatically at specified intervals. You also
can predefine scheduled updates to search by the following severity so the list you choose from contains
only those update types that you need:
• Critical updates (Windows 7 and Windows 10)
• Critical and recommended updates (Windows 7)
For more information about how to use System Update or Lenovo Companion, see the help system of the
program.
Using the ThinkPad Setup program
The ThinkPad Setup program enables you to select the preferred settings for your computer through
configuring the BIOS.
Configuring ThinkPad Setup
The ThinkPad Setup program menu lists various items about system configuration.
Attention: The default configurations are already optimized for you. Improper change of the configurations
might cause unexpected results.
To configure ThinkPad Setup, do the following:
1. Restart the computer. When the logo screen is displayed, press F1. The ThinkPad Setup program starts.
Note: If you are required to enter the supervisor password, enter the correct password. You also can
press Enter to skip the password prompt and start the ThinkPad Setup program. If you do not enter the
password, you cannot change the configurations that are protected by the supervisor password.
2. Use the arrow keys to select a tab; or use the arrow keys to locate an item and press Enter to select it.
Then the supported submenu is displayed.
3. Default values are in boldface. Set the value of an item by doing one of the following:
• Press F6 to change to a higher value.
• Press F5 to change to a lower value.
4. Press the Esc key to exit the submenu and return to the parent menu. Then use the same method
mentioned above to change other configurations.
5. When you complete the configuration, press F10 to save and exit. You also can select the Restart tab in
the ThinkPad Setup menu, and restart your computer with one of the provided options.
You can press F9 to restore to the default settings.
68
P50 User Guide
Page 87

Changing the startup sequence
In some cases, you might have to change the startup sequence so that the computer starts from a desired
device when powered on. Read this topic to learn how to change the computer startup sequence.
Attention:
• After you change the startup sequence, ensure that you select the correct device during a copy, a save, or
a format operation. If you select the wrong device, the data on that device might be erased or overwritten.
• If you are using the Windows BitLocker Drive Encryption feature and your computer has a Trusted
Platform Module, do not change the startup sequence. BitLocker Drive Encryption locks the computer
when it detects the change of startup sequence.
To change the startup sequence, do the following:
1. Access the ThinkPad Setup program and select Startup ➙ Boot. Then press Enter. The default device
order list is displayed.
2. Set the startup sequence as you desired.
3. Press F10 to save the changes and restart the system.
You also can change the startup sequence temporarily by doing the following:
1. Turn off the computer.
2. Turn on the computer. When the logo screen is displayed, press the F12 key.
3. Select the device that you want the computer to start from. Then press Enter.
Note: The Boot menu will be displayed if the computer cannot start from any devices or the operating
system cannot be found.
Updating the UEFI BIOS
The UEFI BIOS is the first program that the computer runs when the computer is turned on. The UEFI BIOS
initializes the hardware components, and loads the operating system and other programs.
When you install a new program, device driver, or hardware component, you might be informed to update
the UEFI BIOS. You can update the UEFI BIOS by starting your computer from a flash update disc or a flash
update program running in the Windows environment.
The requirements for flash update are as follows:
• The computer must be started over LAN.
• The computer must be engaged in the Preboot eXecution Environment (PXE).
• A network-management program must be installed on the computer of the network administrator.
For instructions on how to update the UEFI BIOS, go to
http://www.lenovo.com/support.
BIOS menu
This topic introduces the following BIOS menus of your computer:
• Main menu
• Config menu
• Date/Time menu
• Security menu
• Startup menu
Chapter 6. Advanced configuration 69
Page 88

• Restart menu
Note: Depending on the model and operating system, the menu items and the default value might change
without notice.
Main menu
When you enter the ThinkPad Setup program, you will first see the Main menu as follows:
• UEFI BIOS Version
• UEFI BIOS Date
• Embedded Controller Version
• ME Firmware Version
• Machine Type Model
• System-unit serial number
• System board serial number
• Asset Tag
• CPU Type
• CPU Speed
• Installed Memory
• UUID
• MAC Address (Internal LAN)
• Preinstalled operating system license
• UEFI Secure Boot
• OA3 ID
• OA2
Config menu
To change the configuration of your computer, select the Config tab from the ThinkPad Setup menu.
The following table lists the Config menu items. Default values are in boldface. The menu items might
change without notice. Depending on the model, the default value might vary.
Attention: The default configurations are already optimized for you. Improper change of the configurations
might cause unexpected results.
70
P50 User Guide
Page 89

Table 2. Config menu items
Menu item
Network
Submenu item
Wake On LAN
Ethernet LAN Option
ROM (for Legacy Only
boot mode or Both
with Legacy first)
UEFI IPv4 Network
Stack (for UEFI Only
boot mode or Both
with UEFI first)
Value
• Disabled
• AC only
• AC and Battery
• Disabled
• Enabled
• Disabled
• Enabled
Comments
Enable the computer to power on when
the Ethernet controller receives a magic
packet (a special network message).
If you select AC Only, Wake on LAN is
enabled only when the ac power adapter
is attached.
If you select AC and Battery, Wake on
LAN is enabled with any power sources.
Notes:
• The magic packet type Wake on LAN
requires ac power.
• The Wake on LAN function does not
work when a hard disk password is
set.
Load the Ethernet LAN Option ROM to
enable startup from an integrated
network device.
Enable or disable Internet Protocol
Version 4 (IPv4) network stack for UEFI
environment.
UEFI IPv6 Network
Stack
(for UEFI Only boot
mode or Both with
UEFI first)
UEFI PXE Boot Priority
(for UEFI Only boot
mode or Both with
UEFI first for boot
capability and IPv6
and IPv4 stacks are
both enabled.)
USB USB UEFI BIOS
Support
Always On USB
• Disabled
• Enabled
• IPv6 First
• IPv4 First
• Disabled
• Enabled
• Disabled
• Enabled
Enable or disable Internet Protocol
Version 6 (IPv6) network stack for UEFI
environment.
Select network stack priority for UEFI
PXE boot.
Enable or disable boot support for USB
storage devices.
If you select Enabled, the external USB
devices can be charged through USB
connectors even when the computer is
in low-power mode (sleep, hibernate, or
power-off).
Note: If you select Enabled, USB wake
up function is not supported on Always
On USB connector.
Chapter 6. Advanced configuration 71
Page 90

Table 2. Config menu items (continued)
Menu item
Keyboard/Mouse
Submenu item
– Charge in Battery
Mode
TrackPoint
Trackpad
Fn Sticky key
F1–F12 as primary
function
Value
• Disabled
• Enabled
• Disabled
• Enabled
• Disabled
• Enabled
• Disabled
• Enabled
• Disabled
• Enabled
Comments
If you select Enabled, the external USB
devices can be charged through USB
connectors even when system is in
hibernation or power-off mode and in
battery mode.
Enable or disable the built-in TrackPoint
pointing device.
Note: If you want to use an external
mouse, select Disabled.
Enable or disable the built-in trackpad.
Note: If you want to use an external
mouse, select Disabled.
When the option is enabled, you can
press the Fn key to keep it in a pressed
condition; then press the desired
function key. The action is equivalent to
pressing the required key simultaneously
with the Fn key. When you press the Fn
key twice, the state is locked until you
press the Fn key again.
Enable the F1-F12 function or the
special function printed as an icon on
each key as the primary function.
Fn and Ctrl Key swap
Display Boot Display Device
• Disabled
• Enabled
• ThinkPad LCD
• DisplayPort
• Display on dock
Enabled: Executes the F1-F12 function.
Disabled: Executes the special
function.
To temporarily switch the above two
options, press Fn+Esc to enable
FnLock. The FnLock indicator is on
when FnLock is enabled.
Enable exchanges of Fn and Ctrl key
action at the bottom-left of the
keyboard.
Disabled: Fn key and Ctrl key behavior
is as printed on the keyboard.
Enabled: Fn key works as Ctrl key. Ctrl
key works as Fn key.
Select the display device that is to be
activated at boot time. This selection is
effective for boot time, password
prompt, and ThinkPad Setup.
72 P50 User Guide
Page 91

Table 2. Config menu items (continued)
Menu item
Power
Submenu item
Graphics Device
Shared Display Priority
Total Graphics
Memory
Boot Time Extension
Intel SpeedStep
®
technology
(Intel SpeedStep
mounted models only)
Value
• Discrete
Graphics
• Hybrid
Graphics
• DisplayPort
• Display on
Dock
• 256 MB
• 512 MB
• Disabled
• 1 second
• 2 seconds
• 3 seconds
• 5 seconds
• 10 seconds
• Disabled
• Enabled
Mode for AC
• Maximum
Performance
• Battery
Optimized
Mode for Battery
• Maximum
Performance
• Battery
Optimized
Comments
Enable the Discrete Graphics mode or
the Hybrid Graphics mode.
Discrete Graphics mode provides better
graphics performance.
Hybrid Graphics mode works as
integrated graphics and it consumes
less battery power.
Select the priority between shared
display outputs. DisplayPort and Display
on Dock share a single display output.
This option chooses which one is
prioritized.
Allocate the total memory which Intel
internal graphics shares.
Note: If you select 512 MB, the
maximum usable memory might be
reduced on 32–bit operating system.
This option defines the amount of time to
extend the boot process, in seconds.
The system cannot detect some external
monitors during boot because they need
a few seconds to be ready. Try this
option if the monitor being used does
not display the boot screen.
Select the mode of Intel SpeedStep
technology at runtime.
Maximum Performance: Always
highest speed.
Battery Optimized: Always lowest
speed.
Disabled: No runtime support, highest
speed.
Chapter 6. Advanced configuration 73
Page 92

Table 2. Config menu items (continued)
Menu item
Submenu item
Adaptive Thermal
Management
CPU Power
Management
ExpressCard Speed
Value
Scheme for AC
• Maximize
Performance
• Balanced
Scheme for
Battery
• Maximize
Performance
• Balanced
• Disabled
• Enabled
• Generation 1
• Automatic
Comments
Select a thermal management scheme to
use.
Maximize Performance: Reduce
microprocessor throttling.
Balanced: Balance sound, temperature,
and performance.
Note: Each scheme affects fan sound,
temperature, and performance.
Enable or disable the power-saving
feature that stops the microprocessor
clock automatically when there are no
system activities. Normally, it is not
necessary to change the setting.
Set the transfer speed of the
ExpressCard to the desired level of
performance.
• Generation 1: Some ExpressCards
are not Generation 2 aware, thus
incorrectly respond that they can
handle the higher transfer speed.
• Automatic: It allows the ExpressCard
to specify which transfer speed they
support.
PCI Express Power
Management
Power On with AC
Attach
Beep and Alarm Password Beep
Keyboard Beep
• Enabled
• Disabled
• Disabled
• Enabled
• Disabled
• Enabled
• Enabled
• Disabled
Enables or disables a feature that
automatically adjusts power
management when there is no PCI
Express activity. Normally, it is not
necessary to change this setting.
Enable or disable a feature that powers
on the system when the ac power
adapter is attached.
If you select Enabled, the system is
powered on when the ac power adapter
is attached. When the system is in
hibernate state, the system resumes.
If you select Disabled, the system is not
powered on nor resumed when the ac
power adapter is attached.
Enable this option to have a beep sound
when the system is waiting for a poweron, hard disk, or supervisor password.
Different beeps will sound when the
entered password matches or does not
match the configured password.
Enable or disable keyboard beep when
unmanageable key combinations are
pressed.
74 P50 User Guide
Page 93

Table 2. Config menu items (continued)
Menu item
RAID
Submenu item
RAID Mode Option
RAID Storage
Intel Rapid Storage
Technology User
Interface
CPU Core Multi-Processing
Intel (R) HyperThreading Technology
Value
• Disabled
• Enabled
• SATA HDD
• M.2 SSD
• Enabled
• Disabled
• Enabled
• Disabled
Comments
Select the mode in which the serial SATA
controller operates:
Enabled: RAID mode.
Disabled: AHCI mode.
Note: This option is available if RAID is
supported.
Note: This option is available when
RAID is enabled.
Enter Intel Rapid Storage Technology
Configuration Utility to manage RAID
volumes on the Intel RAID Controller
Note: This option is available if RAID is
supported.
Enable: This selection enables
additional execution core units within a
CPU.
Disable: This selection enables only one
execution core unit within a CPU.
Enable: This selection enables
additional CPU threads. These Threads
appear as additional processors but
share some resources with the other
threads within a CPU.
Intel AMT
Intel AMT Control
• Disabled
• Enabled
• Permanently
Disabled
Disable: This selection enables only one
thread within each execution core unit.
If you select Enabled, Intel AMT (Active
Management Technology) is configured
and additional setup items are provided
in MEBx (Management Engine BIOS
Extension) Setup.
If you select Permanently Disabled, you
will never be able to enable it again. Be
cautious when you want to use this
option.
Note: You can enter the MEBx Setup
menu by pressing the Ctrl+P key
combination in the Startup Interrupt
Menu window. To display the Startup
Interrupt Menu window, press the black
button or Enter key during the power-on
self-test (POST).
Chapter 6. Advanced configuration 75
Page 94

Table 2. Config menu items (continued)
Menu item
Submenu item
CIRA Timeout
Console Type
Value
0-255
Note: The default
value is 60
seconds.
• PC ANSI
• VT100+
• PC-ANSI
• VT-UTF8
Comments
Set the timeout option for CIRA
connection to be established. Selectable
second values are from 1 to 254.
If you select 0, use 60 seconds as the
default timeout value.
If you select 255, the waiting time for
establishing a connection is unlimited.
Select the console type for AMT.
Note: This console type should match
the Intel AMT remote console.
Date and Time menu
To change the date or time of your computer, select the Date/Time tab from the ThinkPad Setup menu.
Then do the following:
1. Use the cursor keys to select System Date or System Time.
2. Type a date or time.
Security menu
To change the security settings of your computer, select the Security tab from the ThinkPad Setup menu.
The following table lists the Security menu items. Default values are in boldface. The menu items might
change without notice. Depending on the model, the default value might vary.
Attention: The default configurations are already optimized for you. Improper change of the configurations
might cause unexpected results.
Table 3. Security menu items
Menu item Submenu item Value Comments
Password Supervisor
Password
Lock UEFI BIOS
Settings
• Disabled
• Enabled
• Disabled
• Enabled
See “Using passwords” on page 57.
Enable or disable the function that protects
items in ThinkPad Setup from being changed by
a user who does not have the supervisor
password. By default, this is set to Disabled. If
you set the supervisor password and enable this
function, no one but you can change any items
in ThinkPad Setup.
76 P50 User Guide
Page 95

Table 3. Security menu items (continued)
Menu item
Submenu item
Password at
Unattended Boot
Password at Restart
Password at Boot
Device List
Value
• Disabled
• Enabled
• Disabled
• Enabled
• Disabled
• Enabled
Comments
If you select and enable Password at
unattended boot, a password prompt is
displayed when the computer is turned on, from
either a power-off state or hibernation state, by
an unattended event such as a Wake on LAN
attempt. If you select Disabled, no password
prompt is displayed; the computer goes ahead
and loads the operating system. To prevent
unauthorized access, set the user
authentication on the operating system.
If you select and enable Password at restart, a
password prompt is displayed when you restart
the computer. If you select Disabled, no
password prompt is displayed; the computer
goes ahead and loads the operating system. To
prevent unauthorized access, set the user
authentication on the operating system.
If the Security password is set, this option is
used to specify whether the Security password
must be entered to display the F12 boot device
list.
Select Enabled to prompt for the Security
password. Select Disabled to proceed without
any user action required.
Password Count
Exceeded Error
Set Minimum Length
Power-On Password
Hard Disk X
Password
Fingerprint Predesktop
Authentication
Reader Priority
• Disabled
• Enabled
• Disabled
• x characters
(4≤x≤12)
• Disabled
• Enabled
• Disabled
• Enabled
• Disabled
• Enabled
• External ➙
Internal
• Internal Only
Select Enabled to show the POST 0199 error
and prompt for the Security password. Select
Disabled to hide the POST 0199 error and
proceed without any user action needed.
Specify a minimum length for power-on
passwords and hard disk passwords. If you set
the supervisor password and specify a minimum
length for passwords, no one but you can
change the length.
Power-On Password prevents unauthorized
users from booting your computer. See “Using
passwords” on page 57.
Hard Disk Password prevents unauthorized
users from accessing the date on the hard disk
drive. In addition to the user hard disk
password, an optional master hard disk
password can be used to give access to an
administrator. See “Using passwords” on page
57.
Enable or disable fingerprint authentication
before the operating system is loaded.
If External ➙ Internal is selected, an external
fingerprint reader is used if attached. Otherwise,
an internal fingerprint reader is used. If Internal
Only is selected, an internal fingerprint reader is
used.
Chapter 6. Advanced configuration 77
Page 96

Table 3. Security menu items (continued)
Menu item
Security Chip Security Chip
Submenu item
Security Mode
Password
Authentication
Reset Fingerprint
Data
Selection
Value
• Normal
• High
• Disabled
• Enabled
• Enter
• Discrete TPM
• Intel PTT
Comments
If fingerprint authentication fails, you still can
start the computer by entering a password. If
you have selected Normal, enter a power-on
password or a supervisor password; if you have
selected High, enter a supervisor password.
Enable or disable password authentication. This
item is displayed only if you have selected
High for the Security Mode option.
Note: This item is displayed when Security
Mode is set to High.
This option is used to erase all fingerprint data
stored in the fingerprint reader and reset
settings to the factory state. As a result, any
power-on security features previously enabled
will not be able to work until they are re-enabled
in the fingerprint software.
If you select Discrete TPM, you can use a
discrete TPM chip with TPM 1.2 mode. If you
select Intel PTT, you can use Intel Platform
Trusted technology (PTT) with TPM 2.0 mode.
If you change from Intel PTT to Discrete TPM,
a message pops up that all encryption keys will
be cleared in the security chip. If you want to
continue, select Yes.
Security Chip
• Active
• Inactive
• Disabled
• Enabled
• Disabled
(For Intel PTT)
If you change from Discrete TPM to Intel PTT,
a message pops up that all encryption keys will
be cleared in the security chip. Intel AMT and
Intel TXT are disabled when the security chip is
set to Intel PTT. If you want to continue, select
Yes.
Note: Intel PTT can be used with the Windows
8 or later operating system.
If you select Active, the security chip is
functional. If you select Inactive, the security
chip is visible, but it is not functional. If you
select Disabled, the security chip is hidden and
it is not functional.
Note: This item is displayed when Security
Chip Selection is set to Discrete TPM.
If you select Enabled, the security chip is
functional. If you select Disabled, the security
chip is hidden and it is not functional.
Note: This item is displayed when Security
Chip Selection is set to Intel PTT.
78 P50 User Guide
Page 97

Table 3. Security menu items (continued)
Menu item
UEFI BIOS Update
Option
Submenu item
Clear Security Chip
Intel TXT Feature
Intel TXT Feature
* Unselectable when
Intel PTT is enabled.
Physical Presence
for Provisioning
Physical Presence
for Clear
Flash BIOS
Updating by EndUsers
Value
• Enter
• Disabled
• Enabled
• Disabled
• Disabled
• Enabled
• Disabled
• Enabled
• Disabled
• Enabled
Comments
Clear the encryption key.
Note: This item is displayed only if you have
selected Active or Enabled for the Security
Chip option.
Enable or disable Intel Trusted Execution
Technology. Intel Trusted Execution Technology
is a hardware based security foundation to build
and maintain a chain if trust, to protect
information from software based attacks.
Note:
This item is displayed when Security Chip is set
to Active and Security Chip Selection is set to
Discrete TPM.
Unselectable when Intel PTT is enabled.
Note:
This item is displayed when Security Chip is set
to Enabled and Security Chip Selection is set to
Intel PTT.
This option enables or disables the confirmation
message when you change the settings of the
security chip.
This option enables or disables the confirmation
message when you clear the security chip.
If you select Enabled, all users can update the
UEFI BIOS. If you select Disabled, only the
person who knows the supervisor password can
update the UEFI BIOS.
Secure RollBack
Prevention
Memory Protection Execution
Prevention
Virtualization Intel Virtualization
Technology
Intel VT-d Feature
I/O Port Access
Ethernet LAN
• Disabled
• Enabled
• Disabled
• Enabled
• Disabled
• Enabled
• Disabled
• Enabled
• Disabled
• Enabled
If you select Disabled, you can flash the older
version UEFI BIOS.
Some computer viruses and worms cause
memory buffers to overflow. By selecting
Enabled you can protect your computer against
attacks by such viruses and worms. If after
choosing Enabled you find that a program does
not run correctly, select Disabled and reset the
setting.
If you select Enabled, a Virtual Machine Monitor
(VMM) can utilize the additional hardware
capabilities provided by Intel Virtualization
Technology.
Intel VT-d stands for Intel Virtualization
Technology for Directed I/O. When enabled, a
VMM can utilize the platform infrastructure for I/
O virtualization.
If you select Enabled, you can use the Ethernet
LAN device.
Chapter 6. Advanced configuration 79
Page 98

Table 3. Security menu items (continued)
Menu item
Internal Device
Access
Submenu item
Wireless LAN
Wireless WAN
Bluetooth
USB Port
Memory Card Slot
Smart Card Slot
Integrated Camera
Microphone
Fingerprint Reader
Thunderbolt™
ExpressCard Slot
Bottom Cover
Tamper Detection
Value
• Disabled
• Enabled
• Disabled
• Enabled
• Disabled
• Enabled
• Disabled
• Enabled
• Disabled
• Enabled
• Disabled
• Enabled
• Disabled
• Enabled
• Disabled
• Enabled
• Disabled
• Enabled
• Disabled
• Enabled
• Disabled
• Enabled
• Disabled
• Enabled
Comments
If you select Enabled, you can use the Wireless-
LAN connection.
If you select Enabled, you can use the wireless-
WAN device.
If you select Enabled, you can use Bluetooth
devices.
If you select Enabled, you can use the USB
connectors.
If you select Enabled, you can use the memory
card slots.
If you select Enabled, you can use the smart
card reader slot.
If you select Enabled, you can use the
integrated camera.
If you select Enabled, you can use the
microphones (internal, external, or line-in).
If you select Enabled, you can use the
fingerprint reader.
If you select Enabled, you can use the
Thunderbolt connector.
If you select Enabled, you can use the
ExpressCard slot.
Enable or disable the tamper detection. If
tamper is detected, Supervisor Password is
required to boot the system. Bottom Cover
Tamper Detection will not take effect unless
Supervisor Password is enabled.
Anti-Theft
80 P50 User Guide
Internal Storage
Tamper Detection
Computrace Module
Activation
• Disabled
• Enabled
• Disabled
• Enabled
• Permanently
Disabled
If you select Enabled, removing any internal
storage device when your computer is in sleep
mode will be detected. If you remove the
internal storage device while the computer is in
sleep mode, the computer will shut down when
you wake it up, and any unsaved data will be
lost.
Enable or disable the UEFI BIOS interface to
activate the computrace module. Computrace is
an optional monitoring service from Absolute
Software.
Note: If you set the computrace module
activation to Permanently Disabled, you will be
unable to enable this setting again.
Page 99

Table 3. Security menu items (continued)
Menu item
Submenu item
Secure Boot Secure Boot
Platform Mode
Secure Boot Mode
Reset to Setup
Mode
Restore Factory
Keys
Value
• Disabled
• Enabled
• Setup Mode
• User Mode
• Standard Mode
• Custom Mode
Comments
Enable or disable the UEFI Secure Boot feature.
Select Enable to prevent unauthorized
operating systems from running at boot time.
Select Disabled to allow any operating systems
to run at boot time.
Specify the system operating mode.
Specify the Secure Boot mode.
This option is used to clear the current platform
key and put the system into Setup Mode. You
can install your own platform key and customize
the Secure Boot signature databases in Setup
Mode.
Secure Boot mode will be set to Custom Mode.
This option is used to restore all keys and
certificates in Secure Boot databases to factory
defaults. Any customized Secure Boot settings
will be erased, and the default platform key will
be re-established along with the original
signature databases including certificate for the
Windows 8 and Windows 10 operating systems.
Clear All Secure
Boot Keys
This option is used to clear all keys and
certificates in Secure Boot databases. You can
install your own keys and certificates after
selecting this option.
Chapter 6. Advanced configuration 81
Page 100

Table 3. Security menu items (continued)
Menu item
Intel (R) SGX Intel SGX Control
Device Guard Device Guard
Submenu item
Change Owner
EPOCH
Value
• Disabled
• Enabled
• Software
Controlled
• Disabled
• Enabled
Comments
This option enables or disables Intel Software
Guard Extensions (SGX) function.
Disabled: Disables SGX.
Enabled: Enables SGX.
Software Controlled: Software Guard
Extensions will be controlled by the operating
system.
Change Owner EPOCH to a random value. This
option is used for clear user data of SGX.
This option is used to support Microsoft Device
Guard. When this option is enabled, Intel
Virtualization Technology, Intel VT-d Feature,
Secure Boot, and OS Optimized Defaults are
automatically enabled. Boot order is not
selectable, and the computer only starts from
the internal storage drive. To complete the
configuration of Device Guard, you have to set a
supervisor password.
When this option is disabled, the setup options
are configurable and you can choose any boot
options to start the computer.
Startup menu
To change the startup settings of your computer, select the Startup tab from the ThinkPad Setup menu.
Attention:
• After you change the startup sequence, ensure that you select a correct device during a copy, a save, or a
format operation. Otherwise your data might be erased or overwritten.
• If you are using the BitLocker drive encryption, do not change the startup sequence. BitLocker drive
encryption locks the computer from starting once detects the change of startup sequence.
To change the startup sequence temporarily so that the computer starts from a desired drive, do the
following:
1. Turn off the computer.
2. Turn on the computer. When the logo screen is displayed, press F12.
3. Select the device that you want the computer to start from.
Note: The Boot menu will be displayed if the computer cannot start from any devices or the operating
system cannot be found.
The following table lists the Startup menu items. Default values are in boldface. The menu items might
change without notice. Depending on the model, the default value might vary.
Note: Some items are displayed on the menu only if the computer supports the corresponding features.
82
P50 User Guide
 Loading...