

®
®
Mercury 4 / MERCURY 5
User Guide
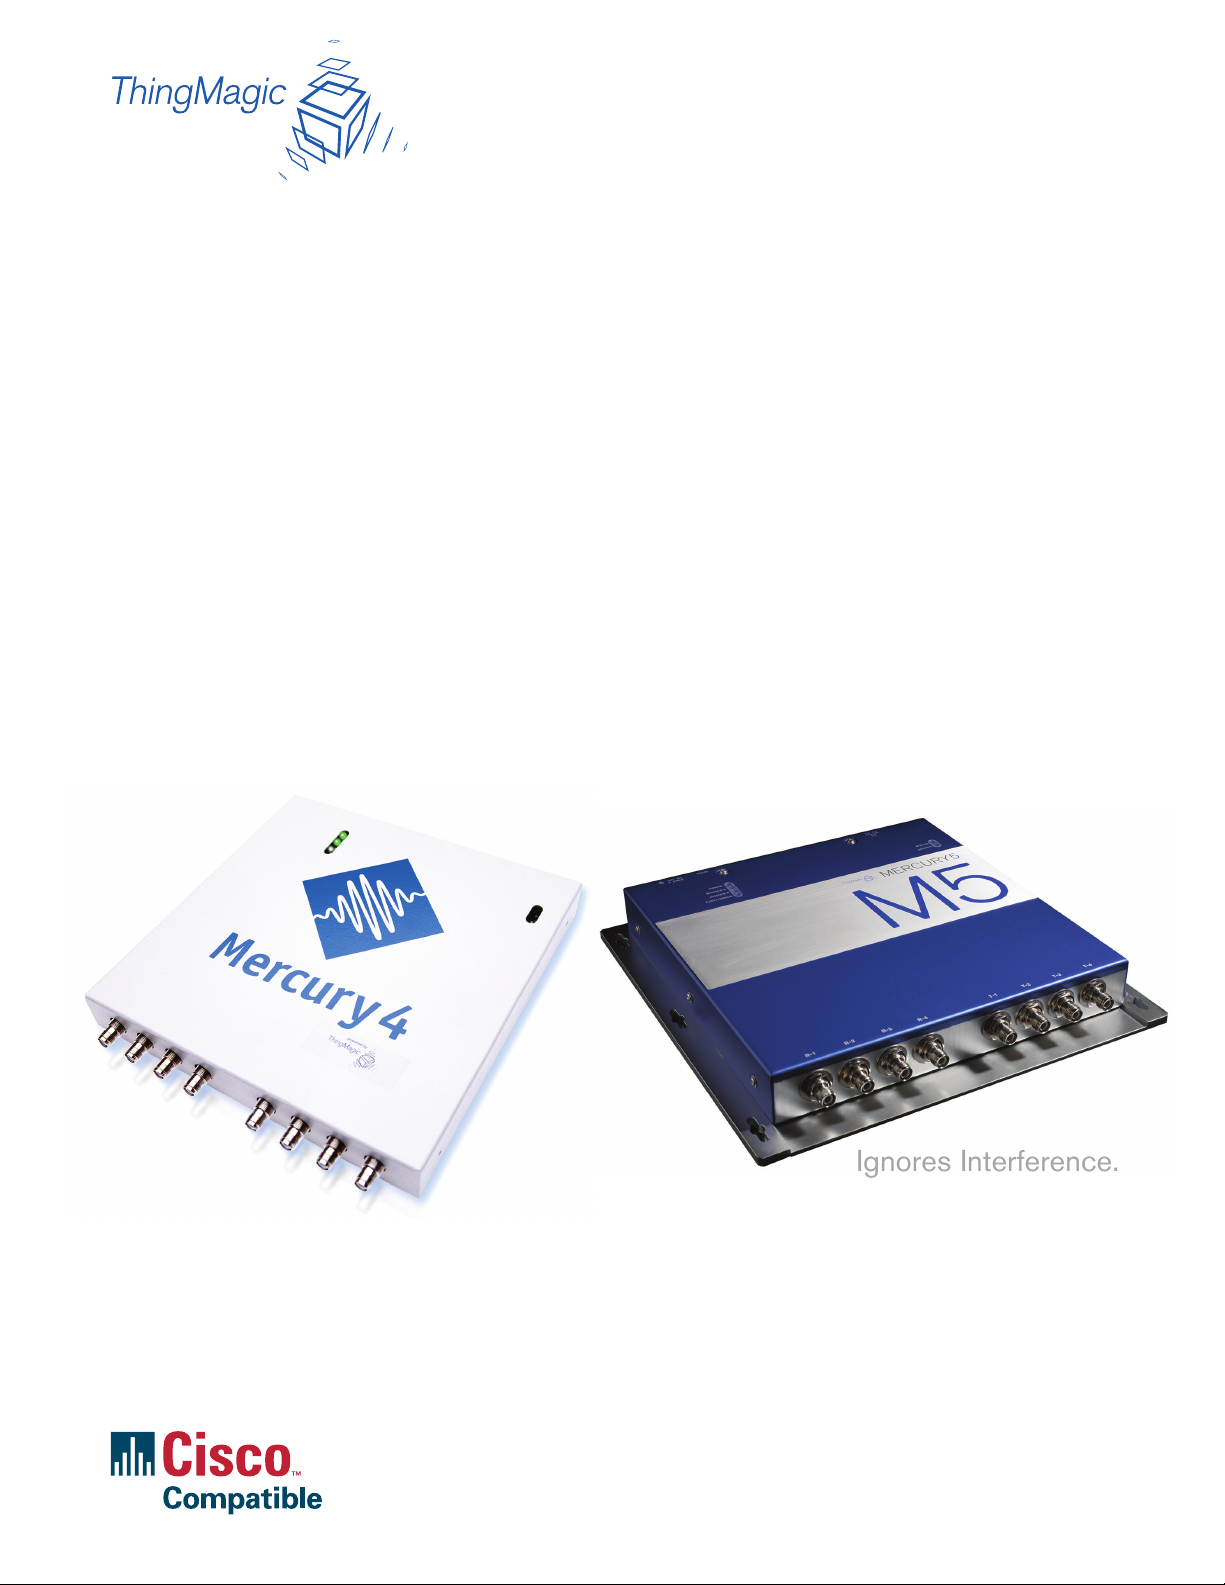
Intelligent.
Network Ready.
Reads Any Tag.
Ignores Interference.
Gets More 100% Reads.

Mercury4/5 User Guide: (TM-M4/5-X-INSTALL) Rev. 2.4.5 February, 2007
THE TERMS AND CONDITIONS OF USE FOR THE PRODUCTS DESCRIBED IN THIS USER
GUIDE ARE GOVERNED BY AN END USER LICENSE AGREEMENT AND LIMITED
WARRANTY PROVIDED SEPARATELY.
Installation Requirement: This equipment must be installed by a ThingMagic representative or
an installer approved by ThingMagic. See www.thingmagic.com or contact your sales
representative for a list of approved partners.
Copyright Notice: This manual and documentation are reserved under and protected by the
copyright laws of the United States by ThingMagic, Inc. No part of this guide may be
reproduced in any form without the prior written permission of ThingMagic, Inc.
Trademark Notice: ThingMagic, Mercury, Reads Any Tag, and the ThingMagic logo are
trademarks or registered trademarks of ThingMagic, Inc. Other product names mentioned
herein may be trademarks or registered trademarks of ThingMagic, Inc. or other companies.
Cisco, Cisco Systems, the Cisco Systems logo, and the Cisco Square Bridge logo are registered
trademarks or trademarks of Cisco Systems, Inc. and/or its affiliates in the U.S. and certain
other countries.
Warranty Disclaimer: THINGMAGIC, INC. MAKES NO REPRESENTATION OR WARRANTY
WITH RESPECT TO THE CONTENTS HEREIN AND SPECIFICALLY DISCLAIMS ANY AND
ALL EXPRESS OR IMPLIED WARRANTIES OF MERCHANTABILITY OR FITNESS FOR A
PARTICULAR PURPOSE. Further, ThingMagic, Inc. reserves the right to revise this publication
and make changes from time to time in the content herein in its sole discretion without
obligation to notify any person of such revision or changes.
Government Limited Rights Notice: All documentation and manuals were developed at private
expense and no part of it was developed using Government funds.
The U.S. Government’s rights to use, modify, reproduce, release, perform, display, or disclose the
technical data contained herein are restricted by paragraph (b)(3) of the Rights in Technical
Data--Noncommercial Items clause (DFARS 252.227-7013(b)(3)), as amended from time-totime. Any reproduction of technical data or portions thereof marked with this legend must also
reproduce the markings. Any person, other than the U.S. Government, who has been provided
access to such data must promptly notify ThingMagic, Inc.
ThingMagic, Inc.
One Broadway, 5th floor
Cambridge, MA 02142
866-833-4069
Mercury 4 / MERCURY 5 User Guide i

Contents
Mercury4/5 Reader User Guide . . . . . . . . . . . . . . . . . . . . . . . . . . . . . . . . . . . . . . . . . . . . . . . . . . . . . . . 1
About This Guide . . . . . . . . . . . . . . . . . . . . . . . . . . . . . . . . . . . . . . . . . . . . . . . . . . . . . . . . . . . . . . . . . . 1
Setting Up For Single Reader Operation . . . . . . . . . . . . . . . . . . . . . . . . . . . . . . . . . . . . . . . . . . . . . . 2
Required Equipmentl. . . . . . . . . . . . . . . . . . . . . . . . . . . . . . . . . . . . . . . . . . . . . . . . . . . . . . . . . . . . . . . . . . . . . . . . . . . . . . . . .2
Set Up Procedure. . . . . . . . . . . . . . . . . . . . . . . . . . . . . . . . . . . . . . . . . . . . . . . . . . . . . . . . . . . . . . . . . . . . . . . . . . . . . . . . . . . .2
Connect the Antenna(s) to the Reader. . . . . . . . . . . . . . . . . . . . . . . . . . . . . . . . . . . . . . . . . . . . . . . . . . . . . . . . . . . . . . . l3
Power-Up the Reader. . . . . . . . . . . . . . . . . . . . . . . . . . . . . . . . . . . . . . . . . . . . . . . . . . . . . . . . . . . . . . . . . . . . . . . . . . . . . . . .5
Interpreting the Reader Indicator LEDs . . . . . . . . . . . . . . . . . . . . . . . . . . . . . . . . . . . . . . . . . . . . . . . . . . . . . . . . . . . . . . .7
Connect Your PC to the Reader . . . . . . . . . . . . . . . . . . . . . . . . . . . . . . . . . . . . . . . . . . . . . . . . . . . . . . . . . . . . . . . . . . . . . .8
Set Your PC’s TCP/IP Setting. . . . . . . . . . . . . . . . . . . . . . . . . . . . . . . . . . . . . . . . . . . . . . . . . . . . . . . . . . . . . . . . . . . . . . . .9
Log On to Reader. . . . . . . . . . . . . . . . . . . . . . . . . . . . . . . . . . . . . . . . . . . . . . . . . . . . . . . . . . . . . . . . . . . . . . . . . . . . . . . . . . 12
Networking the Reader. . . . . . . . . . . . . . . . . . . . . . . . . . . . . . . . . . . . . . . . . . . . . . . . . . . . . . . . . . . . 14
Hardware Setup . . . . . . . . . . . . . . . . . . . . . . . . . . . . . . . . . . . . . . . . . . . . . . . . . . . . . . . . . . . . . . . . . . . . . . . . . . . . . . . . . . . 14
DHCP. . . . . . . . . . . . . . . . . . . . . . . . . . . . . . . . . . . . . . . . . . . . . . . . . . . . . . . . . . . . . . . . . . . . . . . . . . . . . . . . . . . . . . . . . . . . . 15
Automatic Hostname: m5-xxxxxx. . . . . . . . . . . . . . . . . . . . . . . . . . . . . . . . . . . . . . . . . . . . . . . . . . . . . . . . . . . . . . . . 18
MAC Address . . . . . . . . . . . . . . . . . . . . . . . . . . . . . . . . . . . . . . . . . . . . . . . . . . . . . . . . . . . . . . . . . . . . . . . . . . . . . . . . . . 18
Bonjour . . . . . . . . . . . . . . . . . . . . . . . . . . . . . . . . . . . . . . . . . . . . . . . . . . . . . . . . . . . . . . . . . . . . . . . . . . . . . . . . . . . . . . . . . . . 20
Controlling the Reader . . . . . . . . . . . . . . . . . . . . . . . . . . . . . . . . . . . . . . . . . . . . . . . . . . . . . . . . . . . . 22
Using the Browser-Based Interface. . . . . . . . . . . . . . . . . . . . . . . . . . . . . . . . . . . . . . . . . . . . . . . . . . . . . . . . . . . . . . . . . 23
Status Page. . . . . . . . . . . . . . . . . . . . . . . . . . . . . . . . . . . . . . . . . . . . . . . . . . . . . . . . . . . . . . . . . . . . . . . . . . . . . . . . . . . . 26
Query Page . . . . . . . . . . . . . . . . . . . . . . . . . . . . . . . . . . . . . . . . . . . . . . . . . . . . . . . . . . . . . . . . . . . . . . . . . . . . . . . . . . . . 27
Read Tags. . . . . . . . . . . . . . . . . . . . . . . . . . . . . . . . . . . . . . . . . . . . . . . . . . . . . . . . . . . . . . . . . . . . . . . . . . . . . . . . . . . 28
Query Results . . . . . . . . . . . . . . . . . . . . . . . . . . . . . . . . . . . . . . . . . . . . . . . . . . . . . . . . . . . . . . . . . . . . . . . . . . . . . . . 31
Bignum Checkbox . . . . . . . . . . . . . . . . . . . . . . . . . . . . . . . . . . . . . . . . . . . . . . . . . . . . . . . . . . . . . . . . . . . . . . . . . . . 33
Show Raw. . . . . . . . . . . . . . . . . . . . . . . . . . . . . . . . . . . . . . . . . . . . . . . . . . . . . . . . . . . . . . . . . . . . . . . . . . . . . . . . . . . 35
Raw Tag Data . . . . . . . . . . . . . . . . . . . . . . . . . . . . . . . . . . . . . . . . . . . . . . . . . . . . . . . . . . . . . . . . . . . . . . . . . . . . 35
Write Page . . . . . . . . . . . . . . . . . . . . . . . . . . . . . . . . . . . . . . . . . . . . . . . . . . . . . . . . . . . . . . . . . . . . . . . . . . . . . . . . . . . . . 37
Write an ID to a Tag. . . . . . . . . . . . . . . . . . . . . . . . . . . . . . . . . . . . . . . . . . . . . . . . . . . . . . . . . . . . . . . . . . . . . . . . . . 38
Search For a Tag . . . . . . . . . . . . . . . . . . . . . . . . . . . . . . . . . . . . . . . . . . . . . . . . . . . . . . . . . . . . . . . . . . . . . . . . . . . . 38
i

Settings Page . . . . . . . . . . . . . . . . . . . . . . . . . . . . . . . . . . . . . . . . . . . . . . . . . . . . . . . . . . . . . . . . . . . . . . . . . . . . . . . . . . 39
RFID Protocol Settings. . . . . . . . . . . . . . . . . . . . . . . . . . . . . . . . . . . . . . . . . . . . . . . . . . . . . . . . . . . . . . . . . . . . . . . 42
Network Settings . . . . . . . . . . . . . . . . . . . . . . . . . . . . . . . . . . . . . . . . . . . . . . . . . . . . . . . . . . . . . . . . . . . . . . . . . . . . 43
Boot Option Settings. . . . . . . . . . . . . . . . . . . . . . . . . . . . . . . . . . . . . . . . . . . . . . . . . . . . . . . . . . . . . . . . . . . . . . . . . 45
Security Settings. . . . . . . . . . . . . . . . . . . . . . . . . . . . . . . . . . . . . . . . . . . . . . . . . . . . . . . . . . . . . . . . . . . . . . . . . . . . . 46
Firmware Update Page . . . . . . . . . . . . . . . . . . . . . . . . . . . . . . . . . . . . . . . . . . . . . . . . . . . . . . . . . . . . . . . . . . . . . . . . . 47
Restart Page . . . . . . . . . . . . . . . . . . . . . . . . . . . . . . . . . . . . . . . . . . . . . . . . . . . . . . . . . . . . . . . . . . . . . . . . . . . . . . . . . . . 49
Restarting the Reader. . . . . . . . . . . . . . . . . . . . . . . . . . . . . . . . . . . . . . . . . . . . . . . . . . . . . . . . . . . . . . . . . . . . . . . . 50
Diagnostics Page. . . . . . . . . . . . . . . . . . . . . . . . . . . . . . . . . . . . . . . . . . . . . . . . . . . . . . . . . . . . . . . . . . . . . . . . . . . . . . . 51
Using Safe Mode . . . . . . . . . . . . . . . . . . . . . . . . . . . . . . . . . . . . . . . . . . . . . . . . . . . . . . . . . . . . . . . . . . . . . . . . . . . . . . . 52
Reader RF Power. . . . . . . . . . . . . . . . . . . . . . . . . . . . . . . . . . . . . . . . . . . . . . . . . . . . . . . . . . . . . . . . . 54
Reader RF Power Example. . . . . . . . . . . . . . . . . . . . . . . . . . . . . . . . . . . . . . . . . . . . . . . . . . . . . . . . . . . . . . . . . . . . . . . . . 54
Setting the Reader RF Power . . . . . . . . . . . . . . . . . . . . . . . . . . . . . . . . . . . . . . . . . . . . . . . . . . . . . . . . . . . . . . . . . . . . . . 55
Mounting the Reader . . . . . . . . . . . . . . . . . . . . . . . . . . . . . . . . . . . . . . . . . . . . . . . . . . . . . . . . . . . . . 56
Mounting the Antennas . . . . . . . . . . . . . . . . . . . . . . . . . . . . . . . . . . . . . . . . . . . . . . . . . . . . . . . . . . . . . . . . . . . . . . . . . . . . 57
Authorized Antenna and Antenna Cables . . . . . . . . . . . . . . . . . . . . . . . . . . . . . . . . . . . . . . . . . . . . . . . . . . . . . . . . 57
Variables Affecting Performance . . . . . . . . . . . . . . . . . . . . . . . . . . . . . . . . . . . . . . . . . . . . . . . . . . . 58
Environmental Conditions . . . . . . . . . . . . . . . . . . . . . . . . . . . . . . . . . . . . . . . . . . . . . . . . . . . . . . . . . . . . . . . . . . . . . . . . . . 59
Tag Considerations . . . . . . . . . . . . . . . . . . . . . . . . . . . . . . . . . . . . . . . . . . . . . . . . . . . . . . . . . . . . . . . . . . . . . . . . . . . . . . . . 60
Multiple Readers. . . . . . . . . . . . . . . . . . . . . . . . . . . . . . . . . . . . . . . . . . . . . . . . . . . . . . . . . . . . . . . . . . . . . . . . . . . . . . . . . . . 61
M4 Specifications . . . . . . . . . . . . . . . . . . . . . . . . . . . . . . . . . . . . . . . . . . . . . . . . . . . . . . . . . . . . . . . . 62
Electrical . . . . . . . . . . . . . . . . . . . . . . . . . . . . . . . . . . . . . . . . . . . . . . . . . . . . . . . . . . . . . . . . . . . . . . . . . . . . . . . . . . . . . . . . . . 62
Reader. . . . . . . . . . . . . . . . . . . . . . . . . . . . . . . . . . . . . . . . . . . . . . . . . . . . . . . . . . . . . . . . . . . . . . . . . . . . . . . . . . . . . . . . . 62
Separate Power Supply . . . . . . . . . . . . . . . . . . . . . . . . . . . . . . . . . . . . . . . . . . . . . . . . . . . . . . . . . . . . . . . . . . . . . . . . . 62
Environmental . . . . . . . . . . . . . . . . . . . . . . . . . . . . . . . . . . . . . . . . . . . . . . . . . . . . . . . . . . . . . . . . . . . . . . . . . . . . . . . . . . 62
Mechanical. . . . . . . . . . . . . . . . . . . . . . . . . . . . . . . . . . . . . . . . . . . . . . . . . . . . . . . . . . . . . . . . . . . . . . . . . . . . . . . . . . . . . 62
Reader . . . . . . . . . . . . . . . . . . . . . . . . . . . . . . . . . . . . . . . . . . . . . . . . . . . . . . . . . . . . . . . . . . . . . . . . . . . . . . . . . . . . . . 62
Supported UHF Tag Protocols . . . . . . . . . . . . . . . . . . . . . . . . . . . . . . . . . . . . . . . . . . . . . . . . . . . . . . . . . . . . . . . . . . 63
User Memory. . . . . . . . . . . . . . . . . . . . . . . . . . . . . . . . . . . . . . . . . . . . . . . . . . . . . . . . . . . . . . . . . . . . . . . . . . . . . . . . . . . 63
M5 Specifications . . . . . . . . . . . . . . . . . . . . . . . . . . . . . . . . . . . . . . . . . . . . . . . . . . . . . . . . . . . . . . . . 64
Electrical . . . . . . . . . . . . . . . . . . . . . . . . . . . . . . . . . . . . . . . . . . . . . . . . . . . . . . . . . . . . . . . . . . . . . . . . . . . . . . . . . . . . . . . . . . 64
Reader. . . . . . . . . . . . . . . . . . . . . . . . . . . . . . . . . . . . . . . . . . . . . . . . . . . . . . . . . . . . . . . . . . . . . . . . . . . . . . . . . . . . . . . . . 64
Separate Power Supply . . . . . . . . . . . . . . . . . . . . . . . . . . . . . . . . . . . . . . . . . . . . . . . . . . . . . . . . . . . . . . . . . . . . . . . . . 64
Environmental . . . . . . . . . . . . . . . . . . . . . . . . . . . . . . . . . . . . . . . . . . . . . . . . . . . . . . . . . . . . . . . . . . . . . . . . . . . . . . . . . . 64
Mechanical. . . . . . . . . . . . . . . . . . . . . . . . . . . . . . . . . . . . . . . . . . . . . . . . . . . . . . . . . . . . . . . . . . . . . . . . . . . . . . . . . . . . . 64
Reader . . . . . . . . . . . . . . . . . . . . . . . . . . . . . . . . . . . . . . . . . . . . . . . . . . . . . . . . . . . . . . . . . . . . . . . . . . . . . . . . . . . . . . 64
Supported UHF Tag Protocols . . . . . . . . . . . . . . . . . . . . . . . . . . . . . . . . . . . . . . . . . . . . . . . . . . . . . . . . . . . . . . . . . . 65
User Memory. . . . . . . . . . . . . . . . . . . . . . . . . . . . . . . . . . . . . . . . . . . . . . . . . . . . . . . . . . . . . . . . . . . . . . . . . . . . . . . . . . . 65
Compliance, Warranty and IP Notices . . . . . . . . . . . . . . . . . . . . . . . . . . . . . . . . . . . . . . . . . . . . . . . 66
Regulatory Compliance . . . . . . . . . . . . . . . . . . . . . . . . . . . . . . . . . . . . . . . . . . . . . . . . . . . . . . . . . . . . . . . . . . . . . . . . . . . . 66
ii

Warranty Disclaimer and IP Notices. . . . . . . . . . . . . . . . . . . . . . . . . . . . . . . . . . . . . . . . . . . . . . . . . . . . . . . . . . . . . . . . . 66
Appendix A: M4 Antenna Information . . . . . . . . . . . . . . . . . . . . . . . . . . . . . . . . . . . . . . . . . . . . . . . . A-1
Authorized Antennas . . . . . . . . . . . . . . . . . . . . . . . . . . . . . . . . . . . . . . . . . . . . . . . . . . . . . . . . . . . . . . 1
Antenna Cables . . . . . . . . . . . . . . . . . . . . . . . . . . . . . . . . . . . . . . . . . . . . . . . . . . . . . . . . . . . . . . . . . . . 3
Appendix B: M5 Antenna Information . . . . . . . . . . . . . . . . . . . . . . . . . . . . . . . . . . . . . . . . . . . . . . .B-1
Authorized Antennas . . . . . . . . . . . . . . . . . . . . . . . . . . . . . . . . . . . . . . . . . . . . . . . . . . . . . . . . . . . . . . 1
Antenna Cables . . . . . . . . . . . . . . . . . . . . . . . . . . . . . . . . . . . . . . . . . . . . . . . . . . . . . . . . . . . . . . . . . . . 3
iii

About This Guide
This guide explains how to set up the Mercury4 or Mercury5 Reader, how to configure it for
network operation, and how to use the browser-based interface. Separate appendices contain
specifications and antenna information specific to each reader.
Mercury4 & 5
Reader User Guide
To learn more about the software operation of the Mercury 4 and Mercury5 readers, a Reader
Query Language (RQL) Reference Guide is available at http://www.thingmagic.com/html/
support/manuals.htm. RQL queries for accessing tags are built into the reader’s web interface
but you can get more out of your reader by modifying them.
ThingMagic’s low-level application programming interfaces (APIs) provide fine control over all
aspects of the reader. A separate API Programming Guide and software developer kit (SDK) is
available upon request from support@thingmagic.com.
Mercury4 & 5 Reader User Guide 1

Setting Up For Single Reader Operation
Setting Up For Single Reader Operation
The following section describes how to setup the reader for single reader operation. To setup
the reader as part of a larger scale deployment, see the section Networking the Reader
page 14.
Required Equipment
Enclosed with your Mercury4 and 5 reader are the following parts:
A Mercury4 (TM-M4-NA-02) or Mercury5 Reader (TM-M5-NA-02)
Power converter with extension power cable (3m (10ft)) (TM-M4-PS)
Shielded ethernet crossover cable (CAT5:TM-CAB-CROSS5)
This Mercury4 and 5 User Guide (TM-M4/5-X-INSTALL)
on
You’ll also need the following additional hardware:
Up to four Bistatic antennas
Two antenna cables for each antenna
A computer with a java-enabled web browser
Note
There is no software to install.
Set Up Procedure
The following pages detail these steps and show how to get you up and running quickly.
1. Connect the Antenna(s) to the Reader
2. Power-Up the Reader
3. Connect Your PC to the Reader
4. Set Your PC’s TCP/IP Setting
5. Log On to Reader
on page 5
on page 8
on page 9
on page 12
on page 3
2
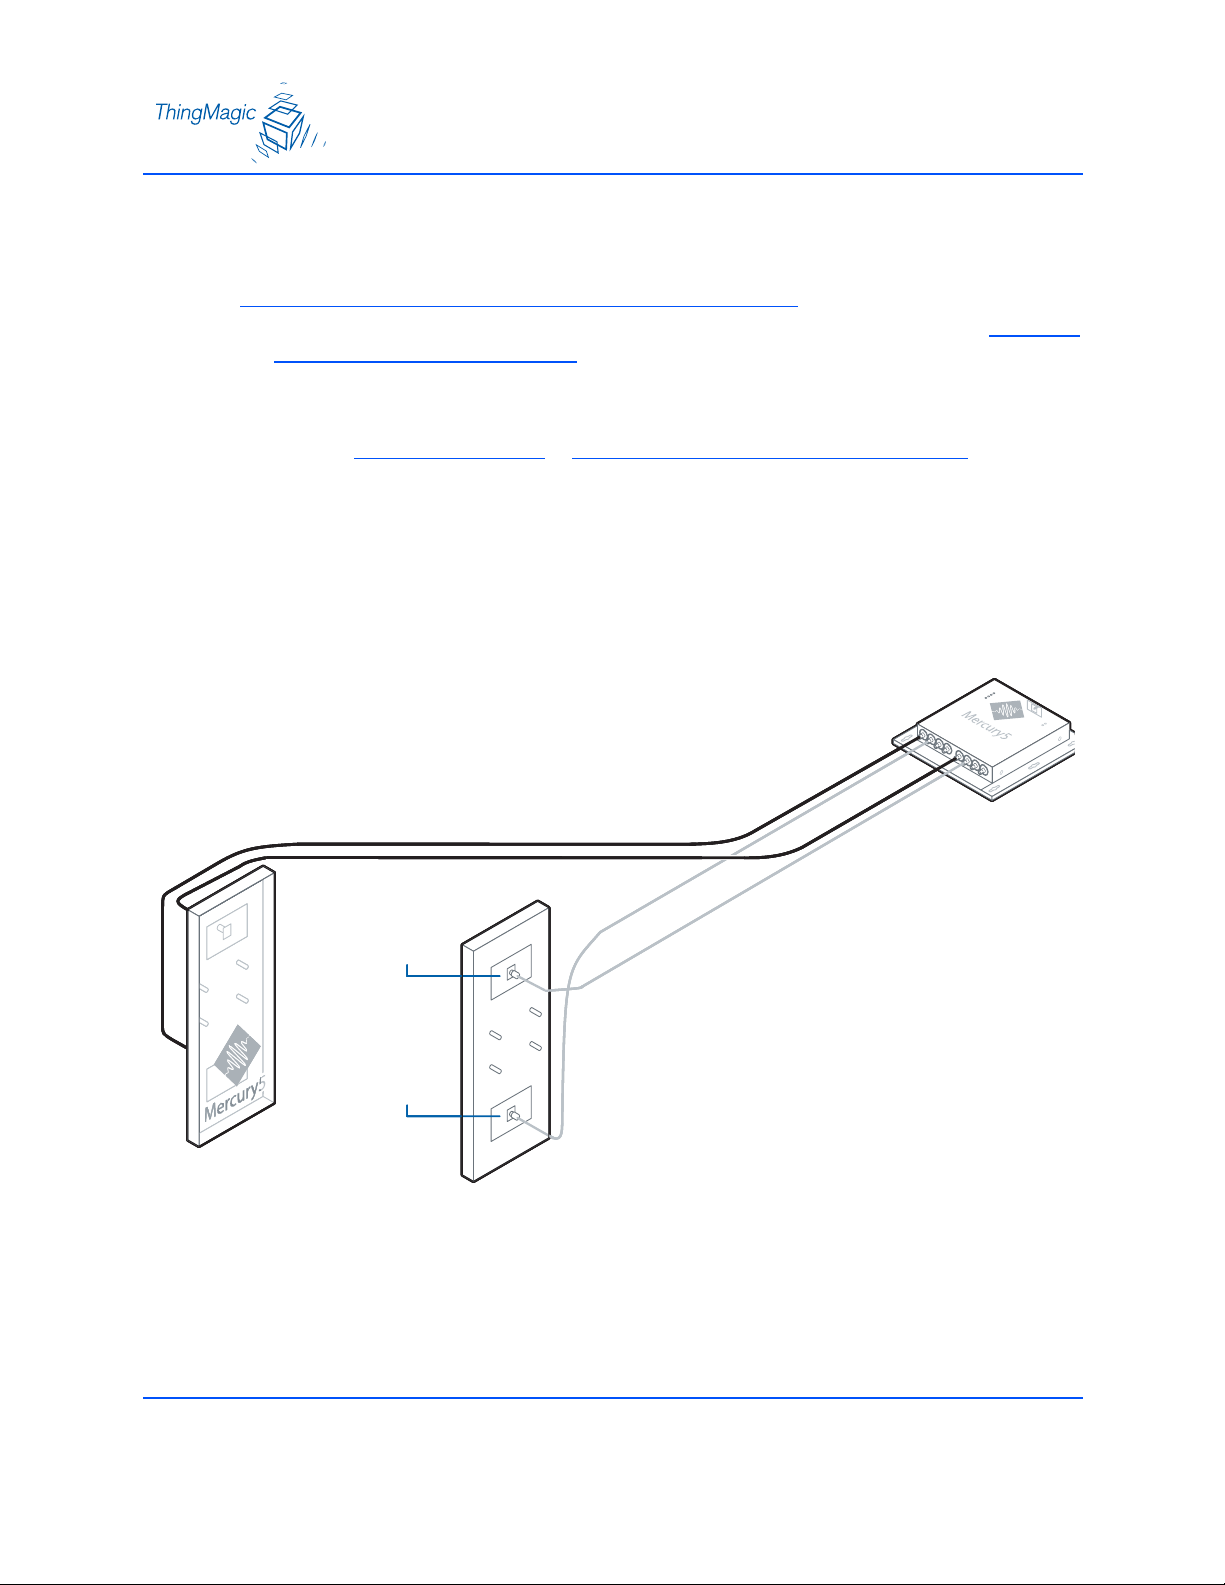
Connect the Antenna(s) to the Reader
Note
Use only authorized antennas and cables to maintain FCC approval. See
A: Mercury4 Antenna Information on page 1.
Connect antennas to the ports before applying power to the reader. Any port not
having an antenna connected to it will be disabled when the reader is powered on.
See Authorized Antennas
on antennas.
Up to four antennas can be connected to the reader. Each antenna has two ports
which are connected in pairs to the reader: one for transmitting, the other for
receiving.
While either port can be used to transmit or receive, for best performance we
recommend using the top port for Transmit and the bottom for Receive. See the
figure.
in Appendix A: Mercury4 Antenna Information for details
Appendix
top port
top port
top port
Transmit
Transmit
Transmit
bottom port
bottom port
bottom port
Receive
Receive
Receive
3
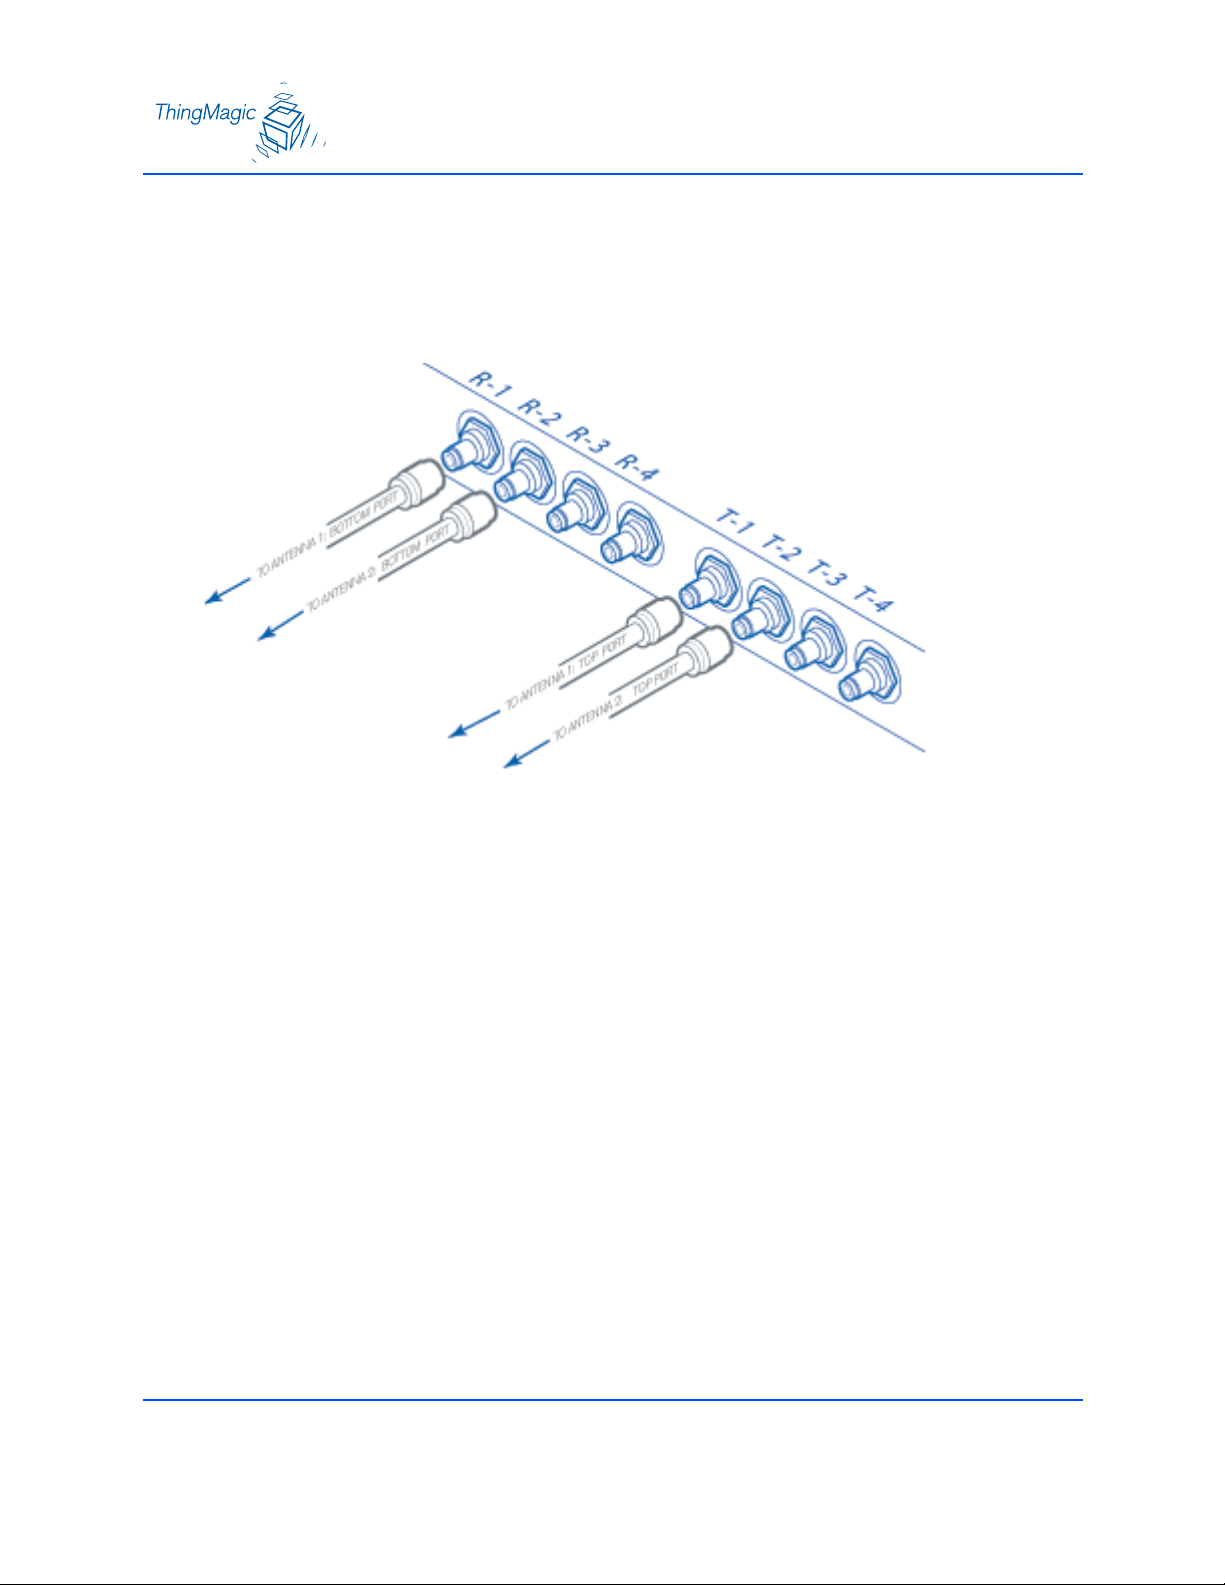
1. Place the antennas upright.
2. When connecting each pair of antenna cables, follow the labels on the reader faceplate
as shown below.
Connecting Cable Pairs to Reader
3. Connect the top port of the antenna to the T-1 (transmit) port on the reader. Connect
the bottom port of the antenna to the R-1 (receive) port on the reader.
4. Repeat for the second through fourth antenna, if supplied, using T2 and R2, etc.
4
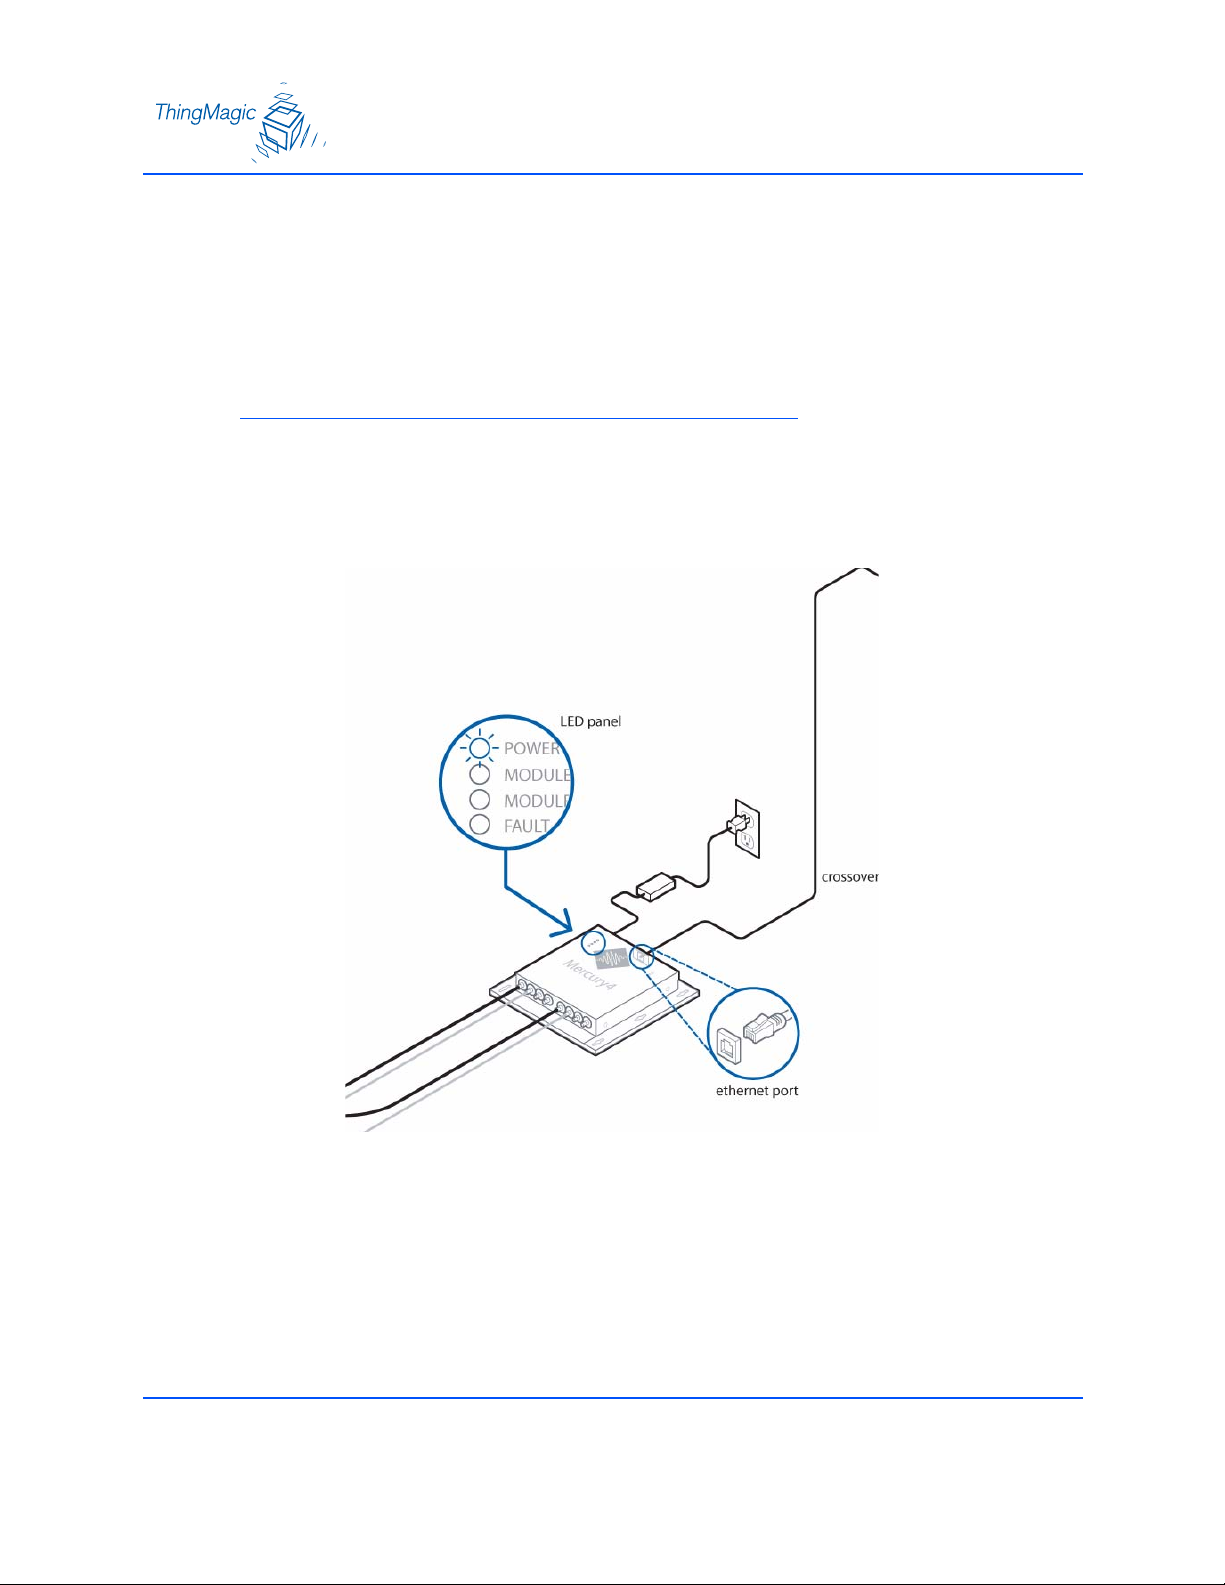
Power-Up the Reader
1. Plug the power supply into the reader’s power port. DC power input connector.
2. Connect the extension cord to the power supply and plug it into a 100-240VAC power
outlet. The reader will immediately begin powering up.
Note
There is no on/off switch on the reader.
3. While the reader is powering up, the power LED is be solid green. After approximately
60 seconds, the power LED will begin to pulse. The reader is now ready for operation.
Powering Up the Reader
5

6
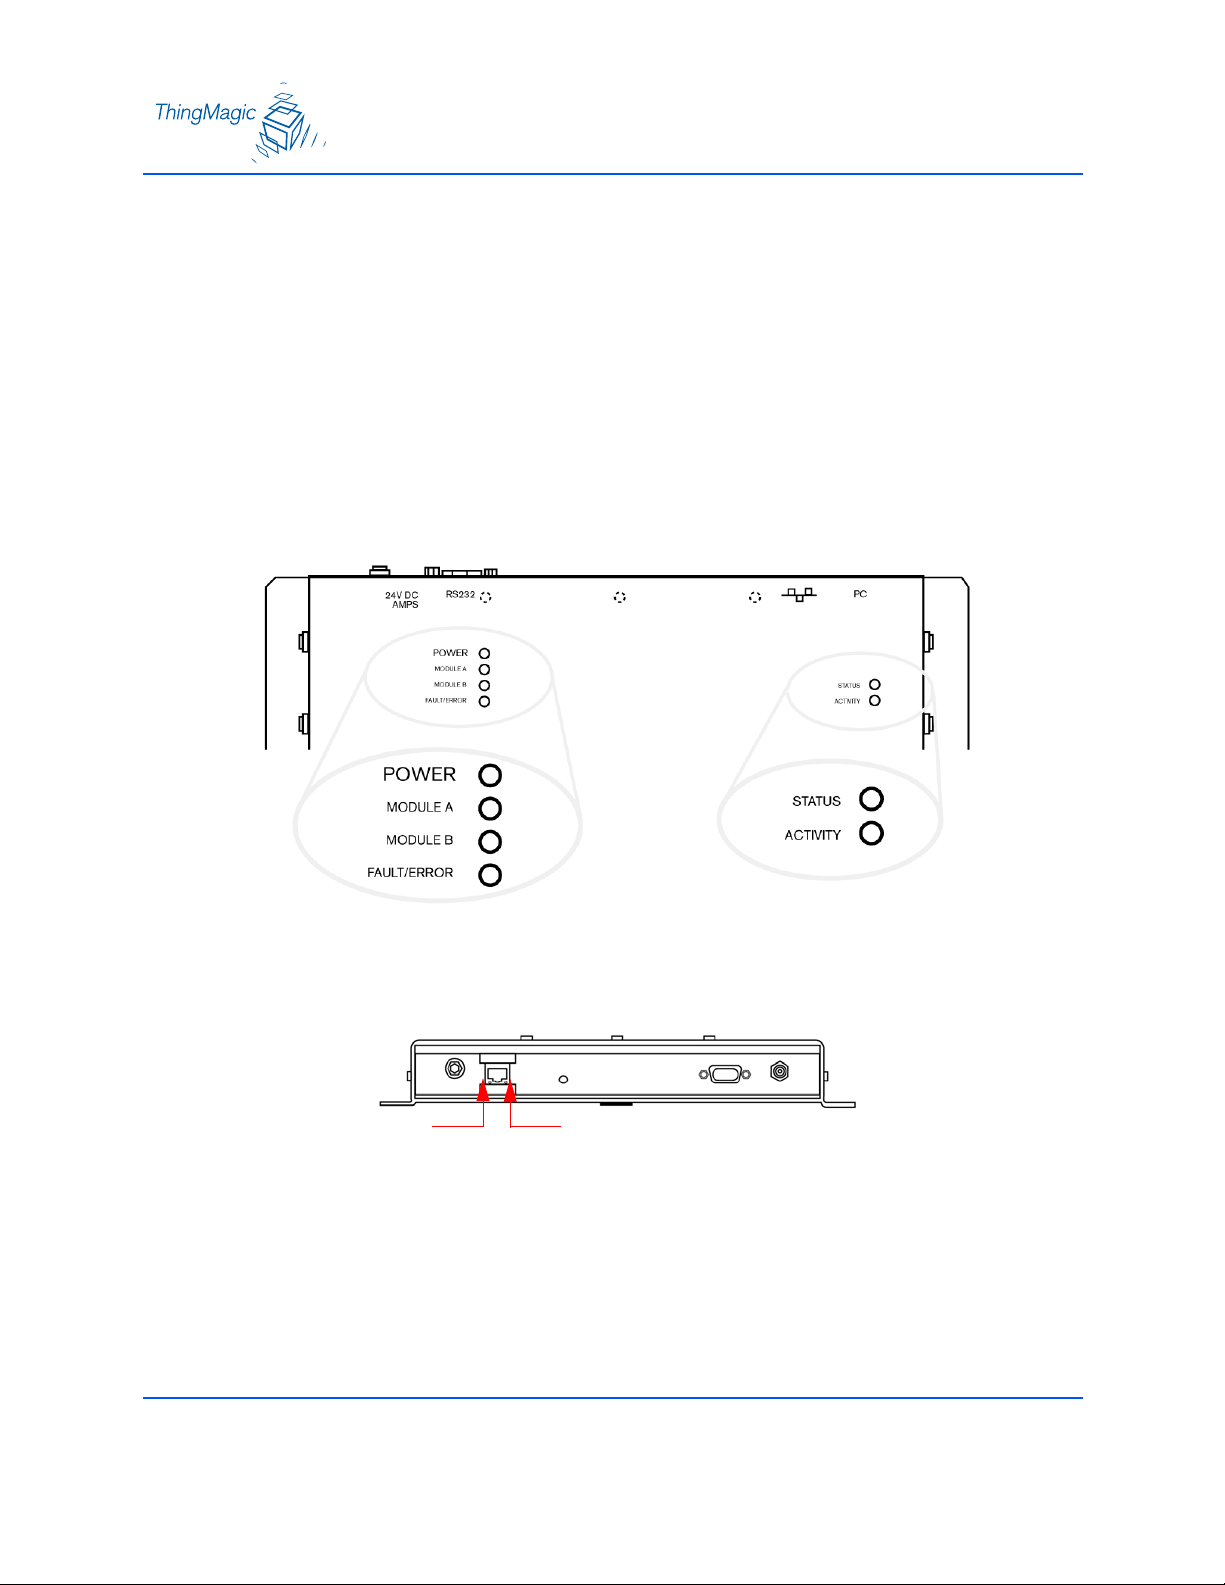
Interpreting the Reader Indicator LEDs
There are four LEDs on the reader indicating reader activity:
Power – When solid, the reader is booting. When pulsing, reader is ready for
operation.
Module A – Operational only on older model Mercury4 readers.
Module B – Flashes continuously when RF is transmitting on any antenna.
Fault/Error – When solid red, the reader has crashed.
Two LEDs on top of the reader, labeled Status and Activity, are not currently
operational. See the figure.
Two small LEDs adjacent to the Ethernet port indicate Status (left) and Activity (right)
when connected to a PC or network plug. See the figure.
Status Activity
7

Connect Your PC to the Reader
Mercury5
These instructions are for directly connecting your computer to the reader. For instructions on
connecting the reader to a network, see the section Networking the Reader
1. Connect the enclosed shielded Ethernet crossover cable to your PC and to the reader.
Note
Straight-through shielded Ethernet cables are fine for connecting the reader to a
network.
on page 14.
ethernet port
The reader is now ready for operation.
ethernet port
crossover cable
8
Set Your PC’s TCP/IP Setting
These instructions assume you are using Windows XP. For other operating systems, consult
your network administrator.
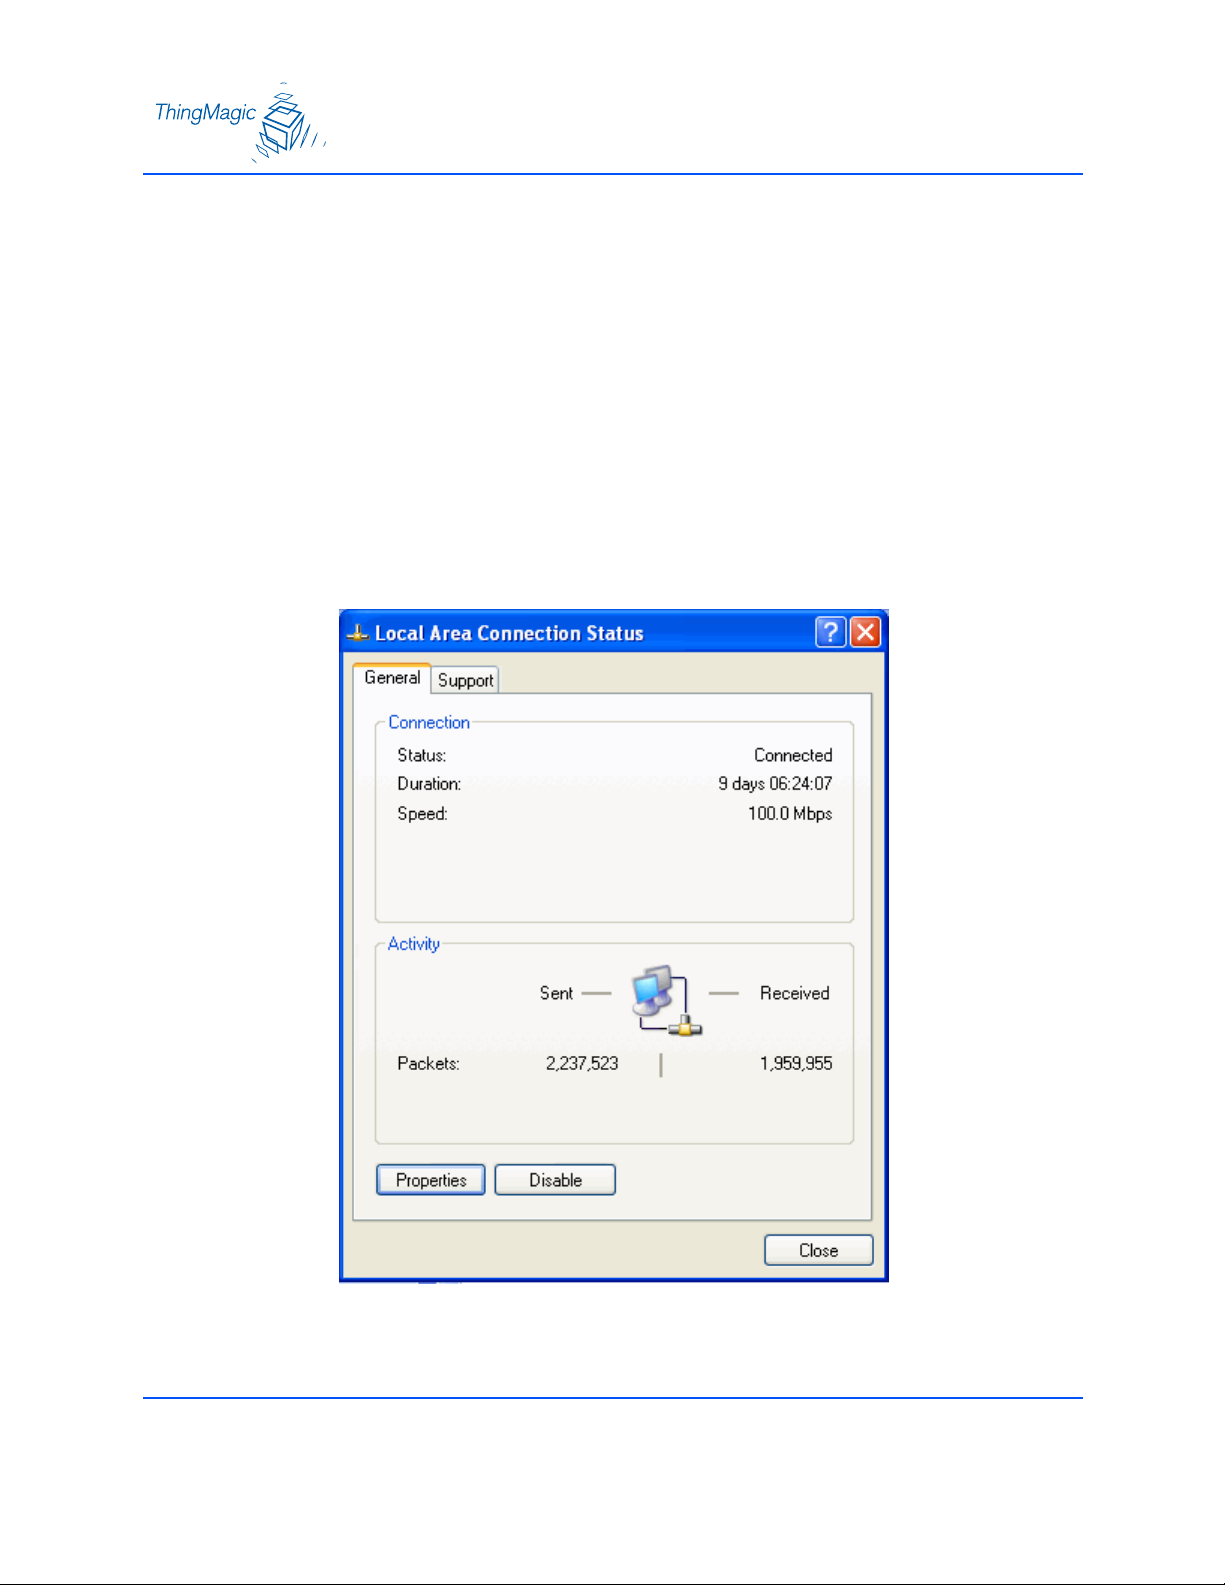
To set your PCs TCP/IP setting use the following steps:
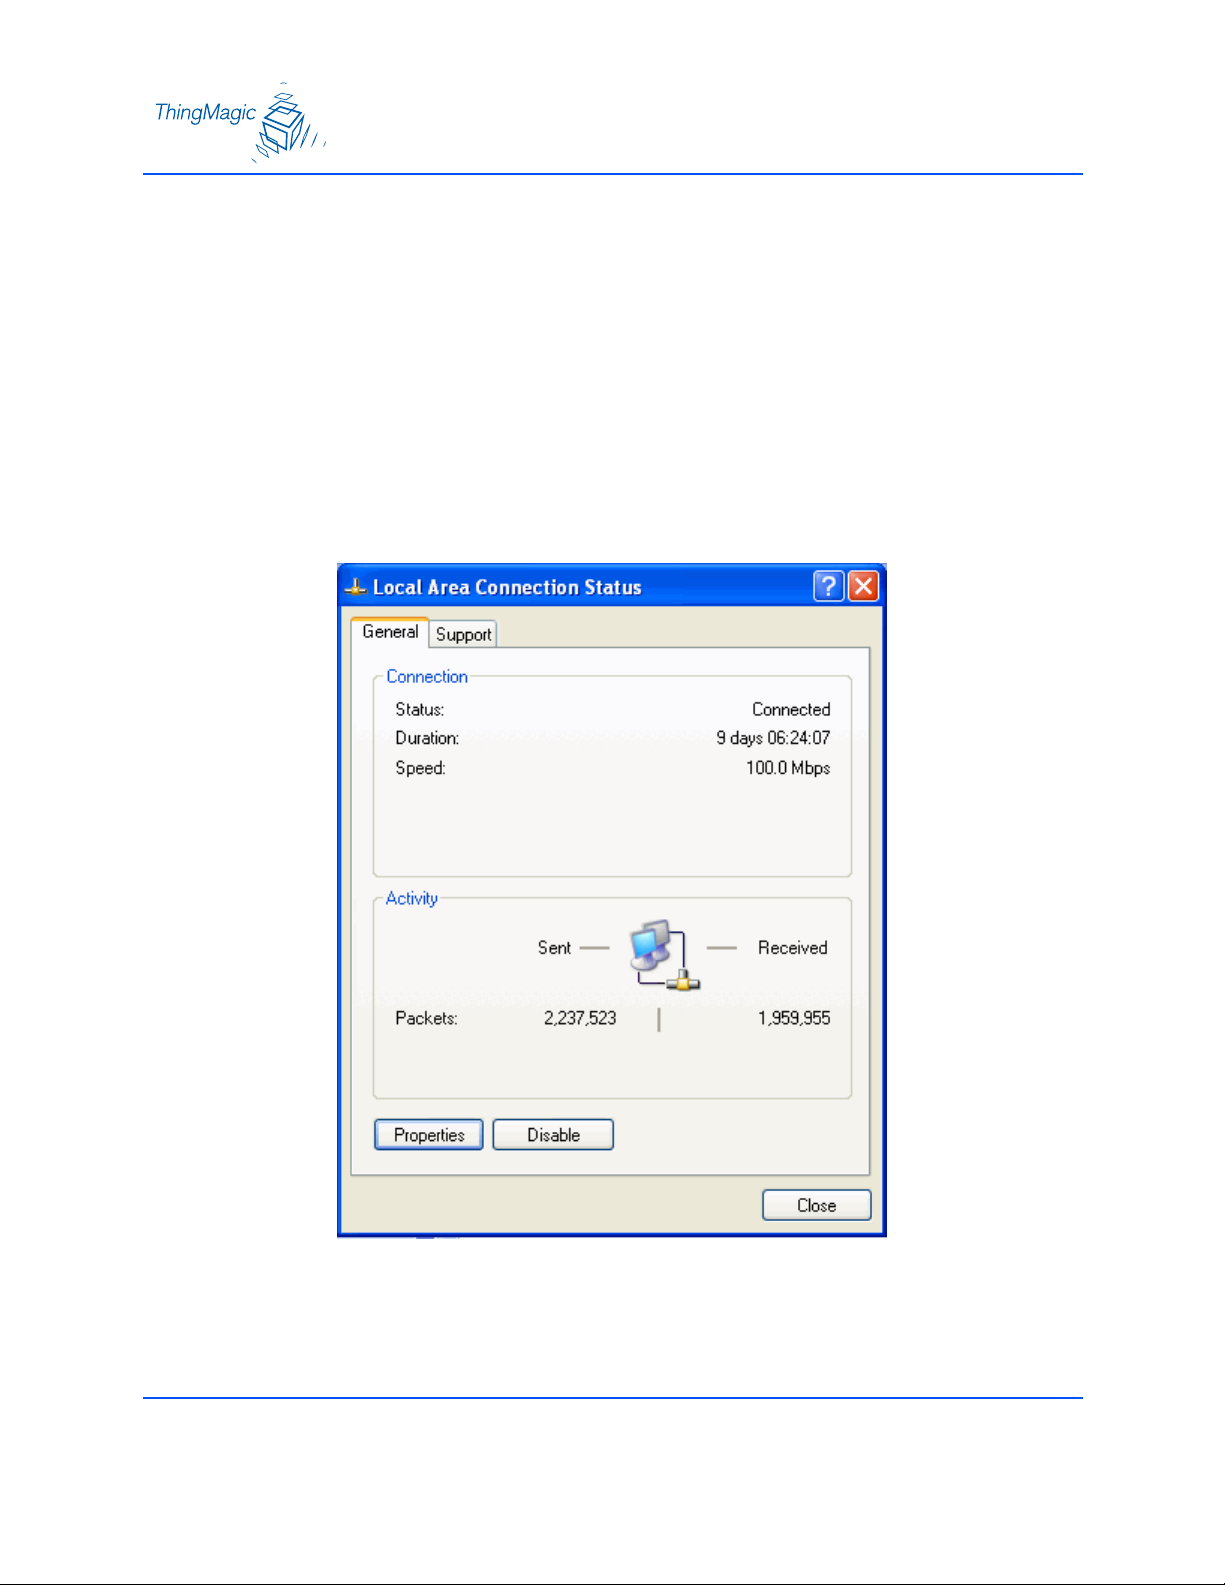
1. From the start bar, select Start →Control Panel.
2. Double-click the Network Connections icon.
3. Disable your PC’s wireless connection.
4. Double-click the the Local Area Connection icon. The Local Area Connection Status
window appears. See the figure.
5. Click the Properties button.
9

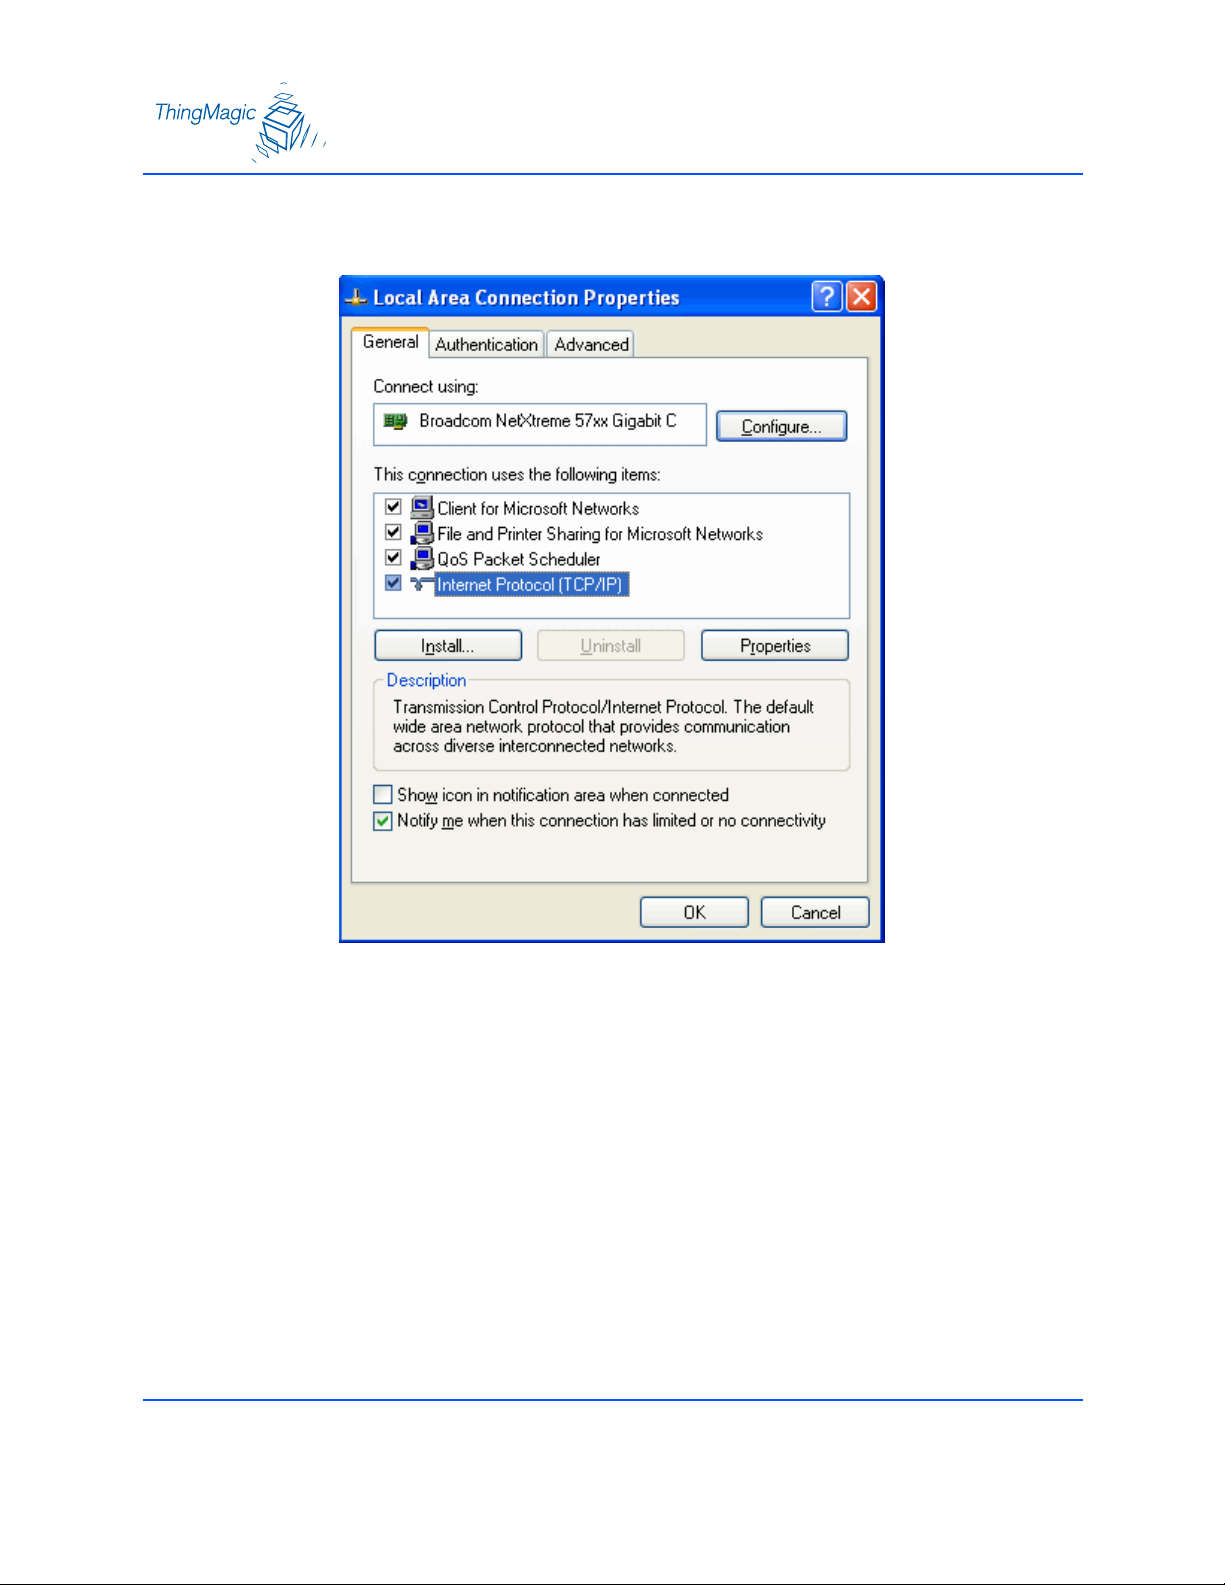
6. Scroll down to the bottom of the list and select the Internet Protocol (TCP/IP) item.
10
7. Click on the Properties button.
8. The Internet Protocol (TCP/IP) Properties window appears. (see below).

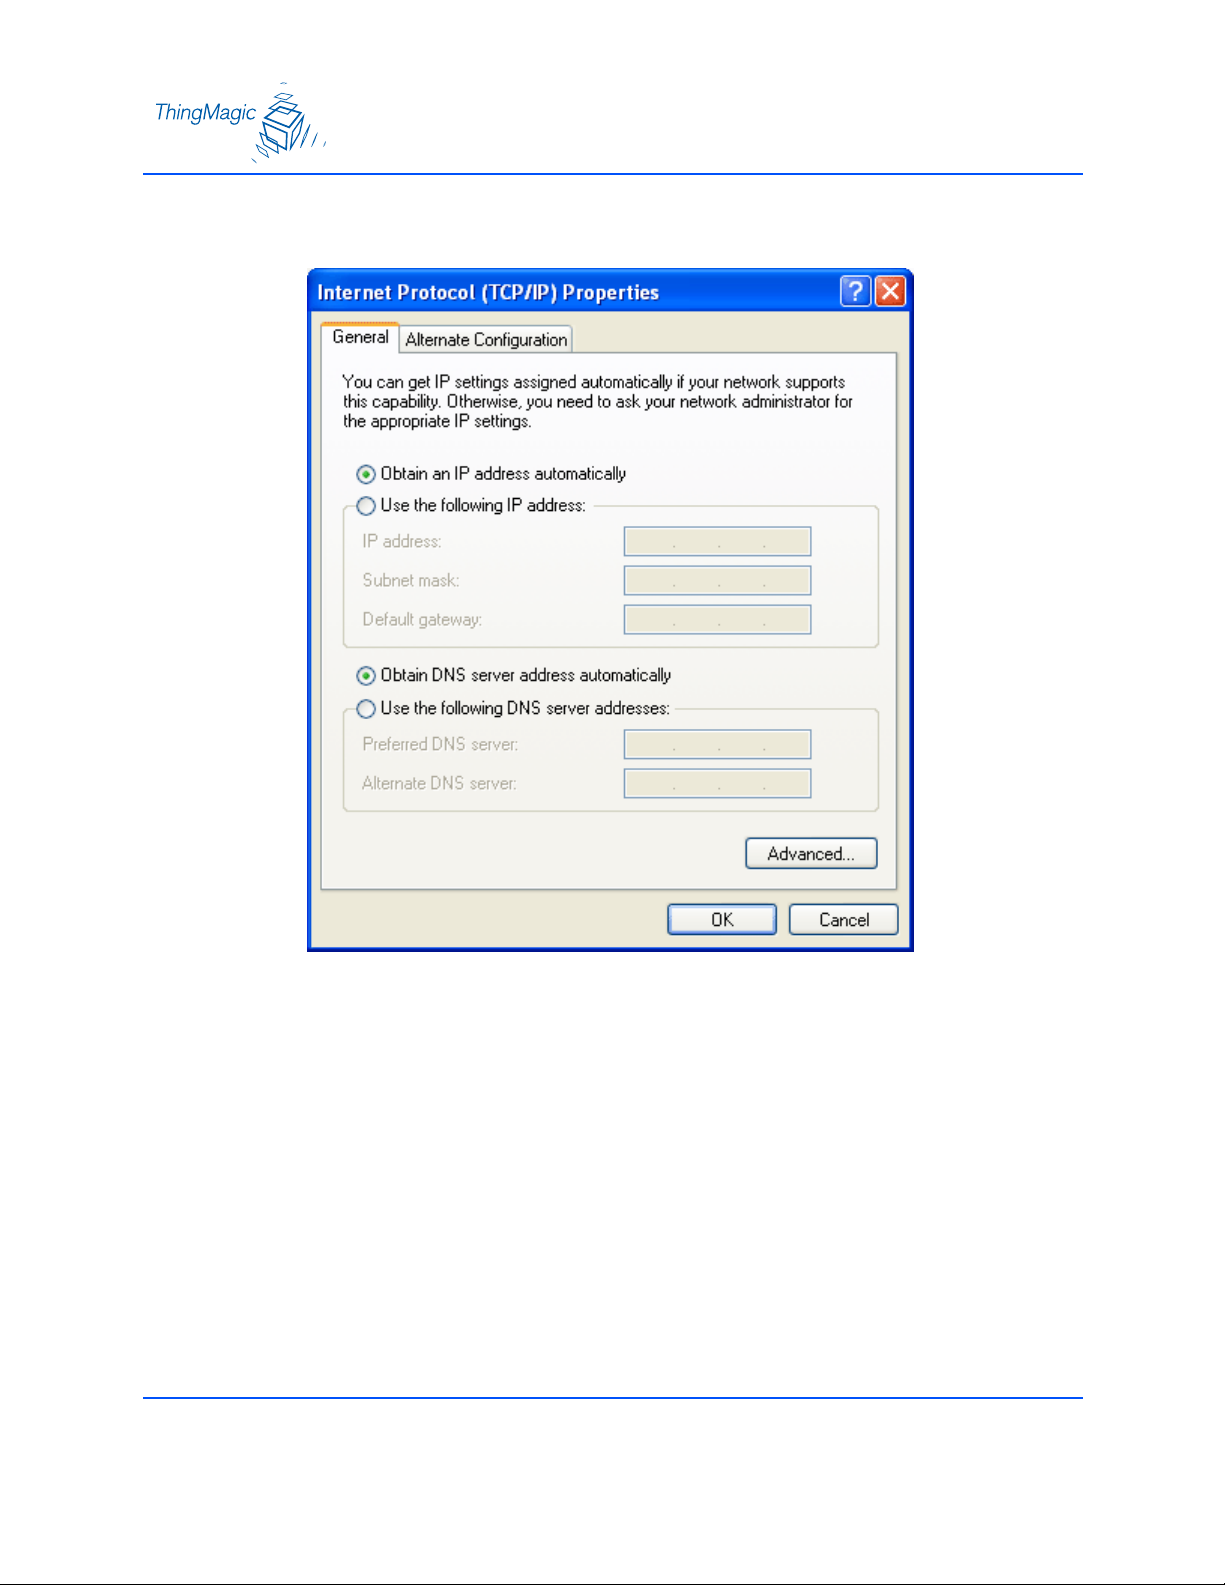
9. Select the radio button labeled “use the following IP address:”
10. Enter the settings as shown below.
IP address: 10.0.0.102
Subnet Mask: 255.255.255.0
Default Gateway: 10.0.0.1
11. Click OK to save and exit the window.
12. Click OK at the Local Area Connection Properties window.
11
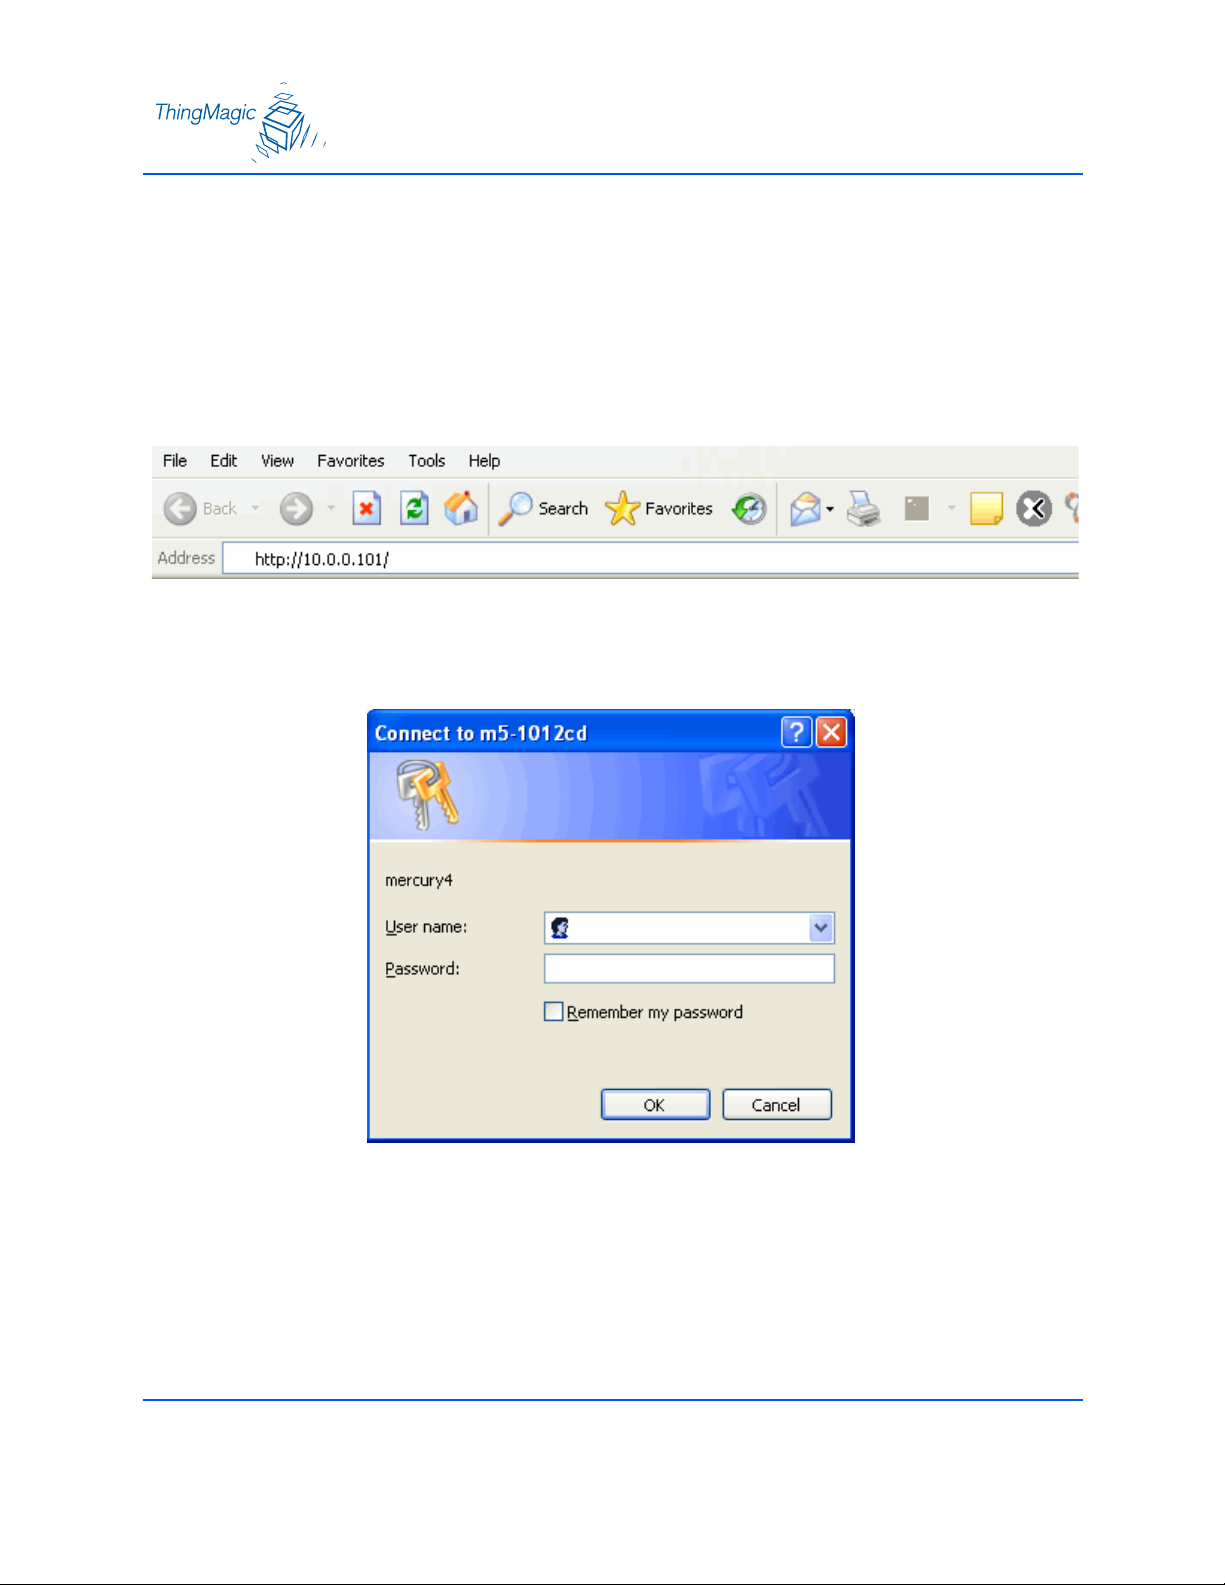
Log On to Reader
You may use any java-enabled web browser to log on to the reader.
Use the following steps to logon to the reader:
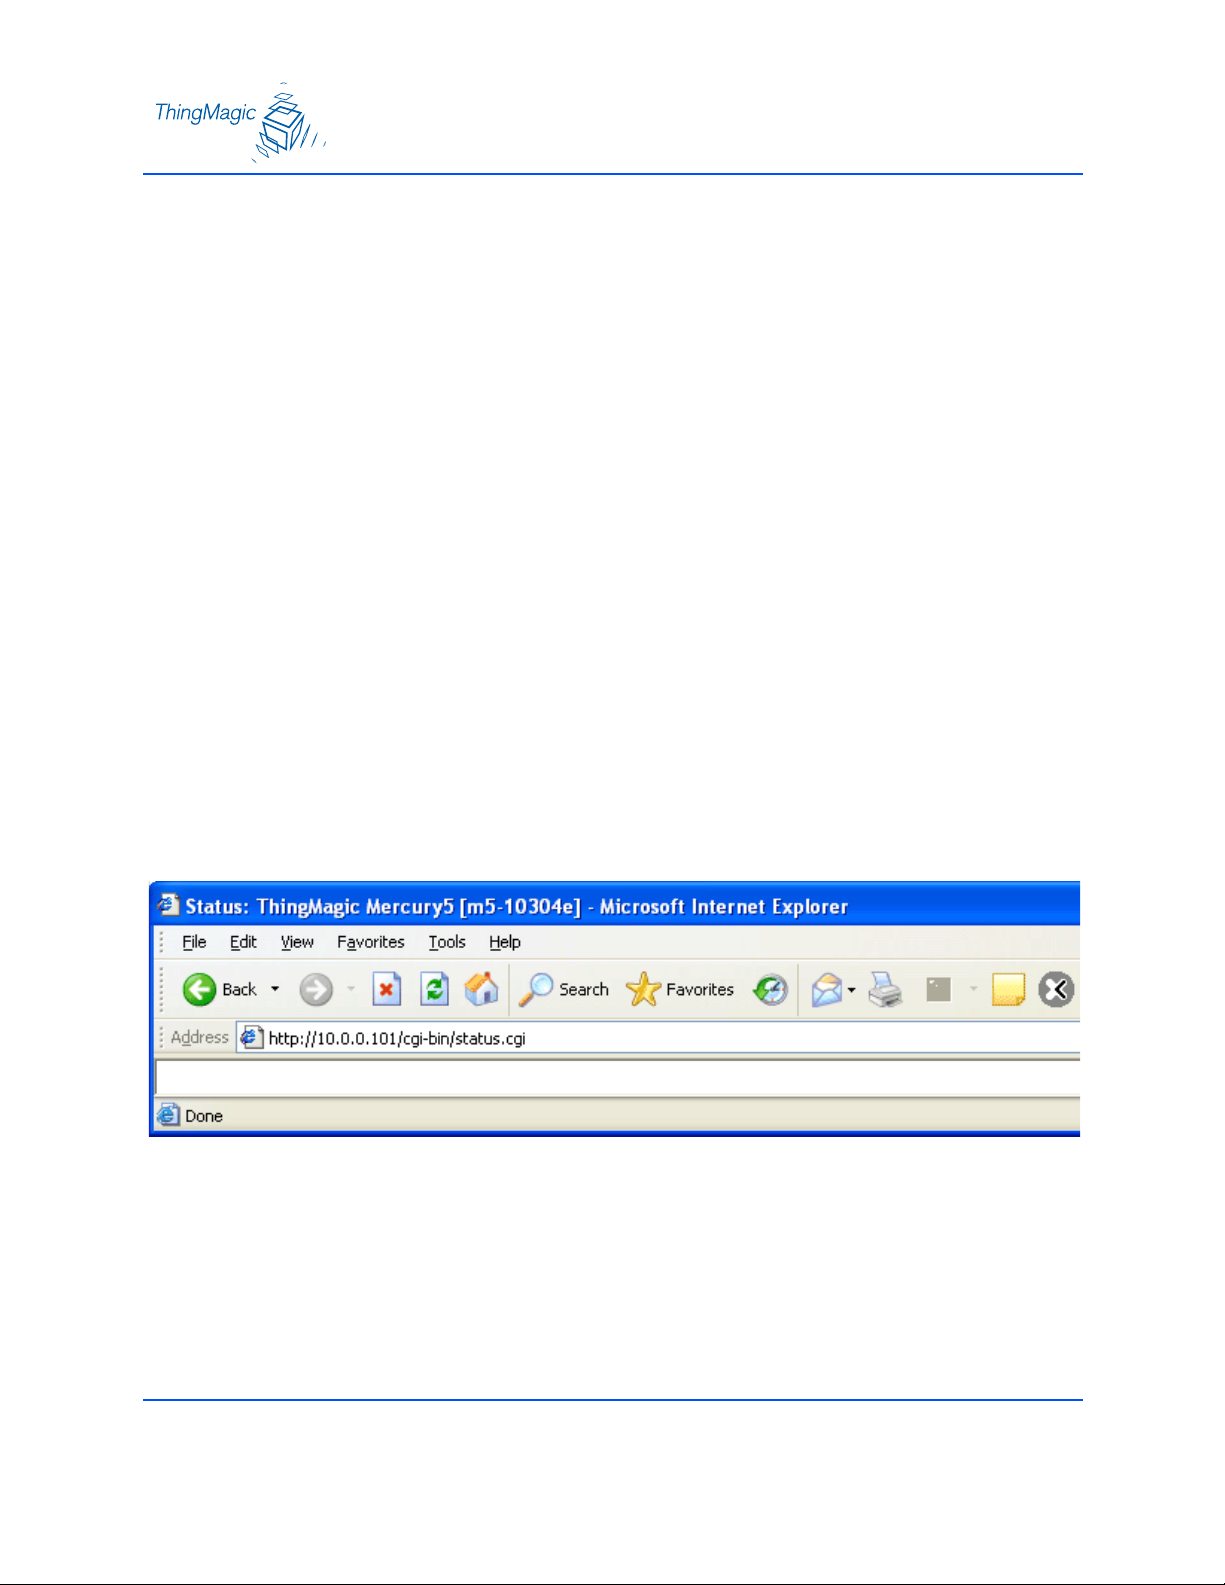
1. Launch your web browser and log on to the reader by entering the reader’s default IP
address of http://10.0.0.101/ in the address bar and pressing ENTER.
2. The log on dialog screen appears.
12
3. Enter the default User name: “web” and Password: “radio” (all lower-case). Click OK.
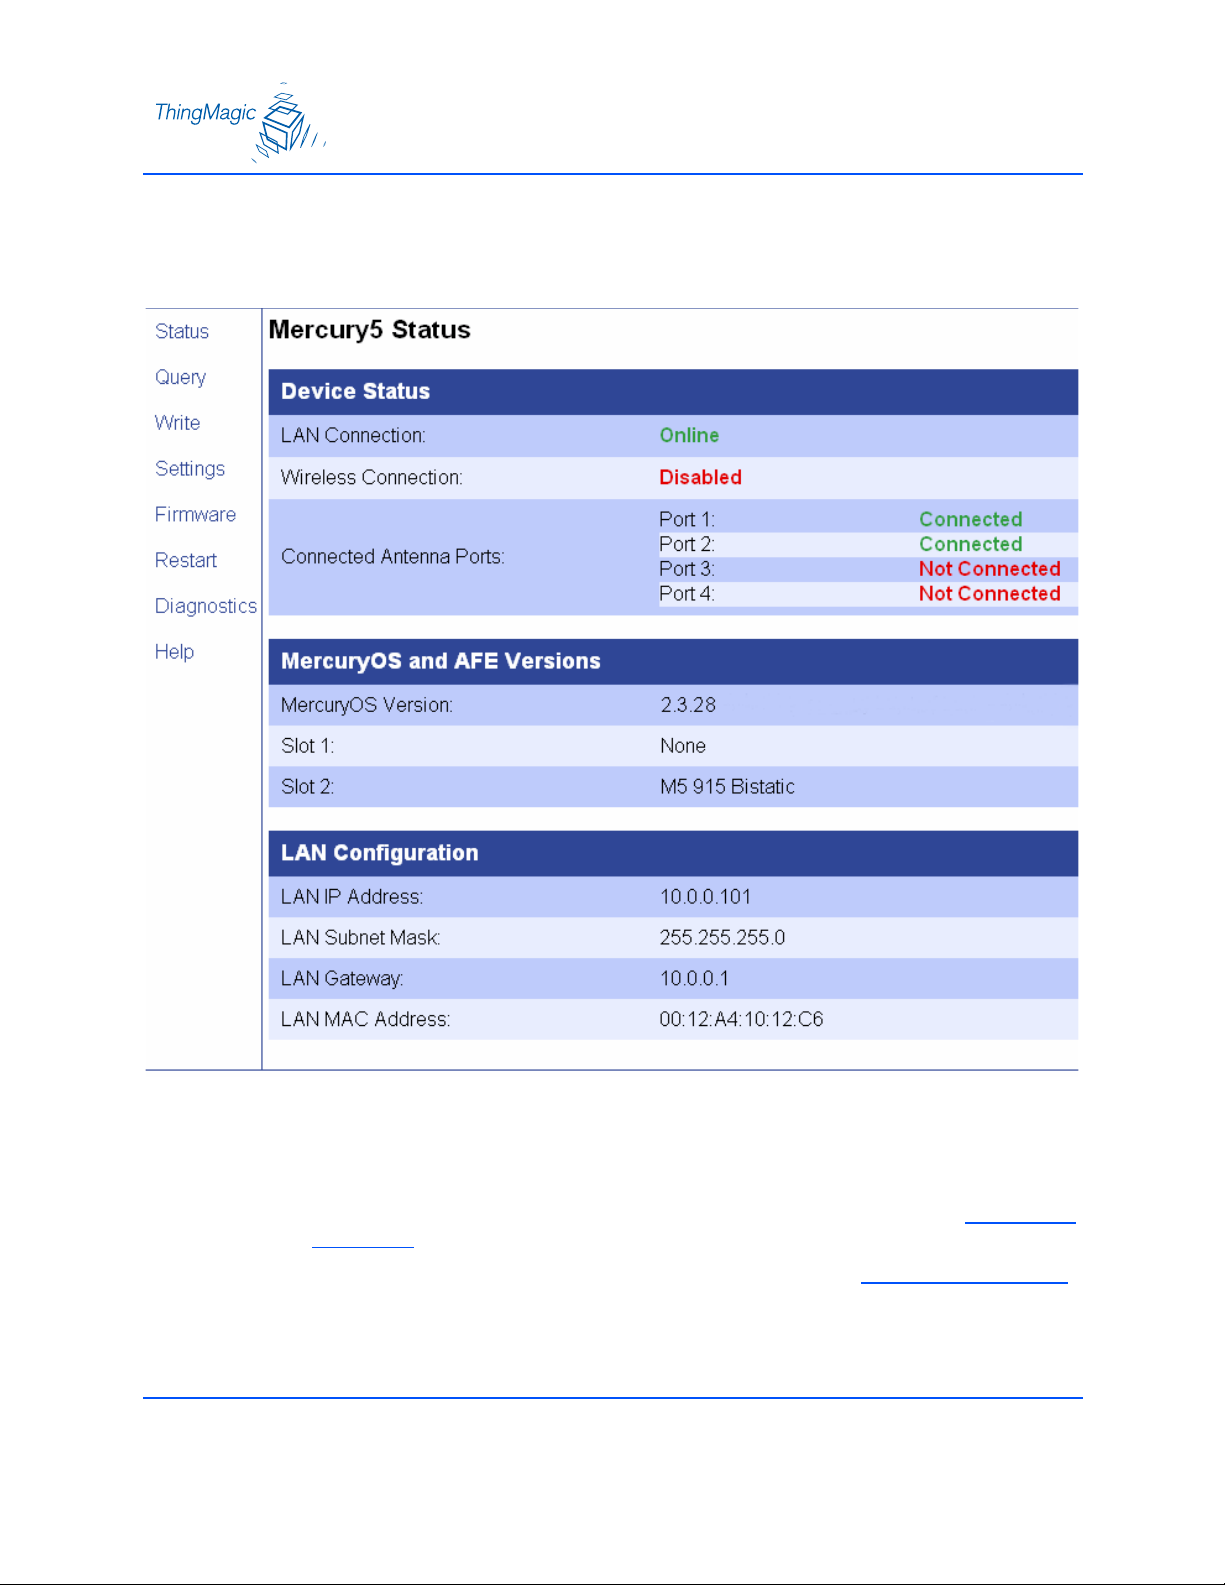
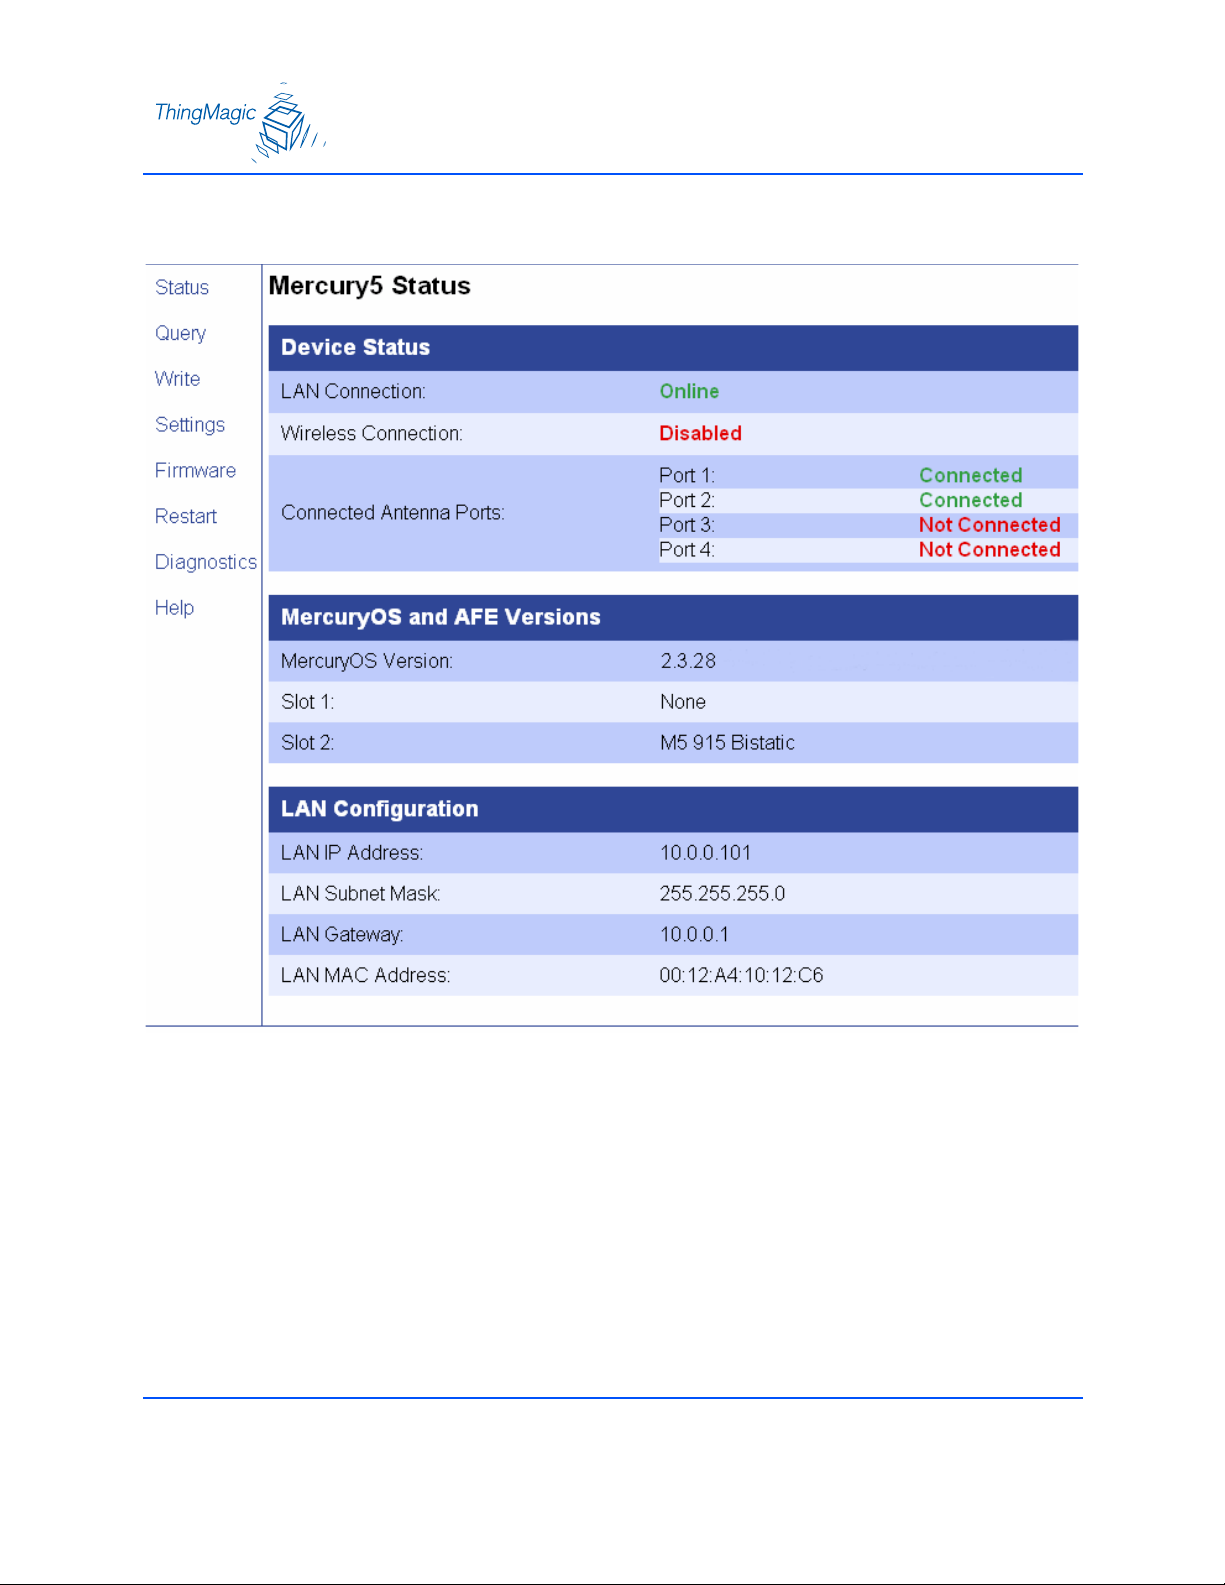
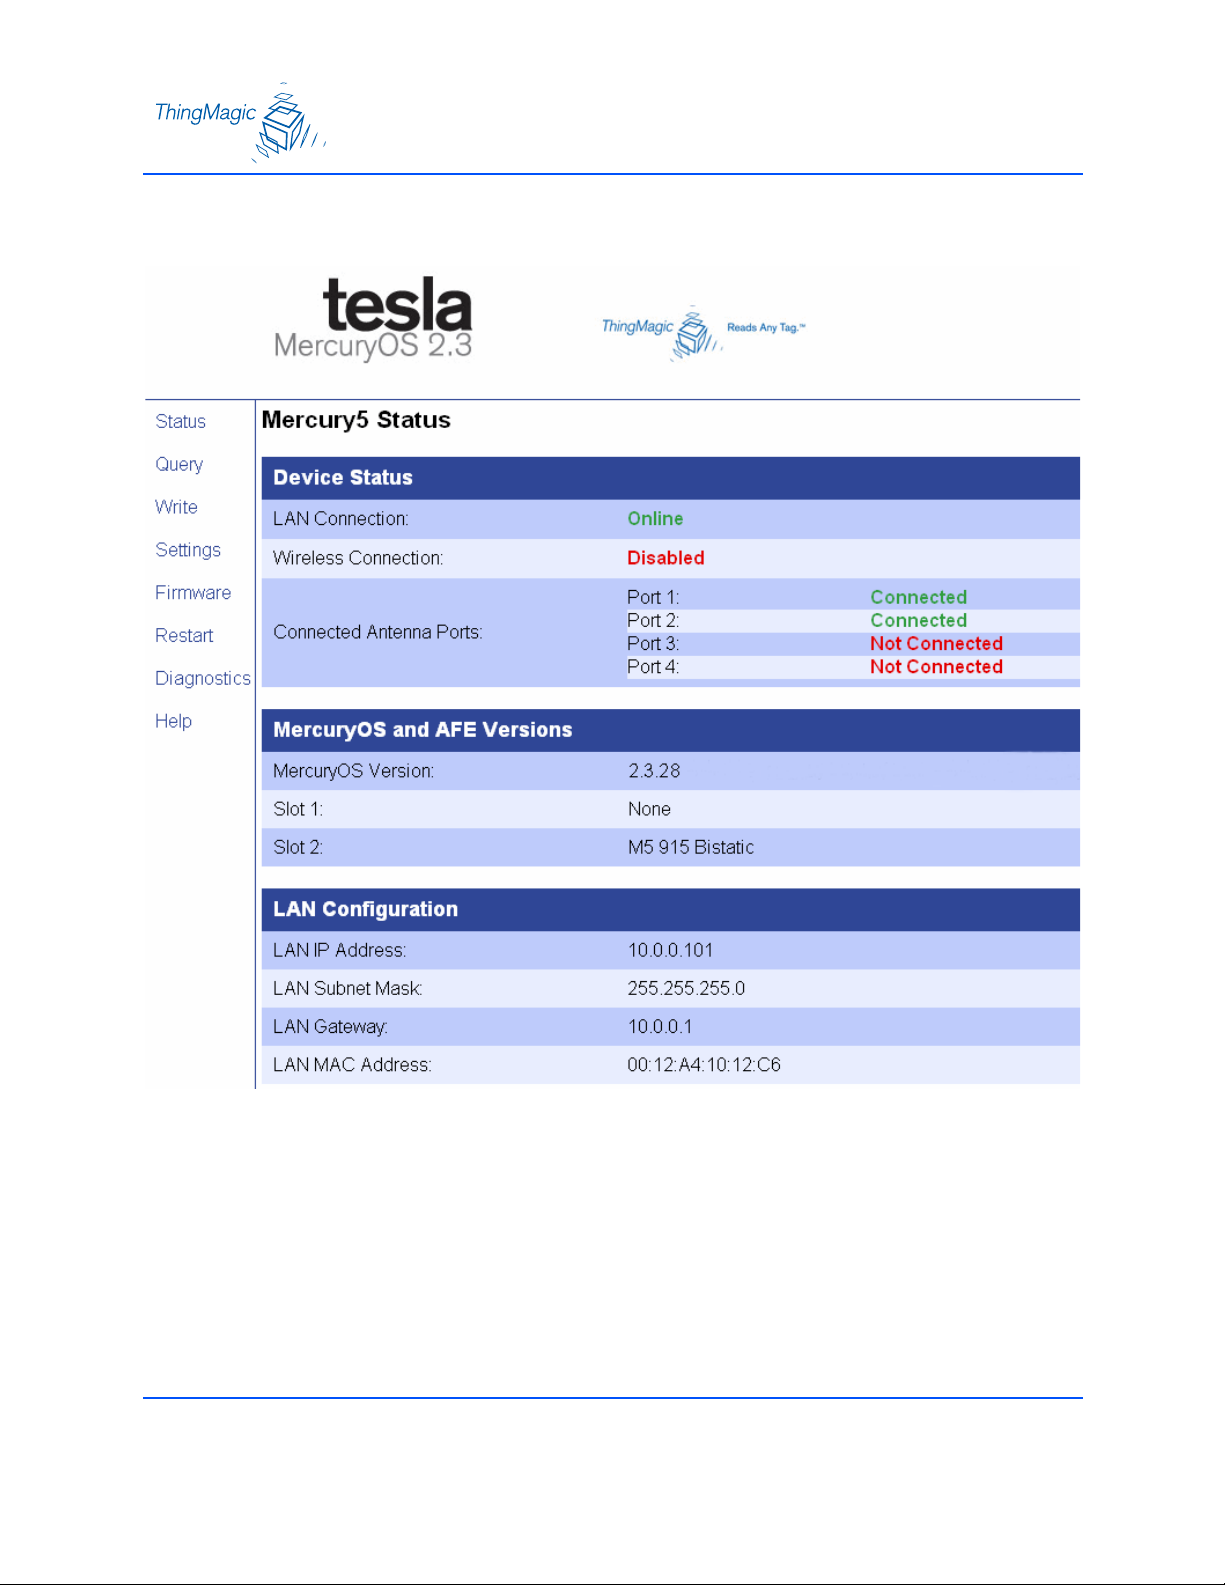
4. The Mercury4 or Mercury5 reader displays its browser-based interface. The Status
Page is the initial page which appears.
Mercury5 Status Page
5. Check the Connected Antenna Ports. Green=Connected
Next Steps
To connect the reader to a network and log in remotely, see the section Networking
the Reader on page 14.
To start reading tags and control the reader, see the section Controlling the Reader
on page 22: it guides you through all the available reader functions including how to
read and write tags, change settings, load firmware and reboot the reader in safe
mode.
13

Networking the Reader
You can set up the reader to use either manual IP addressing or DHCP. By default, the reader
has automatic addressing enabled: it boots up looking for a DHCP server.
DHCP can be used to automatically assign the reader’s IP address, subnet mask, default
gateway, NTP Server, DNS server and hostname. If the reader does not get a DHCP-assigned
IP address during its initial boot sequence, it defaults to the static IP address of 10.0.0.101, but
will periodically check to see if a DHCP server is available.
The following sections detail how to set up your PC and reader for automatic DHCP
configuration, as well as manually configuring the reader without a DHCP server and using the
ZeroConf protocol – Bonjour™ – for subnet reader discovery without a DHCP server.
DHCP on page 15
Bonjour on page 20
Networking the Reader
Hardware Setup
Whether you use DHCP or static network addressing, make sure the network is connected
before powering up the reader. If the reader does not get a lease from a DHCP server, it falls
back to its static IP address of 10.0.0.101, subnet mask 255.255.255.0 and gateway 10.0.0.1.
Before Setting Your Network Settings:
Connect one end of the Ethernet cabling to the reader and the other end to the
Ethernet switch or hub
Check that all antennas are securely connected, and power up your reader
Connect your computer to the same network as the reader
Note
To connect the reader to a network hub or switch, we recommend using shielded
UTP-Cat5 straight through Ethernet patch cabling.
Note
Some older 10baseT network hubs do not work properly with the reader. If you
encounter connectivity problems we recommend using nothing below
10/100baseT hubs/switches.
14
DHCP
To enable automatic assigning of your PC’s IP address by DHCP, use the following steps.
1. From the Start bar, select Start → Control Panel.
2. Double click the Network Connections icon.
3. Disable your PC’s wireless connection, if one exists.
4. Double click the Local Area Connection icon.
5. The local area Connection Status window appears.
15
6. Click the Properties button. The Local Area Connection Properties window appears.
16
7. Scroll down to the bottom of the list and select the Internet Protocol (TCP/IP) item.
8. Click on the Properties button.
9. The Internet Protocol (TCP/IP) Properties window appears.
10. Select the radio button “Obtain an IP address automatically”.
11. Click the OK button to save and exit the Internet Protocol Properties window.
12. Click the OK button at the Local Area Connection Properties window.
13. Click the Close button at the Local Area Connection Status window.
14. Several moments pass as the PC saves its new network settings.
17
Automatic Hostname: m5-xxxxxx
By default at startup, the reader generates an ‘automatic hostname’ by appending the last three
bytes of its MAC address to its hostname, such as m5-6b3043.
Please note that your network needs to have properly configured DNS servers if you wish to
connect to the reader via its hostname.
Typically, when using DHCP the DHCP server adds the hostname to the DNS server’s database
periodically.
MAC Address
The reader’s MAC address can be found on the back of the reader on a white label next to the
Ethernet port. You can also find the reader’s MAC address on the Status page.
The first 6 characters of the MAC address are ThingMagic’s manufacturer’s code. The last 6
characters of the MAC address are specific to the ThingMagic reader and are used for
automatic hostname addressing.
1. Obtain the reader’s MAC address, then launch your web browser and log on to the
reader by entering its automatic hostname in the address bar:
– For Mercury4: http://m4-xxxxxx (the last 6 characters of the reader’s MAC
address) and press Enter.
– For Mercury5: http://m5-xxxxxx.
18
2. The reader’s logon dialog screen appears.
3. Enter “web” and “radio” in the User name and Password fields and click OK.
4. The reader’s Status page appears.
5. Check to see that all the Antenna ports are connected. Green = Connected.
19

Bonjour
Another way of finding readers on a network is to use the Zeroconf protocol, which Apple calls
Bonjour™ (formerly called Rendezvous).
Bonjour works on networks without a DHCP server.
Apple provides a downloadable Bonjour plug-in for Windows Internet Explorer at their web site:
http://www.apple.com/macosx/features/bonjour/
Once you have installed Bonjour, reboot your PC and launch Internet Explorer.
1. Click on the Bonjour icon at the top of the IE browser. See the figure.
).
20

Note
Notice that each ThingMagic reader in the Bonjour frame on the left side of the
page is referenced by the domain name — ThingMagic — followed by the
hostname — Mercury4 and Mercury5 — followed by an m4 or m5 and the last six
characters of the device’s MAC address, such as 10148c.
2. A device frame on the left side of the browser opens and lists the names of all active
Bonjour devices available.
3. Double-click on the name of the reader you want to access. The login dialog for that
specific reader appears.
4. Type in the factory-default name and password: “web” / “radio” and click the OK button.
The status page of the selected reader appears.
This listing is periodically refreshed so that new Bonjour-enabled devices will appear as they
come on-line.
21

Controlling the Reader
The Reader uses RFID (radio frequency identification) technology to read and write data stored
on RFID Tag(s).
The reader provides three levels of access to RFID Tag(s):
Browser-Based Interface—A web browser controls high-level reader operations via a
Java applet.
Controlling the Reader
See Using the Browser-Based Interface
of this manual.
RQL—An intermediate form of accessing the tags is available via the RQL (reader
query language) application, operating similarly to an SQL (structured query
language) database server.
See the Reader Query Protocol and RQL
http://www.thingmagic.com/html/support/manuals.htm
manual or download it from ThingMagic at
API—Finally, low-level APIs (application programming interface) provide fine control
over all aspects of the reader. The reader supports UHF antennas, which are
available separately. The reader supports multiple configurations of UHF antenna
ports and transfers data to a remote computer over a network connection.
See the Yagi 2.4 API Setup & Reference Guide
.
22

Using the Browser-Based Interface
The Mercury4 or Mercury5 Reader browser-based interface communicates directly with the
RFID reader. It includes several tools that enable you to monitor reader performance, change
reader settings, and upgrade reader firmware.
The browser-based interface can be run from any PC on the network.
Care must be taken to configure the PC with an IP address and subnet mask compatible with
the current operational settings of the reader.
A navigation menu provides access to the following pages:
Status Page on page 26—Displays current operational settings.
Query Page on page 27—Allows the user to perform Anti-Collision RFID tag
searches and to specify the constraints used in the search.
Write Page on page 37—Allows the user to write tags; this is only applicable to tags
that are writeable.
Settings Page on page 39—Allows the user to modify reader network settings.
Firmware Update Page on page 47—This page can be used to upgrade the tag
reader with new firmware images supplied by ThingMagic.
Restart Page on page 49—Allows the user to restart the reader via a “warm boot.”
Diagnostics Page on page 51—This page provides the current operating settings of
the reader.
23
To start the browser-based interface:
1. Exit all reader applications on the network.
Note
Running another reader application while using the browser-based interface may
cause a reader error. If this happens, reboot the reader or restart it using the
browser-based interface.
2. Start a Java-enabled web browser from any network-enabled PC.
3. Type the IP address of the reader to which you want to communicate in the address
field of the browser or use Apple’s Bonjour
4. A log-in dialog appears. Enter the factory-installed User name: “web” and Password:
“radio” (all lower-case). Click OK.
™ protocol to browse to it.
24
5. A navigation menu and the Status page appear in the browser.
25

Status Page
The Mercury4 or Mercury5 Status page indicates the connected antennas, software version
and LAN configuration of the reader.
Note
Check to see that at least one antenna port is connected before performing any
tag queries or tag write operations.
26

Query Page
The Query page is mainly used to set up and run Anti-Collision searches quickly and give you
immediate feedback. This can be useful for verifying performance when installation is complete
and for debugging.
1. Click the Query link in the navigation menu.
2. Wait a few moments until the Java applet finishes loading, and prepare some tags for
testing.
3. The screen will be blank except for the controls. You are now ready to read tags.
Note
If the Query page does not load and you do not see the Java logo, you may need
to install the Java Runtime Environment for Windows and restart your PC.
27

Read Tags
1. Position one or more tags a few feet in front of one of the antennas connected to the
reader.
2. Select an appropriate built-in query from the pull-down list.
For instance:
– If you are using GEN2 tags, select “fewer than 10 GEN2 tags” from the list.
– If you are using other types of tags, select an appropriate query.
– If you don’t know what type of tags you have, select “fewer than 10 tags, any
protocol”. Using “any protocol” will slow the search somewhat since the reader will
spend time looking for tag types which may not be in the field.
Note
Reader performace is optimal when the most appropriate query is selected.
Note
Depending on your region and firmware version loaded on the reader, the list of
available built-in queries may vary.
28

Query Field
Query Screen
Drop-down List
Runs the selected Query in Auto Mode
Stops Auto Mode
Runs the selected Query once only
At the bottom of the screen is the Query field in which RQL search statements can be entered
or selected from the stock queries found in the drop-down list to the right of the Query field.
29

The RQL search statement in the Query field specifies which tag protocols will be read, which
antenna ports are to be used, how long the query is to be run, and other read operation
parameters. The query can be run once or continuously. See the figure for a list of available
stock queries.
3. Click the Start button at the bottom right to begin continuously reading tags. Tag data
is displayed. Each row in this example shows sequential tag number, number of times
tag was read, tag data, antenna, and protocol.
4. Click Stop to stop the tag search.
Note
IMPORTANT: Click the Stop button before exiting. You MUST stop the query
before exiting the query page or the reader will continue to transmit RF energy on
its antennas.
30

Query Results
The displayed tag data contains a lot of useful information. Each row shows sequential tag
number, number of times tag was read, tag data, antenna, and protocol. See the figure.
Tot al Ta gs S een
During Current
Search
Query Page Detail
Number of Times Tag Was Read
Date and Time on Reader
Show Raw Button
CRCs
CRCs
64-bit Tag IDs
CRCs
Order in Which
Tags are First Seen
96-bit Tag IDs
Last Antenna to
Read Tag
Tag Protocol
Query Field
Runs the Selected Query in Auto Mode
Stops Auto Mode
Runs the Selected Query Once Only
Query Drop-Down List
31

Note
Notice that EPC1 Tags display their CRC value as the first four digits of the Tag
ID and not the last four as the as GEN2, EPC0 and ISO 18000-6b protocols do.
32

Bignum Checkbox
The Bignum checkbox (when checked) displays the total number of unique tags read
during the current query until you clear the display. The total is displayed in large red
numbers directly over the tags read.
When you’re operating the reader on your own, with no assistance, this feature can
come in handy so you can watch the screen as you move tags and antennas around to
check read rates.
The total is displayed in large red numbers directly over the tags read. Each row in this
example shows sequential tag number, number of times tag was read, tag data,
antenna, and protocol. See the figure below.
Bignum Checkbox
Bignum Checkbox
33

By default, font size is set for 16 points. This can be increased to meet your viewing
requirements, such as displaying the results with an LCD projector. Enter a larger font number
in the font size field to increase the size of the font displaying tag data.
34

Show Raw
The “Show Raw” button displays raw tag data on the Query page. This is the actual console
output returned from the query. Each row in this example shows reader, protocol, antenna, tag
ID and CRC for each tag found. A space separates groups of tags found during each query.
Raw data can be easily copied and pasted into other documents. See the figure below.
Raw Data
CRC
Tag I D
Raw Tag Data
Depending on the fields included in the query, you may display a variety of tag data:
id: Tag id (in hex) and trailing 4-digit (16-bit) CRC cyclical redundancy check.
Note: EPC1 tag ids’ CRCs are the leading 4 digits of the tag id.
read_count: Number of times the tag was seen during query.
protocol_id: EPC1 = 1; ISO18K = 8; EPC0 = 9; GEN2 = 12
antenna_id: From 1 to 4 depending on which antenna saw the tag.
frequency: frequency in KHz in hop table at which tag was seen.
35

timestamp: Unix time in seconds and microseconds from 1-1-1970 when tag was
seen. Ex: 3004832.188394
dspmicros: microseconds after start of reading out the tag cache – per protocol.
36

Write Page
Use the Write page to replace the id or data that is encoded on a tag.
Write Screen
Consider the following guidelines when writing to tags:
Always place a tag 0.3-0.6m (1-2ft) from the antenna when writing. The tag may be
damaged if it is too close to the antenna
Only unlocked EPC0+, EPC1, IS018000-6b, or GEN2 tags can be written. EPC0
tags are always locked and cannot be recommissioned.
The ID to be written must match exactly the number of hexadecimal characters
(numerals from 0-9 and letters from A-F) specified by the tag’s protocol. For
example: 96-bit tag ids are 20 hexadecimal characters long; 64-bit EPC1 tag IDs are
16 hexadecimal characters long
Clear Output button clears the data displayed
Always place only one tag in the antenna’s field when writing. If multiple tags are
present, they may all be encoded with the same EPC data, or the write may fail.
37

Use the antenna connected to port 1 as it is used as the default antenna for writing
tags
Write an ID to a Tag
1. Click the Write link on the navigation menu. The Write page appears.
2. In the middle pane, type or paste a hexadecimal tag id to be written to the tag in the
RQL statement after tag_id=0x . For example: 16 hex characters for 64-bit tags, 20
characters for 96-bit tags, etc.)
3. Click the Make Update button. A query designed to write the highlighted data to the
tag appears in the center pane.
4. Place the tag 0.3-0.6m (1-2ft) from the antenna connected to port 1. Verify that no
other tags are in the antenna’s field.
5. Click the Submit Query button to write the data. If the write was successful, the new
tag id appears in the bottom pane.
Search For a Tag
1. Display the Write page (click the Write link on the navigation menu).
2. Click the Make Select button. A query designed to read data from the antenna
connected to port 1 appears in the center pane.
38
3. Place the tag to be read within the detection zone of the antenna.
4. Click the Submit Query button to find the selected tag type. Query results appear in the
bottom pane. Note that the query can be run only once, unlike on the Query page.

Settings Page
Use the Modify Settings page to change RFID protocol, network and reader security settings.
The page is divided into five sections:
RFID Protocol Settings on page 42
Network Settings on page 43
Network Settings: All Interfaces on page 43
Network Settings: Ethernet Interface on page 44
Boot Option Settings on page 45
Security Settings on page 46
Changing these parameters changes the reader’s settings used on startup. RFID protocol
settings, boot options and network settings can be modified. Care must be taken to use correct
values or you might be unable to connect the reader without restarting into safe mode.
Note
Do not disconnect power until the save process is complete. Note that new RFID,
network and security settings take effect after saving. Boot-related options are
saved but DO NOT take effect until the reader is restarted (see Restarting the
Reader). Therefore, to ensure that all new settings take effect. it is recommended
that you restart the reader whenever reconfiguring and after saving the new
settings.
39

1. Click the Settings link on the navigation menu. The Modify Settings page appears.
40

2. Enter the required settings.
3. Click the Save button to save the new settings. Saving overwrites the reader’s
configuration file with the current settings.
41

RFID Protocol Settings
The RFID protocol settings take effect immediately on the reader upon saving them. A restart is
not required. The Default RQL Query runs continuously at startup and thus a change to this
setting requires a restart of the reader.
RFID Protocol Settings
Setting Description
UHF Power (dBm) This field contains the UHF Output power measured in dBm. This setting must
be adjusted carefully to comply with FCC regulations. See the section
the Reader RF Power.
Setting
EPC1 Tag ID
Length
EPC0 Search Depth This field contains the maximum number of EPC0 tags to be singulated on each
Gen2 Init Q
Gen2 DRM On
Default RQL Query This field contains the initial query that is run continuously when reader starts
These radio buttons enable combined 96- and 64-bit tag support or single tag
id lengths. If the reader will only be reading 96- or 64-bit tags, select the 96-bit
or 64-bit radio button to optimize read rates.
query.
This field contains the initial value of
begins for the first time.
This field controls whether the Dense Reader Mode (DRM) is on or off when
performing Generation 2 searches.
up.
Q when a search on a GEN2 target
42

Network Settings
Static network settings are ignored when in DHCP mode, and DHCP related settings are
ignored when in static IP mode. Please note that your network needs to have properly
configured DNS servers if you wish to connect to the reader via its hostname. Usually when
using DHCP, the DHCP server will add the hostname to the DNS server’s database.
Network Settings: All Interfaces
Setting Description
Automatic Hostname Turning on automatic hostname will append the last six numbers (3 bytes) of the
reader’s address to the text in the hostname field.
For example, given a hostname of mercury(4)or(5) and a MAC Address of
00:12:A4:13:47:AC, the automatic hostname would be mercury(4)or(5)1347ac.
Hostname This field contains the name of the reader
NTP Server This field contains the address of any network time protocol server(s).
(Optional)
Domain Name This field contains the network domain name.
Primary DNS Server This field allows the Mercury4 or Mercury5 to resolve hostnames to IP
addresses
Secondary DNS
Server
This field allows the Mercury4 or Mercury5 to resolve hostnames to IP
addresses
43

Network Settings: Ethernet Interface
Setting Description
Use DHCP? If set to Yes, the reader will automatically look for its LAN IP, Netmask and
Gateway addresses from a
DHCP Server.
Vendor Class Identifier
Use DHCP Serversupplied Hostname?
LAN IP Address If “Use DHCP?” is set to Yes, the LAN IP, Netmask and Gateway values will be
LAN Gateway This is the gateway IP address for the local network, typically the IP address of a
LAN Netmask This is the subnet mask IP address used to determine to which TCP/IP subnet
This radio button that enables 96-bit tag support. To optimize the reader keep
this setting turned off unless it is needed.
If set to Yes, the manually supplied hostname (see Hostname) will be overridden
by the hostname supplied by the DHCP Server.
supplied by the DHCP Server. Default or manually entered addresses will be
dimmed out and bypassed. If Use DHCP? is set to No, you should manually
enter the LAN IP, Netmask and Gateway settings.
router.
the reader belongs. Devices in the same subnet can be communicated with
locally without going through a router.
44

Boot Option Settings
The boot option settings specify the location of downloadable firmware and configuration files
and their optional parameters, and the location of a syslog server to which all reader events may
be sent.
Boot Options
Setting Description
Boot Config Options Optional parameters used when downloading a new configuration file to the
reader.
-f : force a downgrade if config file version is lower than that currently running
on the reader.
-p : preserve configuration settings under a wipe -w : wipe flash memory and
settings
-a : add the reader’s
Boot Config URI to the tm.conf file to be downloaded on startup. Specify local:default for
local tm.config file.
Boot Firmware Options Same as Boot Config Options. Used when downloading new firmware to the
reader.
Boot Firmware URI to the firmware file to be downloaded at startup.
MAC Address to download filename
Syslog Host Name of host for remote logging. All log levels in syslog will be sent to this host.
45

Security Settings
These settings control secure access to the reader using a combination of SSH (Secure Shell),
HTTPS and secure RQL calls.
Setting Description
Secure Shell Only (disable telnet)
Secure Web Only (disable standard http)
Secure RQL Only (disable non-tunneled
RQL)
If Yes, the telnet server is disabled, and reader access can only be performed via
a secure shell (
If Yes, reader will only respond to requests using https URLs.
If Yes, RQL no longer listens on Port 8080 for remote access. RQL is still
accessible via an SSH tunnel.
SSH (Secure Shell)).
46

Firmware Update Page
1. Click the Firmware link on the navigation menu.
The Firmware Upgrade page appears.
47

2. Place the cursor in the Filename field and type the complete URI network pathname of
the firmware file or click the Choose file button to locate the new firmware file.
!
CAUTION!
!
If you select the “Erase contents before
installing” check box, you will erase all
user-installed programs or files residing on
the reader. DO NOT select this option if you
wish to preserve any user programs residing on the reader.
!
CAUTION!
!
If you select the “Revert to factory settings”
check box, you will erase any changes
made to the reader’s configuration settings
and revert to factory default settings. If you
select this option, the reader’s current configuration settings will be erased. DO NOT
select this option if you wish to preserve
the reader’s current configuration settings.
48
3. Click the Update button to download the new firmware to the reader. The status frame
at the bottom of the page displays the progress of the update.
4. To activate the new firmware, restart the reader. Until the reader is restarted, the old
firmware will still be active.
Note
If, for any reason, a firmware update fails, the device may restart in Safe Mode.

Restart Page
Use this procedure to activate reconfigured network reader settings or to recover from a reader
error.
1. Click the Restart link on the navigation menu; the Restart Reader page appears. See
the figure.
2. To restart the reader, click the Restart System button. The following dialog box
appears. See the figure.
3. Click OK. The following message appears and remains on the screen until the reader
restarts.
49

Restarting the Reader
1. Click the restart link on the navigation menu.
2. Click the restart button and the OK button on the confirmation dialog.
Wait for at least 60 seconds for the reader to boot up. The Power/Heartbeat LED is
solid green while the reader boots. When the LED begins blinking, the boot process is
complete.
50

Diagnostics Page
The diagnostics page expands on information found on the Status Page, including the current
settings of the reader, comprehensive version information, and current status of network
interfaces.
51

Using Safe Mode
There are two reasons to enter Safe Mode:
To perform a firmware update to repair a corrupted filesystem.
To change settings that are preventing the reader from operating normally.
Both of these tasks can be performed via the web interface.
Use the recessed Safe Mode button on the reader connector panel to recover from errors
which prevent the reader from operating in normal mode. In Safe Mode the reader is configured
with a static IP address of 10.0.0.102. Safe mode uses the following network settings:
IP Address: 10.0.0.102
Hostname: Mercury(4) or (5)
Although the browser-based interface pages are displayed in red when operating in safe mode,
the reader is still functional, although it cannot read or write tags. In most cases, the reader will
need to be reconfigured for operation with the reader application after starting in Safe Mode.
To manually reboot into Safe Mode use the following procedure:
1. With the reader running (green LED is pulsing), use a non-conductive object to hold
down the recessed reset button for 4 seconds.
52
2. Release the button.
3. The green LED should turn solid as soon as the button is released, indicating the
reader is rebooting. It should take approximately 30 seconds to boot into Safe Mode.
Note
The green LED stays solid in safe mode.
4. Once the maintenance has been performed, restart the reader to activate the changes.
The web server, telnet server and SSH (Secure Shell) server run in Safe Mode, however
none of the RFID features are activated. To communicate with the reader in Safe Mode,

a PC must have an IP address and subnet mask that are compatible with the reader
settings, for example:
IP address: 10.0.0.10
Netmask: 255.255.255.0
53

Reader RF Power
During initial installation, the reader must be properly configured to use the correct RF power to
comply with FCC regulations. DO NOT increase the power beyond this level.
The maximum RF power is determined from antenna gain and antenna cable loss using the
formula:
= 36 dBm - Antenna Gain + Cable Loss
P
max
For example, if the antenna has a maximum gain of 6 dBi, and the cable has a minimum loss of
0.6 dB, the maximum RF power that may be set is (36- 6 + 0.6) = 30.6 dBm.
Reader RF Power Example
Using ThingMagic shielded 25 ft. coaxial antenna cables TM-M5CAB-TT-P25 type LMR-195
and ThingMagic Dual Antenna TM-ANT-NA-2CX.
Reader RF Power
Total 25 ft. cable insertion loss = 3.1 dB.
Antenna gain = 7.0 dB
= 36 dBm - 7.0 dB + 3.1 dB = 32.1 dB maximum reader RF power.
P
max
Cable Loss Values for Shielded Coaxial Cable Provided by ThingMagic
Cable Length (in ft.) Insertion Loss (in dB)
6.9
20 2.5
25 3.1
The Reader RF Power is set through the Settings Page
set higher than 32.5 dBm.
. Note that in no case may the power be
Note
Be sure to read the section Compliance, Warranty and IP Notices on page 66 to
maintain compliance with FCC regulations.
54

Setting the Reader RF Power
The Reader RF Power can be set using the Settings Page of the browser-based interface.
Note that in no case may the power be set higher than 32.5 dBm.
1. Log on to the reader using your browser. The reader’s Status Page
2. Click on the Settings tab. The first field on the Settings page is UHF Power dBm – the
maximum RF power. Its factory default value is 32.5 dBm.
3. Enter the maximum setting based on your cable type, length and antenna type.
4. Scroll down to the bottom of the Settings Page
button to save the settings.
5. The Status Page
on page 26 will reload automatically after the settings been saved.
on page 39, and click Save changes
appears.
Note
If the Status page does not appear after a few moments, manually recycle the
power on the reader. After repowering, load the settings page again and check
the new maximum RF power setting.
55

Mounting the Reader
To install the Mercury reader, use the following steps:
You can place the reader on a shelf or mount it to a wall. To mount the reader on a wall use the
following steps:
1. Hold the reader in its mounting location and mark the position of the two mounting
screws. Minumum screw size is #12
Mounting the Reader
.
56
2. Drill holes for the screws and install wall anchors if necessary.
3. Insert the screws and tighten until almost flush with the wall.
4. Slip the reader over the screws and slide down to lock the screws in the keyhole
openings.
5. Tighten the screws.

Mounting the Reader
Mounting the Antennas
The antennas can be mounted directly to a variety of surfaces or mounting brackets. Up to 4
antennas can be connected to the reader.
Note
Because customer requirements dictate the placement of reader and antenna
components, your ThingMagic representative will supply this information
separately.
Authorized Antenna and Antenna Cables
For information on the only antennas authorized by the FCC for use with the Mercury4
and Mercury5 Readers, see Appendix A: Mercury4 Antenna Information
information on each antenna is available from their respective manufacturers.
. Detailed
57

Variables Affecting Performance
Reader performance may be affected by the following variables, depending on the site where
your RFID solution is being deployed:
Environmental Conditions
Tag Considerations
Multiple Readers
Variables Affecting Performance
58

Environmental Conditions
Reader performance may be affected by the following:
Metal surfaces such as desks, filing cabinets, bookshelves, and wastebaskets may
enhance or degrade reader performance.
Mount antennas as far as possible from metal surfaces that are adversely affecting
system performance.
Devices that operate at 900 MHz, such as cordless phones and wireless LANs, can
interfere with reader performance. These devices may degrade performance of the
reader. The reader may also adversely affect performance of 900 MHz devices.
Avoid mounting reader antennas in close proximity to fluorescent lighting where
possible, and test reader performance with moving machinery turned off.
Fluorescent lighting fixtures are a source of strong electromagnetic interference and
should be replaced if possible, or if not, keep cables and antennas away from them.
Uncoil completely all coaxial cables leading from readers to antennas: they can be a
strong source of electromagnetic radiation and should be laid flat and not coiled up.
59

Tag Considerations
There are several variables associated with tags that can affect reader performance:
Application Surface - Some materials interfere with tag performance including
metal and moisture. Tags applied to items made from or containing these materials
may not perform as expected.
Tag Orientation - Reader performance is affected by the orientation of the tag in
the antenna field. The ThingMagic antenna is circularly polarized, so it reads face-to
but not edge-to.
Tag Model - Many tag models are available. Each model has its own performance
characteristics.
60

Multiple Readers
These devices may degrade performance of the reader. The reader may also adversely affect
performance of 900 MHz devices.
The reader should be set to use Dense Reader Mode (DRM) or Dense Interrogator
Channelized Signaling for GEN2 tags.
Antennas on other readers operating in close proximity may interfere with one
another, thus degrading reader performance.
Interference from other antennas may be eliminated or reduced by using either one
or both of the following strategies:
– Affected antennas may be synchronized by a separate user application using a
time-multiplexing strategy.
– Antenna power can be reduced by reconfiguring the RF Transmit Power setting
for the reader.
When operating the reader with EPC Global Class 1 GEN2 2 tags, ensure that DRM
is turned on for best interference protection. See the Settings Page
Note
Performance tests conducted under typical operating conditions at your site are
recommended to help you optimize system performance.
.
61

Mercury4 Specifications
Electrical
Reader
UHF operating frequency: 902-928MHz
Input voltage: 24Vdc, 2.0A
Separate Power Supply
Input voltage: Nominal 100-240Vac, 50/60Hz
AC line current: Nominal 0.5A at 120V
Output voltage: Nominal 24Vdc, 2.5A peak
Mercury4 Specifications
Certified limited power source
Class 2
Environmental
Operating Temperature: 0° to 40°C (32° to 104°F)
Relative Humidity: 0 to 90% non-condensing
Mechanical
Reader
Length: 30.5cm (12in)
Width (with mounting bracket): 30.5cm (12in)
Depth: 4.4cm (1.75in)
Weight: 2.95kg (6.5lb)
62

Supported UHF Tag Protocols
EPC Class 1, GEN2EPC Class 0
ISO 18000-6BEPC Class 1
User Memory
64MB DRAM16MB Flash
Mercury4 Specifications
63

M5 Specifications
Electrical
Reader
UHF operating frequency: 902-928MHz (NA)
Input voltage: 24Vdc, 2.0A
Separate Power Supply
Input voltage: Nominal 100-240Vac, 50/60Hz
AC line current: Nominal 0.5A at 120V
Output voltage: Nominal 24Vdc, 2.5A peak
M5 Specifications
Certified limited power source
Class 2
Environmental
Operating Temperature: 0° to 40°C (32° to 104°F)
Relative Humidity: 0 to 90% non-condensing
Mechanical
Reader
Length: 30.5cm (12in)
Width (with mounting bracket): 30.5cm (12in)
Depth: 4.4cm (1.75in)
Weight: 2.95kg (6.5lb)
64

Supported UHF Tag Protocols
EPC Class 1, GEN2EPC Class 0
ISO 18000-6BEPC Class 1
User Memory
128MB DRAM32MB Flash
M5 Specifications
65

Compliance, Warranty and IP Notices
Compliance, Warranty and IP Notices
Regulatory Compliance
EMC FCC 47 CFR, Part 15
Industrie Canada RSS-210
Safety UL 60950
CSA C22.2 No 60950
FCC Compliance: This equipment complies with Part 15 of the FCC rules for
intentional radiators and Class A digital devices when installed and used in accordance
with the instruction manual. Following these rules provides reasonable protection
against harmful interference from equipment operated in a commercial area. This
equipment should not be installed in a residential area as it can radiate radio frequency
energy that could interfere with radio communications, a situation the user would have
to fix at their own expense.
Equipment Modification Caution: Equipment changes or modifications not expressly
approved by ThingMagic, Inc., the party responsible for FCC compliance, could void
the user's authority to operate the equipment and could create a hazardous condition.
Important User Information: In order to comply with FCC requirements for RF
exposure safety, a separation distance of at least 22 cm (8.7in) needs to be maintained
between the radiating elements of the antenna and the bodies of nearby persons.
Warranty Disclaimer and IP Notices
Warranty Disclaimer: THINGMAGIC, INC. MAKES NO REPRESENTATION OR
WARRANTY WITH RESPECT TO THE CONTENTS HEREIN AND SPECIFICALLY
DISCLAIMS ANY AND ALL EXPRESS OR IMPLIED WARRANTIES OF
MERCHANTABILITY OR FITNESS FOR A PARTICULAR PURPOSE. Further,
ThingMagic, Inc. reserves the right to revise this publication and make changes from
time to time in the content herein in its sole discretion without obligation to notify any
person of such revision or changes.
Government Limited Rights Notice: All documentation and manuals were developed at
private expense and no part of it was developed using Government funds.
The Government's rights to use, modify, reproduce, release, perform, display, or
disclose the technical data contained herein are restricted by paragraph (b)(3) of the
Rights in Technical Data--Noncommercial Items clause (DFARS 252.227-7013(b)(3)).
Any reproduction of technical data or portions thereof marked with this legend must
66

Compliance, Warranty and IP Notices
also reproduce the markings. Any person, other than the Government, who has been
provided access to such data must promptly notify ThingMagic, Inc.
Copyright Notice: This manual and documentation are reserved under and protected
by the copyright laws of the United States by ThingMagic, Inc.
Trademark Notice: ThingMagic and the ThingMagic logo are trademarks or registered
trademarks of ThingMagic, Inc. Other product names mentioned herein may be
trademarks or registered trademarks of ThingMagic, Inc. or other companies. No part of
this guide may be reproduced in any form without the prior written permission of
ThingMagic, Inc.
67

Appendix A: Mercury4 Antenna
Information
Authorized Antennas
In order to comply with FCC requirements for RF exposure safety, a separation distance of at
least 22 cm (8.7 in) needs to be maintained between the radiating elements of the antenna and
the bodies of nearby persons.
Provide strain relief for all reader connections.
Note
The only antennas authorized by the FCC for use with the Mercury4 reader are in
the tables below. Detailed information on each antenna is available from their
respective manufacturers.
Note
IMPORTANT: No other antennas may be used with the Mercury4 reader without
violating FCC regulations. It is the responsibility of the user to comply with this
requirement.
A- 1

Authorized Antennas
Mercury4 Approved Antennas
Item ThingMagic Dual Antenna Mercury Compact Antenna
Model TM-ANT-NA-2C MT-262010-TRLH/K
Gain 6 dBi max 6 dBi max
Connector Reverse TNC Reverse TNC
Item M/A-COM Dual Antenna Matrics General Purpose Antenna
Model MANNAT0141 ANT-GPHP
Gain 5.9 dBi max. 5.75 dBi max.
Connector Reverse TNC Type N
Item Alien Dual Antenna (Circular/Linear) Matrics General Purpose Antenna
Model ALR9611-CR+CL ALR9611-CR+CL
Gain 6 dBi max. 6 dBi max.
Connector Integral 20 ft. cable with Reverse TNC Integral 20 ft. cable with Reverse TNC
Item Cushcraft Circular Polarity Antenna Sensormatic OMNIPOINT Antenna
Model S9028PCL ID-ANT-20TNA25
Gain 8 dBic, 6 dBi max. 5.75 dBi max
Connector Reverse TNC Reverse TNC
Item Cushcraft Circular Polarity Antenna
Model S9028PCR
Gain 8 dBic, 6 dBi max.
Connector Reverse TNC
A-2

Antenna Cables
The only cables authorized by the FCC for use with the Mercury Readers are in the table below:
ThingMagic Part No. TM-CAB-TT-P25 TM-CAB-TN-P25
Length 25 ft. 25 ft.
Insertion Loss 3.1 dB min. 3.1 dB min.
Connectors Reverse TNC to Reverse TNC Reverse TNC to Type N
ThingMagic Part No. TM-CAB-TT-P6 TM-CAB-TN-P6
Antenna Cables
25 Foot TNC/TNC 25 Foot TNC/N
6 Foot TNC/TNC 6 Foot TNC/N
Length 6 ft. 6 ft.
Insertion Loss 0.9 dB min. 0.9 dB min.
Connectors Reverse TNC to Reverse TNC Reverse TNC to Type N
Note
The two Alien antennas have permanently attached cables with reverse TNC
connectors. Cable loss is 2.2 dB minimum at 902 to 928 MHz. Do not use these
antennas with additional cables.
A-3

Appendix B: M5 Antenna Information
Authorized Antennas
In order to comply with FCC requirements for RF exposure safety, a separation
distance of at least 22 cm (8.7 in) needs to be maintained between the radiating
elements of the antenna and the bodies of nearby persons.
Provide strain relief for all reader connections.
Note
The only antennas authorized by the FCC for use with the Mercury5 reader are in
the tables below. Detailed information on each antenna is available from their
respective manufacturers.
Note
IMPORTANT: No other antennas may be used with the Mercury5 reader without
violating FCC regulations. It is the responsibility of the user to comply with this
requirement.
B- 1

Authorized Antennas
Mercury5 Approved Antennas
Item ThingMagic Dual Antenna Mercury Compact Antenna
Model TM-ANT-NA-2CX MT-262010-TRLH/K
Gain 7 dBi max 6 dBi max
Connector Reverse TNC Reverse TNC
Item M/A-COM Dual Antenna Matrics General Purpose Antenna
Model MANNAT0123 ANT-GPHP
Part No. 250012-001
Gain 6 dBi max. 6 dBi max.
Connector Reverse TNC Type N
Item Cushcraft Circular Polarity Antenna Cushcraft Circular Polarity Antenna
Model S9028PCL S9028PCR
Gain 8 dBic, 6 dBi max. 8 dBic, 6 dBi max.
Connector Reverse TNC Reverse TNC
B-2

Antenna Cables
The only cables authorized by the FCC for use with the Mercury Readers are in the table below:
ThingMagic Part No. TM-CAB-TT-P25 TM-CAB-TN-P25
Length 25 ft. 25 ft.
Insertion Loss 3.1 dB min. 3.1 dB min.
Connectors Reverse TNC to Reverse TNC Reverse TNC to Type N
ThingMagic Part No. TM-CAB-TT-P6 TM-CAB-TN-P6
Antenna Cables
25 Foot TNC/TNC 25 Foot TNC/N
6 Foot TNC/TNC 6 Foot TNC/N
Length 6 ft. 6 ft.
Insertion Loss 0.9 dB min. 0.9 dB min.
Cable Type LMR-195 LMR-195
Connectors Reverse TNC to Reverse TNC Reverse TNC to Type N
20 Foot TNC/TNC 20 Foot TNC/N
ThingMagic Part No. TM-CAB-TT-P20 TM-CAB-TN-P20
Length 20 ft. 20 ft.
Insertion Loss 2.5 dB min. 2.5 dB min.
Connectors Reverse TNC to Reverse TNC Reverse TNC to Type N
B-3
 Loading...