

The Singing Machine SMI-1222 Instruction Manual

DVD / CD+GRAPHICS KARAOKE SYSTEM
SMI-1222
R
THE LEADER IN HOME KARAOKE AND BEYOND
c
SISTEMA DE KARAOKÊ COM CD + IMAGEM / DVD
Please read before using this unit.
Lea antes de usar esta unidad.
Instruction Manual
Manual De Instrucción
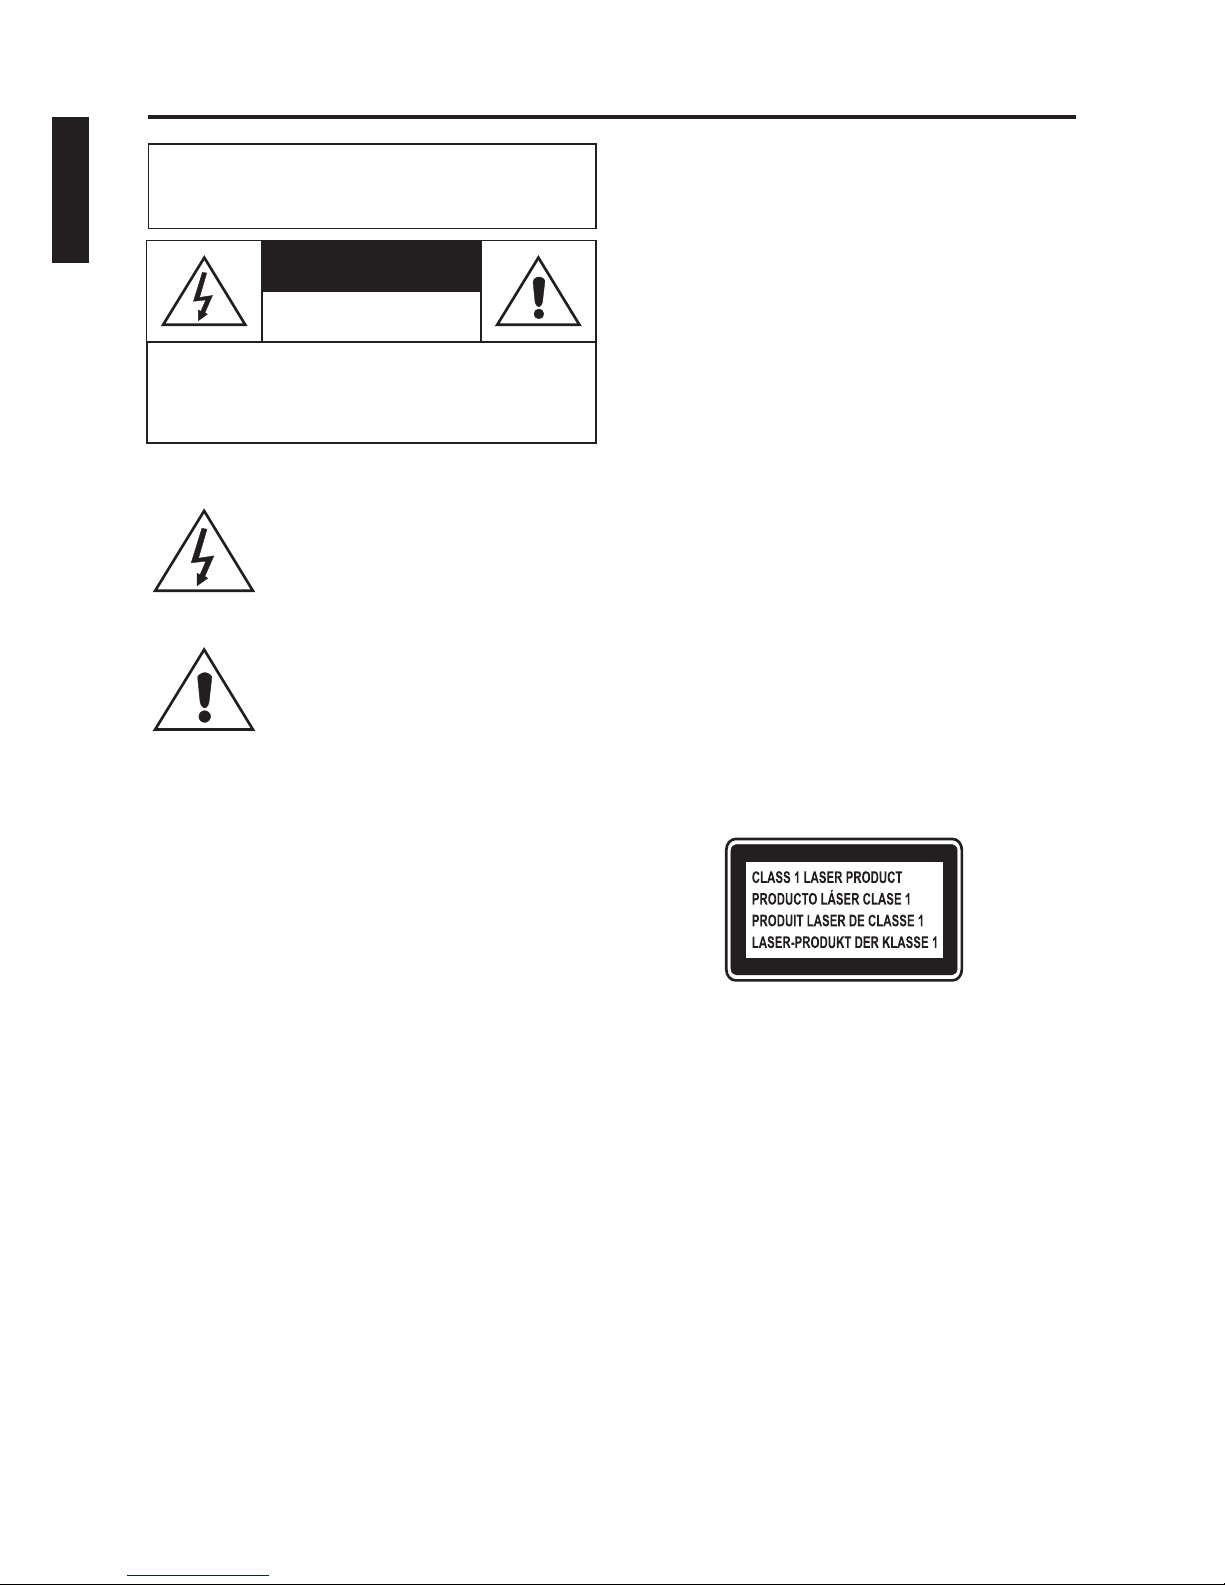
WARNINGS
This symbol is intended to alert you to
the presenceof uninsulated dangerous
voltage within the product's enclosure
that might be of sufficient magnitude to
constitute a risk of electric shock. Do
not open the product'scase.
This symbol is intended to inform you
that important operating and
maintenance instructions are included
in the literature accompanying this
product.
The CAUTION marking islocated at the rear panel.
The product shall not be exposed to dripping or
splashing and that no objects filled with liquids, such as
vases, shall be placedon the product.
The normal ventilation of the product shall not be
impeded for intended use.
DRIPPING WARNING
VENTILATION WARNING
CAUTION
TO PREVENT ELECTRIC SHOCK, MATCH WIDE
BLADE OF PLUG TO WIDE SLOT, FULLY INSERT.
COMPLIES WITH DHHS RADIATION
PERFORMANCE STANDARDS, 21 CFR SUB.
CHAPTERJ. THIS DEVICE COMPLIES WITH PART
15 OF THE FCC RULES, OPERATION IS SUBJECT
TO THE FOLLOWING TWO CONDITIONS: (1) THIS
DEVICE MAY NOT CAUSE HARMFUL
INTERFERENCE, AND (2) THIS DEVICE MUST
ACCEPT ANY INTERFERENCE RECEIVED,
INCLUDING INTERFERENCE THAT MAY CAUSE
UNDESIRED OPERATION.
CERTIFICATION:
SERVICEMAN CAUTION:
IMPORTANT
THIS PRODUCT COMPLIES WITH 21 CFR
CHAPTER 1, SUBCHAPTER J OF DHHS
REGULATIONS.
SEE WARNING NOTICE ON THE INSIDE OF BACK
COVER.
Since CD circuitry may cause interference to other
radio tuners nearby, switch this unit off when not in use
or move it awayfrom the affectedradio tuner.
COMPLIES WITH THE LIMITS FOR A CLASS B
DIGITAL DEVICE, PURSUANT TO PART 15 OF THE
FCC RULES.
This class[B] digital apparatus complies with
Canadian ICES-003.
This DVD player is made and tested to meet existing
safety standards. It meets FCC requirements and
complies with safety performance standardsof theU.S.
Department ofHealth andHuman Services.
This DVD player employs a laser light beam. Only a
qualified service person should remove the cover or
attempt to service this device, due to possible eye
injury.
The use of controls, adjustments,or procedures other
than those specified herein might result in hazardous
radiation exposure.
This compact disc player is classified as a CLASS 1
LASER product.
The CLASS 1 LASER PRODUCT label is located on
the rear panel.
Invisible laser radiation when open and inter locks
defeated.Avoid exposure tobeam.
Warnings:
CAUTION!
!
!
!
CAUTION
The apparatusshall beused in anopen area.
WARNING: TO REDUCE THE RISK OF FIRE OR
SHOCK HAZARD, DO NOT EXPOSE THISPRODUCT TO
RAIN OR MOISTURE.
CAUTION
RISK OF ELECTRIC SHOCK
DO NOT OPEN
CAUTION: TO PREVENT THE RISK OF
ELECTRIC SHOCK, DO NOT REMOVE COVER
OR BACK. NO USER-SERVICEABLE PARTS
INSIDE. REFER SERVICING TO QUALIFIED
PERSONNEL.
E1
ENGLISH
NOTE: This digital apparatus does not exceed the Class B limitsfor radio noise emissions from digital apparatus as
set out in the Radio Interference Regulations of Industry Canada. These limits are designed to provide reasonable
protection against harmful Nterference in a residential installation. Thisequipment generates,uses andcan radiate
radio frequency energy and, if not installed and used in accordance with the instructions, may cause harmful
interference to radio communications. However, there is no guarantee that interference will not occur in a particular
installation. If this equipment does cause harmful interference to radio or television (which can be determined by
turning the equipment off), the user is encouraged to try to correct the interference by one or more of the following
measures:
Reorient or relocate thereceiving antenna.
Increase the separation betweenthe equipment andreceiver.
Connect the equipment intoan outlet on a circuitdifferent from thatto whichthe receiver is connected.
Consult the dealer oran experienced radio / TVtechnician for help.
!
!
!
!

1. Read Instructions
2. Retain Instructions
3. Heed Warnings
4 Follow instructions
5. Cleaning
6. Attachments
7. Water and Moisture
8. Accessories
9.
10. Ventilation
11. Power Sources
12. Grounding or Polarization
Alternate Warnings
13. Power-Cord Protection
14. Protective Attachment Plug
15. Outdoor Antenna Grounding
16. Lightning
17. Power Lines
18. Overloading
19. Object and Liquid Entry
20. Servicing
21. Damage RequiringService
22. Replacement Parts
23. Safety Check
24. Wall or Ceiling Mounting
25. Heat
26.
- All the safety and operating instructions should
be read beforethe product isoperated.
- The safety and operating instructions should
be retained forfuture reference.
- All warnings on the product and in the operating
instructions should beadhered to.
. - All operating and use instructions should be
followed.
- Unplug this product from the wall outlet before cleaning.
Do not use liquid cleaners or aerosol cleaners. Use a dry cloth for
cleaning the exterioronly.Do NOT attemptto clean the inside.
- Do not use attachments not recommended by the
product manufacturer asthey may causehazards.
- Do not use this product near water - for
example, near a bath tub, wash bowl, kitchensink, or laundry tub; in a
wet basement, ornear a swimmingpool, and thelike.
- Do not place this product on an unstable cart, stand
tripod, bracket,or table. Theproduct mayfall, causingserious injuryto
a child or adult, and serious damage to the product. Use only with a
cart, stand, tripod, bracket, or table recommended by the
manufacturer, or sold with the product. Any mounting of the product
should follow the manufacturer's instructions, and should use a
mounting accessory recommendedby the manufacturer.
A product and cart combination should be moved with care. Quick
stops, excessive force,and unevensurfaces may cause the appliance
and cart combinationto overturn.
- Slots and openings in the cabinet are provided for
ventilation and to ensure reliable operation of the product and to
protect it fromoverheating, and theseopenings mustnot be blocked or
covered. The openings should never be blocked by placing the
product on a bed, sofa, rug, or other similar surface. This product
should not be placed in a built-in installation such as a bookcase or
rack unless proper ventilation is provided.
- This product should be operated only from the type
of power source indicated on the marking label. If you are not sure of
the type of power supply to your home, consult your product dealer or
local power company. For products intended to operate from battery
power,or other sources,refer to theoperating instruction.
- This product may be equipped with a
polarized alternating current line plug (a plug having one blade wider
than the other).This plug willfit intothe power outletonly oneway. This
is a safety feature. If you are unable to insert the plug fully into the
outlet, try reversing the plug. If the plug should still fail to fit, contact
your electrician to replace your obsolete outlet. Do not defeat the
safety purpose ofthe polarized plug.
- This product may beequipped witha three-wire
grounding-type plug, a plug having a third (grounding) pin. This plug
will only fit into a grounding-type power outlet.This is a safety feature.
If you are unable to insert the plug into the outlet, contact your
electrician to replace your obsolete outlet. Do not defeat the safety
purpose of thegrounding-type plug.
- Power supply cords should be routed so
that they are not likely to be walked on or pinched by items placed
upon or against them, paying particular attention to cords at plugs,
convenience receptacles, and the point where they exit from the
product.
- The product is equipped with an
attachment plug having overload protection. This is a safety feature.
See Instruction Manual for replacement or resetting of protective
device. If replacement of the plug is required, be sure the service
technician has used a replacementplug specified by the manufacturer
that has thesame overload protectionas the originalplug.
- If an outside antenna is connected to
the receiver, be surethe antenna system is groundedso as to provide
some protection against voltage surges and built-up static charges.
Article 810 of the National Electrical Code, ANSI/NFPA 70, provides
information with regard to proper grounding of the mast and
supporting structure, grounding of the lead-in wire to an antennadischarge unit, size of grounding conductors, location of antennadischarge unit,connection togrounding electrodes,and requirements
for the groundingelectrode. See figure:
- For added protection for this product during a lightning
storm, or whenit isleft unattendedand unusedfor long periods oftime,
unplug it from the wall outlet and disconnect the antenna or cable
system. This will prevent damage to the product due to lightning and
power-line surges.
-An outside antenna system shouldnot belocated in the
vicinity ofoverhead powerlines orother electriclight or power circuits,
or where it can fall into such power lines or circuits. Wheninstalling an
outside antenna system, extreme care should be taken to keep from
touching such power lines or circuits as contact with them might be
fatal.
- Do not overload wall outlets, extension cords, or
integral convenience receptacles as this can result in a risk of fire or
electric shock.
- Never push objects of any kind into this
product through openings as they may touch dangerous voltage
points or short-out parts that could result in a fire or electric shock.
Never spill liquidof any kindon the product.
- Donot attempt to service this product yourselfas opening
or removing covers may expose you to dangerous voltage or other
hazards. Refer allservicing to qualifiedservice personnel.
- Unplugthis product from the wall outlet
and refer servicing to qualified service personnel under the following
conditions:
a) When the power-supply cord or plug is damaged,
b) If liquid has been spilled,or objects havefallen into theproduct,
c) If theproduct has beenexposed to rain or water,
d) If the product does not operate normally by following the
operating instructions. Adjust only those controls that are
covered by the operating instructions as an improper
adjustment ofother controlsmay resultin damageand willoften
require extensive work by a qualified technician to restore the
product to itsnormal operation.
e) If the producthas been droppedor damaged inany way, and
f ) When the product exhibits a distinct change in performance -
this indicates aneed for service.
- When replacement parts are required, be sure
the service technician has used replacement parts specified by the
manufacturer or have the same characteristics as the original part.
Unauthorized substitutions may result in fire, electric shock, or other
hazards.
- Upon completion of any service or repairs to this
product, ask the service technician to perform safety checks to
determine that theproduct is inproper operating condition.
- The product should be mounted to a wall
or ceiling onlyas recommended bythe manufacturer.
- The productshould be situatedaway fromheat sources such as
radiators, heat registers, stoves, or other products (including
amplifiers) that produce heat.
Unplug this apparatus during lightningstorms orwhen unused for long
periods of time.
ANTENNA
LEAD IN
WIRE
ANTENNA
DISCHARGE UNIT
(NEC SECTION 810-20)
GROUNDING CONDUCTORS
(NEC SECTION 810-21)
GROUND CLAMPS
POWER SERVICE GROUNDING
ELECTRODE SYSTEM
(NECART 250. PART H)
GROUND
CLAMP
ELECTRIC
SERVICE
EQUIPMENT
NEC-NATIONALELECTRICAL CODE
S2898A
E2
IMPORTANT SAFETY INSTRUCTIONS
ENGLISH

TABLE OF CONTENTS
FEATURES
NOTES ON DISCS
INTRODUCTION
CONTROL LOCATIONS
REMOTE CONTROL
VFD DISPLAY
CONNECTIONS
INITIAL SETUP
BASIC OPERATIONS
CARE AND MAINTENANCE
TROUBLE SHOOTING GUIDE
SPECIFICATIONS
THE SINGING MACHINE KARAOKE GLOSSARY OF TERMS
PLAYABLE DISC
DISC TYPES
FRONT VIEW
TOP AND REAR VIEW
CONNECTING TO A VIDEO SYSTEM
CONNECTING TO AN AUDIO SYSTEM
GENERAL SETUP
AUDIO SETUP
VIDEO SETUP
PREFERENCE
PASSWORD
BASIC PLAYBACK
TO PLAY A DISC
TO STOP PLAYING DISC
TO REMOVE A DISC
TO GO TO NEXT AND PREVIOUS CHAPTER/TRACK
TO PLAY IN FAST REVERSE OR FAST FORWARD
TO PAUSE PLAYBACK (STILL MODE)
OTHER FUNCTIONS
REPEAT CHAPTER/TITLE/TRACK
TO REPEAT A PARTICULAR SESSION
CHANGING SUBTITLE LANGUAGE
CHANGING AUDIO SOUND TRACK LANGUAGE
VOCAL
PLAYBACK FRAME BY FRAME
BASS/TREBLE EFFECT
ECHO/KEY
TIME DISPLAY
ZOOM
WATCHING A MOVIE IN DIFFERENT ANGLES
SLOW MOTION
CURSOR AND ENTER
GO TO
PROGRAM
TITLE
EXTERNAL SPEAKER ON/OFF
CASSETTE AND OTHER OPERATIONS
VOLUME CONTROL
PLAYBACK CONTROL (PBC)
INTRO (SCAN)
E4
E5
E6
E7
E8
E9
E10
E11
E12
E13
E15
E16
E17
E18
E19
E20
E21
E21
E21
E21
E21
E21
E22
E22
E22
E22
E22
E23
E23
E23
E24
E24
E24
E24
E24
E25
E27
E28
E30
E20
E20
E20
E20
E20
E20
E20
E3
ENGLISH

FEATURES
Dolby Digital Sound
Screen Saver/Auto Power-Off Functions
This player is compatible with Dolby Digital surround sound with 5.1 channels when connected to a Dolby Digital Decoder.
The screen saver program starts when there is no input from the player for 10 minutes in the stop mode. When the screen
saver program is activated for 20 minutes, the unit automatically powers off.
2-times, 3-times, and 4-times ma
Still/Fast/Slow/Step Playback
Program Playback for DVD and Audio CD
DVD Menu in a Desired Language
Subtitles in a Desired Language
Selecting a Camera Angle
Choices for Audio Language and Sound Mode
Parental Lock
Automatic Detection of Discs
Playing a Picture CD Disc
On-Screen Display
Search
Repeat
Zoom
DRC (Dynamic Range Control)
Various playback modes are available including still pictures, fast forward/reverse, slow motion and step frames.
You can program the tracks to play in any desired order.
You can display DVD menus in a desired language, if available on a DVD.
You can select a desired language to the display subtitles, if that language is available on a disc.
You can select the desired camera angle, if a disc contains sequences recorded from different angles.
You can select the desired audio language and sound mode, if different languages and modes are available on a disc.
You can set the control level to limit playback of discs which may not be suitable for children.
This player automatically detects if a loaded disc is DVD, audio CD or Picture CD disc.
You can enjoy Picture CD discs which are recorded on CD-R/RW.
Information about the current operation can be displayed on a TV screen, allowing you to confirm the currently active
functions (such as program playback), on the TV screen using the remote control.
Chapter search: Search for the chapter designated by user is possible.
Title search: Search for the title designated by user is possible.
Track search: Search for the track designated by user is possible.
Time search: Search for the time designated by user is possible.
Chapter: Repeated playback of the chapter of the disc being played is possible.
Title: Repeated playback of the title of the disc being played is possible.
Track: Repeated playback of the track of the disc being played is possible.
Disc: Repeated playback of the entire disc being played is possible.
A-B: The part between A and B designated by user is possible.
gnified screen can be displayed.
You can control the dynamic range of volume.
CDG,
You are able to search the desired title, chapter, or track with the numeric buttons during playback or in stop mode.
Direct Search
E4
ENGLISH
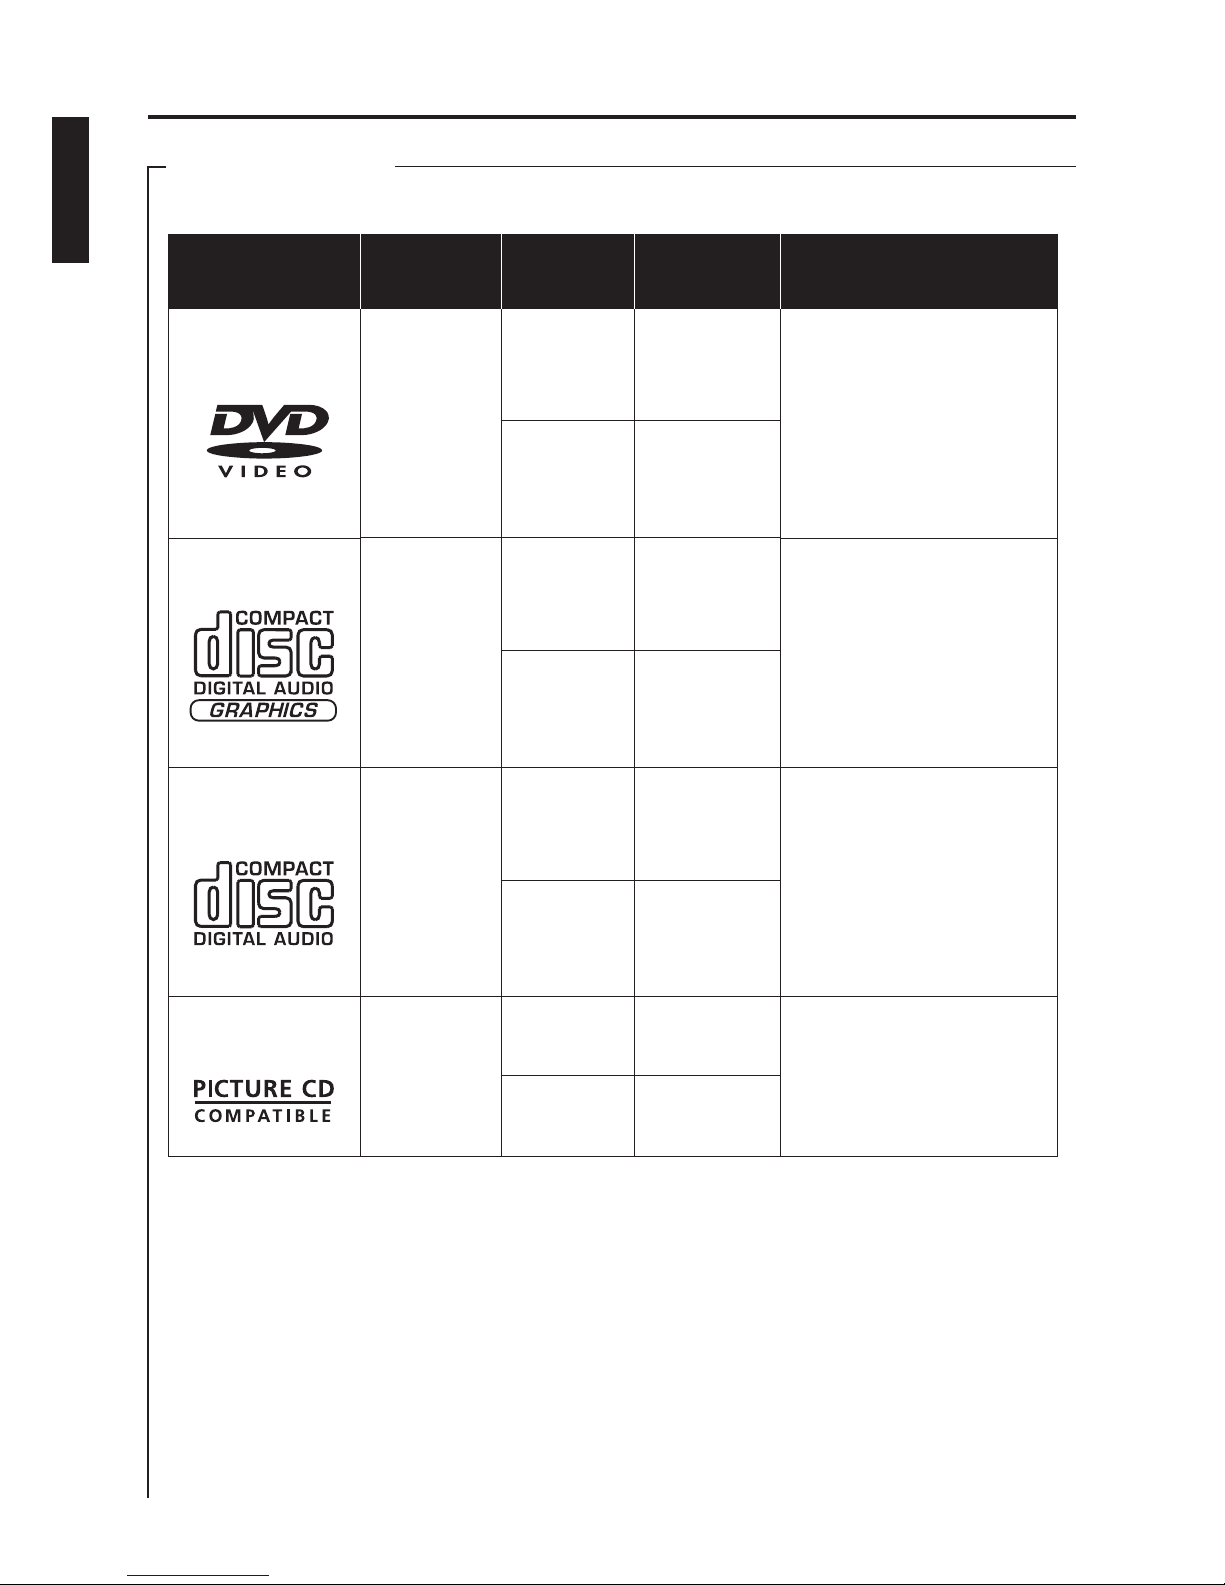
NOTES ON DISCS
PLAYABLE DISCS
This DVD Player compatible with the following discs.
Disc Types
(Logos)
Recording
Types
Disc Size
MAX.
Playing
Time
Characteristics
AUDIO
+
VIDEO
5 inches
(12cm)
3½ inches
(8cm)
Single-sided
240 min.
Double-sided
480 min.
Single-sided
80 min.
Double-sided
160 min.
! DVD contains excellent
sound and video due to
Dolby Digital and MPEG-2
system.
Various screen and audio
functions can be easily
selected through the onscreen menu.
!
DVD
E5
AUDIO
5 inches
(12cm)
3½ inches
(8cm)
74 min.
20 min.
! An LP is recorded as an
analog signal with
distortion. CD is recorded
as a digital signal with
better audio quality, less
distortion and less
deterioration of audio
quality over time.
AUDIO-CD
AUDIO
+
SIMPLE
GRAPHICS
5 inches
(12cm)
3½ inches
(8cm)
74 min.
20 min.
! Compact Disc + Graphics is
a regular audio CD with
information stored on a
data track simultaneous to
music. In the case of
karaoke, the graphics is
used to store song lyrics
and display in synch with
music.
CDG
IMAGE
! Picture CD contains digital
image which compatible
with computer. It provides
an easy way to duplicate
and store pictures in high
quality.
PICTURE
CD FORMAT
5 inches
(12cm)
3½ inches
(8cm)
N.A.
N.A.
ENGLISH
NOTES ON DISCS
PLAYABLE DISCS
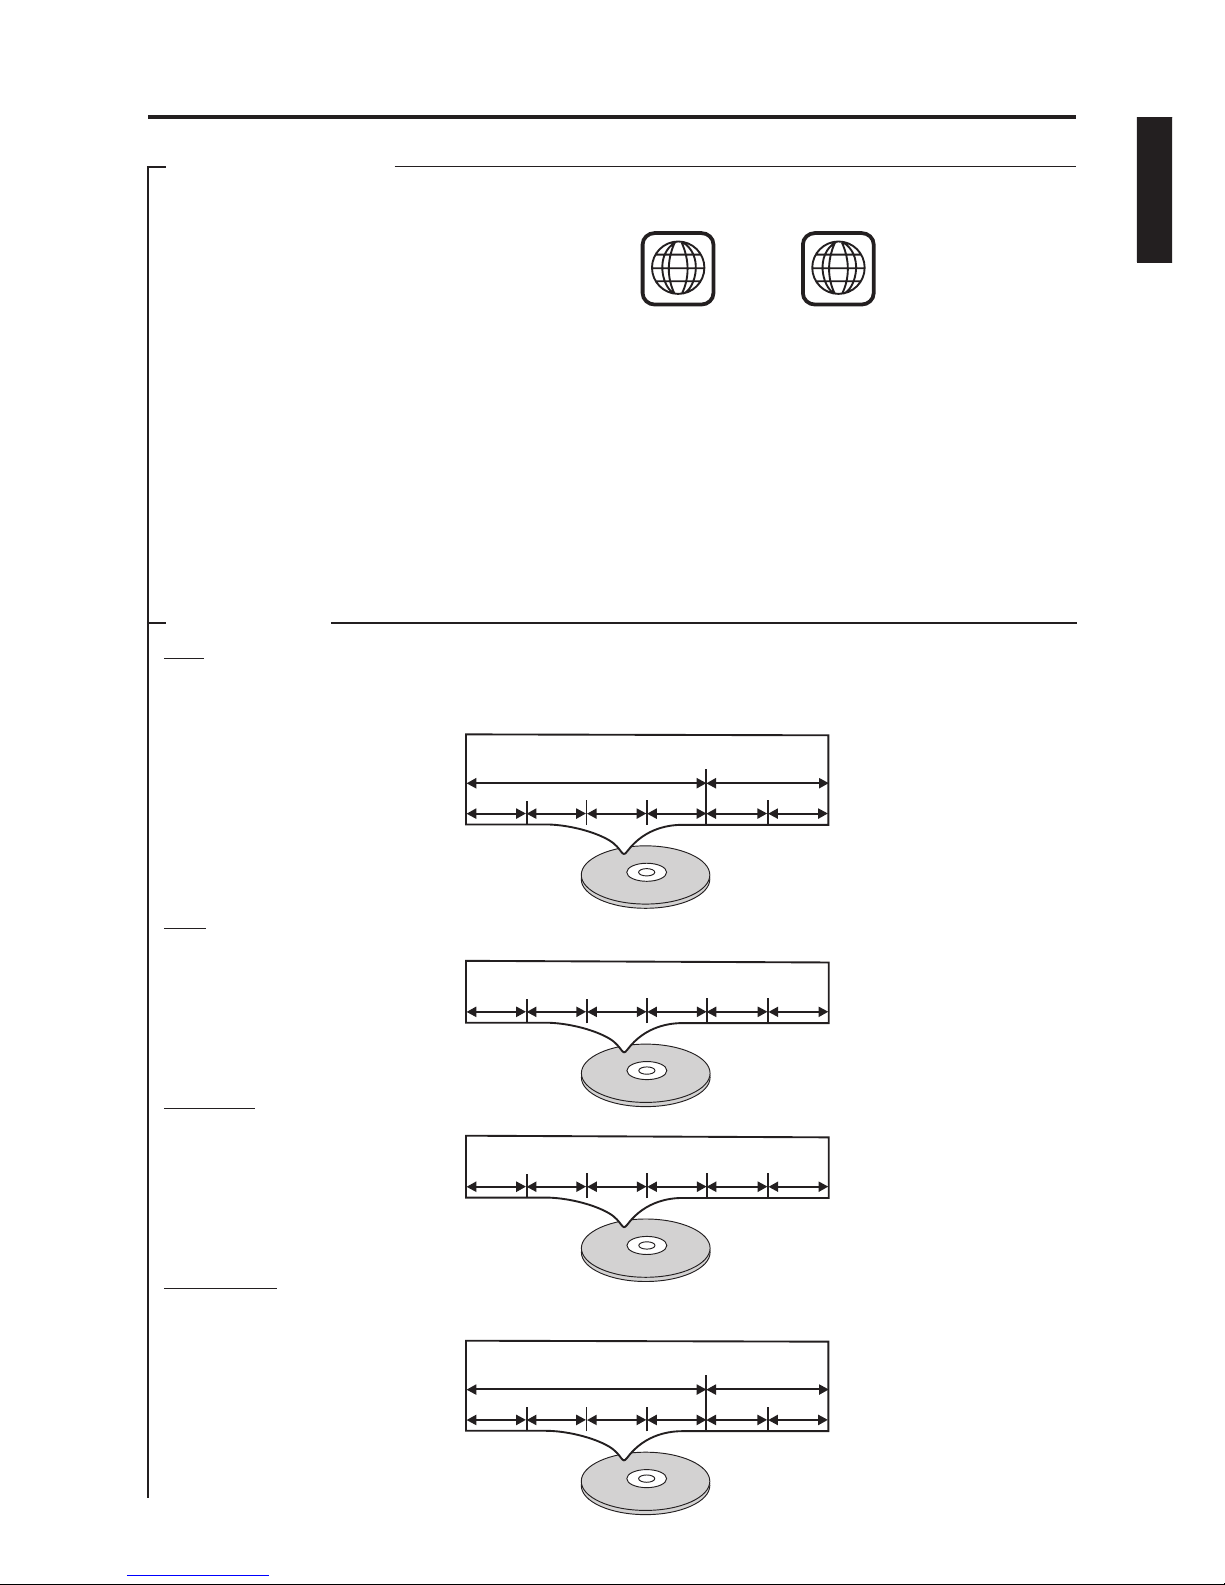
This player conforms to the NTSC color system. You cannot play discs recorded in other color systems such as
PAL or SECAM.
DVD with region codes other than 1 or ALL.
!
!
Some discs include region codes as shown below.
The number inside the symbol refers to a region of the world, and a disc encoded in a specific region format
can only be playedback on a DVD playerswith thesame region code.
The following discs cannot be played back on this DVD player.
DVD-ROM
DVD-RW
DVD+RW
DVD-RAM (Never play back, otherwise malfunction may result.)
VSD
VCD
CDV (Only plays back the audio part.)
CD-I (Never play back, otherwise malfunction may result.)
SACD
Data on a DVD is divided into sections called "titles", and then into subsections called "chapters", each of which is
given a title or chapter number. Playback conditions are preset on some DVD video discs, and these playback
conditions take priority over user operations on this player. If a function you select does not run as desired, refer to
the manual accompanying thedisc.
Data onan CDGis divided intosections called“tracks”, each of which isgiven a track number.
Data onan AUDIOCD issimilar to CDG.
Picture CD stores images in a digital format, it can record on different media such as CD-R, hard disk etc. In order
to be compatiblewith ourmachine, recordingon CD-R/CD-RW discis recommended.Data on CD-R or CD-RW is
divided file by file.
!
!
!
!
!
!
!
!
!
!
DVD
CDG
AUDIO CD
PICTURE CD
1
ALL
Example
Track 1Track 1 Track 2Track 2 Track 3Track 3 Track 4Track 4 Track 5Track 5 Track 6Track 6
DISC TYPES
E6
Example
Track 1Track 1 Track 2Track 2 Track 3Track 3 Track 4Track 4 Track 5Track 5 Track 6Track 6
Example
Title 1Title 1 Title 2Title 2
Chapter 1Chapter 1 Chapter 2Chapter 2 Chapter 3Chapter 3 Chapter 4Chapter 4 Chapter 1Chapter 1 Chapter 2Chapter 2
ENGLISH
Example
Album 1Album 1 Album 2Album 2
Picture 1Picture 1 Picture 2Picture 2 Picture 3Picture 3 Picture 4Picture 4 Picture 1Picture 1 Picture 2Picture 2

Your singing machine DVD / Compact Disc+Graphics Karaoke System
For your easy reference,listed below are some ofthe mainfeatures of thiskaraoke system:
- displays the lyricswith the tempo of musicwhen playingCD+G discs.
- allows you to replace the lead singer's voice with your own when any prerecorded,
multiplex karaoke disc is played. To activate, rotate Mic Volume to a comfortable listening level, rotate Auto Voice
Control to the lighton to max lead forthe best balance betweenplayback andmicrophone levels.
- allows you toadd an echo to enrichyour voice for aconcert halleffect.
- this system will play DVD, , CD, picture CD and cassette
tapes.
- this system includeand built-in speaker system sharethe musicwith your familyand orfriends.
Lyricson TVScreen
Auto Voice Control (A.V.C.)
Echo Control
Multiple Karaoke Music Center
Built-In Speakers
Master Volume Control - Rotate the volume control knob clockwise or counter-clockwise until a desired volume
level is obtained.
CD+Graphics discs
will provide you with fun and entertainment.
You will be the “star” while singing with your favorite recordings as well as listening to your voice with music through
the system’sspeakers.
Before you attempt to use your unit, please read this manual thoroughly to familiarize yourself with all the features
available and the sections of the manual that describe their operation. Browse through this manual to perform a
specific operation you wishto perform.
- lets you adjust the balance between the prerecorded original singer's voice and the music when
using a multiplex karaokedisc.
- allows the singerto adjust music to theirown vocalrange.
- adjuststhe speedof the cassetteplayback toproduce a higher or lowerpitch.
- allows the singerto adjust the volume producedfrom themicrophone.
- this system connects to another audio output component, such as an equalizer/booster
or a PAsystem.
- connecting headphones tothis system willmute soundproduced from the built-in speakers.
Balance Control
DigitalKey Control
Pitch Control
Mic Volume Control
Auxiliary Output Jacks
HeadphoneJack
INTRODUCTION
E7
ENGLISH

R
SMD-1222
CONTROL LOCATIONS
E8
1. AUX Mode LED
2. TAPE Mode LED
3. DVD Mode LED
4.
5.
6. Model Number
7. Key Control-FLAT Button
8. Key Control-HIGH Button
9. Key Indicator LEDs
10. Remote Sensor
VFD Display
Key Control-LOW Button
11. BALANCE Control
12. TREBLE Control
13. BASS Control
14. Function Select knob
15. PLAY Button
16. Search Backward Button
17. ON/OFF Indicator LED
18. ON/OFF Button
19. External Speaker ON/OFF
20. Previous (PRE) Button
21. Cassette Door (Left)
22. Cassette PAUSE Button (L)
23. Cassette STOP/EJ. Button (L)
24. Cassette REC Button (L)
25. Cassette PLAY Button (L)
26. Cassette REW Button (L)
27. Cassette FFWD Button (L)
28. MIC 1 Jack
29. Speaker
30. MASTER Volume Control
31. PITCH Control
32. Auto Voice Control
33. ECHO Control
34. STOP Button
35. Search Forward Button
36. MIC 2 Volume Control
37. MIC 1 Volume Control
38. NEXT Button
39. Cassette Door (Right)
40. Cassette PLAY Button (R)
41. Cassette REW Button (R)
42. Cassette PAUSE Button (R)
43. Cassette STOP/EJ. Button (R)
44. Cassette FFWD Button (R)
45. MIC 2 Jack
FRONT VIEW
20
123 64
11
12
13
14
15
21
22
23
24
16
17
19
30
31
32
33
35
36
37
38
39
40
41
42
34
5
29
18
44
43
789 10
25
26
27
28
45
ENGLISH

CONTROL LOCATIONS
46. DVD Door
47. DVD Door Open Button
48. VIDEO OUT (Cr/Pr) Jack
49. AUDIO IN (L) Jack
50. AUDIO OUT (L) Jack
51. HEADPHONE
54.
55.
56. VIDEO OUT Jack
57. S-VIDEO OUT Jack
58. VIDEO OUT (Y) Jack
59. COAXIAL OUT Jack
60.
Jack
52. External Speaker OUT Jack
53. AUDIO OUT (R) Jack
AUDIO IN (R) Jack
VIDEO OUT (Cb/Pb) Jack
AC POWER CORD
TOP AND REAR VIEW
46
47
E9
49
50
52
53
54
48
51
56
57
59
55
58
60
ENGLISH
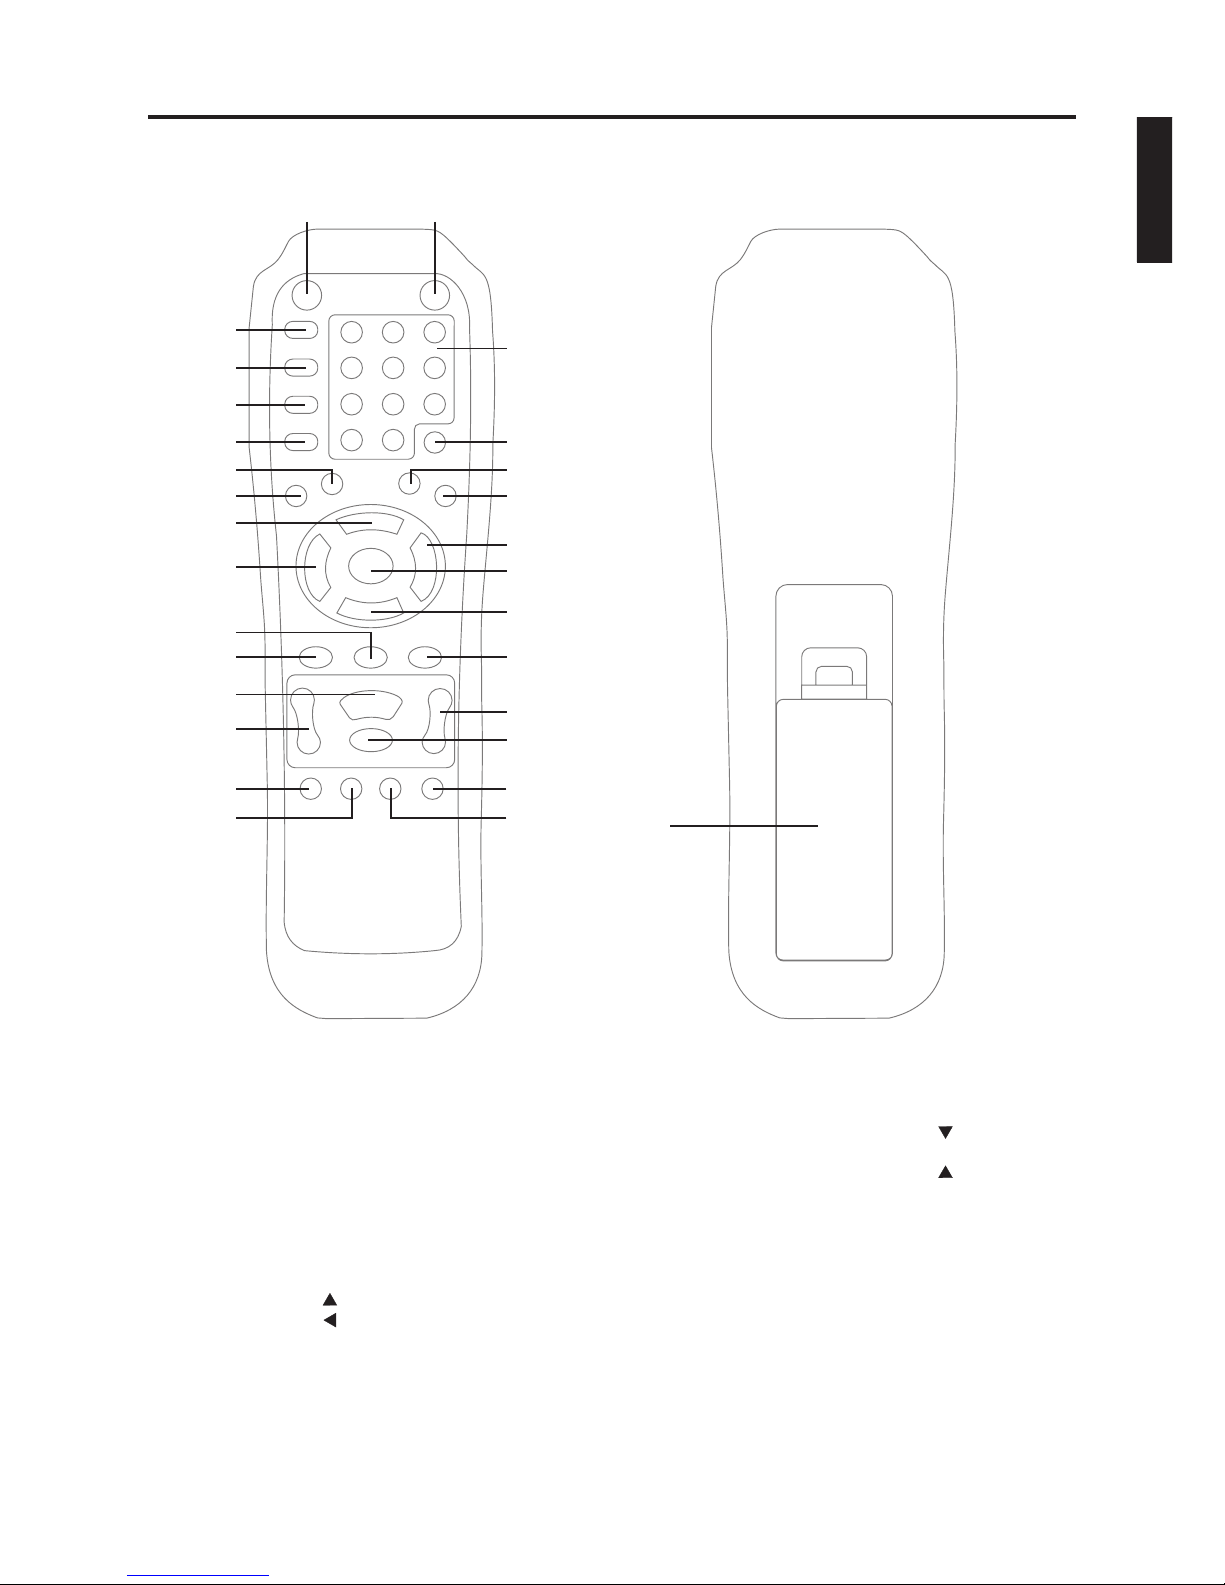
1. AUDIO Button
2. VOCAL Button
3. ANGLE Button
4.
5.
6.
7. MENU Button
8.
9.
10.
11. A-B Button
12.
SUB TITLE Button
DISPLAY Button
PROGRAM Button
SETUP Button
Cursor Button
Cursor Button
REPEAT Button
13. PLAY/PAUSE Button
14. SEARCH Buttons
15. SLOW Button
16. STEP Button
17. Number Buttons (1-9, 0, +10)
18. GO TO Button
19. TITLE Button
20. PBC Button
21. Cursor Button
22. ENTER Button
23. Cursor Button
24. INTRO Button
25. SKIP Buttons
26. STOP Button
27. ROOT MENU Button
28. ZOOM Button
29. Battery Compartment Door
E10
12
3
4
5
6
7
8
9
10
11
12
13
14
15
16
15
16
18
19
20
21
22
23
24
25
27
28
26
29
ENGLISH
17
REMOTE CONTROL

VFD DISPLAY
1. DVD Icons
2. TITLE Icon
3. REPEAT ALL Icons
4. PLAY/PAUSE Icon
5. SVCD Icon
6. DIGIT Display
7. Dolby Digital Icon
8. A-B Icon
9. PBC Icon
E11
1234 5 6 7 8 9
ENGLISH
CONNECTIONS
CONNECTING POWER
CAUTION:
CONNECTING TOYOUR HEADPHONE
Power the system from a standard AC outlet by using the built in power cord.
The built inAC power cord has a polarized plug that fits into the wall outlet only one way. If the plug does
not fit properly, turn itover andtry again. Donot forceit.
A headphone jack is provided for using headphones instead of the built-in speakers. (Headphones are sold
separately.)
A warning that excessive sound pressure from earphones and headphones can cause hearing
loss; The MAINS plug is usedas the disconnect device, the disconnect device shall remain readily operable.
BEFORE CONNECTIONS ARE MADE
!
!
Always turn off theSinging Machine,TV andother components priorto connectingor disconnecting any cables.
Please refer to the following is well as the instruction manuals of the other components if connection problems
come out or moreinformation is needed.
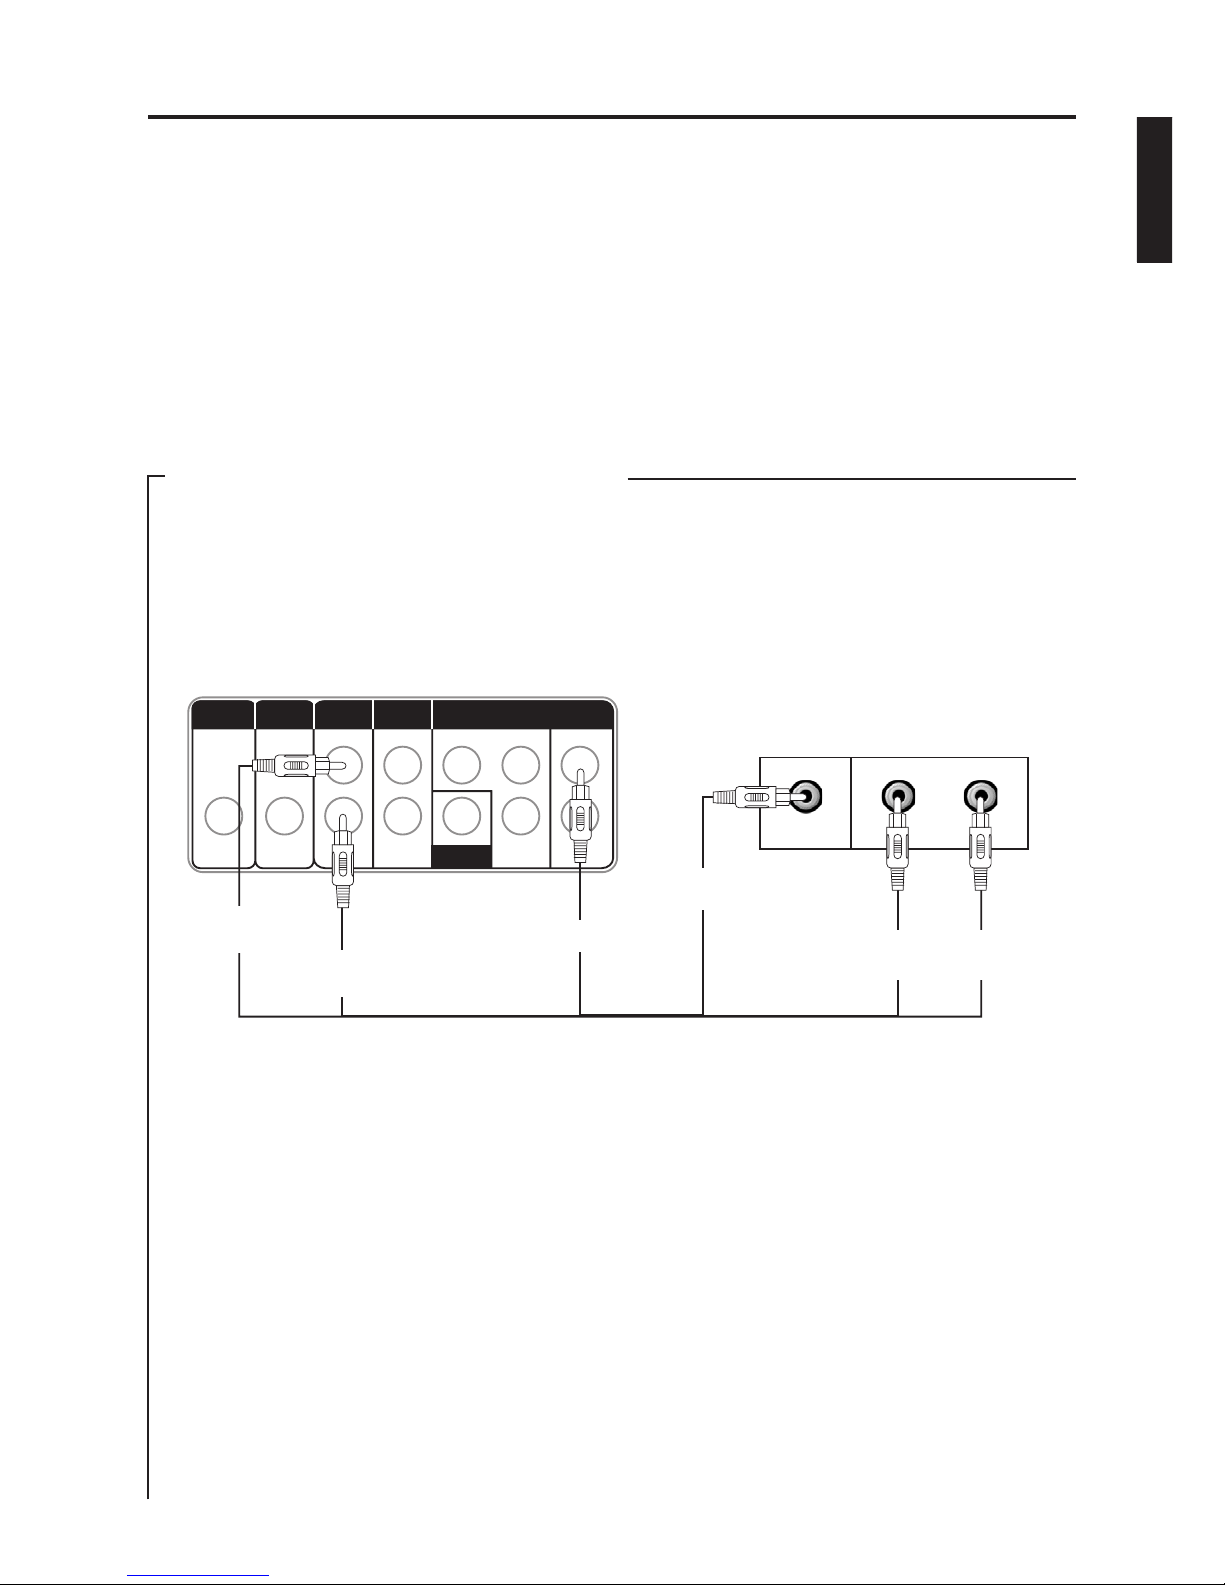
CONNECTING TO A VIDEO SYSTEM
E12
In order towatch a DVD, picture CD orsing-along with a CDG on TV screen, you must connect the included RCA
cables (Red-White-Yellow colored plug cable) to the output jack on the rear panel of the unit. Then connect the
other end of the RCA plug to the AUX and VIDEO Input jack of the video system such as TV. (If your television
does not have the required Video Input, you will need an RF Modulator (Radio Frequency Modulator), which
connects through yourTV antenna or cable line and serves as Video Input. Please view the illustration below as a
reference guide.
: To only display the image on the video system, unplug the AUX OUT (L & R) cards. The audio will be
produced come out fromthe built-inspeakers of theunit. Ifno sound is heard, checkthe volumesettings of
the unit.
Please use the provided CDG disc to test the connections. The lyrics and music of songs on the disc will be
displayed on the TVscreen.
You mustspecify the source you wish to view when you are connecting the video out from the Singing Machine to
either a TV or a VCR. Every TV and VCR manufacturer accomplishes the set-up a little differently. Even though
every TV and VCR is alittle different, the general idea is the same - ifyou have two sources of video signal (cable
or antenna and SingingMachine), you have to specifywhich oneis displayed onthe screen.
If you have never used the video input RCA jack or coaxial cable on your TV/VCR you should consult your
TV/VCR user guide.
They will be able to tell you very quickly how to
configure yourTV orVCR to displaythe videoconnection.
The three most commonways to set up theTV/VCR are:
1) A ‘Video’ button may be on the TV/VCR or on the remote control. Pressing ‘Video’ may display the input from
your Singing Machine.
2) Trylooking for a ‘Video’channel between the regular channels on your TV/VCR. Do this by setting the channel
on the TV/VCR to channel 2 then pressing the ‘Down’ channel button to see if there is a ‘Video In’ or ‘Line In’
between the lowest channeland the highest channel onyour system.
3) The configuration may also be located in the set-up menu on the TV/VCR. Look for a section on ‘Input
Selection’where youmight be ableto choosethe input source i.e. ‘Cable/Ant.’,‘Video 1’, ‘LineIn’ or ‘VideoIn’.
NOTE
COMMON WAYSTO CONFIGUREYOUR TVOR VCR
If you don't have your manual please contact your TV/VCR manufacturer for information
either by phone or by viewing their website for online assistance.
REAR VIEW OF
VIDEO SYSTEM
AUX INAUX IN
L
R
REAR VIEW OF
SINGING MACHINE
VIDEO
IN
AUDIO
OUTPUT
AUDIO
INPUT
VIDEO OUTPUT
COAXIAL
L
R
Cr/Pr Cb/Pb
Y
S-VIDEO
L
R
VIDEO
HEAD-
PHONE
EXTERNAL
SPEAKER
AUDIO OUT
L
(White Jack)
AUDIO OUT
R
(Red Jack)
AUX IN
L
(White Jack)
AUX IN
R
(Red Jack)
VIDEO OUTPUT
(Yellow Jack)
VIDEO INPUT
(Yellow Jack)
ENGLISH
CONNECTIONS
CONNECTING TO A VIDEO SYSTEM
CONNECTINGA VIDEO COMPONENT FOROUTPUT
>> Cr/Pr, Cb/Pb, Y-
RED
BLUE
GREEN
>> S-VIDEO -
fine color details usedon high andmonitors ofbig screen TVs.
super video
·
·
·
Cr/Pr in color
Cb/Pb in color
Y in color
E13
REAR VIEW OF
SINGING MACHINE
AUDIO
OUTPUT
AUDIO
INPUT
VIDEO OUTPUT
COAXIAL
L
R
Cr/Pr Cb/Pb
Y
S-VIDEO
L
R
VIDEO
HEAD-
PHONE
EXTERNAL
SPEAKER
ANOTHER
VIDEO COMPONENT
Cr/Pr Cb/Pb Y
VIDEO
OUTPUT
(Cr/Pr)
VIDEO
OUTPUT
(Cb/Pb)
VIDEO
OUTPUT
(Y)
VIDEO
INPUT
(Cr/Pr)
VIDEO
INPUT
(Cb/Pb)
VIDEO
INPUT
(Y)
CONNECTING TO AN AUDIO SYSTEM
AUDIO
OUTPUT
AUDIO
INPUT
VIDEO OUTPUT
COAXIAL
L
R
Cr/Pr Cb/Pb
Y
S-VIDEO
L
R
VIDEO
HEAD-
PHONE
EXTERNAL
SPEAKER
ANOTHER
VIDEO COMPONENT
S-VIDEO
OUTPUT
S-VIDEO
INPUT
REAR VIEW OF
SINGING MACHINE
S-VIDEO
CONNECTINGANAUDIO COMPONENTFOR INPUT
To connect another audio source (such as a Tuner or an AV Receiver) so you can sing along with its music,
simply connect the Audio Output jacks (Red & White RCAjacks) to the SingingMachine’s AUX IN R & L jacks
and choose theAUX mode by pressing FUNCTION button.
AUDIO
OUTPUT
AUDIO
INPUT
VIDEO OUTPUT
COAXIAL
L
R
Cr/Pr Cb/Pb
Y
S-VIDEO
L
R
VIDEO
HEAD-
PHONE
EXTERNAL
SPEAKER
ANOTHER
AUDIO COMPONENT
AUX INPUT
R
(Red Jack)
R
L
AUDIO OUT
AUDIO OUTPUT
R
(Red Jack)
REAR VIEW OF
SINGING MACHINE
AUDIO OUTPUT
L
(White Jack)
AUX INPUT
L
(White Jack)
ENGLISH
CONNECTIONS
CONNECTING TO AN AUDIO SYSTEM
CONNECTINGAN AUDIO COMPONENT FOROUTPUT
To connect anaudio component (such as a power amplifier or a PA system amplifier) so you can hear the Singing
Machine’s music & vocal through it, plug the audio component into either the AUX OUT jacks or COAXIAL OUT
jack.
E14
OR
REAR VIEW OF
SINGING MACHINE
ANOTHER
AUDIO COMPONENT
AUDIO INPUT
R
(Red Jack)
AUDIO INPUT
L
(White Jack)
R
L
AUDIO IN
AUDIO
OUTPUT
AUDIO
INPUT
VIDEO OUTPUT
COAXIAL
L
R
Cr/Pr Cb/Pb
Y
S-VIDEO
L
R
VIDEO
HEAD-
PHONE
EXTERNAL
SPEAKER
AUX OUTPUT
L
(White Jack)
AUX OUTPUT
R
(Red Jack)
ANOTHER
AUDIO COMPONENT
REAR VIEW OF
SINGING MACHINE
AUDIO
OUTPUT
AUDIO
INPUT
VIDEO OUTPUT
COAXIAL
L
R
Cr/Pr Cb/Pb
Y
S-VIDEO
L
R
VIDEO
HEAD-
PHONE
EXTERNAL
SPEAKER
COAXIAL
As some users may want to use their own speaker. The Singing Machine provides a EXT. SPK. Connect one
end of the cable to theEXT. SPK output Jack on the rear panel of your singing machine, connect the otherend
to the input jack of the external speaker. Audio will be heard through the singing machine’s built-in speakers
along withthe external speaker.
REAR VIEW OF
SINGING MACHINE
ANOTHER
AUDIO COMPONENT
AUDIO INPUT
R
(Red Jack)
R
L
AUDIO IN
EXTERNAL
SPEAKER
EXTERNAL
SPEAKER
OUTPUT
EXTERNAL
SPEAKER
INPUT
AUDIO
OUTPUT
AUDIO
INPUT
VIDEO OUTPUT
COAXIAL
L
R
Cr/Pr Cb/Pb
Y
S-VIDEO
L
R
VIDEO
HEAD-
PHONE
EXTERNAL
SPEAKER
AUX OUTPUT
L
(White Jack)
AUX OUTPUT
R
(Red Jack)
AUDIO INPUT
L
(White Jack)
ENGLISH
INITIAL SETUP
Use the setup button to control the setting of this unit.
The setup menu is divided into five main categories:
General Setup, Audio Setup, Video Setup, Preference
Setup and Password Setup.
The aspect ratio of the TV can be changed by selecting
one of the followingoptions.
NORMAL/PS
If both TV set and DVD do not support wide screen
viewing, a wide picture is displayed on the whole TV
screen with a portionautomatically cut off.
NORMAL/LB
If the TV does not support wide screen viewing but the
DVD does, wide bands will be displayed on the upper
and lower portions ofthe TV screen.
WIDE
For a wide screen TV set, choose this setting. (The wide
screen TV mustbe setto “FULLsize”.)
This only works whenthere is an angle markon thedisc.
ON -Angle mark will beshown when playing aDVD.
OFF -Angle mark will notbe shown.
GENERAL SETUP
SETTING THE TV DISPLAY
ANGLE MARK
!
!
!
CAPTIONS
SCREEN SAVER
This only works when the DVD includes Closed
Captions.
ON - Closed Captionis activated.
OFF - Closed Captionis turned off.
When the unit is turned on and is in idle for ten ,
screen saver will appearin order to protect thescreen.
ON - Screen saveris activated.
OFF - Screen saveris turned off.
!
!
!
OSD LANG
Our unit provides different On-Screen Display
languages for the viewer.
minutes
E15
ENGLISH
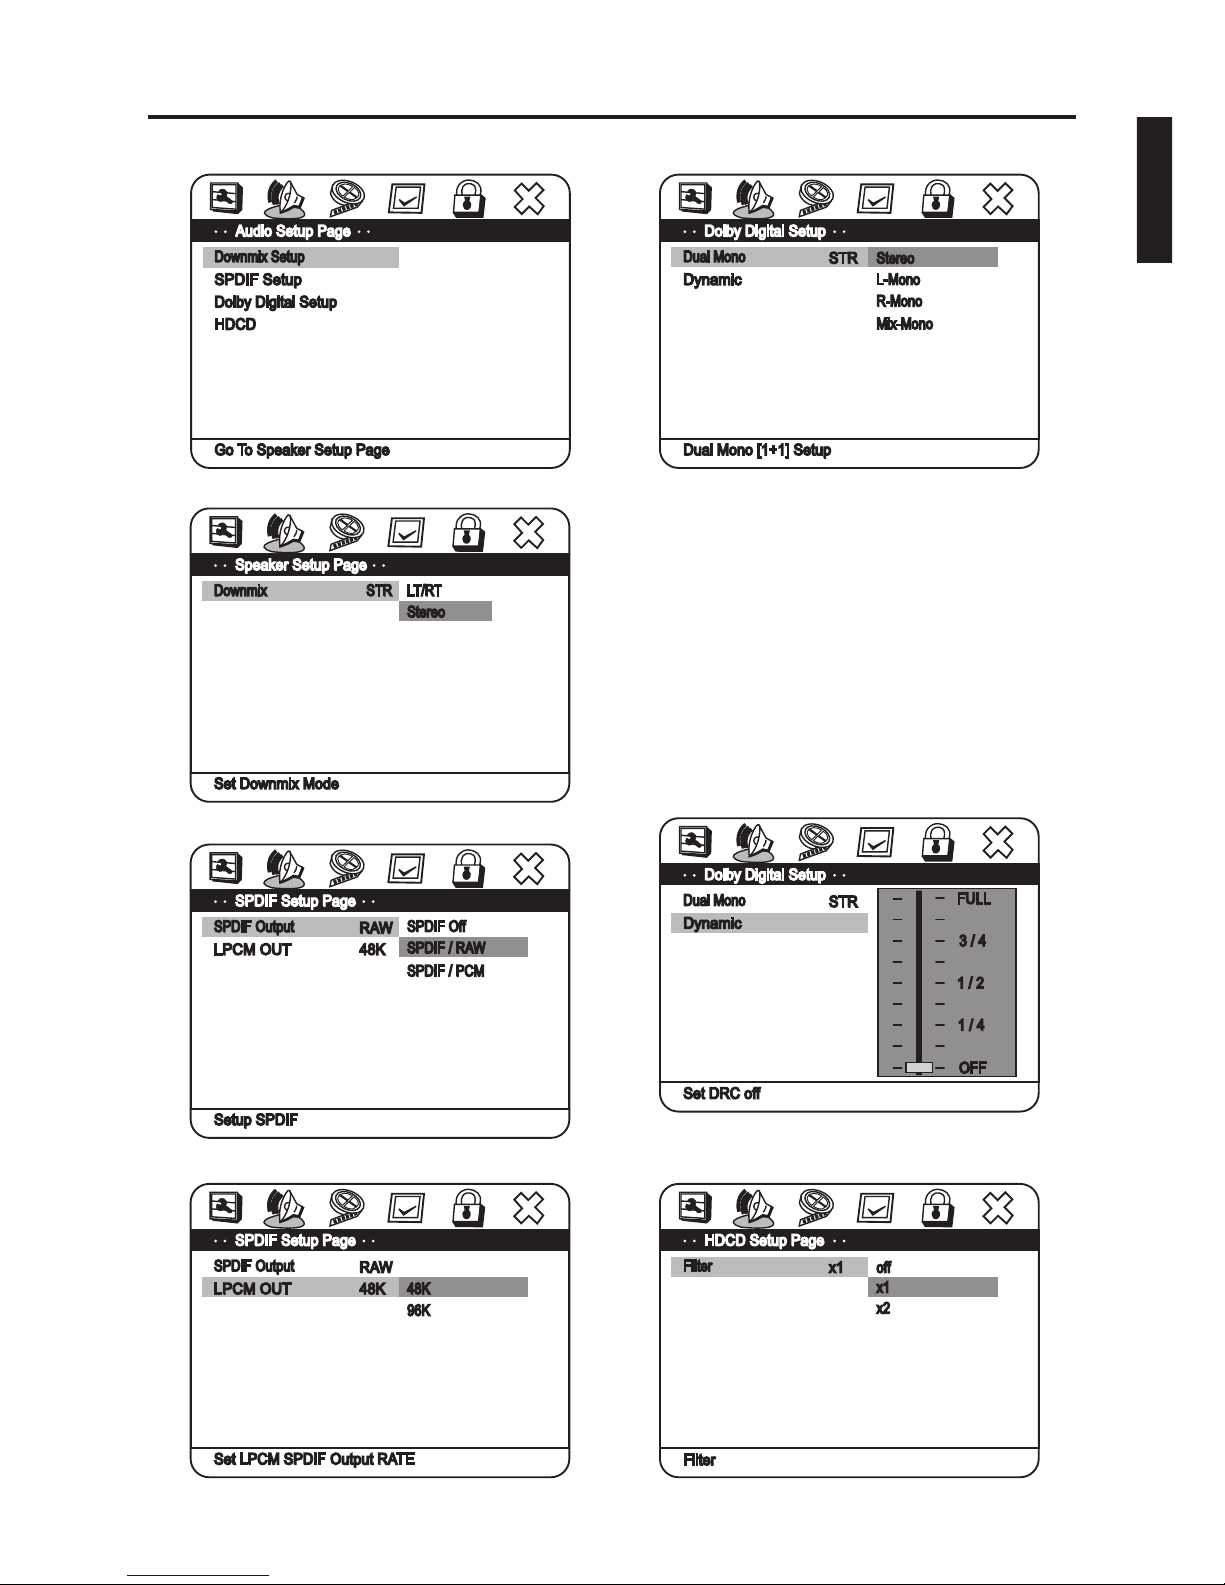
AUDIO SETUP
SPEAKER SETUP
SPDIF OUTPUT SETUP
LPCM OUTPUT SETUP
DOLBY DIGITAL SETUP
DYNAMIC
There can be great differences in the sound levels
between different portions of a movie. Explosions are
extremely loud and whispers can be almost impossible
to hear. Dolby Digital helps balance the sound in a
movie to a more consistent level using the dynamic
range control in thisunit.
Select the dynamic range compression to fit the
individual listening situation ofthe audience.
FULL:Audio with fully compressed dynamicrange.
3/4~1/4:Audio withpartially compresseddynamic range.
OFF: Audio without partially compressed dynamic
range.
HDCD SETUP
INITIAL SETUP
E16
ENGLISH

VIDEO SETUP
COMPONENT
There can be great differences in the picture quality
between different portions of a movie. It can be changes
by selecting one ofthe following options.
Sharpness: High / Medium/ Low levels.
Brightness: Adjusts the Brightness level from -20 to
+20.
Contrast:Adjusts the Contrastlevel from-16 to +16.
QUALITY
The video signal quality can be adjusted by following
the stepslisted blow.
!
!
!
S-VIDEO:
YUV:
RGB:
Separate video, abbreviated S-Video and
also known asY/C (or , S-VHS and "super
video") isan analog video signal that carriesthe video
data as two separatesignals (brightnessand color).
YPbPr is the analog video signal carried by
component video cable in consumer electronics. Note
that the green cable carries Y, the blue cable carries
Pb and the red cablecarries Pr.
—In CRT
based (analog electronics) television three color
electron guns are used to stimulate such an
arrangement of phosphorescent coatings of the
glass, the resultant remission of photons providing the
image seen by the eye.
erroneously
A representation of additive color mixing
INITIAL SETUP
E17
ENGLISH
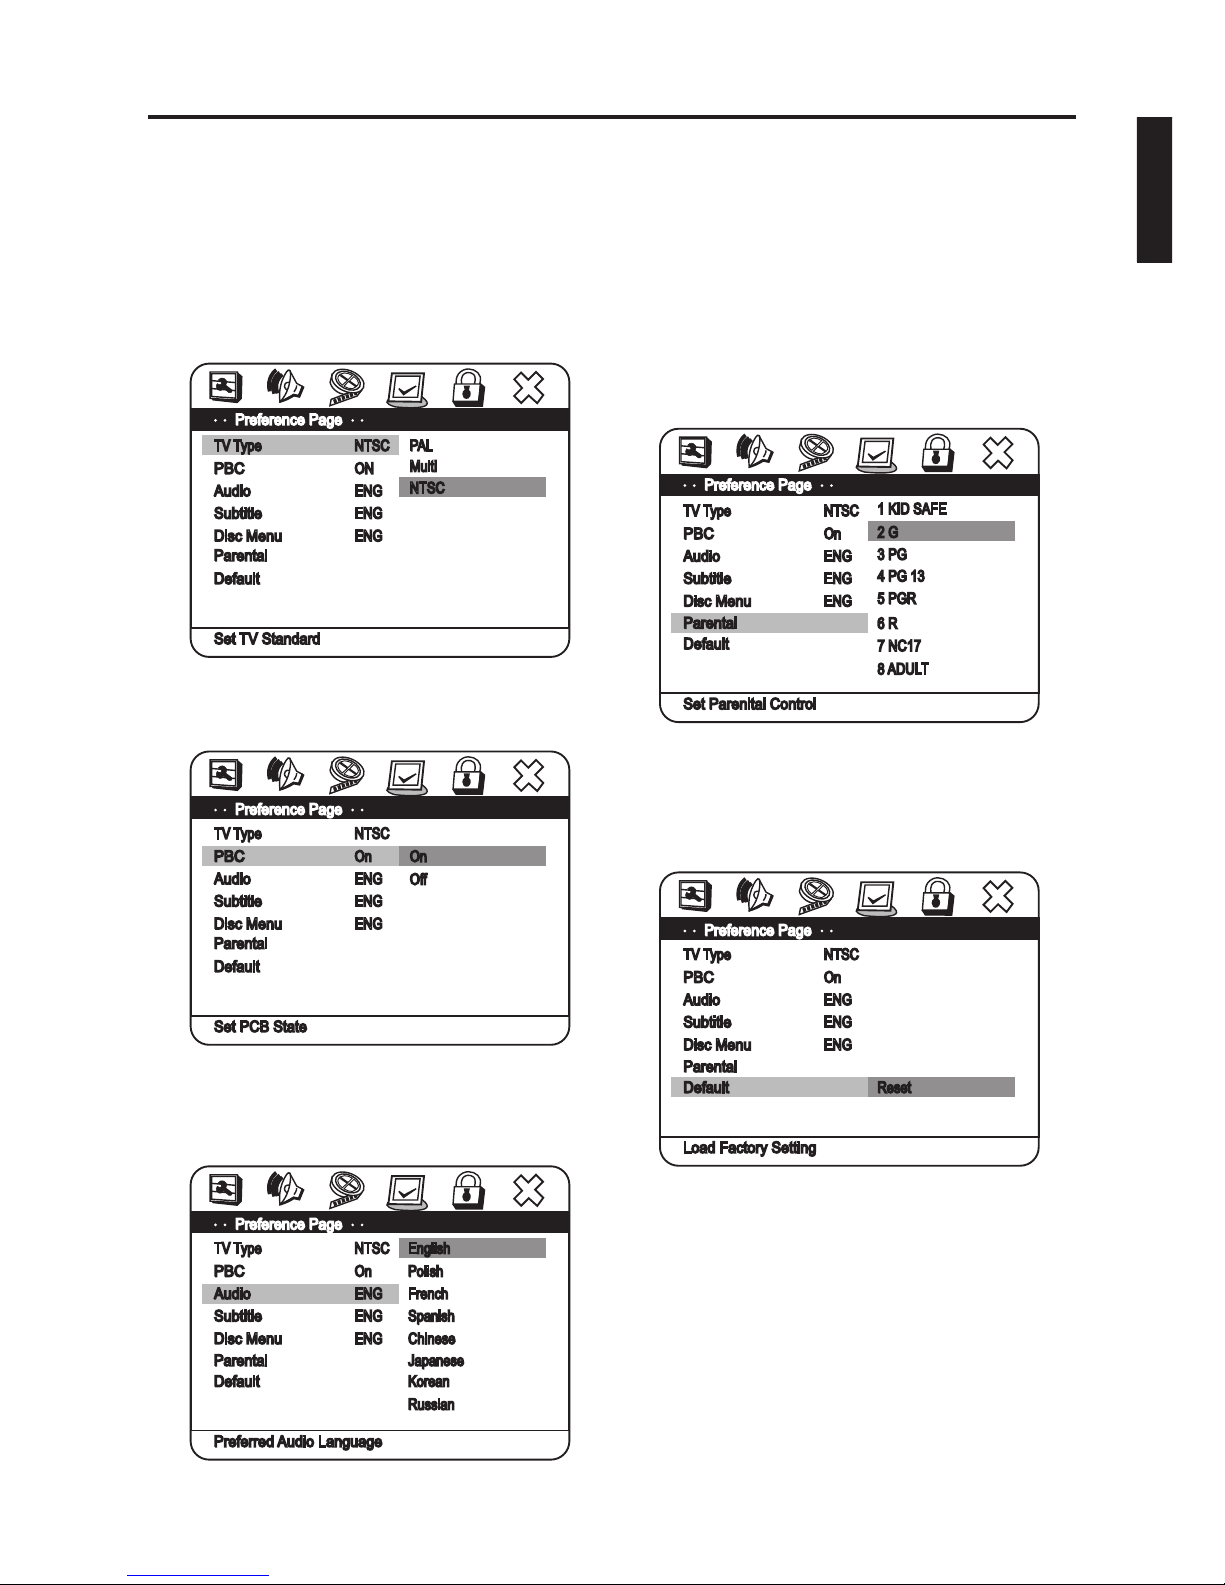
PREFERENCE SETUP
TV TYPE
PBC State
Audio / Subtitle andDisc Menu
PARENTALCONTROL
NOTE
DEFAULT
NOTE: Cannot setup this pagewhen the disc isplaying.
Type of TV can be changed by selecting one of the
following options.
PAL
Multi
NTSC
Can be select inthe language available on thedisc.
This function limits the playback of DVDs based on the
Motion PictureAssociation ofAmerica’s rating assigned
to each movie. Parent’s can specify the ratings that
require a password to view.The rating listed from low to
high, KID SAF is the lowest and ADULT is the highest.
To turn off this setting, use the cursor on the remote
control to select thelast option (Not shown below).
- When changing the parental lock password,
use the number buttons to enter the password
and press ENTER buttonto confirm.
This option is used to reset all functions to the initial
factory setting.
INITIAL SETUP
E18
ENGLISH
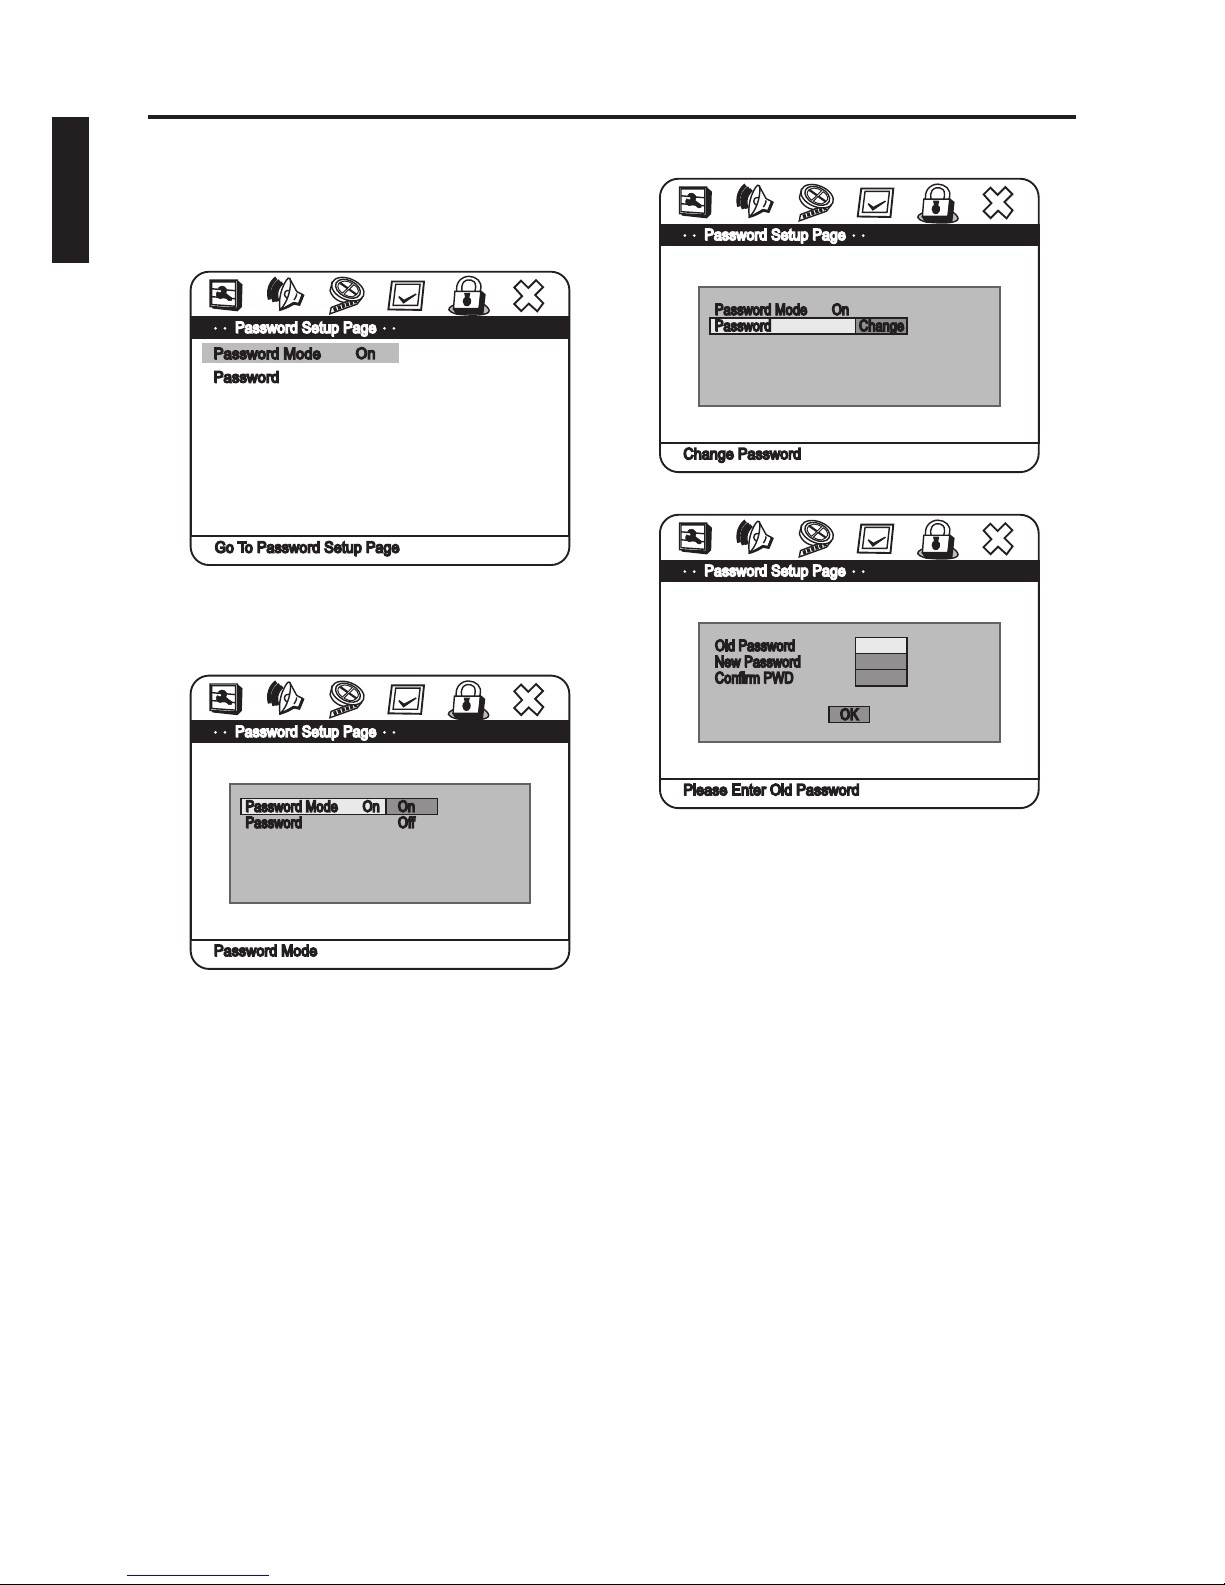
PASSWORD SETUP
8888
CHANGE PASSWORD
This option is used to change the password. User must
enter the old password prior to creating a new one. The
default password is . Remember a new password
is highly recommended.
INITIAL SETUP
E19
ENGLISH
 Loading...