

Page 1
TM
SML418BK / SML418P
INSTRUCTION MANUAL / MANUAL DE INSTRUCCIONES
/ MODE D’EMPLOI
www.singingmachine.com
The Singing Machine® is a registered trademark of The Singing Machine Co., Inc.
The Singing Machine® es marca registrada de The Singing Machine Co., Inc.
The Singing Machine® est une marque déposée de The Singing Machine Co., Inc.
Page 2
Warnings
CAUTION
RISK OF ELECTRIC SHOCK
DO NOT OPEN
CAUTION: TO REDUCE THE RISK OF ELECTRIC SHOCK, DO NOT
REMOVE COVER (OR BACK). NO USER-SERVICEABLE PARTS INSIDE.
REFER SERVICING TO QUALIFIED SERVICE PERSONNEL.
The Caution marking is located on the rear panel.
DANGEROUS VOLTAGE: The lightning flash with arrowhead
symbol within an equilateral triangle is intended to alert the
user to the presence of uninsulated dangerous voltage within
the product’s enclosure that may be of sufficient magnitude to
constitute a risk of electric shock to persons.
ATTENTION: The exclamation point within an equilateral
triangle is intended to alert the user to the presence of
important operating and maintenance (servicing) instructions
in the literature accompanying this product.
DRIPPING WARNING: This product shall not be exposed to dripping or
splashing, and no objects filled with liquids, such as vases, shall be placed
on the product.
VENTILATION WARNING: The normal ventilation of the product shall not be
impeded for intended use.
THIS PRODUCT COMPLIES WITH DHHS RULES 21 CFR CHAPTER 1,
SUBCHAPTER J APPLICABLE AT DATE OF MANUFACTURED.
Warnings:
• This CD player employs a laser light beam. Only a qualified service person
should remove the cover or attempt to service this device, due to
possible eye injury.
• The use of controls, adjustments, or procedures other than those
specified herein might result in hazardous radiation exposure.
• The apparatus shall be used in an open area.
CAUTION!
Invisible laser radiation when open and interlocks defeated. Avoid exposure
to beam.
WARNING: TO PREVENT FIRE OR SHOCK HAZARD, DO NOT EXPOSE
THIS UNIT TO RAIN OR MOISTURE.
FCC WARNING: This equipment may generate or use radio frequency
energy. Changes or modifications to this equipment may cause harmful
interference unless the modifications are expressly approved in the
instruction manual. The user could lose the authority to operate this
equipment if an unauthorized change or modification is made.
This device complies with part 15 of the FCC Rules. Operation is subject
to the following two conditions: (1) This device may not cause harmful
interference, and (2) this device must accept any interference received,
including interference that may cause undesired operation.
NOTE: This equipment has been tested and found to comply with the
limits for a Class B digital device, pursuant to part 15 of the FCC Rules.
These limits are designed to provide reasonable protection against harmful
interference in a residential installation. This equipment generates, uses
and can radiate radio frequency energy and, if not installed and used in
accordance with the instructions, may cause harmful interference to radio
communications. However, there is no guarantee that interference will
not occur in a particular installation. If this equipment does cause harmful
interference to radio or television reception, which can be determined by
turning the equipment off and on, the user is encouraged to try to correct
the interference by one or more of the following measures:
• Reorient or relocate the receiving antenna.
• Increase the separation between the equipment and receiver.
• Connect the equipment into an outlet on a circuit different from that to
which the receiver is connected.
• Consult the dealer or an experienced radio/TV technician for help.
The rating information is located at the back of the unit.
INDUSTRY CANADA NOTICE:
This device contains licence-exempt transmitter(s)/receiver(s) that comply
with Innovation, Science and Economic Development Canada’s licenceexempt RSS(s). Operation is subject to the following two conditions:
(1) This device may not cause interference.
(2) This device must accept any interference, including interference that
may cause undesired operation of the device.
CAN ICES-3(B)/NMB-3(B)
Important Safety Information
1. Read these Instructions.
2. Keep these Instructions.
3. Heed all Warnings.
4. Follow all Instructions.
5. Do not use this apparatus near water.
6. Clean only with a dry cloth.
7. Do not block any of the ventilation openings. Install in
accordance with the Manufacturer’s instructions.
8. Do not install near any heat sources such as radiators, heat
registers, stoves, or other apparatus (including amplifiers) that
produce heat.
9. Do not defeat the safety purpose of the polarized or groundingtype plug. A polarized plug has two blades with one wider than
the other. A grounding type plug has two blades and a third
grounding prong. The wide blade or the third prong are provided
for your safety. When the provided plug does not fit into your
outlet, consult an electrician for replacement of the obsolete
outlet.
10. Protect the power cord from being walked on or pinched
particularly at plugs, convenience receptacles, and the point
where they exit from the apparatus.
11. Only use attachments/accessories specified by the
manufacturer.
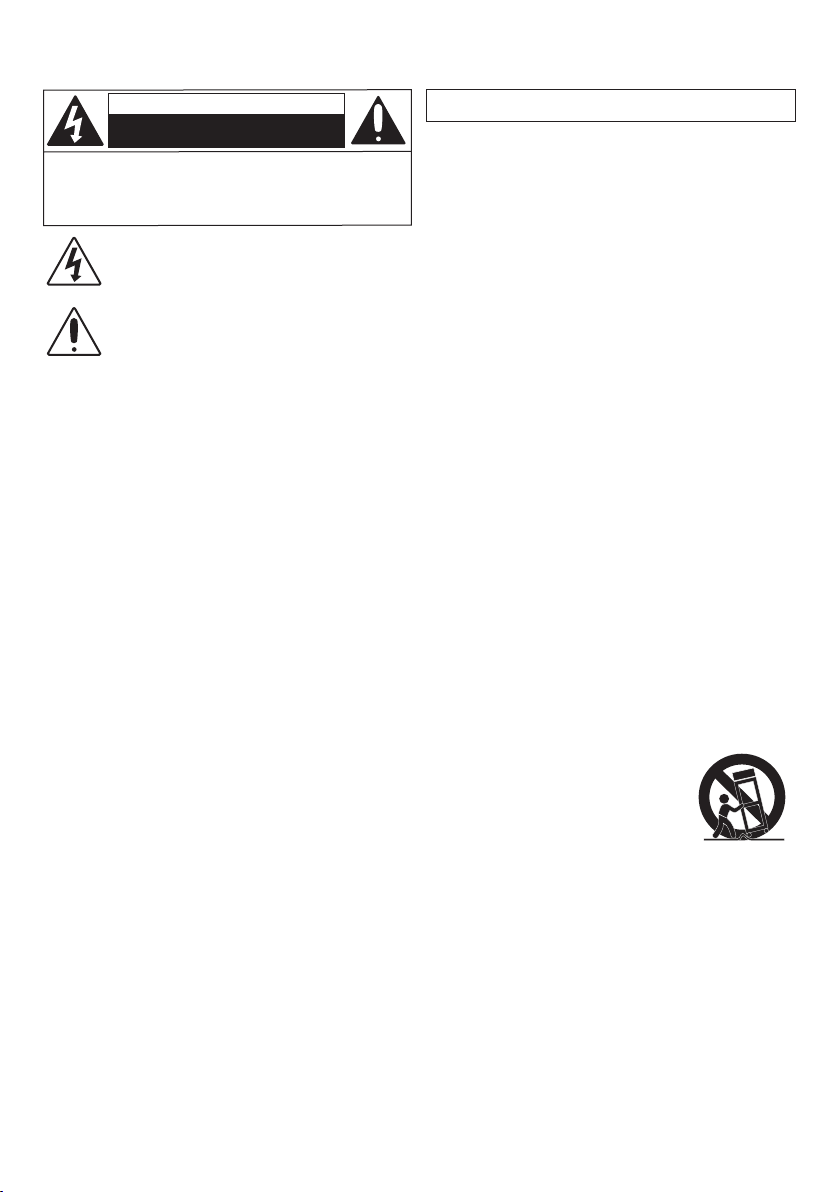
12. Use only with a cart, stand, tripod, bracket,
or table specified by the manufacturer, or
sold with the apparatus. When a cart is
used, use caution when moving the cart/
apparatus combination to avoid injury from
tip-over.
13. Unplug this apparatus during lightning
storms or when unused for long periods of
time.
14. Refer all servicing to qualified service personnel. Servicing is
required when the apparatus has been damaged in any way, such
as power-supply cord or plug is damaged, liquid has been spilled
or objects have fallen into the apparatus, the apparatus has been
exposed to rain or moisture, does not operate normally, or has
been dropped.
15. WARNING: To reduce the risk of fire or electric shock, do not
expose this apparatus to rain or moisture. Do not place objects
filled with water, such as a vase, on the apparatus.
16. The AC mains plug is used as the power disconnect device
and it should remain readily accessible and operable during
intended use. In order to completely disconnect the apparatus
from power, the mains plug should be completely removed
from the AC outlet socket.
17. CAUTION: To reduce the risk of fire or explosion, do not expose
batteries to excessive heat such as sunshine, fire or other
heat sources.
— E1 —
Page 3
Included
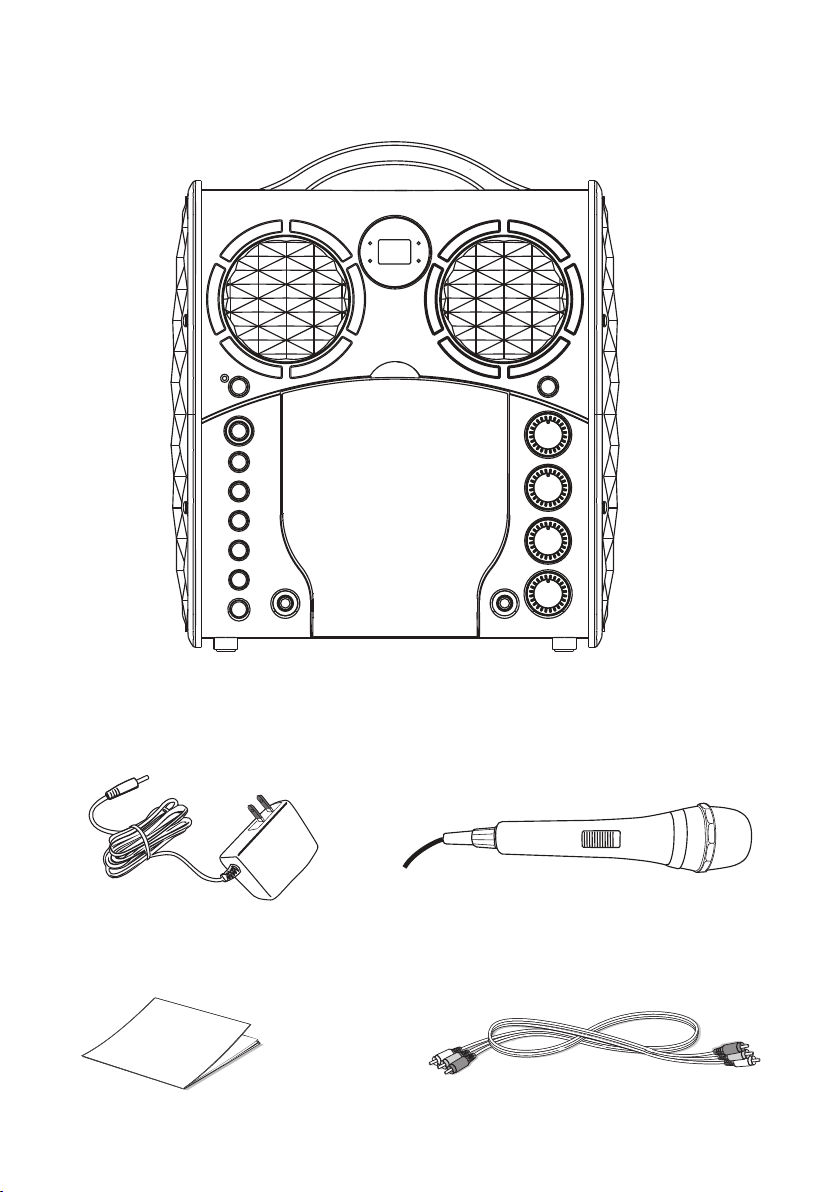
Audio/Video Cables
Manual
What’s in the box.
AC Adapter
Main Unit
Wired Microphone
— E2 —
Page 4
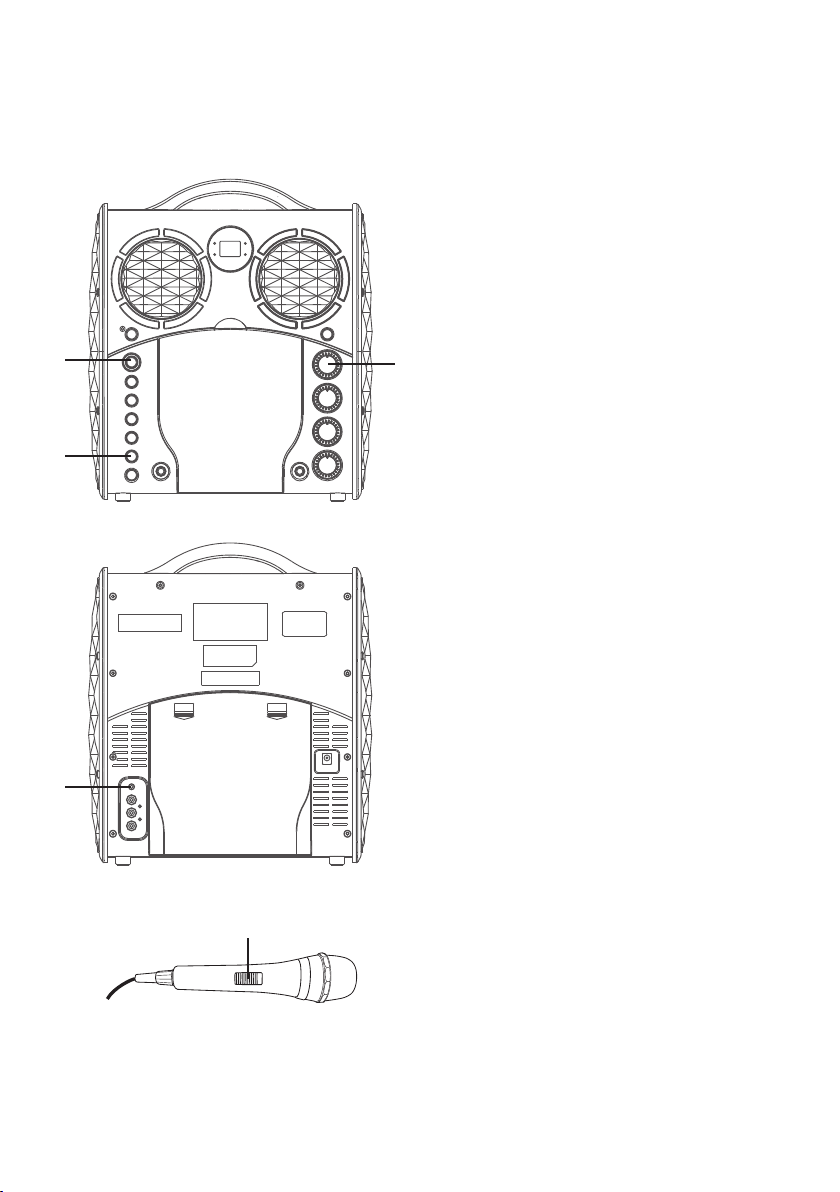
Location of Controls (Front)
u
v
w
x
U
V
W
X
at
ak
aq
ar
xy
as
bt
bk
al
am
an
ao
ap
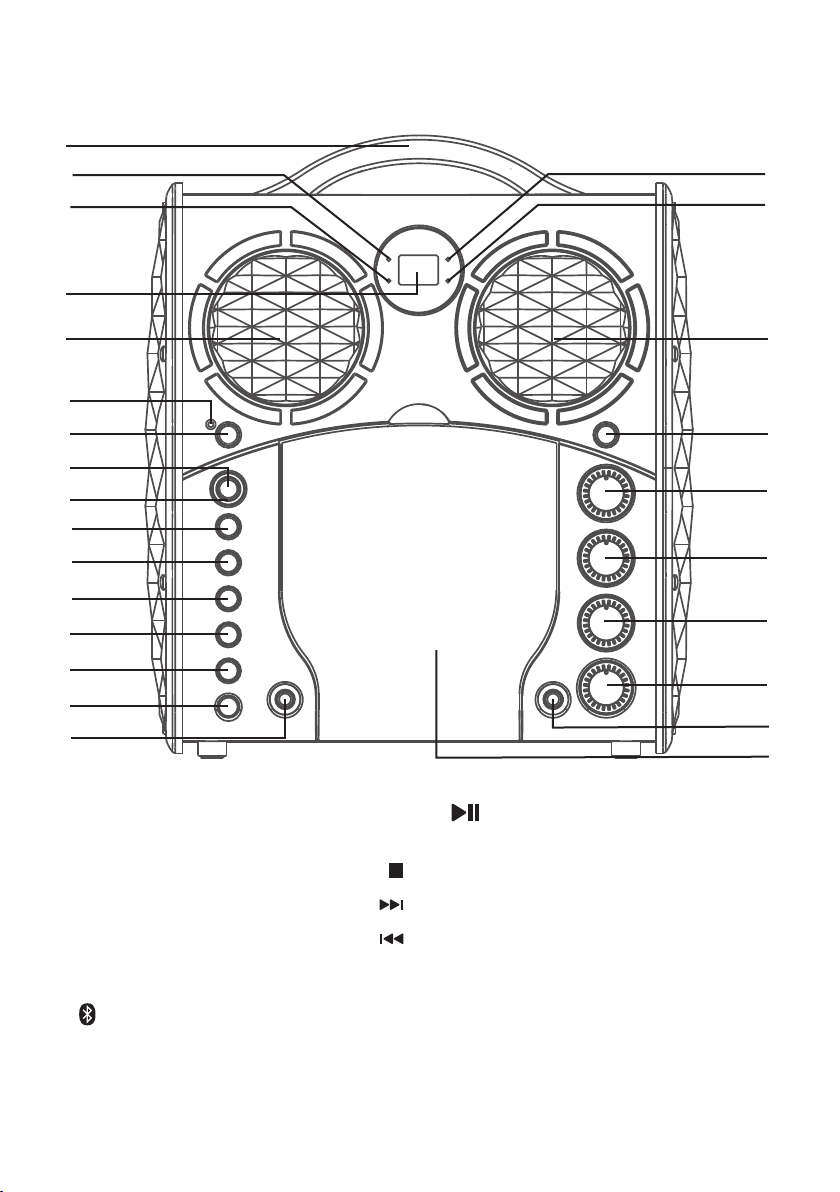
1. Handle
2. PLAY/PAUSE indicator
3. CDG indicator
4. Display
5. Speaker
6. Bluetooth indicator
button
7.
8. ON/OFF button
9. Power indicator
10. PLAY/PAUSE
button
11. STOP button
12. SKIP Button
13. SKIP Button
14. FUNCTION button
15. REPEAT/PROGRAM
button
16. MIC 1 jack
17. REPEAT indicator
— E3 —
bl
bm
bn
bo
18. PROGRAM indicator
19. LIGHTS button
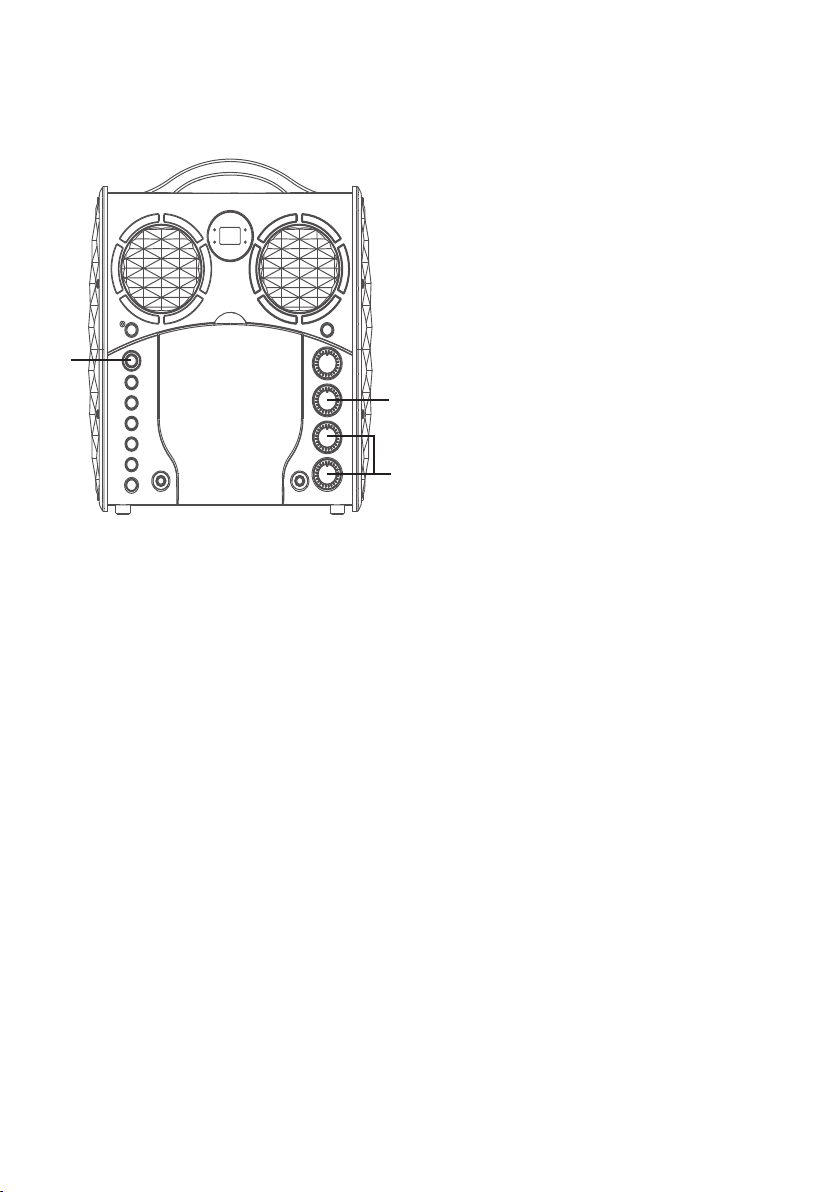
20. MASTER VOLUME
control
21. ECHO control
22. MIC 1 VOLUME control
23. MIC 2 VOLUME control
24. MIC 2 jack
25. CD Compartment
Page 5
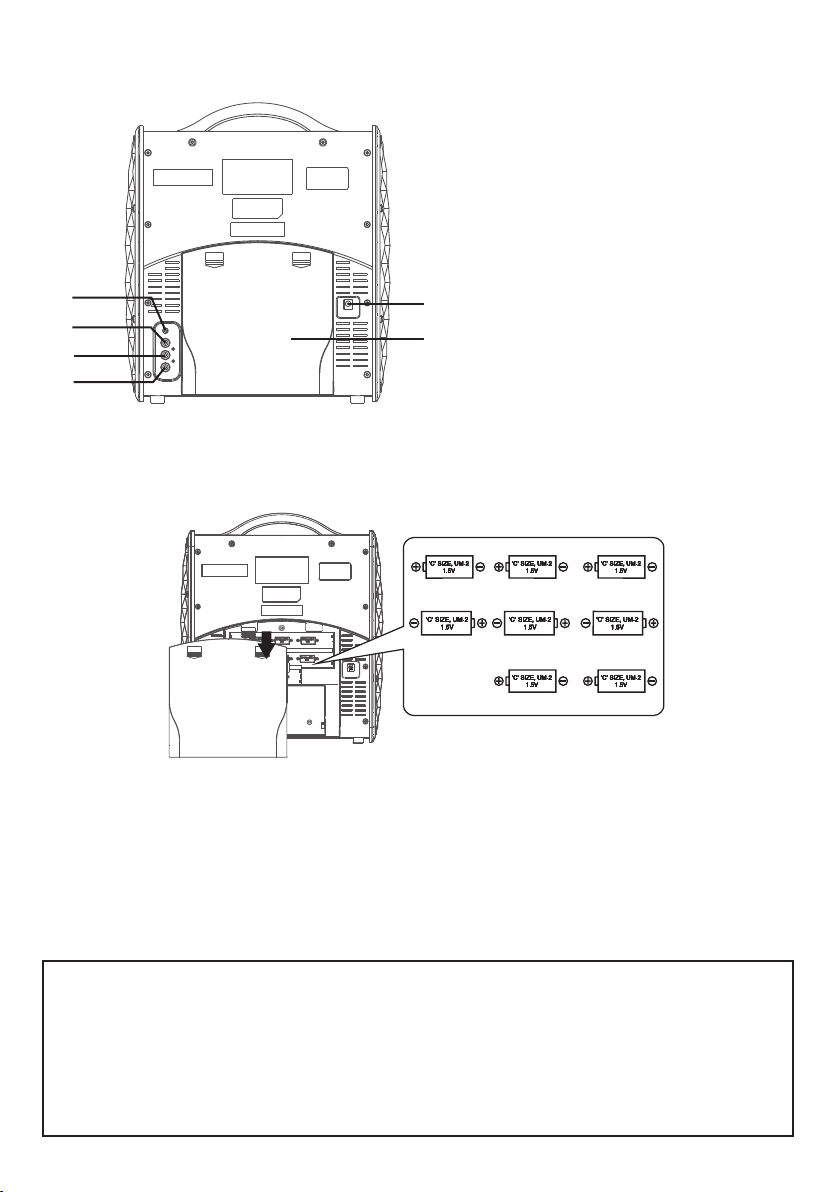
Location of Controls (Rear)
26. LINE IN Jack
27. VIDEO OUT jack
28. AUDIO OUT jack (R)
29. AUDIO OUT jack (L)
30. DC IN Jack
bp
bq
ct
ck
31. Battery Compartment
br
bs
Connection
Installation of Batteries
DC OPERATION
1. Slide the battery door in the direction of the arrow to reveal the battery compartment.
Insert eight (8) “C” size alkaline batteries (not included) as indicated on the diagram.
2. Replace cover tightly before operating.
CAUTIONS:
• Replace all batteries at the same time.
• Do not mix old batteries with new batteries.
Battery Precautions
The precautions below should be followed when using batteries in this
device:
1. Use only the size and type of batteries specified.
2. Be sure to follow the correct polarity when installing the batteries as
indicated in the battery compartment. Reversed batteries may cause
damage to the device.
3. Do not mix different types of batteries together (e.g. Alkaline and
Carbon Zinc) or old batteries with fresh ones.
4. If the device is not to be used for a long period of time, remove the
batteries to prevent damage or injury from possible battery leakage.
5. Do not try to recharge batteries not intended to be recharged, they can
overheat and rupture. (Follow battery manufacturer’s directions.)
6. Rechargeable batteries are to be removed from the product before
being charged.
7. Rechargeable batteries are only to be charged under adult supervision.
8. Exhausted batteries are to be removed from the product.
9. Batteries shall not be exposed to excessive heat such as sunshine, fire
or the like.
— E4 —
Page 6
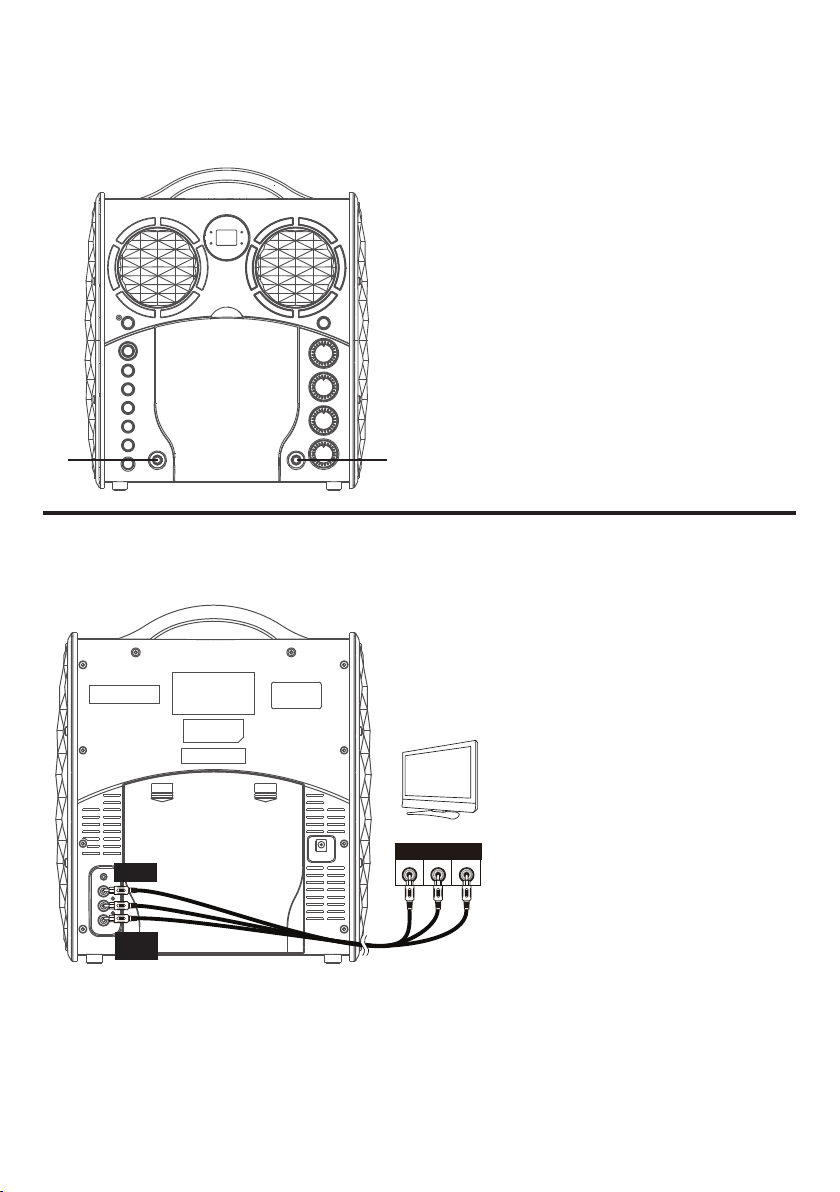
Connection
Connecting the Microphone(s)
Microphones:
Connect a microphone into Mic jack 1 as
well as Mic jack 2 (when desired).
Note: Do not drop or tap the Mic as
damage to the Mic or speakers may occur.
Do not twirl the microphone cord as it will
cause damage to the encased wiring.
u
v
Connecting the Unit to a TV
To output the video, lyrics and
audio to your TV, follow these
steps:
Connect the RCA video cable
(Yellow) to the VIDEO OUT jack
and the audio cables (White
and Red) to the AUDIO OUT
jacks located on the back of the
Singing Machine.
Connect the opposite end of
the RCA video cable (Yellow) to
the VIDEO IN jack and the audio
VIDEO OUT
(yellow)
REAR VIEW OF TV
VIDEO
AUDIO
INPUT
INPUT
R L
cables (White and Red) to the
AUDIO OUT
(white- L
red- R)
RCA cables
AUDIO IN on your TV.
Notes:
• This unit can be used with or without a TV, but it is highly recommended to use a TV in
order to utilize all the features.
• Also refer to the TV’s User Guide.
• To see the lyrics on the screen, you must use a CD+G disc.
— E5 —
Page 7
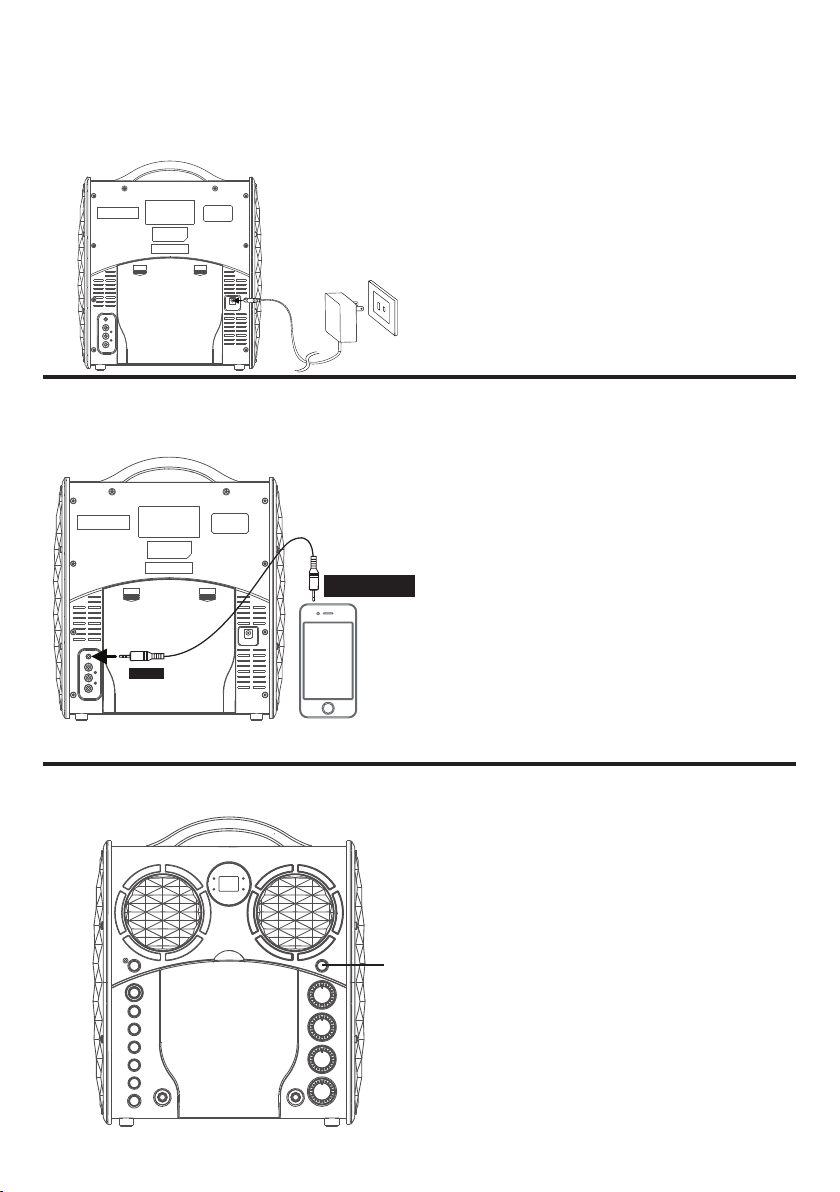
Connection
Connecting to AC Power
Connecting to Line In Jack
LINE IN
AUDIO OUTPUT
/ HEADPHONE JACK
YOUR SMARTPHONE,
DIGITAL PLAYER OR
MP3 PLAYER
Insert the AC power cord into an AC
outlet having 120V AC, 60Hz.
Note:
Make all connections before
connecting to AC power.
Connect an external device by using
an appropriate cable (3.5mm audio
cable not included) as shown.
Note:
See page E12 to select and use the
Line In function.
Glowing Mood Lights
u
— E6 —
When the unit is turned on, the
1
Light mode 1 is automatically
activated. The lights will light up
and will synchronize with sound
when you speak or sing into the
microphone.
Press the LIGHTS button for Light
mode 2 which will display the light
show but will not respond to the
microphone.
Press the LIGHTS button once
again to turn off the Lights.
Page 8
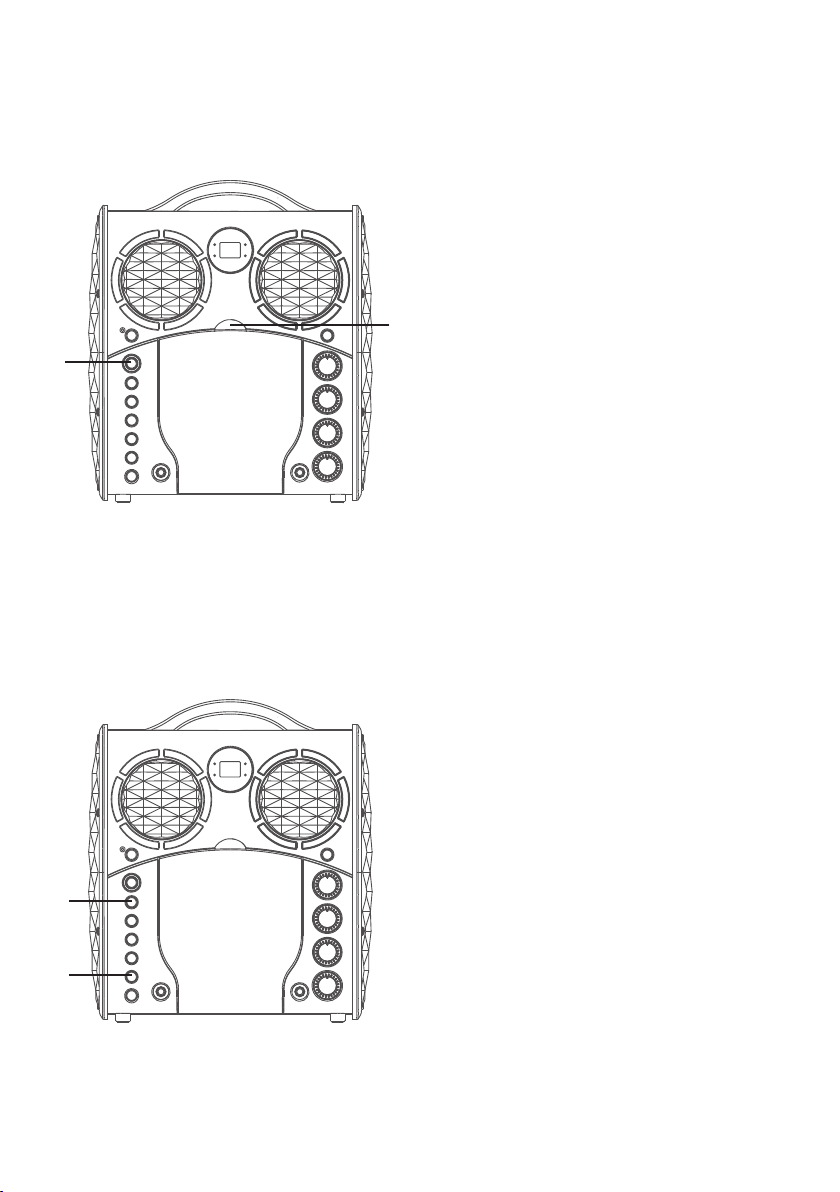
Operation
Playing a CDG
Connect the unit as described
1
previously; if using a CD+G, it is
recommended to connect to a TV.
Press the power ON/OFF button
to turn the unit on.
u
x
w
v
Lift open the CD door and insert a
2
Note:
• What is a CD+G?
A CD+G (CD+Graphics) is the standard
• Never place anything other than a CD in
• If no disc is inserted, “no” will appear on
• If connected to a TV and/or other audio
3
4
CD or a CD+G by gently pressing
it on the center spindle. Then close
the CD door.
format for most karaoke discs that will
display the words on the screen.
the compartment, as foreign objects can
damage the unit.
the display.
source, adjust the volume of the external
unit using its own volume control.
Repeatedly press the FUNCTION
button to select the CDG mode;
“--” will appear when searching the
disc and then the total number of
tracks will appear.
Press the PLAY/PAUSE button
to start playback; if listening to
a CD+G file, the image and lyrics
will appear on the TV screen (if
connected) and the PLAY/PAUSE
indicator light will turn on.
— E7 —
Page 9
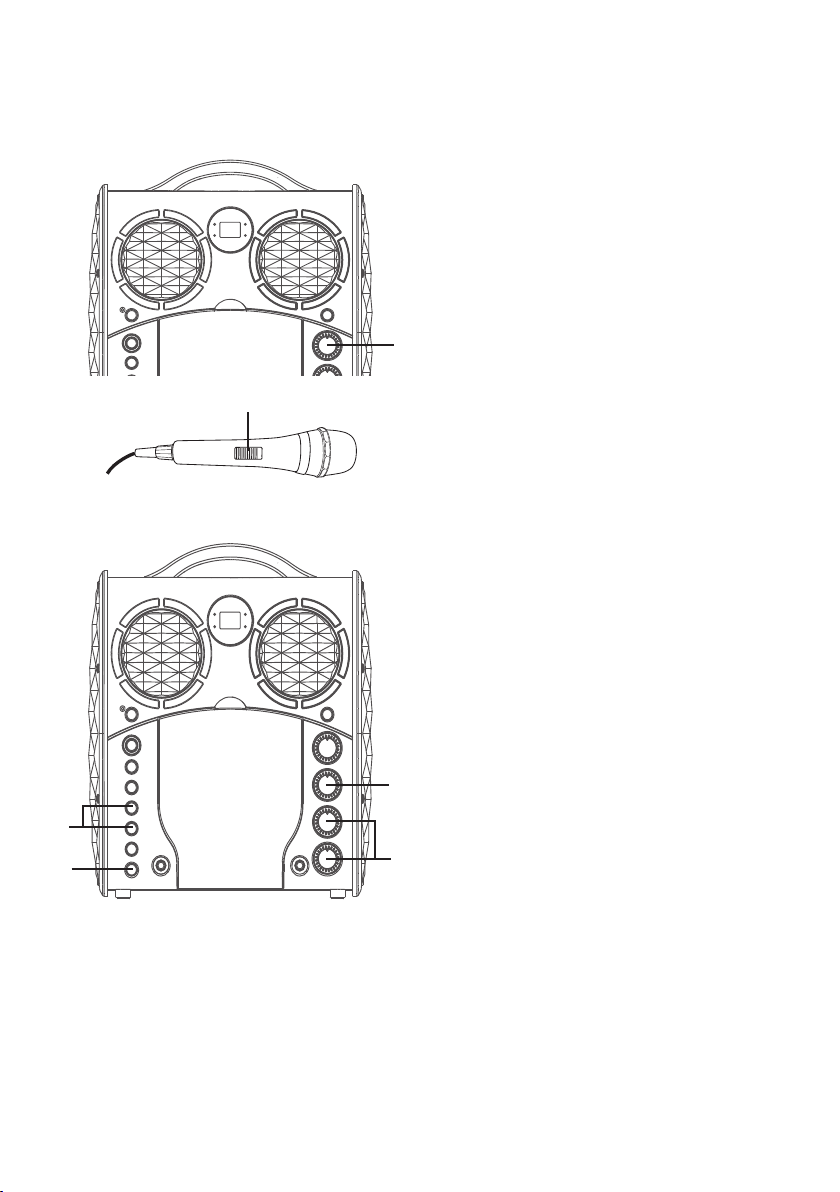
Operation
Playing a CDG (Continued)
y
Adjust the volume to a comfortable
5
level using the MASTER VOLUME
control.
X
at
U
W
V
Connect microphone(s) and
6
7
8
9
10
slide the ON/OFF switch on the
microphone to the ON position.
Adjust the MIC VOLUME 1 or 2
control as desired. Increasing this
will increase the volume of the
respective microphone.
Rotate the ECHO control to add an
echo effect to your voice. Rotate
towards MAX to increase the echo
effect.
SKIP: Advance or go back one track
by pressing the Skip 9/Skip :
buttons.
REPEAT: During playback, press
the REPEAT/PROG button once to
repeatedly play the selected song;
the REPEAT indicator will blink.
Press the REPEAT/PROG button
a second time to repeatedly play
the whole CD; the REPEAT indicator
will light solid. Press it again to
cancel Repeat function, the REPEAT
indicator turns off.
— E8 —
Page 10
Operation
Playing a CDG (Continued)
ak
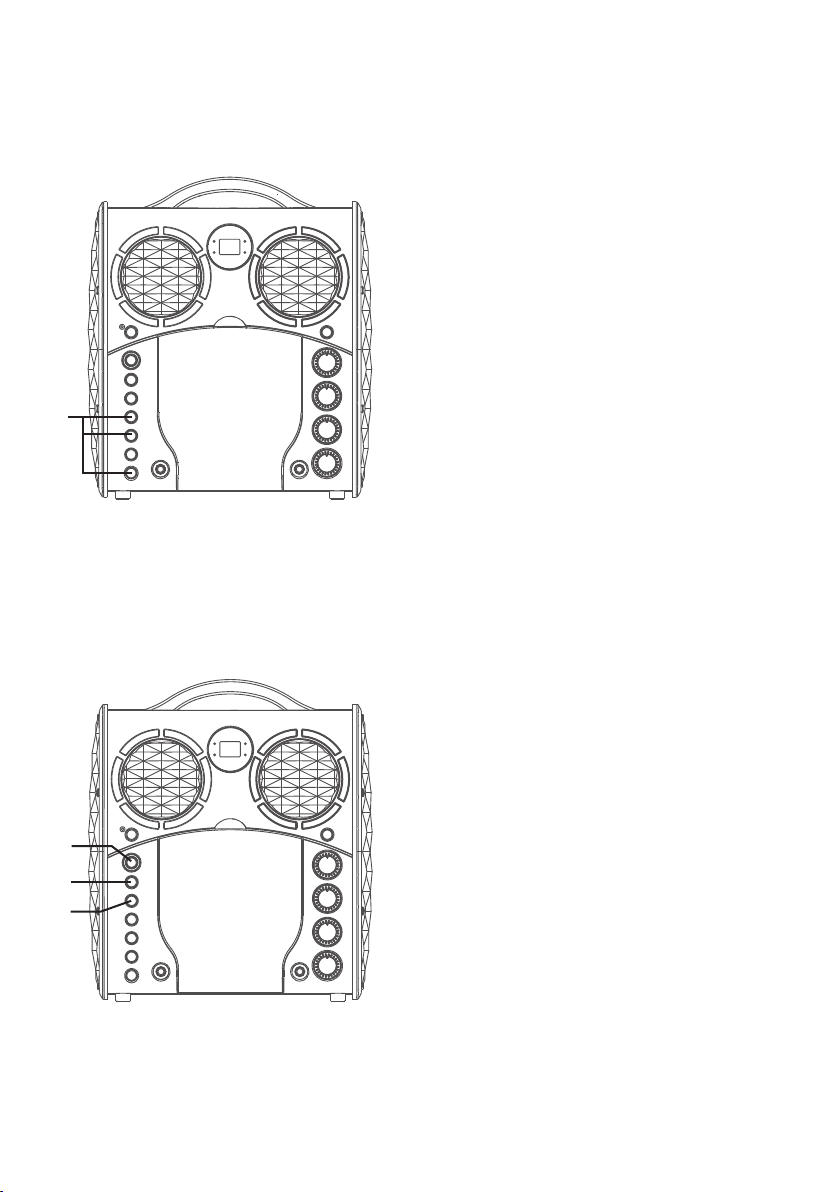
PROGRAM: You can program up to
11
Note:
• Press the STOP button TWICE to stop
20 tracks on any disc for playback
in any desired order. While in the
Stop mode, press the REPEAT/
PROG button; the PROGRAM
indicator will blink and “01” will
appear. Select the first track using
the Skip 9/Skip : buttons. Press
the REPEAT/PROG button again to
confirm the entry. After selecting
the desired tracks the display will
show 02, 03, etc. recognizing
the tracks selected have been
programmed. Repeat to set up to
20 tracks into memory. When done,
press the PLAY/PAUSE button to
start playback.
and clear the program.
an
al
am
12
13
14
— E9 —
PAUSE: During playback, if you
wish to pause the disc momentarily,
press the PLAY/PAUSE button;
the PLAY/PAUSE indicator will
blink. Press again to resume normal
playback.
Press the STOP button to stop
playback.
Press the power ON/OFF button to
turn the unit off.
Page 11
Operation
Please connect your Music Device
Your Music Device is connected
Please connect your Music Device
Your Music Device is connected
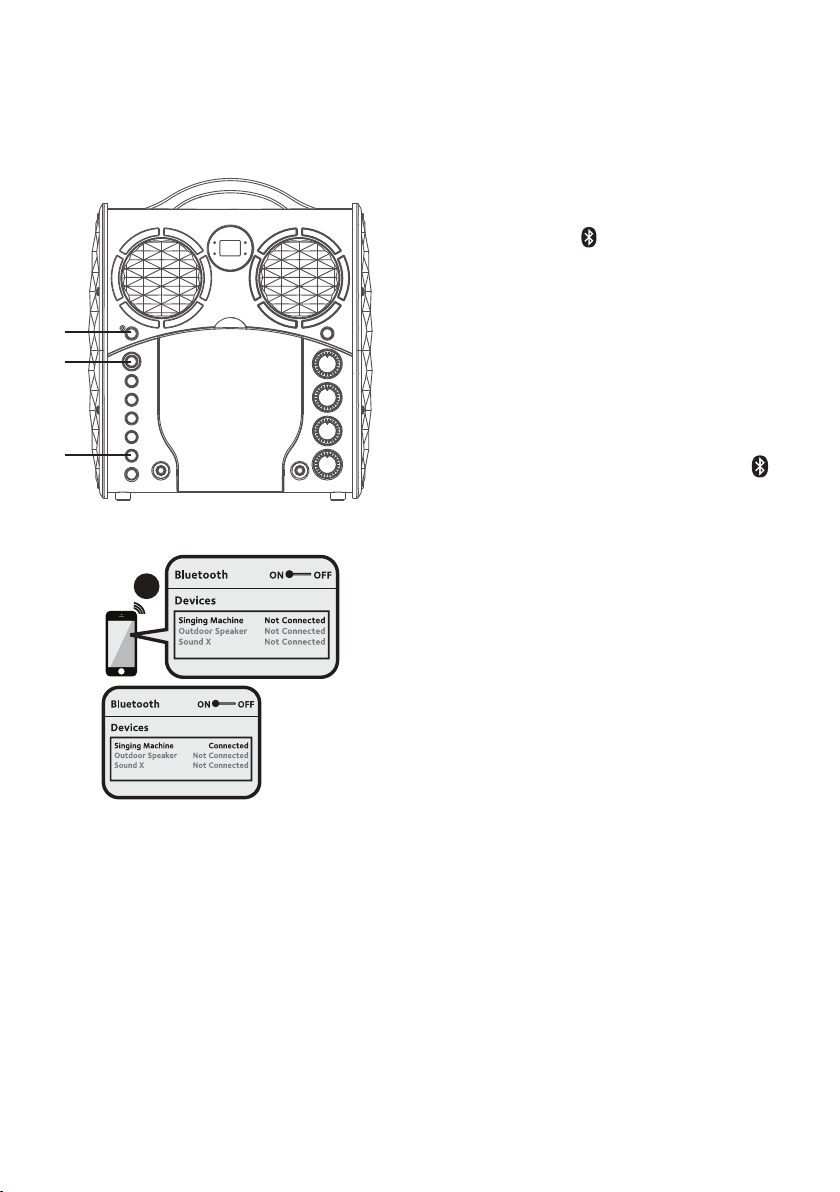
Using a Bluetooth Device
v
u
v
3
Connect the unit as described
1
2
Note: You can also press and hold the
button to disconnect any paired devices in
order to pair another device.
3
Note: Also refer to the user manual of your
Bluetooth device for detailed instructions.
4
Notes:
• If your Bluetooth prompts you for a
• On some Bluetooth devices, once pairing
• If connection is lost after successful
•“Bluetooth” will blink on TV screen,
— E10 —
previously. Press the power ON/
OFF button to turn the unit on.
Press the button or repeatedly
press the FUNCTION button to
select the Bluetooth mode; “bt”
will blink in the display as the unit
automatically searches for and
pairs a previously paired Bluetooth
device (if previously paired). If
no previously paired devices are
present, connect as shown in the
next step.
Turn on your device’s Bluetooth
option in settings to search for
a discoverable device with a
Bluetooth signal. Select “Singing
Machine” from the device results
on the Bluetooth menu.
“bt” will light solid in the display and
a successful pairing sound will be
heard.
passcode during the pairing process,
please enter “0000” to connect.
is complete, select your Bluetooth device
as “Use as Audio Device” or similar.
pairing, check to make sure the distance
between speaker and Bluetooth-enabled
device does not exceed 30 feet/10
meters.
and will stop blinking after successful
connection.
Page 12
Operation
Using a Bluetooth Device (Continued)
y
V
U
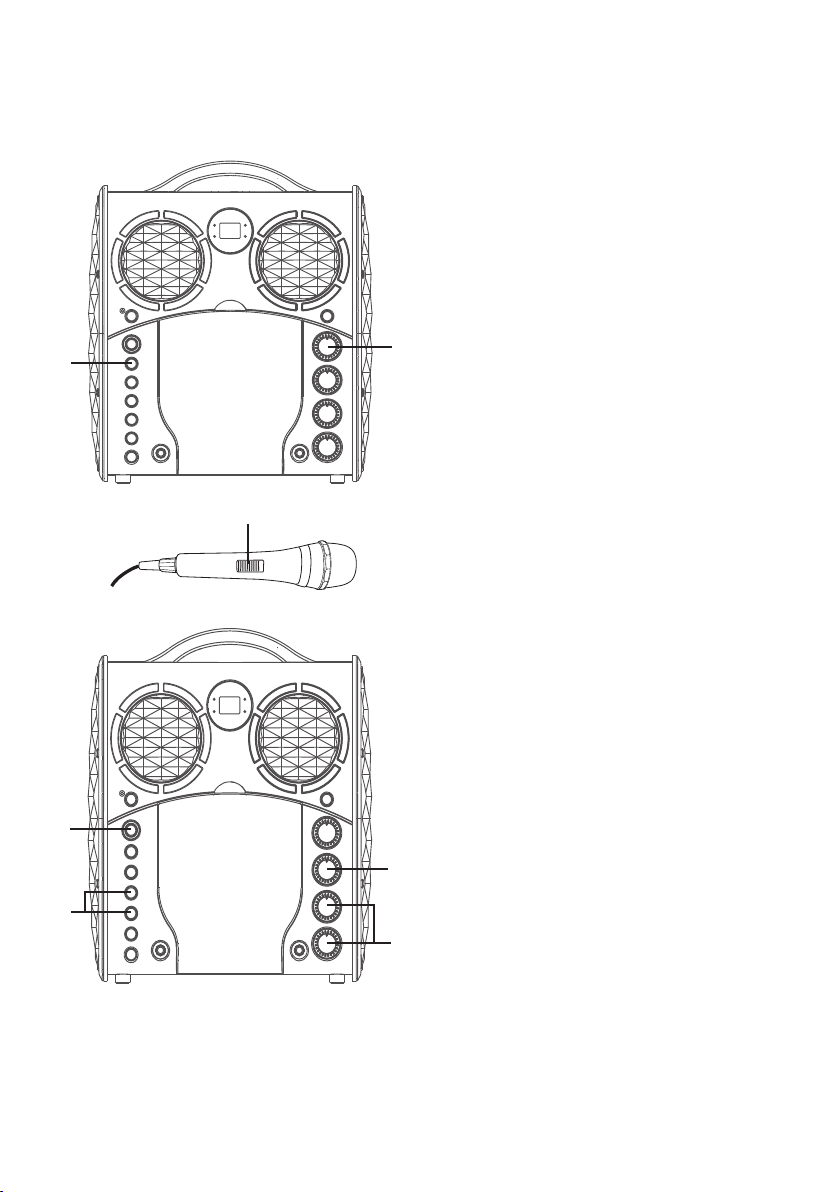
To control your Bluetooth device
5
6
7
8
from this unit, press the PLAY/
PAUSE button to start playback.
Press the PLAY/PAUSE button
during playback to pause the song.
Adjust the volume to a comfortable
level using the MASTER VOLUME
control on this unit as well as the
volume on your Bluetooth device.
Connect microphone(s) and
slide the ON/OFF switch on the
microphone to the ON position.
Adjust the MIC VOLUME 1 or 2
control as desired. Increasing this
will increase the volume of the
respective microphone.
ak
at
9
10
X
W
11
— E11 —
Rotate the ECHO control to add an
echo effect to your voice. Rotate
towards MAX to increase the echo
effect.
SKIP: Advance or go back one track
by pressing the Skip 9/Skip :
buttons.
Press the power ON/OFF button
to turn the unit off.
Page 13
Operation
Using the LINE IN Jack
Connect the unit as described
1
2
previously. Press the power ON/
OFF button to turn the unit on.
Repeatedly press the FUNCTION
button to select the LINE IN mode;
“AU” will appear on the display.
u
v
w
y
x
Connect the external unit to the
3
Notes:
• It is highly recommended to set the
• Skipping files/tracks is not possible on
4
5
LINE IN Jack on the back of this
unit. Connecting an external unit
will allow the audio to be played
through your Singing Machine.
volume on the auxiliary unit to 1/3 or
lower to avoid distortion.
this unit when using an external device.
Adjust the volume using the
MASTER VOLUME control on
this unit or your external device’s
volume control.
Connect microphone(s) and
slide the ON/OFF switch on the
microphone to the ON position.
— E12 —
Page 14
Operation
Using the LINE IN Jack (Continued)
W
V
U
Adjust the MIC VOLUME 1 or 2
6
7
8
control as desired. Increasing this
will increase the volume of the
respective microphone.
Rotate the ECHO control to add an
echo effect to your voice. Rotate
towards MAX to increase the echo
effect.
Press the power ON/OFF button
to turn the unit off.
— E13 —
Page 15

Troubleshooting Guide
Should this unit exhibit a problem, check the following before seeking service:
No Power
• Power is not on; press the power ON/OFF button to turn power on.
• Confirm that the AC adapter is connected securely to the back of the unit.
• Connect the unit to a different outlet.
No Sound – General
• Master Volume is set to minimum; raise volume.
• Correct Function was not selected; select using the FUNCTION button.
• If using an external device, raise the volume.
No Sound – If connected to a TV
• Volume on the TV is muted or too low.
• Correct source (usually AV) was not selected on the TV’s menu.
Lyrics do not appear on the TV screen
• If connected to a TV, Video plug is not connected properly; see page E5.
• If connected to a TV, select the correct source on the TV (usually AV).
• The file/track being played is not a track recording with lyrics. These are the only files
that allow you to view the lyrics on the TV screen.
• Nothing will appear on the TV screen when using AUX In or Bluetooth.
No sound from the microphone
• Make sure the microphone is firmly connected to the MIC 1 or MIC 2 jack.
• Make sure the ON/OFF switch on the microphone is set to the ON position.
• Make sure the MIC VOLUME setting is not set too low.
• MASTER VOLUME is set to minimum; raise volume.
• Adjust the ECHO control past the mid point on the Singing Machine.
The Bluetooth device cannot be paired or connected with the unit
• You have not activated the Bluetooth function of your device; see page E10 or refer to
the Bluetooth device user’s manual.
The Music is not available on the unit after successfully connecting the Bluetooth
• Ensure your Bluetooth device can support the A2DP Bluetooth profile.
• The volume on the external Bluetooth device is set to low or muted; raise as desired.
— E14 —
Page 16
Specifications
AUDIO
OUTPUT POWER (MAXIMUM)................................................................................ 2.5 Watts (RMS)
OUTPUT IMPEDANCE ..................................................................................................................4 Ohms
CD PLAYER SECTION
FREQUENCY RESPONSE ............................................................................................ 100 Hz - 20 kHz
SIGNAL-TO-NOISE RATIO .............................................................................................................50 dB
NUMBER OF PROGRAMS ..................................................20 Step Random Access Programming
BLUETOOTH
Bluetooth Version ...............................................................................................................................V5.0
Working Distance .......................................... Up to 30 feet/10 meters measured in open space
AUX IN SECTION ..........................................................................3.5 mm Stereo Headphone Jack
MICROPHONE .................. -74 db 600 Ohm Impedance with 6.3 mm Dynamic Microphone
POWER SECTION .................. 9V 1.2A (8 x “C” Batteries) (Batteries not included)
DIMENSIONS (HxWxD) ..........................13.6 x 12.0 x 6.2 inches / 34.6 x 30.4 x 15.7 cm
WEIGHT .....................................................................................................................4.19 lbs / 1.90 kgs
Specifications are subject to change without notice.
The Bluetooth® word mark and logos are registered trademarks owned
by Bluetooth SIG, Inc. and any use of such marks and logos by The
Singing Machine Company, Inc. is under license. Other trademarks and
trade names are those of their respective owners.
— E15 —
Page 17
Advertencias
PRECAUCIÓN
RIESGO DE DESCARGA ELÉCTRICA
PRECAUCIÓN: PARA REDUCIR EL RIESGO DE DESCARGAS ELÉCTRICAS,
NO QUITE LA CUBIERTA (NI LA TAPA POSTERIOR) NO HAY PIEZAS
REPARABLES POR EL USUARIO DENTRO. DERIVE LAS REPARACIONES A
ADVERTENCIA DE GOTEO: Este producto no se podrá exponer a goteo o
salpicaduras, y no se colocará ningún objeto lleno con líquidos, como jarrones,
encima del producto.
ADVERTENCIA DE VENTILACIÓN: La ventilación normal del producto no se
bloqueará si se le da el uso previsto.
Este producto cumple con las normas DHHS 21 CFR del capítulo 1,
subcapítulo J que aplican desde la fecha de fabricación.
Advertencias:
• Este reproductor de CD utiliza un haz de luz láser. Solo la persona de
reparaciones calificada es quien puede retirar la cubierta y reparar este
dispositivo debido a posibles lesiones en la vista.
• El uso de controles, ajustes o la realización de procedimientos que no sean
los especificados en el presente pueden producir exposición a radiación
peligrosa.
• El artefacto deberá utilizarse en un espacio abierto.
PRECAUCIÓN!
Si la caja se abre o el dispositivo de seguridad se destruye, puede producirse
la emisión invisible de radiación láser. Evite la exposición al haz de luz.
PERSONAL DE SERVICIO CALIFICADO.
Las marcas de Precaución se ubican en el panel inferior.
TENSIÓN PELIGROSA: La luz intermitente con símbolo de
flecha dentro de un triángulo pretende alertar al usuario de la
presencia de tensión peligrosa no aislada, dentro del paquete
del producto, que puede ser de magnitud suficiente para
constituir un riesgo de descarga eléctrica para las personas.
ATENCIÓN: El signo de exclamación dentro de un triángulo
pretende alertar al usuario de la presencia de instrucciones
importantes de operación y mantenimiento (reparaciones) en
el material que acompaña a este producto.
NO ABRIR
ADVERTENCIA: PARA EVITAR INCENDIOS O PELIGROS DE DESCARGA,
NO EXPONGA ESTA UNIDAD A LA LLUVIA O HUMEDAD.
VISO DE LA FCC: Este equipo puede generar o usar energía de radio frecuencia.
Los cambios o modificaciones realizados en el aparato pueden provocar
interferencia perjudicial, a menos que dichas modificaciones estén autorizadas
en el manual de instrucciones. El usuario puede perder toda autoridad para
operar el equipo si realiza cambios o modificaciones sin autorización.
Este aparato cumple con la parte 15 de las Normas de la FCC. El funcionamiento
está sujeto a las dos condiciones que figuran a continuación: (1) Es probable
que no cause interferencia perjudicial y (2) deberá aceptar cualquier
interferencia recibida, incluyendo la interferencia que pueda llegar a causar un
funcionamiento indeseado.
NOTA: Este equipo fue probado y se concluyó que cumple con los límites
establecidos para los dispositivos digitales Clase B, de acuerdo con el Apartado
15 de las normas de la FCC. Estos límites fueron pensados para proporcionar
protección razonable ante la interferencia perjudicial en una instalación
residencial. Este equipo genera, usa y puede emitir energía de radio frecuencia
y, si no se lo instala y utiliza de conformidad con las instrucciones, puede causar
interferencia perjudicial a las comunicaciones radiales. No obstante, no existe
ninguna garantía de que no se produzca interferencia en una instalación en
particular. Si este equipo provoca interferencia perjudicial a la recepción de
radio o televisión, lo cual puede determinarse apagando y encendiendo el
equipo, el usuario puede intentar corregir la interferencia de alguna/s de las
siguientes maneras:
• Reoriente la antena receptora o ubíquela en otro lugar.
• Aumente la distancia entre el equipo y el receptor.
• Conecte el equipo a un tomacorriente de un circuito distinto al que está
conectado el receptor.
• Consulte al distribuidor o a un técnico experimentado de radio y televisión
para que lo asesore.
• La información de clasificación está ubicada en la parte inferior de la unidad.
CAN ICES-3(B)/NMB-3(B)
Información importante sobre seguridad
1. Lea estas instrucciones.
2. Conserve estas instrucciones.
3. Preste atención a todas las advertencias.
4. Siga todas las instrucciones.
5. No utilice este artefacto cerca del agua.
6. Límpielo únicamente con un paño seco.
7. No obstruya las aberturas para ventilación. Instálelo de acuerdo con
las instrucciones del fabricante.
8. No instale cerca de fuentes de calor, como radiadores, rejillas de
calefacción, estufas u otros aparatos (incluso amplificadores) que
produzcan calor.
9. No desafíe el fin de seguridad del enchufe polarizado o de conexión
a tierra. Un enchufe polarizado tiene dos clavijas y una es más
ancha que la otra. El enchufe de conexión a tierra tiene dos clavijas,
y una tercera punta a tierra. La clavija ancha o la tercera punta se
suministran para su seguridad. Si el enchufe suministrado no coincide
con su tomacorriente, consulte con un electricista para reemplazar el
tomacorriente obsoleto.
10. Evite pisar o apretar el cable de alimentación, especialmente en los
enchufes, tomacorrientes y en el punto por donde salen del artefacto.
11. Utilice sólo los complementos y accesorios especificados por el
fabricante.
12. Utilice la unidad sólo con el carro, soporte, trípode, repisa o mesa
— S1 —
recomendados por el fabricante, o que se
vendan junto con el producto Cuando se
utiliza un carro, tenga cuidado cuando mueva
el carro y artefacto junto a para evitar lesiones
producidas por la caída del producto.
13. Desenchufe este artefacto durante las
tormentas eléctricas o cuando no se lo utilice
durante períodos prolongados.
14. Derive todas las reparaciones al personal de
reparaciones calificado. Es necesario reparar el artefacto cuando se
encuentra dañado; por ejemplo, cuando el cable de suministro de
energía o el enchufe están dañados, cuando se derrama líquido sobre
la unidad o caen objetos dentro del mismo, cuando el producto ha
estado expuesto a la lluvia o a la humedad, cuando no funciona con
normalidad o cuando se ha caído.
15. ADVERTENCIA: Para reducir el riesgo de incendio o descarga eléctrica,
no exponga este artefacto a la lluvia o la humedad. No coloque
objetos llenos de agua, como jarrones, sobre el aparato.
16. El enchufe de conexión de CA se utiliza como dispositivo de
desconexión eléctrica y deberá estar siempre accesible y en
funcionamiento durante el uso previsto. Para desconectar
completamente el aparato de la electricidad, el enchufe de conexión
deberá quitarse por completo del tomacorriente de CA.
17. PRECAUCIÓN: Para reducir el riesgo de incendio o explosión no
exponga las baterías al calor excesivo, como al rayo del sol, fuego u
otras fuentes de calor
ADVERTENCIA SOBRE
EL CARRO PORTÁTIL
(símbolo provisto por RETAC)
Page 18
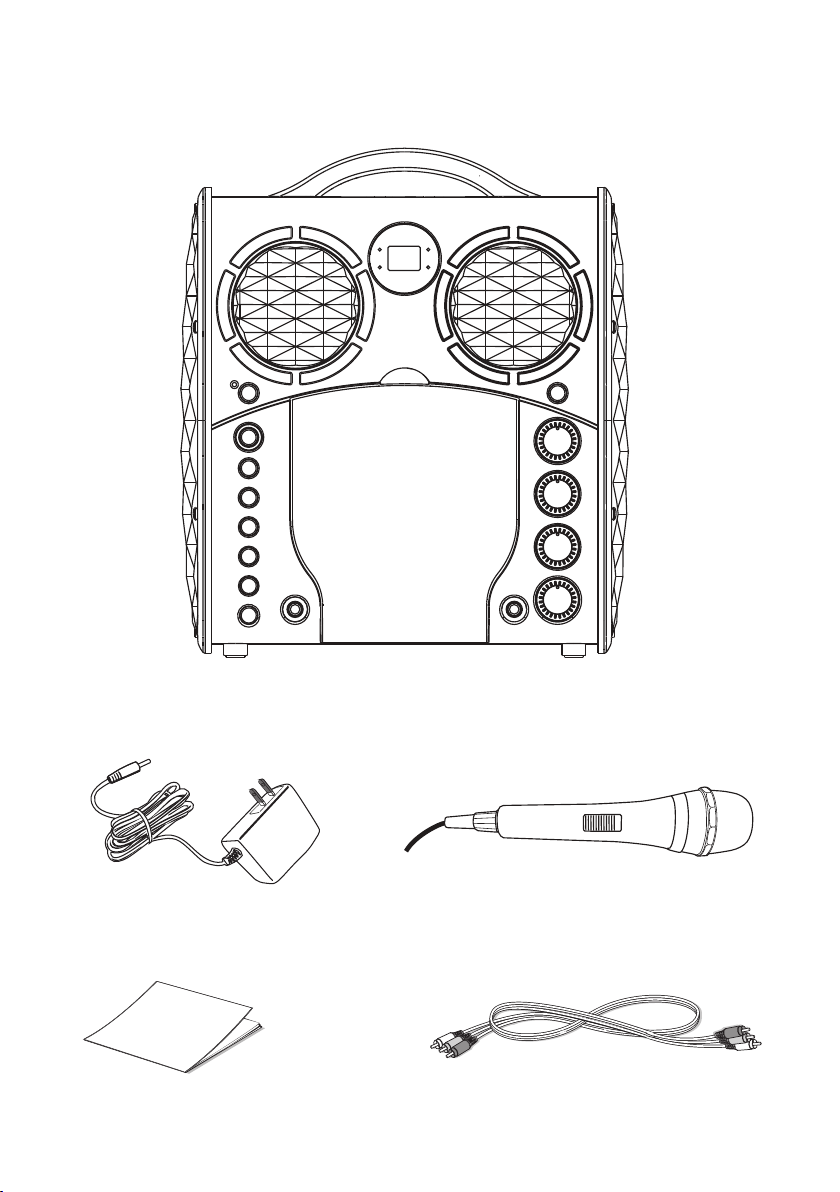
Se incluyen
Asegúrese de que estén incluidos los siguientes elementos.
Adaptador de CA
Manual
Unidad principal
Micrófono con cable
Cables de Audio/Video
— S2 —
Page 19
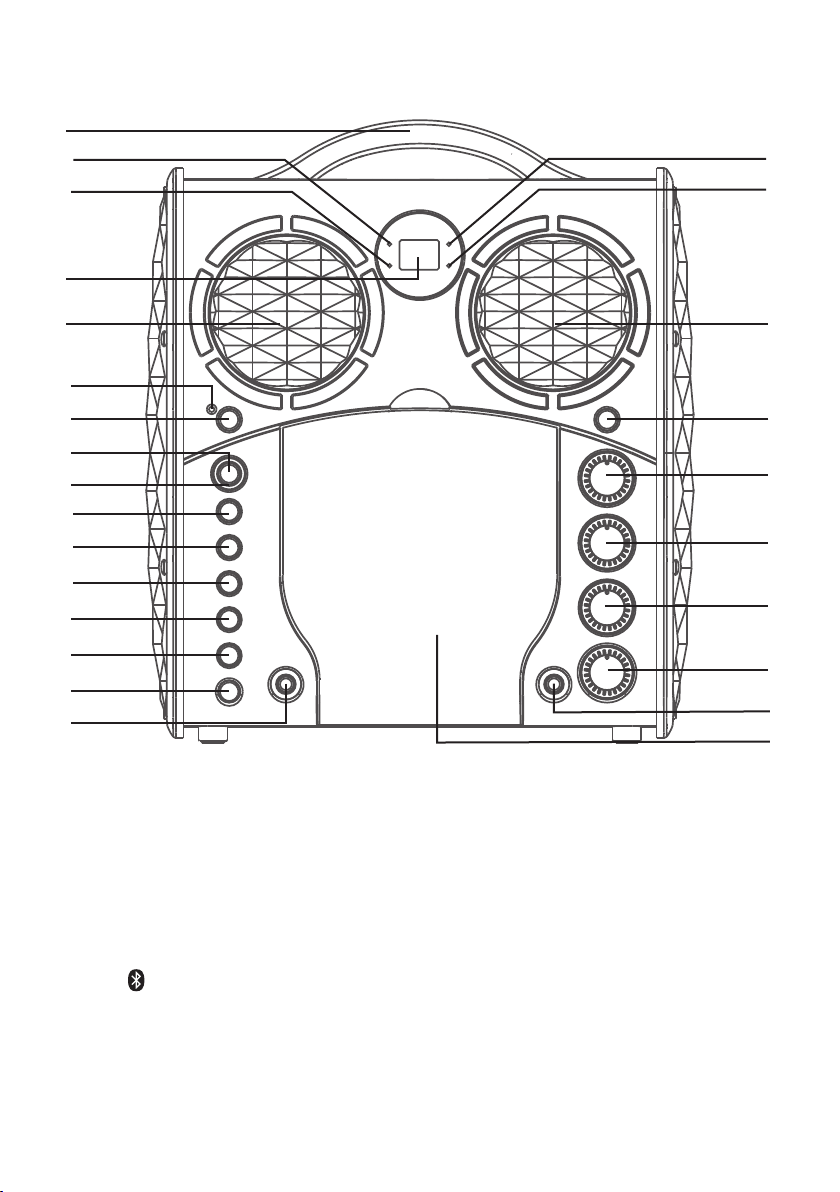
Ubicación de controles (Delantero)
u
v
w
x
U
V
W
X
at
ak
aq
ar
xy
as
bt
bk
al
am
an
ao
ap
1. Manija
2. Indicador de
REPRODUCIR/PAUSAR
(PLAY/PAUSE)
3. Indicador CDG
4. Pantalla
5. Altavoz
6. Indicador de Bluetooth
7. Botón
8. Botón de ENCENDIDO/
APAGADO (ON/OFF)
9. Indicador de ENCENDIDO/
APAGADO (ON/OFF)
10. Botón REPRODUCIR/
PAUSAR (PLAY/PAUSE)
11. Botón DETENER (STOP)
12. Botón SALTO : (SKIP)
13. Botón SALTO 9 (SKIP)
14. Botón de FUNCIÓN
(FUNCTION)
15. Botón REPETIR /
PROGRAMAR (REPEAT /
PROGRAM)
16. Conector para
MICRÓFONO 1 (MIC 1)
17. Indicador de REPETIR
(REPEAT)
18. Indicador de PROGRAMA
(PROGRAM)
19. Botón Luz (Light)
— S3 —
bl
bm
bn
bo
20. Control de VOLUMEN
PRINCIPAL (MASTER
VOLUME)
21. Control de ECO (ECHO)
22. Control de VOLUMEN
DEL MICRÓFONO 1 (MIC
VOLUME 1)
23. Control de VOLUMEN
DEL MICRÓFONO 2 (MIC
VOLUME 2)
24. Conector para
MICRÓFONO 2 (MIC 2)
25. Compartimento de CD
Page 20
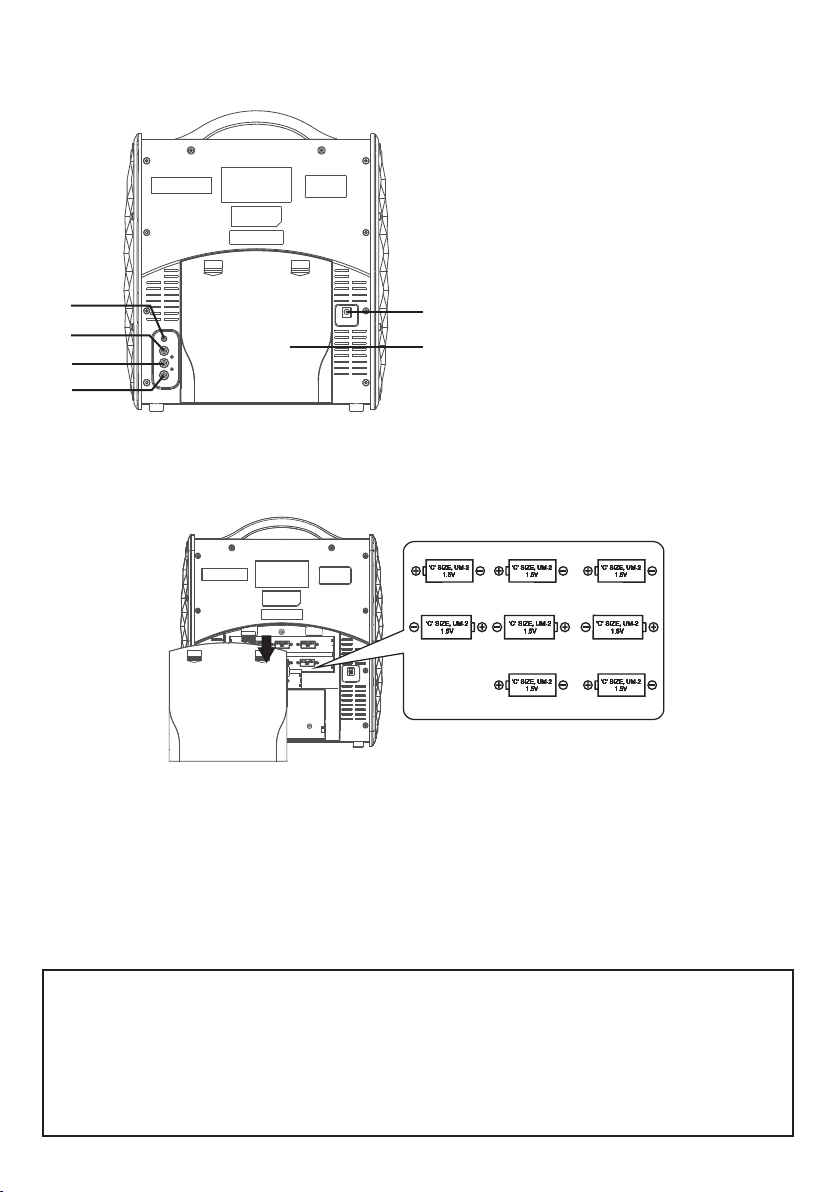
Ubicación de los controles (reverso)
26. Conector de ENTRADA DE LA
LÍNEA (LINE IN)
27. Conector de SALIDA DE VIDEO
(VIDEO OUT)
28. SALIDA DE AUDIO (AUDIO OUT)
derecha (R)
bp
bq
br
bs
ct
29. SALIDA DE AUDIO (AUDIO OUT)
ck
izquierda (L)
30. Conector de entrada de CC
31. Compartimiento para pilas
CONEXION
INSTALACIÓN DE LAS PILAS
FUNCIONAMIENTO DE CC
1. Deslice la tapa de la pila en la dirección de las flechas para exponer el compartimiento
para pilas. Inserte ocho (8) pilas alcalinas tamaño “C” (no incluidas) como lo indica el
diagrama.
2. Reemplace la cubierta firmemente antes de operar.
PRECAUCIONES:
• Reemplace todas las pilas al mismo tiempo.
• No mezcle pilas viejas y nuevas.
Precauciones sobre las pilas
Se seguirán las precauciones a continuación cuando se utilicen pilas en
este dispositivo:
1. Utilice sólo el tamaño y tipo de pilas especificadas.
2. Asegúrese de respetar la polaridad correcta cuando instale las pilas,
según lo indicado en el compartimiento de las pilas. Las pilas al revés
pueden provocar daños al dispositivo.
3. No mezcle diferentes tipos de pilas (por ejemplo, alcalinas y de
zinc-carbono) o pilas viejas con pilas nuevas.
4. Si no va a usarse el dispositivo durante un período prolongado,
asegúrese de quitar las pilas para prevenir daños o lesiones a causa de
posibles pérdidas de las pilas.
5. No intente recargar pilas que no fueron diseñadas para ese fin; pueden
recalentarse y romperse (Siga las indicaciones del fabricante de la pila).
6. Las pilas recargables se deben quitar del producto antes de la carga.
7. Las pilas recargables solo se pueden cargar bajo supervisión de un
adulto.
8. Las pilas sin carga se deben quitar del producto.
9. La pila no deberá exponerse a calor excesivo como luz solar, fuego o
fuentes similares.
— S4 —
Page 21
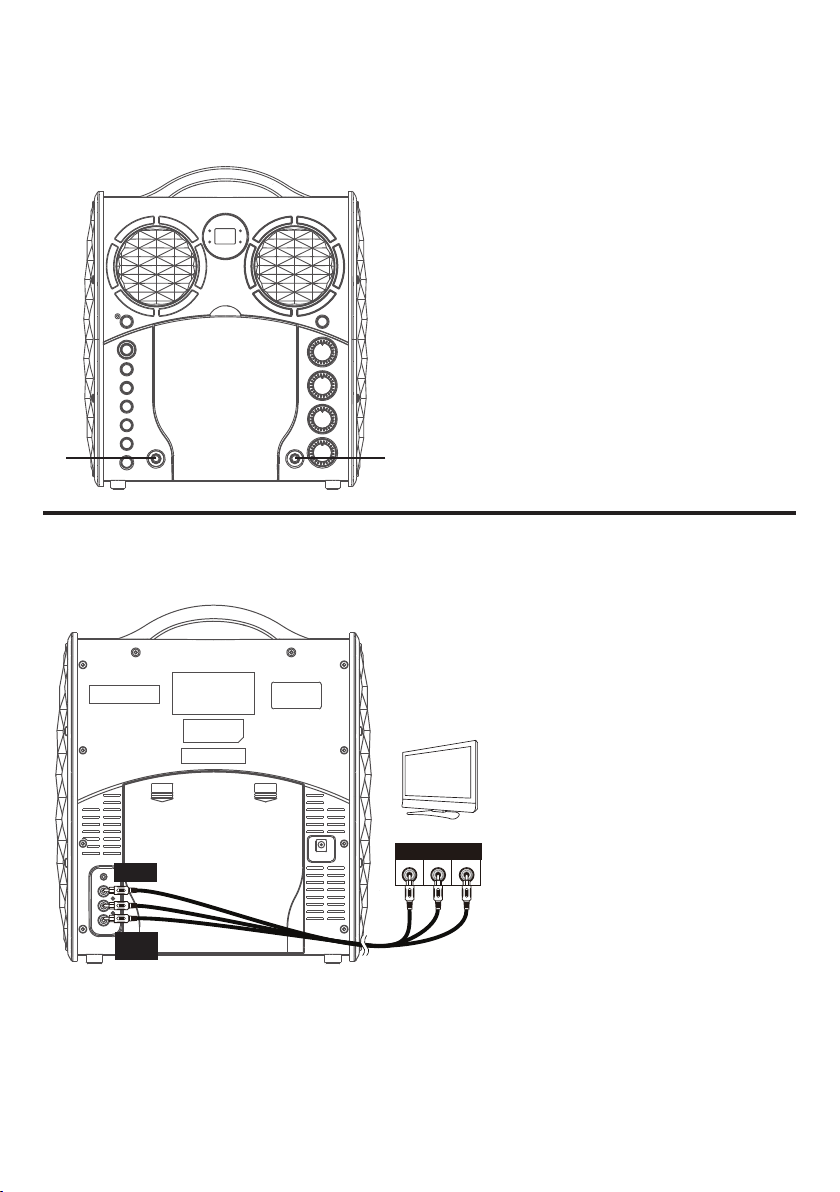
CONEXION
Conexión de micrófono(s)
u
Conexión de la unidad a un televisor
VIDEO OUT
(yellow)
AUDIO OUT
(white- L
red- R)
v
RCA cables
Micrófonos:
Inserte el enchufe de un micrófono en
la entrada para micrófono 1 u y el otro
enchufe de micrófono en la entrada para
micrófono v (si lo desea).
Nota: No arroje o dé golpecitos al
micrófono, puede dañar el micrófono o
los parlantes. No gire el micrófono por el
cable porque causará daños en el cableado
revestido.
Para que se reproduzca el video,
las letras y el audio en su televisor,
siga los siguientes pasos:
Conecte el cable de video RCA
(amarillo) a la SALIDA DE VIDEO
(VIDEO OUT) y los cables de audio
(blanco y rojo) a las SALIDAS DE
AUDIO (AUDIO OUT) ubicadas
en la parte trasera de la Singing
Machine.
REAR VIEW OF TV
VIDEO
AUDIO
INPUT
INPUT
R L
Conecte el otro extremo del
cable de video RCA (amarillo) a la
ENTRADA DE VIDEO (VIDEO IN) y
los cables de audio (blanco y rojo)
a la ENTRADA DE AUDIO (AUDIO
IN) de su televisor.
Notas:
• Esta unidad puede utilizarse con o sin televisor, pero es altamente recomendable usar
uno para aprovechar todas las funciones.
• También consulte la Guía de usuario del televisor.
• Para ver las letras de canciones en la pantalla, debe usar un disco CD+G.
— S5 —
Page 22
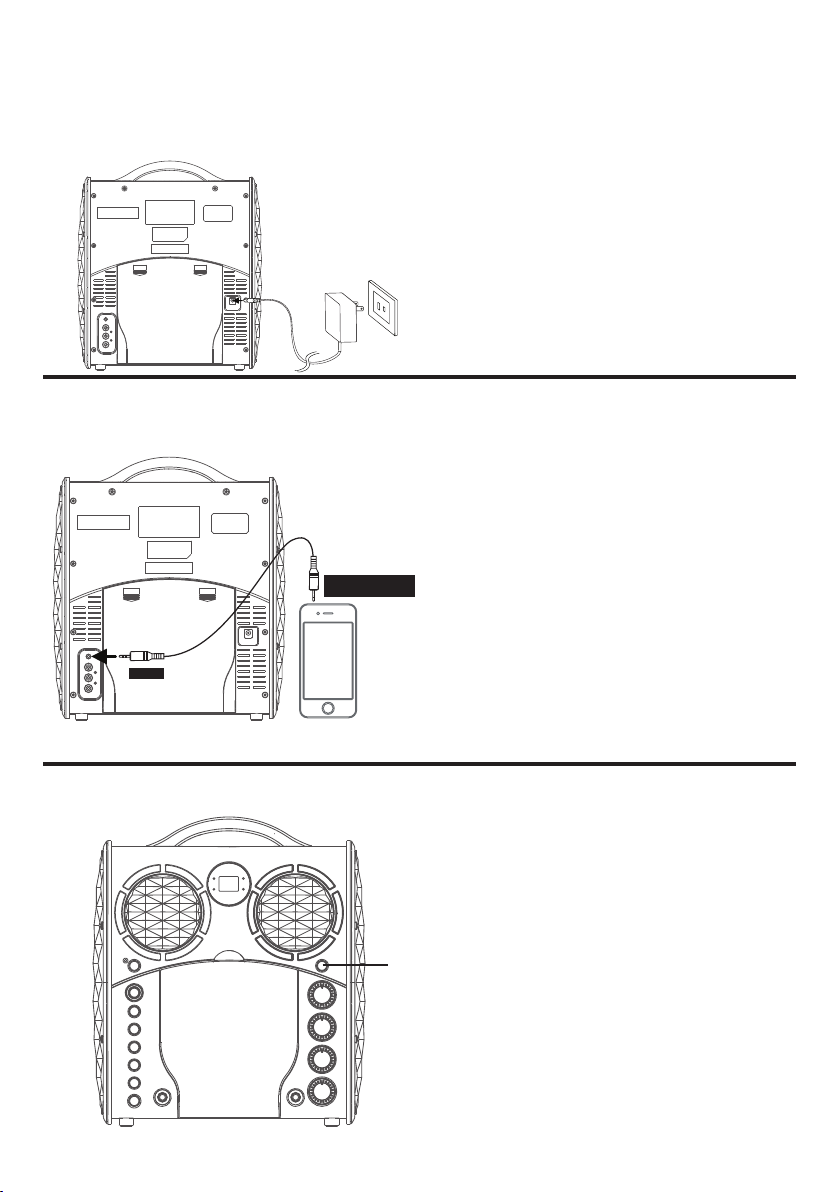
Conexió
Conexión a alimentación de corriente alterna
Conexión a ENTRADA DE LÍNEA
AUDIO OUTPUT
/ HEADPHONE JACK
YOUR SMARTPHONE,
DIGITAL PLAYER OR
LINE IN
MP3 PLAYER
Introduzca el cable de alimentación
de CA en un tomacorriente de CA con
120 V de CA, 60 Hz.
Nota:
Haga todas las conexiones antes de
enchufar a la alimentación de CA.
Conecte su dispositivo externo
utilizando un cable adecuado (no se
incluye el cable de audio de 3,5mm)
como se muestra.
Nota:
Consulte la página S12 para
seleccionar y utilizar la función de
entrada de línea.
Luces de estado brillante
Cuando la unidad está encendida, el
1
modo de LUZ (LIGHT) u se activa
automáticamente. Las luces se
encenderán y se sincronizarán con
el sonido cuando hable o cante por
el micrófono.
u
Presione el botón LUZ (LIGHT)
para seleccionar el modo de luz
2 que mostrará las luces pero no
responderá al micrófono.
Presione el botón LUZ (LIGHT)
otra vez para apagar las luces.
— S6 —
Page 23
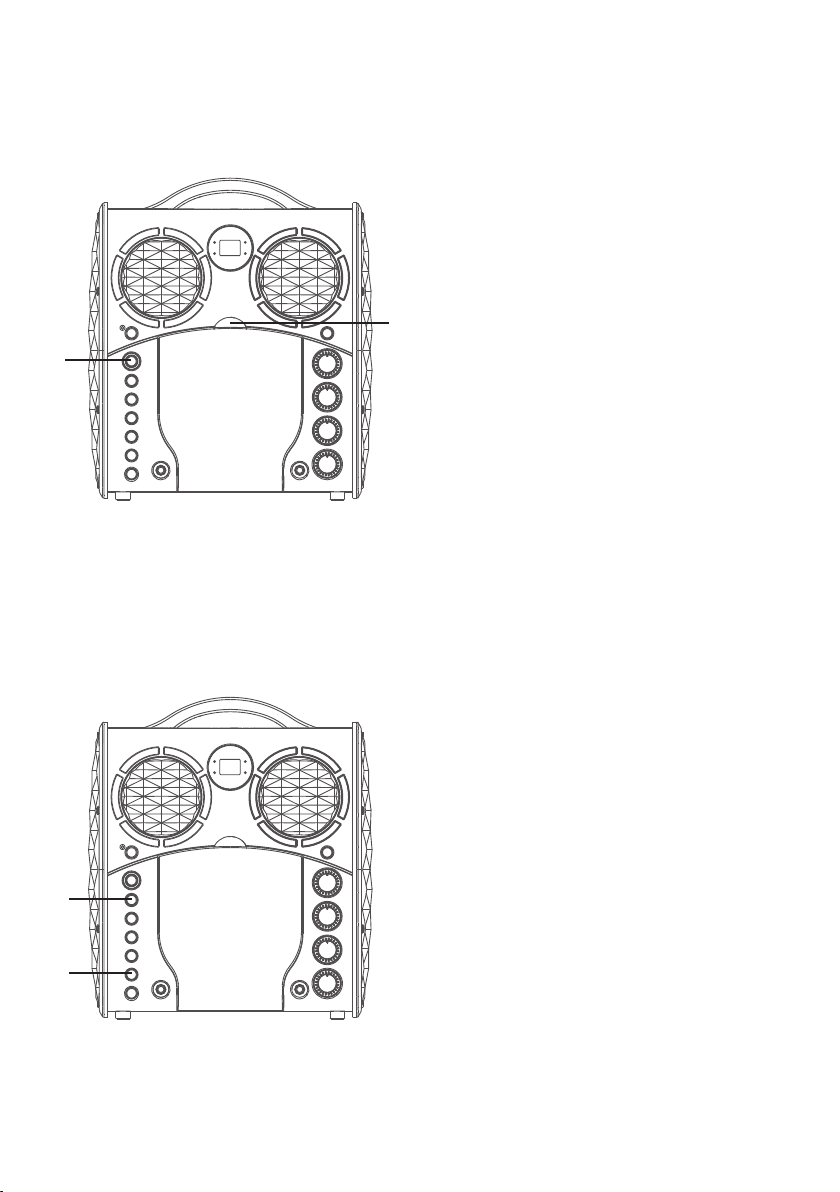
Funcionamiento
Reproducción de un CDG
Conecte la unidad como se
1
describió antes; si utiliza CD+G,
se recomienda que conecte un
televisor. Oprima el botón de
ENCENDIDO/APAGADO (ON/
OFF) para encender la unidad.
u
x
v
Abra el compartimiento de CD
2
Notas:
• ¿Qué es un CD+G?
Un CD+G (CD+ Graphics), es el formato
• Nunca coloque nada que no sea un CD
• Si no introdujo un disco, “No” aparecerá
• Si se conecta a un televisor u otra fuente
3
e introduzca un CD o un CD+G
presionándolo cuidadosamente en
el husillo central. Cierre la tapa del
CD.
estándar para la mayoría de los discos
de karaoke que mostrarán las letras de
canciones en pantalla.
en el compartimiento, como por ejemplo
objetos extraños que puedan dañar la
unidad.
en
de audio, ajuste el volumen del televisor
con su propio control de volumen.
Presione varias veces el botón
FUNCIÓN (FUNCTION) para
seleccionar el modo CDG;
aparecerá “--” cuando busque el
disco. Luego, aparecerá la cantidad
total de pistas.
w
4
— S7 —
Presione REPRODUCIR/PAUSAR
(PLAY/PAUSE) para comenzar la
reproducción; si está escuchando
un archivo CD+G, en la pantalla
del televisor aparecerá la imagen
y la letra (si está conectado) y
se encenderá la luz indicadora de
REPRODUCIR/PAUSAR (PLAY/
PAUSE).
Page 24
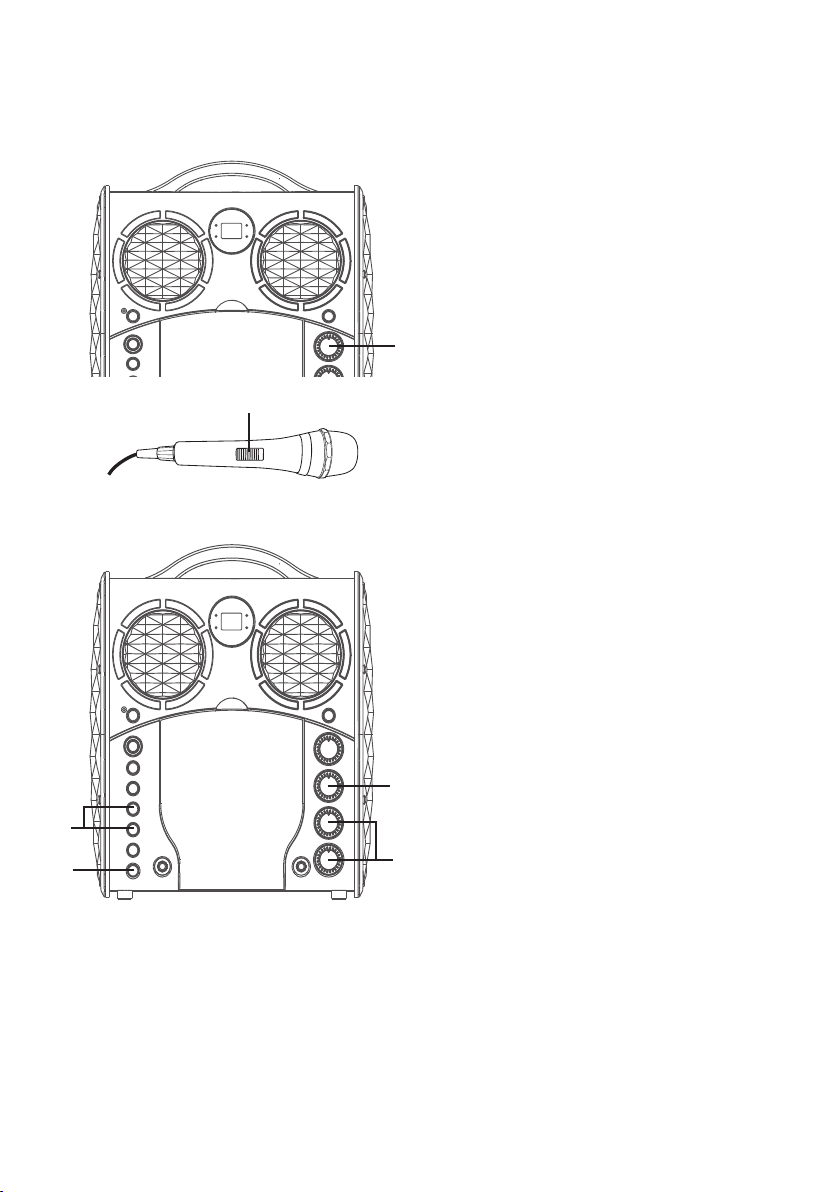
Funcionamiento
Reproducción de un CDG (Continuó)
U
X
at
5
6
y
7
8
W
9
V
10
— S8 —
Ajuste el volumen a un nivel
conveniente, usando el control de
VOLUMEN PRINCIPAL.
Conecte el/los micrófono y ubique
el interruptor de ENCENDIDO/
APAGADO (ON/OFF) del Control
remoto/Micrófono en la posición
de ENCENDIDO (ON).
Ajuste el control de VOLUMEN
DEL MICRÓFONO 1 o 2 según el
nivel deseado. Al aumentar el nivel
de este control se incrementará el
volumen del micrófono respectivo.
Gire el control de ECO (ECHO)
para darle un efecto de eco a su
voz. Gire hacia MAX para aumentar
el efecto de eco.
SALTO: Avance o retroceda una pista
oprimiendo los botones de Salto 9/
:
.
FUNCIÓN REPETIR: Durante la
reproducción, presione REPETIR/
PROGRAMAR (REPEAT/PROG)
una vez para que se reproduzca
varias veces la canción seleccionada;
el indicador Repetir (Repeat)
parpadeará. Presione el botón
REPETIR/PROGRAMAR (REPEAT/
PROG) una segunda vez para que
se reproduzca varias veces el CD
completo; el indicador Repetir
(Repeat) quedará encendido y fijo.
Presiónelo nuevamente para cancelar
la función Repetir, el indicador Repetir
se apaga.
Page 25
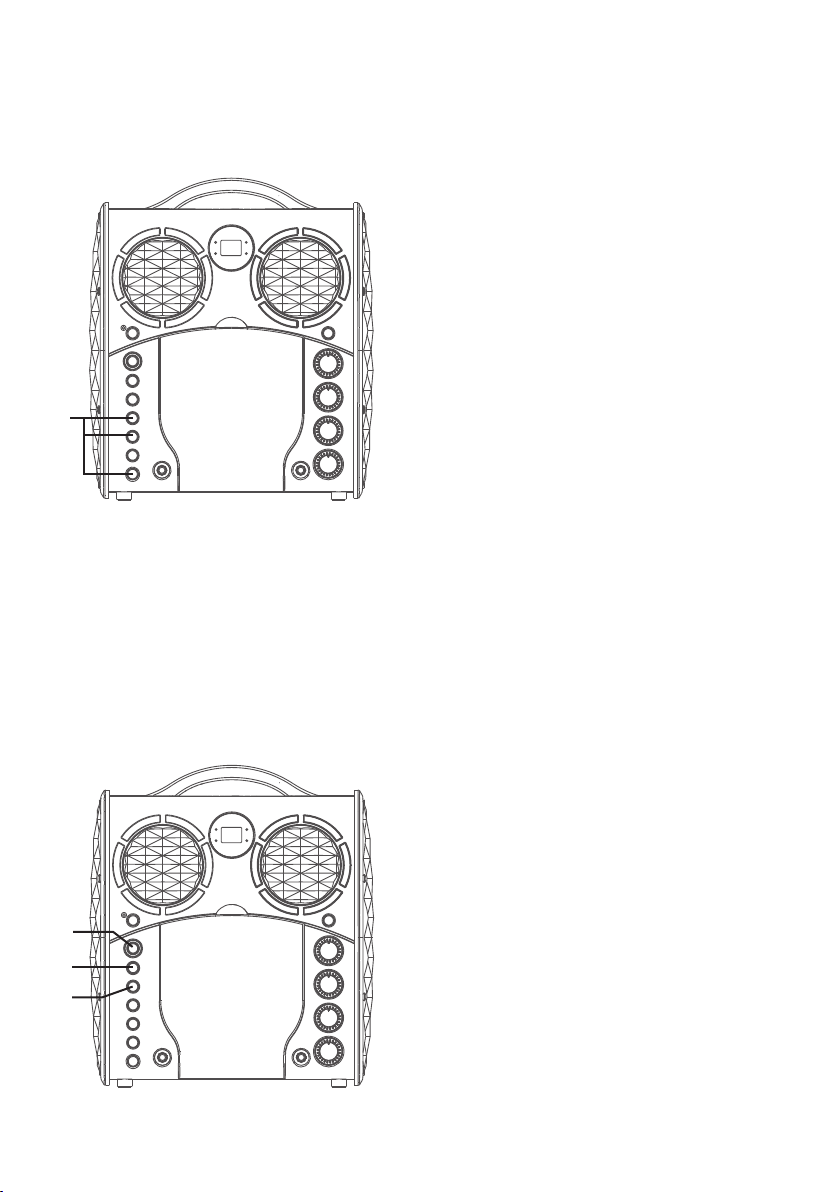
Funcionamiento
Reproducción de un CDG (Continuó)
ak
PROGRAMAR: Puede programar
11
Nota:
• Oprima DOS VECES DETENER para detener
hasta 20 pistas de cualquier disco
para reproducir en el orden deseado.
Mientras se encuentre en el modo
Detener (Stop), presione REPETIR/
PROGRAMAR (REPEAT/PROG);
el indicador Programar (Program)
parpadeará y aparecerá “01”.
Seleccione la primera pista con
los botones Salto hacia atrás/
adelante 9/:. Presione REPETIR/
PROGRAMAR (REPEAT/PROG)
nuevamente para confirmar la
entrada. Después de seleccionar
las pistas deseadas, la pantalla
mostrará 02, 03, etc. reconociendo
que las pistas seleccionadas se
han programado. Repita hasta
agregar un máximo de 20 pistas a
la memoria. Al finalizar, presione el
botón
REPRODUCIR/PAUSAR
(PLAY/PAUSE) para comenzar la
reproducción.
y eliminar el programa.
an
al
am
12
13
14
— S9 —
PAUSAR (PAUSE): Durante la
reproducción, si desea pausar
momentáneamente el disco, oprima
REPRODUCIR/PAUSAR (PLAY/
PAUSE); el indicador REPRODUCIR/
PAUSAR (PLAY/PAUSE) parpadeará.
Oprima nuevamente para reanudar
la reproducción normal.
Oprima DETENER < para detener
la reproducción.
Oprima ENCENDIDO/APAGADO
(ON/OFF) para apagar la unidad.
 Loading...