


 Loading...
Thermo Scientific Genesys GENESYS 30, GENESYS 50, GENESYS 180, GENESYS 40, GENESYS 140 Instruction Manual
...
UV-Visible
GENESYS Family
Spectrophotometers
User Guide
269-331300 Revision A |
February 2018 |

© 2018 Thermo Fisher Scientific Inc. All rights reserved.
Eppendorf and UVette are either trademarks or registred trademarks of Eppendorf AG aktiengesellschaft. BrandTech is a trademark of BrandTech Scientific, Inc. Beckman is a trademark of BECKMAN COULTER, INC. All other trademarks are the property of Thermo Fisher Scientific Inc. and its subsidiaries.
For technical support, please contact: www.thermofisher.com
Thermo Fisher Scientific Inc. provides this document to its customers with a product purchase to use in the product operation. This document is copyright protected and any reproduction of the whole or any part of this document is strictly prohibited, except with the written authorization of Thermo Fisher Scientific Inc.
The contents of this document are subject to change without notice. All technical information in this document is for reference purposes only. System configurations and specifications in this document supersede all previous information received by the purchaser.
Thermo Fisher Scientific Inc. makes no representations that this document is complete, accurate or errorfree and assumes no responsibility and will not be liable for any errors, omissions, damage or loss that might result from any use of this document, even if the information in the document is followed properly.
This document is not part of any sales contract between Thermo Fisher Scientific Inc. and a purchaser. This document shall in no way govern or modify any Terms and Conditions of Sale, which Terms and Conditions of Sale shall govern all conflicting information between the two documents.
For Research Use Only. This instrument or accessory is not a medical device and is not intended to be used for the prevention, diagnosis, treatment or cure of disease.
WARNING Avoid an explosion or fire hazard. This instrument or accessory is not designed for use in an explosive atmosphere.

C
Contents
Chapter 1 GENESYS Spectrophotometers. . . . . . . . . . . . . . . . . . . . . . . . . . . . . . . . . . . . . . . . . . .1
Considerations . . . . . . . . . . . . . . . . . . . . . . . . . . . . . . . . . . . . . . . . . . . . . . . . . . 2 Site Preparation and Safety . . . . . . . . . . . . . . . . . . . . . . . . . . . . . . . . . . . . . . . . . 2 Operating Precautions. . . . . . . . . . . . . . . . . . . . . . . . . . . . . . . . . . . . . . . . . . . . . 2 Spectrophotometer Basics - GENESYS 40 and GENESYS 50. . . . . . . . . . . . . . . 3 Sample Compartment - GENESYS 40 and GENESYS 50 . . . . . . . . . . . . . . . 3 Single Cell Holder - GENESYS 40 and GENESYS 50 . . . . . . . . . . . . . . . . . . 4 Optional Sample Holders - GENESYS 40 and 50 . . . . . . . . . . . . . . . . . . . . . . 5 Cell Holder Replacement - GENESYS 40 and 50 . . . . . . . . . . . . . . . . . . . . . . 6
Spectrophotometer Basics - GENESYS 140, GENESYS 150, GENESYS 180
and BioMate 160. . . . . . . . . . . . . . . . . . . . . . . . . . . . . . . . . . . . . . . . . . . . . . . 6 Sample Compartment - GENESYS 140, GENESYS 150, GENESYS 180
& BioMate 160 . . . . . . . . . . . . . . . . . . . . . . . . . . . . . . . . . . . . . . . . . . . . . . 6 Single Cell Holder - GENESYS 140, GENESYS 150, GENESYS 180 &
BioMate 160 . . . . . . . . . . . . . . . . . . . . . . . . . . . . . . . . . . . . . . . . . . . . . . . . 8 Optional Single Sample Holders - GENESYS 140, GENESYS 150,
GENESYS 180 and BioMate 160 . . . . . . . . . . . . . . . . . . . . . . . . . . . . . . . . 9 Disposable 50 mL Microcell Holder – GENESYS 140, GENESYS 150,
GENESYS 180 and BioMate 160 . . . . . . . . . . . . . . . . . . . . . . . . . . . . . . . 10 Beckman Cell Holder – GENESYS 140, GENESYS 150,
GENESYS 180 and BioMate 160 . . . . . . . . . . . . . . . . . . . . . . . . . . . . . . . 10 Peltier Thermostatted Single Cell Holder – GENESYS 140,
GENESYS 150, GENESYS 180 and BioMate 160 . . . . . . . . . . . . . . . . . . 11 Sipper Accessory - GENESYS 140, GENESYS 150, GENESYS 180
and BioMate 160 . . . . . . . . . . . . . . . . . . . . . . . . . . . . . . . . . . . . . . . . . . . . 14 Fiber Optic Coupler and Probe (UV Vis systems only) . . . . . . . . . . . . . . . . . 21 Spectrophotometer Basics – All Models. . . . . . . . . . . . . . . . . . . . . . . . . . . . . . . 25 Halogen Lamp. . . . . . . . . . . . . . . . . . . . . . . . . . . . . . . . . . . . . . . . . . . . . . . . 29 Lid Removal and Replacement . . . . . . . . . . . . . . . . . . . . . . . . . . . . . . . . . . . 31
Chapter 2 GENESYS On-board Software. . . . . . . . . . . . . . . . . . . . . . . . . . . . . . . . . . . . . . . . . . .33
GENESYS On-board Software Home Screen and Navigation. . . . . . . . . . . . 33
Getting Started . . . . . . . . . . . . . . . . . . . . . . . . . . . . . . . . . . . . . . . . . . . . . . . . . 34
Thermo Scientific |
GENEYS Family Spectrophotometers |
i |
Contents
Viewing Saved Experiment Data . . . . . . . . . . . . . . . . . . . . . . . . . . . . . . . . . . . . 35
Application Home. . . . . . . . . . . . . . . . . . . . . . . . . . . . . . . . . . . . . . . . . . . . . 35
Creating A New Method . . . . . . . . . . . . . . . . . . . . . . . . . . . . . . . . . . . . . . . . 37
Experiment Execution . . . . . . . . . . . . . . . . . . . . . . . . . . . . . . . . . . . . . . . . . . 38
Data Analysis and Actions . . . . . . . . . . . . . . . . . . . . . . . . . . . . . . . . . . . . . . . 40
Live Display Application . . . . . . . . . . . . . . . . . . . . . . . . . . . . . . . . . . . . . . . . . . 42
Fixed Application . . . . . . . . . . . . . . . . . . . . . . . . . . . . . . . . . . . . . . . . . . . . . . . 43
Scan Application . . . . . . . . . . . . . . . . . . . . . . . . . . . . . . . . . . . . . . . . . . . . . . . . 45
Quant Application. . . . . . . . . . . . . . . . . . . . . . . . . . . . . . . . . . . . . . . . . . . . . . . 47
Calibrated and Uncalibrated Quant Methods . . . . . . . . . . . . . . . . . . . . . . . . 47
Cell Changer Setup in Quant . . . . . . . . . . . . . . . . . . . . . . . . . . . . . . . . . . . . 49
C-Mode. . . . . . . . . . . . . . . . . . . . . . . . . . . . . . . . . . . . . . . . . . . . . . . . . . . . . . . 50
Kinetics Application . . . . . . . . . . . . . . . . . . . . . . . . . . . . . . . . . . . . . . . . . . . . . 51
Importing Methods . . . . . . . . . . . . . . . . . . . . . . . . . . . . . . . . . . . . . . . . . . . . . . 53
Exporting Data and Methods . . . . . . . . . . . . . . . . . . . . . . . . . . . . . . . . . . . . . . 54
Performance Verification Tests and Reports . . . . . . . . . . . . . . . . . . . . . . . . . . . 54
Running Performance Verification Tests . . . . . . . . . . . . . . . . . . . . . . . . . . . . 54
Customized Performance Verification Tests . . . . . . . . . . . . . . . . . . . . . . . . . 54
Customizing Stray Light Test . . . . . . . . . . . . . . . . . . . . . . . . . . . . . . . . . . . . 58
Customizing Wavelength Accuracy Test . . . . . . . . . . . . . . . . . . . . . . . . . . . . 60
Customizing Photometric Accuracy Test. . . . . . . . . . . . . . . . . . . . . . . . . . . . 61
Accessory Setup . . . . . . . . . . . . . . . . . . . . . . . . . . . . . . . . . . . . . . . . . . . . . . . . . 62
Cell Changer Configuration . . . . . . . . . . . . . . . . . . . . . . . . . . . . . . . . . . . . . 62
Sipper Configuration. . . . . . . . . . . . . . . . . . . . . . . . . . . . . . . . . . . . . . . . . . . 63
Measurements . . . . . . . . . . . . . . . . . . . . . . . . . . . . . . . . . . . . . . . . . . . . . . . . 64
Calibrated Sipper. . . . . . . . . . . . . . . . . . . . . . . . . . . . . . . . . . . . . . . . . . . . . . 66
Calibrating the Sipper . . . . . . . . . . . . . . . . . . . . . . . . . . . . . . . . . . . . . . . . . . 68
Custom Workflows . . . . . . . . . . . . . . . . . . . . . . . . . . . . . . . . . . . . . . . . . . . . 68
Peltier Configuration. . . . . . . . . . . . . . . . . . . . . . . . . . . . . . . . . . . . . . . . . . . 69
Accessory Configuration in Scan . . . . . . . . . . . . . . . . . . . . . . . . . . . . . . . . . . 71
SmartStart . . . . . . . . . . . . . . . . . . . . . . . . . . . . . . . . . . . . . . . . . . . . . . . . . . . . . 75
Configuring and Switching to SmartStart Mode . . . . . . . . . . . . . . . . . . . . . . 75
Exiting SmartStart Mode. . . . . . . . . . . . . . . . . . . . . . . . . . . . . . . . . . . . . . . . 76
Connecting to VISIONlite . . . . . . . . . . . . . . . . . . . . . . . . . . . . . . . . . . . . . . . . 77
Enable the VISIONlite Mode . . . . . . . . . . . . . . . . . . . . . . . . . . . . . . . . . . . . 77
Printer Setup and Wi-Fi Printing . . . . . . . . . . . . . . . . . . . . . . . . . . . . . . . . . . . 79
Setting Up USB Printer. . . . . . . . . . . . . . . . . . . . . . . . . . . . . . . . . . . . . . . . . 79
Setting Up Thermal Printer. . . . . . . . . . . . . . . . . . . . . . . . . . . . . . . . . . . . . . 83
Configuring Network Paths. . . . . . . . . . . . . . . . . . . . . . . . . . . . . . . . . . . . . . . . 84
Settings . . . . . . . . . . . . . . . . . . . . . . . . . . . . . . . . . . . . . . . . . . . . . . . . . . . . . . . 84
ii |
GENEYS Family Spectrophotometers |
Thermo Scientific |
Contents
Chapter 4 BioMate 160 Applications . . . . . . . . . . . . . . . . . . . . . . . . . . . . . . . . . . . . . . . . . . . . . .87
OD600 . . . . . . . . . . . . . . . . . . . . . . . . . . . . . . . . . . . . . . . . . . . . . . . . . . . . . 87
dsDNA . . . . . . . . . . . . . . . . . . . . . . . . . . . . . . . . . . . . . . . . . . . . . . . . . . . . . 88
RNA . . . . . . . . . . . . . . . . . . . . . . . . . . . . . . . . . . . . . . . . . . . . . . . . . . . . . . . 89
Protein BCA . . . . . . . . . . . . . . . . . . . . . . . . . . . . . . . . . . . . . . . . . . . . . . . . . 89
Protein Bradford . . . . . . . . . . . . . . . . . . . . . . . . . . . . . . . . . . . . . . . . . . . . . . 90
Protein Lowry . . . . . . . . . . . . . . . . . . . . . . . . . . . . . . . . . . . . . . . . . . . . . . . . 91
Protein Pierce 660 . . . . . . . . . . . . . . . . . . . . . . . . . . . . . . . . . . . . . . . . . . . . . 92
Protein Rapid Gold BCA. . . . . . . . . . . . . . . . . . . . . . . . . . . . . . . . . . . . . . . . 93
Thermo Scientific |
GENEYS Family Spectrophotometers |
iii |
Contents
iv |
GENEYS Family Spectrophotometers |
Thermo Scientific |

1
GENESYS Spectrophotometers
This user guide applies to the following spectrophotometers:
•Intermediate capability models – the Thermo Scientific™ GENESYS™ 50 platform – with sample compartments configured for single samples only:
–GENESYS™ 40 Vis
–GENESYS 50 UV-Vis
•Advanced capability models – the GENESYS™ 150 platform – with sample compartments configured for:
–single samples
–multi-cell changer option
–Peltier thermostatted cell holder option
–fiber optic probe option
•GENESYS™ 140 Vis
•GENESYS 150 UV-Vis
•GENESYS™ 180 UV-Vis
•BioMate™ 160
Note There is also a GENESYS™ 30 Vis that shares the sample compartment configuration of the GENESYS 50 platform but offers a user experience with a tactile rubber keypad, high resolution non-touch color 5-inch screen and simplified software. The GENESYS 30 has a separate dedicated user guide
Thermo Scientific |
GENEYS Family Spectrophotometers |
1 |

1 GENESYS Spectrophotometers
Considerations
Considerations
This document uses the following conditions:
DANGER Indicates a hazardous situation which, if not avoided, will result in death or serious injury.
WARNING Indicates a hazardous situation which, if not avoided, could result in death or serious injury.
CAUTION Indicates a hazardous situation which, if not avoided, could result in minor or moderate injury.
NOTICE Follow instructions with this label to avoid damaging the system hardware or losing data.
Note Contains helpful supplementary information.
Site Preparation and Safety
Before using the system, read the site preparation and safety manual on the documentation media provided. Always follow the safety precautions in that manual and in this document when using the system.
Operating Precautions
WARNING Do not operate this system without following the safety precautions described in this manual and the documentation that came with your system.
The spectrophotometer contains precise optical components. Handle it carefully and follow these precautions.
•Do not allow moisture to leak into the instrument interior
•Wipe off spilled chemicals immediately
•Do not drop the instrument
•Protect the instrument from mechanical shock
•Protect the instrument from dust
2 |
GENEYS Family Spectrophotometers |
Thermo Scientific |

1 GENESYS Spectrophotometers
Spectrophotometer Basics - GENESYS 40 and GENESYS 50
Spectrophotometer Basics - GENESYS 40 and GENESYS 50
Remove all tape from the exterior of the instrument and inside the sample compartment.
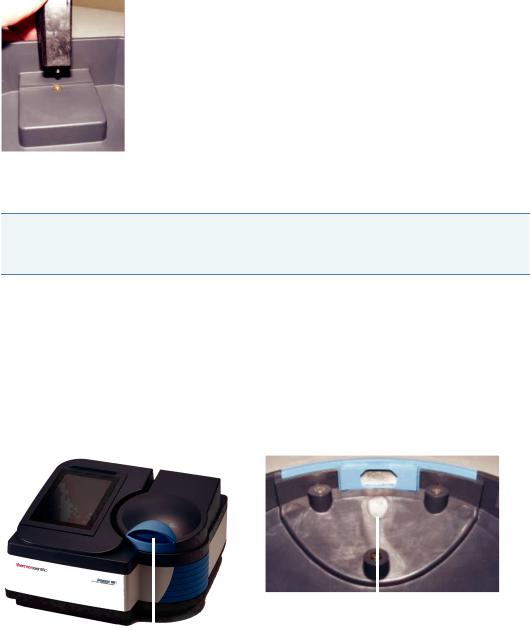
Sample Compartment - GENESYS 40 and GENESYS 50
Closure magnet
Lift here
High durability constant torque hinges hold the lid at any angle
Magnet at front holds lid closed to exclude light when door is lowered
Monochromator |
|
window |
|
Detector lens |
|
|
Tray alignment |
Light beam path |
posts |
Drain
Window and lens protect interior optics from spills and vapors.
Sample holder tray aligns to posts on baseplate.
Excess spills drain to benchtop.
Thermo Scientific |
GENEYS Family Spectrophotometers |
3 |

1 GENESYS Spectrophotometers
Spectrophotometer Basics - GENESYS 40 and GENESYS 50
Single Cell Holder - GENESYS 40 and GENESYS 50
Locater pin
Magnets
|
|
|
|
Standard 10 mm cuvette holder |
Underside of a single cell holder |
||
Tray features
•Able to contain spills up to 150 mL
•Can be removed by pulling up on the cell holder
•Can be washed in the sink or a dishwasher - dry promptly!
NOTICE
•Clean the tray with water and mild detergent. Ethanol and iso-propyl alcohol can be used if necessary but do not soak the tray in alcohols.
•Do not allow acetone, chlorocarbons or other aggressive organic solvents to contact the tray. The PC-ABS plastic will soften and discolor.
Removal – grasp cell holder and lift up and forward
Insertion – allow front magnet to engage. Lower cell holder into place, allowing back magnet to guide and engage
4 |
GENEYS Family Spectrophotometers |
Thermo Scientific |
1 GENESYS Spectrophotometers
Spectrophotometer Basics - GENESYS 40 and GENESYS 50
Optional Sample Holders - GENESYS 40 and 50
Cell holder trays equipped to position other kinds of cells and samples are available. They insert and remove in the same way as the standard cell holder.
Test tube holder
Tall test tube adapter
Long path rectangular cell holder
Long path cylindrical cell holder
Filter holder
Accessory kit for hose entry/exit
Thermo Scientific |
GENEYS Family Spectrophotometers |
5 |
1 GENESYS Spectrophotometers
Spectrophotometer Basics - GENESYS 140, GENESYS 150, GENESYS 180 and BioMate 160
Cell Holder Replacement - GENESYS 40 and 50
Thermostatted cell holder and Adjustable filter holder accessories are supplied without a tray.
Loosen the captive screw at the base of the cell holder to remove it. Attach the new sample holder in the same way.
Note The Accessory Kit for Hose Entry/Exit is required to support use of the thermostatted cell holder. See Lid Removal and Replacement for additional installation instructions.
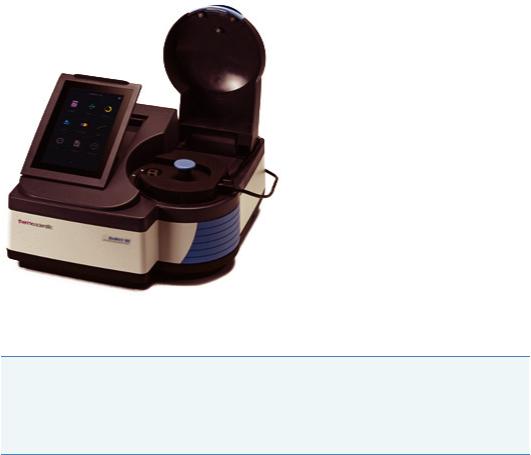
Spectrophotometer Basics - GENESYS 140, GENESYS 150,
GENESYS 180 and BioMate 160
Remove all tape from the exterior of the instrument and inside the sample compartment.
Sample Compartment - GENESYS 140, GENESYS 150, GENESYS 180 & BioMate 160
|
|
|
|
|
|
|
|
|
|
Lid hold-down |
|
|
|
magnet |
|
Lift here to open |
|
|
|
High durability constant torque hinges hold |
Magnet at front holds lid closed to exclude |
||
the lid at any angle |
light when door is lowered |
||
6 |
GENEYS Family Spectrophotometers |
Thermo Scientific |
1 GENESYS Spectrophotometers
Spectrophotometer Basics - GENESYS 140, GENESYS 150, GENESYS 180 and BioMate 160
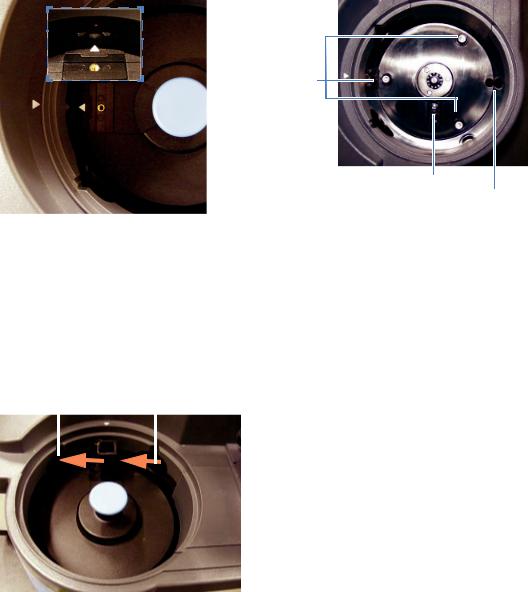
Alignment posts
Opto-sensor
Drain
Align arrow on sample holder base with arrow on sample compartment and groove on sample compartment wall.
Window and lens protect interior optics from spills and vapors.
Sample holder aligns to posts on baseplate and groove.
Excess spills drain to benchtop. Opto-sensor is used for positioning cell changer.
Detector lens |
Monochromator |
||
|
|
window |
|
|
|
|
|
|
|
|
|
Thermo Scientific |
GENEYS Family Spectrophotometers |
7 |
1 GENESYS Spectrophotometers
Spectrophotometer Basics - GENESYS 140, GENESYS 150, GENESYS 180 and BioMate 160
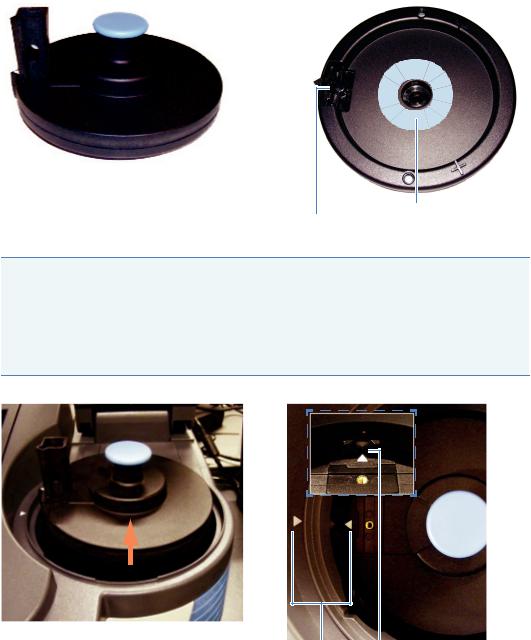
Single Cell Holder - GENESYS 140, GENESYS 150, GENESYS 180 & BioMate 160
Standard 10 mm cuvette holder
Ring magnet
Locater pin
NOTICE
•Clean cell holders by wiping with a solution of mild detergent. Ethanol and isopropyl alcohol can be used if necessary but do not submerge the cell holder in liquid.
•Do not allow acetone, chlorocarbons or other aggressive organic solvents to contact the cell holder or base. The PC-ABS plastic will soften and discolor.
Removal—grasp blue knob and lift straight up
Insertion—align arrow on left side of sample compartment with arrow on sample holder accessory. Lower cell holder into place.
Magnet holds accessory down. Pin under accessory base aligns cell holder in beam and prevents rotation.
8 |
GENEYS Family Spectrophotometers |
Thermo Scientific |
1 GENESYS Spectrophotometers
Spectrophotometer Basics - GENESYS 140, GENESYS 150, GENESYS 180 and BioMate 160
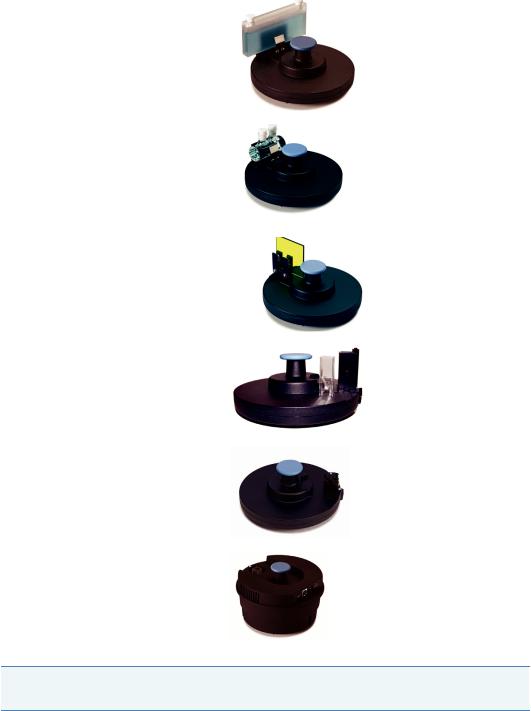
Optional Single Sample Holders - GENESYS 140, GENESYS 150, GENESYS 180 and BioMate 160
Cell holder trays equipped to position other kinds of cells and samples are available. They insert and remove in the same way as the standard cell holder.
Long path rectangular cell holder
Long path cylindrical cell holder
Filter holder
Disposable 50 μL Microcell Holder
Beckman cell holder
Peltier Thermostatted cell holder
Note Water thermostatted cell holders are not supported on this platform. See the Peltier
Thermostatted Cell Holder accessory.
Thermo Scientific |
GENEYS Family Spectrophotometers |
9 |
1 GENESYS Spectrophotometers
Spectrophotometer Basics - GENESYS 140, GENESYS 150, GENESYS 180 and BioMate 160
Disposable 50 mL Microcell Holder – GENESYS 140, GENESYS 150, GENESYS 180 and BioMate 160
Disposable plastic microcells with 50 μL chambers located at a Z-height of 8.5 mm and centered on the cell are supported by this accessory. At time of writing of this user guide, the Eppendorf™ UVette™ is the only brand supported, but see the insert with the accessory for updates. Cuvettes made by BrandTech™ are not supported because of poor manufacturing reproducibility in these cells.
Note Plastic microcells are not as transparent as quartz, especially at very short wavelengths. The combination of absorption by the cell and masking of the spectrophotometer beam required to restrict it to the 2.5 mm tall cell window reduces the energy passing through these cells. Photometric performance will be lower with these cells than with full size quartz cells.
Beckman Cell Holder – GENESYS 140, GENESYS 150, GENESYS 180 and BioMate 160
Beckman™ pioneered the use of a special type of microcell with volumes of 100 μL or less. These very short cells require a special holder to accommodate them at the appropriate Z-height for the cell and to mask off part of the spectrophotometer beam to ensure that light only passes though the sample, and not over it.
10 |
GENEYS Family Spectrophotometers |
Thermo Scientific |
1 GENESYS Spectrophotometers
Spectrophotometer Basics - GENESYS 140, GENESYS 150, GENESYS 180 and BioMate 160
Peltier Thermostatted Single Cell Holder – GENESYS 140, GENESYS 150, GENESYS 180 and BioMate 160
The accessory holds a single cell at a temperature between 20° and 60 °C with a precision of ≤0.2 °C and an absolute accuracy of ±0.5 °C.
Note The specification for absolute accuracy is limited by the accuracy of the thermocouple used in construction of the device. ±0.3° C is the specification of a superior quality thermocouple. Beyond this specification the cost of the thermocouple becomes exponentially higher and use of a calibrated thermocouple becomes a necessity if exceptionally high accuracy is a requirement.
In our tests, using a calibrated thermocouple probe, we generally find the temperature of the solution in the cuvette to fall within ±0.3 °C of the programmed absolute temperature.
The temperature measured and reported by the device is the temperature of the metal cell-holder block. The temperature of stirred liquid in a full size quartz cell will reach the same temperature as the cell holder block after approximately 6 minutes when heating from 23 °C to 35 °C. This is only a guide. Performance will vary if:
•The initial temperature is different
•The final temperature is below room temperature
•The cuvette is not stirred
•The cuvette is not made of glass or quartz
•The cuvette is a micro-cuvette
Thermo Scientific |
GENEYS Family Spectrophotometers |
11 |

1 GENESYS Spectrophotometers
Spectrophotometer Basics - GENESYS 140, GENESYS 150, GENESYS 180 and BioMate 160
The experimental parameters for controlling the Peltier thermostatted cell holder include an equilibration time. This is a “wait time” between when the cell holder block reaches the target temperature and when the absorbance measurement is made. We strongly recommend that you place the probe of a digital thermometer or thermocouple of sufficient accuracy and precision in the liquid in a cell under what will be normal experimental conditions, and bring a quantity of appropriate matrix (solvent or buffer) to temperature in the cell holder while monitoring the temperature to determine performance under your experimental conditions. A white paper describing important considerations and limitations in thermostatting experiments is included with this documentation set. Refer to Introduction to Temperature Control for additional details.
In brief, however:
•Quartz conducts heat six times faster than plastic – samples in quartz cells come to temperature much faster than they do in plastic cells.
•A full size cell takes approximately 66% more time to reach equilibrium temperature if it is not stirred.
•Liquid in unstirred plastic cells did not heat to within 0.6 °C of the cell holder block temperature when heating in our experiments.
•Plastic microcells and semi-microcells have significantly reduced surface contact with the walls of the cell holder block compared to full size plastic cells or glass/quartz reduced volume cells. If using a reduced volume plastic cell it is essential that you perform some experiments to determine the appropriate equilibration time setting.
Installing the Accessory
Align white arrows as shown.
12 |
|
|
|
|
|
|
|
|
|
|
|
|
|
|
|
|
|
|
|
|
|
|
|
|
|
|
|
|
|
|
|
|
|
|
|
|
|
|
|
|
|
|
|
|
|
|
|
|
|
|
|
|
|
|
|
|
|
|
|
|
|
|
|
|
|
|
|
|
|
|
|
|
|
|
|
GENEYS Family Spectrophotometers |
|
|
|
|
|
|
|
|
|
|
|
|
|
|
|
Thermo Scientific |
||
|
|
|
|
|
|
|
|
|
|
|
|
|
|
|
||||
|
|
|
|
|
|
|
|
|
|
|
|
|
|
|
||||
|
|
|
|
|
|
|
|
|
|
|
|
|
|
|
||||
|
|
|
|
|
|
|
|
|
|
|
|
|
|
|
||||
|
|
|
|
|
|
|
|
|
|
|
|
|
|
|
||||

1 GENESYS Spectrophotometers
Spectrophotometer Basics - GENESYS 140, GENESYS 150, GENESYS 180 and BioMate 160
Lower the cell holder into the sample compartment so that the V engages with the groove on the side of the sample compartment and the hold-down magnet engages
Connect cables as shown.
•The power supply is identical to the instrument power supply
•Operate this accessory with the sample compartment lid open
•Do not close the sample compartment lid while the accessory is running
•Optional – the sample compartment lid can be removed while using this accessory
See “Peltier Configuration” on page 69 of this guide for instructions on configuring your method to use this accessory.
Thermo Scientific |
GENEYS Family Spectrophotometers |
13 |
1 GENESYS Spectrophotometers
Spectrophotometer Basics - GENESYS 140, GENESYS 150, GENESYS 180 and BioMate 160
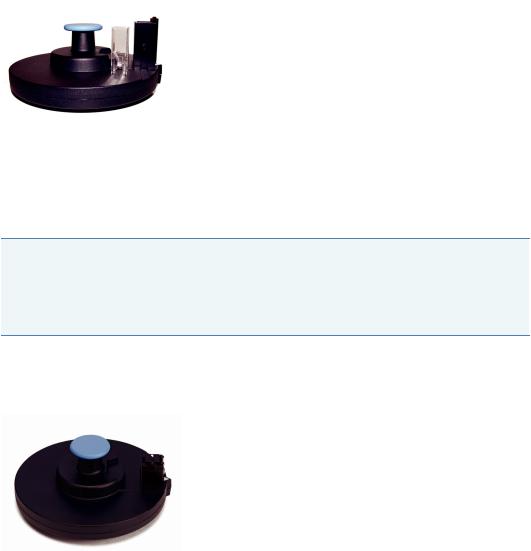
Sipper Accessory - GENESYS 140, GENESYS 150, GENESYS 180 and BioMate 160
Introduction to Sipper Use
A detailed introduction to sippers and how they can be used to get the best results in different situations is provided in a separate document (English language only) included in the documentation media with this user guide.
Components of the Sipper System
Complete sipper systems come with the following components
Item |
Photograph |
|
|
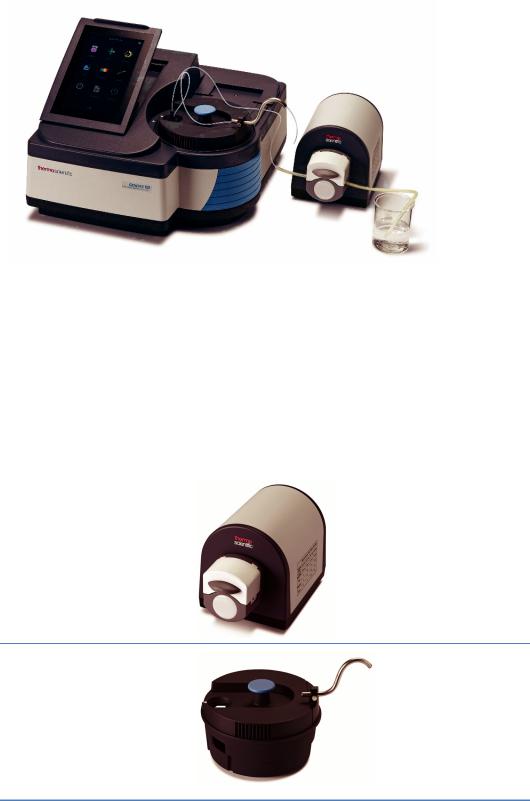
Sipper pump
Sample compartment insert with gooseneck
14 |
GENEYS Family Spectrophotometers |
Thermo Scientific |
1 GENESYS Spectrophotometers
Spectrophotometer Basics - GENESYS 140, GENESYS 150, GENESYS 180 and BioMate 160
Item |
Photograph |
|
|
30 cm Silicone pump tubing (#16 size – 1.6 mm wall, 1.6 mm inside diameter)
3 m PTFE transfer tubing
1 Flow cell, 160 µL volume with screw connector set
Smaller volume flow cells are available but the smaller window size cuts off some of the spectrophotometer beam, reducing photometric performance. If the absorbance values measured are below 1.0, however, this will not make a noticeable impact on data quality.
Connector package
The connectors supplied are designed for use with the # 16 tubing supplied. They can also be used with smaller # 14 tubing with extra effort. To use larger # 25 tubing please purchase a larger connector separately.
Thermo Scientific |
GENEYS Family Spectrophotometers |
15 |
1 GENESYS Spectrophotometers
Spectrophotometer Basics - GENESYS 140, GENESYS 150, GENESYS 180 and BioMate 160
Compatibility of the GENESYS Sipper with tubing sold by us for use with spectrophotometer sippers.
Material / Size |
# 13 |
# 14 |
# 16 |
# 25 |
|
|
|
|
|
Silicone
C-Flex
Viton
ChemDurance Bioa
aChemdurance Bio tubing is suitable for use with the Smart Sipper for Evolution spectrophotometers
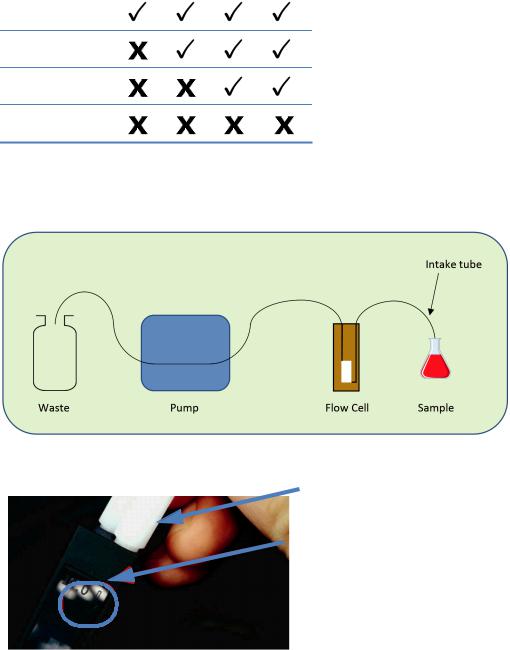
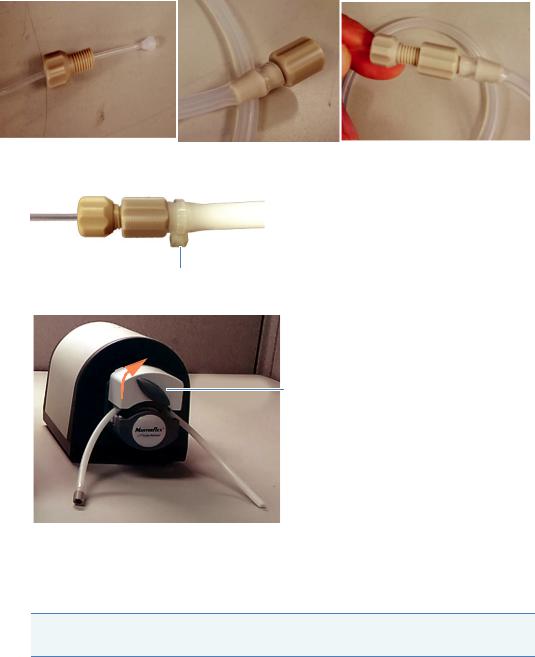
Connecting the Sipper Tubing
1. Connect screw connectors to flow cell.
Attach long connector to inlet
Inlet marker
16 |
GENEYS Family Spectrophotometers |
Thermo Scientific |
1 GENESYS Spectrophotometers
Spectrophotometer Basics - GENESYS 140, GENESYS 150, GENESYS 180 and BioMate 160
2. Attach the gooseneck tube.
3.Lower the cell holder into the sample compartment so that the V engages with the groove on the side of the sample compartment and the hold-down magnet engages.
4. Position sipper pump and connect cables.
Note The power supply for the pump is identical to the power supply for the spectrophotometer. There is no risk or danger to connecting “the wrong one”.
Thermo Scientific |
GENEYS Family Spectrophotometers |
17 |

1 GENESYS Spectrophotometers
Spectrophotometer Basics - GENESYS 140, GENESYS 150, GENESYS 180 and BioMate 160
5.Decide where the waste container will be placed.
•If very close to the pump, run the pump tubing directly to the waste container.
6.If farther, run (less expensive) PTFE transfer tubing from the pump-head tubing to the waste container.
Pump head connection taking silicone tubing to waste
7.Determine the length of pump tubing required for your configuration. Minimum recommended length of pump tubing is 10 cm.
8.Cut a suitable length of pump head tubing and lay it on the bench in front of the pump.
9.Place the flow cell in the cell holder with the windows in the beam (facing to the front and back).
18 |
GENEYS Family Spectrophotometers |
Thermo Scientific |
1 GENESYS Spectrophotometers
Spectrophotometer Basics - GENESYS 140, GENESYS 150, GENESYS 180 and BioMate 160
10.Route the PTFE cell connector tubing from the inlet (long connector) through the gooseneck.
Refer to separate Introduction to Sipper Use for detailed information.
11.Route the PTFE cell connector tubing from the outlet (short connector) to the pump.
12.Trim all cell connector tubing to an appropriate length for your use scenario.
13.Attach the pump-head tubing to the PTFE tubing using the couplers.
Secure the connections with zip-ties if using high pump speeds or tubing larger than the size supplied.
Zip tie
14. Install the pump-head tubing into the pump head as shown.
Turn right to tighten
15.Test the system for leaks.
Use the table on the pump to choose a pump speed suitable to the volume that you wish to pump in your procedure.
Note Accuracy of the volume delivered decreases as pumping speed and tubing size increase.
Thermo Scientific |
GENEYS Family Spectrophotometers |
19 |
1 GENESYS Spectrophotometers
Spectrophotometer Basics - GENESYS 140, GENESYS 150, GENESYS 180 and BioMate 160
Program a custom sequence to sip at the chosen speed for 60 seconds, or longer if necessary. Place the inlet tube in a beaker of clean solvent and pump for long enough to completely fill the system with solvent and deliver it to the waste container.
Repeat the sip sequence while observing the PTFE tubing between the flow cell and the pump. There should be no bubbles in the tubing. If there are, check the tubing connections to the flow cell.
Remove the flow cell from the cell holder and check it for solvent leaks.
Check the connections between the PTFE tubing and the pump-head tubing for solvent leaks.
16.Follow the process to calibrate the sipper.
Failure to deliver a consistent volume can be an indicator of an air leak at the connection between the cell outlet tubing and the pump-head tubing.
Controlling the Sipper from Software
Two sipper control modes:
1.Uncalibrated – Define pump time at all stages.
2.Calibrated – Define pump volume at each pumping stage.
Sipper parameters are stored in the experimental method. Sipper control is supported only in Quant, Fixed and Scan modes.
See “Sipper Configuration” on page 63 for instructions on programming the sipper.
Sipper setup controls
Selection |
Definition |
|
|
Sip |
Pump in the forward direction |
|
(from the inlet tube towards the |
|
flow cell and pump) |
|
|
Settle |
Time to wait for the liquid to stop |
|
moving before making a |
|
measurement |
|
|
Air gap |
Pump air in the forward direction |
|
to push liquid through the system |
|
|
Rinse |
Pump rinse solution in the forward |
|
direction |
|
|
Return |
Pump in the reverse direction (from |
|
the pump and flow cell towards the |
|
inlet tube) |
|
|
20 |
GENEYS Family Spectrophotometers |
Thermo Scientific |
1 GENESYS Spectrophotometers
Spectrophotometer Basics - GENESYS 140, GENESYS 150, GENESYS 180 and BioMate 160
Selection |
Definition |
|
|
Measure |
Record the absorbance |
|
|
Prompt |
Display an on-screen prompt to tell |
|
the user what to place at inlet tube |
|
for the next step in the sequence |
|
|
Uncalibrated vs. calibrated sipper operation
Customers whose existing SOPs are based on a prior sipper system that did not support calibration for volume pumped can continue to use time-based pumping in uncalibrated methods.
In general, calibrating the system for volume delivered is the preferred method. Once calibrated, the system will pump the specified volume at each step.
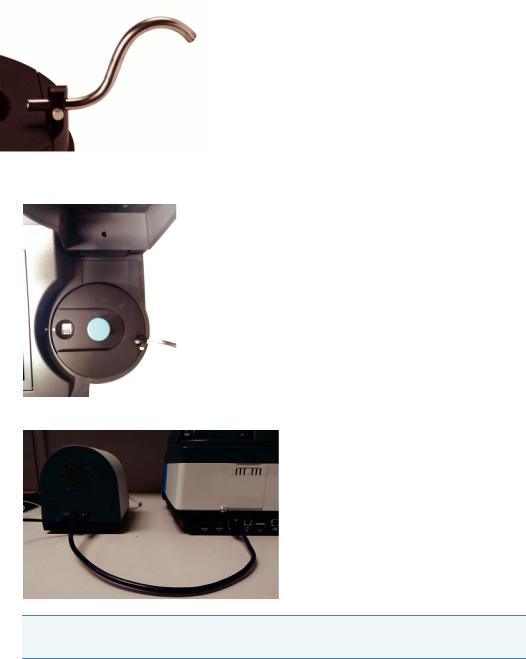
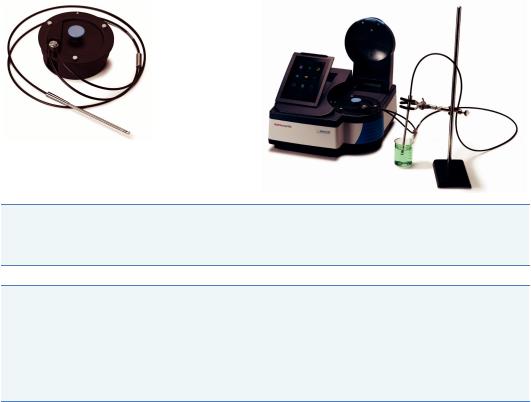
Fiber Optic Coupler and Probe (UV Vis systems only)
NOTICE Fiber optic cables can suffer damage when bent with too small a radius. A small radius can also lead to light loss and reduction of performance even if it does not lead to physical damage. The recommended minimum bend radius when working is 20cm.
Note The fiber optic probes that we supply are equipped with a shorter than normal collar at the SMA connector. This helps to maximize the bend radius of the input fiber. Probes purchased from other vendors will generally have a 25 mm long collar at the SMA connector. This will make them difficult to install and may result in an unacceptably small bend radius to the fiber as it exits the collar. If you wish to use a third-party probe, we recommend that you specify a 13 mm collar.
Assembly
Assemble the fibers to the coupler as shown in the photograph.
1. Loosen the three thumb screws on the top cover and remove it from the coupler.
Thermo Scientific |
GENEYS Family Spectrophotometers |
21 |

1 GENESYS Spectrophotometers
Spectrophotometer Basics - GENESYS 140, GENESYS 150, GENESYS 180 and BioMate 160
2.Remove the protective plastic covers from the ends of the fibers. Save these covers and re-attach them if you remove the probe.
3.Slide the tips of the SMA connector into the receivers and tighten the nuts hand tight. Do not use tools to tighten the nuts further.
4.Loosen the hold-down thumb-screw, place the fibers under it, and tighten it down to hold the fibers in place.
Do not over-tighten. Be sure to route the cables as shown in the photograph above. This routing pattern maximizes the bend radius.
Note The routing distance for the input and output fibers is slightly different so there will be a small excess loop between the junction nut and the coupler. This is normal and correct.
5.Re-attach the top cover to the coupler.
6.Remove the black rubber cover from the pick-up lens. Be careful not to touch the lens with your fingers.
7.Lower the coupler into the sample compartment with the white arrows aligned.
8.Ensure that the probe tip is tight. It screws on and off in the expected way.
22 |
GENEYS Family Spectrophotometers |
Thermo Scientific |
1 GENESYS Spectrophotometers
Spectrophotometer Basics - GENESYS 140, GENESYS 150, GENESYS 180 and BioMate 160
Operation
The recommended operation wavelength range is from 220 nm to 1100 nm. Although the fibers are solarization resistant they can suffer cumulative damage (they become opaque) when used at very short wavelengths. Damage to the fibers due to solarization is not covered under warranty.
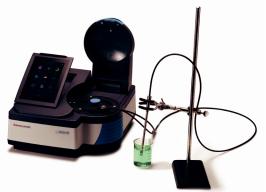
Two configurations are recommended:
1.Place the probe in a clamp and bring the container with the solution up to it.
2.Hold the probe in your hand and place it into the container with the solution.
Configuration 1
Measure the blank solution first and then measure the sample(s) – exactly as you would if you were making measurements with cuvettes.
It is VERY important to avoid having an air bubble in the tip when making a measurement. Air bubbles will result in completely incorrect measurement values. Tap the probe with your finger to knock air bubbles out if using configuration 1. “Shake” the probe back and forth quickly and/or tap it with your finger to knock air bubbles loose if using configuration 2. Do not tap the probe on the side of the container. This could damage the tip or the container.
Probe Tips with Different Pathlengths
While tips with other pathlengths can be purchased for the dip probe we do not recommend their use with the GENESYS systems and have not tested other configurations. Longer pathlengths typically lead to greater light-loss in the tip, reducing photometric range. Shorter pathlengths are more prone to trapping air bubbles in the tip and it is more difficult to shake them loose.
Performance
Fiber optic couplers and probes “cost” light in a spectrophotometer system. Having less light intensity in the system means not being able to deliver the same photometric performance with the fiber probe system that the instrument can deliver with cuvettes in a dark sample compartment. Do not perform the performance verification tests when using the fiber optic probe system.
Thermo Scientific |
GENEYS Family Spectrophotometers |
23 |

1 GENESYS Spectrophotometers
Spectrophotometer Basics - GENESYS 140, GENESYS 150, GENESYS 180 and BioMate 160
As a guide, in our tests, we found the system to very resistant to room lighting conditions and to deliver good linearity to approx. 1.8A and an upper limit of measurement of 2.2A. If performing quantitative analysis with this accessory and measuring above 1A we recommend that users choose a quadratic (second order) fit for the curve and work in an operational range below 1.8A.
Troubleshooting
Problem |
Cause |
Solution |
|
|
|
Readings are unexpectedly high or low with no consistency to the error
Air bubbles in the tip during sample measurement
Inspect the gap in the tip prior to making a measurement. Take steps to remove any bubbles.
Inconsistent small bend radius |
Use a large bend radius and keep it |
|
consistent |
All readings are “off” by a uniform amount
Air bubble in the tip during blank measurement
Inspect the gap in the tip prior to making the blank measurement. Take steps to remove any bubbles.
Change in photometric performance – |
Bend radius too small |
Configure your experimental setup to |
|
depressed ABS readings or maximum |
|
use a large and consistent bend radius |
|
ABS reading |
|
|
|
Damaged optical fiber |
Follow the recommendations above. |
||
|
|||
|
|
Record a blank and scan from |
|
|
|
1100 nm to 220 nm with deionized |
|
|
|
water. Save the spectrum. The |
|
|
|
spectrum should be essentially flat |
|
|
|
with < ±0.05A baseline noise. Large |
|
|
|
spikes or discontinuities are common |
|
|
|
signs of fiber damage. |
|
|
|
Try using a different probe if you have |
|
|
|
one available. |
|
|
|
Contact Us |
|
|
|
|
|
Probe does not work at all – no signal |
Cover over pick-up lens on coupler |
Remove the lens cover. |
|
|
|
|
|
|
Broken fiber |
Replace the probe. |
|
|
|
|
|
|
Tip loose, damaged or missing |
Remove and inspect the tip. Ensure |
|
|
|
that the mirror is present and clean. |
|
|
|
Attach the tip and re-test the system. |
|
|
|
|
|
|
Coupler not inserted correctly |
Remove and re-insert the coupler |
|
|
|
|
|
|
SMA connector not properly |
Remove and re-attach the SMA |
|
|
secured |
connectors inside the fiber coupler. |
|
|
|
Ensure that the nuts are not cross |
|
|
|
threaded. |
|
|
|
|
24 |
GENEYS Family Spectrophotometers |
Thermo Scientific |
Loading...