

Thermo Scientific NS-FANT12-CH, RC BIOS Quick Setup Manual

50125612-3 dicembre 2010
Thermo Fisher Scientific
RC BIOS
Instruction Manual
IMPORTANT!
Please reference this page for the most up-to-date information on the
following*
• web site addresses
• contact information
• copyright and trademark information
*All subsequent pages in this manual may have incorrect web site addresses and contact information.
©2013 Thermo Fisher Scientific Inc. All rights reserved. Delrin, TEFLON, and Viton are registered
trademarks of DuPont. Noryl is a registered trademark of SABIC. POLYCLEAR is a registered
trademark of Hongye CO., Ltd. Hypaque is a registered trademark of Amersham Health As. RULON A
and Tygon are registered trademarks of Saint-Gobain Performance Plastics. Alconox is a registered
trademark of Alconox. Ficoll is a registered trademark of GE Healthcare. Haemo-Sol is a registered
trademark of Haemo-Sol. Triton X-100 is a registered trademark of Sigma-Aldrich Co. LLC. All other
trademarks are the property of Thermo Fisher Scientific Inc. and its subsidiaries.
Manufacturer
Thermo Fisher Scientific
Robert-Bosch-Straße 1
D - 63505 Langenselbold
Germany
Thermo Fisher Scientific Inc. provides this document to its customers with a product purchase to use
in the product operation. This document is copyright protected and any reproduction of the whole or
any part of this document is strictly prohibited, except with the written authorization of Thermo Fisher
Scientific Inc.
The contents of this document are subject to change without notice. All technical information in this
document is for reference purposes only. System configurations and specifications in this document
supersede all previous information received by the purchaser.
Thermo Fisher Scientific Inc. makes no representations that this document is complete,
accurate or error-free and assumes no responsibility and will not be liable for any errors,
omissions, damage or loss that might result from any use of this document, even if the
information in the document is followed properly.
This document is not part of any sales contract between Thermo Fisher Scientific Inc. and a
purchaser. This document shall in no way govern or modify any Terms and Conditions of Sale, which
Terms and Conditions of Sale shall govern all conflicting information between the two documents
ThermoFisher
SCIENTIFIC
Ko
N
Fo nru
rrÄrsERKLAnu
ruc
(2006
I 421 EG; 2006/95/EG', 20041 108/EG)
DECLARATION
OF
CONFORMITY
(2006
I 421 EC; 2006/95/EC
;
2oo4 I 1
08
t EC)
DECLARATION DE CONFORMITE
(2006
I 42t CE;
2006/95/C E ; 2004 I
1 08
I
CE)
Produkt: Labor-Zentrifuge
Product: Laboratory
centrifuge
Produit: Centrifugeuse de laboratoire
Gerät:
Modet:
Rc12 BP+
Modöte:
Rc Blos
Best.-Nr.:
75007032,
75007033
Cat.-No.:
75007036
,75007097
Röförence:
Dr. Thomas
Reck
Werkleiter
C€
Dieses Produkt
wurde
in
Übereinstimmung
mit den Richtlinien
2006/95/EG
N iederspan nu ng, 2006 I 42lEG Masch
i nen,
20041 108/EG
elektromagnetische
Verträg
lichkeit
(E
M\,f hergestel lt u nd
geprüft.
This
product
is manufactured
and
duly carried out
in
compliance with
directions
2006/95/EC
Low
Voltage,2006142lEC Machinery, 20041108/EC electromagnetic
compatibility
(EMC).
Ce
produit
est fabriqu6
et
testö
selon
les directives
2006/95/CE mat6riel
6lectrique destin6 ä ötre
employ6
dans certaines limites de tension,
2006 I 42 I CE machi nes, 2OO4 I 1
08/CE
I a com
pati
bil it6
6lectroma
g
n6ti
q
ue.
Normen / Standards /
Normes:
EN 61010-1: 2004
I EN
61010-2-020:2006
EN 61 326-1:2006
I EN
5501
18:2007
/ EN 61000-6-2: 2005
Osterode, den 08.09.201 0
Thermo Electron LED GmbH
Werk Osterode
Am
Kalkberg
D-37520 Osterode
atum Jol(ument Revision
"stelll
l8 09 2010 29707033-0 50124625.doc
00
Freioeoeben Abdullah Laaboubr l8 09.201 0
V \HSNOC\KONF
WEEE Conformity
This product is subject to the regulations of the EU Waste Electrical & Electronic Equipment (WEEE)
Directive 2002/96 It is marked by the following symbol:
Thermo Fisher Scientific has entered into agreements with recycling and disposal companies in all EU
Member States for the recycling and disposal of this device. For information on recycling and disposal
companies in Germany and on the products of Thermo Fisher Scientific, which fall under the RoHS
Directive (Restriction of the use of certain hazardous substances in electrical and electronic
equipment), please visit the website www.thermo.com/WEEERoHS

Thermo Scientific RC BIOS i
T
Preface .......................................................................................................................................iii
Scope of Supply ........................................................................................................................iii
Intended Use ............................................................................................................................. iv
Accident Prevention ................................................................................................................ iv
Precautions ............................................................................................................................... iv
Chapter 1 Introduction and Description ...............................................................................................1-1
Characteristics of the RC BIOS ................................................................................1-2
Technical Data .........................................................................................................1-3
Directives, Standards and Guidelines ....................................................................................... 1-4
Functions and Features ............................................................................................................. 1-4
Mains Supply ...........................................................................................................1-5
Rotor Selection .........................................................................................................1-5
Chapter 2 Before use ................................................................................................................................2-1
Before Setting up ......................................................................................................2-2
Location ...................................................................................................................2-2
Installation ...............................................................................................................2-2
Aligning the Centrifuge ............................................................................................2-5
Transporting the Centrifuge .....................................................................................2-5
Mains Connection ....................................................................................................2-5
Other connections ....................................................................................................2-6
Storage .....................................................................................................................2-6
Chapter 3 Control Panel ...........................................................................................................................3-1
CONTROLL PANEL ..............................................................................................3-2
KEYS ........................................................................................................................3-2
RUN DISPLAY .......................................................................................................3-3
PRIMARY FUNCTION KEYS ...............................................................................3-4
SET DISPLAY .........................................................................................................3-7
KEYPAD LOCK ......................................................................................................3-8
Chapter 4 Operation .................................................................................................................................4-1
Switch on Centrifuge ................................................................................................4-2
Lid Opening .............................................................................................................4-2
Close Lid ..................................................................................................................4-2
Rotor Installation .....................................................................................................4-3
Normal Operation ....................................................................................................4-3
Centrifugation ..........................................................................................................4-5
Table of Contents

Contents
ii RC B
IOS Thermo Scientific
Programmed Operation ........................................................................................... 4-6
Using Advanced Features (Options) ......................................................................... 4-8
Temperature Control ............................................................................................. 4-13
Rotor Temperature Equilibration .......................................................................... 4-14
Chapter 5 Customer Control Inspection ..............................................................................................5-1
Speed Controls ........................................................................................................ 5-2
Timer Controls ........................................................................................................ 5-2
Temperature Controls ............................................................................................. 5-3
Chapter 6 Maintenance and Care .........................................................................................................6-1
Cleaning Intervalls ................................................................................................... 6-2
Cleaning .................................................................................................................. 6-2
Disinfection ............................................................................................................. 6-4
Decontamination ..................................................................................................... 6-5
Autoclaving .............................................................................................................. 6-5
Service of Thermo Fisher Scientific .......................................................................... 6-6
Chapter 7 Troubleshooting ....................................................................................................................7-1
Mechanical Emergency Door Release ...................................................................... 7-2
Circuit Breakers ....................................................................................................... 7-3
Failure message ........................................................................................................ 7-3
Chemical Compatibility Chart ..............................................................................A-1
Warranty ...................................................................................................................B-1
Contact Information ................................................................................................C-1
Thermo Scientific RC BIOS iii
P
Preface
Before starting to use the centrifuge, read through this instruction manual carefully and follow the
instructions.
The information contained in this instruction manual is the property of Thermo Fisher Scientific. It is
forbidden to copy or pass on this information without explicit approval.
Failure to follow the instructions and safety information in this instruction manual will result in the
expiration of the sellers warranty.
Scope of Supply
If any parts are missing, please contact your nearest Thermo Fisher Scientific representative.
This symbol refers to general hazards.
CAUTION means that material damage could occur.
WARNING means that injuries or material damage or contamination could occur.
This symbol refers to a rotor failure.
3~
This symbol refers 3 phase alternating current.
Article Number Quantity Check
Centrifuge RC BIOS 1
Power supply cable 1
50105346 Instruction manual 1
70907249 Installation kit 1

P
Intended Use
iv RC B
IOS Thermo Scientific
Intended Use
• This centrifuge is a laboratory product designed to separate components by generation of Relative
Centrifugal Force. It separates human samples (e.g. blood, urine and other body fluids) collected in
appropriate containers, either alone or after addition of reagents or other additives.
• The centrifuge is designed to also run other containers filled with chemicals, environmental
samples and other non-human body samples.
• This centrifuge should be operated by trained specialists only.
Accident Prevention
Precautions
In order to ensure safe operation of the centrifuge, the following general safety regulations must be
followed. Ignoring the safety regulations can result in severe damage and inguries.
• Do not manipulate the safety devices
• The centrifuge should be operated by trained specialists only.
• The centrifuge is to be used for its intended purpose only.
• Plug the centrifuge only into sockets which have been properly grounded.
• Do not move the centrifuge while it is running.
• Use only rotors and accessories for this centrifuge which have been approved by Thermo Fisher
Scientific. Exceptions to this rule are commercially available glass or plastic centrifuge tubes,
provided they have been approved for the speed or the RCF value of the rotor.
Prerequisite for the safe operation of the centrifuge is a work environment in compliance
with standards, directives and trade association safety regulations and proper instruction of
the user.
The safety regulations contain the following basic recommendations:
• Maintain a radius of at least 30 cm (12 inch) around the centrifuge.
• Implementation of special measures which ensure that no one can approach the
centrifuge for longer than absolutely necessary while it is running.
The mains plug and main switch must be freely accessible at all times. Pull out the power
supply plug or disconnect the power supply in an emergency.

P
Precautions
Thermo Scientific RC B
IOS v
• Do not use rotors which show any signs of corrosion and/or cracks.
• Do not touch the mechanical components of the rotor and do not make any changes to the
mechanical components.
• Use only with rotors which have been properly installed. Follow the instructions in section “Rotor
Installation” on page 4-3.
• Use only with rotors which have been loaded properly. Follow the instructions given in the rotor
manual.
• Never overload the rotor. Follow the instructions given in the rotor manual.
• Never start the centrifuge when the lid is open.
• Never open the lid until the rotor has come to a complete stop and this has been confirmed in the
display.
• The lid emergency release may be used in emergencies only to recover the samples from the
centrifuge, e.g. during a power failure (see section “Failure message” on page 7-3).
• Never use the centrifuge if parts of its cover panels are damaged or missing.
• Do not touch the electronic components of the centrifuge or alter any electronic or mechanical
components.
• Please observe the safety instructions.
Please pay particular attention to the following aspects:
• Location: well-ventilated environment, set-up on a level and rigid surface with adequate
load-bearing capacity.
• Rotor installation: make sure the rotor is locked properly into place before operating the
centrifuge.
• Especially when working with corrosive samples (salt solutions, acids, bases), the accessory parts
and vessel have to be cleaned carefully.
• Always balance the samples.
Centrifuging hazardous substances:
• Do not centrifuge explosive or flammable materials or substances which could react violently with
one another.
• The centrifuge is neither inert nor protected against explosion. Never use the centrifuge in an
explosion-prone environment.
• Do not centrifuge inflammable substances.
• Do not centrifuge toxic or radioactive materials or any pathogenic micro-organisms without
suitable safety precautions.
When centrifuging microbiological samples from the Risk Group II (according to the Bio-safety
Manual" of the World Health Organization WHO), aerosol-tight biological seals have to be used.
For materials in a higher risk group, extra safety measures have to be taken.

P
Precautions
vi RC B
IOS Thermo Scientific
• If toxins or pathogenic substances have gotten into the centrifuge or its parts, appropriate
disinfection measures have to be taken (see “Disinfection” on page 6-4).
• Highly corrosive substances which can cause material damage and impair the mechanical stability
of the rotor, should only be centrifuged in corresponding protective tubes.
IF A HAZARDOUS SITUATION OCCURS, TURN OFF THE POWER SUPPLY TO THE
CENTRIFUGE AND LEAVE THE AREA IMMEDIATELY.
Normal use
The centrifuge is to be used for separating materials of different density or particle size suspended in a
liquid.
Maximum sample density at maximum speed: 1,2
g
cm
3
---------- -

Thermo Scientific RC BIOS 1-1
1
Introduction and Description
Contents
• “Characteristics of the RC BIOS” on page 1-2
• “Technical Data” on page 1-3
• “Directives, Standards and Guidelines” on page 1-4
• “Functions and Features” on page 1-4
• “Mains Supply” on page 1-5
• “Rotor Selection” on page 1-5

1
Introduction and Description
Characteristics of the RC BIOS
1-2 RC B
IOS Thermo Scientific
Characteristics of the RC BIOS
The maintenance-free induction motor ensures quiet and low-vibration operation even at high speeds,
and guarantees a very long lifetime.
The user-friendly control panel makes it easy to pre-set the speed, RCF value, running time,
temperature, and running profile (acceleration and braking curves). You can choose between the
display of speed and RCF or the entry mode.
These settings can be changed even while the centrifuge is running.
The RC BIOS is equipped with various safety features:
Housing, rotor chamber, baseframe, and guard ring are made of high-strength, high-quality steel.
• The lid is equipped with a view port and a lock.
• The lid of the centrifuge can only be opened while the centrifuge is switched on and the rotor has
come to a complete stop. The centrifuge cannot be started until the lid has been closed properly.
• Electronic imbalance detection.
• Lid emergency release: For emergencies only, e.g. during power failures (see “Failure message” on
page 6-3)

1
Introduction and Description
Technical Data
Thermo Scientific RC B
IOS 1-3
Technical Data
The technical data of the RC BIOS is listed in the following table.
Table 1-1. Technical Data RC B
IOS
Feature Value
Environmental conditions -Use in interior spaces
-Altitudes of up to 2,000 m above sea level
-max. relative humidity 80% up to 31 °C; decreasing linearly up to 50%
relative humidity at 40 °C
permissible ambient temperature +2° C to +40° C +35.6° F to +104° F
Overvoltage category II II II
Pollution degree 2 2 2
Heat dissipation 230V 208V 400V
~5.2 kW ~4.5 kW ~5.8 kW
17700 BTU/h 15300 BTU/h 19700 BTU/h
IP 20 20 20
Running time unlimited unlimited unlimited
Maximum speed n
max
8500 rpm 8500 rpm 8500 rpm
Minimum speed n
min
300 rpm 300 rpm 300 rpm
Minimum sample temperature 4°C at 8500 rpm 4°C at 7800 rpm 4°C at 8500 rpm
Maximum RCF value at n
max
15860 x g 15860 x g 15860 x g
Maximum kinetic energy <212 kJ < 212 kJ < 212 kJ
Noise level at maximum speed
a
< 65 dB (A) < 65 dB (A) < 65 dB (A)
Temperature setting range -10 °C to +40 °C -10 °C to +40 °C -10 °C to +40 °C
Dimensions
Height
Width
Depth
Length power cord
1178 mm
800 mm
905 mm
3000 mm
46.3 inch
31.5 inch
35.6 inch
118.1 inch
Weight without rotor 475 kg 1047 lb
a
front side measurement

1
Introduction and Description
Directives, Standards and Guidelines
1-4 RC B
IOS Thermo Scientific
Directives, Standards and Guidelines
Functions and Features
The following table gives an overview of the important functional and performance characteristics of
the RC BIOS.
Table 1-2. Directives, standards and guidelines
Tension /
Frequency
Produced and inspected according to the following
standards and guidelines
220V-230V 50Hz,
400V 50Hz
2006/95/EC Low Voltage Directive:
2006/42/EC Machine Directive:
2004/108/EC EMC Directive
EN 61010-1, 2
nd
Edition
EN 61010-2-020, 2
nd
Edition
EN 61326-1
EN 55011B
EN 61000-6-2
208-220V 60Hz,
230V 60Hz
The centrifuges are produced and inspected
according to the following standards and
guidelines
UL 61010-1, 2
nd
Edition
CAN/CSA-C22.2 No. 61010-1, 2
nd
Edition
IEC 61010-2-20, 2
nd
Edition
(Pollution degree 2, Overvoltage category II)
Emitted interference FCC Part 15 A
NOTE: This equipment has been tested and found to comply with
the limits for a Class A digital device, pursuant to Part 15 of the
FCC Rules. These limits are designed to provide reasonable
protection against harmful interference when the equipment is
operated in a commercial environment. This equipment
generates, uses, and can radiate radio frequency energy and, if
not installed and used in accordance with the instruction manual,
may cause harmful interference to radio communications.
Operation of this equipment in a residential area is likely to
cause harmful interference in which case the user will be
required to correct the interference at his own expense.
Table 1-3. Functions and features
Component / Function Description / Features
Structure / Housing Galvanized and powder doated high-strength steel chassis and guard-ring
Chamber Stainless steel
Drive Induction drive without carbon brushes
Keys and display Easy-to-clean keypad and display surface
Controls Microprocessor-controlled
Internal memory The most recent data is saved
Functions RCF-selection, temperature control
Acceleration / braking profiles 11 acceleration and 11 braking curves
Imbalance detection Electronic, contingent on rotor and speed
Lid lock Automatic lid closing and locking starting from an initial hold position

1
Introduction and Description
Mains Supply
Thermo Scientific RC B
IOS 1-5
Mains Supply
The following table contains an overview of the electrical connection data for the RC BIOS. This data is
to be taken into consideration when selecting the mains connection socket.
Rotor Selection
RC BIOS is sold commercially in a package solution (unit and rotor included).
The rotor that is available for use in the RC B
IOS:
The technical data of the rotors and the corresponding adapters and reduction sleeves for various
commercially available containers can be found in the corresponding rotor operating manuals.
For more information visit our website at: http://www.thermo.com
Table 1-4. Electrical connection data of the RC BIOS
Cat. Mains voltage Frequency
Rated current
Power consumption
Equipment
fuse
Building
fuse
Supply Power
Plugs
75007034 208-220V 60Hz 23.5 A 4400W 25A & 6A 30 A NEMA 6-30P
SinglePhase
75007035 230V 60Hz 22.5 A 4500 W 25A & 6A 30 A NEMA 6-30P
SinglePhase
75007036 220V-230V 50Hz 22 A 4300 W 25A & 6A 32A IEC60309 CEE 32
A-6h 1P+N+PE
75007037 230V/ 400V 3 50Hz 20.5 A 3800 W 25A & 6A 3x 32A IEC60309 CEE 32
A-6h 3P+N+PE
F8-6x1000y 096-061137

Thermo Scientific RC BIOS 2-1
2
Before use
Contents
• “Before Setting up” on page 2-2
• “Location” on page 2-2
• “Installation” on page 2-2
• “Aligning the Centrifuge” on page 2-5
• “Transporting the Centrifuge” on page 2-5
• “Mains Connection” on page 2-5
• “Other connections” on page 2-6
• “Storage” on page 2-6
2
Before use
Before Setting up
2-2 RC B
IOS Thermo Scientific
Before Setting up
1. Check the centrifuge and the packaging for any shipping damage.
Inform the shipping company and Thermo Fisher Scientific immediately if any damage is
discovered.
2. Remove the packaging.
3. Check the order for completeness (see “Scope of Supply” on page iii).
If the order is incomplete, please contact Thermo Fisher Scientific.
Location
The centrifuge should only be operated indoors.
The set-up location must fulfil the following requirements:
• A safety zone of at least 30 cm must be maintained around the centrifuge.
People and hazardous substances must be kept out of the safety zone while centrifuging.
• The supporting structure must be stable and free of resonance.
• The supporting structure must be suitable for horizontal setup of the centrifuge.
• The centrifuge should not be exposed to heat and strong sunlight.
• The set-up location must be well-ventilated at all times.
Installation
1. Place the pallet with the centrifuge so that you have at leased 2 m room in front of the pallet.
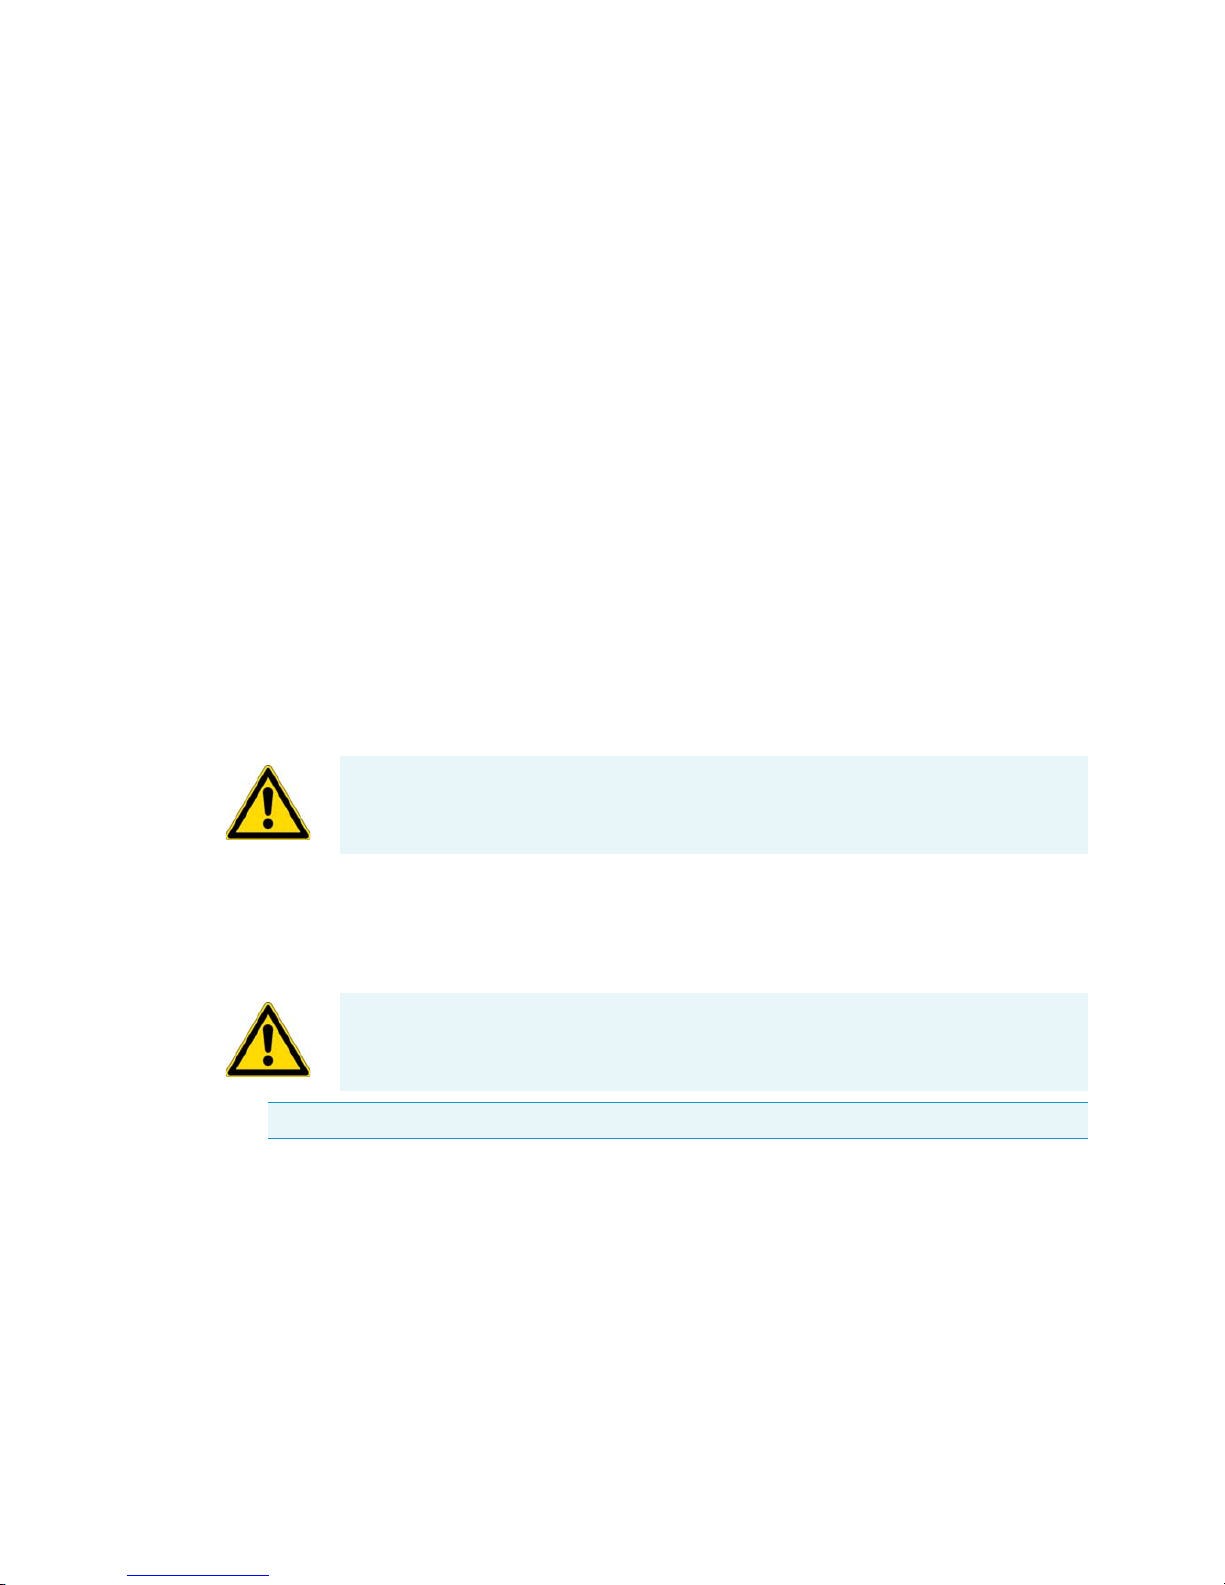
2. Release the rails from the pallet.
3. Screw the rails onto the pallet in front of the centrifuge.
WARNING UV rays reduce the stability of plastics.
Do not subject the centrifuge, rotors and plastic accessories to direct sunlight.
WARNING The centrifuge operates with high kinetic energies. Do not run the centrifuge
without a radius of at least 30 cm (12 inch) around the centrifuge.
Do not run the centrifuge while standing on its casters.
Note The centrifuge is screwed onto the pallet with four screws.
2
Before use
Installation
Thermo Scientific RC B
IOS 2-3
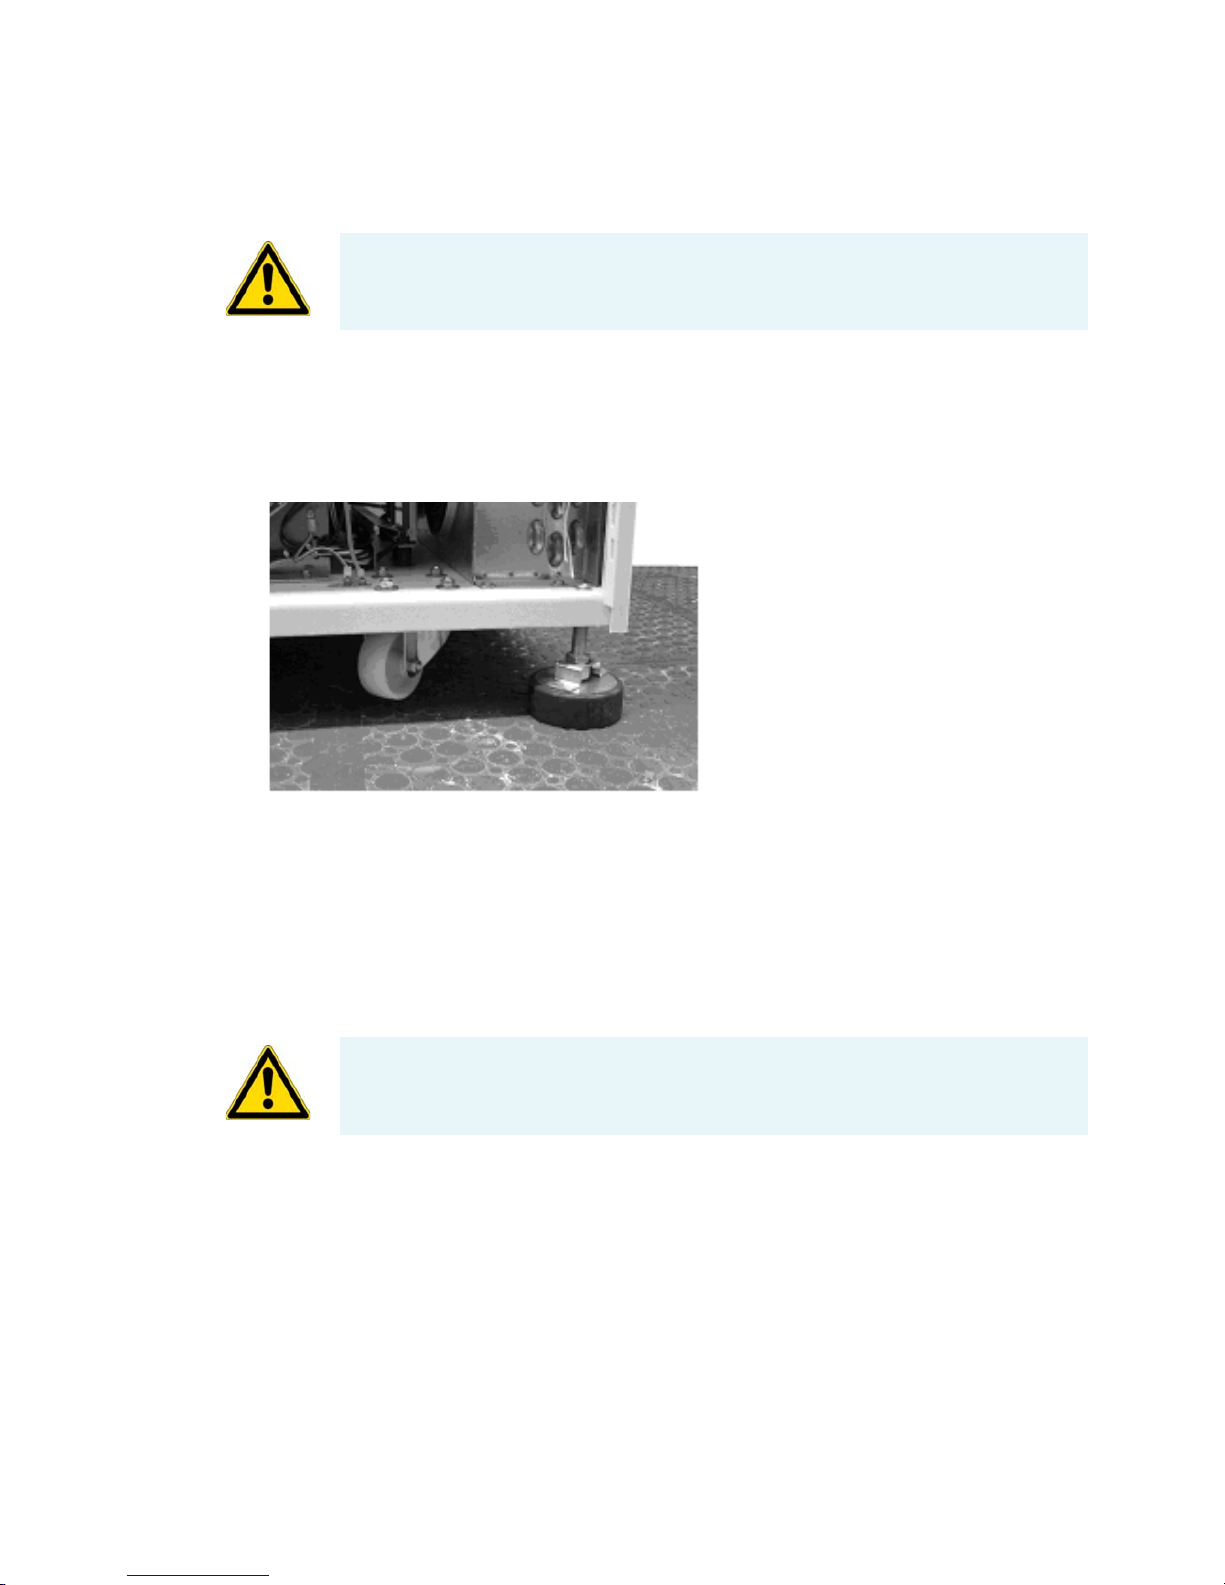
4. Place the piece of wood under the rails.
5. Place the rubber feet under the studs with the safety brackets and screw them entirely up.
6. Remove the four screws that fix the centrifuge t the pallet. The heads are upsiede down in the
pallet.
7. Remove the bolt spacers.
8. Screw the studs with the safety brackets entirely up. Otherwise they might get stuck when rolling
the centrifuge off the pallet.
9. Remove the rubber feet.
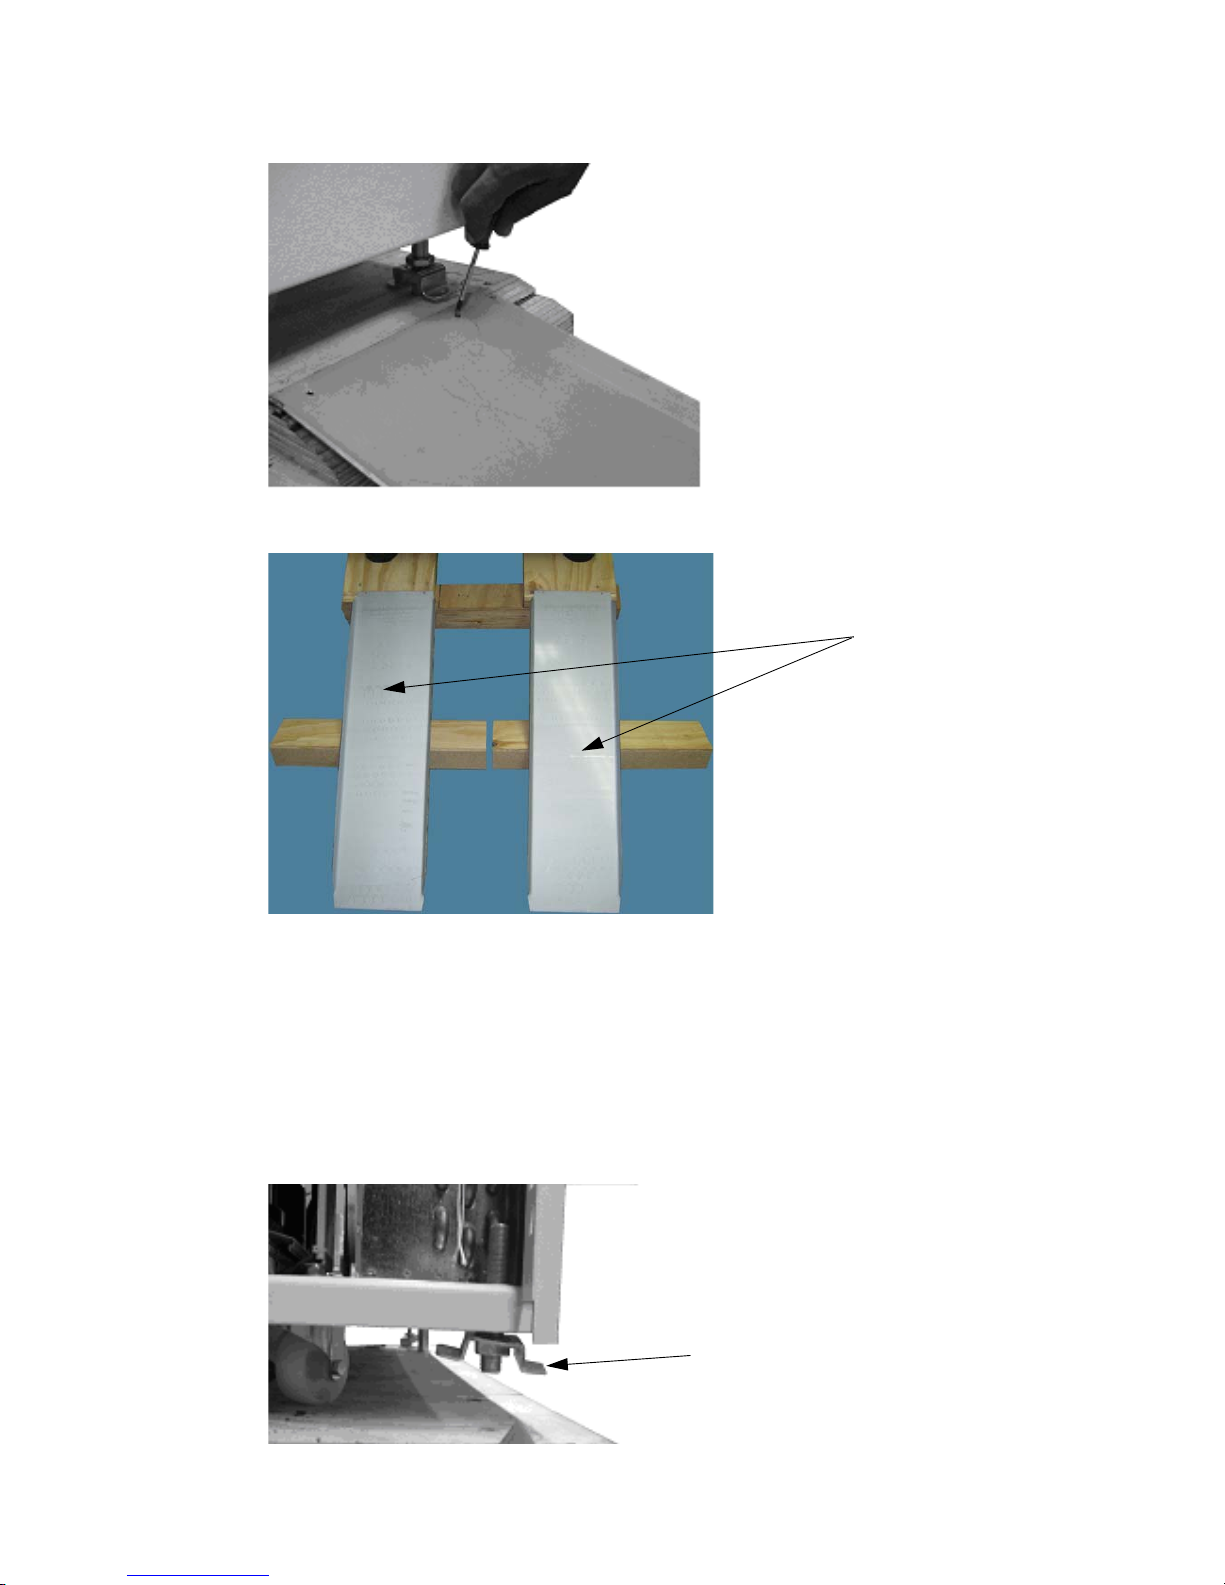
Rails
Safety brackets
2
Before use
Installation
2-4 RC B
IOS Thermo Scientific
10. Check that the stearing casters point to the back.
11. Use several people and other means in order to roll the centrifuge off the pallet.
12. Once the centrifuge is in its final position mount the enclosed locking stabilizers.
13. Screw the studs down.
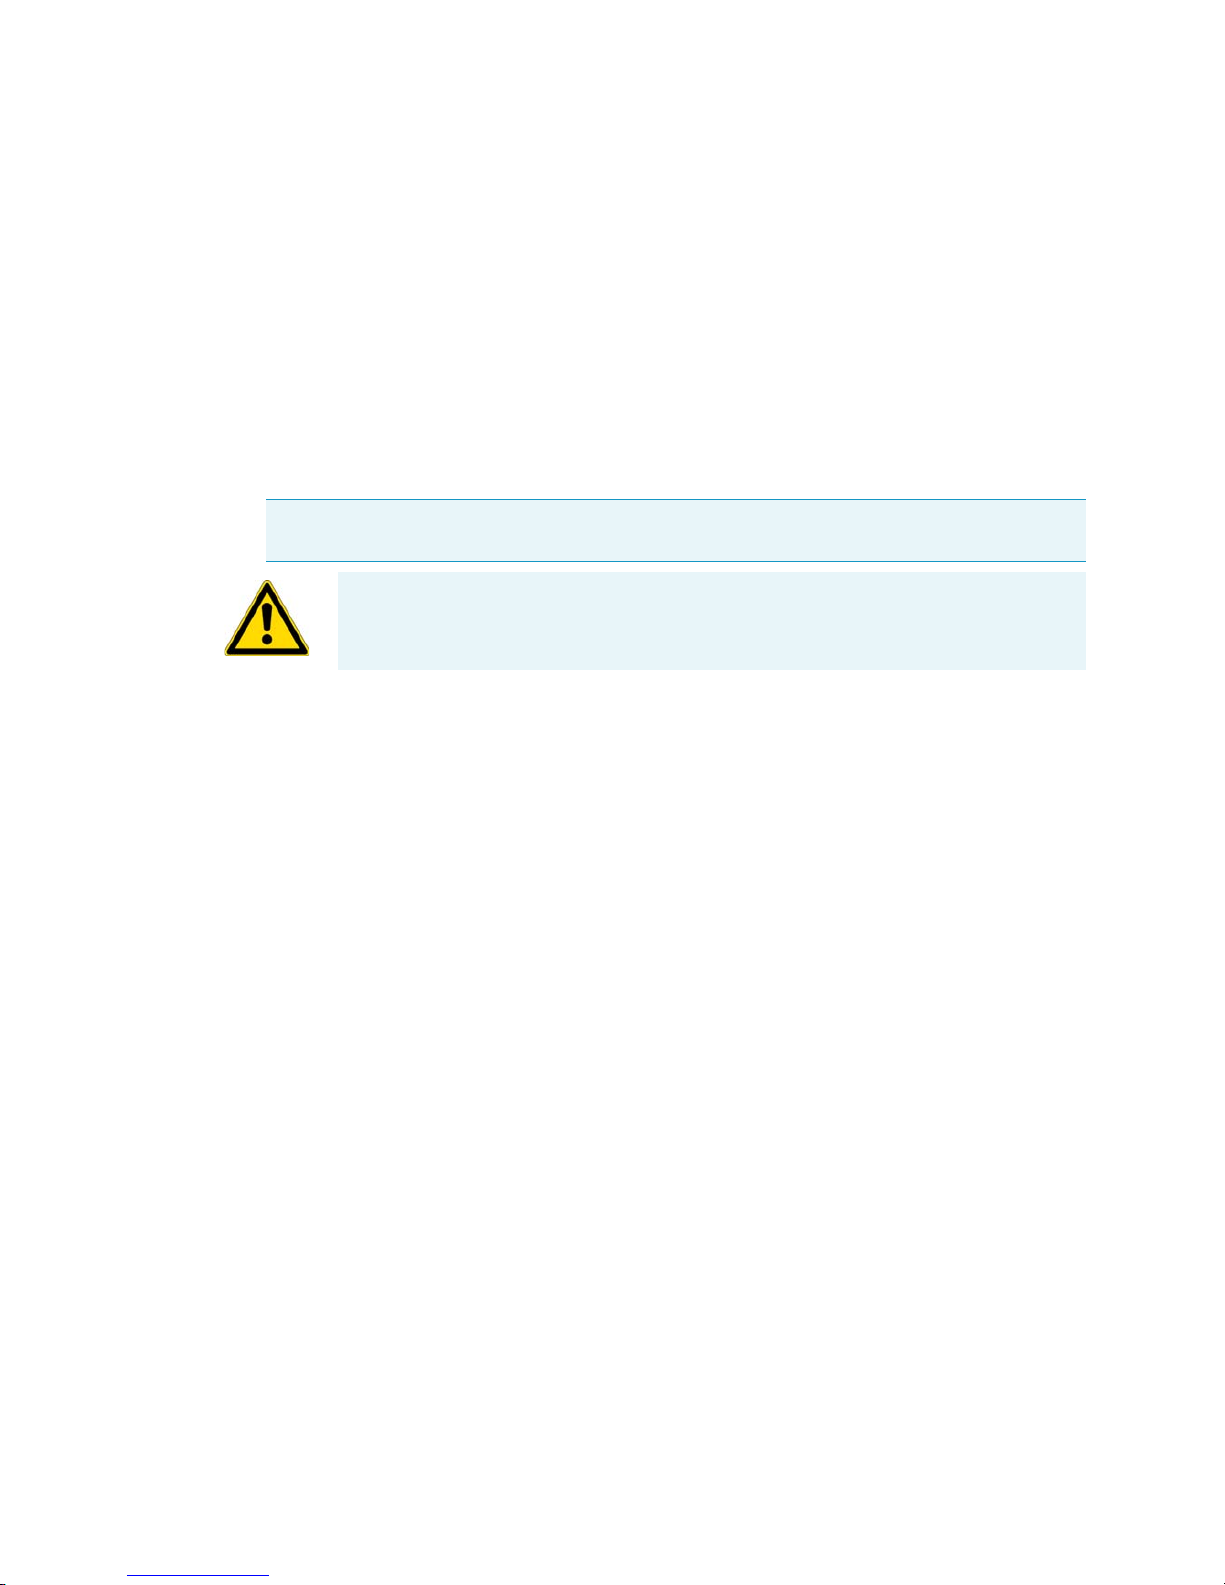
14. Place the rubber feet centrally and align the centrifuge. All the rubber feet should carry uniformly
(check by a tilt test). The casters are at a distance of about 5-15 mm from the ground.
15. Switch on the centrifuge.
16. Open the centrifuge.
17. Put the enclosed water level on the drive spindle.
18. Use a wrench to rotate the safety brackets alternately to raise or lower them until the centrifuge is
leveled.
19. Remove the water level when the centrifuge is leveled.
20. Be sure that the four locking stabilizers stand safe and don't jolt. The final assembly of the safety
brackets is carried out after leveling.
21. Tighten the locking nuts of the locking stabilizers firmly.
Mount the safety brackets by means of an 8 mm open-end wrench on the stabilizers.
22. Optional: To be certain the centrifuge is working properly, refer to the Customer Control
Inspection paragraph located in “Customer Control Inspection” on page 5-1. Perform the
procedures listed under Speed Control, Timer, and Temperature Control.
WARNING Due to the centrifuges weight it must be controlled by several people and
other means when rolling of the pallet. Do not stand in front of the centrifuge when
rolling down for the centrifuge might run you over.
CAUTION If the centrifuge isn’t level, imbalances can occur and the centrifuge can be
damaged.
Do not place anything under the feet to level the centrifuge.
2
Before use
Aligning the Centrifuge
Thermo Scientific RC B
IOS 2-5
Aligning the Centrifuge
The horizontal alignment of the centrifuge must be checked every time after moving it to a different
location.
The supporting structure must be suitable for horizontal setup of the centrifuge.
Transporting the Centrifuge
• Use a forklift to lift the centrifuge.
• The centrifuge can be damaged by impacts.
• Transport the centrifuge upright and if at all possible in packaging.
Mains Connection
1. Turn off the power supply switch located on a small recessed panel in the upper right corner of the front
cabinet panel (press "0").
2. Plug the centrifuge into grounded electrical sockets only.
3. Check whether the cable complies with the safety standards of your country.
4. Make sure that the voltage and frequency correspond to the figures on the rating plate.
5. Establish the connection to the power supply with the connecting cable.
Note The packaging is an one-way packaging. Assign a logistic company for the transport. Contact
Customer Service.
WARNING Always remove the rotor before moving the centrifuge.
2
Before use
Other connections
2-6 RC B
IOS Thermo Scientific
Other connections
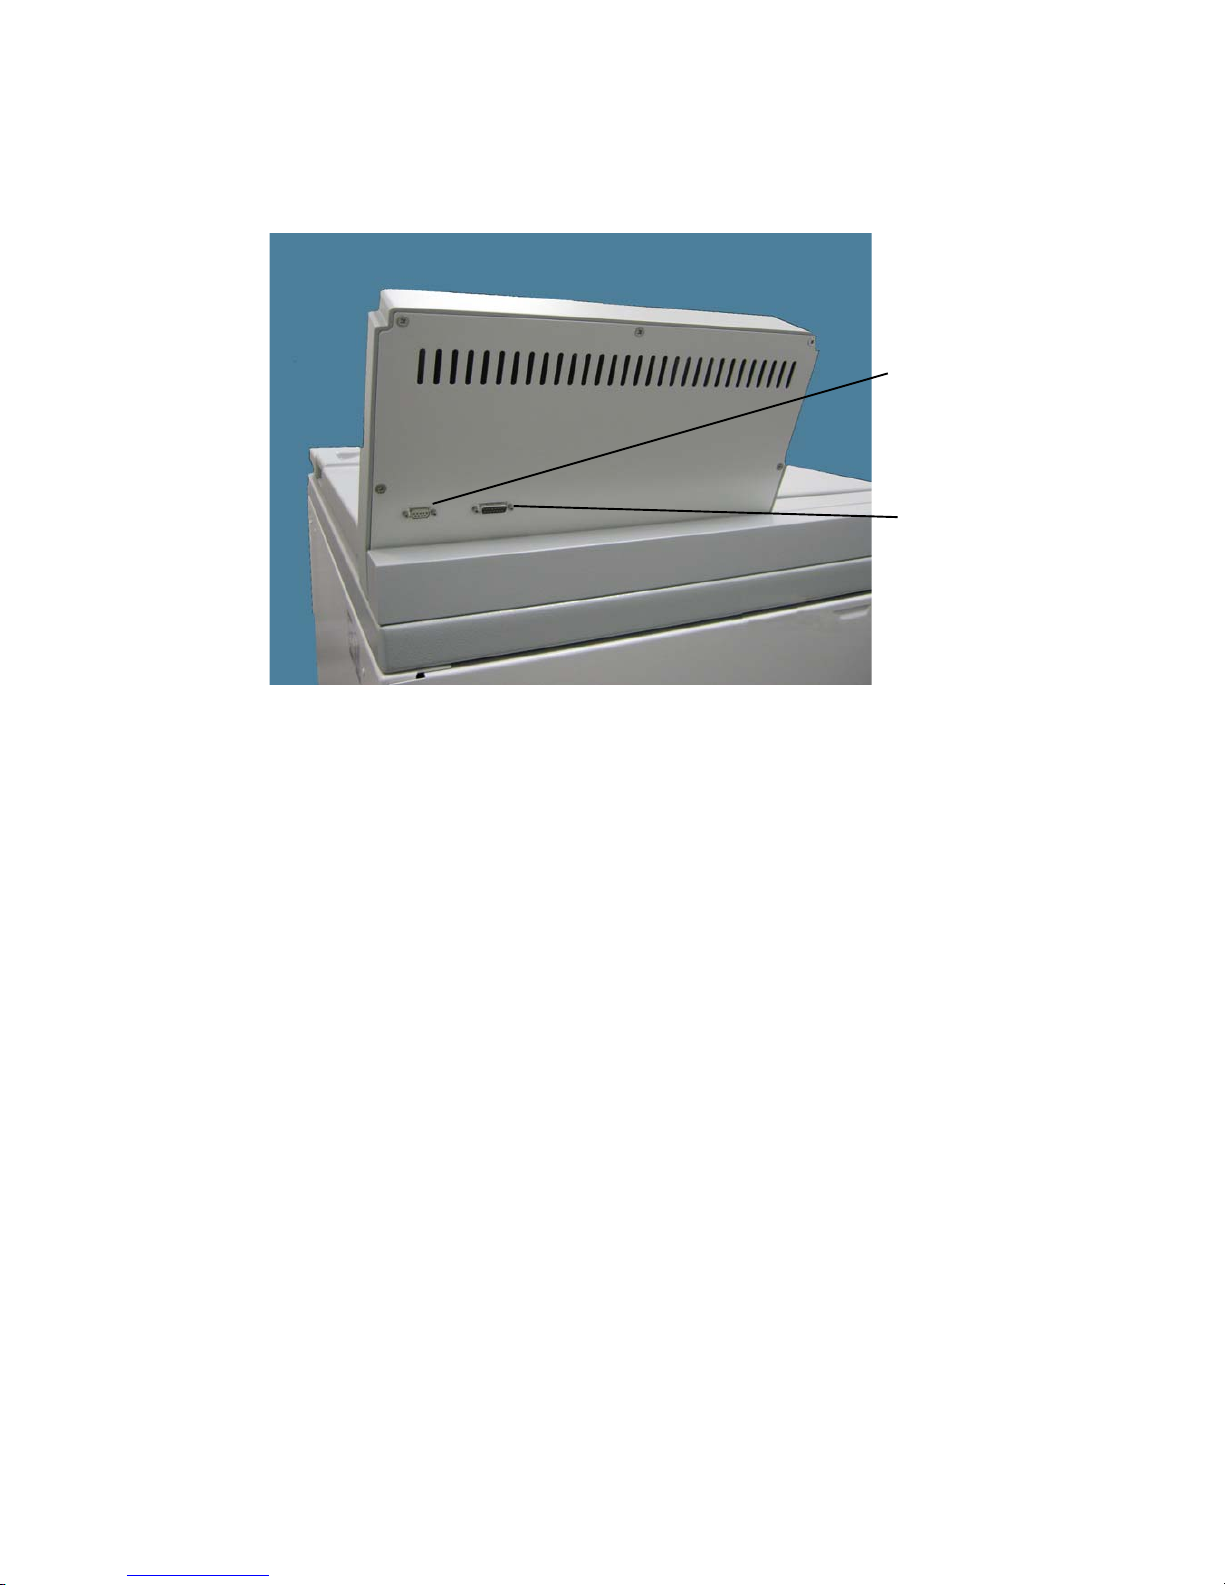
Figure 2-1. Connetors to external devises
Storage
• Before storing the centrifuge and the accesories it must be cleanedand if necessary desinfected and
decontaminated.
• Store the centrifuge in a clean, dust-free location.
• Be sure to place the centrifuge on its feet.
• Avoid direct sunlight.
15 Pol D-Sub Computer
Interface Connector
9 Pol D-Sub Connector Barcode
Reader
 Loading...