

Thermo Scientific Neslab Merlin M 25, Neslab Merlin M 33, Neslab Merlin M 75, Neslab Merlin M 100, Neslab Merlin M 150 Installation, Operation, Basic Maintenance
Page 1

NESLAB MerlinNESLAB Merlin
NESLAB Merlin
NESLAB MerlinNESLAB Merlin
Recirculating ChillersRecirculating Chillers
Recirculating Chillers
Recirculating ChillersRecirculating Chillers
Thermo ScientificManual P/N U00753 Rev. 11/15/06
Installation
Operation
Basic Maintenance
Visit our Web site at:
http://www.thermofisher.com/tchttp://www.thermofisher.com/tc
http://www.thermofisher.com/tc
http://www.thermofisher.com/tchttp://www.thermofisher.com/tc
Product Service Information, Applications
Notes, MSDS Forms, e-mail.
Voice Info: (800) 258-0830
Page 2

Thermo Fisher Scientific
Control Technologies
25 Nimble Hill Road
Newington, NH 03801
Tel : (800) 258-0830 or
(603) 436-9444
Fax : (603) 436-8411
www.thermofisher.com/tc
Control Technologies
Sales, Service, and Customer Support
25 Nimble Hill Road
Newington, NH 03801
Tel : (800) 258-0830 8:00 am to 5:00 pm
(Eastern Time), Monday through Friday.
Fax : (603) 436-8411
service.tc.us@thermofisher.com
Dieselstrasse 4
D-76227 Karlsruhe, Germany
Tel : +49 (0) 721 4094 444
Fax : +49 (0) 721 4094 300
Hotline: +49 (0) 18 05 04 22 53
Building 6, No. 27
Xin Jinqiao Rd., Shanghai 201206
Tel : +86(21) 68654588
Fax : +86(21) 64457830
info. china@thermofisher.com
Statement of Copyright
Copyright © 2006 Thermo Fisher Scientific. All rights reserved.
This manual is copyrighted by Thermo Fisher Scientific.
Users are forbidden to reproduce, republish, redistribute, or resell any materials from this
manual in either machine-readable form or any other form.
Page 3

Contents
Preface ...............................................................................................................................iii
Compliance ......................................................................................................... iii
WEEE/RoHS..................................................................................................... iii
After-sale support .............................................................................................. iv
Feedback .............................................................................................................. iv
Warranty .............................................................................................................. iv
Unpacking............................................................................................................. v
Safety Warnings .................................................................................................. vi
Quick Reference Operating Procedures ......................................................... ix
Chapter 1 Description .......................................................................................................... 1
Specifications ....................................................................................................... 2
Chapter 2 Installation and Operation................................................................................ 7
Site ......................................................................................................................... 7
Electrical Requirements...................................................................................... 8
Plumbing Requirements ................................................................................... 10
Fluids ................................................................................................................... 11
Filling Requirements ......................................................................................... 12
Reservoir Tank Isolation Valves/Open Tank Circulation .......................... 12
Controller ........................................................................................................... 13
Start Up/Shut Down ........................................................................................ 15
Setup/Tuning Loop.......................................................................................... 18
Chapter 3 Options ............................................................................................................... 21
Chapter 4 Maintenance ..................................................................................................... 25
Thermo Scientific
Communication Connector............................................................................. 21
Remote Start/Stop............................................................................................ 22
External Temperature Sensor ......................................................................... 23
Reservoir Level Warning/Fault....................................................................... 24
Low Pump Flow Warning/Fault .................................................................... 24
Additional Accessories ..................................................................................... 24
Error Codes ....................................................................................................... 25
Displaying Software Version Number ........................................................... 26
Controller PID Values...................................................................................... 27
Cleaning .............................................................................................................. 27
Algae .................................................................................................................... 28
Leaks.................................................................................................................... 28
Phase Rotation Interlock ................................................................................. 28
NESLAB Merlin Series i
Page 4

Contents
PD Pressure Relief Valve ................................................................................ 29
Pump Strainer................................................................................................... 30
PD Pump Motor Lubrication ........................................................................ 31
Storage ............................................................................................................... 32
BOM Decoder ................................................................................................. 32
Temperature Sensor Calibration.................................................................... 32
Chapter 5 Troubleshooting
Checklist ............................................................................................................ 37
Service Assistance ............................................................................................ 39
Appendix A Water Quality Standards and Recommendations .................................... 41
Appendix B NC Serial Communications Protocol .......................................................... 47
Warranty
ii NESLAB Merlin Series
Thermo Scientific
Page 5

Preface
Compliance
WEEE/RoHS
Listed to:
UL 61010-1 2nd Edition
CSA C22.2 #6101.1 2nd Edition
Products tested and found to be in compliance with the requirements
defined in the EMC standards defined by 89/336/EEC as well as Low
Voltage Directive (LVD) 73/23/EEC can be identified by the CE Mark
on the rear of the unit. The testing has demonstrated compliance with the
following directives:
z LVD, 73/23/EEC IEC/EN 61010-1
z EMC, 89/336/EEC IEC/EN 61326-1
For any additional information, refer to the Declaration of Conformity
that shipped with the unit.
This product is required to comply with the European Union’s Waste
Electrical & Electronic Equipment (WEEE) Directive 2002/96/EC . It
is marked with the following symbol:
Thermo Scientific
Thermo Fisher Scientific has contracted with one or more recycling/
disposal companies in each EU Member State, and this product should be
disposed of or recycled through them. Further information on Thermo
Scientific’s compliance with these Directives, the recyclers in your
country, and information on Thermo Scientific products which may assist
the detection of substances subject to the RoHS Directive are available at:
www.thermofisher.com/WEEERoHS
NESLAB Merlin Series iii
Page 6
Preface
After-sale Support
Thermo Fisher Scientific is committed to service both during and after the
sale. If you have questions concerning operation, contact our Sales
Department. If your unit fails to operate properly, or if you have questions
concerning spare parts or Service Contracts, contact our Service
Department.
Before calling, please obtain the following information:
z unit BOM number (see page 32)
z unit serial number
z unit software version ( see page 26)
z voltage of power source
The unit’s BOM and serial number are located on the name plate label on
the rear of the unit.
Feedback
Warranty
BOM#: XXXXXXXXXXXX
S/N: XXXXXXXXX
XXX VOLT XX HZ X PH X.X AMP
R134A X.XOZ HIGH XXX PSI LOW XXXPSIG
We appreciate any feedback you can give us on this manual. Please e-mail
us at neslabmanuals@thermofisher.com. Be sure to include the manual
part number and the revision date listed on the front cover.
Units have a warranty against defective parts and workmanship for 24
months from date of shipment. See back page for more details.
iv NESLAB Merlin Series
Thermo Scientific
Page 7

Preface
Unpacking
Retain all cartons and packing material until the unit is operated and found
to be in good condition. If the unit shows external or internal damage
contact the transportation company and file a damage claim. Under ICC
regulations, this is your responsibility.
Out of Box Failure
An Out of Box Failure is defined as any product that fails to operate in
conformance with sellers published specifications at initial power up. The
unit must be installed in accordance with manufacturer's recommended
operating conditions within 30 days of shipment from the seller.
Any Temperature Control product meeting the definition of an Out of
Box Failure must be packed and shipped back in the original packaging to
Thermo Scientific for replacement with a new unit; Seller to pay the cost
of shipping. Customer must receive a Return Material Authorization
(RMA) from Thermo Scientific prior to shipping the unit.
Thermo Scientific
NESLAB Merlin Series v
Page 8

Preface
Safety Warnings
Warnings are posted throughout the manual. These warnings are
designated by an exclamation mark inside an equilateral triangle and text
highlighted in bold. Read and follow these important instructions. Failure
to observe these instructions can result in permanent damage to the unit,
significant property damage, or personal injury or death.
The lightning flash with arrow symbol, within an equilateral triangle, is
intended to alert the user to the presence of non-insulated "dangerous
voltage" within the unit's enclosure. The voltage may be of significant
enough magnitude to constitute a risk of electrical shock.
Make sure you read and understand all instructions and safety precautions
listed in this manual before installing or operating your unit. If you have
any questions concerning the operation of your unit or the information in
this manual, please contact our Sales Department (see After-sale Support).
Never place the unit in a location where excessive heat, moisture, or
corrosive materials are present. S
The unit construction provides protection against the risk of
electrical shock by grounding appropriate metal parts. The
protection may not function unless the power cord is connected to a
properly grounded outlet. It is the user's responsibility to assure a
proper ground connection is provided. S
Never connect the process fluid inlet or outlet fittings to your
building water supply or any water pressure source. S
On units with MD pumps never completely restrict flow to your
application. Dead-heading the pump will damage its coupling and
require pump replacement. S
Never use flammable or corrosive fluids with this unit. Highly
distilled and deionized water may be aggressive and cause material
corrosion. Please contact Thermo Scientific before subjecting this
unit to prolonged exposure to highly distilled or deionized water. S
Do not use automotive antifreeze. Commercial antifreeze contains
silicates that can damage the pump seals. Use of automotive
antifreeze will void the manufacturer’s warranty. S
vi NESLAB Merlin Series
Thermo Scientific
Page 9

Preface
In addition to the specific warnings listed on the previous page the
following general warnings also apply to your unit:
Performance of installation, operation, or maintenance procedures
other than those described in this manual may result in a hazardous
situation and may void the manufacturer's warranty. S
Transport the unit with care. Sudden jolts or drops can damage the
unit's components. S
If the unit is to be transported and/or stored it needs to be drained.
If the unit is to be transported and/or stored in cold temperatures it
needs to be drained and then flushed with a 50/50 glycol/water
mixture. S
The circuit protector located on the rear of the unit is not intended
to be used as a disconnecting means. S
Observe all warning labels. S
Never remove warning labels. S
Never operate damaged or leaking equipment. S
Never operate the unit without cooling fluid in the reservoir. S
Always turn off the unit and disconnect the power cord from the
power source before performing any service or maintenance
procedures, or before moving the unit. S
Never operate equipment with damaged power cords. S
Refer service and repairs to a qualified technician. S
Thermo Scientific
NESLAB Merlin Series vii
Page 10
Preface
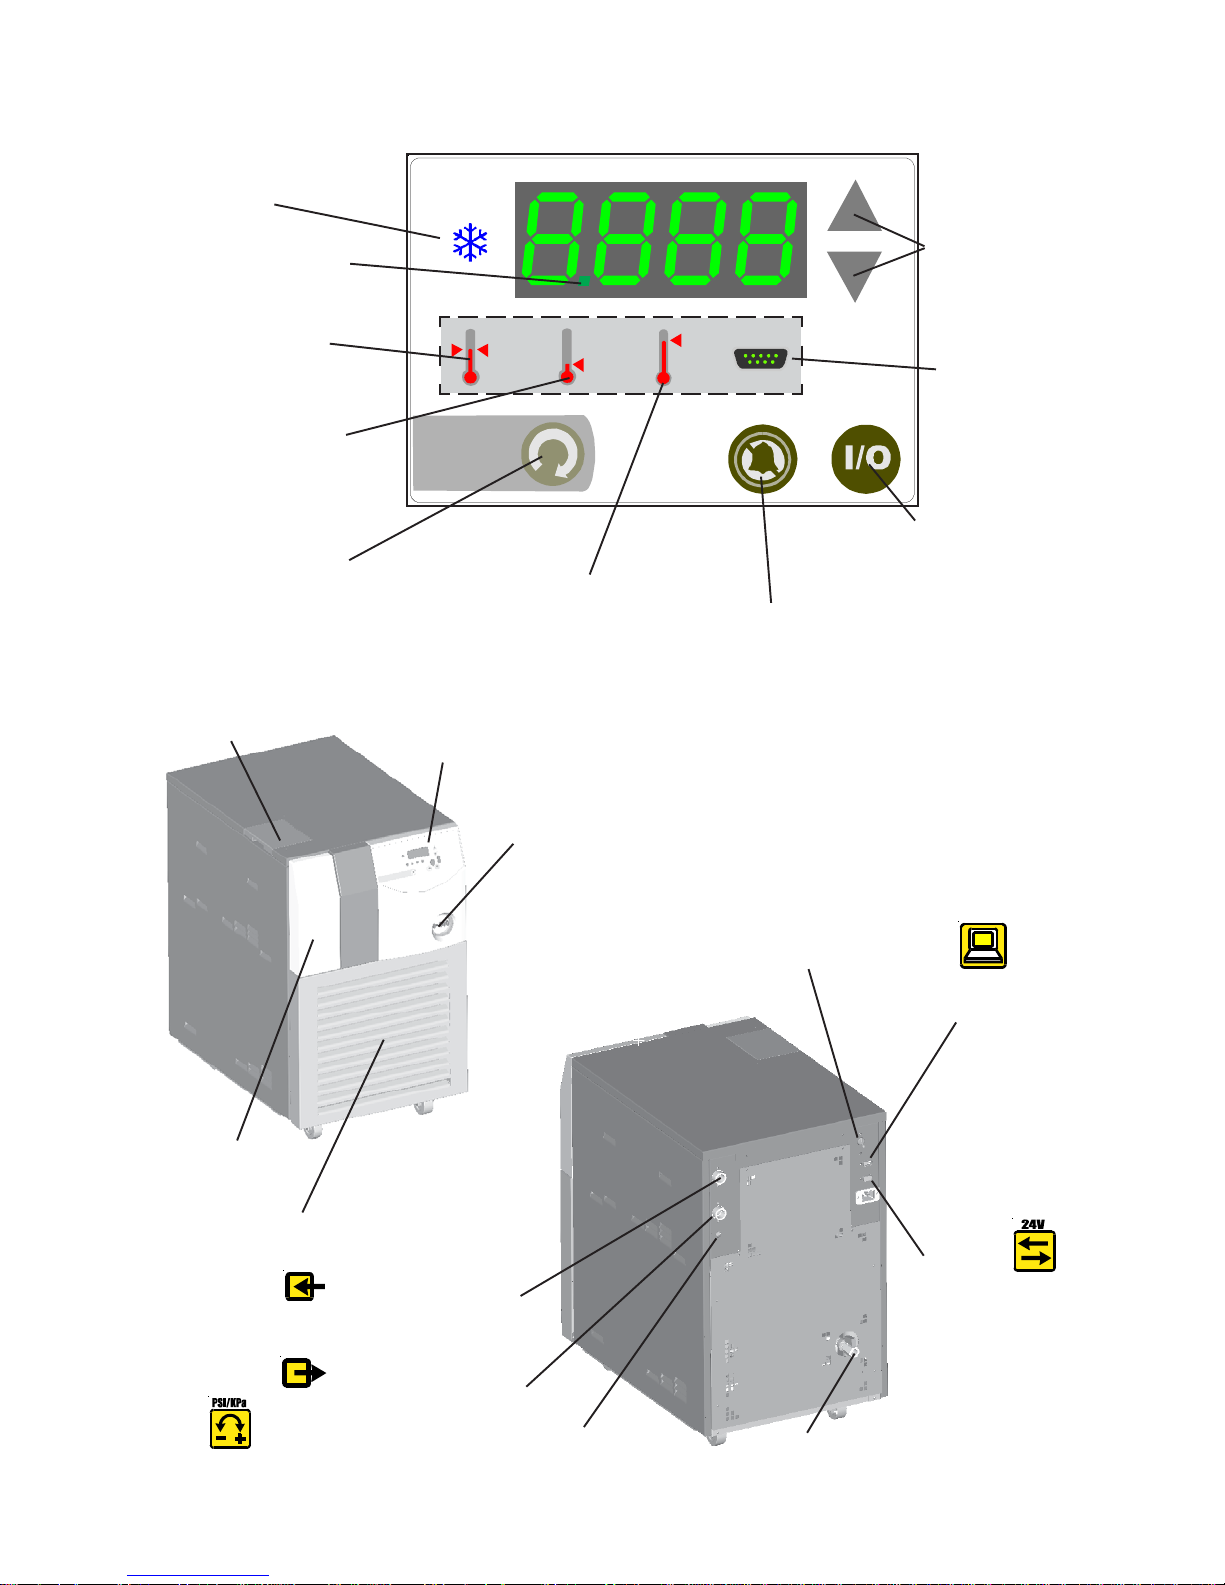
Indicates refrigeration system
status. See page 13.
Optional. Flashes to indicate the
external sensor is enabled. See
page 23.
Indicates the controller is
displaying the setpoint. Press
the arrow keys to change the
value. See pages 13 - 14.
Indicates the controller is
displaying the unit's low
temperature alarm setting.
Press the arrow keys to change
the value. See pages 13 - 14.
Press to sequence through the
four indicators and accept the
displayed value. See page 13.
NOTE: None of the four indicators are visible unless this key is
pressed.
Reservoir Access Panel.
See pages 10 - 12.
Indicates the controller is
displaying the high temperature
alarm setting. Press the arrow
keys to change the value. See
pages 13 - 14.
Controller. See page 13.
Press to change the
displayed value. See
page 13.
Optional. Indicates the
unit is operating in the
serial communication
or remote start/stop
mode. See pages 13 - 14
and 16.
Press to start/stop the unit.
See page 13.
Press to mute the alarm. See page 13.
Reservoir. See page 12.
Condenser Access Panel. See page 27.
Pressure Gauge.
See page 15.
Plumbing Return Connection. See page 10.
Plumbing Supply Connection.
See page 10.
Circuit Protector. See page 15.
Optional
Communications Connector.
See page 21.
Optional
Remote Start/Stop
Connector. See page 22.
External Temperature
Sensor. See page 23.
PD Pump Pressure Relief Valve. See page 29.
viii NESLAB Merlin Series
Drain. See page 10.
Thermo Scientific
Page 11
Preface
Quick Reference
Operating Procedures
Installation
The unit has an air-cooled refrigeration system. Air is drawn in the front
of the unit and discharged through rear and sides. Position the unit so the
intake and discharge are not impeded. Inadequate ventilation will reduce
cooling capacity and, in extreme cases, result in compressor failure.
Excessively dusty areas should be avoided and a periodic cleaning
schedule should be instituted. For proper operation, the unit needs to pull
substantial amounts of air through a condenser. A build up of dust or
debris on the fins of the condenser will lead to a loss of cooling capacity.
The unit will retain its full rated capacity in ambient temperatures up to
approximately +77°F (+25°C).
Make sure the voltage of the power source meets the specified voltage,
±10%.
The plumbing connections are located on the rear of the unit and are
labelled and . These connections are ½ inch FPT (¾ inch
FPT for units with CP-55 pumps). Remove the plastic protective plugs
from both plumbing connections. Connect the fitting to the inlet of
your application. Connect the fitting to the outlet of your
application.
To fill the reservoir, remove the reservoir access panel and locate the
reservoir cap. Remove the cap and fill the reservoir with clean cooling
fluid.
For fluid recommendations refer to page 11.
Operation
Before starting the unit, double-check all electrical and plumbing
connections. Make sure the circulating system is properly filled with
cooling fluid. Place the circuit breaker located on the rear of the unit to
the up position.
To start the unit, press . To turn the unit off press again.
The LED indicates the status of the refrigeration system. It illuminates
to indicate the refrigeration system is removing heat from the cooling
fluid. As the operating temperature approaches the setpoint, the LED will
flash.
Thermo Scientific
NESLAB Merlin Series ix
Page 12

Preface
Temperature Adjustment
To display the temperature setpoint, press on the controller. The
indicator will illuminate and the display will flash the current setpoint
value. To adjust the temperature setpoint, press the arrow keys until the
desired temperature setpoint is indicated. Press again to confirm the
change. The display will rapidly flash the new value for a short time and
then return to the recirculating fluid temperature.
Periodic Maintenance
Periodically inspect the reservoir fluid. If cleaning is necessary, flush the
reservoir with a cleaning fluid compatible with the circulating system and
the cooling fluid.
The cooling fluid should be replaced periodically. Frequency depends on
the operating environment and amount of usage.
Before changing the cooling fluid ensure it is at a safe temperature.
Periodic vacuuming of the condenser fins is necessary. The frequency of
cleaning depends on the operating environment. We recommend a
monthly visual inspection of the condenser after initial installation. After
several months, the cleaning frequency will be established.
Units with PD pumps have a strainer. If debris is in the system, the
strainer will prevent the material from being drawn into the pump and
damaging the pump vanes. A clogged strainer will also cause increased
pump discharge pressure.
After initial installation, the strainer may become clogged. Clean the
strainer after the first week of installation. After this first cleaning, we
recommend a monthly visual inspection. After several months, the
cleaning frequency will be established. Before cleaning the strainer,
disconnect the power cord from the power source and drain the unit.
x NESLAB Merlin Series
Thermo Scientific
Page 13

Preface
Kom hurtigt i gang!
Installering
Merlin-serien er luftkølet. Luftindtaget sker via ribber i kølebadets front,
luftudtaget via huller bagpå og i siderne af kølebadet. Kølebadet skal
anbringes således, at luftindtag og luftudtag ikke hindres. Utilstrækkelig
ventilation vil forårsage nedsat kølekapacitet, og i værste fald ødelægge
kompressoren.
Undgå at anbringe kølebadet i meget støvede omgivelser. Det anbefales, at
indføre en periodisk og systematisk rengøringsprocedure. En kondenser
sikrer kølebadets store luftindtag. Ophobning af f.eks. støv eller snavs på
køleribberne medfører en nedsat kølekapacitet.
Omgivelsestemperaturen må max. være 25oC for at sikre bedst mulig drift.
Spændingen skal være 220V.
Rørtilslutningerne er anbragt på bagsiden af kølebadet og er afmærkede.
Tilslutningerne er 1/2" FPT. (Kølebade med CP-55 pumpe har 3/4" FPT
tilslutning). Den beskyttende plastik om begge rørtilslutninger fjernes.
Tilslutningsslangen forbindes til kølebadets tilslutningsstykke.
Afløbsslangen forbindes til kølebadets afløbsstykke.
Afmonter dernæst panelet til væskebeholderen. Fjern dækslet og fyld ren
kølevæske i væskebeholderen.
Se side 11 i betjeningsvejledningen for anbefalet kølevæske.
Ibrugtagning
Før kølebadet tages i brug, kontrolleres alle elektriske og mekaniske
tilslutninger påny. Påse ligeledes at kølevæske er fyldt på
cirkulationssystemet. Afbryderknappen til cirkulationssystemet er anbragt
bag på kølebadet. Afbryderen sættes i øverste position.
For at starte kølebadet, trykkes afbryderen ned. Når kølebadet skal stoppe,
trykkes ned igen.
LED displayet viser kølesystemets status. Når varme fjernes fra
kølevæsken, lyser displayet. Når driftstemperaturen nærmer sig setpunktet,
vil LED displayet blinke.
Thermo Scientific
NESLAB Merlin Series xi
Page 14

Preface
Indstilling af temperatur
Setpunktet kan vises ved at trykke på kontrolenheden. Det indstillede
setpunkt vil blinke i displayet. Ønskes setpunktet ændret, trykkes på
piltasterne, indtil ønsket temperatur vises. Tryk igen for at bekræfte
ændringen. Displayet vil i et kort øjeblik blinke med den valgte temperatur
og vender dernæst tilbage med visning af den recirkulerende
væsketemperatur.
Periodisk vedligeholdelse
Væskebeholderen kontrolleres regelmæssigt. Er rengøring nødvendig,
skylles væskebeholderen med en rensevæske, der er forenelig med
cirkulationssystemet og kølevæsken.
Kølevæsken udskiftes regelmæssigt afhængig af omgivelsestemperaturen
og hvor tit køleren er i brug.
Inden udskiftning af kølevæske, skal kølevæskens temperatur altid
kontrolleres.
Køleribberne bør altid holdes fri for støv og snavs. Hvor tit ribberne skal
tørres af, afhænger af hvor støvede omgivelserne er. Fra fabrikkens side
anbefales en månedlig inspektion af kondensoren, efter kølebadets første
ibrugtagning. Dernæst bør en rengøringsprocedure indføres, således at
der sikres en regelmæssig og systematisk rengøring af køleren.
Kølebade med PD-pumper har monteret et filter. Filtret forhindrer støv
og snavs i at trænge ind i pumpen og ødelægge pumpefanerne. Et
tilstoppet filter vil ligeledes forårsage øget tryk på afløbspumpen.
For at undgå, at filtret tilstoppes, anbefales det, at rense filtret ugen efter,
køleren har været i brug første gang. Herefter bør filtret kontrolleres en
gang om måneden. Inden filtret renses, skal stikket trækkes ud af
stikkontakten og kølebadet tømmes for kølevæske.
xii NESLAB Merlin Series
Thermo Scientific
Page 15

Preface
Procedures De Mise
En Route
1°) INSTALLATION
Il s’agit d’un groupe dont le condenseur est refroidi par air. L’air est aspiré
à l’avant et rejeté sur les côtés et à l’arrière. Il faut donc que chaque côté
soit suffisamment aéré. Une mauvaise ventilation affecte la capacité de
refroidissement du groupe et peut entrainer des dommages au
compresseur.
Un endroit très poussiereux est donc à proscrire, et un nettoyage
périodique des entrées d’air fortement recommandé.
La capacité du groupe reste maximale pour une température ambiante
n’excédant pas 25°C.
S’assurer que la tension d’alimentation soit celle spécifiée à +/-10 Volts
Les connexions sont situées à l’arrière de l’appareil (diamètre 0,5 pouce
FPT sauf pour les versions avec pompe CP 55 dont le diamètre est alors
de 3/4 pouce). Oter les protections en plastique et connecter le départ et
le retour à votre application.
Pour remplir le réservoir, oter le panneau et s’assurer de la propreté et de
la bonne compatibilité du fluide utilisé.
2°) MISE EN ROUTE
Avant de mettre en route vérifier le branchement électrique, les
connexions entre le groupe et votre application et s’assurer que le le
réservoir soit correctement rempli. Placer le bouton à l’arrière en position
haute.
Pour mettre en route, apuyer sur la touche., pour éteindre appuyer à
nouveau sur la même touche.
Une diode LED s’allume pour indiquer que le groupe commence à
refroidir et se met à flasher lorsque la température de consigne est presque
atteinte.
Thermo Scientific
NESLAB Merlin Series xiii
Page 16

Preface
3°) REGLAGE DE LA TEMPERATURE
Appuyer sur la touche du controleur de température pour sélectionner une
température de consigne. Le témoin s’allume et cette température de
consigne flashe. Pour en changer utiliser les flèches de réglage haut et bas
jusqu’à l’obtention de la température souhaitée. Presser à nouveau pour
valider. Cette nouvelle valeur flashera quelques secondes avant d’être
remplacée par la température présente.
4°) MAINTENANCE PERIODIQUE
Vérifier le fluide dans le réservoir. S’il est sale veuiller rincer et le changer
ou rajouter un produit tout en s’assurant de sa bonne compatibilité. La
périodicité dépend des conditions locales d’utilisation.
Avant de changer le liquide s’assurer qu’on soit à une température qui ne
présente aucun risque.
Nettoyer les grilles du condenseur. La périodicité dépend du degré de
propreté du local. Commencer par une première inspection au bout d’un
mois de fonctionnement puis espacer les vérifications s’il y a lieu.
Les pompes type PD sont munies d’un filtre de protection dont le rôle est
d’empêcher des impuretés ou des corps étrangers d’endommager les corps
de pompe. Pour éviter d’éventuelles pertes de charge il convient de
nettoyer ces filtres. La première inspection doit s’effectuer une semaine
après la mise en route de l’appareil. Ensuite nous préconisons une
vérification tous les mois voire moins selon l’état dudit filtre. Avant de
nettoyer ce filtre déconnecter l’appareil et vidanger.
xiv NESLAB Merlin Series
Thermo Scientific
Page 17

Preface
Installazione
L’unità è dotata di un condensatore raffreddato ad aria. Il flusso d’aria per
il raffreddamento viene prelevato frontalmente ed espulso posteriormente
e lateralmente.
IMPORTANTE
“Posizionare lo strumento in modo da evitare l’ostruzione di tali accessi.
Una ventilazione non appropriata comporterà una riduzione della capacità
refrigerante ed, in casi estremi, danni al compressore.
L’apparecchiatura mantiene la massima capacità di raffreddamento con una
temperatura ambiente fino a 25C° circa”.
È opportuno evitare la locazione dell’unità in ambienti troppo polverosi e
provvedere periodicamente ad una pulizia del condensatore.
Assicurarsi che la tensione di alimentazione rispetti quella specificata
+/- 10%.
Le connessioni idrauliche (1/2 pollici FPT o ¾ pollici FPT con pompe
idrauliche del tipo CP-55) sono posizionate ed indicate nel retro dello
strumento e per accedervi rimuovere l’apposita protezione plastica.
Per accedere alla tanica di riserva del fluido rimuovere il pannello di accesso
ed il relativo tappo protettivo, quindi riempire il serbatoio con l’adeguato
fluido refrigerante (è possibile verificare il livello del fluido refrigerante
attraverso il pannello frontale trasparente).
Per le caratteristiche del fluido riferirsi a pagina 11.
Messa in servizio
Assicurarsi che le connessioni elettriche ed il livello di riempimento del
fluido refrigerante siano appropriati.
Attivare l’interruttore differenziale (locato sul retro dello strumento)
spostando la leva di attuazione nella posizione alta.
Per attivare lo strumento premere .
Per disattivare lo strumento premere .
Sul pannello di controllo frontale è presente un LED che indica lo stato
di funzionamento del sistema di refrigerazione. Nel caso in cui il LED sia
illuminato il sistema sta rimuovendo il calore dal fluido refrigerante.
Quando la temperatura controllata raggiunge il set-point impostato il LED
continuerà a lampeggiare.
Thermo Scientific
NESLAB Merlin Series xv
Page 18

Preface
Impostazione della temperatura
Per visualizzare il set-point della temperatura premere sul controller il tasto
impostazione della temperatura . Un segnale luminoso indicherà la
funzione di settaggio ed il display, ad intervalli regolari, visualizzerà il setpoint che potrà essere modificato premendo .
Una volta effettuata la variazione premere il tasto di conferma per
memorizzare la nuova impostazione, che verrà brevemente visualizzata sul
display.
Manutenzione periodica
Ispezionare periodicamente la tanica di riserva del fluido. Se fosse
necessaria una pulizia utilizzare un fluido compatibile con il sistema
idraulico di circolazione ed il fluido refrigerante.
Il fluido refrigerante dovrebbe essere periodicamente sostituito in base alle
condizioni ambientali ed al tempo di utilizzo.
“Prima di cambiare il fluido refrigerante assicurarsi che esso sia ad una
temperatura di sicurezza”
Periodicamente soffiare il condensatore, se necessario. Anche in questo
caso la frequenza dell’operazione dipende esclusivamente dalle condizioni
ambientali.
Si consiglia almeno un controllo mensile visivo, dopo l’installazione, così
da valutare una appropriata frequenza di pulizia.
Le unità, nelle quali sono installate delle pompe del tipo PD, sono dotate
di un filtro che trattiene eventuali impurità solide evitandone il flusso
attraverso la pompa stessa.
Una settimana dopo l’installazione iniziale si consiglia di pulire
accuratamente questo filtro, in quanto l’intasamento di quest’ultimo
potrebbe causare un incremento nella pressione di mandata della pompa.
Dopo la prima pulizia controllare mensilmente le condizioni del filtro in
modo da valutare un’appropriata frequenza di pulizia.
“ Prima di procedere alla pulizia del filtro disconnettere la tensione di
alimentazione e svuotare il serbatoio dal fluido refrigerante tramite
l’apposito scarico posizionato nel retro dell’unità”.
xvi NESLAB Merlin Series
Thermo Scientific
Page 19
Preface
Kurzbedienung
sanleitung
Installation
Das Gerät verfügt über ein luftgekühltes Kühlsystem. Die Luft wird an der
Vorderseite angesaugt und strömt an den Seitenwänden und an der
Rückseite aus. Das Gerät muß so plaziert werden, daß weder die Ansaugnoch die Ausströmöffnungen blockiert sind. Bei ungenügender Ventilation
wird die Kühlleistung reduziert und kann in extremen Situationen zum
Ausfall des Kühlsystems (Kompressor) führen.
Vermeiden Sie Aufstellorte mit hoher Staubentwicklung und reinigen Sie
das Gerät in regelmäßigen Abständen. Um eine einwandfreie Funktion zu
gewährleisten, muß das Gerät ausreichend Luft Zu- und Abfuhr haben.
Bei Staub- und Schmutzablagerungen auf dem Kondensator kommt es zu
einem Verlust an Kühlleistung.
Das Gerät arbeitet mit seiner maximalen Kühlleistung bis zu einer
Umgebungstemperatur von ca. 25°C.
Vergewissern Sie sich, daß die Netzspannung mit der für das Gerät
vorgesehenen Spannung übereinstimmt (±10%).
Die Schlauchanschlüsse des Gerätes befinden sich an der Rückseite und
sind mit und bezeichnet. Die Anschlüsse haben ein ½ Zoll
FPT Innengewinde, bzw. ¾ Zoll FPT bei Geräten mit CP-55 Pumpe.
Bitte entfernen Sie die Kunststoff-Schutzkappen von den Anschlüssen.
Schließen Sie den an den Eingang Ihres Instruments und den
an den Ausgang Ihres Instruments an.
Um das Reservoir zu füllen, öffnen Sie den Reservoir-Schutzdeckel.
Entfernen Sie den
Reservoir verschluß und befüllen Sie das Reservoir mit sauberer
Kühlflüssigkeit.
Geeignete Flüßigkeiten finden Sie auf Seite 11.
Inbetriebnahme
Vor Inbetriebnahme des Gerätes vergewissern Sie sich bitte nochmalig,
daß die elektrischen Anschlüsse und die Rohr- u. Schlauchanschlüsse
sachgemäß installiert sind und das gesamte System mit Kühlflüssigkeit
gefüllt ist.
Um das Gerät einzuschalten, müssen Sie erst den Hauptschalter an der
Rückseite des Gerätes auf „Ein“ stellen und dann drücken. Zum
Abschalten des Gerätes erneut drücken.
Thermo Scientific
NESLAB Merlin Series xvii
Page 20

Preface
Die LED-Anzeige an der Anzeigetafel leuchtet auf, so lange das Kühlsystem
der Kühlflüssigkeit Wärme entzieht. Ist die gewünschte Temperatur erreicht
(setpoint), blinkt die LED-Anzeige.
Einstellung der Temperatur
Um den Temperatursollwert anzuzeigen, drücken Sie die Taste des
Controllers. Die LED leuchtet und die Anzeige blinkt mit dem
eingestellten Sollwert. Um den Temperatursollwert zu ändern, drücken Sie
Pfeiltasten, bis dere gewünschte Sollwert in der Digitalanzeige angezeigt wird.
Drücken Sie die Taste erneut um den Wert zu bestätigen. Die
Digitalanzeige zeigt kurz den neu eingestellten Sollwert schnell blinkend, um
dann wieder die Temperatur der Kühlflüssigkeit anzuzeigen.
Wartung
Überprüfen Sie regelmäßig die Kühlflüssigkeit im Reservoir. Sollte eine
Reinigung notwendig sein, spülen Sie das Reservoir mit einer speziellen
Reinigungsflüssigkeit, die für das Leitungssystem und die Kühlflüssigkeit
geeignet ist.
Das Kühlmittel sollten Sie in regelmäßigen Abständen erneuern. Wenn Sie
das Gerät bei niedrigen Temperaturen betreiben, erhöht sich mit der Zeit der
Wasseranteil in der Kühlflüssigkeit. Dies führt zum Verlust von
Kühlkapazität.
Vor dem Austausch der Kühlflüssigkeit erhöhen Sie bitte die
Betriebstemperatur des Gerätes so weit, daß die Kühlspulen eisfrei sind.
Regelmäßiges Absaugen des Kühlkörpers ist erforderlich. Die
Reinigungshäufigkeit hängt von der Betriebsumgebung ab. Eine monatliche
Überprüfung des Kondensators ist empfehlenswert. So werden Sie nach
einigen Monaten einen Reinigungsrhythmus gefunden haben.
Geräte mit PD-Pumpen sind mit einem Pumpenfilter ausgestattet. Der Filter
verhindert, daß kleine Teilchen und Schmutzablagerungen in die Pumpe
gelangen und so die Pumpenflügel beschädigen. Ein verstopfter Filter führt
zu einem erhöhten Druckverlust.
Nach der ersten Installation kann es zu einer Verunreinigung des Filters
kommen. Die erste Reinigung sollte daher nach einer Woche erfolgen.
Danach empfehlen wir eine monatliche Überprüfung des Filters. So können
Sie nach einiger Zeit abschätzen, wie oft der Filter gereinigt werden muß.
Bevor Sie den Filter reinigen, ziehen Sie den Netzstecker und entleeren Sie
das Gerät.
xviii NESLAB Merlin Series
Thermo Scientific
Page 21

Preface
Verkorte handleiding
Installatie
Het apparaat heeft een luchtgekoeld koelsysteem. De luchtinlaat is aan de
voorzijde. De luchtuitlaat is aan de twee zijkanten en aan de achterzijde.
Plaats het apparaat zo dat de luchtaanvoer niet geblokkeerd is. Bij
onvoldoende luchtdoorstroming zal het koelvermogen afnemen. In
extreme gevallen zal de compressor uitvallen.
Plaats het apparaat niet in stoffige ruimtes. Maak het apparaat regelmatig
schoon. Voor een goede werking moet het apparaat voldoende lucht door
de condensor laten stromen. Een ophoping van stof of andere deeltjes
zullen het koelvermogen nadelig beinvloeden.
Het apparaat zal de opgegeven specificaties halen tot een
omgevingstemperatuur van ongeveer +77°F (+25°C).
Het voltage moet voldoen aan het opgegeven voltage, ±10%.
De aansluitingen voor de waterslangen zijn gelabeld en bevinden zich aan
de achterzijde. De aansluitingen zijn ½ inch FPT (¾ inch FPT voor
apparaten met een CP-55 pomp). Verwijder de plastic beschermdopjes
die zich in de aansluitingen voor de waterslangen bevinden. Sluit de
“Outlet” van het apparaat aan op de “Inlet” van uw toepassing. Sluit de
“Inlet” van het apparaat aan op de “Outlet” van uw toepassing
Verwijder het paneel wat toegang geeft tot de vulopening van het
vloeistofreservoir. Verwijder de dop van het vloeistofreservoir en vul het
reservoir met schone vloeistof.
Voor aanbevelingen over vloeistoffen verwijzen wij naar pagina 11.
In bedrijf stellen
Check, voor het opstarten, alle aansluitingen. Overtuig u ervan dat het
apparaat op de juiste manier is gevuld met koelvloeistof. Aan de
achterzijde van het apparaat bevind zich de schakelaar voor de zekering.
Deze schakelaar moet naar boven staan.
Om het apparaat te starten druk op “start/stop”. Om het apparaat uit te
schakelen druk nogmaals op “start/stop”.
De LED geeft de status van het koelsysteem aan. De LED gaat aan als
het apparaat warmte ontrekt aan de koelvloeistof. Op het moment dat de
ingestelde temperatuur wordt bereikt zal de LED gaan knipperen.
Thermo Scientific
NESLAB Merlin Series xix
Page 22

Preface
Temperatuur Instelling
Druk op de controller om de ingestelde temperatuur te zien. De indicator
licht op en de ingestelde waarde knippert. Druk op de knop met het pijltje
totdat de gewenste temperatuur is ingesteld. Druk nogmaals op de knop
met het pijltje om de wijziging te bevestigen. De display knippert enkele
malen snel en zal dan weer de actuele temperatuur laten zien.
Periodiek onderhoud
Controleer regelmatig de vloeistof. Als de vloeistof ververst moet worden
handel dan als volgt:
Laat de vloeistof uit het apparaat lopen. Aan de achterzijde van het
apparaat bevindt zich een afvoerkraantje.
Spoel het reservoir door met een spoelvloeistof die geschikt is voor het
apparaat en de koelvloeistof.
Het is noodzakelijk om de ribben van de condensor regelmatig schoon te
maken met behulp van een stofzuiger. Check de condensor maandelijks.
Na enige maanden kunt u de frequentie van het schoonmaken bepalen.
Apparaten met een PD pomp hebben een filter. Het filter beschermt de
pomp tegen deeltjes die in het vloeistofcircuit kunnen komen. Een vies
filter zal de druk in het koelcircuit verhogen.
Na de eerste opstart is er een verhoogde kans op een vervuild filter. Maak
na één week het filter schoon. Wij adviseren een maandelijkse inspectie
van het filter. Na een aantal maanden kunt u de frequentie van inspecties
aanpassen. Haal de stekker uit het stopcontact voordat u het filter gaat
schoonmaken.
xx NESLAB Merlin Series
Thermo Scientific
Page 23
Preface
ˆ
Strucný návod
k obsluze
Instalace
ˆˆ
Jednotka je chlazena vzduchem. Vzduch je nasáván predním panelem a je
odváden bocními panely a zadním panelem. Vzdy umístete jednotku tak,
ˆ
aby nebyl kladen odpor proudení vzduchu. V opacném prípade dojde ke
ˆ
ˆ
ˆ
ˆ
ˆ
ˆ
ˆ
snízení chladicího výkonu a v extrémních prípadech i k poruše
kompresoru.
ˆˆ
Je treba se vyvarovat nadmerne prašného prostredí a stanovit a dodrzovat
ˆ
interval pravidelného cištení kondenzátoru. Pro správnou funkci jednotky
je treba, aby kondenzátorem proudilo dostatecné mnozství vzduchu. Úsady
ˆˆ
ˆˆ
ˆˆ
ˆ
ˆˆ
ˆ
prachu a necistot na zebrech kondenzátoru se projeví snízením chladicího
výkonu.
ˆ
Jednotka je schopna podávat deklarovaný chladicí výkon az do okolní
teploty +25°C.
ˆ
ˆ
ˆ
Napájecí napetí nesmí prekrocit nominální hodnotu ±10%.
ˆ
Pripojení okruhu cirkulacní kapaliny se provádí pomocí prípojek
umístených na zadním panelu jednotky. Prípojky jsou oznaceny
a . Rozmer fittingu je ½ “ FPT (¾ “ FPT pro jednotky s cerpadlem
CP-55 ). Vyjmete plastové ochranné vlozky z obou nátrubku. Pripojte
prívod a odvod vaší aplikace, t.j. externího zarízení které temperujete na
ˆ
ˆ
ˆ
ˆˆ
ˆ
ˆˆ
ˆ
°
ˆ
ˆ
ˆ
°
pozadovanou teplotu.
ˆ
ˆ
ˆ
Plnení rezervoáru se provádí po otevrení prístupového panelu a
vyšroubování zátky rezervoáru. Rezervoár se poté naplní vhodnou
ˆ
cirkulacní kapalinou.
ˆ
ˆ
ˆ
Doporucené parametry cirkulacní kapaliny jsou specifikovány na strane 11.
Thermo Scientific
ˆ
Provoz
Pred zahájením provozu je treba opakovane proverit elektrické pripojení a
cirkulacní obvody jednotky. Cirkulacní obvod musí být zaplnen vhodnou
ˆ
ˆ
ˆ
ˆ
ˆ
ˆˆ
ˆ
ˆ
ˆ
ˆ
ˆ
cirkulacní kapalinou. Sítový spinac na zadní stene jednotky poté umístíme
do horní polohy.
ˆ
ˆ
K zahájení provozu stisknete . K vypnutí jednotky opet stisknete .
ˆˆˆ
ˆ
LED kontrolka indikuje stav chladicího systému. Pokud svítí, signalizuje
ze chladicí systém momentálne bezí a odvádí teplo cirkulacní kapaline.
Pokud se teplota cirkulacní kapaliny priblízí pozadované operacní teplote,
ˆ
ˆˆ
ˆ
ˆ
ˆ
ˆ
ˆ
ˆ
kontrolka zacne blikat.
NESLAB Merlin Series xxi
Page 24

Preface
Nastavení teploty
Po zapnutí jednotky se zobrazí pozadovaná teplota cirkulacní kapaliny. Po
stisknutí kontrolního tlacítka displej zacne blikat. Šipkami nahoru nebo
°
dolu nastavíte, pokud je treba, novou pozadovanou teplotu. Zmena se
potvrdí opetovným stisknutím kontrolního tlacítka. Po potvrzení se
ˆ
ˆ
ˆ
ˆ
ˆ
zobrazí nove pozadovaná hodnota rychlým blikáním displeje, poté se
ˆ
ˆ
ˆ
ˆ
ˆ
ˆ
zobrazí aktuální teplota externí cirkulacní kapaliny.
ˆ
Pravidelná údrzba
Pravidelne kontrolujte stav a kvalitu kapaliny v rezervoáru. Pokud je treba
provést vycištení, pouzijte kapalinu, která je shodná nebo kompatibilní s
ˆ
ˆ
ˆ
ˆˆ
ˆ
ˆ
pouzívanou cirkulacní kapalinou.
ˆˆ
ˆ
Cirkulacní chladicí kapalinu je treba pravidelne obmenovat. Interval
obmeny závisí na stávajících podmínkách a stupni zatízení. Pred výmenou
ˆ
ˆ
ˆ
ˆ
ˆˆ
ˆ
ˆ
ˆ
ˆ
cirkulacní kapaliny se prosím ujistete, ze nemá nebezpecnou teplotu.
ˆ ˆ ˆ
ˆ
Nezbytnou nutností je pravidelné cištení zeber kondenzátoru pomocí
vysavace. Interval cištení závisí na podmínkách. Výrobce doporucuje
provádet vizuální kontrolu a prípadné cištení chladicích zeber
kondenzátoru kazdý mesíc. Po case se na základe zkušenosti stanoví
ˆˆ ˆ ˆ
ˆˆˆˆ ˆ ˆ
ˆ
ˆ
ˆ ˆ ˆ
ˆ
°
ˆ
ˆ
ˆ
ˆ
ˆ
optimální termín cištení, který je treba dusledne dodrzovat.
ˆˆ
Jednotky s PD cerpadly mají v okruhu cirkulacní kapaliny zarazen filtr.
Filtr má za úkol zachycovat mechanické necistoty a zabránit tak poškození
ˆ
°
ˆ
ˆ
ˆ
lopatek cerpadla. Zanesený filtr zpusobí zvýšení tlaku cirkulacní kapaliny.
ˆ
Pri prvním uvedení do provozu se muze filtr snadno zanášet. Po uplynutí
jednoho týdne od uvedení do provozu je treba filtr vycistit. Další
ˆ ˆ ˆ
kontrola a cištení filtru se doporucuje v mesícních intervalech. Po nekolika
mesících se na základe zkušenosti stanoví vhodný interval kontroly cistoty
ˆ
filtru. Pred cištením odpojte prívodní kabel od zdroje elektrické energie a
ˆ ˆ ˆ
ˆ
ˆ
ˆ
°
ˆ
ˆ
ˆ
ˆ
ˆ
ˆ
ˆ
vypustte z jednotky cirkulacní kapalinu.
xxii NESLAB Merlin Series
Thermo Scientific
Page 25

Preface
Forenklet bru
kermanual
Innstalasjon
Kjøleren er ett luftkjølt system.
Luften går inn foran, og går ut på siden og bak kjøleren.
Plassèr derfor alltid kjøleren så det er god plass rundt.
Dårlig luftgjennomstrømning vil kunne forårsake dårlig kjølekapasitet og i
verste fall kan det forårsake skader på kompressoren.
Kjøleren bør ikke plasseres i ekstremt skitne rom, og periodevis rengjøring
må utføres.
Lag gjerne et skjema, og heng det nær kjøleren.
For at kjøleren skal virke ordentlig, trenger den stor luftgjennomstrømning
i kondensator.
Når kondensatoren tettes med støv, eller det blir varmere enn 25°C i
rommet, vil dette føre til tap av kjølekapasitet.
Kjøleren har full kjølekapasitet opp til 25°C (77°F) rom temperatur.
Vær sikker på at strøm, spenning møter de spesifiserte verdier ±10%.
Rørtilkoblinger er plassert bak på kjøleren og er påsatt propper for
beskyttelse.
Størrelsen på rør tilkoblinger er ½" inch FPT gjenger (¾" inch FPT
gjenger for kjølere med CP 55 pumpe).
Ta bort plastikkpropper fra begge kuplingene, og tilkoble deretter rørene.
Ut fra kjøler til inntak på applikasjonen.
Inn på kjøler fra uttak på applikasjonen.
For å fylle systemet.
Åpne deksel for reservoar og skrukork på reservoaret.
Fyll opp med ren kjølevæske/vann.
For anbefalt kjølevæske, se side 11.
Thermo Scientific
NESLAB Merlin Series xxiii
Page 26

Preface
Operasjon
Før start av kjøleren, dobbelsjekk at alle elektriske og rørtilkoblinger er
korrekt tilkoblet.
Kontrollèr at vannsystemet er fylt opp med anbefalt kjølevæske.
Sett på strømmen ved å slå på bryter på baksiden av kjøleren.
For å starte kjøleren,- trykk. For å slå av kjøleren,- trykk igjen.
LED lyset indikerer status på kjøleren. Den lyser når kjøleren fjerner
varme fra vannet.
Når temperaturen nærmer seg settpunktet, begynner LED lyset å blinke.
Temperatur settpunkt justering.
For å programmere kontrolleren,- trykk på kontrolleren. Indikatorlampen
vil nå lyse og nummerdisplayet blinke den satte sett-temperatur. For å
forandre verdien, trykk piltast opp eller ned til ønsket verdi blinker i
displayet. Trykk igjen for å bekrefte den nye verdien.
Displayet vil nå blinke den nye verdien en liten stund og deretter gå
tilbake til den avleste temperaturen.
Periodisk vedlikehold
Kontrollèr væskenivået i reservoaret periodisk. Rengjør reservoaret ved
behov.
Spyl reservoaret med rengjøringsmiddel som er kompatibelt med systemet
og væske som skal brukes som kjølevæske.
Kjølevæsken i systemet bør skiftes med periodiske mellomrom.
Frekvensen på skifte beror på bruken av systemet.
Før kjølevæsken skiftes må, kjølevæske temperaturen være på ett sikkert
nivå.
Periodisk rengjøring av kondensatoren er strengt nødvendig.
Anbefalt frekvens, kontrollèr kondensatoren en gang pr. mnd. etter
installasjon.
Deretter rengjøres kondensatoren jevnlig med samme intervall.
Kjølere med PD pumper er utstyrt med sil. Dersom det er partikler i
systemet , beskytter silen mot ødeleggelser.
Etter noe tid, bør man kontrollere/rengjøre dette filteret, deretter
kontrollèr/rengjør filteret jevnlig.
Tett filter vil forårsake lavere trykk i sirkulasjons systemet.
xxiv NESLAB Merlin Series
Thermo Scientific
Page 27

Chapter 1 Description
The NESLAB Merlin Recirculating Chiller is designed to provide a
continuous supply of cooling fluid at a constant temperature and volume.
The unit consists of an air-cooled refrigeration system, plate heat
exchanger, recirculating pump, polyethylene reservoir, and a
microprocessor controller.
Throughout the manual, you will be asked to consult the unit’s name plate
label for specific information. The label is located on the rear of the unit.
See below for an example.
BOM#: XXXXXXXXXXXX
S/N: XXXXXXXXX
XXX VOLT XX HZ X PH X.X AMP
R134A X.XOZ HIGH XXX PSI LOW XXXPSIG
Thermo Scientific
NESLAB Merlin Series 1
Page 28

Chapter 1
Specifications
M 25 M 33 M 75 M 100 M 150
Temperature Range
Temperature Stability
Reservoir Volume
Refrigerant
Intake Requirements (ft
(60 Hertz units)
Shipping Weight
(Kilograms)
Standard Temp Units
Cooling Capacity
Gallons
Liters
3
/min)
(Pounds)
1
+5°C to +35°C +5°C to +35°C +5°C to +35°C +5°C to +35°C +5°C to +35°C
2,3
±0.1°C ±0.1°C ±0.1°C ±0.15°C ±0.15°C
0.5 0.5 0.5 0.5 0.5
1.8 1.8 1.8 1.8 1.8
R134a R134a R134a R404a R404a
178 178 385 755 755
141 141 200 287
4
64 64 91 130 130
3
2500
Fluid - Water
2000
1500
1000
Heat Removal (Watts)
500
A
B
A = M 75 60Hz
B = M 75 50Hz
C = M 33 60Hz
D = M 33 50Hz
C
E
D
E = M 25 60Hz
F = M 25, 50Hz
F
287
4
5 10 15 20 25 30 35 Temperature °C
6000
5000
4000
Fluid - Water
A
B
C
A = M 150 60Hz
B = M 150 50Hz
C = M 100 50 Hz
C = M 100 60Hz
3000
2000
Heat Removal (Watts)
1000
5 10 15 20 25 30 35 Temperature °C
1. Low temperature units have a range of -15°C to +35°C.
2. At the chiller. Display resolution 1.0°C. 0.1°C display resolution is available using the
controller's Setup/Tuning Loop, see page 18.
3. Circulating at 20°C ambient, pump unloaded. Cooling capacity will vary depending on fluid
temperature, ambient temperature, and cooling fluid.
4. Units with PD 2 pumps. Units with CP 55 pumps weigh 310 pounds (141 kilograms).
5. Thermo Scientific reserves the right to change specifications without notice.
2 NESLAB Merlin Series
Thermo Scientific
Page 29

Chapter 1
Low Temp Units
Cooling Capacity
3
2500
Fluid - 50/50 EG/Water
2000
1500
1000
Heat Removal (Watts)
500
A = M 75 60Hz
B
A
B = M 75 50Hz
C = M 33 50, 60Hz
D = M 25 50, 60Hz
C
D
-15 5 20 35 Temperature °C
2500
Fluid - 50/50 PG/Water
2000
1500
A
B
A = M 75 60Hz
B = M 75 50Hz
C = M 33 50, 60Hz
D = M 25 50, 60Hz
C
1000
Heat Removal (Watts)
500
D
-15 5 20 35 Temperature °C
6000
Fluid - 50/50 EG/Water
5000
4000
3000
2000
Heat Removal (Watts)
A
B
C
D
A = M 150 60Hz
B = M 150 50Hz
C = M 100 60Hz
D = M 100 50Hz
1000
-15 5 20 35 Temperature °C
5000
Fluid - 50/50 PG/Water
4000
3000
A
B
C
D
A = M 150 60Hz
B = M 150 50Hz
C = M 100 60Hz
D = M 100 50Hz
2000
Heat Removal (Watts)
1000
Thermo Scientific
-15 5 20 35 Temperature °C
NESLAB Merlin Series 3
Page 30

Chapter 1
Pump Options
Standard temperature range units
Unit Standard Optional
M 25 MD 30 or PD 1 None
M 33 MD 30 or PD 1 PD 2
M 75 PD 1 PD 2
M 100 (208/230V 60Hz) PD 2 CP 55
M 100 (230V 50Hz) PD 2 None
M 100 (400V 50Hz) PD 2 CP 55
M 150 (208/230V 60Hz) PD 2 CP 55
M 150 (230V 50Hz) PD 2 None
M 150 (400V 50Hz) PD 2 CP 55
Low temperature range units
Unit Standard Optional
M 25 PD 1 None
M 33 PD 1 PD 2
M 75 PD 2 None
M 100 (208/230V 60Hz) PD 2 CP 55
M 100 (230V 50Hz) PD 2 None
M 100 (400V 50Hz) PD 2 CP 55
M 150 (208/230V 60Hz) PD 2 CP 55
M 150 (230V 50Hz) PD 2 None
M 150 (400V 50Hz) PD 2 CP 55
NOTE PD pumps should not be used with applications that are sensitive
to high pressures. S
4 NESLAB Merlin Series
Thermo Scientific
Page 31

Pumping Capacities
Bar PSI
4.0
3.4
2.7
Pressure
2.0
1.3
0.7
Bar PSI
3.5
2.8
60
50
40
30
20
10
50
40
A=PD 1 60Hz
B=PD 1 50Hz
AC
C=PD 2 60Hz
D=PD 2 50Hz
D
B
1 2 3 4 5 GPM
3.8 7.6 11.3 15.1 18.9 LPM
Flow
A=CP 55 60Hz
B=CP55 50Hz
Chapter 1
2.1
Pressure
1.4
0.7
Bar PSI
10
0.7
0.5
0.4
Pressure
0.3
0.1
30
A
B
20
10
2 4 6 8 10 12 14 16 18 20 GPM
7.6 15.1 22.7 30.2 37.9 45.4 53.0 60.6 68.1 75.7 LPM
Flow
8
MD 30 60 Hz
6
4
The MD 30 is not
available for 50 Hz
2
units.
Thermo Scientific
12345GPM
3.8 7.6 11.3 15.1 18.9 LPM
Flow
NESLAB Merlin Series 5
Page 32

Chapter 1
B
H
F
E
G
Unit Dimensions (Inches)
Dimension A
Dimension B
Dimension C
Dimension D
Dimension E
Dimension F
Dimension G
Dimension H
Dimension I
1
1
1
2
3
4
5
6
7
Dimension J
Dimension K
Dimension L
Crate Dimensions
(H x W x D)
8
L
C
K
A
J
Rear View Side View
D
I
M 25 M 33 M 75 M 100 M 150
23 1/2 23 1/2 26 1/8 30 3/8 30 3/8
12 5/8 12 5/8 16 1/4 21 1/4 21 1/4
20 7/8 20 7/8 24 29 1/4 29 1/4
22233
18 1/8 18 1/8 20 3/4 25 25
33333
16 1/4 16 1/4 18 7/8 23 23
1 3/8 1 3/8 1 3/8 1 3/8 1 3/8
2 7/8 2 7/8 3 5/8 4 3/4 4 3/4
5 5 7 7 1/2 7 1/2
7 1/8 7 1/8 7 1/8 7 1/8 7 1/8
1 3/4 1 3/4 1 3/4 1 3/4 1 3/4
36 x 18½ x 26 36 x 18½ x 26 39 x 22¼ x 29¼ 42x 27 x 35¼ 42 x 27 x 35¼
1. Dimension A is the height of the unit. Units with CP-55 pumps are 6" higher. The unit width and depth (dimensions B and C) are the case
dimensions, add approximately 1/2 inch to include the plumbing connections.
2. Dimension D is the distance from the floor to the bottom of the unit case (height of the casters).
3. Dimension E is the distance from the floor to the center of the outlet connection.
4. Dimension F is the distance between the center of the outlet and inlet connections.
5. Dimension G is the distance from the floor to the center of the pressure relief valve (units with PD pumps).
6. Dimension H is the distance from the unit's side to the center of the outlet/inlet connections, and the pressure relief valve. 2" from the unit's
side to the center of the outlet/inlet connections for M-100/150 units with CP-55 pumps.
7. Dimension I is the distance from the unit's side to the center of the drain connection. 5 1/4" for M-100/150 units with CP-55 pumps.
8. Dimension J is the distance from the floor to the center of the drain connection. 7 1/2" for M-100/150 units with CP-55 pumps.
9. Dimension K is the distance from the top of the unit to the center of the power connection.
10. Dimension L is the distance from the unit's side to the center of the power connection. NA for M-100/150 units rated 400V/50Hz.
11. Crate dimensions for units with CP-55 pumps are 6 inches higher. All packages tested to ISTA 2B.
6 NESLAB Merlin Series
Thermo Scientific
Page 33

Chapter 2 Installation and Operation
Site
The unit is designed for indoor use only. It should be located in a clean
industrial environment where ambient temperatures are inside the range of
10°C to 35°C (50°F to 94°F) and relative humidity between 10% to 80%,
noncondensing.
Operating altitude is sea level to 6000 feet (1830 meters). The unit's
overvoltage category is II, its pollution degree is 2.
Never place the unit in a location where excessive heat, moisture, or
corrosive materials are present.
SS
S
SS
The unit has an air-cooled refrigeration system. Air is drawn through the
front of the unit and discharged through rear and side panels. The unit
must be positioned so the intake and discharge are not impeded. A
minimum clearance of 3 feet (1 meter) on all vented sides is necessary for
adequate ventilation. Inadequate ventilation will cause a reduction in
cooling capacity and, in extreme cases, compressor failure.
Direction of Airflow
Thermo Scientific
Excessively dusty areas should be avoided and a periodic cleaning schedule
should be instituted (see Chapter 4, Maintenance). Optional air filters are
available, contact our Service Department. See Preface, After-Sale
Support.
The unit retains its full rated capacity in ambient temperatures up to
approximately 25°C (77°F). Reduce the cooling capacity 1% for every
0.5°C (1°F) above 25°C (77°F), up to a maximum ambient temperature of
35°C (94°F).
NESLAB Merlin Series 7
Page 34

Chapter 2
Electrical
Requirements
The unit construction provides protection against the risk of electrical
shock by grounding appropriate metal parts. The protection may not
function unless the power cord is connected to a properly grounded
outlet. It is the user's responsibility to assure a proper ground
connection is provided.
SS
S
SS
The user is responsible to ensure that the power cord provided meets local
electrical codes. If not, contact qualified installation personnel.
The unit is intended for use on a dedicated outlet. The Merlin has an internal
circuit protection that is equivalent (approx.) to the branch circuit rating.
This is to protect the Merlin, and is not intended as a substitute for branch
circuit protection.
Standard and Low-Temperature 60 Hertz units available power options:
Unit Pump Voltage Current Value Line Cord Plug
M 25 MD 30 115 8.1 5-15P
PD 1 115 9.8 5-15P
M 33 MD 30 115 11.5 5-15P
PD 1 115 13.2 5-20P
PD 2 115 15.5 5-20P
PD 1 208/230 6.5 6-15P
PD 2 208/230 7.8 6-15P
M 75 PD 1 208/230 8.8 6-15P
PD 2 208/230 10.1 6-15P
M 100 PD 2 208/230 13.1 L6-30P
CP 55 208/230 16.1 L6-30P
M 150 PD 2 208/230 15.4 L6-30P
CP 55 208/230 18.4 L6-30P
NOTE All 60 Hertz units are UL Listed and Certified to Canadian
Standards. S
Amperage based on extreme operating conditions. Operating in a 20°C
ambient and at nominal voltage will result in a lower amperage draw.
8 NESLAB Merlin Series
Thermo Scientific
Page 35

Chapter 2
Refer to the name plate label on the rear of the unit for specific
electrical requirements.
NOTE Three-phase units are not supplied with a line cord. Instructions
for wiring three-phase units are located behind the power box cover. To
access the power box remove the unit's top and left-side panel. Remove
the screws securing the cover. S
Standard and Low-Temperature 50 Hertz units:
Unit Pump Voltage Current Value Line Cord Plug
M 25 PD 1 230 5.1 Country Specific
M 33 PD 1 230 6.3 Country Specific
PD 2 230 7.6 Country Specific
M 75 PD 1 230 8.8 Country Specific
PD 2 230 10.1 Country Specific
M 100 PD 2 230 13.5 Country Specific
PD 2 400/3Ø/5W 7.7 Country Specific
CP 55 400/3Ø/5W 5.5 Country Specific
M 150 PD 2 230 15.6 Country Specific
PD 2 400/3Ø/5W 7.7 Country Specific
CP 55 400/3Ø/5W 5.5 Country Specific
Amperage based on extreme operating conditions. Operating in a 20°C
ambient and at nominal voltage will result in a lower amperage draw.
Refer to the name plate label on the rear of the unit for specific
electrical requirements.
NOTE Three-phase units are not supplied with a line cord. Instructions
for wiring three-phase units are located behind the power box cover. To
access the power box remove the unit's top and left-side panel. Remove
the screws securing the cover. S
Thermo Scientific
NESLAB Merlin Series 9
Page 36

Chapter 2
Plumbing
Requirements
Plumbing Connections
The plumbing connections are located on the rear of the unit and are
labeled (supply) and (return). The connections are ½ inch Female
Pipe Thread. For units with CP-55 pumps, the connections are ¾ inch
Female Pipe Thread. Units with ½ inch fittings are supplied with 3/8 inch and
½ inch barbed adapters, units with ¾ inch fittings are supplied with ½ inch
and ¾ inch barbed adapters.
Remove the plastic protective plugs from both plumbing connections.
Install the barbed adapters to these connections.
Connect to the hose feeding the inlet of your application. Connect
to the hose from the outlet of your application. Clamp all connections.
Reservoir Access Panel
Drain
Never connect the fittings to your building water supply or any water
pressure source.
SS
S
SS
NOTE On units equipped with PD pumps, ensure your plumbing is rated
to withstand 110 psi at the highest operating temperature. S
On units with MD pumps never completely restrict flow to your
application. Dead-heading the pump will damage its coupling and
require pump replacement.
SS
S
SS
It is important to keep the distance between the unit and the instrument
being cooled as short as possible. Tubing should be straight and without
bends. If diameter reductions must be made, they should be made at the
inlet and outlet of your application, not at the chiller.
10 NESLAB Merlin Series
Thermo Scientific
Page 37

Fluids
Chapter 2
All units have a ball-valve reservoir drain located on the rear of the unit.
Add the desired length of tubing to the drain valve. To help prevent any
spillage from your application, consider installing external isolation
valves on the supply and return lines.
Never use flammable or corrosive fluids with this unit. Do not use
automotive antifreeze. Commercial antifreeze contains silicates
that can damage the pump seals. Use of automotive antifreeze will
void the manufacturer’s warranty.
Acceptable fluids and their normal operating temperature ranges are:
Filtered/Single Distilled water, +5°C to +35°C (+10°C to +35°C
for low-temperature units)
50/50 Uninhibited Ethylene Glycol/Water, -15°C to +35°C
50/50 Inhibited Ethylene Glycol/Water, -15°C to +35°C
50/50 Uninhibited Propylene Glycol/Water, -15°C to +35°C
50/50 Inhibited Propylene Glycol/Water, -15°C to +35°C
Deionized water (1 - 3 MOhmcm, compensated), +5°C to
+35°C (+10°C to +35°C for low-temperature units)
Ethylene glycol (EG) is hygroscopic, it will absorb water from its
environment. This can affect the freezing point and boiling point
of the fluid over time. This may result in system failure.
When using EG/water or PG/water, top-off with EG/water or
PG/water. Do not top-off with plain water. Topping-off with plain
water can severely effect the freezing point and boiling point of the
fluid. This may result in system failure.
Do not use a Deionization (DI) filter with Inhibited EG or
Inhibited PG. A DI filter will remove inhibitors from the solution
rendering the fluid ineffective against corrosion protection. Also,
inhibitors increase fluid conductivity.
Thermo Scientific
Refer to Appendix A for additional information.
NESLAB Merlin Series 11
Page 38

Chapter 2
Filling Requirements
Reservoir Tank
Isolation Valves
The polyethylene reservoir is translucent for easy fluid level monitoring.
Remove the reservoir access panel, see previous page. Locate and remove
the reservoir cap. Fill the reservoir with clean cooling fluid.
Since the reservoir capacity may be small compared to your application, have
extra cooling fluid on hand to keep the system topped off when external
circulation is started.
Fill to here
Reservoir
10"
4¼"
Minimum fill level
Isolation Valves
Upper Left Side of Unit, Panel Removed
Units are equipped with two reservoir tank isolation valves. The valves are
used to isolate the tank from the fluid flow. The units are factory shipped
with the valves open.
Open Tank
Circulation
Ensure the valves are open when circulating to a closed system. When
operating at low temperatures and circulating to a closed system, should
condensation appear on the reservoir, closing the upper valve after initial start
up will help eliminate it. Leave the valve open for initial start up so process
fluid flow through the reservoir can rapidly bleed air from the system. To
close the upper valve, open the reservoir access panel and turn the valve 90°.
System temperature changes with the isolation valves closed, and
while circulating to a closed system, can create a vacuum and/or high
pressure conditions.
If your application requires the process fluid to flow to an open tank
located above the unit, before starting close the valves to prevent fluid
siphoning and reservoir overflow. To close the upper valve, open the
reservoir access panel, to close the lower valve you must remove the side
access panel. Turn the valves 90°.
12 NESLAB Merlin Series
Thermo Scientific
Page 39

Chapter 2
Controller
The controller controls temperature using a Proportional-IntegralDerivative (PID) algorithm. It is designed with self-diagnostic features
and easy to use operator interface.
Use this key to toggle the unit on or off.
Use this key to scroll through the controller's LEDs. It is also
used to accept and save changes.
If the alarm sounds, use this key to toggle the alarm off and
on. NOTE: If the cause of the alarm is cleared but then
reoccurs, the alarm will sound again.
Use this key to increase displayed numerical values.
Use this key to decrease displayed numerical values.
Indicates refrigeration system status. It illuminates to
indicate the refrigeration system is removing heat from the
cooling fluid. As the operating temperature approaches the
temperature setpoint, the LED will flash. The indicator is off
when heat is not being removed.
Thermo Scientific
NESLAB Merlin Series 13
Page 40

Chapter 2
NOTE The following indications are not visible until is depressed. S
Indicates the controller is displaying the setpoint. Adjust the display
value using the arrow keys.
NOTE You cannot adjust the setpoint closer than 2°C to either of the
temperature limits discussed below.
S
Indicates the controller is displaying the low temperature alarm
setting. The indicator flashes and the alarm sounds if this limit is
exceeded. Adjust the display value using the arrow keys.
Indicates the controller is displaying the high temperature alarm
setting. The indicator flashes and the alarm sounds if this limit is
exceeded. Adjust the display value using the arrow keys.
(Optional) Indicates the unit is in the remote/serial communication
mode of operation. The indicator flashes if the unit is in the remote
start/stop mode of operation. Toggle between the local and remote
modes using the arrow keys.
NOTE For all four indicators, if neither arrow key is pressed within 10
seconds the display will return to the recirculating temperature display. Save
any change using . After pressing an arrow key, if is not pressed
within 60 seconds the display will return to the recirculating temperature
display and ignore any change. S
14 NESLAB Merlin Series
Thermo Scientific
Page 41

Start Up/Shut Down
Chapter 2
Pre-Start
Circuit Protector
Starting
Before starting the unit, double check all electrical and plumbing
connections. Have extra recirculating fluid on hand. If the unit will not
start refer to Chapter 5 Troubleshooting.
Place the circuit protector located on the rear of the unit to the up
position, the controller will flash and the alarm will momentarily sound.
The unit has automatic restart. If the unit was shutdown as a
result of a power failure and power is restored, it will restart.
SS
S
SS
Press . The controller will do a self-test (the controller will quickly
sequence through its LEDs and momentarily sound the alarm) and then
display the recirculating fluid temperature. The refrigeration system and
the recirculation pump will then start. The RECIRCULATING
PRESSURE gauge will display the pump operating pressure. If the
pressure needs adjusting, refer to page 29.
NOTE If on start up the unit's recirculating fluid is outside either
temperature limit, the unit will operate but the appropriate indicator will
flash until the fluid is within the limit. S
Setpoint
Thermo Scientific
To display/change the setpoint press until illuminates. The
display will flash the current setpoint value. Use the arrow keys to
change the value.
NOTE If the arrow keys are not pressed within 10 seconds the display
will return to the current reservoir temperature. The controller will not
allow you to enter a setpoint closer than 2°C of either temperature
alarm setting discussed on the next page. Trying to use a setpoint within
2°C causes the appropriate indicator to flash and sounds the audible
alarm twice. S
NESLAB Merlin Series 15
Page 42

Chapter 2
Once the desired setpoint is displayed, press again to confirm the
change. The display will rapidly flash the new value for a short period and
then return to the recirculating fluid temperature.
NOTE If the value is not confirmed within 60 seconds the display will
return to the recirculating fluid temperature and ignore any changes.
S
Temp Alarms
Remote/Serial Comm
To display/change the temperature alarm setting press until either or
illuminates. The display will flash the current limit value. Use the arrow
keys to change the value. The low-end range is 0°C (-15°C for low-temp
units) to 30°C. The high-end range is 10°C to 40°C.
NOTE If the arrow keys are not pressed within 10 seconds the display will
return to the current reservoir temperature. You cannot set either alarm
closer than 2°C of the setpoint.
S
Once the desired setting is displayed, press again to confirm the change.
The display will rapidly flash the new value for a short period and then return
to the recirculating fluid temperature.
NOTE If the value is not confirmed within 60 seconds the display will
return to the recirculating fluid temperature and ignore any changes. S
(Optional) Once your remote/serial comm cable is connected to the unit,
enable or disable remote operation or serial communication by pressing
until illuminates. The display will flash the communication status. Use
the up arrow key to enable, the down arrow to disable. See pages 21 and 22
for additional information.
16 NESLAB Merlin Series
NOTE If the arrow keys are not pressed within 10 seconds the display will
return to the current reservoir temperature. S
Once the desired status is displayed, press again to confirm the change.
The display will rapidly flash the new status for a short period and then
return to the recirculating fluid temperature.
NOTE If the status is not confirmed within 60 seconds the display will
return to the recirculating fluid temperature and ignore any change. S
NOTE Enabling serial communications disables the remote start/stop
feature. In either mode, the setpoint and alarm values can not be changed
using the controller but they can still be viewed. S
Thermo Scientific
Page 43

Chapter 2
External Sensor
Stopping
(Optional) Once the external sensor cable is connected to the unit,
enable or disable the sensor by pressing
a fifth time. The display will
alternate with and either or . If desired, use the arrow
keys to change the status and then press to return to the
temperature display. See page 23 for additional information.
To turn the unit off, press .
When the display goes blank it is safe to place the circuit protector
located on the rear of the unit to the down position.
Using any other means to shut the unit down can reduce the life of
the compressor. S
The circuit protector located on the rear of the unit is not intended
to be used as a disconnecting means. S
Always turn the unit off and disconnect it from its supply voltage
before moving the unit. S
Thermo Scientific
NESLAB Merlin Series 17
Page 44

Chapter 2
Setup/Tuning Loop
The Setup/Tuning Loop, see illustration next page, is used to configure the
controller temperature display and various operating parameters. To enter
the loop you must be displaying the reservoir fluid temperature and then,
while pressing and holding , press . The display will indicate .
Use the arrow keys to enter/bypass the loop. Once in the loop press to
sequence through it. Use the arrow keys to change any display.
The loop is used to determine how the unit will react when a fault occurs
) — either shut down ( ) or continue to run ( ). The unit is
(
shipped configured to run.
It is also used to configure the temperature displays to indicate to a tenth of
a degree (
).
The loop is used to select which temperature sensor the high and low
temperature monitors will use ( ). is the internal sensor, is
the optional external sensor. is dispayed only if the optional external
sensor is enabled.
If the optional external/remote probe is enabled, the loop is used to set the
remote probe temperature deviation ( ) limit. This limit is applied to
the setpoint to calculate the minimum fluid temperature supplied to your
application. For example, if the setpoint is 10°C and the deviation is set to
3°C, the coldest fluid temperature supplied to your application will be
limited to 7°C.
The deviation can be set from 1°C to 33°C for standard units, 1°C to 53°C
for low-temperature range units. The factory default settings are 30°C and
50°C respectively.
The loop can also be used to set the controller's PID parameters
( ). The factory preset values are on page 27.
Thermo Scientific recommends that only a qualified technician change
PID parameters. Incorrect PID values will hamper unit performance. S
The heat PID is only applicable to units configured with a heater.
The loop is also used to adjust/verify serial communication parameters
( ). This section of the loop is applicable only to units configured for
serial communications capability.
Changes made in the Tuning/Setup Loop take affect when is pressed at
the prompt. Pressing at the prompt aborts all changes.
18 NESLAB Merlin Series
Thermo Scientific
Page 45

Chapter 2
A
XX.X
HOLD
Indicates Optional Displays
Thermo Scientific
RS 485 only.
ccept All Changes
NESLAB Merlin Series 19
Page 46

Chapter 2
20 NESLAB Merlin Series
Thermo Scientific
Page 47

Communication
Connector
Chapter 3 Options
This chapter contains information about available options.
A female 9-pin D-connector is located on the rear of the unit. The
connector is used for either RS-232 or RS-485 serial communication (see
Appendix B).
When the unit is configured for serial communication the LED on
the controller is illuminated. If the unit is shut off while still configured for
serial communication, the temperature display will go blank, but the
LED will still be illuminated.
When the unit is configured for serial communication the unit can be
stopped using the local controller. To restart, send another start
command.
NOTE If you need to start the unit using the local controller,
simultaneously depress and hold both arrow keys for approximately 10
seconds. The display will show the temperature, and the alarm will sound.
Use and scroll to the LED and turn it OFF. The unit can now
be started and operated from the keypad. S
The pin out information is:
Pin RS-232 COMM RS-485 COMM
1 No connection No connection
2 TX No connection
3 RX No connection
4 No connection No connection
5 GND = Signal ground No connection
6 No connection No connection
7 No connection No connection
8 No connection T+
9 No connection TTX = Transmitted data from controller
RX = Received data to controller.
Hardware Mating Connector AMP Part# 745492-2 or equivalent
Thermo Scientific
NESLAB Merlin Series 21
Page 48

Chapter 3
Remote Start/Stop
A male 9-pin D-connector is located on the rear of the unit. The
connector is used for either 12 - 24VAC or 12 - 24VDC remote start/stop;
and as a status relay dry contact.
To start the unit from a remote location apply the correct voltage to pins 6
& 8. When the unit is started by a remote start/stop voltage
on the
controller will flash.
Once started remotely, stop the unit by removing the applied voltage from
pins 6 & 8 or by pressing
on the local controller. To restart remotely
after stopping locally, remove and reapply the remote start voltage to J101.
NOTE Enabling serial communications disables the remote start/stop
feature. S
Remote Start Input
Absolute Maximum
Input Voltages
Should the unit experience a high/low temperature warning/fault, a
reservoir level warning/fault, or a low pump flow warning/fault, the status
relay will de-energize.
The pin out information is:
Pin # Function Pin # Function
1 No Connection 6 Remote On +
2 Status, NO 7 RTD2B
3 Status, NC 8 Remote On 4 RTD2A 9 No Connection
5 Status, Common
Hardware Mating Connector AMP Part# 745491-2 or equivalent
12 to 24 Volts DC ±10% maximum input current, 9ma.
12 to 24 Volts AC ±10% maximum input current, 5ma.
40 volts rms. continuous.
56 volts peak.
22 NESLAB Merlin Series
Rating for both normally open and normally closed status relay contacts
are: Maximum rated load - 1.0 Amp, 24 Volts AC/DC, resistive. Minimum
permissible load - 1 ma @ 5 VDC.
Thermo Scientific
Page 49

Chapter 3
External Temperature
Sensor
Connect the external sensor to the male 9-pin D-connector located on the
rear of the unit, see previous page.
The external temperature sensor is enabled using the controller. With the
controller displaying the temperature press
alternate with
and either or . If desired, use the arrow keys
five times. The display will
to change the status and then press to return to the temperature
display.
If the external sensor is selected the controller will display the temperature
at the external sensor. Also, the controller indicates the external sensor is
selected by flashing the left-most temperature decimal point.
Flashes to indicate the
external sensor is
enabled.
NOTE To display the internal temperature press and hold for one
second. The display will indicate for ½ second and then display the
internal temperature for five seconds. The display then indicates
for ½ second and returns to the external temperature. The key will
need to be released and then pressed and held again to repeat the cycle.
To display the remote probe temperature deviation use the Setup/Tuning
Loop, see page 18. S
The controller continues to use the existing setpoint. When using the
external sensor the controller will not allow internal unit temperatures
outside 3°C to 37°C for standard temperature range units, -17°C to 37°C
for low-temperature range units.
The selected sensor is retained by the controller if it is turned off, or if
power is removed.
If there is an external sensor error the unit will automatically return to the
internal sensor. An error code will flash and if the fault mode is on the
unit will shut down. See Error Codes on page 25. Press to restart the
unit.
The external probe can be used to control the high and low temperature
monitors using the Setup/Tuning Loop, see page 18.
Thermo Scientific
NOTE If you also need to monitor status while using the external sensor,
an optional Y-connector cable is available from Thermo Scientific. S
NESLAB Merlin Series 23
Page 50

Chapter 3
Reservoir Level
Warning/Fault
Low Pump Flow
Warning/Fault
Should the reservoir fluid level drop below normal the mutable alarm will
sound, the status relay will de-energize (if the unit is equipped with the
communications package), an error message will be displayed and,
depending on the unit's configuration, the unit will continue to run or shut
down. The unit is configured to run or shut down using the controller's
Setup/Tuning Loop on page 18.
Refill the reservoir and, if necessary, restart the unit.
NOTE The unit will not start without any fluid in the reservoir regardless
of how it is configured. S
Should the pump flow drop below 0.5 gpm (1.0 gpm for units with a CP55 pump) the mutable alarm will sound, the status relay will de-energize (if
the unit is equipped with the communications package), an error message
will be displayed, and, depending on the unit's configuration, the unit will
continue to run or shut down.
Once the cause of the low flow is identified and corrected restart the unit,
if necessary.
Additional
Accessories
The unit is configured to run or shut down using the controller's Setup/
Tuning Loop, see page 18.
External Filtration Package
A partial flow liquid filter available in 5, 10, 25, and 40 micron filter sizes.
External DEI Package
Partial flow DEI package will maintain between 1 and 3 MOhmcm water
resistivity. A cartridge indicator lets you know when the filter needs
changing.
Condenser Air Filter
An easy to install air filter protects the condenser in dusty environments.
External Strainer Accessory Kit
An easy to install kit to make routine strainer preventative maintenance
easier.
24 NESLAB Merlin Series
Thermo Scientific
Page 51

Chapter 4 Maintenance
This chapter covers the unit's basic manitenance.
Error Codes
ROM checksum. Clear with key.
Test failure. Locks up the program.
Display board failure. Clears when display board is fixed.
Critical checksum failure. Clear with key.
Synchronous comm
Asynchronous comm
Bad calibration data
Unusual Hardware Conditions
These errors will flash on the display and cannot be cleared. These are
internal controller problems.
through - Interrupt errors during runtime.
BOM invalid
Thermo Scientific
Functional/ Machine errors
These errors will clear themselves once the problem disappears.
Display Indication
Low temp setpoint warning/fault
Low level warning, fluid below minimum fill level, see page 12
High temp setpoint warning/fault
Shorted external temperature sensor (rdt2)
Open exernal temperature sensor (rdt2)
NESLAB Merlin Series 25
Page 52

Chapter 4
Shorted internal temperature sensor (rdt1)
Open internal temperature sensor (rtd1)
Reservoir fluid below 1°C, standard-temp units only
Low process flow warning/fault
Fluid low level fault - unit shuts down
Unit reaction to warning/fault errors depend on how the unit is configured,
see Setup/Tuning Loop on page 18. The unit is shipped configured to
continue running. If any other code appears contact our customer service.
Displaying Software
Version Number
The controller can display the installed software version number. For
example, for a unit with software version 026950.1A:
1. Unit is running normally and displaying recirculating fluid temperature.
2. Press and hold for at least 10 seconds. The display will show the first
two digits, for example: .
3. Press
The display will show the remaining digits to the left of the decimal, for
example: .
4. Press
The display will show the decimal point and the digit to the right of the
decimal point, for example, .
5. Press
The display will show the revision letter, as its equivalent number, for
example, = A.
6. Press
Disregard this display.
26 NESLAB Merlin Series
7. Press
The display returns to the recirculating fluid temperature.
Thermo Scientific
Page 53

Chapter 4
Controller PID Values
Cleaning
The factory preset PID values are:
PID
COOL
STD TEMP UNITS 20 0.5 0.0
LOW TEMP UNITS 12 0.5 0.0
HEAT
ALL UNITS 5 0.5 0.0
Thermo Scientific recommends that only a qualified technician
change PID parameters. Incorrect PID values will hamper unit
performance.
SS
S
SS
Reservoir
Periodically inspect the fluid inside the reservoir. If cleaning is necessary,
flush the reservoir with a cleaning fluid compatible with the circulating
system and the cooling fluid.
The cooling fluid should be replaced periodically. Replacement
frequency depends on the operating environment and amount of usage.
Before changing the cooling fluid ensure it is at a safe handling
temperature.
SS
S
SS
NOTE It will be necessary to use a wet-vac or siphon to completely
drain the reservoir. Use care so as not to damage the reservoir float
switch. S
See page 12, Filling Requirements, for instructions on cooling fluid
replacement.
Condenser
For proper operation, the unit needs to pull substantial amounts of air
through a condenser. A build up of dust or debris on the fins of the
condenser will lead to a loss of cooling capacity. Optional air filters are
available, contact our Service Department. See Preface, After-Sale
Support.
The lower front of the unit has a one-piece grille assembly. Using your
hands gently pry the assembly off. Use care not to scratch the paint.
Periodic vacuuming of the condenser fins is necessary. The cleaning
frequency depends on the operating environment. After initial
Thermo Scientific
NESLAB Merlin Series 27
Page 54

Chapter 4
installation we recommend a monthly visual inspection of the condenser.
After several months, the cleaning frequency will be established.
Algae
Leaks
Phase Rotation
Interlock
Use care cleaning the condenser fins, they can be easily bent.
SS
S
SS
To restrict the growth of algae in the reservoir, we recommend keeping the
reservoir cover in place and using opaque circulation lines. This will eliminate
the entrance of light required for the growth of most common algae.
We recommend the use of Chloramine-T, 1 gram per 3.5 liters. Other
algaecides can be harmful to the unit's internal components. Contact
Thermo Scientific for additional information.
A very small leak between the pump and motor is normal. If this is a new
pump, allow it to run for 24 hours and reinspect. A continuous leak will
require pump replacement.
Three phase units have a rotation interlock which prevents the unit from
starting if the phase rotation is wrong. If the unit will not start, see Section
VII, Troubleshooting. If the options in the checklist are not applicable, the
problem may be phase rotation.
28 NESLAB Merlin Series
The interlock is located in the power box. Remove the unit's top and leftside panel to access it. The interlock has a green light which illuminates when
the phase is correct.
If the phase is incorrect, disconnect the unit from its power source. Reverse
any two line conductors on the line side of the main circuit breaker.
Never remove the green ground wire.
SS
S
SS
Reconnect the unit to its power source. If the unit will not start, contact our
Service Department.
Thermo Scientific
Page 55

PD Pressure Relief
Valve
Chapter 4
Units with PD pumps have a Pressure Relief Valve. Refer to the name
plate label on the rear of the unit and the BOM decoder on page 32 to
identify the type of pump. The valve is used to adjust the unit's fluid
pressure.
NOTE The valve is factory preset for the most common applications
and normally requires no further adjustment. The valve is factory preset
not to exceed 80 ± 5 psi (550 ± 1 kPa).
S
NOTE PD pumps are capable of 110 psi maximum output pressure.
Ensure your plumbing is rated to withstand 110 psi at the highest
operating temperatures. S
System back pressure is installation and application dependent. Due to
internal Merlin back pressure, the minimum pressure setting for a
deadheaded pump is 28 psi for a PD-2 pump, and 10 psi for a PD-1
(these settings prohibit external flow from the Merlin).
Before adjusting the valve turn the unit off. Locate the circular relief
valve opening on the rear of the unit. Turn the threaded stem fully
clockwise.
If the unit is not plumbed to an application, install a loop of hose
equipped with a shut-off valve between the supply and return fittings.
Turn the unit on. Ensure that there is back pressure on the system. Use
the pressure gauge to read the relief valve setting.
Back out the threaded stem on the relief valve counterclockwise.
Continue until the gauge indicates 80 psi (550 kPa) or the desired setting.
NOTE The relief valve may drip if the threaded stem is backed out too
far. S
NOTE Should the unit start to vibrate the valve setting may be the
cause. Changing the pressure setting ±5 psi will eliminate the
vibration. S
Thermo Scientific
NESLAB Merlin Series 29
Page 56

Chapter 4
Pump Strainer
Units with PD pumps, and units with CP-55 pumps that are equipped with
reservoir level/low pump flow switches, have a strainer. Refer to the name
plate label on the rear of the unit and the BOM decoder on page 32 to
identify the type of pump and configuration.
If debris is in the system, the strainer will prevent the material from being
drawn into the flow switch and the pump, damaging the pump vanes. A
clogged strainer will also cause increased discharge pump pressures.
After initial installation, the strainer may become clogged with debris and
scale. Therefore, the strainer must be cleaned after the first week of
installation. After this first cleaning, we recommend a monthly visual
inspection. After several months, the cleaning frequency will be established.
Before cleaning the strainer ensure the cooling fluid is at a safe
handling temperature. Disconnect the power cord from the power
source.
SS
S
SS
We also recommend draining the reservoir.
Brass Cap
(some ¾" units only)
13/8" or ¾"
Right-side view
The strainer is in the pump return line, the exact location depends on the
unit's configuration. For most configurations it is located behind the rear
panel. For units configured with low level and low temperature switches, it is
behind the right-side panel.
Brass Cap
(some ¾" units only)
Screen
Screen
Fitting
Fitting
13/8" or ¾"
Rear view
NOTE A small amount of fluid will come out of the internal strainer
housing when the fitting is removed. Have a rag handy to put under the
housing before removing the fitting. S
30 NESLAB Merlin Series
Thermo Scientific
Page 57

Chapter 4
Remove the panel from the unit. Use one wrench to support the filter
housing, and a second wrench to unscrew the fitting, 13/8 inch for CP
pumps, or ¾ inch for PD pumps. Remove the screen.
NOTE Some units with ¾ inch fittings also have a brass end cap, see
illustration below. S
Clean the screen by rinsing it with water. When the screen is clean,
replace it and the cap. Tighten the fitting and replace the panel. Refer to
Section III for instructions on replacing the cooling fluid.
NOTE An external strainer accessory kit is available to make routine
strainer preventative maintenance easier. The part number is
627000000010. S
PD Pump Motor
Lubrication
Some PD pumps use sleeve type bearings with large reservoirs. Oiling
instructions are generally posted on each motor. In the absence of
instructions, add approximately 30 to 35 drops of SAE 20 (142 CS
viscosity) non-detergent oil (i.e. 3-IN-ONE® Tool Oil) to each bearing
on the following schedule:
Duty Cycle Oiling Frequency
Continuous Once every year
Intermittent Once every 2 years
Occasional Once every 5 years
Fill Holes (Typical)
Thermo Scientific
NESLAB Merlin Series 31
Page 58

Chapter 4
Storage
If the unit is to be transported and/or stored in cold temperatures it
needs to be drained and then flushed with a 50/50 glycol/water
mixture.
SS
S
SS
BOM Decoder
Temperature Sensor
Calibration
The Bill of Material (BOM) number helps identify the configuration of your
unit. The number is printed on the label located on the rear of the unit.
(MD-30 units LL only)
Internal Sensor
If the temperature fluid temperature display disagrees with your reference
thermometer, the internal temperature sensor (rtd1) may need calibration.
Do not pick calibration points that are outside the safe operating limits of the
fluid in your application. For example with water, 35°C and 5°C would be
typical calibration points.
32 NESLAB Merlin Series
Run the unit to a high-end calibration point. Place a calibrated reference
thermometer in the reservoir, ensure the fluid temperature is stable.
Enter Calibration by pressing and holding and then pressing three
times. The display will read CAL. Press and the display will read rtd1.
To calibrate the high-end temperature press and the display will read r1H.
Press again and the display will flash between r1H and the current probe
temperature.
Use and to adjust the r1H display. Once the display temperature
matches the reference thermometer press twice. Press until Stor is
displayed, press to accept the new value.
Thermo Scientific
Page 59

Chapter 4
X
X
XX.X
HOLD
rtd2
CAL
rtd1
r1H
r1L
rtd1 = internal sensor
rtd2 = external sensor
optional, see next page
r1H
r1L
X.X
X.X
Stor
Repeat for the low-end temperature r1L.
NOTE Both the high and low temperatures must be entered for a valid
calibration. If power is lost before the procedure is complete, critical
data needed for the calculation of calibration parameters will be lost.
After pressing at the Stor prompt wait several seconds before
proceeding to ensure that a bad calibration message does not appear.
Premature use of the keypad after pressing may cancel the bad
calibration error message. S
Thermo Scientific
NESLAB Merlin Series 33
Page 60

Chapter 4
X
X
External Sensor
When using any external sensor (rtd2) for the first time, Thermo Scientific
recommends a two-point calibration. This calibration will only affect the
temperature read by the external sensor.
Do not pick calibration points that are outside the safe operating limits of the
fluid in your application. For example with water, 35°C and 5°C would be
typical calibration points.
Enter the Calibration Loop by pressing and holding and then pressing the
three times. The display will read CAL. Press and the display will read
rtd1, then press
and the display will read rtd2.
To calibrate the high-end temperature press and the display will read r2H.
Press again and the display will flash between r2H and the current probe
temperature.
XX.X
HOLD
rtd1
rtd2
r2H
r2L
CAL
rtd1 = internal sensor, see
previous page
rtd2 = external sensor
r2H
r2L
X.X
X.X
34 NESLAB Merlin Series
Stor
Thermo Scientific
Page 61

Chapter 4
Place the external sensor and a calibrated reference thermometer in a
source containing fluid that is just below the high-end temperature range
of the unit, ensure the fluid temperature is stable. Use and to
adjust the temperature display to match the reference thermometer.
Once the display temperature matches the reference thermometer press
twice. Press until Stor is displayed, pressing accepts the new
value.
Repeat for the low-end temperature, r2L. Use a fluid that is just above
the low-end temperature range of the unit.
NOTE Both the high and low temperatures must be entered for a valid
calibration. If power is lost before the procedure is complete, critical
data needed for the calculation of calibration parameters will be lost.
After pressing at the Stor prompt wait several seconds before
proceeding to ensure that a bad calibration message does not appear.
Premature use of the keypad after pressing may cancel the bad
calibration error message. S
Thermo Scientific
NESLAB Merlin Series 35
Page 62

Chapter 4
36 NESLAB Merlin Series
Thermo Scientific
Page 63

Chapter 5 Troubleshooting
This chapter covers the basic troubleshooting procedures.
Checklist
1. Unit will not start or shuts down
a. Check the line cord; ensure it is plugged in.
b. Check the position of the circuit protector on the rear of the unit.
c. Check the controller for error codes, see page 25.
NOTE On units with a Low Flow Switch, and that are configured to
shut down with a low flow fault (
be necessary. S
d. On units with a Reservoir Level Switch, check the reservoir level.
e. On units with optional serial communications or remote start/
stop, ensure the desired mode is enabled.
f. Make sure power source voltage is within the unit rated voltage
±10%.
g. 400 Volt, 50 Hertz units are equipped with a phase monitor.
Ensure proper phase to the unit. See Phase Rotation Interlock on
page 28.
), several starting attempts may
Thermo Scientific
h. If is lit, the unit was shut off using serial communications.
Start the unit using serial communications. To start the unit using
the local controller press and hold both arrow keys for 10
seconds, the controller will power. Turn serial communications off
using the procedure on page 163, and then press to turn off
the controller. Press again to start the unit.
NESLAB Merlin Series 37
Page 64

Chapter 5
2. Unit will not circulate fluid
a. Check the reservoir level. Fill, if necessary.
b. Check the position of the reservoir tank valves. See Reservoir Tank
Isolation Valves/Open Tank Circulation, Chapter 2.
c. Check the instrument being cooled for restrictions in the cooling
line.
d. Check the pump strainer (units with PD pumps).
e. The pump motor may be too hot. Allow it to cool.
f. Check the pressure gauge, adjust the relief valve as necessary (units
with PD pumps).
g. On units with MD pumps never completely restrict flow to your
application. Dead-heading the pump will damage its coupling and
require pump replacement.
3. Inadequate temperature control
a. Verify the setpoint.
b. If the temperature continues to rise, make sure your application's
heat load does not exceed the rated specification, see Chapter 2,
Specifications.
c. Make sure the air intake and discharge are not impeded and the
ambient temperature does not exceed +35°C.
d. Make sure the condenser is free of dust and debris, see Chapter 4,
Maintenance and Cleaning.
e. Verify the controller's PID values, see Setup/Tuning Loop.
4. Unit runs loudly
a. Check the position of the reservoir tank valves. See Reservoir Tank
Isolation Valves/Open Tank Circulation, Chapter 2.
38 NESLAB Merlin Series
Thermo Scientific
Page 65

5. Condensation on reservoir
a. Check the position of the upper reservoir tank valve. See
Reservoir Tank Isolation Valves/Open Tank Circulation,
Chapter 2.
6. Unit vibrates
a. The external pressure relief valve may need adjustment. Change
the pressure setting ±5psi, see Chapter 4.
7. No serial communications (optional)
a. All units are tested for serial communications before they leave
the factory. Check the controller, ensure serial communication
is enabled.
b. Check all communications commands, they must be exact. See
Appendix B.
Chapter 5
Service Assistance
c. Check all wiring for proper connections or possible shorts.
d. Software to verify serial communication is available from
Thermo Scientific.
If, after following these troubleshooting steps, your unit fails to operate
properly, contact our Service Department for assistance (see Preface,
After-sale Support). Before calling, please obtain the following
information:
Before calling, please obtain the following information:
z unit BOM number
z unit serial number
z unit software version (page 26)
z voltage of power source
Thermo Scientific
NESLAB Merlin Series 39
Page 66

Chapter 5
40 NESLAB Merlin Series
Thermo Scientific
Page 67

Appendix A Water Quality and
Standards
Contaminants
Permissible (PPM) Desirable (PPM)
Microbiologicals
(algae, bacteria, fungi) 0 0
Inorganic Chemicals
Calcium <40 <0.6
Chloride <250 <25
Copper <1.3 <1.0
Iron <0.3 <0.1
Lead <0.015 0
Magnesium <12 <0.1
Manganese <0.05 <0.03
Nitrates\Nitrites <10 as N 0
Potassium <20 <0.3
Silicate <25 <1.0
Sodium <20 <0.3
Sulfate <250 <50
Hardness <17 <0.05
Total Dissolved Solids <50 <10
Other Parameters
pH 6.5-8.5 7-8
Resistivity 0.01* 0.05-0.1*
Thermo Scientific
* MOhmcm (Compensated to 25°C)
Unfavorably high total ionized solids (TIS) can accelerate the rate of
galvanic corrosion. These contaminants can function as electrolytes which
increase the potential for galvanic cell corrosion and lead to localized
corrosion such as pitting which can be observed at the studs and on the
outside surface of cooling coils. Eventually, the pitting will become so
extensive that the coil will leak refrigerant into the water reservoir.
For example, raw water in the U.S. averages 171 ppm (of NaCl). The
recommended level for use in a water system is between 0.5 to 5.0 ppm (of
NaCl).
Recommendation: Initially fill the tank with distilled/deionized water. Do
not use untreated tap water as the total ionized solids level may be too
high.
NESLAB Merlin Series 41
Page 68

Appendix A
Maintain this water quality at a resistivity of between 1 to 10 MOhmcm
(compensated to 25°C) by using a purification system. Although the initial
fill may be as high as 10 MOhmcm (compensated to 25°C), the desired
level for long time usage is 1 to 3 MOhmcm (compensated to 25°C).
The above two recommendations will reduce the electrolytic potential of
the water and prevent or reduce the galvanic corrosion observed.
Not Recommended, Increasingly Corrosive
15.00
10.00
3.00
1.00
0.10
Resistivity (MOhmcm @ 25°C)
0.05
Operations with
Mixed Metals
Copper/Brass/
Stainless Steel
Operations with Stainless Steel Systems
10 20 30 40 50 60 70 80 °C
CONSULT MATERIALS ENGINEER
Water Quality Considerations
42 NESLAB Merlin Series
Thermo Scientific
Page 69

Compatibility with
Recommended Fluids
Appendix A
Never use flammable or corrosive fluids with this unit. Do not use
automotive antifreeze. Commercial antifreeze contains silicates that
can damage the pump seals. Use of automotive antifreeze will void
the manufacturer’s warranty.
SS
S
SS
Filtered/Singled Distilled water, +5°C to +35°C
This fluid is recommended primarily because it has all microorganisms that
cause biological fouling removed through vaporizing and condensing the
water. However, distilled water does not remain pure for very long when
exposed to the atmosphere. Air-born spores can contaminate the water and
activate algae growth. An effective maintenance plan would include switching
out the fluid with newly distilled water every six months. The particulates that
have been filtered out in the process are also preventative in keeping the
system “clean” of contaminants.
NOTE: Distilling water that contains an additive could increase the
concentration of that additive in the water.
50/50 Uninhibited Ethylene Glycol/Water (-15°C to + 35°C)
Ethylene glycol is used to depress the freezing point of water as a coolant.
We recommend not using the uninhibited (no corrosion additives) ethylene
glycol. It is more corrosive to copper than plain water so it is not
recommended unless required for the application.
50/50 Inhibited Ethylene Glycol/ Water (-15°C to +35°C)
Inhibited glycol can be used to increase the operating temperature range of
the fluid but should not be used as a “pre-mixed anticorrosive” solution.
Industry standards use a pH standard of 8 to determine when the fluid has
become corrosive. Dowtherm® is an ethylene based product that contains
dipotassium phosphates in a 4% concentration. The recommended use of
Dowtherm® is mixing with distilled or deionized water or water that
contains less than 25 ppm chloride and sulfate and less than 100 ppm total
hardness of CACO3. The general term, inhibited glycol/water, is too close
to meaning inhibited water. Inhibited water can have many types of additives
including chromate that will quickly foul the cooling system. Some inhibitor
additives can release the bonding agent in the carbon graphite in the PD2
pumps so they are incompatible, such as Sodium Hydroxide.
Thermo Scientific
NESLAB Merlin Series 43
Page 70

Appendix A
50/50 Uninhibited Propylene Water (-15°C to +35°C)
Although the use of propylene glycol is similar to ethylene glycol,
propylene glycol is considered “safe” to use in the food industry.
Propylene is less dense than ethylene and will have a tendency to weep
through mechanical seals.
50/50 Inhibited Propylene/ Water (-15°C to +35°C)
Same issues as with uninhibited propylene and inhibited ethylene glycol.
Deionized water (1-3 MOhmcm, compensated, +5°C to +35°C)
Deionized water has had the conductive ions that cause galvanic corrosion
between dissimilar metals removed.
NOTE: This is not the normal state of water, so if it is too pure deionized
water is aggressive to metal. The result is the leaching of metallic ions from
metal surfaces which causes pitting.
S
44 NESLAB Merlin Series
Thermo Scientific
Page 71

Appendix A
Wetted Materials
PD PUMPS (PD1 Part Number 008816, PD2 Part Number 008806):
Carbon Graphite (Graphitar Type B)
Brass
303 Stainless Steel
Ceramic (85% Aluminum Oxide and Balance is Considered Glass)
Fluorocarbon (Viton equivalent)
Ultem (relief Valve Material)
MD-30 (Part Number 026922):
Polypropylene
Magnet
Buna-N
CP-55 PUMP (Part Number 026652):
Stainless Steel
Viton
Evaporator
(Part Numbers 026964/026945/026880):
AISI 316 Stainless Steel
Copper Brazing
Tank Fittings:
Brass
Strainer (Part Number 009334):
Bronze
304 Stainless Steel Mesh
Tank Cap (Part Number 026992):
Nylon
Tank Body (Part Number 026933):
Polyethylene (LLPDE, Mobile NRP=135)
Hose Assemblies/Plumbing:
Buna-N (Parker Push-Lok O-ring)
Nitrile based synthetic rubber (Parker Push-Lok hoses)
Part Number 026931
Brass Part Number 032688
Copper Part Number 003752
Ball Valve (Part Number 026981):
Viton
Chrome plated brass body and ball
PTFE
Thermo Scientific
NESLAB Merlin Series 45
Page 72

Appendix A
Sealants:
FasSeal
Teflon tape
Teflon paste
Nickel Impregnated Teflon tape
Rector-Seal Tplus2
Low Level/Low Flow Switches (Optiona1):
Polysulphone (Part Number 026900) Low Level
Brass (Part Number 026901) Low Flow
46 NESLAB Merlin Series
Thermo Scientific
Page 73

Appendix B NC Serial Communications
Protocol
NOTE This appendix assumes you have a basic understanding of
communications protocols.
All data is sent and received in binary form, do not use ASCII. In the
following pages the binary data is represented in hexadecimal (hex) format.
The NC Serial Communications Protocol is based on a master-slave
model. The master is a host computer, while the slave is the chiller's
controller. Only the master can initiate a communications transaction
(half-duplex). The slave ends the transaction by responding to the master’s
query. The protocol uses an RS-232/RS-485 serial interface with the
default parameters: 9600 baud, 8 data bits, 1 stop bit, no parity and no
RS-232 handshaking. RS-485 offers a a slave address selection from 1 to
100, default parameter: 1.
NOTE Before the unit will communicate, ensure the indicator is
illuminated. S
S
The unit can be controlled through your computer’s serial port by using
the unit's standard 9-pin connection, see Chapter 3 for pin out
information.
Communication cables are available from Thermo Scientific. Contact our
sales department for additional information.
All commands must be entered in the exact format shown in the tables on
the following pages. The tables show all commands available, their format
and responses. Controller responses are either the requested data or an
error message. The controller response must be received before the host
sends the next command.
The host sends a command embedded in a single communications packet,
then waits for the controller’s response. If the command is not understood
or the checksums do not agree, the controller responds with an error
command. Otherwise, the controller responds with the requested data. If
the controller fails to respond within 1 second, the host should resend the
command.
Thermo Scientific
NESLAB Merlin Series 47
Page 74

Appendix B
NOTE All byte values are shown in hex, hex represents the binary values that must be sent to the
chiller. Do not use ASCII.
S
The framing of the communications packet in both directions is:
Checksum region
Lead char Addr-MSB Addr-LSB Command n d-bytes d-byte 1 ... d-byte n Checksum
CA or CC 0 1
Lead char
0xCA (RS-232) 0xCC (RS-485)
Device address is 1 (RS-232)
Addr-msb
Addr-lsb
Command
n d-bytes
d-byte 1
Most significant byte of device address (RS-232: 0).
Least significant byte of device address is 1 (RS-232).
Command byte (see Table 1).
Number of data bytes to follow (00 to 03 hex).
1st data byte (the qualifier byte is considered a data byte).
... ...
d-byte n
Checksum
nth data byte.
Bitwise inversion of the 1 byte sum of bytes beginning with the most
significant address byte and ending with the byte preceding the checksum.
(To perform a bitwise inversion, "exclusive OR" the one byte sum with FF hex.)
The master requests information by sending one of the Read Functions as shown in Table 1. Since no
data is sent to the chiller during a read request, the master uses 00 for the number of data bytes
following the command byte.
The chiller will respond to a Read Function by echoing the lead character, address, and command byte,
followed by the requested data and checksum. When the chiller sends data, a qualifier byte is sent first,
followed by a two byte signed integer (16 bit, MSB sent first). The qualifier byte indicates the precision
and units of measure for the requested data as detailed in Table 2.
As an RS-232 example, the master requests to read internal temperature unit address 01 by sending:
command byte
CA 00 01 20 00 DE
0 bytes of data
If the temperature is -12°C, the unit would reply:
command byte
CA 00 01 20 03 01 FF F4 E7
3 bytes to follow
48 NESLAB Merlin Series
The checksum is the bitwise
inversion of 21
(00+01+20+00)
byte values are in hex
The qualifier byte of 01 indicates a precision of 0
decimal point and units of °C. The temperature of
-12°C is -12 decimal = FFF4 hex.
The checksum is the bitwise inversion of 18
(00+01+20+03+01+FF+F4) = 218
Take the LSB = 18
Bitwise inversion = E7
Thermo Scientific
Page 75

Appendix B
The master sets parameters in the chiller by sending one of the Set Functions as shown in Table 1. The
master does not send a qualifier byte in the data field. The master should be preprogrammed to send
the correct precision and units (it could also read the parameter of interest first to decode the correct
precision and units needed).
As an RS-485 example, if the master wants to set the setpoint to 30°C for unit 3, it would send :
command byte
CC 00 03 F0 02 01 2C DD
unit address
2 bytes to follow
The temperature of 30.0°C is 300 decimal = 012C hex.
The checksum is the bitwise inversion of 22
(00+03+F0+02+01+2C)
Take the LSB=22
Unit #3 responds:
The qualifier byte of 11 indicates a precision of 1
decimal point and units of °C. The temperature of
30°C is 300 decimal = 012C hex.
command byte
CC 00 03 F0 03 11 01 2C CB
unit address
3 bytes to follow
Table 1 Commands (All bytes are in hex)
FUNCTION MASTER SENDS UNIT RESPONDS
Read Acknowledge CA 00 01 00 00 FE CA 00 01 00 02(v1)(v2)(cs)
Read Status (see Table 3) CA 00 01 09 00 F5 CA 00 01 09 02(d1)(d2)(cs)
Error CA 00 01 0F 02(en)(ed)(cs)
Read Internal Temperature (RTD1) CA 00 01 20 00 DE CA 00 01 20 03(qb)(d1)(d2)(cs)
Read External Temperature(RTD2) CA 00 01 21 00 DD CA 00 01 21 03(qb)(d1)(d2)(cs)
Read Setpoint (control point) CA 00 01 70 00 8E CA 00 01 70 03(qb)(d1)(d2)(cs)
Read Low Temperature Limit CA 00 01 40 00 BE CA 00 01 40 03(qb)(d1)(d2)(cs)
Read High Temperature Limit CA 00 01 60 00 9E CA 00 01 60 03(qb)(d1)(d2)(cs)
Read Cool Proportional Band (P) CA 00 01 74 00 8A CA 00 01 74 03(qb)(d1)(d2)(cs)
Read Cool Integral (I) CA 00 01 75 00 89 CA 00 01 75 03(qb)(d1)(d2)(cs)
Read Cool Derivative (D) CA 00 01 76 00 88 CA 00 01 76 03(qb)(d1)(d2)(cs)
Read Heat Proportional Band (P) CA 00 01 71 00 8D CA 00 01 71 03(qb)(d1)(d2)(cs)
Read Heat Integral (I) CA 00 01 72 00 8C CA 00 01 72 03(qb)(d1)(d2)(cs)
Read Heat Derivative (D) CA 00 01 73 00 8B CA 00 01 73 03(qb)(d1)(d2)(cs)
The checksum is the bitwise inversion of 34
(00+03+F0+03+01+2C)
Take the LSB=34
command bytes shown in bold v1, v2 = protocol version
qb = qualifier byte, see Table 2 ed Bad command byte gets echoed)
d1,d2 = 16 bit signed integer of the value being en (error number) 01 = Bad command,
sent or received 02 = Bad checksum
cs = the checksum of the string (see text) xx = no valid data, include in checksum
Thermo Scientific
NESLAB Merlin Series 49
Page 76

Appendix B
Table 1 Commands (continued) (All bytes are in hex)
FUNCTION MASTER SENDS UNIT RESPONDS
Set Setpoint (control point)* CA 00 01 F0 02(d1)(d2)(cs) CA 00 01 F0 03(qb)(d1)(d2)(cs)
Set Low Temp CA 00 01 C0 02(d1)(d2)(cs) CA 00 01 C0 03(qb)(d1)(d2)(cs)
Set High Temp CA 00 01 E0 02(d1)(d2)(cs) CA 00 01 E0 03(qb)(d1)(d2)(cs)
Set Cool Proportional Band (P = 0.1 - 99.9) CA 00 01 F4 02(d1)(d2)(cs) CA 00 01 F4 03(qb)(d1)(d2)(cs)
Set Cool Integral (I = 0 - 9.99) CA 00 01 F5 02(d1)(d2)(cs) CA 00 01 F5 03(qb)(d1)(d2)(cs)
Set Cool Derivative (D = 0 - 5.0) CA 00 01 F6 02(d1)(d2)(cs) CA 00 01 F6 03(qb)(d1)(d2)(cs)
Set Heat Proportional Band (P = 0.1 - 99.9) CA 00 01 F1 02(d1)(d2)(cs) CA 00 01 F1 03(qb)(d1)(d2)(cs)
Set Heat Integral (I = 0 - 9.99) CA 00 01 F2 02(d1)(d2)(cs) CA 00 01 F2 03(qb)(d1)(d2)(cs)
Set Heat Derivative (D = 0 - 5.0) CA 00 01 F3 02(d1)(d2)(cs) CA 00 01 F3 03(qb)(d1)(d2)(cs)
Set On/Off Array
The Set On/Off Array command is used to set and/or request unit settings. Depending on the software version, the array
consists of up to 5 data bytes, d1 - d5. Each byte represents the state of one setting, see ** below. The master can send
the array with a value of 0 (turn off/disable), 1 (turn on/enable), or 2 (do not change). 0 or 1 causes the unit to change the
setting, 2 only requests the state of a setting. The slave returns values of 0 (off/disabled) or 1 (on/enabled).
(SW Version 02950.1A-E) CA 00 01 81 01(d1)(cs) CA 00 01 81 01(d1)(cs)
(SW Version 02950.1F-H) CA 00 01 81 04(d1)... (d4)(cs) CA 00 01 81 04(d1)... (d4)(cs)
(SW Version 02950.1J-K) CA 00 01 81 05(d1)... (d5)(cs) CA 00 01 81 05(d1)... (d5)(cs)
(SW Version 02950.1L- ) Any of the above formats
Sample - turn unit on (02950.1J-K) CA 00 01 81 05 01 02 02 02 02 6F
* = limited to the range of the chiller **d1 - unit off = 0, on =1
command bytes shown in bold d2 - external sensor disabled = 0, enabled = 1
qb = qualifier byte, see Table 2 d3 - fault mode disabled = 0, enabled = 1
d1,d2 = 16 bit signed integer of the value being sent or received d4 - tenths display disabled = 0, enabled = 1
cs = the checksum of the string (see text) d5 - Alarms on internal = 0, or external
sensor = 1, (1 is invalid when d2 = 0, external
sensor disabled)
Table 2
QUALIFIER BYTE
00 0 precision, no units of measure
01 0 precision, °C
10 1 precision, no units of measure
11 1 precision, °C
20 2 precision, no units of measure
Example: The temperature of 45.6°C would be represented by the qualifier 11 hex, followed by the 2 bytes 01 C8
hex (456 decimal).
50 NESLAB Merlin Series
Thermo Scientific
Page 77

Table 3 READ STATUS
Appendix B
BIT d1 d2
t
b.7 = 1 External Temp Sensor Enabled Reserved
b.6 = 1 Level 1 Warning/Auto Refill Reserved
b.5 = 1 Low Flow Warning Internal Temp Sensor Fault
b.4 = 1 Low Level 2 Warning External Temp Sensor Fault
b.3 = 1 High or Low Temp Warning High Temp/Fixed High Temp Fault
b.2 = 1 High or Low Temp Bypass Low Temp/Fixed Low Temp Fault
b.1 = 1 Unit Faulted* Low Flow Fault
b.0 = 1 Unit Running* Low Level 2 Fault
t d2 is the detail of fault d1-b.1
* mutully exclusive
Thermo Scientific
NESLAB Merlin Series 51
Page 78

Thermo Fisher Scientific warrants for 24 months from date of shipment any Thermo Scientific unit according to
the following terms.
Any part of the unit manufactured or supplied by Thermo Scientific and found in the reasonable judgment of
Thermo Scientific to be defective in material or workmanship will be repaired at an authorized Thermo Scientific
Repair Depot without charge for parts or labor. The unit, including any defective part must be returned to an
authorized Thermo Scientific Repair Depot within the warranty period. The expense of returning the unit to the
authorized Thermo Scientific Repair Depot for warranty service will be paid for by the buyer. Thermo
Scientific's responsibility in respect to warranty claims is limited to performing the required repairs or replacements, and no claim of breach of warranty shall be cause for cancellation or recision of the contract of sales of
any unit. With respect to units that qualify for field service repairs, Thermo Scientific’s responsibility is limited to
the component parts necessary for the repair and the labor that is required on site to perform the repair. Any
travel labor or mileage charges are the financial responsibility of the buyer.
The buyer shall be responsible for any evaluation or warranty service call (including labor charges) if no defects
are found with the Thermo Scientific product.
This warranty does not cover any unit that has been subject to misuse, neglect, or accident. This warranty does
not apply to any damage to the unit that is the result of improper installation or maintenance, or to any unit that
has been operated or maintained in any way contrary to the operating or maintenance instructions specified in
Thermo Scientific’s Instruction and Operation Manual. This warranty does not cover any unit that has been
altered or modified so as to change its intended use.
In addition, this warranty does not extend to repairs made by the use of parts, accessories, or fluids which are
either incompatible with the unit or adversely affect its operation, performance, or durability.
Thermo Scientific reserves the right to change or improve the design of any unit without assuming any obligation to modify any unit previously manufactured.
THE FOREGOING EXPRESS WARRANTY IS IN LIEU OF ALL OTHER WARRANTIES, EXPRESSED
OR IMPLIED, INCLUDING BUT NOT LIMITED TO WARRANTIES OR MERCHANTABILITY AND
FITNESS FOR A PARTICULAR PURPOSE.
Thermo Scientific's OBLIGATION UNDER THIS WARRANTY IS STRICTLY AND EXCLUSIVELY
LIMITED TO THE REPAIR OR REPLACEMENT OF DEFECTIVE COMPONENT PARTS AND
Thermo Scientific DOES NOT ASSUME OR AUTHORIZE ANYONE TO ASSUME FOR IT ANY OTHER
OBLIGATION.
Thermo Scientific ASSUMES NO RESPONSIBILITY FOR INCIDENTAL, CONSEQUENTIAL, OR
OTHER DAMAGES INCLUDING, BUT NOT LIMITED TO LOSS OR DAMAGE TO PROPERTY,
LOSS OF PROFITS OR REVENUE, LOSS OF THE UNIT, LOSS OF TIME, OR INCONVENIENCE.
This warranty applies to units sold in the United States. Any units sold elsewhere are warranted by the affiliated
marketing company of Thermo Scientific. This warranty and all matters arising pursuant to it shall be governed by
the law of the State of New Hampshire, United States. All legal actions brought in relation hereto shall be filed in
the appropriate state or federal courts in New Hampshire, unless waived by Thermo Scientific.
 Loading...