


QUICK REFERENCE
TaqCheck™ SARS-CoV
-2 Fast PCR Assay
Catalog Numbers A47693
Pub. No. MAN0019744 Rev. B.0
Note: For safety and biohazard guidelines, see the “Safety” appendix in the TaqCheck™ SARS-CoV-2 Fast PCR Assay User Guide
(Pub. No. MAN0019745). Read the Safety Data Sheets (SDSs) and follow the handling instructions. Wear appropriate protective eyewear,
clothing, and gloves.
Product description
The TaqCheck™ SARS-CoV-2 Fast PCR Assay is a multiplex real‑time RT‑PCR assay for the detection of SARS-CoV-2 viral RNA in human
raw saliva samples. The assay has a multi-target design that compensates for emerging SARS-CoV-2 variants and mutations to provide
confidence in results. The assay contains primer and probe sets specific to the following targets:
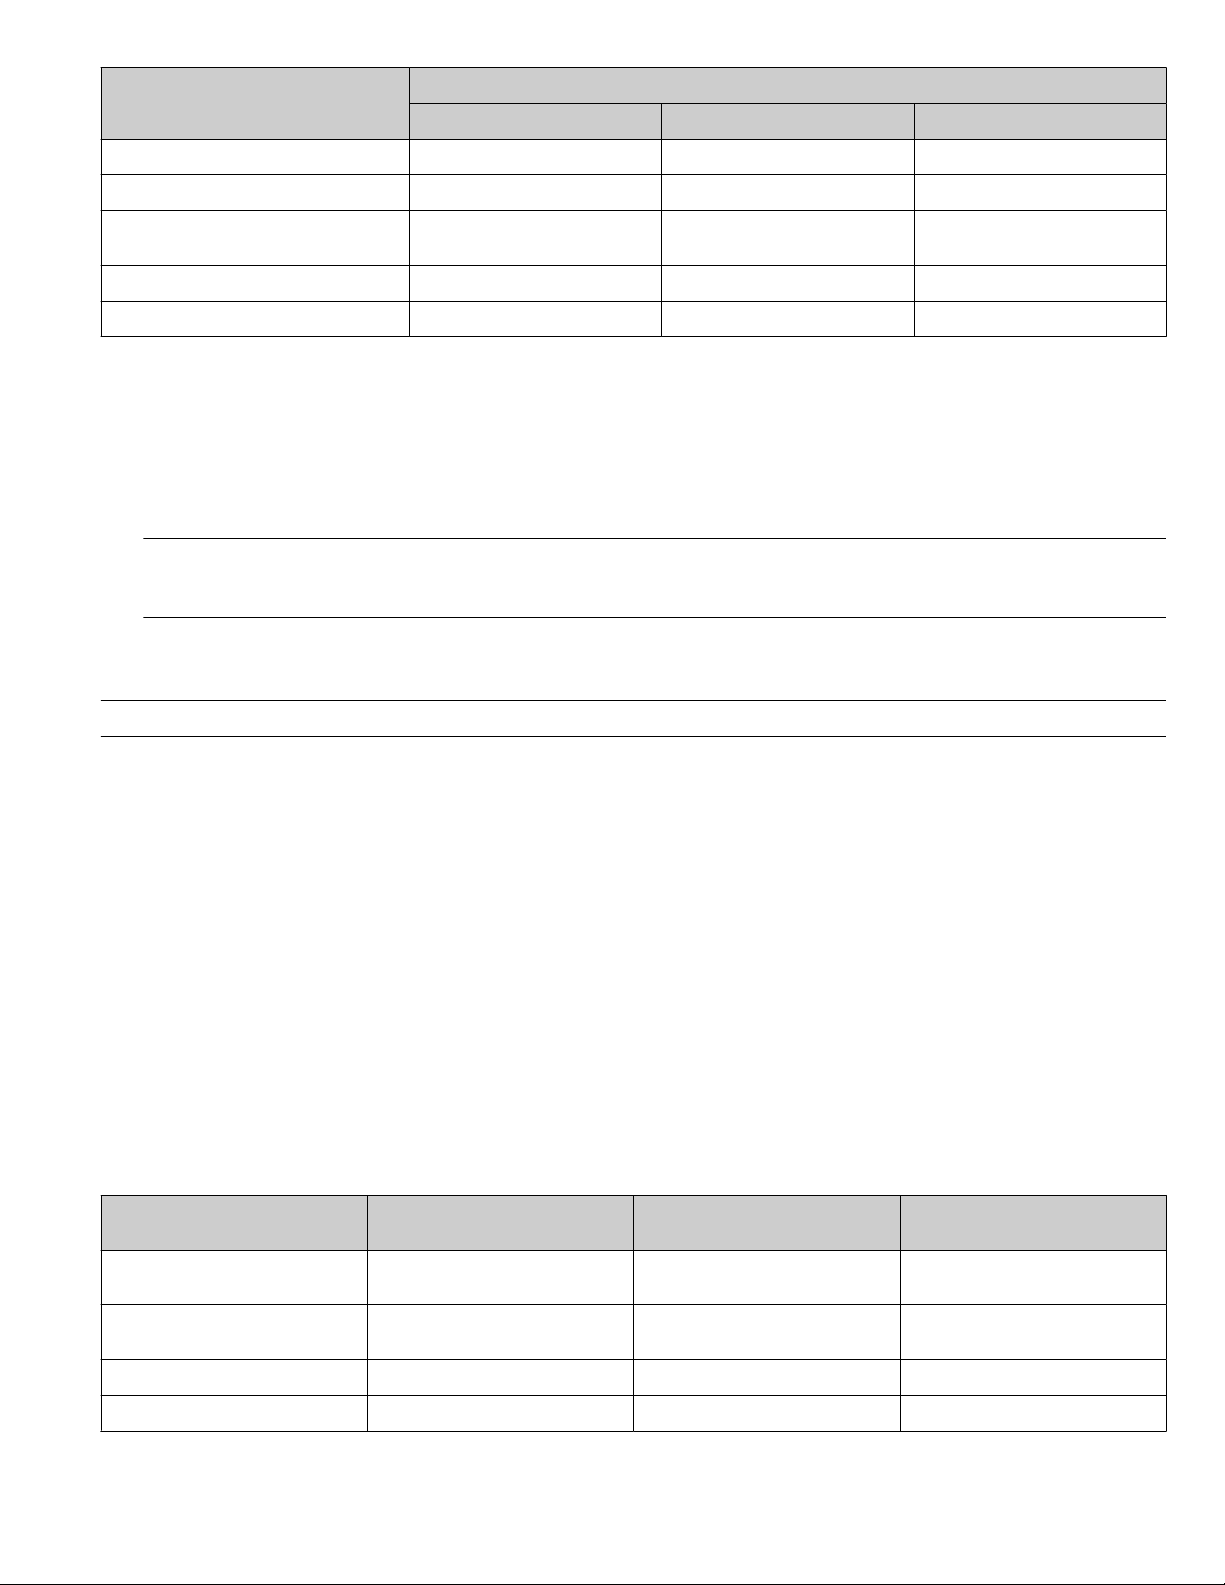
Table 1 Assay targets, dyes, and quenchers
Target Dye Quencher
SARS-CoV-2 N gene
SARS-CoV-2 S gene
Human RNase P RPP30 gene
[1]
S
erves as an internal positive control to monitor sample quality.
The assay requires the following components:
• TaqCheck™ SARS‑CoV‑2 Control—RNA control that contains SARS-CoV-2 N protein and S protein target regions
• TaqCheck™ SARS‑CoV‑2 Control Dilution Buer—Dilution buer for the control
• TaqPath™ 1-Step RT-qPCR Master Mix, CG
For catalog numbers and storage conditions, see “Contents and storage”.
[1]
VIC™ dye QSY™ quencher
FAM™ dye QSY™ quencher
IMPORTANT! It is the r
own experimental design and analysis parameters.
esponsibility of the laboratories using the TaqCheck™ SARS-CoV-2 Fast PCR Assay to design and validate their
Contents and storage
The it
ems listed in the following table are required for the TaqCheck™ SARS-CoV-2 Fast PCR Assay. The items listed are sucient for
1,200 reactions.
Kit or product Cat. No. Amount Storage
TaqCheck™ SARS-CoV
TaqCheck™ SARS‑CoV‑2 Control 956127 3 × 10 µL ≤ –70°C
TaqCheck™ SARS‑CoV‑2 Control Dilution Buer A50486 3 × 250 µL –30°C to –10°C
TaqPath™ 1-S
tep RT-qPCR Master Mix, CG
-2 Fast PCR Assay A47693 690 µL –30°C to –10°C
• A15299
• A15300
• 5 × 1 mL
1 × 10 mL
•
–30°C to –10°C
For Research Use Only. Not for use in diagnostic procedures.

Required materials not supplied
Unless otherwise indicated, all materials are available through thermofisher.com. "MLS" indicates that the material is available from
fisherscientific.com or another major laboratory supplier.
Catalog numbers that appear as links open the web pages for those products.
Item Source
Real-time PCR instrument and software
An Applied Biosystems™ real-time PCR instrument compatible with the dyes listed in
Table 1 on page 1.
The assay was tested with the following instruments:
• Applied Biosystems™ 7500 Fast Real‑Time PCR Instrument
• Applied Biosystems™ QuantStudio™ 5 Real‑Time PCR Instrument, 96‑well, 0.2-mL
block
• Applied Biosystems™ QuantStudio™ 5 Real‑Time PCR Instrument, 384‑well block
• Applied Biosystems™ QuantStudio™ 7 Flex Real-Time PCR Instrument, 384‑well
block
(Recommended) QuantS
tudio™ Design and Analysis Software v2.5 or later
[1]
Equipment
Contact your local sales oce
thermofisher.com/qpcrsoftware
Laboratory freezers
• –30°C to –10°C
• ≤ –70°C
BSL-2 biological safety cabinet, such as Herasafe™ 2030i Class 2 A2 Biological Safety
C
abinets
Centrifuge (capable of achieving 1,400 × g), such as Megafuge™ 8 Small Bencht
op
Centrifuge Series or Multifuge X4 Pro Centrifuge Series
• MLS
• thermofisher.com/tsx
• MLS
• thermofisher
.com
• MLS
• thermofisher
.com
• MLS
Microcentrifuge, such as Pico™ 17 Micr
ocentrifuge
• thermofisher
.com
• MLS
Laboratory mixer, vortex or equivalent, such as Digital Vortex Mixers
Single and multichannel adjustable pipettors (2.00 µL to 1,000.0 µL)
• thermofisher
ww.thermofisher.com/cliptip
• w
• thermofisher.com/finnpipette
.com
Cold block (96‑well or 384‑well) or ice MLS
Heat block or water bath (capable of reaching 95°C), such as Touch Screen Dry
Bath/Block Heat
Liquid handler (if needed for automation)
er or Precision™ General Purpose Baths
[2]
• MLS
• thermofisher
.com
MLS
Kits and reagents
TBE Buer (T
ris-borate-EDTA) (10X) B52, or equivalent
Tween®-20 Surfact-Amps™ Detergent Solution 28320
• AM9938 (1 x 100 mL)
Nuclease-free Water (not DEPC-Treated)
• AM9932 (1 x 1,000 mL)
70% Isopropanol spray or wipes MLS
2 TaqCheck
™
SARS-CoV-2 Fast PCR Assay Quick Reference

Tubes, plates, and other consumables
Item Source
(Recommended) S
terile tube with leak‑proof, screw‑top lid for sample collection
IMPORTANT! Do not use tubes that contain preservative.
[3]
One of the following, or equivalent:
• AM12500
• 339650
• 14-959-49B (fisherscientific.com)
Reservoir for multichannel pipettes MLS
Sterile aerosol barrier (filt
ered) pipette tips thermofisher.com/pipettetips
96‑well plate (for preparing saliva samples, not for RT-PCR) AB0796, or equivalent
code)
MicroAmp™ F
ast Optical 96-Well Reaction Plate, 0.1 mL
• 4346906 (with bar
• 4366932 (with barcode)
• 4346907 (without barcode)
• 4306737 (with bar
code)
• 4326659 (with barcode)
MicroAmp™ Optical 96-W
ell Reaction Plate, 0.2 mL
• N8010560 (without barcode)
• 4316813 (without barcode)
• 4309849 (with bar
code)
• 4326270 (with barcode)
MicroAmp™ Optical 384-W
ell Reaction Plate
• 4343814 (with barcode)
• 4343370 (without barcode)
MicroAmp™ Clear Adhesive Film 4306311
MicroAmp™ Optical Adhesive Film 4311971, 4360954
MicroAmp™ Adhesive Film Applicat
or 4333183
Nonstick, RNase-free microcentrifuge tubes (1.5 mL and 2.0 mL) thermofisher.com/microtubes
DNase and RNase‑free tubes for mixing reagents (capable of mixing 5 mL and 50 mL) thermofisher.com
Nunc™ 1.8‑mL Externally-Threaded Universal Tubes 374502
Nalgene™ General Long-Term Storage Cryogenic Tubes, 0.2 mL 5000-0020
Nunc™ Biobanking and Cell Culture Cryogenic Tubes, 4.5 mL 337516
Sterilin™ Certified Universal Containers – RNase, DNase, human DNA and Pyrogen Free,
30 mL
[1]
Use of QuantStudio™ Design and Analysis Software v2.5 is recommended, but not required. It is the responsibility of the laboratories using the assay to design and validate their
own experimental design and analysis parameters.
[2]
Follow the guidelines provided by the manufacturer.
[3]
The use of the tubes listed in the table is recommended, but not required. Laboratories are responsible for validating their sample collection and preparation procedures for use
with the assay.
• 30APPRN (Unlabelled)
• 30BPPRN (Graduated label)
General laboratory recommendations
• Implement standard operating procedures in your laboratory to prevent contamination, such as the following:
– Frequent glove changes
– Frequent decontamination of surfaces, equipment, and pipettes with 10% bleach or decontamination solution, followed by 70%
ethanol
– Use of ultraviolet light during biosafety cabinet decontamination (when available)
• Saliva samples should always be treated as if infectious and/or biohazardous in accordance with safe laboratory procedures.
• To prevent degradation, keep master mixes, assays, and controls on ice or in cold blocks while in use. Limit freeze-thaw cycles.
• Aliquot reagents to prevent stock contamination and reduce the number of freeze-thaw cycles.
• To ensure reliable performance of the real‑time PCR instrument, perform preventive maintenance according to the instructions
provided by the manufacturer in the instrument documentation (see “Related documentation” on page 9).
TaqCheck™ SARS-CoV
-2 Fast PCR Assay Quick Reference 3

Guidelines for sample collection and storage
• Collect saliva sample in a collection device with a leak‑proof, screw‑top lid.
IMPORTANT! Do not collect saliva using a device that contains preservative solution.
• Collect a minimum of 1 mL saliva.
•
IMPORTANT! Collect saliva samples accor
follow best practices to minimize the presence of inhibitors in the saliva:
At least 30 minutes before collection, clean the mouth. Swish water for 10 seconds, then swallow to remove debris.
·
After cleaning the mouth, avoid eating, drinking, smoking, using chewing tobacco, chewing gum, brushing teeth, and using
·
mouthwash or other foreign substances until the sample is collected to ensure reliable results.
During collection, allow saliva to passively pool in the mouth, then DROOL into the collection device. Do not cough while
·
performing collection, and ensure that the sample is free of phlegm or other debris.
ding to the instructions provided with your collection device. We recommend that you
Note: Labor
atories are responsible for validation of their sample collection procedure.
• Store raw saliva samples according to the procedure established by your laboratory. For long‑term storage, freeze raw saliva samples
at -80°C. Avoid multiple freeze-thaw cycles.
Prepare saliva samples
WARNING! Saliva samples have the pot
personal protective equipment (PPE) and handling samples in a BSL‑2 biological safety cabinet.
IMPORTANT! Saliva samples can contain high amounts of inhibit
are responsible for validating their sample collection and preparation procedures for use with the assay.
Before you begin
If the raw saliva samples are frozen, thaw completely at room temperature before processing.
•
• Ensure that the heating block or water bath is at 95°C.
Prepare 96‑well plates with TBE Buer‑Tween®-20 Detergent (TBE‑T) mix
1. For the required number of samples, prepare the TBE‑T mix in a DNase and RNase‑free tube, according to the following table:
Component Volume per well Volume per 96‑well plate
TBE Buer (10X)
Tween®-20 Detergent (10%)
[2]
[3]
ential to transmit infectious diseases. Use safe laboratory procedures, including wearing
ory compounds that can aect real‑time RT‑PCR results. Laboratories
[1]
20 µL 2.4 mL 9.6 mL
10 µL 1.2 mL 4.8 mL
Volume per four 96‑well plates
[1]
Nuclease-free Water 70 µL 8.4 mL 33.6 mL
Total volume 100 µL 12.0 mL 48.0 mL
[1]
I
ncludes 25% overage.
[2]
The TBE Buffer has a final concentration of 2X in the TBE‑T mix.
[3]
The Tween®-20 Detergent has a final concentration of 1% in the TBE‑T mix.
2. Cap the tube, then mix well by inversion 5–10 times. Do not vortex.
Once mixed, allow bubbles to dissipate naturally.
3. For the required number of samples, add 100 µL of TBE‑T mix to each well of a 96‑well plate.
Store the plates on ice or at room temperature.
Prepare the samples
Keep the saliva samples in the original tubes for the incubation step.
4 T
aqCheck™ SARS-CoV-2 Fast PCR Assay Quick Reference

1. Incubate the saliva sample tubes in a water bath or heat block at 95°C for 30 minutes.
2. Remove the tubes from the water bath or heat block, then allow the samples to equilibrate to room temperature.
3. Vortex each sample at maximum speed for a minimum of 10 seconds, or until the sample appears homogenous.
Note: Samples that are particularly viscous or contain high amounts of particulate may require longer vortex times. Some samples
may contain particulate that does not fully homogenize.
4. Transfer 100 µL of each heat‑treated saliva sample to the designated wells in the prepared TBE‑T 96‑well plates. Gently pipet up and
down 10 times to mix. Ensure that you do not generate bubbles while you pipet.
5. Seal the plate thoroughly with MicroAmp™ Clear Adhesive Film.
Store the prepared sample plates on ice or at 4°C for up to 2 hours while setting up the RT-PCR.
Prepare RT-PCR reactions
Guidelines for RT-PCR
IMPORTANT!
repare the RT-PCR plate on ice or a cold block. Keep the RT-PCR plate on ice or a cold block until it is loaded into the real-time PCR
P
·
instrument.
Run the RT-PCR plate within an hour after preparation. Failure to do so could result in degraded samples.
·
To prevent contamination, prepare reagents in a PCR workstation or equivalent amplicon-free area. Do not use the same pipette for
·
controls and samples, and always use aerosol barrier pipette tips.
Maintain an RNase-free environment.
·
Protect assays from light.
·
Keep samples and components on ice or a cold block during use.
·
For each RT-PCR plate, include the following controls:
·
One Positive Control
·
One No Template Control
·
Prepare the RT‑PCR r
1. If frozen, thaw the reagents on ice or on a cold block.
2. Gently vortex the reagents, then briefly centrifuge the tube or swirl the bottle to collect the liquid at the bottom of the container.
3. Dilute TaqCheck™ SARS‑CoV‑2 Control to a working stock:
a. Pipet 95.0 µL of TaqCheck™ SARS‑CoV‑2 Control Dilution Buer into a microcentrifuge tube, then add 5.0 µL of TaqCheck
SARS‑CoV‑2 Control. Mix well, then centrifuge briefly.
b. Pipet 95.0 µL of TaqCheck™ SARS‑CoV‑2 Control Dilution Buer into a second microcentrifuge tube, then add 5.0 µL of the
dilution created in substep 3a. Mix well, then centrifuge briefly.
4. Prepare the Reaction Mix:
a. For each 96‑well plate, combine the following components sucient for the number of RNA samples plus one Positive Control
and one No Template Control.
Component Volume per sample or control
TaqPath™ 1-Step RT-qPCR Master
Mix, CG (4X)
TaqCheck™ SARS-CoV-2 Fast
PCR Assay
Nuclease-free Water 2.0 µL 2.2 x (n + 2) µL 211.2 µL
Total Reaction Mix volume 5.0 µL — 528.0 µL
[1]
A
ll volumes include 10% overage for pipette error.
eactions (96‑well reaction plate)
2.5 µL 2.75 x (n + 2) µL 264.0 µL
0.5 µL 0.55 x (n + 2) µL 52.8 µL
Volume for n samples plus 2
contr
ols
[1]
Volume for 94 samples plus 2
controls
[1]
™
TaqCheck™ SARS-CoV
-2 Fast PCR Assay Quick Reference 5
5. Set up the reaction plate, according to the following table:
Component
Reaction Mix (from step 4) 5.0 µL 5.0 µL 5.0 µL
Prepared sample (saliva + TBE‑T) 5.0 µL — —
Positive Control (diluted TaqCheck
SARS‑CoV‑2 Control from step 3 )
Nuclease-free Water — 3.0 µL 5.0 µL
Total volume 10.0 µL 10.0 µL 10.0 µL
™
Sample reaction Positive Control reaction No Template Control reaction
— 2.0 µL —
Volume per reaction
a. Add 5.0 µL of the Reaction Mix prepared in step 4 to each well of an optical 96‑well reaction plate.
b. Add 5.0 µL of prepared sample (saliva plus TBE‑T) to each sample well of the reaction plate.
c. Add 2.0 µL of the diluted TaqCheck™ SARS‑CoV‑2 Control and 3.0 µL Nuclease-free Water to the Positive Control well of the
reaction plate.
d. Add 5.0 µL of Nuclease-free Water to the No Template Control well of the reaction plate.
e. Seal the plate thoroughly with MicroAmp™ Optical Adhesive Film.
IMPORTANT! When applying the Micr
oAmp™ Optical Adhesive Film, ensure that pressure is applied across the entire plate
and that there is a tight seal across every individual well. Failure to do so runs the risk of an improperly sealed well, leading to
potential well-to-well contamination during vortexing and PCR.
6. V
ortex the reaction plate at the highest setting speed for 10–30 seconds with medium pressure. Move the plate around to ensure
equal contact on the vortex mixer platform.
IMPORTANT! Failure to vortex the plate for the recommended time can result in inaccurate sample results.
7. Centrifuge the r
eaction plate for 1–2 minutes at ≥1,400 × g (≥1,400 RCF) to remove bubbles and to collect the liquid at the bottom of
the reaction plate.
Prepare the RT‑PCR reactions (384‑well reaction plate)
1. If frozen, thaw the reagents on ice or on a cold block.
2. Gently vortex the reagents, then briefly centrifuge the tube or swirl the bottle to collect the liquid at the bottom of the container.
3. Dilute TaqCheck™ SARS‑CoV‑2 Control to a working stock:
a. Pipet 95.0 µL of TaqCheck™ SARS‑CoV‑2 Control Dilution Buer into a microcentrifuge tube, then add 5.0 µL of TaqCheck
SARS‑CoV‑2 Control. Mix well, then centrifuge briefly.
b. Pipet 95.0 µL of TaqCheck™ SARS‑CoV‑2 Control Dilution Buer into a second microcentrifuge tube, then add 5.0 µL of the
dilution created in substep 3a. Mix well, then centrifuge briefly.
4. Prepare the Reaction Mix:
a. For each 384‑well plate, combine the following components sucient for the number of RNA samples plus one Positive Control
and one No Template Control.
Component Volume per sample or control
TaqPath™ 1-Step RT-qPCR Master
Mix, CG (4X)
Volume for n samples plus 2
contr
2.5 µL 2.75 x (n + 2) µL 1,056.0 µL
ols
[1]
Volume for 382 samples plus 2
controls
[1]
™
TaqCheck™ SARS-CoV-2 Fast
PCR Assay
Nuclease-free Water 2.0 µL 2.2 x (n + 2) µL 844.8 µL
Total Reaction Mix volume 5.0 µL — 2,112.0 µL
[1]
ll volumes include 10% overage for pipette error.
A
6 T
0.5 µL 0.55 x (n + 2) µL 211.2 µL
aqCheck™ SARS-CoV-2 Fast PCR Assay Quick Reference

5. Set up the reaction plate, according to the following table:
Component
Reaction Mix (from step 4) 5.0 µL 5.0 µL 5.0 µL
Prepared sample (saliva + TBE‑T) 5.0 µL — —
Positive Control (diluted TaqCheck
SARS‑CoV‑2 Control from step 3 )
Nuclease-free Water — 3.0 µL 5.0 µL
Total volume 10.0 µL 10.0 µL 10.0 µL
™
Sample reaction Positive Control reaction No Template Control reaction
— 2.0 µL —
Volume per reaction
a. Add 5.0 µL of the Reaction Mix prepared in step 4 to each well of an optical 384‑well reaction plate.
b. Add 5.0 µL of prepared sample (saliva plus TBE‑T) to each sample well of the reaction plate.
c. Add 2.0 µL of the diluted TaqCheck™ SARS‑CoV‑2 Control and 3.0 µL Nuclease-free Water to the Positive Control well of the
reaction plate.
d. Add 5.0 µL of Nuclease-free Water to the No Template Control well of the reaction plate.
e. Seal the plate thoroughly with MicroAmp™ Optical Adhesive Film.
IMPORTANT! When applying the Micr
oAmp™ Optical Adhesive Film, ensure that pressure is applied across the entire plate
and that there is a tight seal across every individual well. Failure to do so runs the risk of an improperly sealed well, leading to
potential well-to-well contamination during vortexing and PCR.
6. V
ortex the reaction plate at the highest setting speed for 10–30 seconds with medium pressure. Move the plate around to ensure
equal contact on the vortex mixer platform.
IMPORTANT! Failure to vortex the plate for the recommended time can result in inaccurate sample results.
7. Centrifuge the r
eaction plate for 1–2 minutes at ≥1,400 × g (≥1,400 RCF) to remove bubbles and to collect the liquid at the bottom of
the reaction plate.
Set up and run the real‑time PCR
A maintained instrument will be calibrated for FAM™ and VIC™ dyes. If calibration is required, refer to the standard calibration procedure in
the instrument user guide.
1. Set up the real-time PCR instrument with the following settings.
• Analysis type: Standard curve
• Run mode: Fast
• Passive reference: ROX
• Sample volume: 10 µL
2. Set up the following reporter dye and detector pairs.
Reporter dye Detector
FAM RNAse P
VIC SARS-CoV-2 N gene and SARS-CoV-2 S gene
TaqCheck™ SARS-CoV-2 Fast PCR Assay Quick Reference 7
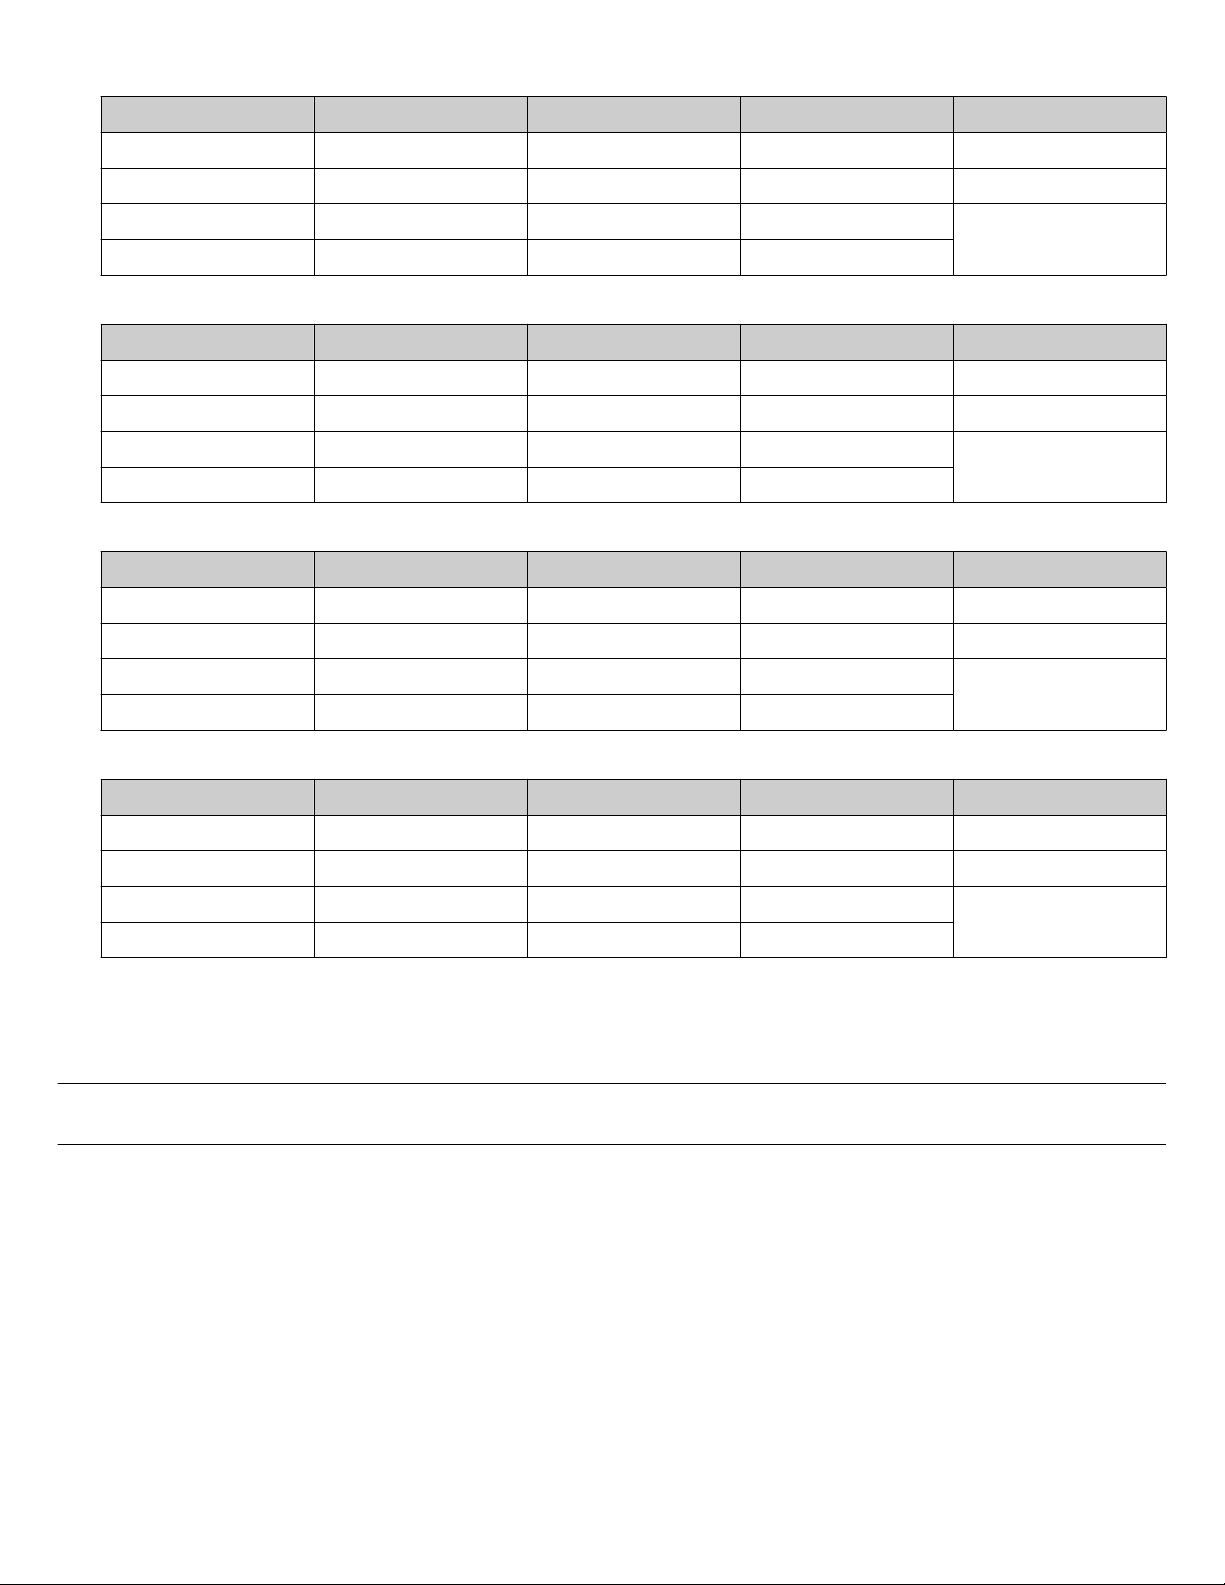
3. Set up the thermal protocol for your instrument.
Table 2 Applied Biosystems™ 7500 Fast Real‑Time PCR Instrument
Step Temperature Ramp rate Time Number of cycles
Reverse transcription 50°C 100% 4 minutes 1
Activation 95°C 100% 2 minutes 1
Denaturation 95°C 100% 1 second
Anneal / extension 60°C 100% 24 seconds
Table 3 Applied Biosystems™ QuantStudio™ 5 Real‑Time PCR Instrument, 96‑well, 0.2-mL block
Step Temperature Ramp rate Time Number of cycles
Reverse transcription 50°C 3.49°C per second 4 minutes 1
Activation 95°C 3.49°C per second 2 minutes 1
Denaturation 95°C 3.49°C per second 1 second
Anneal / extension 60°C 2.7°C per second 20 seconds
Table 4 Applied Biosystems™ QuantStudio™ 5 Real‑Time PCR Instrument, 384‑well block
Step Temperature Ramp rate Time Number of cycles
Reverse transcription 50°C 2.2°C per second 4 minutes 1
Activation 95°C 2.2°C per second 2 minutes 1
Denaturation 95°C 2.2°C per second 1 second
Anneal / extension 60°C 1.8°C per second 20 seconds
Table 5 Applied Biosystems™ QuantStudio™ 7 Flex Real-Time PCR Instrument, 384‑well block
Step Temperature Ramp rate Time Number of cycles
40
40
40
Reverse transcription 50°C 2.34°C per second 4 minutes 1
Activation 95°C 2.34°C per second 2 minutes 1
Denaturation 95°C 2.34°C per second 1 second
Anneal / extension 60°C 1.98°C per second 20 seconds
oad the plate and start the instrument run.
4. L
Analyze data
IMPORTANT! It is the responsibility of the laboratories using the TaqCheck
own experimental design and analysis parameters.
(Recommended) Use QuantS
tudio™ Design and Analysis Software v2.5 or later for data analysis. For more information about using the
software, see “Related documentation” on page 9.
1. In the QuantStudio™ Design and Analysis Software v2 home screen, open the data file (EDS).
2. In the open data file, click Actions4Save As, the save the data file with a new name.
Note: QuantStudio™ Design and Analysis Software v2 requires data files created on a 7500 Fast Real‑Time PCR Instrument,
QuantStudio™ 5 Real‑Time PCR System, and QuantStudio™ 7 Flex Real-Time PCR System to be saved as a new data file.
3. In the analysis settings, select automatic baseline with a start cycle of 5.
™
SARS-CoV-2 Fast PCR Assay to design and validate their
40
8 T
aqCheck™ SARS-CoV-2 Fast PCR Assay Quick Reference

4. Set the appropriate threshold values for each target, as validated by your laboratory.
IMPORTANT! Do not use automatic threshold values.
For the 7500 Fast Real‑Time PCR Instrument, QuantStudio™ 5 Real‑Time PCR System with the 96‑well, 0.2-mL block and 384‑well
block, and QuantStudio™ 7 Flex Real-Time PCR System with the 384‑well block, we recommend that you start with the following
threshold values, then adjust as needed for optimal performance according to your laboratory processes and validation.
Target Threshold value guidelines
[1]
SARS-CoV-2 N gene and SARS-CoV-2 S gene Manually set the threshold to 0.1, then adjust as needed.
RNase P Manually set the threshold to 0.2, then adjust as needed.
[1]
These threshold settings have not been tested with instruments other than the 7500 Fast Real‑Time PCR Instrument, QuantStudio™ 5 Real‑Time PCR System with the
96‑well, 0.2-mL block and 384‑well block, and QuantStudio™ 7 Flex Real-Time PCR System with the 384‑well block. Other instruments may require different threshold
settings. It is the responsibility of the laboratories using the assay to design and validate their own experimental design and analysis parameters.
5. Determine Cq cuto values for each target for samples and controls.
Note: QuantStudio™ Design and Analysis Software v2 reports Cq values instead Ct values. The Cq values are equivalent to Ct values.
6. Analyze results according to analysis, interpretation, and QC parameters, as validated by your laboratory.
Contact Support for more information.
Related documentation
Document Publication Number
Applied Biosystems™ 7500/7500 F
QuantStudio™ 3 and 5 Real‑Time PCR Systems Installation, Use, and Maintenance Guide MAN0010407
QuantStudio™ 6 and 7 Flex Real-Time PCR Systems Maintenance and Administration Guide 4489821
QuantStudio™ Design and Analysis Software v2 User Guide MAN0018200
ast Real‐Time PCR System: Maintenance Guide 4387777
TaqCheck™ SARS-CoV-2 Fast PCR Assay User Guide MAN0019745
Limited product warranty
echnologies Corporation and/or its aliate(s) warrant their products as set forth in the Life Technologies' General Terms and
Life T
Conditions of Sale at www.thermofisher.com/us/en/home/global/terms-and-conditions.html. If you have any questions, please
contact Life Technologies at www.thermofisher.com/support.
Thermo Fisher Scientific | 6055 Sunol Blvd | Pleasant
For descriptions of symbols on product labels or product documents, go to thermofisher.com/symbols-definition.
The information in this guide is subject to change without notice.
DISCLAIMER: T
PUNITIVE, MULTIPLE, OR CONSEQUENTIAL DAMAGES IN CONNECTION WITH OR ARISING FROM THIS DOCUMENT, INCLUDING YOUR USE OF IT.
Revision history: Pub. No. MAN0019744
Important Licensing Information: These pr
applicable Limited Use Label Licenses.
©2021 Thermo Fisher Scientific Inc. All rights reserved. All trademarks are the property of Thermo Fisher Scientific and its subsidiaries unless otherwise specified. Tween is a
registered trademark of Croda Americas, Inc.
O THE EXTENT ALLOWED BY LAW, THERMO FISHER SCIENTIFIC INC. AND/OR ITS AFFILIATE(S) WILL NOT BE LIABLE FOR SPECIAL, INCIDENTAL, INDIRECT,
Revision Date Description
B.0 27 January 2021 Added Applied Biosystems™ 7500 F
A.0 4 December 2020 New document.
oducts may be covered by one or more Limited Use Label Licenses. By use of these products, you accept the terms and conditions of all
on, CA 94566 | USA
ast Real‑Time PCR Instrument, Applied Biosystems
QuantStudio™ 5 Real‑Time PCR Instrument, 96-well, 0.2-mL block, and Applied
Biosystems™ QuantStudio™ 7 Flex Real-Time PCR Instrument, 384‑well block.
™
thermofisher.com/support | thermofisher.com/askaquestion
thermofisher.com
27 January 2021
 Loading...