


QuantStudio™ 6 Pro Real-Time PCR System
and QuantStudio™ 7 Pro Real-Time PCR
System
USER GUIDE
Publication Number MAN0018045
Revision G.0
For Research Use Only. Not for use in diagnostic procedures.
Life Technologies Holdings Pte Ltd | Block 33 | Marsiling Industrial Estate Road 3 | #07-06, Singapore 739256
For descriptions of symbols on product labels or product documents, go to thermofisher.com/symbols-definition.
The information in this guide is subject to change without notice.
DISCLAIMER: T
O THE EXTENT ALLOWED BY LAW, THERMO FISHER SCIENTIFIC INC. AND/OR ITS AFFILIATE(S) WILL NOT BE
LIABLE FOR SPECIAL, INCIDENTAL, INDIRECT, PUNITIVE, MULTIPLE, OR CONSEQUENTIAL DAMAGES IN CONNECTION WITH OR
ARISING FROM THIS DOCUMENT, INCLUDING YOUR USE OF IT.
Revision history: Pub. No. MAN0018045
Revision Date Description
G.0 17 February 2021 v1.4.0
Updat
ed centrifuges for the TaqMan™ Array Card.
F.0 6 November 2020 v1.4.0
•
Specified that the instrument and the desktop software must be connected to the same SAE server
for an account password to be updated on both applications.
•
Provided the option of a static IP address or a dynamic IP address to connect to the SAE server.
•
Corrected standards on 384-well RNase P plate (Figure 14 on page 105).
•
Added a TaqMan™ Array Card block, including system template file names, calibration workflow,
instructions to edit the plate file, and instructions to load and unload from the instrument
(QuantStudio™ 7 Pro System only).
•
Added instructions to review the calibration status in the QuantStudio™ Design and Analysis
Software v2.
•
Added a peripheral self-test and updated the previous self-verification test to a hardware test.
•
Added instructions to upload a certificate for a TaqMan™ Array Plate with RFID.
•
Added the option of a voice recording for Smart Help.
•
Added remote support.
•
Updated the RFID labels (Figure 27 on page 215 and Figure 28 on page 216).
E.0 27 April 2020 v1.3.0
•
•
•
•
•
•
•
•
•
D.0 7 January 2020 v1.2.1
•
•
•
•
•
C.0 3 December 2019 v1.2.0
•
•
•
•
Added protein thermal shift experiments to the instrument functions.
Added a 96-well 0.1-mL block.
Updated instructions to export data files when setting up a run and added instructions to import or
delete export settings.
Updated instructions to save an edited run method.
Updated instructions to add or edit reagents and then to apply the reagents to the plate.
Updated instructions to view the amplification plot after a run.
Added instructions to view QC Check status after the run.
Added information about a locked template file.
Added functions for using the instrument with the SAE Administrator Console.
Added information about position to set up facial authentication and to sign in with facial
authentication.
Added instructions to test the connection to the Connect cloud-based platform and to view the
privacy policy for the Connect platform.
Added instructions to repair the software after a software update.
Changed port 7000 to 7443 for the instrument-to-computer connection.
Corrected Ct to Cq in description of instrument verification.
Added a 384-well plate block.
Updated instructions to set up facial authentication.
Added a new voice command for calibration.
Added custom melt curve run calibration.
Revision Date Description
C.0
(continued)
B.0 22 August 2019 v1.1.0
3 December 2019
•
Added Security, Auditing, and E‑signature (SAE) v2.0 module.
•
Added instructions to generate and reset an access key for external software to connect to the
instrument.
•
Added instructions to import an Assay Information File.
•
Corrected that a Connect profile is required for the instrument schedule and Smart Help.
•
Added new radio compliance standards.
•
Corrected the text on the buttons for the following items:
–
Add facial authentication to an existing instrument profile.
–
View the license agreement.
–
Reset the instrument (restore factory default).
•
Added the following items:
–
TET™ dye as a system dye.
–
Information about sleep mode.
–
Information about the automatic sign-out feature.
–
The option to configure the instrument so that sign-in is required (guest access is not
permitted).
–
Instructions to set up email notification.
–
Information about the speaker volume for each user.
–
Instructions to back up the instrument and to restore a backup of the instrument.
–
Information about multiple instruments and email notification in the comparison of a local
instrument profile and a Connect profile.
–
Instructions to unlink a Connect profile.
–
Instructions to update a PIN for a Connect profile.
–
Lighting guidelines for facial authentication.
–
Radio compliance standards and RF transceiver specifications.
•
Corrected the following items:
–
Indicators for voice commands.
–
Voice commands are only available in select countries.
–
Instructions to remove VeriFlex™ Zones and the Auto Delta setting.
–
Excitation and emission wavelengths of the filters in the calibration instructions.
–
Add a four-digit PIN when signing into the instrument for the first time using a Connect
profile.
–
Add a four-digit PIN when linking a local instrument profile to a Connect profile.
–
Select a region for the Connect cloud-based platform.
–
A run cannot be started if a block has never been calibrated on the instrument.
–
The options after a calibration run is complete.
–
The example files for the desktop software are embedded in the software and do not need to
be downloaded.
•
Updated the following items:
–
Cq Export checkbox is selected as the default.
–
Instructions to sign in with facial authentication.
A.0 18 April 2019 New document (v1.0.1).
Important Licensing Information: These pr
oducts may be covered by one or more Limited Use Label Licenses. By use of these
products, you accept the terms and conditions of all applicable Limited Use Label Licenses.
NOTICE TO PURCHASER: DISCLAIMER OF LICENSE: Purchase of this software product alone does not imply any license under any
process, instrument or other apparatus, system, composition, reagent or kit rights under patent claims owned or otherwise controlled by
Thermo Fisher Scientific, either expressly, or by estoppel.

Trademarks: All trademarks are the property of Thermo Fisher Scientific and its subsidiaries unless otherwise specified. TaqMan is
a registered trademark of Roche Molecular Systems, Inc., used under permission and license. Cy is a registered trademark of GE
Healthcare. Amazon, Alexa, and all related logos are trademarks of Amazon.com, Inc. or its aliates. Windows is a trademark of
Microsoft Corporation. Chrome is a trademark of Google LLC. Pentium is a trademark of Intel Corporation or its subsidiaries in the U.S.
and/or other countries. Macintosh is a trademark of Apple Inc., registered in the U.S. and other countries.
©2021 Thermo Fisher Scientific Inc. All rights reserved.

Contents
■
CHAPTER 1 Product information ................................................ 14
Network and password security requirements ..................................... 14
Network configuration and security .......................................... 14
Password security ......................................................... 14
Instrument hardware description ................................................. 15
Overview of the instrument .................................................. 15
Features of each instrument ................................................. 16
Instrument filters and supported dyes ........................................ 16
Overview of data collection ................................................. 18
VeriFlex™ Zones ........................................................... 18
AutoDelta settings ......................................................... 19
Parts of the instrument ..................................................... 20
Instrument status indicator .................................................. 22
Hands-free features ............................................................ 22
Facial authentication ....................................................... 22
Voice commands .......................................................... 22
Indicators for the hands-free features ........................................ 23
Software description ........................................................... 24
Parts of the home screen ................................................... 24
Connect and Cloud definitions .............................................. 26
Instrument, desktop software, and Connect platform features ................... 26
Overview of file locations and files ........................................... 27
Components of the files .................................................... 30
Third-party software ....................................................... 31
Network connection options ................................................ 31
Types of runs .................................................................. 31
Standard curve run ........................................................ 31
Relative standard curve run ................................................. 32
Comparative Ct (DDCt) run .................................................. 32
Genotyping run ............................................................ 33
Presence/absence run ...................................................... 33
Melt curve run ............................................................. 33
QuantStudio™ 6 Pro Real-Time PCR System and QuantStudio™ 7 Pro Real-Time PCR System User Guide
5

Contents
■
System template file names ..................................................... 34
System template file names for the 96-well 0.2-mL block ....................... 34
System template file names for the 96-well 0.1-mL block ....................... 35
System template file names for the 384-well block ............................. 37
System template file names for the TaqMan™ Array Card block .................. 38
Workflow ..................................................................... 40
CHAPTER 2 Get started .......................................................... 41
Precautions for use ............................................................. 41
Installation and instrument verification ............................................ 42
Overview of guest access ....................................................... 42
Use the instrument as a guest ............................................... 42
Power on the instrument ........................................................ 43
Sign in ........................................................................ 43
Sign in with a PIN .......................................................... 43
Sign in with facial authentication ............................................. 44
Enable or disable the microphone ................................................ 44
Use voice commands .......................................................... 45
Sign out ...................................................................... 46
■
CHAPTER 3 Create and run plates on the instrument ......................... 47
Options to run a plate .......................................................... 47
Create and run a plate from a system template or a saved plate file .............. 47
Repeat the last run ......................................................... 49
Overview of customized data export .............................................. 50
(Optional) Scan a barcode using a barcode scanner ................................ 51
Load a plate into the instrument .................................................. 51
Load a TaqMan™ Array Card into the instrument ................................... 52
Unload a plate or a TaqMan™ Array Card from the instrument ........................ 52
■
CHAPTER 4 Edit a plate before starting a run .................................. 54
Overview of a template file with restricted editing .................................. 54
Options to edit the properties of a plate file ........................................ 55
Import a sample setup ..................................................... 55
Import an auto export setting ................................................ 55
Delete an auto export setting ................................................ 55
Options to edit the method of a plate file .......................................... 56
Method elements .......................................................... 57
Edit the method ........................................................... 57
Add or remove steps ....................................................... 58
Add or remove stages ...................................................... 58
Add or remove data collection locations ...................................... 58
6
QuantStudio™ 6 Pro Real-Time PCR System and QuantStudio™ 7 Pro Real-Time PCR System User Guide

Set up or remove VeriFlex™ Zones ........................................... 59
Set up or remove the Auto Delta feature ...................................... 61
Configure ramp rates ....................................................... 62
Add or remove a pause ..................................................... 62
Options to edit the well details of a plate file ....................................... 62
Options to view a plate layout ............................................... 63
Assign or edit a well for a plate .............................................. 65
Assign or edit a well for a TaqMan™ Array Card ................................ 66
Add or edit the reagent details for a plate ..................................... 66
Apply the reagents to a plate ................................................ 67
Delete the reagent details ................................................... 67
Add or edit the reagent details for a TaqMan™ Array Card ....................... 68
Apply the reagents to a TaqMan™ Array Card .................................. 68
Edit a passive reference dye ................................................ 68
Import an Assay Information File (AIF) ........................................ 69
■
CHAPTER 5 Options for a run .................................................... 70
Contents
Screens available during a run ................................................... 70
Edit a plate file during a run ..................................................... 71
Pause an instrument run ........................................................ 72
Stop an instrument run ......................................................... 72
View the method during a run ................................................... 73
View real-time data and plots during a run ........................................ 73
Adjust the display of real-time plots during a run ............................... 74
View the time remaining during a run ............................................. 74
Lock the touchscreen during a run ............................................... 74
Unlock the touchscreen during a run ............................................. 75
Instrument Schedule ........................................................... 75
Overview of the instrument schedule ......................................... 75
Schedule a run ............................................................ 75
Cancel a scheduled run .................................................... 75
■
CHAPTER 6 View and manage files ............................................. 77
Manage plate files .............................................................. 77
Copy plate files ............................................................ 77
Delete plate files ........................................................... 78
Manage data files .............................................................. 78
View QC Check status after a run ............................................ 78
View an amplification plot after a run ......................................... 80
Transfer a data file immediately after a run .................................... 81
Transfer data files at a later time ............................................. 81
View the list of data files on the instrument .................................... 82
Delete data files from the instrument ......................................... 82
QuantStudio™ 6 Pro Real-Time PCR System and QuantStudio™ 7 Pro Real-Time PCR System User Guide
7

Contents
■
CHAPTER 7 Calibrate and verify instrument performance ..................... 84
Instrument and block calibration ................................................. 84
Calibration and verification schedule ............................................. 85
Calibration descriptions ......................................................... 86
View the calibration status and set reminders ...................................... 87
View the calibration status on the instrument .................................. 87
Set calibration frequency and reminders on the instrument ...................... 88
View calibration status and set reminders on the Connect platform .............. 88
Review calibration status ................................................... 89
Export a calibration report ....................................................... 89
Perform ROI/uniformity, background, and dye calibrations for plate blocks ............ 89
Calibration workflow ....................................................... 90
Prepare a calibration plate .................................................. 90
Perform calibrations ........................................................ 91
View the calibration images ................................................. 93
Transfer calibration results .................................................. 94
Transfer calibration data files ................................................ 94
Troubleshoot calibration failure .............................................. 95
Identify contamination ...................................................... 95
Create a background plate (optional) ......................................... 96
Perform ROI/uniformity, background, dye, and normalization calibrations for the
TaqMan™ Array Card block .................................................... 97
Calibration workflow ....................................................... 97
Prepare a calibration TaqMan™ Array Card .................................... 98
Perform calibrations ....................................................... 100
View the calibration images ................................................ 101
Troubleshoot normalization calibration failure ................................ 102
Perform verification using RNase P plates ........................................ 103
Instrument verification description .......................................... 104
RNase P instrument verification plate ....................................... 104
Performance specifications pass criteria ..................................... 105
Prepare an RNase P plate ................................................. 105
Perform RNase P verification ............................................... 106
Troubleshoot verification failure ............................................. 107
Perform verification using RNase P with a TaqMan™ Array Card ..................... 108
RNase P instrument verification TaqMan™ Array Card ......................... 109
Prepare an RNase P TaqMan™ Array Card ................................... 110
Perform RNase P verification ............................................... 112
Calibrate custom dyes ......................................................... 113
Overview of custom dyes .................................................. 113
Use a dilution series to determine an optimal custom dye concentration ......... 114
Calibrate the custom dye .................................................. 117
Calibrate for a custom melt curve run ............................................ 120
8
QuantStudio™ 6 Pro Real-Time PCR System and QuantStudio™ 7 Pro Real-Time PCR System User Guide

■
CHAPTER 8 Manage profiles ................................................... 122
Require sign-in ............................................................... 122
Recommended order to set up profiles .......................................... 123
Overview of local instrument profiles and Connect profiles ......................... 123
Connect instrument profile roles and functions ................................... 124
Test the connection to the Connect platform ..................................... 124
Link the instrument to your Connect account ..................................... 126
Create a new local instrument profile ............................................ 127
Link a local profile to a Connect profile .......................................... 127
Unlink a Connect account ...................................................... 129
If you link when you are signed in to the instrument ............................... 129
If you link when you are not signed in to the instrument ............................ 130
Manage individual instrument profiles ........................................... 131
Create an administrator instrument profile during initial start-up ................ 131
Set up facial authentication at the initial creation of an instrument profile ........ 131
Add facial authentication to an existing instrument profile ...................... 132
Change the PIN for an instrument profile .................................... 133
Change the PIN for a Connect profile ....................................... 133
Manage all instrument profiles as an administrator ................................ 133
View all instrument profiles ................................................. 133
Reset the PIN for a profile ................................................. 134
Add a profile ............................................................. 134
Enable or disable administrator privileges .................................... 135
Delete a profile ........................................................... 135
Contents
■
CHAPTER 9 Use the instrument with the Security, Auditing, and
E‑signature (SAE) v2.0 module ................................................. 136
Overview of the Security, Auditing, and E‑signature (SAE) v2.0 module components ... 137
Overview of the instrument features when the SAE module is enabled ............... 137
Security, Auditing, and E‑signature (SAE) v2.0 module functions .................... 138
Functions that are controlled ............................................... 138
Functions that can be audited ............................................. 139
Functions that can be signed ............................................... 139
Security, Auditing, and E‑signature (SAE) v2.0 module roles ........................ 139
Dialog boxes in the SAE module ................................................ 140
Profiles when the SAE module is enabled ........................................ 141
SAE-enabled system components .............................................. 141
Compatibility between SAE-enabled and SAE-disabled components ............ 142
QuantStudio™ 6 Pro Real-Time PCR System and QuantStudio™ 7 Pro Real-Time PCR System User Guide
9

Contents
Enable SAE functions ......................................................... 143
Workflow: Enable SAE functions ............................................ 143
Configure SAE Administrator Console application profiles ..................... 143
Enable SAE on the instrument and specify the SAE server (administrator only) ... 143
Connect to the SAE server ................................................. 144
Enable SAE functions in QuantStudio™ Design and Analysis Software v2 ........ 145
Disable SAE on the instrument (administrator only) ................................ 145
Sign in as a local administrator with SAE enabled ................................. 146
Sign in with SAE enabled ...................................................... 147
Sign out with SAE enabled ..................................................... 148
Change your SAE account password on the instrument ............................ 149
Sign a plate setup ............................................................. 150
Enter an audit reason .......................................................... 151
View signing records for a plate file .............................................. 152
View audit records ............................................................ 153
Use the instrument when the SAE server is oine ................................. 154
E-signature requirements to start a run .......................................... 154
Signing in after automatic screen locking ........................................ 155
SAE error messages and actions ................................................ 155
■
CHAPTER 10 Maintain the instrument ......................................... 156
Install a block ................................................................ 156
Change the block ............................................................. 157
Remove the block ............................................................. 158
Decontaminate the sample block ............................................... 159
Materials required ........................................................ 159
Clean the sample block ................................................... 159
Detailed procedures for cleaning the sample block ............................ 160
Replace the instrument fuses ................................................... 161
Materials required ........................................................ 161
Replace the fuses ........................................................ 161
Power on or o, store, and move ................................................ 163
Enable and edit sleep mode ............................................... 163
Power on the instrument ................................................... 164
Power o the instrument ................................................... 164
Prepare the instrument to store, move, or ship ............................... 165
Move the instrument ...................................................... 165
■
CHAPTER 11 Configure the instrument settings .............................. 166
10
View the instrument details ..................................................... 166
View the license agreement .................................................... 167
View the privacy policy for the Connect cloud-based platform ...................... 167
QuantStudio™ 6 Pro Real-Time PCR System and QuantStudio™ 7 Pro Real-Time PCR System User Guide

Contents
Configure the instrument settings ............................................... 168
Enable or disable demonstration mode ...................................... 168
Edit the instrument name (administrator only) ................................ 168
Set the date and the time .................................................. 168
Configure the heated cover settings ......................................... 169
Adjust the speaker volume ................................................. 169
Configure the network ..................................................... 169
Select the region for the Connect platform ................................... 170
Select a disk storage management mode .................................... 171
Enable and edit automatic sign-out ......................................... 171
Set an access key for external software to connect to the instrument ............ 171
Reset the access key for external software to connect to the instrument ......... 172
Configure maintenance and service settings ...................................... 172
Request technical support with Smart Help .................................. 172
Request instrument service with Smart Help ................................. 173
Perform and view self-verification tests ..................................... 173
View the instrument log ................................................... 178
Export the instrument log .................................................. 179
View the instrument statistics .............................................. 179
Enable or disable remote monitoring ........................................ 180
Update the software ...................................................... 180
Repair the software ....................................................... 181
Back up the instrument .................................................... 181
Restore a backup of the instrument ........................................ 182
Upload a certificate for a TaqMan™ Array Plate with RFID ...................... 182
Overview of an instrument reset (restore factory default) ....................... 183
Reset the instrument (restore factory default) ................................. 183
Request remote support ....................................................... 183
Configure the instrument for the hands-free features .............................. 185
Manage the run history ........................................................ 185
Manage the file name convention of the data file .................................. 185
View the notifications .......................................................... 186
Enable and disable home screen notifications .................................... 186
Set up email notifications ...................................................... 187
Clear the notifications ......................................................... 187
■
APPENDIX A Instrument specifications and layout ........................... 188
Instrument dimensions ........................................................ 188
Instrument and computer clearances ........................................ 189
Configured system dimensions ............................................ 190
Light guidelines .......................................................... 191
Electrical requirements ........................................................ 191
Environmental requirements .................................................... 192
QuantStudio™ 6 Pro Real-Time PCR System and QuantStudio™ 7 Pro Real-Time PCR System User Guide
11

Contents
■
APPENDIX B Connect the instrument to a network .......................... 193
Connect the computer to the instrument directly or to a LAN ....................... 193
Connect the instrument to a wired network ....................................... 194
Connect the instrument to a wireless network .................................... 195
Instrument and computer connections ........................................... 196
Download and install the desktop software ....................................... 197
Computer requirements for the desktop software ............................. 197
Download the desktop software ............................................ 197
Install the desktop software ................................................ 198
Networking ................................................................... 198
Supported options for instrument and computer connections .................. 198
Control and monitor networked instruments .................................. 200
Networking guidelines and best practices ................................... 200
Firewall ports that must be open ............................................ 200
Ethernet port overview .................................................... 201
Third-party software ...................................................... 201
■
APPENDIX C Detailed procedures for preparation of a TaqMan
™
Array Card ........................................................................ 202
Guidelines for preparation of a card ............................................. 202
TaqMan™ Array Card diagram .................................................. 203
Load the PCR reaction mix ..................................................... 204
Centrifuge the card ............................................................ 204
Seal the card ................................................................. 206
■
APPENDIX D Parts and materials .............................................. 209
Kits, consumables, accessories, and reagents .................................... 209
96-well 0.2 mL consumables ................................................... 209
96-well 0.1 mL consumables ................................................... 210
384-well consumables ......................................................... 210
TaqMan™ Array Card consumables .............................................. 211
Accessories ................................................................. 212
■
APPENDIX E Safety .............................................................. 213
12
Symbols on this instrument .................................................... 213
Standard safety symbols .................................................. 214
Additional safety symbols ................................................. 215
Location of safety labels .................................................. 215
QuantStudio™ 6 Pro Real-Time PCR System and QuantStudio™ 7 Pro Real-Time PCR System User Guide

Contents
Control and connection symbols ........................................... 219
Conformity symbols ...................................................... 219
Safety information for instruments not manufactured by Thermo Fisher Scientific ..... 220
Instrument safety ............................................................. 220
General ................................................................. 220
Physical injury ............................................................ 221
Electrical safety .......................................................... 222
Laser safety .............................................................. 223
Cleaning and decontamination ............................................. 224
Instrument component and accessory disposal .............................. 224
Safety and electromagnetic compatibility (EMC) standards ......................... 224
Safety standards ......................................................... 225
EMC standards ........................................................... 225
Environmental design standards ............................................ 226
Radio compliance standards ............................................... 226
RF transceiver specifications ............................................... 228
Chemical safety .............................................................. 229
Biological hazard safety ....................................................... 231
■
APPENDIX F Documentation and support ..................................... 232
Related documentation ........................................................ 232
Customer and technical support ................................................ 233
Limited product warranty ...................................................... 233
Index ..................................................................................... 234
QuantStudio™ 6 Pro Real-Time PCR System and QuantStudio™ 7 Pro Real-Time PCR System User Guide
13

Product information
1
Network and password security requirements ............................................ 14
■
Instrument hardware description ....................................................... 15
■
Hands-free features ................................................................... 22
■
Software description .................................................................. 24
■
Types of runs ........................................................................ 31
■
System template file names ............................................................ 34
■
Workflow ............................................................................ 40
■
Network and password security requirements
Network configuration and security
The network configuration and security settings of your laboratory or facility (such as firewalls, anti-
virus software, network passwords) are the sole responsibility of your facility administrator, IT, and
security personnel. This product does not provide any network or security configuration files, utilities, or
instructions.
If external or network drives are connected to the software, it is the responsibility of your IT personnel
to ensure that such drives are configured and secured correctly to prevent data corruption or loss. It
is the responsibility of your facility administrator, IT, and security personnel to prevent the use of any
unsecured ports (such as USB, Ethernet) and ensure that the system security is maintained.
Password security
Thermo Fisher Scientific strongly recommends that you maintain unique passwords for all accounts in
use on this product. All passwords should be reset upon first sign in to the product. Change passwords
according to your organization's password policy.
It is the sole responsibility of your IT personnel to develop and enforce secure use of passwords.
14
QuantStudio™ 6 Pro Real-Time PCR System and QuantStudio™ 7 Pro Real-Time PCR System User Guide

Instrument hardware description
Overview of the instrument
The Applied Biosystems™ QuantStudio™ 6 Pro and 7 Pro Real-Time PCR Systems use fluorescentbased polymerase chain reaction (PCR) reagents to perform the following functions:
•
Quantitative detection of target nucleic acid sequences (targets)
•
Qualitative detection of targets (endpoint analysis)
•
Qualitative analysis of the PCR product (post-PCR target nucleic acid sequences melt curve
analysis)
•
Protein thermal shift experiments
Chapter 1 Product information
Instrument hardware description
1
Each instrument is available with an interchangeable block. The following blocks are available:
•
96-well 0.2-mL block
•
96-well 0.1-mL block
•
384-well block
•
TaqMan™ Array Card block (QuantStudio™ 7 Pro System only)
The instrument can be used directly from the touchscreen to create and start runs. To design runs or to
analyze data, the instrument can be integrated with the desktop software or the Connect platform.
Each instrument has the following features:
•
Sign-in with facial authentication
•
An interchangeable block
•
Microphone for voice commands
•
Speakers for feedback from voice commands and for instructional videos
QuantStudio™ 6 Pro Real-Time PCR System and QuantStudio™ 7 Pro Real-Time PCR System User Guide
15
Chapter 1 P
1
Instrument hardware description
•
•
roduct information
Smart Help to request technical support or instrument service directly from the instrument
Barcode scanner for tracking plates or TaqMan™ Array Cards
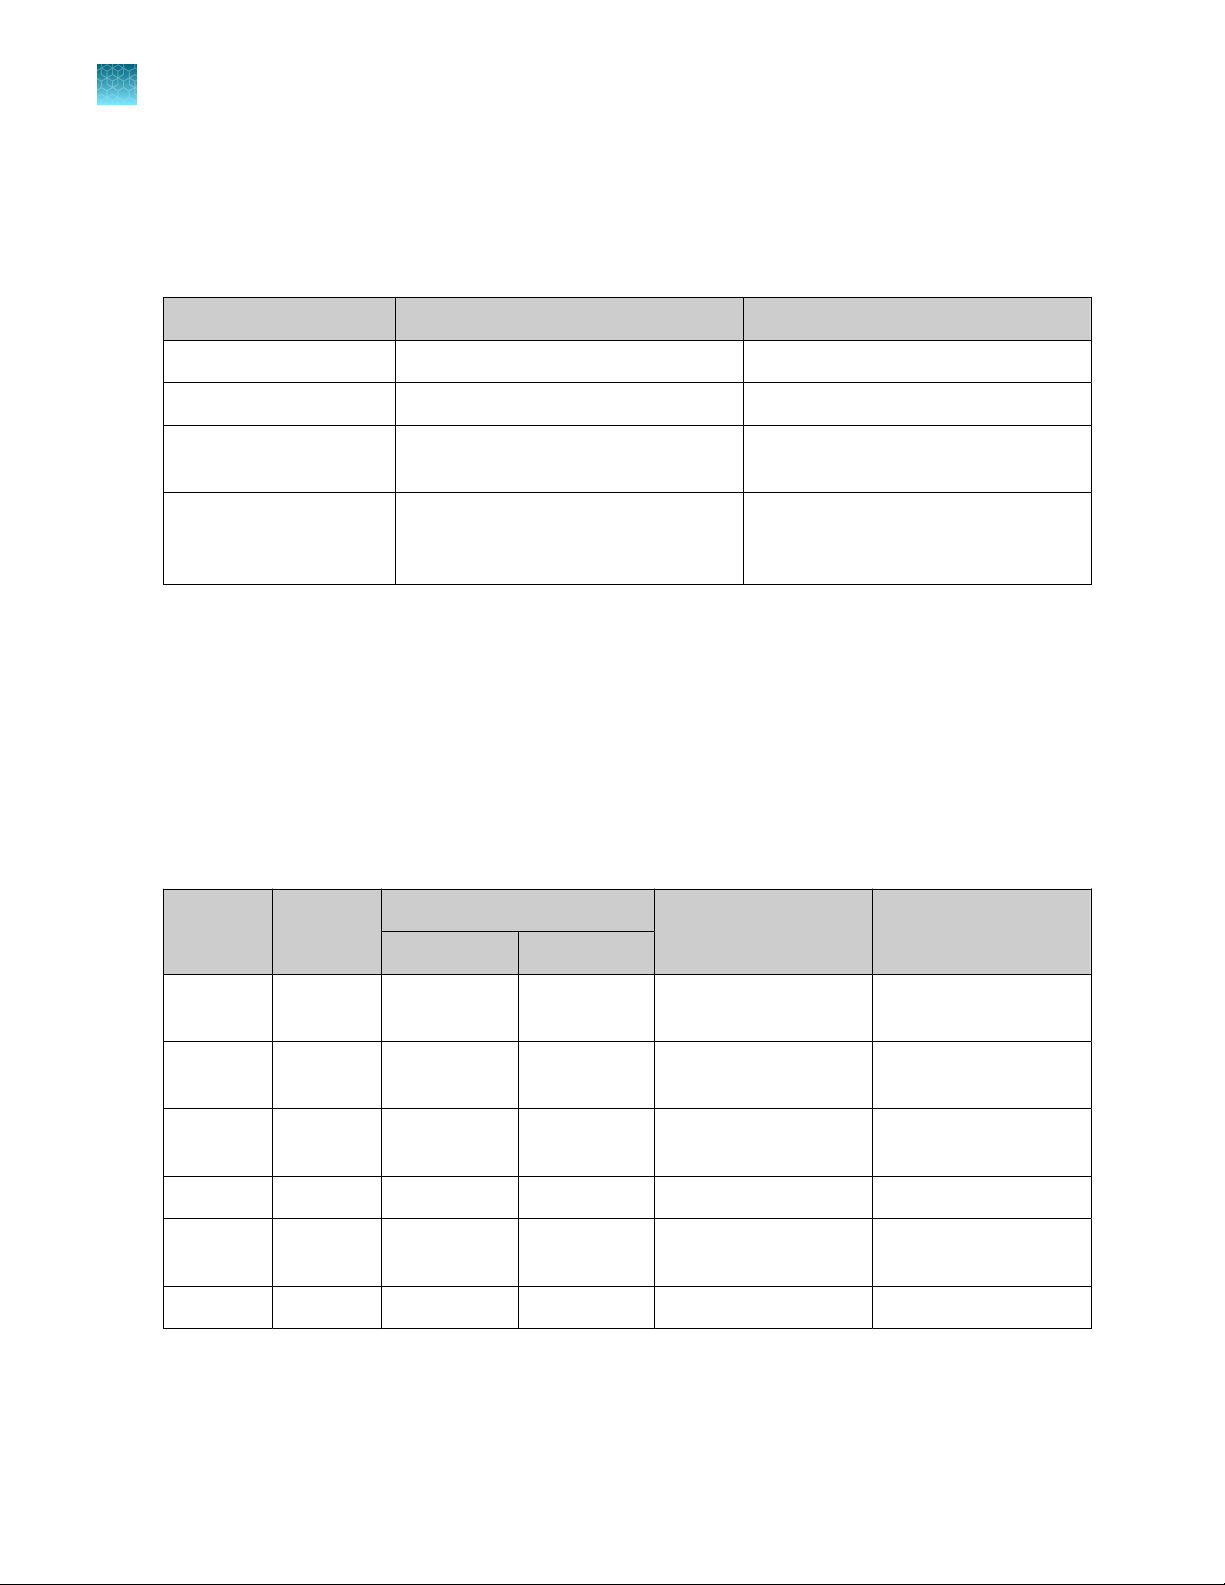
Features of each instrument
Feature
Filter set
[1]
VeriFlex™ Zones
TaqMan™ Array Card
block
Security, Auditing, and
E‑signature (SAE) v2.0
module
[1]
S
ee “System dyes” on page 16.
[2]
See “VeriFlex™ Zones” on page 18.
[3]
See Chapter 9, “Use the instrument with the Security, Auditing, and E‑signature (SAE) v2.0 module”.
Instrument filt
System dyes
The QuantStudio™ 6 Pro Real-Time PCR System has a coupled five-color filter set.
The QuantStudio™ 7 Pro Real-Time PCR System has a decoupled six-by-six color filter set.
For more information about available spectral dye calibration kits, contact Support.
QuantStudio™ 6 Pro System QuantStudio™ 7 Pro System
Coupled five-color filter set Decoupled six-by-six color filter set
[2]
Three VeriFlex™ Zones Six VeriFlex™ Zones
— Available
— Available
ers and supported dyes
[3]
Filter wavelength (nm)
Peak filter Color
[1]
System dyes Example custom dyes
Excitation Emission
x1-m1 Blue 470 ± 15 520 ± 15
x2-m2 Green 520 ± 10 558 ± 11 VIC™ dye
x3-m3 Yellow 550 ± 11 586 ± 10
FAM™ dye, SYBR
GREEN™ dye
NED™ dye, TAMRA
dye, ABY™ dye
SYT09
JOE™ dye, HEX™ dye,
TET™ dye
™
Cy®3 dye
x4-m4 Orange 580 ± 10 623 ± 14 ROX™ dye, JUN™ dye Texas Red™ dye
x5-m5 Red 640 ± 10 682 ± 14
x6-m6 Deep-Red 662 ± 10 711 ± 12 None
[1]
T
he central wavelengths are the optimized wavelengths.
[2]
The HEX™ dye and TET™ dye from Thermo Fisher Scientific fall within the emission wavelength range of the system, therefore they
can be added and adapted for use on the instrument.
[3]
This filter set currently does not support any dyes supplied by Thermo Fisher Scientific.
MUSTANG PURPLE
dye, Cy®5
[3]
™
LIZ™ dye
Cy®5.5 dye
[2]
16
QuantStudio™ 6 Pro Real-Time PCR System and QuantStudio™ 7 Pro Real-Time PCR System User Guide
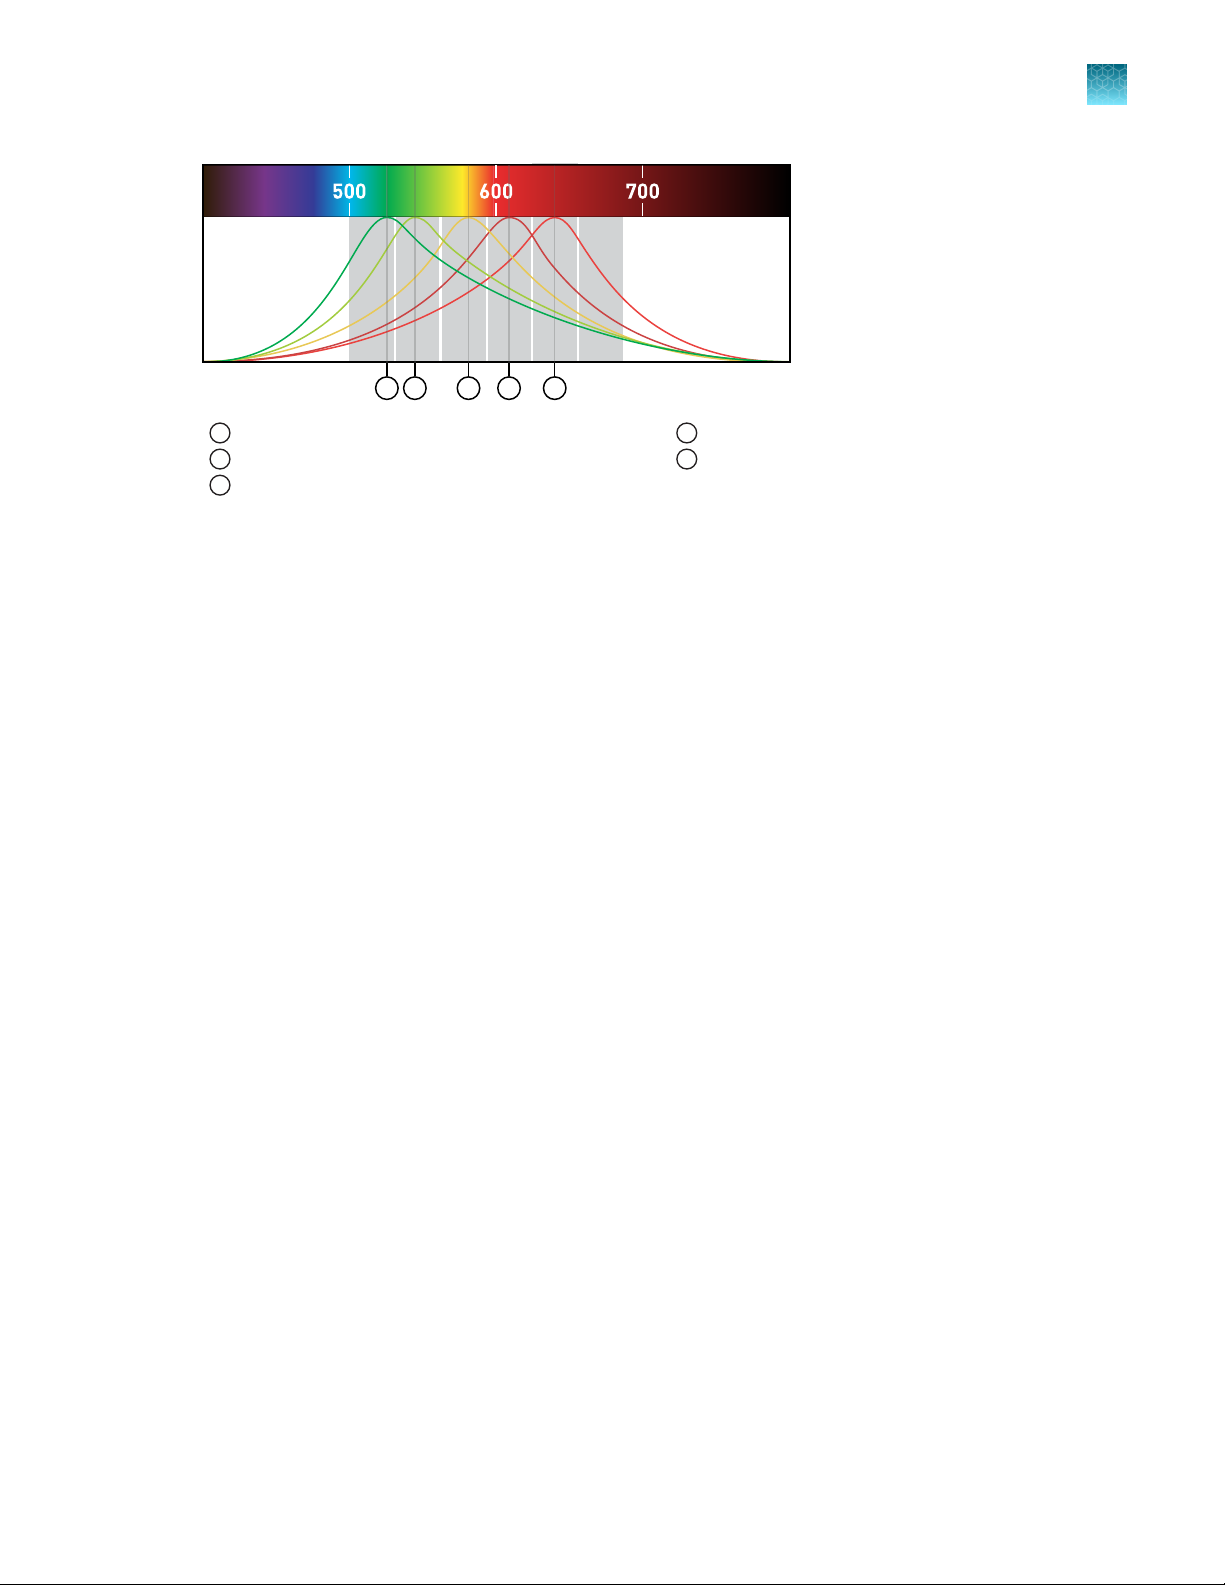
Filters
Wavelength
(nm)
1 2
3
4
5
x1-m1 x2-m2
x3-m3
x4-m4
x5-m5 x6-m6
Emission
Spectra
Chapter 1 P
Instrument hardware description
roduct information
1
x1-m1—FAM™ dye, S
1
x2-m2—VIC™ dye
2
x3-m3—ABY™ dye, NED™ dye, Cy®3, T
3
YBR GREEN™ dye
AMRA™ dye
x4-m4—JUN™ dye, RO
4
x5-m5—Cy® 5, MUS
5
X™ dye, Texas Red™ dye
TANG PURPLE™ dye
Custom dyes
The instrument can run assays designed with custom dyes. Custom dyes include the following options:
•
Dyes that are not supplied by Thermo Fisher Scientific.
•
Dyes or formulations of dyes that are not system dyes for the instrument.
To use a custom dye on the instrument, review the following requirements.
•
Calibrate the instrument for the custom dye (see “Calibrate custom dyes” on page 113).
•
Ensure that the custom dye excites between 455–672 nm and emits between 505–723 nm.
•
Select a custom dye that does not overlap with other dyes used in the run (see “System dyes” on
page 16).
•
The custom dye for use in calibration must be attached to the 5' end of a short DNA
oligonucleotide consisting of the first two bases of the probe sequence without a quencher at
the 3' end.
QuantStudio™ 6 Pro Real-Time PCR System and QuantStudio™ 7 Pro Real-Time PCR System User Guide
17
Chapter 1 Product information
1
Instrument hardware description
Overview of data collection
The instrument collects raw fluorescence data at dierent points during the PCR cycle, depending on
the type of run performed.
When you create a plate file, you can customize the optical filter channels through which the instrument
collects data. You can specify a filter channel set for all PCR thermal protocols and for melt curve
stages.
Run type Run type Data collection point
•
Real-time
Standard curve
•
Relative standard curve
•
Comparative Ct (DDCt)
•
Melt curve
During the thermal cycling protocol.
Typical timing is to collect data at each cycle of a PCR
stage or continuously during a melt stage.
Post-PCR
(endpoint)
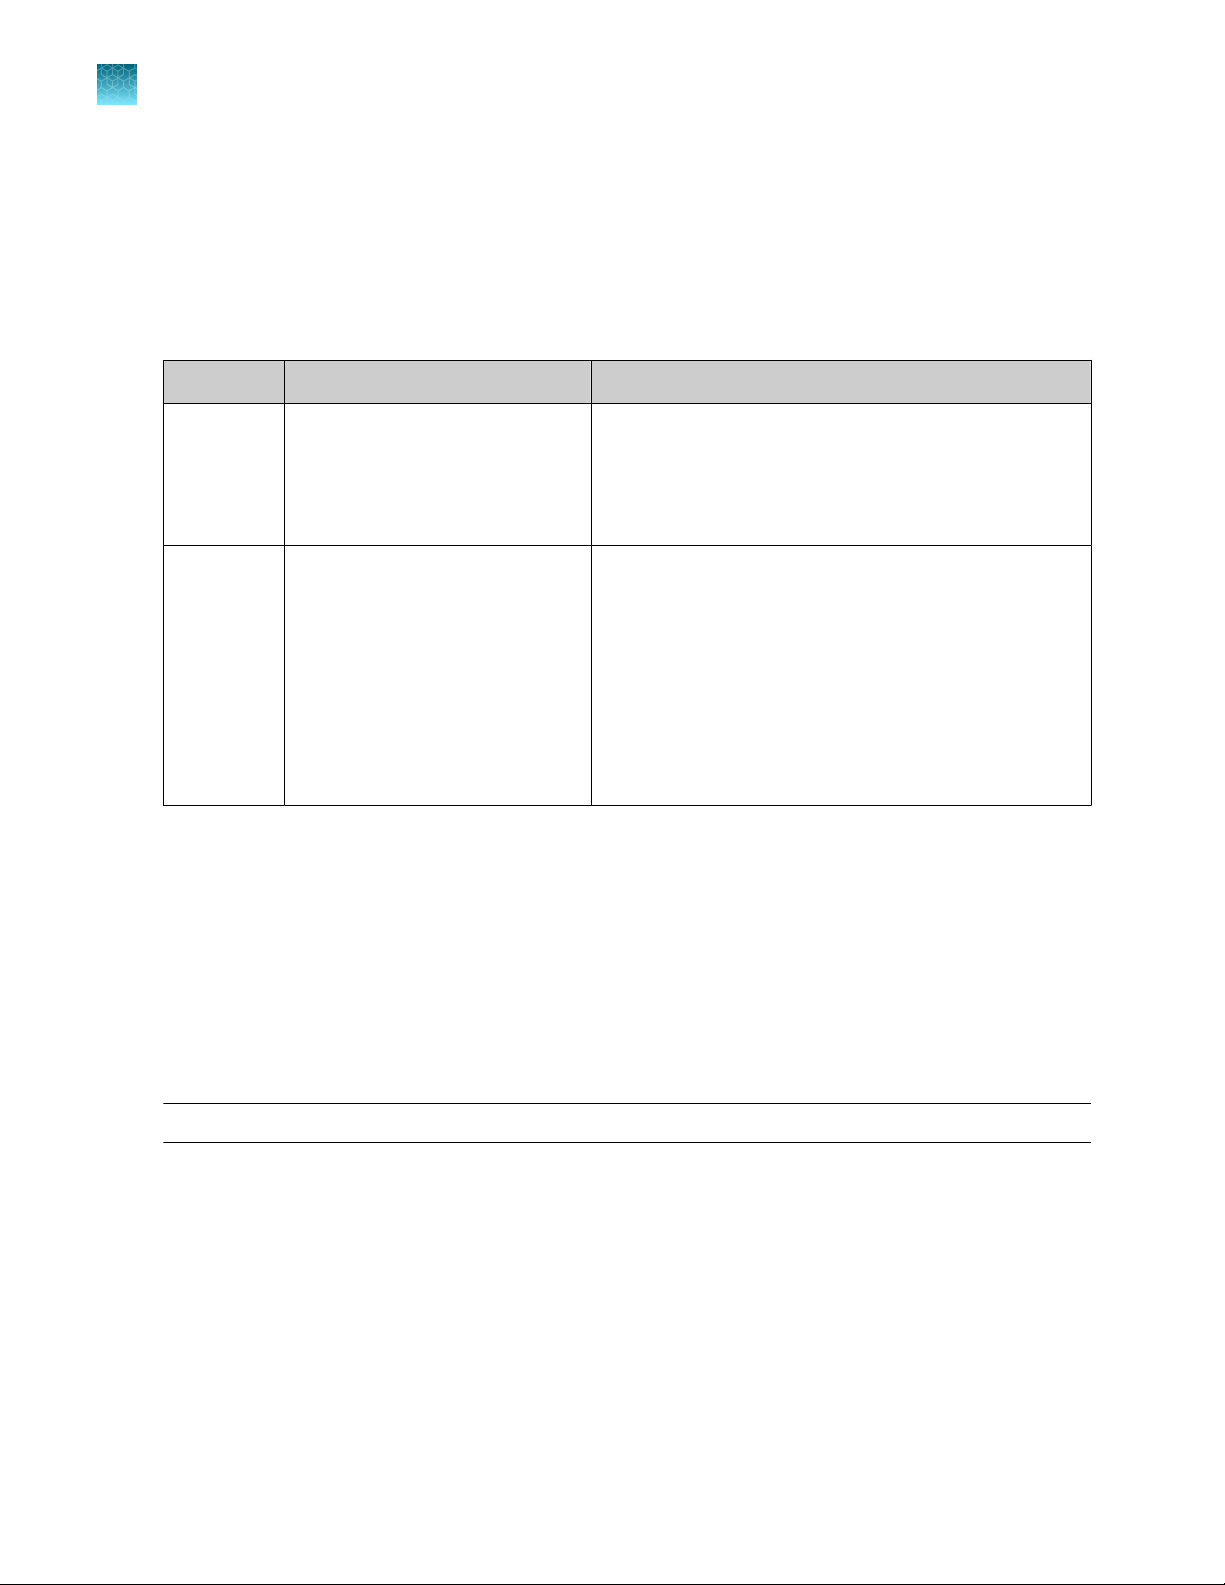
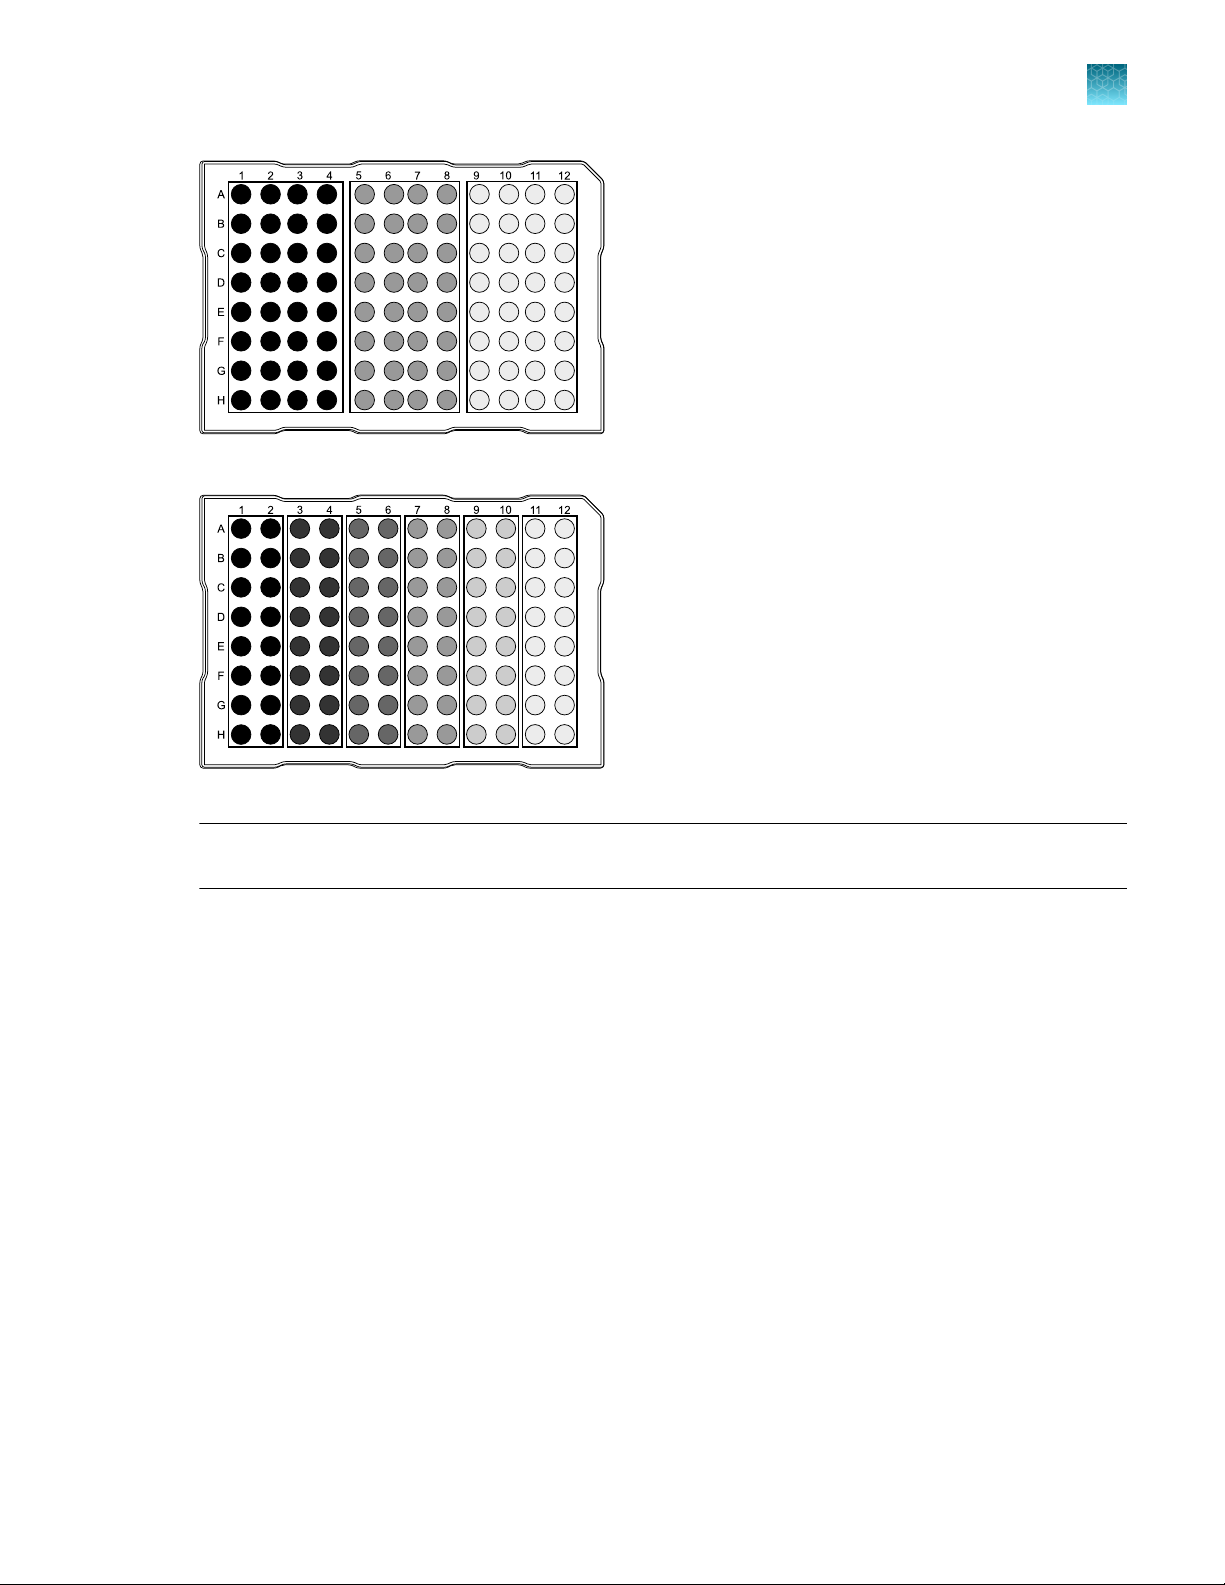
VeriFlex™ Zones
VeriFlex™ Z
control over your real-time PCR runs.
The independent zones are ideal for real-time PCR optimization. They also provide the ability to perform
multiple runs at the same time. Unlike standard gradients which give a sigmoidal temperature curve
across the columns, blocks with VeriFlex™ Zones help deliver accurate temperatures across every zone.
The QuantStudio™ 6 Pro System has three VeriFlex™ Zones (Figure 1 on page 19). The QuantStudio™ 7
Pro System has six VeriFlex™ Zones (Figure 2 on page 19).
Note: VeriFlex™ Zones are only applicable for the 96-well 0.2-mL block and the 96-well 0.1-mL block.
ones provide independent temperature zones that oer enhanced functionality and precise
•
Genotyping
•
Presence/absence
•
After thermal cycling is completed.
For Presence/Absence and Genotyping analysis,
data collection before the PCR cycle is optional, but
recommended.
•
(Optional) During the thermal cycling protocol.
Collecting data during the run can confirm
genotyping results by viewing traces in allelic
discrimination plots or viewing genotyping calls at
earlier cycles.
18
QuantStudio™ 6 Pro Real-Time PCR System and QuantStudio™ 7 Pro Real-Time PCR System User Guide
Chapter 1 P
Instrument hardware description
roduct information
1
Figure 1 Three VeriFlex™ Z
Figure 2 Six VeriFlex™ Z
Note: Plate files are not compatible between the QuantStudio™ 6 Pro System and the QuantStudio™ 7
Pro System. For more information, see “Compatibility of plate files” on page 29.
AutoDelta settings
AutoDelta enables an incremental increase or decrease in the temperature or time in a PCR cycle.
o use AutoDelta, specify a dierence in the time and the temperature. Specify the PCR cycle for this
T
change to be applied.
ones
ones
QuantStudio™ 6 Pro Real-Time PCR System and QuantStudio™ 7 Pro Real-Time PCR System User Guide
19
1
2
3
4
5
6
8
9
7
Chapter 1 Product information
1
Instrument hardware description
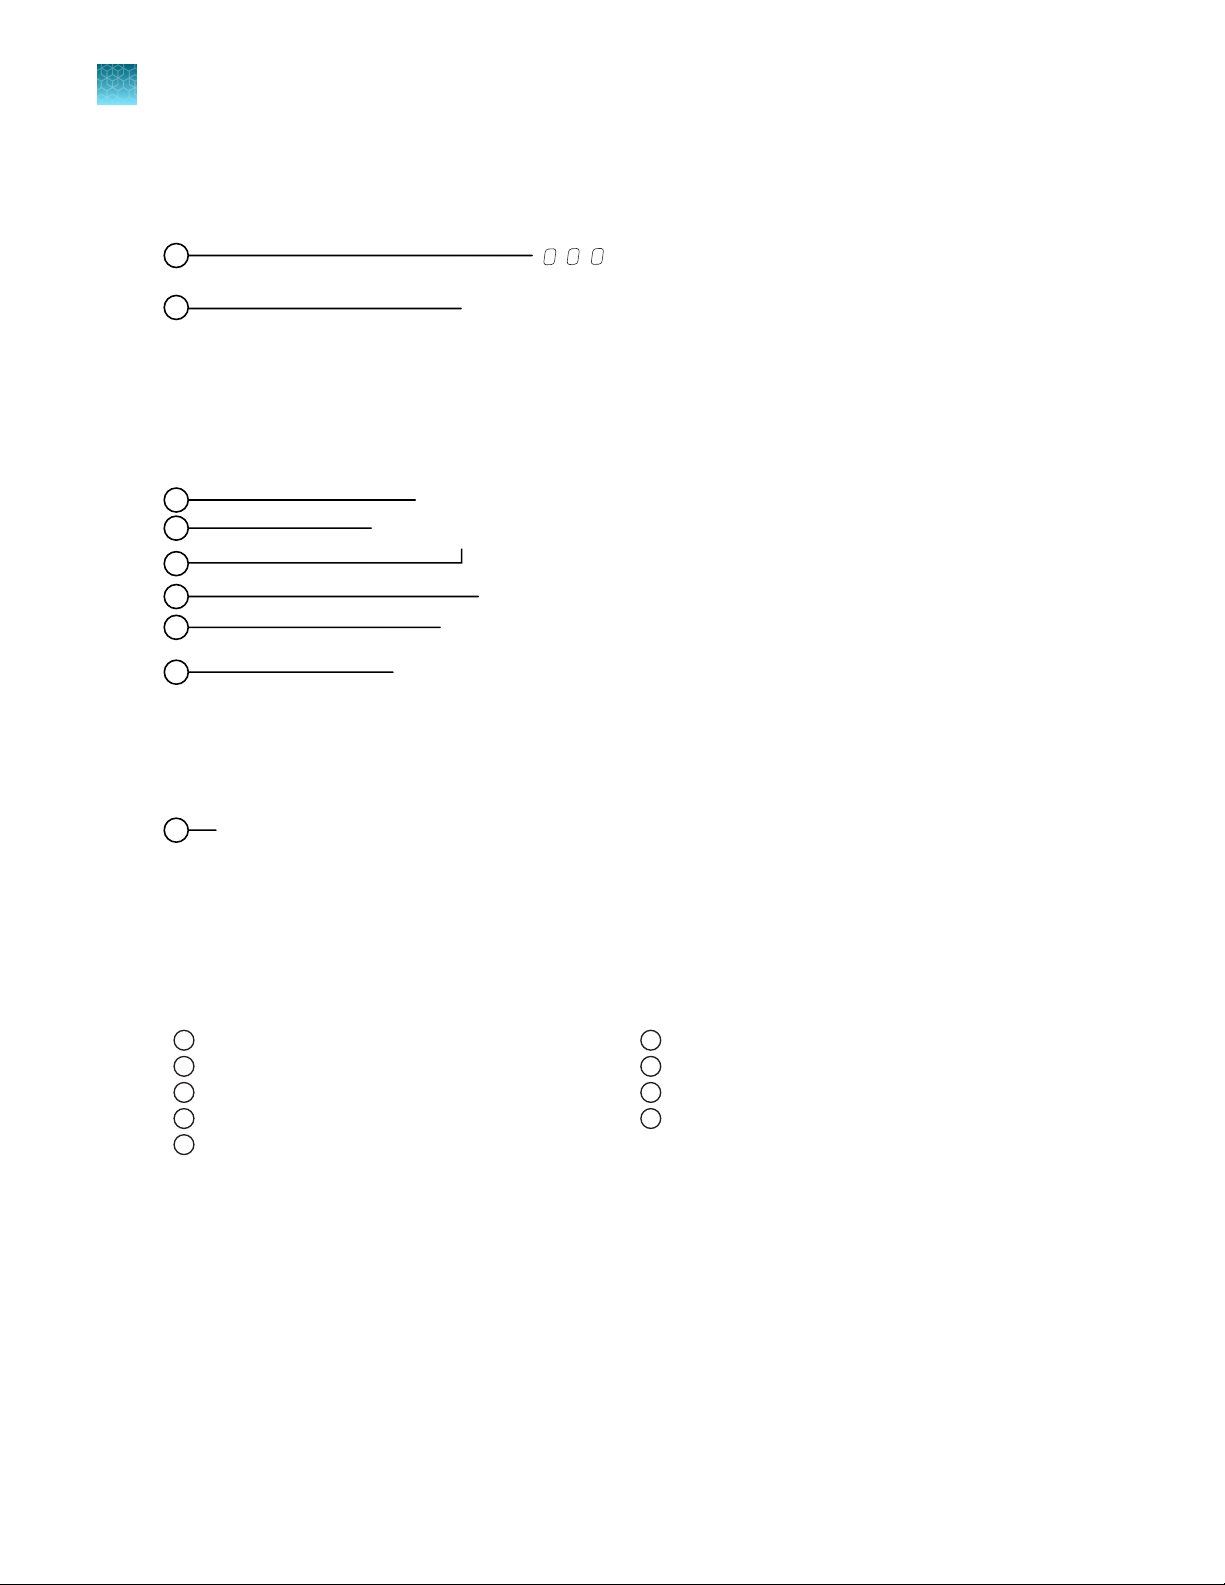
Parts of the instrument
Figure 3 Front of the instrument
Cameras
1
Touchscreen
2
Microphones
3
USB port
4
Indicator light
5
Proximity sensor
6
Access door for block change
7
Speakers
8
Drawer
9
20
QuantStudio™ 6 Pro Real-Time PCR System and QuantStudio™ 7 Pro Real-Time PCR System User Guide
2
3
4
6
5
1
Chapter 1 P
Instrument hardware description
roduct information
1
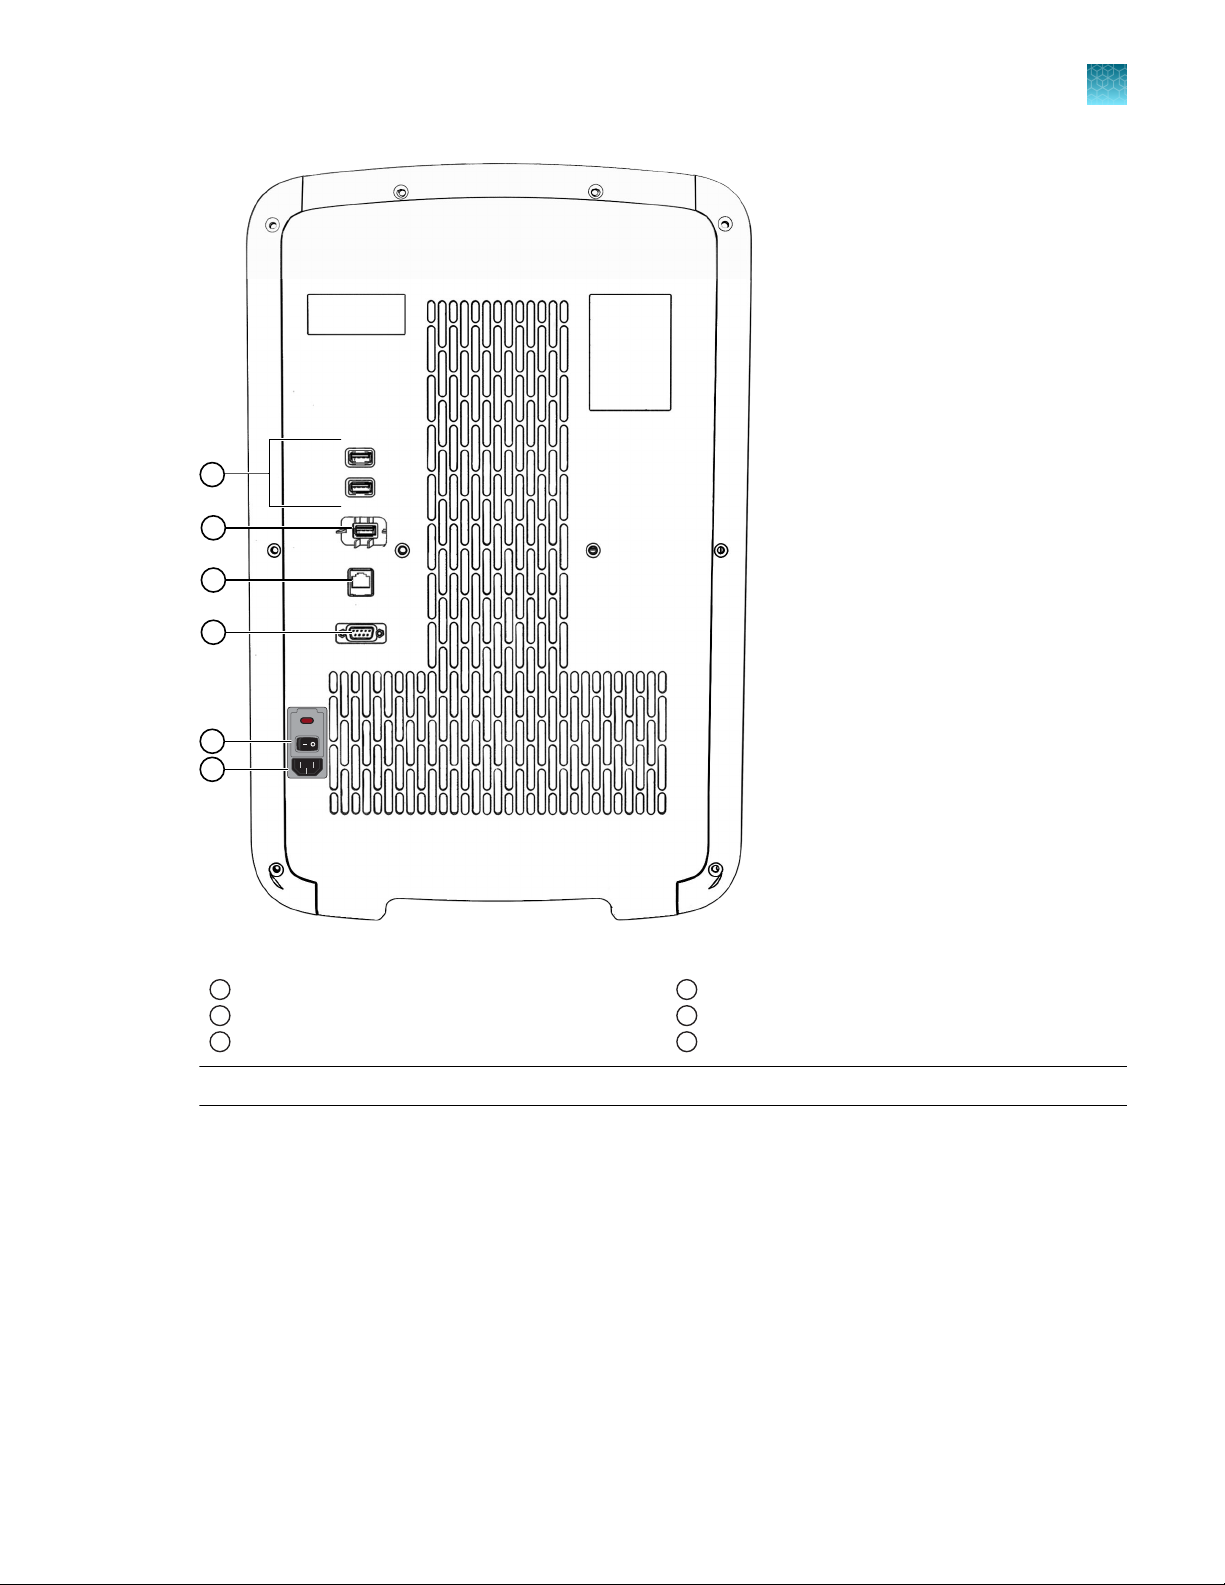
Figure 4 Back of the instrument
USB ports
1
Wi-Fi dongle port
2
Ethernet port
3
Note: The instrument r
The USB ports at the rear of the instrument can be used for external devices, for example, a mouse or a
k
eyboard.
ecognizes only one external storage device at a time for data transfer.
QuantStudio™ 6 Pro Real-Time PCR System and QuantStudio™ 7 Pro Real-Time PCR System User Guide
RS-232 port (service use only)
4
ON/OFF switch
5
Power inlet receptacle
6
21
Chapter 1 Product information
1
Hands-free features
Instrument status indicator
Indicator
O Powered o
Blue light changing brightness slowly Powering on
Blue light changing brightness Standby
Blue light moving inwards towards middle of
instrument
Blue light moving outwards towards side of
instrument
Blue light moving back and forth Block is being changed
Blue light on Instrument is ready to start a run or is performing a
Amber blinking Error
Hands-free features
Instrument status
Sleep mode
Drawer opening
Drawer closing
run
Facial authentication
The instrument allows hands-free facial authentication to sign in a user. The instrument camera detects
a face. The instrument will sign in the user after the face is matched to the photo associated with a
profile.
Voice commands
The instrument recognizes a set of commands for hands-free operation. For list of supported voice
commands, see “Use voice commands” on page 45.
Voice commands are only available when a user is signed in with a Connect account. Voice commands
are not available with a local instrument profile.
Voice commands are only available in select countries.
Voice commands use Amazon™ Alexa™ for Business.
22
QuantStudio™ 6 Pro Real-Time PCR System and QuantStudio™ 7 Pro Real-Time PCR System User Guide
Indicators for the hands-free features
Indicators for facial authentication
Chapter 1 Product information
Hands-free features
1
Display
The Sign In screen displays . Facial authentication for the instrument is enabled.
•
The Sign In screen does not
display .
Facial authentication for the instrument is disabled.
•
All users must sign in with a PIN.
Note: To enable facial authentication, see “Configure the instrument
for the hands-free features” on page 185.
Status of facial authentication
Indicators for voice commands
For the location of the proximity sensor, see Figure 3 on page 20.
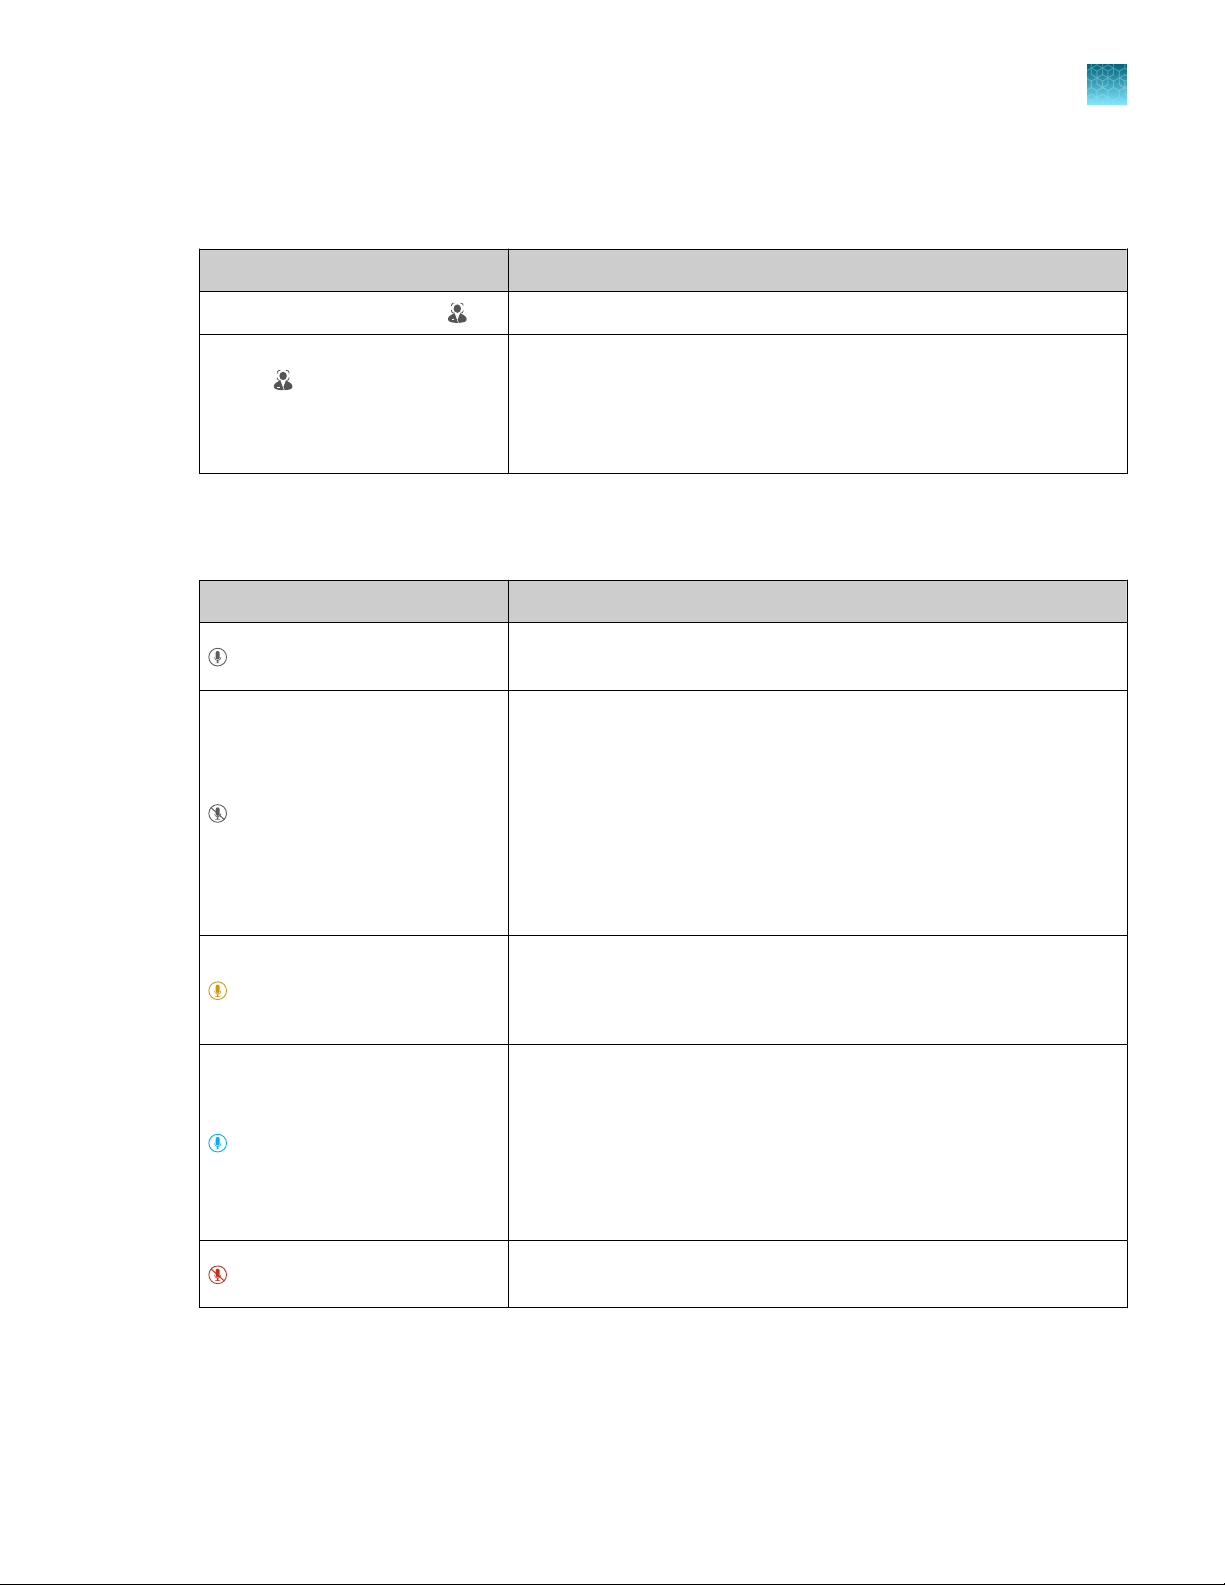
Display Status of voice commands
(Gray)
(Gray)
The voice command function is not available because the proximity
sensor does not detect a person.
The voice command function is not available if any of these conditions
is true:
•
The voice command function for the instrument is disabled by an
administrator.
•
The user is signed in with a local profile.
•
The microphone was disabled by the user and the proximity
sensor does not detect a person. The icon will return to a red
state when the proximity sensor detects a person.
The instrument is preparing to accept voice commands.
(Amber)
(Blue)
(Red)
Note: The amber display is an intermediate state and will only appear
for several seconds.
The voice command function is available if all of these conditions are
true:
•
The voice command function for the instrument is enabled by an
administrator.
•
The user is signed in with a Connect instrument profile.
•
The proximity sensor detects a person.
The microphone was disabled by the user (see “Enable or disable the
microphone” on page 44).
To enable voice commands, see “Configure the instrument for the hands-free features” on page 185.
For more information about linking a local instrument profile to a Connect profile, see “Link the
instrument to your Connect account” on page 126 and “If you link when you are signed in to the
instrument” on page 129.
QuantStudio™ 6 Pro Real-Time PCR System and QuantStudio™ 7 Pro Real-Time PCR System User Guide
23
1 2
3
4
5
6
7
8
9 10
11
Chapter 1 Product information
1
Software description
Software description
Parts of the home screen
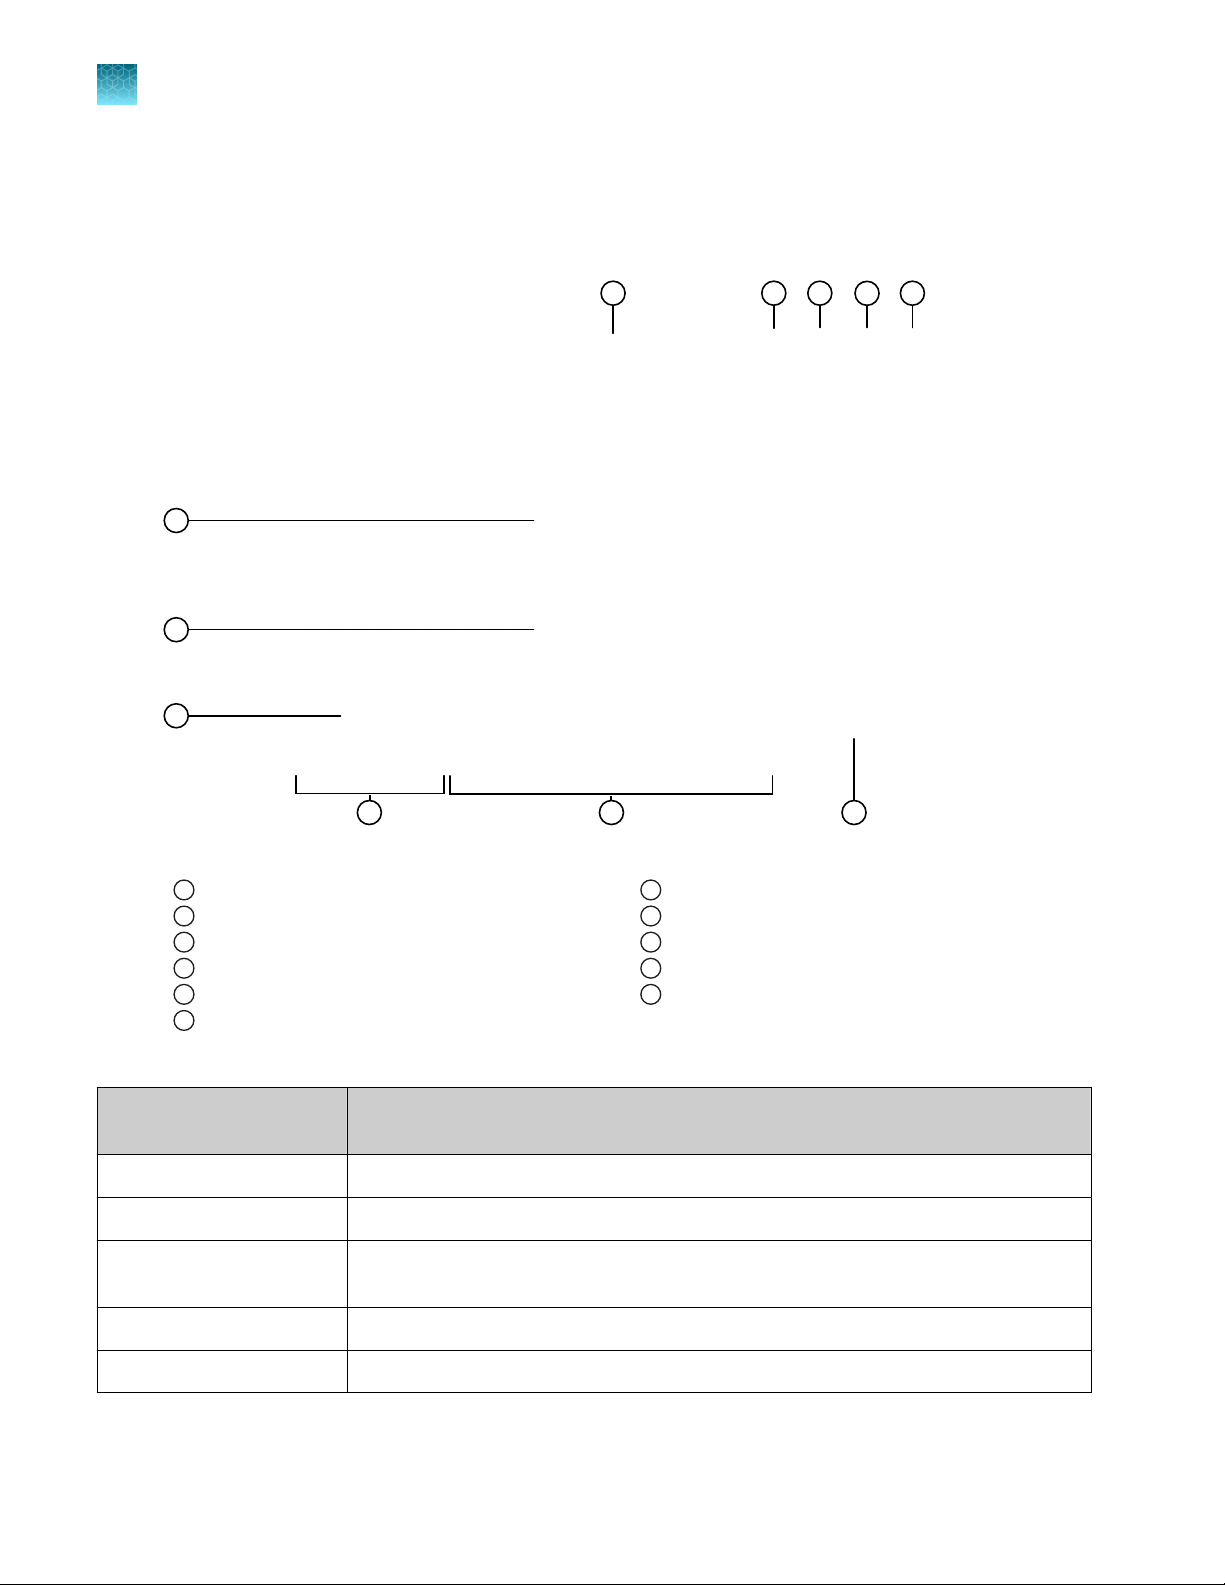
Figure 5 Home screen
Instrument name
1
Instrument calendar
2
Microphone
3
Help
4
Eject
5
Status dial
6
Table 1 Parts of the home screen
Element of the home
scr
een
Block installed
7
Current user
8
Connectivity icons
9
Buttons to access plate files
10
Instrument settings
11
Function
Instrument name Set by the administrator to identify the instrument.
Calendar Schedule time for a run or see runs that are scheduled.
Microphone Shows the status of the microphone (see “Indicators for voice commands” on
page 23 and “Enable or disable the microphone” on page 44).
Help Access the Help.
Eject Open or close the drawer to insert or remove a plate or a TaqMan™ Array Card.
24
QuantStudio™ 6 Pro Real-Time PCR System and QuantStudio™ 7 Pro Real-Time PCR System User Guide
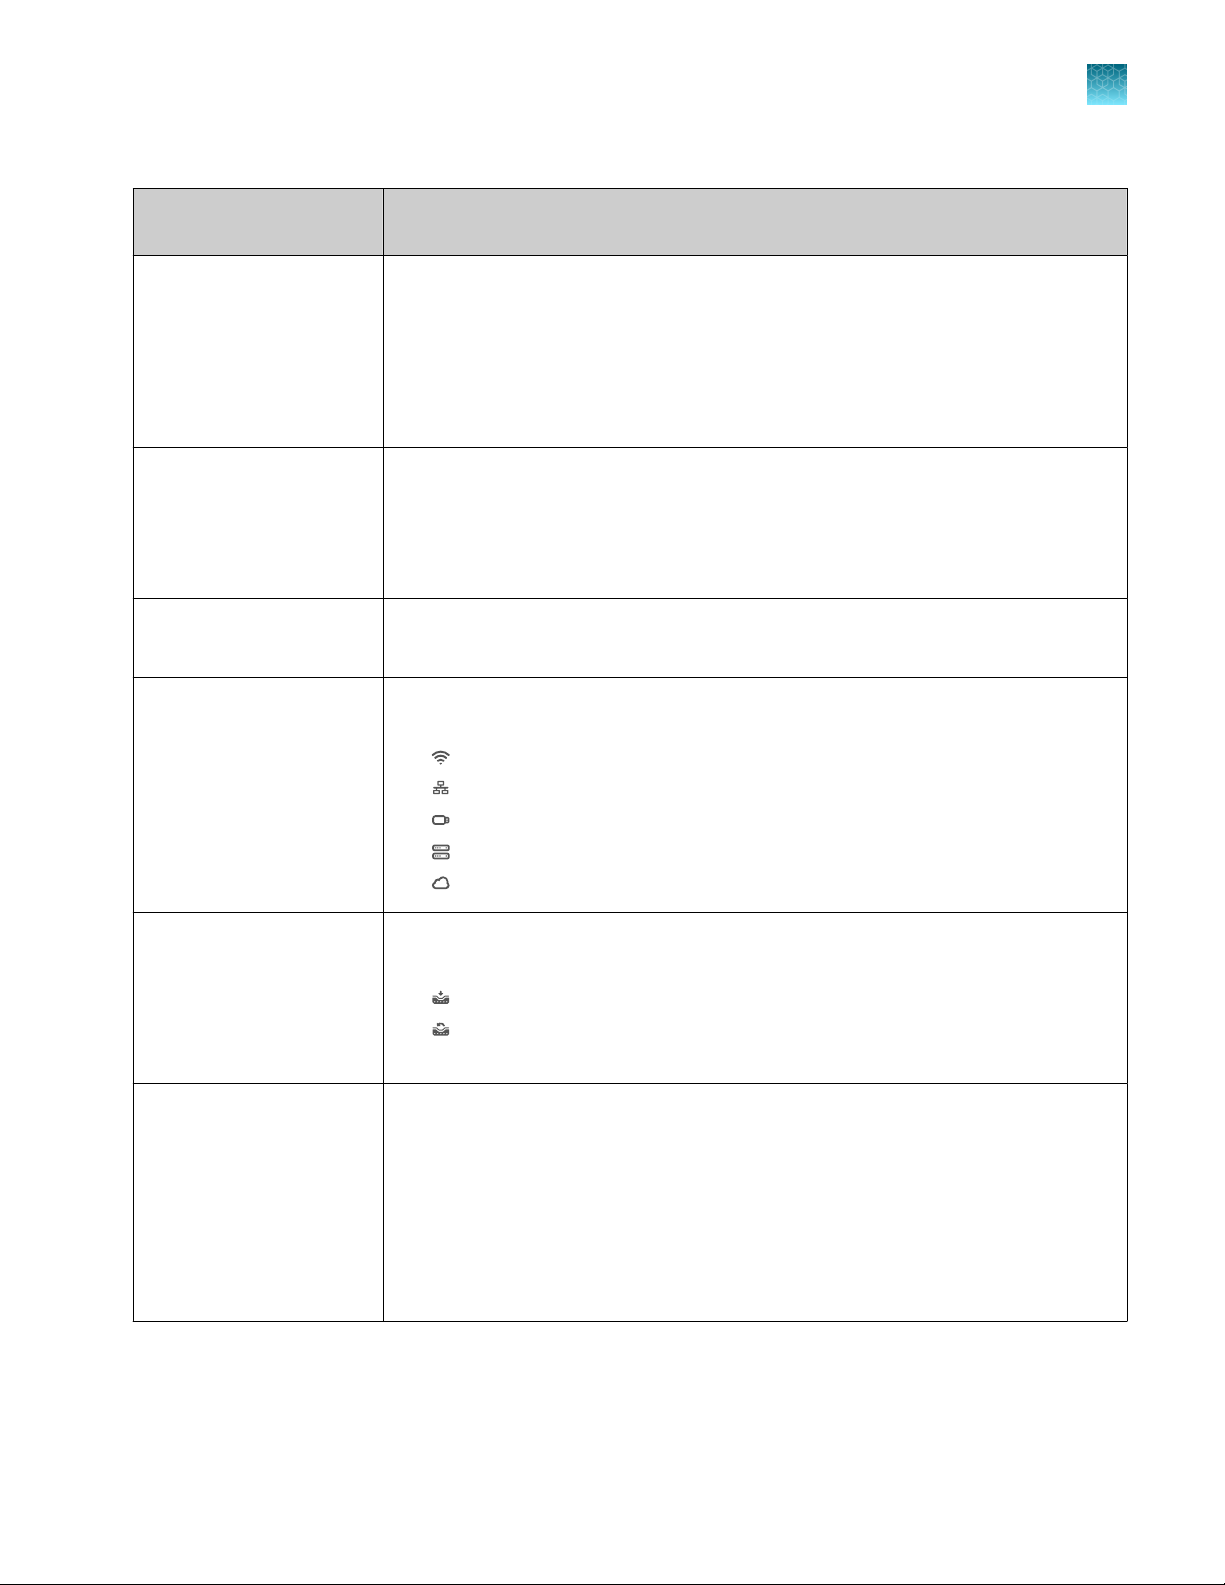
Table 1 Parts of the home screen (continued)
Chapter 1 P
roduct information
Software description
1
Element of the home
screen
Status dial
•
When the instrument is not in use—Displays Set up run.
•
When the instrument is in use—Displays the sample block temperature, the
Function
elapsed run time, and the run status.
•
When the instrument is locked while in use—Displays Locked within the status
dial.
•
When a run is complete—Displays Run complete.
Block type The block that is installed on the instrument.
If applicable, the following items are noted:
•
If there is no block and heated cover set installed.
•
If the block and heated cover are mismatched.
Current user Displays the current signed-in user.
Guest is displayed if no user is signed in.
Connectivity Only the icons that apply to the connectivity status of the instrument at the time are
displayed.
•
—The instrument is wirelessly connected.
•
—The instrument is connected to a wired network.
•
—A USB drive is plugged into the instrument.
•
—The instrument is connected to a network drive.
•
—The instrument is connected to a Connect account.
Buttons to access plate
[1]
files
Access a plate file to edit it or start a run.
•
Set up run—Open a system template or a saved plate file.
•
(Load plate file)—Open a system template or a saved plate file.
•
(Run last)—Open the last plate file that was used to start a run. The last plate
file is specific to the profile.
•
Instrument settings
[1]
P
late files are applicable to TaqMan™ Array Cards.
QuantStudio™ 6 Pro Real-Time PCR System and QuantStudio™ 7 Pro Real-Time PCR System User Guide
Edit the file name convention.
•
View the run history, and transfer or delete data files.
•
Install, change, or remove the block and the heated cover.
•
Configure the instrument settings.
•
Configure the maintenance and service settings.
•
View notifications.
•
Configure hands-free operation.
25
Chapter 1 Product information
1
Software description
Connect and Cloud definitions
The terms Connect, Cloud, Thermo Fisher Connect, and Thermo Fisher Cloud are used interchangeably
on the instrument touchscreen. The term Connect is used in this document.
The following icons are used interchangeably on the instrument touchscreen:
•
•
The icon is used in this document.
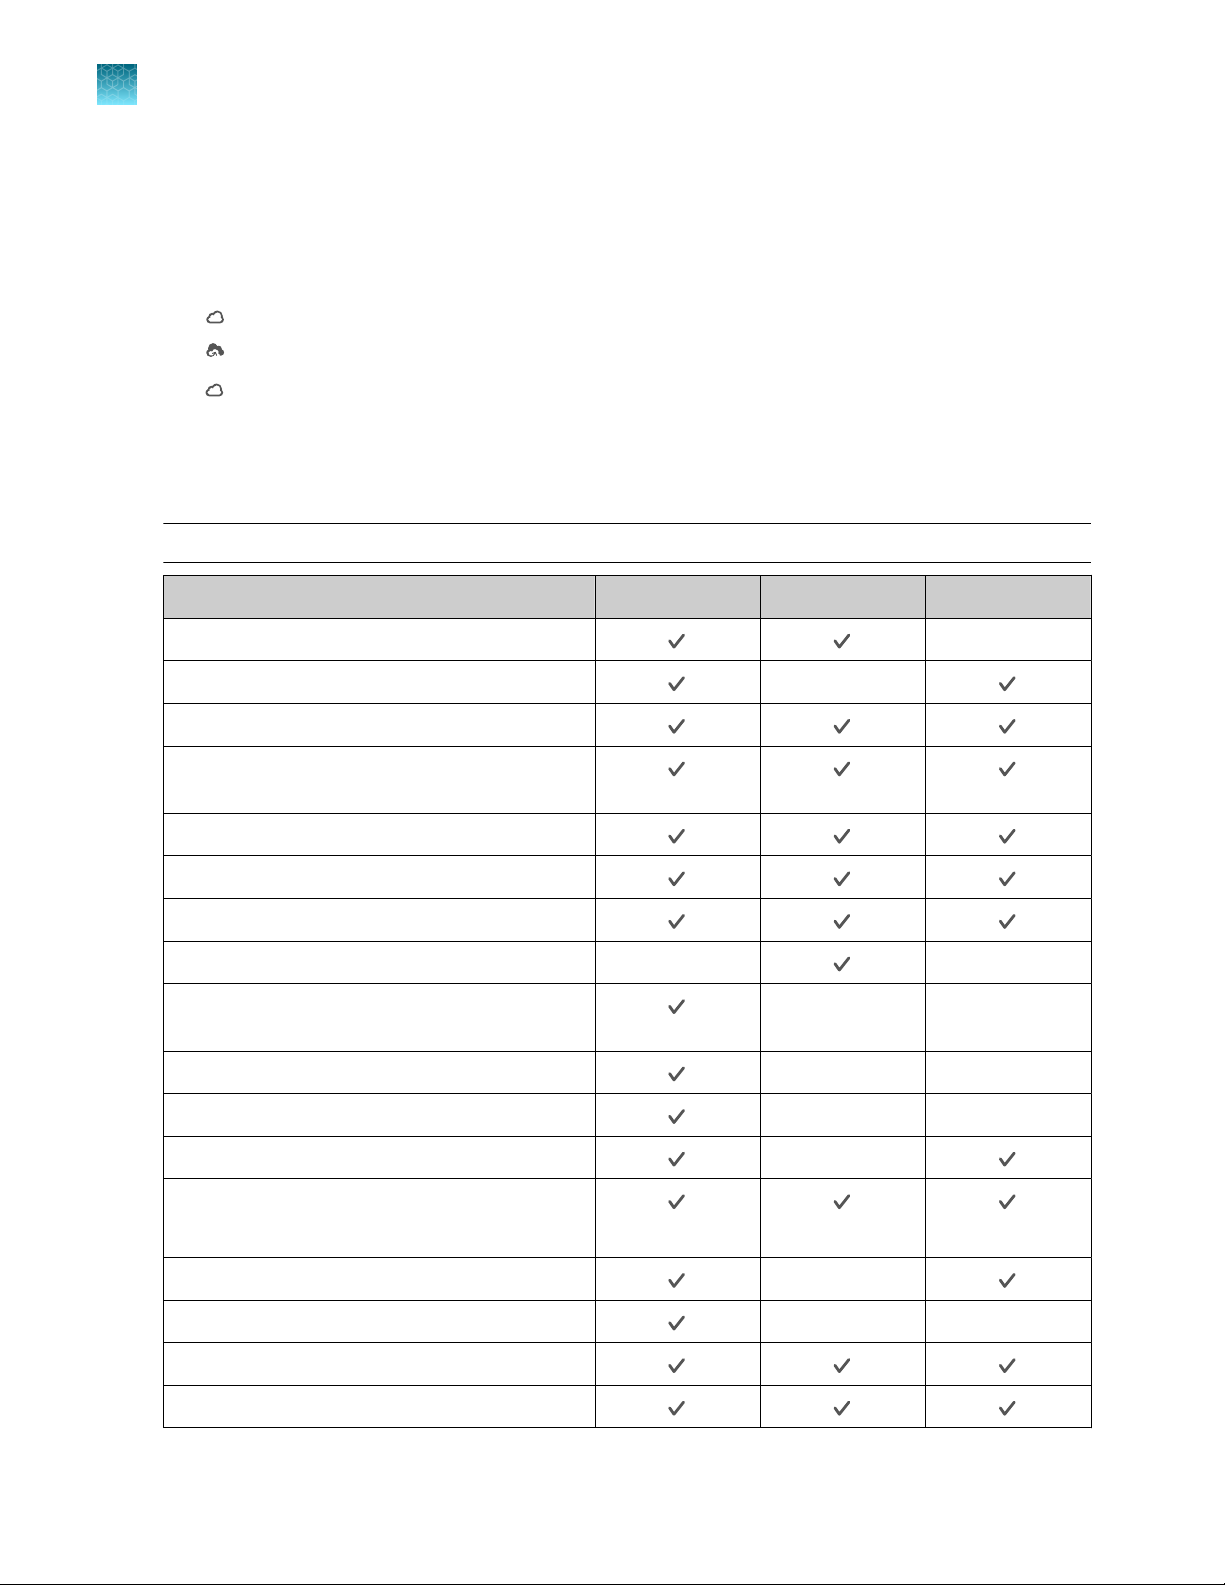
Instrument, desktop software, and Connect platform features
The instrument and the software include the features described below.
Note: System templates cannot be edited. They can be edited, then saved as a separate plate file.
Feature Instrument Desktop Connect
Use as guest (no sign in)
Schedule a run
Open system templates
Open system templates, edit them, and save
them as plate files
Open plate files created on the desktop software
Open plate files created on the Connect platform
Open plate file created on the instrument
Send plate files to the instrument run queue —
Access the plate file associated with last run on
the instrument
Load plate in instrument
Start run
View real-time data during a run
View results after a run is complete
—
—
—
— —
— —
— —
—
26
See instrument status (run in progress)
Send email notifications
Check calibration status
Analyze and export results
QuantStudio™ 6 Pro Real-Time PCR System and QuantStudio™ 7 Pro Real-Time PCR System User Guide
(Limited)
—
— —
Chapter 1 Product information
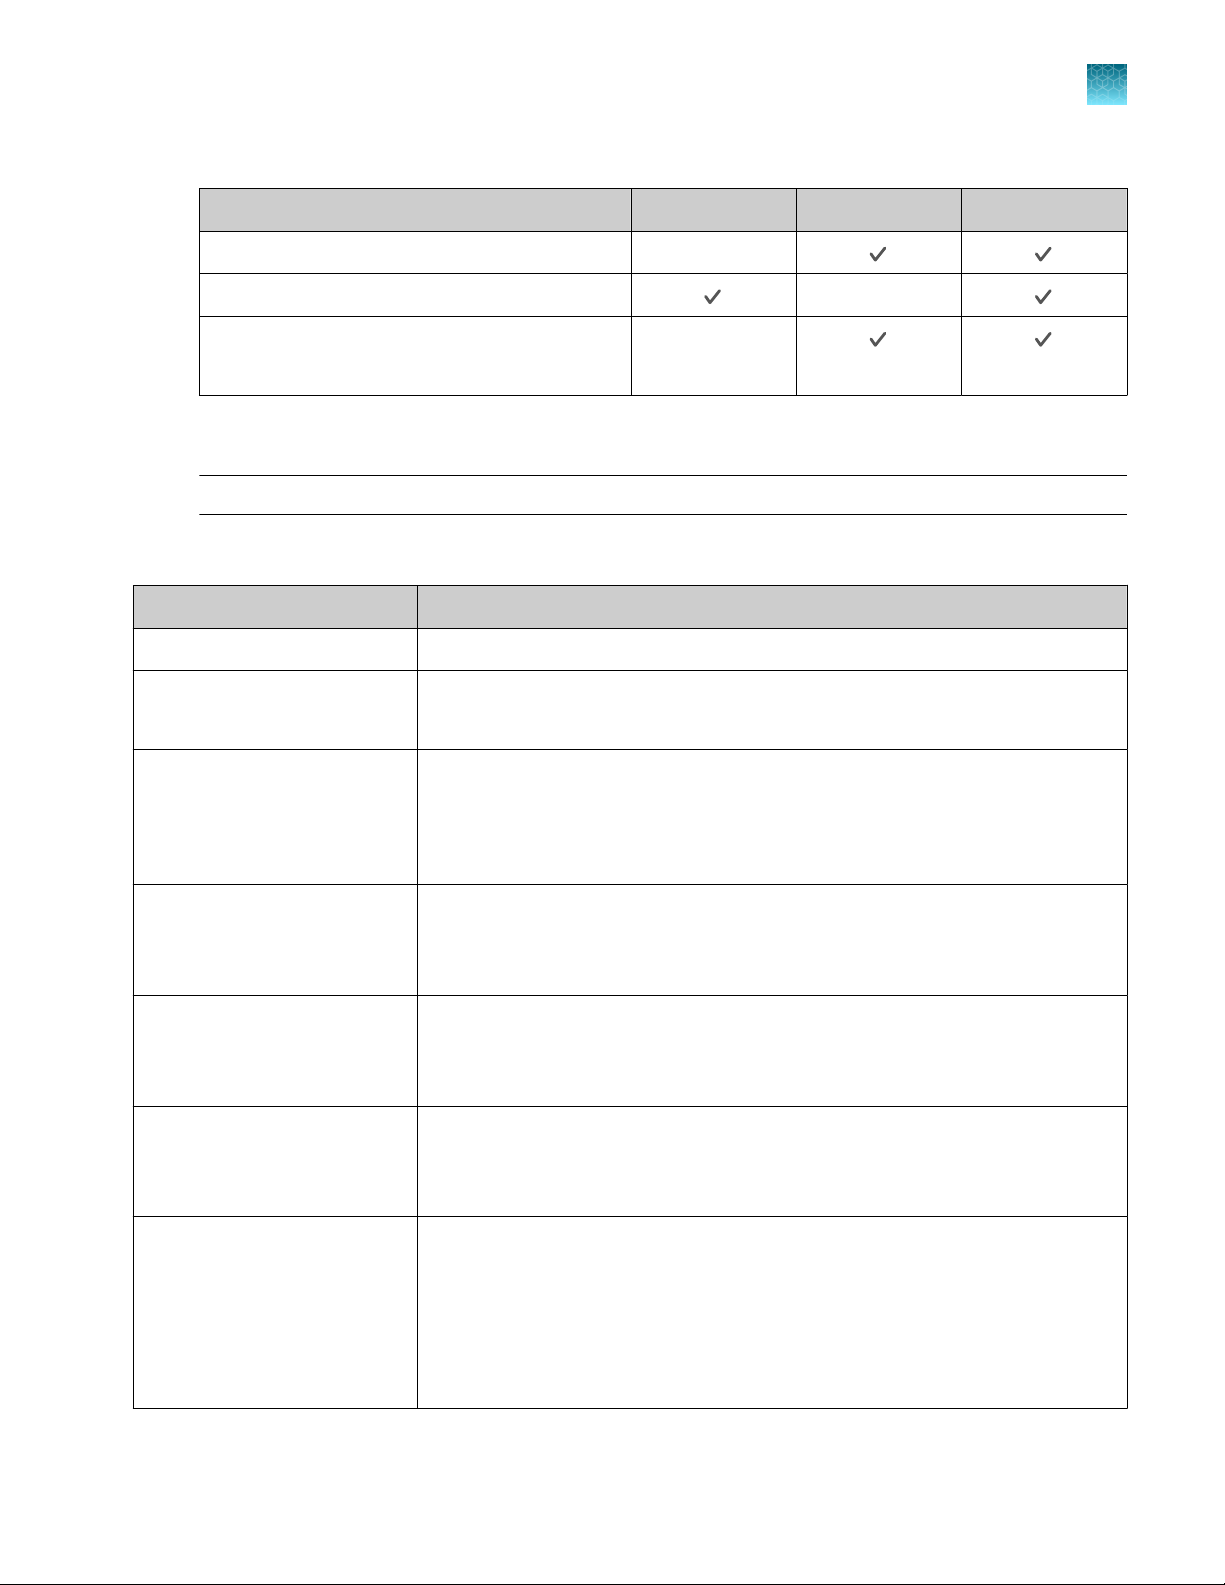
Software description
(continued)
Feature Instrument Desktop Connect
View analysis of results —
1
Set calibration reminders
Review exported calibration or RNase P
verification results
—
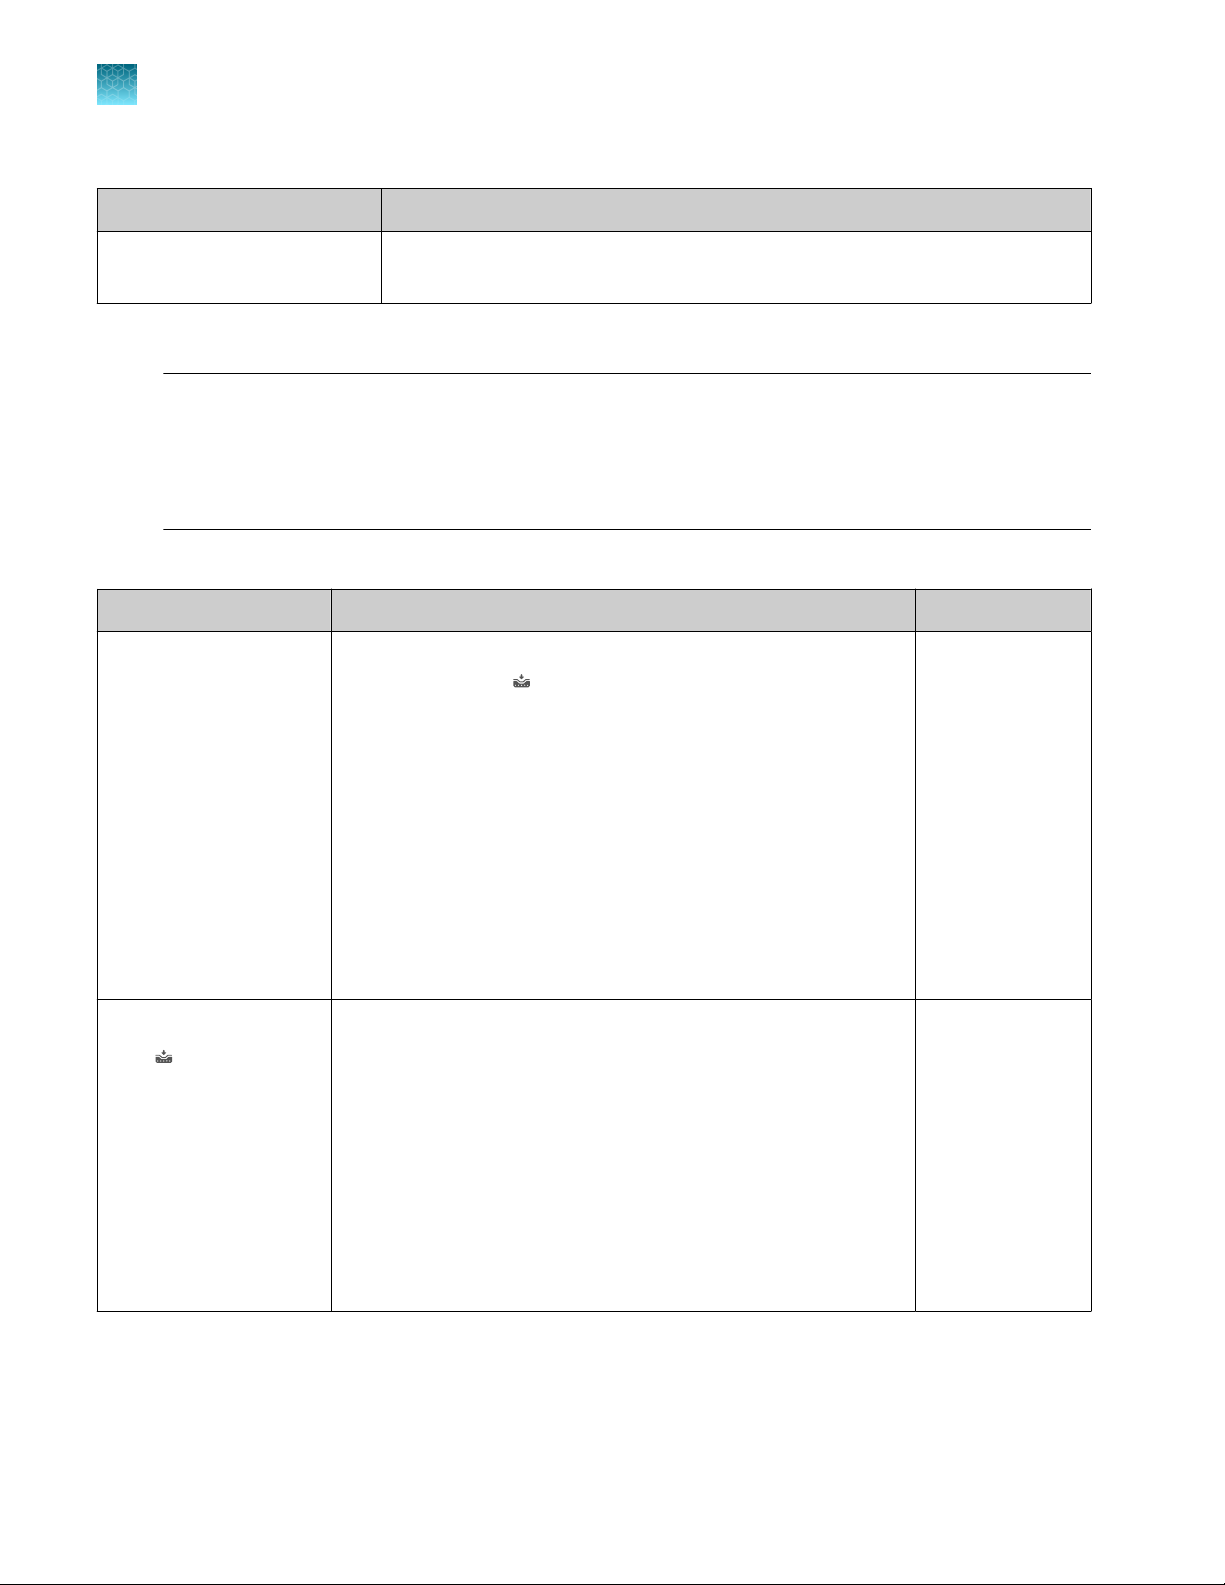
Overview of file locations and files
Note: The term plate file is applicable to both plates and TaqMan™ Array Cards.
File locations
File location
Run queue Plate files sent from the desktop software.
Public
Templates
Description and function
•
Plate files saved by guest users are stored in this folder.
•
Data files from runs started by guest users are stored in this folder.
•
System templates are stored in this folder.
•
System templates cannot be edited. They must be saved as a separate plate
file and stored in a dierent folder.
•
Data files cannot be saved in this folder.
—
(RNase P only)
Connect
Network drive
USB drive
My instrument
•
Plate files can be retrieved from a Connect profile.
•
Data files can be saved to a Connect profile.
•
You must have a Connect profile.
•
Plate files can be retrieved from a network drive.
•
Data files can be saved to a network drive.
•
The instrument must be connected to a network or a computer.
•
Plate files can be retrieved from a USB drive.
•
Data files can be saved to a USB drive.
•
A USB drive must be inserted into the instrument.
•
This location is only available to a user who is signed in. Guest users cannot
access this location to retrieve plate files or save data files.
•
This location is specific to a user. Files are not accessible to any other users,
except for administrators.
•
Plate files can be retrieved from this location.
•
Data files are always saved to this location.
QuantStudio™ 6 Pro Real-Time PCR System and QuantStudio™ 7 Pro Real-Time PCR System User Guide
27
Chapter 1 Product information
1
Software description
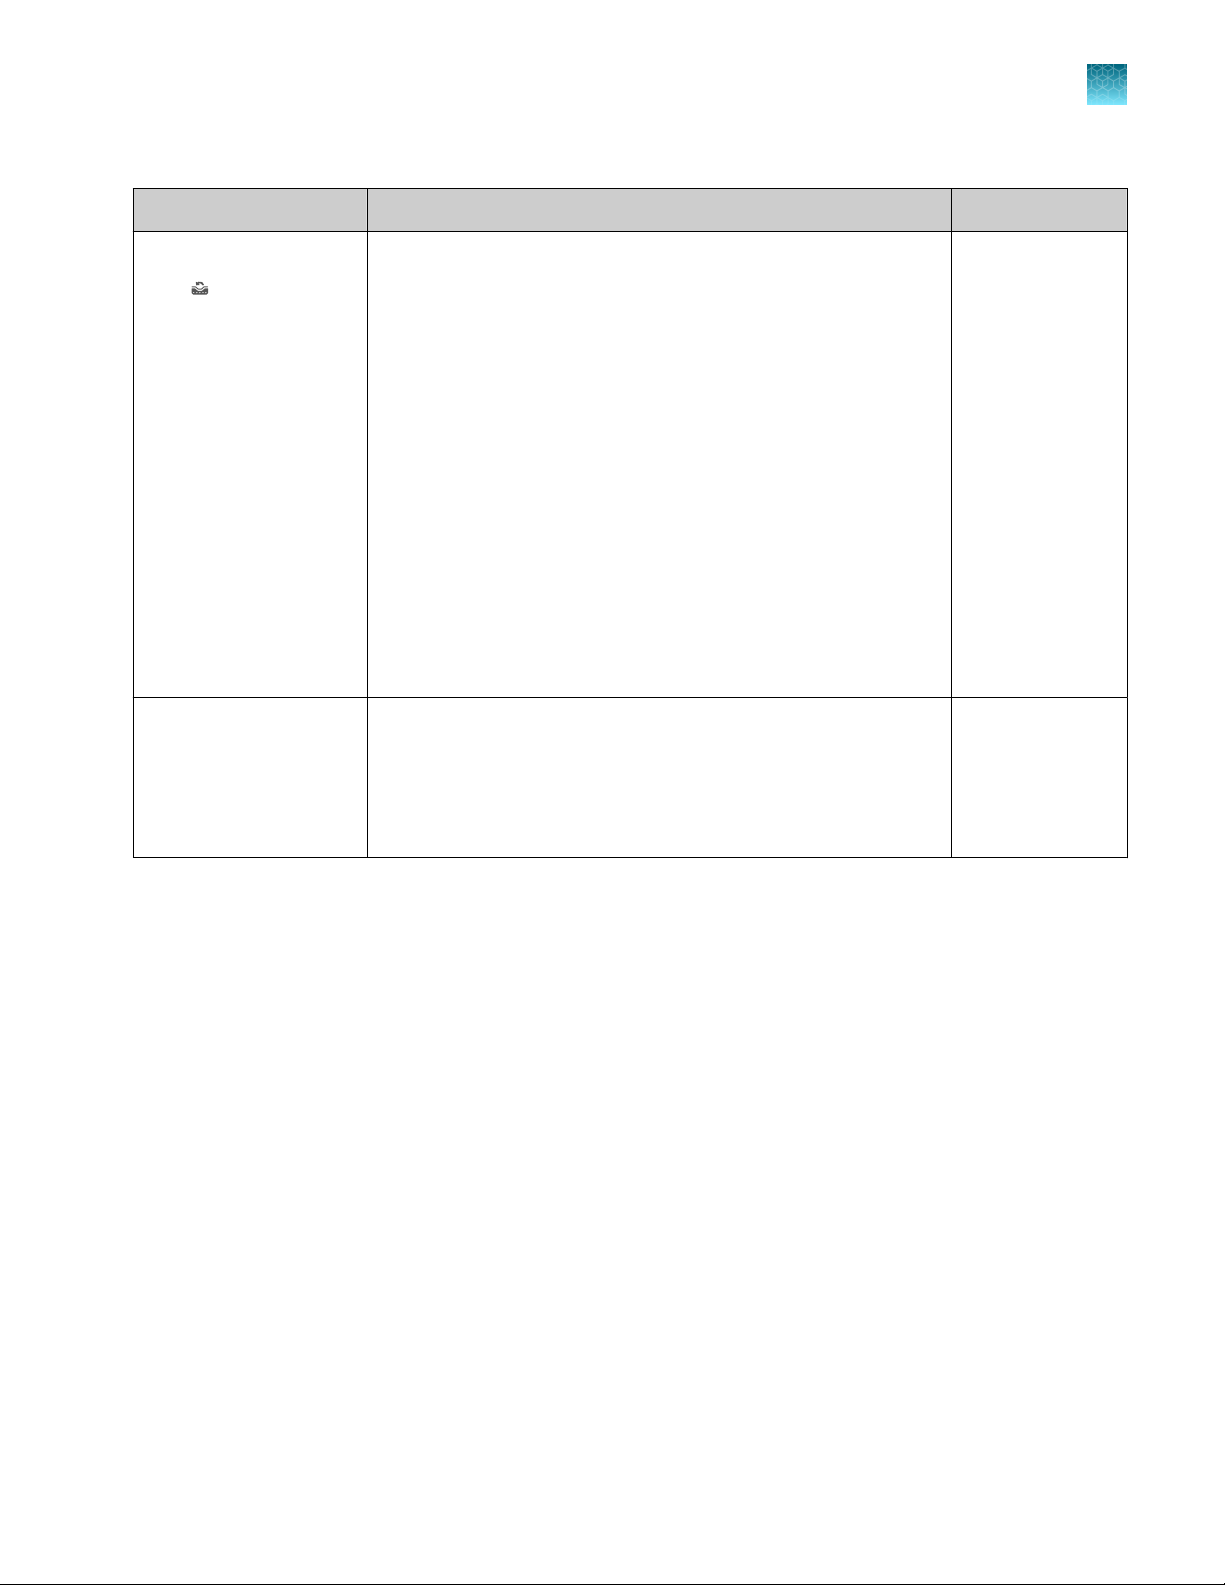
(continued)
File location
Post-read
Description and function
•
In endpoint PCR, the pre-read data is saved in this folder for post-read
analysis.
Files
IMPORTANT! Plate files and data files are not included in a back-up of the instrument and are not
restored when a backup of the instrument is restored.
Plate files and data files must be transferred separately. See Chapter 6, “View and manage files”.
System templates are included in the back-up and are restored when a backup of the instrument is
restored.
All file types ar
Item Description and function Supported in
System template
e applicable to both plates and TaqMan™ Array Cards.
•
A non-editable t
•
Accessed from
(only system templates are stored in this folder).
•
Accessed from the Set up run button.
•
Is saved as a separate plate file if it is edited.
•
Contains the thermal protocol for the real-time PCR.
•
Does not contain the sample information.
•
Does not contain the target information.
•
Sample information and target information must be added
(saved as a separate plate file). The sample information and
target information can be added on the desktop software or
on the Connect platform after the run is complete.
emplate.
(Load plate file) and the T
emplates folder
Instrument
Desktop
Connect
Plate File
From
28
(Load plate file)
QuantStudio™ 6 Pro Real-Time PCR System and QuantStudio™ 7 Pro Real-Time PCR System User Guide
•
A file that has been saved fr
•
Can be edited and saved.
•
Can be edited and saved as a separate plate file.
•
Contains the thermal protocol for the real-time PCR.
•
Can contain the sample information.
•
Can contain the target information.
•
Sample information and target information must be added if
not present. The sample information and target information
can be added on the desktop software or on the Connect
platform after the run is complete.
om a system template.
Instrument
Desktop
Connect
Chapter 1 P
roduct information
Software description
(continued)
Item Description and function Supported in
•
Plate File
From (Run last)
The plate file associated with the last run for the profile.
•
Can be edited and saved.
•
Can be edited and saved as a separate plate file.
•
Contains the thermal protocol for the real-time PCR.
•
Contains the sample information. The sample information can
be edited on the desktop software or on the Connect platform
after the run is complete.
•
Contains the target information. The target information can be
edited on the desktop software or on the Connect platform
after the run is complete.
•
Sample information and target information can be edited on
the instrument.
•
If the sample information and the target information for the last
run were added on the desktop software or on Connect after
the run was complete, they will not be included on the plate
file that is on the instrument.
Instrument
1
Data file
Contains the r
•
Can be viewed on the instrument only immediately after the
run is complete.
•
Transfer to Connect or to the desktop software to view and
analyze data.
eal-time PCR data.
•
Compatibility of plate files
The plat
A plate file for a QuantStudio™ 6 Pro System can only be opened on this instrument. It cannot be
opened on a QuantStudio™ 7 Pro System.
A plate file for a QuantStudio™ 7 Pro System can only be opened on this instrument. It cannot be
opened on a QuantStudio™ 6 Pro System.
e files are specific to the instrument.
Instrument (limited)
Desktop
Connect
QuantStudio™ 6 Pro Real-Time PCR System and QuantStudio™ 7 Pro Real-Time PCR System User Guide
29
Chapter 1 Product information
1
Software description
Components of the files
Component
Properties
Method Thermal cycling conditions
Instrument Desktop Connect
•
Data file name
•
Reagent information
–
Name
–
Type
–
Lot number
–
Barcode
–
Catalog number
–
Expiry date
•
Plate barcode or TaqMan
Array Card barcode
•
Location to send data after the
run is complete
•
T
emperature
•
Time
•
Cover temperature
•
Reaction volume
•
Data collection points
•
Ramp rates
•
VeriFlex™ Zones
•
Auto Delta settings
•
Experiment file name
•
Plate barcode or TaqMan™ Array Card barcode
•
User name
•
Instrument type
•
Block type
•
Analysis module
•
Chemistry (reagent information)
•
Run mode
™
•
Comments
•
(Connect platform only) Notifications
Thermal cycling conditions
Plate Sample names
Targets
SNP assays
Run Monitor a run in progress
View time remaining, temperature,
method, and amplification plots
Pause, resume, or stop a run
Results Not applicable Review plots
Export Export results
Data files are transferred to the
desktop software or the Connect
platform for analysis
30
QuantStudio™ 6 Pro Real-Time PCR System and QuantStudio™ 7 Pro Real-Time PCR System User Guide
Define and assign samples, targets or SNP assays, and
tasks in the Plate setup screen.
Monitor a run in progress
View time remaining
Export results
Monitor a run in progress
(link to Connect Instrument
Details)
View time remaining,
temperature, method, and
amplification plots

Third-party software
Before installing third-party software on the computer running the desktop software, confirm that the
third-party software will not do the following:
•
Restrict Ethernet communication.
•
Interfere with instrument or computer operation.
Network connection options
You can connect an instrument to a network or computer in the configurations listed below. For more
information, see Appendix B, “Connect the instrument to a network”.
Chapter 1 P
roduct information
Types of runs
1
Direct connection
wired wired or wireless wired or wireless
Types of runs
Standard curve run
A standard curve run determines the absolute target quantity in samples.
1.
The softwar
2.
The software generates a standard curve using data from the standard dilution series.
3.
The software uses the standard curve to interpolate the absolute quantity of target in the test
samples.
e measures amplification of the target in a standard dilution series and in test samples.
Local area network (LAN)
connection
Connect platform connection
QuantStudio™ 6 Pro Real-Time PCR System and QuantStudio™ 7 Pro Real-Time PCR System User Guide
31

Chapter 1 Product information
1
Types of runs
Relative standard curve run
A relative standard curve runs determines the relative target quantity in samples.
1.
The software measures amplification of the target of interest and of an endogenous control target
in a standard dilution series, in a reference (calibrator) sample, and in test samples.
The endogenous control is a target that is expressed equally in all samples; examples
of endogenous controls are β‐actin, GAPDH, and 18S ribosomal RNA. The software
can algorithmically incorporate multiple endogenous control targets in relative quantification
calculations.
The reference sample is used as the basis for relative quantification results (or 1× sample). For
example, in a study of drug eects on gene expression, an untreated control is an appropriate
reference sample.
2.
The software generates standard curves for the target of interest and the endogenous control using
data from the corresponding standard dilution series.
3.
The software uses the standard curves to interpolate the quantities of the target of interest and the
endogenous control in each sample. The target quantity in each sample is then normalized to the
sample's endogenous control quantity.
4.
To determine the relative quantity of the target in test samples, the software divides the normalized
target quantity in the sample by the normalized target quantity in the reference sample.
Comparative Ct (DDCt) run
A comparative Ct (DDCt) run determines the relative target quantity in samples.
1.
The software measures amplification of the target of interest and of an endogenous control target
in a reference (calibrator) sample and in test samples.
The endogenous control is a target that is expressed equally in all samples; examples
of endogenous controls are β‐actin, GAPDH, and 18S ribosomal RNA. The software
can algorithmically incorporate multiple endogenous control targets in relative quantification
calculations.
The reference sample is used as the basis for relative quantification results (or 1× sample). For
example, in a study of drug eects on gene expression, an untreated control is an appropriate
reference sample.
2.
The measurements for the target of interest are normalized to the endogenous control.
3.
To determine the relative quantity of the target in test samples, the software compares the
normalized ΔCq (ΔCt or ΔCrt) for the sample to the normalized ΔCq (ΔCt or ΔCrt) for the reference
sample.
32
QuantStudio™ 6 Pro Real-Time PCR System and QuantStudio™ 7 Pro Real-Time PCR System User Guide

Genotyping run
A genotyping runs detects the single nucleotide polymorphism (SNP) variants of a target nucleic acid
sequence.
Genotyping runs use preformulated TaqMan™ SNP Genotyping Assays that include the following
components:
•
Two sequence-specific primers for amplification of sequences containing the SNP of interest
•
Two allele-specific TaqMan™ probes for Allele 1 and Allele 2
1.
The software normalizes the fluorescence of the reporter dyes to the fluorescence of the passive
reference dye in each well.
2.
The software plots the normalized reporter dye signal of each sample well on an Allelic
Discrimination Plot, which contrasts the reporter dye intensities of the allele-specific probes.
3.
The software algorithmically clusters the sample data, and assigns a genotype call to the samples
of each cluster according to its position on the plot.
Presence/absence run
Chapter 1 Product information
Types of runs
1
Presence/absence run determines the presence or absence of a target nucleic acid sequence in a
sample.
The software calls the target present or absent based on an algorithmically determined call threshold.
(The call threshold is dierent from the Ct threshold; the Ct threshold is not used to make calls.)
Melt curve run
Melt curve runs determines the melting temperature (Tm) of the amplification products of a PCR that
used intercalating dyes.
In the software, melt curve analysis is included in the default run method for any run type that uses
intercalating dyes.
1.
The software plots a melt curve based on the fluorescence of the dye with respect to change in
temperature.
2.
Using the melt curve, the software calculates the melting temperature (Tm).
QuantStudio™ 6 Pro Real-Time PCR System and QuantStudio™ 7 Pro Real-Time PCR System User Guide
33

Chapter 1 Product information
1
System template file names
System template file names
The first part of the file name varies, based on the instrument (QuantStudio™ 6 Pro System or
QuantStudio™ 7 Pro System).
The instrument will display the system templates applicable to the block that is installed.
System template file names for the 96-well 0.2-mL block
System template name
QS7Pro-96-Well-0-2ml_GT_Fast.edt
QS7Pro-96-Well-0-2ml_GT_Std.edt
QS7Pro-96-Well-0-2ml_Melt_Fast.edt
QS7Pro-96-Well-0-2ml_Melt_Std.edt
QS7Pro-96-Well-0-2ml_PA_Fast.edt
Run type
•
Genotyping run
•
96-well, 0.2-mL Standard plate
•
Fast cycling mode
•
Genotyping run
•
96-well, 0.2-mL Standard plate
•
Standard cycling mode
•
Melt curve run (no PCR stage)
•
96-well, 0.2-mL Standard plate
•
Fast cycling mode
•
Melt curve run (no PCR stage)
•
96-well, 0.2-mL Standard plate
•
Standard cycling mode
•
Presence/absence run
•
96-well, 0.2-mL Standard plate
•
Fast cycling mode
QS7Pro-96-Well-0-2ml_PA_Std.edt
QS7Pro-96-Well-0-2ml_PCR_Melt_Fast.edt
QS7Pro-96-Well-0-2ml_PCR_Melt_Std.edt
QS7Pro-96-Well-0-2ml_RQ_Fast.edt
34
QuantStudio™ 6 Pro Real-Time PCR System and QuantStudio™ 7 Pro Real-Time PCR System User Guide
•
Presence/absence run
•
96-well, 0.2-mL Standard plate
•
Standard cycling mode
•
Melt curve run (with PCR stage)
•
96-well, 0.2-mL Standard plate
•
Fast cycling mode
•
Melt cur
•
96-well, 0.2-mL Standard plate
•
Standard cycling mode
•
Comparative Ct run
•
96-well, 0.2-mL Standard plate
•
Fast cycling mode
ve run (with PCR stage)

(continued)
Chapter 1 Product information
System template file names
1
System template name
QS7Pro-96-Well-0-2ml_RQ_Std.edt
QS7Pro-96-Well-0-2ml_RSC_Fast.edt
QS7Pro-96-Well-0-2ml_RSC_Std.edt
QS7Pro-96-Well-0-2ml_SC_Fast.edt
QS7Pro-96-Well-0-2ml_SC_Std.edt
Run type
•
Comparative Ct run
•
96-well, 0.2-mL Standard plate
•
Standard cycling mode
•
Relative standard curve run
•
96-well, 0.2-mL Standard plate
•
Fast cycling mode
•
Relative standard curve run
•
96-well, 0.2-mL Standard plate
•
Standard cycling mode
•
Standard curve run
•
96-well, 0.2-mL Standard plate
•
Fast cycling mode
•
Standard curve run
•
96-well, 0.2-mL Standard plate
•
Standard cycling mode
System template file names for the 96-well 0.1-mL block
System template name
QS7Pro-96-Well-0-1ml_GT_Fast.edt
QS7Pro-96-Well-0-1ml_GT_Std.edt
QS7Pro-96-Well-0-1ml_Melt_Fast.edt
QS7Pro-96-Well-0-1ml_Melt_Std.edt
•
Genotyping run
•
96-well, 0.1-mL Standard plate
•
Fast cycling mode
•
Genotyping run
•
96-well, 0.1-mL Standard plate
•
Standard cycling mode
•
Melt curve run (no PCR stage)
•
96-well, 0.1-mL Standard plate
•
Fast cycling mode
•
Melt cur
•
96-well, 0.1-mL Standard plate
•
Standard cycling mode
ve run (no PCR stage)
Run type
QuantStudio™ 6 Pro Real-Time PCR System and QuantStudio™ 7 Pro Real-Time PCR System User Guide
35

Chapter 1 Product information
1
System template file names
(continued)
System template name
QS7Pro-96-Well-0-1ml_PA_Fast.edt
QS7Pro-96-Well-0-1ml_PA_Std.edt
QS7Pro-96-Well-0-1ml_PCR_Melt_Fast.edt
QS7Pro-96-Well-0-1ml_PCR_Melt_Std.edt
QS7Pro-96-Well-0-1ml_RQ_Fast.edt
Run type
•
Presence/absence run
•
96-well, 0.1-mL Standard plate
•
Fast cycling mode
•
Presence/absence run
•
96-well, 0.1-mL Standard plate
•
Standard cycling mode
•
Melt curve run (with PCR stage)
•
96-well, 0.1-mL Standard plate
•
Fast cycling mode
•
Melt curve run (with PCR stage)
•
96-well, 0.1-mL Standard plate
•
Standard cycling mode
•
Comparative Ct run
•
96-well, 0.1-mL Standard plate
•
Fast cycling mode
QS7Pro-96-Well-0-1ml_RQ_Std.edt
QS7Pro-96-Well-0-1ml_RSC_Fast.edt
QS7Pro-96-Well-0-1ml_RSC_Std.edt
QS7Pro-96-Well-0-1ml_SC_Fast.edt
QS7Pro-96-Well-0-1ml_SC_Std.edt
•
Comparative Ct run
•
96-well, 0.1-mL Standard plate
•
Standard cycling mode
•
Relative standard curve run
•
96-well, 0.1-mL Standard plate
•
Fast cycling mode
•
Relative standar
•
96-well, 0.1-mL Standard plate
•
Standard cycling mode
•
Standard curve run
•
96-well, 0.1-mL Standard plate
•
Fast cycling mode
•
Standard curve run
•
96-well, 0.1-mL Standard plate
•
Standard cycling mode
d curve run
36
QuantStudio™ 6 Pro Real-Time PCR System and QuantStudio™ 7 Pro Real-Time PCR System User Guide

System template file names for the 384-well block
Chapter 1 Product information
System template file names
1
System template name
QS7Pro-384-Well-GT-Fast.edt
QS7Pro-384-Well-GT-Std.edt
QS7Pro-384-Well-Melt-Fast.edt
QS7Pro-384-Well-Melt-Std.edt
QS7Pro-384-Well-PA-Fast.edt
Run type
•
Genotyping run
•
384-well plate
•
Fast cycling mode
•
Genotyping run
•
384-well plate
•
Standard cycling mode
•
Melt curve run (no PCR stage)
•
384-well plate
•
Fast cycling mode
•
Melt curve run (no PCR stage)
•
384-well plate
•
Standard cycling mode
•
Presence/absence run
•
384-well plate
•
Fast cycling mode
QS7Pro-384-Well-PA-Std.edt
QS7Pro-384-Well-PCR-Melt-Fast.edt
QS7Pro-384-Well-PCR-Melt-Std.edt
QS7Pro-384-Well-RQ-Fast.edt
QS7Pro-384-Well-RQ-Std.edt
•
Presence/absence run
•
384-well plate
•
Standard cycling mode
•
Melt curve run (with PCR stage)
•
384-well plate
•
Fast cycling mode
•
Melt cur
•
384-well plate
•
Standard cycling mode
•
Comparative Ct run
•
384-well plate
•
Fast cycling mode
•
Comparative Ct run
•
384-well plate
•
Standard cycling mode
ve run (with PCR stage)
QuantStudio™ 6 Pro Real-Time PCR System and QuantStudio™ 7 Pro Real-Time PCR System User Guide
37

Chapter 1 Product information
1
System template file names
(continued)
System template name
QS7Pro-384-Well-RSC-Fast.edt
QS7Pro-384-Well-RSC-Std.edt
QS7Pro-384-Well-SC-Fast.edt
QS7Pro-384-Well-SC-Std.edt
•
Relative standard curve run
•
384-well plate
•
Fast cycling mode
•
Relative standard curve run
•
384-well plate
•
Standard cycling mode
•
Standard curve run
•
384-well plate
•
Fast cycling mode
•
Standard curve run
•
384-well plate
•
Standard cycling mode
Run type
System template file names for the TaqMan™ Array Card block
Note: The TaqMan™ Array Card is only available for the QuantStudio™ 7 Pro System.
System template name Run type
QS7Pro-TAC-PA-Fast.edt
QS7Pro-TAC-PA-Std.edt
QS7Pro-TAC-RQ-Fast.edt
QS7Pro-TAC-RQ-Std.edt
QS7Pro-TAC-SC-Fast.edt
•
Presence/absence run
•
TaqMan™ Array Card
•
Fast cycling mode
•
Presence/absence run
•
TaqMan™ Array Card
•
Standard cycling mode
•
Comparative Ct run
•
TaqMan™ Array Card
•
Fast cycling mode
•
Comparative Ct run
•
TaqMan™ Array Card
•
Standard cycling mode
•
tandard curve run
S
•
TaqMan™ Array Card
•
Fast cycling mode
38
QuantStudio™ 6 Pro Real-Time PCR System and QuantStudio™ 7 Pro Real-Time PCR System User Guide

(continued)
System template name Run type
QS7Pro-TAC-SC-Std.edt
QS7Pro-TAC-RQ-Melt-Fast.edt
QS7Pro-TAC-RQ-Melt-Std.edt
QS7Pro-TAC-SC-Melt-Fast.edt
Chapter 1 Product information
System template file names
•
Standard curve run
•
TaqMan™ Array Card
•
Standard cycling mode
•
Comparative Ct run with melt curve
•
TaqMan™ Array Card
•
Fast cycling mode
•
Comparative Ct run with melt curve
•
TaqMan™ Array Card
•
Standard cycling mode
•
Standard curve run with melt curve
•
TaqMan™ Array Card
•
Fast cycling mode
1
QS7Pro-TAC-SC-Melt-Std.edt
•
Standard curve run with melt curve
•
TaqMan™ Array Card
•
Standard cycling mode
QuantStudio™ 6 Pro Real-Time PCR System and QuantStudio™ 7 Pro Real-Time PCR System User Guide
39

Chapter 1 Product information
1
Workflow
Workflow
Sign in to your instrument profile or your Connect account
(PIN or facial authentication)
▼
Open a plate file
(System template or saved plate file)
▼
(Optional) Edit the plate file
▼
Load the plate into the instrument
▼
Start the run
▼
Unload the plate from the instrument
▼
(Optional) Transfer the data file
(A location to transfer the data file might have been selected before the run. The data file only
needs to be transferred manually after the run in order to transfer to a new location.)
40
QuantStudio™ 6 Pro Real-Time PCR System and QuantStudio™ 7 Pro Real-Time PCR System User Guide

2
Precautions for use ................................................................... 41
■
Installation and instrument verification .................................................. 42
■
Overview of guest access ............................................................. 42
■
Power on the instrument .............................................................. 43
■
Sign in .............................................................................. 43
■
Enable or disable the microphone ...................................................... 44
■
Use voice commands ................................................................. 45
■
Sign out ............................................................................. 46
■
Precautions for use
Get started
CAUTION! PHYSICAL INJURY HAZARD. Do not remove the instrument cover. There are no
components inside the instrument that you can safely service yourself. If you suspect a problem,
contact technical support.
CAUTION! FIRE HAZARD. F
listed and certified fuses of the same type and rating as those currently in the instrument.
CAUTION! PHY
temperature can reach 100°C. Allow it to cool to room temperature before handling.
CAUTION! Befor
Thermo Fisher Scientific, confirm with Thermo Fisher Scientific that the proposed method will not
damage the instrument.
CAUTION! Use flat caps for tubes. Rounded caps can damage the heat
SICAL INJURY HAZARD. During instrument operation, the sample block
e using a cleaning or decontamination method other than those recommended by
or continued protection against the risk of fire, replace fuses only with
ed cover.
QuantStudio™ 6 Pro Real-Time PCR System and QuantStudio™ 7 Pro Real-Time PCR System User Guide
41

1
Chapter 2 Get star
2
Installation and instrument verification
ted
Installation and instrument verification
The instrument is installed by a representative from Thermo Fisher Scientific. The following tasks will be
performed during the installation process:
•
Unpack the instrument and the computer
•
Install the instrument and the computer
•
Install QuantStudio™ Design and Analysis Software v2 on the computer
•
Perform calibrations and RNase P verification
There is a recommended order to create instrument profiles and link Connect accounts to the
instrument (see “Recommended order to set up profiles” on page 123).
Overview of guest access
The instrument can be used without signing in. The following limits are in place if you do not sign in to
the instrument:
•
All actions are recorded to the guest profile.
•
You have access only to the public folder for selecting and storing experiments.
•
You cannot transfer data files to Connect.
•
Data files can only be transferred to a USB drive or a network drive.
The instrument can be configured so that guest access is not permitted (see “Require sign-in” on
page 122).
Use the instrument as a guest
If the Guest button is not visible on the Sign In screen, guest access has been disabled. An
administrator must enable guest access (see “Require sign-in” on page 122).
Guest button
1
42
In the Sign-In scr
QuantStudio™ 6 Pro Real-Time PCR System and QuantStudio™ 7 Pro Real-Time PCR System User Guide
een, tap Guest.

Power on the instrument
1
If left unattended, the instrument automatically enters sleep mode to conserve power. The default time
that an instrument is inactive before going into sleep mode is 15 minutes.
1.
Tap anywhere on the touchscreen to determine if the instrument is in sleep mode.
If the screen becomes active, the instrument is already powered on.
2.
If the home screen does not display, power on the instrument by pressing the ON/OFF switch on
the rear panel.
Chapter 2 Get star
Power on the instrument
ted
2
Figure 6 Location of the ON/OFF switch
ON/OFF switch
1
Note: The length of time that the instrument is inactive befor
customized (see “Enable and edit sleep mode” on page 163).
e going into sleep mode can be
Sign in
Sign in with a PIN
Create an instrument pr
profile” on page 127 and “Link the instrument to your Connect account” on page 126).
1.
In the Sign In screen, tap the PIN field, then enter your PIN.
If your instrument profile is not the default that is displayed, tap
pr
ofile.
2.
Enter your PIN, then tap Enter.
QuantStudio™ 6 Pro Real-Time PCR System and QuantStudio™ 7 Pro Real-Time PCR System User Guide
ofile before signing into the instrument (see “Create a new local instrument
, then select your instrument
43

Chapter 2 Get started
2
Enable or disable the microphone
You are signed in and the home screen is displayed.
See “Parts of the home screen” on page 24.
Sign in with facial authentication
For information on indicators for facial authentication, see “Indicators for facial authentication” on
page 23.
For lighting guidelines, see “Light guidelines” on page 191.
Create an instrument profile before signing into the instrument (see “Create a new local instrument
profile” on page 127 or “Link the instrument to your Connect account” on page 126). The instrument
profile must be set up with facial authentication (see “Add facial authentication to an existing instrument
profile” on page 132).
The instrument must accept facial authentication (see “Configure the instrument for the hands-free
features” on page 185).
The instrument must have the sign-in screen displayed. Sign out the current user to return to the sign-in
screen (see “Sign out” on page 46).
1.
Stand in front of the instrument.
Center yourself in front of the instrument. The ideal position is approximately 27 inches (69 cm)
from the camera.
Note: You do not need to position yourself as closely to the instrument to sign in as when you
took the photos to set up facial authentication.
2.
ait while the instrument searches for a match with the photos associated with profiles.
W
3.
(Optional) Reposition yourself if the instrument indicates that the face is out of position.
Ensure that you are centered in front of the instrument. Move away from the instrument and
towards the instrument to find the correct position.
The user is signed into the instrument and the home screen is displayed.
Enable or disable the microphone
The microphone can be disabled if the voice command function is available. A blue microphone icon
indicates that the voice command function is available.
The microphone cannot be manually disabled if the voice command function is already not available.
A gray microphone icon indicates that the voice command function is unavailable. To enable or disable
the voice command function for the instrument, see “Configure the instrument for the hands-free
features” on page 185.
44
For a description of the indicators, see “Indicators for voice commands” on page 23.
Tap
The micr
(Microphone).
ophone icon will change to red with a bar to indicate that it is disabled (
QuantStudio™ 6 Pro Real-Time PCR System and QuantStudio™ 7 Pro Real-Time PCR System User Guide
).

If the proximity sensor does not detect a person, the microphone icon will change to gray with a bar
( ). It will change back to red with a bar when the proximity sensor detects a person.
Use voice commands
The instrument must accept voice commands (see “Configure the instrument for the hands-free
features” on page 185).
A Connect profile must be used. For information about linking a local instrument profile to a Connect
profile, see “Link a local profile to a Connect profile” on page 127.
Voice commands are not available when the instrument is used as a guest. Voice commands are not
available with a local instrument profile.
The instrument must display a screen where a voice command is supported.
For information on indicators for voice commands, see “Indicators for voice commands” on page 23.
Say "Alexa™, open pro instrument", wait for the instrument audio prompt and, then issue the voice
command.
The instrument audio prompt depends on the voice command that was issued.
Chapter 2 Get star
Use voice commands
ted
2
Voice command Instrument audio output Instrument action
Home — The home screen is displayed.
Open door — Instrument drawer opens.
Shut door — Instrument drawer closes.
Begin Run
End run
Lock screen —
Change Block
Instrument scheduler
Help —
Smart support
[1]
[1]
[1]
"Are you sure you want to
start the run? Yes or no."
"Are you sure you want to
stop the run? Yes or no."
—
— The instrument schedule is displayed.
— The Smart Help screen is displayed.
If yes, the instrument starts the run.
If no, the Plate properties screen is
displayed.
If yes, the instrument stops the run and
displays the Plate properties screen.
If no, the run continues.
The instrument locks the screen. The status
dial displays Locked.
If the instrument has a block installed, the
Change Block screen is displayed.
If there is no block in the instrument, the
Install Block screen is displayed.
The help topic associated with the current
page on the screen is displayed.
Calibrations — The Calibration screen is displayed.
[1]
U
nsaved changes are discarded after the instrument action is completed.
QuantStudio™ 6 Pro Real-Time PCR System and QuantStudio™ 7 Pro Real-Time PCR System User Guide
45

Chapter 2 Get star
2
Sign out
Sign out
1.
In the home screen, tap (Profile).
2.
Tap Sign out, then tap Yes to confirm.
You are signed out and the Sign In screen is displayed.
ted
46
QuantStudio™ 6 Pro Real-Time PCR System and QuantStudio™ 7 Pro Real-Time PCR System User Guide

Create and run plates on the
3
instrument
Options to run a plate ................................................................. 47
■
Overview of customized data export .................................................... 50
■
(Optional) Scan a barcode using a barcode scanner ...................................... 51
■
Load a plate into the instrument ........................................................ 51
■
Load a TaqMan™ Array Card into the instrument ......................................... 52
■
Unload a plate or a TaqMan™ Array Card from the instrument .............................. 52
■
Options to run a plate
Create and run a plate from a system template or a saved plate file
A system template is a plate file that is pre-loaded on the instrument and not editable. It can be edited
and saved as a new custom plate file.
Plate files can be edited in Connect or the desktop software.
The Run Queue folder contains plate files sent to the instrument from the desktop software.
1.
In the home screen, tap one of the following options:
•
(Load plate file)
•
Set up run
2.
Tap the location of the system template or the plate file in the left column.
•
Run Queue
•
Public
•
My Instrument
e: My instrument is not available if you are using the instrument as a guest. You must be
Not
signed in.
•
Templates
•
Connect
e: You must be signed in with a Connect profile.
Not
•
Network Drive
QuantStudio™ 6 Pro Real-Time PCR System and QuantStudio™ 7 Pro Real-Time PCR System User Guide
47

Chapter 3 Cr
3
Options to run a plate
3.
4.
5.
6.
eate and run plates on the instrument
•
USB Drive
Tap the template file name in the right column.
The Plate Properties screen is displayed.
(Optional) In the Plate Properties screen, edit the Data file name.
The default file name is the template name appended with the date and time.
To edit the default file name, see “Manage the file name convention of the data file” on page 185.
(Optional) Use the barcode scanner.
See “(Optional) Scan a barcode using a barcode scanner” on page 51.
Tap the location to send the data file.
•
Connect platform
Not
e: You must be signed in with a Connect profile.
•
USB drive
•
Network drive
•
This instrument
Not
e: This option is not available if you are using the instrument as a guest. You must be
signed in.
The connection status of each location is displayed.
If the connection between the instrument and the location that was select
is interrupted, the instrument completes the run. The data file is saved on the instrument. The data
file must be transferred to another location manually (see “Transfer data files at a later time” on
page 81).
7.
(Optional) Select the Export run results with checkbox.
For more information about this setting, see “Overview of customized data export” on page 50.
To import a dierent export setting, see “Import an auto export setting” on page 55.
8.
(Optional) Edit the run method (see page 57).
9.
(Optional) Edit the plate (see page 65).
10.
Load a plate into the instrument (see page 51).
11.
Tap Start run, then confirm that a plate was loaded.
The confirmation page can be disabled.
The status dial is displayed. The status dial contains the following information:
•
The block temperature
•
The elapsed time of the run
•
The status of the run
ed to save the data file
48
QuantStudio™ 6 Pro Real-Time PCR System and QuantStudio™ 7 Pro Real-Time PCR System User Guide

Chapter 3 Create and run plates on the instrument
Figure 7 Home screen during a run
F
or options during a run, see Chapter 5, “Options for a run”.
Options to run a plate
3
Repeat the last run
The last run is associated with the profile. It is not the last run for the instrument.
1.
In the home screen, tap
The Plat
2.
(Optional) In the Plate Properties screen, edit the Data file name.
The default file name is the template name appended with the current date and time.
To edit the default file name, see “Manage the file name convention of the data file” on page 185.
3.
(Optional) Use the barcode scanner.
See “(Optional) Scan a barcode using a barcode scanner” on page 51.
4.
Tap the location to send the data.
•
•
•
•
e Properties screen is displayed.
Connect platform
Not
e: You must be signed in with a Connect profile.
USB drive
Network drive
This instrument
(Run last).
Not
e: This option is not available if you are using the instrument as a guest. You must be
signed in.
The connection status of each location is displayed.
QuantStudio™ 6 Pro Real-Time PCR System and QuantStudio™ 7 Pro Real-Time PCR System User Guide
49

Chapter 3 Cr
3
Overview of customized data export
5.
6.
7.
8.
9.
The status dial is displayed. The status dial contains the following information:
•
•
•
eate and run plates on the instrument
If the connection between the instrument and the location that was selected to save the data file
is interrupted, the instrument completes the run. The data file is saved on the instrument. The data
file must be transferred to another location manually (see “Transfer data files at a later time” on
page 81).
(Optional) Select the Export run results with checkbox.
For more information about this setting, see “Overview of customized data export” on page 50.
To import a dierent export setting, see “Import an auto export setting” on page 55.
(Optional) Edit the run method (see page 57).
(Optional) Edit the plate (see page 65).
Load a plate into the instrument (see page 51).
Tap Start run, then confirm that a plate was loaded.
The confirmation page can be disabled.
The block temperature
The elapsed time of the run
The status of the run
See Figure 7 on page 49.
For options during a run, see Chapter 5, “Options for a run”.
Overview of customized data export
The instrument can perform the primary analysis and the secondary analysis of the data, then export
the results.
The instrument has a default export setting.
The export settings can be customized. The instrument will perform the primary and secondary analysis
according to the export setting file.
The export settings are customized in the QuantStudio™ Design and Analysis Software v2, then
transferred to the instrument. The export settings are in a JSON file format.
The export settings cannot be created or edited on the instrument.
50
QuantStudio™ 6 Pro Real-Time PCR System and QuantStudio™ 7 Pro Real-Time PCR System User Guide

Chapter 3 Cr
(Optional) Scan a barcode using a barcode scanner
eate and run plates on the instrument
(Optional) Scan a barcode using a barcode scanner
The instrument is compatible with an optional Handheld Barcode Scanner (Cat. No. 4488442,
purchased separately). The barcode scanner reads Code 128 (alphanumeric), which supports
128 ASCII character barcodes.
For safety information, see “Laser safety” on page 223.
1.
Tap the Barcode field.
2.
Hold the scanner 20–30 cm away from a plate or container label and aim at the center of the
barcode, then press the trigger.
3.
Slowly move the scanning beam across the barcode until the scanner emits a high-pitched tone.
When the scanner scans a barcode, it automatically transmits the following information:
•
Transmits the alphanumeric equivalent of the barcode to the Barcode field.
•
Transmits other reagent information.
For more information about the hand-held barcode scanner, see the user documentation provided with
the barcode scanner.
3
Load a plate into the instrument
IMPORTANT! The instrument should be used by tr
moving parts hazard.
CAUTION! Use flat caps for 0.2-mL tubes and 0.1-mL tubes. Rounded caps can damage the heat
cover.
1.
ap
T
2.
Load the plate onto the block.
3.
Tap
(Eject) to open the drawer.
•
Well A1 of the plate is in the top-left corner of the block.
•
If the plate has a barcode, the barcode faces the front of the instrument.
(Eject) t
o close the drawer.
ained operators who have been warned of the
ed
QuantStudio™ 6 Pro Real-Time PCR System and QuantStudio™ 7 Pro Real-Time PCR System User Guide
51

A1
Chapter 3 Cr
3
Load a TaqMan™ Array Card into the instrument
eate and run plates on the instrument
Load a TaqMan™ Array Card into the instrument
IMPORTANT! The instrument should be used by trained operators who have been warned of the
moving parts hazard.
1.
ap
T
2.
Load the plate onto the block.
The block has guides for the position of the array card.
(Eject) t
•
Well A1 of the array card is in the top-left corner of the block.
•
If the array card has a barcode, the barcode faces the front of the instrument.
o open the drawer.
The circles indicate the guides for the position of the array card.
3.
T
ap
(Eject) t
o close the drawer.
Unload a plate or a TaqMan™ Array Card from the instrument
CAUTION! PHY
reach 100°C. Allow it to cool to room temperature before handling.
CAUTION! PHY
temperature can reach 100°C. Allow it to cool to room temperature before handling.
52
SICAL INJURY HAZARD. During instrument operation, the plate temperature can
SICAL INJURY HAZARD. During instrument operation, the TaqMan™ Array Card
QuantStudio™ 6 Pro Real-Time PCR System and QuantStudio™ 7 Pro Real-Time PCR System User Guide

Chapter 3 Cr
Unload a plate or a TaqMan™ Array Card from the instrument
The status dial displays Run complete when the run is finished. If the automatic sign-out feature is
enabled and the set time has elapsed, the instrument will display the Sign In screen.
1.
Tap (Eject) to open the instrument drawer, then remove the plate.
eate and run plates on the instrument
3
2.
Tap (Eject) t
For information on plate disposal, see “Chemical safety” on page 229 and “Biological hazard safety” on
page 231.
o close the instrument drawer.
QuantStudio™ 6 Pro Real-Time PCR System and QuantStudio™ 7 Pro Real-Time PCR System User Guide
53

Edit a plate before starting a run
1
2
3
4
Overview of a template file with restricted editing ........................................ 54
■
Options to edit the properties of a plate file .............................................. 55
■
Options to edit the method of a plate file ................................................ 56
■
Options to edit the well details of a plate file ............................................. 62
■
Overview of a template file with restricted editing
A template file can be set up with restricted editing in the QuantStudio™ Design and Analysis Software
v2. If a template file is set up with restricted editing, only certain parts of the template file can be edited.
The parts of the template file that cannot be edited are defined by the user in QuantStudio™ Design and
Analysis Software v2.
A user cannot set up the restricted editing properties on the instrument.
If a template file has restricted editing, it is noted in the following locations:
•
The top of the screen
•
Under the Data file properties heading
•
In the Data file name field
The top of the screen
1
Under the Data file properties heading
2
In the Data file name field
3
54
QuantStudio™ 6 Pro Real-Time PCR System and QuantStudio™ 7 Pro Real-Time PCR System User Guide

Chapter 4 Edit a plat
Options to edit the properties of a plate file
Options to edit the properties of a plate file
The following files can be edited:
•
A system template (see “Create and run a plate from a system template or a saved plate file” on
page 47)
A system template that is edited must be saved as a plate file. A system template cannot be
overwritten.
•
A saved plate file (see “Create and run a plate from a system template or a saved plate file” on
page 47)
•
The plate file associated with the last run (see “Repeat the last run” on page 49)
The following items can be edited in the Properties tab:
•
Import the sample setup (see page 55)
Import a sample setup
This feature allows you to import a sample setup file. A sample setup file shows the position of each
sample on the plate. The sample setup file is a TXT file or a CSV file.
e before starting a run
4
1.
In the Properties tab, tap Actions, then tap Import sample setup.
2.
In the Import Sample Setup screen, tap the appropriate folder, then tap the appropriate file.
Import an auto export setting
The export settings can be customized. For more information about the export settings, see “Overview
of cust
The export settings file is in a JSON file format.
The export settings must be customized in the QuantStudio™ Design and Analysis Software v2, then
they are imported onto the instrument.
omized data export” on page 50.
1.
In the Properties tab, tap the Export run results with field.
The Auto Export Settings screen is displayed.
2.
Tap Import.
3.
Tap the location of the file in the left pane, then tap the file in the right pane.
Delete an auto export setting
1.
In the P
The Auto Export Settings screen is displayed.
roperties tab, tap the Export run results with field.
2.
Tap Delete.
QuantStudio™ 6 Pro Real-Time PCR System and QuantStudio™ 7 Pro Real-Time PCR System User Guide
55

Chapter 4 Edit a plate before starting a run
4
Options to edit the method of a plate file
Options to edit the method of a plate file
The following files can be edited:
•
A system template (see “Create and run a plate from a system template or a saved plate file” on
page 47)
A system template that is edited must be saved as a plate file. A system template cannot be
overwritten.
•
A saved plate file (see “Create and run a plate from a system template or a saved plate file” on
page 47)
•
The plate file associated with the last run (see “Repeat the last run” on page 49)
The following items can be edited in the Methods tab:
•
Time and temperature for each PCR step (see page 57)
•
Cover temperature and volume (see page 57)
•
Number of cycles (see page 57)
•
Steps (see page 58)
•
Stages (see page 58)
•
Data collection points (see page 58)
•
VeriFlex™ Zones (see page 59)
•
Auto Delta (see page 61)
•
Ramp rates (see page 62)
•
Pauses (see page 62)
56
QuantStudio™ 6 Pro Real-Time PCR System and QuantStudio™ 7 Pro Real-Time PCR System User Guide

Method elements
2
3
1
4
5
9
8
7
6
Chapter 4 Edit a plat
Options to edit the method of a plate file
e before starting a run
4
Method tab
1
Heated cover temperature
2
Reaction volume
3
Stage of thermal protocol
4
Step within a stage
5
Number of cycles for the stage
6
Temperature for the step
7
Hold time for the step
8
Data collection point
9
Edit the method
1.
In the Method tab, tap Edit.
2.
ap a field, then enter the changes.
T
•
Cover temperature
•
Volume
•
Temperature for any steps
•
Time for any steps
•
Number of PCR cycles
3.
Tap Save.
4.
Enter a name for the plate file, then tap Done.
5.
In the Save Template screen, select a storage location for the plate file, then tap Done.
A confirmation is displayed.
6.
Tap Close.
QuantStudio™ 6 Pro Real-Time PCR System and QuantStudio™ 7 Pro Real-Time PCR System User Guide
57

Chapter 4 Edit a plate before starting a run
4
Options to edit the method of a plate file
Add or remove steps
Add a PCR step or remove a PCR step.
1.
In the Method tab, tap Edit4Advanced4Manage steps.
Note: Use or to navigate through the method if it is not all displayed.
2.
ap Add step, then tap
T
3.
Enter the temperature and time, then tap Enter.
(Add) in the location of the st
ep to be added.
4.
Tap Remove step, then tap
5.
Tap Done.
The Method tab is displayed with the updated method.
Add or remove stages
Add a PCR stage or remove a PCR stage.
1.
In the Method tab, tap Edit4Advanced4Manage stages.
e: Use
Not
2.
T
ap Add Stage, then tap
3.
Tap the type of stage.
•
Hold
•
Pre-Read
•
Post-Read
•
Infinite
•
PCR
•
Melt Curve
or to navigate through the method if it is not all displayed.
(Remove) in the appr
(Add) in the location of the stage t
opriate step.
o be added.
The new stage is added. The time and temperature must be edited as part of the method (see “Edit
the method” on page 57).
4.
Tap Remove stage, then tap
5.
ap Done.
T
(Remove).
Add or remove data collection locations
1.
In the Method tab, tap Edit4Advanced4Data collection location.
or to navigate through the method if it is not all displayed.
QuantStudio™ 6 Pro Real-Time PCR System and QuantStudio™ 7 Pro Real-Time PCR System User Guide
58
Not
e: Use

2.
2
1
Tap (Data collection location) to designate a step as a data collection location or to remove
data collection from the step.
The (Data collection location) button functions as an on-o switch.
Data collection is o
1
Data collection is on
2
3.
ap Done.
T
Set up or remove VeriFlex™ Zones
Chapter 4 Edit a plate before starting a run
Options to edit the method of a plate file
4
VeriFlex™ Zones are only available for 96-well blocks.
•
The QuantStudio™ 6 Pro System has three VeriFlex™ Zones.
•
The QuantStudio™ 7 Pro System has six VeriFlex™ Zones.
Note: For more information about compatibility of plate files with VeriFlex™ Zones between the two
instruments, see “VeriFlex™ Zones” on page 18.
1.
In the Method tab, tap Edit4Advanced4 V
Note: Use
Note: The PCR stage pr
or to navigate through the method if it is not all displayed.
ovides the option of VeriFlex™ Zones or the Auto Delta feature. Ensure that
eriFlex™ Zones / Auto Delta.
the VeriFlex™ Zones option is selected.
QuantStudio™ 6 Pro Real-Time PCR System and QuantStudio™ 7 Pro Real-Time PCR System User Guide
59

1
1
2
Chapter 4 Edit a plat
4
Options to edit the method of a plate file
e before starting a run
Figure 8 VeriFlex™ Z
VeriFlex™ Z
1
2.
ap the temperature field in the appropriate VeriFlex™ Zone.
T
3.
Enter a temperature, then tap Enter.
ones is selected
ones and Auto Delta settings
The temperatures in adjacent zones must have a dierence of ≤5°C.
4.
Tap Done.
A stage with VeriFlex™ Zones is denoted with a
5.
In the Method tab, tap
4Remove4Done t
icon.
o remove the VeriFlex™ Zones.
Note: The VeriFlex™ Zones setting is removed from the Method tab.
Indicates that this is the Method tab wher
60
1
Indicates that VeriFlex™ Z
2
QuantStudio™ 6 Pro Real-Time PCR System and QuantStudio™ 7 Pro Real-Time PCR System User Guide
ones are assigned. Tap to remove the VeriFlex™ Zones.
e the VeriFlex™ Zones settings can be removed

Set up or remove the Auto Delta feature
1
2
Note: The Auto Delta feature is only available in the PCR stage.
1.
In the Method tab, tap Edit4Advanced4VeriFlex™ Zones / Auto Delta.
Note: Use or to navigate through the method if it is not all displayed.
2.
ap
T
3.
T
See Figure 8 on page 60.
4.
Enter the starting cycle to apply Auto Delta settings.
(Edit) in one of the PCR stages.
ap Auto Delta settings.
Chapter 4 Edit a plate before starting a run
Options to edit the method of a plate file
4
5.
Set the Delta temperature slider to the
value for the dier
6.
Set the Delta time slider to the
the dier
7.
Tap Done.
ence in the time.
ence in the temperature.
position or the position, then enter the numerical value for
position or the position, then enter the numerical
A PCR step with an Auto Delta setting applied to it is denoted with an
8.
In the Method tab, tap
4Remove4Done t
o remove the Auto Delta setting.
Note: The Auto Delta setting is removed from the Method tab.
.
Indicates that this is the Method tab wher
1
Indicates that Auto Delta is assigned. Tap to remove the Auto Delta settings.
2
QuantStudio™ 6 Pro Real-Time PCR System and QuantStudio™ 7 Pro Real-Time PCR System User Guide
e Auto Delta settings can be removed.
61

Chapter 4 Edit a plate before starting a run
4
Options to edit the well details of a plate file
Configure ramp rates
The ramp rate is how quickly the temperature changes from one stage or step to another stage or step.
The maximum ramp rate for the instrument is 6.5°C/second.
1.
In the Method tab, tap Edit4Advanced4Ramp rates.
Note: Use or to navigate through the method if it is not all displayed.
2.
ap a ramp rate, then edit the value.
T
3.
Tap Done.
Add or remove a pause
A pause allows you to open the drawer to add additional reagents to the plate.
1.
In the Method tab, tap Edit4Advanced4Add pause.
e: Use
Not
2.
ap
T
3.
Ent
A pause in the thermal cycling protocol is denoted with a
t
4.
Tap
5.
Tap Done.
(Pause).
er a temperature and the cycle.
emperature of the pause are also denoted.
(Pause) to remove the pause.
or to navigate through the method if it is not all displayed.
. The cycle of the pause and the
Options to edit the well details of a plate file
The following files can be edited:
•
A system template (see page 47)
A system template that is edited must be saved as a plate file. A system template cannot be
overwritten.
•
A saved plate file (see “Create and run a plate from a system template or a saved plate file” on
page 47)
•
The plate file associated with the last run (see “Repeat the last run” on page 49)
62
QuantStudio™ 6 Pro Real-Time PCR System and QuantStudio™ 7 Pro Real-Time PCR System User Guide

The following items can be edited in the Plate tab:
•
Sample name and sample type (see “Assign or edit a well for a plate” on page 65 and “Assign or
edit a well for a TaqMan™ Array Card” on page 66)
•
Target name, reporter dye, and quencher dye (see page 66)
•
Reagents (see “Add or edit the reagent details for a plate” on page 66 and “Add or edit the
reagent details for a TaqMan™ Array Card” on page 68)
•
Passive reference dye (see page 68)
•
Import an assay information file (AIF; see page 69)
A plate layout file for preplated assays will already be populated with the target name, reporter dye, and
quencher dye.
Options to view a plate layout
The following views are available for a plate layout:
•
Plate view
–
–
Shows each well on the plate
–
Tap to provide information about the sample name, sample type, target name, reporter dye, or
quencher dye
–
An individual well
–
Multiple wells (tap each individual well)
–
A row (tap the letter)
–
A column (tap the number)
–
Tap (Select all) to select all of the wells in the plate
•
Well table view
–
–
Shows the well ID, the sample, the target, the reporter, the quencher, the type, and the
reagents
Chapter 4 Edit a plate before starting a run
Options to edit the well details of a plate file
4
The plate view and the well table view can show the sample color or the target color with the Color By
dropdown list.
QuantStudio™ 6 Pro Real-Time PCR System and QuantStudio™ 7 Pro Real-Time PCR System User Guide
63

1
2
3
4
Chapter 4 Edit a plat
4
Options to edit the well details of a plate file
Select all button
1
Plate view button
2
Well table view button
3
Color by dropdown list
4
e before starting a run
View a 384-well plate
The Plat
384-well view. You can zoom in to a 96-well section of the 384-well plate in order to edit the plate.
1.
e tab displays a 384-well plate if the 384-well block is installed. The plate can be edited in the
In the r
egion of the 384-well plate that you want to zoom in on, pinch outwards with two fingers.
2.
(Optional) To change the region that you are zoomed in on, use two fingers to drag the plate in the
appropriate direction.
The 384-well plate can zoom in on any 96-well section. It is not limited to specific 96-well
quadrants.
64
QuantStudio™ 6 Pro Real-Time PCR System and QuantStudio™ 7 Pro Real-Time PCR System User Guide

1
Chapter 4 Edit a plat
Options to edit the well details of a plate file
If you selected a full row or column in the 96-well view, only the set of wells that was visible in the
96-well view is selected. The full row or column of the 384-well plate is not selected.
3.
To return to the full 384-well view from the 96-well section, pinch inwards with two fingers.
e before starting a run
View a TaqMan™ Array Card
The Plate tab displays a TaqMan™ Array Card if the TaqMan™ Array Card block is installed.
The samples and reagents are edited by port. The samples and reagents are not edited by well.
The targets are added by an assay information file. The targets cannot be edited on the instrument
touchscreen.
4
Figure 9 Plate tab for a TaqMan™ Arr
Port
1
ay Card
Assign or edit a well for a plate
A target or an assay must be defined (see “
A sample setup file can be imported instead of assigning or editing a well manually (see “Import a
sample setup” on page 55).
1.
In the Plate tab, tap a well or multiple wells.
2.
Tap the Sample Information pane, then tap Samples.
Note: If no wells are selected, the pane is labeled Legend.
3.
4.
er a sample name.
Ent
Select a sample type from the dropdown list.
Add a target or an assay” on page 66).
QuantStudio™ 6 Pro Real-Time PCR System and QuantStudio™ 7 Pro Real-Time PCR System User Guide
65

Chapter 4 Edit a plate before starting a run
4
Options to edit the well details of a plate file
5.
Tap Target/SNP, then select Target or Assay from the dropdown list.
6.
Tap a row in the table, then tap Done.
Add a target or an assay
1.
In the Plate tab, tap a well or multiple wells.
2.
Tap the Sample Information pane, then tap Target/SNP.
3.
Tap a row in the table, then tap Add New.
4.
Enter the target, then select the reporter dye and the quencher dye from the respective dropdown
lists.
5.
Tap Add Target, then tap Close.
Assign the target or the assay to a well (see “Assign or edit a well for a plate” on page 65).
Assign or edit a well for a TaqMan™ Arr
An assay information file must be imported to assign targets (see “Import an Assay Information File
(AIF)” on page 69). Targets cannot be assigned on the instrument touchscreen.
A sample can only be edited by port. It cannot be edited by individual well.
A sample setup file can be imported instead of assigning or editing a well manually (see “Import a
sample setup” on page 55).
1.
In the Plate tab, tap a port.
See Figure 9 on page 65.
2.
Tap the Legend pane, then tap Samples.
3.
Enter a sample name.
4.
Select a sample type from the dropdown list.
5.
Tap Done.
ay Card
Add or edit the reagent details for a plate
1.
In the Plat
e tab, tap one of the following items.
66
•
A single well
•
Multiple wells
•
(Select all)
2.
ap the Sample Information pane, then tap Reagents.
T
Note: If no wells are selected, the pane is labeled Legend.
QuantStudio™ 6 Pro Real-Time PCR System and QuantStudio™ 7 Pro Real-Time PCR System User Guide

3.
Tap a row in the table, then enter the information.
•
Reagent name
•
Reagent type
•
Lot number
4.
ap Save reagent.
T
5.
Tap Done.
Apply the reagents to a plate
Add the reagents before they are applied to a plate (see “Add or edit the reagent details for a plate” on
page 66).
Chapter 4 Edit a plat
Options to edit the well details of a plate file
•
SKU (Part number)
•
Expiration date
e before starting a run
4
1.
In the Plat
•
•
•
2.
T
ap the Sample Information pane, then tap Reagents.
Note: If no wells are selected, the pane is labeled Legend.
3.
T
ap a row in the table to apply it to the plate.
4.
Tap Done.
e tab, tap one of the following items.
A single well
Multiple wells
(Select all)
Delete the reagent details
1.
In the Plat
•
•
•
2.
Tap the Sample Information pane, then tap Reagents.
e tab, tap one of the following items.
A single well
Multiple wells
(Select all)
Note: If no wells are selected, the pane is labeled Legend.
3.
(Optional) T
QuantStudio™ 6 Pro Real-Time PCR System and QuantStudio™ 7 Pro Real-Time PCR System User Guide
ap Clear all.
67

Chapter 4 Edit a plat
4
Options to edit the well details of a plate file
4.
Tap a row in the table, then delete the information in each field.
•
Reagent name
•
Reagent type
•
Lot number
5.
ap Save reagent.
T
6.
Tap Done.
e before starting a run
•
SKU (Part number)
•
Expiration date
•
Quencher dye
Add or edit the reagent details for a TaqMan™ Arr
1.
In the Plate tab, tap a port.
See Figure 9 on page 65.
2.
Tap the Legend pane, then tap Reagents.
3.
Tap a row in the table.
4.
Tap Add new, then enter the information.
•
Reagent name
•
Reagent type
•
ot number
L
5.
ap Save reagent, then tap Done.
T
•
SKU (Part number)
•
Expiration date
Apply the reagents to a TaqMan™ Array Card
Add the reagents before they are applied to a plate (see “Add or edit the reagent details for a TaqMan
Array Card” on page 68).
A reagent can only be applied by port. It cannot be applied by individual well.
ay Card
™
1.
In the Plate tab, tap a port.
See Figure 9 on page 65.
2.
Tap the Legend pane, then tap Reagents.
3.
Tap a row in the table to apply it to the port.
4.
Tap Done.
Edit a passive reference dye
A passive reference dye normalizes the fluor
1.
In the Plate tab, tap Actions4Edit passive reference dye.
The Passive Reference Dye screen is displayed.
2.
Select the passive reference dye.
68
QuantStudio™ 6 Pro Real-Time PCR System and QuantStudio™ 7 Pro Real-Time PCR System User Guide
escent reporter signal in real-time PCR.

The passive reference dye is displayed under the plate diagram.
Import an Assay Information File (AIF)
The Assay Information File is provided in TXT format and/or XML and HTML format, depending on the
product line and order date. The HTML format is a reference for users. The XML or the TXT format is
imported.
For a detailed description of the AIF, see Understanding Your Shipment (Pub. No. MAN0017153)
1.
In the Plate tab, tap Actions4Import AIF file.
2.
In the Import AIF file screen, tap the appropriate folder, then tap the appropriate file.
Chapter 4 Edit a plate before starting a run
Options to edit the well details of a plate file
4
QuantStudio™ 6 Pro Real-Time PCR System and QuantStudio™ 7 Pro Real-Time PCR System User Guide
69

5
Options for a run
Screens available during a run ......................................................... 70
■
Edit a plate file during a run ............................................................ 71
■
Pause an instrument run ............................................................... 72
■
Stop an instrument run ................................................................ 72
■
View the method during a run .......................................................... 73
■
View real-time data and plots during a run ............................................... 73
■
View the time remaining during a run .................................................... 74
■
Lock the touchscreen during a run ...................................................... 74
■
Unlock the touchscreen during a run .................................................... 75
■
Instrument Schedule .................................................................. 75
■
Screens available during a run
From the home screen, you can swipe or tap the arrows to navigate to dierent screens. The following
screens are available:
•
A screen displaying the method (swipe left once or tap the right arrow ( ) once)
•
The real-time amplification plot (swipe left twice or tap the arrow right ( ) twice)
•
The time remaining in the run (swipe left three times or tap the right arrow ( ) three times)
70
QuantStudio™ 6 Pro Real-Time PCR System and QuantStudio™ 7 Pro Real-Time PCR System User Guide

1
2
Figure 10 Home screen during a run
Arrow
1
Actions menu
2
Chapter 5 Options for a run
Edit a plat
e file during a run
5
Edit a plate file during a run
The tar
after a run has started.
gets and samples can be added or edited after a run has started. The method cannot be edited
1.
In the home screen during a run, tap
See Figur
2.
Tap Set up.
3.
In the Plate tab, tap a well or multiple wells.
Note: Use the plate view to edit or assign a well (see “Options to view a plate layout” on page 63).
4.
T
ap the Sample Information pane, then tap Samples.
Note: If no wells are selected, the pane is labeled Legend.
5.
Ent
•
•
•
e 10 on page 71.
er a sample name, then select a sample type from the dropdown list.
Unknown
Standard
No template control (NTC)
(Actions).
6.
Tap Target/SNP, then select Target or Assay from the dropdown list.
7.
Tap a row in the table, then tap Close4Done.
QuantStudio™ 6 Pro Real-Time PCR System and QuantStudio™ 7 Pro Real-Time PCR System User Guide
71

Chapter 5 Options for a run
5
ause an instrument run
P
Pause an instrument run
Pause a run to add reagents to the plate or to edit the number of cycles.
1.
In the home screen during a run, tap (Actions).
See Figure 10 on page 71.
2.
Tap Pause run, then enter a pause temperature.
3.
(Optional) Tap Edit to change the number of cycles.
4.
(Optional) Tap
CAUTION! PHY
can reach 100°C. If you want to access the plate during a run pause, enter room temperature as
the pause temperature and allow the plate to cool to room temperature before handling.
(Eject) t
SICAL INJURY HAZARD. During instrument operation, the plate temperature
o open the drawer, then tap
Stop an instrument run
CAUTION! PHY
reach 100°C. If you want to access the plate during a run pause, enter room temperature as the
pause temperature and allow the plate to cool to room temperature before handling.
1.
In the home scr
See Figur
2.
Tap Stop run.
3.
Unload the plate (see “Unload a plate or a TaqMan™ Array Card from the instrument” on page 52).
SICAL INJURY HAZARD. During instrument operation, the plate temperature can
een during a run, tap
e 10 on page 71.
(Actions).
(Eject) t
o close the drawer.
72
QuantStudio™ 6 Pro Real-Time PCR System and QuantStudio™ 7 Pro Real-Time PCR System User Guide

View the method during a run
2
1
3
4
1.
In the home screen during a run, swipe left once or tap the right arrow ( ) once.
Chapter 5 Options for a run
View the method during a run
5
Start time
1
Method, including the current stage
2
End time
3
Time remaining
4
2.
Swipe right once or tap the left arr
iew real-time data and plots during a run
V
1.
In the home screen during a run, swipe left twice or tap the right arrow (
ow (
) once to return to the home screen.
) twice.
QuantStudio™ 6 Pro Real-Time PCR System and QuantStudio™ 7 Pro Real-Time PCR System User Guide
73

Chapter 5 Options for a run
5
iew the time remaining during a run
V
2.
(Optional) Tap the dropdown list then select the view for the plot.
•
Linear
•
Log 10
3.
(Optional) Tap Actions4Analyze amp plots.
4.
(Optional) Tap Actions4View well details to see the amplification for a specific well.
5.
Swipe right twice or tap the left arrow (
) twice to return to the home screen.
Adjust the display of real-time plots during a run
1.
2.
In the r
T
eal-time amplification plot, tap
ap the arrows to pan left or right, or swipe left or right within the amplification plot.
(Zoom) or pinch.
View the time remaining during a run
1.
In the home screen during a run, swipe left three times or tap the right arrow (
The time r
2.
Swipe right three times or tap the left arrow (
ock the touchscreen during a run
L
After you have started a run, you can lock the touchscreen so that other users cannot interfere with
instrument operation.
emaining in the run is displayed.
) three times to return to the home screen.
) three times.
74
Note: You must be signed in.
1.
In the home scr
2.
Tap Lock screen4Lock.
The status dial displays Locked.
The touchscreen automatically unlocks when the run is complete.
The touchscreen can be unlocked during the run (see “Unlock the touchscreen during a run” on
page 75).
QuantStudio™ 6 Pro Real-Time PCR System and QuantStudio™ 7 Pro Real-Time PCR System User Guide
een during a run, tap
(P
rofile).

Unlock the touchscreen during a run
The touchscreen can be unlocked by the user who locked it or an administrator. The touchscreen
automatically unlocks when the run is complete.
1.
Tap anywhere on the touchscreen.
2.
Tap the PIN Code field, then enter your PIN.
The status dial is displayed without Locked.
Instrument Schedule
Overview of the instrument schedule
The instrument schedule allows a user to reserve the instrument at a particular date and time.
Chapter 5 Options for a run
Unlock the t
ouchscreen during a run
5
A Connect pr
The instrument is not locked to prevent any other users at the time.
Schedule a run
1.
In the home screen, tap
2.
Select a view
•
Day
•
Week
•
Month
3.
Tap a time.
The day on the calendar can be selected in the month view.
The day view and the week view show the schedule in 30-minute increments.
4.
Edit the start date, end date, start time, and end time.
5.
(Optional) Add notes.
6.
Tap Save, then tap Done to exit the schedule.
ofile is required.
(Calendar).
.
Cancel a scheduled run
1.
In the home scr
2.
Select a view
•
Day
•
Week
•
Month
QuantStudio™ 6 Pro Real-Time PCR System and QuantStudio™ 7 Pro Real-Time PCR System User Guide
een, tap
.
(Calendar).
75

Chapter 5 Options for a run
5
Instrument Schedule
3.
Tap the reservation.
The Edit Reservation screen is displayed.
4.
Tap Cancel Reservation, then tap Yes.
76
QuantStudio™ 6 Pro Real-Time PCR System and QuantStudio™ 7 Pro Real-Time PCR System User Guide

6
Manage plate files .................................................................... 77
■
Manage data files .................................................................... 78
■
Manage plate files
Copy plate files
1.
In the home screen, tap Load plate file or Set up run.
2.
Tap the appropriate folder.
•
Run Queue
•
Public
•
Connect
•
Network Drive
•
USB Drive
View and manage files
3.
ap Manage.
T
4.
Tap the file, then tap Copy files.
Multiple files can be selected.
5.
Select the destination folder.
•
Public
•
Connect
•
Network Drive
•
USB Drive
6.
T
ap Paste.
Tap
(Back) t
o return to the home screen.
QuantStudio™ 6 Pro Real-Time PCR System and QuantStudio™ 7 Pro Real-Time PCR System User Guide
77

Chapter 6 View and manage files
6
Manage data files
Delete plate files
System templates cannot be deleted. A plate file that was saved from a system template can be
deleted.
For descriptions of files, see “Files” on page 28.
1.
In the home screen, tap Load plate file or Set up run.
2.
Tap the appropriate folder.
•
Run Queue
•
Public
•
Connect
•
Network Drive
•
USB Drive
3.
ap Manage.
T
4.
Tap the file, then tap Delete files.
Multiple files can be selected.
5.
Tap Yes to confirm.
Tap
(Back) to return to the home screen.
Manage data files
View QC Check status after a run
The status dial displays Run complete when a run is complete. After Done is tapped, the amplification
plot can no longer be viewed on the instrument.
1.
In the home screen after a run is complete, see the status of the QC Check.
The status of the QC Check is displayed under the status dial.
78
QuantStudio™ 6 Pro Real-Time PCR System and QuantStudio™ 7 Pro Real-Time PCR System User Guide

1
Figure 11 QC Check passed
1
QC Check
1
Chapter 6 V
iew and manage files
Manage data files
6
Figure 12 Review required for QC Check
QC Check
1
2.
See the QC data in the QuantS
tudio™ Design and Analysis Software v2 or the QuantStudio
Design and Analysis v2.
QuantStudio™ 6 Pro Real-Time PCR System and QuantStudio™ 7 Pro Real-Time PCR System User Guide
™
79

Chapter 6 V
6
Manage data files
iew and manage files
View an amplification plot after a run
The status dial displays Run complete when a run is complete. The amplification plot can only be
viewed immediately after a run. After Done is tapped, the amplification plot can no longer be viewed on
the instrument.
If the automatic sign-out feature is enabled and the set time has elapsed, the instrument will display the
Sign In scr
1.
2.
3.
4.
5.
6.
een. The amplification plot cannot be viewed on the instrument after the run.
In the home screen after a run is complete, tap Details.
The amplification plot is displayed. The display can be adjusted (see “Adjust the display of real-
time plots during a run” on page 74).
(Optional) On the Details screen, tap the Plot Types dropdown list, then select a plot type.
•
Rn vs. Cycle
•
dRn vs. Cycle
(Optional) On the Details screen, tap the Y-Scales dropdown list, then select the view for the plot.
•
Linear
•
Log 10
(Optional) Tap Well details, then tap Samples or Targets.
Select an amplification plot preview, then tap View amp plot.
(Optional) Tap a specific well on the right side of the amplification plot to see the details for the
single well.
80
7.
Tap Close to return to the home screen.
QuantStudio™ 6 Pro Real-Time PCR System and QuantStudio™ 7 Pro Real-Time PCR System User Guide

Transfer a data file immediately after a run
This section describes the transfer of a data file immediately after a run. To transfer a data file or a set of
data files at a later time, see “Transfer data files at a later time” on page 81.
In the home screen, the status dial displays Run complete when a run is complete. The home screen
also shows the location that the data file was transferred to. The location for transfer was selected
before the run was started (see “Create and run a plate from a system template or a saved plate file” on
page 47 and “Repeat the last run” on page 49).
If the automatic sign-out feature is enabled and the set time has elapsed, the instrument with display
the Sign In screen. Data files cannot be transferred from the home screen. They can be transferred at a
later time (see “Transfer data files at a later time” on page 81).
Data files will be transferred to the location that was selected before the run was started, even if the
user was automatically signed out.
1.
In the home screen after a run is complete, tap Transfer file.
2.
Select the destination for the data file.
•
Public
•
Connect
Chapter 6 V
iew and manage files
Manage data files
6
e: You must be signed in with a Connect profile.
Not
•
Network Drive
•
USB Drive
•
My Instrument
e: This option is not available if you are using the instrument as a guest. You must be
Not
signed in.
3.
T
ap OK, then tap Transfer.
Transfer data files at a later time
This section describes the transfer of a data file or a set of data files at any time. To transfer a data file
immediately after a run, see “Transfer a data file immediately after a run” on page 81.
•
Guests can only transfer guest data files.
•
A user that is signed in can transfer their own data files.
•
Administrators can transfer all data files.
QuantStudio™ 6 Pro Real-Time PCR System and QuantStudio™ 7 Pro Real-Time PCR System User Guide
81

Chapter 6 V
6
Manage data files
1.
2.
3.
4.
5.
iew and manage files
Tap (Settings)4Run history.
The Run History screen is displayed. It contains a list of the runs performed on the instrument
associated with the profile. Administrators can view all of the runs performed.
(Optional) Tap the table header to sort by that parameter.
•
Run name
•
Date
•
Transferred
•
User (Administrator only)
Tap the data files to be transferred or tap Select all.
Multiple data files can be selected.
Tap Transfer, then tap the storage location.
Tap Done.
View the list of data files on the instrument
•
Guests can only view the list of guest data files.
•
A user that is signed in can view the list of their own data files.
•
Administr
1.
In the home screen, tap
The Run History screen is displayed.
2.
Tap an individual run record, then tap View.
The following details are displayed:
•
•
•
•
3.
(Optional) T
4.
(Optional) Tap Delete to delete the data file from the instrument.
5.
Tap Cancel to return to the Run History screen.
ators can view all data files.
The file name
The run status
The user name
The star
ap Transfer to transfer the data file.
Delete data files fr
(Settings)4Run hist
t time and the end time
om the instrument
ory.
•
The duration of the run
•
The reaction volume
•
The cover temperature
82
•
Guests cannot delete any data files.
•
A user that is signed in can delete their own data files.
•
Administrators can delete all the data files.
QuantStudio™ 6 Pro Real-Time PCR System and QuantStudio™ 7 Pro Real-Time PCR System User Guide

Chapter 6 V
1.
In the home screen, tap (Settings)4Run history.
The Run History screen is displayed. It contains a list of the runs performed on the instrument
associated with the profile. Administrators can view all of the runs performed.
2.
(Optional) Tap the table header to sort by that parameter.
•
Run name
•
Date
•
Transferred
•
User (Administrator only)
3.
Tap the data files to be deleted or tap Select all.
Multiple data files can be selected.
4.
Tap Delete, then tap Yes to confirm.
iew and manage files
Manage data files
6
QuantStudio™ 6 Pro Real-Time PCR System and QuantStudio™ 7 Pro Real-Time PCR System User Guide
83

7
Calibrate and verify instrument
performance
Instrument and block calibration ........................................................ 84
■
Calibration and verification schedule .................................................... 85
■
Calibration descriptions ............................................................... 86
■
View the calibration status and set reminders ............................................ 87
■
Export a calibration report ............................................................. 89
■
Perform ROI/uniformity, background, and dye calibrations for plate blocks .................. 89
■
Perform ROI/uniformity, background, dye, and normalization calibrations for the
■
TaqMan™ Array Card block ............................................................ 97
Perform verification using RNase P plates .............................................. 103
■
Perform verification using RNase P with a TaqMan™ Array Card ........................... 108
■
Calibrate custom dyes ............................................................... 113
■
Calibrate for a custom melt curve run .................................................. 120
■
Instrument and block calibration
The QuantStudio™ 6 Pro System and the QuantStudio™ 7 Pro System have interchangeable blocks. The
calibration status applies to the combination of the instrument and the block.
If a block is moved to an instrument that it has not been calibrated on, that combination of block and
instrument needs to be calibrated. This applies even if the block has previously been calibrated on a
dierent instrument.
If a block is moved back to an instrument that is has previously been calibrated on, it does not need to
be calibrated again. It needs to be calibrated again if the calibration is expired.
A run can still be started if a calibration of the block on the instrument is expired. A run cannot be
started if a block has never been calibrated on the instrument.
84
QuantStudio™ 6 Pro Real-Time PCR System and QuantStudio™ 7 Pro Real-Time PCR System User Guide

Chapter 7 Calibrate and verify instrument performance
Calibration and verification schedule
The instrument and block will be calibrated during the installation. To ensure optimal performance,
perform calibrations at the recommended frequency.
Note: After instrument calibration, we recommend performing instrument verification using the
provided RNase P plate.
Calibration and verification schedule
7
IMPORTANT! P
erform calibrations and instrument runs under the specified environmental conditions
(see “Environmental requirements” on page 192). Exposure to extreme temperatures can adversely
aect the instrument performance and shorten the life span of the instrument components.
To set calibration frequencies and reminders, see one of the following sections:
•
V
iew the calibration status on the instrument (see page 87)
•
View calibration status and set reminders on the Connect platform (see page 88)
Calibration Recommended frequency
•
E
ROI/Uniformity
Background
very two years (recommended).
•
Always perform new Background and Dye calibrations after an ROI/Uniformity
calibration.
You will be prompted to run a Background calibration after the ROI/Uniformity
calibration is complete.
The ROI/Uniformity calibration and the Background calibration must pass in order
to accept the results. It is recommended to transfer the files if the calibration fails
in order to troubleshoot.
Note: Performing an ROI/Uniformity calibration invalidates all other calibrations.
•
Every month (recommended).
•
Background calibration can also be performed, as needed:
–
To check for contamination (depends on usage and laboratory conditions).
–
To obtain the most accurate data for the removal of background
fluorescence.
Note: Performing a Background calibration does not invalidate any other calibration.
•
Dye
Normalization
(TaqMan™ Array Card block
only)
QuantStudio™ 6 Pro Real-Time PCR System and QuantStudio™ 7 Pro Real-Time PCR System User Guide
Every two years (recommended).
•
During a Dye calibration, only the dyes on the given spectral calibration plate are
calibrated.
Note: Performing a Dye calibration for a given dye plate does not invalidate any other
calibration.
Every two years (recommended).
85

Chapter 7 Calibrate and verify instrument performance
7
Calibration descriptions
(continued)
Calibration Recommended frequency
•
RNase P instrument
verification
After installing or moving the instrument.
•
After performing any of the calibrations.
•
As needed to confirm instrument performance.
Note: To prepare custom dye plates and to perform custom calibrations, see “Calibrate custom dyes”
on page 113.
Calibration descriptions
The combination of the instrument and the block is calibrated (see “Instrument and block calibration”
on page 84).
Calibration description and purpose Pass criteria
ROI/Uniformity
•
The software captures images for each optical filter.
•
The software uses calibration data to map the increase in fluorescence
to the plate wells during subsequent runs and to evaluate well‑to‑well
consistency of the signals.
Background
•
The software captures background images for each optical filter in the
absence of sample and reagent, and it checks that the fluorescence
from each well is below a fluorescence threshold.
•
The software uses calibration data to remove background fluorescence
during a run.
Note: You can also run this calibration to determine if contamination is
related to the sample block or the plate.
Dye
•
The software extracts a spectral profile for each dye standard, then
produces a set of spectral profiles plotted as fluorescence vs filter.
•
The software uses calibration data to characterize and distinguish the
individual contribution of each dye in the total fluorescence signals
collected by the instrument.
The image for each filter
distinguishes all wells of the plate.
Each well in the image is distinct.
The plate images for all filters are free
of abnormal fluorescence.
Dye spectra peak within the same
filter as their group.
86
QuantStudio™ 6 Pro Real-Time PCR System and QuantStudio™ 7 Pro Real-Time PCR System User Guide

Chapter 7 C
(continued)
Calibration description and purpose Pass criteria
Normalization (TaqMan™ Array Card block only)
•
The software extracts a spectral profile for each normalization standard.
•
The software uses the normalization standards to obtain a correction
factor for the specific dyes, for example, FAM™ dye or VIC™ dye.
•
The correction factor is used to generate comparable component signal
levels across instruments.
alibrate and verify instrument performance
View the calibration status and set reminders
Normalization standards have
sucient signals to generate a
correction factor.
View the calibration status and set reminders
View the calibration status on the instrument
The Status and Reminders screen also allows you to perform the following functions:
•
Transfer the calibration results (see page 94)
•
Transfer the calibration data files (see page 94)
•
View the calibration images (see page 93)
7
1.
In the home screen, tap (Settings)4Maintenance and service4Calibration4Status and
reminders.
The Status and Reminders screen is displayed. It shows the following information:
•
Type of calibration
Note:
For dye calibration, the type of calibration is listed as the dye that was calibrated, for
·
example, FAM.
Normalization calibration is required for a TaqMan™ Array Card block. The type of calibration
·
is listed as FAM/ROX or VIC/ROX.
•
Status of the calibration
•
Last calibration
•
Date that the calibration expires
•
If a reminder is set
2.
Tap a calibration row, then tap View to view the history of that specific calibration type.
•
e performed
Dat
•
Result of the calibration
3.
ap Cancel to return to the Status and Reminders screen.
T
•
Whether the calibration is current
•
Operator
QuantStudio™ 6 Pro Real-Time PCR System and QuantStudio™ 7 Pro Real-Time PCR System User Guide
87

Chapter 7 Calibrate and verify instrument performance
7
View the calibration status and set reminders
Set calibration frequency and reminders on the instrument
1.
In the home screen, tap (Settings)4Maintenance and service4Calibration4Status and
reminders.
The Status and Reminders screen is displayed.
2.
Tap a calibration row, then tap Edit.
3.
Tap on the Expiration Interval field, then enter the number of days.
The default is 730 days (2 years).
4.
Tap on the Reminder field, then enter the number of days
The Next Reminder field will be populated.
5.
Set the On/O slider to the On position to enable a reminder about calibration.
6.
Tap Save.
The calibration reminder can be set as a home screen notification (see “Enable and disable home
screen notifications” on page 186).
View calibration status and set reminders on the Connect platform
Note: The calibr
network.
1.
Sign in t
2.
Tap
3.
Select any of your registered instruments.
4.
In the Summary tab:
•
Tap
•
(Optional) Tap
the notification email address or addresses.
Note: More than one email address can receive the calibration reminders.
Note: The settings ar
•
(Optional) In the Downloads section, tap Maint
calibration status report.
ation reminders feature requires a connection between the instrument and a computer
o Connect on a browser.
(Instrument) t
C
alibrations to view the status of each calibration type.
o open InstrumentConnect.
C
alibration Reminders to set the calibration reminder time table and enter
e automatically saved.
enance Summary.pdf to download the
88
5.
In the Calibrations History tab:
•
View the history of each calibration type.
•
(Optional) Tap
QuantStudio™ 6 Pro Real-Time PCR System and QuantStudio™ 7 Pro Real-Time PCR System User Guide
to download the calibration history report.

Review calibration status
The calibration status can be reviewed in the QuantStudio™ Design and Analysis Software v2. The
instrument must be added to the Manage Instruments list.
1.
In the home screen, click Manage Instruments.
To access instruments from a dierent screen, click System4Instruments.
2.
In the Summary tab for the instrument, the calibration status is displayed in the Calibration
Status column.
Export a calibration report
The calibration report is exported as a TXT file.
Chapter 7 C
alibrate and verify instrument performance
Export a calibration report
7
1.
In the home screen, tap (Settings)4Maint
reminders.
2.
Tap Export, then select a destination.
•
Connect
•
Network Drive
•
USB Drive
The connectivity status of each location is displayed.
3.
T
ap Done.
enance and service4Calibration4Status and
Perform ROI/uniformity, background, and dye calibrations
for plate blocks
To calibrate the TaqMan™ Array Card block, see “Perform ROI/uniformity, background, dye, and
normalization calibrations for the TaqMan™ Array Card block” on page 97.
QuantStudio™ 6 Pro Real-Time PCR System and QuantStudio™ 7 Pro Real-Time PCR System User Guide
89

Chapter 7 Calibrate and verify instrument performance
7
Perform ROI/uniformity, background, and dye calibrations for plate blocks
Calibration workflow
You are automatically prompted to perform background calibration.
Perform any time that ROI/uniformity and background calibrations are current.
(Optional ) Perform custom dye calibrations (see “Calibrate custom dyes” on page 113)
Perform any time that ROI/uniformity and background calibrations are current.
Perform an ROI/uniformity calibration
▼
Perform a background calibration
Perform any time that ROI/uniformity calibrations are current.
▼
Perform system dye calibrations
▼
Prepare a calibration plate
Required materials to prepare calibration plates
Note: We recommend calibrating with all Spectral Dye Calibrations Plates available for your block
configuration even if you are not using all the dyes in the plates. This is recommended for optimal
system performance.
Unless otherwise indicated, all materials are available through thermofisher.com. "MLS" indicates that
the material is available from fisherscientific.com or another major laboratory supplier.
Calibration plates
ROI/Uniformity plate
Background calibration plate
Dye calibration plates
Equipment and consumables
Centrifuge with plate adapter; buckets cleaned before use MLS
Powder‑free gloves MLS
Item Source
90
Safety glasses MLS
QuantStudio™ 6 Pro Real-Time PCR System and QuantStudio™ 7 Pro Real-Time PCR System User Guide

Chapter 7 Calibrate and verify instrument performance
Perform ROI/uniformity, background, and dye calibrations for plate blocks
Thaw, vortex, and centrifuge a calibration plate
IMPORTANT! Keep calibration plates protected from light until you perform the calibration. Do not
remove the plate from its packaging until you are ready to use it. Prolonged exposure to light can
diminish the fluorescence of the dyes in the wells of calibration plates.
7
1.
Remove the calibr
ation plate from the freezer, then thaw the plate in its packaging for 30 minutes.
IMPORTANT! Use each plate within 2 hours of thawing.
2.
While wearing powder‐fr
the optical film.
Note: Do not discard the packaging for the calibration plate. Each calibration plate can be used
up to three time if the following conditions are met:
The plate is stored in its packing sleeve at –25°C to –15°C.
·
The plate is used within 6 months after opening.
·
The plate is used before the plate expiry date.
·
3.
ortex the plate for 5 seconds, then centrifuge at 750–1,000 × g for 2 minutes.
V
4.
Confirm that the liquid in each well is at the bottom of the well and free of bubbles. If it is not,
centrifuge the plate again.
ee gloves, remove the calibration plate from its packaging. Do not remove
IMPORTANT! K
of the plate can contaminate the sample block and cause an abnormally high background signal.
eep the bottom of the plate clean. Fluids and other contaminants on the bottom
Perform calibrations
1.
In the home scr
The Calibration screen is displayed.
2.
In the Calibration screen, select a calibration type.
ROI/uniformity ROI and uniformity
Background Background
Dye System dye
QuantStudio™ 6 Pro Real-Time PCR System and QuantStudio™ 7 Pro Real-Time PCR System User Guide
een tap
Calibration type Tap
(Settings)4Maint
enance and service4Calibration.
91

Chapter 7 Calibrate and verify instrument performance
7
Perform ROI/uniformity, background, and dye calibrations for plate blocks
Note: You will be prompted to perform a background calibration after a ROI/Uniformity calibration.
3.
ystem dye calibration only) Select the calibration plate.
(S
4.
Follow the instructions on the screen to start the calibration.
5.
Load the plate into the instrument.
CAUTION! The instrument should be used by tr
moving parts hazard.
6.
ap Start.
T
When the ROI/Uniformity run is complete, you will be prompted to perform a background
calibration.
When the Background calibration is complete, the Calibration Status will display. It will indicate
whether the calibration passed or failed.
7.
(For calibrations that pass) Select an option.
Option Description
Details View the calibration images.
Transfer EDS Transfer the calibration file t
Reject results The calibration file is deleted.
Accept results The calibration file is saved.
If the results are accepted and the calibration file is saved, pr
the combination of the instrument and the block will no longer be used.
8.
(For calibrations that fail) Select an option.
ained operators who have been warned of the
o Connect, a USB drive, or a network drive.
evious calibration files associated with
92
Option Description
Details View the calibration images.
Transfer EDS Transfer the calibration file t
for troubleshooting).
Close The calibration file is deleted.
See “Troubleshoot calibration failure” on page 95.
9.
Unload the plat
CAUTION! PHY
can reach 100°C. Allow it to cool to room temperature before handling.
Note: Use Smar
with Smart Help” on page 172).
QuantStudio™ 6 Pro Real-Time PCR System and QuantStudio™ 7 Pro Real-Time PCR System User Guide
e from the instrument.
SICAL INJURY HAZARD. During instrument operation, the plate temperature
t Help if the instrument does not eject the plate (see “Request technical support
o Connect, a USB drive, or a network drive (recommended

10.
Return the plate to its original packaging.
Note: Do not discard the packaging for the calibration plate. Each calibration plate can be used
up to three time if the following conditions are met:
The plate is stored in its packing sleeve at –25°C to –15°C.
·
The plate is used within 6 months after opening.
·
The plate is used before the plate expiration date.
·
View the calibration images
The instrument performs the ROI, uniformity, and background calibrations in sequence. You can view
the calibration images after the background calibration is complete.
1.
In the home screen, tap (Settings)4Maintenance and service4Calibration4Status and
reminders.
The Status and Reminders screen is displayed.
2.
Tap a calibration type in the table, then tap View.
Chapter 7 Calibrate and verify instrument performance
Perform ROI/uniformity, background, and dye calibrations for plate blocks
7
3.
Tap a calibration date in the table, then tap View.
The following details are displayed:
•
alibration name
C
•
Result
•
Date
•
Whether this calibration is current
4.
ap Detail.
T
Calibration Example results indicating successful calibration
ROI
e: Select the desired filter
Not
combination from the Filter Set
dropdown list.
Green circles around all wells and bright well centers.
•
The operator
•
Reagent name, part number, lot number,
and expiration date
•
Comments.
Uniformity Signals from each well following a uniform trend.
QuantStudio™ 6 Pro Real-Time PCR System and QuantStudio™ 7 Pro Real-Time PCR System User Guide
93

Chapter 7 C
7
Perform ROI/uniformity, background, and dye calibrations for plate blocks
alibrate and verify instrument performance
(continued)
Calibration Example results indicating successful calibration
Background Few, if any, signals with abnormally high fluorescence.
Dye Signals from each well following a uniform trend, and each dye
peaks at the corr
ect filter.
5.
(Optional) F
right side to see the results for a single well.
or Uniformity, Background, and Dye calibration images, tap on an individual well on the
Transfer calibration results
1.
In the home screen, tap
reminders.
The Status and Reminders screen is displayed.
2.
Tap a calibration type in the table.
3.
Tap Export.
(Settings)4Maint
Transfer calibration data files
This section describes transferring calibration files if the calibr
If the calibration fails, the calibration data file is not saved. The data file can only be transferred
immediately after the calibration (see “Perform calibrations” on page 91).
1.
In the home screen, tap
reminders.
The Status and Reminders screen is displayed.
(Settings)4Maint
enance and service4Calibration4Status and
ation passed.
enance and service4Calibration4Status and
94
2.
Tap a calibration type in the table, then tap View.
3.
Tap a calibration date in the table, then tap View.
4.
Tap Transfer EDS.
QuantStudio™ 6 Pro Real-Time PCR System and QuantStudio™ 7 Pro Real-Time PCR System User Guide

Troubleshoot calibration failure
Observation Possible cause Recommended action
Chapter 7 Calibrate and verify instrument performance
Perform ROI/uniformity, background, and dye calibrations for plate blocks
7
Calibration failed
High fluorescence signal in
individual wells
Calibration failed but plate is
undamaged
The plate was improperly
prepared.
The plate is damaged or
contaminated.
Signals that exceed the
limit of normal fluorescence
may indicate fluorescent
contaminants on the plate or the
sample block.
The incorrect plate was used for
calibration performed.
The plate was improperly
prepared.
Ensure the following:
•
The correct plate was used for the
calibration performed.
•
The plate was properly thawed.
•
The plate was properly centrifuged.
•
The plate was properly sealed.
Check for damage, improper plate seal, or
contamination.
Order a replacement plate. Use Smart Help
if the replacement plate fails (see “Request
technical support with Smart Help” on
page 172).
See “Identify contamination” on page 95.
Use the plate that matches the calibration
performed.
Repeat the calibration with the plate properly
prepared.
If the calibration fails again, order a replacement
plate. Use Smart Help if the replacement plate
fails (see “Request technical support with Smart
Help” on page 172).
Identify contamination
Signals that exceed the limit of normal fluorescence may indicate fluorescent contaminants on the
calibration plate or the sample block. Common contaminants include ink residue from permanent pens,
powder from disposable gloves, and dust.
1.
View the calibration data and note the wells that failed the calibration.
2.
Remove the plate from the instrument, rotate the plate 180°, then perform the calibration again.
QuantStudio™ 6 Pro Real-Time PCR System and QuantStudio™ 7 Pro Real-Time PCR System User Guide
95

Chapter 7 C
7
Perform ROI/uniformity, background, and dye calibrations for plate blocks
3.
alibrate and verify instrument performance
Determine the location of the failed wells again as in step 1.
Position of failed wells Action
Identical The sample block is contaminated.
Decontaminate the sample block (see page 159).
Reversed The plate is contaminated.
Discard the plate, then perform the calibration using a new
calibration plate.
4.
Use Smar
plate (see “Request technical support with Smart Help” on page 172).
t Help if the calibration fails after you decontaminate the sample block and replace the
Create a background plate (optional)
Whenever possible, use a background plate listed in “Required materials to prepare calibration plates”
on page 90. These plates contain a buer that accurately simulates the reagents used for PCR, and,
therefore, produces high-quality calibration data.
If a background plate is not available, you can create one as described below.
Required materials:
•
MicroAmp™ optical 96-well reaction plate
•
Optical adhesive cover or optical flat caps
•
Pipettor, 200‐µL (with pipette tips)
•
Powder‐free gloves
•
Safety glasses
•
Deionized water
IMPORTANT! W
1.
Remove a r
ear powder-free gloves while creating the background plate.
eaction plate from its box and place it on a clean, dry surface.
96
2.
Aliquot 50 µL of deionized water to each well of the reaction plate.
3.
Seal the plate using an optical adhesive cover or optical flat caps.
4.
Use the plate for background calibration.
QuantStudio™ 6 Pro Real-Time PCR System and QuantStudio™ 7 Pro Real-Time PCR System User Guide

Chapter 7 Calibrate and verify instrument performance
Perform ROI/uniformity, background, dye, and normalization calibrations for the TaqMan™ Array Card block
Perform ROI/uniformity, background, dye, and
normalization calibrations for the TaqMan™ Array Card
block
To calibrate the plate blocks, see “Perform ROI/uniformity, background, and dye calibrations for plate
blocks” on page 89.
This section covers procedures specific to the TaqMan™ Array Card block. See the following sections
for additional information:
•
Transfer calibration results (page 94)
•
Transfer data files from calibrations (page 94)
•
Troubleshoot calibration failure (page 95)
To troubleshoot normalization calibration, see “Troubleshoot normalization calibration failure” on
page 102.
•
Identify contamination (page 95)
Calibration workflow
7
Perform an ROI/uniformity calibration
You are automatically prompted to perform background calibration.
▼
Perform a background calibration
Perform any time that ROI/uniformity calibrations are current.
▼
Perform system dye calibrations
Perform any time that ROI/uniformity and background calibrations are current.
▼
Perform normalization calibration
Perform after a dye calibration.
▼
(Optional) Perform custom dye calibrations (see “Calibrate custom dyes” on page 113)
Perform any time that ROI/uniformity and background calibrations are current.
QuantStudio™ 6 Pro Real-Time PCR System and QuantStudio™ 7 Pro Real-Time PCR System User Guide
97

Chapter 7 Calibrate and verify instrument performance
7
Perform ROI/uniformity, background, dye, and normalization calibrations for the TaqMan™ Array Card block
Prepare a calibration TaqMan™ Array Card
Required materials to prepare calibration TaqMan™ Array Card
Unless otherwise indicated, all materials are available through thermofisher.com. "MLS" indicates that
the material is available from fisherscientific.com or another major laboratory supplier.
Item Source
Calibration kit
ViiA™ 7 Array Card Spectral Calibration Kit, includes the following
components:
•
Empty TaqMan™ Array Cards
•
FAM™ dye
•
VIC™ dye
•
ROX™ dye
•
ROI dye mix
•
Background buer
•
FAM™/ROX™ dye
•
VIC™/ROX™ dye
4432314
Equipment and consumables
Centrifuge with custom buckets and card holders, one of the following:
•
Sorvall™ centrifuge
•
Multifuge™ centrifuge
•
Megafuge™ centrifuge
TaqMan™ Array Card Sealer Contact your local sales oce
Blank balance TaqMan™ Array Cards Contact your local sales oce
Pipette, 200 µL with tips MLS
Permanent marker or pen MLS
Powder‑free gloves MLS
Safety glasses MLS
Fill the calibration TaqMan™ Arr
ay Cards
Contact your local sales oce
For detailed instructions to prepare a TaqMan™ Array Card, see Appendix C, “Detailed procedures for
preparation of a TaqMan™ Array Card”.
98
IMPORTANT! W
QuantStudio™ 6 Pro Real-Time PCR System and QuantStudio™ 7 Pro Real-Time PCR System User Guide
ear powder-free gloves while creating the calibration array cards.

1
Chapter 7 Calibrate and verify instrument performance
Perform ROI/uniformity, background, dye, and normalization calibrations for the TaqMan™ Array Card block
7
This procedure explains how to create all of the array cards required to calibrate the block, but not all of
them are required for at each calibration. Before preparing array cards for calibration, determine which
calibrations are required (see “Calibration and verification schedule” on page 85).
Note: For more information on the array card loading procedure, contact Technical Support.
1.
Remove the tubes of calibration solutions from the freezer, allow them to thaw, then vortex the
tubes to mix the contents well.
2.
Remove the TaqMan™ Array Cards from their box and place them on a clean, dry surface.
3.
Mark the side of the empty array cards with the following items:
•
•
•
•
Backgr
™
FAM
ROI
™
ROX
ound
•
•
•
™
VIC
FAM™/ROX
VIC™/ROX
™
™
Location to mark each TaqMan™ Arr
1
4.
or each array card, pipet 100 µL of the appropriate calibration solution into each of the eight
F
ay Card
reservoirs in the array card.
See “Load the PCR reaction mix” on page 204.
5.
Centrifuge the array cards, then check each array card for the correct fill.
See “Centrifuge the card” on page 204.
6.
Seal the array cards.
See “Seal the card” on page 206.
IMPORTANT! If an arr
ay card is sealed improperly, it can leak and contaminate the sample block
and/or it can cause the associated calibration or RNase P test to fail.
IMPORTANT! Aft
er the array cards are sealed, store them in a dark place. Do not expose the array
cards to light until you are ready to use them. The dyes in the array cards are photosensitive. Prolonged
exposure to light can diminish the fluorescence of the dye.
QuantStudio™ 6 Pro Real-Time PCR System and QuantStudio™ 7 Pro Real-Time PCR System User Guide
99

Chapter 7 C
7
Perform ROI/uniformity, background, dye, and normalization calibrations for the TaqMan™ Array Card block
alibrate and verify instrument performance
Perform calibrations
1.
In the home screen tap (Settings)4Maintenance and service4Calibration.
The Calibration screen is displayed.
2.
In the Calibration screen, select a calibration type.
Calibration type Tap
ROI/uniformity ROI and uniformity
Background Background
Dye System dye
Normalization Instrument normalization
Note: Y
3.
(S
4.
(Normalization only) Select the reporter dye and passive reference to calibrate.
5.
Follow the instructions on the screen to start the calibration.
6.
Load the TaqMan™ Array Card into the instrument.
See “Load a TaqMan™ Array Card into the instrument” on page 52.
CAUTION! The instrument should be used by tr
moving parts hazard.
7.
ap Start.
T
When the ROI/Uniformity run is complete, you will be prompted to perform a background
calibration.
When the Background calibration is complete, the Calibration Status will display. It will indicate
whether the calibration passed or failed.
ou will be prompted to perform a background calibration after a ROI/Uniformity calibration.
ystem dye calibration only) Select the dye to calibrate.
•
FAM
•
VIC
•
ROX
•
FAM/ROX
•
VIC/ROX
ained operators who have been warned of the
100
QuantStudio™ 6 Pro Real-Time PCR System and QuantStudio™ 7 Pro Real-Time PCR System User Guide
 Loading...