

Page 1

PrepFiler™ Automated Forensic DNA
Extraction Kit
USER BULLETIN
Automated DNA Purification on the HID EVOlution™ Systems
for use with:
HID EVOlution™—Extraction System
HID EVOlution™—Combination System
Publication Number MAN0019298
Revision A.0
For Research, Forensic, or Paternity Use Only. Not for use in
diagnostic procedures.
Page 2

Life Technologies Ltd | 7 Kingsland Grange | Woolston, Warrington WA1 4SR | United Kingdom
For descriptions of symbols on product labels or product documents, go to thermofisher.com/symbols-definition.
The information in this guide is subject to change without notice.
DISCLAIMER: TO THE EXTENT ALLOWED BY LAW, THERMO FISHER SCIENTIFIC INC. AND/OR ITS AFFILIATE(S) WILL NOT BE
LIABLE FOR SPECIAL, INCIDENTAL, INDIRECT, PUNITIVE, MULTIPLE, OR CONSEQUENTIAL DAMAGES IN CONNECTION WITH OR
ARISING FROM THIS DOCUMENT, INCLUDING YOUR USE OF IT.
Revision history: Pub. No. MAN0019298
Revision Date Description
A.0
22 March 2021 New document.
Important Licensing Information: These products may be covered by one or more Limited Use Label Licenses. By use of these
products, you accept the terms and conditions of all applicable Limited Use Label Licenses.
Trademarks: All trademarks are the property of Thermo Fisher Scientific and its subsidiaries unless otherwise specified. Freedom EVO,
EVOware, Te-Shake, and HID EVOlution are trademarks of Tecan Group AG. Microsoft and Windows are trademarks of Microsoft
Corporation.
©2021 Thermo Fisher Scientific Inc. All rights reserved.
Page 3

Contents
■
CHAPTER 1 Product information .................................................. 6
Product description ............................................................. 6
About the HID EVOlution™ systems ................................................ 6
Purification run times ........................................................ 7
System components ........................................................ 8
Plate/tube configurations .................................................... 8
Contents and storage ............................................................ 8
Required materials not supplied ................................................... 9
■
CHAPTER 2 Prepare for the automated purification run ...................... 11
Perform lysis .................................................................. 11
Before first use: Prepare the wash buers ........................................ 11
Before each use: Prepare the magnetic particles .................................. 11
■
CHAPTER 3 Set up the robotic workstation .................................... 12
For more information ........................................................... 12
Workflow ..................................................................... 13
Perform routine maintenance .................................................... 14
Prepare the system liquid carboy ............................................ 14
Empty the waste carboy .................................................... 14
Tighten the DiTi adapter gold cones .......................................... 14
Run maintenance scripts ................................................... 15
(HID EVOlution™—Combination System only) Set up the carriers and labware .......... 16
Set up the disposable pipette tips ................................................ 19
Terms for pipette tips used on the robotic workstation ......................... 19
Fill DiTi carriers and racks ................................................... 20
Set up reagents on the workstation ............................................... 20
Procedural guidelines ...................................................... 20
Set up the reagents ........................................................ 21
Set up lysate, processing, and elution plates and/or tubes .......................... 23
Select a plate/tube configuration ............................................ 23
Set up the PrepFiler™ Processing Plate ....................................... 24
(If needed) Place barcodes .................................................. 25
PrepFiler
Bulletin
™
Automated Forensic DNA Extraction Kit: Automated DNA Purification on the HID EVOlution™ Systems User
3
Page 4

Contents
■
Set up lysate and/or eluate plates ............................................ 25
Set up lysate and/or eluate tubes ............................................ 27
Workstation layouts ............................................................ 30
CHAPTER 4 Perform the automated DNA purification run .................... 34
For more information ........................................................... 34
Workflow ..................................................................... 35
Before you begin ............................................................... 36
Set up and run a script ......................................................... 36
About script files .......................................................... 36
Select a script ............................................................. 36
Set up sample and reagent information ....................................... 38
Confirm workstation setup and start the run .................................. 44
(If needed) Re-cap the magnetic particles tubes ............................... 46
Record file information and exit the script ..................................... 47
Complete the run .............................................................. 48
View the qPCR/STR Sample Input and Report files ................................ 49
About the files ............................................................ 49
View the files .............................................................. 50
■
CHAPTER 5 Experiments and results ........................................... 51
Validation of the PrepFiler™ Automated Forensic DNA Extraction Kit on the
HID EVOlution™—Extraction System ............................................ 52
Overview of experiments and results ......................................... 52
Materials and methods ..................................................... 52
Precision studies (SWGDAM standard 2.9) .................................... 54
Reproducibility studies (SWGDAM standard 2.5) ............................... 59
Correlation studies ......................................................... 61
Cross-contamination studies (SWGDAM standard 3.6) ......................... 64
STR studies ............................................................... 65
Verification studies for remaining scripts ..................................... 69
Additional cross-contamination studies ...................................... 71
Conclusions .............................................................. 72
Validation of PrepFiler™ Wash Buer B and the related modifications to the
workstation layout and scripts ................................................. 73
Overview of experiments and results ......................................... 73
Materials and methods ..................................................... 74
Sample lysis method ....................................................... 77
Script validation ........................................................... 78
Precision and sensitivity studies ............................................. 80
Cross-contamination studies ................................................ 86
Case-type sample studies .................................................. 89
Comparative analysis studies ............................................... 93
Conclusions .............................................................. 99
4
PrepFiler™ Automated Forensic DNA Extraction Kit: Automated DNA Purification on the HID EVOlution™ Systems User
Bulletin
Page 5

■
APPENDIX A Troubleshooting .................................................. 100
■
APPENDIX B Plate setup requirements for <96 samples .................... 104
Place samples in the plate (<96 samples) ........................................ 104
■
APPENDIX C (One-time procedure) Document Te‑Shake™ plate
adapter temperatures ............................................................ 107
Required materials not supplied ................................................ 108
Measure the plate and adapter temperatures .................................... 108
■
APPENDIX D Safety ............................................................. 111
Safety information for instruments not manufactured by Thermo Fisher Scientific ..... 112
Chemical safety .............................................................. 112
Biological hazard safety ....................................................... 114
Contents
■
Documentation and support ...................................................... 115
Related documentation ........................................................ 115
Customer and technical support ................................................ 115
Limited product warranty ...................................................... 115
PrepFiler™ Automated Forensic DNA Extraction Kit: Automated DNA Purification on the HID EVOlution™ Systems User
Bulletin
5
Page 6

1
Product description .................................................................... 6
■
About the HID EVOlution™ systems ...................................................... 6
■
Contents and storage .................................................................. 8
■
Required materials not supplied ......................................................... 9
■
IMPORTANT! Before using this product, read and understand the safety information in the
manufacturer's documentation.
IMPORTANT! Before using this product, read and understand the information in the “Safety” appendix
in this document.
Product description
Product information
The PrepFiler™ Automated Forensic DNA Extraction Kit is part of an integrated solution that includes
proven PrepFiler™ reagents for use in semi-automated, high-throughput workflows to provide reliable,
simplified, and time-saving DNA extraction and purification.
The kit uses magnetic particles with an optimized multi-component surface chemistry to deliver robust
and reliable DNA yield from tested routine forensic sample types, including:
•
Body fluids (blood, saliva, semen)
•
Stains and swabs of body fluids
•
Hair roots
•
Touch/trace samples
About the HID EVOlution™ systems
The HID EVOlution™—Extraction System and HID EVOlution™—Combination System perform
automated DNA purification using a Freedom EVO™ robotic workstation with the PrepFiler™ Automated
Forensic DNA Extraction Kit.
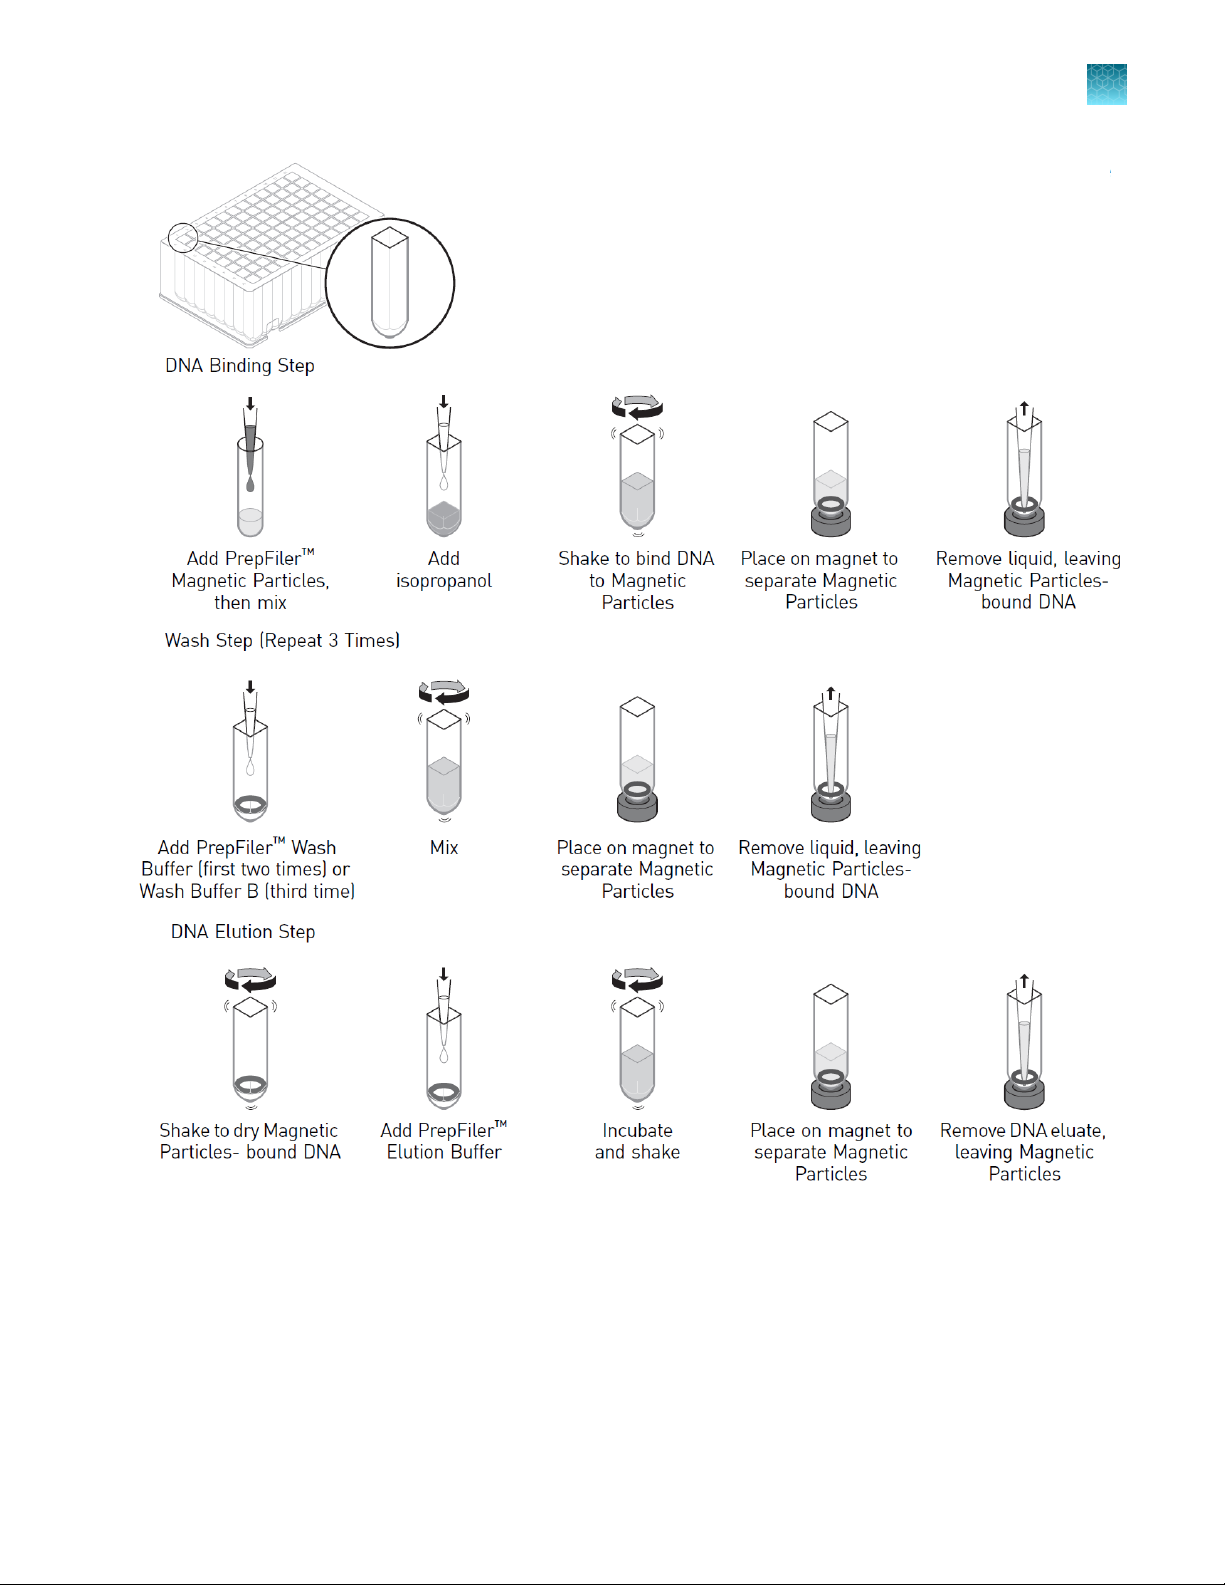
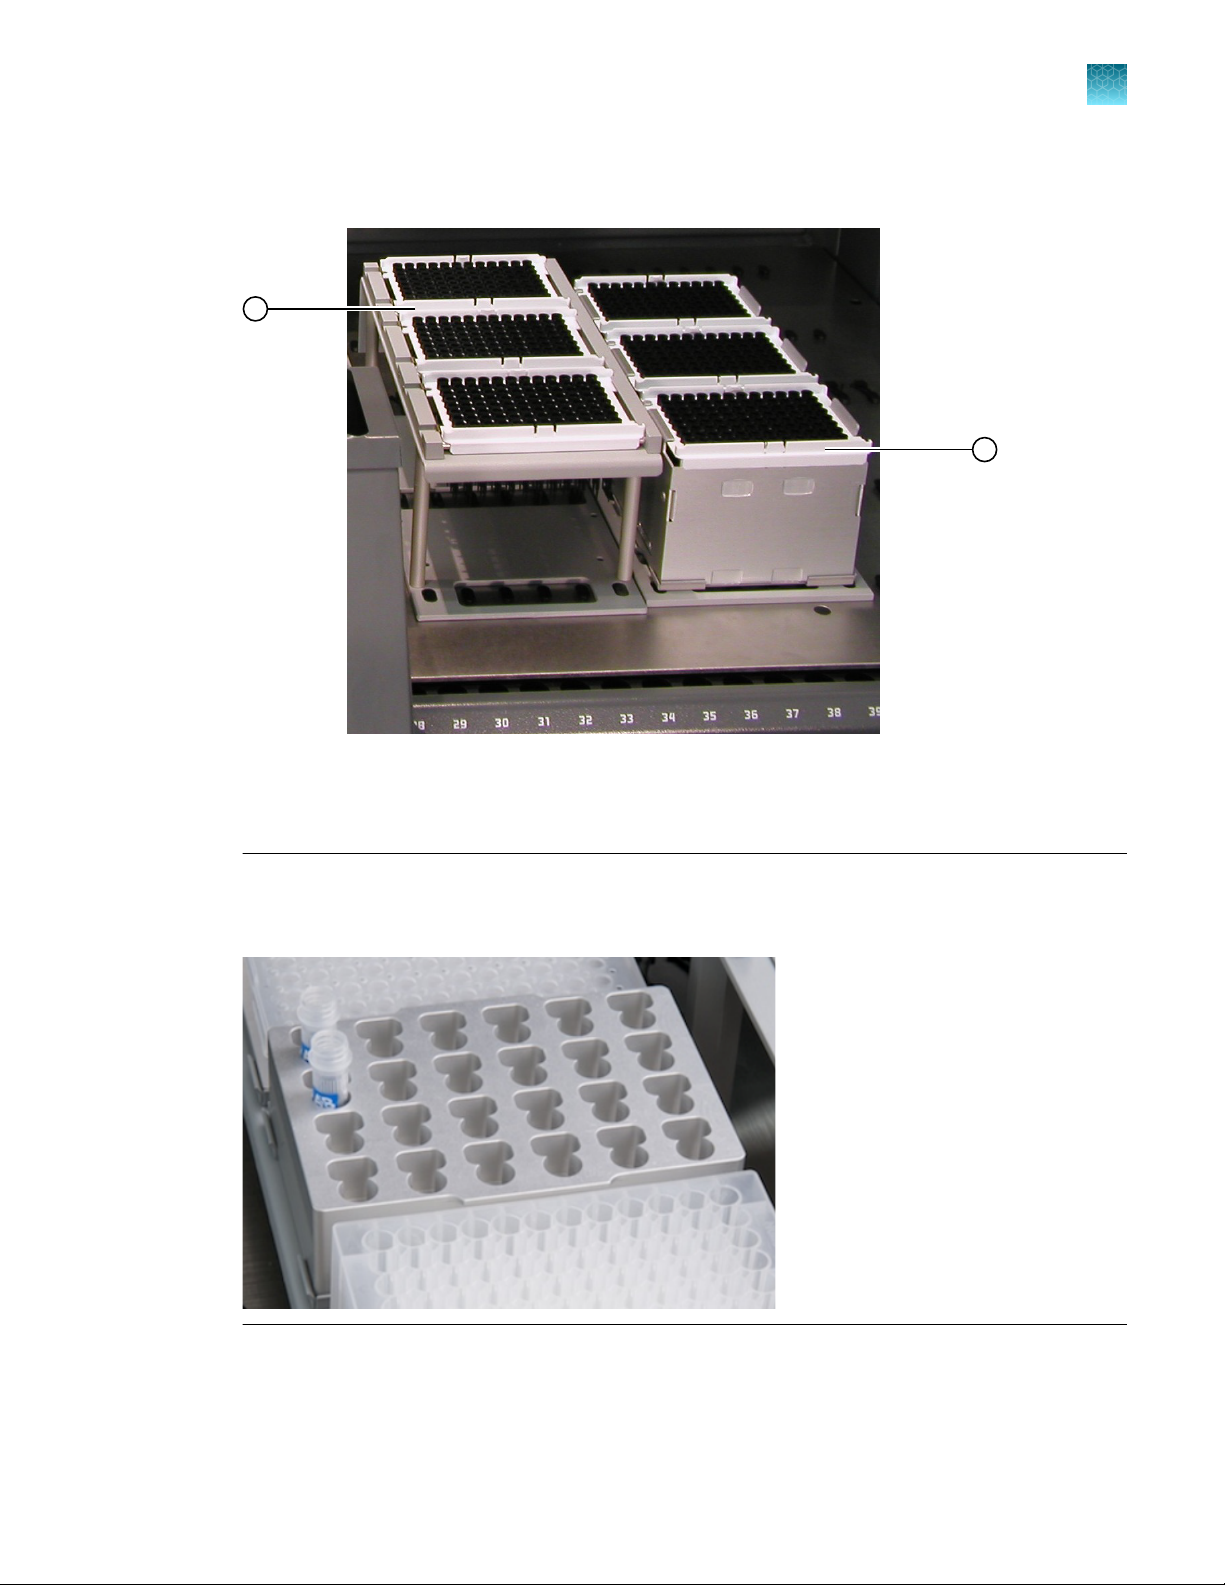
The robotic workstation automates liquid and magnetic particle handling, as shown in Figure 1. The
purified DNA is collected in a 96-well plate or 1.5-mL tubes, depending on the Freedom EVOware
software script that you select.
™
6
PrepFiler™ Automated Forensic DNA Extraction Kit: Automated DNA Purification on the HID EVOlution™ Systems User
Bulletin
Page 7
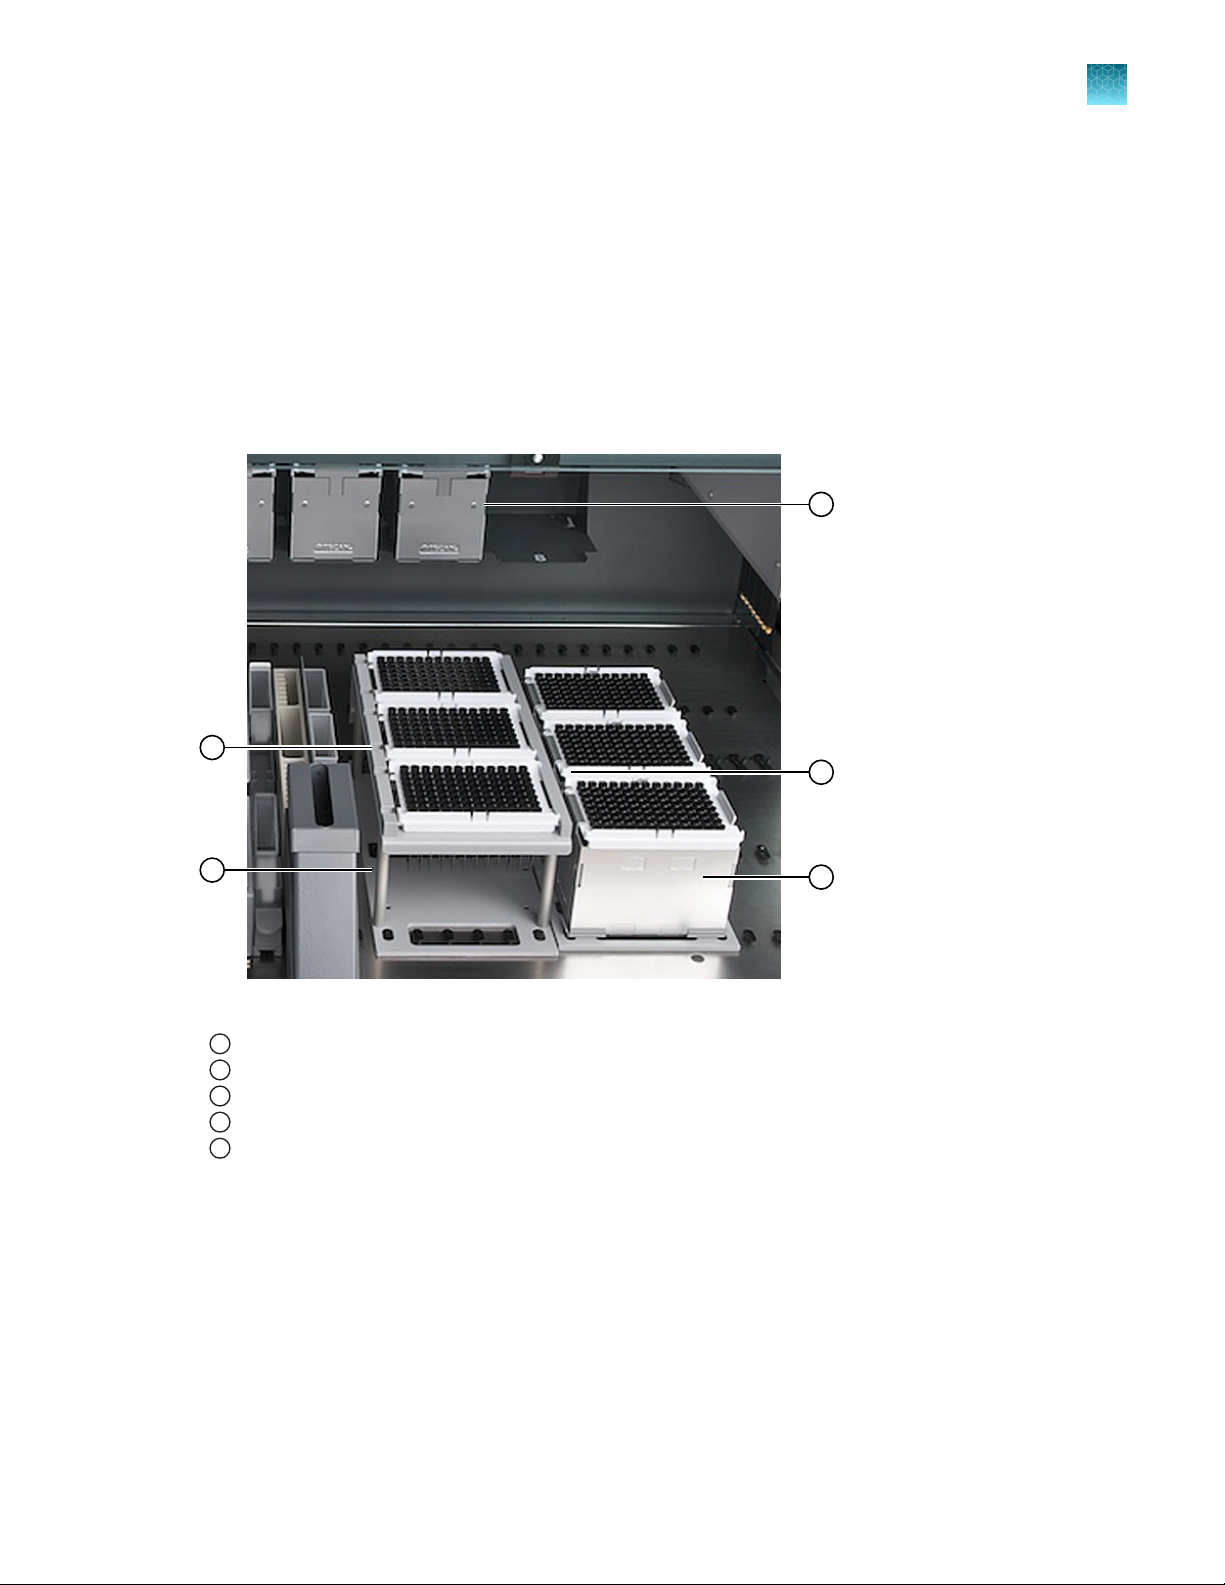
Chapter 1
About the HID EVOlution™ systems
Product information
1
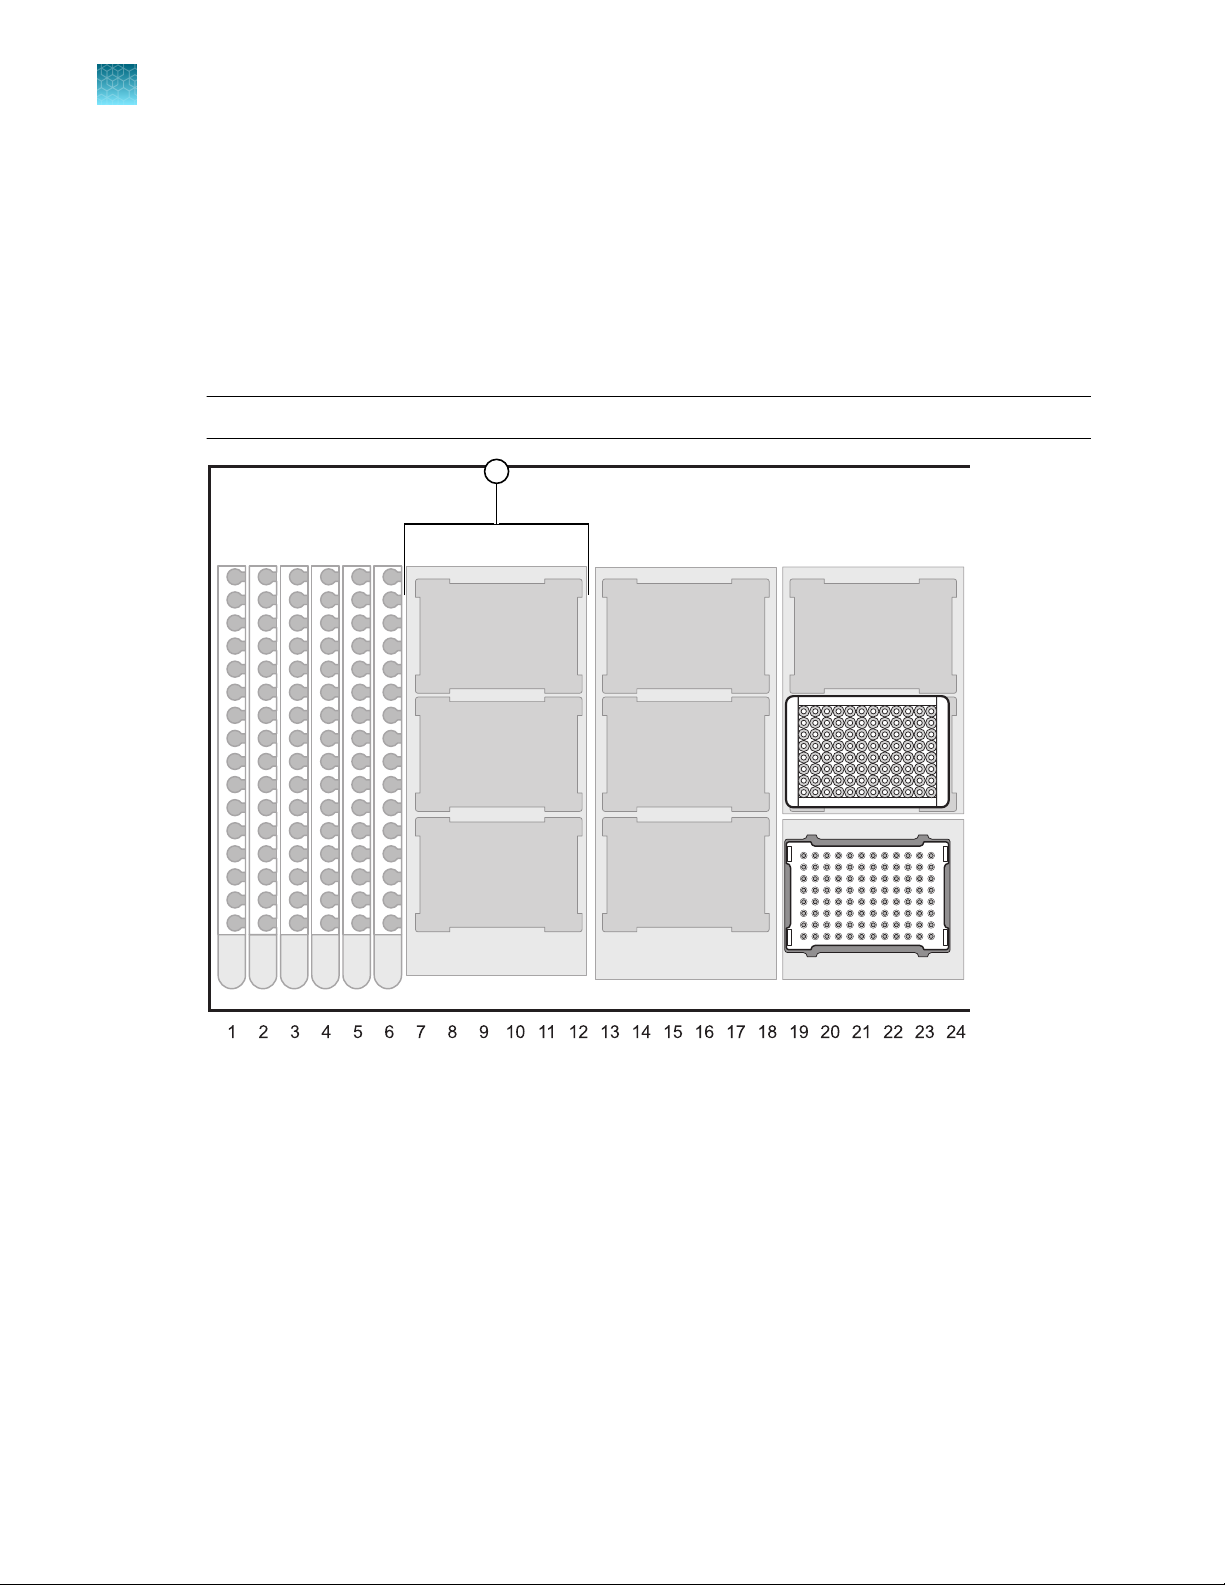
Figure 1 Automated DNA purification steps performed by the HID EVOlution™—Extraction System in plates
(shown) or tubes (not shown)
Lysate is transferred from a spin plate or 1.5‑mL microfuge tubes into the PrepFiler™ 96-Well Processing Plate (shown) for
automated DNA purification.
Purification
The automated purification run time is ~3–4 hours for 96 samples, depending on the type of
HID EVOlution™ system and configuration that you are using.
PrepFiler™ Automated Forensic DNA Extraction Kit: Automated DNA Purification on the HID EVOlution™ Systems User
Bulletin
run times
7
Page 8
Chapter 1 Product information
1
Contents and storage
System components
The HID EVOlution™—Extraction System and HID EVOlution™—Combination System consist of the
following components.
•
A Freedom EVO™ 150 robotic workstation or Freedom EVO™ 200 robotic workstation
•
Freedom EVOware™ software v2.1 SP1 or later, configured with the HID EVOlution™—Extraction
System application
Note: Contact Technical Support for more information on verified configurations. See “Customer
and technical support” on page 115.
•
8-channel liquid-handling arm (LiHa)
•
Robotic Manipulator arm (RoMa)
•
Te‑Shake™ plate adapter with heating block and adapter
Plate/tube configurations
The HID EVOlution™ systems support the following plate/tube configurations. You can select one
configuration per purification run.
•
Plate-to-plate—Process lysate from a 96-well plate and collect eluate in a 96-well plate
•
Plate-to-tubes—Process lysate from a 96-well plate and collect eluate in 1.5‑mL tubes
•
Tubes-to-tubes—Process lysate from 1.5‑mL tubes and collect eluate in 1.5‑mL tubes
•
Tubes-to-plate—Process lysate from 1.5‑mL tubes and collect eluate in a 96-well plate
Contents and storage
The PrepFiler™ Automated Forensic DNA Extraction Kit is intended for semi-automated workflows, and
contains the reagents required for the following procedures:
•
Manual sample lysate preparation (DNA extraction)
•
Automated DNA purification
The kit is sucient for ≤960 samples, depending on the batch size.
Table 1 PrepFiler™ Automated Forensic DNA Extraction Kit (Cat. No. 4463353)
Contents
PrepFiler™ Lysis Buer 1 × 500 mL 18–25°C
PrepFiler™ Magnetic Particles 13 × 1.5 mL
PrepFiler™ Wash Buer A Concentrate 1 × 500 mL
PrepFiler™ Wash Buer B Concentrate 1 × 250 mL
PrepFiler™ Elution Buer 1 × 200 mL
Amount Storage
8
PrepFiler™ Automated Forensic DNA Extraction Kit: Automated DNA Purification on the HID EVOlution™ Systems User
Bulletin
Page 9
Required materials not supplied
Unless otherwise indicated, all materials are available through thermofisher.com. "MLS" indicates
that the material is available from fisherscientific.com or another major laboratory supplier. Catalog
numbers that appear as links open the web pages for those products.
Table 2 Reagent preparation
Item Source
Chapter 1 Product information
Required materials not supplied
1
Ethanol (Molecular biology grade; 95% or 190 proof)
Note: Open a new bottle when preparing the PrepFiler™ Wash Buer A
and Wash Buer B solutions.
Clean containers to store the prepared Wash Buer A and Wash
Buer B solutions; we use:
Nalgene™ Square PETG Media Bottles with Closure: Sterile, ShrinkWrapped Trays
342020-0500 or 342020-1000
MLS
Table 3 Automated purification
Item Source
Isopropanol (2‑Propanol, ACS reagent grade, ≥99.5% )
Note: Purchase isopropanol in small bottles and open fresh bottles
frequently to maintain a high-quality grade reagent.
(If needed) DNA Suspension Buer (low-TE buer)
Note: DNA Suspension Buer is only needed if you run out of
PrepFiler™ Elution Buer.
Magnetic-Ring Stand (96 well) AM10050
MLS
MLS
[1]
Disposable Tips (DiTi), Tecan™ Pure, Filtered, 1,000‑µL (30 000 631); six
trays (each containing 96 DiTis)
Disposable Tips (DiTi), Tecan™ Pure, Filtered, 200‑µL (30 000 629);
three trays (each containing 96 DiTis)
100‑mL disposable troughs for reagents (5 troughs) Tecan™ (10613048)
(Optional) Barcodes See the Tecan™ Freedom EVO
PrepFiler™ 96-Well Processing Plate (10 plates) A47010
PrepFiler™ Automated Forensic DNA Extraction Kit: Automated DNA Purification on the HID EVOlution™ Systems User
Bulletin
Tecan™ (30000631)
https://www.tecan.com/
Tecan™ (30000629)
https://www.tecan.com/
https://www.tecan.com/
Operating Manual, Section 3.5.6
“Positive Identification (PosID)”, for
barcode requirements
[2]
™
9
Page 10

Chapter 1 Product information
1
Required materials not supplied
Table 3 Automated purification (continued)
[1]
If collecting eluate in plates:
Item Source
N8010560 or 4306737
MicroAmp™ Optical 96-Well Reaction Plate (without barcode) or
MicroAmp™ Optical 96-Well Reaction Plate with Barcode
If collecting eluate in tubes:
AM12450, or equivalent
Nonstick, RNase-free Microfuge Tubes, 1.5 mL; certified DNase- and
RNase-free (250 tubes)
[1]
Recommended sources. Unless otherwise indicated, equivalent materials from other suppliers can be used after appropriate
validation studies by the user laboratory.
[2]
Disposable tips that have not been certified by Tecan™ may not yield the same liquid-handling performance.
10
PrepFiler™ Automated Forensic DNA Extraction Kit: Automated DNA Purification on the HID EVOlution™ Systems User
Bulletin
Page 11

Prepare for the automated
2
purification run
Perform lysis ......................................................................... 11
■
Before first use: Prepare the wash buers ............................................... 11
■
Before each use: Prepare the magnetic particles ......................................... 11
■
Perform lysis
Manually perform lysis according to the PrepFiler™ and PrepFiler™ BTA Automated Forensic DNA
Extraction Kits User Guide (Pub. No. 4463349).
Before first use: Prepare the wash buers
1.
Mix 260 mL of PrepFiler™ Wash Buer A Concentrate with 740 mL of freshly-opened 95% ethanol
in a separate, clean container to prepare a 1X solution.
2.
Mix 200 mL of PrepFiler™ Wash Buer B Concentrate with 300 mL of freshly-opened 95% ethanol
in a separate, clean container to prepare a 1X solution.
If the containers are kept closed when not in use, the prepared wash buers have a shelf life of
6 months or the kit expiration date, whichever is earlier.
Before each use: Prepare the magnetic particles
1.
Incubate the PrepFiler™ Magnetic Particles tubes at 37℃ for 10 minutes.
2.
Vortex at medium speed until the particles are completely resuspended and homogenous, then
briefly centrifuge.
3.
Use one of the following methods to remove any air bubbles:
•
Draw o bubbles with a disposable bulb pipette.
•
Use a clean pipette tip to break up the bubbles.
•
Use a lint-free wipe to absorb the bubbles.
IMPORTANT! Bubbles can interfere with automated liquid detection and aspiration.
PrepFiler™ Automated Forensic DNA Extraction Kit: Automated DNA Purification on the HID EVOlution™ Systems User
Bulletin
11
Page 12
Set up the robotic workstation
3
For more information .................................................................. 12
■
Workflow ............................................................................ 13
■
Perform routine maintenance .......................................................... 14
■
(HID EVOlution™—Combination System only) Set up the carriers and labware ............... 16
■
Set up the disposable pipette tips ...................................................... 19
■
Set up reagents on the workstation ..................................................... 20
■
Set up lysate, processing, and elution plates and/or tubes ................................. 23
■
Workstation layouts ................................................................... 30
■
For more information
This chapter provides general procedures for setting up the Freedom EVO™ 150 robotic workstation or
Freedom EVO™ 200 robotic workstation for the HID EVOlution™ system.
For more information, see the appropriate manufacturer's documentation.
Document
Tecan™ HID EVOlution™—Extraction
Application Manual
(395372, v2.0, June 2010)
Pre-run preparation step 4.3.2 “Prepare the Instrument”
Maintenance schedules 7.2, “Maintenance Schedule”
Maintenance procedures 7.3, “Maintenance Tasks”
Maintenance scripts 5.2, “Running Maintenance”
Setting up disposable pipette tips 4.3.5, “Setup Plasticware and
Setting up reagents 4.3.4, “Setup Reagents on
Place the plates and/or tubes 4.3.5, “Setup Plasticware and
Workstation layouts 4.3, "Preparing the Instrument"
Description Section
7.5, “Maintenance Scripts”
Samples on the Workstation”
Workstation”
Samples on the Workstation”
4.4, "Worktable Layouts"
12
PrepFiler™ Automated Forensic DNA Extraction Kit: Automated DNA Purification on the HID EVOlution™ Systems User
Bulletin
Page 13
(continued)
Chapter 3 Set up the robotic workstation
Document Description Section
Workflow
3
Tecan™ HID EVOlution™—
Combination Application Manual
(395967, v2.0, June 2010)
Tecan™ Freedom EVO™ Operating
Manual
Pre-run preparation step 5.3.2 “Prepare the Instrument”
Maintenance schedules 12.2, “Maintenance Schedule”
Maintenance procedures 12.3, “Maintenance Tasks”
Maintenance scripts 6.2 and 10.2, “Running Maintenance”
12.5, “Maintenance Scripts”
Setting up disposable pipette tips 5.3.5, “Set Up Plasticware and
Samples on the Workstation”
Setting up reagents 5.3.4, “Set Up Reagents on
Workstation”
Place the plates and/or tubes 5.3.5, “Set Up Plasticware and
Samples on the Workstation”
Workstation layouts 5.3, "Preparing the Instrument"
5.4, "Worktable Layouts"
Barcode specifications 3.5.6, “Positive Identification (PosID)”
Workflow
Prepare the reagents and samples
Prepare the system liquid carboy
(HID EVOlution™—Combination System only) Set up the carriers and labware
Set up the disposable pipette tips
Set up reagents on the workstation
Set up lysate, processing, and elution plates and/or tubes
PrepFiler™ Automated Forensic DNA Extraction Kit: Automated DNA Purification on the HID EVOlution™ Systems User
Bulletin
13
Page 14

Chapter 3 Set up the robotic workstation
3
Perform routine maintenance
Perform routine maintenance
Before placing the samples, reagents, and labware (DiTis, troughs, plates, and tubes), prepare the
robotic workstation.
Prepare the system liquid carboy
Ensure that the carboy next to the workstation contains enough system liquid (degassed deionized
water) to complete the experiment.
1.
Degas the deionized water overnight or longer before using it on the system.
Note: The time needed for complete degassing varies, depending on the climate in each
laboratory and geographical location. In some situations, it may take up to 3 days to fully degas
the deionized water. We recommend that each laboratory maintain an additional carboy of fully
degassed deionized water to use for replenishment.
2.
To avoid introducing air into the system liquid tubing, follow these guidelines:
•
Place the system liquid carboy at the same height as the worktable.
•
Replenish the system liquid as needed before each run to avoid liquid levels dropping below
one-quarter carboy during the run.
3.
Run the routine maintenance script each time that you change the system liquid carboy.
Empty the waste carboy
Check the waste carboy, and empty if needed.
Tighten the DiTi adapter gold cones
Note: If the cones are loose, the instrument may fail to pick up pipette tips during the run, and liquid
delivery will be inconsistent.
Use your fingers to gently tighten the DiTi adapter gold cones on the LiHa and the syringe assembly
fittings.
For details, see the Tecan™ Freedom EVO™ Operating Manual.
14
PrepFiler™ Automated Forensic DNA Extraction Kit: Automated DNA Purification on the HID EVOlution™ Systems User
Bulletin
Page 15

Run maintenance scripts
Before starting the run, run the appropriate maintenance scripts.
IMPORTANT! Watch for air bubbles in the syringes and tubing. Repeat system flushing as needed to
remove the air bubbles.
If Then run
It is the first run of the day PrepFiler_DailyStartUp or Combo_DailyStartUp
It is not the first run of the day PrepFiler_Flush or Combo_Flush
Chapter 3 Set up the robotic workstation
Perform routine maintenance
3
When you run DailyStartUp or Flush, you see:
•
Air bubbles in the lines
and/or
•
Intermittent flow from a DiTi cone
There are one or more DiTis on the LiHa PrepFiler_Drop_DiTis or Combo_Drop_DiTis
PrepFiler_Flush or Combo_Flush one or more times
until:
•
There are no visible air bubbles
and
•
Flow from the DiTi cones is constant
PrepFiler™ Automated Forensic DNA Extraction Kit: Automated DNA Purification on the HID EVOlution™ Systems User
Bulletin
15
Page 16
7
8
1
Chapter 3 Set up the robotic workstation
3
(HID EVOlution™—Combination System only) Set up the carriers and labware
(HID EVOlution™—Combination System only) Set up the
carriers and labware
If the HID EVOlution™—Combination System was last run for qPCR/STR, you will need to set up the
carriers and labware for a purification run.
1.
If the DNA lysate is in tubes, remove the 3-position microplate carrier from Grid 7, then place six
tube racks on grids 7 through 12.
Note: If the DNA lysate is in a plate, you do not need to remove the 3-position microplate carrier.
16
•
3-position microplate carrier
2.
Set up carriers for the DNA eluate.
•
If you want the DNA eluate placed in tubes, position six tube racks on grids 1 through 6.
•
If you want the DNA eluate placed in a 96-well plate, position the metal plate adaptor on grid
13, position 1.
PrepFiler™ Automated Forensic DNA Extraction Kit: Automated DNA Purification on the HID EVOlution™ Systems User
Bulletin
Page 17
1
2
Chapter 3
(HID EVOlution™—Combination System only) Set up the carriers and labware
3.
Remove the 3-position disposable tips (DiTi) tray carrier from grid 35, then replace it with a flat
Set up the robotic workstation
carrier and three 1,000-μL DiTi boxes as shown.
3
•
200-µL DiTi trays (blue or white trays)
•
1,000-µL DiTi trays (yellow or white trays)
4.
Place the magnetic particle tube block on grid 13, position 2.
IMPORTANT! Ensure that the tubes and the block containing the tubes are positioned as shown.
Incorrect positioning may result in failure to pipet magnetic particles and/or collision of the Liquid
Handling (LiHa) arm with the block.
5.
Ensure that the 96-well magnetic ring stand is on grid 19, position 2.
PrepFiler™ Automated Forensic DNA Extraction Kit: Automated DNA Purification on the HID EVOlution™ Systems User
Bulletin
17
Page 18
Chapter 3
3
(HID EVOlution™—Combination System only) Set up the carriers and labware
6.
Set up the robotic workstation
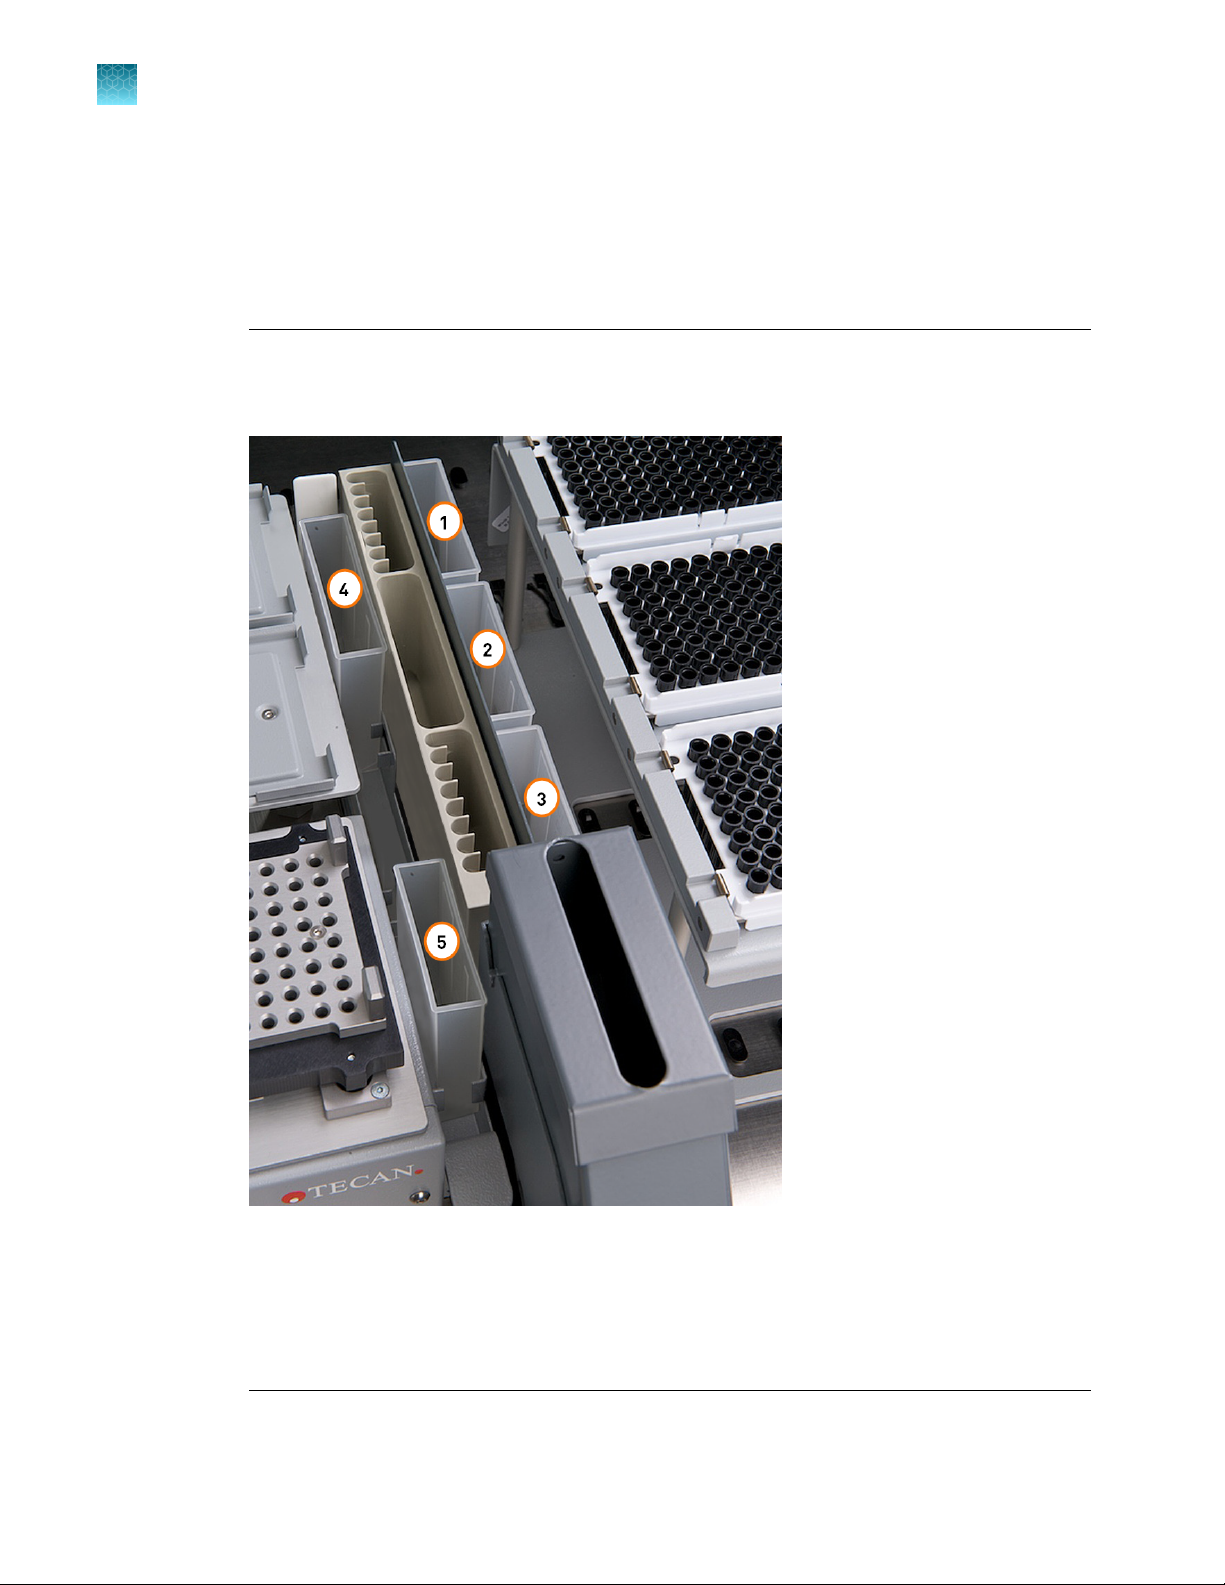
Set up the reagent troughs.
a.
Remove the reagent troughs from previous runs and correctly dispose of the reagents
according to “Complete the run” on page 48.
b.
Place new 100-mL reagent troughs on the worktable for PrepFiler™ Wash Buer B and other
reagents as shown.
Note: The trough layout shown is dierent from the originally validated layout. The validation
of the new trough layout is described in “Validation of PrepFiler™ Wash Buer B and the
related modifications to the workstation layout and scripts” on page 73.
18
Elution buer trough (grid 27, position 1)
·
Prepared Wash Buer B trough (grid 27, position 2)
·
Prepared Wash Buer A trough (grid 27, position 3)
·
Isopropanol trough (grid 25, position 1)
·
Lysate waste trough (grid 25, position 3)
·
The workstation should now match the setup shown in“Workstation layouts” on page 30.
PrepFiler™ Automated Forensic DNA Extraction Kit: Automated DNA Purification on the HID EVOlution™ Systems User
Bulletin
Page 19
1
2
3
5
4
Chapter 3 Set up the robotic workstation
Set up the disposable pipette tips
Terms for pipette tips used on the robotic workstation
•
DiTis—Disposable Tips (DiTi), Tecan™ Pure, Filtered, 200- and 1,000‑µL
•
DiTi tray—Plastic tray containing 96 DiTis
•
DiTi rack—Aluminum holder for a single tray of 1,000‑µL DiTis
•
DiTi carrier—Aluminum holder for three trays of 200‑µL DiTis
•
Orientation nose—Pin on a DiTi rack to hold the tray in place
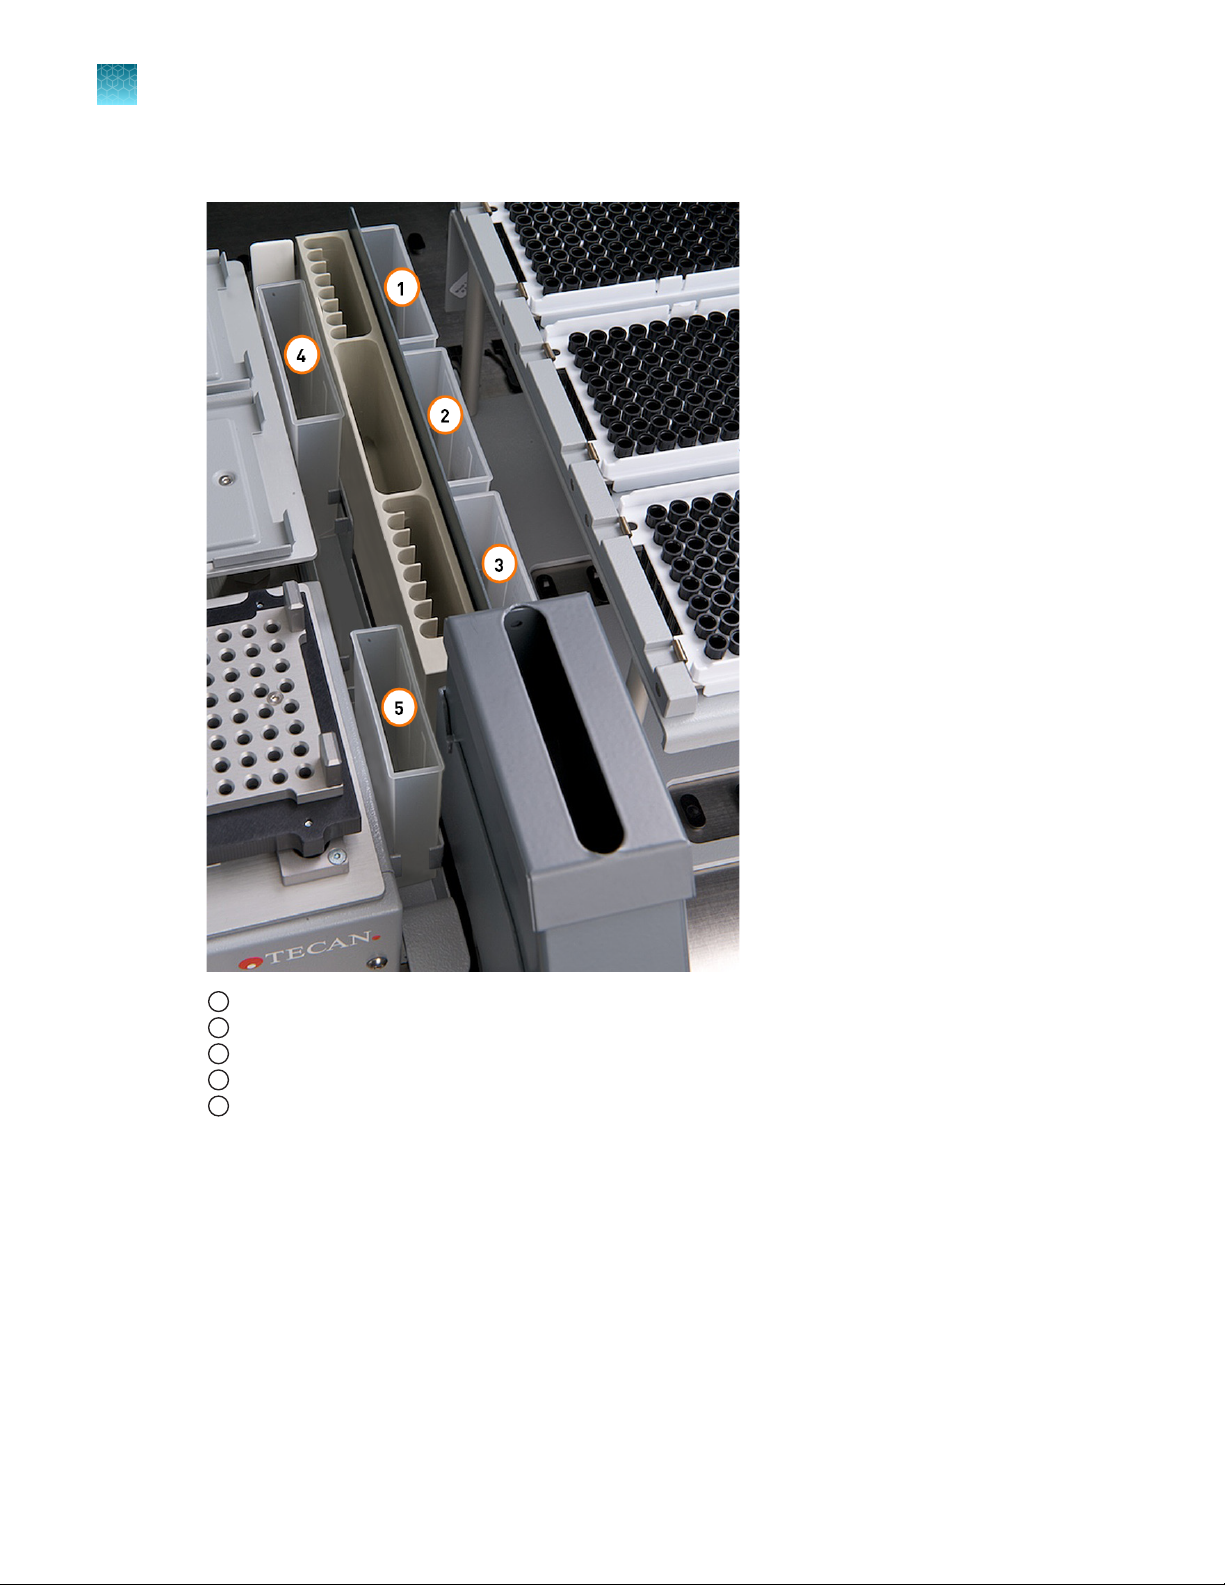
Set up the disposable pipette tips
3
Figure 2 DiTi terms.
Racks that contain 1,000-μL DiTis on the rear shelf positions 5, 6, and 7
1
Notch in the DiTi tray
2
Carrier for 200-μL DiTi trays (trays are blue or white)
3
Orientation nose
4
Racks that contain 1,000-μL DiTi trays (trays are yellow or white)
5
PrepFiler™ Automated Forensic DNA Extraction Kit: Automated DNA Purification on the HID EVOlution™ Systems User
Bulletin
19
Page 20

Chapter 3 Set up the robotic workstation
3
Set up reagents on the workstation
Fill DiTi carriers and racks
Set up the pipette tips for an automated purification run.
IMPORTANT! If nine full DiTi trays are not correctly set up on the Freedom EVO
the workstation repeatedly searches for the missing DiTi tips, during which time the samples may
become unusable.
1.
Place three full trays of 1,000‑µL DiTis into the DiTi racks on the rear shelf (shelf positions 5, 6, and
7). For each tray:
a.
Insert the tray into a rack: Ensure that the notch in the tray is aligned with the orientation nose
on the rack, snap the tray into the rack, then confirm that the tray fits snugly.
b.
Place the rack on the shelf: Ensure that the orientation pin is positioned toward the back of
the shelf, then push the rack all the way to the back of the shelf.
™
robotic workstation,
IMPORTANT! Ensure that there are no objects placed on shelf positions 1–4 or position 8.
2.
Place three full trays of 1,000‑µL DiTis into the DiTi racks on grid 35, positions 1–3, as described in
substep 1a. Ensure that the orientation pin is positioned in the top-left corner.
3.
Place three full trays of 200‑µL DiTis into the carrier on grid 29, positions 1–3. Ensure that the
notch in the tray is positioned in the top-left corner.
IMPORTANT! Ensure that the 3-position DiTi carrier on grid 29 contains three 200-μL DiTi trays.
Set up reagents on the workstation
Procedural guidelines
•
Calculate the reagent volumes needed based on the number of samples you will process plus the
specified overfill and dead volumes.
Note: The dead volume is independent of the number of samples you run.
•
Do not reuse isopropanol, PrepFiler™ Wash Buer A, PrepFiler™ Wash Buer B, or PrepFiler
Elution Buer from previous runs; always properly dispose of used reagents after each run.
•
Do not use water instead of PrepFiler™ Elution Buer. Instead of PrepFiler™ Elution Buer, you can
prepare low-TE buer (10 mM Tris-HCl, 0.1 mM EDTA, pH 8.0) or purchase DNA Suspension Buer
(low-TE Buer) from Teknova™.
•
Use new reagent troughs each day.
™
20
PrepFiler™ Automated Forensic DNA Extraction Kit: Automated DNA Purification on the HID EVOlution™ Systems User
Bulletin
Page 21
Set up the reagents
1.
Place empty troughs on the workstation according to the following table.
PrepFiler™ Elution Buer Grid 27, position 1
PrepFiler™ Wash Buer B Grid 27, position 2
PrepFiler™ Wash Buer A Grid 27, position 3
Isopropanol Grid 25, position 1
Chapter 3 Set up the robotic workstation
Set up reagents on the workstation
Empty trough Location
3
Lysate waste
IMPORTANT! Do not add acids or bases to
any wastes that contain PrepFiler™ Lysis Buer
(guanidine thiocyanate).
2.
Calculate the required PrepFiler™ reagent volumes.
Reagent
Lysis
protocol
Isopropanol Standard,
300‑µL
Largesample,
[4]
Prepared Wash
500‑µL
— Up to 96 900 µL 15% 5 mL 105 mL
Buer A
Prepared Wash
— Up to 96 300 µL 15% 5 mL 40 mL
Buer B
Grid 25, position 3
No. of
reactions
Reagent
volume per
reaction
Overfill
volume per
[1]
run
Dead
volume per
[2]
run
Minimum required
volume for
96 samples
(A×B)+(A×B×C)
A B C D
+D
Up to 96 180 µL 15% 5 mL 25 mL
Up to 96 300 µL 15% 5 mL 40 mL
[3]
Elution Buer — Up to 96 50 µL 15% 5 mL 11 mL
[1]
Overfill (excess volume) is needed to compensate for evaporation and pipetting losses during the run.
[2]
An extra 5 mL per trough is needed to ensure that the pipette tips remain submerged during aspiration so that liquid, not air, enters the tips.
[3]
Includes overfill and dead volume. For example, the required volume of isopropanol for 96 samples when using the standard lysis protocol is
(96 × 180 µL) + (96 × 180 µL × 0.15) + 5 mL = 17.28 mL + 2.59 mL + 5 mL = 24.87 mL, rounded up to 25 mL.
[4]
The large-sample (500‑µL) protocols were not tested as part of our full validation studies. If your laboratory intends to use the large-sample
protocols, perform the appropriate validation studies.
PrepFiler™ Automated Forensic DNA Extraction Kit: Automated DNA Purification on the HID EVOlution™ Systems User
Bulletin
21
Page 22
Chapter 3
3
Set up reagents on the workstation
3.
Set up the robotic workstation
Add the amounts of PrepFiler™ reagents that you calculated in step 2 to the appropriate trough.
22
Elution buer trough
1
Prepared Wash Buer B trough
2
Prepared Wash Buer A trough
3
Isopropanol trough
4
Lysate waste trough, empty
5
4.
Gently invert two tubes of prepared PrepFiler™ Magnetic Particles to remove large air bubbles,
briefly centrifuge the tubes at low speed to collect the contents at the bottom of the tubes, then
open the tubes.
•
If a thin film or bubble (caused by surfactants) stretches across the top of the tube, gently
break the surface with a clean pipette tip.
•
If there is foam (air bubbles) on the surface of the magnetic particles, remove the foam
by pipetting. Surface foam may interfere with liquid level detection during the automated
purification run.
PrepFiler™ Automated Forensic DNA Extraction Kit: Automated DNA Purification on the HID EVOlution™ Systems User
Bulletin
Page 23
Chapter 3
Set up lysate, processing, and elution plates and/or tubes
5.
Place the two tubes of PrepFiler™ Magnetic Particles on the workstation in the first two slots of the
Set up the robotic workstation
metal rack on grid 13, position 2.
IMPORTANT! Ensure that the tubes and the block containing the tubes are positioned as shown.
Incorrect positioning may result in failure to pipette magnetic particles and/or collision of the Liquid
Handling (LiHa) arm with the block.
3
Set up lysate, processing, and elution plates and/or tubes
Select a plate/tube configuration
The HID EVOlution™ systems support four plate/tube configurations for the Freedom EVO™ 150 robotic
workstation or Freedom EVO™ 200 robotic workstation.
Select a configuration for each automated purification run.
Starting labware: Plate or tube
Configuration
Plate-to-plate Process lysate from a 96-well
plate and collect eluate in a 96well plate
Plate-to-tubes Process lysate from a 96-well
plate and collect eluate in
1.5‑mL tubes
Tubes-to-tubes Process lysate from 1.5‑mL
tubes and collect eluate in
1.5‑mL tubes
Tubes-to-plate Process lysate from 1.5‑mL
tubes and collect eluate in a 96well plate
[1]
Your choice is independent of whether the sample lysate is contained in a plate or in tubes
Description
that contains the lysate from
the sample lysis step
PrepFiler™ Spin Plate MicroAmp™ Optical 96-Well
PrepFiler™ Spin Plate Nonstick RNase-free
Nonstick RNase-free Microfuge
Tubes (1.5‑mL)
Nonstick RNase-free Microfuge
Tubes (1.5‑mL)
Ending labware: Plate or tube
to collect DNA eluate at the
end of the run
Reaction Plate
Microfuge Tubes (1.5‑mL)
Nonstick RNase-free
Microfuge Tubes (1.5‑mL)
MicroAmp™ Optical 96-Well
Reaction Plate
[1]
PrepFiler™ Automated Forensic DNA Extraction Kit: Automated DNA Purification on the HID EVOlution™ Systems User
Bulletin
23
Page 24
Chapter 3
3
Set up lysate, processing, and elution plates and/or tubes
“Workstation layouts” on page 30 shows the placement of plates and tubes for each configuration.
Set up the robotic workstation
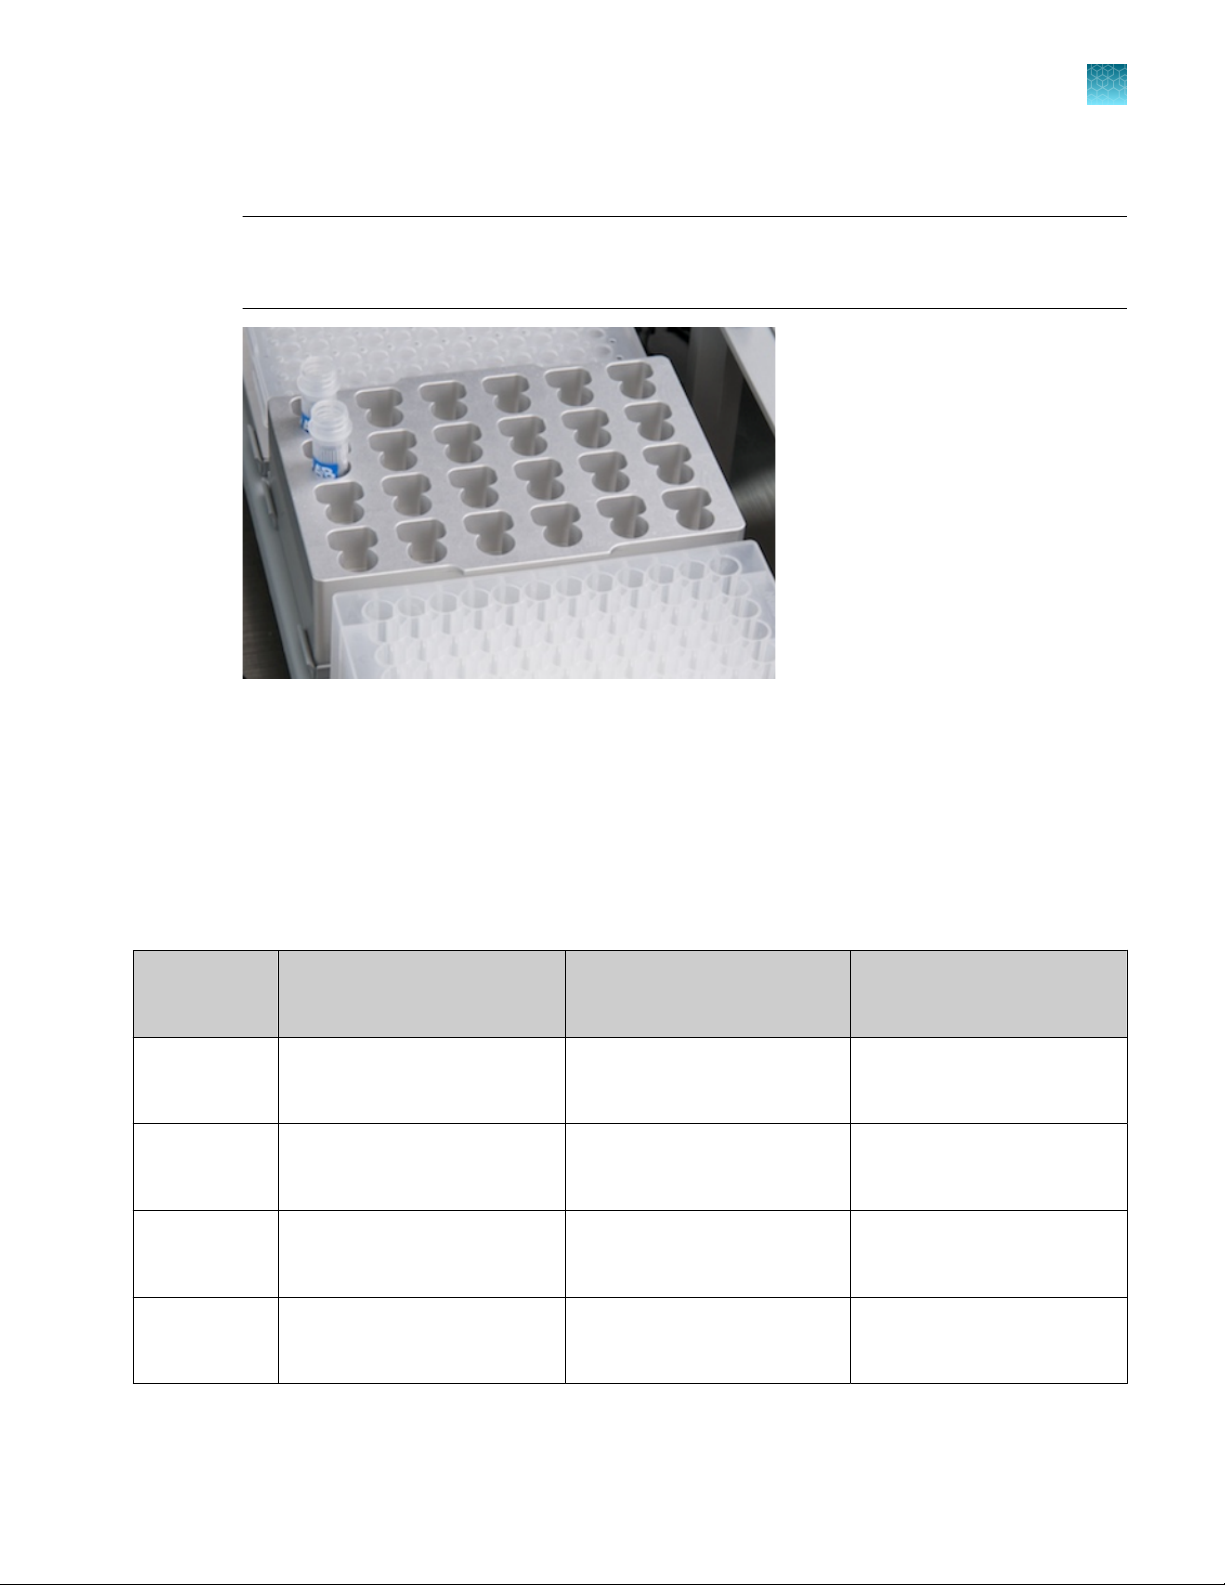
Set up the PrepFiler™ Processing Plate
The PrepFiler™ Processing Plate is a square-well plate that is required to process reactions for all four
automated purification run configurations.
During the washing and elution steps, the Robotic Manipulator arm (RoMa) moves the processing plate
to the 96-Well Magnetic Ring Stand or Te‑Shake™ plate adapter.
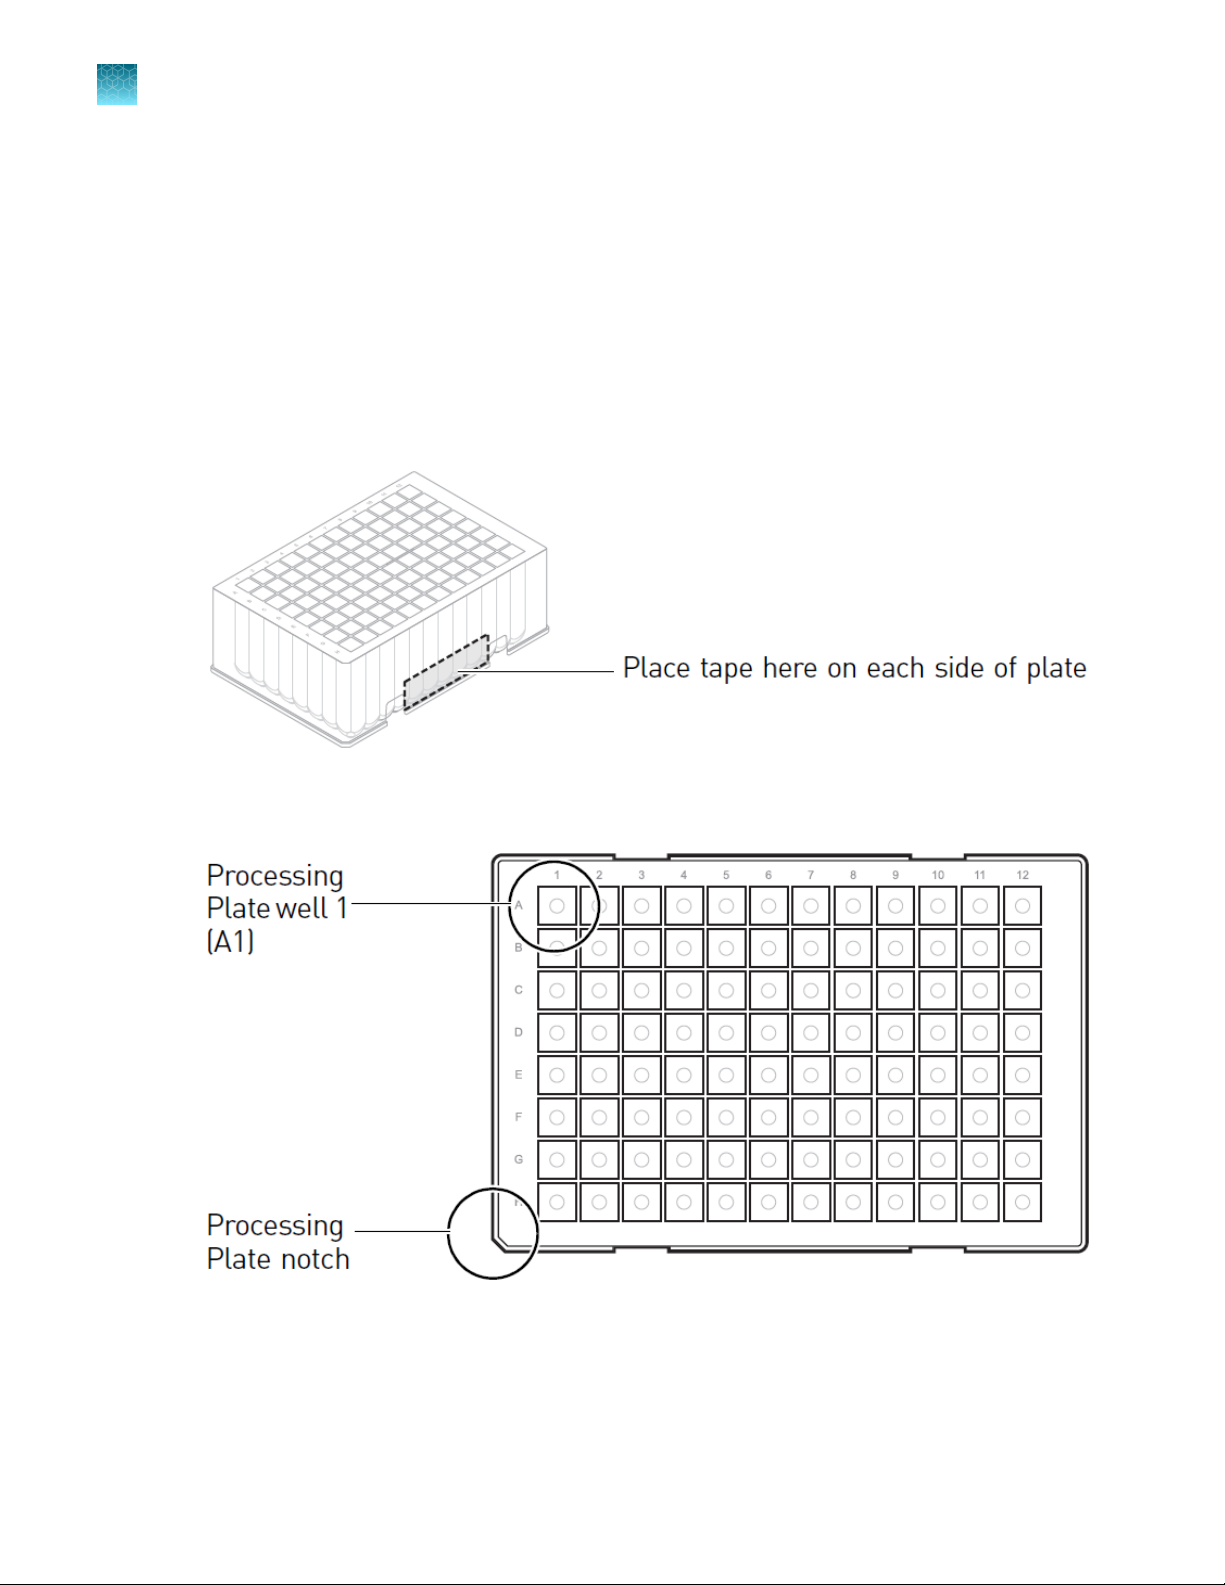
1.
If needed to ensure that the RoMa grips the plate tightly, place a strip of laboratory labeling tape
on each side of the PrepFiler™ Processing Plate as shown.
2.
Place the PrepFiler™ Processing Plate on the Te‑Shake™ plate adapter with well A1 in the top-left
position (grid 19, position 3).
3.
To ensure that samples are transferred to the correct wells, confirm that:
•
The processing plate is placed on the Te‑Shake™ plate adapter with well A1 positioned in the
top-left corner
•
The plate wells are aligned with the holes in the Te‑Shake™ plate adapter
24
PrepFiler™ Automated Forensic DNA Extraction Kit: Automated DNA Purification on the HID EVOlution™ Systems User
Bulletin
Page 25

(If needed) Place barcodes
Perform this procedure if you use barcodes on the plates and/or tubes to track the samples in the
HID EVOlution™ software. The system scans the barcodes to automatically capture sample information.
For more information, see the Tecan™ HID EVOlution™ —Extraction Application Manual, Section 4.5,
“Barcodes”.
IMPORTANT!
If the lysate is in spin/filter plates: Before the plate barcode is scanned during a run, you must
·
manually enter or import the sample information for each well in the plate. (See “Set up sample and
reagent information” on page 40, step 1.)
If the lysate is in tubes: The sample name (barcode) and sample position for each tube are
·
automatically updated in the HID EVOlution™ software when the barcodes are scanned.
1.
Select barcodes that are compatible with the PosID-3.
2.
Before placing items on the robotic workstation, ensure that the barcodes are correctly placed on
the appropriate labware.
Chapter 3 Set up the robotic workstation
Set up lysate, processing, and elution plates and/or tubes
3
Component
Sample lysate PrepFiler™ Spin Plates Nonstick RNase-free Microfuge
DNA eluate MicroAmp™ Optical 96-Well Reaction
Plate
Set up lysate and/or eluate plates
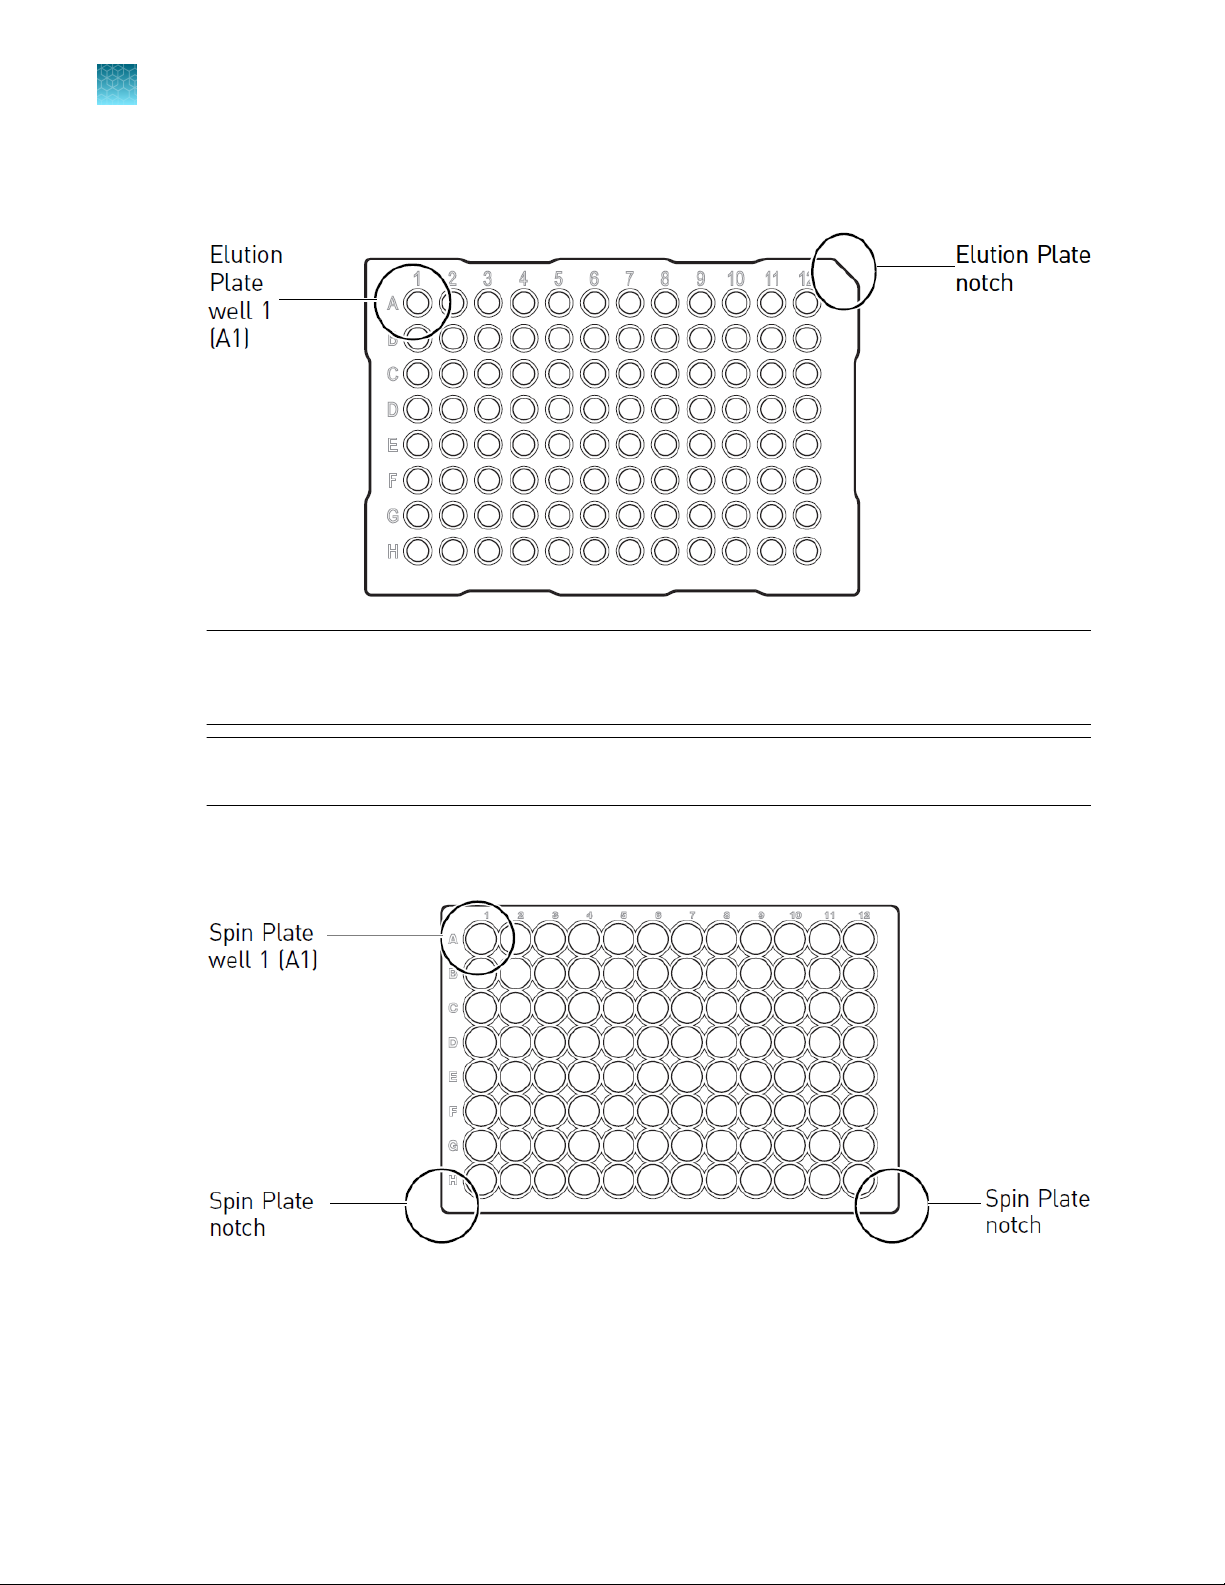
IMPORTANT! To ensure that samples are transferred to the correct wells, confirm the following for
each lysate or eluate plate:
The plate is placed in the metal plate adapter with well A1 positioned in the upper left corner
·
The plate wells are aligned with the holes in the metal plate adapter
·
Plate Tube
Tubes (1.5‑mL)
Nonstick RNase-free Microfuge
Tubes (1.5‑mL)
PrepFiler™ Automated Forensic DNA Extraction Kit: Automated DNA Purification on the HID EVOlution™ Systems User
Bulletin
25
Page 26
Chapter 3 Set up the robotic workstation
3
Set up lysate, processing, and elution plates and/or tubes
1.
If you want DNA eluate to be collected in a plate, place a MicroAmp™ Optical 96-Well Reaction
Plate with well A1 in the top-left position (grid 13, position 1).
Note: The DNA eluate corresponding to the first sample is always placed in the first well (A1) of
the elution plate. The Report file (PDF) that is generated at the end of the purification run lists the
starting position of each sample lysate and the final position of the corresponding DNA eluate.
Note: Using 96-well plates from other manufacturers may result in liquid handling errors if the
instrument is not recalibrated for use with the alternate plates.
2.
If the lysate is in a PrepFiler™ Spin Plate, place the spin plate with well A1 in the top-left position
(grid 13, position 3).
26
PrepFiler™ Automated Forensic DNA Extraction Kit: Automated DNA Purification on the HID EVOlution™ Systems User
Bulletin
Page 27
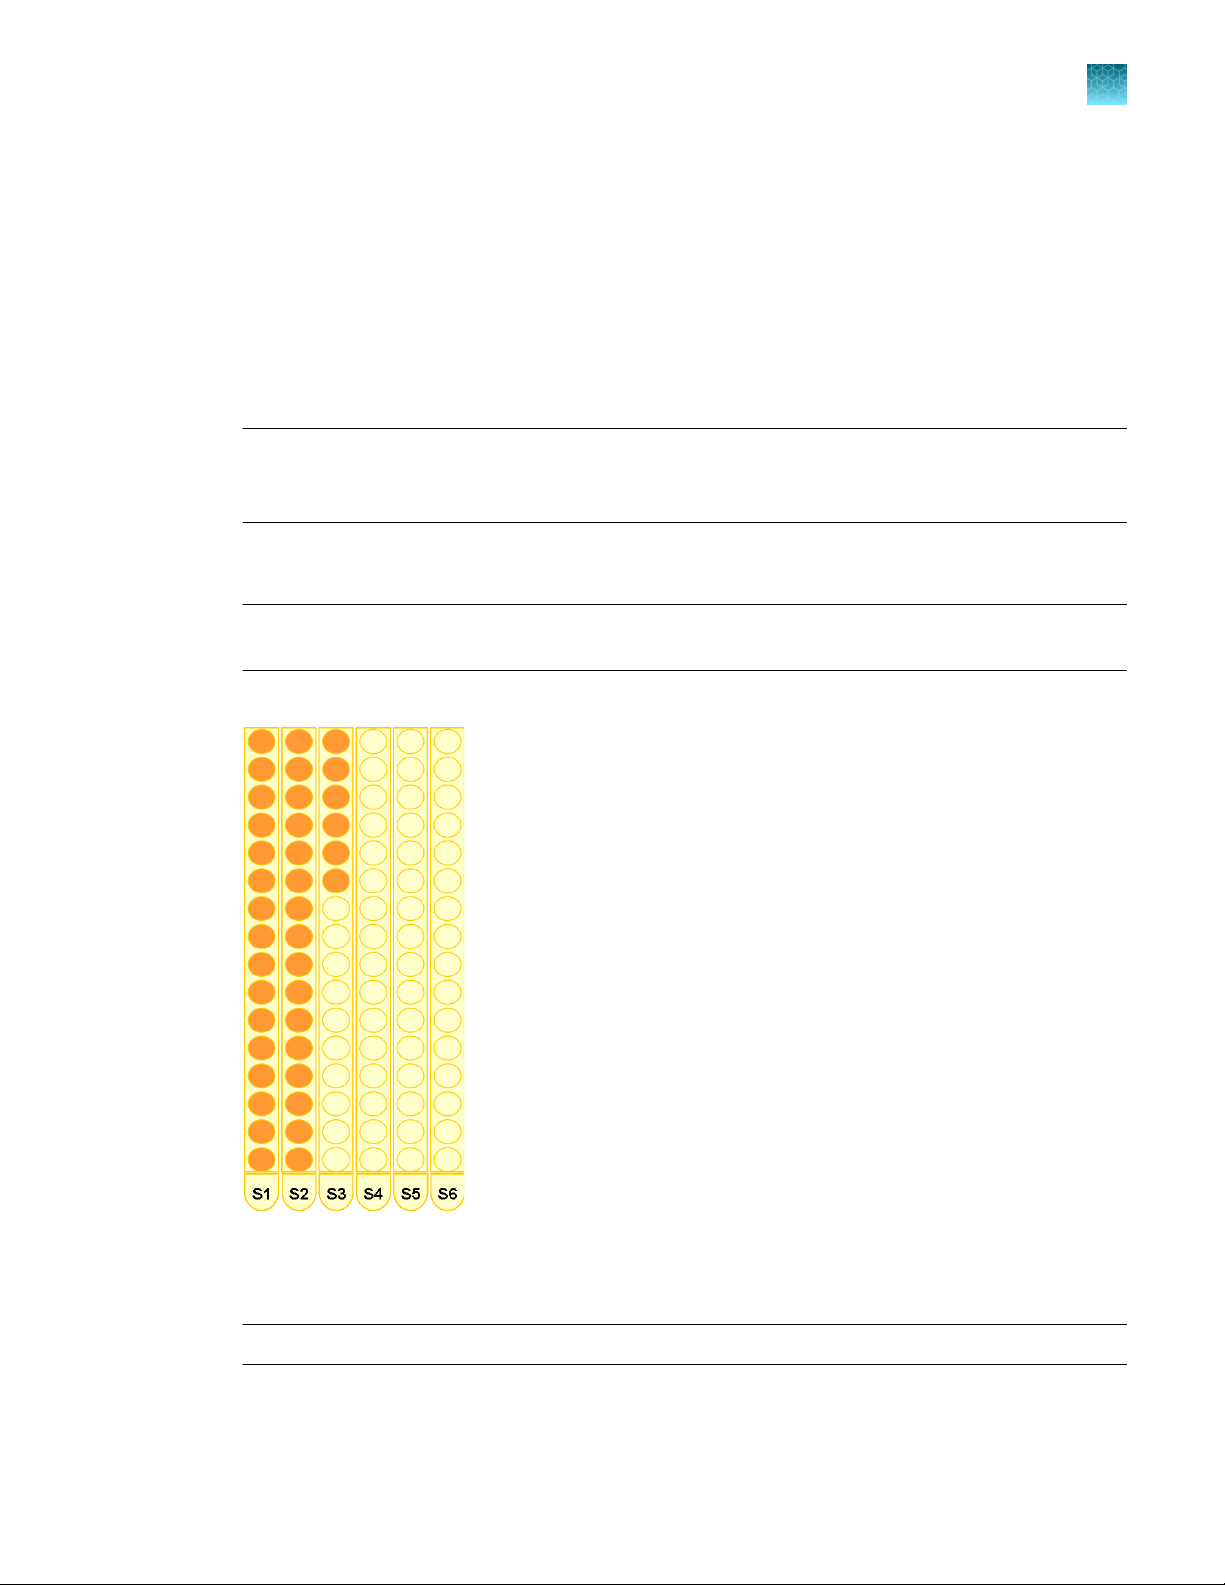
Set up lysate and/or eluate tubes
Set up eluate tubes in tube racks
1.
Ensure that:
•
You have new, labeled 1.5‑mL microfuge tubes equal to the number of DNA samples to be
processed.
•
The tube racks S1–S6 are correctly positioned at grid positions 1–6.
2.
Place the first empty 1.5‑mL microfuge tube in the tube racks in rack S1, position 1.
Note: The DNA eluate corresponding to the first sample is always placed in the first tube (1) in the
first tube rack (S1). The Report file (PDF) that is generated at the end of the purification run lists the
starting position of each sample lysate and the final position of the corresponding DNA eluate.
3.
Continue placing empty tubes from back to front in vertical columns as shown. Place one empty
tube for each sample to be processed. Do not leave empty positions between sample tubes.
IMPORTANT! The tubes must be contiguously loaded. Do not leave empty tube positions
between tubes.
Chapter 3 Set up the robotic workstation
Set up lysate, processing, and elution plates and/or tubes
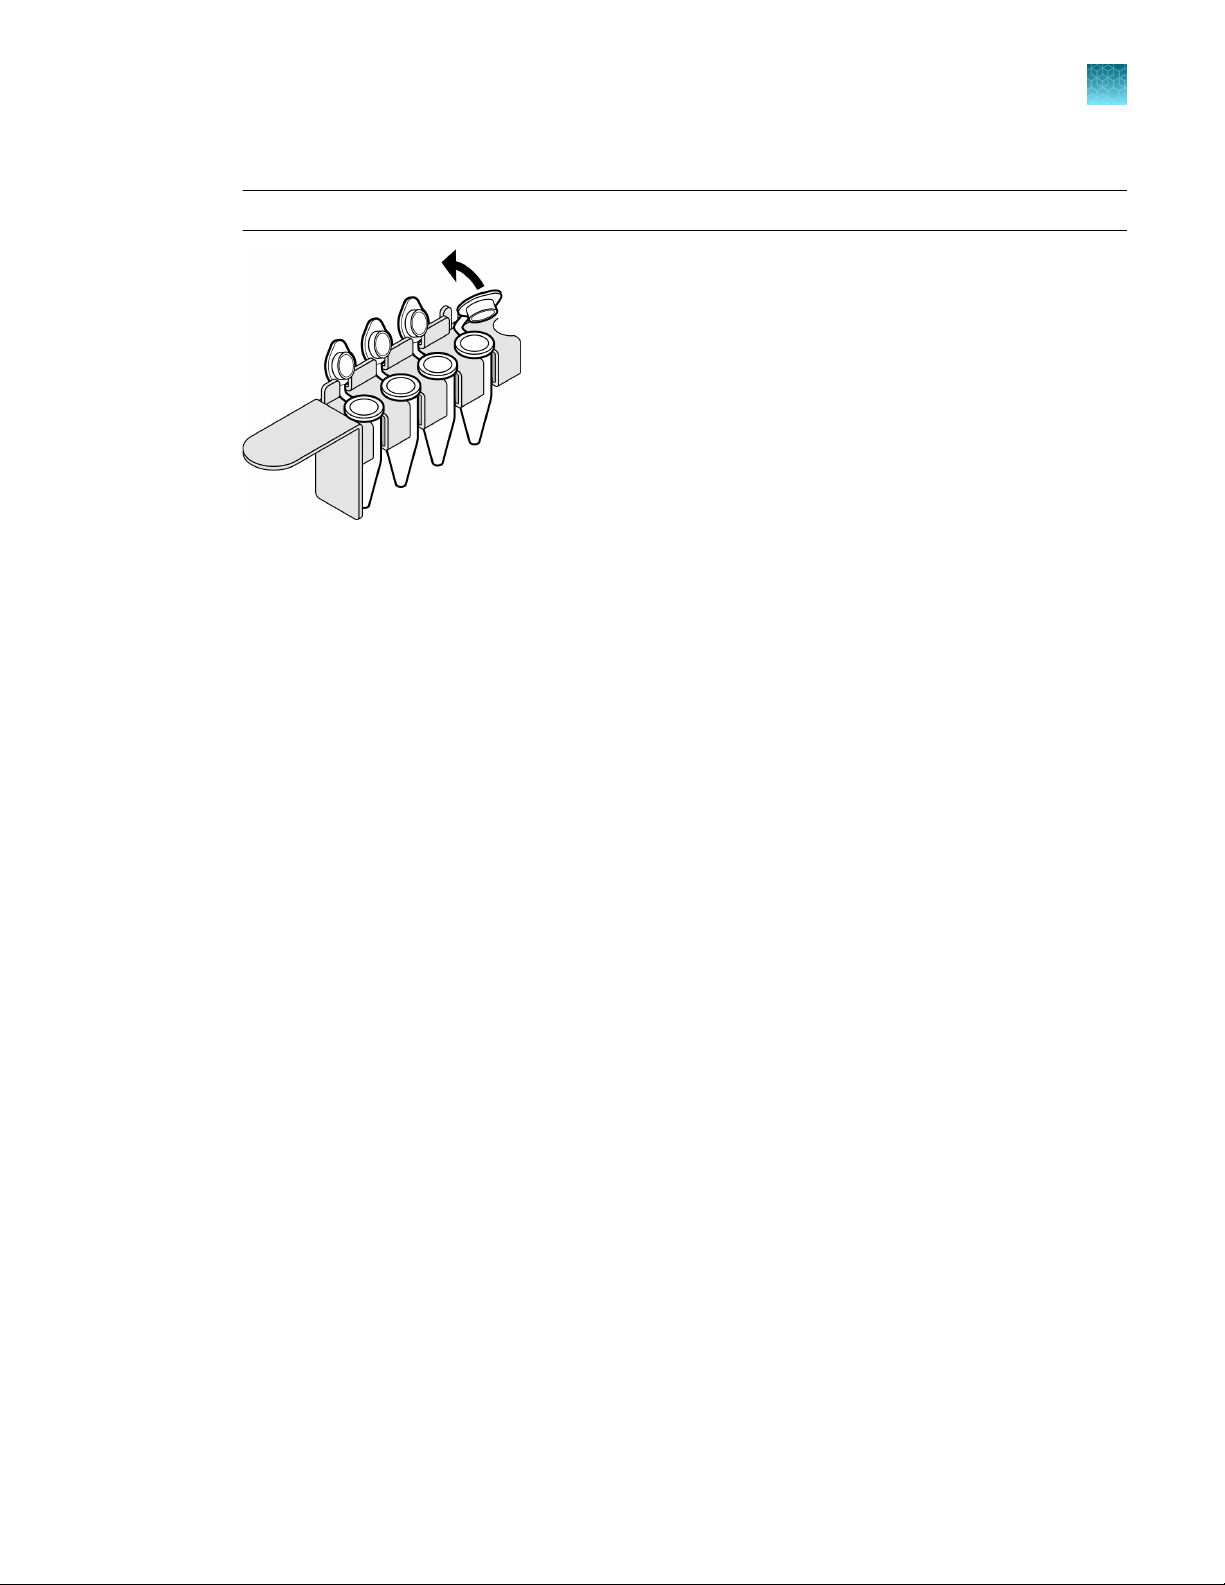
3
Example of correct setup
4.
Ensure that the barcodes are in a readable position.
5.
Open each tube, securing the tube caps in a fixed upright position as shown.
IMPORTANT! Open tube caps carefully to prevent cross-contamination and splatter.
PrepFiler™ Automated Forensic DNA Extraction Kit: Automated DNA Purification on the HID EVOlution™ Systems User
Bulletin
27
Page 28
Chapter 3
3
Set up lysate, processing, and elution plates and/or tubes
Set up the robotic workstation
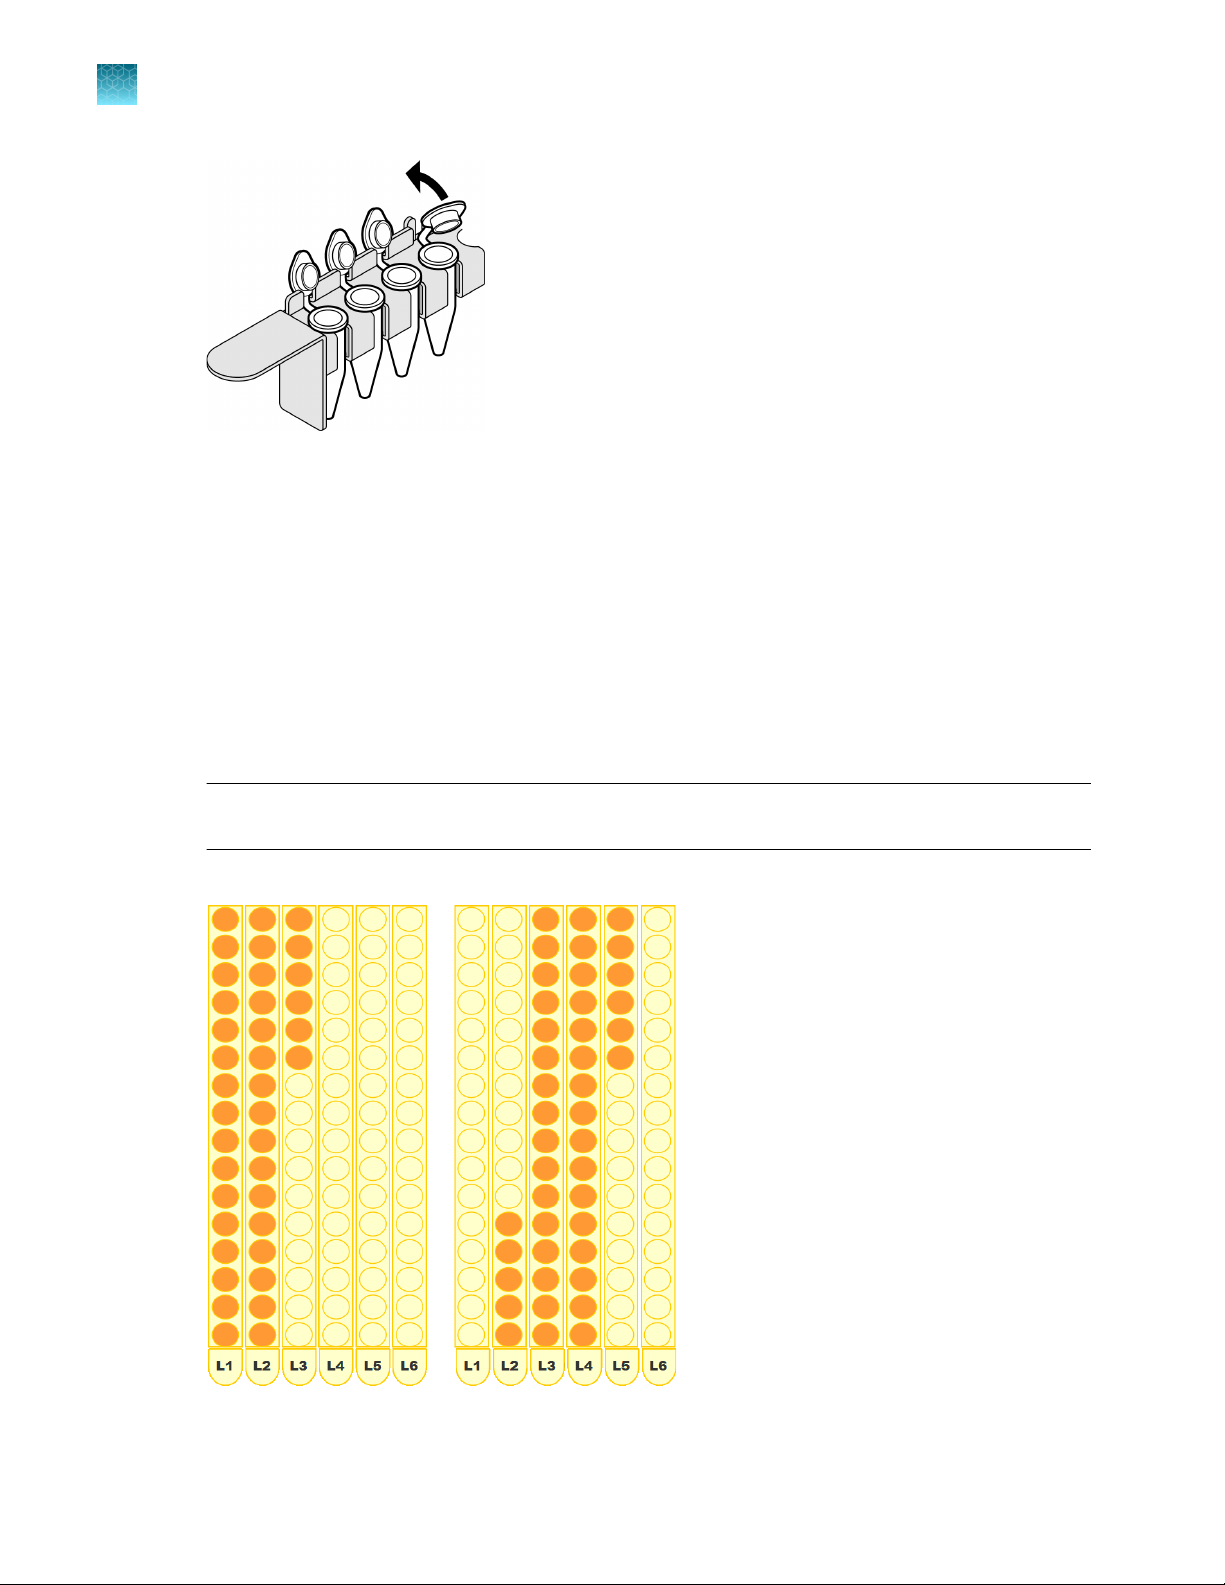
Set up lysate tubes in tube racks
1.
Ensure that:
•
You have ≤96 labeled 1.5‑mL microfuge tubes that contain DNA sample lysate.
•
The tube racks L1–L6 are correctly positioned at grid positions 7–12.
2.
Place the first sample tube in the tube racks. (Unlike the first eluate tube, which must be placed in
rack S1, position 1, the first lysate tube may be placed in any position; for example, you can begin
with rack L1, position 8.)
3.
Continue placing sample tubes from back to front in vertical columns as shown. Do not leave
empty positions between sample tubes.
IMPORTANT! The tubes must be contiguously loaded. Do not leave empty tube positions
between tubes.
Examples of correct setup
28
4.
Ensure that the barcodes are in a readable position.
PrepFiler™ Automated Forensic DNA Extraction Kit: Automated DNA Purification on the HID EVOlution™ Systems User
Bulletin
Page 29
Chapter 3 Set up the robotic workstation
Set up lysate, processing, and elution plates and/or tubes
5.
Open each tube, securing the tube caps in a fixed upright position as shown.
IMPORTANT! Open tube caps carefully to prevent cross-contamination and splatter.
3
PrepFiler™ Automated Forensic DNA Extraction Kit: Automated DNA Purification on the HID EVOlution™ Systems User
Bulletin
29
Page 30
Chapter 3 Set up the robotic workstation
3
Workstation layouts
Workstation layouts
The following figures show the available workstation layouts for the automated purification run
configurations.
Figure 3 Plate-to-plate workstation layout
96-Well Elution Plate
1
Block for PrepFiler™ Magnetic Particles
2
PrepFiler™ Spin Plate
3
Magnetic Ring Stand
4
PrepFiler™ Processing Plate on Te‑Shake™ plate adapter
5
Isopropanol trough
6
Lysate waste trough
7
Elution Buer trough
8
Wash Buer B trough
9
Wash Buer A trough
10
DiTi waste unit
11
200‑µL disposable pipette tips (DiTis)
12
200‑µL disposable pipette tips (DiTis)
13
200‑µL disposable pipette tips (DiTis)
14
1,000‑µL DiTis
15
1,000‑µL DiTis
16
1,000‑µL DiTis
17
Not shown: Rear shelf with 1,000‑µL DiTis in shelf positions 5, 6, and 7
30
PrepFiler™ Automated Forensic DNA Extraction Kit: Automated DNA Purification on the HID EVOlution™ Systems User
Bulletin
Page 31

Figure 4 Plate-to-tubes workstation layout
Elution tube racks S1 to S6 with microcentrifuge tubes
1
Block for PrepFiler™ Magnetic Particles
2
PrepFiler™ Spin Plate
3
Magnetic Ring Stand
4
PrepFiler™ Processing Plate on Te‑Shake™ plate adapter
5
Isopropanol trough
6
Lysate waste trough
7
Elution Buer trough
8
Wash Buer B trough
9
Wash Buer A trough
10
DiTi waste unit
11
200‑µL disposable pipette tips (DiTis)
12
200‑µL disposable pipette tips (DiTis)
13
200‑µL disposable pipette tips (DiTis)
14
1,000‑µL DiTis
15
1,000‑µL DiTis
16
1,000‑µL DiTis
17
Not shown: Rear shelf with 1,000‑µL DiTis in shelf positions 5, 6, and 7
Chapter 3 Set up the robotic workstation
Workstation layouts
3
PrepFiler™ Automated Forensic DNA Extraction Kit: Automated DNA Purification on the HID EVOlution™ Systems User
Bulletin
31
Page 32

Chapter 3 Set up the robotic workstation
3
Workstation layouts
Figure 5 Tubes-to-tubes workstation layout
Elution tube racks S1 to S6 with microcentrifuge tubes
1
Lysate tube racks L1 to L6 with microcentrifuge tubes
2
Block for PrepFiler™ Magnetic Particles
3
Magnetic Ring Stand
4
PrepFiler™ Processing Plate on Te‑Shake™ plate adapter
5
Isopropanol trough
6
Lysate waste trough
7
Elution Buer trough
8
Wash Buer B trough
9
Wash Buer A trough
10
DiTi waste unit
11
200‑µL disposable pipette tips (DiTis)
12
200‑µL disposable pipette tips (DiTis)
13
200‑µL disposable pipette tips (DiTis)
14
1,000‑µL DiTis
15
1,000‑µL DiTis
16
1,000‑µL DiTis
17
Not shown: Rear shelf with 1,000‑µL DiTis in shelf positions 5, 6, and 7
32
PrepFiler™ Automated Forensic DNA Extraction Kit: Automated DNA Purification on the HID EVOlution™ Systems User
Bulletin
Page 33

Figure 6 Tubes-to-plate workstation layout
Lysate tube racks L1 to L6 with microcentrifuge tubes
1
96-Well Elution Plate
2
Block for PrepFiler™ Magnetic Particles
3
Magnetic Ring Stand
4
PrepFiler™ Processing Plate on Te‑Shake™ plate adapter
5
Isopropanol trough
6
Lysate waste trough
7
Elution Buer trough
8
Wash Buer B trough
9
Wash Buer A trough
10
DiTi waste unit
11
200‑µL disposable pipette tips (DiTis)
12
200‑µL disposable pipette tips (DiTis)
13
200‑µL disposable pipette tips (DiTis)
14
1,000‑µL DiTis
15
1,000‑µL DiTis
16
1,000‑µL DiTis
17
Not shown: Rear shelf with 1,000‑µL DiTis in shelf positions 5, 6, and 7
Chapter 3 Set up the robotic workstation
Workstation layouts
3
PrepFiler™ Automated Forensic DNA Extraction Kit: Automated DNA Purification on the HID EVOlution™ Systems User
Bulletin
33
Page 34

4
For more information .................................................................. 34
■
Workflow ............................................................................ 35
■
Before you begin ..................................................................... 36
■
Set up and run a script ................................................................ 36
■
Complete the run ..................................................................... 48
■
View the qPCR/STR Sample Input and Report files ....................................... 49
■
For more information
This chapter provides general procedures for performing an automated purification run on the
HID EVOlution™ systems.
Perform the automated DNA
purification run
For more information, see the appropriate manufacturer's documentation.
Document
Tecan™ HID EVOlution™—Extraction
Application Manual
(395372, v2.0, June 2010)
Tecan™ HID EVOlution™—
Combination Application Manual
(395967, v2.0, June 2010)
Preparing a sample setup
file, including sample naming
requirements
Manually entering sample information 5.3, “Running a HID EVOlution—
Barcode positioning 4.6, “Barcodes”
Running extraction scripts 5.3, “Running a HID EVOlution—
Script error messages 8.4, “Application Software”
qPCR/STR Sample Input and Report
files
Routine cleanup 5.4.2, “Clean Up the Worktable”
Routine maintenance 7, “Maintenance”
Preparing a sample setup
file, including sample naming
requirements
Description Section
3.4, “Sample File”
Extraction Script”
Extraction Script”
6, “Results”
4.4, “Extraction Sample File”
34
PrepFiler™ Automated Forensic DNA Extraction Kit: Automated DNA Purification on the HID EVOlution™ Systems User
Bulletin
Page 35

(continued)
Chapter 4 Perform the automated DNA purification run
Document Description Section
Workflow
4
Tecan™ HID EVOlution™—
Combination Application Manual
(395967, v2.0, June 2010)
Tecan™ Freedom EVO™ Operating
Manual
Tecan EVOware
Standard/EVOware™ Plus 2.1
Software Manual
Tecan EVOware
Standard/EVOware™ Plus 2.1
Software Getting Started Guide
™
™
Manually entering sample information 6.3, “Running a HID EVOlution—
Extraction Script”
Barcode positioning 5.6, “Barcodes”
Running extraction scripts 6.3, “Running a HID EVOlution—
Extraction Script”
Script error messages 13.4, “Application Software”
qPCR/STR Sample Input and Report
files
Routine cleanup 10.4, “Removing the Reagents and
Routine maintenance 12, “Maintenance”
Barcode specifications 3.5.6, “Positive Identification (PosID)”
EVOware™ software —
7, “Results from HID EVOlution—
Extraction”
Cleaning Up the Worktable”
—
Tecan HID EVOlution™ Application
Guide—Automation for Applied
Biosystems Human Identification Kits
Workflow
HID EVOlution™—qPCR/PCR Setup
System
—
Automated DNA purification
Set up and run a script
Complete the run
View the qPCR/STR Sample Input and Report files
PrepFiler™ Automated Forensic DNA Extraction Kit: Automated DNA Purification on the HID EVOlution™ Systems User
Bulletin
35
Page 36

Chapter 4 Perform the automated DNA purification run
4
Before you begin
Before you begin
•
If you want to enter reagent information, have the reagent lot numbers and expiration dates
available before running the script.
•
Ensure that the instrument shield is closed.
•
If a collision occurred during the previous run, a trained user or Tecan™ Service™ Representative
should check the x, y, and z positions before you start a new run. Alternatively, use water in place
of reagents and perform a mock run to confirm proper positioning of the robotic movements.
•
If you observe bubbles in the system liquid (degassed water) tubing, place the system liquid
carboy at the same height as the workstation, then replenish the system liquid as needed before
each run to avoid liquid levels dropping below one-quarter carboy during the run. The time needed
for complete degassing varies depending on the climate in each laboratory and geographical
location. In some situations, it may take up to 3 days to fully degas the system liquid. We
recommend that each laboratory maintain an additional carboy of fully degassed system liquid
to use for replenishment.
Set up and run a script
About script files
Script files contain the workflow instructions for a specific robot, and they can be read only by the
software of that robot. For example, Thermo Fisher Scientific provides scripts specifically for use with
the PrepFiler™ kits (see page 36 for the list of scripts). ThePrepFiler™ kit scripts are for use with
theFreedom EVO™ 150 robotic workstation and Freedom EVO™ 200 robotic workstation, and they can
be read only by Freedom EVOware™ software v2.1 with the HID EVOlution™—Extraction application.
You select a script based on three criteria:
•
The protocol that you used to prepare sample lysate
•
The HID EVOlution™ system that you are using
•
The labware that you want to use on the workstation for sample lysate and eluate
Select a script
1.
On your desktop, click
and password.
2.
Select Edit an existing script, then click
to start the EVOware™ Standard software, then enter your user name
.
36
PrepFiler™ Automated Forensic DNA Extraction Kit: Automated DNA Purification on the HID EVOlution™ Systems User
Bulletin
Page 37

Chapter 4
3.
In the Selection dialog box, select the appropriate script for your HID EVOlution™ system,
Perform the automated DNA purification run
Set up and run a script
plate/tube configuration, and lysis protocol, then click .
4
If you used this lysis
protocol...
1.5‑mL tubes—
standard protocol,
300‑μL
And you want the
eluted DNA in…
1.5‑mL microfuge
tubes
HID EVOlution™—Extraction
System
[1]
PrepFiler_tubes_tubes_V1_SP2 PrepFiler_tubes_tubesCombo_
HID EVOlution™—Combination
System
[1]
V1_SP1
A 96-well plate PrepFiler_tubes_plate_V1_SP2 PrepFiler_tubes_plateCombo_V
1_SP1
Then use this script...
96-well plate—
standard protocol,
300‑μL
1.5‑mL microfuge
tubes
PrepFiler_plate_tubes_V1_SP2 PrepFiler_plate_tubesCombo_V
1_SP1
A 96-well plate PrepFiler_plate_plate_V1_SP2 PrepFiler_plate_plateCombo_V
1_SP1
1.5‑mL tubes—large
sample protocol,
[2]
500‑μL
1.5‑mL microfuge
tubes
PrepFiler_tubes_tubes500_V1_
SP2
PrepFiler_tubes_tubes500Com
bo_V1_SP1
A 96-well plate PrepFiler_tubes_plate500_V1_SP2PrepFiler_tubes_plate500Comb
o_V1_SP1
96-well plate—large
sample protocol,
[2]
500‑μL
1.5‑mL microfuge
tubes
PrepFiler_plate_tubes500_V1_SP2PrepFiler_plate_tubes500Comb
o_V1_SP1
A 96-well plate PrepFiler_plate_plate500_V1_SP2PrepFiler_plate_plate500Comb
o_V1_SP1
[1]
Version 1 (“V1”) scripts or later. Contact Technical Support for more information on validated and verified scripts.
[2]
The large-sample (500‑µL) scripts were not tested as part of our validation studies. If you intend to use the large-sample scripts, perform the
appropriate validation studies.
4.
In the Freedom EVOware™ script dialog box, click
to run the script, then click in the
EVOware™ Runtime Controller.
The Freedom EVOware™ Runtime Controller opens, the system initializes, and the liquid-handling
arm (LiHa) and Robotic Manipulator arm (RoMa) move.
PrepFiler™ Automated Forensic DNA Extraction Kit: Automated DNA Purification on the HID EVOlution™ Systems User
Bulletin
37
Page 38

Chapter 4
4
Set up and run a script
Perform the automated DNA purification run
Note: After clicking to run a script, you can:
Cancel the run at any time by clicking .
·
Pause the run by bringing the EVOware™ Runtime Controller dialog box to the front of your
·
desktop, then clicking .
For details on cancelling or pausing a run, see “(If needed) Re-cap the magnetic particles tubes”
on page 46.
Set up sample and reagent information
About sample information
Sample information is used by the HID EVOlution™—Extraction System or HID EVOlution™—
Combination System to:
•
Set up the elution plate or tubes.
•
Generate a Report file (PDF) at the end of the purification run.
•
(HID EVOlution™—Combination System only) Generate a qPCR/STR Sample Input file (CSV) at the
end of the purification run.
For more information on the CSV and PDF files, see “Record file information and exit the script” on
page 47 and “View the qPCR/STR Sample Input and Report files” on page 49.
(If needed) Create a sample input file from a template
Perform this procedure if you import sample input files to set up sample information in the HID
EVOlution™ software. (See “Set up sample and reagent information” on page 40, step 1.)
IMPORTANT!
Create the sample input file before starting the purification run.
·
Use a text editor such as Microsoft™ Notepad to edit the sample input file. Do not use Microsoft
·
Excel™, which may introduce invalid formatting.
1.
Set up the template files on your system:
a.
Create the following folders for the original and edited template files:
•
<installation drive>:\ PrepFilerTemplateFiles for the original template files
that are provided with the HID EVOlution™ system software CD
•
<installation drive>:\ PrepFilerInputFiles for your edited template files
b.
Copy the following template files from the software CD to the folder that you created for the
template files:
•
Sample File_Plate_96.csv—for sample lysate in a 96-well plate
•
Sample File_Tubes_96.csv—for sample lysate in 1.5‑mL tubes
™
38
2.
Open the appropriate template file:
a.
Select Start4All Programs4Accessories4Notepad to open Microsoft™ Notepad.
PrepFiler™ Automated Forensic DNA Extraction Kit: Automated DNA Purification on the HID EVOlution™ Systems User
Bulletin
Page 39

Chapter 4 Perform the automated DNA purification run
Set up and run a script
b.
Select File4Open, then navigate to <installation drive>:\
PrepFilerTemplateFiles.
c.
Select the appropriate template file for sample lysate in a plate or in tubes, then click Open.
3.
Select File4Save As, navigate to <installation drive>:\ PrepFilerInputFiles, change
the file name to <User Defined>.csv (where <User Defined> is a unique file name of your
choosing), then click Save.
4.
Enter the sample information in the duplicate CSV file. Follow the formatting rules that are
described in the Tecan™ HID EVOlution™—Extraction Application Manual, Section 3.4, “Sample
File”.
•
Do not include empty plate well or tube rack positions between samples.
•
Avoid spaces or other special characters such as commas (,), asterisks (*), or slashes (/).
•
Follow your laboratory naming conventions to assign a unique sample name to each sample.
For samples in plates, assign a unique sample name to all wells that contain samples or blank
reagents.
•
The sample name and sample position in the sample input file must match the samples on the
workstation.
4
5.
Save the file with a CSV extension, then close the file.
IMPORTANT! The file extension must be CSV for the file to be imported to the HID EVOlution
software.
™
PrepFiler™ Automated Forensic DNA Extraction Kit: Automated DNA Purification on the HID EVOlution™ Systems User
Bulletin
39
Page 40

Chapter 4 Perform the automated DNA purification run
4
Set up and run a script
Set up sample and reagent information
1.
In the Sample information page, use one of the options in Table 4 to enter sample information.
Table 4 Options for entering sample information
Option Action
Manually enter sample
information
Import a sample input file
1.
Click Edit next to the plate or next to each tube rack. See #1 in Figure 7.
2.
Enter sample information as described in the Tecan™ HID EVOlution™—Extraction
Application Manual, Section 5.3, “Running a HID EVOlution™—Extraction Script”.
IMPORTANT! When entering sample information, assign a unique sample
name to all samples. For samples in plates, assign a unique sample name to all
wells that contain samples or reagent blanks. (For sample naming requirements,
see the Tecan™ HID EVOlution™—Extraction Application Manual, Section 3.4,
“Sample File”.)
3.
Click OK.
4.
Deselect the Scan labware checkbox. Otherwise, the system will attempt to scan
barcodes and will overwrite the manually entered sample information.
1.
Create a sample input file according to “(If needed) Create a sample input file
from a template” on page 38.
2.
Click , then navigate to <installation drive>:\
PrepFilerInputFiles. See #2 in Figure 7.
3.
Select the sample input file that you created, then click OK.
4.
Ensure that the actual sample names and workstation positions match those in
the imported sample input file.
5.
Deselect the Scan labware checkbox. Otherwise, the system will attempt to scan
barcodes and will overwrite the imported sample information.
Scan barcodes
40
PrepFiler™ Automated Forensic DNA Extraction Kit: Automated DNA Purification on the HID EVOlution™ Systems User
1.
Place barcodes on the plates and/or tubes according to page 25.
2.
Select the Scan labware checkbox. See #3 in Figure 7.
During a run, the system will scan the barcodes to capture sample information.
IMPORTANT!
If the lysate is in spin/filter plates: Before the plate barcode is scanned during a
·
run, you must manually enter or import the sample information for each well in the
plate.
If the lysate is in tubes: The sample name (barcode) and sample position for each
·
tube are automatically updated in the HID EVOlution™ software when the barcodes
are scanned.
Bulletin
Page 41

3
2
1
Chapter 4 Perform the automated DNA purification run
Set up and run a script
4
Figure 7 Sample information page (ways to enter sample information)
Manually enter sample information
1
Import a sample input file
2
Scan barcodes
3
IMPORTANT! To avoid situations where the system overwrites previously entered or imported
sample information, be aware of the following:
If you manually enter sample information, then import a sample input file, the information that
·
you manually entered is overwritten by the imported file.
If your system is set up to use barcodes, any information that you manually entered or imported
·
is overwritten when the sample lysate barcodes are scanned.
PrepFiler™ Automated Forensic DNA Extraction Kit: Automated DNA Purification on the HID EVOlution™ Systems User
Bulletin
41
Page 42

Chapter 4 Perform the automated DNA purification run
4
Set up and run a script
2.
Enter the position and number of samples.
a.
In the Start index field, select a number between 1–96 that corresponds to one of the
following:
•
The tube position of the first tube in the sample racks
•
The well position of the first sample in the plate
b.
In the Number of samples to process field, select a number between 1–96 that corresponds
to the total number of samples that you are running.
c.
Ensure that the number of samples to process (maximum of 96) is correctly shown (for
example, if you are processing 16 samples, the message should read “
samples”).
Processing 16/96
42
PrepFiler™ Automated Forensic DNA Extraction Kit: Automated DNA Purification on the HID EVOlution™ Systems User
Bulletin
Page 43

d.
21
Click to continue.
Chapter 4 Perform the automated DNA purification run
Set up and run a script
4
Figure 8 Sample information page (position and number of samples)
First sample start position
1
Number of samples
2
3.
(Optional) Record information about the PrepFiler™ kit components that are used for this
purification run:
Note: If needed, you can use the kit information for your records and for help with
troubleshooting.
a.
Click Record Reagent Information.
b.
In the Record Reagent Information page, enter the appropriate lot numbers and expiration
dates. Scroll down to see all the fields.
c.
Click OK, then click
to continue.
PrepFiler™ Automated Forensic DNA Extraction Kit: Automated DNA Purification on the HID EVOlution™ Systems User
Bulletin
43
Page 44

Chapter 4 Perform the automated DNA purification run
4
Set up and run a script
Confirm workstation setup and start the run
1.
In the Load worktable page, compare the listed items to the items on the actual workstation.
a.
Confirm that you correctly loaded the following items:
Item Displayed as
PrepFiler™ 96-Well Processing Plate Processing Plate
MicroAmp™ Optical 96-Well Reaction Plate or
1.5‑mL microfuge tubes to collect the DNA
eluate
PrepFiler™ Spin Plate or 1.5‑mL microfuge
tubes that contain the sample lysate
Two tubes of PrepFiler™ Magnetic Particles
Particles
Isopropanol Isopropanol
Prepared PrepFiler™ Wash Buer A Wash Buer
Prepared PrepFiler™ Wash Buer B Wash3
PrepFiler™ Elution Buer Elution Buer
Note: You can place the cursor on an item in the list to highlight the item in the workstation
diagram on the right side of the page.
b.
Ensure that Liquid Level Detection is selected.
Samples or tube racks S1–S6
Spin Plate or tube racks L1–L6
Magnetic Particles
IMPORTANT! When Liquid Level Detection is selected, the system checks the isopropanol,
wash buer, and elution buer liquid levels before starting the run. The system alerts you if the
reagent volumes are insucient for the number of samples that you entered.
44
PrepFiler™ Automated Forensic DNA Extraction Kit: Automated DNA Purification on the HID EVOlution™ Systems User
Bulletin
Page 45

Chapter 4 Perform the automated DNA purification run
2.
Click Loaded All, then click to start the inventory scan.
Set up and run a script
4
3.
In the Scanning results page, wait for scanning to finish, then do one of the following:
•
If you are not using barcodes—Click Ignore, then click
•
If you are using barcoded plates and/or tubes to track your samples, and the Status
column displays:
–
Only green, click to start the run.
–
One or more red warnings, confirm that all barcodes are present and in the correct
position, then click to rescan the barcodes.
Note: During the run, the run status is shown next to .
to start the run.
PrepFiler™ Automated Forensic DNA Extraction Kit: Automated DNA Purification on the HID EVOlution™ Systems User
Bulletin
45
Page 46

Chapter 4 Perform the automated DNA purification run
4
Set up and run a script
(If needed) Re-cap the magnetic particles tubes
Perform this step during the run if you observe crystal formation on the PrepFiler™ Magnetic Particles
tube.
1.
After the magnetic particles have been dispensed into all samples, click in the EVOware
Runtime Controller to pause the run.
2.
Re-cap the magnetic particles tubes to avoid forming a crust around the rim of the tubes.
3.
Click in the EVOware™ Runtime Controller to continue the run.
IMPORTANT! Do not click in the EVOware
script dialog box. Clicking causes the run to stop and it cannot be restarted.
™
Runtime Controller or Freedom EVOware
™
™
46
PrepFiler™ Automated Forensic DNA Extraction Kit: Automated DNA Purification on the HID EVOlution™ Systems User
Bulletin
Page 47

Chapter 4 Perform the automated DNA purification run
Record file information and exit the script
1.
(HID EVOlution™—Combination System only) In the Extraction output file generated page, the
software displays the file path and name for the qPCR/STR Sample Input file. Record the file path
and name, then click .
Set up and run a script
4
2.
In the Reporting page, the software displays the file path and name for the Report file. Record the
file path and name, then click .
PrepFiler™ Automated Forensic DNA Extraction Kit: Automated DNA Purification on the HID EVOlution™ Systems User
Bulletin
47
Page 48

Chapter 4
4
Complete the run
Perform the automated DNA purification run
3.
In the Runtime Controller dialog box, click Cancel to exit the script.
For more information on the files, see “View the qPCR/STR Sample Input and Report files” on
page 49.
Complete the run
1.
Open the front panel of the Freedom EVO™ workstation.
2.
Remove the MicroAmp™ Optical 96-Well Reaction Plate or 1.5‑mL microfuge tubes that contain
the DNA eluate from the worktable, seal the plate or tubes, then store them ≤2 weeks at 4℃. For
longer storage, store at −20℃.
3.
If not capped previously, cap and store the PrepFiler™ Magnetic Particles tubes.
4.
Properly dispose of the PrepFiler™ Spin Plate (if used) and PrepFiler™ Processing Plate.
5.
Properly dispose of any unused isopropanol, wash buer, and elution buer in the reagent troughs.
IMPORTANT! Do not reuse the reagents in the troughs.
6.
(Last run of day) Dispose of the reagent troughs.
7.
If needed, empty the waste carboy and refill the system liquid carboy.
48
8.
Dispose of the used pipette tips.
PrepFiler™ Automated Forensic DNA Extraction Kit: Automated DNA Purification on the HID EVOlution™ Systems User
Bulletin
Page 49

Chapter 4 Perform the automated DNA purification run
View the qPCR/STR Sample Input and Report files
9.
Perform routine cleanup and maintenance on the Freedom EVO™ workstation. See Tecan™ HID
EVOlution™—Extraction Application Manual, Section 5.4.2, “Clean Up the Worktable”, and Chapter
7, “Maintenance”.
IMPORTANT! To clean all workstation surfaces, use deionized water, then wipe with a lint-free lab
wipe dampened with laboratory-grade 70% ethanol. Do not use acids, or bases (such as bleach) to
clean the workstation. Consult Safety Data Sheets (SDS) and product labeling of cleaning agents,
reagents, or chemicals for compatibility with the workstation before cleaning or decontaminating
the workstation.
View the qPCR/STR Sample Input and Report files
About the files
As described page 47, two files are automatically generated at the end of each purification run:
•
qPCR/STR Sample Input file (HID EVOlution™—Combination System only)—A CSV file that
contains sample information from the purification run. You can use the file as a template to import
sample information into the HID EVOlution™—qPCR/PCR Setup System. At the end of each run,
the file is automatically saved as follows:
<installation drive>:\ HIDEVOlutionExtractionFiles\ Export\ HID_<run
date_run time>.csv
where: <installation drive> and <run date_run time> are variable
•
Report file—A PDF file that contains a record of the reagents used and the samples processed
during the purification run, including the starting plate or tube position of each sample lysate and
the final position of the corresponding DNA eluate. At the end of each run, the file is automatically
saved as follows:
<installation drive>:\ HIDEVOlutionExtractionFiles\ DNAextraction_<run
date_run time>.pdf
where: <installation drive> and <run date_run time> are variable
4
When you start your next run, the files from the previous run are automatically moved to the following
folder:
<installation drive>:\ HIDEVOlutionExtractionFiles\ Archive\ <date_time>
where: <installation drive> and <date_time> are variable
For example, if you start your next run on August 15, 2020 at 3:08 PM (15:08
hours), files from the previous run would be archived to the <installation drive>:\
HIDEVOlutionExtractionFiles\ Archive\ 20200815_150800 folder, regardless of the date of
the previous run.
PrepFiler™ Automated Forensic DNA Extraction Kit: Automated DNA Purification on the HID EVOlution™ Systems User
Bulletin
49
Page 50

Chapter 4 Perform the automated DNA purification run
4
View the qPCR/STR Sample Input and Report files
View the files
1.
(Optional) For quick access to the files, create shortcuts on your desktop to the following folders:
•
qPCR/STR Sample Input file folder—<installation drive>:\
HIDEVOlutionExtractionFiles\ Export\
•
Report file folder—<installation drive>:\ HIDEVOlutionExtractionFiles\
•
Archive folder—<installation drive>:\ HIDEVOlutionExtractionFiles\
Archive\
2.
Navigate to the appropriate folder, then open the files of interest.
Note: To quickly locate the files, record the file names that are displayed in the software after each
run. See “Record file information and exit the script” on page 47.
3.
(Optional) Print the Report file (PDF), then sign the printout and keep it for your records.
50
PrepFiler™ Automated Forensic DNA Extraction Kit: Automated DNA Purification on the HID EVOlution™ Systems User
Bulletin
Page 51

Experiments and results
5
Validation of the PrepFiler™ Automated Forensic DNA Extraction Kit on the
■
HID EVOlution™—Extraction System .................................................... 52
Validation of PrepFiler™ Wash Buer B and the related modifications to the workstation
■
layout and scripts .................................................................... 73
This chapter provides the results of the developmental validation experiments performed by Thermo
Fisher Scientific using the PrepFiler™ Automated Forensic DNA Extraction Kit on the HID EVOlution™—
Extraction System. These experiments supplement the developmental validation studies, described in
the PrepFiler™ Forensic DNA Extraction Kit User Guide (Pub. No. 4463348), that were performed to
validate the PrepFiler™ Forensic DNA Extraction Kit chemistry.
The PrepFiler™ Automated Forensic DNA Extraction Kit was designed specifically for the lysis and
automated purification of DNA from forensic samples. The kit contains reagents needed for cell lysis,
binding DNA to magnetic particles, removing PCR inhibitors, and eluting bound DNA. Downstream
applications include using the purified DNA in quantitative real-time PCR and in PCR amplification for
Short Tandem Repeat (STR) analysis.
The PrepFiler™ Automated Forensic DNA Extraction Kit is not a DNA genotyping assay; the kit is
intended to improve the overall yield and quality of DNA isolated from a variety of sample types. By
testing the procedure with samples commonly encountered in forensic and parentage laboratories, the
validation process establishes attributes and limitations that are critical for sound data interpretation.
PrepFiler™ Automated Forensic DNA Extraction Kit: Automated DNA Purification on the HID EVOlution™ Systems User
Bulletin
51
Page 52

Chapter 5
5
Validation of the PrepFiler™ Automated Forensic DNA Extraction Kit on the HID EVOlution™—Extraction System
Experiments and results
Validation of the PrepFiler™ Automated Forensic DNA
Extraction Kit on the HID EVOlution™—Extraction System
Overview of experiments and results
We performed developmental validation experiments to evaluate the performance of the PrepFiler
Automated Forensic DNA Extraction Kit using the HID EVOlution™—Extraction System.
We performed the experiments according to the Revised Validation Guidelines issued by the Scientific
Working Group on DNA Analysis Methods (SWGDAM) published in Forensic Science Communications
Vol. 6, No. 3, July 2004 (http://www.fbi.gov/about-us/lab/forensic-science-communications/fsc/
july2004/standards/2004_03_standards02.htm/). These guidelines describe the quality assurance
requirements that a laboratory should follow to ensure high quality and integrity of data and to
demonstrate the competency of the laboratory. The SWGDAM-based experiments focus on kit
performance parameters relevant to the intended use of the kits, that is, the extraction and purification
of genomic DNA as a part of the forensic DNA genotyping procedure.
Each laboratory using the PrepFiler™ Automated Forensic DNA Extraction Kit should perform
appropriate internal validation studies.
Materials and methods
The following materials and methods were used in all experiments performed as part of the
developmental validation. (A detailed list is provided in Table 5.)
•
Biological samples from 8 donors obtained from the Serological Research Institute were used to
prepare the samples for each experiment.
•
Samples were prepared and lysed using the PrepFiler™ Automated Forensic DNA Extraction Kit
following the standard 300-μL lysis protocol.
•
Genomic DNA was extracted and purified from the lysed samples using the PrepFiler™ Automated
Forensic DNA Extraction Kit and the HID EVOlution™—Extraction System. DNA was eluted with
50 µL of elution buer. Extraction blanks were processed for each study.
•
The HID EVOlution™—Extraction System supports four configurations (see “Plate/tube
configurations” on page 8) with corresponding software scripts that contain the instructions for the
robotic workstation. The core liquid handling script for the binding, washing, and elution operations
is identical in all validated scripts. The software script(s) used are described in the "results" section
for each study.
•
The purified DNA was quantified using the Quantifiler™ Human DNA Quantification Kit on a
7500 Real‑Time PCR Instrument. An elution volume of 50 μL was used for all experiments. The
quantitation results were analyzed using SDS v1.2.3.
•
Quantified DNA was normalized using the HID EVOlution™—qPCR/PCR Setup System and
amplified using the AmpFℓSTR™ Identifiler™ PCR Amplification Kit.
•
Samples with a target DNA input amount of 1 ng were used for STR PCR amplification. Samples
were amplified on a GeneAmp™ PCR System 9700. Electrophoresis was performed on 3130xl
Genetic Analyzers.
•
The STR profiles were analyzed using GeneMapper™ ID‑X Software v1.0.
™
52
PrepFiler™ Automated Forensic DNA Extraction Kit: Automated DNA Purification on the HID EVOlution™ Systems User
Bulletin
Page 53

Chapter 5 Experiments and results
Validation of the PrepFiler™ Automated Forensic DNA Extraction Kit on the HID EVOlution™—Extraction System
Table 5 Summary of materials used in the validation studies
Unless otherwise indicated, all materials are available through thermofisher.com. "MLS" indicates that the material is available
from fisherscientific.com or another major laboratory supplier. Catalog numbers that appear as links open the web pages for
those products.
Component Item Source
Chemistry
[1]
Isopropyl alcohol Sigma-Aldrich
TE buer Teknova
™
™
General reagents and materials MLS
PrepFiler™ Automated Forensic DNA Extraction Kit 4463353
Quantifiler™ Human DNA Quantification Kit 4343895
AmpFℓSTR™ Identifiler™ PCR Amplification Kit 4322288
AmpFℓSTR™ MiniFiler™ PCR Amplification Kit 4373872
5
Labware RNase-free Microfuge Tubes (1.5 mL); certified DNase- and RNase-
free
PrepFiler™ Spin Tubes and Filter Columns
Note: Since these validation experiments were performed, this
product has been discontinued. It has been replaced with
PrepFiler™ Spin Tubes and Filter Columns, ethylene oxide-treated
(Cat. No. A36853).
PrepFiler™ 96-Well Processing Plates
Note: Since these validation experiments were performed, this
product has been discontinued. It has been replaced with
PrepFiler™ 96-Well Processing Plates (Cat. No. A47010).
1,000-μL LiHa disposable tips with filter Tecan™ (30000631)
200-μL LiHa disposable tips with filter Tecan™ (30000629)
100-mL disposable troughs for reagents Tecan™ (10613048)
MicroAmp™ Optical 96-Well Reaction Plate (without barcode) or
MicroAmp™ Optical 96-Well Reaction Plate with Barcode
MicroAmp™ Clear Adhesive Film 4306311
AM12400
4392342
4392904
N8010560 or 4306737
Instruments and
software
Signature™ Benchtop Shaking Incubators VWR International, LLC
Model 1575 (ZZMFG)
Magnetic-Ring Stand (96 well) AM10050
HID EVOlution™—qPCR/PCR Setup System Tecan
HID EVOlution™—Extraction System Tecan
7500 Real‑Time PCR Instrument with SDS v1.2.3 —
PrepFiler™ Automated Forensic DNA Extraction Kit: Automated DNA Purification on the HID EVOlution™ Systems User
Bulletin
™
™
53
Page 54

Chapter 5 Experiments and results
5
Validation of the PrepFiler™ Automated Forensic DNA Extraction Kit on the HID EVOlution™—Extraction System
Table 5 Summary of materials used in the validation studies (continued)
Component Item Source
Instruments and
software
[1]
Identical lot numbers were used within each validation study.
GeneAmp™ PCR System 9700 —
3130xl Genetic Analyzers —
GeneMapper™ ID‑X Software v1.0 —
Precision studies (SWGDAM standard 2.9)
Precision studies experiments
Precision studies were performed to test the precision of DNA recovery within a sample set. Eight
replicates of twelve dierent samples were assayed for DNA concentration and the standard deviation
within a replicate set.
Precision experiment A
DNA was extracted and purified from twelve sample types (see Table 6) in eight replicates using
thePrepFiler™ Automated Forensic DNA Extraction Kit. A PrepFiler™ Spin Plate (96 wells) was used for
lysis, and a MicroAmp™ Optical 96-Well Reaction Plate was used for elution. Each replicate set was
arranged in a separate column in the spin plate. All blood samples were prepared from the same donor
(Donor 85).
DNA concentration and quality were evaluated with the Quantifiler™ Human DNA Quantification Kit. The
DNA concentration and Internal PCR Control (IPC) Ct values were also evaluated for variation among
replicates.
Precision experiment B
The experiment described in precision experiment A was also performed using 96 tubes for both the
lysis and elution containers.
Table 6 Name, description, and liquid volumes of the experimental samples used in this study
Sample name
LB-40μL Liquid human blood 40 µL
LB-30μL Liquid human blood 30 µL
LB-10μL Liquid human blood 10 µL
LB-5μL Liquid human blood 5 µL
LB-2μL Liquid human blood 2 µL
LB-1μL Liquid human blood 1 µL
BSC Human blood stain on non-colored cotton 5 µL
SALSw Human saliva on cotton swab 50 µL
Sample description Body fluid volume
54
PrepFiler™ Automated Forensic DNA Extraction Kit: Automated DNA Purification on the HID EVOlution™ Systems User
Bulletin
Page 55

Chapter 5 Experiments and results
Validation of the PrepFiler™ Automated Forensic DNA Extraction Kit on the HID EVOlution™—Extraction System
Table 6 Name, description, and liquid volumes of the experimental samples used in this
study (continued)
Sample name Sample description Body fluid volume
SSC Human semen stain on non-colored cotton 1 µL
5
BSCI Human blood stain on non-colored cotton
plus inhibitor mix
BSD Human blood stain on denim 5 µL
XB Extraction blank NA
[1]
The inhibitor mix contains 12.5 mM of indigo, 0.5 mM of hematin, 2.5 mg/mL of humic acid, and 8.75 mg/mL of urban dust extract.
[1]
5 µL of blood + 1 µL of
inhibitor mix
Precision studies results
DNA concentrations obtained in precision experiments A and B are summarized in Figure 9. Average
IPC Ct values for the dierent samples are shown in Figure 9 on the secondary y-axis. Linear regression
trend lines of the average DNA concentrations for the liquid blood samples examined in precision
experiments A and B are shown in Figure 10.
PrepFiler™ Automated Forensic DNA Extraction Kit: Automated DNA Purification on the HID EVOlution™ Systems User
Bulletin
55
Page 56

Chapter 5
5
Validation of the PrepFiler™ Automated Forensic DNA Extraction Kit on the HID EVOlution™—Extraction System
Experiments and results
Figure 9 Precision studies A and B—The average DNA concentration and average IPC Ct values for extracted
and purified DNA samples
The same data set is shown on two dierent scales: Concentration ranges 0–50 ng/µL (top) and 0–10 ng/µL (bottom).
56
PrepFiler™ Automated Forensic DNA Extraction Kit: Automated DNA Purification on the HID EVOlution™ Systems User
Bulletin
Page 57

Chapter 5 Experiments and results
Validation of the PrepFiler™ Automated Forensic DNA Extraction Kit on the HID EVOlution™—Extraction System
5
Figure 10 Precision studies A and B—DNA concentration is plotted against liquid blood volume and the
linear regression trend is calculated
Table 7 and Table 8 summarize the statistics obtained from precision experiments A (plate-to-plate) and
B (tubes-to-tubes).
Table 7 Precision study A—Summarized statistics for the eight replicates
DNA concentration
Sample name
Liquid samples
40 µL LB85 8 38.94 ng/µL 49.74 ng/µL 43.02 ng/µL 3.45 ng/µL
30 µL LB85 8 22.06 ng/µL 36.35 ng/µL 27.42 ng/µL 5.54 ng/µL
10 µL LB85 8 6.87 ng/µL 10.59 ng/µL 8.80 ng/µL 1.25 ng/µL
5 µL LB85 8 3.64 ng/µL 4.83 ng/µL 4.29 ng/µL 0.49 ng/µL
2 µL LB85 8 1.08 ng/µL 2.18 ng/µL 1.52 ng/µL 0.33 ng/µL
1 µL LB85 8 0.62 ng/µL 0.97 ng/µL 0.80 ng/µL 0.15 ng/µL
Solid substrates
n=
Minimum Maximum
Average
± Standard
deviation
5 µL BSC 8 2.35 ng/µL 4.11 ng/µL 3.30 ng/µL 0.53 ng/µL
50 µL SALSw 8 2.14 ng/µL 2.90 ng/µL 2.63 ng/µL 0.27 ng/µL
1 µL SSC 8 1.79 ng/µL 3.21 ng/µL 2.23 ng/µL 0.45 ng/µL
PrepFiler™ Automated Forensic DNA Extraction Kit: Automated DNA Purification on the HID EVOlution™ Systems User
Bulletin
57
Page 58

Chapter 5 Experiments and results
5
Validation of the PrepFiler™ Automated Forensic DNA Extraction Kit on the HID EVOlution™—Extraction System
Table 7 Precision study A—Summarized statistics for the eight replicates (continued)
DNA concentration
Sample name n=
Minimum Maximum
5 µL BSCI 8 2.76 ng/µL 4.42 ng/µL 3.51 ng/µL 0.58 ng/µL
5 µL BSD 8 3.63 ng/µL 5.01 ng/µL 4.47 ng/µL 0.49 ng/µL
Extraction blank
XB 8 0.00 ng/µL 0.00 ng/µL 0.00 ng/µL 0.00 ng/µL
Average
± Standard
deviation
Table 8 Precision study B—Summarized statistics for the eight replicates
DNA concentration
Sample name n=
Minimum Maximum
Liquid samples
40 µL LB85 8 38.26 ng/µL 45.58 ng/µL 42.39 ng/µL 2.25 ng/µL
30 µL LB85 8 22.59 ng/µL 39.20 ng/µL 29.46 ng/µL 6.01 ng/µL
10 µL LB85 8 4.14 ng/µL 8.81 ng/µL 6.80 ng/µL 1.86 ng/µL
5 µL LB85 8 2.97 ng/µL 4.75 ng/µL 4.17 ng/µL 0.67 ng/µL
Average
± Standard
deviation
2 µL LB85 8 0.80 ng/µL 1.42 ng/µL 1.09 ng/µL 0.25 ng/µL
1 µL LB85 8 0.15 ng/µL 1.04 ng/µL 0.39 ng/µL 0.36 ng/µL
Solid substrates
5 µL BSC 8 2.29 ng/µL 3.53 ng/µL 3.04 ng/µL 0.44 ng/µL
50 µL SALSw 8 2.04 ng/µL 2.62 ng/µL 2.28 ng/µL 0.16 ng/µL
1 µL SSC 8 0.95 ng/µL 2.79 ng/µL 2.09 ng/µL 0.60 ng/µL
5 µL BSCI 8 3.26 ng/µL 4.76 ng/µL 3.82 ng/µL 0.45 ng/µL
5 µL BSD 8 3.36 ng/µL 4.55 ng/µL 3.94 ng/µL 0.40 ng/µL
Extraction blank
XB 8 0.00 ng/µL 0.00 ng/µL 0.00 ng/µL 0.00 ng/µL
58
PrepFiler™ Automated Forensic DNA Extraction Kit: Automated DNA Purification on the HID EVOlution™ Systems User
Bulletin
Page 59

Validation of the PrepFiler™ Automated Forensic DNA Extraction Kit on the HID EVOlution™—Extraction System
Reproducibility studies (SWGDAM standard 2.5)
Reproducibility studies experiments
Reproducibility studies were performed to assess the reproducibility of the quantity and quality (as
judged by the presence of PCR inhibitors) of DNA obtained from replicate extractions of biological
samples.
Using the sample set shown in Table 6, an experiment was repeated on 3 separate days. In each
experiment, DNA was extracted and purified from eight replicates. A PrepFiler™ Spin Plate (96 wells)
was used for lysis, and a MicroAmp™ Optical 96-Well Reaction Plate was used for elution. The DNA
concentration and IPC Ct values were evaluated for reproducibility using the Quantifiler™ Human DNA
Quantification Kit.
Reproducibility studies results
Figure 11 shows the average DNA concentration and IPC Ct values for each sample by experiment.
The data from each of the eight replicates from the twelve samples from the three separate experiments
were combined. The average and standard deviation were calculated and the summary statistics for all
24 combined replicates are shown in Table 9.
Chapter 5
Experiments and results
5
Figure 11 Reproducibility studies—The average DNA concentration and average IPC Ct for the three dierent
experiments
The same data set is shown on two dierent scales: Concentration ranges 0–50 ng/µL (top) and 0–10 ng/µL (bottom).
PrepFiler™ Automated Forensic DNA Extraction Kit: Automated DNA Purification on the HID EVOlution™ Systems User
Bulletin
59
Page 60

Chapter 5 Experiments and results
5
Validation of the PrepFiler™ Automated Forensic DNA Extraction Kit on the HID EVOlution™—Extraction System
Table 9 Reproducibility studies—The averaged values for all three reproducibility experiments
Sample name
Liquid samples
40 µL LB85 24 31.37 ng/µL 49.74 ng/µL 37.37 ng/µL 4.74 ng/µL
30 µL LB85 24 18.04 ng/µL 36.35 ng/µL 24.95 ng/µL 4.80 ng/µL
10 µL LB85 24 5.73 ng/µL 10.59 ng/µL 8.24 ng/µL 1.17 ng/µL
5 µL LB85 24 3.30 ng/µL 4.83 ng/µL 3.97 ng/µL 0.45 ng/µL
2 µL LB85 24 1.08 ng/µL 2.18 ng/µL 1.49 ng/µL 0.22 ng/µL
1 µL LB85 24 0.31 ng/µL 1.59 ng/µL 0.62 ng/µL 0.30 ng/µL
Solid substrates
5 µL BSC 24 2.35 ng/µL 4.11 ng/µL 3.13 ng/µL 0.40 ng/µL
50 µL SALSw 24 1.27 ng/µL 2.90 ng/µL 2.06 ng/µL 0.47 ng/µL
1 µL SSC 24 1.17 ng/µL 3.21 ng/µL 1.86 ng/µL 0.45 ng/µL
n=
Minimum Maximum
DNA concentration
Average
± Standard
deviation
60
5 µL BSCI 24 2.30 ng/µL 4.42 ng/µL 2.99 ng/µL 0.57 ng/µL
PrepFiler™ Automated Forensic DNA Extraction Kit: Automated DNA Purification on the HID EVOlution™ Systems User
Bulletin
Page 61

Chapter 5 Experiments and results
Validation of the PrepFiler™ Automated Forensic DNA Extraction Kit on the HID EVOlution™—Extraction System
Table 9 Reproducibility studies—The averaged values for all three reproducibility
experiments (continued)
5
Sample name n=
5 µL BSD 24 0.17 ng/µL 5.01 ng/µL 2.78 ng/µL 1.53 ng/µL
Extraction blank
XB 24 0.00 ng/µL 0.00 ng/µL 0.00 ng/µL 0.00 ng/µL
Correlation studies
Correlation studies experiments
Correlation studies were performed to evaluate the performance of the automated protocol relative to
the manual protocol.
The sample set shown in Table 6 was extracted and purified in triplicate using the manual extraction
and purification protocol (see Chapter 2 of the PrepFiler™ Forensic DNA Extraction Kit User Guide). The
purified DNA samples were quantified using the Quantifiler™ Human DNA Quantification Kit. To evaluate
the performance of the automated protocol relative to the manual protocol, the DNA concentration and
IPC Ct data for the manually-purified samples were compared to data generated from the identical
samples for the “Reproducibility studies (SWGDAM standard 2.5)” on page 59.
DNA concentration
Minimum Maximum
Average
± Standard
deviation
PrepFiler™ Automated Forensic DNA Extraction Kit: Automated DNA Purification on the HID EVOlution™ Systems User
Bulletin
61
Page 62

Chapter 5 Experiments and results
5
Validation of the PrepFiler™ Automated Forensic DNA Extraction Kit on the HID EVOlution™—Extraction System
Correlation studies results
Figure 12 shows the data generated from the manually-purified samples compared to the data generated
from the same samples purified using the automated protocol. The DNA concentration and the IPC Ct values
resulting from both extraction and purification methods are in accordance.
Figure 12 Correlation study—The graph shows the average DNA concentration (barchart) and IPC Ct values (line
graph) obtained for the three replicates of each manually-purified sample compared to the data generated from
the identical samples purified using the automated protocol (reproducibility experiments 1–3)
62
PrepFiler™ Automated Forensic DNA Extraction Kit: Automated DNA Purification on the HID EVOlution™ Systems User
Bulletin
Page 63

PrepFiler
Bulletin
Table 10 Correlation study—Legend
™
Automated Forensic DNA Extraction Kit: Automated DNA Purification on the HID EVOlution
Experiment
Concentration
Reproducibility
experiment 1
Reproducibility
experiment 2
Reproducibility
experiment 3
Manual purification 41.99 29.97 8.74 4.21 1.90 0.80 3.19 1.75 2.20 2.81 3.33 0.00
IPC C
t
Reproducibility
experiment 1
Reproducibility
experiment 2
Reproducibility
experiment 3
Manual purification 28.03 27.76 27.25 27.24 27.28 27.34 27.27 27.48 27.31 27.27 27.31 27.21
Sample name
40 30 10 5 2 1 BSC SALSw SSC BSCI BSD XB
43.02 27.42 8.80 4.29 1.52 0.80 3.30 2.63 2.23 3.51 4.47 0.00
35.1 24.99 8.62 3.94 1.50 0.60 3.20 1.79 1.64 2.89 2.51 0.00
34.00 22.44 7.29 3.68 1.46 0.56 2.89 1.75 1.70 2.57 2.72 0.00
28.31 27.91 27.51 27.46 27..44 27.27 27.36 27.75 27.54 27.66 27.89 27.30
27.89 27.70 27.28 27.29 27.32 27.36 27.24 27.41 27.30 27.17 27.98 27.58
28.15 27.91 27.54 27.52 27.57 27.58 27.47 27.68 27.55 27.87 27.13 27.58
Validation of the PrepFiler
™
Automated Forensic DNA Extraction Kit on the HID EVOlution
Chapter 5 Experiments and results
Systems User
63
™
—Extraction System
™
5
Page 64

Chapter 5
5
Validation of the PrepFiler™ Automated Forensic DNA Extraction Kit on the HID EVOlution™—Extraction System
Experiments and results
Cross-contamination studies (SWGDAM standard 3.6)
Cross-contamination studies experiments
These studies were performed to evaluate the potential for cross-contamination.
Checkerboard plate:plate experiment
For lysis, 10-μL samples of blood from six dierent donors were arranged in combination with extraction
blanks in a PrepFiler™ Spin Plate (96 wells). The samples were arranged in a checkerboard format, such
that samples from the same donor were not in adjacent sample wells (see Figure 13a). Samples were
eluted into a MicroAmp™ Optical 96-Well Reaction Plate. The DNA was quantified using the Quantifiler
Human DNA Quantification Kit. All extraction blanks were amplified with the AmpFℓSTR™ MiniFiler
PCR Amplification Kit using 10 μL of eluate.
Checkerboard tubes:plate experiment
An experiment similar to the plate:plate experiment was performed to test the use of microcentrifuge
tubes and a 96-well reaction plate. For lysis, 10-μL samples of blood from eight dierent donors were
arranged in combination with extraction blanks in a checkerboard format using microcentrifuge tubes
(see Figure 13c).The samples were eluted into a 96-well reaction plate.
™
™
64
Figure 13 Cross-contamination study setup
a. Checkerboard format with 6 donors on a plate; b. Checkerboard format using 8 donors in tubes; c. Liquid blood donors
PrepFiler™ Automated Forensic DNA Extraction Kit: Automated DNA Purification on the HID EVOlution™ Systems User
Bulletin
Page 65

Cross-contamination studies results
Checkerboard plate:plate experiment
Of the 48 extraction blanks, six wells produced a Ct value <40. Of the wells with a Ct value <40, only
one well yielded a detectable profile with the AmpFℓSTR™ MiniFiler™ PCR Amplification Kit analysis and
this profile was not attributable to any of the blood donors.
Checkerboard tubes:plate experiment
Of the 48 extraction blanks, one well had a Ct value <40. No detectable AmpFℓSTR™ MiniFiler™ PCR
Amplification Kit profile was observed in any of the analyzed wells.
STR studies
STR studies experiments
The goal of the DNA extraction and purification step in the STR analysis workflow is to extract and
purify DNA of sucient quality and quantity to produce conclusive STR profiles. The quality of the
purified DNA extract obtained from the PrepFiler™ Automated Forensic DNA Extraction Kit was further
evaluated by examining the STR profiles.
Chapter 5 Experiments and results
Validation of the PrepFiler™ Automated Forensic DNA Extraction Kit on the HID EVOlution™—Extraction System
5
The extracted and purified DNA samples described in precision experiment A (eight replicates of
12 samples; see Table 6) were amplified using the AmpFℓSTR™ Identifiler™ PCR Amplification Kit. 1
ng of human DNA, as determined by the Quantifiler™ Human DNA Quantification Kit, was used as the
template DNA.
PrepFiler™ Automated Forensic DNA Extraction Kit: Automated DNA Purification on the HID EVOlution™ Systems User
Bulletin
65
Page 66

Chapter 5 Experiments and results
5
Validation of the PrepFiler™ Automated Forensic DNA Extraction Kit on the HID EVOlution™—Extraction System
STR studies results
Full STR profiles were obtained from all extracted and purified DNA samples (see Figure 14). No crosscontamination was observed.
Figure 14 STR study—AmpFℓSTR™ Identifiler™ PCR Amplification Kit STR profiles for the various sample types
tested
On the left, liquid blood samples (from a single donor) show complete profiles (RFU=3,000). On the right, solid substrate samples
(from dierent donors) each show a dierent profile (RFU=3,000). The extraction blank (XB) is also shown on the right (RFU=500).
The interlocus balance was calculated for each of the 96 individual profiles. The eight replicate measurements
were averaged across each dye for each sample type and the standard deviation was calculated. The average
interlocus balance for each of the eleven sample types and the positive amplification control 9947a is shown in
Figure 15.
66
PrepFiler™ Automated Forensic DNA Extraction Kit: Automated DNA Purification on the HID EVOlution™ Systems User
Bulletin
Page 67

Chapter 5 Experiments and results
Validation of the PrepFiler™ Automated Forensic DNA Extraction Kit on the HID EVOlution™—Extraction System
5
Figure 15 STR study—The average interlocus balance for each sample type (eight replicates each)
Liquid blood samples are shown on the left, and samples spotted on solid substrates are shown on the right. A single replicate of
9947a was used as a positive control.
Heterozygote peak height ratios were calculated for each profile. The eight replicate measurements were
averaged for each sample type and the standard deviation was calculated. The average heterozygote peak
height ratio for each of the eleven sample types, as well as a positive control, is displayed in Figure 16. The
liquid blood graph (left side) does not include homozygous loci for these samples.
PrepFiler™ Automated Forensic DNA Extraction Kit: Automated DNA Purification on the HID EVOlution™ Systems User
Bulletin
67
Page 68

68
PrepFiler
™
Automated Forensic DNA Extraction Kit: Automated DNA Purification on the HID EVOlution
5
Chapter 5 Experiments and results
Validation of the PrepFiler
™
Automated Forensic DNA Extraction Kit on the HID EVOlution
™
Systems User
Bulletin
Figure 16 STR study—The average peak height ratio is shown by locus for the eight replicates of each sample type
The left panel represents data from a range of starting volumes of liquid blood from a single donor and includes heterozygote loci. The right panel includes heterozygote
loci for each of the samples spotted on solid substrates as well as the positive control 9947a.
—Extraction System
™
Page 69

Validation of the PrepFiler™ Automated Forensic DNA Extraction Kit on the HID EVOlution™—Extraction System
Verification studies for remaining scripts
Verification studies experiments
Four software scripts containing the DNA purification instructions for the robotic workstation were
developed:
•
Plate:plate—Beginning with lysate in a 96-well plate and collecting the eluate in a 96-well plate
•
Plate:tubes—Beginning with lysate in a 96-well plate and collecting the eluate in tubes
•
Tubes:tubes—Beginning with lysate in tubes and collecting the eluate in tubes
•
Tubes:plate—Beginning with lysate in tubes and collecting the eluate in a 96‑well plate
The core liquid handling script for operations such as binding, washing, and elution is identical in
all four scripts. The plate:plate script was the primary script used during developmental validation,
including in the cross-contamination study. Verification studies were performed to test the other three
scripts.
Plate:tubes experiment
To test the performance of the PrepFiler™ Spin Plate (96 wells) as a source vessel and microfuge tubes
as elution vessels, the lysate from 10-μL blood samples from six dierent donors was arranged in a
checkerboard pattern in combination with extraction blanks in such a way that samples from the same
donor were not in adjacent sample wells (see Figure 13a).
Chapter 5 Experiments and results
5
Tubes:plate experiment
The tubes:plate experiment performed for the cross-contamination study also served as the tubes:plate
experiment for the verification studies (see “Cross-contamination studies experiments” on page 64):
To test the performance of microfuge tubes as source vessels and the MicroAmp™ Optical 96-Well
Reaction Plate as an elution vessel, the lysate from 10-μL blood samples from eight dierent donors
was arranged in a checkerboard format in combination with extraction blanks in such a way that
samples from the same donor were not in adjacent sample wells (see Figure 13c). Microfuge tubes that
contained the lysate were placed in tube racks L1–L6 and the DNA eluate was collected in a 96-well
reaction plate.
Tubes:tubes experiment
To test the performance of microfuge tubes as source vessels and elution vessels, the lysate from
10-μL blood samples from eight donors was arranged in a checkerboard format in combination with
extraction blanks in such a way that samples from the same donor were not in adjacent sample wells
(see Figure 13c). Microfuge tubes that contained the lysate were placed in tube racks L1–L6 and the
DNA eluate was collected in microfuge tubes in tube racks S1–S6.
The DNA from all three verification experiments was quantified using the Quantifiler™ Human DNA
Quantification Kit.
PrepFiler™ Automated Forensic DNA Extraction Kit: Automated DNA Purification on the HID EVOlution™ Systems User
Bulletin
69
Page 70

Chapter 5 Experiments and results
5
Validation of the PrepFiler™ Automated Forensic DNA Extraction Kit on the HID EVOlution™—Extraction System
Verification studies results
Data from each experiment were reviewed for well-to-well cross-contamination and overall consistency
in DNA yield (see Figure 17 and Table 11).
•
Plate:tubes verification experiment—Of the 48 extraction blanks tested, a Ct value <40 was
observed in three wells.
•
Tubes:tubes verification experiment—See the results of the cross-contamination study
tubes:plate experiment (“Checkerboard tubes:plate experiment” on page 65).
•
Tubes:plate verification experiment—All of the 48 extraction blanks resulted in Ct values >40.
70
Figure 17 Verification studies—The average DNA concentration for each of the six or eight replicates for
each liquid blood donor
Only six of the eight donors are shown for simplicity, with the remaining donors showing similar results.
Table 11 Verification studies—Average total DNA yield (ng)
The average total DNA yield (ng) was calculated for each liquid blood donor for all four automated purification methods
and compared to the expected yield from 4,000 or 11,000 nucleated blood cells per 1 µL.
Sample
LB76 529.90 ng 56.38 ng
LB77 440.71 ng 35.89 ng
LB83 469.50 ng 74.40 ng
LB90 684.27 ng 59.06 ng
PrepFiler™ Automated Forensic DNA Extraction Kit: Automated DNA Purification on the HID EVOlution™ Systems User
Total DNA yield ± Standard deviation
Bulletin
Page 71

Validation of the PrepFiler™ Automated Forensic DNA Extraction Kit on the HID EVOlution™—Extraction System
Table 11 Verification studies—Average total DNA yield (ng) (continued)
Sample Total DNA yield ± Standard deviation
LB91 545.45 ng 51.12 ng
LB92 963.90 ng 109.31 ng
LB93 589.44 ng 54.92 ng
LB94 683.53 ng 61.66 ng
Expected yield (ng)
4,000 cells/μL 250 ng NA
11,000 cells/μL 650 ng NA
Additional cross-contamination studies
Additional cross-contamination studies experiments
Chapter 5
Experiments and results
5
Additional studies were performed to monitor cross-contamination during lysis using the filter plate
and DNA isolation on the HID EVOlution™—Extraction System. The extracted and purified samples
(including extraction reagent blanks) were processed to:
•
Quantitate human DNA using the Quantifiler™ Human DNA Quantification Kit
•
Perform STR typing using the AmpFℓSTR™ Identifiler™ PCR Amplification Kit and AmpFℓSTR
MiniFiler™ PCR Amplification Kit
Two PrepFiler™ Spin Plates (96 wells) were prepared for lysis. Each plate contained 10-μL samples
of blood from six dierent donors arranged in combination with extraction blanks in a checkerboard
format, such that samples from the same donor were not in adjacent sample wells in the lysis or elution
plates (same format as the “Checkerboard plate:plate experiment” on page 64; see also Figure 13a).
The open wells were covered with MicroAmp™ Clear Adhesive Film while the liquid blood samples
were dispensed to avoid any aerosol transfer, and the movement of the pipette was controlled to
reduce aerosol formation. The samples were processed using the plate:plate script and eluted into
two MicroAmp™ Optical 96-Well Reaction Plates. All samples were quantified using the Quantifiler
Human DNA Quantification Kit and amplified with the AmpFℓSTR™ Identifiler™ PCR Amplification Kit
and AmpFℓSTR™ MiniFiler™ PCR Amplification Kit following the standard kit protocols.
™
™
Additional cross-contamination studies results
DNA quantitation using the Quantifiler™ Human DNA Quantification Kit
None of the extraction blanks in plate 1 exhibited the presence of human DNA as determined by the
Quantifiler™ Human DNA Quantification Kit; the Ct values for the human target were Undetermined. In
plate 2, only one well (well B11) exhibited a Ct value of 39.94, which is attributed to higher background
and not necessarily due to cross-contamination (see the STR results below).
PrepFiler™ Automated Forensic DNA Extraction Kit: Automated DNA Purification on the HID EVOlution™ Systems User
Bulletin
71
Page 72

Chapter 5
5
Validation of the PrepFiler™ Automated Forensic DNA Extraction Kit on the HID EVOlution™—Extraction System
Experiments and results
STR profiling using the AmpFℓSTR™ Identifiler™ and MiniFiler™ kits
STR profiling results were generated from samples in plates 1 and 2 using the Identifiler™ and
MiniFiler™ kits. The results were analyzed using a 50‑RFU detection threshold. All samples in both
extraction/purification plates exhibited single source, conclusive, and complete STR profiles. Further,
none of the samples exhibited detectable mixed profiles. None of the extraction blank wells exhibited
partial or complete STR profiles. Extraction blank well B11 from plate 2, which exhibited a Ct value of
39.94, did not exhibit an STR profile using either the Identifiler™ or MiniFiler™ kit.
The results from the two plates of extracts processed for quantitation and STR profiling are summarized
in Table 12.
Table 12 Summary of additional cross-contamination studies
A total of 192 samples were extracted and purified, of which 96 were extraction blanks and 96 were samples originating
from six human donors.
Number of samples
Sample type
Plate 1 Plate 2 Total
Samples analyzed (including extraction blanks) 96 96 192
Extraction blanks 48 48 96
Extraction blanks with Ct <40 0 1 1
Extraction blanks exhibiting peaks called as
alleles in the Identifiler™ kit run
Extraction blanks exhibiting peaks called as
alleles in the MiniFiler™ kit run
[1]
Using the standard cutoff (50 RFU)
Conclusions
The PrepFiler™ Automated Forensic DNA Extraction Kit was developed for the isolation of genomic
DNA from a variety of biological samples. Validation studies confirmed that the kit provides robust and
reliable results in obtaining genomic DNA from forensic biological samples for downstream applications
such as real-time quantitative PCR and PCR for STR profiling.
•
The PrepFiler™ Automated Forensic DNA Extraction Kit was validated following the SWGDAM
standards.
•
The utility of the extraction and purification methods in forensic DNA analysis was demonstrated
using forensic-type samples.
•
The kit is eective in maximizing the amount of DNA obtained from samples that contain small and
large quantities of biological material.
•
The DNA that was extracted and purified was free of PCR inhibitors as determined by the IPC C
values using the Quantifiler™ Human DNA Quantification Kit.
•
The PrepFiler™ Automated Forensic DNA Extraction Kit exhibited clean operations and did not
introduce any detectable cross-contamination of human DNA.
[1]
0 0 0
0 0 0
[1]
t
72
PrepFiler™ Automated Forensic DNA Extraction Kit: Automated DNA Purification on the HID EVOlution™ Systems User
Bulletin
Page 73

Chapter 5 Experiments and results
Validation of PrepFiler™ Wash Buer B and the related modifications to the workstation layout and scripts
Validation of PrepFiler™ Wash Buer B and the related
modifications to the workstation layout and scripts
Overview of experiments and results
We performed developmental validation experiments to evaluate the following:
•
A new wash buer, PrepFiler™ Wash Buer B, for use with the PrepFiler™ Automated Forensic DNA
Extraction Kit
•
Related modifications to the HID EVOlution™—Extraction System and HID EVOlution™—
Combination System
The new buer and system modifications provide a more robust automated protocol and improve
overall performance.
PrepFiler™ Wash Buer B
An additional wash buer, PrepFiler™ Wash Buer B, is used for the third (final) wash during DNA
purification to minimize the potential for detergent carryover from PrepFiler™ Wash Buer A. Detergent
carryover can inhibit downstream PCR applications.
5
Modified workstation layout
The worktable layout has been modified to add a trough for PrepFiler™ Wash Buer B and to rearrange
the remaining reagent and waste troughs to accommodate the new trough. For information on setting
up the workstation, see the appropriate document for your instrument:
•
TecanHID EVOlution™—Extraction System Application Manual, 395372, v2.0 (June 2010), Sections
4.3 and 4.4
•
Tecan HID EVOlution™—Combination System Application Manual, 395967, v2.0 (June 2010),
Sections 4.3 and 4.4
New software scripts
New HID EVOlution™ scripts (see Table 13) replace existing automated purification scripts for use with
the PrepFiler™ Automated Forensic DNA Extraction Kit. The new scripts incorporate the workstation
changes, improvements to eliminate bubble formation on disposable tips during dispensing steps, and
additional changes to optimize liquid handling performance and pathways.
All new HID EVOlution™—Extraction Systems and HID EVOlution™—Combination Systems are delivered
with the new scripts. If you are an existing customer, contact your local Tecan customer support
organization to obtain the new scripts.
PrepFiler™ Automated Forensic DNA Extraction Kit: Automated DNA Purification on the HID EVOlution™ Systems User
Bulletin
73
Page 74

Chapter 5
5
Validation of PrepFiler™ Wash Buer B and the related modifications to the workstation layout and scripts
Experiments and results
For details on script changes, see the service pack revision history file included in the Documents
folder on the CD that contains the new scripts.
Table 13 New Freedom EVOware™ software purification scripts
System Script names
•
HID EVOlution™—Extraction System
HID EVOlution™—Combination
System
PrepFiler_plate_plate_V1_SP2
•
PrepFiler_plate_tubes_V1_SP2
•
PrepFiler_tubes_plate_V1_SP2
•
PrepFiler_tubes_tubes_V1_SP2
•
PrepFiler_plate_plate500_V1_SP2
•
PrepFiler_plate_tubes500_V1_SP2
•
PrepFiler_tubes_plate500_V1_SP2
•
PrepFiler_tubes_tubes500_V1_SP2
•
PrepFiler_plate_plateCombo_V1_SP1
•
PrepFiler_plate_tubesCombo_V1_SP1
•
PrepFiler_tubes_plateCombo_V1_SP1
•
PrepFiler_tubes_tubesCombo_V1_SP1
•
PrepFiler_plate_plateCombo500_V1_SP1
•
PrepFiler_plate_tubesCombo500_V1_SP1
•
PrepFiler_tubes_plateCombo500_V1_SP1
•
PrepFiler_tubes_tubesCombo500_V1_SP1
[1]
[1]
[1]
The 500-mL scripts were not validated as part of the studies described in this chapter.
Note: Core liquid handling for operations such as binding, washing, and elution are identical for all
scripts.
Materials and methods
The following materials and methods were used in all experiments performed as part of the
developmental validation of the PrepFiler™ Wash Buer B and the new scripts. (Detailed lists are
provided in Table 14 and Table 15.)
•
PrepFiler™ Wash Buer B was prepared by adding 95% ethanol to 200 mL of low‑TE buer to bring
the final volume to 500 mL.
•
Biological fluids and tissues used in the studies are listed in Table 15. See each study for a
description of the samples used.
•
Lysis was performed as described in “Sample lysis method” on page 77.
•
Extracted genomic DNA was purified from the lysed samples on the HID EVOlution™—Extraction
System and/or HID EVOlution™—Combination System. The standard 300‑μL scripts were used in
all studies. Except where noted, lysate was processed from a 96‑well plate and eluate collected
in a 96‑well plate. Final elution volumes varied depending on humidity and room temperature, and
ranged between 40–46 μL. Extraction blanks were included in each study.
74
PrepFiler™ Automated Forensic DNA Extraction Kit: Automated DNA Purification on the HID EVOlution™ Systems User
Bulletin
Page 75

Chapter 5 Experiments and results
Validation of PrepFiler™ Wash Buer B and the related modifications to the workstation layout and scripts
•
Purified DNA extract was set up for qPCR on the HID EVOlution™—qPCR/PCR Setup System using
the Quantifiler™ Human DNA Quantification Kit. If study samples filled more than one qPCR plate,
samples of the same type were grouped together in the same qPCR plate to avoid introducing
run-to-run variation.
•
Purified DNA extract from each sample was quantified using the Quantifiler™ Human DNA
Quantification Kit on a 7500 Real‑Time PCR Instrument. The quantitation results were analyzed
using SDS v1.2.3.
•
Quantified DNA from each sample was normalized and set up for amplification using the
HID EVOlution™—Combination System. The AmpFℓSTR™ Identifiler™ PCR Amplification Kit was
used for all studies except the cross-contamination study, which used the AmpFℓSTR™ MiniFiler
PCR Amplification Kit.
•
A target input of 1 ng of DNA was used for STR PCR amplification. For samples with
concentrations <0.10 ng/μL, a maximum of 10 μL of purified DNA extract was added to each
STR reaction. Samples were amplified on a GeneAmp™ PCR System 9700. Electrophoresis was
performed on a 3130xl Genetic Analyzer.
•
The STR profiles were analyzed using GeneMapper™ ID‑X Software v1.0.
Table 14 Summary of materials used in the PrepFiler™ Wash Buer B validation studies
Unless otherwise indicated, all materials are available through thermofisher.com. "MLS" indicates that the material is available
from fisherscientific.com or another major laboratory supplier. Catalog numbers that appear as links open the web pages for
those products.
5
™
Component
Chemistry Isopropyl alcohol Sigma-Aldrich
TE buer Teknova
Ethanol (95% molecular-biology grade) Sigma-Aldrich
PrepFiler™ Automated Forensic DNA Extraction Kit with Plastics
Note: Since these validation experiments were performed,
this product has been discontinued. It has been replaced
with PrepFiler™ Automated Forensic DNA Extraction Kit
(Cat. No. 4463353).
PrepFiler™ Wash Buer B (from the PrepFiler™ Automated Forensic
DNA Extraction Kit, prepared as indicated above)
Quantifiler™ Human DNA Quantification Kit 4343895 (Lot
AmpFℓSTR™ Identifiler™ PCR Amplification Kit 4322288 (Lot
AmpFℓSTR™ MiniFiler™ PCR Amplification Kit 4373872 (Lot
Item Source
™
4397977 (Lot
Number 0901004)
Number 0906112)
Numbers 0901114,
0905120, and 0907123)
Number 0909021)
™
™
Cartridge-based, silica magnetic bead extraction kit Company A
Cartridge-based, silica magnetic bead extraction kit Company B
PrepFiler™ Automated Forensic DNA Extraction Kit: Automated DNA Purification on the HID EVOlution™ Systems User
Bulletin
75
Page 76

Chapter 5 Experiments and results
5
Validation of PrepFiler™ Wash Buer B and the related modifications to the workstation layout and scripts
Table 14 Summary of materials used in the PrepFiler Wash Buer B validation studies (continued)
Component Item Source
Labware MicroAmp™ Optical 96-Well Reaction Plate (without barcode) or
MicroAmp™ Optical 96-Well Reaction Plate with Barcode
RNase-free Microfuge Tubes (1.5 mL); certified DNase- and RNasefree
200 μL and 1,000 μL tips Tecan
100-mL troughs for reagents Tecan
Puritan™ Cotton Tipped Wooden Swabs (without glue) VWR
SERI Washed Cotton Cloth Serological Research
HID EVOlution™—
Extraction System
Freedom EVO™ 150 robotic workstation, including the following hardware:
•
8-channel Liquid Handling accessory (LiHa; channels 1–4 used
for qPCR/STR setup and channels 5–8 used for purification)
•
Robotic Manipulator arm (RoMa)
•
Te‑Shake™ plate adapter with heating block
•
Magnetic-Ring Stand (96 well)
Freedom EVOware™ software v2.1 SP1, configured with
HID EVOlution™—Extraction application v1.0 SP1
N8010560 or 4306737
AM12400
™
™
™
Institute (Richmond, CA)
™
Tecan
AM10050
™
Tecan
HID EVOlution
—Combination
System
Eight new scripts (see Table 13)
Windows™ XP Professional operating system
™
Freedom EVO™ 150 robotic workstation, including the following hardware:
•
8-channel Liquid Handling accessory (LiHa; channels 1–4 used
for qPCR/STR setup and channels 5–8 used for purification)
•
Robotic Manipulator arm (RoMa)
•
Te‑Shake™ plate adapter with heating block
•
Magnetic-Ring Stand (96 well)
Freedom EVOware™ software, v2.1 SP1 configured with the following:
•
HID EVOlution™—Extraction application v1.0 SP1
•
HID EVOlution™ driver v1.0.0.25 SP4
•
HID EVOlution™—qPCR/PCR driver v1.0.0.26 SP5
•
Sample Oriented EVOware™ v1.2 SP1
™
Tecan
AM10050
™
Tecan
76
PrepFiler™ Automated Forensic DNA Extraction Kit: Automated DNA Purification on the HID EVOlution™ Systems User
Bulletin
Page 77

Chapter 5
Validation of PrepFiler™ Wash Buer B and the related modifications to the workstation layout and scripts
Experiments and results
Table 14 Summary of materials used in the PrepFiler Wash Buer B validation studies (continued)
Component Item Source
HID EVOlution
—Combination
System
™
Eight new scripts (see Table 13) Tecan
Windows™ XP Professional operating system
5
™
Other instruments
and software
3130xl Genetic Analyzer with Data Collection Software v3.0 —
GeneMapper™ ID‑X Software v1.0 —
GeneAmp™ PCR System 9700 (gold-plated silver 96-well block) —
7500 Real‑Time PCR Instrument with SDS v1.2.3 —
Signature™ Benchtop Shaking Incubators VWR International, LLC
Eppendorf™ 1.5-mL Tubes Thermomixer Eppendorf™ Model 5350
Table 15 Biological samples used in the PrepFiler™ Wash Buer B validation studies
Sample type
Human peripheral blood 233 Female Serological Research Institute
Human peripheral blood 238 Female
Human peripheral blood 240 Female
Human peripheral blood 236 Male
Donor reference
number
Gender Source
Model 1575 (9120890;
serial number 10032308)
(Richmond, CA)
Semen — Male
Saliva Anonymous Male In house
Sample lysis method
To test the performance of the automated purification system, we took steps to minimize potential
variation because of dierences between manual lysis methods. Except where noted in individual
studies, sample lysis was performed using the PrepFiler™ Automated Forensic DNA Extraction Kit with
Plastics and the following procedure based on the standard (300‑μL) tube protocol from the PrepFiler
and PrepFiler™ BTA Automated Forensic DNA Extraction Kits User Guide (Pub. No. 4463349).
1.
Samples were placed in nuclease-free 1.5-mL polypropylene microcentrifuge tubes.
2.
300 μL of PrepFiler™ Lysis Buer and 3 μL of DTT, 1.0 M, were added to each sample.
3.
The tubes were vortexed for 10 seconds, then briefly centrifuged.
4.
The tubes were incubated in a thermal mixer at 900 rpm for 40 minutes at 70°C.
PrepFiler™ Automated Forensic DNA Extraction Kit: Automated DNA Purification on the HID EVOlution™ Systems User
Bulletin
™
77
Page 78

Chapter 5 Experiments and results
5
Validation of PrepFiler™ Wash Buer B and the related modifications to the workstation layout and scripts
5.
The substrate and residual lysis buer were transferred from the tubes to the wells of a PrepFiler
96‑Well Spin Plate and Filter Plate assembly, then centrifuged at 2,000 rpm for 1 minute to recover
clarified lysates.
6.
The filter plate was separated from the spin plate. The spin plate that contained the lysed sample
was used as the source plate during automated purification.
Script validation
We performed script validation to compare the new scripts to the original scripts.
Note: Because core liquid handling for operations such as binding, washing, and elution are
identical for all new scripts, we performed script validation with only one of the new scripts:
PrepFiler_plate_plateCombo.
Before performing the PrepFiler™ Wash Buer B validation studies, we tested the new workstation
layout, new buer, and new PrepFiler_plate_plateCombo script on the HID EVOlution™—Combination
System using the following sample types:
•
A dilution series of blood dried on cotton-tipped wooden swabs
•
A low-input case-type sample set identical to that shown in Table 24
The performance of the new scripts was equivalent to the original scripts with respect to DNA recovery.
No indication of PrepFiler™ Wash Buer A carryover was observed in the STR profiles. Figure 18 and
Figure 19 show the results for each sample type.
™
78
PrepFiler™ Automated Forensic DNA Extraction Kit: Automated DNA Purification on the HID EVOlution™ Systems User
Bulletin
Page 79

Chapter 5 Experiments and results
Validation of PrepFiler™ Wash Buer B and the related modifications to the workstation layout and scripts
5
Figure 18 Diluted blood on swabs—DNA yield from original (green) and new (blue) scripts
PrepFiler™ Automated Forensic DNA Extraction Kit: Automated DNA Purification on the HID EVOlution™ Systems User
Bulletin
79
Page 80

Chapter 5 Experiments and results
5
Validation of PrepFiler™ Wash Buer B and the related modifications to the workstation layout and scripts
Figure 19 Low-input samples—DNA yield from original (green) and new (blue) scripts
Precision and sensitivity studies
Precision and sensitivity studies experiments
Precision and sensitivity studies were performed to test the consistency of DNA yield and quality from
extracted and purified DNA. Seven replicates of a blood sample dilution series were extracted and
purified. The average and standard deviation DNA yield and the IPC Ct within each replicate set were
examined.
Table 16 Experiment setup for precision and sensitivity studies
Experiment setup
Sample set Dilution series using blood from Donor 238 Dilution series using blood from Donor 233
Lysis method See “Sample lysis method” on page 77.
HID EVOlution™—Combination System HID EVOlution™—Extraction System
Blood was diluted using the following dilution series: 1:5, 1:10, 1:50, 1:100, and 1:250. 5 μL of
diluted blood was then spotted on SERI cotton cloth and Puritan swabs.
80
PrepFiler™ Automated Forensic DNA Extraction Kit: Automated DNA Purification on the HID EVOlution™ Systems User
Bulletin
Page 81

Chapter 5
Validation of PrepFiler™ Wash Buer B and the related modifications to the workstation layout and scripts
Experiments and results
Table 16 Experiment setup for precision and sensitivity studies (continued)
Experiment setup HID EVOlution™—Combination System HID EVOlution™—Extraction System
5
Purification run
setup (layout and
replicates)
Extraction script PrepFiler_plate_plateCombo_V1_SP1 PrepFiler_plate_plate_V1_SP2
Number of
purification runs
qPCR method qPCR setup was performed on the HID EVOlution™ – Combination System using the
STR PCR method DNA normalization and STR PCR setup was performed on the HID EVOlution™—Combination
For each automated purification run, seven replicates of each dilution were set up in a plate
as shown in Table 17. Each plate contained one substrate blank per dilution concentration (five
extraction blanks per plate).
The experiment (purification through STR PCR) was performed three times (once per day on
3 dierent days).
Quantifiler® Human DNA Quantification kit.
System using the AmpFℓSTR™ Identifiler™ PCR Amplification Kit.
A target input of 1 ng of DNA was used for STR PCR amplification. For samples with
concentrations <0.10 ng/μL, a maximum of 10 μL of purified DNA extract was added to each
STR reaction.
Table 17 DNA lysate plate layout for precision and sensitivity studies
Dilution 1:5 Dilution 1:10 Dilution 1:50 Dilution 1:100 Dilution 1:250
A Replicate 1 Replicate 1 Replicate 1 Replicate 1 Replicate 1
B Replicate 2 Replicate 2 Replicate 2 Replicate 2 Replicate 2
C Replicate 3 Replicate 3 Replicate 3 Replicate 3 Replicate 3
D Replicate 4 Replicate 4 Replicate 4 Replicate 4 Replicate 4
E Replicate 5 Replicate 5 Replicate 5 Replicate 5 Replicate 5
F Replicate 6 Replicate 6 Replicate 6 Replicate 6 Replicate 6
G Replicate 7 Replicate 7 Replicate 7 Replicate 7 Replicate 7
H Extraction Blank 1 Extraction Blank 2 Extraction Blank 3 Extraction Blank 4 Extraction Blank 5
Precision and sensitvity studies results
The new scripts returned DNA in similar yield and with more ecient STR PCR amplification than the
original scripts. Background amplification products were not observed from substrate blanks. IPC C
was within normal range for all samples, and consistent results were obtained across the runs and
between the two platforms.
For the HID EVOlution™—Combination System:
•
DNA concentration results are shown in Table 19 below and Figure 21 on page 117
•
Average peak heights are shown in Figure 22 on page 118
t
PrepFiler™ Automated Forensic DNA Extraction Kit: Automated DNA Purification on the HID EVOlution™ Systems User
Bulletin
81
Page 82

Chapter 5
5
Validation of PrepFiler™ Wash Buer B and the related modifications to the workstation layout and scripts
Experiments and results
For the HID EVOlution™—Extraction System:
•
DNA concentration results are shown in Table 20 and Figure 23 on page 119
•
Average peak heights are shown in Figure 24 on page 119
Table 18 HID EVOlution™—Combination System—Precision and sensitivity studies
Average and standard deviation DNA concentration for the seven replicates for each dilution concentration
Run 1 Run 2 Run 3
Sample
dilution
(1:5) 1.331 ng/μL 0.084 1.171 ng/µL 0.302 1.060 ng/µL 0.032
(1:10) 0.700 ng/μL 0.067 0.733 ng/µL 0.043 0.563 ng/µL 0.068
(1:50) 0.135 ng/μL 0.011 0.131 ng/µL 0.009 0.107 ng/µL 0.017
(1:100) 0.057 ng/μL 0.009 0.068 ng/µL 0.007 0.046 ng/µL 0.004
(1:250) 0.027 ng/μL 0.006 0.022 ng/µL 0.007 0.012 ng/µL 0.002
Average
concentration
Conc. standard
deviation
Average
concentration
Conc. standard
deviation
Average
concentration
Conc. standard
deviation
Average
IPC C
t
27.478 ± 0.172
ng/μL
— — — — —
Figure 20 HID EVOlution™—Combination System—Average DNA concentration (ng/μL) for the seven replicates
for each dilution concentration
82
PrepFiler™ Automated Forensic DNA Extraction Kit: Automated DNA Purification on the HID EVOlution™ Systems User
Bulletin
Page 83

Chapter 5 Experiments and results
Validation of PrepFiler™ Wash Buer B and the related modifications to the workstation layout and scripts
5
Figure 21 HID EVOlution™—Combination System—Average peak heights from AmpFℓSTR™ Identifiler™ PCR
Amplification Kit STR profiles
Table 19 HID EVOlution™—Extraction System—Precision and sensitivity studies
Average and standard deviation DNA concentration for the seven replicates for each dilution concentration
Run 1 Run 2 Run 3
Sample
dilution
(1:5) 1.359 ng/μL 0.156 1.270 ng/µL 0.208 1.202 ng/µL 0.155
(1:10) 0.547 ng/μL 0.043 0.585 ng/µL 0.115 0.570 ng/µL 0.036
(1:50) 0.108 ng/μL 0.007 0.109 ng/µL 0.008 0.105 ng/µL 0.011
(1:100) 0.045 ng/μL 0.008 0.045 ng/µL 0.006 0.052 ng/µL 0.007
(1:250) 0.020 ng/μL 0.002 0.016 ng/µL 0.007 0.025 ng/µL 0.009
Average
IPC C
t
Average
concentration
26.46 ± 0.211
ng/μL
Conc. standard
deviation
— — — — —
Average
concentration
Conc. standard
deviation
Average
concentration
Conc. standard
deviation
PrepFiler™ Automated Forensic DNA Extraction Kit: Automated DNA Purification on the HID EVOlution™ Systems User
Bulletin
83
Page 84

Chapter 5 Experiments and results
5
Validation of PrepFiler™ Wash Buer B and the related modifications to the workstation layout and scripts
Figure 22 HID EVOlution™—Extraction System—Average DNA concentration (ng/μL)
84
PrepFiler™ Automated Forensic DNA Extraction Kit: Automated DNA Purification on the HID EVOlution™ Systems User
Bulletin
Page 85

Chapter 5 Experiments and results
Validation of PrepFiler™ Wash Buer B and the related modifications to the workstation layout and scripts
5
Figure 23 HID EVOlution™—Extraction System—Average peak heights from AmpFℓSTR™ Identifiler™ PCR
Amplification Kit STR profile
PrepFiler™ Automated Forensic DNA Extraction Kit: Automated DNA Purification on the HID EVOlution™ Systems User
Bulletin
85
Page 86

Chapter 5 Experiments and results
5
Validation of PrepFiler™ Wash Buer B and the related modifications to the workstation layout and scripts
Cross-contamination studies
Cross-contamination studies experiments
Cross-contamination studies were performed to confirm that the new scripts, wash buer, and
workstation layout do not introduce cross-contamination between samples. Liquid blood samples
and extraction blanks were aliquoted in a checkerboard/column layout, then extracted and purified.
The quantitation and STR results were examined for potential contamination in the extraction blanks.
Consistency in the quality of the extracted and purified DNA, as determined by the presence of PCR
inhibitors, was also assessed.
Table 20 Experiment setup for cross-contamination studies
Experiment setup HID EVOlution™—Combination System HID EVOlution™—Extraction System
Sample set Blood from Donor 238 Blood from Donor 233
Lysis method and
purification run
setup (layout and
replicates)
For each automated purification run, 40 sample replicates and 40 extraction blanks were
arranged as shown in Figure 24 and Figure 25.
To test only for cross-contamination introduced during automated liquid handling, steps were
taken to minimize potential cross-contamination during sample preparation, lysis, and manual
dispensing of samples and extraction blanks:
•
Before beginning this study, 80 extraction blanks were run on each platform using the
cross-contamination study methodology to create a baseline for spurious signals and to
confirm that the instruments, labware, and reagents used in the study were not a source of
contamination.
•
Lysates (equivalent to 20 μL of liquid blood in 300 μL PrepFiler™ Lysis Buer + 3 μL of
DTT) and extraction blanks were prepared in batch, then dispensed into plates or tubes as
follows:
–
For plate-to-plate extraction: With the filter plate removed, 323 μL of extraction blank
lysate was added to the designated spin plate wells (see the plate map in Figure 24),
then the filter plate was placed on top of the spin plate. After lysis, 323 μL of blood
lysate was added to the designated wells. The spin/filter plate unit was centrifuged at
2,000 rpm for 1 minute to recover clarified lysates.
–
For tube-to-tube extraction: 1.5-mL tubes to receive the blood lysate were placed
in the tube racks (see the tube positions in Figure 25). 323 μL of blood lysate was
distributed to each sample tube. 1.5‑mL tubes to receive the extraction blank lysate
were placed in the tube racks, 323 μL of extraction blank lysate was added to each
tube, then the tube racks were placed on the workstation.
Extraction scripts
86
PrepFiler™ Automated Forensic DNA Extraction Kit: Automated DNA Purification on the HID EVOlution™ Systems User
Validation
•
PrepFiler_plate_plateCombo_V1_SP1
•
PrepFiler_tube_tubeCombo_V1_SP1
Verification
•
•
•
[1]
PrepFiler_tube_tubeCombo_V1_SP1
PrepFiler_plate_tubeCombo_V1_SP1
PrepFiler_tube_plateCombo_V1_SP1
Validation
•
PrepFiler_plate_plate_V1_SP2
•
PrepFiler_tube_tube_V1_SP2
Verification
[2]
•
•
•
[1]
PrepFiler_tube_tube_V1_SP2‡
PrepFiler_plate_tube_V1_SP2
PrepFiler_tube_plate_V1_SP2
[2]
Bulletin
Page 87

Chapter 5 Experiments and results
Validation of PrepFiler™ Wash Buer B and the related modifications to the workstation layout and scripts
Table 20 Experiment setup for cross-contamination studies (continued)
Experiment setup HID EVOlution™—Combination System HID EVOlution™—Extraction System
5
Number of
purification runs
STR PCR
method
[3]
qPCR method
For each of the two extraction scripts, the experiment (purification through STR PCR) was
performed two times (once per day on 2 dierent days).
All extraction blanks were processed through STR PCR. STR PCR setup was performed on the
HID EVOlution™—Combination System using the AmpFℓSTR™ MiniFiler™ PCR Amplification Kit.
[3]
For this study, qPCR was performed after STR PCR.
qPCR setup was performed on the HID EVOlution™—Combination System using the
Quantifiler™ Human DNA Quantification Kit.
[1]
Verification studies methodology was identical to that of the validation studies, with the exception that 2‑μL blood samples were used instead
of 20‑μL blood samples.
[2]
For continuity, this script was run in both validation and verification studies.
[3]
As a precaution, STR PCR with the AmpFℓSTR™ MiniFiler™ PCR Amplification Kit was performed before quantitative PCR to eliminate
cross-contamination that could result from accessing the DNA plate during qPCR. A sample sheet and 7500 Results files (CSV) were created
to allow 10 μL of each extraction blank eluate to be directly dispensed in 15 μL of AmpFℓSTR™ MiniFiler™ PCR Amplification Kit reaction mix.
Figure 24 Cross-contamination studies—Plate layout
Plate layout for processing lysate from an 96-well plate and for collecting eluate in a 96-well plate for cross-contamination
studies (S = blood lysate/eluate, X = extraction blank lysate/eluate)
PrepFiler™ Automated Forensic DNA Extraction Kit: Automated DNA Purification on the HID EVOlution™ Systems User
Bulletin
87
Page 88

Chapter 5
5
Validation of PrepFiler™ Wash Buer B and the related modifications to the workstation layout and scripts
Experiments and results
88
Figure 25 Cross-contamination studies—Tube positions
Tube positions for processing lysate from tubes and for collecting eluate in tubes for cross-contamination studies (S =
blood lysate/eluate, X = extraction blank lysate/eluate)
Cross-contamination studies results
Validation studies
For the HID EVOlution™—Extraction System, no evidence of liquid handling cross-contamination was
seen in any of the 160 total extraction blanks.
For the HID EVOlution™—Combination System, no evidence of liquid handling cross-contamination was
seen in any of the 160 total extraction blanks.
The IPC Ct values of the extracted blood samples and extraction blanks matched, indicating that no
PCR inhibitors were present in the extracted DNA.
Verification studies
The remaining new scripts were tested using the cross-contamination study methodology with 2‑μL
blood samples and extraction blanks. No cross-contamination was observed in the extraction blanks.
PrepFiler™ Automated Forensic DNA Extraction Kit: Automated DNA Purification on the HID EVOlution™ Systems User
Bulletin
Page 89

Chapter 5 Experiments and results
Validation of PrepFiler™ Wash Buer B and the related modifications to the workstation layout and scripts
Case-type sample studies
Case-type sample studies experiments
Case-type sample studies were performed to test performance when running low-input, case-type
samples. Ten dierent sample types were extracted and purified in replicates of four, then DNA quality
was evaluated by examining DNA yield and the STR profiles. To compare lysis methods, lysis was
performed in tubes and in plates for the same sample set.
Table 21 Experiment setup for case-type sample studies
Experiment setup HID EVOlution™—Combination System HID EVOlution™—Extraction System
Sample set Ten low-input, case-type samples. See Table 22.
Lysis method Lysis in tubes
Sample lysis was performed in tubes, transferred to a spin/filter plate unit for substrate removal
(see “Sample lysis method” on page 77), then processed on the automated system using a
plate-to-plate script.
Lysis in plates
5
1.
Dried samples were distributed into the wells of the spin/filter plate unit. The unit was
placed on ice for 30 minutes to chill the chambers of the spin plate.
2.
Lysis was initiated by adding a mixture of 300 μL of PrepFiler™ Lysis Buer and 3 μL of
1 M DTT per well.
3.
The spin/filter plate unit was sealed with adhesive film, then shaken at 300 rpm for 40
minutes at 60°C.
4.
Lysates were centrifuged at 2,000 rpm for 1 minute to recover clarified lysates.
Purification run
setup (layout and
replicates)
Extraction script PrepFiler_plate_plateCombo_V1_SP1 NA
Number of
purification runs
qPCR method qPCR setup was performed on the HID EVOlution™—Combination System using the
STR PCR method DNA normalization and STR PCR setup were performed on the HID EVOlution™—Combination
To eliminate potential plate-to plate variation that could occur during purification and
quantitation, all lysates (from lysis in tubes and lysis in plates) were consolidated in one plate for
purification and quantitation.
1 NA
Quantifiler™ Human DNA Quantification Kit.
System using the AmpFℓSTR™ Identifiler™ PCR Amplification Kit.
A target input of 1 ng of DNA was used for STR PCR amplification. For samples with
concentrations <0.10 ng/μL, a maximum of 10 μL of purified DNA extract was added to each
STR reaction.
PrepFiler™ Automated Forensic DNA Extraction Kit: Automated DNA Purification on the HID EVOlution™ Systems User
Bulletin
89
Page 90

Chapter 5
5
Validation of PrepFiler™ Wash Buer B and the related modifications to the workstation layout and scripts
Experiments and results
Table 22 Low-input, case-type sample set
Plate
column
1 Blood dried on white cotton cloth (SERI,
4‑mm punch)
2 Blood dried on unwashed light blue
denim (4‑mm)
3 Blood dried on FTA paper (4‑mm punch) 0.5 µL 4 A3 to H3
4 Saliva dried on cotton swab (Puritan
wooden)
5 Blood dried on unwashed dark blue
denim (4‑mm)
6 Semen dried on white cotton cloth
(SERI, 4‑mm punch)
7 Dried blood in 1.5‑mL tube 0.2 µL 4 A7 to H7
8 Blood dried on unwashed black denim
(4‑mm punch)
9 Blood spiked with PBS dried on pre-
washed white cotton cloth (SERI; 4 μL
of blood + 1 μL of PBS, 3 μL on 4‑mm
punch)
Sample source/substrate Body fluid volume
0.2 µL 4 A1 to H1
0.2 µL 4 A2 to H2
5.0 µL 4 A4 to H4
0.2 µL 4 A5 to H5
1.0 µL 4 A6 to H6
0.2 µL 4 A8 to H8
2.5 µL 4 A9 to H9
Number of
replicates
Plate well
position
[1]
10 Blood spiked with inhibitor mix dried
on pre-washed white cotton cloth (SERI;
4 μL of blood + 1 μL of PBS, 3 μL on
4‑mm punch)
[1]
Four replicates each from lysis in tubes and lysis in plates.
Case-type sample studies results
DNA yield and average IPC Ct for samples lysed in plates and tubes are shown in Figure 26 and
Figure 27. With some sample types and inputs, the tube lysis protocol may be the preferred method
compared to the plate lysis protocol.
The AmpFℓSTR™ Identifiler™ PCR Amplification Kit STR profiles (not shown) were complete except for
those derived from the dark blue and black denim samples that were tested in this study. While not true
for all denim sample types, some of the STR profiles generated from the dark blue and black denim
samples in the study showed signs of PCR inhibition.
2.5 µL 4 A10 to H10
90
PrepFiler™ Automated Forensic DNA Extraction Kit: Automated DNA Purification on the HID EVOlution™ Systems User
Bulletin
Page 91

Chapter 5 Experiments and results
Validation of PrepFiler™ Wash Buer B and the related modifications to the workstation layout and scripts
5
Figure 26 Total DNA yield for sample lysis in plates and in tubes—2.5 μL of blood (with and without inhibitor mix)
on cotton
PrepFiler™ Automated Forensic DNA Extraction Kit: Automated DNA Purification on the HID EVOlution™ Systems User
Bulletin
91
Page 92

Chapter 5 Experiments and results
5
Validation of PrepFiler™ Wash Buer B and the related modifications to the workstation layout and scripts
Figure 27 Total DNA yield for 8 case-type samples comparing lysis in plates and in tubes
92
PrepFiler™ Automated Forensic DNA Extraction Kit: Automated DNA Purification on the HID EVOlution™ Systems User
Bulletin
Page 93

Validation of PrepFiler™ Wash Buer B and the related modifications to the workstation layout and scripts
Comparative analysis studies
Comparative analysis studies experiments
Comparative analysis studies were performed to compare the quantity and quality of DNA purified on
the HID EVOlution™—Combination System and HID EVOlution™—Extraction System to other platforms.
The DNA yield and STR profiles from the “Case-type sample studies” on page 89 were compared to the
data generated on other automated purification systems.
Table 23 Experiment setup for comparative analysis studies
Chapter 5 Experiments and results
5
Experiment setup
Sample set Ten low-input, case-type samples. See Table 24.
Sample
preparation
Lysis method Samples listed in Table 24 were lysed in
Number of
purification runs
qPCR method qPCR setup was performed on the HID EVOlution™—Combination System using the
STR PCR method DNA normalization and STR PCR setup were performed on the HID EVOlution™—Combination
Cartridge-based, silica magnetic bead
extraction kit and platform from Company A
Company A kit using the trace protocol with
carrier RNA
1.5‑mL tubes according to the manufacturer’s
recommended protocol for low-input samples.
1 1
Quantifiler™ Human DNA Quantification Kit.
System using the AmpFℓSTR™ Identifiler™ PCR Amplification Kit.
A target input of 1 ng of DNA was used for STR PCR amplification. For samples with
concentrations <0.10 ng/μL, a maximum of 10 μL of purified DNA extract was added to each
STR reaction.
Cartridge-based, silica magnetic bead
extraction kit and platform from Company B
Company B kit
Samples listed in Table 24 were lysed in
1.5‑mL tubes according to the manufacturer’s
recommended protocol for small casework
samples.
Table 24 Comparative analysis studies sample set and results for average DNA concentration (ng/μL)
Average DNA concentration (n=4)
Plate
column
1 Blood dried on white cotton
2 Blood dried on unwashed light
3 Blood dried on FTA paper (4‑mm
PrepFiler™ Automated Forensic DNA Extraction Kit: Automated DNA Purification on the HID EVOlution™ Systems User
Bulletin
Sample source/substrate
cloth (SERI, 4‑mm punch)
blue denim (4‑mm)
punch)
Body fluid
volume
0.2 µL 0.33 ng/μL 0.15 ng/μL 0.08 ng/μL
0.2 µL 0.27 ng/μL 0.16 ng/μL 0.11 ng/μL
0.5 µL 0.68 ng/μL 0.24 ng/μL 0.12 ng/μL
PrepFiler
Automated
Forensic DNA
Extraction Kit
™
Company A Company B
[1]
93
Page 94

Chapter 5
5
Validation of PrepFiler™ Wash Buer B and the related modifications to the workstation layout and scripts
Experiments and results
Table 24 Comparative analysis studies sample set and results for average DNA concentration
(ng/μL) (continued)
Average DNA concentration (n=4)
Plate
column
Sample source/substrate
Body fluid
volume
PrepFiler
Automated
Forensic DNA
Extraction Kit
™
Company A Company B
[1]
4 Saliva dried on cotton swab
5.0 µL 0.52 ng/μL 0.32 ng/μL 0.05 ng/μL
(Puritan wooden)
5 Blood dried on unwashed dark
0.2 µL 0.11 ng/μL 0.014 ng/μL 0.17 ng/μL
blue denim (4‑mm)
6 Semen dried on white cotton
1.0 µL 0.17 ng/μL 0.07 ng/μL
[2]
cloth (SERI, 4‑mm punch)
7 Dried blood in 1.5‑mL tube 0.2 µL 0.25 ng/μL 0.21 ng/μL 0.01 ng/μL
8 Blood dried on unwashed black
0.2 µL 0.02 ng/μL 0.18 ng/μL 0.09 ng/μL
denim (4‑mm punch)
9 Blood spiked with PBS dried on
2.5 µL 3.5 ng/μL 1.81 ng/μL 1.38 ng/μL
pre-washed white cotton cloth
(SERI; 4 μL of blood + 1 μL of
PBS, 3 μL on 4‑mm punch)
10 Blood spiked with inhibitor mix
2.5 µL 4.6 ng/μL 3.53 ng/μL 1.29 ng/μL
dried on pre-washed white
cotton cloth (SERI; 4 μL of blood
+ 1 μL of PBS, 3 μL on 4‑mm
punch)
Average elution volume 40 µL 45 µL 41 µL
[1]
Lysis in 1.5‑mL tubes incubated in a thermal shaker for 40 minutes at 70°C
[2]
Overnight lysis at 56°C.
0.03 ng/μL
[2]
94
Comparative analysis studies results
The quality of the DNA extracted and purified with the PrepFiler™ Automated Forensic DNA Extraction
Kit on the HID EVOlution™—Combination System was high and generally yielded overall peak heights
and intracolor balance metrics that met or exceeded results obtained from DNA isolated using
Company A and Company B methods.
All extraction blank results demonstrated clean liquid handling. Average yields for the various low-input
samples are listed in Table 24.
Figure 28 and Figure 29 display average total yields, in nanograms, of DNA recovered using Company
A kit and platform, Company B kit and platform, or the PrepFiler™ Automated Forensic DNA Extraction
Kit on the HID EVOlution™—Combination System. Yields were normalized to total elution volume (see
Table 24, last row). The overall yield is generally higher for the HID EVOlution™ system with lysis
performed in 1.5‑mL tubes.
PrepFiler™ Automated Forensic DNA Extraction Kit: Automated DNA Purification on the HID EVOlution™ Systems User
Bulletin
Page 95

Chapter 5 Experiments and results
Validation of PrepFiler™ Wash Buer B and the related modifications to the workstation layout and scripts
5
Figure 28 Comparative overall yield (ng)
PrepFiler™ Automated Forensic DNA Extraction Kit: Automated DNA Purification on the HID EVOlution™ Systems User
Bulletin
95
Page 96

Chapter 5 Experiments and results
5
Validation of PrepFiler™ Wash Buer B and the related modifications to the workstation layout and scripts
Figure 29 Comparative yield for 2.5 μL of blood and blood spiked with inhibitors
Figure 30 shows intracolor balance results for six samples. Samples 5 and 8 were omitted because of
low DNA input and stochastic eects. Figure 31 shows the intracolor balance for samples 9 and 10.
96
PrepFiler™ Automated Forensic DNA Extraction Kit: Automated DNA Purification on the HID EVOlution™ Systems User
Bulletin
Page 97

Chapter 5 Experiments and results
Validation of PrepFiler™ Wash Buer B and the related modifications to the workstation layout and scripts
5
Figure 30 Intracolor balance between purification platforms obtained with the AmpFℓSTR™ Identifiler™ PCR
Amplification Kit
PrepFiler™ Automated Forensic DNA Extraction Kit: Automated DNA Purification on the HID EVOlution™ Systems User
Bulletin
97
Page 98

Chapter 5 Experiments and results
5
Validation of PrepFiler™ Wash Buer B and the related modifications to the workstation layout and scripts
Figure 31 Intracolor balance obtained with the AmpFℓSTR™ Identifiler™ PCR Amplification Kit with DNA
recovered from 2.5 μL of blood on cotton cloth spiked with an inhibitor cocktail
Samples were spiked with phosphate buered saline (first bars) or an inhibitor cocktail (second bars).
The intracolor balances for these samples were all >40% for all dye labels.
To assess the overall performance of the DNA purified using the three extraction and purification
chemistries tested, the average peak heights for all ten sample types listed in Table 24 were calculated
and plotted in a box-plot format in Figure 32.
98
PrepFiler™ Automated Forensic DNA Extraction Kit: Automated DNA Purification on the HID EVOlution™ Systems User
Bulletin
Page 99

Chapter 5
Validation of PrepFiler™ Wash Buer B and the related modifications to the workstation layout and scripts
Experiments and results
5
Figure 32 Average AmpFℓSTR™ Identifiler™ PCR Amplification Kit peak height for low-input, case-type samples
Conclusions
PrepFiler™ Wash Buer B and the scripts listed in Table 13 were validated on the HID EVOlution™—
Extraction System and the HID EVOlution™—Combination System. High-quality genomic DNA, obtained
from a variety of biological samples, was determined to be suitable for downstream applications.
•
Precision and sensitivity studies confirmed that the new scripts perform as well as the original
scripts.
•
Cross-contamination studies of 240 extraction blanks co-extracted with 20 μL of whole blood
samples and amplified with the AmpFℓSTR™ MiniFiler™ PCR Amplification Kit confirmed that the
new scripts operate with clean liquid handling.
•
Low-input, case-type samples studies demonstrated that high-quality STR profiles were obtained
for the majority of samples tested. No PCR inhibition was observed in samples that contained
known PCR inhibitors.
•
Comparative analysis studies demonstrated that extraction and purification with the PrepFiler
Automated Forensic DNA Extraction Kit on the HID EVOlution™—Extraction System or
HID EVOlution™—Combination System, with the new scripts, yielded more DNA, and in most
cases produced better STR profiles, than comparable extraction and purification chemistries. Some
denim samples showed signs of PCR inhibition.
•
With some sample types and inputs, the tube lysis protocol may be the preferred method
compared to the plate lysis protocol.
™
PrepFiler™ Automated Forensic DNA Extraction Kit: Automated DNA Purification on the HID EVOlution™ Systems User
Bulletin
99
Page 100

Troubleshooting
A
Observation Possible cause Recommended action
A run is stopped
You intentionally or accidentally
stopped a run.
Clear the script recovery status before you start a
new run:
1.
Click Cancel in the Runtime Controller.
2.
In the Freedom EVOware™ script dialog box,
note the highlighted orange line; this is the
step where the run stopped.
3.
In the Freedom EVOware™ script dialog box,
select Execute4Clear Recovery Status from
the menu. You can now start a new run.
The DNA eluate contains
magnetic particles
100
PrepFiler™ Automated Forensic DNA Extraction Kit: Automated DNA Purification on the HID EVOlution™ Systems User
•
Small magnetic particles
(fines), which migrate
more slowly towards
the magnet, or particle
aggregates, which hinder
particle migration, were
present.
•
The liquid handling arm
on the Freedom EVO
instrument needs to be
adjusted.
Place the plate or tube containing the DNA eluate
in a deep-well centrifuge, spin at 650 × g for
5 minutes, then pipet the clear DNA extract into a
new plate or tube.
If the problem persists over multiple runs, contact
Technical Support to determine if the liquid handling
(LiHa) arm requires adjustment. Also see the
™
Tecan™ Freedom EVOware™ Standard 2.1 Freedom
EVOware™ PLUS™ 2.1 Extended Device Support
Software Manual, Section 9.4.4, “Teaching the
Labware Coordinates”.
Bulletin
 Loading...