

Page 1
gyM
sy...
Instruction Manual
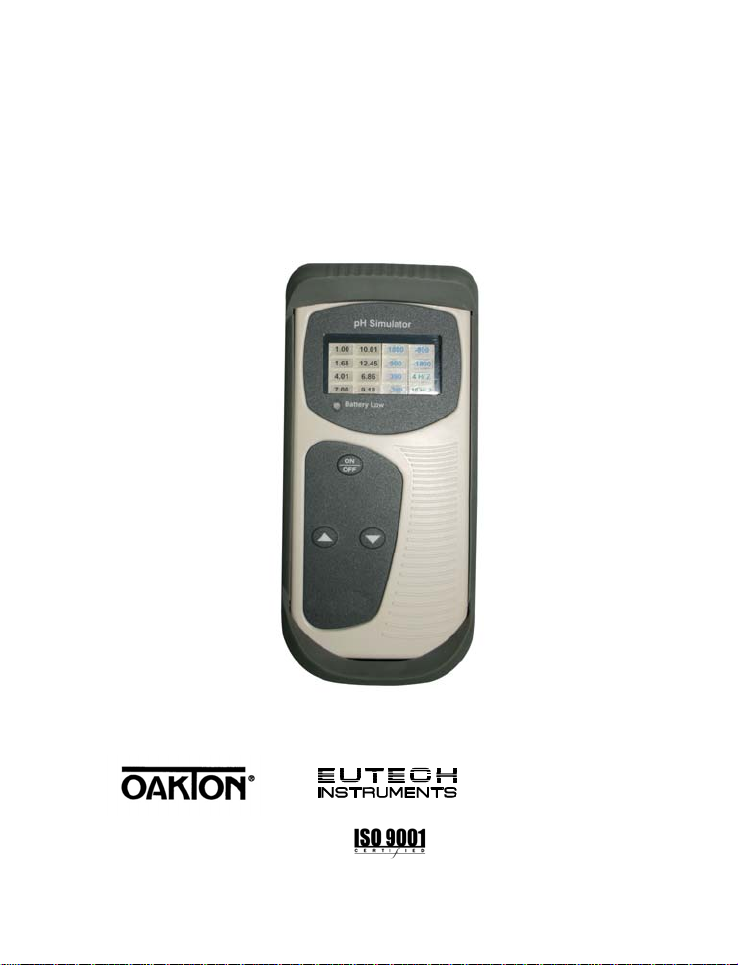
pH Simulator
pH/MV Simulator Handheld
68X243623
Tech nol o
adeEa
Part of Thermo Fisher Scientific
Rev 1 04/08
Page 2

Preface
This manual serves to explain the use of the pH Simulator.
This manual functions in two ways: first as a step by step guide to help you operate the
meter; second, it serves as a handy reference guide.
Eutech Instruments/Oakton Instruments will not accept any responsibility for damage or
malfunction to the meter caused by improper use of the instrument.
The information presented in this manual is subject to change without notice as
improvements are made, and does not represent a commitment on the part of Eutech
Instruments / Oakton Instruments.
Copyright © 2004
Eutech Instruments Pte Ltd
Oakton Instruments
All rights reserved.
Page 3

Table of Content
1
Introduction...................................................................................1
2 Display and Keypad Function ......................................................2
2.1 Display ......................................................................................... 2
2.2 Keypad ......................................................................................... 3
3 Preparation...................................................................................4
3.1 Inserting & Removing Rubber Boot .............................................. 4
3.2 Inserting the Batteries .................................................................. 5
3.3 Battery Replacement.................................................................... 6
3.4 Connecting the BNC cable to simulator........................................ 7
4 Operating Procedure....................................................................8
5 Specification .................................................................................9
6 Accessories ................................................................................10
7 Warranty.....................................................................................11
8 Return of Items...........................................................................11
Page 4

Instruction Manual pH Simulator
1 Introduction
Thank you for selecting our pH/mV simulator handheld. This simulator is designed for
convenient one-hand operation.
Your simulator features user-friendly push-button operation for selection of pH and mV
values on a splash-proof membrane keypad. It also has a large LED display for easy
reading.
Your simulator includes a 1 meter BNC to BNC cable and 4 AAA batteries.
This manual provides a step-by-step guide to operate the simulator.
1
Page 5
Instruction Manual pH Simulator
2 Display and Keypad Function
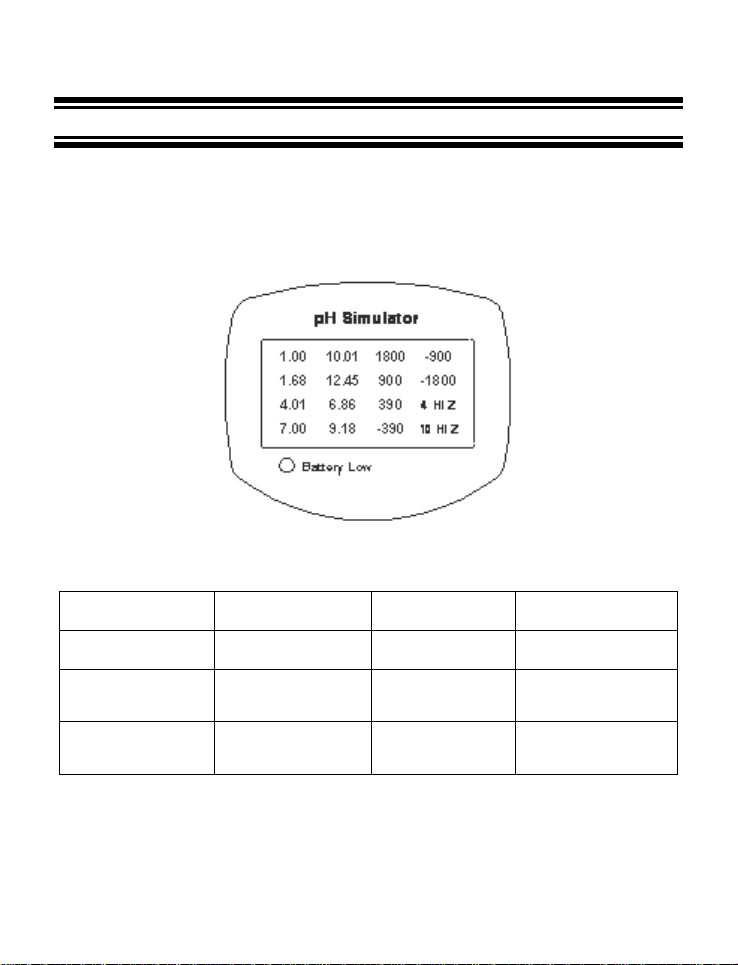
2.1 Display
The display consists of 16 sets of labeled LED for the selection of pH and mV values.
The display also includes the low battery indicator LED at the bottom left hand corner.
Figure 1: Full LED Display
1.00 – 1.00 pH Value 10.01 – 10.01 pH Value 1800 – 1800 mV Value -900 - -900 mV Value
1.68 – 1.68 pH Value 12.45 – 12.45 pH Value 900 – 900 mV Value -1800 - -1800 mV Value
4.01 – 4.01 pH Value 6.86 – 6.86 pH Value 390 – 390 mV Value
7.00 – 7.00 pH Value 9.18 – 9.18 pH Value -390 - -390 mV Value
4 HI Z – 4.01 High
Impedance pH value
10 HI Z –10.01 High
Impedance pH value
2
Page 6

Instruction Manual pH Simulator
2.2 Keypad
A large membrane keypad with tactile feedback makes the instruments easy to use.
ON
OFF
Powers on and shuts off the simulator.
Scroll and select the pH and mV output simulation value.
Scroll and select the pH and mV output simulation value.
Figure 2: pH Simulator Keypad
3
Page 7

Instruction Manual pH Simulator
3 Preparation
3.1 Inserting & Removing Rubber Boot
1. To remove simulator from rubber boot, push out from the bottom edges of
simulator until it is completely out of boot. Ensure that the BNC cables are not
connected.
2. To insert simulator into rubber boot, slide in from the top of meter before
pushing the bottom edges of simulator down to set it into position. Lift up the
stand at the back of simulator for bench top applications if necessary.
Figure 3: Inserting or removing the rubber boot
4
Page 8

Instruction Manual pH Simulator
3.2 Inserting the Batteries
The battery compartment is found at the back of instrument as shown in Figure 4. To
open the battery compartment:
1. Push in the direction of arrow and lift up the cover.
2. Note the polarity of battery before inserting into position.
3. After replacement, place cover back and press down until it locks tight.
Figure 4: Inserting the batteries
5
Page 9

Instruction Manual pH Simulator
3.3 Battery Replacement
A low battery LED alerts you when battery power is running low. See Figure 5. Replace
with the same type as recommended.
LED lights up when
battery voltage is low
Figure 5: Battery Low Indicator
Caution: Power off the simulator when changing battery.
6
Page 10

Instruction Manual pH Simulator
3.4 Connecting the BNC cable to simulator
1. Insert the BNC connector of the cable over the BNC socket on the simulator.
2. Make sure the slots of the connector are in line with the posts of the socket.
3. Slide the BNC connector of the cable over the socket and rotate the
connector clockwise until it locks.
4. To remove cable, push and rotate the connector counterclockwise.
5. While holding onto the metal part of the connector, pull it away from the
simulator.
6. Be careful not to use excessive force.
CAUTION: Do not pull on the cable cord or the cable wires might disconnect.
Cable’s BNC
Connector
Figure 6: BNC cable connection to the simulator
7
Page 11

Instruction Manual pH Simulator
4 Operating Procedure
The simulator is designed to test the accuracy of your pH/ORP meters. It includes the
simulation values for the USA and NIST buffer set standards and the simulation
performance of an electrode in pH 4.01 and pH 10.01 buffers (4 Hi Z & 10 Hi Z). This
High Impedance pH simulation is useful for testing suspected leakage problems of your
pH/ORP meters.
1. Connect the BNC end connector of your simulator to the pH/ORP meter.
2. Switch the simulator on by pressing the ON/OFF button. The ‘7.00’ LED will
light up indicating that the pH 7.00 simulation value has been selected.
Note: The simulator will always be in the pH 7.00 selection every time it is turned
on.
3. Press the ▲ and ▼ key to scroll through the value selection on the LED
display. The LED will light up according to your preferred selection.
4. Select the desired simulation value indicated by the LED light up display.
Figure 7: Selection of simulation values
8
Page 12

Instruction Manual pH Simulator
5 Specification
pH Simulation Value (Normalised to 25°C) 1.00 pH, 1.68 pH, 4.01 pH, 6.86 pH, 7.00 pH, 9.18 pH,
pH Simulation Accuracy (with supplied cable) +/- 0.02 pH
mV Simulation value 1800 mV, 900 mV, 390 mV, -390 mV, -900 mV, -1800
mV Simulation Accuracy (with supplied cable) +/- 1 mV
High Impedance Test (Hi Z) 1 G ohm at 4.01 pH & 10.01 pH
Buffer Set Standard Simulation Value USA, NIST
Display LED, Orange lighting
Output BNC Connector
Power Requirements 4 ‘AAA’ 1.5V Batteries
Operating Temperature 0 to 40°C
Relative Humidity 80% up to 31°C decreasing linearly to 50% at 40°C
Dimensions 14 X 17 X 3.5 cm
Weight 200g (Boxed)
10.01 pH, 12.45 pH
mV
9
Page 13

Instruction Manual pH Simulator
6 Accessories
Item Eutech Instruments
Order Code
pH Simulator with 1m BNC to BNC Cable EC-PHSIMULATOR
1m BNC to BNC Cable 01X373401 -
Oakton Instruments
Order Code
35652-00
10
Page 14

Instruction Manual pH Simulator
7 Warranty
This simulator is supplied with a one-year warranty against significant deviations in
material and workmanship.
If repair or adjustment is necessary and has not been the result of abuse or misuse
within the designated period, please return – freight pre-paid – and correction will be
made without charge. Eutech Instruments/ Oakton Instruments will determine if the
product problem is due to deviations or customer misuse.
Out of warranty products will be repaired on a charged basis.
Exclusions
The warranty on your instrument shall not apply to defects resulting from:
• Improper or inadequate maintenance by customer
• Unauthorized modification or misuse
• Operation outside of the environment specifications of the products
8 Return of Items
Authorization must be obtained from our Customer Service Department or authorized
distributor before returning items for any reason. A “Return Goods Authorization” (RGA)
form is available through our Authorized Distributor. Please include data regarding the
reason the items are to be returned. For your protection, items must be carefully packed
to prevent damage in shipment and insured against possible damage or loss. Eutech
Instruments/ Oakton Instruments will not be responsible for damage resulting from
careless or insufficient packing. A restocking charge will be made on all unauthorized
returns.
NOTE:
Eutech Instruments Pte Ltd/ Oakton Instruments reserve the right to make
improvements in design, construction, and appearance of products without notice.
11
Page 15

Page 16

For more information on Eutech Instruments/ Oakton Instruments’ products,
contact your nearest distributor or visit our website listed below:
Oakton Instruments
P.O Box 5136,
Vernon Hills, IL 60061, USA
Tel: (1) 888-462-5866
Fax: (1) 847-247-2984
E-mail: info@4oakton.com
Web-sites:
www.4oakton.com
www.oaktoninstruments.com
Eutech Instruments Pte Ltd.
Blk 55, Ayer Rajah Crescent,
#04-16/24 Singapore 139949
Tel: (65) 6778 6876
Fax: (65) 6773 0836
E-mail: eutech@thermiofisher.com
Web-site: www.eutechinst.com
Distributed by:
 Loading...