

Page 1

Oncomine™ Comprehensive Assay Plus
USER GUIDE
for use with:
Oncomine™ Comprehensive Assay Plus, DNA panel
Oncomine™ Comprehensive Assay Plus, RNA panel
Catalog Numbers A48577, A48578, A49667, and A49671
Publication Number MAN0018490
Revision C.0
For Research Use Only. Not for use in diagnostic procedures.
Page 2

Life Technologies Corporation | 7335 Executive Way | Frederick, Maryland 21704 USA
For descriptions of symbols on product labels or product documents, go to thermofisher.com/symbols-definition.
The information in this guide is subject to change without notice.
DISCLAIMER: TO THE EXTENT ALLOWED BY LAW, THERMO FISHER SCIENTIFIC INC. AND/OR ITS AFFILIATE(S) WILL NOT BE
LIABLE FOR SPECIAL, INCIDENTAL, INDIRECT, PUNITIVE, MULTIPLE, OR CONSEQUENTIAL DAMAGES IN CONNECTION WITH OR
ARISING FROM THIS DOCUMENT, INCLUDING YOUR USE OF IT.
Revision history: Pub. No. MAN0018490
Revision Date Description
C.0 9 February 2021 Full product launch, updates including:
•
Updated Ion Reporter™ Software analysis workflows:
–
Oncomine™ Comprehensive Plus - w2.1 - DNA and Fusions - Single Sample
–
Oncomine™ Comprehensive Plus - w2.1 - DNA and Fusions - (Low RMC
Signal) - Single Sample
–
Oncomine™ Comprehensive Plus - w2.1 - DNA - Single Sample
–
Oncomine™ Comprehensive Plus - w2.1 - DNA - (Low RMC Signal) - Single
Sample
–
Oncomine™ Comprehensive Plus - w2.1 - Fusions - Single Sample
–
Oncomine™ Comprehensive Plus - w2.1 - Annotate Variants - Single Sample
•
Updated analysis results in Ion Reporter™ Software w2.1 analysis workflows.
–
Automatically calculated tumor cellularity
–
Loss-of-heterozygosity determination
–
Gene fusion detection featuring FusionSync™ technology
•
Instructions for automated library preparation on Ion Chef™ Instrument
C.0 Early Access 18 May 2020 Updates for Oncomine™ Comprehensive Assay Plus, RNA panel early access
B.0 19 December 2019 Updates to user guide for product launch.
A.0 11 November 2019 This user guide provides instructions for library preparation, templating, sequencing,
customers.
•
Updated Ion Reporter™ Software analysis workflows:
–
Oncomine™ Comprehensive Plus - w2.0 - DNA and Fusions - (Manual
Library Prep) - Single Sample
–
Oncomine™ Comprehensive Plus - w2.0 - DNA - (Manual Library Prep) Single Sample
–
Oncomine™ Comprehensive Plus - w2.0 - Fusions - (Manual Library Prep) Single Sample
–
Oncomine™ Comprehensive Plus - w2.0 - Annotate Variants - Single Sample
•
Updated analysis results in Ion Reporter™ Software w2.0 analysis workflows.
•
Inclusion of NTC in UDG treatment of FFPE DNA samples.
•
Expanded list of recommended controls.
•
Create planned runs from the provided template.
•
Update Ion Reporter™ Software analysis workflow name.
•
Include additional troubleshooting.
and results analysis of Oncomine™ Comprehensive Assay Plus libraries, specific for
early access and restricted sales.
Important Licensing Information: These products may be covered by one or more Limited Use Label Licenses. By use of these
products, you accept the terms and conditions of all applicable Limited Use Label Licenses.
Trademarks: All trademarks are the property of Thermo Fisher Scientific and its subsidiaries unless otherwise specified.
TaqMan is a registered trademark of Roche Molecular Systems, Inc., used under permission and license. Eppendorf LoBind is a
trademark of Eppendorf AG. Agencourt and AMPure are trademarks of Beckman Coulter, Inc. Microsoft and Excel are trademarks of
Microsoft Corporation.
©2021 Thermo Fisher Scientific Inc. All rights reserved.
Page 3

Contents
■
CHAPTER 1 Product information .................................................. 7
Product description ............................................................. 7
Contents and storage ............................................................ 9
Oncomine™ Comprehensive Assay Plus – Manual Library Preparation ............. 9
Oncomine™ Comprehensive Assay Plus, RNA – Manual Library Preparation ....... 10
Oncomine™ Comprehensive Assay Plus – Automated Library Preparation ......... 11
Oncomine™ Comprehensive Assay Plus, RNA – Automated Library Preparation .... 12
Required materials not supplied ................................................. 13
Recommended materials ....................................................... 14
■
CHAPTER 2 Before you begin .................................................... 16
Procedural guidelines ........................................................... 16
Before each use of the kit ....................................................... 16
Guidelines for RNA isolation, quantification, and input .............................. 17
Guidelines for DNA isolation, quantification, and input .............................. 17
Library preparation from genomic DNA or RNA .................................... 18
■
CHAPTER 3 Automated library preparation on the Ion Chef™ System ....... 19
Create a sample set to prepare 2 pools of 4 libraries each ........................... 19
Automated RNA library preparation .............................................. 21
Reverse transcribe RNA for Chef Ready library preparation ..................... 21
Ion Chef™ Instrument setup information for automated RNA library preparation .... 23
Automated DNA library preparation ............................................... 24
RMC in DNA target amplification reactions .................................... 24
Remove deaminated bases from FFPE DNA .................................. 24
Ion Chef™ Instrument setup information for automated DNA library preparation .... 27
Oncomine
™
Comprehensive Assay Plus User Guide
3
Page 4

Contents
■
CHAPTER 4 Manual library preparation ......................................... 28
RNA preparation and cDNA amplification ......................................... 28
Reverse transcribe RNA for manual library preparation ......................... 28
Prepare cDNA target amplification reactions .................................. 29
Amplify the cDNA targets ................................................... 31
Combine cDNA target amplification reactions ................................. 32
DNA preparation and amplification ............................................... 33
RMC in DNA target amplification reactions .................................... 33
Remove deaminated bases from FFPE DNA .................................. 33
Prepare DNA target amplification reactions ................................... 34
Amplify the DNA targets .................................................... 35
Combine the DNA target amplification reactions ............................... 36
Library preparation ............................................................. 36
Transfer the DNA amplicons ................................................. 36
Partially digest the DNA and cDNA amplicons ................................. 37
Ligate adapters to the amplicons and purify ................................... 38
Purify the unamplified library ................................................ 39
Elute and dilute the library .................................................. 40
Quantify the library by qPCR and calculate the dilution factor ........................ 41
Combine libraries .............................................................. 43
Guidelines for templating and sequencing ......................................... 46
■
CHAPTER 5 Create a Planned Run .............................................. 47
About Planned Runs ........................................................... 47
Update Oncomine™ Comprehensive Assay Plus templates in Torrent Suite™ Software .. 48
Create a custom Planned Run template ........................................... 49
Create a Planned Run for manual library preparation ................................ 51
Create a Planned Run for automated library preparation using sample sets ............ 53
■
CHAPTER 6 Variant analysis ..................................................... 56
Analysis workflows in Ion Reporter™ Software ..................................... 56
Manually launch a DNA and Fusions analysis ...................................... 58
Manually launch a DNA analysis ................................................. 59
Manually launch a Fusions analysis ............................................... 59
View results ................................................................... 60
Fusion results ............................................................. 64
Visualize tumor mutational burden analysis results ................................. 70
QC metrics for tumor mutational burden ...................................... 71
Sample results ............................................................ 72
4
Oncomine™ Comprehensive Assay Plus User Guide
Page 5

MSI analysis results ............................................................ 75
View MSI parameters ....................................................... 75
Visualize MSI analysis results ................................................ 76
Genomic segmentation analysis ................................................. 78
Visualization of genomic segmentation analysis, Allele Specific Copy
Number plots ........................................................... 79
Visualize exon level loss results .............................................. 81
Generate an Analysis Results Report ............................................. 82
Download Ion Reporter™ annotation VCF or TSV files ............................... 83
Requirements for variant annotation in Ion Reporter™ Software .................. 84
■
APPENDIX A Tips and troubleshooting ......................................... 87
Tips .......................................................................... 87
Troubleshooting ................................................................ 88
Library yield and quantification .............................................. 88
Low amplicon uniformity (DNA only) .......................................... 89
Other ..................................................................... 89
Contents
■
APPENDIX B Supplemental information ........................................ 91
Update Oncomine™ Comprehensive Assay Plus templates in Torrent Suite™ Software .. 91
Install Oncomine™ Comprehensive Assay Plus workflows in Ion Reporter™ Software .... 91
Download and install BED files ................................................... 91
Configure the IonReporterUploader plugin in Torrent Suite™ Software ................. 92
Set TMB Classification parameters ............................................... 93
■
APPENDIX C CNV baseline creation ............................................. 95
Use VCIB CNV baseline ......................................................... 95
Create a CNV baseline .......................................................... 96
Augment (add Samples to) an existing VCIB CNV baseline .......................... 97
Create an Ion Reporter analysis workflow ......................................... 99
Launch an analysis ............................................................ 100
■
APPENDIX D CNV somatic confidence filter .................................. 102
CNV somatic confidence range ................................................. 102
How to change the CI threshold default value .................................... 102
Oncomine™ Comprehensive Assay Plus User Guide
5
Page 6

Contents
■
■
■
APPENDIX E Subset filter creation ............................................. 105
Create a gene-level filter ....................................................... 105
Create a variant-level filter ..................................................... 107
Create a new variantDB from the provided file ................................ 107
Create a new annotation set from the new variantDB and existing
Oncomine™ annotation sources .......................................... 108
Create a new filter chain using the new variantDB ............................. 109
Create a copied workflow with the new annotation set and filter chain ........... 110
Use the new workflow ..................................................... 111
APPENDIX F Safety .............................................................. 112
Chemical safety .............................................................. 113
Biological hazard safety ....................................................... 114
Documentation and Support ...................................................... 115
Related documentation ........................................................ 115
Customer and technical support ................................................ 115
Limited product warranty ...................................................... 116
6
Oncomine™ Comprehensive Assay Plus User Guide
Page 7

1
Product description .................................................................... 7
■
Contents and storage .................................................................. 9
■
Required materials not supplied ........................................................ 13
■
Recommended materials .............................................................. 14
■
IMPORTANT! Before using this product, read and understand the information in the “Safety” appendix
in this document.
Product description
The Oncomine™ Comprehensive Assay Plus is a targeted, next-generation sequencing (NGS) assay that
provides a comprehensive genomic profiling solution appropriate for formalin-fixed paran-embedded
(FFPE) tissues. The assay allows concurrent analysis of DNA and RNA to simultaneously detect multiple
biomarkers associated with targeted and immune checkpoint therapies including comprehensive
targets that are relevant in cancer, in a single workflow.
Product information
Features of the Oncomine™ Comprehensive Assay Plus include:
•
Enables analysis of variants across 500+ genes
•
Detection of SNVs, CNVs, InDels, TMB, MSI, and gene fusions
•
Robust performance from as little as 10 ng per pool of nucleic acid isolated from FFPE samples
including fine needle biopsies
•
Characterized with molecular standards and controls
This guide covers manual library preparation from DNA and RNA using the Oncomine™ Comprehensive
Assay Plus, DNA and Oncomine™ Comprehensive Assay Plus, RNA panels, respectively. Each assay
panel can be used with barcoded adapters, so that up to 4 paired DNA and RNA samples and DNA and
RNA no-template controls (NTCs) can be combined and loaded onto a single Ion 550™ Chip in a single
workflow to minimize the per-sample sequencing cost.
The Oncomine™ Comprehensive Assay Plus, DNA panel includes the Ion AmpliSeq™ Sample ID Panel
primers to prevent research sample misidentification and provide gender determination.
Note: This guide also covers automated library preparation on the Ion Chef™ System using the
Oncomine™ Comprehensive Assay Plus – Automated Library Preparation kit (Cat. Nos. A49667 and
A49671). The kit provides the Oncomine™ Comprehensive Assay Plus, DNA (2-pools) and Oncomine
Comprehensive Assay Plus, RNA (2-pools) at 2X concentration pre-measured in barcoded primer pool
tubes ready to load into an Ion AmpliSeq™ Chef Reagents DL8 cartridge.
™
Oncomine™ Comprehensive Assay Plus User Guide
7
Page 8

Chapter 1 Product information
1
Product description
This guide includes protocols for using the following products:
•
Oncomine™ Comprehensive Assay Plus, DNA, Manual Library Preparation (Part No. A45615)
•
Oncomine™ Comprehensive Assay Plus, RNA, Manual Library Preparation (Part No. A45616)
•
Oncomine™ Comprehensive Assay Plus, DNA, Chef-Ready Library Preparation (Part No. A45617)
•
Oncomine™ Comprehensive Assay Plus, RNA, Chef-Ready Library Preparation (Part No. A45618)
•
Ion AmpliSeq™ Library Kit Plus (Cat. No. 4488990)
•
Ion AmpliSeq™ Kit for Chef DL8 (Cat. No. A29024)
•
Ion Torrent™ NGS Reverse Transcription Kit (Cat. No. A45003)
•
IonCode™ Barcode Adapters 1–384 Kit (Cat. No. A29751)
•
Ion Xpress™ Barcode Adapters (various Cat. Nos.)
•
Ion Library TaqMan™ Quantitation Kit (Cat. No. 4468802)
•
Uracil-DNA Glycoslyase, heat-labile (Cat. No. 78310100UN)
8
Oncomine™ Comprehensive Assay Plus User Guide
Page 9
Chapter 1 Product information
Contents and storage
Contents and storage
Oncomine™ Comprehensive Assay Plus – Manual Library Preparation
Oncomine™ Comprehensive Assay Plus (Cat. No. A48577) is designed to prepare barcoded sample
libraries from DNA and RNA. The kits consist of the Oncomine™ Comprehensive Assay Plus, DNA,
Manual Library Preparation panel (2‑pool) (Part No. A45615) and the Oncomine™ Comprehensive Assay
Plus, RNA, Manual Library Preparation panel (2‑pool) (Part No. A45616), with two Ion AmpliSeq™ Library
Kit Plus (Cat. No. 4488990). Sucient reagents are provided to prepare libraries from 24 samples.
Contents Amount Storage
Oncomine™ Comprehensive Assay Plus, DNA, Manual Library Preparation
2X DNA OCA Plus, Pool 1 of 2 (blue cap) 3 × 40 µL –30ºC to –10ºC
2X DNA OCA Plus, Pool 2 of 2 (blue cap) 3 × 40 µL
RMC 24 µL
Oncomine™ Comprehensive Assay Plus, RNA, Manual Library Preparation
1
5X RNA OCA Plus, Pool 1 of 2 (red cap) 3 × 16 µL –30ºC to –10ºC
5X RNA OCA Plus, Pool 2 of 2 (red cap) 3 × 16 µL
Ion AmpliSeq™ Library Kit Plus
5X Ion AmpliSeq™ HiFi Mix (red cap) 2 x 120 µL –30ºC to –10ºC
FuPa Reagent (brown cap) 2 x 48 µL
Switch Solution (yellow cap) 96 µL
DNA Ligase (blue cap) 2 x 48 µL
25X Library Amp Primers (pink cap) 2 x 48 µL
1X Library Amp Mix (black cap) 2 x 1.2 mL
Low TE 2 x 6 mL 15°C to 30°C
[1]
Can be stored at –30ºC to –10ºC for convenience.
[1]
Oncomine™ Comprehensive Assay Plus User Guide
9
Page 10
Chapter 1 Product information
1
Contents and storage
Oncomine™ Comprehensive Assay Plus, RNA – Manual Library Preparation
Oncomine™ Comprehensive Assay Plus, RNA – Manual Library Preparation (Cat. No. A48578) is
designed to prepare barcoded sample libraries from RNA. The kits consist of the Oncomine
™
Comprehensive Assay Plus, RNA – Manual Library Preparation panel (2‑pool) (Part No. A45616), with
one Ion AmpliSeq™ Library Kit Plus (Cat. No. 4488990). Sucient reagents are provided to prepare
libraries from 24 samples.
Contents Amount Storage
Oncomine™ Comprehensive Assay Plus, RNA – Manual Library Preparation
5X RNA OCA Plus, Pool 1 of 2 (red cap) 3 × 16 µL –30ºC to –10ºC
5X RNA OCA Plus, Pool 2 of 2 (red cap) 3 × 16 µL
Ion AmpliSeq™ Library Kit Plus
5X Ion AmpliSeq™ HiFi Mix (red cap) 120 µL –30ºC to –10ºC
FuPa Reagent (brown cap) 48 µL
Switch Solution (yellow cap) 96 µL
DNA Ligase (blue cap) 48 µL
25X Library Amp Primers (pink cap) 48 µL
1X Library Amp Mix (black cap) 1.2 mL
Low TE 6 mL 15°C to 30°C
[1]
Can be stored at –30ºC to –10ºC for convenience.
[1]
10
Oncomine™ Comprehensive Assay Plus User Guide
Page 11
Chapter 1
Product information
Contents and storage
Oncomine™ Comprehensive Assay Plus – Automated Library Preparation
The Oncomine™ Comprehensive Assay Plus – Automated Library Preparation (Cat. No. A49667)
provides the Oncomine™ Comprehensive Assay Plus, DNA, Chef-Ready panel (2‑pool)
(Part No. A45617) and Oncomine™ Comprehensive Assay Plus, RNA, Chef-Ready panel (2‑pool)
(Part No. A45618) at 2X concentration pre-measured in barcoded primer pool tubes ready to load
into an Ion AmpliSeq™ Chef Reagents DL8 cartridge. In addition, the kit provides all the reagents and
supplies in an Ion AmpliSeq™ Kit for Chef DL8 (Cat. No. A29024) sucient for preparing 32 samples.
Note: For detailed information on preparing Oncomine™ Comprehensive Assay Plus libraries on the
Ion Chef™ System, see the Ion AmpliSeq™ Library Preparation on the Ion Chef™ System User Guide
(Pub. No. MAN0013432).
Component Amount Storage
Oncomine™ Comprehensive Assay Plus, DNA, Chef Ready
2X DNA OCA Plus (pool 1 of 2) 4 × 150 µL –30°C to –10°C
2X DNA OCA Plus (pool 2 of 2) 4 × 150 µL
1
RMC 48 µL
Oncomine™ Comprehensive Assay Plus, RNA, Chef Ready
2X RNA OCA Plus (pool 1 of 2) 4 × 150 µL –30°C to –10°C
2X RNA OCA Plus (pool 2 of 2) 4 × 150 µL
Ion AmpliSeq™ Kit for Chef DL8
Ion AmpliSeq™ Kit for Chef DL8 (Part No. A29025) 2 × 4 cartridges –30°C to –10°C
Ion AmpliSeq™ Chef Solutions DL8 (Part No. A29026) 2 × 4 cartridges 2°C to 8°C
Ion AmpliSeq™ Chef Supplies DL8 (per insert) (Part No. A29027)
•
Ion AmpliSeq™ Tip Cartridge L8
•
PCR Frame Seal
•
Enrichment Cartridge
IonCode™ 0101–0132 in 96 Well PCR Plates (dried) (Part No.
A29028)
Set includes 4 PCR plates:
•
IonCode™ 0101–0108 in 96 Well PCR Plate (red)
•
IonCode™ 0109–0116 in 96 Well PCR Plate (yellow)
•
IonCode™ 0117–0124 in 96 Well PCR Plate (green)
•
IonCode™ 0125–0132 in 96 Well PCR Plate (blue)
2 boxes with
4 inserts
2 sets of 4 plates 15°C to 30°C
15°C to 30°C
[1]
[1]
Ion AmpliSeq™ Chef Solutions DL8 cartridges are shipped at ambient temperature, but need to be stored at 2°C to 8°C upon arrival.
Oncomine™ Comprehensive Assay Plus User Guide
11
Page 12
Chapter 1 Product information
1
Contents and storage
Oncomine™ Comprehensive Assay Plus, RNA – Automated Library Preparation
The Oncomine™ Comprehensive Assay Plus, RNA – Automated Library Preparation (Cat. No. A49671)
provides the Oncomine™ Comprehensive Assay Plus, RNA, Chef-Ready panel (2‑pool)
(Part No. A45618) at 2X concentration pre-measured in barcoded primer pool tubes ready to load
into an Ion AmpliSeq™ Chef Reagents DL8 cartridge. In addition, the kit provides all the reagents and
supplies in an Ion AmpliSeq™ Kit for Chef DL8 (Cat. No. A29024) sucient for preparing 32 samples.
Note: For detailed information on preparing Oncomine™ Comprehensive Assay Plus libraries on the
Ion Chef™ System, see the Ion AmpliSeq™ Library Preparation on the Ion Chef™ System User Guide
(Pub. No. MAN0013432).
Component Amount Storage
Oncomine™ Comprehensive Assay Plus, RNA, Chef-Ready
2X RNA OCA Plus (pool 1 of 2) 4 × 150 µL –30°C to –10°C
2X RNA OCA Plus (pool 2 of 2) 4 × 150 µL
Ion AmpliSeq™ Kit for Chef DL8
Ion AmpliSeq™ Kit for Chef DL8 (Part No. A29025) 2 × 4 cartridges –30°C to –10°C
Ion AmpliSeq™ Chef Solutions DL8 (Part No. A29026) 2 × 4 cartridges 2°C to 8°C
Ion AmpliSeq™ Chef Supplies DL8 (per insert) (Part No. A29027)
•
Ion AmpliSeq™ Tip Cartridge L8
•
PCR Frame Seal
•
Enrichment Cartridge
IonCode™ 0101–0132 in 96 Well PCR Plates (dried) (Part No.
A29028)
Set includes 4 PCR plates:
•
IonCode™ 0101–0108 in 96 Well PCR Plate (red)
•
IonCode™ 0109–0116 in 96 Well PCR Plate (yellow)
•
IonCode™ 0117–0124 in 96 Well PCR Plate (green)
•
IonCode™ 0125–0132 in 96 Well PCR Plate (blue)
[1]
Ion AmpliSeq™ Chef Solutions DL8 cartridges are shipped at ambient temperature, but need to be stored at 2°C to 8°C upon arrival.
2 boxes with
4 inserts
2 sets of 4 plates 15°C to 30°C
15°C to 30°C
[1]
12
Oncomine™ Comprehensive Assay Plus User Guide
Page 13
Required materials not supplied
Unless otherwise indicated, all materials are available through thermofisher.com. "MLS" indicates that
the material is available from fisherscientific.com or another major laboratory supplier.
Item Source
Chapter 1
Required materials not supplied
Product information
1
One of the following:
IonCode™ Barcode Adapters 1–384 Kit
Ion Xpress™ Barcode Adapters Kit
Ion Library TaqMan™ Quantitation Kit and real-time PCR system, see
4468802 (A26121)
A29751
4474517
[1]
“Recommended materials” on page 14.
Agencourt™ AMPure™ XP Kit NC9959336, NC9933872
fisherscientific.com
(RNA only) Ion Torrent™ NGS Reverse Transcription Kit A45003
(DNA only) Uracil-DNA Glycoslyase, heat-labile 78310100UN
One of the following thermal cyclers, or equivalent:
•
ProFlex™ 96‑well PCR System
•
Veriti™ 96‑Well Thermal Cycler
•
2720 Thermal Cycler
•
GeneAmp™ PCR System 9700 96-Well
GeneAmp™ PCR System 9700 Dual 96-Well
[2]
[2]
or
[2]
MicroAmp™ Optical 96-Well Reaction Plate or
MicroAmp™ Optical 96‑Well Reaction Plate with Barcode
Various
N8010560 or
4306737
MicroAmp™ Fast Optical 96-Well Reaction Plate 4346907
MicroAmp™ Clear Adhesive Film 4306311
MicroAmp™ Optical Film Compression Pad 4312639
DynaMag™–96 Side Magnet or other plate magnet 12331D
Eppendorf™ DNA LoBind™ Microcentrifuge Tubes, 1.5 mL 13-698-791
Nuclease-free Water AM9932
Ethanol, Absolute, Molecular Biology Grade BP2818500
Pipettors, 2–200 μL, and low-retention filtered pipette tips MLS
[1]
Various kits are available. For more information, see thermofisher.com.
[2]
Supported but no longer available for purchase.
Oncomine™ Comprehensive Assay Plus User Guide
fisherscientific.com
fisherscientific.com
13
Page 14
Chapter 1 Product information
1
Recommended materials
Recommended materials
Unless otherwise indicated, all materials are available through thermofisher.com. "MLS" indicates that
the material is available from fisherscientific.com or another major laboratory supplier.
Item Source
Recommended additional equipment
One of the following Applied Biosystems™ real‑time PCR instruments:
•
7500 Real-Time PCR System
•
7900HT Fast Real‑Time PCR System
•
StepOne™ Real-Time PCR System
•
StepOnePlus™ Real-Time PCR System
•
ViiA™ 7 Real-Time PCR System
•
QuantStudio™ 3 Real-Time PCR System
•
QuantStudio™ 5 Real‑Time PCR System
•
QuantStudio™ 7 Flex Real-Time PCR System
•
QuantStudio™ 12K Flex Real–Time PCR System
96-well plate centrifuge MLS
Qubit™ 4 Fluorometer
Recommended for nucleic acid isolation
MagMAX™ FFPE DNA/RNA Ultra Kit A31881
Recommended for nucleic acid quantification
Qubit™ dsDNA HS Assay Kit (DNA) Q32851, Q32854,
[2]
[1]
Various
Q33238
14
Qubit™ RNA HS Assay Kit (RNA) Q32852, Q32855
TaqMan™ RNase P Detection Reagents Kit 4316831
[1]
Supported but no longer available for purchase.
[2]
Qubit™ 2.0 Fluorometer or later are supported.
Recommended controls
AcroMetrix™ Oncology Hotspot Control Thermo Fisher Scientific 969056
Seraseq™ Tri‑Level Tumor Mutation DNA Mix v2 HC Seracare 0710‑0097
ATCC cell lines with CNV www.atcc.org ATCC® CRL-2327
Cell- Ref™ FFPE Cell Slide - HCC- 2998 (5 slides) AccuRef ASO-1010
Cell- Ref™ FFPE Cell Slide - T-47D (5 slides) AccuRef ASO-1032
Vendor Part number
ATCC® CRL-2336
ATCC® CRL-5868D
Oncomine™ Comprehensive Assay Plus User Guide
Page 15
Chapter 1 Product information
Recommended materials
(continued)
Recommended controls Vendor Part number
Cell- Ref™ FFPE Cell Slide - A549 (5 slides) AccuRef ASO-1001
Cell- Ref™ FFPE Cell Slide - SK-MEL-2 (5 slides) AccuRef ASO-1028
Cell- Ref™ FFPE Cell Slide - H2228 (5 slides) AccuRef ASO-1006
Seraseq™ gDNA TMB Mix Score 7 Seracare 0710-1326
Seraseq™ gDNA TMB Mix Score 9 Seracare 0710-1325
Seraseq™ gDNA TMB Mix Score 20 Seracare 0710-1324
Seraseq™ gDNA TMB Mix Score 26 Seracare 0710-1323
1
Seraseq™ Fusion RNA Mix v4
18 RNA fusions: RET, ROS1, EGFRvIII, EGFR, ALK,
NTRK3, FGFR3, NTRK1, METex14, PPARG1, BRAF,
ERG
Seraseq™ FFPE NTRK Fusion RNA Reference
Material
Horizon™ ALK RET ROS RNA fusion
RNA fusions: EML4-ALK, CCDC6-RET, and
SLC34A2-ROS1
CancerSeq™ Plus Paran Tissue Curl (5 curls)
Copy number variation (CNV): CCNE1 ,EGFR,
ERBB2, GNAS, KRAS, RB1 (-)
Seracare 0710‑0497
Seracare 0710‑1031
Horizon HD784
BioChain T2235152-SC
Lot No. B906046
Oncomine™ Comprehensive Assay Plus User Guide
15
Page 16

2
Procedural guidelines ................................................................. 16
■
Before each use of the kit ............................................................. 16
■
Guidelines for RNA isolation, quantification, and input ..................................... 17
■
Guidelines for DNA isolation, quantification, and input .................................... 17
■
Library preparation from genomic DNA or RNA ........................................... 18
■
Procedural guidelines
•
Minimize freeze-thaw cycles of Oncomine™ Comprehensive Assay Plus panels and the RMC by
aliquoting into low bind tubes as needed for your experiments. Panels can be stored at 4°C for 1
year. Store RMC at –30°C to –10°C.
•
Use good laboratory practices to minimize cross-contamination of products. If possible, perform
PCR setup in an area or room that is free of amplicon contamination. Always change pipette tips
between samples.
•
Use a calibrated thermal cycler.
•
Pipet viscous solutions, such as 5X Ion AmpliSeq™ HiFi Mix, FuPa Reagent, Switch Solution, DNA
Ligase, and panels, slowly and ensure complete mixing by vortexing or pipetting up and down
several times.
•
Arrange samples in alternating columns on the plate for easier pipetting with multichannel pipettes
during purification with the DynaMag™ Side Magnet.
Before you begin
Before each use of the kit
•
Thaw components that contain enzymes—such as 5X Ion AmpliSeq™ HiFi Mix, FuPa Reagent, DNA
Ligase, and 1X Library Amp Mix —on ice, and keep on ice during procedure. All other components,
including primer pools, can be thawed at room temperature. Gently vortex and centrifuge before
use.
•
If there is visible precipitate in the Switch Solution after thawing, vortex or pipet up and down at
room temperature to resuspend.
•
Bring the Agencourt™ AMPure™ XP Reagent to room temperature.
IMPORTANT! Do NOT substitute a Dynabeads
AMPure™ XP Reagent.
16
™
-based purification reagent for the Agencourt
Oncomine™ Comprehensive Assay Plus User Guide
™
Page 17

Chapter 2 Before you begin
Guidelines for RNA isolation, quantification, and input
Guidelines for RNA isolation, quantification, and input
•
We recommend the MagMAX™ FFPE DNA/RNA Ultra Kit (Cat. No. A31881) for isolating RNA.
•
We recommend the Qubit™ RNA HS Assay Kit (Cat. No. Q32855) for quantifying RNA.
•
Treat total RNA with DNase before use.
•
We recommend using 20 ng of total RNA for reverse transcription. Increasing the amount of
total RNA will usually result in higher quality libraries, especially when RNA quality or quantity is
unknown. With high-quality, well-quantified samples, as little as 1 ng total RNA can be used.
•
In general, library yield from high quality RNA is greater than from degraded samples. Library yield
is not indicative of sequencing performance.
Guidelines for DNA isolation, quantification, and input
•
We recommend the MagMAX™ FFPE DNA/RNA Ultra Kit (Cat. No. A31881) for isolating DNA.
•
We recommend the TaqMan™ RNase P Detection Reagents Kit (Cat. No. 4316831) for quantifying
amplifiable human genomic DNA (see Demonstrated Protocol: Sample Quantification for Ion
AmpliSeq™ Library Preparation Using the TaqMan™ RNAse P Detection Reagents Kit (Pub. No.
MAN0007732) available at thermofisher.com).
•
The Qubit™ dsDNA HS Assay Kit (Cat. No. Q32851 or Q32854) can also be used for quantification,
particularly for FFPE DNA, and highly degraded DNA samples.
•
Quantification methods such as spectrophotometry (for example, using a NanoDrop
spectrophotometer) are not recommended, because they are not specific for DNA. Use of these
methods can lead to gross overestimation of the concentration of sample DNA, under-seeding of
the target amplification reaction, low library yields, and poor chip loading.
•
We recommend using 20 ng of DNA for manual library preparation and automated library
preparation. Increasing the amount of DNA results in higher-quality libraries, especially when DNA
quality or quantity is unknown.
™
2
Oncomine™ Comprehensive Assay Plus User Guide
17
Page 18
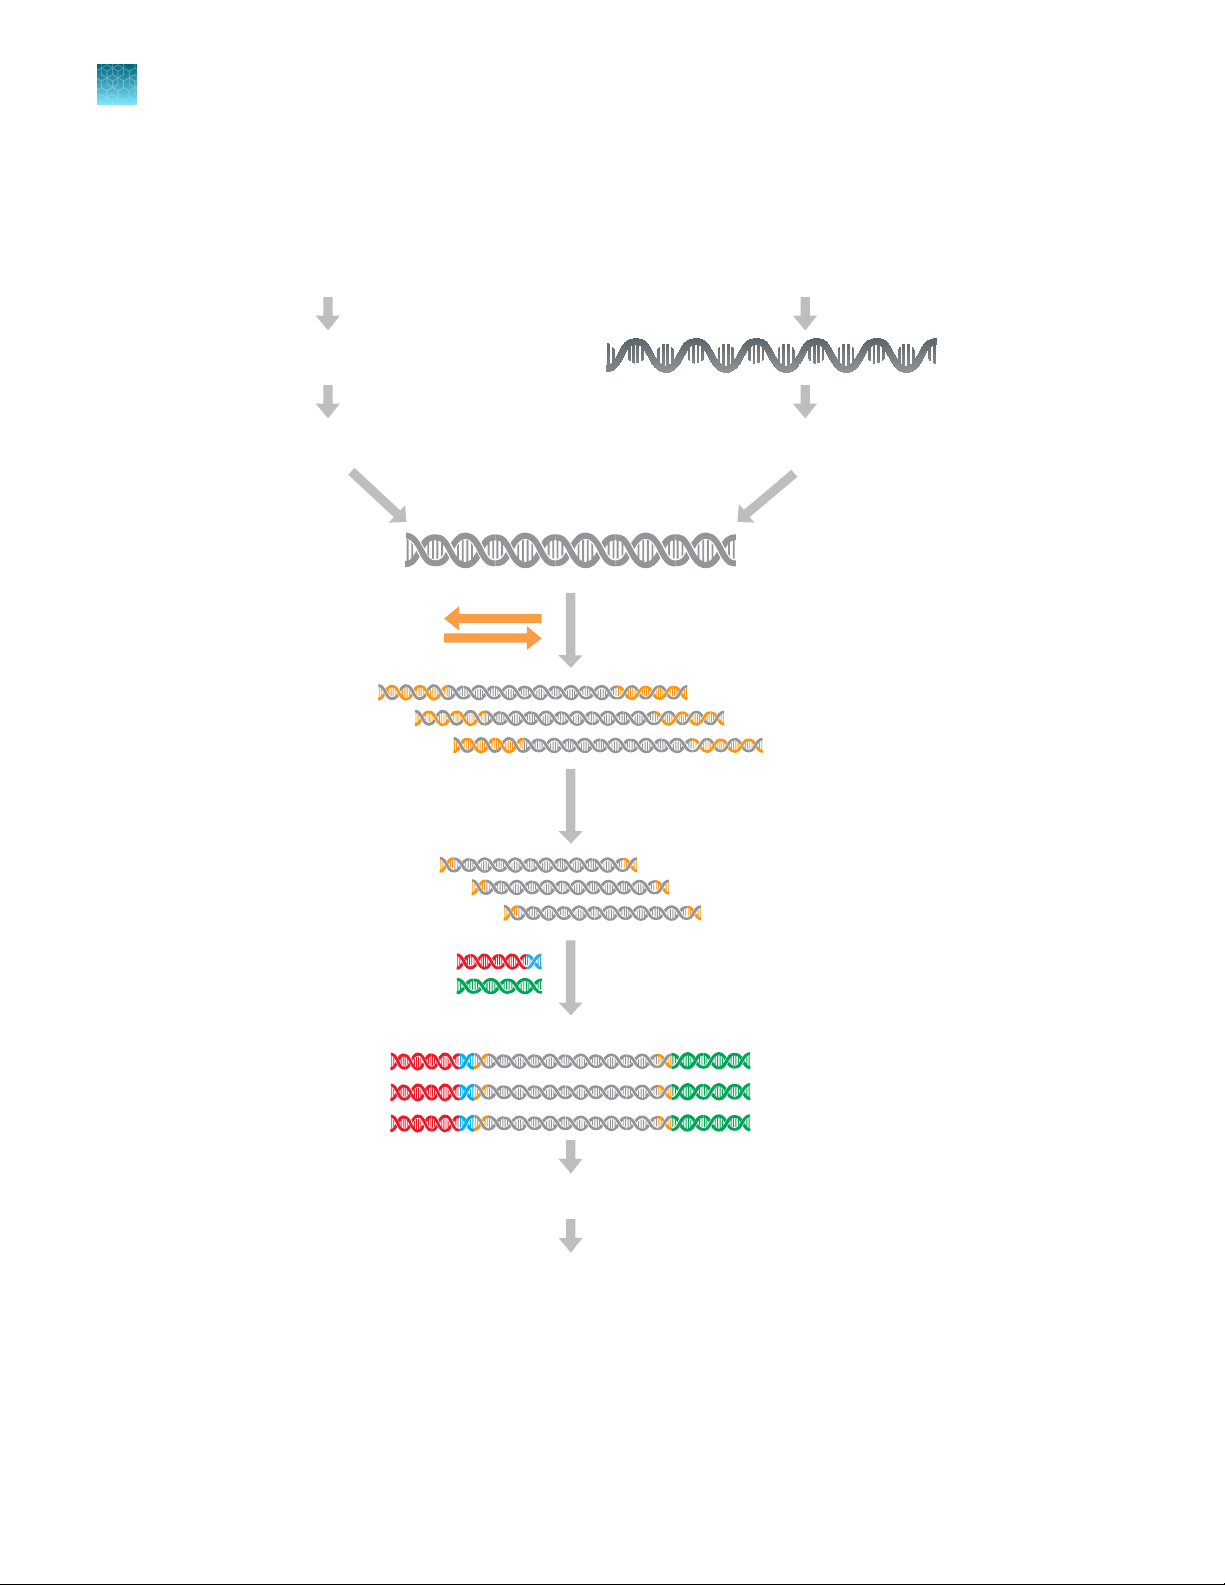
DNA or cDNA
P1
P1
X
Barcode Adapters
Barcoded library
X
Primer pairs
Amplicons
Amplify targets
Partially digest amplicons
Ligate adapters
Quantify libraries
Combine libraries (optional)
RMC reagent addition
Isolate and quantify DNA
UDG treat FFPE DNA
Reverse transcribe RNA
RNA
Isolate and quantify RNA
Chapter 2 Before you begin
2
Library preparation from genomic DNA or RNA
Library preparation from genomic DNA or RNA
18
Oncomine™ Comprehensive Assay Plus User Guide
Page 19
Automated library preparation on the
3
Ion Chef™ System
This chapter describes library preparation using the following components:
•
Oncomine™ Comprehensive Assay Plus, DNA, Chef-Ready Library Preparation (Part No. A45617)
•
Oncomine™ Comprehensive Assay Plus, RNA, Chef-Ready Library Preparation (Part No. A45618)
•
Ion Torrent™ NGS Reverse Transcription Kit (Cat No. A45003)
•
Uracil-DNA Glycoslyase, heat-labile (Cat No. 78310100UN)
•
Ion AmpliSeq™ Kit for Chef DL8 (Cat No. A29024)
Create a sample set to prepare 2 pools of 4 libraries each
IMPORTANT! The Oncomine
OCA Plus Library prep Protocol that limits the number of libraries to 4 per pool in order to generate
sucient read depth when sequencing.
Note:
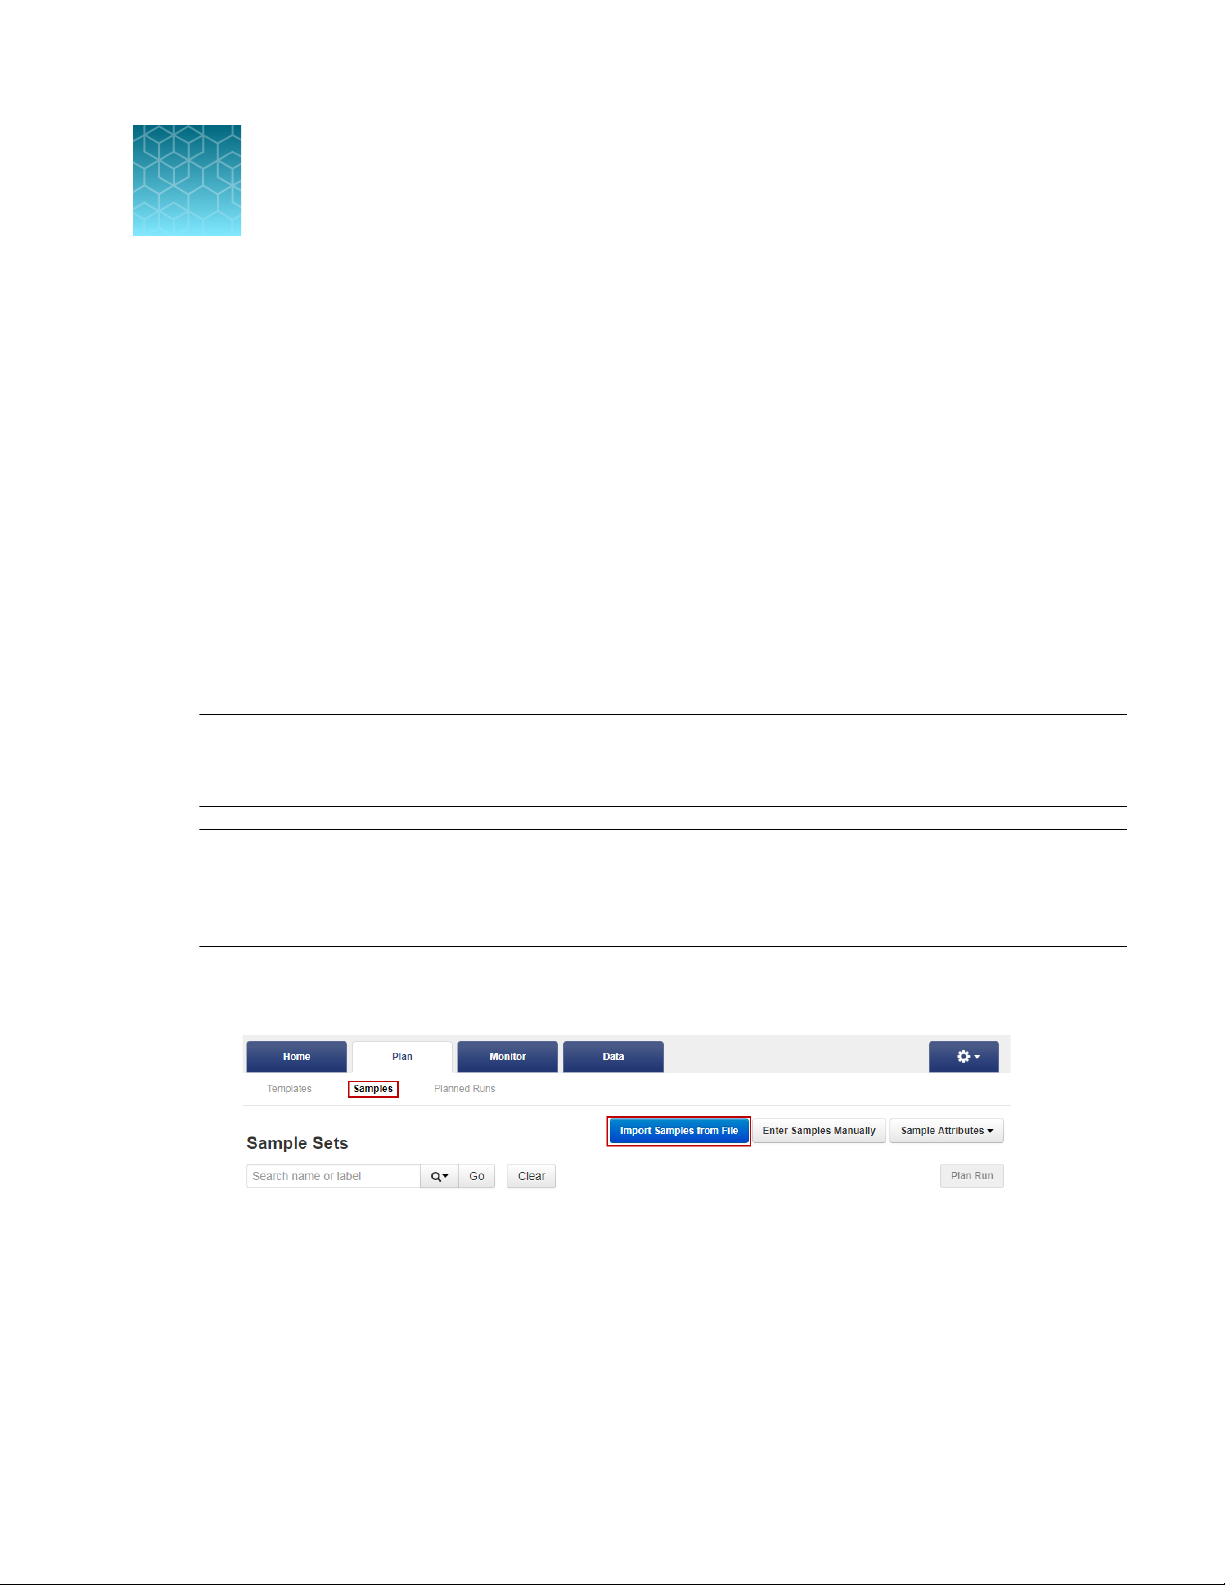
preparation. You can import new samples into Torrent Suite™ Software with the Import Samples
from File feature, using a CSV template file that is available in Torrent Suite™ Software to simplify the
process. During this process, you can also create a new Sample Set for the new samples.
In Torrent Suite™ Software 5.16 or later Sample Sets are required for automated library
1.
In the Plan tab, click Samples, then click Import Samples from File. For more information, see
the Torrent Suite™ Software online help.
™
Comprehensive Assay Plus requires selection the 2 Library Pools -
Oncomine™ Comprehensive Assay Plus User Guide
19
Page 20
Chapter 3
3
Create a sample set to prepare 2 pools of 4 libraries each
2.
Automated library preparation on the Ion Chef™ System
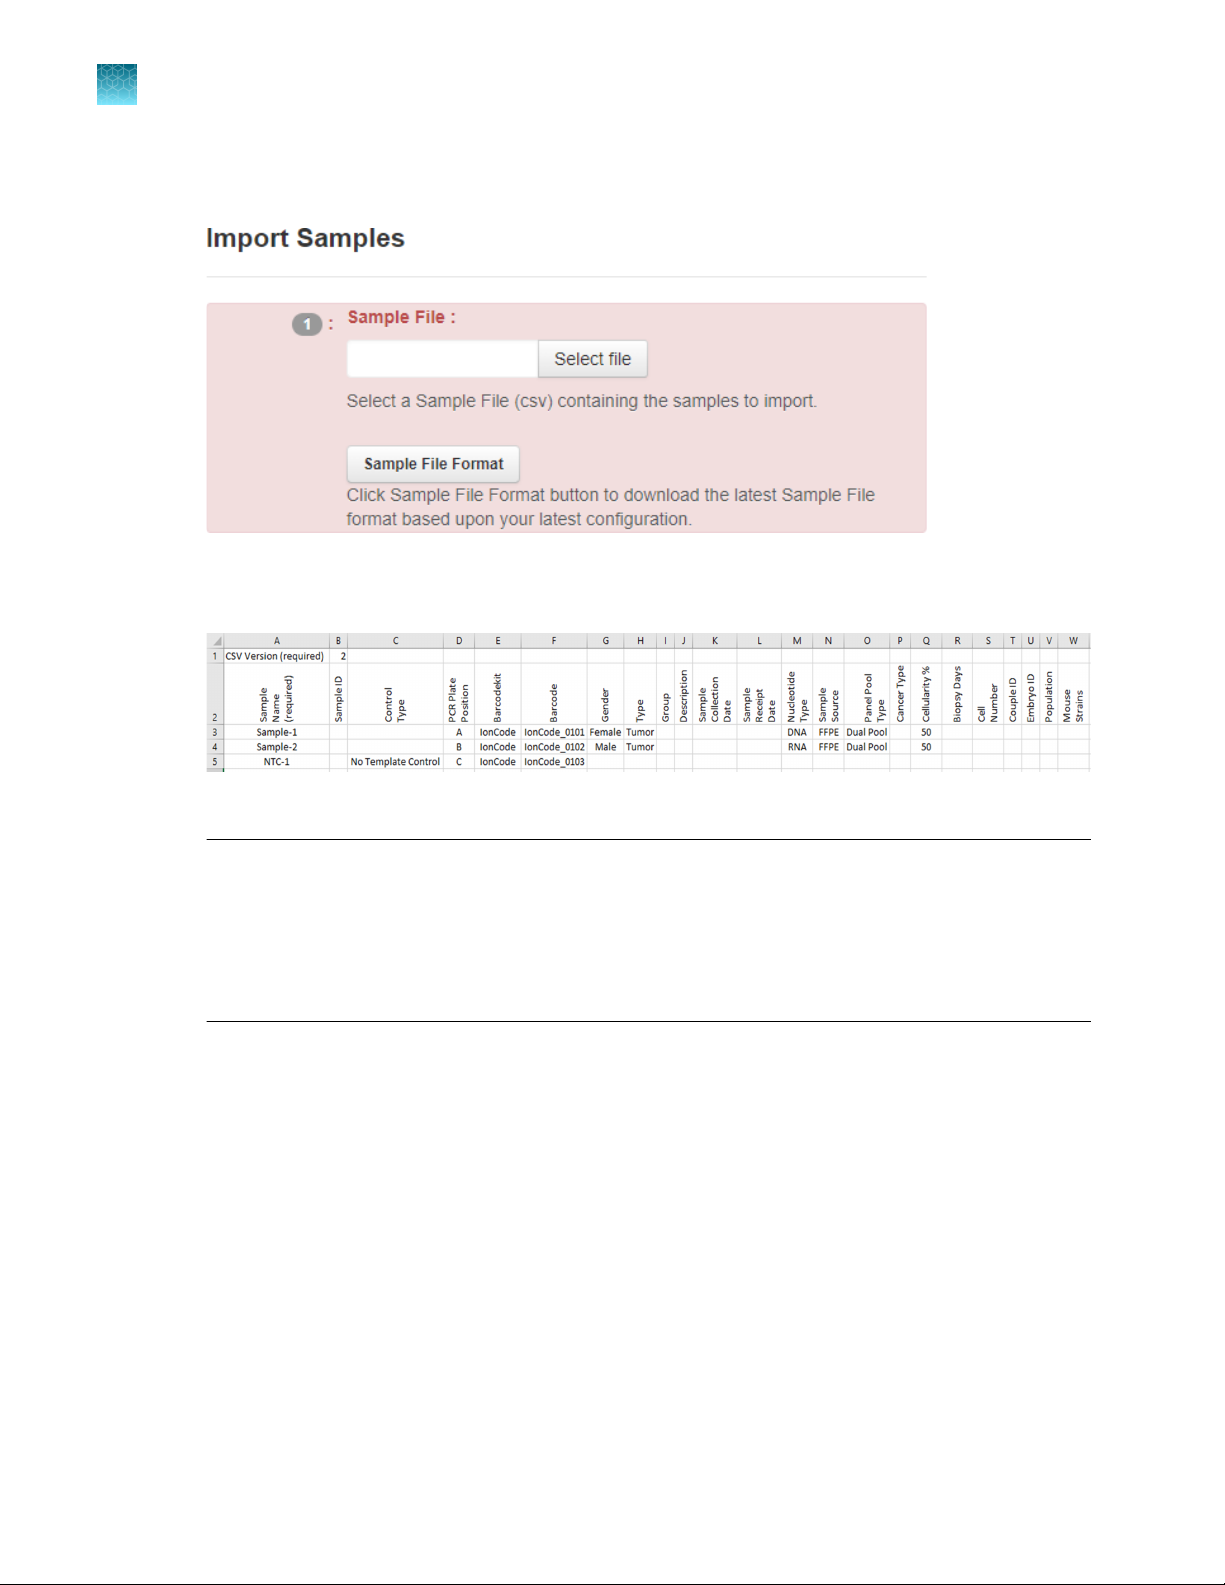
In section 1 of the Import Samples section, click Sample File Format to download a sample CSV
template.
The sample file format CSV contains the version of the CSV file in the top row, and sample
attributes in separate columns.
3.
Fill out the template CSV file as completely as possible, then save it to the location of your choice.
Note:
Required columns include: Sample name, PCR Plate Position (A–H), Barcode Kit (IonCode
·
Barcodes 1–32), and Barcode.
Recommended columns include: Sample ID, Gender, Type (sample type, such as self), Group
·
(number that indicates the sample is a single sample, pair or trio), DNA/RNA, Cancer Type, and
Cellularity %.
4.
When the CSV file is filled out and saved, click Select File, navigate to the completed CSV file,
then click Open.
5.
Click Add Sample Set, then enter or select the required information in each field.
a.
Enter a Sample Set Name.
b.
Select the Group Type.
c.
Select the Library Prep Type—AmpliSeq on Chef.
d.
Select the Library Prep Kit—Ion AmpliSeq Kit for Chef DL8.
20
Oncomine™ Comprehensive Assay Plus User Guide
Page 21

Chapter 3
e.
Select the Library Prep Protocol—2 Library Pools - OCA Plus.
Automated library preparation on the Ion Chef™ System
Automated RNA library preparation
Note: Completed libraries will be delivered to uncapped library Recovery Tubes in Position
C (samples A–D) and Position D (samples E–H) in the Ion AmpliSeq™ Chef Reagents DL8
cartridge. Save the caps. To run 8 RNA samples simultaneously on the same chip do not
select a Library Prep Protocol. All 8 sample libraries are combined in a single Recovery Tube
v2 in Position D of the Ion AmpliSeq™ Chef Reagents DL8 cartridge.
6.
Click Save & Finish.
The software automatically imports the samples into the Sample Sets table.
3
Saved sample sets that enable 2 library pools for OCA Plus can then be selected on the Ion Chef
Instrument user interface when setting up Ion AmpliSeq™ Kit for Chef DL8 library preparation runs.
Automated RNA library preparation
Reverse transcribe RNA for Chef Ready library preparation
If you are starting from RNA, you must first reverse transcribe RNA to cDNA.
1.
Remove and discard the plate seal from an IonCode™ 96‑well PCR Plate.
2.
For each sample, add the following components into a single well in column 1 of the IonCode
96‑well plate (provided in the Ion AmpliSeq™ Kit for Chef DL8). Prepare a master mix without
sample RNA for multiple reactions.
Component
Ion Torrent™ NGS 5X Reaction Buer 2 µL
Ion Torrent™ NGS 10X RT Enzyme Mix 1 µL
Total RNA (20 ng)
Nuclease-free Water to 10 µL
[1]
™
™
Volume
≤7 µL
Total volume per well 10 µL
[1]
If preparing an RNA positive control sample along with high quality RNA samples, use 20 ng positive control sample input. If
preparing an RNA positive control sample along with FFPE RNA samples, reduce the positive control sample input to 2 ng.
Substitute an equal volume of nuclease-free water or low TE to prepare a no-template control (NTC).
Oncomine™ Comprehensive Assay Plus User Guide
21
Page 22
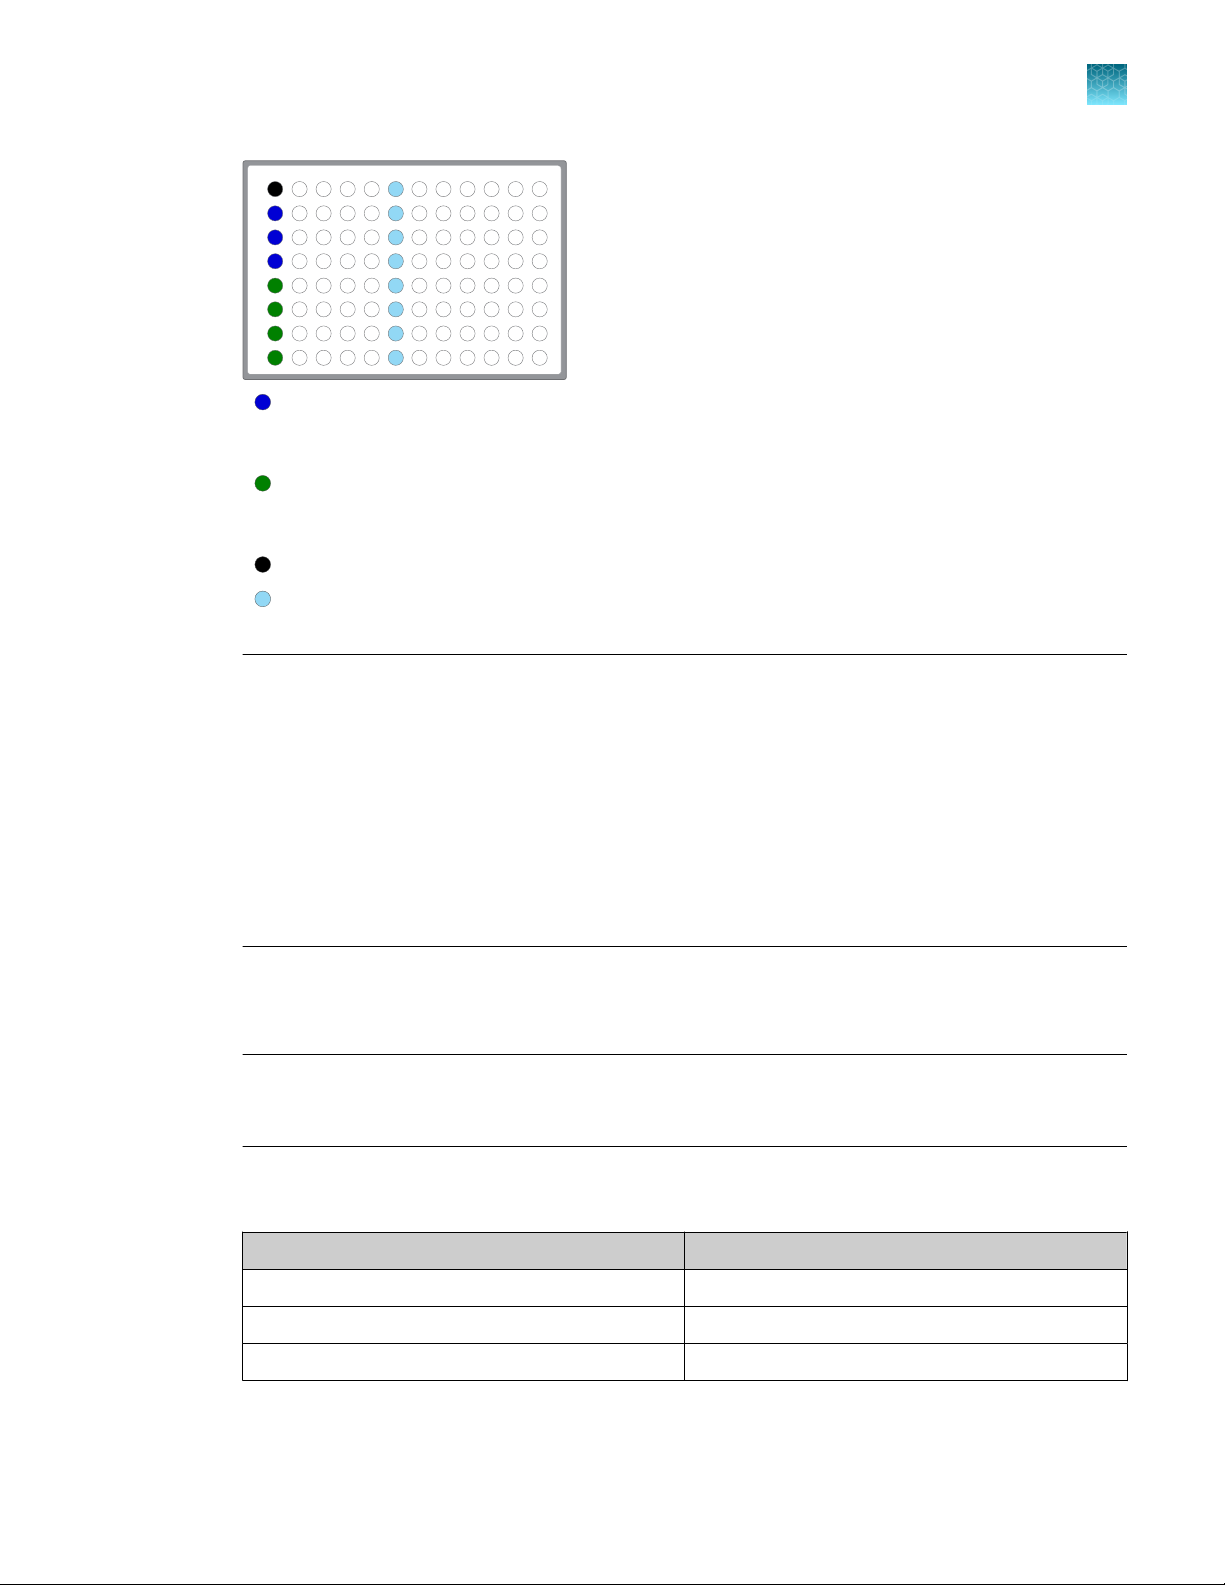
1 2
3
4 5 6
7
8 9
101112
A
B
C
D
E
F
G
H
Chapter 3
3
Automated RNA library preparation
Automated library preparation on the Ion Chef™ System
Column 1 wells contains a 10 μL reverse
transcription reaction, or control reaction.
(Optional) Positive control or Non template
control (NTC)
Each column 6 well contains a dried-down
IonCode™ Barcode Adapter. The lowest barcode
number is in A6, and the highest is in H6. All
appear light blue in the actual plates.
Note:
If you are processing fewer than 8 samples, it is preferable to add replicates or positive control
·
samples to the run. Otherwise, pipet 15 µL of Nuclease-free Water as non-template control into
column 1 wells that do not contain an RNA sample and balance the number of positive samples
between rows A–D and E–H.
We recommend processing at least 6 samples per run. If processing 5 or fewer samples, we
·
recommend that you quantify the output combined library by qPCR to ensure that an optimal
concentration is used in templating reactions.
If processing RNA samples that are to be combined with a paired DNA library ensure the
·
samples are processed in the correct rows A–D or E–H.
3.
Seal the plate with MicroAmp™ Adhesive Film, vortex thoroughly, then briefly centrifuge to collect
droplets. Alternatively, mix by pipetting at least half the total volume up and down at least 5 times
before sealing the plate.
IMPORTANT! Oset the film to the left so that the adhesive does not cover the barcode label. If
the barcode label becomes damaged, you can override the error during Deck Scan.
4.
Place a MicroAmp™ Compression Pad on the plate, load the plate in the thermal cycler, then run
the following program to synthesize cDNA.
Temperature
Time
25°C 10 minutes
50°C 10 minutes
85°C 5 minutes
10°C Hold
STOPPING POINT Samples can be stored at 10°C for up to 16 hours in the thermal cycler. For
longer term, store at −20°C.
5.
22
Briefly centrifuge the plate to collect any droplets at the bottom of the wells.
Oncomine™ Comprehensive Assay Plus User Guide
Page 23

Chapter 3 Automated library preparation on the Ion Chef™ System
Automated RNA library preparation
3
6.
Pipet 5 µL of nuclease-free water into each cDNA synthesis reaction in column 1 of the IonCode
96‑well plate.
7.
Seal the plate with a new MicroAmp™ Adhesive Film, vortex thoroughly, then briefly centrifuge to
collect droplets. Alternatively, mix by pipetting at least half the total volume up and down at least 5
times before sealing the plate.
IMPORTANT! Oset the film to the left so that the adhesive does not cover the barcode label. If
the barcode label becomes damaged, you can override the error during Deck Scan.
Following completion of cDNA synthesis see "Thaw the reagents and prepare the instrument" in the
Ion AmpliSeq™ Library Preparation on the Ion Chef™ System User Guide (Pub. No. MAN0013432) for
instructions to prepare Oncomine™ Comprehensive Assay Plus libraries on the Ion Chef™ System.
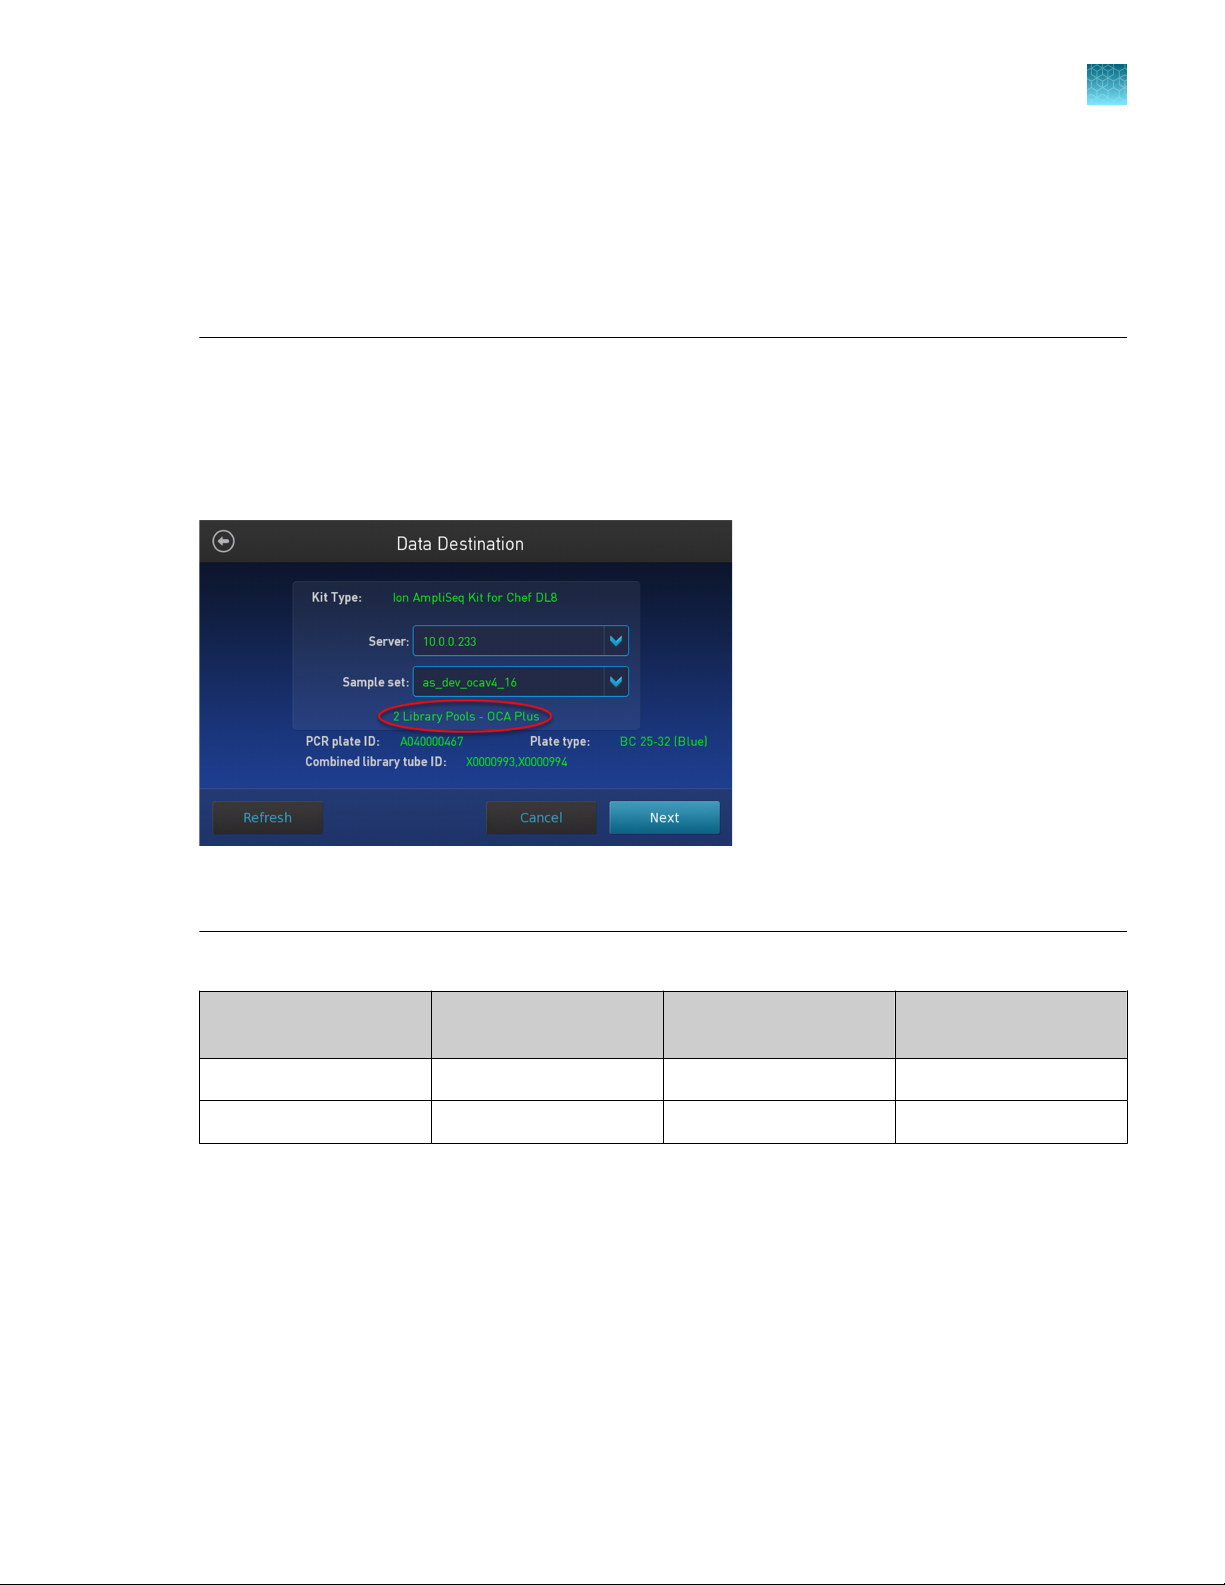
For information on how to set up the Ion Chef™ Instrument, see “Ion Chef™ Instrument setup information
for automated RNA library preparation” on page 23.
Ion Chef™ Instrument setup information for automated RNA library preparation
See the Ion AmpliSeq™ Library Preparation on the Ion Chef™ System User Guide (Pub. No.
MAN0013432) for detailed information on preparing Oncomine™ Comprehensive Assay Plus libraries
on the Ion Chef™ System.
™
IMPORTANT! When starting the library preparation run on the Ion Chef
correct Kit Type and Sample set are selected, and that 2 Library Pools - OCA Plus is displayed in
order to properly prepare Oncomine™ Comprehensive Assay Plus–automated libraries. If 2 Library Pools
- OCA Plus is not displayed the default library preparation script is run which results in all 8 libraries
combined into a single pool. The 2 Library Pools - OCA Plus library preparation script is only available in
Torrent Suite™ Software 5.16 or later.
Figure 1 Example of a correct Oncomine™ Comprehensive Assay Plus setup
Ensure that 2 Library Pools - OCA Plus appears below the Sample set dropdown list.
™
Instrument ensure that the
Oncomine™ Comprehensive Assay Plus User Guide
23
Page 24
Chapter 3
3
Automated DNA library preparation
Automated library preparation on the Ion Chef™ System
During Ion Chef™ Instrument setup, enter the following parameters when prompted.
Stating material # of primer pools
High quality RNA
FFPE RNA
[1]
Due to the disparity in the required number of target amplification cycles for high quality and FFPE RNA we do NOT recommend
running both high quality and FFPE samples on the same plate using the same input amount. If preparing a positive control (high
quality) along with FFPE RNA samples, reduce the positive control sample input to 2 ng and use the FFPE cycling parameters.
[1]
[1]
2 23 4 minutes
2 29 4 minutes
Target amplification
Automated DNA library preparation
RMC in DNA target amplification reactions
Oncomine™ Comprehensive Assay Plus has been developed to support a wide range of biomarkers,
including assessment of microsatellite instability (MSI). MSI arises from defects in the mismatch repair
(MMR) system and is associated with hypermutability of short DNA sequence repeats (microsatellite
locations) throughout the genome.
RMC is composed of in-sample standards that function as internal references in the analysis pipeline to
ensure the robustness of MSI assessment in case of variations in sample preparation or run conditions.
RMC is added to the DNA target amplification reaction.
cycles
Anneal & extension time
Remove deaminated bases from FFPE DNA
Sample age, storage conditions, and FFPE preservation methods can lead to significant cytosine
deamination of the isolated DNA. This deamination can result in an artificially high deamination score
when determining the tumor mutational burden result. We have demonstrated that deaminated cytosine
(uracil) bases can be enzymatically removed by treatment with Uracil DNA Glycosylase (UDG).
Note: We recommend treating all samples including FFPE and high quality (for example, commercial
controls or DNA isiolated from cell lines) DNA with UDG to remove deaminated bases before target
amplification.
1.
Remove and discard the plate seal from an IonCode™ Barcode Adapters 96‑well PCR plate.
2.
For each FFPE DNA sample, add the following components to a single well in column 1 of the
IonCode™ Barcode Adapters 96‑well PCR plate.
Component
20 ng FFPE DNA
Uracil-DNA Glycoslyase, heat-labile 1 µL
Low TE to 10 µL
[1]
Substitute an equal volume of nuclease-free water or low TE to prepare a no-template control (NTC).
[1]
Volume
≤9 µL
24
Oncomine™ Comprehensive Assay Plus User Guide
Page 25
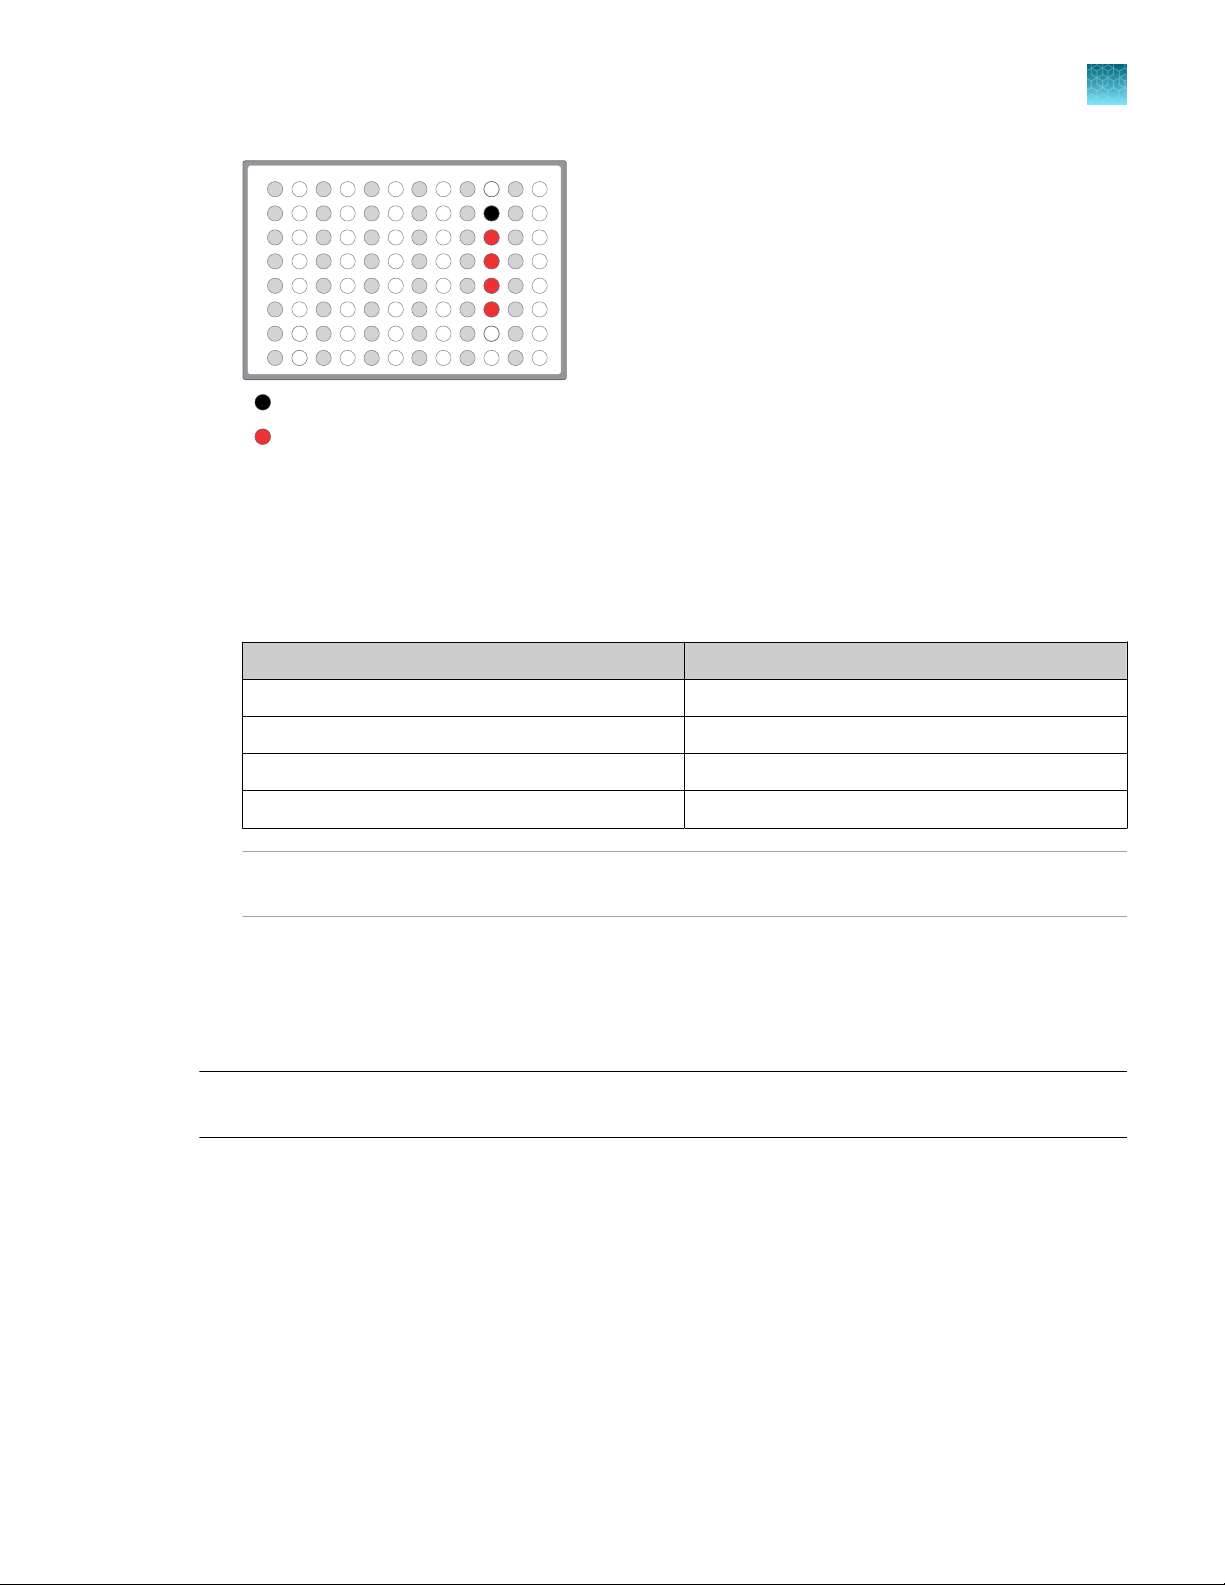
1 2
3
4 5 6
7
8 9
101112
A
B
C
D
E
F
G
H
Chapter 3 Automated library preparation on the Ion Chef™ System
Automated DNA library preparation
Column 1 wells contains 20 ng of FFPE DNA sample in 10 µL, or 10 µL Nuclease-free Water as
non-template control. Samples A–D delivered to uncapped library Recovery Tube in Position C in the Ion
AmpliSeq™ Chef Reagents DL8 cartridge.
Column 1 wells contains 20 ng of FFPE DNA sample in 10 µL, or 10 µL Nuclease-free Water as
non-template control. Samples E–H delivered to uncapped library Recovery Tube in Position D in the Ion
AmpliSeq™ Chef Reagents DL8 cartridge.
(Optional) Non template control (NTC)
Each column 6 well contains a dried-down IonCode™ Barcode Adapter. The lowest barcode number is in
A6, and the highest is in H6. All appear light blue in the actual plates.
3
Note:
If you are processing fewer than 8 samples, it is preferable to add replicates or positive control
·
samples to the run. Otherwise, pipet 10 µL of Nuclease-free Water as non-template control into
column 1 wells that do not contain a DNA sample and balance the number of positive samples
between rows A–D and E–H.
We recommend processing at least 6 samples per run. We do not recommend processing
·
1, 2 or 5 samples per run. If you do process 5 or fewer samples, we recommend that you
quantify the output combined library by qPCR to ensure that an optimal concentration is used in
templating reactions.
If processing only 3 or 4 samples, group them together either in rows A–D or E–H.
·
3.
Mix the reaction by pipetting at least half the total volume up and down at least 5 times, then seal
the plate with MicroAmp™ Clear Adhesive Film. Alternatively, seal the plate, vortex for 5 seconds to
mix the reactions, then centrifuge briefly to collect the contents.
IMPORTANT! To prevent evaporation during UDG treatment, use an applicator tool to press the
film securely around each reaction well and around the perimeter of the plate. Oset the film to the
left so that the adhesive does not cover the barcode label.
4.
Place a MicroAmp™ Optical Film Compression Pad on the plate, load the plate into the thermal
cycler, then run the following program.
Temperature
Time
37°C 2 minutes
50°C 10 minutes
Oncomine™ Comprehensive Assay Plus User Guide
4°C Hold (≤1 hour)
25
Page 26
Chapter 3 Automated library preparation on the Ion Chef™ System
3
Automated DNA library preparation
5.
Remove the plate from the thermal cycler, then centrifuge briefly to collect the contents.
STOPPING POINT Reactions can be stored at −20°C long term.
6.
Carefully remove the plate seal, then add the following components to each well.
Note: If processing multiple samples, prepare a reaction master mix (+ 5–10% overage), then add
15 μL to each well.
Component Volume
RMC 1.5 µL
Nuclease-free Water 3.5 µL
Total volume per well 15 µL
7.
Mix the reaction by pipetting at least half the total volume up and down at least 5 times,
then carefully inspect each well for air bubbles. Remove any air bubbles by gentle pipetting. .
Alternatively, seal the plate with MicroAmp™ Clear Adhesive Film, vortex for 5 seconds to mix the
reactions, then centrifuge briefly to collect the contents.
IMPORTANT! Oset the film to the left so that the adhesive does not cover the barcode label.
If the barcode label becomes damaged, you can override the error during Deck Scan on the
Ion Chef™ Instrument.
Proceed to "Thaw the reagents and prepare the instrument" in the Ion AmpliSeq™ Library Preparation
on the Ion Chef™ System User Guide (Pub. No. MAN0013432) for instructions to prepare Oncomine
™
Comprehensive Assay Plus libraries on the Ion Chef™ System.
For information on how to set up the Ion Chef™ Instrument, see “Ion Chef™ Instrument setup information
for automated DNA library preparation” on page 27.
26
Oncomine™ Comprehensive Assay Plus User Guide
Page 27
Chapter 3 Automated library preparation on the Ion Chef™ System
Automated DNA library preparation
Ion Chef™ Instrument setup information for automated DNA library preparation
See the Ion AmpliSeq™ Library Preparation on the Ion Chef™ System User Guide (Pub. No.
MAN0013432) for detailed information on preparing Oncomine™ Comprehensive Assay Plus libraries
on the Ion Chef™ System.
3
IMPORTANT! When starting the library preparation run on the Ion Chef
™
Instrument ensure that the
correct Kit Type and Sample set are selected, and that 2 Library Pools - OCA Plus is displayed in order
to properly prepare Oncomine™ Comprehensive Assay Plus–Chef Ready libraries. If 2 Library Pools OCA Plus is not displayed the default library preparation script is run which results in all 8 libraries
combined into a single pool. This exceeds the capacity of the Ion 550™ Chip. The 2 Library Pools - OCA
Plus library preparation script is only available in Torrent Suite™ Software 5.16 or later.
Figure 2 Example of a correct Oncomine™ Comprehensive Assay Plus setup
Ensure that 2 Library Pools - OCA Plus appears below the Sample set dropdown list.
During Ion Chef™ Instrument setup, enter the following parameters when prompted.
Stating material
High quality DNA
FFPE DNA
[1]
Due to the disparity in the required number of target amplification cycles for high quality and FFPE DNA we do NOT recommend
running both high quality and FFPE samples on the same plate using the same input amount.
Oncomine™ Comprehensive Assay Plus User Guide
[1]
[1]
# of primer pools
Target amplification
cycles
2 13 16 minutes
2 16 16 minutes
Anneal & extension time
27
Page 28

Manual library preparation
4
RNA preparation and cDNA amplification ................................................ 28
■
DNA preparation and amplification ...................................................... 33
■
Library preparation ................................................................... 36
■
Quantify the library by qPCR and calculate the dilution factor .............................. 41
■
Combine libraries ..................................................................... 43
■
Guidelines for templating and sequencing ............................................... 46
■
This chapter describes library preparation using the following kits:
•
Oncomine™ Comprehensive Assay Plus, DNA, Manual library preparation (Part No. A45615)
•
Oncomine™ Comprehensive Assay Plus, RNA, Manual library preparation (Part No. A45616)
•
Ion AmpliSeq™ Library Kit Plus (Cat No. 4488990)
•
Ion Torrent™ NGS Reverse Transcription Kit (Cat No. A45003)
•
Uracil-DNA Glycoslyase, heat-labile (Cat No. 78310100UN)
RNA preparation and cDNA amplification
Use the components of the Oncomine™ Comprehensive Assay Plus, RNA (Cat. No. A45616) for the
follow procedures.
Reverse transcribe RNA for manual library preparation
1.
If the RNA was prepared from FFPE tissue and not previously heat-treated, heat at 80°C for
10 minutes, then cool to room temperature.
2.
For each sample, add the following components into a single well of a 96-well PCR plate on ice or
in a pre-chilled 4°C cold block. Prepare a master mix without sample RNA for multiple reactions.
Component
Ion Torrent™ NGS 5X Reaction Buer 2 µL
Ion Torrent™ NGS 10X RT Enzyme Mix 1 µL
Total RNA (20 ng)
Nuclease-free Water to 10 µL
Total volume per well 10 µL
[1]
Substitute an equal volume of nuclease-free water or low TE to prepare a no-template control (NTC).
[1]
Volume
≤7 µL
28
Oncomine™ Comprehensive Assay Plus User Guide
Page 29
RNA plate
1 2
3
4 5 6 7 8 9 101112
A
B
C
D
E
F
G
H
Chapter 4 Manual library preparation
RNA preparation and cDNA amplification
(Optional) Non template control (NTC)
RNA sample
3.
Seal the plate with MicroAmp™ Clear Adhesive Film, vortex thoroughly, then briefly centrifuge to
collect droplets. Alternatively, mix by pipetting at least half the total volume up and down at least 5
times before sealing the plate.
4.
Place a MicroAmp™ Optical Film Compression Pad on the plate, load the plate in the thermal
cycler, then run the following program to synthesize cDNA.
4
Temperature
25°C 10 minutes
50°C 10 minutes
85°C 5 minutes
10°C Hold
STOPPING POINT Samples can be stored at 10°C for up to 16 hours in the thermal cycler. For
longer term, store at −20°C.
5.
Briefly centrifuge the plate to collect any droplets at the bottom of the wells, then proceed to the
next step.
Prepare cDNA target amplification reactions
IMPORTANT! The cDNA synthesis reaction, primer pools, and 5X Ion AmpliSeq
Pipet slowly and mix thoroughly.
1.
Place the 96‑well plate in a pre-chilled cold block or on ice.
2.
Thaw the 5X Ion AmpliSeq™ HiFi Mix on ice, gently vortex to mix, then briefly centrifuge to collect.
Time
™
HiFi Mix are viscous.
Oncomine™ Comprehensive Assay Plus User Guide
29
Page 30
RNA plate
1 2
3
4 5 6 7 8 9 101112
A
B
C
D
E
F
G
H
1
2
Chapter 4 Manual library preparation
4
RNA preparation and cDNA amplification
3.
To each cDNA synthesis reaction add:
cDNA synthesis reaction 10 µL
5X Ion AmpliSeq™ HiFi Mix (red cap) 4.5 µL
Nuclease-free Water 3.5 µL
Final volume 18 µL
4.
Mix by pipetting at least half the total volume up and down at least 5 times, then transfer 8 µL to
each of two adjacent wells (~2 µL overage remainder).
Component Volume
cDNA sample Non template control (NTC)
8 µL transferred cDNA target amplification reaction.
1
5.
Add 2 µL of 5X Oncomine™ Comprehensive Assay Plus, RNA primer pool‑1 into the first well, then
~2 µL cDNA target amplification reaction remaining.
2
add 2 µL of primer pool‑2 into the second well for a total of 10 µL in each well.
6.
Seal the plate with a new MicroAmp™ Clear Adhesive Film, vortex thoroughly, then briefly
centrifuge to collect droplets. Alternatively, mix by pipetting at least half the total volume up and
down at least 5 times before sealing the plate.
Proceed to “Amplify the cDNA targets” on page 31 .
30
Oncomine™ Comprehensive Assay Plus User Guide
Page 31

Amplify the cDNA targets
IMPORTANT! When amplifying multiple samples in a single PCR plate, ensure that the input across all
samples is roughly equivalent so that the selected cycle number is optimal for all the samples in the run.
1.
Place a MicroAmp™ Optical Film Compression Pad on the plate, then load the plate into the
thermal cycler.
2.
Run the following program to amplify the target regions.
Stage Step Temperature Time
Hold Activate the enzyme 99°C 2 min
Chapter 4 Manual library preparation
RNA preparation and cDNA amplification
4
Cycle; set number
according to Table 1
Denature 98°C 15 sec
Anneal and extend 60°C 4 min (RNA Panel)
Hold — 10°C Hold
Table 1 Recommended cycle number
Input nucleic acid
Recommended number
[1]
of cycles
[2]
Cycle number adjustment
[3]
10 ng RNA input 1 ng RNA input 100 ng RNA input
High quality RNA 22 +5 –3
FFPE RNA 28 +3 –3
[1]
Due to the disparity in the required number of target amplification cycles for high quality and FFPE RNA we do NOT
recommend running both high quality and FFPE samples on the same plate using the same input amount. If preparing a
positive control (high quality) along with FFPE RNA samples, reduce the positive control sample input to 2 ng and use the
FFPE cycling parameters.
[2]
Number of cycles can be increased when input material quality or quantity is questionable.
[3]
The recommended number of cycles is based on 10 ng RNA input per primer pool. Adjust the cycle number for lower or higher
RNA input.
STOPPING POINT
Target amplification reactions can be stored at 10°C overnight on the thermal
cycler. For longer periods, store at −20°C.
Oncomine™ Comprehensive Assay Plus User Guide
31
Page 32

RNA plate
1 2
3
4 5 6 7 8 9 101112
A
B
C
D
E
F
G
H
Sample
NTC
Chapter 4 Manual library preparation
4
RNA preparation and cDNA amplification
Combine cDNA target amplification reactions
Note: If preparing both RNA and DNA sample libraries use the same FuPa digestion conditions,
samples may be combined onto a single plate for simultaneous processing.
1.
Tap the plate gently on a hard flat surface, or centrifuge briefly to collect the contents at the bottom
of the wells.
2.
Carefully remove the plate seal.
3.
For each sample, combine the 10-µL target amplification reactions. The total volume for each
sample should be 20 µL.
32
Oncomine™ Comprehensive Assay Plus User Guide
Page 33

DNA preparation and amplification
Use the components of the Oncomine™ Comprehensive Assay Plus, DNA, Manual Library Preparation
(Cat. No. A47620) for the following procedures.
RMC in DNA target amplification reactions
Oncomine™ Comprehensive Assay Plus has been developed to support a wide range of biomarkers,
including assessment of microsatellite instability (MSI). MSI arises from defects in the mismatch repair
(MMR) system and is associated with hypermutability of short DNA sequence repeats (microsatellite
locations) throughout the genome.
RMC is composed of in-sample standards that function as internal references in the analysis pipeline to
ensure the robustness of MSI assessment in case of variations in sample preparation or run conditions.
RMC is added to the DNA target amplification reaction.
Remove deaminated bases from FFPE DNA
Sample age, storage conditions, and FFPE preservation methods can lead to significant cytosine
deamination of the isolated DNA. This deamination can result in an artificially high deamination score
when determining the tumor mutational burden result. We have demonstrated that deaminated cytosine
(uracil) bases can be enzymatically removed by treatment with Uracil DNA Glycosylase (UDG). For this
reason, we recommend treating DNA isolated from FFPE samples with UDG to remove deaminated
bases before target amplification.
Chapter 4
Manual library preparation
DNA preparation and amplification
4
Note: We recommend treating all samples including FFPE and high quality (for example, commercial
controls or DNA isiolated from cell lines) DNA with UDG to remove deaminated bases before target
amplification.
1.
For each FFPE DNA sample, add the following components to a single well of a 96‑well PCR plate.
Component
20 ng FFPE DNA
Uracil-DNA Glycoslyase, heat-labile 1 µL
Low TE to 6.5 µL
[1]
Do not exceed 40 ng maximum FFPE DNA sample as input. Substitute an equal volume of nuclease-free water or low TE to
prepare a no-template control (NTC).
2.
Mix the reaction by pipetting at least half the total volume up and down at least 5 times, then seal
the plate with MicroAmp™ Clear Adhesive Film. Alternatively, seal the plate, vortex for 5 seconds to
mix the reactions, then centrifuge briefly to collect the contents.
Note: To prevent evaporation during UDG treatment, use an applicator tool to press the film
securely around each reaction well and around the perimeter of the plate.
[1]
Volume
≤5.5 µL
Oncomine™ Comprehensive Assay Plus User Guide
33
Page 34

5 μL
2X primer
pool 1
Master
Mix
5 μL
5 μL
5 μL
2X primer
pool 2
Sample
Chapter 4
4
DNA preparation and amplification
3.
Manual library preparation
Place a MicroAmp™ Optical Film Compression Pad on the plate, load the plate into the thermal
cycler, then run the following program.
Temperature Time
37°C 2 minutes
50°C 10 minutes
4°C Hold (≤1 hour)
4.
Remove the plate from the thermal cycler, then centrifuge briefly to collect the contents.
STOPPING POINT Reactions can be stored at −20°C long term.
5.
Carefully remove the plate seal, then proceed immediately to “Prepare DNA target amplification
reactions” on page 34, adding the target amplification reaction components to the well containing
6.5 µL of UDG treated FFPE DNA.
Prepare DNA target amplification reactions
IMPORTANT! Primer pools and 5X Ion AmpliSeq
thoroughly.
1.
Place a 1.5‑mL tube and 96-well plate on ice or in a pre-chilled 4°C cold block.
2.
For each sample, prepare a target amplification master mix without primers in a 1.5‑mL tube on
ice.
Component
5X Ion AmpliSeq™ HiFi Mix (red cap) 5 µL
DNA (20 ng) (treated with UDG) 6.5 µL
RMC 1 µL
Nuclease-free Water to 12.5 µL
3.
Mix thoroughly by pipetting up and down 5 times, then
transfer 5 µL of each sample-specific master mix to 2
wells of a 96‑well PCR plate on ice or in a pre-chilled
4°C cold block.
Note: When using multi block thermal cyclers ensure
each pair of samples is in the same temperature zone
for amplification. For example, use the same VeriFlex
block on a Veriti™ Thermal Cycler.
4.
Add 5 µL of 2X Oncomine™ Comprehensive Assay
Plus, DNA primer pool 1 to the first well, and 5 µL of
primer pool 2 to the second well.
™
HiFi Mix are viscous. Pipet slowly and mix
Volume
34
Oncomine™ Comprehensive Assay Plus User Guide
Page 35

5.
Seal the plate with MicroAmp™ Clear Adhesive Film.
6.
Vortex for 5 seconds to mix, then briefly centrifuge to collect the contents. Alternatively, mix by
pipetting at least half the total volume up and down at least 5 times before sealing the plate.
Proceed to “Amplify the DNA targets” .
Amplify the DNA targets
IMPORTANT! When amplifying multiple samples in a single PCR plate, make sure that the input
across all samples is roughly equivalent so that the selected cycle number is optimal for all the samples
in the run.
1.
Place a MicroAmp™ Optical Film Compression Pad on the plate, then load the plate into the
thermal cycler.
2.
Run the following program to amplify the target regions.
Chapter 4 Manual library preparation
DNA preparation and amplification
4
Stage
Step Temperature Time
Hold Activate the enzyme 99°C 2 min
Cycle; set number
according to Table 2
Denature 99°C 15 sec
Anneal and extend 60°C 16 min (DNA Panel)
Hold — 10°C Hold
Table 2 Recommended cycle number
Input nucleic acid
Recommended number
[1]
of cycles
[2]
Cycle number adjustment
[3]
10 ng DNA input 1 ng DNA input 20 ng DNA input
High quality DNA 12 +3 –1
FFPE DNA 15 +3 –1
[1]
If both high quality and FFPE nucleic acids are being used in the same reaction, use the FFPE parameters.
[2]
Number of cycles can be increased when input material quality or quantity is questionable.
[3]
The recommended number of cycles is based on 10 ng DNA input per primer pool. Adjust the cycle number for lower or higher
DNA input.
STOPPING POINT
Target amplification reactions may be stored at 10°C overnight on the thermal
cycler. For longer periods, store at −20°C.
Oncomine™ Comprehensive Assay Plus User Guide
35
Page 36

1 2
3
4 5 6 7 8 9 101112
A
B
C
D
E
F
G
H
DNA plate
Sample
NTC
Chapter 4 Manual library preparation
4
Library preparation
Combine the DNA target amplification reactions
Note: Perform the following steps on ice or in a pre-chilled 4°C cold block.
1.
Remove the DNA plate from the thermal cycler, then centrifuge briefly to collect the contents.
2.
Carefully remove the plate seal.
3.
For each sample, combine both 10-µL DNA target amplification reactions into a single well.
IMPORTANT! Accurate volume transfer in this step is critical. We recommend using a single-
channel pipettor. If you are using a multi-channel pipettor, visually check pipette tips to ensure that
volumes are equivalent.
Note: In multi-zone thermal cyclers ensure samples are in the same zone for amplification.
The total volume for each sample should be ~20 µL.
Library preparation
Transfer the DNA amplicons
If preparing both DNA and cDNA libraries with the same FuPa digestion conditions, library preparations
can be transferred to a single plate for simultaneous processing. For more information, see “Partially
digest the DNA and cDNA amplicons” on page 37.
1.
Remove the plate from the thermal cycler, then briefly centrifuge to collect the contents.
2.
Carefully remove the adhesive film from the plate.
IMPORTANT! Be careful when removing the film to minimize contamination.
36
Oncomine™ Comprehensive Assay Plus User Guide
Page 37

Transfer DNA to RNA plate
RNA plate
1 2
3
4 5 6 7 8 9 101112
A
B
C
D
E
F
G
H
RNA plate
1 2
3
4 5 6 7 8 9 101112
A
B
C
D
E
F
G
H
A
B
C
D
E
F
G
H
1 2 3
4 5
6 7 8
9 10
11
12
DNA plate
Chapter 4 Manual library preparation
Library preparation
3.
Transfer the amplicons from the DNA plate to the corresponding empty wells of the RNA/cDNA
plate.
4
Sample DNA target amplification reactions
Sample cDNA(RNA) target amplification reactions
No template control (NTC) target amplification reaction
Partially digest the DNA and cDNA amplicons
IMPORTANT! Keep each plate on ice or in a pre-chilled 4°C cold block while preparing the reactions.
1.
Thaw the FuPa Reagent (brown cap) on ice, gently vortex to mix, then centrifuge briefly to collect.
2.
Add 2 µL of FuPa Reagent to each amplified DNA or cDNA sample. The total volume per well is
~22 µL.
3.
Seal each DNA or cDNA plate with a clear adhesive film, vortex thoroughly, then centrifuge briefly
to collect droplets. Alternatively, mix by pipetting at least half the total volume up and down at
least 5 times before sealing the plate.
4.
Place a compression pad on the plate, load in the thermal cycler, then run the following program:
Temperature
50°C 20 min (cDNA/DNA)
55°C 20 min (cDNA/DNA)
60°C 20 min (cDNA/DNA)
10°C Hold (for up to 1 hour)
Time
Oncomine™ Comprehensive Assay Plus User Guide
STOPPING POINT Store plate at –20°C for longer periods.
37
Page 38

Chapter 4 Manual library preparation
4
Library preparation
Ligate adapters to the amplicons and purify
When sequencing multiple libraries on a single run, you must ligate a dierent barcode to each library.
DNA and RNA libraries from the same sample also require dierent barcodes.
IonCode™ Barcode Adapters are provided at the appropriate concentration and include forward and
reverse adapters in a single well. No further handling is necessary.
Ion Xpress™ Barcode Adapters require handling and dilution as described in “Ion Xpress™ Barcode
Adapters only: Combine and dilute adapters”.
IMPORTANT! When handling barcoded adapters, be careful to avoid cross contamination by changing
gloves frequently and opening one tube at a time.
Ion Xpress™ Barcode Adapters only: Combine and dilute adapters
For each barcode X selected, prepare a mix of Ion P1 Adapter and Ion Xpress™ Barcode X at a final
dilution of 1:4 for each adapter. Scale volumes as necessary. Use 2 μL of this barcode adapter mix in
step 3 in “Perform the ligation reaction”.
For example, combine the volumes indicated in the following table.
Component
Ion P1 Adapter 2 µL
Ion Xpress™ Barcode X
Nuclease-free Water 4 µL
Total 8 µL
[1]
X = barcode chosen
Note: Store diluted adapters at –20°C.
[1]
Volume
2 µL
Perform the ligation reaction
1.
If there is visible precipitate in the Switch Solution or the tube cap after thawing, vortex or pipet up
and down at room temperature to resuspend before pipetting.
2.
If you have not already done so, briefly centrifuge the plate to collect the contents, then carefully
remove the plate seal.
38
Oncomine™ Comprehensive Assay Plus User Guide
Page 39

Chapter 4
3.
Add the following components in the order listed to each well containing digested amplicons. If
Manual library preparation
Library preparation
preparing multiple non-barcoded libraries, a master mix of Switch Solution and adapters can be
combined before addition.
IMPORTANT! Add the DNA Ligase last. Do not combine DNA Ligase and adapters before adding
to digested amplicons.
4
Order of
addition
1 Switch Solution (yellow cap) 4 µL
2 Adapters (IonCode™ Barcode Adapters or diluted Ion Xpress
barcode adapter mix (for barcoded libraries))
3 DNA Ligase (blue cap) 2 µL
— Total volume (including ~22 µL of digested amplicon) ~30 µL
4.
Seal the plate with a new MicroAmp™ Clear Adhesive Film, vortex thoroughly, then briefly
Component Volume
™
centrifuge to collect droplets. Alternatively, mix by pipetting at least half the total volume up and
down at least 5 times before sealing the plate.
5.
Place a MicroAmp™ Compression Pad on the plate, load in the thermal cycler, then run the
following program:
Temperature
22°C 30 minutes
68°C 5 minutes
72°C 5 minutes
10°C Hold (for up to 24 hours)
Time
2 µL
STOPPING POINT Samples can be stored for up to 24 hours at 10°C on the thermal cycler. For
longer periods, store at –20°C.
Purify the unamplified library
IMPORTANT! Bring the Agencourt
to disperse the beads before use. Pipet the solution slowly.
1.
Briefly centrifuge the plate to collect the contents in the bottom of the wells.
2.
Carefully remove the plate seal, then add 45 μL (1.5X sample volume) of Agencourt™ AMPure™ XP
Reagent to each library. Pipet up and down 5 times to mix the bead suspension with the DNA
thoroughly.
Note: Visually inspect each well to ensure that the mixture is homogeneous.
3.
Incubate the mixture for 5 minutes at room temperature.
Oncomine™ Comprehensive Assay Plus User Guide
™
AMPure™ XP Reagent to room temperature and vortex thoroughly
39
Page 40

Chapter 4 Manual library preparation
4
Library preparation
4.
Place the plate in a magnetic rack such as the DynaMag™–96 Side Magnet, then incubate for
2 minutes or until the solution clears. Carefully remove, then discard the supernatant without
disturbing the pellet.
5.
Add 150 μL of freshly prepared 70% ethanol, move the plate side-to-side in the two positions of
the magnet to wash the beads, then remove and discard the supernatant without disturbing the
pellet.
Note: If your magnet does not have two positions for shifting the beads, remove the plate from
the magnet and gently pipet up and down 5 times (with the pipettor set at 100 μL), then return the
plate to the magnet and incubate for 2 minutes or until the solution clears.
6.
Repeat step 5 for a second wash.
7.
Ensure that all ethanol droplets are removed from the wells. Keeping the plate in the magnet,
air-dry the beads at room temperature for 5 minutes. Do not overdry.
IMPORTANT! Residual ethanol drops inhibit library amplification. If needed, centrifuge the plate
and remove remaining ethanol before air-drying the beads.
Elute and dilute the library
1.
Remove the plate with purified libraries from the plate magnet, then add 50 μL of Low TE to the
pellet to disperse the beads.
2.
Seal the plate with MicroAmp™ Clear Adhesive Film, vortex thoroughly, then briefly centrifuge to
collect droplets. Alternatively, mix by pipetting at least half the total volume up and down at least 5
times before sealing the plate.
3.
Incubate at room temperature for at least 2 minutes.
4.
Place the plate on the magnet for at least 2 minutes.
STOPPING POINT
at –20°C. We recommend transferring the supernatant to a 1.5-mL Eppendorf LoBind™ tube for
long-term storage.
5.
Prepare a 100-fold dilution for quantification. Remove 2 μL of supernatant, containing the library,
then combine with 198 μL of Nuclease-free Water.
Proceed immediately to “Quantify the library by qPCR and calculate the dilution factor” on page 41.
Libraries can be stored at 4–8°C for up to 1 month. For longer term, store
40
Oncomine™ Comprehensive Assay Plus User Guide
Page 41

Chapter 4
Quantify the library by qPCR and calculate the dilution factor
Manual library preparation
Quantify the library by qPCR and calculate the dilution
factor
Determine the concentration of each library by qPCR with the Ion Library TaqMan™ Quantitation Kit
(Cat. No. 4468802) using the following steps. Analyze each sample, standard, and negative control in
duplicate 20‑μL reactions.
4
IMPORTANT! The following steps dier from those in the Ion AmpliSeq
™
Library Kit Plus User Guide.
Follow the steps below for quantifying your Oncomine™ Comprehensive Assay Plus libraries.
1.
Prepare three 10-fold serial dilutions of the E. coli DH10B Ion Control Library (~68 pM, from the 2)
at 6.8 pM, 0.68 pM, and 0.068 pM. Mark these tubes as standards, then use these concentrations
in the qPCR instrument software.
2.
Use the volumes per reaction in the following table to prepare a PCR Reaction Mix for all reactions.
We recommend duplicate reactions for each sample library, standard, and NTC. Include a 5–10%
overage to accommodate pipetting errors.
Note: Volumes are provided per reaction. Double the volume for duplicate reactions.
Component
2X Ion Library qPCR Master Mix 10 µL 5 µL
Ion Library TaqMan™ Quantitation Assay, 20X 1 µL 0.5 µL
Total 11 µL 5.5 µL
3.
In a MicroAmp™ Optical Reaction Plate , set up duplicate PCR reactions for each sample,
96-well plate 384-well plate
Volume per reaction
standard, and NTC. To each well, add the following components:
Component
PCR Reaction Mix (from step 2) 11 µL 5.5 µL
1:100 dilution of the sample
[1]
Substitute E. coli DH10B standards prepared in step 1 for standards. Substitute nuclease-free water for NTC.
[2]
High quality samples may require further dilution (5–10 fold) to give results within the range of the prepared standards. We
recommend starting with 1000X dilution for RNA library quantification.
4.
Seal the plate with a MicroAmp™ Optical Adhesive Film, vortex thoroughly, then briefly centrifuge
[1,2]
to collect droplets.
5.
Program your real-time instrument as follows:
Note: The fast cycling program was developed using the StepOnePlus™ Real-Time PCR System in
Fast mode.
a.
Enter the concentrations of the control library standards.
Oncomine™ Comprehensive Assay Plus User Guide
Volume per reaction
96-well plate 384-well plate
9 µL 4.5 µL
41
Page 42

Chapter 4 Manual library preparation
4
Quantify the library by qPCR and calculate the dilution factor
b.
Select ROX™ Reference Dye as the passive reference dye.
c.
Select a reaction volume of 20 μL (96‑well plate) or 10 μL (384‑well plate).
d.
Select FAM™ dye/MGB as the TaqMan™ probe reporter/quencher.
Reaction plate format Run mode Stage Temperature Time
Hold (UDG incubation) 50°C 2 min
96-well Standard
OR
384-well Standard
48- / 96-well Fast
OR
384-well Standard
6.
Following qPCR, calculate the average concentration of the undiluted library by multiplying the
Standard
Fast
Hold (polymerase
activation)
Cycle (40 cycles)
Hold (UDG incubation) 50°C 2 min
Hold (polymerase
activation)
Cycle (40 cycles)
95°C 2 min
95°C 15 sec
60°C 1 min
95°C 20 sec
95°C 1 sec
60°C 20 sec
determined concentration × 100.
7.
Based on the calculated library concentration, determine the dilution that results in a concentration
of ~50 pM for template preparation on the Ion Chef™ System.
For example:
•
The undiluted library concentration is 300 pM.
•
The dilution factor is 300 pM/50 pM = 6.
•
Therefore, 10 μL of library that is mixed with 50 μL of Low TE (1:6 dilution) yields
approximately 50 pM.
42
Note:
Good results have been observed with libraries ≤50 pM. Proceed to the next step without further
·
dilution.
Libraries that yield significantly less than 50 pM can be rescued with library amplification. See
·
“Tips” on page 87.
8.
Proceed to “Combine libraries” then template preparation, or store libraries as described below.
STOPPING POINT
Libraries can be stored at 4–8°C for up to 1 month. For longer term, store at
–20°C. We recommend transferring the supernatant to an RNase‑free microcentrifuge tube for
long-term storage. Alternatively, seal the plate with a new MicroAmp™ Clear Adhesive Film for
long-term storage.
Oncomine™ Comprehensive Assay Plus User Guide
Page 43

Combine libraries
% Reads, % Volume
of Combined Library
When comparing genomic DNA and RNA libraries that are prepared from the same sample, unequal
volumes of libraries can be combined to produce dierent read depths for the paired DNA and RNA
libraries.
•
Combine DNA and RNA library pools from the same samples prepared on an Ion Chef™ Instrument.
Note: Upon completion of the Ion Chef™ Instrument run libraries have already been adjusted to
a final concentration of ~100 pM each and pooled on the Ion Chef™ Instrument. Libraries from
samples A–D are in the Recovery Tube in Position C and samples E–H in Position D of the Ion
AmpliSeq™ Chef Reagents DL8 cartridge.
a.
Combine the DNA library pool with the RNA library pool for a given set of 4 samples at a 90:10
ratio (DNA:RNA—18 µL of DNA library pool + 2 µL of RNA library pool).
Note: This ratio diers from previous Oncomine™ Comprehensive Assay protocols.
IMPORTANT!
The combined DNA and RNA library pools must be from matched Recovery Tubes. For
·
example, combine Position C libraries, do NOT combine sample DNA libraries from Position
C (samples A–D) with sample RNA libraries from Position D (samples E–F) or vice versa.
Each combined library must have a unique barcode.
·
Chapter 4 Manual library preparation
Combine libraries
4
b.
Dilute the combined (90:10 DNA:RNA) pooled libraries 2‑fold (~50 pM final concentration).
Note: We recommend sequencing up to 4 research samples (one library pool, either samples
A–D or E–H) on a single Ion 550™ Chip.
DNA library pool
RNA library pool
Library pool Sample Barcode Fractional volume (90:10 DNA:RNA)
DNA–C DNA-1 BC_0101 0.225 0.9
DNA-2 BC_0102 0.225
DNA-3 BC_0103 0.225
DNA-4 BC_0104 0.225
RNA–C RNA-1 BC_0109 0.025 0.1
RNA-2 BC_0110 0.025
Oncomine™ Comprehensive Assay Plus User Guide
43
Page 44

% Reads, % Volume
of Combined Library
Sample 1
4.0
0
6.0
8.0
10.0
2.0
% Volume of
Combined Library
NTC
4.0
0
6.0
8.0
10.0
2.0
DNA RNA
Chapter 4 Manual library preparation
4
Combine libraries
(continued)
Library pool Sample Barcode Fractional volume (90:10 DNA:RNA)
RNA–C RNA-3 0.1BC_0111 0.025
Sum — — 1.0 1.0
•
Combine manually prepared DNA and RNA libraries.
a.
Combine each uniquely barcoded DNA and RNA library (~50 pM each) from the same sample
at an 90:10 ratio (DNA:RNA—18 µL of DNA library + 2 µL of RNA library).
Note: This ratio diers from previous Oncomine™ Comprehensive Assay protocols.
b.
Combine equal volumes of the paired libraries (90:10 DNA:RNA) to be sequenced on the same
chip.
Note:
We recommend sequencing up to 5 samples (4 research samples plus 1 no-template
·
control) on a single Ion 550™ Chip.
For runs that include a no-template control (NTC), add in the same fractional volumes of
·
undiluted DNA and RNA NTC libraries as is added for equivalent sample libraries.
RNA-4 BC_0112 0.025
Sample
DNA-1 BC_0101 0.18
RNA-1 BC_0102 0.02
DNA-2 BC_0103 0.18
RNA-2 BC_0104 0.02
DNA-3 BC_0105 0.18
RNA-3 BC_0106 0.02
DNA-4 BC_0107 0.18
RNA-4 BC_0108 0.02
44
Barcode Fractional volume (90:10 DNA:RNA)
Oncomine™ Comprehensive Assay Plus User Guide
Page 45

Chapter 4 Manual library preparation
Combine libraries
(continued)
Sample Barcode Fractional volume (90:10 DNA:RNA)
DNA-5 (NTC) BC_0109 0.18
RNA-5 (NTC) BC_0110 0.02
Sum — 1.0
•
Combine only manually prepared RNA libraries to be sequenced on the same chip.
Note: We recommend sequencing up to 32 sample RNA libraries on a single Ion 550™ Chip.
a.
Combine 2 μL of each uniquely barcoded RNA library (~50 pM each), then mix thoroughly.
•
Combine only RNA library pools prepared on an Ion Chef™ Instrument to be sequenced on the
same chip.
Note:
When combining only RNA libraries, library pools in the Recovery Tube in Position C (samples
·
A–D) can be combined with library pools in the Recovery Tube in Position D (samples E–F).
We recommend sequencing up to 32 sample RNA libraries on a single Ion 550™ Chip or Ion 540
·
Chip.
We recommend sequencing up to 8 sample RNA libraries on a single Ion 530™ Chip.
·
4
™
a.
Combine 5 μL from each of 4 pooled RNA libraries (~100 pM each).
b.
Mix thoroughly, then dilute the combined library pools 2‑fold (~50 pM final concentration).
•
Combine only manually prepared DNA libraries to be sequenced on the same chip.
Note: We recommend sequencing up to 4 sample DNA libraries on a single Ion 550™ Chip.
a.
Combine 10 μL of each uniquely barcoded DNA library (~50 pM each).
•
Combine only DNA library pools prepared on an Ion Chef™ Instrument to be sequenced on the
same chip.
Note: We recommend sequencing up to 4 sample DNA libraries on a single Ion 550™ Chip.
Upon completion of the Ion Chef™ Instrument run each Recovery Tube contains 4 pooled libraries
adjusted to a final concentration of ~100 pM.
a.
Dilute 15 μL of the pooled DNA libraries 2‑fold (~50 pM final concentration), then mix
thoroughly.
Oncomine™ Comprehensive Assay Plus User Guide
45
Page 46

Chapter 4 Manual library preparation
4
Guidelines for templating and sequencing
Guidelines for templating and sequencing
Proceed to template preparation and sequencing using the following kits.
Chip
Ion 550™ Chip Ion Chef
Template
System
System
Sequencer Kit User Guide
™
Ion S5™ XL
Sequencer, Ion
GeneStudio™ S5
Plus Sequencer, or
Ion GeneStudio™ S5
Prime Sequencer
Ion 550™ Kit − Chef
(Cat. No. A34541)
Ion 550™ Single
Chip Supplemental Kit
(Cat. No. A36953)
Ion 550™ Kit − Chef User
Guide
(Pub. No. MAN0017275)
To create a specific Run Plan for use in templating and sequencing, see Chapter 5, “Create a Planned
Run”. Refer to the appropriate user guide listed in the table for more information.
46
Oncomine™ Comprehensive Assay Plus User Guide
Page 47

5
Create a Planned Run
About Planned Runs .................................................................. 47
■
Update Oncomine™ Comprehensive Assay Plus templates in Torrent Suite™ Software ........ 48
■
Create a custom Planned Run template ................................................. 49
■
Create a Planned Run for manual library preparation ...................................... 51
■
Create a Planned Run for automated library preparation using sample sets .................. 53
■
IMPORTANT! This kit is compatible with Torrent Suite
Software 5.16 or later. Before proceeding, we recommend that you update to the latest available
versions of Torrent Suite™, Ion Reporter™, and Ion Chef™ System software. Contact your service
representative for assistance with upgrading the software.
Note: The IonReporterUploader 5.16 plugin must be installed in Torrent Suite™ Software. If your
Ion Reporter™ account is not configured, configure it through Ion Reporter Configure settings (see
“Configure the IonReporterUploader plugin in Torrent Suite™ Software” on page 92).
About Planned Runs
Planned Runs are digital instructions that are created in Torrent Suite™ Software for controlling the
template preparation and sequencing instruments. Planned Runs contain settings such as number
of flows, kit types, barcodes, sample information, and reference files (if any). Planned Runs are also
used to track samples, chips, and reagents throughout the workflow, from template preparation on
the Ion Chef™ Instrument through sequencing on an Ion S5™ XL Sequencer, Ion GeneStudio™ S5 Plus
Sequencer, or Ion GeneStudio™ S5 Prime Sequencer and subsequent data analysis. Each chip that is
prepared in an Ion Chef™ run requires its own Planned Run.
IMPORTANT! For more information on creating a Planned Run in Torrent Suite
a complete description of each field in the Create Plan workflow bar, see the Torrent Suite™ Software
Help, available by clicking the Help button in the software.
™
Software 5.16 or later and Ion Reporter
™
Software, including
™
Oncomine™ Comprehensive Assay Plus User Guide
47
Page 48

Chapter 5 Create a Planned Run
5
Update Oncomine™ Comprehensive Assay Plus templates in Torrent Suite™ Software
In Torrent Suite™ Software 5.16 or later, use the Oncomine™ Comprehensive Plus – DNA and Fusions
template as the primary Planned Run template for the Oncomine™ Comprehensive Assay Plus.
Application category in
Torrent Suite™ Software
Oncology – Solid Tumor Oncomine™ Comprehensive Plus –
DNA and Fusions
Oncomine™ Comprehensive Plus –
DNA
Oncomine™ Comprehensive Plus –
Fusions
[1]
Available in Torrent Suite™ Software 5.16 or later.
Template name Description
DNA and RNA Planned Run template
DNA-only Planned Run template
RNA-only Planned Run template
[1]
Update Oncomine™ Comprehensive Assay Plus templates
in Torrent Suite™ Software
1.
Sign in to the Torrent Suite™ Software as an administrator.
2.
In the upper right corner, click (Settings)4Updates, then scroll to the Update Products
section.
3.
In the Name column find Oncomine™ Comprehensive Assay Plus, then in that row click Update.
The software update begins automatically and displays as Complete when finished.
48
Oncomine™ Comprehensive Assay Plus User Guide
Page 49

Create a custom Planned Run template
Chapter 5
Create a custom Planned Run template
Create a Planned Run
5
IMPORTANT! Before creating a Planned Run, you may need to enable the Oncomine
™
Comprehensive
Plus templates and upload the Reference Library, Target Regions, and Hotspots BED files on the Ion
Torrent™ Server. For more information, see Appendix B, “Supplemental information”. Contact your local
service representative to obtain the most current BED files.
We recommend setting up a customized Planned Run template for reuse when the same conditions
will be used for multiple runs. For more information about creating Planned Runs manually or from the
generic application template, see the Torrent Suite™ Software Help.
Note: Copy number variation (CNV), microsatelite instability (MSI), and tumor mutational burden (TMB)
functionalities may require copy/editing of the Ion Reporter™ Software analysis workflow with user
defined optimizations before creating a Planned Run. For more information on creating a CNV baseline
(see Appendix C, “CNV baseline creation”), setting MSI thresholds (see “MSI parameters” on page 76),
and setting the TMB classification thresholds (see “Set TMB Classification parameters” on page 93) or
refer to the Ion Reporter™ Software Help.
1.
Sign in to the Torrent Suite™ Software.
2.
In the Plan tab, in the Templates screen, click Oncology – Solid Tumor in the left navigation
menu.
3.
In the list of templates, find Oncomine™ Comprehensive Plus – DNA and Fusions, then click
4Copy.
The Copy Template workflow opens to the Save step.
4.
Enter or select the required information in each field:
Entry or selection
Template Name Enter a name for the Planned Run template.
DNA Reference Library Select hg19(Human (hg19)).
DNA Target Regions
[1]
Fusions Reference Library and Fusions Target Regions are not necessary for analysis in Torrent Suite™ Software.
[2]
Check with your service representative for updates to ensure that the most current files are used.
5.
Click the Ion Reporter step, then select your Ion Reporter™ account (version 5.16 or later).
[1]
[2]
Select OCAPlus.20200727.designed.bed.
Action
Note: If the account is not configured, configure it through Ion Reporter Configure settings
(see “Configure the IonReporterUploader plugin in Torrent Suite™ Software” on page 92). For
instructions on how to install the IonReporterUploader plugin, see the Torrent Suite™ Software
Help.
6.
In the Existing Workflow dropdown list, select the appropriate Ion Reporter™ analysis workflow
(page 56) for your Planned Run (for example, Oncomine™ Comprehensive Plus - w2.1 - DNA
and Fusions - Single Sample), then click Next.
Oncomine™ Comprehensive Assay Plus User Guide
49
Page 50

Chapter 5 Create a Planned Run
5
Create a custom Planned Run template
7.
In the Research Application step, verify that the appropriate Research Application and Target
Technique are pre-selected, then click Next.
8.
In the Kits step, verify that the Ion Chef radio button is selected for the Template Kit, then
complete the following fields as described:
Field
Instrument Ion GeneStudio™ S5 System
Library Kit Type Ion AmpliSeq™ Library Kit Plus Ion AmpliSeq™ Kit for Chef DL8
Template Kit Ion 550™ Kit − Chef
Sequencing Kit Ion S5™ Sequencing Kit
Chip Type Ion 550™ Chip
Barcode Set IonXpress or IonCode IonCode
Flows 500
9.
Select or edit the optional information fields appropriately for your run, then click Next.
10.
In the Plugins step, ensure that the sampleID and coverageAnalysis plugins are selected.
11.
Configure the coverageAnalysis plugin as follows:
a.
Click configure next to coverageAnalysis.
b.
Ensure that the Sample Tracking checkbox is selected, then click Save Changes.
c.
Click Next.
Manual library preparation Automated library preparation
Selection
50
12.
In the Projects step, select the project appropriate to your run, then click Next.
13.
In the Save step, click Copy Template to save the new Planned Run template.
The customized template is now available in the Templates screen, under the Oncology – Solid Tumor
application.
Oncomine™ Comprehensive Assay Plus User Guide
Page 51

Chapter 5 Create a Planned Run
Create a Planned Run for manual library preparation
Create a Planned Run for manual library preparation
1.
Sign in to the Torrent Suite™ Software.
2.
In the Plan tab, in the Templates screen, click Oncology – Solid Tumor in the left navigation
menu.
3.
In the list, click on your customized Planned Run template name, or click
The Create Plan workflow opens to the Plan step.
4.
Enter a name for the plan in the Run Plan Name field.
5.
Make or confirm the following selections:
4Plan Run.
5
Field
Analysis Parameters Make sure that Default (Recommended) is selected.
Use same reference & BED
files for all barcodes
Same sample for DNA and
Fusions?
Number of barcodes The standard number of barcodes for an Oncomine™ Comprehensive
Sample Tube Label Enter or scan the barcode of the Ion Chef™ Library Sample Tube that will
Chip Barcode No entry required.
Oncology Make sure that this button is selected.
Pre-implantation Genetic
Screening
6.
Enter the sample and barcode information:
[1]
Field
Make sure that this checkbox is selected.
Make sure that this checkbox is selected.
Assay Plus DNA and Fusions run is 8 without no-template controls (NTC)
and 10 with NTCs. Enter the number of barcodes, then click button to
the right of this field.
be used in the run.
Make sure that this button is deselected.
Action
Action
Barcode Use the default barcode selections, or select the barcode for each
sample from the dropdown list.
Sample Name Each sample must have a unique name. Type in the field to overwrite the
default name. We recommend that you use unique names even between
runs.
Control Type (expanded) Select No Template Control from the dropdown list to designate a
sample as a no template control.
Sample ID (Optional) Click in the field, then enter a sample ID.
Sample Description (Optional) Click in the field, then enter a sample description.
Annotations (expanded) Click to reveal Cancer Type and Cellularity %.
Oncomine™ Comprehensive Assay Plus User Guide
51
Page 52

Chapter 5 Create a Planned Run
5
Create a Planned Run for manual library preparation
(continued)
[1]
Field
Cancer Type Select from the dropdown list. Click to copy the entry to all the
Cellularity % Each DNA sample must have a cellularity percentage. This field is
Ion Reporter Workflow Ensure the correct workflow is selected.
Relation Ensure the correct value is auto-populated. Select from the dropdown
Gender Select from the dropdown list. Click to copy the entry to all the
Action
rows.
optional for RNA samples. Click to copy the same entry to all rows.
Note: If the workflows are not displayed in the dropdown list, select the
Show All Workflows checkbox to view all workflows on the selected Ion
Reporter™ Server.
list to change.
rows.
Note: This is a required field to perform CNV analysis. By default Ion
Reporter™ Software treats samples as female.
IR Set ID
[2]
The IR Set ID links individual samples for analysis. Ensure the correct
value is autopopulated. Select from the dropdown list to change.
IMPORTANT! Ensure that a unique value is entered for each sample.
[1]
Click vertical column headers (Control Type, Reference, Annotations) to reveal additional columns.
[2]
Samples with the same IR Set ID are considered related samples and launched in the same analysis such as the DNA barcode
and Fusions barcode of the same sample. Do not give unrelated samples the same IR Set ID value (even if that value is zero or
blank).
7.
Click Plan Run.
The run is listed in the Planned Runs screen under the name that you specified and is automatically
used by the Ion Chef™ System when the associated Ion Chef™ Library Sample Tube is loaded on the
instrument.
52
Oncomine™ Comprehensive Assay Plus User Guide
Page 53

Chapter 5
Create a Planned Run for automated library preparation using sample sets
Create a Planned Run
Create a Planned Run for automated library preparation
using sample sets
Automated Oncomine™ Comprehensive Assay Plus library preparation on the Ion Chef™ System
requires use of sample sets for creating your planned run. For more information on creating a sample
set, see “Create a sample set to prepare 2 pools of 4 libraries each” on page 19.
If combining more than one sample set, each sample set must correspond to Oncomine
Comprehensive Assay Plus automated library preparations and use the same barcode kit to be included
in a single Planned Run.
1.
In the Plan tab, in the Samples screen, find the Sample Sets that you want to add to the Planned
Run.
2.
Select one or more Sample Sets (for example a DNA Sample Set and an RNA Sample Set) to add
to the Planned Run.
•
To plan a run using one Sample Set, click
Set.
(Actions) 4Plan Run in the row of the Sample
™
5
•
To plan a run using multiple Sample Sets, select the checkboxes next to the Sample Sets you
want to add to the Planned Run, then click Plan Run.
IMPORTANT! Ensure that all Sample Sets used in the Planned Run use the same barcode
kit. To verify the barcode kit used, expand the Sample Set entry to view its details.
The Select a Run Template to apply to this experiment dialog lists Planned Run templates that
support your Sample Set.
Oncomine™ Comprehensive Assay Plus User Guide
53
Page 54

Chapter 5 Create a Planned Run
5
Create a Planned Run for automated library preparation using sample sets
3.
Select a Run Template to use for the experiment.
Select the samples to Create Plan Run using: All (A–H:
Pool 1, 2), Pool 1 (A–D), or Pool 2 (E–H) then click Plan
Run.
Note: If you do not see the template that you are
looking for, select Show All Templates, then look
again for the template.
The Create Plan workflow bar opens to the Barcoding
step with the Sample Sets that you selected:
4.
In the Barcoding step in the workflow bar, make or confirm the following selections.
Field
Analysis Parameters Make sure that Default (Recommended) is selected.
Use same reference & BED
files for all barcodes
Same sample for DNA and
Fusions?
Number of barcodes The standard number of barcodes for an Oncomine™ Comprehensive
Sample Tube Label Enter or scan the barcode of each Ion Chef™ Library Sample Tube that
Chip Barcode No entry required.
Oncology Make sure that this button is selected.
Pre-implantation Genetic
Screening
5.
Make sure your sample set information has been correctly imported. Edit entries in each field as
Make sure that this checkbox is selected.
Make sure that this checkbox is selected.
Assay Plus DNA and Fusions run is 8 without no-template controls (NTC)
and 10 with NTCs. Enter the number of barcodes, then click button to
the right of this field.
will be used in the run.
Make sure that this button is deselected.
Action
needed in the Samples Table, then click Next.
54
[1]
Field
Barcode Use the imported barcode selections, or select the barcode for
each sample from the dropdown list.
Sample Name (required) Each sample must have a unique name. Type in the field to
overwrite the default name. We recommend that you use unique
names even between runs.
Control Type (expanded) Click on the Control Type column header to expand the Control
Type column. Select No Template Control from the dropdown list
to designate a sample as a no template control.
Sample ID (Optional) Click in the field, then enter a sample ID.
Description
Oncomine™ Comprehensive Assay Plus User Guide
Page 55

Chapter 5
Create a Planned Run for automated library preparation using sample sets
Create a Planned Run
(continued)
[1]
Field
Description
Sample Description (Optional) Click in the field, then enter a sample description.
DNA/Fusions For DNA and Fusions application, select DNA or Fusions from the
dropdown menu for each samples.
Annotations (expanded) Click to reveal Cancer Type and Cellularity %.
Cancer Type Select from the dropdown list. Click to copy the entry to all the
rows.
Cellularity % Each DNA sample must have a cellularity percentage. This field is
optional for RNA samples. Click to copy the same entry to all
rows.
Ion Reporter Workflow Ensure the correct workflow is selected.
Note: If the workflows are not displayed in the dropdown list,
select the Show All Workflows checkbox to view all workflows on
the selected Ion Reporter™ Server.
5
Relation Select sample relationship group.
Gender Select "Male", "Female", or "Unknown" from the dropdow list. Click
to copy the entry to all the rows.
Note: Gender must be defined to perform CNV analysis. By default
"Unknown" is treated as female.
IR Set ID
[2]
The IR Set ID links individual samples for analysis. Ensure the
correct value is autopopulated. Set the IR Set ID to the same value
for related samples.
IMPORTANT! Ensure that a unique value is entered for each
sample. Do not give unrelated samples the same Set ID value even
if the value is zero or blank.
[1]
Click vertical column headers (Control Type, Reference, Annotations) to reveal additional columns.
[2]
Samples with the same IR Set ID are considered related samples and launched in the same analysis such as the DNA barcode
and Fusions barcode of the same sample. Do not give unrelated samples the same IR Set ID value (even if that value is zero or
blank).
Note: You can save the samples table to a CSV file as a template for future use. Click Save
Samples Table above the upper right corner of the Samples Table to save the CSV file to your
computer.
6.
Review the Plugins and Projects tabs, make selections appropriate to your run, then click Next.
7.
In the Save & Finish step in the workflow bar, enter a name for the Planned Run in the provided
field.
8.
Click Save & Finish.
The run is listed in the Planned Runs screen under the name that you specified and is automatically
used by the Ion Chef™ System when the associated Ion Chef™ Library Sample Tube is loaded on the
instrument.
Oncomine™ Comprehensive Assay Plus User Guide
55
Page 56

6
Variant analysis
Analysis workflows in Ion Reporter™ Software ........................................... 56
■
Manually launch a DNA and Fusions analysis ............................................ 58
■
Manually launch a DNA analysis ........................................................ 59
■
Manually launch a Fusions analysis ..................................................... 59
■
View results .......................................................................... 60
■
Visualize tumor mutational burden analysis results ........................................ 70
■
MSI analysis results ................................................................... 75
■
Genomic segmentation analysis ....................................................... 78
■
Generate an Analysis Results Report .................................................... 82
■
Download Ion Reporter™ annotation VCF or TSV files ..................................... 83
■
Analysis workflows in Ion Reporter™ Software
If you selected the appropriate Ion Reporter™ workflow when setting up your Planned Run in Torrent
Suite™ Software, automated analysis has already been performed and you can view the Oncomine
analysis results in Ion Reporter™ Software. For instructions to manually launch an analysis, see
“Manually launch a DNA analysis” on page 59 and “Manually launch a Fusions analysis” on page 59.
Note: Microsoft™ Excel™ or another spreadsheet tool is required for viewing VCF, CSV, and TSV files.
Ion Reporter™ Software 5.16 or later includes the following analysis workflows:
Workflow
Oncomine™ Comprehensive Plus w2.1 - DNA and Fusions - Single
Sample
name
[1]
Description
Detects and annotates low frequency somatic variants (SNPs, InDels,
CNVs) from targeted Ion AmpliSeq™ DNA manual or Ion Chef™ automated
libraries, computes automatic tumor cellularity, Loss-of-Heterozygosity,
TMB and microsatellite instability (MSI), as well as gene fusions from
targeted Ion AmpliSeq™ RNA manual or Ion Chef™ automated libraries,
from Oncomine™ Comprehensive Assay Plus run on the Ion 550™ Chip.
TMB uses the TMB (Non-Germline Mutations) filter chain with TMB
algorithm v4.0. MSI status is computed using a baseline with MSI
algorithm v1.2. Released with: Ion Reporter™ Software 5.16. Workflow
Version: 2.1.
™
56
Oncomine™ Comprehensive Assay Plus User Guide
Page 57

(continued)
Chapter 6 Variant analysis
Analysis workflows in Ion Reporter™ Software
6
Workflow name
[1]
Oncomine™ Comprehensive Plus w2.1 - DNA and Fusions - (Low RMC
Signal) - Single Sample
Oncomine™ Comprehensive Plus w2.1 - DNA - Single Sample
Oncomine™ Comprehensive Plus w2.1 - DNA - (Low RMC Signal)- Single
Sample
Description
Detects and annotates low frequency somatic variants (SNPs, InDels,
CNVs) from targeted Ion AmpliSeq™ DNA manual or Ion Chef™ automated
libraries, computes automatic tumor cellularity, Loss-of-Heterozygosity,
TMB and microsatellite instability (MSI), as well as gene fusions from
targeted Ion AmpliSeq™ RNA manual or Ion Chef™ automated libraries,
from Oncomine™ Comprehensive Assay Plus run on the Ion 550
™
Chip. TMB uses the TMB (Non-Germline Mutations) filter chain with
TMB algorithm v4.0. MSI status is computed using a baseline (with
MSI algorithm v1.2) that accommodates libraries with a lower range of
RMC flow signal. Released with: Ion Reporter™ Software 5.16. Workflow
Version: 2.1.
Detects and annotates low frequency somatic variants (SNPs, InDels,
CNVs), computes automatic tumor cellularity, Loss-of-Heterozygosity,
TMB and microsatellite instability (MSI) from targeted Ion AmpliSeq™ DNA
manual or Ion Chef™ automated libraries from Oncomine™ Comprehensive
Assay Plus run on the Ion 550™ Chip. TMB uses the TMB (Non-Germline
Mutations) filter chain with TMB algorithm v4.0. MSI status is computed
using a baseline with MSI algorithm v1.2. Released with: Ion Reporter
™
Software 5.16. Workflow Version: 2.1.
Detects and annotates low frequency somatic variants (SNPs, InDels,
CNVs), computes automatic tumor cellularity, Loss-of-Heterozygosity,
TMB and microsatellite instability (MSI) from targeted Ion AmpliSeq™ DNA
manual or Ion Chef™ automated libraries from Oncomine™ Comprehensive
Assay Plus run on the Ion 550™ Chip. TMB uses the TMB (Non-Germline
Mutations) filter chain with TMB algorithm v4.0. MSI status is computed
using a baseline (with MSI algorithm v1.2) that accommodates libraries
with a lower range of RMC flow signal. Released with: Ion Reporter
™
Software 5.16. Workflow Version: 2.1.
Oncomine™ Comprehensive Plus w2.1 - Fusions - Single Sample
Detects and annotates gene fusions from targeted Ion AmpliSeq™ RNA
manual or Ion Chef™ automated libraries from Oncomine™ Comprehensive
Assay Plus run on the Ion 550™ Chip. Released with: Ion Reporter
Software 5.16. Workflow Version: 2.1.
Oncomine™ Comprehensive Plus w2.1 - Annotate Variants - Single
Annotates VCF files from the Oncomine™ Comprehensive Assay Plus.
Released with: Ion Reporter™ Software 5.16. Workflow Version: 2.1.
Sample
[1]
Workflow names can vary depending on the version of Ion Reporter™ Software.
Oncomine™ Comprehensive Assay Plus User Guide
™
57
Page 58

Chapter 6 Variant analysis
6
Manually launch a DNA and Fusions analysis
Manually launch a DNA and Fusions analysis
1.
Sign in to Ion Reporter™ Software.
2.
In the Workflows tab, in the Overview screen, select DNA and Fusions from the Research
Application dropdown list.
3.
(Optional) In Search, enter a term, then click Go (or press Enter).
4.
In the Workflow Name column, click the appropriate workflow (for example, Oncomine
Comprehensive Plus - w2.1 - DNA and Fusions - Single Sample), then click
Analysis in the Details pane.
5.
Select a DNA sample.
a.
In the Samples step, search by any unique identifier you used to label your samples during
setup, then ensure the sample Cellularity % , Sample Type and Gender are defined.
Note: We recommend that you define the sample Gender to perform accurate CNV analysis.
By default this is treated as female.
b.
Click the checkbox to select a DNA sample, then click Add samples.
6.
Select an RNA sample.
a.
In the Samples step, search by any unique identifier you used to label your samples during
setup, then ensure the sample Sample Type is defined.
b.
Click the checkbox to select an RNA sample, then click Add samples.
7.
Enter a Group Name, then click Add to Analysis.
8.
In the Plugins step, ensure that the Oncomine™ Variant Annotator 3.1 plugin is selected, then
click Next.
Actions4Launch
™
58
9.
(Optional) Enter an Analysis Name and Description.
10.
Click Launch Analysis.
If you selected multiple samples, a separate analysis
is launched for each sample for single-sample analysis
workflows.
Oncomine™ Comprehensive Assay Plus User Guide
Page 59

Manually launch a DNA analysis
1.
Sign in to Ion Reporter™ Software.
2.
In the Workflows tab, in the Overview screen, select DNA from the Research Application
dropdown list.
3.
(Optional) In Search, enter a term, then click Go (or press Enter).
Chapter 6
Manually launch a DNA analysis
Variant analysis
6
4.
In the Workflow Name column, click the appropriate workflow (for example, Oncomine
Comprehensive Plus - w2.1 - DNA - Single Sample ), then click
in the Details pane.
5.
In the Samples step, search by any unique identifier you used to label your samples during setup,
then ensure the sample Cellularity % , Sample Type and Gender are defined.
Note: We recommend that you define the sample Gender to perform accurate CNV analysis. By
default this is treated as female.
6.
Click the checkbox to select a DNA sample, then click Next.
7.
In the Plugins step, ensure that the Oncomine™ Variant Annotator 3.1 plugin is selected, then
click Next.
8.
(Optional) Enter an Analysis Name and Description.
9.
Click Launch Analysis.
Actions4Launch Analysis
™
Manually launch a Fusions analysis
1.
Sign in to Ion Reporter™ Software.
2.
In the Workflows tab, in the Overview screen, select Fusions from the Research Application
dropdown list.
3.
(Optional) In Search, enter a term, then click Go (or press Enter).
4.
In the Workflow Name column, click the appropriate workflow (for example, Oncomine
Comprehensive Plus - w2.1 - Fusions - Single Sample ), then click
in the Details pane.
5.
In the Samples step, search by any unique identifier you used to label your samples during setup,
then ensure that the Sample Type is defined.
6.
Click the checkbox to select a fusions sample, then click Next.
Oncomine™ Comprehensive Assay Plus User Guide
™
Actions4Launch Analysis
59
Page 60

Chapter 6 Variant analysis
6
View results
7.
In the Plugins step, ensure that the Oncomine™ Variant Annotator 3.1 plugin is selected, then
click Next.
8.
(Optional) Enter an Analysis Name and Description.
9.
Click Launch Analysis.
View results
Ion Reporter™ Software analyses are performed automatically on uploading of the data files from the
Torrent Suite™ Software.
1.
Sign in to the Ion Reporter™ Software.
2.
Click the Analyses tab.
The Overview screen displays a list of analyses in the Analyses table.
3.
(Optional) Filter the Analyses table.
•
In the Overview screen, click More Filters4Research Application. In the Research
Application dropdown list, select the Oncomine™‑specific analyses (DNA, Fusions, DNA and
Fusions, or Annotate Variants).
•
Enter a search term in the search field, then click Go (or press Enter).
To further refine the list of analyses, apply additional filters from the More Filters dropdown list or
click the column headers. The Analyses table automatically updates based on the filter selections
and search term.
4.
Click on a row (but not on the sample data set
hyperlink) to open the Details pane on the right side
of the screen for that analysis.
In the Details pane, you can view Workflow Details
and access the Actions dropdown list.
60
Oncomine™ Comprehensive Assay Plus User Guide
Page 61

Chapter 6 Variant analysis
View results
5.
Click a sample result hyperlink in the Analysis column to open the Analysis Results page.
The Analysis Results page opens to the Oncomine™ tab, and displays only variants relevant to
cancer.
6
Item
MAPD (Median Absolute
Pairwise Dierence)
Tumor Cellularity
Percentage
Tumor Mutational Burden
(Mutations/Mb)
Description
The MAPD metric is a measure of read coverage noise detected across all amplicons
in a panel. Higher MAPD typically translates to lower coverage uniformity. Lower
coverage uniformity can result in missed or erroneous CNV calls. MAPD score is
viewable in downloadable VCF file or review of the Analysis Results of a single sample
extended analysis. To make a CNV call the following criteria must be met:
•
MAPD <0.4
•
CNV Ratio for a copy number gain
must be >2
The percent of tumor cells in the sample. Allowed values: Manually input Tumor
Cellularity input per user or Auto-calculated tumor cellularity.
The value of the result for the tumor mutational burden calculation.
•
P-value <10
•
CNV Ratio for a copy number loss
must be <0.85
-5
[1]
Oncomine™ Comprehensive Assay Plus User Guide
61
Page 62

Chapter 6
6
View results
(continued)
Variant analysis
Item Description
TMB Classification (based
on specified parameters)
MSI Status
•
High—The Tumor Mutational Burden (Mutations/Mb) is greater than the value
entered in the TMB-High Threshold parameter.
•
Low—The Tumor Mutational Burden (Mutations/Mb) is less than the value entered
in the TMB-Low Threshold parameter.
•
Intermediate—The Tumor Mutational Burden (Mutations/Mb) is equal to or greater
than the value entered in the TMB-Low Threshold parameter AND less than or
equal to the value entered in the TMB-High Threshold parmeter.
•
Undefined—TMB classification thresholds settings were not included in the
analysis workflow or were set incorrectly.
Note: Threshold values are not provided in the factory shipped analysis
workflow. The analysis workflow always reports the TMB classification status as
Undefined unless a user sets the thresholds in the parameter settings. For more
information on setting TMB Classification thresholds, see “Set TMB Classification
parameters” on page 93.
•
MSI-High—MSI score is greater than the threshold value set in the MSI-High
Threshold parameter.
•
MSS—MSI score is less than the threshold value set in the MSS Threshold
parameter.
•
No Call—MSI score is equal to or greater than the value entered in the MSS
Threshold parameter AND less than or equal to the value entered in the MSI-
ThresholdHigh parmeter.
•
QCFail—Indicates determination of MSI status was not reliable due to the MSI
baseline. For more information, see “MSI QC Failure” on page 90 or for more
assistance contact support (see “Customer and technical support” on page 115).
MSI Score A sample-level MSI score that is calculated with individual MSI marker scores. The
overall score is used to determine the MSI status of the sample.
LOH Percentage Percentage of genomic segments with loss-of-heterozygosity (LOH) detected.
Calculated as the sum of the sizes of the genomic segments with LOH detected /
total size of genomic segments assessed for LOH.
[1]
If tumor cellularity percentage is determined to be not reliable by auto-calculation, then "Manual" is displayed.
6.
In the Analysis Results table, sort or filter the data using the Oncomine™‑specific annotations. See
the Ion Reporter™ Software help menu for more options.
a.
In the Filter Options pane, select the desired Filter Chain.
Note:
The default Filter Chain is Oncomine™ Extended, which limits the results that are
·
displayed to variants relevant to cancer research only. Each variant that is called must meet
all the conditions of the filter chain to be filtered‑in. For more information on filter chains,
see the Ion Reporter™ Software Help.
Select No Filter to view all the variant calls attempted by the variant caller.
·
Saving the analysis using a filter chain other than Oncomine™ Extended changes the
·
variant calls that are saved in the VCF file and can aect downstream workflows.
62
Oncomine™ Comprehensive Assay Plus User Guide
Page 63

Chapter 6 Variant analysis
View results
b.
In the Oncomine™ tab, click the column headers to sort the list of variants by Oncomine
Variant Class or Oncomine Gene Class.
c.
In the Ontologies tab, click the column headers to sort the list by variant Type or Genes.
d.
Click Pharmacogenomics to view the ClinVar column. Click the link in the ClinVar column
for a selected variant to open an NCBI ClinVar website where information about the ClinVar
variant annotation is available.
6
After you review, filter, and sort your Analysis Result, you can create a report (see “Generate an Analysis
Results Report” on page 82), or download the analysis files (see “Download Ion Reporter™ annotation
VCF or TSV files” on page 83). You can view the extracted files individually, or upload a VCF file to a
software that requires VCF files, such as Ion Torrent™ Oncomine™ Reporter Software.
Oncomine™ Comprehensive Assay Plus User Guide
63
Page 64

Chapter 6 Variant analysis
6
View results
Fusion results
The Fusions results table lists the calls and other information for the fusions, including intragenic MET
exon skipping variants, analyzed in each sample in a run.
1.
Click the Analyses tab.
The Overview screen displays a list of analyses in the Analyses table.
2.
Click a sample result hyperlink in the Analysis column to open the Analysis Results summary
screen.
3.
Click the Fusions tab to view the Fusions results table.
If using a Fusions analysis workflow, only the Fusions results table is displayed in the Analysis
Results summary screen.
Column Description
Classification A user-defined classification selected from the list.
Locus The chromosome positions in the reference genome that define the fusion junction.
Type Assay type (for example, Fusion, RNA exon variant (exon skipping), RNAExon Tile, Proc
Control).
Filter Indicates the presence or absence of a fusion or RNA exon variant. When the default filter
chain is applied, only the fusion/RNA exon variant calls that are designated with PASS are
displayed in the results table. To view all calls, including calls that do not pass the required
filter thresholds, apply the No Filter filter chain or download the Variants (.vcf) file.
•
PASS – indicates a high confidence call that passes all filter thresholds at a given
variant position.
•
FAIL – indicates the absence of a fusion due to the variant call failing internal quality
control.
•
NO CALL – while some evidence for the presence of a fusion exists, the call does not
pass one or more filters that are required for a high confidence fusion call.
No Call Reason The reason for reporting a fusion as NOCALL in Filter column.
Genes (Exon) The name of fusion target and representative acceptor and donor exons.
Read Counts The frequency that the fusion was detected in the sample.
64
Oncomine™ Comprehensive Assay Plus User Guide
Page 65

(continued)
Column Description
Chapter 6 Variant analysis
View results
6
Oncomine Variant
Class
Oncomine Gene
Class
Detection Returns: Present, Absent, Present-Non-Targeted or NoCall as suppported by the read
Ratio to Wild Type The ratio of a given variant within all wild type variants of that gene.
Norm Count Within
Gene
Imbalance P-value The P-value calculated for a given variant Imbalance score.
Read Counts Per
Million
Variants that are known Oncomine™ annotated hotspots.
Gain-of-function, or Loss-of-function
counts dependent upon the thresholds set for detection.
The ratio of a given variant within all variants of that gene.
The ratio of target fusion read counts within the total mapped reads X 10
6
After you review, filter, and sort your Analysis Result, you can create a report (see “Generate an Analysis
Results Report” on page 82), or download the analysis files (see “Download Ion Reporter™ annotation
VCF or TSV files” on page 83).
View RNA Exon Tile Fusion Imbalance
The RNA Exon Tile Fusion Imbalance data view provides a visual representation of the RNA fusion
imbalance analyses.
1.
In the menu bar, click Analyses4Overview.
2.
In the Analysis column, click the hyperlinked name of the analysis of interest.
3.
Click the Variants tab, then click Fusions.
The Fusions table opens to display fusions results.
4.
In the top right corner of the screen, click Visualize, then select the RNA Exon Tile Fusion
Imbalance tab to view the plots.
Oncomine™ Comprehensive Assay Plus User Guide
65
Page 66

1 2
Chapter 6 Variant analysis
6
View results
Representative RNA Exon Tile Fusion Imbalance plots
The Fusion Imbalance Call: Imbalance Score & P-value plot shows the imbalance scores and p‑values for all the
1
genes in the selected sample. The dashed gray lines mark the threshold for an imbalance call, which is applied to
all genes across all samples. Points that fall within the blue shaded area of the plot represent fusion‑positive genes
( ). All other points that are outside of the blue shaded area represent fusion‑negative genes ( ). Control genes
are marked with
The Normalized Read Depth by Gene plot shows the mean read counts of each gene that is captured on the chip
2
for the selected sample. For each gene, the read counts are normalized to the number of amplicons.
.
66
Oncomine™ Comprehensive Assay Plus User Guide
Page 67

1
2
3
4
6
5
Chapter 6
Variant analysis
View results
6
The Sample Coverage for Imbalance Analysis plots show the expression profile for each exon‑exon tiling amplicon for each
1
gene. The Y‑axis represents the normalized coverage after baseline correction. The X‑axis represents individual exon‑exon
junctions, which are listed from 5′ to 3′. The imbalance score and p‑value are listed in the panel of each gene that was called
positive for fusion.
Baseline (a cluster of gray lines), generated from a fusion‑negative sample.
2
Test sample corrected read coverage (blue line), normalized to the baseline. Each point on the line represents a unique
3
exon‑exon junction that was covered by the assay and normalized to the baseline.
Predicted range for the fusion break point for a fusion‑positive gene (dashed red line).
4
If the collected data are insucient to determine an imbalance score, the SAMPLE NOT VALID FOR <gene> IMBALANCE
5
ANALYSIS message appears in the panel for that gene.
Sample coverage profile for the control gene (orange line).
6
To return to the table view of fusions, click the browser Back arrow.
View RNA exon variants
The RNA Exon Variant data view displays a bar graph summary of intragenic exon rearrangements or
fusions. The displayed RNA exon variants are defined in the BED file that is associated with an assay.
The RNA Exon Variant data view is available for all RNA and Fusion assays.
1.
In the menu bar, click Analyses4Overview.
2.
In the Analysis column, click the hyperlinked name of the analysis of interest.
Oncomine™ Comprehensive Assay Plus User Guide
67
Page 68

Chapter 6 Variant analysis
6
View results
3.
Click the Variants tab, then click Fusions.
The Fusions table opens to display fusions results.
4.
In the top right corner of the screen, click Visualization4RNA Exon Variant to view the RNA
Exon Variant plot.
To return to the table view of fusions, click the browser Back arrow.
68
Oncomine™ Comprehensive Assay Plus User Guide
Page 69

Representative RNA Exon Variant plots
1 2
Chapter 6 Variant analysis
View results
6
The X‑axis represents specific exon variants, where each variant is labeled with a gene ID followed by a sequence of adjacent
exons. The Y‑axis measures the read counts for each variant, normalized to the wild type.
Example analysis where RNA exon 2–7 deletion occurred in the EFGR gene. The deletion of exons 2–7 resulted in an
1
increase of normalized read counts for the EFGR variant that contains the intragenic fusion of exon 1 and exon 8 (EGFREGFR.E1E8.DelPositive.2), and a decrease of normalized read counts for the wild type EFGR (EFGR.E6E7).
Example analysis where exon-skipping (i.e., exon deletion) of exon 14 in the MET gene was detected. Normalized read counts
2
for the variant representative of the exon-skip event (MET‑MET.M13M15.1) are higher relative to the MET wild-type assays (for
example, MET.M13M14M15.ENST00000397752.WT and MET.M17M18M19M20.ENST00000397752.WT).
Oncomine™ Comprehensive Assay Plus User Guide
69
Page 70

Chapter 6
6
Visualize tumor mutational burden analysis results
Variant analysis
Visualize tumor mutational burden analysis results
To visualize tumor mutational burden analysis results in Ion Reporter™ Software, the analysis workflow
must be any DNA-single sample, or DNA and Fusions-single sample analysis workflow that has tumor
mutational burden enabled.
1.
Do one of the following to open tumor mutational burden analysis results:
Option Description
Visualize analysis results from an
individual sample or from multiple
samples simultaneously from the
Analyses table.
Visualize analysis results individually
from the Analysis Results screen.
The
Tumor Mutational Burden (Mutations/Mb) is displayed at the top of each section of sample
results.
2.
Click Download Report to download the Tumor Mutational Burden Analysis Report in PDF
format, which includes the results with graphs and metrics.
In the Analyses table, select an individual sample result row, or
select the checkbox next to each sample result that you want to
visualize simultaneously, then click Visualize. Alternatively, click
Actions4Visualize.
In the Analyses table, click a sample result hyperlink in the
Analysis column to open the Analysis Results, then click
Visualize.
70
3.
Scroll down to view graphical representations of the analysis results and QC metrics, and
download additional files.
Note: Multiple sample results are listed sequentially.
4.
In the lower right corner of the screen:
• Click Download Variant Details TSV to download a tab-separated list of detected variants
that contributed to the tumor mutational burden count. Open the file with compatible software,
such as Microsoft™ Excel™.
• Click Download the TMB statistic.txt file to download the tumor mutational burden
output file. The file is named <analysis name>_statistic.txt. For example,
NCI-1395_c3495_2020-03-03-10-58-54-007_statistic.txt.
Oncomine™ Comprehensive Assay Plus User Guide
Page 71

QC metrics for tumor mutational burden
Total base coverage across the genomic positions defined by the assay BED file
Number of bases in the DNA BED file
QC metrics for tumor mutational burden are listed at the top of Analysis Visualization in the TMB tab
when you visualize analysis results with Ion Reporter™ Software.
QC metric Definition
Average Coverage The following formula is used to calculate average coverage:
If the average coverage is below 150, the analysis completes successfully but Tumor
Mutational Burden is reported as -1.
Note: This setting cannot be changed in Ion Reporter™ Software.
Chapter 6 Variant analysis
Visualize tumor mutational burden analysis results
6
Number of bases
used in calculating
TMB
Number of variant
calls
Deamination score Deamination score was previously reported as the estimated SNP proportion
The number of bases used as a denominator for the tumor mutational burden
calculation. Only bases with sucient base coverage are used in the calculation,
as defined in the workflow parameters. In the parameters, you can also select only
the exonic regions covered by the panel to be used instead of all genomic regions.
See the Ion Reporter™ Software Help for more information.
The number of somatic variants that are identified in the sample. This value is
reported in the statistic.txt file as Total Somatic Filtered Variants Count
(numerator for TMB calculation) and Variant Count.
For more information, see Ion Reporter™ Software Help.
consistent with deamination (mainly FFPE). The deamination score can be used
to determine the quality of the FFPE sample. For more information on how to
minimize the impact of high deamination on a tumor mutational burden score, see
Ion Reporter™ Software Help.
A deamination QC status of PASS/FAIL is also reported. The threshold for this QC
can be adjusted in the analysis workflow parameter settings. For more information,
see Ion Reporter™ Software Help.
Oncomine™ Comprehensive Assay Plus User Guide
71
Page 72

Chapter 6 Variant analysis
6
Visualize tumor mutational burden analysis results
Sample results
Tumor mutation burden results are represented graphically in the TMB tab when you visualize analysis
results with Ion Reporter™ Software.
Germline and Somatic Variants
This histogram shows the frequency distribution of allele
ratio for total called germline and somatic variants.
Listed below the figure is the combined total of called
germline and somatic variants. The value is reported in
the statistic.txt file as Variant count (Germline
+ somatic). For more information, see Ion Reporter
Software Help.
Only Somatic Variants
This histogram shows the frequency distribution of allele
ratio for only somatic mutations as determined by the
selected TMB filter chain. Listed below the figure are:
•
The number of Total Somatic Variants , reported in the statistic.txt file as Total Somatic
Filtered Variants Count (numerator for TMB calculation).
•
The number of variants determined to be nonsynonymous (detrimental) and synonymous (nondetrimental) as annotated by Ion Reporter™ Software. Values are reported by dierent Ion
Reporter™ annotation types in the statistic.txt file.
•
The number of detected somatic variants found in the COSMIC database. The value is reported in
the statistic.txt file as COSMIC Annotated Somatic Variants.
™
For more information, see step 4 of “Visualize tumor mutational burden analysis results” on page 70 .
72
Oncomine™ Comprehensive Assay Plus User Guide
Page 73

Visualize tumor mutational burden analysis results
Substitution Type and Context of Somatic Mutations
Chapter 6 Variant analysis
6
C>A
C>G
C>T
Somatic mutations can be divided into 6 base substitution classes (that is, C>A, C>G, C>T, T>A, T>C, T>G) based on
their substitution type. After incorporating information on the bases immediately 5′ and 3′ to each mutated base, 96
possible mutation types are in this classification. These 96 mutation types are represented on the x‑axis, and variant
frequency for mutation type on the y‑axis. Bars for each substitution class are grouped and displayed with dierent color.
A summary TXT file of these results is also available, see “Download Ion Reporter™ annotation VCF or TSV files” on
page 83.
T>A
T>C
T>G
Substitution Type of Somatic Mutations
A pie chart dividing somatic mutations into 6 base substitution classes
(that is, C>A, C>G, C>T, T>A, T>C, T>G) based on their substitution type.
C>T
C>G
C>A
Oncomine™ Comprehensive Assay Plus User Guide
T>G
T>C
T>A
73
Page 74

Chapter 6 Variant analysis
6
Visualize tumor mutational burden analysis results
Signature Pattern of Somatic Mutations
A pie chart dividing somatic mutations in groups consistent with specific mechanisms.
C>T at [AG]CG
C>T at [CT]CG
C>T at NCC,CC[ACT],TC[ACT]
C>T at other sites
C>A
T>A and T>C
Rest
In the pie chart, a small fraction of multiple signature types can be observed in the sample. However,
significant dominance of a single signature pattern often correlates to the respective tumor type. For
example, 56.7% of the variants detected (sum of blue, green, and yellow) are an observed UV damage
signature in this sample.
•
High C>T at CpC, CpC, TpC, T>A, and T>C is consistent with UV damage. (Blue + Green + Yellow)
For more information, see https://www.nature.com/articles/nature22071
•
High C>T at CpG is consistent with spontaneous deamination of 5‑methylcytosine. (Red + Blue).
For more information, see https://www.nature.com/articles/nature12477
•
High C>A is consistent with smoking damage.(Orange)
For more information, see https://science.sciencemag.org/content/354/6312/618.full
•
High C>T (site independent) is consistent with FFPE processing. (Green + Purple)
For more information, see https://www.ncbi.nlm.nih.gov/pmc/articles/PMC4032349/
Note: Underlined bases represent the reference base being substituted (for example, CpG in the first
bullet is same as to [ACGT]CG).
74
Oncomine™ Comprehensive Assay Plus User Guide
Page 75

MSI analysis results
You can determine whether microsatallite instability (MSI) is present using Oncomine™ Comprehensive
Assay Plus - w2.1 - DNA (or DNA and Fusions) Ion Reporter™ Software analysis workflows. In these
analysis workflows parameters are applied that detect MSI markers, which can identify a form of
genomic instability in the replication of repetitive DNA.
Note: MSI parameters in the software are not applied when you use the Oncomine™ Comprehensive
Plus - w2.1 - Fusions - Single Sample workflow. For more information, see Ion Reporter™ Software
Help.
View MSI parameters
The parameters for MSI analysis are located in the Oncomine™ Comprehensive Plus - w2.1 - DNA Single Sample workflow in Ion Reporter™ Software.
1.
Under the Workflows tab, in the Overview screen, search for the workflow, then select it in the
list.
Chapter 6 Variant analysis
MSI analysis results
6
2.
In the Details pane to the right of the list, scroll down, then click View next to Parameters.
3.
In the Parameters dialog, select MSI from the left navigation bar.
Oncomine™ Comprehensive Assay Plus User Guide
75
Page 76

Chapter 6
6
MSI analysis results
Variant analysis
MSI parameters
You can adjust MSI parameters to optimize your analysis results when you create or edit analysis
workflows in Ion Reporter™ Software. MSI parameters are available only for some Oncomine™ analysis
workflows. For a complete description of all MSI parameters see the Ion Reporter™ Software Help.
Parameter name Description
Main tab
Enable MSI Detection When set to true, this parameter enables detection of MSI markers for the
workflow. These markers can identify a form of genomic instability in the
replication of repetitive DNA. MSI often occurs in tumor cells. It leads to
the appearance of multiple alleles at microsatellite loci, which can be easily
identified.
This parameter is set to True by default in the Oncomine™ Comprehensive
Assay Plus analysis workflows. If you do not want to include MSI results
in an analysis, you can set to the parameter to False. Do not change this
setting in other Oncomine™ analysis workflows.
MSI-High Threshold The MSI score above which a sample is considered MSI-High. This score is
reported in analysis results.
MSS Threshold The MSI score below which a sample will report MSS in analysis results.
[1]
If the MSI Score falls between the MSI-High Threshold and the MSS Threshold, a No Call is reported in the analysis results.
[2]
The MSI-High and MSS thresholds are optimized based on the MSI baseline of the workflow. Do not change parameters from the
default settings unless you understand how the change can affect your analysis.
Visualize MSI analysis results
1.
There are two ways to visualize MSI analysis results in Ion Reporter™ Software:
Option
Visualize MSI results from one or
more analyses simultaneously from
the Analyses table.
Visualize analysis results
individually from the Analysis
Results screen.
The Analysis Visualization screen opens to the TMB tab.
[1,2]
[1,2]
Description
In the Analyses table, select a row for an analysis or select
the checkbox next to one or more analyses that you want to
visualize simultaneously, then click Visualize. Alternatively, click
Actions4Visualize.
In the Analyses table, click an analysis hyperlink in the Analysis
column to open the Analysis Results, then click Visualize.
76
2.
Click the MSI tab.
A table with MSI Status, MSI Score, and MSI Coverage is shown.
Oncomine™ Comprehensive Assay Plus User Guide
Page 77

Chapter 6 Variant analysis
MSI analysis results
Item Description
MSI Status A sample is assigned an MSI status that is based on the MSI Score. The MSI
status can be one of the following:
•
MSI-High
•
MSS (MSI stable)
•
No Call (MSI status is intermediate, i.e., between the thresholds)
•
QC Fail (See step 3 to download the MSI results files. Review the
MSIQC.json file to determine the failure mode.)
6
MSI parameter settings include thresholds that determine whether the status is
MSI-High or MSS. A status of No Call or QC Fail is based on the MSI marker
coverage.
MSI Score
MSI Coverage A combined sample-level coverage that is calculated with the individual MSI
Controls The in silico control defined by the JSON file displayed.
3.
Click Download Results to download a report of the MSI results. The report is downloaded to the
A sample-level MSI score that is calculated with individual MSI marker scores.
The overall score is used to determine the MSI status of the sample.
marker-level coverage.
folder that is used for downloads, depending on the browser settings.
Oncomine™ Comprehensive Assay Plus User Guide
77
Page 78

Chapter 6
6
Genomic segmentation analysis
Variant analysis
View downloaded MSI results files
The ZIP file of downloaded MSI results contains three files.
Filename File type Description
Details.tsv Tab separated values (TSV) File contains detailed information on each MSI marker in
the assay. Details include Ion Reporter™ Software sample
and analysis name, marker level coverage, MSI score, and
MSI algorithm version.
Summary.tsv Tab separated values (TSV) File contains sample level summary of MSI results. This
includes sample and analysis name in Ion Reporter
Software, total coverage across all MSI markers, MSI
score, MSI status, name of the control file used in the
workflow, and MSI algorithm version.
MSIQC.json JavaScript Object Notation
(JSON)
File contains "flags" and warning messages associated
with MSI status used by support personnel. See
“Customer and technical support” on page 115.
Extract the MSIResults_<date>.zip folder, then open the enclosed folder.
Genomic segmentation analysis
The Ion Reporter™ Software Oncomine™ Comprehensive Assay Plus, DNA analysis workflow utilizes
heterozygous population SNPs covered by the assay to determine the ploidy levels of genomic
segments. The genome is divided into contiguous segments of similar ploidy levels using a circular
binary segmentation (CBS) algorithm. Log odd ratios for variant allele frequency of observed population
SNPs (by TVC) and copy-number (CN) ratios (by CNV pipeline) for each segment are calculated. Log
odd ratio and CN ratios are then used to infer:
•
Tumor cellularity percentage (percentage of tumor cells in the sample)
•
Loss-of-heterozygosity (LOH) for each genomic segment. Segment level LOH events are
intersected with targeted gene boundaries to determine LOH events in selected genes. Segment
level LOH events are also aggregated to determine sample level % LOH.
•
Exon-level copy number alterations in selected genes reported as:
™
78
Type
CNV BigDel
[1]
This CNV subtype detected by the Oncomine™ Comprehensive Assay Plus is not the same as one detected using assays
without genomic segmentation (for example, the Oncomine™ BRCA Research Assay).
CNV Subtype Description
BigDup
[1]
[1]
Deletion is detected between exons and the genomic
segment when it occurs at the beginning or end of a gene.
Duplication is detected between exons and the genomic
segment when it occurs at the beginning or end of a gene.
Oncomine™ Comprehensive Assay Plus User Guide
Page 79

Chapter 6 Variant analysis
Genomic segmentation analysis
Visualization of genomic segmentation analysis, Allele Specific Copy
Number plots
1.
There are two ways to visualize analysis results in Ion Reporter™ Software:
Option Description
6
Visualize analysis results
from one or more analyses
simultaneously from the
Analyses table.
Visualize analysis results
individually from the Analysis
Results screen.
Note: The Analysis Visualization screen opens to the TMB tab by default.
2.
Click the Allele Specific Copy Number tab.
A series of plots showing copy number variation across the entire genome is displayed. Click
Export Image to save a PNG image of all three plots to a location of your choice. If visualizing
multiple analyses simultaneously, individual sample results are listed sequentially.
In the Analyses table, select a row for an analysis or select the checkbox next
to one or more analyses that you want to visualize simultaneously, then click
Visualize. Alternatively, click Actions4Visualize.
In the Analyses table, click an analysis hyperlink in the Analysis column to open
the Analysis Results, then click Visualize.
Oncomine™ Comprehensive Assay Plus User Guide
79
Page 80

Chapter 6 Variant analysis
6
Genomic segmentation analysis
This visualization shows identified genomic segments (shown as horizontal lines) using log2 ratios from the Copy Number Variation
(CNV) analysis and log odds from the Torrent Variant Caller (TVC) analysis. Segments are identified using the heterozygous
population SNPs (shown as dots in the upper two panels) targeted by assay amplicons.
Plot scale (x-axis)
logR = copy number log2
ratio
80
Log2 ratios (top panel) of the copy-number estimates relative to the baseline copynumber as calculated by the CNV algorithm for each amplicon in the assay. Ratio
representative Genome segmentation overlay (horizontal brown bars) shows segments
with similar log2 ratios clustered together.
Description
Oncomine™ Comprehensive Assay Plus User Guide
Page 81

(continued)
Plot scale (x-axis) Description
Chapter 6
Genomic segmentation analysis
Variant analysis
6
log odds = ln(Tumor
Reads / Reference Reads)
Tumor Copy Number Bottom panel shows the total (black horizontal line) and minor (red horizontal line)
Log odds (middle panel) for each heterozygous SNP in the assay. Log odds is
calculated as the natural logarithm of the ratio of the sequencing reads with variant
allele and reference allele that are obtained using Torrent Variant Caller (TVC). Genome
segmentation overlay (horizontal brown bars) shows segments with similar log odds
clustered together. Since the variant allele could be major or minor for any SNP, the
corresponding log odds could be positive or negative and are therfore displayed as
segments that are mirror images around 0.
copy-number estimates for each of the identified genomic segments (top two panels).
Genomic segments where total CN ≥1 and minor CN = 0 are segments with LOH.
There may exist genomic segments for which minor copy-number estimates can not
be determined.
Visualize exon level loss results
Exon level loss is calculated for a subset of tumor suppressor genes. For a list of the genes covered
contact support (see “Customer and technical support” on page 115).
Note: Current exon-deletion algorithm is genomic segmentation based where intersection between
exons and genomic segment (with copy-number alteration) is assessed for reporting partial gene
alterations from beginning or end of a gene. This approach does not provide detection of focal exon
level changes.
1.
There are two ways to visualize exon level loss analysis results in Ion Reporter™ Software:
Option
Visualize analysis results from one
or more analyses simultaneously
from the Analyses table.
Visualize analysis results
individually from the Analysis
Results screen.
In the Analyses table, select a row for an analysis or select
the checkbox next to one or more analyses that you want to
visualize simultaneously, then click Visualize. Alternatively, click
Actions4Visualize.
In the Analyses table, click an analysis hyperlink in the Analysis
column to open the Analysis Results, then click Visualize.
Description
The Analysis Visualization screen opens to the TMB tab.
2.
Click the Exon CNV tab.
A series of plots showing exon level copy number variation for each exon in queried genes is
displayed. Click Download All Plots to save a ZIP file contatining PNG images of each plot to
a location of your choice. If visualizing multiple analyses simultaneously, individual sample results
are listed sequentially.
Oncomine™ Comprehensive Assay Plus User Guide
81
Page 82

Chapter 6 Variant analysis
6
Generate an Analysis Results Report
The visualization displays distribution of copy-number estimates (y-axis) of each amplicon from a gene across dierent exons
(x-axis). Gene name is specified in the text on top of the plot. Each blue dot represents an amplicon. Dotted blue lines corresponds
to the lower and upper range of observed CN estimates to the nearest integer value. Exon-level CNV plots are generated for a
selected subset of tumor suppressor genes. Exon numbering (from left to right) represents strand orientation of the gene. For
genes on the negative strand, exon numbering is in decreasing order.
Generate an Analysis Results Report
After you have reviewed, filtered, and sorted your Analysis Result, you can download an Analysis
Report. The procedure described here includes creating and formatting a report template.
1.
In the Analysis Results screen for your sample, click Generate Report.
The Generate Report workflow bar opens to the Configuration step. The sections of the report
can be rearranged, deleted, or edited.
2.
Hover over the various sections and icons to view instructional text to help you format your report
output.
3.
Enter information in editable fields (for example, edit the report name or enter background
information).
4.
(Optional) Click Save As New Template to save your reconfigured report template for future use
with other sample results.
5.
Click Next, a live preview of your report is displayed.
6.
Click Lock & Publish to generate the final Analysis Report.
7.
Click Download.
82
Oncomine™ Comprehensive Assay Plus User Guide
Page 83

Chapter 6 Variant analysis
Download Ion Reporter™ annotation VCF or TSV files
Download Ion Reporter™ annotation VCF or TSV files
Variant call format (VCF), and tab separated values (TSV) files of the complete or filtered results can be
downloaded from the Analysis Results screen.
1.
Click Download, then select All Variants, Filtered Variants, Current Results TSV, or Selected
Variants.
•
All variants—A VCF file that contains all variants that are included in the analysis.
•
Filtered variants—A VCF file that contains the variants which were filtered IN for the analysis.
•
Selected variants—A VCF file that contains your selected variants from the analysis. Each
variant to be included in the selected variants VCF file must be selected in the Analysis Results
before the files are downloaded.
•
Current Results TSV—A tab separated values (TSV) file of the analysis results of the current
analysis.
6
2.
Click Home4Notifications to open the Notifications screen, then click (Download) next to the
file name to download your results.
Alternatively, select one or more rows, then click Download.
The software generates a compressed directory named <analysis name>_All.zip that is
downloaded. Extract the contents of the ZIP file to access the following 6 folders: CNV_VCIB,
QC, Variants, Results, MSI, and Workflow_Settings. Within the Variants folder, you’ll find the
Oncomine™ annotated VCF file.
Folder
CNV_VCIB Contains an image file (cn_results.png) of the copy number determination for all
amplicons.
QC Contains a PDF of the QC report, and a folder containing coverage statistics files.
Contents of folder
Oncomine™ Comprehensive Assay Plus User Guide
83
Page 84

Chapter 6 Variant analysis
6
Download Ion Reporter™ annotation VCF or TSV files
(continued)
Folder Contents of folder
Variants Contains a folder with the following files:
•
Intermediate and Oncomine™-annotated .VCF files
•
TSV files that contain Oncomine™-filtered and all somatic variants
Results If the Tumor Mutational Burden parameter is enabled a Results folder is generated.
The Results folder contains:
•
A PDF report of the tumor mutational burden results
•
TSV files that contain post-filter and somatic variants
•
Image files that graphically represent the results
•
TXT files that contain summaries of the TMB output
MSI Contains summary and detailed marker-level files with data about microsatellite
instability (MSI) markers. These markers can identify a form of genomic instability
in the replication of repetitive DNA.
Workflow_Settings Contains folders with the following files:
•
A text file that describes settings used for the analysis. Open the file with a text
editor.
•
Configuration files used by the Ion Reporter™ Software in the analysis workflow
settings.
You can view the extracted files individually, or upload a VCF files to an ancillary software application
such as the Ion Torrent™ Oncomine™ Reporter for further analysis.
Requirements for variant annotation in Ion Reporter™ Software
The following table summarizes the requirements that must be met for the Oncomine™ Variant
Annotator to annotate variants in Ion Reporter™ Software for the Oncomine™ Comprehensive Assay
Plus.
For each variant type in this table, an annotation is generated only if all conditions in the corresponding
Annotation Criteria column are satisfied.
Note: You can find all relevant annotation criteria in VCF files.
Variant type
Copy number
amplification
Copy number
deletion
Oncomine
Gene Class
Gain-of-Function Amplification
Loss-of-Function Deletion
™
Oncomine
Variant Class
™
Annotation criteria
•
SVTYPE = "CNV"
•
FILTER = "GAIN"
•
Occurs in a designated copy-gain gene
•
SVTYPE = "CNV"
•
FILTER = "LOSS"
•
Occurs in a designated copy-loss gene
84
Oncomine™ Comprehensive Assay Plus User Guide
Page 85

(continued)
™
Oncomine
Variant Class
Variant type
Copy number
Oncomine
Gene Class
Loss-of-Function ExonDeletion
exon deletion
Loss of
Loss-of-Function LOH
Heterozygosity
Long deletion Loss-of-Function LongDel
Gene fusion Gain-of-Function Fusion
Chapter 6 Variant analysis
Download Ion Reporter™ annotation VCF or TSV files
™
6
Annotation criteria
•
SVTYPE = "CNV"
•
FILTER = "LOSS"
•
SUBTYPE = "BigDel"
•
SVTYPE = "LOH"
•
LOH = "1"
•
FILTER = "GAIN" or "LOSS"or "PASS"
•
Positive mutation call
•
SVTYPE = "LongDel"
•
SVTYPE = "Fusion"
•
FILTER = "PASS"
•
Is a targeted fusion isoform
RNA exon variant Gain-of-Function RNAExonVariant
Expression
imbalance
Loss-of-function
Gain-of-Function ExpressionImbala
nce
Loss-of-Function Truncating
truncating de
novo mutation
Missense hotspot
mutation
Gain-of-
Function / Loss-
Hotspot
of-Function
In-frame hotspot
mutation
Gain-of-
Function / Loss-
Hotspot
of-Function
•
SVTYPE = "RNAExonVariant" or "Fusion"
•
FILTER = "PASS"
•
Is a targeted RNA exon variant
•
SVTYPE = "RNAExonTiles"
•
FILTER = "PASS"
•
Record meets Targeted Isoforms Detected
Requirement
•
Positive mutation call
•
Functional impact is frameshift block substitution,
frameshift deletion, frameshift insertion, or nonsense
•
Occurs in a loss-of-function gene
•
Positive mutation call
•
Functional impact is missense
•
Transcript and codon position occur in predefined
missense hotspot list
•
Positive mutation call
•
Function, transcript, and coding syntax occur in
predefined in-frame hotspot list
Splice site
hotspot mutation
Gain-of-
Function / Loss-
Hotspot
of-Function
Oncomine™ Comprehensive Assay Plus User Guide
•
Positive mutation call
•
Transcript, location, and exon occur in predefined
splice site hotspot list
85
Page 86

Chapter 6 Variant analysis
6
Download Ion Reporter™ annotation VCF or TSV files
(continued)
Variant type
Intronic hotspot
mutation
Promoter hotspot
mutation
Gain-of-function
truncating
hotspot mutation
Loss-of-function
truncating
hotspot mutation
Oncomine
Gene Class
Gain-of-
™
Oncomine
Variant Class
Hotspot
Function / Lossof-Function
Gain-of-
Hotspot
Function / Lossof-Function
Gain-of-Function Hotspot
Loss-of-Function Truncating
™
Annotation criteria
•
Positive mutation call
•
Transcript, location, and coding syntax occur in
predefined intronic hotspot list
•
Positive mutation call
•
Transcript, location, and coding syntax occur in
predefined promoter hotspot list
•
Positive mutation call
•
Function, transcript, and coding syntax occur in
predefined truncating hotspot list
•
Occurs in a gain-of-function gene
•
Positive mutation call
•
Function, transcript, and coding syntax occur in
predefined truncating hotspot list
•
Occurs in a loss-of-function gene
MNV hotspot
mutation
EGFR exon 19
deletion
EGFR exon 20
insertion
ERBB2 exon 20
insertion
MET exon 14
skipping
Gain-of-
Hotspot
Function / Lossof-Function
Gain-of-Function EGFRExon19Dele
tion
Gain-of-Function EGFRExon20Inse
rtion
Gain-of-Function ERBB2Exon20Ins
ertion
Gain-of-Function METExon14Skipp
ing
•
Positive mutation call
•
Transcript and coding syntax occur in MNV hotspot
list
•
Positive mutation call
•
Functional impact is nonframeshift deletion, or
nonframeshift block substitution
•
Deletion impacts codons 744-761 of EGFR
•
Positive mutation call
•
Functional impact is nonframeshift insertion, or
nonframeshift block substitution
•
Insertion impacts codons 762-775 of EGFR or
variant is COSM26720
•
Positive mutation call
•
Functional impact is nonframeshift insertion, or
nonframeshift block substitution
•
Insertion impacts codons 770-783 of ERBB2
•
Positive mutation call
•
Location is splice site in MET exon 14, is intronic >=
4bp deletion in 30 nucleotides preceding MET exon
14, or variant is in MET Exon 14 Skipping confirmed
list
86
Oncomine™ Comprehensive Assay Plus User Guide
Page 87

A
Tips
Tips and troubleshooting
Tips ................................................................................ 87
■
Troubleshooting ...................................................................... 88
■
•
Arrange samples in alternating columns on the plate for easier pipetting with multichannel pipettes
during purification with the DynaMag™–96 Side Magnet.
•
Plate seals can be firmly applied using the applicator in the MicroAmp™ Adhesive Film Applicator.
Plate seals can be removed with less eort when hot. Try removing seals right after taking the plate
out of the thermal cycler.
•
Use IonCode™ Barcode Adapters to avoid handling and diluting adapters. Alternatively, combine
and dilute Ion Xpress™ Barcode Adapters in large batches, then carefully aliquot into 96‑well plates.
•
If library yield is below 50 pM, libraries can still be sequenced by adding a proportionally larger
volume to a combined library or template preparation.
•
If the unamplified library yield is below 50 pM, libraries can be rescued with library amplification.
Combine 25 μL of unamplified library with 71 μL of 1X Library Amp Mix and 4 μL of 25X Library
Amp Primers. Seal the plate and perform 5–10 library amplification cycles as follows:
Stage
Hold 98°C 2 minutes
5–10 cycles 98°C 15 seconds
Hold 10°C Hold (up to 1 hour)
•
When amplifying multiple samples in a single PCR plate, ensure that the input across the samples
is roughly equivalent so that the selected cycle number is optimal for all the samples in the run.
Temperature Time
64°C 1 minute
Oncomine™ Comprehensive Assay Plus User Guide
87
Page 88

Appendix A Tips and troubleshooting
A
Troubleshooting
Troubleshooting
Library yield and quantification
Observation Possible cause Recommended action
Library concentration is low–
general
Details: (Library concentration
is NOT indicative of quality.)
Library concentration is too high
Sample DNA or RNA was mis-
quantified.
Sample DNA or RNA quality was
low.
PCR, digestion, or ligation was
inecient.
Residual ethanol in the sample
DNA or RNA inhibited target
amplification.
Residual ethanol from AMPure
purification inhibited library
amplification.
AMPure™ XP beads were overdried.
FFPE RNA was not heat treated
before reverse transcription.
Sample DNA or RNA was mis-
quantified.
More than 100 ng of sample
DNA/RNA was used.
Requantify sample DNA using the TaqMan
RNase P Detection Reagents Kit.
Requantify sample RNA with a Qubit
Fluorometer.
Add more DNA or RNA or increase target
amplification cycles.
Ensure proper dispensing and mixing of viscous
components at each step.
Incubate uncapped tube in hood for 1 hour.
Speed-vac tube at room temperature for
5 minutes.
™
Carefully remove all drops of ethanol before
library amplification, then centrifuge plate, if
needed.
Do not dry the AMPure™ XP beads more than
5 minutes.
Heat FFPE RNA at 80°C for 10 minutes,
then cool to room temperature before reverse
transcribing.
Requantify sample DNA using the TaqMan
RNase P Detection Reagents Kit; quantify RNA
with a Qubit™ Fluorometer.
Add less DNA/RNA, or decrease target
amplification cycles.
™
™
™
88
Oncomine™ Comprehensive Assay Plus User Guide
Page 89

Low amplicon uniformity (DNA only)
Observation Possible cause Recommended action
Appendix A Tips and troubleshooting
Troubleshooting
A
Pool representation is not balanced
Details: Example of pool imbalance. Within the
Coverage Analysis Plugin, mean read depth per
primer pool is plotted for a 2‑pool Ion AmpliSeq
Panel. In this example, Primer Pool 1 has
approximately one quarter the reads of Primer Pool
2.
Short amplicons are under-represented
™
Amount of DNA in target
amplification reactions varied.
Pipetting is inaccurate when
pools are combined after
target amplification.
Purification was poor. Vortex AMPure™ XP Reagent
Make a master mix for each
sample DNA.
Centrifuge the plate after
target amplification. Ensure
that the entire volume of
each pool is removed and
combined into a single pool.
thoroughly before use, and
be sure to dispense the full
volume.
100% ethanol is dicult to
pipet accurately; it is essential
to pre-wet pipette tips.
In post-ligation library
purification, increase AMPure
XP Reagent volume from
45 μL (1.5X) to 50 μL (1.7X).
™
Other
Observation Possible cause Recommended action
The number of on-target reads
is lower than expected
Percentage of polyclonal ISPs is
high (>40%)
Low quality ISPs are present at
high percentage (>15%)
Oncomine™ Comprehensive Assay Plus User Guide
Unknown. Increase the number of target amplification
Sample ID Panel targets were
counted as o-target reads.
Library input was too high. Decrease amount of library added to the
Library was mis-quantified. Ensure that library was quantified accurately.
Other. Check the appropriate template preparation user
Library input was too low. Double the volume of library used in template
cycles by 2.
Add back the on-target reads from the Sample
ID Panel.
template preparation reaction by 50%.
guide for more information.
preparation.
Use a fresh dilution of library prepared in a lowbind tube.
89
Page 90

Appendix A Tips and troubleshooting
A
Troubleshooting
Observation Possible cause Recommended action
Low quality ISPs are present at
high percentage (>15%)
(continued)
MSI QC Failure
Details: Error message: "Not
enough markers with coverage
X"
MSI QC Failure
Details: Error message: "RMC
Out of Range Failure X"
MSI QC Failure
Details: Error messge: "RMC
Calibration Failure"
Other. Check the appropriate template preparation user
guide for more information.
MSI marker(s) had insucient
coverage to reliably calculate
MSI. This is common in NTC
samples.
RMC flow signal not within range
of QC threshold.
Insucient RMC read coverage
for calibration. RMC reagent
may have been omitted during
library preparation.
If the sample is not an NTC, review the
previous “Troubleshooting” topics to ensure
sucient coverage. For further assistance,
contact support (see “Customer and technical
support” on page 115).
Contact support to determine whether
reanalysis with "Low RMC Signal" analysis
workflow may resolve the QC failure. See
“Customer and technical support” on page 115.
Remake library including RMC in the target
amplification reaction, then sequence the new
library.
90
Oncomine™ Comprehensive Assay Plus User Guide
Page 91

Supplemental information
B
Update Oncomine™ Comprehensive Assay Plus templates in Torrent Suite™ Software ........ 91
■
Install Oncomine™ Comprehensive Assay Plus workflows in Ion Reporter™ Software ......... 91
■
Download and install BED files ......................................................... 91
■
Configure the IonReporterUploader plugin in Torrent Suite™ Software ....................... 92
■
Set TMB Classification parameters ..................................................... 93
■
Update Oncomine™ Comprehensive Assay Plus templates in Torrent Suite™ Software
1.
Sign in to the Torrent Suite™ Software as an administrator.
2.
In the upper right corner, click (Settings)4Updates, then scroll to the Update Products
section.
3.
In the Name column find Oncomine™ Comprehensive Assay Plus, then in that row click Update.
The software update begins automatically and displays as Complete when finished.
Install Oncomine™ Comprehensive Assay Plus workflows in
Ion Reporter™ Software
To install or update the Oncomine™ Comprehensive Assay Plus workflows in Ion Reporter™ Software,
contact your service representative to schedule an update.
Download and install BED files
Contact your service representative to obtain the latest versions of Oncomine™ Comprehensive Assay
Plus BED files.
1.
Extract the ZIP file containing the BED file to a location of your choice.
2.
Sign in to the Ion Torrent™ Server on which you want to install the target regions and hotspots BED
files.
3.
Click the
dropdown list.
Oncomine™ Comprehensive Assay Plus User Guide
(Settings) tab in the upper right of the screen, then select References from the
91
Page 92

Appendix B
B
Configure the IonReporterUploader plugin in Torrent Suite™ Software
4.
Supplemental information
Upload the target regions BED file:
a.
In the left navigation menu, click Target Regions, then click the Add Target Regions button.
b.
Select hg19 - Homo sapiens from the Reference dropdown list.
c.
Click Select File, then navigate to and select the target regions BED file, which has the
following extension: .
.designed.bed
d.
Click Open, then click Upload Target Regions File.
5.
Upload the hotspots BED file:
a.
In the left navigation menu, click Hotspots, then click the Add Hotspots button.
b.
Select hg19 - Homo sapiens from the Reference dropdown list.
c.
Click Select File, then navigate to and select the hotspots file, which has the following
extension:
.hotspots.bed
d.
Click Open, then click Upload Hotspots File.
The installed BED files appear in the dropdown lists in the Ion Reporter™ Software.
Configure the IonReporterUploader plugin in Torrent Suite
Software
1.
Sign in to the Torrent Suite™ Software.
2.
Click (Settings)4Ion Reporter Configure.
™
92
3.
In the Ion Reporter Uploader Account Configuration screen, click Add Account4Ion
Reporter.
Oncomine™ Comprehensive Assay Plus User Guide
Page 93

Appendix B Supplemental information
Set TMB Classification parameters
4.
In the Add Ion Reporter account screen, enter the following information into the fields:
Field Directions
Server Type Select:
Display Name Enter a meaningful name of your choice. This name is used in the run plan
Server Enter:
Port Enter: 443
Username Enter your Ion Reporter™ Software username (your email address)
Password Enter your Ion Reporter™ Software password
[1]
Ask your Ion Reporter™ Server administrator for these values.
5.
The "Default Account" is the account that is configured by default in run templates and run plans.
[1]
template wizard and is seen by other Torrent Suite™ Software users. Use
only alphanumeric characters, spaces, and underscores.
[1]
If this account is the main account to be used for file transfers, enable the Default Account
checkbox.
B
Note: You can always change this selection in the Planned Run template workflow bar and in the
Upload to IR quick link.
6.
Click Get Versions, select Ion Reporter 5.16 or later, then click ✓Add.
Set TMB Classification parameters
Before the Ion Reporter™ Software analysis workflow can determine the TMB classification the
threshold parameters must be set in the analysis workflow. Default threshold values (0) result in a
value of Undefined.
1.
Under the Workflows tab, in the Overview screen, search for the workflow, then select it in the
list.
2.
In the Details pane to the right of the list, click 4Copy (to create a new analysis workflow) or
Edit to modify the existing analysis workflow.
3.
Advance to the Parameters step in the workflow bar.
4.
Click the Tumor Mutation Burden tab.
The Tumor Muational Burden Filter Chain and the Tumor Mutational Burden Calculation
Version are displayed.
Oncomine™ Comprehensive Assay Plus User Guide
93
Page 94

Appendix B Supplemental information
B
Set TMB Classification parameters
5.
Scroll to TMB-Low Threshold, then enter threshold values for the following parameters.
Item
TMB-Low Threshold Tumor Mutational Burden (mut/mb) threshold below which a sample is
defined TMB-Low.
TMB-High Threshold Tumor Mutational Burden (mut/mb) threshold above which a sample is
defined TMB-High.
6.
Click Next to advance to the Confirm step, then click Save Workflow.
Description
94
Oncomine™ Comprehensive Assay Plus User Guide
Page 95

CNV baseline creation
C
Use VCIB CNV baseline ............................................................... 95
■
Create a CNV baseline ................................................................ 96
■
Augment (add Samples to) an existing VCIB CNV baseline ................................ 97
■
Create an Ion Reporter analysis workflow ................................................ 99
■
Launch an analysis .................................................................. 100
■
In Ion AmpliSeq™ assays, Copy Number estimates are made by counting reads for each amplicon,
making adjustments to account for certain types of variability, comparing those read counts to
expected counts for those amplicons in a "normal" sample, and then making further adjustment.
Known sources of variability include pool imbalance (when the assay has more than one pool of
amplicons), total number of reads and per amplicon attributes of GC proportion, and length of the
amplicon insert. In practice, we observe other variability that does not associate with known attributes
yet is systematic. The method that we use trains on many diverse samples, captures systematic eects,
and encodes these into a file (the "baseline").
When augmenting a baseline, new samples are run, the size of each systematic eect encoded in the
baseline is estimated, and a correction is applied to remove the eect. These added samples need not
be normal, and should be diverse so as to capture likely systematic variation.
The following instructions walk you through using the new Variability Correction Information Baseline
(VCIB) CNV baseline, creating a new VCIB CNV baseline, or augmenting an existing VCIB CNV baseline
for Oncomine™ Comprehensive Assay panels.
Use VCIB CNV baseline
If you want to use the VCIB CNV baseline included in Ion Reporter™ Software 5.16, simply select it
when creating your workflow.
Note: The VCIB CNV baseline is currently noncompatible with the Ion GRCh38 human reference.
Oncomine™ Comprehensive Assay Plus User Guide
95
Page 96

Appendix C
C
Create a CNV baseline
CNV baseline creation
Create a CNV baseline
Ion Reporter™ Software provides a wizard to guide you through Copy Number Variation (CNV) Baseline
creation.
1.
In the Workflows tab, in the Presets screen, click
Create Preset, then select Copy Number Baseline
from the dropdown list.
2.
Click AmpliSeq, select Oncomine™ Comprehensive
Plus DNA Regions v1.2 as your Target Regions file,
then click Next.
3.
Select at least 48 samples, flag at least 6 of the selected samples as "Normal" by selecting the
checkbox in the Normal column, then click Next.
Note: Male or Female gender must be specified for Normal samples, but samples that are not
flagged as normal can be male, female, or unknown. You can use the Summary panel to see your
totals.
96
4.
Enter a name for your baseline, then click Create Baseline.
Note: Log files for both successful and failed analyses include the BaselineCreation.log file,
which has the BAM files named that were rejected due to similarity to other files in the baseline, as
well as the map.TmapMergeActor-00.err file that has the BAM files named that were rejected due
to QC failure.
To add this new baseline to your workflow, proceed to “Create an Ion Reporter analysis workflow” on
page 99.
Oncomine™ Comprehensive Assay Plus User Guide
Page 97

Appendix C CNV baseline creation
Augment (add Samples to) an existing VCIB CNV baseline
Augment (add Samples to) an existing VCIB CNV baseline
Ion Reporter™ Software provides a wizard to guide you through Copy Number Variation (CNV) baseline
creation. This example describes how to add additional samples to an existing CNV baseline.
1.
Under the Workflows tab, in the Presets screen, click
Create Preset, then select Copy Number Baseline
from the dropdown list.
2.
Click AmpliSeq, select Oncomine™ Comprehensive
Plus DNA Regions v1.2 as your Targets Region file,
then click Next.
3.
Select the Start with an existing CNV Baseline checkbox, then select a baseline from the
dropdown list.
C
Note: By default, the software prompts you to add another 48 samples. However, you can set the
number to 1 or more. Add non-Normal samples. Marking samples as "Normal" in the augmentation
workflow has no eect, only the original Normals in the first baseline creation are treated as
Normals in the augmented baseline.
4.
Click the Configure Parameters link.
Oncomine™ Comprehensive Assay Plus User Guide
97
Page 98

Appendix C
C
Augment (add Samples to) an existing VCIB CNV baseline
5.
CNV baseline creation
In the Configure Parameters dialog, click Cnv Baseline Creation, then Advanced. Set the
Minimum number of samples required to add to an existing baseline to the number you are
adding, click Done, then click Next.
6.
Select additional samples, then click Next.
7.
Enter a name for your baseline, then click Create Baseline to save.
98
Oncomine™ Comprehensive Assay Plus User Guide
Page 99

Appendix C CNV baseline creation
Create an Ion Reporter analysis workflow
Create an Ion Reporter analysis workflow
Ion Reporter™ Software provides a wizard to guide you through creating a workflow. However, it can be
easier to copy an existing Oncomine™ workflow and edit it by adding your newly created baseline.
1.
In the Workflows tab, in the Overview screen, select an appropriate Oncomine™ Comprehensive
workflow.
2.
In the Details pane, click Actions4Copy.
The workflow wizard opens to the Research Application step in the Create screen.
3.
Click Next to advance to the Reference step.
4.
Confirm that hg19 is the selected Reference, then select a Target Regions, Hotspot Regions,
and Fusions BED file from the respective dropdown lists. Click Next.
5.
Select an Annotation Set from the dropdown list, then click Next.
6.
Select a Filter Chain from the dropdown list, then click Next.
C
7.
In the Copy Number step, select the baseline that you want to use from the Baseline dropdown
list, then click Next.
8.
In the Plugins step, ensure that all In-Analysis plugins are deselected, then click Next.
9.
Select a Final Report Template from the dropdown list, then click Next.
10.
In the Parameters step, review the default settings, then click Next.
Note: Although Read Mapping parameters are exposed in workflow creation, it is not necessary
to change any settings.
11.
In the Confirm step, enter a Workflow Name and Description, then click Save Workflow.
Oncomine™ Comprehensive Assay Plus User Guide
99
Page 100

Appendix C CNV baseline creation
C
Launch an analysis
Launch an analysis
1.
In the Home tab, in the Dashboard screen, click
Launch Analysis.
2.
In the Launch Analysis wizard, in the Workflow step,
select your custom workflow or one of the pre-installed
Oncomine™ workflows, then click Next.
3.
Select the samples to include in the analysis.
a.
Use the Samples dropdown list to filter the
available samples.
b.
Click within a sample row to select each sample
to include in a sample group, then click Add
Samples in the Sample Groups pane.
c.
Enter a Group Name, then click Add to Analysis.
100
Note: The Percentage Cellularity sample attribute is required for DNA samples.
4.
Repeat substep 3b and substep 3c to add additional Sample Groups.
5.
Click Next 2 times to move to the Confirm & Launch step.
Oncomine™ Comprehensive Assay Plus User Guide
 Loading...