

Neon™ Transfection System
USER GUIDE
For transfecting mammalian cells, including primary and stem
cells, with high transfection eciency
Catalog Numbers MPK5000, MPK1025, MPK1096, MPK10025, MPK10096
Document Part Number 251055
Publication Number MAN0001557
Revision B.0
For Research Use Only. Not for use in diagnostic procedures.
Manufacturer: Life Technologies Corporation | 5781 Van Allen Way | Carlsbad, California 92008 USA
The information in this guide is subject to change without notice.
DISCLAIMER: TO THE EXTENT ALLOWED BY LAW, THERMO FISHER SCIENTIFIC INC. AND/OR ITS AFFILIATE(S) WILL NOT BE
LIABLE FOR SPECIAL, INCIDENTAL, INDIRECT, PUNITIVE, MULTIPLE, OR CONSEQUENTIAL DAMAGES IN CONNECTION WITH OR
ARISING FROM THIS DOCUMENT, INCLUDING YOUR USE OF IT.
Revision history: Pub. No. MAN0001557
Revision Date Description
B.0 1 March 2021 Update for RoHS2 compliance and SKU list
A.0 11 July 2014 New document
Important Licensing Information: These products may be covered by one or more Limited Use Label Licenses. By use of these
products, you accept the terms and conditions of all applicable Limited Use Label Licenses.
TRADEMARKS: All trademarks are the property of Thermo Fisher Scientific and its subsidiaries unless otherwise specified.
©2021 Thermo Fisher Scientific Inc. All rights reserved.

Contents
■
CHAPTER 1 Product information .................................................. 6
Product description ............................................................. 6
Features ................................................................... 6
Upon receiving the device ........................................................ 7
Unpacking instructions ...................................................... 7
Product contents ................................................................ 7
Neon™ transfection system contents .......................................... 7
Neon™ kit contents .......................................................... 8
System components ............................................................. 9
Neon™ device .............................................................. 9
Neon™ pipette station ...................................................... 10
Neon™ Kits ................................................................ 10
System overview ............................................................... 11
Description of parts ............................................................ 12
Neon™ device ............................................................. 12
Neon™ pipette ............................................................. 12
Neon™ pipette station ...................................................... 13
Neon™ tube ............................................................... 13
Neon™ tips ................................................................ 14
■
CHAPTER 2 Methods ............................................................. 15
Getting started ................................................................ 15
General guidelines ............................................................. 23
™
Transfection System User Guide
Neon
Install the Neon™ device with pipette station .................................. 15
Register the device ........................................................ 17
Electroporation protocol options ............................................. 17
Input values limit .......................................................... 17
Input window ............................................................. 18
Database window .......................................................... 19
Optimization window ....................................................... 21
Upgrade the firmware ...................................................... 22
Recommended kits ........................................................ 23
Recommended buers ..................................................... 23
DNA quality and amount .................................................... 24
3

Contents
siRNA quality and amount .................................................. 24
Controls .................................................................. 24
Using the Neon™ Transfection System ............................................ 25
Materials needed .......................................................... 25
Set up the Neon™ pipette station ............................................ 26
Prepare adherent cells ...................................................... 27
Prepare suspension cells ................................................... 28
Electroporation protocol .................................................... 29
Optimization .............................................................. 33
Cleaning and maintenance .................................................. 33
Optimization protocol for DNA and siRNA ......................................... 33
Materials needed .......................................................... 33
General guidelines ......................................................... 34
24-well optimization protocol for adherent and suspension cell lines—day one .... 34
18-well optimization protocol for primary suspension blood cells—day one ....... 36
Optimization protocol—day two ............................................. 38
Optional: optimization protocol—day three .................................... 40
■
APPENDIX A Troubleshooting .................................................... 42
Troubleshooting ................................................................ 42
Neon™ device error messages ................................................... 46
■
APPENDIX B Maintenance ....................................................... 47
Repackaging the instrument ..................................................... 47
Repackaging and storage instructions ........................................ 47
Replace the Pipette Gripper ..................................................... 48
■
APPENDIX C Specifications ...................................................... 51
Product specifications .......................................................... 51
■
APPENDIX D Related products .................................................. 52
Accessory products ............................................................ 52
Additional products ........................................................ 52
Cell culture media ......................................................... 53
siRNA .................................................................... 53
■
APPENDIX E Safety ............................................................... 54
Safety information .............................................................. 54
Informational symbols .......................................................... 54
Informations de sécurité ........................................................ 55
Informational symbols .......................................................... 56
4
Neon™ Transfection System User Guide

Chemical safety ................................................................ 57
Biological hazard safety ......................................................... 58
■
APPENDIX F Documentation and support ...................................... 59
Customer and technical support ................................................. 59
Limited product warranty ........................................................ 59
Contents
Neon™ Transfection System User Guide
5

1
Product description
The Neon™ Transfection System is a novel, benchtop electroporation device that employs an
electroporation technology by using the pipette tip as an electroporation chamber to eciently transfect
mammalian cells including primary and immortalized hematopoietic cells, stem cells, and primary cells.
The Neon™ Transfection System eciently delivers nucleic acids, proteins, and siRNA into all
mammalian cell types including primary and stem cells with a high cell survival rate. The transfection is
performed using as few as 1 × 10⁴ or as many as 5 × 10⁶ cells per reaction using a sample volume of
10 µL or 100 µL in a variety of cell culture formats (60 mm, 6-well, 48-well, and 24-well).
The Neon™ Transfection System uses a single transfection kit (Neon™ Kit) that is compatible with
various mammalian cell types including primary and stem cells thereby avoiding the need to determine
an optimal buer for each cell type.
The Neon™ Transfection System oers open and transparent protocols that are optimized for ease of
use and simplicity. The Neon™ device is preprogrammed with one 24-well optimization protocol to
optimize conditions for your nucleic acid/siRNA and cell type, or you can program and store up to
50 cell-specific protocols in the Neon™ device database. Optimized protocols for many commonly used
cell types are also available at https://www.thermofisher.com/us/en/home/life-science/cell-culture/
transfection/neon-transfection-system/neon-transfection-system-cell-line-data.html to maximize
transfection eciencies for your cell types.
Product information
See “Description of parts” on page 12 for details on various parts of the system.
Features
Important features of the Neon™ Transfection System are listed below:
•
•
•
•
•
•
User-friendly Neon™ device benchtop design that easily fits in your tissue culture hood for easy,
ecient transfection of a wide variety of mammalian cells including primary and stem cells
Ability to transfect 1 × 10⁴–5 × 10⁶ cells per reaction in a sample volume of 10 µL or 100 µL in a
variety of cell culture formats (60 mm, 6-well, 48-well, and 24-well)
Utilizes a single buer system for all cell types except primary suspension blood cells
Simple touch screen interface for easy programming of electroporation parameters
Available with one pre-programmed 24-well optimization protocol and the option to customize up
to 50 cell specific protocols
Built-in safety features in the device to enhance user safety
6
Neon™ Transfection System User Guide
Upon receiving the device
Examine the unit carefully for any damage incurred during transit. Any damage claims must be filed
with the carrier. The warranty does not cover in-transit damage. To register the device, activate your
warranty, and be notified of important updates, go to thermofisher.com.
Unpacking instructions
Chapter 1 Product information
Upon receiving the device
1
Consult the following instructions to unpack the Neon™ Transfection System. The weight of the Neon
device is 13.2 pounds (6 kg).
1.
Cut the plastic straps and remove the outer box. Save the outer box and other packaging material
(in case you need to transport or ship the unit).
2.
Remove the plastic bag containing the manual, the Neon™ Pipette box containing the pipette, and
then remove the plastic bag containing the power cords from the box.
3.
Remove the Neon™ device and the Neon™ pipette station from the box and place them on a flat,
level surface.
4.
Set up the Neon™ Transfection System as described on page 15.
Product contents
Neon™ transfection system contents
The contents of the Neon™ Transfection Systems are listed in the following table. The Neon
Transfection System is shipped at room temperature.
See page 12 for specifications and description of the Neon™ Transfection System, and page 15 to set
up the device.
™
™
Neon™ Transfection Device 1
Specific Power Cord
(for US/Canada/Taiwan/Japan, Europe, and UK)
Neon™ Pipette 1
Neon™ Pipette Station 1
User Guide 1
USB Memory Device 1
Neon™ Transfection System User Guide
Product
Quantity
4
7
Chapter 1 Product information
1
Product contents
Neon™ kit contents
The Neon™ Kits are used with the Neon™ Transfection Systems for ecient transfection of mammalian
cells and are available as standalone products (see “Accessory products” on page 52). The kits
consist of two components which are not sold individually (a Tips/Tubes Kit, and a Buer Kit), and are
available in two formats (for electroporation of 10 µL samples, and 100 µL samples).
Neon™ Kit components are listed in the following table, and are shipped at room temperature.
After receiving the kit, store buers at 4℃ and tips/tubes at room temperature.
Neon™ Kit, 10 µL Neon™ Kit, 100 µL
Item
Tips/Tubes Kit
Neon™ Tips 25 tips (10 µL) 96 tips (10 µL) 25 tips (100 µL) 96 tips (100 µL)
Neon™ Tubes 5 20 5 20
Buer Kit
Resuspension Buer R
(Proprietary)
Resuspension Buer T
(Proprietary)
Electrolytic Buer E
(Proprietary)
Electrolytic Buer E2
(Proprietary)
Cat. No.
MPK1025
(50 reactions)
MPK1025K MPK1096K MPK10025K MPK10096K
MPK1025B MPK1096B MPK10025B MPK10096B
1 mL 3 × 1 mL 10 mL 30 mL
1 mL 3 × 1 mL 10 mL 30 mL
75 mL 2 × 150 mL — —
— — 75 mL 2 × 150 mL
Cat. No.
MPK1096
(192 reactions)
Cat. No.
MPK10025
(50 reactions)
Cat. No.
MPK10096
(192 reactions)
8
Neon™ Transfection System User Guide
System components
1
2
1
3 4
5
6
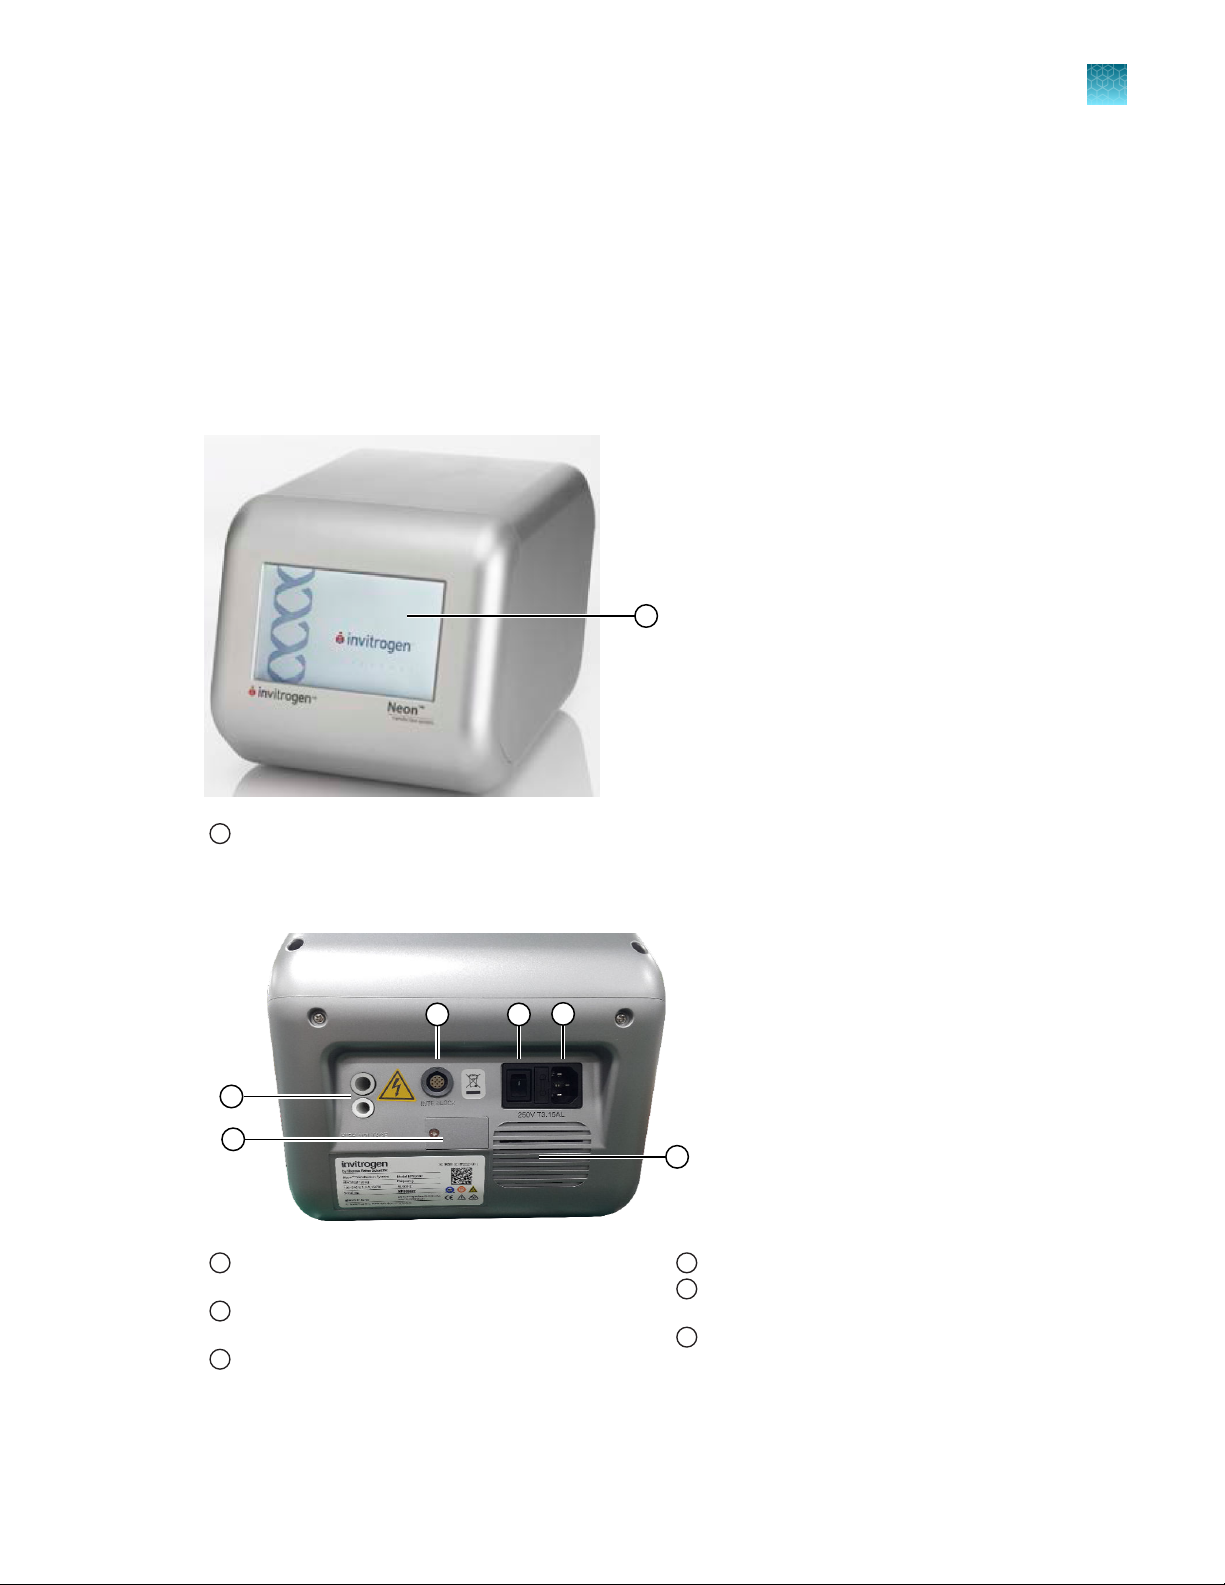
Neon™ device
Chapter 1 Product information
System components
1
The Neon™ device is a simple, user friendly benchtop electroporation device. It is used with the Neon
Pipette Station and Neon™ Kits to eciently transfect mammalian cells including primary and stem
cells. See “Description of parts” on page 12 for details.
Front view
Touchscreen
1
™
Rear view
USB port panel for USB memory device (unscrew the
1
panel to access the port)
High voltage port (connect to the high voltage
2
connector of the Neon™ Pipette Station)
Sensor port (connect to the sensor connector of the
3
Neon™ Pipette Station)
Power switch
4
AC inlet (connect to the power cord, and plug into the
5
power outlet on the wall)
Fan
6
Neon™ Transfection System User Guide
9
2
1
3
2
1
Chapter 1
1
System components
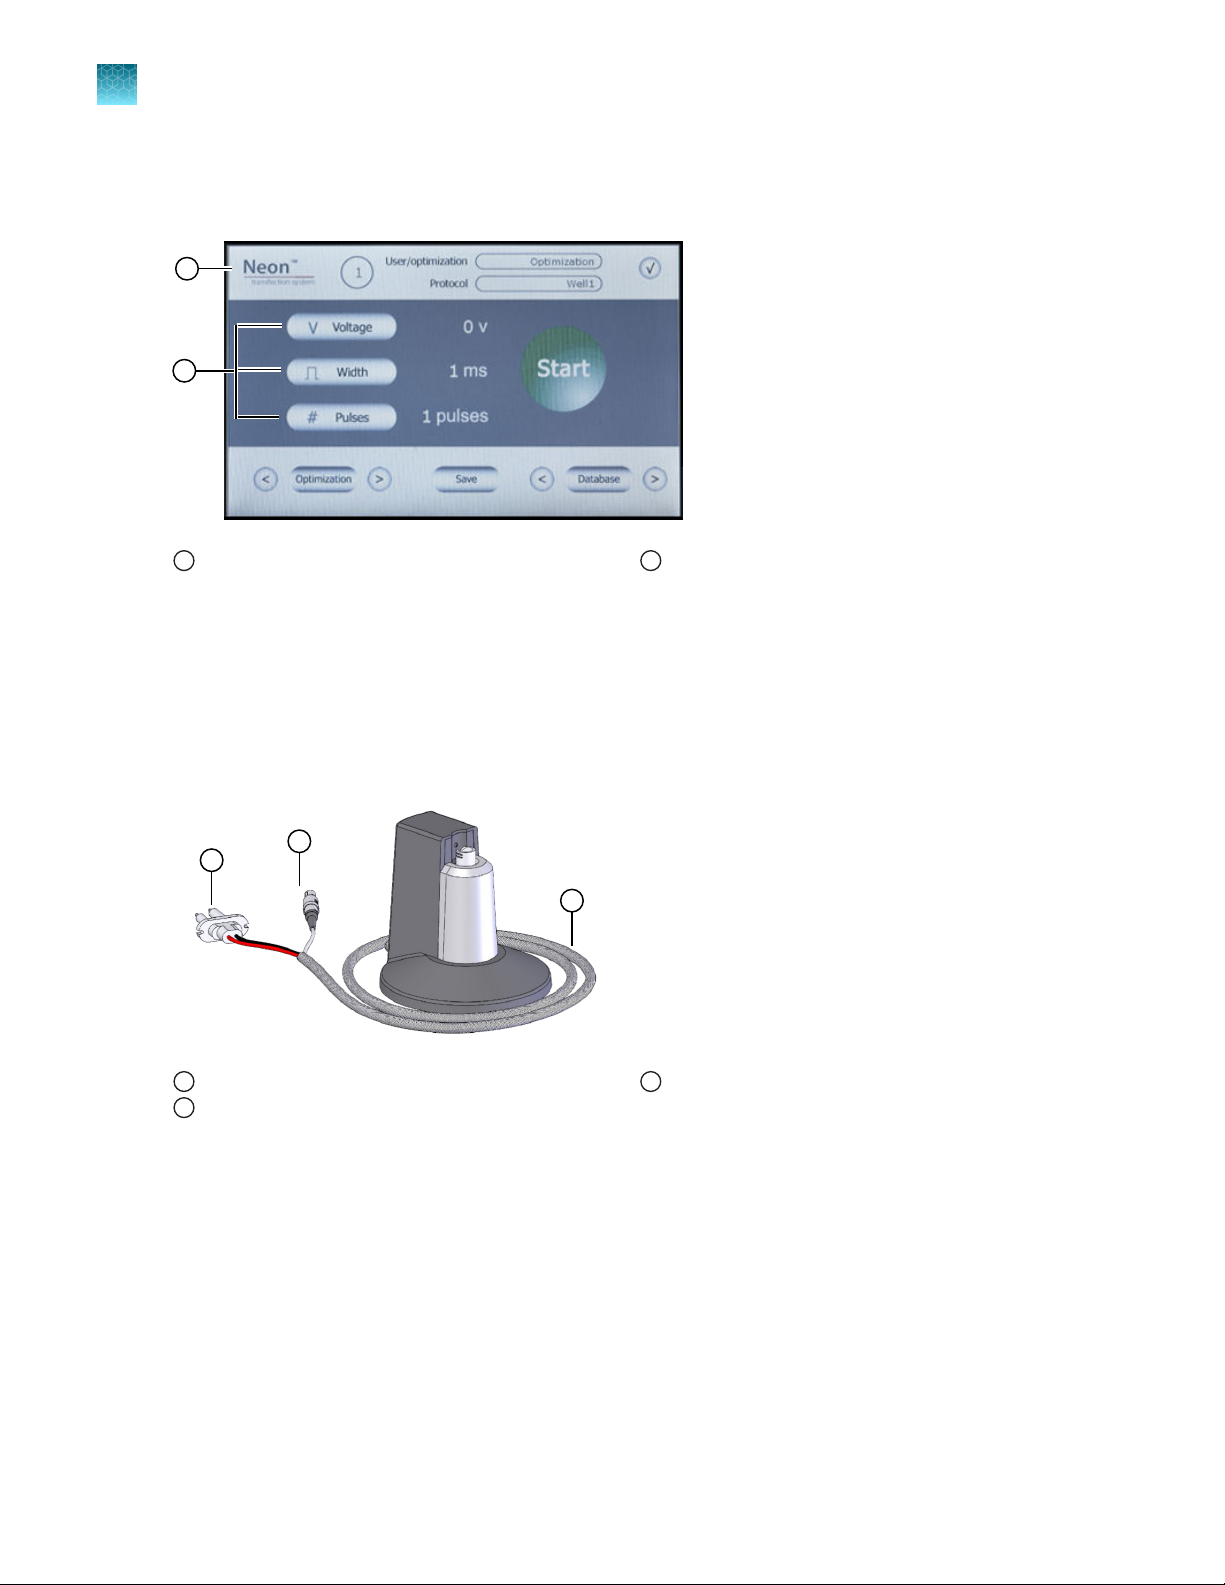
User interface
Product information
Digital Display shows the protocol in use and various
1
protocol parameters
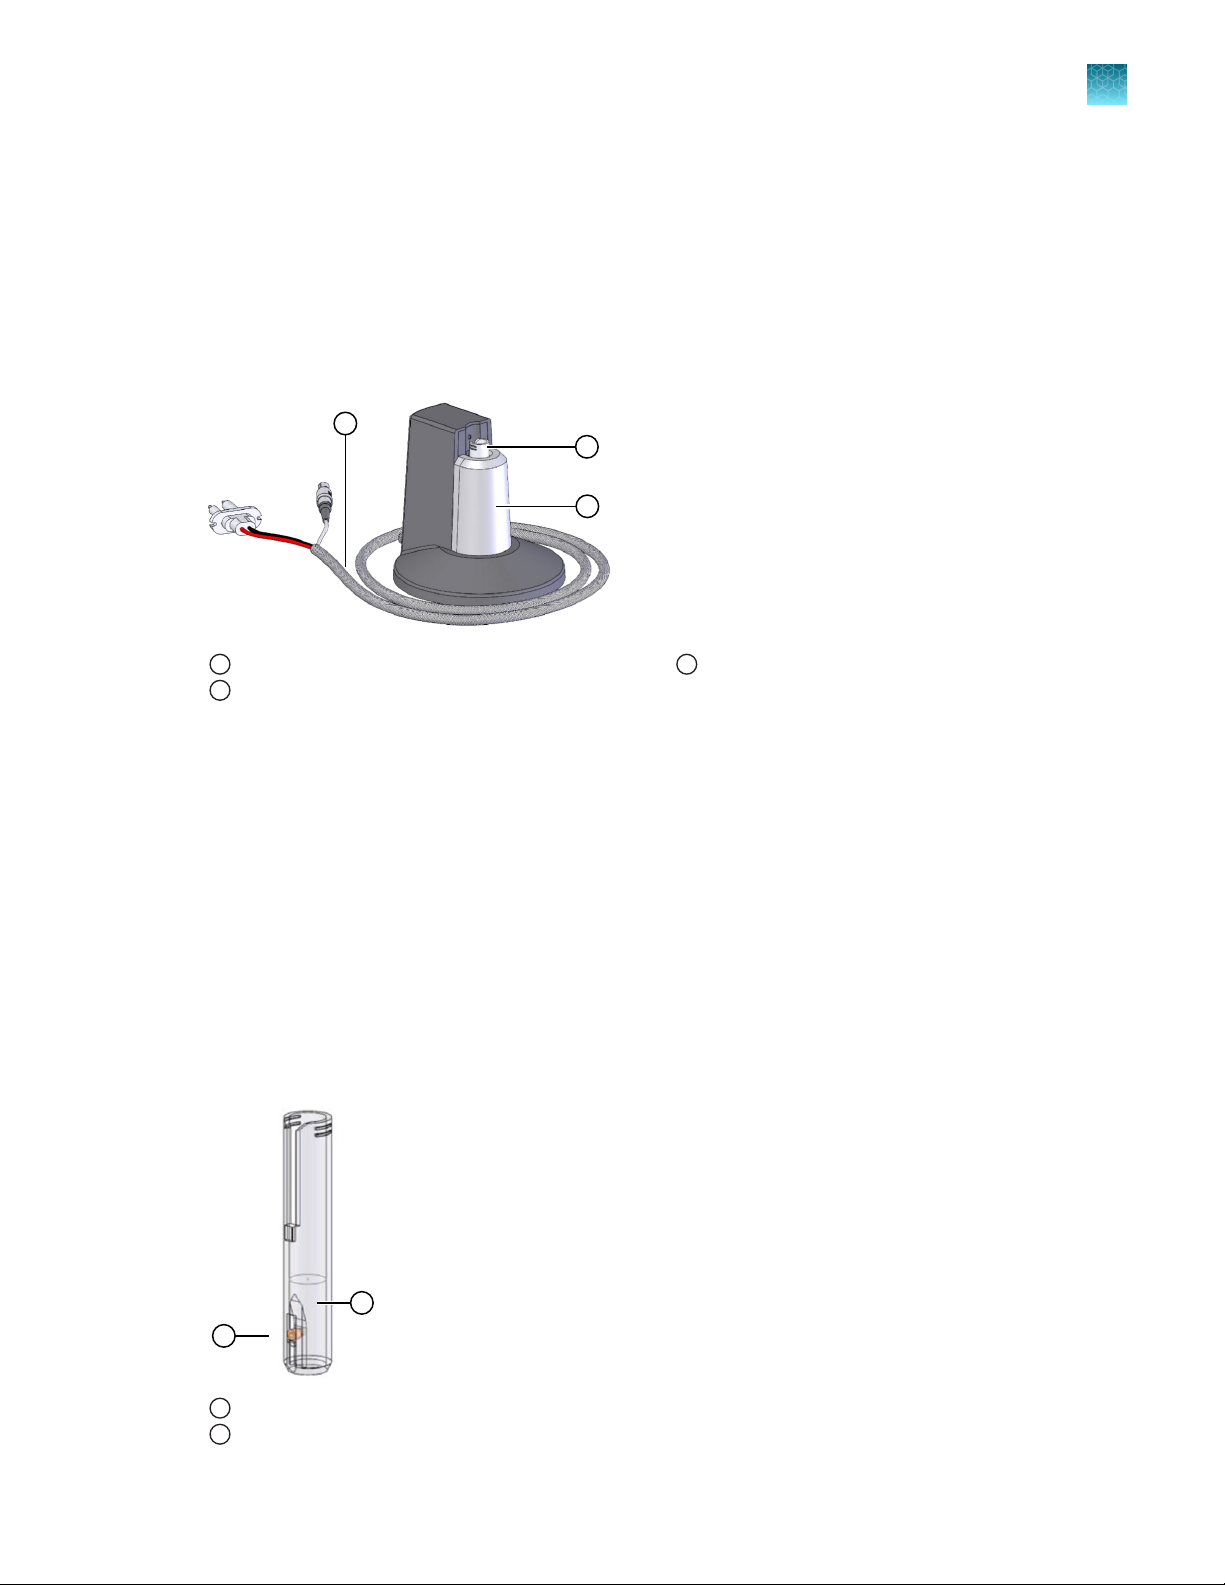
Neon™ pipette station
The Neon™ Pipette Station is a unique component of the system that holds the Neon™ Pipette during
electroporation, and protects the user from any electrical shock exposures. A high voltage and sensor
connector which connects the pipette station to the Neon™ device. See “Description of parts” on
page 12 for details.
Connector cable
1
Sensor connector
2
Touchscreen buttons to operate the device
2
High voltage connector
3
Neon™ Kits
The Neon™ Kits (not supplied with the device) contain the Neon™ Tips, Neon™ Tubes, and buers for
electroporation. The Neon™ Kits are available in two formats for electroporation of 10 µL or 100 µL
samples (See page 52 for ordering information). See page 12 for details on Neon™ Tips and Tubes.
10
Neon™ Transfection System User Guide
System overview
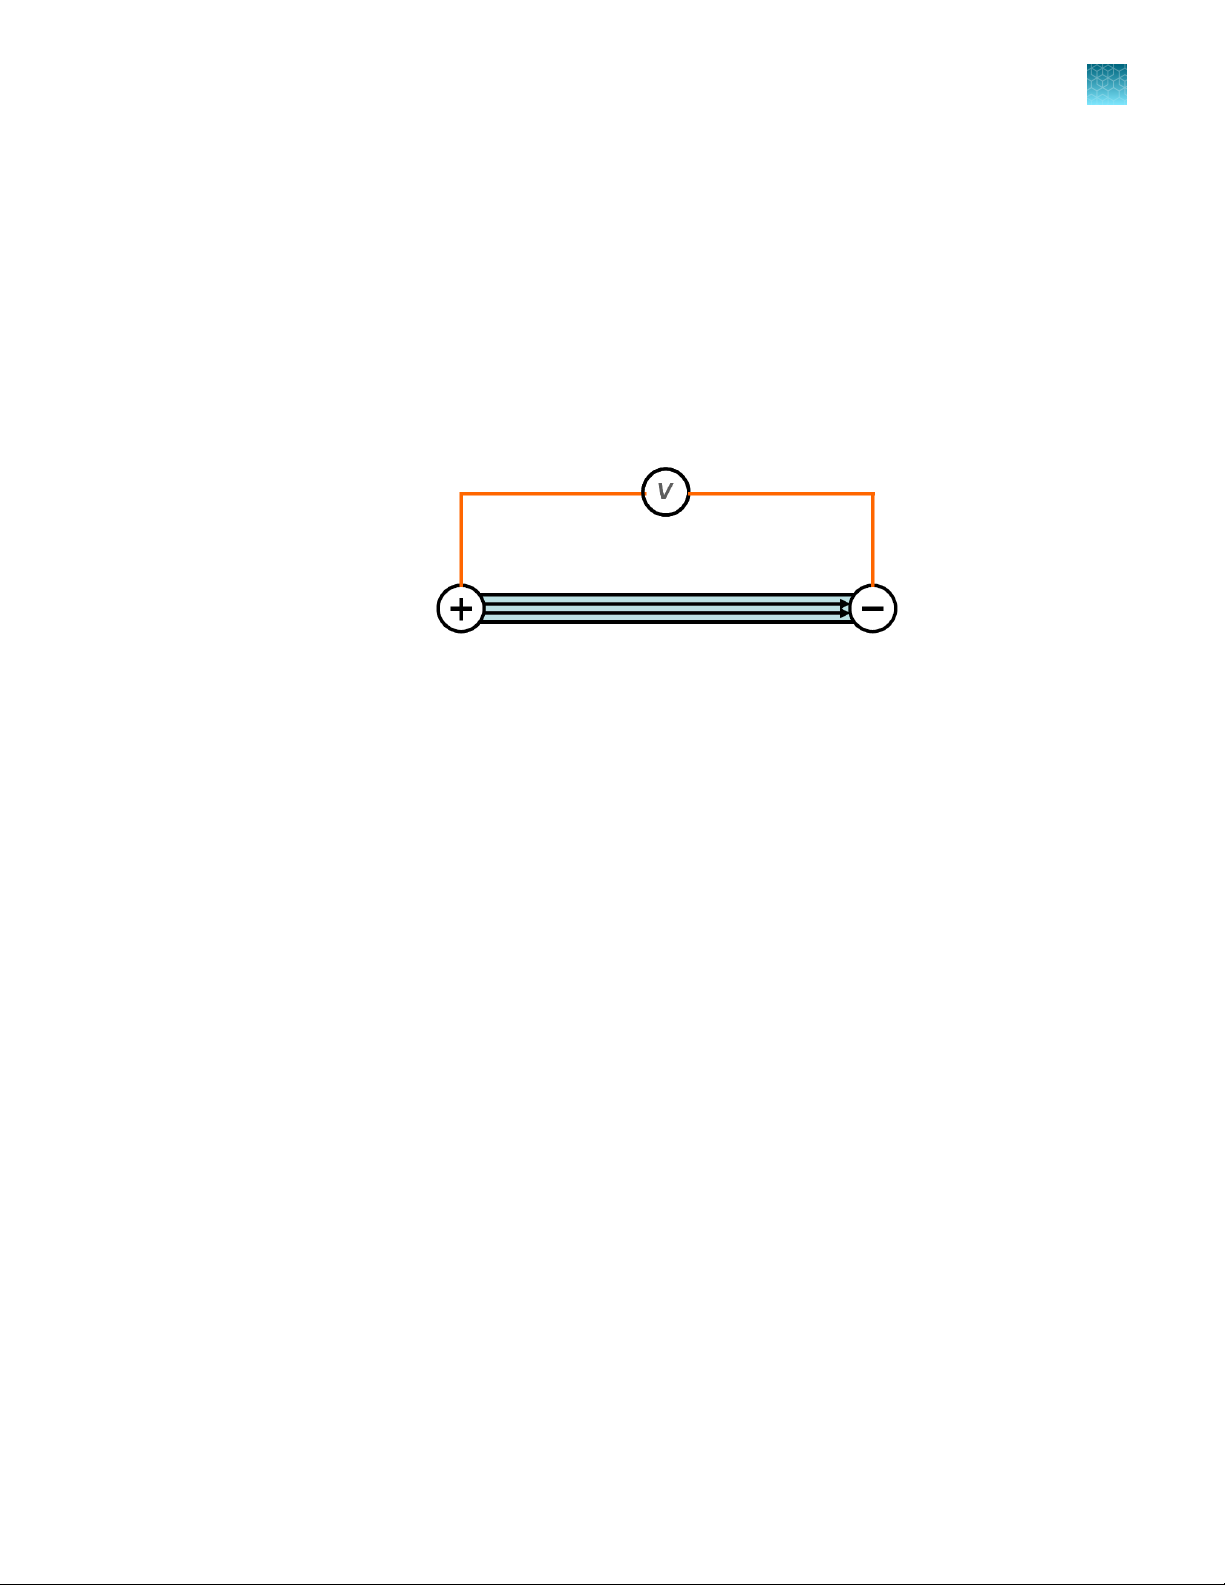
Unlike standard cuvette based electroporation, the Neon™ Transfection System uses a unique
electroporation reaction chamber, the Neon™ Tip that delivers a high electric field to the biological
sample. The Neon™ Tip maximizes the gap size between the two electrodes while minimizing the
surface area of each electrode. As a result, the sample experiences a more uniform electric field,
minimal pH change, less ion formation, and negligible heat generation.
This next generation electroporation technology overcomes many of the limitations associated with
standard cuvette based electroporation thereby increasing transfection eciency and cell viability, and
providing an ergonomic workflow.
Chapter 1 Product information
System overview
1
The transfection occurs in the uniquely designed Neon™ Tip using simple 3-step procedure.
1.
Load a mixture of harvested cells and molecules to be delivered (e.g., DNA, RNA, siRNA) into the
Neon™ Tip.
2.
Plug the Neon™ Pipette with Neon™ Tip into position in the Neon™ Pipette Station with Neon
Tube; select your protocol on the device, and press Start.
3.
Unplug the Neon™ Pipette and transfer your transfected cells into a tissue culture vessel containing
the appropriate medium.
™
Neon™ Transfection System User Guide
11
Chapter 1 Product information
1
Description of parts
Description of parts
Neon™ device
The Neon™ Device employs the pipette tip as an electroporation chamber to eciently transfect
mammalian cells including primary and immortalized hematopoietic cells, stem cells, and primary cells.
The device is preprogrammed with a 24-well optimization protocol and supports a database to store up
to 50 user-specified protocols.
See page 9 for a front and rear view of the device.
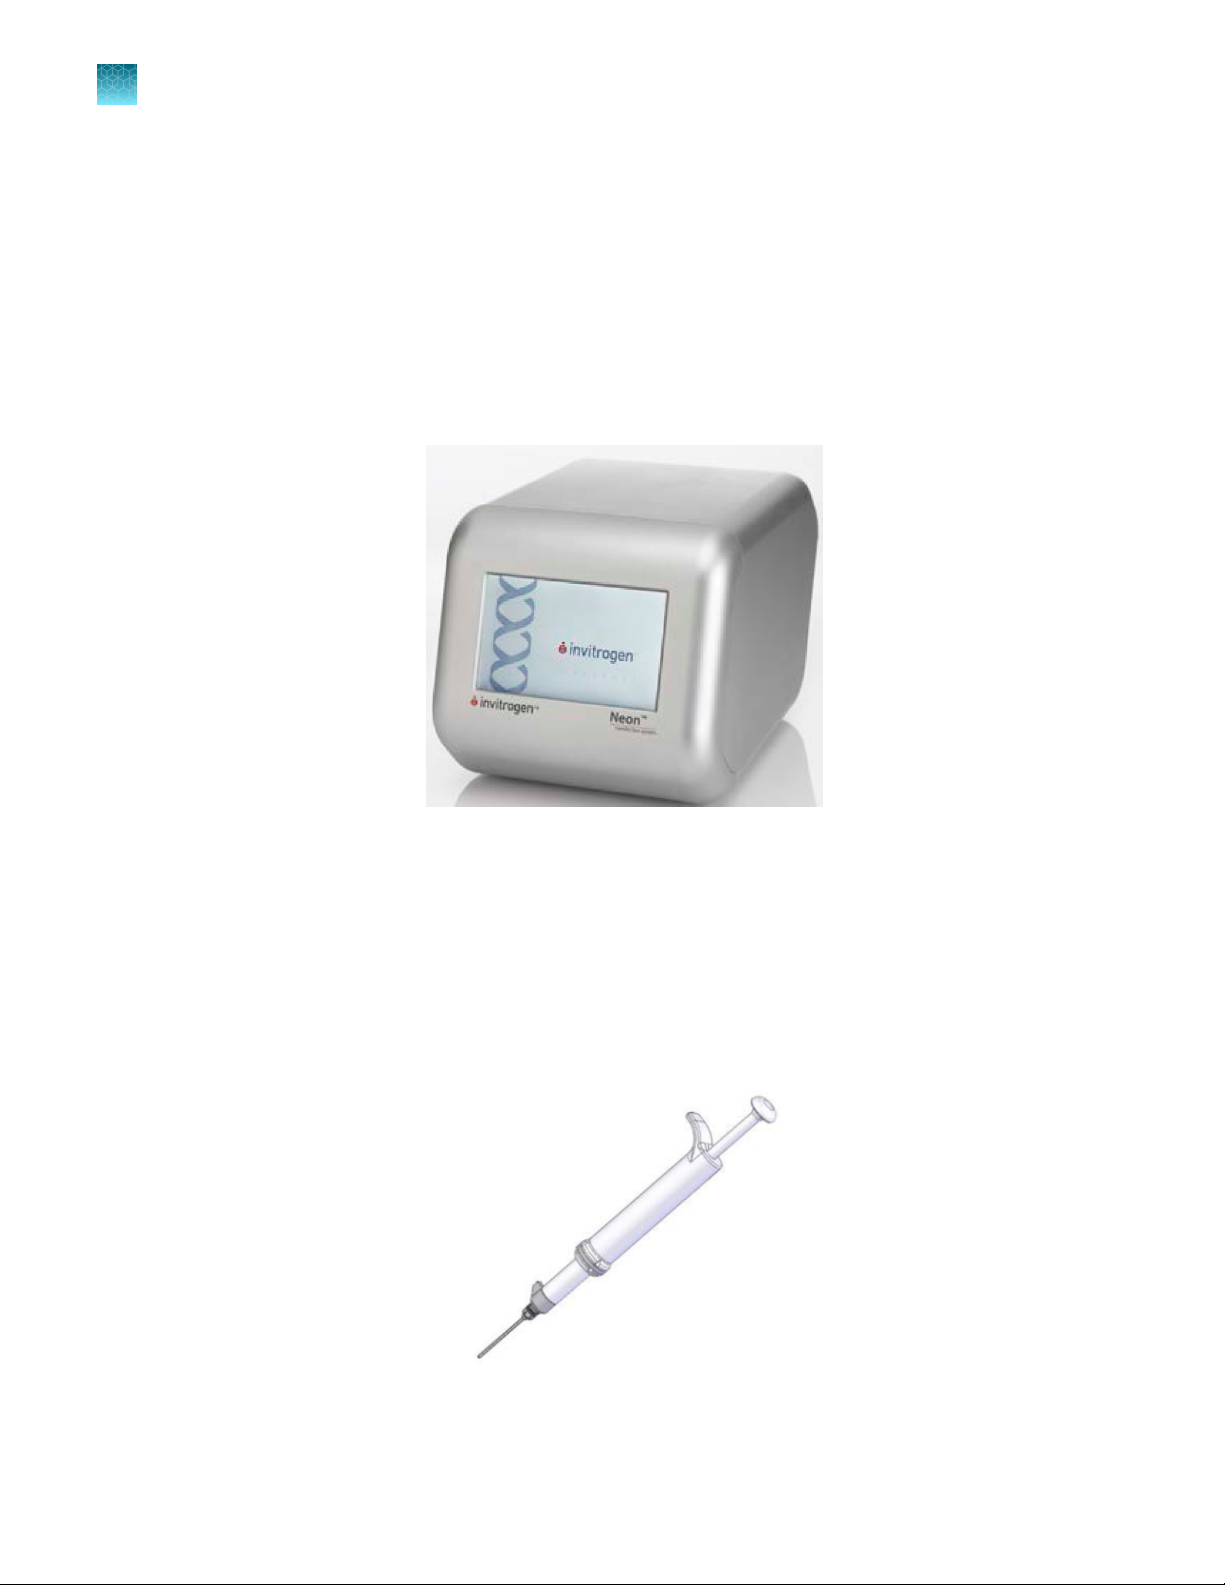
Neon™ pipette
The Neon™ Pipette utilizes a positive displacement pipette mechanism for pipetting mixtures containing
cells and nucleic acid or siRNA. The Neon™ Pipette is a fixed volume pipette and permanently calibrated
at the manufacturing stage and does not require any further calibration.
The Neon™ Pipette is designed for use with Neon™ Tips only. Do not use any other tips with the
Neon™ Pipette.
12
Neon™ Transfection System User Guide
Neon™ pipette station
1
2
3
1
2
Chapter 1 Product information
Description of parts
1
The Neon™ Pipette Station holds a Neon™ Pipette during electroporation procedures. The Neon
Pipette Station is equipped with many safety sensors and protection mechanisms that protect the
user from any exposures to an electrical shock. The Neon™ Pipette Station is connected to the Neon
device using the high voltage and sensor connector (see page 15 for details).
The Neon™ Pipette Station also holds the Neon™ Tube which has an electrode near the bottom that
transfers the electric field from the electrode inside the Neon™ Tip.
Connector cable
1
Area to insert the Neon™ Tube
2
Neon™ tube
The Neon™ Tube holds the Electrolytic Buer during electroporation and is inserted into the Neon
Pipette Station. The Neon™ Pipette with the Neon™ Tip is then inserted into the Neon™ Tube which has
an electrode near the bottom that transfers the electric field from the electrode inside the Neon™ Tip.
The Neon™ Tubes are supplied with Neon™ Kits as well as available separately (see page 52).
Neon™ Pipette Station
3
™
™
™
To avoid contamination, we strongly recommend using the tubes for a maximum of 10 times only.
We recommend changing tube and buer when switching to a dierent plasmid DNA/siRNA or cell
type.
Tube Specifications:
Material: Polystyrene
Capacity: 2.5–4 mL
Electrode
1
Buer
2
Neon™ Transfection System User Guide
13
1
2
3
4
Chapter 1 Product information
1
Description of parts
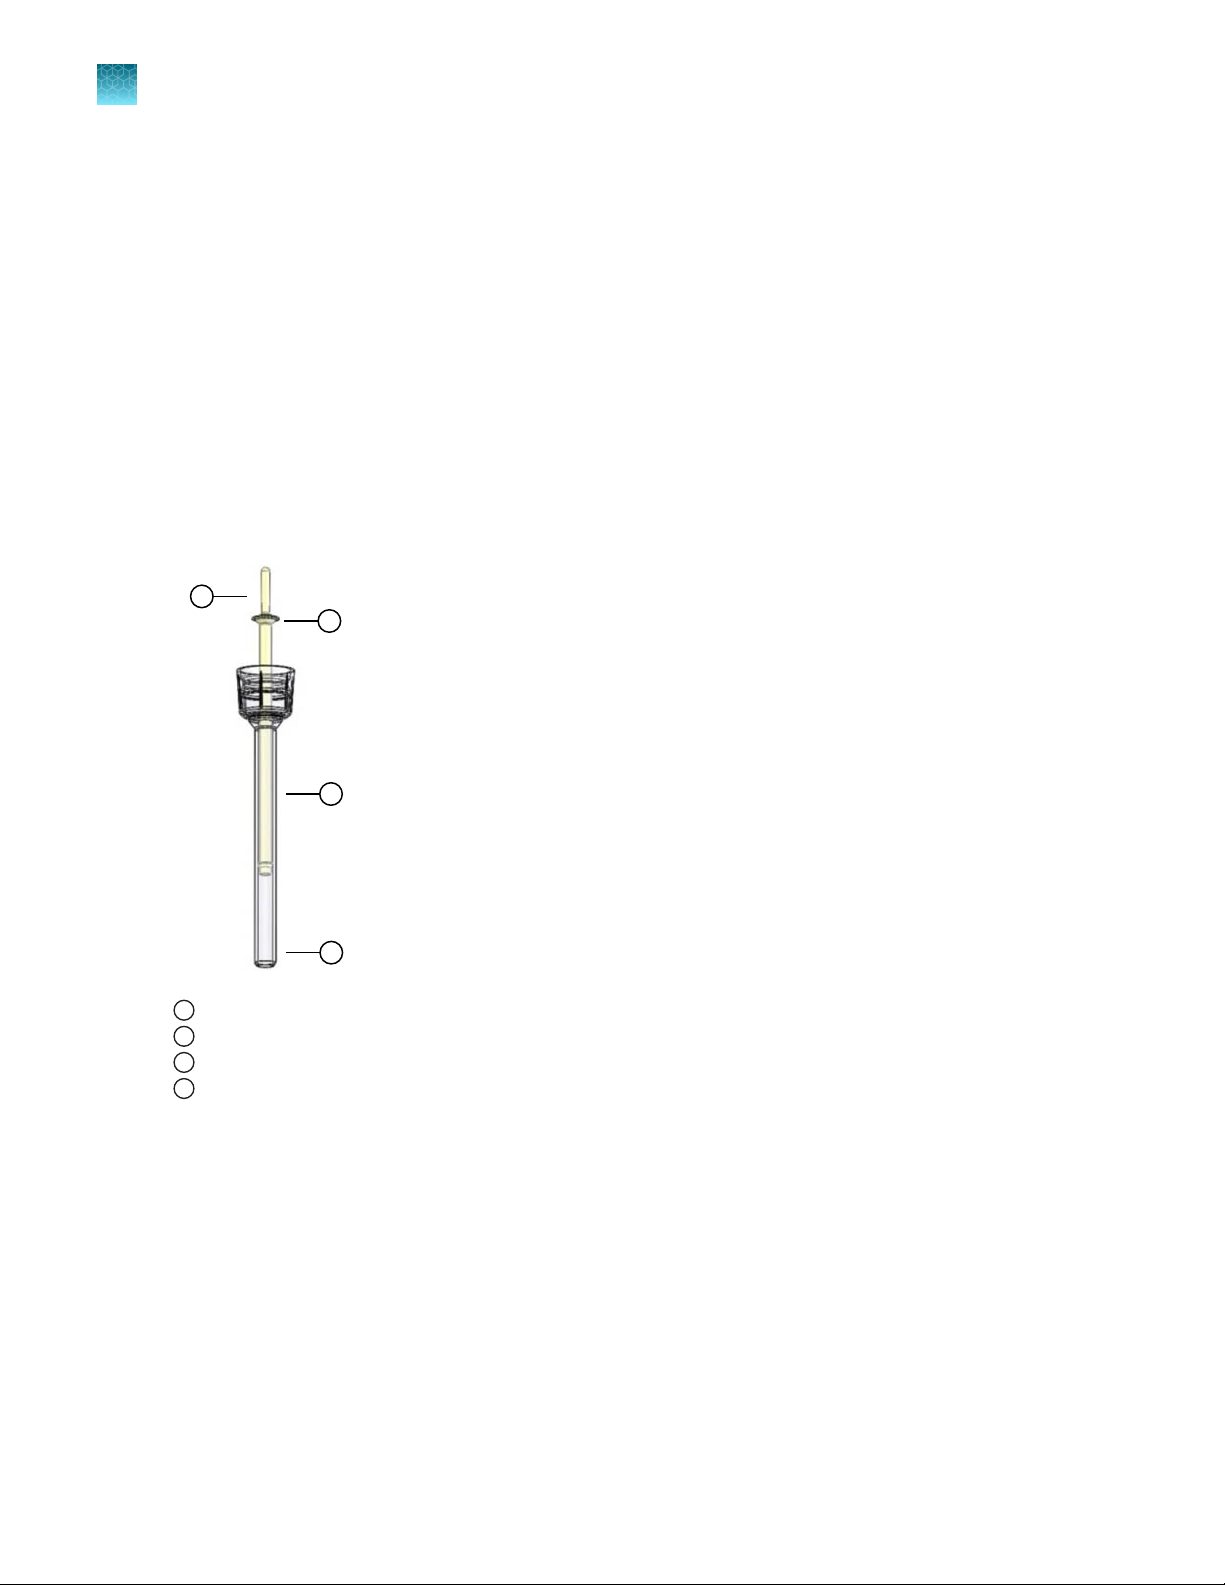
Neon™ tips
The Neon™ Tips are disposable tips composed of a tip and piston used with the Neon™ Pipette. The
Neon™ Tips contain a gold-plated electrode to create a disposable electric chamber for the delivery of a
high electric field to biological samples. The Neon™ Tips are supplied with Neon™ Kits in two formats to
support operating volumes of 10 µL and 100 µL, respectively (see page 52 for ordering information).
To ensure repeatability and eliminate variation of the transfection conditions within or between
experiments, we recommend that you do not use the Neon™ Tip for more than 2 times. Oxide
formation at the piston surface area can be generated if the tips are used more than 2 times, which
decreases electrode function of the piston.
Tip specifications:
Material: Polypropylene
Capacity: 10 µL or 100 µL
Mounting stem
1
Piston
2
Gold electrode
3
Tip
4
14
Neon™ Transfection System User Guide

2
Getting started
Install the Neon™ device with pipette station
1.
Unpack the Neon™ device as instructed in “Unpacking instructions” on page 7.
2.
Four power cords are shipped with the device to ensure that the cord you use is compatible
with your local socket format.
3.
Place the Neon™ device on a level laboratory bench. Keep the area around the unit clear to ensure
proper ventilation of the unit.
Note: The Neon™ device has a small footprint and can be easily set up in the tissue culture hood
for convenience.
Methods
4.
For your safety: Position the device properly such that the power switch and AC inlet located on
the rear of the unit (see page 9) are easily accessible. Be sure to position the device such that it is
easy to disconnect the unit.
Note: Since Neon™ device is air-cooled, its surface may become hot during operation. When
installing the device, leave a space of more than 10 cm from the back of the device.
5.
Place the Neon™ Pipette Station near the Neon™ device.
Neon™ Transfection System User Guide
15
Chapter 2 Methods
2
Getting started
6.
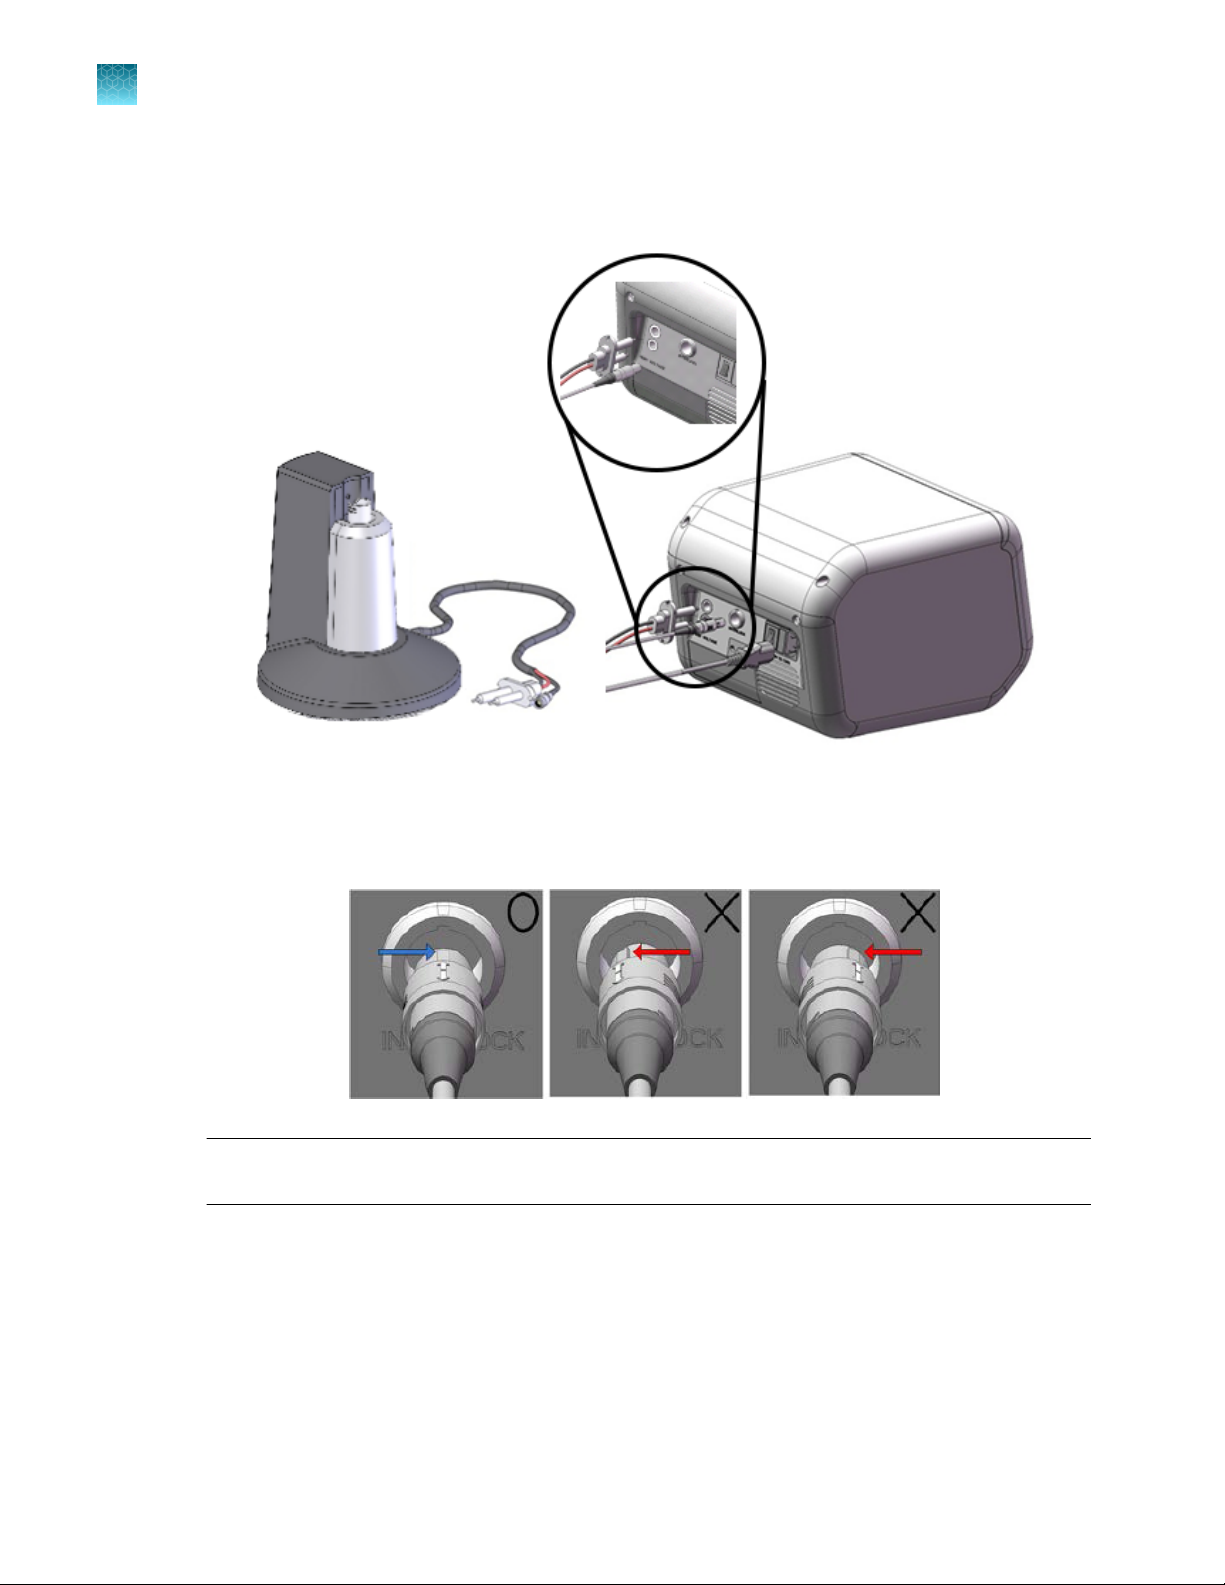
Connect the high voltage and sensor connector on the Neon™ Pipette Station to high voltage port
and sensor port on the rear side of Neon™ device, respectively.
Be sure to align the ridge indicated by a white arrow on the sensor connector on the Neon™ Pipette
Station with a groove indicated by a white dot on the sensor port of the Neon™ device (see figure
for details).
IMPORTANT! To connect or disconnect the sensor connector to the Neon
handle the sensor connector using the cord plug and not the cord cable.
7.
Ensure the AC power switch is in the O position ( see page 9).
™
device, always
16
Neon™ Transfection System User Guide
Chapter 2
8.
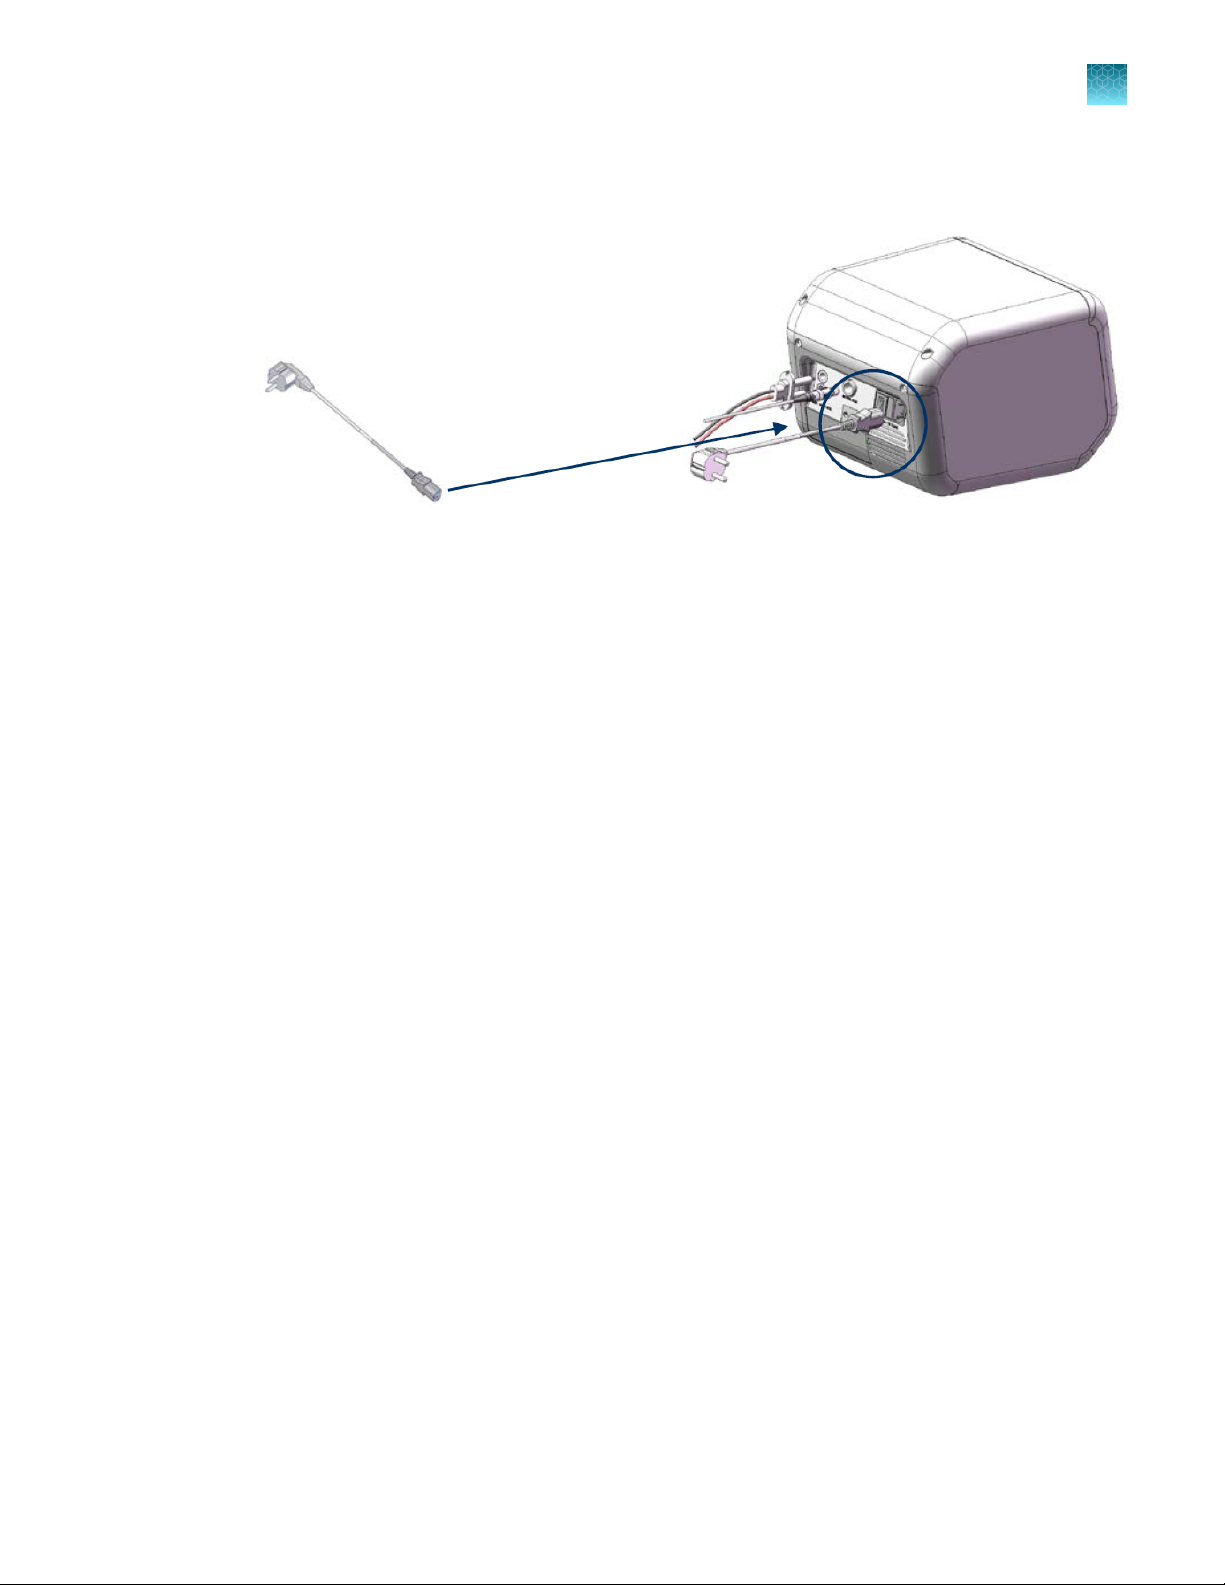
Attach the power cord to the AC inlet on the rear of the Neon™ device and then to the electrical
outlet. Use only properly grounded AC outlets and power cords.
9.
To turn on the power, press the main power switch on the rear of the unit to ON position. The
digital display shows start up screen (see page 17).
10.
The Neon™ device is operated by the touch screen on the front of the device. You can easily input
electroporation parameters by lightly touching the touch screen with a fingertip or a touch screen
pen. See 17 for details.
Methods
Getting started
2
You are ready to use the Neon™ Transfection System. See page 25 for details.
Register the device
Visit thermofisher.com to register the device and activate your warranty or extended warranty, and
ensure that you receive product updates, special oers, and faster service.
Electroporation protocol options
There are three options to select an electroporation protocol for your cell type:
•
If you already have the electroporation parameters for your cell type, input the parameters in the
Input Window (see page 17).
•
If you wish to add cell-specific electroporation parameters to the database on the device for future
use, input the parameters in the Database Window (see page 19). You can also view our library
of protocols for commonly used cell types from thermofisher.com and in put the parameters in the
Database Window (see below) for various cell types.
•
If you do not have any specific electroporation parameters for your cell type and wish to perform
optimization, use the Optimization Window (see page 21).
Input values limit
The Neon™ device is designed to only input certain values and limits for each value are listed below. If
your input value exceeds the maximum value, an error is displayed.
Input Voltage range: 500–2,500 V
Input Pulse Width range: 1–100 ms
Input Pulse Number range: 1–10
Neon™ Transfection System User Guide
17
2
Chapter 2
Getting started
Methods
Input window
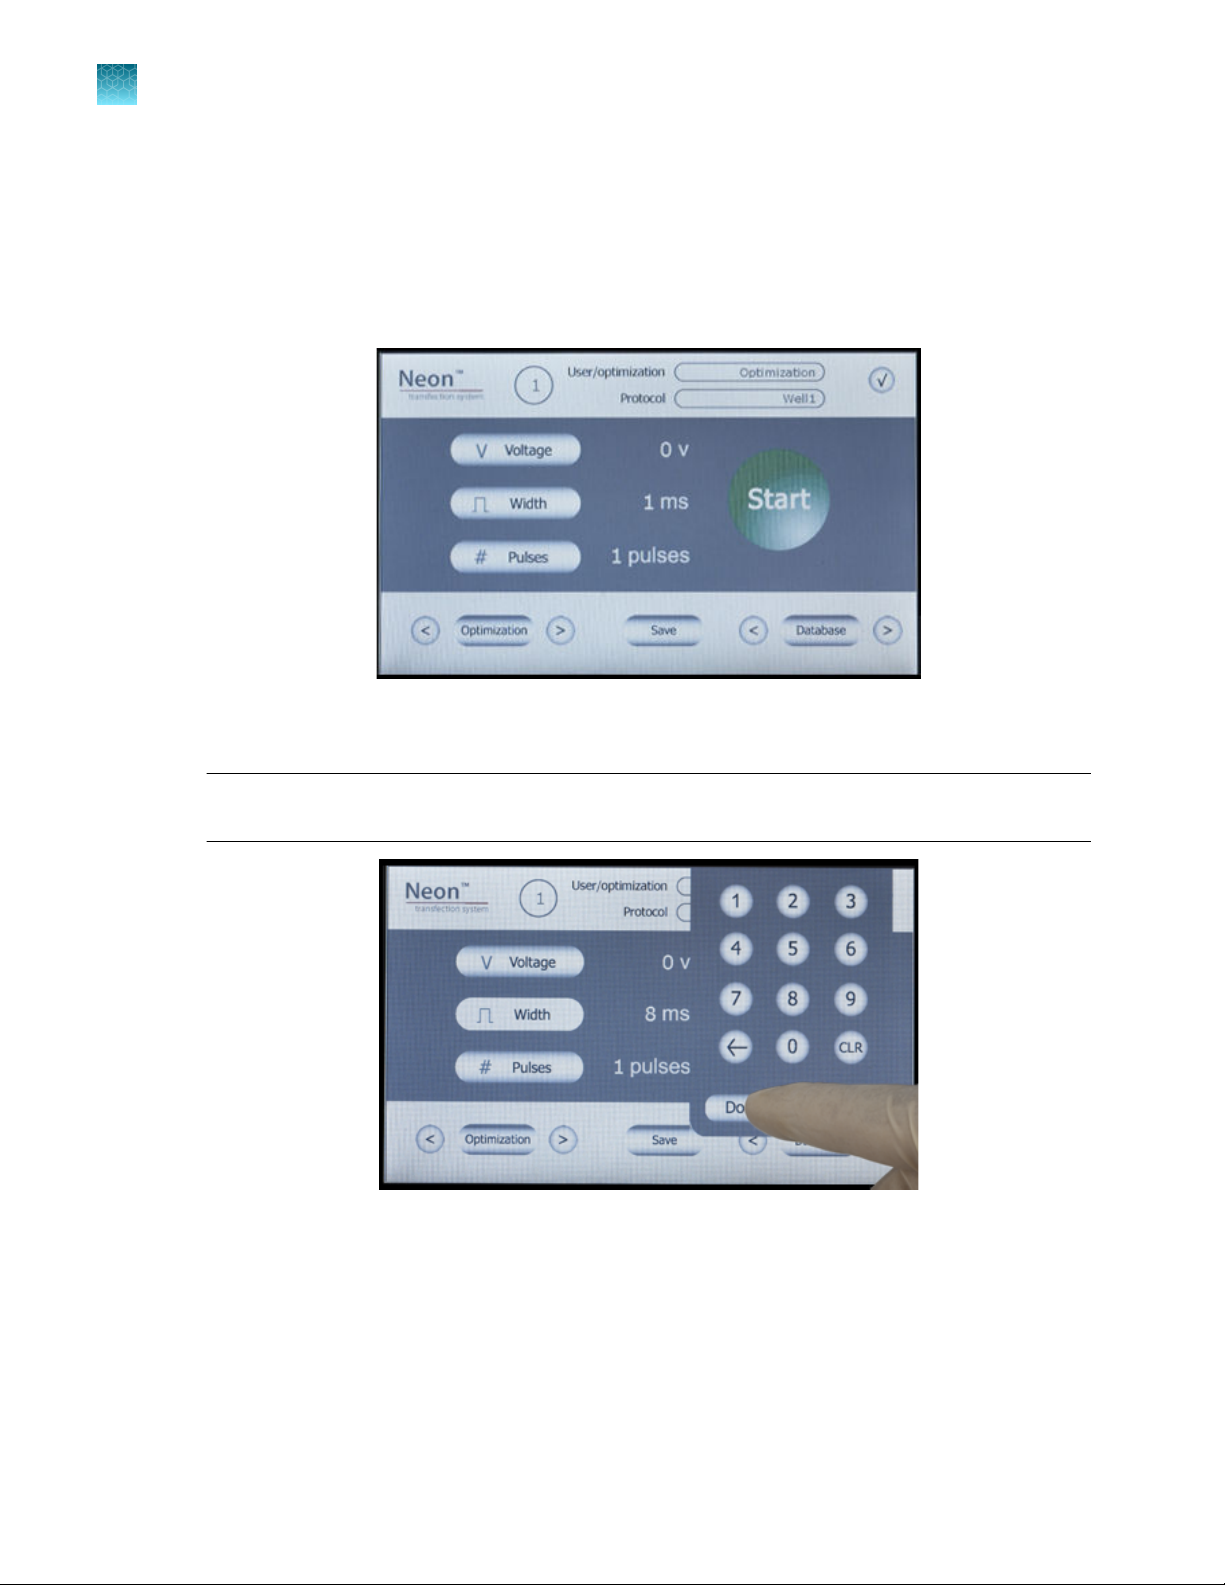
To create a cell specific protocol, if you already have the electroporation parameters for your cell type:
1.
Press the power switch (located at the rear of the unit, see page 9) to turn ON the Neon™ device.
The unit checks to ensure that the Neon™ Pipette Station is connected to the device and then the
start up screen is displayed.
2.
Press Voltage to activate the number key pad to input voltage value. Press the desired voltage
value and press Done to save the value.
Note: If any input value is out of the limit, an error message is displayed and the lowest value of
limit is automatically set.
3.
Press Width to activate the number key pad to input width value. Press the desired width value
and press Done to save the value.
18
4.
Press Pulses to activate the number key pad to input pulse value. Press the desired pulse value
and press Done to save the value.
5.
If you wish to save these electroporation parameters, press Save on the main screen to save the
protocol in the database.
Neon™ Transfection System User Guide

6.
Press the desired protocol number button to edit the protocol. The selected protocol is highlighted.
7.
Once the Edit screen is displayed, enter the User name by pressing the key pad buttons. The
cursor automatically moves to the next field Protocol and is highlighted red.
Continue to enter the information for Voltage, Width, and Pulse.
8.
Press Enter to save the information in the database.
9.
Proceed to preparing cells (see pages 27–28) and DNA, and setting up the Neon™ Pipette
Station for electroporation (see page 25).
Database window
Enter cell-specific protocols into the database. The database can store up to 50 cell-specific protocols.
1.
Press the power switch (located at the rear of the unit, see page 9) to turn ON the Neon™ device.
The unit checks to ensure that the Neon™ Pipette Station is connected to the device and then the
start up screen is displayed.
Chapter 2 Methods
Getting started
2
2.
Press Database button to start the database window. To scroll through the protocols in the
database, use the right/left scroll buttons near the Database button.
Neon™ Transfection System User Guide
19

2
Chapter 2
Getting started
3.
Methods
The Database window shows:
•
Number button: Indicates protocol number
•
User and Protocol: Displays the user and protocol name
•
Parameters (Voltage, Width, Pulse): Displays the electroporation parameter for each protocol
•
Function buttons (Load, Edit, and Delete): Used to load, edit, or delete a protocol. The
function buttons are activated only after a protocol is selected.
•
Page scroll: To scroll to or
Press the desired protocol number button to edit the protocol. The selected protocol is highlighted.
4.
Once the Edit screen is displayed, enter the User name by pressing the key pad buttons. The
cursor automatically moves to the next field Protocol and is highlighted red.
Continue to enter the information for Voltage, Width, and Pulse.
If you wish to password protect the protocol, enter the Password (up to 7 characters) and Repeat
Password information using the key pad.
20
Neon™ Transfection System User Guide

Chapter 2 Methods
Getting started
5.
Press Enter to save the information in the database. To exit the edit screen without saving the
parameters, press X.
6.
The database window is displayed. Press the desired protocol and then press Load to load
electroporation parameters from the database.
2
7.
Proceed to preparing cells (see pages 27–28) and DNA, and setting up the Neon™ Pipette
Station for electroporation (see page 25).
8.
To delete a protocol from the database, select the protocol by pressing the protocol number
button. Press Delete. If the protocol in the database was password protected, a password screen
is displayed. Enter the password and press Enter to delete the protocol.
Optimization window
Perform optimization of electroporation parameters using the preprogrammed 24-well optimization
protocol. These protocols are locked and cannot be edited.
1.
Press the power switch (located at the rear of the unit, see page 9) to turn ON the Neon™ device.
The unit checks to ensure that the Neon™ Pipette Station is connected to the device and then the
start up screen is displayed.
Neon™ Transfection System User Guide
21

Chapter 2 Methods
2
Getting started
2.
3.
Press Optimization button to start the optimization window. To scroll through the protocols, use
the right/left scroll buttons near the Optimization button.
The Optimization window shows:
•
Number button: Indicates protocol number
•
User and Protocol: Displays the optimization and well number
•
Parameters (Voltage, Width, Pulse): Displays the electroporation parameter for each protocol
•
Load Function buttons: Used to load a protocol. The Load button is activated only after a
protocol is selected.
•
Page scroll: To scroll to or
Press the desired protocol number button. The selected protocol is highlighted. Press Load to load
the protocol. To exit the screen without loading the protocol, press X.
4.
The electroporation parameters are displayed on the start up screen.
5.
Proceed to preparing cells (see pages 27–28) and DNA, and setting up the Neon™ Pipette
Station for electroporation (see page 25).
Upgrade the firmware
Upgrades for the Neon™ device firmware are available. To download Neon™ device firmware upgrades,
go to thermofisher.com. Follow instructions on the page to download the upgrades.
22
Neon™ Transfection System User Guide

General guidelines
Recommended kits
To use the Neon™ device for electroporation of mammalian cells, you need to purchase the Neon™ Kits.
Ordering information is on page 52. Do not use any other kits with the unit.
Note: To obtain the best results, follow these recommendations:
Based on your initial results, you may need to optimize the electroporation parameters for your cell
·
type and DNA/siRNA. A preprogrammed 24-well optimization protocol is included in the device for
your convenience.
Before using the device with your samples, ensure that you are able to insert and use the Neon
·
Pipette and Tip correctly into the Neon™ Pipette Station (see page 25 for details).
Wear gloves, laboratory coat, and safety glasses during electroporation.
·
Always use the Neon™ device with Neon™ Kits for electroporation of mammalian cells.
·
The Neon™ Transfection System is compatible for use with most mammalian cells including primary
·
and stem cells.
Use high quality DNA and siRNA to obtain good transfection eciency.
·
Follow the guidelines on pages 27–28 for cell preparation.
·
Use an appropriate GFP (green fluorescent protein) construct or siRNA control (see page 24 for
·
details) to determine transfection eciency.
Discard the Neon™ Tips after 2 usages and Neon™ Tubes after 10 usages as a biological hazard. We
·
strongly recommend changing tube and buer when switching to a dierent plasmid DNA/siRNA or
cell type.
Visit thermofisher.com for a library of electroporation protocols for commonly used cell types.
·
Chapter 2
General guidelines
Methods
2
™
Recommended buers
The Neon™ Kits contain two Resuspension Buers. Use the appropriate Resuspension Buer based on
the voltage.
Resuspension Buer R:
Use Resuspension Buer R for all cell types and electroporation protocols. For high voltage protocols
(≥1900V), optimize with both Resuspension Buer R and T. If arcing occurs with Resuspension Buer R
consider switching to Resuspension Buer T.
Resuspension Buer T:
Use Resuspension Buer T with high voltage protocols of 1900V or more.
Cell-specific Neon™ transfection protocols available
at https://www.thermofisher.com/us/en/home/life-science/cell-culture/transfection/neon-
transfection-system/neon-transfection-system-cell-line-data.html indicate the type of
Resuspension buer for use with each cell type.
Neon™ Transfection System User Guide
23

Chapter 2
2
General guidelines
Methods
DNA quality and amount
The quality and concentration of DNA used for electroporation plays an important role for the
transfection eciency. We strongly recommend using high quality plasmid purification kits such as
PureLink™ HiPure Plasmid DNA Purification Kits (see page 52) to prepare DNA.
•
Resuspend the purified DNA in deionized water or TE buer (10 mM Tris-HCl, 1 mM EDTA, pH 8.0)
at a concentration between 1–5 µg/µL. Concentrations may vary depending on cell type.
•
The DNA amount should not exceed 10% of total volume used.
•
Check the purity of the purified DNA preparation by measurement of the A
should be at least 1.8 for electroporation.
•
The device has been routinely tested with 4–7 kb plasmids and plasmids up to approximately
20 kb should not be a problem. Using plasmids larger than 20 kb will most likely lower transfection
eciency.
IMPORTANT! Do not precipitate DNA with ethanol to concentrate DNA. Concentrated DNA by ethanol
precipitation shows poor transfection eciency and cell viability due to salt contamination.
ratio. The ratio
260/280
siRNA quality and amount
The quality and concentration of siRNA used for electroporation plays an important role for the
transfection eciency. We strongly recommend using high quality siRNA such as Stealth™, Silencer
Select, or Silencer™ siRNA.
•
The recommended starting siRNA concentration is 100–250 µM in nuclease-free water.
•
The siRNA amount should not exceed 10% of total volume used.
Controls
GFP control
To initially assess transfection eciency for your cell type using fluorescent microscopy, we recommend
using a plasmid encoding GFP (green fluorescent protein) or any colored variant of GFP (Clontech™ or
equivalent). For best results, the vector encoding the GFP should have the following features:
•
Strong promoter active in a variety of mammalian cells such as the immediate early CMV
(cytomegalovirus) promoter
•
SV40 polyadenylation signals downstream of the GFP gene for proper processing of the 3’ end of
the GFP mRNA.
•
Antibiotic selection marker
•
pUC origin of replication for propagation in E. coli
™
24
siRNA control
For siRNA experiments, use BLOCK-iT™ Fluorescent Oligo™ for electroporation or Silencer™ Select
GAPDH Positive Control siRNA (see page 52) to assess transfection eciency.
Neon™ Transfection System User Guide

Using the Neon™ Transfection System
Instructions are provided in this section to use the Neon™ device with the Neon™ Pipette Station and
Neon™ Kits for electroporation of mammalian cells.
General instructions to prepare cells for use with the Neon™ Transfection System are described below.
For primary and stem cell types, use the established methods developed in the laboratory.
See “Optimization protocol for DNA and siRNA” on page 33 if you wish to use the preprogrammed
optimization protocol.
Materials needed
See page 52 for ordering information.
•
Cells
•
Neon™ Kits
•
High quality DNA at a concentration of 1–5 µg/µL in deionized water or TE buer, or high quality
RNAi duplex at a concentration of 100–250 µM in nuclease-free water (see page 24)
•
Cell culture plates containing the appropriate medium
•
D-PBS or Phosphate buered saline (PBS) without Ca2+ and Mg2+ (see page 52)
•
Trypsin/EDTA or TrypLE™ Express (Cat. No. 12563) for adherent cells
•
Countess™ Automated Cell Counter (see page 52) or equivalent
Chapter 2 Methods
Using the Neon™ Transfection System
2
Note: If you are a first time user of the Neon™ Transfection System, we recommend that you review the
protocol below and ensure that you are able to insert and use the Neon™ Pipette and Tip correctly into
the Neon™ Pipette Station (see below for details) before you start using the system with your samples.
IMPORTANT!
To obtain the highest transfection eciency and low non-specific eects, optimize transfection
·
conditions by varying electrical parameters as described in “Optimization protocol for DNA and
siRNA” on page 33 using the pre-programmed optimization protocol in a 24-well format.
Since the cell culture conditions vary from user to user, be sure to use low passage number, actively
·
dividing cells (for dividing cells)
For siRNA transfection, the concentration of RNAi duplex required will vary depending on the ecacy
·
of the duplex. After the initial results, vary the siRNA final concentration from 10–200 nM.
Note: The siRNA concentration in the Neon™ transfection protocol refers to the siRNA concentration
in the culture medium and not to the siRNA concentration in the electroporation mix in the Neon
Tip.
™
Neon™ Transfection System User Guide
25

Chapter 2
2
Using the Neon™ Transfection System
Methods
Set up the Neon™ pipette station
1.
Ensure the Neon™ Pipette Station is connected to the Neon™ device (see page 15).
2.
Fill the Neon™ Tube with 3 mL of Electrolytic Buer (use Buer E for 10 µL Neon™ Tip and Buer
E2 for 100 µL Neon™ Tip).
Note: Make sure that the electrode on the side of the tube is completely immersed in buer.
3.
Insert the Neon™ Tube into the Neon™ Pipette Station until you hear a click sound.
26
Note: Make sure that the side electrode of the Neon™ tube is well connected to the side ball
plunger of the Neon™ Pipette Station (see figure on the left below for correct position).
4.
The station is ready for use. Proceed to “Prepare adherent cells” on page 27.
Neon™ Transfection System User Guide

Prepare adherent cells
1.
Cultivate the required number of cells (70–90% confluent on the day of transfection) by seeding a
flask containing fresh growth medium 1–2 days prior to electroporation.
For most optimized protocols, seed with:
•
5 × 10⁴ to 2 × 10⁵ cells for each 10 µL Neon™ Tip
•
5 × 10⁵ to 2 × 10⁶ cells for each 100 µL Neon™ Tip
2.
Pre-warm an aliquot of culture medium containing serum, PBS (without Ca2+ and Mg2+), and
Trypsin/EDTA solution to 37℃.
3.
Aspirate the media from cells and rinse the cells using PBS (without Ca2+ and Mg2+).
4.
Trypsinize the cells using Trypsin/EDTA or TrypLE™ Express (Cat. no. 12563).
Chapter 2 Methods
Using the Neon™ Transfection System
2
5.
After neutralization, harvest the cells in growth medium with serum (∼0.75 mL for a 10 µL Neon
Tip or 7.5 mL for a 100 µL Neon™ Tip).
6.
Take an aliquot of trypsinized cell suspension and count cells to determine the cell density.
7.
Transfer the cells to a 1.5 mL microcentrifuge tube or a 15 mL conical tube and centrifuge the cells
at 100–400 × g for 5 minutes at room temperature.
8.
Wash cells with PBS (without Ca2+ and Mg2+) by centrifugation at 100–400 × g for 5 minutes at
room temperature.
9.
Aspirate the PBS and resuspend the cell pellet in Resuspension Buer R (or Resuspension Buer
T for programs ≥1900V) at a final density of 1.0 × 10⁷ cells/mL. Gently pipette the cells to obtain a
single cell suspension.
Note: Avoid storing the cell suspension for more than 15–30 minutes at room temperature, which
reduces cell viability and transfection eciency. The resuspension cell density may be adjusted to
accommodate the recommended cell numbers for the electroporation protocol (see page 29) or
optimization protocols (see pages 34–40).
10.
Prepare 24-well plates by filling the wells with 0.5 mL of culture medium containing serum and
supplements without antibiotics and pre-incubate plates in a humidified 37℃/5% CO2 incubator.
If you are using other plate format, see page 29 for plating medium volume recommendations.
™
Neon™ Transfection System User Guide
27

Chapter 2 Methods
2
Using the Neon™ Transfection System
Prepare suspension cells
1.
Cultivate the required number of cells (cell density ∼1–3 × 10⁶ cells/T-25 flask) by seeding a flask
containing fresh growth medium 1–2 days prior to electroporation.
For most optimized protocols, seed with:
•
1–5 × 10⁵ cells for each 10 µL Neon™ Tip
•
1–5 × 10⁶ cells for each 100 µL Neon™ Tip
2.
Pre-warm an aliquot (500 µL per sample for 10 µL Neon™ Tips or 5 mL for 100 µL Neon™ Tips) of
culture medium containing serum. Also prepare an appropriate volume of PBS (without Ca2+ and
Mg2+).
3.
Take an aliquot of cell culture and count the cells to determine the cell density.
4.
Transfer the cells to a microcentrifuge tube or 15 mL conical tube and pellet the cells by
centrifugation at 100–400 × g for 5 minutes at room temperature.
5.
Wash the cells with PBS (without Ca2+ and Mg2+) and pellet the cells by centrifugation at 100–
400 × g for 5 minutes at room temperature.
6.
Aspirate the PBS and resuspend the cell pellet in Resuspension Buer R (or Resuspension Buer
T for programs ≥1900V) at a final density of 2.0 × 10⁷ cells/mL. Gently pipette the cells to obtain a
single cell suspension.
Note: Avoid storing the cell suspension for more than 15–30 minutes at room temperature, which
reduces cell viability and transfection eciency. The resuspension cell density maybe adjusted to
accommodate the recommended cell numbers for the electroporation protocol (see page 29) or
optimization protocols (see pages 34–40).
7.
Prepare 24-well plates by filling the wells with 0.5 mL of culture medium containing serum and
supplements without antibiotics and pre-incubate plates in a humidified 37℃/5% CO2 incubator.
If you are using other plate format, see page 29 for plating medium volume recommendations.
28
Neon™ Transfection System User Guide

Electroporation protocol
1.
Make sure you have appropriate number of cells prepared as described on pages 27–28, have
the plasmid DNA or siRNA at the suggested concentrations (see page 24), and prepare a plate
containing culture medium without antibiotics to transfer the electroporated cells.
For details on optimizing the transfection eciency of your cells, see “Optimization protocol for
DNA and siRNA” on page 33.
2.
For each electroporation sample, the recommended amount of plasmid DNA or siRNA, cell
number, and volume of plating medium per well are listed below. Use Resuspension Buer T
for primary suspension blood cells.
Chapter 2
Using the Neon™ Transfection System
Methods
2
Format Cell Type DNA (µg) siRNA (nM) Neon™ Tip
96-well Adherent 0.25–0.5 10–200 10 µL 100 µL 1–2 × 10410 µL/well
Suspension 0.5–1 10 µL 2–5 × 10410 µL/well
48-well Adherent 0.25–1 10-200 10 µL 250 µL 2.5–5 × 10410 µL/well
Suspension 0.5–2 10 µL 5–12.5 ×
24-well Adherent 0.5–2 10-200 10 µL 500 µL 0.5–1 × 10510 µL/well
Suspension 0.5–3 10 µL 1–2.5 × 10510 µL/well
12-well Adherent 0.5–3 10-200 10 µL 1 mL 1–2 × 10510 µL/well
Suspension 0.5–3 10 µL 2–5 × 10510 µL/well
6-well Adherent 0.5–3
(10 µL)
5–30
(100 µL)
Suspension 0.5–3
(10 µL)
5–30
(100 µL)
10-200 10 µL/100 µ
L
10 µL/100 µ
L
Vol. plating
medium
2 mL 2–4 × 10
0.4–1 × 10610 µL or
Cell no.
10
4
Buer R or
Buer T
10 µL/well
5
10 µL or
100 µL/well
100 µL/well
[1]
60 mm Adherent 5–30 10-200 100 µL 5 mL 0.5–1 × 106100 µL/well
Suspension 5–30 100 µL 1–2.5 × 106100 µL/well
10 cm Adherent 5–30 10-200 100 µL 10 mL 1–2 × 106100 µL/well
Suspension 5–30 100 µL 2–5 × 106100 µL/well
[1]
Use Resuspension Buffer T for primary suspension blood cells.
3.
Set up a Neon™ Tube with 3 mL Electrolytic Buer (use Buer E for 10 µL Neon™ Tip and Buer E2
for 100 µL Neon™ Tip) into the Neon™ Pipette Station (see page 26).
4.
Set the desired pulse conditions on the device based on your cell type (see “Electroporation
protocol options” on page 17).
Neon™ Transfection System User Guide
29

Chapter 2 Methods
2
Using the Neon™ Transfection System
5.
Transfer the appropriate amount of plasmid DNA/siRNA into a sterile, 1.5 mL microcentrifuge tube.
6.
Add cells to the tube containing plasmid DNA/siRNA and gently mix. See the table for cell
concentration, DNA, and plating volumes to use.
7.
To insert a Neon™ Tip into the Neon™ Pipette, press the push-button on the pipette to the second
stop to open the clamp.
8.
Insert the top-head of the Neon™ Pipette into the Neon™ Tip until the clamp fully picks up the
mounting stem of the piston (see below)
9.
Gently release the push-button, continuing to apply a downward pressure on the pipette, ensuring
that the tip is sealed onto the pipette without any gaps.
Note: Ensure that the Neon™ Pipette and Tip are tightly connected without a gap (see figure on
the left) for trouble-free pipetting and proper electrical connection.
30
Neon™ Transfection System User Guide

Chapter 2 Methods
Using the Neon™ Transfection System
10.
Press the push-button on the Neon™ Pipette to the first stop and immerse the Neon™ Tip into
the cell-DNA/siRNA mixture. Slowly release the push-button on the pipette to aspirate the cellDNA/siRNA mixture into the Neon™ Tip.
Note: Avoid air bubbles during pipetting as air bubbles cause arcing during electroporation
leading to lowered or failed transfection. If you notice air bubbles in the tip, discard the sample and
carefully aspirate the fresh sample into the tip again without any air bubbles.
2
11.
Insert the Neon™ Pipette with the sample vertically into the Neon™ Tube placed in the Neon
Pipette Station until you hear a click sound. Ensure that the pipette projection is inserted into the
groove of the pipette station.
Neon™ Transfection System User Guide
™
31

Chapter 2
2
Using the Neon™ Transfection System
12.
Methods
Note: Ensure the metal head of the Neon™ Pipette is tightly connected to the ball plunger inside of
the Neon™ Pipette Station and to the Neon™ Tube (see figure on the left for the correct position).
Ensure that you have selected the appropriate electroporation protocol and press Start on the
touchscreen.
13.
The Neon™ device automatically checks for the proper insertion of the Neon™ Tube and Neon
Pipette before delivering the electric pulse.
Note: Monitor the Neon™ Tip during electroporation to see if there is any arcing (sparks) that is
caused by the presence of bubbles in the tip. Arcing results in low transfection eciency and cell
viability.
14.
After delivering the electric pulse, Complete is displayed on the touchscreen to indicate that
electroporation is complete.
15.
Slowly remove the Neon™ Pipette from the Neon™ Pipette Station and immediately transfer the
samples from the Neon™ Tip by pressing the push-button on the pipette to the first stop into the
prepared culture plate containing prewarmed medium.
Note: We strongly recommend loading electroporated cells into growth medium without
antibiotics that can greatly reduce the viability of your cells after transfection.
16.
To discard the Neon™ Tip, press push-button to the second stop into an appropriate biological
hazardous waste container.
17.
Repeat Steps 7–16 for the remaining samples.
Be sure to change the Neon™ Tips after using it twice and Neon™ Tubes after 10 usages. Use a
new Neon™ Tip and Neon™ Tube for each new plasmid DNA sample.
™
32
18.
Gently rock the plate to assure even distribution of the cells. Incubate the plate at 37℃ in a
humidified CO2 incubator.
19.
If you are not using the Neon™ device, turn the power switch on the rear to OFF.
20.
Assay samples to determine the transfection eciency (e.g., fluorescence microscopy or functional
assay) or gene knockdown (for siRNA).
Neon™ Transfection System User Guide

Optimization
Based on your initial results, you may need to optimize the electroporation parameters for your
cell type. See “Optimization protocol for DNA and siRNA” on page 33 for using the 18-well or
preprogrammed 24-well optimization protocol on the Neon™ device.
Cleaning and maintenance
Clean the surface of the Neon™ device and Neon™ Pipette Station with a damp cloth. Do not use harsh
detergents or organic solvents to clean the unit. The Neon™ Pipette is permanently calibrated at the
manufacturer and does not require any further calibration.
Chapter 2
Optimization protocol for DNA and siRNA
Methods
2
IMPORTANT! Avoid spilling any liquid inside of the Neon
rust on the ball plunger in the pipette station.
In case you accidentally spill any liquid (e.g., buer, water, coee) inside the Neon™ Pipette Station,
disconnect the station from the main device and wipe the station using dry laboratory paper. Invert and
allow the station to completely dry for 24 hours at room temperature. Do not use the oven to dry the
Neon™ Pipette Station. If the station does not work after drying, contact Technical Support.
For any other repairs and service, contact Technical Support. Do not perform any repairs or service on
the Neon™ device yourself as it is a high voltage hazard and to avoid any damage to the unit or voiding
your warranty.
™
Pipette Station to prevent any build up of
Optimization protocol for DNA and siRNA
Electroporation is mainly dependent on the combination of three electric parameters such as the
electric field, pulse width, and pulse number. Based on your initial results, you may need to optimize the
electroporation parameters for your cell type especially the hard-to-transfect cells.
The Neon™ device is preprogrammed with a 24-well optimization protocol using the 10 µL or 100 µL
Neon™ Tip that allows you to quickly optimize electric parameters for many adherent and suspension
cell lines within days.
For primary blood suspension cells, use the 18-well optimization protocol with Resuspension
Buer T as described on page 36.
Materials needed
See page 52 for ordering information.
•
Neon™ 10 µL or 100 µL Kit
•
Cells in Resuspension Buer (prepared as described on pages 27–28)
•
High quality DNA at a concentration of 1–5 µg/µL in deionized water or TE buer or high quality
RNAi duplex at a concentration of 100–250 µM in nuclease-free water (see page 24)
•
Cell culture plates containing the appropriate medium
Neon™ Transfection System User Guide
33

Chapter 2
2
Optimization protocol for DNA and siRNA
Methods
General guidelines
General guidelines for optimization are described below. For a detailed protocols, see page 34
for adherent and suspension cell line optimization, and page 36 for primary suspension blood cell
optimization.
Optimization for plasmid
1.
Perform 24-well optimization using the preprogrammed parameters.
2.
Based on results from Step 1, perform optimization using narrower (bracket) parameters.
3.
Based on results from Step 2, further refine the parameters to obtain optimal conditions (this is
optional step).
Optimization for siRNA
1.
Perform 24-well optimization using the preprogrammed parameters.
2.
Based on results from Step 1, perform optimization using narrower (bracket) parameters.
3.
Based on results from Step 2, perform optimization by varying siRNA final concentrations to
10 nM, 30 nM, 100 nM, and 200 nM.
24-well optimization protocol for adherent and suspension cell lines—day one
1.
Make sure you have cells prepared as described on pages 27–28, have the DNA or siRNA, and
prepare a 24-well plate containing 0.5 mL culture medium with serum and without antibiotics
to transfer the electroporated cells. Prepare enough cells and plasmid DNA/siRNA for at least 30
transfections.
2.
For each electroporation sample using the 10 µL Neon™ Tip in 24-well format, see table. For using
the 100 µL Neon™ Tip in 24-well format, adjust the amounts listed in the table appropriately by
10‑fold.
Cell type Cell no. DNA siRNA
Adherent 1 × 10⁵/well 0.5 µg DNA/well
15 µg/plate
Suspension 2 × 10⁵/well 1 µg DNA/well
30 µg/plate
50 pmol in 10 µL
tip
100 nM per well
100 pmol in 10 µL
tip
200 nM per well
Resuspension
Buer R
10 µL/well
285 µL/plate
10 µL/well
270 µL/plate
34
3.
Set up a Neon™ Tube with 3 mL Electrolytic Buer (use Buer E for 10 µL Neon™ Tip and Buer
E2 for 100 µL Neon™ Tip) into the Neon™ Pipette Station containing the cell-DNA/siRNA mixture as
described on page 26.
Neon™ Transfection System User Guide

Chapter 2
Optimization protocol for DNA and siRNA
4.
Press Optimization and load the optimization protocols to begin electroporation using the
parameters listed below.
Methods
2
Sample Well no.
1 A1 Use pre-optimized parameter or control without electroporation.
2 A2 1400 20 1
3 A3 1500 20 1
4 A4 1600 20 1
5 A5 1700 20 1
6 A6 1100 30 1
7 B1 1200 30 1
8 B2 1300 30 1
9 B3 1400 30 1
10 B4 1000 40 1
11 B5 1100 40 1
12 B6 1200 40 1
13 C1 1100 20 2
Pulse
voltage
Pulse width Pulse no.
Transfection
eciency
Results
Cell viability
14 C2 1200 20 2
15 C3 1300 20 2
16 C4 1400 20 2
17 C5 850 30 2
18 C6 950 30 2
19 D1 1050 30 2
20 D2 1150 30 2
21 D3 1300 10 3
22 D4 1400 10 3
23 D5 1500 10 3
24 D6 1600 10 3
5.
After electroporation, immediately remove the Neon™ Pipette and transfer samples from the 10 µL
Neon™ Tip into prewarmed 0.5 mL culture medium.
For 100 µL Neon™ Tip, dilute samples 10‑fold in 900 µL medium and transfer 100 µL of the sample
to 0.4 mL prewarmed culture medium.
6.
Repeat Steps 3–5 for the remaining samples.
Neon™ Transfection System User Guide
35

Chapter 2 Methods
2
Optimization protocol for DNA and siRNA
7.
Gently rock the plate to assure even distribution of the cells. Incubate the plate at 37℃ in a
humidified CO2 incubator.
8.
Assay samples to determine the transfection eciency (e.g., fluorescence microscopy or functional
assay) or gene knockdown (for siRNA). Select the best conditions and proceed to the next day’s
experiment, “Optimization protocol—day two” on page 38.
18-well optimization protocol for primary suspension blood cells—day one
1.
Make sure you have cells prepared as described on pages 27–28, have the DNA or siRNA, and
prepare 18-wells of a 24-well plate containing 0.5 mL culture medium with serum and without
antibiotics to transfer the electroporated cells. Prepare enough cells and plasmid DNA or siRNA
for at least 20 transfections.
2.
For each electroporation sample using the 10 µL Neon™ Tip in 18-wells of a 24-well plate, see
table.
Cell type Cell no. DNA siRNA
Primary blood
suspension cells
3.
Set up a Neon™ Tube with 3 mL Electrolytic Buer E into the Neon™ Pipette Station and Neon™ Tip
2 × 10⁵/well 1 µg DNA/well
20 µg/plate
100 pmol in 10 µL
tip
200 nM per well
Resuspension
Buer T
10 µL/well
180 µL/plate
containing the cell-DNA/siRNA mixture.
4.
Input the electroporation parameters in the Input window and perform electroporation using the
parameters listed below.
Sample
1 A1 Use pre-optimized parameter or control without electroporation.
2 A2 2000 20 1
3 A3 2050 20 1
4 A4 2100 20 1
5 A5 2150 20 1
Well no.
Pulse
voltage
Pulse width Pulse no.
Transfection
eciency
Results
Cell viability
36
6 A6 2200 20 1
7 B1 2250 20 1
8 B2 2300 20 1
9 B3 2350 20 1
10 B4 2400 15 1
11 B5 2450 15 1
12 B6 2500 15 1
Neon™ Transfection System User Guide

(continued)
Chapter 2 Methods
Optimization protocol for DNA and siRNA
2
Sample Well no.
13 C1 2000 15 2
14 C2 2050 15 2
15 C3 2100 15 2
16 C4 2150 15 2
17 C5 2200 15 2
18 C6 2250 15 2
5.
After electroporation, immediately remove the Neon™ Pipette and transfer samples from the 10 µL
Pulse
voltage
Pulse width Pulse no.
Transfection
eciency
Results
Cell viability
Neon™ Tip into prewarmed 0.5 mL culture medium.
6.
Repeat Steps 3–5 for the remaining samples.
7.
Gently rock the plate to assure even distribution of the cells. Incubate the plate at 37℃ in a
humidified CO2 incubator.
8.
Assay samples to determine the transfection eciency (e.g., fluorescence microscopy or functional
assay) or gene knockdown (for siRNA). Select the best conditions and proceed to the next day’s
experiment, “Optimization protocol—day two” on page 38.
Neon™ Transfection System User Guide
37

Chapter 2 Methods
2
Optimization protocol for DNA and siRNA
Optimization protocol—day two
Select the best transfection conditions obtained from the previous experiment and fine-tune the
optimization by narrowing the Pulse Voltage.
For example, if you obtained optimal conditions between 1,500 V, 20 ms and 1,400 V, 30 ms,
(underlined in the table) perform optimization using these narrower parameters as below.
1.
Make sure you have cells prepared as described on pages 27–28, have the DNA or siRNA, and
prepare 18- or 24-wells of a 24-wells plate with 0.5 mL culture medium with serum and without
antibiotics to transfer the electroporated cells.
2.
For each electroporation sample using the 10 µL Neon™ Tip, see table.
For using the 100 µL Neon™ Tip in 24-well format, adjust the amounts listed in the table
appropriately by 10‑fold.
Cell type Format Cell no. DNA siRNA
Adherent 24-well 1 × 10⁵/well 0.5 µg
DNA/well
15 µg/plate
Suspension 24-well 2 × 10⁵/well 1 µg DNA/well
30 µg/plate
Primary
Suspension
Blood Cells
3.
Set up a Neon™ Tube with 3 mL Electrolytic Buer (use Buer E for 10 µL Neon™ Tip and
18-well 1–2 × 10⁵/well 0.5–1 µg
DNA/well
20 µg/plate
50 pmol in
10 µL tip
100 nM per
well
100 pmol in
10 µL tip
200 nM per
well
100 pmol in
10 µL tip
200 nM per
well
Resuspension
Buer E2 for 100 µL Neon™ Tip) into the Neon™ Pipette Station and Neon™ Tip containing the
cell-DNA/siRNA mixture.
4.
Perform electroporation using the parameters listed on the table:
Results
Sample
Well no.
Pulse
voltage
Pulse width Pulse no.
Transfection
eciency
Buer
Buer R
10 µL/well
285 µL/plate
Buer R
10 µL/well
270 µL/plate
Buer R
10 µL/well
180 µL/plate
Cell viability
38
1 A1 1450 20 1
2 A2 1475 20 1
3 A3 1500 20 1
4 A4 1525 20 1
5 A5 1550 20 1
6 A5 1575 20 1
Neon™ Transfection System User Guide

(continued)
Chapter 2 Methods
Optimization protocol for DNA and siRNA
2
Sample Well no.
7 B1 1375 30 1
8 B2 1400 30 1
9 B3 1425 30 1
10 B4 1450 30 1
11 B5 1475 30 1
12 B6 1500 30 1
13 C1 Control containing DNA but no electroporation pulse.
5.
After electroporation, immediately remove the Neon™ Pipette and transfer the samples from the
Pulse
voltage
Pulse width Pulse no.
Transfection
eciency
Results
Cell viability
10 µL Neon™ Tip into prewarmed 0.5 mL culture medium.
For 100 µL Neon™ Tip, dilute samples 10‑fold in 900 µL medium and transfer 100 µL of the sample
to 0.4 mL prewarmed culture medium.
6.
Repeat Steps 3–5 for the remaining samples.
7.
Gently rock the plate to assure even distribution of the cells. Incubate the plate at 37℃ in a
humidified CO2 incubator.
8.
Assay samples to determine the transfection eciency (e.g., fluorescence microscopy or functional
assay) or gene knockdown (for siRNA).
9.
Select the best conditions and proceed to the next day’s experiment, “Optional: optimization
protocol—day three” on page 40.
Neon™ Transfection System User Guide
39

Chapter 2 Methods
2
Optimization protocol for DNA and siRNA
Optional: optimization protocol—day three
For further optimization, repeat experiments by varying other conditions such as multiple pulsations.
This is optional and depends on the cell type.
For siRNA, you can vary the amount of siRNA from 10–200 nM.
1.
Make sure you have cells prepared as described on pages 27–28, have the DNA or siRNA, and
prepare 18- or 24-wells of a 24-well plate containing 0.5 mL culture medium with serum and
without antibiotics to transfer the electroporated cells.
2.
For each electroporation sample using the 10 µL Neon™ Tip, see table.
For using the 100 µL Neon™ Tip in 24-well format, adjust the amounts listed in the table
appropriately by 10‑fold.
Cell Type Format Cell no. DNA siRNA
Adherent 24-well 1 × 10⁵/well 0.5 µg
DNA/well
15 µg/plate
Suspension 24-well 2 × 10⁵/well 1 µg DNA/well
30 µg/plate
Primary
Suspension
Blood Cells
3.
Set up a Neon™ Tube with 3 mL Electrolytic Buer (use Buer E for 10 µL Neon™ Tip and
18-well 1–2 × 10⁵/well 0.5–1 µg
DNA/well
20 µg/plate
50 pmol in
10 µL tip
100 nM per
well
100 pmol in
10 µL tip
200 nM per
well
100 pmol in
10 µL tip
200 nM per
well
Resuspension
Buer E2 for 100 µL Neon™ Tip) into the Neon™ Pipette Station and Neon™ Tip containing the
cell-DNA/siRNA mixture.
4.
Perform electroporation using the parameters listed in the table:
Results
Sample
Well no.
Pulse
voltage
Pulse width Pulse no.
Transfection
eciency
Buer
Buer R
10 µL/well
285 µL/plate
Buer R
10 µL/well
270 µL/plate
Buer R
10 µL/well
180 µL/plate
Cell viability
40
1 A1 1450 10 2
2 A2 1475 10 2
3 A3 1500 10 2
4 A4 1525 10 2
5 A5 1550 10 2
6 A6 1575 10 2
7 B1 1375 10 3
Neon™ Transfection System User Guide

(continued)
Chapter 2 Methods
Optimization protocol for DNA and siRNA
2
Sample Well no.
8 B2 1400 10 3
9 B3 1425 10 3
10 B4 1450 10 3
11 B5 1475 10 3
12 B6 1500 10 3
13 C1 Control containing DNA but no electroporation pulse.
5.
After electroporation, immediately remove the Neon™ Pipette and transfer the samples from the
Pulse
voltage
Pulse width Pulse no.
Transfection
eciency
Results
Cell viability
10 µL Neon™ Tip into prewarmed 0.5 mL culture medium.
For 100 µL Neon™ Tip, dilute samples 10‑fold in 900 µL medium and transfer 100 µL of the sample
to 0.4 mL prewarmed culture medium.
6.
Repeat Steps 3–5 for the remaining samples and incubate the plate.
7.
Assay samples to determine the transfection eciency (e.g., fluorescence microscopy or functional
assay) or gene knockdown (for siRNA).
8.
Select the best conditions and save these parameters into the database for your cell type.
Neon™ Transfection System User Guide
41

A
Troubleshooting
Troubleshooting
Problem
No power (the display remains
blank when the power is turned
on)
Connection error message
displayed
Cause Solution
AC power cord is not connected Check AC power cord
connections at both ends. Use the
correct cords.
•
Pipette or tube is incorrectly
inserted
Properly insert the Neon
Pipette into the Neon™ Pipette
Station as described on page
29. The metal head of the
pipette should be tightly
connected to the ball plunger
inside the pipette station.
•
Properly insert the Neon
Tube into the Neon™ Pipette
Station as described on page
26. The side electrode on
the tube should be tightly
connected to the ball plunger
inside the pipette station.
•
Avoid spilling any liquid into
the pipette station to prevent
any build up of rust on the
ball plunger in the pipette
station.
™
™
42
•
The sensor connector is not
connected
Error messages — See page 46 for a description of
Be sure to connect the sensor
connector of the Neon
Pipette Station to the sensor
port on the rear of the Neon
device.
•
Make sure the mark on the
cable plug and the instrument
connector is aligned correctly
(see page 15)
error messages.
Neon™ Transfection System User Guide
™
™

(continued)
Appendix A Troubleshooting
Troubleshooting
A
Problem
Cause Solution
Connection failure No Neon™ Tip is inserted or the
Neon™ Tip is inserted incorrectly
No buer in the tube or no sample
in the tip
Wrong buers used Use the Electrolytic Buer (Buer
Make sure that the Neon™ Tip
is inserted into Neon™ Pipette
correctly as described on page 29.
There should be no gap between
the tip and the top head of the
pipette.
Be sure to add 3 mL of the
appropriate Electrolytic Buer to
Neon™ Tube. The electrode in
the tube must be completely
immersed in buer.
Be sure to add sample in
Resuspension Buer to the Neon
Tip.
E for 10 µL tip and Buer E2 for
100 µL tip) in the Neon™ Tube and
the sample in Resuspension Buer
in the Neon™ Tip. Do not switch
buers or use any other buer
as these buers are specifically
designed for electroporation with
the Neon™ device.
™
High voltage connector is not
connected
Be sure to connect the high
voltage connector of the Neon
Pipette Station to the high voltage
port on the rear of the Neon
device (see page 15).
If the error persists and all
connections are correct
Perform self diagnostics test Perform self diagnostics test by
clicking on ✓ on the main screen.
During the self diagnostics test,
the device checks a variety of
parameters and indicates if it is
OK or there is a problem. If the
self diagnostics is OK, ensure
that all connections are correct as
described in this section before
contacting Technical Support.
Arcing (sparks) Air bubbles in the Neon™ Tip Avoid any air bubbles in the
Neon™ Tip while aspirating the
sample.
High voltage or pulse length
settings
Reduce the voltage or pulse length
settings.
™
™
Neon™ Transfection System User Guide
43

Appendix A Troubleshooting
A
Troubleshooting
(continued)
Problem
Arcing (sparks) Accidentally used salt-precipitated
DNA
Low cell survival rate Poor DNA quality Use high quality plasmid DNA
Cells are stressed or damaged Avoid severe conditions during cell
Multiple use of the same Neon
Tip
Cause Solution
Do not precipitate DNA with
ethanol to concentrate DNA as
it can cause arcing due to salt
contamination.
for transfection (see page 24 for
guidelines and recommendations
on DNA quality).
harvesting especially high speed
centrifugation and pipette cells
gently.
Avoid using over confluent cells
or cells at high densities as this
may aect the cell survival after
electroporation.
After electroporation, immediately
plate the cells into prewarmed
culture medium without
antibiotics.
™
Do not use the same Neon™ Tip
for electroporation for more than
2 times because the repeated
application of electric pulses
reduce the tip quality and impairs
their physical integrity.
44
Low transfection eciency Poor optimization of electrical
parameters
Poor plasmid DNA quality or the
plasmid DNA is low
Incorrect cell density Cell densities >3 × 10⁵ or <5 ×
Perform optimization for your cell
type as described on page 33.
Use high quality plasmid DNA
for transfection (see page 24 for
guidelines and recommendations
on DNA quality).
Start with 0.5 µg plasmid DNA per
sample.
104 per sample drastically reduces
transfection eciency. Use 5 ×
104–1.5 × 10⁵ cells per 10 µL per
sample.
Neon™ Transfection System User Guide

(continued)
Appendix A Troubleshooting
Troubleshooting
A
Problem
Low transfection eciency Mycoplasma contaminated cells Test cells for Mycoplasma
Non-reproducible transfection
eciency
High energy error Used high electrical parameters Set lower voltage or duration.
Inconsistent cell confluency or
passage number
Multiple use of Neon™ Tip and
Neon™ Tube
Cause Solution
contamination.
Start a new culture from a fresh
stock.
Always use cells with low passage
number and harvest cells with
comparable confluency levels.
Do not use the same Neon™ Tip
for more than 2 times because
the repeated application of electric
pulses reduce the tip quality and
impairs their physical integrity.
Do not use the same Neon™ Tube
for more than 10 times.
Always use a new Neon™ Tip and
Neon™ Tube for dierent plasmid
DNA samples to avoid any crosscontamination.
Neon™ Transfection System User Guide
45

Appendix A Troubleshooting
A
Neon™ device error messages
Neon™ device error messages
This section describes the error messages displayed. Most of the error messages are self explanatory
and after fixing the error, you should be able to continue with the protocol. Contact Technical Support if
you need to send the device for servicing.
Error message Action
Please connect station The Neon™ Pipette Station is not connected
Check tip for air bubbles. Remove the solution and aspirate the sample into
Please enter user name All protocols in the database need a user name.
Please enter protocol name All protocols in the database need a protocol name.
properly; ensure that the sensor connector is
connected to the sensor port on the rear of the
device (see page 15).
the tip again without any air bubbles. Press OK to
exit the screen.
Enter the user name and press OK to exit the screen.
Enter the user name and press OK to exit the screen.
Password incorrect, please re-enter Re-enter the 4-digit password and press OK to exit
the screen.
Input voltage, pulse width, or pulse number error The input voltage, pulse width, or pulse number is
out of range. The valid range is displayed on the
screen. Please enter the valid value and press OK to
exit the screen.
46
Neon™ Transfection System User Guide

B
Repackaging the instrument
If you need to send the device to Thermo Fisher Scientific for warranty issues, or you wish to transport
the instrument to another location, repackage the unit as follows.
Note: Prior to sending the device, ensure the device is properly decontaminated if the device
is exposed to any viable biological agents, radioactive materials, or hazardous chemicals (toxic,
carcinogenic, mutagenic, toxic for reproduction, sensitizing, and/or have not been fully tested). Contact
Technical Support for a decontamination protocol and to obtain a Returns Goods Authorization (RGA)
number and return shipping instructions.
Repackaging and storage instructions
1.
Turn o the main power switch at the rear of the device and detach the power cord from the rear of
device.
Maintenance
2.
Disconnect the high voltage and sensor connector connected to the pipette station via the
connector at the back of the unit.
3.
Place the instrument in the original box including the original packing foam.
4.
Tape the box securely and place appropriate shipping labels for shipping the instrument to
Invitrogen™. Always transport the box with the unit in the upright position.
5.
If the device is not to be used for extended periods of time, store the repackaged device in an
upright position at 4℃ to 40℃.
Neon™ Transfection System User Guide
47

Appendix B Maintenance
B
Replace the Pipette Gripper
Replace the Pipette Gripper
1.
Insert the Neon™ Tube into the Neon™ Pipette Station followed by the Neon™ Pipette vertically into
the Neon™ Tube until it clicks into place
2.
Rotate the Neon™ Pipette counterclockwise; then, hold the SUS Head by hand to disassemble it
completely.
48
Neon™ Transfection System User Guide

1 2 3 4
1
Appendix B Maintenance
Replace the Pipette Gripper
3.
Once the SUS Head is separated, check the internal parts in the following order:
B
Pipette body
1
Gripper
2
4.
To replace Gripper, place the new gripper and spring in order into the Pipette body.
Gripper
1
5.
Next, assemble the SUS Head first by hand and then completely by inserting the Neon™ Pipette
Spring
3
SUS Head
4
vertically into the Neon™ Tube in the Neon™ Pipette Station until it clicks into place.
6.
Lastly, hold the Neon™ Pipette and rotate the Neon™ Pipette clockwise to finish the assembly.
Neon™ Transfection System User Guide
49

1 2
Appendix B Maintenance
B
Replace the Pipette Gripper
7.
When the SUS Head is assembled, the appearance of the pipette should be adjusted so that the
① and ② are collinear.
50
Neon™ Transfection System User Guide

C
Product specifications
Specifications
Operating Power:
Output: 0.5-2.5 kV
Pulse Width: 1-100 ms
Maximum Duty Cycle: 0.1
Charging Time: Maximum 8 seconds
Altitude: Up to 2,000 meters
Operating Temperature: 5℃ to 40℃
Maximum Relative Humidity: Up to 80%
Degree of Protection: IPX0
Protective Earthing: Class I (earthed)
Installation Category: II
Instrument Type: Benchtop unit
Device Dimensions: 9.2 inches (w) × 11.8 inches (l) × 8.66 inches (h)
Pipette Station Dimensions: 5.91 inches (diameter); 5.51 inches (h)
100–240 VAC, 2.1 A, 150 W, Frequency 50/60 Hz,
Device Weight: 13.2 pounds (6 kg)
Built-in Features: Touch screen (800 × 480 pixels), digital display
The Neon™ Transfection System including the Neon™ Pipette Station is compatible with standard
nonhazardous laboratory reagents. Do not use organic solvents in the tip/tubes or with the device.
Neon™ Transfection System User Guide
51

D
Accessory products
Additional products
The following products are for use with the Neon™ Transfection System and are available separately.
For more information, go to thermofisher.com or contact Technical Support.
Product Quantity Catalog no.
Neon™ Kit, 10 µL 1 kit (50 reactions) MPK1025
Neon™ Kit, 100 µL 1 kit (50 reactions) MPK10025
Related products
1 kit (192 reactions) MPK1096
1 kit (192 reactions) MPK10096
Neon™ Pipette 1 each MPP100
Neon™ Pipette Station 1 each MPS100
Neon™ Tubes 1 pack of 100 MPT100
Dulbecco’s Phosphate-Buered Saline (D-PBS) (1X),
liquid without Ca2+ and Mg
BLOCK-iT™ Fluorescent Oligo™ for electroporation 75 µL 13750062
Silencer™ Select GAPDH Positive Control siRNA
(human, mouse, rat)
Silencer™ Select negative Control No. 1 siRNA 40 nmol 4390844
Silencer™ Cy3™ labeled GAPDH siRNA (human,
mouse, rat)
Silencer™ FAM™ labeled GAPDH siRNA (human,
mouse, rat)
Countess™ Automated Cell Counter 1 each C10227
PureLink™ HiPure Plasmid Miniprep Kit 25 preps K2100-02
PureLink™ HiPure Plasmid Midiprep Kit 25 preps K2100-04
2+
500 mL 14190-144
5 nmol 4390849
5 nmol AM4649
5 nmol AM4650
52
PureLink™ HiPure Plasmid Filter Midiprep Kit 25 preps K2100-14
PureLink™ HiPure Plasmid Maxiprep Kit 25 preps K2100-07
Neon™ Transfection System User Guide

(continued)
PureLink™ HiPure Plasmid Filter Maxiprep Kit 25 preps K2100-17
MagMAX™ 96 Total RNA Isolation Kit 96 reactions AM1830
TaqMan™ Gene Expression Cells-to-C
alamarBlue
™
Cell culture media
A large variety of cell culture media and products for mammalian cells including primary and stem cells
is available from Invitrogen™. For more information, contact Technical Support.
siRNA
A large variety of siRNA products including Stealth™ RNAi, Silencer™ Select RNAi,Silencer™ RNAi,
or standard unmodified siRNA is available from Invitrogen™. For more information, contact Technical
Support.
Appendix D Related products
Accessory products
Product Quantity Catalog no.
™
Kit 100 reactions AM1728
T
25 mL DAL1025
D
Neon™ Transfection System User Guide
53

E
Safety information
Follow the instructions in this section to ensure safe operation of the Neon™ Transfection device. The
Neon™ Transfection System is designed to meet EN61010-1 Safety Standards. To ensure safe, reliable
operation, always operate theNeon™ Transfection System according to the instructions in this manual.
Failure to comply with the instructions in this manual may create a potential safety hazard, and will void
the manufacturer’s warranty and void the EN61010-1 safety standard certification. Life Technologies is
not responsible for any injury or damage caused by use of this instrument when operated for purposes
which it is not intended. All repairs and service should be performed by Life Technologies.
•
Always ensure that the power supply input voltage matches the voltage available in your location.
•
For operating environment, see page 51.
•
This device is air-cooled so its surfaces become hot during operation. When installing the device,
leave a space of more than 10 cm (4 inches) around it.
•
Never insert metallic objects into the air vents of the device as this could result in electrical shock,
personal injury and equipment damage.
•
Always set the main switch on the power supply unit to OFF before connecting the power cord to
the wall outlet.
•
Always ensure that the grounding terminal of the device and that of the wall outlet are properly
connected. Connect the power cord to a grounded, 3-conductor power outlet.
•
To avoid potential shock hazard, make sure that the power cord is properly grounded.
•
Be sure to position the instrument such that it is easy to disconnect the unit.
•
Be sure to set the main switch to OFF, unplug the power cord, and secure the pipette station before
moving the device.
Safety
Informational symbols
CAUTION! Risk of danger. Consult the manual for further safety information.
CAUTION! Risk of electrical shock.
WEEE (Waste Electrical and Electronic Equipment) symbol indicates that this product
should not be disposed of in unsorted municipal waste. Follow local municipal waste
ordinances for proper disposal provisions to reduce the environmental impact of WEEE.
This instrument meets European requirement WEEE Directive 2012/19/EU.
54
Symbol and description
Neon™ Transfection System User Guide

(continued)
Appendix E
Informations de sécurité
Symbol and description
ON (power)
OFF (power)
Protective earth (ground)
The CE mark symbolizes that the product conforms to all applicable European Community
provisions for which this marking is required. Operation of the Neon™ Transfection System
is subject to the conditions described in this manual. The protection provided by the device
may be impaired if the instrument is used in a manner not specified by the manufacturer.
This product conforms to UL 61010-1, CAN/CSA C22.2 No.61010-1 “Safety Requirements
for Electrical Equipment for Measurement, Control, and Laboratory Use, Part l: General
Requirements.” Instruments bearing the TUV symbol are certified by TUV Product Services
to be in conformance with the applicable safety standard for the US and Canada.
Safety
E
Regulatory Compliance Mark indicates conformity with Australian standards for
electromagnetic compatibility.
China RoHS EFUP 25
Informations de sécurité
Suivez les instructions de cette section pour vous assurer d’utiliser l’appareil Neon™ Transfection
en toute sécurité. Le Neon™ Transfection System est conçu pour répondre aux normes de sécurité
EN61010-1. Pour assurer un fonctionnement sûr et fiable, utilisez toujours le Neon™ Transfection
System conformément aux instructions de ce manuel. Le non-respect des instructions contenues dans
ce manuel pourrait engendrer un éventuel danger pour la sécurité et annulerait la garantie du fabricant
ainsi que la certification à la norme de sécurité NF EN61010-1. Life Technologies ne peut être tenu
responsable de toute blessure ou dommage provoqués par l’utilisation de cet instrument dans des
buts autres que ceux prévus. Toutes les réparations et la maintenance doivent être eectuées par Life
Technologies.
•
Assurez-vous toujours que la tension d’entrée de l’alimentation corresponde à la tension disponible
sur le lieu d’utilisation.
•
Pour l’environnement d’exploitation, consultez la page 51.
•
Cet appareil étant aéroréfrigéré, ses surfaces chauent lorsqu’il fonctionne. Lors de l’installation de
l’appareil, laissez un espace supérieur à 10 cm (4 pouces) autour de celui-ci.
•
N’introduisez jamais d’objets métalliques dans les orifices d’aération de l’appareil, car cela pourrait
provoquer un choc électrique, des blessures corporelles ou endommager l’équipement.
•
Mettez toujours le commutateur principal de l’alimentation sur OFF (ARRÊT) avant de brancher le
cordon d’alimentation sur la prise murale.
Neon™ Transfection System User Guide
55

Appendix E Safety
E
Informational symbols
•
Vérifiez toujours que la borne de mise à la terre de l’appareil et celle de la prise murale sont
correctement raccordées. Branchez le cordon d’alimentation sur une prise d’alimentation à 3
conducteurs et reliée à la terre.
•
Pour éviter tout risque potentiel de choc électrique, vérifiez que le cordon d’alimentation est
correctement relié à la terre.
•
Veillez à placer l’instrument de manière à pouvoir le débrancher facilement.
•
Veillez à mettre le commutateur principal sur OFF (ARRÊT), à débrancher le cordon d’alimentation
et à immobiliser la station à pipettes avant de déplacer l’appareil.
Informational symbols
MISE EN GARDE ! Risque de danger. Consulter le manuel pour d’autres renseignements de
sécurité.
Symbol and description
MISE EN GARDE ! Risque de choc électrique.
Le symbole DEEE (Déchets d’équipements électriques et électroniques) indique que ce
produit ne doit pas être mis au rebut avec des déchets ménagers non triés. Suivez
la réglementation locale relative à l’élimination des déchets usuels pour réduire l’impact
environnemental des DEEE. Rendez-vous sur www.invitrogen.com/weee pour prendre
connaissance des options de collecte et de recyclage..
ON (MARCHE) (alimentation)
OFF (ARRÊT) (alimentation)
Protection par la mise à la terre (masse)
La marque CE est un symbole indiquant que le produit est conforme à toutes les
dispositions applicables de la Communauté européenne pour lesquelles ce marquage est
obligatoire. L’utilisation du Neon™ Transfection System est soumise aux conditions décrites
dans ce manuel. Si vous utilisez l’instrument d’une manière non spécifiée par le fabricant, la
protection oerte par l’appareil pourrait s’en trouver détériorée.
Ce produit est conforme à UL 61010-1, CAN/CSA C22.2 No.61010-1 «Exigences de
sécurité pour l’équipement électrique pour la mesure, le contrôle et l’utilisation en
laboratoire, Partie l : Généralité Les exigences.» Les instruments portant le symbole TUV
sont certifiés par TUV Product Services conforme à la norme de sécurité applicable aux
États-Unis et au Canada.
56
La marque de conformité réglementaire indique qu’elle est conforme aux normes
australiennes compatibilité électromagnétique
Neon™ Transfection System User Guide

(continued)
Chine RoHS EFUP 25
Chemical safety
WARNING! GENERAL CHEMICAL HANDLING. To minimize hazards, ensure laboratory personnel
read and practice the general safety guidelines for chemical usage, storage, and waste provided
below. Consult the relevant SDS for specific precautions and instructions:
Read and understand the Safety Data Sheets (SDSs) provided by the chemical manufacturer
·
before you store, handle, or work with any chemicals or hazardous materials. To obtain SDSs, see
the "Documentation and Support" section in this document.
Minimize contact with chemicals. Wear appropriate personal protective equipment when handling
·
chemicals (for example, safety glasses, gloves, or protective clothing).
Minimize the inhalation of chemicals. Do not leave chemical containers open. Use only with
·
sucient ventilation (for example, fume hood).
Check regularly for chemical leaks or spills. If a leak or spill occurs, follow the manufacturer
·
cleanup procedures as recommended in the SDS.
Handle chemical wastes in a fume hood.
·
Ensure use of primary and secondary waste containers. (A primary waste container holds the
·
immediate waste. A secondary container contains spills or leaks from the primary container.
Both containers must be compatible with the waste material and meet federal, state, and local
requirements for container storage.)
After emptying a waste container, seal it with the cap provided.
·
Characterize (by analysis if needed) the waste generated by the particular applications, reagents,
·
and substrates used in your laboratory.
Ensure that the waste is stored, transferred, transported, and disposed of according to all local,
·
state/provincial, and/or national regulations.
IMPORTANT! Radioactive or biohazardous materials may require special handling, and disposal
·
limitations may apply.
Symbol and description
Appendix E Safety
Chemical safety
E
WARNING! HAZARDOUS WASTE (from instruments). Waste produced by the instrument is
potentially hazardous. Follow the guidelines noted in the preceding General Chemical Handling
warning.
WARNING! 4L Reagent and Waste Bottle Safety. Four-liter reagent and waste bottles can crack
and leak. Each 4-liter bottle should be secured in a low-density polyethylene safety container with the
cover fastened and the handles locked in the upright position.
Neon™ Transfection System User Guide
57

Appendix E Safety
E
Biological hazard safety
Biological hazard safety
WARNING! Potential Biohazard. Depending on the samples used on this instrument, the surface
may be considered a biohazard. Use appropriate decontamination methods when working with
biohazards.
WARNING! BIOHAZARD. Biological samples such as tissues, body fluids, infectious agents,
and blood of humans and other animals have the potential to transmit infectious diseases.
Conduct all work in properly equipped facilities with the appropriate safety equipment (for example,
physical containment devices). Safety equipment can also include items for personal protection,
such as gloves, coats, gowns, shoe covers, boots, respirators, face shields, safety glasses, or
goggles. Individuals should be trained according to applicable regulatory and company/ institution
requirements before working with potentially biohazardous materials. Follow all applicable local,
state/provincial, and/or national regulations. The following references provide general guidelines when
handling biological samples in laboratory environment.
U.S. Department of Health and Human Services, Biosafety in Microbiological and Biomedical
·
Laboratories (BMBL), 5th Edition, HHS Publication No. (CDC) 21-1112, Revised December 2009;
found at:
https://www.cdc.gov/labs/pdf/CDC-BiosafetymicrobiologicalBiomedicalLaboratories-2009P.pdf
World Health Organization, Laboratory Biosafety Manual, 3rd Edition,
·
WHO/CDS/CSR/LYO/2004.11; found at:
www.who.int/csr/resources/publications/biosafety/Biosafety7.pdf
58
Neon™ Transfection System User Guide

Documentation and support
F
Customer and technical support
Visit thermofisher.com/support for the latest service and support information.
•
Worldwide contact telephone numbers
•
Product support information
–
Product FAQs
–
Software, patches, and updates
–
Training for many applications and instruments
•
Order and web support
•
Product documentation
–
User guides, manuals, and protocols
–
Certificates of Analysis
–
Safety Data Sheets (SDSs; also known as MSDSs)
Note: For SDSs for reagents and chemicals from other manufacturers, contact the
manufacturer.
Limited product warranty
Life Technologies Corporation and/or its aliate(s) warrant their products as set forth in the
Life Technologies' General Terms and Conditions of Sale at www.thermofisher.com/us/en/home/
global/terms-and-conditions.html. If you have any questions, please contact Life Technologies at
www.thermofisher.com/support.
Neon™ Transfection System User Guide
59

MAN0001557_-v1-GUID-6B9C7754-D1A0-4C7E-829D-4CBAD6015920-2018/07/20 12:00:33 en
21:14:00.088Z
thermofisher.com/support | thermofisher.com/askaquestion
thermofisher.com
1 March 2021
 Loading...