

3
4 5 6
2
1
QUICK REFERENCE
MicroSEQ™ ID Software For SeqStudio™ Genetic Analyzer v1.0
Catalog Numbers A49380 and A49382
Pub. No. MAN0019555 Rev. A.0
This document contains basic information that is required to use the MicroSEQ™ ID Software For SeqStudio™ Genetic Analyzer. For more
information, see the MicroSEQ™ ID Software For SeqStudio™ Genetic Analyzer v1.0 User Guide (Pub. No. MAN0019554).
Product description
The Applied Biosystems™ MicroSEQ™ ID Software For SeqStudio™ Genetic Analyzer v1.0 is part of a streamlined workflow for microbial
identification of bacteria and fungi. MicroSEQ™ chemistry kits are used to generate PCR products that are sequenced on a SeqStudio™ Genetic
Analyzer. The MicroSEQ™ ID Software For SeqStudio™ Genetic Analyzer v1.0 compares the sequencing data to validated microbial libraries and
generates an identification report with percent similarity. The report includes a final identification list of the organisms that closely match the
unknown sample and can generate a phylogenetic tree. Security, audit, and e-signature capabilities are included to help enable 21 CFR Part 11
compliance.
Sign in to the MicroSEQ™ ID Software For SeqStudio™ Genetic Analyzer
To log in to the software:
1. Start the MicroSEQ™ ID Software For SeqStudio™ Genetic Analyzer by double-clicking the MicroSEQ ID icon
2. Enter your user name and password, then click OK.
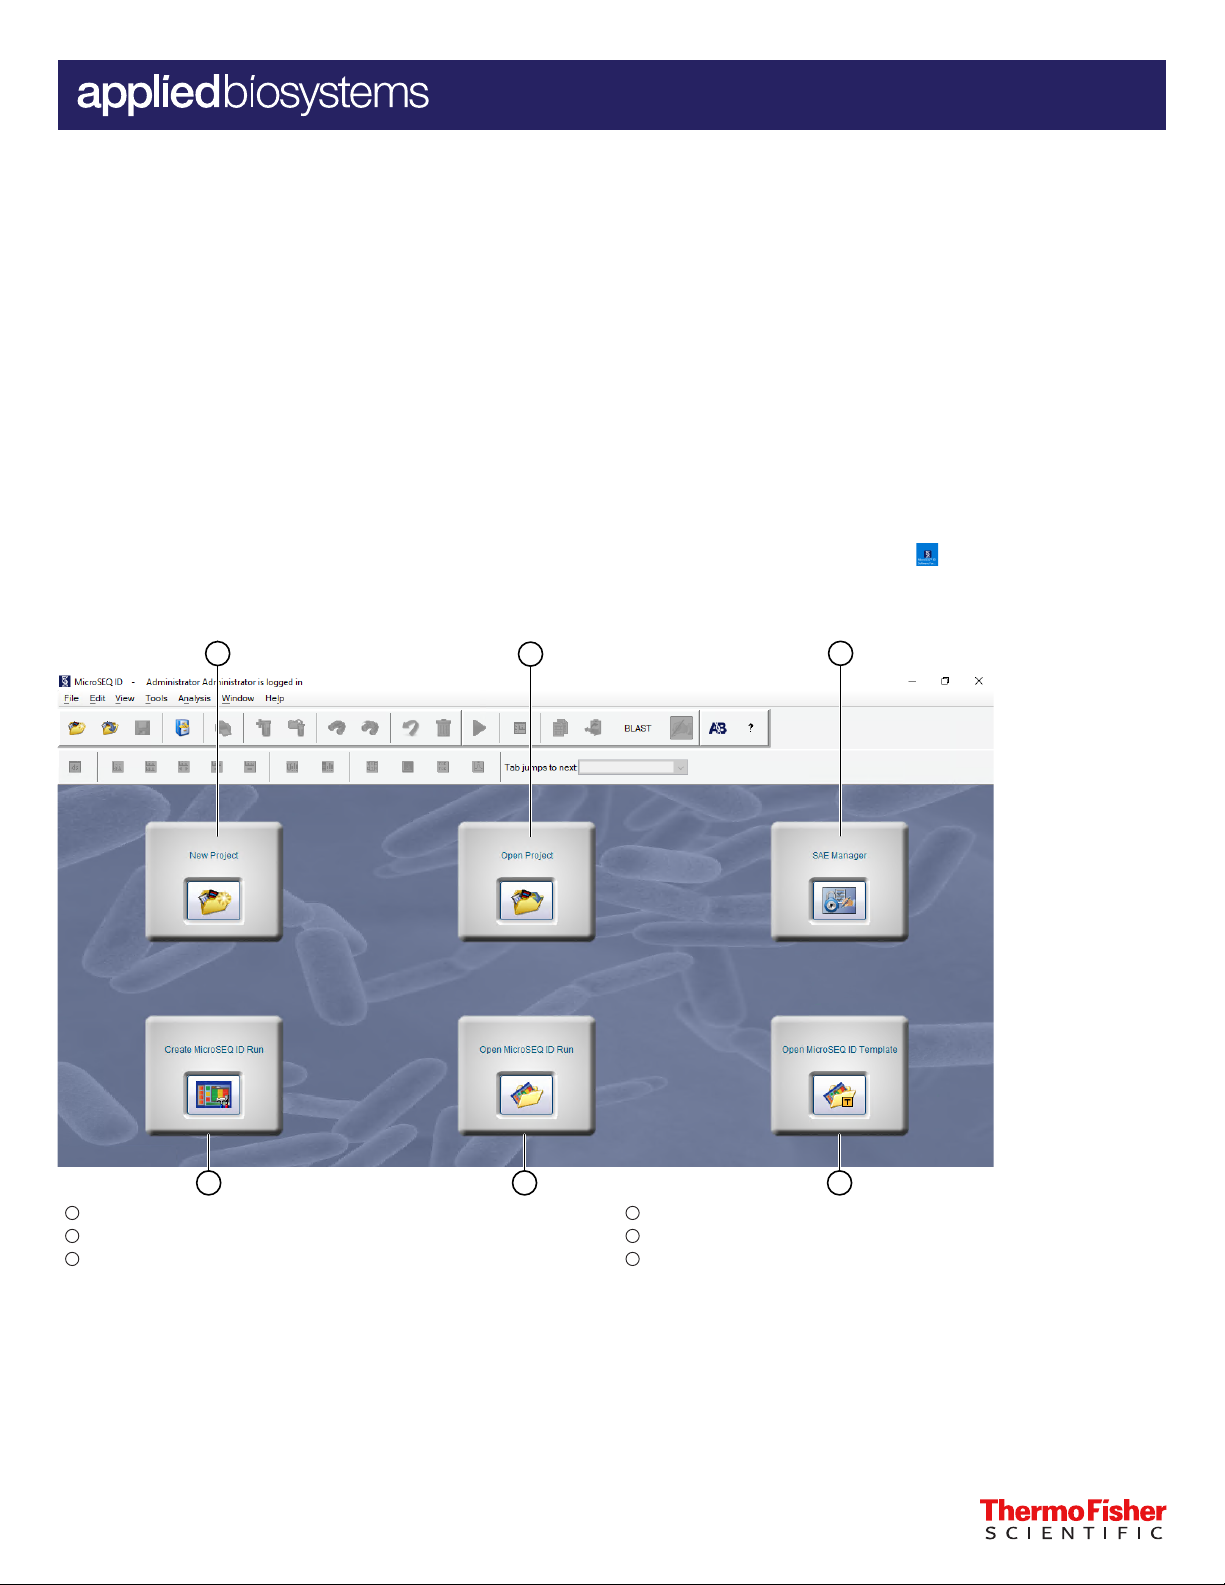
Home screen
on the desktop.
1
New Project
2
Open Project
3
SAE Manager
4
5
6
For Research Use Only. Not for use in diagnostic procedures.
Create MicroSEQ ID Run
Open MicroSEQ ID Run
Open MicroSEQ ID Template
Workflow
2
1
“Start the run on the SeqStudio™ Genetic Analyzer” on page 4
“Confirm that the MicroSEQ ID Run has started” on page 5
“Confirm that the run is complete” on page 6
“Analyze the data in the report” on page 7
“Selecting reports to export or print” on page 7
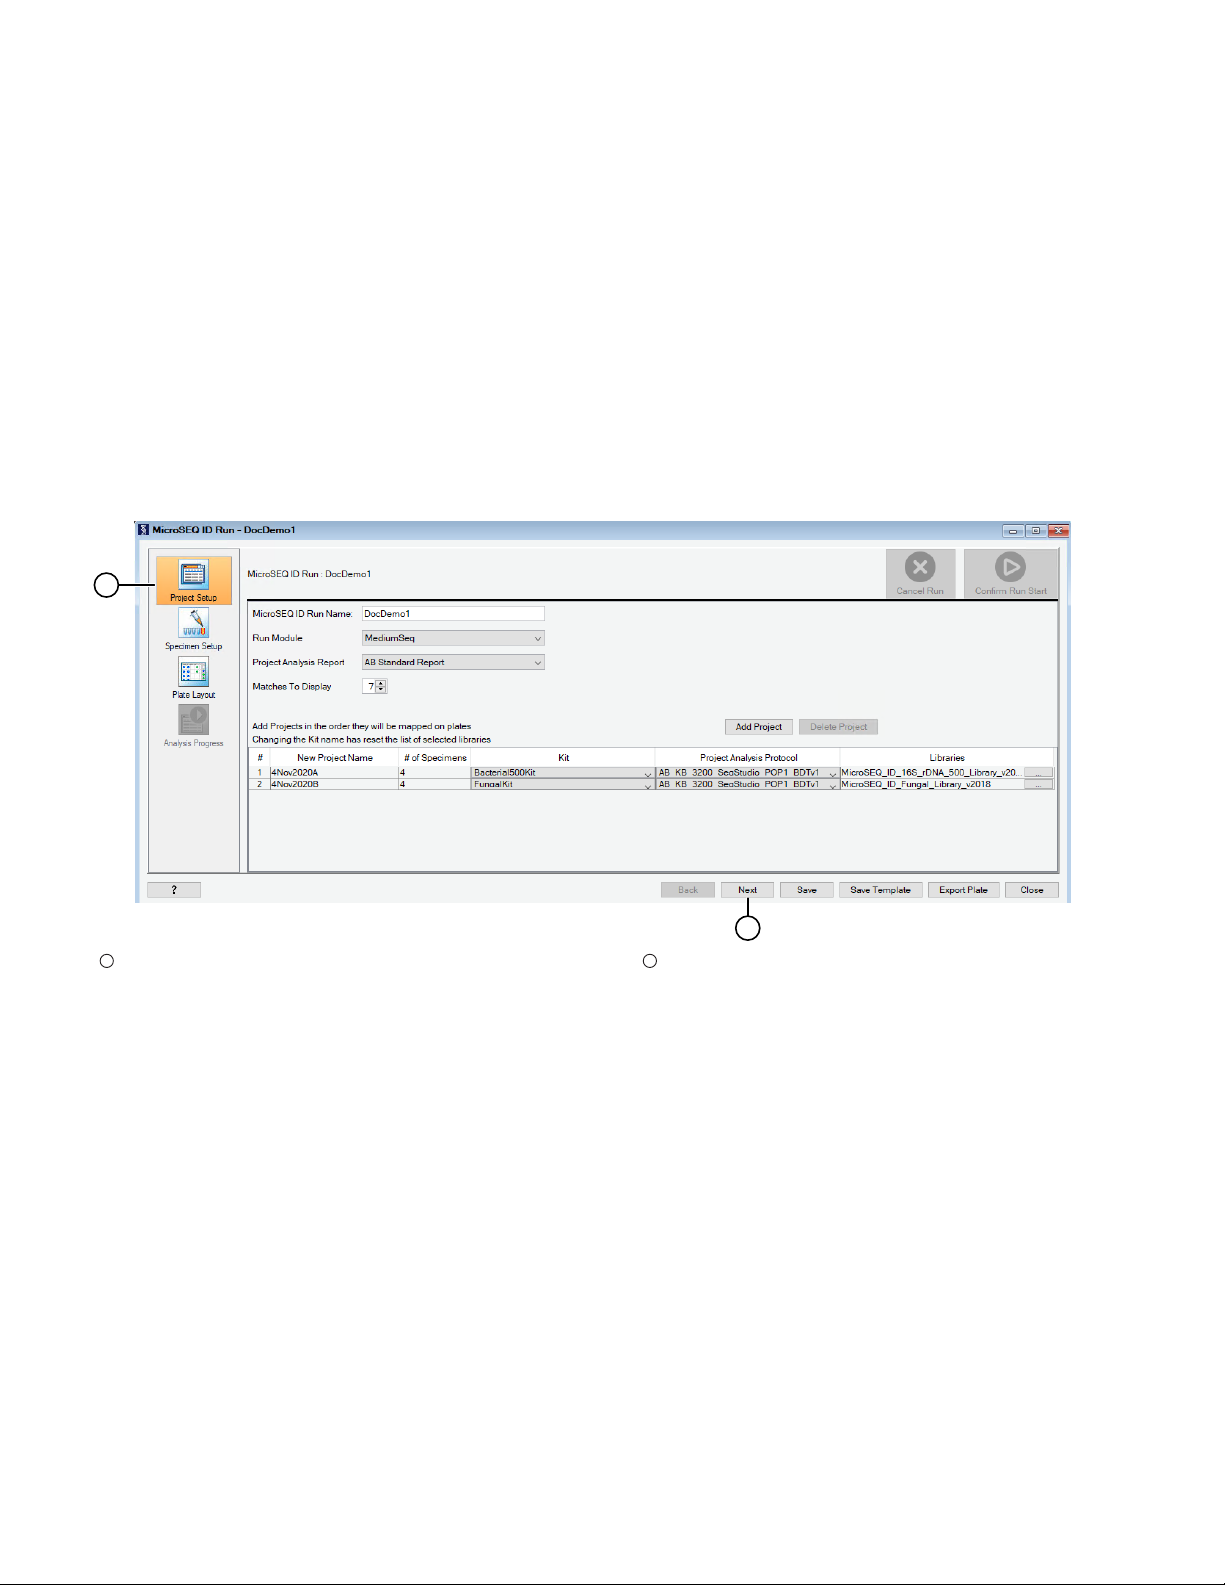
Create a MicroSEQ ID Run
1. On the home screen, click Create MicroSEQ ID Run.
The MicroSEQ ID Run window opens.
“Create a MicroSEQ ID Run” on page 2
▼
▼
▼
▼
▼
“Use SAE features” on page 7
▼
“Export a project” on page 7
▼
1
Project Setup
2. Enter the Project Setup details.
a. Enter the MicroSEQ ID Run Name.
b. Select the Run Module.
c. Select the Project Analysis Report.
d. Select the number of Matches To Display.
3. Click Add Project, then enter the project details.
a. Enter the New Project Name.
b. Enter the # of Specimens.
c. Select the Kit.
d. Select the Project Analysis Protocol.
e. Select the Library.
4. Click Next.
The Specimen Setup pane opens.
2
2
Next
MicroSEQ™ ID Software For SeqStudio™ Genetic Analyzer v1.0 Quick Reference

5. (Optional) Edit the specimen names as required.
1
3
2
1
32
1
Specimen Setup
2
Specimen Name textbox
6. Click Next.
1
Plate Layout
2
Save button
The Plate Layout pane opens.
7. Click Save to save the run.
8. Click Export Plate.
A confirmation is received if the plate is exported successfully.
3
Next
3
Export Plate button
MicroSEQ
™
ID Software For SeqStudio™ Genetic Analyzer v1.0 Quick Reference 3

Start the run on the SeqStudio™ Genetic Analyzer
1
The plate must be exported from the MicroSEQ™ ID Software For SeqStudio™ Genetic Analyzer v1.0 before starting the run on the SeqStudio
™
Genetic Analyzer.
The network location must be established by the Administrator prior to running plates on the SeqStudio™ Genetic Analyzer. This location is used
to store imported plates and instrument AB1 files.
If SAE is enabled on the SeqStudio™ Genetic Analyzer (Recommended), the user must be signed in.
Some SeqStudio™ Genetic Analyzer features (for example, remote monitoring) are disabled when using the MicroSEQ™ ID Software For
SeqStudio™ Genetic Analyzer v1.0.
1. Load the plate into the instrument.
2. Import the plate from the network drive to the SeqStudio™ Genetic Analyzer.
a. In the SeqStudio™ Genetic Analyzer home screen, touch Setup run, then select Network Drive to import the plate exported from the
MicroSEQ™ ID Software For SeqStudio™ Genetic Analyzer v1.0.
1
Network Drive
b. Select the plate from the network drive.
c. Select the Network Drive (established by the Administrator) in the Save location drop-down list.
4
MicroSEQ™ ID Software For SeqStudio™ Genetic Analyzer v1.0 Quick Reference

d. Verify that all Plate Properties are correct.
2
1
1
1
Save location
2
Start run
3. Touch Start Run.
Confirm that the MicroSEQ ID Run has started
Ensure that the run has started on the SeqStudio™ Genetic Analyzer.
Return to the MicroSEQ™ ID Software For SeqStudio™ Genetic Analyzer and click Confirm Run Start.
1
Confirm Run Start button
A confirmation is received if the run was started successfully. The files are auto-imported into the MicroSEQ™ ID Software For SeqStudio™ Genetic
Analyzer v1.0 when the run is complete.
MicroSEQ
™
ID Software For SeqStudio™ Genetic Analyzer v1.0 Quick Reference 5

Confirm that the run is complete
1
4
2
3
1 2
When the run is complete on the SeqStudio™ Genetic Analyzer, return to the MicroSEQ™ ID Software For SeqStudio™ Genetic Analyzer v1.0, then
click Confirm Run Complete. All specimen data from the genetic analyzer are mapped in the software and the boxes in the Result Available
column turn green.
Note: Mapping can only be completed once the run is finished on the SeqStudio™ Genetic Analyzer.
If any specimens were not mapped automatically, see the troubleshooting section of the MicroSEQ™ ID Software For SeqStudio™ Genetic Analyzer
v1.0 User Guide (Pub. No. MAN0019554).
1
Analysis Progress
2
List of imported specimens
3
Open Report
4
Confirm Run Complete button
When specimen data is mapped successfully, the hyperlinks in the Action column turn blue and can be opened.
1
Result Available column
2
Action column
6 MicroSEQ
™
ID Software For SeqStudio™ Genetic Analyzer v1.0 Quick Reference

Analyze the data in the report
1
1. Click Open Report for the Project of interest.
The Analysis QC Report opens.
1
Analysis QC Report
2. In the Analysis QC Report check the following parameters.
a. Check the Basecalling, Filter, and Assembly columns for warnings and failures.
b. Check the values displayed in the Specimen Score column.
c. Check the values displayed in the % Match column.
d. Check the Consensus and Library Entry Length.
e. (Optional) Add comments to the Comments field.
3. Review the Library Search Report, Audit Trail Report, and Electronic Signature Library Report as required.
Use SAE features
Only the Administrator can enable the Authentication, Electronic Signature and Audit Trail features as required for each user and for specific
events. If SAE is enabled, dialog boxes appear at key steps in the process. For more information about SAE features, see the MicroSEQ™ ID
Software For SeqStudio™ Genetic Analyzer v1.0 User Guide (Pub. No. MAN0019554).
To open theElectronic Signature™ Verification dialog box and to e-sign:
• Perform an event that prompts an Electronic Signature™ Verification dialog box.
or
• Select a project, specimen or sample in the Project navigator pane, then select Tools ► Electronic Signature™ ► Sign to open the
Electronic Signature™ Verification dialog box.
To e-sign, enter the username and password in the Electronic Signature™ Verification dialog box, then click OK.
Export a project
1. Close the project.
2. Select Tools4MicroSeqID Manager, then select the Projects tab.
3. Select the project(s) to be exported, then click Export.
4. Browse to your designated folder.
5. Click Export, then Close.
Selecting reports to export or print
View the report
1. In the Project window, select Analysis4Report Manager.
2. To change to a dierent Project Analysis Report (AB™ Standard vs. a custom report):
a. Right-click on the project name and select Properties and Settings.
b. In the Project Analysis Report drop-down list, select the desired report.
c. Click OK.
d. Select Analysis4Report Manager.
Export the report
1. Select the report in the Report Manager navigation pane. Reports can be exported in HTML, PDF, XML, or TXT formats.
2. Select File4Export4Report.
3. Navigate to and select the desired destination folder, then click Export.
™
MicroSEQ
ID Software For SeqStudio™ Genetic Analyzer v1.0 Quick Reference 7

Print the report
1. Select File4Print.
2. Select the desired print settings.
3. Click Print4OK.
Life Technologies Corporation | 200 Oyster Point Blvd | South San Francisco, CA 94080 | USA
For descriptions of symbols on product labels or product documents, go to thermofisher.com/symbols-definition.
The information in this guide is subject to change without notice.
DISCLAIMER: TO THE EXTENT ALLOWED BY LAW, THERMO FISHER SCIENTIFIC INC. AND/OR ITS AFFILIATE(S) WILL NOT BE LIABLE FOR SPECIAL, INCIDENTAL, INDIRECT,
PUNITIVE, MULTIPLE, OR CONSEQUENTIAL DAMAGES IN CONNECTION WITH OR ARISING FROM THIS DOCUMENT, INCLUDING YOUR USE OF IT.
Revision history: Pub. No. MAN0019555
Revision Date Description
A.0 11 November 2020 New document for the MicroSEQ™ ID Software For SeqStudio™ Genetic Analyzer.
Important Licensing Information: These products may be covered by one or more Limited Use Label Licenses. By use of these products, you accept the terms and conditions of all
applicable Limited Use Label Licenses.
©2020 Thermo Fisher Scientific Inc. All rights reserved. All trademarks are the property of Thermo Fisher Scientific and its subsidiaries unless otherwise specified.
thermofisher.com/support | thermofisher.com/askaquestion
thermofisher.com
11 November 2020
 Loading...