

Page 1

QUICK REFERENCE
Genexus™ Integr
ated Sequencer
Catalog Number A45727
Pub. No. MAN0017912 Rev. C.0
Note: For safety and biohazard guidelines, see the “Safety”
appendix in the Genexus™ Integrated Sequencer User Guide
(Pub. No. MAN0017910). Read the Safety Data Sheets (SDSs)
and follow the handling instructions. Wear appropriate protective
eyewear, clothing, and gloves.
The Ion Torrent™ Genexus™ Integrated Sequencer integrates
library preparation, templating, sequencing, and data analysis
into a single-instrument automated run. For more information on
creating assays, adding or importing samples and library batches,
creating plans for sample and library runs, starting a sequencing
run, and data analysis, see the Genexus™ Integrated Sequencer
User Guide (Pub. No. MAN0017910). This quick reference
assumes familiarity with Genexus™ Software and the Genexus
Integrated Sequencer, and is intended for more experienced
users.
Create an assay ................................. 1
■
Add samples and create a run plan in Genexus™ Software
■
............................................... 1
Dilute the samples and load the sample plate .......... 3
■
Load the sequencer and start a run .................. 4
■
Review data and results ........................... 7
■
Limited product warranty .......................... 7
■
™
3. In the Create Sample
fields.
Attributes identified with a red asterisk (*) in the Create
Sample dialog box are required when adding a new sample.
If attribute information is not available when adding a
new sample, substitute mock information to complete the
required fields.
4. Click Save.
The new sample is listed in the Manage Samples screen
and will be available to use in your run.
dialog box, complete the required
Import samples
Sample data files can be used to capture, manage, and edit
sample data. You can import sample data files in the following
formats: TXT, XLS, XLSX, or CSV. For a list of the sample
attributes that are included in the import file, and for information
on downloading a Microsoft™ Excel™ example file to create an
import file, see the Genexus™ Integrated Sequencer User Guide
(Pub. No. MAN0017910), or Genexus™ Software 6.2 Help.
1. In the menu bar, click Samples4Manage Samples, then
click
2. In the Import Samples
file.
Import Samples.
dialog box, click Select samples
Create an assay
For information on how to create and manage assays in Genexus
Software, see the Genexus™ Integrated Sequencer User Guide
(Pub. No. MAN0017910). If you are using a system-installed assay
without change, proceed to “Add samples and create a run plan in
Genexus™ Software”.
Add samples and create a run plan in Genexus
Software
You can create run plans for two types of runs: sample runs
that start from nucleic acid samples, and library runs that start
from manually prepared libraries. Before creating a run plan in
Genexus™ Software for either a sample run or a library run, you
must first enter samples in the software to assign sample names
and provide other information. Alternatively, you can import
sample information from a data file.
Create a new sample
1. In the menu bar, click Samples4Manage Samples.
2. In the Manage Samples screen, click
Create Sample.
3. Navigate to the file, then click Open.
™
™
4. Click Upload.
A progress bar followed by an import report appears. If the
import process fails, an error message indicates the reason
for failure (for example, an invalid character was used).
Successfully imported samples are listed in the
Samples / Manage Samples screen.
Prepare a library batch
A library batch is a group of prepared libraries that are sequenced
in the same library run. If you are planning a run starting from
libraries that you have already prepared manually, you must first
create a library batch in Genexus™ Software from samples that
you have added. If you are planning a run starting from nucleic
acid samples, skip this step and proceed to “Plan a sample run”
on page 2.
For Research Use Only. Not for use in diagnostic procedures.
Page 2
1. In the menu bar, click Samples4Manage Samples.
2. In the Manage Samples screen, in the Filter Samples by...
dropdown menu, apply the To Be Prepared filter to limit
the displayed samples to those samples that have not been
placed in a library batch.
3. Select samples in the list by clicking the checkbox to the left
of each sample, then click
4. In the Creat
the assay that you want to run.
e Library batch screen, in Select Assay, select
Prepare Library Batch.
3. In the Assays st
t
o use in the run.
Use the Filter Assays By list and the Assay Name search
box to search, sort, and filter the list of assays.
4. In the Include NTC column for each assay that you select,
click the Include NTC checkbox to include a no template
control for the assay.
5. After you select an assay (or assays) and make the
appropriate Ion Reporter™ Software selections (if applicable),
click Next.
ep, select the assay or assays that you want
5. In the expanded screen, in Library Batch ID, enter a unique
identifier for the library batch.
6. Select the barcodes from the kit boxes into the appropriate
fields.
7. Select the Include NTC checkbox to add no template
control sample processing and reporting to the library batch.
8. Type a unique library name for each DNA and/or RNA library
in the appropriate field.
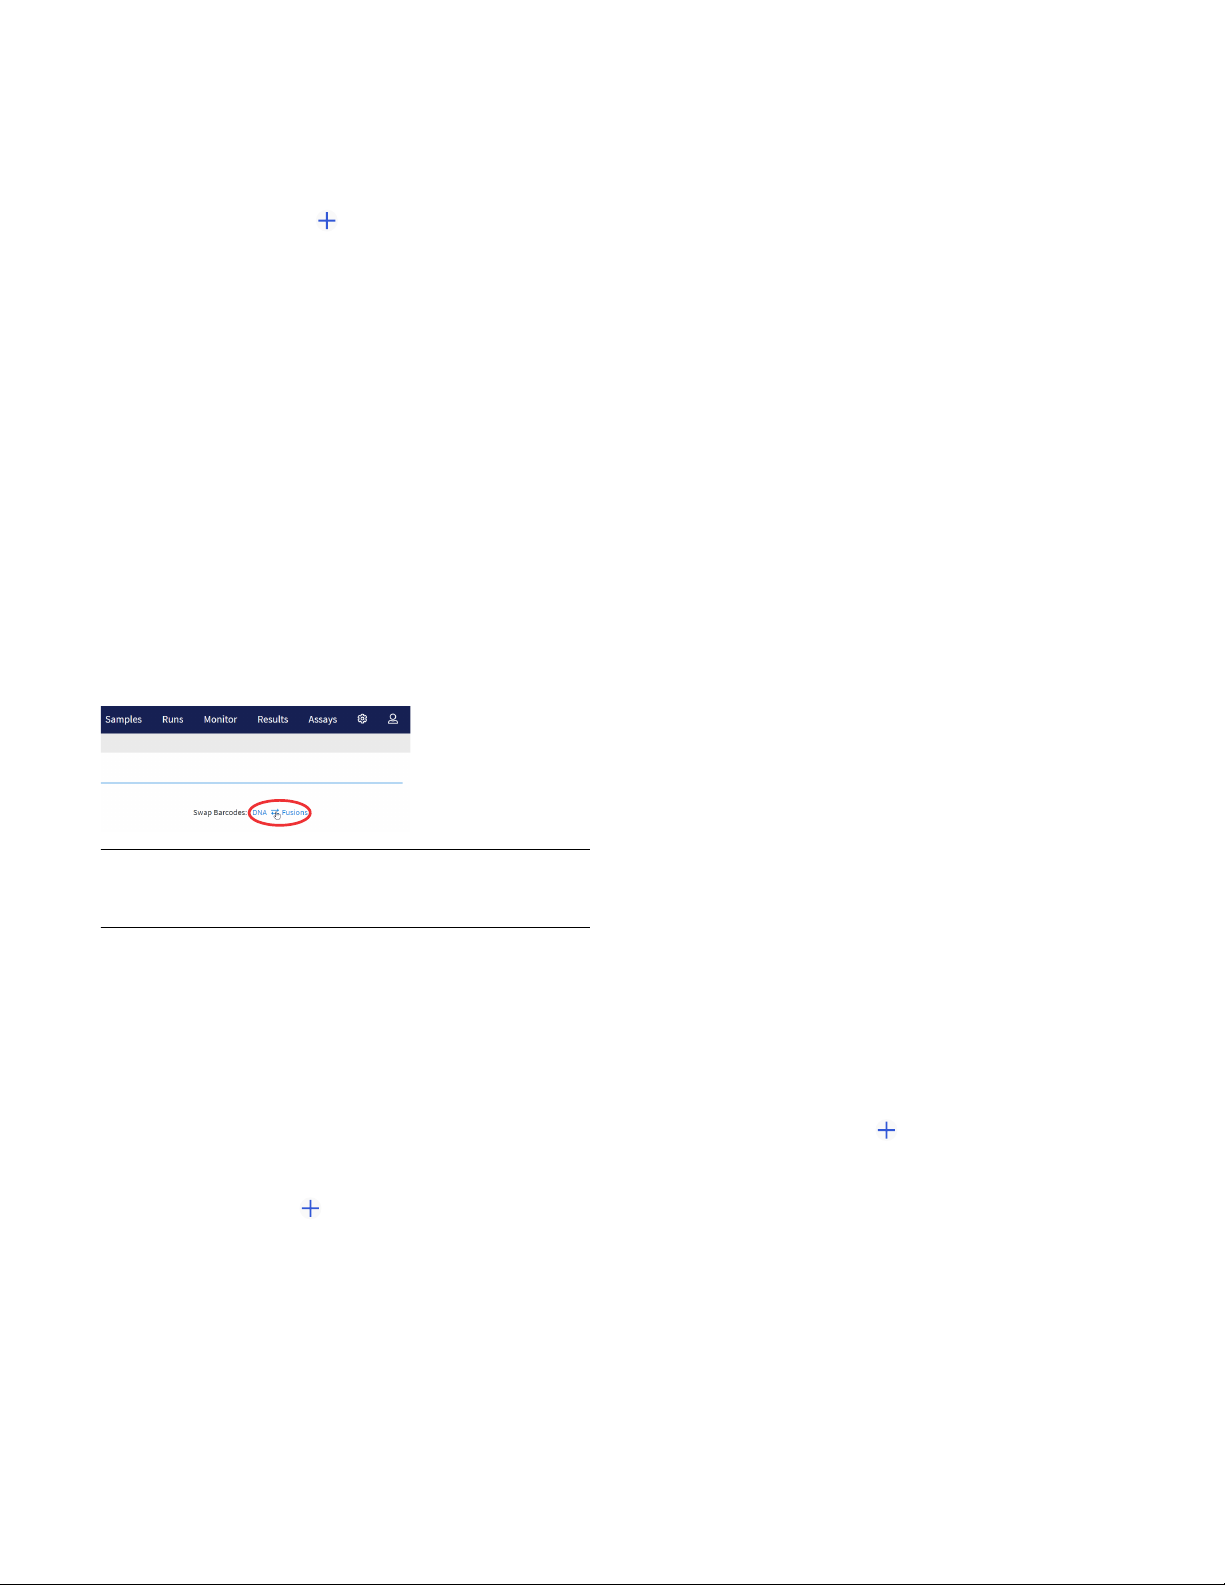
9. Select the barcode ID of the adapter used to prepare each
library. If appropriate, swap the default barcodes in the
dialog box between DNA, RNA, and Fusions by clicking the
Swap Barcodes swap image.
For example, click the DNA and Fusions swap button.
IMPORTANT! Ensure that the actual bar
used to create the libraries match the barcodes that you
enter in the Create Library batch screen.
10. Enter the Input Quantity for each library.
11. Click
Submit to save and submit your selections.
The Manage Libraries screen opens, listing the library batch
that you created. Libraries that are prepared in the same
batch have the same Library Batch ID.
codes that you
Plan a sample run
1. In the menu bar, click Runs4Plan Sample Run.
Note: You can also click
Runs / Manage Runs screen.
2. In the
Setup step, enter or make the following selections.
a. In the Plan section, enter a unique name.
b. (Optional) In the Reporting (Optional) section, select
one or more options if needed. You can select both
options, or leave both options deselected.
• Generate Report
• Upload BAM files to Ion Reporter™ Software
c. Click Next.
Plan Sample Run in the
6. In the Samples step, select the samples from the list that
you want to run with the assay, then click Assign.
7. If you selected more than one assay, repeat step 6 for each
additional assay.
8. If needed, edit samples in one of the following ways, then
click Next.
• Click View & Remove, make your selections, then click
Update.
• Click Remove All, make your selections, then click
Assign.
9. In the Sample Plate step, review sample positions in the
sample plate. Drag and drop samples and no template
controls to edit the location of samples and controls, if
desired.
10. Modify the concentration of samples, if needed.
11. If sample plate information is correct, click Next.
12. In the Review step, review the run plan summary, then click
Save & Print to print the run setup guide, if desired. Click
Save to save the run without printing.
After saving, the run appears in the Manage Runs screen in
the run list with the name you specified.
After selecting the run and loading the sequencer, the run is
started on the sequencer screen.
Plan a library run
1. In the menu bar, click Runs4Plan Library Run.
Note: You can also click
Runs / Manage Runs screen.
2. In the
Setup step, enter a name for the run, then configure
the reporting options.
a. In Run Name, enter a unique name.
b. (Optional) In the Reporting (Optional) section, select
one or more options if needed. You can select both
options, or leave both options deselected.
• Generate Report
• Upload Samples to Ion Reporter™ Software
c. Click Next.
Plan Library Run in the
2 Gene
egrated Sequencer Quick Reference
xus™ Int
Page 3
3. In the Assays step, select the assay or assays that you want
to use in the run, then click Next.
Use the Filter Assays By list and the Assay Name search
box to search, sort, and filter the list of assays.
4. In the Library Batches step, select the library batch or
batches that you want to use in the run.
Note: Only one library batch can be selected per assay.
However, you can plan a multi-assay library run if you select
multiple, dierent assays in the Assays step.
5. After you select a library batch (or batches), click Next.
6. In the Review step, review the run plan summary, then click
Save and Print to print the run setup guide, if desired. Click
Save to save the run without printing.
After saving, the run appears in the run list on the Manage
Runs screen with the name you specified.
The run is started on the sequencer screen after selecting a run
and loading the sequencer.
Note:
If you enter a concentration <0.11 ng/µL or >10,000 ng/µL
·
target concentration, a warning that the concentration is
out of range appears, and you are not allowed to proceed
to the next step.
If the concentration is ≤10,000 ng/µL, but >1,024X of the
·
target concentration, you can proceed, but because the
instrument cannot dilute samples more than 1,024‑fold,
the diluted sample concentration will be greater than the
target concentration.
2. Add samples to the sample plate at the volume and
positions that are specified in the run setup guide.
The sample volume is not adjustable and depends on
sample type, the number of primer pools in the assay, and
library chemistry. The following table also provides loading
volume.
Sample type
DNA 1 15 µL
Number of primer
pools
Ion AmpliSeq™ chemistr
Volume
y
Dilute the samples and load the sample plate
Before starting a run on the instrument, you must quantify and
dilute the samples or sample libraries, then load the sample plate.
Dilute or concentrate the samples (if needed) and load the sample plate—sample run
Isolate DNA and RNA samples using one of the procedures and
kits that are recommended in the Genexus™ Integrated Sequencer
User Guide (Pub. No. MAN0017910).
Samples with concentrations up to 1,024X of the target
concentration for an assay (displayed as default values in the
Sample Plate step screen in run planning) are in range for
automated dilution and require no manual dilution. Enter the
concentrations during sample run planning at the Sample Plate
step (see step 9 on page 2).
1. For samples with concentrations that are out of range
for automated dilution, manually dilute the sample with
nuclease-free water, or concentrate the sample to a
concentration ≤1,024X of the target concentration. For
samples that are in range, go to step 2.
If the sample
concentr
<0.11 ng/µL Concentrate the sample to greater than or
≥0.11 ng/µL, but
less than the target
concentration
≤1,024X of the
target concentration
ation is…
equal to the target concentration.
Run is allowed but sample concentration
may not be optimal for library preparation.
Concentrate the sample to greater than or
equal to the target concentration.
No manual dilution is necessary. The
sequencer dilutes the sample to the target
concentration automatically during the run.
Then…
DNA 2 25 µL
RNA 1 15 µL
RNA 2 25 µL
Ion AmpliSeq™ HD chemistry
DNA 1 20 µL
RNA 1 20 µL
TNA 1 20 µL
3. Seal the plat
e with a sheet of Adhesive PCR Plate Foils
(Thermo Fisher Scientific Cat. No. AB0626).
4. Keep the plate on ice until ready to load it in the sequencer.
Dilute and pool libraries, and load the sample plate— library run
1. Dilute each manually prepared and quantified sample library
to 200 pM with nuclease-free water.
Note: Each library must be barcoded with a unique barcode
or barcode pair. Use this concentration as a starting point,
then titrate up or down based on sequencing results, if
needed.
2. Add equal volumes of each library to a new 1.5‑mL low DNA
retention tube so that the total volume is greater than the
volume specified in the run setup guide provided by the
software.
Note: For information on combining DNA and RNA libraries
recovered from sample runs using assays that include DNA
and fusions, see the Genexus™ Integrated Sequencer User
Guide (Pub. No. MAN0017910).
>1,024X of the
target concentration
Genexus™ Int
Manually dilute to the target concentration
based on assay type, or to a concentration
in range for automated dilution by the
sequencer.
egrated Sequencer Quick Reference 3
3. Mix well by pipetting up and down five times, then transfer
the specified volume of each library batch to the sample
plate position specified in the run setup guide.
Page 4

4. Seal the plate with a sheet of Adhesive PCR Plate Foils
(Thermo Fisher Scientific Cat. No. AB0626).
5. Keep the plate on ice until you are ready to load it in the
sequencer.
5. Inspect all the strips for large bubbles lodged under the
surface of liquid in the tubes. Gently tap the strips on a
benchtop to dislodge any bubbles without splashing the
contents onto the upper tube walls. If tapping fails to
dislodge a bubble, use the swing technique described in
substep 4b until large bubbles are dislodged.
Load the sequencer and start a run
After you have planned a run in Genexus™ Software, use the run
setup guide provided by the software to load samples in the
sample plate, and to determine which consumables to load in the
sequencer. Follow the step‑by‑step instructions in the sequencer
touchscreen during run setup. The vision system of the sequencer
tracks the addition of consumables in real-time and alerts you if
a component is loaded in an incorrect position, or if an incorrect
quantity is loaded.
Before you begin
1. Remove the library and templating strips from their boxes in
the refrigerator or freezer, and ready them for loading in the
sequencer.
• Genexus™ Strip 1 and Genexus™ Strip 3‑GX5™:
equilibrate to room temperature for 30 minutes.
• Genexus™ Strip 2‑AS or Genexus™ Strip 2‑HD,
depending on your assay, and Genexus™ Strip 4: thaw
on ice for at least 30 minutes. Keep the strips on ice
until you load them in the sequencer.
IMPORTANT! Confirm that the strip contents ar
completely thawed before installing in the sequencer.
2. Remove primer pool tubes in tube carriers that ar
for the run fr
om the freezer, then thaw for at least 30
minutes on ice. After thawing, gently tap the primer pool
tube or tubes on a bench surface to ensure that contents
are collected at the bottom of the tubes. Keep the tubes and
carriers on ice until you load them in the sequencer.
e
e needed
Fill Genexus™ Primer Pool Tubes
(custom assays only)
If you are using a custom assay, Genexus™ Primer Pool Tubes
must be manually filled with the custom Ion AmpliSeq™ or Ion
AmpliSeq™ HD panels at the appropriate volume and in the
correct primer pool tube positions. For Ion AmpliSeq™ library
panels, use one carrier per DNA or RNA assay primer pool. The
two positions in the primer pool tube carrier are designated as
shown in the following figure:
1 2
Position 1 tube: Contains Ion AmpliSeq™ DNA, Ion AmpliSeq
1
RNA, or Ion AmpliSeq™ HD FWD primer pool
Position 2 tube: Contains Ion AmpliSeq™ HD REV primer pool
2
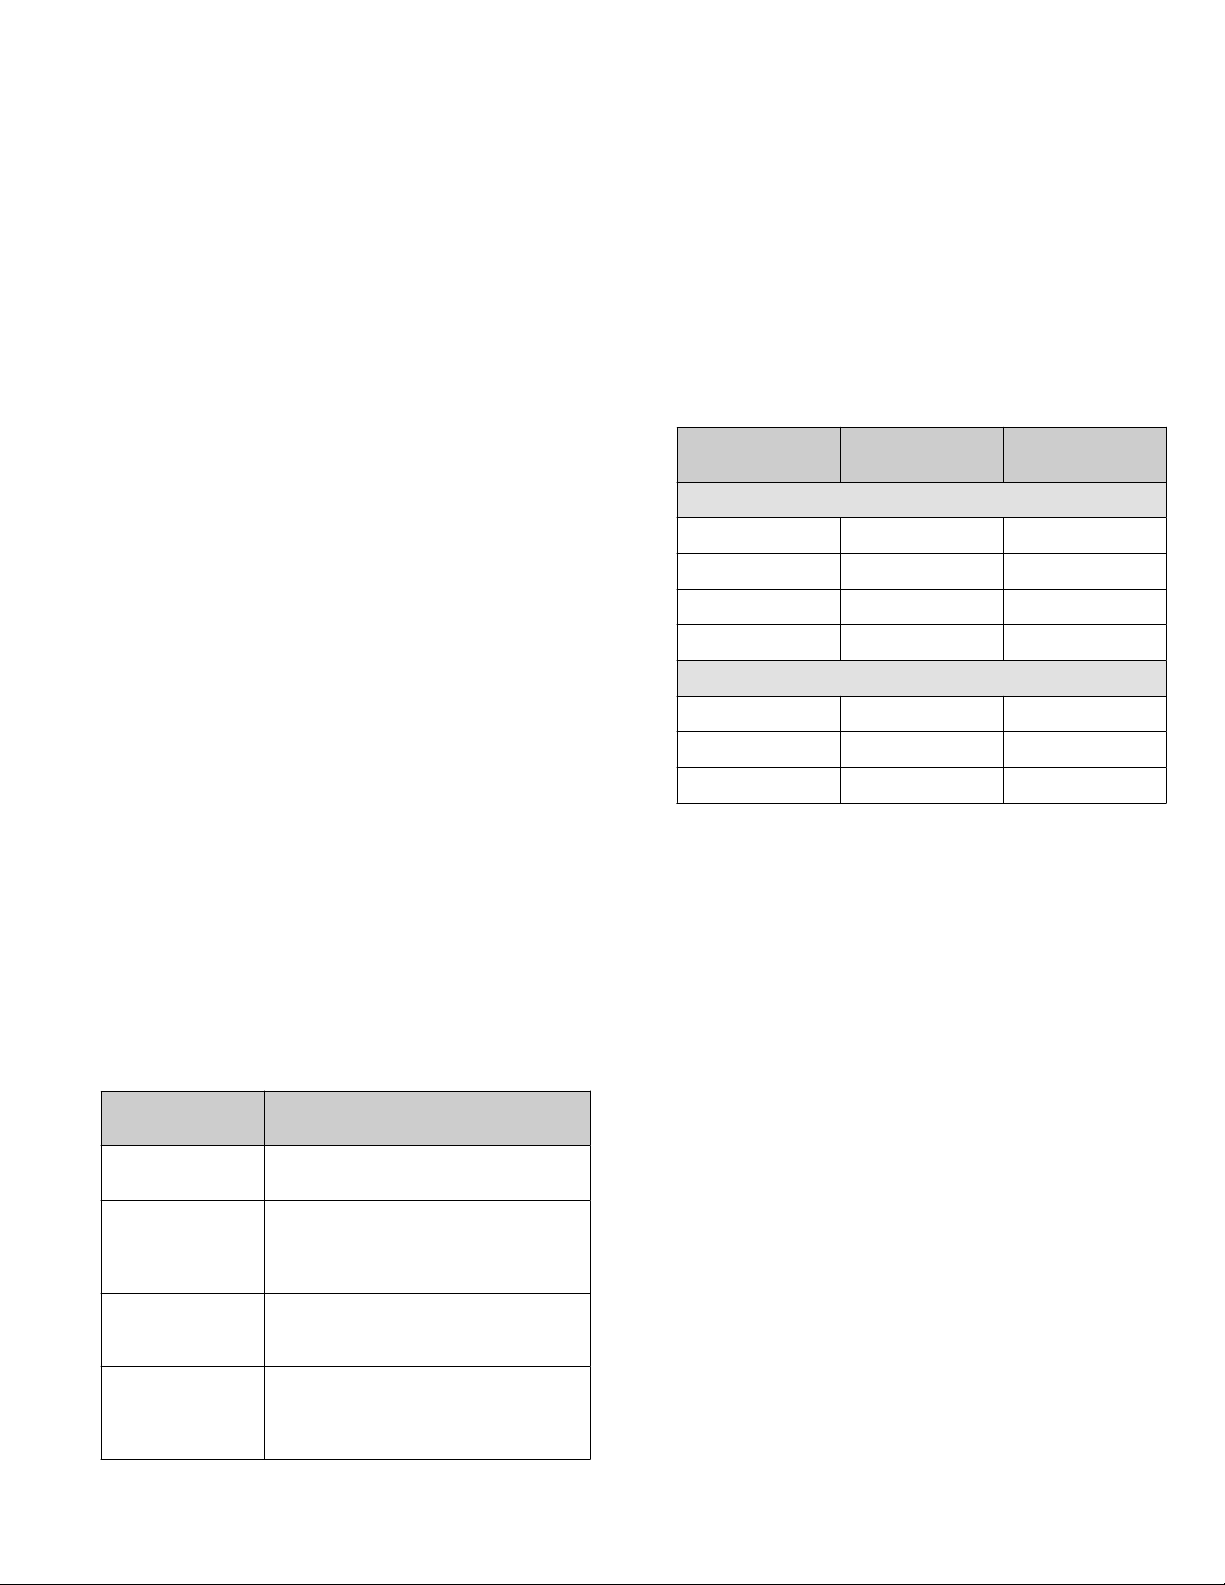
1. Add primer pool at the indicated volume, appropriate to
your assay type, to the Genexus™ Primer Pool Tubes using
the following tables as a guide. Fill the number of tubes
specified by the run plan summary.
Ion AmpliSeq™ DNA assays
Number of
primer pairs
per pool
Concentration
Volume in
position 1
Volume in
position 2
™
3. If you are installing a new Genexus™ Cartridge, thaw
the cartridge at room temperature for 30 minutes before
installing in the sequencer.
4. Genexus™ Strip 1 and Genexus™ Strip 3‑GX5™ contain
magnetic beads in one or two positions, yellow or brown
in color, that sometimes get trapped in the upper "keyhole"
of the tube. Dislodge these beads from the keyhole before
installing the strip in the sequencer. Use the following
procedure for each strip.
a. Invert the strip 3–4 times to dislodge beads that are
trapped in the keyholes.
b. To remove any remaining beads and liquid from the
keyholes, grasp the strip at one end with the strip
seal facing up, then swing the strip with a rapid and
downward centrifugal arm motion, ending with a sharp
wrist-flick.
c. Grasp the strip at the other end, then repeat the
centrifugal motion.
d. Check tube positions for any r
emaining beads that are
trapped in keyholes, then repeat the centrifugal motion,
if needed. It is acceptable if a few beads remain in the
keyhole or on the tube wall, but most should be either
in suspension or in a pellet at the bottom of the tube.
12–96 2X (400 nM) 140 µL —
97–3,072 2X (100 nM) 140 µL —
>3,072 2X ([3,072 / Number
[1]
For example, if a panel pool has 3,500 primer pairs, the 2X concentration is
(3,072 / 3,500) × 100 nM = 87.8 nM.
of primer pairs per
pool] × 100 nM)
140 µL —
[1]
Ion AmpliSeq™ RNA assays
Number of
primer pairs
per pool
12-1,228 5X (250 nM) 75 µL —
>1,228 5X ([1,228 / Number
[1]
For example, if a panel pool has 1,500 primer pairs, the 5X concentration is
(1,228 / 1,500) × 250 nM = 205 nM.
Concentration
of primer pairs per
pool] × 250 nM)
[1]
Volume in
position 1
75 µL —
Volume in
position 2
4 Genexus
™
Integrated Sequencer Quick Reference
Page 5

Ion AmpliSeq™ HD assays
1
Primer pool type Concentration
Ion AmpliSeq™ HD
FWD
Ion AmpliSeq™ HD
REV
10X 50 µL —
10X — 50 µL
Volume in
position 1
Volume in
position 2
IMPORTANT!
If you are using Ion AmpliSeq™ library chemistry, leave
·
the tube in position 2 empty and uncapped, but do not
remove the tube from the carrier before loading in the
sequencer. Do not add a second Ion AmpliSeq™ primer
pool to the position 2 tube.
If you are using Ion AmpliSeq™ HD library chemistry, add
·
the FWD and REV primer pools to the appropriate tubes
in the same carrier.
Ensure that no bubbles are introduced at the bottom of
·
the tube when adding the primer pool.
2. If you do not install the primer pool tube carriers in the
sequencer immediat
pools, then store the tube carriers on ice. Remember to
uncap all tubes before installing.
ely, cap the tubes that contain primer
4. In the L
by step to load each required consumable in a highlighted
position on the deck. The sequencer detects the loading
of each consumable in real time and advances to the next
component automatically.
oad Deck screen, the sequencer instructs you step
IMPORTANT!
Ensure that you remove the primer pool tube cap or caps
·
before installing the tube carrier on the deck.
Ensure that you load the correct type of barcode plate
·
and library strip 2 for the type of run you are setting up.
The sequencer displays a warning if you have installed
consumables that are incompatible with the run you have
selected, for example, a Genexus™ Barcodes AS plate or
Genexus™ Strip 2‑AS in an HD run.
5. If pr
ompted, insert a new GX5™ Chip and Genexus™ Coupler.
Insert the chip into the chip install slot with the chip notch
oriented down and toward the front of the instrument.
Load the sequencer and start a run
1. Tap Run on the sequencer home screen to start the loading
procedure.
2. In the Run Selection scr
use from the list.
Note: If you select a run that requires more lanes than
are available on a currently installed chip, a dialog appears
giving you the option to install a new chip, or cancel. If you
proceed with a new chip, a postChipClean is performed,
then the sequencer prompts you to perform the Clear Deck,
UV Clean, Load Deck, Clear Sequencing Reagents, and
Load Sequencing Reagents steps.
3. In the Review Run screen, confirm the run and assay
selections, then tap Next.
The deck door opens automatically.
een, select the run that you want to
Notched corner of
1
chip
IMPORTANT! Inser
level to ensure it will properly align with the GX5™ Chip. A
coupler that is installed at an angle or is not level will not
align properly to the chip and can result in a failed run.
6. When the deck consumables have been loaded, lock the
library and templating strips in place by sliding the latches
toward the rear of the deck.
If a chip is detected and the strip latches are closed, the
Close Deck Door screen appears.
7. Close the deck door, then tap Next.
• If you installed a new chip in the sequencer, the
sequencer prompts you to open the sequencing
reagents bay doors to empty the waste and remove
used sequencing reagents bay consumables. Proceed
to step 8.
• If you are using a chip that was previously installed and
has sucient lane capacity for the run, the sequencer
prompts you to start the run.
IMPORTANT! The car
reagents bay must be replaced every time that a new chip
is installed, regardless of how many lanes were used in the
previous chip.
t the Genexus™ Coupler so that it is
tridge and bottles in the sequencing
Genexus™ Integrated Sequencer Quick Reference 5
Page 6

8. Follow on-screen instructions to empty the waste in the
Waste Carboy, remove waste pipette tips, remove the used
Genexus™ Bottle 1, Genexus™ Bottle 2, Genexus™ Bottle 3,
and Genexus™ Cartridge, then tap Next.
Clear the instrument deck and perform a UV Clean
After a run completes, remove used consumables from the deck
and perform a
UV Clean to ready the instrument for the next run.
IMPORTANT!
Ensure that you empty and replace the Waste Carboy and
·
the waste pipette tip bin.
After replacing the emptied Waste Carboy, ensure that
·
you reinsert the waste tube into the carboy.
Follow all applicable local, state/provincial, and/or
·
national regulations when recycling or disposing of
consumables and liquid waste.
9. Install a new Genexus™ Bottle 1, Gene
required), Genexus™ Bottle 3, and Genexus™ Cartridge.
After reagents have been installed, the Close Sequencing
Reagent Bay Door screen appears.
10. Close the sequencing reagents bay doors.
After the doors are closed, the sequencer automatically
starts the run.
IMPORTANT! Do not tap S
Sequencing Reagent Bay Door screen. Tapping Start Run
can cancel the run.
At the beginning of the run, the instrument verifies the chip,
checks for leaks, then calculates run time.
A sequencing run encompasses the following stages:
•
Starting
• Initializing
Library Prep
•
• Templating
At each stage, the instrument shows the time remaining on
the t
ouchscr
een.
tar
xus™ Bottle 2 (two
t Run in the Close
• Pre-sequencing
•
Sequencing
• Cleaning
1. In the Run Complete screen, tap Next to start removal of
used consumables.
The deck door opens.
2. In the Clear Deck screen, the sequencer provides
step‑by‑step instructions by highlighting the components to
be removed. Unlock the library and templating strips by
sliding the latches toward the front of the deck, then remove
the used strips. Remove the remaining deck components
specified by the sequencer.
3. Inspect the Genexus™ Filter in the liquid waste disposal port
and verify that no standing liquid is present. If standing liquid
is present, manually remove the liquid with a pipette, then
pull out the filter. Test the
clog is present.
• If the Genexus™ Filter is clogged, replace it with a new
filter. For more information, see "Replace the Genexus
Filter" in the Genexus™ Integrated Sequencer User Guide
(Pub. No. MAN0017910).
• If the Genexus™ Filter does not appear to be clogged, a
line clog downstream of the filter is implicated. Contact
Technical Support and report a possible deck liquid
waste line clog.
filter with water to determine if a
™
4. When finished, close the deck door, then tap Next.
A two-minute UV Clean starts.
When the run finishes, the sequencer displays the Run
Complete
6 Genexus
screen.
™
egrated Sequencer Quick Reference
Int
Page 7

5. After UV cleaning, if all the chip lanes were used, the
sequencing reagents bay doors unlock. Open the doors,
remove used components from the bay and empty the
Waste Carboy, then tap Next.
6. After removal of used components, close the sequencing
reagents bay doors, then tap Next.
The sequencer returns to the home screen.
IMPORTANT! Do not discard or remove the conical
Review data and results
bottles, unless alerted by the sequencer to replace the
bottles after a conical bottle flow rate test. For more
information, see the Genexus™ Integrated Sequencer User
Guide.
You can review run results and data analysis and perform data
management tasks in the Results menu. For more information,
see the Genexus™ Integrated Sequencer User Guide (Pub. No.
MAN0017910), or the Genexus™ Software 6.2 User Guide (Pub.
IMPORTANT! Follow all applicable local, state/provincial,
No. MAN0018955).
and/or national regulations when recycling or disposing of
Genexus™ Integrated Sequencer consumables and liquid
waste.
CAUTION! The Genexus
™
Bottle 1 (small wast
bottle) contains small amounts of formamide. Dispose
of this waste appropriately.
e
Limited product warranty
Life Technologies Corporation and/or its aliate(s) warrant their
products as set forth in the Life Technologies' General Terms
and Conditions of Sale at www.thermofisher.com/us/en/home/
global/terms-and-conditions.html. If you have any questions,
please contact Life Technologies at www.thermofisher.com/
support.
Manufacturer:
Life Technologies Holdings Pte Ltd |
Block 33 |
Marsiling Industrial Estate Road 3 |
#07-06, Singapore 739256
Manufacturer:
Life Technologies Corporation |
200 Oyster Point Blvd |
South San Francisco, CA 94080 | USA
Manufacturer:
Life Technologies Corporation |
7335 Executive Way |
Frederick, MD 21704 | USA
The information in this guide is subject to change without notice.
DISCLAIMER: TO THE EXTENT ALLOWED BY LAW, THERMO FISHER SCIENTIFIC INC. AND/OR ITS AFFILIATE(S) WILL NOT BE LIABLE FOR SPECIAL, INCIDENTAL, INDIRECT,
PUNITIVE, MULTIPLE, OR CONSEQUENTIAL DAMAGES IN CONNECTION WITH OR ARISING FROM THIS DOCUMENT, INCLUDING YOUR USE OF IT.
Revision history: Pub. No. MAN0017912
Revision Date Description
C.0 29 October 2020 • Changed the recommended concentration for manually prepared libraries from 125 pM to 200 pM. See “Dilute and
B.0 30 June 2020 Updated for Genexus™ Softwar
A.0 11 November 2019
Important Licensing Information: These products may be cover
applicable Limited Use Label Licenses.
©2020 Thermo Fisher Scientific Inc. All rights reserved. All trademarks are the property of Thermo Fisher Scientific and its subsidiaries unless otherwise specified. Microsoft and Excel
are trademarks of Microsoft Corp.
Product:
Genexus™ Integrated Sequencer
Product:
Genexus™ Software
Products:
GX5™ Chip and Genexus™ Coupler
Genexus™ Library Strips 1 and 2‑AS
Genexus™ Library Strips 1 and 2‑HD
Genexus™ Templating Strips 3‑GX5™ and 4
Genexus™ Barcodes 1–96 AS
Genexus™ Barcodes 1–32 HD
Genexus™ Primer Pool Tubes
Genexus™ Pipette Tips
pool libraries, and load the sample plate—library run” on page 3.
• Updated “Load the sequencer and start a run” on page 5 to align with changes in Rev. C.0 of the Genexus
Integrated Sequencer User Guide
e 6.2
New Genexus™ Integrated Sequencer quick reference
ed by one or more Limited Use Label Licenses. By use of these products, you accept the terms and conditions of all
Genexus™ Sequencing Kit
Genexus™ Controls
Genexus™ Conical Bottles
Genexus™ Filter
Genexus™ GX5™ Starter Pack‑AS
Genexus™ GX5™ Starter Pack‑HD
Oncomine™ GX assays
™
thermofisher.com/support | thermofisher.com/askaquestion
thermofisher.com
29 October 2020
 Loading...