

Page 1

Genexus™ Integrated Sequencer
USER GUIDE
Catalog Number A45727
Publication Number MAN0017910
Revision D.0
For Research Use Only. Not for use in diagnostic procedures.
Page 2
Manufacturer:
Life Technologies Holdings Pte Ltd |
Block 33 |
Marsiling Industrial Estate Road 3 |
#07-06, Singapore 739256
Manufacturer:
Life Technologies Corporation |
200 Oyster Point Blvd |
South San Francisco, CA 94080 | USA
Manufacturer:
Life Technologies Corporation |
7335 Executive Way |
Frederick, MD 21704 | USA
Product:
Genexus™ Integrated Sequencer
Product:
Genexus™ Software
Products:
GX5™ Chip and Genexus™ Coupler
Genexus™ Library Strips 1 and 2‑AS
Genexus™ Library Strips 1 and 2‑HD
Genexus™ Templating Strips 3‑GX5™ and 4
Genexus™ Barcodes 1–96 AS
Genexus™ Barcodes 1–32 HD
Genexus™ Primer Pool Tubes
Genexus™ Pipette Tips
Genexus™ Sequencing Kit
Genexus™ Controls
Genexus™ Conical Bottles
Genexus™ Filter
Genexus™ GX5™ Starter Pack‑AS
Genexus™ GX5™ Starter Pack‑HD
Oncomine™ GX assays
The information in this guide is subject to change without notice.
DISCLAIMER: TO THE EXTENT ALLOWED BY LAW, THERMO FISHER SCIENTIFIC INC. AND/OR ITS AFFILIATE(S) WILL NOT BE
LIABLE FOR SPECIAL, INCIDENTAL, INDIRECT, PUNITIVE, MULTIPLE, OR CONSEQUENTIAL DAMAGES IN CONNECTION WITH OR
ARISING FROM THIS DOCUMENT, INCLUDING YOUR USE OF IT.
Revision history: Pub. No. MAN0017910
Revision Date Description
D.0 25 November
2020
C.0 29 October
2020
Corrected an error in Genexus™ Software version number in “Software compatibility and requirements” on
page 11.
•
Updated the contents of the Genexus™ Installation and Training Kit. See “Genexus™ Integrated Sequencer”.
•
Corrected guidance on reuse of Genexus™ Barcodes plates. See “Guidelines for Genexus™ Integrated
Sequencer operation” on page 26.
•
Added the topic “Guidelines for expired reagents and chips” on page 27.
•
Changed the recommended concentration for manually prepared libraries from 125 pM to 200 pM.
•
Clarified use of "Do Force Clean" checkbox. See “Load the sequencer and start a run” on page 83.
•
Added screenshots for chip verification and leak checking in “Load the sequencer and start a run” on
page 83.
•
Updated “Options for an expired sequencer initialization” and moved to Chapter 7.
•
Updated recommended actions for instrument error and warning messages in “Genexus™ Integrated
Sequencer error and warning messages” on page 140.
•
Performance qualification results table updated with removal of MAPD metric to align with a new version of
the Performance Qualification Assay (v1.4.0). See “Performance Qualification results” on page 135.
B.0 7 July 2020
A.0 13 November
2019
•
Updated for Genexus™ Software 6.2.0.
•
Updated for library and template strip part numbers.
•
Updated the components of the Genexus™ Installation and Training Kit.
•
Added guidance for using inline controls for troubleshooting.
•
Added the troubleshooting section “Genexus™ Integrated Sequencer error and warning messages”.
•
Added the topic “Replace the Genexus™ Conical Bottles” on page 165.
•
Added the section “Library QC Archive: recover library preparations from the Genexus™ Integrated Sequencer
for reuse” on page 172.
New user guide for the Genexus™ Integrated Sequencer
Important Licensing Information: These products may be covered by one or more Limited Use Label Licenses. By use of these
products, you accept the terms and conditions of all applicable Limited Use Label Licenses.
Page 3

TRADEMARKS: All trademarks are the property of Thermo Fisher Scientific and its subsidiaries unless otherwise specified. Microsoft
and Excel are trademarks of Microsoft Corp. Google and Chrome are trademarks of Google Inc. Ubuntu is a trademark of Canonical
Limited. TaqMan is a registered trademark of Roche Molecular Systems, Inc., used under permission and license. Eppendorf and
LoBind are trademarks of Eppendorf AG. Agencourt and AMPure are trademarks of Beckman Coulter, Inc.
©2020 Thermo Fisher Scientific Inc. All rights reserved.
Page 4

Contents
■
CHAPTER 1 Product information .................................................. 9
Product description ............................................................. 9
Genexus™ Integrated Sequencer ................................................. 10
Software compatibility and requirements .......................................... 11
Reagents and supplies—Ion AmpliSeq™ library chemistry ........................... 11
Genexus™ Library Strips 1 and 2‑AS ......................................... 11
Genexus™ Barcodes AS .................................................... 12
Genexus™ GX5™ Starter Pack‑AS ............................................ 12
Reagents and supplies—Ion AmpliSeq™ HD library chemistry ........................ 13
Genexus™ Library Strips 1 and 2‑HD ......................................... 13
Genexus™ Barcodes 1–32 HD ............................................... 14
Genexus™ GX5™ Starter Pack‑HD ............................................ 14
Shared reagents and supplies ................................................... 15
Genexus™ Templating Strips 3‑GX5™ and 4 ................................... 15
Genexus™ Primer Pool Tubes and Pipette Tips ................................ 15
GX5™ Chip and Genexus™ Coupler .......................................... 16
Genexus™ Sequencing Kit .................................................. 16
Genexus™ Conical Bottles .................................................. 17
Genexus™ Filter ........................................................... 17
Genexus™ Controls ........................................................ 17
Oncomine™ GX assays ......................................................... 18
Required materials not supplied ................................................. 19
Recommended materials for nucleic acid isolation and quantification ................. 19
Genexus™ Integrated Sequencer components ..................................... 21
Genexus™ Integrated Sequencer deck stations .................................... 22
Genexus™ Integrated Sequencer input and output connections ...................... 23
Workflow ..................................................................... 24
4
Genexus™ Integrated Sequencer User Guide
Page 5

■
CHAPTER 2 Before you begin .................................................... 25
Precautions ................................................................... 25
Avoid nucleic acid contamination ............................................ 25
Avoid chip damage ........................................................ 25
Avoid strong electromagnetic radiation ....................................... 25
Protection by equipment .................................................... 25
Guidelines for Genexus™ Integrated Sequencer operation ........................... 26
Guidelines for expired reagents and chips ........................................ 27
Power the Genexus™ Integrated Sequencer on or o ............................... 28
Power on ................................................................. 28
Power o ................................................................. 28
Get started with Genexus™ Software ............................................. 29
About the Genexus™ Software user interface ................................. 29
User-access levels ......................................................... 30
System tracking ........................................................... 30
Request and sign in to a new account ........................................ 30
Sign in ................................................................... 31
Contents
■
CHAPTER 3 Create and manage assays (manager/administrator) ............ 32
About assays in Genexus™ Software ............................................. 32
System-installed assays ........................................................ 33
Manage assays (manager/administrator) .......................................... 33
Create a new assay (manager/administrator) ....................................... 35
Copy an assay (manager/administrator) ........................................... 43
Import an assay (manager/administrator) .......................................... 44
■
CHAPTER 4 Enter samples and libraries ........................................ 46
Create a new sample ........................................................... 46
System-installed sample attributes .......................................... 47
Create a custom sample attribute (manager/ administrator) ...................... 48
Import samples ................................................................ 49
Download an example samples file .......................................... 50
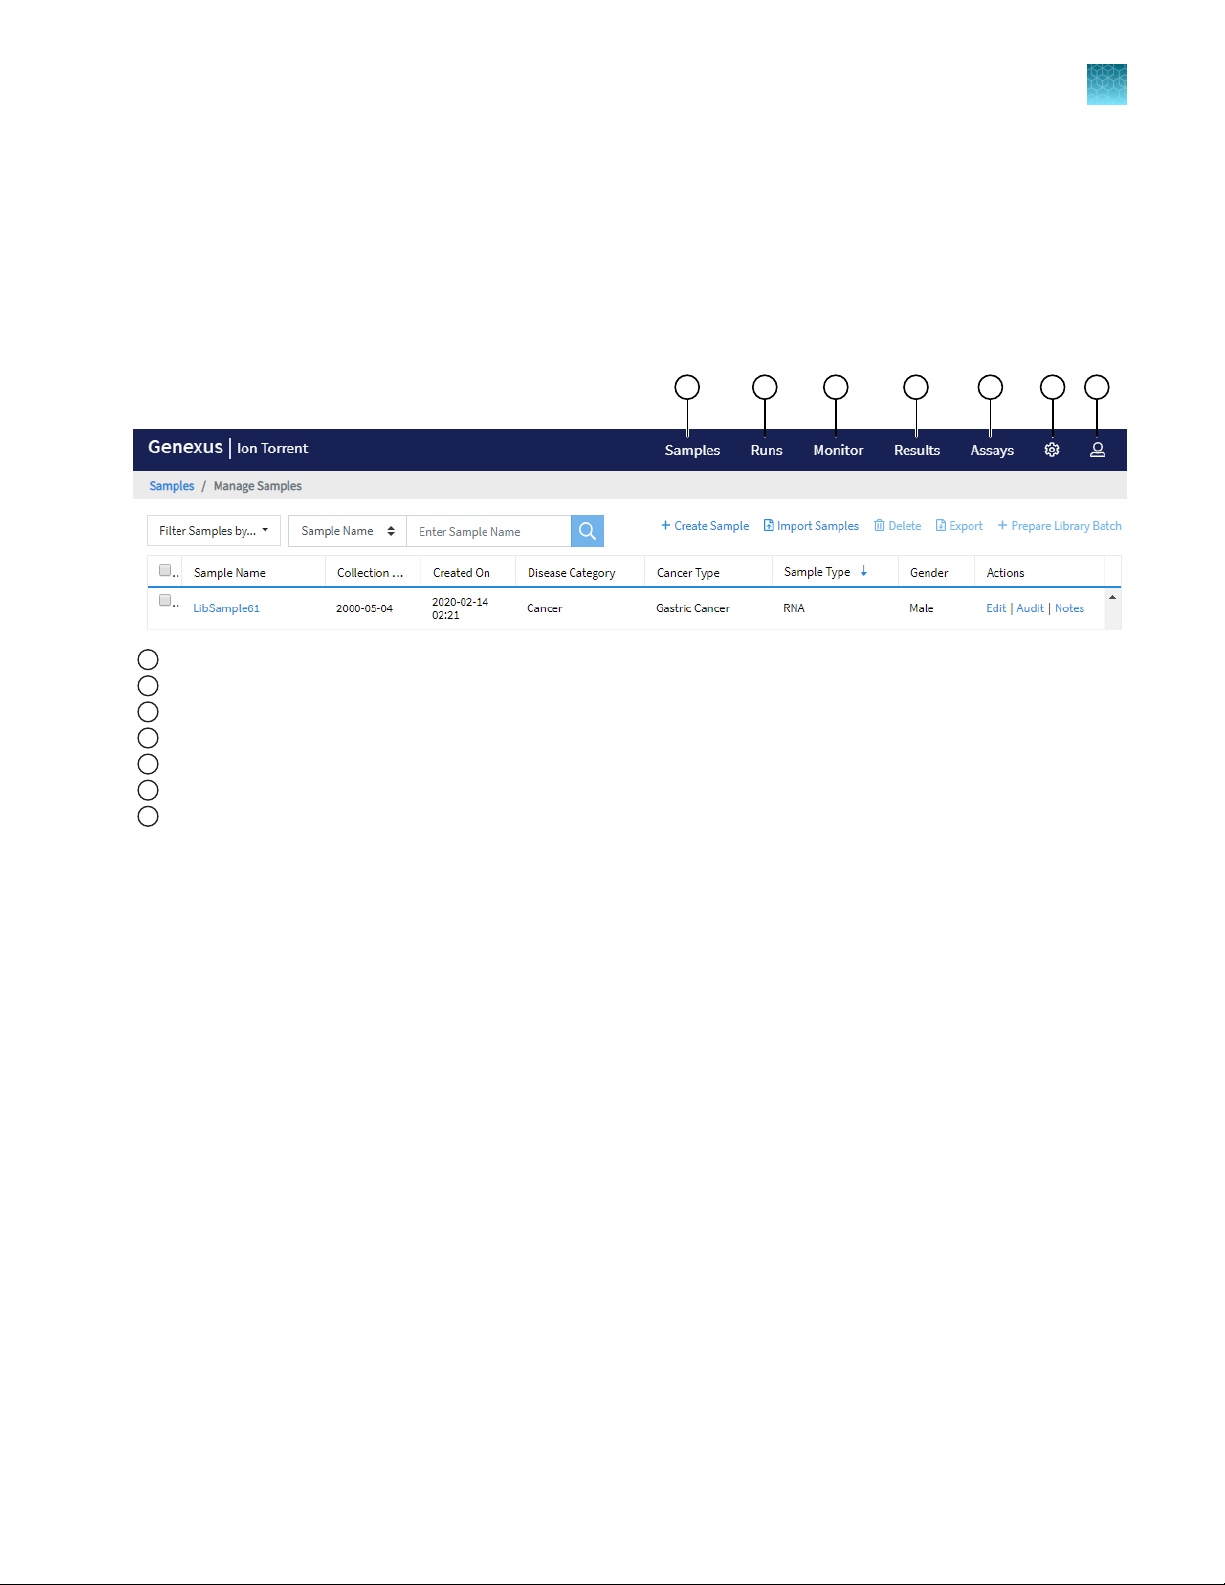
Manage samples ............................................................... 51
Sort, search, and filter samples .............................................. 51
Export samples ............................................................ 52
View notes or add a note to a sample ........................................ 52
Edit a sample (manager/ administrator) ....................................... 52
Edit a sample and amend a report after a run (manager/ administrator) ............ 53
Genexus™ Integrated Sequencer User Guide
5
Page 6

Contents
■
■
Review sample edit history .................................................. 54
Delete samples ............................................................ 54
Prepare or import a library batch ................................................. 55
Prepare a library batch ..................................................... 55
Import a library batch ...................................................... 58
CHAPTER 5 Plan and manage runs ............................................. 61
Plan a sample run .............................................................. 62
Plan a library run ............................................................... 70
CHAPTER 6 Dilute the samples and load the sample plate ................... 75
Guidelines for nucleic acid isolation and quantification—sample runs ................. 75
Dilute or concentrate the samples (if needed) and load the sample plate—sample run .. 76
Guidelines for library quantification—library runs ................................... 77
Dilute and pool libraries, and load the sample plate—library run ...................... 78
■
CHAPTER 7 Load the sequencer and start a run ............................... 79
Before you begin ............................................................... 79
Fill Genexus™ Primer Pool Tubes (custom assays only) .............................. 81
Load the sequencer and start a run .............................................. 83
Clear the instrument deck and perform a UV Clean ................................. 90
Options for an expired sequencer initialization ..................................... 93
■
CHAPTER 8 Monitor the run ...................................................... 94
View run progress on the instrument .............................................. 94
■
CHAPTER 9 Review data and results ............................................ 95
Review sample results .......................................................... 96
Review run results ............................................................. 97
Assign PCR Plate .......................................................... 98
Lab Report .................................................................... 99
Download the Lab Report ................................................. 100
View sequencing results and assay metrics ...................................... 100
Summary of the Sample Results ............................................ 102
Assay metrics ............................................................ 103
QC results ............................................................... 107
View SNV/INDEL results ................................................... 112
View Fusion results ....................................................... 114
View CNV results ......................................................... 119
View annotation sources ................................................... 121
6
Genexus™ Integrated Sequencer User Guide
Page 7

Create and assign variant classifications ..................................... 121
Filter results .............................................................. 122
View Oncomine™ TCR Beta‑LR Assay GX run results .......................... 124
Reanalyze a run ............................................................... 126
Sign o on the run results (manager/ administrator) ................................ 127
Generate customized reports ................................................... 128
Results files .................................................................. 130
Review coverageAnalysis plugin results .......................................... 132
Upload sample results files to Ion Reporter™ Software ............................. 132
Verification runs .............................................................. 133
View and sign o on the verification run results ............................... 134
■
APPENDIX A Troubleshooting .................................................. 137
Troubleshoot Genexus™ Integrated Sequencer performance with CF-1 and
inline controls .............................................................. 137
Genexus™ Integrated Sequencer—general and QC troubleshooting ................. 138
Genexus™ Integrated Sequencer error and warning messages ...................... 140
Genexus™ Software ........................................................... 144
Contents
■
APPENDIX B Touchscreen reference ........................................... 147
Touchscreen icons ............................................................ 147
Settings ..................................................................... 149
Network Settings ......................................................... 149
Perform a Clean instrument procedure ...................................... 152
System Tools ............................................................ 154
Data Management ........................................................ 158
Instrument settings ....................................................... 160
■
APPENDIX C Supplemental information ....................................... 163
Maintain the sequencer ........................................................ 163
Materials required ........................................................ 163
Clean or decontaminate the sequencer ...................................... 164
Replace the Genexus™ Filter ............................................... 164
Replace the Genexus™ Conical Bottles ...................................... 165
Genexus™ Integrated Sequencer power o and power on before and after a
long-term shutdown .................................................... 169
Quantify FFPE DNA with the Qubit™ Fluorometer .................................. 171
Library QC Archive: recover library preparations from the Genexus™ Integrated
Sequencer for reuse ......................................................... 172
Required materials and equipment .......................................... 172
Recover libraries from the sequencer and purify .............................. 172
Quantify the purified libraries ............................................... 175
Genexus™ Integrated Sequencer User Guide
7
Page 8

Contents
■
■
Combine libraries ......................................................... 175
Store libraries ............................................................ 175
Guidelines for using custom assays with the Genexus™ Integrated Sequencer ........ 176
Planning sequencing runs for ecient use of consumables ......................... 178
Configure an Ion Reporter™ Server account (administrator) ......................... 179
Tag an Ion Reporter™ Software analysis workflow for use with the
IonReporterUploader plugin .............................................. 181
Configure Thermo Fisher Accounts in Genexus™ Software (administrator) ............ 182
APPENDIX D coverageAnalysis plugin in Genexus™ Software .............. 184
Reads statistics .............................................................. 184
Example Coverage Analysis Report ............................................. 187
Example charts generated by the coverageAnalysis plugin ......................... 189
Output files generated by the coverageAnalysis plugin ............................. 190
APPENDIX E Safety .............................................................. 193
Symbols on this instrument .................................................... 193
Standard safety symbols .................................................. 193
Additional safety symbols ................................................. 194
Location of safety labels ................................................... 195
Control and connection symbols ........................................... 196
Conformity symbols ...................................................... 196
Instrument safety ............................................................. 197
General ................................................................. 197
Physical injury ............................................................ 197
Electrical safety .......................................................... 198
Cleaning and decontamination ............................................. 199
Instrument component and accessory disposal .............................. 199
Safety and electromagnetic compatibility (EMC) standards ......................... 200
Safety standards ......................................................... 200
EMC standards ........................................................... 200
Environmental design standards ............................................ 201
Radio compliance standards ............................................... 201
Chemical safety .............................................................. 203
Biological hazard safety ....................................................... 205
■
APPENDIX F Documentation and support ..................................... 206
Related documentation ........................................................ 206
Customer and technical support ................................................ 206
Limited product warranty ...................................................... 207
8
Genexus™ Integrated Sequencer User Guide
Page 9

1
Product information
Product description .................................................................... 9
■
Genexus™ Integrated Sequencer ....................................................... 10
■
Software compatibility and requirements ................................................ 11
■
Reagents and supplies—Ion AmpliSeq™ library chemistry ................................. 11
■
Reagents and supplies—Ion AmpliSeq™ HD library chemistry .............................. 13
■
Shared reagents and supplies .......................................................... 15
■
Oncomine™ GX assays ............................................................... 18
■
Required materials not supplied ........................................................ 19
■
Recommended materials for nucleic acid isolation and quantification ....................... 19
■
Genexus™ Integrated Sequencer components ........................................... 21
■
Genexus™ Integrated Sequencer deck stations .......................................... 22
■
Genexus™ Integrated Sequencer input and output connections ............................ 23
■
Workflow ............................................................................ 24
■
IMPORTANT! Before using this product, read and understand the information in the “Safety” appendix
in this document.
Product description
The Ion Torrent™ Genexus™ Integrated Sequencer is a next-generation (NGS) sequencing system that
integrates library preparation, template preparation, and sequencing into a single-day, single-instrument
automated run. The instrument supports both sample-to-results and library-to-results sequencing runs
(up to 32 DNA or RNA samples/run). Ion Torrent™ Genexus™ Software streamlines the NGS workflow by
integrating the setup-to-report workflow within a single software system. Key features include:
•
Go from nucleic acid to report in a single day
•
Flexible and cost-eective run planning making use of a multi-lane, multi-run sequencing chip: the
Ion Torrent™ GX5™ Chip
•
Automated library preparation, including cDNA synthesis, for up to 400 base-read libraries using
either standard Ion AmpliSeq™ or Ion AmpliSeq™ HD library chemistry
•
Automated Ion Sphere™ Particle (ISP)-loading and template preparation with on-chip amplification
•
Support for up to four compatible assays on a GX5™ Chip in a single run, with an output of 12–
15 million reads from each lane.
•
As little as five minutes total hands-on time required per run
•
Real-time consumables tracking by the instrument to guide consumable loading during run setup
Genexus™ Integrated Sequencer User Guide
9
Page 10
Chapter 1 Product information
1
Genexus™ Integrated Sequencer
•
Consumables that are usable for up to 14 days after loading
•
On-instrument sequencing data analysis requiring no external server
Genexus™ Integrated Sequencer
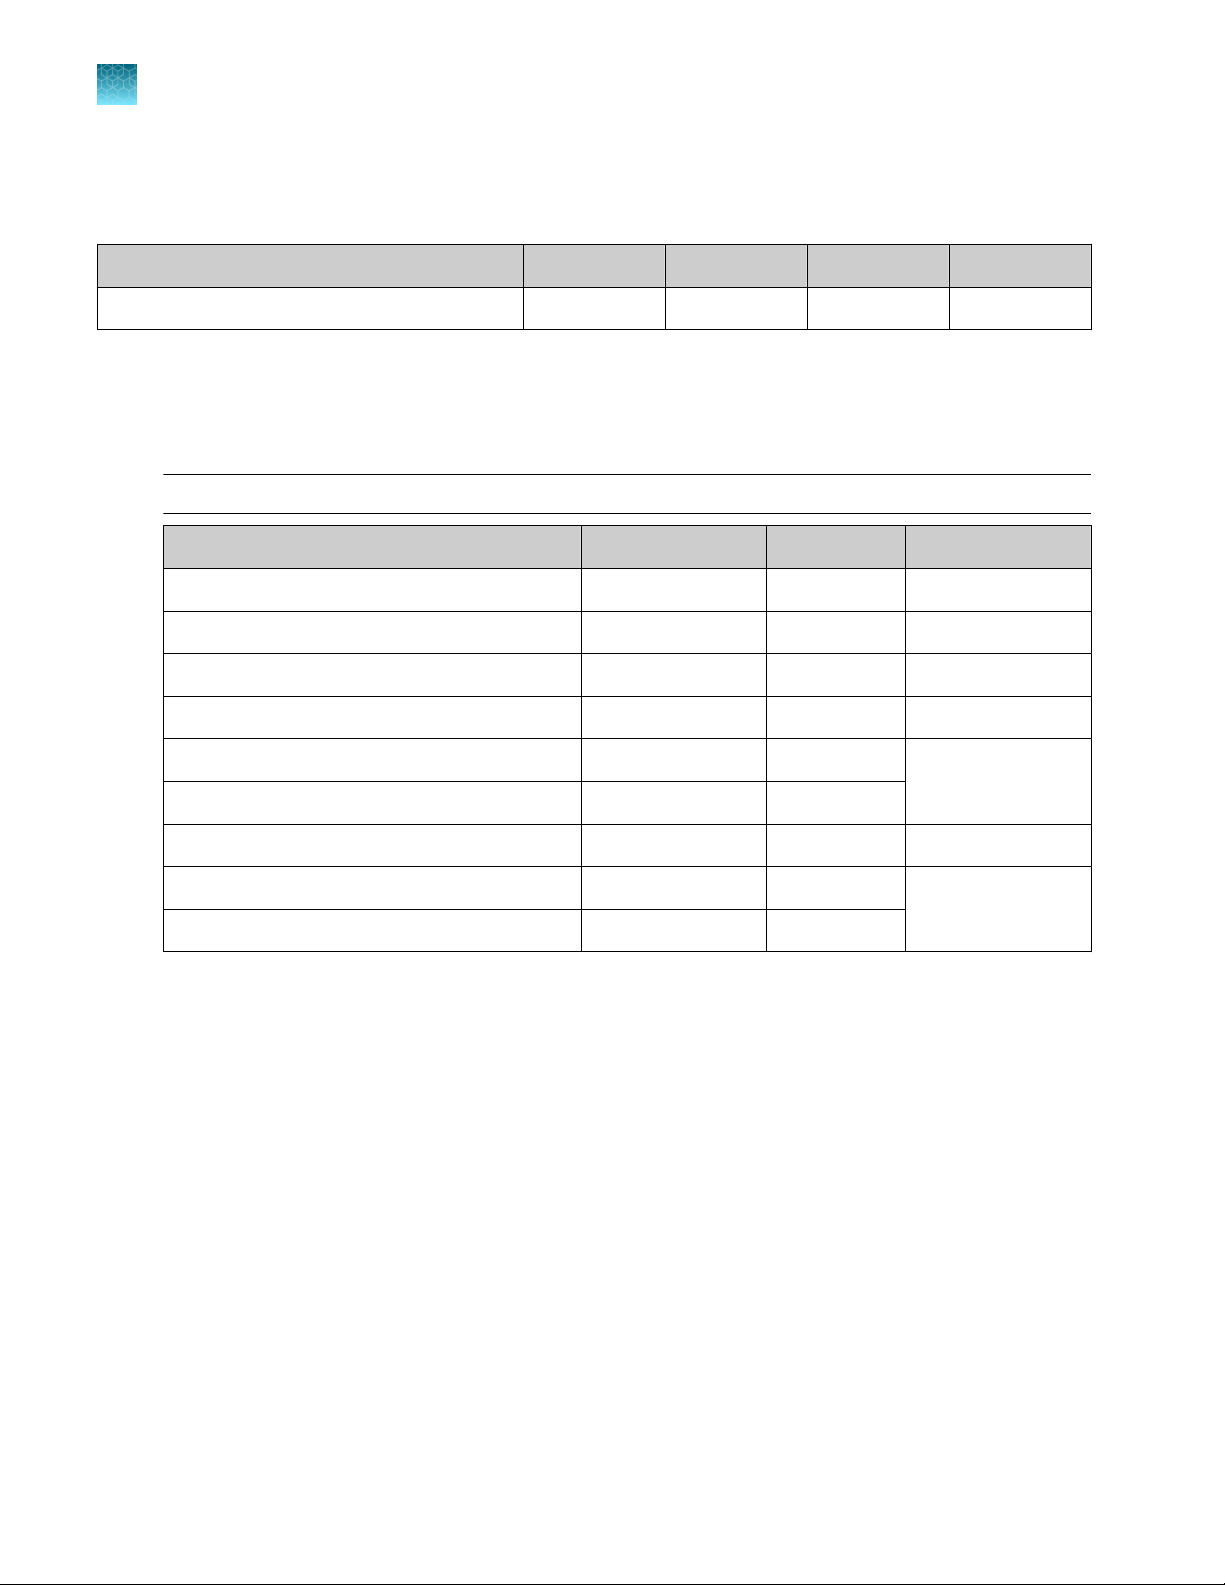
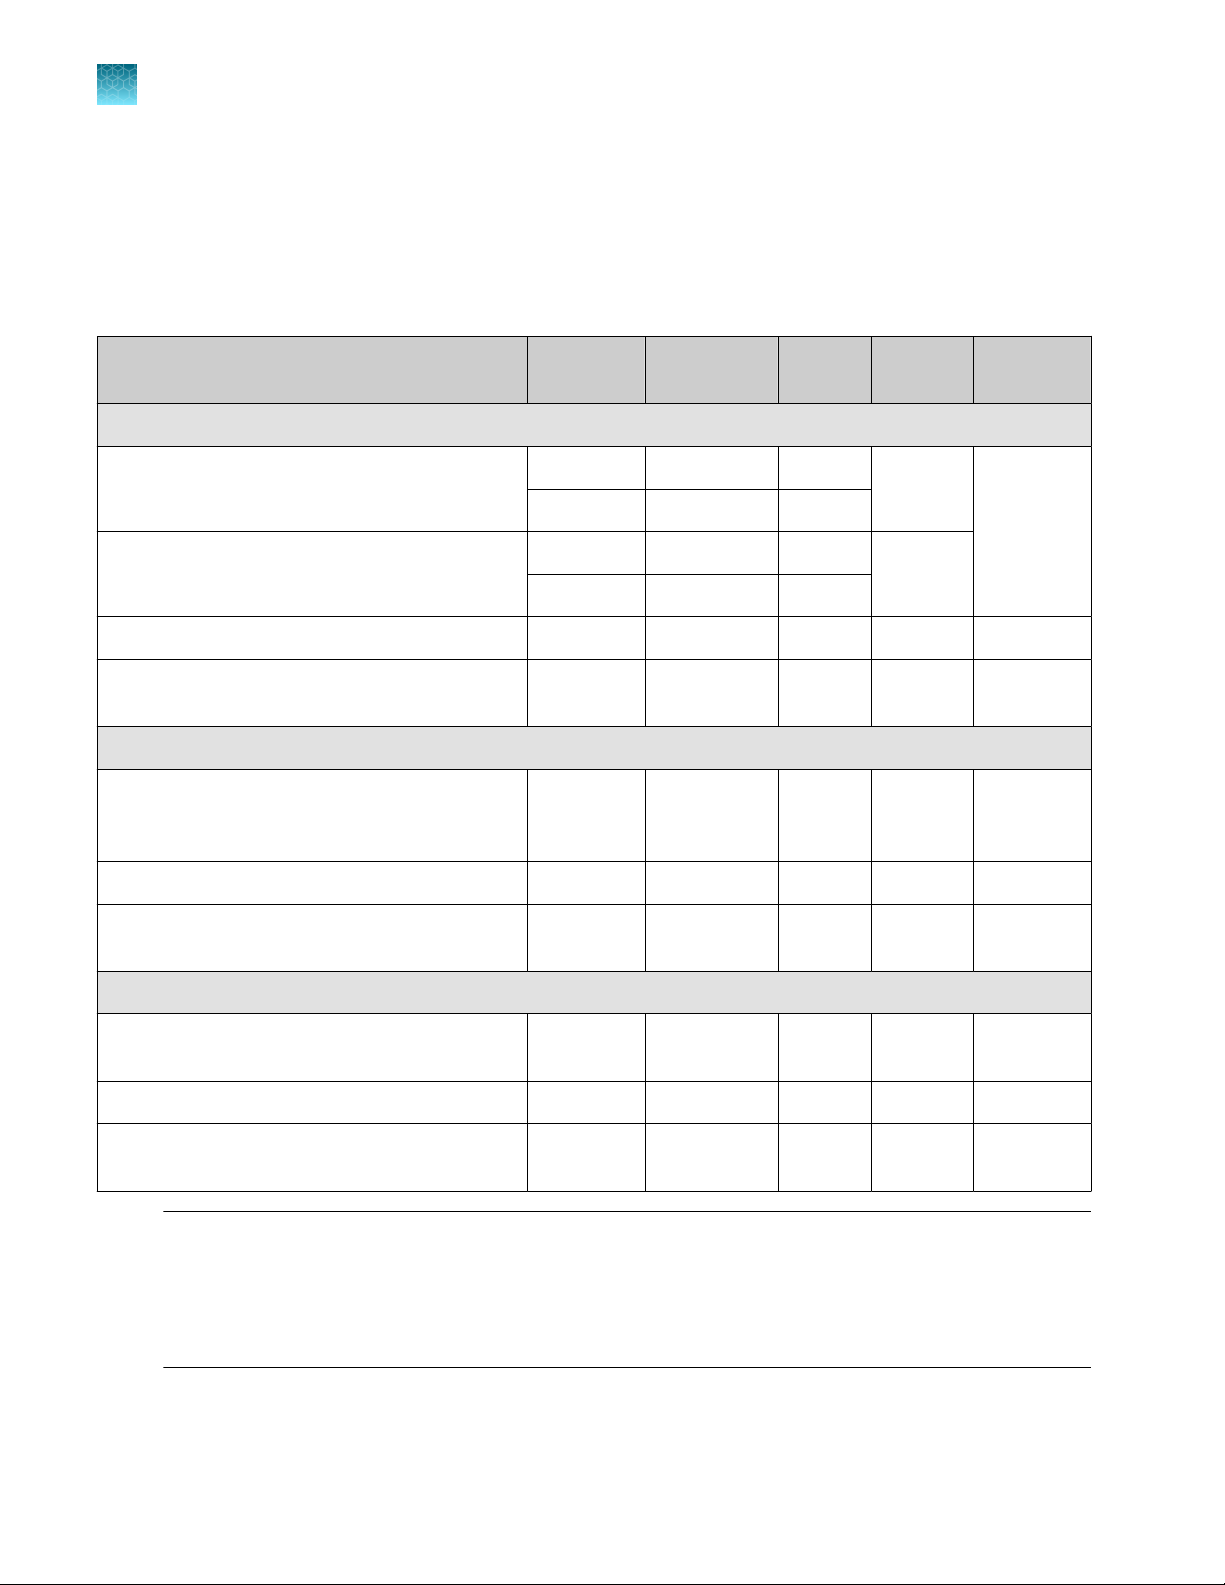
The Genexus™ Integrated Sequencer includes the following components.
Components Cat. No.
Genexus™ Integrated Sequencer A45727
Genexus™ Installation and Training Kit A40278
[1]
N
ot available for separate purchase.
[1]
The Ion Torrent™ Genexus™ Installation and Training Kit (Cat. No. A40278) is available to first-time
owners of a Genexus™ Integrated Sequencer and is shipped with the instrument. The kit contains the
following reagents, supplies, and controls that are used during the installation, training, and operation of
the instrument.
Genexus™ Installation and Training Kit
Contents Part No. Quantity Storage
Genexus™ Controls A40267 1 kit −30°C to −10°C
Genexus™ Strip 1 A46812 8 strips 2°C to 8°C
Genexus™ Strip 2‑AS A46813 8 strips −30°C to −10°C
Genexus™ Barcodes 1–32 AS A40258 1 plate 15°C to 30°C
Genexus™ Strip 3‑GX5
Genexus™ Strip 4 A46816 8 strips −30°C to −10°C
Genexus™ Cartridge A40272 2 cartridges −30°C to −10°C
™
A46815 8 strips 2°C to 8°C
10
Genexus™ Bottle 2 A40273 4 bottles
Genexus™ Bottles 1 and 3 A40274 2 bottles each
Genexus™ Pipette Tips A40266 12 racks
Genexus™ Conical Bottles A40275 2 sets of 5 bottles
Genexus™ Filter A40302 1 filter
GX5™ Chip and Genexus™ Coupler A40269 2 each
Adhesive PCR Plate Foils AB0626 1 box (100 foils)
Genexus™ Integrated Sequencer User Guide
15°C to 30°C
Page 11
Chapter 1 Product information
Software compatibility and requirements
Software compatibility and requirements
The procedures in this guide are designed for use with Genexus™ Software 6.2.0 or later. Versionspecific information is provided in the software release notes for your version of the software. An
administrator-level user can view the software version in the (Settings) / Software Updates screen.
Genexus™ Software is supported on Google™ Chrome™ browser version 64 and later and is best
viewed with 1440 × 900 screen resolution. Google™ Chrome™ browser is recommended for use with the
software.
The operating system of the sequencer is Ubuntu™ 18.041.
For more information on using the software, see the online Genexus™ Software 6.2 Help.
Reagents and supplies—Ion AmpliSeq™ library chemistry
Genexus™ Integrated Sequencer reagents and supplies can be ordered in convenient combo kits and
starter packs, but most consumables can also be ordered individually as your needs require. The
following tables provide information on the various ordering options that are available for Ion AmpliSeq
library chemistry.
1
™
Note:
Consumables that have catalog numbers are orderable. Components that have part numbers cannot
·
be ordered individually.
Reagents that are specific to Ion AmpliSeq™ library chemistry have an AS sux.
·
Genexus™ Library Strips 1 and 2‑AS
Ion Torrent™ Genexus™ Library Strips 1 and 2‑AS (Cat. No. A40252) for standard Ion AmpliSeq™ librarybased chemistry are ordered as kits with eight pairs of strips/kit.
Note: Genexus™ Library Strips 1 and 2‑AS with part numbers listed in the following table are
compatible only with Genexus™ Software 6.2.0 and later.
Component Carrier color Part No. Quantity per kit Storage
Genexus™ Strip 1 Light red A46812 8 strips 2°C to 8°C
Genexus™ S
trip 2‑AS
Light blue A46813 8 strips −30°C to −10°C
Genexus™ Integrated Sequencer User Guide
11
Page 12

Chapter 1 Product information
1
Reagents and supplies—Ion AmpliSeq™ library chemistry
Genexus™ Barcodes AS
Ion Torrent™ Genexus™ Barcodes AS are supplied in plates containing 32 dual barcodes per plate. The
barcodes can be ordered as a set of three plates (Cat. No. A40257), or ordered individually.
Item Label color Cat. No. Quantity Storage
Genexus™ Barcodes 1–96 AS Blue A40257 3 plates
Genexus™ Barcodes 1–32 AS Blue A40258 1 plate
Genexus™ Barcodes 33–64 AS Blue A40259 1 plate
Genexus™ Barcodes 65–96 AS Blue A40260 1 plate
Genexus™ GX5™ Starter Pack‑AS
Ion Torrent™ Genexus™ GX5™ Starter Pack‑AS (Cat. No. A40279) supplies the following components for
Ion AmpliSeq™ library preparation and sequencing using a Genexus™-ready assay.
Note: For custom assays, Genexus™ Primer Pool Tubes (Cat. No. A40262) must be ordered separately.
15°C to 30°C
Component Part or Cat. No. Quantity Storage
Genexus™ Strip 1 A46812 8 strips 2°C to 8°C
Genexus™ Strip 2‑AS A46813 8 strips −30°C to −10°C
Genexus™ Strip 3‑GX5
Genexus™ Strip 4 A46816 8 strips −30°C to −10°C
Genexus™ Barcodes 1–32 AS A40258 1 plate 15°C to 30°C
Genexus™ Pipette Tips A40266 12 racks
Genexus™ Cartridge A40272 2 cartridges −30°C to −10°C
Genexus™ Bottle 2 A40273 4 bottles 15°C to 30°C
Genexus™ Bottles 1 and 3 A40274 2 bottles each
™
A46815 8 strips 2°C to 8°C
12
Genexus™ Integrated Sequencer User Guide
Page 13
Chapter 1 Product information
Reagents and supplies—Ion AmpliSeq™ HD library chemistry
Reagents and supplies—Ion AmpliSeq™ HD library
chemistry
Genexus™ Integrated Sequencer reagents and supplies can be ordered in convenient combo kits and
starter packs, but most consumables can also be ordered individually as your needs require. The
following tables provide information on the various ordering options that are available for Ion AmpliSeq
HD library chemistry.
Note:
Consumables that have catalog numbers are orderable. Components that have part numbers cannot
·
be ordered individually.
Reagents that are specific to Ion AmpliSeq™ HD library chemistry have an HD sux.
·
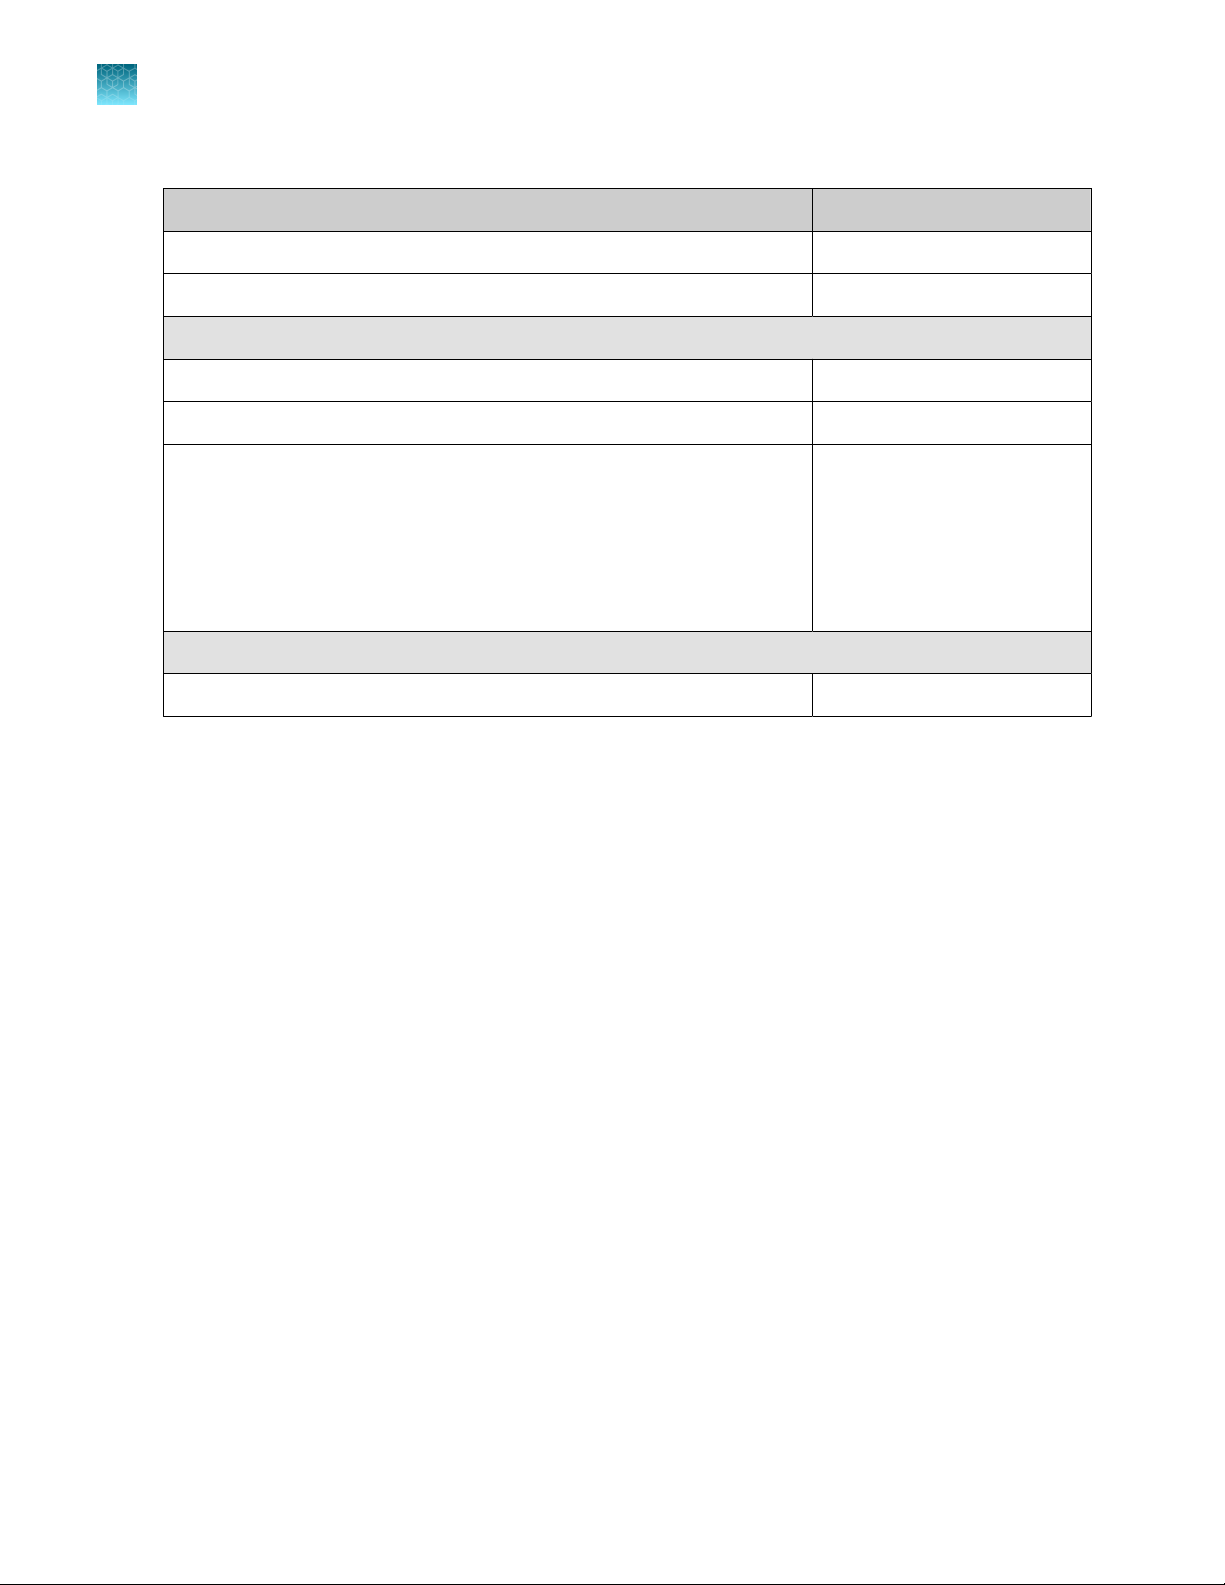
Genexus™ Library Strips 1 and 2‑HD
Ion Torrent™ Genexus™ Library Strips 1 and 2‑HD (Cat. No. A40255) for Ion AmpliSeq™ HD library-based
chemistry are ordered as kits with eight pairs of strips/kit.
1
™
Note: Genexus™ Library Strips 1 and 2‑HD with part numbers listed in the following table are
compatible only with Genexus™ Software 6.2.0 and later.
Component Carrier color Part No. Quantity per kit Storage
Genexus™ Strip 1 Light red A46812 8 strips 2°C to 8°C
Genexus™ S
trip 2‑HD
Violet A46814 8 strips −30°C to −10°C
Genexus™ Integrated Sequencer User Guide
13
Page 14
Chapter 1 Product information
1
Reagents and supplies—Ion AmpliSeq™ HD library chemistry
Genexus™ Barcodes 1–32 HD
Ion Torrent™ Genexus™ Barcodes 1–32 HD are supplied in a plate containing 32 dual barcodes.
Item Label color Cat. No. Quantity Storage
Genexus™ Barcodes 1–32 HD Purple A40261 1 plate 15°C to 30°C
Genexus™ GX5™ Starter Pack‑HD
Ion Torrent™ Genexus™ GX5™ Starter Pack‑HD (Cat. No. A40280) supplies the following components for
Ion AmpliSeq™ HD library preparation and sequencing using a Genexus™-ready assay.
Note: For custom assays, Genexus™ Primer Pool Tubes (Cat. No. A40262) must be ordered separately.
Component Part or Cat. No. Quantity Storage
Genexus™ Strip 1 A46812 8 strips 2°C to 8°C
Genexus™ Strip 2‑HD A46814 8 strips −30°C to −10°C
Genexus™ Strip 3‑GX5
™
A46815 8 strips 2°C to 8°C
Genexus™ Strip 4 A46816 8 strips −30°C to −10°C
Genexus™ Barcodes 1–32 HD A40261 1 plate 15°C to 30°C
Genexus™ Pipette Tips A40266 12 racks
Genexus™ Cartridge A40272 2 cartridges −30°C to −10°C
Genexus™ Bottle 2 A40273 4 bottles 15°C to 30°C
Genexus™ Bottles 1 and 3 A40274 2 bottles each
14
Genexus™ Integrated Sequencer User Guide
Page 15
Shared reagents and supplies
The following reagents and supplies are used in both Ion AmpliSeq™ library chemistry and Ion
AmpliSeq™ HD library chemistry runs.
Note: Consumables that have catalog numbers are orderable. Components that have part numbers
cannot be ordered individually.
Genexus™ Templating Strips 3‑GX5™ and 4
Ion Torrent™ Genexus™ Templating Strips 3‑GX5™ and 4 (Cat. No. A40263) are ordered as kits with eight
pairs of strips/kit.
Note: Genexus™ Templating Strips 3‑GX5™ and 4 with part numbers listed in the following table are
compatible only with Genexus™ Software 6.2.0 and later.
Component Carrier color Part No. Quantity per kit Storage
Genexus™ Strip 3‑GX5
™
Brown A46815 8 strips 2°C to 8°C
Chapter 1 Product information
Shared reagents and supplies
1
Genexus™ S
Genexus™ P
Genexus™ Primer Pool Tubes and Pipette Tips can be ordered individually. Genexus™ Primer Pool Tubes
are required for custom assays.
Genexus™ P
Genexus™ P
trip 4
Yellow A46816 8 strips −30°C to −10°C
rimer Pool Tubes and Pipette Tips
Item Cat. No. Quantity Storage
rimer Pool Tubes
ipette Tips A40266 12 racks
A40262 50 assemblies
(2 tubes/assembly)
Bag of 100 caps
15°C to 30°C
Genexus™ Integrated Sequencer User Guide
15
Page 16
Chapter 1 Product information
1
Shared reagents and supplies
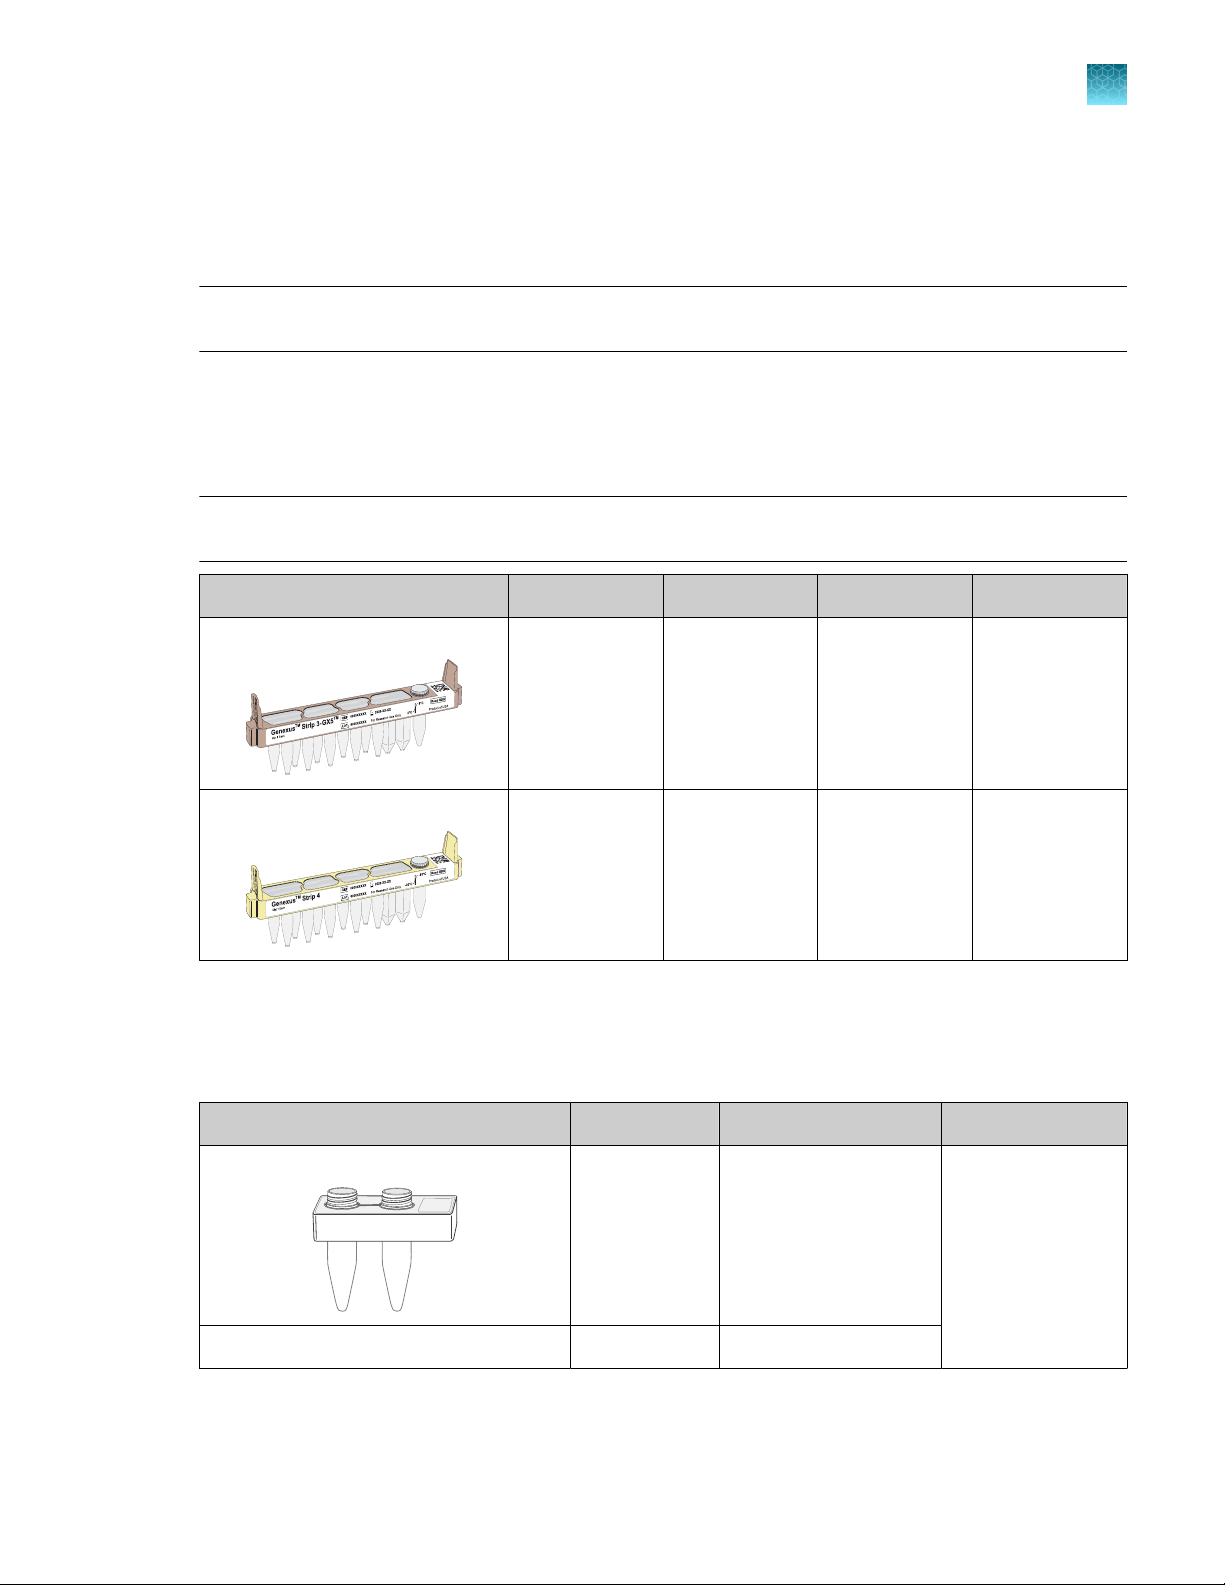
GX5™ Chip and Genexus™ Coupler
The GX5™ Chip and Genexus™ Coupler (Cat. No. A40269) are ordered as a set that contains two chips
and two couplers, sucient for up to eight sequencing runs.
Component Part No. Quantity Storage
GX5™ Chip 100081364 2 chips 15°C to 30°C
Genexus™ Coupler 100081252 2 couplers
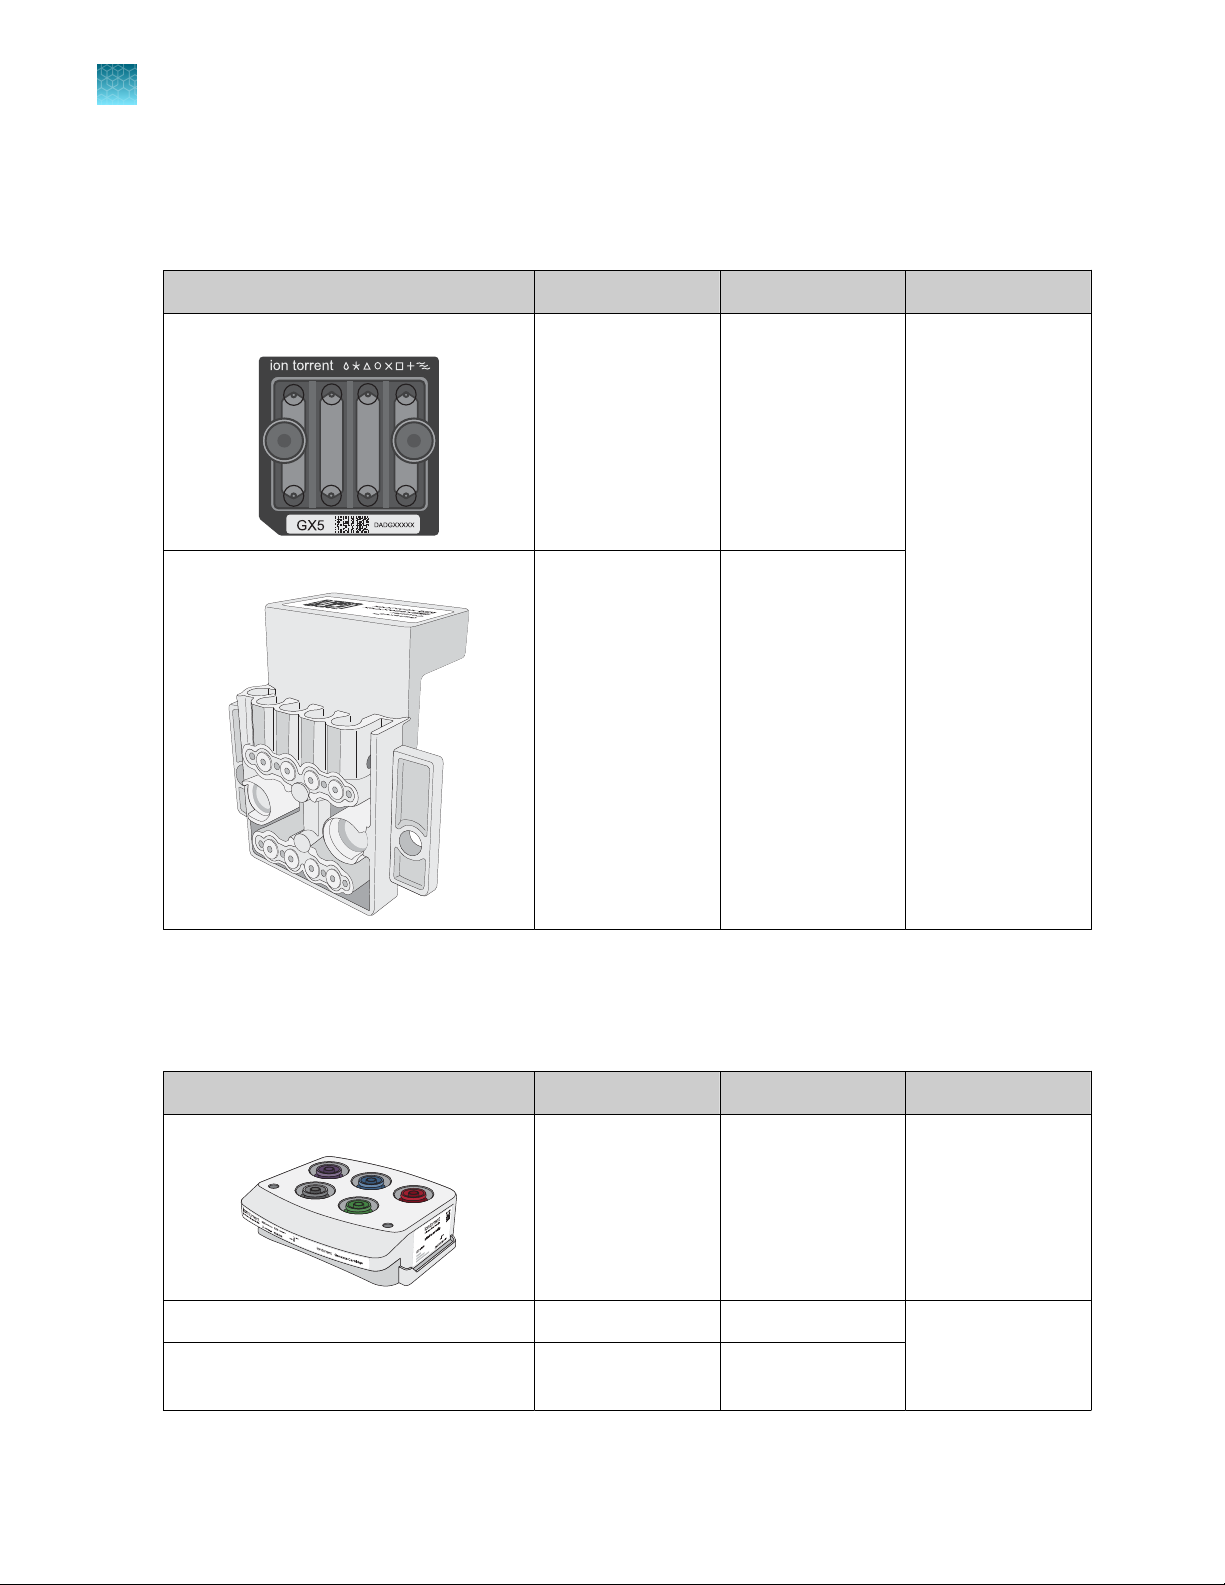
Genexus™ Sequencing Kit
xus™ Sequencing Kit is ordered as a combo (Cat. No. A40271). Each combo kit is
16
The Ion Torrent™ Gene
sucient to sequence up to 2 full chips. The components of the combo are also orderable as listed.
Component Cat. No. Quantity Storage
Genexus™ C
Genexus™ Bottle 2 A40273 4 bottles 15°C to 30°C
Genexus™ Bottles 1 and 3 A40274 2 bottles each
artridge
A40272 2 cartridges −30°C to −10°C
(4 bottles t
Genexus™ Integrated Sequencer User Guide
otal)
Page 17
Genexus™ Conical Bottles
Genexus™ Conical Bottles (Cat. No. A40275) are installed in the sequencing reagents bay and serve as
reservoirs for nucleotide reagent dilutions. For information on when and how to replace the bottles, see
“Replace the Genexus™ Conical Bottles” on page 165.
Component Quantity Storage
Genexus™ Conical Bottles 5 bottles 15°C to 30°C
Genexus™ Filter
Chapter 1 Product information
Shared reagents and supplies
1
The Genexus™ Filter (Cat. No. A40302) is installed in the liquid waste disposal port on the instrument
deck to prevent liquid waste line blockage. For information on installation, see “Replace the Genexus
Filter” on page 164.
Component Quantity Storage
Genexus™ Filter 2 filters 15°C to 30°C
Genexus™ Controls
The Ion Torrent™ Genexus™ Controls kit (Cat. No. A40267) provides sucient Genexus™ Control
Library‑AS to perform four library runs. The kit also provides sucient Genexus™ Control Panel‑AS
and Genexus™ DNA Control to perform eight sample runs.
IMPORTANT! Gene
information, see “Genexus™ Library Strips 1 and 2‑AS” on page 11.
Note: The Gene
Genexus™ Contr
xus™ Control Library‑AS is barcoded with IonCode™ 0101.
Component Quantity Storage
ol Library‑AS 1 tube
™
xus™ Strip 2‑AS is required for sequencing Genexus™ Controls. For ordering
Genexus™ DNA Control 2 tubes
Genexus™ Integrated Sequencer User Guide
−30°C to −10°CGenexus™ Control Panel‑AS 8 carriers (white)
17
Page 18
Chapter 1 Product information
1
Oncomine™ GX assays
Oncomine™ GX assays
Ion Torrent™ Oncomine™ GX assays are Genexus™-ready assays sucient for 32 reactions, and
are supplied in pre-measured ready‑to‑load Genexus™ Primer Pool Tubes. Assays are provided with
Genexus™ Library Strips 1 and 2‑AS (Cat. No. A40252) or Genexus™ Library Strips 1 and 2‑HD (Cat. No.
A40255) in the amount listed.
Contents
Oncomine™ Comprehensive Assay v3 GX (Cat. No. A46296)
Oncomine™ Comprehensive Assay v3 DNA GX Magenta DNA Pool 1 4 A40281 −30°C to
Oncomine™ Comprehensive Assay v3 RNA GX Pale orange RNA Pool 1 4 A44351
Genexus™ Strip 1 Light red — 2 × 8 A46812 2°C to 8°C
Genexus™ Strip 2‑AS Light blue — 2 × 8 A46813 −30°C to
Oncomine™ Precision Assay GX (Cat. No. A46291)
Oncomine™ Precision Assay GX (panel only) Magenta OPA Pool 1
Genexus™ Strip 1 Light red — 8 A46812 2°C to 8°C
Genexus™ Strip 2‑HD Violet — 8 A46814 −30°C to
Carrier
color
Pale green DNA Pool 2 4
Blue RNA Pool 2 4
Pool
(FWD and
REV primers)
Carriers
per kit
8 A44350 −30°C to
Part No. Storage
−10°C
−10°C
−10°C
−10°C
Oncomine™ TCR Beta‑LR Assay GX (Cat. No. A46297)
Oncomine™ TCR Beta‑LR Assay GX (panel only) Magenta RNA Pool 1 8 A40282 −30°C to
−10°C
Genexus™ Strip 1 Light red — 8 A46812 2°C to 8°C
Genexus™ Strip 2‑AS Light blue — 8 A46813 −30°C to
−10°C
Note:
Assays using Ion AmpliSeq™ chemistry have primer pools that are loaded in capped tubes in
·
position 1 of the primer pool tube carriers. Empty uncapped tubes are loaded in position 2.
Assays using Ion AmpliSeq™ HD chemistry have FWD and REV primer pools that are loaded in
·
capped tubes in both positions of the primer pool tube carrier.
18
Genexus™ Integrated Sequencer User Guide
Page 19
Required materials not supplied
Unless otherwise indicated, all materials are available through thermofisher.com. "MLS" indicates
that the material is available from fisherscientific.com or another major laboratory supplier. Catalog
numbers that appear as links open the web pages for those products.
Item Source
Chapter 1 Product information
Required materials not supplied
1
MicroAmp™ EnduraPlate™ Optical 96-Well Clear Reaction Plates with
Barcode
Adhesive PCR Plate Foils AB0626
20‑, 200‑, and 1,000‑µL pipettors and appropriate filtered tips MLS
Microcentrifuge tubes, 1.5-mL or 1.7-mL (low retention for nucleic acids) MLS
Vortex mixer with a rubber platform MLS
Gloves, powder-free nitrile MLS
Ice buckets and ice —
Nuclease-free water, molecular biology grade AM9932
Isopropyl alcohol, 70% solution MLS
Wipes, disposable lint-free MLS
(Optional) Uninterruptible Power Supply (UPS)
[1]
F
or laboratories that experience frequent power outages or line voltage fluctuations, we recommend that you use an uninterruptible
power supply that is compatible with 2500 W output or higher.
[1]
4483352, 4483354
MLS
Recommended materials for nucleic acid isolation and
quantification
Unless otherwise indicated, all materials are available through thermofisher.com. Catalog numbers
that appear as links open the web pages for those products.
Item Source
Nucleic acid isolation
Ion AmpliSeq™ Direct FFPE DNA Kit A31133, A31136
RecoverAll™ Total Nucleic Acid Isolation Kit for FFPE AM1975
RecoverAll™ Multi-Sample RNA/DNA Workflow A26069
MagMAX™ FFPE DNA/RNA Ultra Kit A31881
PureLink™ Genomic DNA Mini Kit K1820-00
MagMAX™ Cell‑Free DNA Isolation Kit A29319
Genexus™ Integrated Sequencer User Guide
19
Page 20
Chapter 1 P
1
Recommended materials for nucleic acid isolation and quantification
roduct information
(continued)
Item Source
MagMAX™ Cell-Free Total Nucleic Acid Isolation Kit A36716
RNaseZap™ RNase Decontamination Solution AM9780
TaqMan™ RNase P Detection Reagents Kit (Recommended for DNA only) 4316831
Nucleic acid quantification
Qubit™ 4 Fluorometer
One or more of the following kits for use with the Qubit™ 4 Fluorometer:
· Qubit™ dsDNA HS Assay Kit (High-sensitivity DNA)
· Qubit™ dsDNA BR Assay Kit (Broad range DNA)
· Qubit™ RNA HS Assay Kit (High-sensitivity RNA)
· Qubit™ RNA BR Assay Kit (Broad range RNA)
[1]
Q33238
Q32851, Q32854
Q32850, Q32853
Q32852, Q32855
Q10210, Q10211
Library quantification (library runs only)
Ion Library TaqMan™ Quantitation Kit 4468802
[1]
Q
ubit™ 2.0 Fluorometer and later are supported.
20
Genexus™ Integrated Sequencer User Guide
Page 21
2
10
1
3
4
7
8
9
5 6
11 11
Chapter 1 Product information
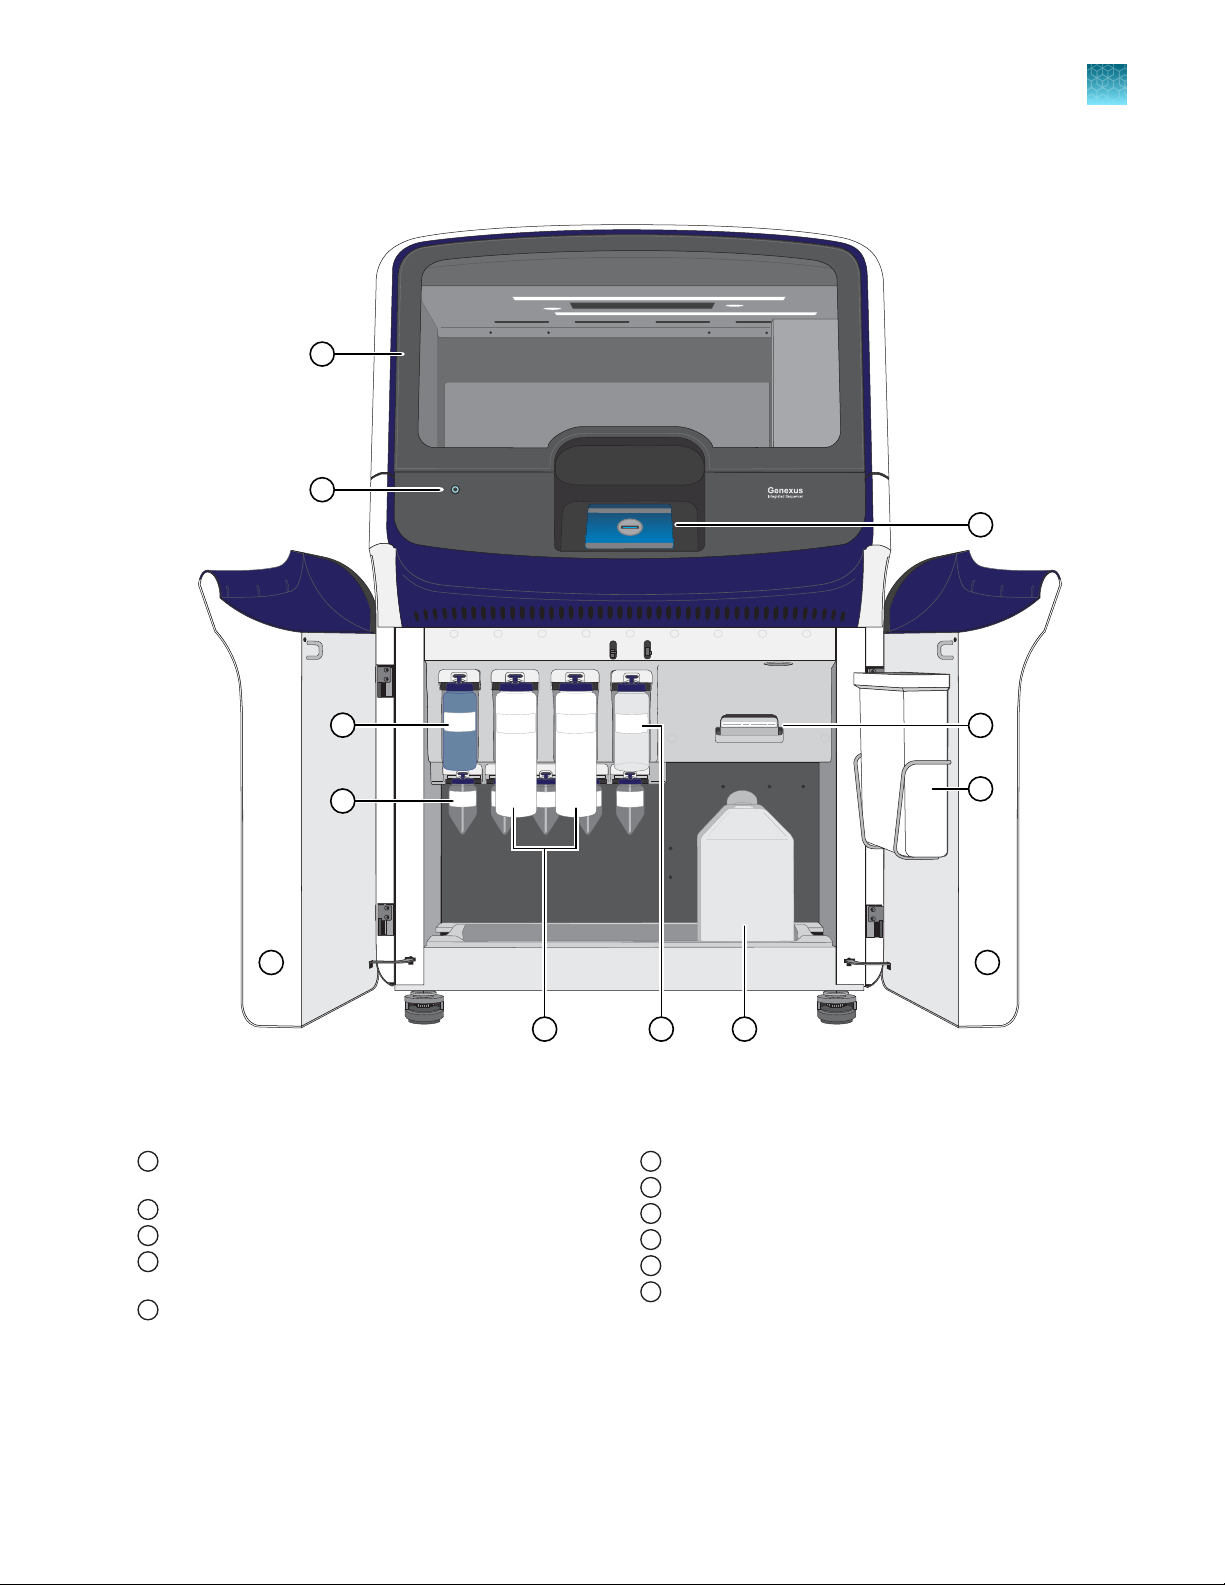
Genexus™ Integrated Sequencer components
Genexus™ Integrated Sequencer components
1
Major features and components of the exterior and sequencing reagents bay of the Genexus™ Int
Door to deck chamber. The door is locked in the closed
1
position during an instrument run.
Power button
2
Genexus™ Bottle 1 (Chemical W
3
Genexus™ Conical Bottles (Reusable conical bottles for
4
xus™ Cartridge reagent dilution)
Gene
Genexus™ Bottle 2 (Sequencing Solution)
5
aste)
Genexus™ Bottle 3 (Cleaning Solution)
6
Waste Carboy
7
Waste pipette tip bin
8
Genexus™ C
9
Touchscreen
10
Sequencing reagents bay door. Doors are locked in the
11
closed position during an instrument run.
artridge
egrated Sequencer
Genexus™ Integrated Sequencer User Guide
21
Page 22
3
13
7
1
6
2
4
5
15
14
16
12
8
11
9 10
Chapter 1 Product information
1
Genexus™ Integrated Sequencer deck stations
Genexus™ Integrated Sequencer deck stations
Interior Genexus™ Int
PCR amplification station
1
Microcentrifuge
2
Genexus™ Bar
3
Genexus™ P
4
Genexus™ Coupler station
5
Chip install station
6
Zone 1 station (Genexus™ S
7
Zone 2 station (Genexus™ S
8
Strip 2‑HD, depending on your assay,)
egrated Sequencer deck components and stations
codes station
rimer Pool Tube station
trip 1)
trip 2‑AS or Genexus
™
Zone 3 station (Genexus™ S
9
Zone 4 station (Genexus™ S
10
Enrichment plate station
11
Liquid waste disposal port
12
Waste pipette tip disposal port
13
Sample plate station
14
Genexus™ P
15
Robotic pipettor
16
ipette Tips station
trip 3‑GX5™)
trip 4)
22
Genexus™ Integrated Sequencer User Guide
Page 23
1
5
2
3
4
Chapter 1 P
Genexus™ Integrated Sequencer input and output connections
roduct information
Genexus™ Integrated Sequencer input and output
connections
The connection panel, power port, and an on/o switch are located on the right side of the rear panel of
the instrument.
1
Power port—100–240VAC port that provides power to the instrument.
1
On/o switch—P
2
USB ports—Connects a USB device to the instrument.
3
Ethernet port—An RJ45 port that provides Ethernet (Gigabit) communication between the sequencer and a local area
4
network.
Ethernet port—An RJ45 port that provides Ethernet (Gigabit) communication between the sequencer and an
5
accessor
y instrument.
ower switch, where the states are on ( | ) or o ( O ).
Genexus™ Integrated Sequencer User Guide
23
Page 24

Chapter 1 Product information
1
Workflow
Workflow
Sample-to-results sequencing run using the Genexus™ Integrated Sequencer
Create an assay (page 32)
ystem installed assays that are specifically configured for each sample type are available in Genexus
S
Software. You can use the system-installed assays in your run without change. If you want to modify any
assay settings, copy the system-installed assay that best represents your experiment, then edit the assay
settings as needed.
Enter samples (page 46)
er samples in Genexus™ Software to assign sample names and provide other information such as
Ent
sample collection date, gender, type, and disease category.
Plan a sample run (page 62)
™
Runs planned in Gene
xus™ Software contain all of the settings that are used in library preparation,
templating, sequencing, and analysis, including sample information and plate location, assays, and
barcodes.
Quantify and dilut
e your nucleic acid samples, then load the sample plate.
Dilute the samples and load the sample plate (page 75)
Load the sequencer and start a run (page 79)
ollow the step-by-step instructions on the sequencer touch screen to load the sample plate and
F
consumables in the Genexus™ Integrated Sequencer.
Monitor the run (page 94)
or the run in Genexus™ Software in real time.
Monit
Review data and results in Genexus™ Softwar
e (page 95)
Review data and results in Genexus™ Software, or analyze data in Ion Reporter™ Software using an Ion
Reporter™ analysis workflow.
24
Genexus™ Integrated Sequencer User Guide
Page 25
2
Precautions .......................................................................... 25
■
Guidelines for Genexus™ Integrated Sequencer operation ................................. 26
■
Guidelines for expired reagents and chips ............................................... 27
■
Power the Genexus™ Integrated Sequencer on or o ..................................... 28
■
Get started with Genexus™ Software ................................................... 29
■
Precautions
Avoid nucleic acid contamination
IMPORTANT! A primary source of contamination is spurious DNA fragments from previous sample
processing steps. Do not introduce amplified DNA into the work area where the instrument is located.
Before you begin
Avoid chip damage
IMPORTANT! To avoid possible damage due to electrostatic discharge, ground yourself before picking
up a chip or placing a chip on a surface such as a lab bench. For example, touch the deck surface or
one of the metal deck stations.
Avoid strong electromagnetic radiation
WARNING! Do not use the instrument in close proximity to sources of strong electromagnetic
radiation (for example, unshielded intentional RF sources), as these sources can interfere with proper
operation.
Protection by equipment
WARNING! The protection that is provided by the equipment can be impaired if the instrument is
operated outside the environment and use specifications, the user provides inadequate maintenance,
or the equipment is used in a manner that is not specified by the manufacturer (Thermo Fisher
Scientific).
Genexus™ Integrated Sequencer User Guide
25
Page 26
Chapter 2 Befor
2
Guidelines for Genexus™ Integrated Sequencer operation
e you begin
Guidelines for Genexus™ Integrated Sequencer operation
•
Follow guidance that is provided by Genexus™ Software when you plan a run to determine which
consumables must be loaded and which consumables can be reused from a previous run.
•
Follow guidance that is provided by the software when you plan a run to determine how many
samples can be run with a given assay or assays in an instrument run. The number of samples that
can be included in a sequencing run depends on multiple factors.
Limiting factor Description
The number of available
barcodes in the barcode
plate
Maximum number of target
amplification reactions per
run
The number of primer pools
per assay
The number of unused
lanes on an installed chip
The minimum read count
per sample for an assay
•
T
wo assays cannot share a chip lane, so a maximum of 4 assays can be run per chip.
•
The assays that are used in a single run must use the same chemistry (Ion AmpliSeq™ or Ion
The maximum number of available barcodes per run is 32.
IMPORTANT! When libraries are prepared on the Genexus
Sequencer, each target amplification reaction for a sample requires a
unique barcode.
One library strip pair has the reagents necessary for 4 target
amplification reactions, or 4 barcodes. With a maximum of 8 library strip
pairs loaded, a maximum of 32 samples can be run using an assay with
one primer pool.
Given the limits of 32 target amplification reactions, and 32 available
barcodes, the number of samples in a run multiplied by the total number
of primer pools in the assays that are used in a run cannot exceed 32.
For one single‑pool assay, a maximum of 32 samples can be run on a
single chip. If you are using 2 assays with two primer pools each, you
can sequence a maximum of 8 samples in a run. Similarly, for one assay
with 4 primer pools, you can sequence a maximum of 8 samples in a run,
if the minimum read count per sample allows it.
A maximum of 4 lanes are available on a single GX5™ Chip.
The minimum read count per sample parameter is set during assay
creation.
™
Integrated
AmpliSeq™ HD), and have compatible cycling parameters to allow amplification in the instrument
thermal cycler. The thermal cycler has two independently controlled heating zones. After you select
an assay, Genexus™ Software restricts the list of available assays to use in the run to those that are
compatible with the selected assay or assays.
•
One library strip pair is required for each primer tube position 1–8 that is filled in a run.
•
One template strip pair is required for every chip lane that is used in a run.
•
Consumables are configured to support sample batch sizes in multiples of four samples. The most
ecient use of consumables occurs when samples are run in multiples of four.
•
If a chip installed in a sequencer has unused lanes, do not remove it unless you are sure that
you want to replace it with a new chip. After a partially used chip has been removed from the
sequencer, it cannot be reinserted and reused. The sequencer cannot track lane usage after chip
removal.
26
Genexus™ Integrated Sequencer User Guide
Page 27

Chapter 2 Before you begin
Guidelines for expired reagents and chips
•
You can remove a chip in one of the following situations.
–
After all the lanes of a chip are used in a run, the chip shuttles to the install position and you
are asked to remove the used chip.
–
When you select a run plan that requires more lanes than are available on the installed chip,
you are asked to remove the partially used chip, and the sequencer performs a post-chip
clean. In addition, you must clear consumables from the lower sequencing reagents bay, even
if only a single lane of the chip was used.
•
The Genexus™ Integrated Sequencer can track used and unused barcodes in barcode plates in
Genexus™ Software 6.2.0 and later, enabling you to swap plates between runs as needed, and
reload a partially used barcode plate for a run if a sucient number of barcodes are available on
the plate.
•
After loading in the sequencer, reusable consumables, such as barcodes, chips, and sequencing
reagents bay components, must be used within 14 days for optimal results.
•
An assay that is selected in a library run cannot include library batches that share one or more
samples. However, two dierent assays in a run can include shared samples, because assays are
run in separate lanes of a chip.
2
Guidelines for expired reagents and chips
Follow these guidelines for using reagents and sequencing chips that are at or near expiration. We
do not recommend using components past the expiration date, but under certain circumstances, a
sequencer warning for expired reagents can be overridden to allow a sequencing run to proceed.
•
For all reagents except for Genexus™ barcode plates, the instrument bypasses an expired reagent
warning after you tap the Help button in the sequencer screen.
•
If a barcode plate has expired, a run cannot proceed, even if you tap Help.
•
If a GX5™ Chip is expiring in a given month, ensure that you use up all lanes of the chip within
that calendar month. If you start a run in the next calendar month with the same chip installed,
the sequencer does not allow the run to proceed. The sequencer prompts you to perform a Clean
instrument procedure and install a new chip and sequencing consumables, even if the initialization
has not expired. For further information, see “Perform a Clean instrument procedure” on page 152.
Genexus™ Integrated Sequencer User Guide
27
Page 28

Chapter 2 Before you begin
2
Power the Genexus™ Integrated Sequencer on or o
Power the Genexus™ Integrated Sequencer on or o
Note: If the Genexus™ Integrated Sequencer is powered on, and the touchscreen is blank, touch the
screen to "wake" the touchscreen.
Power on
If the touchscreen is unresponsive, check the power switch on the back of the instrument to ensure that
the switch is in the on ( | ) position. If the power switch is in the o ( O ) position, proceed with step 1. If
the power switch is already in the on position, proceed to step 2.
1.
Turn the power switch on the back of the instrument to the on ( | ) position.
2.
Press the power button on the front of the instrument.
The button illuminates.
3.
In the Sign In screen, enter the username and password created by the field service engineer
when the instrument was set up.
When the instrument home screen appears, the instrument is ready for use.
Power o
It is not necessary to power o the instrument overnight or over the week
Genexus™ Software will not be used for more than 3 days, power o the instrument as follows:
1.
2.
3.
IMPORTANT! Do not pr
a run can result in sequencing run failure and loss of sample.
end. If the instrument or
In the home screen, tap Settings4System Tools4Shut down.
Select either Shutdown or Reboot.
If you select Shutdown, a confirmation message appears. Select Yes to power o the instrument.
Note: If you power o the instrument with a partially used chip installed, the chip and
consumables status is saved. When you power back on, the saved chip and consumable
information enables you to use the chip for up to 14 days after the chip was installed.
ess the power button during a run. Interrupting power to the instrument during
28
Genexus™ Integrated Sequencer User Guide
Page 29
Get started with Genexus™ Software
1 2 3 4 5 6 7
About the Genexus™ Software user interface
Chapter 2 Befor
Get started with Genexus™ Software
e you begin
2
The Genexus™ Software user interface provides menus to help you add, select, and manage samples,
libraries, runs, and assays. You can also view and manage your sequencing results, monitor Genexus
Integrated Sequencer runs in progress, and manage software settings.
Samples: add new samples, impor
1
Runs: plan a run star
2
Monitor: view a sequencer run in pr
3
Results: view sample r
4
Assays: manage, cr
5
Settings: access audit r
6
Profile: access Help, manage and edit user pr
7
ting from a sample (Sample Run), or library (Library Run). View, edit, and manage runs.
esults, run results, and verification results.
eate, and import assays. Manage assay preset parameters and panels.
ecords and run logs, configure network settings, and manage data archiving, disk space, and users.
t samples, prepare library batches, import library batches and manage attributes.
ogress.
ofile settings and SSH key, sign out.
™
Genexus™ Integrated Sequencer User Guide
29
Page 30

Chapter 2 Befor
2
Get started with Genexus™ Software
e you begin
User-access levels
Users at this level...
•
Operator
Manager Operator functions plus:
Administrator Operator and manager functions plus:
Add and import samples
•
Prepare library batches
•
Plan and save runs
•
Monitor runs
•
View results and reports
•
Create and edit sample attributes
•
Delete runs
•
Create and import assays
•
Manage reference sequences and panel, hotspot, and other sequence files
•
Access services information
•
View, export, and print audit records
•
Configure network settings
•
View and manage software updates
•
Configure data archive and storage settings
•
Manage instrument and software log files
•
Add and manage users
Can...
System tracking
The system tracks and checks user, sample, workflow
If the software detects an error at any step—for example, a scanned barcode is inconsistent with the
information given for the run—the software alerts the user and does not proceed with the run.
Request and sign in to a new account
Only administrator-level users can create user accounts.
After account creation, the Genexus™ Integrated Sequencer automatically sends an email to the new
user with the username and password information.
•
To request a new account, contact your local administrator.
•
To sign in to a new account for the first time:
a.
Open the Genexus™ Software, then enter your username and password.
b.
Press Enter, or click Sign In.
c.
Click Accept to accept the End User Software License Agreement.
30
, reagents and QC metrics for auditable records.
Genexus™ Integrated Sequencer User Guide
Page 31

Sign in
Chapter 2 Befor
Get started with Genexus™ Software
d.
In the Change Password screen, enter your temporary password in the Current Password
field. Type a new password in the New Password field, then confirm the password.
–
Passwords must be between 6 and 10 alphanumeric characters (0–9, Aa–Zz) with no
spaces or special characters.
–
Passwords must contain at least one alphabetic character (Aa–Zz).
–
Passwords must contain at least one numeric character (0–9).
–
Passwords are case-sensitive.
e.
Click Change.
e you begin
2
1.
Open the softwar
2.
Select your preferred language from the dropdown list in the upper right corner of the page.
3.
Enter your username and password, then press Enter or click Sign In.
IMPORTANT! Y
The software opens to the Manage Samples scr
e home page.
our username and password must be unique and not shared with other users.
een.
Genexus™ Integrated Sequencer User Guide
31
Page 32

3
Create and manage assays
(manager/administrator)
About assays in Genexus™ Software ................................................... 32
■
System-installed assays ............................................................... 33
■
Manage assays (manager/administrator) ................................................. 33
■
Create a new assay (manager/administrator) ............................................. 35
■
Copy an assay (manager/administrator) ................................................. 43
■
Import an assay (manager/administrator) ................................................ 44
■
Manager- and administrator-level users can create and manage assays in Genexus™ Softwar
chapter describes how to create, import, and manage assays, and how to copy and edit an assay,
including a system-installed assay. If you are using a system-installed assay without change, proceed to
Chapter 4, “Enter samples and libraries”.
About assays in Genexus™ Software
Assays contain the settings and parameters for library preparation, templating, controlling the
sequencing run, and analyzing the results. Assays also define the panels, kits, and chips that are used
in a run, and specify the reference files and threshold values for quality control and variant detection.
Assays can be created from system-installed templates or assays, or from custom assays that are
copied and edited.
An assay is a reusable experimental design that contains predefined settings appropriate for use with
common types of research applications. An assay can be used to plan many runs and plays an
important role in enabling rapid throughput across the sequencing instrument. Assays help reduce the
chance of errors, because information is stored and then applied to runs instead of entered manually for
each run.
An assay can be copied and edited for a dierent use. Before you can create a custom assay, you must
add a panel file, and hotspot and copy number baseline files (if needed for your assay), to the software.
Custom assays are for advanced users. For assistance, contact your local Field Service Engineer.
e. This
32
Genexus™ Integrated Sequencer User Guide
Page 33

Assays can contain system-installed annotation sets, filter chains, copy number baselines and report
templates. You can also create custom versions of each of these presets.
The software provides to tools to:
•
Create, import, and manage assays.
•
Create and manage annotation sets, report templates, filter chains, and copy number baselines
(Manage Presets).
•
Add and manage panels (Manage Panels).
System-installed assays
Chapter 3 Create and manage assays (manager/administrator)
System-installed assays
3
Genexus™ Software includes system-installed assays that are preconfigured for use with Oncomine
GX assays. System-installed assays are available for download at Software Updates in the
(Settings) menu. System-installed assays are locked and cannot be changed, but the assays can be
copied, then edited.
Manage assays (manager/administrator)
Manager- and administrator-level users create and manage assays for use in Genexus™ Software.
In the menu bar, click Assays4Manage Assays to open the Manage Assays screen.
The following tools are available in this screen.
To... Do the following...
Review and export the assay audit
trail
Lock a draft assay When a manager- or administrator-level user first creates an assay, in the
1.
In the row of an assay, in the Actions column, click Audit.
2.
In the Audit Trail dialog box, in the Record column, click (Audit Trail
Details) in the row of an action to view the details of that action.
3.
In the Audit Record Details dialog box, click Export to export a PDF
file of the record.
Assay column, the assay is listed as assay name (Draft). To use the assay in
a run, you must lock it.
In the row of a draft assay, in the Actions column, for an assay with a status
of Draft, click Lock.
Locked assays cannot be edited or deleted.
™
Edit a draft assay When a manager- and administrator-level user first creates an assay, the
assay name is followed by (Draft) in the Assay column. While the assay is in
draft status, it can be edited. A locked assay cannot be edited.
1.
In the row of a draft assay, in the Actions column, click Edit.
The Create Assay workflow reopens.
2.
Edit the options on each assay step as desired, then click Save.
Genexus™ Integrated Sequencer User Guide
33
Page 34

Chapter 3 Create and manage assays (manager/administrator)
3
Manage assays (manager/administrator)
(continued)
To... Do the following...
Copy an assay to create a new assay Only locked assays can be copied.
1.
In the row of an assay, in the Actions column, click Copy.
The Create Assay workflow reopens.
2.
Edit the options on each assay step as desired, enter a new name for
the assay, then click Save.
Delete an assay Only draft assays can be deleted. When an assay is locked, it can be
removed from use in the software by designating it obsolete.
In the row of a draft assay, in the Actions column, click Delete, then confirm
the deletion.
Remove a locked assay A manager-or administrator-level user can remove a locked assay from use
in the software by designating it obsolete. The assay is not deleted and a
record of it is maintained in the audit trail. The results for any runs already
performed with the assay remain on the sequencer.
1.
In the row of a locked assay, in the Actions column, click Obsolete.
2.
Click Yes to confirm the operation.
Export an assay An assay can be exported, for example if you want to use that assay in
another Genexus™ Integrated Sequencer in your lab. Only locked assays can
be exported.
In the row of a locked assay, in the Actions column, click Export. The assay
parameter files are downloaded to your local drive as a ZIP folder and are
available for import to another sequencer.
Panel reference files are not included in the exported folder.
Download parameters In the row of an assay, in the Actions column, click (More Options).
Assay parameter files are downloaded to your local drive as a ZIP folder
containing assay parameter JSON files.
34
Genexus™ Integrated Sequencer User Guide
Page 35

Chapter 3 Create and manage assays (manager/administrator)
Create a new assay (manager/administrator)
Create a new assay (manager/administrator)
Manager- and administrator-level users can create a new assay.
Assays can be copied from an existing system-installed assay or other assay, then modified as needed.
For more information, see “Copy an assay (manager/administrator)” on page 43.
To create a new assay from an assay template, follow these steps.
1.
In the menu bar, click Assays4Create Assay .
3
The Cr
available. The templates have assay-specific configuration steps that are prepopulated with default
settings and parameters.
Note: Clicking + Create Assay takes you to the same screen.
eate Assay screen opens. Four oncology and one generic sequencing assay templates are
•
Generic Sequencing Application
•
DNA Germline
•
DNA and Fusions
•
DNA Somatic
•
Fusions
Genexus™ Integrated Sequencer User Guide
35
Page 36

Chapter 3 Create and manage assays (manager/administrator)
3
Create a new assay (manager/administrator)
2.
Select the assay template that you want to use, then click anywhere inside its box.
36
Note:
Although each assay template has a specific set of steps in the setup wizard, the setup
·
procedures for all are similar. The following is an example of assay creation after selecting the
DNA and Fusions template.
If you are using a custom assay, see “Guidelines for using custom assays with the Genexus
·
Integrated Sequencer” on page 176 for guidelines for setting parameters for Minimum Read
Count Per Sample and target amplification in the Panel and Parameters steps.
Genexus™ Integrated Sequencer User Guide
™
Page 37

Chapter 3 Create and manage assays (manager/administrator)
Create a new assay (manager/administrator)
3.
In the Panel step, make the following selections or entries, then click Next.
a.
The panel for the assay from the Panel list.
Note: To add a new panel, click Assays4Manage Panels, then click + Add New.
3
b.
The hotspot file for the panel.
e: To add a hotspot file, click Assay4Manage Panels4Hotspots, then click + Add
Not
New.
c.
The CNV baseline for CNV calling, if used in the assay
you are not performing CNV (copy number variant) analysis.
To add a CNV baseline, click Assay4Manage Presets4Copy Number Baselines, then click
+ Create New or
d.
(Optional) If you select
value to copy number based on tumor cellularity,
if you want the CNV analysis to adjust for
heterogenous tumor content in your samples.
Samples with % cellularity below this value when
created are rejected. If you do not want to make this
adjustment, select Do Not Adjust CN and Do Not
Reject Samples.
e.
The extraction method type.
f.
The minimum read count per sample coverage setting (required).
Import Copy Number Baseline.
ed a CNV baseline, select a
. Select Do Not Run CNV Algorithm if
Genexus™ Integrated Sequencer User Guide
37
Page 38

Chapter 3 Cr
3
Create a new assay (manager/administrator)
4.
eate and manage assays (manager/administrator)
g.
The annotation set to use in variant reporting.
To add an annotation set, click Assays4Manage Presets4Annotation Sets, then click +
Add New.
In the Reagent step, make the following selections or entries, then click Next. confirm or select
names of library, barcode, templating, and sequencing kits, select the sequencing chip, and inline
control check boxes, then select or enter values for template size and sequencing flows, if dierent
from the prepopulated values. Click Next.
a.
Confirm or select names of library, barcode, templating, and sequencing kits.
Note: If you select Other AmpliSeq fr
dropdown list includes barcodes sets, such as IonCode™ and Ion Xpress™ barcodes, that are
compatible with manually or Ion Chef™-prepared libraries.
b.
Select the sequencing chip.
c.
Select one or both of the DNA and RNA inline contr
controls in the quality control analysis.
d.
Select or enter values for template size and sequencing flows, if dierent from the
prepopulated values.
om the Library Kit dropdown list, the Barcode Kit
ol check boxes if you want to include inline
38
Genexus™ Integrated Sequencer User Guide
Page 39

Chapter 3 Create and manage assays (manager/administrator)
Create a new assay (manager/administrator)
5.
In the QC step, enter parameters in the CF-1 Control and Run QC sections, and in the NTC (no
template control) QC and Sample QC fields that appear appropriate to the sample types specified
in the assay: NTC QC - DNA, NTC QC - RNA, Sample QC - DNA, and Sample QC - RNA. Leave
parameters that are not applicable to your assay as Not Set. Click Next when finished.
3
Parameters for QC pass/fail thresholds
Parameter Description
CF-1 Control
Average Reads Per Lane The average number of CF-1 reads per chip lane.
Base Call Accuracy The percentage of accuracy of the CF-1 calls aligned to the CF-1 reference.
Mean AQ20 Read Length The mean length of CF-1 reads having ≥99% accuracy at each position.
Run QC
Key Signal The average signal after software processing for all ISPs that identically match the
ary key (TCAG). A measure of the eciency of template amplification.
libr
Genexus™ Integrated Sequencer User Guide
39
Page 40

Chapter 3 Create and manage assays (manager/administrator)
3
Create a new assay (manager/administrator)
Parameters for QC pass/fail thresholds (continued)
Parameter Description
Percent Loading The percentage of addressable wells on a chip lane that are loaded with an ISP.
Raw Read Accuracy The percentage of raw reads mapping to the reference sequence.
Sample QC - DNA
Deamination score Deamination is reported as the estimated SNP proportion consistent with deamination
(low allele frequency C:G>T:A SNVs). The deamination score can be used to
determine the quality of an FFPE sample.
MAPD The Median of the Absolute values of all Pairwise Dierences; a quality metric that
estimates coverage variability between adjacent amplicons in copy number variant
(CNV) analyses. A MAPD value ≤0.5 generally indicates an acceptable level of
coverage variability in the DNA Library or DNA Control.
Mapped Reads The total number of bases mapped to target amplicons.
Mean AQ20 Read Length
(bp)
Mean Read Length (bp) The mean length of all sample reads.
Uniformity of Amplicon
Coverage
Sample QC - RNA
Mapped Reads The total number of reads mapping to a fusion reference sequence.
Mean AQ20 Read Length
(bp)
Mean Read Length (bp) The mean length of all sample reads.
NTC QC- DNA
Average Base Coverage
Depth
Mean Read Length (bp) The mean length of reads in the no template control.
NTC QC - RNA
Mapped Reads The total number of reads in the no template control mapping to a fusion reference
Mean Read Length (bp) The mean length of reads in the no template control.
The mean length of sample reads aligned to a reference sequence that have ≥99%
accuracy at each position.
The percentage of reads showing a depth of coverage ≥20% of the mean base
coverage.
The mean length of called fusion reads that have ≥99% accuracy at each position.
Average base coverage depth of reads aligned to a reference sequence in the no
template control.
sequence.
40
Genexus™ Integrated Sequencer User Guide
Page 41

Chapter 3 Cr
6.
In the Parameters step, review the prepopulated analysis settings, then modify if needed. Click
Next when finished.
Note:
Not all parameters are adjustable. To modify primary analysis parameters, select the Customize
·
Parameters checkbox.
Select Yes under UDG Treat DNA in the Library Prep & Templating Parameters section to
·
include uracil DNA glycosylase (UDG) treatment of DNA during library preparation. Removal
of uracil residues can increase sequencing quality for FFPE samples that have undergone
significant cytosine deamination.
We recommend using multiple samples in runs that include UDG treatment. Single sample runs
can result in low read number.
eate and manage assays (manager/administrator)
Create a new assay (manager/administrator)
3
olling from the top, the settings are grouped in the following categories:
Scr
Genexus™ Integrated Sequencer User Guide
41
Page 42

Chapter 3 Create and manage assays (manager/administrator)
3
Create a new assay (manager/administrator)
•
Library Prep & Templating Parameters
If needed, change the default settings for
the cycling and input parameters used in
library and template preparation.
•
Primary Analysis Parameters
•
Annotation
A parameter category can be quickly brought to the top of the screen by selecting it in the Filter
Parameters by... list at the upper left.
•
CNV Finding
•
Fusions
•
Read Mapping
•
Variant Finding
Parameters can also be set by uploading an Advanced P
overrides default settings. Click Upload , then click Select files... to navigate to this file on your
drive and upload. Click Download to download parameters settings as a JSON file to your hard
drive.
7.
In the Plugins step, select plugins that you want to include in the sequencing data analysis from
the plugin list, then click Next.
arameter Configuration file, which
42
Genexus™ Integrated Sequencer User Guide
Page 43

Chapter 3 Cr
8.
In the Save step, enter a name and a short name for the assay, an optional description, then click
Save.
eate and manage assays (manager/administrator)
Copy an assay (manager/administrator)
3
The assay appears in the Manage Assays scr
9.
In the Manage Assays screen, click Lock in the Actions column of the assay to prevent changes
to the assay.
The assay must be locked to be available for use when planning a run.
een with the name you entered.
Copy an assay (manager/administrator)
Manager- and administrator-level users can create a new assay by copying an existing system-installed
assay or other custom assay and modifying it if needed. Only locked assays can be copied.
1.
In the menu bar, click Assays4Manage Assays.
2.
In the Manage Assays screen, in the Actions column for the assay that you want to copy, click
Copy.
The Copy Assay scr
assay.
3.
Proceed through the workflow steps, and modify assay settings if needed.
Genexus™ Integrated Sequencer User Guide
een opens to the Panel step. The assay settings can be modified for the new
43
Page 44

Chapter 3 Create and manage assays (manager/administrator)
3
Import an assay (manager/administrator)
4.
When finished, enter a new name and short name for the copied assay in the Assay Name field,
then click Save.
The newly created assay is added to the list of assays in the Assays / Manage Assays screen.
The assay name is followed by (Draft) in the Assay column. The assay remains in draft status until it
is locked.
5.
In the Actions column, in the row of the assay, click Lock to enable its use in a run.
Import an assay (manager/administrator)
A manager- or administrator-level user can import an assay from another Genexus™ Integrated
Sequencer if the assay has been first exported to a local drive.
1.
In the menu bar, click Assays4Manage Assays.
2.
In the Manage Assays screen, click
3.
In the Impor
on your drive, then select it.
t Assay dialog box, click Select Assay file, navigate to the exported assay ZIP folder
Import Assay.
44
Genexus™ Integrated Sequencer User Guide
Page 45

Chapter 3 Cr
4.
Navigate to the exported assay ZIP folder on your drive, select it, then click Upload.
eate and manage assays (manager/administrator)
Import an assay (manager/administrator)
3
The assay appears in the list of assays in the Assays4Manage Assays scr
een.
Genexus™ Integrated Sequencer User Guide
45
Page 46

4
Enter samples and libraries
Create a new sample ................................................................. 46
■
Import samples ...................................................................... 49
■
Manage samples ..................................................................... 51
■
Prepare or import a library batch ....................................................... 55
■
Before planning a run in Genexus™ Softwar
enter sample information in the software to assign sample names and provide other information. From
the Samples menu, you can add samples in two ways. You can manually enter sample information or
import sample information from a file.
Create a new sample
You can add a new sample in the Samples / Manage Samples screen. The new sample will be
available to use in your run.
1.
In the menu bar, click Samples4Manage Samples.
2.
In the Manage Samples screen, click
e for either a sample run or a library run, you must first
Create Sample.
46
3.
In the Cr
Attributes identified with a red asterisk (*) in the Create Sample dialog box are required when
adding a new sample. If attribute information is not available when adding a new sample,
substitute mock information to complete the required fields.
eate Sample dialog box, complete the required fields.
Genexus™ Integrated Sequencer User Guide
Page 47

For more information, see “System-installed sample attributes” on page 47.
4.
Click Save.
The new sample is listed in the Manage Samples screen and will be available to use in your run.
System-installed sample attributes
The following table lists and describes system-installed sample attributes. System-installed sample
attribut
Sample attribute Description
es cannot be edited. Custom sample attributes are not listed in this table.
Chapter 4 Enter samples and libraries
Create a new sample
4
Sample Name
Collection Date
Gender
Sample Type
[1]
[1]
[1]
A unique identifier r
The sample name can contain only alphanumeric characters (0–9, Aa–Zz), full stops/periods
(.), underscores (_), or hyphens (-), cannot contain spaces, and is limited to a maximum of
20 characters.
IMPORTANT! T
you assign a unique and distinguishable sample name for each sample.
Note:
Samples that have been used in a run cannot be delet
·
To prevent duplication, the software checks all sample names and returns an error
·
message if a non-unique sample name is detected.
[1]
The date that the sample was collected.
Click
The biological sex of the sample: Female, Male, or Unknown.
Calendar t
IMPORTANT! Male or F
A term that describes the sample, for example, FFPE, DNA, DNA & RNA. You can also select
Other, then ent
epresenting the sample.
o prevent erroneous sample selection during run planning, make sure that
ed.
o select the date in the correct format.
emale must be selected for proper measurement of AR CNV.
er a custom sample type.
Disease Category
Cancer Type
Cancer Stage
Genexus™ Integrated Sequencer User Guide
[1]
The disease type of the sample.
Note: If you select Cancer in this list, the Cancer Stage, Cancer Type, % Cellularity, and
% Necrosis attributes listed below become available in the Add New Sample dialog box.
[1]
[1]
The type of cancer that is represented by the sample.
Select the type of solid or hematologic cancer. If cancer type is unknown, select Unknown
Primary Origin.
The stage of the cancer from which the sample was collected.
Select Stage 0–IV, or Primary, Unknown, or Other.
47
Page 48

Chapter 4 Ent
4
Create a new sample
(continued)
Sample attribute Description
% Cellularity The percentage of tumor cells over normal cells in the sample. This is a whole number
% Necrosis The percentage of cellular necrosis in the sample. This is a whole number between
Notes An open-entry field for any additional sample information.
[1]
equired attribute
R
er samples and libraries
between 1 and 100. The % Cellularity attribute is applicable to FFPE samples only.
IMPORTANT!
If not set, % Cellularity is assumed t
·
% Cellularity is a required attribute for CNV analyses. Do not leave the field blank.
·
(FFPE samples only) If % Cellularity value is set to <100, then the magnitude of copy
·
number gain or loss can be decreased. For more information, see “CNVs table” on
page 119.
1 and 100.
o be 100% in calculations that use this attribute.
Create a custom sample attribute (manager/ administrator)
A manager- or administrator-level user can create custom sample attributes. Sample attributes, such
as the dat
attribute can be made mandatory, in which case you are required to enter the attribute information for
each new sample. Custom attributes can be used to further characterize samples.
Custom samples attributes cannot be edited or deleted after the samples that use them have been
added to a library. To remove a custom sample attribute from use, see “Remove a sample attribute
(administrator)” on page 49.
1.
2.
3.
e of collection and type of cancer, characterize and define a nucleic acid sample. A sample
In the menu bar, click Samples4Manage Attributes.
In the Manage Attributes screen, click
Complet
a.
b.
c.
e the fields in the Add New Attribute dialog box.
In Attribute Name, enter the name of the attribute.
Attribute names are limited to ≤20 alphanumeric characters (0–9 and Aa–Zz), full
stops/periods (.), underscores (_), or hyphens (-).
In Data Type, specify whether the attribute is text or a number.
To require users to select the new attribute when adding or importing samples, click the
toggle button to designate the attribute as Required.
Add New Attribute.
48
d.
Click Submit.
The new sample attribute is listed in the Attribute Name column and is available when you add a
new sample.
Genexus™ Integrated Sequencer User Guide
Page 49

Chapter 4 Ent
The new sample attribute is available in the Create Sample dialog box and in the Edit Sample dialog
box, even for samples that were created before the new sample attribute was created. If the new
sample attribute is a required attribute, it must be specified in the Edit Sample dialog box in order to
save the changes. For more information, see “Edit a sample (manager/ administrator)” on page 52.
er samples and libraries
Import samples
4
Remove a sample attribute (administrator)
An administrator-level user can remove user-created sample attributes from use in the software.
Custom sample attributes that have been made obsolete can be reactivated. A record of how the
attribute is used, removed, or changed, and by whom, is maintained in the audit trail of samples that are
created using that attribute. You cannot designate as obsolete system-installed sample attributes.
1.
In the menu bar, click Samples4Manage Attributes.
2.
In the Manage Attributes screen, select a custom sample attribute to remove.
3.
Click Obsolete in the Actions column, then confirm the action.
Reactivate replaces Obsolete | Edit in the Actions column.
4.
(Optional) To reactivate an attribute, click Reactivate in the Actions column.
Active sample attributes are listed in the Add New Sample dialog box.
Import samples
Sample data files can be used to capture, manage, and edit sample data. You can import sample
data files in the following formats: TXT, XLS, XLSX, or CSV. For a list of the sample attributes that
are included in the import file, see “System-installed sample attributes” on page 47. For ease of use,
you can download a Microsoft™ Excel™ example file to create an import file. For more information, see
“Download an example samples file” on page 50.
1.
In the menu bar, click Samples4Manage Samples, then click
2.
In the Impor
3.
Navigate to the file, then click Open.
t Samples dialog box, click Select samples file.
Import Samples.
4.
Click Upload.
A progress bar followed by an import report appears. If the import process fails, an error message
indicates the reason for failure (for example, an invalid character was used). For troubleshooting,
see “Batch sample import fails” on page 144.
Genexus™ Integrated Sequencer User Guide
49
Page 50

Chapter 4 Enter samples and libraries
4
Import samples
Successfully imported samples are listed in the Samples / Manage Samples screen.
Download an example samples file
Download a Microsoft™ Excel™ example file to create a sample import file. The example file contains
two tabs. The Instruction tab in the spreadsheet lists and indicates mandatory and optional attributes,
which are the column headings in the Specimen Format tab. Use the Specimen Format tab to enter
samples.
1.
In the menu bar, click Samples4Manage Samples, then click Import Samples.
2.
In the Impor
file.
The example file contains default sample attributes as columns. If custom sample attributes have
been configured in the software, add these attributes as columns to the example file.
3.
Save the file.
You can now import the file in the Import Samples dialog box. For more information, see “Import
samples” on page 49.
t Samples dialog box, click Click here to download the Microsoft™ Excel™ example
50
Genexus™ Integrated Sequencer User Guide
Page 51

Manage samples
You can find tools for creating, searching, sorting, editing, deleting, and exporting samples, and for
viewing the sample history in the Samples / Manage Samples screen.
Chapter 4 Enter samples and libraries
Manage samples
4
Sort, search, and filt
Use the Samples / Manage Samples screen to sort, search, and filter the list of samples. The samples
are listed by name with the most recently created sample at the top of the list.
•
Use the Filter Samples by list and the Sample Name search box to search, sort, and filter the list
of samples.
List only the samples that
have not been e
List only the samples that
have not been prepared as a
library.
List all samples. In Filter Samples by, select All.
Sort the samples list.
Search for samples of
interest.
er samples
To Do this
In Filter Samples by, select To Be Extracted.
xtracted.
In Filter Samples by, select To Be Prepared.
1.
Click a column heading to sort the list by the entries in that
column.
2.
Click the column heading again to reverse the order.
1.
In the Sample Name search box, enter the full or partial sample
name.
2.
Click
The sample or samples that match the sample name search entry
are listed.
3.
Click
(Search) or pr
(Remove) t
o return to the complete list of samples.
ess Enter.
Genexus™ Integrated Sequencer User Guide
51
Page 52

4
Chapter 4 Ent
Manage samples
er samples and libraries
Export samples
The Export function generates an XLS file that contains details about the selected sample.
1.
In the menu bar, click Samples4Manage Samples.
2.
In the Manage Samples screen, select the checkbox in the row of each sample that you want to
export. To select all samples, select the checkbox in the column heading row.
3.
Click
An XLS file is cr
browser settings, the software automatically downloads the file or prompts you to open or save the
file.
4.
Open the XLS file in an appropriate viewer to review or print.
Export.
eated that contains the details of the selected samples. Depending on your
View notes or add a note to a sample
You can add notes to a specific sample or view e
written comments and observations for a sample. A sample can contain multiple notes from dierent
users.
1.
In the menu bar, click Samples4Manage Samples.
2.
In the row of the sample of interest, in the Actions column, click Notes, then review existing notes
or add a new note.
Action Description
View existing notes for a
sample.
Add a new note to a
sample.
In the Not
listed by user, date, and time.
1.
2.
es dialog box, notes that are associated with the sample are
In the Notes dialog box, click
In Add Not
xisting notes. Use Notes to capture time-stamped
Add Notes.
es, enter the note, then click Save.
Edit a sample (manager/ administrator)
A manager- or administrator-level user can edit samples. In the Samples / Manage Samples scr
samples that can be edited are identified by the presence of the Edit link in the Actions column.
Samples can be edited at any point before a sample run that uses that sample is complete using the
Edit link. After the sample is used in a run, the Edit link is no longer available. To edit a sample after a
run is complete, use the Edit Sample & Amend Report link instead. For more information, see “Edit a
sample and amend a report after a run (manager/ administrator)” on page 53.
52
een,
Genexus™ Integrated Sequencer User Guide
Page 53

Chapter 4 Enter samples and libraries
Manage samples
To add a custom sample attribute to a sample, see “Create a custom sample attribute (manager/
administrator)” on page 48.
1.
In the menu bar, click Samples4Manage Samples.
2.
In the Manage Samples screen, in the Actions
column, click Edit in the row of the sample of interest.
3.
In the Edit Sample dialog box, edit the sample
attributes.
See “System-installed sample attributes” on page 47 for more information about the systeminstalled sample attributes.
4.
Click Save.
Edit a sample and amend a report after a run (manager/ administrator)
After a sequencing run and its analysis have completed, a manager- or administrator-level user can
edit a sample and amend the Lab Repor
automatic update of the report and other files associated with the sample. In the Samples / Manage
Samples screen, editable samples are identified by the presence of the Edit link in the Actions column.
After 30 days, the Edit link is unavailable, only the Audit link is available.
t for up to 30 days. Editing a sample after a run triggers an
4
1.
In the menu bar, click Samples4Manage Samples.
2.
In the Manage Samples screen, in the Actions
column, click Edit in the row of the sample of interest.
3.
In the Edit Sample & Amend Report dialog box, edit
sample attributes as necessary.
See “System-installed sample attributes” on page 47 for more information about system-installed
sample attributes.
4.
Click Save.
The Edit Sample and Amend Report confirmation dialog box opens.
5.
Click Yes to confirm the changes and continue.
The sample information is edited, and all runs and reports associated with that sample are
updated. Any test report, lab report, tab files and info.csv file that is associated with the sample will
be updated with the changes.
Genexus™ Integrated Sequencer User Guide
53
Page 54

4
Chapter 4 Ent
Manage samples
er samples and libraries
Review sample edit history
The entire history of defining a sample is available to review and export using the audit feature.
The history shows the original sample values and any new values or activities. The following actions
generate an audit record:
• Create a new sample
• Edit a sample
• Obsolete a sample
• Delete a sample
This feature allows you to meet Title 21 CFR Part 11 of Federal Regulations that establishes the
United States Food and Drug Administration regulations on electronic records and signatures, password
policies, and user activity auditing.
1.
In the Samples / Manage Samples screen, in the Actions column, click Audit in the row of the
sample of interest.
The Audit Trail Details window opens, listing each action that was performed for the sample, such
as sample creation or edits.
2.
(Optional) Click Download t
3.
Click
Delete samples
You can delete samples that have not been assigned to a run. Samples that are assigned to a run are
locked and cannot be edited or deleted. Locked samples display Audit in the Actions column.
1.
In the menu bar, click Samples4Manage Samples.
2.
In the Manage Samples screen, select the checkbox in the row of each sample that you want to
delete. To select all samples, select the checkbox in the column heading row.
3.
Click
The Delet
sample(s)?
4.
Click Yes to delete the selected samples.
The sample is removed from the Manage Samples screen.
o export the audit record to a PDF file.
Back t
o close the Audit Trail Details window and return to the list of samples.
Delete.
e Sample dialog box opens with the message Are you sure you want to delete selected
54
Genexus™ Integrated Sequencer User Guide
Page 55

Prepare or import a library batch
A library batch is a group of prepared libraries that are sequenced in the same library run. If you are
planning a run starting from libraries that you have already prepared manually, you must first create a
library batch in Genexus™ Software from samples. You can enter samples in the software or import a
sample file. For more information see:
• “Create a new sample” on page 46
• “Import samples” on page 49
Select the library batch when you plan the run. If you are planning a run starting from nucleic acid
samples, skip this step and proceed to “Plan a sample run” on page 62.
Note:
Each library in a library batch must have a unique library name.
·
When combining libraries in the same run, each library must have a unique barcode.
·
Fields identified with a red asterisk (*) are required.
·
Chapter 4 Enter samples and libraries
Prepare or import a library batch
4
Prepare a library batch
A library batch is a group of prepared libraries that are sequenced in the same library run. If you are
planning a run starting from libraries that you have already prepared manually, you must first create
a library batch in Genexus™ Software from samples that you have added. If you are planning a run
starting from nucleic acid samples, skip this step and proceed to “Plan a sample run” on page 62.
1.
In the menu bar, click Samples4Manage Samples.
2.
In the Manage Samples screen, in the Filter Samples by... dropdown menu, apply the To Be
Prepared filter to limit the displayed samples to those samples that have not been placed in a
library batch.
See “Sort, search, and filter samples” on page 51 for more information on the Filter samples
feature.
Genexus™ Integrated Sequencer User Guide
55
Page 56

Chapter 4 Enter samples and libraries
4
Prepare or import a library batch
3.
Select samples in the list by clicking the checkbox to the left of each sample, then click
Prepare Library Batch.
4.
In the Cr
The assay determines specific parameters of the run, including any required controls and post-run
data analysis settings. Only locked assays appear in the Select Assay dropdown menu. For
instructions to lock an assay, see “Manage assays (manager/administrator)” on page 33.
eate Library batch screen, in Select Assay, select the assay that you want to run.
56
5.
In the e
Note: Library Prep Type: automatically fills for the nucleic acid type specified by the assay you
selected: DNA, RNA, DNA+RNA, or TNA.
xpanded screen, in Library Batch ID, enter a unique identifier for the library batch.
Genexus™ Integrated Sequencer User Guide
Page 57

Chapter 4 Enter samples and libraries
Prepare or import a library batch
Library Batch IDs can contain only alphanumeric characters (0–9, Aa–Zz), full stop/period (.),
underscore (_), and hyphen (-). Required fields are indicated with a red asterisk (*).
4
6.
Select the bar
7.
Select the Include NTC checkbox to add no template control sample processing and reporting to
the library batch.
8.
Type a unique library name for each DNA and/or RNA library in the appropriate field.
•
Library names can contain only alphanumeric characters (0–9, Aa–Zz), full stop/period (.),
underscore (_), and hyphen (-).
•
If your assay requires specific controls, they are automatically listed in the dialog box. These
controls each require a unique barcode ID within the library batch, but do not require library
names.
9.
Select the barcode ID of the adapter used to prepare
each library. If appropriate, swap the default barcodes
in the dialog box between DNA, RNA, and Fusions by
clicking the Swap Barcodes swap image.
For example, click the DNA and Fusions swap button.
Genexus™ Integrated Sequencer User Guide
codes from the kit boxes into the appropriate fields.
57
Page 58

Chapter 4 Enter samples and libraries
4
Prepare or import a library batch
Each library in a library batch must have a dierent barcode ID. When preparing the physical
libraries, best practice is to swap barcodes between DNA and RNA libraries in consecutive
sequencing runs to prevent carryover contamination. The barcodes that are listed in the DNA
Barcode or RNA Barcode dropdown list belong to the barcode set that was selected when the
assay was created.
IMPORTANT! Ensure that the actual barcodes that you used to create the libraries match the
barcodes that you enter in the Create Library batch screen.
10.
11.
er the Input Quantity for each library.
Ent
Click Submit to save and submit your selections.
The Manage Libraries screen opens, listing the library batch that you created. Libraries that are
prepared in the same batch have the same Library Batch ID.
Import a library batch
You can import library batch information in the form of an .XLS or .XLSX file. The impor
include all required library and kit information.
1.
In the menu bar, click Samples4Manage Libraries.
2.
In the Manage Libr
aries screen, click
t file must
Import Library Batch.
58
3.
In the Impor
are prepared, and to download an example file for import.
t Library Batch dialog box, click Click here to select an assay for which the libraries
Genexus™ Integrated Sequencer User Guide
Page 59

er samples and libraries
Prepare or import a library batch
4.
Select an assay from the list, then click Download.
Chapter 4 Ent
The assay name is auto-populated in the Microsoft™ Excel™ template file that downloads to your
drive.
5.
In the template file, enter or confirm the library batch information.
Template item Description
Reagents tab
Assay Name Auto-populated when assay is selected in step 4 (required)
Library Batch ID Must be alphanumeric (0–9, Aa−Zz), full stop/period (.), underscore
(_), and hyphen (-) (r
Library kit barcode For example, Genexus™ Library Strips 1 and 2‑AS barcode
(optional)
Panel kit barcode For example, Oncomine™ Comprehensive Assay v3 DNA GX
barcode (optional)
Libraries tab
Sample Name Same character requirement as Library Batch ID (required)
equired)
4
Library Name Same character requirement as Library Batch ID (required)
Barcode Barcodes used for each sample and control library preparation
(required)
Nucleic Acid Type DNA, RNA, or TNA (required)
Input Quantity Library input quantity (optional)
No Template Control To Include a no template control, add a row with Sample Name as
NTC, Library Name as NA, Barcode and Nucleic Acid Type similar
to sample rows (optional)
IMPORTANT! F
or DNA+Fusions assays, the DNA library and RNA libraries must be listed in
sequential order per pool for each sample. For example, for a 1‑pool DNA+Fusions assay, order
should be DNA, RNA for sample 1, DNA, RNA for sample 2. For a 2‑pool DNA+Fusions assay,
library order should be DNA, RNA (pool 1), DNA, RNA (pool 2) for sample1, then DNA, RNA (pool
1), DNA, RNA (pool 2) for sample 2.
6.
Save the file.
7.
Click Br
owse, navigate to the saved file, then select it.
Genexus™ Integrated Sequencer User Guide
59
Page 60

Chapter 4 Ent
4
Prepare or import a library batch
8.
Click Upload.
A progress bar followed by an import report displays. If the import process fails, an error message
indicat
troubleshooting support, see “Library batch import fails” on page 145.
er samples and libraries
es the reason for failure (for example, an invalid character was used). For additional
60
Genexus™ Integrated Sequencer User Guide
Page 61

5
Plan and manage runs
Plan a sample run .................................................................... 62
■
Plan a library run ..................................................................... 70
■
Runs created in Genexus™ Softwar
templating, sequencing, and analysis, including sample information and plate location, assays, and
barcodes. Runs are used to track samples, consumables, and chips throughout the library preparation,
templating, sequencing, and data analysis workflow.
You can plan runs for sequencing runs that use either nucleic acid samples (sample run) or libraries
that you have previously prepared manually (library run) as input. Genexus™ Software guides you
step-by-step to set up a run that tells you what consumables are needed, and provides a printed run
setup guide to help you load the Genexus™ Integrated Sequencer with the required consumables.
e contain all of the settings that are used in library preparation,
Genexus™ Integrated Sequencer User Guide
61
Page 62

Chapter 5 Plan and manage runs
5
Plan a sample run
Plan a sample run
You can plan a run starting from isolated nucleic acid samples.
Planning a sample run is organized into steps: Setup, Assays, Samples, Sample Plate, and Review.
Progress through the steps is tracked in the upper left corner of the Runs / Plan Sample Run screen.
Before planning a run for a sample run, you must enter sample information into Genexus™ Softwar
more information, see “Create a new sample” on page 46, or “Import samples” on page 49.
1.
In the menu bar, click Runs4Plan Sample Run.
Note: Y
ou can also click
Plan Sample Run in the Runs / Manage Runs scr
een.
e. For
62
Genexus™ Integrated Sequencer User Guide
Page 63

2.
In the Setup step, enter or make the following selections.
a.
In the Plan section, enter a unique name.
Chapter 5 Plan and manage runs
Plan a sample run
5
b.
(Optional) In the Repor
ting (Optional) section, select one or more options if needed. You can
select both options, or leave both options deselected.
Reporting option Description
Generate Report Select this option to generate a Lab Report using a report
t
emplate that you specify in the list.
To create a report template, click Assays4Manage Presets,
Add New.
Upload BAM files t
Reporter™ Software
c.
Click Next.
o Ion
then in the Report Templates tab, click
Select this option to automatically upload data for further
analysis with Ion Reporter™ Software. You can also upload BAM
files after a run if you leave this option unselected.
Select your Ion Reporter™ Software account and release version.
To configure an Ion Reporter™ Server account, see “Configure
an Ion Reporter™ Server account (administrator)” on page 179.
To configure an Ion Reporter™ Software on Connect account,
see “Configure Thermo Fisher Accounts in Genexus™ Software
(administrator)” on page 182.
If a chip is installed in the sequencer, the Chip View graphic in the lower left corner indicates
the lanes that are available for sequencing.
Genexus™ Integrated Sequencer User Guide
63
Page 64

Chapter 5 Plan and manage runs
5
Plan a sample run
3.
In the Assays step, select the assay or assays that you want to use in the run.
Use the Filter Assays By list and the Assay Name search box to search, sort, and filter the list of
assays.
Note:
Aft
er selecting an assay, the list is filtered to show compatible assays that can be selected and
·
run at the same time.
To create a new assay, see Chapter 3, “Create and manage assays (manager/administrator)”.
·
IMPORTANT! Ensur
will use in the run. If you select the wrong assay when you plan a run, the instrument will use
incorrect settings during the run, resulting in invalid sequencing results. Available assays are listed
in the Assays / Manage Assays screen.
e that you select the assay that corresponds with the sample type that you
64
Genexus™ Integrated Sequencer User Guide
Page 65

Chapter 5 Plan and manage runs
Plan a sample run
If you selected the Upload BAM files to Ion Reporter™ Software reporting option in substep 2b,
make the following selections from the dropdown list in the Ion Reporter™ Workflow column in
the row of each assay that you selected.
•
Select Upload Only to upload sample data to Ion Reporter™ Software automatically upon run
completion.
•
Select the desired Ion Reporter™ analysis workflow to upload sample data and launch an
analysis in Ion Reporter™ Software automatically upon run completion.
Note: In order for the Ion Reporter™ analysis workflow to appear in the list, you must tag the
analysis workflow for use with the IonReporterUploader plugin. For more information, see “Tag
an Ion Reporter™ Software analysis workflow for use with the IonReporterUploader plugin” on
page 181.
5
4.
In the Include NT
include a no template control for the assay.
5.
After you select an assay (or assays) and make the appropriate Ion Reporter™ Software selections
(if applicable), click Next.
6.
In the Samples step, select the samples from the list that you want to run with the assay, then
click Assign.
C column for each assay that you select, click the Include NTC checkbox to
The Chip V
on the number of samples (including a no template control, if selected), assay type, primer pools
used, and minimum reads per sample entered at assay setup. Green denotes a chip lane that will
be used in the run containing assigned samples within lane capacity. If the minimum reads per
sample × the number of samples exceeds the chip or lane well capacity, a dialog box appears
Genexus™ Integrated Sequencer User Guide
iew updates to show the lanes to be used in the run. Lane usage is calculated based
65
Page 66

Chapter 5 Plan and manage runs
5
Plan a sample run
after you click Assign asking you to confirm that you want to continue. After confirmation, the
Chip View updates and shows the lane color as red instead of green. The run is allowed, but you
may not achieve the required reads per sample to pass QC metrics.
Green lane color denotes lane usage and sample
assignment within lane capacity
7.
If you select
8.
If needed, edit samples in one of the following ways, then click Next.
•
Click View & Remove, make your selections, then click Update.
•
Click Remove All, make your selections, then click Assign.
9.
In the Sample Plate step, review sample positions in the sample plate. Drag and drop samples
ed more than one assay, repeat step 6 for each additional assay.
.
Red lane color denotes sample assignment that
xceeds lane capacity.
e
and no template controls to edit the location of samples and controls, if desired.
66
Genexus™ Integrated Sequencer User Guide
Page 67

10.
Modify the concentration of samples, if needed.
Chapter 5 Plan and manage runs
Plan a sample run
5
Click Bulk Edit to modify sample concentration of all samples at one time, then click Submit to
return to the Sample Plate screen.
If a sample concentration is ≤1,024X of the target concentration for the assay, which is displayed
as a default value for each sample in the Sample Plat
the sample to the target concentration during the run. If a sample concentration is greater than
this value, you must manually dilute the sample to the target concentration, or to a value within
e screen, the sequencer automatically dilutes
Genexus™ Integrated Sequencer User Guide
67
Page 68

Chapter 5 Plan and manage runs
5
Plan a sample run
range for automated dilution before loading on the sample plate. For more information, see “Dilute
or concentrate the samples (if needed) and load the sample plate—sample run” on page 76.
Note: The sample volume that is required for library preparation is not adjustable. The volume
depends on the number of primer pools in the assay, sample type, and library chemistry. For more
information, see “Dilute or concentrate the samples (if needed) and load the sample plate—sample
run” on page 76 for specific sample volumes to load on the sample plate.
11.
If sample plat
12.
In the Review step, review the run plan summary, then click Save & Print to print the run setup
guide, if desired. Click Save to save the run without printing.
The run plan summary lists the following details:
•
the consumables that are required for this run
•
how much sample volume to load
•
where to load samples and primer pool tubes
•
the sample concentration.
e information is correct, click Next.
68
Genexus™ Integrated Sequencer User Guide
Page 69

1
8
2
3
6
7
4
5
Chapter 5 Plan and manage runs
Plan a sample run
5
Run information
1
List of consumables required for the run
2
List of consumables that are installed on the sequencer and
3
available for the run
Positions to load primer pool tubes
4
Chip view showing the lanes to be used in the run
5
Note: If you ar
show that HD primer pools occupy both rows:
After saving, the run appears in the Manage Runs scr
specified.
e using an assay with Ion AmpliSeq™ HD library chemistry, the primer pool positions
Positions in the sample plate to load the samples
6
Table listing the sample plate position, sample type, volume
7
o load, concentration, dilution factor, and assay for each
t
sample
Description of each primer pool and its position
8
een in the run list with the name you
After selecting the run and loading the sequencer, the run is started on the sequencer screen.
Genexus™ Integrated Sequencer User Guide
69
Page 70

Chapter 5 Plan and manage runs
5
Plan a library run
Plan a library run
Before planning a library run, you must enter sample information and prepare a library batch in
Genexus™ Software. The library batch selects the assay to be used in the run, and the assay in turn
specifies the barcode set that was used to prepare the sample libraries. If your sample libraries were
prepared using a barcode set not specified in an assay you want to use in the run, you must
1. create a new assay, or copy an existing assay, and specify the new barcode set in assay setup.
2. prepare a library batch that selects the new assay.
For more information, see “Create a new assay (manager/administrator)” on page 35, “Copy an assay
(manager/administrator)” on page 43, and “Prepare a library batch” on page 55.
Genexus™ Software guides you through the four steps of planning a library run: Setup, Assays, Library
Batches, and Review. Progress through the steps is tracked in the upper left corner of the Runs / Plan
Library Run screen.
1.
In the menu bar
Note: You can also click
, click Runs4Plan Library Run.
Plan Library Run in the Runs / Manage Runs scr
een.
70
Genexus™ Integrated Sequencer User Guide
Page 71

Chapter 5 Plan and manage runs
2.
In the Setup step, enter a name for the run, then configure the reporting options.
a.
In Run Name, enter a unique name.
Plan a libr
ary run
5
b.
(Optional) In the Repor
ting (Optional) section, select one or more options if needed. You can
select both options, or leave both options deselected.
Reporting option Description
Generate Report Select this option to generate a Lab Report using a report
emplate that you specify in the list.
t
To create a report template, click Assays4Manage Presets,
Upload BAM files t
Reporter™ Software
c.
Click Ne
xt.
o Ion
then click
Select this option to upload data for further analysis with Ion
Reporter™ Software. You can also upload BAM files after a run if
you leave this option unselected.
Select your Ion Reporter™ Software account and release version.
To configure an Ion Reporter™ Server account, see “Configure
an Ion Reporter™ Server account (administrator)” on page 179.
To configure an Ion Reporter™ Software on Connect account,
see “Configure Thermo Fisher Accounts in Genexus™ Software
(administrator)” on page 182.
Add New.
If a chip is installed in the sequencer, the Chip View graphic in the lower left corner indicates
the lanes that are available for sequencing.
Genexus™ Integrated Sequencer User Guide
71
Page 72

Chapter 5 Plan and manage runs
5
Plan a library run
3.
In the Assays step, select the assay or assays that you want to use in the run, then click Next.
Use the Filter Assays By list and the Assay Name search box to search, sort, and filter the list of
assays.
Note: F
assigns the assay to the batch. For more information on preparing a library batch, see “Prepare
a library batch” on page 55. The assay specifies the barcode set that was used to prepare the
sample libraries. To create a new assay, or copy an existing assay, see “Create a new assay
(manager/administrator)” on page 35, or “Copy an assay (manager/administrator)” on page 43.
IMPORTANT! Ensur
will use in the run. If you select a wrong assay when you plan a run, the instrument will use
incorrect settings during the run, resulting in invalid sequencing results. Available assays are listed
in the Assays / Manage Assays screen.
If you selected the Upload BAM files t
make the following selections from the dropdown list in the Ion Reporter™ Workflow column in
the row of each assay that you selected.
•
•
or the assay to be selectable at this step, you must have prepared a library batch that
e that you select the assay that corresponds with the sample type that you
o Ion Reporter™ Software reporting option in substep 2b,
Select Upload Only to upload sample data to Ion Reporter™ Software automatically upon run
completion.
Select the desired Ion Reporter™ analysis workflow to upload sample data and launch an
analysis in Ion Reporter™ Software automatically upon run completion.
Note: In order for the Ion Reporter™ analysis workflow to appear in the list, you must tag the
analysis workflow for use with the IonReporterUploader plugin. For more information, see “Tag
an Ion Reporter™ Software analysis workflow for use with the IonReporterUploader plugin” on
page 181.
72
Genexus™ Integrated Sequencer User Guide
Page 73

Chapter 5 Plan and manage runs
Plan a libr
4.
In the Library Batches step, select the library batch or batches that you want to use in the run.
Note: Only one library batch can be selected per assay. However, you can plan a multi-assay
library run if you select multiple, dierent assays in the Assays step.
ary run
5
The Chip V
iew updates to show the lanes to be used in the run as green. Lane usage is calculated
based on the number of samples, assay type, primer pools used, and minimum reads per sample
entered at assay setup.
Green lane color denotes lane usage and sample
assignment within lane capacity
.
Red lane color denotes sample assignment that
xceeds lane capacity.
e
If the minimum reads per sample × the number of samples exceeds the chip or lane well capacity,
a dialog box appears after you click Next asking you to confirm that you want to continue. After
clicking Yes, the Chip View updates and shows the lane color as red instead of green. In the
example shown at right, seven samples were included in a library batch instead of six. The run is
allowed, but you may not achieve the required reads per sample to pass QC metrics.
Genexus™ Integrated Sequencer User Guide
73
Page 74

1
2
3
6
7
4
Chapter 5 Plan and manage runs
5
Plan a libr
ary run
5.
After you select a library batch (or batches), click Next.
6.
In the Review step, review the run plan summary, then click Save and Print to print the run setup
guide, if desired. Click Save to save the run without printing.
The run plan summary lists the consumables that are required for the run, where to load the library
batch on the sample plate, and how much library volume to load.
Run information
1
List of consumables required for the run
2
List of consumables installed on the sequencer and
3
available for the run
Position(s) in the sample plate to load the library batch
4
After saving, the run appears in the run list on the Manage Runs screen with the name you
specified.
The run is started on the sequencer screen after selecting a run and loading the sequencer.
74
Chip view showing the lanes to be used in the run
5
Table listing assay and run information
6
Table listing the well position, library batch ID, volume to
7
load, and assay for each libr
ary batch
Genexus™ Integrated Sequencer User Guide
Page 75

Dilute the samples and load the
6
sample plate
Guidelines for nucleic acid isolation and quantification—sample runs ....................... 75
■
Dilute or concentrate the samples (if needed) and load the sample plate—sample run ......... 76
■
Guidelines for library quantification—library runs ......................................... 77
■
Dilute and pool libraries, and load the sample plate—library run ............................ 78
■
Before starting a run on the instrument, you must quantify and dilute the samples or sample libraries,
then load the sample plate.
Guidelines for nucleic acid isolation and quantification—
sample runs
These are general guidelines for isolating and quantifying DNA and RNA. For assay-specific guidelines,
see the assay user guide.
•
See “Recommended materials for nucleic acid isolation and quantification” on page 19 for
recommended kits for isolating DNA and RNA.
•
We recommend the TaqMan™ RNase P Detection Reagents Kit (Cat. No. 4316831) for quantifying
amplifiable human genomic DNA (see Demonstrated Protocol: Sample Quantification for Ion
AmpliSeq™ Library Preparation Using the TaqMan™ RNAse P Detection Reagents Kit (Pub. No.
MAN0007732) available at thermofisher.com).
•
The Qubit™ dsDNA HS Assay Kit (Cat. No. Q32851 or Q32854) can also be used for quantification,
particularly for FFPE DNA, and highly degraded DNA samples. See “Quantify FFPE DNA with the
Qubit™ Fluorometer” on page 171 for a detailed procedure for quantifying FFPE DNA.
•
We recommend the Qubit™ RNA HS Assay Kit (Cat. No. Q32852 or Q32855) for quantifying RNA.
•
Quantification methods such as densitometry (for example, using a NanoDrop™ spectrophotometer)
are not recommended, because they are not specific for DNA or RNA. Use of these methods can
lead to gross overestimation of the concentration of sample nucleic acid, under-seeding of the
target amplification reaction, and low library yields.
•
The Ion AmpliSeq™ Direct FFPE DNA Kit bypasses nucleic acid isolation when preparing libraries
from FFPE sections on slides. See the Ion AmpliSeq™ Direct FFPE DNA Kit User Guide (Pub. No.
MAN0014881) for a protocol for using this kit to prepare gDNA from FFPE tissue.
•
The Direct FFPE DNA preparation can be stored for up to 6 months at –30°C to −10°C before
library preparation.
Genexus™ Integrated Sequencer User Guide
75
Page 76

Chapter 6 Dilute the samples and load the sample plate
6
Dilute or concentrate the samples (if needed) and load the sample plate—sample run
Dilute or concentrate the samples (if needed) and load the
sample plate—sample run
Isolate DNA and RNA samples using one of the procedures and kits that are recommended in
“Recommended materials for nucleic acid isolation and quantification” on page 19.
Samples with concentrations up to 1,024X of the target concentration for an assay (displayed as default
values in the Sample Plate step screen in run planning) are in range for automated dilution and require
no manual dilution. Enter the concentrations during sample run planning at the Sample Plate step (see
step 9 on page 66).
1.
For samples with concentrations that are out of range for automated dilution, manually dilute the
sample with nuclease-free water, or concentrate the sample to a concentration ≤1,024X of the
target concentration. For samples that are in range, go to step 2.
If the sample concentration is… Then…
<0.11 ng/µL Concentrate the sample to greater than or equal to the target
concentration.
≥0.11 ng/µL, but less than the
target concentration
≤1,024X of the target
concentration
>1,024X of the target
concentration
Note:
If you enter a concentration <0.11 ng/µL or >10,000 ng/µL target concentration, a warning that
·
the concentration is out of range appears, and you are not allowed to proceed to the next step.
If the concentration is ≤10,000 ng/µL, but >1,024X of the target concentration, you can proceed,
·
but because the instrument cannot dilute samples more than 1,024‑fold, the diluted sample
concentration will be greater than the target concentration.
2.
Add samples t
guide.
The sample volume is not adjustable and depends on sample type, the number of primer pools in
the assay, and library chemistry. The following table also provides loading volume.
o the sample plate at the volume and positions that are specified in the run setup
Sample type Number of primer pools Volume
Run is allowed but sample concentration may not be optimal for
library preparation. Concentrate the sample to greater than or equal
to the target concentration.
No manual dilution is necessary. The sequencer dilutes the sample
to the target concentration automatically during the run.
Manually dilute to the target concentration based on assay type, or
to a concentration in range for automated dilution by the sequencer.
76
Ion AmpliSeq™ chemistr
DNA 1 15 µL
DNA 2 25 µL
RNA 1 15 µL
RNA 2 25 µL
y
Genexus™ Integrated Sequencer User Guide
Page 77

(continued)
Sample type Number of primer pools Volume
Chapter 6 Dilut
Ion AmpliSeq™ HD chemistry
DNA 1 20 µL
RNA 1 20 µL
TNA 1 20 µL
e the samples and load the sample plate
Guidelines for library quantification—library runs
6
3.
Seal the plat
Note: The use of other plate seals may aect performance.
4.
K
eep the plate on ice until ready to load it in the sequencer.
e with a sheet of Adhesive PCR Plate Foils (Thermo Fisher Scientific Cat. No. AB0626).
Guidelines for library quantification—library runs
•
We recommend that you use libraries that are freshly quantified and diluted before pooling in a
library batch.
•
Pre-prepared libraries can be quantified by one of the following three methods:
–
Quantification using the Agilent™ 2100 Bioanalyzer™ instrument
–
Quantification using the Qubit™ Fluorometer
–
Quantification by qPCR using the Ion Library TaqMan™ Quantitation Kit
See one of the following guides for specific procedures.
–
Ion AmpliSeq™ Library Kit 2.0 User Guide (Pub. No. MAN0006735)
–
Ion AmpliSeq™ Library Kit Plus User Guide (Pub. No. MAN0017003)
–
Ion AmpliSeq™ HD Library Kit User Guide (Pub. No. MAN0017392)
Genexus™ Integrated Sequencer User Guide
77
Page 78

Chapter 6 Dilut
6
Dilute and pool libraries, and load the sample plate—library run
e the samples and load the sample plate
Dilute and pool libraries, and load the sample plate—library
run
1.
Dilute each manually prepared and quantified sample library to 200 pM with nuclease-free water.
Note: Each library must be barcoded with a unique barcode or barcode pair. Use this
concentration as a starting point, then titrate up or down based on sequencing results, if needed.
2.
Add equal volumes of each libr
is greater than the volume specified in the run setup guide provided by the software.
Note: For information on combining DNA and RNA libraries recovered from sample runs using
assays that include DNA and fusions, see “Combine libraries” on page 175.
3.
Mix well by pipetting up and down five times, then tr
batch to the sample plate position specified in the run setup guide.
4.
Seal the plate with a sheet of Adhesive PCR Plate Foils (Thermo Fisher Scientific Cat. No. AB0626).
Note: The use of other plate seals may aect performance.
5.
K
eep the plate on ice until you are ready to load it in the sequencer.
ary to a new 1.5‑mL low DNA retention tube so that the total volume
ansfer the specified volume of each library
78
Genexus™ Integrated Sequencer User Guide
Page 79

Load the sequencer and start a run
7
Before you begin ..................................................................... 79
■
Fill Genexus™ Primer Pool Tubes (custom assays only) .................................... 81
■
Load the sequencer and start a run ..................................................... 83
■
Clear the instrument deck and perform a UV Clean ....................................... 90
■
Options for an expired sequencer initialization ........................................... 93
■
After you have planned a run in Genexus™ Software, use the run setup guide provided by the software
to load samples in the sample plate, and to determine which consumables to load in the sequencer.
Follow the step‑by‑step instructions in the sequencer touchscreen during run setup. The vision system
of the sequencer tracks the addition of consumables in real-time and alerts you if a component is
loaded in an incorrect position, or if an incorrect quantity is loaded.
Before you begin
1.
Remove the library and templating strips from their boxes in the refrigerator or freezer, and ready
them for loading in the sequencer.
•
Genexus™ Strip 1 and Genexus™ Strip 3‑GX5™: equilibrate to room temperature for
30 minutes.
•
Genexus™ Strip 2‑AS or Genexus™ Strip 2‑HD, depending on your assay, and Genexus
Strip 4: thaw at room temperature for 30 minutes. If you are delayed in loading, keep the
thawed strips on ice or at 4℃ until you load them in the sequencer.
IMPORTANT! Confirm that the strip contents are completely thawed before installing in the
sequencer.
2.
isually check tube 3 of the Genexus™ Strip 2‑HD for precipitation. If needed, flick the tube or
V
gently vortex the strip to dissolve the precipitate.
3.
Remove primer pool tubes in tube carriers that are needed for the run from the freezer, then thaw
for at least 30 minutes on ice or at 4℃. After thawing, gently tap the primer pool tube or tubes on a
bench surface to ensure that contents are collected at the bottom of the tubes. Keep the tubes and
carriers on ice or at 4℃ until you load them in the sequencer.
4.
If you are installing a new Genexus™ Cartridge, thaw the cartridge at room temperature for
30 minutes before installing in the sequencer.
™
Genexus™ Integrated Sequencer User Guide
79
Page 80

1
2
Chapter 7 Load the sequencer and start a run
7
Before you begin
5.
Genexus™ Strip 1 and Genexus™ Strip 3‑GX5™ contain magnetic beads in one or two positions,
yellow or brown in color, that sometimes get trapped in the upper "keyhole" of the tube. Dislodge
these beads from the keyhole before installing the strip in the sequencer. Use the following
procedure for each strip.
a.
Invert the strip 3–4 times to dislodge beads that are trapped in the keyholes.
b.
To remove any remaining beads and liquid from the
keyholes, grasp the strip at one end with the strip
seal facing up, then swing the strip with a rapid,
downward centrifugal arm motion, ending with a
sharp wrist-flick.
c.
Grasp the strip at the other end, then repeat the
centrifugal motion.
d.
Check tube positions for significant amounts of
beads that are still trapped in keyholes (see the
following figure), then repeat the centrifugal motion,
if needed. It is acceptable if a few beads remain in
the keyhole or on the tube wall, but most should be
either in suspension or in a pellet at the bottom of
the tube.
80
Example Genexus™ S
show tube contents more easily.
Magnetic beads trapped in keyholes
1
trip 3‑GX5™ before (upper) and after (lower) inversion. The carrier has been removed to
Magnetic beads dislodged from keyholes
2
Genexus™ Integrated Sequencer User Guide
Page 81

1 2
Chapter 7 Load the sequencer and start a run
Fill Genexus™ Primer Pool Tubes (custom assays only)
Note:
It is not necessary to resuspend the magnetic beads completely—it is only necessary to
·
dislodge most of the beads that may be trapped in the keyhole. The instrument resuspends
the beads during the run when needed.
Fine bubbles can form above the liquid in some tubes after inversion. These bubbles do not
·
aect the run.
7
6.
Inspect all strips for lar
tube or well. Gently tap the strips on a benchtop to dislodge any bubbles without splashing the
contents onto the upper tube walls. If tapping fails to dislodge a bubble, use the technique that is
described in substep 5b until large bubbles are dislodged.
ge bubbles lodged under the surface of the liquid or at the bottom of each
Fill Genexus™ Primer Pool Tubes (custom assays only)
If you are using a custom assay, Genexus™ Primer Pool Tubes must be manually filled with the custom
Ion AmpliSeq™ or Ion AmpliSeq™ HD panels at the appropriate volume and in the correct primer pool
tube positions. For Ion AmpliSeq™ library panels, use one carrier per DNA or RNA assay primer pool.
The two positions in the primer pool tube carrier are designated as shown in the following figure:
Position 1 tube: Contains Ion AmpliSeq™ DNA, Ion AmpliSeq™ RNA, or Ion AmpliSeq™ HD FWD primer pool
1
Position 2 tube: Contains Ion AmpliSeq™ HD REV primer pool
2
Note: When you or
sucient amount of panel for your needs, and request the tube format, not the plate format. Library
preparation on the Genexus™ Integrated Sequencer requires greater panel volume per sample than
manual library preparation, or library preparation on the Ion Chef™ System.
Genexus™ Integrated Sequencer User Guide
der assays from Ion AmpliSeq™ Designer (AmpliSeq.com), be sure to order a
81
Page 82

Chapter 7 L
7
Fill Genexus™ Primer Pool Tubes (custom assays only)
1.
oad the sequencer and start a run
Add primer pool at the indicated volume, appropriate to your assay type, to the Genexus™ Primer
Pool Tubes using the following tables as a guide. Fill the number of tubes specified by the run plan
summary.
Ion AmpliSeq™ DNA assays
Number of primer pairs
per pool
12–96 2X (400 nM) 140 µL —
97–3,072 2X (100 nM) 140 µL —
>3,072 2X ([3,072 / Number of primer
[1]
F
or example, if a panel pool has 3,500 primer pairs, the 2X concentration is (3,072 / 3,500) × 100 nM = 87.8 nM.
Concentration
pairs per pool] × 100 nM)
[1]
Volume in
position 1
140 µL —
Ion AmpliSeq™ RNA assays
Number of primer pairs
per pool
12-1,228 5X (250 nM) 75 µL —
>1,228 5X ([1,228 / Number of primer
[1]
F
or example, if a panel pool has 1,500 primer pairs, the 5X concentration is (1,228 / 1,500) × 250 nM = 205 nM.
Concentration
pairs per pool] × 250 nM)
[1]
Volume in
position 1
75 µL —
Ion AmpliSeq™ HD assays
Primer pool type Concentration
Volume in
position 1
Volume in
position 2
Volume in
position 2
Volume in
position 2
Ion AmpliSeq™ HD FWD 10X 50 µL —
Ion AmpliSeq™ HD REV 10X — 50 µL
IMPORTANT!
If you are using Ion AmpliSeq™ library chemistry, leave the tube in position 2 empty and
·
uncapped, but do not remove the tube from the carrier before loading in the sequencer. Do
not add a second Ion AmpliSeq™ primer pool to the position 2 tube.
If you are using Ion AmpliSeq™ HD library chemistry, add the FWD and REV primer pools to the
·
appropriate tubes in the same carrier.
Ensure that no bubbles are introduced at the bottom of the tube when adding the primer pool.
·
2.
If you do not install the primer pool tube carriers in the sequencer immediat
ely, cap the tubes
that contain primer pools, then store the tube carriers on ice. Remember to uncap all tubes before
installing.
82
Genexus™ Integrated Sequencer User Guide
Page 83

Load the sequencer and start a run
1.
Tap Run on the sequencer home screen to start the loading procedure.
Chapter 7 Load the sequencer and start a run
Load the sequencer and start a run
7
2.
In the Run Selection scr
Note: If you select a run that r
a dialog appears giving you the option to install a new chip, or cancel. If you proceed with a new
chip, a postChipClean is performed, then the sequencer prompts you to perform the Clear Deck,
UV Clean, Load Deck, Clear Sequencing Reagents, and Load Sequencing Reagents steps.
een, select the run that you want to use from the list.
equires more lanes than are available on a currently installed chip,
Genexus™ Integrated Sequencer User Guide
83
Page 84

Chapter 7 Load the sequencer and start a run
7
Load the sequencer and start a run
3.
In the Review Run screen, confirm the run and assay selections, then tap Next.
The deck door opens automatically.
Not
e:
If the instrument vision system detects consumables loaded on the deck, the sequencer
·
prompts you to remove the consumables, then starts a UV Clean.
Select the Do Force Clean checkbox if there will be an unused lane or lanes on the installed
·
chip after the run, but you want to start your next run on a new chip after the current run. A force
clean automatically cleans the instrument after the run, eliminating the need for an operator to
execute the cleaning procedure between the completion of the current run and the next run.
Selecting Do Force Clean renders all lanes of the installed chip unusable after the run.
4.
In the Load Deck screen, the sequencer instructs you step by step to load each required
consumable in a highlighted position on the deck. The sequencer detects the loading of each
consumable in real time and advances to the next component automatically.
84
Genexus™ Integrated Sequencer User Guide
Page 85

1
1 2
Chapter 7 Load the sequencer and start a run
Load the sequencer and start a run
IMPORTANT!
Ensure that you remove the primer pool tube cap or caps before installing the tube carrier on the
·
deck.
Ensure that you load the correct type of barcode plate and library strip 2 for the type of run
·
you are setting up. The sequencer displays a warning if you have installed consumables that are
incompatible with the run you have selected, for example, a Genexus™ Barcodes AS plate or
Genexus™ Strip 2‑AS in an HD run.
Note:
A primer pool tube carrier can only be installed with
·
the position 1 tube in the back row of the Primer
Pool Tube Station. Follow the guidance in the run
setup guide for loading the primer pool tube carrier or
carriers in the correct position and order in the station.
If the sequencer cannot read the correct loading of
·
an unexpired consumable, tap Help in the lower left
corner of the screen to override the block. After using
this override, the name of the consumable will not
appear in the run summary consumables list.
1
Position 1
2
Position 2
7
5.
ompted, insert a new GX5™ Chip and Genexus™ Coupler. Insert the chip into the chip install
If pr
slot with the chip notch oriented down and toward the front of the instrument.
Notched corner of chip
1
Note: A chip shuttle under the deck moves the installed chip t
o loading and sequencing positions
during the run.
IMPORTANT! Inser
t the Genexus™ Coupler so that it is level to ensure it will properly align with
the GX5™ Chip. A coupler that is installed at an angle or is not level will not align properly to the
chip and can result in a failed run.
Genexus™ Integrated Sequencer User Guide
85
Page 86

Chapter 7 Load the sequencer and start a run
7
Load the sequencer and start a run
6.
When the deck consumables have been loaded, lock the library and templating strips in place by
sliding the latches toward the rear of the deck.
If a chip is detected and the strip latches are closed, the Close Deck Door scr
7.
Close the deck door, then tap Next.
•
If you installed a new chip in the sequencer
sequencing reagents bay doors to empty the waste and remove used sequencing reagents
bay consumables. Proceed to step 8.
•
If you are using a chip that was previously installed and has sucient lane capacity for the run,
the sequencer prompts you to start the run.
, the sequencer prompts you to open the
een appears.
86
IMPORTANT! The cartridge and bottles in the sequencing reagents bay must be replaced every
time that a new chip is installed, regardless of how many lanes were used in the previous chip.
Genexus™ Integrated Sequencer User Guide
Page 87

Chapter 7 L
8.
Follow on-screen instructions to empty the waste in the Waste Carboy, remove waste pipette
tips, remove the used Genexus™ Bottle 1, Genexus™ Bottle 2, Genexus™ Bottle 3, and Genexus
Cartridge, then tap Next.
oad the sequencer and start a run
Load the sequencer and start a run
7
™
IMPORTANT!
Ensur
·
·
·
9.
Install a new Gene
Genexus™ Cartridge.
e that you empty and replace the Waste Carboy and the waste pipette tip bin.
After replacing the emptied Waste Carboy, ensure that you reinsert the waste tube into the
carboy.
Follow all applicable local, state/provincial, and/or national regulations when recycling or
disposing of consumables and liquid waste.
xus™ Bottle 1, Genexus™ Bottle 2 (two required), Genexus™ Bottle 3, and
Note: The installed r
performance. After 14 days, you may observe reduced performance.
After reagents have been installed, the Close Sequencing Reagent Bay Door scr
Genexus™ Integrated Sequencer User Guide
eagents can be used for up to 14 days on the sequencer with full
een appears.
87
Page 88

Chapter 7 Load the sequencer and start a run
7
Load the sequencer and start a run
10.
Close the sequencing reagents bay doors.
After the doors are closed, the sequencer automatically starts the run.
IMPORTANT! Do not tap S
At the beginning of the run, the instrument verifies the chip, checks for leaks, then calculat
time.
tart Run. Tapping Start Run can cancel the run.
es run
88
Genexus™ Integrated Sequencer User Guide
Page 89

Chapter 7 Load the sequencer and start a run
Load the sequencer and start a run
A sequencing run encompasses the following stages:
•
Starting
•
Initializing
•
Library Prep
•
Templating
At each stage, the instrument shows the time remaining on the touchscreen.
Note: The time remaining shown on the screen does not include run analysis time.
•
Pre-sequencing
•
Sequencing
•
Cleaning
7
When the run finishes, the sequencer displays the Run Complet
Note: If all the lanes of a chip are used, the chip shuttles to the install position. You are asked to
remove the chip and coupler, and clear the sequencing reagents.
e screen.
Genexus™ Integrated Sequencer User Guide
89
Page 90

Chapter 7 Load the sequencer and start a run
7
Clear the instrument deck and perform a UV Clean
Clear the instrument deck and perform a UV Clean
After a run completes, remove used consumables from the deck and perform a UV Clean to ready the
instrument for the next run.
1.
In the Run Complete screen, tap Next to start removal of used consumables.
The deck door opens.
2.
In the Clear Deck scr
components to be removed. Unlock the library and templating strips by sliding the latches toward
the front of the deck, then remove the used strips. Remove the remaining deck components
specified by the sequencer.
een, the sequencer provides step‑by‑step instructions by highlighting the
90
Genexus™ Integrated Sequencer User Guide
Page 91

Chapter 7 Load the sequencer and start a run
Clear the instrument deck and perform a UV Clean
3.
Inspect the Genexus™ Filter in the liquid waste disposal port and verify that no standing liquid is
present. If standing liquid is present, manually remove the liquid with a pipette, then pull out the
filter. Test the filter with water to determine if a clog is present.
•
If the Genexus™ Filter is clogged, replace it with a new filter. For more information, see
“Replace the Genexus™ Filter” on page 164.
•
If the Genexus™ Filter does not appear to be clogged, a line clog downstream of the filter is
implicated. Contact Technical Support and report a possible deck liquid waste line clog.
4.
When finished, close the deck door, then tap Next.
7
A two-minute UV Clean star
ts.
Genexus™ Integrated Sequencer User Guide
91
Page 92

Chapter 7 L
7
Clear the instrument deck and perform a UV Clean
5.
oad the sequencer and start a run
After UV cleaning, if all the chip lanes were used, the sequencing reagents bay doors unlock. Open
the doors, remove used components from the bay and empty the Waste Carboy, then tap Next.
IMPORTANT! Do not discar
replace the bottles after a conical bottle flow rate test. For more information, see “Replace the
Genexus™ Conical Bottles” on page 165.
IMPORTANT! F
recycling or disposing of Genexus™ Integrated Sequencer consumables and liquid waste.
ollow all applicable local, state/provincial, and/or national regulations when
CAUTION! The Gene
Dispose of this waste appropriately.
6.
er removal of used components, close the sequencing reagents bay doors, then tap Next.
Aft
The sequencer returns to the home screen.
d or remove the conical bottles, unless alerted by the sequencer to
xus™ Bottle 1 (small waste bottle) contains small amounts of formamide.
92
Genexus™ Integrated Sequencer User Guide
Page 93

Chapter 7 Load the sequencer and start a run
Options for an expired sequencer initialization
Options for an expired sequencer initialization
A sequencer initialization is defined by the installation of a new chip, chip coupler, sequencing bottles,
and reagent cartridge on the sequencer before a run. Reagents are stable on the sequencer for
14 days, after which you may experience reduced performance. An initialization expires after 28 days,
after which the following warning appears. Three options are available: Cancel, Ignore, and Proceed.
7
The outcome of each option is described in the following table.
Option Outcome
Cancel The sequencer returns to the home screen and the run is canceled. The expired initialization
warning appears again if a run is star
Settings4Clean instrument to clean the instrument before starting a run with a new chip. Lane
assignment for a new run starts with lane 1.
Ignore The instrument moves forward with the run and ignores the expired initialization warning. The
warning appears for each run that uses the expired initialization until the instrument is cleaned
and ready for a new initialization. Troubleshooting eorts are not supported on runs that start 28
days after an initialization or later.
Proceed The instrument starts a clean before run setup. After cleaning, you are asked to remove the
used chip and coupler, and to load the deck for a new run. You are also asked to remove the
used sequencing bottles and cartridge and install new consumables. A new run starts.
IMPORTANT! W
Ignore. After tapping Proceed, the lane assignment for the new run after the clean remains
the originally assigned chip lane before the clean (not necessarily lane 1). Subsequent runs will
assign the next available lane. For example, if the originally assigned chip lane was lane 3, lane
3 will be assigned in the newly installed chip and you will lose the use of lanes 1 and 2.
e strongly recommend that you not tap Proceed, and instead use Cancel or
ted on the same initialization. After tapping Cancel, select
Genexus™ Integrated Sequencer User Guide
93
Page 94

Monitor the run
8
In the Monitor menu, you can view the status of the sequencer in an idle condition, or the status of a
run in progress.
View run progress on the instrument
1.
94
In the menu bar
2.
In the Instrument View screen, view the status of a run in progress, or the status of an instrument.
The following information is provided:
•
Sequencer, operator, and run names
•
PQ status of the instrument
•
Instrument status at various stages of the run and post-run
•
Status of the results analysis
•
Run start and completion times
3.
Click
Refresh t
, click Monitor4Instrument View.
o update the information.
Genexus™ Integrated Sequencer User Guide
Page 95

9
Review data and results
Review sample results ................................................................ 96
■
Review run results .................................................................... 97
■
Lab Report .......................................................................... 99
■
View sequencing results and assay metrics ............................................. 100
■
Reanalyze a run ..................................................................... 126
■
Sign o on the run results (manager/ administrator) ...................................... 127
■
Generate customized reports ......................................................... 128
■
Results files ........................................................................ 130
■
Review coverageAnalysis plugin results ................................................ 132
■
Upload sample results files to Ion Reporter™ Software ................................... 132
■
Verification runs ..................................................................... 133
■
Use the Results menu t
can view results sorted by sample or by run.
Selection Description
Click Results4Sample Results Select this option to review completed sample results and
Click Results4Run Results Select this option to review completed run results and reports
Click Results4Verification Select this option to review data from completed verification
Genexus™ Integrated Sequencer User Guide
o review results and data analysis and perform data management tasks. You
eports.
r
by assay.
runs that were performed during sequencer installation or
performance qualification.
95
Page 96

Chapter 9 Review data and results
9
Review sample results
Review sample results
In the Results / Sample Results screen, samples that have been sequenced are listed by sample
name.
You can search the list of results by sample name. Enter a search term, then click (Search).
The following information appears in the Sample Results scr
Column Description
Sample Name The unique identifier cr
Sample Name to open the Sample Details screen for the sample. Use the tabs above the
Sample Details to view the run summary, assay metrics, quality control, detailed variant
results, and results for plugins that are associated with the selected assay, if any.
Sample Name
followed by (Signed
O)
Assay Short Name A shortened version of the assay name you imported or created.
Run Name The unique name of the run given when it was created in the software.
Sample Status The status of the run or sample (for example: Completed, Running, Failed, Terminated,
QC Status The QC status of a completed run.
Manager- and administrator-level users can provide their electronic signature on sample
results for completed runs. A sample name followed by (Signed O) indicates that a
manager- or administrator-level user has approved the sample results. The signature
information appears in the Lab Report PDF file or a user-created report, if selected. For
more information, see “Sign o on the run results (manager/ administrator)” on page 127.
Pending, Stalled).
Note:
(Passed) indicates the sample passed all QC metrics.
·
(Failed) indicates the sample failed a QC metric.
·
(Not Calculated) indicates a sample did not undergo QC analysis.
·
eated when the sample was entered into the software. Click the
een.
Started On The date and time when the run analysis was started.
Last Updated On The date and time when the last action was completed on the run.
96
Genexus™ Integrated Sequencer User Guide
Page 97

Chapter 9 Review data and results
(continued)
Column Description
Actions Click the appropriate link. To see more actions, click (More Options).
•
Lab Report—Download the Lab Report (available only for samples with a sample
status of completed.
•
Audit—View the audit trail for the run.
•
Notes—View or add notes to a run.
•
CSA—Download customer support archive (CSA) log files for the run to help with
troubleshooting.
Click the Compare button in the upper right corner of the Results / Sample Results screen to
compare variant results between multiple samples, or from a single sample source over time. For
detailed information, see Genexus™ Software 6.2 Help, or the Genexus™ Software 6.2 User Guide (Pub.
No. MAN0018955).
Review run results
Review run results
9
In the Results / Run Results screen, runs that are pending, running, or completed are listed.
You can search the list of results by run name or PCR plate number. Enter a search term, then click
(Search).
The following run information appears in the Results / Run Results screen.
Column Description
Run Name The unique name of the run given when it was created in the software. Click a run name to
open the Run Summary.
Assay Short Name The shortened unique identifier of an Assay name. You can view the complete list of Assays
and Assay Short Names in the Assays4Manage Assays screen.
Total Samples The total number of samples in a run.
Run Status The status of the run (for example: Not Started, Pending, Analysis Running, Executing
Plugin, Completed, Terminated, Archival: In Progress).
PCR Plate Number A unique identifier for the 96-well plate used for library preparation and templating. For more
information, see “Assign PCR Plate” on page 98.
Started On The date and time when the run analysis was started.
Updated On The date and time when the last action was completed on the run.
Genexus™ Integrated Sequencer User Guide
97
Page 98

Chapter 9 Review data and r
9
Review run results
esults
(continued)
Column Description
Actions Click the appropriate link. To see more actions, click (More Options).
•
Audit—View the audit trail for the run.
•
CSA—Download customer support archive (CSA) log files for the run to help with
troubleshooting.
•
Reanalyze—Reanalyze the results of a completed run, starting from alignment or
basecalling. Click Reanalyze, then select a new reanalysis assay that you have created
with modified settings. For more information, see “Reanalyze a run” on page 126.
•
Upload Samples to IR—Upload sample results files to Ion Reporter™ Software for
secondary analysis.
For more information, see “Upload sample results files to Ion Reporter™ Software” on
page 132.
•
Assign PCR Plate—Enter a unique identifier for the 96‑well plate used for library
preparation and templating. For more information, see “Assign PCR Plate” on
page 98.
Assign PCR Plate
Genexus™ Softwar
PCR plate is the 96‑well plate that is used for library preparation and templating. You can assign
a unique identifier (PCR Plate Number) to completed runs and runs in progress. The PCR plate
number that you enter is generated on the Lab Report and if needed, can help you track libraries and
troubleshoot.
1.
In the menu bar, click Results4Run Results.
2.
In the Run Results screen, in the Actions column, click
number in the row of the run of interest.
3.
In the Assign PCR Plate dialog box, confirm, edit, or enter the PCR Plate Number.
The PCR plate number must be between 1 and 10 characters. Only alphanumeric characters
(numbers 0 to 9 and letters A to Z), periods, underscores, and hyphens are allowed. Spaces are
not permitted.
4.
Click Submit to associate the PCR plate with the run.
e allows you to track and associate a run with the PCR plate used in the run. The
(More Options)4Assign PCR Plat
e
98
Genexus™ Integrated Sequencer User Guide
Page 99

Lab Report
The Lab Report is a PDF report of the results for each sample in a sequencing run. The assay used in
the run determines the data that is included in the report.
To automatically generate a Lab Report for each sample during data analysis of a run, select the
Generate Report checkbox in the Setup step when you plan the run (for more information, see
Chapter 5, “Plan and manage runs”). To generate a Lab Report for each sample after a run is complete,
see “Generate customized reports” on page 128.
When a Lab Report has been generated for a sample, a link is available in the Results / Sample
Results screen in the Actions column for that sample. Click the link to download the PDF.
Lab reports can be electronically signed by manager- and administrator-level users. Electronically
signed reports have (Signed O) after the sample name in the Sample Results screen. The electronic
signature is included in the footer of the report. For more information, see “Sign o on the run results
(manager/ administrator)” on page 127.
A Lab Report typically contains the following sections and information, depending on the assay used.
Section Description
Chapter 9 Review data and results
Lab Report
9
Sample Details The sample information that is entered into the software. You can customize the format
of the Sample Details section when you create a new report template. To create a new
report template, click Assays4Manage Presets, then in the Report Templates tab, click
Add New.
Sequence Variations:
Detected
Test Description A description of the report or assay that was entered in the report template.
Sequence Variations:
Not Detected
Comments Laboratory comments entered in the report template.
Sequencing Run
Details
Variants and fusions detected in the sample, based on the targets defined by the assay.
Allele frequencies are also reported.
Variants and fusions not detected in the sample, based on the targets defined by the assay.
Contains the following subsections:
•
Assay—the assay name and panel used
•
Analysis—the run date and name of the user who sent the run to the instrument
•
Run Details—the consumables used in the run
•
Control QC Evaluation Metrics—a summary of the CF-1 quality control metrics
•
Run QC Evaluation Metrics—a summary of the run quality control metrics
•
Sample QC Evaluation Metrics—a summary of the sample quality control metrics
Genexus™ Integrated Sequencer User Guide
99
Page 100

Chapter 9 Review data and results
9
View sequencing results and assay metrics
Download the Lab Report
You can download the Lab Report for a sample of interest from the Results / Sample Results screen.
Note: The Lab Report is also available for download as part of the results files in the Results screen for
a specific sample. For more information, see “Results files” on page 130.
1.
In the menu bar, click Results4Sample Results.
2.
In the Sample Results screen, in the Actions column, click Lab Report in the row of the sample
of interest.
A ZIP file that contains the PDF r
3.
Extract the downloaded files, then open the PDF file in an appropriate viewer.
eport downloads automatically.
View sequencing results and assay metrics
For every run, you can view assay-specific results and sample-specific results. Assay-specific results
include assay metrics, such as final read data, and assay-level plugin information, such as execution
of the customer support archive. For more information, see “Assay metrics” on page 103 and “Review
coverageAnalysis plugin results” on page 132.
The following sample-specific result information is available.
Tab Description
Summary An overview of the results for the sample, including Sample Details, K
the Variant Summary. For more information, see “Summary of the Sample Results”
on page 102.
QC The quality metrics for the sample sequenced in the run. For more information, see
“QC results” on page 107.
Variants Detailed variant results for SNVs/Indels, Fusions, and CNVs. For more information,
see “View SNV/INDEL results” on page 112.
ey Metrics, and
100
Plugins Results generated from the plugins associated with the assay used to analyze
the sequenced sample. For more information, see “Review coverageAnalysis plugin
results” on page 132.
Genexus™ Integrated Sequencer User Guide
 Loading...