

Page 1
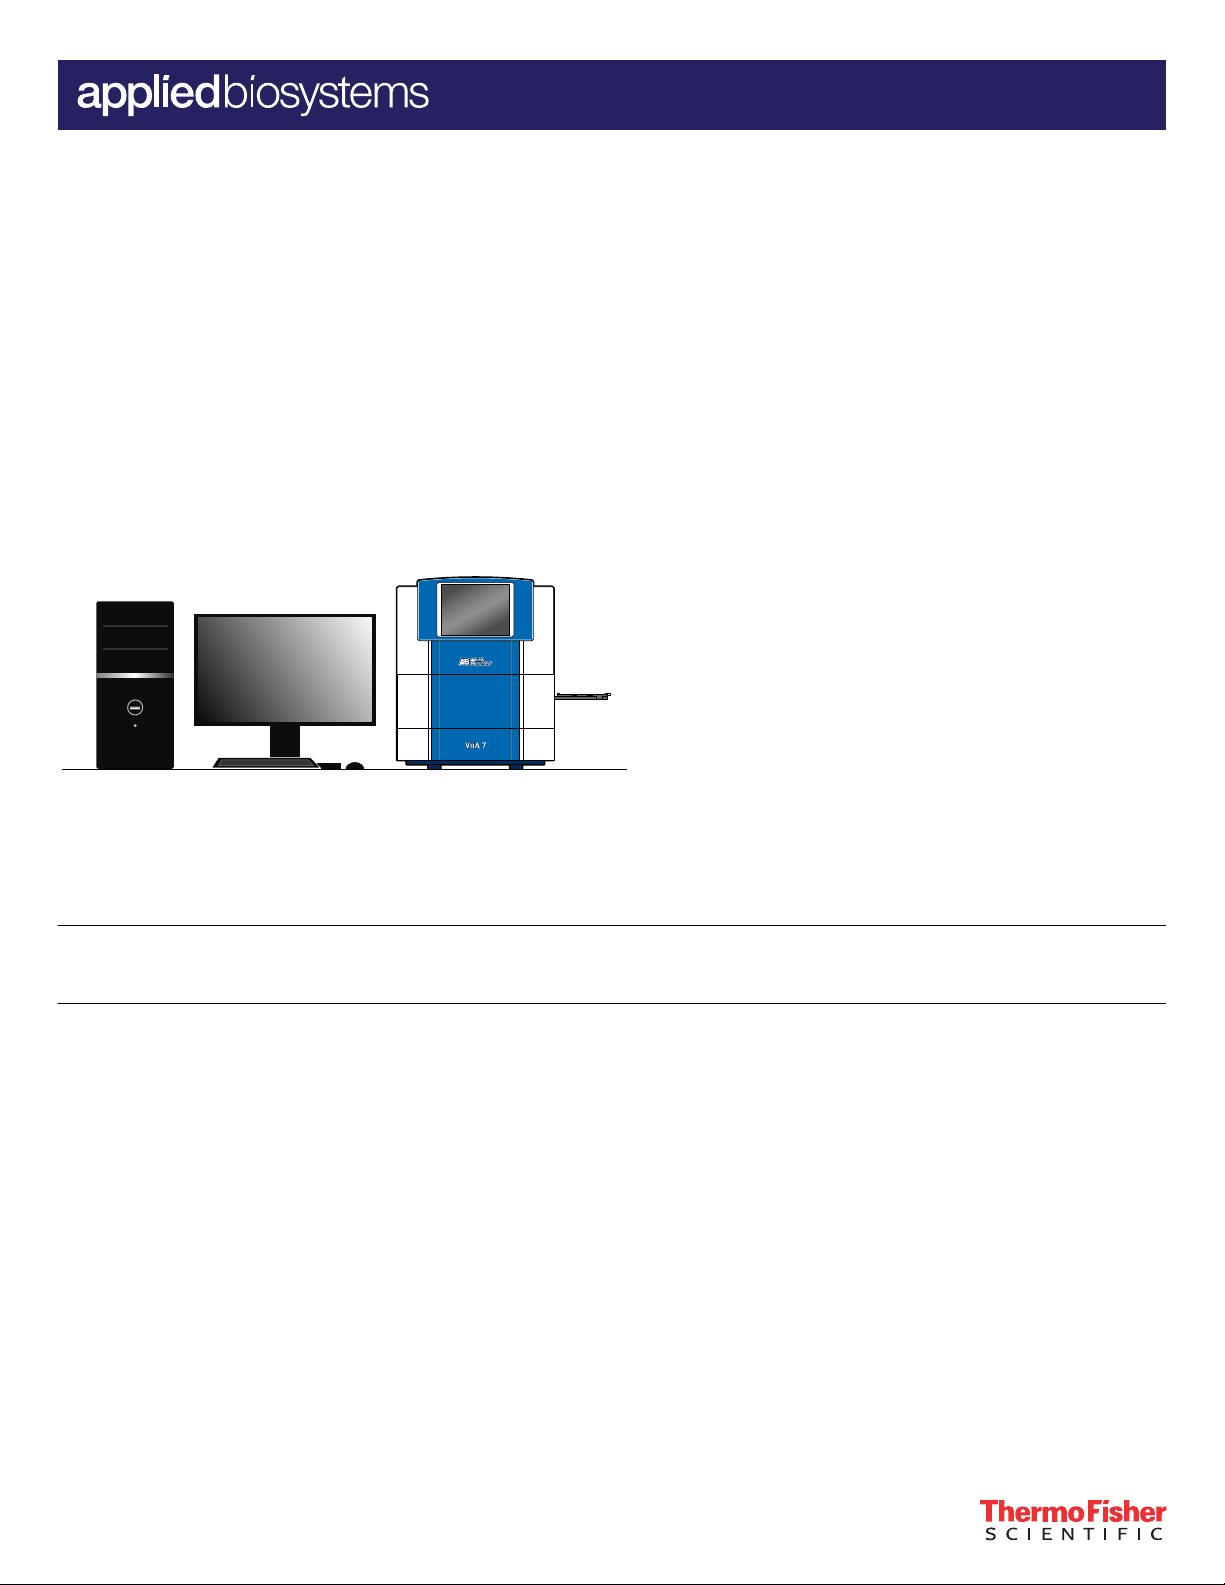
ViiA™ 7 Real-Time PCR System
QUICK REFERENCE
QuantStudio™ Real‑T
Pub. No. MAN0018831 Rev. C.0
Note: For safety and biohazard guidelines, see the “Safety” appendix in the Applied Biosystems™ ViiA™ 7 Real-Time PCR System User
Guide: Calibration, Maintenance, Networking, and Security (Pub. No. MAN0018830). Read the Safety Data Sheets (SDSs) and follow the
handling instructions. Wear appropriate protective eyewear, clothing, and gloves.
ime PCR Software v1.6.1
About the ViiA™ 7 system
The Applied Biosystems™ ViiA™ 7 Real-Time PCR System uses uorescent-based polymerase chain reaction (PCR) reagents to provide:
• Quantitative research detection of target nucleic acid sequences (targets) using real-time analysis.
• Qualitative research detection of targets using post-PCR (endpoint) analysis.
• Qualitative analysis of the PCR product (achieved by melt curve analysis that occurs post-PCR).
Calibrate and maintain the ViiA™ 7 Real-Time PCR System
The ViiA™ 7 Real-Time PCR System r
Calibration with QuantStudio™ Real‑Time PCR Software v1.6.1
IMPORTANT! The spectral calibration plates for the QuantStudio
QuantStudio™ Real‑Time PCR Software v1.6.1. For more information, see the Applied Biosystems™ ViiA™ 7 Real-Time PCR System User
Guide: Calibration, Maintenance, Networking, and Security (Pub. No. MAN0018830).
QuantStudio™ Real‑Time PCR Softwar
plate block. For this version of the software, normalization calibration is only required for the TaqMan™ Array Card block.
After the software is upgraded, the instrument must be calibrated before starting a run with a 96-well plate block or a 384-well plate
block.
After the software is upgraded, the instrument does not need to be calibrated before starting a run with a TaqMan™ Array Card block.
The feature to override a calibration can only be used for a data le with compatible calibration data.
• A data le generated with a previous version of the software cannot have the calibration overridden after an upgrade to
• A data le generated with QuantStudio™ Real‑Time PCR Software v1.6.1 cannot have the calibration overridden if it is opened using
QuantStudio™ Real‑Time PCR Software v1.6.1.
a previous version of the software.
equires regular calibration and maintenance to ensure optimal instrument performance.
™
3 and 5 Instruments ar
e v1.6.1 does not require a normalization calibration for the 96-well plate blocks or the 384-well
e used for the calibration procedure with
For Research Use Only. Not for use in diagnostic procedures.
Page 2
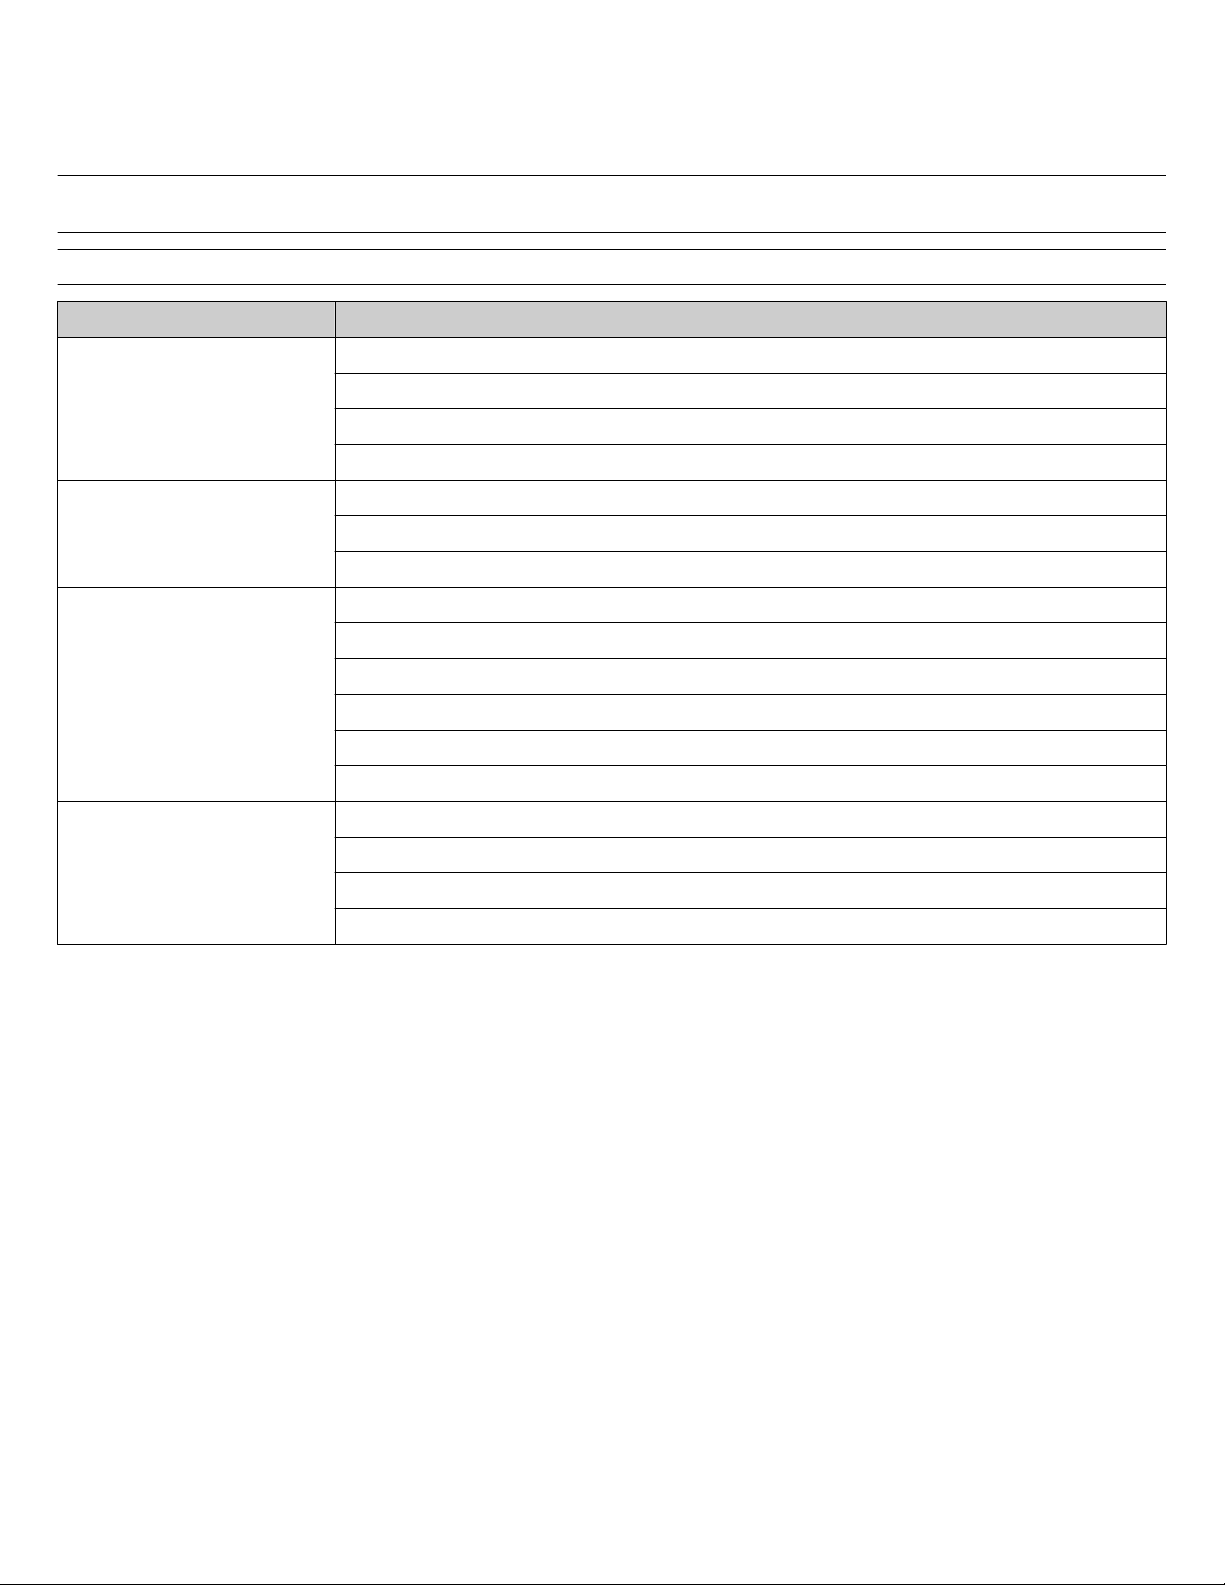
Recommended calibration and maintenance schedule
Note: After the software is upgraded to QuantStudio™ Real‑Time PCR Software v1.6.1, the instrument must be calibrated before starting a
run with a 96-well plate block or a 384-well plate block. The instrument does not need to be calibrated before starting a run with a
TaqMan™ Array Card block.
IMPORTANT! Calibrate the ViiA
™
7 System at the same ambient temperatur
e at which you will run experiments. Extreme variations in
ambient temperature can affect the heating and cooling of the ViiA™ 7 System and, in extreme cases, inuence experimental results.
IMPORTANT! Do not use or
ganic solvents to clean the ViiA™ 7 System.
Frequency User-performed maintenance task
Check the computer disk space. If necessary, archive or back up your experiment files and instrument settings.
Power off the computer that controls the ViiA™ 7 System, then after 30 seconds, power on the computer
Weekly
Clean the surface of the ViiA™ 7 System with a lint-free cloth.
Perform a ViiA™ 7 Instrument self test.
Check the lamp status. If necessary, replace the lamp.
Monthly
Perform a background calibration.
[1]
Run disk cleanup and disk defragmentation.
Perform a regions of interest (ROI) calibration.
Perform a background calibration.
Perform a uniformity calibration.
Semi-annually (6 months)
Perform a dye calibration.
(TaqMan™ Array Card block only) Perform a normalization calibration.
.
Perform an instrument verification run.
Decontaminate the ViiA™ 7 System.
Replace the ViiA™ 7 System fuses.
As needed
Update the Windows™ operating system.
Update the QuantStudio™ Real‑Time PCR Software and firmware.
[1]
Y
ou can perform a background calibration to check for contamination. If any parts of the optics are replaced or moved, you must perform all calibrations, including an RNase P
instrument verification run.
Calibrate the ViiA™ 7 Real-Time PCR System
The ViiA™ 7 Real-Time PCR System uses the following calibration types:
• Regions of interest (ROI)
• Background
• Uniformity
• Dye
•
Instrument verication
• (TaqMan™ Array Card block only) Normalization
2 Applied Biosystems
™
ViiA™ 7 Real-T
ime PCR System Quick Reference Guide
Page 3
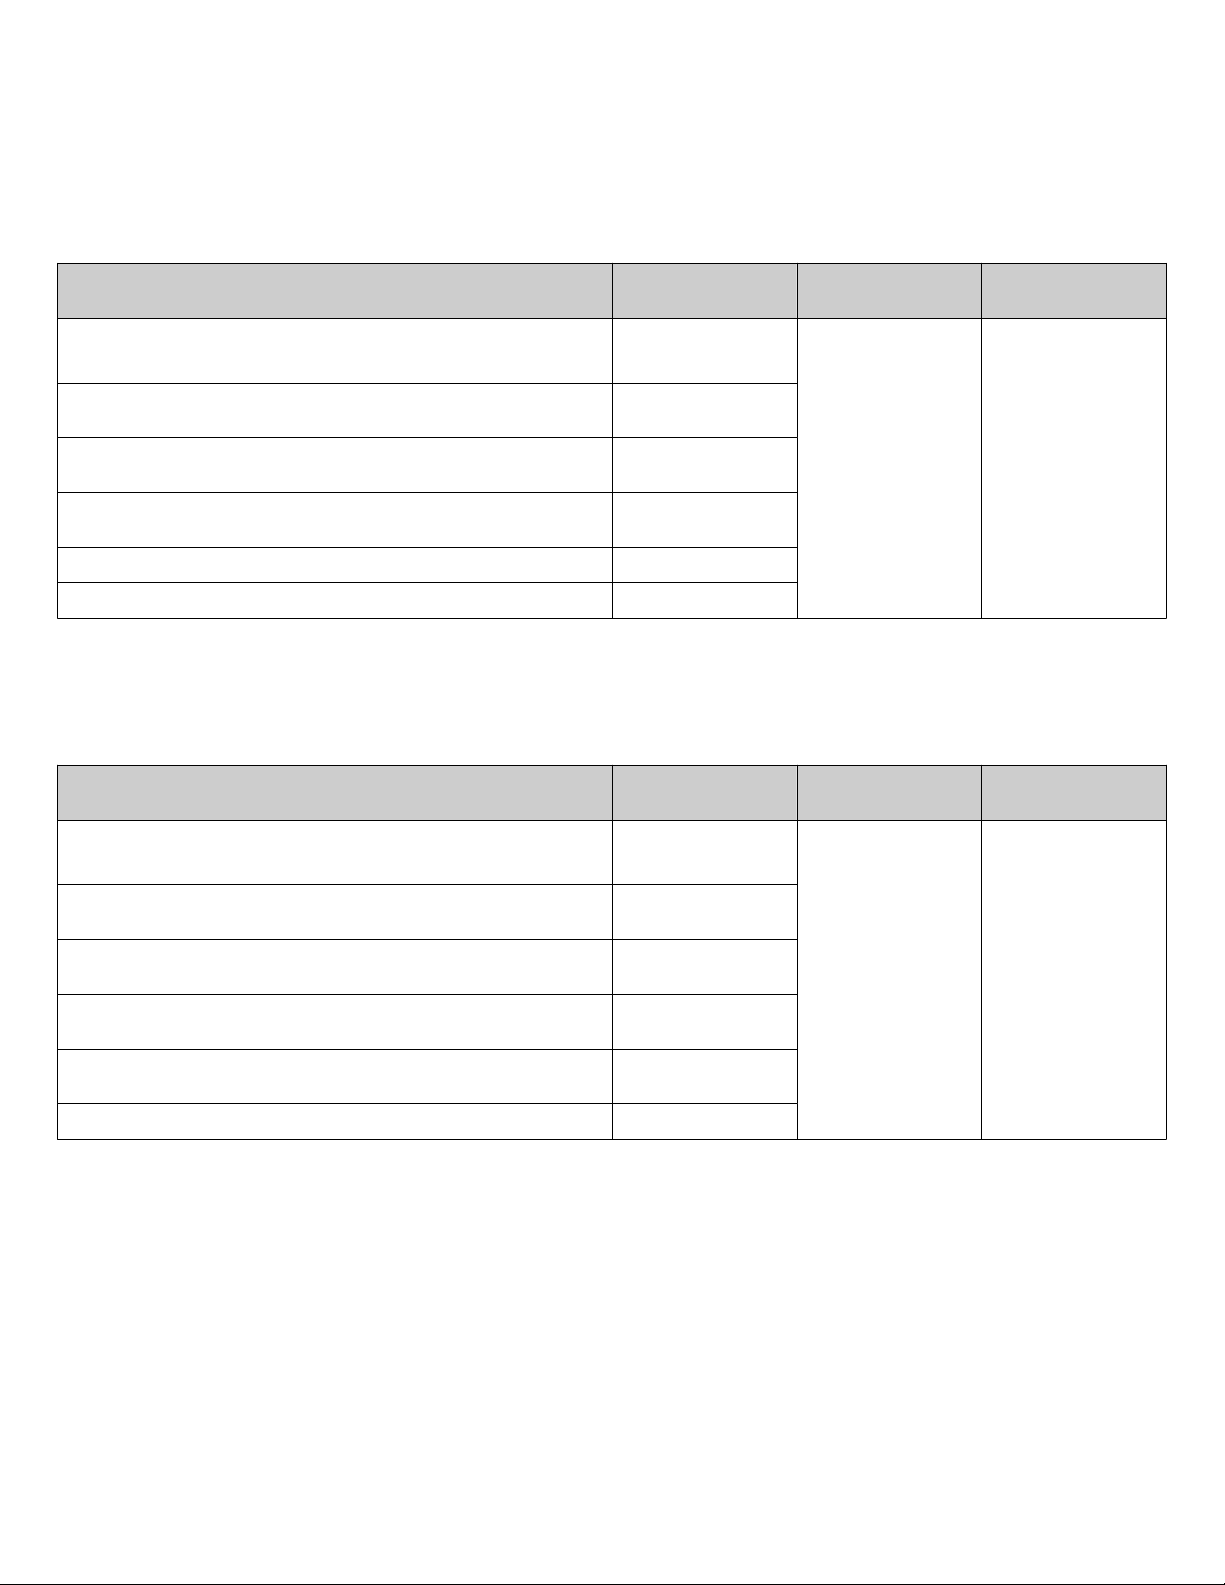
Calibration and verification consumables
Note: For reagent or consumable shelf-life expiration date, see the package label.
96-well 0.2-mL consumables
Note: Spectral calibration plates for the QuantStudio™ 3 and 5 Instruments are used for the calibration procedure with QuantStudio
Real‑Time PCR Software v1.6.1.
™
Consumable Cat. No. Storage
QuantStudio™ 3/5 10‑Dye Spectral Calibration Kit, 96‑W
ell 0.2‑mL
(Contains all 3 spectral calibration plates listed below)
QuantStudio™ 3/5 Spectral Calibration Plate 1
(FAM™, VIC™, ROX™, and SYBR™ dyes), 96‑Well 0.2‑mL
QuantStudio™ 3/5 Spectral Calibration Plate 2, 96‑Well 0.2‑mL
(ABY™, JUN™, and MUSTANG PURPLE™ dyes)
QuantStudio™ 3/5 Spectral Calibration Plate 3, 96‑Well 0.2‑mL
(TAMRA™, NED™, and Cy®5 dyes)
A26343
A26331
A26332
A26333
–25°C to –15°C
Shelf life at storage
temperatur
Use the consumable
by the expiration date
on the packaging.
Region of Interest (ROI) and Background Plates, 96‑Well 0.2‑mL (2 plates) 4432364
TaqMan™ RNase P Instrument Verification Plate, 96‑Well 0.2‑mL 4432382
96-well 0.1-mL consumables
Note: Spectral calibration plates for the QuantStudio™ 3 and 5 Instruments are used for the calibration procedure with QuantStudio
Real‑Time PCR Software v1.6.1.
Consumable Cat. No. Storage
QuantStudio™ 3/5 10‑Dye Spectral Calibration Kit, 96‑well, 0.1‑mL
(Contains all 3 spectral calibration plates listed below)
A26342
Shelf life at storage
temperatur
e
™
e
QuantStudio™ 3/5 Spectral Calibration Plate 1,
AM™, VIC™, ROX™, and SYBR™ dyes), 96‑well, 0.1 mL
(F
QuantStudio™ 3/5 Spectral Calibration Plate 2 (ABY™, JUN™, MUSTANG
PURPLE™ dyes), 96‑well Fast (0.1‑mL) Plate
QuantStudio™ 3/5 Spectral Calibration Plate 3 (TAMRA™, NED™ and Cy®5
dyes) 96‑well Fast (0.1‑mL) Plate
Region of Interest (ROI) and Background Plates, Fast 96‑Well 0.1‑mL
(2 plates)
TaqMan™ RNase P Instrument V
erification Plate, Fast 96-Well 4351979
A26336
A26337
A26340
4432426
–25°C to –15°C
Use the consumable
by the expiration date
on the packaging
Applied Biosystems™ ViiA™ 7 Real-Time PCR System Quick Reference Guide 3
Page 4
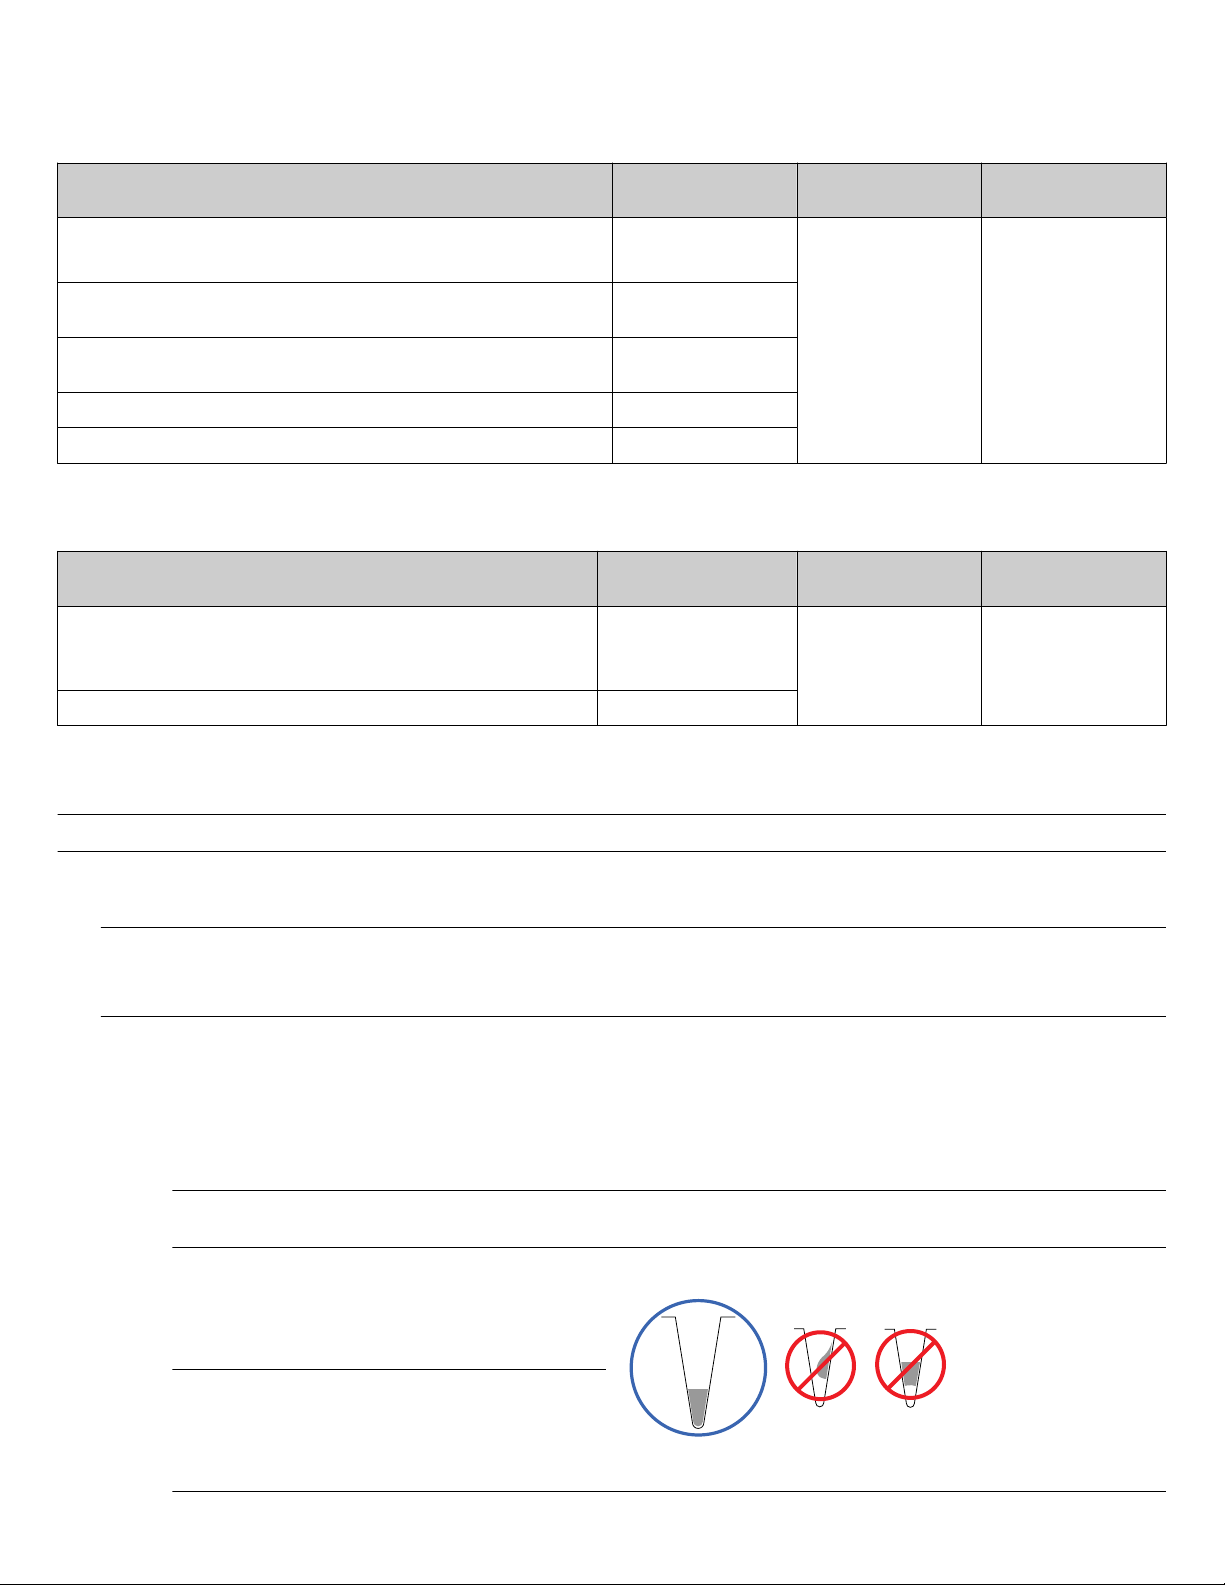
384-well consumables
Note: Spectral calibration plates for the QuantStudio™ 3 and 5 Instruments are used for the calibration procedure with the QuantStudio
Real‑Time PCR Software v1.6.1.
™
Consumable Cat. No. Storage
QuantStudio™ 5 10-Dye Spectral Calibration Kit, 384-well
(Contains the 2 spectral calibration plates listed below)
QuantStudio™ 5 Spectral Calibration Plate 1, (F
TAMRA™, and SYBR™ dyes), 384-well
QuantStudio™ 5 Spectral Calibration Plate 2 (ABY™, JUN™, MUSTANG
PURPLE™, NED™, and Cy®5 dyes), 384-well
Region of Interest (ROI) and Background Plates, 384-well 4432320
TaqMan™ RNase P Instrument Verification Plate, 384-well 4455280
AM™, VIC™, ROX
™
A26341
A26334
A26335
Array card sample block consumables
Consumable Cat. No. Storage
ViiA™ 7 Array Car
Includes FAM™ Dye, VIC™ Dye, ROX™ Dye, ROI Dye, FAM™/ROX™ Dye,
VIC™/ROX™ Dye, and Background Buffer
ViiA™ 7 Array Card RNaseP Verification Kit 4432265
d Spectral Calibration Kit
4432314
–25°C to –15°C
–25°C to –15°C
Shelf life at storage
temperatur
Use the consumable
by the expiration date
on the packaging.
Shelf life at storage
temperatur
Use the consumable
by the expiration date
on the packaging.
e
e
Prepare the calibration plate or array card
IMPORTANT! Wear powder-free gloves and safety glasses when you prepare plates or array cards.
1.
Remove the calibration plate or the calibration solution from the freezer, then allow it to thaw to room temperature in the dark
(approximately 5 minutes).
IMPORTANT! Pr
otect the calibration plate and the calibration solution from light. The uorescent dyes in the calibration plate wells
and calibration solutions are photosensitive. Prolonged exposure to light can diminish the uorescence of the dye.
Do not remove the calibration plate from its packaging until you are ready to run it.
2.
epare the calibration plate or array card.
Pr
• To prepare an array card, ll it with calibration solution. For a normalization calibration, ll two cards with separate normalization
solutions.
• To prepare a plate:
a. Remove the plate from its packaging.
IMPORTANT! Do not discar
d the packaging. The plate can be used up to three times if it is stored in its original packaging
sleeve.
b. Vortex the plate for 5 seconds, then centrifuge it for 2 minutes.
Verify that the liquid is at the bottom of each well of
c.
the plate. If not, centrifuge the plate again at a
higher rpm and for a longer period of time.
IMPORTANT! Do not allow the bottom of the plate
to become dirty
. Fluids and other contaminants that
adhere to the bottom of the plate can contaminate
the sample block(s) and cause an abnormally high
background signal.
4 Applied Biosystems
™
ViiA™ 7 Real-Time PCR System Quick Reference Guide
Page 5
Perform the calibration
A1
1.
In the Home screen of the QuantStudio™ Real‑Time PCR Software, click Instrument Console.
2.
In the Instrument Console, select your ViiA™ 7 Instrument from the list of instruments on the network, then click Add to My
Instruments.
Note: You must add an instrument to your list before you can manage it.
3.
After the instrument is added to your list of instruments, select it, then click Manage Instrument.
4.
In the Instrument Manager, select the calibration, then click Start Calibration.
5.
Click Next, then perform the calibration as instructed. When
the side door opens, load the calibration plate or array card.
Ensure that the plate or array card is properly aligned in the
holder.
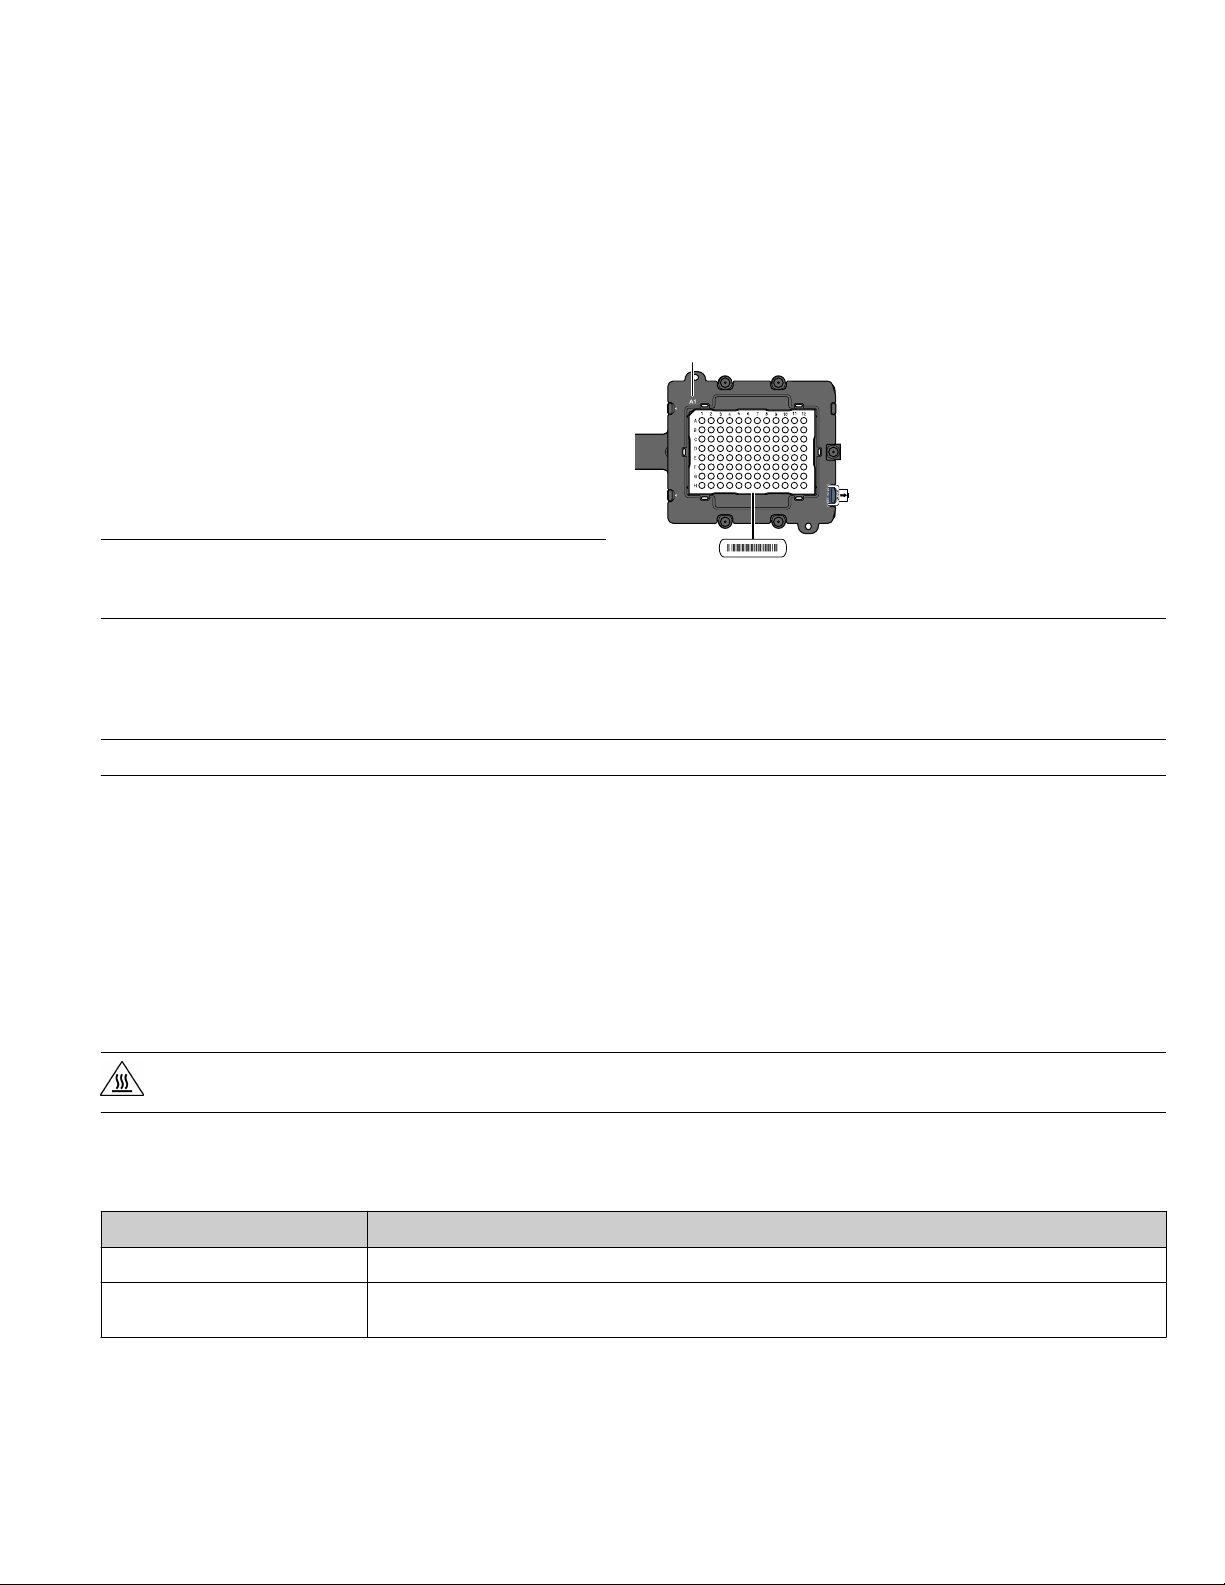
• Load 96/384-well plates with the A1 position at the topleft corner of the plate adapter.
• Load both plates and array cards with the bar code
facing the front of the instrument.
IMPORTANT! Plates should be loaded and unloaded by
operators who have been war
and have been adequately trained.
6.
After loading the plate or array car
a.
In the Setup tab, select Check the box when the calibration plate has been loaded, then click Next.
b.
In the Run screen, click START RUN
ned of the moving parts hazard
d, start the calibration:
IMPORTANT! Do not attempt to open the access door during the run. The door is locked while the instrument is in operation.
Review the results and complete the calibration
1.
When the run is complete and the softwar
the QC tab and review the quality check summary. If the run failed, troubleshoot the failed calibration as described in the Applied
Biosystems™ ViiA™ 7 Real-Time PCR System User Guide: Calibration, Maintenance, Networking, and Security (MAN0018830).
Note: You can accept a calibration that passes the Analysis Status check, but fails the QC Status check. We recommend using
calibrations that yield passing results for both status reports.
2.
After you inspect results, click Next, then remove the plate or array card when the instrument ejects the plate adapter.
WARNING! PHYSICAL INJUR
removing the plate, wait until it reaches room temperature.
3.
Click Finish to complete the calibration.
4.
d or store the plate or array card.
Discar
Consumable Action
Array card Discard the array card.
Plate
Discard the plate, unless it can be reused. If you can store the plate for reuse, return the calibration plate to
its packaging sleeve, then r
e displays the Analysis screen, conrm the analysis status of the calibration, then select
Y HAZARD. During instrument operation, the plate can be heated to 100°C. Before
eturn the packaged plate to the freezer.
Applied Biosystems™ ViiA™ 7 Real-Time PCR System Quick Reference Guide 5
Page 6
Maintain the ViiA™ 7 system
Decontaminate the sample block
Perform this procedure to eliminate uorescent contaminants from the ViiA™ 7 System sample block. Contamination is generally evident in
failed background calibrations where one or more wells consistently exhibit abnormally high signals.
CAUTION! PHYSICAL INJUR
instrument that you can safely service yourself. If you suspect a problem, contact a Technical Support.
CAUTION! PHYSICAL INJUR
performing the following procedure, be sure to wait until the sample block reaches room temperature.
CAUTION! Befor
Fisher Scientic that the proposed method will not damage the equipment.
e using a cleaning or decontamination method other than those recommended in this guide, verify with Thermo
Y HAZARD. Do not remove the ViiA™ 7 Instrument cover. There are no components inside the
Y HAZARD. During instrument operation, the sample block can be heated to 100°C. Before
Materials required
•
Bleach, 10% solution
• Tissue, lint-free
• Cotton or nylon swabs and lint-free cloths
• Ethanol, 95% solution
• Safety glasses
• Pipette (100‑µL) with pipette tips
• Powder-free gloves
• Screwdriver
• Deionized water
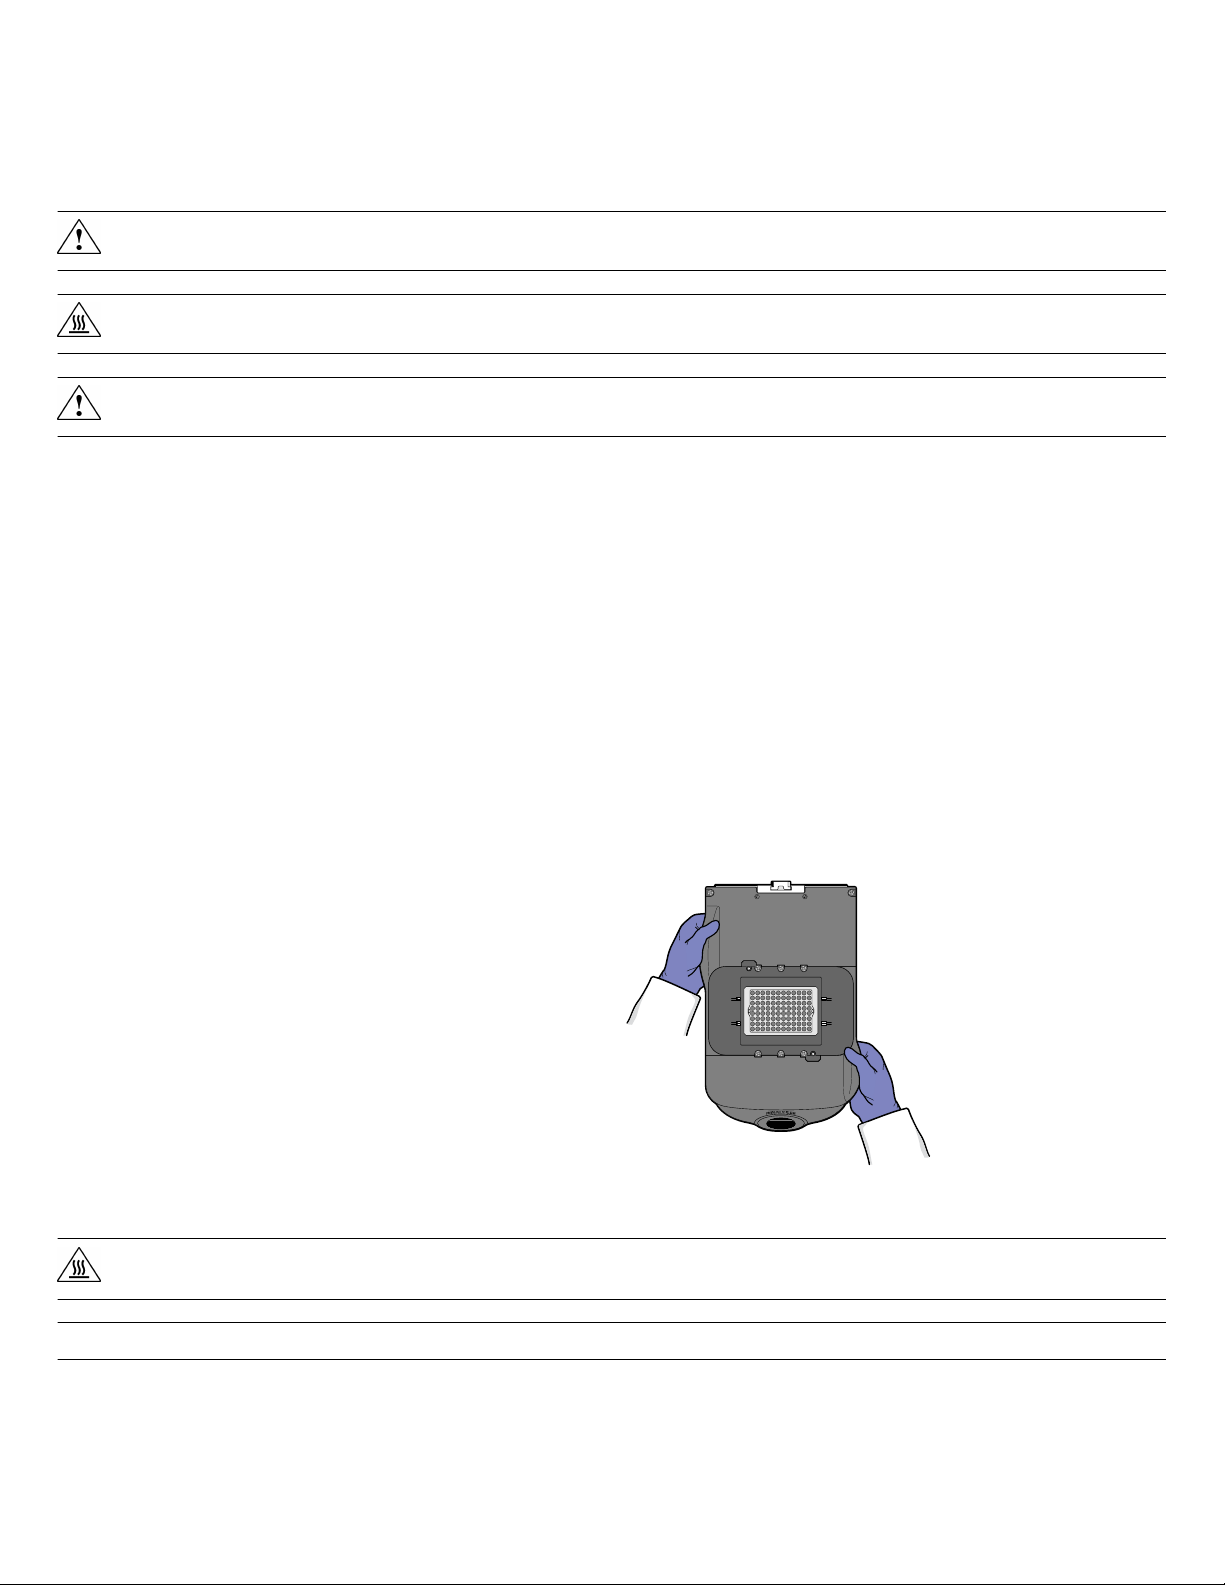
How to handle the sample block
To prevent damaging or contaminating the sample block, handle the
assembly as shown below. After the assembly has been removed
from the ViiA™ 7 Instrument, place the sample block on a clean, dry
surface or in its shipping container.
Clean the sample block
WARNING! PHYSICAL INJUR
100°C. Before removing the sample block, be sure to wait until it reaches room temperature.
IMPORTANT! W
1.
Identify the contaminated wells of the sample block.
ear powder-free gloves when you perform this procedure.
Y HAZARD. During instrument operation, the sample block and heated cover can be heated to
2.
Power of
3.
Open the access door.
6 Applied Biosystems
f and unplug the instrument, then allow it to cool for 15 minutes.
™
ViiA™ 7 Real-Time PCR System Quick Reference Guide
Page 7
4.
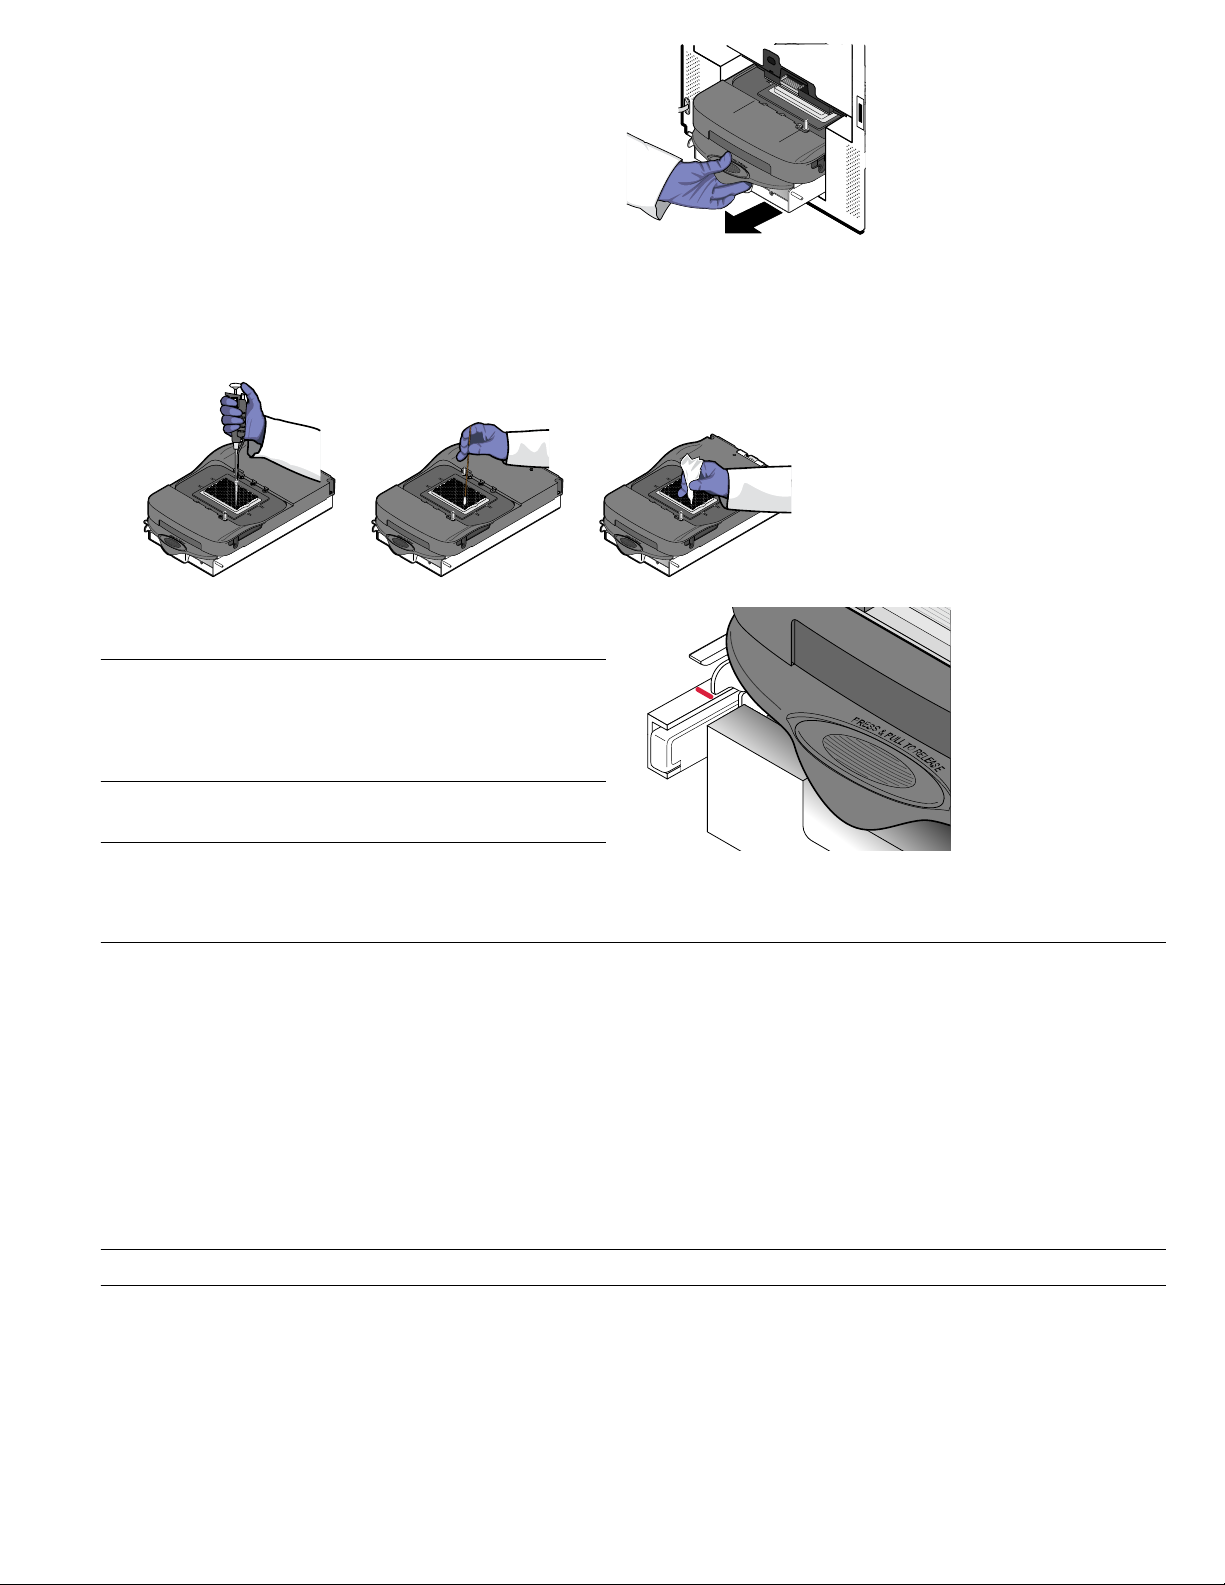
Firmly press down on the handle of the sample block, then
remove it from the instrument. Place the sample block on a
clean, dry surface.
5.
Clean the contaminated wells of the sample block using
deionized water:
a.
Pipette a small volume of deionized water into each
contaminated well.
b.
In each well, pipette the water up and down several
times to rinse the well.
c.
Pipette the water to a waste beaker.
d.
Using a cotton swab, scrub inside of each contaminated well.
e.
Using a lint-free cloth, absorb the excess deionized water.
6.
Load the sample block into the ViiA™ 7 Instrument, then close
the access door
.
IMPORTANT! After installing the sample block, conrm that
the indicator on the left side of the sample block is positioned
behind the r
forward of the red line, push the sample block into the
instrument until it is seated correctly.
7.
Close the access door
ed line on the instrument rail. If the indicator is
.
IMPORTANT! Conrm that the access door is completely
closed. The softwar
not completely closed and latched, or if the sample block is
not seated correctly.
8.
Plug in, then power on the ViiA™ 7 System.
9.
Perform a backgr
10.
If the contamination remains, repeat steps 2 through 5, then clean the contaminated wells of the sample block using a 95% ethanol
solution:
a.
Pipette a small volume of 95% ethanol solution into each contaminated well.
b.
In each contaminated well, pipette the solution up and down several times to rinse the well.
c.
Pipette the ethanol solution to a waste beaker.
11.
Repeat steps 5 through 9 to rinse the wells of the sample block and to verify that you have eliminated the contamination.
e displays an error message if the door is
ound calibration to conrm that you have eliminated the contamination.
IMPORTANT! Always use deionized water to rinse wells after cleaning with bleach or ethanol solution.
12.
If the contamination r
solution:
a.
Pipette a small volume of 10% bleach solution into each contaminated well.
b.
In each contaminated well, pipette the solution up and down several times to rinse the well.
c.
Pipette the bleach solution to a waste beaker.
Applied Biosystems™ ViiA™ 7 Real-Time PCR System Quick Reference Guide 7
emains, repeat steps 2 through 5, then clean the contaminated wells of the sample block using 10% bleach
Page 8
13.
Repeat steps 5 through 9 to rinse the wells of the sample block and to verify that you have eliminated the contamination.
IMPORTANT! Always use deionized water to rinse wells after cleaning with bleach or ethanol solution.
14.
If the contamination r
emains, contact Technical Support.
Replace the sample block
Replace the sample block in the event of a hardware failure or to change the consumable format of the ViiA™ 7 Instrument.
WARNING! PHYSICAL INJUR
Y HAZARD. During instrument operation, the sample block and heated cover can be heated to
100°C. Before removing the sample block, be sure to wait until it reaches room temperature.
Materials required
•
Safety glasses
• Powder-free gloves
• Sample block
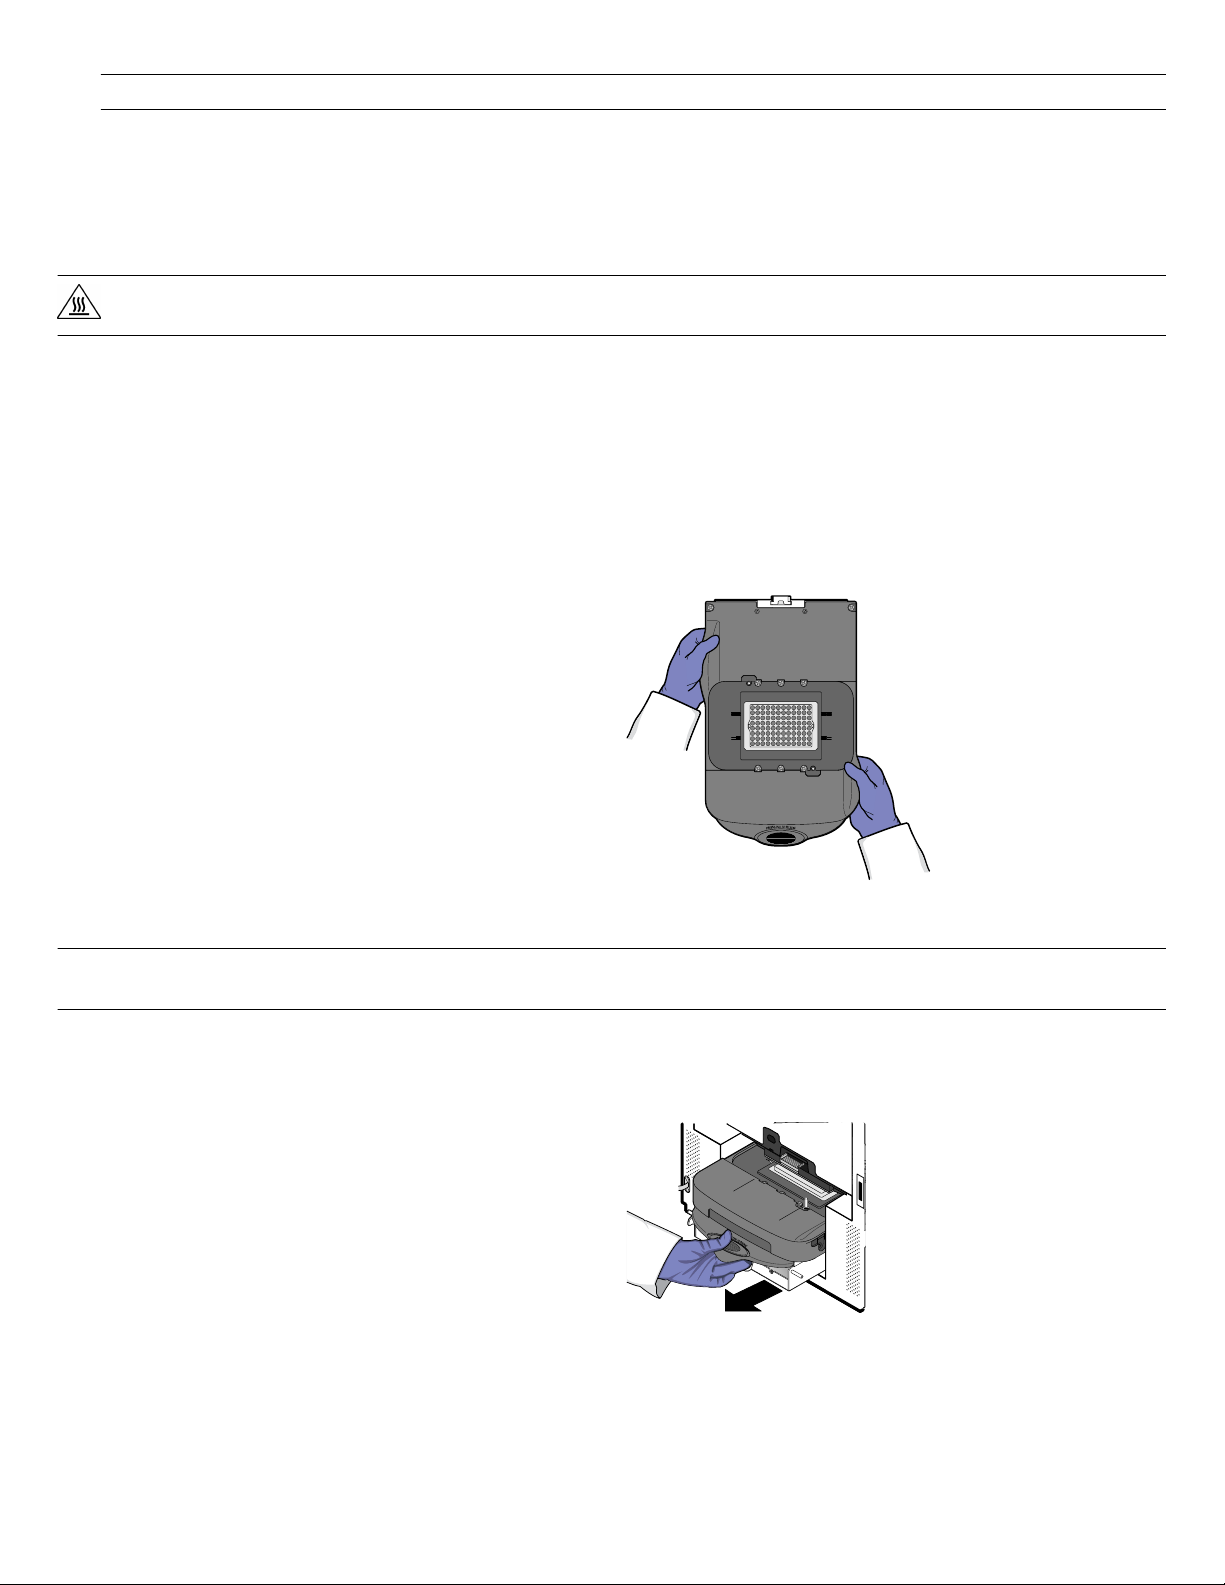
How to handle the sample block
To prevent damaging or contaminating the sample block, handle the
assembly as shown below. After the assembly has been removed
from the ViiA™ 7 Instrument, place the sample block on a clean, dry
surface or in its shipping container.
Replace the sample block
IMPORTANT! If you ar
e installing a sample block of a different format (for example, 96/384-well plate to array card), you must also
change the plate adapter to match the new consumable format.
1.
Power of
2.
Open the access door.
3.
Firmly press down on the handle of the sample block, then
f and unplug the ViiA™ 7 Instrument, then allow it to cool for 15 minutes.
remove it from the instrument. Place the sample block on a
clean, dry surface.
8 Applied Biosystems
™
ViiA™ 7 Real-Time PCR System Quick Reference Guide
Page 9
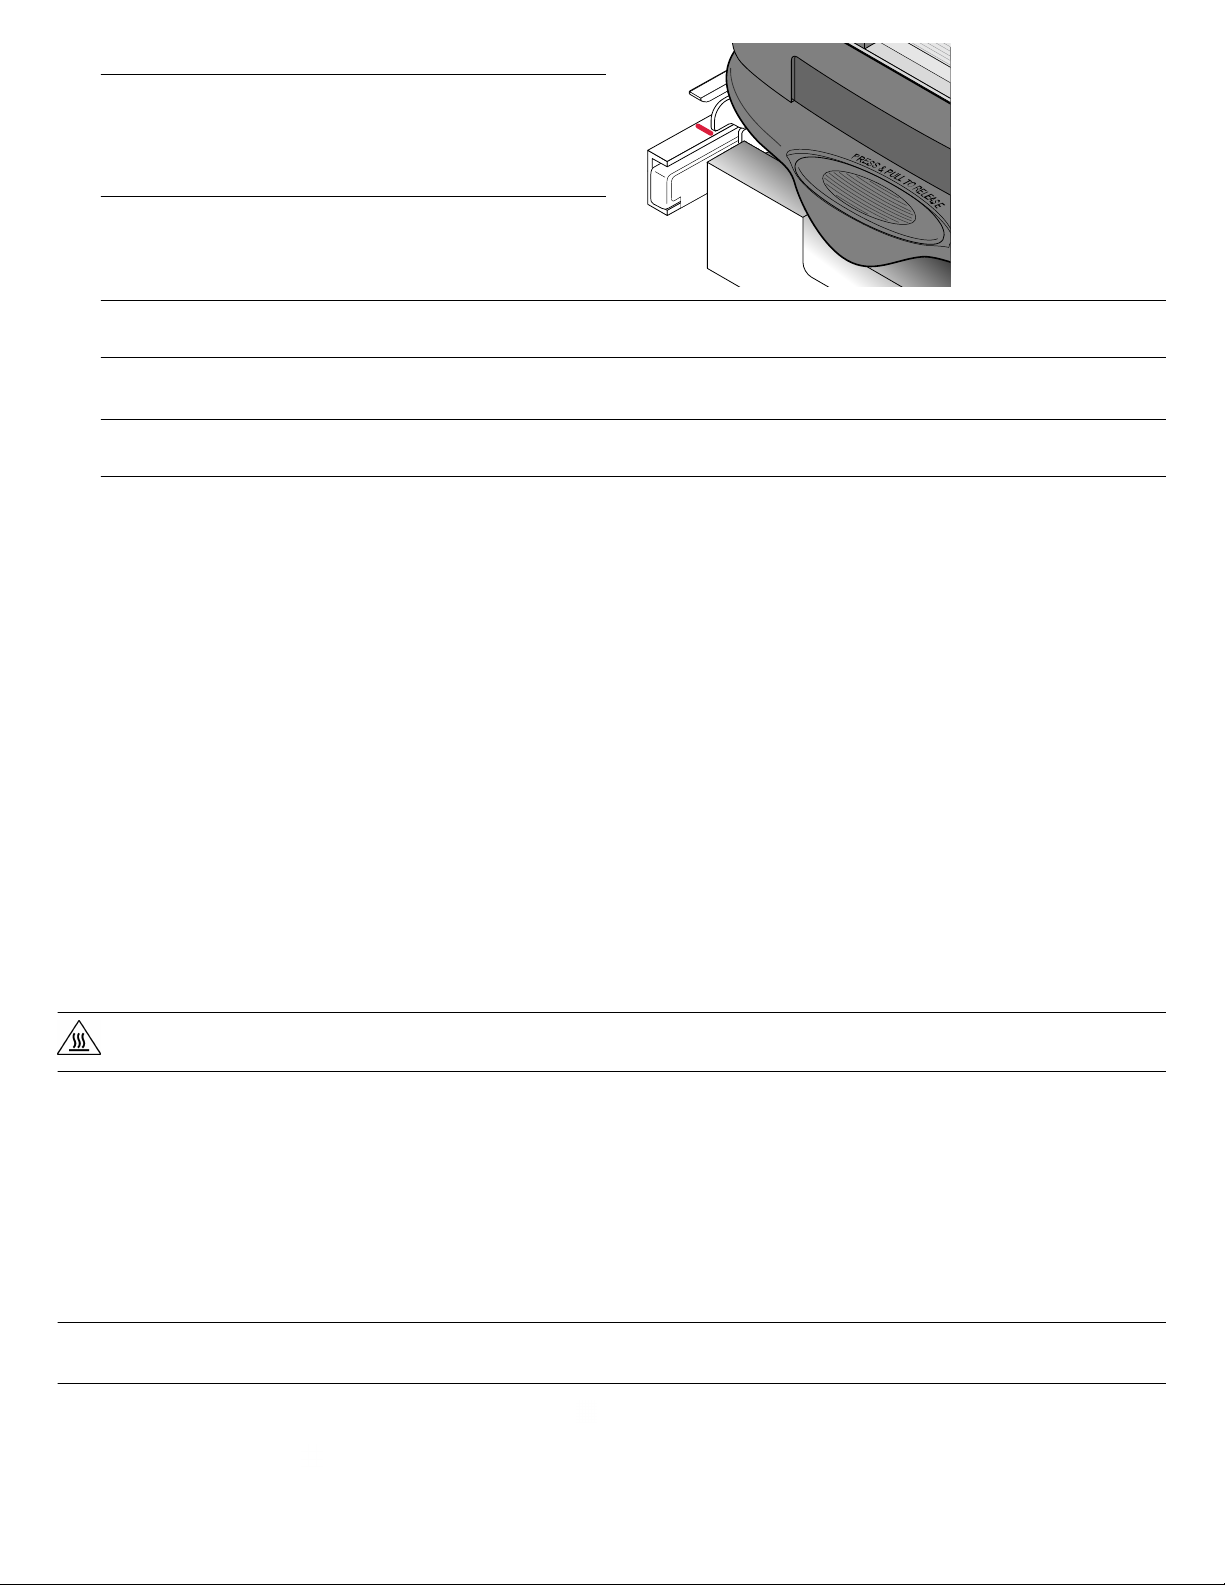
4.
Install the new sample block into the instrument.
IMPORTANT! After installing the sample block, conrm that
the indicator on the left side of the sample block is positioned
behind the r
forward of the red line, push the sample block into the
instrument until it is seated correctly.
ed line on the instrument rail. If the indicator is
5.
If you ar
format, replace the heated cover and plate adapter if
necessary to match the new consumable format.
IMPORTANT! If you ar
consumable format.
6.
Close the access door
IMPORTANT! Conrm that the access door is completely closed. The softwar
completely closed and latched, or if the sample block is not seated correctly.
7.
Plug in and power on the ViiA™ 7 System.
8.
In the Home scr
9.
In the Instrument Console, select your ViiA™ 7 Instrument from the list of instruments, then review the Block Type eld in the
Instrument Properties pane.
The installation is successful if the instrument powers on and if the Block Type eld displays the correct type of sample block.
Note: The Block Type eld displays the type of sample block installed to the instrument.
10.
Perform the following calibrations in the specied order:
e installing a sample block of a different consumable
e installing a sample block of a different format, you must also change the plate adapter to match the new
.
e displays an error message if the door is not
een of the QuantStudio™ Real‑Time PCR Software, click Instrument Console.
1. ROI calibration
2. Background calibration
3. Uniformity calibration
4. Dye calibration
5. (TaqMan™ Array Card block only) Normalization calibration
Replace the plate adapter
Replace the plate adapter in the event of a hardware failure or if you want to change the consumable format of the ViiA™ 7 Instrument.
WARNING! PHYSICAL INJUR
100°C. Before removing the heated cover, be sure to wait until it reaches room temperature.
Y HAZARD. During instrument operation, the sample block and heated cover can be heated to
Materials required
Safety glasses
•
• Powder-free gloves
• Plate adapter
Replace the plate adapter
IMPORTANT! If you ar
the new consumable format.
1.
T
ouch the instrument touchscreen to awaken it, then press
2.
In the Main Menu, touch .
e installing a plate adapter of a different format, you may also be required to change the sample block to match
.
Applied Biosystems™ ViiA™ 7 Real-Time PCR System Quick Reference Guide 9
Page 10
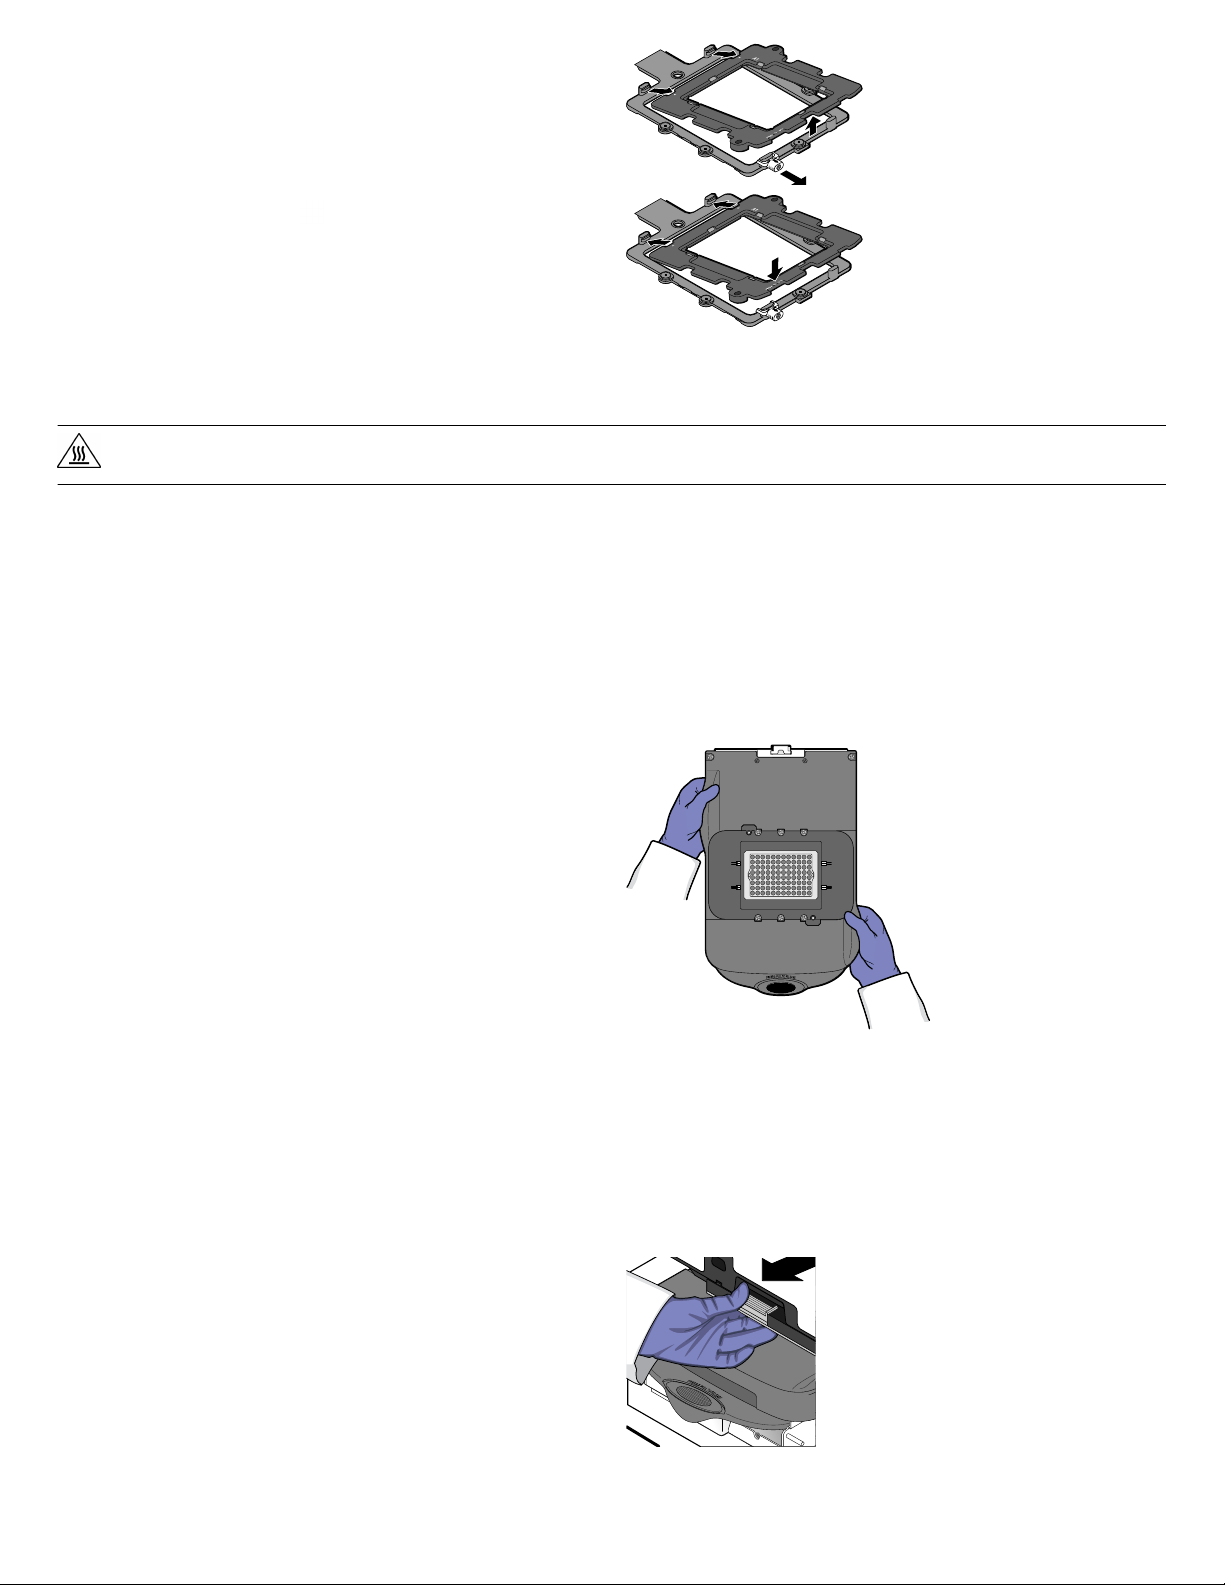
3.
When the tray arm opens, pull the latch, then lift and remove
the plate adapter.
4.
Attach the new adapter to the tray arm, then pull the latch to
allow the adapter to lower into place. If necessary, apply
pressure as indicated until the adapter snaps into place.
5.
In the Main Menu, touch
6.
If you ar
e installing a tray adapter of a different consumable
.
format, replace the sample block if necessary.
Replace the heated cover
Replace the heated cover in the event of a hardware failure or if you want to change the consumable format of the ViiA™ 7 Instrument.
WARNING! PHYSICAL INJUR
Y HAZARD. During instrument operation, the sample block and heated cover can be heated to
100°C. Before removing the heated cover, be sure to wait until it reaches room temperature.
Materials required
•
Safety glasses
• Powder-free gloves
• Heated cover
How to handle the heated cover
To prevent damaging or contaminating the heated cover, handle the
assembly as shown below. After the assembly has been removed
from the ViiA™ 7 Instrument, place the heated cover on a clean, dry
surface or in its shipping container.
Replace the heated cover
Note: Conrm that the replacement heated cover supports the consumable format that you want to use. Some heated covers support
more than one consumable type.
1.
Power off and unplug the ViiA™ 7 System, then allow it to cool for 15 minutes.
2.
Open the access door.
3.
Unlock the heated cover by pinching the handle together,
then pull the assembly from the ViiA™ 7 Instrument and place
it on a clean, dry surface.
10 Applied Biosystems
™
ViiA™ 7 Real-Time PCR System Quick Reference Guide
Page 11
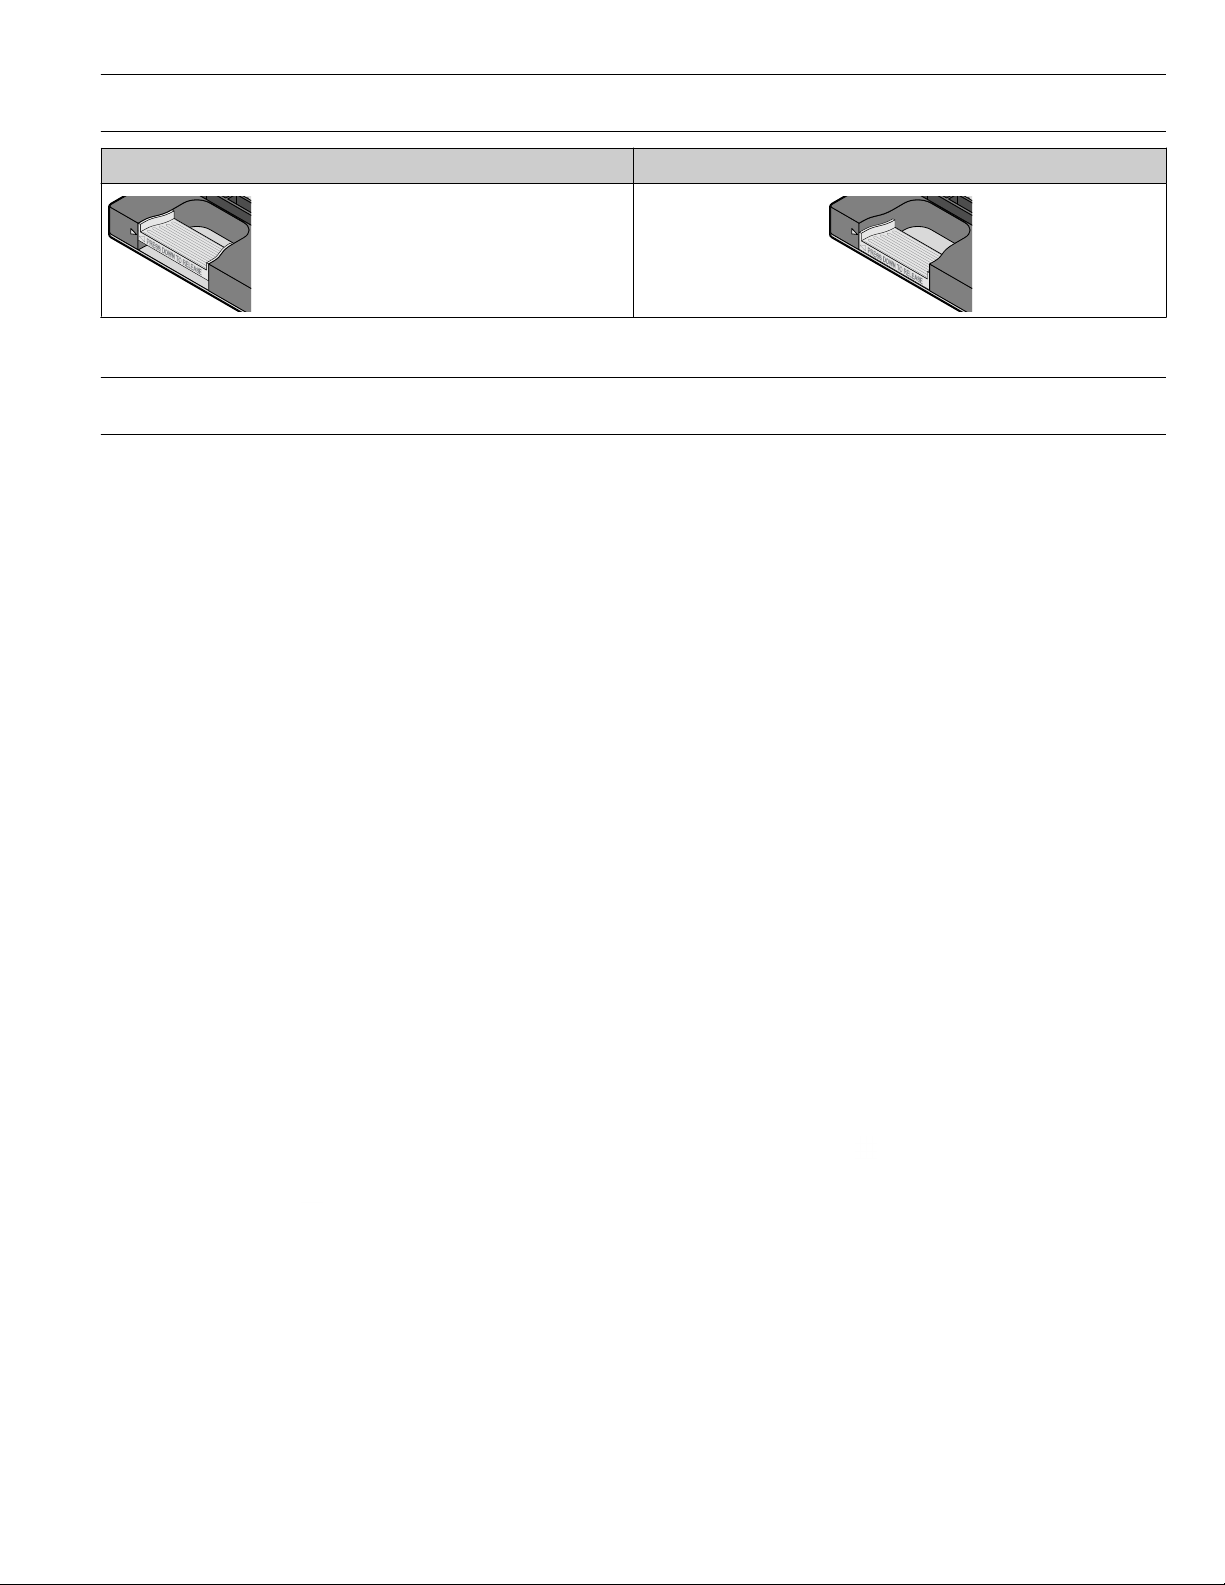
4.
Install the new heated cover into the instrument.
IMPORTANT! When the heated cover is seated corr
align, push the heated cover further into the instrument until the handle locks into place.
Correct Incorrect
5.
If you ar
IMPORTANT! If you ar
match the new consumable format.
6.
Close the access door
Conrm that the access door is completely closed. The software displays an error message if the door is not completely closed and
latched, or if the sample block is not seated correctly.
7.
Plug in and power on the ViiA™ 7 System.
8.
In the Home screen of the QuantStudio™ Real‑Time PCR Software, click Instrument Console.
9.
In the Instrument Console, select your ViiA™ 7 Instrument from the list of instruments, then review the Heated Cover Firmware
Version eld in the Instrument Properties pane.
The installation is successful if the ViiA™ 7 Instrument powers on and if the Heated Cover Firmware Version eld displays a version
number.
e installing a heated cover of a different consumable format, replace the sample block and plate adapter if necessary.
e installing a heated cover of a different format, you must also change the sample block and plate adapter to
.
ectly, the arrows on the front handle align as shown below. If the arrows do not
10.
Perform the following calibrations in the specied order:
1. ROI calibration
2. Background calibration
3. Uniformity calibration
4. Dye calibration
5. (TaqMan™ Array Card block only) Normalization calibration
Perform an instrument self test
You can use the ViiA™ 7 Instrument touchscreen to perform a comprehensive self test of the ViiA™ 7 Instrument subsystems. After the self
test is complete, the ViiA™ 7 Instrument generates two les that provide a detailed summary of the instrument condition and function. In
the event of a problem, you can save the results les to a USB drive and email them to Technical Support for a diagnosis.
Note: We recommend running the self test as part of regular maintenance to ensure optimal performance of the instrument.
1.
If the instrument is in standby, touch the ViiA™ 7 System touchscreen to awaken it, then press
2.
In the Main Menu, touch
3.
In the Self Test screen, touch Start Self Test, then wait for the test to complete.
4.
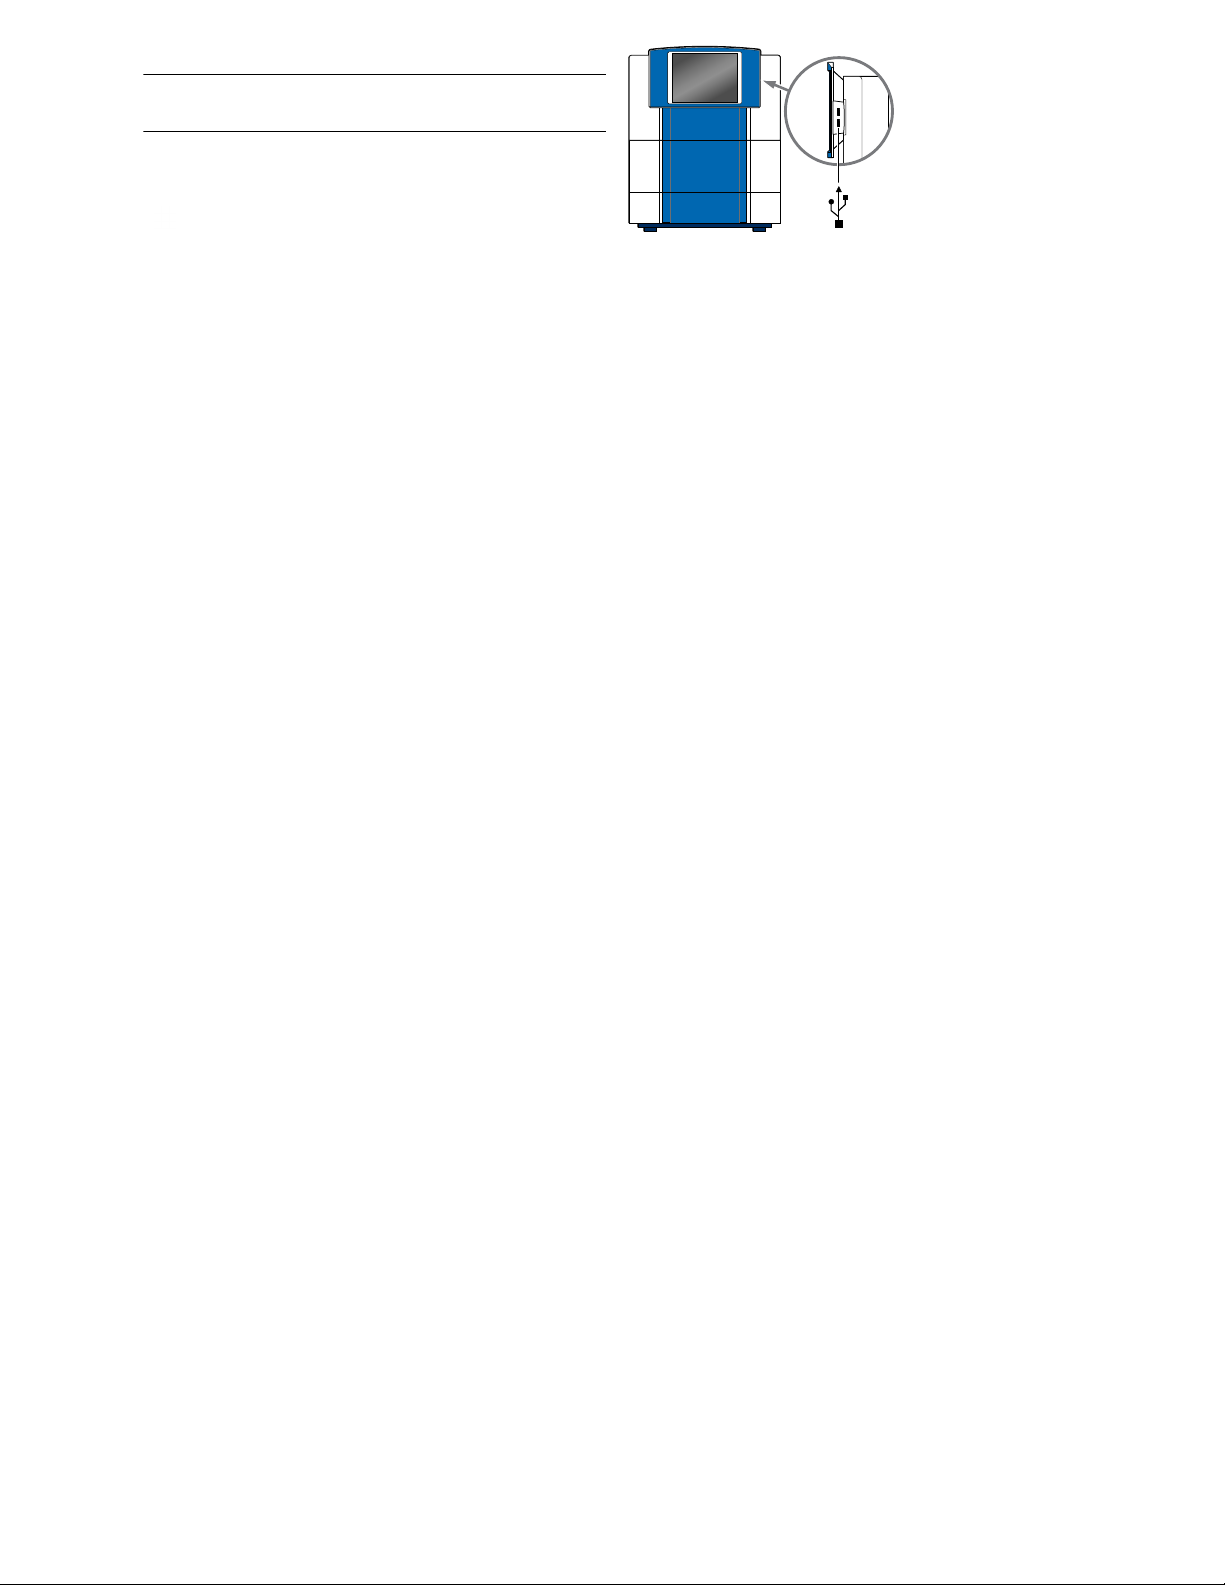
(Optional) When the ViiA™ 7 Instrument completes the self test, save the results to a USB drive:
a.
Plug a USB drive into the USB port on the right side of the instrument touchscreen.
T
ools, then touch Run Self Test.
.
Applied Biosystems™ ViiA™ 7 Real-T
ime PCR System Quick Reference Guide 11
Page 12
b.
Touch Save to USB.
5.
IMPORTANT! Do not r
instrument until instructed to do so.
c.
When the instrument nishes writing the r
USB drive, touch OK, then remove the USB drive.
Touch
to return to the Main Menu.
emove the USB drive from the
esults to the
Power off the ViiA™ 7 Real-Time PCR System
The ViiA™ 7 Real-Time PCR System operates in low-power mode when not in use. However, the ViiA™ 7 System can be powered off
completely so that the components draw no power.
Note: If the system will be inactive for extended period of time, prepare it for storage as explained in the instrument user guide.
To power off the ViiA™ 7 System components:
1.
Power off the ViiA™ 7 Instrument:
a.
If the ViiA™ 7 Instrument touchscreen is not blank, touch to place the ViiA™ 7 Instrument into stand-by mode.
b.
oggle the power button on the rear of the instrument.
T
2.
Power off the ViiA™ 7 System computer:
a.
In the desktop, select Start4Shut Down.
b.
In the Shut Down Windows™ dialog box, select Shut Down, then click OK.
3.
Power off the monitor.
Perform an experiment
Materials required
• For all sample blocks:
– DI water/DEPC water
– Microcentrifuge tubes
– Pipettors and pipette tips
– Vortex mixer
– Safety goggles
– Powder-free gloves
– Sample stock
– Standard stock
– Reaction mix components
• For 384-well, 96-well, or Fast 96-well sample blocks:
– Centrifuge with plate adapter
– Plate or (96-well and Fast 96-well blocks only) tube strip, or single tube
– Optical adhesive lm
• For array card sample blocks:
– Centrifuge with centrifuge array-card carrier clips and buckets
– Array-card staker/sealer xture
– Array card
12 Applied Biosystems
™
ViiA™ 7 Real-Time PCR System Quick Reference Guide
Page 13
Workow
Design the experiment (page 13)
“Prepare the reaction plate or array card” on page 14
“Start and monitor the experiment” on page 18
“Unload the plate or array card” on page 19
“View analysis reports” on page 19
“Export results” on page 19
Design the experiment
Define the experiment properties
1.
In the Experiment properties screen, dene the experiment name and type.
• Experiment name
• User name of the experiment owner
• (Optional) Barcode for the plate or array card
• (Optional) Comments
• Block type: 384-well, Array Card, 96-well (0.2mL), or Fast 96-well (0.1mL)
• Experiment type: Standard Curve, Relative Standard Curve, Comparative Ct (ΔΔCt), Melt Curve, Genotyping, or
Presence/Absence
▼
▼
▼
▼
▼
2.
Select the reagents.
Experiment type Reagent options
Standard Curve TaqMan™ Reagents, SYBR™ Gr
Relative Standard Curve TaqMan™ Reagents, SYBR™ Green Reagents, or Other
Comparative C
Melt Curve SYBR™ Green Reagents or Other
Genotyping TaqMan™ Reagents or Other
Presence/Absence TaqMan™ Reagents or Other
Note: If you select SYBR™ Gr
3.
Dene the instrument run properties
t
een as the reagent, then you have the option of including a melt curve for that experiment.
TaqMan™ Reagents, SYBR™ Green Reagents, or Other
een Reagents, or Other
• Ramp speed: Standard or Fast
• (Genotyping and Presence/Absence) Collect data during Pre-PCR Read, Amplification, or Post-PCR Read
• (Experiments using SYBR™ Green) Select whether or not to include a melt curve.
• (Melt Curve) Select whether or not to include PCR.
Define targets, samples, biological replicates, and dye
In the Dene screen, dene targets, samples, biological replicates, and dye
• (All experiments except Genotyping) Dene Targets.
• (Genotyping) Dene SNPs.
Applied Biosystems™ ViiA™ 7 Real-T
ime PCR System Quick Reference Guide 13
Page 14

• (All experiments) Dene Samples.
• (Optional) (Standard Curve, Relative Standard Curve, and Comparative Ct) Dene Biological Replicate Groups.
• (All experiments except Presence/Absence) Select the Passive Reference dye.
• (Relative Standard Curve and Comparative Ct) Select the Reference Sample and the Endogenous Control.
Assign targets and samples
In the Assign screen, assign targets and samples.
• (All experiments except Genotyping) Assign targets, tasks, and samples to wells. Tasks include Unknown, Standard, Positive, and
Negative controls, depending on experiment type.
• (Genotyping) Assign SNP assays, tasks, and samples to wells.
• (Standard Curve and Relative Standard Curve) Dene and set up standards: Click Define and Set Up Standards, select a target,
dene the standard curve, then select and arrange wells for the standards.
• (Optional) (Standard Curve, Relative Standard Curve, and Comparative Ct) Assign Biological Replicate Groups to wells.
Define the run method
1.
In the Run method screen, enter the reaction volume:
• 384-well plate: 1 - 30 µL
• Array card: 1µL
• 96-well plate: 1 - 200 µL
• Fast 96-well plate: 1 - 100 µL
2.
Edit the thermal prole as needed.
• Add and delete steps or stages.
• Edit the time, temperature, or ramp rate for a step.
• Click
Note: For r
to enable or click to disable data collection.
eal-time data collection during amplication, change the default analysis settings (Start Cycle and End Cycle) in
Preferences.
3.
Edit the cycling stages of the thermal protocol as needed.
• Edit the number of cycles.
• Enable or disable AutoDelta. For an AutoDelta step, enter the Starting Cycle.
4.
For a melt curve stage, select the ramp increment.
• Step and Hold: Click the Step and Hold eld, select the minutes or seconds, then use the up or down arrow keys or click the
up or down buttons in the eld until you reach the desired time.
• Continuous (default): Click 1.6 °C/s (the ramp rate), select the value in the eld, then enter the desired ramp rate.
Save the file
After you design an experiment, you can also save the experiment as a template, then create experiments from the template using
QuickStart.
Prepare the reaction plate or array card
IMPORTANT! W
ear powder-free gloves when you handle the plate or array card.
Guidelines for preparing the reaction plate or array card
Include excess volume in your calculations to provide for loss during reagent transfers.
•
• Use TE buffer or water to dilute the standards and samples.
• Prepare the reagents according to the manufacturer’s instructions.
• Keep the dilutions and assay mix protected from light, in the freezer, until you are ready to use it. Excessive exposure to light may
affect the uorescent probes or dyes.
• To prepare the reactions:
– Mix the master mix thoroughly by swirling the bottle.
14 Applied Biosystems
™
ViiA™ 7 Real-T
ime PCR System Quick Reference Guide
Page 15

– Resuspend the assay mix by vortexing, then centrifuge the tube briey.
– Thaw any frozen samples, resuspend them by vortexing, then centrifuge the tubes briey.
• (Genotyping only) Prepare the reactions for each SNP separately
• Place the reaction plate or array card at 4°C in the dark until you are ready to load it into the instrument.
Prepare the reaction plate
1.
Load the plate with the prepared reactions.
2.
Remove a single optical adhesive lm from the box and bend both end-tabs upward. Hold the lm backing side up.
3.
In one swift movement, peel back the white protective
backing from the center sealing surface. Do not touch the
center sealing surface.
IMPORTANT! Impr
may result in haziness, but it will not affect results. Haziness
disappears when the lm comes into contact with the heated
cover in the instrument.
4.
Holding the lm by the end-tabs, lower the lm onto the
r
eaction plate (adhesive side facing the reaction plate). Be
sure that the lm completely covers all wells of the reaction
plate.
5.
While applying rm pressure, move the applicator slowly
across the lm, horizontally and vertically, to ensure good
contact between the lm and the entire surface of the
reaction plate.
6.
While using the applicator to hold the edge of the lm in
place, grasp one end of the end-tab and pull up and away
sharply. Repeat this step for the other end-tab.
7.
To ensure a tight, evaporation-free seal, repeat step d on
page 15: While applying rm pressure, run the edge of the
applicator along all four sides of the outside border of the
lm.
Note: Optical adhesive lms do not adhere on contact. The
lms require the application of pressure to ensure a tight,
evaporation-free seal.
oper peeling of the optical adhesive lm
8.
Inspect the reaction plate to be sure that all wells are sealed.
You should see an imprint of all wells on the surface of the
lm. Check for the perforated tab to be completely torn off to
avoid plates sticking to the instrument after a run.
IMPORTANT! Remove all excess adhesive fr
perimeter of the optical adhesive cover. When the lm is
applied, the glue from the optical adhesive cover can adhere
to the edges of the plate. If the excess glue is not removed,
the plate may adhere to the sample block of the ViiA™ 7
System.
Applied Biosystems™ ViiA™ 7 Real-Time PCR System Quick Reference Guide 15
om the
Page 16
9.
GR2158
Microfluidic Card
Card Ports detail
21
GR2159
Microfluidic Card
Filling the card
GR2155
Microfluidic Card
Plates into clip
Centrifuge the plate for 2 minutes, then verify that the liquid is
at the bottom of each well of the plate. If not, centrifuge the
plate again at a higher rpm and for a longer period of time.
IMPORTANT! Do not allow the bottom of the plate to become dirty. Fluids and other contaminants that adhere to the bottom of the
plate can contaminate the sample block(s) and cause an abnormally high background signal.
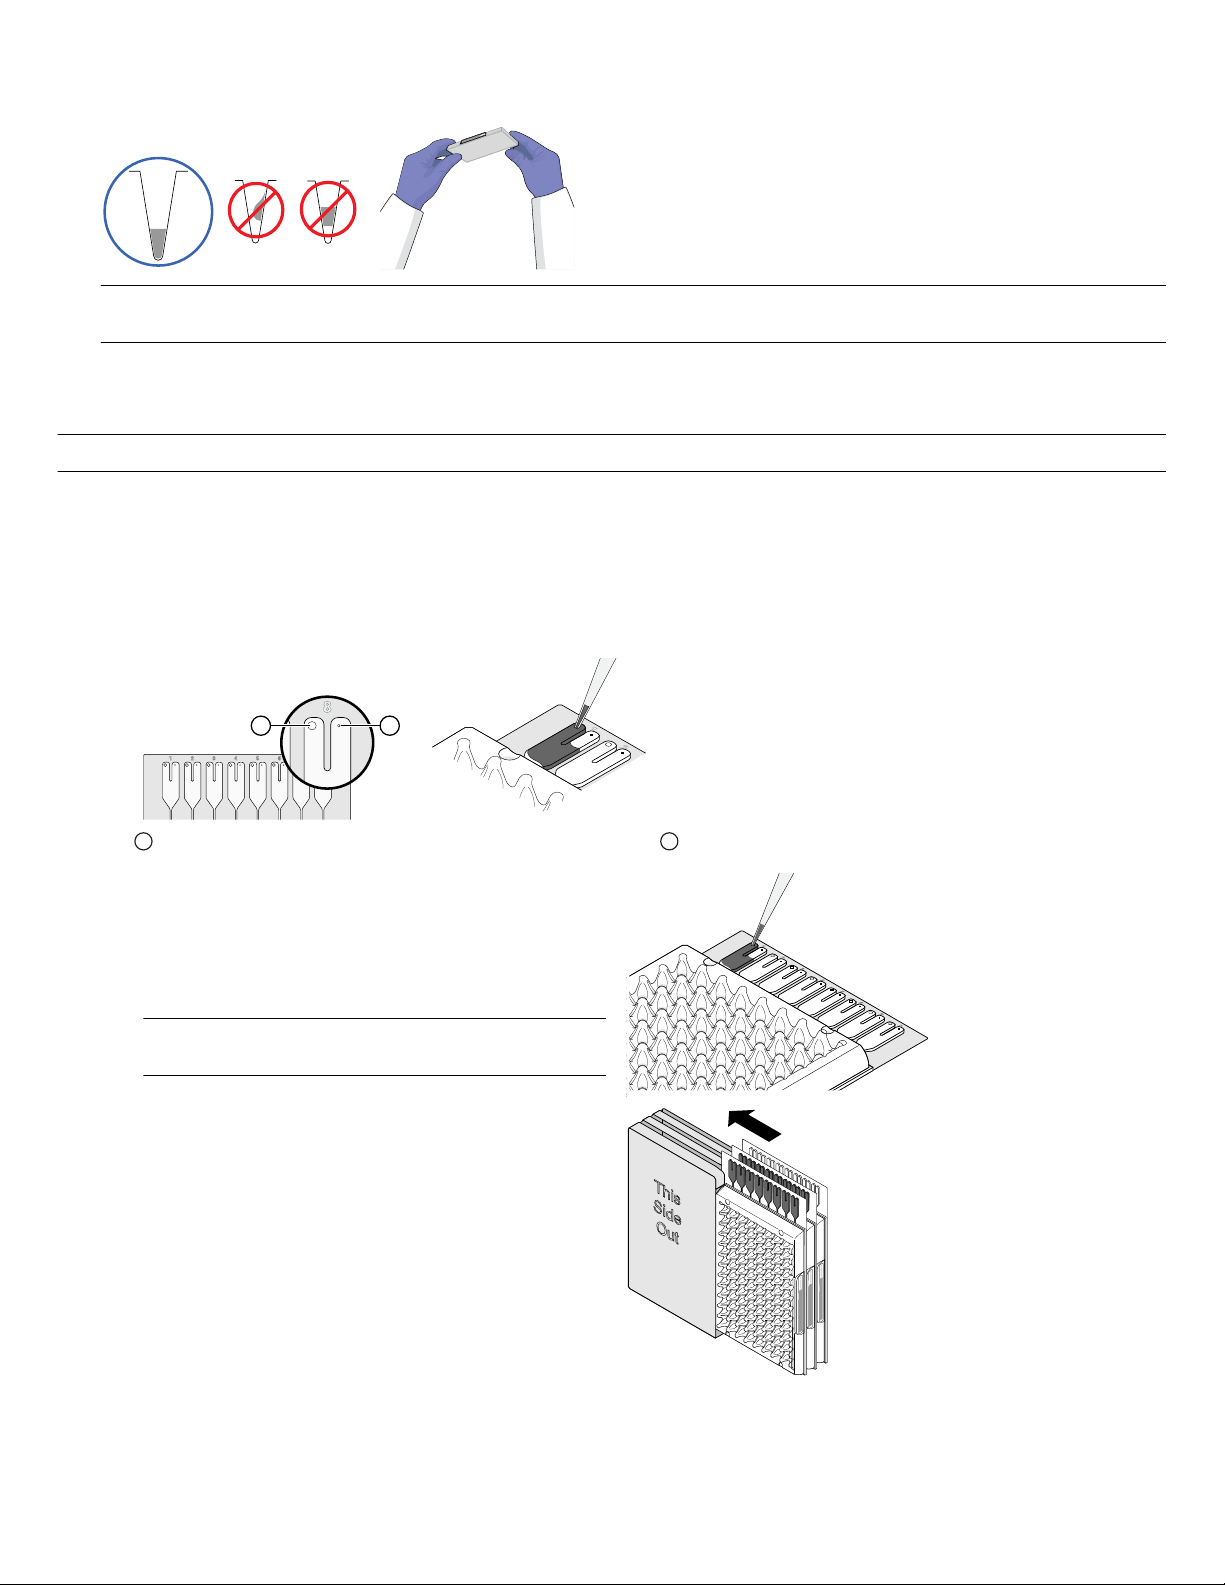
Prepare the array card
IMPORTANT! W
1.
Remove the array car
2.
For each chemical and solution transferred, pipette 100 µL into each of the eight reservoirs in the array card:
a.
b.
c.
1
d.
ear powder-free gloves while creating the calibration array cards.
ds from their box, then place them on a clean, dry surface.
Place the array card on a lab bench, with the foil side down.
Load 100 µL of the calibration solution into a pipette.
Hold the pipette in an angled position (approximately 45°), then place the tip into the ll port.
Fill port
Dispense the uid so that it sweeps in and ar
ound the
2
Vent port
ll reservoir toward the vent port.
When pipetting the reagents into the array card, pipette
the entire 100‑µL volume into the ll reservoir, but do not
go past the rst stop of pipettor plunger or you can
blow the solution out of the port.
IMPORTANT! Do not allow the tip to contact and
possibly damage the coated foil beneath the ll port.
3.
Place the lled array car
d(s) into a centrifuge array card
carrier clip and place empty array cards in the remaining
slots. Conrm that the labels on the buckets and clips face
the same way.
16 Applied Biosystems
™
ViiA™ 7 Real-Time PCR System Quick Reference Guide
Page 17
4.
GR2157
Microfluidic Card
Card structure
GR2162
Microfluidic Card
Bad fill 1
GR2163
Microfluidic Card
Bad fill 2
GR2161
Microfluidic
Card
Centrifuge half full
GR2172a
MicroFluidic Card
Sealer with card
GR2174a
MicroFluidic Card
Spring Plate
GR2172
MicroFluidic Card
Sealer with plate
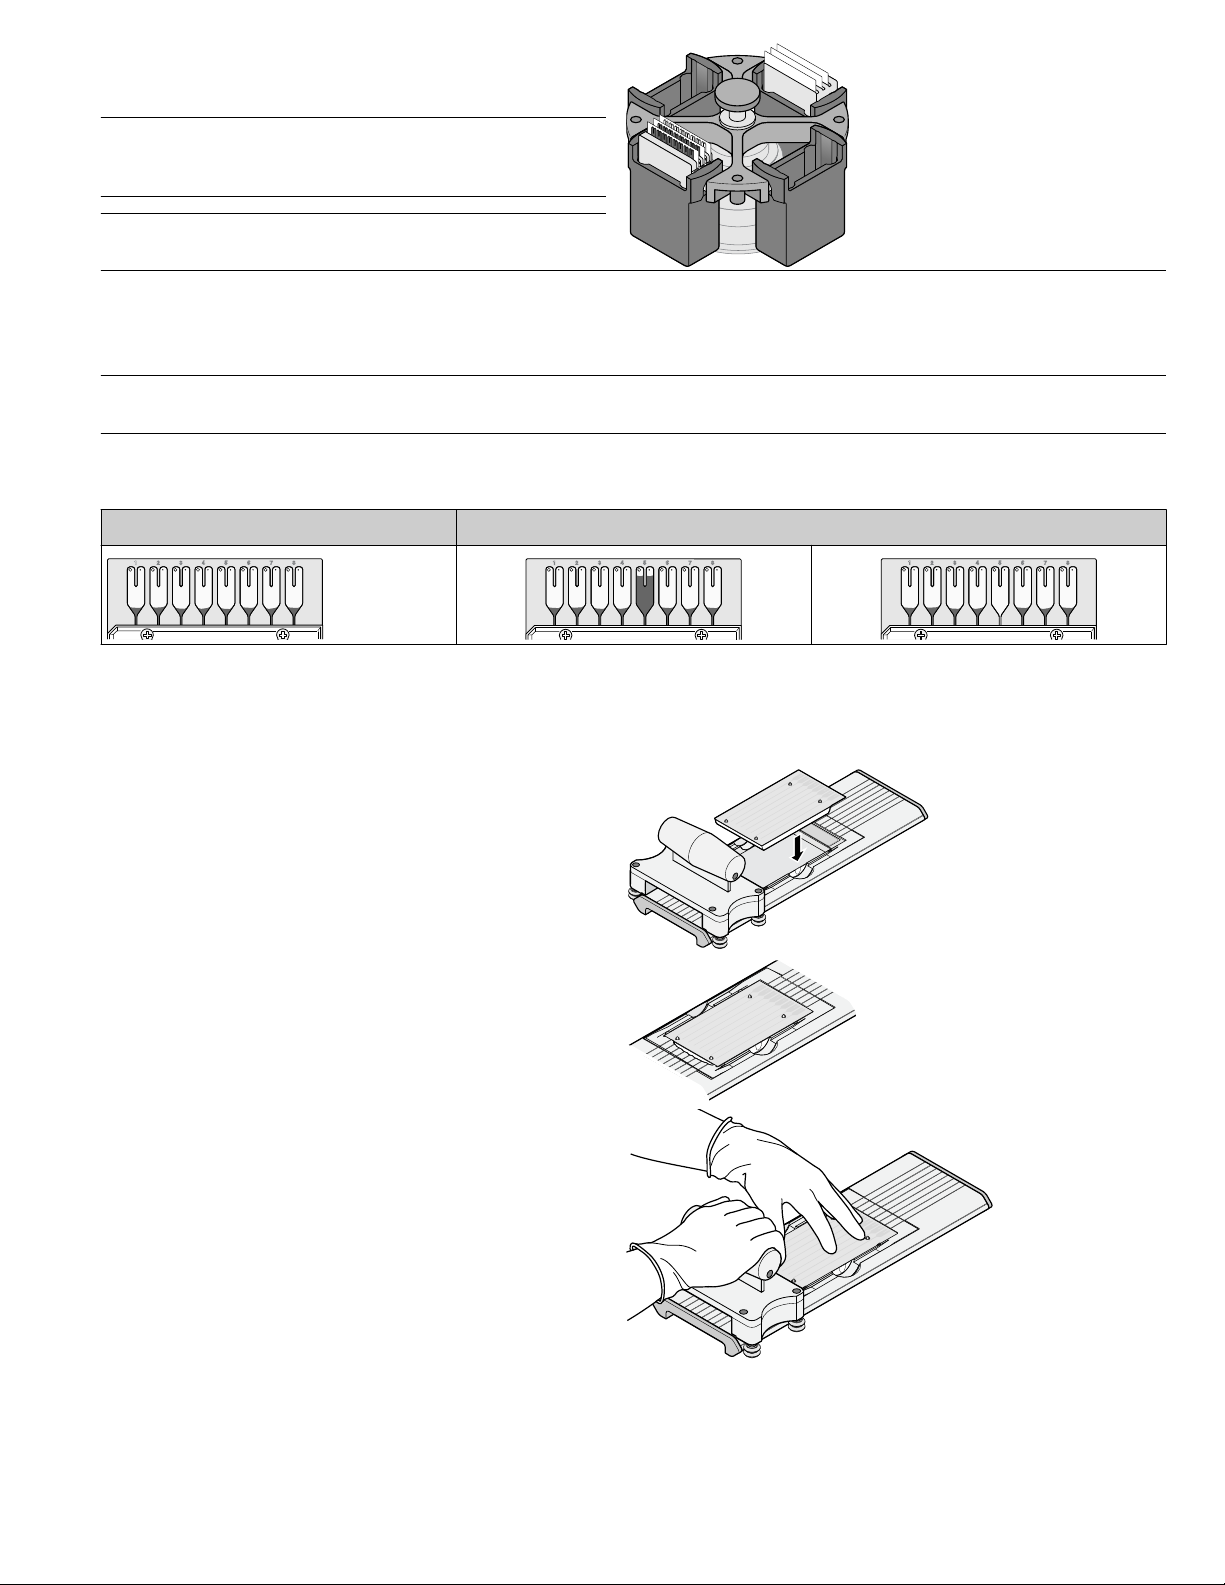
Place the lled carrier clips into the centrifuge buckets.
Ensure that the array card ll reservoirs and bucket and clip
labels face outward when loaded into the centrifuge.
IMPORTANT! Y
ou must run the centrifuge with all four
buckets in place and each of the two carriers that are lled
with array cards. Place empty array card into unlled slots.
IMPORTANT! Balance the loads in opposite buckets in the
centrifuge.
5.
Close the centrifuge cover
6.
When the run is nished, stop the centrifuge, then spin the array cards again for 1 minute at 1,200 rpm.
, then spin the array cards for 1 minute at 1,200 rpm.
IMPORTANT! Do not try to save time by doing one spin for 2 minutes. The two sets of ramps are important for a good ll into the
array card.
7.
When the second run is nished, open the centrifuge, then check that the uid levels in the r
eservoirs of each array card have
decreased by the same amount. Also, check for the formation of bubbles in all wells, then note possible problems.
Correct fill Incorrect/partial fill
If needed, centrifuge the array cards for an extra minute to ll any unlled wells. Do not exceed thr
ee 1‑minute runs or centrifuge the
array card for longer than 1 minute at a time.
8.
Seal the array card(s):
a.
With the carriage (roller assembly) of the Array Card
Staker/Sealer in the Start position, place a lled array
card into the xture with the foil side up so that the ll
reservoirs are the farthest away from the carriage.
b.
Press down on all four corners of the array card to
ensure that it is fully seated within the xture.
c.
Use the two alignment pins in the xture to position the
array card correctly.
Applied Biosystems™ ViiA™ 7 Real-Time PCR System Quick Reference Guide 17
Page 18
d.
GR2176
MicroFluidic Card
Sealer position end
GR2168
Microfluidic Card
Trim Edge
A1
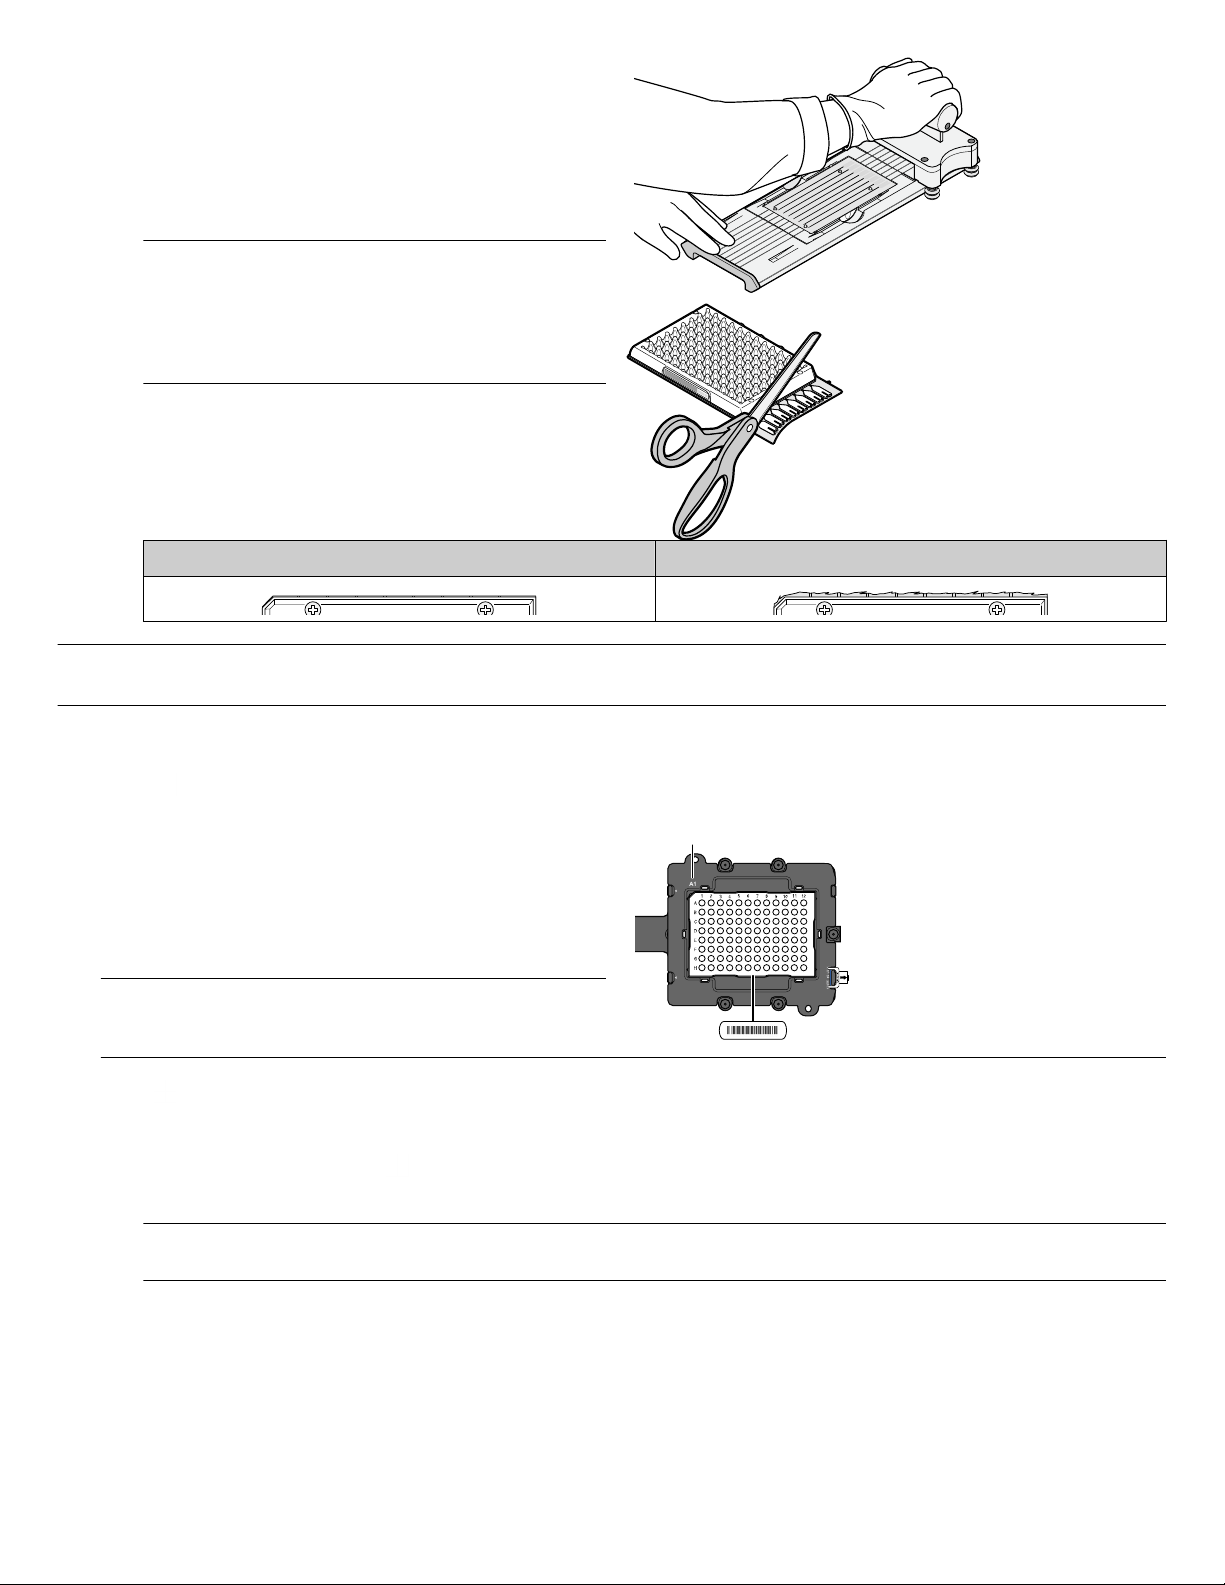
Seal the array card by running the carriage slowly over
it. Run the carriage over the array card in one direction
only. Do not apply downward force on the carriage as
you move it forward over the card.
e.
Remove the sealed array card from the xture, then trim
the ll reservoirs from the array card assembly using
scissors. Trim the foil array card so that the edge is even
with the plastic carrier.
IMPORTANT! Completely remove the ll reservoirs
from the array card so that the edge is free of residual
plastic. The plastic from the ll reservoirs that extends
beyond the edge of the card can prevent the array card
from seating properly on the sample block and can
affect amplication.
Correct trim Incorrect trim
IMPORTANT! Keep the lled array car
d our of the light. The uorescent dye in the array card is photosensitive. Prolonged exposure to
light can diminish the uorescence of the dye.
Start and monitor the experiment
1.
ouch
T
2.
Place the plate or array car
the plate or array card is properly aligned in the holder:
IMPORTANT! Plates should be loaded and unloaded by
operators who have been war
and have been adequately trained.
3.
Touch to load the plate.
4.
Start the experiment in the QuantStudio™ Real‑Time PCR Software:
a.
b.
on the instrument touchscreen to eject the plate adapter.
d on the plate adapter. Ensure that
• Load 96/384-well plates with the A1 position at the topleft corner of the plate adapter.
• Load both plates and array cards with the bar code
facing the front of the instrument.
ned of the moving parts hazard
In the Experiment menu, click Run in the Experiment menu.
Click ST
ART RUN, then select the instrument from the drop-down menu.
IMPORTANT! Do not attempt to open the access door during the run. The door is locked while the ViiA
operation.
™
7 System is in
5.
(Optional) Monitor the experiment.
18 Applied Biosystems
™
ViiA™ 7 Real-Time PCR System Quick Reference Guide
Page 19
Unload the plate or array card
WARNING! PHYSICAL INJUR
Y HAZARD. During instrument operation, the plate can be heated to 100°C. Before removing the
plate, wait until it reaches room temperature.
Touch , remove the plate or array card from the plate adapter, then touch to retract the plate adapter.
If the ViiA™ 7 System does not eject the plate, r
1.
Power off and unplug the ViiA™ 7 System.
2.
Wait for 15 minutes, then power on the ViiA™ 7 System and eject the plate.
3.
If the plate does not eject, power off the ViiA™ 7 System, then open the instrument door.
4.
While wearing powder-free gloves, reach into the ViiA™ 7 System and remove the plate from the heated cover, then close the
emove the plate as follows:
instrument door.
5.
Perform a background calibration to conrm that the sample block has not been contaminated.
View analysis reports
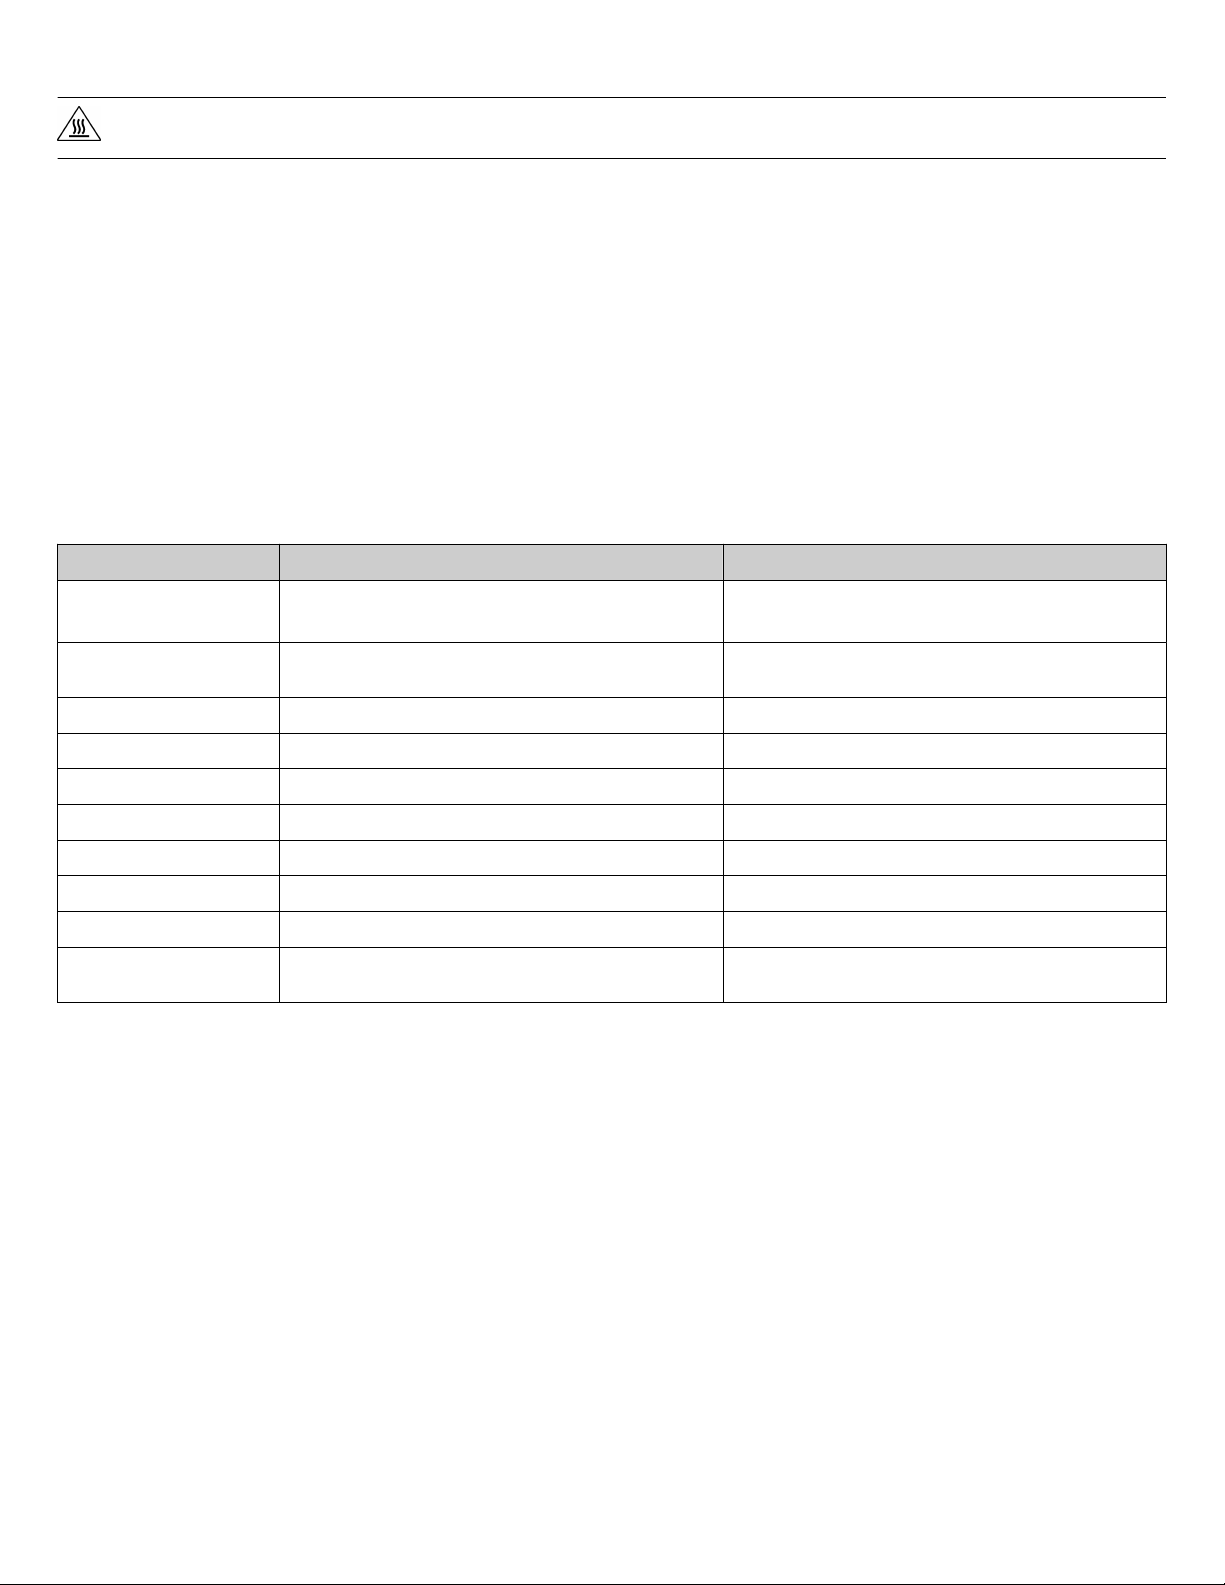
Plot Applicable experiment type Purpose
Amplification
Multicomponent
All experiment types (if the experiment includes
amplification)
All experiment types (if the experiment includes
amplification)
• To set baseline and threshold
To compare the data on a per well basis
•
To review data for anomalies
Raw Data All experiment types To review data for anomalies
QC Summary All experiment types To view flags trigger
Well Table All experiment types To identify well problems
Gene Expression Comparative Ct and Genotyping To view the genotypes identified in the experiment
QC Plot Comparative Ct, Relative Standard Curve To view the Endogenous Control Profile for an experiment
Presence/Absence Presence/Absence To confirm the presence or absence of a target gene
Standard Curve Standard Curve, Relative Standard Curve To confirm that the r2 value is acceptable
Derivative Melt Curve
Melt Curve and any other type, when the experiment
includes a melt curve
To review melt curve data
ed by experiment data
Export results
1.
om the experiment le, click Export.
Fr
2.
Select the type and format of the le to which data will be exported:
• ViiA™ 7
• 7900
• RDML
3.
Select to export all data in one le or in separate les for each data type.
4.
Select the contents of the le. Include any of the following information in your export le:
• Sample setup data
• Raw data
• Amplication data
• Multicomponent data
• Results
Applied Biosystems™ ViiA™ 7 Real-T
ime PCR System Quick Reference Guide 19
Page 20
5.
Depending on the le type, enter or select export le properties (name, type, and location).
6.
(Optional) Save export settings. Select the Save Export Set As check box and name the settings le. You can select the settings le
later when you perform a similar experiment.
7.
Click Start Export.
Limited product warranty
Life Technologies Corporation and/or its afliate(s) warrant their products as set forth in the Life Technologies' General Terms and
Conditions of Sale at www.thermofisher.com/us/en/home/global/terms-and-conditions.html. If you have any questions, please
contact Life Technologies at www.thermofisher.com/support.
Life Technologies Holdings Pte Ltd | Block 33 | Marsiling Industrial Estate Road 3 | #07-06, Singapore 739256
For descriptions of symbols on pr
The information in this guide is subject to change without notice.
DISCLAIMER: TO THE EXTENT ALLOWED BY LAW
PUNITIVE, MULTIPLE, OR CONSEQUENTIAL DAMAGES IN CONNECTION WITH OR ARISING FROM THIS DOCUMENT, INCLUDING YOUR USE OF IT.
Revision history: Pub. No. MAN0018831
Revision Date Description
C.0 15 July 2020 Removed Twister™ Robot.
B.0 16 January 2020 Update QuantStudio™ Real‑T
A.0 30 September 2019 Initial document release for the ViiA™ 7 Real-Time PCR System with QuantStudio
Important Licensing Information: These pr
applicable Limited Use Label Licenses.
©2020 Thermo Fisher Scientic Inc. All rights reserved. All trademarks are the property of Thermo Fisher Scientific and its subsidiaries unless otherwise specified. Cy is a registered
trademark of GE Healthcare. Twister is a registered trademark of Calliper Life Sciences, Inc. TaqMan is a registered trademark of Roche Molecular Systems, Inc., used under permission
and license.
oduct labels or product documents, go to thermofisher.com/symbols-definition.
, THERMO FISHER SCIENTIFIC INC. AND/OR ITS AFFILIATE(S) WILL NOT BE LIABLE FOR SPECIAL, INCIDENTAL, INDIRECT,
interface compared to v1.6.
Real‑Time PCR Software v1.6.
Based on Applied Biosystems™ ViiA™ 7 Real-Time PCR System Quick Reference Guide
(Pub. No. 4448987, Rev. C) with a new calibration workflow for plates.
oducts may be covered by one or more Limited Use Label Licenses. By use of these products, you accept the terms and conditions of all
ime PCR Software to v1.6.1. No changes to workflow or user
™
thermofisher.com/support | thermofisher.com/askaquestion
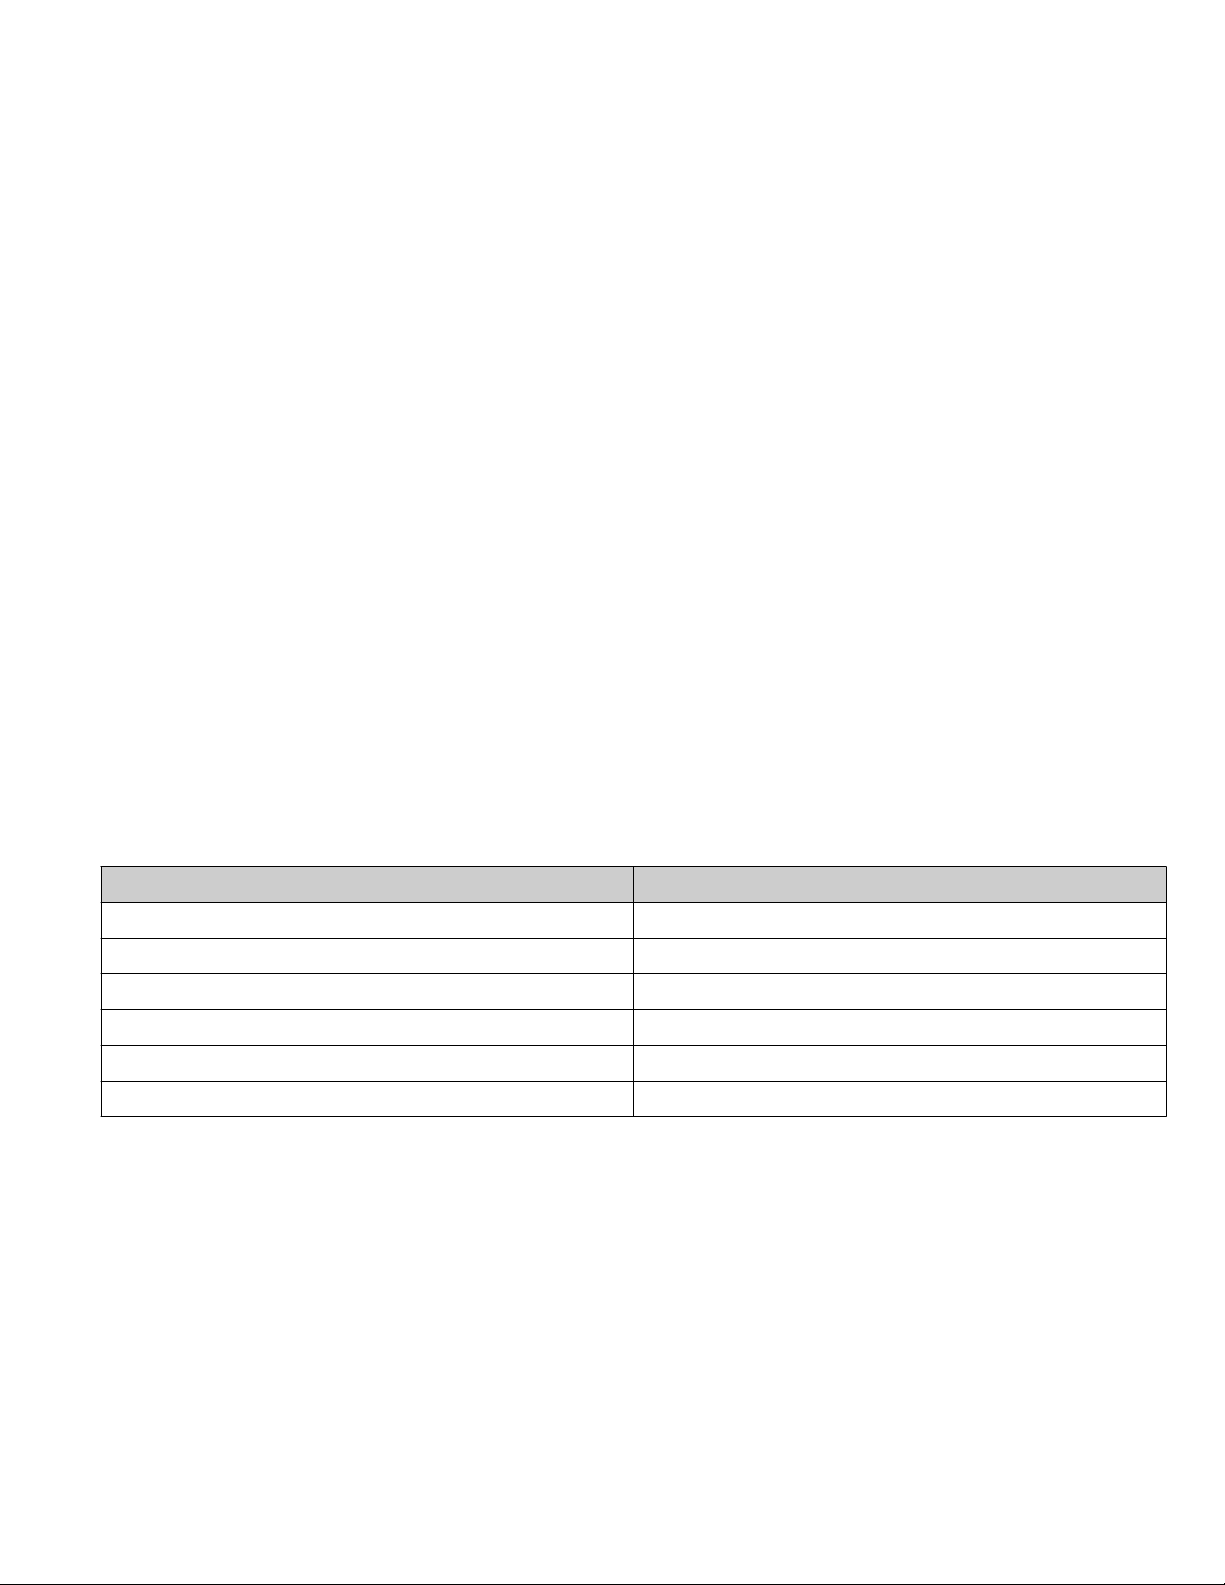
thermofisher.com
15 July 2020
 Loading...