

Page 1
Orion Star™
Series Meter
User’s Guide
Analyze • Detect • Measure • Control
™
Page 2

ROSS and the COIL trade dress are trademarks of Thermo Electron Corporation.
AQUAfast, Cahn, EZ Flash, Ionalyzer, ionplus, KNIpHE, No Cal, ORION, perpHect, PerpHecT, PerpHecTion, pHISA,
pHuture, Pure Water, Sage, Sensing the Future, SensorLink, ROSS Ultra, Sure-Flow, TEA Analyzer, Titrator PLUS,
TURBO2 and Wine Master are registered trademarks of Thermo.
1-888-pHAX-ION, A+, All in One, Aplus, AQUAsnap, AssuredAccuracy, AUTO-BAR, AUTO-CAL, AUTO DISPENSER,
Auto-ID, AUTO-LOG, AUTO-READ, AUTO-STIR, Auto-Test, BOD AutoE Z, Cable-Free, CERTI-CAL, CISA, DataCOLLECT,
DataPLUS, digital LogR, DirectCal, DuraProbe, Environmental Product Authority, Extra Easy/Extra Value, FAST
QC, Flash Titration, Flash Titrator, GAP, GLPcal, GLPcheck, GLPdoc, ISEasy, KAP, LabConnect, LogR, Low
Maintenance Triode, Minimum Stir Requirement, MSR, NISS, One-Touch, One-Touch Calibration, One-Touch
Measurement, Optimum Results, Orion Constellation Software, Pentrode, pHuture MMS, pHuture Pentrode,
pHuture Quatrode, pHuture Triode, Quatrode, QuiKcheK, rf link, ROSS, ROSS Resolution, SAOB, SMART
AVERAGING, Smart CheK, SMART STABILITY, Stacked, Stat Face, The Enhanced Lab, ThermaSense, Triode,
TRIUMpH, Unbreakable pH, Universal Access are trademarks of Thermo.
Guaranteed Success and The Technical Edge are service marks of Thermo.
PerpHecT meters are protected by U.S. patent 6,168,707.
PerpHecT ROSS are protected by U.S. patent 6,168,707.
ORION Series A meters and 900A printer are protected by U.S. patents 5,198,093, D334,208 and D346,753.
ionplus electrodes and Optimum Results solutions are protected by US Patent 5,830,338.
ROSS Ultra electrodes are protected by US patents pending 6,793,787.
Orion ORP Standard is protected by US Patent 6,350,367.
Orion NoCal electrodes have patent pending.
© Copyright 2006, Thermo Electron Corporation. All rights reserved. Question everything, and
Analyze.Detect.Measure.Control are trademarks of Thermo Electron Corporation.
The specifications, descriptions, drawings, ordering information and part numbers within this document are
subject to change without notice.
This publication supersedes all previous publications on this subject.
Page 3

Table of Contents
Chapter I Introduction
Password Protected Methods . . . . . . . . . . . . . . . . . . . . . . . . . . . . . . . . . . . . . . . . . I-1
AUTO-READ™ . . . . . . . . . . . . . . . . . . . . . . . . . . . . . . . . . . . . . . . . . . . . . . . . . . . . . I-1
Stirrer Control . . . . . . . . . . . . . . . . . . . . . . . . . . . . . . . . . . . . . . . . . . . . . . . . . . . . . . I-2
SMART STABILITY™ and SMART AVERAGING™ . . . . . . . . . . . . . . . . . . . . . . . . . . I-2
Chapter II Display
General Description . . . . . . . . . . . . . . . . . . . . . . . . . . . . . . . . . . . . . . . . . . . . . . . . . II-1
Chapter III Keypad
Convenience Features . . . . . . . . . . . . . . . . . . . . . . . . . . . . . . . . . . . . . . . . . . . . . . III-2
Audible Signals & Alarms . . . . . . . . . . . . . . . . . . . . . . . . . . . . . . . . . . . . . . . . . . III-2
Automatic Shut-off . . . . . . . . . . . . . . . . . . . . . . . . . . . . . . . . . . . . . . . . . . . . . . . III-2
Icon Definitions. . . . . . . . . . . . . . . . . . . . . . . . . . . . . . . . . . . . . . . . . . . . . . . . . . . . III-3
Chapter IV Preparation
Installing the power adapter. . . . . . . . . . . . . . . . . . . . . . . . . . . . . . . . . . . . . . . . . . IV-1
Installing batteries . . . . . . . . . . . . . . . . . . . . . . . . . . . . . . . . . . . . . . . . . . . . . . . . . IV-2
Connecting the electrodes . . . . . . . . . . . . . . . . . . . . . . . . . . . . . . . . . . . . . . . . . . . IV-4
Turning on the Instrument . . . . . . . . . . . . . . . . . . . . . . . . . . . . . . . . . . . . . . . . . . . IV-6
Chapter V Generic Menu Setup
Navigation Tips . . . . . . . . . . . . . . . . . . . . . . . . . . . . . . . . . . . . . . . . . . . . . . . . . . . . . V-1
General Menu Settings. . . . . . . . . . . . . . . . . . . . . . . . . . . . . . . . . . . . . . . . . . . . . . . V-2
Time/Date/Day Settings . . . . . . . . . . . . . . . . . . . . . . . . . . . . . . . . . . . . . . . . . . . . . . V-4
Continuous, Timed, or AUTO-READ™ Measurement Selection . . . . . . . . . . . . . . . . V-6
Stirrer Control . . . . . . . . . . . . . . . . . . . . . . . . . . . . . . . . . . . . . . . . . . . . . . . . . . . . V-7
Getting Started with GLP Methods . . . . . . . . . . . . . . . . . . . . . . . . . . . . . . . . . . . . . V-8
Password Protected Methods . . . . . . . . . . . . . . . . . . . . . . . . . . . . . . . . . . . . . . V-10
Selecting Measurement Mode. . . . . . . . . . . . . . . . . . . . . . . . . . . . . . . . . . . . . . . . V-11
Calibration. . . . . . . . . . . . . . . . . . . . . . . . . . . . . . . . . . . . . . . . . . . . . . . . . . . . . . . . V-12
Calibration Alarm Setup . . . . . . . . . . . . . . . . . . . . . . . . . . . . . . . . . . . . . . . . . . . V-13
Chapter VI Data Archiving and Retrieval
Datalog Setup. . . . . . . . . . . . . . . . . . . . . . . . . . . . . . . . . . . . . . . . . . . . . . . . . . . . . VI-1
Log view. . . . . . . . . . . . . . . . . . . . . . . . . . . . . . . . . . . . . . . . . . . . . . . . . . . . . . . . . VI-2
RS-232 Instrument Setup . . . . . . . . . . . . . . . . . . . . . . . . . . . . . . . . . . . . . . . . . . . . VI-3
Chapter VII pH Technique
pH Setup. . . . . . . . . . . . . . . . . . . . . . . . . . . . . . . . . . . . . . . . . . . . . . . . . . . . . . . . . VII-1
pH Calibration . . . . . . . . . . . . . . . . . . . . . . . . . . . . . . . . . . . . . . . . . . . . . . . . . . . . . VII-3
pH Measurement . . . . . . . . . . . . . . . . . . . . . . . . . . . . . . . . . . . . . . . . . . . . . . . . . .VII-5
Page 4

Chapter VIII Dissolved Oxygen Technique
DO Setup . . . . . . . . . . . . . . . . . . . . . . . . . . . . . . . . . . . . . . . . . . . . . . . . . . . . . . . VIII-1
DO Calibration . . . . . . . . . . . . . . . . . . . . . . . . . . . . . . . . . . . . . . . . . . . . . . . . . . . VIII-5
Air, Water, Manual . . . . . . . . . . . . . . . . . . . . . . . . . . . . . . . . . . . . . . . . . . . . . . VIII-7
Winkler Titration Method . . . . . . . . . . . . . . . . . . . . . . . . . . . . . . . . . . . . . . . . . VIII-9
Probe Zero Calibration . . . . . . . . . . . . . . . . . . . . . . . . . . . . . . . . . . . . . . . . . . VIII-10
Chapter IX Conductivity Technique
Definition of Terms & Concepts . . . . . . . . . . . . . . . . . . . . . . . . . . . . . . . . . . . . . . . IX-1
Conductivity Setup . . . . . . . . . . . . . . . . . . . . . . . . . . . . . . . . . . . . . . . . . . . . . . . . . IX-4
Conductivity Calibration . . . . . . . . . . . . . . . . . . . . . . . . . . . . . . . . . . . . . . . . . . . . . IX-6
Conductivity Measurement . . . . . . . . . . . . . . . . . . . . . . . . . . . . . . . . . . . . . . . . . . IX-7
Chapter X ISE Technique
Definition of Terms & Concepts . . . . . . . . . . . . . . . . . . . . . . . . . . . . . . . . . . . . . . . . X-1
Setup Options. . . . . . . . . . . . . . . . . . . . . . . . . . . . . . . . . . . . . . . . . . . . . . . . . . . . . . X-2
ISE Calibration . . . . . . . . . . . . . . . . . . . . . . . . . . . . . . . . . . . . . . . . . . . . . . . . . . . . .X-4
Autoblank Correction . . . . . . . . . . . . . . . . . . . . . . . . . . . . . . . . . . . . . . . . . . . . . . X-5
ISE Measurement. . . . . . . . . . . . . . . . . . . . . . . . . . . . . . . . . . . . . . . . . . . . . . . . . . . X-7
Chapter XI mV and ORP Technique
Definition of Terms & Concepts . . . . . . . . . . . . . . . . . . . . . . . . . . . . . . . . . . . . . . . XI-1
Relative mV and ORP(EH) Calibration . . . . . . . . . . . . . . . . . . . . . . . . . . . . . . . . . . . XI-1
mV Measurement. . . . . . . . . . . . . . . . . . . . . . . . . . . . . . . . . . . . . . . . . . . . . . . . . . XI-2
Chapter XII Orion Star Series Meter Specifications
Specifications . . . . . . . . . . . . . . . . . . . . . . . . . . . . . . . . . . . . . . . . . . . . . . . . . . . . .XII-1
2 & 3-Star Meter. . . . . . . . . . . . . . . . . . . . . . . . . . . . . . . . . . . . . . . . . . . . . . . . . . . XII-3
4-Star Meter . . . . . . . . . . . . . . . . . . . . . . . . . . . . . . . . . . . . . . . . . . . . . . . . . . . . . .XII-4
5-Star Meter . . . . . . . . . . . . . . . . . . . . . . . . . . . . . . . . . . . . . . . . . . . . . . . . . . . . . .XII-6
Chapter XIII Care and Maintenance
Error Codes & Debugging. . . . . . . . . . . . . . . . . . . . . . . . . . . . . . . . . . . . . . . . . . . XIII-1
Troubleshooting . . . . . . . . . . . . . . . . . . . . . . . . . . . . . . . . . . . . . . . . . . . . . . . . . . XIII-7
Chapter XIV Terms and Conditions
Warranty. . . . . . . . . . . . . . . . . . . . . . . . . . . . . . . . . . . . . . . . . . . . . . . . . . . . . . . . XIV-1
Chapter XV Declaration of Conformity. . . . . . . . . . . . . . . . . . . . . . . . . . . XV-1
WEEE Compliance . . . . . . . . . . . . . . . . . . . . . . . . . . . . . . . . . . . . . . . . . . . . . . . . . XV-2
Page 5

Chapter I
Introduction
Congratulations! You have selected one of seven models of the industry-leading
Orion Star Series meter designed for electrochemistry measurement in the field or
in the laboratory.
• 2 & 3-Star meters provide single measurement of pH, Dissolved Oxygen,
or Conductivity.
• 4-Star meters provide dual-parameter measurement of pH/DO, pH/Conductivity,
or pH/ISE (ion selective electrode).
• The 5-Star meter provides multi-parameter measurement including mV/ORP.
Built to meet the demands of busy, multi-user laboratories or plant environments, all
meters are microprocessor controlled aiding in the delivery of accurate and precise
measurements. The waterproof portable meters can even withstand submersion
for short periods of time without any negative effect on operation. To better meet
the needs of users in environmental protection and control, food and beverage,
pharmaceutical, and consumer product laboratories, the Orion Star Series include
these key features:
•
Password Protected Methods – Meter’s memory will save up to ten custom
measurements and calibrations for future reference. Password protection of
each method eliminates any tampering with methods as multiple users access
only the procedure most appropriate to their work.
•
AUTO-READ™ – The instrument automatically starts a measurement and
automatically prints or logs data when the reading becomes stable.
I-1
Orion Star Series Meter
Thermo Electron Corporation
Page 6

Thermo Electron CorporationI-2 Orion Star Series Meter
Introduction
• Stirrer Control – Benchtop meters have stirrer control for the Orion 096019
Stirrer and the Auto-Stir™ BOD probe eliminating the need for additional stir
plates and stir bars.
•
SMART STABILITY™ and SMART AVERAGING™ – Remove the
guesswork by automatically compensating for measurement conditions thus
optimizing response time.
An easy-to-reference pictorial style Quick Guide, attached to each meter, supports
daily use.
Please read this manual thoroughly before using your benchtop or portable meter.
Any use outside of these instructions could invalidate your warranty and/or cause
permanent damage to the meter.
Page 7
II-1
Orion Star Series Meter
Thermo Electron Corporation
Chapter II
Display
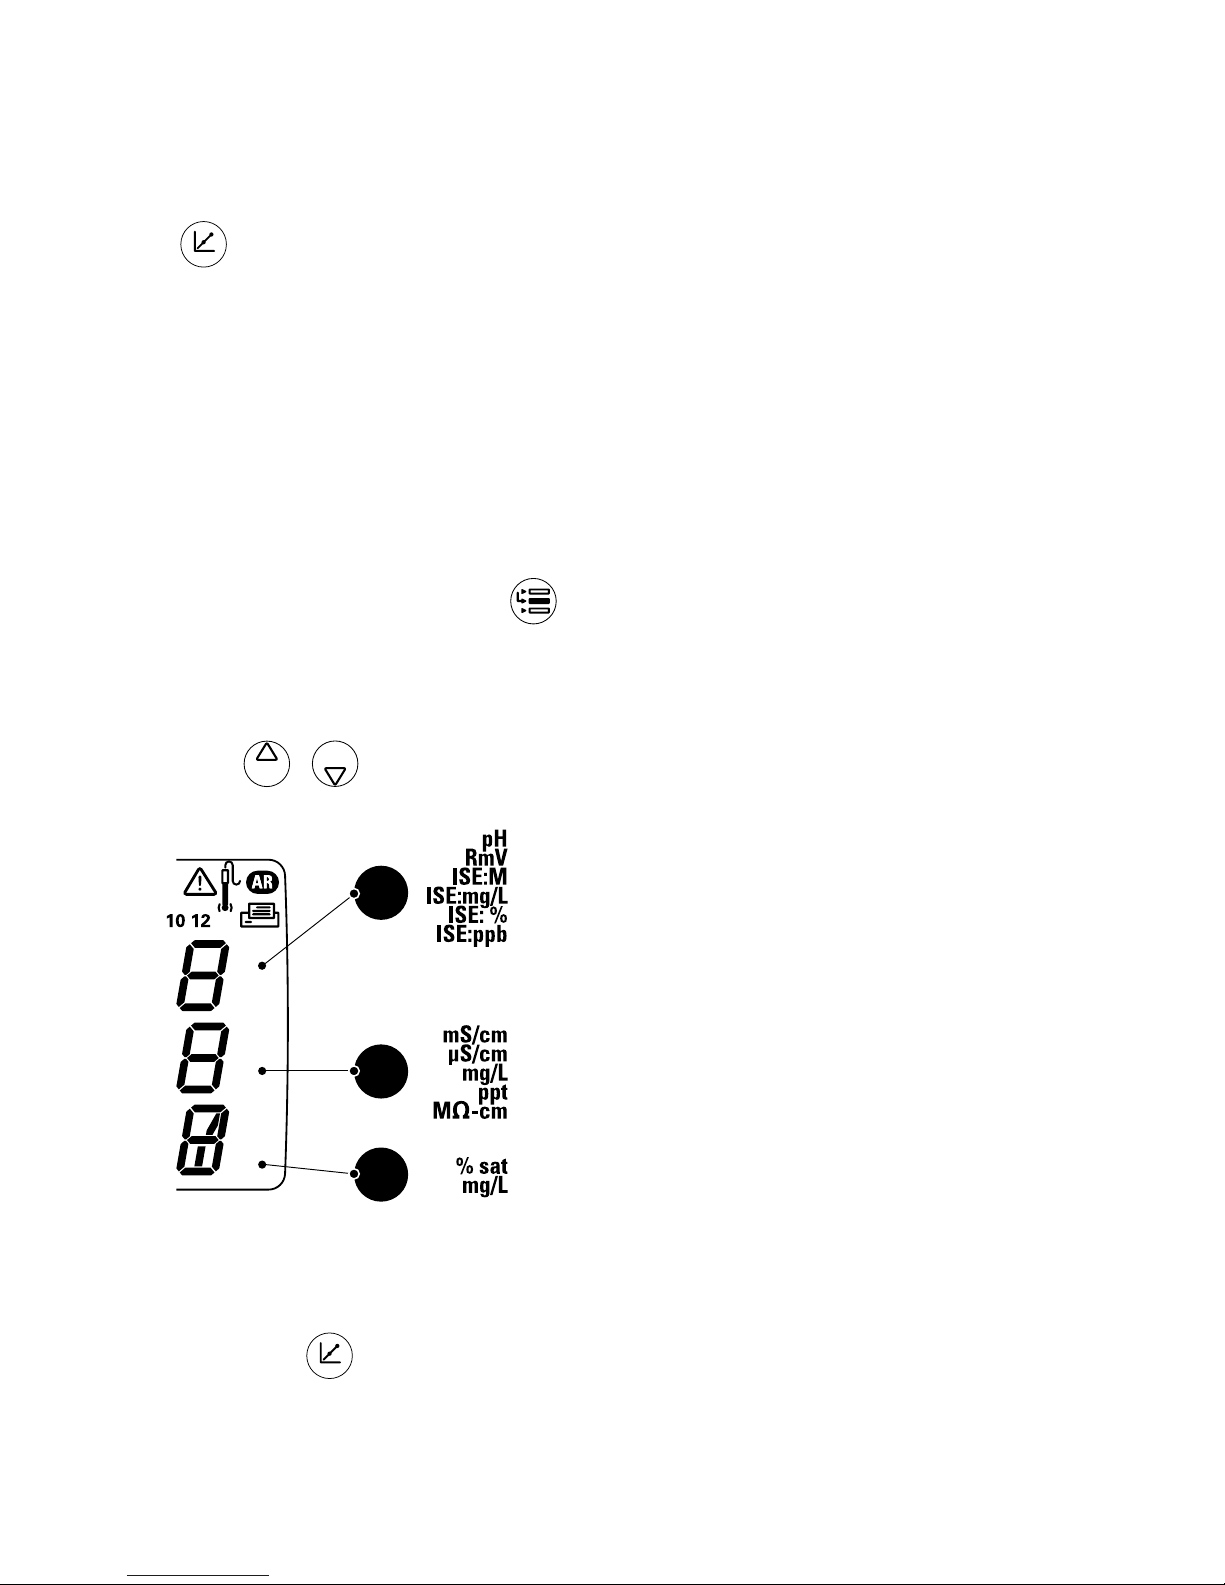
General Description
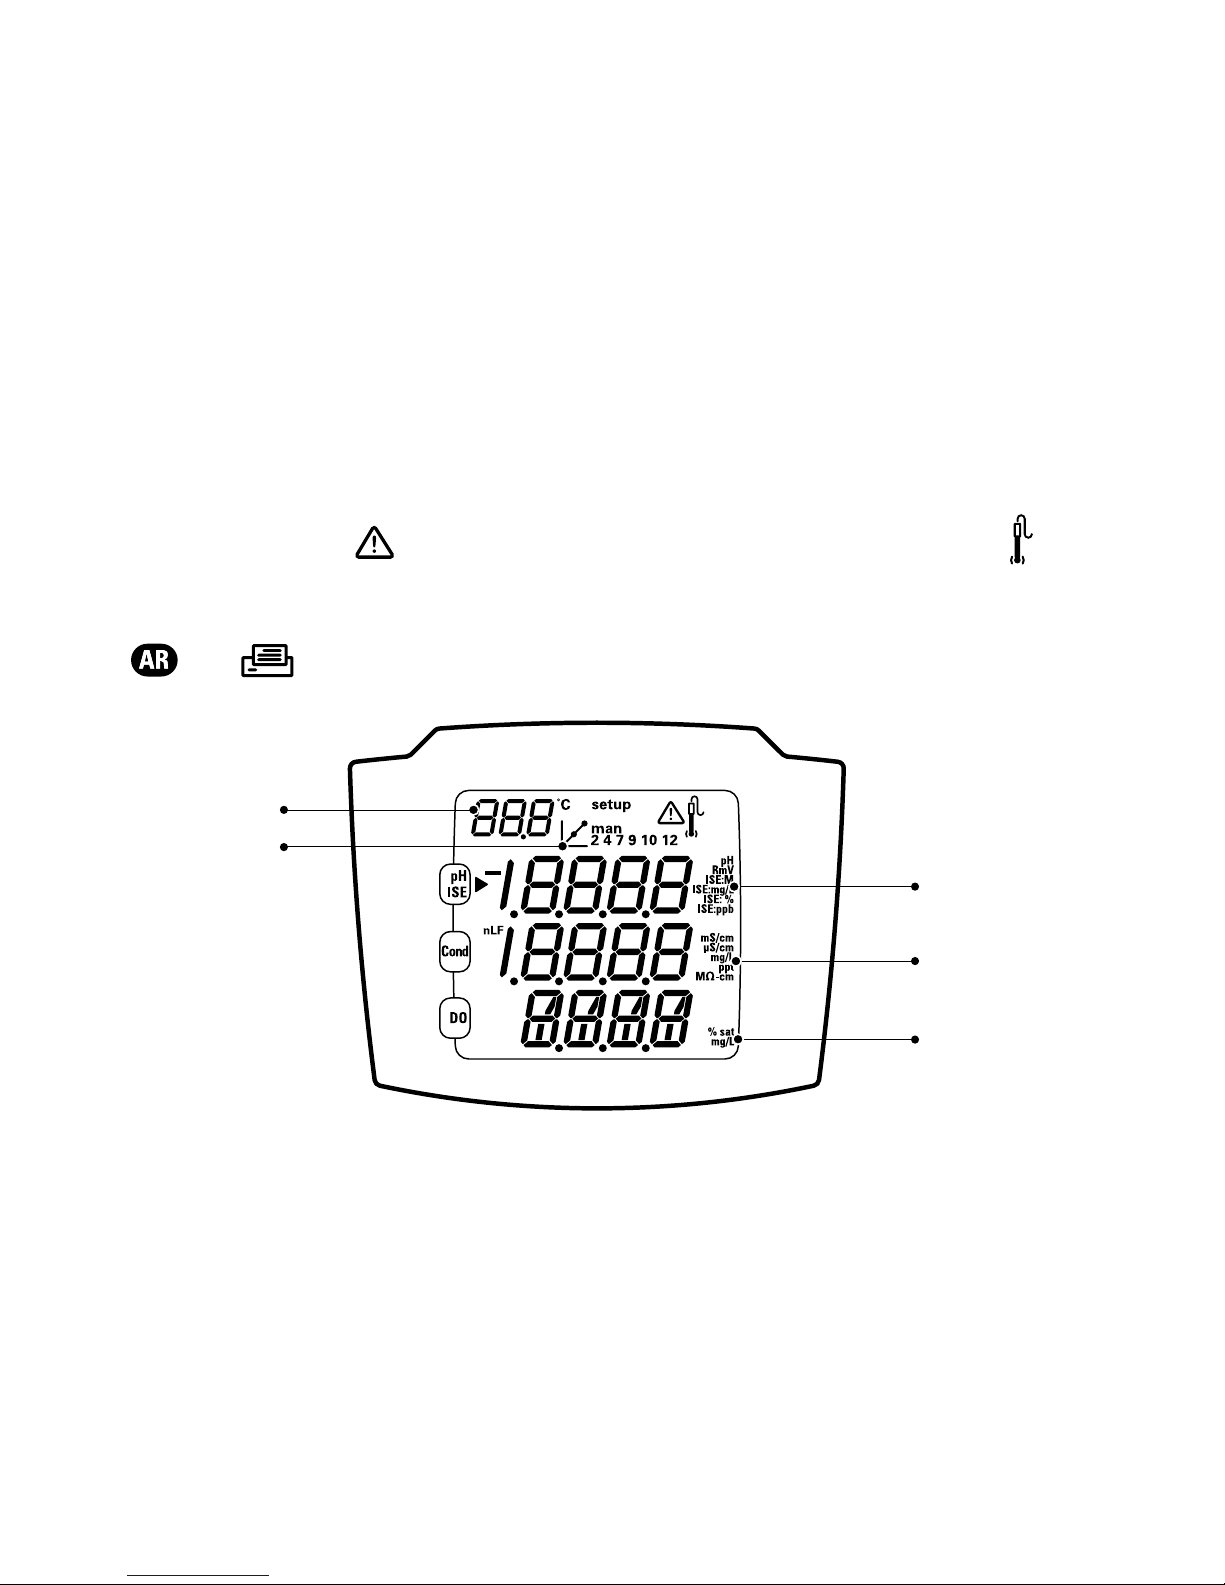
Throughout a given process, the LCD on any Orion Star Series meter provides
Temperature and Calibration data. The setup only appears when the meter is
in setup mode. The indicates an error condition; when displayed with the , a
sensor quality issue exists.
, and functions will be discussed in greater detail on page V-6 and VI-1.
Depicted here is the primary LCD of the 5-Star meter capable of multi-parameter
measurement.
Temperature
Calibration
5 Star Meter
pH/ISE/ORP
Unit
Conductivity
Unit
DO Unit
Page 8
Thermo Electron CorporationII-2 Orion Star Series Meter
Display
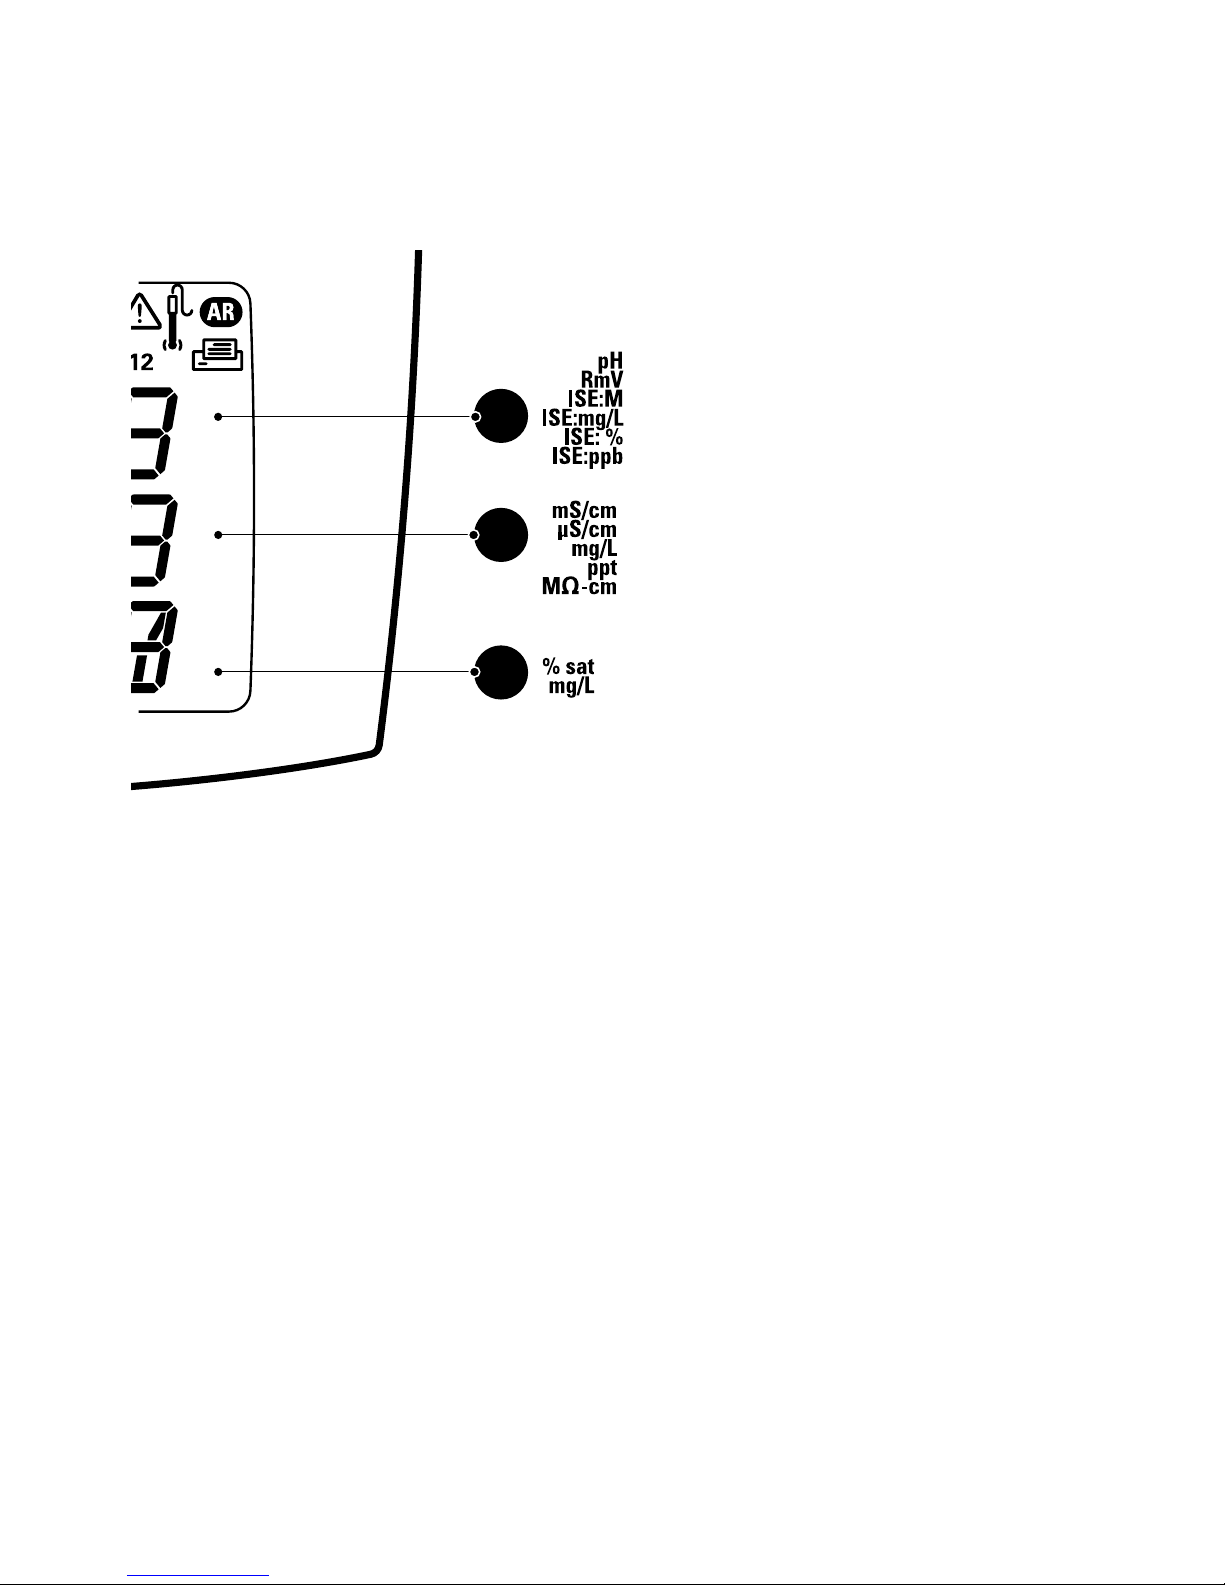
Note: the lowest 3 lines of data correspond to what is being measured. s
A
pH, mV, Rel mV, or ISE
B
Conductivity, TDS, Salinity, or
Resistivity
C
Dissolved Oxygen % Saturation,
DO Concentration,
or Barometric Pressure
Units of measure, displayed on the right side of the screen, will flash until the
reading is stable.
Page 9

III-1
Orion Star Series Meter
Thermo Electron Corporation
Chapter III
Keypad
General Description
Keypad layout is the same for all Orion Star Series meters. The portable meters have
9 keys. The benchtop meters have 10 keys due to the addition of a button.
Power
Back Light
View Log
Measure
Save/Print
Scroll Up
Calibrate
Setup
Scroll Down
Digits
Stirrer On/Off
Measure
Save/Print
View Log
Power
Line Select
Digits
Setup
Calibrate
Back Light
Portable Keypad
Benchtop Keypad
Line Select
Page 10
Thermo Electron CorporationIII-2 Orion Star Series Meter
Keypad
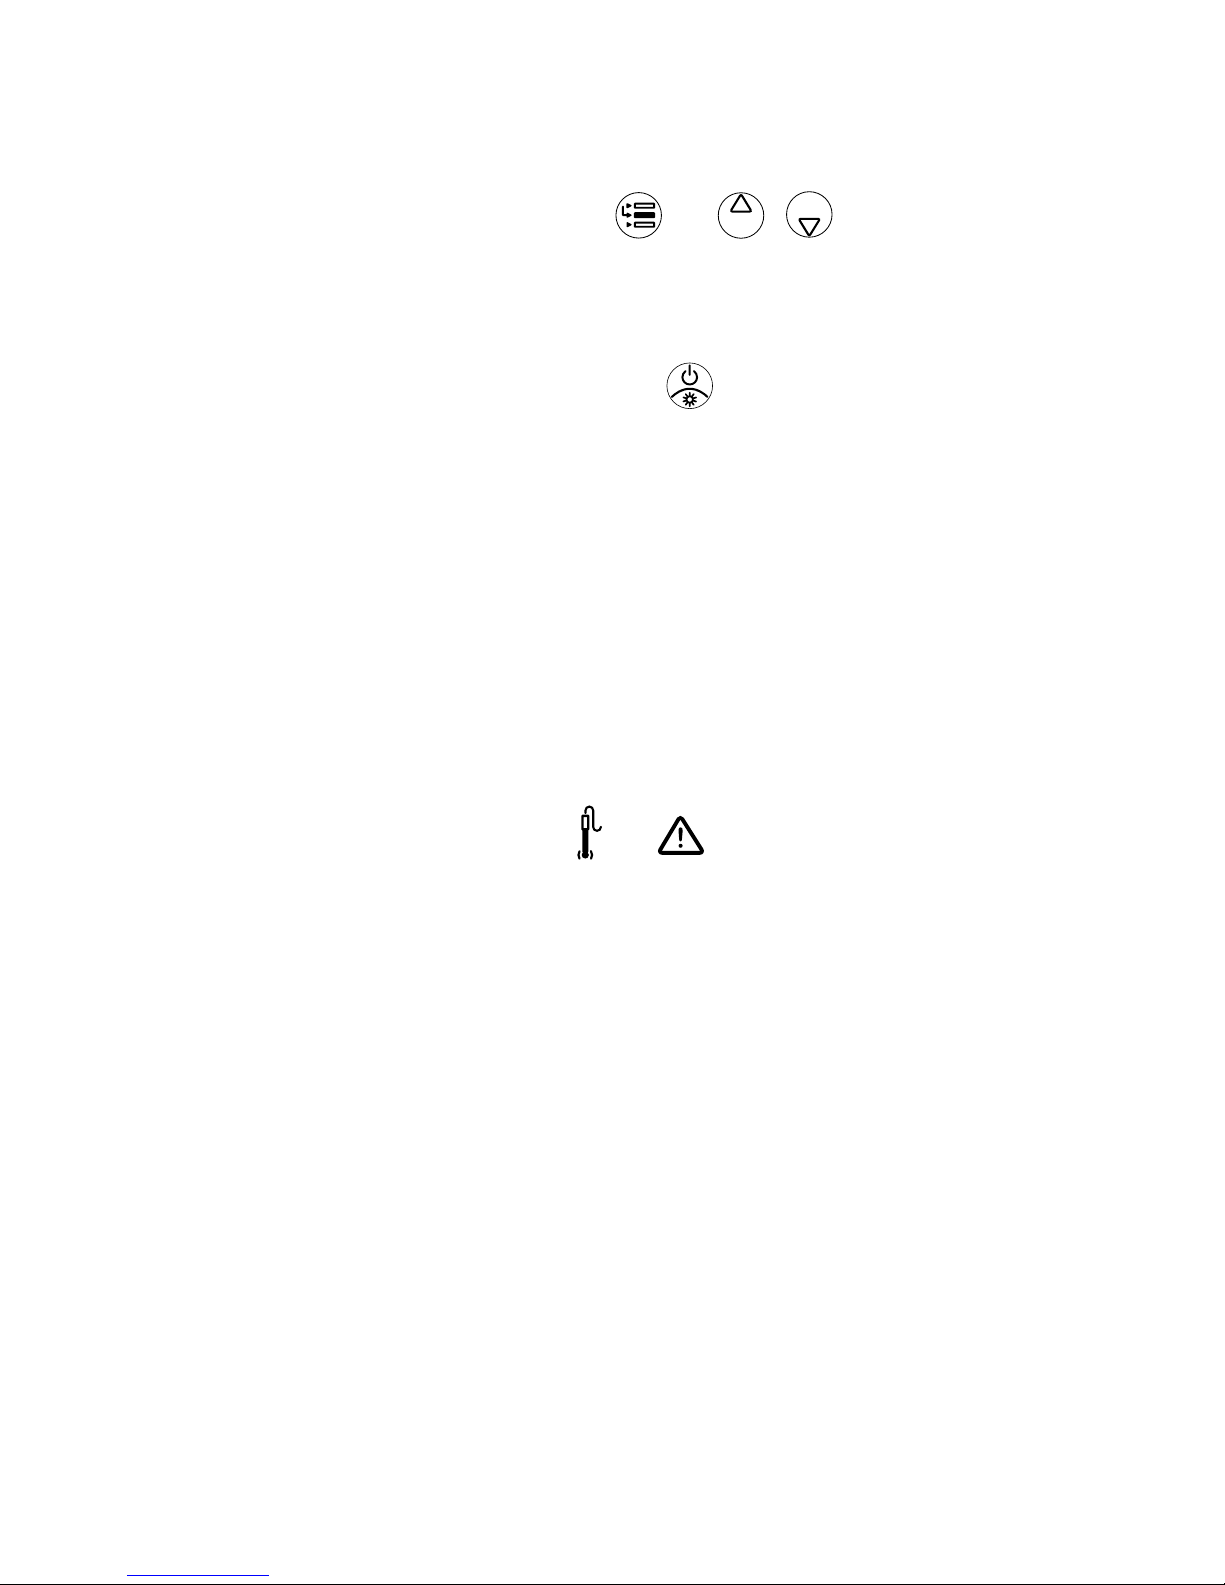
The center area of the ergonomically designed keypad is the focal point for setting
up and navigating the meter. In particular, and / are used frequently to
change LCD views.
Convenience features include:
• Display Backlight – A quick press of the will turn the backlight “on”
and “off”. When the meter is operating on battery power, the backlight will
automatically turn “off” after two minutes to conserve power. When batteries
are low, the backlight will no longer turn “on”.
•
Automatic Shut-off – All Orion Star Series meters will shutdown after 20
minutes without a keypress. This maximizes battery power on portable meters
or benchtop meters being run on battery power.
•
Audible Signals – The meter will beep whenever a key is pressed providing
immediate verification that the user’s input was received.
•
Visual Alarm Signals – Flashing and indicate calibration settings
need adjustment. For more detail, refer to subsequent sections of this manual
discussing specific measurement techniques.
To become familiar with each function, please review these icon definitions.
Page 11
III-3
Orion Star Series Meter
Thermo Electron Corporation
Keypad
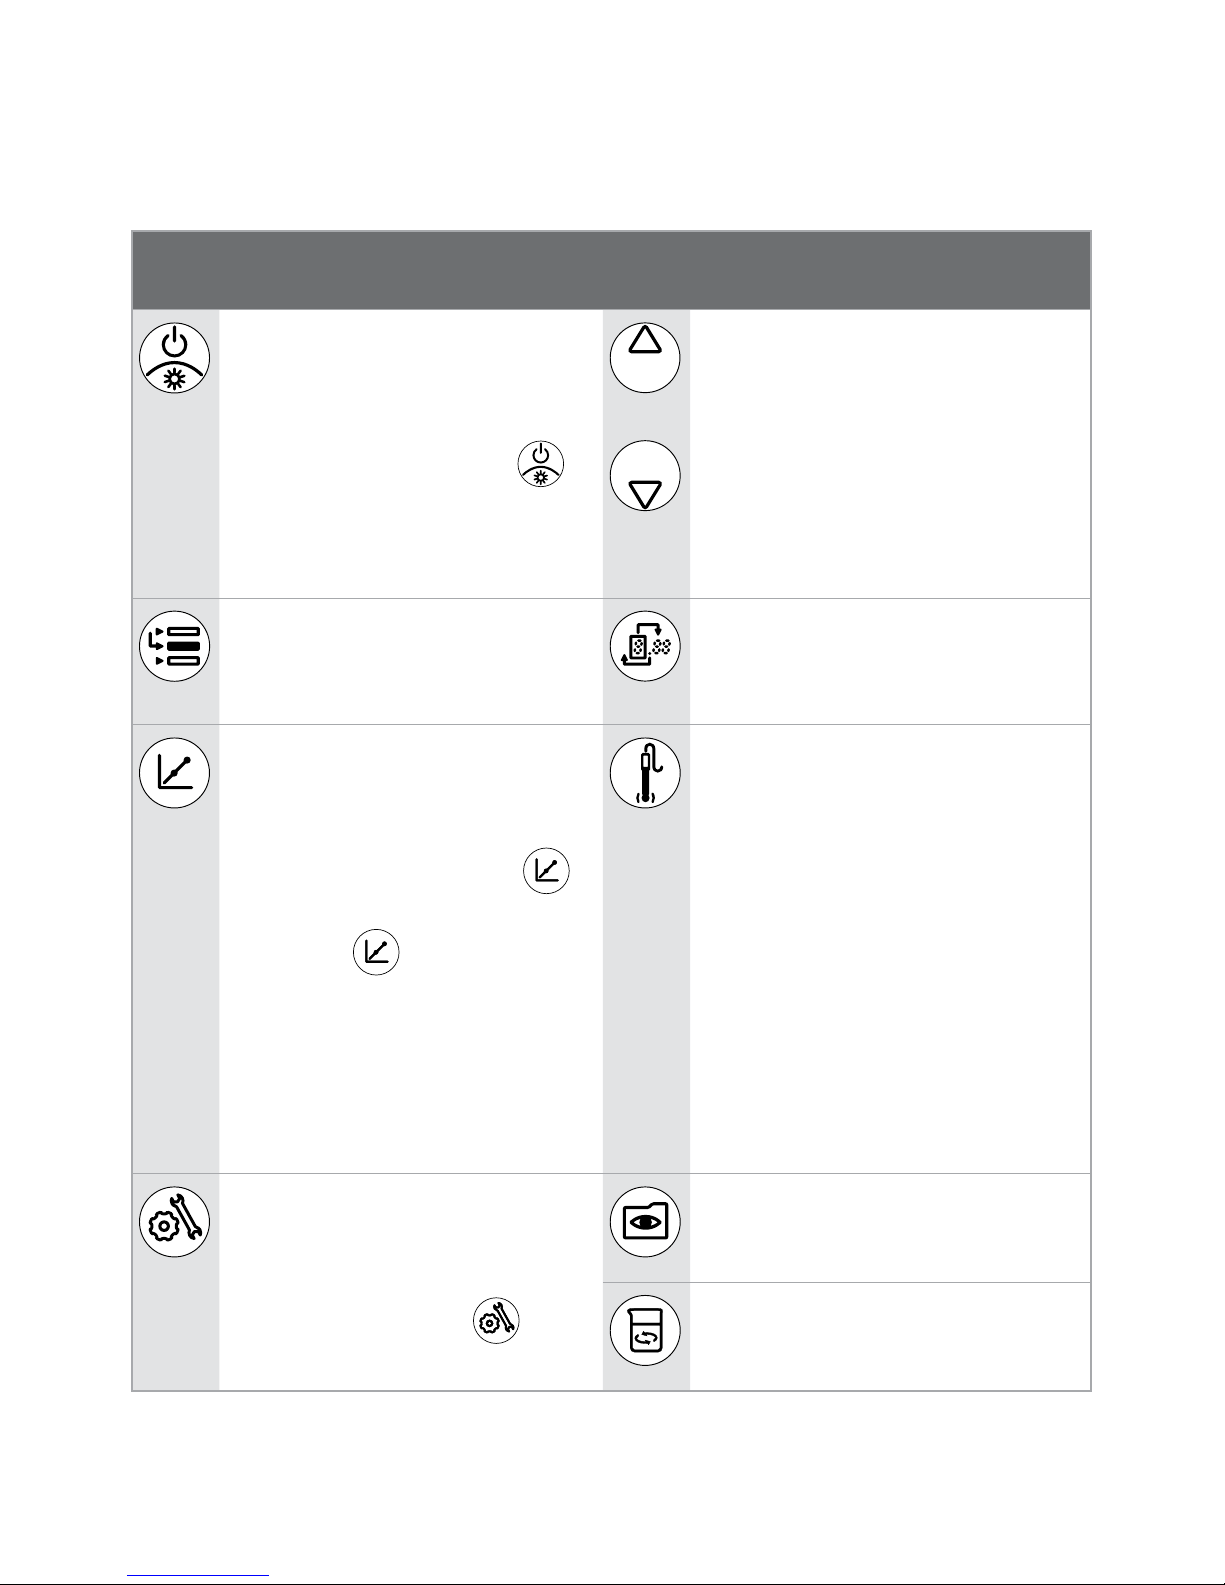
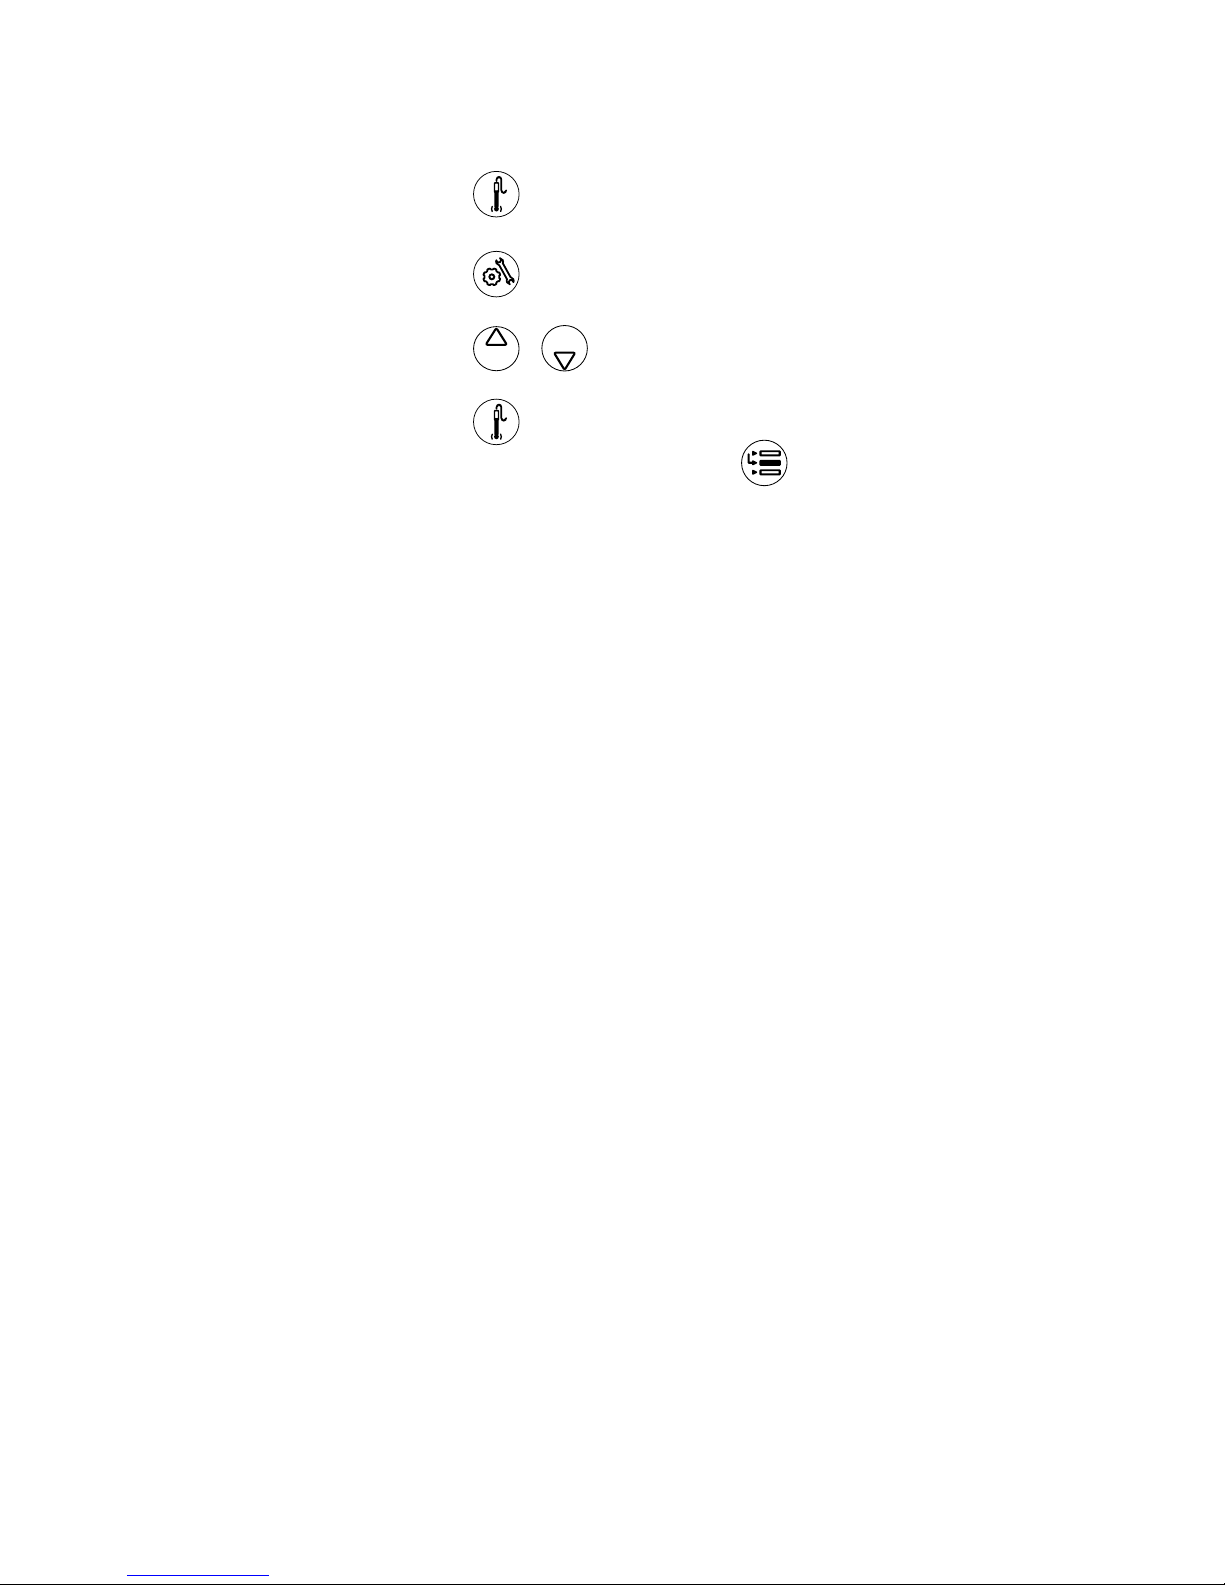
Icon Definitions
Key Description Key Description
• Turns meter on, if shut off.
• Toggles backlight on & off, if meter
is on.
• If meter is on, holding down
will turn off the meter.
• Changes measurement mode of the
selected line.
• Changes selected line in Setup,
Methods & Log View.
• Edits the value of the flashing digit
for Setup, Password entry, and
Calibration.
Switches arrow on left of the screen
between 3 display lines to select and
edit.
Changes selected digit to edit and moves
decimal point when changing values in
Setup, Password entry, & Calibration.
Starts calibration for currently selected
line and measurement mode.
• If arrow is pointed to the top line
and the current units are pH,
will start a pH calibration.
• Each time is pressed in the
calibration it will accept the current
point value and move to the next
cal pt until the max # of cal pts are
performed, then it will return to
measurement mode.
• Print & Log a measurement in
continuous or timed measurement
mode.
• Prints, Logs, & Freezes screen when
the reading becomes stable.
• Exits SETUP and returns to
measurement mode.
• Accepts Cal pt and returns to
measurement mode.
Enters SETUP menu starting with
selected line and measurement mode:
If arrow is pointed to top line and
current units are ISE, then will
enter the ISE setup screen.
Enters LOG View & Download Screens.
Turns stirrer on & off.
Page 12

Thermo Electron CorporationIII-4 Orion Star Series Meter
NOTES
Page 13
IV-1
Orion Star Series Meter
Thermo Electron Corporation
Chapter IV
Preparation
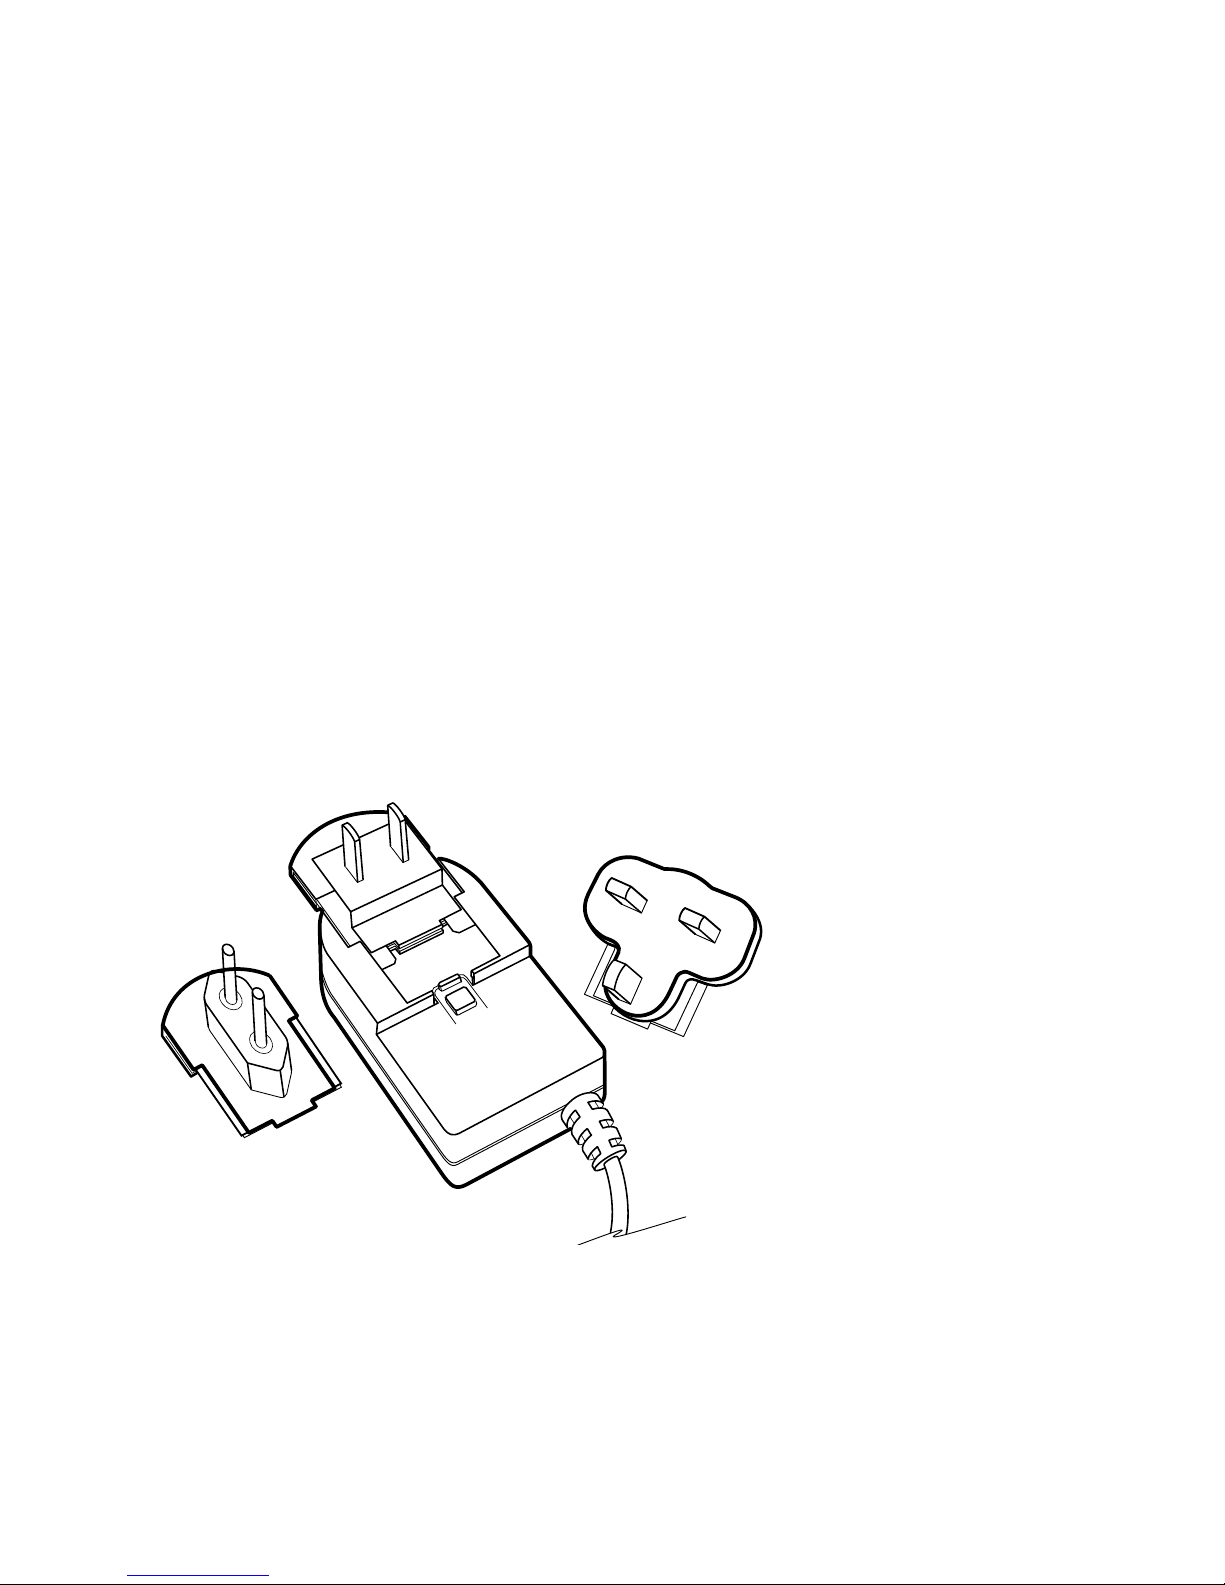
Installing Power Adapter
The universal power supply which is included with your benchtop meter is the ONLY
power supply source recommended for use with this unit. Use of any other power
supply will void your meter warranty.
The external electrical power supply is rated to be operated at 100-240 VAC, 0.5A,
50/60 Hz.
Based on your power source, select one of the three plugs provided – 110V, 220V,
240V – and slide it into the grooves on the adapter. A click will be heard when the
plug is properly in place.
Page 14
Thermo Electron CorporationIV-2 Orion Star Series Meter
Preparation
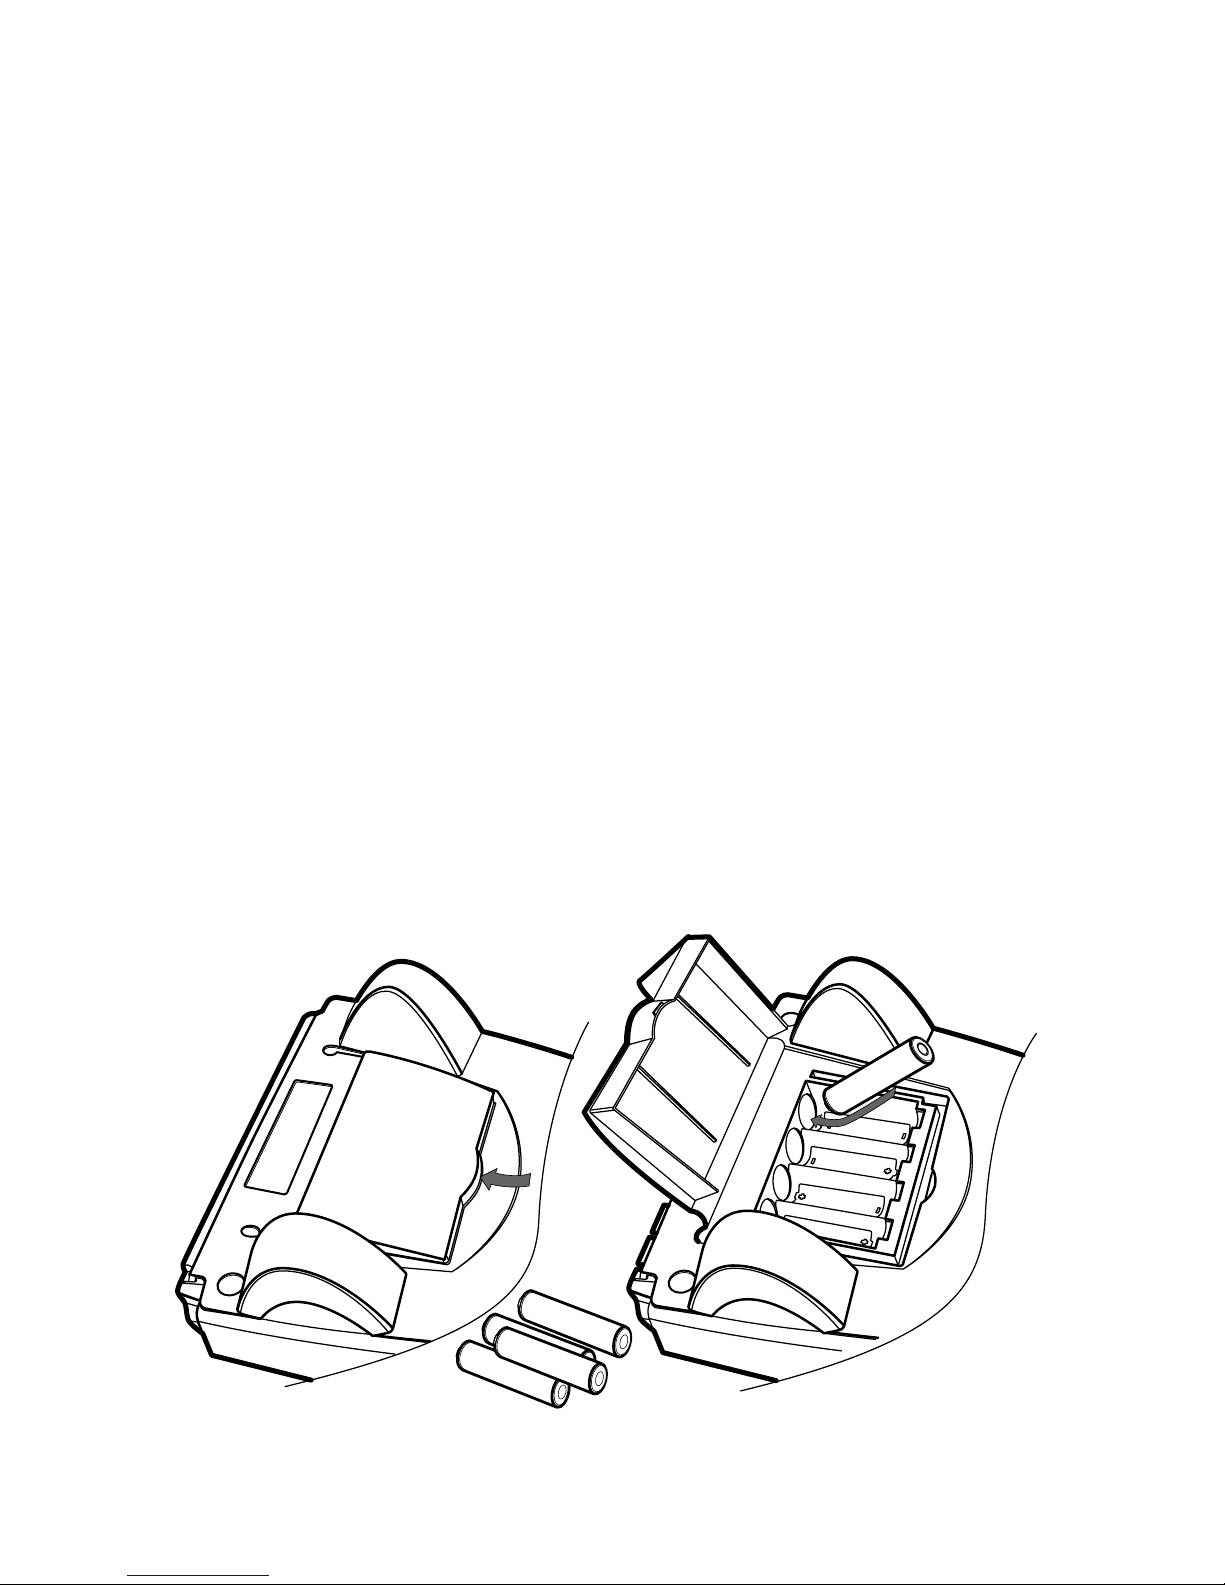
Installing Batteries
Thermo Orion Star Series meters use four AA Alkaline batteries. Do not use lithium
or rechargeable batteries. Improper installation of non-alkaline batteries could create
a hazard.
1. Confirm meter is “off”.
2. Gently place meter upside down on a clean, lint-free cloth to prevent scratching
of LCD.
3. Remove the battery case cover.
4. Insert new batteries with the “+” pole oriented as depicted in the battery
compartment housing.
5. Replace the cover.
6. Stored data, calibrations and methods will remain in the meter’s nonvolatile
memory when batteries are being replaced, however, date and time may need
to be reset.
Page 15

IV-3
Orion Star Series Meter
Thermo Electron Corporation
Preparation
To access the battery compartment in portable meters, loosen the two screws
in the center back of the meter. Note these are captive screws which cannot be
completely removed.
Page 16
Thermo Electron CorporationIV-4 Orion Star Series Meter
Preparation
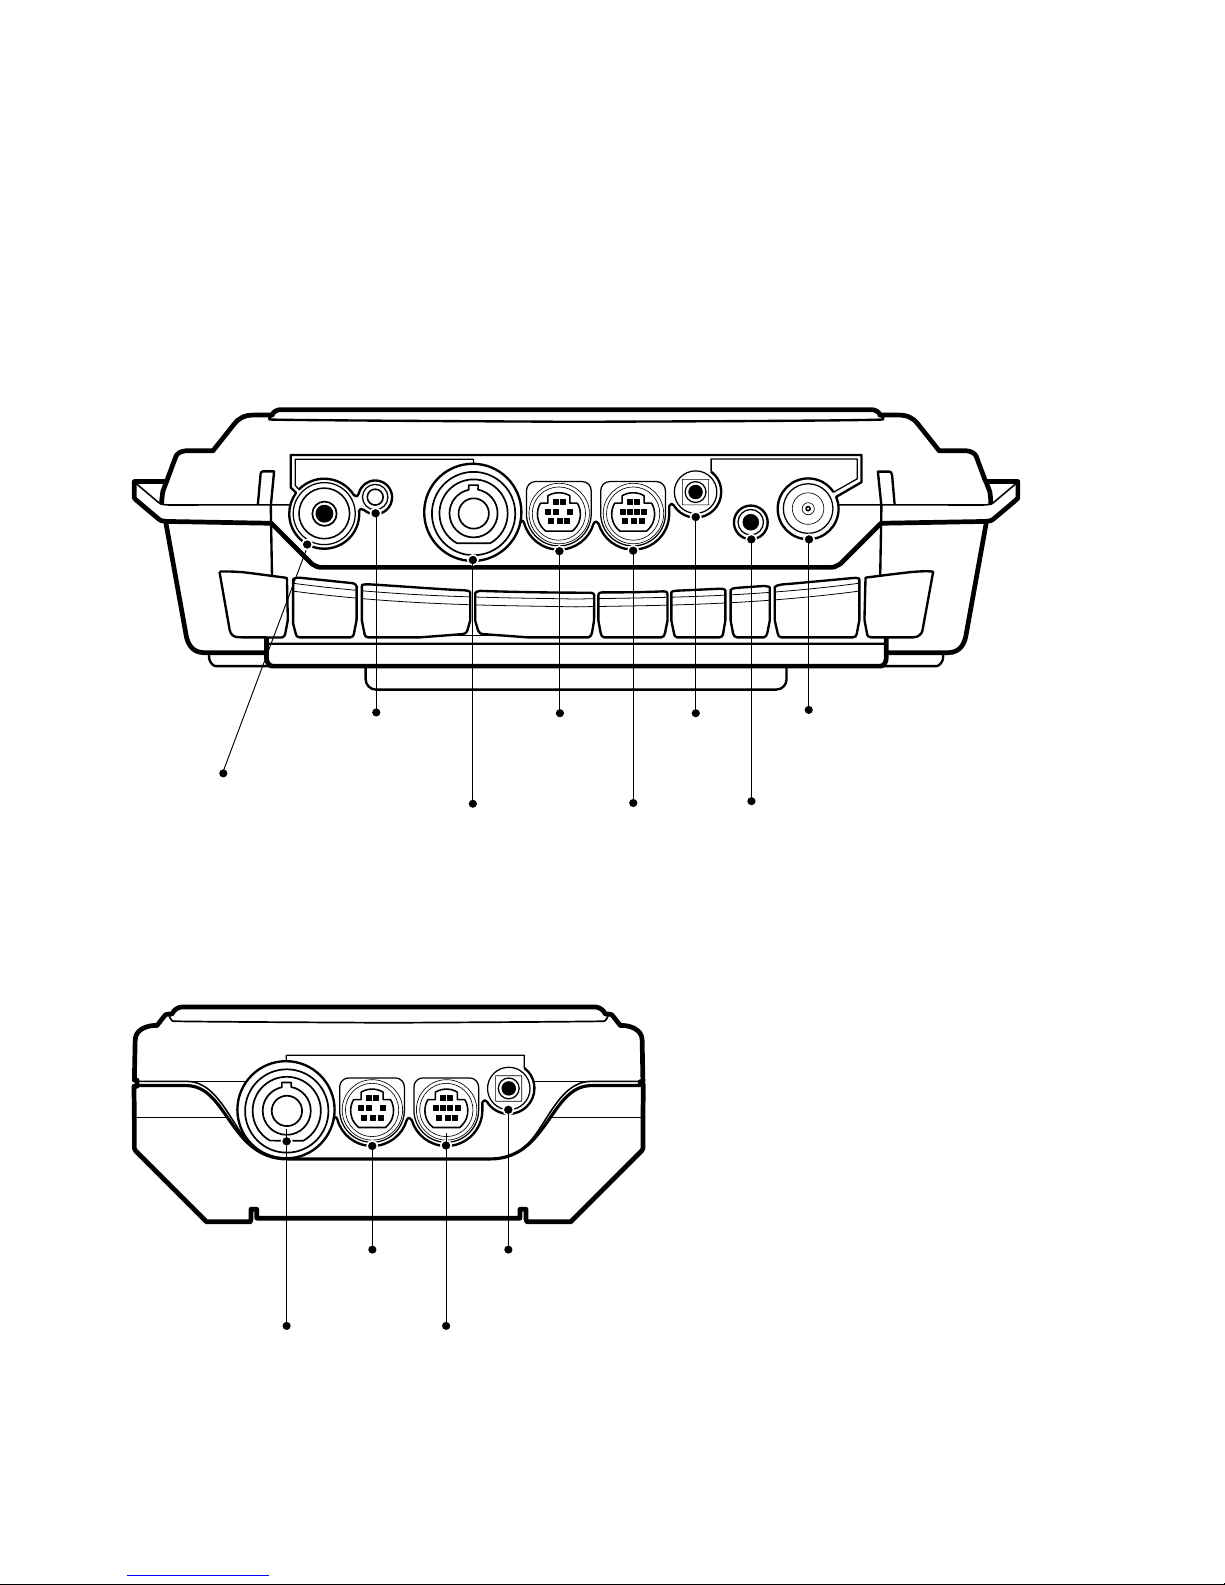
Connecting the Electrodes
Follow the diagrams below to correctly connect electrodes and probes to the meter.
The 5-Star meter is depicted; 4-Star and 3-Star meters will have fewer connections.
Benchtop Meter – Electrode Connections
Portable Meter – Electrode Connections
Stirrer jack,
stirrer or DO
auto stir probe
Reference
pH or ISE
Cond
ATC
8 pin
DO
9 pin
Ground
BNC
Power
RS232
RS232
BNC
Cond
ATC 8 pin
DO 9 pin
Page 17

IV-5
Orion Star Series Meter
Thermo Electron Corporation
Preparation
Some connections serve multiple uses, for example:
• Use the BNC post to connect pH, ISE and ORP combination and sensing
electrodes with a waterproof BNC connector.
• Benchtop meters have a pin tip jack for a separate reference electrode. These
require an appropriate BNC sensing electrode for measurement.
• The 970899WP Dissolved Oxygen electrode can be used with the
BNC connector.
• Use the waterproof 8 pin MiniDIN connector for Conductivity probes. All Orion
Star series 2- and 4- electrode cell conductivity probes have built-in temperature
sensors.
• The waterproof 8 pin MiniDIN connector is also used for Automatic Temperature
Compensation (ATC) probes.
• The DO autostir probe uses the waterproof 9 pin MiniDIN connector and the
stirrer jack for the smaller probe connector.
Page 18

Thermo Electron CorporationIV-6 Orion Star Series Meter
Preparation
Turning On the Instrument
With the batteries installed in the portable meters, or either the batteries installed or
line power attached to the benchtop meter, press the to turn on the instrument.
A quick press of the after the meter has powered up will toggle the backlight
on & off. When the benchtop is drawing line power, the backlight will stay “on” until
turned “off” with the . To turn “off” the meter press and hold the for
3 seconds.
Page 19
Thermo Electron Corporation V-1Orion Star Series Meter
Chapter V
Menu Setup
Navigation Tips
• Press / to scroll through main menu items on
the top line. You will see corresponding grey text on
the LCD.
• The
enters the setup mode.
• Use to select top, middle or bottom line.
• Use
/ in combination with to edit the
values in selected line.
• Use
to accept changes and return the arrow icon
to the top line.
• Use
to save changes and return to the
measurement mode.
Page 20

Thermo Electron CorporationV-2 Orion Star Series Meter
Menu Setup
General Menu Settings
The following table describes general instrument setup.
Description Display Range of Values Default
Value
Method
Specific
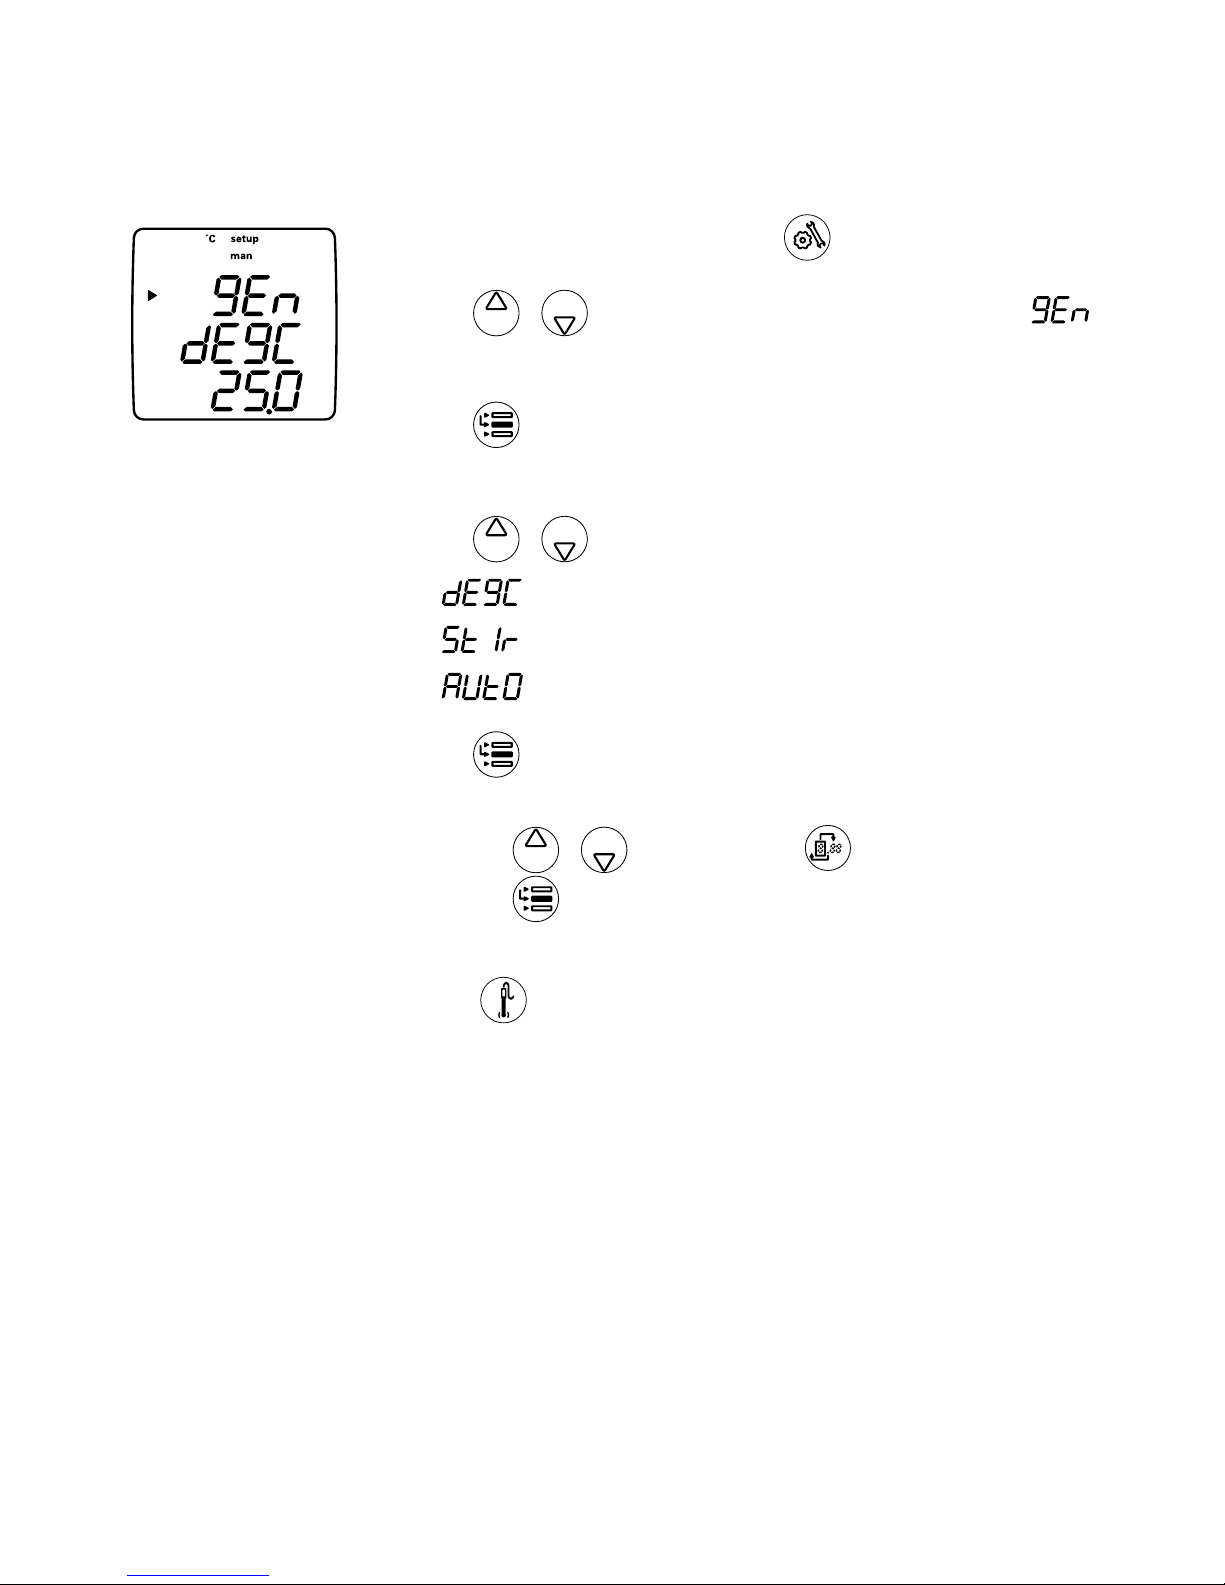
Manual Temperature
Compensation Setting
gEn
dEgC
25.0
-5.0 - 105 25.0
Yes
Stirrer Speed Setting
(Benchtop only)
gEn
StIr
4
OFF, 1, 2, 3, 4, 5, 6, 7 4
Yes
Auto-Shut Off Selection gEn
AUtO
On
OFF, On On
Yes
•
Manual Temperature setting controls temperature compensation when no
temperature sensors are attached to the instrument.
•
Stirrer Speed Setting (benchtop meters only) sets the speed from 1 through
7 with speed 1 being the slowest and 7 being the fastest. A speed of 3 or 4 is
recommended for most applications.
•
Auto-Shut Off is the default which automatically turns off the instrument after
20 minutes elapse without a key press. To override this feature, select “Off” and
the instrument will continue to operate.
Page 21
V-3
Orion Star Series Meter
Thermo Electron Corporation
Menu Setup
To access these settings:
1. In the measurement mode press .
2. Press
/ to scroll through the setup menu until
is displayed on the top line.
3. Press
to accept selection and move the arrow icon to
the middle line.
4. Press
/ to scroll through:
a.
= Manual Temperature Setting
b. = Enable and Set Stirrer Speed
c. = Auto-Shut Off enable/disable
5. Press
to accept the selection and move the arrow icon
to the bottom line.
a. Press
/ to identify and to edit next value.
b. Press to accept the selection and move the arrow
icon to the top line.
6. Press
to return to the measurement mode.
Page 22

Thermo Electron CorporationV-4 Orion Star Series Meter
Menu Setup
Time and Date Setup
The following table describes in greater detail the abbreviations shown on the
display screen.
Description Display Range of Values Default
Value
Method
Specific
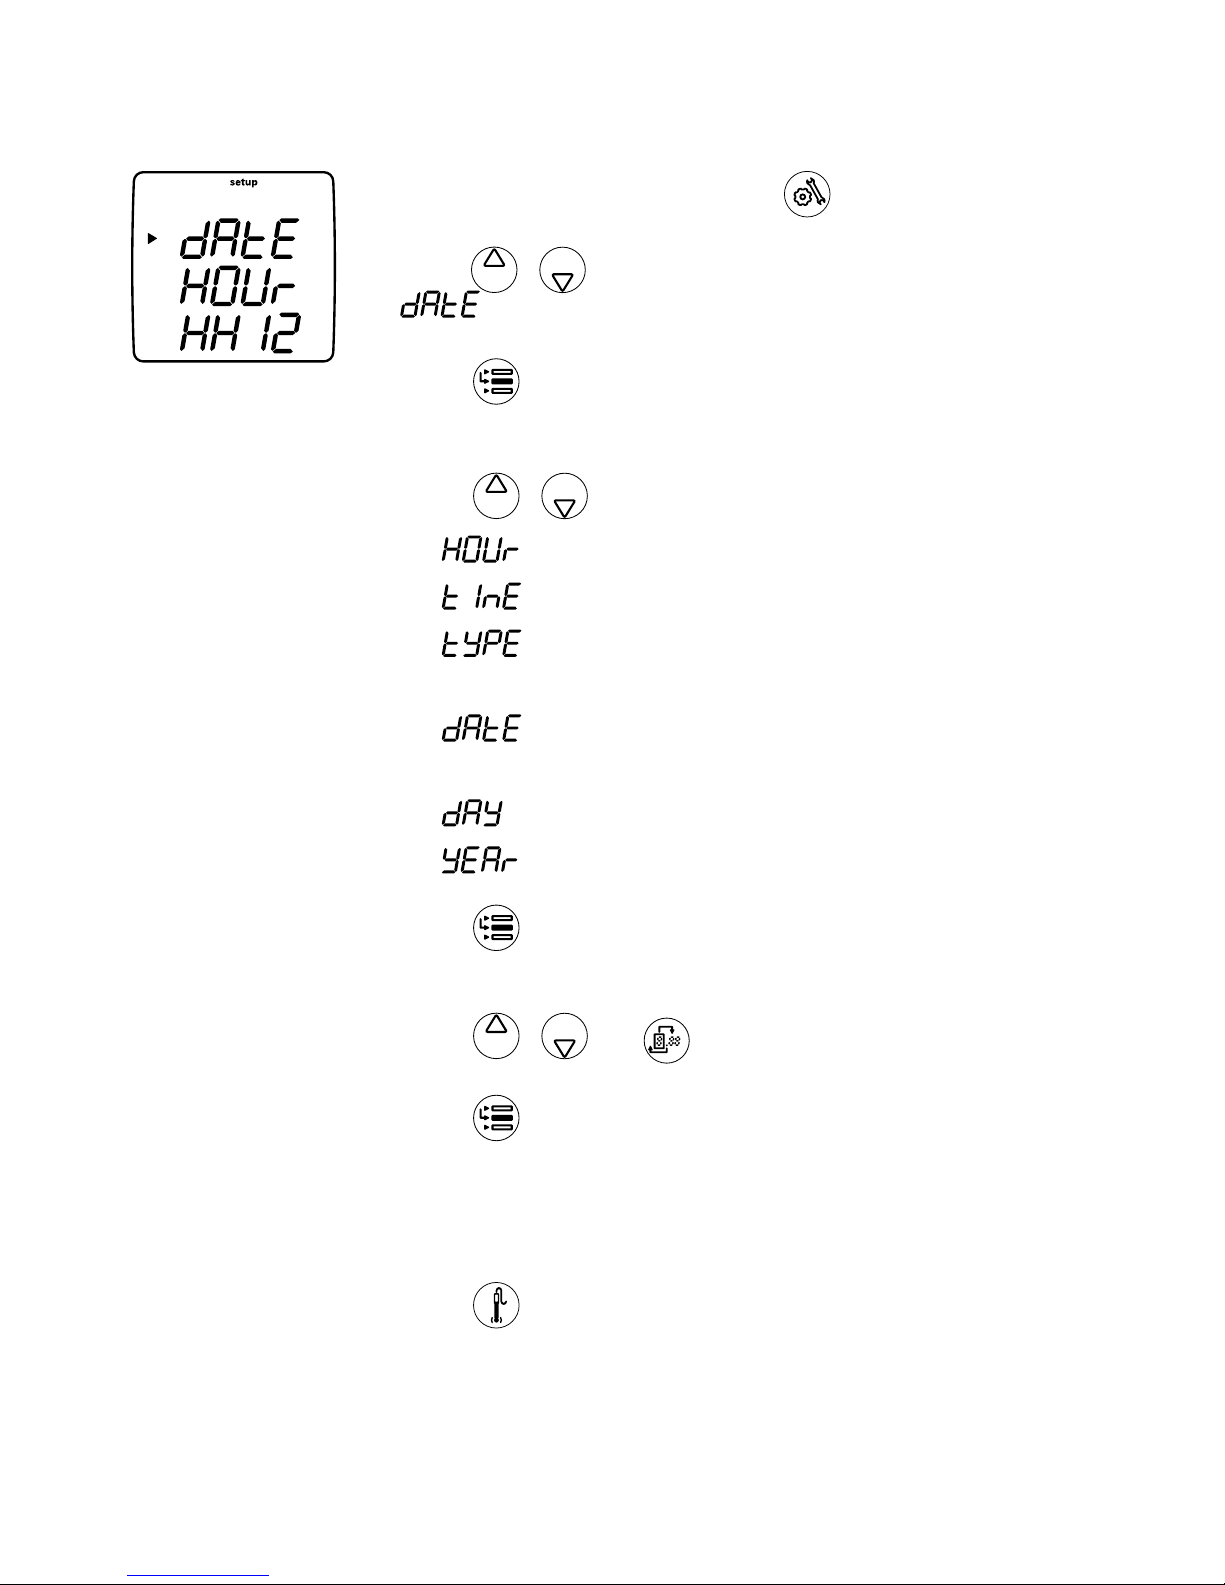
Time: Hour Setting dAtE
HOUr
HH12
00 - 23
Sets the hour of the current
time in 24Hr format
12
Yes
Time: Minute Setting dAtE
tInE
mm12
00 - 59
Sets the minutes for the
current time
00
Yes
Date Format dAtE
tyPE
dmy
mdy, dmy
Month, Day, Year or Day,
Month, Year Selection
mdy
Yes
Date: Year Setting dAtE
yEAr
2004
00 - 99
Sets the year for the
current date from 2000
to 2099
04
Yes
Date: Month Setting dAtE
dAtE
mm01
01 - 12
Month Setting 01 “Jan”
Thru. 12 “Dec”
01
Yes
Date: Day of the Month
Setting
dAtE
dAy
dd01
01 - 31
Day of the Month
01
Yes
Page 23
V-5
Orion Star Series Meter
Thermo Electron Corporation
Menu Setup
1. In the measurement mode press .
2. Press
/ to scroll through the setup menu until
is displayed on the top line.
3. Press
to confirm setting and move the arrow icon to the
middle line.
4. Press
/ to scroll through:
a.
= Current Hour
b. = Current Minute
c. = Format the date stamp as either “mdy”
(month, day, year) or “dmy” (day, month, year)
d. = Current Month (Use numeric equivalents for
months of the year)
e. = Current Day of the Month
f. = Current Year
5. Press
to accept selection and move the arrow icon to
the bottom line.
6. Press
/ and to edit the selected value.
7. Press
to accept the selection and move the arrow icon
to the top line.
8. Repeat steps 3-7 to edit time and date settings as needed.
9. Press
to return to the measurement mode.
Page 24

Thermo Electron CorporationV-6 Orion Star Series Meter
Menu Setup
Continuous, Timed, or AUTO-READ™ Measurement Selection
The following table describes in greater detail the abbreviations shown on the
display screen.
Description Display Range of Values Default
Value
Method
Specific
Continuous, Timed,
or Auto-Read
Measurement Selection
rEAd
tyPE
COnt
Cont, AUtO, timE
Timed, Continuous, or
Auto-Read; Auto Prints
and Datalogs in AUTO &
Timed Modes
Auto
Yes
Timed Reading Setting rEAd
tImE
00:00
00:05 - 99:61
Timed Readings in Minutes
& Seconds
01:00
Yes
To change settings, simply use and / to move between options.
Pressing will confirm the change of a value and end the flashing display.
Orion Star Series meters allow you to select your preferred timing for measurement
intervals.
• In continuous mode the instrument is constantly making
measurements and updating the screen. To Print & Log the
measurement in this mode press .
• In timed mode the instrument is constantly making
measurements, updating the display, and will automatically
log and print data at a pre-selected time interval.
• In the setup menu enter the minutes & seconds
between timed readings by pressing / to
change the value of the flashing digit. Press to
change the digit to be scrolled.
• The minimum time interval is 5 seconds. Acceptable
time ranges are: –
Page 25

V-7
Orion Star Series Meter
Thermo Electron Corporation
Menu Setup
• In AUTO-READ mode the instrument starts a measurement
whenever is pressed. Once the reading becomes
stable, the display freezes while data is automatically logged
and printed.
• The AUTO-READ mode will also automatically operate
the Stirrer Control. It will stop stirring when the
reading becomes stable. To set the stirrer speed, press
. Using / to select:
AUTO-READ
Page 26
Thermo Electron CorporationV-8 Orion Star Series Meter
Menu Setup
Getting Started with GLP Methods
The following table describes in greater detail the abbreviations shown on the
display screen.
Description Display Range of Values Default
Value
Method
Specific
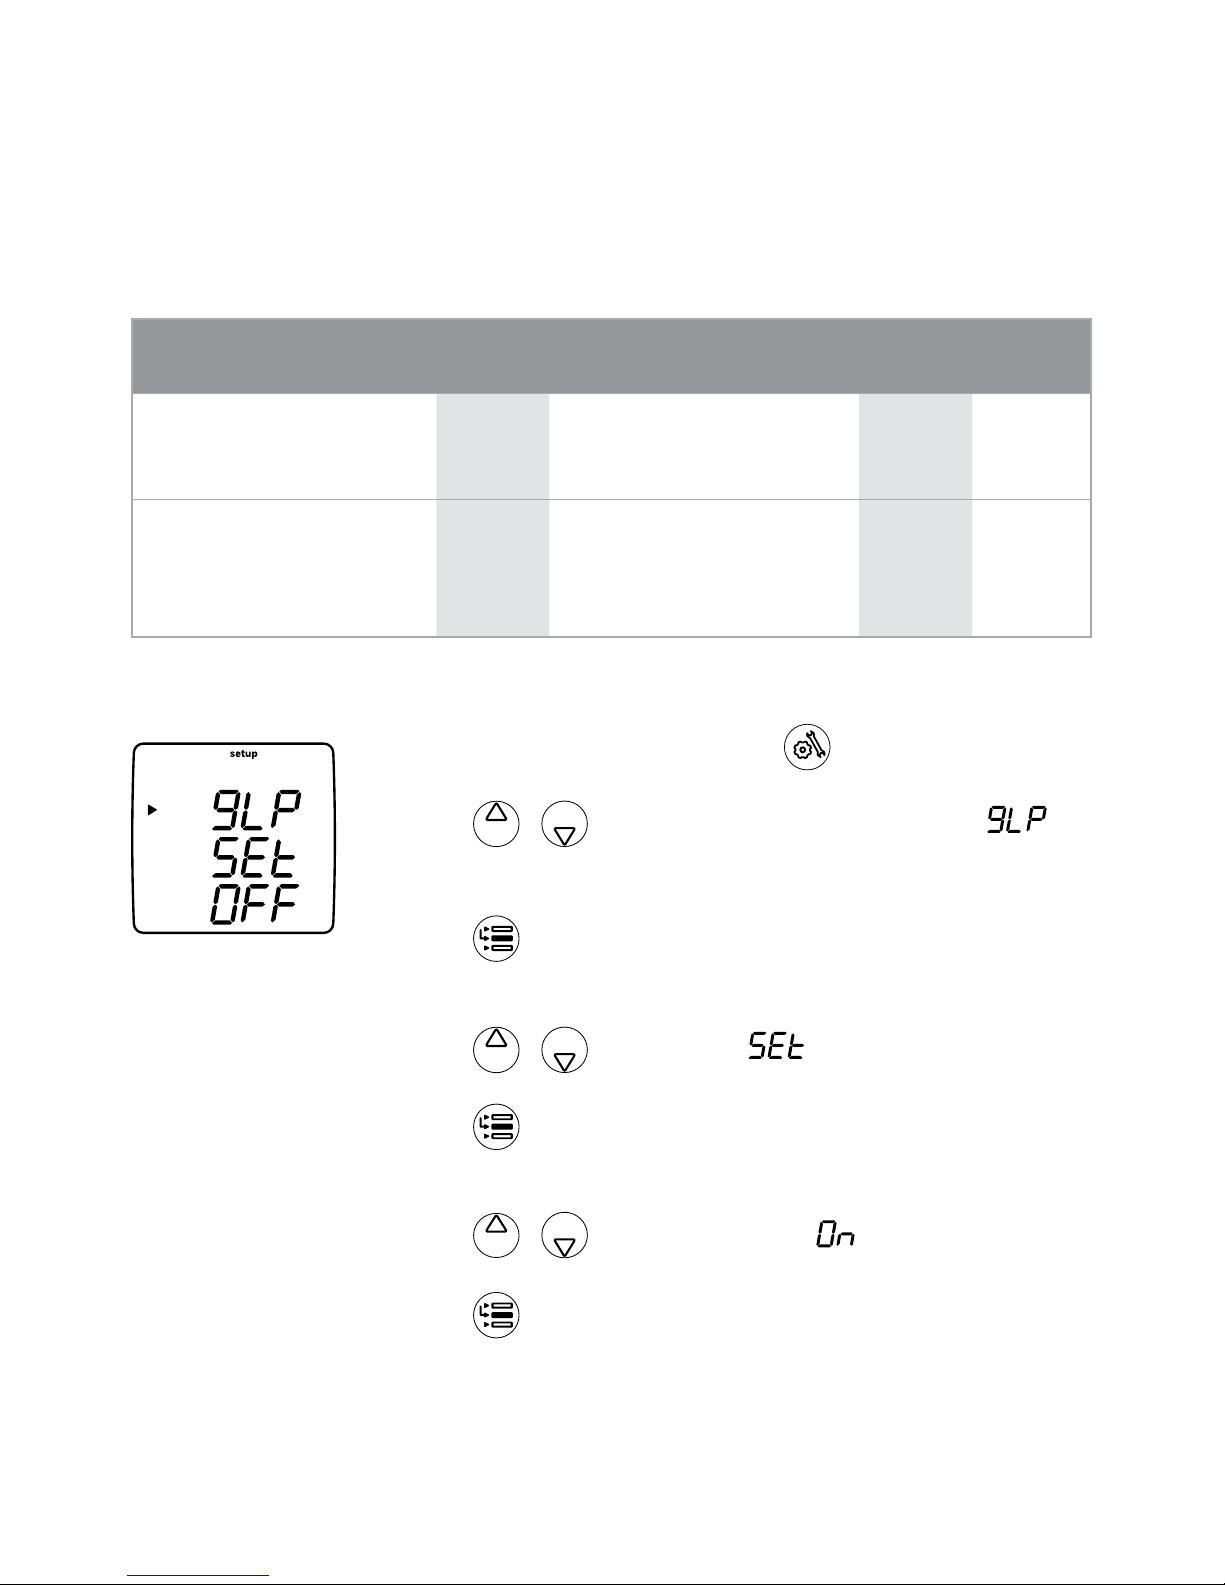
Enable or Disable Methods
“Setting”
gLP
SEt
On
OFF, On
When on will allow storing
And using 10 stored Methods
OFF
No
Enable & Set Instrument
Password
gLP
PASS
0000
0000 - 9999
Sets the Setup/Method
Password; 0000 disables
passwords
0000
No
Method Selection
1. In the measurement mode press .
2. Press
/ to scroll through setup menu until is
displayed on the top line.
3. Press
to accept the selection and move the arrow icon
to the middle line.
4. Press
/ to scroll until is displayed.
5. Press
to accept the selection and move arrow icon to
the bottom line.
6. Press
/ to edit the value to .
7. Press
to accept the selection and move arrow icon to
the top line.
Page 27
V-9
Orion Star Series Meter
Thermo Electron Corporation
Menu Setup
8. Press to return to the measurement mode.
9. Press
.
10. Press
/ to assign a method number.
11. Press
to implement method and return to
measurement mode or press to enter the setup menu
for the selected method.
Page 28

Thermo Electron CorporationV-10 Orion Star Series Meter
Menu Setup
Password Selection
Each method can be password protected to prevent unauthorized individuals from
changing the setup options.
As a default setting, all Orion Star Series meters are shipped with the Password set
to . Retaining this setting allows unlimited access by any user.
To set the Password protection feature:
1. In measurement mode press
.
2. Press
/ to scroll through the setup menu until
is displayed on the top line.
3. Press
to accept the selection and move arrow icon to
the middle line.
4. Press
/ to scroll until is displayed.
5. Press
to accept the selection and move the arrow icon
to the bottom line.
6. Press / and to enter the password.
7. Press to accept the selection and return the arrow icon
to the top line.
8. Press to return to the measurement mode display.
When is pressed the password entry screen will appear
and the user must enter the password to proceed into the
setup menu.
Page 29
V-11
Orion Star Series Meter
Thermo Electron Corporation
Menu Setup
Selecting Measurement Modes
In the measurement mode the arrow icon on the left side of the display screen
indicates which mode is selected. Use / to scroll through the various
modes associated with a selected line. Use to move the arrow icon to the next
line, and then toggle / to scroll through the modes associated with the
selected line.
pH
mV
Rel mV
ISE
Off
μS/cm or mS/cm for conductivity
mg/L for TDS
ppt for Salinity
MΩ-cm for resistivity
Off
%Sat for DO percent saturation
mg/L for DO concentration
Barometric Pressure
Off
For setup information related to specific techniques, refer to Chapter 7 through
Chapter 11 of this manual.
Page 30
Thermo Electron CorporationV-12 Orion Star Series Meter
Menu Setup
Setting Calibration
The indicates calibration mode or calibration setup.
Before beginning a calibration, prepare the electrode or probe according to the
instructions received with the electrode. The calibration standards or buffers or
calibration sleeve should also be prepared prior to the calibration. After preparing
the electrode or probe per manufacturer’s instructions, connect the electrode or
probe to the meter. Basic information on proper calibration for each measurement
technique is found in the appropriate section of this manual.
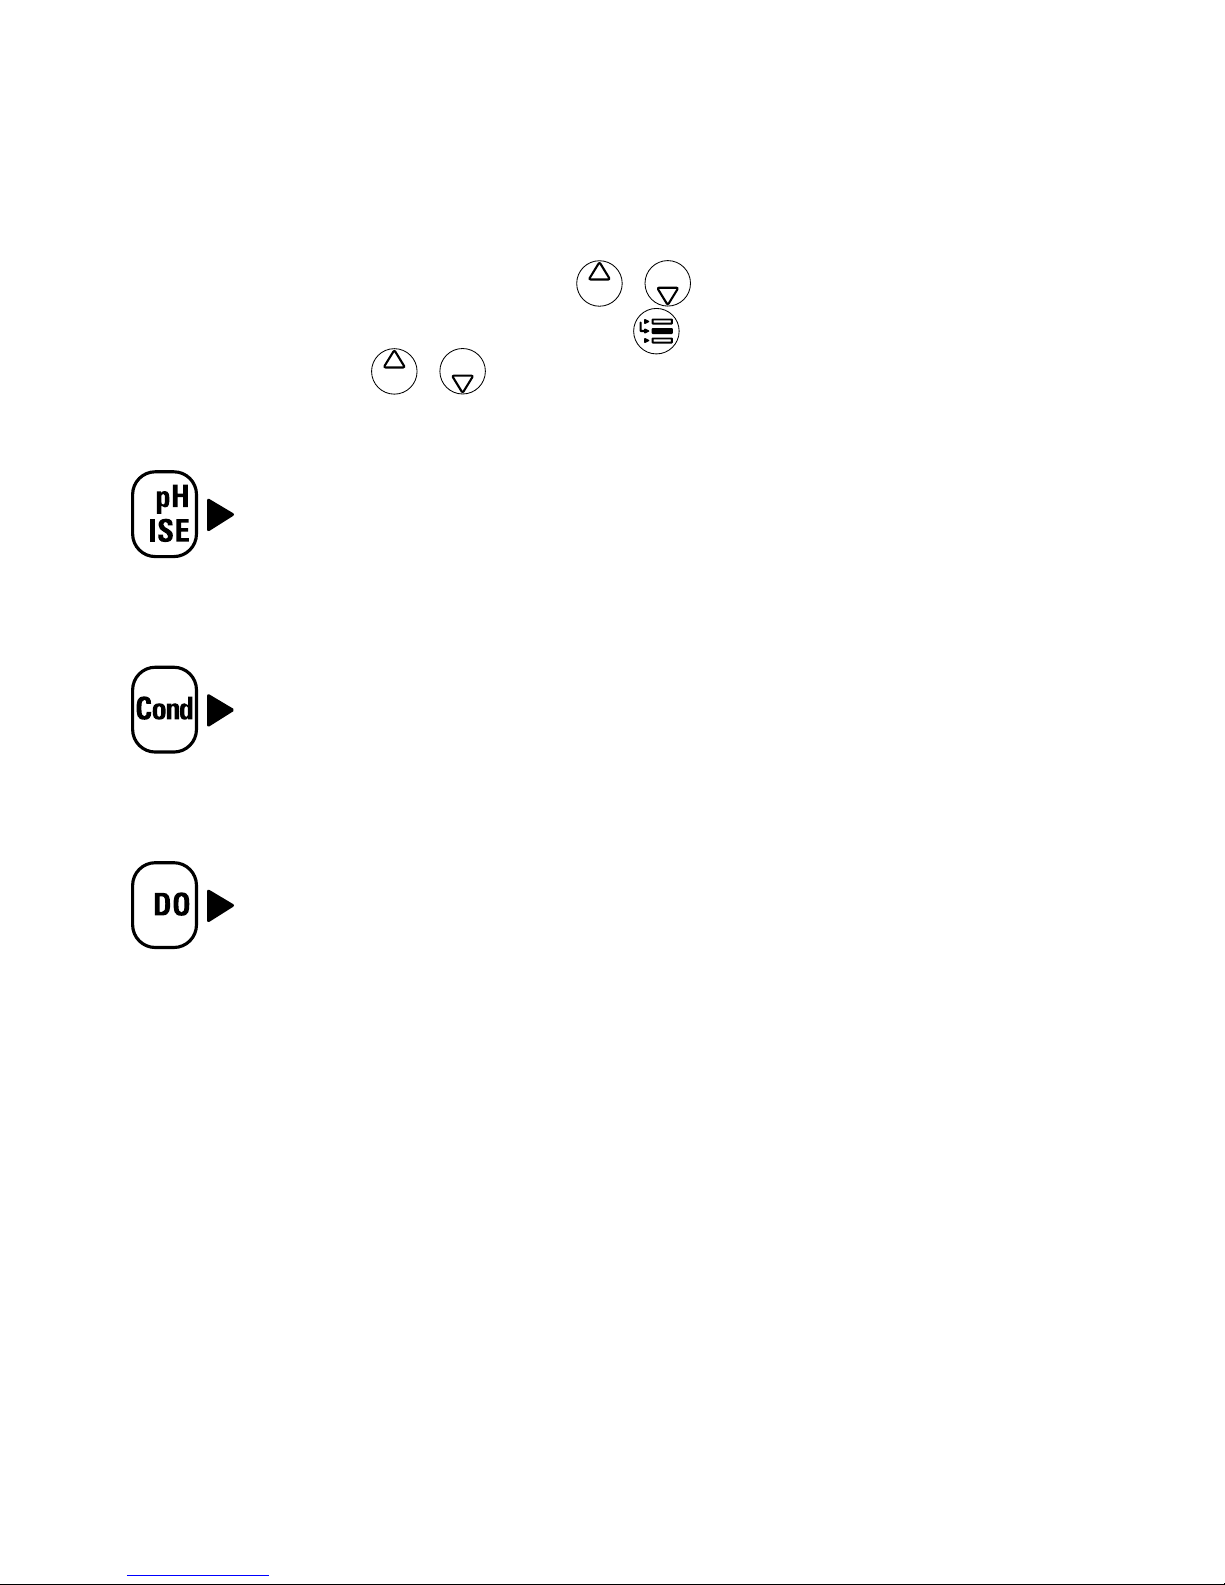
General Navigation for Selecting Calibration
1. In measurement mode press until the arrow icon on the left of the screen is
pointed toward the measurement mode to the calibrated:
pH, ORP, ISE • Conductivity • DO
2. Press
/ until the appropriate icon is lit for the measurement mode to
be calibrated.
A
– pH/ORP/ISE
pH icon – pH Calibration
RelmV icon – ORP Calibration
ISE icon or no icon – ISE Calibration
B
– Conductivity Calibration
mS/cm, μS/cm, mg/L, ppt icon and MΩ-cm
C
– DO Calibration
%Sat or mg/L icon
No icon – Barometer Calibration
3. Then press
to begin the selected calibration.
Page 31

V-13
Orion Star Series Meter
Thermo Electron Corporation
Menu Setup
Calibration Alarm Setup
The following table describes in greater detail the abbreviations shown on the
display screen.
Description Display Range of Values Default
Value
Method
Specific
pH Calibration Alarm
Setting
dUE
PH
0
0000 - 9999
Time in Hours; 0000 = Cal
Alarm Off
0000
Yes
ORP Calibration Alarm
Setting
dUE
OrP
0
0000 - 9999
Time in Hours; 0000 = Cal
Alarm Off
0000
Yes
ISE Calibration Alarm
Setting
dUE
ISE
0
0000 - 9999
Time in Hours; 0000 = Cal
Alarm Off
0000
Yes
Conductivity Calibration
Alarm Setting
dUE
COnd
0
0000 - 9999
Time in Hours; 0000 = Cal
Alarm Off
0000
Yes
Dissolved Oxygen
Calibration Alarm Setting
dUE
dO
0
0000 - 9999
Time in Hours; 0000 = Cal
Alarm Off
0000
Yes
The following steps enable calibration alarms:
1. In the measurement mode, press
.
2. Press / to scroll through the setup menu until
is displayed on the top line.
3. Press to accept the selection and move the arrow icon
to the middle line.
4. Press / to scroll through the measurement modes.
Page 32

Thermo Electron CorporationV-14 Orion Star Series Meter
Menu Setup
5. Press to accept the selection and move the arrow icon
to the bottom line.
6. Press / and to edit the calibration interval.
7. Press to accept the selection and move the arrow icon
to the top line.
8. Press to return to the measurement mode display.
Page 33

Thermo Electron Corporation VI-1Orion Star Series Meter
Chapter VI
Data Archiving and Retrieval
The Orion Star Series offer all the features required to create printouts of data
reports in full compliance with Good Laboratory Practice (GLP).
Description Display Range of Values Default
Value
Method
Specific
Data Log roll-over or LOg nO, yES yES yes
Delete on Download Option dEL
Selection yES
Datalog Setup
1. In the measurement mode press the .
2. Press / to scroll through the setup menu until
is displayed on the top line of the display.
3. Press to enter setting on the middle line.
4. Press to move to the bottom line.
5. Press / to select either.
a. to indicate automatic log deletion after download to
a computer or printer
b. to roll-over data log when memory is full
6. Press to accept the selection and return to the top line.
7. Press to return to the measurement mode.
Page 34

Thermo Electron CorporationVI-2 Orion Star Series Meter
Data Archiving and Retrieval
Log View Setup
1. In the measurement mode, press to see
displayed.
2. Press
/ to select , or on the
bottom line.
3. Press
to accept the selection.
a. enables display of the log point number on the
Temperature line. The time of the log point on the top
line, the date of the log point on the middle line, and the
year of the log point on the bottom line.
i. Press / to select log point number to view.
ii. Press to view the selected log point.
iii. Press to return to log point number selection
menu.
b. will output all measurement log points to a
printer or computer.
i. Press to send log.
c. will output all calibrations to a computer or
printer.
i. Press to send log.
4. Press to return to measurement mode.
Page 35

VI-3
Orion Star Series Meter
Thermo Electron Corporation
Data Archiving and Retrieval
RS-232 Interface Setup
The following table describes in greater detail the abbreviations shown on the
display screen.
Description Display Range of Values Default
Value
Method
Specific
Baud Rate Selection r232
bAUd
1200
1200, 2400, 4800, 9600 9600 No
Printout Format r232
OUtF
Prnt
Print
COmP
Print No
Note: A multi-parameter printout will display the header and footer only once. Each
section will be separated by a blank. If display of a particular function is turned “off”,
then that section will not be printed. s
1. From the measurement screen press .
2. Use
/ to scroll through the menus until is
displayed on the top line.
3. Press
to accept the selection and move the arrow icon
to the middle line.
4. Press
/ to select rate for the serial port.
5. Press
to move the arrow icon to the bottom line.
a. Use / to select one of the values: ,
, , or .
b. Press to accept the entry and move the arrow icon
to the top line.
Page 36

Thermo Electron CorporationVI-4 Orion Star Series Meter
6. Press
to move the arrow icon to the middle line.
7. Press / to select which controls the output
format.
8. Press
to move the arrow icon to the bottom line.
a. Use
/ to select one of the following two values:
i. = printer format
ii. = comma delimited format for integration
with LIMS or data analysis software.
b. Press to accept the entry and move the arrow icon
to the top line.
9. Press
to return to the measurement mode.
Page 37

Thermo Electron Corporation VII-1Orion Star Series Meter
Chapter VII
pH Technique
The following table describes pH setup.
Description Display Range of Values Default
Value
Method
Specific
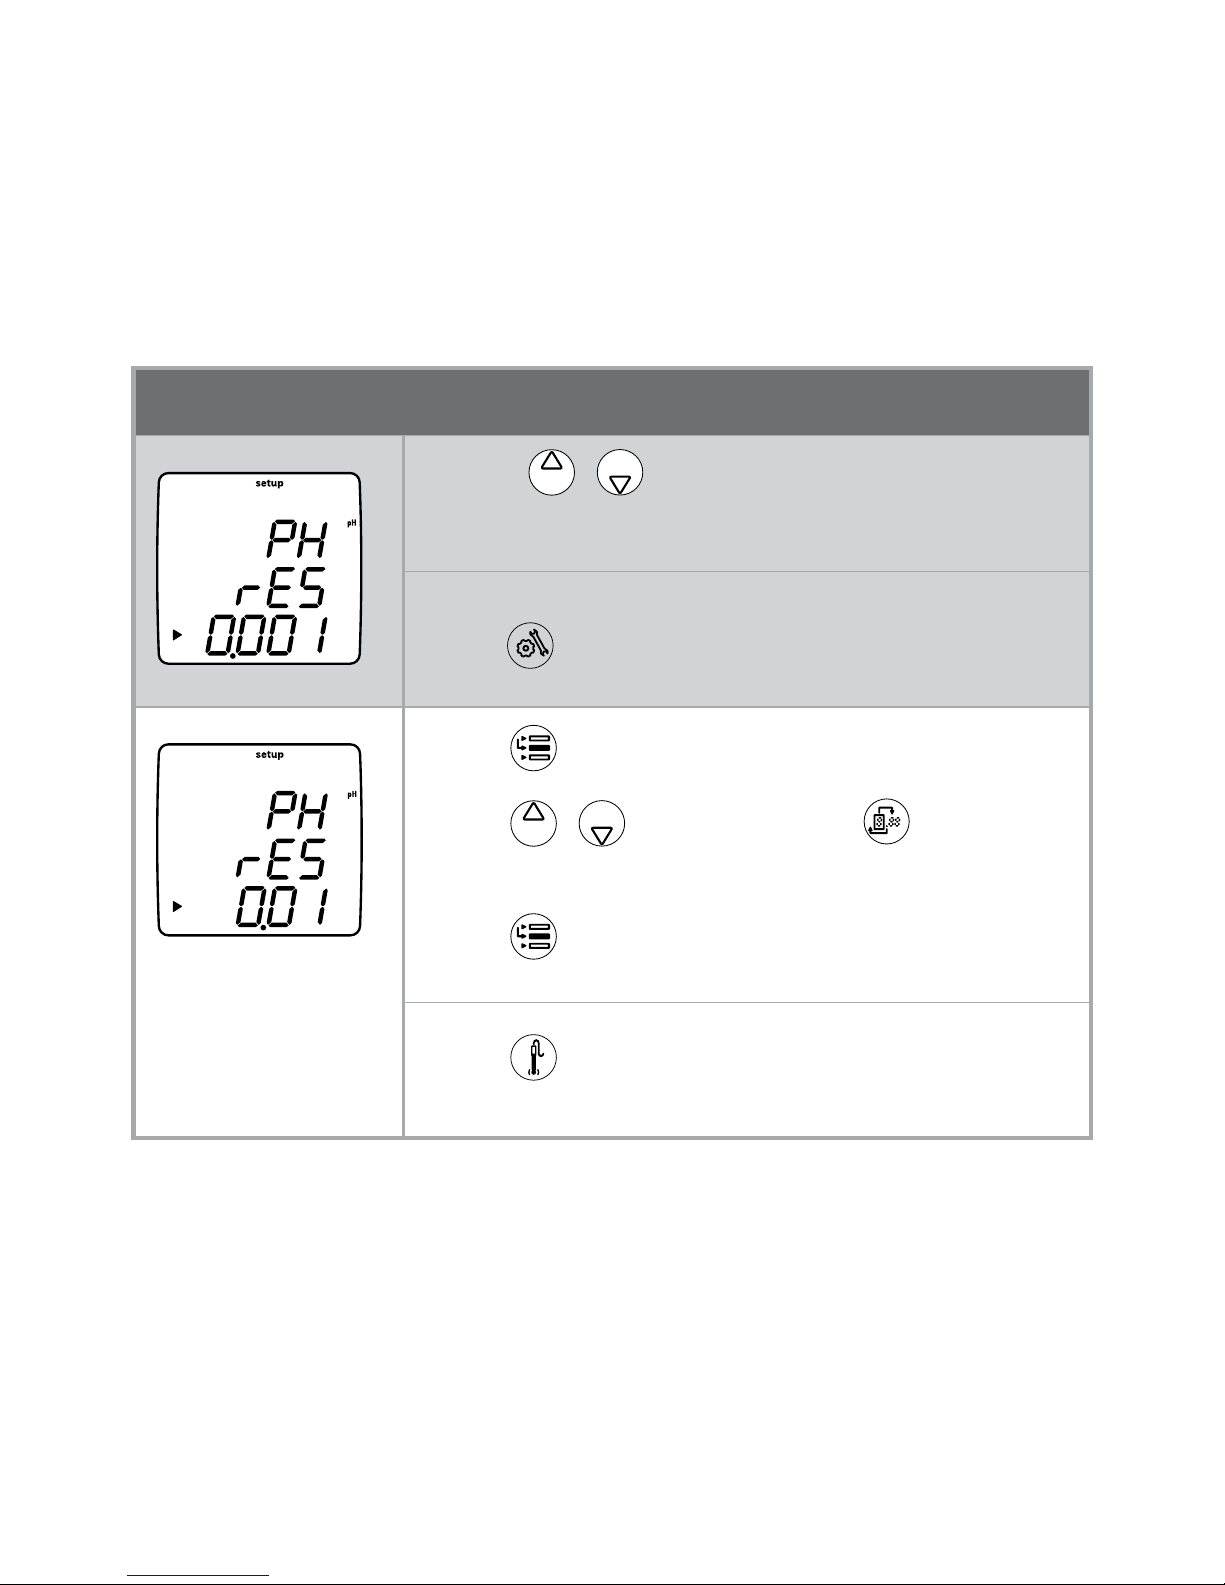
pH Resolution rES O.1, 0.01, 0.001 0.01
Yes
pH Buffer Set bUF USA (USA/Orion Buffers)
1.68, 4.01, 7.01, 10.01, 12.46
EUrO (Euro Buffers)
1.68, 4.01, 6.86, 9.15
USA
Yes
To access the pH Setup Menu
1. In the measurement mode press .
2. Press
/ to scroll through the setup menu until
is displayed on the top line.
3. Press
to confirm setting and move the arrow icon to the
middle.
4.
Press / to select for Resolution.
5. Press
to select option and move the arrow icon to the
bottom line.
a. Use
/ to set the desired resolution.
Page 38

Thermo Electron CorporationVII-2 Orion Star Series Meter
pH Technique
6. Press to accept the selection and move the arrow icon
to the top line.
7. Press
to move to middle line and press / to
select for Auto-Buffer setting and press again to
move to the bottom line.
8. Press
/ to select either or ; press
to accept the selection.
9. Press
to return to measurement mode.
pH Calibration Alarm Setting
The Caution symbol accompanied by the flashing and flashing
pH units alerts the operator that pH needs to be recalibrated. In
advance of beginning measurements, the operator may select
the number hours to elapse before the alarm is affected; a
setting of 0000 turns off the calibration alarm. To set the alarm
from the setup screen, find dUE/PH, then use / and
to display:
Page 39

VII-3
Orion Star Series Meter
Thermo Electron Corporation
pH Technique
pH Calibration for 1-5 Points
The calibration points should bracket the expected pH range of the samples to
be measured. Calibration points should be not less than 1 pH unit apart and not
greater than 4 pH units apart.
It is recommended that a two buffer calibration, using buffers that bracket the
expected sample range, be performed at the beginning of each day to determine the
slope and offset of the electrode. This step will also compensate for any changes in
the electrode and determine if it is working properly. For optimal accuracy perform
a one buffer calibration every two hours to compensate for electrode drift using a
fresh aliquot from one of the buffers used in the initial calibration.
Fresh buffers should be used each time you calibrate.
Care should be taken when rinsing the electrode with deionized water and gently
blotting all remaining water drops with a lint-free tissue prior to moving the
electrode to the next beaker. DO NOT wipe a glass or epoxy electrode body with a
tissue as static build up will result.
1. Prepare the electrode for use according to the instructions received with the
electrode.
2. In setup mode select the buffer set of NIST (
) or DIN ( ) being used
for the proper buffer recognition to occur.
3. Press
until the arrow icon is pointing to the pH measurement line.
4. Press
.
5. Rinse the electrode and ATC probe and place into the buffer.
Page 40

Thermo Electron CorporationVII-4 Orion Star Series Meter
pH Technique
6. Wait for the pH to stop flashing.
a. Auto Buffer Recognition – When the
pH stops flashing the meter will display
the temperature-corrected pH value for the buffer.
b. Manual Calibration – When the
pH stops flashing the meter will display the
actual buffer value read by the pH electrode. Use the and / to
change the pH value to the temperature-corrected pH value for the buffer.
7. Once the correct buffer value is shown on the meter display, press
to
proceed to the next calibration point and repeat steps 5 through 7 or press
to save the calibration.
8. The slope will be displayed before the meter returns to the measurement mode.
is displayed in the lower field and the actual electrode slope, in percent, is
displayed in the main field.
a. On a 1 point calibration use the
and / to edit the slope then
press to return to the measurement mode.
b. On the 2 or more point calibration the meter will automatically go to
measurement 2 seconds after display of .
After calibration, the electrode and meter are ready to start taking sample
measurements. Make sure that the instrument is in measurement mode and
that the pH is lit. If the is not lit, press to return to measurement mode.
If the pH is not lit, press until the arrow on the left of the display is pointing
at the top line. Then press until the pH lights. You are now ready to start
measuring.
The man display indicates manual pH calibration was
performed. The numbers on the top of the display indicate
which pH Auto buffers were used in the last calibration.
Page 41

VII-5
Orion Star Series Meter
Thermo Electron Corporation
pH Technique
pH Measurements
1. Rinse the electrode, as well as ATC probe and stirrer if being used, in deionized
water. Blot dry with a lint-free tissue. Do not wipe glass electrodes as static
charge will build up on the sensor.
2. Place the electrode in your sample.
a. If you are in continuous measurement mode, the instrument will start
measuring immediately. If you are using the benchtop meter & the stirrer
control is enabled then pressing will start the stirrer.
The
will flash until the reading is stable. Once the reading is stable you
can Log & Print the measurement by pressing the . If you are recording
the data into a notebook, record the pH as well as the temperature at which
the pH reading is taken. If the stirrer is in motion, press to turn off the
stirrer before removing the stirrer from the sample.
b. If you are in AUTO-READ™ mode then press
to start the measurement.
Once the reading is stable the meter will automatically Log & Print the
results and freeze the display. If the stirrer is enabled, then the stirrer will
turn on when is pressed and turn “off” once the reading has stabilized.
When using the AutoStir™ BOD Probe, pressing the button on the probe will
start the AUTO-READ measurement.
c. If you are in Timed Measurement mode then the meter will start making
measurements as soon as it goes into measurement mode at the frequency
selected in setup. It will automatically Log & Print each measurement. If
you are using the benchtop meter and the stirrer control is enabled then
pressing will start the stirrer. Pressing again will turn off the stirrer.
Page 42

Thermo Electron CorporationVII-6 Orion Star Series Meter
pH Technique
3. Remove the electrode from the sample and rinse with deionized water, then
place it in your next sample and repeat step 2.
4. When all samples have been measured, rinse the electrode with deionized
water and blot dry. Consult your electrode manual for proper electrode storage
instructions.
Page 43

Thermo Electron Corporation VIII-1Orion Star Series Meter
Chapter VIII
Dissolved Oxygen Technique
Dissolved Oxygen Setup Options
The following table describes Dissolved Oxygen setup.
Description Display Range of Values Default
Value
Method
Specific
Dissolved Oxygen
%Saturation Resolution
DO
rES
1
1, 0.1
DO % Saturation
Resolution
0.1
Yes
Dissolved Oxygen
Concentration Resolution
DO
rES
0.1
0.1, 0.01
DO Concentration
“mg/L” resolution
0.01
Yes
Dissolved Oxygen
Barometric Pressure
Compensation Selection
DO
bAr
AUtO
AUtO, mAn
Selects Internal Barometer
or Manual Pressure
AUtO
Yes
Dissolved Oxygen Manual
Barometric Pressure
Setting
DO
PrES
760.0
450.0 - 850.0
Manual Pressure
Compensation Value
760.0
Yes
Dissolved Oxygen Salinity
Correction Selection
DO
SAL
AUtO
AUtO, mAn
Selects Method of Salinity
Correction; Meters w/Cond
Only
AUtO
Yes
Dissolved Oxygen Manual
Salinity Correction Factor
DO
SALF
0
0 - 45
Manual Salinity Correction
Factor
0
Yes
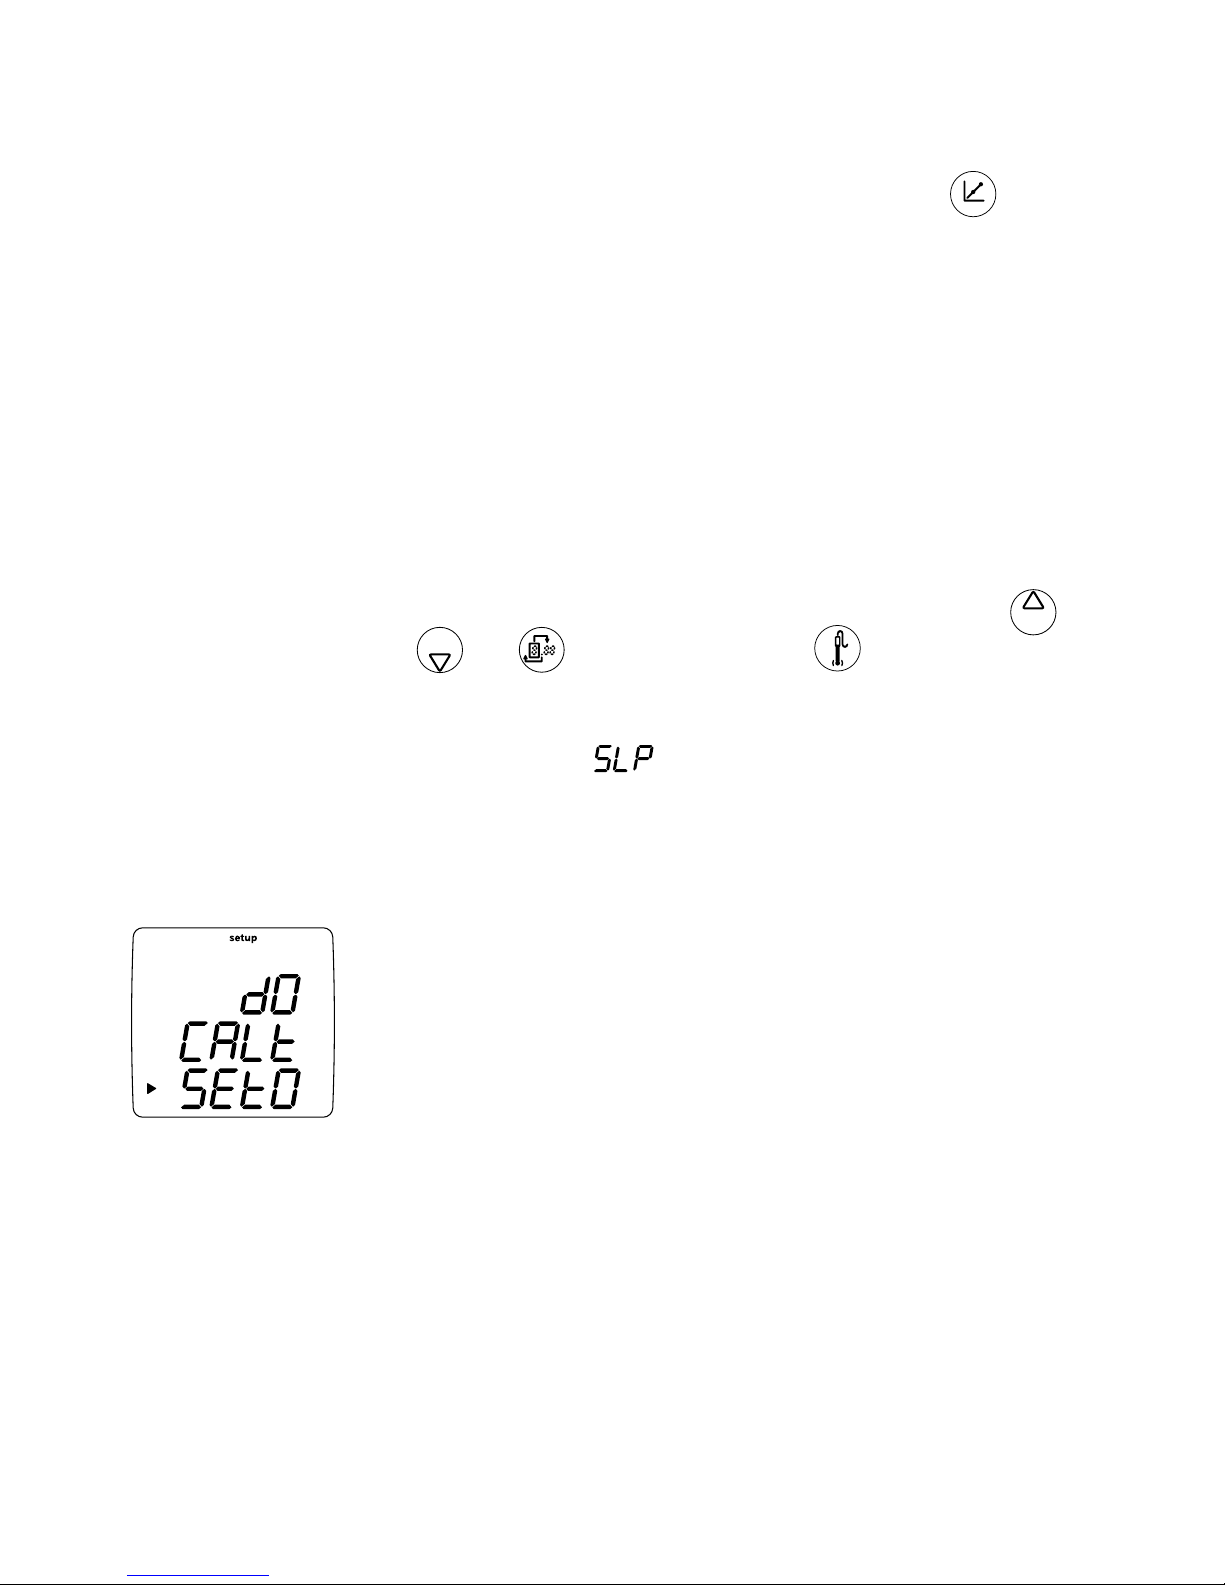
Dissolved Oxygen
Calibration Type Selection
DO
CALt
Air
Air, H2O, mAn, SEt0
Air = Water Sat Air,
H2O = Air Sat Water,
mAn = Manual,
SEt0 = Zero Cal
Air
Yes
Page 44

Thermo Electron CorporationVIII-2 Orion Star Series Meter
Dissolved Oxygen Technique
DO Setup Steps
1. From the Measurement mode, press .
2. Press
/ to scroll through the setup menu until is displayed on the
top line.
3. Press
to confirm the setting and move the arrow icon to the middle line.
4. Press
/ to scroll through:
a.
+ % Sat = % Saturation Resolution
b. + mg/L = Concentration Resolution
c. = Barometer Type (Auto/Manual)
d. = Manual Pressure Compensation
e. = Automatic/Manual Salinity Compensation
f. = Manual Salinity Correction
g. = Calibration Type
5. Press to select the option and move the arrow icon to the bottom line.
6. Press
/ and to enter the value. The previous table identifies what
you will see on the display and the range of values which may be entered.
7. After entering a value, press
to complete programming of that option and
move the arrow icon to the top line. Repeat steps 3 through 7 for all options.
8. Press
to return to measurement mode.
Page 45

VIII-3
Orion Star Series Meter
Thermo Electron Corporation
Dissolved Oxygen Technique
Special Features
Before beginning DO setup, note these special features:
• The resolution selection automatically engages the Orion Star Series’ SMART
STABILITY™ & SMART AVERAGING™ algorithms to optimize the accuracy,
precision, and response of the DO measurement.
• Orion Star Series meters include an internal barometer for pressure
compensation. In general we recommend using the internal barometer, but you
may wish to use manual pressure compensation if you are measuring DO with
a submerged probe or in a pressurized vessel where the probe is exposed to
higher pressures than the meter.
• DO Manual Pressure Setting screen will only appear if Manual Barometric
Pressure compensation has been selected. The pressure in entered in mm
of Hg (Mercury). See the following table to convert from other units
of
pressure.
hPa (mBar) mm Hg (torr) Inches Hg lbf/in2 (PSI)
1 hPa (mBar) 1 0.75006 0.02953 0.014504
1 mm Hg (torr) 1.3332 1 0.039370 0.019337
1 Inches Hg 33.864 25.400 1 0.491154
1 lb/in2 (PSI) 68.9475 51.7149 2.03602 1
Example: To convert 14.7 PSI to mm Hg, multiply 14.7 by 51.7149 to get
760.21 mm Hg. s
• Automatic DO Salinity Correction Selection is only available on 4-Star and 5-Star
meters designed to measure conductivity as well as DO. On these meters, the
instrument automatically takes the conductivity reading to calculate the salinity
correction factor then applies that to the DO measurement.
• A conductivity probe must be used in addition to the DO probe for automatic
salinity correction.
Page 46

Thermo Electron CorporationVIII-4 Orion Star Series Meter
Dissolved Oxygen Technique
• The user may disable the automated process by selecting the setting
rather than .
• DO Manual Salinity Correction Factor Setting adjusts the dissolved oxygen
concentration in mg/L based on the samples salinity. Use the following table
to select an appropriate salinity factor. A typical value for Sea Water is 35,
but does vary considerably based on location.
Conductivity
in mS/cm
Salinity
Value
Conductivity
in mS/cm
Salinity
Value
Conductivity
in mS/cm
Salinity
Value
5 3 20 13 35 25
6 4 21 14 36 25
7 4 22 15 37 26
8 5 23 15 38 27
9 6 24 16 39 28
10 6 25 17 40 29
11 7 26 18 42 30
12 8 27 18 44 32
13 8 28 19 46 33
14 9 29 20 48 35
15 10 30 21 50 37
16 10 31 22 52 38
17 11 32 22 54 40
18 12 33 23 56 42
19 13 34 24
Salinity depending on the conductivity at 20 ˚C
ppt = Parts per Thousand Salinity
This table was calculated from the International Oceanographic Tables. International Oceanographic
Tables, Vol. 1, National Institute of Oceanography of Great Britian, Womley, Godaming, Surrey, England
and Unesco, Paris 1971
Page 47

VIII-5
Orion Star Series Meter
Thermo Electron Corporation
Dissolved Oxygen Technique
DO Calibration
Prior to calibration the probe must be prepared and polarized.
• The DO probe is continuously polarized when connected to the meter. When
first connected, or after an interval of more than 60 minutes has elapsed
since the probe was last connected, allow 30 to 60 minutes for polarization.
Interrupted connections of less than one hour will take 5 to 25 minutes for the
readings to stabilize.
• Zeroing the Probe – a DO probe can generate a 0.02 to 0.05 mg/L positive error
in an oxygen free (anoxic) solution. If this error is unacceptable, then zero the
probe when using a new sensing membrane, using fresh filing solution, or when
measuring dissolved oxygen below 1 mg/L or 10% saturation.
An air calibration should be done prior to the zero calibration.
1. In the measurement mode press
.
2. Press
/ until is shown on the top line.
3. Press
to confirm the setting and move the arrow to the middle line.
4. Press
/ to scroll to .
5. Press
to select setting and move arrow icon to the bottom line.
6. Press
/ to select one of the following calibration modes.
a.
denotes calibration performed in water saturated air using the
air calibration sleeve. This is generally the simplest and most accurate
calibration method. It is also the meter’s default setting. If the calibration
selection in has not been changed, then pressing will automatically
perform an Air calibration. Due to the inherent differences between watersaturated air and air-saturated water, upon stability, the air standard is set to
102.3 % saturation.
Page 48

Thermo Electron CorporationVIII-6 Orion Star Series Meter
Dissolved Oxygen Technique
i. The highest possible accuracy is reached when calibration temperature is
the same as the measuring temperature.
ii. Moisten the sponge or absorbent cloth in the calibration sleeve with
water and insert the probe into the sleeve, but without touching the
water saturated material. For BOD measurements, this calibration can be
performed in a BOD bottle.
iii. For oxygen levels below 1 mg/L, a second zero calibration point is often
required.
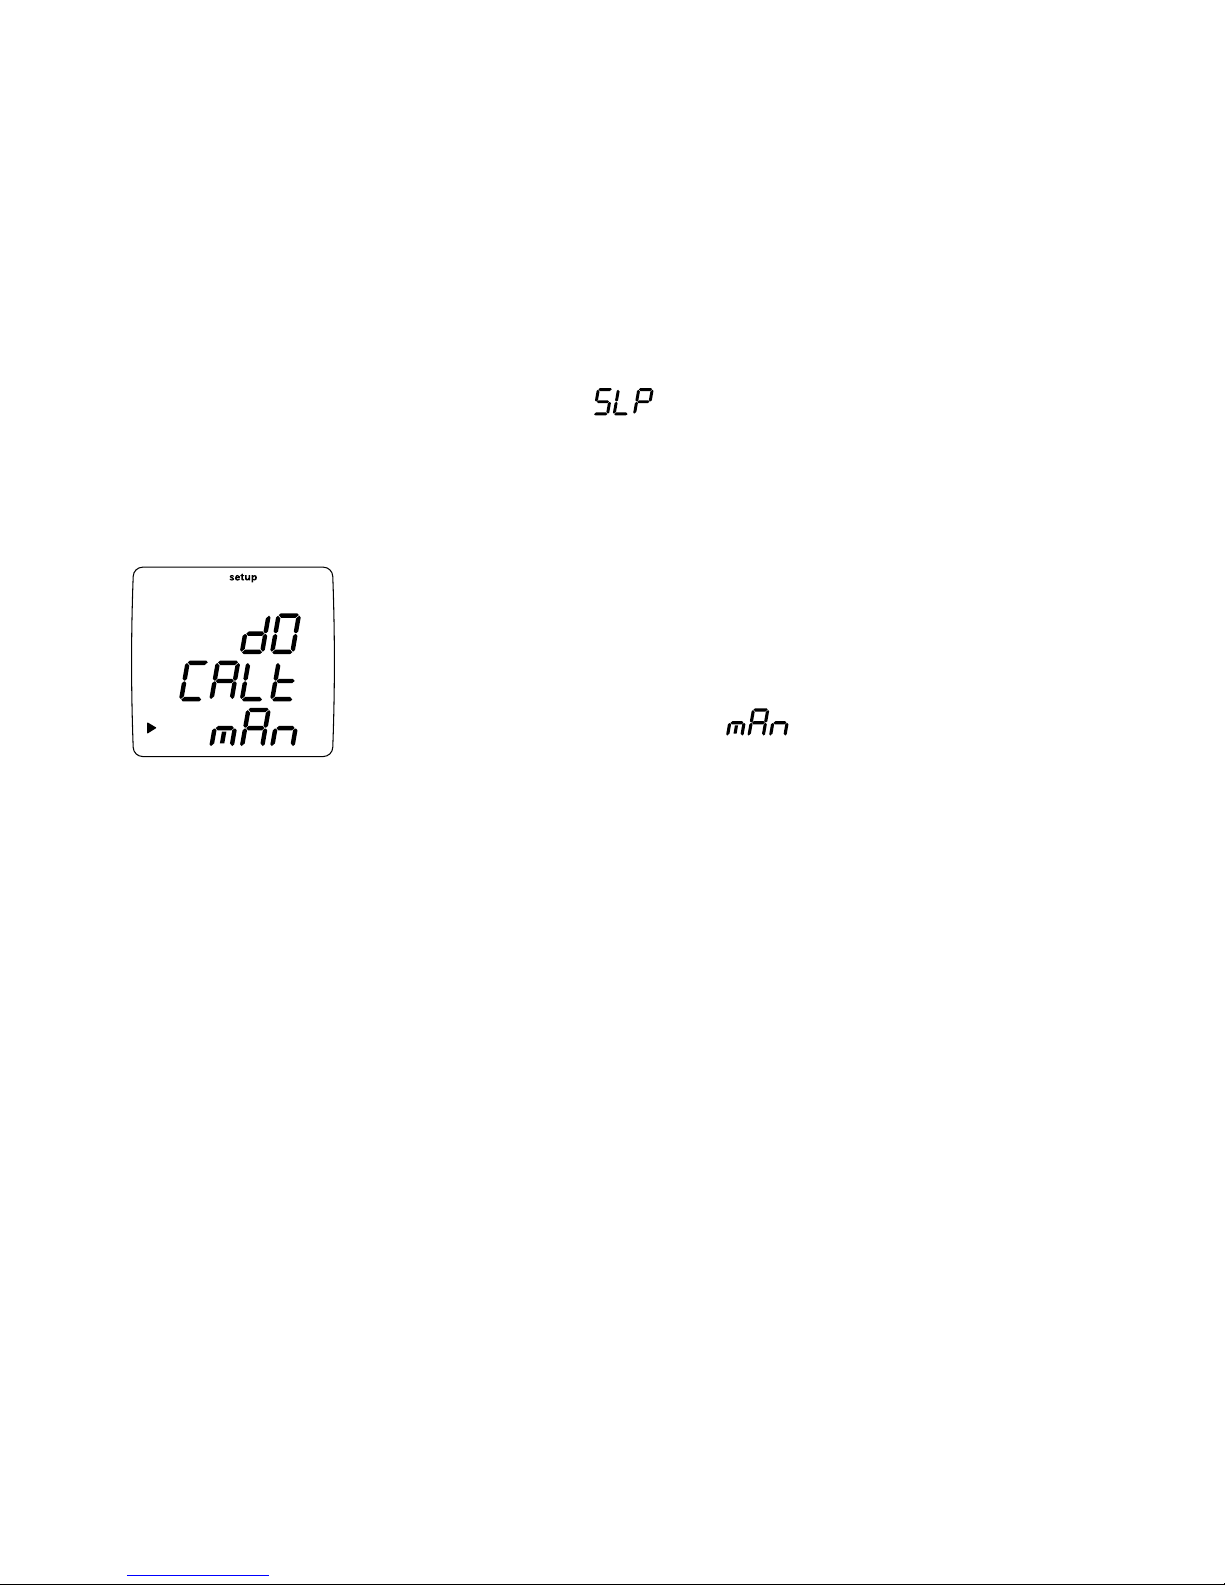
b. denotes Water Calibration performed using a water sample that is
100% saturated with air. It is the least commonly used calibration method.
c. display denotes manual calibration using a water sample with a know
concentration of dissolved oxygen. It can be used to calibrate the sensor to
the value achieved by a Winkler titration.
i. A Winkler calibration involves performing a manual Winkler titration and
then using that sample as a standard. The titration oxygen level result is
entered in a Winkler calibration as the DO standard value. This correlates
the meter input to the Winkler titration. Note, this method is inherently
less accurate due to the possibility of titration errors introduced when the
calibration is set to the titration test results
d. is a zero calibration, which is used for very low level DO
measurements. Not generally required unless you are making
measurements below 5% Saturation or 0.5 mg/L.
7. The probe and calibration standard (water-saturated air or air-saturated water)
should be allowed to reach equilibrium before the system is calibrated.
8. Press
to accept selection and return the arrow icon to the top line.
9. Press
to return to measurement mode.
Page 49

VIII-7
Orion Star Series Meter
Thermo Electron Corporation
Dissolved Oxygen Technique
Calibrating with Water Saturated Air
The calibration function must be enabled in Setup before
the calibration is started.
1. Prepare the calibration sleeve
* by removing the reservoir
cap from the bottom of the sleeve. Remove the sponge
from the cap and saturate it with water. Squeeze all excess
water out of the sponge so that it is merely damp. Replace
the sponge into the cap and replace the cap onto the
calibration sleeve.
* A standard 300 mL BOD bottle may also be used for AIR calibration.
Fill the bottom of the bottle with 50 mL of distilled water. Be sure to
use the BOD funnel accessory (Orion Cat. Nos. 080360 or 080160,
depending on the probe in use). Place the probe into the funnel
so that it is just above the stirring paddle. Ensure that there are no
drops of water on the surface of the membrane. Ensure that the
water level is 1/2 inch below the tip of the probe. Allow at least
30 minutes for the bottle to equilibrate.
2. Place the dissolved oxygen probe into the calibration
sleeve. Ensure that the probe membrane does not come
into contact with the sponge in the calibration sleeve. Also
ensure that there are no drops of water on the membrane.
3. Make sure Setup has
calibration set.
4. To initiate the Air calibration, press
. The “cal” indicator
will light up.
5. While the electrode signal is stabilizing, the meter will
flash a dissolved oxygen reading (based upon the current
calibration data) in the main field. Once the input has
stabilized, 102.3 % saturation will be displayed for three
seconds. The meter will return to measure mode.
Page 50

Thermo Electron CorporationVIII-8 Orion Star Series Meter
Dissolved Oxygen Technique
Water Calibration
The calibration function must be enabled in Setup before
the calibration is started. When stability is reached, the water
standard is set to 100 % or the corresponding concentration
value.
The highest possible accuracy is reached when calibration
temperature is the same as the measuring temperature.
1. Prepare the calibration standard by bubbling air through
a beaker of stirred deionized water for at least one hour.
Ensure that the stirring is vigorous enough to provide
adequate mixing yet not forceful enough to create a vortex
in the beaker. Make sure that the water level is high enough
to fully submerge the probe thermistors, which are located
inside the metal band above the membrane cap. Ensure that
no air bubbles accumulate on the surface of the membrane.
Note: Some magnetic stirrers generate enough heat to change
solution temperature. To avoid this, place a piece of cardboard,
foam rubber or other insulating material between the stir plate
and sample beaker. s
2. Place the dissolved oxygen probe into the aerated water so
that the sensors are immersed. Ensure that there are no air
bubbles accumulating on the membrane.
3. To initiate the Water calibration, press
. The “cal”
indicator will light up.
Page 51
VIII-9
Orion Star Series Meter
Thermo Electron Corporation
Dissolved Oxygen Technique
4. While the electrode signal is stabilizing, the meter will
flash a dissolved oxygen reading (based upon the current
calibration data) in the main field. Once the input has
stabilized, 100.0 % saturation will be displayed for three
seconds.
5. The slope value (
) will then be displayed. The meter
will return to measure mode.
Calibration to the Winkler Titration Method
Many regulatory agencies require the determination of dissolved
oxygen in water to be referenced to the Winkler Titration
Method. The Meter allows the user to scroll the dissolved
oxygen measurement to correlate with the value obtained from
the Winkler titrated sample. The calibration function must
be enabled in Setup before the calibration is started.
1. Place the dissolved oxygen probe into the sample. Make
sure that the water level is high enough to fully submerge
the probe thermistors, which are located inside the metal
band above the membrane cap. Ensure that the stirring is
vigorous enough to provide adequate mixing yet not forceful
enough to create a vortex in the beaker. Ensure that there
are no air bubbles accumulating on the membrane.
Note: Some magnetic stirrers generate enough heat to change
solution temperature. To avoid this, place a piece of cardboard,
foam rubber or other insulating material between the stir plate
and sample beaker. s
Page 52
Thermo Electron CorporationVIII-10 Orion Star Series Meter
Dissolved Oxygen Technique
2. To initiate the Winkler titration calibration, press . The
“cal” indicator will light up.
3. While the electrode signal is stabilizing, the meter will
flash a dissolved oxygen reading (based upon the current
calibration data) in the main field. Once the input has
stabilized, the concentration value, which corresponds to
saturation at the current temperature, pressure and salinity,
will be displayed.
4. The concentration value should then be adjusted to the
value that was obtained via the Winkler titration. Use
/ and to enter value. Press to accept the
concentration value.
5. The slope value (
) will then be displayed for three
seconds. The meter will then return to measure mode.
Probe Zero Calibration
If the expected sample range is at the lower end of the
dissolved oxygen scale, you may want to perform a zeroing
of your probe. If the probe exhibits any residual current, this
calibration will compensate for it. A Probe Zero calibration
should always follow as the second point determination of a
two-point calibration. To remove the effects of a Probe Zero
calibration, perform an Air, Water or Winkler calibration as a onepoint calibration. To perform a Probe Zero calibration, follow the
steps outlined below.
Page 53

VIII-11
Orion Star Series Meter
Thermo Electron Corporation
Dissolved Oxygen Technique
1. Perform either an , , or (Winkler) calibration
before continuing with the Probe Zero calibration. See the
appropriate calibration procedure above.
2. Enable the
calibration function in Setup before the
calibration is started.
3. Prepare an oxygen scavenging solution, such as sodium
sulfide. Add 15 grams of sodium sulfide to 250 mL of
deionized water. Stir until most of the salt has dissolved.
Transfer the solution into a BOD bottle. Place the overflow
funnel into the bottle so that it is snugly sealed.
4. Place the probe into the bottle ensuring that the thermistor
is fully submerged in the solution. Place the bottle on a
magnetic stirrer and stir gently.
5. Allow the solution to eliminate all oxygen from the
membrane module. This should take at least 5 minutes.
6. To initiate the Probe Zero calibration, press
. The “cal”
indicator will light.
7. While the electrode signal is stabilizing, the meter will
flash a dissolved oxygen reading (based upon the current
calibration data) in the main field. Once the input has
stabilized, will be displayed.
8. The user must press
to zero the probe.
Page 54

Thermo Electron CorporationVIII-12 Orion Star Series Meter
Dissolved Oxygen Technique
9. The slope value will then be displayed for three
seconds. The meter will then return to measure mode.
10. After performing the probe zeroing, thoroughly rinse the
probe with deionized water.
Note: Prior to using the BOD funnel and bottle again, be sure
to remove all traces of the oxygen scavenging solution for
accurate measurements. s
DO Measurememts
1. Rinse the electrode, as well as ATC probe and stirrer if being used, in deionized
water. Blot dry with a lint-free tissue. Do not wipe glass electrodes as static
charge will build up on the sensor.
2. Place the electrode in your sample.
a. If you are in continuous measurement mode, the instrument will start
measuring immediately. If you are using the benchtop meter & the stirrer
control is enabled then pressing will start the stirrer.
The
will flash until the reading is stable. Once the reading is stable you
can Log & Print the measurement by pressing the . If you are recording
the data into a notebook, record the pH as well as the temperature at which
the pH reading is taken. If the stirrer is in motion, press to turn off the
stirrer before removing the stirrer from the sample.
b. If you are in AUTO-READ™ mode then press
to start the measurement.
Once the reading is stable the meter will automatically Log & Print the
results and freeze the display. If the stirrer is enabled, then the stirrer will
turn on when is pressed and turn “off” once the reading has stabilized.
Page 55

VIII-13
Orion Star Series Meter
Thermo Electron Corporation
Dissolved Oxygen Technique
When using the AutoStir™ BOD Probe, pressing the button on the probe will
start the AUTO-READ measurement.
c. If you are in Timed Measurement mode then the meter will start making
measurements as soon as it goes into measurement mode at the frequency
selected in setup. It will automatically Log & Print each measurement. If
you are using the benchtop meter and the stirrer control is enabled then
pressing will start the stirrer. Pressing again will turn off the stirrer.
3. Remove the electrode from the sample and rinse with deionized water, then
place it in your next sample and repeat step 2.
4. When all samples have been measured, rinse the electrode with deionized
water and blot dry. Consult your electrode manual for proper electrode storage
instructions.
Page 56

Thermo Electron CorporationVIII-14 Orion Star Series Meter
Dissolved Oxygen Technique
NOTES
Page 57

Thermo Electron Corporation IX-1Orion Star Series Meter
Chapter IX
Conductivity Technique
Definitions of Terms
Before proceeding with instrument setup, the user is advised to become familiar
with the following concepts:
• Conductivity Linear Temperature Compensation
is a default setting in the
Orion Star Series meters.
• The conductivity of a solution with a specific electrolyte concentration changes
with temperature. The relationship of the change in conductivity as a function of
temperature is described by a solution’s temperature coefficient. Temperature
coefficients vary with each solution. Some examples are shown in the table
which follows. This meter uses 2.1%/˚C as the default linear temperature
coefficient, which is representative of many aqueous samples, to compensate
for temperature changes. The meter has an adjustable temperature coefficient of
0.0 to 10.0%/˚C.
Table IX-1 – Typical Temperature Coefficients Between 25 and 50 ºC (Percent
change of Conductivity per ºC)
Solution %/˚C
Ultrapure Water 4.55
Salt (NaCl) Solutions 2.12
5% NaOH 1.72
Dilute Ammonia 1.88
10% HCl 1.32
5% Sulfuric Acid 0.96
98% Sulfuric Acid 2.84
Sugar Syrup 5.64
Page 58

Thermo Electron CorporationIX-2 Orion Star Series Meter
Conductivity Technique
• Conductivity TDS Factor: Total Dissolved Solids (TDS) refers to the dissolved
inorganics in a solution. These dissolved inorganics will carry a current and
will be reflected as a conductivity reading. Since a relationship can be shown
between conductivity and TDS, a conductivity reading can be used as an
estimation of the presence of inorganics.
• The standard method of determining TDS (Total Dissolved Solids) is by
evaporating the sample to dryness at 180 ˚C and weighing the residue. After
evaporating the sample, one would have to calculate a specific “factor” for
the solution by taking the TDS value obtained in weighing and dividing it by
the conductivity of the sample. This factor would then be multiplied by the
subsequent conductivity readings to obtain the TDS value of the sample as
referenced in Standard Methods for Water and Wastewater.
• This Meter allows the operators to enter their own TDS factor for the
calculation of the TDS value in mg/L, with a selectable range from 0.01 to
10.00 and a default value of 0.49. The default value for TDS factor on the
meter is 0.49, which is a reasonable estimate of a TDS factor for natural
water applications.
• Auto-Calibration for conductivity uses a default cell constant to determine the
value of the conductivity standard. In order for the instrument to Auto-recognize
a conductivity standard it must know the cell constant within a factor of 3. So
the meter needs a nominal cell constant for the probe being used. If the real
cell constant was 1.0 then having an estimate of any value between 0.3 and 3.0
would be sufficient to determine which standard was being used and therefore
determine the standards temperature corrected value for calibration.
• The instrument Auto-recognizes Orion conductivity standards
1413 μS/cm,100 μS/cm, and 12.9 mS/cm only.
Page 59

IX-3
Orion Star Series Meter
Thermo Electron Corporation
Conductivity Technique
• Conductivity Temperature Reference: By definition, temperature compensated
conductivity of a solution is the conductivity which that solution exhibits at the
reference temperature. The temperature is chosen to be either 25 ˚C, 20 ˚C,
or 15 ˚C. A measurement made at the reference temperature needs no
compensation. The closer the sample is to the reference temperature, the
smaller the error will be if the meter temperature coefficient is incorrect. The
meter automatically compensates for temperature changes based on the
temperature coefficient and the reference temperature when a temperature
measurement is simultaneously made.
• Conductivity Cell Type & Manual Ranging: This allows you to select a Standard
( ) cell where the conductivity plates are parallel to each other, or Planar
( ) where the conductivity plate are on the same plane. Almost all
conductivity cells are of the Standard arrangement. This also allows the user to
fix the meter in one range. This can be useful with extremely long cables where
cable capacitance could cause non-linearities due to the drive frequency change
between ranges.
Page 60

Thermo Electron CorporationIX-4 Orion Star Series Meter
Conductivity Technique
Conductivity Setup
Description Display Range of Values Default
Value
Method
Specific
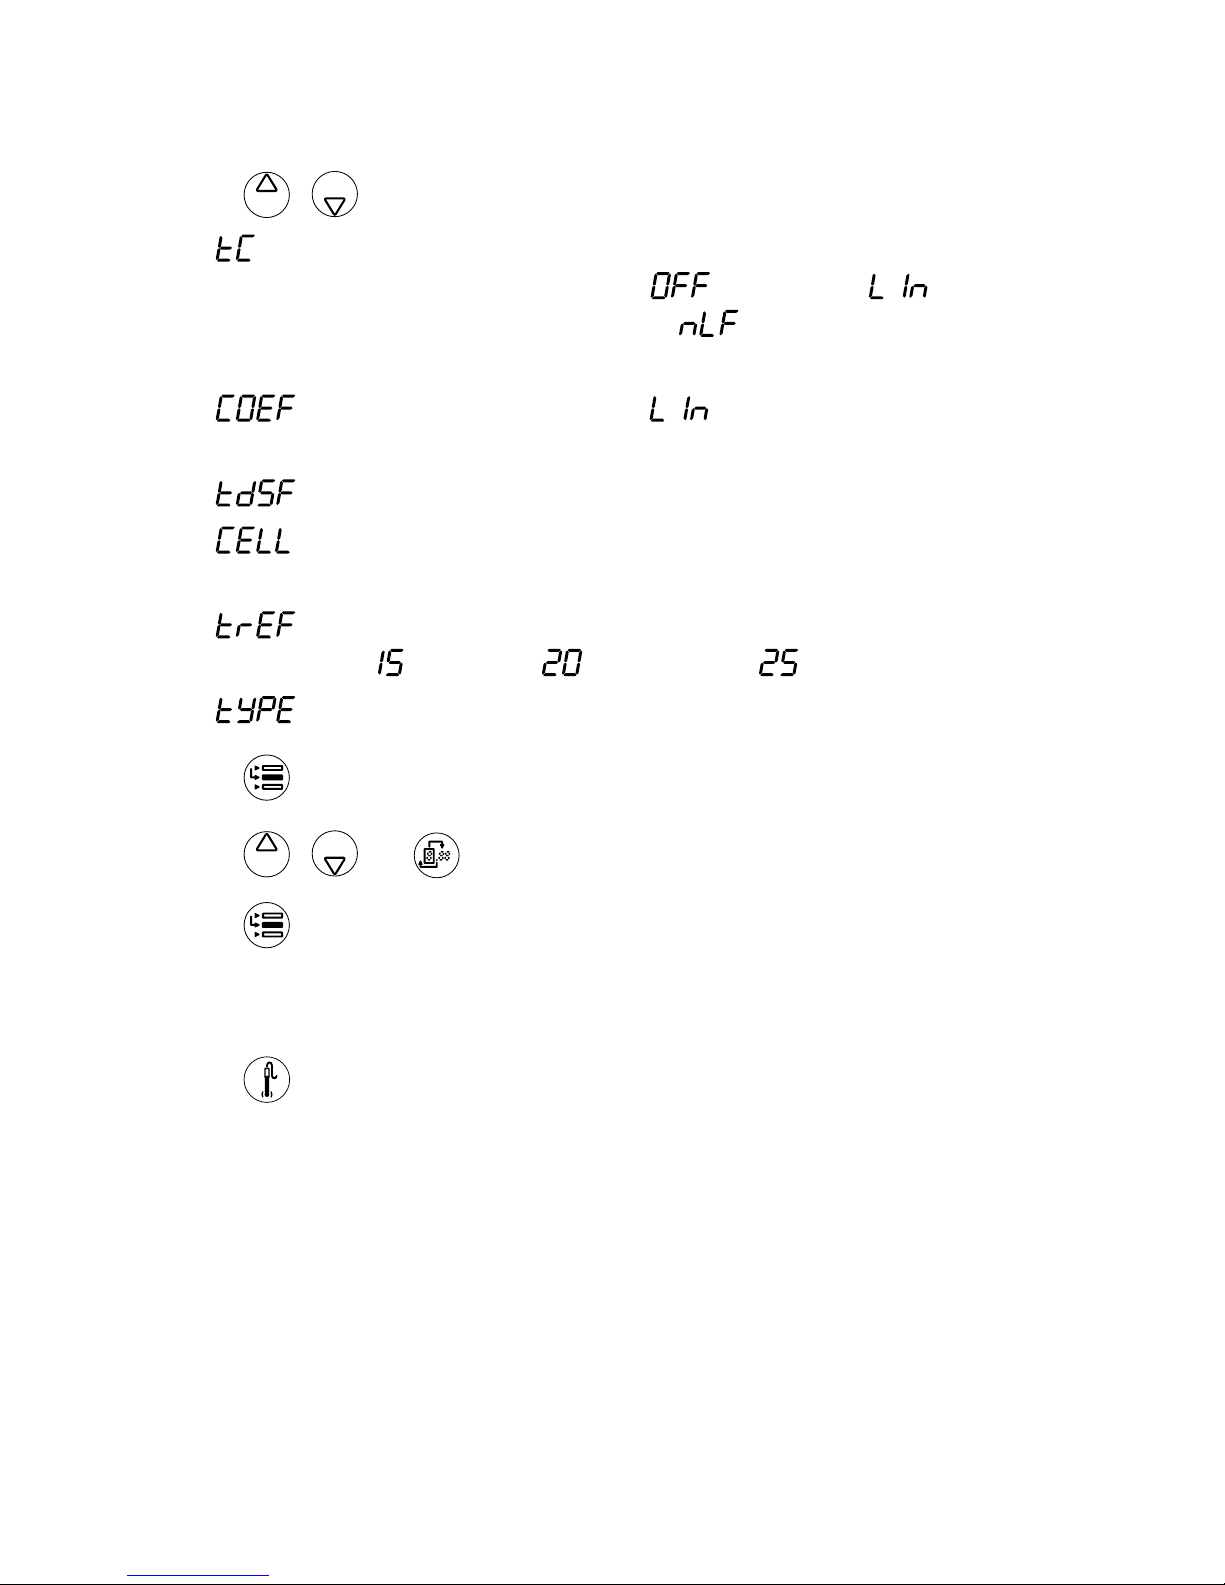
Conductivity Temperature
Compensation Selection
COnd
tC
LIn
OFF, LIn, nLF
Selects Temp Comp OFF,
Linear, or Ultra-pure Water
Lin
Yes
Conductivity Linear
Temperature Compensation
Coefficient Setting
COnd
COEF
2.1
0.0 - 10.0
Linear Temp Compensation
Coefficient in %/C
2.1
Yes
Conductivity TDS Factor
Setting
COnd
tdSF
0.49
0.00 - 10.0
TDS factor
0.49
Yes
Conductivity AutoCalibration Default Cell
Constant Setting
COnd
CELL
0.475
0.001 - 199.0
Cell Constant used for
Cond Auto-Standard
0.475
Yes
Conductivity Temperature
Reference Selection
COnd
trEF
25
15, 20, 25
Conductivity Reference
Temperature
25
Yes
Conductivity Cell Type &
Manual Ranging Selection
COnd
tyPE
PLnr
PLnr, Std, 1, 2, 3, 4, 5, 6, 7
Standard, Planer Cond Cell
Or sets Manual range 1-7
Std
Yes
1. In the measurement mode press
.
2. Press
/ to scroll through the Setup Menu’s until is displayed on
the Top line.
3. Press
to accept the selection and move the arrow icon to the middle line.
Page 61
IX-5
Orion Star Series Meter
Thermo Electron Corporation
Conductivity Technique
4. Press / to scroll through the following Conductivity settings:
•
= Temperature Compensation Selection. The users may elect to turn
temperature compensation , select linear temperature
compensation, or a non-linear temperature compensation for
natural and ultra-pure water.
• = Temperature coefficient for (linear) temp compensation
expressed in % /C.
• = TDS Factor for Total Dissolved Solids measurement
• = Conductivity Cell Constant (nominal cell constant used for
Auto-Calibration)
• = Reference temperature for temperature compensation. Options
are degrees C, degrees C, or degrees C.
• = Conductivity cell type (Planar or Conventional)
5. Press
to accept the selection and move the arrow icon to the bottom line.
6. Press
/ and to edit value.
7. Press
to accept the selection and move the arrow to the top line.
8. Repeat steps 3-7 to edit conductivity settings as needed.
9. Press
to return to measurement mode.
Page 62

Thermo Electron CorporationIX-6 Orion Star Series Meter
Conductivity Technique
Conductivity Calibration for 1-5 Points
• Select a conductivity probe with an appropriate cell constant for the expected
conductivity of the samples to be measured. A flow cell is recommended for
greater low level measurement accuracy. Fresh standards should be used for
each calibration.
• Verify the correct reference temperature has been selected in the conductivity
setup menu.
• All conductivity calibrations are performed in mS/cm or μS/cm. The other
measurement modes of conductivity are calculated using the cell constant
determined from the calibration measurement parameters selected in the
setup menu.
1. Prepare the probe for use according to the probe user guide or operator’s
manual.
2. In the measurement mode press
until the arrow icon is pointing to the
conductivity measurement line.
3. Press
.
4. Rinse the probe and place into the conductivity standard.
5. To perform a Manual Calibration – The screen will display the cell constant on
the bottom line and the conductivity value on the middle line. Use
and
/ to change the cell constant until the displayed conductivity value matches
the conductivity of the conductivity standard at the measured temperature.
• If you do not start changing the cell constant within 5 seconds the meter will
automatically proceed to the AutoCal™/DirectCal™ screen.
Page 63

IX-7
Orion Star Series Meter
Thermo Electron Corporation
Conductivity Technique
6. To perform an AutoCal or Direct Calibration – Wait for the µS/cm or mS/cm icon
to stop flashing.
• AutoCal – When the
µS/cm or mS/cm icon stop flashing the meter will
display the temperature corrected value of the conductivity standard.
• Direct Calibration – When the
µS/cm or mS/cm icon stop flashing the
meter will display the actual conductivity value read by the conductivity
probe. Use and / to change the conductivity value to the actual
value of the conductivity standard at the measured temperature.
7. Press
to proceed to the next calibration point and repeat steps 4 through 6
or press to save and end the calibration.
8. After the value for the last standard has been entered the cell constant will
be displayed appears in the lower field and the actual constant
appears in the main field. The meter will automatically advance to the
measurement mode. The is displayed above the main field.
To Take a Conductivity Measurement
1. Rinse electrode and place into sample. Record conductivity directly from the
main meter display when the mS/cm or μS/cm icon stops flashing indicating a
stable value. Temperature is displayed in the top left corner of the display.
2. Place the electrode in your sample.
a. If you are in continuous measurement mode, the instrument will start
measuring immediately. If you are using the benchtop meter & the stirrer
control is enabled then pressing will start the stirrer.
Page 64

Thermo Electron CorporationIX-8 Orion Star Series Meter
The
will flash until the reading is stable. Once the reading is stable you
can Log & Print the measurement by pressing the . If you are recording
the data into a notebook, record the pH as well as the temperature at which
the pH reading is taken. If the stirrer is in motion, press to turn off the
stirrer before removing the stirrer from the sample.
b. If you are in AUTO-READ™ mode then press
to start the measurement.
Once the reading is stable the meter will automatically Log & Print the
results and freeze the display. If the stirrer is enabled, then the stirrer will
turn on when is pressed and turn “off” once the reading has stabilized.
When using the AutoStir™ BOD Probe, pressing the button on the probe will
start the AUTO-READ measurement.
c. If you are in Timed Measurement mode then the meter will start making
measurements as soon as it goes into measurement mode at the frequency
selected in setup. It will automatically Log & Print each measurement. If
you are using the benchtop meter and the stirrer control is enabled then
pressing will start the stirrer. Pressing again will turn off the stirrer.
3. Remove the electrode from the sample and rinse with deionized water, then
place it in your next sample and repeat step 2.
4. When all samples have been measured, rinse the electrode with deionized
water and blot dry. Consult your electrode manual for proper electrode storage
instructions.
Page 65

Thermo Electron Corporation X-1Orion Star Series Meter
Chapter X
ISE Technique
Definition of Terms and Concepts
• ISE Resolution selects the number of significant digits displayed in
measurement mode. In addition, the resolution selection is used by SMART
STABILITY™ & SMART AVERAGING™ algorithms to optimize the accuracy,
precision, and response of the ISE measurement.
• ISE Units denote the units to be displayed in measurement & calibration. Both
measurement and calibration must be performed in the same units.
• ISE Calibration Standard Concentration Range selects the stability criteria to
be used in the ISE calibration. For most calibrations the
setting is the
best option. The setting can improve the accuracy of low concentration
measurements by allowing the sensor a longer amount of time to stabilize in the
calibration standard.
• ISE Auto-Blank Correction uses Thermo’s patented Auto-Blank algorithm to
compensate for sensor non-linearities in low-level measurements. Since these
require the use of a set of non-linear equations that can only be calculated
numerically, the user cannot analytically verify the calibration. In applications
were analytical verification is a requirement, the user can choose the turn the
Auto-blank correction .
Page 66

Thermo Electron CorporationX-2 Orion Star Series Meter
ISE Technique
ISE Setup Options
Description Display Range of Values Default
Value
Method
Specific
ISE Resolution ISE
rES
1
1, 2, 3
ISE Resolution in
Significant Digits
1
Yes
ISE Units ISE
UnIt
PPb
M, mG/L, per, PPb, nOnE
ISE Units Displayed
PPb
Yes
ISE Calibration Standard
Concentration Range
ISE
rAng
HIgH
LOw, HIgH
Stability criteria used
during ISE Calibration
HIgH
Yes
ISE Auto-Blank Correction ISE
nLIn
AUtO
AUtO, OFF
Enables or Disables
Calibration Auto-Blank
AUtO
Yes
1. In the measurement mode press
.
2. Press
/ to scroll through the setup menu until is displayed on the
top line.
3. Press
to accept the selection and move to the middle line.
4. Press
/ to scroll through the following options:
•
= Resolution
•
= ISE Measurement units
• M = Molar
• mG/L = mg/L
• PEr = Percent
• PPb = Parts per Billion
• nOnE = No units
Page 67

X-3
Orion Star Series Meter
Thermo Electron Corporation
ISE Technique
• = ISE Measurement range
• HIgH
• LOw
• = Non-linear Blank Correction
• OFF
• AUtO
5. Press
to accept the selection and move the arrow icon to the bottom line.
6. Press
/ and to edit the selected value.
7. Press
to accept the selection and return the arrow icon to the top line.
8. Repeat steps 3 through 7 to edit ISE settings as needed.
9 Press
to return to measurement mode.
Page 68

Thermo Electron CorporationX-4 Orion Star Series Meter
ISE Technique
Preparation of Standards
The standards should be prepared in the same ISE units as required by the sample
results. It is preferable to use serial dilutions with volumetric glassware to obtain
the different concentration levels.
Note: Any reagents such as ionic strength adjustors, should be added to
samples and standards as specified in the electrode User Guide or Instruction
Manual. s
The calibration points should bracket the expected concentration range of the
samples and there should be a tenfold change in concentration (i.e. 1 ppm and
10 ppm or 10 ppm and 100 ppm).
Fresh aliquots of standard should be used at each calibration.
Prior to each day’s measurements, a two or more point calibration should be
performed. To verify the calibration the electrode should be placed in a fresh aliquot
of standard and if the value has changed the electrode should be recalibrated.
Recommended slopes are given with electrode instructions.
It is recommended that the calibration and sample measurements be taken at the
same temperature for greater accuracy and reproducibility.
Note: For greater low-level measurement accuracy, a new low-level ISE
calibration option is available. An additional rinse of the electrode with the
next standard or sample solution is recommended for any low level
measurements. s
Page 69

X-5
Orion Star Series Meter
Thermo Electron Corporation
ISE Technique
Autoblank Correction
Blank correction occurs automatically when calibrating with three or more
standards. This feature automatically calculates and corrects for background levels of
the species of interest.
Auto-Blank correction can be turned off in ISE setup as described in the ISE setup
instructions.
ISE Setup Options
1. In measurement mode press .
2. Press
/ to scroll through setup menu until ISE is displayed on the
top line.
3. Press
to accept the selection and move arrow icon to the middle line.
4. Press
/ until is displayed on the middle line.
5. Press
to accept the selection and move arrow icon to the bottom line.
6. Press
/ to scroll:
•
– Auto Blank correction OFF
• – Auto Blank correction ON
7. Press
to accept the selection and move arrow icon to the top line.
8. Press
to return to the measurement mode.
Page 70

Thermo Electron CorporationX-6 Orion Star Series Meter
ISE Technique
ISE Calibration for 1-5 Points
1. Prepare the electrode and standard for use according to the electrode user
guide or instruction manual.
2. Press
until the arrow icon is pointing to the ISE measurement line.
3. Press
.
4. Rinse the electrode and place into the standard.
5. Wait for
ISE to stop flashing. Press / and to change the value of
the standard.
6. Press
to proceed to the next calibration point and repeat steps 4-6 or press
to save the calibration.
7. The slope will be displayed before the meter returns to the measurement mode.
is displayed in the lower field and the actual electrode slope, in mV, is
displayed in the main field.
Note: For a 2 or more point calibration the meter will automatically proceed
to measurement mode after 3 seconds. For a 1 point calibration the meter will
allow you to edit the slope then press to proceed to measurement mode. s
Note: If editing a negative number for slope: s
a. Press until no digit is blinking and the arrow icon is blinking.
b. Press / to change the sign of the slope.
c. Press to save.
Page 71

X-7
Orion Star Series Meter
Thermo Electron Corporation
ISE Technique
ISE Measurement
After calibrating the electrode the meter is ready to start making measurements.
Make sure that the instrument is in measurement mode ( is lit) and that the ISE
is lit. If the is not lit press to return to measurement mode. If the ISE is
not lit, press until the arrow on the left of the display is pointing at the top line.
Then press until the ISE lights. You are now ready to start measuring.
1. Rinse the electrode in deionized water.
2. Place the electrode in your sample.
a. If you are in continuous measurement mode, the instrument will start
measuring immediately. If you are using the benchtop meter & the stirrer
control is disabled, then pressing will start the stirrer. The ISE will flash
until the reading is stable. Once the reading is stable you can Log & Print
the measurement by pressing . If the stirrer is on, press to turn off
the stirrer before removing the stirrer from the sample.
b. If you are in AUTO-READ™ mode then press
to start the measurement.
Once the reading is stable the meter will automatically Log & Print the
results and freeze the display. If the stirrer is enabled then the stirrer will
turn on when is pressed and turn off once the reading has stabilized.
c. If you are in timed measurement mode then the meter will start making
measurements at the frequency you have specified during setup. It will
automatically Log & Print each measurement. If you are using the benchtop
meter & the stirrer control is enabled, then pressing will start the stirrer.
Pressing again will turn off the stirrer.
Page 72

Thermo Electron CorporationX-8 Orion Star Series Meter
ISE Technique
3. Remove the electrode from the sample and rinse with deionized water, then
place it in your next sample and repeat step 2.
4. Once your are finished measuring samples, rinse the electrode with deionized
water and blot dry. Then consult your electrode manual for proper electrode
storage instructions.
Page 73

Thermo Electron Corporation XI-1Orion Star Series Meter
Chapter XI
mV and ORP Technique
Definition of Terms and Concepts
• mV is a raw input reading and therefore does not have a user calibration.
• The Orion Star Series meter can measure the absolute millivolts from pH, ISE,
or ORP sensors.
Relative mV and ORP (EH) Calibration
Note: Auto-Calibration for ORP requires an Orion ORP electrode and Orion ORP
calibration standards (Cat. Nos. 967901 and 967961). s
1. Prepare the electrode and standard for use according to the electrode User
Guide or Instructions Manual received with the electrode.
2. Press
until the arrow icon is pointing to the pH/RmV measurement line.
3. Press
/ until RmV is lit.
4. Press
.
5. Rinse the electrode and place into the ORP standard.
6. Wait for the
RmV to stop flashing. When the RmV stop flashing the meter
will display the temperature – corrected mV value as compared to the Standard
Hydrogen Electrode (SHE or NHE) for the Orion ORP standard.
7. Press
to save the calibration.
Page 74

Thermo Electron CorporationXI-2 Orion Star Series Meter
mV and ORP Technique
If performing a manual calibration, when the RmV stops flashing, press /
and to change the value, then press or to accept the standard value
and return to measurement mode. Use the temperature chart on the standard bottle
or instruction sheet to enter the appropriate value for the temperature and reference
type being used.
mV Measurement
Make sure that the instrument is in measurement mode (the is lit) and that
the arrow on the left of the display is pointing at the top line. Then press /
until the mV lights. The mV will now be displayed. This mode is very helpful
in troubleshooting because it displays the input signal being received from the
electrode.
If the is not lit, press to return to measurement mode. If the mV is not lit,
press until the arrow icon is pointing at the top line. Then press / until
the mV lights. You are now ready to make measurements.
1. Rinse the electrode in deionized water.
2. Place the electrode in your sample.
a. If you are in continuous measurement mode, the instrument will start
measuring immediately. If you are using the benchtop meter & the stirrer
control is disabled then pressing will start the stirrer. mV will flash until
the reading is stable. Once the reading is stable you can Log & Print the
measurement by pressing . If the stirrer is on press to turn off the
stirrer before removing the stirrer from the sample.
Page 75

XI-3
Orion Star Series Meter
Thermo Electron Corporation
mV and ORP Technique
b. If you are in AUTO-READ mode then press to start the measurement.
Once the reading is stable the meter will automatically Log & Print the
results and freeze the display. If the stirrer is enabled then the stirrer will
turn on when is pressed and turn off once the reading has stabilized.
c. If you are in timed measurement mode then the meter will start making
measurements as soon as it goes into measurement mode at the frequency
set in setup. It will automatically Log & Print each measurement. If you are
using the benchtop meter & the stirrer control is disabled then pressing
will start the stirrer. Pressing again will turn off the stirrer.
3. Remove the electrode from the sample and rinse with deionized water, then
place it in your next sample and repeat step 2.
4. Once you have finished measuring samples, rinse the electrode with deionized
water and blot dry. Then consult your electrode manual for proper electrode
storage instructions.
Relative mV & ORP (EH) Measurement
After calibrating the electrode the meter is ready to start making measurements.
Make sure that the instrument is in measurement mode (the is lit) and that the
Rel mV is lit. If the is not lit press to return to measurement mode. If the
Rel mV is not lit, press the until the arrow on the left of the display is pointing
at the top line. Then press / until the Rel mV lights. You are now ready to
start measuring.
1. Rinse the electrode in deionized water.
Page 76

Thermo Electron CorporationXI-4 Orion Star Series Meter
mV and ORP Technique
2. Place the electrode in your sample.
a. If you are in continuous measurement mode, the instrument will start
measuring immediately. If you are using the benchtop meter & the stirrer
control is disabled then pressing will start the stirrer. The Rel mV will
flash until the ready is stable. Once the ready is stable you can Log & Print
the measurement by pressing . If the stirrer is on press to turn off
the stirrer before removing the stirrer from the sample.
b. If you are in AUTO-READ™ mode then press
to start the measurement.
Once the ready is stable the meter will automatically Log & Print the results
and freeze the display. If the stirrer is enabled then the stirrer will turn on
when is pressed and turn off once the reading has stabilized.
c. If you are in timed measurement mode then the meter will start making
measurements as soon as it goes into measurement mode at the frequency
set in setup. It will automatically Log & Print each measurement. If you are
using the benchtop meter & the stirrer control is enabled then pressing
will start the stirrer. Pressing again will turn off the stirrer.
3. Remove the electrode from the sample and rinse with deionized water, then
place it in your next sample and repeat step 2.
4. Once you have finished measuring samples, rinse the electrode with deionized
water and blot dry. Then consult your electrode manual for proper electrode
storage instructions.
Page 77

Thermo Electron Corporation XII-1Orion Star Series Meter
Chapter XII
Orion Star Series Specifications
Environmental Operating Conditions
Portable and Benchtop Meters
Ambient Operating Temperature 5 to 45 °C
Relative Humidity 5 to 85%, Non-Condensing
Storage Temperature - 20 to + 60 °C
Storage Humidity 5 to 85%, Non-Condensing
Pollution Degree 2
Overvoltage Category II
Altitude up to 2000 m
Weight Portable: 0.45 kg
Benchtop: 0.91 kg
Size Portable: 4.8 cm (H) x 9.7 cm (W) x 21.3 cm (D)
Benchtop: 9.4 cm (H) x 17.0 cm (W) x 22.4 cm (D)
AC powered Meters Indoors Use Only
Battery operated meters Indoors/Outdoors
Wall Adapter Environmental Conditions
Ambient Operating Temperature 0 to 40 °C
Relative Humidity 20 to 90%, Non-Condensing
Storage Temperature - 20 to 85 °C
Storage Humidity 20 to 90%, Non-Condensing
Pollution Degree 2
Overvoltage Category II
Operating Altitude up to 2000 m
Storage Altitude up to 3000 m
Benchtop Meters Indoors Use Only
Page 78

Thermo Electron CorporationXII-2 Orion Star Series Meter
Orion Star Series Specifications
Orion Star Series Specifications (cont’d)
Regulatory and Saftey
CE, CSA, TÜV, UL, FCC Class limits
Case Material
ABS
Shock and Vibration
Vibration, Shipping/Handling Per ISTA #1A
Shock, Drop Test in Packaging Per ISTA #1A
Enclosure (designed to meet)
IP67 (Portable Meter)
IP54 (Benchtop Meter)
Note: If the products described in this manual are used in a manner that is not
specified by Thermo Electron the protection provided by the equipment maybe
impaired. s
Page 79

XII-3
Orion Star Series Meter
Thermo Electron Corporation
Orion Star Series Specifications
2 & 3-Star Meter Specifications (Benchtop & Portable)
2, 3-Star pH
pH Range - 2.000 to 19.999
Resolution 0.1/0.01/0.001
Relative accuracy ± 0.002
ORP mV/RmV/Eh Range ± 1999.9
Resolution ± 0.1
Relative accuracy ± 0.2 mV or 0.5%, whichever is greater
3-Star DO
DO Concentration 0.000 to 90.00 mg/L
Relative Accuracy 0.2 mg/L
% Saturation 0.0 to 600
Salinity factor 0 to 45 ppt
Barometric pressure 450 - 850 mm Hg
3-Star Conductivity
Conductivity Range 0 - 5000 mS/cm cell constant dependent
See probe specification for the cell constant
Resistivity 0.0001 to 100 Megohms
Salinity 0.01 to 80.0 ppt NaCl
TDS 0.0 to 19.999.0 mg/L
Cell Constant 0.001 to 199.9
Reference temperature 15 °C, 20 °C or 25 °C (default), autoranging
Note: 2-Star Benchtop pH meter does not include methods, password, calibration
alarms, backlight, stirrer, remote control, computer output format, and is limited to
3-point calibration, 50 datalog points, and a range of 0.000 to 14.000 pH units.
Page 80

Thermo Electron CorporationXII-4 Orion Star Series Meter
Orion Star Series Specifications
4-Star Meter Specifications (Benchtop & Portable)
4-Star pH/ISE
pH Range - 2.000 to 19.999
Resolution 0.1/0.01/0.001
Relative accuracy ± 0.002
ISE Concentration Range 0.0 to 19,900.0
Units M, mg/L, %, ppb, none
Resolution 1, 2, or 3 sig. Digits
Relative Accuracy ± 0.2 mV or 0.05%, whichever is greater
mV/RmV ± 1999.9
ORP mV/RmV/Eh Range ± 1999.9
Resolution ± 0.1
Relative accuracy ± 0.2 mV or 0.5%, whichever is greater
4-Star pH/DO
pH Range - 2.000 to 19.999
Resolution 0.1/0.01/0.001
Relative accuracy ± 0.002
DO Concentration 0.000 to 90.00 mg/L
Relative Accuracy 0.2 mg/L
% Saturation 0.0 to 600
Salinity factor 0 to 45 ppt
Barometric pressure 450 - 850 mm Hg
ORP mV/RmV/Eh Range ± 1999.9
Resolution ± 0.1
Relative accuracy ± 0.2 mV or 0.5%, whichever is greater
Page 81

XII-5
Orion Star Series Meter
Thermo Electron Corporation
Orion Star Series Specifications
4-Star pH/Conductivity
pH Range - 2.000 to 19.999
Resolution 0.1/0.01/0.001
Relative accuracy ± 0.002
Conductivity Range 0 - 5000 mS/cm cell constant dependent
See probe specification for the cell constant
Resistivity 0.0001 to 100 Megohms
Salinity 0.01 to 80.0 ppt NaCl
TDS 0.0 to 19.999.0 mg/L
Cell Constant 0.001 to 199.9
Reference temperature 15 °C, 20 °C or 25 °C (default), autoranging
ORP mV/RmV/Eh Range ± 1999.9
Resolution ± 0.1
Relative accuracy ± 0.2 mV or 0.5%, whichever is greater
Page 82

Thermo Electron CorporationXII-6 Orion Star Series Meter
5-Star Meter Specifications (Benchtop & Portable)
5 Star pH/ISE/DO/Cond
pH Range - 2.000 to 19.999
Resolution 0.1/0.01/0.001
Relative accuracy ± 0.002
ISE* Concentration Range 0.0 to 19,900.0
Units M, mg/L, %, ppb, none
Resolution 1, 2, or 3 sig. Digits
Relative Accuracy ± 0.2 mV or 0.05% whichever is greater
mV/RmV ± 1999.9
DO Concentration 0.000 to 90.00 mg/L
Relative Accuracy 0.2 mg/L
% Saturation 0.0 to 600
Salinity factor 0 to 45 ppt
Barometric pressure 450 - 850 mm Hg
Conductivity Range 0 - 5000 mS/cm cell constant dependent
See probe specification for the cell constant
Resistivity 0.0001 to 100 Megohms
Salinity 0.01 to 80.0 ppt NaCl
TDS 0.0 to 19.999.0 mg/L
Cell Constant 0.001 to 199.9
Reference temperature 15 °C, 20 °C or 25 °C (default), autoranging
ORP mV/RmV/Eh Range ± 1999.9
Resolution ± 0.1
Relative accuracy ± 0.2 mV or 0.5%, whichever is greater
* 5-Star pH/DO/Cond meter is also available in a portable model.
Page 83

Chapter XIII
Care and Maintenance
The Orion Star Series meters combine simple three-button operation with
exceptional long-life performance. Rugged enough for the most challenging
environmental laboratory and field applications, all housings are dustproof and
splash proof. The benchtop meters are rated IP54. The handheld meters are rated
IP67 and may be immersed for up to one hour with no water incursion;
they even float!
Regular maintenance should include dusting and wiping the unit with a damp cloth.
A mild water-based detergent may be used if necessary.
Spills should be removed immediately using the proper procedure for the type of spill.
Error Codes & Debugging
If an error code is displayed on the screen, the user must press to clear.
Error
Code
Description
Press
to Clear
Cause Trouble Shooting
E001 No Model Number Yes Memory Corrupted
Contact Customer Service
E002 No HW Calibration Yes Memory Corrupted
Contact Customer Service
E003 Bad HW Calibration Yes Memory Corrupted
Contact Customer Service
E004 RTC Failure Yes HW Transient or Failure
Reset Meter, if error
reoccurs contact Customer
Service
E005 User out of range Yes HW Transient
or Failure
Re-enter value. Check
specifications for range of
correct values
E033 Keypad Failure Yes Hardware problem or
user missed hitting
one of the keys during
the test
Re-run the self test to
insure you have a hardware
problem, then contact
Customer Service
XIII-1
Orion Star Series Meter
Thermo Electron Corporation
Page 84

Thermo Electron CorporationXIII-2 Orion Star Series Meter
Care and Maintenance
Error
Code
Description
Press
to Clear
Cause Trouble Shooting
E034 Input Failure Yes Hardware problem or
BNC shorting cap not
attached during self test
Attach BNC shorting cap
and return the self test
E035 Password Wrong Yes User entered
incorrect password
Re-enter the password
If you have forgotten your
password contact Customer
Service
E036 User Entered
Wrong Value
Yes User entered value is
out of range
Re-enter value. Check
specifications for range of
correct values
E038 Log Full Yes User setup as delete on
download & data log
is full
Download the datalog or
change setup to delete on
download off. This will
start over writing the oldest
log values.
E105 Auto-Buffer Failure Yes Auto-buffer not
recognized, will
only happen in remote
control
Contact Customer Service
E?? Memory Error Yes A memory read, write,
verify, or checksum error
This is ANY error message
starting with E. The 2nd
2 digits refer to what
memory section failed.
Clear error and if repeats
return for service.
F01 No DO board in DO
meter
Yes Meter is missing DO board Return for service
F02 No FET board in
FET meter
Yes Meter is missing FET
board
Return for Service
F05 An option board is
installed and none
is required
Yes Meter has a DO or FET
board installed and it’s not
used in this model
Return for service
Page 85

XIII-3
Orion Star Series Meter
Thermo Electron Corporation
Care and Maintenance
pH Events/Errors
Error
Code
Description
Press
to Clear
Cause Trouble Shooting
105 pH Auto-Buffer
Failure
Yes Auto-buffer not
recognized, will only
happen in remote
control
• Check that electrode is in
correct buffer.
• Check that correct buffer set in
selected in the method setup.
• Clean electrode & refill
reference electrode
• Perform a manual calibration.
Some electrodes may operate
outside of the range for pH
autocalibration. This may be
a sign of electrode aging and
is normal.
107 pH Calibration
Standard Error
Yes The milivolts being
measured are the
same for two different
standards.
• Check that the two different
buffers are being used and
that the electrode is in the
correct buffer.
• Make fresh buffers and repeat
the calibration.
109 Bad pH Slope Yes The pH slope is not in
the range of 80% to
120%
• Repeat calibration using fresh
buffers
• Clean electrodes and refill
reference electrode
• Refer to electrode instruction
on how to check electrode
Page 86

Thermo Electron CorporationXIII-4 Orion Star Series Meter
Care and Maintenance
ISE Events/Errors
Error
Code
Description
Press
to Clear
Cause Trouble Shooting
306 ISE Blank Error Yes The meter is unable to
calculate a blank value.
This error occurs when
Auto Blank is enabled
in setup and a three or
more point calibration
has been performed,
when one solution
has been defined as
zero concentration
and the actual
concentration of the
blank is substantially
greater then the least
concentrated standard.
This can also occur
during a one or two
point calibration if one
of the standards is
defined as zero.
• Check to make sure electrodes
were placed in the proper
standards and blank solution
and recalibrate.
• Repeat calibration using fresh
standards and blank solution.
• Repeat using two standards
of known concentration other
then zero.
307 ISE Calibration
Standard Error
Yes The milivolts being
measured are the
same for two different
standards.
• Check that the two different
standards are being used and
that the electrode is in the
correct standard.
• Make fresh standards and
repeat the calibration.
309 Bad ISE Slope Yes The pH slope is
not in the range of
- 99 to + 99 mV/Decade
• Repeat calibration using fresh
standards
• Clean electrodes and refill
reference electrode
• Refer to electrode instruction
on how to check electrode
Page 87

XIII-5
Orion Star Series Meter
Thermo Electron Corporation
Care and Maintenance
Conductivity Events/Errors
Error
Code
Description
Press
to Clear
Cause Trouble Shooting
705 Conductivity
Auto-Standard
Failure
Yes Auto-standard
not recognized,
will only happen
in remote control
• Check that electrode is in correct
standard.
• Recalibrate using fresh standards
• Check that the appropriate cell constant
is entered in the method setup.
• Clean electrode
• Replatinize conductivity cell (if
applicable)
707 Conductivity
Calibration
Standard Error
Yes The conductance
being measured
is the same for
two different
standards.
• Check that the two different standards
are being used and that the electrode is
in the correct standard.
• Make fresh standards and repeat the
calibration.
709 Conductivity
Cell Constant
Yes The cell constant
is not in the
range of 0.001 to
199.0
• Repeat calibration using fresh
standards
• Clean electrodes
• Replatinize conductivity cell (if
applicable
DO Events/Errors
Error
Code
Description
Press
to Clear
Cause Trouble Shooting
809 Bad DO Slope Yes The DO slope is
not in the range
of 3.92 to 19.7
nano-amps /
%saturation
• Repeat calibration
• On Air calibration make sure sponge in
calibration sleeve is damp.
• On water calibration make sure water
is saturated with air by bubbling but
stirred to prevent keep bubbles off the
membrane surface.
• Polish the cathode and replace the
membrane cap and fill solution.
Page 88

Thermo Electron CorporationXIII-6 Orion Star Series Meter
Care and Maintenance
Troubleshooting
Conductivity
1. Temperature coefficient entry screen doesn’t show up in Setup.
• or is selected for the temperature compensation in Setup. Change
conductivity temperature compensation to and the next screen allows
the manual entry of the temperature coefficient.
2. Conductivity goes out of range when it should still be in range.
• Check that the Cell Type selected in setup is and not one of the
manual ranging numbers 1 – 7.
Dissolved Oxygen
1. Manual barometric pressure entry screen doesn’t show up in Setup.
• Auto is selected for barometric pressure compensation in
setup. Change pressure compensation to manual and the
next screen will be the manual pressure entry screen.
2. Manual salinity factor entry screen doesn’t show up in Setup.
• Auto is selected for salinity correction in setup. Change salinity correction to
manual and the next screen will be the salinity factor entry screen.
3. The Auto-stir DO probe doesn’t turn on when is pressed.
• Read Type must be set as Auto and a stirrer speed must be set to operate
initiate auto-read & stirring from the BOD probe button.
ISE
1. It takes several minutes for the readings to stabilize in calibration.
• Concentration range in setup maybe set too low. Change setting to high.
• ISE may need maintenance, refer to the ISE electrode User Guide.
2. Auto-blank correction gives slope that is too low or cannot be manually checked.
• Turn Auto-Blank correction off in Setup.
Page 89

XIII-7
Orion Star Series Meter
Thermo Electron Corporation
Care and Maintenance
General
1. The display freezes and will not change value.
• The meter is in Auto-Read mode. Press to start a new measurement,
or switch to continuous measurement in setup.
2. The Timed reading time entry screen doesn’t show up in setup.
• Measurement type is set to Auto-Read or Continuous mode in setup.
Change to Timed mode and the next screen will be the timed reading time
setting menu.
3. When I hit the Calibration key the display says “wAIt”.
• The meter is printing out and cannot enter calibration until printing is
complete. If the meter is at a default baud rate of 9600 then this should
rarely occur and not last more then a second before preceding to calibration.
If it’s set to a lower baud rate the delay could be several seconds.
4. The meter did not accept my setup changes. When I return to setup it still has
the old values.
• You either went back to the wrong setup or did not accept the value you
entered by pressing the line select key before pressing measure to return to
measurement mode.
5. How can I abort a calibration?
• Pressing and holding will abort any operation and return you to
measurement mode.
6. My printout is just a string of numbers and units with commas.
• The printout format in setup is set for computer output. Change this to
Printer output.
• The “SYSTEM” command was issued within 30 seconds of the printout.
7. When I press , the stirrer doesn’t work.
• Go into setup and select a stirrer speed. The current setting is probably OFF.
• The unit was running on batteries in a bench top unit.
Page 90

Thermo Electron CorporationXIII-8 Orion Star Series Meter
Care and Maintenance
Self-Test Instructions
1. Power up the meter and wait until the SW revision is displayed, then press .
2. The display will then fully light and remain lit.
3. Once you have visual checked that all display segment have lit press again
and this will turn off the display.
4. After visually confirming that all the display elements are turned off, press
again the display will show KEY.
5. Press each key on the meter. If each key isn’t pressed in 5 seconds it will
display “Err” on the middle line & “033” on the bottom line indicating a key
failure. Press to clear the error and complete the self-test.
6. If all the keys are functioning then the meter will restart and go to measurement
mode.
7. If you get the error 034 during the self-test, check that the shorting cap is
installed on the meter.
8. Reject the meter if any errors are reported during self-test.
Page 91

XIII-9
Orion Star Series Meter
Thermo Electron Corporation
Care and Maintenance
Example printouts
The examples below show the printer version of the RS232 output. If the user
has selected the computer output, then the data will be presented in the same
order, but only the raw data (no labels or units) will be given in a comma separated
format. User fields will not be output in the computer format. A user field is a label
with a line after it, such as “Sample # ____________”. In the example printouts, this
computer output text will be in red.
Example of a pH printout using “printer” setting:
3-Star BENCHTOP pH
Meter S/n 123456
SW rev 1.29
Method # 5
06-29-2004 09:05:27
pH 10.45 pH
mV -183.3 mV
Temperature 25.0 C
Calibration # 3
Log # 2
Sample # ____________
Example of a pH printout using “computer” setting:
112,123456,28,5,06-29-2004 09:05:27,-183.3,mV,10.45,pH,25.0,C,3,2
Note that the sample # and operator lines are not shown in the computer printout.
Blank lines are also skipped. Units are given directly after a measurement. If a
measurement does not have units, then this field will be blank.
Page 92

Thermo Electron CorporationXIII-10 Orion Star Series Meter
Care and Maintenance
Meter power-up, calibration and measurement printout
header
Each printout will start with a particular style of header, shown below. For ease of
documentation maintainability, this header is not shown in the examples below.
Company name Thermo Electron ©2005 (only valid when first turned on)
Model 5-Star BENCHTOP MULTI (see section Error! Reference source not
found., computer format is only 3 digits)
Serial number Meter S/n 123456
SW rev SW rev 1.29
Method number Method # 5
Date & Time 06-29-2004 09:05:27
Calibration number & type Calibration # 3 PH
Blank
Please note that the calibration number & type is only printed for calibrations, and
the type can be one of the following options: pH, ORP, ISE, Planar Conductivity,
Conductivity, DO air, DO zero, DO water, DO man.
Example of mV Measurement
MV mV -183.3 mV
Temperature Temperature 25.0 C
Log number Log # 2
Operator Operator ____________
Sample ID Sample # ____________
Page 93

XIII-11
Orion Star Series Meter
Thermo Electron Corporation
Care and Maintenance
Example of pH Measurement
PH pH 10.45 pH
MV mV -183.3 mV
Temperature Temperature 25.0 C
Calibration number Calibration # 3
Log number Log # 2
Operator Operator ____________
Sample ID Sample # ____________
Example of ISE Measurement
Concentration Concentration 100 ppb (or M or% or mg/L)
mV mV 100.1 mV
Temperature Temperature 25.0 C
Calibration number Calibration # 3
Log number Log # 2
Operator Operator ____________
Sample ID Sample # ____________
Example of ORP Measurement
Relative mV Relative 120.1 mV
Absolute mV Absolute 100.1 mV
Temperature Temperature 25.0 C
Calibration number Calibration # 3
Log number Log # 2
Operator Operator ____________
Sample ID Sample # ____________
Example of Conductivity Measurement
Conductivity Conductivity 1413 µS/cm
Conductance Conductance 30.2 mS
Page 94

Thermo Electron CorporationXIII-12 Orion Star Series Meter
Care and Maintenance
Temperature Temperature 25.0 C
Temp. Coefficient Temp. Coefficient 10.0 %/C (or OFF, or NLF)
Temp. Reference Temp. Reference 25.0 C
Cell Constant Cell Constant 1.00 /cm
Calibration number Calibration # 3
Log number Log # 2
Operator Operator ____________
Sample ID Sample # ____________
Example of Resistivity Measurement
Resistivity Resistivity 100.0 Mohm-cm
Conductance Conductance 30.2 mS
Temperature Temperature 25.0 C
Temp. Coefficient Temp. Coefficient 10.0 %/C (or OFF, or NLF)
Temp. Reference Temp. Reference 25.0 C
Cell Constant Cell Constant 1.00 /cm
Calibration number Calibration # 3
Log number Log # 2
Operator Operator ____________
Sample ID Sample # ____________
Example of TDS Measurement
TDS TDS 100.0 mg/L
Conductance Conductance 30.2 mS
Temperature Temperature 25.0 C
Temp. Coefficient Temp. Coefficient 10.0 %/C (or OFF, or NLF)
Temp. Reference Temp. Reference 25.0 C
TDS Factor TDS Factor 0.49
Cell Constant Cell Constant 1.00 /cm
Page 95

XIII-13
Orion Star Series Meter
Thermo Electron Corporation
Care and Maintenance
Calibration number Calibration # 3
Log number Log # 2
Operator Operator ____________
Sample ID Sample # ____________
Example of Salinity Measurement
Salinity Salinity 100.0 ppt
Conductance Conductance 30.2 mS
Temperature Temperature 25.0 C
Cell Constant Cell Constant 1.00 /cm
Calibration number Calibration # 3
Log number Log # 2
Operator Operator ____________
Sample ID Sample # ____________
Example of DO Measurement
Concentration Concentration 100.0 mg/L
% Saturation Saturation 60.0 %sat
Current Current 100.0 nA
Temperature Temperature 25.0 C
Barometric Pressure Barometric Pressure 760.0 mmHg
Salinity Correction Salinity Correction 20.0 ppt
Calibration number Calibration # 3
Log number Log # 2
Operator Operator ____________
Sample ID Sample # ____________
Page 96

Thermo Electron CorporationXIII-14 Orion Star Series Meter
Care and Maintenance
Example of a multi-parameter printout
A multi-parameter printout is the same as the above printouts, with the exception of
a few minor changes.
1. the header and footer is only printed once.
2. Each section is separated by a blank line. The print out is determined by what is
on the display.
3. If a particular line is turned off, then that section will not be printed out.
4. If all lines are turned off, nothing other than the header will get printed.
PH pH 10.45 pH
MV mV -183.3 mV
Temperature Temperature 25.0 C
Calibration number Calibration # 2
Blank line
Conductivity Conductivity 1413 uS/cm
Conductance Conductance 30.2 mS
Temperature Temperature 25.0 C
Temp. Coefficient Temp. Coefficient 10.0 %/C (or OFF, or NLF)
Temp. Reference Temp. Reference 25.0 C
Cell Constant Cell Constant 1.00 /cm
Calibration number Calibration # 7
Blank line
Concentration Concentration 100.0 mg/L
% Saturation Saturation 60.0 %sat
Current Current 100.0 nA
Temperature Temperature 25.0 C
Barometric Pressure Barometric Pressure 760 mmHg
Page 97

XIII-15
Orion Star Series Meter
Thermo Electron Corporation
Care and Maintenance
Salinity Correction Salinity Correction 20 ppt
Calibration number Calibration # 3
Log number Log # 2
Operator Operator ____________
Sample ID Sample # ____________
Example of pH Calibration
Cal. Pt. 1 Point 1
pH 1 pH 2.00 pH
mV 1 MV 190.0 mV
Temp. 1 Temperature 25.0 C
Auto/Manual Cal. Type: Auto
Blank line
Cal. Pt. 2 Point 2
pH 2 pH 4.55 pH
mV 2 mV 173.0 mV
Temp. 2 Temperature 25.0 C
Auto/Manual Cal. Type: Manual
Blank line
Cal. Pt. 3 Point 3
pH 3 pH 7.00 pH
mV 3 mV 0.0 mV
Temp. 3 Temperature 25.0 C
Auto/Manual Cal. Type: Auto
Blank line
Cal. Pt. 4 Point 4
pH 4 pH 10.01 pH
mV 4 mV -170.0 mV
Temp. 4 Temperature 25.0 C
Page 98

Thermo Electron CorporationXIII-16 Orion Star Series Meter
Care and Maintenance
Auto/Manual Cal. Type: Auto
Blank line
Cal. Pt. 5 Point 5
pH 5 pH 13.85 pH
mV 5 mV -192.0 mV
Temp. 5 Temperature 25.0 C
Auto/Manual Cal. Type: Auto
Blank line
Slope P1 - P2 Slope 1 98.1 %
Slope P2 - P3 Slope 2 99.2 %
Slope P3 - P4 Slope 3 100.3 %
Slope P4 - P5 Slope 4 98.4 %
E01 Eo 1 50.1 mV
E02 Eo 2 50.1 mV
E03 Eo 3 50.1 mV
E04 Eo4 50.1 mV
Operator Operator _____________
Example of ISE Calibration
Cal. Pt. 1 Point 1
Concentration 1 Concentration 10.0 ppb
mV 1 mV 190.0 mV
Temp. 1 Temperature 25.0 C
Cal. Type 1 Cal. Type: Manual
Blank line
Cal. Pt. 2 Point 2
Concentration 2 Concentration 23.1 ppb
mV 2 MV 173.0 mV
Temp. 2 Temperature 25.0 C
Page 99

XIII-17
Orion Star Series Meter
Thermo Electron Corporation
Care and Maintenance
Cal. Type 2 Cal. Type: Manual
Blank line
Cal. Pt. 3 Point 3
Concentration 3 Concentration 40.0 ppb
mV 3 MV 0.0 mV
Temp. 3 Temperature 25.0 C
Cal. Type 3 Cal. Type: Manual
Blank line
Cal. Pt. 4 Point 4
Concentration 4 Concentration 50.0 ppb
mV 4 MV -170.0 mV
Temp. 4 Temperature 25.0 C
Cal. Type 4 Cal. Type: Manual
Blank line
Cal. Pt. 5 Point 5
Concentration 5 Concentration 60.0 ppb
mV 5 MV -192.0 mV
Temp. 5 Temperature 25.0 C
Cal. Type 5 Cal. Type: Manual
Blank line
Slope P1 - P2 Slope 1 59.1 mV/dec
Slope P2 - P3 Slope 2 59.2 mV/dec
Slope P3 - P4 Slope 3 59.6 mV/dec
Slope P4 - P5 Slope 4 59.4 mV/dec
E01 Eo 1 50.1 mV
E02 Eo 2 50.1 mV
E03 Eo 3 50.1 mV
E04 Eo4 50.1 mV
Blank correction blank 0.123 ppb
Operator Operator _____________
Page 100

Thermo Electron CorporationXIII-18 Orion Star Series Meter
Care and Maintenance
Example of Conductivity Calibration
Cal. Pt. 1 Point 1
Conductivity 1 Conductivity 100.0 µS/cm
Conductance 1 Conductance 10.0 mS
Temp. 1 Temperature 25.0 C
Auto/Manual Cal. Type: Auto
Blank line
Cal. Pt. 2 Point 2
Conductivity 2 Conductivity 1413 uS/cm
Conductance 2 Conductance 32.2 mS
Temp. 2 Temperature 25.0 C
Auto/Manual Cal. Type: Auto
Blank line
Cal. Pt. 3 Point 3
Conductivity 3 Conductivity 12.9 mS/cm
Conductance 3 Conductance 67.2 mS
Temp. 3 Temperature 25.0 C
Auto/Manual Cal. Type: Auto
Blank line
Cal. Pt. 4 Point 4
Conductivity 4 Conductivity 111.9 mS/cm
Conductance 4 Conductance 100.0 mS
Temp. 4 Temperature 25.0 C
Auto/Manual Cal. Type: Aut
Blank line
Cal. Pt. 5 Point 5
Conductivity 5 Conductivity 200.0 mS/cm
Conductance 5 Conductance 150.5 mS
 Loading...