


Winemex
English - Svenska - Español

WARNING
Thermex Scandinavia A/S offers no guarantee for our wine cooler if it is being used for any purpose
other than that for which it was specifically designed. We cannot be held responsible for any error in this
manual. is not responsible or liable for any spoilage or damage to wines or any other contents incidental
or consequential to possible defects of the wine cooler. Warranty applies to the wine cooler only and not
to the content of the wine cooler.
This appliance can be used by children aged from 8 years and above and persons with reduced physical,
sensory or mental capabilities or lack of experience and knowledge if they have been given supervision or
instruction concerning use of the appliance in a safe way and understand the hazards involved. Children
shall not play with the appliance. Cleaning and user maintenance shall not be made by children without
supervision.
Children should be supervised to ensure that they do not play with the appliance.
Please don't put such as acidic items, flammable and explosive goods into wine cooler.
This appliance is intended to be used in household and similar applications such as
– staff kitchen areas in shops, offices and other working environments;
– farm houses and by clients in hotels, motels and other residential type environments;
– bed and breakfast type environments;
– catering and similar non-retail applications.
DANGER: Risk of child entrapment. Before you throw away your old wine cooler:
- Take off the doors;
- Leave the shelves in place so that children may not easily climb inside;
- When disposing of the appliance, do so only at an authorized waste disposal center.
R600a WARNINGS:
For your safety observe the following recommendations.
This appliance contains a small quantity of R600a refrigerant which is environmentally friendly, but
flammable. It does not damage the ozone layer, nor does it increase the greenhouse effect.
During transportation and installation, ensure that the tubing of the refrigerant circuit is not damaged.
Avoid using or manipulating sharp objects near by the appliances.
Leaking refrigerant can ignite and may damage the eyes.
In the event any damage does occur, avoid exposure to open fires and any device which creates a
spark. Disconnect the appliance from the mains power.
Thoroughly ventilate the room in which the appliance is located for several minutes.
Notify Customer Service for necessary action and advice.
The room for installing the appliance must be at least 1 cubic metre per 8 grams of refrigerant. The
refrigerant quantity contained in this appliance is listed above in grams; it is also noted on the Rating
Plate of the appliance.
It is hazardous for anyone other than an Authorised Service Person to carry out servicing or
repairs to this appliance.
- WARNING: Keep ventilation openings in the appliance enclosure or in the built-in structure clear
of obstruction.

- WARNING: Do not use mechanical devices or other means to accelerate the defrosting process, other
than those recommended by the manufacturer.
- WARNING: Do not damage the refrigerant circuit.
- WARNING: Do not use electrical appliances inside the food storage compartments of the appliance,
unless they are of the type recommended by the manufacturer.
- WARNING: If you do not use the machine for a long time, please unplug the power plug from the
socket or switch off the power supply.
- WARNING: This appliance is not intended for use by persons (including children)
with reduced Physical, sensory or mental capabilities, or lack of experience and knowledge, unless they
have been given supervision or instruction concerning use of the appliance by a person responsible
for their safety;
- WARNING: Children should be supervised to ensure that they do not play with the appliance;
- WARNING: Do not use extension cords or ungrounded (two prong) adapters;
- WARNING: If the supply cord is damaged, it must be replaced by the manufacturer,
Its service agent or similar qualified person in order to avoid hazard.
Allow 24 hours before switching on the wine cooler. During this time we recommend that you leave
the door open to clear any residual odors.
BEFORE LOADING & PLUGGING IN THE WINE COOLER
Important: All models without front venting (air opening) are strictly for free standing only. (See
technical chart)
Recommendations:
The location you have selected for your wine cooler should:
- be unencumbered and well ventilated;
- be well away from any heat source and direct sunlight;
- not be too damp (laundry, pantry, bathroom etc.);
- have a flat floor;
- have a standard and reliable electricity supply (standard socket to country standards, linked to the
ground), it is NOT recommended to use a multi-socket or extension lead;
- have a surge protector fitted to the electrical outlet;
- Away from the microwave oven. Certain microwave ovens do not have wave interference shield.
When placed within 1 meter vicinity of the wine cabinet, they may affect the operation of the wine
cabinet.
Notes:
- Winemex24 model is for built-in ONLY.
- Winemex69 model is for free standing ONLY.
- Winemex20, Winemex40, Winemex145 models are Both built-in and free-standing type as per the
drawings thereafter.
Wine cooler should be placed where the ambient temperature is proper (Please view the end of Manual).
If the temperature is above or below this range, it will affect the performance of the cooler. Placing in
cold or hot temperature conditions may cause cooler's temperatures fluctuating, and it will not reach the
ideal one.

Grounding instructions:
The wine cooler must be grounded in case of wire leakage. Grounding reduces the risk of electrical
shock. The wine cooler is equipped with a power cord having a grounding wire and plug. The wine cooler
plug must be plugged into a properly affixed and grounded electrical outlet.
Note: In locations where there is frequent lightning, it is advisable to use surge protectors.
Improper use of the grounding plug can result in the risk of electric shock. Consult a qualified electrician
or service person if the grounding instructions are not completely understood.
If the supply cord is damaged, it must be replaced by a qualified person in order to avoid electrical
hazard.
DIMENSIONAL DRAWINGS:
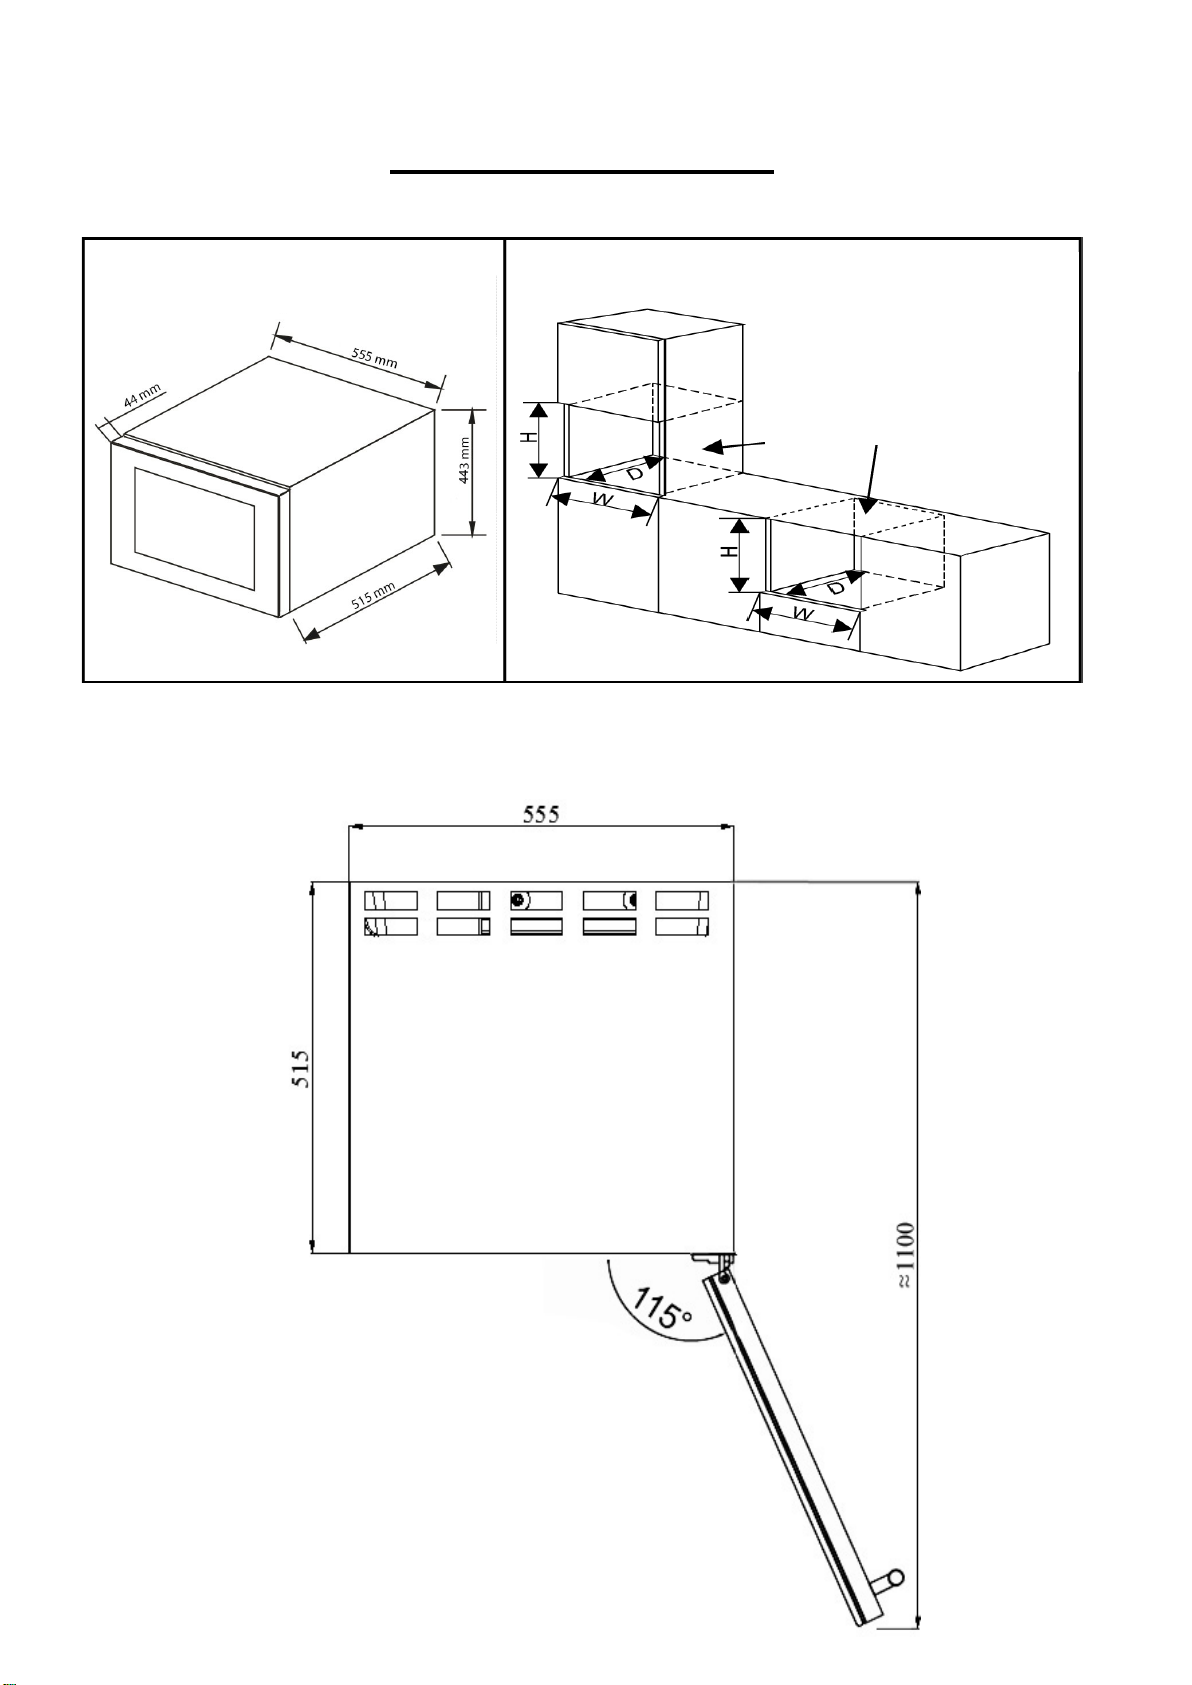
WINEMEX24
Installation Dimension
W564*H450*D550
No background in the
cabinet (for heat dissipation)
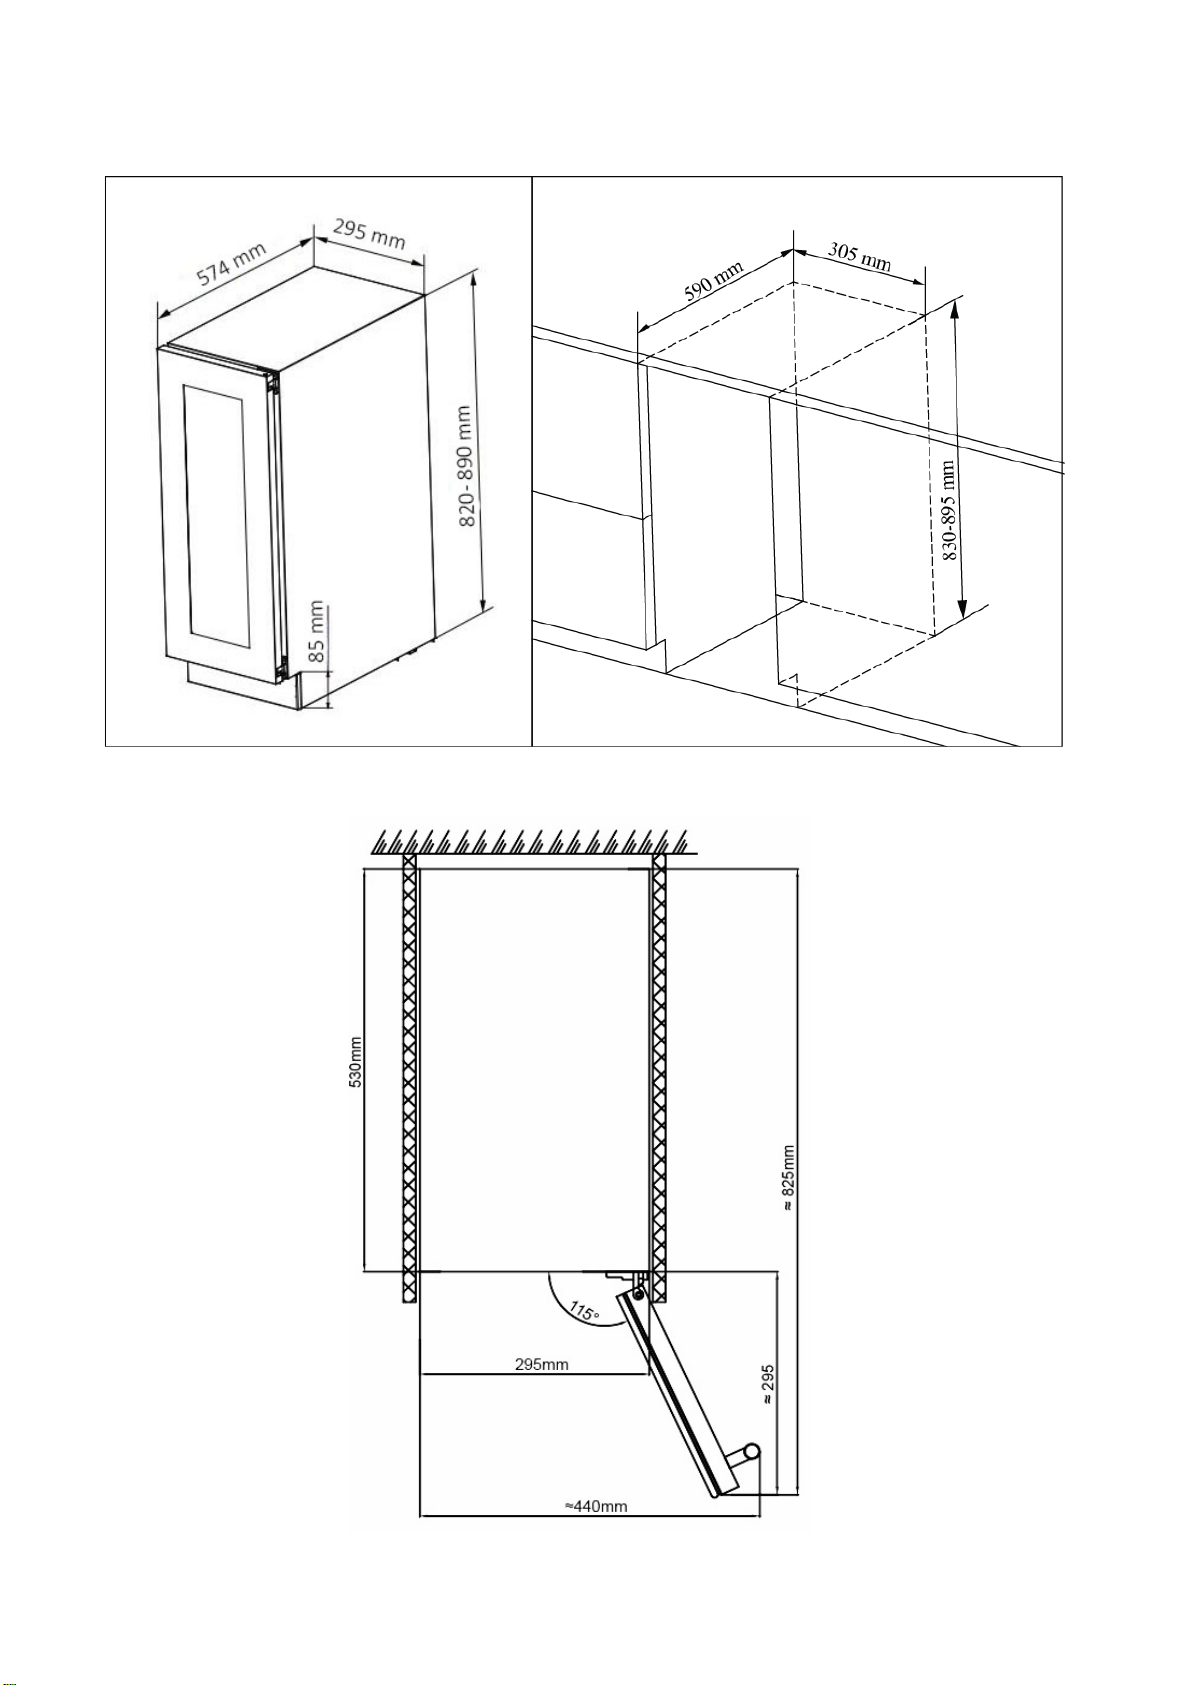
WINEMEX20
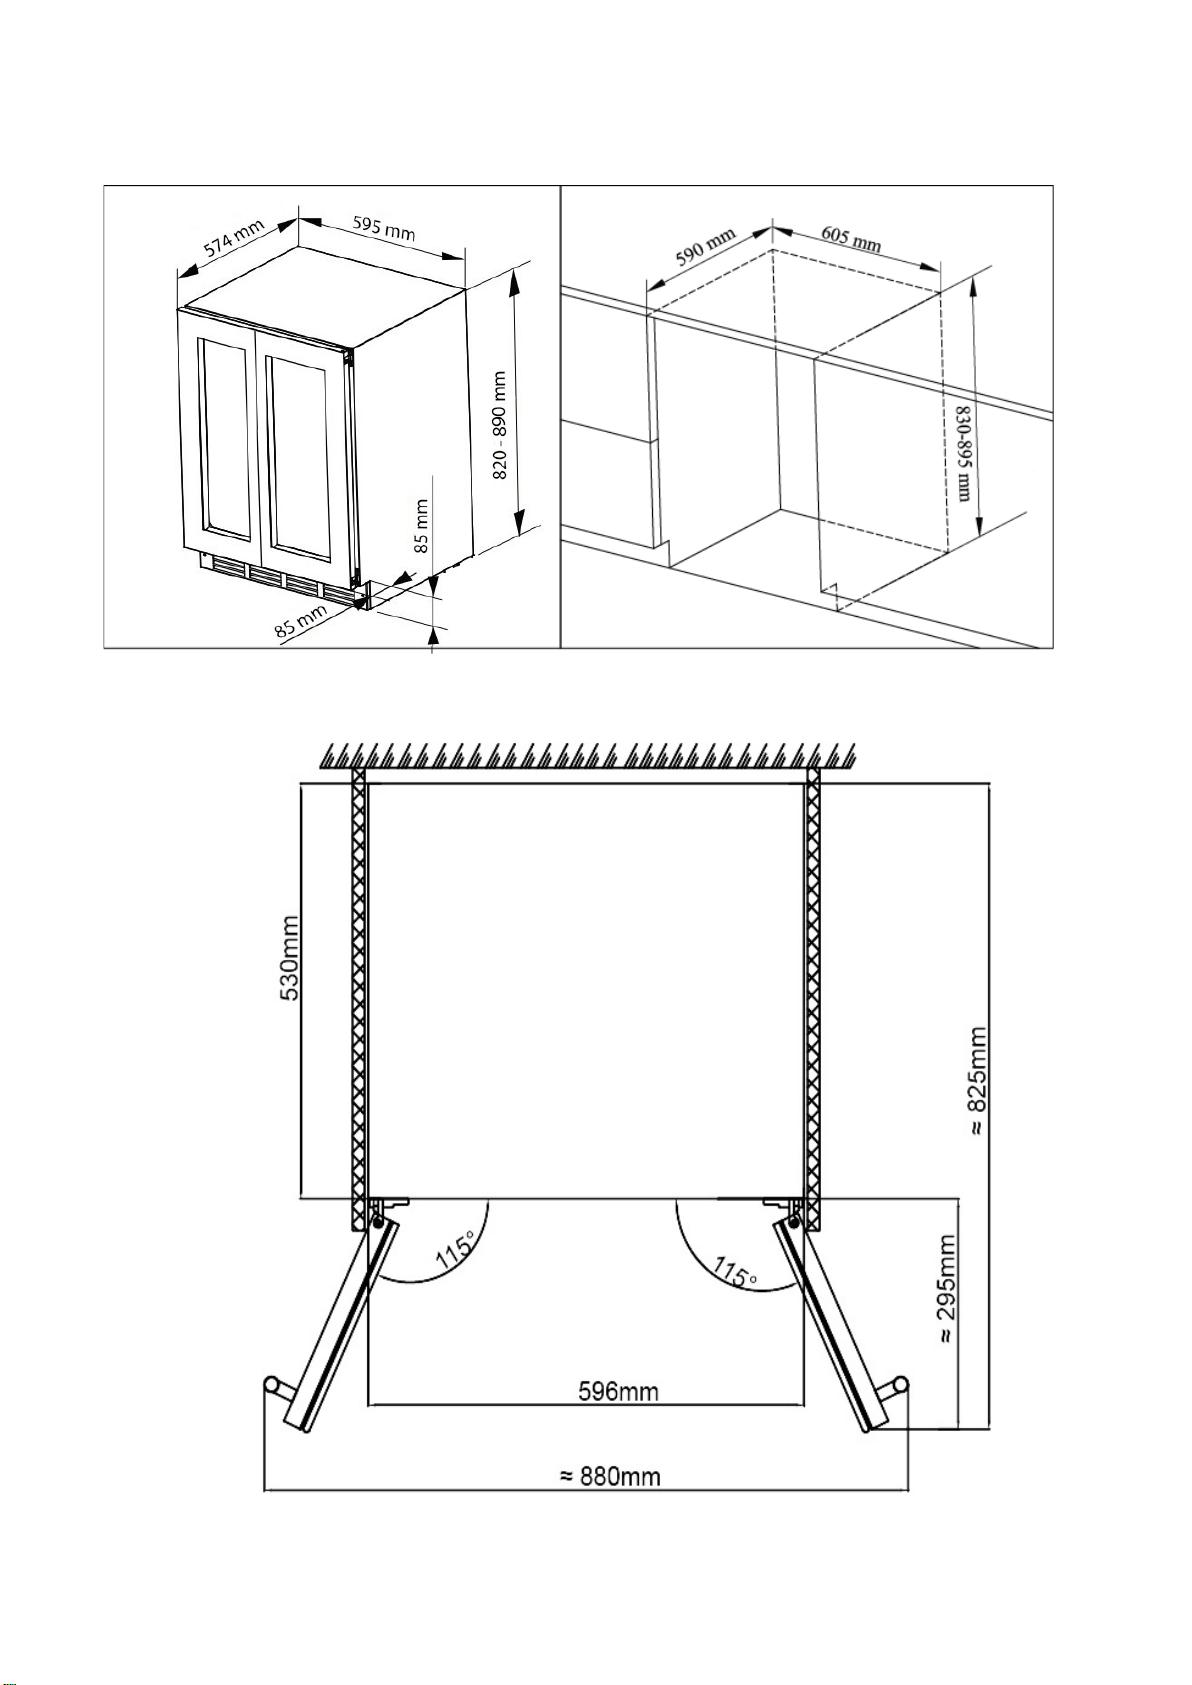
WINEMEX40
WINEMEX69
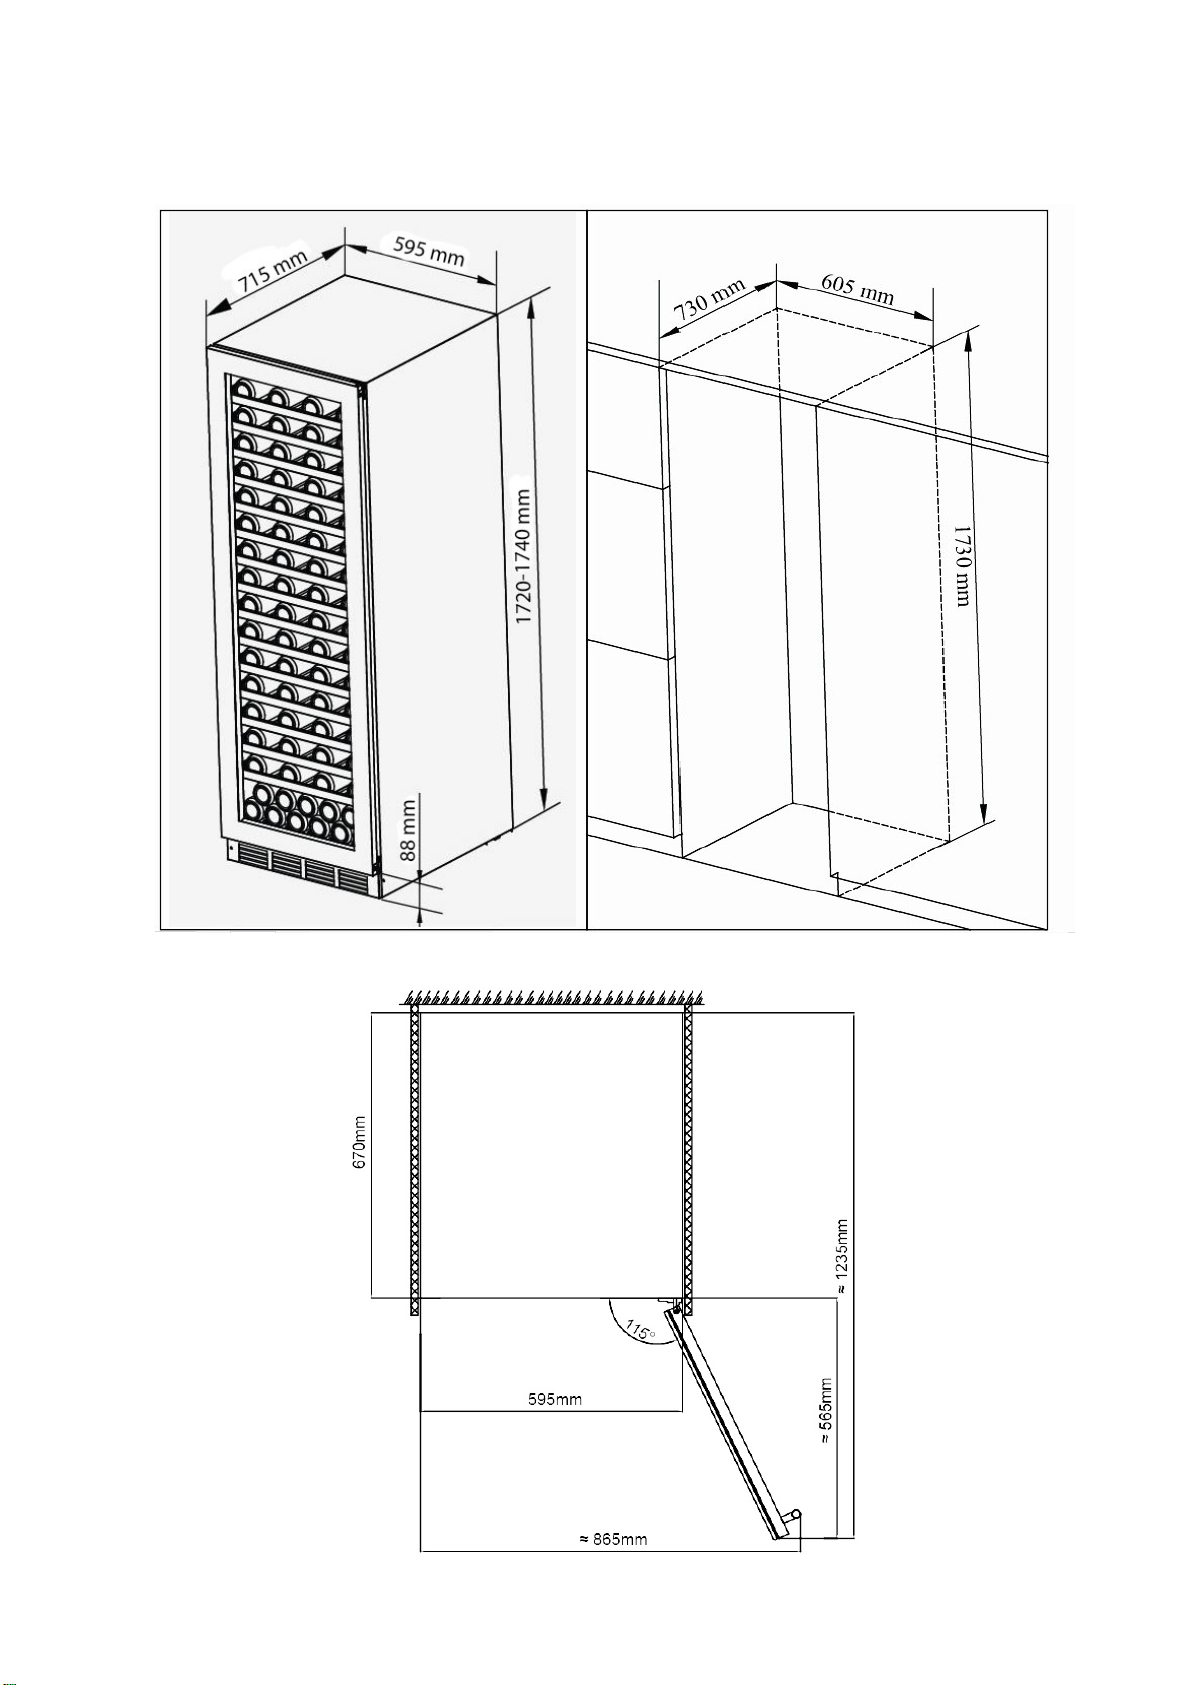
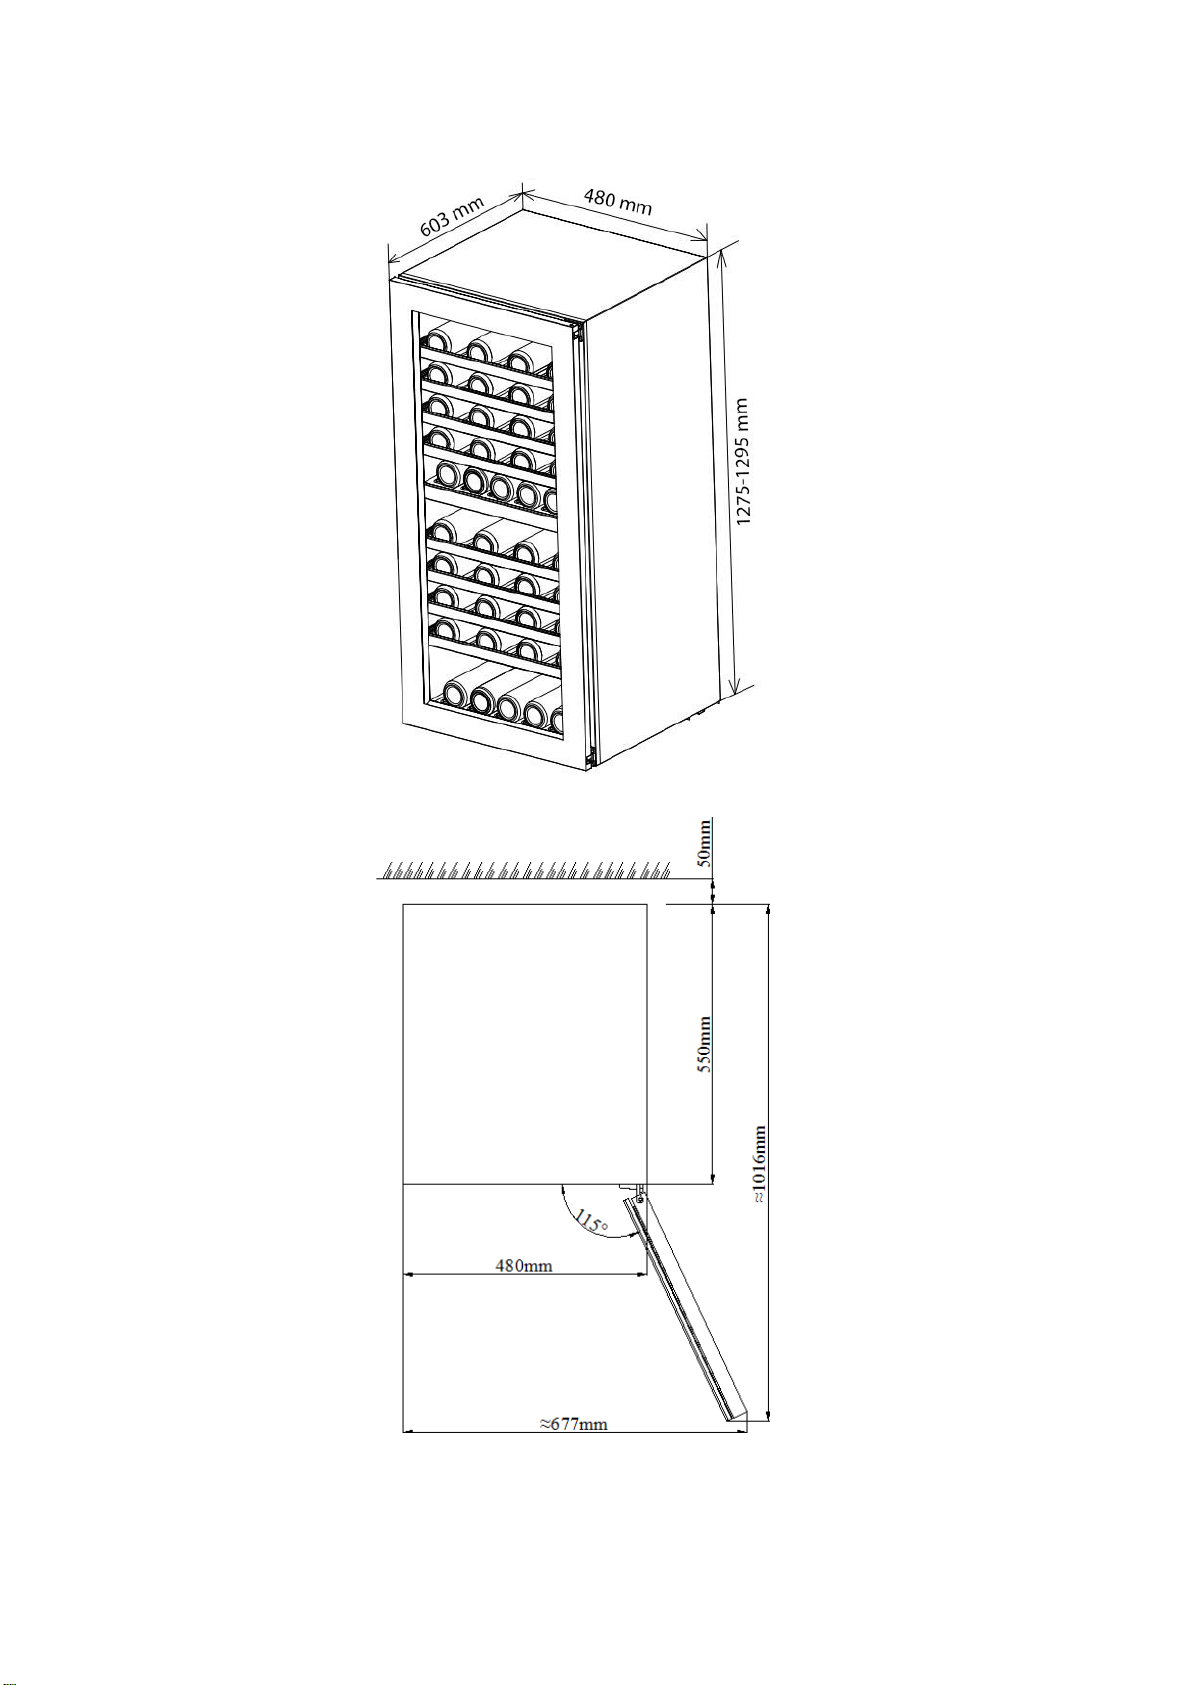
WINEMEX145
INSTALLING YOUR WINE COOLER
Unpack and remove all of the protection and adhesive strips from the packaging around and inside the
wine cooler.
The wine cooler must be positioned such that the plug is accessible. Release the power cord. Move your
wine cooler to its final location. The wine cooler should be installed in a suitable place where the
compressor will not be subject to physical contact.
Leveling your wine cooler: Wine cooler must be leveled BEFORE loading your wines.
Your wine cooler is equipped with 4 adjustable feet to facilitate easy leveling. We recommend that you
tighten the back feet to the maximum and adjust the front feet to level the wine cooler.
ADJUSTING AND REMOVING THE SHELVES
For easy access to the storage content, you must pull the shelves approximately 1/3 of its depth out of the
rail compartment. These wine cabinets, however, are designed with a notch on each side of the shelf
tracks to prevent bottles from falling.
When removing any of these shelves out of the rail compartment, tilt the shelf as per the diagram and
simply pull out, or push in the shelf until it sits on the support brackets securely.
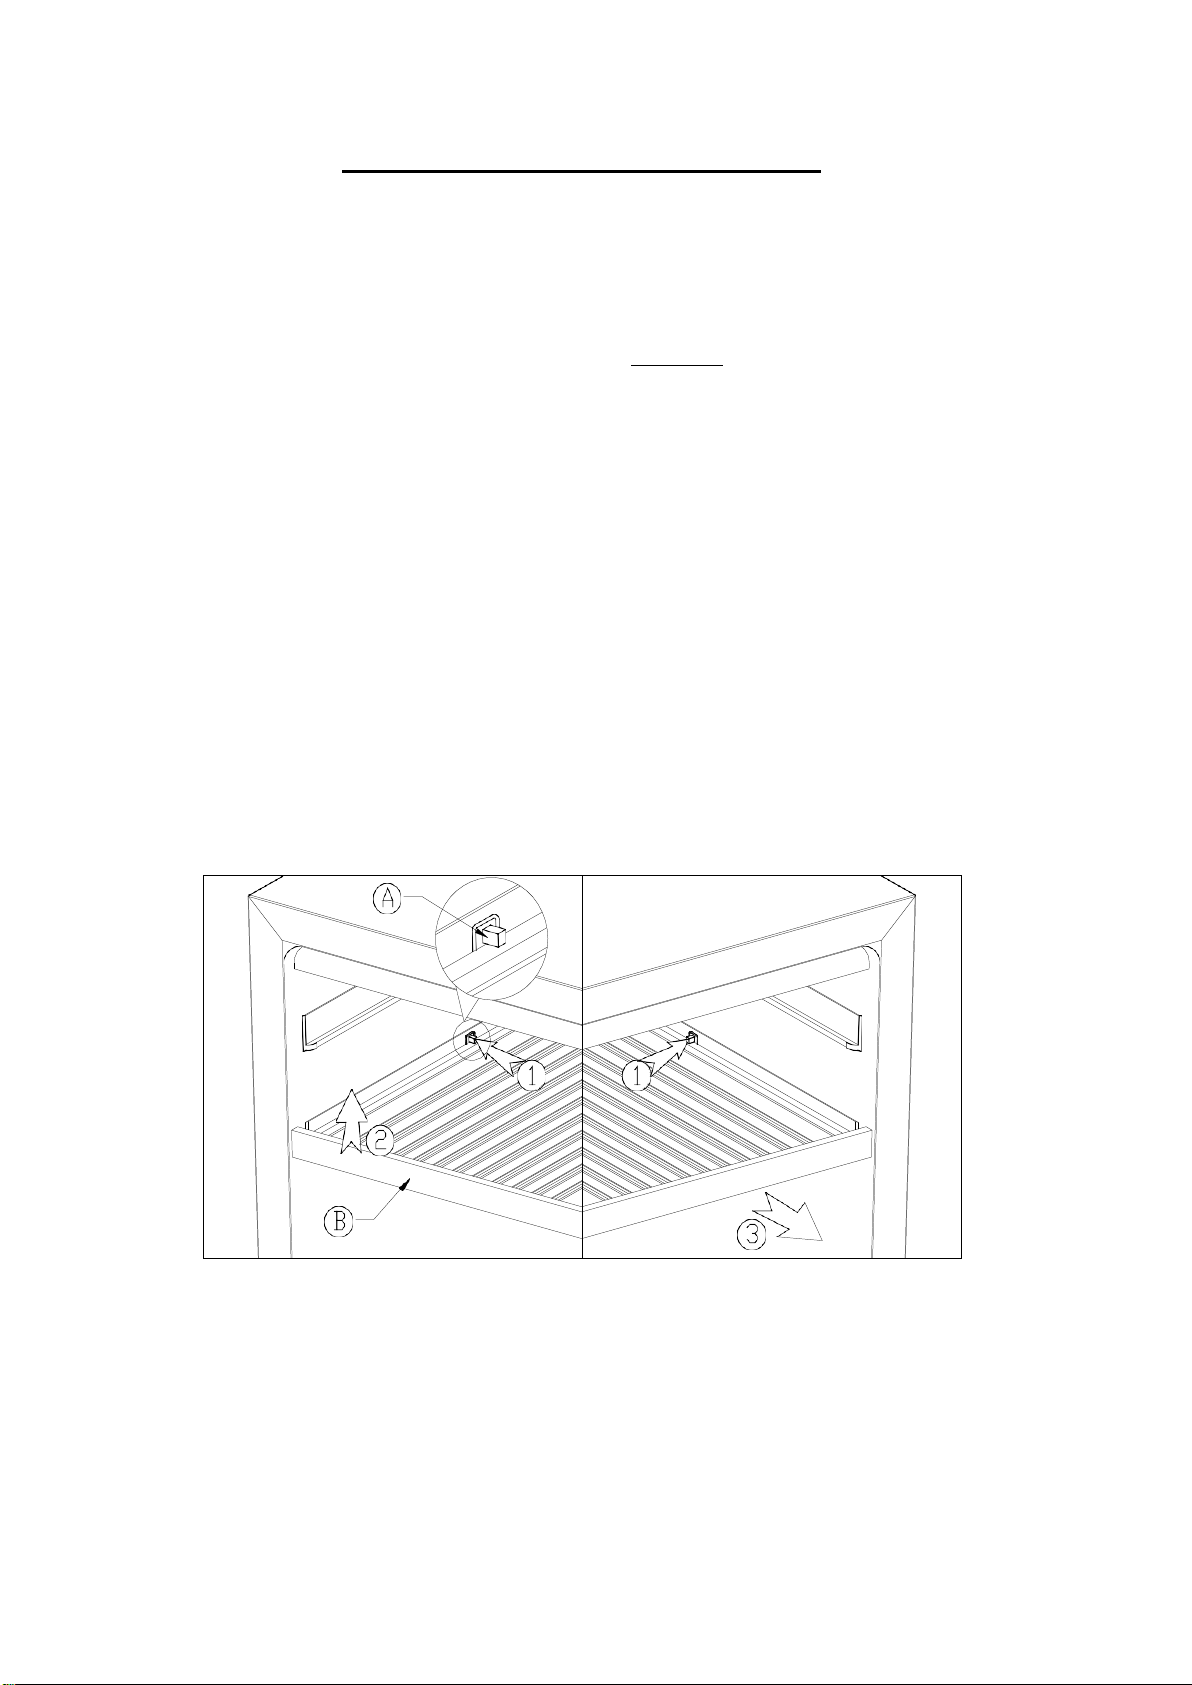
Shelf installation and taking instruction:
Common wooden shelf:
Shelf taking: According to below instruction drawing to press one side of shelf limit pin①, extract and
remove the shelf from the other side of support bracket②, then take off the shelf following the arrow
mark ③.
Shelf installation will be opposite with shelf taking.
1、”A” is shelf limit pin
2、”B” is shelf
Sliding wooden shelf installation and taking instruction:
Shelf taking: According to below instruction drawing to pull out the shelf to support bracket ① , press
two sides of sliding roller buckles and pull out the shelf following the arrow mark ② .
Shelf installation: According to below instruction drawing to push in the shelf alignment with two sides
of sliding roller following the arrow mark ③ .
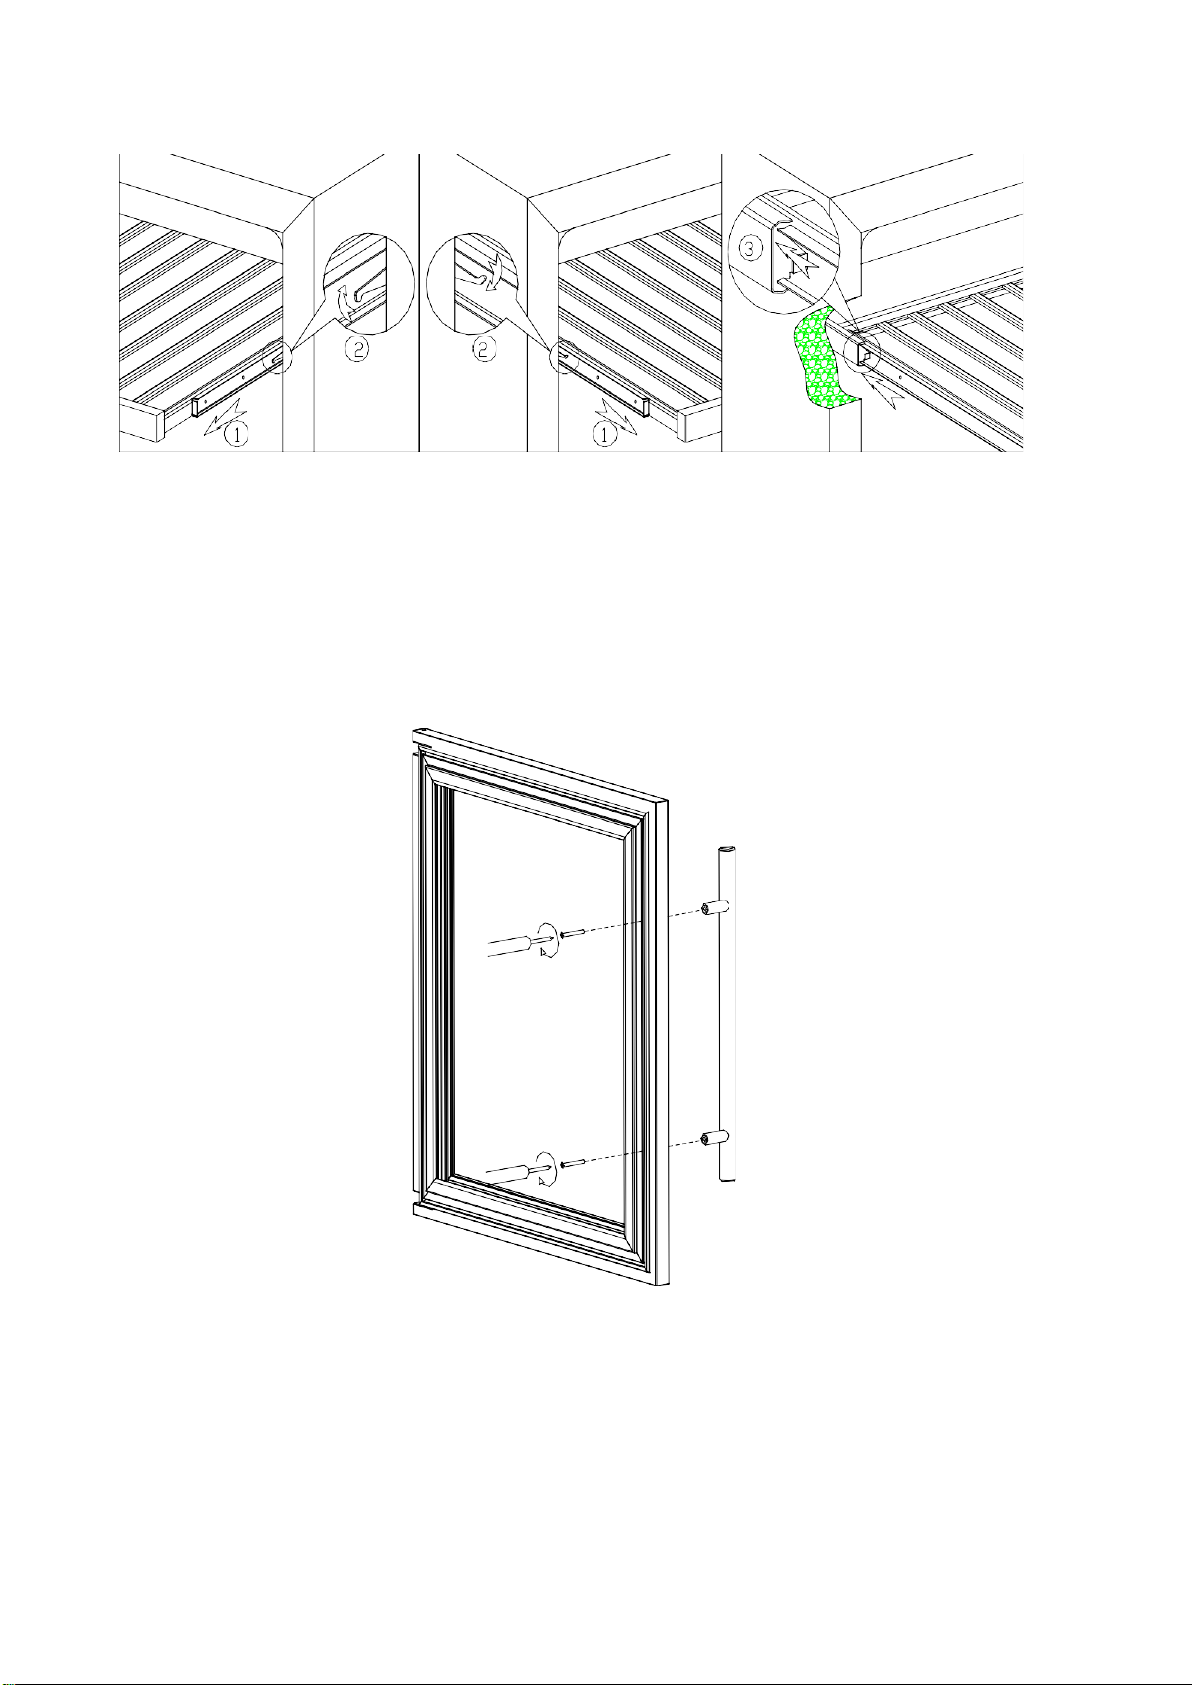
HANDLE INSTALLATION METHOD
Take out handle from cabinet, then take out 4pcs 4 * 35 screws from accessory bag
Pull open door seal from the side of door, then insert screws into the 2 handle holes on side of door, then
put the screws alignment the hole of handle, tighten the screws by Phillips screwdriver, then compress the
door seal
If the screws holes of the handle don't match perfectly with the holes of the door, please
use the electric drill to drill the holes of the door a bit big (in surface side) ,
in order to install the handle perfectly .
1
1
11
1
2
2 3 2 3
3
4
6
5
6 5 4
4
7 8 9
10 8 9
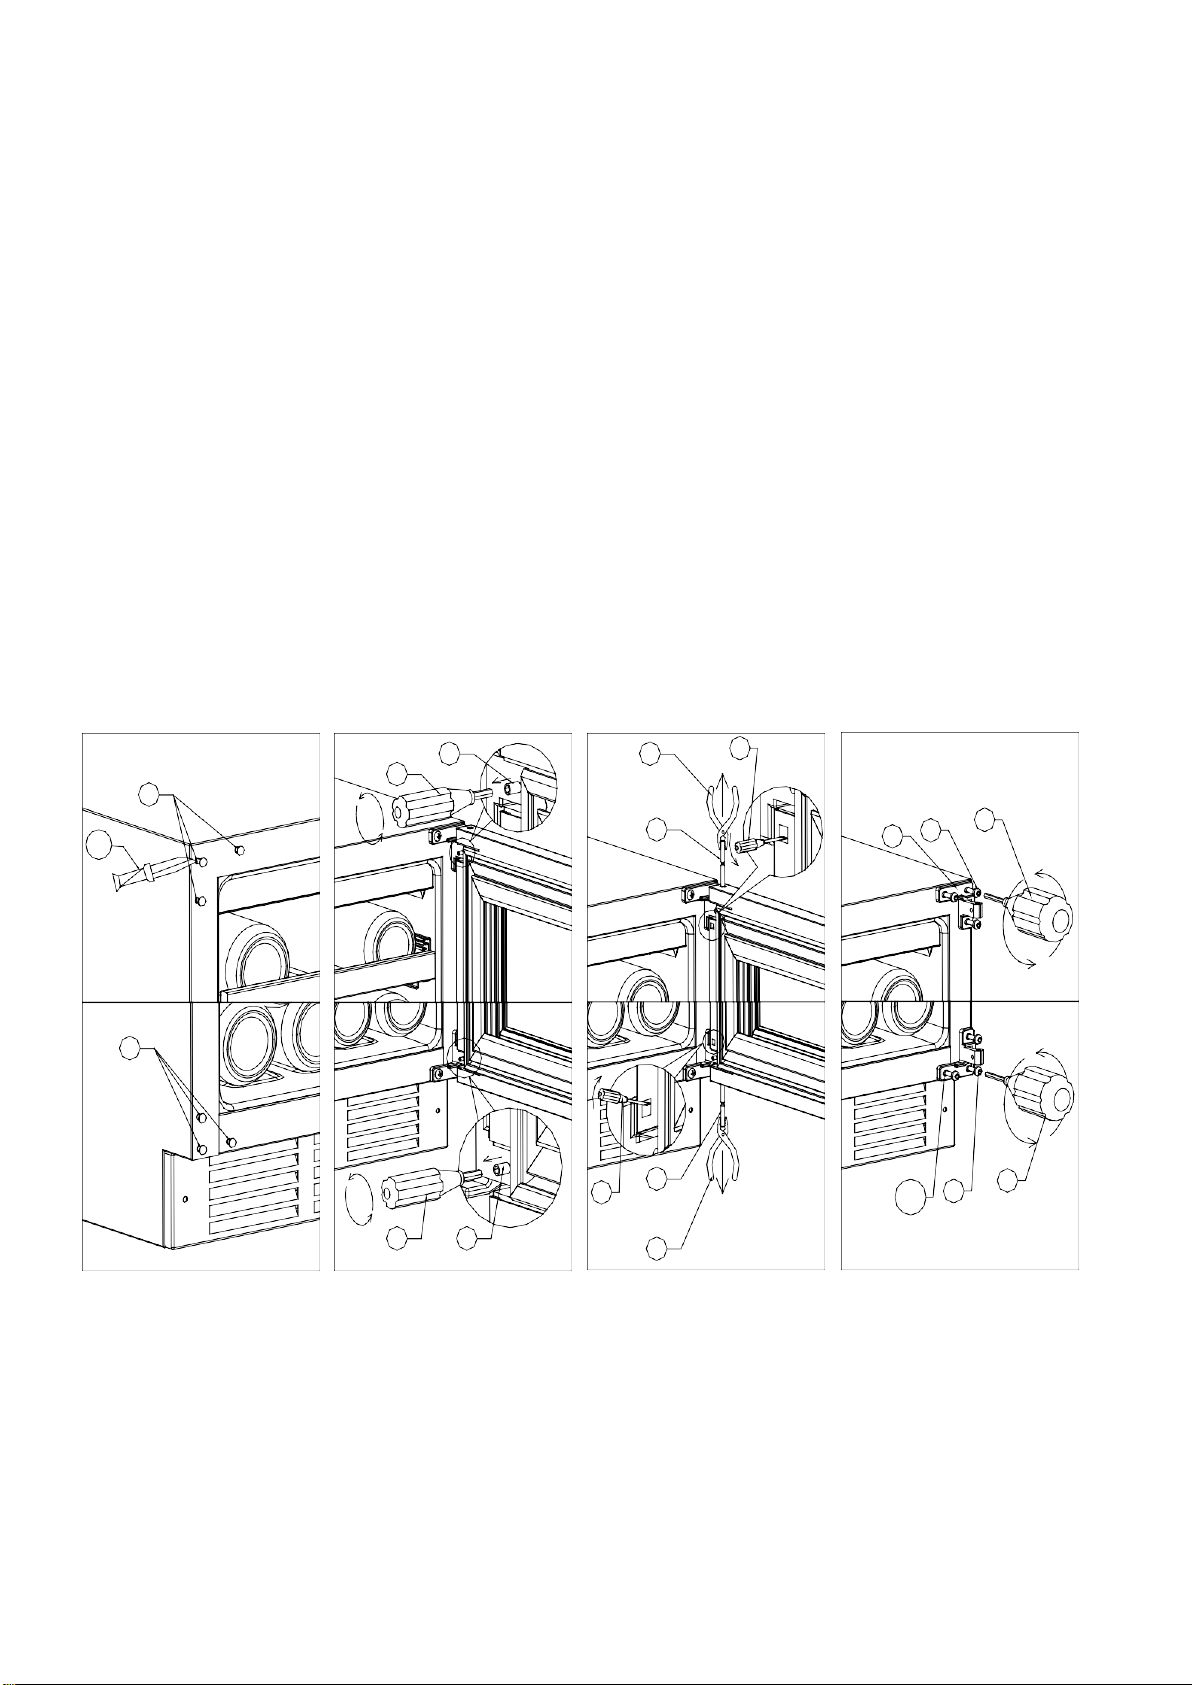
REVERSIBILITY OF THE DOOR
1.Decorative nail
2.M4 six angle screwdriver
3.M4 door limit screw
4. Pincer
5.Door core
6. Slot type screwdriver
7. Upper door hinge
8.Lower door hinge
9. M5 six angle screwdriver
Warning: To avoid accidents during the process of changing the door, we recommend that you get
assistance. The glass door is heavy and may cause injury if dropped.
- Depending on to the model and the type of handle your wine cabinet is equipped with, you may have to
rotate the door through 180 degrees.
- Depending on the type of handle your wine cabinet is equipped with, the door may not be reversible or
may require that a left or right opening door be ordered to change the opening side.
REMARK: WINEMEX69: The door could not reverse when the control panel install on the door.
WINEMEX20/WINEMEX40/WINEMEX69/WINEMEX145 will use same method to install the
door
1. To put the cabinet on open operation place;
2. The door opened to the maximum angle, take off the decorative nail on opposite side (Drawing 1);
3.To disassemble the pivot core of upper and lower door hinge by the inner six angle screwdriver
(Drawing 2);
4. To suck out the door shaft core from the two ends of the top of the door by magnet (Drawing 3).
5. Take away the door from cabinet after discharge the door core.
6. Discharge the upper and lower door hinge by screwdriver (Drawing 4).
7. To assemble the door on the opposite side with accessories in accessory bag.
10.lower door hinge 11. Knife
INSTALLATION INSTRUCTIONS FOR BUILT IN WINE COOLERS:
WINEMEX69
model is free standing only. Any built in voids the warranty
1. “Built in” wine coolers are front venting but are not designed to be fully integrated behind a joinery
door.
2. Please follow the installation diagram when installing built-in wine coolers. No less than the minimum
installation dimension, or it will affect the venting of cooler.
3. Built-in wine coolers draw air from right of ventilation frame (WINEMEX24 from the rear) and expel
through left of ventilation frame under the front door.
4. “Built in” wine coolers have a power switch located on the control panel so power point location is not
critical.
5. The wine cooler requires a standard 240 volt/10 amp power point. (Or according to different countries
specifications).
6. The power cord is 2.0m in length and is fixed on the right side at the back when looking from front of
cabinet.
7. As with most appliances of today, the wine cooler has sensitive electronic components which are
susceptible to damage through lightning and electricity supply faults. It is therefore advised to use a
power surge protector to avoid problems of this nature.
Air vent on door must be provided for built-in wine coolers when a wood door installed.
In Hot climate zone, an air vent or grid, with a minimum ventilation size of 200mm x 40mm MUST be
cut out at the rear top of the back partitioning or at the top of either side of the partitioning, allowing cool
fresh air full access to flow into the 30mm gap located at the rear of the cabinet.
This air vent or grid must not be opened on the same side as other appliances such as ovens or an area
that is sealed and without access to fresh cool air. Failing to comply with the above specifications could
result in WARRANTY void.
Note: The appliance must be positioned so that the plug is accessible after installed.
WINEMEX24 Installation Instruction:
It is built-in model inside cabinet, the cabinet should come with good ventilation space and no backplane,
otherwise it will affect the wine cooler working normally. (Installation drawing as below)
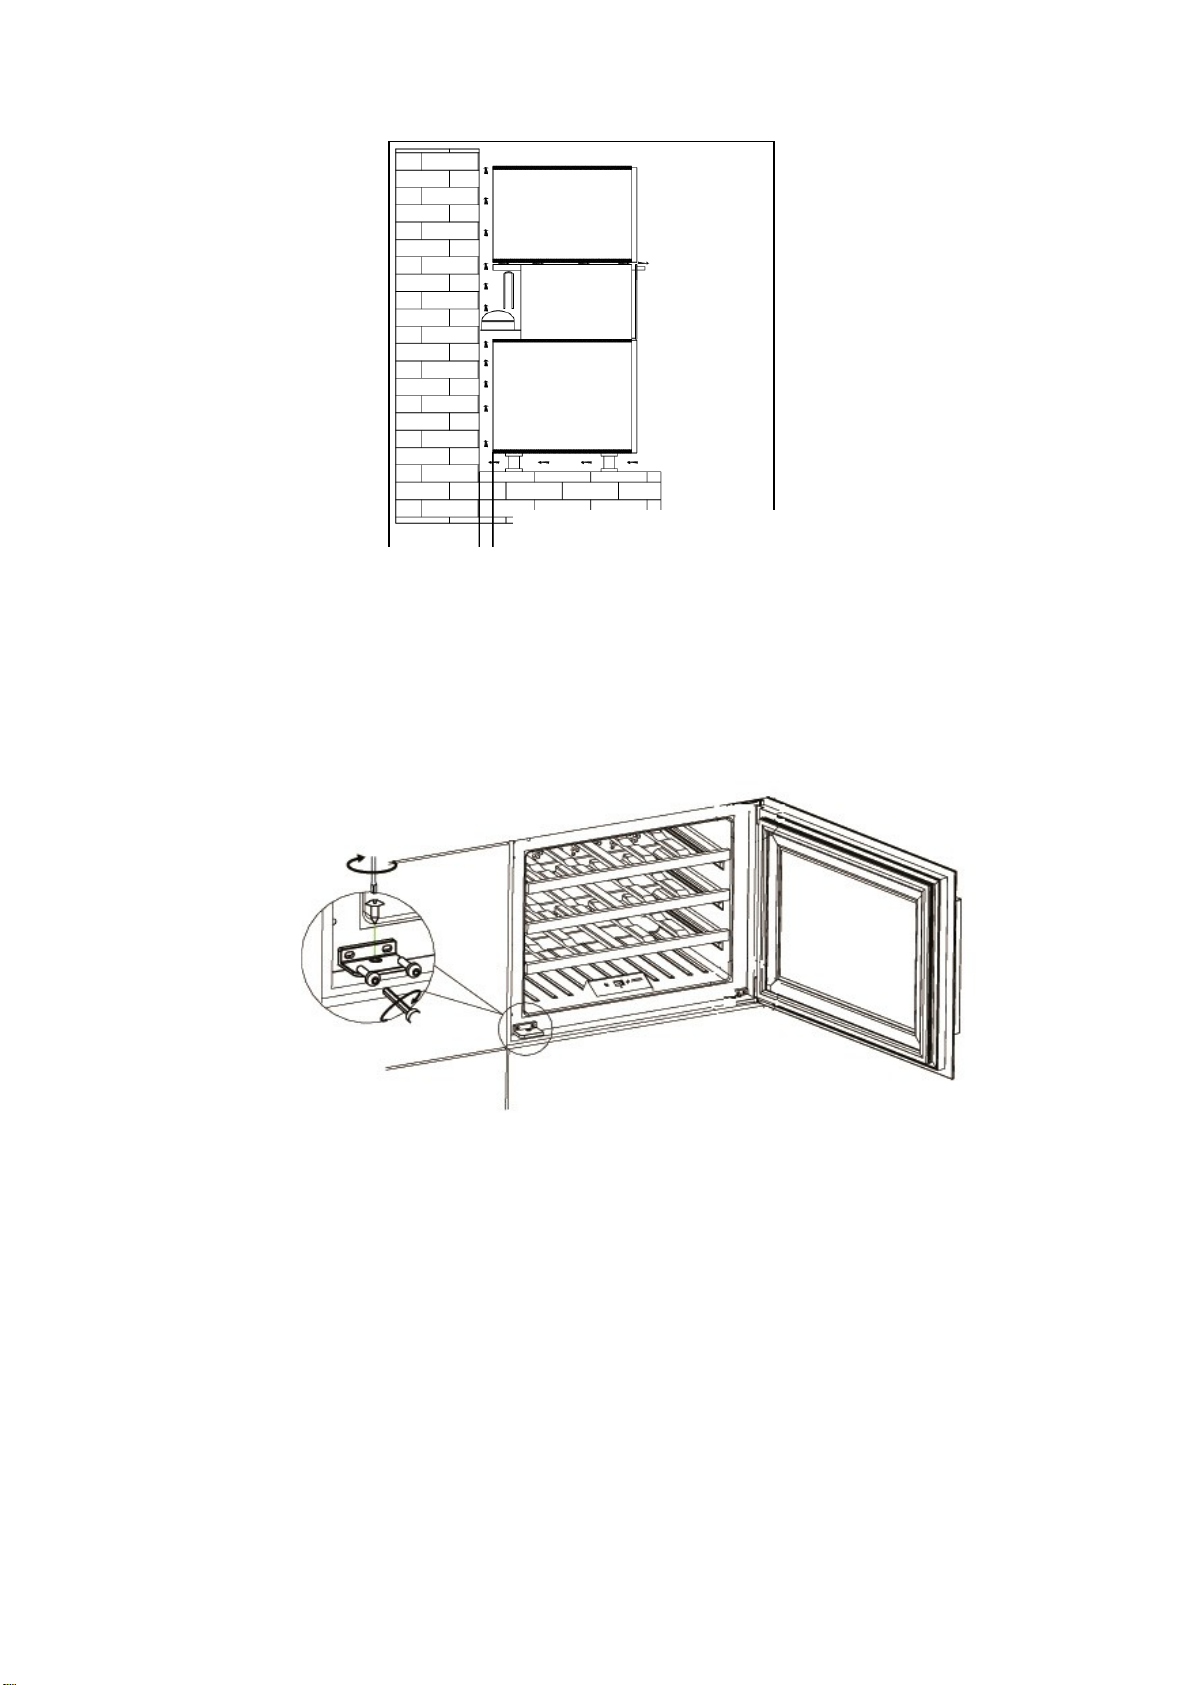
The ventilation distance at least 50 mm
Fig. 1
1. Put the wine cooler into the cabinet, then adjust the wine cooler to make it steady. Open the door, take
out the fixing plate (1 pcs) , inner Hexagon Screws ((2 pcs) , inner Hexagon Screwdriver (1 pcs), selftapping screws (1 pcs) from the accessory bag.
2. Use the inner hexagon screwdriver to fix the fixing plate on the lower left side of wine cooler with 2
inner Hexagon Screws ( Fig.1).
3. Fix the fixing plate into the cabinet with 1pcs self-tapping screw.
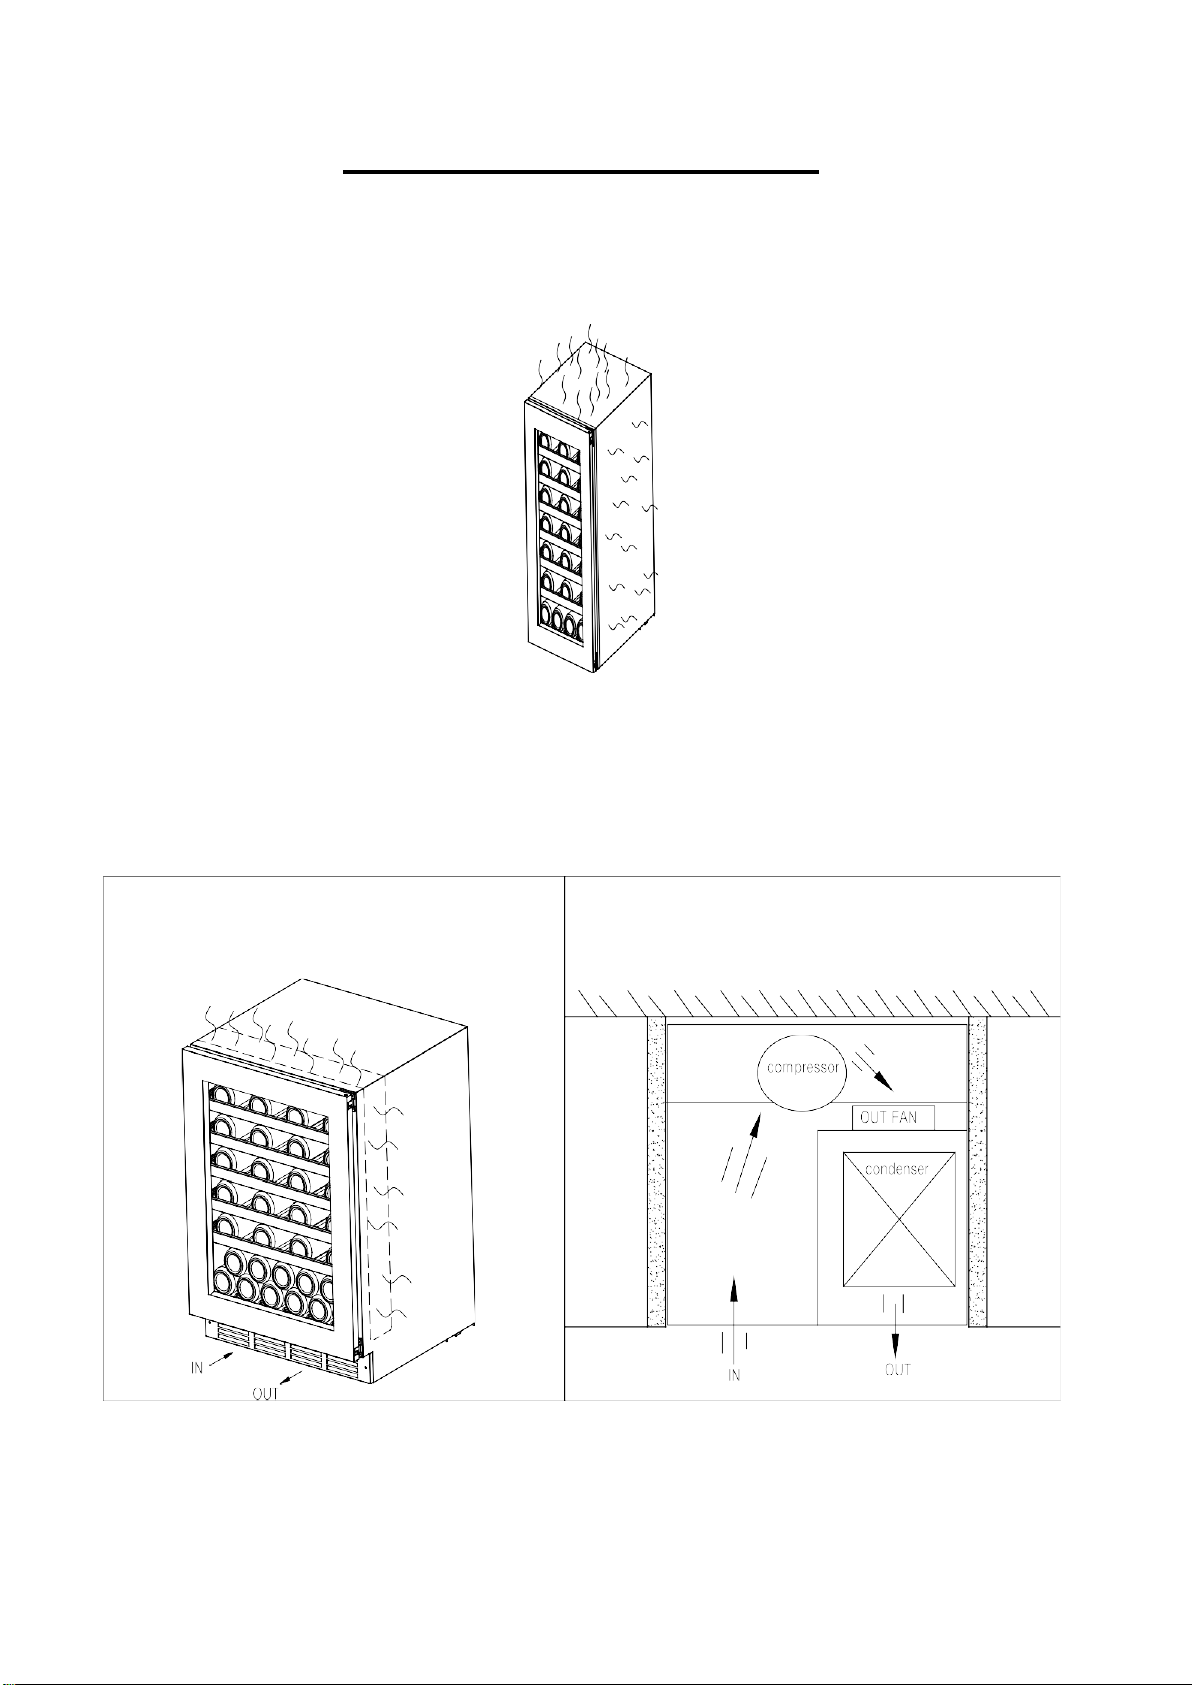
RADIATOR SYSTEM DESCRIPTION
WINEMEX69 model use lateral condensation cooling mode
WINEMEX20/WINEMEX40/WINEMEX145 Models use side anti-dew tube and Independent
cooling system:

TURNING ON YOUR WINE COOLER
Plug in and switch on the cooler by pressing on the power button for a few seconds.
When you use the wine cooler for the first time (or restart the wine cooler after having it shut off for a
long time), there will be a few degrees variance between the temperature you have selected and the one
indicated on the LED readout. This is normal and it is due to the length of the activation time. Once the
wine cooler is running for a few hours everything will stabilize.
Important: If the unit is unplugged, power is lost, or turned off, wait 3 to 5 minutes before restarting
the unit. The wine cooler will not start if you attempt to restart before this time delay.
Operating Noises
To reach the desired temperature settings, Our wine coolers, like all wine coolers operating with
compressors and fans, may produce the following types of noises. These noises are normal and may occur
as follows:
- Gurgling sound - caused by the refrigerant flowing through the appliance’s coils.
- Cracking/popping sounds - resulting from the contraction and expansion of the refrigerant gas to
produce cold.
- Fan operating sound - to circulate the air within the wine cooler.
An individual’s perception of noise is directly linked to the environment in which the wine cooler is
located, as well the specific type of models. Our wine coolers are in line with international standards for
such appliance. We will always do its utmost to satisfy its customers but will not retake possession of the
goods due to complaints based on normal operating noise occurrences.
TYPES OF REGULATION
Please note that depending on the loading and settings chosen it takes about 24 hours for the wine cooler
to see the temperature stabilizing.
During this time LED seems to move erratically in particular it is normal and this process occurs
whenever the setting is modified and/or whenever a large amount of bottles are added to the cooler.
Single temperature Maturing/Storage wine coolers:
WINEMEX20: Both built-in and free-standing type, sensor touch controller and LED displayer
WINEMEX24: Built-in type, sensor touch controller and LED displayer
Dual temperature Maturing/Storage wine coolers:
WINEMEX40: Both built-in and free-standing type, sensor touch controller and LED displayer
WINEMEX69: Free-standing type, sensor touch controller and LED displayer
Triple temperature:
WINEMEX145: Both built-in and free-standing type, sensor touch controller and LED displayer
Designed to store and mature all wines: red, white and sparkling. These wine coolers reproduce the ideal
conditions for wine storage, at a constant recommended temperature of 12ºC. They can also be set to
provide ideal serving temperature for full enjoyment of the wine’s qualities. Unless stated by the wine
maker on the bottle, We recommends 7ºC for your champagne, 12ºC for whites and 18ºC for reds. (Refer
to “Wine Service Temperature” recommendation chart)

TEMPERATURE SETTINGS
Important: The LED displays by default the actual internal air temperature.
The temperature of the power, before all Settings will be resumed after the electricity to power the preset
temperature
The electrical board of all models comes with memory function.
It is important to understand that there is a difference between the air temperature inside the wine cooler
and the actual temperature of the wine: You will need to wait approximately 12 hours before noticing the
effects of temperature adjustment due to the critical mass within a full wine cooler.
Once the temperature is set, it is strongly advised not to toy with it or adjust frequently. The thermostat
will maintain the temperature inside the wine cooler within a +/- 2.5ºC range. But the thermal inertia of
the wine and the glass is such that within this temperature range, the actual temperature of the wine will
only fluctuate 0.5ºC to 1ºC.
AUTO LIGHTNING FUNCTION
Default setting - Auto lighting on:
− Lighting on when door opened.
− Lighting off when door closed.
To keep lighting on even when door closed:
A. Open door (lighting on)
B. Manually switch off lighting
C. Manually switch on lighting
D. Lighting keeps on when door closed.
To resume Auto lighting setting:
A. Open door (lighting on)
B. Manually switch off lighting
C. Manually switch on lighting
D. Lighting auto off when door closed (Auto lighting resumed).
WINEMEX20 and WINEMEX40 Control panel Operation Guide
From left to right:
① Display Window:
Display the measured temperature inside the wine cooler;
② Cycle Button:
Each time, the temperature inside will drop 1 ℃, until reduced to a minimum 5 degree Celsius , and then
return to the highest. temperature 20 degree Celsius.
Press for 3 seconds, the window to achieve Celsius / Fahrenheit display conversion
③ Lamp & Power Button:
When power cord connected: press and hold for 3 seconds, power is turned on, the machine starts.
In the machine power-on-state: press this button, LED lights on; Press once again, LED lights off.
In the machine power-on-state: press and hold for 3 seconds, power is turned off, the machine is off.
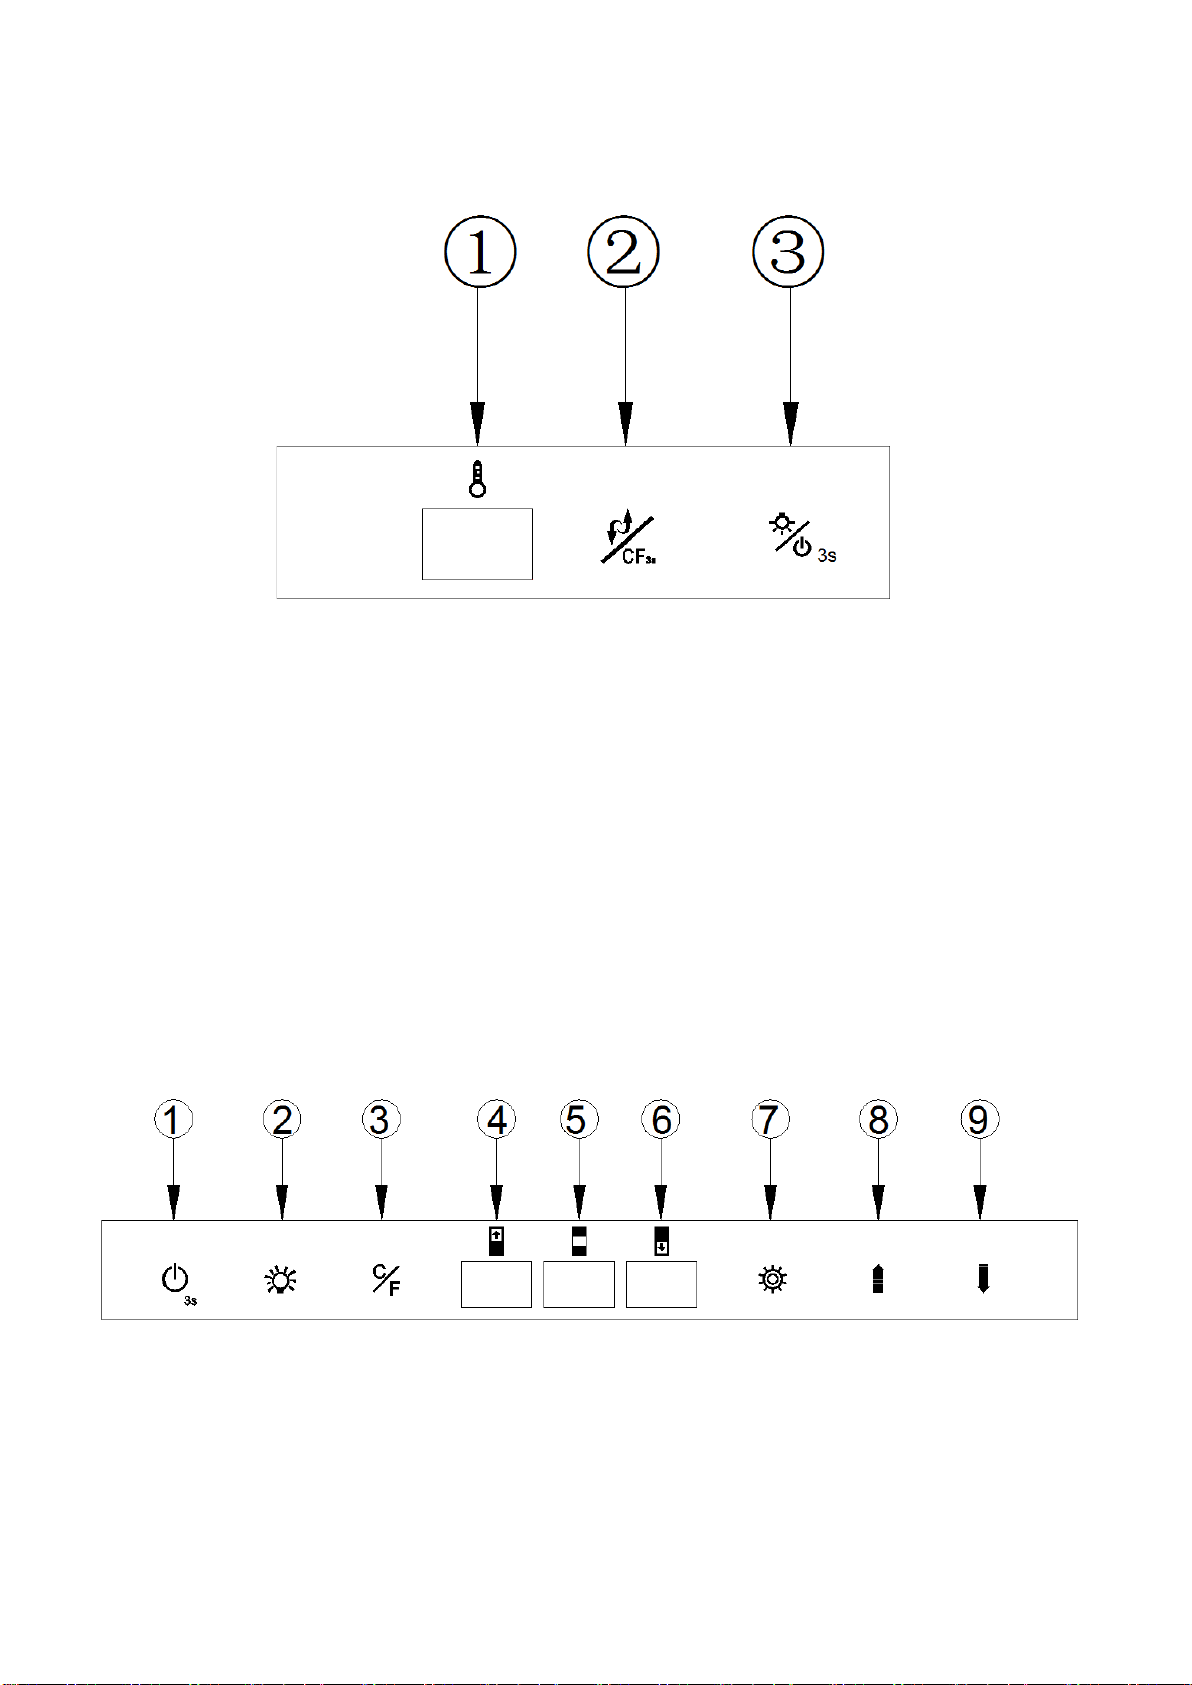
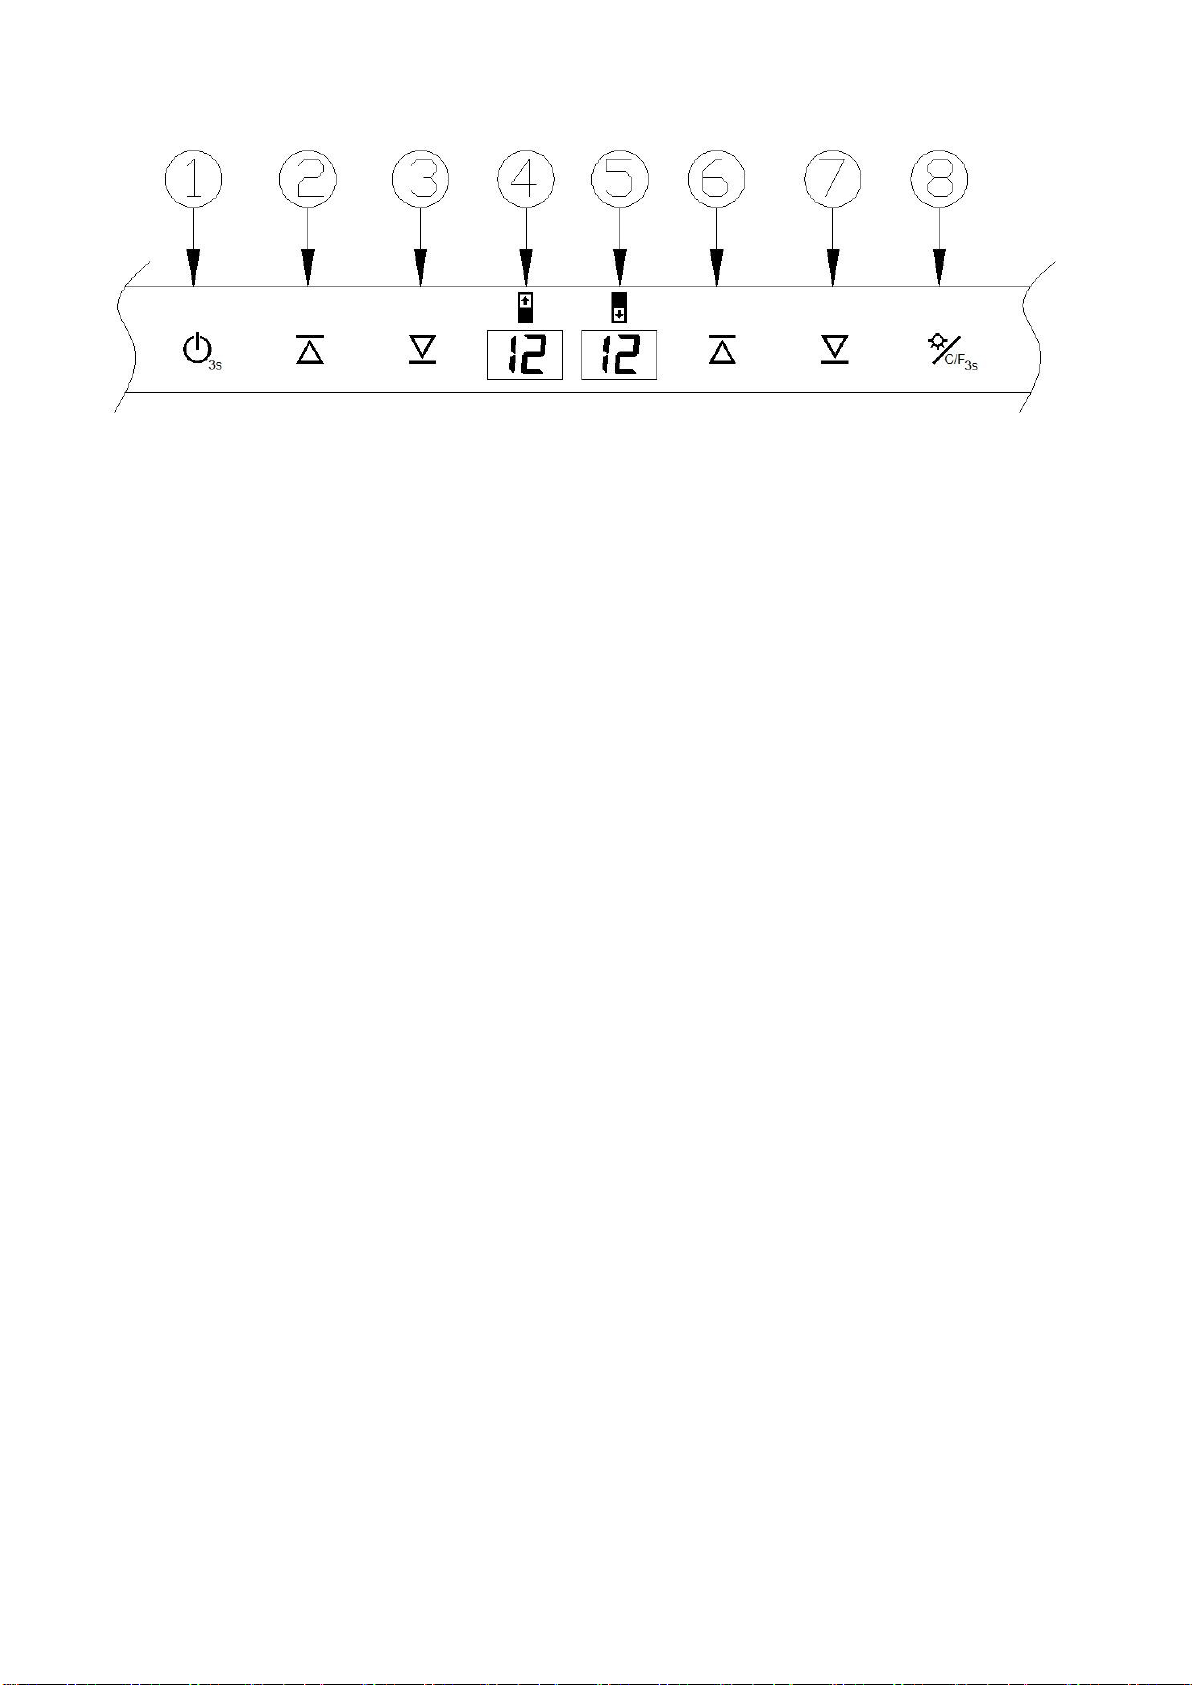
WINEMEX145 Control panel Operation Guide
① “ON/OFF” Power Button :
Press the button 3 seconds to power off (④ digital countdown displays 3, 2, 1, press the button for 0.9
seconds after the window just POP countdown numbers).
② Lamp Button:
Press the button and the lamp turns on, the lamp will turn off once press again.

③C/F display conversion function button:
Set the conversion degrees Celsius / Fahrenheit display, each press this button, the display window will
be into degrees Celsius or Fahrenheit.
④ Display window:
Display the upper zone temperature
⑤ Display window:
Display the middle zone temperature
⑥ Display Window:
Display the lower zone temperature
⑦ Function setting button:
For temperature setting, press this button to select a zone, selection window will flash the
temperature set by buttons ⑧ and ⑨
⑧ Temperature setting up button
By pressing the ⑦ function setting button to select a zone, press the temperature setting up button 1 time,
the temperature will increase 1 degree Celsius.
⑨Temperature setting down button
By pressing the ⑦
function setting button to select a zone, press the temperature setting down button 1 time,
the temperature will decrease 1 degree Celsius.
WINEMEX69 Control Panel Operation Guide
① “ON/OFF” the power button :
In the standby mode: press 3 seconds, the power is turned on, the whole machine starts
In the power-on state: press the power button, window ④ shows the countdown 3 2 1, the power is turned
off, the machine is turned off (show 3 2 1 process, the hand cannot leave the button)
② Upper zone temperature setting up button:
Press one time, the setting temperature showing in window ④
The highest setting temperature is 20 degree Celsius.
will increase 1 degree Celsius.
③
Upper zone temperature setting down button:
Press one time, the.setting temperature showing in window ④ will decrease 1 degree Celsius.
The lowest setting temperature is 12 degree Celsius.
④ Display window (upper zone):
Display the upper zone temperature
⑤
Display window (lower zone):
Display the lower zone temperature
⑥ Lower zone temperature setting up button:
Press one time, the setting temperature showing in window ⑤ will increase 1 degree Celsius.
The highest setting temperature is 12 degree Celsius.
⑦ Lower zone temperature setting down button:
Press one time, the setting temperature showing in window ⑤ will decrease 1 degree Celsius.
The lowest setting temperature is 5 degree Celsius.
⑧
Lamp button & C/F display conversion function:
Press the button and the lamp turns on, the lamp will turn off once press again.
Set the conversion of degrees Celsius / Fahrenheit display. Press this button and hold for 3 seconds,
the display window will be into degrees Celsius or Fahrenheit display.
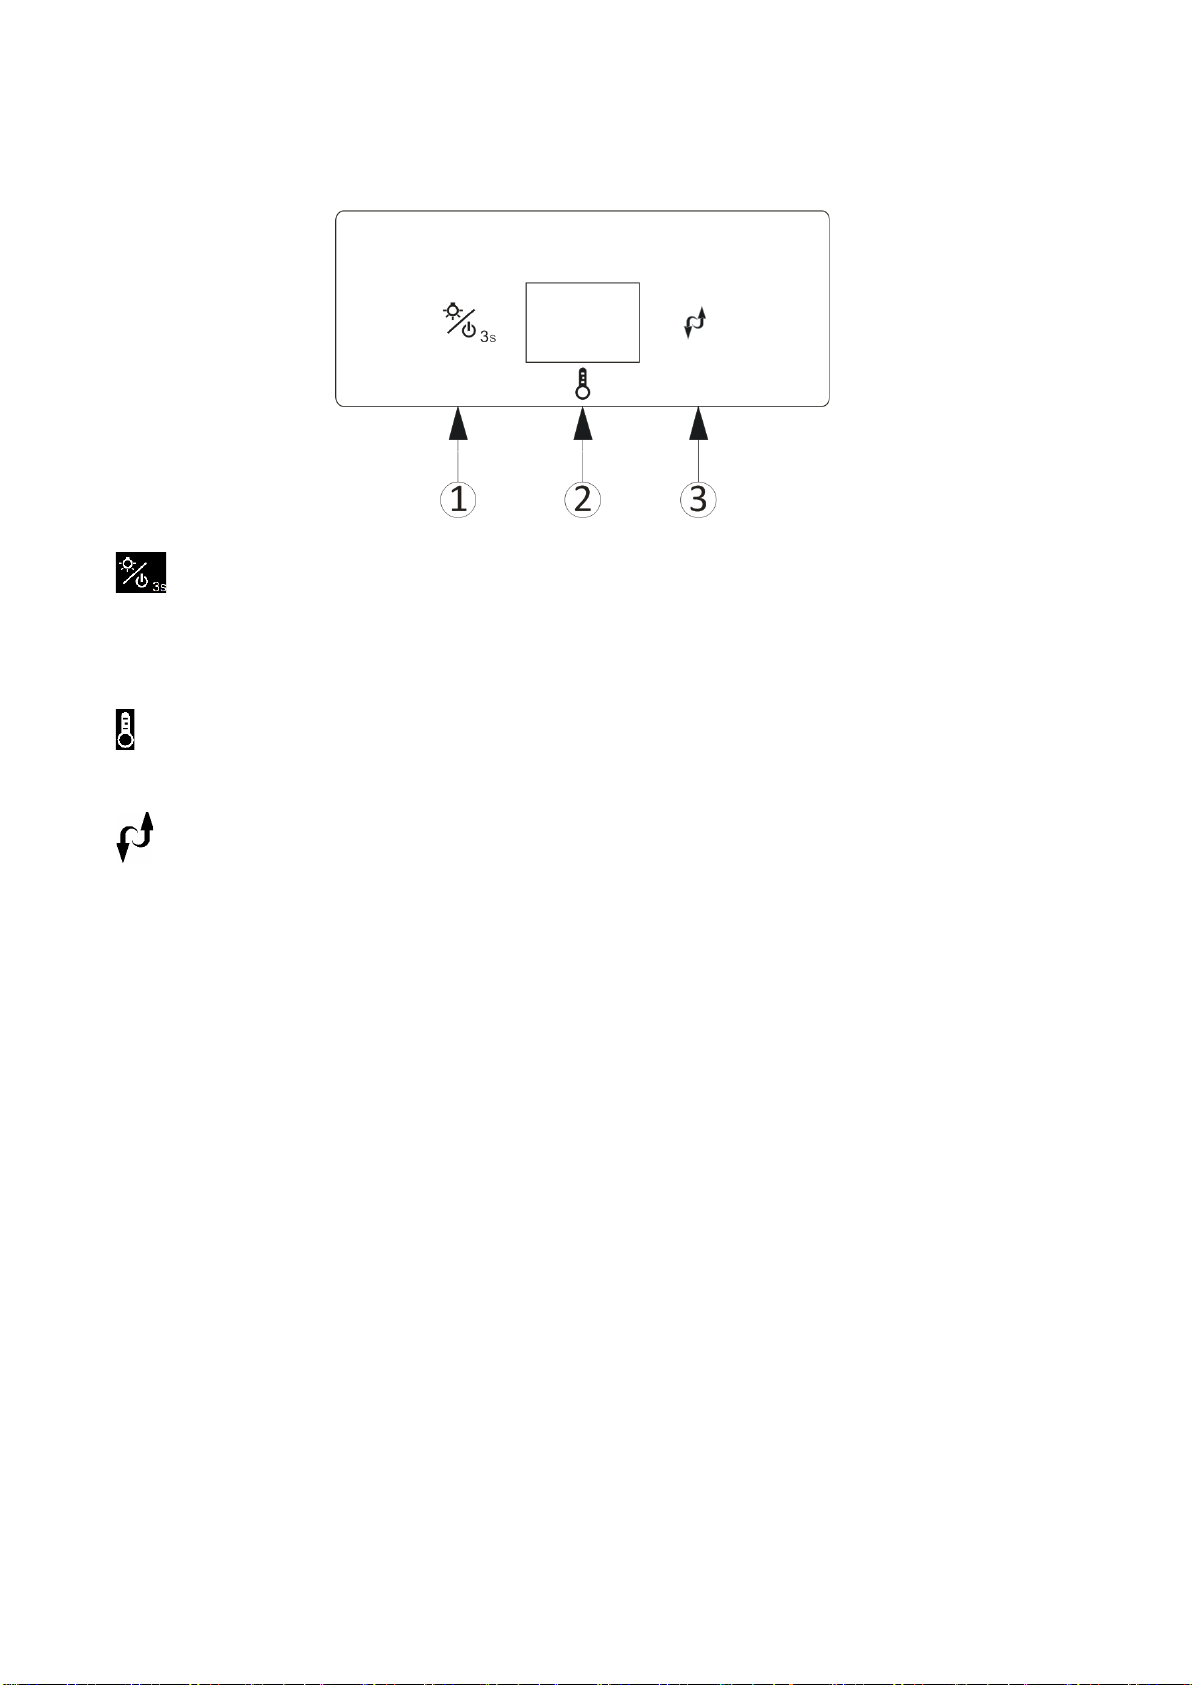
WINEMEX24 Display Board Control Instruction
① Lamp & Power Button
When power cord connected: press and hold for 3 seconds, power is turned on, the machine starts.
In the machine power-on-state: press this button, LED lights on; Press once again, LED lights off.
In the machine power-on-state: press and hold for 3 seconds, power is turned off, the machine is off.
② Display Window:
Display the measured temperature inside the wine cooler;
③ Cycle Button:
Each time, the temperature inside will drop 1 ℃, until reduced to a minimum 5 degree Celsius , and then
return to the highest. temperature 20 degree Celsius.
LOADING YOUR WINE COOLER
You may load your wine bottles in single or double rows while taking note of the following: if you do not
have enough bottles to fill your wine cooler, it is better to distribute the load throughout the wine cooler
so as to avoid “all on top” or “all below” type loads.
- Do remove or relocate adjustable wooden shelves to accommodate larger type of bottles or increase the
capacity of the cooler by stacking the bottles up when necessary. (See removing shelves)
- Keep smalls gap between the walls and the bottles to allow air circulation. Like an underground cooler
air circulation is important to prevent mould and for a better homogeneous temperature within the cooler.
− Do not over load your wine cooler to facilitate air circulation.
− Do not stack more than 1.5 rows of standard 0.75L bottles per shelves to facilitate air circulation
− Avoid obstructing the internal fans (located inside on the back panel of the wine cooler).
− Do not slide the shelves outwards beyond the fixed position to prevent the bottles from falling.
− Do not pull out more than one loaded shelf at a time as this may cause the wine cooler to tilt forward.
− Do not cover the wooden shelves with alloy foil or other materials, as it will obstruct air circulation.
− Do not move your wine cooler while it is loaded with wines. This might distort the body of the wine
cooler and cause back injury.

WINE SERVING TEMPERATURE CHART
All wines mature at the same temperature, which is a constant temperature set between 12ºC to 14ºC. The
below chart is an indicative temperature chart to indicate the best temperature for drinking purposes.
Champagne NV, Sparkling, Spumante 6ºC
Dry White Semillon, Sauvignon Blanc 8ºC
Champagne Vintage, 10ºC
Dry White Chardonnay 10ºC
Dry White Gewürztraminer, Riesling, Pinot grigio 10ºC
Sweet White Sauternes, Barsac, Montbazillac, Ice Wine, Late Harvest 10ºC
Beaujolais 13ºC
Sweet White Vintage: Sauternes… 14ºC
White Vintage Chardonnay 14ºC
Red Pinot Noir, 16ºC
Red Grenache, Syrah 16ºC
Red Vintage Pinot Noir 18ºC
Cabernet & Merlot: French, Australian, New Zealand, 20ºC
Chilean, Italian, Spanish, Californian, Argentinean…
Vintage Bordeaux … Room temperature not exceeding 20ºC
IMPORTANT INFORMATION ABOUT TEMPERATURE
Your wine cooler has been designed to guarantee optimum conditions for storing and/or serving your
wines.
Fine wines require long and gentle developments and need specific conditions in which to reach their full
potential.
All wines mature at the same temperature, which is a constant temperature set between 12ºC to 14ºC.
Only the temperature of “dégustation” (wine appreciation) varies according to the type of wines (see
“Wine Serving Temperature Chart” above). This being said and as it is for natural coolers used by wine
producers for long period of storage, it is not the exact temperature that is important, but its consistency.
In other words, as long as the temperature of your wine cooler is constant (between 12ºC to 14ºC) your
wines will be stored in perfect conditions.
Not all wines will improve over the years. Some should be consumed at an early stage (2 to 3 years)
while others have tremendous ageing capability (50 and over). All wines have a peak in maturity. Do
check with your wine merchant to get the relevant information.
 Loading...