

Page 1

THERMAL ENGINEERING COMPANY
a division of airserco manufacturing
7555 Tyler Boulevard
Mentor, OH 44060
USA
800 473-1754
Vacuum Pump Accessories
Fax: 440 946-8188
1833 Minivac Manifold
www.thermalengineeringcompany.com
14571 Super Vak Check Vacuum Gauge
4501 Vak Check Vacuum Gauge
5000 Vacuum Pump Oil – gallon or quart size
Tru Pro Charging Hoses
1400 Series Manifolds
VACUUM PUMP
OPERATING MANUAL
models amc-2.1.8 / 2.1.8B, amc-2.3.0 / 2.3.0B, amc-2 .5.0 / 2.5.0B, amc-2.7.0 / 2 .7.0B, amc- 2.9.8 / 2.9.8B
Contents
1 Operating
3 Maintenance
4 Troubleshooting
5 Technical Parameters
6 Pump Accessories
9 Pump Explosion
12/06
10 Warranty
Page 2

OPERATING
Components
WARRANTY
WARRANTY: (1) year from the date of purchase, with a 60 day over the
counter exchange for all defective pumps.
OIL FILL CAP
EXHAUST FITTING
SIGHT GLASS
OIL DRAIN
DIE CAST
ALUMINUM HOUSING
HANDLE
ON/OFF SWITCH
FAN COVER
MOTOR
BASE
RUBBER FOOT
Before Using Your Vacuum Pump
In all cases, motors are designed for operating voltages plus or minus 10%
of the normal rating. Single voltage motors are supplied fully connected and
ready to operate.
1. Check to be sure the voltage and frequency at the outlet match the
specifications on the pump motor decal. Check the ON-OFF switch to make
sure it is in the OFF Position before you plug the pump into an outlet. Check
to be sure the gas ballast valve is closed. Remove and discard the exhaust
plug from the end of the pump’s handle.
2. The pump is shipped without oil in the reservoir. Before starting the pump,
fill it with oil. Remove the OIL FILL Cap and add oil until oil just shows in
the bottom of the sight glass. The approximate oil capacity of the pump is
between 6.1 oz. and 20 oz. Depending on the size of the pump. (Reference
the Table in Section 5 Technical Data for your specific requirements).
To better serve you, please complete the following form and return this form
with your pump.
Company Name:
Your Name:
Street Address:
City: State: Zip:
Model: Purchase Date:
Description of the problem you are experiencing:
How To Return Your Pump
1. Drain the oil
2. Return this form, a copy of your proof of purchase
and the vacuum pump (freight prepaid) to:
Airserco Manufacturing Company, Inc.
Attn: Repair / Warranty Dept.
7555 Tyler Blvd., Unit #1
Mentor, OH 44060
NOTE: Units received without a proof of purchase will not be repaired under warranty.
1
10www.thermalengineeringcompany.com
Page 3
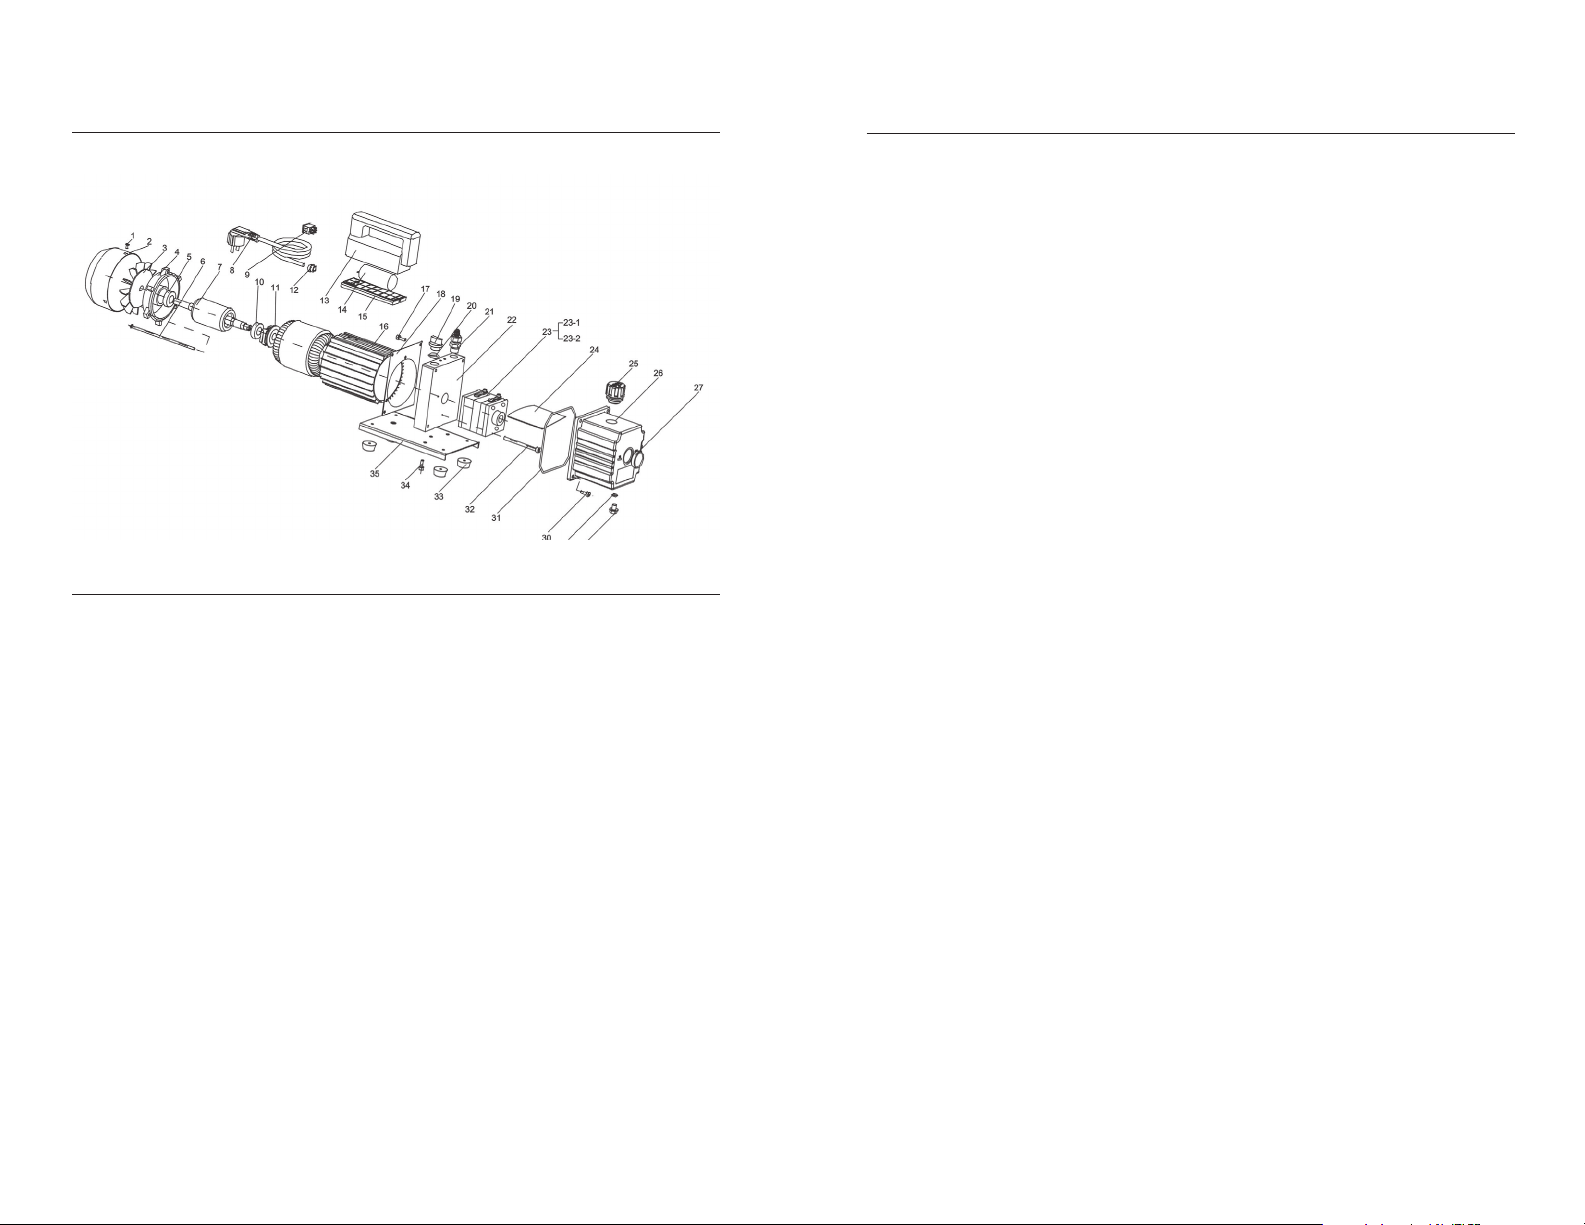
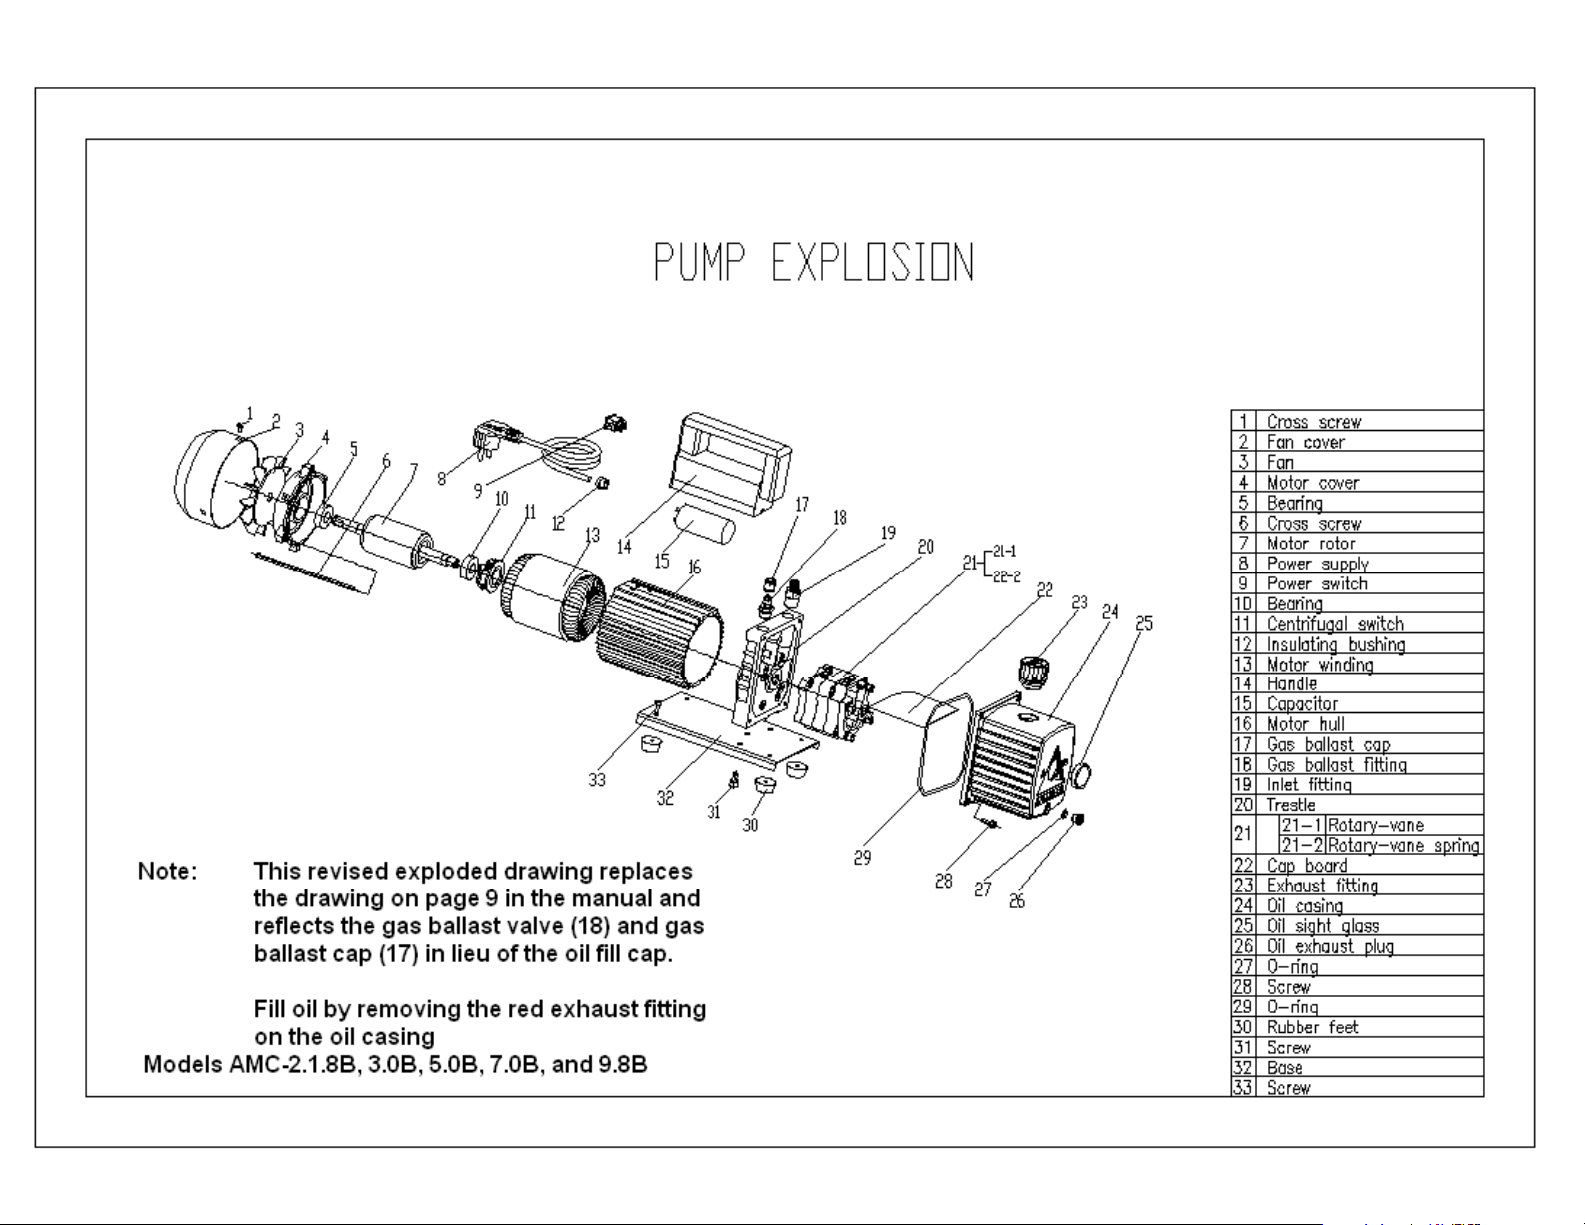
PUMP EXPLOSION
1. Cross screw
2. Fan cover
3. Fan
4. Motor cover
5. Bearing
6. Cross screw
7. Motor rotor
8. Power supply
9. Power switch
10. Bearing
11. Centrifugal switch
12. Insulating brusing
13. Motor winding
14. Handle
15. Capacitor
16. Motor hull
17. Inlet fitting
18. Oil inlet plug
19. O-ring
20. Trestle
21. Pump body:
21-1 Rotary-vane
21-2 Rotary-vane spring
22. Cap board
23. Exhaust fitting
24. Oil casing
25. Oil sight glass
26. Oil exhaust plug
27. O-ring
28. Screw
29. O-ring
30. Rubber feet
31. Screw
32. Base
33. Screw
Before Using Your Vacuum Pump, continued
3. Replace the OIL FILL Cap and remove the cap from one of the inlet ports.
Turn the motor switch to ON. When the pump runs smoothly, replace the
cap on the inlet port. This may take from two to 30 seconds depending on
the ambient temperature. After the pump runs for approximately one minute,
check the sight glass to ensure proper oil level. Oil in sight glass should be
even with the SIGHT GLASS OIL LEVEL line. Add oil if necessary.
the pump is running, the oil level should be even with the line on the sight
glass. Under filling will result in poor vacuum performance. Over filling can
result in oil blowing from the exhaust.
During Operation
The Valu-Vac series is manufactured with an internal breaker that shuts
down the pump to prevent overheating. It is generally recommended that
you shut down your pump after every 4-6 hours of usage to allow for cooling
of the unit.
Warning
Do not run pump open to direct air for more than 3 minutes as sever damage
may occur.
Shutting Down Your Vacuum Pump After Use
To help prolong pump life and promote easy starting, follow these procedures
for shut down.
1. Close the manifold valve between the pump and the system.
2. Remove the hose from the pump inlet.
3. Cap the inlet port to prevent any contamination or loose particles
from entering the port.
Note: When
9
www.thermalengineeringcompany.com 2
Page 4
MAINTENANCE
VACUUM PUMP ACCESSORIES CONTINUED
Vacuum Pump Oil
The condition and type of oil used in any high vacuum pump are extremely
important in determining the ultimate attainable vacuum. We recommend
the use of Model #5000 Super X Premium Vacuum Pump Oil. This oil has
been specifically blended to maintain maximum viscosity at normal running
temperatures and to improve cold weather starts.
Oil Change Procedure
1. Be sure the pump is warmed up.
2. Remove the OIL DRAIN cap. Drain contaminated oil into a suitable container
and dispose of properly. Oil can be forced from the pump by opening the inlet
and partially blocking the exhaust with a cloth while the pump is running. Do
not operate the pump for more than 20 seconds using this method.
3. When the flow of oil has stopped, tilt the pump forward to drain residual oil.
4. Replace the OIL DRAIN cap. Remove the OIL FILL cap and fill the reservoir
with new vacuum pump oil until the oil just shows at the bottom of the sight
glass. The approximate oil capacity of the pump is 6-20oz.
technical data).
5. Be sure the inlet ports are capped, then turn on the pump and allow it
to run for one minute, then check the oil level. If the oil is below the SIGHT
GLASS OIL LEVEL line; add oil slowly (with the pump running) until the oil
reaches the SIGHT GLASS OIL LEVEL line. Replace the OIL FILL cap, making
sure the inlet is capped and the drain cap is tight.
6. a) If the oil is badly contaminated with sludge that forms when water is
allowed to collect in the oil, you may need to remove the oil reservoir cover
and wipe it out. b) Another method of dealing with heavily contaminated oil
is to force the oil from the pump reservoir. To do this, allow the pump to run
until it is warmed up. While the pump is still running, remove the oil drain
cap. Slightly restrict the exhaust. This will back-pressure the oil reservoir and
forces the oil from it, carrying more contaminants. When the oil ceases to flow,
turn off the pump. Repeat this procedure as required until the contamination
is removed. Replace the OIL DRAIN cap and refill the reservoir to the proper
level with fresh pump oil.
(reference the
Manifolds
Thermal Engineering is proud to re-introduce its side wheel charging mani
fold. Its features include floating valve stems, forged brass construction,
hose holders, chrome plated hanging hooks, and charging line sight glass.
The right manifold for the right price!
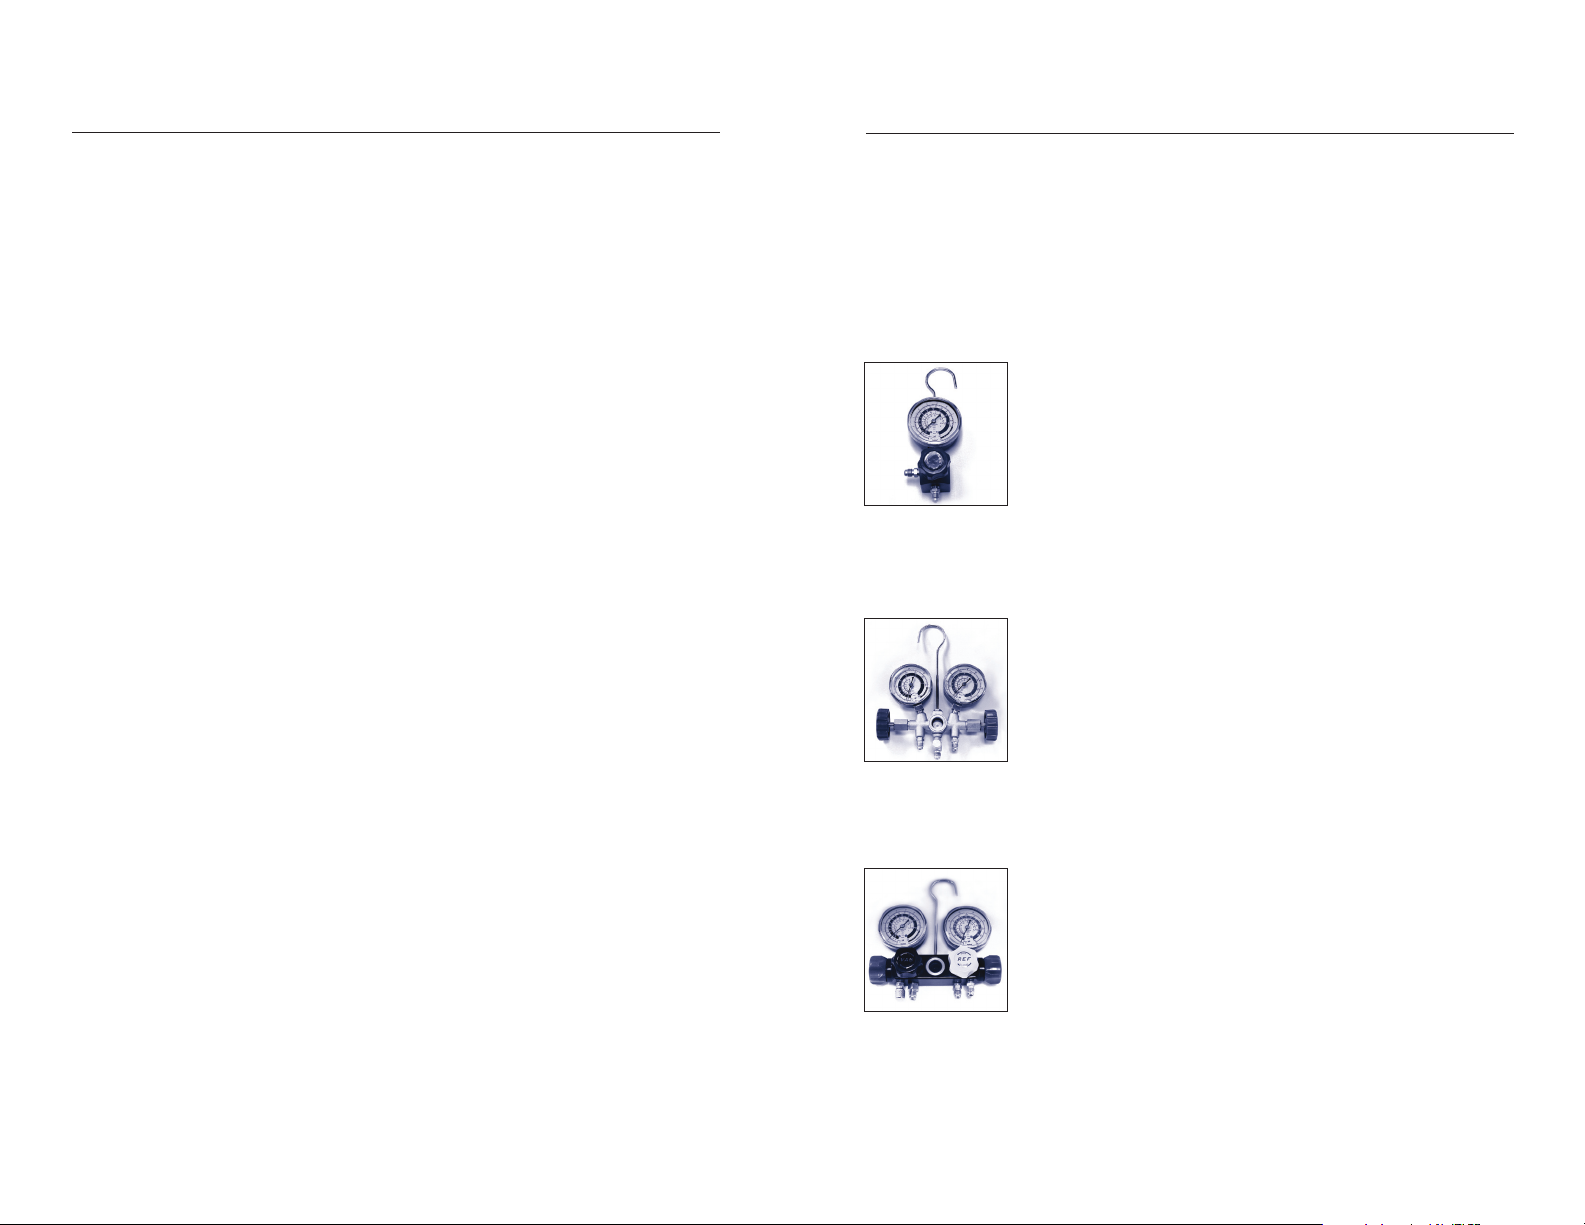
1300
Single gauge manifolds
The Thermal Engineering 1300 series single gauge
manifolds are the ideal choice for testing either the high
or low side of system. The 1300 series body is a high
quality anodized aluminum block with 1/4" fittings.
The gauges include a rugged metal housing and the no
flutter dial ensures accuracy.
1400
2-valve brass manifold
• Connection: 1/4" SAE
• Press-in sight glass, extra clear scale
• Iron hand wheel solid and robust
• High quality C3771 BRASS
• Integrated block body minimizing leakage
• Available with custom hose lengths
2400
4-valve aluminum manifold
• Anodized aluminum block body
with sight glass and hanger
• Rugged metal housing with no flutter gauge
• Easy to grip knobs
• 1/4" fittings and a 3/8" vacuum fitting
• Diaphragm design for easy open/close
-
3 8www.thermalengineeringcompany.com
Page 5

VACUUM PUMP ACCESSORIES CONTINUED
TROUBLESHOOTING
5000 Vacuum Pump Oil
Airserco Super-X Vacuum Pump Oil keeps any high
vacuum pump at maximum performance. No pump
can deliver a lower pressure than its sealing oil’s vapor
pressure. This oil must have the viscosity to lubricate
and seal clearances in the pump’s moving parts at the
extreme temperatures developed during continuous use.
Super-X oil is a premium quality mineral oil formulated to
tolerate exposure to vacuums of 5 microns. Super-X oil
resists the formation of deposits and maintains its original
lubricating properties over a long life. Super-X offers very
high vacuums, excellent lubrication, and long oil life.
Available in 1 gallon plastic containers, 4 per case, or 1
quart bottles, 12 per case.
Super-X Oil Typical Characteristics
Gravity, API: 29.2
Viscosity: SUS at 100°F 335
Flash Point: 450°F
Pressure, microns, Hg, max: 5
Tru Pro Charging Hoses
For those interested in premium quality, the Thermal
Engineering Tru Pro Series refrigerant charge hose is the
only choice. Made in the USA, these hose assemblies
conform to UL 1963, SAE J-51, J-639, J-2196, and J-2197.
With 4000psi minimum burst and a working pressure
800psi these hoses are long lasting, durable, and come in
a range of options to meet your specific requirements.
Your pump has been designed for dependable use and long life. If something
should go wrong, however, the following guide will help you get the pump
back into service as quickly as possible. If disassembly of the pump is
required, please check your warranty. The warranty may be voided by misuse
or customer tampering which results in the pump being inoperable.
Failure To Star t
Check the line voltage. The pumps are designed to start at ±10% line voltage
(loaded) at 32˚F. At extremes, however, switching between the start and run
windings may occur.
Oil Leakage
1. Be sure the oil is not a residual accumulation from spillage, etc.
2. If leakage exists, the module cover gasket or the shaft seal may need
replacing. If leakage exists in the area of the oil drain plug, you may need to
reseal the plug using a commercial pipe thread sealer.
Failure To Pull A Good Vacuum
1. Be sure the vacuum gauge and all connections are in good condition and
leak-free. You can confirm leakage by monitoring the vacuum with a thermistor
gauge while applying vacuum pump oil at connections or suspected leak
points. The vacuum will improve briefly while the oil is sealing the leak.
2. Be sure the pump oil is clean. A badly contaminated pump may require
several oil flushes.
3. Be sure the oil is at the proper level. For maximum pump operation, the
oil must be even with the OIL LEVEL line on the sight glass when the pump is
running. Do not overfill – operating temperatures will cause the oil to expand
so it will appear at a higher level than when the pump is not running. To check
the oil level, start the pump with the inlet capped, check the oil level in the
sight glass. Add oil if necessary.
7
4www.thermalengineeringcompany.com
Page 6

TECHNICAL PARAMETERS
VACUUM PUMP ACCESSORIES
Model AMC-2.1.8 / 2.1.8B AMC-2.3.0 / 2.3.0B AMC-2.5.0 / 2.5.0B
Type
Frequency 60 Hz 60 Hz 60 Hz
Flow Rate 1.8 CFM; 6.1 oz. 3.0 CFM; 9.5 oz. 5.0 CFM; 11.5 oz.
Ultimate Vacuum 3 x 10 Pa
Motor 1/4 HP 1/3 HP 1/3 HP
Inlet Fitting
Oil Capacity 6.1 oz. 9.5 oz. 11.5 oz.
Dimensions, in.
Dimensions, mm.
Net Weight, lbs.
Net Weight, kg.
Model AMC-2.7.0 / 2.7.0B AMC-2.9.8 / 2.9.8B
Type
Frequency 60 Hz 60 Hz
Flow Rate 7.0 CFM; 20 oz. 9.0 CFM; 20 oz.
Ultimate Vacuum 3 x 10 Pa
Motor 3/4 HP 1 HP
Inlet Fitting
Oil Capacity 20 oz. 20 oz.
Dimensions, in.
Dimensions, mm.
Net Weight, lbs.
Net Weight, kg.
Dual Stage
Vacuum Pump
25 Microns
1/4" and 3/4" Flare 1/4" and 3/4" Flare 1/4" and 3/4" Flare
12 x 5 x 9
308 x 124 x 230
16.5 lbs.
7.5 kg.
Dual Stage
Vacuum Pump
25 Microns
1/4" and 3/4" Flare 1/4" and 3/4" Flare
15.5 x 5.5 x 10.5
400 x 145 x 270
36.0 lbs.
16.5 kg.
Dual Stage
Vacuum Pump
3 x 10 Pa
25 Microns
12.5 x 5 x 9.5
315 x 124 x 240
19.0 lbs.
8.6 kg.
Dual Stage
Vacuum Pump
3 x 10 Pa
25 Microns
15.5 x 5.5 x 10.5
400 x 145 x 270
36.0 lbs.
16.7 kg.
Dual Stage
Vacuum Pump
3 x 10 Pa
25 Microns
13 x 5.5 x 10
335 x 138 x 250
24.5 lbs.
11.2 kg.
1833 Mini-Vac Manifold
Mini-Vac is a compact High Vacuum Manifold which
provides a 3/8" flare yoke and an electronic vacuum
gauge sensor port (sensor not included). Features a 3/8"
packless diaphragm valve to isolate the vacuum pump
from the system. The Mini-Vac mounts on the pump with
a 3/8" quick coupler.
14571 Super Vak Check Vacuum Gauge
This analog thermistor vacuum gauge allows you to
choose between 110AC and battery as your power source
with the same features as the Model 4501.
• AC/battery operated
• Range: Atmosphere to 10 microns
• Ambient temperature compensated
• Complete with Model 4510 Sensor
• Accuracy: 200-1000 microns ±5%
• Power: 110AC or 2 “D” cell batteries
(Batteries not included)
4501 Vak Check Vacuum Gauge
• Atmosphere to 10 microns
• Ambient temperature compensated
• Accuracy: 200-1000 microns: ± 5%
• Comes complete with Model 4510 Sensor
• Battery powered, No searching for outlets
(2 “D” cell batteries not included)
5 6
www.thermalengineeringcompany.com
Page 7
 Loading...